ALL BEST TECHNOLOGY M9 Buletooth Speaker with Charging and alarm Clock User Manual M9 v1
All Best Technology Limited Buletooth Speaker with Charging and alarm Clock M9 v1
15_M9 UserMan,r4.pdf
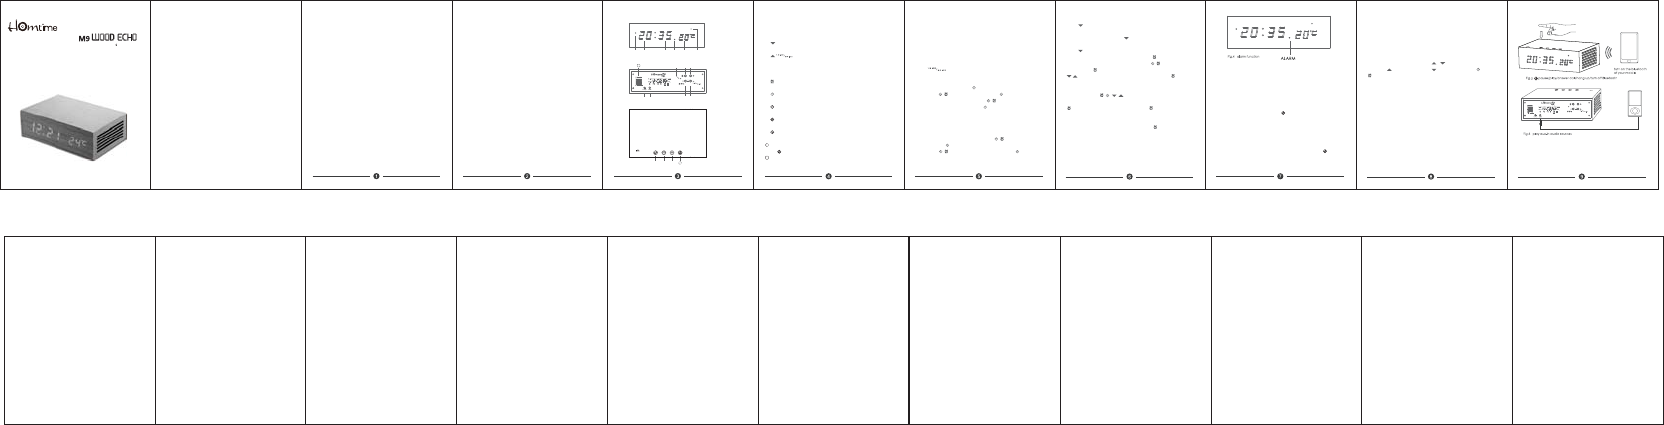
5 Operating Instruction of the Button and DC & Aux-in Jack
Connect the adaptor with the unit to turn on the unit. The Time
display on the LED screen will be random during the first use
of the unit; the figure on the right side is the room temperature.
There is about 2 degree difference between the displaying
temperature and the actual temperature.
5.1 Time Settings
Press to switch 12-hour mode and 24 -hour mode.
In 12- hour mode, a single hour figure begins to flash; in 24 -
hour mode, both of the two hour figures begin to flash. After
confirm the hour mode, press , the HOUR figure begins to
flash. Press / to adjust the HOUR; Press again, the
MINUTE figure beings to flash. Press / to adjust the
MINUTE. To exit time setting, Press to confirm your setting.
(Idling for 15 seconds also exits time setting automatically)
5.2 Date Settings
After time setting, it switches to Date settings automatically.
The MONTH figure begins to flash. Press / to adjust the
MONTH; Press to confirm it and the DATE figure begins to
flash, Press / to adjust the DATE, and then Press to
confirm and exit the settings.
5.3 Alarm Settings
Press to turn on alarm. The alarm indicator light begins to
flash on the LED screen in every 2 seconds. The alarm clock
only works for one time. Press again, the alarm indicator light
stops flashing.The alarm clock works everyday (See Fig 4)
Press to turn on alarm. The alarm indicator light begins to
display on the LED screen. (See Fig.4) Press to set alarm
time, the HOUR figure begins to flash, Press / to adjust the
HOUR; Press again, the MINUTE figure beings to flash. Press
/ to adjust the MINUTE. To exit alarm setting, press to
confirm your setting. (Idling for 15 seconds exits alarm setting
automatically).When alarm is on; it can last for one hour.
Press any key on / / / to stop the alarm. After stop the
alarm, it will be on again after 24 hours. To turn off alarm, press
, the alarm indicator light goes out. Press to turn on alarm,
the circle dot lights up. When it begins to flash, it means the
alarm clock only works for one time. When it stops to flash, it
means the alarm clock works everyday. Press to turn off alarm,
the circle dot goes out.
5.4 Bluetooth Function
When connecting the power with the unit, the unit is under
Bluetooth mode.
Go to smartphone or the pairing device settings and turn on
Bluetooth, searching Bluetooth devices. Choose “ W1 by
Homtime” to pair. When it is successfully paired, you will hear a
“DU”sound. Music can be played from the paired device now.
When playing music, press“PLAY ”to pause. Press it again to
continue music (See Fig.5). Hold and press “+” and “-” to volume
up and down.
5.5 Handsfree Function
When playing music under Bluetooth mode, the phone call is
coming in, press “PLAY” to answer the call. Press“PLAY ”
to end the call, the music playing continues.
Table of contents
1 Features ᱎᱎᱎᱎᱎᱎᱎᱎᱎᱎᱎᱎᱎᱎᱎᱎᱎᱎᱎᱎᱎᱎᱎ1
2 Included in this Package ᱎᱎᱎᱎᱎᱎᱎᱎᱎᱎᱎᱎᱎᱎᱎᱎ2
3 Technology Specification ᱎᱎᱎᱎᱎᱎᱎᱎᱎᱎᱎᱎᱎᱎᱎᱎ2
4 Diagram of the LED display& the Button ᱎᱎᱎᱎᱎᱎᱎᱎᱎ3
5 Operating Instruction of the Button and DC & Aux-in Jack ᱎ5
5.1 Time Settings ᱎᱎᱎᱎᱎᱎᱎᱎᱎᱎᱎᱎᱎᱎᱎᱎᱎᱎᱎᱎ5
5.2 Alarm Settings ᱎᱎᱎᱎᱎᱎᱎᱎᱎᱎᱎᱎᱎᱎᱎᱎᱎᱎᱎᱎ 5
5.3 Date Settings ᱎᱎᱎᱎᱎᱎᱎᱎᱎᱎᱎᱎᱎᱎᱎᱎᱎᱎᱎᱎ6
5.4 Bluetooth Function ᱎᱎᱎᱎᱎᱎᱎᱎᱎᱎᱎᱎᱎᱎᱎᱎᱎᱎ7
5.5 Hands free Function ᱎᱎᱎᱎᱎᱎᱎᱎᱎᱎᱎᱎᱎᱎᱎᱎᱎ8
5.6 Aux in Jack ᱎᱎᱎᱎᱎᱎᱎᱎᱎᱎᱎᱎᱎᱎᱎᱎᱎᱎᱎᱎᱎ8
5.7 Temperature Display Setting ᱎᱎᱎᱎᱎᱎᱎᱎᱎᱎᱎᱎᱎ8
5.8 USB outlet port ᱎᱎᱎᱎᱎᱎᱎᱎᱎᱎᱎᱎᱎᱎᱎᱎᱎᱎᱎ8
6 Playing and Connection diagram ᱎᱎᱎᱎᱎᱎᱎᱎᱎᱎᱎᱎ9
7 Disposal of your old product ᱎᱎᱎᱎᱎᱎᱎᱎᱎᱎᱎᱎᱎᱎ9
Dear customer, thanks for your purchasing M9
Please read all safety instructions before proceeding for your
safety and proper usage.
1 Features
- Pure wood, texture surfaces, stylish appearance.
- Integrate clock, alarm, Bluetooth speaker and thermometer
function all in one.
- LED digital display.
- Sensory touch buttons.
- 3.5mm stereo line-in cable (included) for playing other audio
devices.
- Easily paired with Bluetooth-enabled devices, enjoy music
freely.
- Simple appearance, easy configuration.
- Built-in microphone, have a clear call through Bluetooth
hands-free function.
- Built-in high-quality speakers, bright treble, deep bass. Music
performance beyond your imagination.
- 5V 2.1A USB outlet port for traditional USB charging for most
devices
2 Included in this package
(Please check the accessories included in this package after
purchasing)
M9 main unit 1 pcs
3.5mm jack audio cable 1 pcs
Power Adaptor 1 pcs
User manual 1 pcs
3 Technology Specification
- Bluetooth Versionᷛ4.1classical
- Bluetooth Profiles: A2DP, AVRCP, HFP, HSP
- Bluetooth Range: 10 M
- Output Power: RMS 3W+3W
6SHDNHUȍ:LQ
- Frequency Response: 60Hz-20KHz
- S/N Ratio: ᱖70dB
- Distortion: <1%
- Cable: 3.5mm jack audio cable
- Power AdaptorᷛAC100 - 240V 50/60Hz
- DC 5V 1.2A
- Product Net Weight: 0.81kg
- Product Dimension: 221X140X68mm
ᴺDC 5V
Power jack
ᴻ AUX
Support other audio sources (3.5mm adapter)
ᴼ
turn on alarm/turn off alarm/ stop alarm
ᴽ
Adjust time /switch hour mode/ stop alarm
ᴾTem p
Temperature sensor
ᴿ
Set alarm/stop alarm
ᵀ
Set time/stop alarm
ᵁ
Volume down
ᵂ
Pause/play/answer call/end call/turn on or off Bluetooth
ᵃ
Volume up
Snooze
Press to adjust the LED brightness
USB outlet port
11
5.6 AUX-in Jack
When the unit is on, connect the device to“AUX-in”jack on
the back of the unit with a 3.5mm stereo audio cable. The unit
will switch to AUX mode automatically and play AUX-in audio
sources only (See Fig.6).
5.7 Temperature Display Setting
Fahrenheit or Celsius. Long press + for 5 seconds to display
C/F, press to switch to C, press to switch to F. Press or
to confirm the setting.
5.8 USB outlet port
UBS outlet port available for wiring additional USB cables to
power other devices
7 Disposal of your old product
The crossed-out wheeled trash can symbol on the rating label
indicates that this product is covered by the European Directive
2002/96/EC.
6 Playing and Connection diagram
ᵂ ᵁᵃ 11
4 Diagram of the LED Display& the Button
PM Hour Min TempAlarm Mic
Fig.1 LED Display
Fig.3 The Top Button
Fig.2 DC&AUX JACK
ᴾ ᴿ ᵀ
ᴺᴻᴼᴽ
FCC NOTE:
This device complies with Part 15 of the FCC Rules.
Operation is subject to the following two conditions: (1) this device may not cause
harmful interference, and (2) this device must accept any interference received,
including interference that may cause undesired operation.
THE MANUFACTURER IS NOT RESPONSIBLE FOR ANY RADIO OR TV
INTERFERENCE CAUSED BY UNAUTHORIZED MODIFICATIONS OR
CHANGE TO THIS EQUIPMENT. SUCH MODIFICATIONS OR CHANGE
COULD VOID THE USER’S AUTHORITY TO OPERATE THE EQUIPMENT.
This equipment has been tested and found to comply with the limits for a Class B
digital device, pursuant to part 15 of the FCC Rules. These limits are designed to
provide reasonable protection against harmful interference in a residential installation.
This equipment generates, uses and can radiate radio frequency energy and, if not
installed and used in accordance with the instructions, may cause harmful interference
to radio communications. However, there is no guarantee that interference will not
occur in a particular installation. If this equipment does cause harmful interference to
radio or television reception, which can be determined by turning the equipment off
and on, the user is encouraged to try to correct the interference by one or more of the
following measures:
-- Reorient or relocate the receiving antenna.
-- Increase the separation between the equipment and receiver.
-- Connect the equipment into an outlet on a circuit different from that to which the
receiver is connected.
-- Consult the dealer or an experienced radio/TV technician for help.
Wood Echo
Wooden Bluetooth
Alarm Clock Speaker
Any changes. or modifications not expressly approved by the party responsible for
compliance could void the use,r authority to operate this equipment
UBS outlet port can not connect PC with data transmission