ALL BEST TECHNOLOGY S1-QI Bluetooth Speaker System with Alarm Clock User Manual s1 qi
ALL BEST TECHNOLOGY LIMITED Bluetooth Speaker System with Alarm Clock s1 qi
User Manual
%OXHWRRWK6SHDNHU6\VWHPZLWK
$ODUP&ORFN
1
User Manual
Thank you for purchasing S1. S1lets you create the perfect
sleeping and waking environments and enjoy outstanding
audio performance throughour the day.With S1 user-
friendly controls you can simply set the clock and alarm
time, or customize everything from the display brightness
to the snooze timer, keep it simple,this manual will show
you how to do just that.

1. Product Features ……………………………………………………1
2. What is included………………………………………………………1
3. Specification Parameters……………………………………………
2
4. Diagram of the LCD Display & the Buttons………………………3
5. Operating Instruction…………………………………………………5
5.1 Power ON……………………………………………………………5
5.2 Set Time………………………………………………………………5
5.3 Set Alarm Time………………………………………………………5
5.4 Alarm Function………………………………………………………6
6. SLEEP Function under ON Model…………………………………6
7. Play Music from Mobile via Bluetooth………………………………7
7.1 Operation……………………………………………………………7
7.2 Answer the Phone…………………………………………………7
7.3 Hang up………………………………………………………………7
7.4 Play Music……………………………………………………………7
8. Play Music from Aux Jack……………………………………………8
9. Back-up Button Battery………………………………………………8

1
2. What is included
1. Product Features
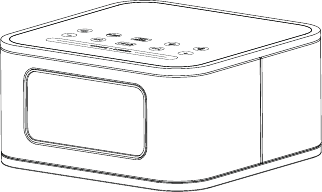
(1) Elegant and fashionable design; simple setting
(2) Built-in Microphone, having clear hands-free calls
(3) 3.2 inch LCD display
(4) 3.5mm audio jack for connecting other audio sources
(5) Built-in high quality loudspeaker
(6) USB port for charging iPone/iPod/iPad/Mobiles
(7) Dual Alarms
Open S1’s box, and you will find
S1 Body Unit 1 PC
Power Adaptor 1 PC
User Manual 1 PC
Audio Cable 1 PC

3. Specification Parameters
- Bluetooth Version: 2.1+EDR
- Bluetooth Profiles: A2DP, AVRCP, HFP, HSP
- Receive range: within 10 meters
- Operation Voltage: DC 5V 3A
- Output Power: 3W + 3W
- Driver Unit: 4Ą3W 1.5in
- Frequency range: 40Hz-20KHz
- S/N Ratio: >65dB
- Distortion Rate: <1%
- USB Port: DC 5V 1A
- Product Net Weight: 0.75kg
- Product Size: 138*138*69mm
2
- Audio Output Power: 3W + 3W
AUX IN TIME
DC 5V
3
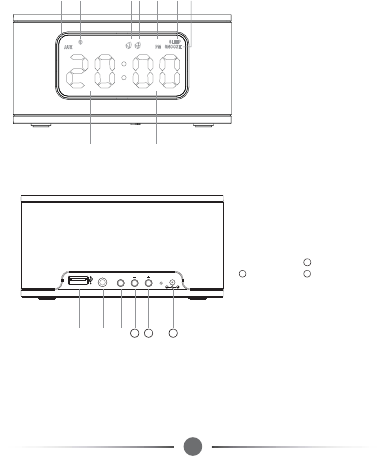
4. Diagram of the LCD Display & the Buttons
ᴺ ᴻᴼ ᴽᴾᴿ ᵀ
ᴺAUX IN ᴻBluetooth
ᴼAlarm 1 ᴽAlarm 2
ᴾPM ᴿSLEEP
ᵀSNOOZE
+2850,187(
ᵁᵂ ᵃ
ᵁUSB JackᵂAUX IN Jack
ᵃTime SettingVolume down
Volume upDC 5V Power Input

4
)XQFWLRQ
3RZHU212))
6122=(0LQXWH
6ZLWFK0RGHV$ODUP7LPH6HWWLQJ
7LPH6HWWLQJRI$ODUP
7LPH6HWWLQJRI$ODUP
9ROXPHGRZQ$GMXVWLQJ$ODUP7LPH
6NLS%DFNZDUGVODVW6RQJ
%OXHWRRWK3OD\3DXVH$QVZHUWKHSKRQHDQG+DQJXS
6NLS)RUZDUGVQH[W6RQJ
9ROXPHXS$GMXVWLQJ$ODUP7LPH
6122=('LVSOD\%ULJKWQHVV/HYHO/HYHOV
SNOOZE | DIMMER
%XWWRQ

4
5
5. Operating Instruction
5.1 Power ON
Connect the power adaptor into the jack on the back of S1 labeled
“DC”, and then plug the power adaptor into the wall outlet. The LCD
display turns on. Press to turn on the unit.
5.2 Set Time
Under any mode, press “Time” to set time. Press “+” or “-” to switch
the Hour mode between 12-Hour and 24-Hour. Press “Time” to
confirm it. Then Hour figure and MINUTE figure begin to flash. Press
“+” or “-” to adjust the HOUR and press “Time” to confirm it, then press
“+” or “-” to adjust the MINUTE and press “Time” to confirm the setting.
It exits the setting in 10seconds if no operation on any key.
5.3 Set Alarm Time
Under any mode, press to enter alarm time setting, icon displays
in the LCD. Press some times to display OFF/BU. (OFF- none alarm
is selected). When BU icon appears, press “SET/MODE” to enter alarm
time setting. The HOUR figure begins to flash, then press “+” or “-” on
the top side of the unit to adjust the figure; Press “SET/MODE”, the
MINUTE figure begins to flash. Press “+” or “-” to adjust the figure. It
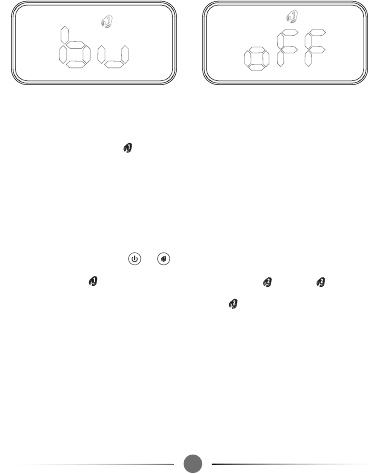
6
$ODUP5LQJ6RXUFH%8== $ODUP2))
will exit the setting in 5 seconds if no operation on any key.
5.4 Alarm Function
1) When alarm1 is on, icon is flashing in the LCD and the alarm ring
tone is becoming larger and larger. Press “SNOOZE” to activate the
Snooze function. SNOOZE icon appears in the LCD. Alarm will be on
again in 9-minute snooze. The alarm can last for 30minutes at most if
no button is pressed (including snooze time).
2) To stop alarm, press or . Alarm 1 is one-off alarm.
3) Setting Alarm is the same as setting Alarm . Alarm works
everyday. To turn it off completely, switch to OFF mode.
6. SLEEP Function under ON Mode
Press “SLEEP” to set timing shutdown time from 90-80-70…….OFF.
Choose the time, it will store it automatically in 3 seconds and exit the
setting. To see the remaining sleep time, press “SLEEP”.

6
7
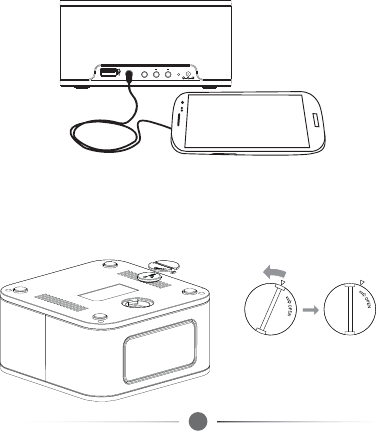
7. Play Music from Mobile via Bluetooth
7.1 Operation
Press “MODE” to choose Bluetooth mode. Go to mobile settings, turn
on Bluetooth and search Bluetooth devices. Connect “Smart one”.
When it is successfully paired, you will hear a sound of “DU”. Play
music from your mobile now. (When Bluetooth is connected, press
“Mode” to switch it to other mode, Bluetooth will be OFF automatically
and get disconnected with mobile. When switching it to Bluetooth
mode again, connect “Smart one” manually or automatically.)
7.2 Answer the Phone
When a phone call is coming, press to answer the phone.
7.3 Hang up
Press to hang up when having a phone call.
7.4 Play Music
When playing music, press to pause the music. Press to
skip backwards last song; Press to skip forwards next song.
76
8
8. Play Music from Aux Jack
Press “MODE” to switch the mode to AUX IN, pug in the 3.5mm
audio cable into the AUX IN jack. Play music now.
9. Back-up Button Battery
The 3V button battery is to retain the alarm/clock setting in case of
a power failture. It can not display the alarm/clock time.
AUX IN TIME
DC 5V
FCC STATEMENT:
This equipment has been tested and found to comply with the limits
for a Class B digital device, pursuant to Part 15 of the FCC Rules.
These limits are designed to provide reasonable protection against
harmful interference in a residential installation. This equipment
generates uses and can radiate radio frequency energy and, if not
installed and used in accordance with the instructions, may cause
harmful interference to radio communications. However, there is no
guarantee that interference will not occur in a particular installation. If
this equipment does cause harmful interference to radio or television
reception, which can be determined by turning the equipment off and
on, the user is encouraged to try to correct the interference by one or
more of the following measures:
-- Reorient or relocate the receiving antenna.
-- Increase the separation between the equipment and receiver.
-- Connect the equipment into an outlet on a circuit different from that
to which the receiver is connected.
-- Consult the dealer or an experienced radio/TV technician for help.
Changes or modifications not expressly approved by the party
responsible for compliance could void the user's authority to operate
the equipment.
This device complies with part 15 of the FCC Rules. Operation is
subject to the following two conditions: (1) This device may not cause
harmful interference, and (2) this device must accept any interference
received, including interference that may cause undesired operation.