ALPS ALPINE 8M740BT Bluetooth Integrated VGA Monitor User Manual TME M740BT User Menual Revised
Alpine Electronics Inc Bluetooth Integrated VGA Monitor TME M740BT User Menual Revised
User Manual
Designed by ALPINE Japan
Printed in Japan (Y)
EN
DE
FR
ES
IT
SE
01GB01TMEM860.fm
ALPINE TME-M740BT 00-00000Z00-A (EN)
FOR CAR USE ONLY/NUR FÜR AUTOMOBIL GEBRAUCH/POUR APPLICATION AUTOMOBILE/PARA USO EN
AUTOMÓVILES/SOLO PER L’UTILIZZO IN AUTOMOBILE/ENDAST FÖR BILBRUK
TME-M740BT
BLUETOOTH INTEGRATED VGA MONITOR
• OWNER'S MANUAL
Please read before using this equipment.
• BEDIENUNGSANLEITUNG
Lesen Sie diese Bedienungsanleitung bitte vor
Gebrauch des Gerätes.
• MODE D'EMPLOI
Veuillez lire avant d’utiliser cet appareil.
• MANUAL DE OPERACIÓN
Léalo antes de utilizar este equipo.
• ISTRUZIONI PER L’USO
Si prega di leggere prima di utilizzare l’attrezzatura.
• ANVÄNDARHANDLEDNING
Innan du använder utrustningen bör du läsa igenom
denna användarhandledning.
ALPINE ELECTRONICS MARKETING, INC.
1-1-8 Nishi Gotanda,
Shinagawa-ku,
Tokyo 141-0031, Japan
Phone 03-5496-8231
ALPINE ELECTRONICS OF AMERICA, INC.
19145 Gramercy Place, Torrance,
California 90501, U.S.A.
Phone 1-800-ALPINE-1 (1-800-257-4631)
ALPINE ELECTRONICS OF CANADA, INC.
777 Supertest Road, Toronto,
Ontario M3J 2M9, Canada
Phone 1-800-ALPINE-1 (1-800-257-4631)
ALPINE ELECTRONICS OF AUSTRALIA PTY. LTD.
161-165 Princes Highway, Hallam
Victoria 3803, Australia
Phone 03-8787-1200
ALPINE ELECTRONICS GmbH
Frankfurter Ring 117,
80807 München, Germany
Phone 089-32 42 640
ALPINE ELECTRONICS OF U.K. LTD.
Alpine House
Fletchamstead Highway, Coventry CV4 9TW, U.K.
Phone 0870-33 33 763
ALPINE ELECTRONICS FRANCE S.A.R.L.
(RCS PONTOISE B 338 101 280)
98, Rue de la Belle Etoile, Z.I. Paris Nord Il,
B.P. 50016, 95945 Roissy Charles de Gaulle
Cedex, France
Phone 01-48638989
ALPINE ITALIA S.p.A.
Viale C. Colombo 8, 20090 Trezzano
Sul Naviglio (MI), Italy
Phone 02-484781
ALPINE ELECTRONICS DE ESPAÑA, S.A.
Portal de Gamarra 36, Pabellón, 32
01013 Vitoria (Alava)-APDO 133, Spain
Phone 945-283588
ALPINE ELECTRONICS (BENELUX) GmbH
Leuvensesteenweg 510-B6,
1930 Zaventem, Belgium
Phone 02-725-13 15
R
R
01GB00TMEM860.book Page 1 Monday, October 16, 2006 1:50 PM

01GB02TMEM860.fm
ALPINE TME-M740BT 00-00000Z00-A (EN)
01GB00TMEM860.book Page 2 Monday, October 16, 2006 1:50 PM

1-EN
ENGLISH
01GB03TMEM860TOC.fm
ALPINE TME-M740BT 00-00000Z00-A (EN)
Contents
Operating Instructions
WARNING
WARNING ................................................. 2
CAUTION .................................................. 2
PRECAUTIONS ........................................ 2
Getting Started
Location of Controls ........................................ 4
Turning Power On or Off ................................. 4
Adjusting the Volume ....................................... 4
Switching the Source ........................................ 4
Auxiliary Device Operation
DVD Video Player Operation (Optional) ......... 5
DVD Menu Operations ................................. 6
TUE-T200DVB Operation (Optional) ............. 6
Menu Operations ........................................... 6
TV Operation (Optional) .................................. 7
Hands-Free Phone (Optional)
About Hands-Free Phone ................................. 7
Connect a Mobile Phone .................................. 7
Receiving a Call ............................................... 8
Hanging up ....................................................... 8
Placing a Call ................................................... 8
Placing a Call by Inputting a Telephone
Number (Inputting a Number) ................... 8
Placing a Call by the Telephone Book
(Telephone Book) ...................................... 8
Placing a Call by History
(History of Received Calls/Dialed Calls/
Missed Received Calls) ............................. 8
Placing a Call by QUICK CALLS
(QUICK CALLS) ......................................... 9
Placing a Call by SPEED DIAL
(SPEED DIAL) ............................................. 9
Downloading a Telephone Book ...................... 9
Bluetooth Audio Function (Optional)
Bluetooth Audio Operation ............................ 10
Setup
Display Setup Operation ..............................11
GENERAL Setup ........................................13
SYSTEM Setup ...........................................13
Bluetooth Setup ...........................................13
REAR SELECT Setup .................................14
Information
In Case of Difficulty .......................................15
Specifications ..................................................15
Installation and Connections
Warning .................................................. 16
Caution ................................................... 16
Precautions ........................................... 16
Installation ......................................................17
Attaching the monitor and stand ..................17
Mounting an external Microphone for Hands-
Free Calling ..............................................18
Connections ....................................................19
System Example .............................................20
01GB00TMEM860.book Page 1 Monday, October 16, 2006 1:50 PM
2-EN
01GB04TMEM860.fm
ALPINE TME-M740BT 00-00000Z00-A (EN)
Operating Instructions
INSTALL THE PRODUCT CORRECTLY SO THAT THE DRIVER
CANNOT WATCH TV/VIDEO UNLESS THE VEHICLE IS
STOPPED AND THE EMERGENCY BRAKE IS APPLIED.
It is dangerous for the driver to watch TV/Video while driving a
vehicle. Installing this product incorrectly enables the driver to
watch TV/Video while driving. This may cause a distraction,
preventing the driver from looking ahead, thus causing an accident.
The driver or other people could be severely injured.
DO NOT WATCH VIDEO WHILE DRIVING.
Watching the video may distract the driver from looking ahead of
the vehicle and cause an accident.
DO NOT OPERATE ANY FUNCTION THAT TAKES YOUR
ATTENTION AWAY FROM SAFELY DRIVING YOUR VEHICLE.
Any function that requires your prolonged attention should only be
performed after coming to a complete stop. Always stop the vehicle
in a safe location before performing these functions. Failure to do
so may result in an accident.
KEEP THE VOLUME AT A LEVEL WHERE YOU CAN STILL
HEAR OUTSIDE NOISES WHILE DRIVING.
Excessive volume levels that obscure sounds such as emergency
vehicle sirens or road warning signals (train crossings, etc.) can be
dangerous and may result in an accident. LISTENING AT LOUD
VOLUME LEVELS IN A CAR MAY ALSO CAUSE HEARING
DAMAGE.
MINIMIZE DISPLAY VIEWING WHILE DRIVING.
Viewing the display may distract the driver from looking ahead of
the vehicle and cause an accident.
DO NOT DISASSEMBLE OR ALTER.
Doing so may result in an accident, fire or electric shock.
USE ONLY IN CARS WITH A 12 VOLT NEGATIVE GROUND.
(Check with your dealer if you are not sure.) Failure to do so may
result in fire, etc.
KEEP SMALL OBJECTS SUCH AS BATTERIES OUT OF THE
REACH OF CHILDREN.
Swallowing them may result in serious injury. If swallowed,
consult a physician immediately.
USE THE CORRECT AMPERE RATING WHEN REPLACING
FUSES.
Failure to do so may result in fire or electric shock.
USE THIS PRODUCT FOR MOBILE 12V APPLICATIONS.
Use for other than its designed application may result in fire,
electric shock or other injury.
DO NOT INSTALL THE MONITOR NEAR THE PASSENGER
SEAT AIR BAG.
If the unit is not installed correctly the air bag may not function
correctly and when triggered the air bag may cause the monitor to
spring upwards causing an accident and injuries.
HALT USE IMMEDIATELY IF A PROBLEM APPEARS.
Failure to do so may cause personal injury or damage to the
product. Return it to your authorized Alpine dealer or the nearest
Alpine Service Centre for repairing.
PRECAUTIONS
Product Cleaning
Use a soft dry cloth for periodic cleaning of the product. For more
severe stains, please dampen the cloth with water only. Anything
else has the chance of dissolving the paint or damaging the plastic.
Temperature
Be sure the temperature inside the vehicle is between +45°C
(+113°F) and 0°C (+32°F) before turning your unit on.
Maintenance
If you have problems, do not attempt to repair the unit yourself.
Return it to your Alpine dealer or the nearest Alpine Service
Station for servicing.
Installation Location
Make sure the TME-M740BT will not be installed in a location
subjected to:
• Direct sun and heat
• High humidity and water
• Excessive dust
• Excessive vibrations
WARNING
WARNING
This symbol means important instructions.
Failure to heed them can result in serious injury
or death.
CAUTION
This symbol means important instructions.
Failure to heed them can result in injury or
material property damage.
01GB00TMEM860.book Page 2 Monday, October 16, 2006 1:50 PM

3-EN
01GB04TMEM860.fm
ALPINE TME-M740BT 00-00000Z00-A (EN)
• After turning the system off, a slight ghost of the image will
remain temporarily. This is an effect peculiar to LCD technology
and is normal.
• In cold temperature conditions, the screen may lose contrast
temporarily. After a short warm-up period, it will return to
normal.
Operation of some of the functions of this unit is very complex.
Because of this, it was deemed necessary to place these functions
into a special screen. This will restrict operation of these functions
to times when the vehicle is parked. This ensures the focus of the
driver’s attention will be on the road and not on the TME-M740BT.
This has been done for the safety of the driver and passengers.
The setup operation cannot be made if the car is moving. The car
must be parked and the parking brake must be engaged for the
procedure described in the Owner’s Manual to be valid. The
warning “Operation is not allowed while driving,” will be displayed
if any attempts are made to perform these operations while driving.
01GB00TMEM860.book Page 3 Monday, October 16, 2006 1:50 PM
FCC Warning statement:
You are cautioned that changes or modifications not expressly
approved by the party responsible for compliance could void
your authority to operate the equipment.
FCC RF Radiation Exposure Statement:
1. This Transmitter must not be co-located or operating in conjunction with any other antenna or transmitter.
2. This equipment complies with FCC RF radiation exposure limits set forth for an uncontrolled environment.
Label Warning statement:
This device complies with Part15 of the FCC Rules.
Operation is subject to the following two condition:
(1)this device may not cause harmful interference and
(2)this device must accept any interference received,
including interference that may cause undesired operation
"Complies with CANADA RSS-210Γ
Industry Canada - Class B
This digital apparatus does not exceed the Class B limits for radio noise emissions
from digital apparatus as set out in the interference-causing equipment standard
entitled “Digital Apparatus,” ICES-003 of Industry Canada.
Cet appareil numérique respecte les limites de bruits radioélectriques applicables
aux appareils numériques de Classe B prescrites dans la norme sur le matérial
brouilleur: “Appareils Numériques,” NMB-003 édictée par l’Industrie.
(1) this device may not cause interference,and (2) this device must accept any
interference, including interference that may cause undesired operation of the device."
4-EN
01GB05TMEM860.fm
ALPINE TME-M740BT 00-00000Z00-A (EN)
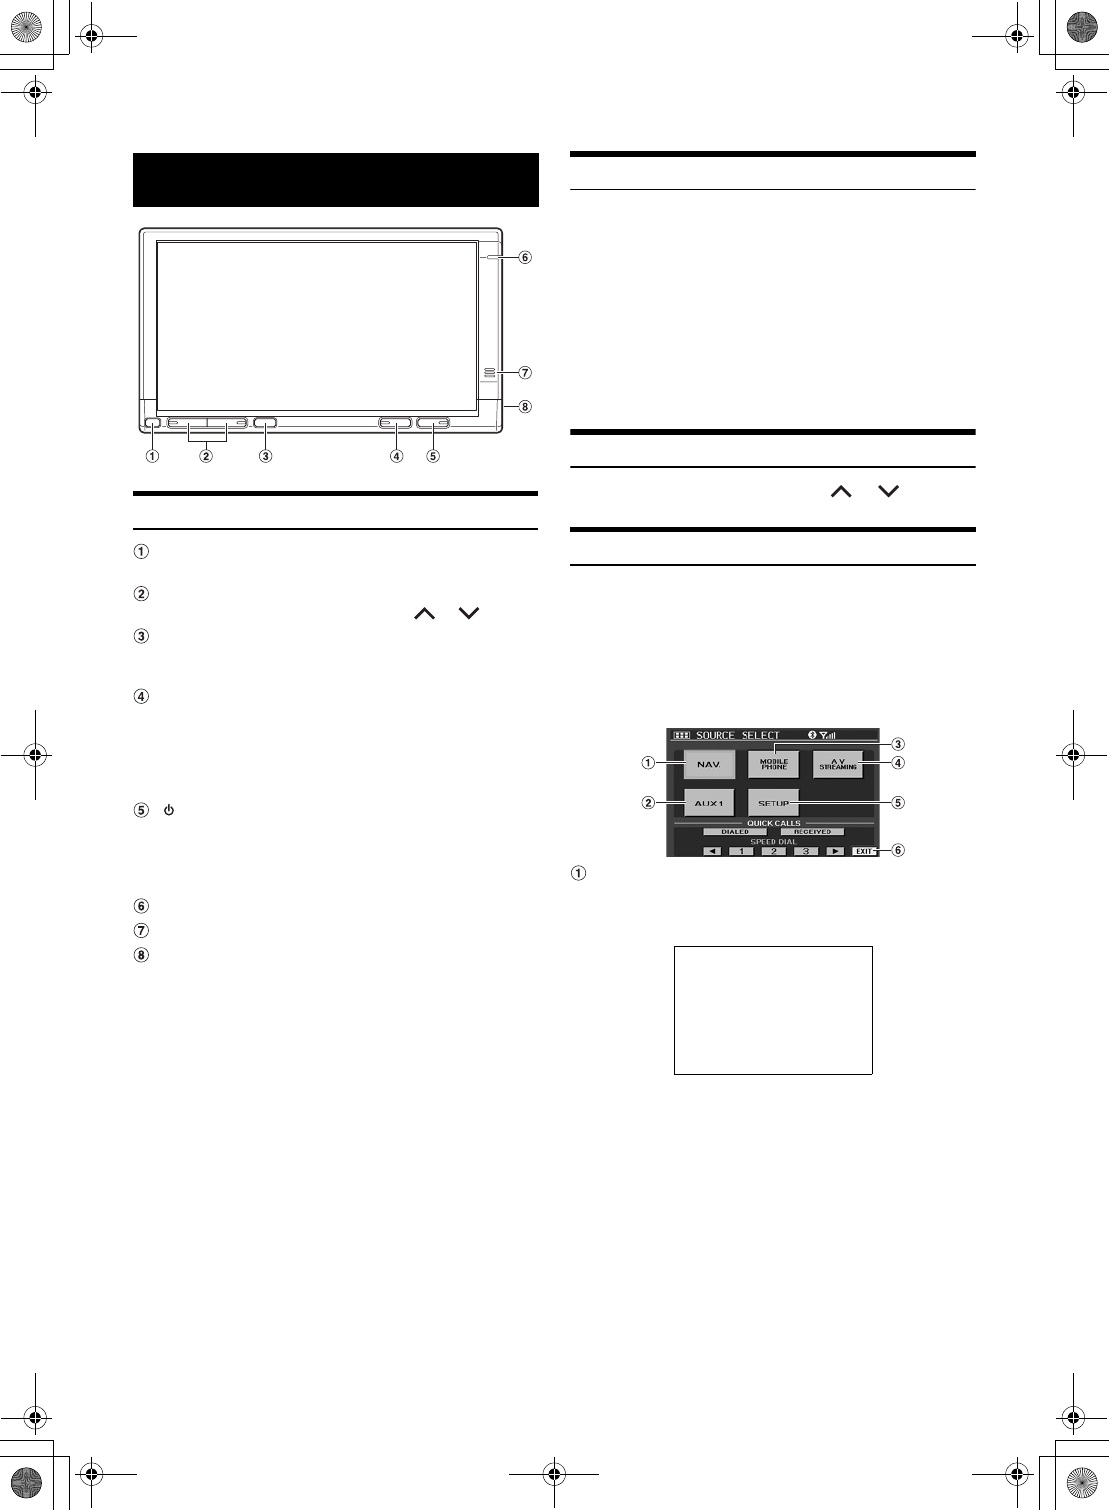
Location of Controls
DIMMER Sensor
Senses the brightness of the car interior
Volume button
Adjust the volume level by pressing the or button.
Remote Sensor
Point the optional remote control transmitter toward the
remote sensor within a range of 2 m.
SOURCE button
Each time you press the SOURCE button, SOURCE is
switched.
If the button is pressed and held for at least 3 seconds, the
Vehiclehub Pro VPA-B222R’s (optional) power is turned on/
off.
(POWER) button
Turns the power on and off.
If the button is pressed and held for at least 3 seconds, the
Vehiclehub Pro VPA-B222R’s (sold separately) V.SEL is
turned on/off.
POWER Indicator
Mobile Phone Microphone
Mobile Phone external Microphone jack
If an external microphone is connected, the internal
microphone cannot be used.
Turning Power On or Off
1
Press POWER to turn on the unit.
2
Press POWER to turn off the unit.
•Some operation of the unit cannot be performed while the vehicle is
in motion. In this case, be sure to first stop your vehicle and apply the
parking brake, then perform the operation.
•In low ambient temperature conditions, the display may be dark for a
short period of time immediately after the power is turned on. Once
the LCD has warmed up, the display returns to normal.
•If the voltage of the vehicle's battery power is low, the screen may
blink. This is normal and not a malfunction.
Adjusting the Volume
Adjust the volume level by pressing or .
Switching the Source
1
Press SOURCE.
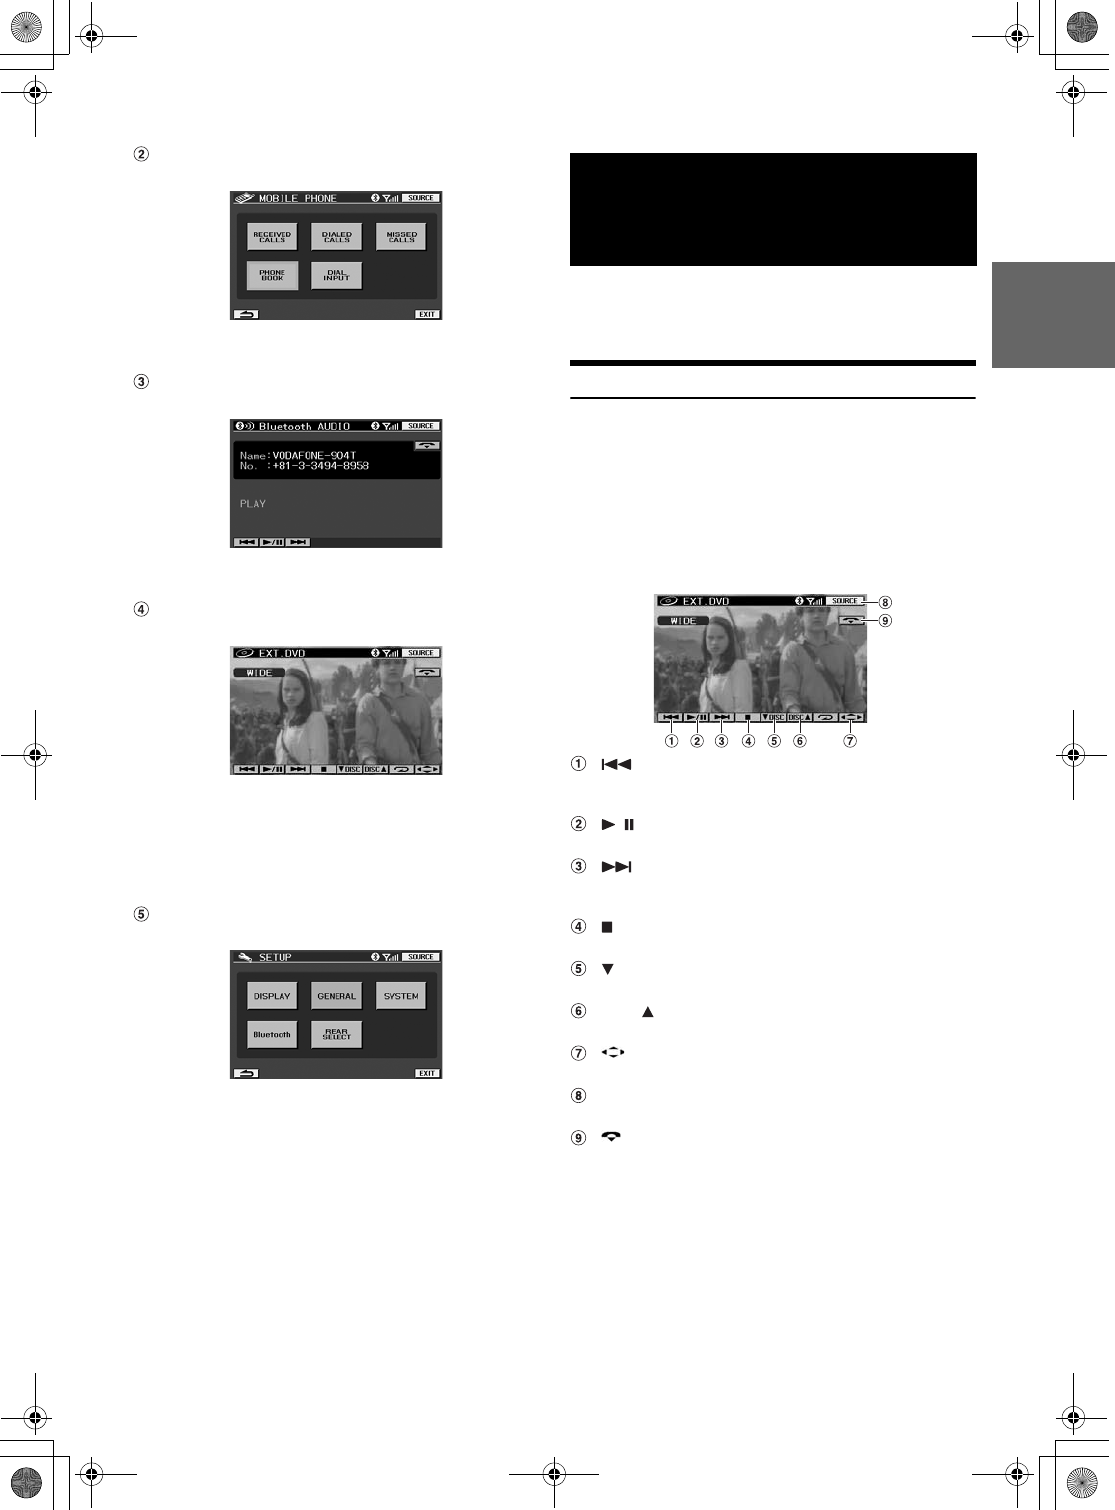
The source selection screen is displayed.
2
Touch the desired source.
The main source screen is displayed.
Display example for source selection screen
Nav. (Navigation)
The Navigation screen is displayed. If an optional Alpine
Navigation System is connected to the TME-M740BT, the
Navigation screen can be displayed on this unit.
•For navigation operation, refer to the Owner's Manual of the
navigator.
•If the NAV. is not displayed on the source selection screen, set
NAV.MODE to NAV. by following "Setting the Navigation Mode"
(page 13).
Getting Started
CP002.00.eps
01GB00TMEM860.book Page 4 Monday, October 16, 2006 1:50 PM
5-EN
01GB05TMEM860.fm
ALPINE TME-M740BT 00-00000Z00-A (EN)
MOBILE PHONE
The MOBILE PHONE screen is displayed.
•For details, refer to “Hands-Free Phone” (page 7).
Bluetooth AUDIO
The Bluetooth AUDIO mode screen is displayed.
•For details, refer to “Bluetooth AUDIO Operation” (page 10).
AUX
The external input screen is displayed.
• The name which is given as the source name in "External Input
Name setting (AUX NAME)" on page 13 is displayed.
•For details, refer to “DVD Video Player Operation” (page 5).
•For details, refer to “TUE-200DVB Operation” (page 6).
SETUP
The SETUP selection screen is displayed.
•For details, refer to “Setup” (page 10).
If an ALPINE device is connected to AUX-1, the device is controllable
from the unit. The following explains how to operate representative
devices.
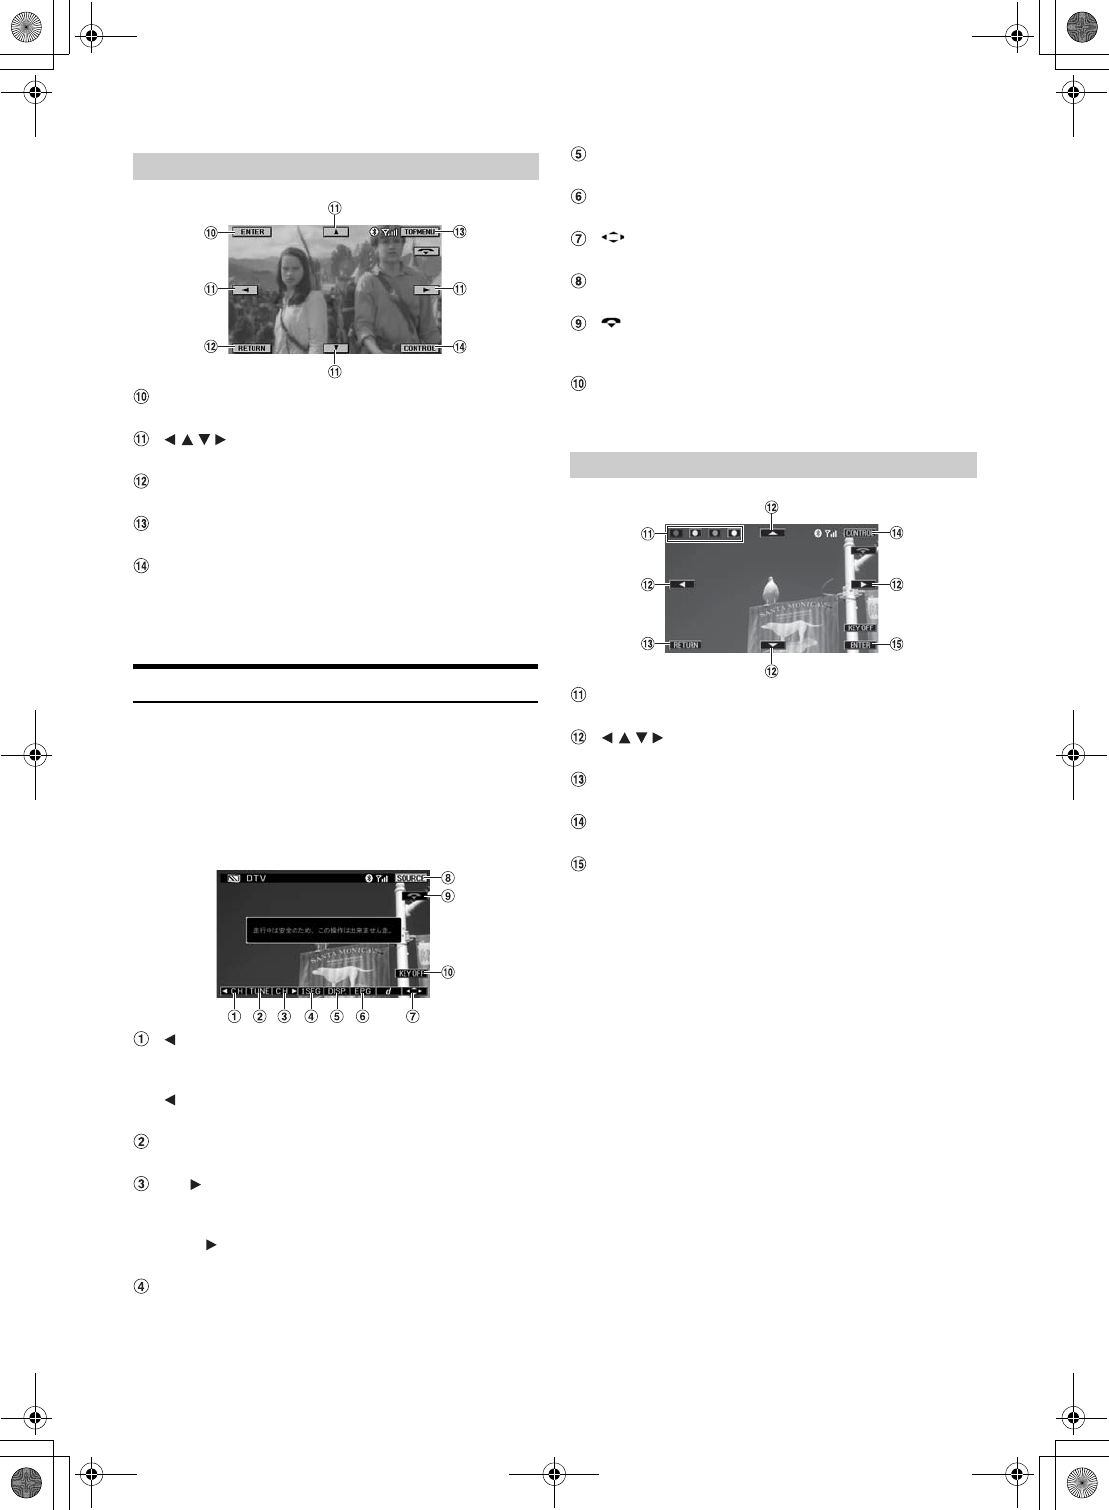
DVD Video Player Operation (Optional)
Operable when optional DVD Video Player
(DVA-5210/DVE-5207/DHA-S680) is connected.
When EXT. DVD is selected in "Setting the AUX Mode" (page XX),
the source is displayed in SOURCE selection screen.
Touch the display panel to display the operation screen.
•The operation screen changes to the visual screen in the DVD mode
for 5 seconds after an operation has been performed. Touch the
display panel to display the operation screen again.
Finds the beginning of track/chapter. Touching and holding
plays fast- reverse.
/
Pauses and plays back.
Finds the beginning of a track/chapter. Touching and
holding plays fast- forward.
PRE- STOP/STOP
DISC
Switch DISC (DHA-S680 only)
DISC
Switch DISC (DHA-S680 only)
Displays the DVD menu operation screen.
SOURCE
Displays the source selection screen.
Hangs up the mobile phone connection. The indication is
displayed only during a call.
Screen Example:EXT. DVD
Auxiliary Device
Operation
01GB00TMEM860.book Page 5 Monday, October 16, 2006 1:50 PM
6-EN
01GB05TMEM860.fm
ALPINE TME-M740BT 00-00000Z00-A (EN)
TOP MENU
The DVD top menu screen is displayed.
Moves an item displayed on the screen.
RETURN
Returns to the previous screen.
CONTROL
Displays the main operation screen.
ENTER
Enters the selected item.
•Operation may differ depending on the connected device. Refer to
owner's manual of the connected device.
TUE-T200DVB Operation (Optional)
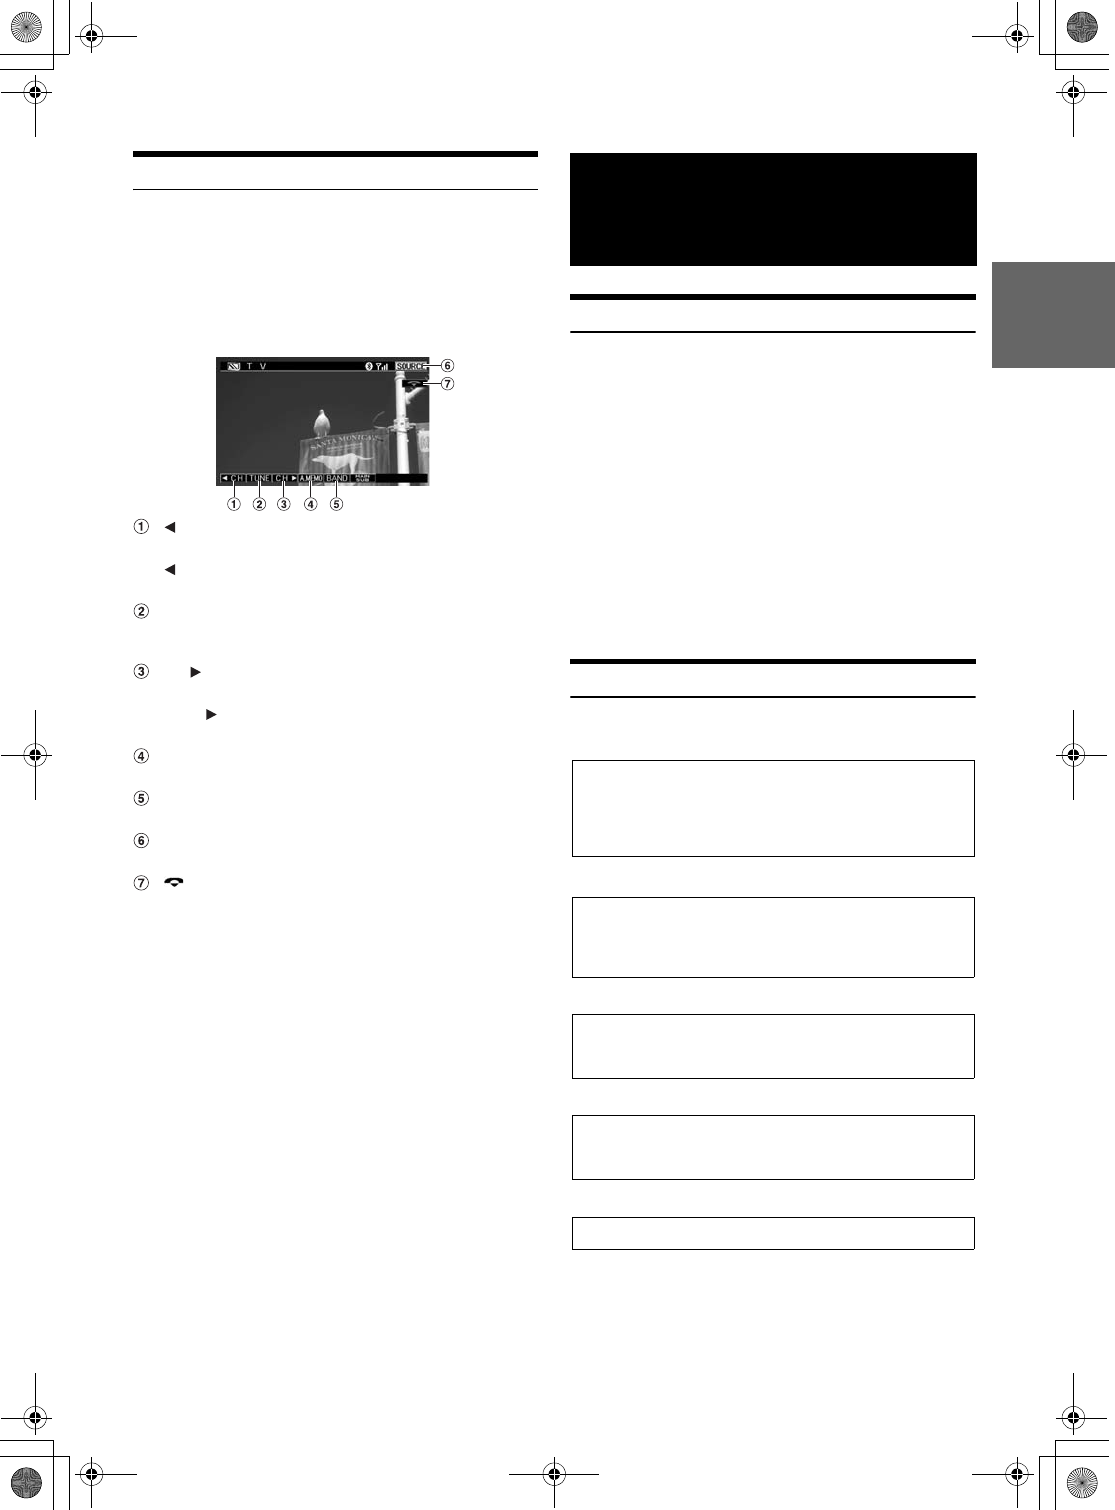
Operable when optional TUE-T200DVB is connected.
When DVB-T is selected in "Setting the AUX Mode" (page XX), the
source is displayed in SOURCE selection screen.
Touch the display panel to display the operation screen.
•The operation screen changes to the visual screen in the DVB-T mode
for 5 seconds after an operation has been performed. Touch the
display panel to display the operation screen again.
CH
Decreases channels one by one. Touching and holding
changes continuously.
P. D N
Decreases preset channels.
TUNE
Changes the tuning way (channel and preset channel).
CH
Increases channels one by one. Touching and holding
changes continuously.
P. UP
Increases preset channels.
A. MEMO
Memorizes automatically.
BAND
Switches source of digital TV.
EPG
Displays EPG screen.
Displays the menu operation screen.
SOURCE
Displays the source selection screen.
Hangs up the mobile phone connection. The indication is
displayed only during a call.
KEY OFF
Temporarily turns off the operation screen. If the screen is
touched, the operation screen is displayed again.
ENTER
Enters the selected item.
Moves an item displayed on the screen.
RETURN
Returns to the previous screen.
TOP MENU
Displays the menu screen.
CONTROL
Displays the main operation screen.
•For detail, refer to the Owner's Manual of the TUE-T200DVB sold
separately.
DVD Menu Operations
Menu Operations
01GB00TMEM860.book Page 6 Monday, October 16, 2006 1:50 PM
7-EN
01GB05TMEM860.fm
ALPINE TME-M740BT 00-00000Z00-A (EN)
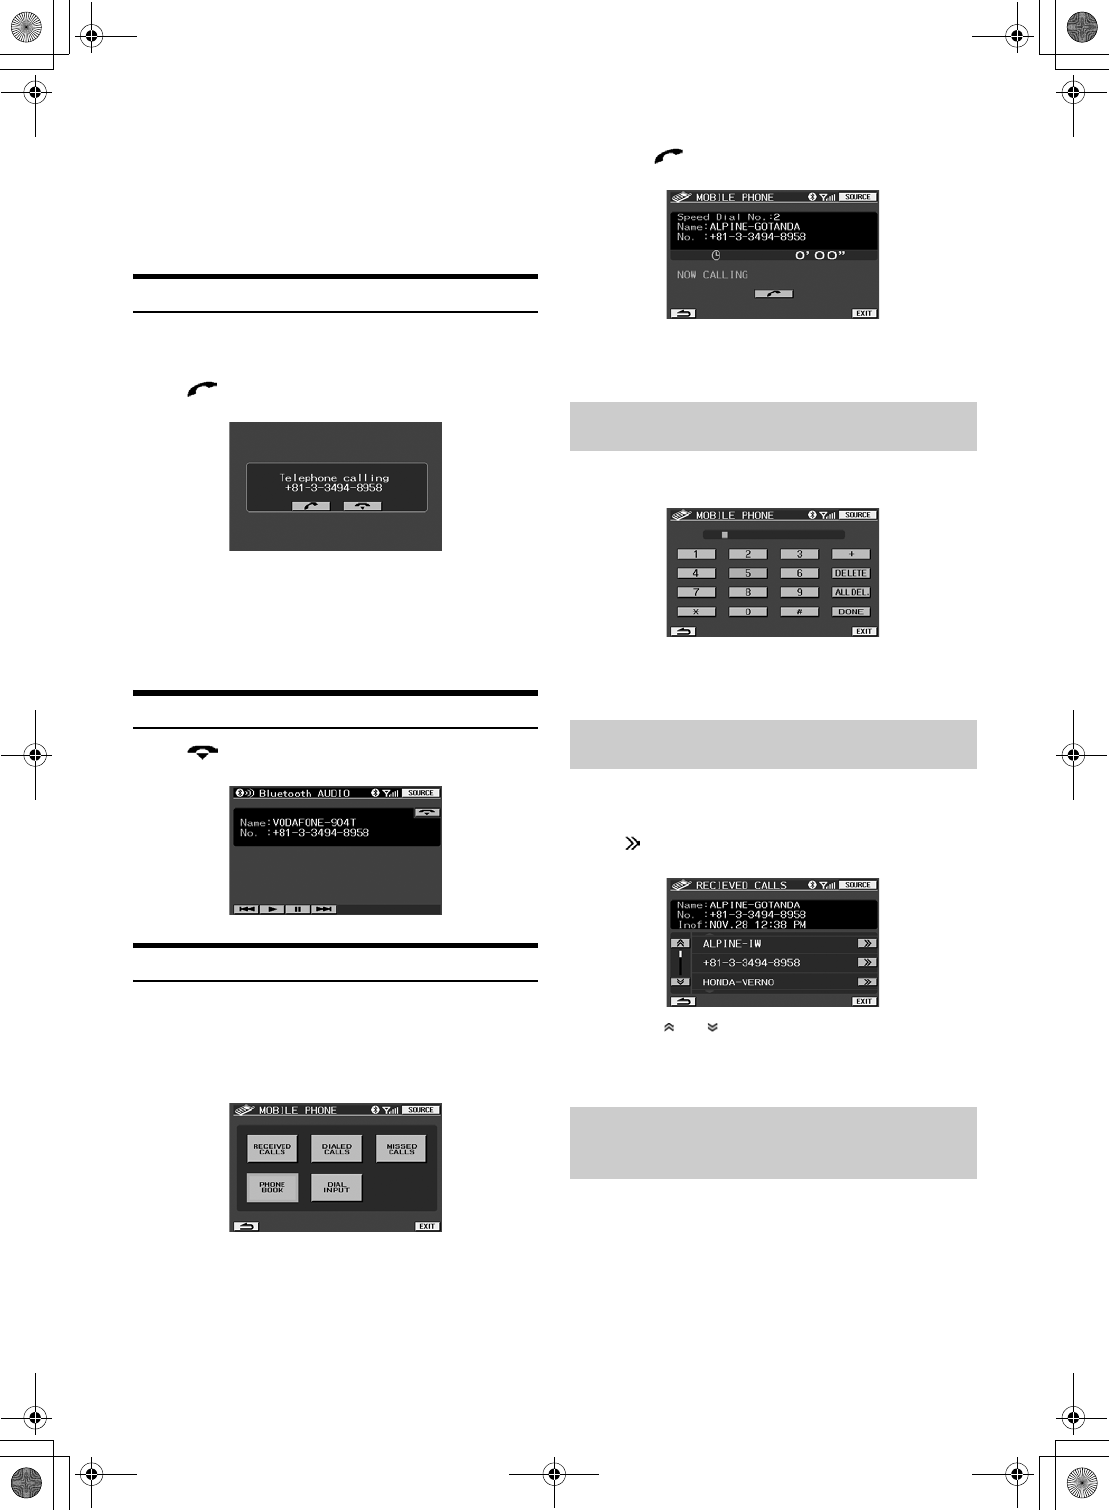
TV Operation (Optional)
Operable when optional TUE-T252TX is connected.
When TV is selected in "Setting the AUX Mode" (page XX), the source
is displayed in SOURCE selection screen.
Touch the display panel to display the operation screen.
•The operation screen changes to the visual screen in the TV mode for
5 seconds after an operation has been performed. Touch the display
panel to display the operation screen again.
CH
Decreases channels one by one.
P. D N
Decreases the preset numbers one by one.
TUNE
Changes the tuning way (manual mode, auto seek mode
and preset number).
CH
Increases channels one by one.
P. UP
Increases the preset numbers one by one.
A. MEMO
Memorizes automatically.
BAND
Changes the band.
SOURCE
Displays the source selection screen.
Hangs up the mobile phone connection. The indication is
displayed only during a call.
•Operation may differ depending on the connected device. Refer to
owner's manual of the connected device.
About Hands-Free Phone
The unit is compatible with Bluetooth® international standard wireless
communication technology. You can place a hands-free call* using a
Bluetooth compatible mobile phone.
* To make a hands-free call, your mobile phone needs to conform to
HPF (Hands-Free Profile) or HSP (Headset Profile).
•Avoid performing a hands-free call in a city where traffic is
congested, or in the narrow street.
•When you place a call, speak loudly and clearly.
•Shut the windows before calling.
•If both persons use a hands-free call to each other, or you make a call
in a noisy location, you may have difficulty hearing the other
person’s voice, or transmitting to the other person.
•Certain voices may sound unnatural, depending on the person using
the telephone, or on telephone line conditions.
•Depending on the mobile phone, you may not be able to use a hands-
free phone.
Connect a Mobile Phone
If a mobile phone is connected for the first time, register a mobile phone
by doing the following.
•The Bluetooth setting is required for a mobile phone. See the
Owner’s Manual of the mobile phone.
•To input a pass code in the mobile phone, see the Owner’s Manual of
the mobile phone.
Hands-Free Phone
(Optional)
Bluetooth Setting
Refer to “Setting the Bluetooth Connection (Bluetooth)”
(page 13).
Refer to “Sending Name Information of the Unit (VISUAL
MODE)” (page 14).
➧
Searching for a Mobile Phone
Refer to “Finding a Bluetooth Device Name (SEARCH DEVICE)”
(page 13)
➧ ➧
Inputting a pass code (4-digit)
Input a 4-digit number of your choice.
➧
Input a pass code (4-digit) on the Mobile Phone.
Input the same pass code number (4-digit) as the unit.
The connection is made.
01GB00TMEM860.book Page 7 Monday, October 16, 2006 1:50 PM
8-EN
01GB05TMEM860.fm
ALPINE TME-M740BT 00-00000Z00-A (EN)
•If ON is set in “Setting the Connection automatically (AUTO
CONNECT)” (page 14), automatic connection of the previously
connected mobile phone will start when power is turned on.
•If you previously registered a mobile phone in the unit, select the
mobile phone you want from the registration device setting list. Refer
to “Setting the Bluetooth Connection” (page 13).
Receiving a Call
When a call is received, a received call sound rings, and the received
call is announced in the display.
Touch [ ].
The call starts.
•If ON is set in “Receiving a Received Call automatically (AUTO
ANSWER)” (page 14), an incoming call is answered automatically 5
seconds after it is received.
•You can set whether full-screen is displayed while a call is placed.
For details, refer to “Setting the Screen to be Displayed while
Calling (CALLING DISPLAY)” (page 11).
Hanging up
Touch [ ].
The call finishes.
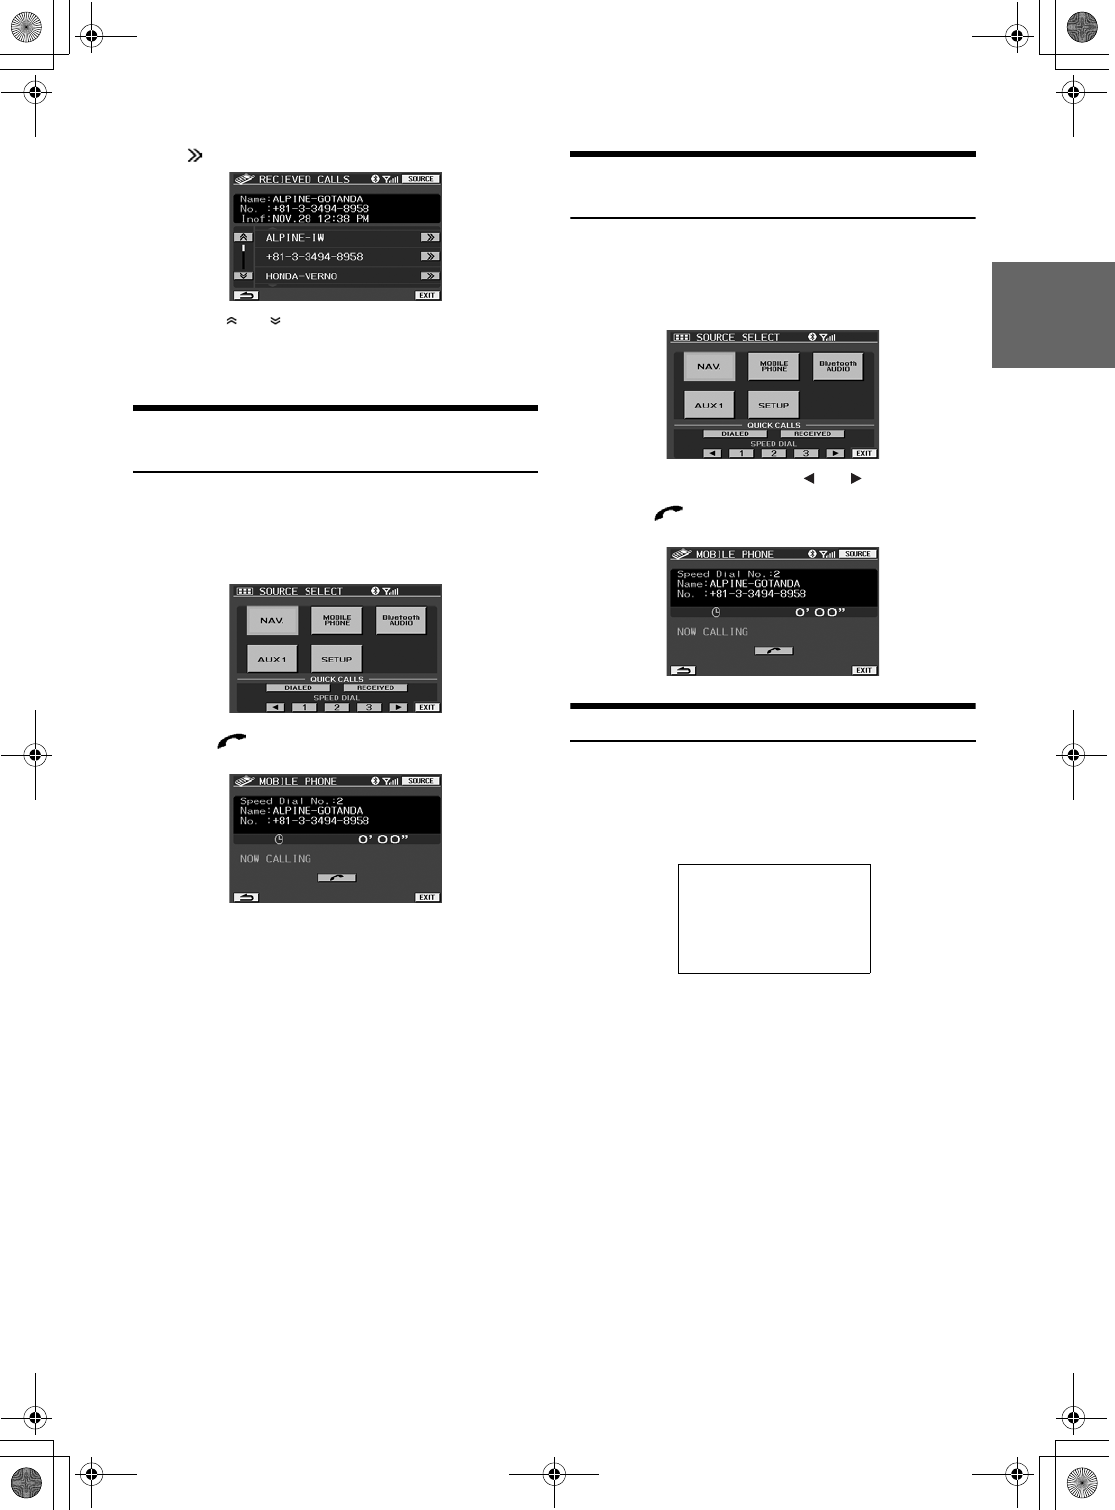
Placing a Call
1
Touch [Hands-Free] on the SOURCE SELECT
screen.
The HFT screen is displayed.
2
Select the desired method.
3
Touch [ ].
The telephone is placing a call.
•If you input a telephone number and place a call, this screen is not
displayed.
•If [Registration] is touched, you can register in SPEED DIAL.
Input the destination number, starting with the area
code, and touch [ENT].
•If [Delete] is touched, delete a character one by one. If [Delete] is
touched and held, all characters are deleted.
•If [Registration] is touched, you can register in SPEED DIAL.
You can select a person and place a call from a telephone book list
downloadable to the unit from a mobile phone.
Touch [ ] of the person to whom you want to place a
call.
•If you touch [ ] or [ ], you can change the list page.
•If you touch [SEARCH], you can download the telephone book of a
mobile phone to the unit. You may need to send a telephone book
from another mobile phone if this is not possible.
You can place a call by selecting a person from a list of received
calls, dialed and missed calls, or received calls history.
Placing a Call by Inputting a Telephone
Number (Inputting a Number)
Placing a Call by the Telephone Book
(Telephone Book)
Placing a Call by History (History of
Received Calls/Dialed Calls/Missed
Received Calls)
Received calls history: A telephone number list of previously
received calls.
Dialed calls history: A telephone number list of previously
dialed calls.
Missed, received calls history: A telephone number list of persons
whose calls you received but
missed.
01GB00TMEM860.book Page 8 Monday, October 16, 2006 1:50 PM
9-EN
01GB05TMEM860.fm
ALPINE TME-M740BT 00-00000Z00-A (EN)
Touch [ ] of the person you wish to call.
•If you touch [ ] or [ ], you can change the list page.
•A maximum of 20 numbers can be stored in each call history. If a call
history exceeds 20, the call history will be deleted in order from the
oldest.
Placing a Call by QUICK CALLS (QUICK
CALLS)
You can place a call quickly to a telephone number you last dialed or
received.
1
Touch [REDIAL] or [RECEIVED CALLS] of QUICK
CALLS on the SOURCE SELECT screen.
2
Touch [ ].
The call is placed.
•If [Register] is touched, you can register in SPEED DIAL.
Placing a Call by SPEED DIAL (SPEED
DIAL)
You can register up to 9 telephone numbers you frequently call in
SPEED DIAL for easy dialing any time.
1
Touch the number you want to call by SPEED DIAL
on the SOURCE SELECT screen.
•You can scroll a number by touching [ ] or [ ].
2
Touch [ ].
The call is placed.
Downloading a Telephone Book
You can place a call by downloading the telephone book registered in a
mobile phone to the unit.
Touch [SEARCH] on the telephone book screen.
Downloading of the telephone book starts.
•To place a call by a telephone book, refer to “Placing a Call by the
Telephone Book (Telephone Book)” (page 8).
•If a telephone book is rewritten, download a new telephone book to
the unit. When a message is displayed, touch [YES]. The earlier
telephone book is deleted and the new one is downloaded.
CP022.00.eps
01GB00TMEM860.book Page 9 Monday, October 16, 2006 1:50 PM
10-EN
01GB05TMEM860.fm
ALPINE TME-M740BT 00-00000Z00-A (EN)
Bluetooth Audio Operation
Audio information of a Bluetooth compatible mobile phone, portable
player, etc., is by wireless controllable/playable* from the unit.
Refer to “Connect a Mobile Phone” (page 7) to connect Bluetooth
Audio devices.
* To play back audio, a mobile phone or portable player that conforms
to A2DP (Advanced Audio Distribution Profile) or AVRCP (Audio/
Video Remote Control Profile) is required. Video playback is not
supported.
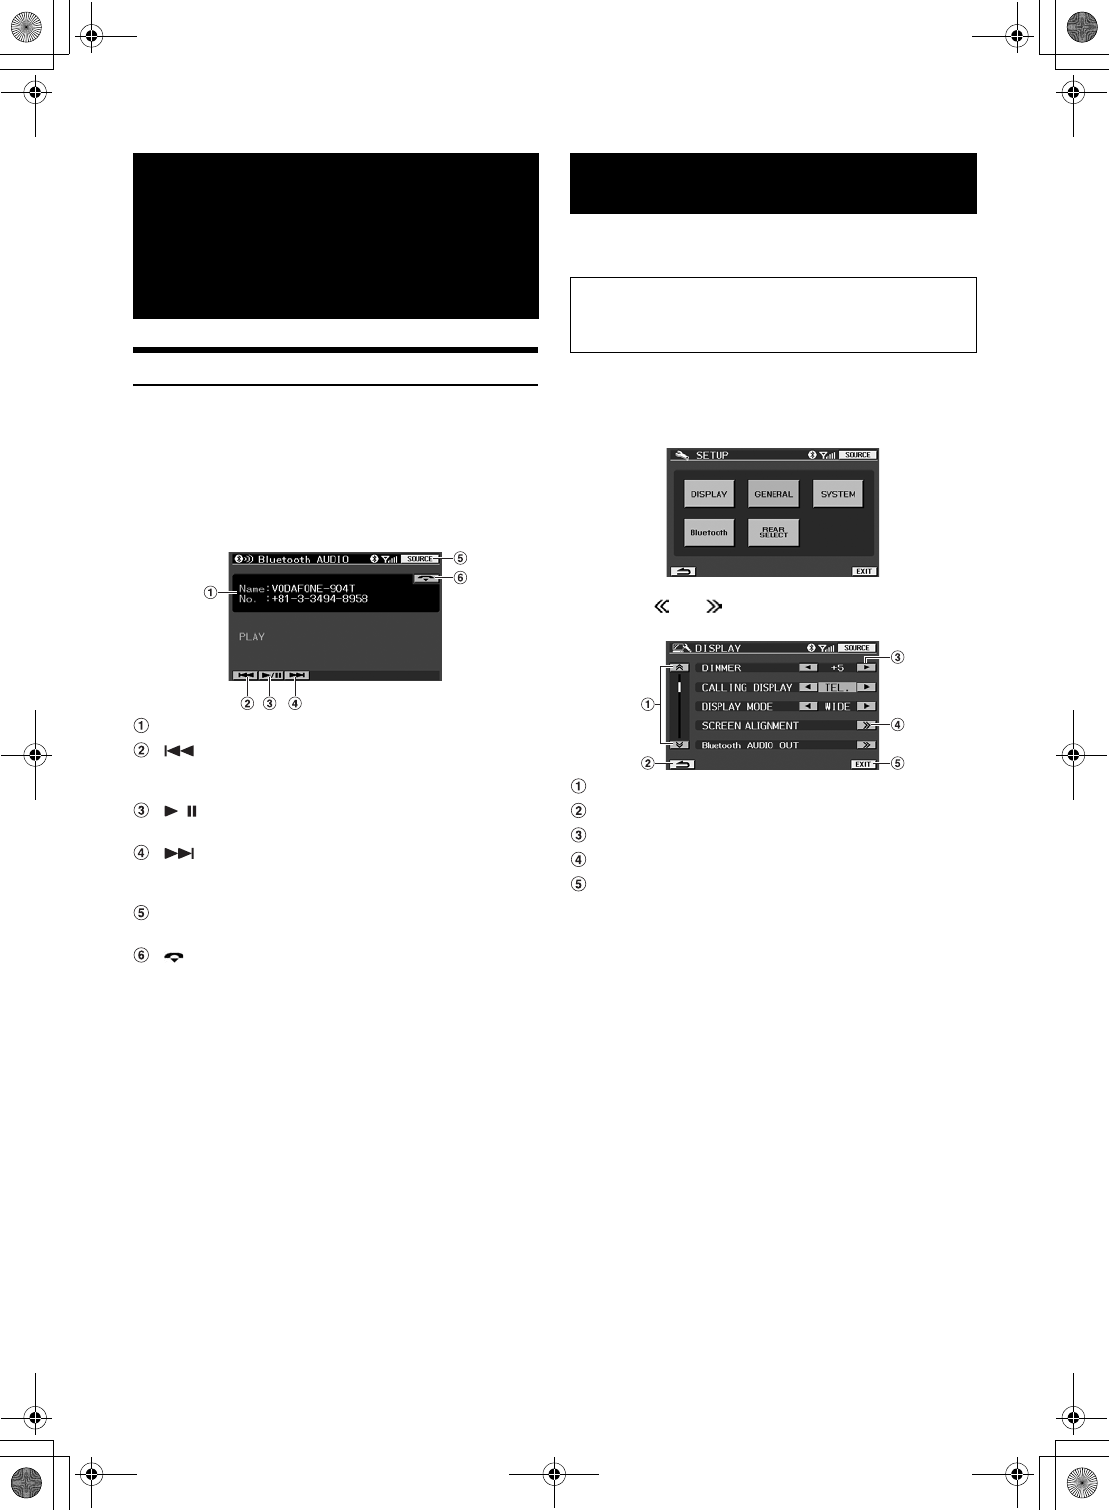
Displays the song title
Finds the beginning of the current track.
Touch and hold to play fast-reverse.
/
Pauses and plays back.
Finds the beginning of the next track.
Touch and hold to play fast-forward.
SOURCE
Displays the source selection screen.
Hangs up a hands-free phone connection. The indicator is
displayed while the call is placed.
You can flexibly customize the unit to suit your own preferences and
usage.
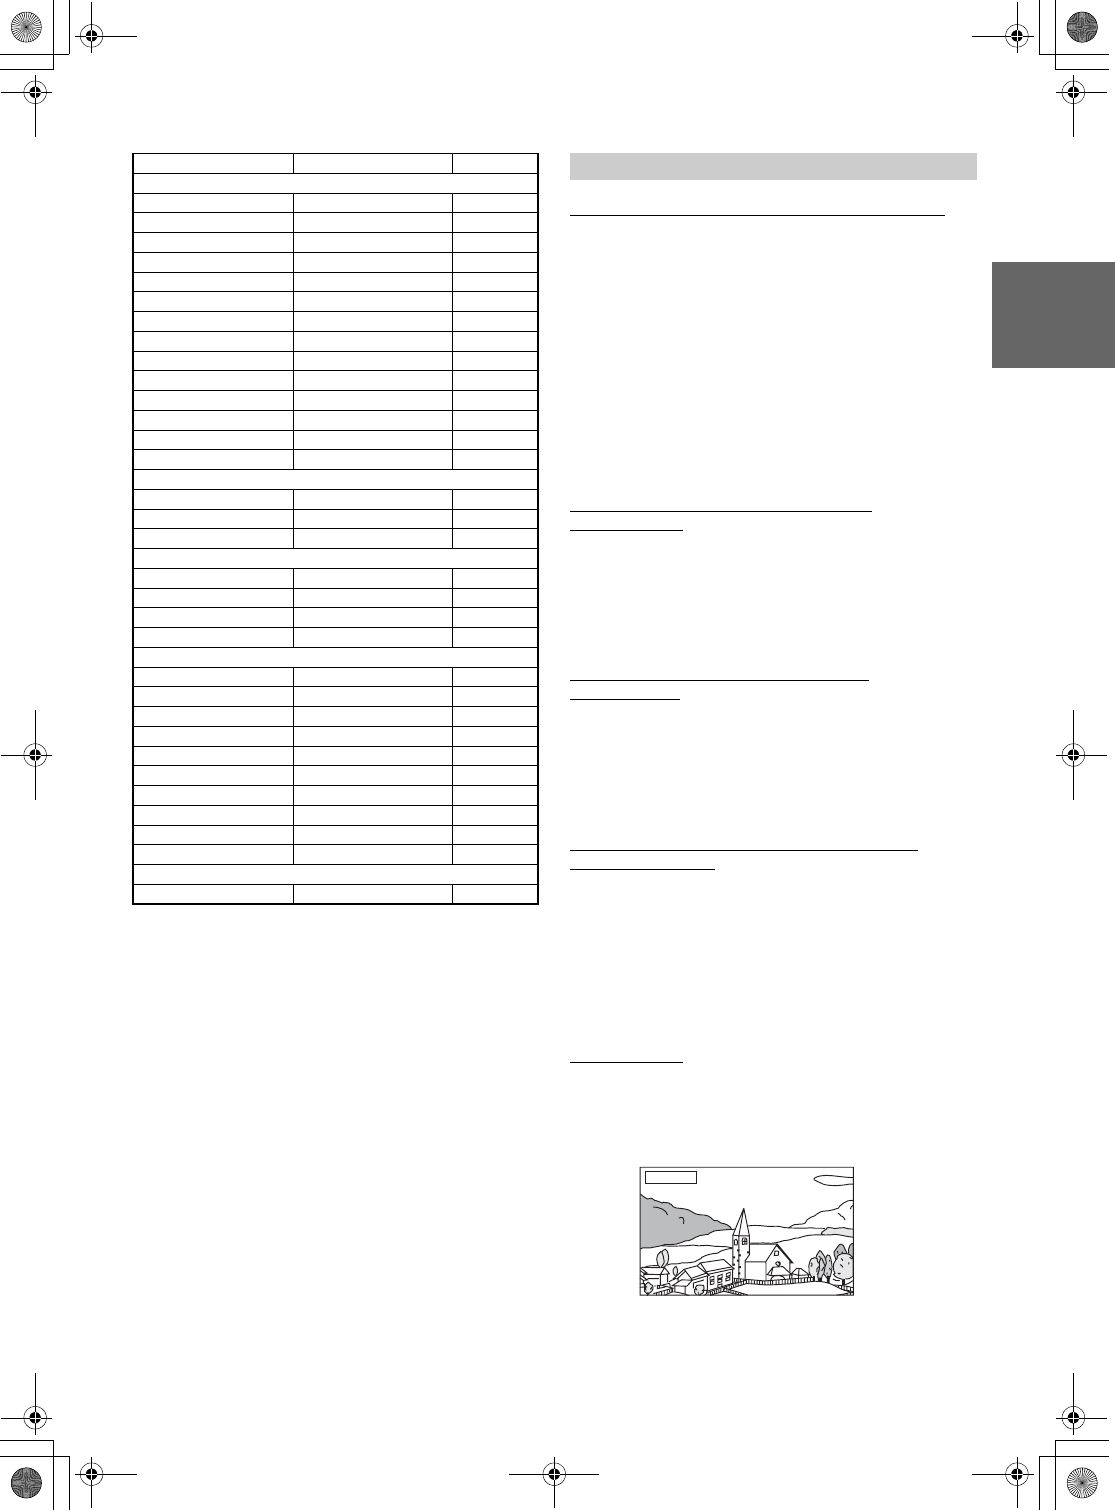
1
Touch [SETUP] on the source select screen.
The SETUP selection screen is displayed.
2
Touch the desired setup item.
3
Touch [ ] or [ ], etc., of the desired item to
change its setting.
Switch page
Returns to the previous display.
Change the setting item.
Displays the detailed setting screen.
Exits the setting screen.
4
Touch [EXIT].
Bluetooth Audio
Function
(Optional)
Setup
Use steps 1 to 4 to select one of the SETUP modes to modify. See
the applicable section below for details about the selected
SETUP item.
01GB00TMEM860.book Page 10 Monday, October 16, 2006 1:50 PM
11-EN
01GB05TMEM860.fm
ALPINE TME-M740BT 00-00000Z00-A (EN)
Setting the Brightness of the Backlighting (DIMMER)
HIGH / LOW / AUTO (Initial Setting)
Backlighting is provided by a fluorescent light built into the liquid
crystal panel. The illumination control adjusts the brightness of
the backlighting based on the car ambient lighting for easier
viewing.
Adjusting the Maximum Level of Backlight
(DIMMER HIGH)
MIN(16) to MAX(31) (Initial Setting: MIN)
If HIGH is set in “Setting the Brightness of the Backlighting
(Dimmer)” (page 11), you can adjust the brightness of the
backlighting. This function can be used, for instance, to change
the screen brightness while traveling at night.
Adjusting the Minimum Level of Backlight
(DIMMER LOW)
MIN(0) to MAX(15) (Initial Setting: MIN)
If LOW is set in “Setting the Brightness of the Backlighting
(Dimmer)” (page 11), you can adjust the brightness of the
backlighting. This function can be used, for instance, to change
the screen brightness while traveling at night.
Setting the Screen to be Displayed while Calling
(CALLING DISPLAY)
TEL.(Initial Setting) / MAIN
While a call is placed by a hands-free phone, you can set
whether the telephone screen or the navigation screen, etc., is
displayed
DISPLAY MODE
WIDE (Initial Setting) / CINEMA / NORMAL
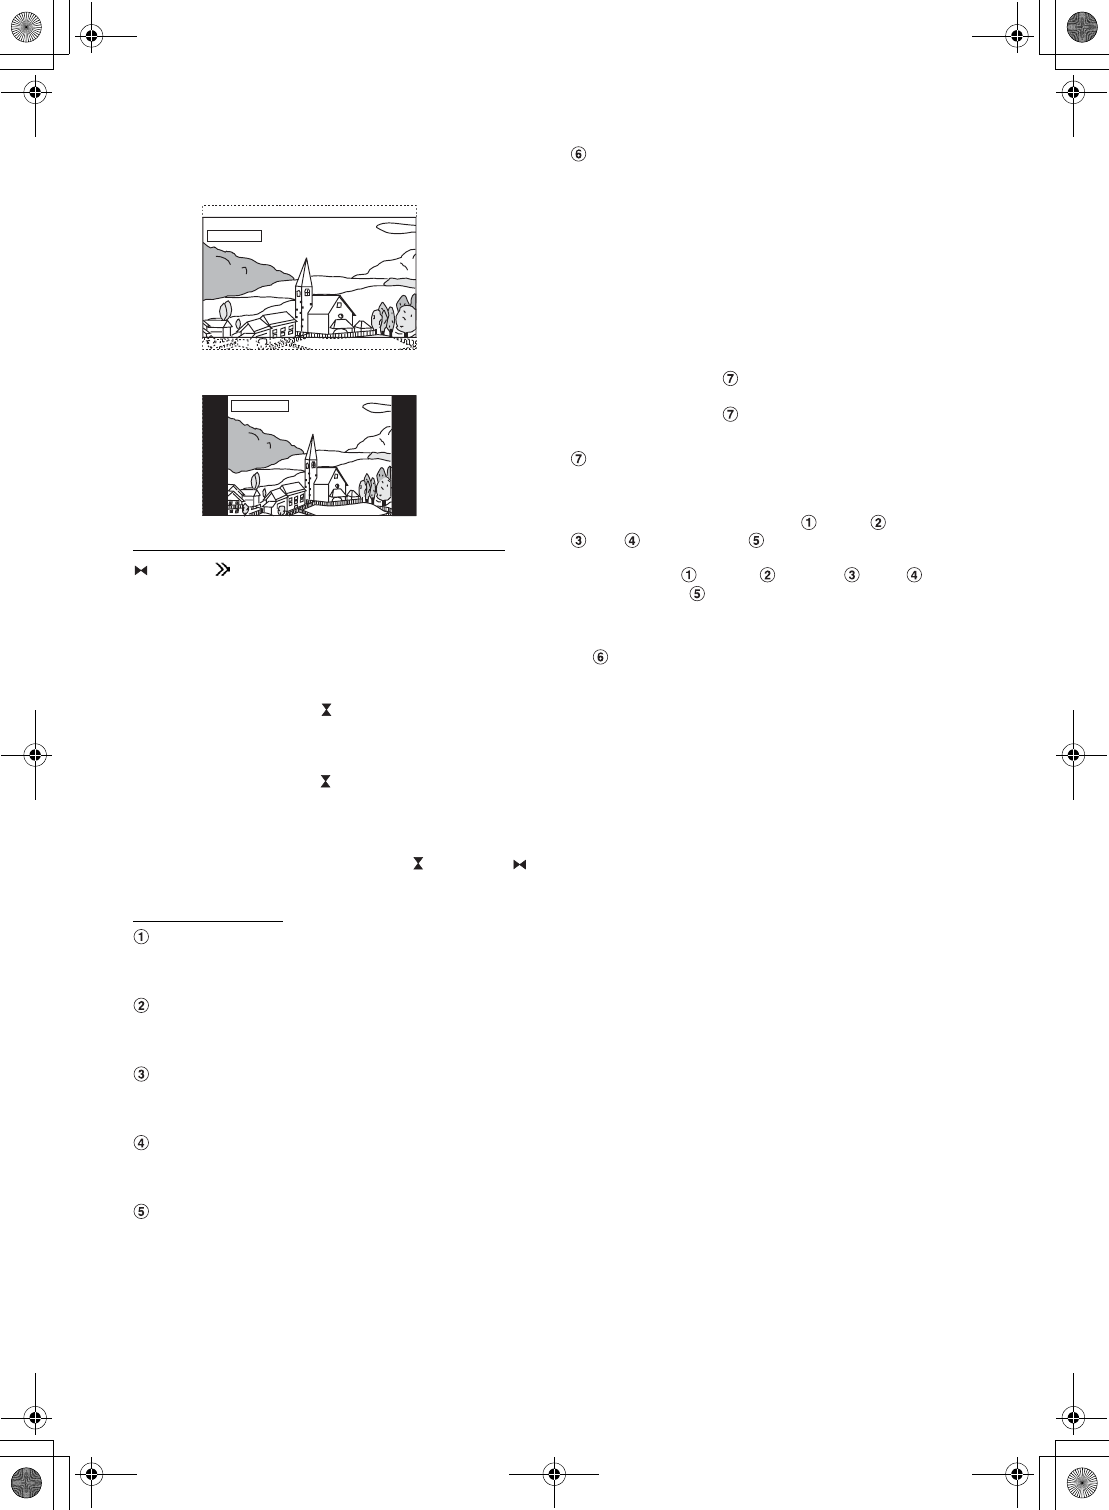
Setup item Initial setting page
DISPLAY
DIMMER AUTO page 11
DIMMER HIGH MIN page 11
DIMMER LOW MIN page 11
CALLING DISPLAY TEL. page 11
DISPLAY MODE WIDE page 11
SCREEN ADJUSTMENT — page 12
VISUAL EQ — page 12
BRIGHT 0 page 12
COLOR 0 page 12
TINT 0 page 12
CONTRAST 0 page 12
SHARP 0 page 12
VISUAL EQ MODE OFF page 12
USER MEMORY P-1 page 12
GENERAL
BEEP ON page 13
LED BRIGHTNESS LOW page 13
VOLUME CONTROL MONITOR page 13
SYSTEM
INT MUTE ON page 13
AUX NAME AUX page 13
NAV. MODE NAV. page 13
CAMERA INT ON page 13
Bluetooth
Bluetooth ON page 13
SEARCH DEVICE — page 13
ACTIVE DEVICE — page 13
PAIRED DEVICE — page 14
AUTO CONNECT ON page 14
VISIABLE MOD ON page 14
AUTO ANSWER OFF page 14
REFUSED CALL OFF page 14
PHONEBOOK MEMORY page 14
MIC GAIN 5 page 14
REAR SELECT
REAR SELECT AUX page 14
Display Setup Operation
HIGH: Sets the brightness of the screen to the same brightness that
was set in DIMMER HIGH in "Adjusting the Level of Backlight"
(page 11).
LOW: Sets the brightness of the screen to the same brightness that
was set in DIMMER LOW in "Adjusting the Level of Backlight"
(page 11).
AUTO: Adjust the brightness of the background illumination of the
monitor automatically to the brightness of the car interior.
TEL.: Displays the telephone screen.
MAIN: Displays the current source screen (navigation, etc.).
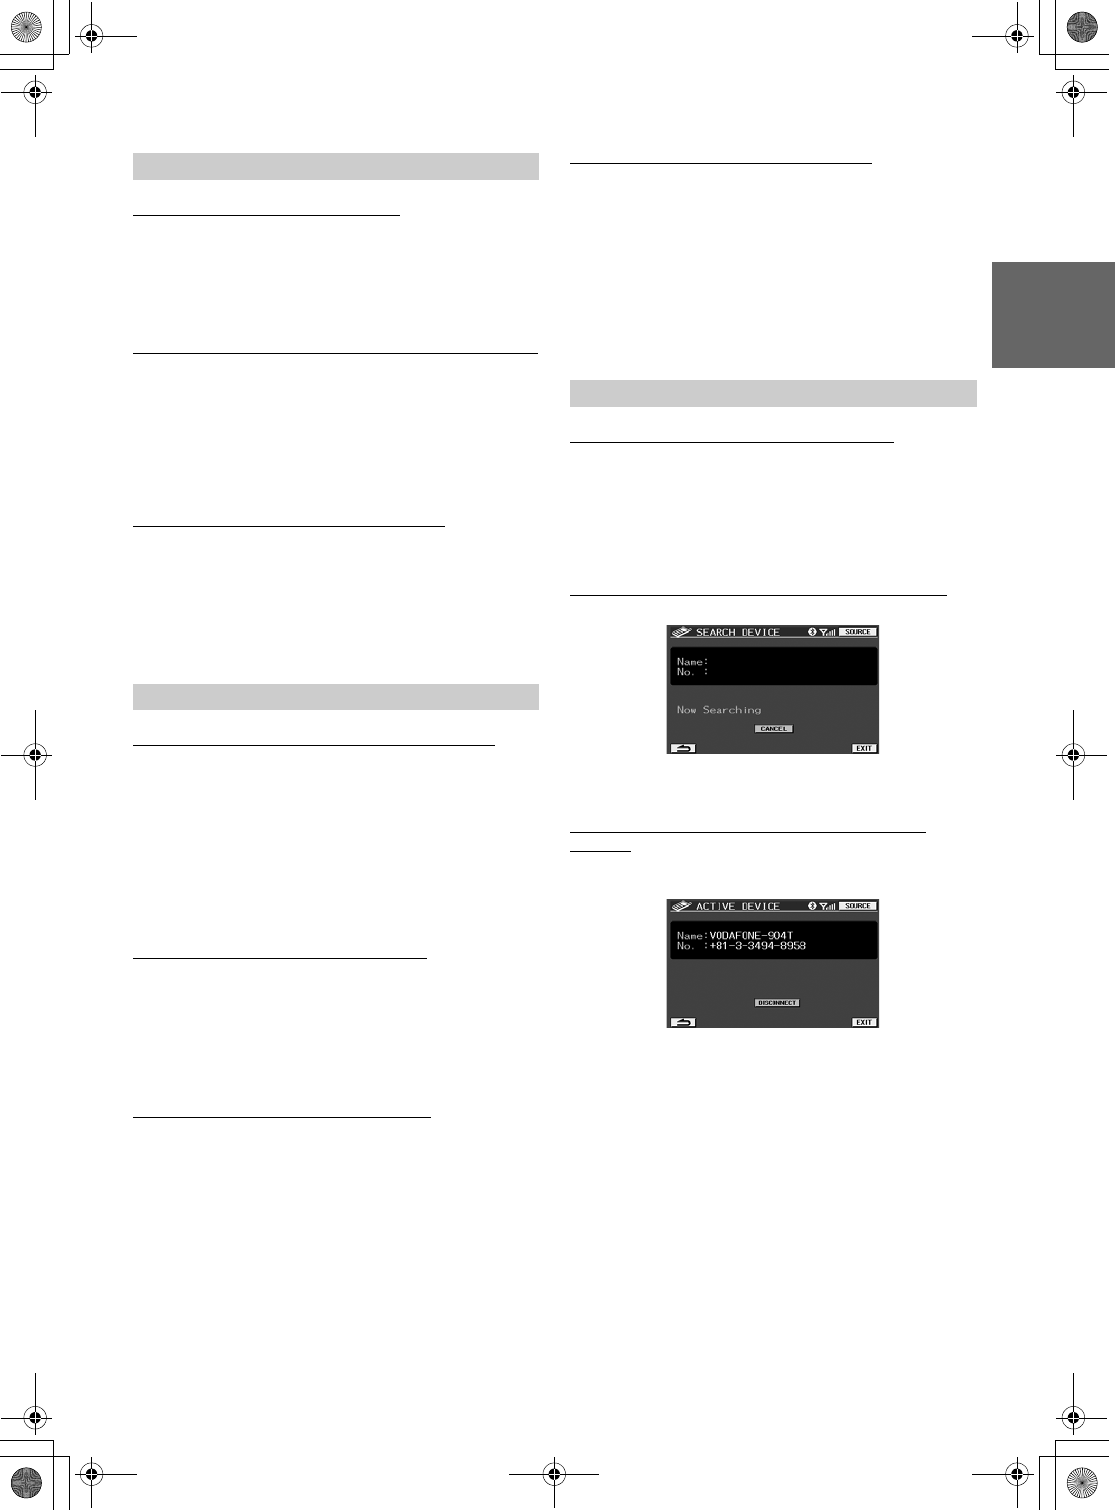
WIDE: The monitor displays a normal picture wider to fit in a
wide-screen monitor by evenly stretching out the picture
horizontally.
WIDE
01GB00TMEM860.book Page 11 Monday, October 16, 2006 1:50 PM
12-EN
01GB05TMEM860.fm
ALPINE TME-M740BT 00-00000Z00-A (EN)
Adjusting the Touch Panel (SCREEN ADJUSTMENT)
(RESET) / (SETUP)
Adjustment becomes necessary when the display position on
the LCD and the touch position on the touch panel do not match.
1
Touch [>>] of SCREEN ALIGNMENT.
The adjustment screen appears.
2
Accurately touch the [ ] mark provided in the lower
left corner of the screen.
The screen changes to the adjustment screen.
3
Accurately touch the [ ] mark provided in the upper
right corner of the screen.
This completes adjustment, and returns to the DISPLAY
setup mode screen.
•If you have touched a location other than the [ ] mark, touch [ ]
to restore the adjustment screen to the initial setting.
VISUAL EQ™ Setting
BRIGHT
MIN(-15) to MAX(+15) (Initial Setting: 0)
COLOR
MIN(-15) to MAX(+15) (Initial Setting: 0)
TINT
GMAX(G15) to RMAX(R15) (Initial Setting: 0)
CONTRAST
MIN(-15) to MAX(+15) (Initial Setting: 0)
SHARP
MIN(-15) to MAX(+15) (Initial Setting: 0)
VISUAL EQ MODE
OFF(Initial Setting) / NIGHT M / SOFT / SHARP / CONTRAST / P-1
/ P-2
USER MEMORY
P-1 (Initial Setting) / P-2
You can store the settings made for " BRIGH, COLOR,
TINT, CONTRAST and SHARP."
After adjusting BRIGH, COLOR, TINT,
CONTRAST and SHARP, select the preset number (P-
1) or (P-2) and store it by touching [WRITE].
•You can recall the VISUAL EQ mode stored here from P-1 or P-2 of
" VISUAL EQ Mode" (page 12).
CINEMA: The monitor displays a normal picture by stretching out
the picture vertically. This mode is good for displaying a
cinema type picture at the 16 : 9 ratio.
NORMAL: The monitor displays a normal picture at the centre of the
screen with a vertical black band at each side.
CINEMA
NORMAL
OFF : Initial Setting
NIGHT M.: Suitable for movies in which dark scenes frequently
appear.
SOFT: Suitable for CGs and animated films.
SHARP: Suitable for old movies where images are not clearly
shown.
CONTRAST: Suitable for recent movies.
P-1: Recalls the VISUAL EQ mode being stored on preset
No.P-1 from " USER MEMORY" (page XX).
P-2: Recalls the VISUAL EQ mode being saved on preset
No.P-2 from " USER MEMORY" (page XX).
01GB00TMEM860.book Page 12 Monday, October 16, 2006 1:50 PM
13-EN
01GB05TMEM860.fm
ALPINE TME-M740BT 00-00000Z00-A (EN)
Sound (Beep) Guide Function (BEEP)
ON (Initial Setting) / OFF
Adjusting the Brightness of the LED (LED BRIGHTNESS)
HIGH (Initial Setting) / LOW / NORMAL / OFF
You can set LED brightness (POWER indicator, etc.).
Change Sound Output(VOLUME CONTROL)
MONITOR (Initial Setting) / SYSTEM
If the unit is connected to the Vehiclehub Pro (VPA-B222R), set to
ON.
Hands-Free Phone Interruption Setting (INT MUTE)
ON (Initial Setting) / OFF
You can set a hands-free phone call to interrupt the head unit
(DVA-9861R, etc.).
•IN-INT cable connected devices should be connected to the OUT-
ONT cable of the unit.
External Input Name Setting (AUX NAME)
OFF / DVB-T / TV / DVD HU / EXT. DVD / GAME / AUX (Initial
Setting)
Select the name from the following list, to be used for the product
using the external input mode. This will apply to the touch switch
name at source selection time and the source name during
playback change.
Setting the Navigation Mode (NAV. MODE)
NAV. (Initial Setting) / EXT. / OFF
Setting of the Rear Camera (CAMERA INT)
ON (Initial Setting) / OFF
When the rear camera is connected, rear pictures are output on
the screen.
•By shifting to reverse (R), the rear pictures are output. This function
is effective when the reverse wire is properly connected.
Setting the Bluetooth Connection (Bluetooth)
ON (Initial Setting) / OFF
The setting is made when a hands-free phone or Bluetooth
Audio is used. Be sure to set to ON.
Finding a Bluetooth Device Name (SEARCH DEVICE)
Search a currently connectable Bluetooth device
•If [CANCEL] is touched, search of the Bluetooth device is
terminated.
Observing Bluetooth Device Information (ACTIVE
DEVICE)
You can check the details of a currently connected Bluetooth
device.
•If [DISCONNECT] is touched, the Bluetooth device is disconnected.
GENERAL Setup
ON: Activate the Sound Guide mode.
OFF: Deactivate the Sound Guide mode. The sound guide beep will
not be produced when a button on the unit is pressed.
HIGH: Makes LED brighter.
LOW: Makes LED darker.
NORMAL: Normal LED brightness.
OFF: Turns LED off.
MONITOR: Outputs sound through the built-in speakers.
SYSTEM: Volume is adjustable from the VPA-B222R if compatible
devices are connected to the VPA-B222R.
SYSTEM Setup
ON: The received call or placed call interrupts the head unit. Audio
of the head unit is muted at this time.
OFF: The received call or placed call does not interrupt the head unit.
OFF: Navigation source is not displayed. The settings related to the
navigation can not be changed from this unit.
NAV.:Navigation source is displayed.
EXT.: The source name is displayed as Vehicle Hub.
OFF: The CAMERA source is not displayed on the SOURCE selection
screen.
ON: Even if the shift lever is not set to reverse (R), the rear pictures
are output by selecting the CAMERA source.
Bluetooth Setup
ON: The Bluetooth function can be used.
OFF: The Bluetooth function cannot be used.
01GB00TMEM860.book Page 13 Monday, October 16, 2006 1:50 PM
14-EN
01GB05TMEM860.fm
ALPINE TME-M740BT 00-00000Z00-A (EN)
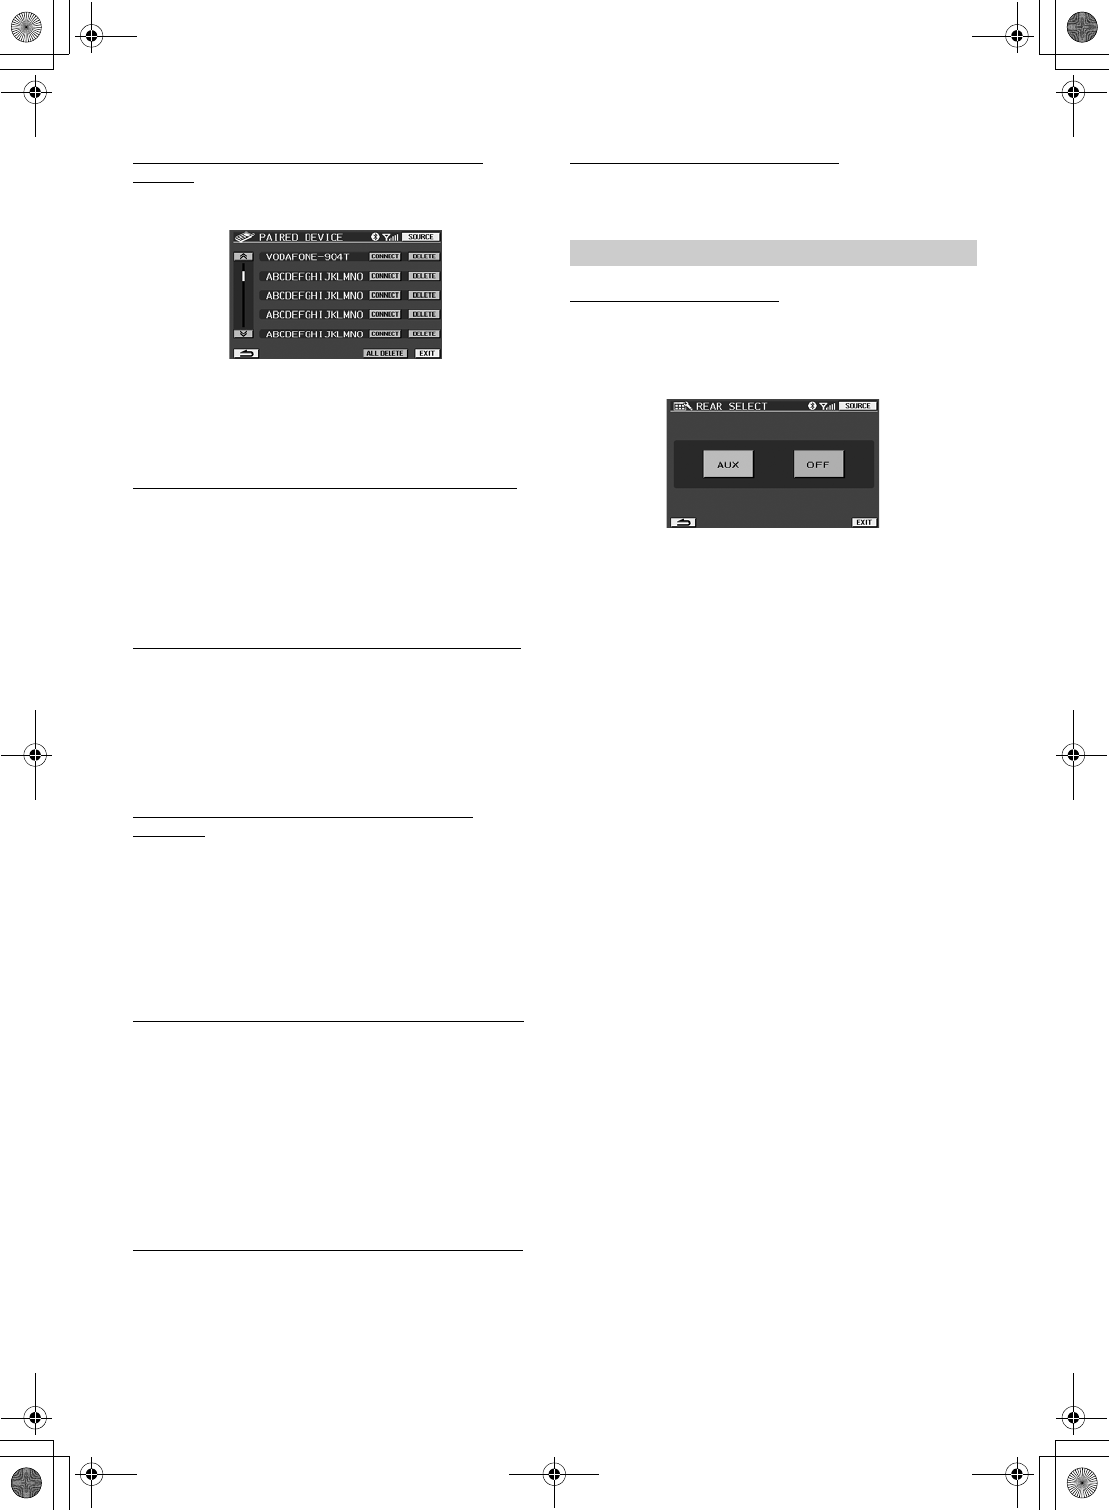
Setting the registered Bluetooth Device (PAIRED
DEVICE)
Previously up to 5 connected mobile phones to the unit were
registered. Select the one you wish to use.
•If [CONNECT] is touched, the Bluetooth device is connected.
•If [DELETE] is touched, the Bluetooth device is deleted. If [ALL
DELETE] is touched, all Bluetooth devices are deleted.
•If a Bluetooth device which is not registered in the list is connected,
search for a Bluetooth device by touching [SEARCH].
Setting a Connection automatically (AUTO CONNECT)
ON (Initial Setting) / OFF
The setting can be made whether previously connected mobile
phone is automatically recognized and connected or not.
Sending Name Information of the Unit (VISUAL MODE)
ON (Initial Setting) / OFF
The setting can be made whether unit name information is sent
to the Bluetooth device (mobile phone, etc.) or not.
Receiving a Received Call automatically (AUTO
ANSWER)
ON / OFF (Initial Setting)
The setting can be made whether the call is automatically
received or not when a call is received.
Making effective use of Refused Call (REFUSED CALL)
ON / OFF (Initial Setting)
If you do not wish to accept a received call while driving, you
can set to not receive that call by hands-free operation.
•If [REFUSED CALL] is set to ON when a call is received, a mobile
phone will still be received.
Setting the Telephone Book to be used (PHONEBOOK)
PHONE (Initial Setting) / CARD
You can set whether to use a mobile phone or SIM card from
which to download a telephone book to the unit.
Setting Volume of the Call (MIC GAIN)
MIN(1) to MAX(7) (Initial Setting:5)
The volume of a call can be set at one of 7 levels.
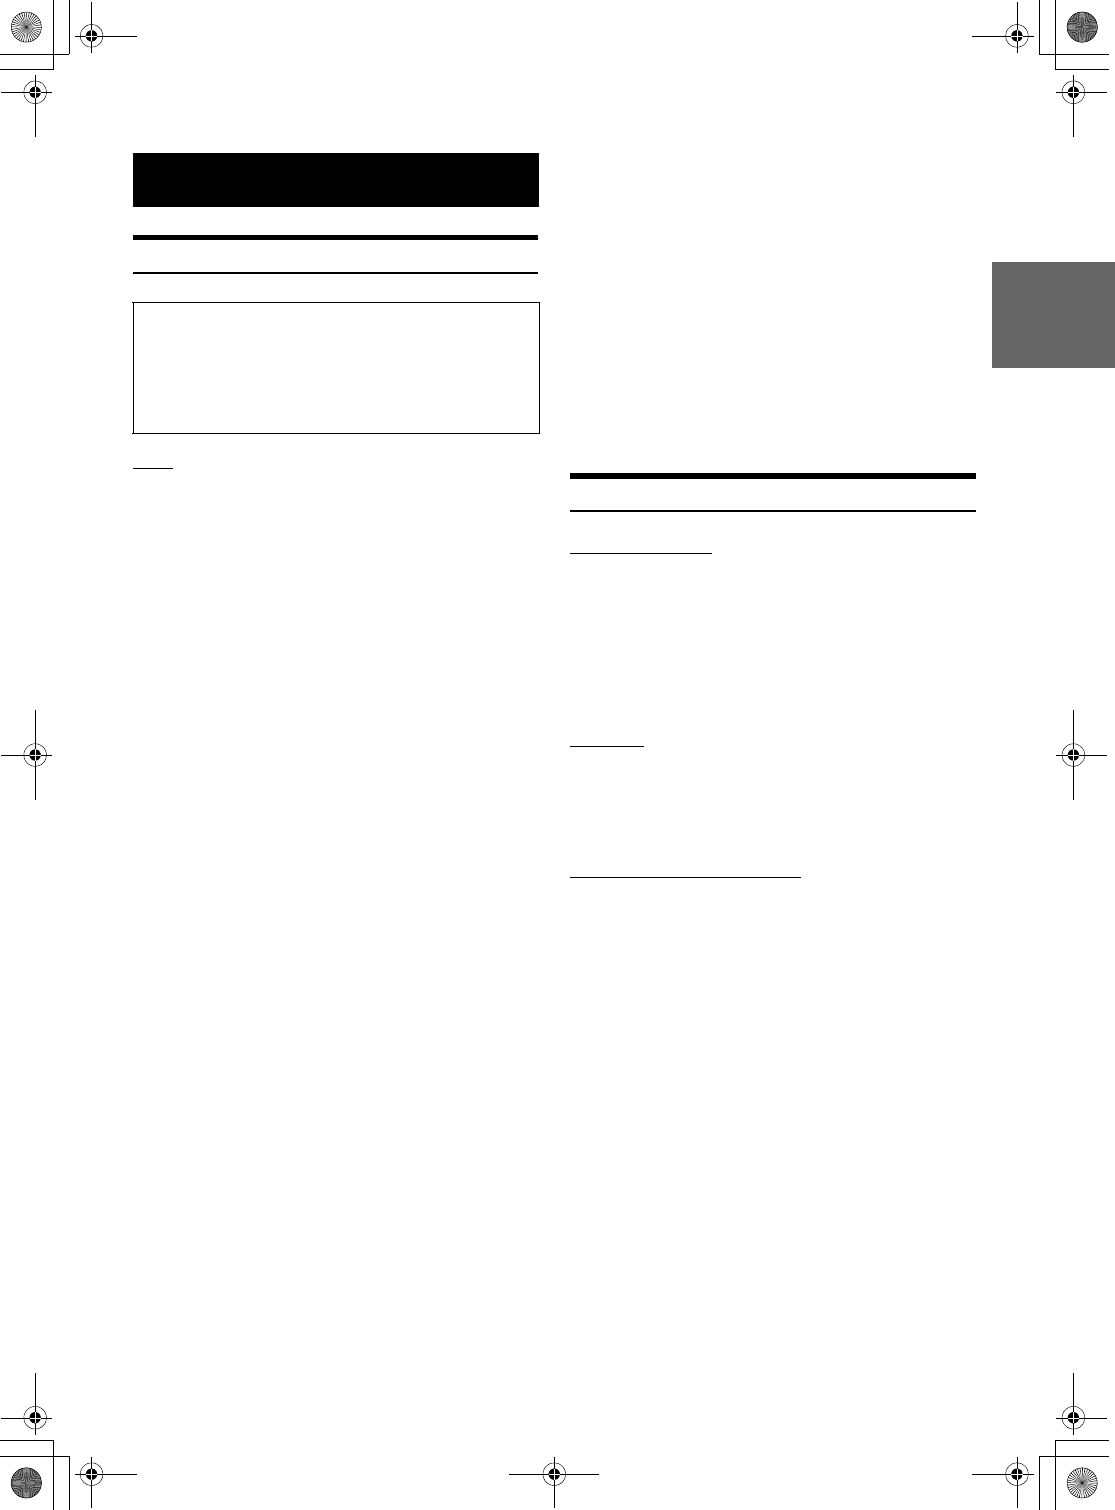
Rear Monitor Select Function
AUX (Initial Setting) / BT AUDIO / OFF
If another monitor (Rear) is connected to the unit, image/audio of
the rear monitor can be changed from the unit, so you can enjoy
separate image/audio in the rear seats.
ON: The previously connected mobile phone will be automatically
connected.
OFF: Select a mobile phone by using [DEVICE SEARCH].
ON: Name information of the unit (TME-M740BT) is sent to the
Bluetooth device.
OFF: Name information of the unit is not sent to the Bluetooth device.
ON: When receiving a call, you can automatically call after approx. 5
seconds.
OFF: When receiving a call, the call will not be automatically
received. Receive the call by touching [#].
ON: When a call is received, nothing appears in the display, and you
can neither receive the call by hands-free operation, or
automatically receive it.
OFF: You can receive a call by hands-free operation.
PHONE: The telephone book of a mobile phone is used.
CARD: The telephone book of a SIM card, etc., is used.
REAR SELECT Setup
01GB00TMEM860.book Page 14 Monday, October 16, 2006 1:50 PM
15-EN
01GB06TMEM860.fm
ALPINE TME-M740BT 00-00000Z00-A (EN)
In Case of Difficulty
Basic
No function or display.
• Vehicle’s ignition is off.
- If connected according to the instructions, the unit will not
operate with the vehicle’s ignition off.
• Improper power lead connections.
- Check power lead connections.
• Blown fuse.
- Check the fuse on the battery lead of the unit; replace with the
proper value if necessary.
No sound or unnatural sound.
• Connections are not properly or securely made.
- Check the connections and firmly connect.
Screen not displayed.
• Brightness control is set at the minimum position.
- Adjust the Brightness control.
• Temperature in the vehicle is too low.
- Increase the vehicle’s interior temperature to operation
temperature range.
• Connections to the DVD, navigation system are not securely
made.
- Check the connections and firmly connect.
Unclear or noisy display.
• Fluorescent plate is worn out.
- Replace the fluorescent plate.
Navigation system inoperative.
• Connections to the navigation system are incorrect.
- Check the connections with the navigation system and connect
the cables correctly and firmly.
Unclear picture display.
• Fluorescent tube is exhausted.
- Replace the fluorescent tube*.
* The fluorescent tube replacement is not free of charge even within the
warranty period, for the tube is an article of consumption.
Unit does not operate.
• Monitor’s power is not turned on.
- Turn on the monitor’s power.
No picture is produced.
• Monitor’s mode is not switched to the mode you want to see.
- Switch to the mode you want to see.
• Monitor’s parking brake lead is not connected.
- Connect the monitor’s parking brake lead and set the parking
brake.
(For details, refer to the monitor’s instructions.)
• Monitor’s parking brake is not set.
- Connect the monitor’s parking brake lead and set the parking
brake.
(For details, refer to the monitor’s instructions.)
Picture is unclear or noisy.
• Vehicle’s battery power is weak.
- Check the battery power and wiring.
(The unit may malfunction if the battery power is under 11
volts with a load applied.)
• Monitor’s fluorescent tube is worn.
- Replace the monitor’s fluorescent tube.
Spots or dotted lines/stripes appear.
• Caused by neon signs, high-voltage power lines, CB transmitter,
other vehicle's ignition plugs, etc.
- Change the location of your vehicle.
Specifications
MONITOR SECTION
GENERAL
CHASSIS SIZE (Monitor section)
•Due to continuous product improvement, specifications and design
are subject to change without notice.
•The LCD panel is manufactured using an extremely high precision
manufacturing technology. Its effective pixel ratio is over 99.99%.
This means that there is a possibility that 0.01% of the pixels could
be either always ON or OFF.
Information
If you encounter a problem, please turn the power off, then on again.
If the unit is still not functioning normally, please review the items
in the following checklist. This guide will help you isolate the
problem if the unit is at fault. Otherwise, make sure the rest of your
system is properly connected, or then consult your authorized
Alpine dealer.
Screen Size 7.0-type
LCD Type Transparent type TN LCD
Operation System TFT active matrix
Number of Picture Elements 1,152,000 pcs.
Effective Number of Picture Elements
99.99% or more
Illumination System Cold cathode fluorescent tube
Power Requirement 14.4 V DC
(11–16 V allowable)
Weight (Monitor Section) 680 g
(1 lbs. 8 oz)
Width 178 mm (7")
Height 100 mm (3-15/16")
Depth 145 mm (5-45/64")
01GB00TMEM860.book Page 15 Monday, October 16, 2006 1:50 PM
16-EN
01GB07TMEM860.fm
ALPINE TME-M740BT 00-00000Z00-A (EN)
Installation and Connections
Before installing or connecting the unit, please read the
following and pages 2 to 3 of this manual thoroughly for
proper use.
Warning
MAKE THE CORRECT CONNECTIONS
Failure to make the proper connections may result in fire or product
damage.
USE ONLY IN CARS WITH A 12 VOLT NEGATIVE GROUND.
(Check with your dealer if you are not sure.) Failure to do so may
result in fire, etc.
BEFORE WIRING, DISCONNECT THE CABLE FROM THE
NEGATIVE BATTERY TERMINAL.
Failure to do so may result in electric shock or injury due to
electrical shorts.
DO NOT ALLOW CABLES TO BECOME ENTANGLED IN
SURROUNDING OBJECTS.
Arrange wiring and cables in compliance with the manual to
prevent obstructions when driving. Cables or wiring that obstruct or
hang up on places such as the steering wheel, shift lever, brake
pedals, etc. can be extremely hazardous.
DO NOT SPLICE INTO ELECTRICAL CABLES.
Never cut away cable insulation to supply power to other
equipment. Doing so will exceed the current carrying capacity of
the wire and result in fire or electric shock.
DO NOT DAMAGE PIPE OR WIRING WHEN DRILLING
HOLES.
When drilling holes in the chassis for installation, take precautions
so as not to contact, damage or obstruct pipes, fuel lines, tanks or
electrical wiring. Failure to take such precautions may result in fire.
DO NOT USE BOLTS OR NUTS IN THE BRAKE OR STEERING
SYSTEMS TO MAKE GROUND CONNECTIONS.
Bolts or nuts used for the brake or steering systems (or any other
safety-related system), or tanks should NEVER be used for
installations or ground connections. Using such parts could disable
control of the vehicle and cause fire etc.
KEEP SMALL OBJECTS SUCH AS BOLTS OR SCREWS OUT
OF THE REACH OF CHILDREN.
Swallowing them may result in serious injury. If swallowed,
consult a physician immediately.
DO NOT INSTALL IN LOCATIONS WHICH MIGHT HINDER
VEHICLE OPERATION, SUCH AS THE STEERING WHEEL OR
SHIFT LEVER.
Doing so may obstruct forward vision or hamper movement etc.
and results in serious accident.
Caution
HAVE THE WIRING AND INSTALLATION DONE BY EXPERTS.
The wiring and installation of this unit requires special technical
skill and experience. To ensure safety, always contact the dealer
where you purchased this product to have the work done.
USE SPECIFIED ACCESSORY PARTS AND INSTALL THEM
SECURELY.
Be sure to use only the specified accessory parts. Use of other than
designated parts may damage this unit internally or may not
securely install the unit in place. This may cause parts to become
loose resulting in hazards or product failure.
ARRANGE THE WIRING SO IT IS NOT CRIMPED OR
PINCHED BY A SHARP METAL EDGE.
Route the cables and wiring away from moving parts (like the seat
rails) or sharp or pointed edges. This will prevent crimping and
damage to the wiring. If wiring passes through a hole in metal, use
a rubber grommet to prevent the wire’s insulation from being cut by
the metal edge of the hole.
DO NOT INSTALL IN LOCATIONS WITH HIGH MOISTURE OR
DUST.
Avoid installing the unit in locations with high incidence of
moisture or dust. Moisture or dust that penetrates into this unit may
result in product failure.
Precautions
• Be sure to disconnect the cable from the (–) battery post before
installing your TME-M740BT. This will reduce any chance of
damage to the unit in case of a short-circuit.
• Be sure to connect the color coded leads according to the
diagram. Incorrect connections may cause the unit to
malfunction or damage to the vehicle’s electrical system.
• When making connections to the vehicle’s electrical system, be
aware of the factory installed components (e.g. on-board
computer). Do not tap into these leads to provide power for this
unit. When connecting the TME-M740BT to the fuse box, make
sure the fuse for the intended circuit of the TME-M740BT has
the appropriate amperage. Failure to do so may result in damage
to the unit and/or the vehicle. When in doubt, consult your
ALPINE dealer.
• The TME-M740BT uses female RCA-type jacks for connection
to other units having RCA connectors. You may need an adaptor
to connect other units. If so, please contact your authorized
ALPINE dealer for assistance.
• The Display must be completely retracted in the casing when
installing. If it is not, problems may occur.
IMPORTANT
Please record the serial number of your unit in the space provided
below and keep it as a permanent record. The serial number plate is
located on the bottom of the unit.
SERIAL NUMBER:
INSTALLATION DATE:
INSTALLATION TECHNICIAN:
PLACE OF PURCHASE:
01GB00TMEM860.book Page 16 Monday, October 16, 2006 1:50 PM
17-EN
01GB07TMEM860.fm
ALPINE TME-M740BT 00-00000Z00-A (EN)
Installation
Accessory List
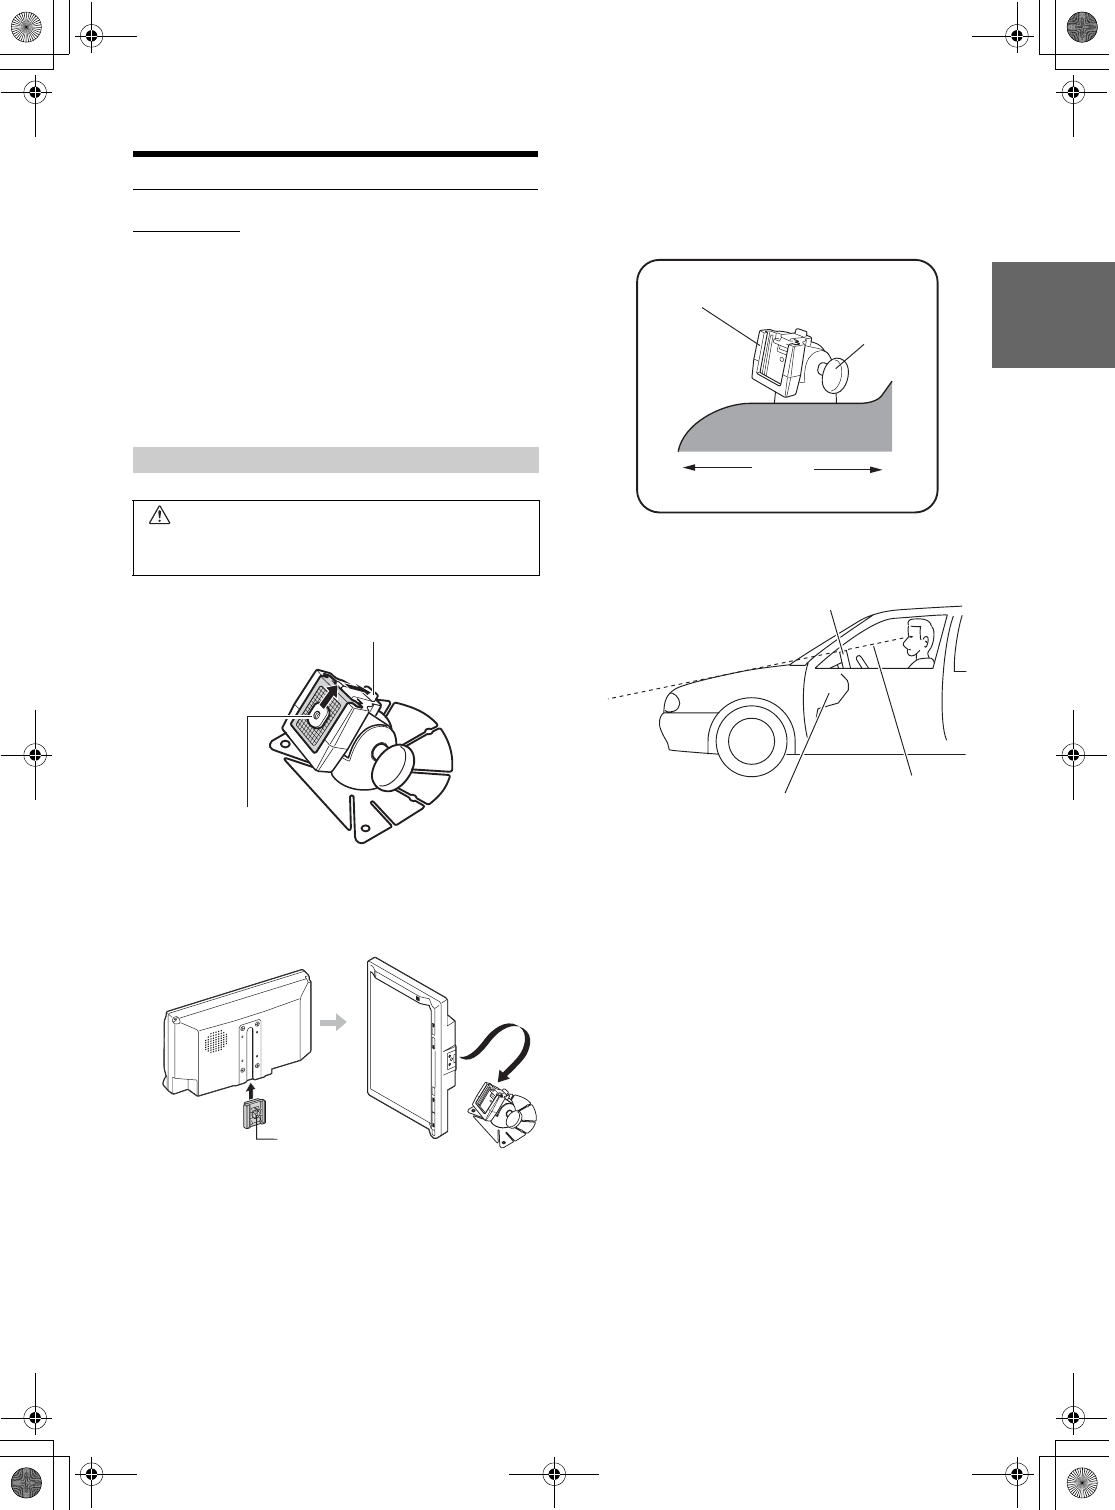
1
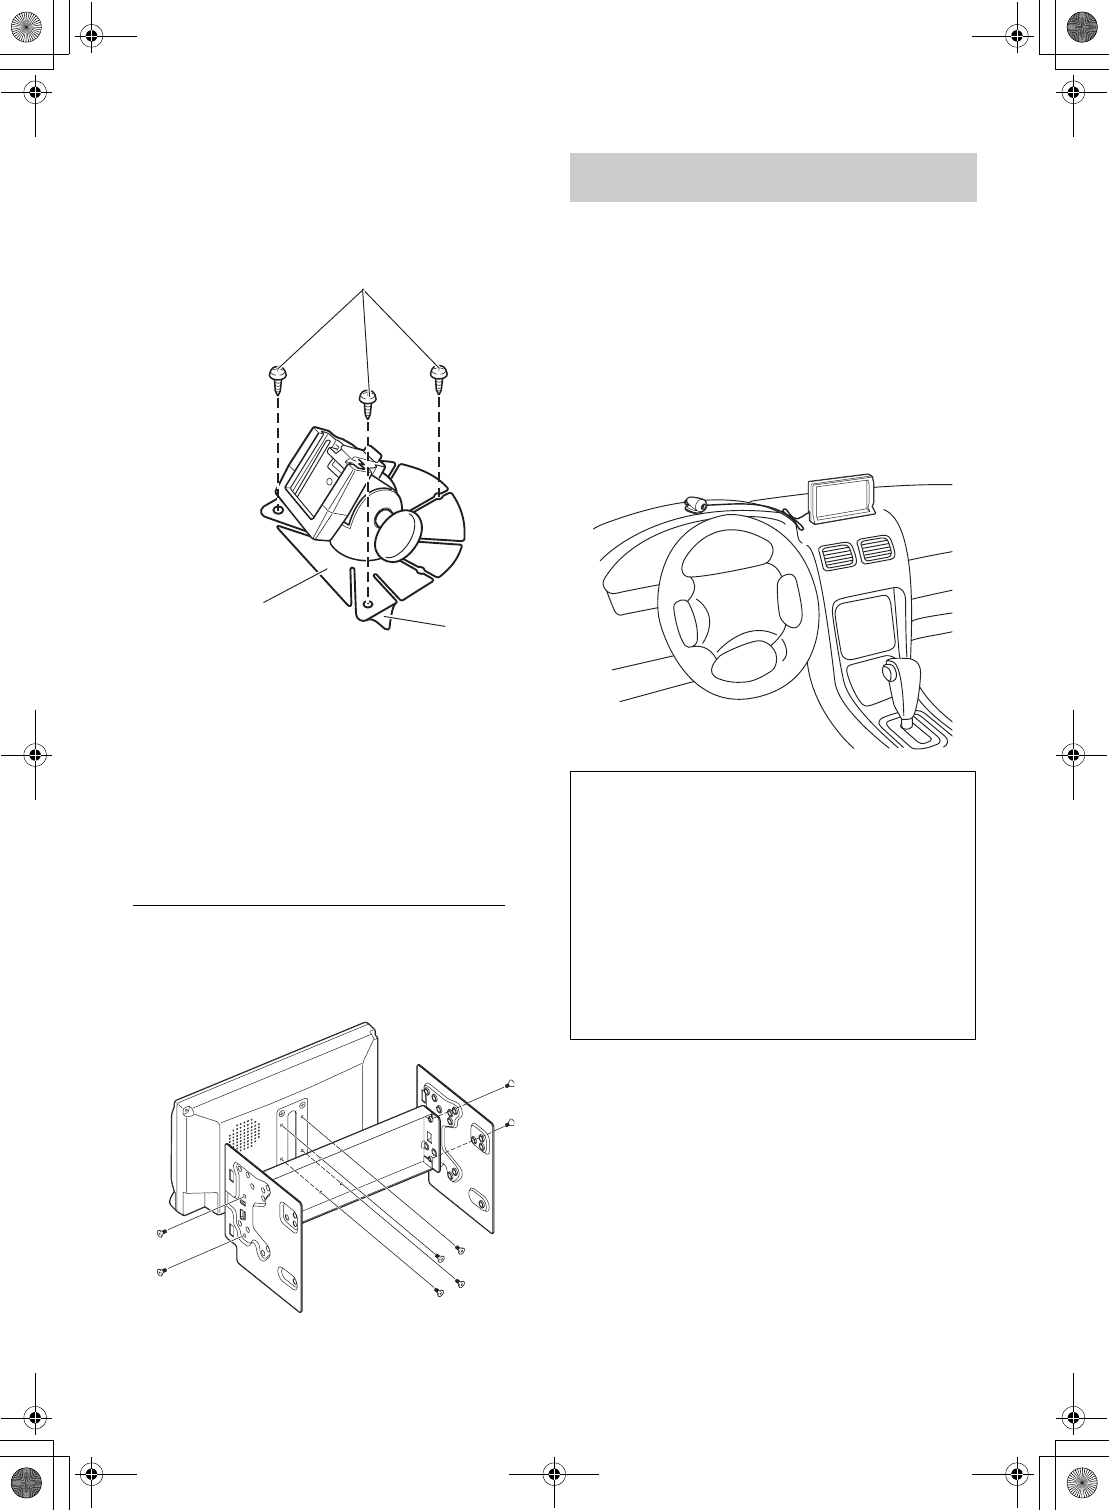
Remove the main unit attachment fitting.
2
Loosen the main unit attachment fitting with a coin
etc., slide it into the track on the rear of the main unit
and temporarily fasten it. Then fix it to the stand.
3
Check the sticking position.
Attaching the monitor and stand
CAUTION
Do not install the monitor near the front passenger
seat air bag system.
Monitor. . . . . . . . . . . . . . . . . . . . . . . . . . . . . . . . . . . . . . . . . . . . . . . . .1
Display cable (2.5m)/Power Cable. . . . . . . . . . . . . . . . . . . . . . . . . . . .1
Cord clamp . . . . . . . . . . . . . . . . . . . . . . . . . . . . . . . . . . . . . . . . . . . . . .3
Monitor stand . . . . . . . . . . . . . . . . . . . . . . . . . . . . . . . . . . . . . . . . . . . .1
Fixing Screw (M4×12) . . . . . . . . . . . . . . . . . . . . . . . . . . . . . . . . . . . . .3
Cloth. . . . . . . . . . . . . . . . . . . . . . . . . . . . . . . . . . . . . . . . . . . . . . . . . . .1
Bracket Center . . . . . . . . . . . . . . . . . . . . . . . . . . . . . . . . . . . . . . . . . . .1
Bracket Side (L/R) . . . . . . . . . . . . . . . . . . . . . . . . . . . . . . . . . . . . . . . .2
Screw (M5×8) . . . . . . . . . . . . . . . . . . . . . . . . . . . . . . . . . . . . . . . . . . .8
Owner's Manual . . . . . . . . . . . . . . . . . . . . . . . . . . . . . . . . . . . . . . . . . .1
Pull this part to release.
Main unit
attachment fitting
Slide in an
upward direction.
In order to use safely, attach to the following places.
•Stable and secure places.
•Places that will not have your view blocked by the main
unit when driving.
•Places that you will not hit against if you lean forward
while you wearing your seatbelt.
•Places where the main unit cannot hit against the steering
wheel while driving.
•Be aware that if the surface of the dashboard is leather, wooden
panel, stretched fabric or any non-resin based product, then the
surface will be damaged when you remove the stand.
•Do not place the main unit directly in front of the air conditioner
vents.
The fixed arm tilts towards the seat side.
Angle
adjustment
screw
Seat side Front glass side
ATemporarily fasten the stand with gum tape.
BLoosen the adjustment screws, and adjust to a safe,
viewable position.
Main unit
Line of sight
Dashboard
If the main unit
invades your line
of sight then it will
block your view.
01GB00TMEM860.book Page 17 Monday, October 16, 2006 1:50 PM
18-EN
01GB07TMEM860.fm
ALPINE TME-M740BT 00-00000Z00-A (EN)
4
Remove the main unit from the stand.
5
Remove the mount from the stand and stick it to the
dashboard etc.. Remove any dirt on the place to
install, using the supplied cloth.
•If the temperature in the car is low (Winter), then first heat up the
place where you are going to stick the mount with a hairdryer etc.
•Do not apply force to the mount, or expose to humidity, within 24
hours after attaching.
•If the mount is not firmly stuck, then we recommend that you attach
with the supplied fixing screws.
6
Attach the main unit to the stand as shown in step 2.
Use the cable clamps to fix the cables.
•Before using, check that the main unit and the stand, and the stand
and the place where it is attached to the car are fixed securely.
Mounting the Monitor on the Indash using a Bracket
1
Mount the bracket using the supplied screws
(M5 x 8).
2
Mount the bracket on the monitor using the supplied
screws (M5 x 8).
\
3
Mount the monitor with bracket attached in the car.
For the sake of safety, mount the microphone in the following location.
•In a stable and secure location.
•In a location where there is no interference of driver operation.
•Mount the external microphone used for the hands-free phone in a
location where the driver’s voice can easily be picked up. Mount the
microphone in consideration of its direction and distance from the
driver so that the voice can easily be picked up with no driver
movement, which may otherwise cause driver distraction.
1
Peel off the paper seal on the base of the external
microphone, and stick it on the dashboard.
Using the supplied cleaner, clean the mounting surface
area thoroughly, and then stick the microphone in place.
Fixing screws
(M4 x 12 Supplied)
If the place of
attachment is
curved, then
bend this
part to match
the shape.
Mount
Mounting an external Microphone for
Hands-Free Calling
To prevent external noise from entering the audio system.
•Locate the unit and route the leads at least 10 cm away
from the car harness.
•Keep the battery power leads as far away from other
leads as possible.
•Connect the ground lead securely to a bare metal spot
(remove any paint, dirt or grease if necessary) of the car
chassis.
•If you add an optional noise suppressor, connect it as far
away from the unit as possible. Your Alpine dealer carries
various noise suppressors, contact them for further
information.
•Your Alpine dealer knows best about noise prevention
measures so consult your dealer for further information.
01GB00TMEM860.book Page 18 Monday, October 16, 2006 1:50 PM
19-EN
01GB07TMEM860.fm
ALPINE TME-M740BT 00-00000Z00-A (EN)
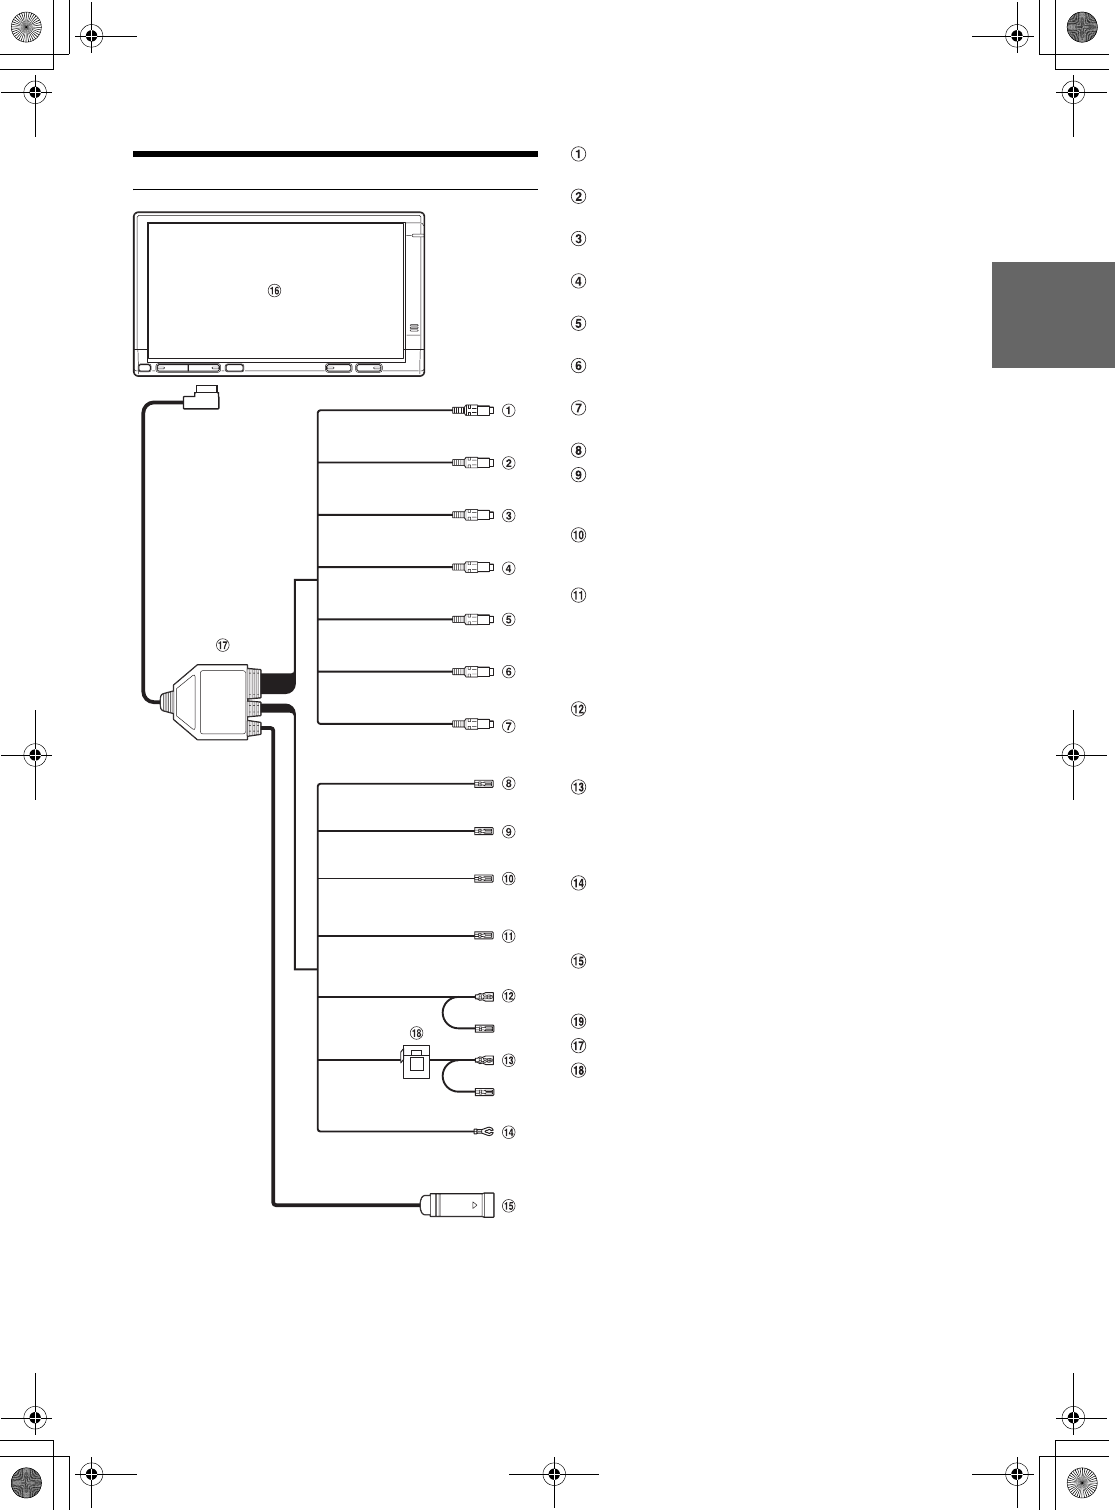
Connections Audio Input Connector (AUX IN) (White)
Left input the audio.
Audio Input Connector (AUX IN) (Red)
Right input the audio.
Video Input Connector (AUX IN) (Yellow)
Input the video.
Audio Output Connector (AUX OUT) (White)
Left output the audio.
Audio Output Connector (AUX OUT) (Red)
Right output the audio.
Video Output Connector (AUX OUT) (Yellow)
Output the video.
Camera Input Connector (Yellow)
Use when connecting a back-up camera.
Audio Interrupt Out Lead (Black/White)
Remote Control Output Lead (AUX) (Brown/White)
Connect this lead to the remote control input lead. This lead
outputs the controlling signals from the remote control.
Remote Control Output Lead (HU) (Brown/White)
Connect this lead to the remote control input lead. This lead
outputs the controlling signals from the remote control.
Reverse Lead (Orange/White)
Use only when a back-up camera is connected. Connect to
the plus side of the car's reverse lamp that lights when the
transmission is shifted into reverse (R).
Switches the video picture to the back-up camera. This is
linked with putting the car into reverse (R).
Parking Brake Lead (Blue/ Yellow)
Connect this lead to the power supply side of the parking
brake switch to transmit the parking brake status signals to
the TME-M740BT.
Switched Power Lead (Ignition) (Red)
Connect this lead to an open terminal on the vehicle's fuse
box or another unused power source which provides (+)
12V only when the ignition is turned on or in the accessory
position.
Ground Lead (Black)
Connect this lead to a good chassis ground on the vehicle.
Make sure the connection is made to bare metal and is
securely fastened using the sheet metal screw provided.
RGB Input Connector
Connect this to the RGB output terminal of the Navigation
System.
Main monitor
Display cable / Power cable
Fuse Holder (2A)
FUSE
(2A)
AUX IN (White)
AUX IN (Red)
AUX IN (Yellow)
OUT-IN
(Black/White)
AUX OUT (White)
AUX OUT (Red)
AUX OUT (Yellow)
CAMERA IN (Yellow)
REMOTE IN (AUX)
(Brown/White)
REMOTE IN (HU)
(Brown/White)
REVERSE
(Orange/White)
PARKING BRAKE
(Blue/Yellow)
ACC
(Red)
GND
(Black)
01GB00TMEM860.book Page 19 Monday, October 16, 2006 1:50 PM
20-EN
01GB07TMEM860.fm
ALPINE TME-M740BT 00-00000Z00-A (EN)
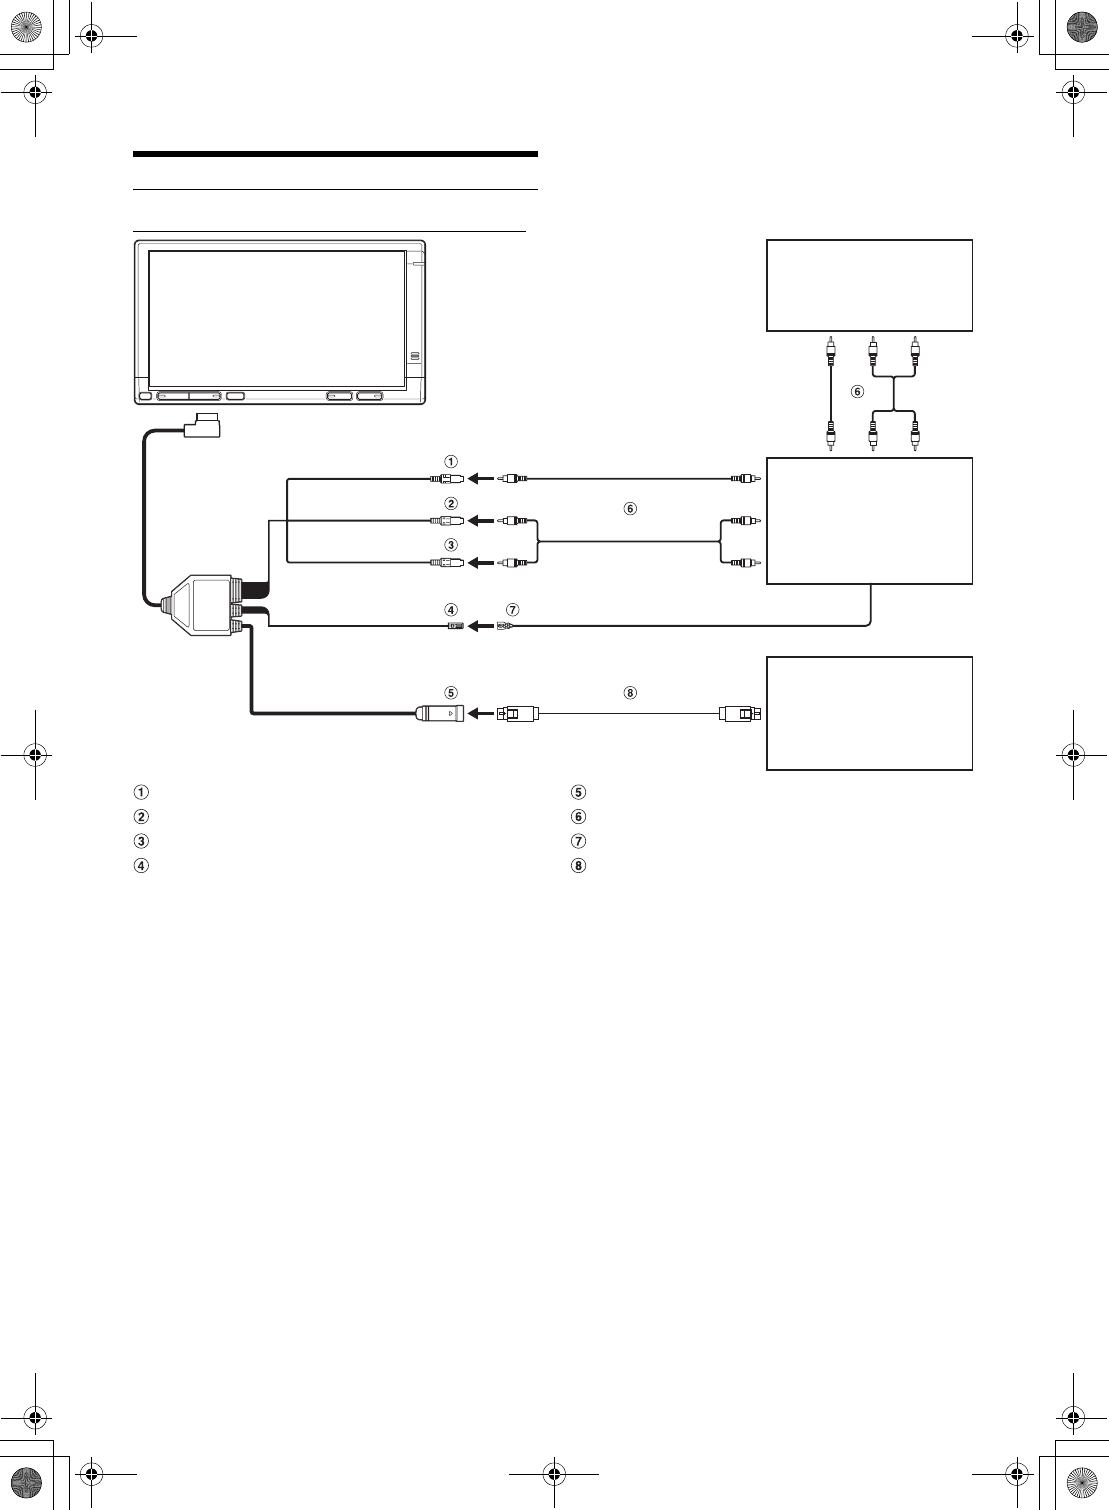
System Example
Connect the Navigation system, DVB-T and DVD Player
Navigation
NVE-N099P, etc.
(Sold separately)
(Brown/White)
REMOTE OUT (AUX 1) REMOTE IN (White/Brown)
Audio Input Connector (AUX IN) (White)
Audio Input Connector (AUX IN) (Red)
Video Input Connector (AUX IN) (Yellow)
Remote Control Output Lead (AUX) (Brown/White)
Connect this lead to the remote control input lead. This lead
outputs the controlling signals from the remote control.
RGB Input Connector
RCA Extension Cable (Sold separately)
Remote Control Input Lead (White/Brown)
RGB Cable (Included with Navigation)
Digital TV Receiver
(DVB-T)
TUE-T200DVB
(Sold separately)
DVD Player
DVE-5207
(Sold separately)
01GB00TMEM860.book Page 20 Monday, October 16, 2006 1:50 PM
21-EN
01GB07TMEM860.fm
ALPINE TME-M740BT 00-00000Z00-A (EN)
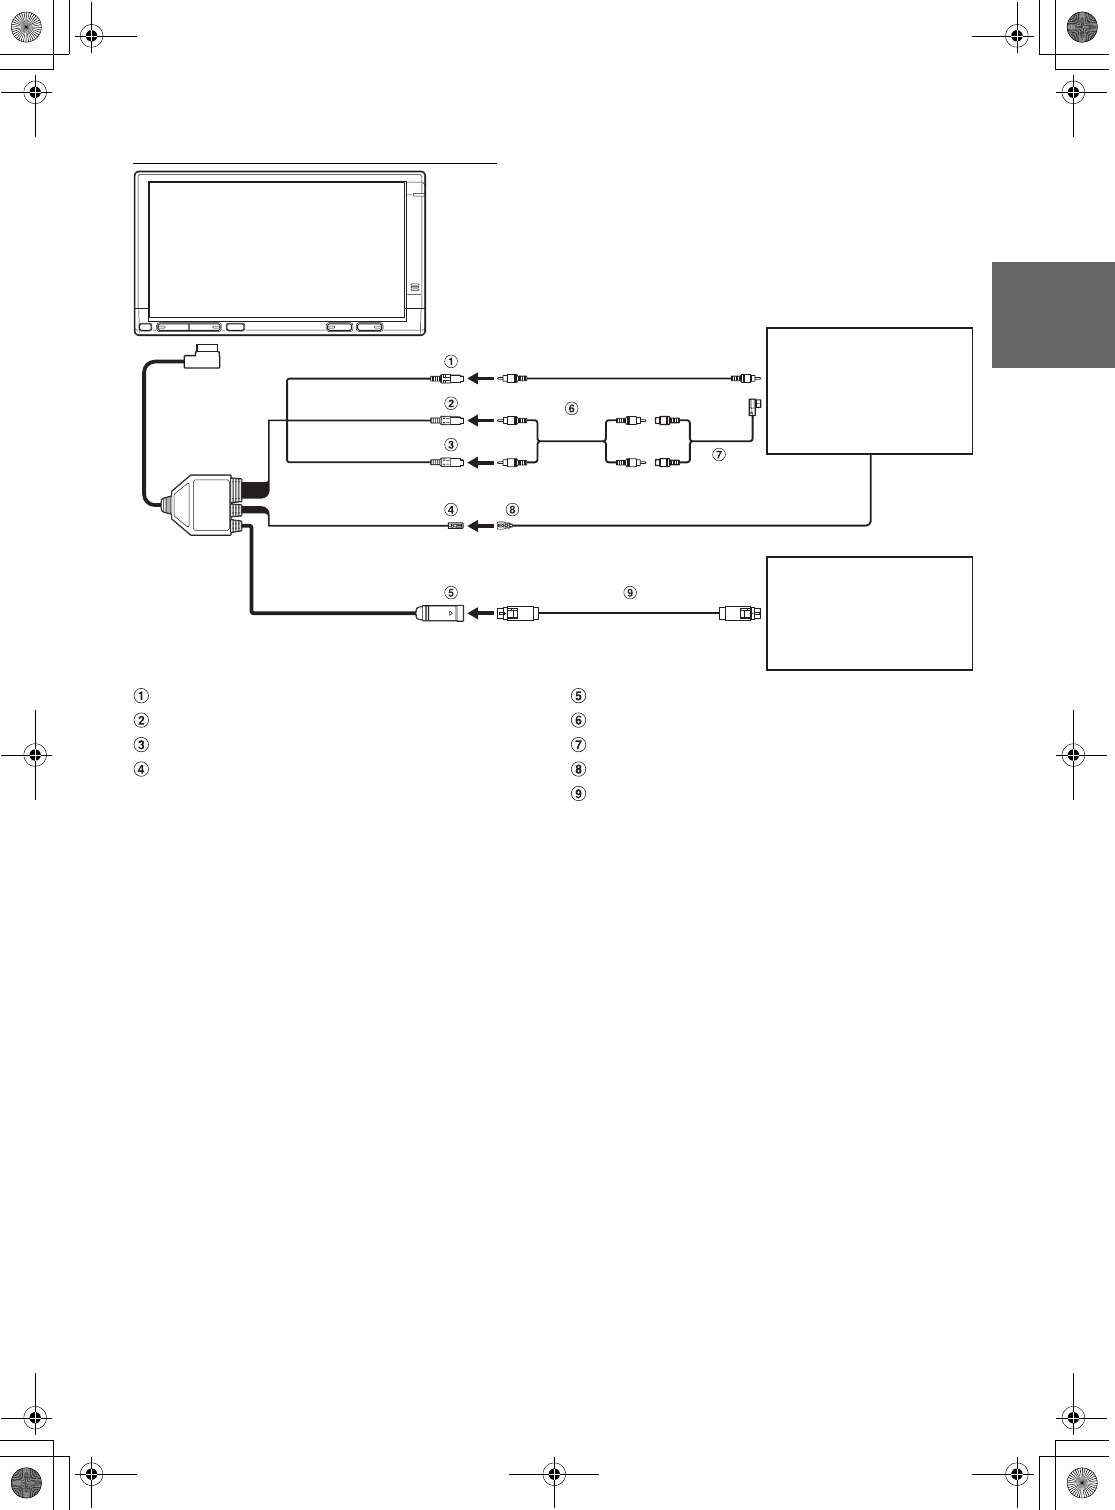
Connect the Navigation system and DVD Head Unit
Navigation
NVE-N099P, etc.
(Sold separately)
(Brown/ White)
REMOTE OUT (HU) REMOTE IN (White/Brown)
Audio Input Connector (AUX IN) (White)
Audio Input Connector (AUX IN) (Red)
Video Input Connector (AUX IN) (Yellow)
Remote Control Output Lead (AUX) (Brown/White)
Connect this lead to the remote control input lead. This lead
outputs the controlling signals from the remote control.
RGB Input Connector
RCA Extension Cable (Sold separately)
Ai-RCA Connector KCA-121B (Sold separately)
Remote Control Input Lead (White/Brown)
RGB Cable (Included with Navigation)
DVD Head Unit
DVA-9861R, etc.
(Sold separately)
To Video Output terminal
01GB00TMEM860.book Page 21 Monday, October 16, 2006 1:50 PM
22-EN
01GB07TMEM860.fm
ALPINE TME-M740BT 00-00000Z00-A (EN)
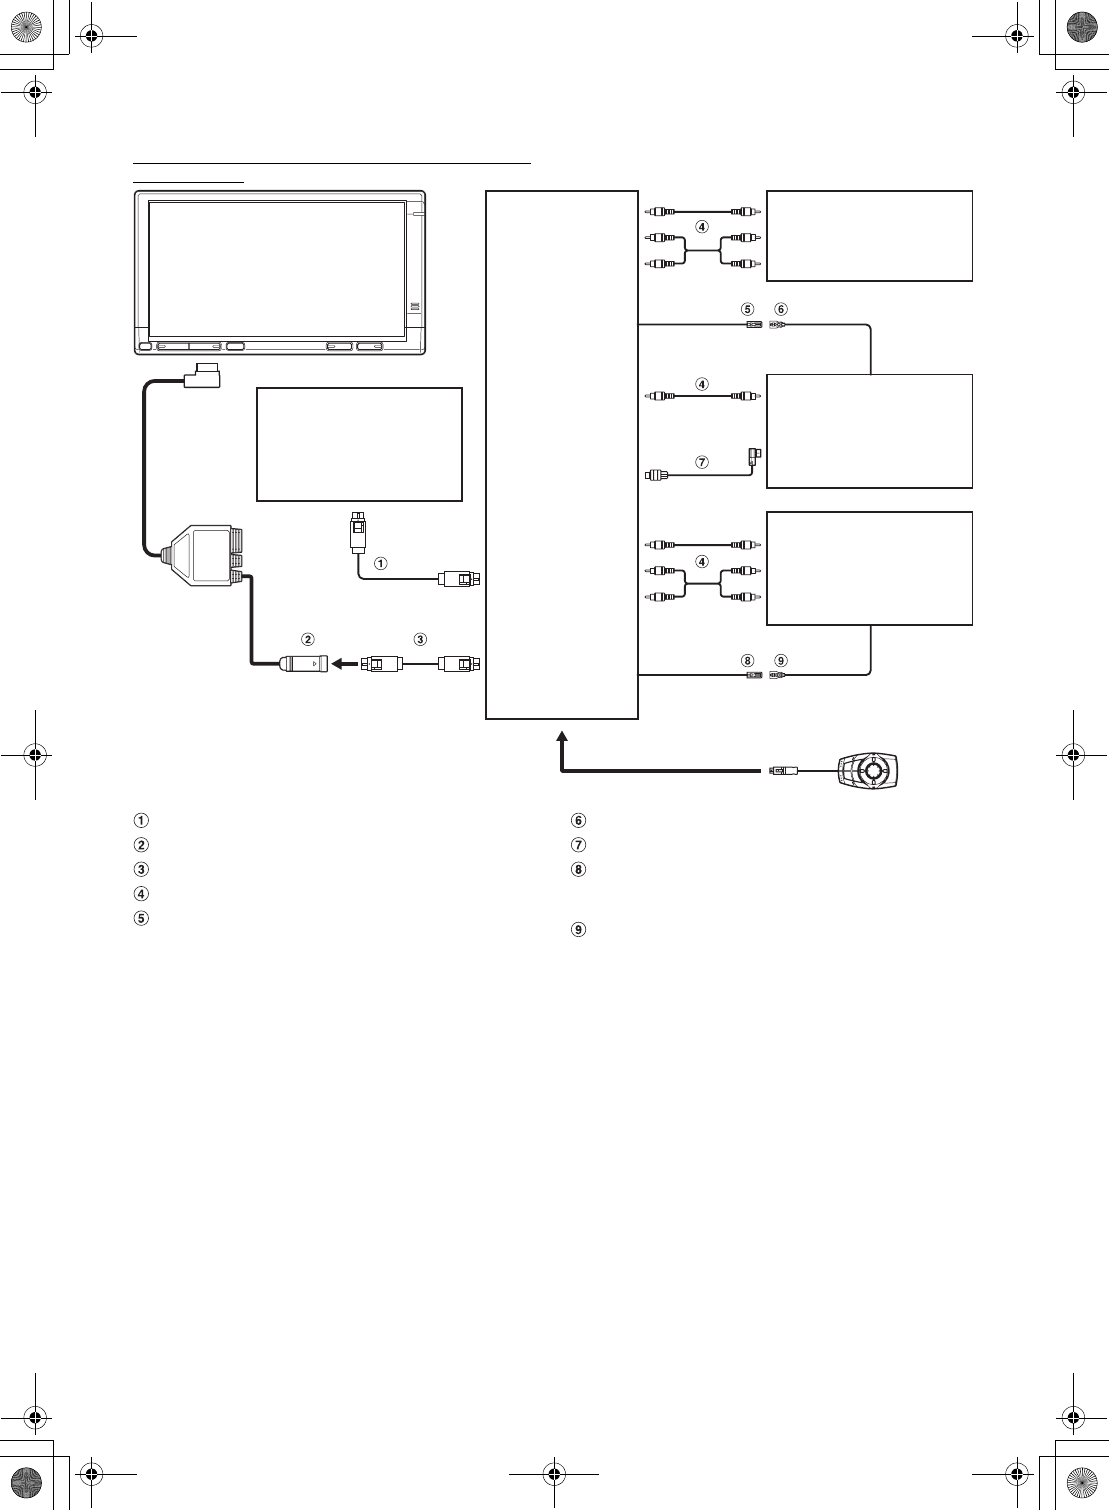
Connect the Vehiclehub Pro, Navigation system, DVB-T
and DVD Player
(White/Brown)
REMOTE OUT (AUX 1)
RGB Cable (Included with Navigation)
RGB Input Connector
RGB Cable (Sold separately)
RCA Extension Cable (Sold separately)
Remote Control Output Lead (AUX 1) (White/Brown)
Connect this lead to the remote control input lead. This lead
outputs the controlling signals from the remote control.
Remote Control Input Lead (White/Brown)
Ai-NET Cable (Included with DVD Head Unit)
Remote Control Output Lead (AUX 2) (White/Brown)
Connect this lead to the remote control input lead. This lead
outputs the controlling signals from the remote control.
Remote Control Input Lead (White/Brown)
Ai-NET DVD Player
DVA-5210, etc.
(Sold separately)
Rear Monitor
(Sold separately)
(White/Brown)
REMOTE IN
Digital TV Receiver
(DVB-T)
TUE-T200DVB
(Sold separately)
(White/Brown)
REMOTE OUT (AUX 2)
REMOTE IN (White/Brown)
Vehivlehub Pro
VPA-B222R
(Sold separately)
Navigation
NVE-N099P, etc.
(Sold separately)
01GB00TMEM860.book Page 22 Monday, October 16, 2006 1:50 PM