ALPS ALPINE 9ZUA145 Car Navigation Unit User Manual 68 29530Z12 A c3 comm FCC
Alpine Electronics Inc Car Navigation Unit 68 29530Z12 A c3 comm FCC
Contents
- 1. (Short-Term Confidential) User Manual_1
- 2. (Short-Term Confidential) User Manual_2
- 3. (Short-Term Confidential) User Manual_3
(Short-Term Confidential) User Manual_3
![60-ENRepeat PlayTouch [ ] to repeatedly play back the currently track.The tracks (files) will be played repeatedly.Touch [ ] again to deactivate Repeat play.Random Play (Shuffle)1Touch [ ].The Random Play mode select pop up screen is displayed.• The [ ] button displays the currently selected mode.2Select your desired Random Play mode.The selected Random Play mode changes the button.Switching Display Modes (During Video File Play Back)You can switch the Display Mode while playing a Video File.1Touch [ ].The Display Mode select pop up screen is displayed.• The [ ] button displays the currently selected mode. (e.g. [Normal])2Select your desired Display Mode.Wide modeIn Wide mode, the monitor displays a normal picture wider to fit in a wide-screen monitor by evenly stretching out the picture horizontally.Cinema modeIn Cinema mode, the monitor displays a normal picture by stretching out the picture horizontally and vertically. This mode is good for displaying a cinema type picture at the 16:9 ratio.Normal modeIn Normal mode, the monitor displays a normal picture at the centerof the screen with a vertical black band at each side.Track Repeat OFF Track Repeat Song : All files in the iPod are played back in random sequence.Album : The songs on each album are played back in proper order. Upon completing of all the songs on the album, the next album is selected randomly. This continues until all albums have been played.Songs : Song shuffle randomly plays back songs within a selected category (playlist, album, etc.). The songs within the category are played just once until all songs have been played.OFF : Random mode Off.](https://usermanual.wiki/ALPS-ALPINE/9ZUA145.Short-Term-Confidential-User-Manual-3/User-Guide-2723197-Page-1.png)
![61-ENPandora® internet radio is your own FREE personalized radio now available to stream music on your Smartphone (which runs Android OS, iOS or BlackBerry OS).Just start with the name of one of your favorite artists, songs or classical composers and Pandora® will create a “station” that plays their music and more music like it.The unit enables you to interact with your Pandora® account by connecting an iPhone and smartphone that has the latest version of the Pandora® application installed.iPhone Pandora main screen exampleFunction mode Bluetooth Pandora main screen exampleFunction mode Station nameArtist NameSong NameAlbum NamePlaying timeArtwork displayTrack/Artist bookmark iconListening to Pandora®1Launch the Pandora® on the smartphone.2Press the (AUDIO) button to select Pandora® or Bluetooth Pandora® mode.The display shows the Pandora mode screen.• You can select and change the source in the Menu screen (page @@) or Favorites screen (page @@).3To pause playback, touch [ / ].4To skip to the next song, touch [ ].• The operation to replay a previous song is not available.• Pandora® limits the number of skips allowed on their service. If you attempt to skip songs beyond the limit, “You’ve reached your skip limit.” is displayed.• Even if you reconnect an iPhone without launching Pandora Application while the power is off, Pandora mode (not iPod mode) is displayed when power is turned back on.• Depending on the signal status, song may be stopped during playback.• While receiving an advertisement, you cannot operate any buttons other than [ / ] (play/pause) and [ ] (Search).• The playback time may not be correctly displayed.• The display content varies when ads are received.Pandora® internet radio (optional)](https://usermanual.wiki/ALPS-ALPINE/9ZUA145.Short-Term-Confidential-User-Manual-3/User-Guide-2723197-Page-2.png)
![62-EN “Thumbs” FeedbackYou can personalize your stations with “Thumbs Up” or “Thumbs Down” feedback, which the system takes into account for future music selections.During playback, touch [ ] for thumbs up, or touch [ ] for thumbs down.• In some situations, “Thumbs” feedback may not be available.Searching for a Desired StationYou can display your station list and select stations directly from the unit.1Touch [ ] (Search) to activate the Search mode.Alphabet Search2Touch [By A-Z].The “By A-Z” search mode is activated and the station names are listed alphabetically.3Touch the desired station.Pandora will play that station.Search by Date Added2Touch [By Date].The “By Date” search mode is activated and the station names are listed by the date they were added to the account.3Touch the desired station.Pandora will play that station.QuickMixUse QuickMix to create a playlist based on two or more of your Pandora stations. Edit your QuickMix station selections on the Pandora Compatible Application for iPhone when it is not connected to the unit.1Touch [ ] (Search) to activate the Search mode.The “By A-Z” or “By Date” search mode is activated and the station name is displayed.2Touch [ ] (QuickMix).• The indicator lights, and the songs from the created stations are played back in random sequence.Creating a New StationBasing on the currently playing song or artist, a personalized Pandora station can be created. The new station will play more music like it.Free word1During playback, touch [ ] (New Station).The Key Pad screen is displayed. You can enter a keyword and search for Artist/Song.2Enter a keyword and touch [OK].3Touch the desired list.The new station is automatically applied.• For details of how to input characters from the keypad, refer to “How to Input Characters and Numbers (Keypad)” (page @@).Artist/TrackDuring playback, touch [ ] (Artist) or [ ] (Track).• The created station is saved to your station list.• When the Smartphone is not connected to this unit, you can create personalized Pandora® stations using the Pandora® Application on your Smartphone. You can also create stations on the web at www.pandora.com.• In some situations, creating a new station may not be available. • You cannot perform this operation while driving.Bookmarking a Desired Track or ArtistThe currently playing song or artist can be bookmarked and saved to your Pandora account.During playback, touch [ ] (Artist) or [ ] (Track).The current track or artist is bookmarked. “ ” icon or “ ” icon is displayed.• Your bookmarks can be viewed on your “Profile” page at www.pandora.com.• In some situations, bookmarks may not be available. : The “ ” indicator appears in the display. Pandora® will add similar music to your station.: The “ ” indicator is displayed. Pandora® will ban that song from your station, and the current song is skipped. If the number of skips allowed has reached its limit, the current song continues to play back.](https://usermanual.wiki/ALPS-ALPINE/9ZUA145.Short-Term-Confidential-User-Manual-3/User-Guide-2723197-Page-3.png)
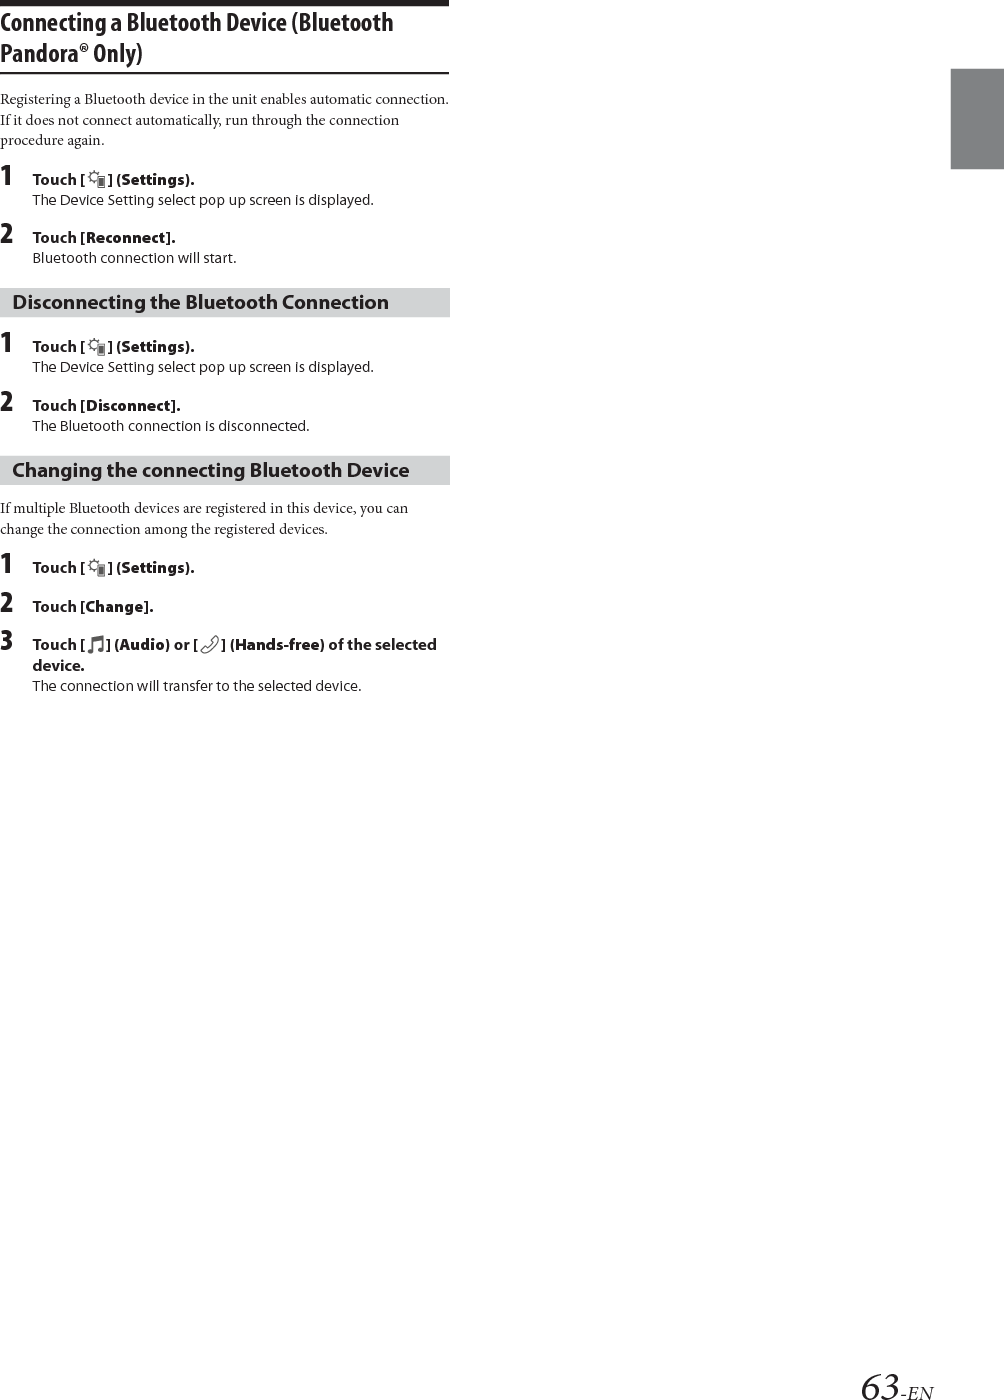
![63-ENConnecting a Bluetooth Device (Bluetooth Pandora® Only)Registering a Bluetooth device in the unit enables automatic connection.If it does not connect automatically, run through the connection procedure again.1Touch [ ] (Settings).The Device Setting select pop up screen is displayed.2Touch [Reconnect].Bluetooth connection will start.1Touch [ ] (Settings).The Device Setting select pop up screen is displayed.2Touch [Disconnect].The Bluetooth connection is disconnected.If multiple Bluetooth devices are registered in this device, you can change the connection among the registered devices.1Touch [ ] (Settings).2Touch [Change].3Touch [ ] (Audio) or [ ] (Hands-free) of the selected device.The connection will transfer to the selected device.Disconnecting the Bluetooth ConnectionChanging the connecting Bluetooth Device](https://usermanual.wiki/ALPS-ALPINE/9ZUA145.Short-Term-Confidential-User-Manual-3/User-Guide-2723197-Page-4.png)
![65-ENReceiving Channels with the SiriusXM TunerAbout SiriusXM Satellite RadioEverything worth listening to is on SiriusXM, getting over 130 channels, including the most commercial-free music, plus the best sports, news, talk and entertainment. A SiriusXM Tuner and Subscription are required. For more information, visit www.siriusxm.com/activatenow, or call 1-866-635-2349.To activate SiriusXM Canada service, go www.xmradio.ca and click on “ACTIVATE RADIO” in the top right corner, or call 1-877-438-9677.• The SiriusXM Satellite Radio controls on this unit are available only when a SiriusXM Tuner is connected.1Press the (AUDIO) button to select SiriusXM mode.The display shows the SiriusXM mode screen.• You can select and change the source in the Menu screen (page @@) or Favorites screen (page @@).2Touch [ ] or [ ] to select the desired channel. Touching and holding either button will rapidly browse through the channels.• Refer to the SiriusXM Tuner User Guide for details on how to install the SiriusXM Tuner.Tuning Channels by CategoryChannels are grouped into categories based on the type of content heard on the channels.1Touch [ ] (Category) on the SiriusXM main screen to activate the category browsing mode.The channels within the category of the current channel are listed.Category browsing mode screen exampleTouching the [Info] button changes the display of information for the channels in the category with the following three options.Channel No./Channel Name Channel No./Artist Name Channel No./Song Title Channel No./Content Info Channel No./ Channel Name2Touch [ ] (Category Up) or [ ] (Category Down) on the category browsing mode screen to select a desired category.The Category Name is shown at the top of the display.3Select the desired channel.• If no operation is performed for 10 seconds, the category browsing modeis canceled.Changing the DisplayText information, such as the channel name, artist name/feature, and song/program title, is available with SiriusXM or channel. The unit can display this text information as explained below.Touch [ ] (Info).Each time you touch this button, the Station Info. mode and the Song Info. mode switch alternately. For displayed contents, see “SiriusXM main screen example” (page @@).Checking the SiriusXM Radio ID NumberTo subscribe to the SiriusXM Satellite Radio service, it is necessary to locate and identify the Radio ID of your SiriusXM Tuner. You can check the Radio ID on the bottom surface of the SiriusXM Tuner box. You can also check it from this unit by performing the following procedure.1While receiving SiriusXM Radio, touch [ ] or [ ] to select channel “0”.The unit displays the ID number.2To cancel the ID number display, change the channel other than “0”.• The SiriusXM Radio ID does not contain the letters I, O, S, or F.Storing Channel PresetsYou can store 18 of your favorite SiriusXM channels for easy recall with Preset buttons.1Touch the Preset number you want to store, for at least 2 seconds.The selected channel is stored.2Repeat the procedure to store up to 17 other channels.A total of 18 channels can be stored in the preset memory.• For details on switching to the Preset mode screen, see in “Preset mode screen example” (page @@).• If you store a new channel into a preset which already has a channelassigned, the current channel will be cleared and replaced with the new one.Tuning Channels using PresetsTouch any one of the Preset numbers you have already stored in the Preset mode screen.The preset station is received.• For details on switching to the Preset mode screen, see in “Preset mode screen example” (page @@).](https://usermanual.wiki/ALPS-ALPINE/9ZUA145.Short-Term-Confidential-User-Manual-3/User-Guide-2723197-Page-6.png)
![66-ENTune Start FunctionUse Tune Start to play music content from its beginning on programmed preset stations. The user can, therefore, enjoy the full track (i.e. song) rather than hearing what’s left from its current live playback position.1Touch and hold [ ] (Tune Start) for at least 2 seconds to activate or deactivate the Tune Start function.When the Tune Start function is activated, [ ] (Tune Start) is highlighted.2On the Preset Mode screen, touch the Preset number.Tune Start mode will begin.• To switch to the Preset mode screen, see in “SiriusXM main screen example” (page @@).• The number of preset channels that Tune Start can access differsdepending on the SiriusXM Tuner Box.• Touching [ ] (Track Up) or [ ] (Track Down) will move a track up/down.• To fast reverse, touch and hold [ ] (Track Up) and to fast forward,touch and hold [ ] (Track Down).• During Tune Start mode, the difference between the “ ” indicator and the current time is displayed (ex. -15:00).• When you touch [ ] (Live) or [ ] (Tune Start) during Tune Start, the program currently selected in Tune Start mode changes to the program currently being broadcast.• This function is available only when SiriusXM Tuner-SXV200 isconnected.• Preset stations that play other than music-type content will start playing the channel from the current live play point when selected.Tune Scan FunctionWhile listening to SiriusXM Satellite Radio, you can scan through all the songs you missed from your current band of preset channels.1Touch [ ] (Tune Scan).The [ ] (Tune Scan) highlighted during Tune Scan mode.2Touch [ ] (Tune Scan) during scan playback, tunescan mode will be canceled and the selected track will be played back normally.Touch and hold [ ] (Tune Scan) for at least 2 seconds during scan playback to cancel Tune Scan mode. The tuner returns to the channel before Tune Scan was initiated.• This function is available when SiriusXM Tuner-SXV200 is connected.• If no operation is performed during the scanning process, when scanning finishes, the next mode depends on the SiriusXM Tuner.• During Tune Scan mode, the artist and song name will be displayed.• The SiriusXM Tune scans through the songs from the preset music channels on the current band only, scanning from oldest to newest.• The number of Preset channels and the play times that can performTune Scan differ depending on the SiriusXM Tuner box.Search Function1Touch the Search mode button on the Preset modescreen.The Search list screen appears.• To switch into Search mode, see in “Preset mode screenexample” (page 46).Search item:All Channels / Category Name*1 / My Music / My Games / Featured*2*1 The Category name for the channel currently being received is displayed.*2 Displayed only when the SiriusXM Tuner-SXV200 is connected.• You can switch the category by touching [ ] (Category Up) or [ ] (Category Down) on the List screen after selecting a Search item other than Featured.• You can switch the display format by touching [ ] (Info) in the List screen after selecting a Search item.Channel No./Channel Name Channel No./Artist Name Channel No./Song Title Channel No./Content Info Channel No./Channel NameSearching by Channel2Touch [All Channels].All Channels will be displayed in a list.3Touch the selected channel.Searching by Category2Touch Category Name.The channels within the category of the current channel are listed.3Touch the selected channel.The channel you selected is received.Searching by My Music2Touch [My Music]*.The artist names and song titles that you have stored and are currently playing will be displayed in a list.*Displayed only when the stored song or artist is broadcasting.3Touch the desired artist/song.The channel of the selected artist/song being broadcast is received.Searching by My Games2Touch [My Games]*.The sport teams that you have stored and the game is currently broadcasting will be displayed in a list.*Displayed only when the game of stored team is broadcasting.3Touch the desired team.The channel of the selected game being broadcast is received.](https://usermanual.wiki/ALPS-ALPINE/9ZUA145.Short-Term-Confidential-User-Manual-3/User-Guide-2723197-Page-7.png)
![67-ENSearching by Featured Favorites1Touch [Featured]*.The Category that SXM recommends will be displayed in a list.*Displayed only when the SiriusXM Tuner-SXV200 is connected.2Touch the desired category.3Touch the desired channel within the selected category.Selecting the Channel DirectlyYou can directly select the channel number on the display of the numeric keypad.1Touch [ ] (Direct Tune).The numeric keypad input screen is displayed.2Touch to input the channel number.3Touch [Enter].The selected channel is received.Storing the desired Song/ArtistWhile listening to SiriusXM Satellite Radio, you can be alerted when your favorite songs or artists are playing on other channels. An interruption Alert will be displayed when a matching artist or song is found on another channel. For receiving interruption Alert information, see “Receiving and Tuning to an Alert”.1Touch [##] (Set Alert) for at least 2 seconds on the SiriusXM mode screen.The Memory type selection screen is displayed.2Touch the ”Artist Saved” or “Song Saved” to select thestore type.Scrolling text of the Artist’s name (Song Title), Total registrations, and Remaining number of registration slots is displayed for 2 seconds, then the Artist or Song is registered as an Artist alert or Song alert.• The maximum number of registered Teams, Artists, and Songs is 50. For details on how to register a Favorite Team, see “Setting the Favorite Sports Team Alerts” (page @@).• “Artist /Song Unavailable” appears on the display if both the artist and song is not available to be stored. • “Artist (Song) Unavailable” is displayed if just the artist (song) is notavailable to be stored. “Artist (Song) Saved” is displayed if this Artist (Song) was previouslystored.• If there is no memory space, “Alert Memory Full” is displayed, and thenyou are asked whether you want to replace a stored item. If you select “OK,” then the list of stored alert items is displayed. Touch the item that you want to replace.Receiving and Tuning to an AlertWhenever a stored sports team, artist, or song is playing on another channel, an interruption Alert appears on the unit display. To tune to the game, artist or song identified by the alert, follow the steps below:1When stored information is broadcast, after displaying“Song Alert”, “Artist Alert” or “Game Alert,” the screen changes to My Music list*1 or My Games list*2 display.*1 Only for Song Alert and Artist Alert.*2 Only for Game Alert.2Touch the channel on the list you want to receive.The display changes to the selected channel and the channel is received.• Touch [ ] (Info) on the My Music list/My Games list screen, the information of the broadcasting channels will be changed.Each time you touch the [ ] (Info), the display changes as below.My Music list (Artist Alert):Artist name Song Title Channel name Artist nameMy Music List (Song Alert):Song Title Channel Name Artist Name Song TitleMy Games list:League Short Name/Team Abbrev/Team Nickname Channel name League Short Name/Team Abbrev/Team NicknameReplay FunctionIn SiriusXM mode, you can pause, rewind and replay of live Satellite Radio.Replay mode screen exampleBuffer usageCurrent Replay pointReplay status indicator ( or )Replay rangeTime to live1Touch [ / ] to Pause playing of the channel content.The “ (Pause)” indicator and replay progress bar is displayed.2Touch [ / ] again to resume playing the content.The “ (Play)” indicator lights up and offset playback commences.](https://usermanual.wiki/ALPS-ALPINE/9ZUA145.Short-Term-Confidential-User-Manual-3/User-Guide-2723197-Page-8.png)
![68-EN3Touch [ ] to exit Instant Replay and listen to livecontent.• To fast reverse, touch and hold [ ] and to fast forward, touch and hold [ ].• Touching [ ] or [ ] will move a track up/down.• If you change channels while in Replay mode, the contents of the replaybuffer are emptied.• The allowed recording time differs depending on the SiriusXM Tunerbox.Parental Lock FunctionThis function can help restrict the listening of channels to children of appropriate age levels only. For information on setting the Parental Control passcode, see “Setting the Parental Lock” (page @@).When a locked channel is selected, “Channel <xxx> Locked” is displayed and then the numeric keypad appears for you to enter the passcode.Input the 4-digit passcode you set in “Setting the Parental Lock” (page @@).The initial number is 0000.• If you input a wrong passcode, “Incorrect Pass Code entered” isdisplayed.• After entering the correct passcode, you can access all locked channelswithout entering the passcode again until the unit is powered off andthen back on.Using Jump Memory and Jump Recall functionThe Jump Channel is a special channel that you can jump to with the press of a dedicated button and then jump back to the previous channel. This channel is often used to select your favorite SiriusXM traffic and weather report channel.1To store the Jump channel in memory, touch and hold [ ] (Jump) for at least 2 seconds.2Touch [ ] (Jump) to recall and tune to the saved Jump channel.3Touch [ ] (Jump) again to receive the previous channel.• While receiving the Jump channel, you cannot perform otheroperations.• Only one channel can be stored as the jump source channel. When youwant to store a new channel, the old channel will be cleared and the new one will be memorized.Storing the Tag informationiTunes Tagging lets you tag songs heard on SiriusXM channels. Using this unit in conjunction with an optional SiriusXM Tuner and a Tagging compatible iPod/iPhone, you can tag the music that you listen to, then transfer the tag information to your iPod/iPhone, and later, when your iPod/iPhone is connected to iTunes, you can preview, buy and download your tagged songs. For details, refer to the Owner’s Manual of the Tagging compatible iPod/iPhone.The “Tag” indicator will appear when a song playing on a SiriusXM channel has tag information available.When Tagging is available, the “Tag” indicator is shown.When a desired song is heard on an SiriusXM channel, touch the [ ] (Tag) to save its tag information.If no iPod/iPhone is connected, “Tag count X” is displayed (X is the total amount of the tag information stored in this unit).• During tagging, the iPod/iPhone takes priority to save the tag information. If no iPod/iPhone is connected, the tag information issaved to this unit.• When the memory of iPod/iPhone is full, “iPod memory full.” is displayed. The tag information will be stored to the unit.• If the tagging operation is interrupted by a hands-free phone call, the tagging operation will be canceled and the unit will display “Cannot Tag”.• This unit can store up to 50 pieces of tag information. When thememory of the unit is full, “Tag count 50. Tuner memory full. Connect iPod.” may be displayed.• When the iPod/iPhone is disconnected from the unit during tagging, its tag information will be stored in the unit.• If there is stored tag information on the unit, when an iPod/iPhone supporting the tag function is connected, the stored tag information will be transferred to the iPod/iPhone automatically. When the iPod/ iPhone memory becomes full, “iPod memory full <xx> remaining.” maybe displayed, and any remaining tag information on the unit will not be transferred to the iPod/iPhone.• If tag information already exists, “Already Tagged” will be displayed when you try to tag information again.Tag indicator](https://usermanual.wiki/ALPS-ALPINE/9ZUA145.Short-Term-Confidential-User-Manual-3/User-Guide-2723197-Page-9.png)
![69-ENDevices supporting HDMI can connect and play back through this unit (for example, an optional DVE-5300 (DVD Player), iPhone or other Smartphones). When making HDMI connections, you need to set HDMI on the unit suitable for the connected device. For details, see “HDMI Setup” (page 45).• The HDMI/MHL connecting cable differs depending on the connected device corresponding to HDMI. Prepare optional HDMI/MHL connecting cable sets suitable for your device.When you connect an optional DVE-5300 (DVD Player), you can operate it from the unit. For details on how to operate the DVD player, see “DVD Player Operation” (page 69).For details on how to operate iPhones and Smartphones, see “HDMI Operation” (page 78).• The HDMI connector is for use exclusively with a standard DVD Player. Other HDMI devices (i.e. iPhone, etc.) cannot be used.You can operate discs using the Remote Control unit supplied with the DVE-5300 (DVD Player). For detailed notes on handling and operating the Remote Control unit, see “About Remote Control Operation (X110 with DVE-5300X only)” (page 97).• For precautions concerning the use of discs, usable discs, and formats, see “Cautions about Discs (X110 with DVE-5300X only)” (page 99) and “About the Supported Formats” (page 101).Inserting/Ejecting a DiscInsert the disc with the label side facing up.For X110 with DVE-5300XFor X108U/INE-W967HD (DVE-5300)Insert the disc until it is automatically pulled into the unit.• Do not touch the surface of the disc directly with your fingers.• Before inserting or removing the disc, always turn the ignition key toACC or ON. • You cannot remove or insert the disc with the ignition key turned toOFF.Press (Eject) button.When the disc has been ejected part way, take it out.• Press the [ ] (Eject) button on the front panel of the optional DVD Player (DVE-5300).• If the disc cannot be ejected by pressing [ ] (Eject), press and hold[ ] (Eject) again for at least 2 seconds.DVD Player SETUPYou can setup only when a disc is not inserted or playback pauses.1Touch [ ] (Setup).The Setup main screen is displayed.Setting items:System Setup / DVD Contents Setup / CD Contents Setup / Audio Setup2Touch [ ] or [ ] to select the setting item.3Touch [Enter] , then touch [ ], [ ], [ ] or [ ] to change the setting item.4Touch [ ] to return to the main source screen.• Touch [ ] (Return) to return to the previous display.Switching the Bar ColorSelect the colors (8) used for highlighting items in the System Setup screen.Setting items:Bar ColorSetting contents:Blue / Green / Light blue / Amber (Initial setting) / Aqua blue / Yellow / Red / WhiteHDMI Device (Optional)DVD Player OperationInserting the DiscRemoving the DiscSystem Setup](https://usermanual.wiki/ALPS-ALPINE/9ZUA145.Short-Term-Confidential-User-Manual-3/User-Guide-2723197-Page-10.png)
![70-ENSetting the TV Screen ModeSetting item:TV Screen Aspect Setting contents:16:9 (Initial setting) / 4:3LB / 4:3PS• For some discs, the picture may not be set to the selected screen size. (For details, refer to the explanation on the disc’s jacket.)• You can also switch the TV Screen mode by touching [ ] (Display Mode) on the display of this unit. For details, see “Switching Display Modes (During Video File Play Back)” (page 60).4:3 LETTER BOX:Select this when connected to a conventional 4:3 size (normal TV aspect ratio) monitor. There may be black stripes visible at the top and bottom of the screen (when playing a 16:9 size movie). The width of these stripes will depend upon the original aspect ratio of the theatrical release of the movie.4:3 PAN-SCAN:Select this when connected to a conventional 4:3 size monitor. The picture will fill the entire TV screen. However, due to the mismatch in aspect ratio, parts of the movie at the extreme left and right sides will not be visible (when playing a 16:9 size movie).16:9 WIDE:Select this when connected to a wide screen TV. This is the factory setting.Delaying Image OutputUse this function when an external audio processor is connected. Depending on the connected audio processor, the audio and image currently played back may not be output at the same time. In this case, you can output an image delayed by 0.1 second by setting to On.Setting item:Video DelaySetting contents:Off (Initial setting) / On• If a disc with a high compression rate is played back, the image and audio may be distorted.Returning to the Initial SettingYou can return the contents you previously set to the initial factory settings.Setting item:Setup InitializeSetting contents:Yes / No (Initial setting)Setting the languageThe audio language, subtitle language and menu language can be set according to your preferences.Once set, this becomes the default language. This function is convenient when you always want to listen in English. (Not all discs allow changing the default language. If not, the factory default language applies.)Setting item:LanguagesSetting contents:Audio / Subtitle / MenuFurther Setting contents: Auto (Initial setting) / Off (Subtitle only) / English / French / Japanese / Italian / German / Swedish / Spanish / Chinese / Russian / Others• If you change the language setting when the disc is in the unit, the setting is decided with one of the following operations.- Disc eject.- Turn OFF the main unit.- Switch the source on the head unit.• To temporarily change the language of the current disc, either do so from the DVD menu or using the operation described in the section “Switching the Audio Tracks” (page 77).• If the disc does not include the selected language, the disc’s default language is set.• Languages set upon shipment from the factory:Audio language : AutoSubtitle language : AutoMenu language : Auto• Touch [ ] (Return) to return to the previous display.On: Output image is delayed by 0.1 second.Yes: Returns to the initial setting.No: Does not returns to the initial setting.DVD Contents SetupAudio: Set the audio track language.Subtitle: Set the language of the subtitles displayed on the screen.Menu: Set the language used for the menus (title menu, etc.).Auto: The disc is played with the audio language or subtitle language set as the priority language for the disc.Off: Subtitles are not displayed. (Subtitle only)Others: Set this to play the disc with a language other than one of the languages displayed. Touch [Enter], then use the numeric keypad (“0” to “9”) to input the 4-digit language code. Then touch [Enter] again. For the language codes, refer to “List of Language Codes” (page 104).](https://usermanual.wiki/ALPS-ALPINE/9ZUA145.Short-Term-Confidential-User-Manual-3/User-Guide-2723197-Page-11.png)
![71-ENPlaying MP3/WMA/AAC/WAV DataSetting item:CD Play ModeSetting contents:CD-DA / Compress (Initial setting)This unit can play back CDs containing both CD and MP3/WMA/AAC/WAV data (created in Enhanced CD (CD Extra) format).Setting the Video CD Play ModeWhen playing a Playback Control (PBC) enabled video CD, you can choose to set PBC On or Off.Setting item:VCD Play ModeSetting contents:PBC On (Initial setting) / PBC Off• You can set PBC On or Off directly by pressing MENU.Displaying the Disc Status Automatically (CD/MP3/WMA/AAC/WAV only)When playing a CD/MP3/WMA/AAC/WAV file, you can choose to display the Disc Status (track number, etc.) automatically.Setting item:Audio DisplaySetting contents:Off / On (Initial setting)Setting the Digital OutputUse the following procedure to set the digital audio signal output from the DVE-5300 (DVD Player).Setting item:Digital OutOutput Modes:Dolby D / DTSSetting contents:Bitstream / LPCM (Initial setting)• Touch [ ] (Return) will return to the previous screen.• Set to “LPCM” to connect to the unit.Digital audio outputSetting the Downmix ModeThis function applies to Dolby Digital, DTS stream sound.Setting item:Downmix ModeSetting contents:Stereo (Initial setting) / Surround EncodedCD Contents SetupCD-DA: Only CD data can be played back.Compress: Only MP3/WMA/AAC/WAV data can be playedback.PBC On: The PBC menu is displayed.PBC Off: The PBC menu is not displayed.On: The Disc Status is displayed automatically while playing back.Off: Disc Status is not displayed automatically while playing back.Audio SetupBitstream: Select “Bitstream” when you want to connect a digital audio processor to play Dolby Digital or DTS audio. When “Bitstream” is selected, the HDMI audio will be muted. The DVE-5300 (DVD Player) optical output must be used for the external processor.LPCM: The audio signal recorded on the disc is converted to 48 kHz/16 bit (for DVDs) or 44.1 kHz (for video CDs and CDs) linear PCM audio signals for output.Disc Audio recording format Digital output settingOptical digital audio output (when a digital audio processor is connected)Digital audio output (HDMI output)Format Fs QLPCM(DVD, CD)48/96kHz 16/20/24bitBitstream LPCM 2chDown mix(48kHz/16bit)—LPCMLPCM 2chDown mix(48kHz/16bit)44.1kHz 16bitBitstream LPCM 2ch(44.1kHz/16bit)—LPCM LPCM 2ch(44.1kHz/16bit)Dolby Digital(DVD) 48kHz 16/18/20bitBitstream Bit stream(Max 7.1ch) —LPCMLPCM Encode2ch Down mix(48kHz/16bit)LPCM Encode2ch Down mix(48kHz/16bit)DTS(DVD, CD)48/96kHz 16/20/24bitBitstream Bit stream(Max 6.1ch) —LPCMLPCM Encode2ch Down mix(48kHz/16bit)LPCM Encode2ch Down mix(48kHz/16bit)44.1kHz 16/20/24bitBitstream Bit stream(Max 5.1ch) —LPCMLPCM Encode2ch Down mix(44.1kHz/16bit)LPCM Encode2ch Down mix(44.1kHz/16bit)MPEG1(DVD, Video CD)48kHz 16bitBitstream Bitstream (Max 5.1ch) —LPCMLPCM Encode2ch Down mix(48kHz/16bit)LPCM Encode2ch Down mix(48kHz/16bit)44.1kHz 16bitBitstream Bit stream —LPCMLPCM Encode2ch(44.1kHz/16bit)LPCM Encode2ch(44.1kHz/16bit)MPEG2(DVD) 48kHz 16bitBitstream Bit stream(Max 5.1ch) —LPCMLPCM Encode2ch Down mix(48kHz/16bit)LPCM Encode2ch Down mix (48kHz/16bit)MP3/WMA/AAC8/11.025/12/16/22.05/24/32/44.1/48kHz16bitBitstream LPCM Encode2ch (32kHz,44.1kHz or48kHz/16bit)—LPCMLPCM Encode2ch (32kHz, 44.1kHz or 48kHz/16bit)WAV 44.1kHz 16bitBitstream LPCM Encode2ch(44.1kHz/16bit)—LPCMLPCM Encode2ch(44.1kHz/16bit)Stereo: Stereo Downmix.Surround Encoded:Surround compatible Downmix.](https://usermanual.wiki/ALPS-ALPINE/9ZUA145.Short-Term-Confidential-User-Manual-3/User-Guide-2723197-Page-12.png)
![72-ENMP3/WMA/AAC main screen exampleInfo modeFunction modeCurrent song no.Total song no.Album titleSong titleArtist titleElapsed time• If there is no CD text, the message “No Text” appears.Playback1Press the (AUDIO) button to select DVD (CD) mode.The display shows the DVD (CD) mode screen.• You can also select and change from the Menu screen (page 21) or Favorite screen (page 24).When a disc is inserted into the disc slot of the DVD Player, with the label side facing up, the unit starts playback of the disc.2Touch [ ] or [ ] to select the desired track (file).Returning to the beginning of the current (or previous) track (file):Touch [ ].Fast reverse :Touch and hold [ ].Advancing to the beginning of the next track (file) :Touch [ ].Fast forward :Touch and hold [ ].• The , buttons provide the same functions above.3To pause playback, touch [ / ].• The unit can play back MP3/WMA/AAC/WAV files saved to CD or DVD.For further information about playing or storing MP3/WMA/AAC/WAV files, see pages 101 and 102 before using the unit.• Any file protected by DRM (Digital Rights Management) copy protection, cannot be played back on this unit.• If a disc contains both audio data and MP3/WMA/AAC/WAV data, this unit plays back only the audio data.• The track display for CD audio data playback shows the track numbers recorded on the disc.• If an MP3/WMA/AAC/WAV disc with many files and folders is played, it may take longer than normal to start playback.• The playback time may not be correctly displayed when a VBR (Variable Bit Rate) recorded file is played back.• For details on switching the HDMI source when you have connected the HDMI selector and two HDMI devices, see “HDMI Operation” (page @@).Stopping PlaybackTouch [ ] during playback.“STOP” indicator is displayed, and playback stops.• Playback starts from the beginning when [ / ] is touched while playback is stopped.Repeat PlayTouch [ ] to repeatedly play back.The tracks (files) will be played repeatedly.The repeat mode switches every time the button is touched.*Only files in a folder are repeatedly played back.• If the Repeat Play mode is activated during MIX playback, the MIX mode will be canceled.CD/MP3/WMA/AAC/WAVCD:Track Repeat Off Track RepeatMP3/WMA/AAC:Repeat File Repeat Folder* Off Repeat File](https://usermanual.wiki/ALPS-ALPINE/9ZUA145.Short-Term-Confidential-User-Manual-3/User-Guide-2723197-Page-13.png)
![73-ENMIX (Random Play)Touch [ ] during playback.The tracks (files) on the disc will be played back in a random sequence.The MIX mode switches every time [ ] is touched.*1 Only files in a folder are played back in random sequence.*2 All files on the disc will be played back in a random sequence.• If the MIX mode is activated during Repeat playback, the Repeat Play mode will be canceled.• If you select a track by using the search mode, the MIX play mode will be canceled.File/Folder Name Search (Concerning MP3/WMA/AAC/WAV)1Touch [ ] (Search) during playback.The search mode is activated.The mode is changed to the search mode, and the list select panel appears.2Touch [ ] or [ ] in the list select panel to select Folder or File, then touch [Enter].When selecting Folder, select File following same procedure, then touch [Enter].• When there are 9 or more names on the list, a page number is displayed. Touch [ ] or [ ] to change the page.• Touch [ ] or [ ] to change the list select panel location from right to left or vice-versa.• To return to the previous hierarchy, touch [ ].Selecting Folders (Concerning MP3/WMA/AAC/WAV)Touch [ ] (Folder Down) or [ ] (Folder Up) to select the folder.Info Mode Function You can display the DISC information.1During playback, touch [ ] (Display).The playback status is displayed.2The playback status display closes when [ ] (Display) is touched.• For details on the display example, see Info mode in “MP3/WMA/AAC main screen example” (page 72).DVD Video main screen exampleFunction modeInfo modeTitle no./Chapter no.Audio signal output/Subtitle/AngleElapsed timeVideo CD main screen exampleFunction modeCD:MIX Off MIXMP3/WMA/AAC:MIX Folder*1MIX Disc*2Off MIX Folder*1DVD](https://usermanual.wiki/ALPS-ALPINE/9ZUA145.Short-Term-Confidential-User-Manual-3/User-Guide-2723197-Page-14.png)
![74-ENInfo modeCurrent track no.Playback control (PBC)/Current audio statusElapsed timeDisc types that can be used for each heading are represented by the following marks.The DVD operation screen displayTouch the screen while the DVD playback screen is displayed.To display the operation screen, touch [Control].• The operation screen changes to the visual screen in the DVD mode for 5 seconds after an operation has been performed.• If you try to activate the DVD while driving, the display will show the warning-Picture off for your safety.• Some operations cannot be carried out depending on the disc or playback screen.Playing a Disc 1Press the (AUDIO) button to select DVD (CD) mode.The display shows the DVD (CD) mode screen.When a disc is inserted into the disc slot of the DVD Player, with the label side facing up, the unit starts playback of the disc.• The reverse side of a double-sided DVD will not be played automatically. Remove the disc, turn it over, and reinsert it.• DO NOT insert discs containing maps for the navigation system. Doing so could result in damage.• For details on switching the HDMI source when you have connected the HDMI selector and two HDMI devices, see “HDMI Operation” (page @@).DVD Commercial Video discs (used for the distribution of movies, etc.) or a DVD-R/DVD-RW, DVD+R/DVD+RW recorded in a video mode can be used.Video-CD discs can be used.WARNINGIt is dangerous for the driver to watch the DVD while driving the vehicle. The driver may be distracted from looking ahead and an accident could occur.Install the unit correctly so that the driver cannot watch DVD unless the vehicle is stopped and the emergency brake is applied.If the unit is not installed correctly, the driver will be able to watch DVDs while driving the vehicle and may be distracted and could cause an accident. The driver or other people could be severely injured.CAUTION• Not all functions will operate for every DVD. See the individual DVD’s instructions for details on the features supported.• Fingerprints on a disc may adversely affect playback. If a problem occurs, remove the disc and check for fingerprints on the playback side. Clean the disc if necessary.• If you switch the power or Ignition key OFF or change sources during playback, playback will continue where you left off when you resume playback. • If you try to perform an invalid operation (based on the type of disc being played), the following mark is displayed on the monitor screen:• Play Position Memory Function Even if you turn power off or switch the Ignition key to OFF during playback or change the source, playback will continue from the point where playback stopped when the power is turned ON again.](https://usermanual.wiki/ALPS-ALPINE/9ZUA145.Short-Term-Confidential-User-Manual-3/User-Guide-2723197-Page-15.png)
![75-ENOn DVD mode, menu screens may appear automatically. If this happens, perform the operation described below to start playback.Direct Menu Operations 1Touch the screen while the DVD menu is being displayed.Directly touch operation switches displayed on the screen to operate.• To display the operation screen, touch [Control].2Touch the DVD menu directly.Menu Operations 1Touch [ ] (Menu Control).The menu operation mode will be displayed.2Touch [Key].The Key panel is displayed.Touch [Return] to return to the previous display.3Select a desired menu item by touching [ ], [ ], [ ] or [ ].• Touch [ ] or [ ] to change the Key panel location from right to left or vice-versa. • Touching [ ] in the operation panel returns to the screen in step 1.• Touching [Key] displays the numeric keypad input mode screen.For details of the numeric keypad input mode screen, see “Numeric Keypad Input Operations” (page 75).4Touch [Enter] to confirm the selected item.1Touch [key] again in the menu operation mode.The numeric keypad input mode screen appears2Touch a desired number.Touch [ ] to delete an entered number.To delete all the numbers you have entered, touch [ ] for at least 2 seconds.3Touch [Enter] on the numeric keypad input mode screen to confirm your selection.Touch [ ] to hide the keypad display.When a DVD contains two or more titles, the top menu screen appears.Touch [ ] (Top Menu).The top menu screen appears.• To perform necessary operations, see “If a Menu Screen Appears” (page 75).With a DVD having two or more menus, a menu screen will appear for the programmes available, in addition to the main programmes.Touch [ ] (Menu).The Root menu screen appears.• To perform necessary operations, see “If a Menu Screen Appears” (page 75).Playing Still Frames (Pausing) 1During playback, touch [ / ].2Touch [ / ] to resume playback.• No sound is played during the still frame mode.• The image or sound may stop temporarily when playback starts from the pause mode. This is not a malfunction.If a Menu Screen Appears• Some operations cannot be performed depending on the disc.Numeric Keypad Input Operations Displaying the Top Menu Screen Displaying the Menu Screen](https://usermanual.wiki/ALPS-ALPINE/9ZUA145.Short-Term-Confidential-User-Manual-3/User-Guide-2723197-Page-16.png)
![76-ENStopping Playback Touch [ ] during playback.“ ” indicator is displayed, and playback stops.• Playback starts from the beginning when [ / ] is touched while playback is stopped.Fast-forwarding/Fast-reversing 1During playback, touch and hold [ ] (Fast-reverse) or touch and hold [ ] (Fast-forward).Touch and hold for more than 1 second to forward/reverse at double speed.Every time you touch [ ]/[ ] during fast- reverse/fast- forward, the speed changes as follows: 2x 8x 32x 2x.2Touch [ / ] to return to normal playback.• No sound is played back during fast-forwarding/fast-reversing.• On DVD mode, the menu screen may reappear during fast-forwarding/fast-reversing.• This operation may not be possible on certain discs.Finding the Beginnings of Chapters/Tracks/Files During playback, touch [ ] or [ ].The chapter/track/file switches each time the button is touched, and playback of the selected chapter/track/file starts.• Some DVDs do not have chapters.• Be sure to turn PBC off before starting the search. See “Setting the Video CD Play Mode” (page 71).Forward/Reverse frame-by-frame Playback 1In the pause mode, touch [ ] or [ ].The picture advances by one frame each time the button is touched.2Touch [ / ] to return to normal mode.• No sound is output during forward frame-by-frame playback.• You can only execute reverse frame-by frame playback when playing DVD-V.Repeat Playback Use this function to play the disc’s titles, chapters or tracks, etc., repeatedly.Touch [ ] to repeatedly play back.The repeat mode switches every time the button is touched.DVD Video• The Repeat mode is always turned off when [ ] is touched and held for at least 2 seconds.• Only discs containing a Playlist can be displayed.Video CD• Display may vary depending on the connected devices.• The track/disc repeat modes cannot be used on Video CDs with playback control (PBC). These modes can be carried out after turning PBC off. See “Setting the Video CD Play Mode” (page 71).• For some discs it is not possible to switch the repeat mode.: Touch this to start playback from the beginning of the following chapter, track or file.: Touch this to start playback from the beginning of the current chapter, track or file.Supplementary explanations“Chapters” are divisions of movies or musical selections on DVDs.“Tracks” are divisions of movies or musical selections on Video CD.The chapter is played repeatedly.The title is played repeatedly.Playback returns to normal mode.ChapterTitleOffThe track is played repeatedly.TrackThe disc is played repeatedly.Off](https://usermanual.wiki/ALPS-ALPINE/9ZUA145.Short-Term-Confidential-User-Manual-3/User-Guide-2723197-Page-17.png)
![77-ENSearching by Title Number Use this function to easily find positions on the DVD using the DVD’s titles. Perform operations while playback is stopped.1Touch [ ] (Menu Control).The menu operation mode screen appears.2Touch [Key] again in the menu operation mode.3Enter a desired title by touching its number.See page 75 for operation of the numeric keypad.4Touch [Enter].Playback will start from the number selected.5Touch [ ].• This function cannot be used on discs on which no title numbers are recorded.• Some disc may not accept any operation.Searching Directly by Chapter Number Use this function to easily move to the beginnings of the chapters on the disc. Perform operations during playback, during PRE-STOP or while playback is paused.1Touch [ ] (Menu Control).The menu operation mode screen appears.2Touch [Key] again in the menu operation mode.3Touch and enter the chapter number you want to play.See page 75 for operation of the numeric keypad.4Touch [Enter] to confirm your selection.Playback will start from the selected chapter.5Touch [ ].• This function is not available for a disc on which chapters are not stored.Switching the Angle On DVDs in which scenes have been filmed from multiple angles, the angle can be switched during playback.Touch [ ] (Angle).The angle switches between the angles recorded on the disc every time the button is touched.• Some time may be required for the angle to change.• Depending on the disc, the angle may switch in one of two ways.- Seamless: The angle switches smoothly.- Non-seamless: When the angle is switched, a still picture is displayed first, after which the angle switches.Switching the Audio Tracks DVDs with multiple audio tracks or languages allow switching the sound during playback.Touch [ ] (Audio).The sound switches between the alternate audio tracks recorded on the disc every time the button is touched.• The alternate track selected becomes the default setting every time the power is turned on or the disc is replaced. If the disc does not include that track, the disc’s default language is selected instead.• Not all discs will allow changing the alternate audio tracks during playback. In these cases, select audio tracks from the DVDs menu.• There may be a delay before the selected alternate track begins to play.Video CDs with multiplex audioTouch [ ] (Audio).The left and right channels will be output as shown below, each time the button is touched.Audio: LL Audio: RR Audio: LR Audio: LRSwitching the Subtitles (Subtitle Language) With DVDs on which multiple subtitle languages are recorded, the subtitle language can be switched during playback; moreover, subtitles can be hidden.Touch [ ] (Sub Title).Touching this button repeatedly selects sequentially the subtitle languages recorded on the disc, and then turns the subtitles OFF.• There may be a delay before the selected subtitle appears.• Not all discs will allow changing the subtitles during playback. In these cases, select subtitles from the DVDs menu.• The subtitle language selected becomes the default setting every time the power is turned on or the disc is replaced. If the disc does not include that language, the disc’s default language is selected instead.However, the subtitle language may differ depending on the disc.• For some discs, the subtitles will be displayed even when this is set to OFF. However, the subtitle language may differ depending on the disc.Info Mode Function You can display the DISC information.1During playback, touch [ ] (Display).The playback status is displayed.2The playback status display closes when [ ] (Display) is touched.• For details on the display example, see Info mode in “DVD Video/Video CD main screen example” (pages 73, 74).Switching Display ModesYou can switch the Display Mode by touching [ ] (Display Mode). For details, see “Switching Display Modes (During Video File Play Back)” (page 60).](https://usermanual.wiki/ALPS-ALPINE/9ZUA145.Short-Term-Confidential-User-Manual-3/User-Guide-2723197-Page-18.png)
![78-ENiPhone, Smartphone, etc.The output of your electronic device will be mirrored on this unit through the HDMI connector. Control from this unit is not possible.• The electronic device must possess an HDMI output interface.• Not all devices with an HDMI output interface can be recognized by this unit.• Use only the Alpine Special HDMI connection cable.1Press the (AUDIO) button to select HDMI mode.The display shows the HDMI mode screen.• You can select and change the source in the Menu screen (page 21) or Favorite screen (page 24).2In HDMI player mode, the screen of the device displays the content of electronic equipment by mirror image.You can select Display Mode. For details, see “Switching Display Modes (During Video File Play Back)” (page 60).Switching the source when two HDMI devices are connectedYou can switch the source only when you have connected the HDMI selector and “Setting the HDMI selector On/Off ” is set to “On.”Screen example when the HDMI Setup is “HDMI 1”Touch [ ] (HDMI 2).The HDMI source changes to HDMI 2, and the Function button changes to [ ] (HDMI 1).Each time you touch [ ] (HDMI 1)* or [ ] (HDMI 2), the HDMI source changes.*When HDMI Setup is “DVD,” the Function button is changed to [ ] (DVD).HDMI Operation](https://usermanual.wiki/ALPS-ALPINE/9ZUA145.Short-Term-Confidential-User-Manual-3/User-Guide-2723197-Page-19.png)
![79-ENSetup Before UsingBluetooth is a wireless technology allowing communication between a mobile device or personal computer over short distances. This enables a hands-free call or data transmission between Bluetooth compatible devices. Bluetooth transmission is available in the unlicensed 2.4 GHz spectrum if the distance between devices is within 10 meters. For details, refer to the Bluetooth website (http://www.Bluetooth.com/).• Depending on the Bluetooth version, a Bluetooth compatible devicemay not be able to communicate with this unit.• Proper function of this unit with all Bluetooth compatible devices is not guaranteed. For handling of the Bluetooth compatible device, consult your Alpine dealer or Alpine website.• Depending on the surroundings, Bluetooth wireless connection may beunstable.• When you place a call, or perform setup operations, be sure to stop yourcar in a safe place.• Depending on the connected Bluetooth compatible device(s), the function may differ. Also refer to the Owner’s Manual of the connected device(s).Hands-free calls are possible when using a HFP (Hands-Free Profile) compatible mobile phone with this unit.• Avoid performing a hands-free call in heavy traffic or on narrow orwinding streets.• Close the windows while calling to reduce background noise.• If both calling parties are using hands-free devices, or the call is made ina noisy location, difficulty hearing the other person’s voice is normal. • Depending on telephone line conditions or certain mobile devices used, voices may sound unnatural.• When using a microphone, speak as directly as you can into themicrophone to obtain the best sound quality.• Certain mobile phone features are dependent on the capabilities and settings of your service provider’s network. Additionally, certain features may not be activated by your service provider, and/or the provider’s network settings may limit the feature’s functionality.Always contact your service provider about feature availability and functionality.All features, functionality, and other product specifications, as well as the information contained in the Owner’s Manual are based upon the latest available information and are believed to be accurate at the time of printing.Alpine reserves the right to change or modify any information or specifications without notice or obligation.Before using the hands-free phone/audio function, the following settings need to be made.1Set “Bluetooth” to “On” ( ).2Register a Bluetooth device in this unit (page 30).• See “Bluetooth Setup” (page 30).• You can search for this unit using a Bluetooth compatible device, and then connect that Bluetooth compatible device to this unit. The devicename of this unit is “ALPINE NAVI” and the initial number of the passcode is “0000.” Also refer to the Owner’s Manual of the connected device(s).• Before using the hands-free function, make sure “Setting the Hands-free Connection” (page @@) is set to “Aftermarket.”Touch [Phone] in the Menu screen to display the Phone menu screen (page 79).Phone menu screen exampleRecent Events list*You can display up to 60 items, such as phone numbers of the most recent incoming calls, missed calls and outgoing calls, and contact names that are registered in the Phone Book. When 60 items exist in the list, the oldest item is deleted when a further item is to be added.Contacts list*You can make a phone call from the Phone Book, or edit the Phone book.Keypad screenUse to type a phone number.Edit*Use to edit the Contacts list.*When you connect two Hands-Free Phones, the information of the Bluetooth device set to Priority1 is displayed.Bluetooth OperationAbout BluetoothAbout the Hands-free PhoneBefore Using BluetoothHands-free Phone Control[Phone] button](https://usermanual.wiki/ALPS-ALPINE/9ZUA145.Short-Term-Confidential-User-Manual-3/User-Guide-2723197-Page-20.png)
![80-ENAnswering a CallIncoming calls are announced by the received call ring tone and a displayed message (PHONE No., etc.).1An incoming call triggers the ringtone and an incoming call display.2Touch incoming call notification screen.The call starts.• During a call, the audio for the current mode on the unit is muted. After calling, playback will resume.• When the caller’s number is transmitted to the system, if the caller’sname is stored in the phone book, the name is displayed. If the name isnot stored, the number is displayed. When neither the name or the number is unavailable, “Unknown” is displayed.• Touch [ ] (Decline) to reject an incoming call.• By touching the call info area during phone call, you can change to thePhone Operation screen and adjust the speech volume, etc. For details, see “Operations During a Conversation” (page 83).• Touch [ ] during a conversation to hide the call info area. To display it again, Touch or swipe downward on [ ] on the upper part of the screen.• During an incoming call or a conversation on the Priority1 (Priority2)Hands-Free Phone, if there is an incoming call on the Prority2 (Priority1) Hands-Free Phone, you cannot answer the call on the Prority2 (Priority1) Hands-Free Phone without first ending the call on the Prority1 (Priority2) Hands-Free Phone.Hanging up the Telephone1Touch [ ] (End Call).The call finishes.Call Waiting FunctionIf a call comes in from another phone during a call, a notice is displayed on the screen. This function can only be used if the connected mobile phone has a call waiting function service included.Second incoming call during a conversation in the call info areaBy touching the second incoming call notification screen, you can put the current call on hold and answer the second call.• To switch a party, touch the on-hold screen.• To finish a call, touch [ ] (End Call).Incoming call notification screenCall info areaSecond incoming call notification screenOn-hold screen](https://usermanual.wiki/ALPS-ALPINE/9ZUA145.Short-Term-Confidential-User-Manual-3/User-Guide-2723197-Page-21.png)
![81-ENSecond incoming call during a conversation in the Phone Operation screen• The display or operation may differ depending on the connected mobilephone or the caller’s mobile phone.By touching the second incoming call notification screen, you can put the current call on hold and answer the second call.• To switch a party, touch the on-hold screen.• To finish a call, touch [ ] (End Call).• This unit supports only the Call Waiting function of a mobile phone. The second call function and three-way calling function of a mobile phone cannot be operated from this unit. Also the screen display maymalfunction.CallingYou can make a phone call using the Short Cut function of numbers that have been registered in Favorite. For details, see “Favorite Function” (page 24).1Press the (Favorite) button.The Favorite screen is displayed.Favorite screen2Touch the Short Cut icon.A contact’s name, phone number, and a confirmation message of the phone number are displayed.3Touch [Call].The phone call is started.Making a phone call from the Recent Events list1Touch [ ] (Recents) to change to the Recent Events list screen.Dialled history: Names or Numbers/DateReceived history: Names or Numbers/DateMissed Incoming history: Names or Numbers/Date2Touch the name of the contact you want to call.The Detail info screen is displayed.3Touch [ ].The phone call is started.Calling from the Contacts list (Phone Book)1Touch [ ] (Contacts) to change to the Contacts list screen.2Touch the name of the contact you want to call.The Phone Operation screen is displayed.3Touch [ ].The phone call is started.Calling by Favorite FunctionSecond incoming call notification screenCall On Hold screenMaking a phone call using the Phone Menu](https://usermanual.wiki/ALPS-ALPINE/9ZUA145.Short-Term-Confidential-User-Manual-3/User-Guide-2723197-Page-22.png)
![82-ENEntering a Phone Number to Make a Call1Touch [ ] (Keypad).The number input screen (Keypad) appears.Touch [ ] to delete an entered number.Touch [Delete All] to delete all entered numbers.2Enter the phone number you wish to call.• You can enter up to 31 digits.3Touch [ ] (Call).A confirmation message of the phone number appears.4Touch [Call].The phone call is started.Using Voice Recognition functionYou can use Siri function of your iPhone or make a telephone call by using voice operation of your smartphone.You can use the Siri function of your iPhone. To use this function, set the Siri setting of your iPhone to ON.• Connect your iPhone to the unit via Bluetooth, then set to “Hands-free”or “Both” (page 30).• The available functions differ depending on the connected iPhone.• Ask Siri to play a track from the music library applies only to USBsource.• Siri and other streaming services are enabled by connecting to compatible smartphones that are able to receive data. Please ensure that cellular data and/or Wi-Fi is turned on in the smartphone to enjoy these features.• Extensive use of Siri or other streaming services may increase your phone’s data usage. Please check with your phone company to ensureyou have an appropriate Data plan.1Press and hold the (AUDIO) button for at least 2 seconds.The Voice Control mode screen is displayed.2Speak into the microphone supplied with this unit.• If no speech is detected, the unit may pause depending on versionof the connected iPhone. In that case, touch the microphone icon [ ] in the center of the Voice Control mode screen. You can continue to use the Voice Control mode.3To finish the Voice Control mode, touch [ ] or press andhold the (AUDIO) button for at least 2 seconds.• Depending on the iPhone, the Siri function may finish automatically.Adjusting the volumeAdjust the speaker/microphone volumes in Voice Control mode. Perform the same procedure to adjust the speaker/microphone volumes of hands-free phone.Touch [ ] or [ ].Adjust the speaker and microphone volumes.Stopping input to the microphoneIf the surrounding sound (road noise, etc.) is loud, you may wish to cut input to the microphone for 3 seconds.Touch [ ].You can make a telephone call by using voice operation.• Connect your smartphone to the unit via Bluetooth, then set to “Hands-free” or “Both” (page 30).1Press and hold the (AUDIO) button for at least 2 seconds.The Voice Dial mode screen is activated.2Say the telephone number* or name* you want to call, into the microphone.*The number and name depend on the voice dial information storedin the smartphone.3To finish the Voice Dial mode, touch [ ] or press andhold the (AUDIO) button for at least 2 seconds.• You can perform this operation only when a voice dial compatiblesmartphone is connected.• The Voice Dial function performance depends on the recognition range of the smartphone and mounting location of the microphone. Note when the microphone is mounted.• Voice dial operation depends on the function being available on the smartphone. For details, refer to the owner’s manual of the smartphone.• Depending on the smartphone, the Voice Dial operation may finishautomatically.Using SiriVoice Dial Function](https://usermanual.wiki/ALPS-ALPINE/9ZUA145.Short-Term-Confidential-User-Manual-3/User-Guide-2723197-Page-23.png)
![83-ENAdjusting the volumeAdjust the speaker/microphone volume in Voice Dial mode. Perform the same procedure to adjust the speaker/microphone volume of hands-free phone.Touch [ ] or [ ].Adjust the speaker and microphone volumes.Stopping input to the microphoneIf the surrounding sound (road noise, etc.) is loud, you may wish to cut input to the microphone for 3 seconds.Touch [ ].Operations During a ConversationPhone Operation screenName and phone number• If registered with a Group, the Group Name is also displayed.Although, depending on the connected mobile phone, it may not be displayed.Conversation timeYou can adjust Caller Level and Mic. Level (Microphone Level) during a phone call.Touch [ ] or [ ].You can adjust the volume in 11 levels.The voice output for calls is switchable between car speakers and the mobile phone speaker.Touch [ ].• Depending on the mobile phone, this operation may not be possible.Transmits a DTMF (Touch-Tone) during a call.1Touch [ ] (Keypad).The number input screen (Keypad) appears.2Input number.• You can transmit a Touch-Tone signal during a call.Phone Book FunctionPhone Book screen exampleUse to search by directly inputting a name or phone number with the Keypad.For details, see “How to Input Characters and Numbers (Keypad)” (page 23).Displayed when multiple phone numbers are registered. Touch [ ] to display the registered phone number list.Use to narrow down your search for names, etc.For details, see “Alphabet Search Function” (page 59).Touch [ ] to register as Favorite.You can synchronize the system’s phone book with the mobile phone’s phone book.1Touch [ ] (Edit).2Touch [Download].3Touch [SYNC].Synchronization of the phone books starts.• You can store up to 1,000 registered name in the phone book.• You can store up to 5 phone numbers by one person’s name.1Touch [ ] (Edit).2Touch [Download].3Touch [Add].Stays on standby for connection of the mobile phone.• Touch [Cancel] to cancel the standby mode.4The mobile phone accesses this unit and then transfers the phone book from the mobile phone to this unit.• Mobile phone connection is canceled while the phone book is being transferred.Adjusting the Speech VolumeChanging the Voice OutputDTMF (Touch-Tone) FunctionSynchronizing the Phone BookAdding the Phone Book](https://usermanual.wiki/ALPS-ALPINE/9ZUA145.Short-Term-Confidential-User-Manual-3/User-Guide-2723197-Page-24.png)
![84-ENDeleting One Entry from the Phone Book1Touch [ ] (Edit).2Touch the checkbox [ ] of the contact name (or phone number) you want to delete. A tick ( ) appears in the checkbox.• You can choose up to 10 names and numbers at a time.3Touch [ ] (Delete).The confirmation screen is displayed.If multiple phone numbers are registered, they are all deleted.4Touch [OK].The selected number is deleted.Deleting All Entries from the Phone Book1Touch [ ] (Edit).2Touch [ ] (Delete All).The confirmation screen is displayed.3Touch [OK].All entries of the phone book are deleted.You can make a call using the phone book search function.1Touch [ ] (Search).The Input User Name screen (Keypad) is displayed.2Input the string of letters of the name that you want to search, then touch [OK].A list of names beginning with the string of letters you entered is displayed.3Touch the name you want to call.The Phone Operation screen is displayed.4Touch [ ].The phone call is started.• For details of how to input characters using the keypad, see “How to Input Characters and Numbers (Keypad)” (page 23).• If there are fewer than five registered items in the phone book, you cannot use the phone book search function.If a Bluetooth compatible mobile phone, portable player, etc. is connected by wireless, you can play back a song (operation is controllable from the unit).• Operation may vary, depending on the Bluetooth compatible device.Bluetooth Audio main screen exampleFunction modeCurrent track no./Total song no.Artist titleSong titleAlbum titleElapsed timeTouch or swipe to the right to use the Quick Search mode and Full Search mode.Quick Search mode screen exampleSwipe vertically in the list to change pages.Full Search buttonSwipe to the right when using Full Search mode.• The displayed onscreen buttons may differ depending on the AVRCPversion.• Song title/Artist title/Album title/Elapsed time do not display forAVRCP Ver. 1.0.Deleting the Phone Book EntriesSearching in the Phone BookBluetooth Audio](https://usermanual.wiki/ALPS-ALPINE/9ZUA145.Short-Term-Confidential-User-Manual-3/User-Guide-2723197-Page-25.png)
![85-EN• To play back audio, a mobile phone or a portable player conforming to A2DP (Advanced Audio Distribution Profile) or AVRCP (Audio/Video Remote Control Profile) is required. Not all functions work with all devices.• During a call, sound on the Bluetooth audio source is paused.Compatible AVRCP versions: 1.0, 1.3, 1.4, 1.5• Available functions may differ depending on the AVRCP version.Playback1Press the (AUDIO) button to select Bluetooth Audio mode.The display shows the Bluetooth Audio mode screen.• You can also select and change the source in the Menu screen(page 21) or the Favorite screen (page 24).2Touch [ ] or [ ] to select the desired track (file).Returning to the beginning of the current file:Touch [ ].Fast backward the current file:Touch and hold [ ].Advance to the beginning of the next file:Touch [ ].Fast forward the current file:Touch and hold [ ].• The , buttons provide the same functions above.3To pause playback, touch [ / ].Repeat PlayAvailable for AVRCP Ver. 1.3, 1.4 and 1.5 only.1Touch [ ].The Repeat mode select pop up screen is displayed.•[ ] displays the currently selected mode.2Select your desired Repeat mode.The selected Repeat mode changes the button.• Operations may differ depending on the connected Bluetooth compatible device.Random PlayAvailable for AVRCP Ver. 1.3, 1.4 and 1.5 only.1Touch [ ].The Random Play mode select pop up screen is displayed.• The [ ] button displays the currently selected mode.2Select your desired Random Play mode.The selected Random Play mode changes the button.• Operations may differ depending on the connected Bluetooth compatible device.Search FunctionAvailable for AVRCP Ver. 1.4 and 1.5 only.The displayed list differs with the connected Bluetooth device. You can search for your desired song by using one of two modes; the Quick Search mode and the Full Search mode.Quick Search mode Touch your desired Group name or File name.The selected Group*1 or file is played back.*1 The first file in the selected Group is played back.• To switch into Quick Search mode, see in “Bluetooth Audio mainscreen example” (page 84).Full Search mode Touch your desired Group name*2 or File name.When you select a File name, the selected song is played.When you select a Group name, repeat the same procedure to select another Group name or File name.*2 When you touch the [ ] by a Group name, the unit plays from the first song in the Group.• To switch into Full Search mode, see in “Quick Search mode screenexample” (page 84).• To switch the displayed list or return to the previous page in the List screen, see “About Basic Operation for List Screen” (page 18).All Track : Once all of the songs have finished playing, play back is repeated, starting with the first song.Group : Only files in a group are repeatedly played back.Single Track : Only the track currently playing is repeatedly played back.Off : Repeat mode Off.All Track : All songs in the BLUETOOTH compatible devices are played back in random sequence. Any one song does not play back again until all songs have been played back.Group : A Group is selected randomly and songs in the Group are played back in order. After all songs are played in the Group, the next Group is selected randomly.Off : Random mode Off.](https://usermanual.wiki/ALPS-ALPINE/9ZUA145.Short-Term-Confidential-User-Manual-3/User-Guide-2723197-Page-26.png)
![86-ENConnecting a Bluetooth DeviceRegistering a Bluetooth device in the unit enables automatic connection.If it does not connect automatically, run through the connection procedure again.1Touch [ ] (Phone Setting).The Device Setting select pop up screen is displayed.2Touch [Reconnect].Bluetooth connection will start.1Touch [ ] (Phone Setting).The Device Setting select pop up screen is displayed.2Touch [Disconnect].The Bluetooth connection is disconnected.If multiple Bluetooth devices are registered in this device, you can change the connection among the registered devices.1Touch [ ] (Phone Setting).2Touch [Change Phone].3Touch [ ] (Audio) or [ ] (Hands-free) of the selected device.The connection will transfer to the selected device. Disconnecting the Bluetooth ConnectionChanging the connecting Bluetooth Device](https://usermanual.wiki/ALPS-ALPINE/9ZUA145.Short-Term-Confidential-User-Manual-3/User-Guide-2723197-Page-27.png)
![87-ENOperating Auxiliary Devices (Optional)To operate devices connected to the AUX terminals of the unit, follow the procedure described below.• Set AUX to “On.” See “AUX Setup” (page 44).• Depending on the connected unit, the onscreen buttons may not work, or their operation may differ.• If you try to activate the auxiliary device while driving, the display willshow the warning-Picture off for your safety.Press the (AUDIO) button to select Auxiliary (AUX)* mode.The display shows the Auxiliary (AUX) mode screen.*The name which is given as the mode name in “Setting the Auxiliary(AUX) Name” (page 45) is displayed.• You can select and change the source in the Menu screen (page 21) orFavorite screen (page 24).• For details on the connected auxiliary device, refer to its owner’s manual.AUX Operation Screen Display During Video File PlaybackTouch the screen.The Auxiliary (AUX) operation screen is displayed.• The operation screen changes to the visual screen in the Auxiliary (AUX) mode for 5 seconds after an operation has been performed. To hide the Auxiliary (AUX) operation screen, touch the video display area.Example for AUX, AUX DVD, GAME, USB Player mode display[ ] (Display Mode)For details, see “Switching Display Modes (During Video File Play Back)” (page 60).External DVD player display example[ ]Touch the switch to go back to the beginning of the current chapter/track/file. Touch the switch once more to find the beginning of the previous chapter/track/file. Touch and hold to fast reverse.[ ]Touch the switch to advance to the beginning of the next chapter/track/file. Touch and hold to fast forward.[ / ]Switches between play and pause.[ ]Touching during play initiates a pre stop. Touching again stops play.[ ]Starts/Stop repeat play.[ ]Starts/Stop M.I.X. play.[ ] (Top Menu)Calls up the Top Menu screen.Auxiliary Device (Optional)WARNINGIt is dangerous (and illegal in many states) for the driver to watch TV/video while driving the vehicle. The driver may be distracted from looking ahead and an accident could occur.Install the unit correctly so that the driver cannot watch TV/video unless the car is stopped and the parking brake is applied.If the unit is not installed correctly, the driver will be able to watch TV/video while driving and may be distracted from looking ahead and cause an accident. The driver or other people could be severely injured.Operating an AUX, AUX DVD, GAME or USB PlayerOperating an External DVD Player](https://usermanual.wiki/ALPS-ALPINE/9ZUA145.Short-Term-Confidential-User-Manual-3/User-Guide-2723197-Page-28.png)
![88-EN[ ] (Menu)Calls up the Menu screen.[ ] (Menu Control)Calls up the menu operation mode.[ ]Switches the program/playlist/folder down.[ ]Switches the program/playlist/folder up.[ ] (Display Mode)You can set the Display Mode. For details, see “Switching Display Modes (During Video File Play Back)” (page 60).[ ] (Angle)Switches angle.[ ] (Audio)Switches audio.[ ] (Sub Title)Switches sub titles.Menu operation mode screen example[Key]Displays the Key panel ( ).[ ], [ ]Moves key panel location.[ ]Closes menu operation mode.[ ]Closes key panel.[ ], [ ], [ ], [ ]Moves menu cursor.[Enter]Determines the selected item.[Return]Returns to the previous item/screen.The DVD-CHG operation mode screen and the Menu operation mode screen are the same as the external DVD player operation screen. See “Operating an External DVD Player.”External DVD changer screen example[Disc1]-[Disc6]Selects a Disc.• Touch the left side of the operation screen or swipe the operation screen to the right to display the Disc selection screen.Menu operation mode screen example[ ]Switches the Channel number / Favorite channel number down.[ ]Switches the Channel number / Favorite channel number up.[ ] (Tune) (Channel or Favorite)Switches between the Channel mode and the Favorite channel mode.[ ] (EPG)Call up the Electronic Program Guide (EPG). [ ] (Menu)Call up the menu screen.[ ] (Menu Control)Call up the menu operation mode.[ ] (A/V)Switches the source.[ ] (Scan)Touch the switch to start the scan procedure.[ ] (Display Mode)You can set the Display Mode. For details, see “Switching Display Modes (During Video File Play Back)” (page 60).Operating an External DVD ChangerOperating the Mobile Digital TV Receiver (DVB-T)](https://usermanual.wiki/ALPS-ALPINE/9ZUA145.Short-Term-Confidential-User-Manual-3/User-Guide-2723197-Page-29.png)
![89-ENMenu operation mode screen example[ ], [ ]Switches the Channel number / Preset channel down.[ ], [ ]Switches the Channel number / Preset channel up.[ ] (Band)Switches the band.[ ] (Tune) (Channel or Preset or Manual)Switches amongst Channel mode, Preset mode, and Manual mode. [ ] (Auto Memory)The tuner automatically seeks and stores stations.[ ] (Display Mode)You can set the Display Mode. For details, see “Switching Display Modes (During Video File Play Back)” (page 60).Operating a TV](https://usermanual.wiki/ALPS-ALPINE/9ZUA145.Short-Term-Confidential-User-Manual-3/User-Guide-2723197-Page-30.png)
![90-ENWhen an optional camera is connected, the view video of camera can be output to the monitor.Front camera, Rear camera or Side camera can be connected to this unit.Make the Camera Select setting (Front, Rear, Side or Other) according to your connected camera. For details, see “Setting the Camera Input” (page @@).When using the optional Multi Camera Interface box, you can connect up to 3 cameras: Front Camera, Rear Camera, and Side Camera. When connecting the optional Multi Camera Interface box, you need to set each camera to On/Off in “Setting Multi Camera to On/Off ” (page @@).When displaying the camera view while connected to the optional Multi Camera Interface box, you can switch the camera view using the switch button at the top of the screen.Front camera:When the HCE-C257FD is connected, conditions in front of the vehicle, such as objects, people and other hazards, can be seen.Rear camera:If an HCE-C127D/HCE-C157D/HCE-C252RD camera is connected, when the vehicle is reversed, the rear camera view (guide marks for vehicle width and available distance) is displayed automatically on the screen of this unit.Side camera:If the HCE-C259SD is connected, you can check for obstacles in the blind spot on the passenger side.Other camera:Set when connecting to a camera other than the Front camera or Rear camera, such as a room camera and side camera.Rear Camera Operation1Press the MENU button.The menu screen is displayed.• You can also display the menu screen by touching [ ]on the lower part of the Audio source screen or by swiping upward.2Touch [Camera].The Rear Camera view is displayed.• Touch the screen while the camera image is being displayed, and touch [ ] or [ ] to return to the main source screen or previous screen.• You can perform a Guide Adjustment. For details, see “Adjusting the Rear/Front/Side Camera Guide” (page 46).• If you connect a Front Camera and Side Camera using the optionalMulti Camera Interface box, touch [Front] or [Side] to switch theCamera display.• You can also switch the Camera view by Pressing (CAMERA)button. (X110 only)1Shift the gear lever to the reverse (R) position.The rear view image is displayed while the car remains in reverse.2If you shift the gear lever to a position other than reverse (R), the monitor returns to the previous screen.• Never depend solely on the camera when backing up. Always turn and look and only use the camera for additional assistance.• This function is effective when the reverse wire is properly connected.• You can perform a Guide Adjustment. For details, see “Adjusting the Rear/Front/Side Camera Guide” (page 46).If the camera has a view switch function, the Direct Change switch is displayed.1Touch the screen when the image from the rear camera isdisplayed.The operation screen is displayed on the screen.• After a 5-second time-out, the operation screen returns to the camera display screen. 2Touch [Back], [Panorama], [Corner] or [Top]. The image pattern changes. • For detailed information about image patterns, see the camera Owner’s Manual. • You can perform a Guide Adjustment. For details, see “Adjusting the Rear/Front/Side Camera Guide” (page 46).1Touch the screen when the image from the camera is displayed. The operation screen is displayed on the screen.• After a 5-second time-out, the operation screen returns to the camera display screen.2Touch [Guide Off] or [Hitch Guide Off] on the Rear camera display screen.The guide disappears, and then the [Guide Off] or [Hitch Guide Off] switch changes to [Guide On] or [Hitch Guide On].3Touch [Guide On] or [Hitch Guide On] to turn on theguide.Camera Operation (Optional)You can adjust the quality of the camera image.Setting items: Brightness / Color / ContrastSee “Picture Quality. Setup” (page 39).Displaying the Rear Camera Image from the Menu screen[Camera] buttonDisplaying the rear view video while the car isin reverseSwitching the Image Pattern for the RearCamera[Back]: Rear View[Panorama]: Panorama View[Corner]: Corner View[Top]: Ground ViewGuide Display ON/OFF Setting](https://usermanual.wiki/ALPS-ALPINE/9ZUA145.Short-Term-Confidential-User-Manual-3/User-Guide-2723197-Page-31.png)
![91-EN1Touch the screen when the image from the camera is displayed. The operation screen is displayed on the screen.• After a 5-second time-out, the operation screen returns to the camera display screen.2Touch [ Caution].• For each touch, the caution location moves to the top or bottom of the screen. About the Rear Camera GuideTo display the guide, set “Guide Display ON/OFF Setting” (page 90) to On. Also, to adjust the guide, see “Adjusting the Rear/Front/Side Camera Guide” (page 46). You can also turn off the guide in the Rear camera display screen.Indication mark meaningWhen the car is put into reverse gear, the monitor switches to the rear view camera image. Guides appear to help visualize the car’s width and distance from the rear bumper.Car width extension marks (red, yellow and green in order of distance)If properly calibrated, the marks indicate the car’s width. This helps guide the car’s path when backing up in a straight line.The marks represent the distance from the rear of the car (from the rear end of the bumper).• The marks do not move in synchronization with the steering wheel.• Set the marks to suit the car’s width.Distance guidance marksThe marks represent the distance from the rear of the car (from the rear end of the bumper).• The marks do not move in synchronization with the steering wheel.• We recommend that you measure the actual distance to the marks when parked on a level surface.• Depending on the condition of the car or road surface, the range of vision may vary.• The camera has a limited range of vision. Objects at extreme angles to the camera (e.g. under the bumper or at opposite ends of the bumper) may not be in the its field-of-vision.• The rear camera image may have a tint which is different from the actual surroundings.• Depending on the car, the guidance may deviate to the right or left. This is not a malfunction.Distance guidance markThe distance guides represent the ground level distance from the rear bumper. It is difficult to accurately estimate the distance to objects above ground level.In the following example, the distance to A is 0.5 m and the distance to B is 1 m.<Screen><Positions of A, B and C>In the screen, according to the distance guidance marks, the truck seems to be parked about 1 m away (at the position B). In actual fact, however, if you reversed to position A, you would collide with the truck.In the screen, positions A, B and C seem to be located in order of proximity. However, in actual fact, the position A and C are the same distance, and B is farther away than positions A and C.• The car width extension mark represents the distance to the road surface. The distance to an object on the road is not accurately represented by the guides.Error between the screen and the actual road surfaceIn the following conditions, errors are produced between the screen guidance and the actual road surface. (The illustrations represent a case when the camera is installed in the standard position.)When there is a steep upward slope behind the car (example)<Screen>Adjusting the Caution Display LocationCBA (about 0.5 m)about 1 mDistance guidance marks](https://usermanual.wiki/ALPS-ALPINE/9ZUA145.Short-Term-Confidential-User-Manual-3/User-Guide-2723197-Page-32.png)
![92-EN<Situation of the car>The distance guidance mark represents the distance to a flat road surface. Therefore in the case of an upward slope behind the car, the distance guides are displayed closer to the rear bumper than the actual distance. For example, if there is an obstacle on the upward slope, it may appear farther away than its actual position.Also, an error may occur between the guidance and the actual path of the car on the road surface.When there is a steep downward slope behind the car (example)<Screen><Situation of the car>In the case of a downward slope behind the car, the distance guides are displayed farther from the rear bumper than the actual distance. If there is an obstacle on the downward slope, it seems closer than its actual position.Also, an error may occur between the guidance and the actual path of the car on the road surface.Front Camera Operation1Press the MENU button.The menu screen is displayed. • You can also display the menu screen by touching [ ]on the lower part of the Audio source screen or by swiping upward.2Touch [Camera].The Front Camera view is displayed.• Touch the screen while the camera image is being displayed, and touch [ ] or [ ] to return to the main source screen or previous screen.• You can perform a Guide Adjustment. For details, see “Adjusting the Rear/Front/Side Camera Guide” (page 46).• If you connect a Rear Camera and Side Camera using the optionalMulti Camera Interface box, touch [Rear] or [Side] to switch theCamera display.• You can also switch the Camera view by Pressing (CAMERA)button. (X110 only)If the camera has a view switch function, the Direct Change switch is displayed.1Touch the screen when the image from the front camera is displayed. The operation screen is displayed on the screen.• After a 5-second time-out, the operation screen returns to the camera display screen.2Touch [Panorama], [Corner] or [Top]. The image pattern changes. • For detailed information about image patterns, see the camera Owner’s Manual.• You can perform a Guide Adjustment. For details, see “Adjusting the Rear/Front/Side Camera Guide” (page 46).Actual distancesError ErrorError ErrorDisplaying the Front Camera image from the Menu screen.Switching the Image Pattern for the FrontCamera[Panorama]: Panorama View[Corner]: Corner View[Top]: Ground View[Camera] button](https://usermanual.wiki/ALPS-ALPINE/9ZUA145.Short-Term-Confidential-User-Manual-3/User-Guide-2723197-Page-33.png)
![93-ENAs with the rear camera, the front camera guide display ON/OFF setting and Caution display location can be adjusted. See “Guide Display ON/OFF Setting” (page 90) and “Adjusting the Caution Display Location” (page 91) for the operations.Side Camera Operation1Press the MENU button.The menu screen is displayed.• You can also display the menu screen by touching [ ] on the lower part of the Audio source screen or by swiping upward.2Touch [Camera].The Side Camera view is displayed.• Touch the screen while the camera image is being displayed, and touch [ ] or [ ] to return to the main source screen or previous screen.• You can perform a Guide Adjustment. For details, see “Adjusting the Side Camera Guide” (page @@).• If you connect a Rear Camera and Front Camera using the optional Multi Camera Interface box, touch [Rear] or [Front] to switch theCamera display.• You can also switch the Camera view by Pressing (CAMERA)button. (X110 only)If the camera has a view switch function, the Direct Change switch is displayed.1Touch the screen when the image from the side camera is displayed.The operation screen is displayed on the screen.• After a 5-second time-out, the operation screen returns to the camera display screen.2Touch [Rear] or [Front].The image pattern changes.• For detailed information about image patterns, see the camera Owner’s Manual.• You can perform a Guide Adjustment. For details, see “Adjusting the Side Camera Guide” (page @@).About the adjustment of guide display ON/OFF setting and adjustment of Caution display location Displaying the Side Camera image from the Menu screen.[Camera] buttonSwitching the Image Pattern for the Side CameraRear: Vehicle Rear viewFront: Vehicle Front view](https://usermanual.wiki/ALPS-ALPINE/9ZUA145.Short-Term-Confidential-User-Manual-3/User-Guide-2723197-Page-34.png)
![94-ENWhen the unit is connected to the car’s iDataLink module, you can transfer and receive data between the car and the unit to check the car’s status, or to make various operations from the unit.When you use iDataLink mode, set each setting other than “Aftermarket” in “Setting the Source Category” (page @@).• Available functions differ depending on your vehicle. For details, refer to your vehicle’s instruction manual.Access to iDataLink ModeYou can check the car’s status, set the air conditioning, etc.1Press and hold the ## (Favorite) button for at least 2 seconds, or touch [ ] (Vehicle Info.) in the Menu screen to activate iDataLink mode.• The iDataLink mode screen selected in “Setting the Default Vehicle Screen” (page @@) is displayed.2Touch the desired tag on the top of the screen.• The displayed tag options differ depending on the type of vehicle.Setting contents:Climate / Gauges / Park Sensor / Vehicle Info. / Car SettingClimate screen example3Adjust or confirm the item/information accordingly.• Operable functions and displays may differ depending on the vehicle.iDataLink Function Screen exampleClimate screen exampleYou can control the temperature inside the vehicle, etc.Gauges screen exampleYou can check the vehicle's speed, the engine's rotation speed, etc.Parking sensor screen exampleYou can check the distance from the front and rear of the vehicle to an obstacle.• If the car sensor detects an obstacle, the screen automatically changes to the Parking sensor screen. For details, see “About Parking Sensor screen” (page @@).Vehicle Information screen exampleYou can check for open doors, check the tire pressure, the battery life, etc. for the vehicle.Car Setting screen example (Generic List screen)The Generic List/Popup Window/Current source control screen is displayed.iDataLink Operation (Optional)](https://usermanual.wiki/ALPS-ALPINE/9ZUA145.Short-Term-Confidential-User-Manual-3/User-Guide-2723197-Page-35.png)
![95-ENThe Parking sensor screen turns on when the front or rear sensor on your vehicle detects an obstacle within a certain distance.Parking Sensor Full screen exampleWhen the front or rear sensor detects an obstacle within a certain distance, the Parking Sensor screen is displayed, and the indicator ( - ) that corresponds with that area lights up.Indicator colors when an obstacle is detected.Red: close distanceOrange: medium distanceYellow: long distance• Depending on the speed of the vehicle, when moving faster than a certain speed, the Parking Sensor screen may not be displayed.• Vehicles that do not have the obstacle detection sensor cannot use this function.*[ ] is displayed only when the Front camera or Rear camera is interlocked.Parking Sensor Camera interlock screen example (Rear camera)You can check for obstacles through an interlocked camera image by connecting a Front or Rear Camera.• Touch the Camera image area to switch to the Camera full screen. (While displaying the Camera full screen, touch the Camera screen, then touch [Sensor] to return to the Parking Sensor Camera interlock screen.)• Touch the car icon to switch to the Parking sensor full screen. (Touch [ ] on the Parking Sensor full screen to return to the Parking Sensor Camera interlock display.)• To use this function, set the Camera Select setting to “Front/Other” or “Rear.” For details, see “Setting the Camera Input” (page 46).• If you connect a Front Camera/Rear Camera/Side Camera using the optional Multi Camera Interface box, you can switch the Camera display. For details on the camera settings when connected to the Multi Camera Interface box, see “Setting Multi Camera to On/Off” (page @@). For details on how to switch the camera display, see “Camera Operation (Optional)” (page @@).External Accessory Control OperationYou can set the headlights to ON/OFF or adjust the air suspension from this unit by connecting the optional External Accessory Control box.The following explains how to edit the control switches, because the functions that can be controlled differ depending on the type of vehicle.1Touch [ ] (Ext Acc Ctrl) in the Menu screen to activate External Accessory screen.The External Accessory screen is displayed.2Touch [ ] (Edit).The Edit Control Switches screen is displayed.About Parking Sensor screen](https://usermanual.wiki/ALPS-ALPINE/9ZUA145.Short-Term-Confidential-User-Manual-3/User-Guide-2723197-Page-36.png)
![96-EN3Edit each switch.When changing an icon:Touch the icon, and select your desired icon from the Icon Type list. After selecting the icon, set the Output Type (Timing) for each function.*The Output Type (Timing) sets the operating time for that function when you touch the icon on the External Accessory screen.When changing the name:Touch the icon name, then input characters into Edit Name (Keypad). You can also select a basic name from the [Template] of the Keypad. For details on how to input characters using the keypad, see “How to Input Characters and Numbers (Keypad)” (page @@). (When a basic name is selected from the Template, the icon will be changed according to the basic name.)When changing the layout of the switches:Drag and drop an icon to the desired location.To revert to a default icon:Touch the check box “ ” of the icon that you want to revert to default, and then touch [ ] (Reset). If you touch [ ] (Reset All), all icons revert to default icons.4After editing is complete, touch [ ] (Back).5After the caption for the confirmation is displayed, touch [OK].• If you touch [ ] (Cancel) while editing, the screen switches to the Edit screen.Pulse: The operating time when you touch the icon. (Select from 11 steps, ranging 0.5 sec. to 10 sec.)Latch: Switch On/Off by touching the icon.Momentary: Operating time lasts from when an icon is touched to when it is released.](https://usermanual.wiki/ALPS-ALPINE/9ZUA145.Short-Term-Confidential-User-Manual-3/User-Guide-2723197-Page-37.png)
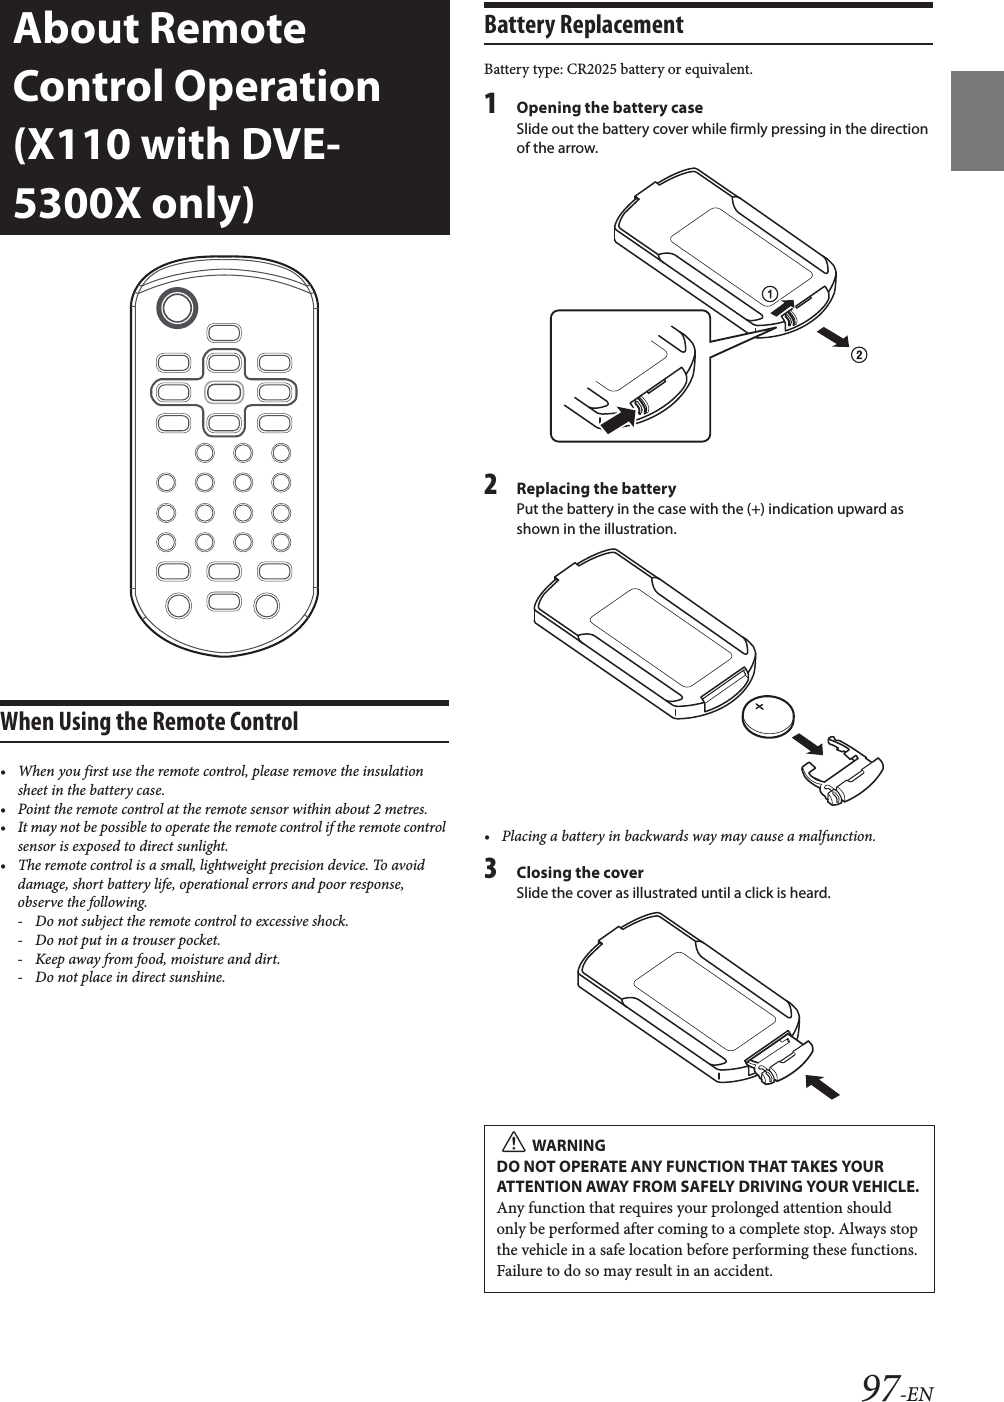
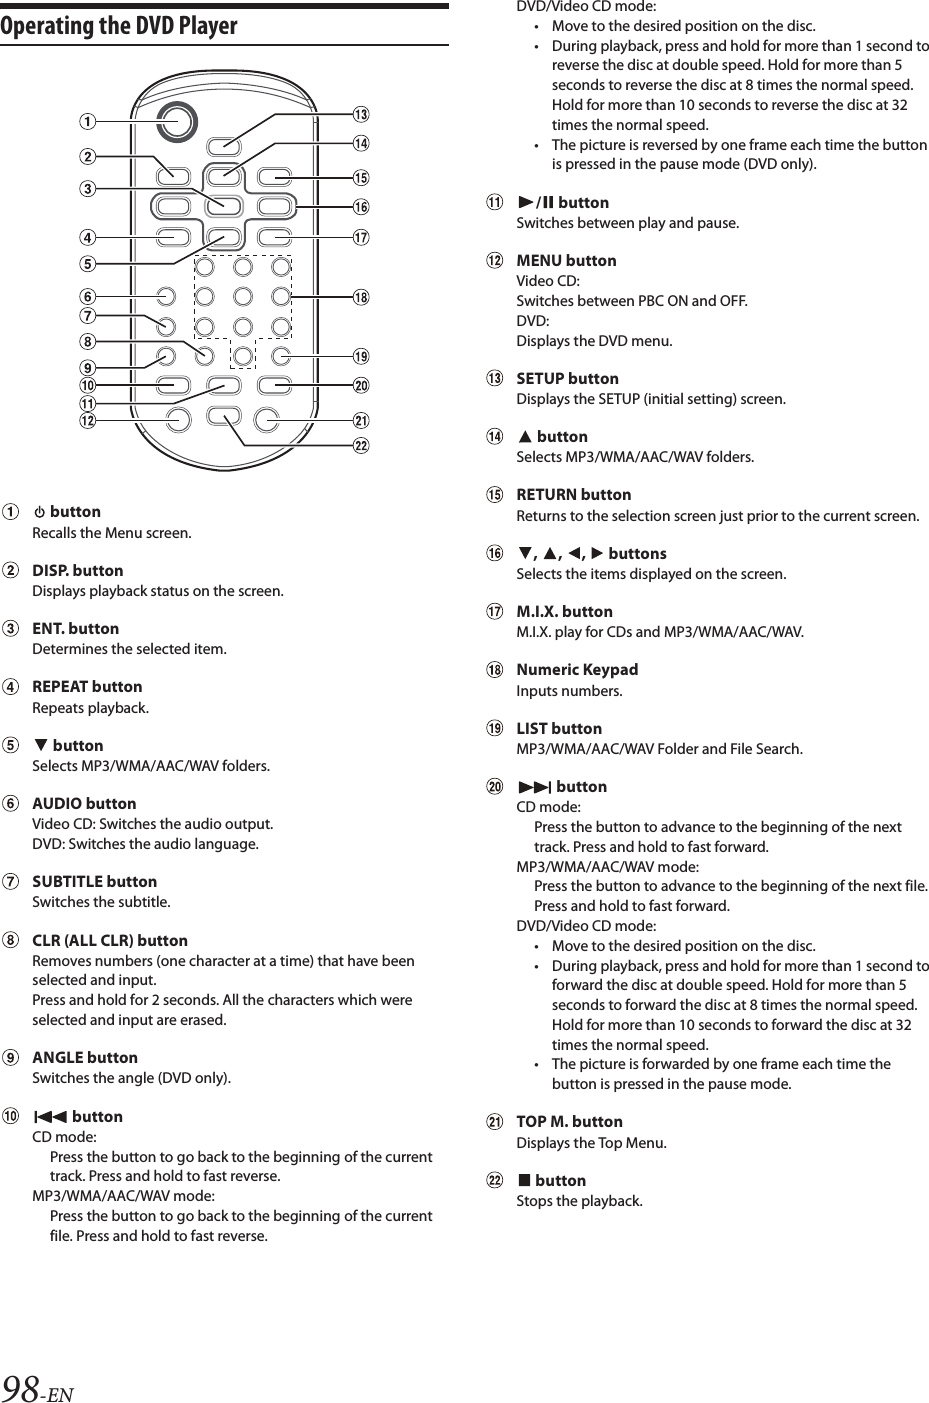
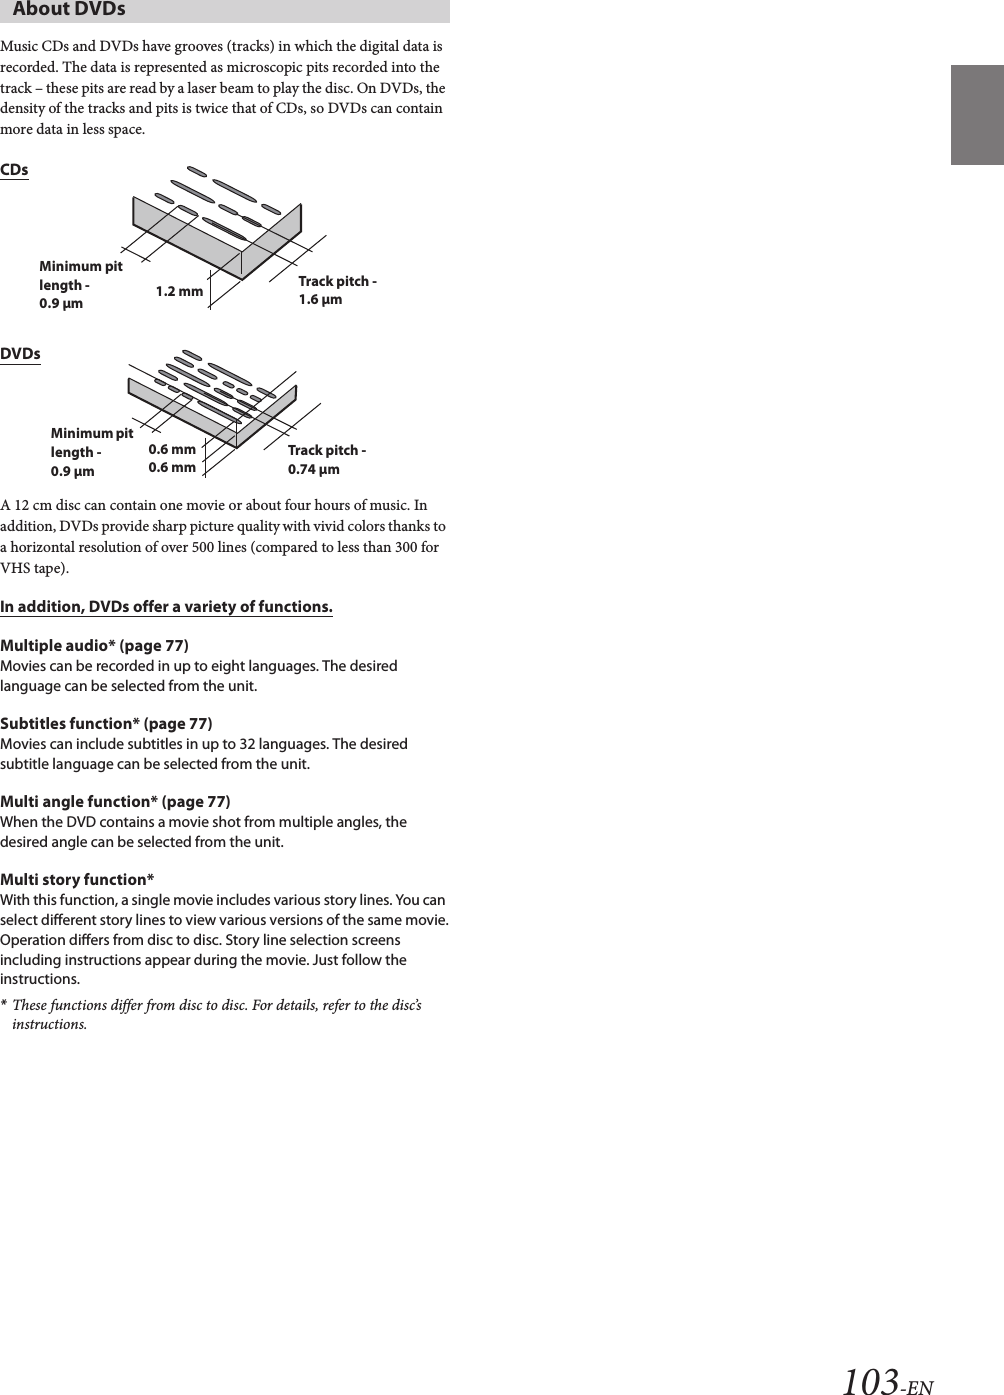
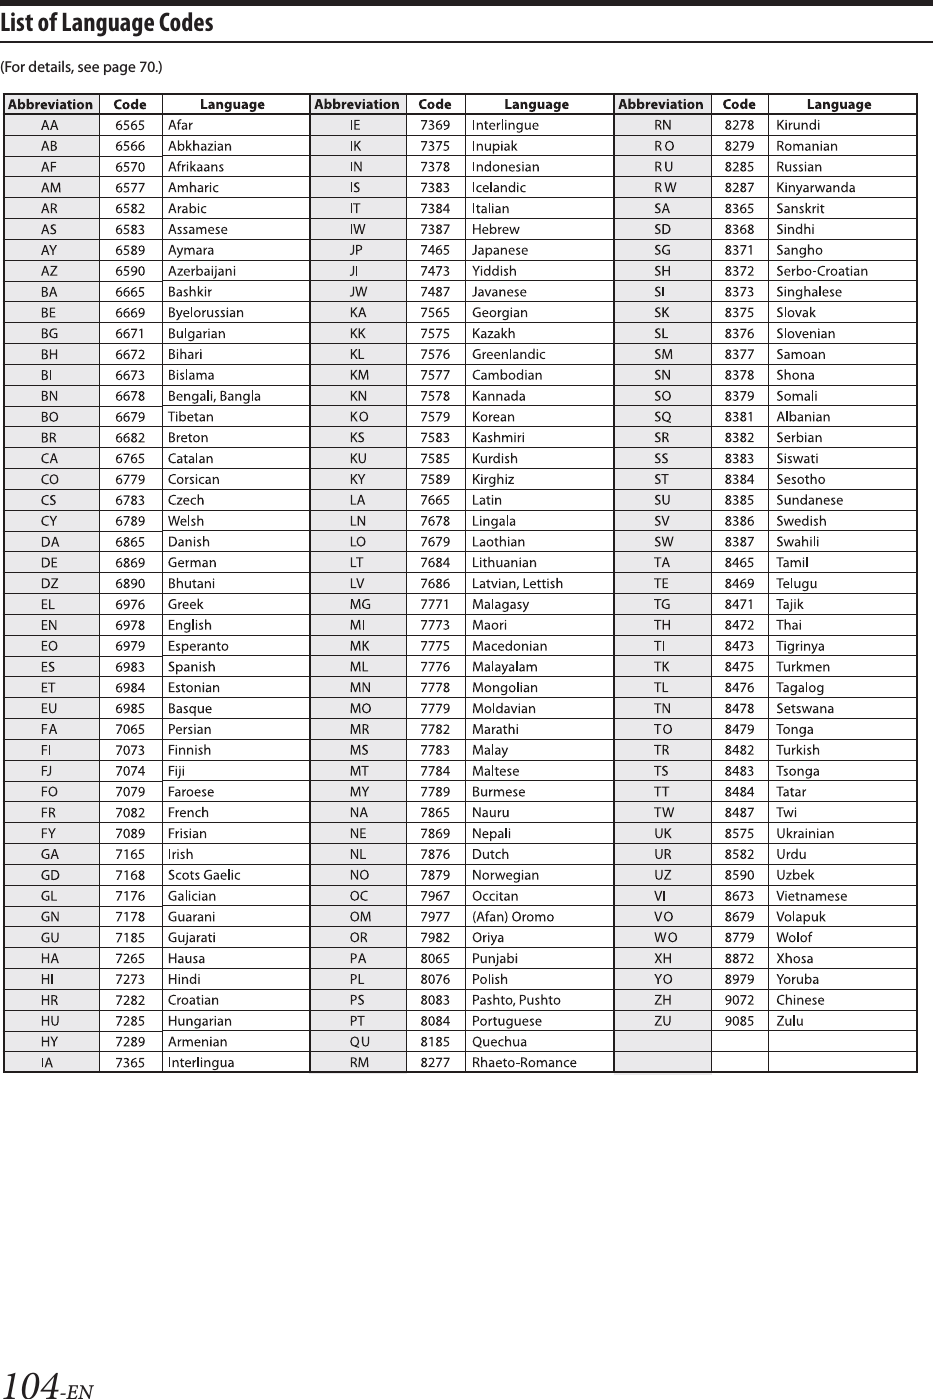
![107-ENBluetoothPlease connect Bluetooth audio device.• The Bluetooth audio device was not connected correctly.- Check the settings for the unit and the Bluetooth audio device and reconnect.Unable to download phonebook.• Phonebook failed to read due to mobile phone disconnection, etc. - Check the mobile phone connection, and then conduct synchronizing and adding again. (See page 83)• The connected mobile phone does not support synchronizing of its phone book.- Connect the mobile phone that supports synchronizing the phone book, then synchronize again. (See page 83)HDMIHDMI communication error,Please check your device and operate it again.• Communication error.- Turn the ignition key off, and then set to ON again.- Check the display by reconnecting between the HDMI and the unit, using the HDMI cable.- Check the display by reconnecting between the HDMI device and the unit.HDMI current error, Please Connect your device again.• Abnormal current is run to the HDMI connector device.- Turn the ignition key off, and then set to ON again.- Disconnect the HDMI device from the unit, and then reconnect it.HDMI monitor communication error. Please check the connection or ACC off / on.• HDMI device communication error.- Turn the engine (ACC) OFF/ON. Or, check the HDMI cable where it connects to the HDMI monitor.Monitor connect via HDMI has been exceeded.Please check the connection.• More than 4 HDMI monitors are connected.• A cascade connection using more than 2 distributors is made.- Use one distributor and less than 4 HDMI monitors when connecting.iDataLinkCAN Communication error• Communication error.- Check the iDataLink module connection.SiriusXMCheck Tuner• The SiriusXM Tuner is disconnected or the unit is having trouble communicating with the Tuner.- Connect the Tuner or check the Tuner connection to the back of the unit.Check Antenna• The SiriusXM Satellite Radio antenna or cable is either damaged or not connected correctly to the SiriusXM Tuner.- Check that the SiriusXM antenna cable is connected to the SiriusXM Tuner and check that the antenna cable is not kinked or otherwise damaged. Replace the antenna if necessary.No Signal• The SiriusXM satellite signal is too weak at the current location.- Move the vehicle to a location with a clear view of the southern sky.- Make sure the Satellite Radio antenna is properly mounted and not obstructed by metal objects.Channel <xxx> Not SubscribedCall SiriusXM To Subscribe• The active channel has become unsubscribed or the requested channel is not available in your subscription package.- Visit www.siriusxm.com for information on subscribing to this channel.- The unit will revert to the previous selected channel or to channel 1 automatically.Channel <xxx> Not Available• The active channel is no longer in the SiriusXM channel lineup or the user has entered an invalid channel number.- Visit www.siriusxm.com for information on the current channel lineup.• The unit will revert to the previous channel or to channel 1 automatically.Subscription UpdatedPress OK to Continue• Your subscription has been updated.- Touch [OK] to clear this message.Channel <xxx> Locked• A locked channel is selected.- Input the passcode on the number keypad screen, see “Parental Lock Function” (page @@). If wrong passcode is input, “Incorrect Pass Code entered” will be displayed and the unit will revert to the previous channel.Updating · · ·• The Featured Favorites channels are during updating.Updating Teams, please wait• While the Game table is during updating, the [Game Alert Setup] button in SiriusXM setup mode is touched.Replay Memory Full• Buffer for Replay is full.Replay Memory Near Full• Buffer for Replay will full within 11 seconds.](https://usermanual.wiki/ALPS-ALPINE/9ZUA145.Short-Term-Confidential-User-Manual-3/User-Guide-2723197-Page-48.png)