ALPS ALPINE 9ZUA145 Car Navigation Unit User Manual 68 29530Z12 A c3 comm FCC
Alpine Electronics Inc Car Navigation Unit 68 29530Z12 A c3 comm FCC
Contents
- 1. (Short-Term Confidential) User Manual_1
- 2. (Short-Term Confidential) User Manual_2
- 3. (Short-Term Confidential) User Manual_3
(Short-Term Confidential) User Manual_1

![14-ENAbout Dual Screen Dual Screen allows you to display the Navigation and Audio/Visual screens simultaneously.*Touch [ ], or swipe to the left to switch to the Navigation menu screen. For details of navigation operations, refer to “Navigation System OM” in the CD-ROM.You can switch the left/right positions of the Audio/Visual screen and Navigation screen.Each time you touch , the positions of Audio/Visual screen and Navigation screen switch.• When is not displayed, touch [ ].Dual Screen Display PositionAudio full ScreenTouch [ ], or swipe to the left.Touch [ ], or swipe to the right.Touch [ ], or swipe to the left.Touch [ ], or swipe to the right.Navigation full ScreenDual Screen](https://usermanual.wiki/ALPS-ALPINE/9ZUA145.Short-Term-Confidential-User-Manual-1/User-Guide-2723195-Page-14.png)
![15-ENLocation of ControlsFor X108U/INE-W967HDFor X110MicrophoneUsed for Hands-free or Voice Control modes.For X701D, the microphone is built into the left side of the monitor. (AUDIO)/ (Voice Recognition mode) buttonDisplays the Audio/Visual screen. If the Audio/Visual screen is already displayed, changes the source.When a hands-free phone with Voice Recognition is connected, press and hold for at least 2 seconds to switch to the Voice Recognition mode. (MUTE) button (X108U/INE-W967HD only)Press to activate/deactivate the mute mode. / (DOWN/UP) button (X108U/INE-W967HD only)Press to adjust the volume. (Favorite) buttonRecalls the Favorite screen.• Press and hold this button for at least 2 seconds to switch to iDataLink mode. For details, see “iDataLink Operation (Optional)” (page @@).MENU/ (Power Off) buttonRecalls the Menu screen.Press and hold this button for at least 5 seconds to turn the power off. / buttonPress to seek down/up a station in radio mode or down/up a track, chapter, etc., in other audio/visual sources. RESET switchThe system of this unit is reset. (NAVI/NAV) buttonRecalls the navigation map screen.Press again to switch to Navigation menu screen.Press and hold this button for at least 2 seconds to change to Go Home route screen. (If Home is not set yet, it will change to the Home setting screen.)For details of navigation operations, refer to “Navigation System OM” in the website at http://www.alpine-usa.com. Remote SensorPoint the remote control transmitter towards the remote sensor within a range of 2 meters. (CAMERA) button (X110 only)Use to display the camera image.Disc Slot (X110 only)Rotary encoder/MUTE button (X110 only)Adjust the volume by turning to the left or right.Press to activate /deactivate MUTE mode. (Eject) button (X110 only)Ejects a disc.Getting StartedControllable with Remote ControlThis unit can be controlled with an optional Alpine remote control. For details, consult your Alpine dealer. Point the optional remote control transmitter at the remote control sensor.About the button descriptions used in this Owner’s ManualThe buttons found on the face of the unit are expressed in bold (e.g. MENU). The buttons found on the touch-screen display are shown in bold within brackets, [ ] (e.g. [ ]).](https://usermanual.wiki/ALPS-ALPINE/9ZUA145.Short-Term-Confidential-User-Manual-1/User-Guide-2723195-Page-15.png)
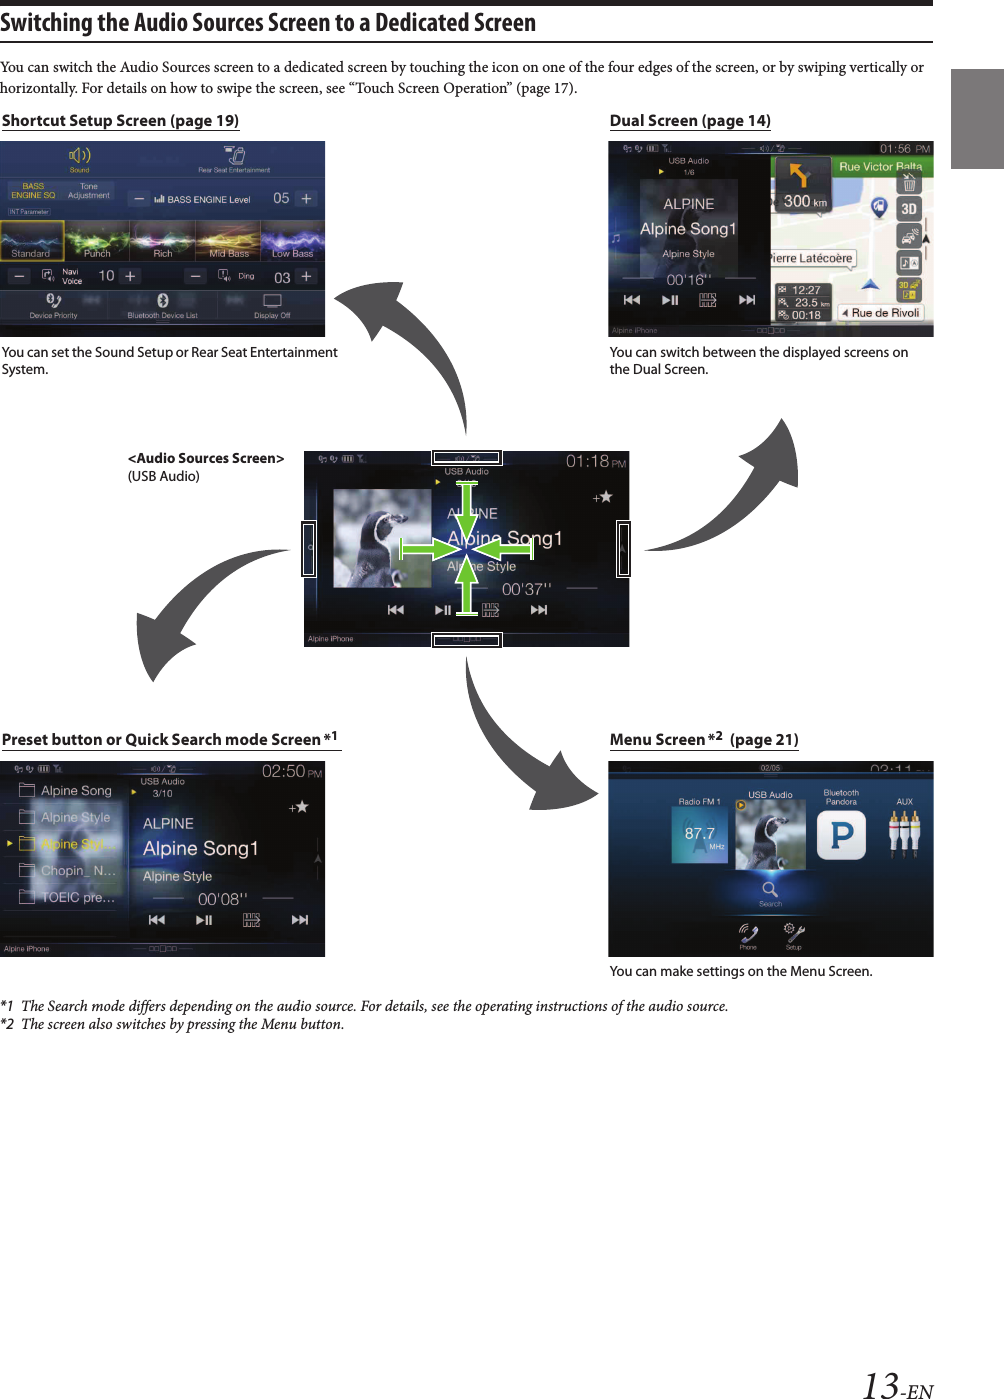
![17-ENTouch Screen OperationYou can operate the system by using the touch panel on the screen.• Be sure to touch the onscreen button lightly with the pad of your finger to avoid scratching the display.Touch operationTouch a button or list item on the screen lightly.• If you touch a button and there is no reaction, remove your finger.• Onscreen buttons that cannot be operated are dimmed.Swipe operationMove your finger lightly with a swipe. Drag & Drop operationTouch and hold the desired item, then drag it to its new location by moving your finger, then release your finger to place the item.• It is not possible to narrow the screen with two fingers (pinch in) orspread the screen (pinch out).Switching SourcesPress the (AUDIO) button to change the source.Switching sources using the (AUDIO) buttonDuring audio/visual playback, press the (AUDIO) button repeatedly to switch to the desired source.Radio USB/iPod*1 iDataLink USB/iPod*2 HDMI*1, 3 Pandora*1 Bluetooth Pandora*1, 4 SiriusXM*1 or iDataLink SiriusXM*2 AUX*5 Bluetooth Audio*1 or iDataLink Bluetooth Audio*2 Radio*1 When no USB flash drive/iPod/HDMI device/Smartphone/Bluetoothcompatible device is connected, this option is not available.*2 Displayed only when the unit is connected to the car’s iDataLinkmodule and the iDataLink related setting item is set to “OEM” or “Both” on the unit. (page @@)*3 The name set for “HDMI Setup (page 45)/AUX Setup” is displayed.*4 When Bluetooth Pandora is set to “Off ”, this option is not available.(page @@)*5 When AUX is set to “Off,” this option is not available. (page 44)Switching Sources from the Menu screen1Press the MENU button. The menu screen is displayed.• You can also display the menu screen by touching [ ]on the lower part of the Audio source screen or by swiping upward.2Touch your desired source in the Audio source selecting area.• In the menu screen, you can change the Audio source directly or changethe order in which sources change. For details, see “About the Menu Screen” (page 21).The Audio source selecting area](https://usermanual.wiki/ALPS-ALPINE/9ZUA145.Short-Term-Confidential-User-Manual-1/User-Guide-2723195-Page-17.png)
![18-ENOperating the Function Button on the Audio/Video Main ScreenUsing the Function button on the Audio/Visual main screen.Touch [ ] to change to the Function mode.Radio main screen exampleSwipe to the right or left to change to the Function mode.To close the Function mode, touch [ ].• Depending on the Audio source, the Function mode displays from the beginning. About Basic Operation for List ScreenBasic operations on the Setup list screen and the Search list screen.How to display on the list screen differs depending on the selected item.Switches to the menu screen or the previous screen.Item select buttonCloses the window.Displays the next list page.• When the next selection item does not exist, the list item is notdisplayed.Lists items for selection • When there are more than five list items, the page can be changed by swiping vertically.Returns to the list screen of the page that you touched.• The list screens that can be displayed are up to the 2 previouspages. If you touch [ ], you can recall your desired page.Changes the page of the Item select button above. • “ ” indicates the total number of pages, “ ” indicates thelocation of the current page. Displays when the next list page does not exist.• Touch or swipe to the left to return to the previous screen that has not displayed the list yet (the menu screen or the Audio main screen).Function mode](https://usermanual.wiki/ALPS-ALPINE/9ZUA145.Short-Term-Confidential-User-Manual-1/User-Guide-2723195-Page-18.png)
![19-ENAbout the Shortcut Setup ScreenDisplaying the Sound Setup screen, or the Shortcut Setup screen of the Rear Seat Entertainment System screen. Touch [ ] or swipe downward in the Audio source screen.The Sound Setup screen or the Rear Seat Entertainment System Setup Screen is displayed.Sound Setup screen (Tone Adjustment mode) exampleYou can adjust the attention tone (Ding) before the voice navigation starts and Navi voice interrupt volume (Navi Voice).Volume: 0 - 35Button for Display Off *Displays the Hands-free Device Priority setting screen.• See “Hands-free Device Priority Setting” (page @@).Touch this or swipe upward to change to the currently playing source screen.Displays the registered Bluetooth Device List screen.• See “Registering the Bluetooth Device” (page 30).*Display Off mode- To cancel Display Off mode, touch the screen or press any button.- Display Off mode is canceled when the power or ACC is turned off.- When the gear lever is shifted to the reverse (R) position and the rearcamera is connected, the rear camera image is displayed.- When a call is received on a Bluetooth-connected phone, theincoming call screen is displayed.Tone Adjustment modeBASS ENGINE SQ modeButton for changing the BASS ENGINE SQ mode screenBalance/Fader Image area*1Rear Seat Entertainment Function screen switch button• When Setting the Rear Seat Entertainment is “Off,” you cannot change the screen. For details on Rear Seat Entertainment setting, see “Rear Seat Entertainment Setup” (page 48).Buttons for switching between Front/Rear when adjusting Bass/Treble*2Buttons for adjusting Bass Level/Treble Level*3, 4Buttons for adjusting Media Xpander *1, 3Buttons for adjusting Subwoofer Level *1, 3, 5Button for changing the Tone Adjustment mode screen• If changing to the Tone Adjustment mode, BASS ENGINE SQmode will be disabled.Buttons for adjusting the BASS ENGINE Level*4Buttons for selecting the BASS ENGINE type *4*1 You can perform a more detailed set up in “Sound Setup” (page 33).*2 You cannot switch when Front/Rear Sync in “Adjusting the ParametricEqualizer Curve (Dual HD EQ)” (page 34) is “On.”*3 When you switch to the BASS ENGINE SQ mode, the value you have set is ignored.*4 When the Defeat setting is “On,” you cannot perform the set up.*5 If the Subwoofer setting is “Off,” the setting cannot be changed. See “Turning Subwoofer ON/OFF” (page 33).Sound Setup Function](https://usermanual.wiki/ALPS-ALPINE/9ZUA145.Short-Term-Confidential-User-Manual-1/User-Guide-2723195-Page-19.png)
![20-ENAdjusting Bass Level/Treble LevelBass Level and Treble Level can be set for each front seat and for each rear seat by touching [Front] or [Rear].Setting item:Bass / TrebleSetting contents:-14 to +14 (Initial setting: 0)• When the Sound Setup of the Shortcut Setup is selected to “BASS ENGINE SQ,” you cannot perform the set up.• Adjustment cannot be performed when Defeat is set to “On.”• The Bass adjusted setting value is interlinked with Band2 of Dual HD EQ, and the Treble adjusted setting value is interlinked with Band8.Setting the BASS ENGINE SQSetting the BASS ENGINE TypeCreating the ideal Bass impact for your musical taste using BASS ENGINE SQ.Setting contents:Standard (Initial setting) / Punch / Rich / Mid Bass / Low BassAdjusting the BASS ENGINE LevelYou can adjust the BASS ENGINE Level.Setting item:BASS ENGINE LevelSetting contents:0 to 6 (Initial setting: 3)• The BASS ENGINE Level 0 of the BASS ENGINE SQ is common to all the types.About setup when the external power amplifier is connectedIn order to optimize the BASS ENGINE SQ mode, we recommend the following procedure to set up the power amplifier.Use your favorite music to make the following amplifier adjustment.1) Set GAIN of the power amplifier to “MIN.”2) Set the Crossover Mode Sector switch to “OFF.”• If the switch has no “OFF” position, set as near as possible to full range.3) Set the BASS ENGINE Level to “03.”4) Play a song of the genre you frequently listen to, and adjust GAIN of the power amplifier.The Rear Seat Entertainment function independently routes different sources to the front and the rear side of the car. For example, while listening to the radio or other audio sources in the front, HDMI can be enjoyed at the rear with optional rear monitors and headphones.Rear Seat Entertainment System Setup screenButton for changing to the Sound Setup screen.Visual source selection area that is displayed on the Rear monitor.*1, 2Touch the source icon displayed on the Rear monitor.Auto: The image and sound of the same visual source as the unit are output.Off: Stops output to the Rear monitor.Illumination Color button*3The color coordination select button of the Rear monitor:White/Blue/Green/Amber/Red/Purple/Skyblue/Off(This function is depended on Over Head Monitor)Plasmacluster air volume adjustment button*4Whenever you touch the button, you can change the air volume.Off Low Mid High Off• While the plasmacluster is operating, the indicator is displayed on the Audio source screen.Remote SensorYou can set whether the sensor on Rear monitor receives remote control operation, or the unit receives it.*1 The visual source that can be output to the Rear monitor is “HDMI/DVD,” “iPod Video,” and “AUX.” When the unit plays back the visual source, you can only select the same visual source as the unit.*2 When selecting AUX and iPod video source selection, the “Additional AUX BOX” setup (page 49) is set to “On” and an optional external AUX distribution box is required.*3 When the Illumination Color in “Setting the Rear Seat Entertainment System” (page 48) is set to “Off,” the Illumination Color button is not displayed. *4 When the Plasmacluster in “Setting the Rear Seat Entertainment System” (page @@) is set to “Off,” the Plasmacluster air volume adjustment button is not displayed.• If the same visual source is being output to both the unit and the Rear monitor when an incoming/outgoing call is made, the visual/audio output to the Rear monitor is interrupted temporarily depending on the source.If different visual sources are being output to the unit and the Rear monitor, visual/audio output to the Rear monitor continues without interrupting playback.Standard: Mild low-end boost with mid-range focus for front-centre staging.Punch: Mid-bass punched up with mid-range impact.Rich: Accented highs and mid-bass giving outstanding balance for all types of music.Mid-Bass: Strong high frequency emphasis with mid-bass boost for more low-end attack.Low-Bass: Strong, low-bass boost with extended highs for a very dynamic sound.Rear Seat Entertainment Function](https://usermanual.wiki/ALPS-ALPINE/9ZUA145.Short-Term-Confidential-User-Manual-1/User-Guide-2723195-Page-20.png)
![21-ENAbout the Menu ScreenIn the menu screen, you can select the audio source and perform various setups or operations on the unit.Press the MENU button.The menu screen is displayed.• You can also display the menu screen by touching [ ] on the lower part of the Audio source screen or by swiping upward. The screen changes to the menu screen.Menu screen exampleDisplays the currently playing audio source.Touch or swipe downward to return to the Audio source screen.Displays the total number of the audio sources that can be selected. Also displays the current position, counting from the leftmost audio source. Audio source select areaTouch your desired source icon to change the audio source.• Swiping to the right or left in the Audio source select area, you can change one audio source at a time. Moreover, swiping to the right or left outside the Audio source select area (upper and lower sides), you can change pages of the Audio source select area. • The source icon displayed in the Audio source select area is the one checked on the Edit menu screen. For details on how to display/hide the source icon, see “Edit Menu” (page 21).Displays Preset No, and information of the Search mode, etc., located in the middle of the Audio source select area.• Touch the desired preset number or the Search mode to change the audio source directly.• The displayed information differs depending on the audio source. Some sources are not displayed.External Accessory Control buttonIs displayed when the optional External accessory control box is connected and “Setting the External Accessory Control” is set to “On” (page @@).• You can operate the external accessories from this unit. For details, see “External Accessory Control Operation” (page @@).Notification List button*1Use to display the Facebook Notification List on the connected smartphone via this unit. (page 28)Camera button*2Displays camera images. (page 90)Setup buttonDisplays the Setup screen. (page 29)Vehicle Info button*3Displays the Vehicle Info mode screen. (page @@)Phone button*4Displays the Phone menu screen. (page 79)*1 Displays when TuneIt is set to “USB (iPhone)” or “Bluetooth(Android),” and when a smartphone with TuneIt App installed is connected. (page 27)*2 Displays when the Camera Select is set to “Front,” “Rear,” or “Other.”(page 46)*3 Displayed only when the unit is connected to the iDataLink module.*4 Displays when the Bluetooth setting is set to “On.” (page 30)In the Edit Menu screen, you can change the audio source order or set the display/hide settings.1Touch the desired source icon in the Menu screen for at least 2 seconds.A checkbox ( or ) is displayed on the upper left area of the source icon and switches to the edit mode.• The source icon displayed in the Edit Menu screen is displayed only when usable setup and conditions of each Audio source are fulfilled. For details on setup and conditions of each audio source,see “Switching Sources” (page 17).Changing the order of Audio sourceDrag and drop the source icon to the desired location.Hiding/Displaying Audio sourcePlace a check in the checkbox ( ) to display the Audio source icon. Uncheck the checkbox ( ) to hide it.• You cannot hide the icon of a source that is currently playing.2Touch [Done].The editing content is confirmed, and returns to the menu screen.• Editing here is reflected in the order of (AUDIO) button touching and change of the Audio source. (page 17)Edit MenuYou cannot operate the Edit Menu screen while driving.Your vehicle must be parked with the ignition key in the ACC or ON position. For details, see “To display the Setup Menu screen” in “Setup Operation” (page @@).](https://usermanual.wiki/ALPS-ALPINE/9ZUA145.Short-Term-Confidential-User-Manual-1/User-Guide-2723195-Page-21.png)
![22-ENAbout the Indicator DisplayThe Indicator Bar at the bottom of the screen displays various types of information, like the current time.Lights up when connected to a Bluetooth compatible device. (Does not display when connection is set to OFF.): Bluetooth connection to audio device: Bluetooth connection to Hands Free PhoneBlinks while reconnecting.Indicates the battery level of the connected Bluetooth device*.This may not be displayed depending on the connected Bluetooth device. Whenever one battery level decreases, the alarm sounds.Indicates the signal strength level of the connected Bluetooth compatible device*.Displayed when Bluetooth setting is ON.Plasmacluster indicator Indicates the setting value (Low/Mid/High) selected in “Plasmacluster air volume adjustment.”The clock displayYou can switch between the 12 hour display and 24 hour display options.For details of the clock display settings, refer to “Navigation System OM” in the CD-ROM.Bluetooth devices Name**When you connect two Hands-Free Phones, the information of the Bluetooth device set to Priority1 is displayed.Opening screen Customization You can set a BMP image that is stored on a USB flash drive as the opening screen.This setting requires the following image format, folder name and file name.Usable file format:- BMP image- Image size: 800 × 480 pixels (RGB 24 bit or less/number of color bit: 24, 8, 1 bit)- Compression format: non-compressed- Folder name*1: OPENINGFILE- File name*2: openingfile.bmp1Connect the USB flash drive to the USB extension cable.A message confirming the opening screen change is displayed.2Touch [OK].An update indicator “ (Loading)” is displayed, and update for the opening screen starts.3After the update is complete, the following message isdisplayed.*3“Customization succeeded. Please remove USB memory and press ”OK.”4After removing the USB flash drive, touch [OK].The opening screen setting is complete.*1 Be sure to save the folder to the first layer of the USB flash drive.*2 Only one BMP image can be set as the opening screen.*3 If “Customization failed,” is displayed, touch [OK] and then check that the folder name, file name and file format are correct.• Do not perform the following actions during the update.- Do not turn off the ACC to the car.- Do not unplug the USB flash drive.- Do not turn off or operate the unit.• To return the opening screen to its original image, you must Clear AllSettings. Be careful of this operation, as your other settings are also initialized. For details, see “Initializing the System” (page 41).Battery Level Level 3 Level 2 Level 1 No BatteryIcon0 1 2 3 No Service](https://usermanual.wiki/ALPS-ALPINE/9ZUA145.Short-Term-Confidential-User-Manual-1/User-Guide-2723195-Page-22.png)
![24-ENUsing the Favorite FunctionThis unit enables you to recall functions easily by registering frequently used items such as the Audio source, the navigation search function, etc. to the Favorite screen. You can recall any of these items easily.1Press the (Favorite) button.The Favorite screen is displayed.Favorite screen exampleChanges to the Edit screen used for registering items or changing names.Favorite registration itemSwipe to the left and right to change the pages. You can add up to 6 pages.Indicates the location of the currently displayed Favorite screen.Swipe to the left and right to change the pages. You can add up to 6 pages.2Touch your desired Favorite registered item.The desired item is displayed.• When making a phone call by choosing shortcut dialing, after the message of confirmation of outgoing phone calls is displayed, touch [Call]. For details, see “Calling by Favorite Function” (page 81).Editing the Favorite Screen1Touch [ ] (Edit).A checkbox is displayed on the upper left area of the registration icon and it changes to Edit mode.Setting item:Item registration / Item name change / Icon change / Layout change / Item deletion2After editing is complete, touch [ ] (Back).3After the caption for the confirmation is displayed, touch [OK].4Editing is complete and the screen switches to the Favorite screen.• If you touch [ ] (Cancel) while editing, the screen switches to the previous Favorite Edit screen.1Touch [ ] (Add).The items to be added (categories) are displayed.2Touch the desired item to be added (category).3Choose the desired item to be added.• You can add up to 54 items.• You cannot register an item more than once.Favorite FunctionYou cannot edit the Favorites screen while driving.Your vehicle must be parked with the ignition key in the ACC or ON position. For details, see “To display the Setup Menu screen” in “Setup Operation” (page @@).Registering Items](https://usermanual.wiki/ALPS-ALPINE/9ZUA145.Short-Term-Confidential-User-Manual-1/User-Guide-2723195-Page-24.png)
![25-ENAudio[Radio]*1 / [USB/iPod] / [iDataLink USB/iPod]*2 / [HDMI] / [Pandora] / [Bluetooth Pandora] / [SiriusXM]*3 or [iDataLink SiriusXM]*2, 3 / [AUX] / [Bluetooth Audio] or [iDataLink Bluetooth Audio]*2*1 You can choose the frequency from Preset 1 - 12, registered into each FM1/FM2/AM band of HD Radio or RBDS.*2 iDataLink sources are displayed only when the car has the iDataLink module installed and the setting item in “Setting the Source Category” (page @@) is set to “Both” or “OEM” for each source.*3 You can choose a channel registered to Presets 1 - 18.• You can also register directly by touching [ ] in the Audio source screen.However, if it is already registered, [ ] is not displayed.Navigation[Specific Place]:You can display places registered in Favorite and set your destination.[Quick Place search]:Displays the address search keypad.[Place Categories]:Displays the nearby search screen.[POI category]:Displays the selected POI category list.• For details on navigation operations, refer to “Navigation System OM” in the CD-ROM.Phone (Shortcut Dialing)*4You can register the user’s shortcut dialing stored in the Phone Book.• If multiple phone numbers are stored, select a number you want to register.• You can register directly by touching [ ] of the Contacts list. (page 79)• You can change the icon you registered. (page 25)*4 You can only select Phone when a mobile phone is connected.For details on how to register a mobile phone and downloading Phone Book, see “Bluetooth Operation” (page 79).1Touch the text area of the registered item.The Input User Name screen (Keypad) is displayed.2Input the name and touch [OK].• For details on how to input characters using the keypad, see “How to Input Characters and Numbers (Keypad)” (page 23).You can change the icons of Shortcut Dialing and Navigation category.The following example explains how to change the Shortcut Dialing icon. Perform the same procedure to change the Navigation category icon.1Touch the icon that you want to change.The icon list is displayed.2Touch the icon you want to change from the icon list.The icon is changed to the selected icon.Changing Item NamesChanging Icons (only the Shortcut Dialing and Navigation icons)](https://usermanual.wiki/ALPS-ALPINE/9ZUA145.Short-Term-Confidential-User-Manual-1/User-Guide-2723195-Page-25.png)
![26-ENDrag and drop the item to the desired location.The item location is changed.• When you move to other pages, switch pages, or when you make a new page and move to another, drag to the end of the screen, and lift your finger after the page changes.When deleting a selected item1Touch the checkbox at the left of the item you want to delete and place a check ( ) in it.2Touch [ ] (Delete).The selected item will be deleted.When deleting all itemsTouch [ ] (Delete All).All items are deleted.Changing the LayoutDeleting Items](https://usermanual.wiki/ALPS-ALPINE/9ZUA145.Short-Term-Confidential-User-Manual-1/User-Guide-2723195-Page-26.png)
![27-ENThis unit’s sound tuning is programmable from a connected Smartphone. It is also possible to download specific parameters for certain vehicles from Alpine’s TuneIt database stored in the Cloud. Using the Alpine TuneIt App, customized parameters can also be uploaded for others to share and rate.Through this unit, it is also possible to receive and respond to information from Alpine’s Social Network Service (SNS) available through the connected Smartphone.The installed Alpine TuneIt App should be launched on the Smartphone before connection to the head unit.Alpine TuneIt App, is downloadable from Apple’s App Store; the Android user can download it from Google Play. For details, consult your Alpine dealer.Before these operations, set TuneIt to USB (iPhone) or Bluetooth (Android) depending on the connected Smartphone. For details, see “Smartphone Apps Setup” (page 50).• The application programme and related specifications and data may be deleted or terminated without notice.• Some Alpine TuneIt App functions may not be available if the Smartphone is not in a service area or receives no signal.Adjusting the sound via the SmartphoneAfter setting the above procedure, you can adjust the unit’s sound function on the Smartphone.1Make sure the unit is powered on.2Launch the Alpine TuneIt App on the Smartphone. Adjust the unit’s sound accordingly on the Smartphone.• The setting cannot be done on both the Smartphone and this unit at the same time. While the sound function of this unit is set via Smartphone, the sound function settings on the unit will be displayed as “Sound APP Connected.”• In some situations, such as the unit is powered off or during a call, etc., sound setting cannot be done via the Smartphone.• This function may not be available depending on the paired Smartphone.• Please obey all local traffic laws while using this function.• When “Setting the External Audio Processor” (page 49) is “On,” this function is not available.Facebook Notification FunctionSome functions may be available in a future version of Alpine TuneIt App.• Depending on the paired Smartphone, the following functions may not be available even though the Alpine TuneIt App version is updated.• Text information and Facebook screen are not displayed while driving.Receiving NotificationWhen the smartphone connected to the unit receives new notifications from Facebook, the unit emits a notification sound or displays the notification screen. Set this up in the Alpine TuneIt App settings.Notification Incoming screen examplePoster’s pictureDisplay poster’s picture. (Provided from Alpine TuneIt App on Smartphone, displayed with a default image when invalid.) Touch here to switch to Facebook screen.Poster’s nameDisplay poster’s name. (Provided from Alpine TuneIt App on Smartphone, not displayed when invalid.) Touching here can also switch to Facebook screen.Read (Stop) buttonTouch to TTS (Text To Speech) play received notification (Depending on the status, operation may not be available). During TTS play mode, touch [Stop] to stop play.Like buttonFor “Like” operation. (Valid when Wall Posts or Comments is received)Notifications List buttonTouch to switch to Notifications List screen.Close buttonClose the notification screen.Touch the desired button to operate.• A new received Notification prompt will last for 15 seconds. If there is no operation within 15 seconds, the unit will return to normal mode.• Touching current main screen will close the notification screen.• Volume adjustment during TTS play can be adjusted by / or the Rotary encoder (0-35). Settings will be reflected at the next TTS reproduction.• The TTS volume is output via the car’s front right and left speakers.• While you play a Notification by TTS during iPod video mode, the TTS volume is the same as the iPod video source. The adjusted TTS volume will be reflected on the iPod video source.• While you play a Notification by TTS during iPod video mode, the iPod VIDEO extension cable should be connected correctly. Otherwise, you will not be able to hear the TTS.Applying Alpine TuneIt App](https://usermanual.wiki/ALPS-ALPINE/9ZUA145.Short-Term-Confidential-User-Manual-1/User-Guide-2723195-Page-27.png)
![28-ENDisplaying Facebook ScreenDuring Notification incoming or Notification List screen, you can switch to Facebook screen.Facebook screen exampleMessage contentPoster’s photoClose button: Close the Facebook screen.Touch Poster’s picture or Poster’s name to switch to Facebook screen.The detailed information of Notification is displayed.• Touch [ ] to return to Notifications List screen.• Depending on the status, contents of message and photo may not bedisplayed.• In some situations, such as the unit is powered off or during a call, etc.,Notification of the Smartphone will not be prompted by this unit.Displaying Notification ListYou can view the received Notification from Facebook in the connected Smartphone via this unit.Notification List screen examplePoster’s Name and MessageTouch [Read All]/[Stop] to play/stop all Notifications.• You can switch to the Notification List screen from the Menu screen.• Touch [ ] to return to Current screen. • Depending on the status, some functions may not be available.• When there is no Notification, “No Notifications.” will be displayed.• The displayable amount of the Notification list depends on the connected Smartphone.](https://usermanual.wiki/ALPS-ALPINE/9ZUA145.Short-Term-Confidential-User-Manual-1/User-Guide-2723195-Page-28.png)
![29-ENSetup Operation1Press the MENU button.The Menu screen is displayed. • You can also display the menu screen, by touching [ ] on the lower part of the Audio source screen or by swiping upward.2Touch [Setup].The Setup main screen is displayed.3Touch the required setting icon on the upper part of the Setup main screen or swipe the list area vertically, then touch the setting item.Setting items:Wireless: See “Wireless (Bluetooth) Setup” (page 30).General: See “General Setup” (page 32).Source: See “Source Setup” (page 42).System: See “System Setup” (page 45).SetupAs the X110 is for specialized vehicles, its initial settings differ from the values shown in this manual.To display the Setup Menu screen:Your vehicle must be parked with the ignition key in the ACC or ON position. To do this, follow the procedures below.1 Bring your vehicle to a complete stop at a safe location. Engage the parking brake.2 Release the parking brake. (For safety, release the parking brake while depressing the foot brake pedal).3 Engage the parking brake again.• For automatic transmission vehicles, place the transmission lever in the Park position.Now, the locking system for the Setup operation has been released. Engaging the parking brake can reactivate the Setup Menu, as long as the car’s ignition has not been turned off. It is not necessary to repeat the above procedure (1 through 3) of “To display the Setup Menu screen.”Each time the ignition is turned OFF, perform the procedure of “To display the Setup Menu screen.”[Setup] button](https://usermanual.wiki/ALPS-ALPINE/9ZUA145.Short-Term-Confidential-User-Manual-1/User-Guide-2723195-Page-29.png)