ALPS ALPINE WB1U733 Transmitter Assy-Lock System Remote Control User Manual Part2
Alps Electric Co., Ltd. Transmitter Assy-Lock System Remote Control Users Manual Part2
Contents
- 1. Users Manual Cover
- 2. Users Manual Part1
- 3. Users Manual Part2
- 4. Users Manual Part3
Users Manual Part2

3 Pre-driving checks and adjustments
Keys.............................................3-2
Nissan vehicle immobilizer system keys ...........3-2
Intelligent keys (if so equipped) ..................3-3
Doors ............................................3-4
Locking with key................................3-4
Locking with inside lock knob ....................3-5
Locking with power door lock switch
(if so equipped) ................................3-6
Child safety rear door lock.......................3-6
Remote keyless entry system (models without
Intelligent Key system) (if so equipped)...............3-7
How to use remote keyless entry system ..........3-7
Intelligent Key system (if so equipped) ..............3-10
Operating range...............................3-12
Door locks/unlocks precaution ..................3-13
Intelligent Key operation ........................3-13
How to use the remote keyless entry
function ......................................3-16
Warning lights and audible reminders ............3-19
Warning signals ...............................3-19
Troubleshooting guide .........................3-21
Hood ...........................................3-22
Rear hatch.......................................3-23
Opening the rear hatch.........................3-23
Rear hatch release.............................3-24
Fuel-filler door ...................................3-25
Opener operation..............................3-25
Fuel-filler cap . . . ..............................3-25
Steering wheel ...................................3-26
Tilt operation..................................3-26
Sun visors .......................................3-27
Vanity mirrors (if so equipped)...................3-27
Mirrors ..........................................3-27
Rearview mirror ...............................3-27
Outside mirrors ...............................3-28
੬REVIEW COPY—
2007 Versa (vrs)
Owners Manual—USA_English (nna)
03/06/06—arosenma
੭
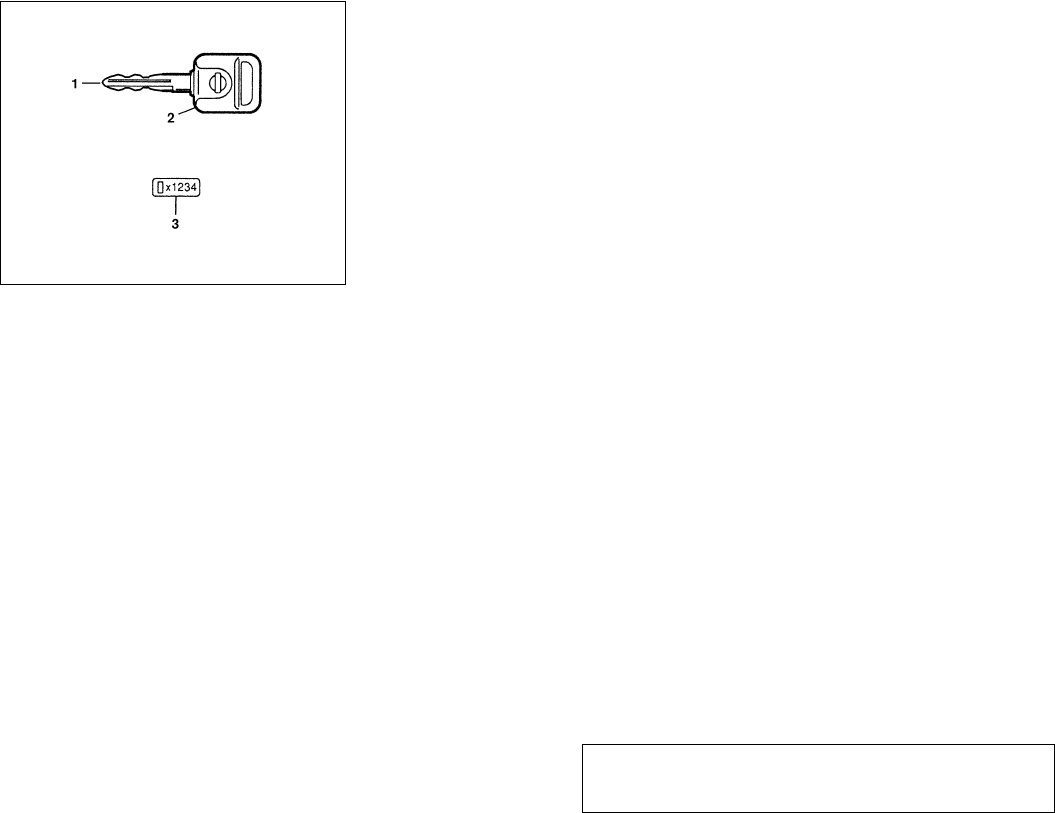
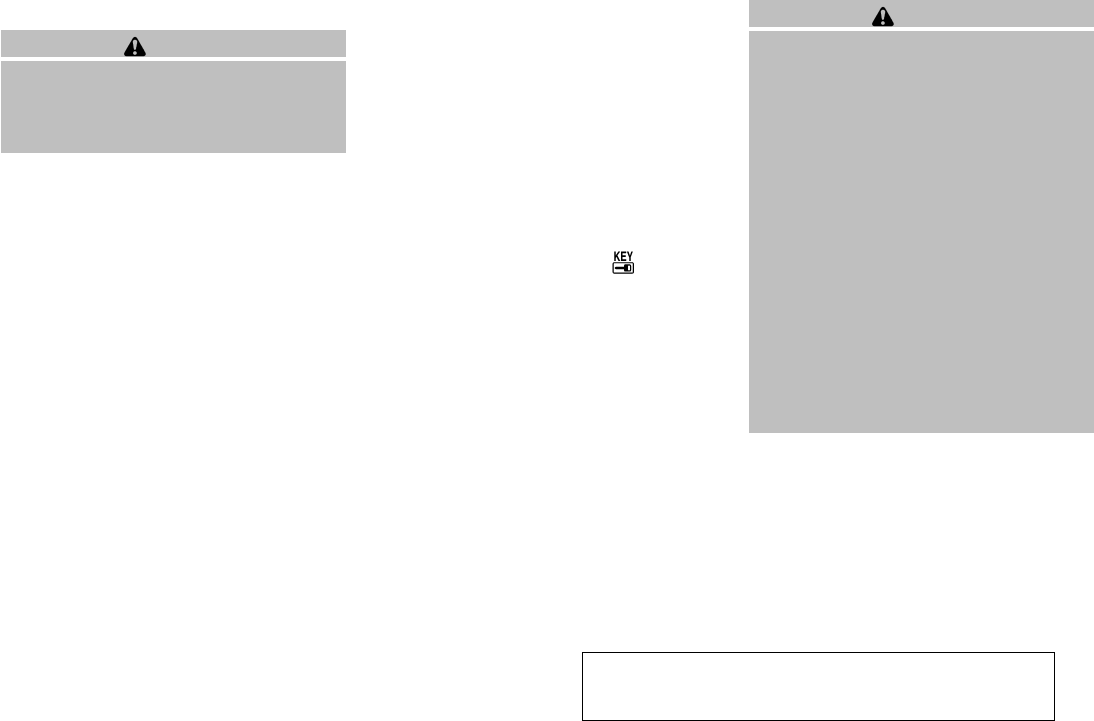
1. Two master keys (black) with transpon-
der chip and chrome NISSAN brand
symbol on one side
2. Transponder chip
3. Key number plate
A key number plate is supplied with your keys.
Record the key number and keep it in a safe place
(such as your wallet), not in the vehicle. If you lose
your keys, see a NISSAN dealer for duplicates by
using the key number. NISSAN does not record
key numbers so it is very important to keep track
of your key number plate.
A key number is only necessary when you have
lost all keys and do not have one to duplicate
from. If you still have a key, your NISSAN dealer
can duplicate it.
NISSAN VEHICLE IMMOBILIZER
SYSTEM KEYS
You can only drive your vehicle using the master
keys which are registered to the NISSAN Vehicle
Immobilizer System components in your vehicle.
These keys have a transponder chip in the key
head.
The master key can be used for all the locks.
Never leave these keys in the vehicle.
Additional or replacement keys:
If you still have a key, the key number is not
necessary when you need extra NISSAN Vehicle
Immobilizer System keys. Your dealer can dupli-
cate your existing key. As many as five NISSAN
Vehicle Immobilizer System keys can be used
with one vehicle. You should bring all NISSAN
Vehicle Immobilizer System keys that you have to
your NISSAN dealer for registration. This is be-
cause the registration process will erase the
memory of all key codes previously registered
into the NISSAN Vehicle Immobilizer System.
After the registration process, these components
will only recognize keys coded into the NISSAN
Vehicle Immobilizer System during registration.
Any key that is not given to your dealer at the time
of registration will no longer be able to start your
vehicle.
Do not allow the immobilizer system key, which
contains an electrical transponder, to come into
contact with salt water. This could affect system
function.
LPD0348
KEYS
3-2 Pre-driving checks and adjustments
੬REVIEW COPY—
2007 Versa (vrs)
Owners Manual—USA_English (nna)
03/06/06—arosenma
੭
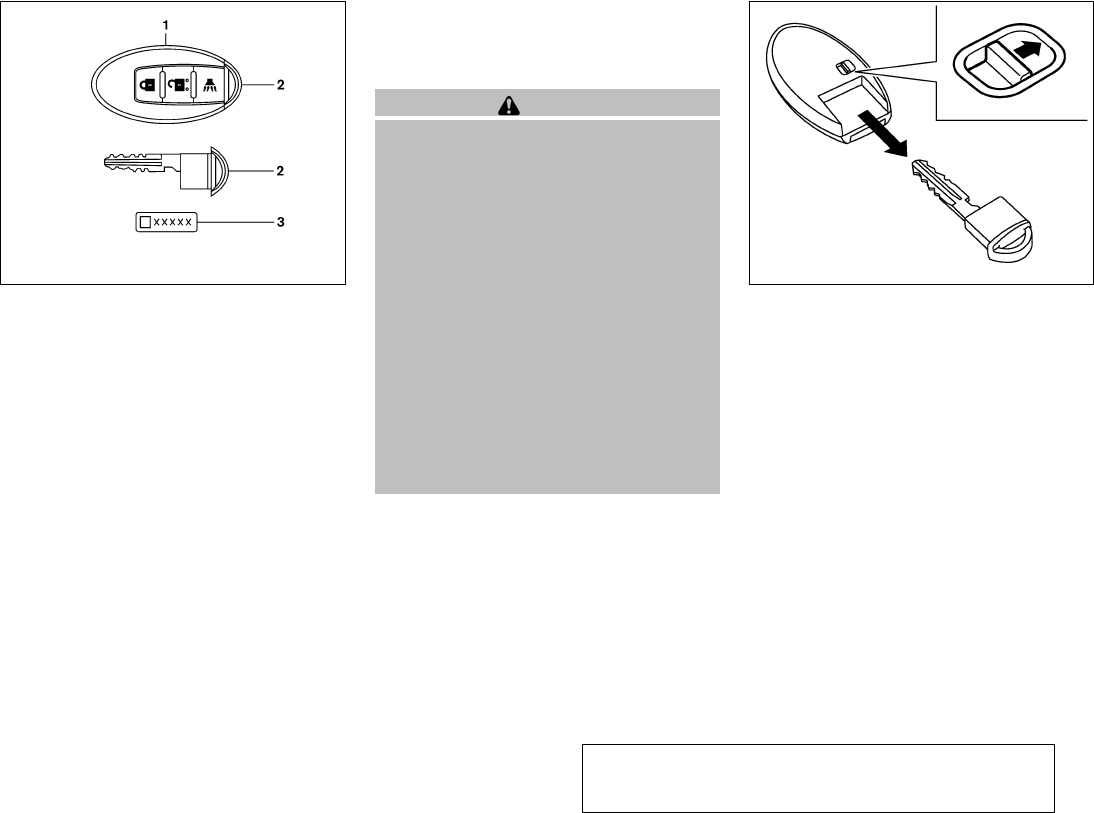
1. Two Intelligent Keys
2. Mechanical keys (inside Intelligent
Keys)
3. Key number plate
INTELLIGENT KEYS (if so equipped)
Your vehicle can only be driven with the Intelligent
Keys which are registered to your vehicle’s Intel-
ligent Key system components and NISSAN Ve-
hicle Immobilizer System components. As many
as 4 Intelligent Keys can be registered and used
with one vehicle. The new keys must be regis-
tered by a NISSAN dealer prior to use with the
Intelligent Key system and NISSAN Vehicle Im-
mobilizer System of your vehicle. Since the reg-
istration process requires erasing all memory in
the Intelligent Key components when registering
new keys, be sure to take all Intelligent Keys that
you have to the NISSAN dealer.
CAUTION
●Do not allow the Intelligent Key, which
contains electrical components, to
come into contact with water or salt
water. This could affect the system
function.
●Do not drop the Intelligent Key.
●Do not strike the Intelligent Key sharply
against another object.
●Do not place the Intelligent Key for an
extended period in an area where tem-
peratures exceed 140°F (60°C).
●Do not attach the Intelligent Key with a
key holder that contains a magnet.
●Do not place the Intelligent Key near
equipment that produces a magnetic
field, such as a TV, audio equipment and
personal computers.
Mechanical key
The Intelligent Key contains the mechanical key,
which can be used in case of a discharged bat-
tery.
To remove the mechanical key, release the lock
knob on the back of the Intelligent Key.
To install the mechanical key, firmly insert it into
the Intelligent Key until the lock knob returns to
the lock position.
The mechanical key can be used for operation in
the same way as an ordinary key.
LPD0350 SPA1951
Pre-driving checks and adjustments 3-3
੬REVIEW COPY—
2007 Versa (vrs)
Owners Manual—USA_English (nna)
03/06/06—arosenma
੭
CAUTION
Always carry the mechanical key installed
in the Intelligent Key slot.
WARNING
●Always have the doors locked while
driving. Along with the use of seat belts,
this provides greater safety in the event
of an accident by helping to prevent
persons from being thrown from the
vehicle. This also helps keep children
and others from unintentionally open-
ing the doors, and will help keep out
intruders.
●Before opening any door, always look
for and avoid oncoming traffic.
●Do not leave children unattended inside
the vehicle. They could unknowingly ac-
tivate switches or controls. Unattended
children could become involved in seri-
ous accidents.
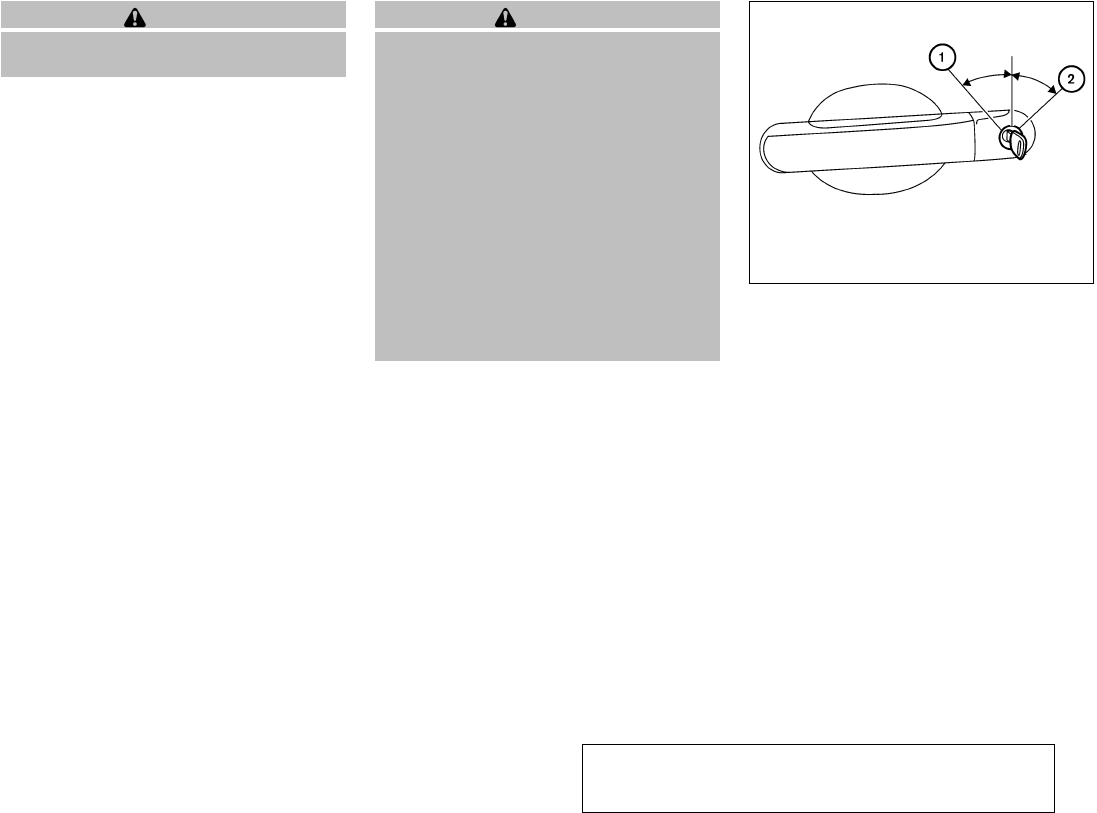
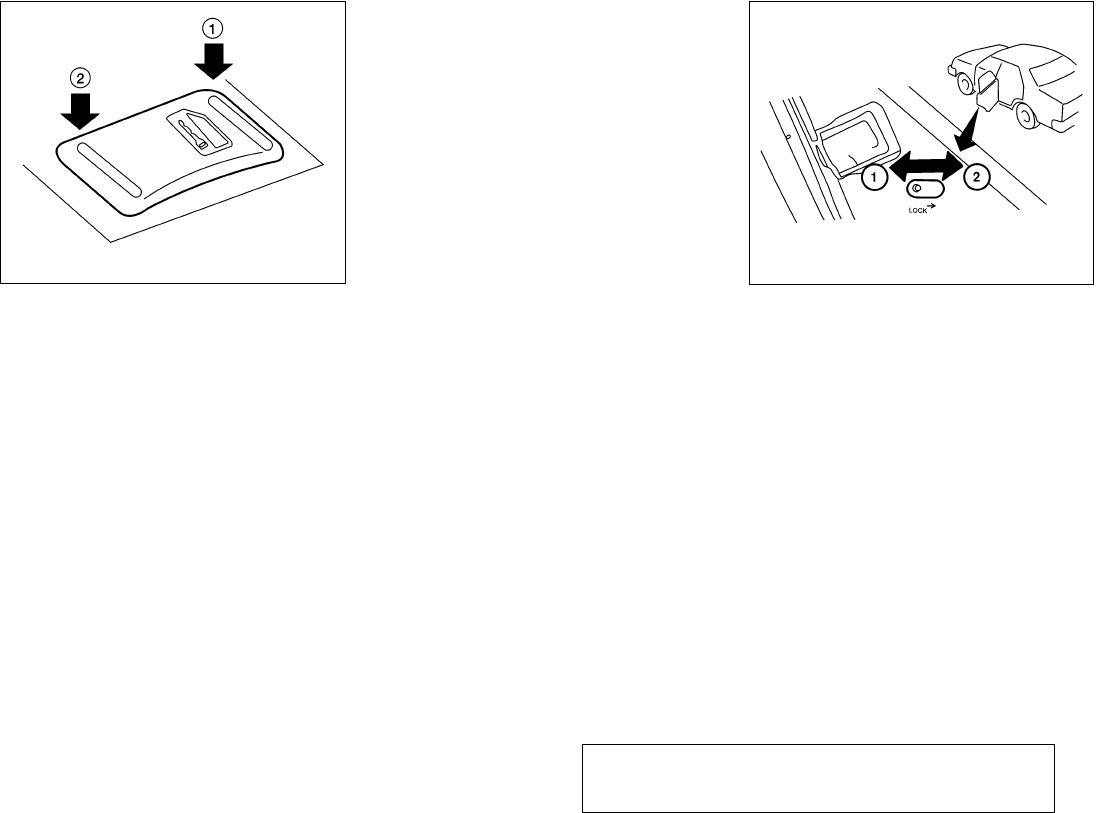
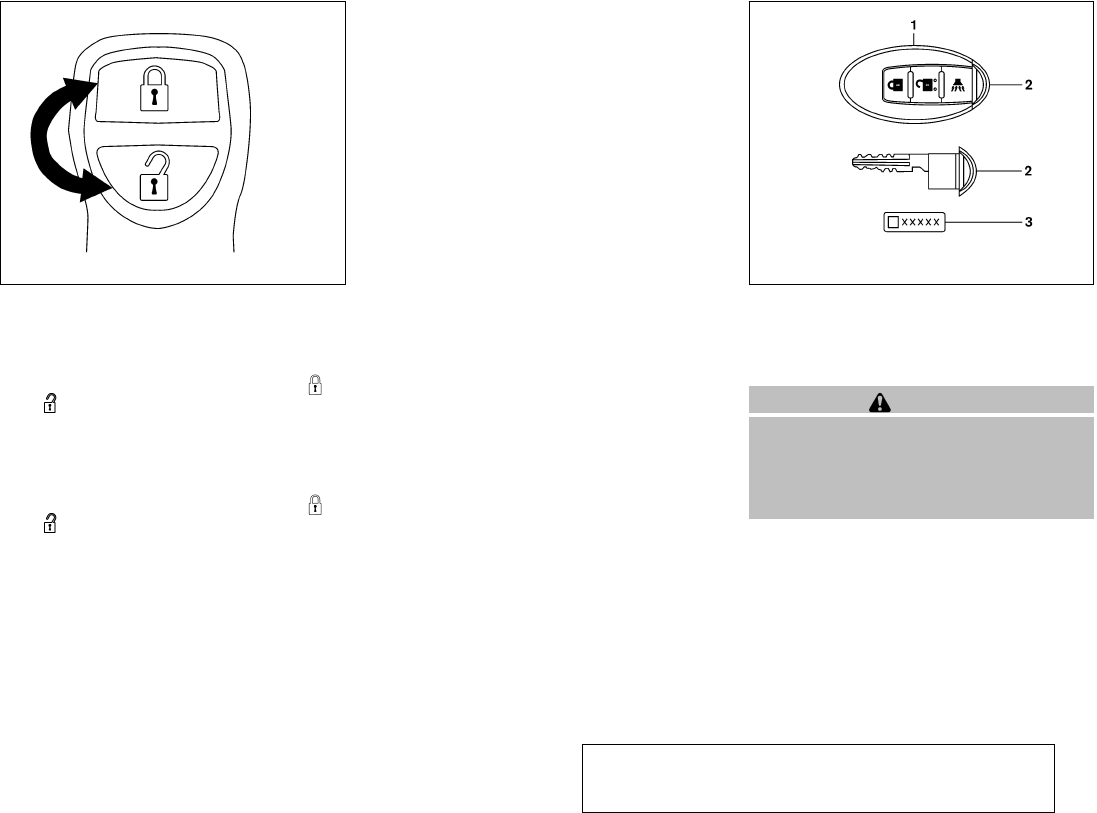
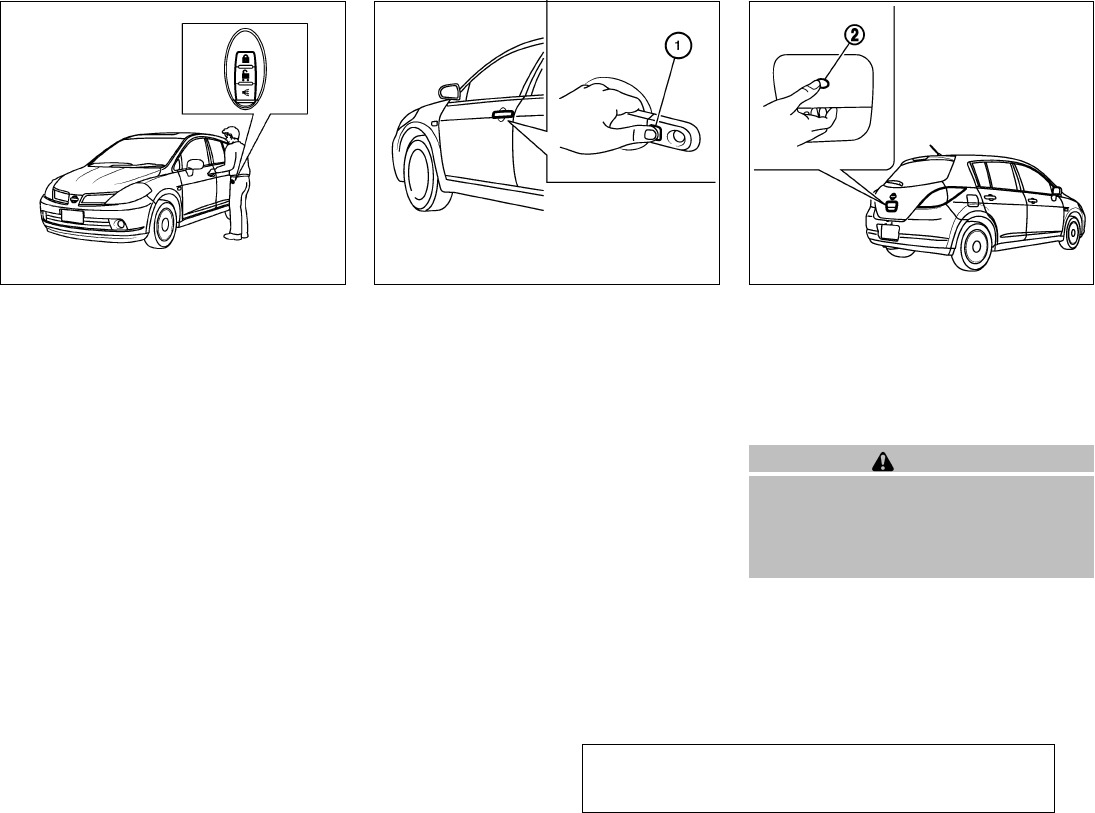
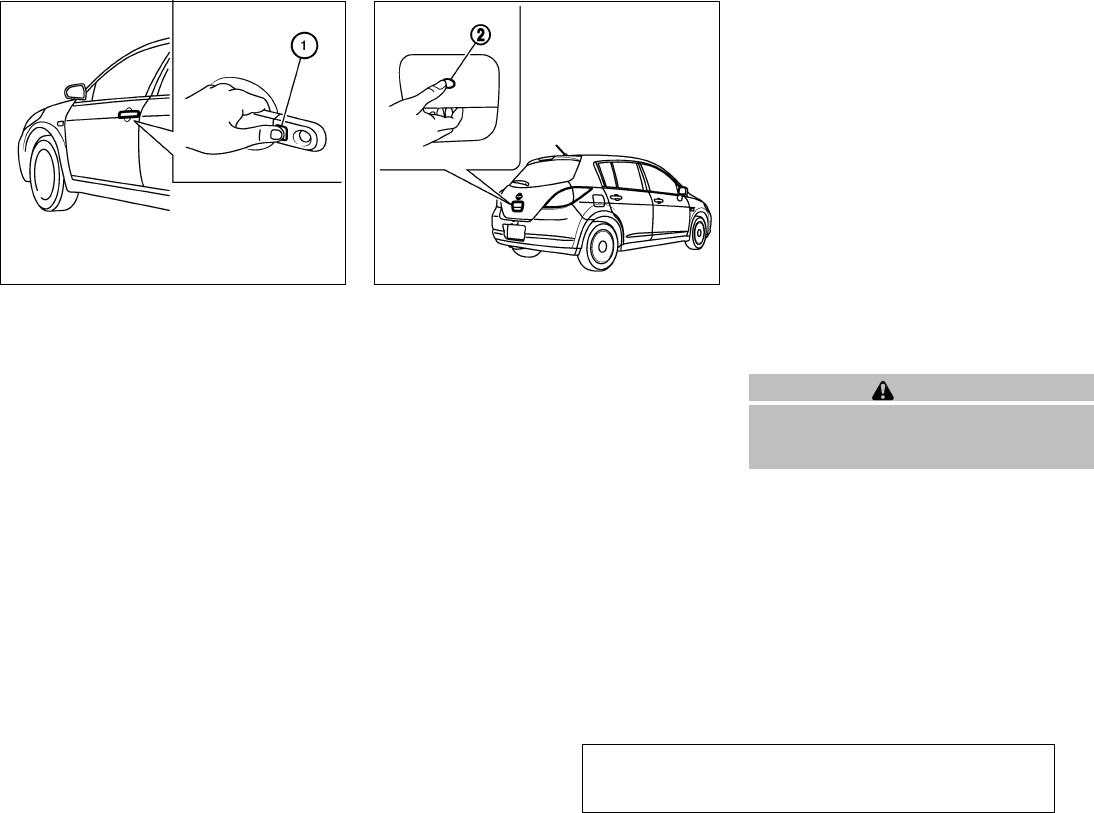
LOCKING WITH KEY
Manual
To lock a door, turn the key toward the front of the
vehicle ᭺
1. To unlock, turn the key toward the rear
᭺
2.
Driver’s side
LPD0349
DOORS
3-4 Pre-driving checks and adjustments
੬REVIEW COPY—
2007 Versa (vrs)
Owners Manual—USA_English (nna)
03/06/06—arosenma
੭
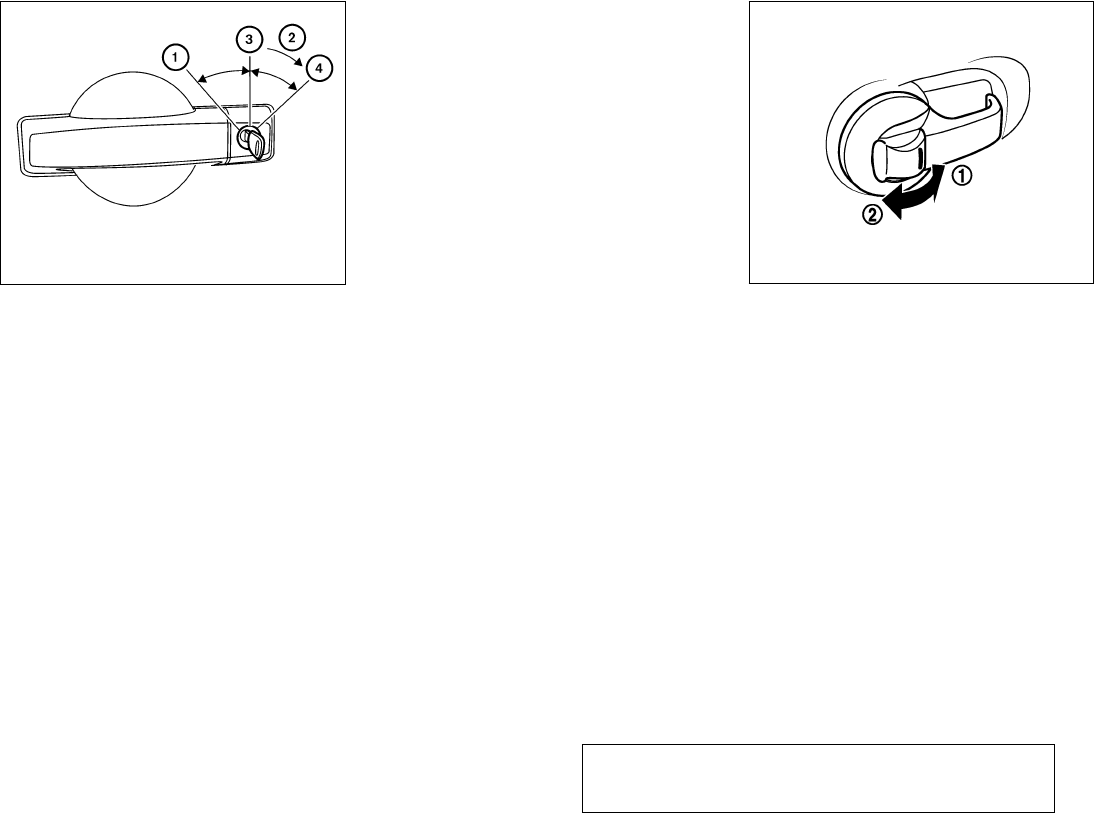
Power (if so equipped)
The power door lock system allows you to lock or
unlock all doors at the same time.
Turning the key toward the front ᭺
1of the vehicle
locks all doors.
Turning the key one time toward the rear ᭺
2of the
vehicle unlocks that door. From that position,
returning the key to neutral ᭺
3(where the key can
only be removed and inserted) and turning it
toward the rear again within 5 seconds unlocks
all doors ᭺
4.
Opening and closing windows (if so
equipped)
The driver’s door key operation allows you to
open and close windows equipped with auto-
matic operation at the same time.
●To open the windows, turn the driver’s door
key toward the rear of the vehicle for longer
than 1 second after the door is unlocked.
●To close the windows, turn the driver’s door
key toward the front of the vehicle for longer
than 1 second after the door is locked.
LOCKING WITH INSIDE LOCK
KNOB
To lock the door without the key, move the inside
lock knob to the lock position ᭺
1, then close the
door.
To unlock the door without the key, move the
inside lock knob to the unlock position ᭺
2.
LPD0240
Inside lock
SPA2169
Pre-driving checks and adjustments 3-5
੬REVIEW COPY—
2007 Versa (vrs)
Owners Manual—USA_English (nna)
03/06/06—arosenma
੭
LOCKING WITH POWER DOOR
LOCK SWITCH (if so equipped)
To lock all the doors without a key, push the door
lock switch (driver’s or front passenger’s side) to
the lock position ᭺
1. When locking the door this
way, be certain not to leave the key inside the
vehicle.
To unlock all the doors without a key, push the
door lock switch (driver’s or front passenger’s
side) to the unlock position ᭺
2.
Lockout protection
When the power door lock switch (driver’s or
front passenger’s side) is moved to the lock
position with the key in the ignition and any door
open, all doors will lock and unlock automatically.
This helps to prevent the keys from being acci-
dently locked inside the vehicle.
CHILD SAFETY REAR DOOR LOCK
Child safety locks help prevent the rear doors
from being opened accidentally, especially when
small children are in the vehicle.
The child safety lock levers are located on the
edge of the rear doors.
When the lever is in the unlock position ᭺
1, the
door can be opened from the outside or the
inside.
When the lever is in the lock position ᭺
2,
the door can be opened only from the out-
side.
Door lock switch
LPD0183 LIC0716
3-6 Pre-driving checks and adjustments
੬REVIEW COPY—
2007 Versa (vrs)
Owners Manual—USA_English (nna)
03/06/06—arosenma
੭
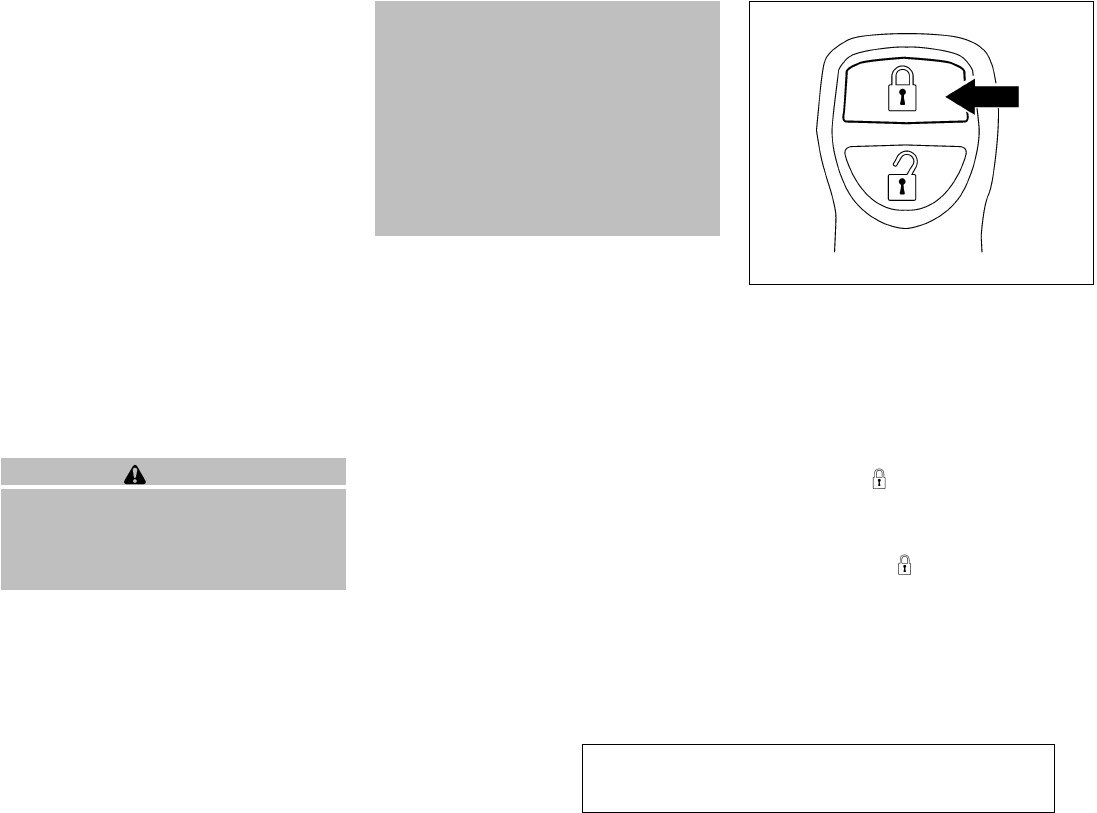
It is possible to lock/unlock all doors, turn the
interior lights on, and activate the panic alarm by
using the keyfob from outside the vehicle.
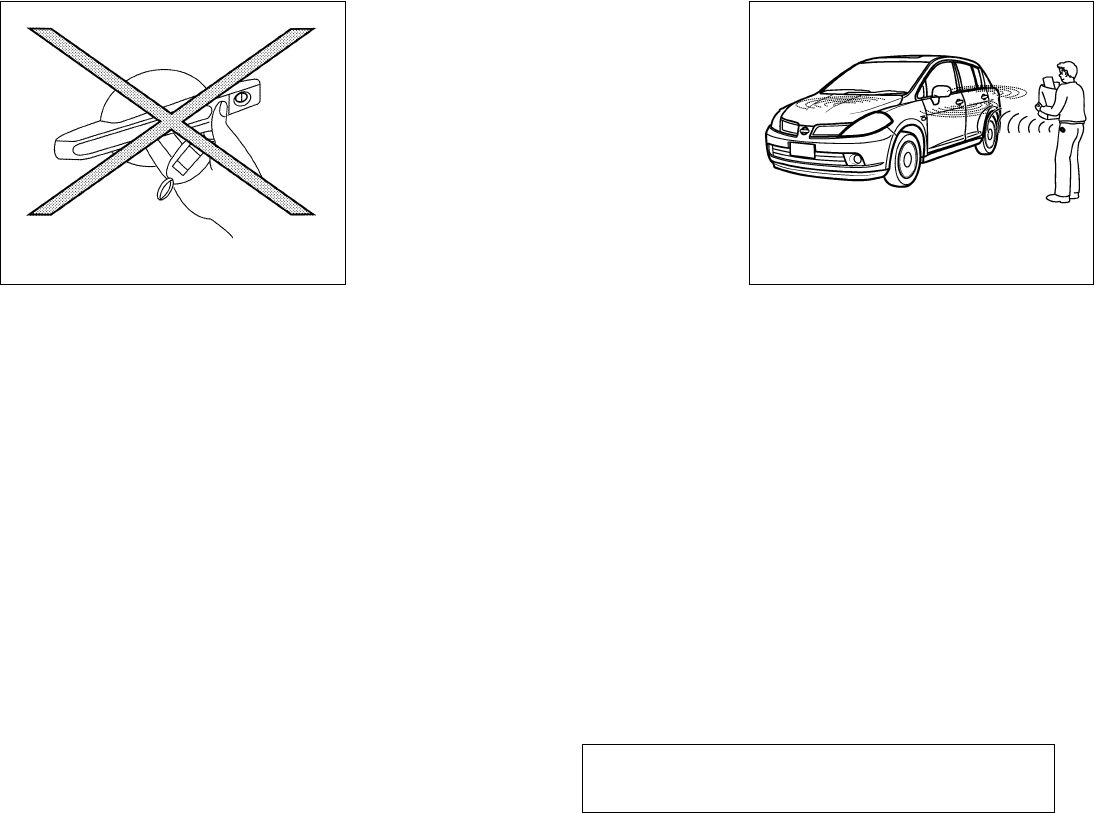
Be sure to remove the key from the vehicle
before locking the doors.
The keyfob can operate at a distance of approxi-
mately 33 ft (10 m) from the vehicle. The effective
distance depends on the conditions around the
vehicle.
As many as 5 keyfobs can be used with one
vehicle. For information concerning the purchase
and use of additional keyfobs, contact a NISSAN
dealer.
The keyfob will not function when:
●the battery is discharged
●the distance between the vehicle and the
keyfob is over 33 ft (10 m)
The panic alarm will not activate when the
key is in the ignition switch.
CAUTION
Listed below are conditions or occur-
rences which will damage the keyfob:
●Do not allow the keyfob to become wet.
●Do not drop the keyfob.
●Do not strike the keyfob sharply against
another object.
●Do not place the keyfob for an extended
period in an area where temperatures
exceed 140°F (60°C).
If a keyfob is lost or stolen, NISSAN rec-
ommends erasing the ID code of that key-
fob. This will prevent the keyfob from un-
authorized use to unlock the vehicle. For
information regarding the erasing proce-
dure, please contact a NISSAN dealer.
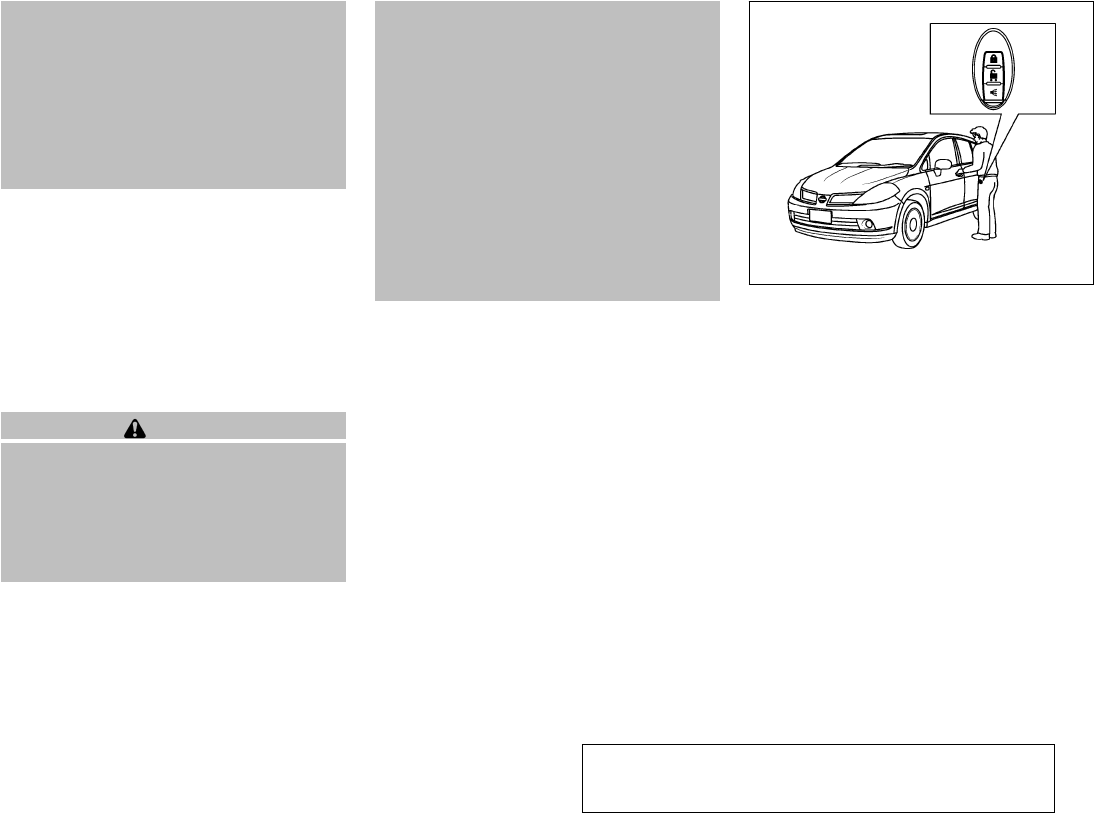
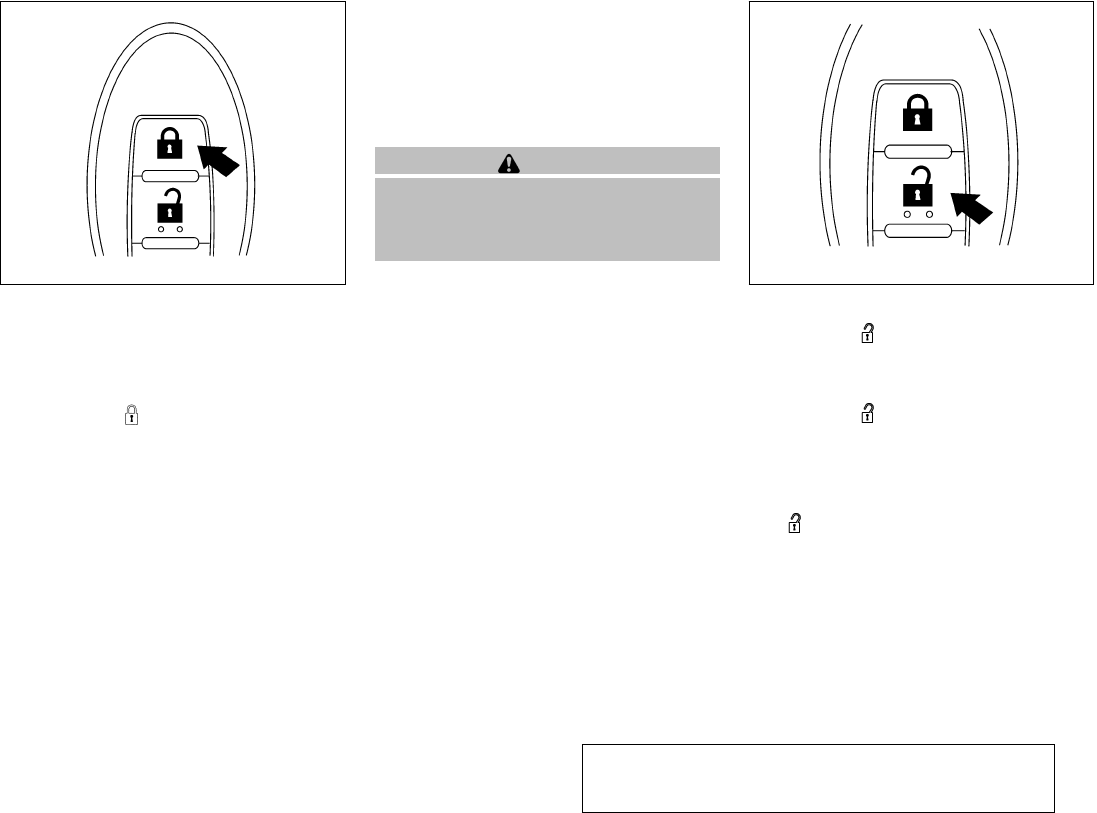
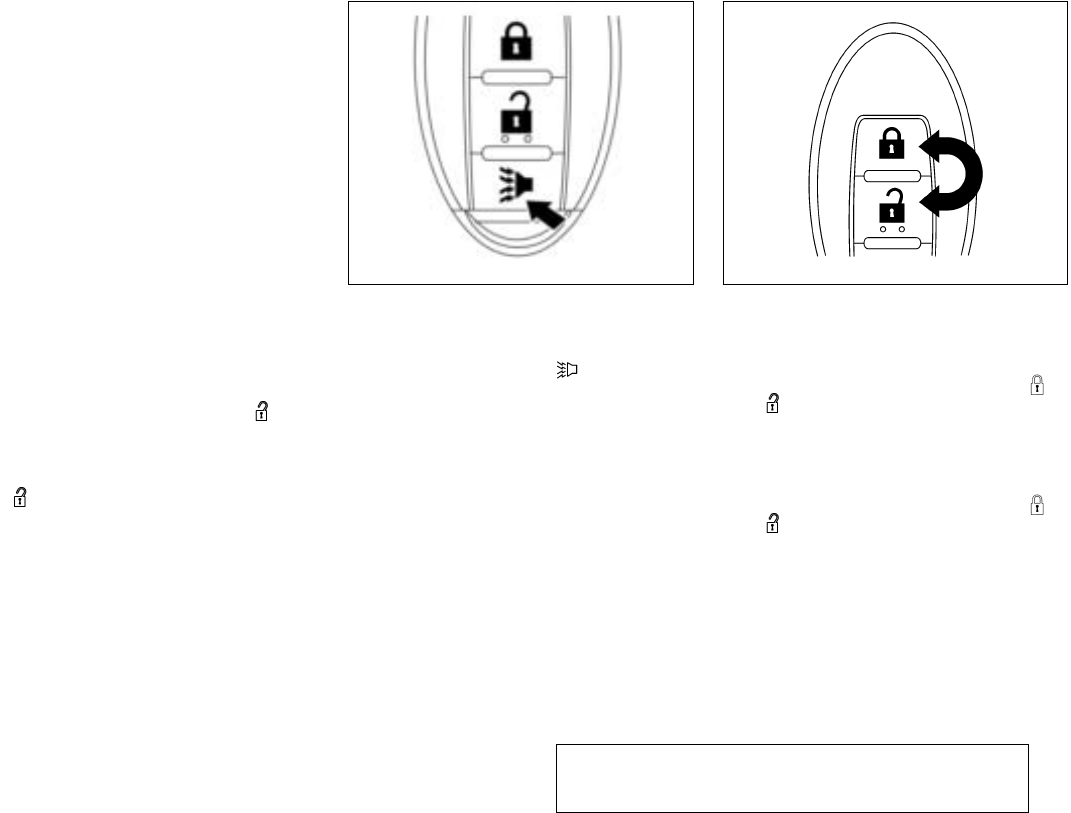
HOW TO USE REMOTE KEYLESS
ENTRY SYSTEM
Locking doors
1. Close all windows.
2. Remove the key from the ignition switch.
3. Close the hood and all doors.
4. Push the button on the keyfob. All
the doors lock. The hazard warning lights
flash twice and the horn beeps once to
indicate all doors are locked.
●When the button is pushed with
all doors locked, the hazard warning lights
LPD0209
REMOTE KEYLESS ENTRY SYSTEM
(models without Intelligent Key
system) (if so equipped)
Pre-driving checks and adjustments 3-7
੬REVIEW COPY—
2007 Versa (vrs)
Owners Manual—USA_English (nna)
03/06/06—arosenma
੭
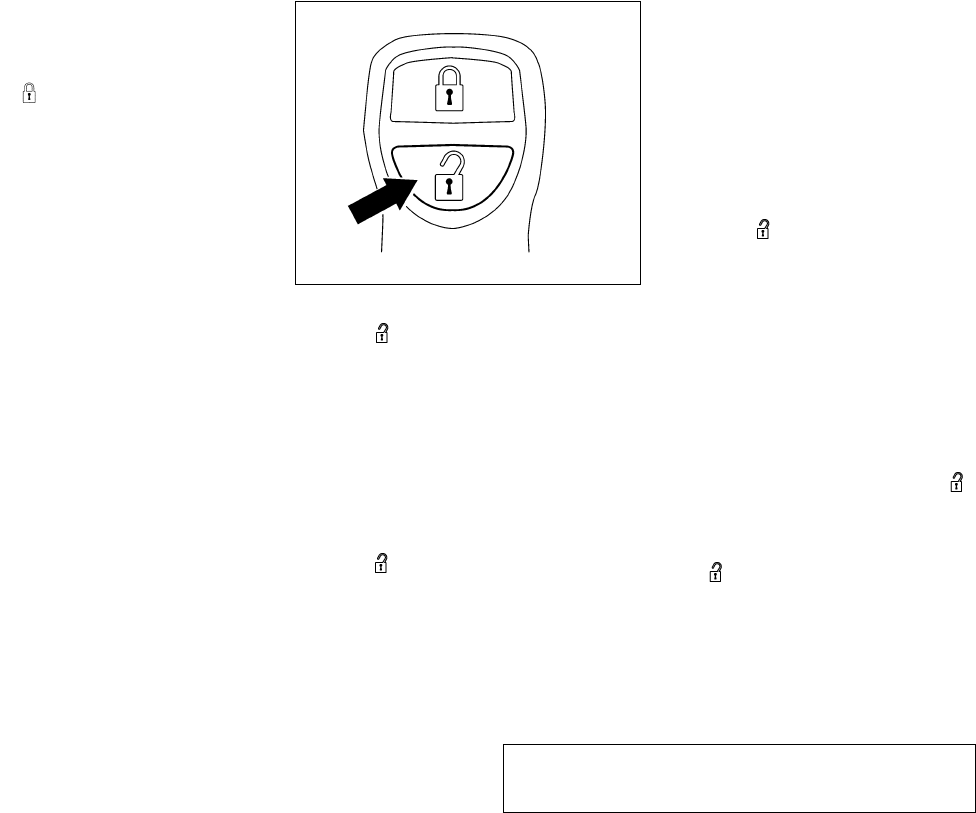
flash twice and the horn beeps once as a
reminder that the doors are already
locked.
●If a door is open and you push
the button, the doors will lock
but the horn will not beep and the hazard
lights will not flash.
The horn may or may not beep. Refer to “Silenc-
ing the horn beep feature” later in this section for
details.
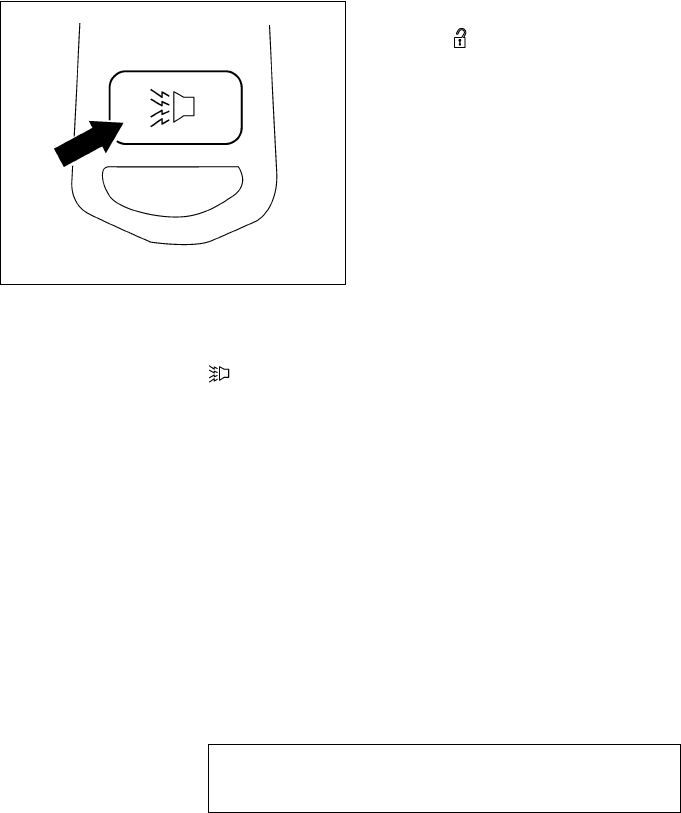
Unlocking doors
Push the button on the keyfob once.
●Only the driver’s door unlocks.
●The hazard warning lights flash once if all
doors are completely closed with the ignition
key in any position except the ON position.
●The interior light turns on and the light timer
activates for 30 seconds when the interior
light switch is in the DOOR position with the
ignition key in any position except the ON
position.
Push the button on the keyfob again within
5 seconds.
●All doors unlock.
●The hazard warning lights flash once if all
doors are completely closed.
The interior lights can be turned off without wait-
ing 30 seconds by inserting the key into the
ignition and turning to the ON or START position,
locking the doors with the keyfob or pushing the
interior light switch to the OFF position.
Auto relock
When the button on the keyfob is pushed,
all doors will lock automatically within 1 minute
unless one of the following operations is per-
formed:
●Any door is opened.
●A key is inserted into the ignition switch and
the key is turned from OFF to ON.
Opening windows (if so equipped)
The keyfob allows you to open windows equipped
with automatic operation simultaneously.
●To open the windows, press the but-
ton on the keyfob for longer than 3 sec-
onds after all doors are unlocked.
The door windows will open while pressing
the button on the keyfob.
LPD0210
3-8 Pre-driving checks and adjustments
੬REVIEW COPY—
2007 Versa (vrs)
Owners Manual—USA_English (nna)
03/06/06—arosenma
੭
The door windows cannot be closed by
using the keyfob.
Using the panic alarm
If you are near your vehicle and feel threatened,
you may activate the panic alarm to call attention
by pushing and holding the button on the
keyfob for longer than 0.5 second.
The panic alarm and headlights will stay on for 25
seconds.
The panic alarm stops when:
●it has run for 25 seconds, or
●any button is pushed on the keyfob.
Using the interior light
Push the button on the keyfob once to turn
on the interior lights.
For additional information, refer to “Interior light”
in the “Instruments and controls”section earlier in
this manual.
LPD0211
Pre-driving checks and adjustments 3-9
੬REVIEW COPY—
2007 Versa (vrs)
Owners Manual—USA_English (nna)
03/06/06—arosenma
੭
Silencing the horn beep feature
If desired, the horn beep feature can be deacti-
vated using the keyfob.
To deactivate: Press and hold the
and buttons for at least 2 seconds.
The hazard warning lights will flash three times to
confirm that the horn beep feature has been
deactivated.
To activate: Press and hold the
and buttons for at least 2 seconds
once more.
The hazard warning lights will flash once and the
horn will sound once to confirm that the horn
beep feature has been reactivated.
Deactivating the horn beep feature does not si-
lence the horn if the alarm is triggered.
1. Two Intelligent Keys
2. Mechanical keys (inside Intelligent
Keys)
3. Key number plate
WARNING
Radio waves could adversely affect elec-
tric medical equipment. Those who use a
pacemaker should contact the electric
medical equipment manufacturer for the
possible influences before use.
The Intelligent Key system can operate all the
door locks using the remote controller function or
pushing the request switch on the vehicle without
LPD0262 LPD0350
INTELLIGENT KEY SYSTEM (if so
equipped)
3-10 Pre-driving checks and adjustments
੬REVIEW COPY—
2007 Versa (vrs)
Owners Manual—USA_English (nna)
03/06/06—arosenma
੭
taking the key out from a pocket or purse. The
operating environment and/or conditions may af-
fect the Intelligent Key system operation.
Be sure to read the following before using the
Intelligent Key system.
CAUTION
●Be sure to carry the Intelligent Key with
you when operating the vehicle.
●Never leave the Intelligent Key in the
vehicle when you leave the vehicle.
The Intelligent Key is always communicating with
the vehicle as it receives radio waves. The Intel-
ligent Key system transmits weak radio waves.
Environmental conditions may interfere with the
operation of the Intelligent Key system under the
following operating conditions.
●When operating near a location where
strong radio waves are transmitted, such as
a TV tower, power station and broadcasting
station.
●When in possession of wireless equipment,
such as a cellular telephone, transceiver,
and CB radio.
●When the Intelligent Key is in contact with or
covered by metallic materials.
●When any type of radio wave remote control
is used nearby.
●When the Intelligent Key is placed near an
electric appliance such as a personal com-
puter.
●When the vehicle is parked near a parking
meter.
In such cases, correct the operating conditions
before using the Intelligent Key function or use
the mechanical key.
Although the life of the battery varies depending
on the operating conditions, the battery’s life is
approximately 2 years. If the battery is dis-
charged, replace it with a new one.
When the Intelligent Key battery is low, the Intel-
ligent Key system warning light ( ) will blink
green for about 30 seconds after the ignition
switch is turned to the ON position.
Since the Intelligent Key is continuously receiving
radio waves, if the key is left near equipment
which transmits strong radio waves, such as sig-
nals from a TV and personal computer, the bat-
tery life may become shorter.
For information regarding replacement of a bat-
tery, see “Battery” in the “Maintenance and do-it-
yourself” section.
As many as 4 Intelligent Keys can be registered
and used with one vehicle. For information about
the purchase and use of additional Intelligent
Keys, contact a NISSAN dealer.
CAUTION
●Do not allow the Intelligent Key, which
contains electrical components, to
come into contact with water or salt
water. This could affect the system
function.
●Do not drop the Intelligent Key.
●Do not strike the Intelligent Key sharply
against another object.
●Do not change or modify the Intelligent
Key.
●Wetting may damage the Intelligent
Key. If the Intelligent Key gets wet, im-
mediately wipe until it is completely dry.
●Do not place the Intelligent Key for an
extended period in an area where tem-
peratures exceed 140°F (60°C).
●Do not attach the Intelligent Key with a
key holder that contains a magnet.
Pre-driving checks and adjustments 3-11
੬REVIEW COPY—
2007 Versa (vrs)
Owners Manual—USA_English (nna)
03/06/06—arosenma
੭
●Do not place the Intelligent Key near
equipment that produces a magnetic
field, such as a TV, audio equipment and
personal computers.
If an Intelligent Key is lost or stolen, NISSAN
recommends erasing the ID code of that Intelli-
gent Key from the vehicle. This may prevent the
unauthorized use of the Intelligent Key to operate
the vehicle. For information regarding the erasing
procedure, contact a NISSAN dealer.
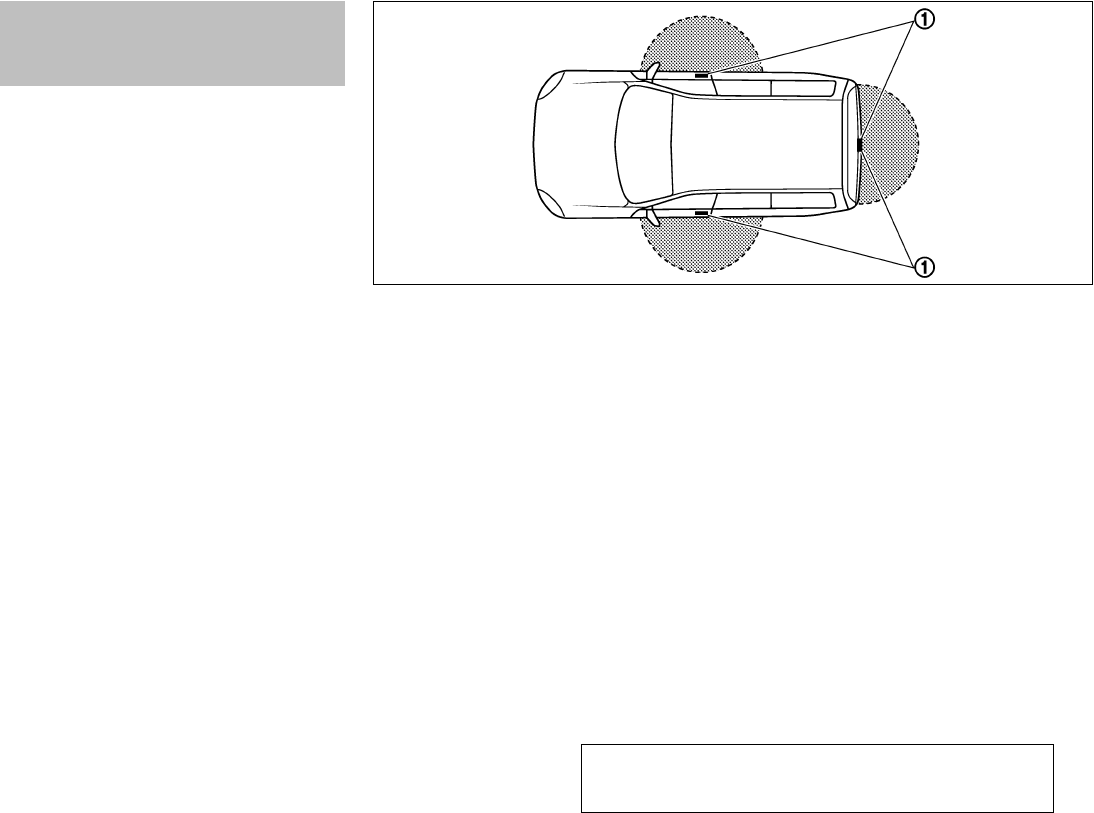
OPERATING RANGE
The Intelligent Key functions can only be used
when the Intelligent Key is within the specified
operating range from the request switch ᭺
1.
When the Intelligent Key battery is discharged or
strong radio waves are present near the operat-
ing location, the Intelligent Key system’s operat-
ing range becomes narrower, and the Intelligent
Key may not function properly.
The operating range is within 31.50 in (80 cm)
from each request switch ᭺
1.
If the Intelligent Key is too close to the door glass,
handle or rear bumper, the request switches may
not function.
When the Intelligent Key is within the operating
range, it is possible for anyone, even someone
who does not carry the Intelligent Key, to push the
request switch to lock/unlock the doors.
SPA2038
3-12 Pre-driving checks and adjustments
੬REVIEW COPY—
2007 Versa (vrs)
Owners Manual—USA_English (nna)
03/06/06—arosenma
੭
DOOR LOCKS/UNLOCKS
PRECAUTION
●Do not push the door handle request switch
with the Intelligent Key held in your hand as
illustrated. The close distance to the door
handle will cause the Intelligent Key system
to have difficulty recognizing that the Intelli-
gent Key is outside the vehicle.
●After locking with the door handle request
switch, verify the doors are securely locked
by testing them.
●To prevent the Intelligent Key from being left
inside the vehicle, make sure you carry the
key with you and then lock the doors.
●Do not pull the door handle before pushing
the door handle request switch. The door
will be unlocked but will not open. Release
the door handle once and pull it again to
open the door.
INTELLIGENT KEY OPERATION
You can lock or unlock the doors without taking
the key out of your pocket or bag.
When you carry the Intelligent Key with you, you
can lock or unlock all doors by pushing the door
handle request switch or rear hatch request
switch within the range of operation.
WPD0375 WPD0368
Pre-driving checks and adjustments 3-13
੬REVIEW COPY—
2007 Versa (vrs)
Owners Manual—USA_English (nna)
03/06/06—arosenma
੭
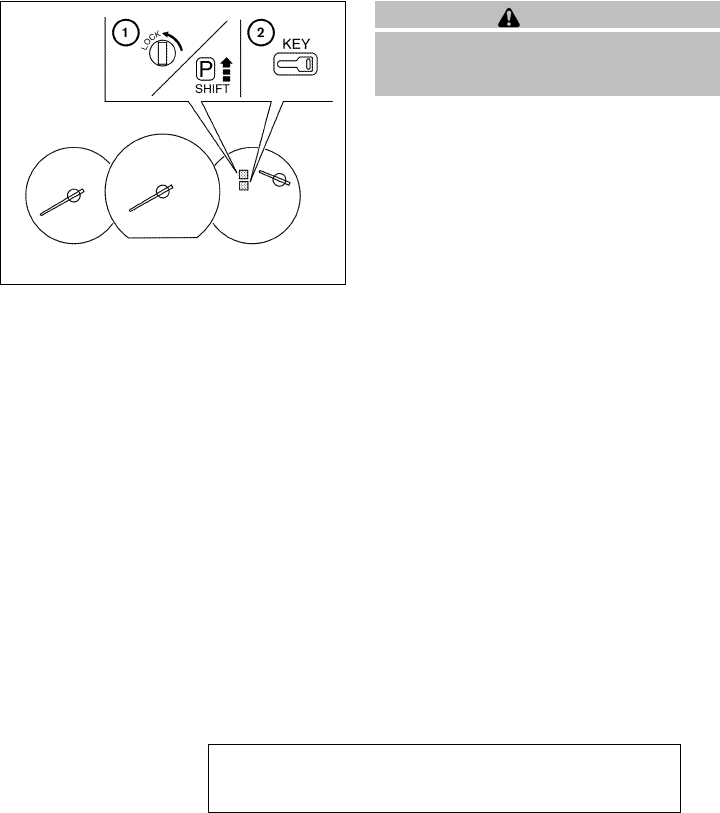
Locking doors
1. Turn the ignition switch to the LOCK posi-
tion. (Remove the key if any key is in the
ignition switch.)
2. Close all doors and the rear hatch.
3. Push any door handle request switch ᭺
1or
the rear hatch request switch ᭺
2while car-
rying the Intelligent Key with you.
4. All doors and the rear hatch will lock.
5. The hazard warning lights flash twice and
the outside buzzer sounds twice.
NOTE:
●Doors lock with the door handle request
switch or rear hatch request switch while a
mechanical key is in the ignition switch or the
ignition switch is pushed in.
●Doors lock with the door handle request
switch or the rear hatch request switch while
the ignition switch is not in the LOCK posi-
tion.
●Doors do not lock by pushing the door
handle request switch or the rear hatch re-
quest switch while any door is open. How-
ever, doors lock with the mechanical key
even if any door is open.
●Doors do not lock with the door handle
request switch or the rear hatch request
switch with the Intelligent Key inside the
vehicle and a beep sounds to warn you.
However, when an Intelligent Key is inside
the vehicle, doors can be locked with an-
other Intelligent Key.
CAUTION
●After locking the doors using the re-
quest switch, make sure that the doors
have been securely locked by operating
the door handles or the rear hatch
opener switch.
WPD0358 WPD0369 SPA2043
3-14 Pre-driving checks and adjustments
੬REVIEW COPY—
2007 Versa (vrs)
Owners Manual—USA_English (nna)
03/06/06—arosenma
੭
●When locking the doors using the re-
quest switch, make sure to have the
Intelligent Key in your possession be-
fore operating the request switch to
prevent the Intelligent Key from being
left in the vehicle.
●The request switch is operational only
when the Intelligent Key has been de-
tected by the Intelligent Key system.
Lockout protection
To prevent the Intelligent Key from being acci-
dentally locked in the vehicle, lockout protection
is equipped with the Intelligent Key system.
When the driver’s side door is open, the doors
are locked, and then the Intelligent Key is put
inside the vehicle and all the doors are closed;
the lock will automatically unlock and the door
buzzer sounds.
CAUTION
The lockout protection may not function
under the following conditions:
●When the Intelligent Key is placed on
top of the instrument panel.
●When the Intelligent Key is placed on
top of the rear parcel.
●When the Intelligent Key is placed on
the tonneau cover.
●When the Intelligent Key is placed in-
side the glove box or a storage bin.
●When the Intelligent Key is placed in-
side the door pockets.
●When the Intelligent Key is placed on or
under the spare tire area.
●When the Intelligent Key is placed in-
side or near metallic materials.
The lockout protection may function when
the Intelligent Key is outside the vehicle
but it is too close to the vehicle. Unlocking doors
1. Carry the Intelligent Key.
2. Push the door handle request switch ᭺
1or
the rear hatch request switch ᭺
2.
3. The hazard warning lights flash once and the
outside buzzer sounds once.
4. Push the door handle request switch ᭺
1
again within 1 minute to unlock all doors and
the rear hatch.
If a door handle is pulled while unlocking the
doors, that door may not be unlocked. Returning
the door handle to its original position will unlock
the door. If the door does not unlock after return-
WPD0358
Pre-driving checks and adjustments 3-15
੬REVIEW COPY—
2007 Versa (vrs)
Owners Manual—USA_English (nna)
03/06/06—arosenma
੭
ing the door handle, push the door handle re-
quest switch to unlock the door.
All doors and the rear hatch will be locked auto-
matically unless one of the following operations is
performed within 1 minute after pushing the re-
quest switch.
●Opening any doors or the rear hatch.
●Pushing the ignition switch.
●Inserting the mechanical key into the ignition
switch.
The interior light timer illuminates for 30 seconds
when a door is unlocked and the room light
switch is in the DOOR position.
The interior light can be turned off without waiting
for 30 seconds by performing one of the follow-
ing operations.
●Turning the ignition switch to the ON posi-
tion.
●Locking the doors with the remote controller.
●Switching the room light switch to the OFF
position.
HOW TO USE THE REMOTE
KEYLESS ENTRY FUNCTION
The remote keyless entry function can operate all
door locks using the remote keyless function of
the Intelligent Key. The remote keyless function
can operate at a distance of 33 ft (10 m) away
from the vehicle. The operating distance de-
pends upon the conditions around the vehicle.
The remote keyless entry function will not func-
tion under the following conditions:
●When the Intelligent Key is not within the
operational range.
●When the doors or the rear hatch are open
or not closed securely.
●When the Intelligent Key battery is dis-
charged.
CAUTION
When locking the doors using the Intelli-
gent Key, be sure not to leave the key in
the vehicle.
WPD0369 SPA2043
3-16 Pre-driving checks and adjustments
੬REVIEW COPY—
2007 Versa (vrs)
Owners Manual—USA_English (nna)
03/06/06—arosenma
੭
Locking doors
1. Turn the ignition switch to the LOCK posi-
tion.
2. Close all doors and the rear hatch.
3. Push the button on the Intelligent
Key.
4. The hazard warning lights flash twice, the
outside buzzer sounds twice, and the horn
beeps once.
5. All doors and the rear hatch will be locked.
NOTE:
●Doors will lock with the Intelligent Key while
the ignition switch is in the ACC or ON
position.
●Doors will not lock with the Intelligent Key
while any door is open.
CAUTION
After locking the doors using the Intelli-
gent Key, be sure that the doors have been
securely locked by operating the door
handles.
Unlocking doors
1. Push the button on the Intelligent Key.
2. The hazard warning lights flash once and the
outside buzzer sounds once.
3. Push the button again within 1 minute
to unlock all doors and the rear hatch.
All doors and the rear hatch will be locked auto-
matically unless one of the following operations is
performed within 1 minute after pushing
the button.
●Opening any doors or the rear hatch.
●Pushing the ignition switch.
WPD0359 WPD0360
Pre-driving checks and adjustments 3-17
੬REVIEW COPY—
2007 Versa (vrs)
Owners Manual—USA_English (nna)
03/06/06—arosenma
੭
●Inserting the mechanical key into the ignition
switch.
The interior light illuminates for 30 seconds when
a door is unlocked and the room light switch is in
the DOOR position.
The light can be turned off without waiting for 30
seconds by performing one of the following op-
erations.
●Turning the ignition switch to the ON posi-
tion.
●Locking the doors with the remote controller.
●Switching the room light switch to the OFF
position.
Opening windows (if so equipped)
The Intelligent Key allows you to open windows
equipped with automatic operation simulta-
neously.
●To open the windows, press the but-
ton on the keyfob for longer than 3 sec-
onds after all doors are unlocked.
The door windows will open while pressing
the button on the keyfob.
The door windows cannot be closed by
using the keyfob.
Using the panic alarm
If you are near your vehicle and feel threatened,
you may activate the panic alarm to call attention
by pushing and holding the button on the
Intelligent Key for longer than 0.5 second.
The panic alarm and headlights will stay on for 25
seconds.
The panic alarm stops when:
●it has run for 25 seconds, or
●any button is pushed on the Intelligent Key.
Silencing the horn beep feature
If desired, the horn beep feature can be deacti-
vated using the Intelligent Key.
To deactivate: Press and hold the
and buttons for at least 2 seconds.
The hazard warning lights will flash three times to
confirm that the horn beep feature has been
deactivated.
To activate: Press and hold the
and buttons for at least 2 seconds
once more.
WPD0374 WPD0362
3-18 Pre-driving checks and adjustments
੬REVIEW COPY—
2007 Versa (vrs)
Owners Manual—USA_English (nna)
03/06/06—arosenma
੭
The hazard warning lights will flash once and the
horn will sound once to confirm that the horn
beep feature has been reactivated.
Deactivating the horn beep feature does not si-
lence the horn if the alarm is triggered.
᭺
1Intelligent Key lock warning light (M/T
models) or P position selecting warning
light (CVT models)
᭺
2Intelligent Key system warning light
WARNING LIGHTS AND AUDIBLE
REMINDERS
The Intelligent Key system is equipped with a
function that is designed to minimize improper
operations and to help prevent the vehicle from
being stolen. The warning buzzer sounds and the
warning light illuminates when improper opera-
tions are detected.
CAUTION
When the buzzer sounds and the warning
light illuminates, be sure to check both
the vehicle and the Intelligent Key.
WARNING SIGNALS
To help prevent the vehicle from moving unex-
pectedly by erroneous operation of the Intelligent
Key or to help prevent the vehicle from being
stolen, a chime or buzzer sounds from inside and
outside the vehicle and a warning light comes on
in the instrument panel.
When a chime or beep sounds or the warning
light comes on, be sure to check the vehicle and
the Intelligent Key.
Audible reminder and warning when
locking the doors
When the chime or buzzer sounds from inside
and outside the vehicle, check for the following:
●The ignition switch is turned to the LOCK
position.
●The Intelligent Key is not left inside the ve-
hicle.
●The selector lever is in the P position.
WPD0370
Pre-driving checks and adjustments 3-19
੬REVIEW COPY—
2007 Versa (vrs)
Owners Manual—USA_English (nna)
03/06/06—arosenma
੭
Audible reminder and warning when
the engine stops
When the P position selecting warning light
() (CVT models) in the instrument panel
blinks in red:
●Make sure the selector lever is in the P
position.
When the chime sounds intermittently:
●Make sure the selector lever is in the P
position and the ignition switch is turned to
the LOCK position.
If the chime sounds continuously when the driv-
er’s door is opened, check the following:
●The selector lever is in the P position and the
ignition switch is turned to the LOCK posi-
tion.
●The mechanical key is not inserted into the
ignition switch.
●The warning chime may stop when one of
the following is performed.
– Returning the ignition switch to the LOCK
position.
– Removing the mechanical key.
– Closing the doors.
When the Intelligent Key lock warning light
() (M/T models) in the instrument panel
blinks:
●Make sure the selector lever is in the P
position.
●Make sure the ignition switch is in the LOCK
position.
Alarm and warning when the engine
starts
When the Intelligent Key system warning light
() blinks red and the outside buzzer
sounds, make sure the Intelligent Key is inside the
vehicle.
Warning for low battery power
When the Intelligent Key battery is low, the Intel-
ligent Key system warning light ( ) will blink
green for about 30 seconds after the ignition
switch is turn to the ON position. This warning is
to let you know that the battery of the Intelligent
Key will run down soon. Replace it with a new
one. Refer to the “Battery replacement” in the
“Maintenance and do-it-yourself” section
NISSAN recommends replacing the battery at a
NISSAN dealer.
Preventing the Intelligent Key from
being left in the vehicle
If you lock all doors using the power door lock
switch with the Intelligent Key in the vehicle, all of
the doors unlock immediately and the buzzer will
warn you when the door is closed.
3-20 Pre-driving checks and adjustments
੬REVIEW COPY—
2007 Versa (vrs)
Owners Manual—USA_English (nna)
03/06/06—arosenma
੭

TROUBLESHOOTING GUIDE
Symptom Possible Cause Remedy
When pushing the door
handle request switch
The front door beep sounds for approxi-
mately 2 seconds. The doors cannot be locked. Take out the Intelligent Key from the vehicle and push the door
handle request switch.
When closing the doors
The front door beep sounds for approxi-
mately 10 seconds.
The ignition knob is not turned to
LOCK position.
Turn the ignition knob to LOCK.
The key warning light in the instrument panel
blinks in red and the front door warning beep
sounds for approximately 3 seconds.
The Intelligent Key is not in the
vehicle.
Be sure to carry the Intelligent Key with you.
The front door beep sounds for approxi-
mately 3 seconds and all doors unlock.
The Intelligent Key is left in the vehicle. Take out the Intelligent Key from the vehicle and close the
door.
When opening the driver’s
door A warning chime sounds continuously.
The ignition knob is not in LOCK
position, or the mechanical key is in-
serted into the ignition knob.
Turn the ignition knob to LOCK.
Remove the mechanical key or valet key form the ignition
knob.
When stopping the engine The P position warning light in the instru-
ment panel blinks in red.
The selector lever is not in the P
(Park) position.
Make sure that the selector lever is in the P (Park) position
and turn the ignition knob to LOCK.
When turning the ignition knob The warning chime sounds
The ignition knob is not turned to LOCK.
Turn the ignition knob to LOCK.
When starting the engine The key warning light in the instrument
panel blinks in green.
The battery charge is low. Replace the battery to new one. See “Battery replacement” in
the “Maintenance and do-it-yourself” section.
When turning the ignition
switch
A warning chime sounds continuously. The ignition switch is not turned to the
LOCK position.
Turn the ignition switch to the LOCK position.
A warning chime sounds continuously and
the Intelligent Key lock warning light blinks.
When pushing the ignition
switch
The Intelligent Key system warning light in
the instrument panel illuminates red.
The Intelligent Key is not in the
vehicle.
If the Intelligent Key system warning light illuminates red even
while you are carrying the Intelligent Key, the battery is com-
pletely discharged. Replace the battery to new one. See “Battery
replacement” in the “Maintenance and do-it-yourself” section.
Pre-driving checks and adjustments 3-21
੬REVIEW COPY—
2007 Versa (vrs)
Owners Manual—USA_English (nna)
03/06/06—arosenma
੭
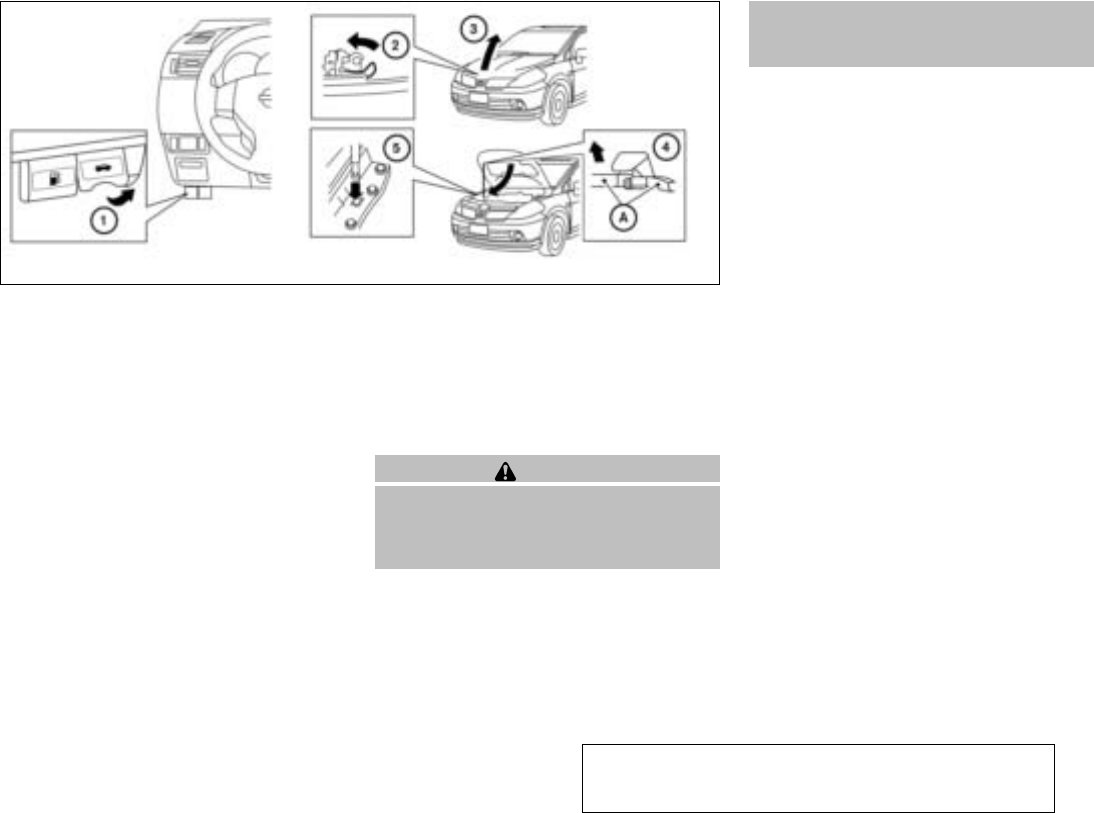
1. Pull the hood lock release handle ᭺
1located
below the instrument panel until the hood
springs up slightly.
2. Locate the lever ᭺
2in between the hood and
grille and push the lever sideways with your
fingertips.
3. Raise the hood ᭺
3.
4. Remove the support rod ᭺
4and insert it into
the slot ᭺
5.
Hold the coated parts ᭺
Awhen removing or
resetting the support rod. Avoid direct con-
tact with the metal parts, as they may be
hot immediately after the engine has been
stopped.
When closing the hood, first return the support
rod to its original position. Slowly move the hood
down to latch the lock. Push the hood down to
lock the hood securely into place.
WARNING
●Make sure the hood is completely
closed and latched before driving. Fail-
ure to do so could cause the hood to fly
open and result in an accident.
●If you see steam or smoke coming from
the engine compartment, to avoid injury
do not open the hood.
WPD0371
HOOD
3-22 Pre-driving checks and adjustments
੬REVIEW COPY—
2007 Versa (vrs)
Owners Manual—USA_English (nna)
03/06/06—arosenma
੭
WARNING
The rear hatch must be closed securely
before driving. An open rear hatch could
allow dangerous exhaust gases to be
drawn inside the vehicle.
OPENING THE REAR HATCH
To open the rear hatch, unlock it with one of the
following operations, then push the opener
switch ᭺
A.
●Push the power door lock switch to the
unlock position.
●Unlock all doors using the key.
●Push the button on the remote con-
troller (if equipped) twice. See “Remote key-
less entry system” earlier in this section.
●Push the rear hatch request switch or door
handle request switch (if equipped) twice.
See “Intelligent key system” earlier in this
section.
●Push the button on the Intelligent Key
(if equipped) twice. See “Intelligent key sys-
tem” earlier in this section.
SPA2048
REAR HATCH
Pre-driving checks and adjustments 3-23
੬REVIEW COPY—
2007 Versa (vrs)
Owners Manual—USA_English (nna)
03/06/06—arosenma
੭
To close the rear hatch, push the rear hatch down
until it securely locks. REAR HATCH RELEASE
The rear hatch release mechanism allows the rear
hatch to be opened in the event of a discharged
battery.
To release the rear hatch from the inside of the
vehicle, perform the following operations:
1. Fold the rear seats down. See “Folding rear
seat” in the “Safety — seats, seat belts and
supplemental restraint system” section.
2. Put a hand or a suitable tool in the underside
of the rear hatch to access the release lever
᭺
A. Move the release lever to the right. The
rear hatch will be unlatched.
3. Push the rear hatch up to open.
NOTE:
If you had to open the rear hatch using this
lever, have your vehicle checked by a
NISSAN dealer as soon as possible.
SPA2049 LPD0352
3-24 Pre-driving checks and adjustments
੬REVIEW COPY—
2007 Versa (vrs)
Owners Manual—USA_English (nna)
03/06/06—arosenma
੭
OPENER OPERATION
The fuel-filler door release is located below the
instrument panel. To open the fuel-filler door, pull
the release. To lock, close the fuel-filler door
securely.
FUEL-FILLER CAP
The fuel-filler cap is a ratcheting type. Turn the
cap counterclockwise to remove. To tighten, turn
the cap clockwise until ratcheting clicks are
heard.
Put the fuel-filler cap on the cap holder ᭺
1while
refueling.
WARNING
●Gasoline is extremely flammable and
highly explosive under certain condi-
tions. You could be burned or seriously
injured if it is misused or mishandled.
Always stop the engine and do not
smoke or allow open flames or sparks
near the vehicle when refueling.
●Fuel may be under pressure. Turn the
cap a third of a turn, and wait for any
“hissing” sound to stop to prevent fuel
from spraying out and possibly causing
personal injury. Then remove the cap.
●Do not attempt to top off the fuel tank
after the fuel pump nozzle shuts off
automatically. Continued refueling may
cause fuel overflow, resulting in fuel
spray and possibly a fire.
●Use only an original equipment type
fuel-filler cap as a replacement. It has a
built-in safety valve needed for proper
operation of the fuel system and emis-
sion control system. An incorrect cap
can result in a serious malfunction and
possible injury. It could also cause the
malfunction indicator light to come on.
●Never pour fuel into the throttle body to
attempt to start your vehicle.
WPD0372 LPD0354
FUEL-FILLER DOOR
Pre-driving checks and adjustments 3-25
੬REVIEW COPY—
2007 Versa (vrs)
Owners Manual—USA_English (nna)
03/06/06—arosenma
੭
●Do not fill a portable fuel container in
the vehicle or trailer. Static electricity
can cause an explosion of flammable
liquid, vapor or gas in any vehicle or
trailer. To reduce the risk of serious
injury or death when filling portable fuel
containers:
– Always place the container on the
ground when filling.
– Do not use electronic devices when
filling.
– Keep the pump nozzle in contact
with the container while you are fill-
ing it.
– Use only approved portable fuel con-
tainers for flammable liquid.
CAUTION
●If fuel is spilled on the vehicle body,
flush it away with water to avoid paint
damage.
●Tighten until the fuel-filler cap clicks.
Failure to tighten the fuel-filler cap
properly may cause the mal-
function indicator light (MIL) to illumi-
nate. If the light illuminates be-
cause the fuel-filler cap is loose or
missing, tighten or install the cap and
continue to drive the vehicle.
The light should turn off after a
few driving trips. If the light
does not turn off after a few driving
trips, have the vehicle inspected by a
NISSAN dealer.
●For additional information, see the
“Malfunction indicator light (MIL)” in
the “Instruments and Controls” section
earlier in this manual.
TILT OPERATION
Push the lock lever ᭺
1down and adjust the
steering wheel up or down ᭺
2to the desired
position.
Pull the lock lever up to lock the steering wheel in
place.
WARNING
Do not adjust the steering wheel while
driving. You could lose control of your
vehicle and cause an accident.
LPD0355
STEERING WHEEL
3-26 Pre-driving checks and adjustments
੬REVIEW COPY—
2007 Versa (vrs)
Owners Manual—USA_English (nna)
03/06/06—arosenma
੭
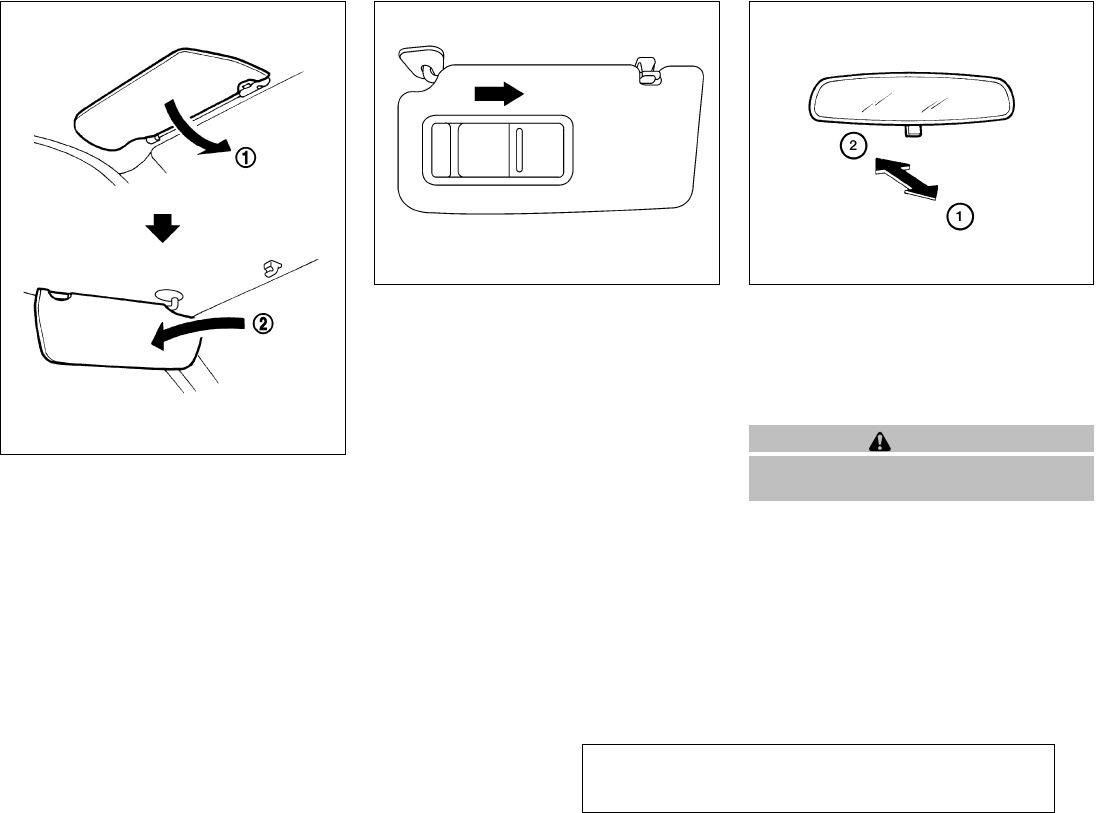
To block out glare from the front, swing down the
sun visor ᭺
1.
To block glare from the side, remove the sun visor
from the center mount and swing it to the side ᭺
2.
VANITY MIRRORS (if so equipped)
To access the vanity mirror, pull the sun visor
down and slide the mirror cover open. Some
vanity mirrors are illuminated and turn on when
the mirror cover is open.
REARVIEW MIRROR
The night position ᭺
1reduces glare from the
headlights of vehicles behind you at night.
Use the day position ᭺
2when driving in daylight
hours.
WARNING
Use the night position only when neces-
sary, because it reduces rear view clarity.
SIC2872
LPD0356 WPD0126
SUN VISORS MIRRORS
Pre-driving checks and adjustments 3-27
੬REVIEW COPY—
2007 Versa (vrs)
Owners Manual—USA_English (nna)
03/06/06—arosenma
੭

OUTSIDE MIRRORS
The outside mirror remote control will operate
only when the ignition switch is in the ACC or ON
position.
Move the small switch ᭺
1to select the right or left
mirror. Adjust each mirror to the desired position
using the large switch ᭺
2.
WARNING
●Objects viewed in the outside mirror on
the passenger side are closer than they
appear. Be careful when moving to the
right. Using only this mirror could cause
an accident. Use the inside mirror or
glance over your shoulder to properly
judge distances to other objects.
●Do not adjust the mirrors while driving.
You could lose control of your vehicle
and cause an accident.
Foldable outside mirrors
Push the mirrors backward to fold them.
Heated mirrors (Canada only)
Some outside mirrors can be heated to defrost,
defog, or de-ice for improved visibility. Press the
rear window defroster switch to activate the heat-
ing function. Press the switch again to deactivate,
or the heating function will automatically turn off
after approximately 15 minutes.
LPD0237 MPA0008
3-28 Pre-driving checks and adjustments
੬REVIEW COPY—
2007 Versa (vrs)
Owners Manual—USA_English (nna)
03/06/06—arosenma
੭

4 Heater, air conditioner, audio and phone
systems
Ventilators ........................................4-2
Heater and air conditioner (manual)..................4-3
Controls.......................................4-3
Heater operation . . . ............................4-4
Air conditioner operation ........................4-5
Air flow charts..................................4-6
Servicing air conditioner............................4-9
Audio system ....................................4-10
Radio ........................................4-10
FM radio reception ............................4-10
AM radio reception ............................4-10
Satellite radio reception (if so equipped) .........4-10
Audio operation precautions ....................4-11
FM/AM radio with compact disc (CD) player......4-16
FM/AM/SAT radio with compact disc (CD)
changer ......................................4-20
CD care and cleaning..........................4-25
Steering wheel switch for audio control
(if so equipped) ...............................4-25
Antenna ......................................4-26
Car phone or CB radio............................4-27
BluetoothாHands-Free Phone System
(if so equipped) ..................................4-27
Using the system ..............................4-29
Control buttons ...............................4-31
Getting started ................................4-31
List of voice commands ........................4-33
Speaker adaptation (SA) mode..................4-38
Troubleshooting guide .........................4-39
੬REVIEW COPY—
2007 Versa (vrs)
Owners Manual—USA_English (nna)
03/06/06—arosenma
੭
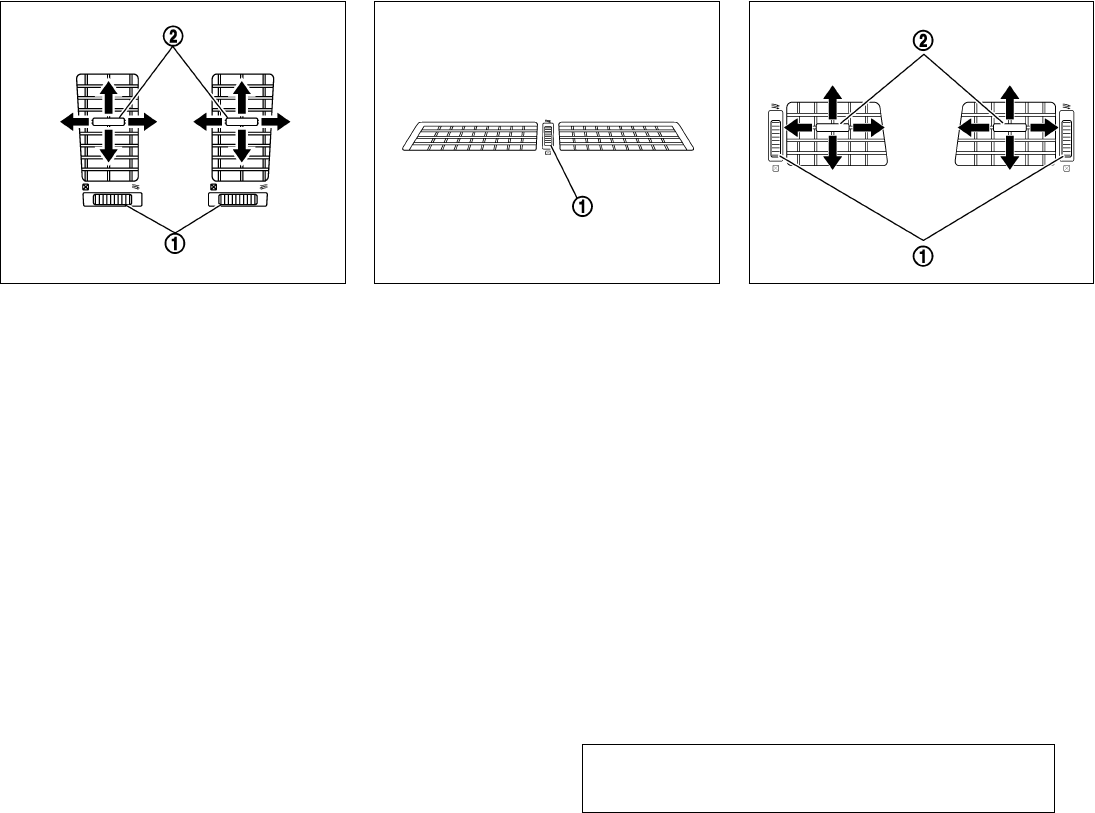
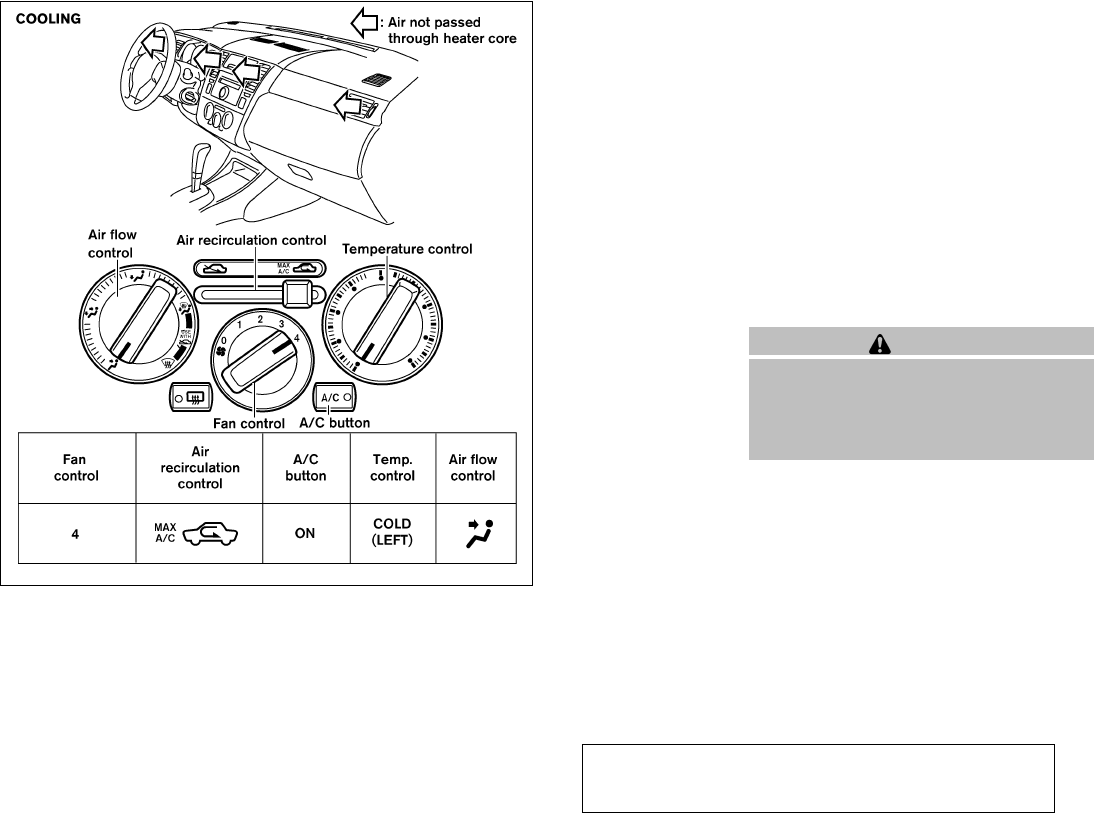
Adjust air flow open/close ᭺
1
Adjust air flow direction ᭺
2
center
SAA1176
center upper
SAA1177
sides
SAA1178
VENTILATORS
4-2 Heater, air conditioner, audio and phone systems
੬REVIEW COPY—
2007 Versa (vrs)
Owners Manual—USA_English (nna)
03/06/06—arosenma
੭
WARNING
●The air conditioner cooling function op-
erates only when the engine is running.
●Do not leave children or adults who
would normally require the assistance
of others alone in your vehicle. Pets
should also not be left alone. They
could accidentally injure themselves or
others through inadvertent operation of
the vehicle. Also, on hot, sunny days,
temperatures in a closed vehicle could
quickly become high enough to cause
severe or possibly fatal injuries to
people or animals.
●Do not use the recirculation mode for
long periods as it may cause the interior
air to become stale and the windows to
fog up.
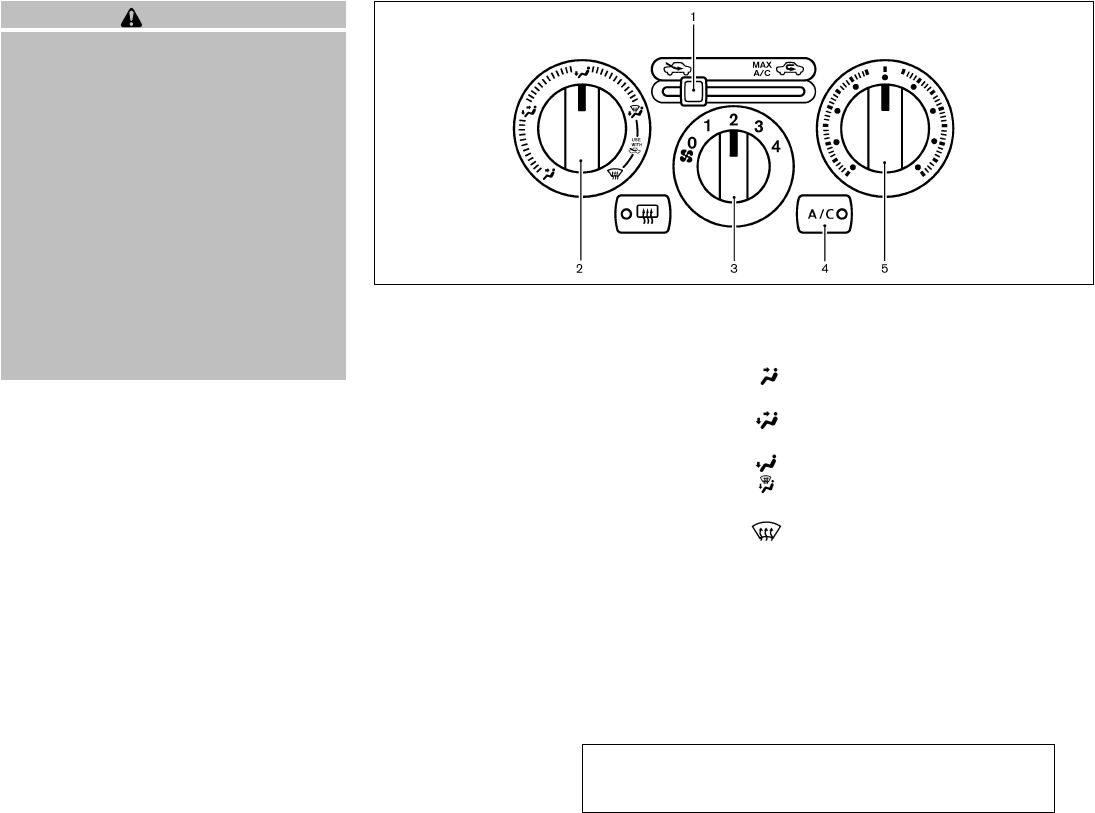
1. Air intake lever (Outside air circulation/
Air recirculation)
2. Air flow control dial
3. Fan control dial
4. Air conditioner button
5. Temperature control dial
CONTROLS
Fan control dial
The fan control dial turns the fan on and off, and
controls fan speed.
Air flow control dial
The air flow control dial allows you to select the
air flow outlets.
— Air flows from center and side
ventilators.
— Air flows from center and side
ventilators and foot outlets.
— Air flows mainly from foot outlets.
— Air flows from defroster outlets
and foot outlets.
— Air flows mainly from defroster
outlets.
WHA0663
HEATER AND AIR CONDITIONER
(manual)
Heater, air conditioner, audio and phone systems 4-3
੬REVIEW COPY—
2007 Versa (vrs)
Owners Manual—USA_English (nna)
03/06/06—arosenma
੭
Temperature control dial
The temperature control dial allows you to adjust
the temperature of the outlet air. To lower the
temperature, turn the dial to the left. To increase
the temperature, turn the dial to the right.
Fresh air
Move the air intake lever to the position.
The air flow is drawn from outside the vehicle.
Air recirculation
Move the air intake lever to the position to
recirculate air inside the vehicle.
Use the selection:
●when driving on a dusty road.
●to prevent traffic fumes from entering pas-
senger compartment.
●for maximum cooling when using the air con-
ditioner.
Air conditioner button
Start the engine, turn the fan control dial to the
desired position and push the button to
turn on the air conditioner. The indicator light
comes on when the air conditioner is operating.
To turn off the air conditioner, push the
button again.
The air conditioner cooling function oper-
ates only when the engine is running.
Rear window defroster switch
For more information about the rear window de-
froster switch, see “Rear window defroster
switch” in the “Instruments and controls” section
of this manual.
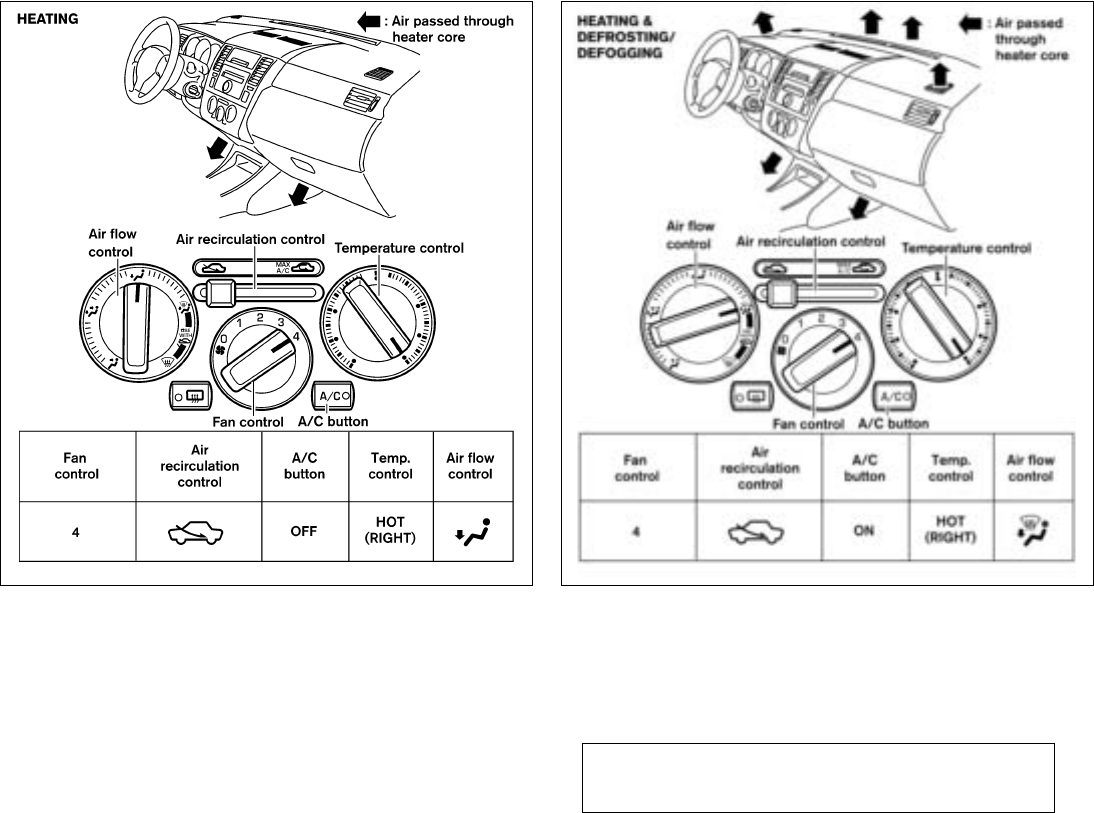
HEATER OPERATION
Heating
This mode is used to direct heated air to the foot
outlets. Some air also flows from the defrost
outlets.
1. Move the air intake lever to the posi-
tion for normal heating.
2. Turn the air flow control dial to the
position.
3. Turn the fan control dial to the desired posi-
tion.
4. Turn the temperature control dial to the de-
sired position between the middle and the
hot position.
Ventilation
This mode directs outside air to the side and
center ventilators.
1. Move the air intake lever to the posi-
tion.
2. Turn the air flow control dial to the
position.
3. Turn the fan control dial to the desired posi-
tion.
4. Turn the temperature control dial to the de-
sired position.
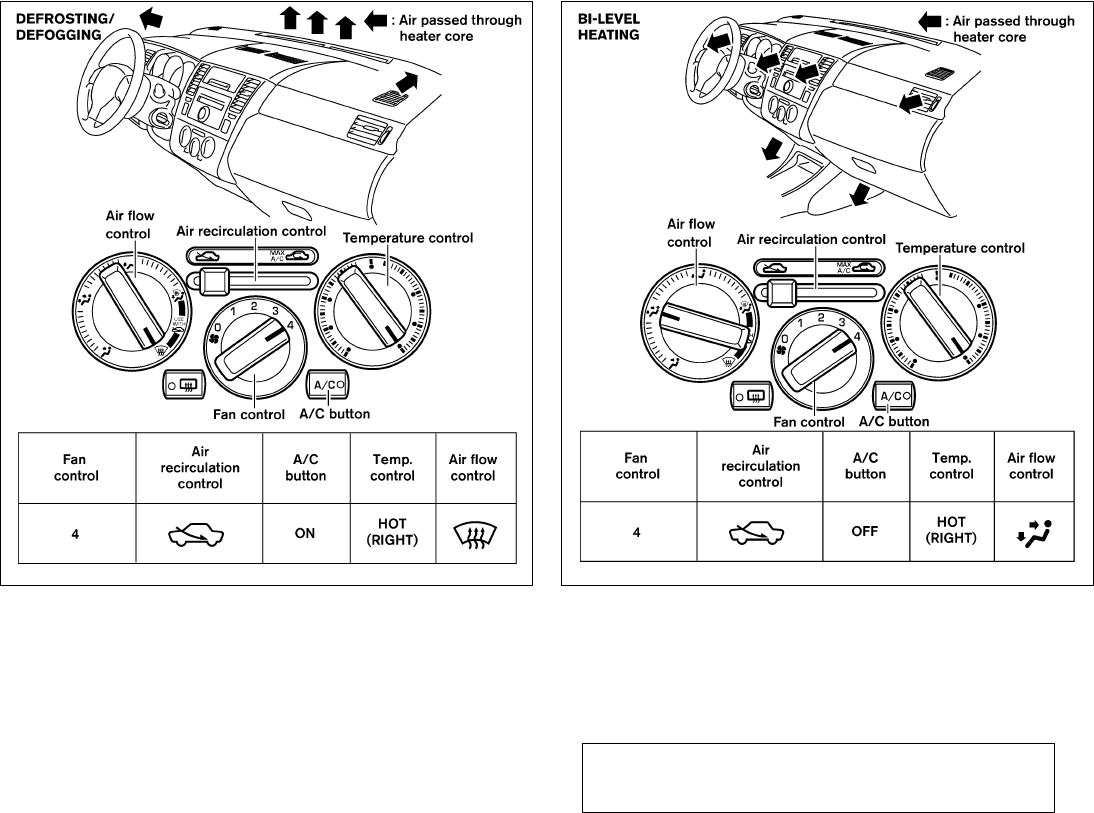
Defrosting or defogging
This mode directs the air to the defrost outlets to
defrost/defog the windows.
1. Move the air intake lever to the posi-
tion.
2. Turn the air flow control dial to the
position.
3. Turn the fan control dial to the desired posi-
tion.
4. Turn the temperature control dial to the de-
sired position between the middle and the
hot position.
●To quickly remove ice or fog from the win-
dows, turn the fan control dial to the maxi-
mum position and the temperature control
dial to the full HOT position.
4-4 Heater, air conditioner, audio and phone systems
੬REVIEW COPY—
2007 Versa (vrs)
Owners Manual—USA_English (nna)
03/06/06—arosenma
੭
When the position is selected, A/C will be
automatically turned on (but the indicator light will
remain off). This will dehumidify the air and help to
defog the windows. When the air flow control dial
is changed to a different position, the A/C will be
turned off.
Bi-level heating
This mode directs cooler air from the side and
center vents and warmer air from the floor outlets.
When the temperature control dial is moved to
the full hot or full cool position, the air between
the vents and the floor outlets is the same tem-
perature.
1. Move the air intake lever to position.
2. Turn the air flow control dial to the
position.
3. Turn the fan control dial to the desired posi-
tion.
4. Turn the temperature control dial to the de-
sired position.
Heating and defogging
This mode heats the interior and defogs the wind-
shield.
1. Move the air intake lever to the posi-
tion.
2. Turn the air flow control dial to the
position.
3. Turn the fan control dial to the desired posi-
tion.
4. Turn the temperature control dial to the de-
sired position between the middle and the
hot position.
When the position is selected, A/C will be
automatically turned on (but the indicator light will
remain off). This will dehumidify the air and help to
defog the windows. When the air flow control dial
is changed to a different position, the A/C will be
turned off.
Operating tips
Clear snow and ice from the wiper blades
and air inlet in front of the windshield. This
improves heater operation.
AIR CONDITIONER OPERATION
Start the engine, turn the fan control dial to the
desired position, and push the button to
activate the air conditioner. When the air condi-
tioner is on, cooling and dehumidifying functions
are added to the heater operation.
The air conditioner cooling function oper-
ates only when the engine is running.
Cooling
This mode is used to cool and dehumidify the air.
1. Move the air intake lever to the posi-
tion.
2. Turn the air flow control dial to the
position.
3. Turn the fan control dial to the desired posi-
tion.
4. Push the button. The indicator light
comes on.
5. Turn the temperature control dial to the de-
sired position.
●For quick cooling when the outside tem-
perature is high, move air intake lever to
the position. Be sure to return to
the position for normal cooling.
Dehumidified heating
This mode is used to heat and dehumidify the air.
1. Move the air intake lever to the posi-
tion.
2. Turn the air flow control dial to the
position.
3. Turn the fan control dial to the desired posi-
tion.
Heater, air conditioner, audio and phone systems 4-5
੬REVIEW COPY—
2007 Versa (vrs)
Owners Manual—USA_English (nna)
03/06/06—arosenma
੭
4. Push the button. The indicator light
comes on.
5. Turn the temperature control dial to the de-
sired position.
Dehumidified defogging
This mode is used to defog the windows and
dehumidify the air.
1. Move the air intake lever to the posi-
tion.
2. Turn the air flow control dial to the
position.
3. Turn the fan control dial to the desired posi-
tion.
4. Push on the button. The indicator
light comes on.
5. Turn the temperature control dial to the de-
sired position.
Operating tips
●Keep the windows and sunroof closed while
the air conditioner is in operation.
●After parking in the sun, drive for 2 or 3
minutes with the windows open to vent hot
air from the passenger compartment. Then,
close the windows. This allows the air con-
ditioner to cool the interior more quickly.
●The air conditioning system should be
operated for approximately 10 minutes
at least once a month. This helps pre-
vent damage to the system due to lack
of lubrication.
●If the engine coolant temperature
gauge indicates engine coolant tem-
perature over the normal range, turn
the air conditioner off. See “If your
vehicle overheats” in the “In case of
emergency” section of this manual.
AIR FLOW CHARTS
The following charts show the button and dial
positions for MAXIMUM AND QUICK heating,
cooling or defrosting. The air recirculation
lever should always be in the OFF position
for heating and defrosting.
4-6 Heater, air conditioner, audio and phone systems
੬REVIEW COPY—
2007 Versa (vrs)
Owners Manual—USA_English (nna)
03/07/06—cathy
੭
LHA0664 LHA0666
Heater, air conditioner, audio and phone systems 4-7
੬REVIEW COPY—
2007 Versa (vrs)
Owners Manual—USA_English (nna)
03/06/06—arosenma
੭
LHA0667 WHA0685
4-8 Heater, air conditioner, audio and phone systems
੬REVIEW COPY—
2007 Versa (vrs)
Owners Manual—USA_English (nna)
03/15/06—cathy
੭
The air conditioner system in your NISSAN ve-
hicle is charged with a refrigerant designed with
the environment in mind.
This refrigerant does not harm the earth’s
ozone layer.
Special charging equipment and lubricant is re-
quired when servicing your NISSAN air condi-
tioner. Using improper refrigerants or lubricants
will cause severe damage to your air conditioner
system. See “Air conditioner system refrigerant
and lubricant recommendations” in the “Techni-
cal and consumer information” section of this
manual.
A NISSAN dealer is able to service your “environ-
mentally friendly” air conditioning system.
WARNING
The air conditioner system contains re-
frigerant under high pressure. To avoid
personal injury, any air conditioner ser-
vice should be done only by an experi-
enced technician with proper equipment.
LHA0668
SERVICING AIR CONDITIONER
Heater, air conditioner, audio and phone systems 4-9
੬REVIEW COPY—
2007 Versa (vrs)
Owners Manual—USA_English (nna)
03/06/06—arosenma
੭

RADIO
Turn the ignition key to the ACC or ON position
and press the PWR button to turn the radio on. If
you listen to the radio with the engine not running,
the key should be turned to the ACC position.
Radio reception is affected by station signal
strength, distance from radio transmitter, build-
ings, bridges, mountains and other external influ-
ences. Intermittent changes in reception quality
normally are caused by these external influences.
Using a cellular phone in or near the ve-
hicle may influence radio reception quality.
Radio reception
Your NISSAN radio system is equipped with
state-of-the-art electronic circuits to enhance ra-
dio reception. These circuits are designed to
extend reception range, and to enhance the qual-
ity of that reception.
However there are some general characteristics
of both FM and AM radio signals that can affect
radio reception quality in a moving vehicle, even
when the finest equipment is used. These char-
acteristics are completely normal in a given re-
ception area, and do not indicate any malfunction
in your NISSAN radio system.
Reception conditions will constantly change be-
cause of vehicle movement. Buildings, terrain,
signal distance and interference from other ve-
hicles can work against ideal reception. De-
scribed below are some of the factors that can
affect your radio reception.
FM RADIO RECEPTION
Range: FM range is normally limited to 25 – 30
miles (40 – 48 km), with monaural (single chan-
nel) FM having slightly more range than stereo
FM. External influences may sometimes interfere
with FM station reception even if the FM station is
within 25 miles (40 km). The strength of the FM
signal is directly related to the distance between
the transmitter and receiver. FM signals follow a
line-of-sight path, exhibiting many of the same
characteristics as light. For example, they will
reflect off objects.
Fade and drift: As your vehicle moves away from
a station transmitter, the signals will tend to fade
and/or drift.
Static and flutter: During signal interference from
buildings, large hills or due to antenna position
(usually in conjunction with increased distance
from the station transmitter) static or flutter can
be heard. This can be reduced by adjusting the
treble control to reduce treble response.
Multipath reception: Because of the reflective
characteristics of FM signals, direct and reflected
signals reach the receiver at the same time. The
signals may cancel each other, resulting in mo-
mentary flutter or loss of sound.
AM RADIO RECEPTION
AM signals, because of their low frequency, can
bend around objects and skip along the ground.
In addition, the signals can be bounced off the
ionosphere and bent back to earth. Because of
these characteristics, AM signals are also sub-
ject to interference as they travel from transmitter
to receiver.
Fading: Occurs while the vehicle is passing
through freeway underpasses or in areas with
many tall buildings. It can also occur for several
seconds during ionospheric turbulence even in
areas where no obstacles exist.
Static: Caused by thunderstorms, electrical
power lines, electric signs and even traffic lights.
SATELLITE RADIO RECEPTION (if so
equipped)
When the satellite radio is first installed or the
battery has been replaced, the satellite radio may
not work properly. This is not a malfunction. Wait
more than 10 minutes with satellite radio ON and
the vehicle outside of any metal or large building
for satellite radio to receive all of the necessary
data.
AUDIO SYSTEM
4-10 Heater, air conditioner, audio and phone systems
੬REVIEW COPY—
2007 Versa (vrs)
Owners Manual—USA_English (nna)
03/06/06—arosenma
੭
No satellite radio reception is available and “NO
SAT” is displayed when the SAT band option is
selected unless optional satellite receiver and
antenna are installed and an XMாor SIRIUS™
satellite radio service subscription is active. Sat-
ellite radio can only be installed in vehicles that
were factory pre-wired for satellite radio. Satellite
radio is not available in Alaska, Hawaii and Guam.
Satellite radio performance may be affected if
cargo carried on the roof blocks the satellite radio
signal.
If possible, do not put cargo over the satellite
antenna.
AUDIO OPERATION PRECAUTIONS
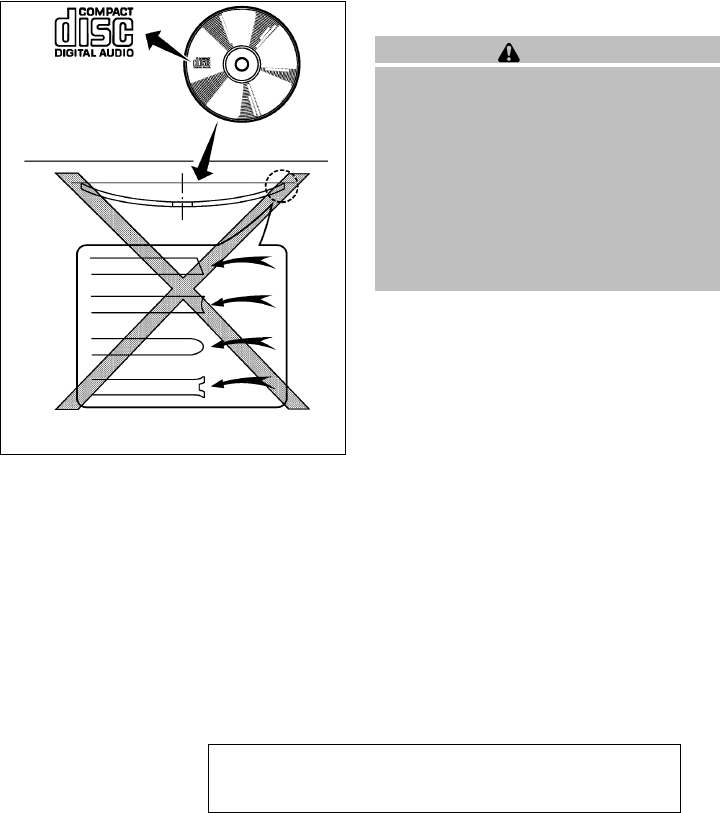
Compact disc (CD) player
CAUTION
●Do not force a compact disc into the CD
insert slot. This could damage the CD
and/or CD changer/player.
●Trying to load a CD with the CD door
closed could damage the CD and/or CD
changer.
●Only one CD can be loaded into the CD
player at a time.
●Only load one CD into the CD changer at
a time
●Only use high quality 4.7 inches (12 cm)
round discs that have the “COMPACT
disc DIGITAL AUDIO” logo on the disc
or packaging.
●During cold weather or rainy days, the
player may malfunction due to the hu-
midity. If this occurs, remove the CD
and dehumidify or ventilate the player
completely.
●The player may skip while driving on
rough roads.
●The CD player sometimes cannot func-
tion when the compartment tempera-
ture is extremely high or low.
LHA0099
Heater, air conditioner, audio and phone systems 4-11
੬REVIEW COPY—
2007 Versa (vrs)
Owners Manual—USA_English (nna)
03/06/06—arosenma
੭

Decrease/increase the temperature
before use.
●Do not expose the CD to direct sun-
light.
●CDs that are in poor condition or are
dirty, scratched or covered with finger-
prints may not work properly.
●The following CDs may not work prop-
erly:
●Copy control compact discs (CCCD)
●Recordable compact discs (CD-R)
●Rewritable compact discs (CD-RW)
●Do not use the following CDs as they
may cause the CD player to malfunc-
tion:
●3.1 in (8 cm) discs with an adapter
●CDs that are not round
●CDs with a paper label
●CDs that are warped, scratched, or
have abnormal edges
●This audio system can only play pre-
recorded CDs. It has no capability to
record or burn CDs.
●If the CD cannot be played, one of the
following messages will be displayed.
CHECK DISC:
●Confirm that the CD is inserted cor-
rectly (the label side is facing up,
etc.).
●Confirm that the CD is not bent or
warped and it is free of scratches.
PRESS EJECT:
This is an error due to excessive tem-
perature inside the player. Remove the
CD by pressing the EJECT button. After
a short time, reinsert the CD. The CD
can be played when the temperature of
the player returns to normal.
UNPLAYABLE:
The file is unplayable in this audio sys-
tem (only MP3 CD).
Compact Disc with MP3
Terms:
●MP3 — MP3 is short for Moving Pictures
Experts Group Audio Layer 3. MP3 is the
most well-known compressed digital audio
file format. This format allows for near “CD
quality” sound, but at a fraction of the size of
normal audio files. MP3 conversion of an
audio track from CD-ROM can reduce the
file size by approximately a 10:1 ratio with
virtually no perceptible loss in quality. MP3
compression removes the redundant and
irrelevant parts of a sound signal that the
human ear doesn’t hear.
●Bit rate — Bit rate denotes the number of
bits per second used by a digital music file.
The size and quality of a compressed digital
audio file is determined by the bit rate used
when encoding the file.
●Sampling frequency — Sampling frequency
is the rate at which the samples of a signal
are converted from analog to digital (A/D
conversion) per second.
●ID3 tag — The ID3 tag is the part of the
encoded MP3 file that contains information
about the digital music file such as song title,
artist, album title, encoding bit rate, track
time duration, etc. ID3 tag information is
displayed on the Album/Artist/Track title line
on the display.
4-12 Heater, air conditioner, audio and phone systems
੬REVIEW COPY—
2007 Versa (vrs)
Owners Manual—USA_English (nna)
03/06/06—arosenma
੭
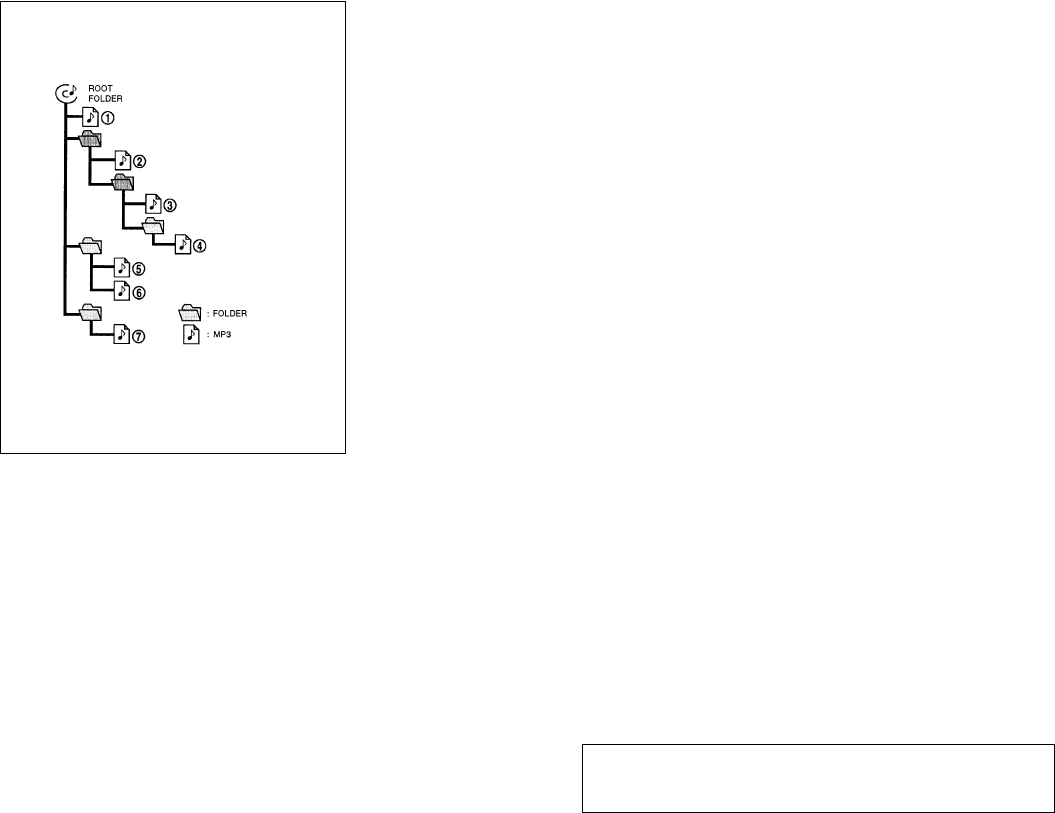
Playback order:
Playback order of the CD with compressed files
(MP3) is as illustrated.
●The names of folders not containing MP3
files are not shown in the display.
●If there is a file in the top level of the disc,
“ROOT” is displayed.
●The playback order is the order in which the
files were written by the writing software.
Therefore, the files might not play in the
desired order.
Playback order chart
WHA0543
Heater, air conditioner, audio and phone systems 4-13
੬REVIEW COPY—
2007 Versa (vrs)
Owners Manual—USA_English (nna)
03/06/06—arosenma
੭
Specification chart:
Supported media CD, CD-R, CD-RW
Supported file systems ISO9660 LEVEL1, ISO9660 LEVEL2, Apple ISO, Romeo, Joliet * ISO9660 Level 3 (packet writing) is not supported.
Supported
versions* MP3
Version MPEG1, MPEG2, MPEG2.5
Sampling frequency 8 kHz - 48 kHz
Bit rate 8 kbps - 320 kbps, VBR
Tag information ID3 tag VER1.0, VER1.1, VER2.2, VER2.3 (MP3 only)
Folder levels Folder levels: 8, Max folders: 255 (including root folder), Files: 512
Text character number limitation 31 characters
Displayable character codes 01: ASCII, 02: ISO-8859-1, 03: UNICODE (UTF-16 BOM Big Endian), 04: UNICODE (UTF-16 Non-BOM Big Endian), 05:
(UTF-8), 06: UNICODE (Non-UTF-16 BOM Little Endian)
*Files created with a combination of 48 kHz sampling frequency and 64 kbps bit rate cannot be played.
4-14 Heater, air conditioner, audio and phone systems
੬REVIEW COPY—
2007 Versa (vrs)
Owners Manual—USA_English (nna)
03/06/06—arosenma
੭
Troubleshooting guide:
Symptom Cause and Countermeasure
Cannot play
Check if the disc was inserted correctly.
Check if the disc is scratched or dirty.
Check if there is condensation inside the player. If there is, wait until the condensation is gone (about 1 hour) before using the player.
If there is a temperature increase error, the CD player will play correctly after it returns to the normal temperature.
Files with extensions other than “.MP3”, “.mp3” or “.wma” cannot be played. In addition, the character codes and number of characters for folder names
and file names should be in compliance with the specifications.
Poor sound quality Check if the disc is scratched or dirty.
Bit rate may be too low.
It takes a relatively long time
before the music starts
playing.
If there are many folders or file levels on the MP3 disc, or if it is a multisession disc, some time may be required before the music starts playing.
Music cuts off or skips The writing software and hardware combination might not match, or the writing speed, writing depth, writing width, etc., might not match the
specifications. Try using the slowest writing speed.
Skipping with high bit rate
files
Skipping may occur with large quantities of data, such as for high bit rate data.
Moves immediately to the
next song when playing
When a non-MP3 file has been given an extension of “.MP3” or “.mp3”, or when play is prohibited by copyright protection, there will be approximately 5
seconds of no sound and then the player will skip to the next song.
Songs do not play back in
the desired order
The playback order is the order in which the files were written by the writing software. Therefore, the files might not play in the desired order.
Heater, air conditioner, audio and phone systems 4-15
੬REVIEW COPY—
2007 Versa (vrs)
Owners Manual—USA_English (nna)
03/06/06—arosenma
੭
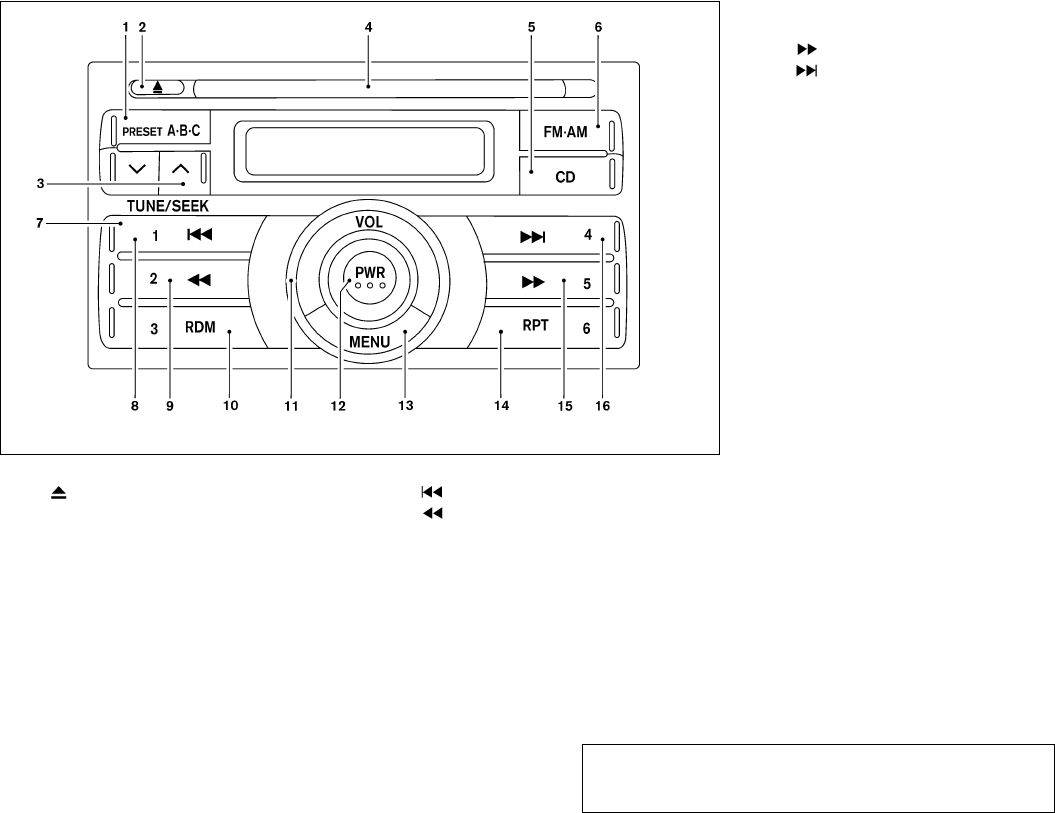
1. PRESET A·B·C button
2. CD eject button
3. TUNE/SEEK buttons
4. CD insert slot
5. CD button
6. FM·AM button
7. Station select (1 - 6) buttons
8. (CD seek/track) button
9. (CD rewind) button
10. RDM button
11. VOL control knob
12. PWR button
13. MENU button
14. RPT button
15. (CD fast forward) button
16. (CD seek/track) button
FM/AM RADIO WITH COMPACT
DISC (CD) PLAYER
For all operation precautions, see ЉAudio opera-
tion precautionsЉearlier in this section.
PWR button and VOL control knob
Turn the ignition key to the ACC or ON position,
then press the PWR button. If you listen to the
radio with the engine not running, turn the key to
the ACC position. The mode (radio or CD) that
was playing immediately before the system was
turned off resumes playing.
When no CD is loaded, the radio comes on.
Pressing the PWR button again turns the system
off.
Turn the VOL control knob to the right to increase
volume or to the left to decrease volume.
MENU button (BASS, TREBLE, FADE, BAL-
ANCE and CLOCK):
Press the MENU button to change the mode as
follows:
BAS →TRE →FAD →BAL →CLK →Audio or
OFF →BAS
LHA0657
4-16 Heater, air conditioner, audio and phone systems
੬REVIEW COPY—
2007 Versa (vrs)
Owners Manual—USA_English (nna)
03/06/06—arosenma
੭
To adjust Bass, Treble, Fade and Balance, press
the MENU button until the desired mode appears
in the display. Press the TUNE/SEEK button to
adjust Bass and Treble to the desired level. You
can also use the TUNE/SEEK button to adjust
Fader and Balance modes. Fader adjusts the
sound level between the front and rear speakers
and Balance adjusts the sound between the right
and left speakers.
Once you have adjusted the sound quality to the
desired level, press the MENU button repeatedly
until the radio or CD display reappears. Other-
wise, the radio or CD display will automatically
reappear after about 10 seconds.
Clock operation
Press the MENU button until CLK-ON or CLK-
OFF is displayed, use the TUNE/SEEK button to
turn the clock display on or off.
Clock set
If the clock is not displayed with the ignition
switch in the ACC or ON position, you need to
select the CLK-ON mode. Press the MENU but-
ton repeatedly until CLK-OFF mode is displayed.
Use the TUNE/SEEK button to enable CLK-ON
mode.
1. Press the MENU button repeatedly until
CLK-ON mode appears.
2. Press the MENU button again, the time will
start flashing.
3. Press the TUNE/SEEK button
or to adjust the hour.
4. Press the MENU button again; the display
will switch to the minute adjustment mode.
5. The minutes will start flashing. Press
TUNE/SEEK button or to ad-
just the minutes.
6. Press the MENU button again to exit the
clock set mode.
The display will return to the regular clock display
after 10 seconds, or press the MENU button
again to return to the regular clock display.
Resetting the time
Hold the MENU button down and then press the
TUNE/SEEK button, the time will reset as fol-
lows:
●If the displayed minutes before the reset are
in the range of :00 - :29, the hour displayed
before the reset will stay the same and the
minutes will be reset to :00.
●If the displayed minutes before the reset are
in the range of :30 - :59, the hour displayed
before the reset will advance by one hour
and the minutes will be reset to :00.
For example, if the MENU button and the
TUNE/SEEK button are pressed while the time
displayed is between 8:00 and 8:29, the display
will be reset to 8:00. If the buttons were pressed
while the time was between 8:30 and 8:59, the
display will be reset to 9:00. At the same time the
display will return to the audio.
FM/AM radio operation
FM·AM button:
Press the FM·AM button to change from AM ←→
FM reception.
The FM stereo indicator, ST, illuminates during
FM stereo reception. When the stereo broadcast
signal is weak, the radio automatically changes
from stereo to monaural reception.
TUNE/SEEK buttons:
Manual tuning
Press the or button for less than 0.5
seconds for manual tuning.
SEEK tuning
Press the or button for more than
1.5 seconds to seek through the frequencies.
Seek tuning begins from low to high frequencies,
or high to low frequencies depending on which
button is pressed, and stops at the next broad-
casting station. Once the highest broadcasting
Heater, air conditioner, audio and phone systems 4-17
੬REVIEW COPY—
2007 Versa (vrs)
Owners Manual—USA_English (nna)
03/06/06—arosenma
੭
station is reached, the radio continues in the seek
mode at the lowest broadcasting station.
Station memory operations:
18 stations can be set for the FM and AM radio to
the A, B and C preset button in any combination
of AM or FM stations.
1. Press the PRESET A·B·C button to change
between storage banks. The radio displays
the icon A, B or C to indicate which set of
presets are active.
2. Tune to the desired station using manual
TUNE or SEEK tuning. Press and hold any of
the desired station memory buttons (1 – 6)
until a beep sound is heard. (The radio mutes
when the select button is pressed.)
3. The channel indicator will then come on and
the sound will resume. Programming is now
complete.
4. Other buttons can be set in the same man-
ner.
If the battery cable is disconnected, or if the fuse
opens, the radio memory will be canceled. In that
case, reset the desired stations.
Compact disc (CD) player operation
Turn the ignition key to the ACC or ON position,
and carefully insert the compact disc into the slot
with the label side up. The compact disc is auto-
matically pulled into the slot and starts to play.
If the radio is already operating, it automatically
turns off and the compact disc begins to play.
CD button:
When the CD button is pressed with a compact
disc loaded and the radio playing, the radio turns
off and the last used compact disc starts to play.
Rewind and Fast For-
ward buttons:
When the or button is pressed
while the compact disc is playing, the compact
disc plays at an increased speed while rewinding
or fast forwarding. When the button is released,
the compact disc returns to normal play speed.
SEEK/TRACK buttons:
When is pressed while the compact disc
is playing, the next track following the present
one starts to play from the beginning.
Press several times to skip several tracks.
Each time the button is pressed, the CD ad-
vances 1 additional track. The track number ap-
pears in the display window. (When the last track
on the compact disc is skipped, the first track is
played.)
When is pressed, the track being played
returns to the beginning. Press several
times to skip back several tracks. Each time the
button is pressed the CD moves back 1 track.
RPT button:
When the RPT button is pressed while the com-
pact disc is being played, the play pattern can be
changed as follows:
1 TRACK RPT ←→ Normal
1 TRACK RPT: The track that is currently playing
will be repeated.
RDM button:
When the RDM button is pressed while the com-
pact disc is being played, the play pattern can be
changed as follows:
RDM ←→ Normal
RDM: Tracks from the disc that is currently play-
ing will be played randomly.
CD EJECT button:
When the button is pressed with a com-
pact disc loaded, the compact disc will be
ejected.
When the button is pressed twice with a
compact disc loaded, the compact disc will be
ejected further, for easier CD removal.
4-18 Heater, air conditioner, audio and phone systems
੬REVIEW COPY—
2007 Versa (vrs)
Owners Manual—USA_English (nna)
03/06/06—arosenma
੭
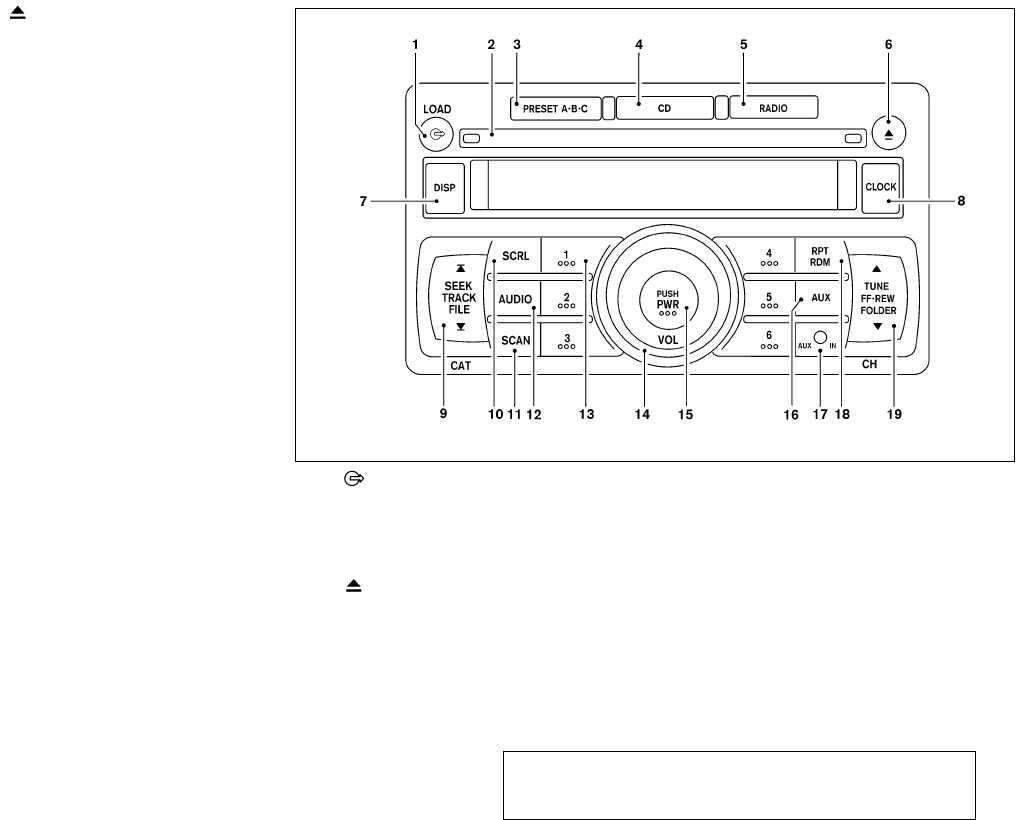
When the button is pressed while the
compact disc is being played, the compact disc
will eject and the system will turn off.
CD IN indicator:
CD IN indicator appears on the display when the
CD is loaded with the system on.
1. CD LOAD button
2. CD insert slot
3. PRESET A·B·C button
4. CD button
5. RADIO button*
6. CD eject button
7. DISP button
8. CLOCK button
9. SEEK/TRACK/FILE button
10. SCRL button
11. SCAN button
12. AUDIO button
LHA0659
Heater, air conditioner, audio and phone systems 4-19
੬REVIEW COPY—
2007 Versa (vrs)
Owners Manual—USA_English (nna)
03/06/06—arosenma
੭

13. Station and CD select (1–6) buttons
14. VOL control knob
15. PUSH PWR button
16. AUX button
17. AUX IN jack
18. RPT/RDM button
19. TUNE/FF·REW/FOLDER button
*No satellite radio reception is available
when the RADIO button is pressed to
access satellite radio stations unless
optional satellite receiver and antenna
are installed and an XMாor SIRIUS™
satellite radio service subscription is
active. Satellite radio can only be in-
stalled in vehicles that were factory pre-
wired for satellite radio. Satellite radio is
not available in Alaska, Hawaii and
Guam.
FM/AM/SAT RADIO WITH
COMPACT DISC (CD) CHANGER
For all operation precautions, see ЉAudio opera-
tion precautionsЉearlier in this section.
No satellite radio reception is available when the
RADIO button is pressed to access satellite radio
stations unless optional satellite receiver and an-
tenna are installed and an XMாor SIRIUS™ sat-
ellite radio service subscription is active. Satellite
radio can only be installed in vehicles that were
factory pre-wired for satellite radio. Satellite radio
is not available in Alaska, Hawaii and Guam.
Audio main operation
PWR and VOL control:
Turn the ignition key to ACC or ON, and then
press the PWR button while the system is off to
call up the mode (radio or CD) which was playing
immediately before the system was turned off.
To turn the system off, press the PWR button.
Turn the VOL control knob to adjust the volume.
This vehicle may be equipped with Speed Sen-
sitive Volume (SSV) for audio. The audio volume
changes as the driving speed changes.
AUDIO button (BASS, TREBLE, BALANCE,
FADE, SSV and BEEP):
Press the AUDIO button to change the mode as
follows:
BAS →TRE →BAL →FAD →SPD VOL (SSV if
so equipped) →BEEP ON/OFF →Audio or OFF
→BAS
To adjust Bass, Treble, Balance and Fade, press
the AUDIO button until the desired mode ap-
pears in the display. Press the
TUNE/FF·REW/FOLDER button to adjust Bass
and Treble to the desired level. You can also use
the TUNE/FF·REW/FOLDER button to adjust
Balance and Fade modes. Balance adjusts the
sound between the right and left speakers and
Fade adjusts the sound level between the front
and rear speakers.
To change the SSV mode to OFF, LOW, MID or
HIGH, press the TUNE/FF·REW/FOLDER but-
ton up or down.
To change the BEEP to ON or OFF, press the
TUNE/FF·REW/FOLDER button up or down.
This will enable or disable the beep sound heard
during menu selection.
Once you have adjusted the sound quality to the
desired level, press the AUDIO button repeatedly
until the radio or CD display reappears. Other-
wise, the radio or CD display will automatically
reappear after about 10 seconds.
Clock operation
Pressing the CLOCK button displays the clock
with the radio on or off. Press the CLOCK button
again to turn off the clock display.
Pressing the CLOCK button alternates the clock
and the radio/CD player options in the display.
4-20 Heater, air conditioner, audio and phone systems
੬REVIEW COPY—
2007 Versa (vrs)
Owners Manual—USA_English (nna)
03/06/06—arosenma
੭

Clock set
1. Press and hold the CLOCK button until it
beeps for more than 1.5 seconds to enter
the clock set mode.
2. The time will start flashing. Press the
SEEK/TRACK/FILE button or
to adjust the hours.
3. Press the TUNE/FF·REW/FOLDER
button or to adjust the minutes.
4. Press the CLOCK button again to exit the
clock set mode.
The display will return to the regular clock display
after 10 seconds, or you may press the CLOCK
button again to return to the regular clock display.
DISP (display) button:
The DISP (display) button will show text about
FM stations, CD or MP3 and SAT (satellite, if so
equipped) information in the audio display.
FM display mode
To change the text displayed while listening to an
FM station that broadcasts with Radio Data Sys-
tem (RDS), press the DISP button. The DISP
button will allow you to change RDS information
as follows: Station call number →Program type
→Station information →Station call number.
●Station call number displays the radio fre-
quency number of the station.
●Program type displays the type or category
of radio station.
●Station information displays information the
radio station wants to broadcast.
For additional information, see “Radio data sys-
tem (RDS)” later in this section.
CD display mode
To change the text displayed while playing a CD
with text, press the DISP button. The DISP button
will allow you to scroll through CD text as follows:
Track number and Track time ←→ Disc title ←→
Track number and Track title.
●Track number displays the number selected
on the disc.
●Track time displays the amount of time the
track has played.
●Disc title displays the title of the CD being
played.
●Track title displays the title of the selected
CD track.
MP3 display mode
To change the text displayed when listening to an
MP3 with MP3 text (when CD with text is being
used), press the DISP button. The DISP button
will scroll through the CD text as follows: Track
number and Track time ←→ Folder number and
Folder title ←→ Album title ←→ Artist title ←→
Song title ←→ Disc title ←→ Track number and
Track title.
●Track number and time displays the number
of the track and how long it has been playing.
●Folder number and title displays the number
of the folder and the name.
●Album title displays the album name of the
track playing.
●Song title displays the song name of the
track playing.
●Disc title displays the disc name of the CD
playing
●Track number and title displays the number
of the track and the name.
Display satellite radio display mode (if so
equipped)
To change the text displayed when listening to
satellite radio (if so equipped) press the DISP
button. The DISP button will scroll through the
broadcast information as follows: Name ←→
Title ←→ Current display mode.
Heater, air conditioner, audio and phone systems 4-21
੬REVIEW COPY—
2007 Versa (vrs)
Owners Manual—USA_English (nna)
03/06/06—arosenma
੭
To change the default display mode press the
AUDIO button to display mode and press the
TUNE button to select the following display
modes: Channel number ←→ Channel name
←→ Name ←→ Title. Once the display mode is
selected press the AUDIO button again to store
the setting. If the AUDIO button is not pressed
after 8 seconds the display will refresh with the
last selected display mode setting.
●Channel number mode displays the channel
number of the selected satellite radio sta-
tion.
●Channel name mode displays the channel
name of the selected satellite radio station.
●Name mode displays the name of the artist,
host or weather condition of the selected
satellite radio station.
●Title mode displays the song title, show
name, or temperature of the selected satel-
lite radio station.
SCRL (Scroll) button:
Press the SCRL button to scroll through
CD/MP3 text that is too long to be displayed on
the first line of the display.
FM/AM/SAT radio operation
FM/AM/SAT band select:
Pressing the RADIO button will change the band
as follows:
AM ←→ FM or SAT (Satellite, if so equipped)
When the RADIO button is pressed while the
ignition switch is in the ACC or ON position, the
radio will come on at the station last played.
No satellite radio reception is available when the
RADIO button is pressed to access satellite radio
stations unless optional satellite receiver and an-
tenna are installed and an XMாor SIRIUS™ sat-
ellite radio service subscription is active. Satellite
radio can only be installed in vehicles that were
factory pre-wired for satellite radio. Satellite radio
is not available in Alaska, Hawaii and Guam. If
satellite radio is not operational then the RADIO
button is used to toggle between AM and FM
bands.
If a compact disc is playing when the RADIO
button is pressed, the compact disc will auto-
matically be turned off and the last radio station
played will come on.
The FM stereo indicator ST will glow during FM
stereo reception. When the stereo broadcast
signal is weak, the radio will automatically change
from stereo to monaural reception.
TUNE/FF·REW/FOLDER
(Tuning):
To manually tune the radio, press the
TUNE/FF·REW/FOLDER button or .
To move quickly through the channels, hold either
the or button down for more than
1.5 seconds.
SEEK/TRACK/FILE tun-
ing:
Press the SEEK/TRACK/FILE button
or for less than 1.5 seconds to tune from
high to low or low to high frequencies and stop at
the next broadcasting station.
To seek quickly through the channels, press and
hold the SEEK/TRACK/FILE button for more than
1.5 seconds. When the button is released, the
radio will seek to the next broadcasting station.
SCAN tuning:
Press the SCAN button for more than 1.5 sec-
onds to stop at each broadcasting station for 5
seconds. Pressing the button again during this 5
second period will stop SCAN tuning and the
radio will remain tuned to that station. If the
SCAN button is not pressed within 5 seconds,
SCAN tuning moves to the next station.
4-22 Heater, air conditioner, audio and phone systems
੬REVIEW COPY—
2007 Versa (vrs)
Owners Manual—USA_English (nna)
03/06/06—arosenma
੭
PRESET A·B·C (Station memory opera-
tions):
18 stations can be set for the FM, AM and SAT
(satellite, if so equipped) radio to the A, B and C
preset button in any combination of FM, AM or
SAT stations.
1. Choose preset channel A, B or C using the
PRESET A·B·C select button.
2. Select the desired FM, AM or SAT station
band.
3. Tune to the desired station using manual,
SEEK or SCAN tuning. Press and hold any
of the desired station memory buttons (1 –
6) until a beep sound is heard.
4. The channel indicator will then come on and
the sound will resume. Programming is now
complete.
5. Other buttons can be set in the same man-
ner.
If the battery cable is disconnected, or if the fuse
opens, the radio memory will be canceled. In that
case, reset the desired stations.
Radio data system (RDS):
RDS stands for Radio Data System, and is a data
information service transmitted by some radio
stations on the FM band (not AM band). Cur-
rently, most RDS stations are in large cities, but
many stations are now considering broadcasting
RDS data.
RDS can display:
●Station call sign, such as “WHFR 98.3”.
●Station name, such as “The Groove”.
●Music or programming type such as “Clas-
sical”, “Country”, or “Rock”.
If the station broadcasts RDS information, the
RDS icon is displayed.
Compact disc (CD) changer operation
Turn the ignition key to the ACC or ON position
and insert the compact disc into the slot with the
label side facing up. The compact disc will be
guided automatically into the slot and start play-
ing. To insert the disc, first press the but-
ton.
If the radio is already operating, it will automati-
cally turn off and the compact disc will play.
If the system has been turned off while the com-
pact disc was playing, pressing the PWR button
will start the compact disc.
Do not use 3.1 in (8 cm) diameter compact discs
in the CD changer.
LOAD button:
To insert a CD in the CD changer, press the load
button for less than 1.5 seconds. Select
the loading slot by pressing the CD insert select
button (1 – 6), then insert the CD.
To insert 6 CDs to the CD changer, press the
load button for more than 1.5 seconds.
The slot numbers (1 – 6) will illuminate on the
display when CDs are loaded into the changer.
CD button:
When the CD button is pressed with the system
off and the compact disc loaded, the system will
turn on and the compact disc will start to play.
When the CD button is pressed with the com-
pact disc loaded with the radio playing, the radio
will automatically be turned off and the compact
disc will start to play.
TUNE/FF·REW/FOLDER
(Fast Forward and Re-
wind):
When the TUNE/FF·REW/FOLDER button is
pressed, (fast forward) or (rewind)
while the compact disc is being played, the com-
pact disc will play while fast forwarding or re-
winding . When the button is released, the com-
pact disc will return to normal play speed.
Heater, air conditioner, audio and phone systems 4-23
੬REVIEW COPY—
2007 Versa (vrs)
Owners Manual—USA_English (nna)
03/07/06—cathy
੭
SEEK/TRACK/FILE:
When the button is pressed for less than
1.5 seconds while a compact disc is playing, the
track being played returns to its beginning. Press
several times to skip back through tracks. The
compact disc will go back the number of times
the button is pressed.
When the button is pressed for less than
1.5 seconds while the compact disc is playing,
the next track will start to play from its beginning.
Press several times to skip through tracks. The
compact disc will advance the number of times
the button is pressed. (When the last track on the
compact disc is skipped through, the first track
will be played.)
TUNE/FF·REW/FOLDER:
While playing an MP3, press the
TUNE/FF·REW/FOLDER button or
to scan forward or backward through available
folders.
To fast forward or rewind through an audio track,
press the TUNE/FF·REW/FOLDER button
or for more than 1.5 seconds.
SCAN button:
While listening to a CD, press the SCAN button
to preview the first 10 seconds of each track on
the current CD playing. Pressing the SCAN but-
ton during this 10 second period stops the scan
and the CD remains on that track.
Press the SCAN button for more than 1.5 sec-
onds to preview 10 seconds of the first track on
each disc, only if more than 1 disc is loaded into
the CD changer. Pressing the button again dur-
ing this 10 second period will stop the scan and
the CD that was being previewed will remain on
and will continue the regular playback.
CD select buttons:
To play another CD that has been loaded, press a
CD select button (1 – 6).
RPT/RDM button:
When the RPT/RDM button is pressed while the
compact disc is played, the play pattern can be
changed as follows:
RPT DISC →RPT TRACK →RDM ALL DISC →
RDM DISC →RPT ALL DISC →RPT DISC
RPT DISC: The disc that is currently playing will
be repeated.
RPT TRACK: The track that is currently playing
will be repeated.
RDM ALL DISC: Tracks from all discs will be
played randomly.
RDM DISC: Tracks from the disc that is currently
playing will be played randomly.
RPT ALL DISC: All discs will be played normally,
with no special play pattern enabled.
MP3 RPT/RDM mode:
When the RPT/RDM button is pressed while an
MP3 compact disc is played, the play pattern can
be changed as follows:
RPT DISC →RPT FOLDER →RPT TRACK →
RDM ALL DISC →RPT ALL DISC →RPT DISC
RPT DISC: The disc that is currently playing will
be repeated.
RPT FOLDER: The folder selected that is cur-
rently playing will be repeated.
RPT TRACK: The track that is currently playing
will be repeated.
RDM ALL DISC: Tracks from all discs will be
played randomly.
RPT ALL DISC: All discs will be played normally,
with no special play pattern enabled.
EJECT button:
Current disc:
●Press the slot number (1 – 6) for the desired
disc, then press the button. The com-
pact disc will be ejected.
●When the button is pressed twice,
the CD will be ejected further for easier CD
removal. If the disc is not removed within 15
seconds, the disc will reload.
4-24 Heater, air conditioner, audio and phone systems
੬REVIEW COPY—
2007 Versa (vrs)
Owners Manual—USA_English (nna)
03/06/06—arosenma
੭
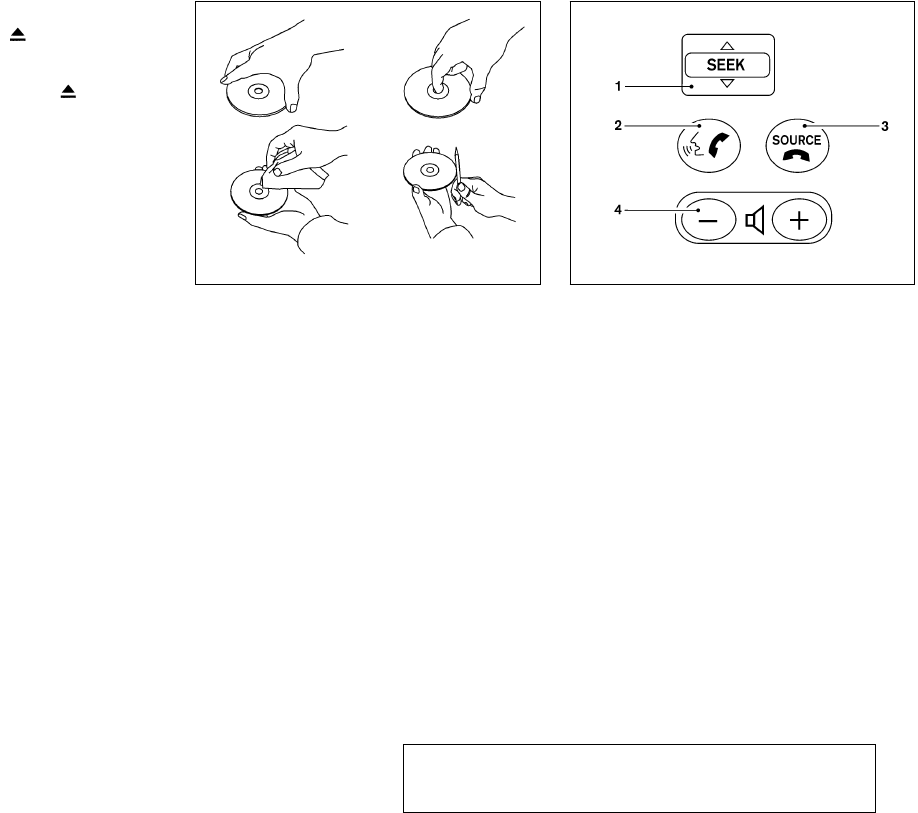
All discs:
●Press and hold the button for more
than 1.5 seconds. The compact discs will be
ejected one by one. If a disc is not removed
within 15 seconds, or the button is
pressed again during the eject sequence,
the entire disc eject sequence will be can-
celed.
When this button is pressed while the compact
disc is being played, the compact disc will eject
and the last source will be played.
CD IN indicator:
The slot numbers (1 – 6) will illuminate if CDs
have been loaded into the changer in CD mode
only.
AUX (Auxiliary) button:
The AUX jack is located on the CD player. The
AUX audio input jack accepts any standard ana-
log audio input such as from a portable cassette
tape/CD player, MP3 player or laptop computers.
Press the AUX button to play a compatible device
when it is plugged into the AUX jack.
CD CARE AND CLEANING
●Handle a CD by its edges. Do not bend the
disc. Never touch the surface of the disc.
●Always place the discs in the storage case
when they are not being used.
●
To clean a disc, wipe the surface from the center
to the outer edge using a clean, soft cloth. Do
not wipe the disc using a circular motion.
●Do not use a conventional record cleaner or
alcohol intended for industrial use.
●A new disc may be rough on the inner and
outer edges. Remove the rough edges by
rubbing the inner and outer edges with the
side of a pen or pencil as illustrated.
1. SEEK tuning switch
2. Phone operation switch
3. POWER on and SOURCE select
switch
4. Volume control switch
STEERING WHEEL SWITCH FOR
AUDIO CONTROL (if so equipped)
The audio system can be operated using the
controls on the steering wheel.
LHA0049 LHA0660
Heater, air conditioner, audio and phone systems 4-25
੬REVIEW COPY—
2007 Versa (vrs)
Owners Manual—USA_English (nna)
03/06/06—arosenma
੭
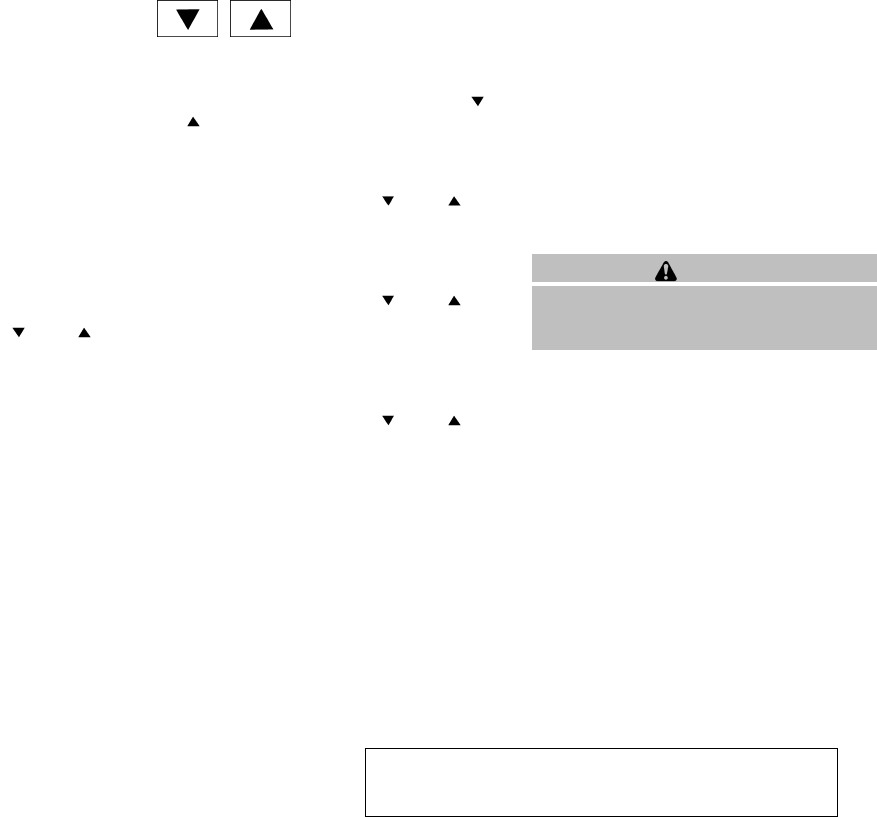
POWER on switch
With the ignition key turned to the ACC or ON
position, push the POWER switch to turn the
audio system on.
SOURCE select switch:
Push the SOURCE select switch to change the
mode in the following sequence: PRESET A →
PRESET B →PRESET C →PRESET A.
With a CD inserted and an auxiliary device
plugged in, push the SOURCE select switch to
change the mode in the following sequence: CD
→AUX →PRESET A →PRESET B →PRESET
C→CD.
While in one of the preset radio station banks (A,
B or C), use the SEEK switch or to
select one of the preset radio stations (1–6).
Volume control switch
Push the volume control switch to increase or
decrease the volume.
SEEK tuning
Memory change (radio):
While in one of the preset radio station banks (A,
B or C), push the SEEK tuning switch
or for less than 1.5 seconds to change to
the next preset station in memory.
Seek tuning (radio):
Push the SEEK tuning switch or for
more than 1.5 seconds to seek the next or previ-
ous radio station.
Next/Previous track (CD):
Push the SEEK tuning switch or for
less than 1.5 seconds to return to the beginning
of the present track or skip to the next track. Push
several times to skip back or skip through tracks.
Change disc (CD) (if so equipped):
Push the SEEK tuning switch or for
more than 1.5 seconds to change the playing
disc up or down.
ANTENNA
The antenna should be placed in the rearward
position for maximum radio reception.
The antenna cannot be shortened, but can be
folded down or removed. When you need to
remove the antenna, turn the antenna rod coun-
terclockwise.
To install the antenna rod, turn the antenna clock-
wise. Tighten the antenna rod to specification
using a suitable tool such as an open-end
wrench. The antenna rod tightening specification
is 18 – 23 in-lb (2.0 – 2.6 N·m). Do not use pliers
to tighten the antenna as they can leave marks on
the antenna surface. The antenna rod cannot be
hand tightened to the proper specification.
CAUTION
Always properly tighten the antenna rod
during installation or the antenna rod may
break during vehicle operation.
4-26 Heater, air conditioner, audio and phone systems
੬REVIEW COPY—
2007 Versa (vrs)
Owners Manual—USA_English (nna)
03/06/06—arosenma
੭

When installing a CB, ham radio or car phone in
your NISSAN, be sure to observe the following
precautions, otherwise the new equipment may
adversely affect the engine control system and
other electronic parts.
WARNING
●A cellular telephone should not be used
while driving so full attention may be
given to vehicle operation. Some juris-
dictions prohibit the use of cellular tele-
phones while driving.
●If you must make a call while your ve-
hicle is in motion, the hands free cellu-
lar phone operational mode (if so
equipped) is highly recommended. Ex-
ercise extreme caution at all times so
full attention may be given to vehicle
operation.
●If a conversation in a moving vehicle
requires you to take notes, pull off the
road to a safe location and stop your
vehicle before doing so.
CAUTION
●Keep the antenna as far away as pos-
sible from the electronic control
modules.
●Keep the antenna wire more than 8 in
(20 cm) away from the electronic con-
trol system harnesses. Do not route the
antenna wire next to any harness.
●Adjust the antenna standing-wave ratio
as recommended by the manufacturer.
●Connect the ground wire from the CB
radio chassis to the body.
●For details, consult a NISSAN dealer.
WARNING
●Use a phone after stopping your vehicle
in a safe location. If you have to use a
phone while driving, exercise extreme
caution at all times so full attention may
be given to vehicle operation.
●If a conversation in a moving vehicle
requires you to take notes, pull off the
road to a safe location and stop your
vehicle before doing so.
CAUTION
To avoid draining the vehicle battery, use
a phone after starting the engine.
CAR PHONE OR CB RADIO BLUETOOTHாHANDS-FREE PHONE
SYSTEM (if so equipped)
Heater, air conditioner, audio and phone systems 4-27
੬REVIEW COPY—
2007 Versa (vrs)
Owners Manual—USA_English (nna)
03/06/06—arosenma
੭

Your NISSAN is equipped with the Bluetoothா
Hands-Free Phone System. If you are an owner
of a Bluetoothாenabled cellular phone, you can
set up the wireless connection between your
cellular phone and the in-vehicle phone module.
With Bluetoothாwireless technology, you can
make or receive a hands-free telephone call with
your cellular phone in the vehicle.
Once your cellular phone is paired to the in-
vehicle phone module, no other phone connect-
ing procedure is required. Your phone is auto-
matically connected with the in-vehicle phone
module when the ignition switch is turned to the
ON position with the paired cellular phone turned
on and carried in the vehicle.
You can register up to 5 different Bluetoothா
cellular phones to the in-vehicle phone module.
However, you can talk on only one cellular phone
at a time.
Before using the BluetoothாHands-Free Phone
System, refer to the following notes.
●Set up the wireless connection between a
cellular phone and the in-vehicle phone
module before using the hands-free phone
system.
●Some Bluetoothாenabled cellular phones
may not be recognized by the in-vehicle
phone module. Please visit www.nissan-
usa.com/bluetooth for a recommended
phone list.
●You will not be able to use a hands-free
phone under the following conditions:
– Your vehicle is outside of the cellular ser-
vice area.
– Your vehicle is in an area where it is
difficult to receive radio waves; such as in
a tunnel, in an underground parking ga-
rage, near a tall building or in a mountain-
ous area.
LHA0662
4-28 Heater, air conditioner, audio and phone systems
੬REVIEW COPY—
2007 Versa (vrs)
Owners Manual—USA_English (nna)
03/06/06—arosenma
੭
– Your cellular phone is locked to prevent it
from being dialed.
When the radio wave condition is not ideal or
ambient sound is too loud, it may be difficult to
hear the other person’s voice during a call.
Do not place the cellular phone in an area sur-
rounded by metal or far away from the in-vehicle
phone module to prevent tone quality degrada-
tion and wireless connection disruption.
While a cellular phone is connected through the
Bluetoothாwireless connection, the battery
power of the cellular phone may discharge
quicker than usual.
If the hands-free phone system seems to be
malfunctioning, please refer to “Troubleshooting
guide” later in this section. You can also visit
www.nissan-usa.com/bluetooth for trouble-
shooting help.
Refer to the cellular phone Owner’s Manual re-
garding the telephone charges, cellular phone
antenna and body, etc.
This device complies with Part 15 of the
FCC Rules. Operation is subject to the fol-
lowing two conditions: (1) this device may
not cause harmful interference, and (2) this
device must accept any interference re-
ceived, including interference that may
cause undesired operation.
FCC Radiation Exposure Statement:
This equipment complies with FCC radiation ex-
posure limits set forth for an uncontrolled envi-
ronment. This equipment should be installed and
operated with minimum distance 8 inches (20
cm) between the radiator and your body. This
Transmitter must not be co-located or operating
in conjunction with any other antenna or transmit-
ter.
USING THE SYSTEM
The NISSAN Voice Recognition system allows
hands-free operation of the BluetoothாPhone
System.
If the vehicle is in motion, some commands may
not be available so full attention may be given to
vehicle operation.
Initialization
When the ignition switch is turned to the ON
position, NISSAN Voice Recognition is initialized,
which takes a few seconds. When completed,
the amber light on the overhead console illumi-
nates and the system is ready to accept voice
commands. If the button is pressed before
the initialization completes, the system will an-
nounce “Hands-free phone system not ready”
and will not react to voice commands.
Operating tips
To get the best performance out of the NISSAN
Voice Recognition system, observe the following:
●Keep the interior of the vehicle as quiet as
possible. Close the windows to eliminate
surrounding noises (traffic noises, vibration
sounds, etc.), which may prevent the system
from recognizing voice commands correctly.
●Wait until the tone sounds before speaking a
command. Otherwise, the command will not
be received properly.
●Start speaking a command within 5 seconds
after the tone sounds.
●Speak in a natural voice without pausing
between words.
Giving voice commands
To operate NISSAN Voice Recognition, press
and release the button located on the
steering wheel. The light on the overhead con-
sole flashes to signal you have entered a voice
recognition (VR) session. After the tone sounds,
speak a command.
The command given is picked up by the micro-
phone, and voice feedback is given when the
command is accepted.
Heater, air conditioner, audio and phone systems 4-29
੬REVIEW COPY—
2007 Versa (vrs)
Owners Manual—USA_English (nna)
03/06/06—arosenma
੭

●If you need to hear the available commands
for the current menu again, say “Help” and
the system will repeat them.
●If a command is not recognized, the system
announces, “Command not recognized.
Please try again.” Repeat the command in a
clear voice.
●If you want to go back to the previous com-
mand, you can say “Go back” or “Correc-
tion” any time the system is waiting for a
response.
●You can cancel a command when the sys-
tem is waiting for a response by saying,
“Cancel” or “Quit.” The system announces
“Cancel” and ends the VR session. You can
also press the button on the steering
wheel at any time. Whenever the VR session
is cancelled, a double beep is played to
indicate you have exited the system.
●If you want to adjust the volume of the voice
feedback, press the volume control switches
(+ or -) on the steering wheel while being
provided with feedback. You can also use
the radio volume control knob.
How to say numbers
NISSAN Voice Recognition requires a certain
way to speak numbers in voice commands. Refer
to the following rules and examples.
●Either “zero” or “oh” can be used for “0”.
Example: 1-800-662-6200
– “One eight oh oh six six two six two oh
oh”, or
– “One eight zero zero six six two six two oh
oh”
●Words can be used for the first 4 digits
places only.
Example: 1-800-662-6200
– “One eight hundred six six two six two oh
oh”,
– NOT “One eight hundred six six two sixty
two hundred, and
– NOT “One eight oh oh six six two sixty two
hundred.
●Numbers can be spoken in small groups.
The system will prompt you to continue en-
tering digits, if desired.
Example: 1-800-662-6200
– “One eight oh oh”
The system repeats the numbers and
prompts you to enter more.
– “six six two”
The system repeats the numbers and
prompts you to enter more.
– “six two oh oh”
●You can say “Star” for * and “Pound” for # at
any time in any position of the phone num-
ber.
Example: 1-555-1212 *123
– “One five five five one two one two star
one two three”
NOTE:
For best results, say phone numbers as
single digits.
4-30 Heater, air conditioner, audio and phone systems
੬REVIEW COPY—
2007 Versa (vrs)
Owners Manual—USA_English (nna)
03/06/06—arosenma
੭

CONTROL BUTTONS
The control buttons for the BluetoothாHands-
Free Phone System are located on the steering
wheel.
PHONE/SEND
Press the button to initiate a VR
session or answer an incoming call.
You can also use the button to
skip through system feedback and to
enter commands during a call. See “List
of voice commands” and “During a call”
later in this section for more information.
PHONE/END
Press the button to cancel a VR
session or end a call.
GETTING STARTED
The following procedures will help you get
started using the BluetoothாHands-Free Phone
System with NISSAN Voice Recognition. For ad-
ditional command options, refer to “List of voice
commands” later in this section.
Choosing a language
You can interact with the BluetoothாHands-Free
Phone System using English, Spanish or French.
To change the language, perform the following.
1. Press and hold the button for more
than 5 seconds.
2. The system announces: “Press the
PHONE/SEND ( ) button for the
hands-free phone system to enter the
speaker adaptation mode or press the
PHONE/END ( ) button to select a dif-
ferent language.”
3. Press the button.
For information on speaker adaptation, see
“Speaker adaptation (SA) mode” later in this
section.
4. The system announces the current language
and gives you the option to change the lan-
guage to Spanish (in Spanish) or French (in
French). Use the following chart to select
the language.
NOTE:
Note: You must press the button or
the button within 5 seconds to
change the language.
Current
language
Press
(PHONE/SEND)
to select
Press
(PHONE/END)
to select
English Spanish French
Spanish English French
French English Spanish
LHA0661
Heater, air conditioner, audio and phone systems 4-31
੬REVIEW COPY—
2007 Versa (vrs)
Owners Manual—USA_English (nna)
03/06/06—arosenma
੭
5. If you decide not to change the language, do
not press either button. After 5 seconds, the
VR session will end, and the language will
not be changed.
Pairing procedure
NOTE:
The pairing procedure must be performed
when the vehicle is stationary. If the vehicle
starts moving during the procedure, the
procedure will be cancelled.
Main Menu
“Setup” ᭺
A
“Pair Phone” ᭺
B
“New Phone” ᭺
C
Initiate from handset ᭺
D
Name phone ᭺
E
Assign priority ᭺
F
Choose ringtone ᭺
G
1. Press the button on the steering
wheel. The system announces the available
commands.
2. Say: “Setup” ᭺
A. The system acknowledges
the command and announces the next set of
available commands.
3. Say: “Pair phone” ᭺
B. The system acknowl-
edges the command and announces the
next set of available commands.
4. Say: “New phone” ᭺
C. The system acknowl-
edges the command and asks you to initiate
pairing from the phone handset ᭺
D.
The pairing procedure of the cellular phone
varies according to each cellular phone
manufacturer. See the cellular phone Own-
er’s Manual for details. You can also visit
www.nissan-usa.com/bluetooth for instruc-
tions on pairing NISSAN recommended cel-
lular phones.
When prompted for a PIN code, enter
“1234” from the handset. The PIN code
“1234” has been assigned by NISSAN and
cannot be changed.
5. The system asks you to say a name for the
phone ᭺
E.
If the name is too long or too short, the
system tells you, then prompts you for a
name again.
Also, if more than one phone is paired and
the name sounds too much like a name
already used, the system tells you, then
prompts you for a name again.
6. The system asks you to assign a priority level
᭺
F. The priority level determines which
phone is active when more than one paired
Bluetoothாphone is in the vehicle. Follow
the instructions provided by the system or
refer to “Setup” later in this section for more
information on changing priorities.
7. The system will ask if you would like to select
a custom ring tone ᭺
G. Follow the instruc-
tions provided by the system or refer to
“Setup” later in this section for more infor-
mation on selecting ringtones.
Making a call by entering a phone
number
Main Menu
“Call” ᭺
A
Number (speak digits) ᭺
B
“Dial” ᭺
C
1. Press the button on steering wheel. A
tone will sound.
2. Say: “Call” ᭺
A. The system acknowledges
the command and announces the next set of
available commands.
4-32 Heater, air conditioner, audio and phone systems
੬REVIEW COPY—
2007 Versa (vrs)
Owners Manual—USA_English (nna)
03/06/06—arosenma
੭
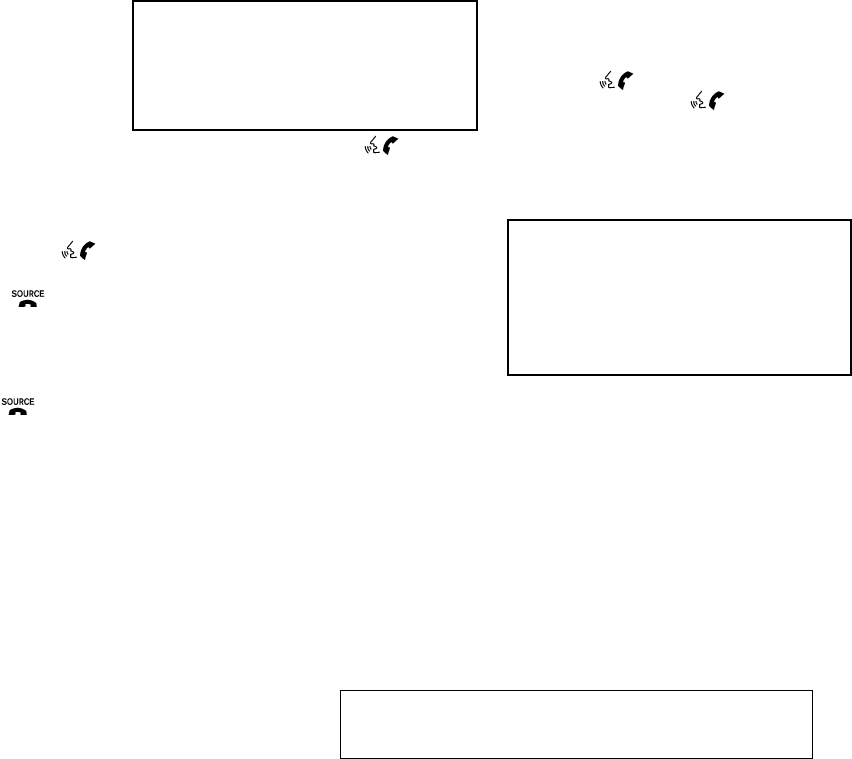
3. Say the number you wish to call ᭺
B. For
example, 555-1212 can be said as “five five
five one two one two.” See “How to say
numbers” earlier in this section for more
information.
4. When you have finished speaking the phone
number, the system repeats it back and an-
nounces the available commands.
5. Say: “Dial” ᭺
C. The system acknowledges
the command and makes the call.
For additional command options, see “List of
voice commands” later in this section.
Receiving a call
When you hear the ring tone, press the
button on the steering wheel.
Once the call has ended, press the button
on the steering wheel.
NOTE:
If you do not wish to take the call when you
hear the ring tone, press the button
on the steering wheel.
For additional command options, see “List of
voice commands” later in this section.
LIST OF VOICE COMMANDS
Main Menu
“Call”
“Phone Book”
“Memo Pad”
“Setup”
When you press and release the button on
the steering wheel, you can choose from the
commands on the Main Menu. The following
pages describe these commands and the com-
mands in each sub-menu.
Remember to wait for the tone before
speaking.
You can say “Help” to hear the list of commands
currently available any time the system is waiting
for a response.
If you want to end an action without completing it,
you can say “Cancel” or “Quit” at any time the
system is waiting for a response. The system will
end the VR session. Whenever the VR session is
cancelled, a double beep is played to indicate
you have exited the system.
If you want to go back to the previous command,
you can say “Go back” or “Correction” any time
the system is waiting for a response.
When you get used to the menus in the system,
you can talk ahead by saying more than one
command at a time. For example, say, “Call five
five five one two one two” or “Memo pad record.”
Also, when you get used to the system re-
sponses, you can skip ahead to the tone by
pressing the button on the steering wheel.
However, if you press the button when the
system is waiting for a response from you it will
end the VR session.
“Call”
Main Menu
“Call”
Name (speak name) ᭺
A
Number (speak digits) ᭺
B
“Redial” ᭺
C
“Call Back” ᭺
D
Name (speak name) ᭺
A
If you have stored entries in the Phone Book, you
can dial a number associated with a name and
location.
See “Phone book” later in this section to learn
how to store entries.
Heater, air conditioner, audio and phone systems 4-33
੬REVIEW COPY—
2007 Versa (vrs)
Owners Manual—USA_English (nna)
03/06/06—arosenma
੭

When prompted by the system, say the name of
the phone book entry you wish to call. The system
acknowledges the name.
If there are multiple locations associated with the
name, the system asks you to choose the loca-
tion.
Once you have confirmed the name and location,
the system begins the call.
Number (speak digits) ᭺
B
When prompted by the system, say the number
you wish to call. Refer to “How to say numbers”
and “Making a call by entering a phone number”
earlier in this section for more details.
“Redial” ᭺
C
Use the Redial command to call the last number
that was dialed within the vehicle.
NOTE:
The system will not redial the last number
dialed by the handset keypad.
The system acknowledges the command, re-
peats the number and begins dialing.
If a redial number does not exist, the system
announces, “There is no number to redial” and
ends the VR session.
“Call back” ᭺
D
Use the Call Back command to dial the number of
the last incoming call within the vehicle.
The system acknowledges the command, re-
peats the number and begins dialing.
If a call back number does not exist, the system
announces, “There is no number to call back” and
ends the VR session.
During a call
During a call there are several command options
available. Press the button on the steering
wheel to mute the receiving voice and enter com-
mands.
●“Help” — The system announces the avail-
able commands.
●“Go back/Correction” — The system an-
nounces “Go back,” ends the VR session
and returns to the call.
●“Cancel/Quit” — The system announces
“Cancel,” ends the VR session and returns
to the call.
●“Send/Enter/Call/Dial” — Use the Send
command to enter numbers during a call. For
example, if you were directed to dial an ex-
tension by an automated system:
Say: “Send one two three four.”
The system acknowledges the command
and sends the tones associated with the
numbers. The system then ends the VR ses-
sion and returns to the call.
●“Transfer call” — Use the Transfer Call com-
mand to transfer the call from the Bluetoothா
Hands-Free Phone System to the cellular
phone when privacy is desired.
The system announces, “Transfer call. Call
transferred to privacy mode.” The system
then ends the VR session.
You can also issue the Transfer Call com-
mand again to return to a hands-free call
through the vehicle.
●“Mute” — Use the Mute command to mute
your voice so the other party cannot hear it.
Use the mute command again to unmute
your voice.
4-34 Heater, air conditioner, audio and phone systems
੬REVIEW COPY—
2007 Versa (vrs)
Owners Manual—USA_English (nna)
03/06/06—arosenma
੭

NOTE:
If a call is ended or the cellular phone
network connection is lost while the Mute
feature is on, the Mute feature will be reset
to “off” for the next call so the other party
can hear your voice.
“Phone book”
NOTE:
Phone book commands are not available
when the vehicle is moving.
Main Menu
“Phone Book”
“New Entry” ᭺
A
“Edit” ᭺
B
“Delete” ᭺
C
ЉList Names” ᭺
D
The Phone Book stores up to 40 names for each
phone paired with the system. Each name can
have up to 4 locations/phone numbers associ-
ated with it.
NOTE:
Each phone has its own separate phone
book. You cannot access Phone A’s phone
book if you are currently connected with
Phone B.
“New entry” ᭺
A
Use the New Entry command to store a new
name in the system.
When prompted by the system, say the name you
would like to give the new entry.
For example, say: “Mary.”
If the name is too long or too short, the system
tells you, then prompts you for a name again.
Also, if the name sounds too much like a name
already stored, the system tells you, then prompts
you for a name again.
Once the system accepts the name and you
confirm it is correct, the system asks for a location
(Home, Office, Mobile or Other).
For example, say: “Home.”
The system acknowledges the location and asks
for a number.
For example, say: “five five five one two
one two.” See “How to say numbers”
earlier in this section for more
information.
The system repeats the number and prompts you
for the next command. When you have finished
entering numbers, choose “Store.”
The system confirms the name, location and
number. The system then asks if you would like to
store another location for the same name. If you
do not wish to store another location, the system
ends the VR session.
“Edit” ᭺
B
Use the Edit command to alter an existing phone
book entry or to add a 2nd, 3rd or 4th phone
number to an existing entry.
When prompted by the system, say the name of
the entry you wish to edit.
The system acknowledges the name and asks
you for the location you would like to edit.
Say the name of the location. The system ac-
knowledges and asks you for the phone number
you would like to store with this location.
See “How to say numbers” earlier in this section
for more information.
The system repeats the number and prompts you
for the next command. When you have finished
entering numbers, choose “Store.”
Heater, air conditioner, audio and phone systems 4-35
੬REVIEW COPY—
2007 Versa (vrs)
Owners Manual—USA_English (nna)
03/06/06—arosenma
੭
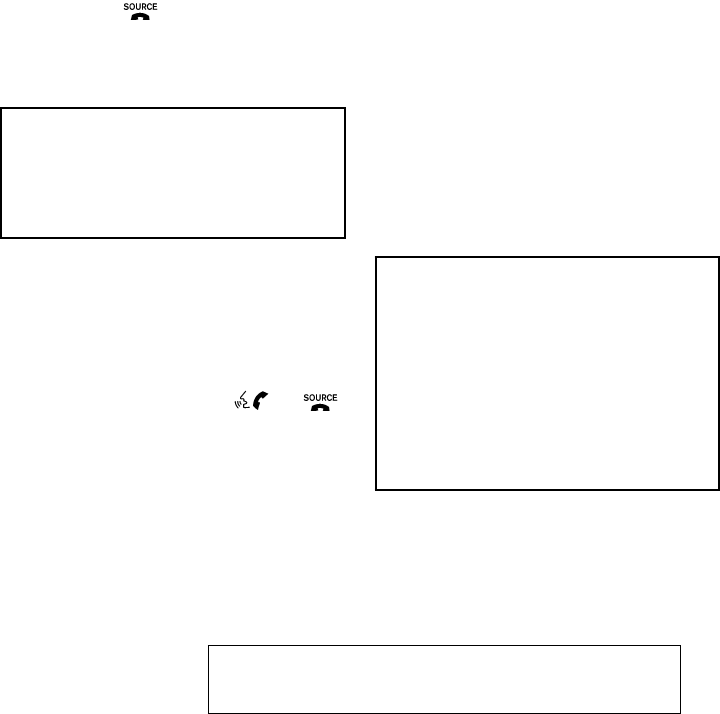
The system confirms the name, location and
number, then announces that the entry has been
stored. The system then ends the VR session.
“Delete” ᭺
C
Use the Delete command to erase one entry from
the phone book, all entries from the phone book,
the current redial number or the current call back
number.
To delete entries from the phone book, say a
name or “All entries” when prompted by the sys-
tem.
The system acknowledges the command and
asks you to confirm the deletion.
To delete the current redial number or call back
number, say “redial number” or “call back num-
ber” when prompted by the system.
If a redial number or a call back number exists, the
system deletes them without asking for confirma-
tion.
If there is no number for the entry you are trying to
delete, the system says so and ends the VR
session.
“List names” ᭺
D
Use the List Names command to hear all the
names and locations in the phone book.
The system recites the phone book entries but
does not include the actual phone numbers.
When the playback of the list is complete the
system ends the VR session.
You can stop the playback of the list at any time
by pressing the button on the steering
wheel. The system ends the VR session.
“Memo pad”
Main Menu
“Memo Pad”
“Record” ᭺
A
“Play” ᭺
B
“Delete” ᭺
C
The Memo Pad records a maximum of 3 voice
memos, each up to 20 seconds long.
“Record” ᭺
A
The system announces “Recording” and a tone
sounds signaling you to begin.
Speak the information you wish to record clearly.
When you are done, press the or
button on the steering wheel.
A tone sounds and the system announces
“Memo recorded.” Another tone sounds to end
the VR session.
If the memo pad is full, the system asks if you wish
to record over the oldest memo.
“Play” ᭺
B
The system plays back all the memos in the order
of newest to oldest. The system ends the VR
session.
If there are no memos recorded, the system an-
nounces “No messages to play.” The system
ends the VR session.
“Delete” ᭺
C
The Delete command erases all memos. The
system asks you to confirm this action before
deleting all memos.
“Setup”
Main Menu
“Setup”
“Pair Phone” ᭺
A
“List Phone” ᭺
B
“Select Phone” ᭺
C
“Change Priority” ᭺
D
“Delete Phone” ᭺
E
“Select Ringtone” ᭺
F
“Bluetooth Off” ᭺
G
4-36 Heater, air conditioner, audio and phone systems
੬REVIEW COPY—
2007 Versa (vrs)
Owners Manual—USA_English (nna)
03/06/06—arosenma
੭

Use the Setup command to change options as-
sociated with the BluetoothாHands-Free Phone
System.
“Pair phone” ᭺
A
Use the Pair Phone command to pair a phone to
the BluetoothாHands-Free Phone System.
NOTE:
The pairing procedure must be performed
when the vehicle is stationary. If the vehicle
starts moving during the procedure, the
procedure will be cancelled. Also, see
“Pairing procedure” earlier in this section
for additional information.
Up to 5 phones can be paired. If you try to pair a
sixth phone, the system announces that you must
first delete one phone or replace an existing
phone.
If you try to pair a phone that has already been
paired to your vehicle’s system, the system an-
nounces the name the phone is already using.
The pairing procedure will then be cancelled.
When prompted by the system, choose from the
following commands:
●“New phone” — Refer to “Pairing a phone”
earlier in this section.
●“Replace phone” — The system announces
the names of the phones already paired and
asks which you would like to replace.
Once you say the name of the phone you
wish to replace, the pairing procedure will
begin. Refer to “Pairing procedure” earlier in
this section.
●“List phone” – See the description below.
“List phone” ᭺
B
Use the List Phone command to hear the names
of the phones currently paired. If no phones are
paired, the system announces, “No paired
phones to list.” The system then ends the VR
session.
“Select phone” ᭺
C
Use the Select Phone command to select a
phone of lesser priority when two or more phones
paired with BluetoothாHands-Free Phone Sys-
tem are in the vehicle at the same time.
The system asks you to name the phone and
confirm the selection.
Once the selection is confirmed, the selected
phone remains active until the ignition switch is
turned OFF or you select a new phone.
“Change priority” ᭺
D
Use the Change Priority command to change the
priority level of the active phone.
The priority level determines which phone is ac-
tive when more than one paired Bluetoothா
phone is in the vehicle.
The system states the priority level of the active
phone and asks for a new priority level (1, 2, 3, 4,
5).
If the new priority level is already being used for
another phone, the two phones will swap priority
levels.
For example, if the current priority levels are:
Priority Level 1 = Phone A
Priority Level 2 = Phone B
Priority Level 3 = Phone C
and you change the priority level of Phone C to
Level 1, then:
Priority Level 1 = Phone C
Priority Level 2 = Phone B
Priority Level 3 = Phone A
“Delete phone” ᭺
E
Use the Delete Phone command to delete a
specific phone or all phones from the Bluetoothா
Hands-Free Phone System.
Heater, air conditioner, audio and phone systems 4-37
੬REVIEW COPY—
2007 Versa (vrs)
Owners Manual—USA_English (nna)
03/06/06—arosenma
੭
The system announces the names of the phones
already paired with the system and their priority
level. The system then gives you the option to
delete a specific phone, all phones or listen to the
list again.
Once you chose to delete a phone or all phones,
the system asks you to confirm this action.
NOTE:
When you delete a phone, the associated
phone book for that phone will also be
deleted.
“Select ringtone” ᭺
F
Use the Select Ringtone command to select the
tone heard in the vehicle when an incoming call is
received.
The system announces the name of the active
phone and asks you to choose from the following
commands:
●“Ringtone” — The system plays a ringtone
and asks if you would like to select that tone.
If you say no, the system plays the next
ringtone available and continues to cycle
through the ringtones until you select one or
quit.
●“Silent” — The system asks you to confirm
your wish to disable the ringtone.
“Bluetooth off” ᭺
G
Use the Bluetooth Off command to turn off the
BluetoothாHands-Free Phone System.
When the BluetoothாHands-Free Phone Sys-
tem is off, you will not be able to make or receive
calls using NISSAN Voice Recognition. Also, you
will not have access to the Phone Book.
You can still use the Memo Pad and access
Setup.
SPEAKER ADAPTATION (SA) MODE
Speaker Adaptation allows up to two out-of-
dialect users to train the system to improve rec-
ognition accuracy. By repeating a number of
commands, the users can create a voice model of
their own voice that is stored in the system. The
system is capable of storing a different speaker
adaptation model for memory A and memory B.
If memory A is available, the system will use
memory A to store the model. If memory A is in
use and memory B is available, the system will
use memory B to store the model. If both of the
memory locations are in use, the system will ask
the user to select which memory location should
be overwritten.
Training procedure
The procedure for training a voice is as follows.
1. Position the vehicle in a reasonably quiet
outdoor location.
2. Sit in the driver’s seat with the engine run-
ning, the parking brake on, and the transmis-
sion in P (Park) (AT and CVT models) or N
(Neutral) (MT models).
3. Press and hold the button for more
than 5 seconds.
4. The system announces: “Press the
PHONE/SEND ( ) button for the
hands-free phone system to enter the
speaker adaptation mode or press the
PHONE/END ( ) button to select a dif-
ferent language.
5. Press the button.
For information on selecting a different lan-
guage, see “Choosing a language” earlier in
this section.
6. Voice memory A or memory B is selected
automatically. If both memory locations are
already in use, the system will prompt you to
overwrite one. Follow the instructions pro-
vided by the system.
7. When preparation is complete and you are
ready to begin, the press the button.
8. The SA mode will be explained. Follow the
instructions provided by the system.
4-38 Heater, air conditioner, audio and phone systems
੬REVIEW COPY—
2007 Versa (vrs)
Owners Manual—USA_English (nna)
03/06/06—arosenma
੭

9. When training is finished, the system will tell
you an adequate number of phrases have
been recorded.
10. The system will ask you to say your name.
Follow the instructions to register your
name.
11. The system will announce that speaker ad-
aptation has been completed and the sys-
tem is ready.
The SA mode will stop if:
●The button is pressed for more than 5
seconds in SA mode.
●The vehicle begins moving during SA mode.
●The ignition switch is turned to the OFF or
LOCK position.
Training phrases
During the SA mode, the system instructs the
trainer to say the following phrases. (The system
will prompt you for each phrase.)
●phone book new entry
●dial three oh four two nine
●delete call back number
●setup pair phone
●memo pad play
●eight pause nine three two pause seven
●delete all entries
●call seven two four zero nine
●phone book delete entry
●memo pad record
●dial star two one seven oh
●Yes
●No
●select ring tone
●dial eight five six nine two
●Bluetooth on
●setup change priority
●call three one nine oh two
●nine seven pause pause three oh eight
●Cancel
●call back number
●call star two zero nine five
●delete phone
●dial eight three zero five one
●Home
●four three pause two nine pause zero
●delete redial number
●phone book list names
●call eight oh five four one
●Correction
●setup change ring tone
●dial seven four oh one eight
●setup main menu
●Delete
●dial nine seven two six six
●memo pad delete
●call seven six three oh one
●go back
●call five six two eight zero
●dial six six four three seven
TROUBLESHOOTING GUIDE
The system should respond correctly to all voice
commands without difficulty. If problems are en-
countered, try the following solutions.
Where the solutions are listed by number, try
each solution in turn, starting with number 1, until
the problem is resolved.
Heater, air conditioner, audio and phone systems 4-39
੬REVIEW COPY—
2007 Versa (vrs)
Owners Manual—USA_English (nna)
03/06/06—arosenma
੭
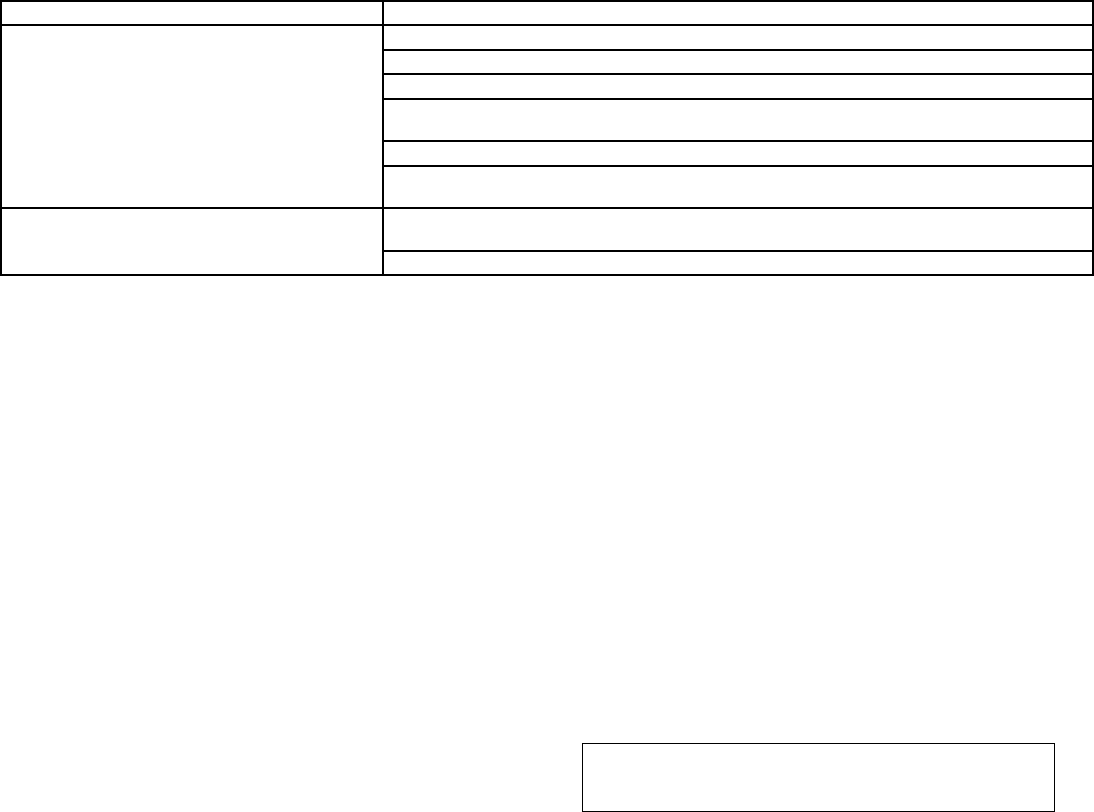
Symptom Solution
System fails to interpret the command correctly.
1. Ensure that the command is valid. See “List of voice commands” earlier in this section.
2. Ensure that the command is spoken after the tone.
3. Speak clearly without pausing between words and at a level appropriate to the ambient noise level in the vehicle.
4. Ensure that the ambient noise level is not excessive (for example, windows open or defroster on). NOTE: If it is too
noisy to use the phone, it is likely that the voice commands will not be recognized.
5. If more than one command was said at a time, try saying the commands separately.
6. If the system consistently fails to recognize commands, the voice training procedure should be carried out to im-
prove the recognition response for the speaker. See “Speaker adaptation (SA) mode” earlier in this section.
The system consistently selects the wrong entry from the
phone book.
1. Ensure that the phone book entry name requested matches what was originally stored. This can be confirmed by
using the “List Names” command. See “Phone book” earlier in this section.
2. Replace one of the names being confused with a new name.
4-40 Heater, air conditioner, audio and phone systems
੬REVIEW COPY—
2007 Versa (vrs)
Owners Manual—USA_English (nna)
03/06/06—arosenma
੭

5 Starting and driving
Precautions when starting and driving................5-2
Exhaust gas (carbon monoxide) ..................5-2
Three-way catalyst..............................5-2
Tire pressure monitoring system (TPMS)
(if so equipped) ................................5-3
Avoiding collision and rollover....................5-4
Drinking alcohol/drugs and driving................5-5
Ignition switch.....................................5-5
Intelligent Key System (if so equipped) ............5-6
Continuously Variable Transmission (CVT).........5-7
Manual transmission ............................5-8
Key positions ..................................5-9
Nissan vehicle immobilizer system ................5-9
Before starting the engine .........................5-10
Starting the engine ...............................5-10
Driving the vehicle ................................5-12
Continuously Variable Transmission (CVT)
(if so equipped) ...............................5-12
Manual transmission ...........................5-15
Parking brake ....................................5-17
Cruise control (if so equipped) .....................5-18
Precautions on cruise control ...................5-18
Cruise control operations.......................5-18
Break-in schedule ................................5-19
Increasing fuel economy...........................5-20
Parking/parking on hills............................5-21
Power steering ...................................5-22
Brake system ....................................5-23
Brake precautions .............................5-23
Anti-lock braking system (ABS)
(if so equipped) ...............................5-23
Cold weather driving..............................5-25
Freeing a frozen door lock ......................5-25
Anti-freeze....................................5-25
Battery .......................................5-25
Draining of coolant water .......................5-25
Tire equipment ................................5-25
Special winter equipment.......................5-25
Driving on snow or ice .........................5-25
Engine block heater (if so equipped).............5-26
੬REVIEW COPY—
2007 Versa (vrs)
Owners Manual—USA_English (nna)
03/06/06—arosenma
੭
WARNING
●Do not leave children or adults who
would normally require the assistance
of others alone in your vehicle. Pets
should also not be left alone. They
could accidentally injure themselves or
others through inadvertent operation of
the vehicle. Also, on hot, sunny days,
temperatures in a closed vehicle could
quickly become high enough to cause
severe or possibly fatal injuries to
people or animals.
●Properly secure all cargo to help pre-
vent it from sliding or shifting. Do not
place cargo higher than the seatbacks.
In a sudden stop or collision, unsecured
cargo could cause personal injury.
EXHAUST GAS (carbon monoxide)
WARNING
●Do not breathe exhaust gases; they
contain colorless and odorless carbon
monoxide. Carbon monoxide is danger-
ous. It can cause unconsciousness or
death.
●If you suspect that exhaust fumes are
entering the vehicle, drive with all win-
dows fully open, and have the vehicle
inspected immediately.
●Do not run the engine in closed spaces
such as a garage.
●Do not park the vehicle with the engine
running for any extended length of time.
●Keep the rear hatch closed while driv-
ing, otherwise exhaust gases could be
drawn into the passenger compart-
ment. If you must drive with the rear
hatch open, follow these precautions:
1. Open all the windows.
2. Turn the air recirculation mode off
and set the fan speed control to the
highest level to circulate the air.
●The exhaust system and body should be
inspected by a qualified mechanic
whenever:
a. The vehicle is raised for service.
b. You suspect that exhaust fumes are
entering into the passenger
compartment.
c. You notice a change in the sound of
the exhaust system.
d. You have had an accident involving
damage to the exhaust system, un-
derbody, or rear of the vehicle.
THREE-WAY CATALYST
The three-way catalyst is an emission control
device installed in the exhaust system. Exhaust
gases in the three-way catalyst are burned at
high temperatures to help reduce pollutants.
WARNING
●The exhaust gas and the exhaust sys-
tem are very hot. Keep people, animals
or flammable materials away from the
exhaust system components.
●Do not stop or park the vehicle over
flammable materials such as dry grass,
waste paper or rags. They may ignite
and cause a fire.
CAUTION
●Do not use leaded gasoline. Deposits
from leaded gasoline will seriously re-
duce the three-way catalyst’s ability to
help reduce exhaust pollutants.
PRECAUTIONS WHEN STARTING
AND DRIVING
5-2 Starting and driving
੬REVIEW COPY—
2007 Versa (vrs)
Owners Manual—USA_English (nna)
03/06/06—arosenma
੭

●Keep your engine tuned up. Malfunc-
tions in the ignition, fuel injection, or
electrical systems can cause overrich
fuel flow into the three-way catalyst,
causing it to overheat. Do not keep driv-
ing if the engine misfires, or if notice-
able loss of performance or other un-
usual operating conditions are
detected. Have the vehicle inspected
promptly by a NISSAN dealer.
●Avoid driving with an extremely low fuel
level. Running out of fuel could cause
the engine to misfire, damaging the
three-way catalyst.
●Do not race the engine while warming it
up.
●Do not push or tow your vehicle to start
the engine.
TIRE PRESSURE MONITORING
SYSTEM (TPMS) (if so equipped)
Each tire, including the spare (if provided),
should be checked monthly when cold and in-
flated to the inflation pressure recommended by
the vehicle manufacturer on the vehicle placard
or tire inflation pressure label. (If your vehicle has
tires of a different size than the size indicated on
the vehicle placard or tire inflation pressure label,
you should determine the proper tire inflation
pressure for those tires.)
As an added safety feature, your vehicle has been
equipped with a Tire Pressure Monitoring System
(TPMS) that illuminates a low tire pressure telltale
when one or more of your tires is significantly
underinflated. Accordingly, when the low tire
pressure telltale illuminates, you should stop and
check your tires as soon as possible, and inflate
them to the proper pressure. Driving on a signifi-
cantly underinflated tire causes the tire to over-
heat and can lead to tire failure. Underinflation
also reduces fuel efficiency and tire tread life, and
may affect the vehicle’s handling and stopping
ability.
Please note that the TPMS is not a substitute for
proper tire maintenance, and it is the driver’s
responsibility to maintain correct tire pressure,
even if underinflation has not reached the level to
trigger illumination of the TPMS low tire pressure
telltale.
Your vehicle has also been equipped with a
TPMS malfunction indicator to indicate when the
system is not operating properly. The TPMS mal-
function indicator is combined with the low tire
pressure telltale. When the system detects a
malfunction, the telltale will flash for approxi-
mately one minute and then remain continuously
illuminated. This sequence will continue upon
subsequent vehicle start-ups as long as the mal-
function exists. When the malfunction indicator is
illuminated, the system may not be able to detect
or signal low tire pressure as intended. TPMS
malfunctions may occur for a variety of reasons,
including the installation of replacement or alter-
nate tires or wheels on the vehicle that prevent
the TPMS from functioning properly. Always
check the TPMS malfunction telltale after replac-
ing one or more tires or wheels on your vehicle to
ensure that the replacement or alternate tires and
wheels allow the TPMS to continue to function
properly.
Additional information:
●The TPMS does not monitor the tire pres-
sure of the spare tire.
●The TPMS will activate only when the vehicle
is driven at speeds above 16 MPH (25
km/h). Also, this system may not detect a
sudden drop in tire pressure (for example a
flat tire while driving).
●Tire pressure rises and falls depending on
the heat caused by the vehicle’s operation
and the outside temperature. Low outside
temperature can lower the temperature of
the air inside the tire which can cause a
lower tire inflation pressure. This may cause
the low tire pressure warning light to illumi-
nate. If the warning light illuminates in low
Starting and driving 5-3
੬REVIEW COPY—
2007 Versa (vrs)
Owners Manual—USA_English (nna)
03/06/06—arosenma
੭

ambient temperature, check the tire pres-
sure for all four tires.
For additional information, see “Low tire pressure
warning light” in the “Instruments and controls”
section, “Tire pressure monitoring system
(TPMS)” in the “In case of emergency” section.
WARNING
●If the low tire pressure warning light
illuminates while driving, avoid sudden
steering maneuvers or abrupt braking,
reduce vehicle speed, pull off the road
to a safe location and stop the vehicle
as soon as possible. Serious vehicle
damage could occur and may lead to an
accident and could result in serious
personal injury. Check the tire pressure
for all four tires. Adjust the tire pressure
to the recommended COLD tire pres-
sure shown on the Tire and Loading
Information label to turn the low tire
pressure warning light OFF. If you have
a flat tire, replace it with a spare tire as
soon as possible. (See “Flat tire” in the
“In case of emergency” section for
changing a flat tire.)
●When a spare tire is mounted or a wheel
is replaced the TPMS will not function
and the low tire pressure warning light
will flash. Contact your NISSAN dealer
as soon as possible for tire replacement
and/or system resetting.
●Replacing tires with those not originally
specified by NISSAN could affect the
proper operation of the TPMS.
●Do not inject any tire liquid or aerosol
tire sealant into the tires, as this may
cause a malfunction of the tire pressure
sensors.
CAUTION
Do not place metalized film or any metal
parts (antenna, etc.) on the windows. This
may cause poor reception of the signals
from the tire pressure sensors, and the
TPMS will not function properly.
FCC Notice:
Changes or modifications not expressly ap-
proved by the party responsible for compli-
ance could void the user’s authority to op-
erate the equipment.
This device complies with Part 15 of the
FCC Rules and RSS-210 of Industry
Canada.
Operation is subject to the following two
conditions: (1) This device may not cause
harmful interface, and (2) this device must
accept any interference received, including
interference that may cause undesired op-
eration of the device.
AVOIDING COLLISION AND
ROLLOVER
WARNING
Failure to operate this vehicle in a safe
and prudent manner may result in loss of
control or an accident.
Be alert and drive defensively at all times. Obey
all traffic regulations. Avoid excessive speed,
high speed cornering, or sudden steering ma-
neuvers, because these driving practices could
cause you to lose control of your vehicle. As with
any vehicle, loss of control could result in a
collision with other vehicles or objects, or
cause the vehicle to roll over, particularly if
the loss of control causes the vehicle to
slide sideways. Be attentive at all times, and
avoid driving when tired. Never drive when under
the influence of alcohol or drugs (including pre-
5-4 Starting and driving
੬REVIEW COPY—
2007 Versa (vrs)
Owners Manual—USA_English (nna)
03/06/06—arosenma
੭

scription or over-the-counter drugs which may
cause drowsiness). Always wear your seat belt
as outlined in the “Safety – Seats, seat belts and
supplemental restraint system” section of this
manual, and also instruct your passengers to do
so.
Seat belts help reduce the risk of injury in colli-
sions and rollovers. In a rollover crash, an
unbelted or improperly belted person is
significantly more likely to be injured or
killed than a person properly wearing a
seat belt.
DRINKING ALCOHOL/DRUGS AND
DRIVING
WARNING
Never drive under the influence of alcohol
or drugs. Alcohol in the bloodstream re-
duces coordination, delays reaction time
and impairs judgement. Driving after
drinking alcohol increases the likelihood
of being involved in an accident injuring
yourself and others. Additionally, if you
are injured in an accident, alcohol can
increase the severity of the injury.
NISSAN is committed to safe driving. However,
you must choose not to drive under the influence
of alcohol. Every year thousands of people are
injured or killed in alcohol-related accidents. Al-
though the local laws vary on what is considered
to be legally intoxicated, the fact is that alcohol
affects all people differently and most people
underestimate the effects of alcohol.
Remember, drinking and driving don’t mix! And
that is true for drugs, too (over-the-counter, pre-
scription, and illegal drugs). Don’t drive if your
ability to operate your vehicle is impaired by alco-
hol, drugs, or some other physical condition.
WARNING
Never remove or turn the key to the LOCK
position while driving. The steering wheel
will lock. This may cause the driver to lose
control of the vehicle and could result in
serious vehicle damage or personal injury.
IGNITION SWITCH
Starting and driving 5-5
੬REVIEW COPY—
2007 Versa (vrs)
Owners Manual—USA_English (nna)
03/06/06—arosenma
੭
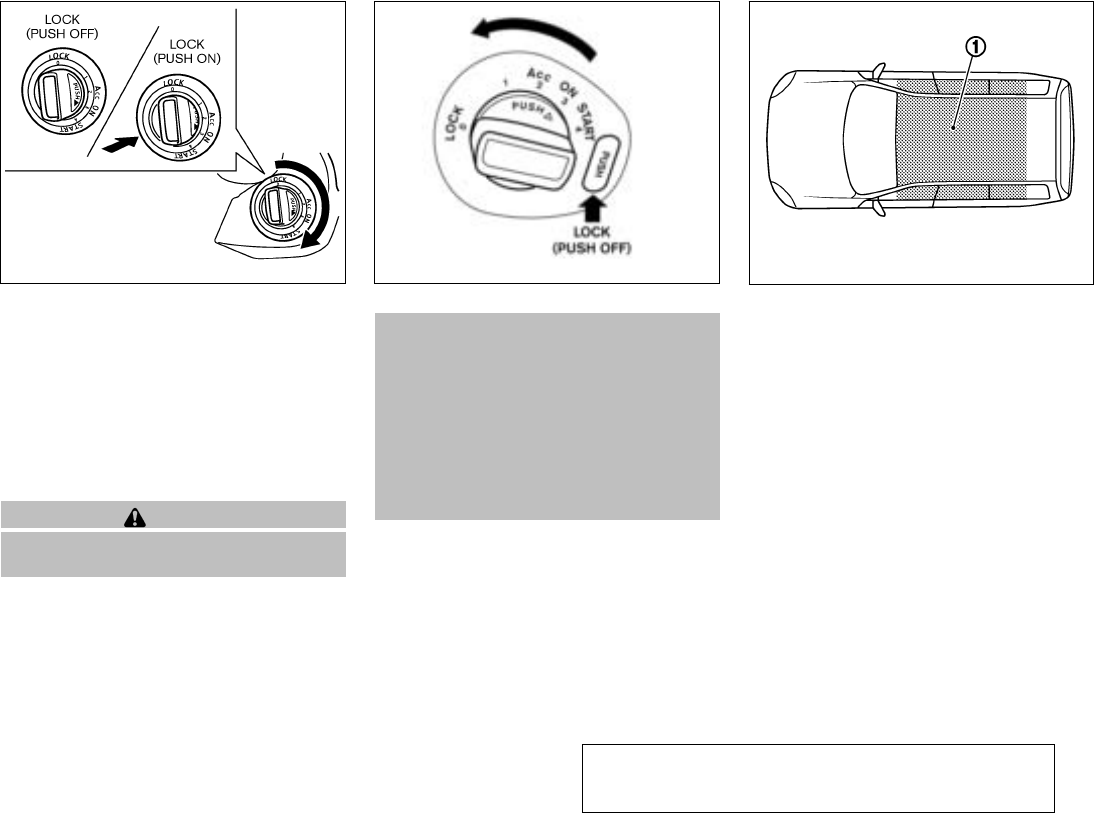
INTELLIGENT KEY SYSTEM (if so
equipped)
The Intelligent Key system can operate the igni-
tion switch without taking the key out from your
pocket or purse. The operating environment
and/or conditions may affect the Intelligent Key
system operation.
CAUTION
●Be sure to carry the Intelligent Key with
you when operating the vehicle.
●Never leave the Intelligent Key inside
the vehicle when you leave the vehicle.
●If the vehicle battery is discharged the
ignition switch cannot be moved from
the “LOCK” position and if the steering
lock is engaged, the steering wheel
cannot be moved. Charge the battery as
soon as possible. (See “JUMP START-
ING” in the “In case of emergency” sec-
tion of this manual.)
Operating range
The Intelligent Key functions can only be used
when the Intelligent Key is within the specified
operating range.
When the Intelligent Key battery is almost dis-
charged or strong radio waves are present near
the operating location, the Intelligent Key sys-
tem’s operating range becomes narrower and
may not function properly.
If the Intelligent Key is within the operating range,
it is possible for anyone, even someone who does
not carry the Intelligent Key, to turn the ignition
switch to start the engine.
CVT models
SSD0435
M/T models
LSD0172 WSD0165
5-6 Starting and driving
੬REVIEW COPY—
2007 Versa (vrs)
Owners Manual—USA_English (nna)
03/06/06—arosenma
੭
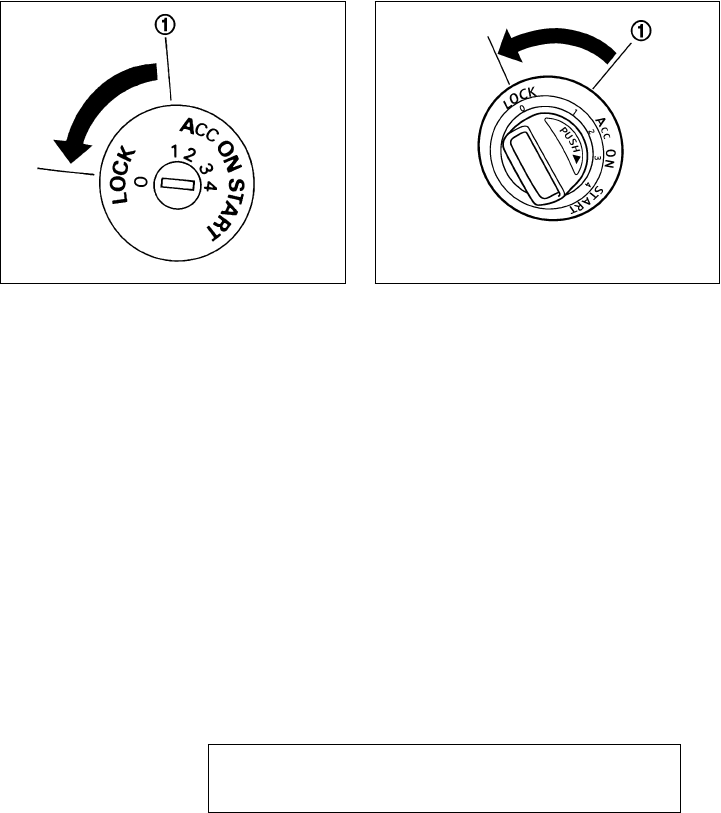
The operating range of the engine start function
is inside of the vehicle ᭺
1.
●The luggage area is not included in the op-
erating range, but the Intelligent Key may
function.
●If the Intelligent Key is placed on the instru-
ment panel, rear parcel shelf, inside the
glove box, storage bin or door pocket, the
Intelligent Key may not function.
●If the Intelligent Key is placed near the door
or window outside the vehicle, the Intelligent
Key may function.
CONTINUOUSLY VARIABLE
TRANSMISSION (CVT)
The ignition lock is designed so that the ignition
switch cannot be turned to the LOCK position
until the selector lever is moved to the P (Park)
position. When moving the ignition switch to the
LOCK position, to remove the key from the igni-
tion switch, make sure the selector lever is in the
P (Park) position.
When the ignition switch cannot be turned to the
LOCK position:
Without Intelligent Key system
SSD0392
With Intelligent Key system
SSD0437A
Starting and driving 5-7
੬REVIEW COPY—
2007 Versa (vrs)
Owners Manual—USA_English (nna)
03/07/06—cathy
੭
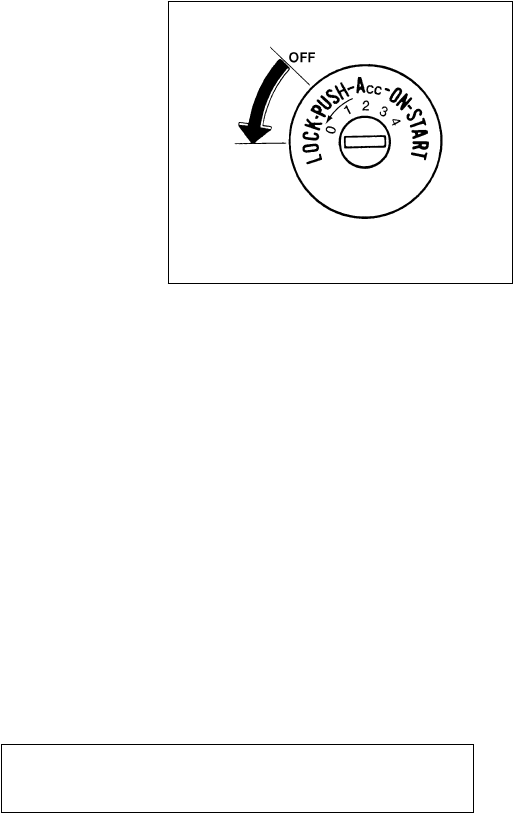
1. Shift the selector lever to the P (Park) posi-
tion.
2. Turn the ignition switch slightly in the ON
direction.
3. Turn the ignition switch to the LOCK posi-
tion.
4. Remove the key if it is inserted in the ignition
switch.
If the ignition switch is turned to the LOCK posi-
tion, the selector lever cannot be moved from the
P (Park) position.
The shift selector lever can be moved if the
ignition switch is in the ON position and the
foot brake pedal is depressed.
There is an OFF position ᭺
1between the
LOCK and ACC positions. The OFF position
is indicated by a “1” on the key cylinder.
When the ignition is in the OFF position,
the steering wheel is not locked.
To lock the steering wheel:
1. Turn the ignition switch to the LOCK posi-
tion.
2. Remove the key, if it is inserted in the ignition
switch.
3. Turn the steering wheel 1/8 of a turn clock-
wise from the straight up position.
To unlock the steering wheel:
1. Insert the key into the ignition switch, if nec-
essary.
2. Gently turn the ignition switch while rotating
the steering wheel slightly right and left.
MANUAL TRANSMISSION
The ignition switch includes a device that helps
prevent accidental removal of the key while driv-
ing.
The key can only be removed when the ignition
switch is in the LOCK position.
Type A models without Intelligent Key: To
turn the ignition key to the LOCK position from
the ACC or ON position, turn the key to OFF,
push the key in, then turn the key to LOCK.
Type A
WSD0052
5-8 Starting and driving
੬REVIEW COPY—
2007 Versa (vrs)
Owners Manual—USA_English (nna)
03/06/06—arosenma
੭
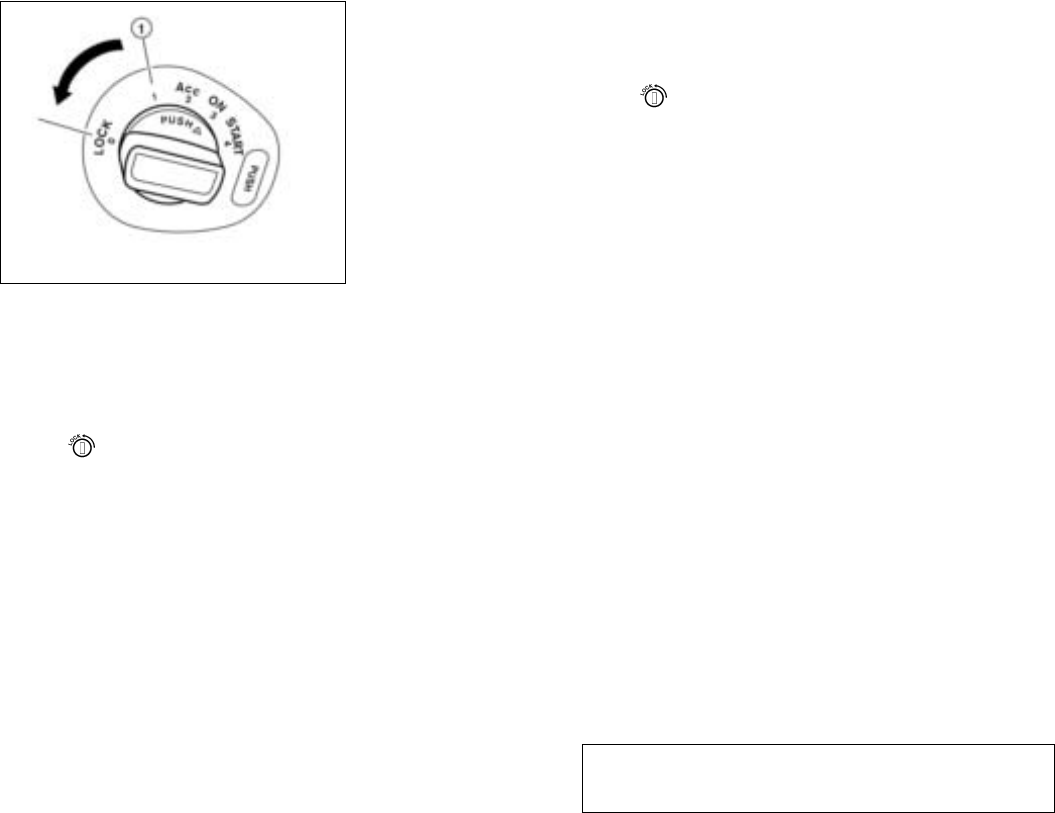
Type B models with Intelligent Key: The
ignition lock is designed so that the switch can
only be turned to the LOCK position when the
PUSH release button has been pressed.
NOTE:
●The Intelligent Key lock warning light
blinks and the buzzer sounds when the igni-
tion switch is turned to the LOCK position
and the ignition PUSH release button has
not been pressed completely. See “Intelli-
gent Key lock warning light” in the “Instru-
ments and controls” section of this manual
for further details regarding the functionality
of the Intelligent Key lock warning light.
●When the mechanical key is being used, the
ignition PUSH release button has to be
pressed in order to turn the ignition switch to
the LOCK position although the Intel-
ligent Key lock warning light will not blink and
the buzzer will not sound.
To lock the steering wheel
In the LOCK position, turn the steering wheel 1/8
of a turn clockwise from the straight up position.
To unlock the steering wheel
Press the brake pedal, push the ignition switch
and turn it gently while rotating the steering wheel
slightly right and left.
KEY POSITIONS
LOCK: Normal parking position (0)
Intelligent Key system:
PUSH OFF- The steering lock can only be locked
at this position.
PUSH ON- The ignition switch will be unlocked
while carrying the Intelligent Key.
OFF: (Manual transmission model) (1)
The engine can be turned off without locking the
steering wheel.
ACC: (Accessories) (2)
This position activates electrical accessories
such as the radio when the engine is not running.
ON: Normal operating position (3)
This position turns on the ignition system and the
electrical accessories.
START: (4)
This position starts the engine. As soon as the
engine has started, release the key. It automati-
cally returns to the ON position.
NISSAN VEHICLE IMMOBILIZER
SYSTEM
The NISSAN Vehicle Immobilizer System will not
allow the engine to start without the use of the
registered key.
If the engine fails to start using a registered key
(for example, when interference is caused by
another registered key, an automated toll road
device or automatic payment device on the key
ring), restart the engine using the following pro-
cedures:
1. Leave the ignition switch in the ON position
for approximately 5 seconds.
Type B
LSD0173
Starting and driving 5-9
੬REVIEW COPY—
2007 Versa (vrs)
Owners Manual—USA_English (nna)
03/06/06—arosenma
੭

2. Turn the ignition switch to the OFF or LOCK
position, and wait approximately 10 sec-
onds.
3. Repeat steps 1 and 2.
4. Restart the engine while holding the device
(which may have caused the interference)
separate from the registered key.
If the no start condition re-occurs, NISSAN rec-
ommends placing the registered key on a sepa-
rate key ring to avoid interference from other
devices.
●Make sure the area around the vehicle is
clear.
●Check fluid levels such as engine oil, cool-
ant, brake and clutch fluid, and window
washer fluid as frequently as possible, or at
least whenever you refuel.
●Check that all windows and lights are clean.
●Visually inspect tires for their appearance
and condition. Also check tires for proper
inflation.
●Lock all doors.
●Position seat and adjust head restraints.
●Adjust inside and outside mirrors.
●Fasten seat belts and ask all passengers to
do likewise.
●Check the operation of warning lights when
the key is turned to the ON (3) position. See
“Warning/indicator lights and audible re-
minders” in the “Instruments and controls”
section of this manual.
1. Apply the parking brake.
2. CVT model:
Move the shift selector lever to P (Park) or N
(Neutral). P (Park) is recommended.
The shift selector lever cannot be
moved out of P (Park) and into any of
the other gear positions if the ignition
key is turned to the OFF position or if
the key is removed from the ignition
switch.
The starter is designed not to operate if
the shift selector lever is in any of the
driving positions.
Manual transmission model:
Move the shift lever to N (Neutral). Depress
the clutch pedal to the floor while cranking
the engine.
The starter is designed not to operate
unless the clutch pedal is fully de-
pressed.
Intelligent Key system models: Slowly
“PUSH ON” the ignition switch. When the
Intelligent Key system warning light in
the meter illuminates in green, the ignition
switch can be turned.
BEFORE STARTING THE ENGINE STARTING THE ENGINE
5-10 Starting and driving
੬REVIEW COPY—
2007 Versa (vrs)
Owners Manual—USA_English (nna)
03/06/06—arosenma
੭
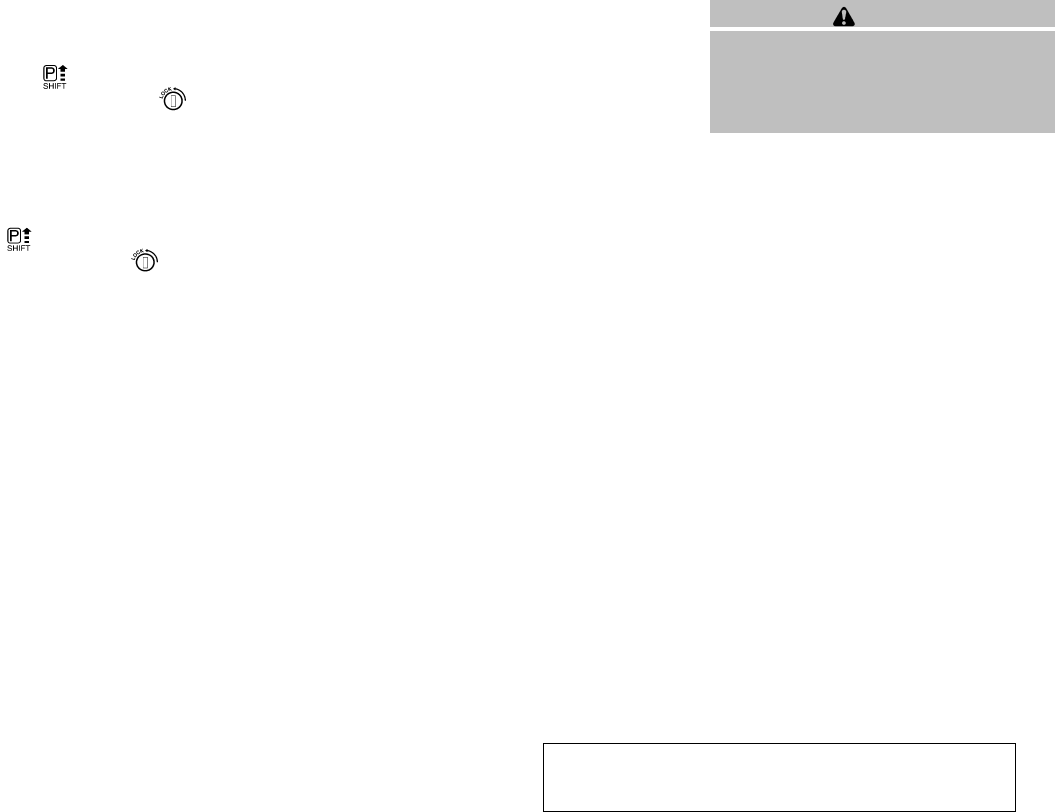
The Intelligent Key must be carried
when operating the ignition switch.
When the Intelligent Key system warning
light ( CVT models) or the Intelligent
Key lock warning light ( M/T models) in
the meter blinks in red and the inside warn-
ing buzzer emits a short beep, be sure that
the selector lever is in the “P” (Park) position
and the ignition switch is securely returned
to the “LOCK” position.
The Intelligent Key system warning light
(CVT models) or the Intelligent Key
lock warning light ( M/T models) blink-
ing in red, turns off by performing the follow-
ing operations:
●Return the ignition switch to the “LOCK”
position.
●Turn the ignition switch to the “ACC”
position.
When the buzzer beeps 4 times continu-
ously, check for the following:
●The ignition switch is returned to the
“LOCK” position.
●The mechanical key is not inserted into
the ignition switch.
The inside warning buzzer stops when one
of the following is performed:
●Return the ignition switch to the “LOCK”
position.
●Remove the mechanical key from the ig-
nition switch.
●Close the doors.
3. Crank the engine with your foot off the
accelerator pedal by turning the ignition
key to START. Release the key when the
engine starts. If the engine starts, but fails to
run, repeat the above procedure.
●If the engine is very hard to start in ex-
tremely cold weather or when restarting,
depress the accelerator pedal a little (ap-
proximately 1/3 to the floor) and hold it
and then crank the engine. Release the
key and the accelerator pedal when the
engine starts.
●If the engine is very hard to start because
it is flooded, depress the accelerator
pedal all the way to the floor and hold it.
Crank the engine for 5-6 seconds. After
cranking the engine, release the accel-
erator pedal. Crank the engine with your
foot off the accelerator pedal by turn-
ing the ignition key to START. Release the
key when the engine starts. If the engine
starts, but fails to run, repeat the above
procedure.
CAUTION
Do not operate the starter for more than
15 seconds at a time. If the engine does
not start, turn the key off and wait 10
seconds before cranking again, otherwise
the starter could be damaged.
4. Warm-up
Allow the engine to idle for at least 30 sec-
onds after starting. Do not race the engine
while warming it up. Drive at moderate
speed for a short distance first, especially in
cold weather.
Starting and driving 5-11
੬REVIEW COPY—
2007 Versa (vrs)
Owners Manual—USA_English (nna)
03/06/06—arosenma
੭
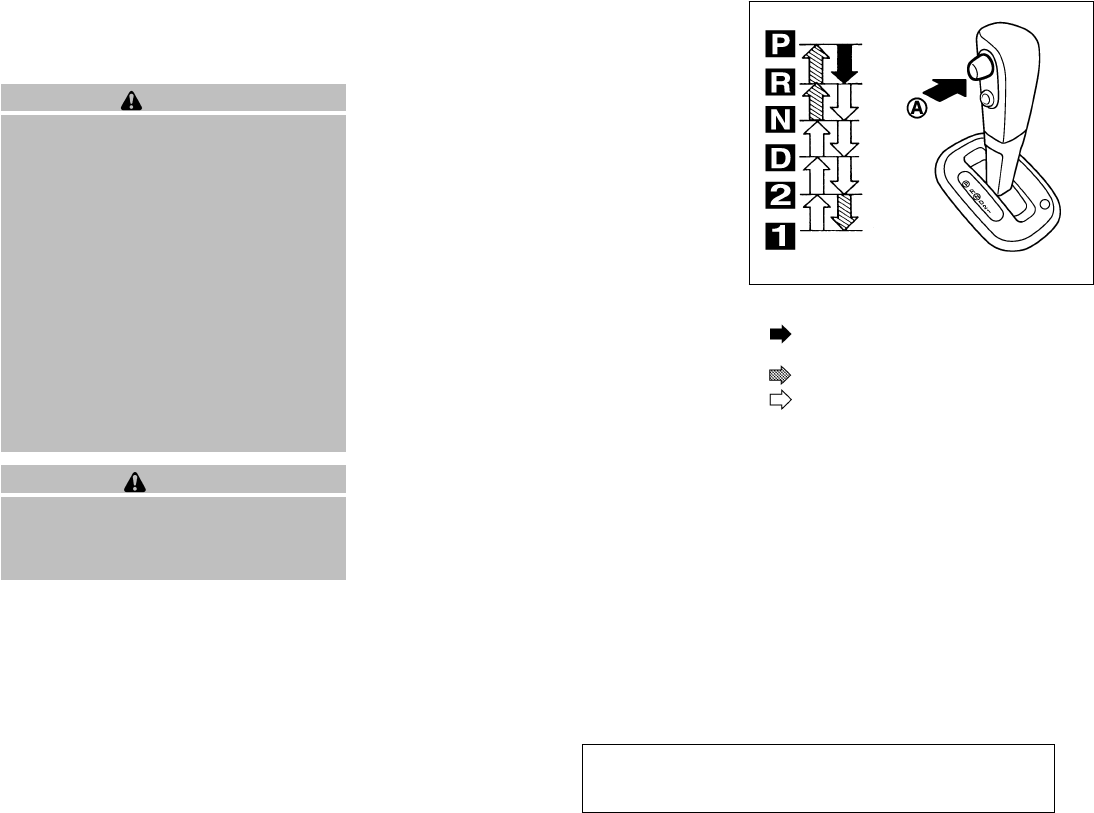
CONTINUOUSLY VARIABLE
TRANSMISSION (CVT) (if so
equipped)
WARNING
●Do not depress the accelerator pedal
while shifting from P (Park) or N (Neu-
tral) to R (Reverse), or L (Low). Always
depress the brake pedal until shifting is
completed. Failure to do so could cause
you to lose control and have an
accident.
●Cold engine idle speed is high, so use
caution when shifting into a forward or
reverse gear before the engine has
warmed up.
●Do not downshift abruptly on slippery
roads. This may cause a loss of control.
●Never shift to P (Park) or R (Reverse)
while the vehicle is moving. This could
cause an accident.
CAUTION
When stopping the vehicle on an uphill
grade, do not hold the vehicle by depress-
ing the accelerator pedal. The foot brake
should be used for this purpose.
The CVT in your vehicle is electronically con-
trolled to produce maximum power and smooth
operation.
The recommended operating procedures for this
transmission are shown on the following pages.
Follow these procedures for maximum vehicle
performance and driving enjoyment.
Starting the vehicle
1. After starting the engine, fully depress the
foot brake pedal before attempting to move
the shift selector lever out of the P (Park)
position.
2. Keep the foot brake pedal depressed and
move the shift selector lever into a driving
gear.
3. Release the foot brake, then gradually start
the vehicle in motion.
The CVT is designed so the foot brake
pedal MUST be depressed before shifting
from P (Park) to any drive position while
the ignition switch is in the ON position.
The shift selector lever cannot be moved
out of P (Park) and into any of the other
gear positions if the ignition key is turned
to the LOCK, OFF or ACC position or if the
key is removed.
To move the selector lever:
Push the button ᭺
Awhile depressing the
brake pedal
Push the button ᭺
Ato shift
Shift without pushing button ᭺
A
Shifting
After starting the engine, fully depress the brake
pedal and move the shift selector lever out of the
P (Park) position.
SSD0532
DRIVING THE VEHICLE
5-12 Starting and driving
੬REVIEW COPY—
2007 Versa (vrs)
Owners Manual—USA_English (nna)
03/07/06—cathy
੭

WARNING
Apply the parking brake if the selector
lever is in any position while the engine is
not running. Failure to do so could cause
the vehicle to move unexpectedly or roll
away and result in serious personal injury
or property damage.
If the key is turned to the OFF or ACC position for
any reason while the vehicle is in N (Neutral), or
any D (Drive) position, the shift selector lever
cannot be moved to P (Park). Additionally, the key
cannot be turned to the LOCK position and be
removed from the ignition switch. If this occurs,
perform the following steps:
1. Apply the parking brake when the vehicle is
stopped.
2. Turn the key to the ON position.
3. Depress the foot brake pedal.
4. Move the shift selector lever to P (Park) or N
(Neutral) to restart the vehicle (P is pre-
ferred). Move the shift selector lever to P
(Park) to park the vehicle and turn the igni-
tion key to the LOCK position to remove the
key.
P (Park):
Use this selector position when the vehicle is
parked or when starting the engine. Make sure
the vehicle is completely stopped. The brake
pedal must be depressed and the selector
lever button pushed in to move the selector
lever from the N (Neutral) or any drive po-
sition to P (Park). Apply the parking brake.
When parking on a hill, apply the parking brake
first, then shift the selector lever into the P (Park)
position.
R (Reverse):
CAUTION
Use this position only when the vehicle is
completely stopped.
Use this position to back up. Make sure the
vehicle is completely stopped before selecting R
(Reverse) position. The vehicle speed in R (Re-
verse) is governed at 15 MPH (25 km/h). Do not
exceed 15 MPH (25 km/h) in the R (Reverse)
position.
The brake pedal must be depressed
and the selector lever button pushed in to
move the selector lever from P (Park), N (Neu-
tral) or any drive position to R (Reverse).
N (Neutral):
Neither forward nor reverse gear is engaged. The
engine can be started in this position. You may
shift to N (Neutral) and restart a stalled engine
while the vehicle is moving.
D (Drive):
Use this position for all normal forward driving.
L (Low):
Use this position for maximum engine braking on
steep downhill gradients/climbing steep slopes
and whenever approaching sharp bends. Do not
use the L position in any other circumstances.
Starting and driving 5-13
੬REVIEW COPY—
2007 Versa (vrs)
Owners Manual—USA_English (nna)
03/15/06—cathy
੭

Shift lock release
If the battery is discharged, the shift selector lever
may not be moved from the P (Park) position even
with the brake pedal depressed and the shift
selector lever button pushed.
To move the shift selector lever, release the shift
lock and push the shift selector lever button. The
shift selector lever can be moved to N (Neutral).
However, the steering wheel will be locked un-
less the ignition switch is turned to the ON posi-
tion.
To release the shift lock, complete the following
procedure:
1. Turn the ignition key to the LOCK position
and remove the key.
2. Apply the parking brake.
3. Depress the shift lock release button ᭺
1.
4. Push and hold the shift selector lever button
᭺
2and move the shift selector lever ᭺
3to N
(Neutral) position while holding down the
shift lock release button.
5. Turn the key to the ON position to unlock the
steering wheel. Now the vehicle may be
moved to the desired location.
If the shift selector lever cannot be moved out of
P (Park), have a NISSAN dealer check the CVT
system as soon as possible. Overdrive (O/D) OFF switch
When the O/D OFF switch is pushed with the
selector lever in the D (Drive) position, the
light in the instrument panel illuminates. See
“Overdrive off indicator light” in the “Instruments
and controls” section of this manual.
Use the Overdrive off mode when you need im-
proved engine braking.
To turn off the Overdrive off mode, push the O/D
OFF switch again. The indicator light will
turn off.
Each time the engine is started, or when the
selector lever is shifted to any position other than
SSD0534 WSD0164
5-14 Starting and driving
੬REVIEW COPY—
2007 Versa (vrs)
Owners Manual—USA_English (nna)
03/06/06—arosenma
੭
D (Drive), the Overdrive off mode will be auto-
matically turned off.
Accelerator downshift
— in D position —
For passing or hill climbing, depress the accel-
erator pedal to the floor. This shifts the transmis-
sion down into a lower gear, depending on the
vehicle speed.
Fail-safe
When the fail-safe operation occurs, the CVT will
not be shifted into the selected driving position.
If the vehicle is driven under extreme con-
ditions, such as excessive wheel spinning
and subsequent hard braking, the fail-safe
system may be activated. The MIL may
come on to indicate the fail-safe mode is
activated, see “Malfunction indicator lamp
(MIL)” in the “Instrument and controls” sec-
tion. This will occur even if all electrical
circuits are functioning properly. In this
case, turn the ignition switch to the OFF
position and wait for 10 seconds. Then turn
the switch back to the ON position. The
vehicle should return to its normal operat-
ing condition. If it does not return to its
normal operating condition, have a
NISSAN dealer check the transmission and
repair if necessary.
WARNING
When the high fluid temperature protec-
tion mode or fail-safe operation occurs,
vehicle speed may be gradually reduced.
The reduced speed may be lower than
other traffic, which could increase the
chance of a collision. Be especially care-
ful when driving. If necessary, pull to the
side of the road at a safe place and allow
the transmission to return to normal op-
eration, or have it repaired if necessary.
MANUAL TRANSMISSION
WARNING
●Do not downshift abruptly on slippery
roads. This may cause a loss of control.
●Do not over-rev the engine when shift-
ing to a lower gear. This may cause a
loss of control or engine damage.
CAUTION
●Do not rest your foot on the clutch pedal
while driving. This may cause clutch
damage.
●Fully depress the clutch pedal before
shifting to help prevent transmission
damage.
●Stop your vehicle completely before
shifting into R (Reverse).
●When the vehicle is stopped with the
engine running (for example, at a stop
light), shift to N (Neutral) and release
the clutch pedal with the foot brake
applied.
Starting and driving 5-15
੬REVIEW COPY—
2007 Versa (vrs)
Owners Manual—USA_English (nna)
03/06/06—arosenma
੭

Shifting
To change gears, or when upshifting or down-
shifting, depress the clutch pedal fully, shift into
the appropriate gear, then release the clutch
slowly and smoothly.
To ensure smooth gear changes, fully depress
the clutch pedal before operating the shift lever. If
the clutch pedal is not fully depressed before the
transmission is shifted, a gear noise may be
heard. Transmission damage may occur.
Start the vehicle in 1st gear and shift to 2nd, 3rd,
4th and 5th up to 6th gear in sequence according
to vehicle speed.
To back up, lift up on the shift lever ring ᭺
1and
then move it to the R (Reverse) position after
stopping the vehicle completely.
The shift lever ring returns to its original position
when the shift lever is moved to the “N” (Neutral)
position.
If it is difficult to move the shift lever into R
(Reverse) or 1 (1st), shift into N (Neutral), then
release the clutch pedal. Depress the clutch
pedal again and shift into R (Reverse) or 1 (1st).
Suggested maximum speed in each
gear
Downshift to a lower gear if the engine is not
running smoothly, or if you need to accelerate.
Do not exceed the maximum suggested speed
(shown below) in any gear. For level road driving,
use the highest gear suggested for that speed.
Always observe posted speed limits, and drive
according to the road conditions, which will en-
sure safe operation. Do not over-rev the engine
when shifting to a lower gear as it may cause
engine damage or loss of vehicle control.
GEAR MPH (km/h)
1st 29 (47)
2nd 51 (83)
3rd 74 (120)
4th —
5th —
6th —
SSD0552
5-16 Starting and driving
੬REVIEW COPY—
2007 Versa (vrs)
Owners Manual—USA_English (nna)
03/06/06—arosenma
੭
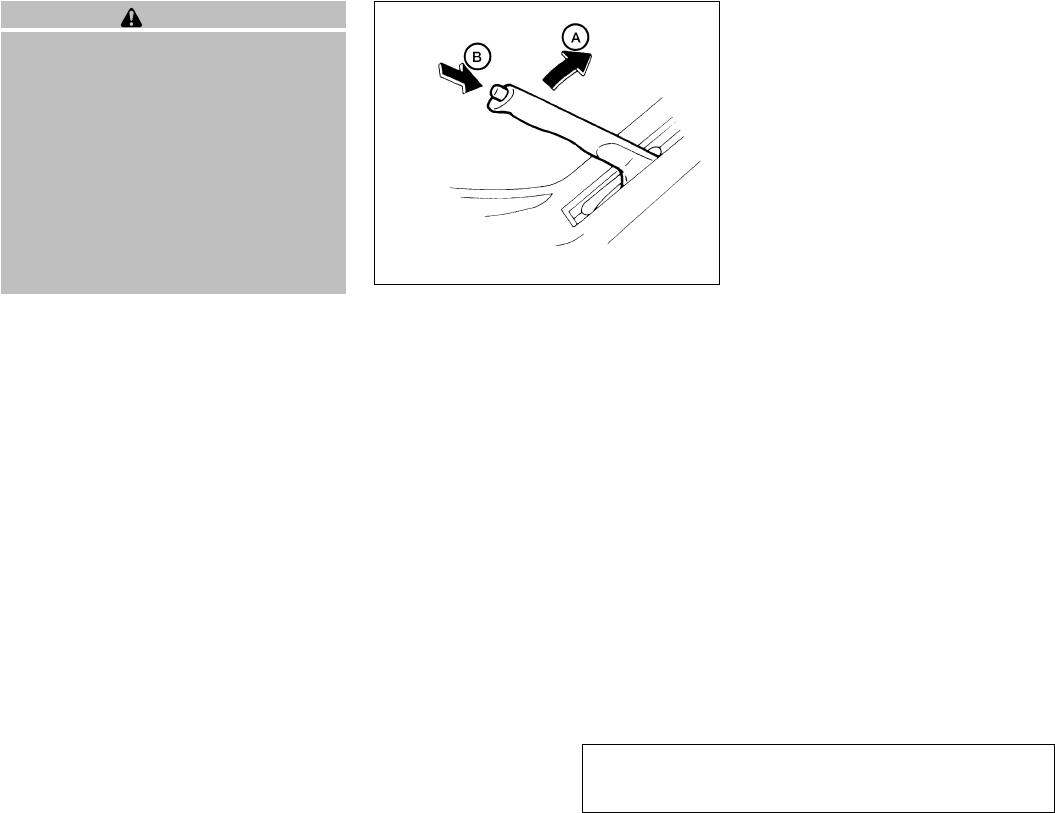
WARNING
●Be sure the parking brake is fully re-
leased before driving. Failure to do so
can cause brake failure and lead to an
accident.
●Do not release the parking brake from
outside the vehicle.
●Do not use the gear shift in place of the
parking brake. When parking, be sure
the parking brake is fully engaged.
●Do not leave children unattended in a
vehicle. They could release the parking
brake and cause an accident.
To engage: Pull the lever up ᭺
A.
To release:
1. Firmly apply the foot brake.
2. Manual transmission models:
Place the shift lever in the N (Neutral) posi-
tion.
Automatic transmission models:
Move the shift selector lever to the P (Park)
position.
3. While pulling up on the parking brake lever
slightly, push the button and lower com-
pletely ᭺
B.
4. Before driving, be sure the brake warning
light goes out.
WSD0048
PARKING BRAKE
Starting and driving 5-17
੬REVIEW COPY—
2007 Versa (vrs)
Owners Manual—USA_English (nna)
03/06/06—arosenma
੭
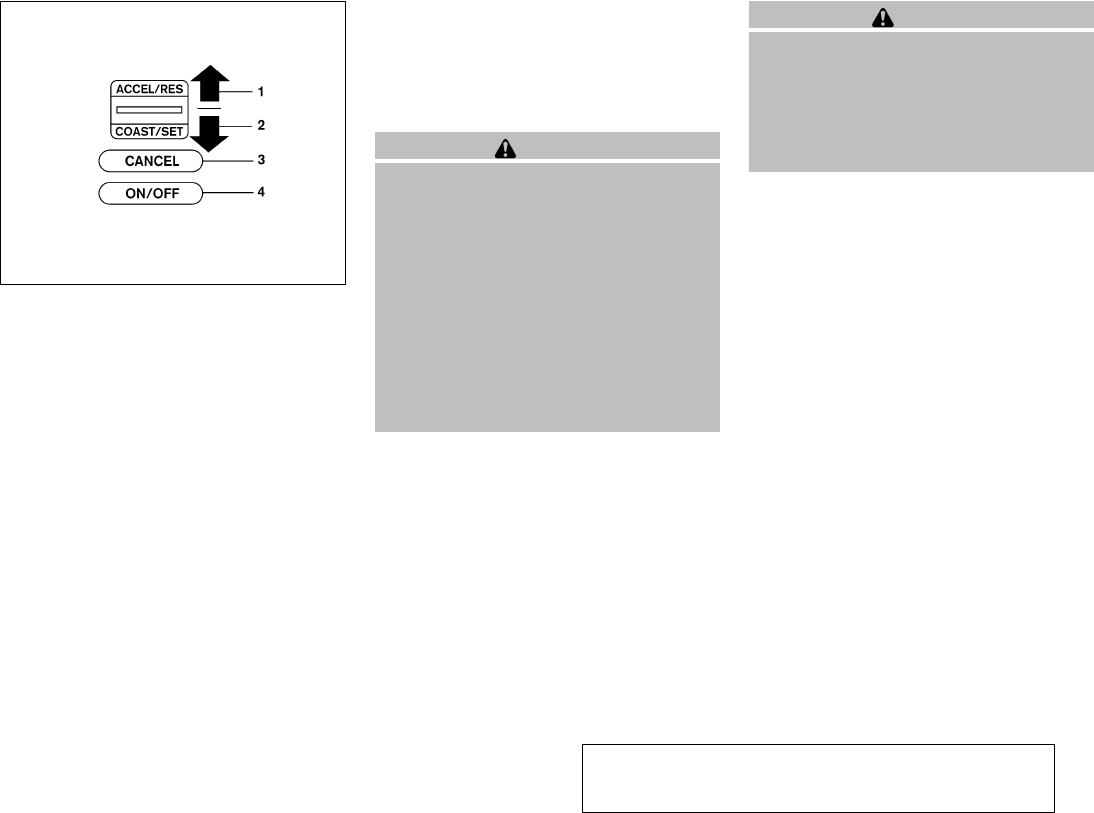
1. ACCEL/RES switch
2. COAST/SET switch
3. CANCEL switch
4. ON/OFF switch
PRECAUTIONS ON CRUISE
CONTROL
●If the cruise control system malfunctions, it
cancels automatically. The SET indicator
light in the instrument panel then blinks to
warn the driver.
●If the SET indicator light blinks, turn the
cruise control switch off and have the sys-
tem checked by a NISSAN dealer.
●The SET indicator light may blink when the
cruise control switch is turned ON while
pushing the ACCEL/RES, COAST/SET, or
CANCEL switch. To properly set the cruise
control system, use the following proce-
dures.
WARNING
Do not use the cruise control when driving
under the following conditions:
●When it is not possible to keep the
vehicle at a set speed.
●In heavy traffic or in traffic that varies in
speed.
●On winding or hilly roads.
●On slippery roads (rain, snow, ice, etc.).
●In very windy areas.
Doing so could cause a loss of vehicle
control and result in an accident.
CAUTION
On manual transmission models, do not
shift into N (Neutral) without depressing
the clutch pedal when the cruise control is
set. Should this occur, depress the clutch
pedal and turn the main switch off imme-
diately. Failure to do so may cause engine
damage.
CRUISE CONTROL OPERATIONS
The cruise control allows driving at a speed be-
tween 25 - 89 MPH (40 - 144 km/h) without
keeping your foot on the accelerator pedal.
To turn on the cruise control, push the main
switch. The CRUISE indicator light in the instru-
ment panel comes on.
To set cruising speed, accelerate the vehicle to
the desired speed, push the COAST/SET switch
and release it. The SET indicator light in the
instrument panel comes on. Take your foot off the
accelerator pedal. Your vehicle maintains the set
speed.
●To pass another vehicle, depress the ac-
celerator pedal. When you release the
pedal, the vehicle returns to the previously
set speed.
LSD0160
CRUISE CONTROL (if so equipped)
5-18 Starting and driving
੬REVIEW COPY—
2007 Versa (vrs)
Owners Manual—USA_English (nna)
03/06/06—arosenma
੭

●The vehicle may not maintain the set speed
when going up or down steep hills. If this
happens, drive without the cruise control.
To cancel the preset speed, use one of the
following three methods.
●Push the CANCEL button; the SET indicator
light in the instrument panel goes out.
●Tap the brake pedal; the SET indicator light
goes out.
●Turn the main switch off. Both the CRUISE
indicator light and SET indicator light in the
instrument panel go out.
The cruise control is automatically canceled and
the SET light in the instrument panel goes out if:
●you depress the brake or clutch pedal while
pushing the ACCEL/RES or SET/COAST
switch. The preset speed is deleted from
memory.
●the vehicle slows down more than 8 MPH
(13 km/h) below the set speed.
●you depress the clutch pedal (manual trans-
mission), or move the shift selector lever to N
(Neutral) (CVT).
To reset at a faster cruising speed, use one
of the following three methods.
●Depress the accelerator pedal. When the
vehicle attains the desired speed, push and
release the COAST/SET switch.
●Push and hold the ACCEL/RES switch.
When the vehicle attains the speed you de-
sire, release the switch.
●Push and release the ACCEL/RES switch.
Each time you do this, the set speed in-
creases by about 1 MPH (1.6 km/h).
To reset at a slower cruising speed, use one
of the following three methods.
●Lightly tap the brake pedal. When the ve-
hicle attains the desired speed, push the
COAST/SET switch and release it.
●Push and hold the COAST/SET switch. Re-
lease the switch when the vehicle slows to
the desired speed.
●Push and release the COAST/SET switch.
Each time you do this, the set speed de-
creases by about 1 MPH (1.6 km/h).
To resume the preset speed, push and re-
lease the ACCEL/RES switch. The vehicle re-
turns to the last set cruising speed when the
vehicle speed is over 25 MPH (40 km/h).
CAUTION
During the first 1,200 miles (2,000 km),
follow these recommendations to obtain
maximum engine performance and en-
sure the future reliability and economy of
your new vehicle. Failure to follow these
recommendations may result in short-
ened engine life and reduced engine
performance.
●Avoid driving for long periods at constant
speed, either fast or slow, and do not run the
engine over 4,000 rpm.
●Do not accelerate at full throttle in any gear.
●Avoid quick starts.
●Avoid hard braking as much as possible.
BREAK-IN SCHEDULE
Starting and driving 5-19
੬REVIEW COPY—
2007 Versa (vrs)
Owners Manual—USA_English (nna)
03/06/06—arosenma
੭

●Accelerate slowly and smoothly. Maintain
cruising speeds with a constant accelerator
position.
●Drive at moderate speeds on the highway.
Driving at high speed lowers fuel economy.
●Avoid unnecessary stopping and braking.
Maintain a safe distance behind other ve-
hicles.
●Use a proper gear range which suits road
conditions. On level roads, shift into high
gear as soon as possible.
●Avoid unnecessary engine idling.
●Keep your engine tuned up.
●Follow the recommended periodic mainte-
nance schedule.
●Keep the tires inflated to the correct pres-
sure. Low tire pressure increases tire wear
and lowers fuel economy.
●Keep the wheels in correct alignment. Im-
proper alignment increases tire wear and
lowers fuel economy.
●Air conditioner operation lowers fuel
economy. Use the air conditioner only when
necessary.
●When cruising at highway speeds, it is more
economical to use the air conditioner and
leave the windows closed to reduce drag.
●Use the recommended viscosity engine oil.
See “Engine oil and oil filter recommenda-
tion” in “Technical and consumer informa-
tion” later in this manual.
INCREASING FUEL ECONOMY
5-20 Starting and driving
੬REVIEW COPY—
2007 Versa (vrs)
Owners Manual—USA_English (nna)
03/06/06—arosenma
੭
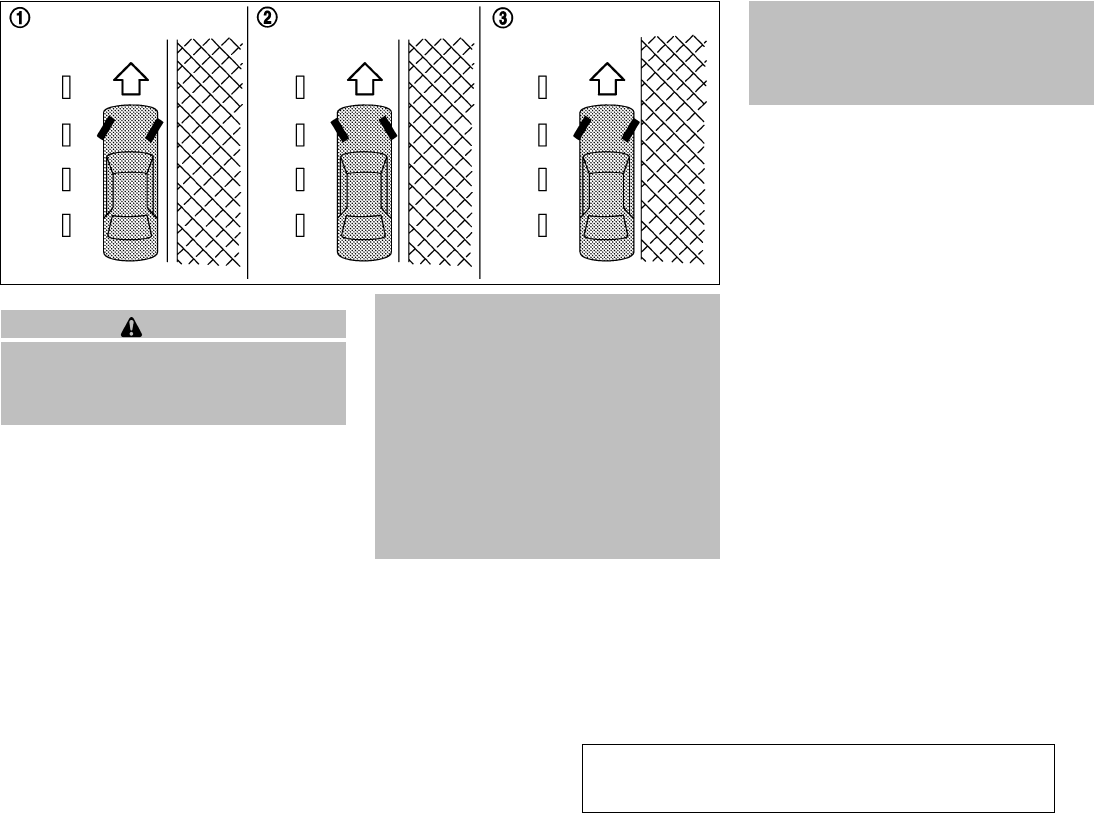
WARNING
●Do not stop or park the vehicle over
flammable materials such as dry grass,
waste paper or rags. They may ignite
and cause a fire.
●Safe parking procedures require that
both the parking brake be set and the
transmission placed into P (Park) for
CVT models or in an appropriate gear
for manual transmission models. Fail-
ure to do so could cause the vehicle to
move unexpectedly or roll away and re-
sult in an accident. Make sure the shift
lever has been pushed as far forward as
it can go and cannot be moved without
depressing the foot brake pedal.
●Never leave the engine running while
the vehicle is unattended.
●Do not leave children unattended inside
the vehicle. They could unknowingly ac-
tivate switches or controls. Unattended
children could become involved in seri-
ous accidents.
1. Firmly apply the parking brake.
2. Manual transmission models:
Place the shift lever in the R (Reverse) posi-
tion. When parking on an uphill grade, place
the shift lever in 1st gear.
Continuously Variable Transmission
(CVT) models:
Move the shift selector lever to the P (Park)
position.
3. To help prevent the vehicle from rolling into
traffic when parked on an incline, it is a good
practice to turn the wheels as illustrated.
●HEADED DOWNHILL WITH CURB: ᭺
1
Turn the wheels into the curb and move the
vehicle forward until the curb side wheel
gently touches the curb.
●HEADED UPHILL WITH CURB: ᭺
2
Turn the wheels away from the curb and
move the vehicle back until the curb side
wheel gently touches the curb.
SSD0488
PARKING/PARKING ON HILLS
Starting and driving 5-21
੬REVIEW COPY—
2007 Versa (vrs)
Owners Manual—USA_English (nna)
03/06/06—arosenma
੭

●HEADED UPHILL OR DOWNHILL, NO
CURB: ᭺
3
Turn the wheels toward the side of the road
so the vehicle will move away from the cen-
ter of the road if it moves.
4. Turn the ignition key to the LOCK position
and remove the key.
WARNING
●If the engine is not running or is turned
off while driving, the power assist for
the steering will not work. Steering will
be harder to operate.
●When the power steering warning light
illuminates with the engine running,
there will be no power assist for the
steering. You will still have control of
the vehicle but the steering will be
harder to operate. Have the power
steering system checked by a NISSAN
dealer.
The power steering system is designed to pro-
vide power assist while driving to operate the
steering wheel with light force.
When the steering wheel is operated repeatedly
or continuously while parking or driving at a very
low speed, the power assist for the steering
wheel will be reduced. This is to prevent over-
heating of the power steering system and protect
it from getting damaged. While the power assist
is reduced, steering wheel operation will become
heavy. When the temperature of the power steer-
ing system goes down, the power assist level will
return to normal. Avoid repeating such steering
wheel operations that could cause the power
steering system to overheat.
You may hear a sound when the steering wheel is
operated quickly. However, this is not a malfunc-
tion.
If the power steering warning light PS illuminates
while the engine is running, it may indicate the
power steering system is not functioning properly
and may need servicing. Have the power steering
system checked by a NISSAN dealer.
When the power steering warning light illumi-
nates with the engine running, there will be no
power assist for the steering but you will still have
control of the vehicle. At this time, greater steer-
ing effort is required to operate the steering
wheel, especially in sharp turns and at low
speeds.
For additional information see “Power steering
warning light” in the “Instruments and controls”
section.
POWER STEERING
5-22 Starting and driving
੬REVIEW COPY—
2007 Versa (vrs)
Owners Manual—USA_English (nna)
03/06/06—arosenma
੭

The brake system has two separate hydraulic
circuits. If one circuit malfunctions, you will still
have braking at two wheels.
BRAKE PRECAUTIONS
Vacuum assisted brakes
The brake booster aids braking by using engine
vacuum. If the engine stops, you can stop the
vehicle by depressing the brake pedal. However,
greater foot pressure on the brake pedal will be
required to stop the vehicle and stopping dis-
tance will be longer.
Using the brakes
Avoid resting your foot on the brake pedal while
driving. This will overheat the brakes, wear out the
brakes and pads faster, and reduce gas mileage.
To help reduce brake wear and to prevent the
brakes from overheating, reduce speed and
downshift to a lower gear before going down a
slope or long grade. Overheated brakes may
reduce braking performance and could result in
loss of vehicle control.
WARNING
●While driving on a slippery surface, be
careful when braking, accelerating or
downshifting. Abrupt braking or accel-
erating could cause the wheels to skid
and result in an accident.
●If the engine is not running or is turned
off while driving, the power assist for
the brakes will not work. Braking will be
harder.
Wet brakes
When the vehicle is washed or driven through
water, the brakes may get wet. As a result, your
braking distance will be longer and the vehicle
may pull to one side during braking.
To dry the brakes, drive the vehicle at a safe
speed while lightly pressing the brake pedal to
heat up the brakes. Do this until the brakes return
to normal. Avoid driving the vehicle at high
speeds until the brakes function correctly.
Parking brake break-in
Break-in the parking brake shoes whenever the
stopping effect of the parking brake is weakened
or whenever the parking brake shoes and/or
drum/rotors are replaced, in order to assure the
best brake performance.
This procedure is described in the vehicle service
manual and can be performed by a NISSAN
dealer.
ANTI-LOCK BRAKING SYSTEM
(ABS) (if so equipped)
The anti-lock braking system controls the brakes
so the wheels do not lock when braking abruptly
or when braking on slippery surfaces. The system
detects the rotation speed at each wheel and
varies the brake fluid pressure to prevent each
wheel from locking and sliding. By preventing
wheel lockup, the system helps the driver main-
tain steering control and helps to minimize swerv-
ing and spinning on slippery surfaces.
Using the system
Depress the brake pedal and hold it down.
WARNING
Do not pump the brake pedal. Doing so
may result in increased stopping
distances.
Normal operation
The anti-lock braking system does not operate at
speeds below3-6MPH(5-10km/h). (The
speeds vary according to road conditions.)
BRAKE SYSTEM
Starting and driving 5-23
੬REVIEW COPY—
2007 Versa (vrs)
Owners Manual—USA_English (nna)
03/06/06—arosenma
੭

When driving, the anti-lock braking system con-
trols the wheels so they will not lock when brak-
ing abruptly or when braking on a slippery road.
Thus, steering control is increased and swerving
of the vehicle is decreased during emergency
braking. The system detects the wheel rotation
rate and electronically controls the pressure ap-
plied to each brake. Slight vibration on the brake
pedal accompanied by noise usually occurs while
the ABS system is operating. Such vibration and
noise encountered during abrupt braking is not a
problem, but indicates that the system is func-
tioning properly. However, the pulsation may in-
dicate that road conditions are hazardous and
extra care is required while driving.
Self-test feature
The anti-lock braking system consists of elec-
tronic sensors and hydraulic solenoids controlled
by a computer. The computer has a built-in diag-
nostic feature that tests the system each time you
start the engine and move the vehicle at a low
speed in forward or reverse. When the self-test
occurs, you may hear a “clunk” noise and/or feel a
pulsation in the brake pedal. This is normal and is
not an indication of any malfunction. If the com-
puter senses any malfunction, it switches the
anti-lock braking system off and turns on the ABS
brake warning light on the instrument panel. The
braking system then operates normally, but with-
out anti-lock assistance.
If the light comes on during the self-test or while
driving, take the vehicle to a NISSAN dealer for
repair.
WARNING
●The anti-lock braking system is a so-
phisticated device, but it cannot pre-
vent accidents resulting from careless
or dangerous driving techniques. It can
help maintain vehicle control during
braking on slippery surfaces, but re-
member that the stopping distance on
slippery surfaces will be longer than on
normal surfaces even with the anti-lock
braking system. Stopping distances
may also be longer on rough, gravel or
snow covered roads, or if you are using
tire chains. Tire type and condition may
also affect braking effectiveness. Al-
ways maintain a safe distance from the
vehicle in front of you. Ultimately, the
responsibility for safety of self and oth-
ers rests in the hands of the driver.
●Tire type and condition of tires may also
affect braking effectiveness.
●When replacing tires, install the speci-
fied size of tires on all four wheels.
●When installing a spare tire, make sure
it is the proper size and type as speci-
fied on the Tire and Loading Informa-
tion label. For tire placard location in-
formation, refer to “Tire and Loading
Information label” in the “Technical and
consumer information” section of this
manual.
●Refer to “Wheels and tires” in the
“Maintenance and do-it-yourself” sec-
tion of this manual.
5-24 Starting and driving
੬REVIEW COPY—
2007 Versa (vrs)
Owners Manual—USA_English (nna)
03/06/06—arosenma
੭
FREEING A FROZEN DOOR LOCK
To prevent a door lock from freezing, apply de-
icer through the key hole. If the lock becomes
frozen, heat the key before inserting it into the key
hole or use the remote keyless entry keyfob (if so
equipped).
ANTI-FREEZE
In the winter when it is anticipated that the tem-
perature will drop below 32°F (0°C), check the
anti-freeze to assure proper winter protection.
For details, see “Engine cooling system” in the
“Maintenance and do-it-yourself” section of this
manual.
BATTERY
If the battery is not fully charged during extremely
cold weather conditions, the battery fluid may
freeze and damage the battery. To maintain maxi-
mum efficiency, the battery should be checked
regularly. For details, see “Battery” in the “Main-
tenance and do-it-yourself” section of this
manual.
DRAINING OF COOLANT WATER
If the vehicle is to be left outside without anti-
freeze, drain the cooling system, including the
engine block. Refill before operating the vehicle.
For details, see “Changing engine coolant” in the
“Maintenance and do-it-yourself” section of this
manual.
TIRE EQUIPMENT
1. SUMMER tires have a tread designed to
provide superior performance on dry pave-
ment. However, the performance of these
tires will be substantially reduced in snowy
and icy conditions. If you operate your ve-
hicle on snowy or icy roads, NISSAN recom-
mends the use of MUD & SNOW or ALL
SEASON TIRES on all four wheels. Please
consult a NISSAN dealer for the tire type,
size, speed rating and availability informa-
tion.
2. For additional traction on icy roads, studded
tires may be used. However, some U.S.
states and Canadian provinces prohibit their
use. Check local, state and provincial laws
before installing studded tires.
Skid and traction capabilities of studded
snow tires on wet or dry surfaces may be
poorer than that of non-studded snow tires.
3. Tire chains may be used. For details see
“Tire chains” in the “Maintenance and do-it-
yourself” section of this manual.
SPECIAL WINTER EQUIPMENT
It is recommended that the following items be
carried in the vehicle during winter:
●A scraper and stiff-bristled brush to remove
ice and snow from the windows and wiper
blades.
●A sturdy, flat board to be placed under the
jack to give it firm support.
●A shovel to dig the vehicle out of snowdrifts.
●Extra window washer fluid to refill the reser-
voir tank.
DRIVING ON SNOW OR ICE
WARNING
●Wet ice (32°F, 0°C and freezing rain),
very cold snow or ice can be slick and
very hard to drive on. The vehicle will
have much less traction or “grip” under
these conditions. Try to avoid driving on
wet ice until the road is salted or
sanded.
COLD WEATHER DRIVING
Starting and driving 5-25
੬REVIEW COPY—
2007 Versa (vrs)
Owners Manual—USA_English (nna)
03/06/06—arosenma
੭
●Whatever the condition, drive with cau-
tion. Accelerate and slow down with
care. If accelerating or downshifting too
fast, the drive wheels will lose even
more traction.
●Allow more stopping distance under
these conditions. Braking should be
started sooner than on dry pavement.
●Allow greater following distances on
slippery roads.
●Watch for slippery spots (glare ice).
These may appear on an otherwise
clear road in shaded areas. If a patch of
ice is seen ahead, brake before reach-
ing it. Try not to brake while on the ice,
and avoid any sudden steering
maneuvers.
●Do not use the cruise control on slip-
pery roads.
●Snow can trap dangerous exhaust
gases under your vehicle. Keep snow
clear of the exhaust pipe and from
around your vehicle.
ENGINE BLOCK HEATER (if so
equipped)
An engine block heater to assist in extreme cold
temperature starting is available through a
NISSAN dealer.
WARNING
Do not use your heater with an un-
grounded electrical system or two-
pronged (cheater) adapters. You can be
injured by an electrical shock if you use an
ungrounded connection.
5-26 Starting and driving
੬REVIEW COPY—
2007 Versa (vrs)
Owners Manual—USA_English (nna)
03/06/06—arosenma
੭