AMANA Side By Refrigerator Manual L0303327
User Manual: AMANA AMANA Side by Side Refrigerator Manual AMANA Side by Side Refrigerator Owner's Manual, AMANA Side by Side Refrigerator installation guides
Open the PDF directly: View PDF ![]() .
.
Page Count: 27
BUILT BETTER THAN IT HAS TO BE
/_• ..... • _ •
.._. sr_ _ow THJStVC_t_ i
Owner's
Covering
Manual
Distinctions"Models
Keep instructions for future reference.
Keep this manual and your sales receipt together in a safe place in
case warranty service is required.
Side by Side
Refrigerator
Ordering parts and accessories?
Questions about your features?
Please contactus with yourmodel andserial number:
ConsumerAffairs Department
AmanaAppliances
2800 - 220th Trail
Amana, Iowa 52204
Ph# 1(800)843-0304
1(319)622-5511 outside U.S.A.
Intcrnet:http://www.amana.com
Contents
Introduction ............................................................................ 2
Important Safety Information................................................. 3
Installing Your Refrigerator.................................................... 4
How to Remove the Doors and Hinges .............................. 5
How to Install and Remove Handles .................................. 5
How to Level Your Refrigerator............................................ 8
How to Connect the Water Supply ....................................... 9
How to Adjust the Temperature Controls .......................... 10
About Your FiltrationSystem ............................................... 11
Fresh Food Features ........................................................... 12
Door Storage...................................................................... 12
Shelves .............................................................................. 13
Drawers ............................................................................. 13
Freezer Features ................................................................. 15
Principal Characteristics ................................................... 15
Drawers ............................................................................. 15
Shelves .............................................................................. 15
Door Storage ...................................................................... 16
Dispenser Features ............................................................ 17
Primary Features ............................................................... 17
Water Dispenser Operation .............................................. 17
Control Features ................................................................ 18
Hints and Care .................................................................... 19
How to Clean Your Unit ..................................................... 19
How to Remove and Replace Light Bulbs ........................ 20
Trouble Shooting ................................................................. 21
Water Filter Data .................................................................. 25
Warranty ............................................................................... 27
"__ As an Energy Star °Partner,
Amana ®has determined that this
product* meets the Energy Star °
guidelines for energy efficiency.
* This manual covers several models. Please refer to the feature sticker on the
interior of the fresh food door to verify that your model number complies with
Energy Star _ standards.
Part No. 12591306 ©Sales
PrintedinUS,A. 2/02 ...ay_=_r-.pp..un_= Co. 2OO2
Please read this Owner's Manual thoroughly. This manual provides proper
maintenance information.
Complete registration card and promptly return. If registration card is missing,
call the Consumer Affairs Department.
Warranty service moat be performed by an authorized servicer. Amana also
recommends conta_ing an authorized sewicer if service is required after warranty
expires. To locate an authorized servicer, call 1-600-NAT-LSVC (t-800-628-5782),
or call 1(319)622-5511 if outside the U.S.A. You may also contact us on the web at
www.amana.com.
When contacting Amana, please provide the following information. Product
information Is on the sedal plate, located on ceiling of fresh food section.
Model Number
'P' Number
Serial Number
Purchase Oate
Amana offers long-term service
protection for this new refrigerator.
Asure TM Extended Service Plan is
specially designed to supplement
Amana's strong warranty. This plan
covers parts, labor, and travel charges.
Call 1(800)528-2682, or contact us at
www.amana.com for more information.
If something seems unusual, please
check "Trouble Shooting" section,
which is designed to help you solve
problems before calling service.
Dealer Name
Dealer Address
Dealer Phone
@
This book is intended to show the
variety of features that are available in
the product line. If your refrigerator
does not have all the options that are
shown, many of these options may be
purchased by contacting the Consumer
Affairs Department. See contact
information on the cover of your
manual.
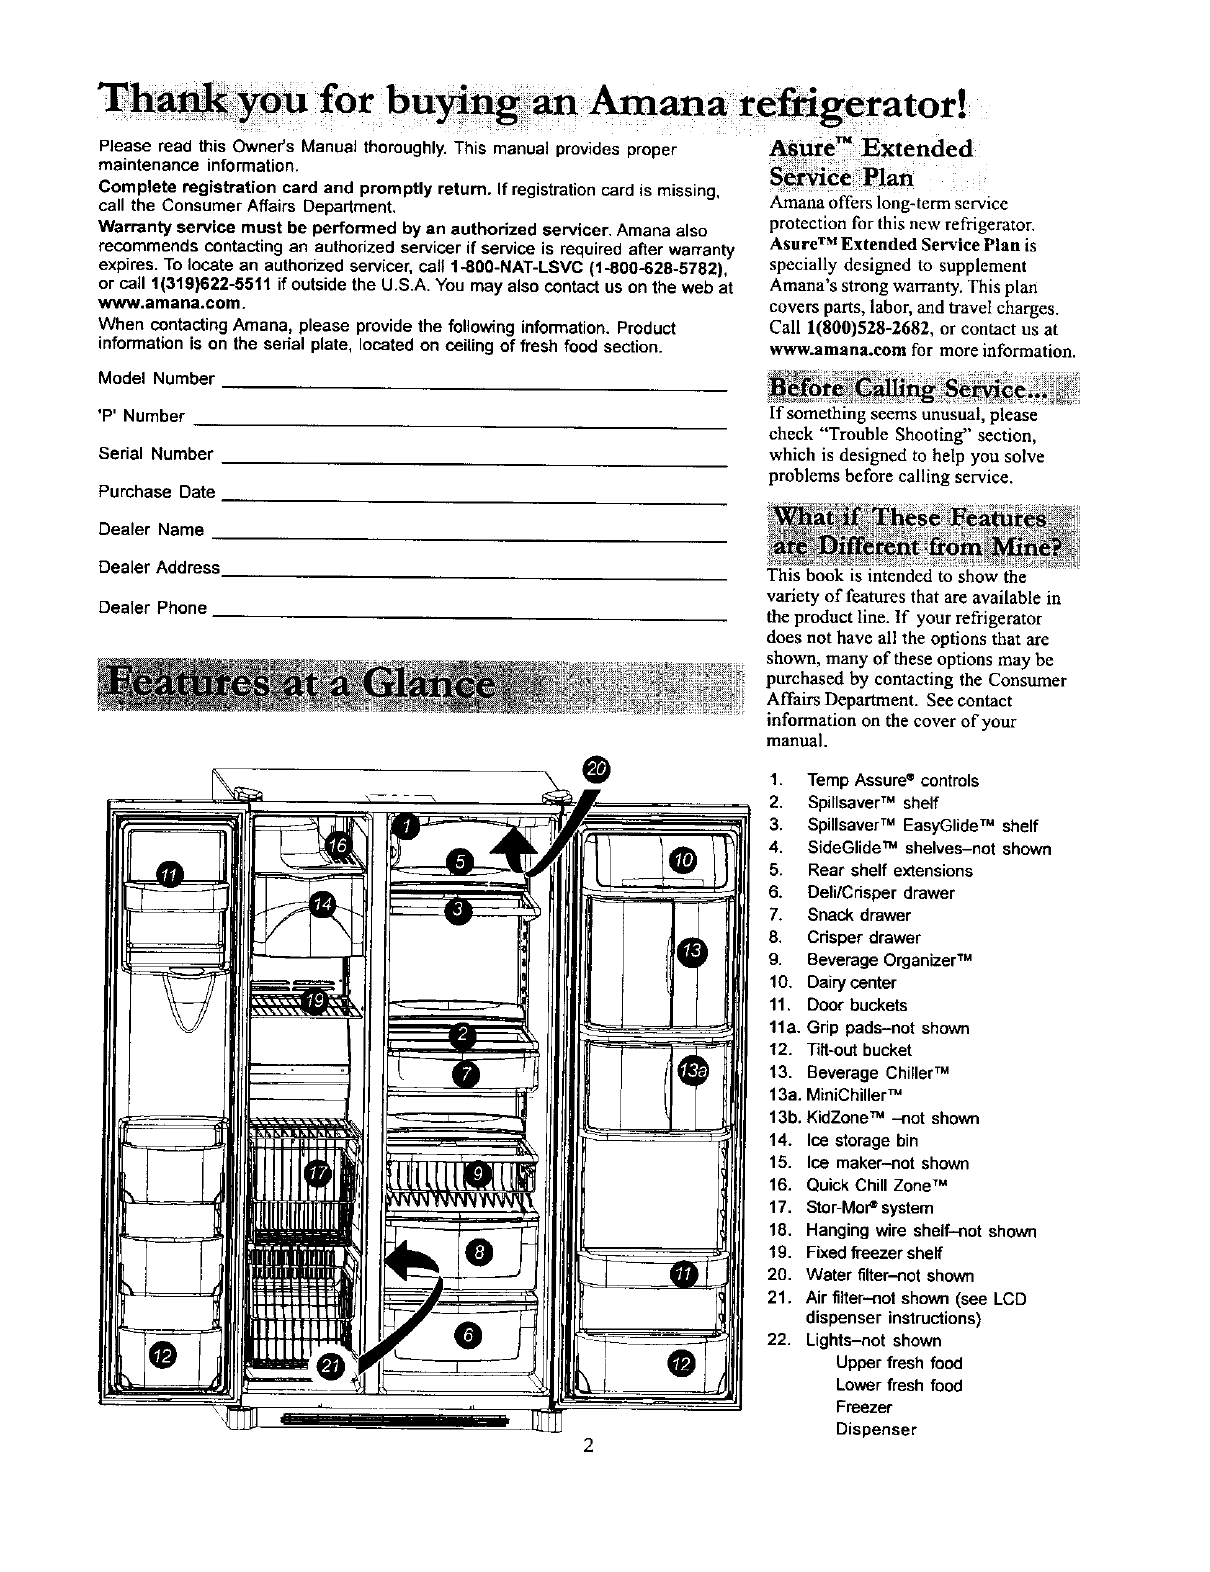
1. Tamp Assure®controls
2. Spillsaver TM shelf
3. Spillsaver TM EasyGlide TM shelf
4. SideGlide TM shelves-not shown
5. Rear shelf extensions
6. Dell/Crisper drawer
7. Snack drawer
8. Cdsper drawer
9. Beverage OrganizerTM
10. Dairy center
11. Door buckets
11a. Grip pads-not shown
12. Tiff-out bucket
13. Beverage Chiller TM
13a. MiniChillerTM
13b. KidZoneTM -not shown
14. Ice storage bin
15. Ice maker-not shown
16. Quick Chill ZoneTM
17. StoroMo_system
18. Hanging wire shelf-not shown
19. Fixedfreezer shelf
20. Water filter-not shown
21. Air filter-not shown (see LCD
dispenser inst.ructions)
22. Lights-not shown
Upper fresh food
Lower fresh food
Freezer
Dispenser
Important Safety Information
Recognize Safety Symbols, Words, Labels
I DANGER
DANGER--Immediate hazards which WILL result in severe personal injury or
death.
I WARNING I
WARNING--Hazards or unsafe practices which COULD result in severe personal
injuryor death.
I CAUTION I
CAUTION--Hazards or unsafe practices which COULD result in minor personal
injuryor product or property damage,
Warning and Important Safety
Instructions appearing in this manual
are not meant to cover all possible
conditions and situations that may
occur. Common sense, caution, and care
must be exercised when installing,
maintaining, or operating refrigerator.
Always contact your dealer, distributor,
service agent, or manufacturer about
problems or conditions you do not
understand.
[Ak WARNING
To reduce risk of fire, electric shock, serious injury, or death when using your
refrigerator, follow these basic precautions, including the following:
1. Read all instructions before using 8.
refrigerator.
2. Observe all local codes and 9.
ordinances
3. Be sure to follow grounding 10.
instructions.
4. Check with a qualified electrician 11.
if you are not sure this appliance
is propedy grounded.
5. DO NOT ground to a gas line.
6. DO NOT ground to cold water
pipe.
7. Refrigerator is designed to
operate on a separate 103 to 126
volt, 15 amp., 60 cycle line. DO 12.
NOT modify plug on power cord. If
plug does not fit electrical outlet,
have proper outlet installed by a
qualified electrician.
DO NOT use a two-prong adapter,
extension cord or power strip.
DO NOT remove warning tag from
power cord.
DO NOT tamper with refrigerator
controls.
DO NOT service or replace any
part of refrigerator unless
specifically recommended in
owner's manual or published
user-repair instructions. DO NOT
attempt service if instructionsare
not understood or if they are
beyond personal skill level.
13. Install refrigerator according to
Installation Instructions. All
connections for water, electrical
power, and grounding must
comply with local codes and be
made by licensed personnel
when required.
14. Keep your refrigerator in good
condition. Bumping or dropping
refrigerator can damage unit or
cause unit to malfunction or leak.
If damage occurs, have
refrigerator checked by qualified
service technician.
Always disconnect refrigerator
from electrical supply before
attempting any service. Disconnect
power cord by grasping the plug,
not the cord.
15. Replace worn power cords and/or
loose plugs.
16. Always read and follow
manufacturer's storage and ideal
environment instructions for items
being stored in refrigerator.
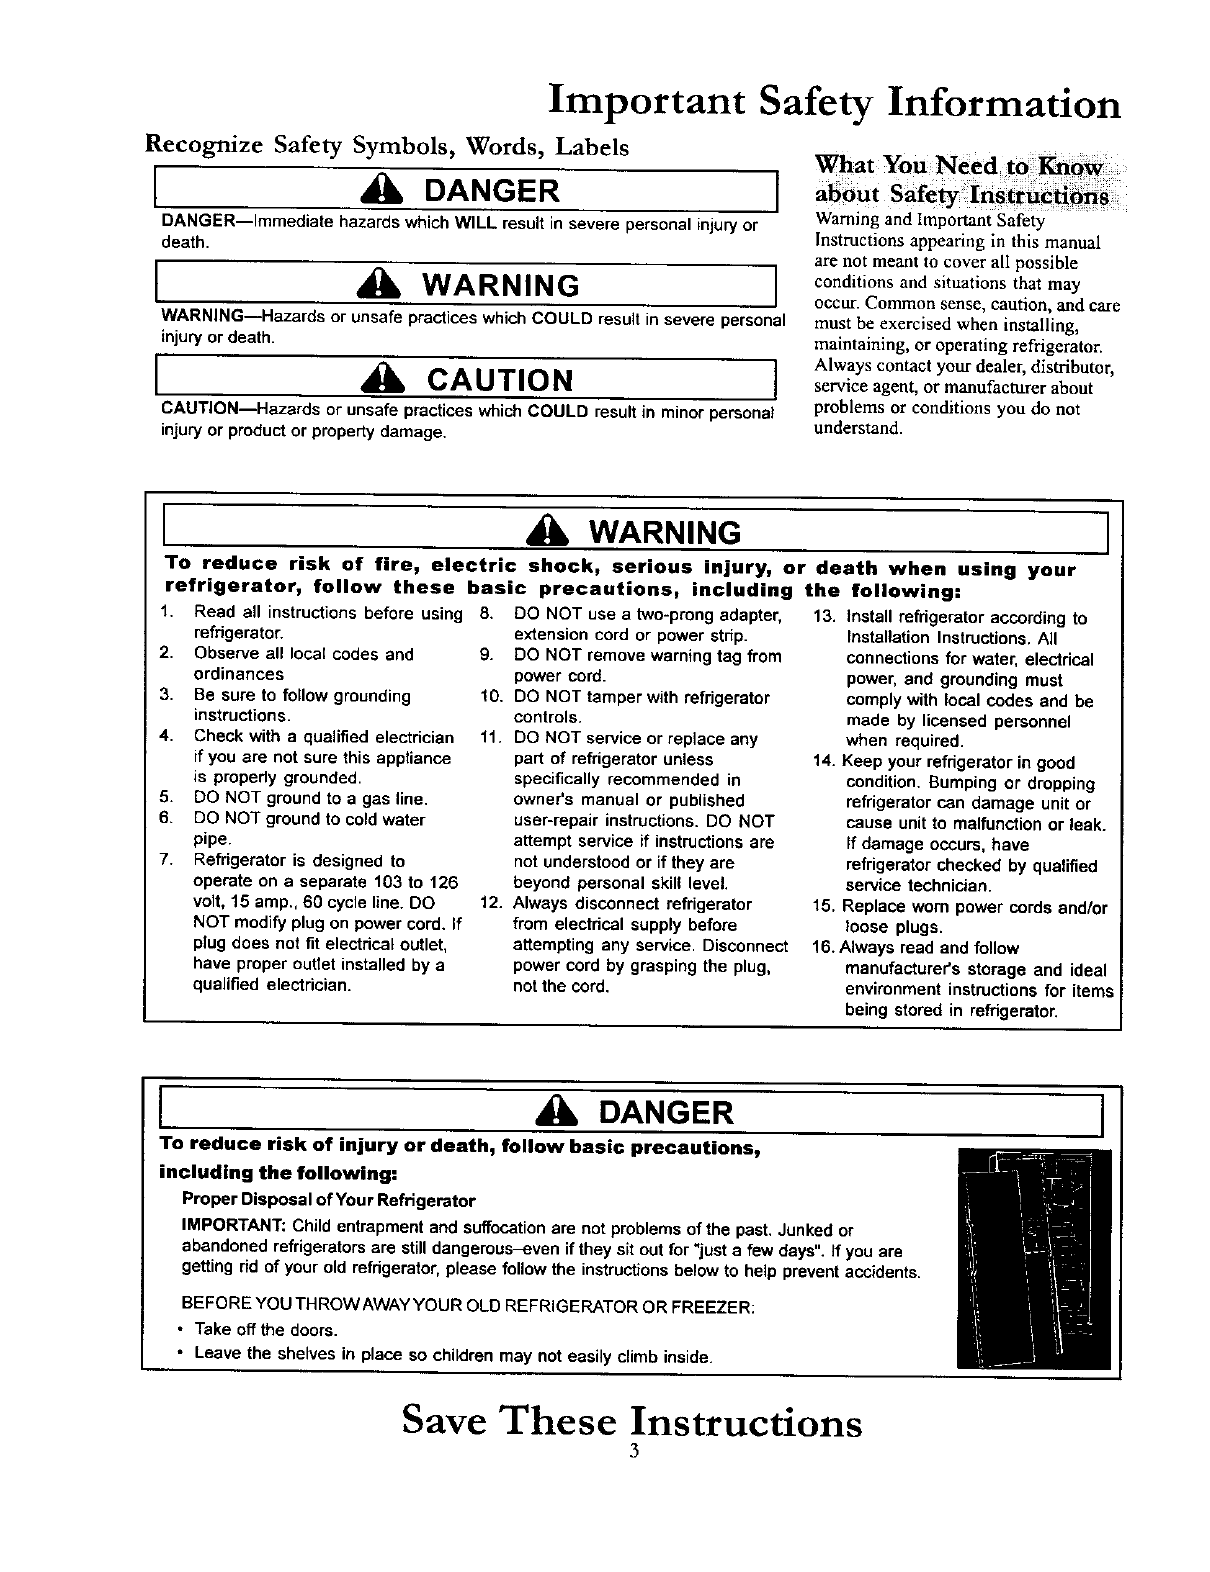
I DANGER I
To reduce risk of injury or deathw follow basic precautions,
including the following:
Proper Disposal of Your Refrigerator
IMPORTANT: Child entrapment and suffocationare not problems of the past. Junked or
abandoned refrigerators are still dangerous-even if they sit out for "just afew days". If you are
getting rid of your old refrigerator, please follow the instructionsbelow to help prevent accidents.
BEFORE YOU THROWAWAYYOUR OLD REFRIGERATOR OR FREEZER:
• Take off the doors.
• Leave the shelves in place so children may not easily climb inside.
Save These Instructions
3
Installing Your Refrigerator
These instructions were provided to aid you in the installation of your unit. Amana cannot be responsible for
improper installation.
How do Imeasure an
opening to insure proper fit?
This refrigerator was designed to fit a 69"
tall opening to allow for proper ventilation, leveling,
and door adjustments.
Please also take into account, when measuring space
for your unit, that some models require a certain
amount of clearance around it to allow for proper air
flow. Proper air flow is key to keep your unit
running a optimum efficiency. To determine
measurements, please reference the table below.
Subflooring or floor coverings (i.e. carpet, tile,
wood floors, rugs) may make your opening smaller
than anticipated.
Some clearance may be gained by using the leveling
procedure under How to Level Your Refrigerator.
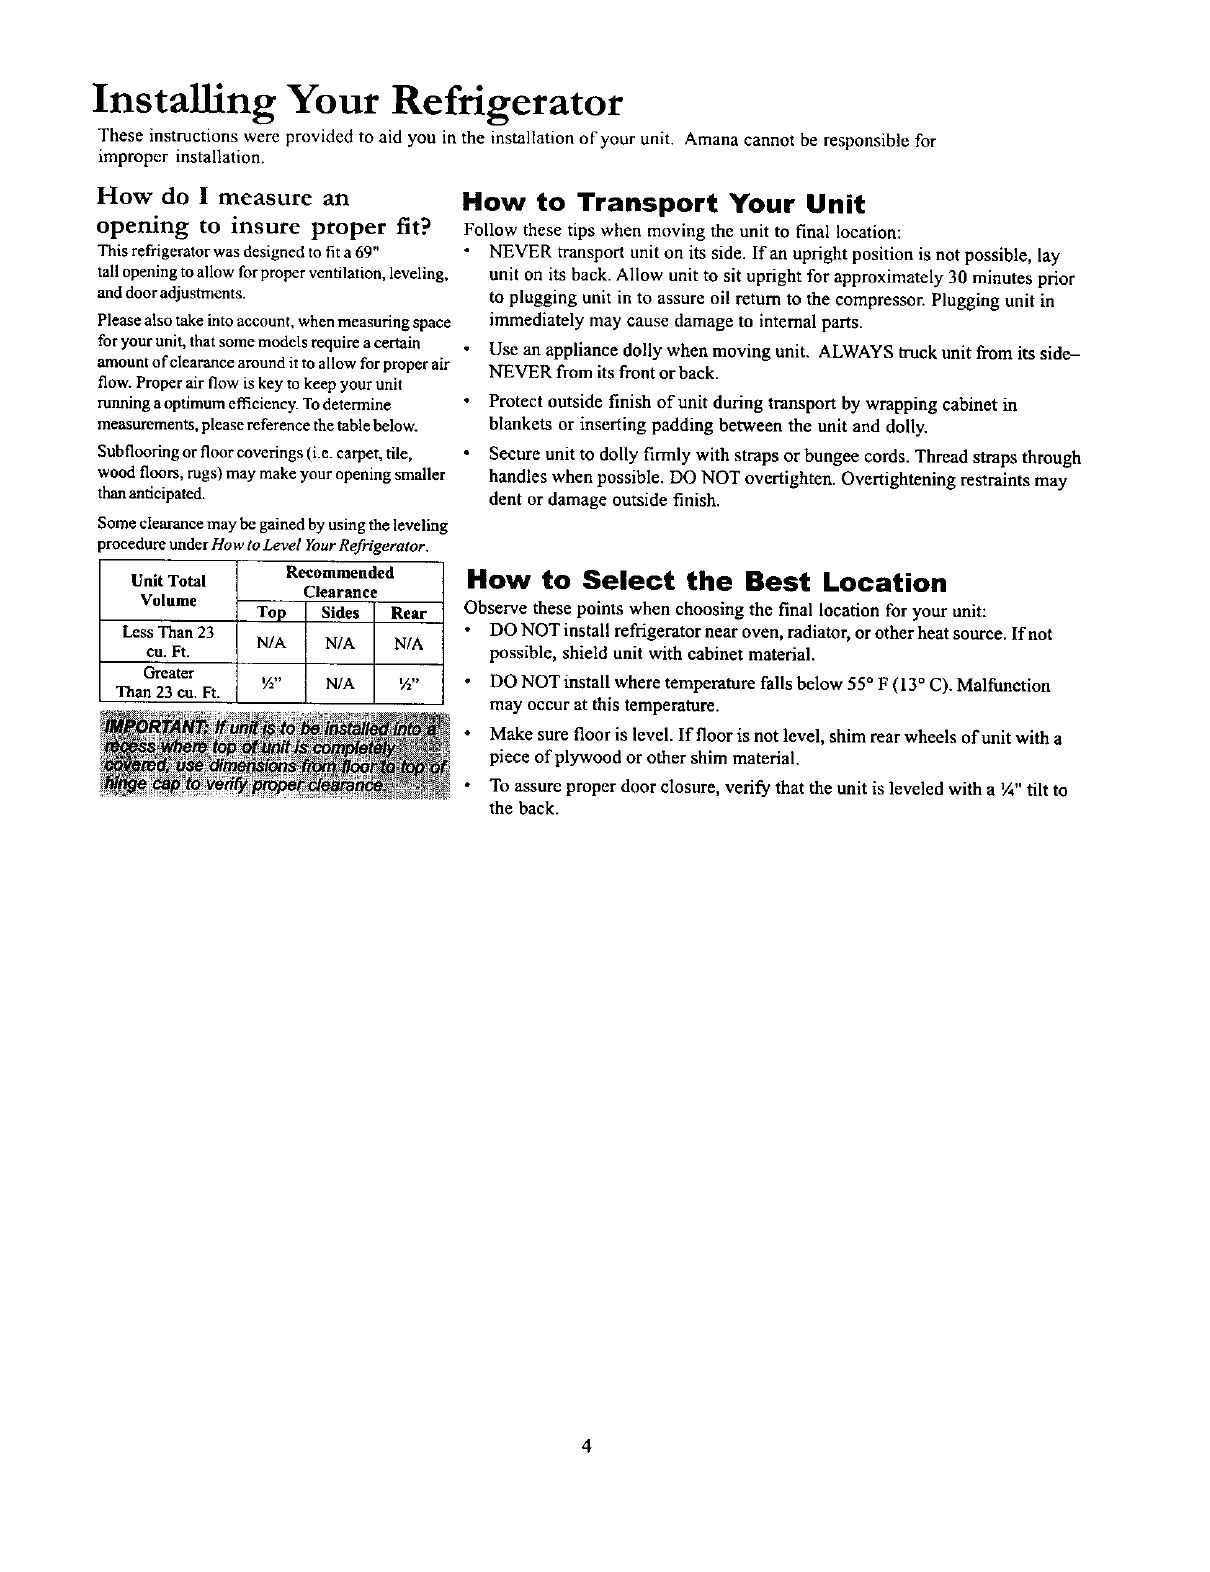
Unit Total Recommended
Volume Clearance
Top Sides Rear
Less Than 23 N/A N/A N/A
eu. Ft.
Greater ½" N/A W'
Than 23 cu. Ft.
How to Transport Your Unit
Follow these tips when moving the unit to final location:
•NEVER transport unit on its side. If an upright position is not possible, lay
unit on its back. Allow unit to sit upright for approximately 30 minutes prior
to plugging unit in to assure oil return to the compressor. Plugging unit in
immediately may cause damage to internal parts.
• Use an appliance dolly when moving unit. ALWAYS truck unit from its side-
NEVER from its front or back.
•Protect outside finish of unit during transport by wrapping cabinet in
blankets or inserting padding between the unit and dolly.
•Secure unit to dolly firmly with straps or bungee cords. Thread straps through
handles when possible. DO NOT overtighten. Overtightening restraints may
dent or damage outside finish.
How to Select the Best Location
Observe these points when choosing the final location for your unit:
DO NOT install refrigerator near oven, radiator, or other heat source. If not
possible, shield unit with cabinet material.
DO NOT install where temperature falls below 55 °F (13 ° C). Malfunetinn
may occur at this temperature.
•Make sure floor is level. If floor is not level, shim rear wheels of trait with a
piece of plywood or other shim material.
• To assure proper door closure, verify that the unit is leveled with a¼" tilt to
the back.
4
Installing Your Refrigerator
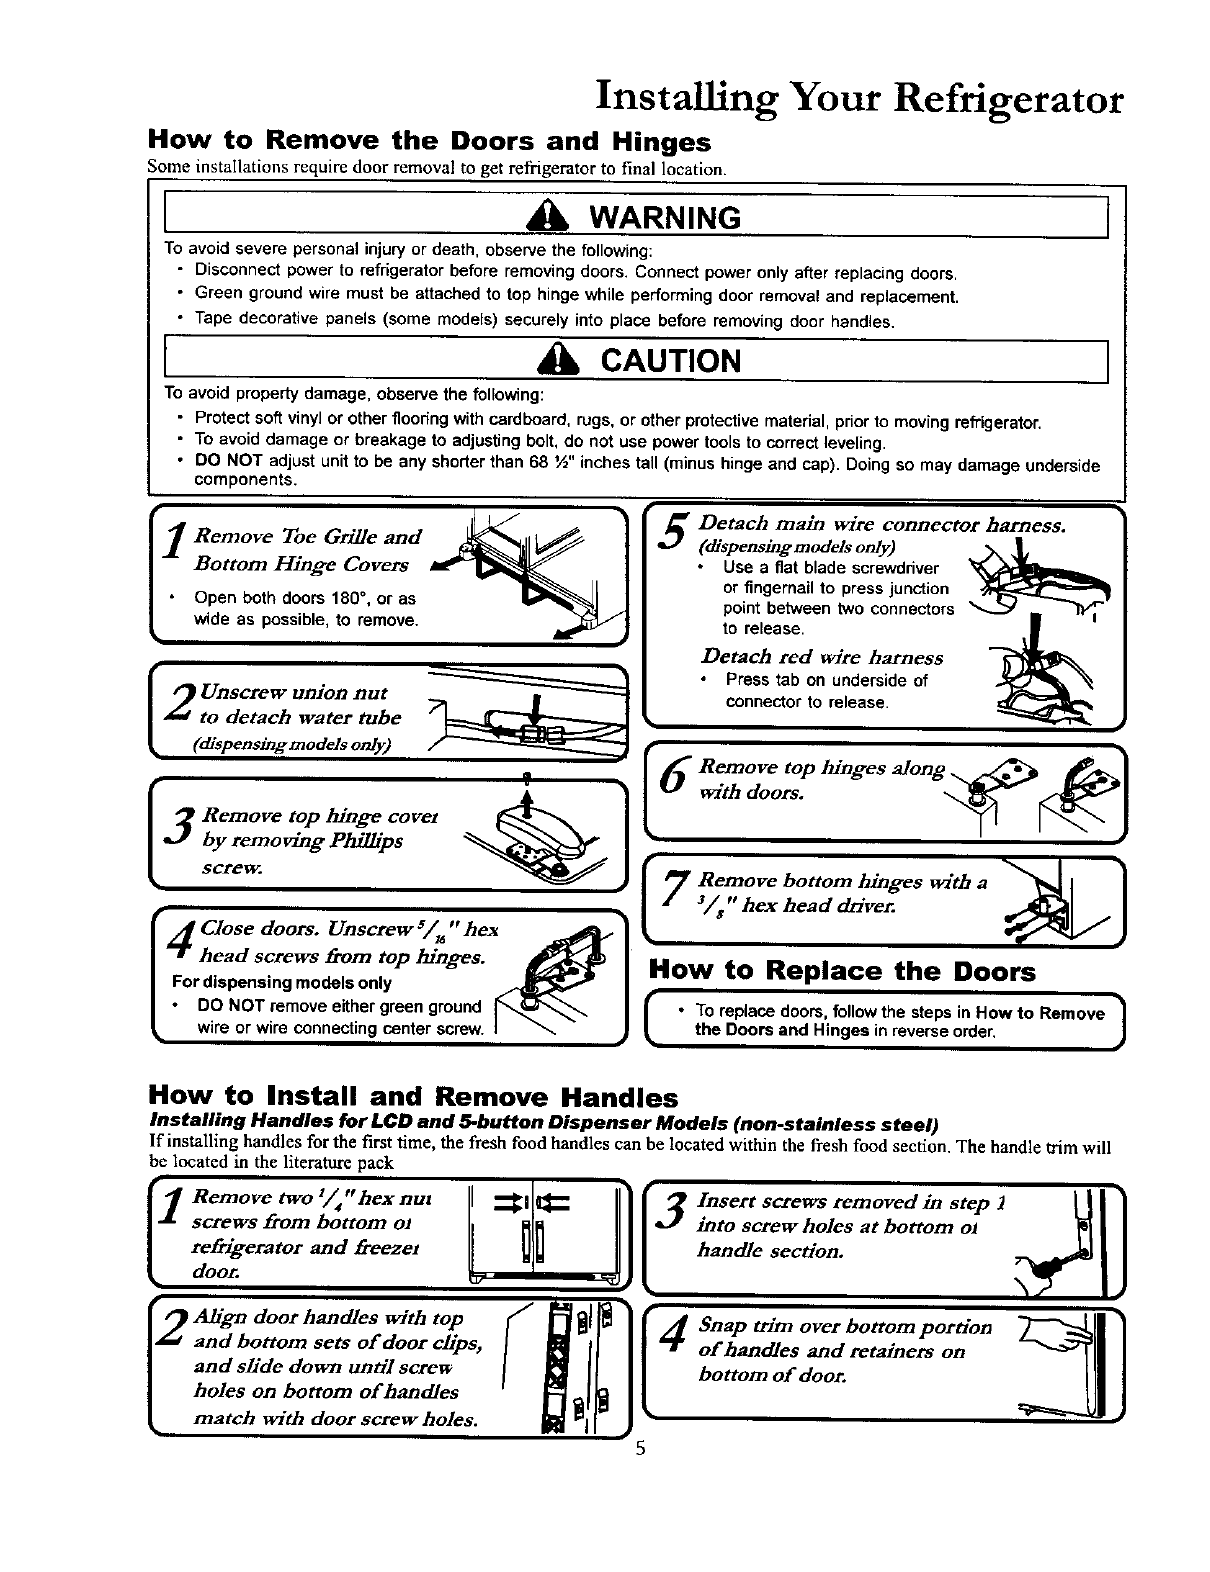
How to Remove the Doors and Hinges
Some installations require door removal to get refrigerator to final location.
I_WARNING ]
To avoid severe personal injury or death, observe the following:
•Disconnect power to refrigerator before removing doors. Connect power only after replacing doors.
•Green ground wire must be attached to top hinge while performing door removal and replacement.
• Tape decorative panels (some models) securely into place before removing door handles.
[CAUTION I
To avoid property damage, observe the following:
•Protect soft vinyl or other floodng with cardboard, rugs, or other protective material, prior to moving refrigerator.
•To avoid damage or breakage to adjusting bolt, do not use power tools to correct leveling.
•DO NOT adjust unit to be any shorter than 68 ½" inches tall (minus hinge and cap). Doing so may damage underside
components.
How to Replace the Doors
I•To replace doors, follow the steps in How to Remove l
the Doors and Hinges in reverse order J
How to Install and Remove Handles
Installing Handles for LCD and 5-button Dispenser Models (non-stainless steel)
If installing handles for the first time, the fresh food handles can be located within the fresh food section. The handle trim will
be located in the literature pack
1Remove two 1,/4"hex nut
screws from bottom oi
refn'gerator and greezel
door. ]II_st:r: Scr_t:7°lreesma;bd:n_toelP'l
of handles and retainers on
bottom of door.
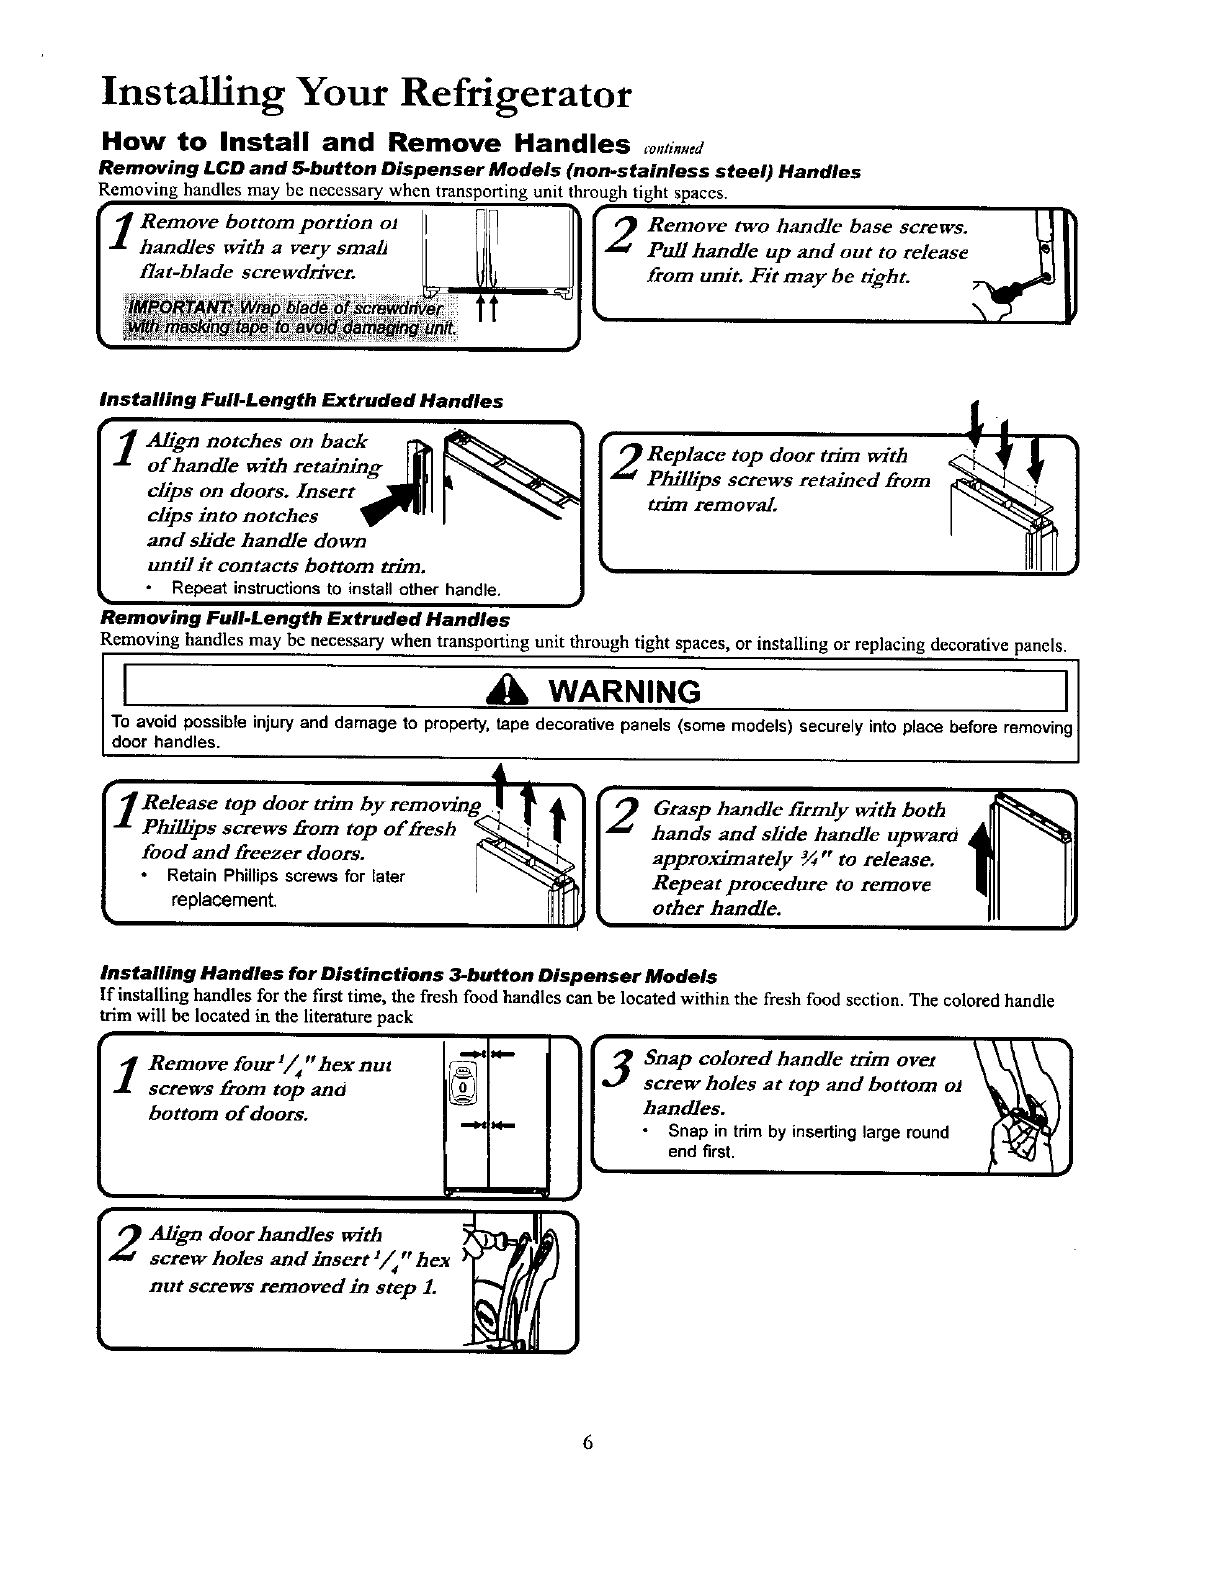
Installing Your Refrigerator
How to Install and Remove Handles ,o,,ti.#od
Removing LCD and 5-button Dispenser Models (non-stainless steel) Handles
Removing handles may be necessary when transporting unit through tight spaces.
Pull handle up and out to release
from unit. Fit may be tight.
Installing Full-Length Extruded Handles
IAh'ga notches on back _
of handle with retaining rill k_
dipsondoors.Znse,t_IRII F_'_
clips into notches _"*" I _-
and slide handle down
until it contacts bottom trim.
•Repeat instructionsto install other handle.
k
Removing Full-Length Extruded Handles
II
Phillips screws retained from
trim removal.
Removing handles may be necessary when transporting unit through tight spaces, or installing or replacing decorative panels.
I_l_ WARNING )g
To avoid possible injury and damage to property, tape decorative panels (some models) securely into place before removi
door handles.
4,
(tXeleasetopdoortrimbyremo_ing | $ a" f2 Grasp handle arndy with both ._t_ l
Il Pin_psscrewsf_°mt°l"°f_esh _ [handsandslidehandleupwara_11 "_1
Ifoodand_eezerdoors. ?"_"% [ approx_a,elr_" torelease. 1/11 Ill
I"Retain Phillips screws for Eater ]
replacement. IFIfL Repeat procedure to remove qlll Ill
Lotherhandle. I" I_)
Installing Handles for Distinctions 3-button Dispenser Models
If installing handles for the first time, the fresh food handles can be located within the fresh food section. The colored handle
trim will be located in the literature pack
1Remove fourl/4"hex nut _'_-
screws fxom top and
bottom of doors.
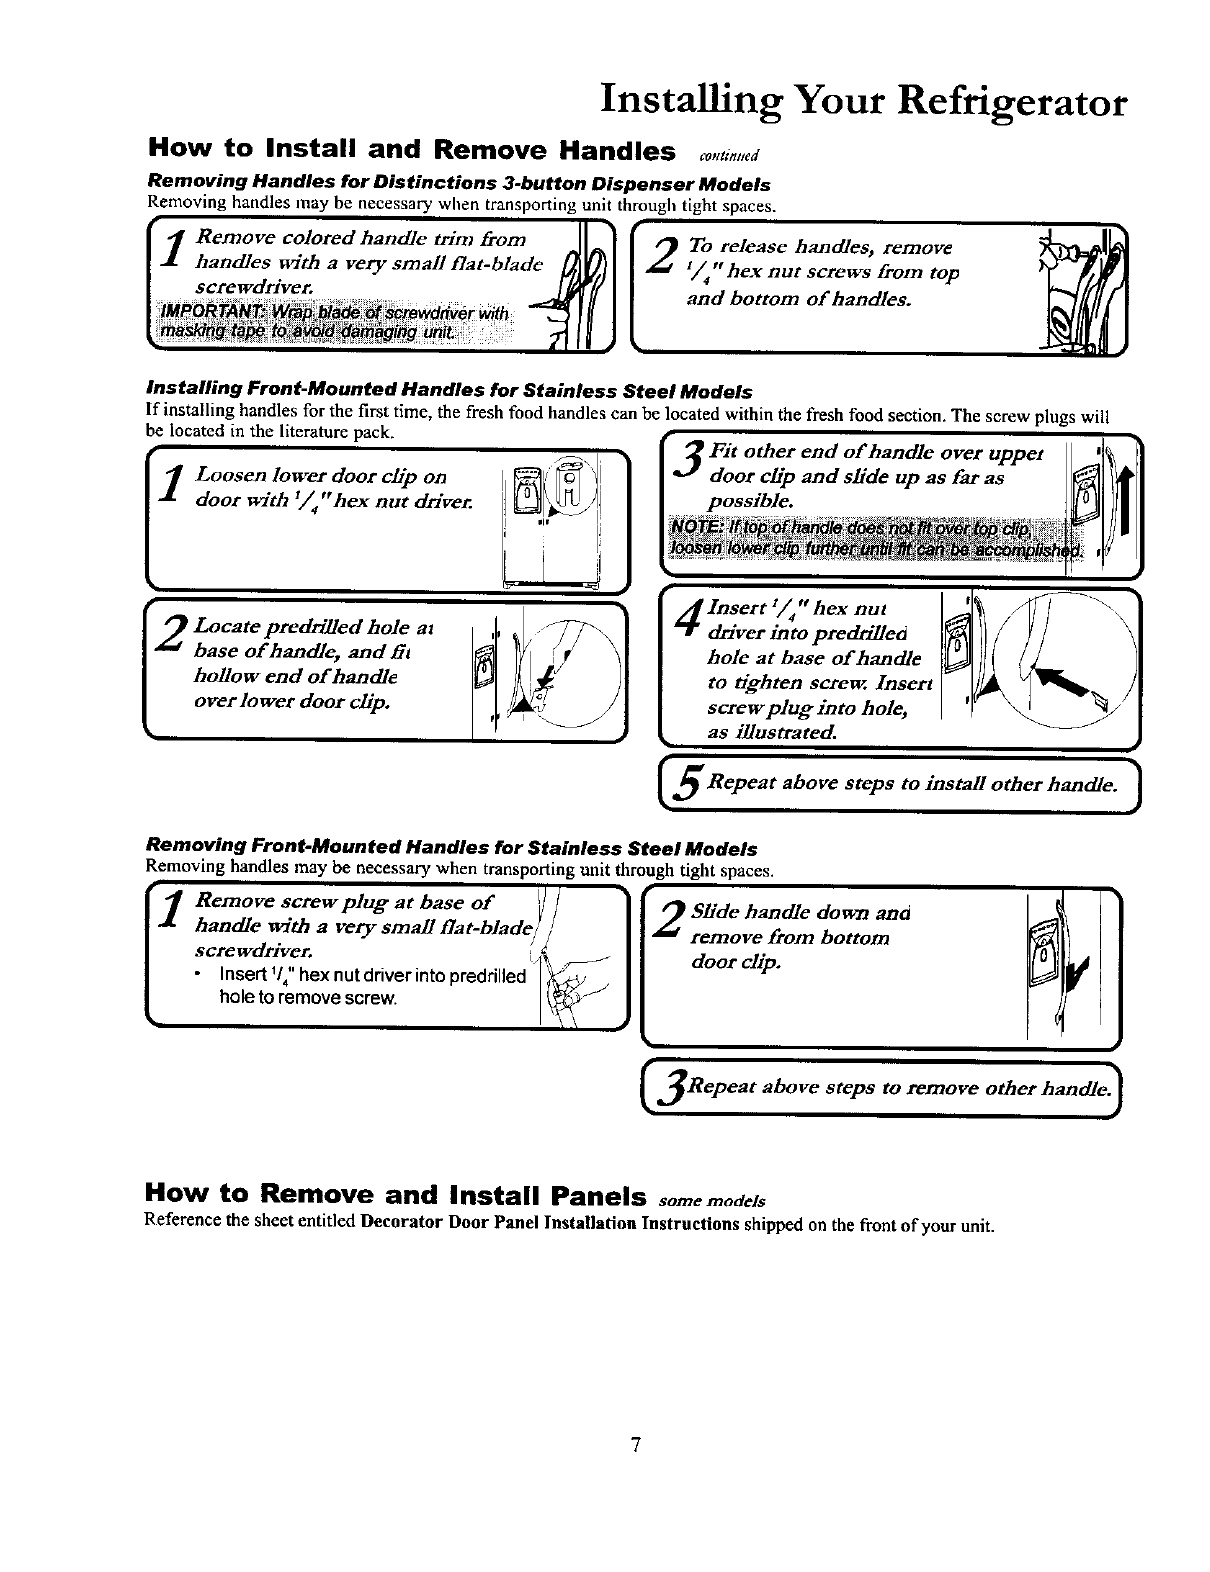
Installing Your Refrigerator
How to Install and Remove Handles _,,ti,,,e_
Removing Handles for Distinctions 3-button Dispenser Models
Removing handles may be necessary when transporting unit through tight spaces.
Installing Front-Mounted Handles for Stainless Steel Models
If installing handles for the first time, the fresh food handles can be located within the fresh food section. The screw plugs will
be located in the literature pack.
II Loosen lower door ch'p on
door with 1//4''hex nut d_'ver.
Ig ocate predrllled hole at
base of handle, and tit
hollow end of handle
over lower door clip.
Insert 1,/4" hex nut
driver into predrillea
hole at base of handle
to tighten screw. Insert
screw plug into hole,
as illustrated.
'f_\
I
Repeat above steps to instMl other handle. )
Removing Front-Mounted Handles for Stainless Steel Models
Removing handles may be necessary when transporting unit through tight spaces.
1.emovescrewplugatbaseo£V/
handle with avery small 17at-blade/ /
screwdriver. _
•Insert 1/4"hex nut driver into predrilled ['_
hole to remove screw. /_ I
3Repeat abovestepsto_moveotherh,_,_e.)
How to Remove and Install Panels somemodels
Reference the sheet entitled Decorator Door Panel Installation Instructions shipped on the front of your unit.
7
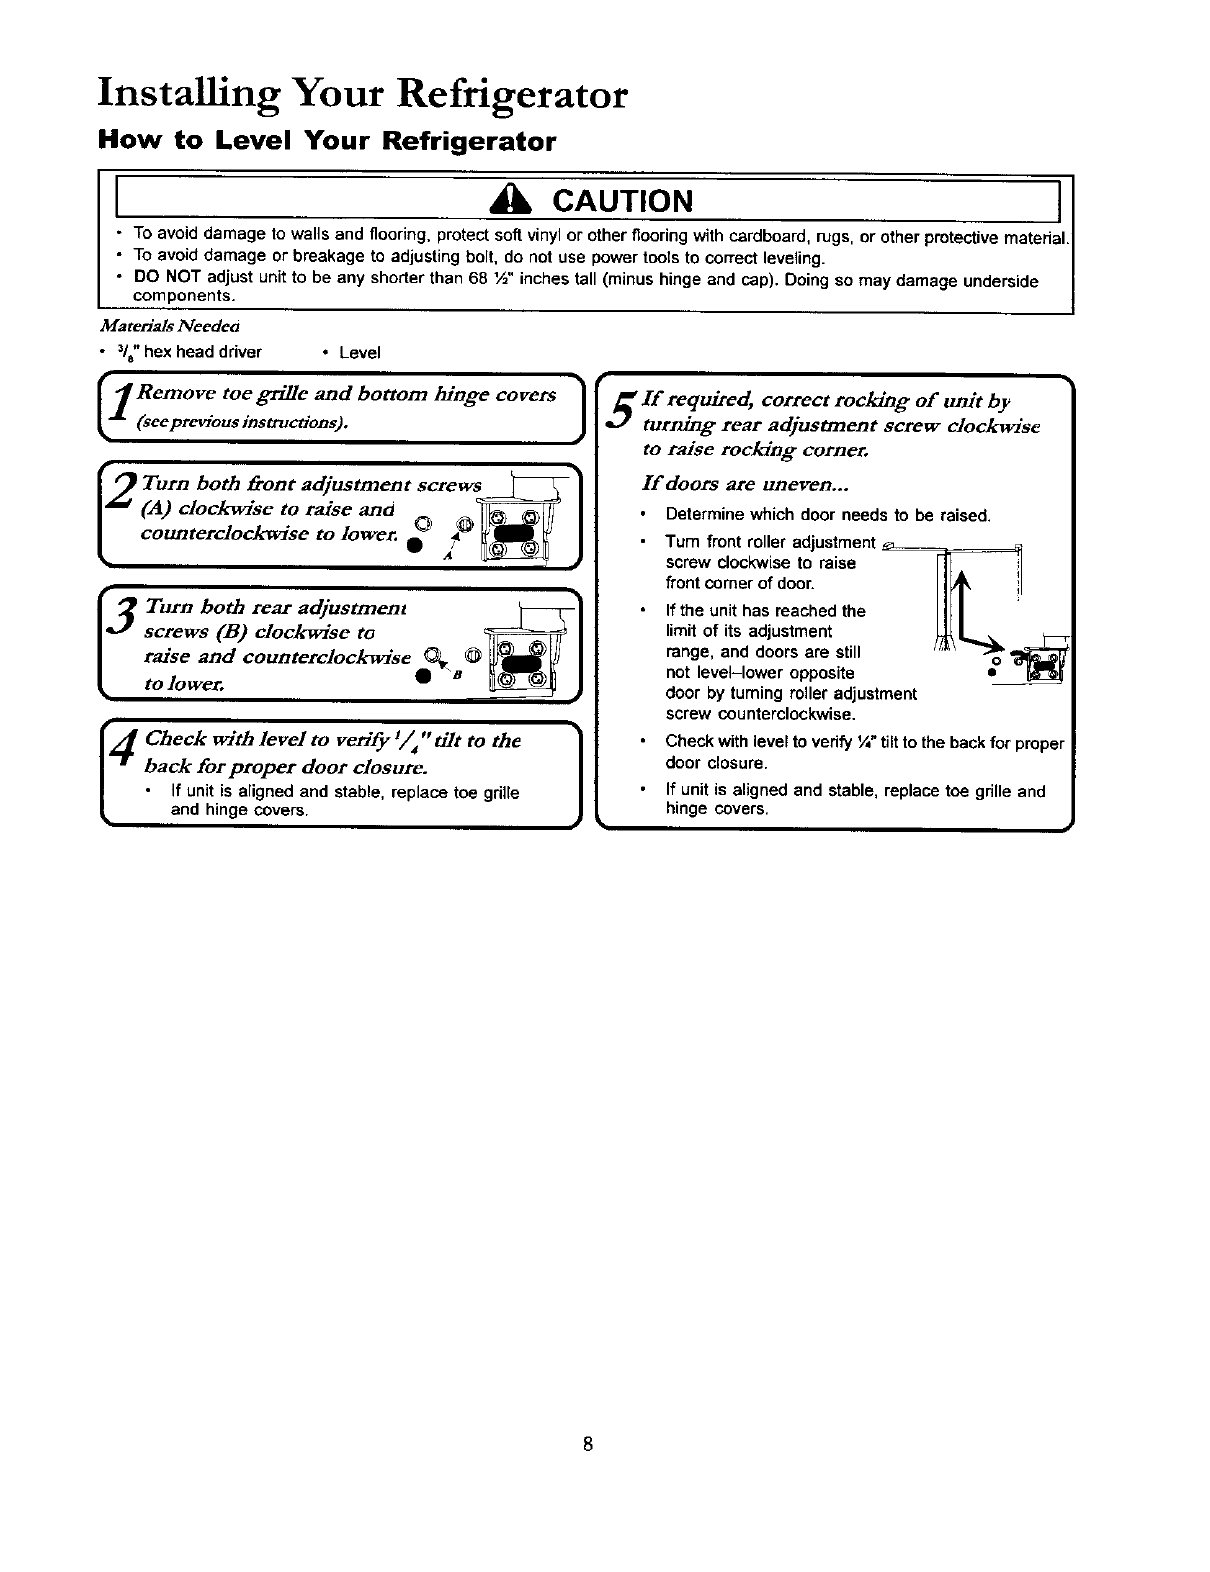
Installing Your Refrigerator
How to Level Your Refrigerator
li _CAUTION I
• TOavoid damage or breakage to adjusting bolt, do not use power tools to correct leveling.
DO NOT adjust unit to be any shorter than 68 ½" inches tall (minus hinge and cap). Doing so
components.
MateWMs Needeo
•3/,. bex head driver • Level
1Remove gr_e hinge covers
(seeprevioust°einstructlons).and bottom ]
Ig Turn both front adjustment screw_]
(A) clockwise to raise ano _l
3Turn both rear adjustment _S-]
screws (B) clockwise to _I
raiseandcountercloclcwl'seo_._J
to lower. ._ .
Check with level to vexifg '/, tilt to the
back for proper door closure.
•If unit is aligned and stable, replace toe grille
and hinge covers.
If required, correct rocldng of unit by
turning rear adjustment screw clockwise
to raise rocking corner.
_f doors 8Fe uoeveN...
Determine which door needs to be raised.
Turn front roller adjustment
screw clockwise to raise
front corner of door.
Ifthe unit has reached the
limit of its adjustment
range, and doors are still
not level-lower opposite
door by turning railer adjustment
screw counterclockwise.
Check with level to vedfy ¼" tilt to the back for proper
door closure.
If unit is aligned and stable, replace toe grille and
hinge covers.
Installing Your Refrigerator
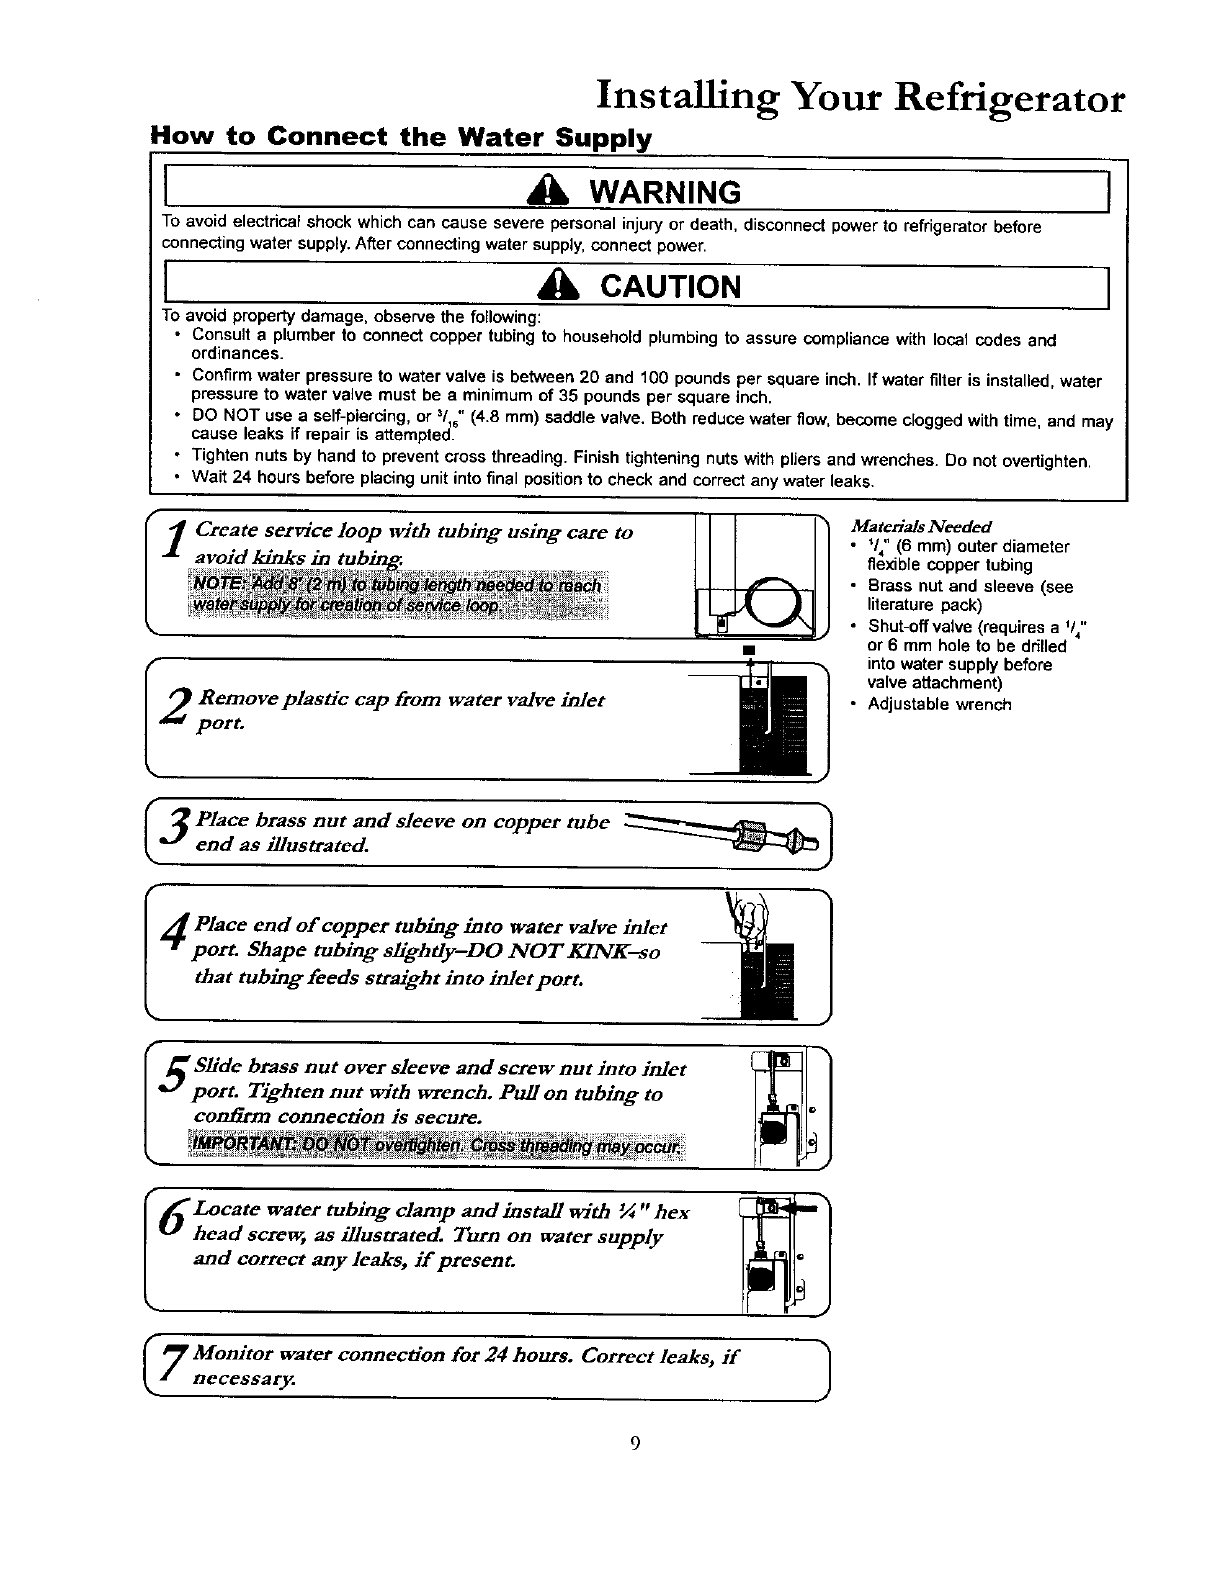
How to Connect the Water Supply
I _lk WARNING I
To avoid electrical shock which can cause severe personal injury or death, disconnect power to refrigerator before
connecting water supply. After connecting water supply,connect power.
]Ak CAUTION I
To avoid property damage, observe the following:
•Consult a plumber to connect copper tubing to household plumbing to assure compliance with local codes and
ordinances.
• Confirm water pressure to water valve is between 20 and 100 pounds per square inch. If water filter is installed, water
pressure to water valve must be aminimum of 35 pounds per square inch.
• DO NOT use a self-piercing, or 3/_6"(4.8 mm) saddle valve. Both reduce water flow,become clogged with time, and may
cause leaks if repair is attempted.
•Tighten nuts by hand to prevent cross threading. Finish tightening nuts with pliers and wrenches. Do not overtighten.
•Wait 24 hours before placing unit into final position to check and correct any water leaks.
Create service loop _vith tubing using care to
2Remove plastic cap from water valve inlet
port.
Materials Needed
• _/4"(8 mm) outer diameter
flexible copper tubing
•Brass nut and sleeve (see
literature pack)
•Shut-offvalve (requires aV4-
or 6 mm hole to be ddlled
into water supply before
valve attachment)
• Adjustable wrench
I _ Place brass nut and sleeve
*J end as illustrated.
_th_ lace end of copper tubing into water valve inlet
port. Shape tubing sh'ghdy-DO NOT KINK--so
at tubing feeds straight into inlet port.
oncoppermbe
pSlide brass nut over sleeve and screw nut into inlet
oft. Tighten nut with wrench. Pull on tubing to
contitm connection is secure.
II_ Locate water tubing clamp andinstall with ¼ "hex
tJ head screw, as illustrated. Turn on water supply
and correct any leaks, if present.
I7 Monitor water connection for 24 hours. Correct leaks, if
i necessary.
Installing Your Refrigerator
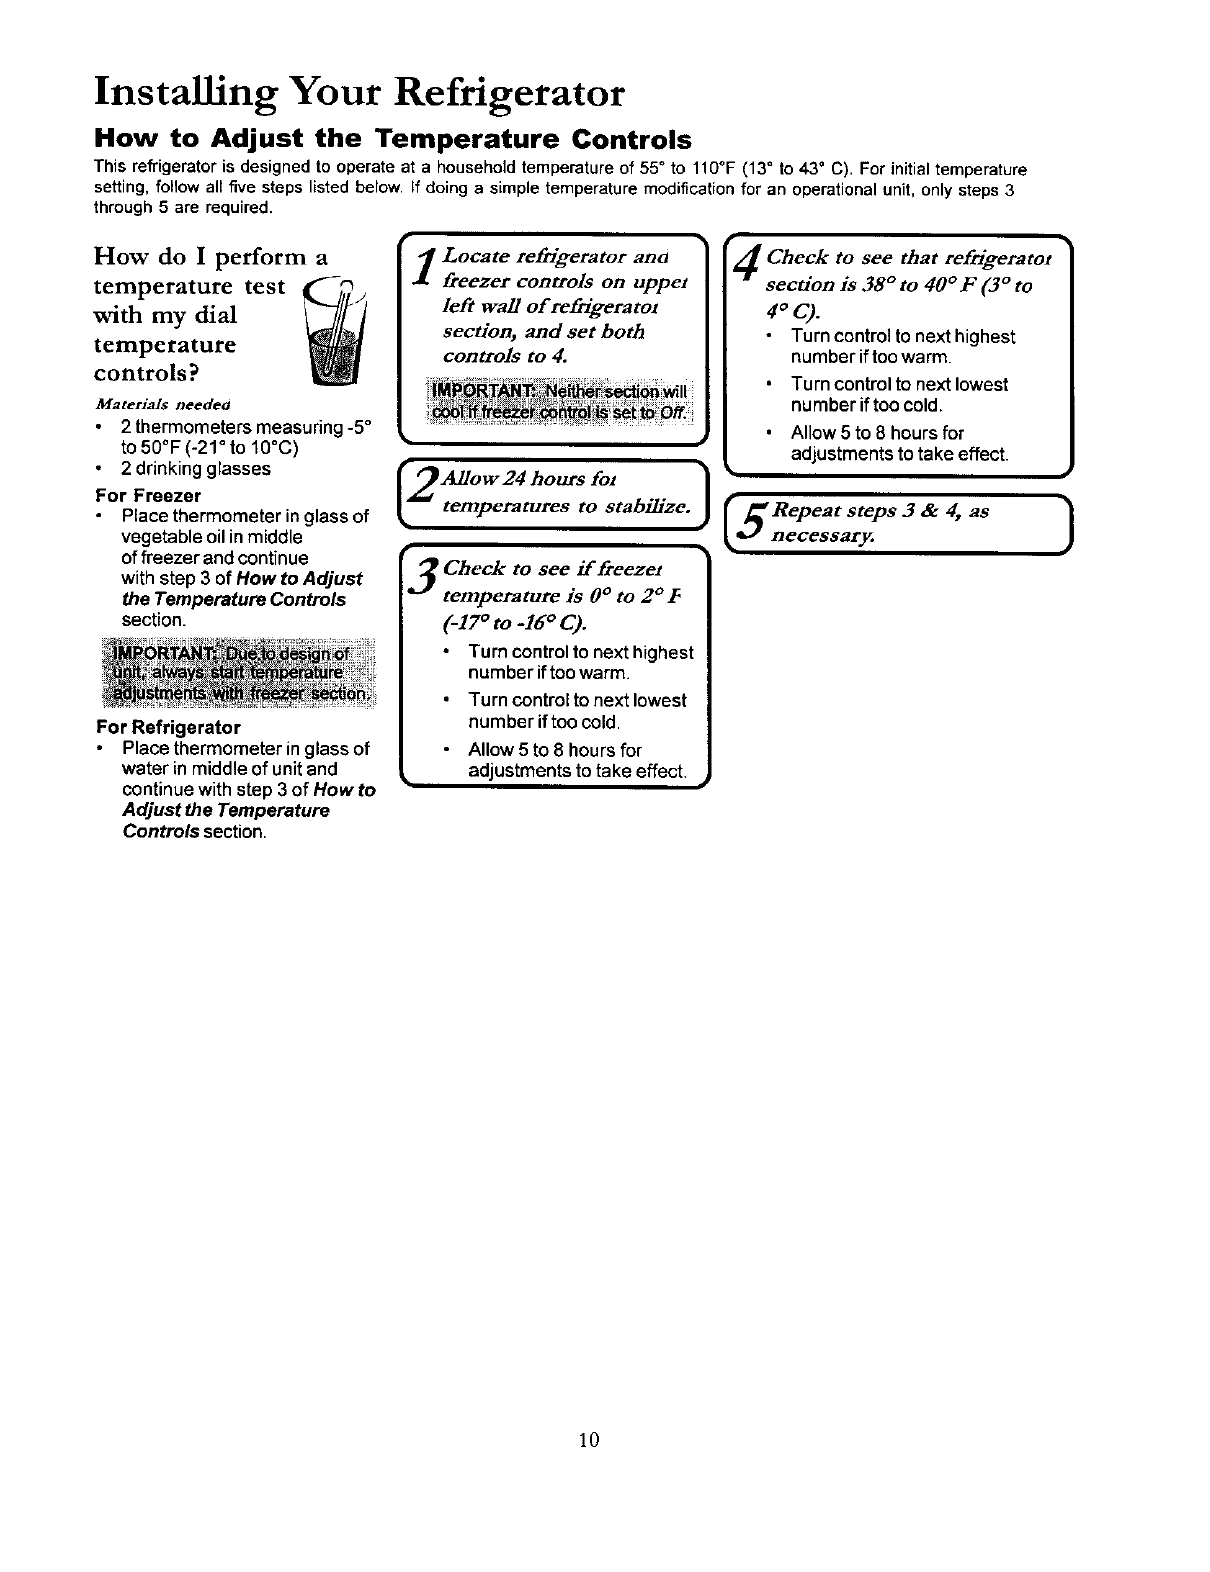
How to Adjust the Temperature Controls
This refrigerator is designed to operate at ahousehold temperature of 55 ° to 110°F (13 ° to 43 ° C). For initial temperature
setting, follow all five steps listed below. If doing a simple temperature modification for an operational unit, only steps 3
through 5 are required.
How do I perform a
temperature test _
with my dial
temperature
controls?
Materials needea
2thermometersmeasuring -5°
to 50°F (-21° to 10°C)
2 drinking glasses
For Freezer
Place thermometeringlass of
vegetable oilinmiddle
of freezer andcontinue
withstep 3 of How to Adjust
the Temperature Controls
section.
For Refrigerator
Place thermometer inglassof
water in middle of unitand
continuewithstep 3 of How to
Adjust the Temperature
Controls section.
Locate refrigerator ana
freezer controls on uppel
left wall of reftlgerato,
sectionj and set both
controls to 4.
fgAllow 24 hours for
temperatures to stabilize.
Check to see if freeze1
"! temperature is 0 °to 2 ° zg
(-17 ° to -16°C).
Turncontrol to next highest
number if too warm.
Turn control to next lowest
number if too cold.
Allow 5 to 8 hours for
• adjustments to take effect. ,
r4 Check tO that "
tef13_ge£atot
see
section is 38 ° to 40° F (3 ° to
4°C).
Turn control to next highest
number if too warm.
Turn control to next lowest
number if too cold.
Allow 5 to 8 hours for
adjustments to take effect.
], ,
f5 "epea'tep & )
_ necessary,
10
About Your Filtration System...
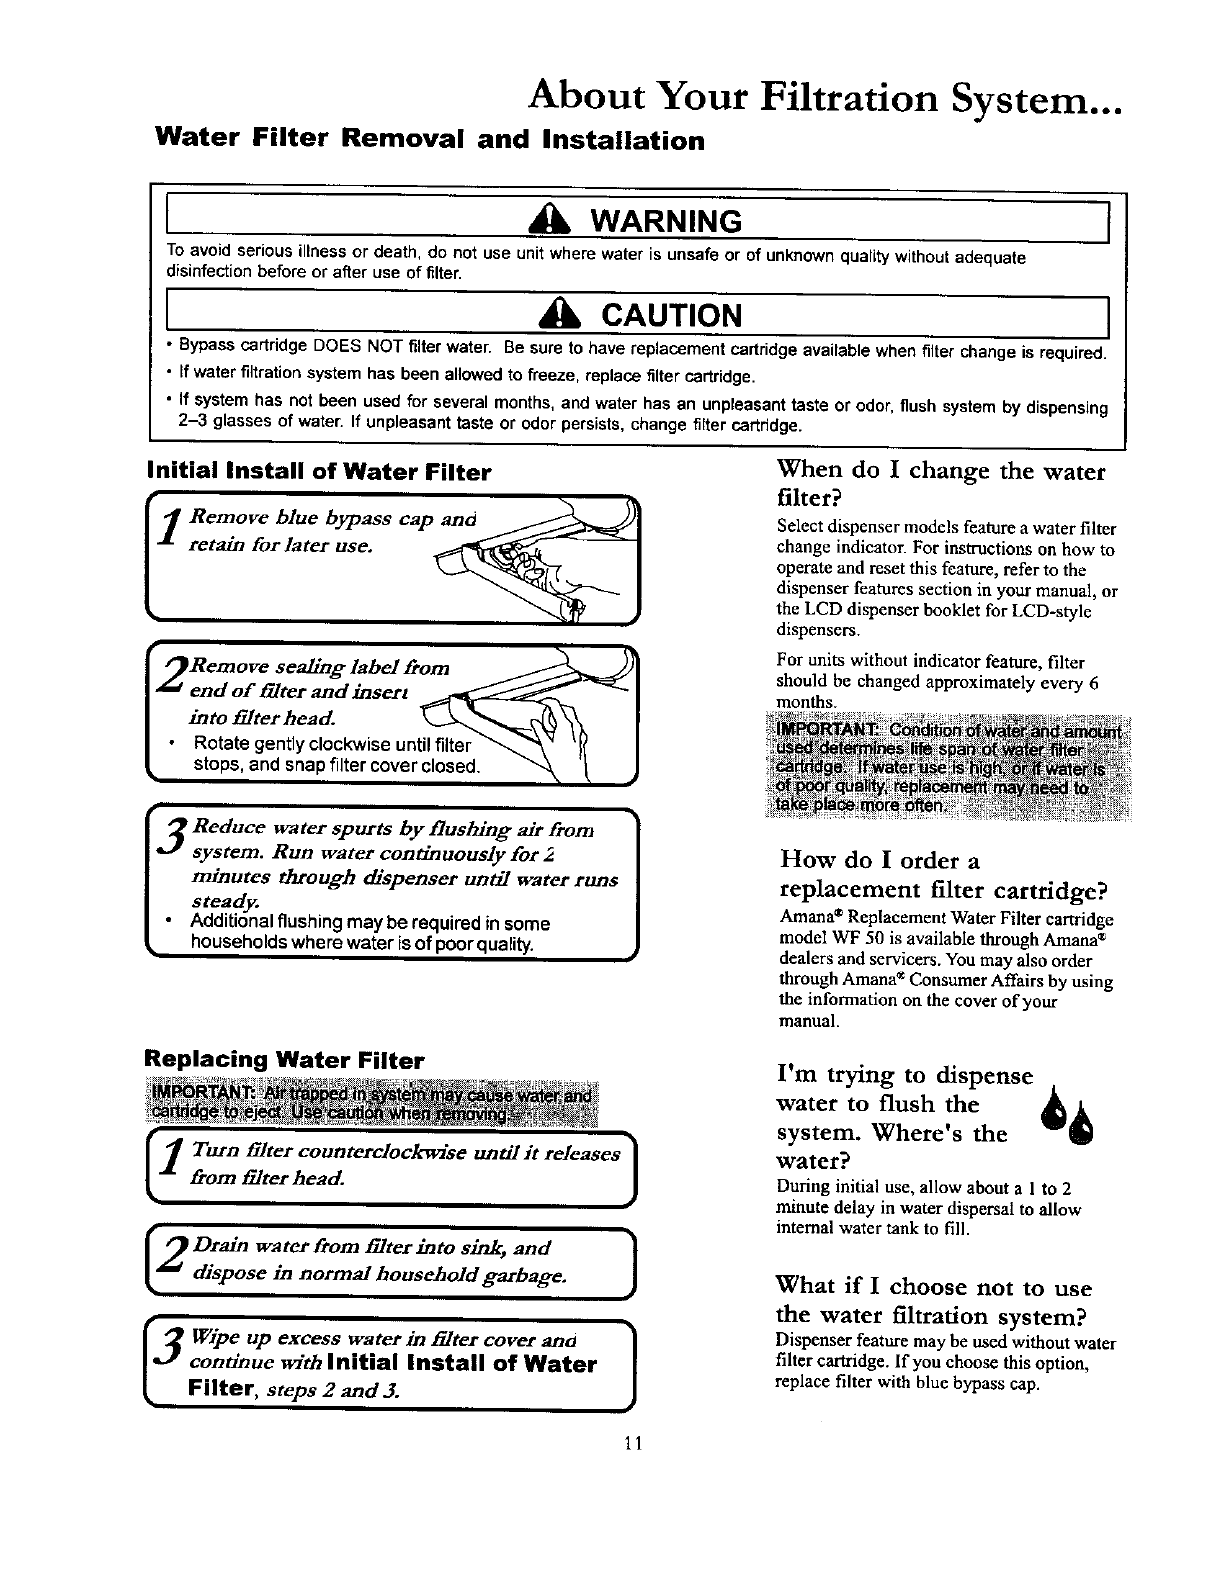
Water Filter Removal and Installation
IAWARNING I
TO avoid serious iltness or death, do not use unit where water is unsafe or of unknown quality without adequate
disinfection before or after use of filter.
I4k CAUTION I
•Bypass cartridge DOES NOT filter water. Be sure to have replacement cartridge available when filter change is required.
• If water filtrationsystem has been allowed to freeze, replace filler cartridge.
•If system has not been used for several months, and water has an unpleasant taste or odor, flush system by dispensing
2-3 glasses of water. If unpleasant taste or odor persists, change filter certddge.
Initial Install of Water Filter
II Remove blue bypass cap and
retainforlateruse. __
Remove sealing label from
end of Falter and insert _ _ I
•into rllterhead, k_...._ _ [
Rotate gently clockwise until filter _'_" ]( [
stops, and snap filter cover closecL _ _ ,)
When do I change the water
filter?
Select dispenser models feature a water filter
change indicator. For instructions on how to
operate and reset this feature, refer to the
dispenser features section in your manual, or
the LCD dispenser booklet for LCD-style
dispensers.
For units without indicator feature, filter
should be changed approximately every 6
months.
Reduce water spurts by Hushing Mr from
system. Run water continuously for z
minutes through dispenser until water runs
steady.
•Additional flushingmay be required in some
• households where water isof poor quality.
Replacing Water Filter
1 Turn Falter counterclockwise until Jt releases I
J
from Falter head.
Ig Drain water from t_lter into sink, and 1
dispose in normal household garbage. J
f3Wipe up excess water in ffllter cover ana ]
1, continue with Initial Install of Water
L Filter, steps 2and 3. J
How do I order a
replacement filter cartridge?
Amana ®Replacement Water Filter cartridge
model WF 50 is available through Amana ®
dealers and servicers. You may also order
through Amana ®Consumer Affairs by using
the information on the cover of your
manual.
I'm trying to dispense /
water to flush the _
system. Where's the U
water?
During initial use, allow about a1 to 2
minute delay in water dispersal to allow
internal water tank to fill.
What if I choose not to use
the water filtration system?
Dispenser feature may be used without water
filter cartridge. If you choose this option,
replace filter with blue bypass cap.
11
Fresh Food Features
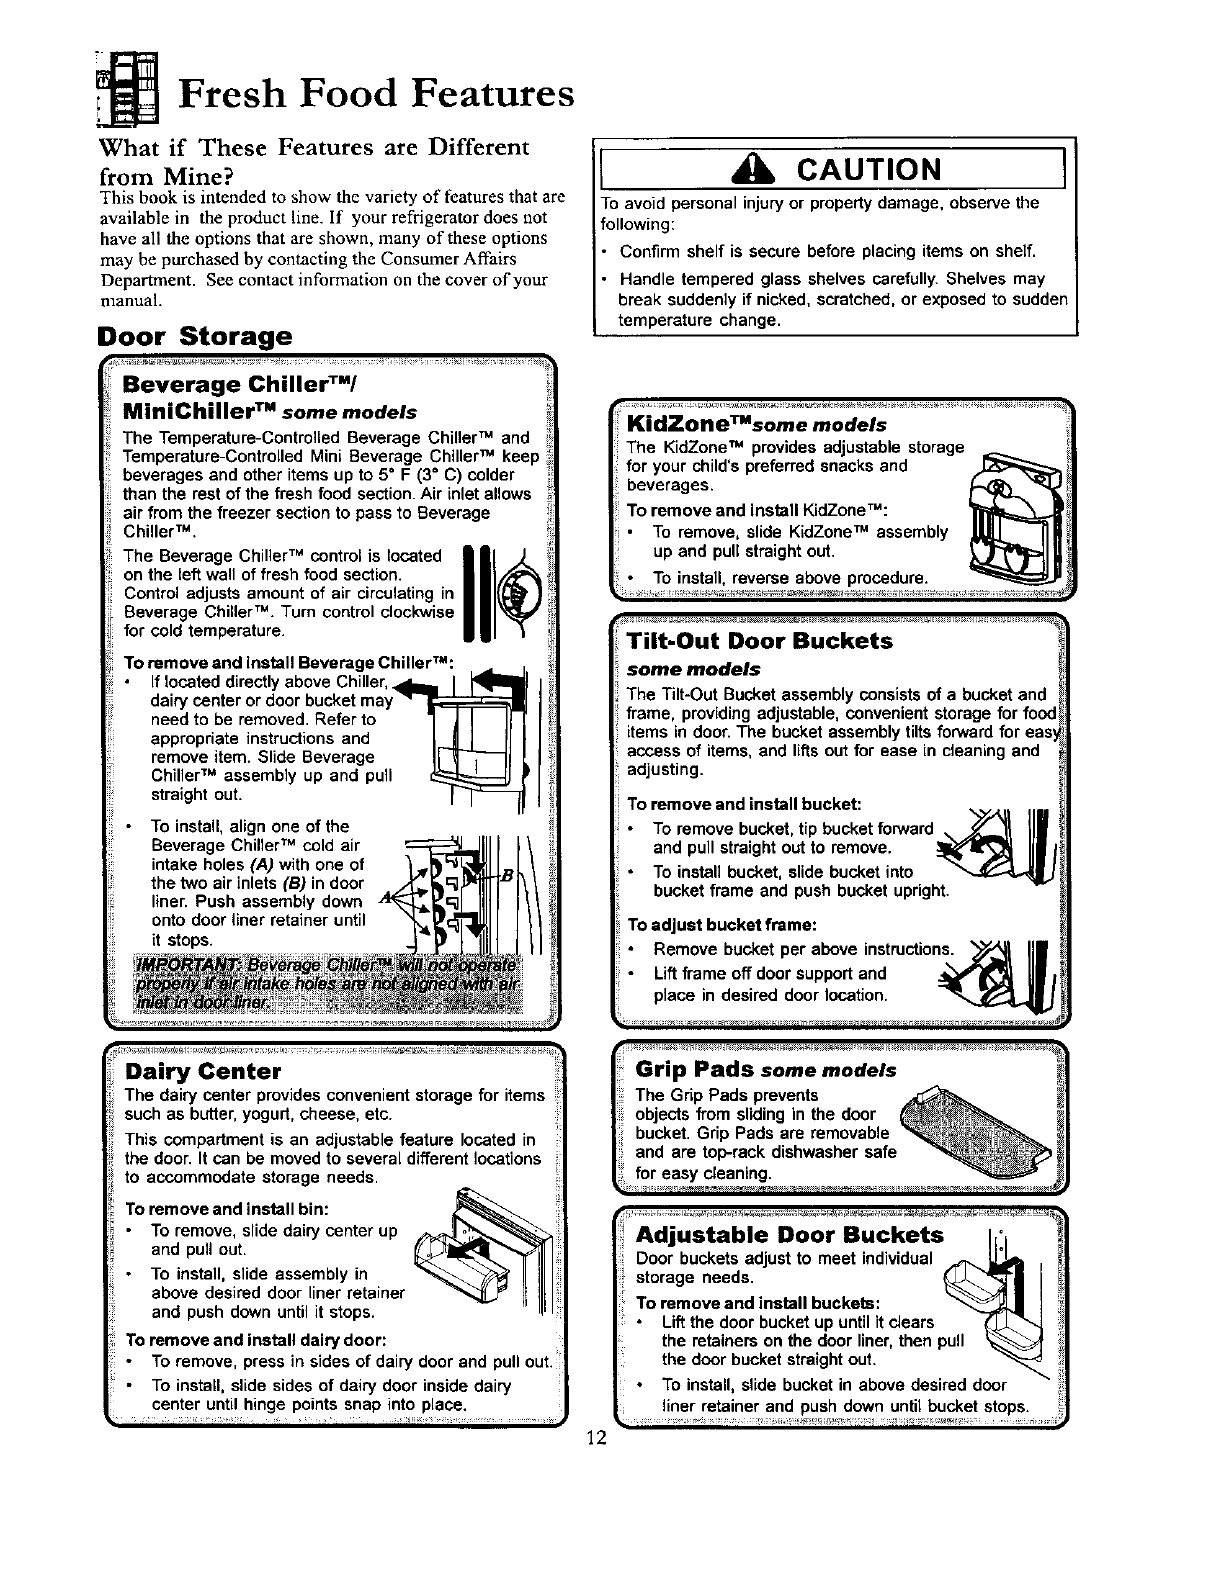
What if These Features are Different
from Mine?
This book is intended to show the variety of features that are
available in the product line, If your refrigerator does not
have all the options that are shown, many of these options
may be purchased by contacting the Consumer Affairs
Department. See contact information on the cover of your
manual.
Door Storage
Beverage ChillerT"/
MiniChiller T" some models
The Temperature-Controlled Beverage Chiller TM and
Temperature-Controlled Mini Beverage Chiller TM keep
beverages and other items up to 5* F (3* C) colder
than the rest of the fresh food section. Air inlet allows
air from the freezer section to pass to Beverage
Chiller TM .
The Beverage Chiller TM control is located
on the Mft wall of fresh food section.
Control adjusts amount of air circulating in
Beverage Chiller "r". Turn control clockwise
for cold temperature.
To remove and install Beverage Chiller'ra:
If located directly above Chiller,_I_1_
dairy center or door bucket may TM
need to be removed. Referto "] J]Jl
appropriate instructionsand I,--_] II
remove item. Slide Beverage II _I_11
Chiller TM assembly up and pull_
straight out. I _'_
To install, align one of the
Beverage Chiller TM cold air
intake holes (,4) with one of
the two air inlets (13)in door
liner. Push assembly down
onto door liner retainer until
it stops.
Dairy Center
The dairy canter provides convenient storage for items
such as butter, yogurt, cheese, etc.
This compartment is an adjustable feature located in
the door. It can be moved to several different locations
to accommodate storage needs.
To remove and install bin: _
To remove, slide dairy center up
and pull out.
To install, slide assembly in
above desired door liner retainer
and push down until it stops.
To remove and install dairy door:
To remove, press in sides of dairy door and pull out.
To install, slide sides of dairy door inside dairy
center until hinge points snap into place.
CAUTION ]
To avoid personal injuryor property damage, observe the
following:
Confirm shelf is secure before placing items on shelf.
Handle tempered glass shelves carefully. Shelves may
break suddenly if nicked, scratched, or exposed to sudden
temperature change.
reverse above
some models
The Tilt-Out Bucket assembly consists of a bucket and
frame, providing adjustable, convenient storage for food
items in door. The bucket assembly tilts forward for eas,
access of items, and lifts out for ease in cleaning and
adjusting.
To remove and install bucket:
To remove bucket, tip bucket forward
and pull straight out to remove.
To install bucket, slide bucket into
bucket frame and push bucket upright.
"oadjust bucket frame:
Remove bucket per above instructions.
Lift frame off doorsupport and
place in desired door location.
Grip Pads some models
12
Adjustable Door Buckets I_,l
Door buckets adjust to meet individual _ _ ,
storage needs. _11 I
To remove and install buckets: _]
•Liftthe door bucket up until it clears _'_"_
the retainers on the door liner,then pull
the door bucket straightout.
• To install, slide bucket in above desired door
liner retainer and push down until bucket stops.
Fresh Food Features
Shelves
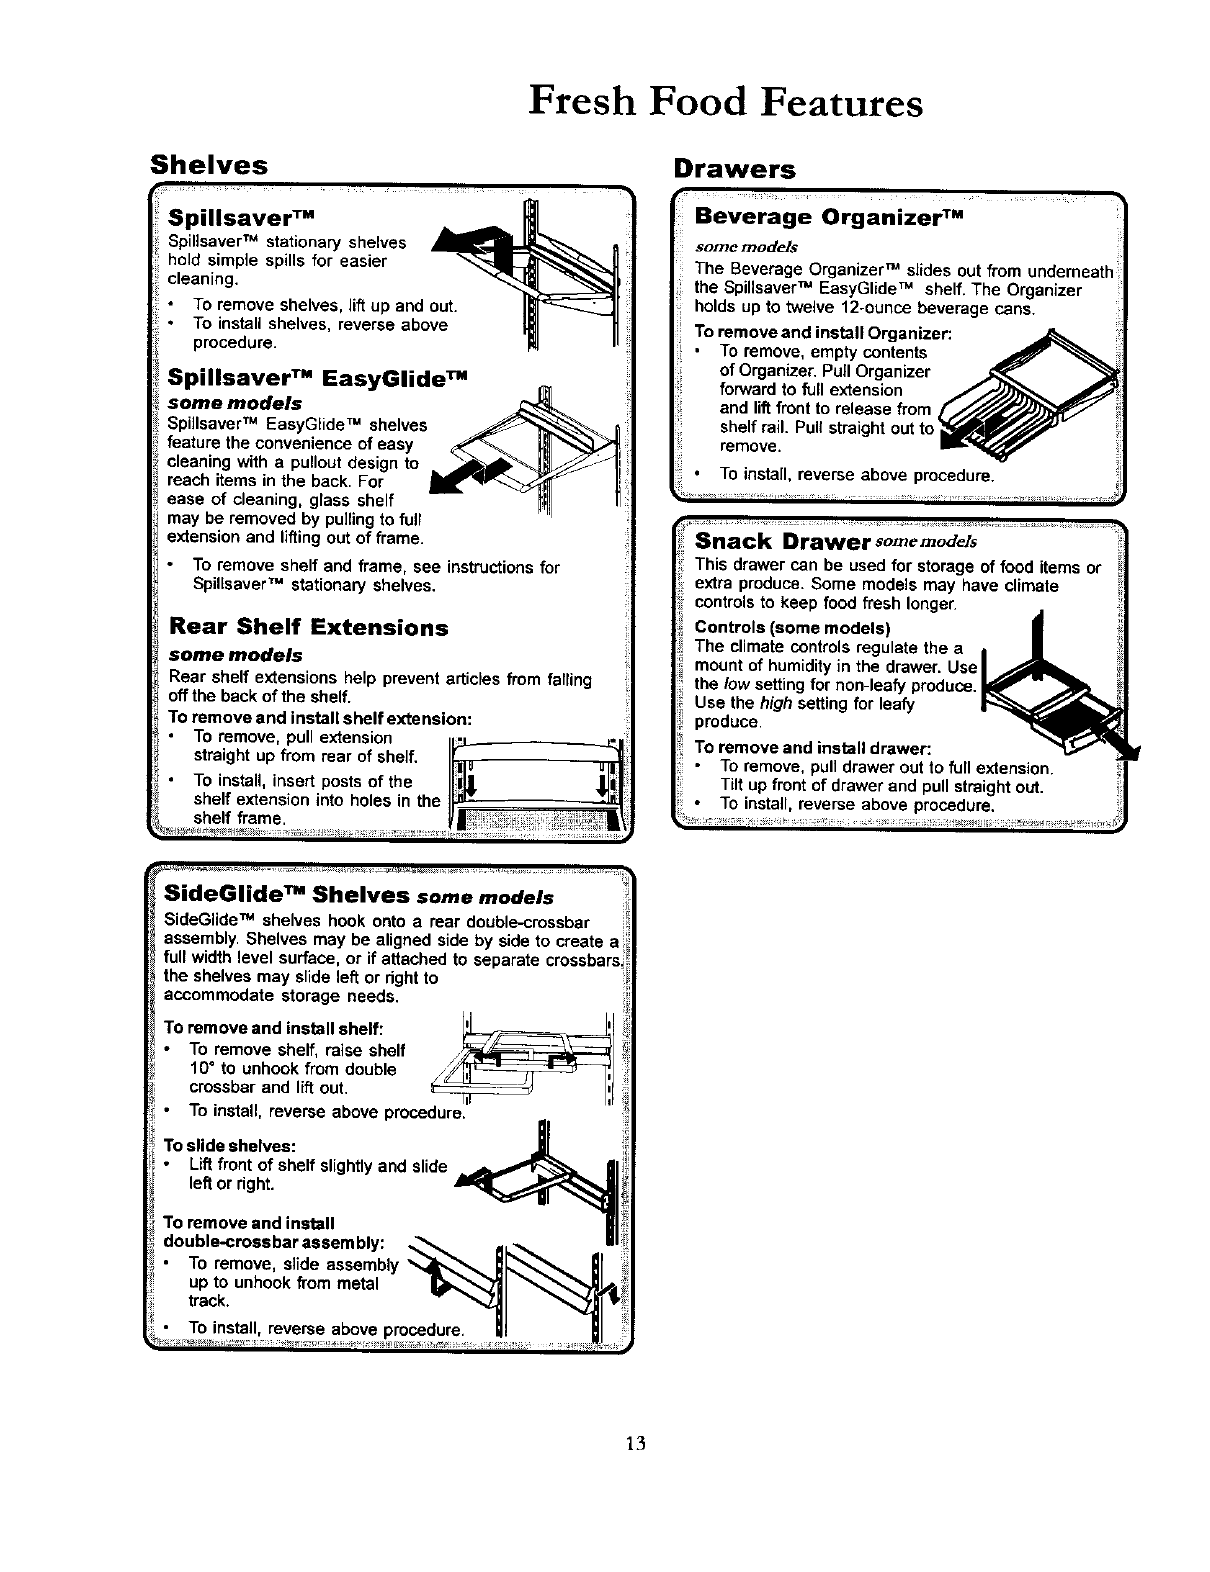
Spillsaver TM _
Spilisaver TM stationary shelves ,__ I_
hold simple spills for easier _'_
cleaning.
TOremove shelves, lift up and out IBI- "
To install shelves, reverse above I_1
procedure.
Spillsaver TM EasyGlide TM
some models _-_
SpillsaverTM EasyGtideTM shelves __
feature the convenience of easy _ _ _,JJ_1_
cleaning with a pullout design to .. ___I
reach items in the back. For m_'v'_
ease of cleaning, glass shelf _FI I
may be removed by pullingto full
extension and liftingout of frame.
• To remove shelf and frame, see instructions for
Spillsaver TM stationary shelves.
Rear Shelf Extensions
some models
Rear shelf extensions help prevent articles from falling
offthe back of the shelf.
To remove and install shelf extension:
To remove, pull extension t_ -_
straight up from rear of shelf. _1u _Ul!
TOinstall, insert posts of the I[lll. _l!
shelf extension into holes in the I_, +.u
she f frame ;__ .... !_,;_
SideGlide TM Shelves some models
SideGUdeTM shelves hook onto a rear double-crossbar
assembly. Shelves may be eUgeed side by side to create s
full width level surface, or if attached to separate crossbars
the shelves may slide left or dght to
accommodate storage needs.
; To remove and install shelf:
TO remove shelf raise shelf /_1
10°to unhook from double /_/I;1_ ;
• crossbar and lift out. _ Ill
To install, reverse above procedure.
To slide shelves:
•Lift front of shelf slightlyand slide
left or right.
To remove and install
double-crossbar sssem bly:
To remove, slide assembly
up to unhook from metal
track.
Drawers
Beverage Organizer TM
somemodels
The Beverage Organizer TM slides out from underneath
the Spillsaver TM EasyGlide TM shelf. The Organizer
holds up to twelve t2°ounce beverage cans.
To remove and install Organizer:
• To remove, empty contents
of Organizer. Pull Organizer
forward to full extension
and tiltfront to release from,
shelf rail. Pull straightout to
remove.
To install, reverse above procedure.
Snack I}rawer somemodels
This drawer can be used for storage of food items or
extra produce. Some models may have climate
controls to keep food fresh longer.
Controls (some models)
The climate controls regulate the a
mount of humidityin the drawer. Use
the low settingfor non-leafy produce.
Use the highsetting for leafy
produce.
To remove and install drawer:
•To remove, pull drawer out to full extension.
Tilt up front of drawer and pull straight out.
• To install, reverse above procedure.
13
Fresh Food Features
What setting should Iuse for items
in my temperature-controlled
drawer?
• cauliflower •apples
COLD •corn •oranges
•zucchini •grapes
• cucumbers
• steaks •hard
•bacon cheeses
• cold cuts •bacon
• hot dogs
What setting should I use for items
in my humidity-controlled drawers?
LOW • cauliflower *apples
• cord * oranges
•zucchini •grapes
• cucumbers
HIGH • lettuce •asparagus
• spinach • cabbage
• celery •broccoli
• fresh sprouts •freshherbs
What can Ido to prolong the life of
my produce?
Please observe the following rules when storing
produce in humidity-controlled crispers:
DO NOT wash produce before placing in crispers.
Any additional moisture added to the crispers may
cause produce to prematurely spoil.
• DO NOT line crispers with paper towels. Towels will
retain moisture.
Follow control instructions carefully. Incorrect
control settings may damage produce.
D rawe rs
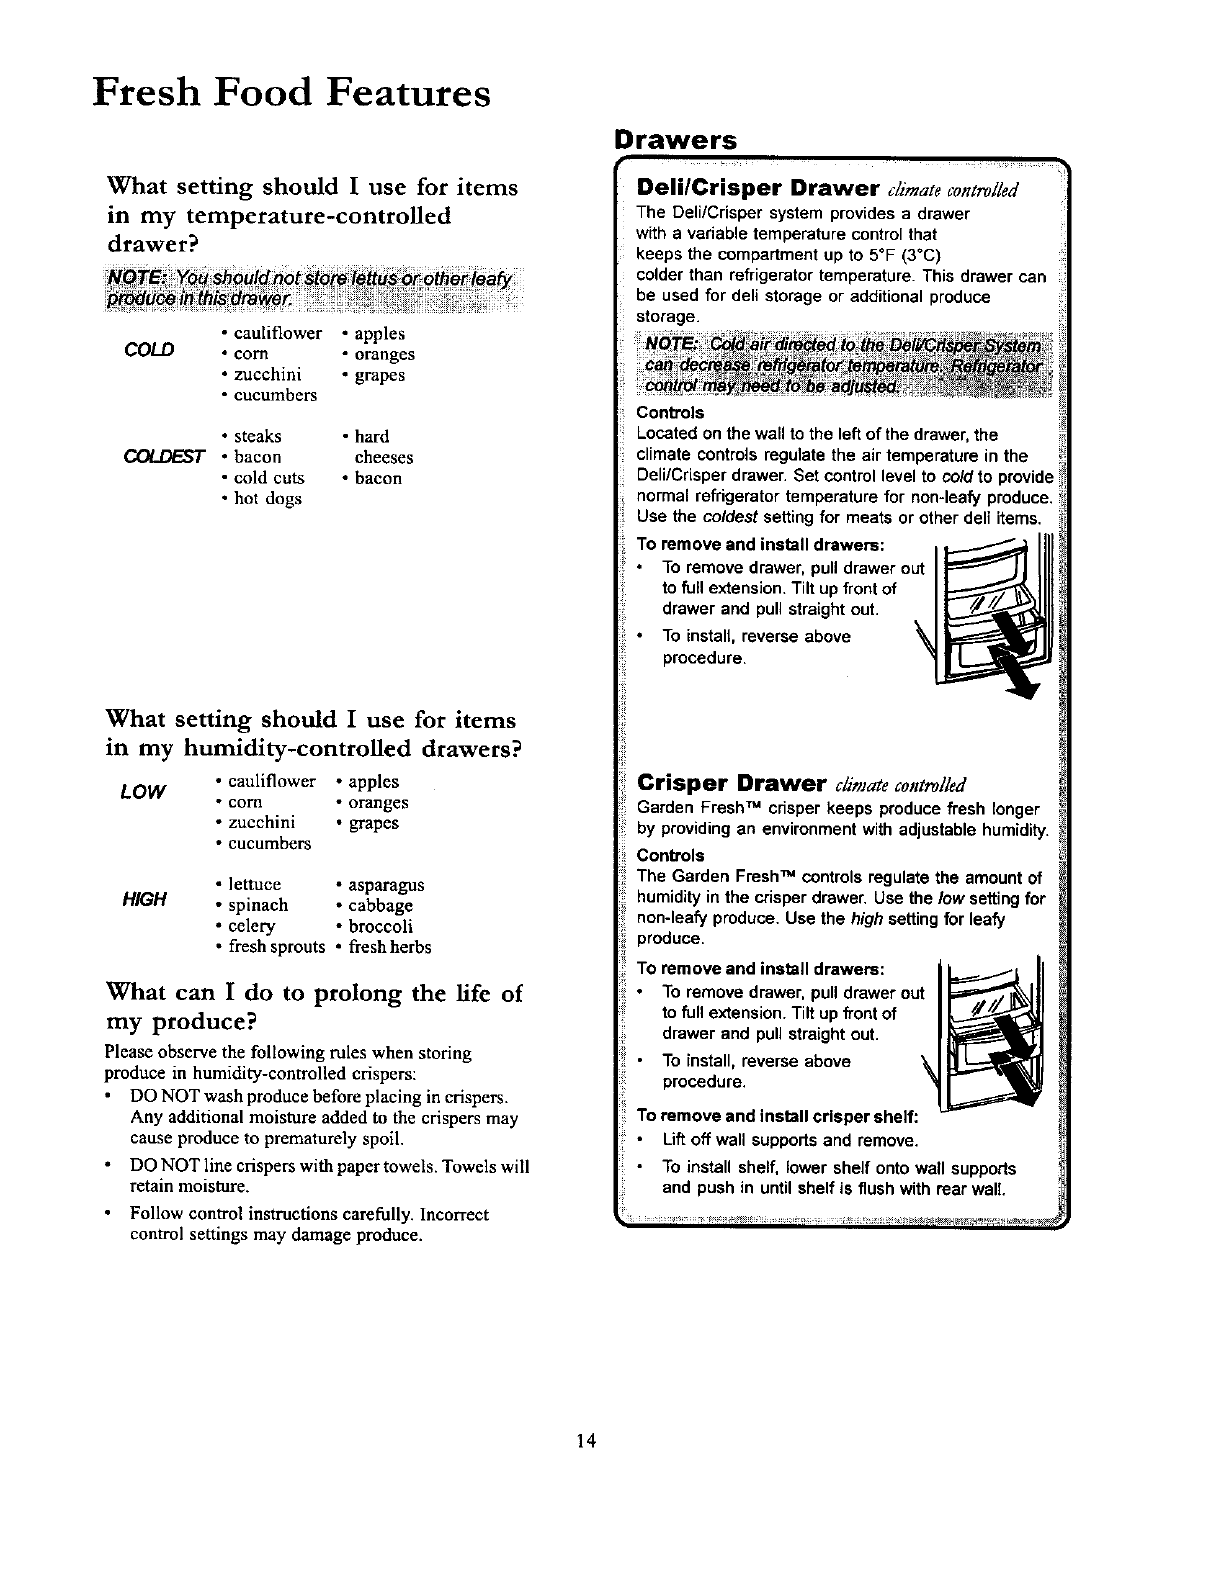
Deli/Crisper Drawer climate controlled
The Dell/Crisper system provides a drawer
with a variable temperature control that
keeps the compartment up to 5OF(3°C)
colder than refrigerator temperature. This drawer can
be used for dell storage or additional produce
storage.
Controls
Located onthe wall to the leftof the drawer, the
climate controls regulate the air temperature in the
Dell/Crisper drawer. Set control level to cold to provide
normal refrigerator temperature for non-leafy produce.
Use the coldest setting for meats or other deft items.
To remove and install drawers:
• To remove drawer, pull drawer out
to full extension. Tilt up frontof
drawer and pull straight out.
•To install, reverse above
procedure.
Crisper Drawer dimate controlkd
Garden Fresh TM crisper keeps produce fresh longer
by providing an environment with adjustable humidity.
Controls
The Garden FreshTM controls regulate the amount of
humidity in the crisper drawer, Use the low settingfor
non-leafy produce, Use the highsetting for leafy
produce.
To remove and install drawers:
•To remove drawer, pull drawer out
to full extension. Tilt up front of
drawer and pull straight out.
•To install, reverse above \
procedure.
To remove and install crisper shelf:
Lift off wall supports and remove.
•To install shelf, lower shelf onto wall supports
and push in untilshelf is flush with rear wall
14
[ CAUTION
To avoid property damage, observe the following:
•Do not force ice maker arm down or up.
•Do not place or store anything in ice storage bin.
IAWARNING I
To avoid possible injury,including death, do not pMce
glass items in Quick Chili ZoneTM, Glass objects may
shatter or explode if exposed to extreme cold,
Principal Characteristics
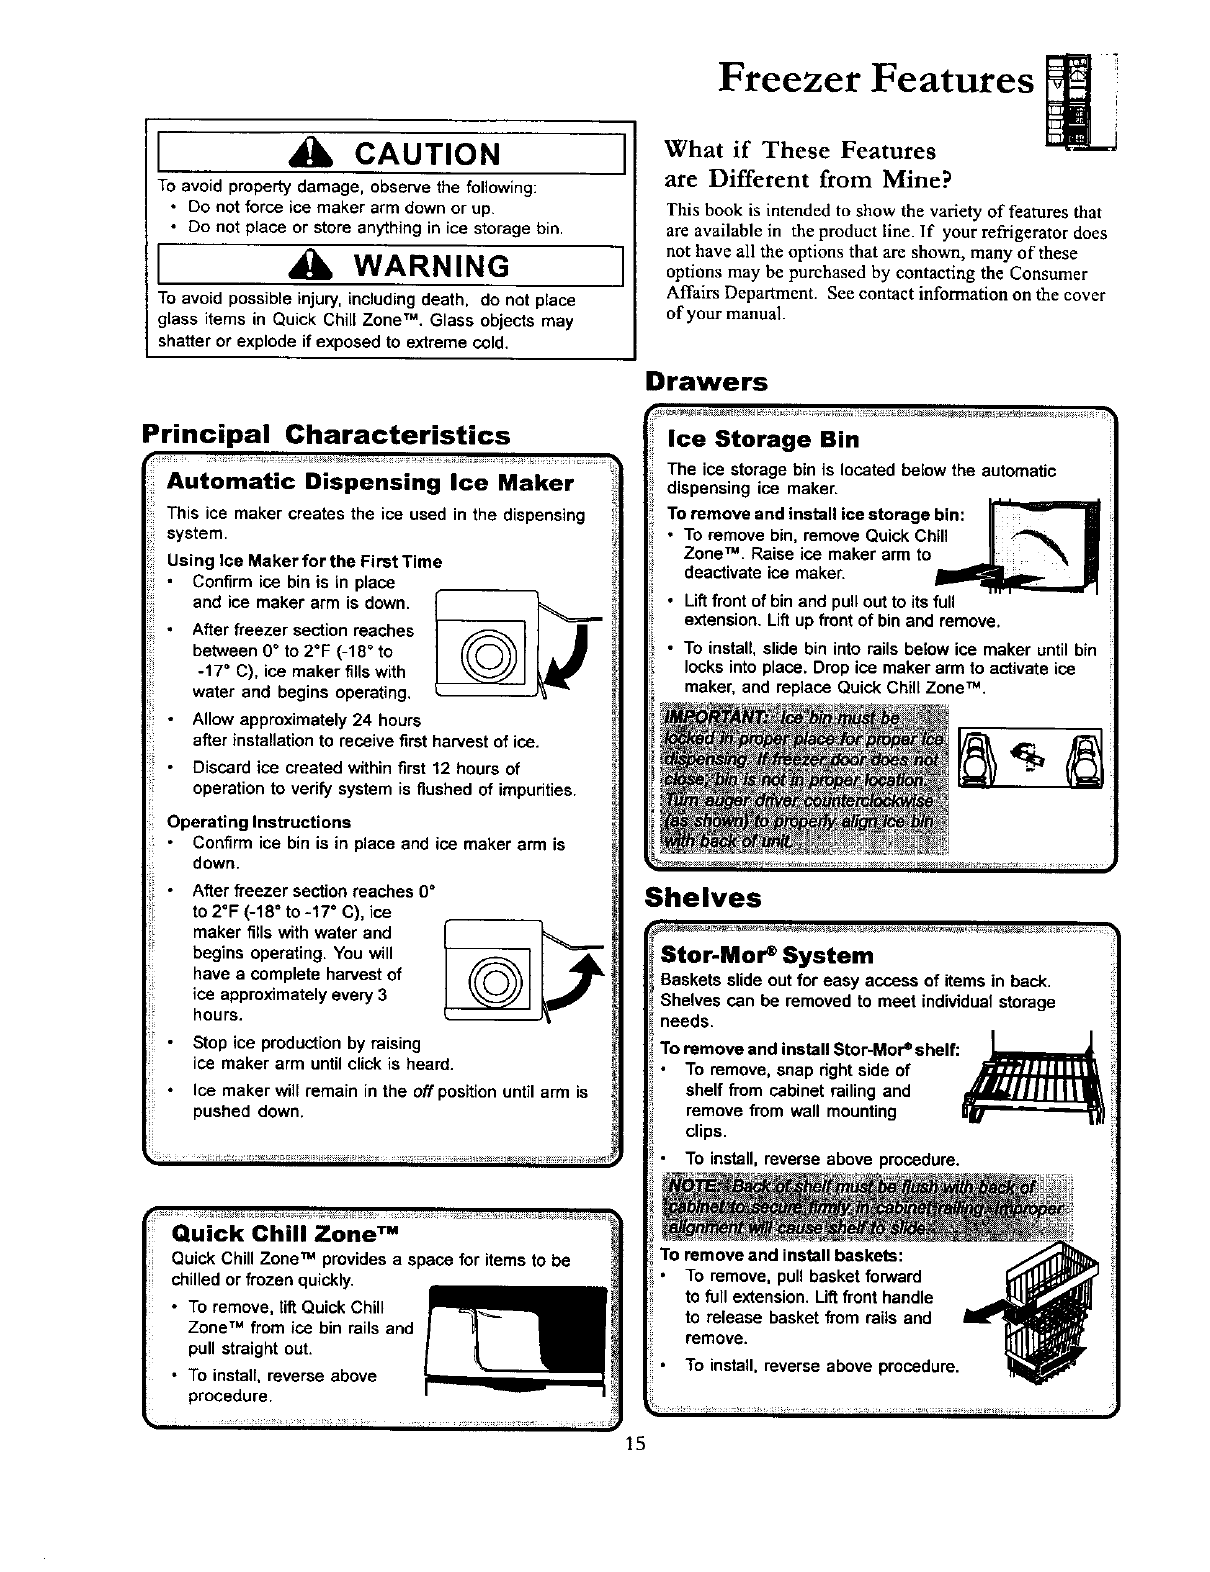
Automatic Dispensing Ice Maker
This ice maker creates the ice used in the dispensing
system.
Using Ice Maker for the First Time
Confirm ice bin is in place
and ice maker arm is down.
After freezer section reaches
between 0°to 2°F (-18° to
-17°C), ice maker fills with
water and begins operating.
Allow approximately 24 hours
after installation to receive first harvest of ice.
Discard ice created within first 12 hours of
operation to verify system is flushed of impurities.
Operating Instructions
Confirm ice bin is in place and ice maker arm is
down.
After freezer section reaches 0°
to 2°F (-18°to -17 ° C), ice
maker fills with water and
begins operating. You will
have a complete harvest of
ice approximatelyevery 3
hours.
Stop ice production by raising
ice maker arm untilclick is heard.
Ice maker will remain in the off position until arm is
pushed down.
Quick Chill Zone TM
Freezer Features
What if These Features
are Different from Mine?
This book is intended to show the variety of features that
are available in the product line. If your refrigerator does
not have all the options that are shown, many of these
options may be purchased by contacting the Consumer
Affairs Department. See contact information on the cover
of your manual.
Drawers
Ice Storage Bin
The ice storage bin is located below the automatic
dispensing ice maker=
To remove and install ice storage bin:
•TOremove bin, remove Quick Chill l[ _ []
Zone TM. Raise ice maker arm to J _ []
deactivate ice maker. J_L=_.. _
m_--_-===--m- =
• Lift front of bin and pull out to its full
extension. Lift up front of bin and remove.
• To install, slide bin into rails below ice maker until bin
locks into place. Drop ice maker arm to activate ice
maker, and replace Quick Chill ZoneTM.
Shelves
Stor-MoP System
Baskets slide out for easy access of items in back.
Shelves can be removed to meet individual storage
needs.
To remove and install Stor-MoP shelf:
:• To remove, snap right side of
shelf from cabinet railing and
remove from wall mounting
clips.
To install, reverse above procedure.
15
Freezer Features
Shelves
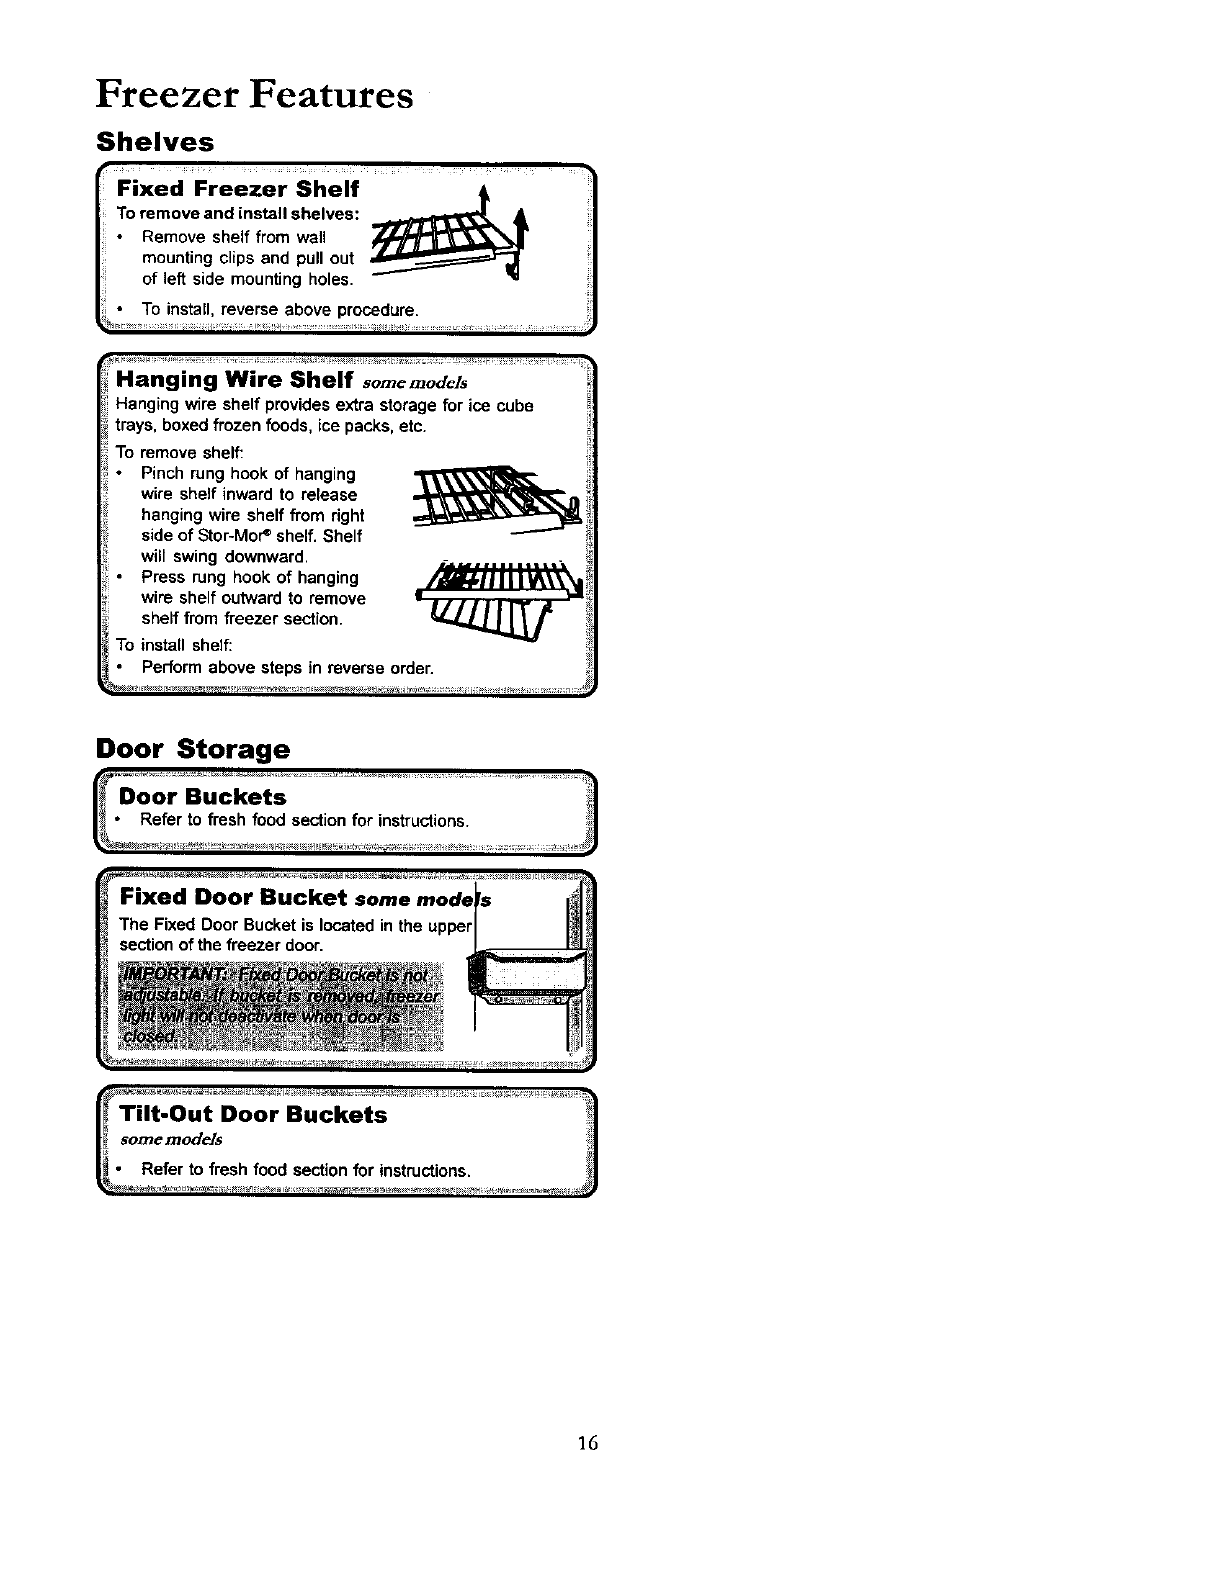
_Fixed Freezer Shelf ......... _.....
Toremove and install shelves: _
•Remove shelf from wall
mounting clips and pull out
of left side mounting holes. -- "_
•To install, reverse above procedure.
ElWire Shelf somcmodds
Hanging wire shelf provides extra storage for ice cube
trays, boxed frozen foods, ice packs, etc.
To remove shelf:
Pinch rung hook of hanging
wire shelf inward to release
hanging wire shelf from right
side of Stor-Mor_ shelf. Shelf
will swing downward.
Press rung hook of hanging
wire shelf outward to remove
shelf from freezer section.
To install shelf:
Perform above steps in reverse order.
Door Storage
16
Dispenser Features
Primary Features
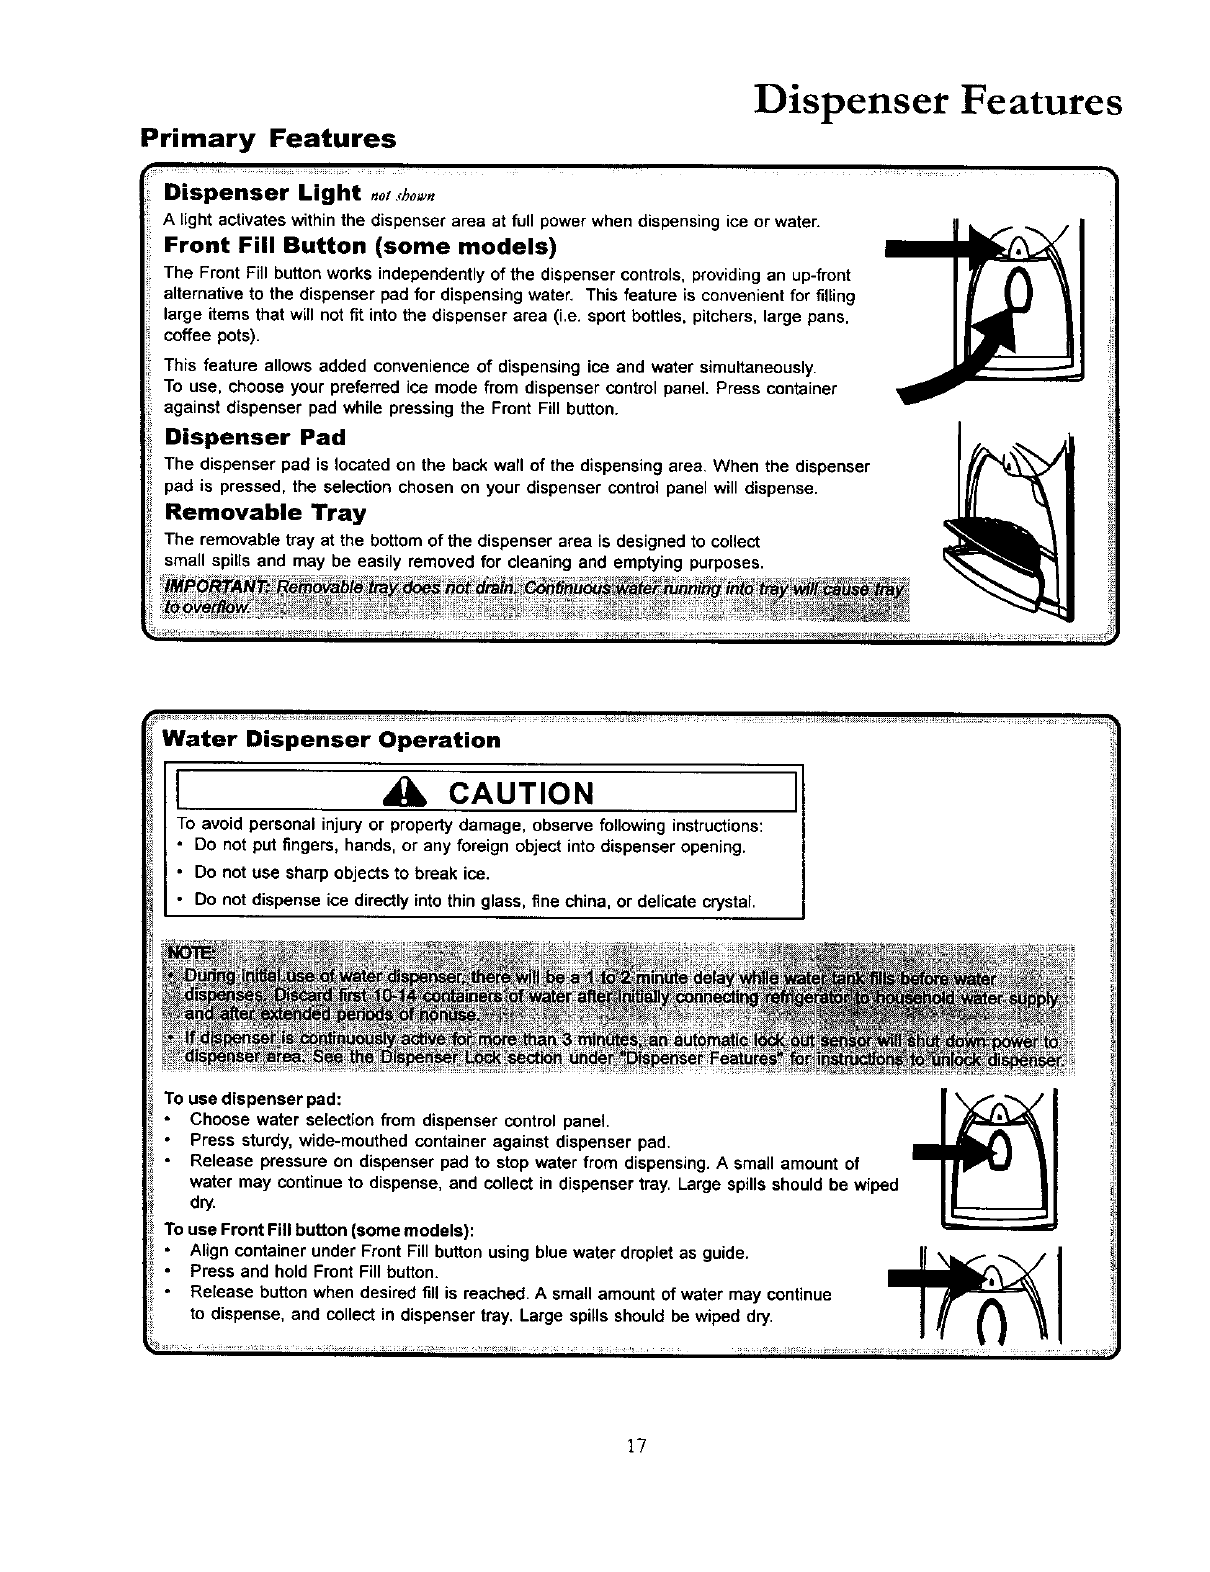
Dispenser Light .ot.,ho_,,_
A light activates within the dispenser area at full power when dispensing ice or water.
Front Fill Button (some models)
The Front Fill button works independently of the dispenser controls, providing an up-frent
alternative to the dispenser pad for dispensing water. This feature is convenient for filling
large items that will not fit into the dispenser area (i.e. sport bottles, pitchers, large pans,
coffee pots).
This feature allows added convenience of dispensing ice and water simultaneously.
To use, choose your preferred ice mode from dispenser control panel. Press container
against dispenser pad while pressing the Front Fill button.
Dispenser Pad
The dispenser pad is located on the back wall of the dispensing area. When the dispenser
pad is pressed, the selection chosen on your dispenser control panel will dispense.
Removable Tray
The removable tray at the bottom of the dispenser area is designed to collect
small spills and may be easily removed for cleaning end emptying purposes.
Water Dispenser Operation
ICAUTION I
To avoidpersonalinjuryor propertydamage, observefollowinginstructions:
• Do not put fingers, hands, or any foreign object into dispenser opening.
• Do not use sharp objects to break ice.
• Do not dispense ice directly into thin glass, fine chine, or delicate crystal.
To use dispenser pad:
Choose water seleotlon from dispenser control panel.
Press sturdy, wide-mouthed container against dispenser pad.
Release pressure on dispenser pad to stop water from dispensing.Asmall amount of
water may continue to dispense, and collect in dispenser tray. Large spills should be wiped
dry.
Touse Front Fill button (some models):
Align container under Front Fill button using blue water droplet as guide.
Press and hold Front Fill button.
Release button when desired fill is reached. Asmall amount of water may continue
to dispense, and collect in dispenser tray. Large spills should be wiped dry.
17
Control Features
Dispenser Features
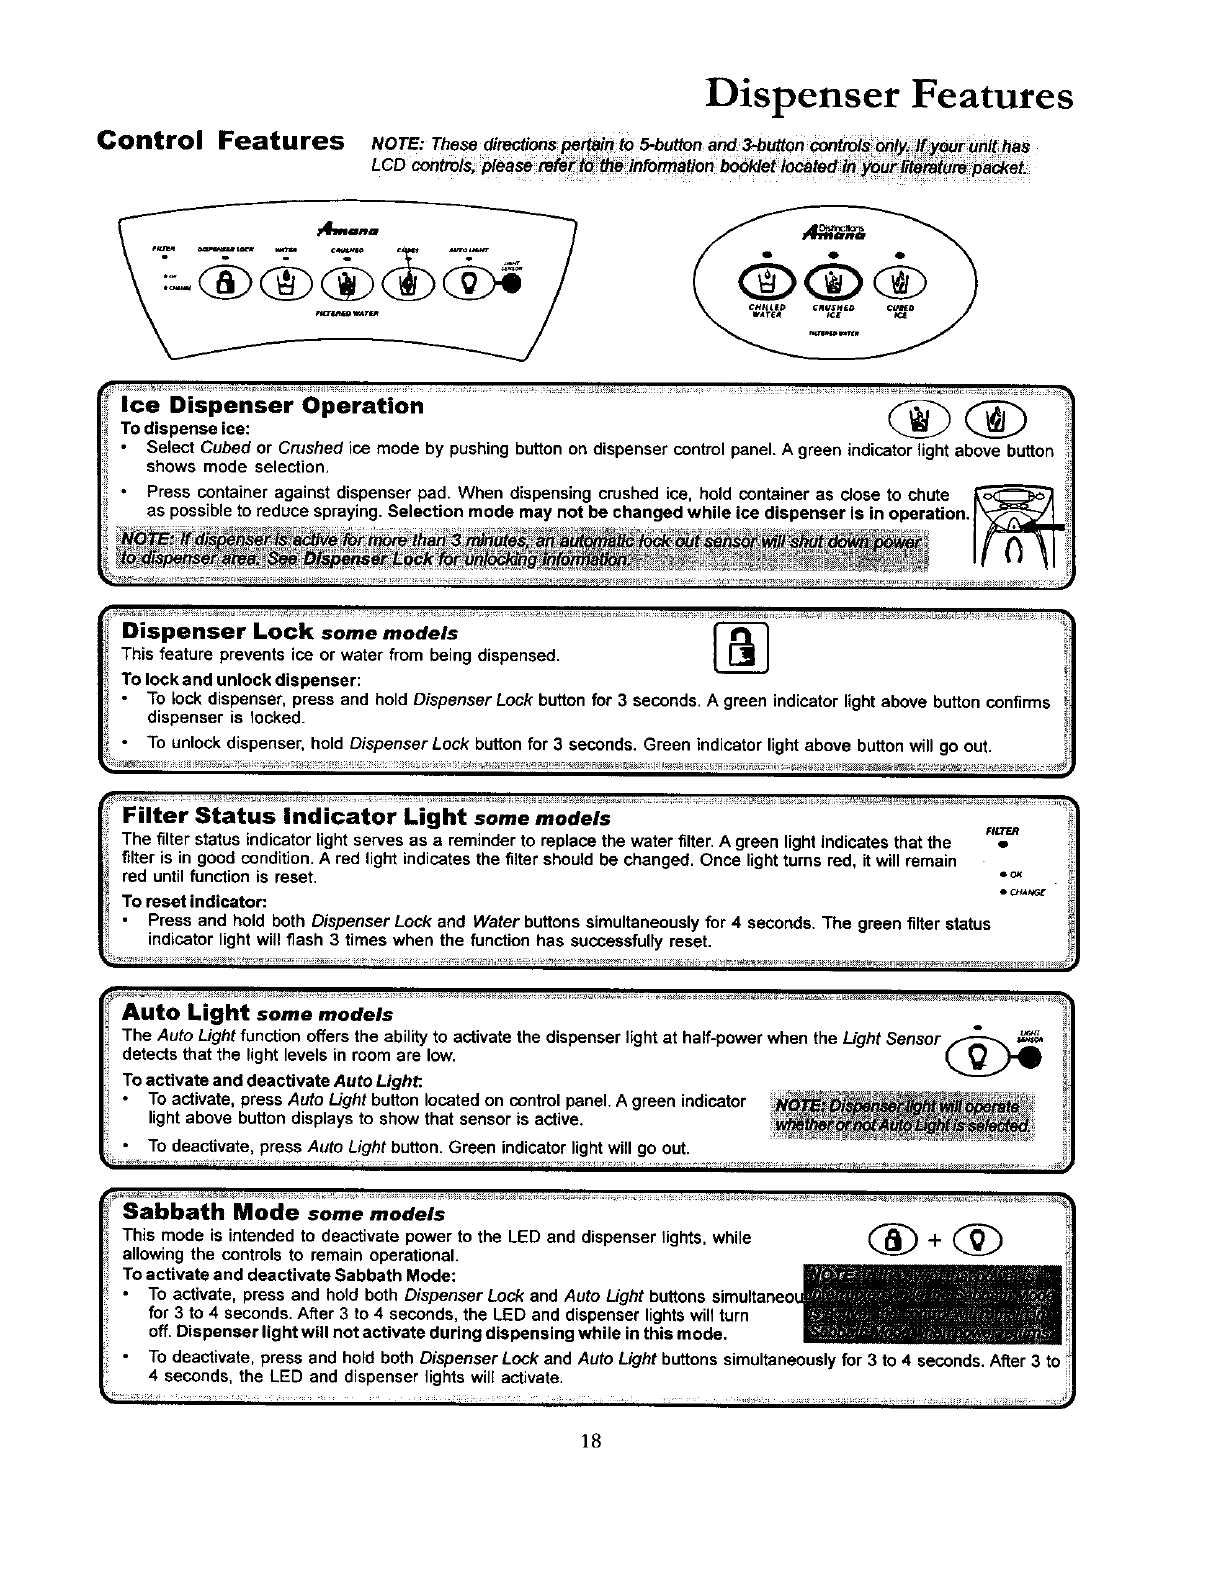
NOTE: These directionspettain to S.button and 3-button controls _ly. _your unit haS
LCD contro,s, p,eas_ _fer_ithe info_tion b_klef ,oo*ted in _ui'ii_ture _cket.
@
Ice Dispenser Operation
To dispense ice: @ @
Select Cubed or Crushed ice mode by pushing button on dispenser control panel. A green indicator _ight above button
shows mode selection.
Dispenser Lock some models
This feature prevents ice or water from being dispensed.
To lock and unlock dispenser:
To lock dispenser, press and hold Dispenser Lock buttonfor 3 seconds. Agreen indicatorlight above buttonconfirms
dispenser is locked.
To unlock dispenser, hold Dispenser Lock button for 3 seconds. Green indicator light above buttonwill go out.
Filter Status Indicator Light some models _
The filter status md_cator hghtserves as a reminder to replace the water filter. A green I_ghtindicates that the e il
filter is in good condition. A red light indicates the filter should be changed. Once lightturns red, itwill remain !ii
red until function is reset. .o_ _1
To reset indicator: ° c_,,_,_ _I
•Press and hold both Dispenser Lock and Water buttonssimultaneously for 4 seconds. The green filter status _1
ndcator ght willflash 3 times when the functon has successfullyreset !_
Auto Light some models .
The Auto Lightfunction offers the ability to actwate the d_spenser hght at half-power when the Light Sensor _,_ _1
detects that the light levels in room are low. (_)'_ i_
Toactivate and deactivate Auto Light. _|
• Toactvate, press Auto Ught button.. oceted on centro panel. Agreen indicator _;_ _
hghtabove buttondisplays to show that sensor is active. _1
•To deactwate, press Auto Dght button. Green mdmator hghtw_llgo out. iil
Mode some models
This mode is intended to deactivate power to the LED and dispenser lights, while _+
allowing the controls to remain operational.
To activate and deactivate Sabbath Mode:
• To activate, press and hold both Dispenser Lock and Auto
for 3 to 4 seconds. After 3 to 4 seconds, the LED and dispenser lights will turn
off. Dispenser light will not activate during dispensing while in this mode.
•To deactivate, press and hold both Dispenser Lock and Auto Light buttons simultaneouslyfor 3 to 4 seconds. After 3 to
4 seconds, the LED and dispenser lights will activate.
18

Hints and Care
How to Clean Your Unit
(]) o®
[ WARNING ]
To avoid electrical shock which can cause severe personal injury or death,
disconnect power to refrigerator before cleaning. After cleaning, connect power.
I CAUTION I
TOavoid personal injury or property damage:
• Read and follow manufacturer's directionsfor all cleaning products.
•Do not place buckets, shelves, or accessories in dishwasher. Cracking or
warping of accessories may result
Textured Doors
andExterior
CabinetInterior
Stainless Steel Doors
and Exterior
IMPORTANT:
Damage to stainless steel
finish due to improper use
of cleaning products or
non-recommended
products is not covered
under any warranty
Dispenser Controls
DoorGaskets
Condenser Coil Remove
toe grille to access
Condenser Fan Outlet
Grille
See back of refn_,crator
Accessories Shelves,
buckets, drawers, ere
DO NOT USE
Abraswe or harsh cleaners
Ammonia
Chlorine bleach
Concentrated detergents or
solvents
Metal or ptsstis-taxtured
scouring pads
Abrasive or harsh cleaners
Ammonia
Chlorine bleach
Concentrated detergents or
solvents
Metal or plastic-textured
scouring pads
Vinegar-based product
Citrus-based cleaners
Abrasive or harsh cleaners
Ammonia
Chlorine btsach
Concentrated detergents or
solvents
Metalorplastic-textured
scouring pads
Alxasiveorharshcleaners
Metalor ptsstic-taxtured
scouring pads
N/A
A Dishwasher
DO*°°
Use 4 tablespoons of
baking soda dissolved In 1
quart 11 liter) warm soapy
water.
Rinse surfaces with dean
warm water and dry
immediately to avoid
water spots
Use warm, soapy water
and a soft, dean cloth or
sponge.
Rinse surfaces With clean
warm water and dry
immediately to avoid
water spots
Use a vacuum cleaner
hose nozzle
Use a vacuum cleaner
hose nozzle with brush
attachment.
Follow removal and
installation instructions
from appropriate feature
section.
Allow items to adjust to
room temperature.
Dilute mild detergent and
use a soft clean cloth or
sponge for cleaning.
Use a plastic bdstle brush
to get into crevices
Rinse surfaces vdth clean
warm mater.
Dry glass and clear items
immediately to avoid
spots.
19
What cleaners does
Amana recommend for
my stainless steel
product?
Amahs has a cleaner available for
purchase (Part # 31960801) through our
Consumer Affairs division.
For this, or a list of other recomntended
cleaning products, please contact us at
Amana Consumar Affairs using the
information on the cover of your Owner's
Manual.
How do I remove an odor
from my refrigerator?
1.Remove all food.
2. Disconnect refrigerator.
3. Clean the following items
using the appropriate instructions in
How to Clean Your Unit :
•Walls, floor, and ceiling of cabinet
interior.
• Drawers, shelves, and gaskets
according to the instructions in this
section.
4. Pay special attention to clean all
crevices by completing the following
steps:
•Dilute mild detergent and brush
solution into crevices using a plastic
bristle brush.
• Let stand for 5 minutes.
• Rinse surfaces with warm water. Diy
surfaces with a soft, clean cloth.
5. Wash and dry all bottles, containers, and
jars. Discard spoiled or expired items.
6. Wrap or store odor-causing foods in
tightly-sealed containers to prevent
reoccurring odors.
7. Connect power to refrigerator and return
food to unit.
8. After 24 hours, check if odor has been
eliminated.
If odor is still present...
1. Remove drawers and place on top shelf
of refrigerator.
2. Pack refrigerator and freezer sections-
including doors-with crumpled sheets
of black and white newspaper.
3. Place charcoal briquettes randomly on
crumpled newspaper in both freezer and
refrigerator compartments.
4. Close doors and let stand 24-48 hours.
5. Repeat steps 5 through 7.
Hints and Care
How to Remove and Replace Light Bulbs
How to Get the
Most Out of
Your Energy
Dollar
•Avoid overcrowding refrigerator
shelves. This reduces effectivity of
air circulation around food and
causes refrigerator to run longer.
•Avoid adding too much warm food
to unit at one time. This overloads
compartments and slows rate of
cooling.
•Do not use aluminum foil, wax
paper, or paper toweling as shelf
liners. This decreases air flow and
causes unit to run less efficiently.
• A freezer that is 2/3full runs most
efficiently.
• Locate refrigerator in coolest part of
room. Avoid areas of direct sunlight,
or near heating ducts, registers, or
other heat producing appliances. If
this is not possible, isolate exterior
by using a section of cabinet or an
added layer of insulation.
• Refer to owner's manual section on
temperature controls for
recommended control settings
• Clean door gaskets every three
months according to Owner's
Manual cleaning instructions. This
will assure that door seals properly
and unit runs efficiently.
•Take time to organize items in
refrigerator to reduce time that door
is open.
• Be sure your doors are closing
securely by leveling unit as
instructed in your Owner's Manual.
• Clean condenser coils of as
indicated in the owner's manual
every 3 months. This will increase
energy efficiency and cooling
performance.
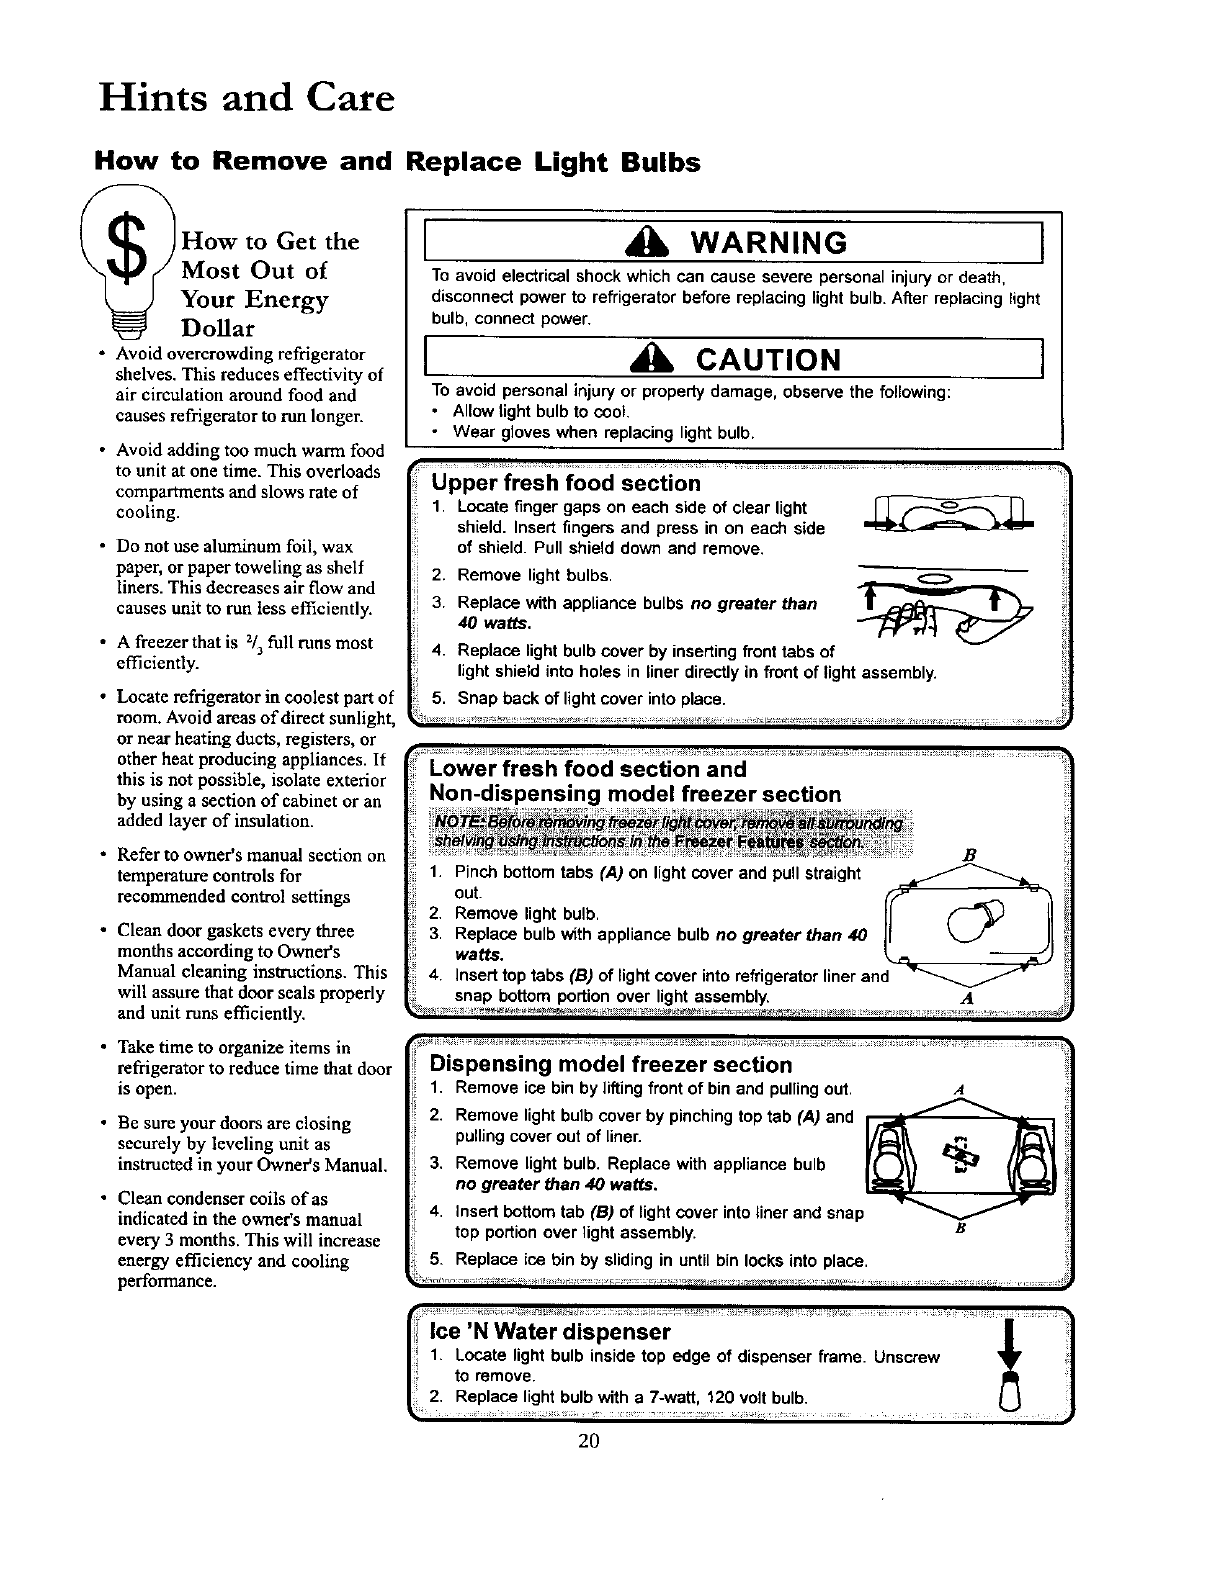
I WARNING !
To avoid electrical shock which can cause severe personal injuryor death,
disconnect power to refrigerator before replacing lightbulb. After replacing light
bulb, connect power.
IACAUTION I
To avoid personal injury or propertydamage, observe the following:
•Allow light bulbto cooL
•Wear gloves when replacing lightbulb.
upper fresh food section )
1. Locate finger gaps on each side of clear light _(I
shield. Insert fingers and press in on each side 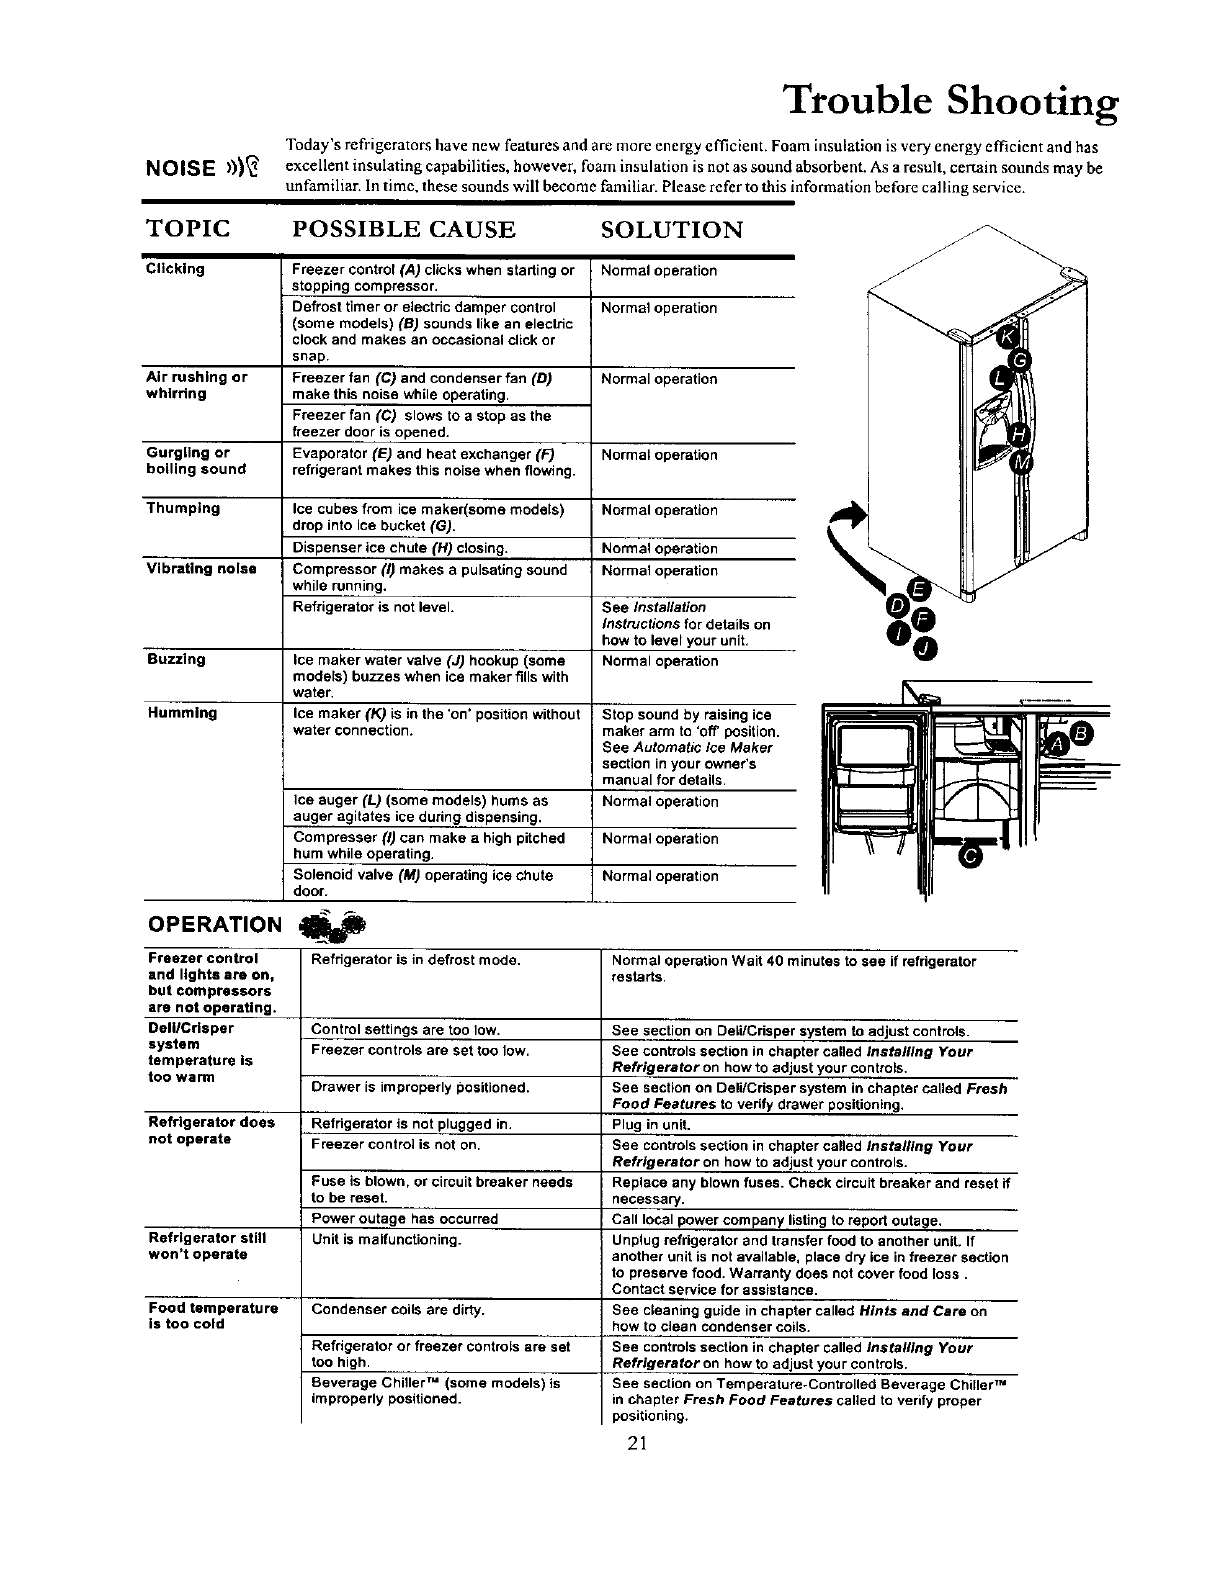
NOISE )))_
TOPIC POSSIBLE CAUSE SOLUTION
Clicking Normal operation
Normal operation
Air rushing or Normal operation
whirring
Trouble Shooting
Today's refrigerators have new features and arc more energy efficient. Foam insulation is very energy efficient and has
excellent insulating capabilities, however, foam insulation is not as sound absorbent. As a result, certain sounds may be
tmfamiliar. In time, these sounds will become familiar. Please refer to this information before calling service.
Freezer control (A) clicks when starting or
stopping compressor.
Defrost timer or electric damper control
(some models) (B) sounds like an electric
clock and makes an occasional click or
snap.
Freezer fan (C) and condenser fan (D)
make this noise while operating.
Freezer fan (C) slows to a stop as the
freezer door is opened.
Evaporator (E) and heat exchanger (F)
refrigerant makes this noise when flowing.
Gurgling or Normal operation
boiling sound
Thumping Ice cubes from ice maker(some models) Normal operation
drop into ice bucket (G).
Dispenser ice chute (H) closing. Normal operation
Vibrating noise Compressor (I) makes a pulsating sound Normal operation
while running.
Refrigerator is not level. See Installation
Instructions for details on
how to level your unit.
Buzzing Ice maker water valve (J) hookup (some Normal operation
models) buzzes when ice maker fills with
water.
Humming Ice maker (K) is in the 'on' position without Stop sound by raising ice
water connection, maker arm to 'off" position.
See Automatic Ice Maker
section in your owner's
manual for details.
Ice auger (L) (some models) hums as Normal operation
auger agitates ice during dispensing.
Compresser (I) can make a high pitched Normal operation
hum while operating.
Solenoid valve (M) operating ice chute Normal operation
door.
OPERATION _
Refrigerator is in defrost mode.Freezer control Normal operation Wait 40 minutes to see if refrigerator
and lights are on, restarts.
but compressors
are not operating.
DelgCdsper Control settings are too low.
system Freezer controls are set too low,
temperature is
too warm Drawer is improperly positioned.
Refrigerator is not plugged in.
Freezer control is not on.
Refrigerator does
not operate
Fuse is blown, or circuit breaker needs
to be reset.
Power outage has occurred
Refrigerator still Unit is malfunctioning.
won't operate
Food temperature Condenser coils are dirty.
is too cold
See section on Dell/Crisper system to adjust controls.
See controls section in chapter called Installing Your
Refrigerator on how to adjust your controls.
See section on Dell/Crisper system in chapter called Fresh
Food Features to verify drawer positioning.
Plug in unit.
See controls section in chapter called Installing Your
Refrigerator on how to adjust your controls.
Replace any blown fuses. Check circuit breaker and reset if
necessary.
Call local power company listing to report outage.
Unplug refrigerator and transfer food to another unit. If
another unit is not available, place dry ice in freezer section
to preserve food. Warranty does not cover food loss.
Contact service for assistance.
See cleaning guide in chapter called Hints and Care on
how to clean condenser coils.
See controls section in chapter called Installing Your
Refrigerator on how to adjust your controls.
See section on Temperature-Controlled Beverage Chiller TM
in chapter Fresh Food Features called to verify proper
positioning.
Refrigerator or freezer controls are set
too high.
Beverage Chiller TM (some models) is
improperly positioned.
21
Trouble Shooting
OPERATION'
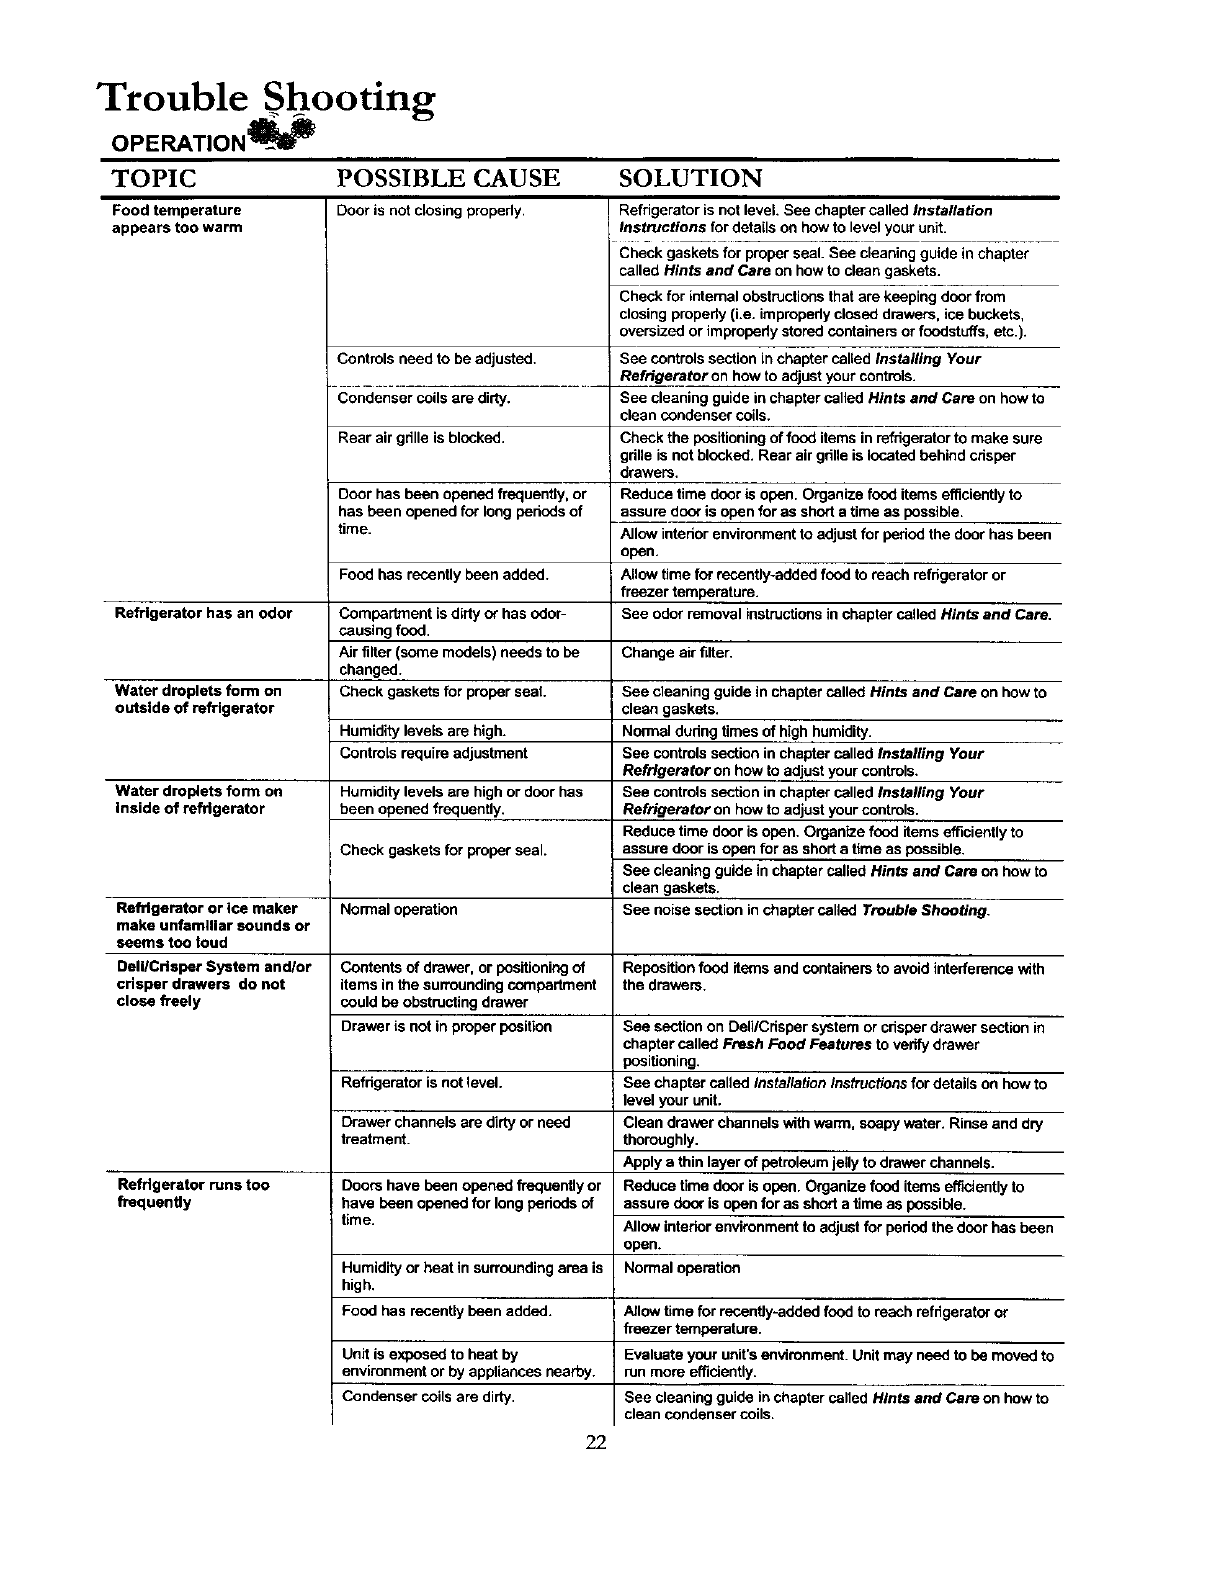
TOPIC POSSIBLE CAUSE SOLUTION
Food temperature
appears too warm
Door is not closing properly.
Controls need to be adjusted.
Condenser coils are dirty.
Rear air grille is blocked.
Door has been opened frequengy, or
has been opened for long pededs of
time.
Refrigerator is not level. See chapter called Installation
Instructions for details on how to level your unit.
Check gaskets for proper seal. See cleaning guide in chapter
called Hints and Care on how to clean gaskets.
Food has recently been added.
Compartment is dirtyor has odor-
causing food.
Air tilter (some models) needs to be
changed.
Check gaskets for proper seat.
Humidity levels are high.
Controls require adjustment
Humiditylevels are high or door has
been opened frequently.
Check gaskets for proper seal.
Check for internal obstructionsthat are keeping door from
closing properly (i.e. improperlyci(_sdd drawers, ice buckets,
oversized or improperlysto_=dcontainers or foodstuffs,etc.).
See controlssection in chapter called Installing Your
Refrigerator on howto adjust your controls.
See cleaning guide in chapter called Hints and Care on how to
clean condenser coils.
Refrigerator has an odor
Change air filter.
Water droplets form on
outside of refrigerator
Water droldets form on
inside of refrigerator
Check the positioning of food items in refrigerator to make sure
grille is not blocked. Rear air grille is located behind crisper
drawers,
Reduce time door is open. Organize food items ef_ciently to
assure door is open for as short a time as possible.
Allow interior environmentto adjust for period the door has been
open.
Allow time for mcently-edded food to reach refrigerator or
freezer temperature.
See odor removal instructionsin chapter called Hints and Care.
See cleaning guide in chapter called Hints and Care on how to
clean gaskets.
Nonnal dudng times of high humidity.
See controls section in chapter called Installing Your
Refrigerator on how to adjust your controls.
See controls section in chapter called Installing Your
Refrigerator on how to adjust yourcontrols.
Reduce time door is open. Organize food items efficientlyto
assure door is open for as shorta time as possible.
See cleaning guide inchapter called Hints and Care on how to
clean gaskets.
See noise section in chapter called Trouble Shooting.Refrigerator or ice maker Normal operation
make unfamltlar sounds or
seems too loud
DelllCrt sper System andlor Contents of drawer, or positioningof Repesition food items and containers to avoid interference with
crisper drawers do not items in the surroundingcompartment the drawers.
close fi'eely could be obstructingdrawer
Drawer is not in proper position
Refdgerator is not level.
Drawer channels are dirtyor need
treatment.
Doors have been opened frequently or
have been opened for long periods of
time.
Refrigerator runs too
frequently
See section on Deli/Crispar system or ctispardrawer section in
chapter called Fresh Food Features to verily drawer
positioning.
See chapter called Installation Instructionsfor details on how to
level your unit.
Clean drawer channels with warm, soapy water. Rinse and dry
thoroughly.
Apply a thin layer of petroleum jelly to drawer channels.
Reduce time door is open. Organize food items eff'_.,ientlyto
assure door is open for as short a time as pessible.
Allow interior environment to adjust for period the door has been
open.
Normal operationHumidityor heat in surroundingarea is
high.
Food has recently been added. Allow time for recently-added food to reach refrigerator or
fi-eezer temperature.
Unit is exposed to heat by Evaluate your unit's environment. Unit may need to be moved to
environment or by appliances nearby, nJnmore efficiently.
Condenser coils are dirty. See cleaning guide inchapter called Hints and Care on how to
clean condenser coils.
22
Trouble Shooting
O PE RATIO N _=_(continued)
TOPIC POSSIBLE CAUSE SOLUTION
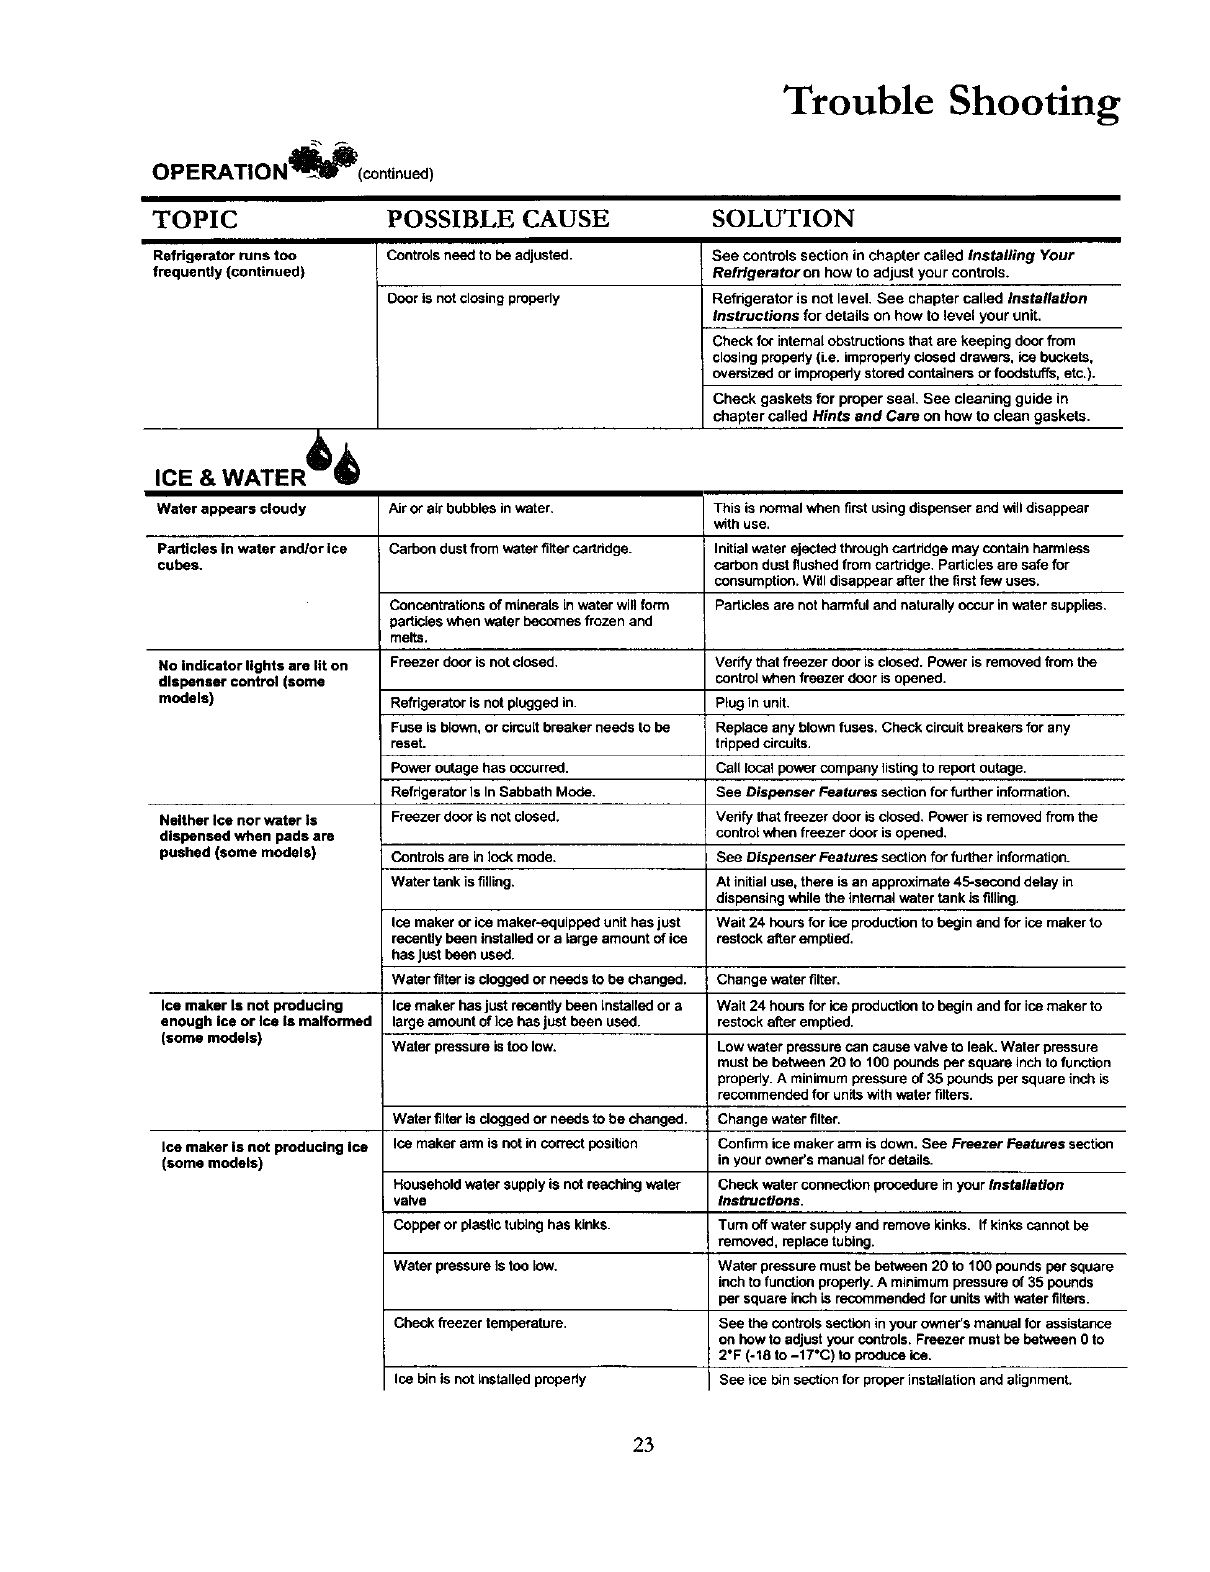
Refrigerator runs too Controls need to be adjusted. See controls section in chapter called Installing Your
frequently (continued) Refrigerator on how to adjust your controls.
Door is not closing properly Refrigerator is not level. See chapter called Installation
Instructions for details on how to level your unit.
Check for intemal obstructions that are keeping door from
closing probedy (i.e. improberly dosed drawers, ice buckets,
oversized or impropedy stored containers or foodstuffs, etc.).
Check gasketsfor proper seal, See cleaning guide in
chapter called Hints and Care on how to clean gaskets.
,CE.W.TE.d>
Air or air bubbles in water,
Carbon dust from water filter cartridge.
Water appears cloudy
Particles in water and/or ice
cubes.
No indicator lights are lit on
d/spenser control (some
models)
Neither Ice nor water Is
dispensed when pads are
pushed (some models)
Ice maker Is not producing
enough Ice or Ice Is malformed
(some models)
Ice maker is not producing Ice
(some models)
Concentratior_s of minerals in water will form
_artioios when water becomes frozen and
melts.
Freezer door is not closed,
Refrigerator is not plugged in.
Fuse is blown, or circuit breaker needs to be
reset.
Power outage has occurred.
Refrigerator Is In Sabbath Mode.
Freezer door is not dosed.
Controls are in lock mode.
Water tank is filling.
Ice makeror ice maker-equippedunit hasjust
recentlybeen installedora large amountof ice
hasJustbeen used.
Water filteris cloggedor needsto be changed.
This is normal when first using dispenser and will disappear
with use.
Initial water ejected through cartridge may contain harmless
carbon dust flushed from cartridge. Particles are safe for
consumption. Wifl disappear after the first few uses.
Particles are not harmful and naturally occur in water supplies.
Verify that freezer door is closed. Power is removed from the
control when freezer door is opened.
Plug in unit.
Replace any blown fuses. Check circuit breakers for any
tripped circuits.
Call local power company listing to report outage.
See Dispenser Features section for further information.
Verify that freezer door is blo6ed. Power is removed from the
control when freezer door is opened.
See Dispenser Features section for further information.
At initial use, there is an approximate 45-second delay in
dispensing while the internal water tank is filling.
Wait 24 hours for ice production to begin and for ice maker to
restock after emptied.
Change water filter.
Ice maker has just recently been installed or aWait 24 houm for ice preductio(1 to begin and for ice maker to
large amount of ice has just been used. restock _er emptied.
Water pressure is too low. Low water pressure can cause valve to leak, Water pressure
must be between 20 to 100 pounds per square inch to function
properly. A minimum pressure of 35 pounds per square inch is
recommended for units with water filters.
Change water filter.
Water filter is clogged or needs to be changed.
Ice maker arm is not in correct position Confirm ice maker arm is down. See Freezer Features section
m your owner's manual for details.
Household water supply is nat reaching water Check water connection procedure in your InstditsUon
valve Ins_ucttans.
Copper or plastic tubing has kinks. Turn off water supply and remove kinks, If kinks cannot be
removed, replace tubing.
Water pressure is too low.
Check freezer temperature.
Ice bin is not Installed prppedy
Water pressure must ha between 20 to 100 pounds per square
inch to function properly. A minimum pressure of 35 pounds
per square inch is recommendsd for units with water filters.
See the controls section in your owner's manual for assistance
on how to adjust your controls. Freezer must be between Oto
2"F (-18 to -17"C) to produce ice.
See ice bin section for proper installation and alignment.
23
Trouble Shooting
,cE w,TER
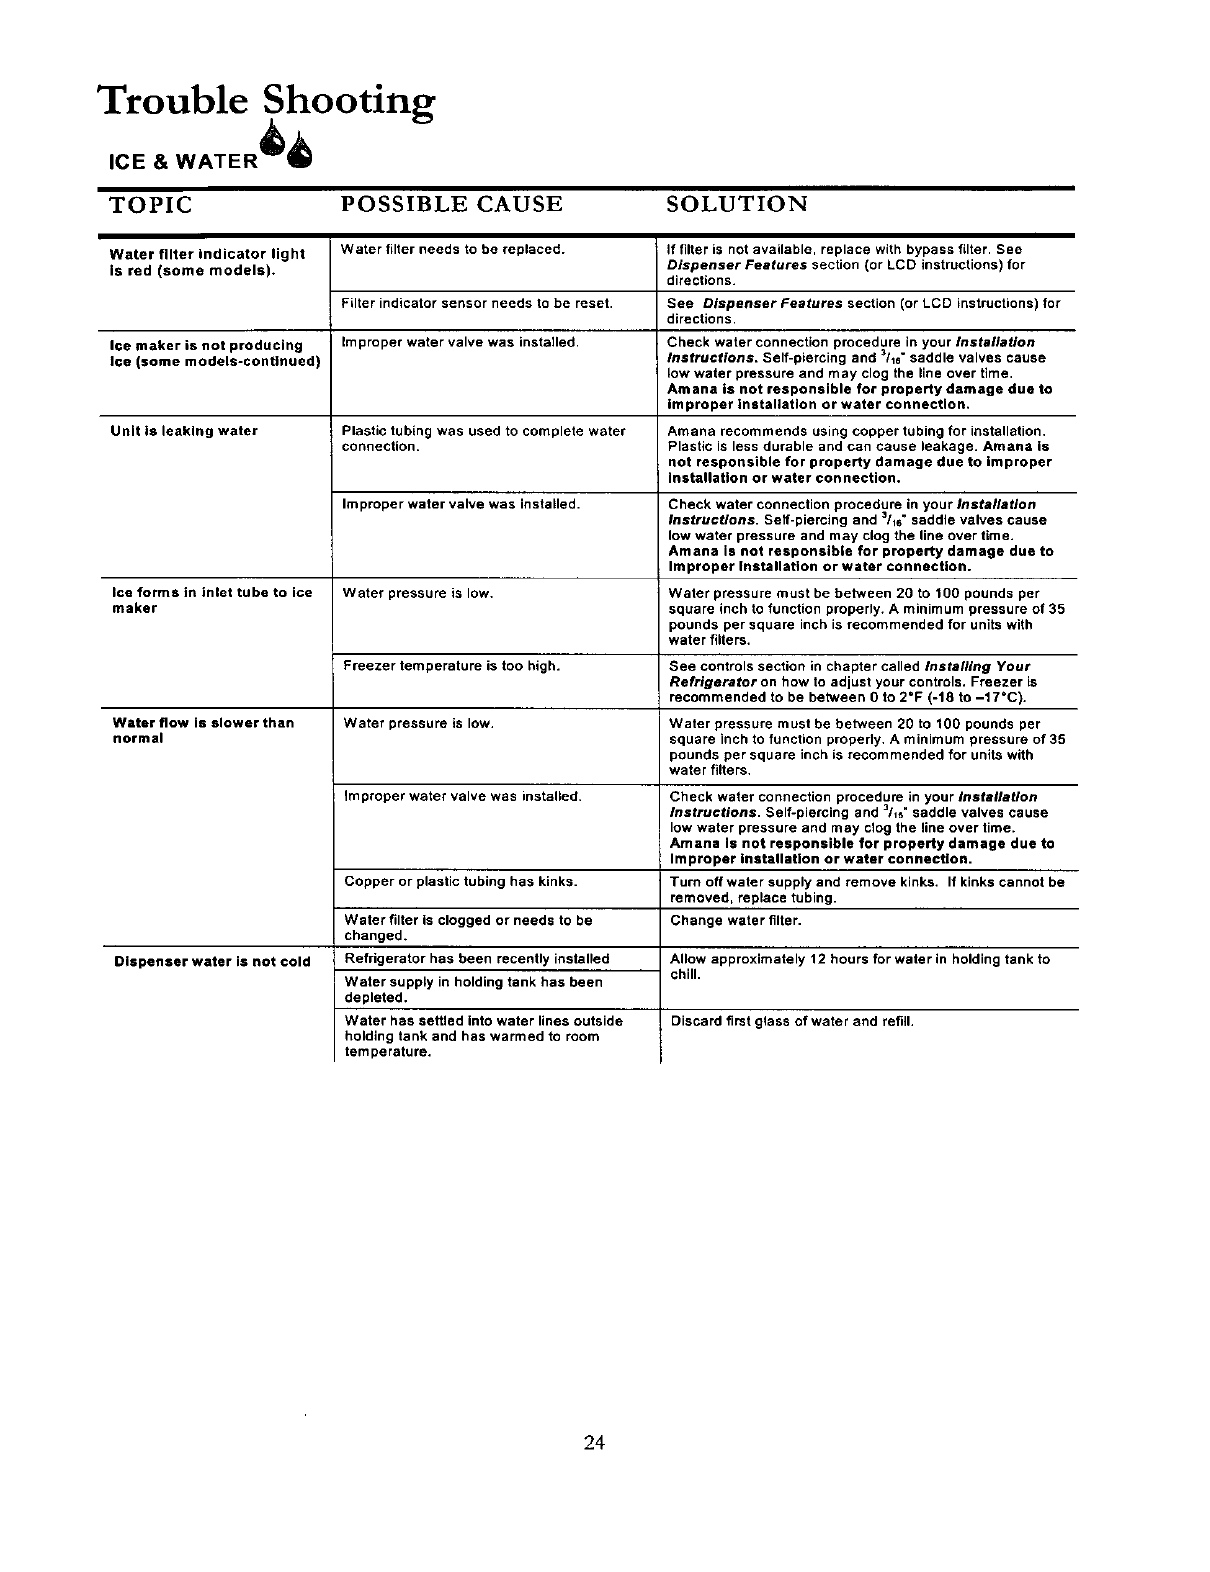
TOPIC POSSIBLE CAUSE SOLUTION
Water filter indicator light Water filter needs to be replaced, if filter is not available, replace with bypass filter. See
Dispenser Features section {or LCD instructions) for
is red (some models), directions.
Filter indicator sensor needs to be reset. See Dispenser Features section (or LCD instructions) for
directions.
Ice maker is not producing Improper water valve was installed. Check water connection procedure in your Installation
Ice (some models-conUnued) !Instructions. Self-piercing and 3118"saddle valves cause
low water pressure and may clog the line over time.
Amana is not responsible for property damage due to
improper installation or water connection.
Unit Is leaking water Plastic tubing was used to complete water Amana recommends using copper tubing for installation.
connection. Plastic is less durable and can cause leakage. Amana is
not responsible for property damage due to improper
Installation or water connection.
Improper water valve was installed. Check water connection procedure in your installation
Instructions. Self-piercing and 3/1_" saddle valves cause
low water pressure and may clog the line over time.
Amana is not responsible for property damage due to
Improper installation or water connection.
Ice forms in inlet tube to ice Water pressure is low. Water pressure must be between 20 to 100 pounds per
maker square inch to function properly. A minimum pressure of 35
pounds per square inch is recommended for units with
water filters.
Freezer temperature is too high. See controls section in chapter called Installing Your
Refrigerator on how to adjust your controls. Freezer is
recommended to be between 0 to 2"F (-18 to -17°C).
Water flow is slower than Water pressure is low. Water pressure must be between 20 to 100 pounds per
normal square inch to function properly. A minimum pressure of 35
pounds per square inch is recommended for units with
water filters.
Improper water valve was installed. Check water connection procedure in your Installation
Instructions. Self-piercing and _/1_" saddle valves cause
low water pressure and may clog the line over time.
Amana is not responsible for property damage due to
Improper installation or water connection.
Copper or plastic tubing has kinks. Turn off water supply and remove kinks. If kinks cannot be
removed, replace tubing.
Change water filter.
Dispenser water is not cold Allow approximately 12 hours for water in holding tank to
chill.
Water filter is clogged or needs to be
changed.
Refrigerator has been recently installed
Water supply in holding tank has been
depleted.
Water has settled into water lines outside
holding tank and has warmed to room
temperature.
Discard first glass of water and refill,
24
Water Filter Data
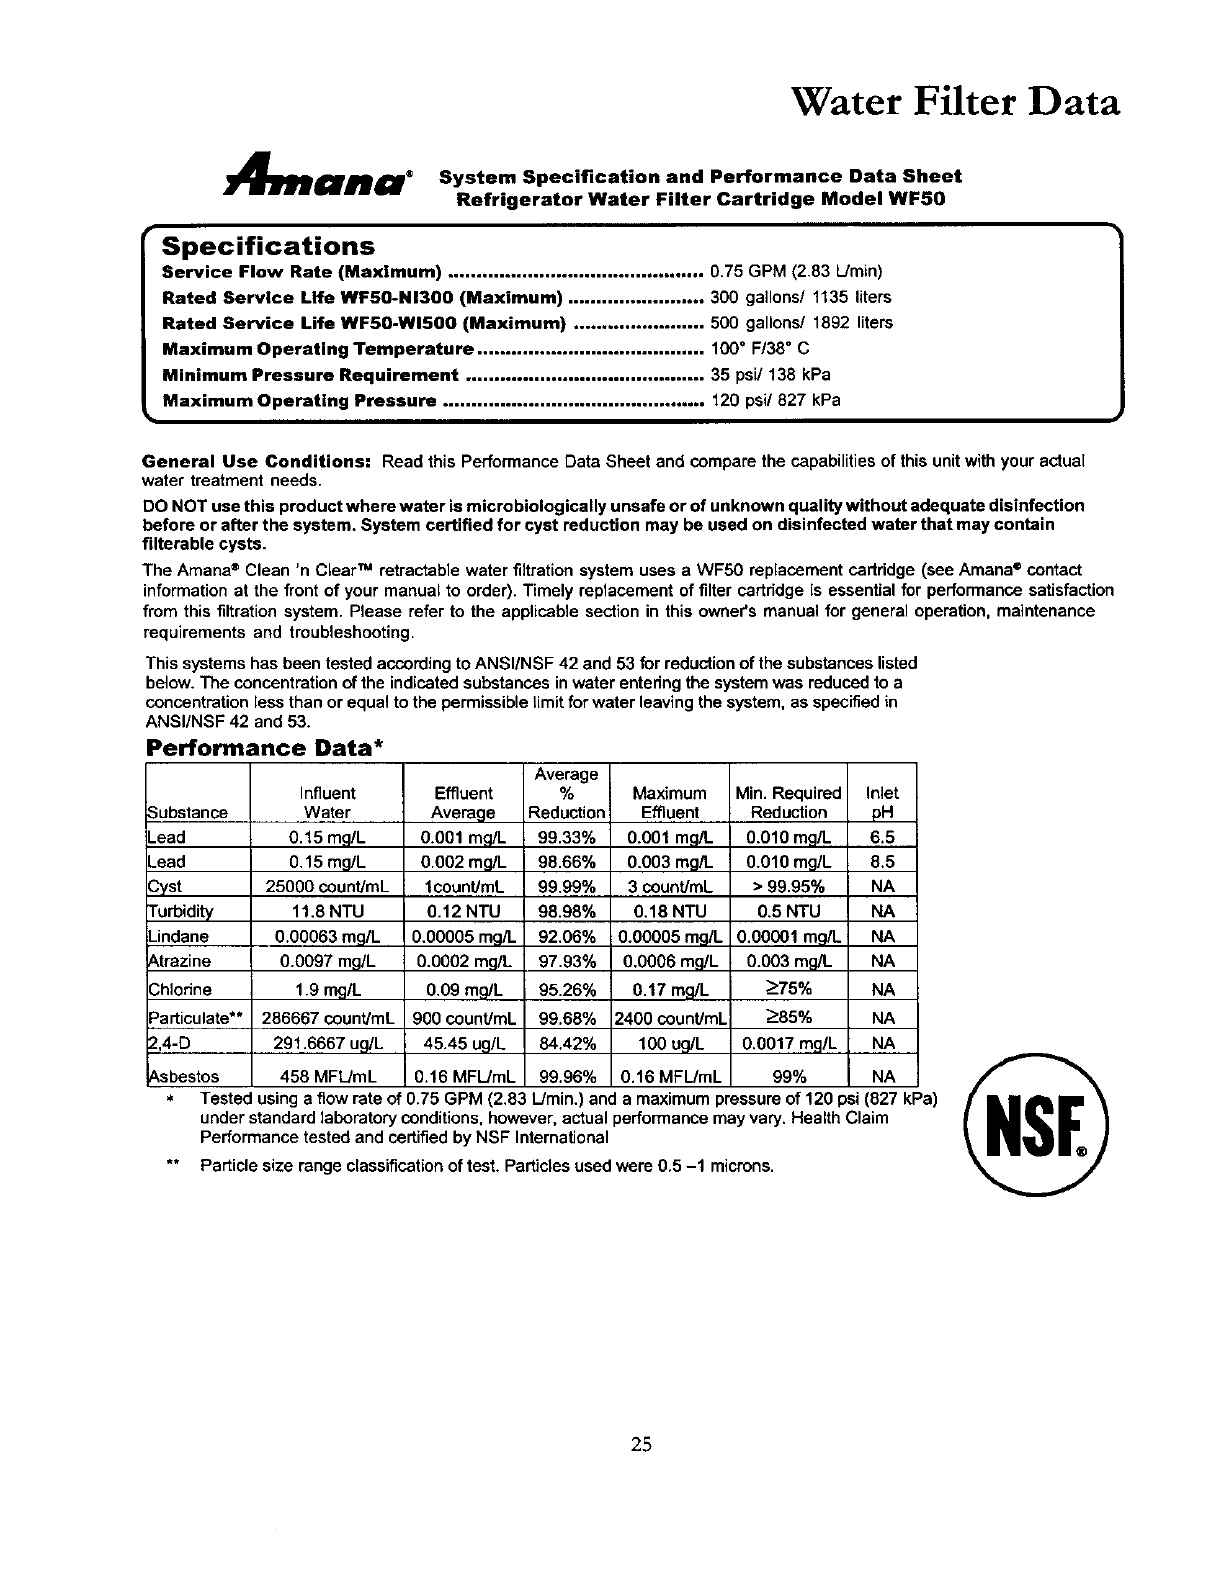
System Specification and Performance Data Sheet
Refrigerator Water Filter Cartridge Model WF50
Specifications
Service Flow Rate (Maximum) ............................................. 0.75 GPM (2.83 tJmin)
Rated Service Life WF50-NI300 (Maximum) ........................ 300 gallons/ 1135 liters
Rated Service Life WF50-Wl500 (Maximum) ....................... 500 gallons/ 1892 liters
Maximum Operating Temperature ........................................ 100 °F/38 ° C
Minimum Pressure Requirement .......................................... 35 psi/138 kPa
Maximum Operating Pressure .............................................. 120 psi/827 kPa
General Use Conditions: Read this Performance Data Sheet and compare the capabilities of this unit with your actual
water treatment needs.
DO NOT use this product where water is microbiologicaily unsafe or of unknown quality without adequate disinfection
before or after the system. System certified for cyst reduction may be used on disinfected water that may contain
filterable cysts.
The Amana ®Clean 'n ClearTM retractable water filtrationsystem uses a WF50 replacement cartridge (see Amana ® contact
information at the front of your manual to order). Timely replacement of filter cartridge is essential for performance satisfaction
from this filtrationsystem. Please refer to the appticable section in this owner's manual for general operation, maintenance
requirements and troubleshooting.
This systems has been tested accordingto ANSI/NSF 42 and 53 for reductionof the substanceslisted
below.The concentrationof the indicatedsubstances inwater entering the systemwas reduced to a
concentration less than or equal to the permissible limit for water leaving the system,as specifiedin
ANSI/NSF 42 and 53.
Performance Data*
Substance
_ead
.ead
3yst
Turbidity
Lindane
Atrazine
Chlorine
Particulate**
2,4-D
Asbestos
Influent
Water
0.15 mg/L
0.15 mg/L
25000 count/mL
11.8 NTU
0.00063 mg/L
0.0097 mg/L
1.9 rng/L
286667 countJmL
291.6667 ug/L
458 MFL/mL
Effluent
Average
0.001 mg/L
0.002 mg/L
lcount/mL
0.12 NTU
0.00005 mg/L
0.0002 mq/L
0.09 mg/L
900 count/mL
45.45 ug/L
0.16 MFL/mL
Average
%
Reduction
99.33%
98.66%
99.99%
98.98%
92.06%
97.93%
95.26%
99.68%
84.42%
99.96%
Maximum
Effluent
0.001 m,q/L
0.003 mg/L
3countJmL
0.18 NTU
0.00005 mg/L
0.0006 mg/L
0.17 mg/L
2400 count/mL
100 ug/L
0.16 MFIJmL
Min. Required
Reduction
0.010 mg/L
0.010 mg/L
•99.95%
0.5 NTU
0.00001 mg/L
0.003 mg/t.
>75%
>85%
0.0017 mg/L
99%
Inlet
pH
6.5
8.5
NA
NA
NA
NA
NA
NA
NA
NA
*Tested using a flow rate of 0.75 GPM (2.83 L/min.) and a maximum pressure of 120 psi (827 kPa)
under standard laboratory conditions, however, actual performance may vary. Health Claim
Performance tested and certifiedby NSF International
** Particle size range classificationof test. Particles usedwere 0.5 -1 microns.
25
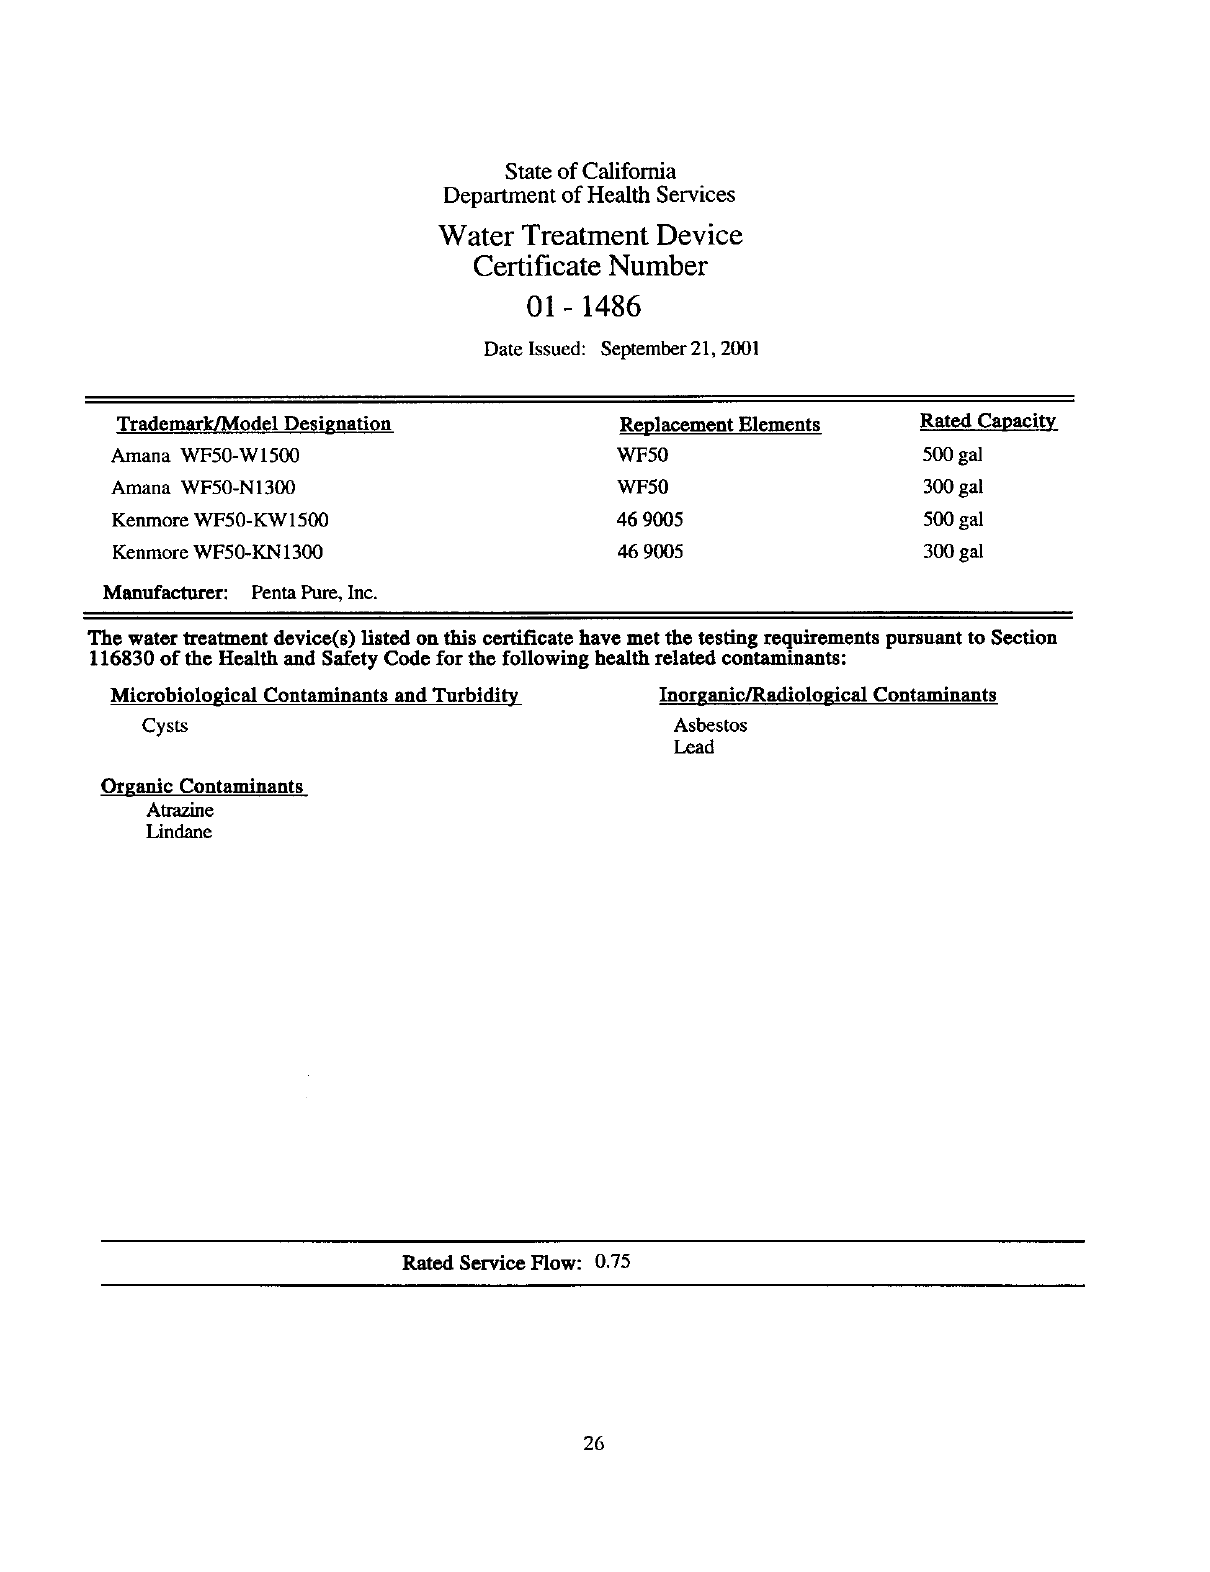
State of California
Department of Health Services
Water Treatment Device
Certificate Number
01-1486
Date Issued: September21, 2001
Tredemark/Model Designation
Amana WF50-Wl500
Amana WF50-N1300
Kenmore WF50-KW1500
Kenmore WF50-KN 1300
Manufacturer: Penta Pure, Inc.
Replacement Elements Rated Capacity
WF50 500 gal
WF50 300 gal
46 9005 500 gal
46 9005 300 gal
The water treatment device(s) listed on this certificate have met the testing requirements pursuant to Section
116830 of the Health and Safety Code for the following health related contaminants:
Microbiological Contaminants and Turbidity
Cysts
Organic Contaminants
Atrazine
Lindane
Inorganic/Radiological Contaminants
Asbestos
Lead
Rated Service Flow: 0.75
26
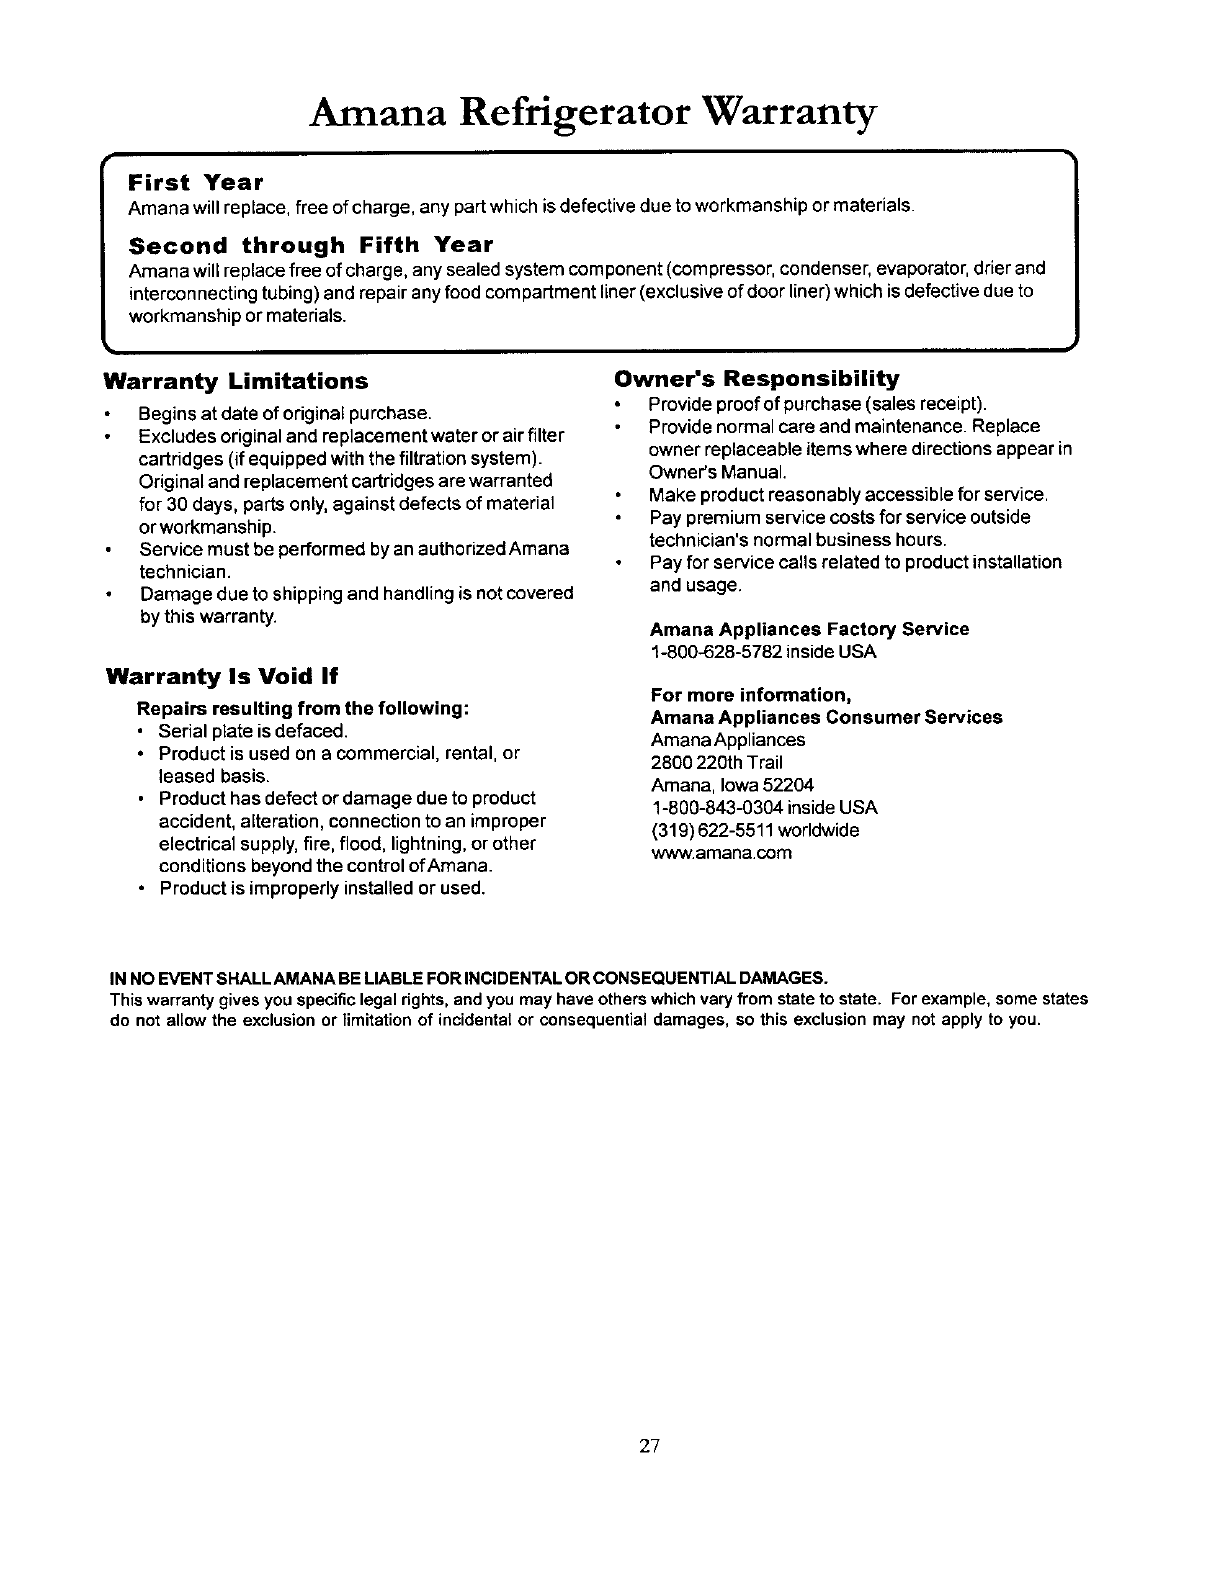
Amana Refrigerator Warranty
First Year
Amana willreplace, free of charge, any part which is defective due to workmanshipor materials.
Second through Fifth Year
Amana will replace free of charge, any sealed system component (compressor, condenser, evaporator, drier and
interconnecting tubing) and repair any food compartment liner (exclusive of door liner) which is defective due to
workmanship or materials. 1
Warranty Limitations
Begins at date of original purchase.
Excludes original and replacement water or air filter
cartridges (if equipped with the filtration system).
Original and replacement cartridges are warranted
for 30 days, parts only, against defects of material
or workmanship.
Service must be performed by an authorized Amana
technician.
Damage due to shipping and handling is not covered
by this warranty.
Warranty Is Void If
Repairs resulting from the following:
•Serial plate is defaced.
• Product is used on a commercial, rental, or
leased basis.
•Product has defect or damage dueto product
accident, alteration,connectionto an improper
electrical supply,fire, flood, lightning,or other
conditionsbeyondthe controlofAmana
• Productis improperly installedor used.
Owner's Responsibility
Provide proof of purchase (sales receipt).
Provide normal care and maintenance. Replace
owner replaceable items where directions appear in
Owner's Manual.
Make product reasonably accessible for service.
Pay premium service costs for service outside
technician's normal business hours.
Pay for service ceils related to product installation
and usage.
Amana Appliances Factory Service
1-800-628-5782 inside USA
For more information,
Amana Appliances Consumer Services
Amana Appliances
2800 220th Trail
Amana, Iowa 52204
1-800-843-0304 inside USA
(319) 622-5511 worldwide
www.amana.com
IN NO EVENT SHALLAMANA BE LIABLE FOR INCIDENTAL OR CONSEQUENTIAL DAMAGES.
This warranty gives you specific legal rights, and you may have others which vary from state to state. For example, some states
do not allow the exclusion or limitation of incidenta[or consequential damages, so this exclusion may not apply to you.
27
