AMOI Electronics GSM6711A PCS1900 (Mobile Phone) User Manual
AMOI Electronics Co., Ltd. PCS1900 (Mobile Phone) Users Manual
Users Manual

GSM6711A English User Manual
Special features
Internet Explorer (page 96)
Built-in ActiveSync to synchronize
with PC (page 59)
Windows Media Player (page 107)
Supports Outlook E-mail (page 76)
Amusing games (page 123 )
Supports MicroSD card (page19)
Supports Voice Notes (page105)
2 mega pixel camera (page 113)
Supports video capture (page 113)
Supports Internet sharing (page 99)
Supports Speed Dial (page 36)
Supports Multimedia Message (page
71)
Supports Java (page 123)
Supports Windows Live (page 84)

Declaration
Congratulations on the purchase of your new
Windows Mobile™ Smart phone!
COPYRIGHT INFORMATION
Microsoft, MS-DOS, Windows, Windows NT,
Windows Server, Windows Mobile, ActiveSync,
Excel, Internet Explorer, MSN, Outlook,
PowerPoint and Word are either registered
trademarks or trademarks of Microsoft
Corporation in the United States and/or other
countries.
Bluetooth is the registered trademark of
Bluetooth SIG Inc.
JAVA is the registered trademark of Sun
Microsystems, Inc.
Please Read Before Proceeding.
THIS DEVICE IS NOT CHARGED WHEN
YOU TAKE IT OUT OF THE BOX.
DO NOT REMOVE THE BATTERY PACK
WHEN THE DEVICE IS CHARGING.
WHEN INSERTING YOUR SIM CARD,
MAKE SURE THE DEVICE IS POWERED
OFF, AND THAT THE SIM CARD SNAPS
INTO THE SOCKET SECURELY.
YOUR WARRANTY IS INVALIDATED IF
YOU OPEN OR TAMPER WITH THE
DEVICE’S OUTER CASING.
PRIVACY RESTRICTIONS
Some countries require full disclosure of
recorded telephone conversations, and
stipulate that you must inform the person with
whom you are speaking that the conversation is
being recorded. Always obey the relevant laws
and regulations of your country when using the
recording feature of your phone.
RELATIVE INSTRUCTION
Some functions referred to in this guide also
need the support of a network operator or
service provider. If you are unable to confirm
whether you will be able to use certain
functions or services with this phone, please
consult your network operator or service
provider.
The phone may include some commodities,
technology or software that is controlled by
export law, Chinese regulations and regulations
governed by other countries or areas.
In order to ensure your safety, please read the
“Safety Notice” and “Safety Precaution”.
Typographic conventions used in this user
guide include:
<>: shows function key;
““: shows important information on the phone
interface;
[ ]: shows the phone menus.

I
Content
Safety notice ................................................. X
1.Getting Started..........................................13
Getting to know your phone and it's accessaries
....................................................................... 13
Front view of your phone............................ 13
Side view of your phone............................. 13
Rear view of your phone ............................ 14
Accessaries................................................ 14
Key functions .................................................15
To use shortcut keys ..................................17
Installing the SIM card and battery................. 18
Installing the Micro-SD card ........................... 19
Battery charging............................................. 21
To charge the phone using the travel charger
................................................................... 21
The Home Screen.......................................... 22
Power on/ off.................................................. 23
Status icon and program introduction .............24
Using the Quick List........................................28
Entering menu ................................................28
To scroll to enter menu function..................28
To enter a menu by using speed dial ..........29
Entering information .......................................29
To change input modes...............................29
To use Fn input mode .................................29
To use Fn input mode .................................29
To use abc input mode................................29
To insert symbol..........................................30
2.Using Call Function ..................................31
Making a call ..................................................31
To make a call from the Home screen ........31
To make a call from contacts ......................31
To make a call from call history...................32
To make a call from text messages ............32
II
To make a call from speed dial .................. 32
Receiving a call.............................................. 32
To answer and reject a call ........................ 32
To end a call............................................... 33
In-call options ................................................ 33
To make two calls simultaneously (this must
be supported by the network) .................... 33
To switch between two calls (this must be
supported by the network) ......................... 33
To make a conference call (this must be
supported by the network) Conference call 33
To mute a call............................................. 34
To turn the speakerphone on and off ......... 34
To save the current caller to your contacts list
................................................................... 35
Additional dialing information......................... 35
To make an emergency call ....................... 35
To make an international call ..................... 35
To dial a voice mail..................................... 35
Using speed dial.............................................36
To create a speed dial number for a contact
...................................................................36
To create a speed dial number for a menu .36
To make a call from speed dial...................37
To enter a menu by using speed dial.......... 37
Managing call history .....................................37
To view call history list ................................37
To send text message or email from call
history.........................................................38
To save a phone number to contacts..........38
3.Personalising Your Phone....................... 40
Customising the tones of events or actions.... 40
To change the current profile......................40
To edit a profile ........................................... 40
To copy a sound to your phone ..................40
To set the sound for an event ..................... 41
To adjust the volume of the ring tone..........41
To set sound for the Key sound .................. 42
III
Setting the Home screen................................ 42
To customise the Home screen.................. 42
To set a picture as the wallpaper................ 43
Setting date, time and alarm .......................... 43
To set date and time................................... 43
To set an alarm........................................... 43
Changing the regional settings....................... 44
Setting owner information .............................. 44
Changing the accessibility settings ................ 45
Enabling error reporting ................................. 45
Setting the calls.............................................. 46
To use call divert ........................................ 46
To use call barring ...................................... 46
To use call waiting ...................................... 47
To use fixed dialling.................................... 47
To hide your phone number........................ 48
Setting the network ........................................ 48
To select the network service ..................... 48
Setting connections ........................................48
To use wireless manager............................48
To receive incoming beams ........................49
To set bluetooth ..........................................50
To set multiple network connection.............50
4.Managing Your Phone ..............................51
Managing files ................................................51
To copy a file using ActiveSync...................51
To use file explorer......................................51
To chang the display of the file ...................52
To send a file via messaging.......................52
To send a file via Bluetooth.........................53
Folder options.............................................53
Using task manager........................................53
To start task manager(including refresh).....54
To stop applications ....................................54
Power Management .......................................54
To check the battery power.........................55
IV
To optimise the power performance........... 55
Viewing the phone information....................... 55
To view memory details.............................. 55
Protecting your phone.................................... 56
To enable or disable the phone lock .......... 56
To enable or disable SIM PIN .................... 56
To change PIN ........................................... 56
To lock or unlock the keypad...................... 57
Removing programs ...................................... 57
Resetting your phone..................................... 58
5.Synchronising Information ..................... 59
Connecting your phone to your PC(USB mass
storage) ......................................................... 59
Using ActiveSync ........................................... 59
About ActiveSync....................................... 59
To set up ActiveSync.................................. 60
To start and stop synchronisation............... 61
To install software in the phone through c.. 65
To synchronise via bluetooth ...................... 66
To solve ActiveSync connection problems..66
6.Exchanging Messages............................. 69
Using text messages......................................69
To view and edit text messages service center
...................................................................69
To enable request delivery notification .......69
To write and send messages......................70
To receive messages(including reply\ forward)
...................................................................71
Using multimedia messages ..........................71
To configure multimedia message settings. 71
To write and send multimedia messages....73
To create a multimedia message from a
template .....................................................74
To add predefined text to a multimedia
message..................................................... 75
To view and reply to multimedia messages 75
Using email .................................................... 76
V
To set up a POP3/IMAP4 email account .... 76
To download messages.............................. 78
To write and send email ............................. 80
To receive email ......................................... 80
To reply or forward an email....................... 81
To individually sign and encrypt a new ....... 81
To set digital signature for an email............ 82
Managing folders ........................................... 82
To access messages folders ...................... 82
Message folders......................................... 82
7.Windows Live Messenger........................84
Setting an account ......................................... 84
To sign in Windows Live Messenger .......... 85
To send a Windows Live message ............. 85
To end a chat..............................................86
To invite another contact to join in chat ...... 86
To block or unblock a contact ..................... 86
To delete a contact ..................................... 87
To change your display name.....................87
To sign out ..................................................87
8.Using Contacts..........................................88
Adding a new contact .....................................88
To add a new contact on your phone..........88
To add a new contact on your SIM card......89
Searching for a contact...................................89
Viewing and editing a contact.........................90
To assign a ringtone to a contact ................90
To assign a picture to a contact ..................90
Sending a text message, multimedia message
to a contact.....................................................90
To send a text message to a contact ..........91
To send a multimedia message to a contact
...................................................................91
Making a call to the selected contact..............91
Sending the contact’s information...................92
To send the contact’s information via text
message .....................................................92
VI
To send the contact’s information via
Bluetooth.................................................... 92
To send the contact’s information via
multimedia message.................................. 92
Managing the contacts................................... 93
To delete a contact..................................... 93
To copy contacts between SIM card and the
phone......................................................... 93
To filter the contact list ............................... 93
9.Connecting to the Internet ...................... 94
Setting up a connection ................................. 94
To set up a GPRS connection.................... 94
To set up a Dial-up connection................... 95
Using advanced options ................................ 95
Adding a URL exception ................................ 96
Using Internet Explorer .................................. 96
To browse a Web page .............................. 97
To use Favorites ........................................ 98
To clear temporary files, cookies or history 99
Using Internet sharing ....................................99
To set up the phone as a modem ...............99
To connect to the Internet......................... 100
To deactivate Internet sharing ..................101
10.Using Tools ........................................... 102
Using task .................................................... 102
To create a task on the phone .................. 102
To beam a task .........................................102
To delete a task ........................................102
To mark a task as completed....................102
To sort and filtering the task list ................ 103
Using calculator............................................103
Using calendar .............................................104
To view your schedule ..............................104
To create a new appointment ...................104
To send a calendar appointment ..............104
Using voice notes.........................................105
To record voice notes ...............................105
VII
To play voice notes................................... 105
To delete a voice note .............................. 105
To set a voice note as a ringtone.............. 106
11.Using Multimedia ..................................107
Using Windows media player....................... 107
Controls of Windows Media Player .......... 107
The screens and options of Windows Media
Player....................................................... 108
To add files to play list ...............................111
To remove a file from play list....................111
To play music and videos on your phone . 112
To play music and videos on a network.... 112
To change Player appearance.................. 113
Using camera and video recorder ................ 113
To enter the Camera and Video Recorder
preview..................................................... 114
Camera and Video settings...................... 114
To change the storage location of photos and
videos....................................................... 115
To include audio when recording video files
.................................................................116
To include audio when recording video files
.................................................................116
To take pictures and video clips................116
To send the captured photo or video clips 117
To beam the captured photo or video clips117
To set the captured photo as Home Screen
.................................................................118
To edit the captured photo or video clips .. 118
To delete the captured photo or video clips
.................................................................119
To view the stored photos and videos.......119
Using pictures&videos..................................119
To view pictures ........................................119
To view the pictures in slide show.............119
To play videos...........................................120
To edit a picture ........................................120
To delete a picture or video clip ................121
VIII
To set a picture as Home Screen............. 121
To send pictures and video clips via
multimedia message or Email.................. 122
To beam pictures ..................................... 122
To set a picture as a contact image.......... 123
Playing games ............................................. 123
Using Java................................................... 123
To manage Java programs ...................... 123
To view information about Java program . 124
To select the network type ....................... 124
12.Using Bluetooth ................................... 125
Turning Bluetooth on or off .......................... 125
Making your phone discoverable ................. 126
Connecting a Bluetooth device to your phone
..................................................................... 126
To search Bluetooth devices.................... 126
To match the found device....................... 127
To accept a Bluetooth partnership ........... 127
To change the display name of a bluetooth
device.......................................................128
To delete a bluetooth device.....................128
Connecting a Bluetooth earphone to your phone
.....................................................................128
Sending files via Bluetooth...........................130
Receiving files via Bluetooth ........................ 130
13.Phone Maintenance.............................. 132
14.Troubleshooting ................................... 134
The phone can’t be switched on...................134
The phone is switched off automatically.......134
PIN/ PUK code lock......................................135
Bad call quality .............................................135
Can’t answer a call.......................................136
Can’t make a call..........................................136
The call volume is too low ............................137
The person you are calling cannot hear your
voice............................................................. 137
The incoming call doesn’t ring......................137
The battery can’t be charged........................138
IX
Can’t display network................................... 139
The phone does not recognize the storage card
..................................................................... 139
Browser can’t connect to Internet normally .. 140
Lack of space............................................... 140
15.Safety Precaution .................................141
Usage environment...................................... 141
Medical devices ........................................... 141
Pacemaker............................................... 141
Hearing aids............................................. 142
Emergency calls........................................... 142
Making an emergency call........................ 142
Password access......................................... 143
Phone password ......................................143
PIN code .................................................. 143
PIN2 code ................................................ 144
PUK code................................................. 144
PUK2 code............................................... 144
Note about charging the battery ...................144
Battery information and care ........................145
Note about using spare parts........................146
Other safety information ...............................147
X
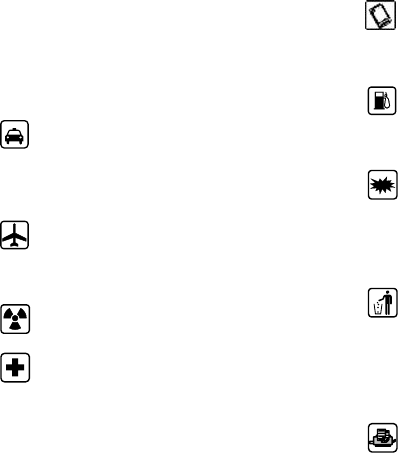
Safety notice
Before using the phone, please read and follow
the rules below carefully. For the detailed
information, please refer to the “Safety
precaution” section on page 141.
If you dial or answer a call while driving,
please use the hands-free device (e.g.
earphone, vehicle hands-free system,
phone hands-free system) or use your
phone after parking the vehicle.
The phone may interfere with the
communication network of aeroplanes, so
please make sure your phone is switched
off during the flight.
All phones can be subject to interference,
which could affect its performance.
Please switch off your phone where you
see signs forbidding phone use. Such
signs can be found in medical centres or
establishments containing medical
equipment.
In order to ensure high performance and to
avoid damage the phone, please use the
original accessories and battery. Avoid
using products which are not compatible.
To avoid the risk of any explosion, please
switch off the phone at petrol stations and
places which are near fuel, chemical
solvent or other dangerous substances.
Please switch off your phone in areas
where there could be a risk of explosion
and in areas where you are asked to
switch off bidirectional radios. Pay
attention and adhere to any rules and
regulations concerning mobile phone use.
Please neither burn the phone battery nor
use it as ordinary rubbish, as this could
endanger life and damage to the
environment. Please obey the
environmental policy of the local
government and dispose of and recycle
them in time.
If you need to connect your phone to other
devices, please read the user guide
carefully to ensure the procedure is carried

XI
out safety.
Keep small parts (e.g. SIM card) out of the
reach of children to prevent batteries from
being swallowed or causing other dangers.
Please back up the important information
of phone and be sure to have a second
copy in case data is lost from your phone.
SOS
Make sure the phone is switched on and
has service coverage before inputting the
emergency number. Press the call key for
your position to be located. Please don’t
end call unless told to do so.
Cautions:
Any unapproved changes or modifications by
the party responsible for compliance might
infringe the user’s authority to operate this
mobile phone.
This mobile phone may generate radio
frequency energy, which, if not installed and
used in accordance with the instructions, may
cause harmful interference to radio
communications. However, there is no
guarantee that interference will not occur in a
particular installation. If this mobile phone
does cause harmful interference to radio or
television reception, which can be determined
by turning the equipment off and on, the user is
encouraged to try one or more of measures
listed below to clear the interference:
--Reorient or relocate the receiving antenna.
--Increase the separation between the
equipment and receiver.
--Connect the equipment into an outlet on a
circuit different from that to which the
receiver is connected.
--Consult the dealer or an experienced radio/TV
technician for help.
Attention: 1. Please send used li-ion batteries to
appropriate disposal locations or return them to
our company. Do not dispose of the batteries in
the dustbin.
2. For body worn operation this phone has been
tested and meets FCC RF exposure guidelines
when used with an accessory that contains no
metal and that positions the handset a minimum
XII
of 1.5 cm from the body. Use of other
accessories may not ensure compliance with
FCC RF exposure guidelines
Statement: This device complies with
Part 15 of the FCC Rules. Operation is
subject to the following two conditions:
(1) this device may not cause harmful
interference, and (2) this device must
accept any interference received,
including interference that may cause
undesired operation.
Changes or modifications not expressly
approved by the party responsible for
compliance could void the user's
authority to operate the equipment.
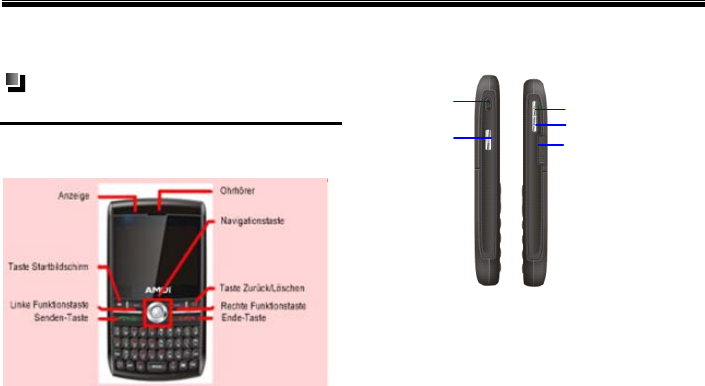
Getting Started
13
1. Getting Started
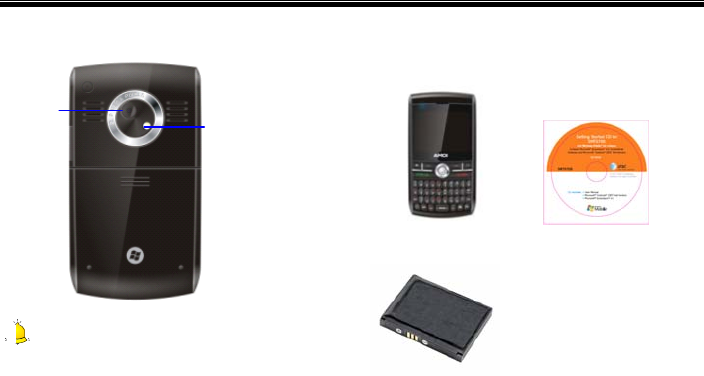
Getting to know your phone
and it's accessaries
Front view of your
phone
Side view of your phone
Volume Down Key
Volume Up Key
Power Key
Camera Key USB/ Charge/Audio
Interface
Getting Started
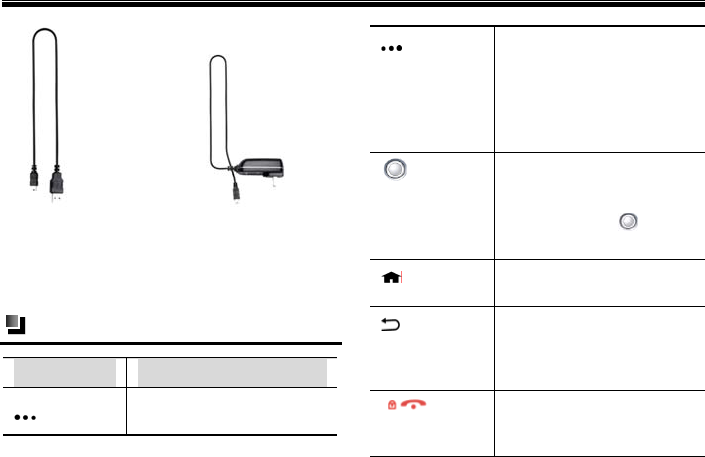
15
Data Cable Travel Charger
If any are missing or different, immediately
contact the retailer where you purchased the
device.
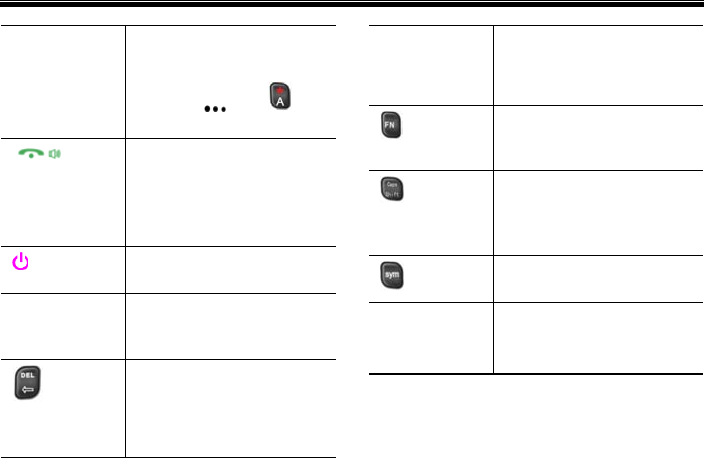
Key functions
Key Function
Press to access the Main
menu.
1. While using menu
functions, press the key to
select menu option
2. Press the key from the
Home Screen to enter
Contacts list
Scroll left, right, up and
down to move through
menus; press the
Navigation key to
select an item
Press to return to the
Home Screen.
After entering the Menu
screen, press the key to
return to the last operation
screen or Home Screen
1. While on a call, press
the key to end the current
call.
Getting Started
16
2. Press and hold the key
from the Home Screen to
lock the keypad, while
pressing and to
unlock it
1. Press to answer or
make a call
2. Press the key from
home screen to enter Call
History screen
Press and hold to turn the
device on/off
Volume Up
Key/Volume
Down Key
During a call, press to
increase or reduce volume
1. While editing, press
briefly to delete the last
entered character (letter,
number, symbol or space);
2. While editin
g
,
p
ress and
hold to quickly delete
characters (letters,
numbers, symbols&
space)
While editing, press the
key to switch between
input modes
Caps Shift Key: Press
this key and a letter key at
the same time to type a
single uppercase letter
Symbol Key: Press to
access Symbol Menu
USB/Charge/
Audio
Interface
USB Port for Charging and
Audio support
Getting Started
17
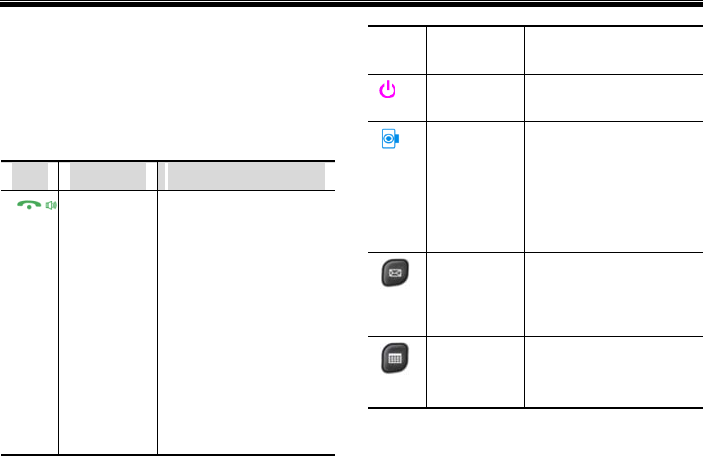
To use shortcut keys
Pressing some keys directly from the Home
Screen provide direct access to common phone
functions. The following table lists the
operations and functions of some common
shortcut keys
Key Operation Function
Press
briefly
During a call:
1. Answer the second
call while putting the
first call on hold
2. Switch between
two calls answered at
the same time
3. While answering or
dialing calls, activates
call holding function
4. While on a call,
press and hold to
activate the s
p
eaker
phone
Press
briefly
Enter the Quick List
Press
briefly
Camera Key:
1. Launch the camera
2. If already running,
press to capture an
image or start
recording a video clip
Press
briefly
Messaging Key:
Access the
messaging
application
Press
briefly
Calendar Key:
Access the calendar
application
Getting Started
18
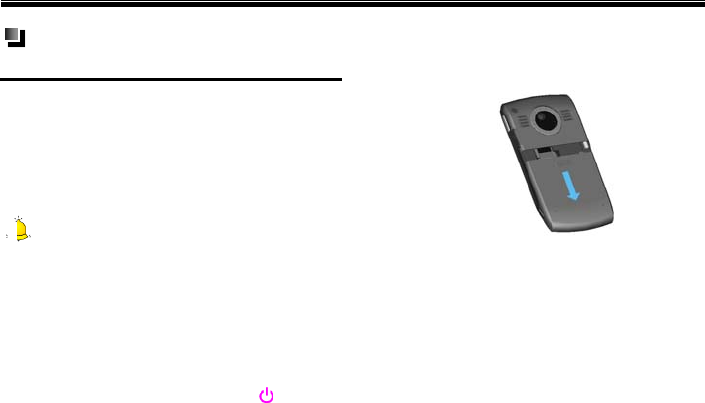
Installing the SIM card and
battery
Before using the phone, please insert a SIM
card supplied by a network service provider.
The SIM card (Subscriber Identification Module)
includes phone number and detailed
information of service items, and can be used
to store phone number and user information.
Caution:
SIM card and its contacts can be easily damaged by
scratching or bending, so be very careful when
inserting or removing the card. Please follow the
instructions of SIM card user guide provided by
the manufacturer and7 keep SIM card out of the
reach of children.
(1) Press and hold the Power Key for
several seconds to switch off the phone.
(2) As shown in the following diagram, slide
the battery cover in the direction of the
bottom of the phone and then remove it
and battery.
(3) Slide the SIM card into the SIM card slot
Press the card downwards while inserting
and make sure the card is facing the
correct way, as shown in the following
image (with the contact point facing down).
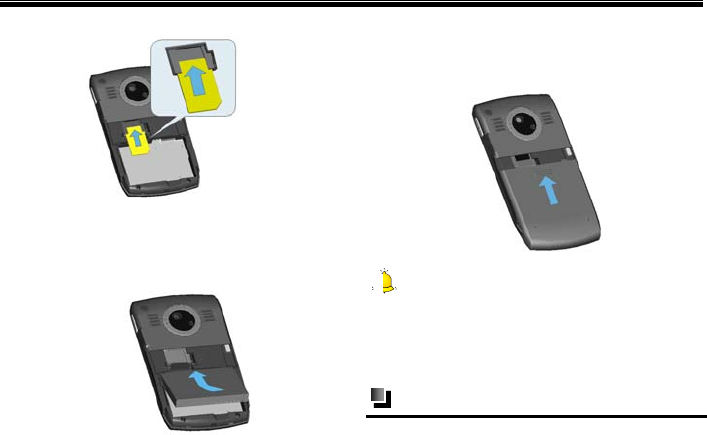
Getting Started
19
(4) Make sure the battery contacts are facing
into the phone, and then push the other
side of the battery gently until it fixes itself
in the battery slot.
(5) Make sure the battery has been installed
correctly, and then slide the battery cover
in the direction of the top of the phone until
it is covered, as shown below:
Warning:
Don’t insert or remove the SIM card when the
phone is switched on or getting charged, or this
may damage the SIM card.
Installing the Micro-SD card
A MicroSD card is a removable storage card
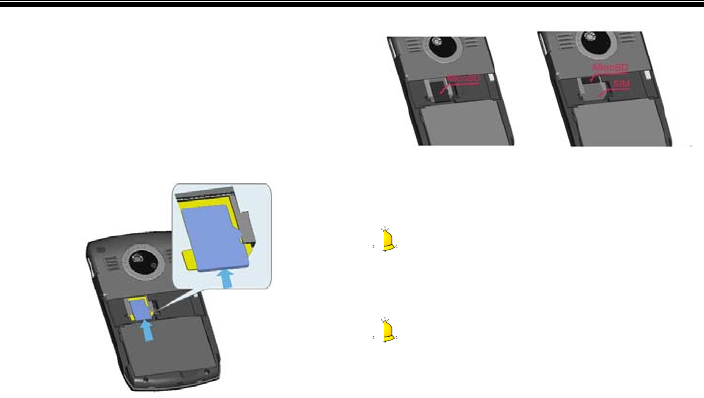
Getting Started
20
that can be used to increase phone memory.
(1) Make sure the side with the golden
contacts is facing down and insert the
narrower end of card.
(2) Push the card gently until it is fixed in the
battery slot. See the following images for
additional information.
When successfully installed, the MicroSD card
sits on top of the SIM card.
To remove the MicroSD card, gently push it
toward the phone, and the card will
automatically eject from the card slot.
Caution:
Don’t forcefully remove the MicroSD card from the
card slot.
Warning:
During the process of reading and writing to the
MicroSD card, do not remove or insert the card.
Vodafone will take no responsibility for the
following situations including, but not limited to,
lost data or damage to the card damage.

Getting Started
21
Battery charging
The phone is powered by a rechargeable Li-ion
battery.
To charge the phone using the travel
charger
(1) Install the battery in the phone.
(2) Insert the lead of the travel charger to USB
slot of phone carefully
(3) Connect the charger to a standard wall
outlet.
To view charging process and status, click
[Start→More→Settings→More...→Power
Management]
While the phone is switched off, the battery
bar will scroll and you can view charging
process.
(4) When charging is complete, disconnect
the charger and standard power socket
first, and then disconnect the phone and
charger.
Caution:
1
. If the battery is empty, the battery icon will
appear after charging for two to three minutes.
Generally, the charging time is 2-5 hours
depending on the status of the phone (whether
switched on, making a call etc.)
2. For optimal battery performance, charge and
discharge the new battery two or three times. The
first several times you charge the battery, charge it
for at least 10 hours. You should immediately
recharge the phone when it is turns off due to no
battery power.
3. Please use the approved battery and charger
designated for this product, otherwise it may cause
explosion. Try to avoid using USB cable to charge.
Getting Started
22
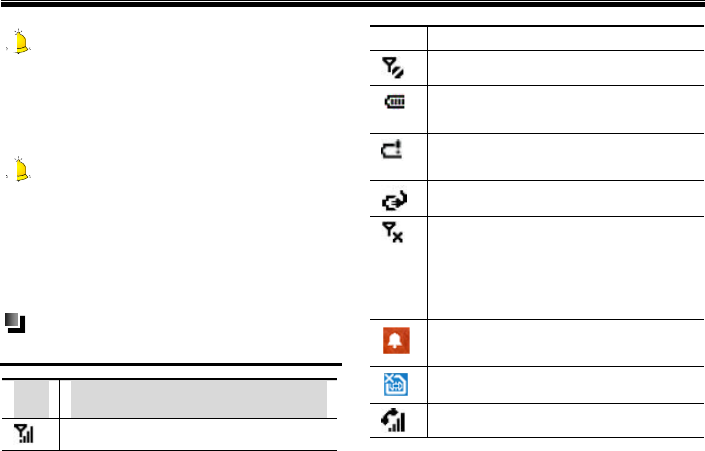
The Home Screen
The Home Screen displays important
information, such as upcoming appointments,
status indicators, the current time, date and
profile, and icons for frequently used programs.
You can open a program directly by selecting its
icon and pressing the center of the Navigation
key.
To access the Home Screen from anywhere,
press .
To access the Home Screen display setting,
including the background, click [Start→
More→Settings→Display→Home Screen].
The Home Screen consists of the following five
areas.
[Y1]
Area Function
Status Bar
Indicates your phone’s
current status, such as the
battery and signal strength.
For more details about status
icons, please see the next
page.
Shortcut
Bar
Shows the shortcut menus of
several recently-used
o
p
tions. You can scroll the
Getting Started
23
Navigation Key left or
right to select your desired
shortcut menu. Press the
Navigation Key to
activate this function.
Information
Display
Area
Displays information including
the network service provider,
current time and date, and
recent appointments. Scroll
the Navigation Key up or
down to select your desired
option, then press the center
of the Navigation Key to
enter the corresponding
function.
Start Menu Press the Left Soft Key
to open the start menu and
switch to a program
Function Press the Ri
g
ht Soft Ke
y
Key Bar to open [Contacts]
Power on/ off
Press and hold the Power Key to switch the
phone on/off.
If no SIM card is inserted when powered on,
the phone will show the icon as .
If the PIN code is activated, your phone will
be connected to a GSM network upon
entering the correct PIN code.
If you enter the wrong PIN code three times
in succession, you will need a PUK code in
order to unlock your phone.If you input wrong
PIN code ten times in succession, SIM card
will be locked forever. Generally PUK code is
supplied with SIM card. If you lose your PUK
code or PUK code isn’t supplied with SIM
card, please contact your network operator.
Getting Started
24
Caution:
The phone is equipped with an antenna. When
power is on, please do not touch antenna as this
may affect call quality and require phone to
consume more power.
Warning:
Don’t switch the phone on in areas where wireless
phone use is prohibited or where it may cause
interference or danger. Make sure that your
phone’s “Alarm and clock” function is not
activated.
Status icon and program
introduction
Icon Function description
Signal Strength: Represents
the current network signal.
You are out of a service area
Battery Status: Represents the
level of your battery.
Low Battery : Displays when there
is little battery power
Phone is charging
Switch off phone function: The
phone functions are turned off if
needed but you can still use the
other functions: such as Camera,
Calendar, Games, Windows Media
Alarm Clock: Appears when the
alarm clock is activated.
No SIM card inserted
Appears during a call.
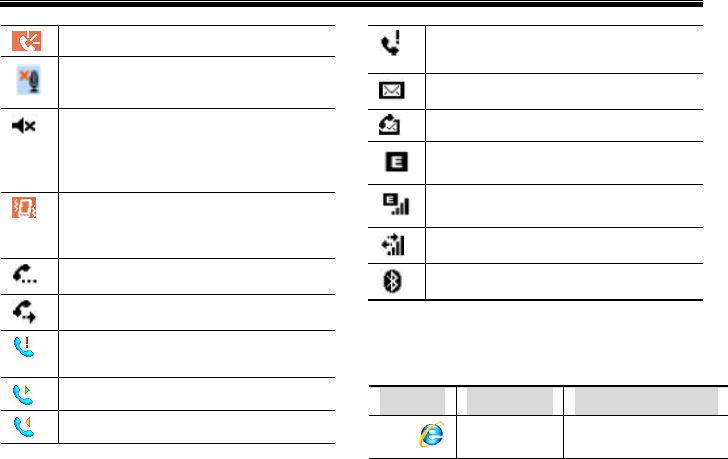
Getting Started
25
Speakerphone on
Microphone muted
Ringer off: Appears when the
profile is set as [Headset]. For more
details, please see “To edit a profile”
on page 40.
Vibrate call alert: Appears when
the profile mode is set as
[Conference].
Call holding
Call forwarding
Missed call icon appears in [ Call
History] menu
Outgoing call
Incoming call
Missed call icon appears on the
Home Screen.
New e-mail or text message
New voice message
EDGE available
EDGE connected
Data call in progress
Bluetooth
The following table lists the icons for programs
already installed on the phone.
Icon Name Introduction
[Y2] Internet
Explorer
Allows you to
browse Web
p
a
g
es,
Getting Started
26
Explorer and to download
new programs or
files from Internet
Tasks Keeps track of your
tasks.
Windows
Media
Lets you play back
video and audio
files.
Calendar
Keeps track of your
appointments and
creates meeting
requests.
Messaging
Lets you send and
receive text
messages,
multimedia
messages and
e-mail.
Contacts Keeps track of
contacts
information.
ActiveSync
Synchronises
information
between your
phone and PC.
Call History
Keeps track of all
phone calls made,
received and
missed.
Settings
Personalises your
phone to suit the
way you use it.
Games
Lets you play two
games: Bubble
Breaker and
Solitaire coming
with your phone.
Voice Notes
Allows you to make
short voice
recordings.

Getting Started
27
Pictures&
Videos
Collects, organises,
and sorts picture
and video files in
the My Picture
folder on your
phone or on a
storage card.
Accessories
Checks here for a
download agent
wireless modem
and more.
Internet
Sharing
You can wireless
online by using
Modem function.
File
Explorer
Lets you organise
and manage files on
your phone
Messenger Acess to the
Windows Live
Messenger
Speed Dial
Creates speed dial
numbers for
frequently-dialed
phones or
frequently-accessed
programs.
Windows
Live
Visits Windows Live
Hotmail and uses
Windows Live
Messenger
Tools
Lets you operate
Java-based
applications or Java
games on your
phone.

Getting Started
28
Using the Quick List
The Quick List offers convenient access to a list
of functions, such as locking your phone or
keypad and choosing a different profile.
(1) Briefly press the Power Key (press and
quickly release).
(2) Scroll through the list and select the
desired item by pressing the Left Soft key
<Select>, pressing or pressing
the related numeric key on the keypad.
[Y3]
(3) To exit the Quick List at any time, press
the Right Soft key <Cancel>.
Entering menu
The mobile phone provides you with a wide
variety of functions. These functions are
arranged in the form of menus and you can
look at, use or set each menu as required.
To scroll to enter menu function
(1) Press the Left Soft Key from the
Home Screen to enter the main menu.
Scroll the Navigation Key up, down,
right or left to move to your desired menu,
and then the Navigation Key to access
this menu. Click <More> to view the next
menus.
(2) If there are sub-menus, scroll the
Navigation Key up or down to select
the desired one then press the Navigation
Getting Started
29
Key to enter it.
To enter a menu by using speed dial
(1) Click [Start→More→More→Speed Dial]
from the Home Screen.
(2) Enter the Speed Dial List then scroll the
Navigation Key up or down to select
the menu that you want to access. Click
[Menu→Run], and then you can enter the
menu function.
Entering information
The phone supports input modes that feature a
strong, intelligent word-building capacity.
To change input modes
To switch between input modes while editing,
repeatedly press . The input mode icons will
appear in the upper right corner of the screen.
To use Fn input mode
Press the corresponding key to enter your
desired number or symbol labeled on the upper
side of the key.
To use Fn input mode
Press the corresponding keys to enter your
desired numbers or symbols labeled on the
upper side of the keys.
To use abc input mode
Press the corresponding keys to enter your
desired English letters labeled on the lower
side of the keys.
Press to enter Capitalization status.
This allows you press the corresponding key
to enter its capital letter. To exit Capitalization,
press again.
Press and hold and press the key
Getting Started
30
labeled with the required letter, so you can
enter the corresponding capital letter. (Once
in capitalization status, you can enter its
small letter).
To insert symbol
(1) Press to access symbol menu.
(2) Scroll the Navigation Key up, down,
right or left to move to your desired
symbol, and then press the Navigation Key
to insert.
Using Call Function
31
2. Using Call Function
Making a call
To make a call from the Home screen
(1) From the Home Screen, access the Phone
Screen by pressing the SEND Key
or by pressing the numeric keys on the
keypad.
(2) After entering the phone number, press the
SEND Key .
Notice:
When your press a numeric key on the keypad, a
list of names and numbers appears as the phone
automatically searches Contacts, Call History,
Speed Dial and your SIM card to find a matching
name or number. For example, when you press a
number such as (including the number “1”
and the letter “E”), the names that begin with E
will be displayed as well as phone numbers that
begin with 1. The next number you press continues
to narrow the search. When you see the name of the
person you want to dial, select it and press the
SEND Key .
To make a call from contacts
(1) Press the Right Soft Key or click
[Start→Contacts] from the Home Screen
to enter the Contacts screen.
(2) Do one of the following:
Select the desired contact, and press the
SEND Key .
Select the desired contact in the contact list,
and press the Navigation Key twice
(once to view the contact details, and once to
dial the associated number).
Using Call Function
32
To make a call from call history
(1) Press the SEND key or click
[Start→Call History] from the Home
Screen.
(2) Select your desired number.
(3) Press the Navigation Key or press the
SEND key .
To make a call from text messages
(1) Select the desired number from a text
message
(2) Press the SEND key to dial.
(3) The system asks you confirm whether the
number is correct or not. After confirming,
press the Left Soft Key or the SEND
key to dial the number.
To make a call from speed dial
(1) Create a speed dial number for the desired
contact, for more details; please refer to
“Using Speed dial” on page 36 .
(2) Pressing and holding down the
corresponding numeric key. The phone will
automatically dial the number.
(3) If you set a number with two digits, input
the first digit, then press and hold down the
second number. For example, if you set 12
as a speed dial number, you could input
the first digit “1” before holding down the
second digit “2.”
Receiving a call
To answer and reject a call
When you receive a phone call, you have the
option to answer it or ignore it.
To answer the call, you can press the SEND
Using Call Function
33
key or the Left Soft Key
<Answer>.
To ignore the call, you can press the END
Key or the Right Soft Key
<Ignore>.
Caution:
If you click [Start →More→Settings
→Phone→Call Options] and activate [Any key
answer] option, then you can press any key to
answer phone except the End Key , the
Right Soft Key , the Power Key , the Home
Key , the Clear/Back Key , or the Camera
Key .
To end a call
Press the END Key to end a call.
In-call options
To make two calls simultaneously (this
must be supported by the network)
Click [Menu → Hold]. You can place the
current call on hold and dial another phone
number at the same time.
To switch between two calls (this must
be supported by the network)
To switch between the two calls, click
[Menu→Swap]. The side that is on hold cannot
hear the other conversation.
When you end one call, the other call is
activated automatically.
To make a conference call (this must
be supported by the network)
Conference call
The phone enables the user to make a
Using Call Function
34
conference call with up to five callers.
(1) Either put a call on hold and dial a second
number, or answer a second incoming call
during a call.
(2) Click [Menu → Hold] and click [Menu →
Conference].
Caution:
1. If the conference connection is successful, the
word “Conference” appears at the top of the
screen.
2. To add more people to your conference call,
click [Menu→Hold], enter the phone number,
then click [Resume] to return to the call.
(3) To end the conference call, press the END
Key and select the desired
number to disconnect.
To mute a call
You can turn off the microphone during a call,
so that you can hear the caller but the caller
cannot hear you.
During a call, click [Menu→Mute].
When the microphone is turned off, the icon
appears on the screen. Click
[Menu→Unmute] to turn on the microphone
again.
To turn the speakerphone on and off
During a call, you can talk handsfree or let other
people listen to the conversation.
Click [Menu →Speakerphone On], the icon
appears at the top of the screen.
To turn off the Speakerphone during the call,
click [Menu →Speakerphone Off].
Notice:
To avoid damage to your hearing, do not hold your
phone against your ear when the Speakerphone is
Using Call Function
35
turned on.
To save the current caller to your
contacts list
During a call, click [Menu→Save to contacts]
to save the current contact to your Contacts List.
If the contact is already saved to your phone,
“View Contact” appears.
Additional dialing information
To make an emergency call
(1) Enter the appropriate emergency numbers
for your location (such as 911).
(2) Press the SEND key
Notice:
Additional emergency numbers may be included in
your SIM card. Contact your service provider for
details.
To make an international call
(1) Press and hold on the phone keypad
until the “+” sign appears. The “+” replaces
the 00 in the international prefix of the
country that you are calling.
(2) Enter the full phone number, then press
the SEND key . The full phone
number includes country code, area code
(without the leading zero, if any) and
phone number.
To dial a voice mail
Voice Mail is a system dependent feature. To
activate Voice Mail from the Home Screen,
press and hold .The system will
automatically dial your voice mailbox. Contact
your service provider for your voice mail access
phone number
Using Call Function
36
Caution:
1. To set your voice mail number, click
[Start→More→Settings→Phone→Call Options]
then enter “Call Options.” Your voice mail number
appears in the “Voice mail number” box.
2. Call waiting, call holding, and conference call
are system dependent features. Contact your service
provider for additional information.
Using speed dial
To create a speed dial number for a
contact
(1) On the Home screen, click
[Start→Contacts].
(2) Select a contact, then press the
Navigation Key to view the contact
details.
(3) Select the desired phone number and
click [Menu→Add to Speed Dial].
(4) Enter the appropriate details in [Name],
[Value] and [Keypad assignment].
(5) Press the Left Soft Key <Done>, to
quit at any time during this process, click
[Menu→ Cancel].
Caution:
1. While selecting the corresponding numeric key
of speed dial in [Keypad assignment], the number
key and will be saved by system and can’t
be modified.
2. Speed dials can be created only for numbers
that are stored in Contacts.
To create a speed dial number for a
menu
(1) On the Home screen, click <Start> to
Using Call Function
37
enter Main menu, then use the Navigation
Key to select the menu you want to
create a speed dial for.
(2) Click [Menu→ Add Speed Dial].
(3) Enter the appropriate details in [Name],
[Value] and [Keypad assignment].
(4) Press the Left Soft Key <Done> to
save.
To make a call from speed dial
If you have assigned a speed dial (in this
example, the second location) to a contact in
Speed Dial, you can simply press and hold
on the Phone keypad to dial the contact’s
number.
To enter a menu by using speed dial
If you have assigned a speed dial (in this
example, the second location) to a program in
Speed Dial, you can simply press and hold
on the Phone keypad to launch the program.
Managing call history
Call History includes the entries for [Incoming
Calls], [Outgoing Calls] and [Missed Calls].
You can only view Call History if you are
subscribed to the service.
To view call history list
On the Home Screen, select [Start→Call
History] or press the SEND Key to view
the call history list.
Different icons appear for different types of calls.
For more details, see the following table.
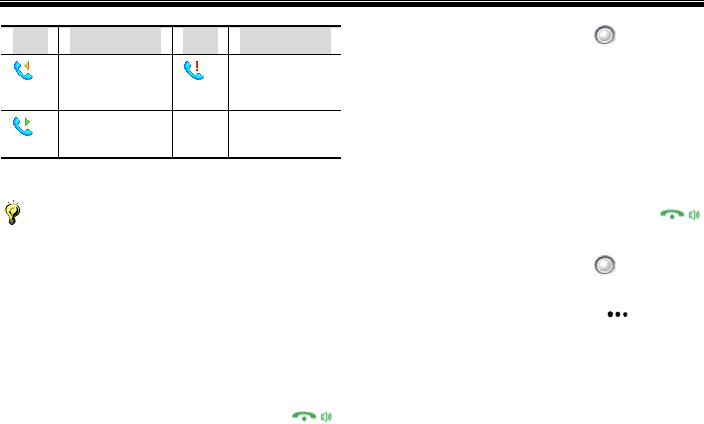
Using Call Function
38
Icon Introduction Icon Introduction
[Y4]
Incoming
calls Missed Calls
Outgoing
calls
—— ——
Notice:
If a phone number in the Call History is saved to
your Contact List, the name and the number will
display. If it is not in your Contact List only the
phone number displays.
To send text message or email from
call history
(1) On the Home Screen, select [Start→Call
History] or press the SEND Key
to view the call history list.
(2) Scroll the Navigation Key up or down
to select the desired call entry.
(3) Click [Menu→Send Text Message].
(4) Type a text message and click <Send> to
send the message.
To save a phone number to contacts
(1) On the Home Screen, select [Start→Call
History] or press the SEND Key
to view the call history list.
(2) Scroll the Navigation Key up or down
to select the desired phone number.
(3) Press the Left Soft Key <Save>,
then select to save the number as a new
contact or add it to the other contacts.
(4) Click [New Contact] and enter the relative
information of the contact, or scroll to
select the desired contact and

Using Call Function
39
click<Select>, and the phone number will
be automatically inserted in the contact.
(5) After finished, click <Save>.
Personalising Your Phone
40
3. Personalising Your Phone
Customising the tones of
events or actions
With your phone, you can make calls from the
Home Screen, the Phone screen, from
Contacts, Speed Dial, Call History, or SIM
Contacts (contacts stored on your SIM card).
To change the current profile
(1) On the Home Screen, click [Start→
More→Settings→Profiles] to enter the
Profiles screen.
(2) Click the preferred profile, and click
<Done>.
Caution:
To quickly change the profile, briefly press Power
Key to display the Quick List, and click a
profile.
To edit a profile
(1) On the Home screen, click [Start→
More→Settings→Profiles] to enter the
Profiles screen.
(2) Click the preferred profile, and click
[Menu→Edit].
(3) Do one of the following:
Modify the settings, and click <Done>.
To cancel without saving changes, click
<Cancel>.
Caution:
To revert to the default profile settings, click
[Menu → Reset to default].
To copy a sound to your phone
You can connect your phone to PC with a USB

Personalising Your Phone
41
data cable to download your favorite ringtones
from your PC, then use the sound for various
phone functions. To copy a sound from your
PC:
(1) Connect the phone to your PC by using a
USB connection.
(2) On your PC, copy the sound file you want.
(3) In ActiveSync on your PC, click[Explorer]
and double-click [My Windows
Mobile-Based Device].
(4) Do one of the following:
To save the sound file on your phone,
double-click [Application Data], double-click
[Sounds] and paste the file into that folder.
To save the sound file on your storage card,
double-click [Storage Card], and paste the
file into the folder you want.
To set the sound for an event
(1) On the Home Screen, click
[Start→More→Settings→ Sounds].
(2) For the desired event, select a sound.
Click [None] if you do not want to hear a
sound.
(3) When finished, press the Left Soft Key
<Done>.
Caution:
1. The phone only supports audio files with MIDI,
MP3 or WMA formats. The audio files with the
other formats can’t be played.
2. After selecting a sound, the sound plays. To hear
it again, click [Menu→Play].
To adjust the volume of the ring tone
(1) On the Home screen, click [Start→More→

Personalising Your Phone
42
Settings→Profiles] to enter the Profiles
screen.
(2) Select the profile to edit, and click
[Menu→Edit].
(3) In [Ring volume] option, scroll the
Navigation Key left or right to adjust
the ring volume. Click [Off] to turn off the
ring tune.
(4) When finished, press the Left Soft Key
<Done>.
To set sound for the Key sound
(1) On the Home screen, click [Start→More→
Settings→ Sounds].
(2) In [Keypad control] option, select a
sound. Click [None] if you do not want to
hear any sound while pressing a key.
(3) Click <Done>.
Setting the Home screen
The Home screen is your starting place for
most tasks. You can gain access to all
features and programs from the Home screen.
The centre of the Home screen can display
your next appointment, the current profile, the
number of new messages (voice mail, text
message, email or multimedia message) that
you have received, and other important
information.
To customise the Home screen
(1) On the Home screen, click [Start→
More→Settings→Display→ Home
Screen].
(2) In [Home screen layout], [Colour
scheme], [Background image], and
[Time out], select the options you want,
and click <Done>.

Personalising Your Phone
43
To set a picture as the wallpaper
(1) On the Home screen, click [Start→
More→ Pictures & Videos].
(2) Select the picture you want to set as the
background. Click <View> or press the
Navigation Key for a larger view of
the image.
(3) Click [Menu → Use as Home Screen].
(4) In [Adjust the transparency], select a
higher percentage for a more transparent
picture or a lower percentage for a more
opaque picture.
(5) Click <Finish>.
Setting date, time and alarm
To set date and time
(1) On the Home screen, click [Start→More→
Settings→Clock & Alarm→Date and
Time].
(2) In [Time zone], select your time zone.
(3) In [Date], edit the month, day or year.
(4) In [Time], edit the hour, minute and
second.
(5) Click <Done>.
To set an alarm
(1) On the Home screen, click [Start→More→
Settings→Clock & Alarm→Alarm].
(2) In [Alarm], choose one of the following:
Off: to turn the alarm off.
On: to turn the alarm on.

Personalising Your Phone
44
(3) In [Alarm time], enter the time for the
alarm to go off.
(4) Click< Done>.
Changing the regional
settings
Your phone should already be set up with the
regional settings that are appropriate for your
locale.
You can specify the language, locale, date and
time style, as well as number and currency
formatting options.
(1) On the Home screen, click [Start
→More→ Settings →More→Regional
Settings].
(2) In [Language], select your preferred
language.
(3) In [Locale], select the locale for the
language you selected. The Locale option
automatically changes the format of the
remaining options (such as date, time and
currency) according to the locale you
specify.
(4) Click <Done>.
Caution:
You must turn your phone off and on again for
the changes to take effect.
Setting owner information
Entering and displaying owner information are
best practices; they allow someone to return
the phone to you in case it is lost.
(1) On the Home screen, click [Start→More→
Settings →More→Owner Information].
(2) Complete the following:
In [Name], enter your name.

Personalising Your Phone
45
In [Telephone number].enter a number
where you can be reached.
In [Email address], enter your email
address.
In [Notes], enter any other information you
want to include.
(3) Click <Done>.
Changing the accessibility
settings
In this option, you can set the system font size,
the time for Multipress time out, confirmation
time out and the alert volume while in-call.
(1) On the Home screen, click [Start
→More→Settings→More→More→Acce
ssibility].
(2) Select your preference for the following:
System font size: Set the size of the font
that is displayed on the screen.
Multiple press time out: Set the length of
time between key presses when entering text
in Multipress mode.
Confirmation time out: Set the delay before
an unconfirmed action times out.
In-call alert volume: Set the volume of
sounds that play when you are in a call
(3) Click <Done>.
Enabling error reporting
(1) On the Home screen, click [Start→More→
Settings→More→More→Error
Reporting].
(2) Do one of the following:
Select [Enable] to turn on error reporting.
Select [Disable] to turn off error reporting.
(3) Click <Done>.
Personalising Your Phone
46
Setting the calls
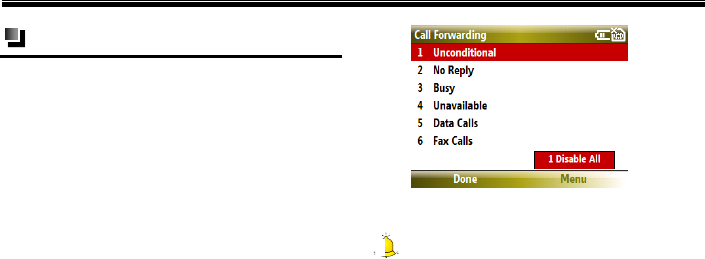
To use call divert
Call Forwarding allows you to divert incoming
calls to another number.
(1) On the Home screen, click [Start →
More→ Settings→Phone].
(2) Click [Call Forwarding] and select the
preferred call forwarding type, for
example: [Unconditional]. The following
image displays the Call Forwarding
options.
[Y5]
(3) Click <Done>.
Caution:
This function needs to be supported by your
network and must be activated before using it.
For more details, please check with your service
provider.
To use call barring
This network service allows you to restrict your
calls. Before using this function, you have to
enter a password obtained from your service
Personalising Your Phone
47
provider.
(1) On the Home screen, click [Start
→More→Settings→Phone].
(2) Click [Call Barring] to activate this
function.
Caution:
1. If you input the wrong restricted password three
times in a row, the call barring function will be
locked and disabled.
2. Call Barring needs to be supported by your
network. For more details, please check with your
service provider.
To use call waiting
This network service informs you when
someone is trying to reach you while you are on
another call.
(1) On the Home screen, click [Start
→More→Settings→Phone].
(2) Click [Call Waiting] to activate this
function.
To use fixed dialling
You can set whether or not to enable the fixed
dial function.
(1) On the Home screen, click [Start →
More→Settings→Phone→More].
(2) Click [Fixed Dialling] to activate this
function.
(3) On this screen, press the Right Soft Key
<Menu> to edit the number or to
cancel the operation.
Caution:
This function needs to be supported by your
network service provider. For more details, please
check with your service provider.
Personalising Your Phone
48
To hide your phone number
This network service allows you to hide your
phone number from the person you are calling.
(1) On the Home screen, click [Start
→More→Settings→Phone→Caller ID].
(2) In [Provide my caller ID to], scroll the
Navigation Key left or right to display
your phone number to [Everyone], [No
one] or [Only my contacts].
Setting the network
To select the network service
(1) On the Home screen, click [Start
→More→Settings→Phone→More→Net
works].
(2) In [Network selection], scroll the
Navigation Key left or right to select
[Automatic] and your phone will
automatically search for local networks, or
you can select [Manual] and click
[Menu→Find a New Network], the results
will be listed on the screen.
(3) Highlight the network you want to use and
click <Select>to connect.
Setting connections
To use wireless manager
[Wireless Manager] acts like a central switcher
that lets you enable or disable phone features
as well as easily manage your data
connections.
(1) On the Home screen, click [Start
→More→Settings→Connections→
Wireless Manager].
(2) Simply scroll the Navigation Key up,
down to switch between [Bluetooth] and
[Phone], then press the Navigation Key

Personalising Your Phone
49
to activate or lock it. Click [All] and
press the Navigation Key to turn
on/off both Bluetooth and phone functions.
[Y6]
If you have activated the Bluetooth function,
the icon will appear on the screen and the
indicator will flash.
While switching off the phone function, the
signal icon on the Home Screen displays ,
and other people can not get through your
phone.
If you are unable to make a call after
inputting a phone number, “The phone is
currently off. Would you like to turn on
the phone?” will appear on the screen.
Press the Left Soft Key <Yes> to activate
the phone function.
Caution:
Follow the above instructions to switch off your
phone in places where it is prohibited to use your
phone.
To receive incoming beams
(1) On the Home screen, click [Start
→More→Settings→Connections→
Beam].
(2) Press the Navigation Key to enable
[Receive incoming beams] function, then
your phone can receive data beamed from
other devices.

Personalising Your Phone
50
To set bluetooth
(1) On the Home screen, click [Start
→More→Settings→Connections→Blue
tooth].
(2) Click [Menu→Turn On Bluetooth /Turn
Off Bluetooth] to turn on/off Bluetooth or
click [Menu→Turn On Visibility /Turn Off
Visibility] to select to whether to make this
device visible to other devices.
For more details about setting Bluetooth,
please refer to “Using Bluetooth” on page 125 .
To set multiple network connection
With wireless connection, the Internet and WAP
network, your phone provides you with various
network connection manners, including
[Dial-up], [GPRS], [Proxy], [VPN] and [USB to
PC].
(1) On the Home screen, click [Start
→More→Settings→Connections].
(2) Scroll to select [Dial-up], [GPRS] or
[Proxy], or click [More] to select [VPN] or
[USB to PC], then press the Left Soft Key
<Menu> to add, edit or delete the
network connection.
(3) Click <Done>.
Caution:
You phone includes the default network connection
settings, so you do not need to modify this setting.
In case you modify any setting, you can restore it
using the restore factory setting function. For more
details, please refer to “Resetting your phone” on
page 58.

Managing Your Phone
51
4. Managing Your Phone
Managing files
To copy a file using ActiveSync
Copying a file results in separate versions of a
file on your phone and PC. Because the files
are not synchronised, changes made to one file
will not affect the other.
(1) Connect the phone to your PC by using a
USB cable.
(2) In ActiveSync, click [Explore], which
opens the Mobile Device folder for your
phone. In the Mobile Device folder, go to
the file that you want to copy your phone
or PC.
(3) Do one of the following:
To copy the file to your phone, right-click the
file and click [Copy]. Right-click the desired
folder on your phone and click [Paste].
To copy the file to your PC, right-click the file
and click [Copy].Right-click the desired
folder on your PC and click [Paste].
Caution:
To copy a file from PC to your phone, you should
create a synchronization relationship between your
PC and the phone. For more details about it,
please refer to “To set up ActiveSync” on page 60.
To use file explorer
File Explorer provides many easy-to-use
features for file and folder management.
On the Home screen, click [Start →More→File
Explorer] to enter the My Documents screen.
My Pictures: Store the system pictures and
the captured photos by using [Camera]
function of the phone.
My Ringtones: Store all types of ring tone

Managing Your Phone
52
that you have downloaded.
My sounds: Store the default audio files of
the phone.
My Videos: Stores the captured video files
in this folder.
Notes: Stores the recorded files with WAV
format by using [Voice Notes] function of the
phone. If you haven’t recorded audio files,
the folder will not appear.
Templates[Y7]:
UAContents: It is multimedia message mail
box which is used to store some multimedia
message files.
On the My Documents screen, click<Up> to
access some system folders.
To chang the display of the file
(1) On the Home screen, click [Start
→More→File Explorer].
(2) Scroll to select the desired folder and
press the Navigation Key .
(3) Click [Menu→View] to select to view the
files with icons or list.
To send a file via messaging
(1) On the Home screen, click [Start
→More→File Explorer].
(2) Open a folder and scroll to select the
desired file.
(3) Click [Menu→Send] and select to send
the file via multimedia messages or
Outlook Email.
(4) The file will be added to the multimedia
messages or email as an attachment
automatically, then enter the relative
information of the message or email.
(5) Click <Send>.
Managing Your Phone
53
To send a file via Bluetooth
You can beam a picture to your friends or
family by using Bluetooth technology.
(1) On the Home screen, click
[Start→More→File Explorer].
(2) Open a folder and scroll to select the
desired file.
(3) Click [Menu → Beam…].
(4) Select the device to which you want to
send the picture.
(5) Click <Beam>.
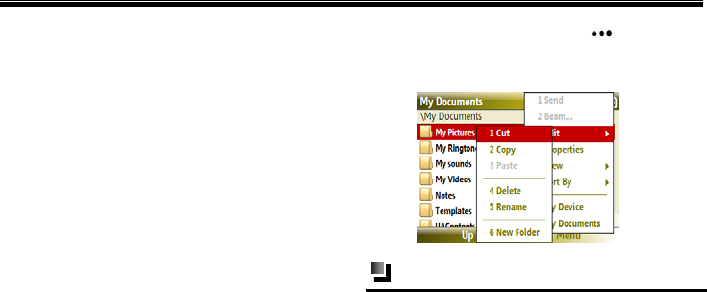
Folder options
(1) On the Home screen, click [Start
→More→File Explorer] to enter the File
Explorer screen.
(2) Open a folder and select the desired file.
(3) Press the Right Soft Key <Menu> to
access the following options. See the
following image for more details.
[Y8]
Using task manager
Task Manager allows you to view all the
programs currently running on your phone in
the form of a list. From Task Manager, you can
switch to activate or terminate any currently
running program. It also allows you to view the
phone memory status.
Managing Your Phone
54
To start task manager(including
refresh)
On the Home screen, click [Start →
More→Accessories → TaskManager] to
enter the Task Manager screen, shown as the
below image:
[Y9]
Click [Menu→Refresh], then you can refresh
the Task Manager screen to reflect a list of
currently running programs.
To stop applications
(1) On the Home screen, click [Start
→More→Accessories → Task Manager]
to enter the Task Manager screen.
(2) Use the Navigation Key to select the
desired application, click [Menu→Stop] to
stop the selected program. To stop all
listed programs, click [Menu→StopAll].
Click [Menu→ Stop All but Selected] to
stop all the running programs in the list
except the one you selected.
Power Management
You can use Power Management to check the
battery and configure settings that prolong
battery life.

Managing Your Phone
55
To check the battery power
(1) On the Home screen, click [Start→
More→Settings→More→Power
Management].
(2) In [Main battey], you can check the
amount of battery life remaining.
To optimise the power performance
(1) On the Home screen, click [Start→ More
→Settings→More→Power
Management].
(2) Adjust the following:
In [Backlight time out on battery], scroll the
Navigation Key left or right to select the
amount of time for the phone to be idle
before the backlight turns off.
In [Backlight time out on AC], scroll the
Navigation Key left or right to select the
amount of time for the phone to be idle
before the backlight turns off when using AC
power.
In [Display time out], scroll the Navigation
Key left or right to select the time limit
for the phone to be idle before the screen
turns off.
(3) Click <Done>.
Viewing the phone
information
To view memory details
(1) On the Home screen, click [Start→ More
→Settings→More→More→About].
(2) Scroll down to [Available Storage] and
[Total Storage] to see the total memory
and how much memory is available.

Managing Your Phone
56
Protecting your phone
There are several levels of security on your
phone. You can protect your phone from
unauthorised use by requiring a type of
password called a PIN (personal identification
number) in order to make calls. Your first PIN
will be given to you by your wireless service
provider. Additionally, you can lock the keypad
or the entire phone to prevent unauthorised
access.
To enable or disable the phone lock
(1) On the Home screen, click [Start→
More→ Settings →More →Security →
Device lock].
(2) Select [Prompt if device unused for],
then select the amount of time for the
phone to be inactive before automatically
locking.
(3) Select the [Password type], then enter
and confirm your password.
(4) Click <Done>.
(5) To unlock the phone, click <Unlock> then
enter the password you have set.
To enable or disable SIM PIN
(1) On the Home screen, click [Start→More→
Settings →More →Security].
(2) Click [Enable SIM PIN].
(3) Enter your PIN, and click <Done>.
(4) To disable SIM PIN, click [Disable SIM
PIN] and enter your PIN.
To change PIN
Be sure to make a note of your personal
identification number (PIN). When the
SIM/USIM PIN is enabled, you must provide
this PIN to unlock the phone.
(1) On the Home screen, click [Start→More→
Settings →More →Security].
Managing Your Phone
57
(2) Click [Change PIN2].
(3) In [Old PIN], enter the current PIN.
(4) Enter and confirm the new PIN, and click
<Done>.
To lock or unlock the keypad
Locking the keypad turns off keypad
functionality. This is a helpful feature if, for
example, the phone is turned on and in your
pocket, and you want to prevent accidental key
presses.
(1) On the Home screen, press and hold the
END Key to lock the phone. Once
the keypad is locked, the left soft key label
changes to <Unlock>.
(2) Click <Unlock> and press to unlock
the keypad.
Caution:
1. To quickly lock the keypad, press the Power Key
briefly to display the Quick List, and select
[lock].
2. You can still receive calls and make emergency
calls when the keypad is locked.
Removing programs
You can delete the programs you won’t use so
as to release more memory for the system.
(1) On the Home screen, click [Start→More→
Settings →More →Remove Programs].
(2) Scroll to the program to remove.
(3) Click [Menu → Remove].

Managing Your Phone
58
Caution:
Programs that come with the phone cannot be
removed.
Resetting your phone
Resetting your phone will remove all the data
from its memory which include contacts, tasks,
calendar appointments and more, and restore
the phone back to the factory default settings.
Caution:
All your data will be deleted. It is recommended
that you back up your data first before resetting
your phone.
(1) On the Home screen, click [Start→More→
Settings →More →Security].
(2) Click [Reset]
(3) Follow the on-screen instructions to reset
the phone. The phone will restart after it
has been reset.

Synchronising Information
59
5. Synchronising Information
Connecting your phone to
your PC (USB mass storage)
You can use the phone as a USB flash disk to
store information, which is very convenient and
helpful for your work and life.
(1) Insert an USB data cable to the USB port
of PC, then connect the phone, at this time,
ActiveSync software will connect and
activate automatically.
(2) Click [My Computer→Mobile Device] on
PC, so you can have some operations on
files (such as new, copy, cut, paste,
delete).
(3) To view the downloaded or copied pictures
or ringtone, you can enter [File Explorer],
select a folder and click [Menu→My
Device], and then you can view the
current file, such the downloaded audio
file.
Caution:
It is advisable not to delete the preset system folders
of phone on the PC
Using ActiveSync
About ActiveSync
ActiveSync synchronises information on your
phone with information on your PC. ActiveSync
can also synchronise over a wireless network
with Exchange Server if your company or
service provider is running Exchange Server
with Exchange ActiveSync.
To access ActiveSync from the Home Screen,
click [Start→ActiveSync].
Specifically, you can use ActiveSync to:
Synchronise information such as Outlook
E-mail, contacts, calendar or tasks

Synchronising Information
60
information on your phone with your PC, as
well as music and video files.
Synchronise Outlook E-mail, contacts,
calendar appointments and tasks on your
phone directly with Exchange Server so that
you can stay up to date even when your PC
is turned off.
Copy files between your phone and your PC.
Without synchronising.
Select which types of information are
synchronised and specify how much
information is synchronised. For example,
you can choose how many weeks of past
calendar appointments to synchronise.
To set up ActiveSync
To install and set up ActiveSync on the
computer:
(1) Install ActiveSync on your PC, as
described on the Window Mobile™ Getting
Started Disc. After Setup completes, the
synchronisation setup wizard starts
automatically when you connect your
phone to the PC.
(2) Follow the instructions on the screen to
complete the wizard, in the sync setup
wizard, do one or both of the following:
Create a synchronisation relationship
between your PC and the phone
Configure the Exchange Server connection
to synchronise directly with Exchange server.
You need to specify the Exchange Server
address, user name, password, and domain
name.( Get this information from your
administrator)
(3) Choose the information types to
synchronise.
When you finish the wizard, ActiveSync
automatically synchronises your phone. Once
synchronisation completes, you can disconnect
your phone from your PC.

Synchronising Information
61
To start and stop synchronisation
(1) Connect your phone.
To synchronise local information on the PC,
such as Outlook information or media files,
connect your phone to the PC using
Bluetooth or a USB cable.
If you are synchronising directly with
Exchange Server, you can use the
connection to the PC to access the network,
or you can synchronise over a cellular
without connecting to the PC.
(2) In ActiveSync, click [Sync]
(3) To end synchronisation before it
completes, click [Stop].
ActiveSync synchronises a limited amount of
information by default to save memory on your
phone. You can change the amount of
information that is synchronised by performing
the following steps.
To To change the synchronised information
(1) On the Home screen, click [Start→
ActiveSync].
(2) Click [Menu→Options]
(3) Do one of the following:
Select the check box for the items you want
to synchronise by pressing the Navigation
Key . If you can not select a check box,
you might have to clear the check box for the
same information type elsewhere in the list
Clear the check box for any items you want
to exclude.
To customise synchronisation of a computer,
select the computer name and then click
[Menu→Settings].
To customise synchronisation of particular
information, select the information type and
click <Settings>.

Synchronising Information
62
To stop synchronisation with one computer
completely, select a computer name and
click [Menu→Delete].
Caution:
Outlook emails can be synchronised with only one
computer.
To synchronise inbox
(1) As a default, while synchronising Inbox of
PC or server, it can only synchronise the
e-mails for the latest three days and only
the first 500 bytes of each e-mail. If you
want to view the whole e-mail, you should
download the whole e-mail.
(2) Your phone has a sync relationship with a
PC. In case an e-mail in the phone or the
PC is deleted, the same e-mail in the PC
or the phone will be deleted while
synchronising next time.
(3) While synchronising mails in the other
folders of Outlook Email besides Inbox,
you need to select the corresponding
folders in the phone.
Caution:
Text messages and multimedia messages can’t be
synchronised.
To synchronise schedule
(1) You can synchronise the Schedule stored
on your phone with that of Outlook or
Mobile Information Server 2002 and the
other advanced versions stored on the PC.
(2) As a default, only the schedule for the past
two weeks and all future schedules can be
synchronised.
To synchronise task
You can synchronise the Microsoft Outlook
tasks on PC to your phone.
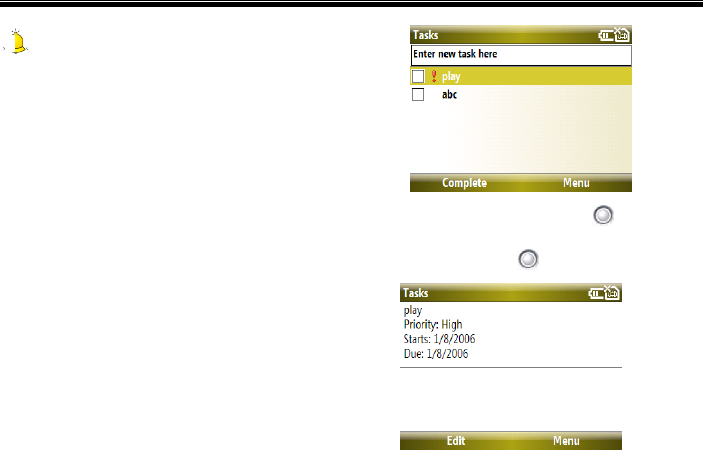
Synchronising Information
63
Caution:
Before synchronising, you need to use the
attached disc and install ActiveSync software
according to the prompts on the screen.
(1) On the Home screen, click [Start→
Tasks].
(2) After installation, please activate
ActiveSync software on PC and use USB
cable to connect your phone with PC. As
default, the system will synchronise the
tasks on PC to [Tasks] of your phone
automatically.
(3) After synchronisation, the following
[Tasks] screen will appear:
[Y10]
(4) Scroll the Navigation Key up or down
to select your desired task and press the
Navigation Key to view the following:
[Y11]

Synchronising Information
64
To synchronise with exchange server
To set up your phone to synchronise directly
with exchange server, you will need to get the
server name and the server domain name form
your service provider or system administrator;
you must also know your exchange user name
and password.
Caution:
Before changing synchronisation settings on the
phone, disconnect it from your PC.
(1) On the Home screen, click [Start→
ActiveSync → Menu →Configure
Server]. If you have not yet set up
synchronization with Exchange Server,
this will say [Add Server Source].
(2) On the Edit Server Settings screen, enter
the name of the server running Exchange
Server in the [Server address] box and
click <Next>.
(3) On the User Information screen, enter your
user name, password and domain name.
(4) If you want the phone to save your
password so that you will not need to enter
it again when connecting, click the [Save
password] check box. Then click <Next>.
(5) On the Options screen, select the check
boxes of the types of information that you
want to synchronise with Exchange
Server.
(6) To customise synchronisation of a
particular type of information, select the
type of information then click [Menu
→Settings].
(7) To change the rules for resolving
synchronisation conflicts, click
[Menu→Advanced] on the Options
screen.
(8) Click <Finish>.
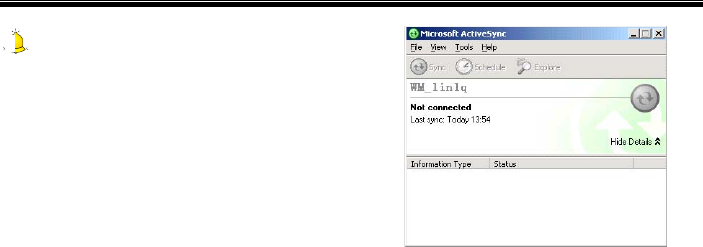
Synchronising Information
65
Caution:
You can also use the Sync Setup Wizard to set up
the phone to synchronize remotely with Exchange
Server. This wizard is started when you connect
your phone to your PC after installing ActiveSync
on the PC.
To stop synchronisation
(1) Disconnect the device from your phone.
(2) As shown on the next page, select “Mobile
device” in the “Files” menu.
(3) Select the device that you want to stop
synchronization.
(4) Select “Delete mobile device” in “Files”
menu.
To install software in the phone
through c
(1) Create connection between your phone
and PC through ActiveSync.
(2) Operate the installation files on PC.
(3) Select the installation position in the phone
and begin to install.

Synchronising Information
66
To synchronise via bluetooth
With Bluetooth function, you can connect your
phone with other mobile devices or PCs and
synchronise between them.
(1) Follow the instructions in ActiveSync Help
on the PC for configuring Bluetooth on
your PC to support ActiveSync.
(2) On the Home screen, click [Start
→ActiveSync].
(3) Click [Menu → Connect via Bluetooth],
and ensure that the phone and the PC are
within close range.
(4) If this is the first time you have connected
to this PC via Bluetooth, you must
complete the Bluetooth wizard on the
phone and set up a Bluetooth partnership
with the PC before synchronising.
(5) Click <Sync>.
(6) When finished, click [Menu → Disconnect
Bluetooth]
Caution:
1. To preserve battery power, turn off Bluetooth
when not in use.
2.To connect and synchronise your phone with a
computer via Bluetooth, your computer must have
a Bluetooth adapter or dongle.
To solve ActiveSync connection
problems
If you use a USB data cable to connect your
device to a PC, and ActiveSync can’t recognize
the device or the program stops responding,
you can solve the problems by referring to the
following information.
Carry out the following steps one by one until
you have solved the problem. For more detailed
information (including the detailed instructions
about the common PC firewall program), visit

Synchronising Information
67
the troubleshooting section of the Windows
Mobile web page.
Check the devices according to the system
information, and solve all connection
problems.
Make sure both the device and the PC have
an activated USB connection.
(1) In [File] menu of ActiveSync on PC, click
[Connection setting] and then click
[Allow USB connection].
(2) In ActiveSync on the device, click
[ActiveSync] to enter the ActiveSync
screen, and then click
[Menu→Connections→ Synchronize all
PCs using this connection].
Disconnect the device and re-connect it.
Disconnect the device, then restart and
reconnect the device.
Disconnect the device, then restart the PC
and re-connect the device.
Do the following:
(1) Disconnect the device.
(2) Open the following PC firewall ports for all
programs:
- 990: Open entry TCP port
- 999: Open entry TCP port
- 5678: Open entry TCP port
- 5679: Open exit UDP port
- 5721: Open entry TCP port
- 26675: Open entry TCP port
(3) Reconnect the device.
Do the following:
(1) Disconnect the device.
(2) Disable the antivirus program.
(3) Reconnect the device
Do the following:

Synchronising Information
68
(1) Disconnect the device.
(2) Delete ActiveSync by using “Add/Delete
program”.
(3) Install ActiveSync.
(4) Reconnect the device.
Do the following:
(1) Disconnect the device.
(2) Select [Control panel→Network
Connection] on PC.
Caution:
If [Control panel] sets as sort view, please click
[Network and Internet connection] and then click
[Network connection].
(1) Select local connections established by
ActiveSync with right key, and then click
“Property”. It will display “Devices based
on Windows Mobile” in “Use during
connection” box.
(2) Select all menus in “The connection uses
the following items”.
(3) Reconnect the device.
Please make sure DHCP client server is
operating on PC. As for the details about how
to activate or stop Windows services and
view its status, please refer to “Windows help
and support center”.
Exchanging Messages
69
6. Exchanging Messages
The messaging service is a network service
which is used to send text messages or
multimedia messages between mobile phone
users. (Or send to an e-mail address if this is
supported by the network). Whether this menu
can operate normally depends on your SIM
card and the services supplied by the network
provider, so please check before using this
service.
Using text messages
With Text Messages, you can use other
people’s phone numbers to send instant text
messages from your phone to their
messaging-ready phones – and they can send
messages to you. When you receive a new
message, it will automatically display on your
phone’s screen.
To view and edit text messages service
center
On the Home screen, click [Start→More→
Settings→ Phone→Call Options→Text
messages service center]. You can also
consult your network service provider about
your local text messages service number.
To enable request delivery notification
After enabling this function, you will receive a
message delivery notification from your
network when the message has been
successfully sent.
(1) On the Home screen, click [Start
→Messaging].
(2) Highlight the [Messages] option and click
[Menu→Settings].
(3) In [Request delivery notifications], press
the Navigation Key to enable or
disable this function.
Exchanging Messages
70
(4) When finished, click <Done>.
To write and send messages
(1) On the Home screen, click [Start
→Messaging→Messages].
(2) Click [Menu→New], and a new message
screen will open.
(3) In [To], add a recipient’s phone number
manual or select Contacts list to use a
number stored on your phone by pressing
the Navigation Key , or clicking
[Menu→Add Recipient]. The phone also
supports the “Group message” function. If
you have selected “Send a Text Message”
and addressed it to a group, then you can
send the message to multiple-recipients.
(4) Use your keypad to enter your message
content. Press repeatly to select the
desired character input mode. (See
“Entering information” on page 29.) During
typing, click [Menu →My Text] to insert
commonly used phrases in the message,
or you can click [Menu→ Cancel
Message] to cancel the current text
message.
(5) After typing a message, click
[Menu→Message Options], then press
the Navigation Key to select
[Request message delivery
notification], A “” symbol will appear
and click <Done>. You will receive a
message delivery notification from your
network when the message has been
successfully sent.
(6) Press the Left Soft Key <Send> to
send the text message directly to the
recipient.

Exchanging Messages
71
To reply or forward messages
(1) From an open message, click <Reply>, or
click [Menu →Reply→ Reply All or
Forward].
(2) Enter a message in the message area.
(3) Click <Send>.
Using multimedia messages
Creating and sending Multimedia Message
Service to your friends and family is fun and
easy. You can include or capture photos or
video clips, include or record audio, add text,
then send them along with your multimedia
message.
To configure multimedia message
settings
When you send a multimedia message, a text
message notification message will first be sent
to the recipient, while your multimedia message
will be temporarily stored on a multimedia
message server of your wireless service
provider. Similarly, when others send you a
multimedia message, the multimedia message
will be stored on the multimedia message
server, waiting for you to retrieve it. Hence,
your phone must be configured with the
location of the multimedia message server for
you to be able to send and receive multimedia
messages on your phone.
When you purchase your phone, it is already
preset with your wireless service provider’s
multimedia message server settings. If you
accidentally lose the preset settings or if you
change to another wireless service provider,
follow the steps below to configure multimedia
message settings.
(1) On the Home screen, click
[Start→Messaging→MMS].
(2) Click [Menu→New].
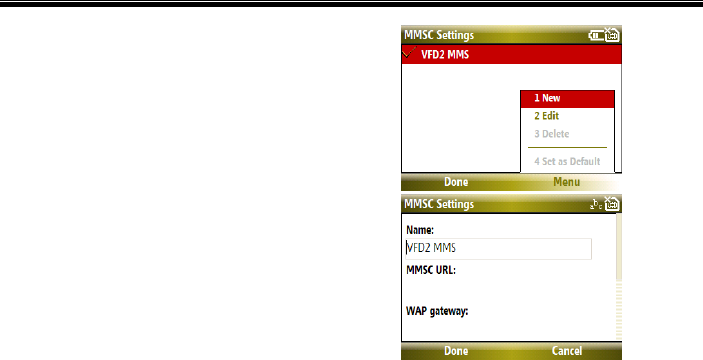
Exchanging Messages
72
(3) Highlight the [MMS] option and click
[Menu→Settings] to open the
Preferences screen.
(4) Select or clear the provided check boxes
according to your needs. You can select to
keep track of your multimedia messages,
retrieve messages immediately, accept or
reject messages and request a delivery or
read receipt. You can also specify a
resolution for images you send and
message delivery attempts.
(5) On the Preferences screen, click [Menu →
MMSC Settings], then click [Menu→Edit]
to access Multimedia Messaging Service
Center (MMSC) settings.
(6) Check if your phone is preset with
multimedia message server settings.
If there are no preset settings, click [Menu →
New] on the MMSC Settings screen and enter
the following information, which you can get
from Vodafone.
[Y12]
[Y13]
Name: A descriptive name, such as your
wireless service provider name.
MMSC URL: URL address of the multimedia
message server.
Exchanging Messages
73
WAP gateway: Location of the multimedia
message server, which is usually in the form
of an IP address.
Port: HTTP port number used for connecting
to the multimedia message server and for file
transfer.
Connect via. Select [The Internet] from the
list.
Max. sending size: Select the maximum
multimedia message size allowed by your
wireless service provider.
(7) Press the Left Soft Key <Done>.
The multimedia message server settings will
then be added as an entry on the Multimedia
Message Configuration screen.
Caution:
If you add several multimedia message service
providers to the MMSC Settings you can choose
one as your default multimedia message provider.
Select the multimedia message provider’s name in
the list, then click [Menu → Set as Default].
To write and send multimedia
messages
You can compose multimedia messages in a
combination of various slides, where each slide
can consist of a photo, audio or video clip,
and/or text.
(1) On the Home screen, click [Start →
Messaging→MMS].
(2) Click [Menu→New], and a new message
screen will open.
(3) In [To], enter the recipient’s phone number
or email address directly, or press the
Navigation Key to choose a phone
number or an email address from
Contacts. You can also click [Menu →

Exchanging Messages
74
Recipients → Add] to add a new contact
entry.
(4) In [Subject], enter a subject for your
message.
(5) Click [Insert Picture/Video] to select a
photo or video clip from the Select Media
screen and click [Menu→Select] insert it.
To navigate to any other folder containing
pictures or videos, click [Menu → Change
Folder].
(6) Or you can capture a new photo or video
clip and send it immediately with the
message, click [Menu → Capture→
Picture] or [Menu →Capture→ Video]
from the Select Media screen. The newly
captured photo or video clip is
automatically inserted into your message.
(7) Enter text and insert audio clips by clicking
the respective fields.
(8) Click <Send> to send the message.
The following symbols act as shortcuts to some
of the options on the Multimedia Message
screen.
Click [MU14] to go to the previous
slide.
Click [MU15]to go to the next slide.
Caution:
To send a copy of this message to others, access Cc
and Bcc by clicking [Menu→ Options→Send
Options…]. In these fields, enter the recipient's
phone number or email address or click [Menu →
Recipients → Add] to add from Contacts.
To create a multimedia message from a
template
On the blank Multimedia Message screen, click
[Menu → Template → New from Template] to
compose a message using a predefined

Exchanging Messages
75
template.
Caution:
To save a message as a template, create a message
or open an existing message, and click [Menu→
Template→ Save as Template].
To add predefined text to a multimedia
message
You can instantly add text to any slide from a
list of predefined words or phrases, called [My
Text].
On the New Multimedia Message screen, scroll
to [Insert Text] and press the Navigation
Key , click [Menu →MyText] and then click
<Select> to add a text string from the My Text
list.
[Y16]
To edit or delete a phrase on the My Text list,
select a text string and click [Menu→Edit] or
[Menu → Delete]. To create and add a new
phrase to the list, click [Menu →New].
To view and reply to multimedia
messages
To receive a multimedia message
On any multimedia message folder screen,
click [Menu → Send/Receive]. By default,
messages are automatically downloaded to
your phone.

Exchanging Messages
76
To view a multimedia message
You can view multimedia messages in several
ways:
Press the Navigation Key to view and
play the message on your phone. Click
<Pause> or [Menu → Stop] to pause the
playback of the message.
•Click [Menu →Object View] to see a list of
files included in the message. To open a file,
select it and click <Open>. To save a file,
select it, and click <Save>, [Menu → Save
Audio], or [Menu → Save Photo].
View each slide included in the message by
clicking [Menu → Next].
To reply to a multimedia message
Click [Menu→ Reply →Reply] to reply to the
sender of the message, or click [Menu →
Reply → Reply All] to reply to all persons
listed in the To and CC boxes of the message.
Click [Menu→ Reply → Forward] to forward
the message to someone else.
Using email
The phone can receive and send e-mail and
can be synchronized with Outlook E-mails on
your PC. However, this function needs to be
supported by the network, so you must set
network and account information before using it.
(The phone has been set to the default network,
and you don’t need to set it).
To set up a POP3/IMAP4 email account
You need to set up an email account that you
have with an Internet service provider (ISP) or
an account that you access using a VPN server
connection (typically a work account) before
you can send and receive email.
(1) On the Home screen, click [Start
→Messaging].
(2) Scroll to the [New E-mail Account…]
option and click <Select>.
Exchanging Messages
77
(3) In [Email address], enter the email
address for this account.
(4) Press the Navigation Key to activate
[Try to get e-mail settings automatically
from the Internet], and click <Next>.
Auto Setup attempts to download necessary
email server settings so that you do not need to
enter them manually. If the account is set up
successfully, you will be prompted to send and
receive email.
If [Auto Setup] is unsuccessful or you have an
account you access using a VPN server
connection, contact your ISP or network
administrator for the following information and
enter it manually:
Setting Description
Your e-mail
provider
Scroll the Navigation
Key left or right to
select
[
Exchan
g
e
server] or [Internet
e-mail] and click
<Next>.
Your name Enter your display name
for email messages.
Account display
name
Enter a unique name for
the account, such as
“Work” or “Home”.
This name cannot be
changed later.
Incoming mail
server
Enter the name of your
email server (POP3 or
IMAP4).
Account type Select POP3 or IMAP4.
User name
Enter the username
assigned to you by your
ISP or network
administrator. This is
often the first
p
art of
y
our
Exchanging Messages
78
email address, which
appears before the sign
(@).
Password
Choose a strong
password. You have the
option to save your
password so you do not
need to enter it each
time you connect to your
email server.
Outgoing(SMTP)
mail server
Enter the name of your
outgoing email server
(SMTP).
Outgoing
server requires
authentication
Select this if your
outgoing email server
(SMTP) requires
authentication. Your
username and password
from above will be used.
Use the same
name and
p
assword for
Select this if you want to
use the same username
and
p
assword for
sending e-mail sending e-mail.
Advanced Server
Settings
Select this to ensure you
always send or receive
email for this account
using an SSL
connection. This
enables you to send or
receive personal
information more
securely You can also.
select the type of
network your email
server connects to.
To download messages
The manner in which you download messages
depends on the type of account you have:
To send and receive email for an Outlook
Email account, begin synchronisation using
ActiveSync. For more information, see “To

Exchanging Messages
79
set up ActiveSync” on page
60.
To send and receive email messages for
an email account that you have with an
Internet Service Provider (ISP) or that you
access using a VPN server connection
(typically a work account) download
messages through a remote email server.
For more information, see "To download
messages from the server" below.
Text messages are automatically received
when your phone is turned on. When your
phone is in turned off, messages are held
by your service provider until you turn on
your phone again.
To download messages from the server
To send and receive email messages for an
email account that you have with an Internet
Service Provider (ISP) or that you access using
a VPN server connection (typically a work
account), you first need to connect to the
Internet or your corporate network, depending
on the account.
(1) On the Home screen, click [Start →
Messaging].
(2) Select the email account.
(3) Click [Menu →Send/Receive]. The
messages on your phone and email server
are synchronised as follows: new
messages are downloaded to the phone
Inbox folder, messages in the phone
Outbox folder are sent, and messages that
have been deleted from the server are
removed from the phone Inbox folder.
Caution:
If you want to download the entire message, select
the message and click [Menu→ Download
Message]. The remainder of the message will be
downloaded the next time you send and receive
email.

Exchanging Messages
80
To write and send email
(1) On the Home screen, click [Start →
Messaging].
(2) Select an email account, then click
<Select>.
(3) Click[Menu→New]
(4) Enter the email address of one or more
recipients, separating them with a
semicolon (;). To access addresses and
phone numbers from Contacts, in To,
press the Navigation Key and select a
recipient from the list.
(5) Enter a message. In a new message, click
[Menu → Insert] and then click [Picture],
[Voice Note] or [File]. Select the picture,
file you want to attach, or record a voice
note.
(6) Click <Send>.
Caution:
1. If you are working offline, email messages are
moved to the Outbox folder and will be sent the
next time you connect.
2. To set the priority of an email message, click
[Menu → Message Options].
To receive email
On any Email folder screen, click [Menu →
Send/Receive]. By default, messages are
automatically downloaded to your phone.
Caution:
In an open message with an attachment, select the
attachment. The attachment is downloaded the
next time you synchronise or connect to your
email server and send and receive email.
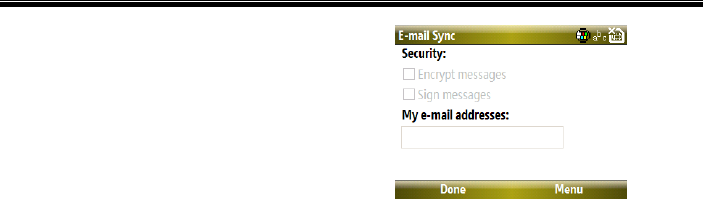
Exchanging Messages
81
To reply or forward an email
(1) From an open email, click <Reply>, or
click [Menu → Reply→Reply All or
Forward].
(2) Enter a message in the message area.
(3) Click <Send>.
When you reply to all the recipients of an email,
your own email address will also be added to
the recipient list. You can customise
ActiveSync so that your email address will be
excluded from the recipient list.
(1) On the Home screen, click [Start
→ActiveSync].
(2) Click [Menu →Options].
(3) Select [Email], and click <Settings>.
(4) Click [Menu → Advanced].
(5) In the [My e-mail address] text box, enter
your email address.
[Y17]
To individually sign and encrypt a new
(1) On the Home screen, click [Start →
Messaging].
(2) In the message list, select an email
account.
(3) Click [Menu → New].
(4) Click [Menu → Message Options].
(5) In the [Security] field, select [Sign or
encrypt] check boxes then click <Done>.
Exchanging Messages
82
To set digital signature for an email
(1) On the Home screen, click [Start →
Messaging].
(2) Select an email account, and then click
<Select>.
(3) Click [Menu→Tools→Options], and then
select [Signatures].
(4) In [Select an account], scroll the
Navigation Key left or right to select
the desired account, then in [Use
signature with this account], press the
Navigation Key to enable the digital
signature function. In [Signature] check
box, you can edit the signature content.
(5) Click<Done>.
Managing folders
To access messages folders
(1) On the Home screen, click [Start →
Messaging], then click [Messages] or
select an email account.
(2) Click [Menu→Folders]
Message folders
Deleted items: Store the messages or
emails deleted from the other folders. If you
delete the message or email from [Deleted
Items], the message or email is permanently
deleted.
Drafts: Store messages and emails that will
be sent later.
Inbox: Store received message and emails.
Outbox: Store messages and emails that are
sent unsuccessfully.

Exchanging Messages
83
Sent items: Store messages and emails
which have been sent successfully.
Caution:
To ensure there is enough memory in the phone,
delete the old messages in [Sent Items]. As the
remaining memory decreases, you can play a
received multimedia message, but you can’t send,
save or download the multimedia messages.
Windows Live Messenger
84
7. Windows Live Messenger
With Windows Live Messenger, you can do the
followings:
See which contacts are online or offline.
Send and receive windows live message
Chat with the contacts by using Windows
Live Messenger.
Inform the selected contacts when you come
online.
Block contacts from seeing you status or
sending you messages.
You must have a Microsoft Passport account
while using Windows Live Messenger. If you
already have a passport, you must also do
the followings:
Set a Hotmail account on Windows Live
Messenger
Sign in Windows Live Messenger.
Setting an account
Before using Windows Live Messenger, you
must set an account. You must have either a
Microsoft Passport account or a Hotmail
account to use Windows Live Messenger. In
addition, please connect your phone to the
Internet when using Windows Live Messenger.
(1) On the Home screen, click [Start→
More→Messenger].
(2) On the Windows Live screen, you need to
sign into Windows Live first;
(3) Click [Sign in].
(4) Enter your Windows Live ID in the Live
Search bar, then press the Navigation
Key to click [Sign in to Windows
Live] box.
[Y18]
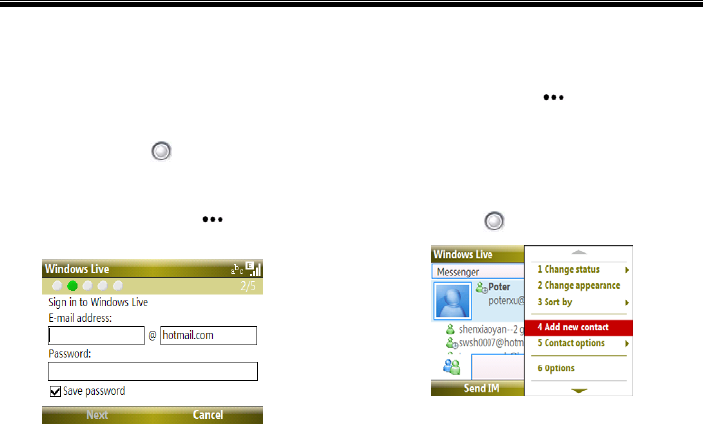
Windows Live Messenger
85
To sign in Windows Live Messenger
(1) On the Home screen, select
[Start→More→Messenger].
(2) On the Windows Live screen, click
[Menu→Sign in as…], and scroll the
Navigation Key left or right to set your
own Sign in status as [Online], [Busy],
[Be Right back], etc.
(3) Press the Left Soft Key <Sign in> to
enter the Sign In screen.
(4) Enter the e-mail address and password. If
you want to save your password, click the
[Save password] box.
(5) Press Left Soft Key to sign in.
To send a Windows Live message
After signing in Windows Live Messenger,
select the contact you want to send a message,
and click [Send IM] or the center of the
Navigation Key .
[Y19]
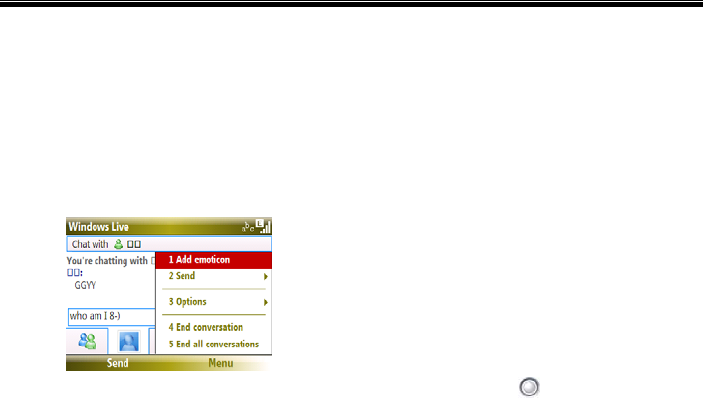
Windows Live Messenger
86
To end a chat
(1) First sign in the Windows Live Messenger,
select the contact you want to chat, and
click [Send IM].
(2) On the Chat screen, click [Menu → End
conversation], so you can end the current
chat, shown as the below image.
To invite another contact to join in chat
While chatting with a contact, meanwhile, you
can invite another contact to join in the chat.
(1) First sign in the Windows Live Messenger,
select the contact you want to chat, and
click [Send IM].
(2) On the Chat screen, click
[Menu→Option→Add participation],
after selecting your desired contact and
click [Add], so the contact can be joined in
the chat.
To block or unblock a contact
To block a contact from seeing your status and
sending messages to you, do the followings:
(1) First sign in the Windows Live Messenger.
For more information about this, please
refer to “To sign in Windows Live
Messenger” on page 85.
(2) Select the contact by scrolling the
Navigation Key up or down, and click
[Menu →Contact options→Block].

Windows Live Messenger
87
(3) To unblock a contact, you can repeat the
above operation and click
[Menu→Contact options→Unblock].
To delete a contact
(1) First sign in the Windows Live Messenger.
For more information about this, please
refer to “To sign in MSN Messenger” on
page 85.
(2) Select the contact by scrolling the
Navigation Key up or down, and click
[Menu →Contact options→Remove
contact].
To change your display name
(1) First sign in the Windows Live Messenger.
For more information about this, please
refer to “To sign in Windows Live
Messenger” on page 85.
(2) Select your own name from contacts list,
and click [Menu→Change appearance],
then you can enter the name you want to
display to others in Windows Live
Messenger.
To sign out
(1) First sign in the Windows Live Messenger.
For more information about this, please
refer to “To sign in Windows Live
Messenger” on page 85.
(2) On the Contacts list screen, click
[Menu→Sign out], then you can sign out
the Windows Live Messenger.

Windows Live Messenger
88
8. Using Contacts
[Contacts] is your address book and
information storage for the people and
businesses you communicate with. You can
store phone numbers, email addresses, home
addresses and any other information that
relates to a contact, such as a birthday or an
anniversary date. You can also add a picture or
assign a ringtone to a contact.
To enter Contacts from the Home Screen, press
the Right Soft Key <Contacts>, or click
[Start→Contacts].
All contacts are saved in SIM card or the
phone.
SIM card contacts: Each entry includes a
name and a phone number. The memory and
the content of the SIM card differ according
to the SIM card type.
Phone contacts: You can not only store the
contact name, many different types of phone
number, e-mail address, family address etc,
but also can store a great deal of the
contact’s personal information, such as
birthday and anniversary.
Caution:
Contacts stored on your SIM card can also be
stored on the phone. Contacts stored on the phone
will be kept in the original phone. To move them to
another phone you will need to copy them to the
SIM card.
Adding a new contact
To add a new contact on your phone
(1) On the Home screen, click [Start
→Contacts → New→Outlook Contact].
(2) Enter information for the new contact.
(3) Click <Done>.
Windows Live Messenger
89
Caution:
1.If someone who isn’t in your list of contacts calls
you or sends you a message, you can quickly
create a contact from Call History or from the
message by clicking [Menu→ Save to Contacts].
2. In the list of contact information, you’ll see
where you can add a picture or assign a ringtone
to a contact.
To add a new contact on your SIM card
(1) On the Home screen, click [Start
→Contacts].
(2) Click [New →SIM Contact].
(3) Enter information for the new contact then
click <Done>.
Searching for a contact
To find a contact in the Contacts List:
Scroll the Navigation Key up or down to
search for your desired contact.
Begin entering a name or phone number of
the contact until the contact is displayed.
When you press a key, such as , you will
find names that begin with D, and the phone
numbers that start with 4. The next key you
press continues to narrow the search. For
example, to find “David”, you would
press , , , , and then .
Caution:
While pressing the numeric keys to find a contact,
the system can only find the contact with the same
phone number that you input.

Windows Live Messenger
90
Viewing and editing a contact
(1) On the Home screen, click [Start →
Contacts].
(2) Click the contact whose information you
want to view.
(3) To edit the information, click [Menu →
Edit].
(4) When finished making changes, click
<Done>.
To assign a ringtone to a contact
To easily identify who is calling you, you can
assign a custom ringtone to each contact.
(1) On the Home screen, click
[Start→Contacts].
(2) Click the contact you want to assign a
ringtone to.
(3) Click [Menu → Edit].
(4) Click [Custom ring tone] and select the
ringtone you want.
(5) Click <Done>.
To assign a picture to a contact
(1) On the Home screen, click
[Start→Contacts].
(2) Click the contact you want to assign a
picture to.
(3) Click [Menu → Edit].
(4) Click [Picture] and select the picture you
want to add.
(5) Click<Done>.
Caution:
You can only assign a ringtone and a picture to a
contact stored on the phone.
Sending a text message,

Windows Live Messenger
91
multimedia message to a contact
To send a text message to a contact
(1) On the Home screen, click
[Start→Contacts].
(2) Click the desired contact to view its detail,
and click [Menu → Send Text Message].
(3) Compose your message, and click
<Send>.
To send a multimedia message to a
contact
(1) On the Home screen, click
[Start→Contacts].
(2) Scroll to the desired contact, and click
[Menu → Send MMS by mobile].
(3) Enter a subject, then compose your
message, and click <Send>.
Caution:
You can only send a multimedia message to a
contact stored in the SIM card.
Making a call to the selected
contact
(1) On the Home screen, click
[Start→Contacts].
(2) Click the contact to call.
(3) Click <Call> or press the SEND
Key . The contact’s default phone
number is dialled.
Caution:
To call a phone number other than the default,
click the contact, scroll to the number you want to
dial, and press .

Windows Live Messenger
92
Sending the contact’s
information
To send the contact’s information via
text message
(1) On the Home screen, click
[Start→Contacts].
(2) Click the contact, and click [Menu → Send
Contact→Messages].
(3) Press the Navigation Key to select
the contact information to send, then
click<Done>.
(4) Compose the text message and
click<Send>.
To send the contact’s information via
Bluetooth
(1) On the Home screen, click
[Start→Contacts].
(2) Click the contact, and click [Menu → Send
Contact→Beam].
(3) Press the Left Soft Key <Beam> and
the phone will search for Bluetooth-enable
devices automatically and send the
contact’s information.
To send the contact’s information via
multimedia message
You can send a contact card to another phone
over multimedia message.
(1) On the Home screen, click
[Start→Contacts].
(2) Select a contact, then click [Menu → Send
as vCard].
(3) Enter the recipient in [To] of the
multimedia message, then click <Send>.

Windows Live Messenger
93
Managing the contacts
To delete a contact
(1) On the Home screen, click
[Start→Contacts].
(2) Select a contact, then click [Menu →
Delete Contact].
To copy contacts between SIM card
and the phone
(1) On the Home screen, click
[Start→Contacts].
(2) Click a contact and click [Menu→Save to
Contacts/Save to SIM].
(3) Enter the contact’s information and click
<Done>.
To filter the contact list
Contacts that have categories assigned are
displayed in the list when you filter by category.
(1) On the Home screen, click
[Start→Contacts].
(2) Click [Menu→Filter].
(3) Click a category to filter

Connecting to the Internet
94
9. Connecting to the Internet
Your phone’s powerful networking capabilities
allow you to access the Internet or your
corporate network at work through wireless and
conventional connections. Specifically, you can
configure your phone to establish a connection
via Dial-up, GPRS, Bluetooth, Virtual Private
Network (VPN), or Proxy.
Setting up a connection
To set up a GPRS connection
GPRS is a non-voice value-added service that
allows information to be sent and received
across a mobile telephone network. You can
use GPRS to connect to the Internet or to send
and receive multimedia message on your
phone. When you use GPRS, you will be billed
per KB (Kilobyte) when sending or receiving
information.
Notice:
Check with Vodafone about charges for its GPRS
service.
(1) On the Home screen, click [Start
→More→ Settings → Connections →
GPRS].
(2) Click [Menu → Add].
(3) In [Description], enter a name for the
connection.
(4) In [Connects to], select [The Internet].
(5) In [Access point], enter the name of the
GPRS of your wireless service provider.
(6) Enter the appropriate information in the
remaining fields, if required by your
wireless service provider.
(7) Click <Done>. To start browsing the
Internet, click [Start → Internet Explorer].

Connecting to the Internet
95
To set up a Dial-up connection
(1) On the Home screen, click [Start
→More→ Settings → Connections →
Dial-up].
(2) Click [Menu → Add].
(3) In [Description], enter a name for the
connection.
(4) In [Connects to], select [Work].
(5) Enter the appropriate information in the
remaining fields.
(6) Click <Done>.
Caution:
You can also add and set up the following
connections:
1. VPN: A VPN connection is used to access your
corporate network by using an existing Internet
connection.
2. Proxy: A Proxy connection is used to access the
Internet using an existing connection to your
corporate or wap network.
Using advanced options
From the Connections screen, you can access
advanced options to specify the service
provider, the number of redial attempts, the
amount of idle time to wait before disconnecting,
and so on.
(1) On the Home screen, click [Start
→More→ Settings → Connections].
(2) Click [Menu → Advanced].
(3) Select a network service provider for each
connection type. You can choose
[Automatic] to allow the phone to set a
service provider for each connection by
default.
(4) Click [Menu → Options].

Connecting to the Internet
96
(5) Choose the appropriate information in the
remaining fields.
(6) Click <Done>.
Adding a URL exception
Some URLs for Web pages on your company
internet may use periods, for example:
internet.companyname.com. To view these
pages in Internet Explorer Mobile, you must
create a URL exception.
(1) On the Home screen, click [Start
→More→ Settings → Connections].
(2) Click [Menu → Advanced].
(3) Click [Menu → Work URL Exceptions].
(4) Click [Menu → Add].
(5) In [URL Pattern], enter the URL name. To
add multiple URLs, use a semicolon (;).
(6) Click <Done>.
Caution:
You do not need to create URL exceptions for
Internet URLs.
Using Internet Explorer
Internet Explorer Mobile is a full-featured
Internet browser, optimized for use on your
phone.
The phone allows you to access the Internet or
applications through Internet Explorer. To
connect to Internet Explorer:
Ensure that your SIM card supports the
network function. For additional details,
check with your network service operator.
Contact your network service provider for
opening and ordering data service or GPRS
service.

Connecting to the Internet
97
To browse a Web page
(1) On the Home screen, click [Start
→Internet Explorer].
(2) In Internet Explorer, click [Menu →
Address Bar].
(3) Enter the address, and click <Go>.
To set the display of Web page
(1) While on a Web page, click [Menu →
View].
(2) Select one of the following:
Text Size: Select the text size on Web pages.
One Column. Arranges the content into one
column that is as wide as the screen. This
means that you will rarely have to scroll
horizontally.
Fit To Screen: Maintains a layout similar to
what you see on a desktop computer, but
makes items smaller and arranges the content
so that you can see most of it without having to
scroll horizontally.
Desktop: Keeps the same layout and size as
on a desktop computer, which will require both
horizontal and vertical scrolling.
Full screen: Select to view a Web page in
full-screen mode.
Show Picture: Select to show or hide
pictures on Web pages.
To send a link via email
(1) Go to the desired Web page.
(2) Click [Menu →Tools →Send Link…].
(3) Select [Messages] or [Outlook Email].’
(4) A new message is created with the page
address inserted in the message body.
(5) Enter the other information and click
<Send>.

Connecting to the Internet
98
To use Favorites
[Favorites] stores your most commonly visited
websites. You can select from five default
network addresses in [Favorites], or you can
also scroll the Navigation Key down to
select [More Favorites], and then press the
Navigation Key to visit more Web Pages.
To add a Web page to the Favourites list
(1) On the Home screen, click [Start
→Internet Explorer].
(2) To go to the page you want to add, click
[Menu → Address Bar], enter the
address, and click <Go>.
(3) Click [Menu → Add to Favourites].
(4) Confirm or change the name and Web
page address.
(5) In [Folder], select a folder for the Favorite.
(6) Click <Add>.
Caution:
A quick way to add Favourites to your phone is to
synchronise with your PC using ActiveSync. For
more information, see ActiveSync Help on your
PC.
To view a Favourite
(1) On the Home screen, click [Start
→Internet Explorer].
(2) While on a Web page, click <Favorites>.
(3) Select a Favorite, and click <Go>.
To move a Favorite to a folder
(1) On the Home screen, click [Start
→Internet Explorer].
(2) Click <Favorites>.
(3) Select the Favorite to move.
(4) Click [Menu → Edit].

Connecting to the Internet
99
(5) In [Folder], scroll to the folder to which you
want to move the Favorite.
(6) Click <Done>.
To clear temporary files, cookies or
history
(1) While on a Web page, click [Menu →
Tools →Options].
(2) Click [Memory].
(3) Select the type of memory to clear.
(4) Click <Clear>, then click <Yes>, and then
click <Done>.
Using Internet sharing
When you connect your phone to a PC or
laptop computer, Internet Sharing allows you to
use your phone as an external modem for the
computer.
To set up the phone as a modem
(1) Use the USB data cable to connect your
phone with your PC. The PC will
automatically detect that your phone has
been connected, and you can install the
USB RNDIS drive on the Getting Started
CD.
(2) While connecting the network line, select
[Network Neighborhood] on PC then
click [Properties→Local Connection→
Forbidden] with the Right Soft Key
to disconnect the current network.
(3) After finishing installation, confirm that the
RNDIS network card has been added to
the network adapter in the Device
manager of your PC. If it has, then the
drive has been installed successfully.
(4) At this time, the phone can be used as an
external modem for PC, and you can
access the Internet.
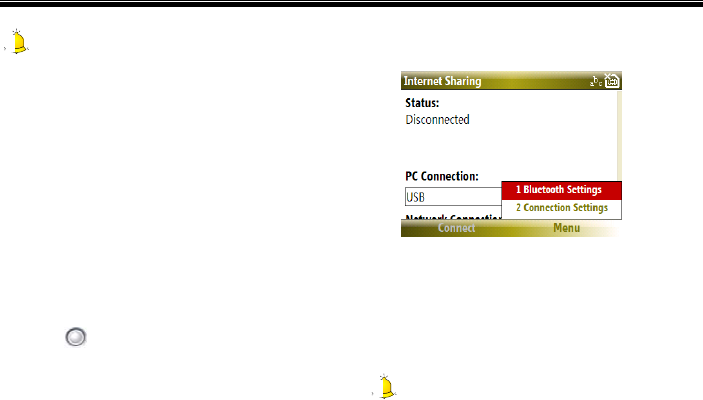
Connecting to the Internet
100
Caution:
Please make sure you have selected [Tool→
Internet Options→Connection] on your PC. Click
“Never dial-up to connect,” then select [Local
Network Setting]. When the screen appears on your
PC, select [Cancel Proxy Server].
To connect to the Internet
(1) On the Home screen, click [Start
→More→Internet Sharing].
(2) Select the PC connection manner – [USB]
connection or [Bluetooth PAN]
connection, then press the Navigation
Key .
(3) Select network connection type. The
phone defaults to [none], or you can set it
by referring to “To set multiple network
connection” on page 50. To modify the
network connection type, Click [Menu→
Connection Settings]. See the image
below.
[Y20]
(5) Click <Connect>. If you selected [USB],
the PC will automatically check the USB
cable connection until the screen displays
“Connected” and recognises your phone
as a modem. You are now ready to access
the Internet on your PC using your phone.
Caution:
1. In order to use the phone as a modem, your
SIM card must support this function. For more
detailed information, please contact with your

Connecting to the Internet
101
service provider.
2. If you select [USB] as the PC connection
manner, you must install Microsoft ActiveSync
version 4.2 on your PC. If you select [Bluetooth
PAN] as the PC connection manner, you must first
activate and finalize the personal local network
setting of Bluetooth on the PC. For more detailed
information, please refer to Windows help and
support software.
To deactivate Internet sharing
On the Internet sharing screen, click
<Disconnect>.
Caution:
Before using ActiveSync, confirm that Internet
sharing is deactivated.
Using Tools
102
10. Using Tools
Using task
Use Tasks to keep track of things you need to
do. A task can occur once or repeatedly
(recurring). You can set reminders for your
tasks and you can organise them using
categories. Your tasks are displayed in a task
list. Overdue tasks are displayed in red.
To create a task on the phone
(1) On the Home screen, click [Start→Tasks].
(2) In the [Enter new task here] box, enter
the task name and press the Navigation
Key .
Caution:
1. You can synchronise information on your
phone with your PC to keep your task list up to
date in both locations.
2. If you create a new task with a reminder on
your PC and then synchronise tasks with your
phone, the reminder will play at the time that was
set on your PC.
To beam a task
(1) On the Home screen, click [Start →Tasks].
(2) Select the desired task, and click
[Menu→Beam Task].
To delete a task
(1) On the Home screen, click [Start→Tasks].
(2) Select the desired task, and click [Menu →
Delete Task].
To mark a task as completed
(1) On the Home screen, click [Start→Tasks].
(2) Select the desired task, and click
<Complete>.
Using Tools
103
To sort and filtering the task list
(1) On the Home screen, click [Start →Tasks].
(2) In the task list, do one of the following:
To sort the list, click [Menu → Sort By], and
select a sort option.
To filter the list by category, click [Menu →
Filter], and click the category you want
displayed.
Caution:
1. Categories appear only in tasks that are
synchronised with your PC.
2. To filter your tasks further, click [Active Tasks]
or [Completed Tasks].
Using calculator
The calculator function can perform standard
mathematical operations such as addition,
subtraction, multiplication, and division.
Using methods
(1) On the Home Screen, click [Start→,
More→Accessories→Calculator].
(2) After entering Calculator screen, enter
numbers and press repeatedly or
scroll the Navigation Key up, down,
left or right to select your desired operation
symbols (+,-, /,X).
(3) Press to enter a decimal and
press to enter a minus sign. Press the
Navigation Key or press to get the
answer. Press the Back/Clear to
clear last digit entered, and press the Left
Soft Key <Clear>to clear the display.

Using Tools
104
Using calendar
Use Calendar to schedule appointments,
including meetings and other events. Your
appointments for the day can be displayed on
the Home screen. If you use Outlook on your
PC, you can synchronise appointments
between your phone and PC. You can also set
Calendar to remind you of appointments with a
sound or flashing light, for example.
To view your schedule
You can view your schedule in three different
views: Month, Week and Agenda.
(1) On the Home screen, click [Start
→Calendar].
(2) Do one of the following:
Click [Menu → Month View].
Click [Menu → Week View].
Click [Menu→ Go to Today], or from Week
or Month view, click [Menu → Agenda
View].
To create a new appointment
(1) On the Home screen, click [Start
→Calendar].
(2) Click [Menu → New Appointment].
(3) Enter information about the appointment.
(4) To schedule an all-day event, in [End
time]; select [All day event].
(5) Click <Done>.
Caution:
All-day events do not occupy blocks of time in
Calendar; instead, they appear in banners at the
top of the calendar.
To send a calendar appointment
You can send a calendar appointment to
Using Tools
105
another phone over multimedia message.
(1) On the Home screen, click
[Start→Calendar].
(2) Select an appointment, then click [Menu
→Send as vCalendar].
(3) Enter the recipient in the [To] line of the
multimedia message, then click <Send>.
Using voice notes
Use Voice Notes to create short voice
recordings. Voice notes are included in the All
Notes list and are named consecutively
(Recording1, Recording2, and so on).
To record voice notes
(1) On the Home screen, click
[Start→More→Voice Notes].
(2) Hold the phone’s microphone near your
mouth.
(3) Click <Record> and say your voice note.
(4) Click <Stop> to stop recording a voice
note.
To play voice notes
(1) On the Home screen, click
[Start→More→Voice Notes].
(2) Select the voice note to play, and press
the Navigation Key or click
[Menu→Play].
Caution:
To stop listening to the voice note, click <Stop>
while the voice note is playing.
To delete a voice note
(1) On the Home screen, click
[Start→More→Voice Notes].
(2) Select the voice note to delete.

Using Tools
106
(3) Click [Menu → Delete].
(4) Click <Yes>.
Caution:
If you delete a voice note that has a default name,
such as [Recording1], this name becomes
available for a new voice note.
To set a voice note as a ringtone
(1) On the Home screen, click [Start→More
→Voice Notes].
(2) Select the voice note, and click [Menu →
Set As Ringtone].
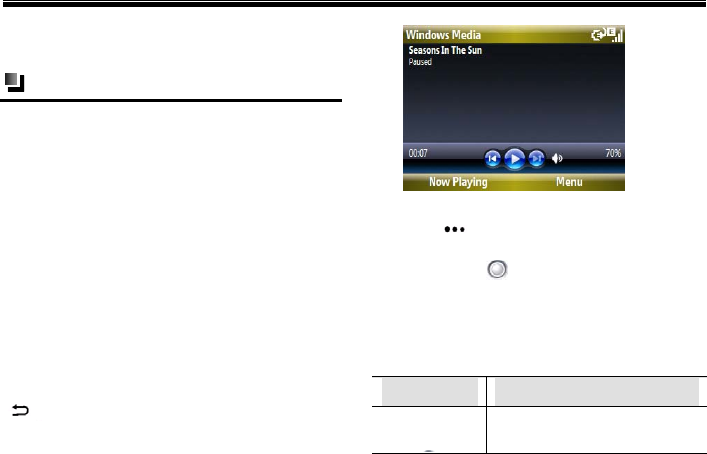
Using Multimedia
107
11. Using Multimedia
Using Windows media player
You can use built-in Windows Media Player to
play digital audio and video files that are stored
on your phone or MicroSD card.
The player can play audio files with the
following formats: MP3, MID, WAV and WMA.
The player can also play video files in ASF and
WMV formats.
To enter Windows Media from the Home
Screen, select [Start→Windows Media].
The Library screen defaults as Windows Media
screen; you can select the files that you want to
play from different types of files.
On Library screen, press the Back/Clear Key
to enter playback screen, the details are
in the figure on the next page:
[Y21]
On the Windows media screen, press the Left
Soft Key <Now Playing> to select your
desired file in playback list, then press the
Navigation Key to play the file.
Controls of Windows Media Player
By default, these hardware buttons are
assigned to Windows Media.
Buttons Allows you to
Scroll the
Navigation
Skip to the beginning of the
currently playing file
Using Multimedia
108
Key left Quickly press the key twice
to skip to the previous file
Hold the key, it will rewind a
file
Scroll the
Navigation
Key
right
Skip to the beginning of the
next file. Press and hold to
fast-forward a file.
Press the
Navigation
Key
Play or pause
Scroll the
Navigation
Key up
or down
Increase or decrease the
volume
Switch to silent mode
The screens and options of Windows
Media Player
Windows Media Player has three primary
screens:
Playback screen: The default screen that
displays the playback controls (such as Play,
Pause, Next, Previous and Volume) and the
video window. You can change the
appearance of this screen by choosing a
different skin.
Now Playing screen: The screen that
displays the Now Playing playlist. This
special playlist indicates the current file being
played and files that are queued up to play
next.
Library screen: The screen that lets you
quickly find your audio files, video files and
playlists. It contains categories such as [My
Music], [My Videos], [My TV] and [My
Playlists].
Using Multimedia
109
At the bottom of each screen is a Menu. The
commands on this menu vary, depending upon
which screen you are viewing.
Playback screen menu
When you are viewing the Playback screen,
these options appear on the <Menu>.
Options Allows you to
Library
Display the Library screen
so you can select a file to
play
Play/Pause
Start or pause playback
Stop Stop playback
Shuffle/
Repeat
Play the items in the Now
Playing play list in random
order or repeatedly.
Full screen Play video file or network
video media files with full
screen (this function isn’t
available for audio files).
Options Adjust various Windows
Media Player Mobile
options, including
network, skin and hardware
button options
Properties Display detailed information
about the currently playing
file.
About Display information about
Windows Media Player,
such as the version number.
Now playing screen menu
When you are viewing the Now Playing screen,
these options appear on the [Menu].
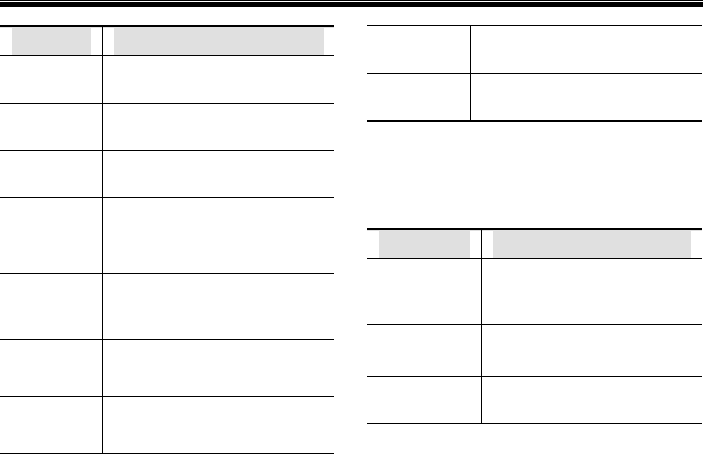
Using Multimedia
110
Options Allows you to
Library Display the Library screen so
you can select a file to play
Move Up Move the selected item up in
the play list order
Move
Down
Move the selected item down
in the play list order
Delete
from Play
list
Remove the selected item
from the play list but the file is
still stored in Library.
Shuffle/
Repeat
Play the items in the Now
Playing play list in a random
order or repeatedly.
Save Play
list Save the current files in play
list
Clear Now
playing Remove all items from the
Now Playing play list.
Error
Details
View error information about
the selected item
Properties View information about the
selected file
Library screen menu
When you are viewing the Library screen, these
options appear on the [Menu]:
Options Allows you to
Queue Up
Add the selected item to the
end of the current (Now
Playing) playlist.
Delete from
Library
Delete the selected item
from the library.
Now Playing Display the Now Playing
playlist.
Using Multimedia
111
Library Switch between libraries,
such as between [My
Device] and [Storage
Card].
Update
Library
Add new items to the library
by searching your phone or
storage card.
Open File Find and play files that are
stored on your phone or
storage card but are not in
the library.
Open URL Play a file on a network,
such as the Internet.
Properties View information about the
selected file.
Player Enter the playback screen
To add files to play list
(1) On the Home screen, click
[Start→Windows Media].
(2) If you are not on the Playback screen,
press the Back/Clear Key to
display the Playback screen.
(3) Press the Left Soft Key <Now
Playing> and select the desired file in play
list.
(4) Click [Menu→Save Playlist] to save the
current file to play list.
To remove a file from play list
(1) On the Home screen, click
[Start→Windows Media].
(2) If you are not on the Playback screen,
press the Back/Clear Key to
display the Playback screen.

Using Multimedia
112
(3) Press the Left Soft Key <Now
Playing> and select the desired file in play
list.
(4) Click [Menu→Remove from Playlist] to
delete the current file from play list.
To play music and videos on your
phone
Use the library to find and play songs, videos
and playlists that are stored on your phone or
removable storage card.
(1) On the Home screen, click
[Star→Windows Media].
(2) If you are not on the Library screen, click
[Menu →Library], and then select the
library that you want to use (for example,
Storage Card).
(3) In most cases, Windows Media Player
Mobile automatically updates the library.
However, you can manually update the
library to ensure that it contains new files
that you recently copied to your phone or
storage card. Click [Menu→Update
Library] to manually update the library list.
(4) Select a category (for example, [My
Music] or [My Playlists]), select the item
that you want to play (such as a song,
album or artist name), and then click
<Play>.
Caution:
To play a file that is stored on your phone but is
not in a library, on the Library screen, click
[Menu→ Open File]. Select the item that you want
to play (such as a file or a folder), and click
<Play>.
To play music and videos on a network
Use the [Open URL] command to play a song
or video that is stored on the Internet or on a
network server.
Using Multimedia
113
(1) On the Home screen, click
[Start→Windows Media].
(2) If you are not on the Library screen, click
[Menu → Library].
(3) Click [Menu → Open URL].
(4) Do one of the following:
In [URL], enter a network address.
In [History], select a URL that you have
previously used.
Caution:
To play media on a network, your phone must be
connected to a network
To change Player appearance
You can change the appearance of the
Playback screen by choosing a new skin.
(1) On the Home screen, click
[Start→Windows Media].
(2) If you are not on the Playback screen,
press the Back/Clear Key to
display the Playback screen.
(3) Click [Menu → Options → Skins].
(4) To select a skin, scroll the Navigation Key
left or right until you find the skin that
you want to use.
(5) Click <Done>.
Using camera and video
recorder
Taking photos and shooting video clips with
audio are easy with your phone’s built-in
camera.
Using Multimedia
114
To enter the Camera and Video
Recorder preview
(1) On the Home screen, click
[Start→More→Pictures&Videos] and
press the Navigation Key or press the
Camera Key to enter the Camera
Preview screen.
(2) Click [Menu→Video] to enter the Video
Recorder Preview screen.
(3) To exit the Camera or Video Recorder,
press the Back/Clear Key .
Camera and Video settings
While capturing a photo, click <Menu> to
access the following options:
Options Description
Video Select to switch to the video
mode.
Mode
Indicates the current
capture mode, and you can
set it as [Normal], [Burst]
or [Timer].
Brightness Select the desired
brightness for the photo.
Resolution Select a picture’s file size
(QVGA-320x240,
VGA-640x480,
SXGA-1280x960,
or UXGA-1600x1200).
Zoom Zoom in on an object
when you take
a picture. You can adjust
the zoom from 1x to 8x.
White
Balance
Set the capture
environment as
[Automatic], [Sunny],
[Cloudy], [Office], [Home]
or [Night].
Using Multimedia
115
Flash Select to turn on or turn off
the flash light while
capturing
Full screen Select to take photos in full
screen.
Options Enter the Options Menu
screen, and set the
parameters for the camera.
While capturing video clip, click <Menu> to
access the following options:
Options Description
Still Select to switch to the
capture mode.
Brightness Select the desired
brightness for the photo.
Quality Select the picture quality
setting
White
Balance
Set the capture
environment as
[Automatic], [Sunny],
[Cloudy], [Office], [Home]
or [Night].
Full screen Select to take Video in full
screen.
Options Enter the Options Menu
screen, and set the
parameters for the camera.
To change the storage location of
photos and videos
(1) On the Home screen, click
[Start→Pictures&Videos] and press the
Navigation Key or press the Camera
Key to enter the Camera Preview
screen.

Using Multimedia
116
(2) Click [Menu→Options→Camera].
(3) In [Save files to], scroll the Navigation
Key up or down to set the desired
storage location as [Main memory] or
[Storage Card] (if inserted).
(4) Click <Done>.
To include audio when recording video
files
(1) On the Home screen, click
[Start→Pictures&Videos] and press the
Navigation Key or press the Camera
Key to enter the Camera Preview
screen.
(2) Click [Menu→Options→Video].
(3) In [Include audio when recording video
files], press the Navigation Key to
activate this function.
(4) Click <Done>.
To limit time when recording video files
(1) On the Home screen, click
[Start→Pictures&Videos] and press the
Navigation Key or press the Camera
Key to enter the Camera Preview
screen.
(2) Click [Menu→Options→Video].
(3) In [Time limit for videos], scroll the
Navigation Key left or right to set the
time limit as [No limit], [15 seconds] or
[30 seconds].
(4) Click <Done>.
To take pictures and video clips
(1) On the Home screen, click
[Start→Pictures&Videos] and press the
Navigation Key or press the Camera

Using Multimedia
117
Key to enter the Camera Preview
screen.
(2) On the Capture Preview screen, click
[Menu→Video] to switch to the video
capture code.
(3) Press the Navigation Key or the
Camera Key to capture a photo or
video clip. Press the Left Soft
Key <Stop> to stop recording.
To send the captured photo or video
clips
(1) First, take a picture or video clip, for more
details; please refer to “To take pictures
and video clips”.
(2) Click [Menu → Send].
(3) On the Messaging screen, select
[Multimedia Message] or [Outlook
E-mail] then click <Select>.
(4) A new message is created with the item
attached.
(5) Enter the recipient name and subject, and
click <Send>. The message will be sent
the next time you synchronise your phone.
To beam the captured photo or video
clips
(1) First, take a picture or video clip, for more
details; please refer to “To take pictures
and video clips”.
(2) Click [Menu → Beam].
(3) Select the device to which you want to
send the picture.
(4) Click <Beam>.

Using Multimedia
118
To set the captured photo as Home
Screen
(1) First, take a picture or video clip, for more
details; please refer to “To take pictures
and video clips”.
(2) Click [Menu → Use as Home Screen].
(3) Select the display area and click <Next>.
(4) Adjust the transparency. Select a higher
percentage for a more transparent picture,
or a lower percentage for a more opaque
picture.
(5) Click <Finish>.
To edit the captured photo or video
clips
(1) First, take a picture or video clip, for more
details; please refer to “To take pictures
and video clips”.
(2) Click [Menu →Edit], and do any of the
following:
To rotate a picture 90 degrees, click [Menu
→ Rotate].
To crop a picture, click [Menu → Crop].
Then, drag the cursor to position it on the
first corner of the cropping area, and click
<Next>. Select the second corner with the
area to crop and click <Finish>, or click
<Previous> to go back to the previous
screen and select again.
To auto-adjust the brightness and contrast
levels of a picture, click [Menu →Auto
Correct].
Click [Menu → Save As] to save the edited
picture with a new name or at a new
location.
Caution:
To undo an edit, click [Menu → Undo]. To cancel
all unsaved edits you made to the picture, click

Using Multimedia
119
[Menu → Cancel].
To delete the captured photo or video
clips
(1) First, take a picture or video clip, for more
details; please refer to “To take pictures
and video clips”.
(2) Click [Menu →Delete].
To view the stored photos and videos
(1) First, take a picture or video clip, for more
details; please refer to “To take pictures
and video clips”.
(2) The captured photos or video clips will be
saved to [File Explorer] automatically.
Enter the [File Explorer] to view the
stored photos or videos.
(3) To view the photos and videos stored in
the storage card, enter [File Explorer] and
click [Menu→ Storage Card].
Using pictures&videos
The Pictures & Videos program allows you to
view pictures and play GIF animation files and
video clips on your phone. You can also view
the pictures as a slide show, beam them, send
them via a messaging program, edit them, or
set them as the background on the Home
Screen.
To view pictures
(1) On the Home screen, click [Start→
More→Pictures&Videos]. The images in
the My Pictures folder appear as
thumbnails by default.
(2) Select a picture and click <View>. If you
cannot find a picture in the default My
Pictures folder, click [Menu →Folders →
My Device] to go to other folders.
To view the pictures in slide show
You can view your pictures as a slide show on

Using Multimedia
120
your phone. Pictures are shown in full-screen
view with five-second intervals between slides.
(1) On the Home screen, click
[Start→More→Pictures&Videos].
(2) Click [Menu → Play Slide Show].
Caution:
You can specify how pictures are scaled to optimise
their display in a slide show. Click [Menu
→Options], select [Slide Show], and choose either
[Portrait pictures] or [Landscape pictures]. You
can even set your phone to play a screensaver on
its monitor while your phone is connected to the
PC and idle for 2 minutes.
To play videos
(1) On the Home screen, click
[Start→More→Pictures&Videos]. Video
files appear as thumbnails with an
icon [Y22] .
(2) Select a video and click <Play> to play it
with the built-in Windows Media Player.
To edit a picture
You can rotate, crop and adjust the brightness
and colour contrast of your pictures.
(1) On the Home screen, click
[Start→More→Pictures&Videos].
(2) Select the picture you want to edit, click
<View>.
(3) Click [Menu →Edit], and do any of the
following:
To rotate a picture 90 degrees, click [Menu
→ Rotate].
To crop a picture, click [Menu → Crop].
Then, drag the cursor to position it on the

Using Multimedia
121
first corner of the cropping area, and click
<Next>. Select the second corner with the
area to crop and click <Finish>, or click
<Previous> to go back to the previous
screen and select again.
To auto-adjust the brightness and contrast
levels of a picture, click [Menu →Auto
Correct].
Click [Menu → Save As] to save the edited
picture with a new name or at a new
location.
Caution:
To undo an edit, click [Menu → Undo]. To cancel
all unsaved edits you made to the picture, click
[Menu → Cancel].
To delete a picture or video clip
(1) On the Home screen, click
[Start→More→Pictures&Videos].
(2) Select a picture or video clip on the
Pictures & Videos screen, and click [Menu
→ Delete]. Click <Yes> to confirm the
deletion.
To set a picture as Home Screen
(1) On the Home screen, click
[Start→More→Pictures&Videos].
(2) Select the picture you want to set as the
background.
(3) Click <View>.
(4) Click [Menu → Use as Home Screen].
(5) Scroll the Navigation Key left or right to
adjust the transparency. Select a higher
percentage for a more transparent picture,
or a lower percentage for a more opaque
picture.
(6) Click <Finish>.

Using Multimedia
122
To send pictures and video clips via
multimedia message or Email
You can send pictures and video clips to other
phones via Mulitmedia message or email.
(1) First, set up Messaging to send and
receive messages.
(2) On the Home screen, click
[Start→More→Pictures&Videos].
(3) On the Pictures & Videos screen, select
the item you want to send.
(4) Click [Menu → Send].
(5) On the Messaging screen, select [Outlook
E-mail] or [Messages], then click
<Select>.
(6) On the Messages screen, click [Menu→
New→Multimedia Message].
(7) A new message is created with the item
attached.
(8) Enter the recipient name and subject, and
click <Send>. The message will be sent
the next time you synchronise your phone.
Caution:
Pictures and video clips are saved automatically
before they are sent.
To beam pictures
You can beam a picture to your friends or
family by using Bluetooth technology.
(1) On the Home screen, click
[Start→More→Pictures&Videos].
(2) Select the picture you want to beam.
(3) Click [Menu → Beam…].
(4) Select the device to which you want to
send the picture.
(5) Click <Beam>.
Using Multimedia
123
To set a picture as a contact image
You can assign a picture to a contact so that
you can easily identify the contact at any time.
(1) On the Home screen, click
[Start→More→Pictures&Videos].
(2) Select the picture you want to assign to a
contact.
(3) Click [Menu → Save to Contact…].
(4) Select the contact, and click <Select>.
Playing games
This function lets you play two games: Bubble
Breaker and Solitaire come with your phone.
To access the Games screen, click
[Start→More→Games] from the Home screen.
Using Java
Java-based applications (MIDlet files) can be
run on your phone. Your phone supports Java 2
Edition, J2ME. Java allows you to download
MIDlet files, such as games and tools that are
specifically designed for mobile devices. Java
gives you the flexibility of installing and
managing additional J2ME applications from
the Internet.
On the Home screen, click [Start→More
→More→Tools→Java] and press the
Navigation Key to enter the Java
application screen.
If you haven’t installed any Java games on your
phone, the phone screen will display “No
applications installed”, Whereas if there has
existed some java games on your phone, all
stored games will be shown on the screen, so
you can select your desired game and click
<Run>to run it.
To manage Java programs
(1) On the Home screen, click [Start→More

Using Multimedia
124
→More→Tools→Java].
(2) Select a Java MIDlet and click
[Menu→Application] to delete, set
permission or view the detail for the
current Java program.
To view information about Java
program
(1) On the Home screen, click
[Start→More→More→Tools
→Java].
(2) Select a Java MIDlet and click
[Menu→Java Info] to view some
information about the current Java
program.
To select the network type
(1) On the Home screen, click
[Start→More→More→Tools→Java].
(2) On the Java Apps screen, click [Menu
→Java Settings].
(3) In [Select Network], select the desired
network by using the Navigation control.
(4) Click <OK>.
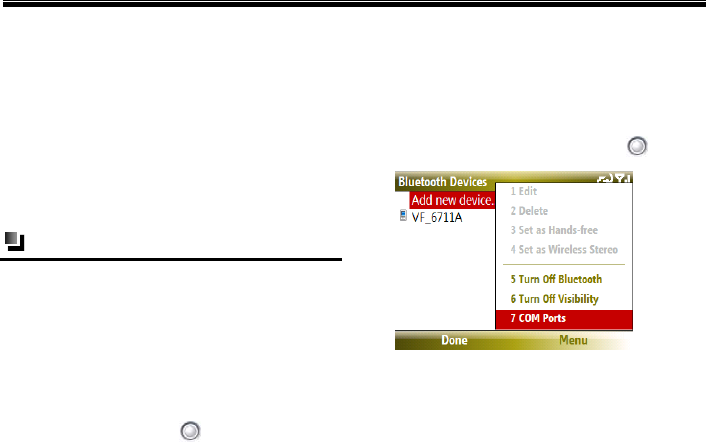
Using Bluetooth
125
12. Using Bluetooth
Bluetooth is a short-range wireless
communications technology. Devices with
Bluetooth capabilities can exchange
information over a distance of about 10 meters
without requiring a physical connection. You
can even beam information to a device in a
different room, as long as it is within the
Bluetooth signal coverage range.
Turning Bluetooth on or off
You can enable Bluetooth by clicking the
On/Off switch in Comm Manager. You can also
do the following:
(1) On the Home screen, click [Start →
More→Settings → Connections →
Bluetooth].
(2) Click [Menu→Turn On Bluetooth], press
the Navigation Key to activate it. Your
phone can now receive the connection
request of all Bluetooth-enabled devices.
(3) Click <Done>.
(4) To turn off Bluetooth capabilities on your
phone, click [Menu→Turn Off Bluetooth],
then press the Navigation Key again.
[Y23]
Using Bluetooth
126
Making your phone
discoverable
(1) On the Home screen, click [Start
→More→ Settings → Connections →
Bluetooth].
(2) Click [Menu→Turn On Visibility], then
press the Navigation Key to activate
it.
(3) Click <Done>.
Connecting a Bluetooth device
to your phone
A Bluetooth partnership is a relationship that
you create between your phone and another
Bluetooth-enabled device in order to exchange
information in a secure manner.
Creating a partnership between two devices
involves entering the same personal
identification number (PIN) on both devices,
and this is a one-time process. Once a
partnership is created, the devices can
recognise the partnership and exchange
information without entering a
PIN again. Make sure the two devices are
within a range of 10 metres, and Bluetooth is
turned on and in discoverable mode.
To search Bluetooth devices
(1) On the Home screen, click [Start
→More→ Settings → Connections →
Bluetooth].
(2) On the Bluetooth Device screen, press the
Navigation Key to enter the Add
Devices screen.
(3) The system begins to search for Bluetooth
devices within 10 meters, as detailed in
the following image.
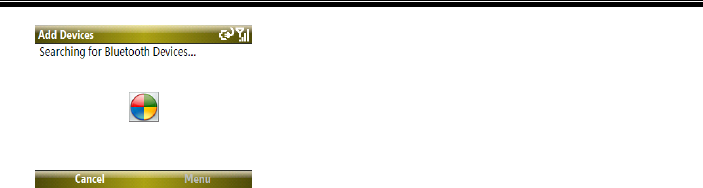
Using Bluetooth
127
[Y24]
To match the found device
(1) After the phone has searched for other
Bluetooth-enabled devices and lists them,
you can select your desired device name
in the list. Click <Next > and enter a
passcode (the passcode must be between
1 and 16 characters long), then click
<Next> to establish a secure connection
(2) Wait for the paired device to accept the
partnership.
(3) On your phone, a message will appear,
indicating that your phone has connected
with the paired device. Click <OK>.
(4) The name of the paired device is then
displayed. You may edit and enter a new
name for that device and the devices
which have created partnership with your
phone will be saved in “Add Devices” list.
To accept a Bluetooth partnership
(1) Ensure that Bluetooth is turned on and in
discoverable mode.
(2) Click <Yes> when prompted to establish a
partnership with the other device.
(3) Enter a passkey (the same passkey that is
entered on the device requesting the
partnership) to establish a secure
connection. The passkey must be between
1 and 16 characters long.
(4) Click <Next>.

Using Bluetooth
128
(5) A message will appear indicating that your
phone has connected with the paired
device. Click <OK>.
(6) The name of the paired device is then
displayed. You may edit and enter a new
name for that device, then click <Next>.
(7) Select the check boxes of services that
you want to use from the paired device.
(8) Click <Done>.You can now exchange
information with the other device.
To change the display name of a
bluetooth device
(1) On the Home screen, click [Start
→More→ Settings → Connections →
Bluetooth].
(2) On the Bluetooth Devices screen, scroll to
select a detected Bluetooth device.
(3) Click [Menu → Edit].
(4) Enter a new display name for the
Bluetooth device, then click <Next>.
(5) Click <Done>.
To delete a bluetooth device
(1) On the Home screen, click [Start
→More→ Settings → Connections →
Bluetooth].
(2) On the Bluetooth Devices screen, select a
detected Bluetooth device.
(3) Click [Menu→ Delete].
(4) Click <Done>.
Connecting a Bluetooth
earphone to your phone
For handsfree phone conversations, you can
use a Bluetooth handsfree headset such as a
car kit with your phone.
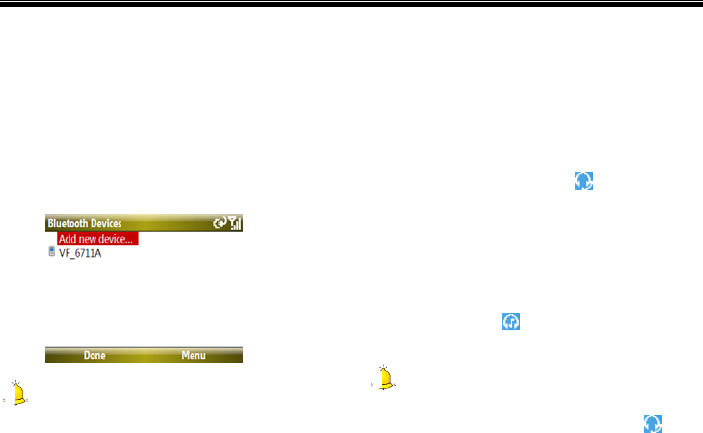
Using Bluetooth
129
(1) Set Bluetooth on your phone to
discoverable mode. For information about
this, see “Making your phone
discoverable”on page 126.
(2) Create a Bluetooth partnership, for more
information about this, see “To search
bluetooth devices” and “To match the
found device” on page 126. After matching
successfully, the following screen appears:
[Y25]
Caution:
1. For the above screen, each Bluetooth earphone
device will have a different display name.
2. You need to enter a passcode when connecting
to a Bluetooth handsfree or stereo headset. The
passcode is fixed and cannot be changed on a
Bluetooth headset.
(3) Click [Menu→Set as Hands-free], then
you can make a call via the Bluetooth
earphone and the icon will appear on
the Home Screen.
(4) While click [Menu→ Set as Wireless
Stereo], then you can enter [Windows
Media] to select the desired file to play via
the Bluetooth stereo. You can also use the
Bluetooth earphone to listen to the audio
file. The icon will appear on the Home
Screen.
Caution:
If you choose [Set as Hands-free] and [Set as
Wireless Stereo] simultaneously, the icon will
appear in standby mode.
Using Bluetooth
130
Sending files via Bluetooth
(1) Set Bluetooth on your phone to
discoverable mode. For information about
this, see “Making your phone
discoverable” on page 126.
(2) Create a Bluetooth partnership, for more
information about this, see “To search To
search bluetooth devices” and “To match the
found device” on page 126.
(3) On the Home screen, click
[Start→More→File Explorer].
(4) Select a file you want to send and click
[Menu→Beam…].
(5) Select the device name to which you want
to beam.
(6) Click <Beam>.
While establishing the FTP link between other
Bluetooth-enabled devices and your phone, the
system will prompt you whether or not to save a
file to the phone. If you click <OK>, the other
Bluetooth-enabled devices can visit any folder
in [File Explorer] of your phone and you can
send files to another matching device as well.
Receiving files via Bluetooth
(1) Set Bluetooth on your phone to
discoverable mode. For information about
this, see “Making your phone
discoverable”.
(2) On the Home screen, click [Start
→More→ Settings → Connections →
Beam].
(3) In [Receive incoming beams], press the
Navigation Key to activate it, and the
“” symbol appears.
(4) Click <Done> and you can receive files
from another Bluetooth-enabled device.
The received files (images or audio) will be

Using Bluetooth
131
saved in the [File Explorer→My
Documents] folder.

Phone Maintenance
132
13. Phone Maintenance
Mobile phones are very exact electronic
devices and must be looked after carefully. The
following advice can help you to look after your
phone and prolong its life.
The phone and its spare parts should be
put out of the reach of children.
Keep the phone dry. Rain, moisture or
water will corrupt its electronic circuitry. If
your phone does get wet, remove the
battery immediately and take the phone to
the nearest authorized service center.
Don’t put the phone in dusty places or this
will affect the everyday use of the phone.
LCD is a part of the phone which could be
easily damaged, so try to avoid dropping
the phone on the ground or any other form
of shock. Do not touch the screen with a
sharp object.
Don’t put the phone in a high temperature
environment. High temperatures will
shorten the life of electronic devices,
destroy the battery and destroy or melt a
phone’s plastic shell.
Don’t put the phone in a low temperature
environment. Otherwise, when the
temperature rises to normal temperature,
there will be moisture in the phone and this
will destroy the phone’s electronic circuitry.
Don’t throw, knock or shake the phone
intensely as this could damage the
electronic circuitry and structure of the
phone.
Use soft cloth with soap water to clean the
phone. Do not use rough chemical or
abrasive cleaners to clean the phone as
these could damage the phone.
Don’t paint your phone, for fear the parts
which can be taken down will be pasted
and affect its normal use.

Phone Maintenance
133
Please use a clean, soft cloth to clean the
camera lens etc.
If you have to replace the phone’s antenna,
please only do so with a suitable
replacement. Using an unsuitable antenna
or spare parts will damage the phone and
radio system.
Troubleshooting
134
14. Troubleshooting
Please check to see if any problems you have
encountered while using your phone are
described below. If you were unable to find the
solution to a particular problem, please contact
one of our maintenance centres.
The phone can’t be switched on
Possible
reason
Solution
You are not
holding down
the Power Key
for long
enough
Press and hold for at
least 2 seconds.
The battery
power is used
up
Charge the battery
Incorrect
battery
installation
Install battery correctly
The phone is switched off
automatically
Possible
reason
Solution
Low battery
power
Charge the battery
Troubleshooting
135
PIN/ PUK code lock
Possible reason Solution
Enter wrong
PIN Code( Personal
Identification Code)
or PUK Code
(Personal Unlocking
Key)
Enter correct
password
N.B
1. If you enter an incorrect PIN code three times in
succession, many SIM and phone functions will be
locked. For more details, please refer to “Safety
Precautions”.
2. If you do not know the correct PIN code and
PUK code, please contact your operator or network
service provider.
Bad call quality
Possible
reason
Solution
The signal
changes
suddenly
Maybe you are moving at
high-speed (e.g. on a train
or bus). Observe the
signal strength and select
the place with the
strongest signal to make a
call and ensure better call
quality.
The area does
not have a
good signal
Move to a more open
area.
Troubleshooting
136
Can’t answer a call
Possible
reason
Solution
The call
forwarding
option has
been set
Cancel call forwarding
according to
requirements.
The call
barring option
has been set
Cancel the function of
incoming call barring or
roam incoming call
barring.
Can’t make a call
Possible reason Solution
The phone is
switched off
Turn on the phone.
You are outside
the network
service area
Check the network
area.
The SIM card has
been incorrectly
inserted
Check whether your
SIM card can be used
normally.
The keypad locks
automatically
Press the Left Soft Key
and hold down
to unlock your
keypad
Use the phone
during call rush
hours and cause
line jam
Try to avoid using the
phone during call rush
hours
Call barring has
been set
Cancel the call barring
option according to
your requirements.

Troubleshooting
137
The call volume is too low
Possible
reason
Solution
The call volume
has been set
too low
Increase the call volume.
The person you are calling
cannot hear your voice
Possible reason Solution
Call status is set
to mute
Turn off the mute
function on the call
menu.
The microphone
is too far from the
sound source
Put the phone’s
microphone closer to
your mouth.
The incoming call doesn’t ring
Possible reason Solution
The phone selects
silent mode
Reset the ring type in
[Profiles] to [Normal]
or [Outdoor], for
more details, refer to
“To edit a profile” on
page 40.
The ring volume is
set too low
Increase the volume
The call forwarding
option has been
set
Cancel call
forwarding according
to requirements.
Troubleshooting
138
The battery can’t be charged
Possible
reason
Solution
The battery is
worn out and the
charging time
takes too long
Charge when the phone
prompts low battery.
The battery
doesn’t connect
well to the phone
Ensure the battery has
been inserted correctly.
The charger
doesn’t connect
to the phone
Ensure that the
interface between the
charger and the phone
is correctly connected,
and the charger icon
should appear on the
screen.
The battery
p
ower is em
p
t
y
,
When the battery power
is em
p
t
y
,
y
ou mustn’t
so charge with
USB data cable
charge with USB cable,
Use Vodafone standard
charger to charge
Battery or
charger has
been damaged
Contact one of our
maintenance centers.
The surrounding
temperature is
too low or too
high
Make sure the phone is
charged in a normal
temperature.
Troubleshooting
139
Can’t display network
Possible
reason
Solution
The SIM card
has been
incorrectly
installed
Refer to the SIM card
installation method.
The contact
between the SIM
card and phone
is dirty
Ensure the contact
between the SIM card
and phone remains
clean.
The SIM card
does not work
Check whether the SIM
card is out of date.
The network is
very weak
Move to a place with a
strong signal to use the
phone
The phone does not recognize
the storage card
Possible
reason
Solution
The storage
card has been
incorrectly
inserted
Insert the storage card
correctly according to
instructions in the user
manual.
The storage
card has been
damaged
Replace the storage card
Troubleshooting
140
Browser can’t connect to
Internet normally
Possible
reason
Solution
The network
service
provider don’t
provide the
service or you
haven’ apply
for this service
Contact with your network
service provider and
consult information about
how to apply for and use
these services
Haven’t set
correctly
About more details about
setting, refer to
“Connecting to the
Internet” on page 94.
Lack of space
Possible
reason
Solution
The resource
manager file is
taking up too
much space
Delete unnecessary files.
The browser’s
history records
are taking up
too much
space
Delete unwanted history
records.
Multi-message,
e-mail etc. are
taking up too
much space
Delete unwanted
messages and e-mails.

Safety Precaution
141
15. Safety Precaution
Usage environment
Please remember to obey the necessary
rules and regulations whenever use your
phone. This will help keep you safe and
respect your environment.
Switch off your phone when close to petrol
stations, bunkers, chemical factories or
explosive areas and adhere to any safety
signs and instructions there. Breaking any
rules may cause explosion or injury.
Using the phone in plane can cause
interference and danger to an aircraft
navigation system and network. You must
switch off your phone before boarding and
make sure your phone is switched off during
the whole flight.
Please place the phone somewhere safe and
don’t put it on a seat or in places where it
could fall and break. In order to ensure safe
driving and avoid road accidents, please
don’t use the phone when driving. If you must
use it, please use the phone’s hands-free or
park at roadside before making or answering
a call.
Medical devices
Please switch off your phone in areas near the
electronic medical equipments that obviously
desire to switch your phone off (.such as heart
pacemakers, hearing aids etc). Most medical
devices can shield the phone’s RF signal, but
some can’t. If you have any questions or need
to find out more, please consult your doctor or
medical device manufacturer.
Pacemaker
Pacemaker manufacturers advise the distance
between your phone and heart pacemaker to
be at least 6 inches (15.3 cm), or the phone
could interfere with the pacemaker.

Safety Precaution
142
The personnel who wears pacemaker
should do the followings:
ALWAYS keep the phone more than six
inches from your pacemaker when the phone
is turned on.
Do not carry the phone in a breast pocket.
Use the ear opposite the pacemaker to
minimize the potential for interference.
If you have any reason to suspect that
interference is taking place, turn your phone
OFF immediately.
Caution:
If you are unsure as to the level of interference,
please switch off the phone at once and consult a
doctor immediately.
Hearing aids
Some digital wireless phones may interfere with
some hearing aids. In the event of such
interference, you may want to consult your
service provider (or call the customer service
line to discuss alternatives).
Emergency calls
As the phone uses a radio signal, wireless and
ground communication network and personal
settings functions like other phones, it is
impossible to ensure your phone can be
connected successfully in any situation, so
please don’t rely purely on your phone as the
only means of notification in cases of
emergency (such as medical first aid )
Making an emergency call
(1) If your phone is switched off, please turn
on your phone and check whether the
network signal is strong enough.

Safety Precaution
143
(2) Input the local first aid number correctly
(such as 120), different areas have
different first aid numbers.
(3) Please press the call key to call.
Caution:
While making an emergency call, you should try
to provide all important information correctly. At
this time, the phone may be the only
communication tool, so don’t end the call without
permission.
Password access
Your phone and SIM card can be protected by a
password, to prevent others using it illegally.
Phone password
This protects your phone from unauthorised
use by other people. The preset password is
0000. After using it, please modify your phone
password as soon as possible and keep it
secret.
PIN code
This is personal identification code which is
used to protect the SIM card from unauthorised
use by other people. Generally, the PIN code
and SIM card are provided together. After
activating the PIN code, you can use the phone
normally by correctly inputting your password
each time.
Caution:
If you input your PIN code incorrectly three times
in succession, the SIM card will be locked. You will
need to input the PUK code to unlock it. (If you
don’t have a PUK code, please contact your
operator and SIM card provider for this
information. Please input all characters).

Safety Precaution
144
PIN2 code
This is the password which activates the
special SIM card functions. Usually, the PIN2
code and the SIM card will be provided together.
If you incorrectly input the PIN2 code three
times in succession, it will be locked and you
will need to input PUK2 to unlock it again.
PUK code
This is used to unlock the PIN code. If you
incorrectly input the PUK code ten times in
succession, then the SIM card cannot be used
again. Usually the PUK code and SIM card are
provided together. If you lose PUK code or it
isn’t supplied with SIM card, please contact with
your network operator or SIM card provider.
PUK2 code
This is used to unlock the PIN2 code. Usually
the PUK2 code and the SIM card are provided
together. PUK2 can modify the locked PIN2
code. If you incorrectly input the PUK2 code ten
times in succession, you will not be able to
access some of the functions. Please apply to
your operator for a new card. The PUK2 code
cannot be changed. If you lose it, please
contact your service provider.
Note about charging the battery
The phone provides power by using a lithium
battery. The standby time and call time will be
influenced by the system’s environment and
phone settings.
Please use the battery and charger provided
by the Vodafone. Company. Vodafone will
take no responsibility for damage caused by
using the wrong battery or charger.
Caution:
Generally, the charging time is 2-5 hours
according to the current status of the phone
(whether switch on the phone, make a call etc)

Safety Precaution
145
Don’t use wet hands to touch the phone
battery or charger while charging.
Caution:
To make the new battery achieve the best capacity,
please charge and discharge the phone for twice or
three times. As for the first several times, you
should charge the battery for at least 10 hours in
succession. Please charge the phone due to no
power and switch off the phone automatically.
Battery information and care
Never use any battery that has been
damaged.
While using the phone near network station,
the power consumption is very little.
Therefore, the call and standby time depends
on greatly by the signal strength of
honeycomb network and the parameters set
by network operator.
The battery charging time will depend on the
amount of electricity remaining and the type
of battery and charger used. When the
operation time (talk time and standby time) is
noticeably shorter than normal, it is time to
buy a new battery.
Only use batteries that are compatible with
your phone and only recharge your battery
with a compatible charger. If a charger is not
in use, disconnect it from the power source.
Do not leave the battery connected to a
charger for more than a week, as
overcharging may shorten its life.
Improper battery use may result in a fire,
explosion or other hazard. Do not
disassemble or open, crush, bend or deform,
puncture or shred the battery.
Do not connect the anode and cathode of a
battery the wrong way round.
Do not leave the battery in places with too
high or too low temperature or the battery

Safety Precaution
146
capacity will be reduced and battery life will
be shortened. Always try to keep the battery
at room temperature.
Do not short-circuit the battery. This may
damage the electronic core or the protected
circuit inside the battery. Accidental
short-circuiting may occur when a metal
object (coin, clip or pen) causes a direct
connection between the anode and cathode
of the battery, for example when you carry a
spare battery in a pocket or bag.
Short-circuiting the terminals may damage
the battery or the object causing the
short-circuiting. Therefore, please store the
battery carefully and on its own.
Don’t burn your phone battery or treat it as
common rubbish. Please adhere to the local
environmental policy in order to avoid
endangering life and causing environmental
damage, and recycle your batteries in time.
If your phone, battery or other charging
device leaks due to carelessness, you must
not put it inside any piece of equipment that
heats up (such as drier, microwave etc.).The
phone or other products may go wrong, or
this could even cause the phone, battery or
other charging device to burn, expand and
explode.
Please deal with the useless old battery
according to the relative introduction.
Vodafone will take no responsibility for any
direct or indirect damage caused by user error.
Note about using spare parts
Please put all spare parts (such as SIM card,
storage card, battery etc) out of reach of
children, in case danger occurs.
Please do switch off the phone and
disconnect the phone and charger before
you removing the battery from the phone.
As the phone’s spare parts are not
waterproof, please keep all spare parts dry.

Safety Precaution
147
You should pull out the plug of any spare part
correctly when you switch off the power, don’t
drag the power line forcibly.
If the phone, battery, and charger don’t operate
normally, ally, please contact one of our
maintenance centres with a qualified repair
service as soon as possible.
Other safety information
When you are not using your phone, it is
advisable to switch it off, remove the battery
to save energy and avoid radicalising the
phone.
If you use earphones to listen to music or
watch a film, please don’t turn the volume up
too high as this could damage your hearing.
You can’t disassemble the terminal and
battery of the phone unless the technical
personnel.

Index
148
Index
-A-
ActiveSyn
Install software, 67
Solve connection
problems, 68
ActiveSync, 60
Set up, 61
Start and stop, 62
Synchronise via
Bluetooth, 67
Additional dialing
information, 34
-B-
Battery charging, 20
Bluetooth
Connect a Bluetooth
device, 129
Connect a Bluetooth
earphone, 131
Make your phone
discoverable, 128
Receive files, 133
Send files, 133
Turn on or turn off,
128
-C-
Call history, 37
Change
Accessibility settings,
44
Regional settings, 43
Conference call, 33
Connection
Add a URL exception,
99
Set up a connection,
97
Use advanced
options, 98

Index
149
Connectiyour phone
to your PC, 60
Contacts
Add, 91
Make a call, 94
Manage, 96
Search for, 92
Send text messages,
or multimedia
message, 94
Send the contact's
information, 95
View and edit, 92
Customise
the tones, 39
-E-
Email
Download, 81
Individually sign and
encrypt, 84
Receive, 83
Reply and forward,
83
Set digital signature,
84
Set up a
POP3/IMAP4
account, 79
Write and send, 82
Enter
Information, 28
Menu, 27
-H-
Home Screen, 21
-I-
Install
Micro-SD card, 18
SIM card and battery,
17
Internet Explorer, 99
Internet sharing, 102
-K-
Key functions, 14
-M-

Index
150
Make call
Call history, 31
from contacts, 30
from Home screen,
30
from text messages,
31
Speed dial, 31
Manage files, 51
Manage folders, 85
Multimedia
Camera and video
recorder, 116
Games, 126
Java, 126
Pictures&videos, 122
Windows media, 110
Multimedia messages
Add predefined text,
77
Configure, 73
View and reply, 78
Write and send, 75
Mute call, 33
-P-
Phone Maintenance,
135
Power management,
55
Power on/ off, 22
-Q-
Quick List, 27
-R-
Receive a call, 32
Remove programs,
58
Reset your phone, 59
-S-
Safety notice, X
Safety Precaution,
144
Set
Calls, 45

Index
151
Coonections, 48
Date, time and alarm,
42
Error reporting, 45
Home screen, 41
Network, 47
Owner information,
43
Speed dial, 35
Status icon and
program introduction,
23
-T-
Task manager, 54
Text messages, 71
Enable request
delivery notification,
71
Reply or forward, 73
View and edit service
center, 71
Write and send, 72
Tools
Calculator, 106
Calendar, 107
Tasks, 105
Voice notes, 108
Troubleshooting, 137
Turn on/off the
speakerphone, 34
-V-
View the phone
information, 56
-W-
Windows Live
Messenger
Block or unblock, 89
Change display name,
89
Delete a contact, 89
End a chat, 88
Invite another contact,
88
Sign out, 90
Send a message, 88

Index
152
Set an account, 86
Sign in, 87
-Y-
Your phone
Accessaries, 13
Front view, 12
Protect, 56
Rear view, 13
Side view, 12