AMOI Electronics N810 PCS1900 (Mobile Phone) User Manual
AMOI Electronics Co., Ltd. PCS1900 (Mobile Phone) Users Manual
Users Manual

N810 User Manual
Touching Your Future
Welcome to the user guide for the N810
mobile phone.
With a whole suite of
powerful business
functions and
entertainment programs,
the N810 provides a
fresh and exciting level
of enjoyment.
By using the GPS
(Global Positioning
System), the N810 will
provide you a variety of
the best routes and
real-time voice service
according to your
different needs. You can easily locate your
current position and the correct direction.
The N810 can take photos or record video clips
with the built-in 2 million pixel CMOS camera,
which lets you memories every wonderful
moment.
Connect to the Internet with Internet Explorer;
synchronize your phone and PC with
ActiveSync. Wherever you go, whatever you do,
keep the N810 close and never skip a beat.
Special features
Supports GPS (page
88 )
Built-in 2 mega pixel
CMOS camera (page
80)
Built-in ActiveSync to
synchronize with PC
(page 65)
Touch Screen and
Manual Input
Identification (page
25)
Supports Windows
Mobile 6.0
Supports Micro-SD
card (page 87)
Internet sharing (page
75 )
Supports Outlook
email (page 48 )
65 K , 2.8 inches
Screen
Windows Media (page
77 )

Declaration
Copyright: 2007 Amoi Electronic Co. Ltd
reserves all rights.
The content of this guide is protected by
Copyright Law. It is forbidden to copy, distribute,
publish or cite the content of this user guide, in
whatever form, without the authorisation of
Amoi Electronic Co. Ltd.
JAVA is the registered trademark of Sun
Microsystems, Inc.
“” and “ “are registered trade
marks and belong to Amoi. They are protected
by law. The other products or company names
referred to in this guide are registered
trademarks, trademarks, or registered names
belonging to their owners.
Amoi has carefully and closely reviewed the
content of this user guide. Nevertheless, it is
possible that there are mistakes and omissions.
Amoi reserves the right to update and improve
any products described in this guide, as well as
the content of this guide. Amendments will be
made without prior notification.
The is the user guide for the Amoi mobile
phone only and does not include an
introduction to this product’s software and
hardware configuration. The product and spare
parts vary according to region. For more details,
please contact an Amoi customer service
centre.
Some functions referred to in this guide also
need the support of a network operator or
service provider. If you are unable to confirm
whether you will be able to use certain
functions or services with this phone, please
consult your network operator or service
provider.
The phone may include some commodities,
technology or software that is controlled by
export law, Chinese regulations and regulations
governed by other countries or areas.
In order to ensure your safety, please read the
“Safety Notice” and “Safety Precaution”.
Typographic conventions used in this user
guide include:
<>: shows function key;
““: shows important information on the phone
interface;
[ ]: shows the phone menus.
I
Content
Safety notice ............................................... VII
1.Getting to know your phone......................1
Your phone....................................................... 1
Front view of your phone.............................. 1
Side view of your phone............................... 1
Rear view of your phone .............................. 2
The Today Screen............................................ 2
Status Icon ....................................................... 3
2.Getting Started............................................6
Installing SIM card and battery......................... 6
Installing Micro SD card ................................... 7
Battery charging............................................... 8
Battery power display....................................... 9
Power on/ off.................................................... 9
Switching the phone on................................ 9
Switching the phone off.............................. 10
Turning the phone function on/off................... 11
Turning on the phone function.................... 11
Turning off the phone function.................... 11
Using shortcut keys........................................ 12
Using Stylus ................................................... 12
Instruction for the first used............................ 13
Touch screen and Calibration..................... 13
Align screen ............................................... 13
Text Size..................................................... 13
Reminder........................................................14
Start ................................................................14
Programs ....................................................14
Device locked .................................................15
Device Lock................................................15
Locking the phone ......................................15
Locking SIM Card .......................................15
3.Call Functions...........................................17
Entering the phone screen .............................17
Enter PIN code ...........................................17
Making a call ..................................................18
To make a call from the Pone Screen.........18
To make a call from Contacts......................18
To make a call from Call History .................18
To make a call from Speed Dial ..................18
Creating a speed dial number from Contacts
...................................................................19
Editing or canceling a speed dial number ...19
To make an emergency call........................20
To make an international call ......................20
Caller ID......................................................20
Checking Voice Mail ...................................20
To adjust the volume...................................20
Answering or rejecting a call...........................21
Answering or rejecting an incoming call......21
II
Ending a call .............................................. 21
In-call options ................................................ 22
Call Holding (requires network support)..... 22
Switching between two calls (requires
network support) ........................................ 22
Making a conference call (requires network
support)...................................................... 22
Viewing notes while on a call ..................... 22
Mute while on a call ................................... 23
4.Call History ............................................... 24
Call list ........................................................... 24
Viewing detailed call history....................... 24
Save contacts from Call History................. 24
Call Timers................................................. 24
5.Input Modes.............................................. 25
Enter Screen.................................................. 25
Switch the input modes.............................. 25
Block Recognizer........................................... 25
Keyboard ....................................................... 26
Letter Recognizer .......................................... 26
Transcriber..................................................... 27
Drawing on the screen................................... 27
Editing the drawing .................................... 28
6.Settings..................................................... 29
Personal Settings........................................... 29
Owner Information ..................................... 29
Today ......................................................... 29
Sounds & Notifications ............................... 30
More sounds...............................................30
Buttons .......................................................31
Phone ring and Security .............................31
Call Barring.................................................31
Caller ID ..................................................... 31
Call Forwarding .......................................... 32
Call Waiting ................................................ 32
Voice Mail and Text Messages ................... 32
Fixed Dialing...............................................32
Network ......................................................33
Menus ........................................................33
Input ...........................................................33
Lock............................................................ 34
System Settings ............................................. 34
About..........................................................34
Backlight..................................................... 35
Certificates .................................................35
Clock & Alarms ...........................................35
Customer Feedback ...................................36
Encryption ..................................................36
Error Reporting........................................... 36
External GPS..............................................36
Memory ......................................................37
Power .........................................................37
Regional Settings ....................................... 37
Remove Programs .....................................37
Screen........................................................38
III
Windows Update........................................ 38
Connections Setting....................................... 38
Beam.......................................................... 38
Connections ............................................... 38
Network Cards ........................................... 38
USB to PC.................................................. 39
7.Personal Manager.....................................40
Contacts......................................................... 40
Creating new contact on the phone............ 40
Creating new contact on SIM card ............. 41
Viewing contacts ........................................ 41
Searching contacts..................................... 41
Speed Dial.................................................. 42
Changing list viewing mode........................ 42
Changing display type of Contacts............. 42
Editing contacts’ information....................... 43
Deleting contacts........................................ 43
Tasks.............................................................. 43
Creating a new task ................................... 43
Notes ............................................................. 44
Createing notes.......................................... 44
Methods for recording ................................ 44
Adjusting the voice recording format .......... 45
Rename or move notes.............................. 45
Select note template .................................. 45
Send notes via e-mail................................. 45
Calendar ........................................................ 45
Creating a new appointment ...................... 46
Editing appointments ..................................46
Sending meeting notification.......................46
Search ............................................................47
Calculator .......................................................47
Help ................................................................47
8.Messaging .................................................48
Outlook E-mail................................................48
New E-mail account....................................48
Switching accounts.....................................52
Deleting accounts .......................................52
Editing e-mails ............................................53
Receiving e-mails .......................................53
MMS ...............................................................54
Configuring MMS settings...........................54
Editing a MMS ............................................55
SMS................................................................57
Editing a Text Message...............................57
MSN Messenger.............................................58
Functions of Messenger .............................58
Setting account...........................................58
Log in and Log on.......................................59
9.Office Mobile .............................................60
Word Mobile ...................................................60
Creating documents....................................60
Transferring documents..............................60
Excel Mobile ...................................................61
IV
Using skills of Excel Mobile........................ 62
Transferring sheets .................................... 62
PowerPoint Mobile......................................... 63
Functions PowerPoint Mobile doesn’t support:
................................................................... 63
Showing slides........................................... 63
Stopping slide show ................................... 63
Viewing different slides .............................. 63
10.ActiveSync.............................................. 65
Setting up ...................................................... 65
Synchronizing with PC............................... 65
Synchronizing with server.......................... 67
Synchronization Information .......................... 68
Synchronizing Outlook............................... 69
Synchronizing Favourites........................... 69
Synchronizing Documents ......................... 69
Synchronizing Music, Video and Picture.... 69
Installing software on the phone .................... 70
Stopping Synchronization .............................. 71
ActiveSync Error Information......................... 72
11.Wireless Network ................................... 73
Creating Internet connection.......................... 73
Disconnect GPRS connection ....................... 73
Creating WAP connection.............................. 74
Internet Explorer ............................................ 75
Internet Sharing.............................................. 75
Creating Internet Sharing connection.........76
Remote Desktop ............................................76
12.Entertainment .........................................77
Windows Media..............................................77
Add music files ........................................... 77
Pictures and Videos ....................................... 78
Pictures ......................................................78
Searching and displaying pictures list ........78
Viewing pictures .........................................78
Picture listing sequence .............................79
Deleting pictures.........................................79
Editing pictures...........................................79
Setting pictures as Today Background ....... 79
Setting slide show format ........................... 80
Camera ..........................................................80
Capturing photos........................................80
Setting the capturing effect ................................81
Saving settings ........................................... 82
Capturing videos ........................................82
Video time settings .....................................82
Browsing and deleting videos..................... 83
Games ...........................................................83
Bubble Breaker...........................................84
Solitaire ......................................................84
Java ...............................................................84
13.File Explorer............................................86
V
14.Micro SD Card.........................................87
Using Micro SD card ...................................... 87
Installation steps ........................................ 87
15.GPS..........................................................88
Introduction of GPS........................................ 88
GPS ........................................................... 88
16.Maintaining your Pocket PC..................89
Creating or deleting programs........................ 89
Installing new programs by ActiveSync ...... 89
Installing new programs directly from the
Internet....................................................... 90
Removing programs................................... 90
Managing the storage .................................... 90
Checking the assignment and usability of the
storage ....................................................... 91
Checking the free memory ......................... 91
Saving new documents on Micro SD card.. 91
Deleting unnecessary documents .................. 92
Backup........................................................... 92
17.Phone Maintenance................................93
18.Troubleshooting .....................................95
The phone can’t be switched on .................... 95
The phone is switched off automatically......... 95
PIN/ PUK code lock ....................................... 96
Bad call quality............................................... 96
Can’t answer a call......................................... 97
Can’t make a call ........................................... 97
The call volume is too low ..............................98
The person you are calling cannot hear your
voice ...............................................................98
The incoming call doesn’t ring ........................98
The battery can’t be charged..........................99
Can’t display network ...................................100
The stylus can’t tap accurately .....................100
The phone does not recognize the storage card
.....................................................................100
ActiveSync can’t connect with the PC ..........101
ActiveSync has connected with the PC, but
cannot sync files...........................................101
Browser can’t connect to Internet normally...102
Lack of space ...............................................102
19.Safety Precaution .................................103
Usage environment ......................................103
Medical devices............................................103
Pacemaker ...............................................103
Hearing aids .............................................104
Emergency calls ...........................................104
Making an emergency call........................104
Password access..........................................105
PIN code...................................................105
PIN2 code.................................................105
PUK code .................................................106
PUK2 code ...............................................106
Notes about charging the battery..................106
Battery information and care ........................107
VI
Note about using spare parts....................... 108
Other safety information .............................. 109
Safety notice
Before using the phone, please read and follow
the rules below carefully. For the detailed
information, please refer to the “Safety
Precaution” section on page103.
If you dial or answer a call while driving,
please use the hands-free device (e.g.
earphone, vehicle hands-free system,
phone hands-free system) or use your
phone after parking the vehicle.
The phone may interfere with the
communication network of aeroplanes, so
please make sure your phone is switched
off during the flight.
All phones can be subject to interference,
which could affect its performance.
Please switch off your phone where you
see signs forbidding phone use. Such
signs can be found in medical centres or
establishments containing medical
equipment.
In order to ensure high performance and to
avoid damage the phone, please use the
original accessories and battery. Avoid
using products which are not compatible.
To avoid the risk of any explosion, please
switch off the phone at petrol stations and
places which are near fuel, chemical
solvent or other dangerous substances.
Please switch off your phone in areas
where there could be a risk of explosion
and in areas where you are asked to
switch off bidirectional radios. Pay
attention and adhere to any rules and
regulations concerning mobile phone use.
Please neither burn the phone battery nor
use it as ordinary rubbish, as this could
endanger life and damage to the
environment. Please obey the
environmental policy of the local
government and dispose of and recycle
them in time.
If you need to connect your phone to other
devices, please read the user guide
carefully to ensure the procedure is carried
VII

out safety.
Keep small parts (e.g. SIM card) out of the
reach of children to prevent batteries from
being swallowed or causing other dangers.
Please back up the important information
of phone and be sure to have a second
copy in case data is lost from your phone.
VIII
SOS
Make sure the phone is switched on and
has service coverage before inputting the
emergency number. Press the call key for
your position to be located. Please don’t
end call unless told to do so.
Cautions:
Any unapproved changes or modifications by
the party responsible for compliance might
infringe the user’s authority to operate this
mobile phone.
This mobile phone may generate radio
frequency energy, which, if not installed and
used in accordance with the instructions, may
cause harmful interference to radio
communications. However, there is no
guarantee that interference will not occur in a
particular installation. If this mobile phone
does cause harmful interference to radio or
television reception, which can be determined
by turning the equipment off and on, the user is
encouraged to try one or more of measures
listed below to clear the interference:
--Reorient or relocate the receiving antenna.
--Increase the separation between the
equipment and receiver.
--Connect the equipment into an outlet on a
circuit different from that to which the
receiver is connected.
--Consult the dealer or an experienced radio/TV
technician for help.
Attention: 1. Please send used li-ion batteries to
appropriate disposal locations or return them to
our company. Do not dispose of the batteries in
the dustbin.
2. For body worn operation this phone has been
tested and meets FCC RF exposure guidelines
IX
when used with an accessory that contains no
metal and that positions the handset a minimum
of 1.5 cm from the body. Use of other
accessories may not ensure compliance with
FCC RF exposure guidelines
Statement: This device complies with
Part 15 of the FCC Rules. Operation is
subject to the following two conditions:
(1) this device may not cause harmful
interference, and (2) this device must
accept any interference received,
including interference that may cause
undesired operation.
Changes or modifications not expressly
approved by the party responsible for
compliance could void the user's
authority to operate the equipment.
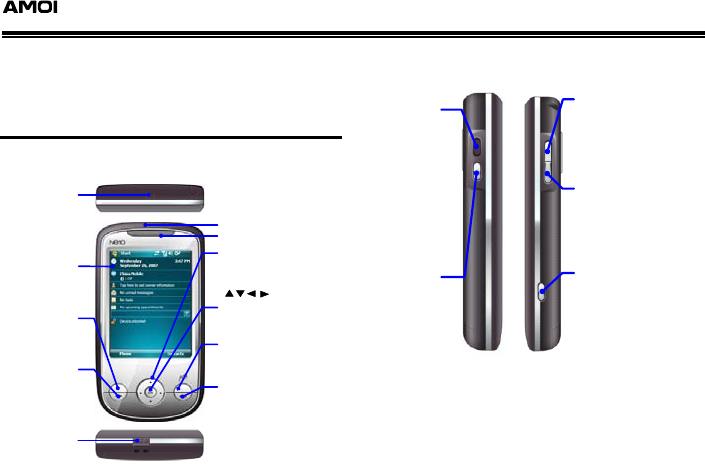
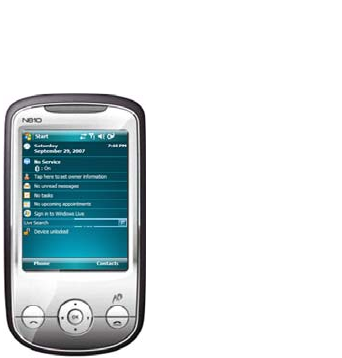
Getting to know your phone
1. Getting to know your phone
1
• Your phone
Front view of your phone
Send Key
Press the key to dial or
answer a call.
Left Soft Key
Press to carry out left -
hand-side commands
on the display screen .
Earpiece
Navigation Key
The four-way
navigation keys
OK Key
Press this key to
confirm your choice
End Key
During a call, press the key
to end the call .
LED Indicator
Touch Screen
Display screen and use
touch pen to select or
write
Right Soft Key
Press to carry out right-hand-
side commands on the display
screen.
USB/Headset
Interface
GPS External
Antenna Aperture
Side view of your phone
Shot Key
1. On the standby mode ,
hold down to enter the
Camera Preview screen .
2. On the Camera
Preview screen , press to
activate the automatic
focus function; hold
down to focus and shot .
Power
1. When the device is
on, press to enter in
sleep mode, press
again to wake the
device.
2. When the device is
on, hold down to
choose to switch the
device off.
3. When the device is
off, press to switch it
on.
GPS Key
Up Side Key
Down Side Key
1. Press to mute when the
phone rings to notify a
incoming call; hold down to
reject a call.
2. Press to adjust the
volume while on a call.
1. Press to mute when the
phone rings to notify a
incoming call ; hold down
to reject a call.
2. Press to adjust the
volume while on a call.
Hold down to
activate GPS
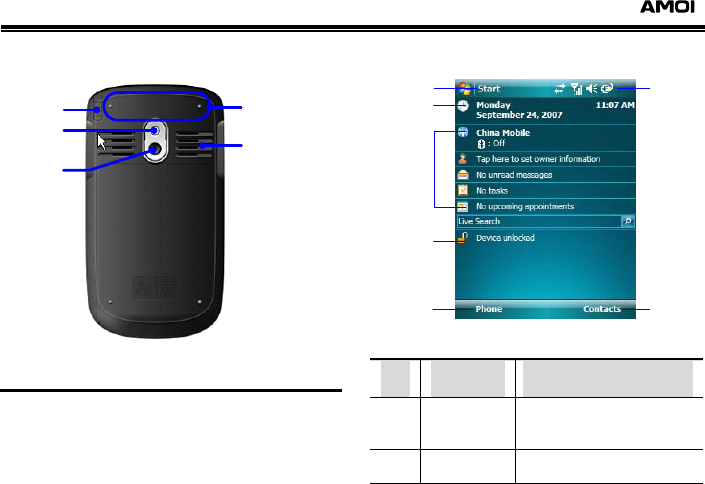
Getting to know your phone
Rear view of your phone
2
Camera
Flashing
Light
Stylus Antenna
Loudspeaker
• The Today Screen
Select [Start→Today] to enter the Today
screen which displays important messages like
upcoming appointments and all status icons.
Enter the corresponding program by selecting
its icon on the today screen.
1
2
3
4
56
7
NO. Program Function
1 Start Click [Start] to open
the main menu
2 Time and
Dt
Click to adjust the date,
ti d l k tti
Getting to know your phone
Date time and clock settings
3 Program
Menu Click to open the
corresponding
programs
4 Device
Locked
Click to lock the keypad
and the touch screen to
avoid error operation.
As for the unlocked
operation, please see
Page14 ‘Lock the
Phone’
5 Phone Click to make a phone
call
6 Contacts Click to enter the
contacts list
7 Status
Bar Shows the phone’s
status; click to see the
information
Status icons locate on the top right side of the
today screen. Below are some common status
icons. If you are not sure about the meaning of
a given icon, using your stylus to select this
icon, the screen will display a dialog box to
indicate its function; you can also change the
icon settings.
• Status Icon
Icon Function description
Signal Strength: Represents
the current network signal. Click it, and
select [Wireless Manager], then
choose to turn on/off the phone
function
Searching for the signal
3
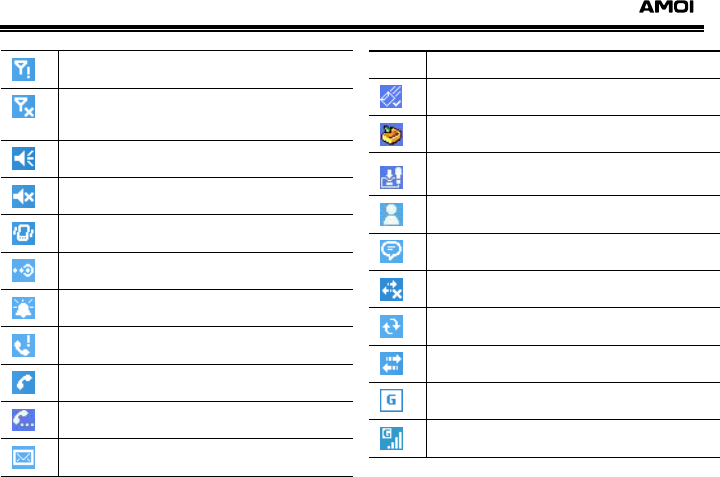
Getting to know your phone
No service
Low Battery : Displays when there is
little battery power
Volume on
Volume off
Vibrate
Receiving beam request
Reminder
Missed call
Dial emergency call without SIM card
Call Holding
New messages or message sent
successfully
successfully
Receive multimedia messages
Downloading multimedia message
Fail to download multimedia message
Receive messages from MSN
Several reminders
No connection
Synchronizing in progress
Active Sync connected
GPRS available
Connecting GPRS
4
Getting to know your phone
NO SIM card inserted
Phone is charging. Click to check the
charging status
Full Battery: Click to check
information about the battery
Low Battery
No Power
5
Getting Started
rem
(1)
2. Getting Started
6
Before using the phone, please insert a SIM
card supplied by a network service provider.
The SIM card (Subscriber Identification Module)
includes phone number and detailed
information of service items, and can be used
to store phone number and user information.
Caution:
SIM card and its contacts can be easily damaged by
scratching or bending, so be very careful when
inserting or removing the card. Please follow the
instructions of SIM card user guide provided by
the manufacturer and keep SIM card out of the
reach of children
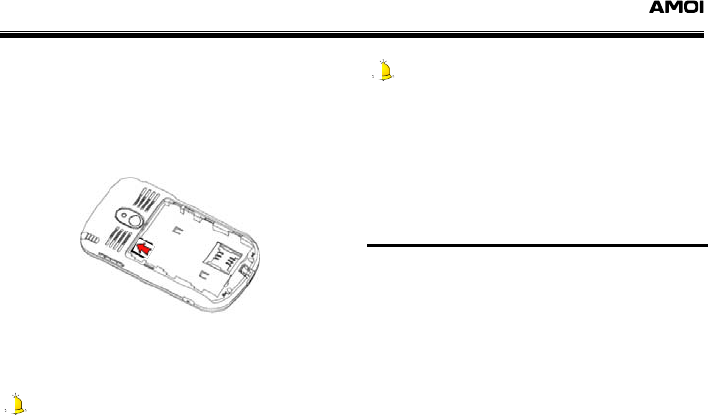
• Installing SIM card and battery
Before inserting the SIM card, please make
sure the phone is switched off, and then
ove the battery.
Press and hold for several seconds to
(2)
ne and then remove it
switch off the phone.
As shown in the following diagram, slide
the battery cover in the direction of the
bottom of the pho
and the battery.
1
2
Slide the SIM card into the SIM card slot.
Press the card downwards while inserti
and make sure the card is facing the
correct way, as shown below
(3)
ng
(with the
contact point facing down).

Getting Started
3
7
(4) Make sure the battery contacts are facing
into the phone, and then push the other
side of the battery gently until it fixes itself
in the battery slot.
4
(5)
correctly, and then slide the battery cover
Make sure the battery has been installed
in the direction of the top of the phone until
it is covered, as shown below:
5
Warning:
Do remove the SIM card when the
• Installing Micro SD card
n’t insert or
phone is switched on or getting charged, or this
may damage the SIM card.
A Micro SD card is a removable storage card
that can be used to increase phone memory, or
to backup files and data.
Getting Started
(1) the
ng
formation:
When installing the card, make sure
side with the golden contacts is faci
8
down and insert the narrower end of the
card. Then push the card gently until it is
fixed in the battery slot. See the image
below for additional in
(2) To remove the Micro SD card, gently push
it toward the phone, and the card will
automatically eject from the card slot.
Caution:
Don’t forcefully remove the Micro SD card from
the c
ard slot.
Warning:
Dur eading and writing to the
ding, but not limited to, lost data or
amage to the card damage.
ing the process of r
Micro SD card, do not remove or insert the card.
Amoi will take no responsibility for the following
ituations inclu
s
d
• Battery charging
Charge the N800 by the travel charger:
) Install the battery in the phone.
(1
(2) Insert the lead of the travel charger to USB
d connect the
ll outlet.
slot of phone carefully, an
charger to a standard wa
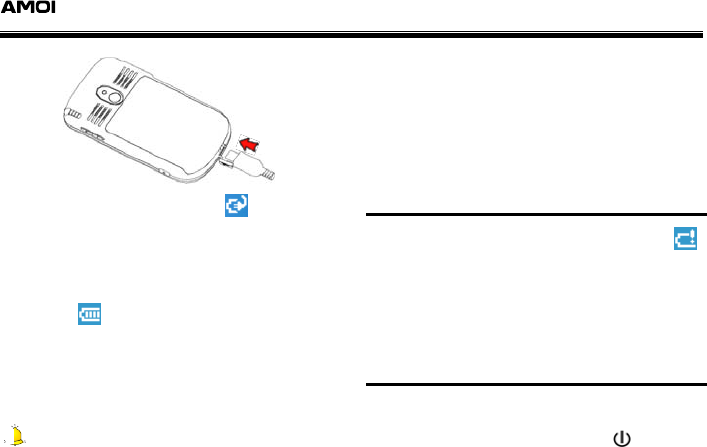
Getting Started
9
(3) While charging, such icon will be
displayed. You can view the charging
status by clicking it, or selecting
[Start→Settings→System→Power].
(4) When charging is finished, the icon turns
to be ; and the charging process will
keep in 100.
(5) Disconnect the charger and standard
power socket first, and then disconnect the
phone and charger.
Caution:
1. Please use the approved battery and charger
approved by Amoi for use only, otherwise it may
cause explosion.
2. Try to avoid using USB cable to charge.
3. Generally, the charging time is 2-5 hours
depending on the status of the phone (whether
switched on, making a call etc.)
• Battery power display
If the battery is low, the empty battery icon
will display.
If the battery is too low, the phone will switch off
automatically. If this occurs, you may lose data
that has not been stored.
• Power on/ off
Switching the phone on
When the phone is off, hold down for
several seconds to switch it on. Connect with
USB cable or charger will switch the phone on
Getting Started
as well.
Switching the phone off
While the phone is on, hold down to choose
whether to switch the phone off. While the
device is locked, you shall unlock it and then
turn it off.
10
Warning:
While in sleeping mode, the phone just consumes
lower power but not turns the phone function off.
For the sake of safety, do switch the phone
function off and remove the battery in areas where
wireless phone use is prohibited.
If no SIM card is inserted when powered on, the
phone will display corresponding prompt and
show the icon as .
If the PIN code is activated, the phone will
remind you to enter the correct PIN code when
the phone is switched on.
Caution:
If you enter the wrong PIN code three times in
succession, your SIM card is locked, and you will
need a PUK code supplied by the GSM operator to
unlock your phone.
If the phone is out of service, it will remind you
“No Service”, and display the icon . Under
the circumstances, you are not allowed to make
or answer a call. Only when entering the
service area can you regain the network
service.
Caution:
1. Please don’t switch the phone on in areas where
wireless phone use is prohibited or where it may
cause interference or danger. Please click , and
select [Wireless Manager] to turn the phone
function off.
2. The phone is equipped with an antenna. When
power is on, please do not touch antenna as this
Getting Started
and require phone to
onsume more power
• the phone function
may affect call quality
c
Turning
on/off
11
Turning on the phone function
Correc y insert the battery and SIM card, h
down
tl old
to switch on the phone. You can
activate and use the phone function in service
Turning off the phone function
(1)
area.
When the phone is on, click and select
[Wireless Manager] to turn
When the phone is off, click and
select [Wireless Manager] to turn on the
phone function,
(2)
off the phone
function, as shown below: Warning:
You shall follow the instruction to turn off the
phone function in areas where wireless phone use
is prohibited.

Getting Started
• Using shortcut keys
When in standby mode, to press some keys
directly provides direct access to some
frequently used functions. The following table
lists the operations and functions of some
common shortcut key.
12
Key Operation Function
Press
briefly
Switch the phone on
when the phone is
power off
Press and
hold
Choose to switch the
phone off or not when
the phone is power
on
Press
briefly
Rotate the screen
orientation: Portrait,
Landscape(Right-han
ded
)
, and Landsca
p
e
(Left-handed)
Press and
hold
Camera Key:
Press to enter the
camera state
• Using Stylus
The stylus is the device for you to operate
AMOI N800 by clicking on the screen to choose
programs or to enter some data.
Your stylus is extension and retractile. Pulling
out of the slot, it will draw out for your
convenience. Just insert it into the slot when
you don’t need it.
Stylus is able to do:
Click: Click on the screen by the penpoint to

Getting Started
13
•
open or select programs.
Drag: Click on the screen and drag to choose
the programs by the penpoint.
Click and hold down: Click one program and
hold it on to enter its shortcut menu. The
menu will list all the available operations.
Instruction for the first used
When you switch the phone on for the first time,
please follow the prompts displayed on the
screen to make the basic operation settings.
Touch screen and Calibration
It is necessary to calibrate the touch screen
when switching the phone on for the first time.
The specific method is to follow the movement
of the symbol “+” and click the center of it. Such
calibration can make sure the veracity when
you use the stylus to choose or enter some
information.
Align screen
If the phone cannot respond to your choice
correctly, you need to align it:
(1)
(2)
Select [Start →Settings →System
→Screen].
Click [General→Align Screen], then
follow the prompts displayed on the screen
to align the screen.
When you are aligning the screen, please try as
much as possible to tap accurately on the
center of the “+”.
Text Size
If you want to improve the readability or to view
more contents in programs which support
adjusting text size, select
[Start→Settings→System→Screen→Text
Size]. Just move the coordinates to zoom in/out
the text size.

Getting Started
• • Reminder
14
When there are upcoming appointments or new
text/multimedia messages, the phone will
remind you in some ways. For instance, when
there are upcoming appointments, tasks at
term, or settled alarms, it will remind you in the
below ways:
A prompt box will appear on the inferior of
the screen.
Sound prompts
Flash light
Vibrate prompts
To set the system notification mode and sound,
please select
[Start→Settings→Personal→Sounds &
Notification]. For the details, please see
“Sounds & Notifications” on page 30.
Start
The Start menu locates on the upper part of the
screen and displays the shortcut ways of those
frequently-used applications.
Programs
Select the program list on the start menu to
switch between several programs. To activate
one, just select [Start→Programs], then click
the title or icon of the program.
Notice:
The procedures to access to a certain program
described in the user manual may be different with
your real operation procedures, because the
accessing procedures differ as the setting made in
[Start→Settings→Menus]. Please follow your
phone settings.

Getting Started
• Device locked
Device Lock
Use it to avoid improper operation.
(1)
(2)
Click <Device unlocked> on the [Today]
screen to lock the device.
While the phone is locked, click <Unlock>
on the left inferior side on the today screen,
and then tap <Unlock> button to unlock
the device.
15
Notice:
If such item cannot be found in Today screen,
select [Start→Settings→Personal→Today→Items],
and put a √ in the box before [Device Lock], then
click <ok>.
Locking the phone
Select [Start→Settings→Personal→Lock],
then click [Prompt for device unused for] to
set the time. Enter the password to lock the
whole device in order to prevent others to get
your personal information. After the function is
activated, the phone will automatically lock
when no operation occurs within a period.
Under the circumstance, if you want to use your
phone again, the phone will display prompt
which requires you to enter the password
correctly. As for the details, please see P34
“Lock”.
Locking SIM Card
You can use PIN code to protect your phone so
as to prevent other to use it without your
permission. The original PIN code is supplied
by GSM operator.
(1)
(2)
Select [Start→Settings→Personal →
Phone], and click [Require PIN when
phone is used].
Enter the original PIN code supplied by
GSM operator.

Getting Started
16
(3) Click <Enter>
If you want to change PIN code at anytime,
please select [Change PIN].
Call Functions
3. Call Functions
You can use the call function to save the call
log, or to record.
17
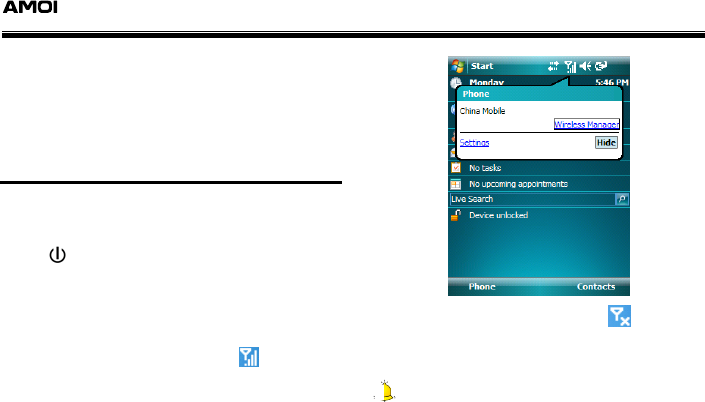
• Entering the phone screen
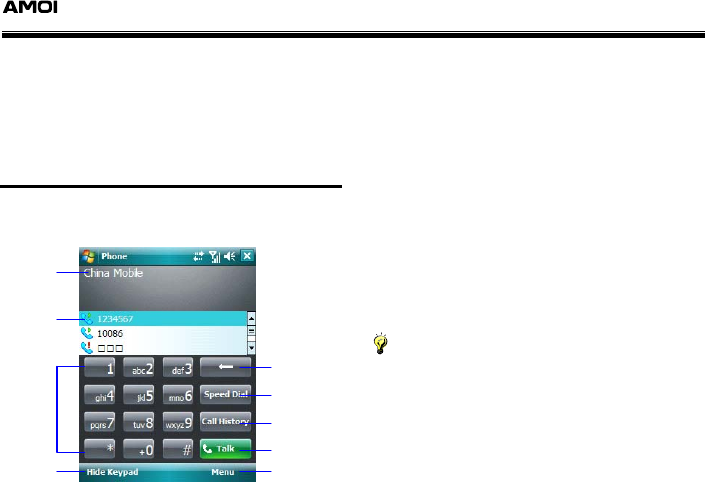
On the today screen, click <Phone> to enter
the phone screen as shown below:
Network
Operator
Call and
Contacts
Keypad
Hide
Keypad
Enter Speed
Dial List
Clear numbers
or words
View call
history
Make a
phone call
Call Menu
Enter PIN code
Most SIM cards have PIN code supplied by
GSM operator. If the PIN function is activated,
each time to switch the phone on or to make a
phone call, you have to enter the code.
To activate or deactivate the PIN function,
select [Menu→Options→Phone] from the
phone screen, then click [Require PIN when
phone is used].
(1)
(2)
Enter the original PIN code supplied by the
GSM operator
Click <Enter>
Notice:
If you enter the wrong PIN code three times in
succession, your SIM card is locked, and you will
need a PUK code supplied by the GSM operator to
unlock your phone.
Call Functions
18
• Making a call
You can make a call by the number keys,
Contacts, Speed Dial, Call History and SIM
Contacts.
To make a call from the Pone Screen
From the Today Screen, click <Phone> to
enter the Phone Screen.
(1)
(2) Enter the numbers on the keypad, click
or to call.
(3) Click or to end the call.
Clear numbers: If you dial a wrong number,
click . Click once, clear one number; hold
it down to clear all numbers.
To make a call from Contacts
You can use below methods to make a call from
Contacts,
(1)
(2)
(1)
(2)
(3)
(1)
(2)
Click <Contacts> from the Today Screen
to enter the Contacts List.
Select the desired contact, enter its
detailed information screen, and click
<Call>.
To make a call from Call History
On the Phone Screen, click <Call
History>.
You can first choose the type of the call
history. If you want to check all the call
history, select [Menu→Filter→All Calls].
Select the desired number, click <Call> by
the stylus.
To make a call from Speed Dial
After created the speed dial, just hold down the
corresponding number key to speed dial a call.
On the Phone Screen, [Speed
Dial→Menu→New].
Select one contact.
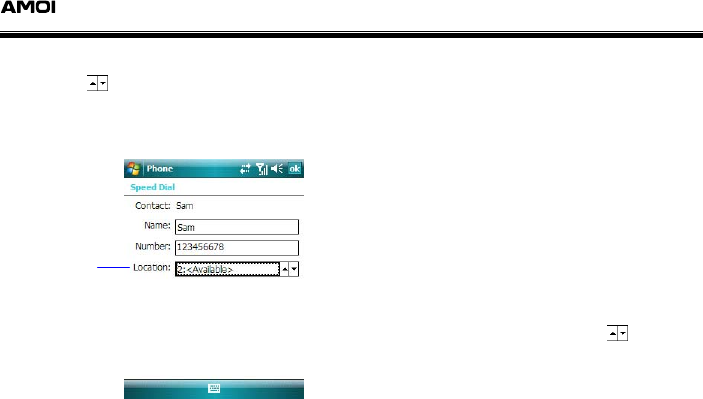
Call Functions
19
(3) Choose the available number by click the
button on [Location] box, (Number 1
is reserved for Voice Mail, which is to say,
Number 1 is not available), then click <ok>
to save the setting as shown below:
Corresponding
Numeric Keys
for Speed Dial
(4)
(1)
(2)
On the Phone Screen, tap the
corresponding numeric key set for Speed
Dial for 1 to 3 seconds, the phone will dial
the phone number automatically. If the
corresponding number is double-digit, you
shall enter the first digit then tap the
second digit by your stylus for 1 to 3
seconds.
To replace an occupied numeric key with a new
phone number, you can choose to overwrite it.
Creating a speed dial number from
Contacts
To create a speed dial number from
Contacts, select your desired contact from
Contacts, enter its detailed screen, then
select [Menu→Edit Speed Dial…].
On the [Location] box, click to choose
the available numeric key.
Editing or canceling a speed dial
number
On the Phone Screen, click <Speed Dial> to
enter the Speed Dial List, tap your desired
Speed Dial number for a while, there will be a
Call Functions
check box, you can select [Delete] or [Edit…].
To make an emergency call
On the Phone Screen, enter the emergency call
numbers, and click to call.
To make an international call
(1) Click and hold down till the plus “+”
sign appears which is in the use of
replacing 00.
20
(2)
) Click
Enter your desired numbers, including
country code, area code (without the initial
0) and the phone number.
(3 to call.
Caller ID
AMOI N800 supports Caller ID (Caller Line
Identification Service); besides, SIM Card
supports Caller ID as well.
If the caller’s information is saved in Contacts
(Saved at Phone or Saved at SIM Card), when
it calls, the phone will display the caller’s name
and number. If the caller’s information hasn’t
been saved in Contacts, when it calls, the
phone will display its name, and its number (if it
is a telephone number or personal
handy-phone number, the city or country code
the caller’s number belonging to will be
displayed on the name part.
Checking Voice Mail
Number 1 is reserved as [Voice Mail].
On the Phone Screen, select [Speed
Dial→Voice Mail]. On the setting screen,
select [Service→Voice Mail and Text
Messages]. Click <Get Settings> and enter
voice mail number (supplied by network
operator), then you can view the voice mails by
activating the call forwarding function.
To adjust the volume
Adjust the volume:
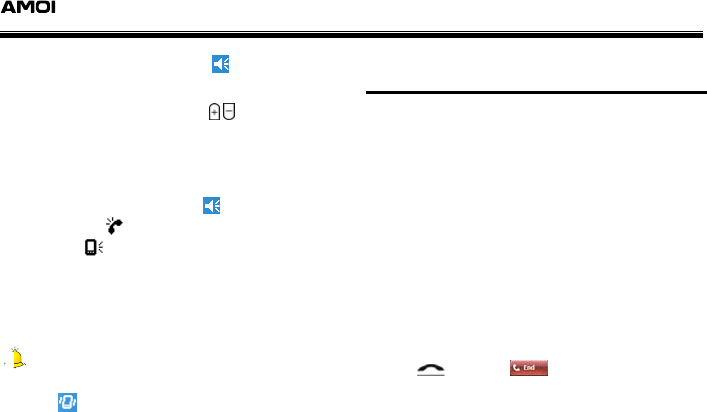
Call Functions
•
While on a call, click to adjust the
volume.
21
While on a call, press / to adjust the
volume.
Adjust the volume of ringtone or other
reminders:
On non-phone screen, click . Then you can
choose to tap (to adjust the ringtone
volume) or (to adjust the phone volume,
including reminders and MP3). Select [Off] to
mute the volume. When you finish your settings,
click the blank area beside the volume box to
save your settings.
Caution:
1. If vibrate mode is chosen, the phone will display
an icon on the Status Bar.
2. You can adjust the phone volume only in the
process of a call. Besides it, to adjust the volume is
to adjust volumes for ringtones, reminders and
MP3.
Answering or rejecting a call
Answering or rejecting an incoming
call
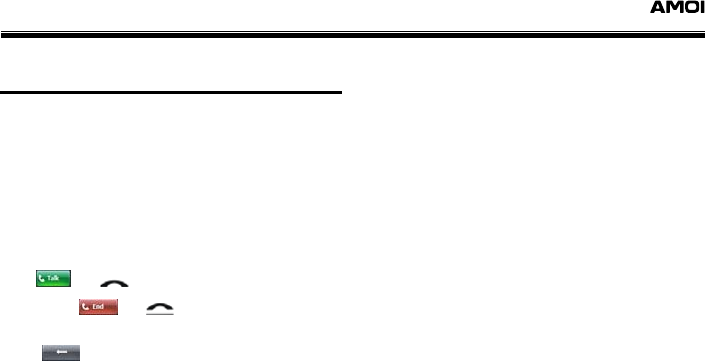
Click <Answer> to pick up the incoming call.
If your phone is connected with earphone,
you can press the answer key on the
earphone to answer the call.
Click <End> to reject the call. If your phone
is connected with earphone, you can hold
down the answer key on the earphone to
reject it.
Ending a call
Press or click on the Phone
Screen to end a call.

Call Functions
22
• In-call options
Call Holding (requires network
support)
There comes a new call while on a call, your
phone will remind you. Then, you can decide to
reject or answer the new incoming phone. If
choose to answer, you can switch between two
calls or three calls.
(1)
(2)
Select the second call to answer and keep
the first on hold;
To end the second call and back to the first
one, click or press .
Switching between two calls (requires
network support)
Select <Hold> and click <Switch> to switch
between two calls.
Making a conference call (requires
network support)
(1)
(2)
(3)
(1)
Keep the first call and to dial or answer the
second call.
If the conference connection succeeds,
the word “Conference” will appear on the
upper part of the Phone Screen.
To add more to your conference call, click
the <Keyboard> button and enter the
numbers.
Viewing notes while on a call
You can view notes when you are on a call
dialed from keypad, Contacts, Call History,
Speed Dial or SIM Card Contacts. When the
note is finished, it will be annexed to this call
and be saved at [Call History].
Creating notes:
On the Phone Screen, click <Note> button
on the inferior of the screen.

Call Functions
(2) Enter the contents and click <ok> to save.
Viewing notes:
On call history list, click and hold down your
desired call history. Such indicates that
this history contains one note. Click [View Note]
or [Start→Programs→Notes] to view.
Mute while on a call
You can turn off the microphone so that you can
hear the caller but the caller cannot hear you.
On the Phone Screen, click <Mute> to activate
the function; click again to deactivate.
Caution:
Call waiting, call holding, and conference call
depend on the network supply. Contact your
service provider for additional information.
23

Call History
4. Call History
24
• Call list
On the Today Screen, click <Phone> to enter
the Phone Screen, and then tap <Call History>
to view the call records.
Viewing detailed call history
On the call history screen, select [Menu→
Filter]. Below are all types of the calls and their
corresponding icons:
All Calls: Includes all outgoing calls and
incoming calls.
Missed : Displays missed calls.
Outgoing : Displays all dialed calls.
Incoming : Displays all answered calls.
Select the desired entry from call history, click it
by your stylus, the phone will automatically
display all details, including time, date, etc.
Select one entry, click it by the stylus and hold
down to choose the following options: [Delete],
[Send Text Message], and [Call].
Save contacts from Call History
(1)
(2)
(1)
(2)
On the Call History Screen, click the entry
and hold down to select [Save to
Contacts].
Enter the details of the contact, and click
<ok> to save it.
Call Timers
On the Call History Screen, select
[Menu→Call Timers] to view.
Click <Reset>. Records here will be
initialized.
Input Modes
5. Input Modes
You can enter letters and words by using the
touch screen. N810 has four ways to input:
Block Recognizer, Keyboard, Letter Recognizer,
and Transcriber.
25
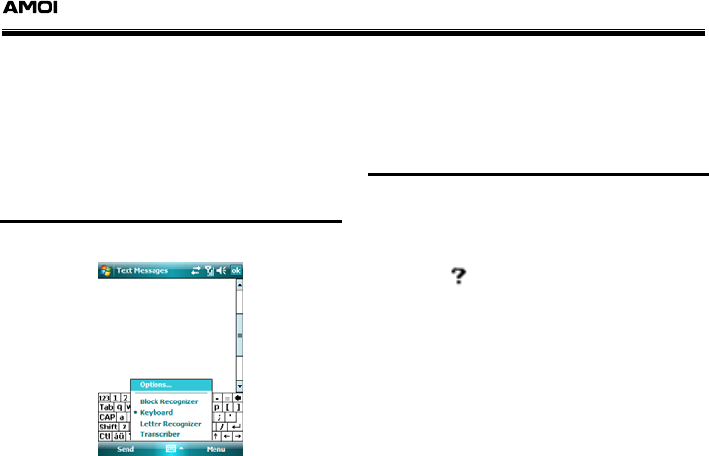
• Enter Screen
Below is the layout of the enter screen.
Switch the input modes
Click ▲ beside the input icon to choose your
desired input mode.
• Block Recognizer
(1)
(2)
(3) Click
Click ▲ to choose [Block Recognizer].
Enter letters on the left letter frame; enter
numbers on the right number frame.
to see how to input
distinguishable letters and numbers.
Input Modes
26
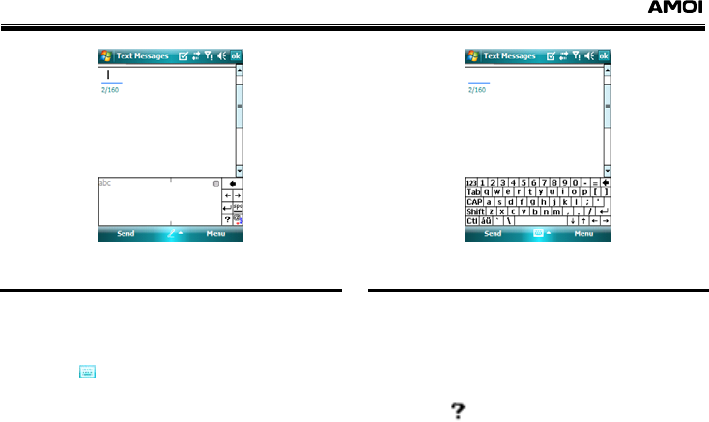
• Keyboard
(1)
(2)
(3) Click
Click ▲ to choose [Keyboard].
Use the stylus to tap the letters and words.
to hide the keyboard.
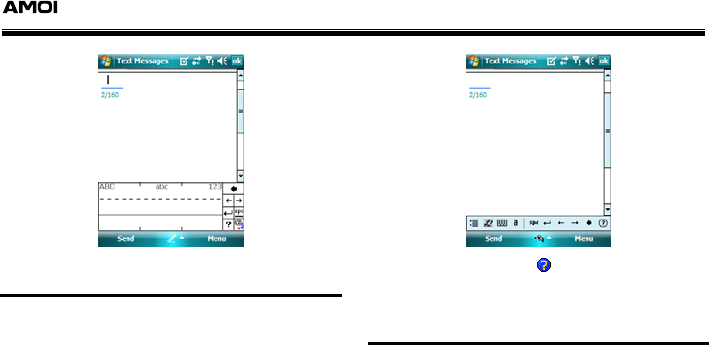
• Letter Recognizer
(1)
(2)
(3) Click
Click ▲ to choose [Letter Recognizer].
Write capital letters on the left frame;
lowercase on the middle frame; and
numbers on the right frame.
to see how to input
distinguishable letters and numbers.
Input Modes
27
• Transcriber
(1) Click ▲ to choose [Transcriber]. There
will be a transcriber intro box, click <ok>.
(2) Use the stylus to write letters or words on
any place of this screen. Please stop for a
second when you finish one letter, as the
below figure:
For more, please click to see help
information.
• Drawing on the screen
Select [Start→ Programs→ Notes] to open
any note, and click [Menu→ Draw] to draw
directly on the screen.
Once you draw one line cross three lines on the
screen, there will appear one frame. Then any
drawing within the frame will be defaulted as
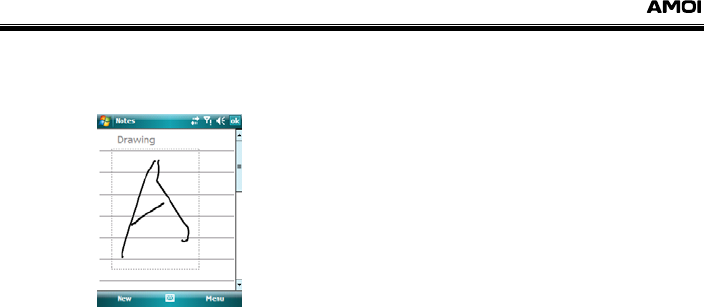
Input Modes
one part of it. If the drawing hasn’t crossed
three lines, it will be defaulted as the contents
of writing. Below is the figure of the frame:
Editing the drawing
Before you edit the drawing, select if first.
28
(1)
(2)
Keep taping on the drawing by the stylus
till the selecting dots appear. Select
several drawings, deactivate [Draw] and
drag your desired drawings.
Click and hold down the selected drawings,
and then select to edit or click <Menu> to
cut, copy and paste. To adjust the size of
the drawing, deactivate [Draw] function,
and then drag the selected dots toward the
outside of the drawing.
To zoon the drawing, please select [Menu→
Zoom].

Settings
6. Settings
You can adjust the phone settings according to
your own favour, please select [Start→
Settings] to set.
29
• Personal Settings
Select [Start→Settings→Personal] to choose
to adjust the following settings:
Owner Information
(1)
(2)
(3)
Select [Start→Settings→Personal→
Owner Information].
Enter your own information on
[Identification] screen.
Enter other information needed to display
while switching on the phone on [Notes]
screen.
Notice:
Only when you enter [Option] screen and tap
[Notes] on it can your device display the
information you input on [Notes].
On the [Notes] screen, click
[Identification information] and
[Notes].Thus if you lose your phone,
people who pick up it will have a clue to
contact you.
(4)
Today
Select [Start→Settings→Personal→Today].
Change the background
On the [Appearance] screen, you are able to
set a theme for your device. Following are the
setting methods:
(1) Click [Use this picture as the
background] if you want to customize the
background.
(2) Click [Browse] to select more files to be

Settings
30
the background.
(3) Click <ok> to save the setting.
If you want to beam your favourite theme to
your friends, please select the theme and click
[Beam] on the [Appearance] screen.
Customize the displayed information
(1) Select
[Start→Settings→Personal→Today].
(2) On the [Items] screen, click the items you
want to display on the Today Screen.
Sounds & Notifications
Enable to change the sounds types:
(1) Select [Start→Settings→Personal→
Sounds & Notification].
(2) On the [Sounds] screen, you can choose
to activate the sounds for events and
programs.
(3) On the [Notifications] screen, select your
desired event and its corresponding
notification way. There are several kinds of
notifying methods available, for instance,
play sound, display message on screen,
flash light, and vibrate.
More sounds
You can download more sounds from your PC
via USB cable, and set them as the ringtone or
notification sounds.
(1) Insert the USB cable to the USB port on
your PC to connect your phone to your PC.
Active Sync will be activated
automatically.
(2) Select [My Computer→Mobile
Device→My Windows Mobile-Based
Device→Application Data→Sounds].
You can copy your favourite ringtones to
the file.

Settings
31
Buttons
You can customize the buttons functions to
open the most frequently used programs.
Program Buttons
(1) Select [Start→Settings→Personal→
Buttons→Program Buttons].
(2) Select one button, and choose a
corresponding program on [Assign a
program] box.
(3) Click <ok> to save your settings.
Up/Down Control
You can customize the way your Up/Down
control repeats.
Phone ring and Security
Select [Start→Settings→Personal→Phone]
to open the setting screen.
You can choose the ring tone and ring type.
You can use PIN code to protect your phone
preventing others to use it without your
permission. The original PIN code is supplied
by the GSM operator.
(1) Select [Require PIN when phone is
used], input the correct PIN code and click
<Enter>.
(2) If you need to change PIN code, please
click [Change PIN].
Call Barring
(1) Select [Start→Settings→Personal→
Phone].
(2) Select [Services→Call Barring], click
[Get Settings…]. After the phone finish to
read settings from the network, you can
customize it. Click <ok> to save the
settings.
Caller ID
(1) Select [Start→Settings→Personal→

Settings
32
Phone].
(2) Select [Services→Caller ID], click [Get
Settings…]. After the phone finish to read
settings from the network, you can
customize it. Click <ok> to save the
settings.
Call Forwarding
(1) Select [Start→Settings→Personal→
Phone].
(2) Select [Services→Call Forwarding], click
[Get Settings…]. After the phone finish to
read settings from the network, you can
customize it. Click <ok> to save the
settings.
Call Waiting
(1) Select [Start→Settings→Personal→
Phone].
(2) Select [Services→Call waiting], click
[Get Settings…]. After the phone finish to
read settings from the network, you can
customize it. Click <ok> to save the
settings.
Voice Mail and Text Messages
(1) Select [Start→Settings→Personal→
Phone].
(2) Select [Services→Voice Mail and Text
Messages], click [Get Settings…]. After
the phone finish to read settings from the
network, you can customize it. Click <ok>
to save the settings.
Fixed Dialing
If the network operator and your SIM card
support this function, you can restrict the phone
numbers you dial.
If activate the function, your phone can only call
the numbers saved at fixed number list.
Besides, the first time you switch the phone on
if you activate the function, you need to enter

Settings
33
(1)
(2)
(1)
(2)
(1)
(2)
(3)
(1)
(2)
(3)
the PIN2 Code; and if you don’t switch off the
phone, you don’t need to enter it the next time
to set.
Select [Start→Settings→Personal→
Phone].
Select [Services→Fixed Dialing], click
[Get Settings…]. After the phone finish to
read settings from the network, you can
choose to activate it or not. Click <ok> to
save the settings.
Network
Select [Start→Settings→Personal→
Phone].
Select [Network] to do the corresponding
settings.
Menus
The [Start] menu only allows 7 programs. To
add programs you use most frequently to the
[Start] menu, please follow the below steps:
Select [Start→Setting→ Personal→
Menus] to enter the menu screen.
Drag the scroll bar to choose different
menus. The selected will appear on the
[Start] menu, and the others will appear on
[Start→Program].
Click <ok> to save the settings.
Input
Select [Start→Setting→ Personal→Input]
On the [Input Method] screen: Click your
desired input method and then to do the
corresponding settings.
On the [Option] screen: Choices like voice
recording format, Default zoom level for
writing, are available here. The setting will
be applied to any written or recorded
programs of N800, but not to the contents
you input on the Enter Screen.
You can also change the settings on the

Settings
•
Enter Screen. Click ▲ beside the input
icon and select [Options] to set.
34
(1)
(2)
Lock
Select [Start→Setting→ Personal→Lock].
On the [Passsword] screen:
Click [Prompt if device unused for], and
set the time limit.
Select password types: [Simple PIN] or
[Strong alphanumeric]. The strong one
requires 7 characters, including capital
letter, lowercase, number and punctuation.
On the [Hint] Screen:
If you enter the password wrongly more
then 5 times, the password hint will appear.
Caution:
Forgetting you password, you need to reset the
phone to the original state. But all data and
installed applications will lose.
System Settings
About
Version: Displays relevant information of this
device.
Device ID: If other devices have the same
device name with your phone, and you
cannot connect to the net, please change
your device name.
Copyrights: Provides the declaration of the
copyrights.
Settings
Backlight
Select [Start→Settings→System→Backlight]
to adjust the backlight settings.
Certificates
Select [Start→Settings→System→
Certificates].
Use [Personal] to positively identify yourself to
others.
Use [Intermediate] to positively identify
intermediate certification authorities.
35
Use [Root] to positively identify root
certification authorizes.
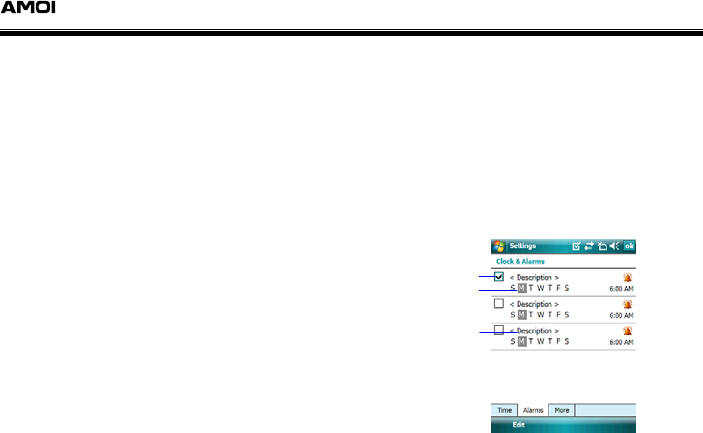
Clock & Alarms
Select [Start→Settings→System→Clock &
Alarms].
Time: [Home] or [Visiting] is available for you
to choose in order to give you a convenient
way to check the accurate local date and
time while traveling.
Alarms: click the alarm icon to adjust the
reminding mode of the alarm, including
sound, flash light, and vibrate. Click time to
adjust the alarm time. Click [Description] to
enter the prompt information you want to
display. Select the day you need the alarm
and click <ok> to save, please see the
following picture:
Activat
alarms e
Valid ti
for ala
Prompt
me
rms
More: Select to decide whether to display the
clock on the title bar in all programs.

Settings
36
To change the format of the displayed date and
time, please select [Start→Settings→System
→Regional Settings].
Customer Feedback
Select [Start→Settings→System→Customer
Feedback]. You can choose to participate in
the Customer Experience Improvement
Program to better Windows Mobile software.
Encryption
Select [Start→Settings→System→
Encryption]. Click<Encrypt files placed on
storage cards> to encrypt files placed on a
storage card. These files are readable only by
this Windows Mobile-based device.
Error Reporting
Select [Start→Settings→System→Error
Reporting] to activate it.
External GPS
With the support of GPS receiver, your device
is able to reveal your location accurately on the
map. The GPS receiver of your device has two
types, the installed and the built-in.
Select [Start→Settings→System→External
GPS] to set the GPS.
Select [Start→Help→Contents→GPS] to view
the details.

Settings
(1)
(2)
(3)
Memory
Select [Start→Settings→System→Memory].
Main: Displays the memory information of the
data storage and of the program storage.
Storage Card: Displays the memory state of
the storage card or USB.
Running Programs: Displays a list of the
running programs. Select a certain program
from the list and click <Activate> to run, click
<Stop> to stop the program.
If the running state of the program is unstable
or the program memory is not enough, you may
need to cease the program.
Power
Select [Start→Settings→System→
Power].
Battery: Displays the remaining battery
power.
Advanced: [Turn off device if not used
for] will let the phone turn to sleep mode
after a corresponding period. [On external
power] means the phone is being used
while charging.
Regional Settings
Select [Start→Settings→System→Regional
Settings] to adjust the settings of [Regional],
[Number], [Currency], [Time] and [Date].
Remove Programs
Select [Start→Settings→System→Remove
Programs] to remove your desired programs,
and then click <Remove>.
Caution:
You are only allowed to remove programs installed
by yourself. The original programs installed on the
factory are irremovable.
37

Settings
38
•
Screen
Select [Start→Settings→System→Screen].
General: You can adjust the screen orientation
and align the screen if it is not responding
accurately to stylus taps.
Clear Type: Smoothes the edges of screen
fonts for many programs.
Text Size: Adjusts the text size.
Windows Update
This function enables your phone to update its
programs.
Select [Start→Settings→System→ Windows
Update], and then follow the instruction to
check and download the updated applications.
Connections Setting
Beam
After choosing <Receive all incoming
beams>, you are allowed to receive the
incoming beam from other devices..
Connections
For the details, please see “Internet Explorer”
on page 75.
Network Cards
You can choose different network adapters and
adjust the settings.

Settings
39
USB to PC
Click <Enable advanced network
functionality>, and then you can change the
type of USB connection to help to solve the
connecting ActiveSync problems.

Personal Manager
40
•
7. Personal Manager
The N810 includes [Contacts], [Calendar],
[Tasks] and [Notes], etc. You are allowed to
use these programs alone or together. For
example, when you are editing a short
message, you can add the e-mail address from
Contacts.
You can click the program icons on the [Start]
menu to switch between different programs.
Contacts
The [Contacts] list will give you a convenient
way to access to your desired information.
All the contacts’ information is saved on SIM
Card or on the phone.
Contacts saved on SIM Card: Only includes
the name and one number (its memory size
depends on the type of the SIM card).
act
d
ess,
ersary, name of the spouse
Crea phone
(1)
e [details] option shown as the
below:
Contacts saved on the phone: On the cont
list of the phone, you can not only recor
information about the contact’s name,
different types of numbers, e-mail addr
and home address, but also save the
contact’s personal information, like the
birthday, anniv
and children.
ting new contact on the
On the Today screen, select
[Contacts→New→Outlook Contact] to
enter th
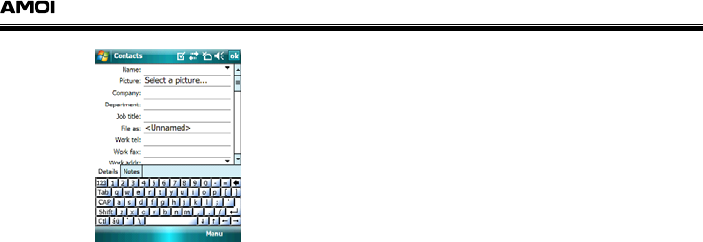
Personal Manager
(2)
(3)
(1)
(2)
(3)
Input the name and other information of
the contact. Click <ok> after you finish
your editing to back to the contacts list.
You can also add notes to the contact by
selecting [Contacts→New→Outlook
Contact →Notes].
Creating new contact on SIM card
On Today screen, select
[Contacts→New→SIM Contact].
Input the contact’s name and one phone
number.
Click <ok> to back to the contacts list.
Viewing contacts
On the Today screen, select <Contacts> to
enter the contacts list. It includes all contacts
saved on SIM card and on the phone.
On the contacts list, an icon will appear on
the right side of the contact’s name,
indicating the type of the saved number. If it
is a work number, “w” will appear; if it is a
home number, “h” will appear after the name;
if is a mobile phone number, “m” will appear.
But SIM contacts only have an icon of the
SIM card.
Click your desired contact to view its detailed
information.
Searching contacts
On the Today screen, select <Contacts> to
enter the contact list as shown below:
41
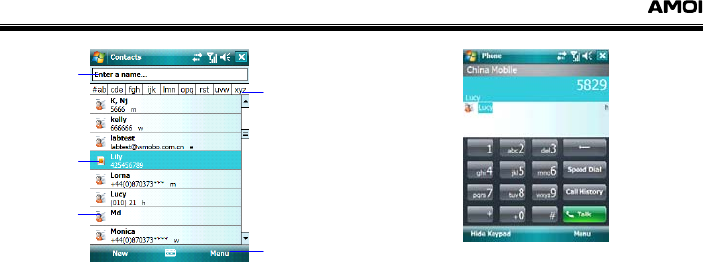
Personal Manager
Enter parts of the
name to search the
contact quickly
Indicate the contact
is saved on the SIM
card
1. Click to display or
edit the details of the
contact; 2. Click and
hold down to select
operating options
Select it to
choose the
correspondi
ng options
Select the
corresponding
first letter to
search for the
contact
Speed Dial
The smart dial enables you to find your desired
contact fast.
On the Today screen, click <Phone> to enter
the Phone screen. Directly click the letter or the
corresponding numeric key of the contact’s
name. After the phone lists the matched contact,
click your desired one, and dial.
Changing list viewing mode
Changing the list viewing mode of Contacts, on
the Contact screen, select [Menu→Option] to
enter the List View Settings screen. Choose
your desired mode by clicking the
corresponding check box.
Changing display type of Contacts
On the Contacts screen, select [Menu→Filter]
to choose the display type of contacts, including
[All Contacts], [Recently Viewed], [No
42

Personal Manager
Categories] and [More…].
Editing contacts’ information
43
If you want to change contact’s information,
enter the detailed screen of the contact, and
select [Menu→Edit] to start editing, as shown
below:
Deleting contacts
On the Today screen, click <Contacts> to enter
the screen. Choose one contact, and select
[Menu→Delete Contact], click <Yes> to delete
it.
• Tasks
This function will keep a track to all your tasks
which can be displayed on the Today screen.
Creating a new task
(1)
(2)
Select
[Start→Programs→Tasks→Menu→New
Task].
Edit the subject and contents of the task;
click <ok> to save it.
Categories: Grouping the tasks. Click
[Categories] and select one. To create a
new category, select <New> and click <ok>
to save it.
Notes: On the Notes screen, you can add
other information of the task and click <ok>
to save it.

Personal Manager
Speed create new task: On the Today screen,
select the bar displaying tasks to enter the
Tasks screen. Click [Tap here to add a new
task], and input the contents.
To set reminders for new tasks: Select
[Menu→Options…] and click [Set
reminders for new items].
Editing the task: Select the task and click
<Edit> to change the information.
44
• Notes
This function allows you to track your ideas,
drawings and phone numbers on the written or
recording form.
Creating notes
(1)
(2)
(3)
(1)
(2)
(3)
(4) Click
Select [Start→Programs→Notes→New].
You are able to create a note by writing,
drawing, typing or recording.
You can also insert date to the note. First,
make sure you don’t select any thing or
any drawing; then, click and hold down on
any places of the Note screen; finally,
select [Insert].
Methods for recording
Select [Start→Programs→Notes] to open
a note.
Select [Menu→View Recording Toolbar].
Keep the microphone close to your mouth
or other sounds.
to start recording and you will
hear “Beep” once. Click to stop and
you will hear “Beep” twice. Such
represents a piece of recording.
(5) Click on the file explorer or notes with
records to play the record. Click to
adjust the volume.

Personal Manager
45
(1)
(2)
•
Adjusting the voice recording format
Select [Menu→Options…→Global Input
Options→ Options] to adjust the voice
recording format.
Rename or move notes
If you want to rename the note, select
[Menu→Tools→ Rename/Move…] to operate.
Select note template
On the note list, select [Menu→
Options…].
Select one from the check box of [Default
template].
Send notes via e-mail
On the note list, click and hold down one note
or one piece of record, select [Send…].
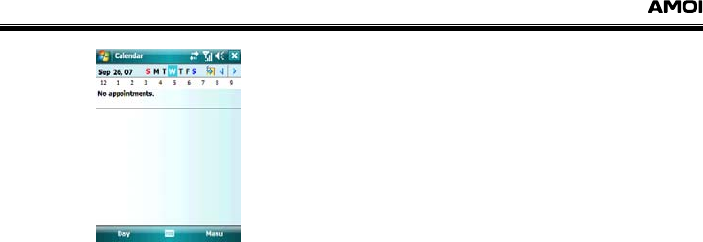
Calendar
The function will arrange appointments for you,
including meeting and others. You can select
one of the following display modes: <Day>,
<Week>, <Month>, <Year>, and <Agenda> to
check your appointment. Besides, you can also
set sounds or other methods to remind you.
The Today screen will list appointments
occurred today.
Select [Start→Calendar] to enter the calendar
list as the below shown:
Personal Manager
Creating a new appointment
46
(1)
(2)
(3)
(1)
(2)
(3)
(1)
(2)
Select [Menu→New Appointment] to
create a new appointment.
Input the details of the appointment.
Click <ok> to save it.
Click [Starts] and [Ends] to change the date
and time.
To add note, please select [Notes] to input.
To set reminders, please select [Remind me]
on the check box of [Reminder].
Editing appointments
Select one appointment and enter its
viewing screen, and then select
[Menu→Edit] to start editing.
Click <ok> to save it.
To activate reminder function for new
appointments, please select
[Menu→Tools→Options…→Appointments→
Set reminder for new items] from the
Calendar screen.
Sending meeting notification
You can set meetings with Outlook E-mails
users by using Calendar.
Create a new appointment and enter
contents of the meeting.
Select [Attendees] to add attendees from
the list of the contacts’ e-mail address.

Personal Manager
47
(3)
(4)
Click <ok> to save it.
The meeting notification will be created
automatically and will be sent to the
attendees at the time you synchronizing
with your PC. The contents you input on
[Notes] will be sent out together.
Notes:
The available contacts for attendees are contacts
saved with e-mail address.
• Search
This function can help you to find the files you
need quickly.
(1)
(2)
(3)
(4)
(5)
•
Select [Start→Programs→Search].
Enter key words on the check box of
[Search for].
Select the data type on the check box of
[Type] to improve the searching efficiency.
Click <Search> to find matched files or
folders.
If you want to find out data which requires
huge memory, please select [Larger than
64 KB] on the check box of [Type].
Calculator
The calculator function can perform standard
mathematical operations such as addition,
subtraction, multiplication, and division.
Select [Start→Programs→Calculator].
• Help
Select [Start→Help] to view the information
about the using method of the N810.
Messaging
•
8. Messaging
48
With this function, you can create, edit, send
and receive SMS, MMS and Outlook E-mails.
E-mails are sent via the e-mail address which is
supplied by ISP (Internet Service Provider) or
E-mail service provider. SMS and MMS use the
phone number as the information address
which are sent and received by GSM network
operator.
Notes:
When your phone is using ActiveSync to
synchronize with your PC, you are not allowed to
serf on the internet via GPRS, send or receive
MMS and Internet e-mails.
Select [Start→Messaging] to enter the
Messaging screen. Click on the Text
Messages screen to switch between SMS,
MMS and Outlook E-mail.
Outlook E-mail
The mail system can receive e-mails from the
Internet, and from Exchange or Outlook while
synchronizing with your PC by ActiveSync. You
are able to send and receive mails sent or
received via POP3 and IMAP from the Internet.
Caution:
If you are using MMS and E-mail functions,
please select
[Start→Settings→Connections→Connections] to
choose the corresponding connections.
New E-mail account
(1) Select [Start→Messaging→New E-mail
Account] and input the e-mail address.
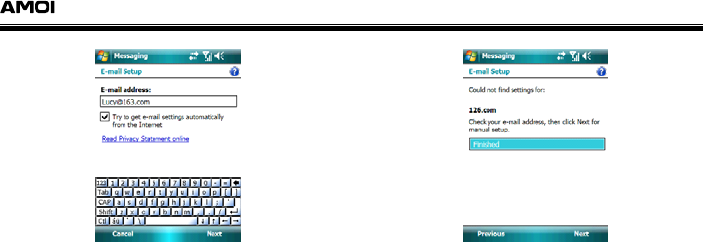
Messaging
If you click [Try to get e-mail settings
automatically from the Internet], tap
<Next>. The phone will automatically
connect to the E-mail server and start to
download necessary connection settings.
When the phone cannot find the account you
entered, click <Next> to start manual setup.
When the account is found, click <Next> to
continue.
49
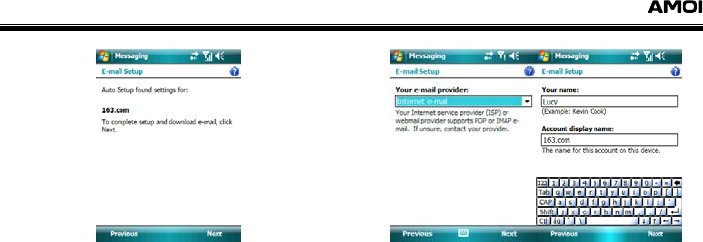
Messaging
If you don’t select [Try to get e-mail settings
automatically from the Internet], click
<Next> to start manual setup.
50
(2) Select the needed E-mail service provider
and enter your name. Click <Next>.
(3) Input the title of E-mail incoming server
and select the account types your e-mail
service provider supports. Click <Next>.
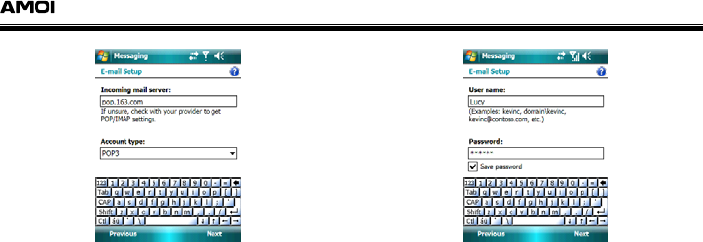
Messaging
51
(4) Enter the account name and password,
and then click <Next>. If you select [Save
Password], you won’t be required to enter
your password the next time you log in
your e-mail account. But if you lose your
phone, others who pick it up will have your
account.
(5) Input the title of the e-mail outgoing server,
and click <Next>. Now most free e-mail
requires SMTP authentication. If your
outgoing server requires it too, you are
suggested to click [Outgoing server
requires authentication] to ensure the
successful e-mail sending.

Messaging
52
(6) Select [Automatic Send/Receive], and
click <Finish> to complete the setup.
Finishing all these steps, select the account.
Your new account will appear on the messaging
menu. Then you are able to connect to your
e-mail server.
Switching accounts
Select [Menu→Go To] to choose the account.
Deleting accounts
Select [Start→Messaging], click / to
choose the account you want to delete. Select
Messaging
[Menu→Delete→Yes]. But you cannot delete
accounts of SMS and MMS.
53
(1)
(2)
(3)
(4)
(5)
(6)
(7)
(1)
(2)
(3)
Editing e-mails
Select [Start→Messaging], and click to
enter the account you want to send out the
mail.
Select [Menu→New].
Enter the recipient’s e-mail address on the
check box of [To], or click it to choose the
recipient from the contacts list.
Input the subject and contents.
To send out an annex, click [Menu→Insert]
to choose picture, voice note or file to be
the annex.
If you want to send out a voice file, you can
record one by inserting [Voice Note] and
manually add it as the annex.
When you finish editing the mail, click
<Send> to send it our, or click <ok> to
save it on the draft.
Receiving e-mails
On any folder of the account, click
[Menu→Send/Receive].
When connecting to the e-mail system,
mails saved in Outbox will be sent out
automatically; meanwhile, new incoming
e-mails will be automatically downloaded
to Inbox.
By the Default Settings, the inbox will
download each e-mail without its annex.
You can adjust the setting on the e-mail
server attribute. If you want to read the
whole mail, you have to mark the incoming
e-mail and connect to the e-mail server or
synchronize again.
Caution:
The moment you send out your e-mail the phone is
connected with the e-mail server, the mail will be

Messaging
54
•
sent out right away. If it is offline, the mail will be
saved on the Outbox, and be sent out
automatically at the next time the phone is
connected to the e-mail server or synchronizing
with your PC.
MMS
Only when your SIM card supports this function
can your phone receive and send MMS
(Multimedia Messages). As for the price of the
MMS service, please contact with your GSM
network operator.
Configuring MMS settings
[MMS Configuration] will list the available
MMS server for you. [About] will list all program
information concerning with MMS.
To successfully send and receive MMS, please
set accurately on [MMS Configuration].
(1)
(2)
Select [Start→Messaging→MMS].
Choose any account on the Messaging
screen and select
[Menu→Tools→Options…→MMS] to
enter the MMS Configuration screen.
There are four options: [Preferences],
[Blacklist], [Servers], and [About]. Select
[Servers] and click [CmwapMMSC] to set.
Select [Preference] option:
Retrieve messages immediately: Usually
you will receive a notification of an incoming
MMS. If you click this option, the phone will
automatically download new MMS.
Confirm to retrieve messages while
roaming: Selecting it, your phone will not
have a corresponding prompt of downloading
a new MMS while roaming.
Save sent messages: Save sent MMS.
Allow read report: You will receive a report
that the recipient has received and read the
MMS you sent.

Messaging
Disconnect network connection after
MMS: After sending or receiving a MMS, the
phone will disconnect with GPRS.
Attempts before giving up: The option
allows you to set the times of attempts before
giving up sending MMS.
Phone resolution: Select the phone
resolution you want to send. To choose a
resolution lower than the original resolution
will shorten the sending or receiving time.
55
Editing a MMS
MMS is formed by different kinds of slides.
Each slide can be picture, video clip, audio clip,
and text. Please select
[Start→Messaging→MMS→Menu→New].
The screen will not be blank. Default template
pictures will appear. If you want to start editing
from a blank screen, please click [Always
choose custom] and select [Options…] to
enter the below screen:
1
2
3
4
5
6
7
910
8
1. Enter the subject.
2. Click the icon beside the [Subject] check box
to select [Cc] and [Bcc].
3. Click to choose the picture or video clip you
want to insert.
4. Click to choose your favourites website, and
then click <Select> to insert.
5. Click to enter text.
6. Click to choose the video clip you want to

Messaging
56
insert.
7. Menu: Includes options like [Add recipients],
[Insert Media] etc.
Add Recipient…: Enter the Contacts
screen to choose the recipient. You can
choose to send the MMS to several
recipients, in other words, you can select
several contacts.
Insert Media: Select to insert
[Picture/Video], [Audio] or [Text].
Remove Media: Select to remove
[Picture/Video], [Audio] or [Text].
Slides: Provides [Insert Slide], [Delete
Slide], and [Organize Slides…].
Template: Includes [New From Template…],
[Save as Template] options.
New From Template…: Use the default
template to edit a new MMS.
Save as Template: Save the editing MMS
as a template.
Capture:
Picture…: Capture new pictures.
Video…: Capture new video.
Attachment…: Insert vCard, vCalendar or
other files to the editing MMS.
Send via SMS…: Change the MMS as SMS
and send it out. But this operation only
reserves the recipient and the text.
Cancel Message: Cancel the new MMS and
back to the previous menu.
Options:
Background: Select the background
colour of MMS.
Text Layout…: Decides where the
inserted text will be.

Messaging
57
•
Text Size: [Small], [Normal] and [Large]
are available for you to choose.
Text Colour: Choose the text colour
according to your favour.
Text Background: Choose the colour of
the text background.
Send Options…: You can adjust the
settings of [Delivery], [Expiration],
[Priority], etc.
8. Click to preview MMS.
9. Select the input mode.
10. Click <Send> to send the current MMS.
SMS
Before you send a text message, your phone
must store the accurate service center number
supplied by GSM network operator.
(1)
(2)
(1)
(2)
(3)
(4)
On the Today screen, click <Phone> to
enter the phone screen, and select
[Menu→Options…→Services→Voice
Mail and text Messages]. Click < Get
Settings…>.
Enter the service center supplied by GSM
network operator and click <ok>.
Editing a Text Message
Select [Start→Messaging→Text
Messages→Menu→New] to open the text
message editing screen.
Insert one or several phone numbers on
[To] check box, using semicolon to
separate the numbers; or select
[Menu→Add Recipients] to open the
contacts list.
On the text box to enter the contents, or
select [Menu→My Text] to insert the
default text.
Click <Send>.

Messaging
58
(5)
(6)
(7)
•
If you want to insert your signature after
each SMS, click [Menu→Tools→
Options…→Accounts→Signatures…]
on the Inbox screen.
Choose [Text Messages] on [Select an
account] box. Click [Use signature with
this account] and enter the signature on
the text box. If you want to use signature
when replying and forwarding messages,
click [Use when replying and
forwarding].
If you want to delivery notification, please
click [Menu→Tools→Options…→
Accounts→Text Messages], and click
[Reuest delivery notifications].
MSN Messenger
MSN Messenger gives you convenience to chat
with your friends at anytime or anywhere.
Select [Start→Programs→Messenger].
Functions of Messenger
View the online list
Send and receive MSN messengers
Chat with groups of the contacts
Inform friends your online state
Make your state invisible to others or forbid
them to send messages to you
You need a Microsoft Passport account to use
MSN Messenger. If you already have an
account, you still need:
(1)
(2)
Set an account on MSN Messenger.
Log in MSN Messenger.
Setting account
You have to set the account so as to use MSN
Messenger. You need a Microsoft Passport or
Hotmail account. Besides, before you use it,
make sure that the phone is connected to the

Messaging
59
(1)
(2)
(3)
(4)
(1)
(1)
Internet.
Select [Start→Programs→Messenger].
Select [Menu→Options→Messenger] on
the MSN Messenger screen.
Enter your display name.
Click [Update all contacts display name
automatically].
Log in and Log on
Click anywhere on the screen when you
log in and follow the prompts to log in.
Select [Menu→Log on].

Office Mobile
60
•
9. Office Mobile
Word Mobile
Word Mobile will provide the users convenience
to copy documents, cooperating with Microsoft
Word on your PC. You can use it to create new
documents or copy Word documents from PC
to this device.
You can also use Word Mobile to create every
kind of documents, like letter, meeting notes,
memo, etc.
Creating documents
(1)
(2)
(3)
(4)
(5)
Select [Start→Office Mobile→Word
Mobile→New].
There will appear a blank document. If
you’ve selected the default mode, the
document will be displayed in a given
template format. You can only open one
document once a time. If you open the
second document, the system will save the
first one automatically. You are able to
save or use documents of different formats,
including <.txt>, <.doc>, <.dot>, and
<.rtf>, etc.
On the editing screen, click <View> to
choose [Toolbar], [Wrap to Window], and
[Zoom] functions.
Word Mobile includes one corresponding
document list saved on the phone. Click the list
to open the document; click and hold down one
document, you can enter to choose operations
like [Rename/Move…], [Delete], [Create
Copy], [Select All], [Send…], [Beam File…].
For more information about Word Mobile,
please select [Start→Help] to view.
Transferring documents
When transferring data, Word documents (.doc)
and templates (.dot) created by Word 6.0 or
updated versions on your PC will be transferred

Office Mobile
as Word Mobile documents (.psw) and
templates (.psw). Times to transfer the data
including:
Synchronizing data
Copying Word documents from your PC
to the phone
Incoming an e-mail with Word documents
as the attachment
While synchronizing or copying the document
to your PC, Word Mobile documents will be
transferred as Word documents. Transferring
Word to Word Mobile, most simple text and
paragraph format will be saved and displayed,
but most formats will be lost or changed.
61
• Excel Mobile
Excel Mobile will provide the users
convenience to copy documents, cooperating
with Microsoft Excel on your PC. You can use it
to create new documents or copy Excel
documents from PC to this device.
To create a new document, click [Start→Office
Mobile→Excel Mobile→New], and a blank
e-table.
You can use different formats, including Excel
template (.xlt) and Excel Sheet (.xls), etc. to
save the e-tables.
(1) Excel Mobile includes one corresponding
document list saved on the phone. Click
the list to open the document; click and
hold down one document, you can enter to

Office Mobile
62
(2)
choose operations like [Rename/Move…],
[Delete], [Create Copy], [Select All],
[Send…], [Beam File…].
Excel Mobile provides the basic e-table
tools, for example, filter, formula, and
function. To display the toolbar, click
[View→Toolbar].
Using skills of Excel Mobile
While using big Excel Sheet, please pay
attention to the below items:
On full screen view, you are able to view the
sheet as much as possible. Click
[View→Full Screen]. To deactivate full
screen mode, click [Full Screen] again.
Display or hide items from the window, click
[View→Show] to select your desired items.
Freezing panes on the sheet. Choose your
desired pane to freeze. Click [View→Freeze
Panes]. You are able to freeze the pane on
the top of the left side so as to make the
targets visible while scrolling.
Spilting panes to display different area of the
big table. Click [View→Split], and then drag
the split bar to your desired place. To remove
the split bar, click [View→Remove Split].
Transferring sheets
When transferring data, Excel sheet (.xls) and
templates (.xlt) created by Excel 5.0/9.5 or
updated versions on your PC will be transferred
as Excel Mobile sheet (.pxl) and templates
(.pxt). Times to transfer the data including:
Synchronizing data
Copying Excel sheets from your PC to the
phone
Incoming an e-mail with Excel sheets as
the attachment
While synchronizing or copying the sheets to
your PC, Excel Mobile sheets will be
transferred as Excel sheets. Transferring Excel

Office Mobile
to Excel Mobile, most simple text and
paragraph format will be saved and displayed,
but most formats will be lost or changed.
63
• PowerPoint Mobile
You can use PowerPoint Mobile to open or view
slides of ppt or pps created by PowerPoint 97
or updated versions.
The briefing elements used by many slides,
such as switching slides or animation are able
to be show on this phone. If slides are set to be
time play, the phone will automatically switch to
the next slide when comes to the due time.
Connecting to the web is also available here.
Functions PowerPoint Mobile doesn’t
support:
Notes: Notes will not be shown on the slide.
Rearrange/Editing slides: PowerPoint
Mobile only available for you to view.
Document Types: PPT documents created
by versions before PowerPoint 97, and
documents have attachments which are
HTML websites of htm and mht formats.
Showing slides
(1)
(2)
(3)
(4)
Select [Start→Office Mobile→
PowerPoint Mobile].
Click your desired slide on the list.
Click on the showing slide screen to
forward to the next slide.
If the slide contents are set to be time play,
the phone will automatically switch to the next
slide when comes to the due time.
Stopping slide show
Click [ →Stop slide show].
Viewing different slides
If the slides haven’t been set to time play, you

Office Mobile
can switch to the next or previous slide
manually.
(1)
(2)
Select [Start→Office Mobile→
PowerPoint Mobile].
Open the slides.
(3) Select [ →Next/Previous], or click
[Switch to Slides] to choose the slides
you want to view.
Caution:
If you want to zoom in the scaling, you are not
allowed to view other slides before you set it to the
normal scaling. Select [Next/Previous], the phone
will play the animation but not back to the
previous slide or forward to the next slide.
64

ActiveSync
nc 10. ActiveSy
Microsoft ActiveSync can synchronize
information on the phone with information on
the PC via USB cable.
65
Note:
Before using ActiveSync, you shall install the
ActiveSync software attached with the phone to
your PC by following the instructions shown on the
screen.
• Setting up
Caution:
1. When you need to synchronize information
of Contacts, Calendar, E-mails, Tasks, and
Notes on the phone with your PC, first you
have to ensure that your PC has installed
Microsoft Office Outlook.
2. ActiveSync cannot synchronize with
Microsoft Office Express, but only with
Microsoft Office Outlook.
3. While synchronizing, make sure that the
phone has disconnected [Internet Sharing],
otherwise, ActiveSync cannot connect
automatically.
Synchronizing with PC
(1)
(2)
First connect the phone to your PC by
USB cable.
The PC will automatically activate
Microsoft ActiveSync, and then the
located down on the taskbar on your PC
will turn green. The Pocket PC Sync Setup
Wizard will appear on your PC screen.
(3) As the below picture shown, follow the
instructions to set up synchronization
between your PC and the phone.
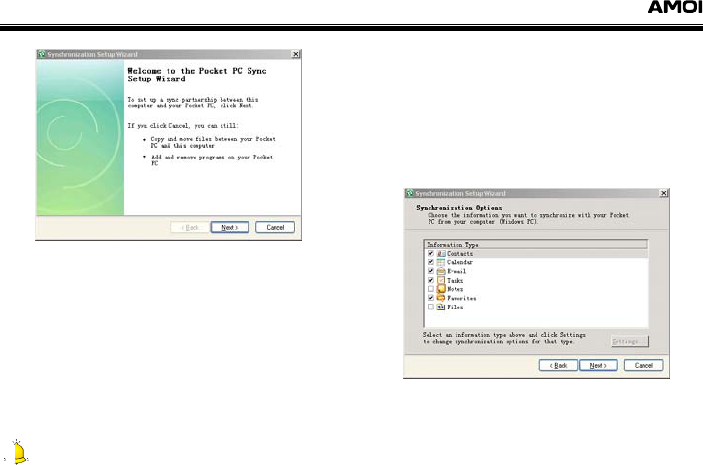
ActiveSync
On the setup wizard screen, click <Cancel>,
then you can only copy or delete files
between your PC and the phone, and add or
move programs on the phone, but cannot
synchronize corresponding data.
If you click <Next>, then it is able to
synchronize information (Contacts, Calendar,
E-mails, etc.) between your phone and the
PC and to adjust the settings.
66
Caution:
If choose “Document” information type to sync,
ActiveSync will create a folder named “<Device
Name> My Documents” on the folder of “My
Documents”. ActiveSync will sync all information
saved in this folder with information saved in “My
Documents” folder on your phone.
As the below figure shown, click <Finish>
to complete the setup.
(4)
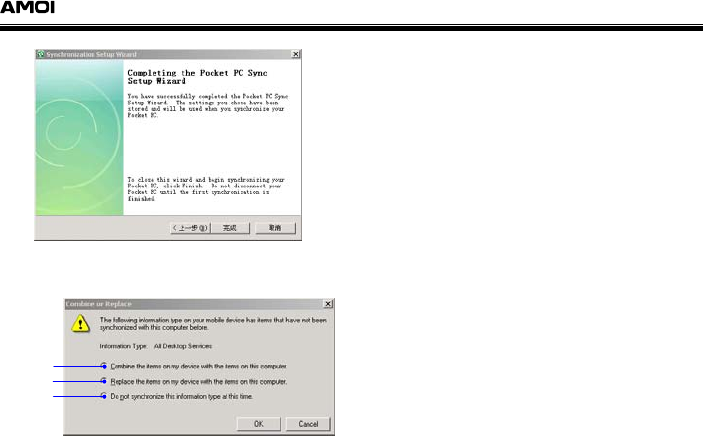
ActiveSync
67
(5) Save the settings and start selecting your
desired items to sync.
Item Three
Item Two
Item One
Item one: Combine the items on your phone
with the items on the PC.
Item two: Replace the items on your phone
with the items on the PC.
Item three: Do not synchronize the
information, and keep each device
separately independent.
According to your selected item, click <ok> to
complete the sync setup automatically.
“Synchronizing” will appear on the main screen
of Microsoft ActiveSync. And the information
type you select will be synchronized
automatically.
On the ActiveSync screen on your phone,
select <Sync> to start; if you want to stop
before completing the synchronization, click
<Stop>.
Synchronizing with server
To set up your phone to synchronize directly
with exchange server, you will need to get the
server name and the server domain name form
your service provider or system administrator;

ActiveSync
you must also know your exchange user name
and password. •
68
(1)
(2)
(3)
(4)
Select [Start→Programs→ ActiveSync
→ Menu →Configure Server].
Enter the server address in the [Server
address] box and click <Next> to
continue.
Enter the needed server information in
[User Name] box and [Password] box,
and input the server’s domain on [Domain]
box. Click <Next>.
Select the information type you want to
sync, and click <Finish> to end the setting.
Click <Sync> to start synchronizing.
. Note:
After setting up the connection between your
phone and the PC, remote connection between
server and the phone can be set up as well.
Synchronization Information
You can adjust the information type and
settings on ActiveSync on the PC. Click “Tools”,
and then select “Options…” to choose your
desired information type. If the item you select
is available, click “Settings” to choose the
options you need. You can also click the right
key of the mouse to adjust the settings directly.
While connecting, if the set information type is
different between the phone and the PC,
ActiveSync will automatically check the
updated contents and start synchronizing. You
can also click to sync and click to
stop it.

ActiveSync
Synchronizing Outlook
Based on your selection, Contacts, Calendar,
E-mails, Tasks, and Notes will be
synchronized between your phone and the PC.
Synchronizing Favourites
Synchronize [Favourites] in Internet Explorer
on your phone with [Move Favoutites] on the
PC favorites.
Synchronizing Documents
Synchronize all documents in [My Documents]
folder on your phone with documents in
[<Device Name> My Documents] folder on
your PC.
Synchronizing Music, Video and
Picture
You can combine ActiveSync and Windows
Media Player on the PC to sync with music,
video and picture files saved on the playing list
of [Windows Media] on your phone. To do this,
you have to set synchronization operation for
these media files on Windows Media Player on
your PC.
Only complete the below operations can your
phone be able to start media synchronization:
Install Windows Media Player10 or updated
versions (requires Windows XP system or
updated system).
Use USB cable to connect the mobile device
to the PC. Deactivate.
69
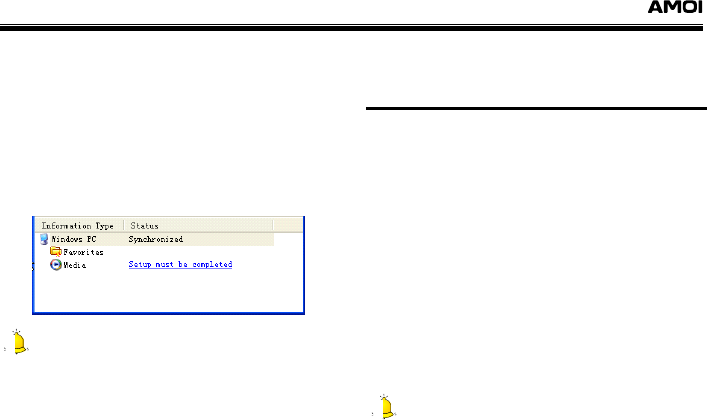
ActiveSync
Set up synchronization between the phone
and Windows Media Player. •
Select “Media” on ActiveSync screen after
synchronizing, shown as the below figure, and
click [Setup must be completed] to open
Windows Media Player, and then choose
“Sync” to start sync. You can click “Set Sync”
to reset the media files you want to sync.
70
Caution:
ActiveSync cannot sync SMS and MMS.
Installing software on the
phone
You can install software on the phone from the
PC through ActiveSync.
(1)
(2)
(3)
Set up connection between the PC and
your phone through ActiveSync.
Run the installation driver on the PC.
Select the saved place for the installation
on your phone, and install it. If there is a
Micro SD card in the phone, you will be
reminded to select the place to save.
ActiveSync will transfer files while
synchronizing. For more details, please refer to
ActiveSync Help on the PC.
Caution:
If you delete or change one item on the PC, the
item on the phone will be deleted or changed the
next time you synchronize, vice versa.

ActiveSync
71
• Stopping Synchronization
Stopping synchronization will delete all
synchronization and file transferring settings.
(1)
(2)
Disconnect your phone from the PC.
As the below figure shown, click “Mobile
Device” on File menu, and choose your
desired devices.
(3) Click “Delete Mobile Device” on “File”
menu.

ActiveSync
72
• ActiveSync Error Information
If synchronization is unsuccessful through
ActiveSync, error information will appear on the
phone screen. When the error information
appears, click the “Prompt” button on the PC
and ActiveSync will display additional error
information.
Some errors may influence ActiveSync
operation. If you suspect there may be
something wrong with ActiveSync you can
select manual synchronization. After finishing
manual synchronization, Auto Sync will reset.
For more details, please refer to
“Synchronizing information” in the
ActiveSync introduction of PC.
Wireless Network
73
rk 11. Wireless Netwo
Caution:
1. Please make sure that your SIM card has
relevant GPRS service before using the wireless
network function. Contact with your GSM
network operator for more details. If your SIM
card has this function, and you’re using it, the
icon will appear on the top of the screen.
2. You cannot log in webs, and send/receive MMS
and Internet E-mails while synchronizing with
your PC through ActiveSync.
• Creating Internet connection
(1)
P
(2) Settings→Connections→Connc
(3) ct], and
(4) GRPS)]
x are
oose
For
Get the below information from your ISP:
Phone number of the ISP server
User name
assword
Select
[Start→
tions].
Create a new connection on [My ISP], and
select [Add a new modem conne
follow the instructions to operate.
[Cellular Line] and [Cellular Line (
on the [Select a modem] bo
available for you to ch .
more, please click .
• Disconnect GPRS connection
Hold down to disconnect GPRS. Or you
can click its icon to select [Wireless
Manager] and click [Phone] to disconnect it.
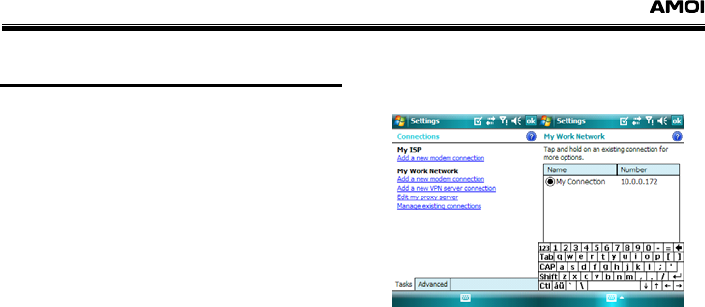
Wireless Network
74
• Creating WAP connection
(1)
(2)
(3)
(4)
(5)
Select [Start→Settings→Connections→
Connctions→Tasks→Edit my proxy
server].
Click [The network connects to the
Internet] and [This network uses a proxy
server to connect to the Internet]. The
Proxy server is 10.10.0.172.
Click <Advanced…> and select [Wap] to
set its proxy server as 10.0.0.172, and its
port as 9201. Let the user name, password,
and domain blank.
Click <New…> on the My Work Network
screen. Select [Cellular Line (GPRS)] on
the [Select a modem] box. Click <Next>
to enter the My Connection 1 screen.
Enter “cmwap” on the [Access point
name] box. Click <Next>, <Finish>, <ok>
to complete the settings.
On the [Connections] screen, select
[Manage existing connections] from [My
Work Network]. Hold down [My
Connection] to select [Connect].
To switch to [Internet Explorer Mobile], please
enter “wsp: //” before the website, for example,
wsp://wap.montenrnet.com.
To change the setting of the modem, please
select [Manage existing connections] on the
[Tasks] screen to choose your desired one, and
select [Edit]. Follow the instructions to operate.
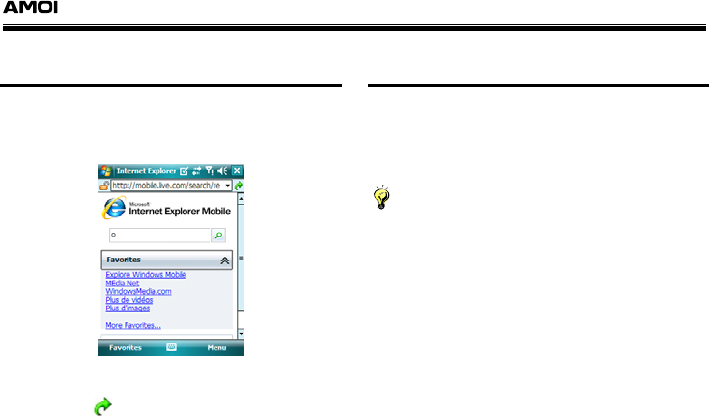
Wireless Network
• • Internet Explorer
75
(1) On the Today screen, select
[Start→Internet Explorer] to browse the
webs.
(2) Enter the website on the address box.
(3) Select to connect.
The phone has several preset websites. You
can select [Favourites] and click the website
you need to connect.
Internet Sharing
When the phone is connected with a PC, this
function will make your phone as an external
Modem to help the computer to browse the web
wirelessly.
Note:
1. To use your phone as an external modem
requires the support of SIM card. For more,
please contact with your network operator.
2. Please make sure that the installed ActiveSync is
4.5 version or updated versions.

Wireless Network
76
(1)
(2)
(3)
(4)
(5)
(6)
•
Creating Internet Sharing connection
Select [Start→Programs→Internet
Sharing] to enter.
Select PC connection mode, [USB] .You
can select your desired PC connection
mode and network connection mode.
Connect your phone with the PC by USB
cable. The PC will automatically find new
device and install it.
After the installation, please check the
network adapter has window mobile
network card on the PC. If it has, the
installation successes.
After selecting the network connection
mode, select <Connect>. If “Connected”
appears on the Internet Sharing screen,
you are able to browse the webs wirelessly.
If you want to disconnect it, select
<Disconnect> on the Internet Sharing
screen.
Then the phone is an external modem for
the computer.
Remote Desktop
With this function, you can log in the computers
running terminal service ore remote desktop,
and use all available programs on the PC via
your own mobile device. For example, you can
use your phone to access to all Word
documents on your PC without activating Word
Mobile. Select
[Start→Help→Contents→Connect→Use
Remote Desktop Mobile to access a PC] to
view the operating details.
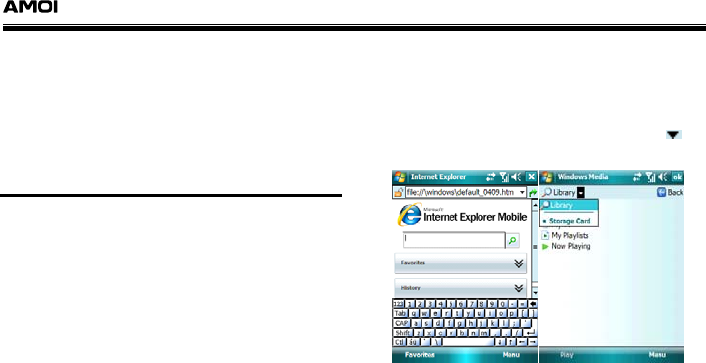
Entertainment
nt
•
12. Entertainme
The N810 provides Windows Media Player,
wonderful games and useful camera to rich
your life.
Windows Media
77
It is able to play audio files of Window Media or
MP3 format (including asf, wma, wmv and mp3,
etc.). To search the Windows Media formats
your phone supports, please go to
http://www.windowsmedia.com.
To activate Windows Media Player on your
phone, select [Start→Programs→Windows
Media].
Add music files
(1)
(2)
(3)
Select [My Computer→Mobile
Device→My Windows Mobile-Based
Device→My Documents→My Music] on
your PC, and copy your desired music files
to this folder.
On the Now Playing screen, select
[Menu→Library…] to open it.
On the Library screen, you can click to
select the saved place.
(4) Select [Menu→Update Library…], the
phone will automatically update all saved
music files to Library.
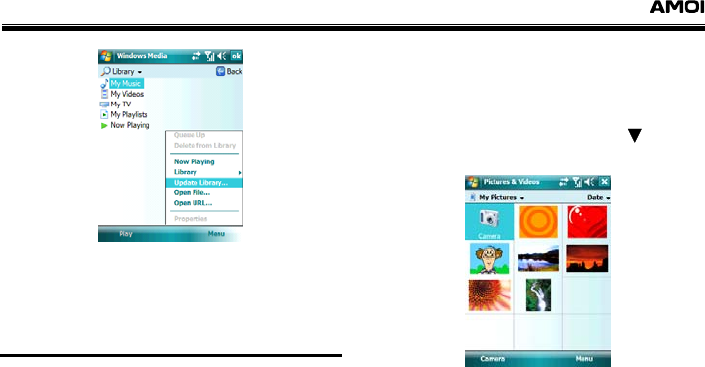
Entertainment
78
(5)
•
For more information about how to create
and edit the playing list on your phone,
please select [Start→Help].
Pictures and Videos
Pictures
You can use [My Pictures] to view the saved
pictures of jgp format, send them to your friends,
view picture slides, and set pictures as the
[Today] background.
Searching and displaying pictures list
(1)
(2)
Select [Start→Programs→Pictures &
Videos].
Select [My Pictures], and click to
choose a folder.
Viewing pictures
(1)
(2)
On the Pictures screen, select
[Menu→Play Slide Show] to view.
On the slide show mode, click anywhere

Entertainment
on the shown picture, the toolbar of slide
show will appear. You can use it to
suspend the slides show or change the
show orientation.
79
) Click
(3 / to forward or backward the
showing slides.
Picture listing sequence
(1)
(2)
(1)
(2)
(3)
(4)
(5)
Select [Start→Programs→Pictures &
Videos].
Select [Date] to choose the way picture
sorted by Name, Date, or Size.
Deleting pictures
Hold down on the file name of the deleted
pictures, and select [Delete] from the menu.
Editing pictures
You can cut, copy and paste jgp pictures.
Click the picture you want to edit, and
select [Menu→Edit] on the Pictures &
Videos screen,
Click <Rotate> to rotate the picture on the
editing screen.
To set the rotating orientation, click the
picture on My Pictures screen, and select
[Menu→Options…→General] to click
[Left] or [Right] on [When rotating a
picture, rotate 90 degrees:] box.
Select [Menu→Crop] to drag and choose
the cropping area. Click anywhere on the
picture to crop; click anywhere out side the
picture to stop cutting.
Select [Menu→Revert to Saved] to
cancel all the editing.
Setting pictures as Today Background
You can set any jgp pictures as Today
background and set it on to display on
anywhere of the Today screen, for example to
adjust its transparency level.

Entertainment
(1)
(2)
(3)
(1)
(2)
(3)
•
Click your desired picture on [My
Pictures].
Select [Menu→Set as Today
Background…].
Select [Transparency Level] to set.
80
Setting slide show format
Select [Start→Programs→Pictures &
Videos] to enter.
Select [Menu→Options…→Slide Show].
Choose the slide show mode, portrait or
landscape.
If you want to want to set the slides as the
screensaver, please click [Play screensaver
when connected to my PC and idle for 2
minutes].
Camera
The phone is equipped with a built-in 2 mega
pixel CMOS camera, supporting full screen
shooting, bursting, and zooming, to help you to
take splendid photos.
Capturing photos
(1) To enter camera mode, select
[Start→Programs→Pictures &
Videos→Camera], or on the Today screen,
hold down to enter the Capture
Preview screen.
On the Capture Preview screen, press
to focus automatically. Color of the
focusing frame turns from red to green,
which means that the phone has finished
focusing; then, you can hold down the
button or press [OK Key] to take photos.
All captured photos will be saved on the
[Start→Programs→Pictures & Videos]
list.
(2)
(3) To view the captured photos, click
<Thumbnails> to browse the photos. To
enter Capture Preview screen during

Entertainment
81
browsing, click <Camera>.
Setting the capturing effect
On the Capture Preview screen, select
<Menu> to do the following settings:
Video: Switches the Capture Preview screen
to the video Capture Preview screen.
Modes: There are three modes available.
Normal: Captures one image.
Burst: Captures pictures in a sequence
and the captured photos will be saved
automatically.
Timer: Starts to capture at the set time.
Brightness: Several brightness levels are
available for you to choose.
Resolution: Several resolutions are
available for you to choose.
Zoom: Several zooming levels are available
for you to choose.
White Balance: The phone provides several
options:
Automatic: Select it in normal lighting
condition.
Sunny: Select it in strong lighting
condition.
Cloudy: Select it at cloudy days.
Fluorescent: Select it in the state of
fluorescent.
Incandescent: Select it in the state of
incandescent.
Flash: You can choose to turn it on during
capturing, or turn it off, or let the camera to
adjust automatically.
Full Screen: Switches to full screen to
capture photos.

Entertainment
82
Saving settings
Select [Menu→Options…→Camera].
Type filename prefix: Enter your desired
filename prefix.
Save files to: Saves files to main memory, or
Storage card (appears only when the Micro
SD card is inserted).
Still image compression level: Three
options available (High quality, Normal
quality, and Low quality).
Capturing videos
Click <Menu> on the video Capture Preview
screen to do the following settings:
Still: Switches to the photo Capture Preview
screen.
Brightness: Several brightness levels are
available for you to choose.
Quality: The resolution for capturing video is
PC (240*320).
White Balance: The phone provides several
options:
Automatic: Select it in normal lighting
condition.
Sunny: Select it in strong lighting
condition.
Cloudy: Select it at cloudy days.
Fluorescent: Select it in the state of
fluorescent.
Incandescent: Select it in the state of
incandescent.
Full Screen: Switches to full screen to
capture videos.
Video time settings
On the video Capture Preview screen, click
[Menu→ Options…→Video]. To add audio
files to video clip, please click [Include audio

Entertainment
when recording video files]. To set the time
for capturing video, please click [Time limit for
videos] and select the time according to your
necessity.
Browsing and deleting videos
83
(1)
(2)
(3)
Select [Start→Programs→Pictures &
Videos], and click the captured video file
to view.
Click and hold down the video file you
want to delete, and select [Delete].
If “Cannot delete ‘XXX’: There has been
a sharing violation. The source or
destination file may be in use” appear
on the screen, then you can delete the
video file by the below methods:
Select
[Start→Settings→System→Memory→Run
ning Programs→Windows Media], and
click <Stop>. Then back to the browsing
videos screen to delete the file.
Select [Now Playing] on the Playing screen
of Windows Media. Click the video file you’ve
browsed, and tap to delete it. Then back
to the Pictures & Videos screen, and select
[Delete].
• Games
Select [Start→Programs→Games]. You can
see several kinds of exciting games which will
make your life more interesting.
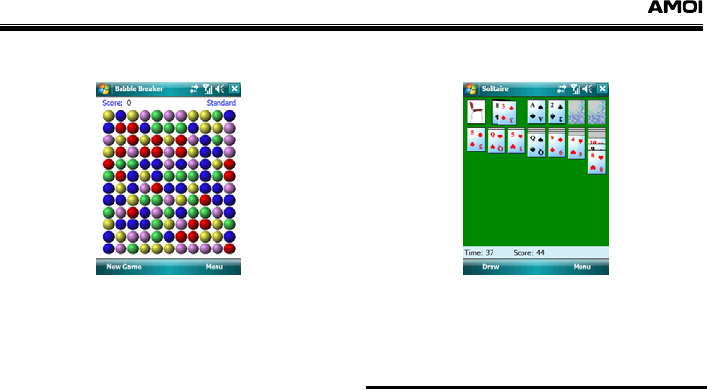
Entertainment
Bubble Breaker
This is a game to clear bubbles of the same
color. Click the connected bubbles of the same
color twice to clear them. Keep clicking till no
bubbles to be cleared.
Solitaire
Move the card from A to K to the blank places
on the top right side by the rule of sort
ascending and straight flush rules.
• Java
Select [Start→Programs→Java] to enter.
If your phone hasn’t installed any Java
applications, “No applications installed” will
appear on the screen. Select <Download> to
84

Entertainment
85
download Java applications. Click <Menu> to
do the below Java settings:
Java settings: Set whether to activate the
[Backlight Always on] function, or select the
network type for the current Java program.
Java info: You can view some relative
information about the current Java program.
Exit: Quit Java game screen.

TFile Explorer
86
er 13. File Explor
Select [Start →Programs→File Explorer] to
view, delete, and copy files from the phone or
Micro SD card.

Micro SD Card
rd
•
14. Micro SD Ca
Micro SD card is the storage card inserted on
the phone in order to enlarge the storage
memory.
Using Micro SD card
87
Note:
Before using Micro SD card, you need to use the
disc together with the phone and follow the
instructions to install the ActiveSync software and
USB driver.
Installation steps
(1)
(2)
(3)
Insert the USB cable to the USB port on
the PC, and connect with your phone.
ActiveSync will be activated automatically.
Select [My Computer→Mobile
Device→My Windows Mobile-Based
Device→Storage Card] on your PC.
You can operate (create, copy, cut, paste,
delete) files stored on [Storage Card].
Note:
You’d better not delete the default system folders
of your phone on the PC.

GPS
88
S
•
15. GP
Introduction of GPS
This product is a set of self-navigation software
installed in PDA (Personal Digital Assistant) or
PC, with a city navigation map of large-scale as
its display platform, which can provides several
ideal routines and real time voice prompts to
you based on your different necessities. You
can easily locate your current position and the
correct direction.
GPS
GPS (Global Positioning System) is a global
wireless navigation system on the basis of
satellites. GPS terminal can figure out its own
position, and its precision can come to 25
meters. The positioning precision depends on
the number of satellites and the GPS receiving
signal. Under the best circumstances, the
system can position precisely within few
meters.
For more details about it, please refer to the
relevant instructions on the GPS suite attached
with the phone.

Maintaining your Pocket PC
89
PC
16. Maintaining your Pocket
• Creating or deleting programs
You cannot and will not delete these original
programs stored on your phone. As long as
there are free memories on your phone, you
can install any other applications designed for
dow
(1) (or
(2)
. Most
uctions.
Connect your phone with your PC.
e installed application.
your phone.
Installing new programs by ActiveSync
Before installing the new program, you need to
nload the software to your PC hard disk.
Download the application to your PC
insert the disk which contains the
application to your PC). Please use
applications or soft wares specially
designed for your phone.
Read all relevant installation instructions
or files attached with the application
applications contain such instr
(3)
(4) Run th
Note:
Some CAB applications need to be installed
e
installation of the software,
directly on the phone.
If it is not an application, the installation
wizard will be activated automatically. Pleas
follow the instructions to operate. When
completing the
the application will be sent to your phone
automatically.
If it is not an application, an error prompt will
appear to remind you that it is workable but
just suits for other types of PC. You shall
move it to your phone. If you cannot find any
installation instructions while reading the
information or files, please use ActiveSync

GPS
90
rectly
ation, please click
Inst
the
(1) phone and
(2)
,
ors. Please
(3) s
t
(4)
phone will begin
n. Please follow the
p
programs installed on the
stor hone
cann
browser to copy the application data di
to the Program File folder on your phone.
Completing the install
[Start→Programs] to select the icon of the
installed application.
alling new programs directly from
Internet
Make sure of the type of your
the processor so as to choose software of
the correct version to install.
Directly download the application from the
Internet to your phone through Internet
Explorer. You may find a document of xip
exe, or zip format, or a setup.exe
document, or documents with several
versions which are suitable for different
types of phones and process
select a suitable one for the application
your phone processor uses.
Read all relevant installation instruction
or files attached with the application. Mos
applications contain such instructions.
Click the document, for example, xip or
exe document. Then the
to install the applicatio
instructions to operate.
Removing rograms
Select [Start→Settings→System→Remove
Programs].
You can only remove
age. Programs installed on the p
ot be removed.
• Managing the storage
The storage of your phone is composed by
storage card and program storage. The forme
is used to save the information you created and
the programs you installed; while the later is
used to run the programs installed on y
r
our

Maintaining your Pocket PC
91
].
to
Moving
(1) plorer].
(2)
are using Notes, Word
d select
the
ments of
If yo :
(1)
(2) re
be
phone. The phone will manage the distributions
between them automatically.
Checking the assignment and usability
of the storage
Select [Start→Settings→System→Memory
Checking the free memory
Your phone may not adjust the distribution
automatically under some circumstances like
the memory isn’t enough. If you see the prompt
reminding you that no available memory
save programs, please try to solve it by the
below methods:
documents to Micro SD card
Select [Start→Programs→File Ex
Hold down the document you want to
move, and select [Cut]. Open [My
Documents] in the storage card folder,
and select [Menu→Edit→Paste].
Documents saved on [My Documents] or its
sub-folders may not appear on the list of some
programs. When you
Mobile or Excel Mobile, you are able to open
one item an
[Menu→File→Rename/Move…] to move
document.
Moving the attached docu
E-mails
u insert Micro SD card to your phone
Select [Start→Messaging→Menu
→Options].
On [Storage] option, click [When
available, use this storage card to sto
attachments], and click <ok>. All
attachments will be moved to Micro SD
card, and newly-created attachment will
automatically saved on Micro SD card.

GPS
92
To s
etc. is
avai
(1) Sel
reen.
(2) ard] on the [Save to] box.
•
Saving new documents on Micro SD
card
ave notes, Word Mobile or Excel Mobile,
automatically to Micro SD card when it
lable, follow the below steps:
ect [Menu→Options…] on the Notes,
Word Mobile or Excel Mobile sc
Click [Storage C
Deleting unnecessary
documents
(1) Select [Start→Programs→File Explore
(2) Hold down the document you want to
remove, and select [Delete].
r].
t
r
brow ds of Internet Explorer:
Select [ Tools→Options…→Memory]
To search document of huge memory, selec
[Start→Programs→Search]. Click [Large
than 64 KB] on the [Type] box.
Deleting all documents and clearing the
sing recor
Menu→
from Internet Explorer screen, and click [Clear
History].
• Backup
Since all documents and programs are stored
on the phone, if your phone is power off, all of
them will disappear. So please backup them to
your PC or Micro SD card to prevent losing
your materials. You can backup them to your
PC through ActiveSync. If the PC isn’t available,
you can backup the documents and programs
to Micro SD card.

Phone Maintenance
93
ce
and destroy or melt a phone’s plastic
ature
try.
ectronic
the
one as
wn will be pasted and
n, soft cloth to clean the
17. Phone Maintenan
Mobile phones are very exact electronic
devices and must be looked after carefully. The
following advice can help you to look after your
phone and prolong its life.
The phone and its spare parts should be put
out of the reach of children.
Keep the phone dry. Rain, moisture or water
will corrupt its electronic circuitry. If your
phone does get wet, remove the battery
immediately and take the phone to the
nearest Amoi authorized service center.
Don’t put the phone in dusty places or this
will affect the everyday use of the phone.
LCD is a part of the phone which could be
easily damaged, so try to avoid dropping the
phone on the ground or any other form of
shock. Do not touch the screen with a sharp
object.
Don’t put the phone in a high temperature
environment. High temperatures will shorten
the life of electronic devices, destroy the
battery
shell.
Don’t put the phone in a low temper
environment. Otherwise, when the
temperature rises to normal temperature,
there will be moisture in the phone and this
will destroy the phone’s electronic circui
Don’t throw, knock or shake the phone
intensely as this could damage the el
circuitry and structure of the phone.
Use soft cloth with soap water to clean
phone. Do not use rough chemical or
abrasive cleaners to clean the ph
these could damage the phone.
Don’t paint your phone, for fear the parts
which can be taken do
affect its normal use.
Please use a clea

Phone Maintenance
94
s will damage the phone and radio
system.
camera lens etc.
If you have to replace the phone’s antenna,
please only do so with a suitable
replacement. Using an unsuitable antenna or
spare part
Troubleshooting
95
g
•
18. Troubleshootin
Please check to see if any problems you have
encountered while using your phone are
described below. If you were unable to find the
solution to a particular problem, please contact
one of our maintenance centres.
The phone can’t be switched on
Possible
reason Solution
The battery
power is used
up
Charge the battery
Incorrect
battery
installation
Install battery correctly
• The phone is switched off
automatically
Possible
reason Solution
Low battery
power
Charge the battery

Troubleshooting
96
• PIN/ PUK code lock
Possible reason Solution
Enter wrong
PIN Code( Personal
Identification Code)
or PUK Code
(Personal Unlocking
Key)
Enter correct
password
Caution
1. If you enter an incorrect PIN code three times in
succession, many SIM and phone functions will be
locked. For more details, please refer to “Safety
Precautions”.
2. If you do not know the correct PIN code and
PUK code, please contact your operator or network
service provider.
• Bad call quality
Possible
reason Solution
The signal
changes
suddenly
Maybe you are moving at
high-speed (e.g. on a train
or bus). Observe the
signal strength and select
the place with the
strongest signal to make a
call and ensure better call
quality.
The area does
not have a
good signal
Move to a more open
area.

Troubleshooting
97
• Can’t answer a call
Possible
reason Solution
The call
forwarding
option has
been set
Cancel call forwarding
according to
requirements.
• Can’t make a call
Possible reason Solution
The phone is
switched off
Turn on the phone.
You are outside
the network
service area
Check the network
area.
The SIM card has
been incorrectly
inserted
Check whether your
SIM card can be used
normally.
The keypad locks
automatically
Click <Unlock> on the
Today screen, and tap
the [Unlock] button.
Use the phone
during call rush
hours and cause
line jam
Try to avoid using the
phone during call rush
hours
Call barring has
been set
Cancel the call barring
option according to
your requirements. For
more, please see ”Call
Forwarding” on page
32

Troubleshooting
98
• The call volume is too low
Possible
reason Solution
The call volume
has been set
too low
Increase the call volume.
• The person you are calling
cannot hear your voice
Possible reason Solution
Call status is set
to mute
Turn off the mute
function on the call
menu.
The microphone
is too far from the
Put the phone’s
micro
p
hone closer to
sound source your mouth.
• The incoming call doesn’t ring
Possible reason Solution
The phone selects
silent mode
Check the settings by
selecting
[Start→Settings→Pers
onal→Sounds &
Notifications].
The ring volume is
set too low
Click to increase the
volume
The call forwarding
option has been
set
Cancel call forwarding
according to
requirements. For more,
please see “” on page.

Troubleshooting
99
• The battery can’t be charged
Possible
reason Solution
The battery is
worn out and the
charging time
takes too long
Charge when the phone
prompts low battery.
The battery
doesn’t connect
well to the phone
Ensure the battery has
been inserted correctly.
The charger
doesn’t connect
to the phone
Ensure that the
interface between the
charger and the phone
is correctly connected,
and the charger icon
should appear on the
screen.
Battery or
char
g
er has
Contact one of our
maintenance cente
r
s.
been damaged maintenance centers.
The surrounding
temperature is
too low or too
high
Make sure the phone is
charged in a normal
temperature.
Troubleshooting
100
• Can’t display network
Possible
reason Solution
The SIM card
has been
incorrectly
installed
Refer to the SIM card
installation method.
The contact
between the SIM
card and phone
is dirty
Ensure the contact
between the SIM card
and phone remains
clean.
The SIM card
does not work
Check whether the SIM
card is out of date.
The network is
very weak
Move to a place with a
strong signal to use the
phone
• The stylus can’t tap accurately
Possible
reason Solution
The phone
hasn’t yet
aligned the
screen
Select
[Start→Settings→System
→Screen] to align the
screen.
• The phone does not recognize
the storage card
Possible
reason Solution
The storage
card has been
incorrectly
inserted
Insert the storage card
correctly according to
instructions in the user
manual.

Troubleshooting
101
The storage
card has been
damaged
Replace the storage card
• ActiveSync can’t connect with
the PC
Possible
reason Solution
The PC has
installed the
firewall
Check whether the firewall
is installed on the PC. If it
is installed, turn it off and
restart the computer to
connect with your phone.
• ActiveSync has connected with
the PC, but cannot sync files
Possible Solution
reason
The
synchronization
option hasn’t
been chosen
Select
[Tools→Options…→Options]
on the ActiveSync screen on
your PC. Make sure that the
files you want to sync are
chosen.

Troubleshooting
102
• Browser can’t connect to
Internet normally
Possible
reason Solution
The network
service
provider don’t
provide the
service or you
haven’ t apply
for this service
Contact with your network
service provider and
consult information about
how to apply for and use
these services
Haven’t set
correctly
Please set correctly by
selecting
[Start→Settings→Conne
ctions→Connections].
• Lack of space
Possible
reason Solution
The resource
manager file is
taking up too
much space
Delete unnecessary files.
The browser’s
history records
are taking up
too much
space
Delete unwanted history
records.
Multi-message,
e-mail etc. are
taking up too
much space
Delete unwanted
messages and e-mails.

Safety Precaution
103
on
•
19. Safety Precauti
Usage environment
Please remember to obey the necessary
rules and regulations whenever use your
phone. This will help keep you safe and
respect your environment.
Switch off your phone when close to petrol
stations, bunkers, chemical factories or
explosive areas and adhere to any safety
signs and instructions there. Breaking any
rules may cause explosion or injury.
Using the phone in plane can cause
interference and danger to an aircraft
navigation system and network. You must
switch off your phone before boarding and
make sure your phone is switched off during
the whole flight.
Please place the phone somewhere safe and
don’t put it on a seat or in places where it
could fall and break. In order to ensure safe
driving and avoid road accidents, please
don’t use the phone when driving. If you must
use it, please use the phone’s hands-free or
park at roadside before making or answering
a call.
• Medical devices
Please switch off your phone in areas near the
electronic medical equipments that obviously
desire to switch your phone off (.such as heart
pacemakers, hearing aids etc). Most medical
devices can shield the phone’s RF signal, but
some can’t. If you have any questions or need
to find out more, please consult your doctor or
medical device manufacturer.
Pacemaker
Pacemaker manufacturers advise the distance
between your phone and heart pacemaker to
be at least 6 inches (15.3 cm), or the phone
could interfere with the pacemaker.

Safety Precaution
104
The personnel who wears pacemaker
should do the followings:
ALWAYS keep the phone more than six
inches from your pacemaker when the phone
is turned on.
Do not carry the phone in a breast pocket.
Use the ear opposite the pacemaker to
minimize the potential for interference.
If you have any reason to suspect that
interference is taking place, turn your phone
OFF immediately.
Caution:
If you are unsure as to the level of interference,
please switch off the phone at once and consult a
doctor immediately.
Hearing aids
Some digital wireless phones may interfere with
some hearing aids. In the event of such
interference, you may want to consult your
service provider (or call the customer service
line to discuss alternatives).
• Emergency calls
As the phone uses a radio signal, wireless and
ground communication network and personal
settings functions like other phones, it is
impossible to ensure your phone can be
connected successfully in any situation, so
please don’t rely purely on your phone as the
only means of notification in cases of
emergency (such as medical first aid )
Making an emergency call
If your phone is switched off, please turn on
your phone and check whether the network
signal is strong enough.
(1) Input the local first aid number correctly
(such as 120), different areas have

Safety Precaution
different first aid numbers.
(2) Please press to call.
Caution:
While making an emergency call, you should try
to provide all important information correctly. At
this time, the phone may be the only
communication tool, so don’t end the call without
permission.
105
• Password access
Your phone and SIM card can be protected by a
password, to prevent others using it illegally.
PIN code
This is personal identification code which is
used to protect the SIM card from unauthorised
use by other people. Generally, the PIN code
and SIM card are provided together. After
activating the PIN code, you can use the phone
normally by correctly inputting your password
each time.
Caution:
If you input your PIN code incorrectly three times
in succession, the SIM card will be locked. You will
need to input the PUK code to unlock it. (If you
don’t have a PUK code, please contact your
operator and SIM card provider for this
information. Please input all characters).
PIN2 code
This is the password which activates the
special SIM card functions. Usually, the PIN2
code and the SIM card will be provided together.
If you incorrectly input the PIN2 code three
times in succession, it will be locked and you
will need to input PUK2 to unlock it again.

Safety Precaution
106
•
PUK code
This is used to unlock the PIN code. If you
incorrectly input the PUK code ten times in
succession, then the SIM card cannot be used
again. Usually the PUK code and SIM card are
provided together. If you lose PUK code or it
isn’t supplied with SIM card, please contact with
your network operator or SIM card provider.
PUK2 code
This is used to unlock the PIN2 code. Usually
the PUK2 code and the SIM card are provided
together. PUK2 can modify the locked PIN2
code. If you incorrectly input the PUK2 code ten
times in succession, you will not be able to
access some of the functions. Please apply to
your operator for a new card. The PUK2 code
cannot be changed. If you lose it, please
contact your service provider.
Notes about charging the
battery
The phone provides power by using a lithium
battery. The standby time and call time will be
influenced by the system’s environment and
phone settings.
Please use the battery and charger provided
by the Amoi. Amoi will take no responsibility
for damage caused by using the wrong
battery or charger.
Caution:
Generally, the charging time is 2-5 hours
according to the current status of the phone
(whether switch on the phone, make a call, etc.)
Don’t use wet hands to touch the phone
battery or charger while charging.
Try not use the phone as much as possible
while charging.
When the battery power is full, the battery

Safety Precaution
icon will turn as .
107
Caution:
To make the new battery achieve the best capacity,
please charge and discharge the phone for twice or
three times. As for the first several times, you
should charge the battery for at least 10 hours in
succession. Please charge the phone due to no
power and switch off the phone automatically.
• Battery information and care
Never use any battery that has been
damaged.
While using the phone near network station,
the power consumption is very little.
Therefore, the call and standby time depends
on greatly by the signal strength of
honeycomb network and the parameters set
by network operator.
The battery charging time will depend on the
amount of electricity remaining and the type
of battery and charger used. When the
operation time (talk time and standby time) is
noticeably shorter than normal, it is time to
buy a new battery.
Only use batteries that are compatible with
your phone and only recharge your battery
with a compatible charger. If a charger is not
in use, disconnect it from the power source.
Do not leave the battery connected to a
charger for more than a week, as
overcharging may shorten its life.
Improper battery use may result in a fire,
explosion or other hazard. Do not
disassemble or open, crush, bend or deform,
puncture or shred the battery.
Do not connect the anode and cathode of a
battery the wrong way round.
Do not leave the battery in places with too
high or too low temperature or the battery

Safety Precaution
108
•
capacity will be reduced and battery life will
be shortened. Always try to keep the battery
at room temperature.
Do not short-circuit the battery. This may
damage the electronic core or the protected
circuit inside the battery. Accidental
short-circuiting may occur when a metal
object (coin, clip or pen) causes a direct
connection between the anode and cathode
of the battery, for example when you carry a
spare battery in a pocket or bag.
Short-circuiting the terminals may damage
the battery or the object causing the
short-circuiting. Therefore, please store the
battery carefully and on its own.
Don’t burn your phone battery or treat it as
common rubbish. Please adhere to the local
environmental policy in order to avoid
endangering life and causing environmental
damage, and recycle your batteries in time.
If your phone, battery or other charging
device leaks due to carelessness, you must
not put it inside any piece of equipment that
heats up (such as drier, microwave etc.).The
phone or other products may go wrong, or
this could even cause the phone, battery or
other charging device to burn, expand and
explode.
Please deal with the useless old battery
according to the relative introduction.
Amoi will take no responsibility for any direct or
indirect damage caused by user error.
Note about using spare parts
Please put all spare parts (such as SIM card,
storage card, battery etc) out of reach of
children, in case danger occurs.
Please do switch off the phone and
disconnect the phone and charger before
you removing the battery from the phone.
As the phone’s spare parts are not
waterproof, please keep all spare parts dry.

Safety Precaution
109
•
You should pull out the plug of any spare part
correctly when you switch off the power, don’t
drag the power line forcibly.
If the phone, battery, and charger don’t operate
normally, ally, please contact one of our
maintenance centres with a qualified repair
service as soon as possible.
Other safety information
When you are not using your phone, it is
advisable to switch it off, remove the battery
to save energy and avoid radicalising the
phone.
If you use earphones to listen to music or
watch a film, please don’t turn the volume up
too high as this could damage your hearing.
You can’t disassemble the terminal and
battery of the phone unless the technical
personnel.

Safety Precaution
110
Index
—A—
About, 34
AcitveSync
Installing software on
the phone, 70
ActiveSync
Error information, 71
Setting up, 65
Stopping, 71
Synchronization
information, 68
Align screen, 14
—B—
Backlight, 35
Battery
Charging, 9
Power display, 10
Buttons, 31
—C—
Calculator, 47
Calendar, 45
Call
Answering or
rejecting a call, 21
Caller ID, 20
Emergency call, 20
History, 24
In-call, 22
International call, 20
List, 24
Making a call, 18
Timer, 24
Voice mail, 20
Volume, 21
Call barring, 31
Call forwarding, 32
Call waiting, 32
Caller ID, 32
Camara, 83
Certificates, 35
Clock & Alarm, 35
Connections
Settings, 38
Contacts, 40
Customer feedback,
36
—D—
Drawing, 27
—E—
Elevation of phone
Front view, 1
Rear view, 2
Side view, 2
Encryption, 36

Index
111
Error reporting, 36
—F—
File explorer, 89
fixed dialing, 33
—G—
Games, 86
GPS
External GPS, 36
Introduction, 91
—H—
Help, 47
—I—
Input modes
Block recognizer, 25
Keyboard, 26
Letter recognizer, 26
Transcriber, 27
Installing Micro SD
card, 8
Installing SIM card
and battery, 6
—J—
Java, 87
—L—
Lock, 15, 34
Phone, 16
SIM card, 16
—M—
Maintenance, 96
Memory, 37
Menus, 33
Messagfing
Outlook e-mail, 48
Messaging
MMS, 54
MSN Messenger, 58
SMS, 57
Micro SD card, 90
—N—
Notes, 44
—O—
Office mobile
Excel, 61
PowerPoint, 63
Office moblie
Word, 60
Owner information,
29
—P—
Phone function, 11
Phone ring and
security, 31
Pictures and videos,

Index
112
81
Pocket PC, 92
Power, 37
Power on/off, 10
—R—
Regional settings, 37
Reminder, 14
—S—
Safety notice, VII
Safety precaution,
106
Search, 47
Shortcut keys, 12
Sounds &
Notifications, 30
Speed dial, 42
Start, 15
Status icon, 4
Stylus, 13
—T—
Tasks, 43
Text size, 14
Today, 29
Today screen, 2
Touch screen and
calibration, 14
Troubleshooting, 98
—V—
Voice mail and text
messages, 32
—W—
Windows media, 80
Windows update, 38
wireless network
Internet connection,
73
Internet explorer, 75
Wireless network
Internet sharing, 75
Remote desktop, 79
WAP connection, 73