AMOI Electronics SMT5700WOC GSM850 AND PCS1900 (Mobile Phone) User Manual
AMOI Electronics Co., Ltd. GSM850 AND PCS1900 (Mobile Phone) Users Manual
Users Manual

SMT 5700WOC User Manual

Innovation makes
your dreams come true
Welcome to the user guide for the SMT
5700WOC mobile phone. We are paving the way
for modern technology.
With a whole suite of
productivity and
entertainment programs, the
SMT 5700WOC provides a
fresh and exciting level of
enjoyment. Connect to the
Internet with Internet
Explorer, synchronize your
phone and PC with
ActiveSync, or listen to
your favorite music through
Windows Media. Wherever
you go, whatever you do,
keep the SMT 5700WOC close and never skip a
beat.
Special features
Internet Explorer
(page82)
Built-in ActiveSync
to synchronize with
PC (page 51)
Windows Media
Player (page 71)
Supports Outlook
E-mail (page 33)
Amusing games
(page 59)
Supports MicroSD
card (page 11)
Supports Voice
Notes (page 96)
Calendar (page 42)
Supports video (page
93)
Supports Internet
sharing (page 98)
Supports Speed Dial
(page 103)
Supports MMS (page
29)
Supports TeleNav
(page 81)
Supports MobTV
(page 87)
Supports Documents
To Go (page 61)

Declaration
Congratulations on the purchase of your new
Windows Mobile™ Smartphone!
COPYRIGHT INFORMATION
©2007 AT&T Knowledge Ventures. All rights
reserved. AT&T, AT&T logo, Cingular and Cingular
logos are trademarks of AT&T Knowledge Ventures
and/or AT&T affiliated companies. Some features
may require monthly access and/or per use charges.
This phone is sold for use on AT&T's wireless
systems. It may not be compatible with other
wireless systems. Battery life, talk and standby
times are approximate and depend on network
configuration, signal strength, features selected, and
customer usage patterns.
Microsoft, Outlook, Excel, Windows Mobile and
PowerPoint are either registered trademarks or
trademarks of Microsoft Corporation in the United
States and/or other countries. The Bluetooth word
mark and logos are owned by the Bluetooth SIG,
Inc. and any use of such marks by AT&T Wireless
is under license. The GSM lettermark is a trademark
of the GSM Association.
©2007 UTStarcom Incorporated, All Rights
Reserved. Appearance of phone may vary. Screen
images simulated. Phone made in China with
Chinese and foreign components. All other items
imported. See each item for country of origin.
WARNING: This product contains small parts.
Keep your mobile phone and any small parts out of
small children's reach. To take advantage of all the
benefits and service features, you may need to
purchase additional hardware or software, pay
monthly access and/or per use charges. This device
contains a Lithium Ion Battery. Dispose of
batteries according to local regulations, (e.g.
recycling). Do not dispose of as household waste.
Please Read Before Proceeding.
THIS DEVICE IS NOT CHARGED WHEN
YOU TAKE IT OUT OF THE BOX.
DO NOT REMOVE THE BATTERY PACK
WHEN THE DEVICE IS CHARGING.
WHEN INSERTING YOUR SIM CARD, MAKE
SURE THE DEVICE IS POWERED OFF, AND
THAT THE SIM CARD SNAPS INTO THE

SOCKET SECURELY.
YOUR WARRANTY IS INVALIDATED IF
YOU OPEN OR TAMPER WITH THE
DEVICE’S OUTER CASING.
RELATIVE INSTRUCTION
Some countries require full disclosure of recorded
telephone conversations, and stipulate that you must
inform the person with whom you are speaking that
the conversation is being recorded. Always obey the
relevant laws and regulations of your country when
using the recording feature of your phone.
Some functions referred to in this guide also need
the support of a network operator or service
provider. If you are unable to confirm whether you
will be able to use certain functions or services with
this phone, please consult your network operator or
service provider.
The phone may include some commodities,
technology or software that is controlled by export
law, Chinese regulations and regulations governed
by other countries or areas.
In order to ensure your safety, please read the
“Safety Notice” and “Safety Precaution”.
Typographic conventions used in this user guide
include:
<>: Shows function key;
““: Shows important information on the phone
interface;
[ ]: Shows the phone menus.
I
Content
Safety notice .........................................................IX
1.Getting to know your phone .............................. 1
What’s in the box ......................................................1
Your phone ................................................................2
Front view of your phone .....................................2
Side view of your phone .......................................2
Rear view of your phone ......................................3
The Home Screen......................................................3
Status Icon.................................................................5
Program .....................................................................6
2.Getting Started.................................................... 9
Installing SIM card and battery.................................9
Installing MicroSD card..........................................11
Battery charging ......................................................12
To charge the SMT 5700WOC using the travel
charger:................................................................12
Battery power display .............................................13
Power on/ off ...........................................................13
Using the Quick List ...............................................14
To access the Quick List .....................................15
Using shortcut keys .................................................15
Using Function keys................................................17
3.Call Functions ...................................................18
Making a call ...........................................................18
To make a call from the Home Screen................18
To make a call from contacts ..............................18
Creating a speed dial for a contact......................19
Making a call from Call History .........................19
To make a call from text messages .....................20
Receiving a call .......................................................21
Answering or ignoring an incoming call ............21
II
Ending a call .......................................................21
In-call options..........................................................21
Making two calls simultaneously (this must be
supported by the network) ..................................22
Switching between two calls (this must be
supported by the network).22
Making a conference call (this must be supported
by the network) ...................................................22
Additional dialing information ...............................23
Making an emergency call..................................23
Making an international call ...............................23
Dialing a voice mail............................................23
Call functions ..........................................................24
4.Input Modes ...................................................... 25
Switching input modes............................................25
Character input mode ..............................................25
Numeric input mode................................................26
5.Menu Use ........................................................... 27
Entering menu .........................................................27
Scrolling to enter menu function ....................... 27
Entering a menu by using shortcuts................... 27
6.Messaging .......................................................... 28
Messages ................................................................ 28
Editing an MMS................................................. 29
Configuring MMS settings ................................ 30
Editing a Text Message ...................................... 32
Outlook E-mail ....................................................... 33
Editing an e-mail................................................ 33
Setting Up your E-mail .......................................... 35
Setting Up E-mail on Your Device with Xpress
Mail .................................................................... 35
Sending and receive personal E-mail ................ 38
New account........................................................... 39
Folders .................................................................... 40
Deleted items...................................................... 40
Drafts.................................................................. 40
Inbox .................................................................. 40
III
Outbox ................................................................40
Sent items............................................................40
Options ....................................................................40
7.Calendar ............................................................ 42
Viewing calendar.....................................................42
New appointment ....................................................43
Calendar settings .....................................................43
8.Contacts ............................................................. 44
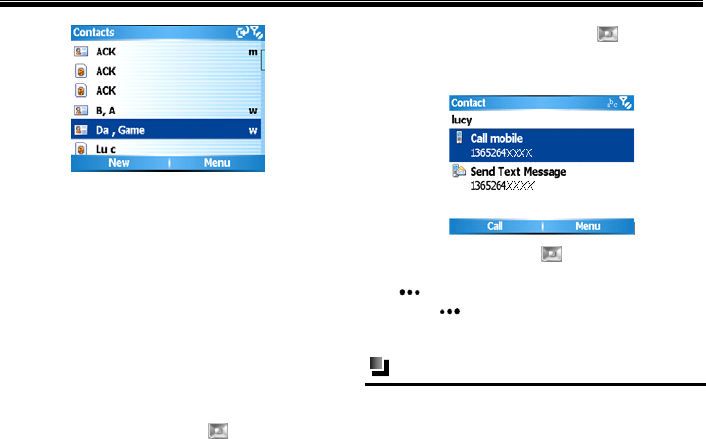
Viewing a contact....................................................44
Editing a contact......................................................45
New contacts ...........................................................46
New SIM contacts ...................................................47
Speed dials ..............................................................47
Setting method ....................................................47
Finding a contact.....................................................48
Beaming a contact...................................................48
Transferring methods..........................................48
Copying contacts between SIM card and the phone
.................................................................................49
Copying SIM card contacts to phone..................49
Copying phone contacts to SIM card..................49
Deleting a contact....................................................50
9.ActiveSync .........................................................51
Setting up.................................................................51
To manually start and stop synchronization .......52
To change which information is synchronized ...52
Synchronizing with exchange server ..................53
To synchronize directly with Exchange Server..53
Stopping synchronization....................................54
Synchronization information...................................55
Synchronizing inbox ...........................................55
Synchronizing schedule ......................................55
Synchronizing through Bluetooth.......................56
Installing software in the phone..........................56
Solving ActiveSync Connection Problems.........56
ActiveSync error information .................................58
IV
10.Games .............................................................. 59
11.IM ..................................................................... 60
Instant Messaging ...................................................60
Setting up ............................................................60
Sign In.................................................................60
Add a contact ......................................................60
12.Documents To Go............................................ 61
PDF to go ................................................................61
Sheet to go...............................................................62
Slideshow to go.......................................................63
Word to go...............................................................64
Zip to go ..................................................................66
13.My Stuff ........................................................... 67
Folder use ................................................................67
My pictures .........................................................67
My sounds...........................................................67
My videos ...........................................................67
UAContents ........................................................67
Folder operation ..................................................... 67
14.MEdia Net........................................................ 68
15.AT&T Mall ...................................................... 69
MEdia net home ..................................................... 69
Shop application ..................................................... 69
Shop games............................................................. 69
Shop graphics ......................................................... 70
Shop multimedia .................................................... 70
Shop tones .............................................................. 70
16.AT&T Music.................................................... 71
Transfering Music .................................................. 71
Windows Media...................................................... 72
About the controls.............................................. 73
About the screens and menus............................. 74
Playback screen menu........................................ 74
Now playing screen menu.................................. 75
Library screen menu .......................................... 76
Player setting...................................................... 77
V
Shop music ..............................................................78
Music ID..................................................................79
XM Radio Mobile ...................................................79
The Buzz .................................................................79
Community..............................................................79
Music apps ..............................................................80
17.Entertainment ................................................. 81
Get TeleNav.............................................................81
Internet Explorer .....................................................82
Activating Internet Explorer...............................82
The menu when Internet Explorer is off line......84
The menu when Internet Explorer is on line ......85
Options................................................................86
MobiTV...................................................................87
Pictures & Videos....................................................87
Pictures................................................................87
The functions in picture list ................................88
The functions during browsing...........................89
The storage location of photos and videos .........90
18.Call History .....................................................91
Call list ....................................................................91
Options in call list ...................................................91
Saving a contact ..................................................91
19.Organizer .........................................................93
Calculator ................................................................93
Clear ........................................................................93
Download agent.......................................................94
Task manager...........................................................94
Task..........................................................................95
The synchronization task on PC .........................95
Creating a task on the phone...............................96
Voice notes ..............................................................96
Recording voice notes.........................................97
Playing ................................................................97
20.Tools..................................................................98
Internet sharing........................................................98
VI
Activating Internet sharing .................................98
Deactivating Internet sharing............................100
Java........................................................................100
SIM manager.........................................................101
SIM memory .....................................................103
Speed dial ..............................................................103
Creating a speed dial number for a contact ......103
Creating a speed dial number for a menu.........103
Using speed dial................................................103
21.Settings........................................................... 105
Phone.....................................................................105
Call barring .......................................................105
Call forwarding.................................................105
Call options .......................................................106
Call waiting.......................................................106
Caller ID ...........................................................106
Channels............................................................106
Fixed dialing .....................................................106
Networks .......................................................... 107
Service dialing.................................................. 107
TTY mode ........................................................ 107
Sounds .................................................................. 107
To specify the sound for an event .................... 107
To copy a sound to your phone........................ 108
Profiles.................................................................. 108
Display.................................................................. 109
Clock & alarm ...................................................... 109
Date and time ................................................... 109
Alarm.................................................................110
Connections ...........................................................110
Wireless manager ..............................................110
Beam .................................................................112
Bluetooth...........................................................112
Searching Bluetooth devices.............................113
Bluetooth partnerships ......................................114
Bluetooth stereo headset ...................................114
VII
Sending files by using Bluetooth......................115
Receiving files by using Bluetooth...................116
Multiple network connection setting ................116
Advance ............................................................116
More..................................................................117
Security .................................................................117
Device lock .......................................................118
Enable SIM PIN................................................118
Change PIN2.....................................................118
Certificates ........................................................118
Remove programs .................................................119
Power management ...............................................119
Accessibility..........................................................120
Regional settings ...................................................120
Owner information................................................121
More ......................................................................121
Phone information ............................................121
Backlight level ..................................................121
System information.......................................... 121
About................................................................ 121
Error reporting ................................................. 121
22.Phone Maintenance ......................................122
23.Troubleshooting ............................................124
The phone can’t be switched on........................... 124
The phone is switched off automatically ............. 124
PIN/ PUK code lock............................................. 125
Bad call quality..................................................... 125
Can’t answer a call ............................................... 126
Can’t make a call.................................................. 126
The call volume is too low ................................... 127
The person you are calling cannot hear your voice
.............................................................................. 127
The incoming call doesn’t ring ............................ 127
The battery can’t be charged ................................ 128
Can’t display network .......................................... 129
The phone does not recognize the storage card ... 129
VIII
Browser can’t connect to Internet normally .........130
Lack of space.........................................................130
24.Safety Precaution.......................................... 131
Usage environment ...............................................131
Medical devices.....................................................131
Pacemaker .........................................................131
Hearing aids ......................................................132
Emergency calls ....................................................132
Making an emergency call................................132
Password access ....................................................133
PIN code ...........................................................133
PIN2 code .........................................................133
PUK code ..........................................................133
PUK2 code ........................................................134
Note about charging the battery............................134
Battery information and care ................................135
Note about using spare parts .................................136
Other safety information .......................................136
25.12 Month Limited Warranty .................138
IX
Safety notice
Before using the phone, please read and follow the
rules below carefully. For the detailed information,
please refer to the “Safety precaution” section on
page 131.
If you dial or answer a call while driving,
please use the hands-free device (e.g.
earphone, vehicle hands-free system, phone
hands-free system) or use your phone after
parking the vehicle.
The phone may interfere with the
communication network of aeroplanes, so
p
lease make sure your phone is switched off
during the flight.
All phones can be subject to interference,
which could affect its performance.
Please switch off your phone where you see
signs forbidding phone use. Such signs can be
found in medical centres or establishments
containing medical equipment.
In order to ensure high performance and to
avoid damage the phone, please use the
original accessories and battery. Avoid using
products which are not compatible.
To avoid the risk of any explosion, please
switch off the phone at petrol stations and
p
laces which are near fuel, chemical solvent or
other dangerous substances.
Please switch off your phone in areas where
there could be a risk of explosion and in areas
where you are asked to switch off bidirectional
radios. Pay attention and adhere to any rules
and regulations concerning mobile phone use.
Please neither burn the phone battery nor use it
as ordinary rubbish, as this could endanger life
and damage to the environment. Please obey
the environmental policy of the local
government and dispose of and recycle them
in time.
If you need to connect your phone to other
devices, please read the user guide carefully to
ensure the procedure is carried out safety.
Keep small parts (e.g. SIM card) out of the
reach of children to prevent batteries from
being swallowed or causing other dangers.

X
Please back up the important information of
phone and be sure to have a second copy in
case data is lost from your phone.
SOS
Make sure the phone is switched on and has
service coverage before inputting the
emergency number. Press the call key for your
position to be located. Please don’t end call
unless told to do so.
Cautions:
Any unapproved changes or modifications by the party
responsible for compliance might infringe the user’s
authority to operate this mobile phone.
This mobile phone may generate radio frequency
energy, which, if not installed and used in accordance
with the instructions, may cause harmful interference
to radio communications. However, there is no
guarantee that interference will not occur in a
particular installation. If this mobile phone does cause
harmful interference to radio or television reception,
which can be determined by turning the equipment off
and on, the user is encouraged to try one or more of
measures listed below to clear the interference:
--Reorient or relocate the receiving antenna.
--Increase the separation between the equipment and
receiver.
--Connect the equipment into an outlet on a circuit
different from that to which the receiver is
connected.
--Consult the dealer or an experienced radio/TV
technician for help.
Attention: 1. Please send used li-ion batteries to
appropriate disposal locations or return them to our
company. Do not dispose of the batteries in the dustbin.
2. For body worn operation this phone has been
tested and meets FCC RF exposure guidelines
when used with an accessory that contains no
metal and that positions the handset a minimum
of 1.5 cm from the body. Use of other
accessories may not ensure compliance with
FCC RF exposure guidelines
Statement: This device complies with Part
15 of the FCC Rules. Operation is
XI
subject to the following two conditions:
(1) this device may not cause harmful
interference, and (2) this device must
accept any interference received,
including interference that may cause
undesired operation.
Changes or modifications not expressly
approved by the party responsible for
compliance could void the user's
authority to operate the equipment.
Getting to know your phone
1
1. Getting to know your phone
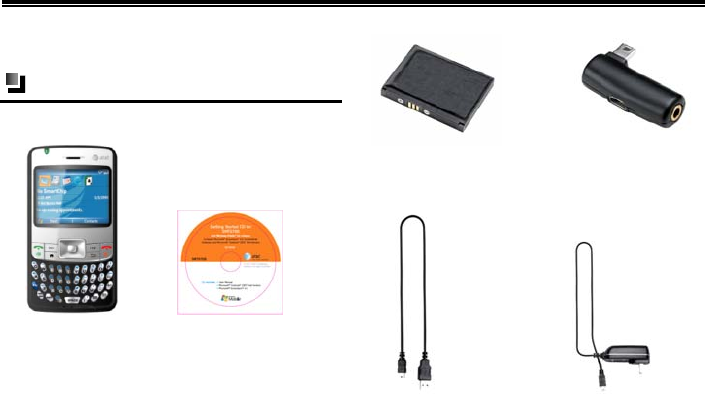
What’s in the box
This package should include all items:
AT&T SMT 5700WOC Getting Started
CD
Battery Audio Adapter
Data Cable Travel Charger
If any are missing or different, immediately
Getting to know your phone
2
contact the retailer where you purchased the device.
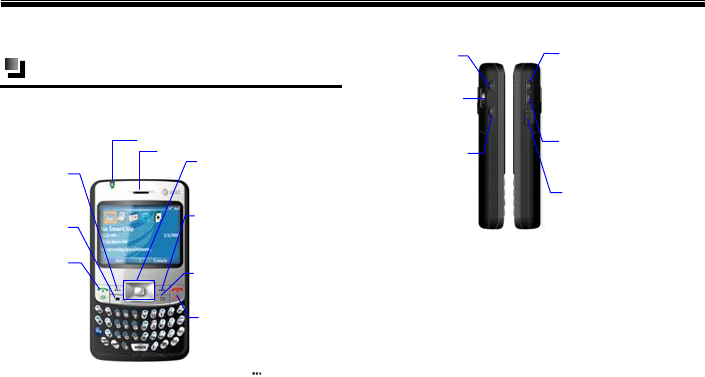
Your phone
Front view of your phone
Navigation Key
Right Soft Key
Clear/Back Key
Left Soft Key
Home key
Send Key
End Key
Press to access the
Main menu
Press to return to the
Home Screen
1. Press to answer or
make a call .
2. Press the key from
home screen to enter
Call History screen .
3. While on a call ,
press the key to
activate/deactivate the
loudspeaker mode.
Press left, right, up and down to
scroll through menus ; press the
center of the Navigation key to
select an item
After entering the Menu screen ,
press the key to return to the last
operation screen or Home Screen .
1. While on a call, press the key to
end the current call .
2. Press and hold the key from the
Home Screen to lock the keypad ,
while pressing and to unlock
it.
Indicator
Earpiece
1. While using menu functions , press
the key to select menu option .
2. Press the key from the Home
Screen to enter Contacts list .
Side view of your phone
Music Key
Picture Key
Press the key from Home
Screen to enter the AT &T
music screen .
1. Press the key from Home
Screen to come into my picture
folder .
Power Key
Thumbwheel Dial
Back Key
Press to enter the Menu
screen, or to return to the
p
revious screen or Home
Screen
USB
/
Charge
/
Audio
Interface
USB Port for Charging and Audio
support.
During a call,
p
ress to
adjust volume .
Press and hold to turn the
device on
/
off. Press to
access the Quick List .
Getting to know your phone
3
Rear view of your phone
Caution:
For additional information about using shortcut
key operations for the above functions, see “Using
Shortcut Keys” on page 15.
The Home Screen
The Home Screen displays important information,
such as upcoming appointments, status indicators,
the current time, date and profile, and icons for
frequently used programs. You can open a program
directly by selecting its icon and pressing .
To access the Home Screen from anywhere,
press
To access the Home Screen display setting,
including the background, select [Start→
More→Settings→Display→Home Screen].
The Home Screen consists of the following five
areas.
Status Bar
Information
Display Area
Start Menu
Shortcut Key Bar
Function Key Bar
Area Function
Status Bar Indicates your phone’s current
status, such as the batter
y
and

Getting to know your phone
4
signal strength. For more details
about status icons, please see the
next page.
Shortcut
Bar
Shows the shortcut menus of
several recently-used options.
You can press the Navigation
Key left or right to select
your desired shortcut menu and
press the center of the
Navigation Key to activate
this function.
Information
Display
Area
Displays information including
the network service provider,
current time and date, and recent
appointments. Xpress Mail
allows you to access data while
on the go via your smart phone.
Press the Navigation Key up
or down to select your desired
option then press the center of
the Navi
g
ation Ke
y
to
enter the corresponding
function.
Start Menu Press the Left Soft Key to
open the start menu and switch
to a program
Function
Key Bar Press the Right Soft Key
to open [Contacts]
Getting to know your phone
5
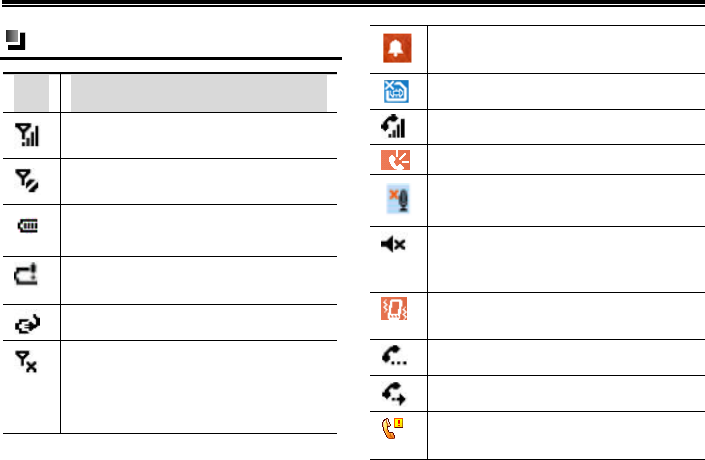
Status Icon
Icon Function description
Signal Strength: Represents
the current network signal.
You are out of a service area
Battery Status: Represents the level of
your battery.
Low Battery : Displays when there is
little battery power
Phone is charging
Switch off phone function: The phone
functions are turned off if needed but
you can still use the other functions:
such as, Calendar, Games, Windows
Media
Alarm Clock: Appears when the alarm
clock is activated.
No SIM card inserted
Appears during a call.
Speakerphone on
Microphone muted
Ringer off: Appears when the profile is
set as [Headset]. For more details,
please see “Profiles” on page 108.
Vibrate call alert: Appears when the
profile mode is set as [Conference].
Call holding
Call forwarding
Missed call icon appears in [ Call
History] menu
Getting to know your phone
6
Outgoing call
Incoming call
Missed call icon appears on the Home
Screen.
New e-mail or text message
New voice message
EDGE available
EDGE connected
Data call in progress
Bluetooth
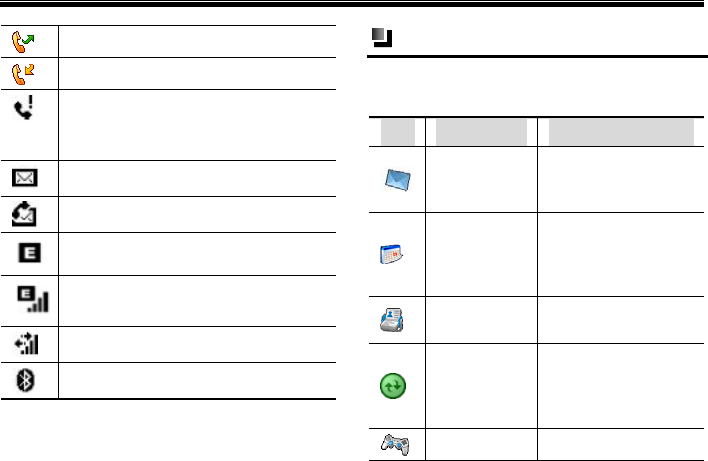
Program
The following table lists the icons for programs
already installed on the SMT 5700WOC.
Icon Name Introduction
Messaging
Lets you send and
receive SMS, MMS
and E-mail.
Calendar
Keeps track of your
appointments and
creates meeting
requests.
Contacts Keeps track of
contacts information
ActiveSync
Synchronizes
information between
your phone and the
PC
Games Lets you play two
Getting to know your phone
7
games: Bubble
Breaker and Solitaire.
IM
Provides
synchronization to
AT&T wireless
e-mail, calendar,
contacts and more
Documents
To Go
Lets you view, edit
and create Microsoft®
Word, Excel and
PowerPoint® files,
view Adobe® PDF
files as well as unzip
files.
My Stuff
Lets you organize and
manage files on your
phone or a storage
card.
MEdiaNet Launches the browser
to access AT&T
Media Net.
AT&T Mall
Lets you enjoy
multi-functional and
convenient AT&T
services.
AT&T Music
Plays video and audio
files stored on the
phone or network and
access other music
related services.
Entertainment
Provides on-screen
and voice-guided
driving directions,
Internet access, lets
you watch your
favorite channels, and
you can browse
pictures and videos.
Call History Keeps track of all
p
hone calls made,
Getting to know your phone
8
received and missed.
Organizer
Keeps track of tasks,
allows you to make
short voice recordings
and accesses
Calculator, Task
Manager and other
programs.
Tools
Provides access to
services including
[Internet Sharing],
[Java], [SIM
Manager] and [Speed
Dial].
Settings
Personalizes your
phone to suit the way
you use it.
Getting Started
9
2. Getting Started
Before using the phone, please insert a SIM card
supplied by a network service provider. The SIM
card (Subscriber Identification Module) includes
phone number and detailed information of service
items, and can be used to store phone number and
user information.
Caution:
SIM card and its contacts can be easily damaged by
scratching or bending, so be very careful when
inserting or removing the card. Please follow the
instructions of SIM card user guide provided by
the manufacturer and keep SIM card out of the
reach of children
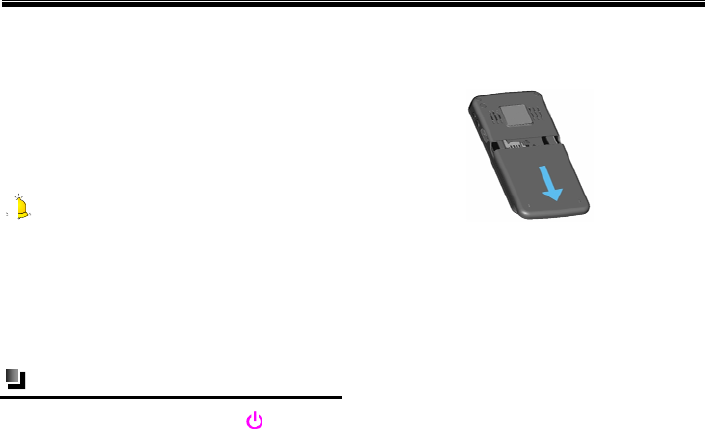
Installing SIM card and battery
(1) Press and hold the Power Key for several
seconds to switch off the phone.
(2) As shown in the following diagram, slide the
battery cover in the direction of the bottom of
the phone and then remove it and battery.
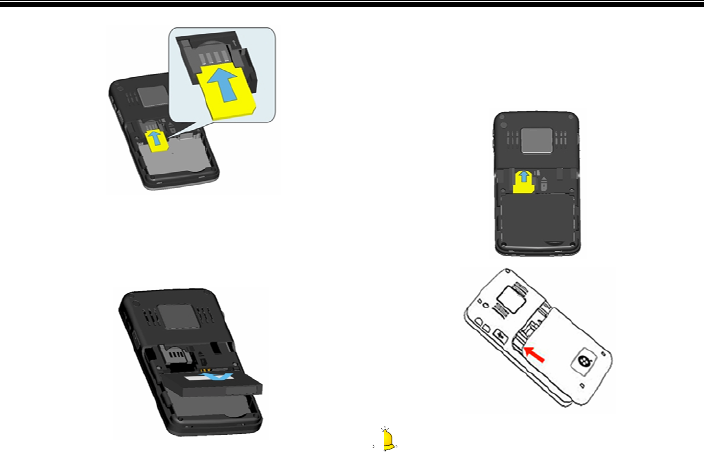
(3) Slide the SIM card into the SIM card slot
Press the card downwards while inserting and
make sure the card is facing the correct way,
as shown in the following image (with the
contact point facing down).
Getting Started
10
(4) Make sure the battery contacts are facing into
the phone, and then push the other side of the
battery gently until it fixes itself in the battery
slot.
(5) Make sure the battery has been installed
correctly, and then slide the battery cover in
the direction of the top of the phone until it is
covered, as shown below:
Warning:
Getting Started
11
Don’t insert or remove the SIM card when the
phone is switched on or getting charged, or this
may damage the SIM card.
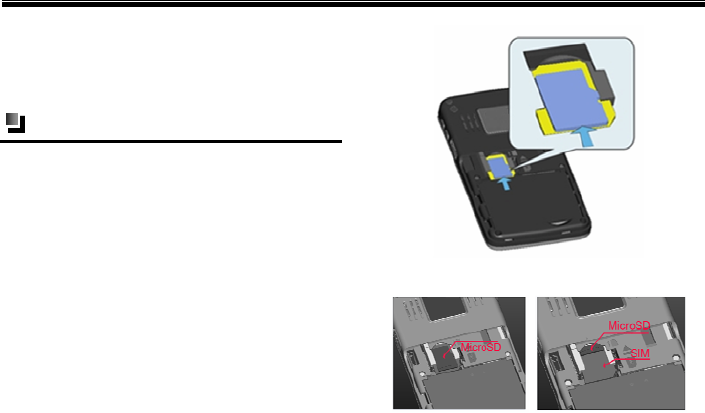
Installing MicroSD card
A MicroSD card is a removable storage card that
can be used to increase phone memory.
When successfully installed, the MicroSD card sits
on top of the SIM card.
When installing the card, make sure the side with
the golden contacts is facing down and insert the
narrower end of card. Then push the card gently
until it is fixed in the battery slot. See the following
images for additional information.

Getting Started
12
To remove the MicroSD card, gently push it toward
the phone, and the card will automatically eject
from the card slot.
Caution:
Don’t forcefully remove the MicroSD card from the
card slot.
Warning:
During the process of reading and writing to the
MicroSD card, do not remove or insert the card.
UT Starcom will take no responsibility for the
following situations including, but not limited to,
lost data or damage to the card damage.
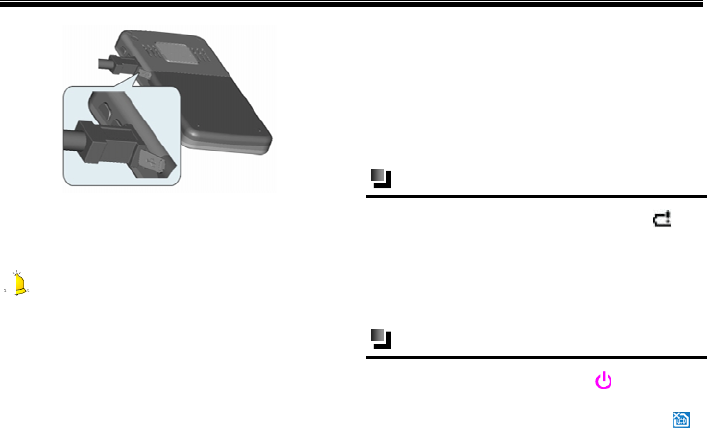
Battery charging
SMT 5700WOC is powered by a rechargeable
Li-ion battery. When you purchase your phone, you
also receive a travel charger and a seat-charger.
To charge the SMT 5700WOC using the
travel charger:
(1) Install the battery in the phone.
(2) Insert the lead of the travel charger to USB
slot of phone carefully, and connect the
charger to a standard wall outlet.
(3) To view charging process and status,
select[Start→More→Settings→More...→Po
wer Management]
(4) While the phone is switched off, the battery
bar will scroll and you can view charging
process.
Getting Started
13
(5) When charging is complete, disconnect the
charger and standard power socket first, and
then disconnect the phone and charger.
Caution:
1
. If the battery is empty, the battery icon will
appear after charging for two to three minutes.
Generally, the charging time is 2-5 hours
depending on the status of the phone (whether
switched on, making a call etc.)
2. For optimal battery performance, charge and
discharge the new battery two or three times. The
first several times you charge the battery, charge it
for at least 10 hours. You should immediately
recharge the phone when it is turns off due to no
battery power.
3. Please use the approved battery and charger
designated for this product, otherwise it may cause
explosion. Try to avoid using USB cable to charge.
Battery power display
If the battery is low, the empty battery icon will
flash.
If the battery is too low, the phone will switch off
automatically. If this occurs, you may lose any data
that has not been stored.
Power on/ off
Press and hold the Power Key to switch the
phone on/off. If no SIM card is inserted when
powered on, the phone will show the icon as .
If the PIN code is activated, your phone will be
Getting Started
14
connected to a GSM network upon entering the
correct PIN code.
If you enter the wrong PIN code three times in
succession, you will need a PUK code in order to
unlock your phone.If you input wrong PIN code
ten times in succession, SIM card will be locked
forever. Generally PUK code is supplied with
SIM card. If you lose your PUK code or PUK
code isn’t supplied with SIM card, please contact
your network operator.
Caution:
The phone is equipped with an antenna. When
power is on, please do not touch antenna as this
may affect call quality and require phone to
consume more power
Warning:
Don’t switch the phone on in areas where wireless
phone use is prohibited or where it may cause
interference or danger. Make sure that your
phone’s “Alarm and clock” function is not
activated.
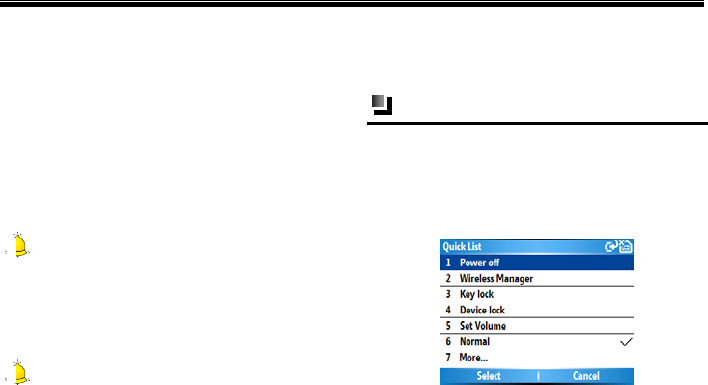
Using the Quick List
The Quick List offers convenient access to a list of
functions, such as locking your phone or keypad
and choosing a different profile. For more
information about profiles, please see “Profiles” on
page 108.
Getting Started
15
To access the Quick List
(1) Briefly press the Power Key (press and
quickly release).
(2) Scroll through the list and select the desired
item by pressing the Left Soft key
<Select>, pressing or pressing the
related numeric key on the keypad.
(3) To exit the Quick List at any time, press the
Right Soft key <Cancel>.
Using shortcut keys
Pressing some keys directly from the Home Screen
provide direct access to common phone functions.
The following table lists the operations and
functions of some common shortcut keys
Key Operation Function
Press briefly During a call:
1. Answer the second
call while putting the
first call on hold.
2. Switch between two
calls answered at the
same time
3. While answering or
dialing calls, activates
call holding function.
4. While on a call, press
and hold to activate the
speaker phone.
Press briefly
While editing, deletes
the last entered
character (letter,
number, symbol or
space)
Getting Started
16
Press and
hold
While editing, quickly
deletes characters
(letters, numbers,
symbols& space).
Press and
hold
Switch the phone on/
off at any time
Press briefly Enter the Quick List
Press briefly
Press from Home
Screen to access AT&T
Music Screen.
Press briefly
My pictureKey:
Press to launch my
picture folder.
Press briefly
Return to the last
operation screen or the
Home Screen.
Press briefly
Messaging Key: Press
to access the messaging
application.
Press briefly
While editing, press the
key to switch between
input modes.
Press and
hold
Caps Shift Key: Press
this key and a letter key
at the same time to type
a single uppercase
letter.
Press
briefly
Symbol Key: Press to
access Symbol Menu
Press and
hold
Calendar Key: Press
to access the calendar
application
Getting Started
17
application
Using Function keys
The following keys when pressed at the same time
will take you to the associated entry.
Notice:
These functions are only available from the
Home/Idle Screen.
Do To
+ Takes you to MEdia Net
+ Takes you to Entertainment
+ Turn Bluetooth on/off
+ Takes you to AT&T Mall
+ Takes you to AT&T Music
Call Functions
18
3. Call Functions
Making a call
With your phone, you can make calls from the
Home Screen, the Phone screen, from Contacts,
Speed Dial, Call History, or SIM Contacts (contacts
stored on your SIM card).
To make a call from the Home Screen
(1) From the Home Screen, access the Phone
Screen by pressing the SEND Key or by
pressing the numeric keys on the keypad.
(2) After entering the phone number, press the
SEND Key .
Notice:
When your press a numeric key on the keypad, a
list of names and numbers appears as the phone
automatically searches Contacts, Call History,
Speed Dial and your SIM card to find a matching
name or number. For example, when you press a
number such as (including the number “1”
and the letter “E”), the names that begin with E
will be displayed as well as phone numbers that
begin with 1. The next number you press continues
to narrow the search. When you see the name of the
person you want to dial, select it and press the
SEND Key .
To make a call from contacts
(1) Press the Right Soft Key or select
[Start→Contacts]from the Home Screen to
enter the Contacts screen
Do one of the following:
Select the desired contact, and press the SEND
Key .
Select the desired contact in the contact list, and

Call Functions
19
press the center of the Navigation Key
twice (once to view the contact details, and once
to dial the associated number).
Creating a speed dial for a contact
Creating a speed dial number for contacts stored in
the phone allows you to dial a contact’s number by
simply pressing and holding down the
corresponding numeric key. The phone will
automatically dial the number. If you set a number
with two digits, input the first digit, then press and
hold down the second number. For example, if
you set 12 as a speed dial number, you could input
the first digit “1” before holding down the second
digit “2.”
Setting methods
(1) To create a speed dial, select a contact from
[Contacts], and then press the center of the
Navigation Key to view its detail. If
there is more than one number, select the
desired number for the speed dial.
(2) Select [Menu→Add to Speed Dial], and
select the speed dial number in [Keypad
assignment]. Press the Left Soft Key
<Done>.
Caution:
While selecting the corresponding numeric key of
speed dial in [Keypad assignment], the number key
and will be saved by system and can’t be
modified.
Making a call from Call History
Press the SEND key from the Home Screen
to enter the Call History screen and select your
desired number to dial.
Select [Start→More→Call History] from the
Home Screen to select the desired call entry to
dial.
Select the contact then press the center of the

Call Functions
20
Navigation Key twice (once to view the
contact details, and once to dial the associated
number). Or press the SEND key .
To customize calls by using the menu
By pressing the Right Soft Key [Menu]
from the Call History screen, you can access the
following options:
Find contact: Finds the selected name or
number in [Contacts].
Send text message: Sends a text message to
the selected name or number.
E-mail: Sends an e-mail to the selected name or
number.
View timers: Displays the duration of the
selected call.
Delete: Removes the selected call or number
from [Call History].
Delete list: Removes all the calls and numbers
from [Call History].
Save to contacts: Saves the selected name or
number in [Contacts].
Filter: Categorizes the call or number into
various call types.
Caution:
You can also save a number in [Contacts] by
pressing the Left Soft Key <Save> on the
Call History screen.
To make a call from text messages
Select the desired number from a text message then
press the SEND key to dial. The system asks
you confirm whether the number is correct or not.
After confirming, press the Left Soft Key or
the SEND key to dial the number.
Call Functions
21
Receiving a call
When you receive a phone call, you have the option
to answer it or ignore it.
Answering or ignoring an incoming call
To answer the call, you can press the SEND key
or the Left Soft Key <Answer>.
To ignore the call, you can press the END
Key or the Right Soft Key <Ignore>.
To set your phone to Auto Answer-in, from
Standby Mode with the headset inserted into your
phone, select
[Start→More→Settings→Profiles→Headset].
Select [Edit] to set the time for [Auto
answer-in].
Caution:
If you select [[Start → More →Settings
→Phone→Call Options] and activate [Any key
Answer] option, then you can press any key to
answer phone except the Power Key , the Home
Key , the Clear/Back Key , the Back
Key , the Music Key or the My picture Key
.
Ending a call
Press the END Key to end a call.
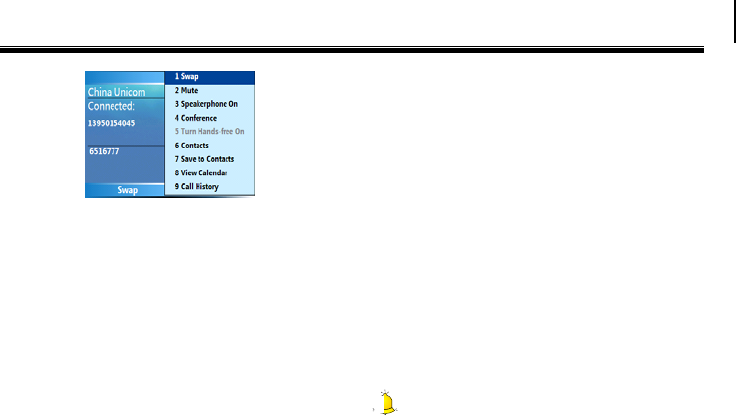
In-call options
Your phone provides various options for managing
multiple calls at the same time. You are notified
when you have another incoming call, and you have
the choice of ignoring or accepting the call. If you
are already on a call and accept the new call, you
can select to switch between the two callers, or set
up a conference call between all three parties.
Call Functions
22
Making two calls simultaneously (this must
be supported by the network)
While on a call, you can place the current call on
hold and dial another phone number at the same
time. To place a call on hold, press [Menu →
Hold].
Switching between two calls (this must be
supported by the network).
(1) While on a call with A, you receive a call from
B. You can set the current call on Hold and
accept another call simultaneously.
(2) Select [Menu→Swap] to switch between the
two calls. The side that is on hold cannot hear
the other conversation.
When you end one call, the other call is activated
automatically.
Making a conference call (this must be
supported by the network)
The SMT 5700WOC phone enables the user to
make a conference call with up to five callers.
(1) Either put a call on hold and dial a second
number, or answer a second incoming call
during a call. To place a call on hold, press
[Menu → Hold]. Click [Menu →
Conference].
Caution:
1. If the conference connection is successful, the
word “Conference” appears at the top of the
screen.
2. To add more people to your conference call,
Call Functions
23
select [Menu→Hold], enter the phone number,
then select [Resume] to return to the call.
(2) To end the conference call, press the END
Key and select the desired number to
disconnect.
Additional dialing information
Making an emergency call
Enter the appropriate emergency numbers for your
location (such as 911) then press the SEND key
.
Caution:
Additional emergency numbers may be included in
your SIM card. Contact your service provider for
details.
Making an international call
(1) Press and hold on the phone keypad
until the “+” sign appears. The “+” replaces
the 00 in the international prefix of the country
that you are calling.
(2) Enter the full phone number then press the
SEND key . The full phone number
includes country code, area code (without the
leading zero, if any) and phone number.
Dialing a voice mail
Voice Mail is a system dependent feature. To
activate Voice Mail from the Home Screen, press
and hold .The system will automatically dial
your voice mailbox. Contact your service provider
for your voice mail access phone number
Notice:
To set your voice mail number, select

Call Functions
24
[Start→More→Settings→Phone→Call Options]
then enter “Call Options.” Your voice mail number
appears in the “Voice mail number” box.
Caution:
Call waiting, call holding, and conference call are
system dependent features. Contact your service
provider for additional information.
Call functions
During a call, press the Right Soft Key
<Menu> to access the following operations:
Hold: Select to place the caller you are talking to
on hold. Select [Unhold] to remove the call
from Hold.
Mute: Select to turn off the microphone so that
you can hear the caller but the caller cannot hear
you. Select [Unmute] to switch on the
microphone again.
Speakerphone on: Select to turn on the
speakerphone.
Conference: Select to make a conference call.
For more details, see “Making a conference call”
on page 22.
Turn hands-free on: Select to activate
hands-free function, so you can talk hands-free.
Contacts: Select to view your Contacts List.
Save to contacts: Select to save the current
contact to your Contacts List. If the contact is
already saved to your phone, “View Contact”
appears.
View calendar: Select to view your Calendar.
Call history: Select to view your Call History
list.
Caution:
This is a system dependent feature. Contact your
service provider for additional information.

Input Modes
25
4. Input Modes
The SMT 5700WOC supports input modes that
feature a strong, intelligent word-building capacity.
It includes the following input mode options:
Fn : Press the corresponding key to enter your
desired number or symbol labeled on the upper
side of the key.
Fn: Press the corresponding keys to enter your
desired numbers or symbols labeled on the upper
side of the keys.
abc: Press the corresponding keys to enter your
desired English letters labeled on the lower side
of the keys.
Switching input modes
To switch between input modes while editing,
repeatedly press . The input mode Icons will
appear in the upper right corner of the screen.
Character input mode
Character input mode means [abc] input mode.
(1) Switch to [abc] mode, and you can enter
letters by pressing the key labeled with the
required letter.
(2) In any input mode, press to enter
Capitalization status. This allows you press the
corresponding key to enter its capital letter. To
exit Capitalization, press again.
(3) Press and hold and press the key
labeled with the required letter, so you can
enter the corresponding capital letter. (Once in
capitalization status, you can enter its small
letter).

Input Modes
26
Numeric input mode
Switch to [Fn] input mode by pressing twice
then press the keys labelled with your required
numbers or symbols.
Menu Use
27
5. Menu Use
The SMT 5700WOC mobile phone provides you
with a wide variety of functions. These functions
are arranged in the form of menus and you can look
at, use or set each menu as required.
Entering menu
Scrolling to enter menu function
(1) Press the Left Soft Key from the Home
Screen to enter the main menu. Press the
Navigation Key up, down, right or left to
move to your desired menu, and then press the
center of the Navigation Key to access
this menu. Select <More> to view the next
menus.
(2) If there are sub-menus, press the Navigation
Key up or down to select the desired one
then press the center of the Navigation Key
to enter it.
Entering a menu by using shortcuts
From the Home Screen, press the Navigation Key
left or right to select from the most recently
accessed shortcut icons, then press the center of the
Navigation Key to enter the corresponding
menu directly.
Messaging
28
6. Messaging
With this function, you can create, edit, send and
receive SMS, MMS and Outlook E-mails.
To enter the Messaging screen from the Home
Screen, press [Start→ Messaging].
Messages
The messaging service is a network service which is
used to send SMS/MMS between mobile phone
users. (Or send to an e-mail address if this is
supported by the network). Whether this menu can
operate normally depends on your SIM card and the
services supplied by the network provider, so please
check before using this service.
First, confirm the service center number has been
set before using the phone for the first time. To set
the number from the Home Screen, select
[Start→More→Settings→ Phone→Call
Options→Text messages service center]. You can
also consult your network service provider about
your local SMS service number.
To enter the Messaging screen from the Home
Screen, select [Start→Messaging]. All the received
SMS/MMS will display on the screen and you can
access the following options:
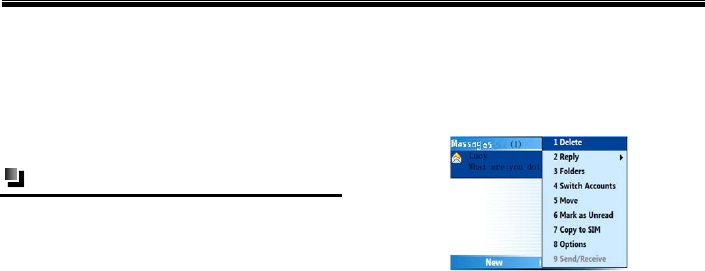
Messaging
29
Option Function
Delete Delete the selected SMS/MMS.
Reply Reply, reply all and forward the
selected SMS/MMS.
Folders Switch to other folders
( including [Drafts], [Outbox],
[Inbox], [Sent Items] and
[Deleted Items])
Switch
Accounts Return to the Messaging screen
Move Move the message to other
folders
Mark as
Unread Mark the selected SMS/MMS as
an unread message.
Copy to
Inbox
Copy the selected SMS/MMS to
[Inbox] of your phone.
Co
py
to
Copy the selected SMS/MMS to
hS d
SIM the SIM card.
Options Access additional settings for all
received SMS/MMS. For more
details, please refer to “Options”
on page 40.
Send/Re-
ceive
Send and receive e-mails.
Editing an MMS
To enter the New MMS screen, select
[New→Multimedia Message] from the Messages
screen or select [Menu→Reply via MMS] while
viewing an MMS to enter the New MMS screen.
The steps to edit a new MMS are as follows:
(1) To: To enter a recipient’s number directly in
the editing box, press the center of the
Navigation Key , or press the Right Soft
Messaging
30
Key <Menu> and select
[Recipients→Add] to select your desired
contact from Contacts. The phone also
supports the “Group message” function. If you
have selected “Send an MMS” and addressed
it to a group, then you can send the MMS to
multiple-recipients.
(2) Subject: Enter a subject for your message.
(3) Insert picture/video: Press the center of the
Navigation Key and select your desired
picture or video files to insert.
(4) Insert text: Press the center of the Navigation
Key to enter the Edit text screen.
(5) Insert audio: Press the center of the
Navigation Key and select the desired
audio file(s) to insert.
After you edit the message, you can select
[Menu→Preview Message] to preview the
message, then select the Left Soft Key <Send>
to send it. While editing, you can also access other
options such as [Insert Media], [Slides],
[Template] by pressing the Right soft Key
<Menu>.To exit the current MMS, select
[Cancel Message].
Notice:
To send a copy of this message to others, you can
access [CC] and [BCC] by selecting [Menu→
Options→ Send Options]. In these fields, enter the
recipient's phone number or e-mail address or
select [Menu → Recipients→ Add] to add from
[Contacts].
Configuring MMS settings
When you send an MMS message, an SMS
notification message will first be sent to the
recipient, while your MMS message will be
temporarily stored on an MMS server of your
wireless service provider. Similarly, when others
send you an MMS message, the MMS message will
be stored on the MMS server, waiting for you to

Messaging
31
retrieve it. Hence, your phone must be configured
with the location of the MMS server for you to be
able to send and receive MMS messages on your
phone.
When you purchase your phone, it is already preset
with your wireless service provider’s MMS server
settings. If you accidentally lose the preset settings
or if you change to another wireless service
provider, follow the steps below to configure MMS
settings.
(1) On the MMS main screen, select [Menu
→Options→MMS Configuration] to open
the Preferences screen.
(2) Select or clear the provided check boxes
according to your needs. You can select to
keep track of your MMS messages, retrieve
messages immediately, accept or reject
messages and request a delivery or read
receipt. You can also specify a resolution for
images you send and message delivery
attempts.
(3) On the Preferences screen, select [Menu →
MMSC Settings →Edit] to access
Multimedia Messaging Service Center
(MMSC) settings.
(4) Check if your phone is preset with MMS
server settings.
If there are no preset settings, select [Menu → New]
on the MMSC Settings screen and enter the
following information, which you can get from your
wireless service provider:
Name: A descriptive name, such as your wireless
service provider name.
MMSC URL: URL address of the MMS server.
WAP gateway: Location of the MMS server,
which is usually in the form of an IP address.
Port: HTTP port number used for connecting to
the MMS server and for file transfer.
Connect Via. Select [The Internet] from the
list.
Messaging
32
Max. Sending Size: Select the maximum
MMS message size allowed by your wireless
service provider.
(5) Press the Left Soft Key <Done>.
The MMS server settings will then be added as an
entry on the MMS Configuration screen.
Editing a Text Message
Select [New→Text Message] from the Messages
screen or select [Menu→Reply] while viewing an
SMS to enter the New SMS screen. The steps to
edit a new SMS are as follows:
(1) To: You can directly enter the recipient’s
number in the editing box, press the center of
the Navigation Key , or select
[Menu→Add Recipient] to select your
desired contact in Contacts List. The phone
also supports the “Group message” function. If
you have selected “Send an SMS” and
addressed it to a group, then you can send the
message to multiple-recipients.
(2) After inputting the recipient, press the
Navigation Key down to move the
cursor to the editing box, then you can edit
an SMS. During editing, select [Menu
→My Text] to insert commonly used
phrases in the message, or you can select
[Menu→ Cancel Message] to cancel the
current SMS.
(3) After editing a message, select
[Menu→Message Options] to enter the
Message options screen. Then press the center
of the Navigation Key to select [Request
message delivery notification], A “”
symbol will appear, and you will receive a
message delivery notification from your
network when the message has been
successfully sent. Or, the Left Soft
Key <Send> to send the SMS directly to
the recipient.
As a default, successfully sent SMS/MMS messages
will be stored in the [Sent Item] folder. For more
details, please refer to “Folders” on page 40.
Messaging
33
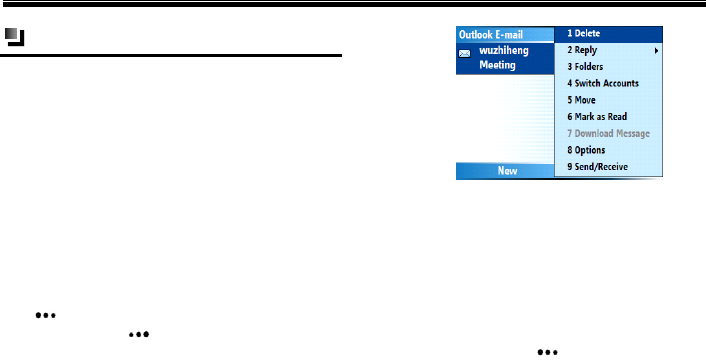
Outlook E-mail
The SMT 5700WOC can receive and send e-mail
and can be synchronized with Outlook E-mails on
your PC. However, this function needs to be
supported by the network, so you must set network
and account information before using it. (The phone
has been set to the default network, and you don’t
need to set it). For more details, please refer to
“Options” on page 40.
To enter the Outlook E-mail screen from the Home
Screen, select [Start→ Messaging→Outlook
E-mail].
On the Outlook E-mail screen, press the Left Soft
Key <New> to create a new e-mail. Press the
Right Soft Key <Menu> and you’ll have
access to the following options. For more detail,
please refer to “Messages” on page 28.
The [Download Message] option, shown in the
above figure, can only be used in Outlook E-mail
and MMS. Because the phone only receives the
e-mail and MMS headlines, you should download
the whole mail and MMS to view the entire
message.
Editing an e-mail
Press the Left Soft Key <New> directly from
the Outlook E-mail screen or select [Menu→Reply]
while viewing an e-mail to enter the Outlook E-mail
screen. The steps to edit a new e-mail are as
follows:
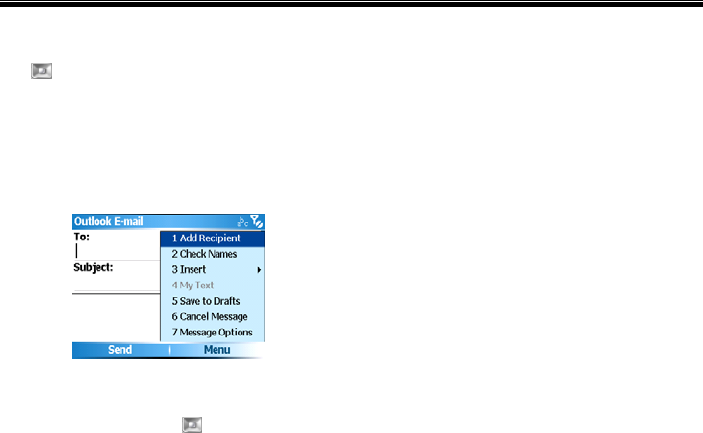
Messaging
34
To: You can enter an e-mail address directly in the
editing box, press the center of the Navigation
Key , or select [Menu→Add Recipient] to
select your desired contact in Contacts List. The
phone also supports the “Group message”
function.”
(1) If you have selected “Send an e-mail” and
addressed it to a group, then you can send the
e-mail to multiple-recipients.
(2) Subject: Input the subject of the E-mail.
(3) After entering the recipient and subject, press
the Navigation Key down to move the
cursor to the editing box, then you can
input the text of the E-mail. Select [Menu
→My Text] to insert commonly used
phrases in the e-mail (or you can select
[Menu→Insert] to insert pictures, voice
notes or files), or you can select
[Menu→Cancel Message] to cancel the
current e-mail.
As a default, the successfully sent e-mails will be
stored in the [Sent Items] folder. For more
details, refer to “Folders” on page 40.
Messaging
35
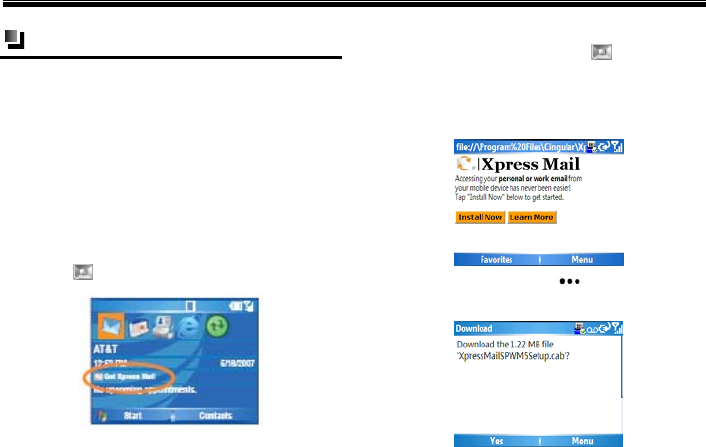
Setting Up your E-mail
Setting Up E-mail on Your Device with
Xpress Mail
Xpress Mail will work with the majority of email
services. MSNٛ and AOLٛ Email.Users please visit
http://www.att.com/xpressmail for the latest on
support and alternate setup instructions for MSN
and AOL email.
(1) Highlight “Get Xpress Mail” on the Home
Screen and press the center of the Navigation
Key .
(2) Highlight “Install Now”, and then press the
center of the Navigation Key .
(3) Click “Download Now” on the download
page. (Download time will vary depending on
your service area).
(4) Press the Left Soft Key to select “Yes” to
continue the download.

Messaging
36
(5) Press the Right Soft Key to select
<OK>and accept the license agreement.
(6) Enter your 10 digit mobile (cell) number
(numbers only) and press the Right Soft
Key to select <Next>.
(7) Select “Portal or ISP” and press the RIGHT
SOFT key to select <Next>.
(8) Highlight your provider and press the Right
Soft Key to select <Next>. (If you
provider is not listed tap “More” to view an
additional list of personal email providers.)
(9) Enter your User Name and Password and press
the Right Soft Key to select <Next>.

Messaging
37
Caution:
To enter a symbol, such as @, press the Function
Key then the corresponding character key.
(10) Press the Right Soft Key to select
<Register>and wait for the registration
process to complete.
(11) After successfully registering, your device will
automatically display the XM Settings section.
Press the Right Soft Key to select
<Inbox> to go to your personal email.
Messaging
38
Caution:
Some personal email services require a premium
subscription to access email from a mobile devices.
If you complete this setup process and your email
does not start arriving on your device, check with
your email provider to validate eligibility.
After successfully registering, you will be taken to
your Xpress Mail Settings where you can define
your preferences. After finishing with your
preferences click on the right soft key with your ISP
provider name on it to go to your Inbox.
Sending and receive personal E-mail
(1) On the Home screen select
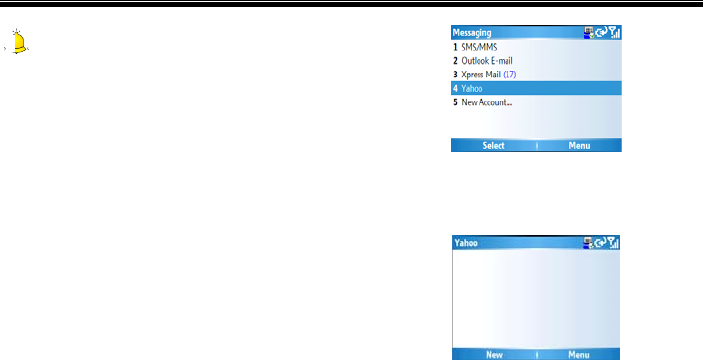
[Start→Messaging], and select [Ya h o o ] (or
your personal email provider).
(2) Select <Menu>and select <Receive>to
synchronize your email.
(3) Select <New>to compose a new email.
(4) When you are finished composing your
message, select <Send>.

Messaging
39
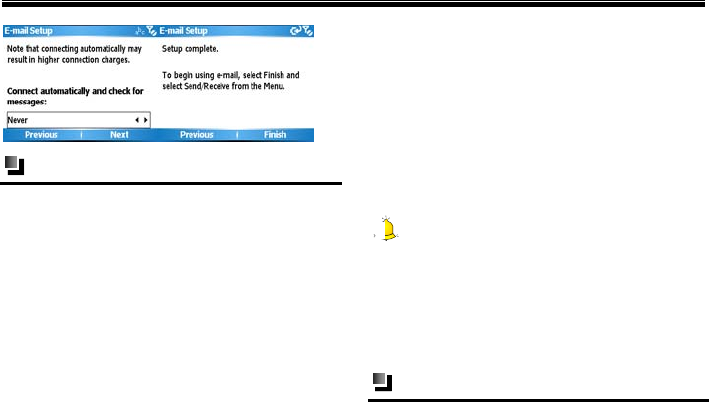
New account
To enter the E-mail setup screen from the Home
Screen, select [Start→Messaging→New Account],
and press to enter the E-mail setup screen.
Select [New Account] to set up an e-mail account
to send and receive emails. The phone supports
POP3/ IMAP. The detailed steps are displayed in
the following figures:
Messaging
40
Folders
Select [Menu→ Folders] from the SMS/MMS or
Outlook E-mail screen and you can enter the
following folders:
Deleted items
Stores the files deleted from the other folders. If
you delete the file from [Deleted Items], the
message is permanently deleted.
Drafts
Stores messages that will be sent later.
Inbox
Stores received message.
Outbox
Stores messages that are sent unsuccessfully.
Sent items
Stores messages which have been sent successfully.
Caution:
To ensure there is enough memory in the phone,
delete the old messages in [Sent Items]. As the
remaining memory decreases, you can play a
received MMS, but you can’t send, save or
download the MMS.
Options
You can set the parameters of [Messaging] with this
function.

Messaging
41
After entering the SMS/MMS or Outlook E-mail
screen, select [Menu→Options] to access:
Display: Select to check “Show date and time
in the message list” and to determine how to
sort messages.
Sending: Select to check “Include a copy of the
original message when replying to an e-mail”
and “Save copies of sent items.”
Signature: Select to create and set a signature to
insert into a message.
Account setting: Select to set SMS service and
MMS in account setting.
New account: For more details, please refer to
“New account” on page 36.
Calendar
42
7. Calendar
Use Calendar to schedule appointments, including
meetings and other events. Your appointments for
the day can be displayed on the Home Screen. If
you use Outlook on your PC, you can synchronize
appointments between your phone and PC. You can
also set Calendar to remind you of appointments
with a sound or flashing light, for example.
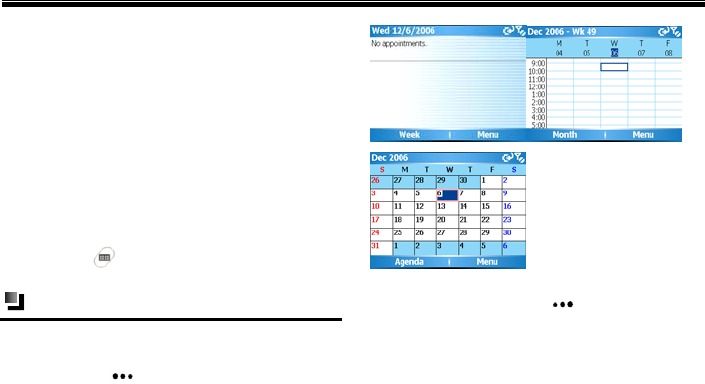
To access the calendar screen from the Home
Screen, select [Start→ Calendar] or press the
Calendar Key
Viewing calendar
You can view your schedule in three different views:
Month, Week and Agenda. Repeatedly press the
Left Soft Key to switch among them. The
following screen appears:
After entering the above three screens, you can
press the Right Soft Key <Menu> to access
the following options.
Calendar
43
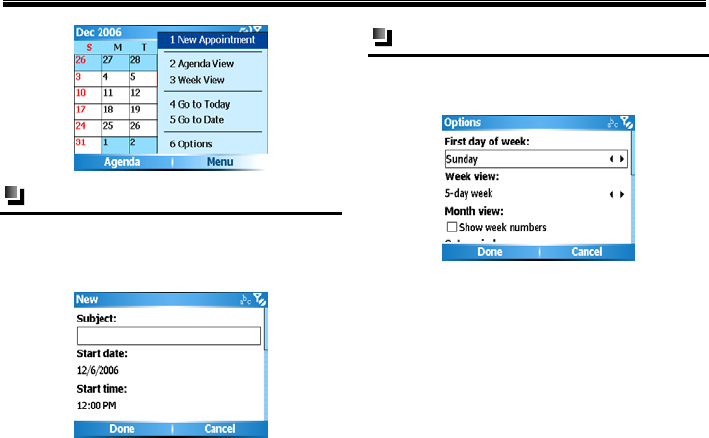
New appointment
Select [Menu→New Appointment] from the
calendar screen to create a new appointment, and
enter information about the appointment.
Calendar settings
Select [Menu→ Options] from the calendar screen
to access the following settings:

Contacts
44
8. Contacts
With this function, you can view and keep track of
Contacts information.
To enter Contacts from the Home Screen, press the
Right Soft Key <Contacts>, or select
[Start→Contacts].
All contacts are saved in SIM card or the phone.
SIM card contacts: Each entry includes a name
and a phone number. The memory and the
content of the SIM card differ according to the
SIM card type.
Phone contacts: You can not only store the
contact name, many different types of phone
number, e-mail address, family address etc, but
also can store a great deal of the contact’s
personal information, such as birthday and
anniversary.
Caution:
Contacts stored on your SIM card can also be
stored on the phone. Contacts stored on the phone
will be kept in the original phone. To move them to
another phone you will need to copy them to the
SIM card.
Viewing a contact
On the Home Screen, select [Start→Contacts], or
press the Right Soft Key <Contacts>. All
contacts stored in the phone and SIM card will be
listed on the screen, as shown on the next page:
Contacts
45
In the Contacts List, all the contacts are arranged
in alphabetical order. Contacts stored in the
phone usually appear before the contacts stored
on the SIM card.
In the Contacts List, the contact will display its
default phone number type. For example, if the
default phone number is a work number, “w”
appears after the contact; if the default phone
number is a home number, “h” appears after the
contact name; a mobile phone number will
display “m” after the contact. SIM card contacts
only display the SIM card sign.
Press the Navigation Key up or down to
select your desired contact, then press the
center of the Navigation Key to view its
detail (e.g.: contacts in the phone), shown in the
figure below:
Press the Navigation Key up or down to select
the desired phone number, then press the Left Soft
Key <Call> to make a call. Press the Right
Soft Key <Menu> to access options including
[Edit], [Save to SIM] and others.
Editing a contact
To modify the information for a contact, select the
desired contact then press [Menu→Edit].
Contacts
46
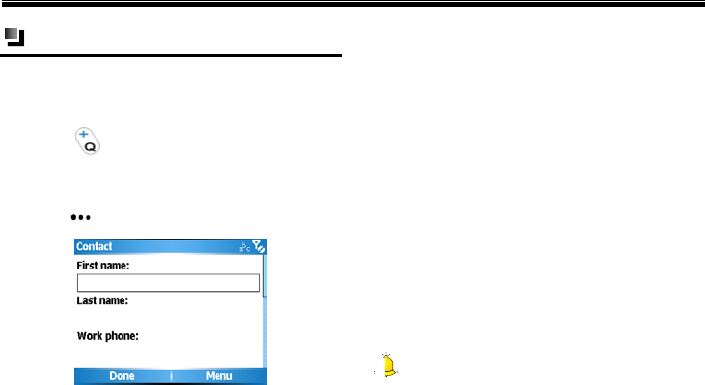
New contacts
(1) Select [Start→Contacts→New] from the
Home Screen to create a new contact ( To
input ”+” before entering country code,
press )
(2) After you finish entering the new contact
information, press the Left Soft
Key <Done> to save it.
Some international calls require a pause in the
dialing sequence in order for the call to process
successfully.
To insert a pause in a dialing sequence,
position the cursor on the phone number
where you want to insert a pause and
select [Menu→Insert Pause]. The letter
“p” will appear in the number to indicate
where the pause will occur in the dialling
sequence.
If you need to insert a longer pause,
position the cursor on the phone number
where you want to insert a longer pause
and click [Menu→Insert Wait].The letter
“w” will appear in the number to indicate
where the longer pause will occur in the
dialing sequence.
Select [Menu→ Cancel] to stop editing and
return to the Contacts List screen.
Caution:
You can add a new contact while on a call,
receiving SMS or e-mail
Contacts
47
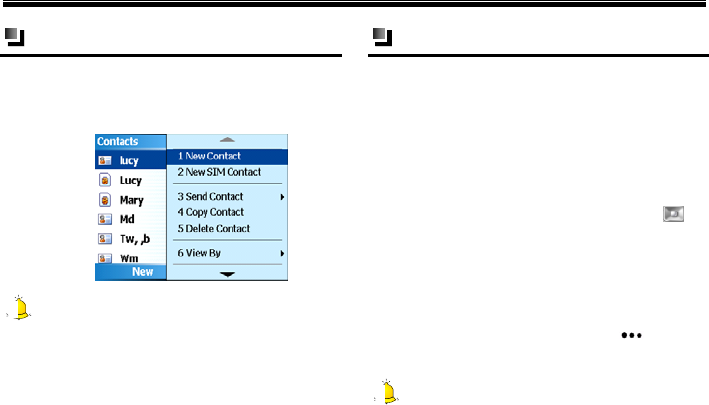
New SIM contacts
To add a new SIM contact from the Contacts List,
select [Menu→New SIM Contact], as displayed
below.
Caution:
The SIM card contact only includes the contact
name and a phone number that depends on the
SIM card type and function. For more details,
please consult your network service provider.
Speed dials
You can create speed dial numbers for the
frequently-called contacts stored on your phone.
Once stored in speed dial, you can call the number
by just pressing one or two keys.
Setting method
(1) To create a speed dial, select the contact then
press the center of the Navigation Key to
view the contact details. Select the phone
number you want to save to speed dial.
(2) Select [Menu→ Add to Speed Dial], then
enter the appropriate details in the Name,
Value and Keypad assignment fields. When
finished, press the Left Soft Key <Done>
to save.
Caution:
1. Only contacts stored on the phone can be used to
create speed dial entries.
Contacts
48
2. The speed dial location settings are from 2-99.
The “0” and “1” locations are preset numbers on
the phone.
Finding a contact
To find a contact in the Contacts List:
Press the Navigation Key up or down to
search for your desired contact.
Begin entering a name or phone number of the
contact until the contact is displayed. When you
press a key, such as , you will find names
that begin with D, and the phone numbers that
start with 4. The next key you press continues to
narrow the search. For example, to find “David”,
you would press , , , , and
then
Caution:
While pressing the numeric keys to find a contact,
the system can only find the contact with the same
phone number that you input.
Beaming a contact
You can send a contact on the phone to another
phone through the Bluetooth function.
Caution:
You can only beam contacts saved on the phone,
not SIM card contacts.
Transferring methods
(1) In Contacts List, select a contact stored in
the phone and select [Menu→ Send
Contact], as shown on the following page:

Contacts
49
(2) Press the Left Soft Key [Beam], and the
phone will search for Bluetooth-enable
devices automatically.
Copying contacts between SIM
card and the phone
You can copy contacts between SIM card and the
phone.
Copying SIM card contacts to phone
After entering the SIM contact screen, select
[Menu→Save to Contacts]. Select either to save it
as a new contact or to add to an existing contact.
See details in the following figure:
Copying phone contacts to SIM card
(1) For the contacts with more than one phone
number, please select your desired phone
number first.
(2) Select [Menu→Save to SIM], after checking
the contact’s name and number, press the Left
Soft Key <Done> to save.
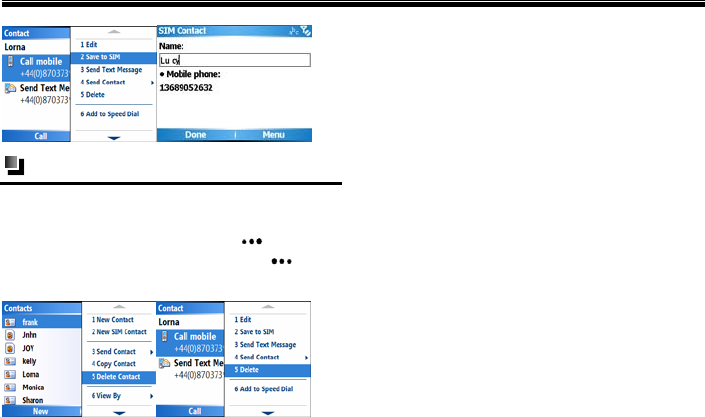
Contacts
50
Deleting a contact
To delete a contact in Contacts List or after entering
Contacts screen, highlight the contact you want to
delete, press the Right Soft Key <Delete a
Contact>, then press the Left Soft Key <Ye s >.
See the image below for additional information:

ActiveSync
51
9. ActiveSync
ActiveSync synchronizes information on your
phone with information on your PC. ActiveSync
can also synchronize over a wireless network with
Exchange Server if your company or service
provider is running Exchange Server with Exchange
ActiveSync.
To access ActiveSync from the Home Screen, select
[Start→ActiveSync].
Specifically, you can use ActiveSync to:
Synchronize information such as Outlook E-mail,
contacts, calendar or tasks information on your
phone with your PC, as well as music and video
files.
Synchronize Outlook E-mail, contacts, calendar
appointments and tasks on your phone directly
with Exchange Server so that you can stay up to
date even when your PC is turned off.
Copy files between your phone and your
PC. Without synchronizing.
Select which types of information are
synchronized and specify how much
information is synchronized. For example,
you can choose how many weeks of past
calendar appointments to synchronize.
Setting up
To install and set up ActiveSync on the computer:
(1) Install ActiveSync on your PC, as described
on the Window Mobile™ Getting Started
Disc. After Setup completes, the
synchronization setup wizard starts
automatically when you connect your phone to
the PC.
(2) Follow the instructions on the screen to
complete the wizard, in the sync setup wizard,
do one or both of the following:
Create a synchronization relationship between

ActiveSync
52
your PC and the phone
Configure the Exchange Server connection to
synchronize directly with Exchange server. You
need to specify the Exchange Server address,
user name, password, and domain name.( Get
this information from your administrator)
(3) Choose the information types to synchronize.
When you finish the wizard, ActiveSync
automatically synchronizes your phone. Once
synchronization completes, you can disconnect your
phone from your PC.
To manually start and stop synchronization
(1) Connect your phone.
To synchronize local information on the PC, such
as Outlook information or media files, connect
your phone to the PC using Bluetooth or a cable.
If you are synchronizing directly with Exchange
Server, you can use the connection to the PC to
access the network, or you can synchronize over
a cellular without connecting to the PC.
(2) In ActiveSync, select [Sync]
(3) To end synchronization before it completes,
select [Stop].
ActiveSync synchronizes a limited amount of
information by default to save memory on your
phone. You can change the amount of information
that is synchronized by performing the following
steps:
To change which information is synchronized
(1) Select [Start→ActiveSync] from the Home
Screen.
(2) Select [Menu→Options]
(3) Do one of the following:
Select the check box for the items you want to
synchronize by pressing the center of the
Navigation Key . If you can not select a check
box, you might have to clear the check box for
the same information type elsewhere in the list

ActiveSync
53
Clear the check box for any items you want to
exclude.
To customize synchronization of a computer,
select the computer name and then select
[Menu→Settings].
To customize synchronization of particular
information, select the information type and
select [Settings].
To stop synchronization with one computer
completely, select a computer name and select
[Menu→Delete].
Caution:
Outlook E-mail can be synchronized with only one
computer.
Synchronizing with exchange server
To set up your phone to synchronize directly with
exchange server, you will need to get the server
name and the server domain name form your
service provider or system administrator; you must
also know your exchange user name and password.
Caution:
Before changing synchronization settings on the
phone, disconnect it from your PC.
To synchronize directly with Exchange Server
(1) On the Home Screen, select [Start→
ActiveSync → Menu →Configure Server].
If you have not yet set up synchronization with
Exchange Server, this will say [Add Server
Source].
(2) On the Edit Server Settings screen, enter the
name of the server running Exchange Server
in the [Server address] box and select
<Next>.
(3) On the User Information screen, enter your
user name, password and domain name.

ActiveSync
54
(4) If you want the phone to save your password
so that you will not need to enter it again when
connecting, select the [Save password] check
box. Then, select <Next>.
(5) On the Options screen, select the check boxes
of the types of information that you want to
synchronize with Exchange Server.
(6) To customize synchronization of a particular
type of information, select the type of
information then select [Menu →Settings].
(7) To change the rules for resolving
synchronization conflicts, select
[Menu→Advanced] on the Options screen.
(8) Select <Finish>.
Caution:
You can also use the Sync Setup Wizard to set up
the phone to synchronize remotely with Exchange
Server. This wizard is started when you connect
your phone to your PC after installing ActiveSync
on the PC.
Stopping synchronization
(1) Disconnect the device from your phone.
(2) As shown on the next page, select “Mobile
device” in the “Files” menu.
(3) Select the device that you want to stop
synchronization.
(4) Select “Delete mobile device” in “Files”
menu.
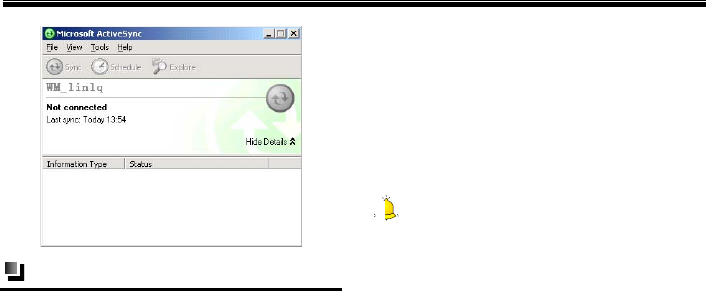
ActiveSync
55
Synchronization information
Synchronizing inbox
(1) As a default, while synchronizing Inbox of PC
or server, it can only synchronize the e-mails
for the latest three days and only the first 500
bytes of each e-mail. If you want to view the
whole e-mail, you should download the whole
e-mail.
(2) Your phone has a sync relationship with a PC.
In case an e-mail in the phone or the PC is
deleted, the same e-mail in the PC or the
phone will be deleted while synchronizing
next time.
(3) While synchronizing mails in the other folders
of Outlook besides Inbox, you need to select
the corresponding folders in the phone.
Caution:
SMS and MMS can’t be synchronized.
Synchronizing schedule
(1) You can synchronize the Schedule stored on
your phone with that of Outlook or Mobile
Information Server 2002 and the other
advanced versions stored on the PC.
(2) As a default, only the schedule for the past two
weeks and all future schedules can be
synchronized.

ActiveSync
56
Synchronizing through Bluetooth
With Bluetooth function, you can connect your
phone with other mobile devices or PCs and
synchronize between them.
Installing software in the phone
To install software on the phone through your PC
by using ActiveSync:
(1) Create connection between your phone and PC
through ActiveSync.
(2) Operate the installation files on PC.
(3) Select the installation position in the phone
and begin to install.
Solving ActiveSync Connection Problems
If you use a USB data cable to connect your device
to a PC, and ActiveSync can’t recognize the device
or the program stops responding, you can solve the
problems by referring to the following information.
Carry out the following steps one by one until you
have solved the problem. For more detailed
information (including the detailed instructions
about the common PC firewall program), visit the
troubleshooting section of the Windows Mobile
web page.
Check the devices according to the system
information, and solve all connection problems.
Make sure both the device and the PC have an
activated USB connection.
(1) In [File] menu of ActiveSync on PC, click
[Connection setting] and then click [Allow
USB connection].
(2) In ActiveSync on the device, click
[ActiveSync] to enter the ActiveSync
screen, and then click
[Menu→Connections→ Synchronize all
PCs using this connection].
Disconnect the device and re-connect it.
Disconnect the device, then restart and reconnect
the device.

ActiveSync
57
Disconnect the device, then restart the PC and
re-connect the device.
Do the following:
(1) Disconnect the device.
(2) Open the following PC firewall ports for all
programs:
- 990: Open entry TCP port
- 999: Open entry TCP port
- 5678: Open entry TCP port
- 5679: Open exit UDP port
- 5721: Open entry TCP port
- 26675: Open entry TCP port
(3) Reconnect the device.
Do the following:
(1) Disconnect the device.
(2) Disable the antivirus program.
(3) Reconnect the device
Do the following:
(1) Disconnect the device.
(2) Delete ActiveSync by using “Add/Delete
program”.
(3) Install ActiveSync.
(4) Reconnect the device.
Do the following:
(1) Disconnect the device.
(2) Select [Control panel→Network
Connection] on PC.

ActiveSync
58
Caution:
If [Control panel] sets as sort view, please click
[Network and Internet connection] and then click
[Network connection].
(3) Select local connections established by
ActiveSync with right key, and then click
“Property”. It will display “Devices based on
Windows Mobile” in “Use during
connection” box.
(4) Select all menus in “The connection uses the
following items”.
(5) Reconnect the device.
Please make sure DHCP client server is operating
on PC. As for the details about how to activate or
stop Windows services and view its status, please
refer to “Windows help and support center”.
ActiveSync error information
If synchronization is unsuccessful through
ActiveSync, error information will appear on the
phone screen.
When the error information appears, click the
“Prompt” button on the PC and ActiveSync will
display additional error information.
Some errors may influence ActiveSync operation.
If you suspect there may be something wrong with
ActiveSync you can select manual synchronization.
After finishing manual synchronization, Auto Sync
will reset. For more details, please refer to
“Synchronizing information” in the ActiveSync
introduction of PC.

Games
59
10. Games
To access Games from the Home Screen, select
[Start→More→Games].

IM
60
11. IM
Instant Messaging
If you subscribe to an instant messaging (IM)
service such as AOL, MSN, or Yahoo!, you can
take the convenience and fun of IM on the go with
your mobile phone.
Setting up
(1) From the Home Screen, press [Start→IM &
Email].
(2) Highlight “IM” and press the center of the
Navigation Key .
(3) Follow the easy steps to download and install
the application on your device.
(4) After installation is complete, go back to the
IM&Email Folder, and click on “IM” to
launch the application.
Sign In
(1) After setting up the IM application, press
[Start→IM & Email].
(2) Highlight “IM” and press the center of the
Navigation Key
(3) Select the desired service and press the center
of the Navigation Key
(4) Enter your user name and password and select
“Sign In”.
Add a contact
(1) From the IM main screen, select [Menu].
(2) Select “Add Contact”.
(3) Type in the ID of the contact you would like to
add and then select [Add].

Documents To Go
61
12. Documents To Go
Documents To Go is the first and only mobile office
editor for Windows Mobile 5.0 Smartphone edition
on the market today. Now you can view, edit and
create Microsoft® Word, Excel and PowerPoint®
files, view Adobe® PDF files as well as unzip files
on your smartphone no matter where your personal
or professional life takes you.
To access Documents To Go from the Home Screen,
select [Start→More→Documents To Go].
PDF to go
[PDF to go] option allows you to View Adobe PDF
files on your smartphone.
Selecting [PDF To Go] from the Documents screen,
press the Left Soft Key <Zoom> to select your
zoom mode. Nine zoom levels including [Fit To
Screen] and [Fit To Width] are provided for you.
Press the Right Soft Key <Menu> to access
the following options
File: Select [File] to access the following
options:
Open: Select and open a PDF file in [My
Stuff].
Save copy: Save the current PDF file.
Send: Select to send the current PDF file
via Messages or Outlook E-mail.
View: View the selected PDF file and
attachments, such as faxes sent as PDF
attachments. You can select the desired view
mode between [Page Layout] and [Word
Wrap].
Go: Go to your desired page.
Preference: View the six default file types of
[Documents To Go]: [Word], [Excel],
[PowerPoint],[PDF],[Text] and [Zip]
About PDF To Go: View the properties of [PDF
To Go], such as version, registration number, etc.
Check for updates: Connects to the Dataviz

Documents To Go
62
web page and update the latest PDF To Go
software version.
Register: Connect to the Dataviz web page and
register the user information.
Exit: Exit the PDF to Go screen.
Sheet to go
[Sheet To Go] option allows you to view, edit or
create Excel files on your smartphone.
Whether it’s a sales forecast or a price list, you can
now insert functions, update data and recalculate
values instantly and your entire Excel spreadsheet's
original formatting such as macros and charts will
be maintained when making edits on your device.
Select [Sheet To Go] from the Documents screen
and press the Right Soft Key <Menu> to
access the following options:
File: Select [File] to access the following
options.
New: Create a new Excel file.
Open: Select and open an Excel file in [My
Stuff].
Save: Save the current Excel file.
Save as: Set the name, location and
format for the Excel file to be saved.
Send: Select to send the current Excel file
via Messages or Outlook E-mail.
Edit: While editing an Excel file, you can access
[Undo], [Redo], [Cut], [Copy], [Paste], and
[Clear].
Delete: Delete the selected sheet, row or column.
Selection mode: Press the center of the
Navigation Key to activate or deactivate
[Selection Mode] and set the edited region.
Zoom: Zoom out of or zoom in the current
Excel file. The three zoom levels are: [150%],
[100%] and [50%].

Documents To Go
63
View: View the current Excel file, such as [Cell
Contents], [Comment], [Freeze Panes] or
[Chart in Sheet].
Insert: Insert new rows, columns, sheet, chart or
your desired function.
Format: Set number formatting and cell
formatting, select a region to sort, rename and
protect the current sheet.
Row: Adjusts row height and select to hide or
unhide the selected row.
Column: Adjusts column width and select to
hide or unhide the selected column.
Go: Move to your desired sheet, cell, the first
cell or the next cell.
Preference: View the six default file types of
[Documents To Go]: [Word], [Excel],
[PowerPoint],[PDF],[Text] and [Zip]
About sheet to go: View the properties of [Sheet
To Go], such as version, registration number etc.
Check for updates: Connects to the Dataviz
web page and updates the latest Sheet To Go
software version.
Register: Connect to the Dataviz web page and
register the user information.
Exit: Exit the Sheet to go screen.
Slideshow to go
[Slideshow To Go] option allows you to view, edit
or create PowerPoint presentations on your
smartphone.
Select [Slideshow To Go] from the Documents
screen, press the Left Soft Key <Slide View>
to select your view mode (Online, Notes and Slides)
or select the Right Soft Key <Menu> to
access the following options:
File: Select [File] to access the following options:
[New], [Open], [Save], [Save as] and [Send].
For more details, please refer to [Sheet To Go].
Edit: While editing a slide, you can access

Documents To Go
64
[Undo], [Redo], [Cut], [Copy], [Paste], [Find],
[Find Next], or select to delete the current slide.
Selection mode: Press the center of the
Navigation Key to activate or deactivate
[Select Mode] and set the edited region.
Zoom: Zoom out of or zoom in the current
PowerPoint file. Eight zoom levels are available:
[200%] [150%], [125%], [100%] and others.
Insert: Select to insert a new slide, duplicate the
current slide or a new bullet item.
Format: Select to increase or decrease indent.
Go to slide: Select and move to the slide which
you want to go.
Slide sorter: Select and adjust your desired slide,
or press the Right Soft Key <Menu> to
move up or move down the selected slide.
Preference: View the six default file types of
[Documents To Go]: [Word], [Excel],
[PowerPoint],[PDF],[Text] and [Zip]
About slideshow to go: View the properties of
[Slide To Go], such as version, registration
number etc.
Check for updates: Connects to the Dataviz
web page and updates the latest Slideshow To Go
software version.
Register: Connect to the Dataviz web page and
register the user information.
Exit: Exit the Slideshow To Go screen.
Word to go
[Word To Go] option allows you to view, edit or
create Word files on your smartphone.
Select [Word To Go] from the Documents screen
and press the Left Soft Key <Page Scroll> to
select page scroll or line scroll mode to make
navigating documents easier. Press the Right Soft
Key <Menu> to access the following options:
File: Select [File] to access the following options:
[New], [Open], [Save], [Save as] and [Send].

Documents To Go
65
For more details, please refer to [Sheet To Go].
Edit: While editing a document, you can access
[Undo], [Redo], [Cut], [Copy], [Paste], [Select
All], [Find and Replace] and [Find Next].
Selection mode: Press the center of the
Navigation Key to activate or deactivate
[Select Mode] and set the edited region.
Zoom: Zoom out of or zoom in the current Word
file: Three zoom levels are available: [150%],
[100%] and [50%].
View: View the current Word information, such
as [Comments], [Footnotes], [Endnotes], [Split
Window] [Word Count], and others.
Insert: Select to add a page break, hyperlink or
bookmark in the current Word file.
Format: Set the format for the current Word file ,
such as font, paragraph, bullets and numbering
and bookmark, or select to increase or decrease
indent
Table: Insert a table in the current Word file and
edit the table, including [Insert Rows Above],
[Insert Rows Below], [Delete Table], and
others.
Go: Select and move to the beginning, the end of
the current Word file, or your desired bookmark
Preference: View the six default file types of
[Documents To Go] and they are: [Word],
[Excel], [PowerPoint],[PDF],[Text] and [Zip]
About Word to Go: View the properties of
[Word To Go], such as version, registration
number, etc.
Check for updates: Connects to the Dataviz
web page and updates the latest Word To Go
software version.
Register: Connect to the Dataviz web page and
register the user information.
Exit: Exit the Word To Go screen.

Documents To Go
66
Zip to go
[Zip To Go] option allows you to decompress zip
archives on your smartphone, so you can open
attachments on your smartphone even if they've
been compressed
Select [Zip To Go] from the Documents screen then
press the Right Soft Key <Menu> to access the
following options:
Open archive: Select and extract a single file in
[My Stuff].
Extract all: Extract all zip files on your phone.
Extract and open: Extract a zip file and then
open it.
Preference: View the six default file types of
[Documents To Go] and they are: [Word],
[Excel], [PowerPoint],[PDF],[Text] and [Zip]
About zip to go: View the properties of [Zip To
Go], such as version, registration number, etc.
Check for updates: Connects to the Dataviz
web page and updates the latest Zip To Go
software version.
Register: Connect to the Dataviz web page and
register the user information.
Exit: Exit the Zip To Go screen.
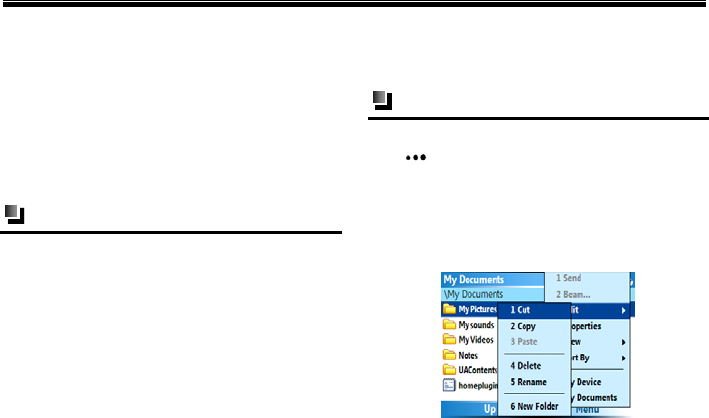
My Stuf
f
67
13. My Stuff
The My Stuff menu allows you to access images,
videos, music and sound files that are stored in the
phone or the storage card. However, you can not
modify or delete the folders.
From the Home Screen, select [Start→My
Stuff].
Folder use
My pictures
Stores pictures taken using the [My pictureKey]
function of the phone.
My sounds
Stores the default audio files of the phone.
My videos
Stores video files.
UA Contents
This is an MMS mail box used to store MMS files.
Folder operation
For the files in this folder, press the Right Soft
Key <Menu> to access the following file
operations: view the files with icon or list; sort them
by name or date, send them with MMS; use them
for wireless data exchange and edit the files (such
as copy, paste, rename, etc.) See the following
image for more details.

MEdia Net
68
14. MEdia Net
MEdia™ Net gives you access to all the cool things
you can do with your wireless phone—email, Web
sites, games, and more. It is wireless Internet access
for your wireless device.
To access MEdia Net, select
[Start→More→MEdia Net] from the Home
Screen.
To personalize your MEdia Net homepage, press
the Right Soft Key <Menu>. From there, you
can add, move, or delete categories and links.
This function is system dependant. Contact your
service provider for additional details. The menus
and settings are similar to those of “Internet
Explorer”; please refer to “Internet Explorer” on
page 82.
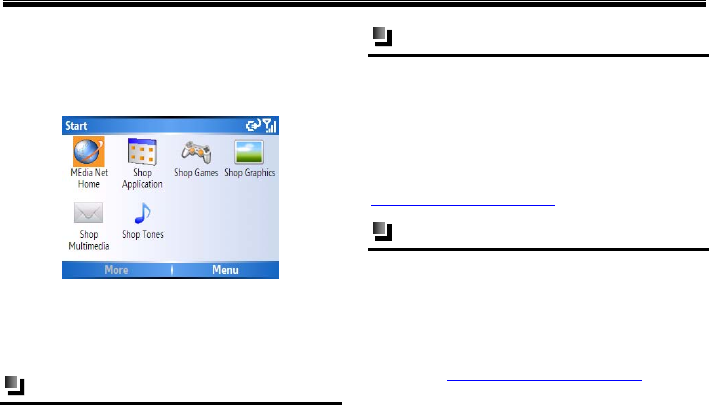
AT&T Mall
69
15. AT&T Mall
To enter AT&T Mall from the Home Screen, select
[Start→More→AT&T Mall].
This menu is a system dependent feature where you
can access multiple functional and convenient
AT&T brand services. For more details, please
consult with your network service provider.
MEdia net home
Select [MEdia Net Home] from AT&T mall screen
and enter the Home Screen of MEdia net.
Shop application
Selecting [Shop Application] from the AT&T
mall screen launches the browser to a landing
page where the user can purchase and
download java applications.
As a default, pressing Shop Applications
automatically launches to
http://appslink.cingular.com/
Shop games
Selecting [Start→AT&T Mall→Shop Games]
launches the browser to a game storefront/landing
page where the user can purchase and download
games.
As a default, pressing Shop Games automatically
launches to http://downloads.cingular.com.
AT&T Mall
70
Shop graphics
Selecting [Start→AT&T Mall→Shop Graphics]
launches the browser to a graphics
storefront/landing page where the user can purchase
and download graphics.
As a default, pressing Shop Graphics automatically
launches to http://grphdownloads.cingular.com
Shop multimedia
Selecting [Start→ AT&T Mall→Shop
Multimedia] launches the browser to a multimedia
storefront/landing page where the user can purchase
and download multimedia files.
As a default, pressing Shop Multimedia
automatically launches to
http://mmsstore.cingular.com .
Shop tones
Selecting [Start→ AT&T Mall →Shop Tones]
automatically launches the browser to a tone
storefront/landing page where the user can purchase
and download ringtones.
As a default, pressing Shop Tones automatically
launches to http://rtdownloads.cingular.com.
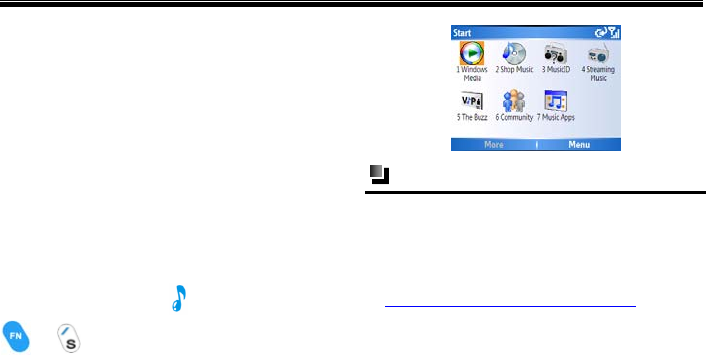
AT&T Music
71
16. AT&T Music
With this function, you can listen and learn about
artists on the move and share artist and song info
with friends wherever you are. Music contents can
be accessed via various filter elements (artist, album,
genre, etc) and you can access to the player and
various player controls. In addition, you can visit
music storefronts to purchase and download your
favorite music and get other music related services
(e.g. Music ID, karaoke, etc).
To enter the AT&T Music screen from the Home
Screen, select [Start→More→AT&T Music] or
press the Music Key or press and hold
and at the same time .
Transferring Music
To transfer music to your SMT 5700WOC, you
will need the following:
Windows Media Player® loaded onto your PC.
You can download this at:
http://www.microsoft.com/mediaplayer.
Music on your PC in one of the formats: MP3,
WMA, AAC.
Microsoft® ActiveSync® software loaded onto
your PC.
This is included in your CD that came with your
phone.

AT&T Music
72
You are now ready to start transferring music to
your device:
(1) Open Windows Media Player® on your PC.
(2) Connect the phone to your PC using the USB
cable included in the box. Microsoft®
ActiveSync® is needed for the PC to
recognize your SMT 5700WOC but Windows
Media Player® is the software you use to
actually download songs to your device.
(3) In Windows Media Player®, click Media
Library.
(4) In the pane on the left, expand the All Music
category by clicking the plus sign next to it,
and highlight the music you want to copy to
your phone.
(5) Right-click the music that you want to copy,
point to Add to playlist, and then click Sync
List. (If the Sync List is displayed, you can
also drag and drop files to the list.) The songs
are added to the Sync List in the pane on the
right.
(6) At the bottom of the Sync List, click Start
Sync.
Caution:
You can transfer music to your device using
digital music stores as long as Microsoft®
ActiveSync® is installed. Tunes is not supported.
The number of files you can store depends on the
size and format options of the memory card. A
microSD™ memory card is preferable to copy
songs to your phone.
Windows Media
You can use built-in Windows Media Player to play
digital audio and video files that are stored on your
phone or MicroSD card.
The player can play audio files with the following
formats: MP3, MID, WAV and WMA.
The player can also play video files in ASF and
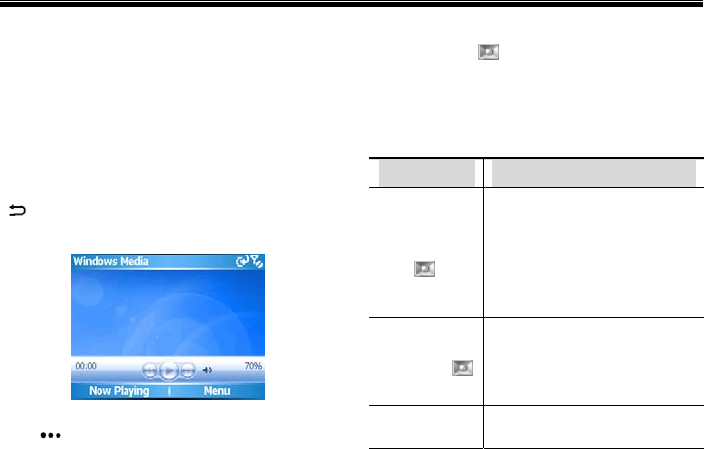
AT&T Music
73
WMV formats.
To enter Windows Media from the Home Screen,
select [Start→More→AT&T Music→Windows
Media].
The Library screen defaults as Windows Media
screen; you can select the files that you want to play
from different types of files.
On Library screen, press the Back/Clear Key
to enter playback screen, the details are in
the figure on the next page:
On the Windows media screen, press the Left Soft
Key <Now Playing> to select your desired
file in playback list, and then press the center of the
Navigation Key to play the file.
About the controls
By default, these hardware buttons are assigned to
Windows Media.
Buttons Allows you to
Press the
Navigation
Key left
Skip to the beginning of the
currently playing file
Quickly press the key twice to
skip to the previous file
Hold the key, it will rewind a
file
Press the
Navigation
Key
right
Skip to the beginning of the
next file. Press and hold to
fast-forward a file.
Press the
center of the
Play or pause
AT&T Music
74
Navigation
Key
Press the
Navigation
Key up
or down
Increase or decrease the
volume
Switch to silent mode
About the screens and menus
Windows Media Player has three primary screens:
Playback screen: The default screen that
displays the playback controls (such as Play,
Pause, Next, Previous and Volume) and the video
window. You can change the appearance of this
screen by choosing a different skin.
Now Playing screen: The screen that displays
the Now Playing playlist. This special playlist
indicates the current file being played and files
that are queued up to play next.
Library screen: The screen that lets you quickly
find your audio files, video files and playlists. It
contains categories such as [My Music], [My
Videos], [My TV] and [My Playlists].
At the bottom of each screen is a Menu. The
commands on this menu vary, depending upon
which screen you are viewing.
Playback screen menu
After entering playback screen, press the Right Soft
Key <Menu> to access the following
operation:
AT&T Music
75
Options Allows you to
Library Display the Library screen so
you can select a file to play
Play/Pause
Start or pause playback
Stop Stop playback
Shuffle/
Repeat
Play the items in the Now
Playing play list in random
order or repeatedly.
Full screen Play video file or network
video media files with full
screen (this function isn’t
available for audio files).
Options Adjust various Windows
Media Player options. Refer to
“Player Setting” on page 77 for
more details.
Properties Display detailed information
bh llifil
about the currently playing file.
About Display information about
Windows Media Player, such
as the version number.
Now playing screen menu
Enter playback screen and press the Left Soft Key
<Now Playing> to open the Now Playing. The
current playback list will appear on the screen.
Press the Right Soft Key <Menu> to access
the following operation.
Options Allows you to
Library Display the Library screen so you
can select a file to play
Move up Move the selected item up in the
play list order
Move Move the selected item down in

AT&T Music
76
down the play list order
Remove
from play
list
Remove the selected item from
the play list but the file is still
stored in Library.
Shuffle/
Repeat
Play the items in the Now Playing
play list in a random order or
repeatedly.
Save play
list Save the current files in play list
Clear
Now
playing
Remove all items from the Now
Playing play list.
Error
Details
View error information about the
selected item
Properties View information about the
selected file
Library screen menu
On the Playback screen, select [Menu→ Library]
to enter the library screen, shown in the figure
below:
When you are viewing the Library screen, press the
Right Soft Key <Menu> and you can:
Options Allows you to
Queue Up
Add the selected item to the
end of the current (Now
Playing) playlist.
Delete from Delete the selected item from
h lib
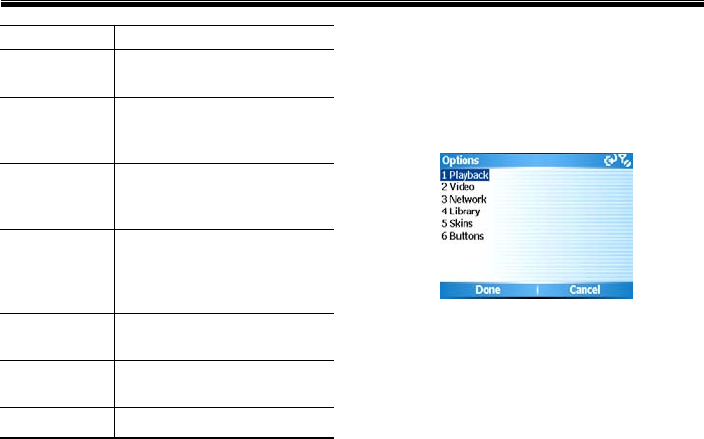
AT&T Music
77
Library the library.
Now Playing Display the Now Playing
playlist.
Library Switch between libraries, such
as between [My Device]
and[Storage Card].
Update
Library
Add new items to the library
by searching your phone or
storage card.
Open File Find and play files that are
stored on your phone or
storage card but are not in the
library.
Open URL Play a file on a network, such
as the Internet.
Properties View information about the
selected file.
Player Enter the playback screen
Player setting
Select [Menu→ Options] from the playback screen
and you can set the player, as shown in the image
below:
Playback: With this function, you can set
according to the different situations during
playing files.
Show time as: You can set the time
display format while playing files.
Pause playback while using another
program: You can set whether to continue

AT&T Music
78
to play the file when the phone is operating
the other programs (except call function).
Resume playback after a phone call: If
you receive a call while playing a file, you
can stop playing the current file and set
whether or not to continue to play the file
after ending a call.
Video: You can set the screen status while
playing video files.
Play videos in full screen: You can set
this option to [Never], [Only when
Oversized] or [Always].
Scale it to fit window: In case the size of
video file is over that of the screen, you
can zoom out of the video window to play.
Network: To achieve better video and audio
quality, you can change the Internet connection
speed according to Internet link manner. (See
figure on the next page.)
Library
With this function you can set whether to start
player on library screen.
Skins
Displays Player appearance.
Buttons
With this function you can redefine the buttons of
Windows Media Player.
Shop music
Select [Start→More→AT&T Music→Shop

AT&T Music
79
Music] from the Home Screen to launch the
browser and access a music storefront/website
where you can purchase music.
This is system dependent feature. Contact your
service provider for more details. As a default, Shop
Music automatically launches to
http://music.shop.The menus and settings are
similar to those of “Internet Explorer”; please refer
to “Internet Explorer” on page 82.
Music ID
Selecting Music ID from the AT&T wireless music
screen launches a preinstalled application. The
application allows the user to sample a selection of
unknown music and to receive the applicable
information about the title, artist, and album.
XM Radio Mobile
Selecting XM Radio Mobile from the AT&T Music
screen launches a preinstalled application. The
application allows the user to listen to streaming
audio (e.g. Mobile Radio)
The Buzz
Select [The Buzz] from the AT&T wireless music
screen to launch a preinstalled application (e.g.
Billboard). The application allows the user to obtain
relevant music industry news and information.
Community
Select [Community] from the AT&T wireless
Music screen to launch the browser to access one or
more of the hot user communities (e.g.
myspace.com). The application allows the user to
contact with their friends and the community.
This is system dependent feature. Contact your
service provider for more details. As a default,
when you select Community the browser launches
to http://music.community. The menus and settings
are similar to those of “Internet Explorer”; please
refer to “Internet Explorer” on page 82.

AT&T Music
80
Music apps
Select [Music Apps] from the AT&T wireless
music screen to launch the browser to an area
where the user can purchase music related
applications for download.
This is system dependent feature. Contact your
service provider for more details. As a default,
when you select Music Apps the browser launches
to http://music.apps. The menus and settings are
similar to those of “Internet Explorer”; please refer
to “Internet Explorer” on page 82.

Entertainment
81
17. Entertainment
To enter the Entertainment screen from the Home
Screen, select [Start →More→Entertainment].
Get TeleNav
TeleNav GPS Navigator is the next-generation
GPS navigation system that works directly on
your AT&T wireless mobile device. Get TeleNav
GPS Navigator and you will always have driving
directions available on your mobile phone — by
voice and onscreen.
Tell TeleNav GPS Navigator where you want to
go by inputting an intersection or an address,
and instantly get detailed information regarding
your trip.
With the easy-to-use TeleNav GPS Navigator, you
get:
Turn-by-turn driving directions: Get
turn-by-turn driving directions by voice and
onscreen.
Biz Finder: Find restaurants, coffee shops, hotels,
and more from over 10 million points of interest.
TeleNav Traffic: Alerts and intelligent
rerouting.
Full-color maps: Find full-color maps
nationwide.
Caution:
TeleNav GPS Navigator is network dependent.
You can get it by purchasing it online or via any
AT&T wireless retail store. For more details, please
consult with your local network service provider.
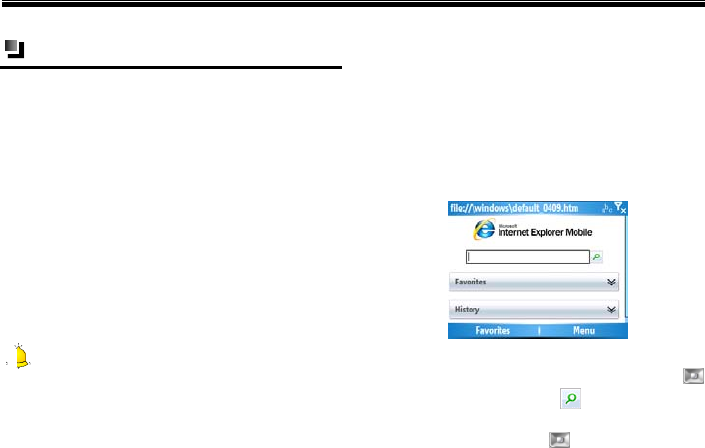
Entertainment
82
Internet Explorer
The SMT 5700WOC allows you to access the
Internet or applications through Internet Explorer.
To connect to Internet Explorer:
Ensure that your SIM card supports the network
function. For additional details, check with your
network service operator.
Contact your network service provider for
opening and ordering data service or GPRS
service.
Make sure you have the correct settings for Internet
Explorer on your phone. For more details, please
refer to” Options” on page 86.
Caution:
The function of accessing WAP network is network
dependent. For more details, please consult your
local network service provider.
Activating Internet Explorer
To access Internet Explorer from the Home Screen,
select [Start →More→Entertainment
→Internet Explorer].
After entering the Internet Explorer screen, you can
select [Search Bar], [Favorites] or [History], and
the following appears
Search bar: Input the network address which
you want to visit. Press the Navigation Key
to the right to select the icon and you can
search for all relative web pages. Press the center
of the Navigation Key to access and visit
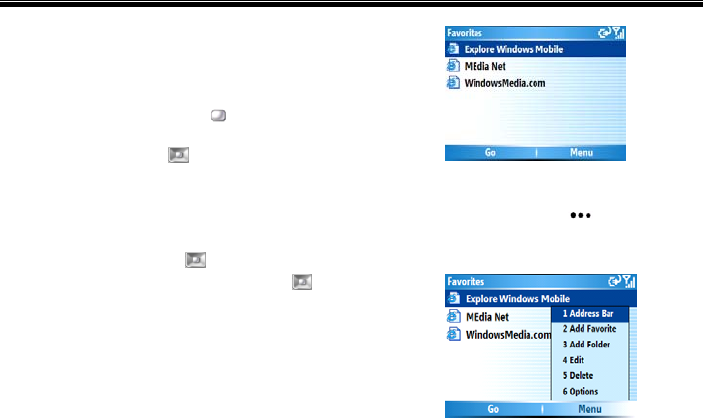
Entertainment
83
your desired webpage.
Favorites: Stores your most commonly visited
websites. You can select from five default
network addresses in [Favorites], or you can also
press the Navigation Key down to select
[More Favorites], and then press the center of
the Navigation Key to visit more Web
Pages.
More Favorites: After entering the
Favorites screen, it will display all the
network addresses you have stored. Press
the Navigation Key up or down then
press the center of the Navigation to
quickly connect to these web pages, as
shown below
Or you can select [Menu→ Address Bar]
to enter your desired network address then
press the Left Soft Key <Go>. You will
connect to your desired web page, as
shown below
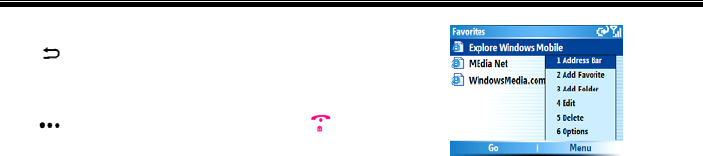
Entertainment
84
While browsing, press the Back/Clear Key
to return to the last web page that
you visited.
To stop browsing, press the Left Soft Key
<Stop> or press the END Key .
The Internet will still be connected. To
disconnect from the Internet completely,
you must access [Task Manager]. For
more details, please refer to “Task
Manager” on page 94.
History: Stores the network addresses
you’ve visited recently and displays in list form.
You can select your desired network address and
visit it.
The menu when Internet Explorer is off
line
When Internet Explorer is offline, press the Right
Soft Key <Menu> and you can access the following
options. For more details, please see the below
figure:
Address bar: Enter your desired network
address.
Add favorite: Add favorite website to
[Favorites].
Add folder: Create new folders in [Favorites] to
better manage your favorite websites.
Edit: Edit the currently selected web page.
Delete: Delete the current selected web page.
Options: Access additional Internet Explorer
settings. For more details, refer to “Options” on
page 86.
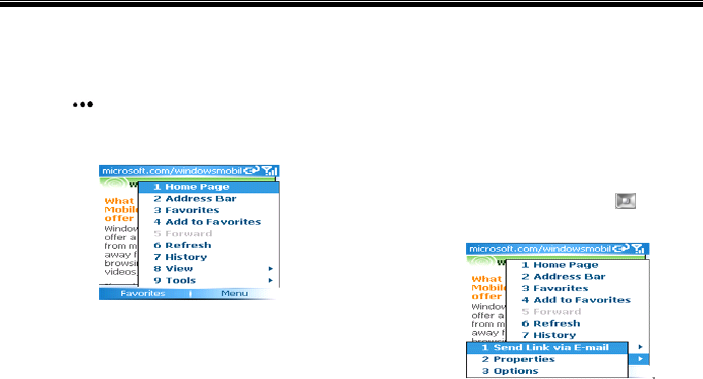
Entertainment
85
The menu when Internet Explorer is on
line
When Internet Explorer is online, press the Right
Soft Key <Menu> to access the following
options. For more details, please see the following
figure:
Home page: Enter your home page.
Address bar: Enter your desired network
address.
Favorites: With this function, you can enter
Favorites screen.
Add to favorites: Add your favorite website.
Forward: Enter the next web page that you have
visited in [History].
Refresh: Refresh the current Web page.
History: View and access the latest network
pages you have visited.
View: Determine the screen display settings for
browsing a web page.
Tools: Select this option and press to access
the following options:
Send link via E-mail: Send out the current
web page address via E-mail.
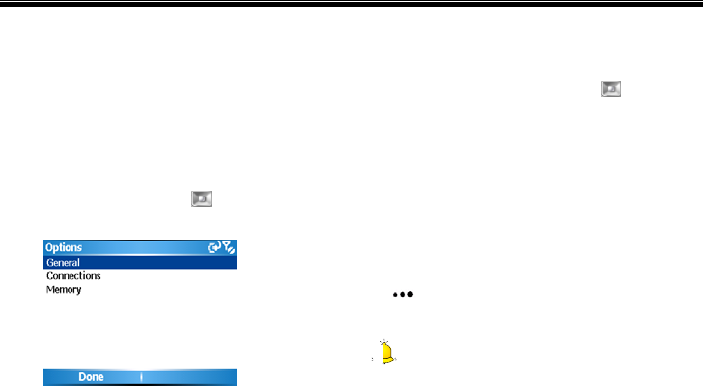
Entertainment
86
Properties: View the details of the current
selected Web page.
Options: Access additional settings for
Internet Explorer. For more details, please
see “Options” below.
Options
Select [Menu→Tools→Options] from the Internet
Explorer screen and press to enter Options
screen. The details include:
General: After entering [General], you can
change the download and network display
manners. The phone provides you with the
following options: [Play sound], [Warn when
changing to an unsecured page], [Allow
cookies], [Encoding] etc. You can select or
cancel these options by pressing .
Connections: After entering [Connections], you
can change the connection manner for the web
page. By using the [Automatically detect
settings] function, the system can select a proper
connection manner according to the network
address.
Memory: After entering [Memory] function,
you can view the memory status of the system.
On the Memory screen, press the Right Soft Key
<Clear> and you can clear temporary files,
Cookies and history.
Caution:
While searching or browsing a web page, select the
correct coding manner in [Encoding] on the
General screen, so the phone can properly access
and display the web page.
Entertainment
87
MobiTV
With MobiTV function, your phone becomes a
portable TV. Watch your favorite channels right in
the palm of your hand. See channels you watch at
home, made for mobile programming, and the latest
primetime shows from NBC, like Friday Night
Lights. The Emmy® Award winning service is
available through your wireless carrier and offers
over 100 TV channels worldwide, such as MSNBC,
ABC News Now, CNN International, FOX News
Channel, Fox Sports, ESPN 3GTV, NBC Mobile,
Bravo To Go, Sci Fi Pulse Mobile, Telemundo
Mobile, Discovery Channel, TLC, The Weather
Channel and others that deliver the latest music
videos, cartoons, comedy, and more.
To access MobiTV from the Home Screen, select
[Start→More→Entertainment→
MobiTV]
Caution:
Mobile TV function is network dependent. For
more details, please consult your local network
service provider.
Pictures & Videos
With this function, you can view the pictures stored
in the phone or storage card and you can set the
pictures as wallpaper or forward to others.
Pictures
On the Home Screen, select [Start→More→
Entertainment→Pictures&Videos] and press
the center of the Navigation Key .
After entering this function, all pictures stored in
the phone and storage card will be displayed on the
screen.
Press the Navigation Key up, down, right or
left to view your desired picture. To view the
picture, press the Left Soft Key <View> or

Entertainment
88
press the center of the Navigation Key .
While viewing a picture, press the Navigation
Key up or down to browse the last or the
next picture.
The functions in picture list
On the Picture list screen, press the Right Soft Key
<Menu> to access the following options:
Options Functions
Send Send the pictures to other
recipients with MMS or
e-mails.
Beam Send the pictures via
Bluetooth to other handset
devices with Bluetooth
function.
Save to
Contact
Set a picture as a contact
image
and later the
p
icture will
appear in the detailed
information of the selected
contact
Delete Delete the pictures
Edit Edit the pictures, such as
[Cut], [Copy], [Paste] and
[New folder],
Play Slide
Show
Preview the pictures in slide
show manner, and you can
set the visual effect in
[Options].
Folders You can select to view the
pictures stored in [My Device]
folder.
Options You can set viewing manner
for the pictures, set slide
show effect, etc.

Entertainment
89
The functions during browsing
From the Picture list screen, select the picture and
press the Left Soft Key <View> to view the
picture then press the Right Soft Key <Send>
to send the picture as an Outlook e-mail attachment
or MMS attachment. Press the Right Soft Key
<Menu> to access the following options:
Zoom: Zoom in or zoom out of the picture to
adapt the screen size and view.
Play Slide Show: Preview the pictures in slide
show.
Use as Home Screen: Set the picture the Home
Screen background.
Beam pictures…: Send the pictures through
Bluetooth to other handset devices with
Bluetooth function.
Edit: Edit the picture the following ways:
[Rotate], [Crop], [Auto Correct] and others.
Save: Save the picture the following ways: [Save
to Contact] or [Save As…].
Properties: View the picture name, type and
some other information.
Options: Set picture viewing options.
Send via MMS: Send the selected picture via
MMS.
Send via E-mail: Send the selected picture via
E-mail.
Beam: Send the captured photo to other
Bluetooth-enabled handset devices via
Bluetooth.
Use as Home Screen: Set the captured
photo as Home Screen background.
Edit: After entering the Editing screen,
select <Menu> and you can access
[Rotate], [Crop] and [Auto Correct].
Select [Save as] to rename the captured
photo.

Entertainment
90
Properties: View or modify detailed
information about the current photo,
including name, file type, dimensions, file
size, etc.
Options: Set general content, such as the
picture size when sending pictures or
rotation for editing pictures, or you can set
[Slide show], [Video] options.
Send via MMS: Send the selected picture
via MMS.
Send via E-mail: Send the selected
picture via E-mail.
The storage location of photos and videos
As a default, the captured photos and videos
are stored in the phone. You can view them by
entering [My Stuff] and [Photos &Video].
In order to make sure there is enough memory in
your phone, it is advisable to store the photos and
videos to a storage card.
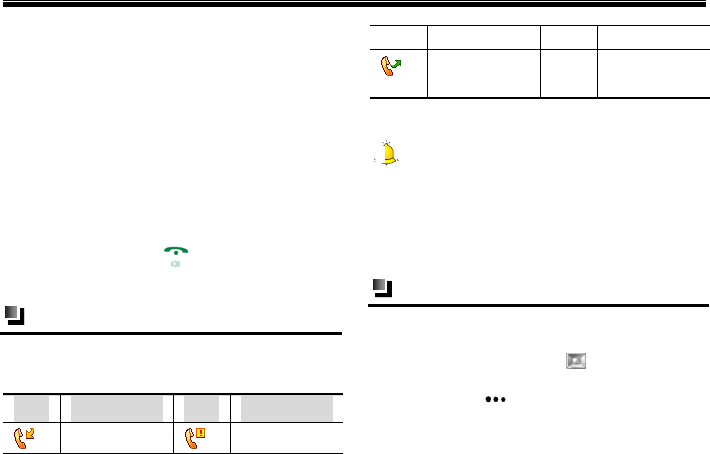
Call History
91
18. Call History
Call History includes the entries for [Incoming
Calls], [Outgoing Calls] and [Missed Calls]. You
can only view Call History if you are subscribed to
the service.
You can enter the Call History Screen from the
Home Screen by the following two methods:
On the Home Screen, select [Start→More→
Call History].
Press the SEND Key to view the latest Call
History.
Call list
Different icons appear for different types of calls.
For more details, see the following table.
Icon Introduction Icon Introduction
Incoming
ll
Missed Calls
calls
Outgoing
calls
—— ——
Caution:
If a phone number in the Call History is saved to
your Contact List, the name and the number will
display. If it is not in your Contact List only the
phone number displays.
Options in call list
Saving a contact
Press the Navigation Key up or down to
move to your desired number then press the
Left Soft Key <Save> to save it. At this
time, you can select to save the number as a new
contact or add it to the other contacts.
Call History
92
If you want to save the number as a new contact,
after choosing your desired storage position,
press the Left Soft Key <Save> to insert
the number and enter other relative information,
and then press the Left Soft Key <Done>
to save the number in contacts.
If you want to add the number to other contacts,
after choosing your desired storage position, you
can press the Left Soft Key <Insert> to
insert.
Select the desired number, and press the Right Soft
Key <Menu>to access the following options
Option Function
Find Contact Displays the name, number
and some other relative
information about the
contact
Send Text
Message
Enter text message screen,
edit and send a text message
to the contact.
E-mail Send an e-mail to the
contact.
View Timers View the time of last call, all
calls, incoming calls,
outgoing calls, etc.
Delete Delete the selected entry
Delete List Clear Call History
Save to
Contacts
Save the current number to
contacts.
Filter Filter missed calls ,
incoming calls and outgoing
calls.
Organizer
93
19. Organizer
Calculator
The calculator function can perform standard
mathematical operations such as addition,
subtraction, multiplication, and division.
On the Home Screen, select [Start→,
More→Organizer→Calculator].
Using methods
(1) After entering Calculator screen, enter
numbers and press repeatedly or press
the Navigation Key up, down, left or
right to select your desired operation symbols
(+,-, /,X).
(2) Press to enter a decimal and press the
center of the Navigation Key to get the
answer. Press the Back/Clear to clear
last digit entered, and press the Left Soft
Key <Clear>to clear the display.
Clear
Master Clear deletes all your saved data, and resets
all settings to the manufacturer default.
Caution:
1
. Use this function carefully.
2.
Back up the materials on the phone before
restoring to factory value. UT Starcom will take no
responsibility for material loss due to using the
restore factory setting function. Data stored on the
SIM card will not be influenced.
Select [Start→More→Organizer→ Clear] from
the Home Screen.
Enter “1234” in the inputting box then press the
Left Soft Key <Ye s >. The Master Clear
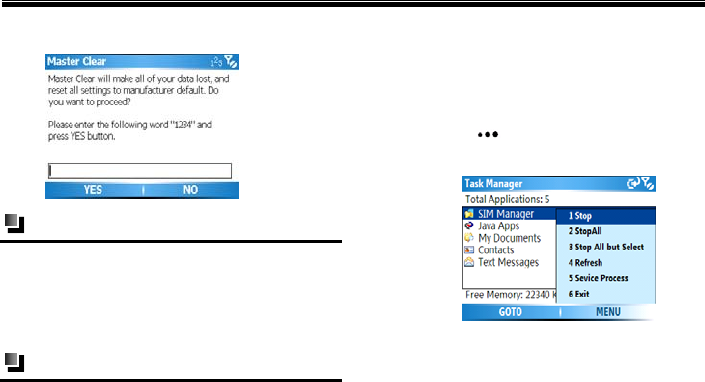
Organizer
94
operation begins as detailed in the following image.
Download agent
In this function, you can view the current download
status of the phone.
To access from the Home Screen, select
[Start→More→Organizer→Download Agent]
Task manager
When the system operates slowly, this menu can
help you quickly end the current tasks and free
more phone memory.
To enter Task Manager from the Home Screen,
select [Start→More→Organizer→Task
Manager].
After entering Task manager screen, you can
store the operated function options. Press the
Right Soft Key <Menu> to access the options
in the figure below:
Stop: End the selected task.
Stop all: End all operating tasks.
Stop all but select: End all other tasks
except the selected tasks.
Refresh: Enter the current screen again.
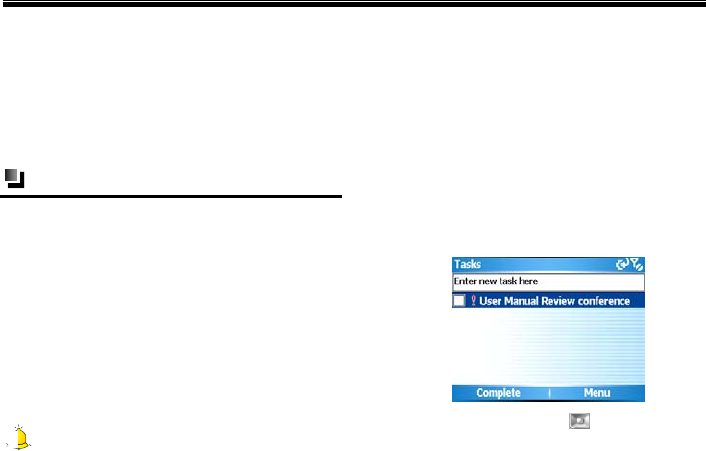
Organizer
95
Service process: Display the process list for
the current tasks.
Exit: Quit this screen.
For the above options, after entering the screen,
select <Back> and you can return to the Task
manager screen again.
Task
[Tas ks] is used to keep track of things you need to
do. The information in [Tasks] mainly comes from
Microsoft Outlook software after finishing
synchronization between the phone and PC.
To access from the Home Screen, select
[Start→More→Organizer→Tasks]
The synchronization task on PC
You can synchronize the Microsoft Outlook tasks
on PC to your phone.
Caution:
Before synchronizing, you need to use the
attached disc and install ActiveSync software
according to the prompts on the screen.
After installation, please activate ActiveSync
software on PC and use USB cable to connect your
phone with PC. As a default, the system will
synchronize the tasks on PC to [Tas ks] of your
phone automatically.
After synchronization, the following [Task s] screen
will appear:
Press the Navigation Key up or down to
select your desired task and press the center of
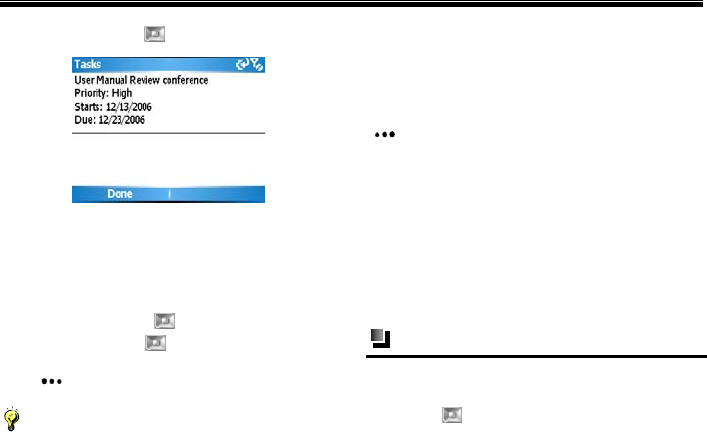
Organizer
96
the Navigation Key to view the following:
Creating a task on the phone
To enter Tasks from the Home Screen, select
[Start→More →Organizer→Tasks ].
Enter a new task on the screen and press the center
of the Navigation Key to finish creating. Press
the Navigation Key up or down, so you can
move to the new task and press the Left Soft
Key to activate the task.
Notice:
If you need to set the details (such as data, priority
etc) in Tasks, you need to first synchronize the
phone with the PC, and set the details in Microsoft
Outlook on your PC.
After entering [Tas ks], press the Right Soft Key
<Menu> to access the following options
Beam task: Send the current selected task to
another Bluetooth-enabled handset device
through the Bluetooth function.
Delete task: Delete the currently selected task.
Sort by: Sort tasks by selecting a sort option.
Filter: Filter the tasks by the category you want
to be displayed
Voice notes
To access Voice Notes from the Home Screen,
select [Start→More→Organizer→Voice Notes]
then press to enter.
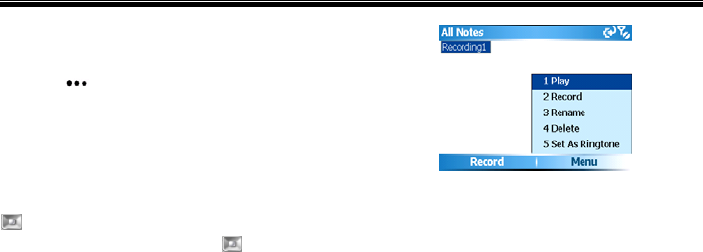
Organizer
97
Recording voice notes
After entering the Voice Notes screen, press the Left
Soft Key <Record> to begin recording, and
select <Stop> to stop recording. The recorded files
will automatically be saved to the [My
Stuff→Notes] folder.
Playing
In the Voice Notes list, press the Navigation Key
up or down to select the recording, then press
the center of the Navigation Key to play or you
can select [Menu→Play]. In addition, you can
access the following options: [Record], [Rename],
[Delete], and [Set As Ringtone]. See details in the
following image.

Tools
98
20. Tools
[Tools] provides access to convenient services.
Internet sharing
When you connect your phone to a PC or laptop
computer, Internet Sharing allows you to use your
phone as an external modem for the computer.
Activating Internet sharing
(1) Select [Start → More→Tools→Internet
Sharing] from the Home Screen, then press
the center of the Navigation Key to enter
Internet sharing screen.
(2) Select the PC connection manner – either
[USB] connection or [Bluetooth PAN]
connection, then press the center of the
Navigation Key .
(3) Select network connection type. The phone
defaults to [MEdia Net], or you can set it by
referring to “Multiple network connection
setting” on page 116. To modify the network
connection type, select<Menu> then select
[Connection Settings]. For additional details,
refer to “Connections” on page 110, and see
the image below.
After selecting the network connection manner,
select <Connection>. If you selected [USB], the
PC will automatically check the USB cable
connection until the screen displays “Connected”
and recognizes your phone as a modem. You are
now ready to access the Internet on your PC using
your phone.

Tools
99
Notice:
In order to use the phone as a modem, your SIM
card must support this function. For more detailed
information, please contact with your service
provider.
Caution:
If you select [USB] as the PC connection manner,
you must install Microsoft ActiveSync version 4.2
on your PC. If you select [Bluetooth PAN] as the
PC connection manner, you must first activate and
finalize the personal local network setting of
Bluetooth on the PC. For more detailed
information, please refer to Windows help and
support software.
To activate Internet sharing:
(1) Use the USB data line to connect your phone
with your PC. The PC will automatically
detect that your phone has been connected,
and you can install the USB RNDIS drive on
the Getting Started CD.
(2) While connecting the network line, select
[Network Neighborhood] on PC then select
[Properties→Local Connection→
Forbidden] with the Right Soft Key to
disconnect the current network.
(3) After finishing installation, confirm that the
RNDIS network card has been added to the
network adapter in the Device manager of
your PC. If it has, then the drive has been
installed successfully.
(4) At this time, the phone can be used as an
external modem for PC, and you can access
the Internet.
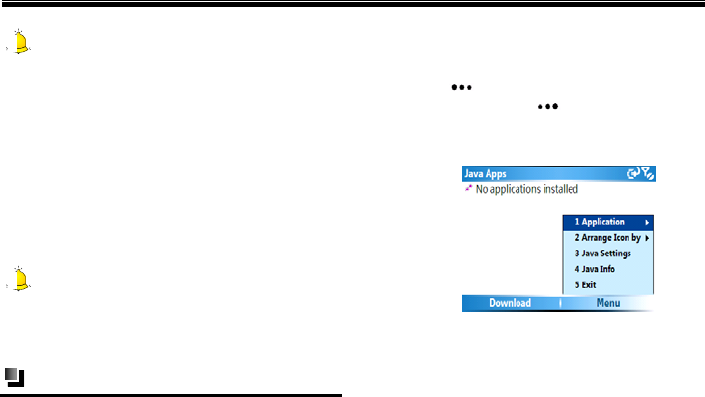
Tools
100
Caution:
Please make sure you have selected [Tool→
Internet Options→Connection] on your PC. Click
“Never dial-up to connect,” then select [Local
Network Setting]. When the screen appears on your
PC, select [Cancel Proxy Server].
Deactivating Internet sharing
On the Internet sharing screen, select
<Disconnected>.
Caution:
Before using ActiveSync, confirm that Internet
sharing is deactivated.
Java
To enter the Java screen from the Home Screen,
select [Start→More→Tools→Java].
If you haven’t downloaded any Java games on your
phone, the phone screen will display “No
applications installed”. At this time, press the Left
Soft Key <Download>to download games
and the Right Soft Key <Menu> to set Java
games or view the relative information about Java.
See details in the figure below.
Application: Manages the Java programs or
games that have been installed in the phone. You
can delete, set permission and view the detailed
information for each Java program.
Arrange icon by: Arrange the order of installed
Java programs or games by [Install Order],
[Name] or [Size].

Tools
101
Java settings: Set whether to activate the
[Backlight Always on] function, or select the
network type for the current Java program.
Java info: You can view some relative
information about the current Java program.
Exit: Quit Java game screen.
SIM manager
With this function, you can better manage SIM card
contacts and the contacts of the phone.
Select [Start→More→Tools→SIM Manager]
from the Home Screen and press the center of the
Navigation Key to enter.
After entering the SIM manager screen, the
following options are available:
Copy all SIM contacts to phone: After
selecting <OK> and <Ye s >, all SIM contacts will
be copied to the phone.
Copy some SIM contacts to phone: After
selecting <OK> and selecting the SIM contacts
to move, press the center of the Navigation Key
to confirm your choice. Or you can select
<Menu>, and access options including [Mark
All], [Unmark All] and [Reverse]. If you select
[Mark All] and press the center of the
Navigation Key , all SIM contacts will be
copied to the phone. Select [Cancel] to exit the
screen.
Copy all phone contacts to SIM: After selecting
<OK> and<Ye s >, all contacts of the phone will
be copied to the current SIM card. Select
[Menu→Settings] from SIM manager screen,
and press the Navigation Key up or down
to configure copy priority from [Mobile Phone],
[Work Phone] and [Home Phone], then select
<OK> to finish setting. See details in the figure
below.
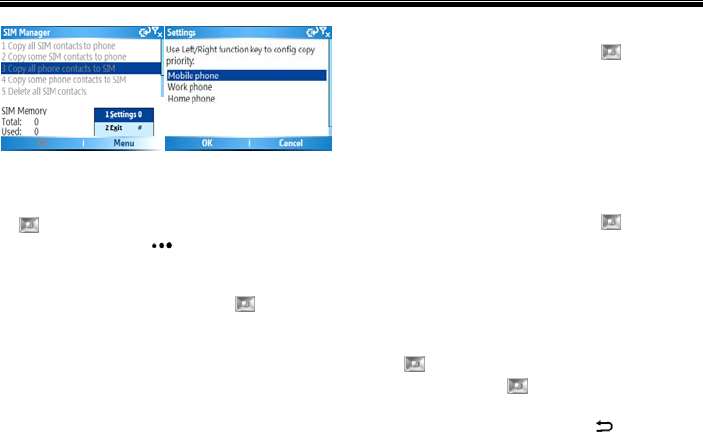
Tools
102
Copy some phone contacts to SIM: After
selecting <OK> and selecting the phone contacts
to move, press the center of the Navigation Key
to confirm your choice. Or you can press the
Right Soft Key <Menu>, and access
options including [Mark All], [Unmark All] and
[Reverse]. If you select [Mark all] and press the
center of the Navigation Key , all phone
contacts will be copied to the SIM card. Select
[Cancel] to exit the screen.
Delete all SIM contacts: After selecting
<OK>and <Ye s >, all the SIM contacts will be
permanently deleted.
Delete some SIM contacts: Select <OK> and
select your desired SIM contacts, then press the
center of the Navigation Key to confirm
your choice. For more details, please refer to
“Copy some SIM contacts to phone”.
Delete all Phone contacts: After selecting
<OK>and <Ye s >, all the Phone contacts will be
permanently deleted.
Delete some phone contacts: Select <OK> and
select your desired phone contacts, then press the
center of the Navigation Key to confirm
your choice. For more details, please refer to
“Copy some phone contacts to SIM”.
When choosing [Copy some SIM contacts to
phone], [Copy some phone contacts to SIM],
[Delete some SIM contacts] and [Delete some
phone contacts], press the center of the Navigation
Key to enter the corresponding screen. Press
the Navigation Key to the left to return to the
last page and press it to the right to go to the next
page. Press the Back/Clear Key to exit the
screen.

Tools
103
SIM memory
This menu provides you with the total and used
memory of the current SIM card.
Speed dial
In this function, you can manage your speed dial
list.
Creating a speed dial number for a contact
To create a speed dial number for a contact, please
refer to” Speed Dials” on page 47.
Creating a speed dial number for a menu
To create a speed dial entry for a menu item:
(1) Select <Start> from the Home Screen to
enter Main menu, then use the Navigation
Key to select the menu you want to
create a speed dial for.
(2) Select [Menu→ Add Speed Dial ]
(3) Press the Left Soft Key <Done> to save.
Using speed dial
Select [Start→More→Tools→Speed Dial]
from the Home Screen.
Enter the Speed Dial List then press the
Navigation Key up or down o select the
phone number or menu that you want to access.
Select [Menu→Run], then you can dial the
number or directly enter the menu function. See
details in the following image.
From the Home Screen, press and hold the speed
dial number keys. If it is a two-digit entry, press

Tools
104
the first digit and then press and hold the second
digit. The system will dial the number or directly
enter the menu function.
You can view information on creating a speed dial
through the [Help] function on the speed dial list.

Settings
105
21. Settings
Use this menu to personalize your phone by
changing the display settings, call settings and
phone settings.
To enter the Settings screen from the Home Screen,
select [Start→More→Settings]. Select [More]
from the Settings screen to access additional menus.
Phone
On the Home Screen, select [Start → More→
Settings→ Phone] to enter the Phone settings
screen, where you can set [Caller Barring], [Call
Forwarding] and other options.
Caution:
The following functions need to be supported by
your network. For more details, please check with
your service provider.
Call barring
This network service allows you to restrict your
calls. Before using this function, you have to enter a
password obtained from your service provider.
Caution:
1. If you input the wrong restricted password three
times in a row, the call barring function will be
locked and disabled.
2. Call Barring needs to be supported by your
network. For more details, please check with your
service provider.
Call forwarding
Call Forwarding allows you to divert incoming calls
to another number. The following image displays
the Call Forwarding options.
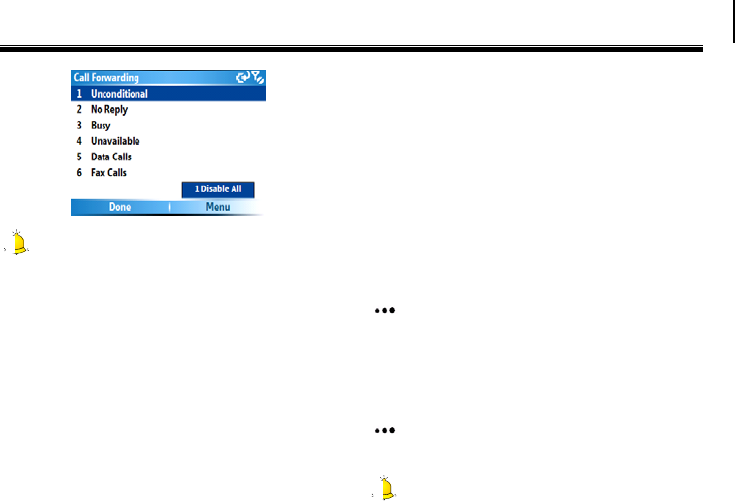
Settings
106
Caution:
This function needs to be supported by your
network and must be activated before using it.
For more details, please check with your service
provider.
Call options
With call options you can view your phone number,
your voice mail access number and other
information about your phone.
Call waiting
This network service informs you when someone is
trying to reach you while you are on another call.
Caller ID
This network service allows you to hide your phone
number from the person you are calling.
Channels
This option can set whether to enable channels or to
receive the channel list. Press the Right Soft Key
<Menu> to edit the number or to cancel the
operation.
Fixed dialing
You can set whether or not to enable the fixed dial
function. On this screen, press the Right Soft Key
<Menu> to edit the number or to cancel the
operation.
Caution:
Settings
107
This function needs to be supported by your
network service provider. For more details, please
check with your service provider.
Networks
To view the current network name and set a
network connection manner, press the Right Soft
Key <Menu>.
In Networks you can also change the Band
Selection for your device for when you travel to
another country. Options include [North
America(850/1900)], [Europe(900/18000]
and].[Default(850/1900/900/1800)]
Service dialing
Press the center of the Navigation Key to
select [Service Dialing Numbers]. If a “√”
symbol appears before it, you can dial the service
center. Press the Right Soft Key
<Operation> to access the [Browse] or [Edit]
operations, then press the Left Soft Key
<Done> to save.
TTY mode
You can press the Navigation Key left or right
to enable or disable TTY mode. Press the Left Soft
Key <Done> to finish setting and press the
Right Soft Key <Cancel> to cancel setting.
Sounds
Select [Start→More→Settings→Sounds] from the
Home Screen to enter the sounds screen. You can
set sound alerts for all relative phone functions.
To specify the sound for an event
(1) On the Home Screen, select [Start →More→
Settings→ Sounds].
(2) For the desired event, select a sound. Select
[None] if you do not want to hear a sound.

Settings
108
(3) When finished, press the Left Soft Key
<Done>.
Caution:
SMT 5700WOC only supports audio files with
MIDI, MP3 or WMA formats. The audio files with
the other formats can’t be played.
Notice:
After selecting a sound, the sound plays. To hear it
again, select [Menu→Play].
To copy a sound to your phone
You can connect your phone to your PC with a USB
data cable to download your favorite ringtones from
your PC. You can then use the sound for various
phone functions. To copy a sound from your PC:
(1) Connect the phone to your PC by using a USB
connection.
(2) On your PC, copy the sound file you want.
(3) In ActiveSync on your PC, select [Explorer]
and double-click [My Windows
Mobile-Based Device].
(4) Do one of the following:
To save the sound file on your phone, double-click
[Application Data], double-click [Sounds] and
paste the file into that folder.
To save the sound file on your storage card,
double-click [Storage Card], and paste the file into
the folder you want.
Profiles
With this function, you can set different user
profiles to adapt to different environments.
To enter Profiles from the Home Screen, select
[Start→More→Settings→Profiles] then select the
profile to edit.
Select [Menu→Edit] and you can modify the

Settings
109
settings for each profile. To cancel without saving
changes, press the Right Soft Key [Cancel].
See detailed information in the following image:
Display
From the Home Screen, select
[Start→More→Settings→Display] to enter the
display screen to set [Home Screen] or [Start
Menu Style] settings. In the [Home Screen] option,
use the Navigation Key to set the layout, color
scheme, background image of the Home Screen and
the time for the phone to automatically return to the
Home Screen in standby mode. In the [Start Menu
Style] option, use the Navigation Key to select
the [Grid] or [List] option.
Caution:
The background image of the main screen must be
in a GIF, JPG, BMP or PNG format.
Clock & alarm
In this option, you can edit the time and date of
your phone and set alarms. To enter the Clock &
Alarm screen from the Home Screen, select
[Start→More→Settings→Clock & Alarm]
Date and time
With this function, you can select your time zone
and edit the time and date. See detailed information
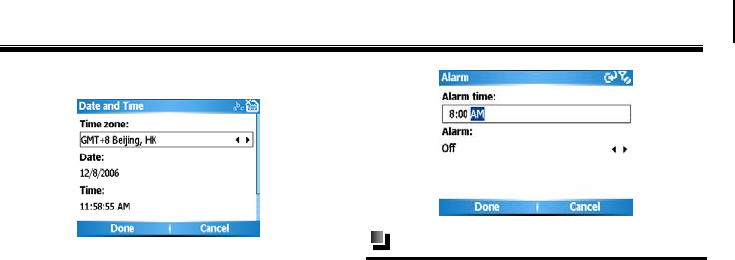
Settings
110
in the image below:
Alarm
After setting an alarm, it will ring to alert you at the
set time everyday. The phone must be on for the
alarm to work. See the following figure for detailed
information.
Connections
This function allows you to establish various
connections between your phone and outer devices
via [Wireless Manager], [Beam], [Bluetooth],
[Dial- up] and others.
To enter the Connections screen from the
Home Screen, select [Start→More→Settings
→Connections].
Wireless manager
[Wireless Manager] acts like a central switcher
that lets you enable or disable phone features as
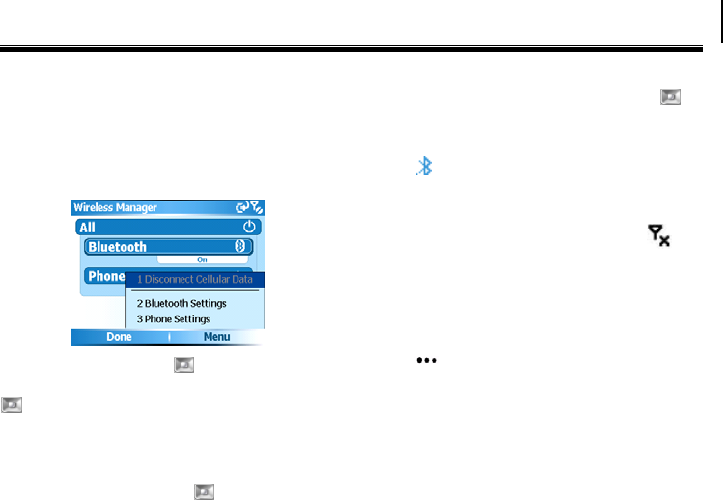
Settings
111
well as easily manage your data connections.
Simply select the corresponding button to enable or
disable a function. When you enable a function, its
button gets highlighted. The button appears gray
when the corresponding function is disabled, shown
in the figure below
Press the Navigation Key up or down to select
[All] then press the center of the Navigation Key
to turn off, Bluetooth and the phone function
will be locked. Other phones won’t be able to
access the phone. Repeating this operation will turn
on Bluetooth and the phone function.
Press the Navigation Key up or down to
select between [Bluetooth] and [Phone], and
press the center of the Navigation Key to
activate or lock it
If you have activated the Bluetooth function, the
icon will appear on the screen and the
indicator will flash.
While switching off the phone function, the
signal icon on the Home Screen displays , and
other people can not get through your phone.
If you are unable to make a call after inputting a
phone number, “The phone is currently off.
Would you like to turn on the phone?” will
appear on the screen. Press the Left Soft
Key <Ye s > to activate the phone function.

Settings
112
Caution:
Follow the above instructions to switch off your
phone in places where it is prohibited to use your
phone.
Press the Right Soft Key <Menu> then
select [Bluetooth Settings] and [Phone Settings] to
enter the relative setting screen.
Bluetooth settings: For more details about
Bluetooth settings, please refer to “Bluetooth” on
page 112.
Phone settings: For more details about phone
settings, please refer to “Phone” on page 105.
Beam
This function must be activated to receive data
beamed from other devices. See details in the
following image.
Bluetooth
Bluetooth is a short-range wireless communications
technology. Devices with Bluetooth capabilities can
exchange information over a distance of about 10
meters without requiring a physical connection.
You can even beam information to a device in a
different room, as long as it is within the Bluetooth
signal coverage range.
(1) To enter Bluetooth from the Home Screen,
[Start→More→Settings→Connections→Bl
uetooth].
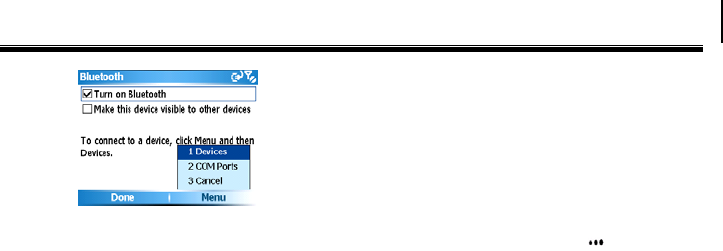
Settings
113
(2) In this function, you can select whether to turn
on the Bluetooth function, or you can set to
make your phone discoverable.
(3) After you activate [Make this device
visible to other devices] option, a
“”symbol will appear before the option.
Your phone can now receive the
connection request of all
Bluetooth-enabled devices. At this time, all
other Bluetooth devices are allowed to
connect with your phone, so it is advisable to
think carefully before activating this function.
(4) Select [Menu→Devices] or select
[Menu→COM ports] to create or modify
Bluetooth devices and COM port.
Searching Bluetooth devices
(1) To enter Bluetooth from the Home Screen,
[Start→More→Settings→Connections→Bl
uetooth].
(2) Press the Right Soft Key <Menu> and
select [Menu→Devices] to enter the
Bluetooth devices screen.
(3) On the Bluetooth device screen, select
[Menu→Add new device].
(4) The system begins to search for Bluetooth
devices within 10 meters, as detailed in the
following image.
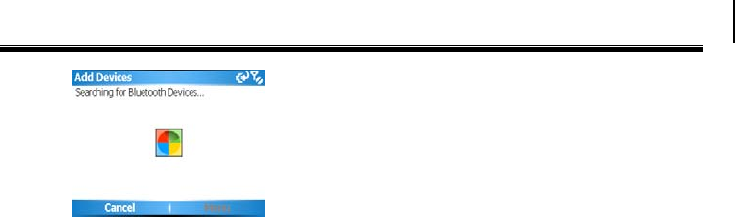
Settings
114
Bluetooth partnerships
Matching the found device
A Bluetooth partnership is a relationship that you
create between your phone and another
Bluetooth-enabled device in order to exchange
information in a secure manner. To create a
Bluetooth partnership:
(1) After the phone has searched for other
Bluetooth-enabled devices and lists them, you
can select your desired device name in the list.
Select <Next > and enter a passcode (the
passcode must be between 1 and 16 characters
long), then select <Next> to establish a secure
connection
(2) Wait for the paired device to accept the
partnership.
(3) On your phone, a message will appear,
indicating that your phone has connected with
the paired device. Select <OK>.
(4) The name of the paired device is then
displayed. You may edit and enter a new name
for that device and the devices which have
created partnership with your phone will be
saved in “Add Devices” list.
Bluetooth stereo headset
For handsfree phone conversations, you can use a
Bluetooth handsfree headset such as a car kit with
your phone.
If you want connect to a Bluetooth handsfree or
stereo headset, you must first search for it. Refer
to “Searching Bluetooth devices” on page 113.
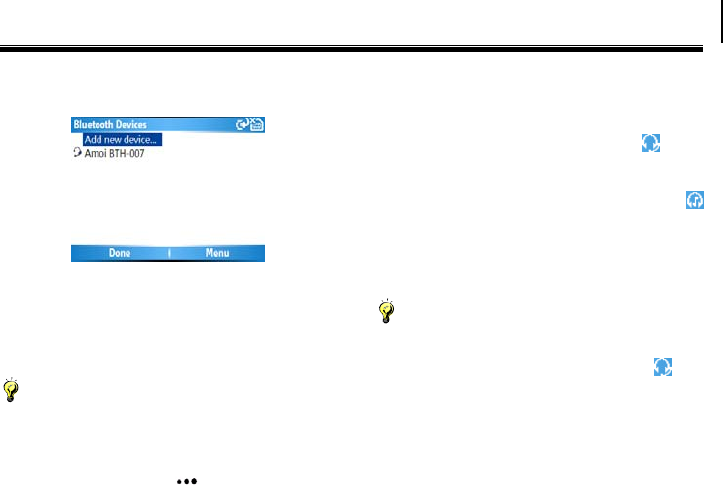
Settings
115
After matching successfully, the following screen
appears:
Just like when connecting to any Bluetooth device,
you also need to enter a passcode when connecting
to a Bluetooth handsfree or stereo headset. The
passcode is fixed and cannot be changed on a
Bluetooth headset.
Caution:
For the above screen, each Bluetooth earphone
device will have a different display name.
Press the Right Soft Key <Menu> to access
options including [Add new device], [Edit],
[Delete], [Set as Hands-free] and [Set as
Wireless Stereo].
If you select [Set as Hands-free], the icon
will appear on the Home Screen, which means you
can make a call through the Bluetooth earphone. If
you choose [Set as Wireless Stereo], the
icon appears on the Home Screen, and you can then
enter [Windows Media] to select the desired file to
play via the Bluetooth stereo. You can also use the
Bluetooth earphone to listen to the audio file.
Notice:
If you choose [Set as Hands-free] and [Set as
Wireless Stereo] simultaneously, the icon will
appear in standby mode.
Sending files by using Bluetooth
To send a file to another device, enter [My Stuff] or
the folder where the file is saved, select the file then
select [Menu→Beam]. While establishing the FTP

Settings
116
link between other Bluetooth-enabled devices and
your phone, the system will prompt you whether or
not to save a file to the phone. If you select <OK>,
the other Bluetooth-enabled devices can visit any
folder in [My Stuff] of your phone and you can
send files to another matching device as well. You
can also access the [Upload], [Download], [Delete],
and [Create new folder] options.
Receiving files by using Bluetooth
To receive files via Bluetooth function, you must
first activate it by selecting
[Start→More→Settings→Connections→Beam]
from the Home Screen. After you activate it, the
“” symbol appears and you can receive files from
another Bluetooth-enabled device. The received
files (images or audio) will be saved in the [My
Stuff→My Document] folder.
Multiple network connection setting
With wireless connection, the Internet and WAP
network, your phone provides you with various
network connection manners, including [Dial],
[GPRS], [Proxy server], [VPN] and others.
To add a new network connection scheme or
modify a network connection manner, select the
[GPRS] or [Proxy Server] option then press the
center of the Navigation Key to enter the
GPRS or Proxy server screen. Press the Right Soft
Key <Menu> to access [Add], [Edit] or
[Delete].
Caution:
You phone includes the default network connection
settings, so you do not need to modify this setting.
In case you modify any setting, you can restore it
using the restore factory setting function. For more
details, please refer to “Clear” on page 93.
Advance
Select [Menu→ Advanced] from the connections
screen to enter the advanced screen of network
connection. In this option, you can press the

Settings
117
Navigation Key left or right to set Internet
connection manner, work connection manner and
others. See details in the following figure:
Caution:
You phone includes the default network connection
settings, so you do not need to modify this setting.
In case you modify any setting, you can restore it
using the restore factory setting function. For more
details, please refer to “Clear” on page 93.
More
SMS service: You can set SMS service as
[Circuit-switched preferred], [GPRS] or
[GPRS preferred], [Circuit-switched] as
required.
VPN: Press the Right Soft Key <Menu>
and you can add, edit or delete VPN.
USB to PC: Press the center of the Navigation
Key to select “Enable advanced network
functionality, so you can change the type of USB
connection to help with problems while
connecting ActiveSync.
WAP push message: Use the Navigation Key
to enable or disable WAP push message
function.
Security
By setting and modifying the passwords and options
of Security, you can protect your phone from
unauthorized use by other people and restrict phone
use.
To enter Security from the Home Screen, select
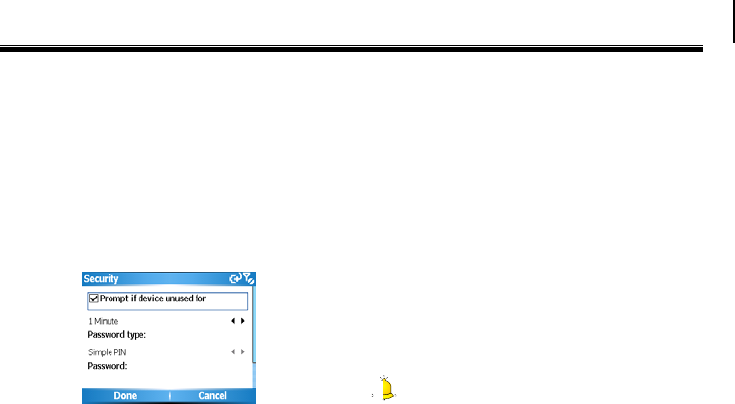
Settings
118
[Start→More→Settings→More…→ Security]
Device lock
If you set the phone’s lock function, it will
automatically lock after remaining dormant for
some time. After activating the phone lock function,
you need to input the password each time you
switch on the phone. Only by inputting the correct
password can you use the phone normally. See
details in the following figure.
Enable SIM PIN
In this option, you can protect your phone from
unauthorized use by entering a type of password
called a PIN (personal identification number) in
order to make calls. Your first PIN will be given to
you by your network service provider.
Change PIN2
Be sure to make a note of your PIN, when the SIM
PIN is enabled, you must provide this new PIN to
unlock the phone.
Certificates
The certificate is the indispensable file of the phone
that keeps the software operating normally. If you
delete it, the program can’t be operated normally.
You can restore the deleted certificate by restoring
the factory function. For more details, please refer
to “Clear” on page 93.
Caution:
[Enable SIM PIN] and [Change PIN2] only
appear when the SIM card has been inserted.
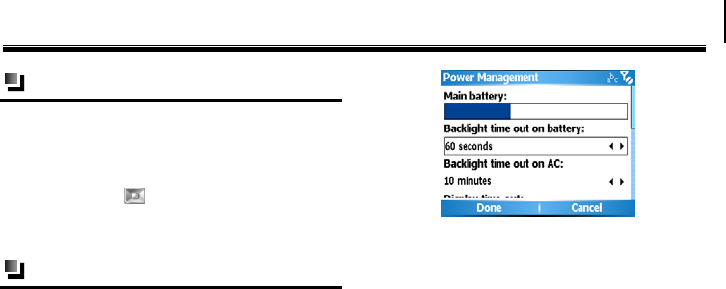
Settings
119
Remove programs
To free up memory on your phone, you can delete
the programs. From the Home Screen select
[Start→More→Settings→More…→ Remove
programs]. In the program list, press the
Navigation Key up or down to select the
program(s) you want to remove then select
[Menu→Remove] to delete them.
Power management
In this option, you can view the battery power, and
set a time limit for the background light and screen.
From the Home Screen, select
[Start→More→Settings→More…→Power
management], and the following screen
appears:
Main battery: Indicates the amount of battery
life remaining.
Backlight time out on battery: Select the
amount of time for the phone to be idle before
the backlight turns off.
Backlight time out on AC: Select the amount of
time for the phone to be idle before the backlight
turns off when using AC power.
Display time out: Select the number of minutes
for the phone to be idle before the screen turns
off.
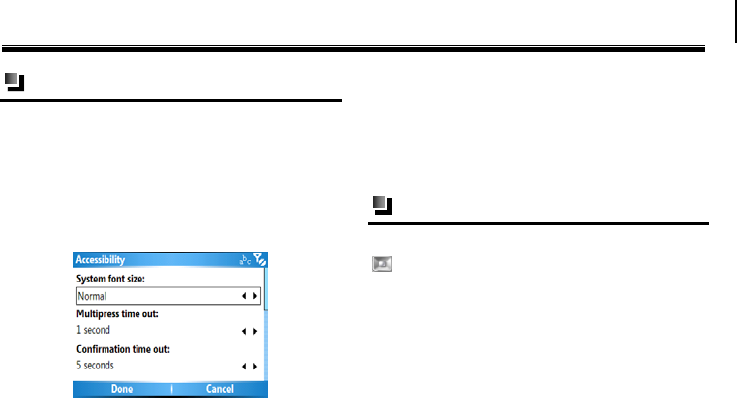
Settings
120
Accessibility
In this option, you can set the system font size, the
time for Multipress time out and confirmation time
out and the alert volume while in-call.
To access Regional settings from the Home Screen,
select , [Start →More→Settings→
More…→Accessibility]. The following screen
appears:
System font size: Set the size of the font that is
displayed on the screen.
Multiple press time out: Set the length of time
between key presses when entering text in
Multipress mode.
Confirmation time out: Set the delay before an
unconfirmed action times out.
In-call alert volume: Set the volume of sounds
that play when you are in a call
Regional settings
In this option, you can press the Navigation Key
left or right to set [Language], [Locale],
[Short date style], [Long date style], [Time
format] and more.
Select [Start→More→Settings→More…
→Regional settings] from the Home Screen
and the following screen appears:
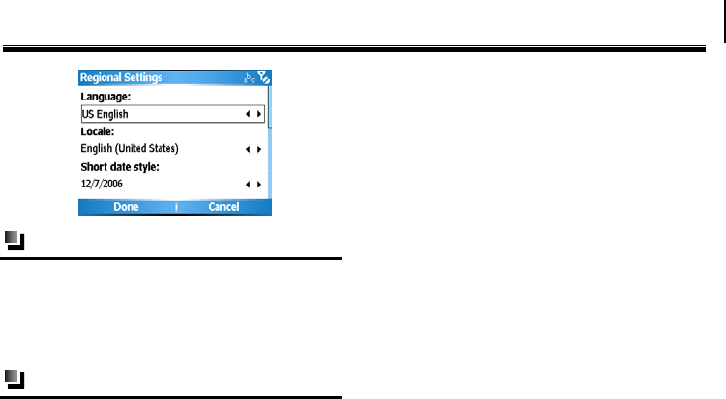
Settings
121
Owner information
To add your name, telephone number, email address
and other information, from the Home Screen select
[Start →More→Settings→More
→Owner information].
More
Phone information
In this option, you can view the detailed
information of the software version, hardware
version and IMEI number of the phone.
Backlight level
In this option, you can set the backlight intensity
level and choose from 5 different settings.
System information
In this option, you can view some information about
the system.
About
In this option, you can view the basic configurations
of the phone and software version information, but
you can’t modify their contents.
Error reporting
When enabled, the phone will automatically send
system error reports to Microsoft. Sending error
reporting from your phone is fully voluntary and
confidential.

Phone Maintenance
122
22. Phone Maintenance
Mobile phones are very exact electronic devices and
must be looked after carefully. The following advice
can help you to look after your phone and prolong
its life.
The phone and its spare parts should be put out
of the reach of children.
Keep the phone dry. Rain, moisture or water will
corrupt its electronic circuitry. If your phone
does get wet, remove the battery immediately
and take the phone to the nearest UT Starcom
authorized service center.
Don’t put the phone in dusty places or this will
affect the everyday use of the phone.
LCD is a part of the phone which could be easily
damaged, so try to avoid dropping the phone on
the ground or any other form of shock. Do not
touch the screen with a sharp object.
Don’t put the phone in a high temperature
environment. High temperatures will shorten the
life of electronic devices, destroy the battery and
destroy or melt a phone’s plastic shell.
Don’t put the phone in a low temperature
environment. Otherwise, when the temperature
rises to normal temperature, there will be
moisture in the phone and this will destroy the
phone’s electronic circuitry.
Don’t throw, knock or shake the phone intensely
as this could damage the electronic circuitry and
structure of the phone.
Use soft cloth with soap water to clean the phone.
Do not use rough chemical or abrasive cleaners
to clean the phone as these could damage the
phone.
Don’t paint your phone, for fear the parts which
can be taken down will be pasted and affect its
normal use.
If you have to replace the phone’s antenna,
please only do so with a suitable replacement.
Using an unsuitable antenna or spare parts will

Phone Maintenance
123
damage the phone and radio system.
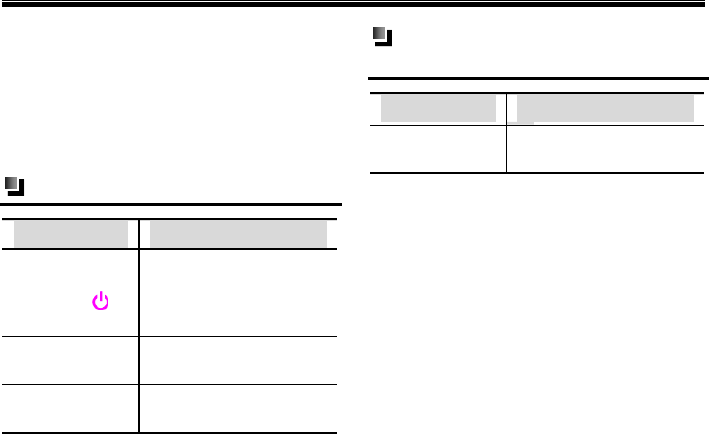
Troubleshooting
124
23. Troubleshooting
Please check to see if any problems you have
encountered while using your phone are described
below. If you were unable to find the solution to a
particular problem, please contact one of our
maintenance centres.
The phone can’t be switched on
Possible reason Solution
You are not
holding down the
Power Key
for long enough
Press and hold for at least
2 seconds.
The battery
power is used up
Charge the battery
Incorrect battery
installation
Install battery correctly
The phone is switched off
automatically
Possible reason Solution
Low battery
power
Charge the battery

Troubleshooting
125
PIN/ PUK code lock
Possible reason Solution
Enter wrong
PIN Code( Personal
Identification Code) or
PUK Code
(Personal Unlocking
Key)
Enter correct
password
Caution
1. If you enter an incorrect PIN code three times in
succession, many SIM and phone functions will be
locked. For more details, please refer to “Safety
Precautions”.
2. If you do not know the correct PIN code and
PUK code, please contact your operator or network
service provider.
Bad call quality
Possible
reason
Solution
The signal
changes
suddenly
Maybe you are moving at
high-speed (e.g. on a train or
bus). Observe the signal
strength and select the place
with the strongest signal to
make a call and ensure better
call quality.
The area does
not have a good
signal
Move to a more open area.
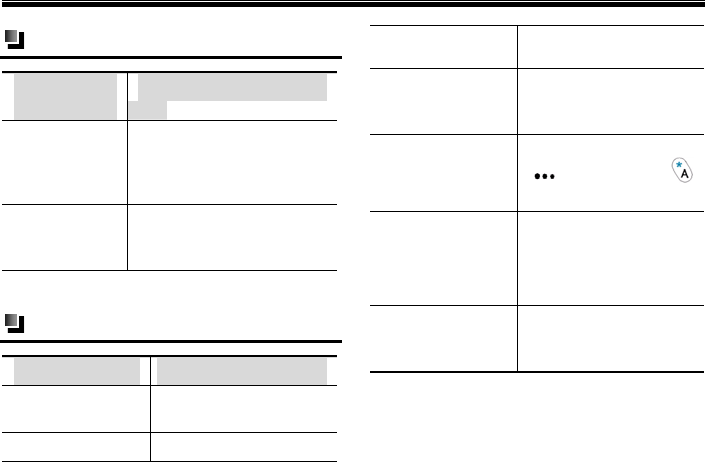
Troubleshooting
126
Can’t answer a call
Possible
reason
Solution
The call
forwarding
option has been
set
Cancel call forwarding
according to requirements.
The call barring
option has been
set
Cancel the function of
incoming call barring or
roam incoming call barring.
Can’t make a call
Possible reason Solution
The phone is
switched off
Turn on the phone.
You are outside the
ki
Check the network area.
network service
area
The SIM card has
been incorrectly
inserted
Check whether your SIM
card can be used
normally.
The keypad locks
automatically
Press the Left Soft Key
and hold down
to unlock your keypad
Use the phone
during call rush
hours and cause
line jam
Try to avoid using the
phone during call rush
hours
Call barring has
been set
Cancel the call barring
option according to your
requirements.
Troubleshooting
127
The call volume is too low
Possible reason Solution
The call volume
has been set too
low
Increase the call volume.
The person you are calling cannot
hear your voice
Possible reason Solution
Call status is set to
mute
Turn off the mute
function on the call
menu.
The microphone is
too far from the
sound source
Put the phone’s
microphone closer to
your mouth.
The incoming call doesn’t ring
Possible reason Solution
The phone selects
silent mode
Reset the ring type in
[Profiles] to [Ring] or
[Vibrate and Ring],
for more details, refer
to “Profiles” on page
108.
The ring volume is
set too low
Increase the volume
The call forwarding
option has been set
Cancel call forwarding
according to
requirements.
Troubleshooting
128
The battery can’t be charged
Possible reason Solution
The battery is
worn out and the
charging time
takes too long
Charge when the phone
prompts low battery.
The battery
doesn’t connect
well to the phone
Ensure the battery has
been inserted correctly.
The charger
doesn’t connect to
the phone
Ensure that the interface
between the charger and
the phone is correctly
connected, and the
charger icon should
appear on the screen.
The battery power
is empty, so
charge with USB
data cable
When the battery power is
empty, you mustn’t charge
with USB cable, Use UT
Starcom standard charger
h
to charge
Battery or charger
has been damaged
Contact one of our
maintenance centers.
The surrounding
temperature is too
low or too high
Make sure the phone is
charged in a normal
temperature.

Troubleshooting
129
Can’t display network
Possible reason Solution
The SIM card has
been incorrectly
installed
Refer to the SIM card
installation method.
The contact
between the SIM
card and phone is
dirty
Ensure the contact
between the SIM card and
phone remains clean.
The SIM card
does not work
Check whether the SIM
card is out of date.
The network is
very weak
Move to a place with a
strong signal to use the
phone
The phone does not recognize the
storage card
Possible
reason
Solution
The storage
card has been
incorrectly
inserted
Insert the storage card
correctly according to
instructions in the user
manual.
The storage
card has been
damaged
Replace the storage card

Troubleshooting
130
Browser can’t connect to Internet
normally
Possible
reason
Solution
The network
service
provider don’t
provide the
service or you
haven’ apply
for this service
Contact with your network
service provider and consult
information about how to
apply for and use these
services
Haven’t set
correctly
About more details about
setting, refer to “Options” on
page 86.
Lack of space
Possible reason Solution
The resource
manager file is
taking up too
much space
Delete unnecessary files.
The browser’s
history records
are taking up too
much space
Delete unwanted history
records.
Multi-message,
e-mail etc. are
taking up too
much space
Delete unwanted messages
and e-mails.

Safety Precaution
131
24. Safety Precaution
Usage environment
Please remember to obey the necessary rules and
regulations whenever use your phone. This will
help keep you safe and respect your environment.
Switch off your phone when close to petrol
stations, bunkers, chemical factories or explosive
areas and adhere to any safety signs and
instructions there. Breaking any rules may cause
explosion or injury.
Using the phone in plane can cause interference
and danger to an aircraft navigation system and
network. You must switch off your phone before
boarding and make sure your phone is switched
off during the whole flight.
Please place the phone somewhere safe and don’t
put it on a seat or in places where it could fall
and break. In order to ensure safe driving and
avoid road accidents, please don’t use the phone
when driving. If you must use it, please use the
phone’s hands-free or park at roadside before
making or answering a call.
Medical devices
Please switch off your phone in areas near the
electronic medical equipments that obviously desire
to switch your phone off (.such as heart pacemakers,
hearing aids etc). Most medical devices can shield
the phone’s RF signal, but some can’t. If you have
any questions or need to find out more, please
consult your doctor or medical device manufacturer.
Pacemaker
Pacemaker manufacturers advise the distance
between your phone and heart pacemaker to be at
least 6 inches (15.3 cm), or the phone could
interfere with the pacemaker.
The personnel who wears pacemaker should do
the followings:
ALWAYS keep the phone more than six inches
Safety Precaution
132
from your pacemaker when the phone is turned
on.
Do not carry the phone in a breast pocket.
Use the ear opposite the pacemaker to minimize
the potential for interference.
If you have any reason to suspect that
interference is taking place, turn your phone OFF
immediately.
Caution:
If you are unsure as to the level of interference,
please switch off the phone at once and consult a
doctor immediately.
Hearing aids
Some digital wireless phones may interfere with
some hearing aids. In the event of such interference,
you may want to consult your service provider (or
call the customer service line to discuss
alternatives).
Emergency calls
As the phone uses a radio signal, wireless and
ground communication network and personal
settings functions like other phones, it is impossible
to ensure your phone can be connected successfully
in any situation, so please don’t rely purely on your
phone as the only means of notification in cases of
emergency (such as medical first aid )
Making an emergency call
(1) If your phone is switched off, please turn on
your phone and check whether the network
signal is strong enough.
(2) Input the local first aid number correctly (such
as 120), different areas have different first aid
numbers.
(3) Please press the call key to call.
Caution:
While making an emergency call, you should try

Safety Precaution
133
to provide all important information correctly. At
this time, the phone may be the only
communication tool, so don’t end the call without
permission.
Password access
Your phone and SIM card can be protected by a
password, to prevent others using it illegally.
Phone password
This protects your phone from unauthorised use by
other people. The preset password is 0000. After
using it, please modify your phone password as
soon as possible and keep it secret.
PIN code
This is personal identification code which is used to
protect the SIM card from unauthorised use by
other people. Generally, the PIN code and SIM card
are provided together. After activating the PIN code,
you can use the phone normally by correctly
inputting your password each time.
Caution:
If you input your PIN code incorrectly three times
in succession, the SIM card will be locked. You will
need to input the PUK code to unlock it. (If you
don’t have a PUK code, please contact your
operator and SIM card provider for this
information. Please input all characters).
PIN2 code
This is the password which activates the special
SIM card functions. Usually, the PIN2 code and the
SIM card will be provided together. If you
incorrectly input the PIN2 code three times in
succession, it will be locked and you will need to
input PUK2 to unlock it again.
PUK code
This is used to unlock the PIN code. If you

Safety Precaution
134
incorrectly input the PUK code ten times in
succession, then the SIM card cannot be used again.
Usually the PUK code and SIM card are provided
together. If you lose PUK code or it isn’t supplied
with SIM card, please contact with your network
operator or SIM card provider.
PUK2 code
This is used to unlock the PIN2 code. Usually the
PUK2 code and the SIM card are provided together.
PUK2 can modify the locked PIN2 code. If you
incorrectly input the PUK2 code ten times in
succession, you will not be able to access some of
the functions. Please apply to your operator for a
new card. The PUK2 code cannot be changed. If
you lose it, please contact your service provider.
Note about charging the battery
The phone provides power by using a lithium
battery. The standby time and call time will be
influenced by the system’s environment and phone
settings.
Please use the battery and charger provided by
the UT Starcom Company. UT Starcom will take
no responsibility for damage caused by using the
wrong battery or charger.
Caution:
Generally, the charging time is 2-5 hours
according to the current status of the phone
(whether switch on the phone, make a call etc)
Don’t use wet hands to touch the phone battery
or charger while charging.
Caution:
To make the new battery achieve the best capacity,
please charge and discharge the phone for twice or
three times. As for the first several times, you
should charge the battery for at least 10 hours in
succession. Please charge the phone due to no
power and switch off the phone automatically.

Safety Precaution
135
Battery information and care
Never use any battery that has been damaged.
While using the phone near network station, the
power consumption is very little. Therefore, the
call and standby time depends on greatly by the
signal strength of honeycomb network and the
parameters set by network operator.
The battery charging time will depend on the
amount of electricity remaining and the type of
battery and charger used. When the operation
time (talk time and standby time) is noticeably
shorter than normal, it is time to buy a new
battery.
Only use batteries that are compatible with your
phone and only recharge your battery with a
compatible charger. If a charger is not in use,
disconnect it from the power source. Do not
leave the battery connected to a charger for more
than a week, as overcharging may shorten its life.
Improper battery use may result in a fire,
explosion or other hazard. Do not disassemble or
open, crush, bend or deform, puncture or shred
the battery.
Do not connect the anode and cathode of a
battery the wrong way round.
Do not leave the battery in places with too high
or too low temperature or the battery capacity
will be reduced and battery life will be shortened.
Always try to keep the battery at room
temperature.
Do not short-circuit the battery. This may damage
the electronic core or the protected circuit inside
the battery. Accidental short-circuiting may occur
when a metal object (coin, clip or pen) causes a
direct connection between the anode and cathode
of the battery, for example when you carry a
spare battery in a pocket or bag. Short-circuiting
the terminals may damage the battery or the
object causing the short-circuiting. Therefore,
please store the battery carefully and on its own.
Don’t burn your phone battery or treat it as

Safety Precaution
136
common rubbish. Please adhere to the local
environmental policy in order to avoid
endangering life and causing environmental
damage, and recycle your batteries in time.
If your phone, battery or other charging device
leaks due to carelessness, you must not put it
inside any piece of equipment that heats up (such
as drier, microwave etc.).The phone or other
products may go wrong, or this could even cause
the phone, battery or other charging device to
burn, expand and explode.
Please deal with the useless old battery according
to the relative introduction.
UT Starcom will take no responsibility for any
direct or indirect damage caused by user error.
Note about using spare parts
Please put all spare parts (such as SIM card,
storage card, battery etc) out of reach of children,
in case danger occurs.
Please do switch off the phone and disconnect
the phone and charger before you removing the
battery from the phone.
As the phone’s spare parts are not waterproof,
please keep all spare parts dry.
You should pull out the plug of any spare part
correctly when you switch off the power, don’t
drag the power line forcibly.
If the phone, battery, and charger don’t operate
normally, ally, please contact one of our
maintenance centres with a qualified repair service
as soon as possible.
Other safety information
When you are not using your phone, it is
advisable to switch it off, remove the battery to
save energy and avoid radicalising the phone.
If you use earphones to listen to music or watch a
film, please don’t turn the volume up too high as
this could damage your hearing.

Safety Precaution
137
You can’t disassemble the terminal and battery of
the phone unless the technical personnel.

12 Month Limited Warranty
138
25. 12 Month Limited
Warranty
UTStarcom Personal Communications (the
Company) warrants to the original retail purchaser
of this UTStarcom handheld portable cellular
telephone, that should this product or any part
thereof during normal consumer usage and
conditions, be proven defective in material or
workmanship that results in product failure within
the first twelve (12) month period from the date of
purchase, such defect(s) will be repaired or replaced
(with new or rebuilt parts) at the Company’s option,
without charge for parts or labor directly related to
the defect(s).
The antenna, keypad, display, rechargeable battery
and battery charger, if included, are similarly
warranted for twelve (12) months from date of
purchase.
This Warranty extends only to consumers who
purchase the product in the United States or Canada
and it is not transferable or assignable.
This Warranty does not apply to:
Product subjected to abnormal use or conditions,
accident, mishandling, neglect, unauthorized
alteration, misuse, improper installation or repair
or improper storage;
Product, whose mechanical serial number or
electronic serial number has been removed,
altered or defaced.
Damage from exposure to moisture, humidity,
excessive temperatures or extreme environmental
conditions;
Damage resulting from connection to, or use of
any accessory or other product not approved or
authorized by the Company;
Defects in appearance, cosmetic, decorative or
structural items such as framing and
non-operative parts;
Product damaged from external causes such as
fire, flooding, dirt, sand, weather conditions,

12 Month Limited Warranty
139
battery leakage, blown fuse, theft or improper
usage of any electrical source.
The Company disclaims liability for removal or
reinstallation of the product, for geographic
coverage, for inadequate signal reception by the
antenna or for communications range or operation
of the cellular system as a whole.
When sending your wireless device to UTStarcom
Personal Communications for repair or service,
please note that any personal data or software stored
on the device may be inadvertently erased or altered.
Therefore, we strongly recommend you make a
back up copy of all data and software contained on
your device before submitting it for repair or
service. This includes all contact lists, downloads
(i.e. third-party software applications, ringtones,
games and graphics) and any other data added to
your device. In addition, if your wireless device
utilizes a SIM or Multimedia card, please remove
the card before submitting the device and store for
later use when your device is returned, UTStarcom
Personal Communications is not responsible for and
does not guarantee restoration of any third-party
software, personal information or memory data
contained in, stored on, or integrated with any
wireless device, whether under warranty or not,
returned to UTStarcom Personal Communications
for repair or service.
To obtain repairs or replacement within the terms of
this Warranty, the product should be delivered with
proof of Warranty coverage (e.g. dated bill of sale),
the consumer’s return address, daytime phone
number and/or fax number and complete
description of the problem, transportation prepaid,
to the Company at the address shown below or to
the place of purchase for repair or replacement
processing. In addition, for reference to an
authorized Warranty station in your area, you may
telephone in the United States (800) 229-1235, and
in Canada (800) 465-9672 (in Ontario call
416-695-3060).
THE EXTENT OF THE COMPANY’S LIABILITY
UNDER THIS WARRANTY IS LIMITED TO
THE REPAIR OR REPLACEMENT PROVIDED

12 Month Limited Warranty
140
ABOVE AND, IN NO EVENT, SHALL THE
COMPANY’S LAIBILITY EXCEED THE
PURCHASE PRICE PAID BY PURCHASER FOR
THE PRODUCT.
ANY IMPLIED WARRANTIES, INCLUDING
ANY IMPLIED WARRANTY OF
MERCHANTABILITY OR FITNESS FOR A
PARTICULAR PURPOSE, SHALL BE LIMITED
TO THE DURATION OF THIS WRITTEN
WARRANTY. ANY ACTION FOR BREACH OF
ANY WARRANTY MUST BE BROUGHT
WITHIN A PERIOD OF 18 MONTHS FROM
DATE OF ORIGINAL PURCHASE. IN NO
CASE SHALL THE COMPANY BE LIABLE FOR
AN SPECIAL CONSEQUENTIAL OR
INCIDENTAL DAMAGES FOR BREACH OF
THIS OR ANY OTHER WARRANTY, EXPRESS
OR IMPLIED, WHATSOEVER. THE
COMPANY SHALL NOT BE LIABLE FOR THE
DELAY IN RENDERING SERVICE UNDER
THIS WARRANTY OR LOSS OF USE DURING
THE TIME THE PRODUCT IS BEING
REPAIRED OR REPLACED.
No person or representative is authorized to assume
for the Company any liability other than expressed
herein in connection with the sale of this product.
Some states or provinces do not allow limitations
on how long an implied warranty lasts or the
exclusion or limitation of incidental or
consequential damage so the above limitation or
exclusions may not apply to you. This Warranty
gives you specific legal rights, and you may also
have other rights, which vary from state to state or
province to province.
IN USA: UTStarcom Personal Communications
555 Wireless Blvd.
Hauppauge, NY 11788
(800) 229-1235

12 Month Limited Warranty
141
IN CANADA: UTStarcom Canada Company
5535 Eglinton Avenue West
Suite# 234
Toronto, ON M9C 5K5
(800) 465-9672

Index
142
Index
ActiveSync
Error information, 59
Setting up, 52
Synchronization
information, 56
AT&T Mall, 71
AT&T music
Community, 81
Music apps, 82
Music ID, 81
Shop music, 80
Streaming music, 81
The buzz, 81
Windows media, 73, 74
Battery
Charging, 12
Power display, 13
Calendar
New appointment, 44
Settings, 44
Viewing, 43
Call
Additional dialing
information, 23
Functions, 24
History, 96
List, 96
Making, 18
Options, 21, 96
Receving, 21
Contacts
Beaming, 49
Copying, 50
Creating new, 47
Creating new SIM, 48
Deleting, 51
Editing, 46
Finding, 49
Speed dials, 48

Index
143
Viewing, 45
Documents to go
PDF to go, 62
Sheet tp go, 63
Slideshow to go, 64
Word to go, 66
Zip to go, 67
Entertainment
Get TeleNav, 83
Internet Explorer, 84
MobiTV, 89
Pictures & Videos, 89
Games, 60
Home Screen, 3
IM & Email, 61
Input modes
Character, 26
Numeric, 27
Switching, 26
Installing
SIM card and battery, 9
T-flash card, 11
Media net, 70
Menu
Entering, 28
Messaging
Folders, 41
Messages, 29
New account, 40
Options, 41
Outlook E-mail, 34
My stuff
Folder operation, 69
Folder use, 69
Organizer
Calculator, 98
Clear, 98
Download agent, 99
Task, 100
Task manager, 99
Voice notes, 102
Phone Maintenance,
128
Power on/ off, 13
Program, 6

Index
144
Safety notice, IX
Safety Precaution, 137
Settings
Accessibilty, 125
Clock & alarm, 114
Connections, 115
Display, 114
More, 126
Owner information,
126
Phone, 110
Power management,
124
Profiles, 113
Regional, 125
Remove programs, 124
Security, 123
Sounds, 112
Status icon, 5
Tools
Internet sharing, 103
Java, 105
SIM manager, 106
Speed dial, 108
Troubleshooting, 130
Using
Quick list, 14
Shortcut keys, 15, 17
Your phone
Front view, 2
Rear view, 3
Side view, 2