AMOI Electronics V870 CDMA 1X EVDO/GSM Digital Mobile Phone User Manual CMAV870
AMOI Electronics Co., Ltd. CDMA 1X EVDO/GSM Digital Mobile Phone CMAV870
Users Manual
Innovation makes
your dreams come true
Welcome to the user guide for Amoi V870
mobile phone. We are paving the way for
modern technology
Amoi V870 gives you a
fresh and exciting level of
enjoyment from a mobile
phone: It has a built-in 1.3
mega pixel camera
providing excellent vision
and recording every
unforgettable moment in
your life. You can switch
between GSM and CDMA
to communicate quickly
and conveniently. In
addition, the phone supports strong CDMA
services and wonderful multimedia function for
the purpose of modern entertainment and
comfortable life.
When you need to relax, download and take in
a game or two from the interesting selection on
board the V870. Take your entertainment
wherever you go with WEP browser for
seamless Internet connectivity. No matter where
you are, Amoi V870 is easy to use
Special features
1.3 mega pixel camera P48
Strong multimedia playerP54
Resource Manager P59
Supports long messages group sending P30
Supports Modem to access InternetP63
Supports MMSP35
Supports Bluetooth P66
Supports Contacts manager P26
Supports video captureP52
Supports JavaP47
Supports speed search P24
Voice RecorderP56
Supports GSM and CDMA double network

Declaration
Copyright: 2006 Amoi Electronic Co. Ltd
reserves all rights.
The content of this guide is protected by
Copyright Law. It is forbidden to copy, distribute,
publish or cite the content of this user guide, in
whatever form, without the authorisation of
Amoi Electronic Co. Ltd.
“AMOI” and “ “are registered trade
marks and belong to Amoi. They are protected
by law. The other products or company names
referred to in this guide are registered
trademarks, trademarks, or registered names
belonging to their owners.
Amoi has carefully and closely reviewed the
content of this user guide. Nevertheless, it is
possible that there are mistakes and omissions.
Amoi reserves the right to update and improve
any products described in this guide, as well as
the content of this guide. Amendments will be
made without prior notification.
This is the user guide for the Amoi mobile phone
only and does not include an introduction to this
product’s software and hardware configuration.
The product and spare parts vary according to
region. For more details, please contact an
Amoi customer service centre.
Some functions referred to in this guide also
need the support of a network operator or
service provider. If you are unable to confirm
whether you will be able to use certain functions
or services with this phone, please consult your
network operator or service provider.
The phone may include some commodities,
technology or software that is controlled by
export law, Chinese regulations and regulations
governed by other countries or areas.
In order to ensure your safety, please read the
“Safety Notice” and “Safety Precaution”.
Typographic conventions used in this user
guide include:
<>: shows function key;
““: shows important information on the phone
interface;
[ ]: shows the phone menus.
I
Content
Special features.............................................II
1.Getting to know your phone......................1
Your phone........................................................ 1
Front view of your phone ............................... 1
Flip view of your phone.................................. 1
Side view of your phone................................. 2
Rear view of your phone................................ 2
Home screen .................................................... 2
Programs .......................................................... 4
2.Getting Started............................................6
Using your phone.............................................. 6
Installing SIM card and battery ......................... 6
Battery charging................................................ 7
Battery power display........................................ 8
Power on/ off..................................................... 9
Power on........................................................ 9
Power off ......................................................10
Using shortcut keys .........................................10
3.Call Functions...........................................12
Making a call ...................................................12
Making a call from the Home screen ............12
Making a call from contacts..........................12
Creating a speed dial for a contact...............12
Making a call from call log ............................13
Making a call from SMS ...............................13
Making two calls simultaneously (this function
must be supported by the network) ..............14
Making a conference call (this must be
supported by the network)............................14
Additional dialing information ..........................15
Making an emergency call............................15
Making an international call..........................15
Dialing a voice mail ......................................15
Receiving a call ...............................................15
Answering or rejecting an incoming call .......16
II
Ending a call................................................ 16
Call functions.................................................. 16
4.Input Modes.............................................. 18
Input screen.................................................... 19
Switching input modes.................................... 19
Inserting symbol ............................................. 20
Inserting template ........................................... 20
Inserting contact ............................................. 20
Inserting net symbol ....................................... 20
Dictionary ....................................................... 20
English input mode......................................... 20
Using method .............................................. 20
Letter input mode............................................ 21
Number input mode........................................ 21
Deleting operation ....................................... 22
5.Menu Use .................................................. 23
Entering menu ................................................ 23
6.Contacts.................................................... 24
Contacts list.....................................................24
Searching a contact ........................................ 24
Search by name...........................................25
Search by number........................................ 25
Adding a contact ............................................. 25
Add to local .................................................. 25
Add to SIM ................................................... 25
Groups ............................................................25
Management ...................................................26
Delete...........................................................27
Copy.............................................................27
Memory ........................................................ 27
Info..................................................................28
Own number ................................................28
Country/ area codes.....................................28
7.Message….................................................29
SMS ................................................................30
Creating an SMS.......................................... 30
III
Inbox ............................................................ 31
Outbox ......................................................... 33
Drafts ........................................................... 34
Template ...................................................... 34
Settings........................................................ 34
MMS ............................................................... 35
Creating an MMS......................................... 35
Inbox ............................................................ 37
Outbox ......................................................... 37
Drafts ........................................................... 37
Sent ............................................................. 37
My folders .................................................... 37
Settings........................................................ 38
Wap push........................................................ 39
CDMA voice message..................................... 39
8.Calls...........................................................40
Call Log........................................................... 40
Outgoing calls .............................................. 40
Incoming calls...............................................40
Missed calls..................................................40
Call timer Calls ................................................41
GSM Call cost .................................................41
Accumulated call cost...................................41
Last call cost.................................................41
Counter clear................................................41
Display restriction .........................................42
Set restriction ...............................................42
Cancel restriction..........................................42
Price unit ......................................................42
Call settings.....................................................42
CDMA call settings .......................................42
GSM call settings .........................................43
Answer mode ...............................................45
Auto redial off ...............................................46
Speed dial .......................................................46
9.Java............................................................47
IV
10.Multimedia .............................................. 48
Camera........................................................... 48
Camera........................................................ 48
My photos.................................................... 51
Camcorder................................................... 52
My videos .................................................... 53
Media player................................................... 53
Multimedia player ........................................ 54
Music player ................................................ 55
Settings ....................................................... 55
Voice recorder ................................................ 56
Record......................................................... 56
My records................................................... 56
Save to ........................................................ 57
Games............................................................ 57
Boxman ....................................................... 57
Terix............................................................. 58
11.Resource Manager ................................. 59
All data............................................................59
Bluetooth files .................................................59
My data ...........................................................59
My Vcards.......................................................60
Other files........................................................61
External memory............................................. 61
Info...............................................................61
Format..........................................................61
T-card memory info ......................................61
T-card.............................................................. 61
Installing T-card............................................ 61
12.Browser...................................................63
Home ..............................................................63
Go to webpage................................................63
Input address ............................................... 63
Last address ................................................63
Past input..................................................... 63
Bookmark list ..................................................63
V
History............................................................. 63
Page memo list ............................................... 64
Options ........................................................... 64
Home ........................................................... 64
View ............................................................. 64
Proxy............................................................ 64
Cache .......................................................... 64
Cookies........................................................ 64
Certificates................................................... 65
Push setting ................................................. 65
APN setting.................................................. 65
Background music ....................................... 65
Reset ........................................................... 65
13.Toolbox....................................................66
Alarm .............................................................. 66
Bluetooth......................................................... 66
World time....................................................... 67
Calculator........................................................ 67
Stopwatch........................................................68
Calendar..........................................................68
Notes...............................................................69
PC sync...........................................................69
Data service status..........................................69
14.Settings....................................................70
Clock ...............................................................70
Mobile..............................................................70
Sound..............................................................71
Ring settings.................................................71
Power on tone ..............................................72
Power off tone ..............................................72
Key tone .......................................................72
Flip tone........................................................72
Prompt tone..................................................72
Display ............................................................72
Main screen..................................................73
Front screen .................................................73
VI
Theme style................................................. 73
Power on ..................................................... 73
Power off ..................................................... 73
GSM network settings .................................... 73
Select network............................................. 73
Preferred network ........................................ 74
CDMA roam settings....................................... 74
Security .......................................................... 74
PIN check .................................................... 74
Chang PIN................................................... 74
Chang PIN2................................................. 75
Chang phone password............................... 75
Phone lock................................................... 75
Fixed dialing ................................................ 75
Function protection ...................................... 75
GPS settings................................................ 75
Resetting ........................................................ 76
15.Phone Maintenance ...............................77
16.Troubleshooting .....................................79
The phone can’t be switched on .....................79
The phone is switched off automatically..........79
PIN/ PUN code lock ........................................80
Bad call quality................................................80
Can’t answer a call..........................................81
Can’t make a call ............................................81
The call volume is too low............................... 82
The person you are calling cannot hear your
voice................................................................82
The incoming call doesn’t ring.........................82
The battery can’t be charged .......................... 83
Can’t display network...................................... 84
The phone does not recognise the T- card...... 84
Browser can’t connect to Internet normally .....85
Lack of space.................................................. 85
17.Safety Precaution...................................86
Usage environment......................................... 86
VII
Medical devices .............................................. 86
Pacemaker................................................... 86
Hearing aids................................................. 87
Emergency calls ............................................. 87
Making an emergency call ........................... 87
Password access............................................ 88
PIN code ...................................................... 88
PIN2 code .................................................... 88
PUK code..................................................... 89
PUK2 code................................................... 89
Note about charging the battery...................... 89
Battery information and care........................... 90
Note about using spare parts .......................... 91
Other safety information.................................. 92
VIII
Safety notice
Before using the phone, please read and follow
the rules below carefully. For more details,
please refer to the “Safety precaution” section
on P.86
If you dial or answer a call while driving,
please use the hands-free device (e.g.
earphone, vehicle hands-free system,
phone hands-free system) or use your
phone after parking the vehicle.
The phone will interfere with the
communication network of a plane, so
please make sure your phone is switched
off during the flight.
All phones can be subject to interference,
which could affect its performance.
Please switch off your phone where you
see signs forbidding phone use. Such
signs can be found in medical centres or
establishments containing medical
equipment.
In order to ensure high performance and
avoid damaging the phone, please use the
original accessories and battery. Avoid
using products which are not compatible.
To avoid the risk of any explosion, please
switch off the phone at petrol stations and
places which are near fuel, chemical
solvent or other dangerous substances.
In order to avoid the risk of explosion,
please switch off your phone in areas
where there could be a risk of explosion
and in areas where you are asked to switch
off bidirectional radios. Pay attention and
adhere to any rules and regulations
concerning mobile phone use.
Please neither burn the phone battery nor
use it as ordinary rubbish, as this could
endanger life and damage to the
environment. Please obey the
environmental policy of the local
government and dispose of and recycle
them in time.
If you need to connect your phone to other
devices, please read the user guide

IX
carefully to ensure the procedure is carried
out safety.
Keep small parts (e.g. SIM card) out of the
reach of children to prevent batteries from
being swallowed or causing other dangers.
Please back up the important information
of phone and be sure to have a second
copy in case data is lost from your phone.
SOS
Make sure the phone is switched on and
has service coverage before inputting the
emergency number. Press the call key for
your position to be located. Please don’t
end call unless told to do so.
Getting to know your phone
1
1. Getting to know your phone
Your phone
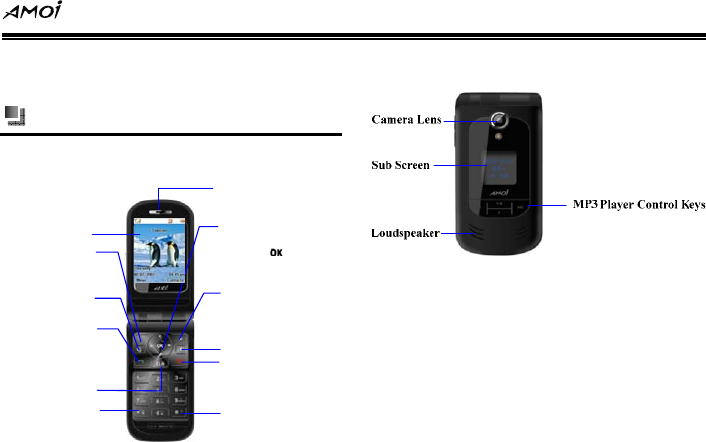
Front view of your phone
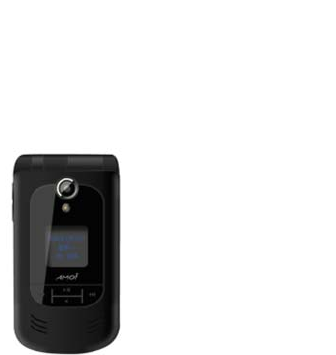
Earpiece
Left Function Key
Display Screen
Right Function Key
End Key
Navigation Key
*Key
Press the key from the
home screen to enter the
Main menu screen
# Key
C/G Switching Key
Send Key
1. Answering or Making calls.
2 .Press the key from the home
screen to enter the Outgoing
call list.
Scroll to select or browse
menus, press key to
confirm your choice
Press the key from the home
screen to enter the Contacts
screen
1. Hold down the key to switch
on or switch off the phone.
2. While in a call, press the key
to end the current call.
Shortcut Menu Key
Camera Key
Flip view of your phone
Getting to know your phone
2
Side view of your phone
Rear view of your phone
Caution:
As for the shortcut keys operation of the above keys,
please refer to “Using Shortcut Keys” on P10
Home screen
The Home screen is mainly made up of five
parts, shown as the below figure:
Getting to know your phone
3
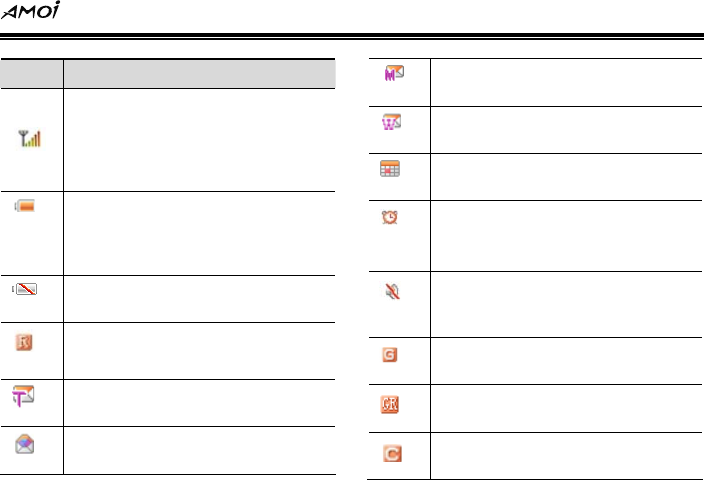
Icon Function Description
Signal Strength: Represents the
current network signal. The number
of bars indicates the signal
strength. The more bars, the
stronger the signal.
Battery Status: Represents the
level of your battery. The more the
battery bars, the more power you
have.
Low Battery : Displays when there
is little battery power
Roaming: Appears when you are
out of your home area and have
registered on a different network.
SMS: Appears when there is a new
unread SMS.
Memory Full: Appears when the
memory for messages is full.
MMS: Appears when there is a new
unread MMS message.
Wap Push: Appears when there is
new Wap push message.
Calendar: Appears on the day
when a calendar event exists.
Clock: Appears when the clock
function has been activated.
Silent: Indicates that no audio and
vibration alert when a call comes in
or a new message is received.
GSM network: Appears when the
phone currently on GSM network
Represents when GPRS is
connecting
CDMA network Appears when the
phone currently on CDMA network
Getting to know your phone
4
No network: Appears when there
is no network.
Represents when data connection
has been activated.
Represents when data connection
has not been activated.
Appears when all the calls are
being diverted.(supported by GSM
network)
Programs
The following table lists icons of the
programmes that are already installed on your
phone.
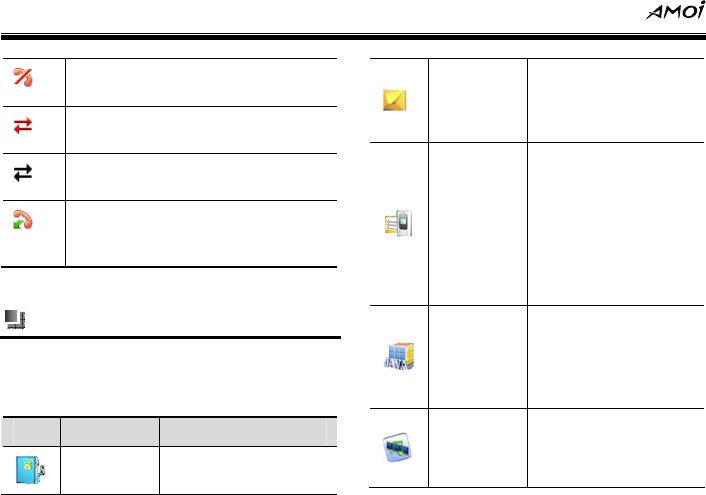
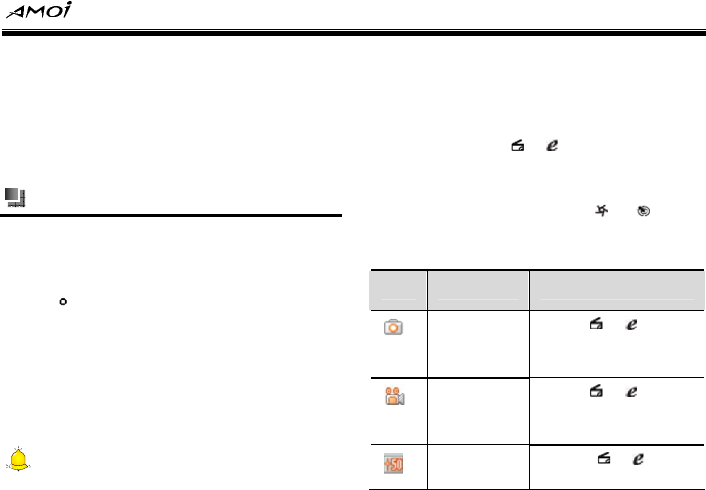
Icon Name Introduction
Contacts Keeps track of
contacts information
Message
Lets you send and
receive SMS.MMS,
and Wap push
messages.
Calls
Keeps track of all
phone calls made,
received or missed
and lets you create
speed dial entries for
dialing frequently
-called phone
numbers
Java
Lets you operate
Java-based
applications or Java
games on your
phone.
Multimedia
Lets you play back
video and audio files,
make short voice
recordings and
Getting to know your phone
5
capture photos and
videos in various
modes, in addition,
you can play two
games: Boxman and
Tetris coming with
your phone.
Resource
Manager
Lets you organise and
manage files on your
phone
Browser
Allows you to browse
Web pages, and to
download new
programs or files from
Internet
Toolbox
Prepares various
wonderful and
convenient services
for your work and life,
such as [Alarm],
[Calendar],
[Calculator] etc.
Settings
Personalize your
phone to suit the way
you use it.
Getting Started
6
2. Getting Started
Using your phone
Before using your mobile phone, you must
insert a SIM card supplied by a network service
provider. The SIM card includes detailed
information of various service items and can be
used to store your phone number and user
information.
Caution
The SIM card and its contacts can be easily
damaged by scratching or bending, so be very
careful when handling, inserting or removing the
card. Follow the instructions provided with the
SIM card and keep all such cards out of the reach
of children. If this SIM card lost, please ask your
network service provider for help.
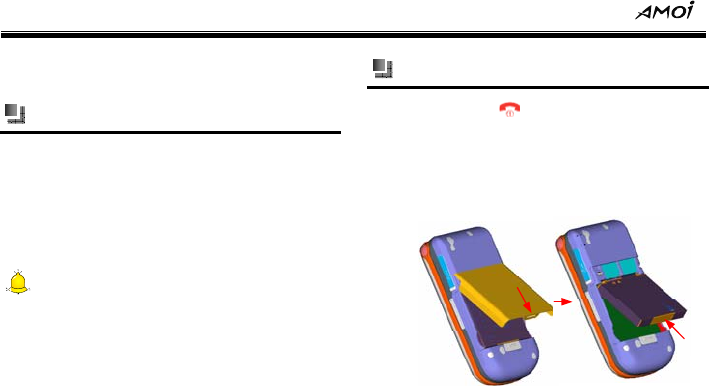
Installing SIM card and battery
(1) Hold down for several seconds to
switch off the phone.
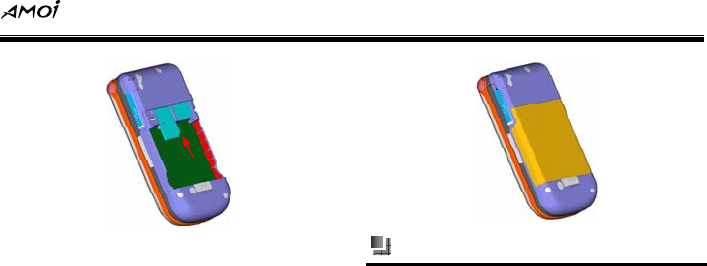
(2) As shown in the following diagram, lift up
the back cover of the phone and remove it
and the battery.
(3) Insert the SIM card into the SIM card slot.
Press the card downwards while inserting
and make sure the card is facing the
correct way, as shown below (with the
contact point facing down).
Getting Started
7
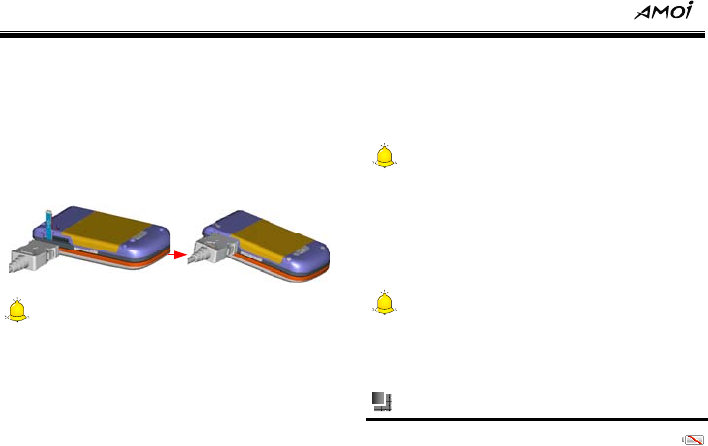
(4) Make sure the golden contact of battery
face into the corresponding contact of the
phone, and then push down the bottom of
battery until it is fixed in the battery slot. At
last, replace the battery cover, shown as
the below figure
Battery charging
The battery of the phone is Lithium ion
rechargeable battery. A travel charger is
supplied with the phone.
To charge the battery:
(1) Put the battery in the phone.
(2) Connect the lead of the travel charger to
the connecting slot at the side of the
phone.
Getting Started
8
(3) Connect the adapter to a standard AC wall
outlet, and the battery image on the
phone’s display screen begins to scroll.
(4) After charging, disconnect the charger
from the power socket before
disconnecting the phone from the charger,
shown as the below figures:
Caution
1. If the battery is empty, the battery icon will
appear after charging for two to three minutes.
Generally, the charging time is 2-5 hours
depending on the status of the phone (whether
switched on, making a call etc.)
2. Try to avoid using I/O interface line to charge.
While charging, the battery image on the
phone’s display screen begins to scroll from
empty to full. Once the phone has finished
charging, the battery image will display as full.
Caution
In order to get the best out of the new battery,
please charge it two or three times. For the few
times, please charge the phone for at least 10
hours. Please ensure your phone is switched off
while being charged.
Warning:
Please use the battery and charger authorised by
Amoi, otherwise explosion may occur.
Battery power display
If the battery is low, the empty battery icon
will flash.
Getting Started
9
If the battery is too low, the phone will switch off
automatically. If this happened, you may lose
any data that has not been stored.
Notice:
While in CDMA mode, the battery is:
1. Time: 48h (Minimum)
2. Call duration: 3h (Minimum)
3. Data mode: 1h (Minimum)
Power on/ off
Power on
Hold down for several seconds to switch
on/off the phone.
If the PIN code is activated, your phone will
be connected to a GSM network upon
entering the correct PIN code.
If you enter the wrong PIN code three times
in succession, you will need a PUK code in
order to unlock your phone. For more
details, please refer to “Safety precaution”
on P86
Warning:
Don’t switch the phone on in areas where wireless
phone use is prohibited or where it may cause
interference or danger. Make sure that your
phone’s “Automatic power on / power off” function
is not activated.
Caution:
The phone is equipped with an antenna. When
power on, please do not touch antenna at the
bottom of the phone as this could affect the phone’s
performance.
Power off
Hold down for approx two seconds to
switch off the phone.
Getting Started
10
Using shortcut keys
Press some keys directly from the home screen
and you can speed enter the common functions
of phone. The following table lists the operations
and functions of some common shortcut keys:
Key Operation Function
Press
briefly
Press the key from the
home screen to enter
the Net select screen,
and you can switch
between GSM and
CDMA
The default network of
the phone is CDMA
Press
briefly
Press the key from the
home screen to enter
the Call list
Press
briefly
Press the key from the
home screen to enter
the Browser screen
(While supported by
CDMA);
Press
briefly
Press the key from the
home screen to enter
the MMS main menu
Press
briefly
Press the key from the
home screen to enter
the SMS screen
Press
briefly
1. Press the key from
the home screen to
enter the Shortcut
menu screen, you
should preset this
menu.
2. While using the
Getting Started
11
phone, press the key
to return to the last
menu.
Press
briefly
While editing, press
the key to open
symbol table
Hold down Hold down the key
from the home screen
to switch between
mute and unmute
mode.
Press
briefly
Press the key from the
home screen to enter
the Camera screen
MP3 control keys:
While playing MP3, you can press
these keys from the home screen to
set MP3 player. For more details,
please refer to “Media player” on
P53
Call Functions
12
3. Call Functions
Making a call
Making a call from the Home screen
(5) Enter area code and phone number in
standby mode.
(6) Press to dial.
Making a call from contacts
(1) On the Home screen, press .or select
[Menu→Contacts→Contact list] to enter
the Contacts screen.
(2) Do one of the following:
Select the desired contact in the contacts
list, and press to view the contact
details, then select the desired number and
select [Options→Call] to dial the
associated number.
Or you can select [Menu→Contacts→
Search] from the home screen to search your
desired contact by name or number, and
press
Creating a speed dial for a contact
You can create a speed dial number for the
desired contact stored in the phone, so you can
dial the contact by simply holding down the
corresponding numeric key (if you set a speed
dial number with two digit bits, you could input
the first digit ,and then hold down the second
number, for example, if you set 12 as a speed
dial number, you could input the first digit “1”
before holding down the second digit “ 2” ), and
the system will dial the number automatically.
Setting methods
(1) Select [Menu→Calls→Speed Dial] from
the home screen and select your desired
speed dial number.
Call Functions
13
(2) Select <Add> and press to select
the contact which you want to create a
speed dial.
(3) Select <OK>and you can create a speed
dial for the selected contact
Caution:
1. The contacts both in the phone and in the SIM
card can be created speed dials.
2. The speed dial numbers are from 2-99, 0 and 1
are the preset numbers of the phone.
Making a call from call log
Select [Menu→Calls→Call Log] from the
home screen to select the desired call entry and
press to dial, or you can press and
select [Call] to dial the associated number.
To customise calls by using the menu
On the Outgoing, Incoming, or Missed call list,
you can select various options to customize the
call.
Call: Dials the selected number.
Send SMS: Sends an SMS to the selected
name or phone number.
Send MMS: Sends an MMS to the selected
name or phone number.
Detail: Views the detailed information of the
selected call, such as the time and duration.
Delete: Removes the selected call or
number from the corresponding call list.
Delete all: Removes all the calls and
numbers from the corresponding call list.
Making a call from SMS
You can pick out your desired number from
SMS and select [Options→Call Back] to dial
the number.
Call Functions
14
Making two calls simultaneously (this
function must be supported by the
network)
You can hold the current call and dial another
call at the same time, and the first call will be
hold automatically.
Switching between two calls (this function
must be supported by the network)
(1) While in call with A, you receive a call from
B. You can set the current call on Hold and
answer another call simultaneously.
(2) At this time, you can select [Menu→Status
Switch] and make calls between A and B
in turn. The side which is not in call will be
hold automatically and can’t hear the call
content.
Making a conference call (this must be
supported by the network)
This phone allows multiple users to participate
in the same call.
(1) If A is on a call with B, and C dials A’s
number, then A can answer C’s call while B
remains on the line.
(2) Press , select [Add to Teleconference]
to add C to the call and allow A, B & C to
participate in the same call.
If you want to quit the conference call, press ,
select [Separate], select the number you want
to quit, and separate this call from the
conference call.
Additional dialing information
Making an emergency call
Enter the appropriate emergency numbers
(such as 112) for your locale and press .
Call Functions
15
Caution:
Additional emergency numbers may be included in
your SIM card. Contact your service provider for
details.
Making an international call
(1) Hold down on the phone keypad
until”+” sign appears. The “+” replaces the
00 in the international prefix of the country
that you are calling.
(2) Enter the full phone number and press .
The full phone number includes country
code, area code (without the leading zero,
if any) and phone number.
Dialing a voice mail
Voice mail is a kind of network service. If you
activate call diverting function and divert the
incoming call to voice mail, the caller can leave
message in voice mail.
Hold down from the home screen and the
system will dial your voice mailbox automatically.
You can get your voice mail number from the
network service provider.
Receiving a call
When you receive a phone call, you have the
option to answer it or ignore it
Answering or rejecting an incoming call
To answer the call, you can press or .
To reject the call, you can press or
Caution:
If you select [Menu →Calls→Call Settings→
Answer Mode] and activate [Any Key] option, then
you can press any key to answer phone except
/
Call Functions
16
Ending a call
Press to end a call.
Call functions
(7) While in a call, press and you can have
the following options:
Make another call: You can hold the
current call and dial another call at the
same time, and the first call will hold
automatically. (This function needs to be
supported by the network).
Hold current call: While supported by
GSM network, press to dial B and A
will be hold automatically.
End current call: End the current call.
Menu: While in a call, you can enter the
menu options.
Mute: After activating this function, the
person you are calling can’t hear your voice.
If you need to cancel this function, please
select [Cancel Mute].
Record: You can record for the current call.
After choosing [Stop Rec], you can stop
recording the current call and the recorded
file will be saved in [Voice Recorder]
automatically.
Select [Multimedia→Voice Recorder→My
Records] to view the recorded files.
Caution:
1. Recording a call is illegal in some countries;
therefore, before recording, you should get the
permission of the person you are calling. The
phone can only record for the person you are
calling, but can not record for your own.
2. Conference call function is a service supported
by the network, for more detail about this; please
consult your network service provider.
Input Modes
17
4. Input Modes
V870 phone applies eZi input mode. This input
mode has strong intelligent word-building
capacity, and you can use it freely. It has the
following several input modes for you to select:
This mode allows you to enter words with only
one keystroke per letter. Each key on the
keypad has more than one letter - when you
press once, every letter on it may be displayed.
The English mode automatically compares your
keystrokes with an internal linguistic dictionary
to determine the correct word. After finishing
entering, press to ensure and input
blanks.
Eng /eng /ENG: This mode allows you to
use English input mode to enter English
words. While editing, press to select
[English] and you can switch to Eng input
mode. While in this mode, press to
switch between Eng /eng /ENG.
Abc/ABC/abc: This mode allows you to
enter letters by pressing the key labeled
with the required letter, once for the first
letter, twice for the second letter, and so on
until your desired letter appears on the
screen. While editing, press to select
[Letter Input] and you can switch to Abc
input mode. While in this mode, press
to switch between ABC/Abc/abc.
123: Press the corresponding keys to enter
number. While editing, press to select
[Number Input] and you can switch to 123
input mode.
The input mode symbols are shown as the
below table:
Input Modes
18
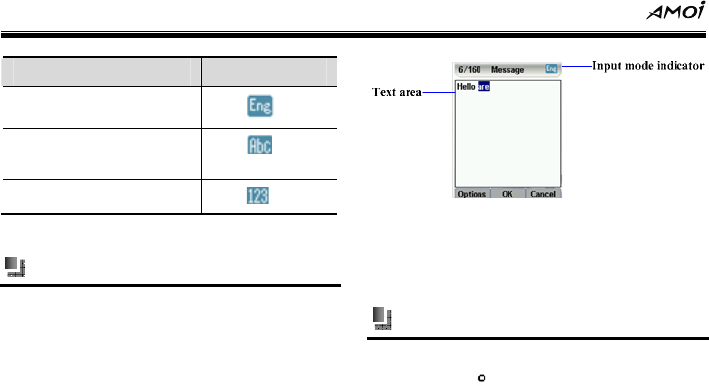
Input mode Indicator
English input mode
Letter input mode
Number input mode
Input screen
The input screen displays as the below figure:
Text area: Displays the text content that
has been inputted.
Input mode indicator: Displays your
current selected input mode.
Switching input modes
The way of switching input modes: While
editing, press to select your desired input
mode.

Input Modes
19
Inserting symbol
While editing a message, press to select
[Insert Symbol] to enter the Symbol table
screen and press / to select your desired
symbol, and then insert in the message.
Inserting template
The phone presets 12 templates for you. While
editing a message, press to select [Insert
Template] and press / to select your
desired template, then insert in the message.
Inserting contact
While editing a message, press to select
[Insert Contact.] and press / to select
your desired contact from the contacts list, then
insert it in the message.
Inserting net symbol
While editing, if you need to inset a network
address, you can press to select your desired
net symbol from the list and insert it in the
message.
Dictionary
While editing a message, press to select
[Dictionary] to add, edit or delete the words in
dictionary.
English input mode
English input mode means [eZi En] input mode,
including [ENG], [Eng] and [eng].
Using method
Entering English word: This mode allows
you to enter words with only one keystroke
per letter. Each key on the keypad has more
Input Modes
20
than one letter - when you press once,
every letter on it may be displayed. The
English mode automatically compares your
keystrokes with an internal linguistic
dictionary to determine the correct word.
Selecting English letter combination:
When a series of English words appear in
inputting line, press / to select your
desired English word and press to
enter word
Notice:
Press and you can switch between ENG /
Eng / eng, which represent respectively: English
word with capital letters, English word which has
a capital initial letter, English word with small
letters. While entering, you can also press /
to switch between them.
Letter input mode
Letter input mode means [Abc] input mode,
including [Abc], [abc] and [ABC].
Enter letters by pressing the key labeled with
the required letter, once for the first letter, twice
for the second letter, and so on until your
desired letter appears on the screen.
Number input mode
Number input mode means [123] input mode.
Press - and the corresponding
numbers will display on the screen, while
pressing to input a blank under editing
status.

Input Modes
21
Deleting operation
While editing a message, press to delete
the last character or symbol (on the left side of
cursor) in text area and hold down the key to
delete all characters or symbols in the text area.
Menu Use
22
5. Menu Use
The V870 mobile phone provides you with a
wide variety of functions. These functions are
arranged in the form of menus and you can look
at, use or set each menu as required.
Entering menu
Press from the home screen to enter the
main menu and press / / / to scroll
to your desired menu.
Contacts
23
6. Contacts
No matter in GSM or CDMA network, the V870
has a multi-function phone book with a practical
name card management system and an
effective search function. The phone book can
store up to 1000 call entries; you can save the
contacts’ phone numbers and information in
SIM card or the phone.
On the Home screen, select [Menu→Contacts]
to enter the Contacts screen.
Contacts list
On the Home screen, press or select
[Menu→Contacts→Contacts list] to enter the
Contacts list, you can input the name of your
desired contact or press / , and select
<OK> to view its detail. Press and you can
have the following options:
Option Function
Edit Edit the information of the
selected contact
Delete Delete the selected contact
Copy Copy the selected contact to
SIM card.
Send Vcard Send the selected contact in
the form of Vcard (which
displays the name and
mobile phone number)
Save Vcard Save the selected Vcard to
[My Vcards] in “Resource
Manager”.
Searching a contact
The phone supports two search methods, which
are using very conveniently.
Contacts
24
Search by name
You can input the name of your desired contact,
and select <OK> to search. If the contact’s
name has not been saved in [Contacts], the
phone will prompt: “No record” on the screen.
Search by number
You can input the phone number of your desired
contact, and select <OK> to search. If the
contact’s phone number has not been saved in
[Contacts], the phone will prompt: “No record”
on the screen.
Adding a contact
You can add a new contact to the phone or SIM
card.
Add to local
Press / to select the information you
want to input. Select <Edit > to open the
message window, and then select <OK> when
you have finished entering the new details.
Once all the information has been entered
select <Save> to store these details on your
phone.
Add to SIM
Select <Edit> to open the message window,
then select <OK> once you have finished
entering the new details and each contact can
store only one phone number. Once all the
information has been entered select <Save> to
store these details on your phone.
Groups
You can divide the contacts in [Contacts] into
several groups, and can preset different
ringtone for different group.
Notice:
Personal ring is prior to group ring, and group ring
Contacts
25
is prior to default ring of the phone.
The phone provides five groups for you:
[Family], [Friend], [VIP], [Workmate] and
[Card Group]. In addition, you can add 15 new
groups as desired and divide the contacts to
different groups. After adding, press and
you can have the following operations, show as
the below table:
Option Function
Delete
Group
Deletes your selected group
Group Send
SMS
Sends an SMS to your
selected group
Group Send
MMS
Sends an MMS to your
selected group
Change
Name
Changes the name of your
selected group
Set Group Sets the photo for your
Photo selected group from [Local
Image] or [Resource
Manager].
Set Group
Ring
Sets the ring for your
selected group from [Local
Ring] or [Resource
Manager].
Management
Press <OK> to enter the Management screen
and the following options are available:
Delete
Delete range: Select<OK>to enter the
Delete range screen and all contacts in
[Contacts] will be listed on the screen,
press / to select your desired
contact and press . After selecting, select
<OK> and you can delete these contacts.

Contacts
26
Delete local all: Select <OK> and the
phone will prompt:” Delete all?” If you
select <OK>, you can delete all contacts in
the phone.
Delete SIM all: Select <OK> and the phone
will prompt:” Delete all?” If you select
<OK>, you can delete all contacts in the
SIM card.
Copy
This function will copy the contacts between the
phone and the SIM card to enable resources to
be shared.
Local to SIM: Copy the contacts from the
phone to the SIM card.
¾ Copy range: Press / to select your
desired contact and press . After selecting,
select <OK> and you can copy the selected
contacts to SIM card.
¾ Copy all: Select <OK> and you can copy all
the contacts in the phone to SIM card.
SIM to local: Copy the contacts from the
SIM card to the phone.
¾ Copy range: Press / to select your
desired contact and press . After selecting,
select <OK> and you can copy the selected
contacts to the phone.
¾ Copy all: Select <OK> and you can copy all
the contacts in the SIM card to the phone
Memory
You can view the used and left memory of your
phone and SIM card
Info
You can save your own number and country/
area codes with this function.
Select [Menu→Contacts→Info] from the home

Contacts
27
screen to enter the Info screen.
Own number
You can edit your name and mobile phone
number with this function.
Country/ area codes
With this function, you can view the country/
area codes in the world. Press / to view
your desired country/ area code, or you can
press to search:
Search name: You can input your desired
country/ area name to search.
Search code: You can input your desired
country/ area code to search.
Message
28
7. Message
The phone supports SMS, MMS, and other
related operations. The messaging service is a
network service. Whether this menu can operate
normally depends on your SIM card and the
services supplied by the network provider, so
please check before using this service.
Icon Description Introduction
Unread
SMS
Represents the
SMS that have not
been read in
[Inbox]
Read SMS Represents the
SMS that have
been read in
[Inbox]
Unread
MMS
Represents the
SMS that have not
been read in
[Inbox]
Read MMS Represents the
MMS that have
been read in
[Inbox]
Unsent
SMS
Represents the
SMS that have not
been sent in
[Outbox]
Sent SMS Represents the
SMS that have
been sent in
[Outbox]
Sent MMS Represents the
MMS that have
been sent in [Sent]
Message
29
Unsent
MMS
Represents the
MMS that have not
been sent in
[Outbox]
SMS
Before using this function, you should get the
service center number from the network service
provider. The phone can store 500 SMS at most,
and the memory of SIM card depends on the
card type.
Creating an SMS
You can write an SMS of up to 160 characters.
Press to enter the main menu and select
[Message→SMS→New message].
After entering the new message screen and you
can edit the message.
While editing, press and you can have the
following options:
Insert symbol: Insert your desired symbol
from the symbol table.
Insert template: Insert your desired
common phrase in the message.
Insert contact: Insert your desired phone
number in the message.
Insert net symbol: Insert your desired net
symbol in the message.
English: Select to use English input mode.
Letter input: Select to use letter input
mode.
Number input: Select to use number input
mode.
Copy: While editing, you can copy your
selected words.
Paste: Paste your selected words.
Message
30
Dictionary: Insert the word in the dictionary
and you can add, delete or edit words with
this menu.
After finishing editing the message, select <OK>
and you can have the following options:
Send: Select <OK> to enter the Send
screen, input the recipient’s number in the
box or press to search your desired
phone number in [Contacts]
Send and save: Send the SMS that has
been edited and save it to [Outbox], (The
SMS that has not been sent will be saved in
[Outbox]).
Save: Save the SMS that you have edited to
[Drafts].
Send to a group: Select <OK> to enter the
screen, input the recipients’ numbers in the
box one by one or press to search your
desired phone numbers in [Contacts]. After
that, press <OK> to send the message to
your selected recipients.
Save and send in group: You can send the
edited SMS to a group and save it in
[Outbox].
Inbox
[Inbox] contains received SMS. You can save
the received SMS to [Inbox] of your phone or
SIM card.
Phone: You can view the SMS that have
been saved in the phone.
Press / to view the SMS that have been
saved in the phone, press and you can have
the following options:
¾ View: View the selected SMS.
¾ Reply: Reply an SMS to the sender.
¾ Forward: Forward the selected SMS to
another recipient.
¾ Call back: Give a call to the sender.

Message
31
¾ Extract: Extract the phone number of the
sender or the phone numbers in the SMS.
¾ Delete: Delete the selected SMS.
¾ Multiple delete: Delete the selected multiple
SMS
¾ Delete all: Delete all SMS in [Inbox].
¾ Copy to card: Copy your selected SMS to
SIM card.
After selecting an SMS, select <View > to view
its detail and press to have the following
options:
¾ Reply: Reply an SMS to the sender.
¾ Forward: Forward the current SMS.
¾ Call back: Give a call to the sender.
¾ Extract: Extract the phone number of the
sender or the phone numbers in the SMS.
¾ Delete: Delete the selected SMS.
¾ Copy to card: Copy the selected SMS from
the phone to SIM card.
Card: You can view the SMS that have been
saved in [Inbox] of the SIM card.
Press / to view the SMS that have been
saved in the SIM card, press and you can
have the following options:
¾ View: View the selected SMS.
¾ Reply: Reply an SMS to the sender.
¾ Forward: Forward the selected SMS to
another recipient.
¾ Call back: Give a call to the sender.
¾ Extract: Extract the phone number of the
sender or the phone numbers in the SMS.
¾ Delete: Delete the selected SMS.
¾ Multiple delete: Delete the selected multiple
SMS
¾ Delete all: Delete all SMS in [Inbox].

Message
32
¾ Copy to phone: Copy your selected SMS to
the phone.
After selecting an SMS, select <View > to view
its detail and press to have the following
options:
¾ Reply: Reply an SMS to the sender.
¾ Forward: Forward the current SMS.
¾ Call back: Give a call to the sender.
¾ Extract: Extract the phone number of the
sender or the phone numbers in the SMS.
¾ Delete: Delete the selected SMS.
¾ Copy to card: Copy the selected SMS from
the SIM card to the phone.
Outbox
Phone: You can view the SMS that have
saved in [Outbox] of the phone.
¾ View: View the selected SMS which has
been sent and saved in [Outbox].
¾ Send: Send the selected SMS.
¾ Delete: Delete the selected SMS.
¾ Multiple delete: Delete the selected multiple
SMS
¾ Delete all: Delete all SMS in [Inbox].
¾ Copy to card: Copy your selected SMS to
SIM card.
After selecting an SMS, select <View > to view
its detail and press to have the following
options:
¾ Send: Send the selected SMS in [Outbox]
¾ Delete: Delete the selected SMS.
¾ Copy to card: Copy the selected SMS from
the phone to SIM card.
Card: You can view the SMS that have been
saved in [Outbox] of the SIM card. For more
details about the options, please refer to
“Phone” of [Outbox].

Message
33
Drafts
You can view the SMS that have not been sent in
the phone or SIM card and you can have some
options on the selected SMS, such as [Edit],
[Delete], [Multiple Delete], [Delete All], [Copy
to Card].
Tem pla te
The phone provides you with some common
phrases, and you can press / to select.
Select <Options>and the following options are
available:
View: View the selected template.
Edit: Edit the content of the selected
template.
Send: Send the selected template.
Delete: Delete the selected template.
Add: Add a new template to [Template].
Settings
Select [Message→SMS→Settings] to enter the
SMS setting screen.
CDMA SMS setting:
¾ Priority: Press and you can set the
priority of SMS as [Normal], [Interactive],
[Urgent] or [Emergency].
¾ Arrival prompt: If you set this function as
[Activated], the SMS center will prompt you
when the SMS has been sent successfully.
The phone default as [Closed]
¾ History record: With this function, you can
view the memory of your sent messages and
received messages.
¾ Memory: With this function, you can view
the left memory of your phone.
GSM SMS setting
¾ SMS center: You must set the SMS center
number of the network service provider while
Message
34
sending an SMS or you can get the number
from your network service provider. Most SIM
cards have contained SMS center numbers.
¾ Preferred memory: Press to select the
preferred memory between [Phone] and [SIM
Card].
¾ Validity: The phone provides you with [1
Hour], [12 Hours], [1 Day], [1 Week] and
[Max Time].
¾ Types: You can set the SMS type as [Text],
[Fax Group 3], [Fax Group 4], [Voice],
[ERMES], [Pager] or [Email].
¾ Status report: If you set this function as [On],
the SMS center will prompt you when the SMS
has been sent successfully. The phone default
as [Off]
¾ History record: With this function, you can
view the memory of your sent messages and
received messages.
¾ Memory: With this function, you can view
the left memory of your phone and SIM card.
MMS
MMS is a kind of multimedia messages.
The phone supports the picture files in PNG, JPG,
BMP, WBMP or GIF format; the audio files in
AMR, MIDI, MMF, AAC, QCP,I-MELODY, MP3 or
WAV format and the video files in MP4, 3GP,
3G2 format.
Creating an MMS
Press and select [Message→MMS→
Create MMS] to enter the screen.
Select <OK> to enter the New message screen
and select [Add Content], and the following
options are available:
Insert image: You can insert your selected
image to the MMS. Select <Insert> and the
phone will search the suitable image in

Message
35
[Resource Manager] (Supporting: JPG,
BMP, PNG, WBMP, GIF format).
Insert text: Select <Insert> and you can
edit the text.
Insert audio: Insert the selected audio file.
Select <Insert> and the phone will search
for the suitable audio files in [Resource
Manager].
Insert video: Insert the selected video file in
the MMS.
Side timing: Press / to select your
desired playing time.
Select the files you want to insert in [Resource
Manager] and select <Add>, then press and
you can have:
Remove: Remove the file that you have
inserted.
Add slide: Add another slide.
Insert slide: Insert another slide.
Delete slide: Delete the current slide.
Preview slide: Preview the current slide.
Preview: Preview all the slides in the MMS.
Slide options: You can set the slide to
[Image Timing], [Sound Timing], [Video
Timing] and [Text timing].
After adding content, select <Back> to return the
New message screen, and then select
<Options> to have the following options:
Edit: Select <OK> and you can edit the
selected item.
Send: Select <OK> and you can send the
MMS that have been edited.
Save: Select <OK> and you can save the
selected MMS to [Drafts] for editing or
sending.
Send options: You can set [Message
Priority] and [Delivery Time] with this
function.

Message
36
Summary: You can view the size for the
selected MMS.
Inbox
You can save the MMS that you have received in
[Inbox], if the MMS sender has been saved in
[Contacts], the screen will display the name of
the sender, or it will display the sender’s phone
number.
Outbox
You can view and save the MMS that have not
been sent successfully.
Drafts
[Drafts] is used to save the MMS that you have
been edited.
Sent
The [Sent] folder contains all the messages that
have been sent successfully. You can edit and
send the message again. Select a message and
press and you can have the following
options:
Open: View the MMS in [Sent].
Edit: Edit the MMS in [Sent].
Move: Remove the MMS in [Sent].
Sort: Sort the MMS in [Sent].
Filter view: Select and view MMS in [Sent]
Report detail: Display the detail of the MMS
that has been sent (Sent time, subject, the
recipient number, size and etc)
Delete: Delete the MMS that has been sent.
Delete all: Delete all MMS in [Sent].
My folders
This function is used to save the user boxes (you
can save 10 user boxes at most), press to
rename your selected folder.
Message
37
Settings
MMS settings
After entering the MMS settings screen, the
following options are available:
¾ Download timing: The phone provides you
with [Automatic], [Roaming] and [Manual]
and you can press / to select.
¾ Delivery time: You can set the delivery time
of MMS to [Immediate] or [Deliver After].
¾ Validity: You can set the validity period of
the MMS to [12 Hour], [One Day], [One
Week], [One Month] or [Maximum].
¾ MMS playback: You can set MMS playback
as [Automatic] or [Manual].
¾ Anonymous Msg: When you received an
anonymous MMS (which has not displayed
the address and number of the sender), you
can select [Refuse] or [Accept].
¾ Server address: The phone can display the
server address of the MMS. And you can edit
or save the address.
¾ Proxy server: You can press / to
select between [Use Proxy] and [Proxy
Server].
¾ APN setting: You can set some options with
this function, such as [Access Point Name],
[IP Address], [Primary DNS] and etc.
Reset settings
Select <OK> and the phone prompts “Reset?”
Press and you can restore the phone to
factory default settings.
Wap push
With this function, you can save the Wap push
messages.

Message
38
CDMA voice message
With this function, you can save the CDMA voice
message.
Calls
39
8. Calls
Call history details all incoming, outgoing and
missed calls and also provides a summary of
total calls. It can also tell you when a call was
initiated and how long it lasted. Only when your
phone has subscribed to the network service you
can view the number and name in [Outgoing],
[Incoming] and [Missed].
Call Log
Outgoing calls
Shows only calls made from the phone.
Incoming calls
Shows only calls made to the phone. For more
detail, please refer to “Missed”.
Missed calls
This menu shows calls that were not answered.
Press / to view the missed calls list or
you can select an entry and press to dial it.
If the entry has been saved in [Contacts], the
contact’s name will be displayed on the screen,
or it will display the phone number directly Select
an entry and press , and the following options
are available, shown as the below table:
Option Function
Call Make a call to the selected
phone number
Send SMS Edit an SMS and send to
the selected phone number
Send MMS Edit an MMS and send to
the selected phone number
Detail Displays the detail of the
selected phone number
Save Save the selected phone
number to [Contacts]
Calls
40
Delete Delete the selected phone
number
Delete All Delete all phone numbers
in [Missed Calls]
Call timer Calls
Last call: It allows you to view the duration
of your last call.
Total: You can view the duration of total calls,
including dialed calls and received calls.
If you need to reset it back to zero, press /
to select call duration type and select <Reset>,
the phone will appear prompt screen, select
<OK> to reset it back to zero, while selecting
<Back> to cancel this operation.
GSM Call cost
Enter the main menu and select [Calls→GSM
Call Cost] to enter this screen. This function
needs the support of your network.
Accumulated call cost
This function allows you to view the total charge
for your calls.
Last call cost
This function allows you to view the charge for
your last call.
Counter clear
Select this option to reset it back to zero, while
you need to input the PIN2 code first provided by
your network provider.
Display restriction
You can view the max charge that can be used

Calls
41
for making calls of the phone.
Set restriction
Set a desired max charge that can be used for
making calls. When your call charge exceeds
this limit, no more calls (except free calls) can be
made unless you reset it. Select <Edit> to reset
it and PIN2 code is required when making
modification.
Cancel restriction
This function allows you to cancel the call cost
restriction which you have set. Before canceling
it, you need to input PIN2 code.
Price unit
This function allows you to set the price unit for
call cost. Select <Edit> to reset it and PIN2 code
is required when making modification.
Call settings
CDMA call settings
Incoming filter
This function enables you to avoid some
unexpected calls on some special occasions.
The phone provides you with [Reject] and
[Accept] options.
Reject: After selecting this option, numbers
put into the [List] can not get through your
phone.
¾ On/Off: You can set this function as [On] or
[Off], and the phone defaults as [Off].
¾ List: Displays the phone numbers which have
been set as [Reject].
¾ Add: Add new numbers to [List]
Accept: After selecting this option, numbers
put into the [List] can get through your
phone.

Calls
42
¾ On/Off: You can set this function as [On] or
[Off].
¾ List: Displays the phone numbers which have
been set as [Accept].
¾ Add: Add new numbers to [List]
Notice:
1. Before activating [Accept] function, you should
activate call display function firstly.
2. If [Incoming Calls] has no record, the phone will
prompt “No Record” on the screen and this function
can not be activated.
Call diverting
This option enables the incoming calls to be
transferred to a specified number, but this
function needs to be supported by network, for
more details, please consult with network
provider. On the Call diverting screen, you can
select [Always], [No Reply] and [Busy]
Select <OK> to input number or select
<Contacts > to search for your desired number,
then press , so that you can preset the
number you want to divert to.
Call waiting
This network service informs you when someone
is trying to reach you while you are on another
call and you can set it as [On] or [Off].
GSM call settings
Incoming filter
This function enables you to avoid some
unexpected calls on some special occasions.
The phone provides you with [Reject] and
[Accept] options. For more details please refer
to “CDMA call settings” on P42.
Call diverting
This option enables the incoming calls to be
transferred to a specified number, but this

Calls
43
function needs to be supported by network, for
more details, please consult with network
provider. On the Call diverting screen, the
following options are available:
Always: Calls will be transferred to the
appointed number all the time.
No reply: Calls will be transferred if there is
no one available to answer the call.
Busy: Calls will be transferred when your
line is busy or the call is rejected.
Unreachable: Calls will be transferred to the
appointed number when you are not in an
area covered by your service network or
when the phone is switched off
Status inquiry: You can inquire the network
about the current status of call divert
function.
Cancel all: All call diverts functions are
cancelled.
Select <OK> to input number or select
<Contacts > to search for your desired number,
then press , so that you can preset the
number you want to divert to.
Call waiting
This network service informs you when someone
is trying to reach you while you are on another
call and you can set it as [On] or [Off], or you can
select [Status Inquiry] to view the status of call
waiting function.
Call barring
The call barring function helps you to restrict the
incoming and outgoing calls, and the phone
provides the call barring functions as follows
All outgoing: To select this option, the
phone will be restricted from making any
calls (except the emergency calls).
International: To select this option, the
phone will be restricted from making any
international calls.

Calls
44
International except to home: To select
this item, the phone will be restricted from
making any international calls except those
to your home country when roaming (out of
the network service area).
All incoming: To select this item, it will
restrict all incoming calls.
Incoming while abroad: To select this item,
it will restrict all incoming calls when
roaming.
Status inquiry: You can inquire the network
about the current status of call barring.
Cancel all: To select this item, the phone will
allow the making and answering of all calls.
Change restriction password: Set the new
password for call barring function, and you
should input the old password first.
Select any call barring type, if you select<OK>,
you are allowed to “Input Password”. After
setting, the network will deal with the current
setting .At this time; the phone will delay for a
while.
Caution:
This function needs the support of your network
operator, for more details; please contact your
network operator. You will also need the net
password (which can be obtained from your
operator) to set the above functions.
Send number
With this function, you can select to display or
hide your own number to the person whom you
are calling to and you can set this option as [Set
By Net] ,[Send] or [Not Send].
Answer mode
If you have an incoming call, you can select your
desired answer mode. The phone provides you
with 4 kinds of answer mode and they are: [Call
Key], [Open Flip], [Auto Answer] and [Any

Calls
45
Key].
Call key: This method is set as default.
Press or to answer.
Open flip: If the answer mode is set as
[Open Flip], you can open the flip to answer
the call. If the phone has been open already,
press or to answer.
Auto answer: If the answer mode is set as
[Auto Answer] and the headset is being
used, when an incoming call is received, the
phone answers the call automatically in 3
seconds.
Any key: If the answer mode is set as [Any
Key], when an incoming call is received, you
can press any key to answer the call.
Auto redial off
The phone will redial your desired phone number
when there is no one to answer the call or the
call is not reachable. You can set this option as
[On] or [Off].
Speed dial
You can view the voice mail number or select
<Add> and set speed dials for the contacts in
[Contacts]. For more details about it, please
refer to “Creating a speed dial for a contact” on
P12.

Java
46
9. Java
The phone has a variety of fun and interesting
games for you to play. In addition, the relative
programmes can be downloaded from the WAP
website.
Select [Menu → JAVA] from the home screen
and you can enter the games screen. This
screen displays the installed games. Press
/ / to select a certain game, Enter
<Options>.
Launch: Allows you to run the game.
Delete: Allows you to delete the current
game.
Details: Allows you to view the details
about the current game, including name,
vendor, version, and domain.
Permission: Allows you to view and set the
authorised groups for the selected items:
net access, messaging, automatic start,
local connectivity, multimedia recording,
read file and write file.
Local install: Allows you to store several
Java files in local files for installation.
Net settings: Allows you to select different
configuration from Browser and MMS.
Select <OK > and set the current network
settings such as [Access Point Name], [IP
Address], [Primary DNS], [Second DNS],
[Security], [User ID] and [Password].
Download: Allows you to download the
relative programmes from the website.
Multimedia
47
10. Multimedia
The phone has a strong multimedia function,
which gives you fresh and exiting enjoyment
from the mobile phone. It supports MP3 player,
voice recording and games function.
Camera
V870 is installed with a 1.3 mega-pixel camera
and its memory depends on the memory of the
phone.
Press from the home screen and select
[Multimedia→Camera→Camera] to enter this
screen.
Camera
The photo capturing process is divided into
three steps: Previewing, capturing and saving.
Notice:
You can not enter the capture preview screen while
the phone has low battery power.
(1) Previewing: On the capture preview
screen, press / and you can switch
between camera shot model and video
shot model.
In addition, you can press / to set
different options to get better capture quality.
The detail shows as the below table:
Icon Option Introduction
Camera
shot model
Press / to set
the shot model as
[Camera]
Video shot
model
Press / to set
the shot model as
[Video].
Brightness Press / to set
the brightness as [1],
Multimedia
48
[10], [20], [30], [40],
[50], [60], [70], [80],
[90] or [100] and the
phone default as [50].
Zoom Press / to set
zoom as [*1], [*2],
[*3], [*4], [*5], [*6],
[*7], [*8], [*9] or [*10]
and the phone
defaults as [*1].
WB Adjust the color
balance of photos.
Press / to set
the white balance as
[Auto], [Night],
[Incandescence] and
[Fluorescent],
[Cloudy] and
[Daylight] and the
phone defaults as
[Auto].
Effect Changes the color
tone for photos or
applies a special
effect to photos.
Press / and
you can set effect as
[Normal], [Mono],
[Negative] and
[Sepia]. The phone
defaults as [Normal].
Reflect Changes the direction
for photos. Press
/ and you can set
reflect as [Normal],
[Water] and [Mirror].
The phone defaults
as [Normal].
Multimedia
49
On the Capture preview screen, press and
you can have the following options:
Resolution: You can set the resolution as
[1280*1024], [1280*960], [1024*768],
[800*600], [640*480], [320*240], [176*144]
and [160*120] and it defaults as [800*600].
Quality: Allows you to select an image
quality. You can press / to set the
image quality as [High], [Medium] and
[Low] and it defaults as [Medium].
Flash light: You can press / to set
the flash light as [On] or [Off] and it defaults
as [Off].
Multi shot: Takes a series of stills. You can
press / to select [Yes] or [No] and it
defaults as [No].
Timer: Selects the length of time for the
camera to delay before taking a photo. You
can press / to select [Yes] or [No]
and it defaults as [No].
Frame: You can select your favorite
decorative frame from the frame list of the
phone.
Notice:
While selecting a frame, the phone will prompt:
“Can add frame only in 176*144, change?”
Save to: You can set to save the captured
photos as [Phone] or [External Memory].
My photos: You can view the photos which
have been saved in [My Photos].
Settings: You can set some parameters of
the camera.
¾ Delay timer: You can press / to set
the delay timer as [1S], [2S], [5S], or [10S]
¾ Multi shot numbers: You can press /
to set the shot numbers as [3], [5], [10],
[15], [20] or [30]
Multimedia
50
¾ Slide show rate: You can press / to
set the slide show rate as [Fast], [Normal]
or[Slow],
¾ Shutter sound: You can press / to
set the shutter sound as [Shutter Sound 1],
[Shutter Sound 2] or [Shutter Sound 3],
(2) Capturing: Press or press to
capture.
After taking a photo, press to save the
photo to [My Photos], while pressing to edit
or send it via MMS.
My photos
All captured photos will be saved in [My
Photos], you can press / to move to
your desired photo and press :
Icon: Previews the selected photo with
Icon.
Editor: Edits the selected photo.
Slide show: Displays all photos in [My
Photos] in slide show form.
Delete: Deletes the selected photo.
Delete all: Deletes all photos in [My
Photos].
Info: Views the properties of the selected
photo (such as title, date, size, pixel and
format).
Media player: Displays the selected photo
through media player.
Move: Moves the selected photo to another
folder.
Select a photo in [My Photos] and press to
view it, at this time, press and you can have
the following options:
Editor: Edit the current photo. Select
<Options> and you can have:
¾ Frame: Adds your selected frame to the
photo.
Multimedia
51
¾ Stamp: Adds your selected stamp to the
photo.
¾ Photo size: Adjusts the photo size, and you
can select [176*144] or [160*120].
¾ Gloom: Adjusts the photo gloom.
¾ Negative: Sets the photo as [Negative].
¾ Auto flash: Sets the photo as [Auto Flash]
¾ Reminiscence: Set the photo as
[Reminiscence].
Slide show: Sets all the photos in [My
Photos] to display in the form of slide show.
Info: Displays the properties of the current
photo (such as title, date, size, pixel and
format).
Media player: Displays the selected photo
through media player.
Set wallpaper: Sets the current photo to
the wallpaper in standby mode.
Set call photo: Selects <OK> to enter the
speed search screen and set the current
photo to a contact’s image.
Camcorder
Press from the home screen and select
[Multimedia→Camera→Camcorder] to enter
this screen.
The process is divided into three steps:
Previewing, capturing and playing.
(1) Previewing: On the Capture preview
screen, press / and you can
switch between camera shot model and
video shot model.
In addition, you can press / to set
different options to get better capture quality.
For more detail, please refer to “Camera” on
P48
On the Capture preview screen press and
you can have the following options:
Multimedia
52
Resolution: You can set the resolution as
[176*144], [128*96] or [96*80].
Quality: You can press / to set the
image quality as [High], [Medium] or [Low].
REC speed: You can press / to set
the REC speed as [Normal] or [Slow].
Timer: You can press / to select
[Yes] or [No] and it defaults as [No].
REC length: You can set the REC length as
[10s], [30s], [60s] or [1 h].
REC voice: You can press / to
select [Yes] or [No] and it defaults as [Yes].
Save to: You can set to save the captured
videos to [Phone] or [External Memory].
My videos: You can view the photos which
have been saved in [My Videos].
Settings: You can set the delay timer as
[1S], [2S], [5S] or [10S]
(2) Capturing
Press or press to begin capturing a
REC. After finishing capturing, press or
press to pause, while pressing to stop
capturing the REC
My videos
All captured videos will be saved in [My Videos],
you can press / to move to your desired
photo and press :
Delete: Delete the selected REC
Delete all: Delete all REC in [My Videos].
Info: You can view the properties of the
selected REC (such as title, date, size, pixel
video, audio and length).
Media player: Display the selected REC
through media player.
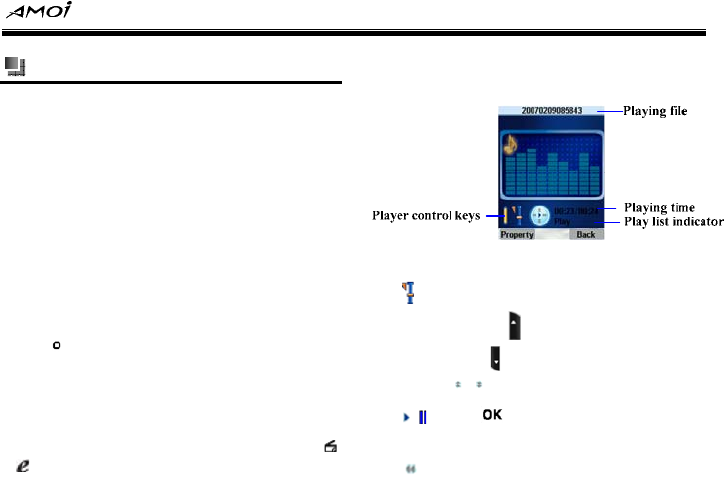
Multimedia
53
Media player
You can use built-in Media player of the phone
to play audio and video files stored on your
phone or T-card.
The player can play image files in the following
formats: BMP, JPEG, PNG, BCI, GIF and
WBMP.
The player can play audio files in the following
formats: MIDI, MP3, QCP, WAV, MMF, AAC,
IMELODY and PMD.
The player can play video files in the following
formats: MP4, 3GP, AMC and 3G2.
Press from the home screen and select
[Multimedia→ Media Player] to enter the
media player screen.
Multimedia player
Select <OK> to enter the play list and press
/ to select your desired playing file.
The MP3 playing screen shows as the below
figure:
MP3 Player description:
: The icon indicates the current volume
status, press to increase the volume
while press to decrease the volume or
select / to adjust volume.
/: Press and you can switch to play
or pause the current file.
: Press the key to fast reverse.
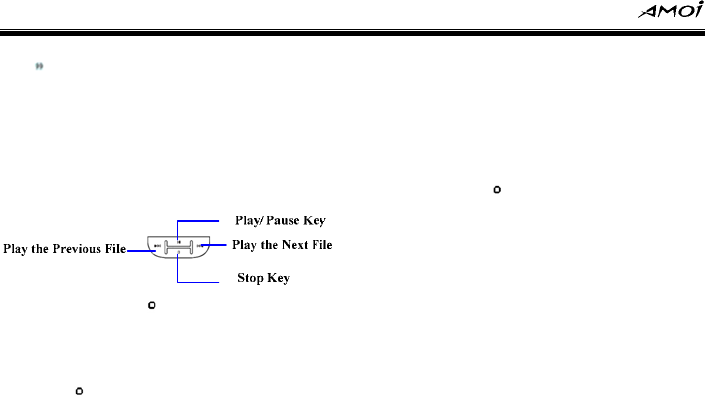
Multimedia
54
: Press the key to fast forward
Properties: Displays the properties of the
current MP3 file (Such as title, type, type,
size, length, and path).
Back: Returns to the last menu.
External screen player
In play list, press and you can have the
following options:
Create new list: You can create a new play
list with this menu. Select <OK>and
press , the following options are available:
[Add File], [Add Folder], [Add URL],
[Change Order], [Remove], [Remove All]
and etc.
Delete list: Deletes the current MP3 play
list.
Rename list: Renames the current MP3
play list.
Music player
You can play the audio files in [Resource
Manager], press to select [Add File] and you
can search for and play the desired audio files in
[Resource Manager].
Settings
You can set the current media player.
Picture display
The phone provides you with [2S], [5S], [10S],
[30S] and [Manual Switch] options to select.
Repeat
You can set the repeat mode for the playing file.
¾ Off: Plays no files in the play list repeatedly.
¾ One: Plays the selected file repeatedly.
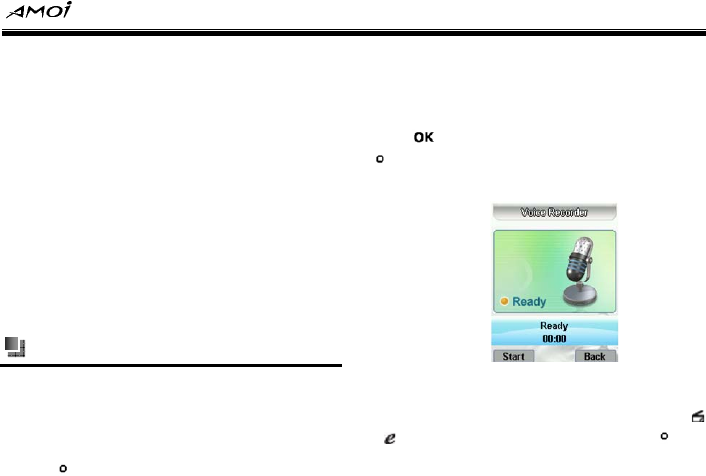
Multimedia
55
¾ All: Plays all the files in the play list
repeatedly.
Shuffle
You can select to play the files in play list one by
one or randomly by setting this menu as [On] or
[Off].
Flip settings
¾ Do not exit: If you select this option, the
phone will still on the media player screen
after flip.
¾ Exit: If you select this option, the phone will
quit the media player screen after flip.
Voice recorder
You can record or play your recorded files. The
recorded files will be saved in QCP format.
Record
Press from the home screen and select
[Multimedia→Voice Recorder→ Record] to
enter the voice recorder screen. Select<Start>
to begin recording and select <Back> to exit the
voice recorder screen. During recording,
press to pause the recording, while press
to stop it. The detail shows as the below
figure:
My records
This menu stores your audio records. Press
/ to select your desired file and press , and
the following options are available:
Multimedia
56
Delete: Deletes the selected recorded file.
Delete all: Deletes all recorded files in [My
Records].
Property: Displays the properties of your
selected file (such as title, date, size, format
and time).
Media player: Plays your selected
recorded file by using media player.
Save to
After finishing recording, you can select to save
the recorded file to [Phone] or [External
Memory].
Phone: Save the recorded file to the phone.
External memory: If you select this option,
you can store your recorded file to T-card
(Insert T-card firstly).
Games
The phone has two fun and interesting games
for you to play, and they are [Boxman] and
[Teris].
Press from the home screen and select
[Games] to enter the Games screen.
Boxman
Start: Begin to play the game.
Press / / / to move the boxman,
while pressing to restart the game and
pressing to quit.
Select level: Press / to select the
game level.
Resume: Continues to play the game you
played last time.
Set audio: Sets the volume for the game.
Exit: Exits the game and return to the last

Multimedia
57
menu.
Ter ix
[Teris] is a kind of typical game. Press to
change the shape and direction and press to
speed, while pressing to move left side and
pressing to move to the right side.
Start: Begins to play the game.
Setting: Press / to set [Volume] or
[Vibration] of the game.
Speed: Press / to set the game
speed.
Score: Press / to view the scores of
the five top players.
Help: Provides detailed operation method.
Exit: Exits the game and return to the last
menu.
Resource Manager
58
11. Resource Manager
The V870 can manage your phone’s resources
in a very practical way. It can download files
from the Internet and sort them. Similar files will
be stored in the same folder. You are allowed to
navigate through your phone to locate the
desired folders and files and view the detailed
information.
All data
This menu displays all images and files of the
phone. Press and you can have the following
options:
Info: Displays all information of the file
(including name, type, type, size, space,
date, path and copyright).
Send via MMS: Sends the selected file via
MMS.
Send via Bluetooth: Sends the selected
file via Bluetooth.
Delete: Deletes the selected file.
Delete all: Deletes all the files in
[Resource Manager].
Bluetooth files
This menu displays all Bluetooth files of the
phone. If there is no file in the folder, the phone
will display “No match file found” on the
screen.
My data
[My data] provides five folders for you and they
are: [My Photo], [My Video], [My Record], [My
Pictures] and [My Music]. Press / to
select your desired folder and press : (E.g.:
[My Photo])
Set wallpaper: Sets the selected image as
the wallpaper in standby mode.
Send via MMS: Sends the selected image
via MMS.

Resource Manager
59
Send via Bluetooth: Sends the selected
image via Bluetooth.
Rename: Renames the selected image.
Arrange: Arranges the images in [My
Photo] by name, date, size or set the
arrange manner as [Ascend] or [Descend].
Delete: Deletes the selected image.
Delete all: Deletes all the images in [My
Photo].
Move: Moves the selected image to
another folder.
Copy: Copies the selected image.
Info: Views the relative information of the
selected image, such as name, type, size
and etc.
My Vcards
[My Vcards] supports vcf. files and your phone
will list all Vcard files. In [My Vcard] list, press
and you will have the following options:
Send via MMS: Sends the selected file via
MMS.
Send via Bluetooth: Sends the selected
file via Bluetooth.
Rename: Renames the selected file.
Arrange: Arranges the files in [My Vcards]
by name, date, size or set the arrange
manner as [Ascend] or [Descend].
Delete: Deletes the selected file.
Delete all: Deletes all the files in [My
Vcards].
Move: Moves the selected file to another
folder.
Import: Saves the selected file to
[Contacts]
Copy: Copies the selected file.
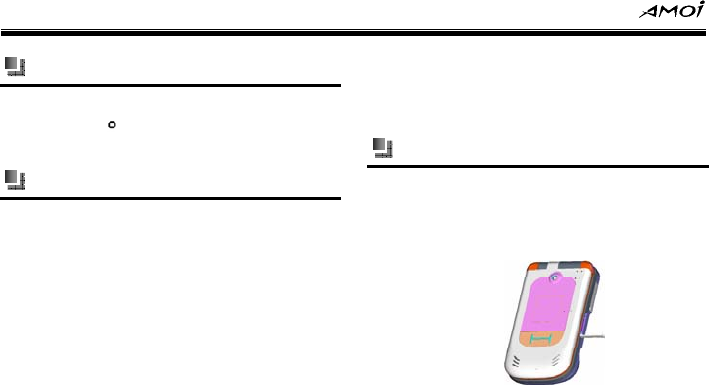
Resource Manager
60
Other files
This option is used to store the other files or
data, press to view the current folder
property.
External memory
You can view the files which have been saved in
external memory. If your phone supports T-card,
after inserting a T-card, you can view or copy
the files on T-card, thus to enlarge the phone
memory.
Info
You can view some properties of the current
T-card.
Format
After the T-card has been formatted, you will
lose all data stored in T-card forever.
T-card memory info
You can view the used memory and left memory
of the current T-card and
T-card
Installing T-card
(1) Open the T-card protective cover on the
right side of the phone.
(2) Make sure the side with golden contact of
T-card is facing down and insert the card
according to the arrow sign on it. It shows
as the below figure:
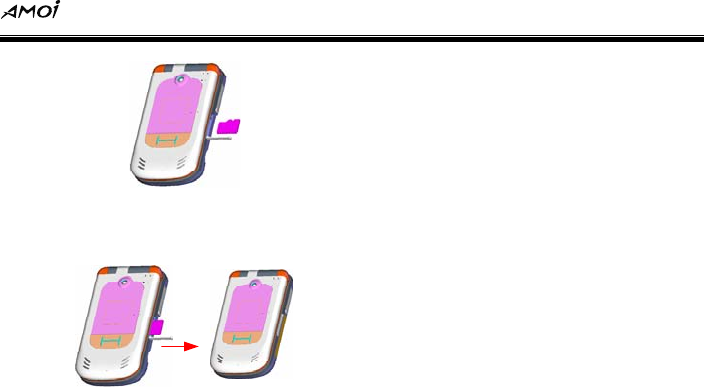
Resource Manager
61
(3) Push T-card gently until it is fixed in the
T-card slot and replace the card protective
cover. It shows as the below figure:
Browser
62
12. Browser
By using Browser, you can browse the WAP
service preset by your service preset by your
service provider and other WAP (Wireless
Application Protocol) sites on your phone.
Select [Menu→Browser] from the home screen
and press to enter this screen.
Home
Select this option and you will connect to the
preset or default Homepage.
Go to webpage
Input address
Inputs the network address you want to visit.
Last address
Records the latest webpage you have
accessed.
Past input
Records the previous WebPages you have
accessed.
Bookmark list
[Bookmark List] defaults to blank and you can
edit as you required. You can save the network
addresses which are frequently used in
[Bookmark List] and mark it with simple name.
Select a bookmark and connect to the
corresponding webpage or you can select
<Add> to add new bookmarks.
History
This option records the network addresses you
have every visited.

Browser
63
Page memo list
This option is used to save the WebPages you
have visited for browsing while offline next time.
Options
Home
You can edit the network address and set it to
Homepage.
View
Press / and you can set the view menu
as [Script], [Animation], [Images] or [Table].
Proxy
Use proxy: Sets whether to activate this
function by selecting [On] or [Off].
Proxy address: The default proxy address
is 166.179.37.129
Proxy port: This option defaults as 80.
User name: This means the user name that
visits the proxy server.
Password: This means the password that
visits the proxy server.
Cache
Cache mode: The phone provides you with
the following four cache modes: [Net Only],
[Net First], [Cache First] and [Cache
Only].
Clear diskcache: To increase the browsing
speed for accessing webpage, please clear
diskcache termly.
Cookies
Cookie mode: You can set the cookie
mode as [Accept All], [Reject All] or
[Prompt].
Delete all: If you select this option, the
phone will prompt you:” Delete all Cookie
info?” If you select <OK>, all cookies will be

Browser
64
deleted.
Certificates
The phone provides [Root Cert] and [CA Cert]
for you.
Push setting
This option can set whether receive Push
message, and the phone provides you with [Do
Not Rcv Msg] and [Receive Msg].
APN setting
You can modify or select the current GPRS
settings, such as [Access Point Name], [IP
Address], [Primary DNS] and etc.
Background music
If you select [On], the background music can be
played when you browse the webpage, or you
can select [Off] to close this function.
Reset
Reset all the settings in [Browser] to initial
value.
Toolbox
65
13. Toolbox
[Toolbox] prepares various wonderful and
convenient services for your work and life
Alarm
Press from the home screen and select
[Toolbox→ Alarm] to enter the Alarm clock
setting screen. There are three alarm clocks
provided for you. Press / and you can
select [Alarm 1], [Alarm 2] or [Alarm 3] as
required, while selecting [Cancel All] to cancel
this function.
Bluetooth
You can use your phone with a variety of data
communications applications. After entering the
main menu, select [Toolbox→Bluetooth] and
select <OK>:
Bluetooth modem: You can select
[Standby Mode] or [Disconnection Mode]
to switch on/off the Bluetooth function. It
would be better to switch the Bluetooth off if
you don’t expect any other devices to
connect to your phone.
FTP: The phone supports Bluetooth file
transmission, this means FTP server
function. You can select from [Search
Server] or [Standby Mode]. If you select
[Search Server] and select<OK>, you can
transmit the file to other Bluetooth devices
via the Bluetooth function; while selecting
[Standby Mode] to activate Bluetooth FTP
server.
Vcard: You can select [Search Server] or
[Standby Mode] to select whether to hide
or display your information to other
Bluetooth devices.
Bluetooth device: You can establish
connections with many Bluetooth-enabled
devices and manage them through this
option.
Info: Allows you to view the device

Toolbox
66
information of your phone, such as the device
address and device name
World time
This function allows you to check the standard
time in different areas.
Press / to select the cities in the time
zone and press to set local time as
systematic time in GSM network, while pressing
to set systematic time as local time in CDMA
network. The phone defaults as the time in local
city. For more details, please see the below
figure:
Calculator
With this function, you can use the phone as a
calculator practically and conveniently. The
calculator provides the basic arithmetic
functions: addition, subtraction, multiplication
and division. Press to delete a number,
while selecting <Clear> and you can return to
the initial state, shown as the below table:
Keys Function
+
-
*
/
=
Negative sign
Toolbox
67
A decimal point
Clear
Delete a number or
character
Stopwatch
You can use this function to time. Enter the
stopwatch, and you’ll have:
Start: Press to start timing while
press to exit the stopwatch screen.
Lap: After starting, press to make the
record of the lap time. Select <Stop> to
stop lapping, while selecting <Reset> to
reset the run time to zero and clear time list.
Calendar
Press from the home screen and select
[Toolbox→Calendar] to enter this screen.
Initially, the cursor appears on today’s date
according to your phone settings. You can move
the date cursor to the desired location by using
/ / .Enter [Options] and the
following options are available:
View: You can view [Calendar], [Call] or
[Anniversary] of your current selected
date.
New: You can add [Calendar], [Call] or
[Anniversary] to your selected date.
Delete today: You can delete [Calendar],
[Call] or [Anniversary] of your selected
date.
Delete all: You can delete all settings in
[Calendar].
Settings: You can set the saving period of
[Calendar], and select from [Never Delete],
Toolbox
68
[One Day], [One Week], and [One Month].
Notes
Allows you to create and save personal notes
and you can edit 10 notes at most. Select a note
and press , and you can have the operations
such as [View], [Edit], [Delete] and [Delete All].
PC sync
This function allows your phone to share the
info with the PC. You can manage the phone
resource through the computer. For more
information, please refer to the PC sync
software made for your phone.
Data service status
With this option, you can view the status of data
service. (E.g. GPRS)
.
Settings
69
14. Settings
Select [Menu→Settings] from the home screen
and press to enter this screen.
Using this menu to set or change display
settings, call settings, phone settings etc, so as
to personalize your phone to suit the way you
use it.
Clock
Press from the home screen and select
[Settings→Clock] and you can have the
following options:
Enter time: Sets the current time.
Time format: Sets the time format as [12
Hours] or [24 Hours].
Enter date: Sets the current date.
Date format: Sets the date format: as
[D/M/Y], [M/D/Y] or [Y/M/D].
Notice:
You can not enter time and date while in CDMA
network.
Mobile
You can set some parameters of the phone with
this menu, and the following options are
available:
Language: The phone provides only
[English] for you.
Contrast: You can press / to adjust
the contrast of [Main Display] and [Sub
Display].
Backlight time: Press / to set the
backlight time of the screen as [Always On],
[5S], [10S] or [20S].
Auto on/off: You can press to activate
Power On] or [Power Off] function and set
the time for auto power on or power off.
Settings
70
Sound
After entering the main screen, select
[Settings→ Sound] to enter the Sound screen.
You can set sound alert for all relative phone
functions.
Ring settings
Incoming tone: Select <Options> and
press , and you can press / to
select your desired incoming tone from
[Local Ring] or [Resource Manager].
Alarm tone: Select <Options> and
press , and you can press / to
select your desired alarm clock tone from
[Local Ring] or [Resource Manager].
Calendar tone: Select <Options> and
press , and you can press / to
select your desired calendar tone from
[Local Ring] or [Resource Manager].
Message tone: Select <Options> and
press , and you can press / to
select your desired message tone from
[Local Ring] or [Resource Manager].
MMS tone: Select <Options> and
press , and you can press / to
select your desired MMS tone from [Local
Ring] or [Resource Manager].
Alert type: You can press / to set
the alert type as [Vibration], [Ring Tone],
[Ring &Vibration] and [No Prompt].
Volume: You can press / to
increase or reduce the prompt volume of
ring.
Power on tone
Music: Select <Options> and press ,
and you can press / to select your
desired power on tone from [Local Ring] or
[Resource Manager].
On/ off: You can select [On] or [Off] to

Settings
71
switch on or switch off the [Power On
Tone].
Power off tone
Music: Select <Options> and press ,
and you can press / to select your
desired power off tone from [Local Ring] or
[Resource Manager].
On/ off: You can select [On] or [Off] to
switch on or switch off the [Power Off
Tone].
Key tone
Volume: You can press / to
increase or reduce the prompt volume for
[Key Tone].
On/ off: You can select [On] or [Off] to
switch on or switch off the [Key Tone].
Flip tone
Volume: You can press / to
increase or reduce the volume for [Flip
Tone].
On/ off: You can select [On] or [Off] to
switch on or switch off the [Flip Tone].
Prompt tone
You can press / to select the item which
needs to be prompted and press , after
selecting, select <Save> to save the setting.
The phone provides 4 items for you: [Access
Network Prompt], [Low Battery], [Minute
Beep] and [Call Connection].
Display
After entering the main screen, select
[Settings→Display] and you can enter the
Display screen.
Main screen
Press / and you can set the mainscreen
mode of your phone as [Text Mode], [Picture
Settings
72
Mode], [Animation Mode], [Clock Mode] or
[Calendar Mode].
Front screen
Press / and you can set the front screen
mode of your phone as [Clock Mode] or
[Picture Mode],
Theme style
Press / and you can set the display skin
of your phone as [Blue Style], [Platinum Style]
or [Softness Style].
Power on
Press / and you can set the power on
screen of your phone as [Text Mode], [Picture
Mode] or [Animation Mode].
Power off
Press / and you can set the power off
screen of your phone as [Text Mode], [Picture
Mode] or [Animation Mode].
GSM network settings
Select network
When you use the phone, the phone will
automatically select the network service. When
the phone is out of the service area or abroad,
you can manually select the appropriate
network.
Preferred network
This function allows you to add and edit the
network list, thus to define the searching
sequence. Select <OK> and select [Network
List] or [Add Network], so you can view the
network in the list or add new networks.
CDMA roam settings
This function needs to be supported by the
network, so you should register CDMA network
firstly. For more detail, please consult your
network service provider.

Settings
73
Security
By setting and modifying the passwords and
options of Security setting functions, you can
protect your phone from unauthorized use by
other people and restrict phone use.
After entering the main menu, select
[Settings→Security] and press to enter
the Security setting screen .Before entering,
you need to input password (the default
password is 1234).
PIN check
Your PIN (Personal Identification Number) code
is the password used to protect your SIM card
from unauthorised use by other people.
On: After activating PIN verification, you will
need to input your PIN code each time
when you switch on your phone.
Off: You can use the phone without
inputting your PIN code when you switch on
your phone.
Chang PIN
Only when the PIN check has been activated
can you alter the PIN code. Before changing,
you should input the old PIN password. (The
initial PIN is 1234)
Chang PIN2
The PIN2 code is supplied by the network
operator and used to realize some special
functions, such as cost rate. The PIN2 code
modification process is similar to that of the
normal PIN code. For more details, please refer
to “Change PIN”.
Chang phone password
You can set your desired new phone password
with this option. Before changing, you should
input the old password firstly (the initial
password is 1234).
Settings
74
Phone lock
If you set this function as [On], you’ll need to
input the phone password while switching on
the phone. Select [Off] to cancel the phone lock
function.
Fixed dialing
If the network service provider and your SIM
card support this function, you can limit the
outgoing telephone number. If this function is
set enabled, you need to input the PIN2 code.
On: Your mobile phone can only dial the
number in the fixed number list. (Except the
emergency calls),
Off: You mobile phone can dial any number.
Function protection
Select <Set> and press and you can set
function protection for contacts, SMS, outgoing
call and incoming call. After locking, you are
asked to “Input Password” while activating
these functions each time.
GPS settings
GPS Lock on/off: You can set this option
as [On] or [Off] to lock or unlock the GPS.
Privacy alarm: You can set this option as
[Active] or [Inactive] to enable privacy
alarm or not.
Caution
[PIN Check], [Change PIN], [Change PIN2] can
be available only when the SIM card has been
inserted in GSM network
Resetting
Master reset: Resetting your phone will
remove all the data from its memory which
include contacts, tasks, calendar,
appointments and more, and restore the
phone back to the factory default settings.

Settings
75
For this function, you’ll have to input the
phone password and the default phone
password is 1234.
Master clear: Select <OK> to input
password in the box, after inputting the
correct password, the phone will prompt:”
This will clear all data, continue?” Select
<OK> to restore your phone to the default
settings, while selecting <Back> to cancel
this function.

Phone Maintenance
76
15. Phone Maintenance
Mobile phones are very exact electronic devices
and must be looked after carefully. The following
advice can help you to look after your phone
and prolong its life.
The phone and its spare parts should be put
out of the reach of children.
Keep the phone dry. Rain, moisture or water
will corrupt its electronic circuitry. If your
phone does get wet, remove the battery
immediately and take the phone to the
nearest Amoi authorized service center.
Don’t put the phone in dusty places or this will
affect the everyday use of the phone.
LCD is a part of the phone which could be
easily damaged, so try to avoid dropping the
phone on the ground or any other form of
shock. Do not touch the screen with a sharp
object.
Don’t put the phone in a high temperature
environment. High temperatures will shorten
the life of electronic devices, destroy the
battery and destroy or melt a phone’s plastic
shell.
Don’t put the phone in a low temperature
environment. Otherwise, when the
temperature rises to normal temperature,
there will be moisture in the phone and this
will destroy the phone’s electronic circuitry.
Don’t throw, knock or shake the phone
intensely as this could damage the electronic
circuitry and structure of the phone.
Use soft cloth with soap water to clean the
phone. Do not use rough chemical or
abrasive cleaners to clean the phone as
these could damage the phone.
Don’t paint your phone, for fear the parts
which can be taken down will be pasted and
affect its normal use.
Please use a clean, soft cloth to clean the

Phone Maintenance
77
camera lens etc.
If you have to replace the phone’s antenna,
please only do so with a suitable
replacement. Using an unsuitable antenna or
spare parts will damage the phone and radio
system.
Troubleshooting
78
16. Troubleshooting
Please check to see if any problems you have
encountered while using your phone are
described below. If you were unable to find the
solution to a particular problem, please contact
one of our maintenance centres.
The phone can’t be switched on
Possible reason Solution
You are not holding
down for long
enough
Please hold it down
for at least 2 seconds.
The battery power
is used up
Please charge the
battery
Incorrect battery
installation
Please install battery
correctly
The phone is switched off
automatically
Possible
reason Solution
The phone has
been set to
power off
automatically at
a certain time.
If you don’t want this to
happen, please cancel
this command.
Low battery
power
Please charge the
battery
Troubleshooting
79
PIN/ PUN code lock
Possible reason Solution
Enter wrong
PIN Code( Personal
Identification Code)
or PUK Code
(Personal Unlocking
Key)
Please enter correct
password
Caution
1. If you enter an incorrect PIN code three times in
succession, many SIM and phone functions will be
locked. For more details, please refer to “Safety
Precautions”.
2. If you do not know the correct PIN code and
PUK code, please contact your operator or network
service provider.
Bad call quality
Possible
reason Solution
The signal
changes
suddenly
Maybe you are moving at
high-speed (e.g. on a train
or bus). Observe the
signal strength and select
the place with the
strongest signal to make a
call and ensure better call
quality.
The area does
not have a
good signal
Please move to a more
open area.

Troubleshooting
80
Can’t answer a call
Possible
reason Solution
The incoming
call filter
option has
been set
Please cancel incoming
call filter according to
requirements
The call
forwarding
option has
been set
Please cancel call
forwarding according to
requirements.
The call
barring option
has been set
Please cancel the function
of incoming call barring or
roam incoming call
barring.
Can’t make a call
Possible reason Solution
The phone is
switched off
Please turn on the
phone.
You are outside
the network
service area
Please check the
network area.
The SIM card has
been incorrectly
inserted
Please check whether
your SIM card can be
used normally.
Call barring has
been set
Please cancel the call
barring option
according to your
requirements.
Troubleshooting
81
The call volume is too low
Possible
reason Solution
The call volume
has been set
too low
Please increase the call
volume.
The person you are calling
cannot hear your voice
Possible reason Solution
Call status is set
to mute
Please turn off the
mute function on the
call menu.
The microphone
is too far from the
sound source
Please put the phone’s
microphone closer to
your mouth.
The incoming call doesn’t ring
Possible
reason Solution
The phone
selects silent
mode
Please reset the alert type
in [Ring Settings] as
[Ring] or [Ring&
Vibration].
The ring
volume is set
too low
Please increase the
volume
The call
forwarding
option has
been set
Please cancel call
forwarding according to
requirements.
Troubleshooting
82
The battery can’t be charged
Possible
reason Solution
The battery is
worn out and
the charging
time takes too
long
Please charge when the
phone prompts low
battery.
The battery
doesn’t
connect well
to the phone
Please ensure the battery
has been inserted
correctly.
The charger
doesn’t
connect to the
phone
Please ensure that the
interface between the
charger and the phone is
correctly connected, and
the charger icon should
appear on the screen.
Battery or Please contact one of our
charger has
been
damaged
maintenance centres.
The
surrounding
temperature is
too low or too
high
Please make sure the
phone is charged in a
normal temperature.
Troubleshooting
83
Can’t display network
Possible
reasons Solutions
The SIM card
has been
incorrectly
installed
Please refer to the SIM
card installation
method.
The contact
between the SIM
card and phone
is dirty
Please ensure the
contact between the
SIM card and phone
remains clean.
The SIM card
does not work
Please check whether
the SIM card is out of
date.
The network is
very weak
Please move to a place
with a strong signal to
use the phone
The phone does not recognise
the T- card
Possible
reason Solution
The T-card
has been
incorrectly
inserted
Please insert the T-card
correctly according to
instructions in the user
manual.
The T-card
has been
damaged
Please replace the T-card
Troubleshooting
84
Browser can’t connect to
Internet normally
Possible
reason Solution
The network
service
provider don’t
provide the
service or you
haven’ apply
for this service
Please contact with your
network service provider
and consult information
about how to apply for and
use these services
Haven’t set
correctly
About more details about
setting, please refer to
“Options” on P64
Lack of space
Possible
reason Solution
The resource
manager file is
taking up too
much space
Please delete
unnecessary files.
The browser’s
history records
are taking up
too much
space
Delete unwanted history
records.
Multi-message,
taking up too
much space
Please delete unwanted
messages and e-mails.

Safety Precaution
85
17. Safety Precaution
Usage environment
Please remember to obey the necessary
rules and regulations whenever use your
phone. This will help keep you safe and
respect your environment.
Switch off your phone when close to petrol
stations, bunkers, chemical factories or
explosive areas and adhere to any safety
signs and instructions there. Breaking any
rules may cause explosion or injury.
Using the phone in plane can cause
interference and danger to an aircraft
navigation system and network. You must
switch off your phone before boarding and
make sure your phone is switched off during
the whole flight.
Please place the phone somewhere safe
and don’t put it on a seat or in places where
it could fall and break. In order to ensure
safe driving and avoid road accidents,
please don’t use the phone when driving. If
you must use it, please use the phone’s
hands-free or park at roadside before
making or answering a call.
Medical devices
Please switch off your phone in areas near the
electronic medical equipments that obviously
desire to switch your phone off (.such as heart
pacemakers, hearing aids and etc). Most
medical devices can shield the phone’s RF
signal, but some can’t. If you have any
questions or need to find out more, please
consult your doctor or medical device
manufacturer.
Pacemaker
Pacemaker manufacturers advise the distance
between your phone and heart pacemaker to be
at least 6 inches (15.3 cm), or the phone could

Safety Precaution
86
interfere with the pacemaker.
The personnel who wears pacemaker
should do the followings:
Should always keep a distance between the
phone and pacemaker of more than 6
inches (15.3 cm) when the phone is
switched on.
Should not carry the phone in a breast
pocket
Should listen to the phone using the ear on
the opposite side of the body to the
pacemaker.
Caution:
If you are unsure as to the level of interference,
please switch off the phone at once and consult a
doctor immediately.
Hearing aids
Phones will cause some interference to some
hearing aids. If there is any interference, please
get in touch with the manufacturers of the
hearing aid immediately.
Emergency calls
As the phone uses a radio signal, wireless and
ground communication network and personal
settings functions like other phones, it is
impossible to ensure your phone can be
connected successfully in any situation, so
please don’t rely purely on your phone as the
only means of notification in cases of
emergency (such as medical first aid )
Making an emergency call
(1) If your phone is switched off, please turn
on your phone and check whether the
network signal is strong enough.
Safety Precaution
87
(2) Input the local first aid number correctly
(such as 112), different areas have
different first aid numbers.
(3) Please press the call key to call.
Caution:
While making an emergency call, you should try
to provide all important information correctly. At
this time, the phone may be the only
communication tool, so don’t end the call without
permission.
Password access
Your phone and SIM card can be protected by a
password, to prevent others using it illegally.
PIN code
This is personal identification code which is
used to protect the SIM card from unauthorised
use by other people. Generally, the PIN code
and SIM card are provided together. After
activating the PIN code, you can use the phone
normally by correctly inputting your password
each time.
Caution:
If you input your PIN code incorrectly three times
in succession, the SIM card will be locked. You will
need to input the PUK code to unlock it. (If you
don’t have a PUK code, please contact your
operator and SIM card provider for this
information. Please input all characters).
PIN2 code
This is the password which activates the special
SIM card functions. Usually, the PIN2 code and
the SIM card will be provided together. If you
incorrectly input the PIN2 code three times in
succession, it will be locked and you will need to
input PUK2 to unlock it again.
Safety Precaution
88
PUK code
This is used to unlock the PIN code. If you
incorrectly input the PUK code ten times in
succession, then the SIM card cannot be used
again. Usually the PUK code and SIM card are
provided together. If you lose PUK code or it
isn’t supplied with SIM card, please contact with
your network operator or SIM card provider.
PUK2 code
This is used to unlock the PIN2 code. Usually
the PUK2 code and the SIM card are provided
together. PUK2 can modify the locked PIN2
code. If you incorrectly input the PUK2 code ten
times in succession, you will not be able to
access some of the functions. Please apply to
your operator for a new card. The PUK2 code
cannot be changed. If you lose it, please contact
your service provider.
Note about charging the battery
The phone provides power by using a lithium
battery. The standby time and call time will be
influenced by the system’s environment and
phone settings.
Please use the battery and charger
provided by the Amoi Company. Amoi will
take no responsibility for damage caused by
using the wrong battery or charger.
Caution:
Generally, the charging time is 2-5 hours
according to the current status of the phone
(whether switch on the phone, make a call and etc)
Don’t use wet hands to touch the phone
battery or charger while charging.
Caution:
To make the new battery achieve the best capacity,

Safety Precaution
89
please charge and discharge the phone for twice or
three times. As for the first several times, you
should charge the battery for at least 10 hours in
succession. Please charge the phone due to no
power and switch off the phone automatically.
Battery information and care
Never use any battery that has been
damaged.
While using the phone near network station,
the power consumption is very little.
Therefore, the call and standby time
depends on greatly by the signal strength of
honeycomb network and the parameters
set by network operator.
The battery charging time will depend on
the amount of electricity remaining and the
type of battery and charger used. When the
operation time (talk time and standby time)
is noticeably shorter than normal, it is time
to buy a new battery.
Only use batteries that are compatible with
your phone and only recharge your battery
with a compatible charger. If a charger is not
in use, disconnect it from the power source.
Do not leave the battery connected to a
charger for more than a week, as
overcharging may shorten its life.
Do not connect the anode and cathode of a
battery the wrong way round.
Do not leave the battery in places with too
high or too low temperature (such as block
the battery in a car during summer or
winter), or the battery capacity will be
reduced and battery life will be shortened.
Always try to keep the battery at room
temperature.
Do not short-circuit the battery. This may
damage the electronic core or the protected
circuit inside the battery. Accidental
short-circuiting may occur when a metal

Safety Precaution
90
object (coin, clip or pen) causes a direct
connection between the anode and cathode
of the battery, for example when you carry a
spare battery in a pocket or bag.
Short-circuiting the terminals may damage
the battery or the object causing the
short-circuiting. Therefore, please store the
battery carefully and on its own.
Don’t burn your phone battery or treat it as
common rubbish. Please adhere to the
local environmental policy in order to avoid
endangering life and causing environmental
damage, and recycle your batteries in time.
If your phone, battery or other charging
device leaks due to carelessness, you must
not put it inside any piece of equipment that
heats up (such as drier, microwave
etc.).The phone or other products may go
wrong, or this could even cause the phone,
battery or other charging device to burn,
expand and explode.
Please deal with the useless old battery
according to the relative introduction.
Amoi will take no responsibility for any direct or
indirect damage caused by user error.
Note about using spare parts
Please put all spare parts (such as SIM card,
memory card, battery etc) out of reach of
children, in case danger occurs.
Please do switch off the phone and
disconnect the phone and charger before
you removing the battery from the phone.
As the phone’s spare parts are not
waterproof, please keep all spare parts dry.
You should pull out the plug of any spare
part correctly when you switch off the power,
don’t drag the power line forcibly.
If the phone, battery, and charger don’t operate
normally, ally, please contact one of our
maintenance centres with a qualified repair
service as soon as possible.

Safety Precaution
91
Other safety information
When you are not using your phone, it is
advisable to switch it off, remove the battery
to save energy and avoid radicalising the
phone.
If you use earphones to listen to music or
watch a film, please don’t turn the volume
up too high as this could damage your
hearing.
You can’t disassemble the terminal and
battery of the phone unless the technical
personnel.
For body worn operation this phone has been
tested and meets FCC RF exposure guidelines
when used with an accessory that contains no
metal and that positions the handset a minimum
of 1.5 cm from the body. Use of other
accessories may not ensure compliance with
FCC RF exposure guidelines.”

Index
92
Index
-B-
Battery
Charging, 7
Installing, 6
Power display, 8
Browser, 63
-C-
Call
Additional dialing
information, 15
Functions, 16
Making, 12
Receiving, 15
Calls
GSM call cost, 41
Log, 40
Settings, 42
Speed dial, 46
Timer, 41
Contacts
Adding, 25
Groups, 25
Info, 28
List, 24
Management, 26
Searching, 24
-H-
Home screen, 2
-I-
Input mode
English, 20
Input screen, 19
Letter, 21
Number, 21
Switching, 19
Input modes, 18

Index
93
-J-
Java, 47
-M-
Menu
Entering, 23
Message
CDMA voice, 39
MMS, 35
SMS, 30
Wap push, 39
Multimedia
Camera, 48
Games, 57
Media player, 54
Voice recorder, 56
-P-
Phone maintenance,
77
Power on/ off, 9
Programs, 4
-R-
Resource manager,
59
-S-
Safety notice, VIII
Safety precaution, 86
Settings
CDMA roam, 74
Clock, 70
Display, 72
GSM network, 73
Mobile, 70
Resetting, 76
Security, 74
Sound, 71
-T-
T-card
Installing, 61
Toolbox
Alarm, 66

Index
94
Bluetooth, 66
Calculator, 67
Calendar, 68
Data service status, 69
Notes, 69
PC sync, 69
Stopwatch, 68
World time, 67
Troubleshooting, 79
-U-
Using shortcut keys,
10
-Y-
Your phone
Flip view, 1
Front view, 1
Rear view, 2
Side view, 2
Using, 6