AMS Diffusion CB710 Car Audio User Manual
AMS DIFFUSION Car Audio Users Manual
Users Manual
NL-4
IT- 5
ES-6
DA-7
DE-3
FR-2
EN-1
OWNER'S MANUAL
CB710 DAB BT
PL- 8
9482CMB747NA338A说明书-1-EN.indd 1 2014-10-28 13:44:28
EN-1
Safety Information
Thank you for purchasing the player. Please
read this manual carefully before operating
and reserve it for future reference.
— — — — — — — — — — — — — — — — — — ——
WARNING:
Toreducetheriskofreorelectricshock,
DO NOT expose this product to rain or
moisture.
DO NOT open covers and do not repair
yourself. Consult the dealer or an
experienced technician for help.
— — — — — — — — — — — — — — — — — — ——
PRECAUTIONS
Use only in a 12-volt DC negative-ground
electrical system.
Disconnect the vehicle's negative battery
terminal while mounting and connecting
the unit.
Whenreplacingthe fuse,besuretouse
one with an identical amperage rating.
Using a fuse with a higher amperage rating
may cause serious damage to the unit.
DO NOT attempt to disassemble the unit.
Laser beams from the optical pick up are
dangerous to the eyes.
Make sure that pins or other foreign objects
do not get inside the unit; they may cause
malfunctions,orcreatesafetyhazards
such as electrical shock or laser beam
exposure.
If you have parked the car for a long
timeinhotorcoldweather,waituntilthe *InadditiontoordinaryCDs,thisunitcanplay
back a CD-R/CD-RW/MP3/CD-TEXT.
temperature in the car becomes normal
before operating the unit.
Keep the volume at a level at which you
can hear outside warning sounds (horns
sirens,etc.).
— — — — — — — — — — — — — — — — — — ——
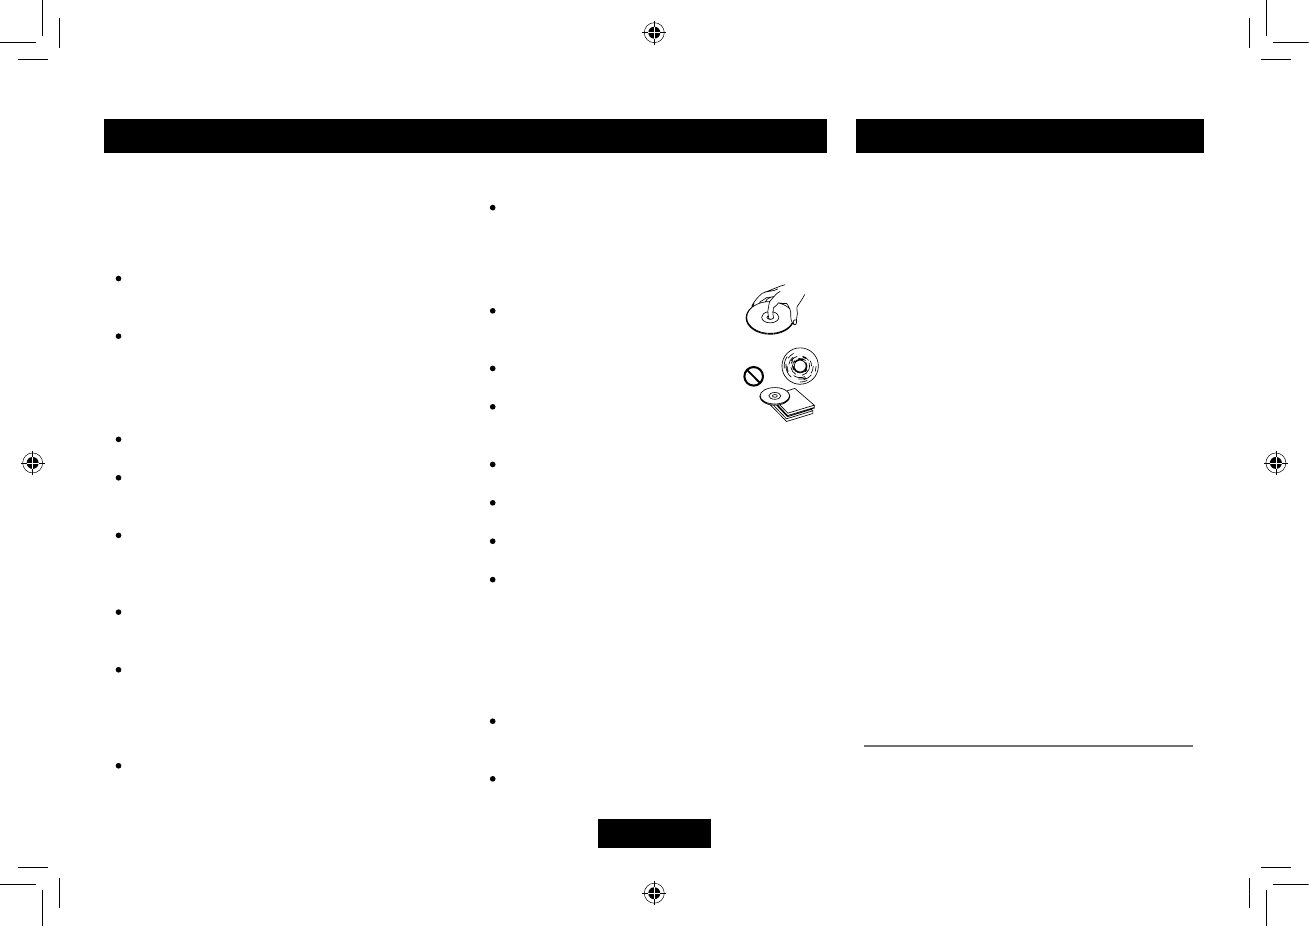
DISC NOTES
Playing a defective or dusty
CD can cause dropouts in
sound. Hold CDs as illustrated.
Do not touch the unlabelled
side.
Donotattachanyseal,labelor
data protection sheet to either
side of a disc.
Do not expose a CD to direct sunlight or
excessive heat.
Wipe a dirty CD from the center outward
with a cleaning cloth.
Neverusesolventssuchasbenzineor
alcohol.
Thisunitcannotplay3-inch(8cm)CDs.
Never insert a 3-inch CD contained in the
adapter or an irregularly shaped CD. The
unitmaynotbeabletoejectit,resultingin
a malfunction.
— — — — — — — — — — — — — — — — — — ——
BEFORE OPERATION
Donotraisethevolumelevel toomuch,
asthiswillblockoutside sounds,making
driving dangerous.
Stop the car before performing any
complicated operation.
Contents
Safety Information ........................................ 1
Panel Controls .............................................. 2
PanelControls(Keypad) .............................. 3
General Operation ........................................ 4
Radio Operation ........................................... 4
RDS(RadioDataSystem)............................ 5
USB/SD/MMC Operation .............................. 6
MP3/WMA Playback .................................. 6-8
Menu Function ........................................... 8-9
Bluetooth Operation................................. 9-10
Password entered:...................................... 11
Electrical Connections ................................ 11
Installation Guide ........................................ 12
Anti-Theft System .................................. 12-13
Troubleshooting .......................................... 13
Specications ............................................. 14
FCC Statement ........................................... 15
9482CMB747NA338A说明书-1-EN.indd 1 2014-10-28 13:44:28
EN-2
Panel Controls
Press PWR button to turn on the unit.
1. - Mute
- Press more than 2 seconds to power off.
2. - Rotate to adjust volume.
3. - Press to select VOLUME/BASS/TREBLE/
BALANCE/FADER,rotatetheknobto
adjust.
- Long press to enter system menu.
4. - Radio
-Discplay(whendiscisin)
-SD/MMCcard(whenSD/MMCinserted)
-USB-drive(whenUSBinserted)
- Aux-in
- BT MUSIC
- Long press to disconnect /reconnect
bluetooth phone.
5. - Radio band switch:
FM1->FM2->FM3->MW1->MW2->LW
- Dial/Receive call
7. - Radio preset scan
-Radioautopreset(longpress)
- MP3/ WMA search
- Call off / cancel
8. - Display switch
-Timeadjust(longpress)
9. Radio tune
- Track skip/seek
10.- Aux-in jack
11.- USB connector
12.- Panel open
13.- Press to enter RDS PTY mode and use
number button 1~6 to select RDS PTY
stations.
14.- Press to turn RDS AF on/off.
- Long press to turn RDS TA on/off.
- Long press to re-dial.
-Whiletalking,presstotransferthecall.
6: - Disc playback
Button 1: - Play/Pause
-Topplay(pressmorethan2sec.)
Button2:-Introplay(10sec.)
Button 3: - Track repeat play
Button 4: - Track random play
Button 5: - MP3 folder down (If there are
morethan1folders)
-MP3track-10down(longpress)
Button 6: - MP3 folder up (If there are more
than1folders)
-MP3track+10up(longpress)
Radio preset 1~6
- Press to tune in a preset station.
- Hold for more than 2 seconds to store
station.
1
2
345
11
13 12
7
14
8
10
9
6
FF
9482CMB747NA338A说明书-1-EN.indd 2 2014-10-28 13:44:29
EN-3
Panel Controls (Keypad)
Radio preset
Press each number button 1 ~ 6 more than 2
secondstostorecurrentstation,pressbriey
to recall stored station.
— — — — — — — — — — — — — — — — — — ——
Disc playback
Pressnumberbutton1topause,pressagain
to resume play.
Press number button 2 to intro play track on
thediscfor10seconds each,pressagainto
intro play track in current folder for 10 seconds
each,pressagaintoendscanandplaythe
selected track.
Press number button 3 to repeatedly play
thecurrenttrack,pressagaintorepeatedly
playalltracksincurrentfolder,pressagainto
resume normal play.
Press number button 4 to randomly play the
currenttrack,pressagaintorandomlyplayall
tracksincurrentfolder,pressagaintoresume
normal play.
Press number button 5 or 6 to previous or next
folder.(iftherearemorethan1folders)
Press and hold 5 or 6 more than 2 seconds to
goto -10 down or +10 up track.
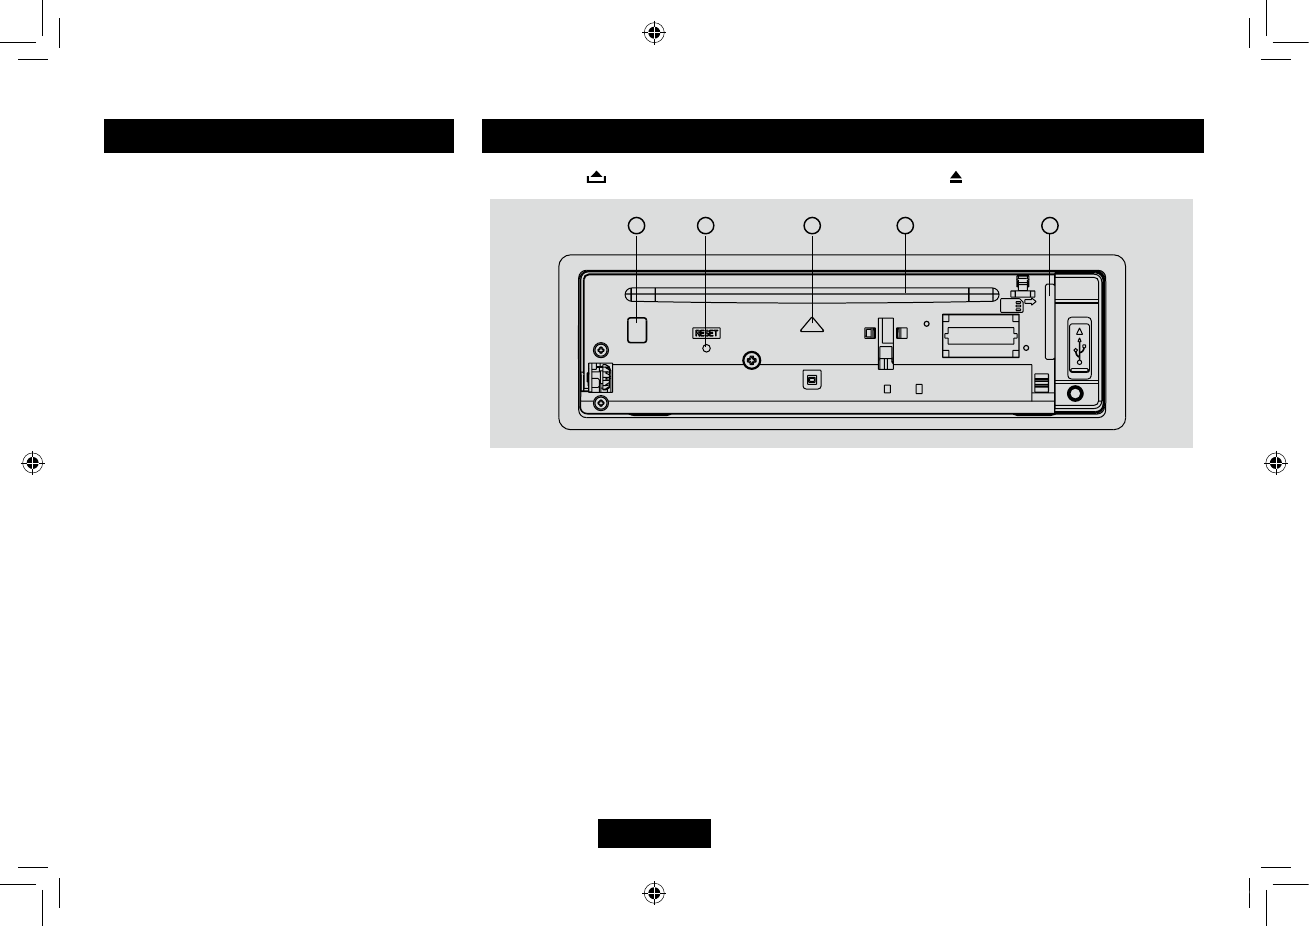
Panel Controls (Other Instructions)
Press the button to open the panel and press to eject the disc.
1.Disceject(ifthereisadiscintheunit)
2.Resethole(Note:PressingtheRESETholewillerasetheclocksettingandstoredstations.)
3.Panelstatusindication:Lightsupwhenyouipdownthepanel;twinkleswhenyouremovethe
panel.
4.Slot,Insertthedisc
5. SD/MMC card slot
134
25
9482CMB747NA338A说明书-1-EN.indd 3 2014-10-28 13:44:30
EN-4
Display Selector (DISP)
This unit can display either the clock time
or radio frequency/ CD player functions.
Ordinarily,theradiofrequencyorCD
playertrackindicationisdisplayed,butthe
unit will display the time when the DISP
button is pressed. The time will display for
approximately 5 seconds then return to the
radio/CD player function display.
— — — — — — — — — — — — — — — — — — ——
Setting the Clock
The correct time of day can be set by pressing
and holding the DISP button.
Tosettheclock,performthefollowingsteps:
1. Turn the vehicle ignition and radio on.
2. Press the DISP button to view the clock.
3.Withtheclockvisibleonthedisplay,press
and hold the DISP button until the time
displayashes.
4.Within5seconds,rotatetheVOLknob
counter clockwise to adjust the minutes to
thedesiredsetting.Tochangethehour,
rotate the VOL knob clockwise to adjust the
hour to the desired time.
5.PressDISPbuttontoconrmandexitclock
setting.
General Operation
Power On/Off Button
Press the PWR button to turn the unit on when
the vehicle ignition switch is on. Long press to
turn the unit off.
— — — — — — — — — — — — — — — — — — ——
Adjust Volume level
Rotate the VOL knob to adjust volume
level. Rotate it clockwise to increase and
anticlockwise to decrease the volume.
— — — — — — — — — — — — — — — — — — ——
Mode Button (SRC)
Press the SRC button to change between
Radio,DISC(whendiscisin),USB(when
USBconnected),SD/MMCcard(whencard
inserted),AUXplay,BTaudio.
— — — — — — — — — — — — — — — — — — ——
Disc Load/Eject
Load: Press toipdownthepanel.Insert
the disc into the slot .
Eject: Press toip downthepanel.Press
to eject the disc .
— — — — — — — — — — — — — — — — — — ——
Auxiliary Input
To access an auxiliary device:
1. Connect the portable audio player to the
AUX interface.
2. Press the SRC button to select Aux-In
mode.
3. Press SRC again to cancel Aux-In mode
and go to the next mode.
Radio Operation
Band Switch
Duringradioplay,pressthe BANDbuttonto
choosebetweenthreeFM,twoMWandLW
bands.Theindication“MW”,“FM”or“LW“
appears on the display panel according to
your selection.
— — — — — — — — — — — — — — — — — — ——
TUNE
MANU SEEK: Press or to tune step by
step.
AUTO SEEK: Press or more than 2
seconds to seek automatically.
— — — — — — — — — — — — — — — — — — ——
Store Station Manually
Press button 1 - 6 more than 2 seconds to
store current station.
Press1-6brieytorecallpresetstation.
— — — — — — — — — — — — — — — — — — ——
Store Station Automatically
Press AMS button more than 2 seconds to
seek and save the 10 strongest stations in
current band automatically.
Press AMS button briefly to intro play the
preset stations.
9482CMB747NA338A说明书-1-EN.indd 4 2014-10-28 13:44:30
EN-5
RDS service availability varies with areas.
Please understand if RDS service is not
availableinyouarea,the followingserviceis
not available.
— — — — — — — — — — — — — — — — — — ——
RDS Basics
AF(AlternativeFrequency): Whentheradio
signalstrengthispoor,enablingtheAF
function will allow the unit to automatically
search another station with the same PI
(programidentication)asthecurrentstation
but with stronger signal strength.
PS(ProgramServicename):The nameof
station will be display instead of frequency.
AF Mode:
AF on: AF function is activated.
AF off: AF function is disabled.
Remark: AF indicator on LCD will flash until
RDS information is received. If RDS service
isnotavailableinyourarea,turnofftheAF
mode.
REG Mode: Press AF on the remote control
for more than 2 seconds to switch REG mode
on and off.
REG on: AF function will implement the
regionalcode(ofthePI) andonlystationsin
the current region can be tuned automatically.
REG off: AF function will ignore the regional
code(ofthePI)andstationsintheother
regions can also be tuned automatically.
Trafc Announcements
Some RDS FM stations periodically provide
trafcinformation.
TP(TrafcProgramIdentication)
Broadcastingoftrafcinformation
TA(TrafcAnnouncementsIdentication)
Radioannouncementsontrafcconditions
TA Mode: Hold TA/AF button on the panel or
press TA button on the remote control to turn
on/offTAmode.WhenTAmodeisturnedon,
the TA indicator will blink.
Whentrafcannouncementisreceived,theTA
indicator will display. The unit will temporarily
switch to the tuner mode (regardless of the
currentmode)andbeginbroadcastingthe
announcement at TA volume level. After the
trafficannouncementisover,itwillreturnto
the previous mode and volume level. When
TAisturnedon,SEEK,SCAN,AMSfunction
can only be received or saved when traffic
programidentication(TP)codeisreceived.
— — — — — — — — — — — — — — — — — — ——
EON (Enhanced Other Networks)
WhenEONdataisreceived,theEON
indicator lights and the TA and AF functions
are enhanced.
TA: Traffic information can be received from
the current station or stations in other network.
AF: The frequency list of preset RDS stations
is updated by EON data. EON enables the
radio to make fuller use of RDS information.
It constantly updates the AF list of preset
stations,includingtheonethatcurrentlytuned
into. If you preset a station around the area at
yourhome,youwilllaterbeabletoreceivethe
samestationatanalternativefrequency,or
anyotherstationservingthesameprogram,
EON also keeps track of locally available TP
stations for quick reception.
— — — — — — — — — — — — — — — — — — ——
PTY Reception (Program Type)
RDS FM stations provide a program type
identicationsignal.
Example:news,rock,info,sport,etc.
PTY Mode: Press PTY button to enter the
MUSICtype,theprevioustypeisshown.
Press PTY again to enter SPEECH type. At
MUSICtypeorSPEECHtype,usebuttons1
- 6 to select the desired program type. The
selected PTY type is shown and searching
starts if no other function is selected for 2
seconds. If there is no corresponding program
type,NOPTYisshownandtheunitwillreturn
to normal mode.
RDS (Radio Data System)
9482CMB747NA338A说明书-1-EN.indd 5 2014-10-28 13:44:30
EN-6
1. Loading SD/MMC card
Press buttonto openthepanel,insert
anSD/MMCcardintotheslot,withthefront
side at left. The unit will play the music
automatically.
2. Taking out SD/MMC card
Push SRC button and switch to non CARD
mode,slightlypressSD/MMCcard,takeout
the card after it popped out.
3. Loading USB equipment
Openthecap,insert theUSBintothe
connector and the unit play the music in the
USB storer automatically.
4. Taking out USB equipment
Push the SRC button and switch to non
USBmode,thentakeofftheUSBstorer,
close the rubber cap.
USB/SD/MMC Operation
USB/SD/MMC Notes
USBfunctions(ashmemorytype)MP3music
play
1. SD/MMC card support.
2.USBflashmemory2in1(SD/MMC)
support.
3. Fat 12/fat 16/fat 32 is possible.
4. File name : 32 byte/dir name : 32 byte/tag
name : 32 byte
5.Tag(ID3tagver2.0)
- title/artist/album : 32 byte support.
6. Multi card reader not support.
7. USB 1.1/2.0 support (It can not support
USB2.0speed.Just,getthesamespeed
withUSB1.1).
Not all kinds of USB devices are compatible
with the unit.
MP3/WMA Playback
Pause
Press the pause button to suspend play.
Press the button again to resume play.
— — — — — — — — — — — — — — — — — — ——
Track Select
Press the or for less than one second to
advancetotheprevious/nexttrack,orformore
than 2 seconds to fast forward or fast reverse
through the track. Playback begins when the
button is released.
— — — — — — — — — — — — — — — — — — ——
Intro Scan (INT)
• PresstheINTbuttononcetoselectINT
ONandplaytherst 10secondsofeach
track.
• PressINTagaintoselect“INTFOLD”and
play the first 10 seconds of each track in
the current folder.
• Toturnoffintroscanandplaythecurrent
track,presstheINTbuttonagain.
— — — — — — — — — — — — — — — — — — ——
Repeat (RPT)
• Press theRPTbuttononcetoselectRPT
ONandrepeatedlyplaythecurrentle.
• PressRPTagaintoselectRPTFOLD
andrepeatedlyplayalllesinthecurrent
folder.
• Toturnoffrepeatplay,presstheRPT
button again.
9482CMB747NA338A说明书-1-EN.indd 6 2014-10-28 13:44:31
EN-7
Maximum numberofdirectorylevelis8,
including the root directory. Maximum number
oflesandfoldersperdiscis256.
The unit may not play tracks in the order of
track numbers.
The unit plays only the audio tracks if a disc
containsbothaudiotracksandMP3les.
Whenplayingadiscof8kbpsorVBR*,the
elapsed playing time in the display window
will not be correct and also the intro play may
not function properly.
*VBR: Variable Bit Rate.
— — — — — — — — — — — — — — — — — — ——
Note on creating your own CD-Rs or
CD-RWs containing MP3 les
Toenjoyhighqualitysound,werecommend
converting to MP3 files with a sampling
frequencyof44.1kHzandaxedbitrateof
128 kbps.
DONOTstoremorethan256MP3 lesper
disc.
ForISO9660-compliantformat,the
maximum allowable depth of nested folders
is8,includingtherootdirectory(folder).
WhenCD-Rdiscisused,playbackispossible
onlyfordiscswhichhavebeennalized.
Make sure that when MP3 CD-R is burned
that it is formatted as a data disc and NOT as
an audio disc.
You should not write non-MP3 files or
unneededfoldersalongwithMP3lesonthe
CD-R otherwise it takes a long time until the
unit starts
Press MENU button to play the selected song/
le.
— — — — — — — — — — — — — — — — — — ——
MP3 Character Search
• PressAMSbuttonthreetimesto selectthe
"CHAR SCH" mode.
• PressMENUbuttonand"A"display.
• Ifyouwanttoselectatracknamebeginning
withadifferentletter,rotatetheknobtoselect
aletter,thenpressMENUbuttontoconfirm.
Then"A"ashesatthenextplace,select2nd
and other character of the desired track name
as steps above.
• PressMENUbuttonmorethan2secondsto
play your desired track.
— — — — — — — — — — — — — — — — — — ——
MP3 Overview
MP3 is short for MPEG Audio Layer 3 and
refers to an audio compression technology
standard.
This product allows playback of MP3 files on
CD-R or CD-RW discs.
The unit can read MP3 files written in the
format compliant with ISO 9660. However it
does not support the MP3 data written by the
method of packet write.
TheunitcannotreadanMP3lethathasale
extension other than ".mp3".
Ifyouplayanon-MP3lethat hasthe".mp3"
extension,youmayhearsomenoise.
Inthismanual,werefer towhatarecalled
"MP3 file" and "folder" in PC terminology as
"Track"and"Album",respectively.
Random (RDM)
• PresstheRDMbuttononcetoselectRDM
ON and randomly play all files on the
source.
• PressRDMagaintoselectRDMFOLD
and randomly play all files in the current
folder.
• Toturnoffrandomplay,presstheRDM
button again.
— — — — — — — — — — — — — — — — — — ——
MP3 Track Search
• PressAMSbuttontoselectthe"TRKSCH"
mode.
• PressMENUbuttonandLCDdisplaywill
show "TRK 001".
• RotatetheVOLknobtoselecttherstdigit
andpressMENUbuttontoconrm.
• RotatetheVOLknobtoselectthetenth
digitandpresstheMENUbuttontoconrm.
• RotatetheVOLknobtoselectthe
hundredth digit and press the MENU button
toconrmandplaythetrack.
— — — — — — — — — — — — — — — — — — ——
MP3 File Search
• PressAMSbuttontwicetoselectthe"FILE
SCH" mode.
• PressMENUbuttontoenter.
• RotatetheVOLknobtoselect thedesired
directory/song.
• PressMENUbuttontoviewtheles inside
the selected directory.
• RotatetheVOLknobtoselectthesong/le.
MP3/WMA Playback
9482CMB747NA338A说明书-1-EN.indd 7 2014-10-28 13:44:31
EN-8
TA VOL
Rotate the knob to adjust TA volume.
— — — — — — — — — — — — — — — — — — ——
RETUNE mode
RETUNE mode: Rotate the knob to choose
RETUNE-S or RETUNE-L.
RETUNE-S or RETUNE-L is time length
selection of TA SEEK retune interval.
RETUNE-S:short,TASEEKretuneintervalis
45 seconds.
RETUNE-L:long,TASEEKretune intervalis
180 seconds.
Remark: RETUNE mode functions for TA
during TA SEEK mode only.
— — — — — — — — — — — — — — — — — — ——
DSP mode
Rotate the knob to choose DSP sound effect:
POP - ROCK - CLASSIC - FLAT - DSP OFF
— — — — — — — — — — — — — — — — — — ——
LOCAL/DX mode
Rotate the knob to choose tuner sensitivity
local or distant.
— — — — — — — — — — — — — — — — — — ——
BEEP ON/OFF mode
Rotate the knob to choose button beep sound
on or off.
— — — — — — — — — — — — — — — — — — ——
STEREO/MONO mode
Rotate the knob to choose FM stereo or mono.
Press the MENU button more than 2 seconds
toentermenumode,theneachpresschanges
themode,rotatetheVOLknobtoadjust.
— — — — — — — — — — — — — — — — — — ——
TA mode
Rotate the knob to choose TA ALARM or TA
SEEK mode.
IftheTA(trafcAnnouncements)isturnedon
and there is no traffic program identification
codereceivedinthespecifiedtime,noTA/
TP will display and either TA ALARM or TA
SEEK will be activated.
TA ALARM mode : Alarm is turned on.
TA SEEK mode: TA SEEK is automatically
activated.
— — — — — — — — — — — — — — — — — — ——
MASK mode
Rotate the knob to choose MASK DPI or
MASK ALL mode.
Insomecases,theAF functionmaybe
influencedbysomeinterference,examples
are signals with strong field but without the
RDSdata.Forthisreason,theunithastwo
options to avoid the above interference.
MASK DPI mode :
Only AF which has different program
identicationismasked.
MASK ALL mode :
The AF which has different program
identification and NO RDS signal with high
eldstrengthismasked.
Menu Function
toplayMP3les.
WithsomeCD-Rmedia,datamaynot
be properly written depending on their
manufacturingquality.Inthiscase,data
may not be reproduced correctly. High
quality CD-R disc is recommended.
Up to 16 characters are displayed for the
name of an Album or a Track. ID3 TAG
version 1.x is required.
Note that the unit may not play tracks in the
order that you wrote them to the disc.
MP3/WMA Playback
9482CMB747NA338A说明书-1-EN.indd 8 2014-10-28 13:44:31
EN-9
VOL LAST/ADJUST mode
PressMENUbuttontochooseVOLLAST,
the turn-on volume level is the volume level of
latest power off.
RotateknobtochooseVOLADJ,thenrotate
the knob to set the turn-on volume level.
— — — — — — — — — — — — — — — — — — ——
LOUD mode
Rotate the knob to choose loudness on or off.
— — — — — — — — — — — — — — — — — — ——
SEEK 1 / 2 mode
SEEK 1: Searching station will stop when the
next station is received.
SEEK 2: Searching station will stop when
or button is released and next station is
received.
— — — — — — — — — — — — — — — — — — ——
12/24 HOUR SET mode
Press MENU button to enter 12/24 hour set
mode,rotatetheknobtoselect12or24hour
mode.
— — — — — — — — — — — — — — — — — — ——
Frequency Range:
Rotate the knob to choose frequency range:
EUR(Europe),USA,JAP(Japan).
— — — — — — — — — — — — — — — — — — ——
Power On Password
RotatetheknobtochoosePWDON,PWD
OFF or PWD NEW
Menu Function Bluetooth Operation
Note:
Foryoursafety,avoidtalkingonthephone
as much as possible while driving.
Bluetooth is a wireless transmission way
for short distance. The built-in Bluetooth
can connect with the mobile phones having
Bluetooth function.
Afterconnecting,youcancontrolyourmobile
phone through the unit.
Pairing
Use this function to establish a connection
between the unit and your mobile phone.
1. Turn On the car radio.
2. T urn on Bluetooth function of your mobile
phone,keepphonewithin3metersto
the unit and start to search for Bluetooth
devices.
3. A fter the name of the Bluetooth module
“CB710 BT” appears on the pairing list of
yourmobilephone,selectit.Atthistime,a
pairing code is required. Enter the pairing
code(“0000”bydefault)andtheBluetooth
pairing will process automatically. Some
mobile phones may instruct you to select
connectordisconnect,pleaseselect
connecting.
Exit Pair
Afterpairsuccessfully,ifyouwantto
disconnect,pressandholdSRCbuttonto
disconnect Bluetooth connection.
Ifyouwanttore-connect,pressandhold
SRC button.
Make a call
1. Press SRC button to select BT MUSIC
mode.
2. Press the /AMS button.
3. Rotate the VOL knob to select from the
following list:
DIAL NUML dial number directly
DIALLED: dialed number
MISSED: missed call
RECEIVED: received call
ME PBK: Phone directory
SIM PBK: SIM directory
4. Press MENU button to confirm the
selection.
Todialanumberdirectly,selectDIALNUM.
1. Rotate the VOL knob to select phone
number,pressMENUbuttonto
- Press button to delete a digit inputted.
- Press button to reset entered number.
2. Press to dial out.
To use a number in call log or directory, select
the option other than DIAL NUM.
9482CMB747NA338A说明书-1-EN.indd 9 2014-10-28 13:44:32
EN-10
Bluetooth Operation
Receive
1.Afterpairsuccessfully,ifthereisacall
incoming,theunitswitchtoBTmode
automatically.
2. Press button to receive.
3. Press button to hang up.
Call Transfer
Duringtalking,press button to transfer
audio from the unit to your mobile phone.
Note:
Some mobile phones will transfer audio from
the unit to themselves once the incoming call
is answered.
BT Audio
To listen to audio from a bluetooth device and
control playback with the unit.
1. Press SRC button repeatedly to select BT
MUSIC mode.
2. Toplayorpause,press1( TOP).
Music Mode
A2DP
A2DP is short for Advanced Audio Distribution
Profile. The mobile phones supporting this
functioncantransmitstereoaudio,whereas
the ones not supporting this function can
transmit mono audaio only.
AVRCP
AVRCP is short for Audio/Video Remote
ControlProle.Themobilephonessupporting
this function can control the playback of a
Bluetooth audio player.
General Notes for Bluetooth
1.Forsometypesofmobilephones,during
ourtest,afterthemobile phonesappear
connectionsuccessful,theunitstill appear
waitingforpairing.Atthistimeyoumustnd
the unit’s Bluetooth module name “CB710
BT” on the pairing list on your mobile phone
andselectconnectinginthesubmenu,then
theunitwillappearCONNECT.Otherwise,
there is no voice coming out when
communicating,thoughthemobilephone
has already displayed CONNECT. Some
mobilephones,whenitplaybackA2DP,
youmustnetheunitnameinthephone’s
menu and reconnect (check your mobile
phone whether has the A2DP & AVRCP
functions).
2.When pairing,sometypesofmobilephone
hintthathowtooperate,forexample,when
youmakeaphonecallbytheunit,ifthe
mobile phone voice dosn’t be transferred to
theunit,novoicecomesout.
3.Dependingonthemobilephone,ifprivate
modeisselected,whenyoumakeaphone
callbytheunit,orreceive,thevoicewould
be transferred to the mobile phone. But
sometime the Bluetooth maybe disconnect
tillthecommunicationends,thenconnects
your mobile phone to the unit automtically.
Some mobile phones maybe need pair
again.
4.Formobilephone,theBluetoothdevice
name must be pr imary symbols or
numbers.Otherwise,someunpredictable
issues may occur during the Bluetooth
devices connecting and making phone call.
5.AfterCONNECT,ifnosoundproduced,
please check whether the Bluetooth stereo
audio on the phone switched ON.
6. Not all functions are supported on all
phones. The compatibility of phones is
variable.
9482CMB747NA338A说明书-1-EN.indd 10 2014-10-28 13:44:33
EN-11
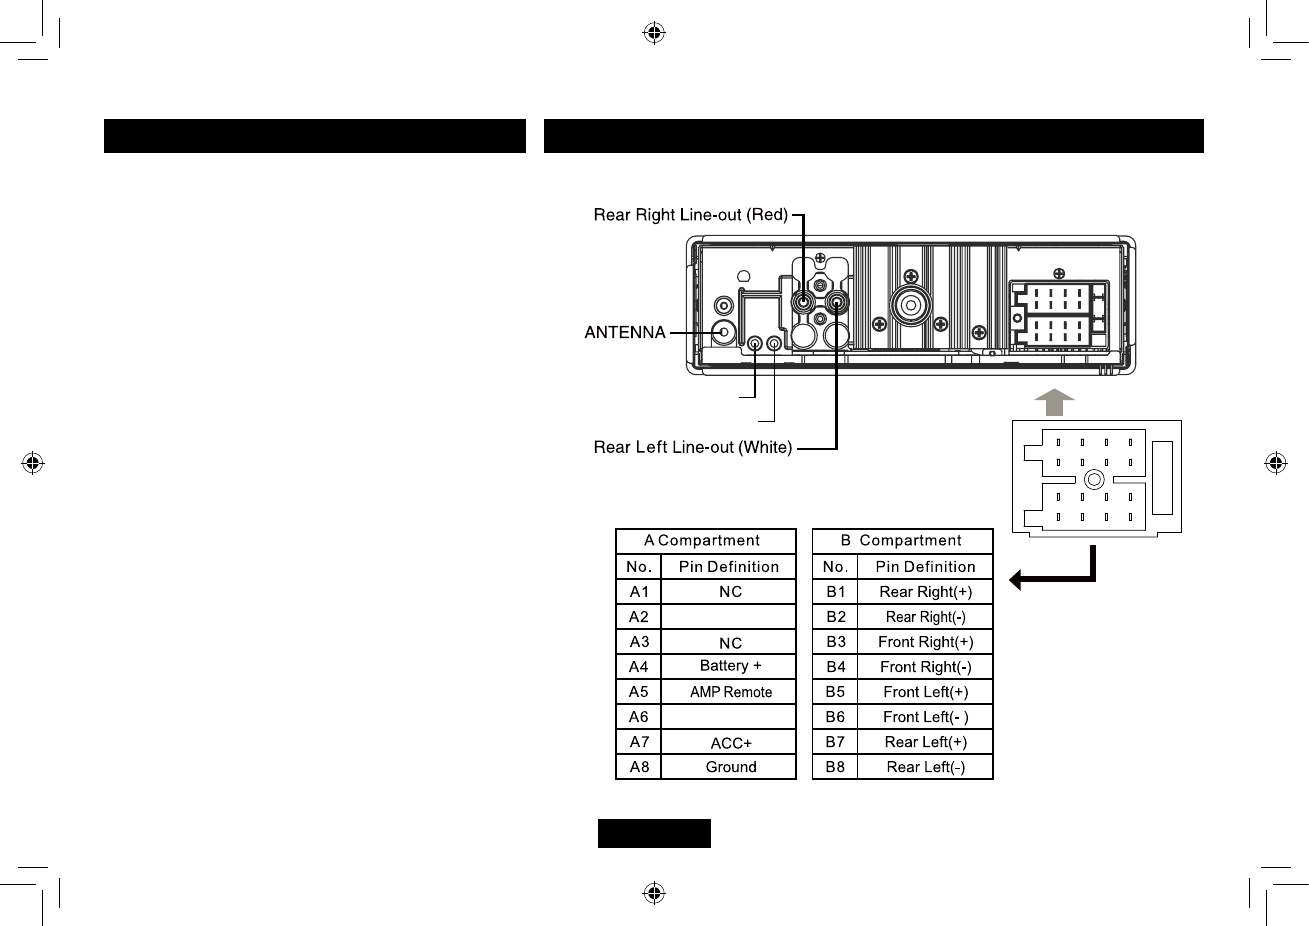
Electrical Connections
Wiring Diagram
Password entered
Rotatethe"VOLUME"knobtochoosethenumbers,press
the">>"buttontoenterthenextnumber,pressthe"<<"
button to change the number in case of error. Once the
passwordisfullydisplayed,pressthe"MENU"buttonat
least2secondstoconrm,theradioswitchestothetuner
mode.Ifthepasswordisincorrect,"ERROR"appearson
the display. Please enter the password again. If the user
codeislost,contacttheAfterSalesService.
PWD OFF/ON: Activating /Deactivating the security
code
Whentheunitisrunning,pressthe"MENU"button2
second,whenseveraltimestoselect"PWDOFF"(ON)
andturnthe"VOLUME"knobtoselect"ON"or"OFF",the
passwordisactivatedordeactivated.Whensetto"ON",
the radio code will be requested if you have disconnected
thepermanent+(B+ battery),youwilhavetoenterthe
password after each time the battery is disconnected
(thedefaultpasswordis"1234").Ifyouonlyturnoffthe
ignition(+15/30),thecodewillnotberequested.
PWD NEW: Create a new password
You can set a new password for the unit. Press the
"MENU"button2seconds,whenseveraltimesto
select "PWD ON/OFF" rotate the "VOLUME" button to
choose "PWD NEW". Press the "MENU" button to
confirm,"PWD>OLD"appears,enteryouroldpassword,
press the "MENU" button at least 2 seconds to confirm.
Iftheoldpasswordis incorrect,"ERROR"appearson
thedisplay,pleaseenterthepasswordagain.Iftheold
passwordiscorrectlyentered,"NEW"isdisplayed,enter
yournewpassword,pressthe"MENU"buttonatleast 2
secondstoconfirm."AGN"is displayed,enteryournew
password again and press the "MENU" button at least 2
secondstoconrm;"SETOK"isdisplayed:thecodehas
been updated.
A
B
1 3 5 7
2 4 6 8
13 5 7
24 6 8
MIC
AUX2
ILL
AUX2 CTL
9482CMB747NA338A说明书-1-EN.indd 11 2014-10-28 13:44:33
EN-12
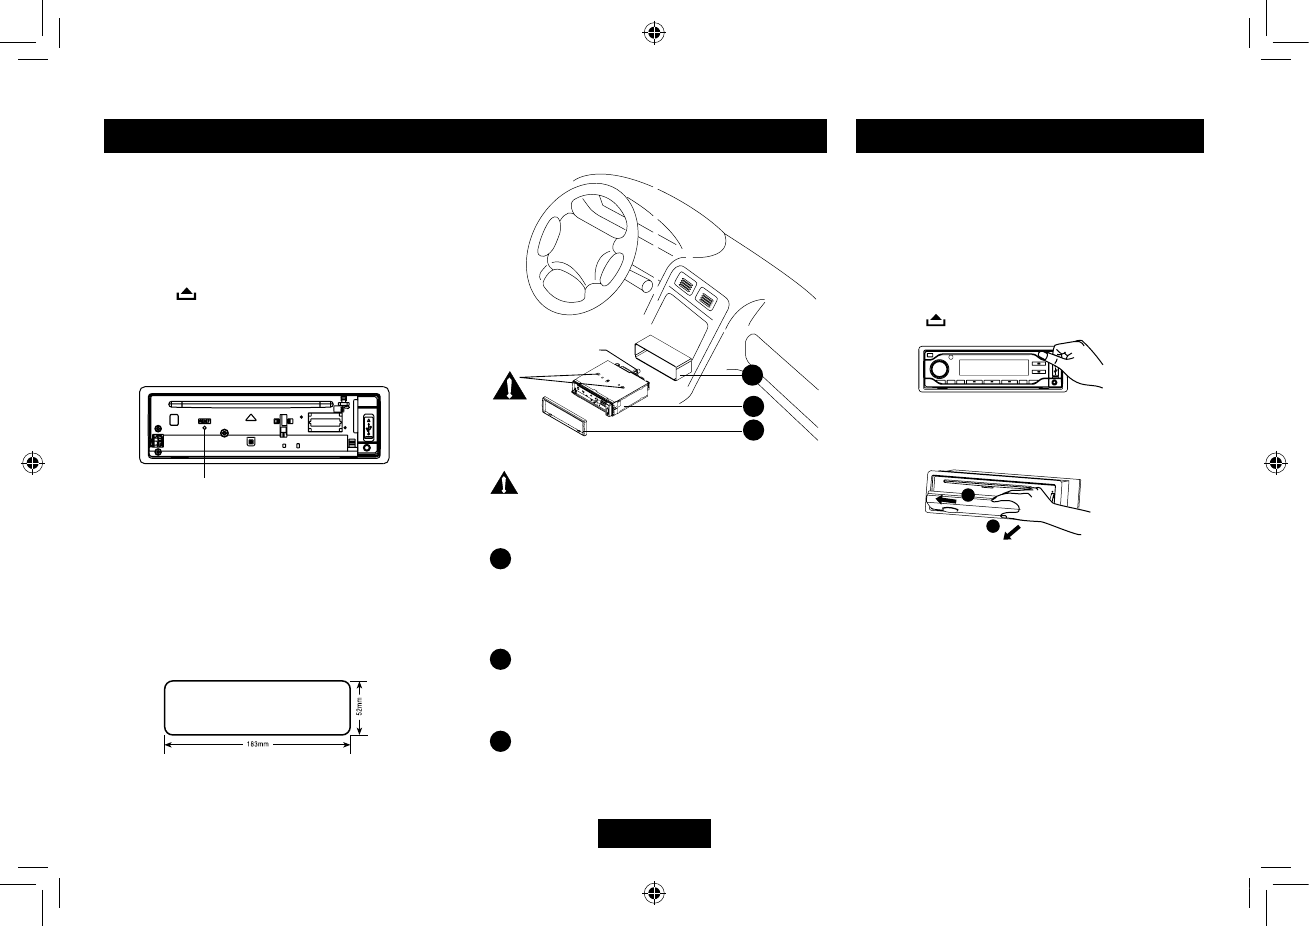
Installation Procedures
Carefully complete the electrical connections.
Check connections before operation.
— — — — — — — — — — — — — — — — — — ——
Reset
Press “ ” to flip down the panel. Then
press the “ RESET ” hole with a pointed object
to reset the unit to restore the system to the
original factory settings.
Installation Opening
This unit can be installed in any dashboard
withasuitable183mm (W)x52mm (H)
opening as shown below. The dashboard
should be 4.75 mm - 5.56 mm thick in order to
be able to support the unit.
Mounting bolt
rubber cushion.
1
2
3
Installation Guide
Important: Remove these two screws
beforeinstallation.Otherwise,theplayerwill
not work.
1Insertmountingcollarintothedashboard,
and bend the mounting tabs out with a
screwdriver. Make sure that lock lever
is flush with the mounting collar (not
projectingoutward).
2 Secure the rear of the unit.
After fixing mounting bolt and power
connector,xtherearoftheunittothecar
body by rubber cushion.
3 Insert trim plate.
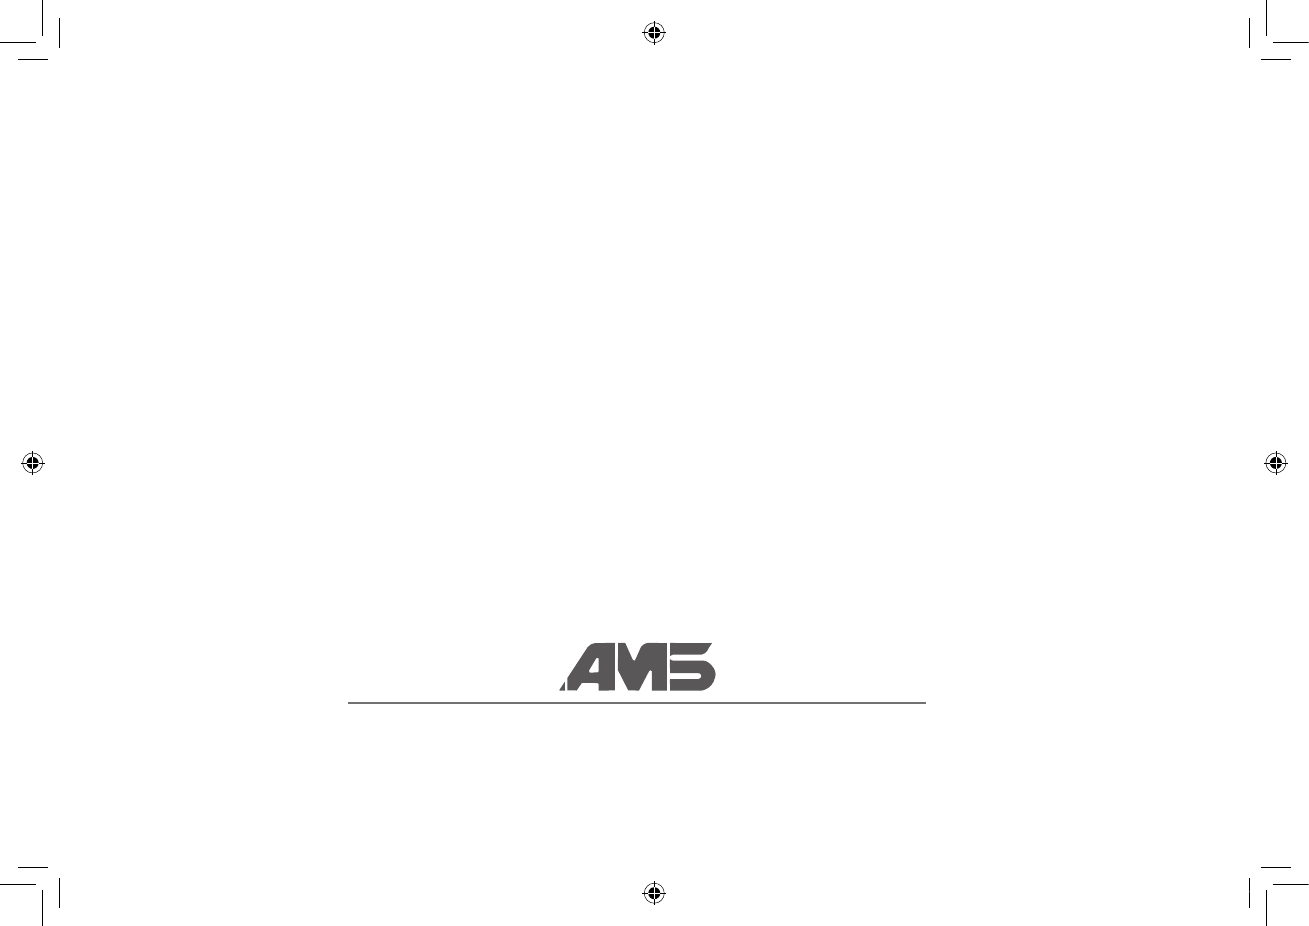
Anti-Theft System
This unit is designed with a flip-down
detachable panel.
The panel can be detached and taken with
you,helpingtodetertheft.
— — — — — — — — — — — — — — — — — — ——
Removing the panel
• Switchoffthepoweroftheunit.
• Press toipdownthepanel.
• Holdrightsideofthepanel,slightlypushit
totheleftside,thenpullitout.
• Placethepanelintothecaseandtakeitwith
you when you leave the car.
Reset
1
1
2
2
1
1
2
2
9482CMB747NA338A说明书-1-EN.indd 12 2014-10-28 13:44:37

EN-13
Disc
Disc is inside but no sound.
Disc is upside down.
Place disc in the correct direction, and the
label side up.
Disc is dirty or damaged.
Clean disc or change another disc.
Disc sound skips, tone quality is low.
Disc is dirty or damaged.
Clean CD or change another CD.
Sound skips due to vibration.
Mounting angle is over 30o.
Adjust mounting angle to less than 30o.
Unstable mounting.
Mount the unit securely with the mounting parts.
General
No power or no sound.
Car's engine switch is not on.
Turn your car's key to ACC or ON.
Cable is not correctly connected.
Check connection.
Fuse is burnt. Replace fuse.
Check volume or mute on / off.
If the above solutions cannot help.
Press the RESET button.
Radio
Noise in broadcasts.
Stationistoofar,orsignalsaretooweak.
Select other stations of higher signal level.
Preset station lost.
Battery cable is not correctly connected.
Connect the battery cable to the terminal
that is always live.
Troubleshooting
Ifyoususpectsomething iswrong,immediately
switch power off. Do not use the unit in abnormal
condition,forexamplewithoutsound, orwithsmoke
orfoulsmell,cancausefireorelectric shock.
Immediately stop using it and call the store where
you purchased it. Never try to repair the unit yourself
because it is dangerous to do so.
Please Recycle Your Spent Batteries
Batteries should not be disposed of in unsorted
municipalwaste,butseparatelycollectedtofacilitate
the correct treatment and recycling of the substances
they contain. The recycling of batteries ensures the
recovery of these valuable materials and prevents any
potentially harmful effects upon both the environment
and human health.
Please contribute to battery recycling by segregating
all spent batteries and actively participating in their
collection and recycling. Various battery collection
schemes will be in operation in different areas of
thecountry.However, batterycollectionbinswill be
available at retail stores that sell batteries as well as
atschools,librariesandotherpublicbuildings.
Installing the panel
• Holdthepanelandensurethepanelfaces
dwonward,andatananglesetone side
of the panel in the panel bracket.Press the
other side of the panel until it locks.
Anti-Theft System
Removing the unit
• Removethepanelandthetrimplate.
• InsertbothT-Keysintoholesonthefrontof
the set until they lock.
• Pullouttheunit.
• Turn thepanelfromhorizontaltovertical,
push until it locks.
1
1
2
2
1
1
2
2
1
1
2
2
9482CMB747NA338A说明书-1-EN.indd 13 2014-10-28 13:44:38

EN-14
Specications
General
Power supply: 12VDC(11V-16V)
Testvoltage14.4V,negativeground
Maximum power output: 45Wx4 channels
Continuous power output: 20Wx4 channels (4 ,10%T.H.D.)
Suitable speaker impedance: 4-8 ohm
Pre-Amp output voltage:
2.0V(CDplaymode:1KHz,0dB,10K
load)
Fuse: 15A
Dimensions(WxHxD): 178x50x166mm
Weight: 1.64kg
Aux-in: ≥300mV
FM Stereo Radio
Frequency range:
87.5-108.0MHz(EUR)
87.5-107.9MHz(USA)
76-90MHz(JP)
Usable sensitivity: 8 dBμ
Frequency response: 30Hz-15kHz
Stereo separation: 30dB(1kHz)
Image response ratio: 50dB
IF response ratio: 70dB
Signal/noise ratio: 55dB
MW(AM) Radio
Frequency range:
522-1620KHz(EUR)
530-1710KHz(USA)
522-1629KHz(JP)
Usablesensitivity(S/N=20dB): 30 dBμ
Note:Specicationsandthedesignaresubjecttochangewithoutnotice
due to improvements in technology.
LW Radio
Frequency range: 153-279KHz(EUR)
Usablesensitivity(S/N=20dB): 30 dBμ
Disc Player
System: Disc digital audio system
Frequency response: 20Hz-20kHz
Signal/noise ratio: >75 dB
Total harmonic distortion: Lessthan0.20%(1kHz)
Channel separation: >60 dB
Components
Mounting collar 1
Machine screws M5x6mm 4
Mountingbolt(50mm) 1
Wire connector 1
Case for removable control panel 1
Trim plate 1
T-key 2
Operating instructions 1
Rubber cushion 1
External microphone 1
9482CMB747NA338A说明书-1-EN.indd 14 2014-10-28 13:44:39

EN-15
FCC Statement
1. This device complies with Part
15 of the FCC Rules. Operation
is subject to the following two
conditions:
(1)Thisdevicemaynotcause
harmful interference.
(2)Thisdevicemustacceptany
interferencereceived,including
interference that may cause
undesired operation.
2. Changes or modifications not
expressly approved by the party
responsible for compliance could
void the user’s authority to operate
the equipment.
NOTE: This equipment has been
tested and found to comply with the
limitsforaClassBdigitaldevice,
pursuant to Part 15 of the FCC
Rules. These limits are designed
to provide reasonable protection
against harmful interference in a
residential installation.
This equipment generates uses and
can radiate radio frequency energy
and,ifnotinstalledandusedin
accordancewiththeinstructions,may
cause harmful interference to radio
communications.However,thereis
no guarantee that interference will
not occur in a particular installation.
If this equipment does cause harmful
interference to radio or television
reception,whichcanbedetermined
by turning the equipment off and
on,theuserisencouragedtotryto
correct the interference by one or
more of the following measures:
. Reorient or relocate the receiving
antenna.
. Increase the separation between
the equipment and receiver.
. Connect the equipment into an
outlet on a circuit different from that
to which the receiver is connected.
. Consult the dealer or an
experienced radio/TV technician for
help.
FCC Radiation Exposure Statement
This equipment complies with FCC
radiation exposure limits set forth for
an uncontrolled environment. This
equipment should be installed and
operated with minimum distance
20cm between the radiator & your
body.
FCC Statement
9482CMB747NA338A说明书-1-EN.indd 15 2014-10-28 13:44:39
PN: 12707500xxxx
25 Impasse de la Commanderie – 59500 DOUAI – France
Phone:+33(0)327944444/Fax:+33(0)327944445
9482CMB747NA338A说明书-1-EN.indd 16 2014-10-28 13:44:39