ANDESFIT SA-B23 Bluetooth Blood Glucose Monitoring System User Manual
ANDESFIT LIMITED Bluetooth Blood Glucose Monitoring System Users Manual
ANDESFIT >
Users Manual

GSH R5228 Owner’s Manual
Language: English
Unit: mg/dL
Market: US
VERSION Date By
M01A1Draft 2016/11/01 Karen Yeh
from FDA Single Patient version
BMU5228BTB_5228BT-M02A4

IMPORTANT SAFETY INFORMATION
Federal Communication Commission Interference Statement
This equipment has been tested and found to comply with the limits for a Class B
digital device, pursuant to Part 15 of the FCC Rules. These limits are designed to
provide reasonable protection against harmful interference in a residential installation.
This equipment generates, uses and can radiate radio frequency energy and, if not
installed and used in accordance with the instructions, may cause harmful
interference to radio communications. However, there is no guarantee that
interference will not occur in a particular installation. If this equipment does cause
harmful interference to radio or television reception, which can be determined by
turning the equipment off and on, the user is encouraged to try to correct the
interference by one of the following measures:
- Reorient or relocate the receiving antenna.
- Increase the separation between the equipment and receiver.
- Connect the equipment into an outlet on a circuit different from that to which the
receiver is connected.
- Consult the dealer or an experienced radio/TV technician for help.
FCC Caution: Any changes or modifications not expressly approved by the party
responsible for compliance could void the user's authority to operate this equipment.
This device complies with Part 15 of the FCC Rules. Operation is subject to the
following two conditions: (1) This device may not cause harmful interference, and (2)
this device must accept any interference received, including interference that may
cause undesired operation.
IMPORTANT NOTE:
Radiation Exposure Statement:
The product comply with the US portable RF exposure limit set forth for an

uncontrolled environment and are safe for intended operation as described in this
manual. The further RF exposure reduction can be achieved if the product can be
kept as far as possible from the user body or set the device to lower output power if
such function is available.
This transmitter must not be co-located or operating in conjunction with any other
antenna or transmitter.
Please use this device only for the intended use described in this user guide.
Before using this system to test your blood glucose, please read instructions
thoroughly and practice the test when you first use this system. Do a quality
check on the system by following the instructions and consult with healthcare
professionals for questions or problems.
Be aware of the safety of young children or handicapped persons near you
when you conduct a glucose test using this system.
Please keep the test strip vial away from children. The test strips and vial cap
can present a choking hazard.
GSH test strips can only be used with the GSH glucose meter.
Precaution
The meter and lancing device are for single patient use. Do not share them with
anyone including other family members!
Do not use on multiple patients!
All parts of the kit are considered biohazardous and can potentially transmit
infectious diseases, even after all cleaning and disinfection procedures have
been performed.
For further information, please refer to below:
FDA Public Health Notification: Use of Fingerstick Devices on More than One
Person Poses Risk for Transmitting Bloodborne Pathogens: Initial
Communication” (2010)
http://www.fda.gov/MedicalDevices/Safety/AlertsandNotices/
ucm224025.htm
CDC Clinical Reminder: Use of Fingerstick Devices on More than One Person
Poses Risk for Transmitting Bloodborne Pathogens” (2010)
http://www.cdc.gov/injectionsafety/Fingerstick-DevicesBGM.html
Lancet
Never share a lancet with anyone. Always use a new, sterile lancet; lancets are
for single use only.
Lancing Devices
Lancing devices should never be used for more than one person. Lancing
devices are re-useable, and the lifetime cleaning does not affect its
performance.
Test Strips
GSH Glucose test strips are intended for single use only. They should be
disposed of in an appropriate container according to your healthcare
provider’s instructions.
Meter
GSH Blood Glucose Monitoring System Model R5228 should only be used for
testing single patient.
Please test your blood glucose using the meter and the test strips with the
same reference number as labeled on the outer box of meter and the test
strips.
Limitations
1. Do not use for neonatal blood glucose testing or use the system for the
diagnosis or screening of diabetes.
2. Alternate site testing should not be used for CGM calibration or for insulin
dose calculations.
3. Hematocrit in the range of 20~60% does not affect the glucose results.
4. Cholesterol level up to 500 mg/dL(12.9 mmol/L) and Triglycerides up to 3,000
mg/dL(99.3mmol/L) have been shown not to affect glucose results.
5. Interference was observed for therapeutic levels of Glutathione.
6. Certain substances occurring in the blood naturally, such as uric acid, or from
normal therapeutic treatments (Ascorbic acid, L-Dopa, Tolazamide and Gentisic
acid) will not significantly affect results. However, higher concentrations in
blood may cause incorrect results.
7. There is no significant interference in the presence of galactose, maltose, or
fructose observed in blood glucose test.
8. Do not test blood glucose during or soon after xylose absorption test. Xylose
in the blood can give falsely elevated results.
9. The test strips may be used at altitudes up to 10,744 feet (3,275 m) without an
effect on test results.
10. Persons suffering from severe dehydration should not be tested using a
capillary whole blood sample.
11. Test results below 70 mg/dL(3.9 mmol/L) indicate low blood glucose
(hypoglycemia). Test results greater than 240 mg/dL (13.3 mmol/L )
indicate high blood glucose (hyperglycemia). If you get results below 70
mg/dL(3.9 mmol/L)or above 240 mg/dL(13.3 mmol/L), repeat the test, and
if the results are still below 70 mg/dL(3.9 mmol/L)or above 240 mg/dL(13.3
mmol/L), please consult your healthcare professional immediately2.
12. Not for use on critically ill patients, patients in shock, dehydrated patients or
hyper-osmolar patients.
TABLE OFCONTENTS
Understanding Your New System
Introduction 2-3
Test Principle 3
Appearance and Key Functions of the Meter 4
LCD Screen Overview 5
Installing/Replacing the Batteries 6
Settings (Date/Time/Alarm/Measuring Unit/Memory Deletion) 7-9
Performing a Control Test
About Control Solution Tests 10
Running a Control Solution Test 11-12
Testing Your Blood Sugar
Alternate Site Testing 13
How to Obtain a Blood Sample 14-15
Running a Blood Glucose Test 16-17
Recalling the Memory and Viewing the Average 18-19
Expected Values 20
Transmitting Results 20
Maintenance and Troubleshooting
Maintenance of Your System 21-24
Troubleshooting 25-26
Customer Service 27
Important Additional Information
Specifications 28
Ordering Supplies 28
Warranty Information 29
NOTE: For information about the name of the manufacturer of the lancing device
and the lancets, please refer to the package inserts that came with your
starter kits.
Understanding Your New System
Introduction
Intended Use / Indications for Use
The GSH Blood Glucose Monitoring System (Model R5228) is intended to be used for
the quantitative measurement of glucose in fresh capillary whole blood drawn from
the fingertips or forearm. The GSH Blood Glucose Monitoring System (Model R5228)
is intended to be used by a single person and should not be shared.
The GSH Blood Glucose Monitoring System (Model R5228) is intended for
self-testing outside the body(in vitro diagnostic use) by people with diabetes at
home as an aid in monitoring the effectiveness of a diabetes control program.
The GSH Blood Glucose Monitoring System (Model R5228) should not be used for
the diagnosis of or screening of diabetes or for neonatal use. Alternative site testing
should be done only during steady state times (when glucose is not changing rapidly).
The GSH Test Strips are for use with the GSH Blood Glucose Meter to quantitatively
measure glucose in fresh capillary whole blood drawn from the fingertips or
forearm.
The GSH Control Solutions are for use with the GSH Blood Glucose Monitoring
System (Model R5228) as a quality control check to verify that the meter and test
strips are working together properly.
Contents of the System
This User Guide has been prepared to describe the proper use of the GSH Blood
Glucose Monitoring System Model R5228. Please read this User Guide and the
package insert that comes with the GSH Glucose Test Strips before testing. The
system is available either as a meter alone or as a kit. If you have a meter only, you
can purchase the system supplies from your system provider. Please provide to your
system provider with the 4 digit system reference number marked on the packaging
box when you purchase supplies.
The starter kit of GSH Blood Glucose Monitoring System Model R5228 includes the
following items:
1. GSH Glucose Meter with 2 AAA batteries
2. User Guide
3. Log Book
4. Carrying Case
5. GSH Glucose Test Strips
6. GSH Control Solution (Level II)
7. Sterile Lancets
8. Lancing Device
9. Package Inserts for Test Strips, Control Solution, and Lancets/Lancing Device
A single level control solution (Level II) is provided in the "Starter Kit," and no control
solution is included in the "Meter Only" kit. You may purchase GSH Control Solution
Level I, Level II or III from your system provider if needed.
The GSH Glucose Meter uses GSH Glucose Test Strips. Neither the meter nor the test
strips will work when used with any other brand of glucose products.
Test Principle
When glucose reacts with the reagents on the test strips, an electrical current is
produced, which is proportional to the glucose concentration in the blood sample.
The glucose concentration is calculated by the meter and based on the current
measured.
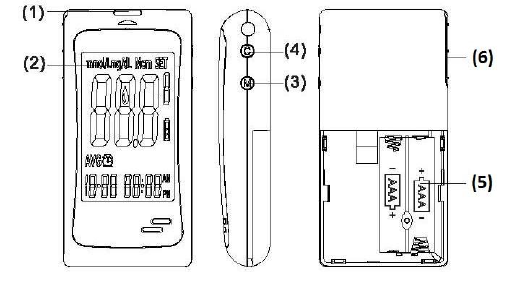
Appearance and Key functions of the meter
1. Test strip slot - When the strip is inserted into the slot, the meter will
automatically turn on.
2. LCD Display - Guide you through the test using symbols and simple messages.
3. M Key - Power ON/OFF, also for memory recalling mode, please refer to
manual for detailed function description.
4. C Key - Setting mode, please refer to manual for detailed function description.
5. Battery Compartment - Where batteries are located.
6. Ejector - Remove used strip.
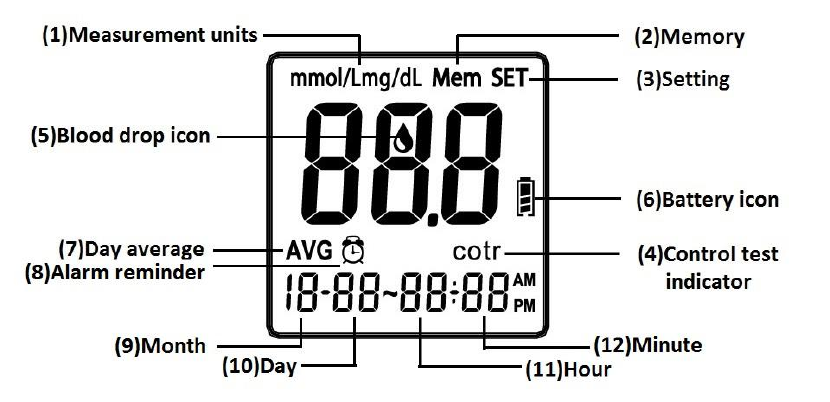
LCD Screen Overview
1. Appears with the test result either in mg/dL or in mmol/L.
2. Appears when you recall the memory.
3. Appears when you are in setting mode.
4. Appears for control solution test flag.
5. Indicates the meter is ready to take the blood sample when it flashes.
6. Indicates the battery status.
7. Indicates current displayed result is an average.
8. Appears when alarm is on.
9. Month
10. Day
11. Hour
12. Minute
Installing/Replacing the Batteries
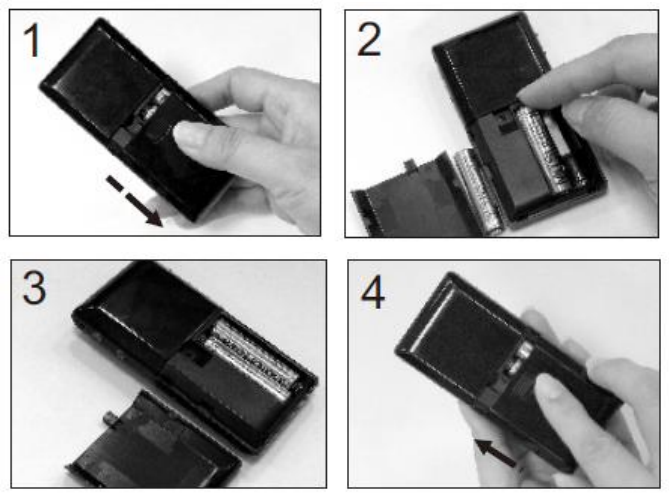
1. Turn off the meter by pressing “M” button and hold for 2 seconds before
replacing the batteries. Slide down the battery cover on the back of the meter
by pushing the cover in the direction of the arrow and put the cover aside.
2. Remove the two used batteries.
3. Insert 2 new batteries with correct +/- direction.
(Battery: AAA 1.5V 2 Alkaline 24A LR03)
4. Put the battery cover back in place by pushing the cover in the opposite
direction of the arrow to close the cover into position.
NOTE:
1. It is suggested that batteries need to be replaced when the battery icon
appears empty. If you keep using the meter, the battery icon will start
flashing and an error message E_3 will appear on the screen.
2. Note that replacing the battery will not reset the stored testing results.
3. You need to reset the time and date after the batteries are replaced.
4. If there is any unexpected symbol on the display, please follow the above
procedure to replace the batteries again.
5. Please dispose of batteries according to your local ordinances.
Settings (Date/Time/Alarm/Measuring Unit/ Memory
Deletion)
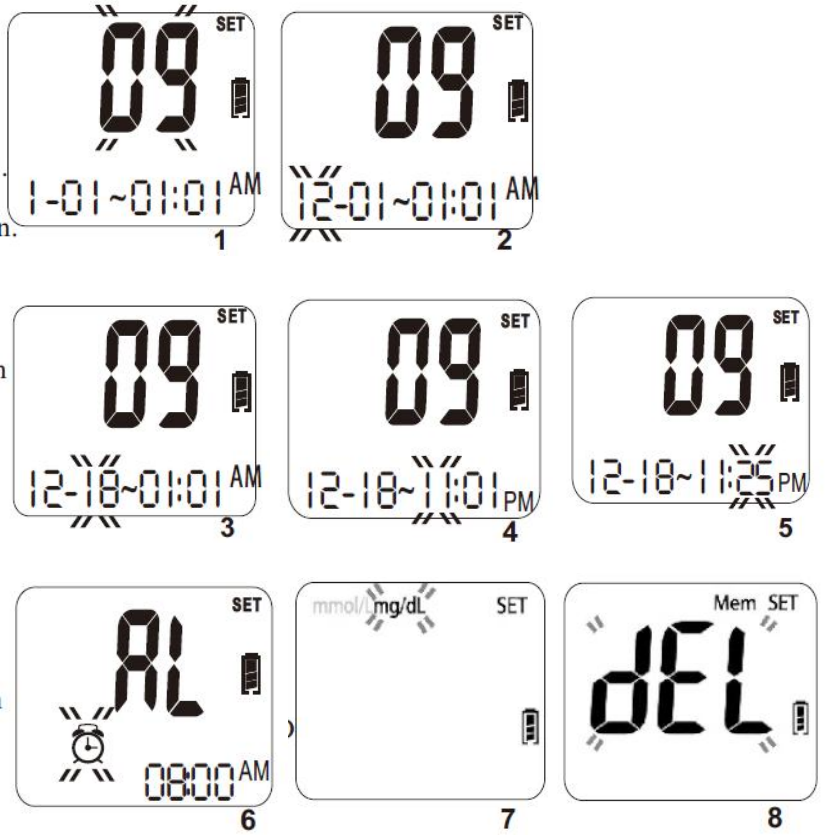
With the meter in off position, please press M key and hold until the LCD screen
displays a flashing “16” digits which represent the last two digits of the Year. The
meter is now in the setting mode.
1. Set the Year - Press C key to adjust the year until the desired year is displayed
and then press the M key to confirm the year setting. When pressing the C key,
the year will be adjusted in the range of 2016 to 2030. After the year setting is
confirmed, you will see the month segment flashing on the screen. (Please see
Figure 1.)
2. Set the Month - Press C key to adjust the month until the desired month is
displayed and then press the M key to confirm the month setting. You will then
see the day segment is flashing on the screen. (Please see Figure 2.)
3. Set the Day - Press C key to adjust the day until the desired day appears and
then press the M key to confirm the day setting. You will then see the hour
segment is flashing on the LCD screen. (Please see Figure 3.)
4. Set the Hour - Press C key to adjust the hour until the desired hour appears on
the screen and then press the M key to confirm the setting. You will then see
the minute segment is flashing on the screen. (Please see Figure 4.)
5. Set the Minute - Press C key to adjust the minute until the desired minute
appears on the screen and then press the M key to confirm the setting. You will
then see an “AL” displayed on the screen center. (Please see Figure 5.)
6. Set the Alarm Reminder – Press C key to toggle between the alarm reminder
setting and no-setting mode. If you see the LCD display a small flashing icon of
alarm clock in the lower left corner with a time segment display, it means that
you are in the alarm setting mode. (Please see Figure 6.)
If you see only AL without the icon of the small alarm clock, it means that you
are not in the alarm setting mode. Press M key to confirm the alarm setting
mode. If you select the alarm setting mode, alarm clock icon will stop flashing
and the hour of the time segment will start flashing. Press C key until the
desired alarm hour appears and then press M key to confirm the hour setting.
Then the minute segment will start flashing. Press C key until the desired
minute appears on the screen and then press M key to confirm the minute

setting. You will see the measuring unit flashing on the upper left corner of the
LCD display. (Please see Figure 7.).
7. Set the measurement unit – Press C key to toggle between mg/dL and mmol/L
measurement units. Press M key to confirm the setting. You will see a “dEL”
displayed in the center of the screen. (Please see Figure 8.)
The unit of measurement-mg/dL-is the standard unit of measurement in the
U.S.
8. Delete Memory – Press C key to toggle between a flashing “dEL” for memory
deletion and a non-flashing “dEL”. If you want to delete all memory, press M
key while the “dEL” is flashing. If you do not want to delete all memory, press
M key when the “dEL” is not flashing. Once the M key is pressed, the LCD
display will turn off automatically after 2 seconds.
NOTE: Your meter can show results either in “mg/dL” or “mmol/L” units. Mg/dL is
the correct unit used in the United States, please contact the manufacturer
if your meter does not display mg/dL when you turn it on. The factory set
default for the meter is mg/dL.
In the event that the meter loses power or the batteries are changed, the
factory set default is mg/dL. It is very important to use the correct unit of
measurement to properly manage your diabetes. If you live in the United
States, you should use mg/dL. If you are testing in mg/dL, your results will
never have a decimal point. If you live outside the United States and use
the metric system, you should use mmol/L.
Your result will ALWAYS have a decimal point.
NOTE:
1. When you change the date and time backward, you will not change the test
results in the meter memory.
2. You need to move through the year, month, day, hour, minutes, alarm, unit,
and dEL to save the meter settings and turn off the meter.
3. The average readings in the meter memory are calculated from the results
obtained during the 7, 14, 28, 60, and 90 calendar days preceding the
current date and time settings.
Performing a Control Test
About Control Solution Tests
GSH Control Solution contains a known amount of glucose and is used to confirm
that the meter and test strips are working properly. A control solution test should be
performed every time a new vial of test strips are opened, or whenever you suspect
that the meter or test strips may not be functioning properly.
1. The Control Solution range is found on the bottle of the GSH test strips and
NOT the control solution itself (see Figure 1).
Note: The ranges in Figure 1 are examples only and not the ranges that you
should refer to.
2. Gently roll the control bottle in the palm of your hands to thoroughly mix the
control solution content (see Figure. 2).
3. Discard the first drop as crystallization may occur.
4. Place a drop of the control solution either on a hard surface or the “dimple” of
the control solution cap (see Figure 3).
5. Place the meter into “Control” mode when performing a control test so the
readings do NOT get averaged with your other readings.
Running a Control Solution Test
IMPORTANT:
Always make sure you press C key for Control Solution test, otherwise the control
solution test result will be stored in the memory, and affect your “AVG” results.
1. Insert a strip into the meter. A full LCD screen will be displayed briefly and then
a blood drop icon appears.
2. Press the C key, and the meter will display a letter “cotr” on the screen,
indicating the control test mode. The test result will not be stored in the
memory.
3. Squeeze a small amount of Control Solution on a flat surface and apply to the
front edge of the test strip.
4. Wait for 5 seconds, and the meter will display the result.
5. Remove the used strip by hand or by pushing the ejector and the meter will
power off.
IMPORTANT!!!
1. If the meter, test strips and control solutions are moved from one temperature
to another, allow thirty (30) minutes for them to adjust to the new
temperature before performing a control test.
2. You must push the C key to distinguish the control solution test from the blood
glucose test. Do not perform the blood test in Control Solution mode. (If you
perform the blood test in Control Solution mode, the test result will not be
stored.)
3. Use only GSH Control Solution with the GSH Glucose Meter.
4. GSH Control Solution is used to check that the meter and the test strips are
working together as a system and that you are performing the test correctly.
5. GSH Control Solution contains a known amount of glucose that reacts with test
strips. The Level I, Level II and III Control Solutions are intended to check the
monitoring system in different measurement ranges.
6. Shake the vial, discard the first drop of control solution, and wipe off the
dispenser tip to ensure a good sample and an accurate result.
7. Use only for 3 months after first opening. Record the open date on the Control
Solution vial. Discard after 3 months.
8. Compare your Control Solution test results with the expected range printed on
the test strip vial label. If your glucose control results fall outside the expected
range; repeat the test. Results that repeatedly fall outside the expected range
may indicate:
(1) You may not be doing the test correctly; repeat the test, by shaking the
control solution vial well and carefully following instructions. Please make sure
the test is done within the temperature range.
(2) The Control Solution is expired or contaminated.
(3) The test strips are damaged or outdated.
(4) You may have applied the Control Solution before the blood drop appears
on the screen. This will cause incorrect glucose measurement.
(5) Meter malfunction
Testing Your Blood Sugar
Alternate Site Testing (AST)
What is AST?
Sampling from anatomical sites (parts of the body) other than the fingertip to check
the blood glucose levels. This system allows you to test on the forearm when glucose
is not changing rapidly.
There are important limitations to AST. Please consult your healthcare
professional before you use AST.
What is the advantage?
It is more painful feeling when taking blood sample from fingertips because
fingertips have many nerve endings. Other body sites do not have as many nerve
endings, so you will not feel as much pain as at the fingertip.
When to use AST ?
Medication, stress, illness, food and exercise can affect blood glucose levels.
Capillary whole blood at the fingertip can reflect test changes faster than capillary
blood at other sites
of body. If you test your blood glucose level during or immediately after a meal,
physical exercise or stressful events, take the blood sample from your fingertip
instead of from other sites.
Use AST only:
1. 2 hours or more after taking insulin;
2. 2 hours or more after a meal;
3. 2 hours or more after exercise.
Do not use AST if you are aware that your glucose level is not as stable as usual, or if
you think you have hypoglycemia (low blood sugar) or hyperglycemia (high blood
sugar).
Do not use AST if you think your blood glucose is low and if your AST results do
not match the way you feel.
AST should not be used to calibrate CGMs or in insulin dose calculation.
How to Obtain a Blood Sample
IMPORTANT:
1. The meter and lancing device are for single patient use. Do not share them
with anyone including other family members! Do not use on multiple patients!
2. All parts of the kit are considered biohazardous and can potentially transmit
infectious diseases, even after all cleaning and disinfection procedures have
been performed.
3. Only the single-use lancing device and lancet should be used with GSH
meter.
4. Users should wash hands thoroughly with soap and water after handling the
meter, lancing device, or test strips. Please follow the cleaning and disinfection
procedure on page 21of this user guide.
GSH Meter requires a small blood drop to perform a test. You may obtain your
blood sample from a fingertip or forearm. Be sure to wear a new pair of gloves
before obtaining blood sample from each patient. Read the instructions of lancing
device carefully before obtaining blood sample.
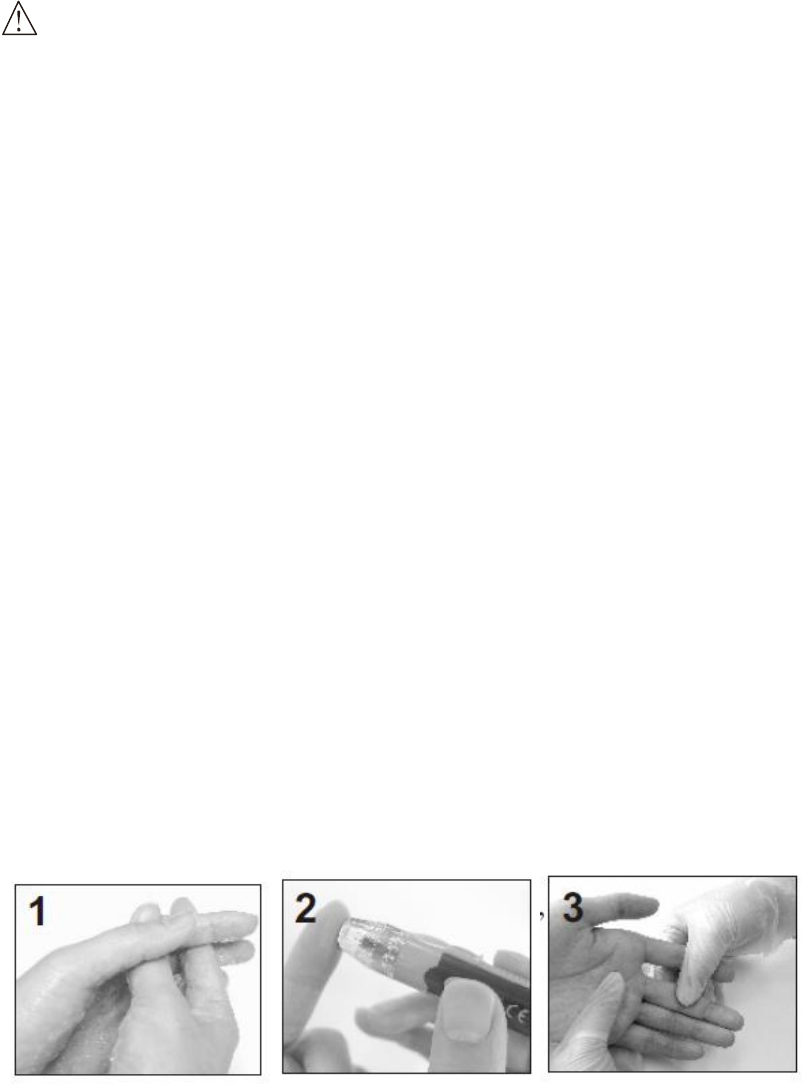
From Fingertip
1. Wash hands in warm, soapy water. Be sure to rinse and dry well.
2. Hold the lancing device firmly against the side of a finger and retrieve the
loaded single use lancing device.
3. Gently massage the finger, if needed, to help obtain a round drop of blood.
4. Do not smear the blood sample. Proceed with blood test.
From Forearm
1. Select a soft, fleshy area on forearm that is clean and dry. Make sure it is away
from bone and free of visible veins and hair.
2. Massage the selected area gently to increase blood flow to the puncture site.
Clean the test location with soap and water. Be sure to rinse and dry well.
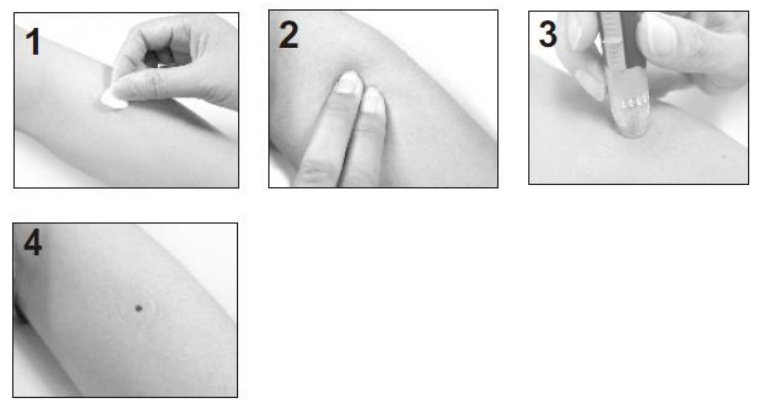
3. Press and hold the loaded single use lancing device against the forearm firmly
and press the release button.
4. Wait a few seconds until a blood drop forms. Make sure you have sufficient
blood to fill the test strip. Be careful not to smear the blood sample and
proceed with blood test.
Running a Blood Glucose Test
1. Open the app on your cell phone and turn the Bluetooth function on.
2. Open the test strip vial. Take one new test strip out of the vial and recap the
vial quickly and firmly (see Figure 1).
3. While the meter is off, insert a test strip into the meter's strip slot in the right
direction. The meter will turn on with a full screen display, and a blood drop
icon will be blinking on the screen. If no action is taken in 2 minutes, the meter
will turn off automatically (see Figure 2).
4. Use a single lancing device to take a blood sample from the fingertip or
forearm (see Figure 3).
5. Apply a small blood drop (● actual size) to the front edge of the test strip, and
the blood should be pulled into the test strip before the meter begins to count
down. Do not push your finger against the test strip or try to apply a smeared
blood sample (see Figure 4).
6. The meter will count down from 5 to 1 and test result will be displayed on the
screen.
7. Right after test result is displayed the meter’s Bluetooth function will be turned
on and you will see “bLE” and test time flashing alternately (see Figure 5). Once
the meter is connected to the app, test result will be transferred to the app

automatically. Check the app to make sure the test result has been received. If
the transfer failed, the test result will be transferred next time when you
perform a test successfully.
8. Remove the used test strip by hand or by pushing the ejector button. The
meter will turn off and the test result is stored automatically (see Figure 6).
9. Wash your hands thoroughly with soap and water after handling the meter,
lancing device, or test strips.
Important:
1. Never reuse a test strip or a lancet. An “E_5” error message will be displayed in
the center of screen if a used strip is inserted into the meter.
2. Discard the test strip and lancet immediately in a puncture-proof container
with a lid after use.
3. If the meter and test strips are moved from one temperature to another, allow
thirty (30) minutes for them to adjust to the new temperature before
performing a blood test.
Recalling the Memory and Viewing the Average
A. Using the Meter Memory
The test results for blood sample will be stored in the memory automatically. The
meter can store up to 500 of the most recent test results. You can also view the
average of test results for various periods of 7, 14, 28, 60 and 90 days. The control
solution test results will not be stored in memory.
(Note: Please make sure that you press C key when you run a Control Solution test,
so that the control test result will not be added to memory.)
B. Recalling the Test Results from the Meter Memory
1. With meter off, press M key to turn on the meter, the meter will display the
total number of test data stored in memory. Then the screen will display “001”
as the sequential number of the most recent test result in memory. The
memorized test data will be displayed next. If there is no memorized result in
the meter, “---” is displayed and the meter will turn off after 60 seconds if no
action is taken. (The meter will display “---” if no previous results were
memorized.)
2. The screen will display each of the memorized test data in sequence. Press M
and C key to review your test results in memory forwards and backwards.
3. To turn off the meter, press M key for 2 seconds, or the meter will turn off
automatically after 60 seconds of no activity.
C. Viewing the Average (AVG) of Test Data in Memory
1. To display the average (AVG) test result, please turn meter off. Press C and M
keys at the same time and hold for about 2 seconds, wait for AVG displayed
on screen, then release the two buttons. The meter will be in the average
mode with “AVG” font displayed.
2. When the “AVG” is flashing at the lower left corner of screen, the number 7
will be displayed under AVG and the average of the last 7 days test results will
be displayed in the center of the screen. The number of tests done in the last 7
days will be also displayed at the lower right corner of screen. If you want to
see the average of 14, 28, 60 and 90 days, keep pressing the M key to move
the LCD display forward from 7 day average to 90 day average. The average
display will move from 90 days backward to 7 days if you continue to press C
key.
3. Press the M key and hold for 2 seconds to exit the recall mode and turn off
the meter, or the meter will automatically power off after 60 seconds.
4. When “---” is displayed, showing that there are no test results in memory.
Calculations:
The 7 days average is the average of the last 7 day test results. The 14 days
average is the average of last 14 day test results. The 28 days average is the
average of last 28 day test results. The 60 days average is the average of last 60
day test results. The 90 days average is the average of last 90 day test results.
NOTE:
1. HI/LO results are not stored in the memory.
2. Do not insert the strip into the meter when you want to recall the test
result
Expected Values Reference1
Blood glucose levels normally will vary from time to time depending on food intake,
medication dosages, health, stress or exercise. Consult your physician or healthcare
professional for the target glucose value appropriate for you.
Expected plasma blood glucose values for normal, nondiabetic adults are as
follows.
Before eating <100mg/dL
Two hours after meals <140mg/dL
GSH meter gives plasma equivalent results.
Transmitting Results
Your GSH Blood Glucose Meter transfers test result every time when a test is
performed successfully. You will need to install an app to your device to receive
the test result. Please read the app manual that comes with this meter for
instructions. You can also check with your distributor for the app download and
install option.
The meter does not play any message during the data transmission, but you can
check the app on your device to confirm if the test result is received. The meter
still keeps the results in the memory after transmitting.
Maintenance and Troubleshooting
Maintenance of your system
Please, treat this meter with proper care, and keep it in good condition. Store
your meter in its case, in a clean dry place at 35.6~86°F (2~30°C).
Cleaning and Disinfecting Your Meter and Lancing Device
Cleaning and disinfecting your meter and lancing device is important to prevent the
spread of infectious diseases.
Cleaning is the physical removal of dirt (e.g. dust, grease, and touch contaminants)
from the external surfaces of meter and lancing device. By keeping your meter and
lancing device clean, you help ensure that it is working properly and that no dirt gets
in the device. Cleaning allows for successful, subsequent disinfection.
Disinfection is a process that destroys pathogens, such as viruses and other
microorganisms on the external surfaces of meter and lancing device. By
disinfecting your meter and lancing device, you help ensure that no infection is
passed when you or others come in contact with your meter and lancing device.
Clorox® Bleach Germicidal Wipes (EPA Reg. No. 67619-12) have been shown to be
safe for use with the meter and lancing device and that these wipe should be used
for both cleaning and disinfection.
Cleaning and Disinfection Instructions
We recommend users to clean and disinfect the meter and lancing device at least
once per week. Please keep the meter free of dirt, dust, bloodstain, and water
stains. Using two wipes, follow the cleaning instruction first and the disinfection
instruction second to clean and disinfect your meter.
Cleaning: Do the cleaning step first to remove heavy soil and touch contaminants
left on the surface of your meter. Use a germicidal wipe to clean your meter. All
blood and other body fluids must be thoroughly cleaned before disinfection by the
germicidal wipe.
Disinfection: After cleaning, use a germicidal wipe and thoroughly wet all the surface

of your meter, including the strip lot and other connection ports. Treated area must
remain visibly wet for a full 1 minute. Let the devices air dry completely before
turning it on (30 seconds or so).
Do:
Make sure the meter is in OFF mode during cleaning and disinfection.
Keep the test strip vial tightly closed when performing the cleaning and
disinfection procedures because the fumes from the disinfectant may affect the
performance of the strip.
Stop using the devices and contact your customer service if any of the following
signs of deterioration are noted after each cleaning and disinfection cycle:
For meter:
- The meter does not turn on.
- The meter's screen has been cracked or clouded.
- Any meter's functions are abnormal.
- Any buttons have stopped working.
For lancing device:
- Any button or moving part has stopped working.
- The device is cracked.
- The device does not yield an adequate blood drop.
Please call the Customer Service at Toll Free 1-888-887-4772 (EST
9:00AM~5:00PM /Mon. to Fri.) for support.
Do Not:
Get any liquid in the test strip slot and other connection ports.
Spray any cleaning solution directly on to the meter.
Put the meter under water or liquid.
Pour liquid into the meter.
NOTE:
1. If the meter is being operated by a second person who is providing testing
assistance to the user, the meter and lancing device should be cleaned and
disinfected prior to use by the second person.
2. Be sure to wash your hands with soap and warm water, rinse and dry
thoroughly after handling the meter, lancing device or test strips.
Cleaning and Disinfection Frequency
11,000 validated cycles for the meter and lancing device were done; 11,000
cycles of cleaning and 11,000 cycles of disinfection were included. 5 cycles of
cleaning per day and 1 cycle of disinfection per week allow the user to use the
device for 3 year use life.
Cleaning Frequency:
5 cycles/day x 365 days/year x 3 year use life.
=5475 cycles of cleaning < 11,000 validated cycles of cleaning.
Disinfection Frequency:
1 cycle/week x 52 weeks/year x 3 year use life.
=156 cycles of disinfection < 11,000 validated cycles of disinfection.
3 year use life for properly cleaning and disinfection.
After 3 years, the meter and lancing device must be replaced with a new meter
and a new lancing device.
To purchase Clorox® Bleach Germicidal Wipes (EPA Reg. No. 67619-12), you can find
the nearest Clorox Sales Representative at Clorox's global website,
http://www.cloroxprofessional.com/products/clorox-germicidal-wipes/at-a-glance/.
In addition, you can purchase them at http://www.amazon.com,
http://www.grainger.com/category/cleaning/ecatalog/N-bi4, or other online
retail sites.
NOTE:
Unless you cannot purchase the wipes recommend above, you may consider
purchasing the other similar disinfectant products with the EPA registration
number of 6719-12.
Troubleshooting:
Following is a summary of all Error Messages. These messages help to identify
certain problems, but do not appear in all cases when a problem has occurred.
Improper use may cause an inaccurate result without producing an error
message or a symbol. In the event of a problem, refer to the information in the
table under Solution.
Error messages:
E_ 1: The temperature is too low.
E_2: The temperature is too high.
E_3: Battery Low.
E_4: Memory damaged.
E_5: The strip is wet or used.
E_6: Error in meter or strip.
E_7: The blood sample is not sufficient.
HI: The glucose level is too high.
LO: The glucose level is too low.
NOTE: Your meter can show results either in “mg/dL” or “mmol/L” units. Mg/dL
is the typical unit used in the United States, please contact the
manufacturer if your meter does not display mg/dL when you turn it on.
The factory set default for the meter is mg/dL.
In the event that the meter loses power or the batteries are changed, the
factory set default is mg/dL. It is very important to use the correct unit of
measurement to properly manage your diabetes. If you live in the United
States, you should use mg/dL. If you are testing in mg/dL, your results will
never have a decimal point. If you live outside the United States and use
the metric system, you should use mmol/L.
Your result will ALWAYS have a decimal point.

Problem Possible Cause Solution
(1)
The meter displays an
E_1 error message.
The meter is operating
in an ambient
temperature below 10
°C or 50°F which is the
lowest range of
operating temperature.
Repeat the test after the meter
and strip are placed in a warmer
environment and allow the meter
to warm up for a while before
retesting.
(2)
The meter displays an
E_2 error message.
The meter is operating
in an ambient
temperature above
40 °C or 104°F which is
the upper limit of
operating temperature.
Repeat the test after the meter
and strip are placed in a cooler
environment and allow the meter
to cool down for a period before
retesting.
(3) The meter displays
an E_3 error message.
The battery is too low to
operate the meter.
Please replace the two AAA
batteries.
(4)
The meter displays an
E_4 error message.
The memory chip of
the meter could be
damaged or
malfunctioning.
The meter can perform the
glucose measuring without storing
the test results into the meter's
memory. Please write down the
test results into the data logger
before you call a customer service
representative.
(5)
The meter displays an
E_5 error message.
1. If you apply the
sample before blood
drop icon appears on
the screen.
2. The inserted test strip
has been wet or used.
Please check the test strip to see if
it is damaged or used. In either
case, please discard the strip and
repeat the test using a new strip.
(6)
The meter displays an
E_6 error message.
The meter is not
working properly,
either because of a
defective meter or a
defective strip.
Repeat the test with a new test
strip. If E_6 continues to show up
on screen, please call a customer
service representative.
(7)
The meter displays an
E_7 error message.
The blood sample is not
sufficient.
Please re-test by inserting a new
test strip ensuring an adequate
amount of blood comes into
contact with the test strip.

(8)
The meter displays
HI on
screen.
The test result is
higher than the
measuring range of
600 mg/dL (33.3
mmol/L).
Test again following the user guide
for correct glucose measurement
process. If you see HI again, please
call your medical doctor for advice
immediately.
(9)
The meter displays
LO on
the screen.
The test result is lower
than the measuring
range of 20 mg/dL
(1.1 mmol/L).
Test again following the user guide
for correct glucose measurement
process. If you see LO again, please
call your medical doctor for advice
immediately.
Customer Service
If you need assistance with your GSH Blood Glucose Monitoring System Model
R5228, please contact:
Biotest Medical Corporation
No. 3-2 Chien-kuo Road, TEPZ Tantzu, Taichung 427
Taiwan R.O.C.
TEL: 886-4-2532 6668
For U.S.A. 1-888-887-4772
Hours: 9 AM to 5 PM EST/Mon. to Fri.
Outside of these times, contact your healthcare professional for medical issues
or advice.
For questions related to your health condition, please call your doctor or healthcare
professional.
Important Additional Information
Specifications
Test: Glucose
Sample: Capillary whole blood
Principle of the test method: Amperometric, FAD- glucose dehydrogenase
Test sites: Fingertip, forearm
Measurement time: 5 seconds
Measurement Range: 20 - 600 mg/dL (1.1 - 33.3mmol/L)
Batteries: 2 x AAA 1.5 V Alkaline 24A LR03
Operating Condition:
10 - 40°C (50 - 104°F)
20 - 80% RH (non-condensing)
Storage/Transportation Condition:
2 - 30°C (35.6 - 86°F)
20 - 80% RH (non-condensing)
Width: 50 mm
Length: 100 mm
Thickness: 20 mm
Weight: ~72g
Memory: 500 measurement results with date and time
Auto power off after 2 minutes without action when a strip is inserted, or 60 seconds
if there is no strip inserted.

Federal Communication Commission Interference Statement
This equipment has been tested and found to comply with the limits for a Class B
digital device, pursuant to Part 15 of the FCC Rules. These limits are designed to
provide reasonable protection against harmful interference in a residential
installation. This equipment generates, uses and can radiate radio frequency energy
and, if not installed and used in accordance with the instructions, may cause harmful
interference to radio communications. However, there is no guarantee that
interference will not occur in a particular installation. If this equipment does cause
harmful interference to radio or television reception, which can be determined by
turning the equipment off and on, the user is encouraged to try to correct the
interference by one of the following measures:
- Reorient or relocate the receiving antenna.
- Increase the separation between the equipment and receiver.
- Connect the equipment into an outlet on a circuit different from that to
which the receiver is connected.
- Consult the dealer or an experienced radio/TV technician for help.
FCC Caution: Any changes or modifications not expressly approved by the party
responsible for compliance could void the user's authority to operate this
equipment.
This device complies with Part 15 of the FCC Rules. Operation is subject to the
following two conditions: (1) This device may not cause harmful interference, and (2)
this device must accept any interference received, including interference that may
cause undesired operation.
IMPORTANT NOTE:
Radiation Exposure Statement:
The product comply with the US portable RF exposure limit set forth for an
uncontrolled environment and are safe for intended operation as described in this
manual. The further RF exposure reduction can be achieved if the product can be
kept as far as possible from the user body or set the device to lower output power if
such function is available.
This transmitter must not be co-located or operating in conjunction with any other
antenna or transmitter.
Ordering Supplies
To order supplies, please contact:
Biotest Medical Corporation
No. 3-2 Chien-kuo Road, TEPZ Tantzu, Taichung 427
Taiwan R.O.C.
TEL: 886-4-2532 6668
For U.S.A. 1-888-887-4772
Hours: 9 AM to 5 PM EST/Mon. to Fri.
(Outside of these times, contact your healthcare professional for medical issues or
advice.)
Warranty Information
Your GSH Glucose Meter is warranted to be free of defects in materials and
workmanship for one year from the date of the original purchase.
This warranty does not cover device failure due to owner misuse or negligence, or
normal wear and tear.
If you have a question about your GSH Glucose Meter or this warranty, please
contact:
Biotest Medical Corporation
No. 3-2 Chien-kuo Road, TEPZ Tantzu, Taichung 427
Taiwan R.O.C.
TEL: 886-4-2532 6668
For U.S.A. 1-888-887-4772
Hours: 9 AM to 5 PM EST/Mon. to Fri.
(Outside of these times, contact your healthcare professional)
Reference:
1. American Diabetes Association: Diabetes Care, January 2016, Volume 39 (Suppl. 1)
S13 – S22.
2. American Diabetes Association-Diabetes Forecast website information:
http://www.forecast. diabetes.org/diabetes-101/hyperglycemia
http://www.forecast.diabetes.org/diabetes-101/ hypoglycemia