ANGEL TECHNOLOGY L706 Tablet PC User Manual
ANGEL TECHNOLOGY CO., LTD. Tablet PC Users Manual
Users Manual
1
Catalogue
Catalogue .......................................................................................................................................... 1
1 Introduction ................................................................................................................................. 3
1.1 Acknowledge ....................................................................................................................... 3
1.2 Matters needing attention .................................................................................................... 3
1.3 Safety instructions ............................................................................................................... 4
1.4 Abbreviations / Terminology ............................................................................................... 4
2 MID Profile ................................................................................................................................. 5
2.1 MID Accessories introduction ............................................................................................. 5
2.2 MID Using with prepare ..................................................................................................... 5
1.3MID Status and alerts ............................................................................................ 5
3 Quick start ............................................................................................................................... 7
3.1 Button function ................................................................................................................... 7
3.2 Boot and shutdown .............................................................................................................. 7
3.3 Opening and closing of the screen ...................................................................................... 7
3.4 The use of touch-screen ...................................................................................................... 8
3.5 Home page interface ........................................................................................................... 9
3.6 Access to the application ................................................................................................... 11
3.7 USB Connection ............................................................................................................... 11
3.8 Enter your text ................................................................................................................... 12
3.9 Use skill ............................................................................................................................ 13
4 Basic settings ............................................................................................................................... 14
4.1 Wireless and network ........................................................................................................ 14
4.2 Bluetooth ........................................................................................................................... 14
4.3 Display .............................................................................................................................. 14
4.4 Management Application .................................................................................................. 15
4.5 SD Card and MID Storage ............................................................................................. 15
4.6 Date and time ................................................................................................................. 16
4.7 Setting Language ............................................................................................................ 16
4.8 About the Tablet PC ....................................................................................................... 17
4.9 Timing poweroff / poweron............................................................................................... 17
Enter “the setting Application” .......................................................................................... 17
4.10 Security Settings .......................................................................................................... 17
5 Multimedia ................................................................................................................................... 19
5.1 Music ................................................................................................................................. 19
5.2 Video .............................................................................................................................. 19
5.3 Map depot ......................................................................................................................... 20
5.4 Camera .............................................................................................................................. 21

2
5.5 FM ..................................................................................................................................... 22
Click the main menu or desktop into radio main interface: ...................................... 22
6 Communication Function .......................................................................................................... 23
6.1 Phone ................................................................................................................................. 23
6.2 Note ................................................................................................................................... 24
6.3 address book ...................................................................................................................... 24
7 Internet ...................................................................................................................................... 24
7.1 browser .............................................................................................................................. 24
7.2 E-mail ............................................................................................................................. 24
8 Other application program ........................................................................................................... 25
8.1 Clock ................................................................................................................................. 25
8.2 Calculator .......................................................................................................................... 26
8.3 File manager ...................................................................................................................... 27
8.4 Recorder ............................................................................................................................ 28
9 The installation of the program ................................................................................................. 29
9.1 Install ................................................................................................................................. 29
9.2 Uninstall ............................................................................................................................ 29
9.3 The way of update ............................................................................................................. 29
10 Problem Solving ...................................................................................................................... 30
Appendix 1 ...................................................................................................................................... 31
1
3
1 Introduction
1.1 Acknowledge
Thank you for choosing this product. L706-2G-MTK8312D, is
a 7 -inch HD Tablet PC. Main chip used is MT8312, this chip is Cortex-A9*2
architecture, frequency 1GHz, based on Android4.2.2 or higher operating system,
Third party applications can be extended easily.
Built-in 2G 、 WIFI 、 BT 、 GPS 、 FM Features such as, voice calls, easy
wireless communication and wireless networking functions, surf the Internet anytime,
anywhere; equipped with high precision GPS Module, you can load navigation map
software. Built-in sensor will give you a new experience of manipulation and
entertainment; the built-in camera and photography, leading the handheld Internet
consumer electronics into an entirely new era of entertainment.
Introduced the system in this manual MID The various functions, using
techniques and considerations, please use MID Read this manual carefully before.
1.2 Matters needing attention
Maintenance and repair
Please keep the device dry. Do not expose the device, battery, charger to
water and water vapor, or operate the equipment with wet hands or charger,
so as not to cause the device failure caused by short circuit, caused by
erosion, personnel contacts.
Please do not make the device, battery and charger are subject to strong
shocks or vibration, so as not to cause a fault in equipment, battery and
charger.
Do not precede the temperature too high or too low, place the device,
batteries and Chargers, otherwise it may cause a fault in equipment, battery
and charger.
Please do not strike, throw, acupuncture MID And to avoid falling,
squeezing, bending MID.
Are not allowed to disassemble the device and accessories, otherwise the
device and accessories are not covered by this warranty the company.

4
1.3 Safety instructions
Before using MID , please read the information in this section and make your children
aware of this information. For more detailed information, please refer to the safety
instructions and precautions.
Do not use when driving a car MID In order not to hamper safe driving.
In medical settings, please observe the relevant regulations or rules. The
area in the vicinity of medical equipment, turn off the MID.
Please switch off your flight MID Or turn on airplane mode to avoid
wireless signal jamming aircraft control signals.
In use near high-precision electronic equipment, turn off the MID ,
Otherwise it may cause electronic devices to malfunction.
Are not allowed to disassemble MID And accessories that only
authorized agencies to repair this MID.
MID Stay away from magnetic equipment, MID Radiation erases
information that is stored on a magnetic device.
Please do not in hot places, where there is flammable gas (For example,
near a gas station) MID.
MID And accessories on the place where child can't touch, do not let
children use in unsupervised situations MID.
Using this MID Shi, please observe the relevant laws and regulations,
and respect the privacy and legitimate rights of others.
USB Cable Please strictly observe the instructions in this manual,
otherwise you may damage your MID Or personal computer.
Do not use this in moist environments such as bathrooms MID And to
avoid the MID Drench is liquid or cleaning.
1.4 Abbreviations / Terminology
Abbreviations/term Full name explain
MID Mobile Internet Device Mobile Internet terminals
WIFI Wireless Fidelity IEEE 802.11b Wireless LAN standard
T F TransFlash Also known as Micro SD And miniature
storage card
5
2 MID Profile
2.1 MID Accessories introduction
Packing list
Your MID in the box the following items are included:
MID machine
Power adapter
USB Connector
Headphones
Leather case
User's manual
Three packs of certificate
Product certification
2.2 MID Using with prepare
Charge the battery
The first time use the MID, charge the battery first.
1. Using the power adapter, MID charging.
1.3 MID Status and alerts
Notification icons
When you notice Panel when prompted, click column box and hands slip on the
screen to open the notifications list. Click to view the options for more information.
You can click on the message box after slide upwards to close the information
window. Following is a status bar icons graphics:
3.
1
Bu
t
3.
2
Bo
o
Lo
n
int
o
Sh
u
1.
L
2.
S
3.
C
3.
3
Wi
l
1. I
1
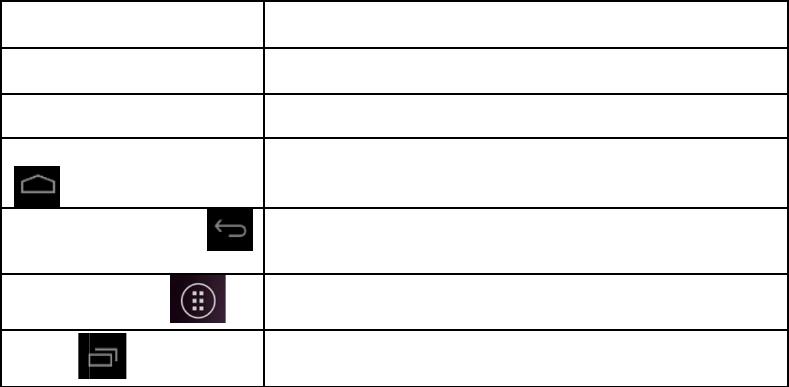
Button
t
ton functi
o
Power k
e
Volume
+
Volume
-
HOME
K
Return
k
Menu ke
y
Set key
2
Boot a
n
o
t
n
g press P
O
o
screen loc
k
u
tdown
L
ong press
t
S
hutdown o
p
C
lic
k
shutd
o
3
Openi
n
l
l be auto
m
dle screen
3
functio
n
o
n descrip
t
e
y ( power )
+
Keys ( up )
-
Keys ( dow
n
K
eys ( home
k
ey ( back )
y
n
d shut
d
O
WE
R
Bu
t
k
, unlock.
t
he POWE
R
p
tions have
o
wn .
n
g and c
l
m
atically cl
o
after a per
3
Q
u
n
t
ion:
Sh
o
In
c
n
) Re
d
) An
y
An
y
to
Thi
ap
p
Cli
his
d
own
t
ton 3 seco
n
R
key to, s
h
silent mod
e
l
osing o
f
o
sed when
t
io
d
of tim
e
7
u
ick
o
rt press s
l
c
rease the
v
d
uce the vo
y
interface
y
interface
the parent
s key will
p
lication
ck, short
tory
n
ds, you c
a
h
utdown op
t
e
, flight m
o
f
the scr
e
t
he screen
e
, will auto
star
t
l
eep / Wake
u
v
olume
lume
click to
r
click on t
directory
menu Keys
p
ress to d
i
a
n see the
b
t
ions will p
o
de , restar
t
e
en
is idle
matically t
u
t
u
p, press
s
r
eturn to
m
his button
displayed
i
splay the
b
oot screen
.
op up.
t
and shutd
o
u
rn off the
s
witch func
m
ain inter
f
you can re
in the
user brow
s
.
System t
u
o
wn.
screen to
tion
f
ace
turn
s
ed
u
rne
d
save
8
battery power.
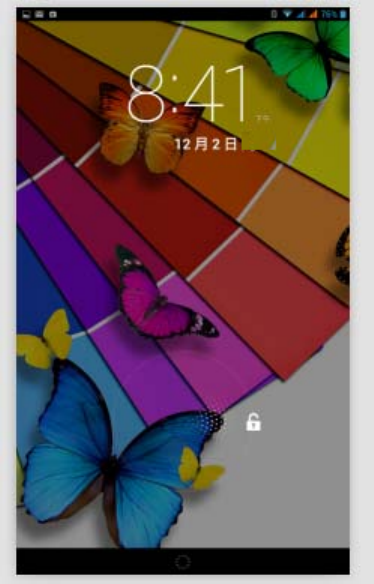
2. The screen turned on, press POWER Keys. Screen can be closed immediately.
Screen closed to open
If the screen is off, you can short press POWER Keys open the screen. After opening
will enter the lock, click on the little lock on the screen appears as in Figure 3.1 shows,
slide right to explain only the screen unlock
Figure 3.1
3.4 The use of touch-screen
MID Mode of operation
There are several ways to browse your MID on the home screen, menus and
applications.
Click
When you want to use the on-screen keyboard to input, when you want to select items
on the home page interface for your application, as long as the touch point with your
finger.
Press and hold
9
To open an item (such as a text box or a link on a Web page) the options available, or
home screen shortcut. Moving from the main program menu, as long as you hold the
item.
Slip or slide
Slip or slide on the screen with your finger to make rapid vertical or horizontal drag
operation.
Towing
Before you start dragging, you must press a finger and put some pressure until asked
to return to the
Can't release your finger until the reset.
Rotate
For most of the images, as long as the MID lateral rotation to automatically screen
orientation from horizontal to vertical. For example,
Interface when you enter text, music, and so on.
3.5 Home page interface
Home interface as shown in Figure 3.2 long pressing the home screen space, you can
use applications, shortcuts and customize your home screen wallpaper.
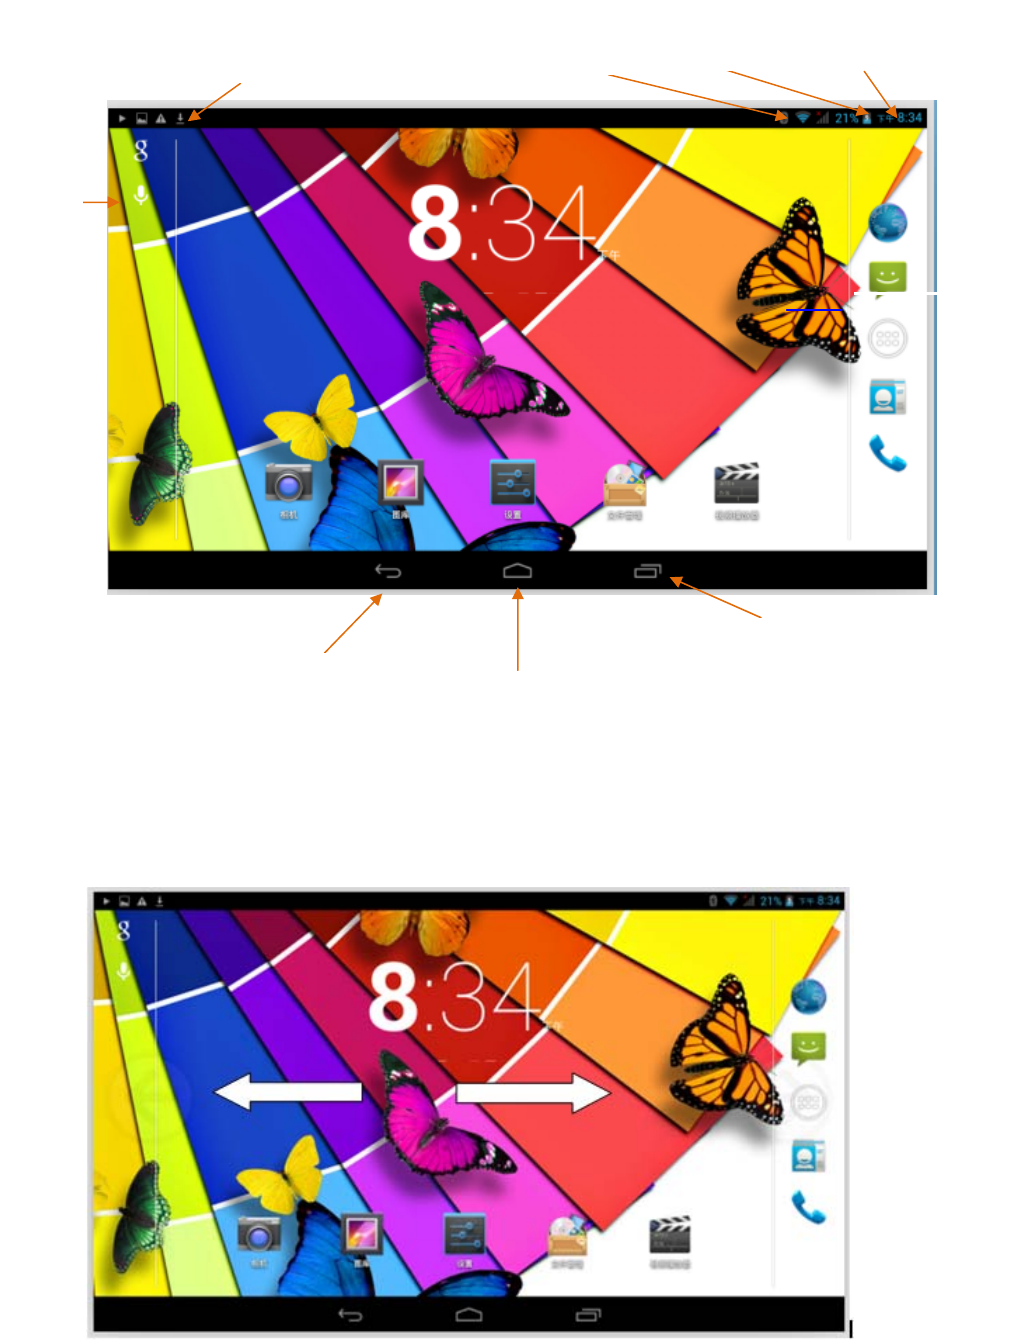
10
Figure 3.2
Extensible home page interface
Home screen extends beyond the screen width to provide more space, you can add
shortcuts, widgets, and so on. Press the home screen blank, and then jumps to quick
slide with your finger extends out of the screen left or right. Home page interface with
2 extending above a screen like Figure 3-2.1.
Figure 3- 2.1
Home
Back
Short press to view
recently used
search
Notice
board Notice
Battery
level Time

11
Desktop shortcut icons for the application management
Android 2.3 Following system , Has a function to create a folder on the desktop ,
And then placed under the folder icon set 。 Android 40 system allows the new
folders feature becomes more simple . Steps are as follows:
1. Icon to put together , Drag an icon overlay ( You can also stack multiple icons)
2. Then click the stacking lots of shortcut icons
Click on the bottom edge of the black box shows " Untitled folder " , Will pop up
hide keyboard , You can Rename this folder ( This is similar to Apple's IOS
System ) , Long press on the program icon you can also adjust the location
Delete the icons on the desktop
1. long press the icon that you want to delete , screen shows “Delete” icons .
2. directly above the icon onto the delete icon , after the icon becomes red , can be loosely
deleted .
Change desktop wallpaper
1. On the home page interface, long pressing the home screen space, pop-up Windows, you can
set the wallpaper .
2. Gallery or click on wallpaper gallery to choose the picture.
3.6 Access to the application
Click on Figure 3.2 Button to enter the main menu interface; Select the application
that you want to access.
3.7 USB Connection
MID Storage settings
Before transferring files, you must first provide the MID for storage mode settings:
1. Using USB transmission lines will be MID with computers. Notification bar will appear.
2. Open the notifications Panel, how to open a panel review 2.3 MID State and
notification.
3. In the notifications Panel, tap USB connected , and then click Open the USB storage
device.
4. Until the USB connection has been successful.
To copy files to the memory card
1. Using USB cable MID with computers.
2. In accordance with MID store settings successfully connected to the computer.
3. Open your computer on my computer , check "removable disk (x)" .
4. Locate the file that you want to copy, and copy to "removable disk (x)" .
5. After the copy is completed, click on "turn off USB storage device " uninstall it.
12
Note:1. When you are MID connect USB cable when, if you turned on the USB storage device ,
you will not pass the MID access memory card, if you want to access the MID
in the memory card, just disconnect the USB connection.
2. copy please confirm before MID in the SD card, and properly detected.
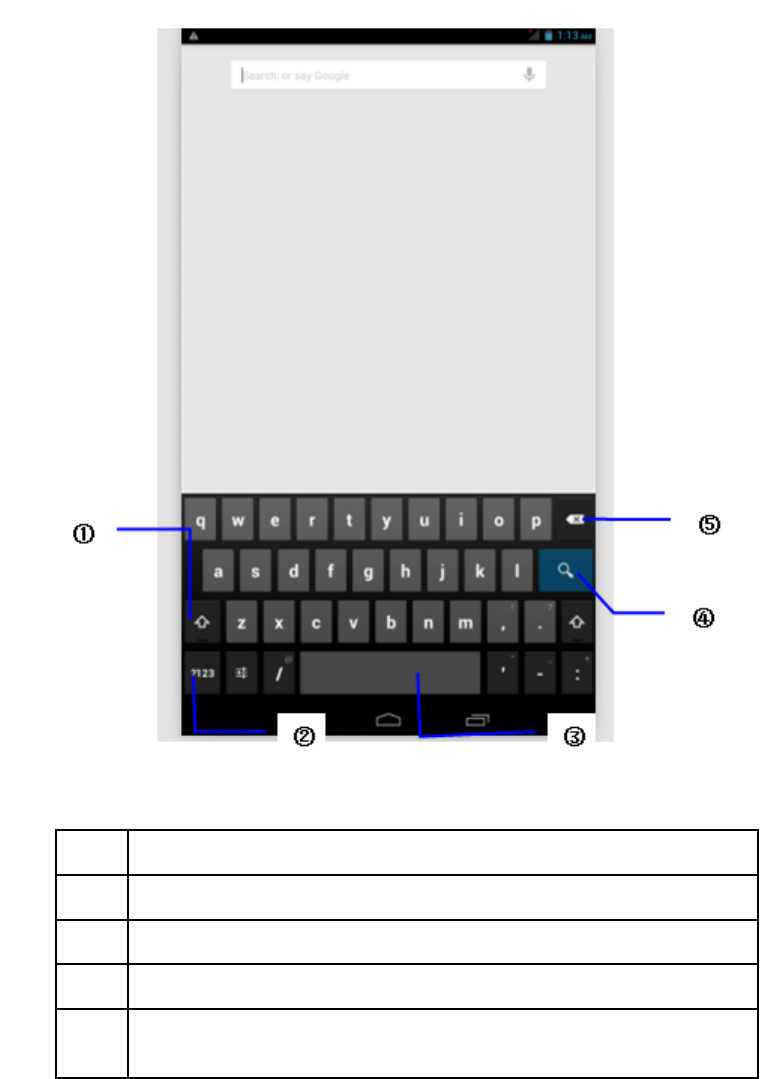
3.8 Enter your text
Use the on-screen keyboard
When you start a program or select the text you want to type the text or number edit box, the
on-screen keyboard will appear. Keyboards have the following input options:
1. Android keyboard
2. Google pinyin input method
Select the input method you want to use
1. Click on Setup application.
2. Select language and Input method 。
3. In the text area will list your MID all the installed input locales.
4. After the input method you want to bite.
Use and switch input method
13
Figure 3.5
1Switch input case
2Switch the text input mode
3Click Insert spaces
4Click Input can be obtained The implementation of
5Deletes the character to the left of the cursor. Click and hold to
delete all characters left
3.9 Use skill
Enter the widget interface
Click on the top of the screen in the application interface " Widget " Paddling by hand or on the
screen to the left , Will switch to the widget interface 。 Long press any widget can build shortcut
on your desktop , back through the shortcut icon on your desktop , you can quickly access the
appropriate application .

14
Create an application shortcut icons on the desktop
In the application or widget interface, long press any icon will automatically switch to the
desktop, drag icons onto can be placed anywhere on your desktop.
Note: System may require you to make more choices, then you can activate the window widget.
If the drop target does not have a space, then the widget will not be added to the home screen.
4 Basic settings
4.1 Wireless and network
Set up WiFi Connection
1. In main menu, select set up applications
2. Click WLAN , Open the wifi ,MID Will automatically scan for available Wi-Fi wireless
network .
3. Select the desired connection Wi-Fi The network if encryption password window will pop
up, enter the appropriate password, click on the link.
4.2 Bluetooth
Bluetooth-enabled applications
1. in main menu, select set up applications
2. click Bluetooth, turn on the Bluetooth
3. in the case of someone nearby to turn on Bluetooth, click the upper right corner of the search
device, MID will automatically search for nearby Bluetooth devices.
4. click the search for Bluetooth devices, pairing request window will automatically pop up, enter
the appropriate password and corresponding match each other, and can be paired
5. after successful pairing, found in the paired devices to operate the machine number, click on the
icons into the interface. Can be corresponding action
4.3 Display
Brightness Adjustment
1. Click on Settings application
2. Click on Display, click on Brightness.
3. Pop-up brightness Settings panel, drag around the brightness slider to adjust the dark bright
degree.
4. After finish adjusting brightness, click the “ok”
15
Adjust The Screen Standby Time
1. Click on “Settings application.”
2. Click on “display”.
3. Click on “ screen delay.”
4. Then will pop-up “Settings standby time screen” , select the standby time you want..
6. Wireless Display
Into the display menu, open the wireless display menu, the interface as the following figure
displays (figure 4.6). When connect the device successful, the TV and tablet can be synchronous
broadcast the video.
Figure 4.6
4.4 Management Application
1. In the application list, select “setting application”
2. Choose to application item, enter to manage and delete installed applications.
4.5 SD Card and MID Storage
Check SD card and MID available space
1. Enter “setting application”
2. Click “Storage”
3. Check SD card available space
16
4. Check MID internal storage space
Safely remove SD card
1. Click on “Settings application”.
2. Click Save.
3. Click on “ uninstall SD card”.
4. Then can remove the SD card saftly.
Note: security remove SD card, can effectively protect the SD card to increase the SD card.
service life .
4.6 Date and time
By default, the system will automatically use the network to provide the date, time zone
and time.
Manually adjust the date, time and time zone
1. Click on “Settings application”.
2. Scroll down the screen, and then click on the date and time.
3. Close “automatically determine the date and time”.
4. Close” automatically determine the time zone”
5. Click on “the select time zone”, and then selected time zones of the list .Scroll down the list to
see more time zones.
6. Click on “the set date”, and then click on the button up or down buttons to adjust the date,
month and year, when finished click Settings.
7. Click on the set time. Then click on the button up or down buttons to adjust the hour and minute,
click on the AM or PM change morning or afternoon (select use 24-hour format without this
option).Click on the Settings.
8. Select “use 24-hour format ”check box, in the use of 12 hours or 24 hours between system
switching. Select the time format will be applied to the alarm clock shows the time format.
9. Click on ”the select date format ”, and then select the format of the date should be displayed
on the MID.
Note: if the automatically use time provide by network, you can't set the date, time and time
zone.
4.7 Setting Language
1. Click on “the Settings application”
2. Click on “the language and the input method”
3. Click on “language” , and then select the language you need. Scroll down the list to view more
languages.
17
4.8 About the Tablet PC
Check the state of MID
1. Enter “the Settings application” .
2. Click on “About the tablet pc ” .To view status messages number, types etc
system update
1. Enter “the Settings application” .
2. Click on “about the tablet pc”.
3. Click on “the system update”, follow the steps to update(before the installation,
please confirm with the new version of the TF card inside the equipment)
Check the system version
1. Enter “the Settings application”.
2. Click on “about the tablet pc ”.
3. You can view model, power usage situation and internal version etc.
4.9 Timing power off / power on
Enter “the setting Application”
1. Click on “Timing power off/on item”
4.10 Security Settings
Set up Screen Lock
Can be used to unlock pattern or the password to lock the touch screen, to protect
your MID privacy
Note: after the set up screen lock , when power on or unlock touch screen, will be
required to enter your unlock code.
Set the unlock pattern
1. In the homepage, click on “the Settings application”.
2. Click on” the security”.
18
3. Click on” the lock screen”.
4. In the pop-up text area, choose “pattern”
5. According to the prompt to choose “the next step”.
6. The pop-up unlock pattern panel with 9 of touch spot. .In vertical, horizontal or
diagonal direction connection at least four points. when finish , system will record
your Settings.
7. Click to “continue “.
8. When prompted, draw a screen unlock pattern, click on “ok”.
Set the unlock PIN code
1. In the homepage, click on ”the Settings application”.
2. Click on” the security “.
3. Click on “the lock screen”.
4. In the pop-up text set area, select ” PIN”.
5. Enter the new PIN code (Numbers) and select “continue”.
6. Enter a new PIN number again and choose “ok”.
Set up the unlock password
1. In the homepage, click on “the Settings application”.
2. Click on “the security”.
3. Click on “the lock screen “.
4. In the pop-up text area, choose “password”.
5. Set the new password (alphanumeric) and select “continue”.
6. Enter the password again and select “ok”
19
5 Multimedia
5.1 Music
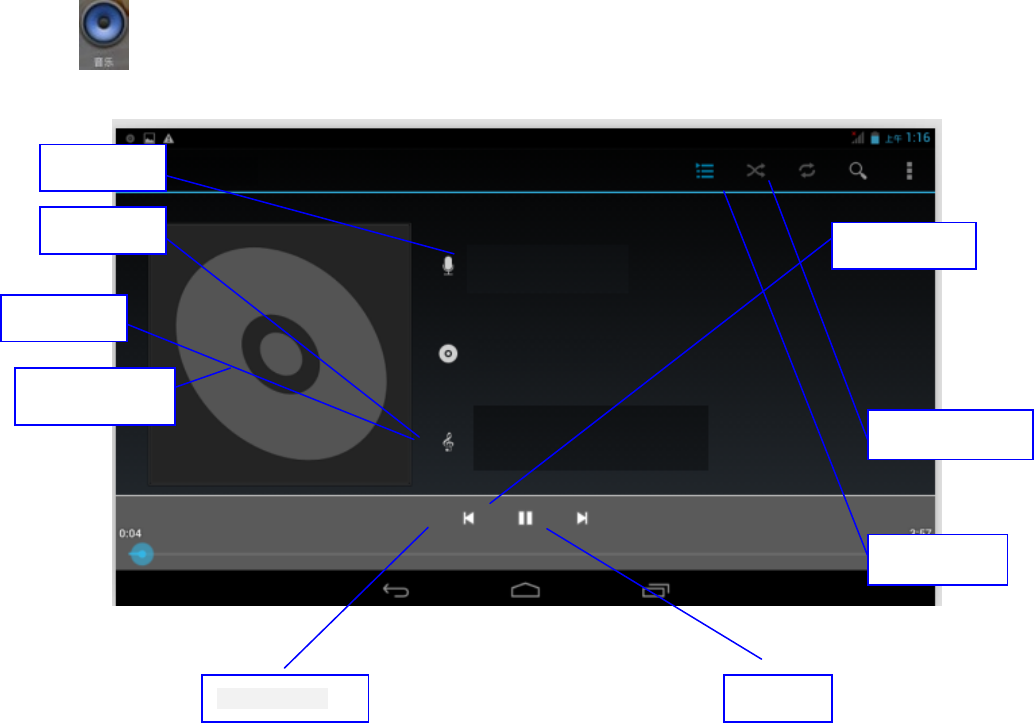
Enter the music player: in the homepage menu or desktop interface click music
icon to enter music playback, click list music can play music .
Figure 5.1
drag the playback progress bar, which can adjust the audio broadcast schedule
music player button as shown in figure 5.2
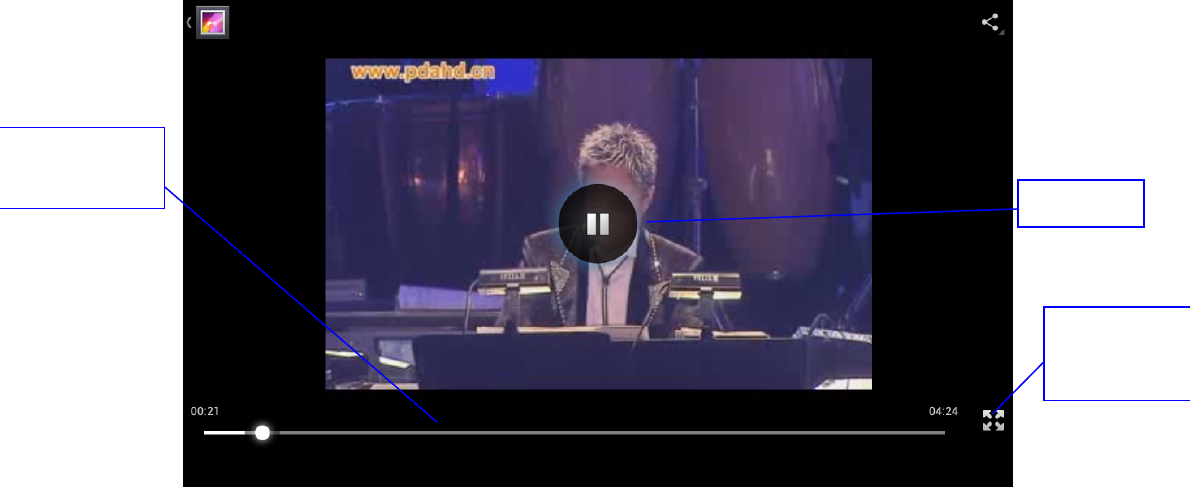
5.2 Video
1. into video player: in the main menu to select “Vidio Player” the application, choose
video to broadcast.
2. video player button as shown in figure 5.2
album art
Stop/ play
next
previous track
artist
Album name
Song name
shuffle play
Loop playback
Unknow Artist
spring---yue
Muisc
20
Figure 5.2
5.3 Map depot
Map depot application can automatically search photos and video files on SD card .
map depot will classify these images and video files save as the folder. You can use
the map depot application to view and edit photos, pictures as a desktop and review
images.
View the image
1. In the homepage, click on “the map application”.
2. Enter map , click to see the folder to view pictures.
3. Click on the pictures, system will automatically check in full screen mode.
4. Viewing photos can zoom in, put two fingers on the screen, and then the fingers
(closed fingers will show narrow) or double click on the screen
Skills: when browse pictures can slide pictures to the right or left, switch pictures
for browse
Edit and set the picture
While viewing images in full screen mode, press menu display menu option, you may
select the options to edit and setting up the picture.
Select screen
mode
A
djust the
p
layback progress Play / stop

21
Power point display
1. Open a picture, using the virtual button to click menu button and display menu options.
2. Click on the slideshow, then automatically loop display (or select the button )
Trim
1. Click on the menu and display menu options.
2. Then click on “the Trim”, click and drag areas to adjust the cutting machine.
3. Click on the cutting device inside and outside drag to center, to adjust the cutting size.
4. Adjust the size of the you want to, click on the Cut.
5. Such as cutting, click Cancel return to browse pictures.
Edit
1. Click on the menu and display menu options.
2. Click on the Edit.
3. the pop-up option can be set Brightness, Style, Color, Effect.
4. Click Save.
5. Such as give up the Edit, click on the Return Key, in the pop-up dialog box, click
Yes or NO return to browse pictures.
5.4 Camera
Under the main menu or desktop, click “Camera” application icon, into the camera
mode.
L camera action button, switch camera: select the Menu button, click on the switch
front/rear camera . As shown in figure 5.3
22
Figure 5.3
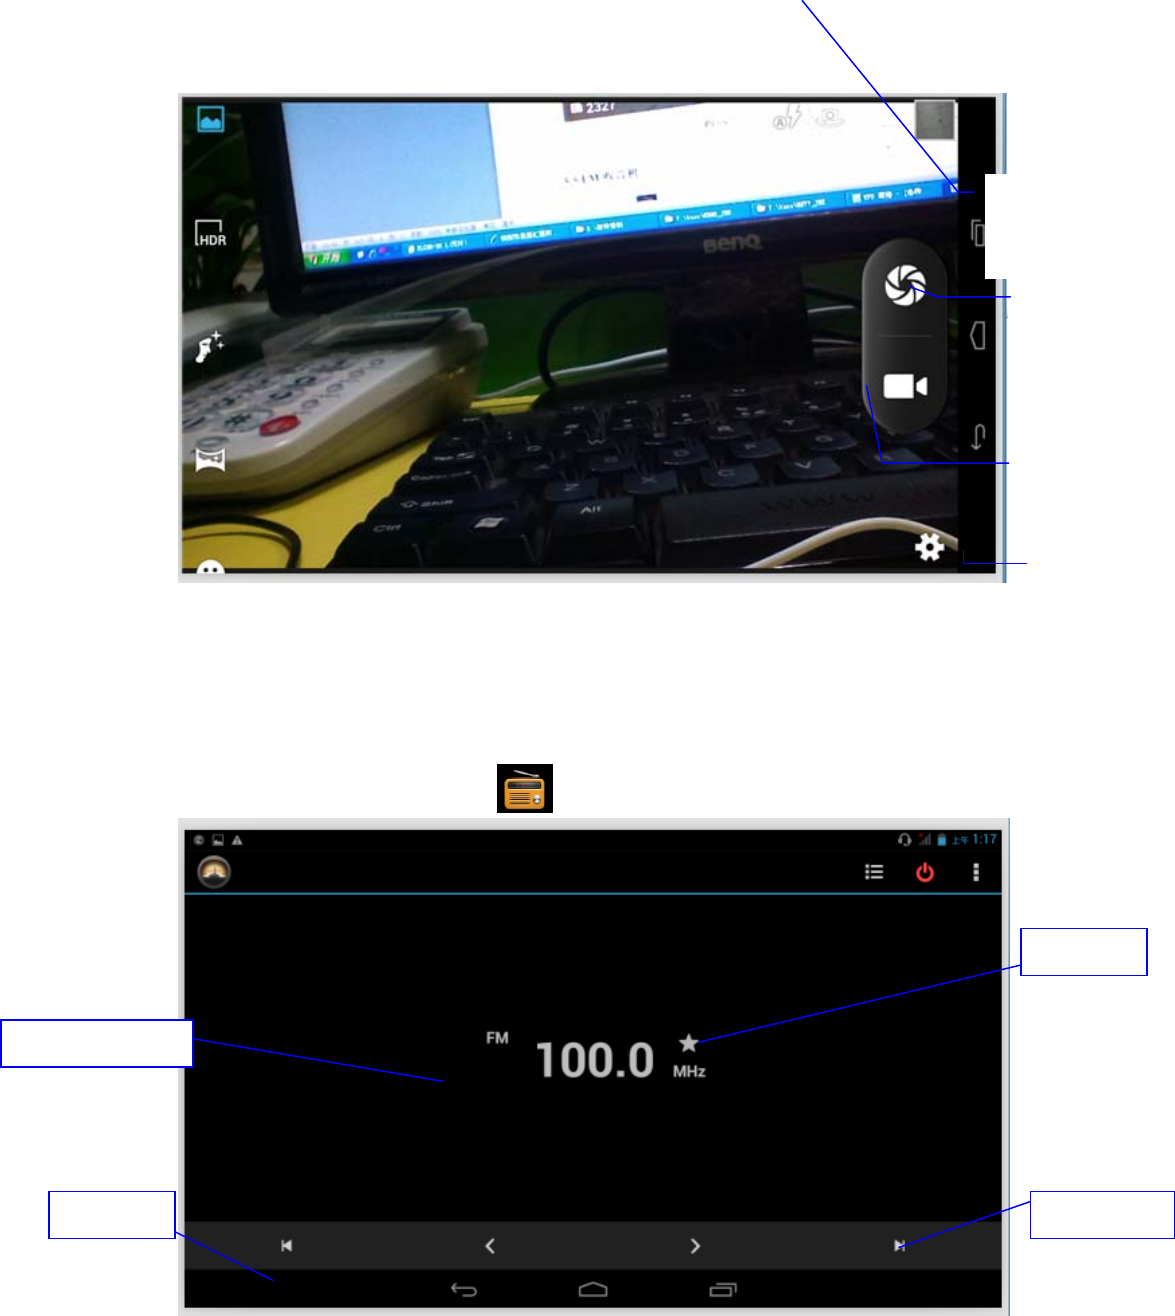
5.5 FM
Click the main menu or desktop into radio main interface:
Figure 5.4
1. search channel: click the radio Menu button, click Search, will automatically
search channel, search the channel will be saved to the list
collection
A channel next channel
Current frequency
switch front/rear
camera
Take photo
setup men
Camera model
23
2. collection channel: click on the button on main interface, you can collect
the channel, the channel will be saved to the list
6 Communication Function
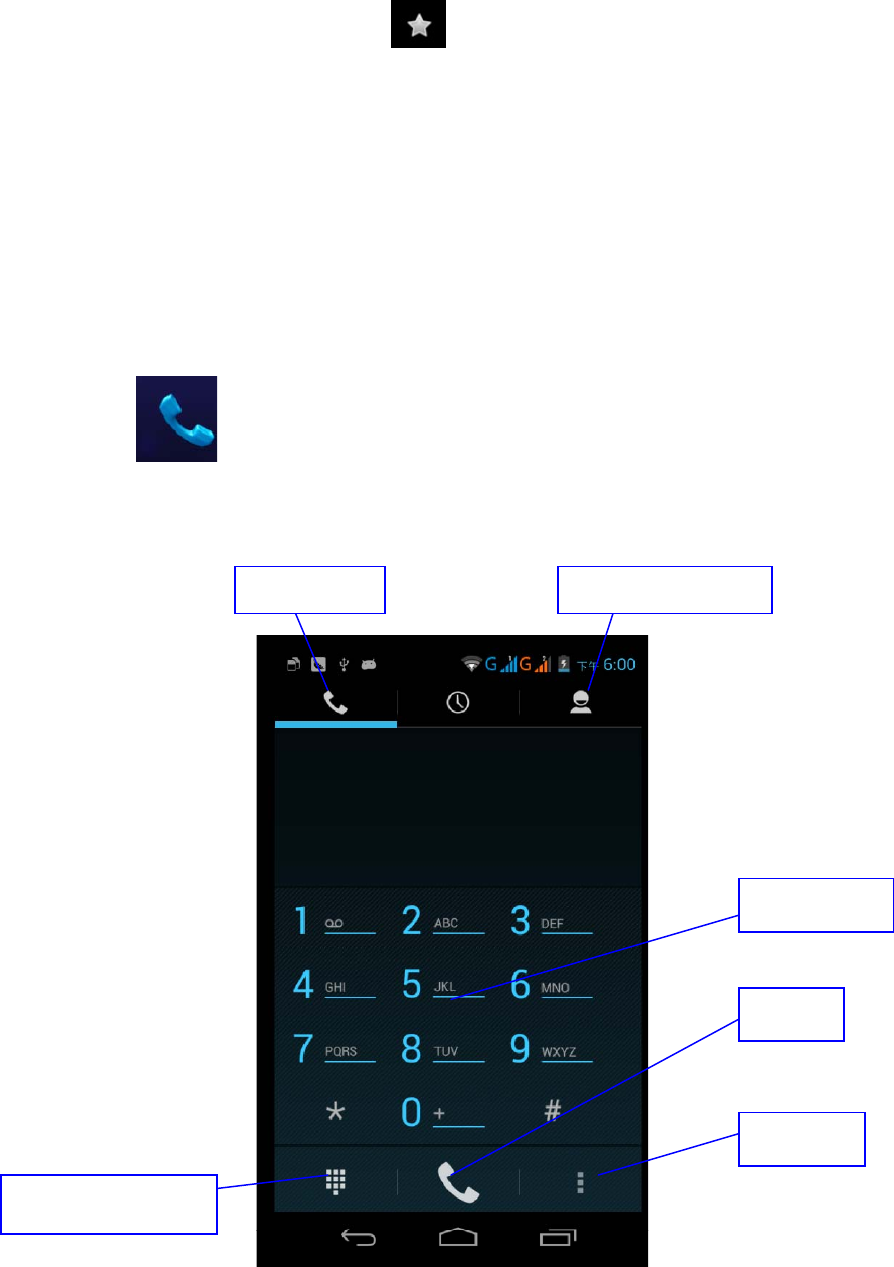
6.1 Phone
1 choose Dialing Application, into the interface.
2 As show as figure 6.1
Figure 6.1
dial
dialing area
MENU
Dial hidden keyboard
Call records Address book

24
6.2 Note
1 Enter the main menu interface,choose application program
2 choose write the new information
6.3 address book
In the main menu interface choose “contact person” application program,enter the address book
program.
Search contacts:click button,enter the search function
Add contacts:click button,enter add contacts interface
7 Internet
7.1 browser
Under the condition that the wifi or mobile network is normal connection (See section 4.1 wireless
and network settings ),click on the main menu or desktop browser enter IE interface.
Click on the address bar, input the website, then click start,enter the corresponding page, can
browse the website information.
7.2 E-mail
E-mail program attach email setup wizard,can add common Web email service provider’s(such
as Yahoo、Gmail and 163 etc)external POP3 / IMAP email account.
a. Mailbox setting
1. After click on icon, a mailbox setup wizard will help you set.

25
2. Input your email account’s address and password.
3. Click on the Next button to check email sending and receiving server is available.
4. Input the account name, and the names that need to display and send email, then
click on Finish.
5. If the mailbox is available, it will automatically into your inbox.
b. Delete the email account
You can delete the setting POP3 / IMAP email account from your MID.
1. click .
2. enter your mailbox.
3. Click on MENU.
4. Click on Set.
5. Choose delete account on the right side of the drop-down.
6. Choose OK to delete.
c. Send E-mail message
1. Click ,display your inbox。
2. Click inbox will automatically refresh the email, click can read.
3. Press the menu button, popup menu.
4. Click top-right ,into the interface of writing a new mail.
5. Enter your recipient’s email address in the recipient column.
6. Input the theme and information content.
7. Click on Add attachment.
8. Choose the attachment you want to send(such as pictures, videos etc).
9. Click on Send to send the email.
8 Other application program
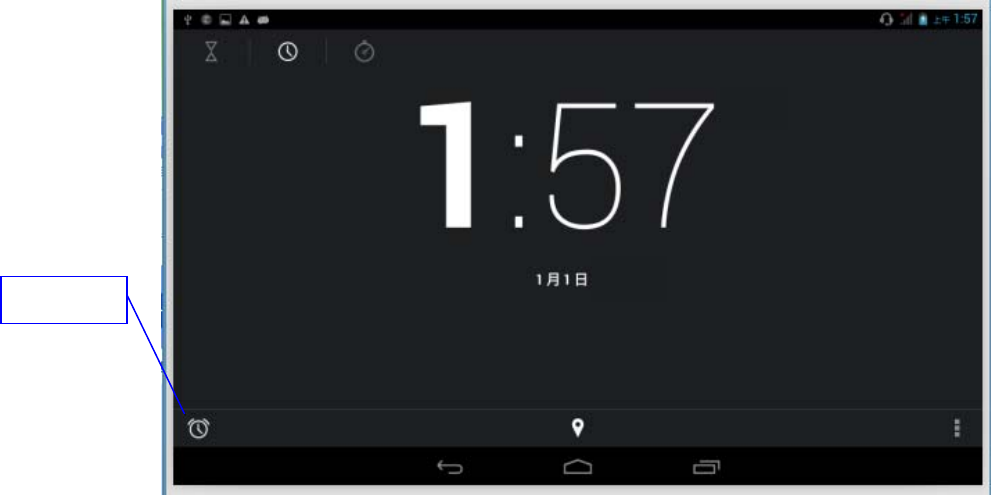
8.1 Clock
Click on Clock program, enter the program interface. As picture9.1。
There are Alarm Clock, Picture, Music, and Home button.
26
Figure 9.1
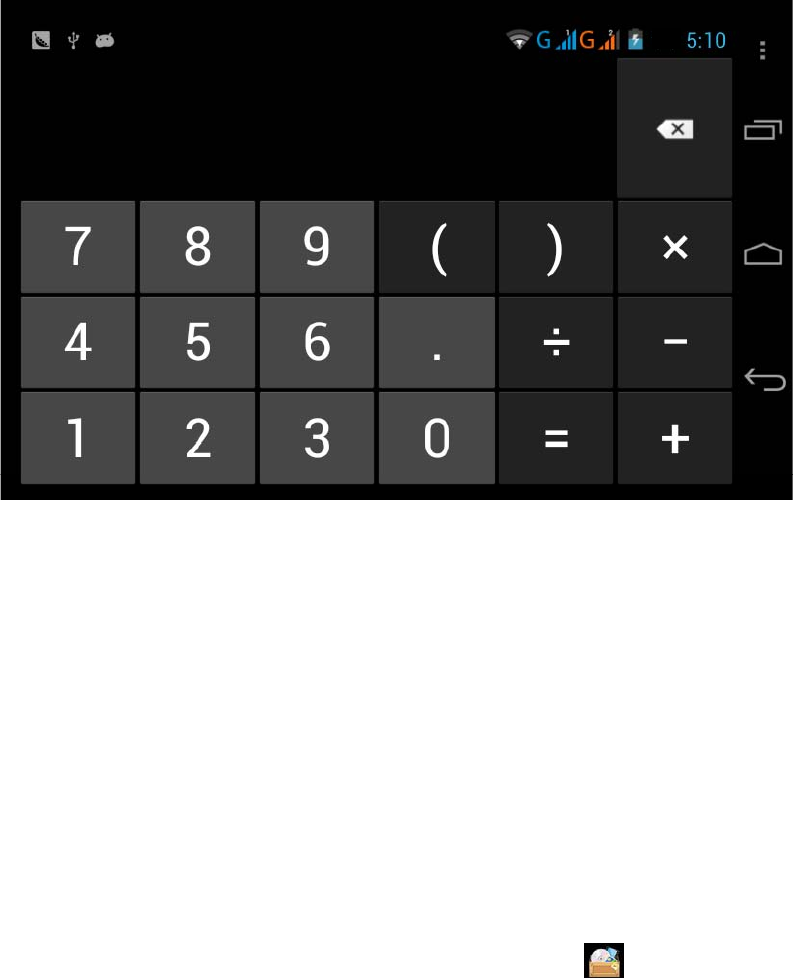
8.2 Calculator
1. Click “calculator”.
2. Into the basic panel of calculator.
3. Touch panel number on the counter or operator to calculate.
Set alarm
27
Figure 9.2
8.3 File manager
File manager has a file or folder of TF card to copy, cut, delete, rename, etc operations.
Can also to share files, install the apk, and other functions.
Under the main menu or the desktop, click on the icon file management into file manager
a、The folder or the file copy, cut, delete, rename, etc: select a folder or file, long press this folder
or file into the figure interface, then can operate the related file or folder.
b、To share file:select one of the file, long press this file, according to this file, select “share ” in
the pop-up list, then select the way you want to share.
28
c、install apk file:select the file that the suffix is .apk in the file manager, popup the install
program, can install third-part software according to clew.
d、New folder:select the directory you want to add new folder, click on the upper right button
, choose New Folder,according to the prompt can complete the new folder.
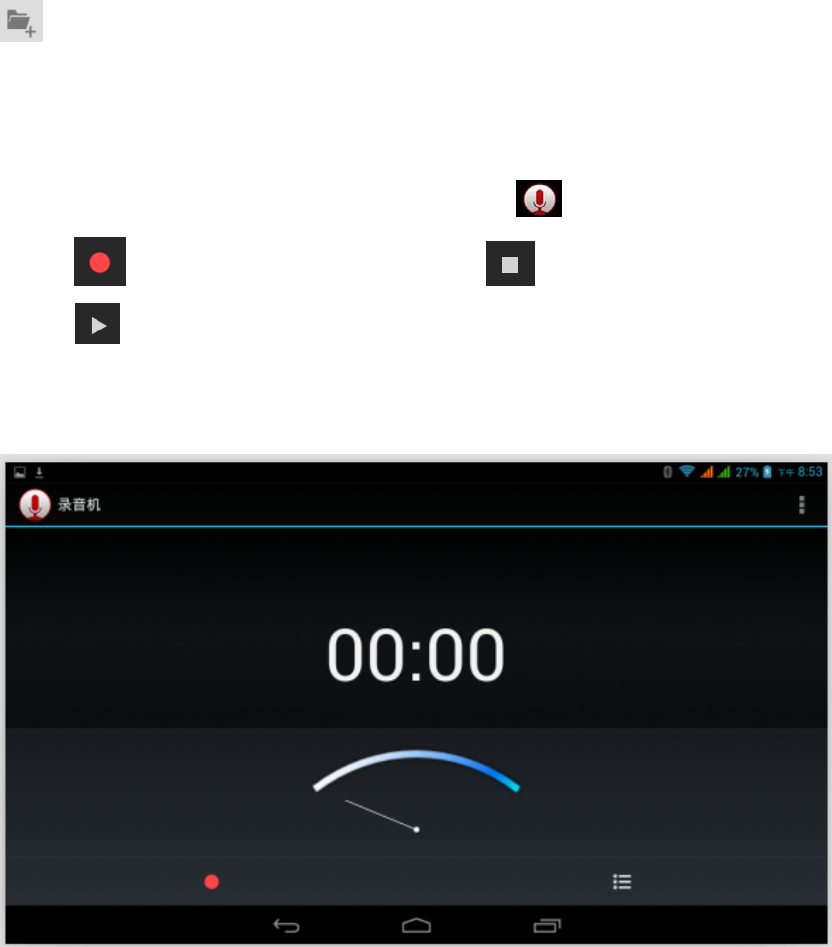
8.4 Recorder
Under the main menu or the desktop, click the recording icon into the interface, click the start
button to start recording. Click the stop button to stop recording. Click the play
button to play the record you just record. System automatically prompt to use the
recording or give up, please select manually.
Play the record: choose a audio player play the tape, first choose catalogue file according to the
root directory in the resource manager, click to play.
Figure 9.6
29
9 The installation of the program
9.1 Install
Install third-party applications
You can get the suitable third party applications of Android system on the Internet,
and can be used to install on the MID. Copy the application to the SD card, put
in the MID.
1. Click on the ”file manager” application, choose the application that need to
install.
2. Press the application that you need to install.
1. Popup the installation options, click on Install apk。
2. It can be run after completing the installation wizard.
Note:search on the Internet third party application are all used .apk suffix file.
9.2 Uninstall
Uninstall application
1. In the homepage interface, click on the SET button.
2. Click on Apply,list all the installed application list in the system.
3. Click on apk you want to uninstall, click unloading.
4. Click OK to finish unloading
9.3 The way of update
Update the Android application
By specifying website to download the latest application
By Android related software BBS on the Internet to download
30
10 Problem Solving
1. MID boot slowly for the first time
After MID system upgrade, first boot need to install pre-installed application
software, about 2-3minutes, after that power on will be quickly.
2. MID unable to connect to WIFI
To ensure that providing network services wireless router is working
properly.
Ensure MID and wireless router are keeping in a certain distance, and there
are no walls or other obstacles between them to separated.
3. MID hot to the touch
When using more than one application at a time, or when charging and the
screen is opening to the brightest may be hot. It belongs to the normal
situation.
4. Unable to set E-mail or registration application
Make sure that your network connection is normal, can be connected to the
Internet.
Make sure the email set up correctly
Make sure your system time is consistent with the local time
5. The system abnormal situation, can’t be normal run
When you install some third-party applications, may lead to the system can’t be normal run.
You can press the reset button(beside the power port) to reset the system.
6. Unable to open web pages
Please keep routing and MID in a effective distance.
Please restart your WIFI to try again
7. MID sometimes run slowly
It is the normal phenomenon. Please end the application that no need
to use in the advanced task management.

31
Appendix 1
Product specification
category content describe
Basic
specification
MID model L706-2G-MTK8312D
CPU model MT8312D
CPU frequency 1GHz
DDR-RAM 512M
DDR-ROM 8G
T- FLASH 32G max support
OS Android4.4.2
network GSM
data service GPRS
Support
Frequency
GSM850/1900;
camera Built-in dual cameras, back 2.0M ,front 0.3M
USB port Micro USB
battery 2200mAh
Power adapter DC 5V, 2A
memory Micro SD Card ,max support 32G
screen 7.0inch TFT, 800*480
Basic
function
GPS Built-in GPS
bluetooth Built-in bluetooth
G-sensor support
FM FM radio, can bring you all kinds of channel choice anytime and
anywhere
Application
program
video Support 3GP、MP4,support max resolution 1080P
music Built-in music play, support MP3/AAC/AMR/WAV etc.
game Support to install Android third-party game
Input method Android keyboard
Picture
browsing
Support JPG、BMP、PNG、GIF
OFFICE
software
Support office (word、excel)/,PDF
FCC Warning:
Any Changes or modifications not expressly approved by the party responsible for compliance could void
the user's authority to operate the equipment.
This device complies with part 15 of the FCC Rules. Operation is subject to the following two conditions: (1)
This device may not cause harmful interference, and (2) this device must accept any interference received,
including interference that may cause undesired operation.
Note: This equipment has been tested and found to comply with the limits for a Class B digital device,
pursuant to part 15 of the FCC Rules. These limits are designed to provide reasonable protection against
harmful interference in a residential installation. This equipment generates, uses and can radiate radio
frequency energy and, if not installed and used in accordance with the instructions, may cause harmful
interference to radio communications. However, there is no guarantee that interference will not occur in a
particular installation. If this equipment does cause harmful interference to radio or television reception,
which can be determined by turning the equipment off and on, the user is encouraged to try to correct the
interference by one or more of the following measures:
—Reorient or relocate the receiving antenna.
—Increase the separation between the equipment and receiver.
—Connect the equipment into an outlet on a circuit different from that to which the receiver is connected.
—Consult the dealer or an experienced radio/TV technician for help.
Specific Absorption Rate (SAR) information
SAR tests are conducted using standard operating positions accepted by the FCC with the phone
transmitting at its highest certified power level in all tested frequency bands, although the SAR is
determined at the highest certified power level, the actual SAR level of the phone while operating can be
well below the maximum value, in general, the closer you are to a wireless base station antenna, the lower
the power output. Before a new model phone is a available for sale to the public, it must be tested and
certified to the FCC that it does not exceed the exposure limit established by the FCC, Tests for each
phone are performed in positions and locations (e.g. at the ear and worn on the body)as required by the
FCC. For body worn operation, this tablet P C has been tested and meets the FCC RF exposure
guidelines when used with an accessory designated for this product or when used with an accessory that
contains no metal and that positions the handset a minimum of 0 cm from the body. Non-compliance
with the above restrictions may result in violation of RF exposure guidelines.