AOpen orporated 10MFRGCM389 AOPEN Chromebase Mini Commercial User Manual WT10M FRG

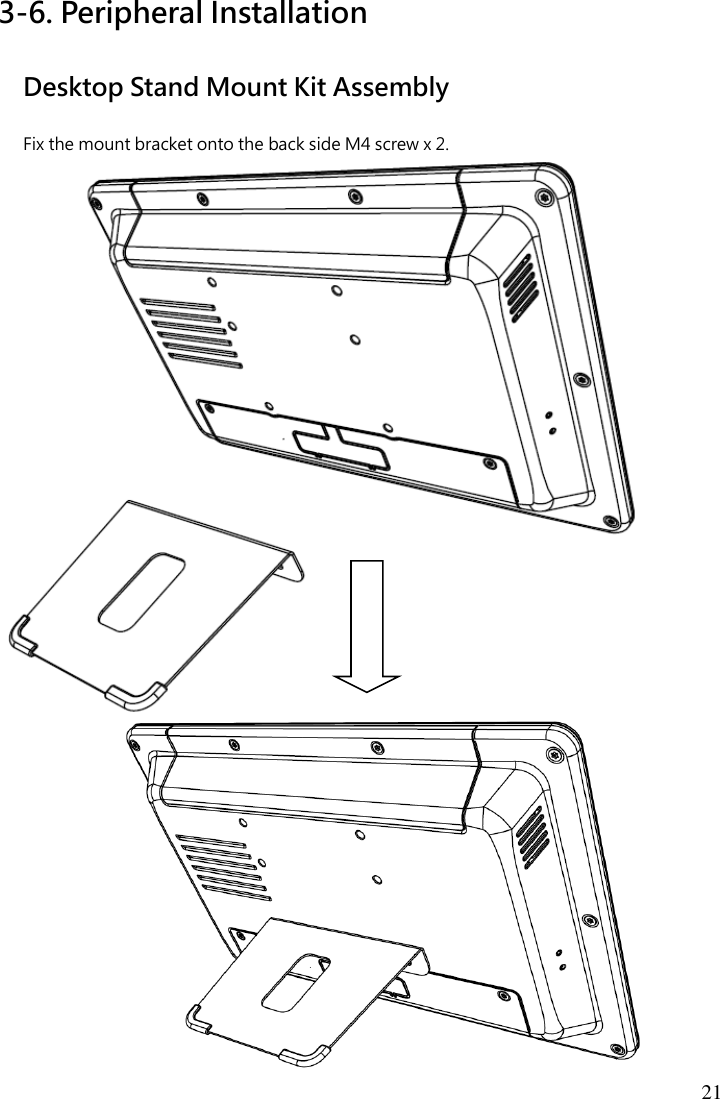
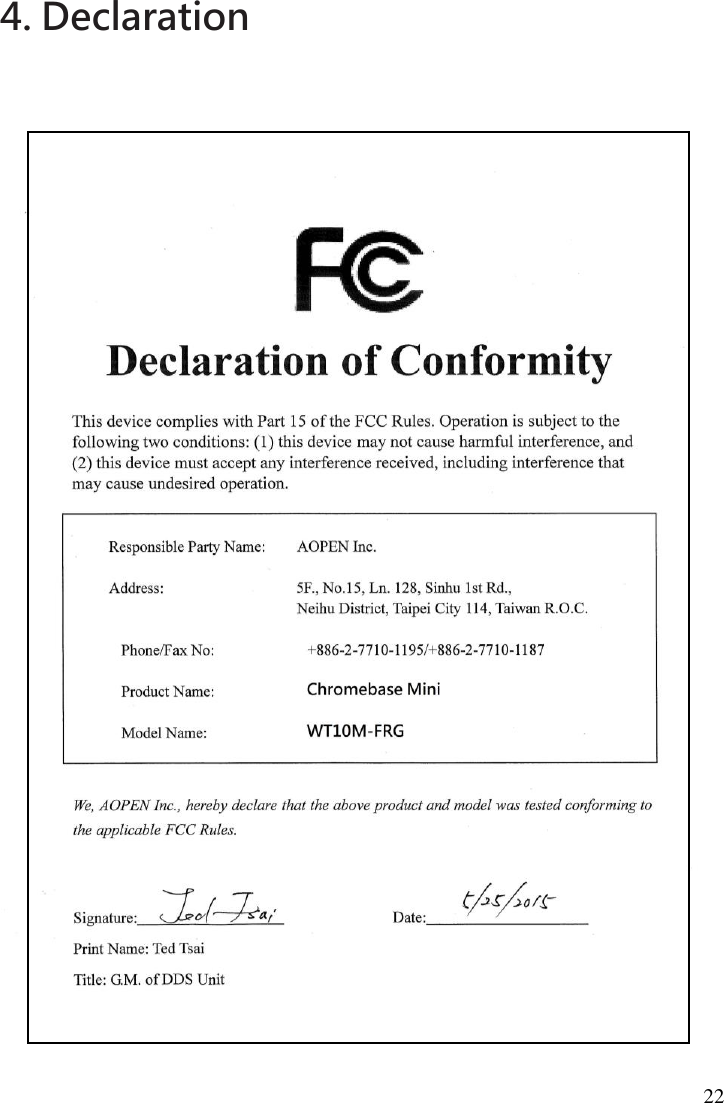
AOpen Incorporated AOPEN Chromebase Mini Commercial WT10M FRG

Users Manual

Chromebase Mini   Commercial 10”All in one device   Model : WT10M-FRG   User Guide
2
3 Table of Contents      Disposal Instructions .................................................. 4   Copyright ...................................................................... 8 Disclaimer ..................................................................... 8   1.  Safety Instructions ...................................................... 9 ENERGY STAR Certification.......................................... 10 Risk of Overheating ...................................................... 11 2. Packing List ................................................................. 12 2-1. Standard Accessories ............................................ 12 2-2. Optional Accessories .............................................. 13  3. Product Introduction ................................................... 14   3-1. Getting started ....................................................... 14 3-2. Outlook View ......................................................... 15   3-3. Dimensions ........................................................... 26 3-4 Getting to know your Chromebase Mini 10” …….…... 17 3-5 Rear side Introduction. ……………………………..... 19 3-6. Peripheral Installation ............................................. 21 Wall Mount Kit Assembly ........................................ 21  4. Declaration ................................................................... 22   5. Contact Information .................................................... 24   6. Chrome Care ................................................................ 25
4  Disposal Instruction (US) For conservation purposes, please do not throw this electronic device into the municipal trash bin when discarding.   To minimize pollution of our environment, please recycle this product. For more information about the collection and recycling of Waste Electrical and Electronic Equipment (WEEE), you are invited to visit our homepage at www.aopen.com under “Green Products”  廃棄上の指示 より良い地球保護のために、電子機器を廃棄処分にする時は、ゴミ箱に捨てないで下さい。汚染を最小限に抑え、地球環境の最大限の保護のために、製品をリサイクルして下さい。 廃電気電子機器  (WEEE)  の回収とリサイクルについての情報は、弊社ホームページ www.aopen.com  の“Green Products”(環境に優しい製品)をご覧下さい。  廢棄及回收處理 為了保護環境,請勿將本產品當作一般廢棄物處理。為減少環境污染,維護地球資源,本產品報廢時,請回收本產品。 有關收集和回收廢棄電子電氣設備(WEEE)的更多信息,請參考我們的網頁www.aopen.com“綠色產品”的資訊。
5 Instruktion til bortskaffelse (Danish) Af hensyn til vores miljø bedes De ikke bortskaffe denne elektroniske enhed i en almindelig affaldsspand. For at mindske forurening og sikre beskyttelse af miljøet bedes De genbruge produktet. For yderligere information vedrørende indsamling og genbrug af elektronik-affald (Waste Electrical and Electronic Equipment (WEEE)) er De velkommen til at besøge vores website www.aopen.com og læse nærmere under "Green Products".  Verwijderingsinstructie (Dutch) Om mogelijke schade aan het milieu of de menselijke gezondheid door ongecontroleerde afvalverwijdering te voorkomen, moet u dit elektronisch product scheiden van andere soorten afval en op een verantwoorde manier recyclen. Verwijder dit product dan ook alstublieft niet samen met ander huishoudelijk afval. Voor meer informatie over de verzameling en recycling van elektrisch afval en elektronische apparatuur (WEEE), nodigen we u uit om onze homepage te bezoeken www.aopen.com onder "Green Products".  Instruction de Disposition (French) Pour une meilleure protection de la terre, ne jetez pas ce dispositif électronique dans la poubelle municipale lors de la disposition. Pour éliminer la pollution et assurer la plus grande protection de l'environnement global, réutilisez s’il vous plaît le produit. Pour plus d'informations sur la gestion des déchets d’Equipements Electriques et Electroniques (DEEE ou WEEE), vous êtes invité à visiter notre site à www.aopen.com sous " Green Products".
6 Entsorgungsanleitung (German) Zum besseren Schutze unseres Planeten, schmeissen Sie elektrische Geräte bitte nicht in öffentliche Mülleimer. Zur Verringerung der Verschmutzung und zur Sicherstellung grösstmöglichen Schutzes der Umwelt recyceln Sie bitte das Produkt. Für mehr Informationen zum Sammeln und Recyceln von elektrischen und elektronischen Müll (WEEE) besuchen Sie bitte unsere Homepage unter www.aopen.com unter dem Punkt "Green Products".  Istruzioni per lo smaltimento (Italian) Per una migliore salvaguardia del nostro pianeta, si prega di non gettare questo dispositivo elettronico nei normali rifiuti al momento dell'eliminazione. Per ridurre al minimo l'inquinamento ed assicurare la massima protezione dell'ambiente, si prega di riciclare il prodotto. Per maggiori informazioni riguardanti la raccolta ed il riciclaggio delle apparecchiature elettriche ed elettroniche residue (WEEE), siete invitati a visitare la nostra homepage www.aopen.com alla voce "Green Products".  Instruksjoner for Resirkulering og Oppsamling (Norweigian) For ĺ beskytte vĺr planet, kast ikke dette elektroniske utstyret sammen med vanlig avfall. For ĺ beskytte vĺr natur og miljř, vennligst resirkuler dette produktet. For mer informasjon om oppsamling og resirkulering i henhold til Waste Electrical and Electronic Equipment (WEEE), se vĺr hjemmeside pĺ www.aopen.com under "Green Products".
7 REEE - Programa de Tratamento de Resíduos de Equipamentos Eléctricos e Electrónicos (Portugese) Para melhor protecção ambiental do nosso planeta terra, não coloque o dispositivo electrónico no receptáculo de lixo municipal. Para minimizar a poluição e garantir protecção máxima do ambiente global, recicle o produto. Para mais informações sobre acerca da recolha e reciclagem de Equipamento Eléctrico e Electrónico (WEEE), convidamos-lhe a visitar nossa página na Internet em www.aopen.com sobre "Green Products".  Instrucciones para depositar los productos electrónicos (Spanish) Para proteger mejor el medio ambiente, por favor, no deposite los productos electrónicos en los contenedores de basura tradicionales. Para reducir la contaminación y proteger el medio ambiente se recomienda que los recicle. Para más información acerca de dónde depositar y cómo reciclar Equipos Electrónicos y Desperdicios Electrónicos (WEEE), por favor, visite la página web www.aopen.com entre en la sección Productos Ecológicos (“Green Products”).  Kassering (Swedish) För att bättre värna om vår jord bör denna elektroniska utrustning ej kasseras tillsammans med vanligt avfall. För att minimera mängden föroreningar och så långt som möjligt skydda den globala miljön bör produkten återvinnas. För vidare information om insamling och återvinning av uttjänta elektriska och elektroniska produkter (Waste Electrical and Electronic Equipment, WEEE), besök avsnittet "Green Products" på vår hemsida, www.aopen.com.
8 Copyright   Copyright of this publication belongs to AOPEN Inc. AOPEN reserves the right to change the content of this publication without obligation to notify any party of such changes or revisions. No part of this publication may be reproduced, transcribed, transmitted, translated into any language,  and  stored  in  a  retrieval  system  in  any  form  or  by  any  means  electronically, mechanically, optically without the prior written permission of AOPEN Inc.      Disclaimer   AOPEN makes no warranties or representations, either expressed or implied, with respect to the content herein and specifically disclaims any warranties, merchantability of fitness for any particular purpose.    AOPEN and AOPEN logos used herein are registered trademarks of AOPEN Inc.   All other brand names and trademarks are owned by their respective owners.    Copyright © 2015 by AOPEN Inc.   All rights reserved.   Chrome, Chromebox and Chromebase are   Registered trademarks of Google Inc.
9 1. Safety Instructions   1. Please read these safety instructions carefully.   2. Please keep this User's Manual for reference.   3. Please disconnect this equipment from its power source before cleaning. Do not use liquid or sprayed detergent for cleaning. Use a lightly moistened sheet or cloth for cleaning.   4.  Make  sure  the  equipment  is  connected  to  the  power  source  with  the  correct  voltage, frequency and amperage.   5. All cautions and warnings on the equipment should be noted and followed.   6. Never pour any liquid into any opening of this equipment; this could cause fire or electrical shock.   7.  Never  disassemble  the  equipment.  For  safety  reasons,  the  equipment  should  only  be handled by qualified service personnel.   8. If one of the following situations arises, get the  equipment checked by qualified service personnel:   a. Liquid has penetrated the equipment.   b. The equipment has been exposed to moisture.   c. The equipment has not worked well or you cannot get it to work according to user's manual.   d. The equipment has been dropped and damaged.   e. The equipment has obvious signs of breakage.   9. Caution on use of battery: Use the battery recommended by the manufacturer or the same type of battery installed by the manufacturer. If the incorrect battery is used, it may cause an explosion  or  can  present  a  fire  hazard.  Recycle  or  discard  used  batteries  according  the manufacturer's instruction or your local authority.   10. Ambient operating temperature for this equipment is: 0~  40 degrees Celsius. (32~104 degrees Fahrenheit)   11. Wall Mounting Holder needs to be an UL 1678 approved product.
10 ENERGY STAR Certification  ENERGY STAR is a U.S. Environmental Protection Agency voluntary program that helps businesses and individuals save money and protect our climate through superior energy efficiency. AOPEN products that   have the ENERGY STAR logo complies with the   ENERGY STAR standard. The monitor and computer are automatically set to sleep after 8 and 30 minutes of user inactivity. To restart your device after sleep mode, click the mouse, press any key on the keyboard or touch screen.  Additional information on the potential energy and financial savings of the power management feature can be found on the EPA ENERGY STAR Power Management website at http://www.energystar.gov/ powermanagement.  Additional information on the ENERGY STAR program and its environmental benefits are available on the EPA ENERGY STAR Web site at http://www.energystar.gov.
11 Risk of Overheating!   a.     Do not install Chromebase mini 10” in an enclosed space or place any objects on the back side of the Chromebase mini 10”. b.     Be sure the heat sink that is on the back side of the Chromebase mini 10”has at least 5mm of clear space for thermal holes. c.     Do not use Chromebase mini 10”when the ambient temperature is higher than 40℃.  ≧5mm
12 2. Packing List 2-1. Standard Accessories a. System   b. Power adapter (40W / 19V)   c. Power cord   d. Desktop stand e. Button tool, M4 Screw x 8, Washer x 8, Tie x 3 M3 Screw x 2 (for I/O cover) f. User Manual   g. Warranty Card a.      b.    c.    d. Desktop stand and I/O cover     Note:   Please note that the images are for visual representation purposes only and may differ from the actual product   e. Button tool x1  M4 VESA Screw x 8 M3 Screw x 2 ( for I/O cover)  Washer x 8   Tie x 3   f.           g.
13 Recommend 802.3at Type 2 "PoE+“ switchDE3255/DE3250 use 12V/2A onlyChrome box and base mini suggest 24V/1AIncorrect voltage might cause device damageLAN (RJ45)Cable hole Table stand Deco coverDisplay bracketWall bracket2-2. Optional Accessories  a. PoE Splitter (IEEE 802.3at Type 2 "PoE+")              b. Desktop Mounting KIT         c. Wall Mounting KIT
14 3. Product Introduction 3-1 Getting started  Connect the AC power adapter to your Chromebase Mini 10”:    Plug the AC power cord into a 100 V~240 V power source.              Connect the DC power connector into your Chromebase Mini 10”(DC) input port.  IMPORTANT! •  Only use the recommended adapter and cable that came with your Chromebase Mini 10”. •  We strongly recommend that you use a grounded wall socket while using your Chromebase Mini 10”. •  The socket outlet must be easily accessible and near your Chromebase Mini 10”. •  To disconnect your Chromebase Mini 10” from its main power supply, unplug your device from the power socket.  NOTE: Power adapter information: •  Input voltage: 100-240 Vac •  Input frequency: 50-60 Hz •  Rating output current: 2.1A (40 W) •  Rating output voltage: 19 V BC1.2 each port supported 5V/1.5A
15 3-2. External View  Front Side                  Rear Side
16 3-3. Dimensions       29.9mm
17 3-4. Getting to know your Chromebase Mini 10” Please use attached tool or paper clip to insert into buttonhole   to amend the following settings.              Power button The power button allows you to turn the Chromebase Mini 10” on or off. You can use the power button to put your Chromebase mini 10” to sleep mode or hold the clip in the power button for four (4) seconds to force shutdown the device. To power on, hold the clip in the power button for 0.6 to 1 second.      When you install devices or cables, please ensure that DC plug is removed prior to plugging in powered devices.  Wake on LAN (WOL) Ethernet RJ45   WOL enabled by default for Sleep Mode, when the system is operating on AC mains power. (S5 power off not supported) If you need disable WOL. Please log on to chrome OS and press Ctrl + Alt + T then go to command mode, and type below command to disable WOL. To use this function, turn Verification Off (Developer Mode). crosh > shell  chronos@localhost / $ sudo su Localhost / # set_wake_on_lan false The default WOL function will be restored after reboot.   IMPORTANT!   Forcing the system to restart may result in data loss. We strongly recommend that you back up your data regularly. Caution:  Recovery button Power button Kensington security lock LED Power Indicator
18                         Kensington security Lock The Kensington security slot allows you to secure your Chromebase Mini 10” using Kensington® security products.    VESA Hole The VESA standard defines dimensions of a display's four-hole. The Chromebase mini 10” VESA 75x75mm (75x50mm) hole allows you to screw in M4 (Deep 3.5mm) products. Kensington security lock
19 3-5. Rear side Introduction Air vent holes The air vent holes allow cooler air to enter your Chromebase mini 10” chassis.                           USB 2.0. These ports also support the Battery Charging 1.2 (5V/1.5A) technology that allows you to charge your USB devices.    Power input The supplied power adapter converts AC power to DC power for use with this jack. Power supplied through this jack supplies power to the Chromebase mini 10”. To prevent damage to the Chromebase mini 10”, always use the supplied power adapter.     Remove I/O Cover   WARNING!   The power adapter may become hot when in use. Do not cover the adapter and keep it away from your body. BC1.2 each port supported 5V/1.5A
20                 HDMI port The HDMI (High Definition Multimedia Interface) port supports a Full-HD device such as an LCD TV or monitor to allow viewing on a larger external display.        LAN port The 8-pin RJ-45 LAN port supports a standard Ethernet cable for connection to a local network.         Headphone/Mic Audio Out/In jack The stereo headphone jack is used to connect the system's audio out signal to amplified speakers (headphones) or Microphone.    USB 2.0 x 3
21 3-6. Peripheral Installation Desktop Stand Mount Kit Assembly Fix the mount bracket onto the back side M4 screw x 2.
22 4. Declaration
23
24  5. Contact Information AOPEN America   AOPEN America Inc.   2150 N. First Street, Ste. 300, San Jose, CA 95131   USA   Telephone: (+1) 408-586-1201    AOPEN Australia anhd New Zealand   AOPEN ANZ   AOPEN Australia & New Zealand   Level 1, 572 -574 Swan Street     Richmond VIC 3121, Australia.   Telephone: (+61) 3 9427 7379    AOPEN Europe   AOPEN Computer BV   Stadionlaan 151-153   5246 JT Rosmalen   The Netherlands   Telephone: (+31) 73 646 6400    AOPEN Japan   AOPEN Japan Corp.   3F, Daiichi-denpa Bldg, 2-4-4, Sotokanda,   Chiyoda-ku, Tokyo 101-0021   Japan   Telephone: (+81) 3 5298 1668    AOPEN Inc.   AOPEN Inc.   5F., No.15, Ln. 128, Sinhu 1st Rd., Neihu District,   Taipei City 114,   Taiwan (R.O.C.)   Telephone: (+886) 2 7710 1195    AOPEN Taiwan   AOPEN Great Connection Corporation   5F., No.15, Ln. 128, Sinhu 1st Rd.,Neihu District,   Taipei City 114,   Taiwan (R.O.C.)   Telephone: (+886) 2 7710 1195
25 6. Chrome Care  Please contact your authorised reseller or authorised distributor in the first instance for all warranty queries.   For direct AOPEN Care in regard to AOPEN chrome products please see below:    Australia/ News Zealand   chromecare-au@aopen.com    Americas - including South America, Canada   chromecare-usa@aopen.com    Europe   chromecare-eu@aopen.com    Japan   chromecare-jp@aopen.com    Asia - Africa   chromecare-asia@aopen.com    All other areas:   chromecare-global@aopen.com
26 Use the on-screen keyboard To type or handwrite text, or to add images to files, documents, and emails, you can use your Chromebook’s on-screen keyboard.  Open the keyboard Open the keyboard in Settings 1. Sign in to your Chromebase mini. 2. Tap or click the status area, where your account picture appears. 3. Tap or click Settings   Show advanced settings. 4. Under "Accessibility," check the box for Enable on-screen keyboard.  Open the keyboard in tablet mode If your Chromebase mini can be used as a tablet, the on-screen keyboard will automatically open when you flip the screen of your Chromebase mini over its hinge.  Adjust keyboard settings 1. Open your Chromebase's on-screen keyboard. 2. In the lower left corner, tap or click More   . 3. Tap or click Settings   . 4. Under "Input Method," tap or click Configure…  5. Decide which settings to change:  Turn keypress sound on and off.  Set the level of automatic correction you'd like.  Erase all changes you've made to your dictionary.  Turn auto-capitalization on and off.  Choose whether a double space automatically adds a period.
                           Part No.: Doc. No.: 161-213-101
Federal Communication Commission Interference StatementThis equipment has been tested and found to comply with the limits for a Class B digital device,pursuant to Part 15 of the FCC Rules. These limits are designed to provide reasonable protectionagainst harmful interference in a residential installation. This equipment generates, uses, and canradiate radio frequency energy and, if not installed and used in accordance with the instructions, maycause harmful interference to radio communications. However, there is no guarantee that interferencewill not occur in a particular installation. If this equipment does cause harmful interference to radio ortelevision reception, which can be determined by turning the equipment off and on, the user isencouraged to try to correct the interference by one or more of the following measures:• Reorient or relocate the receiving antenna.• Increase the separation between the equipment and receiver.• Connect the equipment into an outlet on a circuit different from that to which the receiver is connected.• Consult the dealer or an experienced radio/TV technician for help.FCC Caution:This device complies with Part 15 of the FCC Rules. Operation is subject to the following two conditions:(1) This device may not cause harmful interference, and (2) this device must accept any interferencereceived, including interference that may cause undesired operation.Non-modification Statement:Changes or modifications not expressly approved by the party responsible for compliance could void the user'sauthority to operate the equipment.FCC Radiation Exposure Statement:This equipment complies with FCC radiation exposure limits set forth for an uncontrolled environment.This equipment should be installed and operated with minimum distance 20cm between the radiator &your body.

Navigation menu