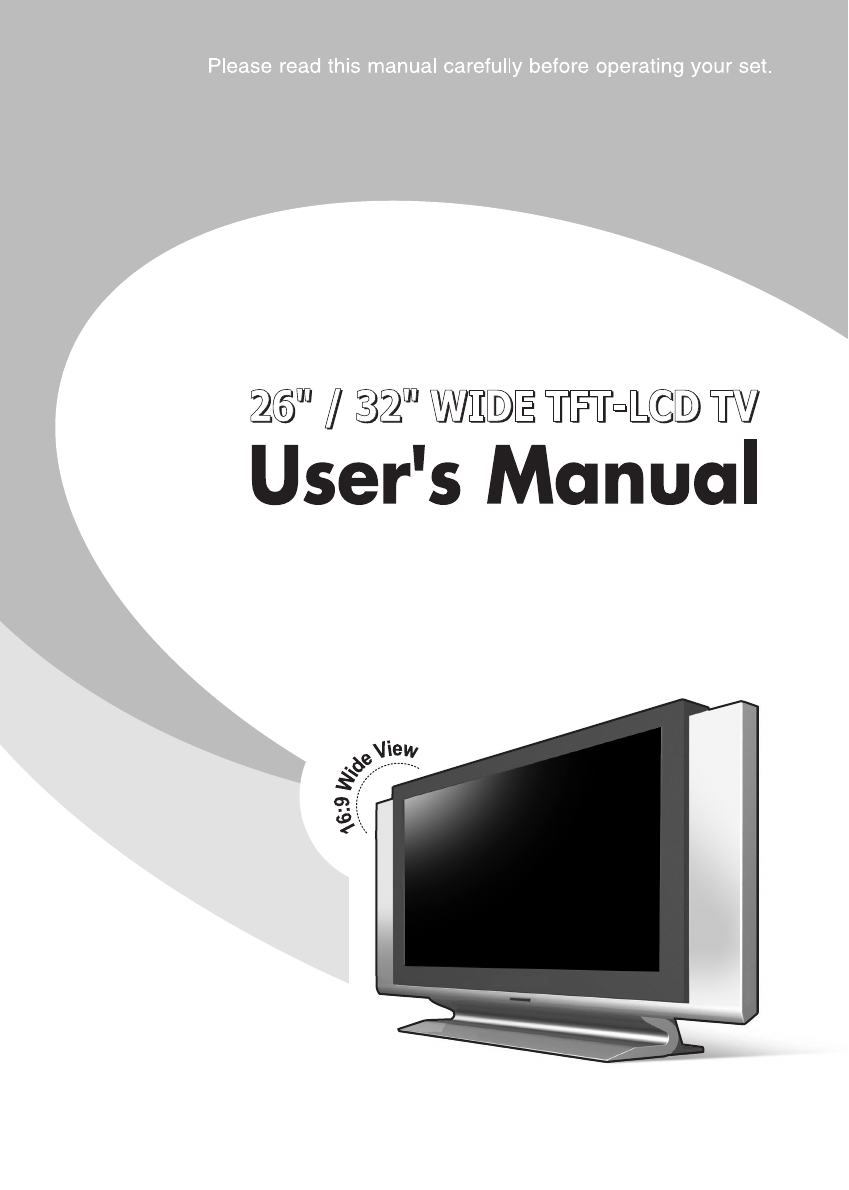
APRO MEDIA INV-32W LCD TV User Manual
APRO MEDIA CO., LTD LCD TV Users Manual
User Manual

Safety Instructions
To reduce the risk of fire, electrical shock and other injuries, keep these safety precautions in mind
when installing, using and maintaining your TV.
Warning : If you manipulate against the notice, it may cause serious injury or death to user.
Caution : If you manipulate against the notice, it may cause slight injury to user or appliance.
Notes & Descriptions
1
ENGLISH
EN 2 26” / 32” WIDE TFT-LCD TV
Note: This equipment has been tested and found to
comply with the limits for a Class B digital device,
pursuant to part 15 of the FCC Rules. These limits are
designed to provide reasonable protection against
harmful interference in a residential installation. This
equipment generates, uses and can radiate radio
frequency energy and, if not installed and used in
accordance with the instructions, may cause harmful
interference to radio communications. However, there is
no guarantee that interference will not occur in a
particular installation. If this equipment does cause
harmful interference to radio or television reception,
which can be determined by turning the equipment off
and on, the user is encouraged to try to correct the
interference by one or more of the following measures:
◎ Reorient or relocate the receiving antenna.
◎ Increase the separation between the equipment and
receiver.
◎ Connect the equipment into an outlet on a circuit
different from that to which the receiver is connected.
◎ Consult the dealer or an experienced radio/TV
technician for help.
Modifications not expressly approved by the
manufacturer could void the user's authority to operated
the equipment under FCC rules.
EN 2 26” / 32” WIDE TFT-LCD TV 3
ENGLISH
Warning
Disconnect the power cable and signal cable connected to the product
in case of thunder or lightning.
Do not attempt to touch its power cord with wet hands.
If any electric pin is wet or dusty, remove the moisture or dust first
before use.
It is recommended to pull out the power cord unless you use it for a
long time.
Damaged power cord, plug or unfitted outlet may be very dangerous.
Do not install the set close to any heating sources.
Do not place heavy articles on it or step on the product.
The product should be installed on a clean and dry place.
When you detect any smog, unusual noise or smell, just disconnect the
electric power and refer servicing to qualified service personnel.
Do not place any bowl with water, beverage, can or other liquid
products on it.
Do not use or place any combustible sprayer or inflammable substances
close to the product.
Do not arrange the power cord close to any heating devices/sources.
Install the outdoor antenna for the set far away from high voltage cables.
Warning
When moving it, do not apply any forces on the set.
Do not attempt to disassemble, repair or change the product.
Whenever you need to repair, adjust or check it, refer servicing to
qualified service personnel.
Do not directly spray water or rub it with inflammable substances
(thinner or benzene) when cleaning it.
Do not wet or penetrate water over/into the set.
When cleaning the LCD surface, disconnect the power and use a piece
of smooth cloth against any scratches on it. Never use wet cloth.
Caution
Make sure to pull out the power cord when cleaning or removing the
product.
Ventilation should be always open and the set should be installed in a
well-ventilated and wide enough place (a minimum distance away from a
wall 10cm or more).
Do not install the set in a place directly exposed to sunlight.
Precautions for Image Ghost
Watching TV in a still image for an excessive time may seriously harm the LCD panel. Note that any
troubles from the reckless use are not guaranteed and please be cautious of the use.
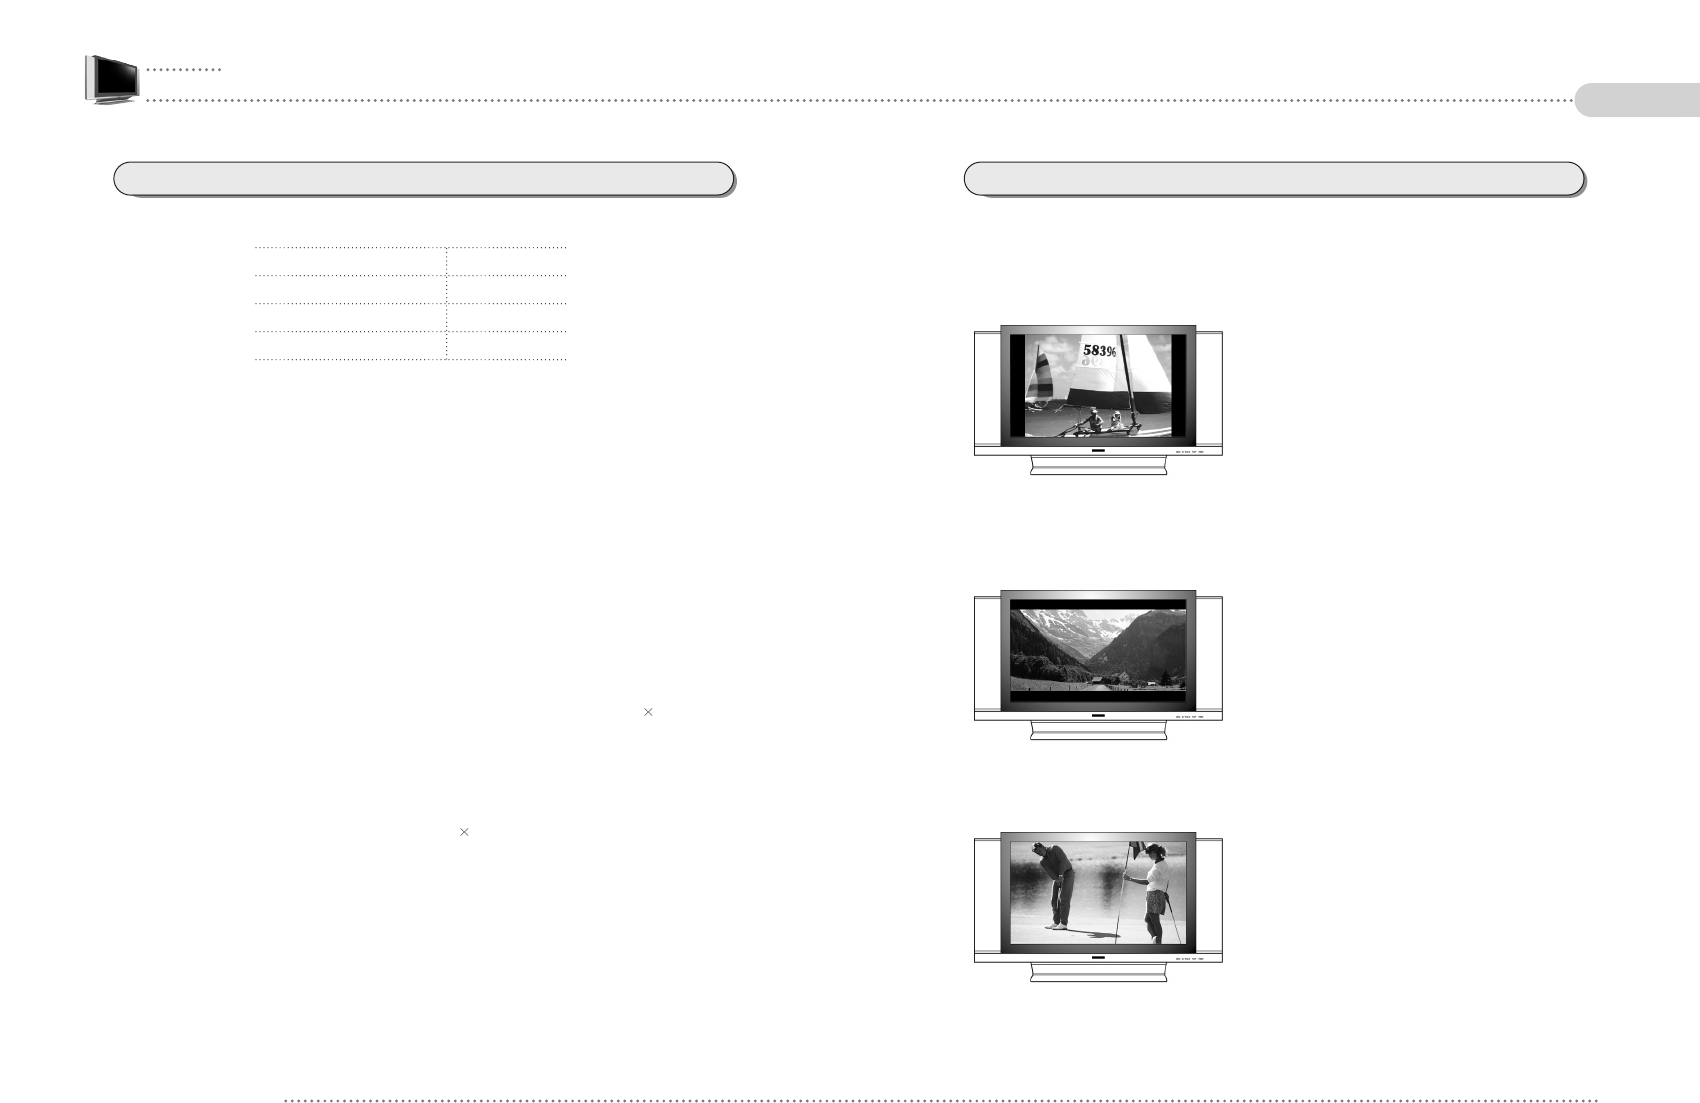
1. Digital broadcast is delivered in wide screen standard
(16:9) DTV, so if the existing broadcasting program
made in general screen size (4:3) is on the TV, both
sides may not be completely displayed.
Any different brightness, in case limits to left/right
sides are fixed, may leave image ghost of the limits
on the LCD penal, if you watch it for a long time.
2. When you watch panorama broadcasting in a
general display, it may show the central image with
up/down parts removed.
Any different brightness, in case limits to top/bottom
sides are fixed, may leave image ghost of the limits
on the LCD penal, if you watch it for a long time.
3. Watching the screen in a still image for a long time
may leave image ghost on the LCD panel.
Available Temperature & Humidity
Operating Temperature 0~40˚C
Storage Temperature -10~50˚C
Operating Humidity 10~80% RH
Storage Humidity 10~90% RH
For dot defect [dead pixel] of LCD ;
TFT-LCD produced by using high-end semiconductor technology with precision of 99.9% above is
used for this TV.
However the pixels of R.G.B. & White color seem to be right sometimes or some of black pixels could
be seen on the LCD. This is not from bad quality or functional problem and you can use it without any
problem.
Precautions when used as a PC monitor ;
Since the LCD TV is not designed for a PC monitor, it may not support very high resolutions that are
supported in a PC. When you use it for the purpose, refer to the supportable resolution levels as
follows.
When used as a PC monitor : Optimal resolution is XGA (1,024 X 768) @60Hz
This TV has RGB & DVI input connector and its optimal resolution (RGB / DVI) is 1,024 768 @ 60Hz.
If you connect DVI connector, you can enjoy better image quality.
When used as a DTV : 720p Input
If you set 720p resolution for your Set-Top BOX output, you can enjoy better quality image & sound
with the TV, because applied LCD panel is WXGA (1,366 768) resolution product.
EN 4 26” / 32” WIDE TFT-LCD TV 5
ENGLISH

CHAPTER 3. Connection (PAL/SECAM)
3-1. Connecting Power 30
3-2. Connecting TV Antenna 30
3-3. Connecting PC 31
3-4. Connecting PC DVI 31
3-5. Connecting DVI (AV equipment) 32
3-6. Connecting DTV / DVD 33
3-7. Connecting SCART (Full) 34
3-8. Connecting SCART (Half) 35
3-9. Connecting Headphone (speaker) Output 36
3-10. Connecting VIDEO Output 37
CHAPTER 4. Using TV Menus
4-1. Watching TV 40
4-2. Auto On/Off Timer 43
4-3. Change TV Channel Mode 45
4-4. Channel Search 46
4-5. Add/Remove Channel 47
4-6. Channel Swap 48
4-7. V-chip Funetion 49
4-8. Caption 51
4-9. Password 52
4-10. DTV Field 53
4-11. AVC Control 54
4-12. PC / DTV Mode 55
4-13. Stereo 56
3-14. Bilingual (Multi-Language Broadcasting) 56
Contents
CHAPTER 1. Before Use
1-1. Accessories 10
1-2. Panels 11
1-3. Remote Control 14
1-4. MENU Configuration 16
1-5. Inserting the Batteries in the Remote Control 18
CHAPTER 2. Connection (NTSC)
2-1. Connecting Power 20
2-2. Connecting TV Antenna 20
2-3. Connecting PC 21
2-4. Connecting PC DVI 21
2-5. Connecting DVI (AV equipment) 22
2-6. Connecting DTV 23
2-7. Connecting DVD 24
2-8. Connecting VIDEO / S-VHS Input 25
2-9. Connecting Headphone (speaker) Output 26
2-10. Connecting VIDEO Output 27
EN 6 26” / 32” WIDE TFT-LCD TV 7
ENGLISH
CHAPTER 1
Before use
1-1. Accessories
1-2. Panels
1-3. Remote Control
1-4. MENU Configuration
1-5.
Inserting the Batteries in the Remote Control
Contents
CHAPTER 5. Using Menus of Picture,
Sound and Others
5-1. Setting Display Mode 58
5-2. Setting Scale Mode 60
5-3. Setting Picture Mode 61
5-4. Setting Simultaneous Picture Mode 64
5-5. Setting Screen MENU by Simultaneous Picture 67
5-6. Setting Sound 70
5-7. Setting Others 72
CHAPTER 6. Using PC MENU
6-1. Auto Adjustment 76
6-2. Setting PC Scale Mode 78
6-3. Setting Phase/Frequency 79
6-4. Setting Position/Size 80
CHAPTER 7. Services & Others
7-1. Troubleshooting 84
7-2. Concerning Services 86
EN 8 26” / 32” WIDE TFT-LCD TV 9
ENGLISH
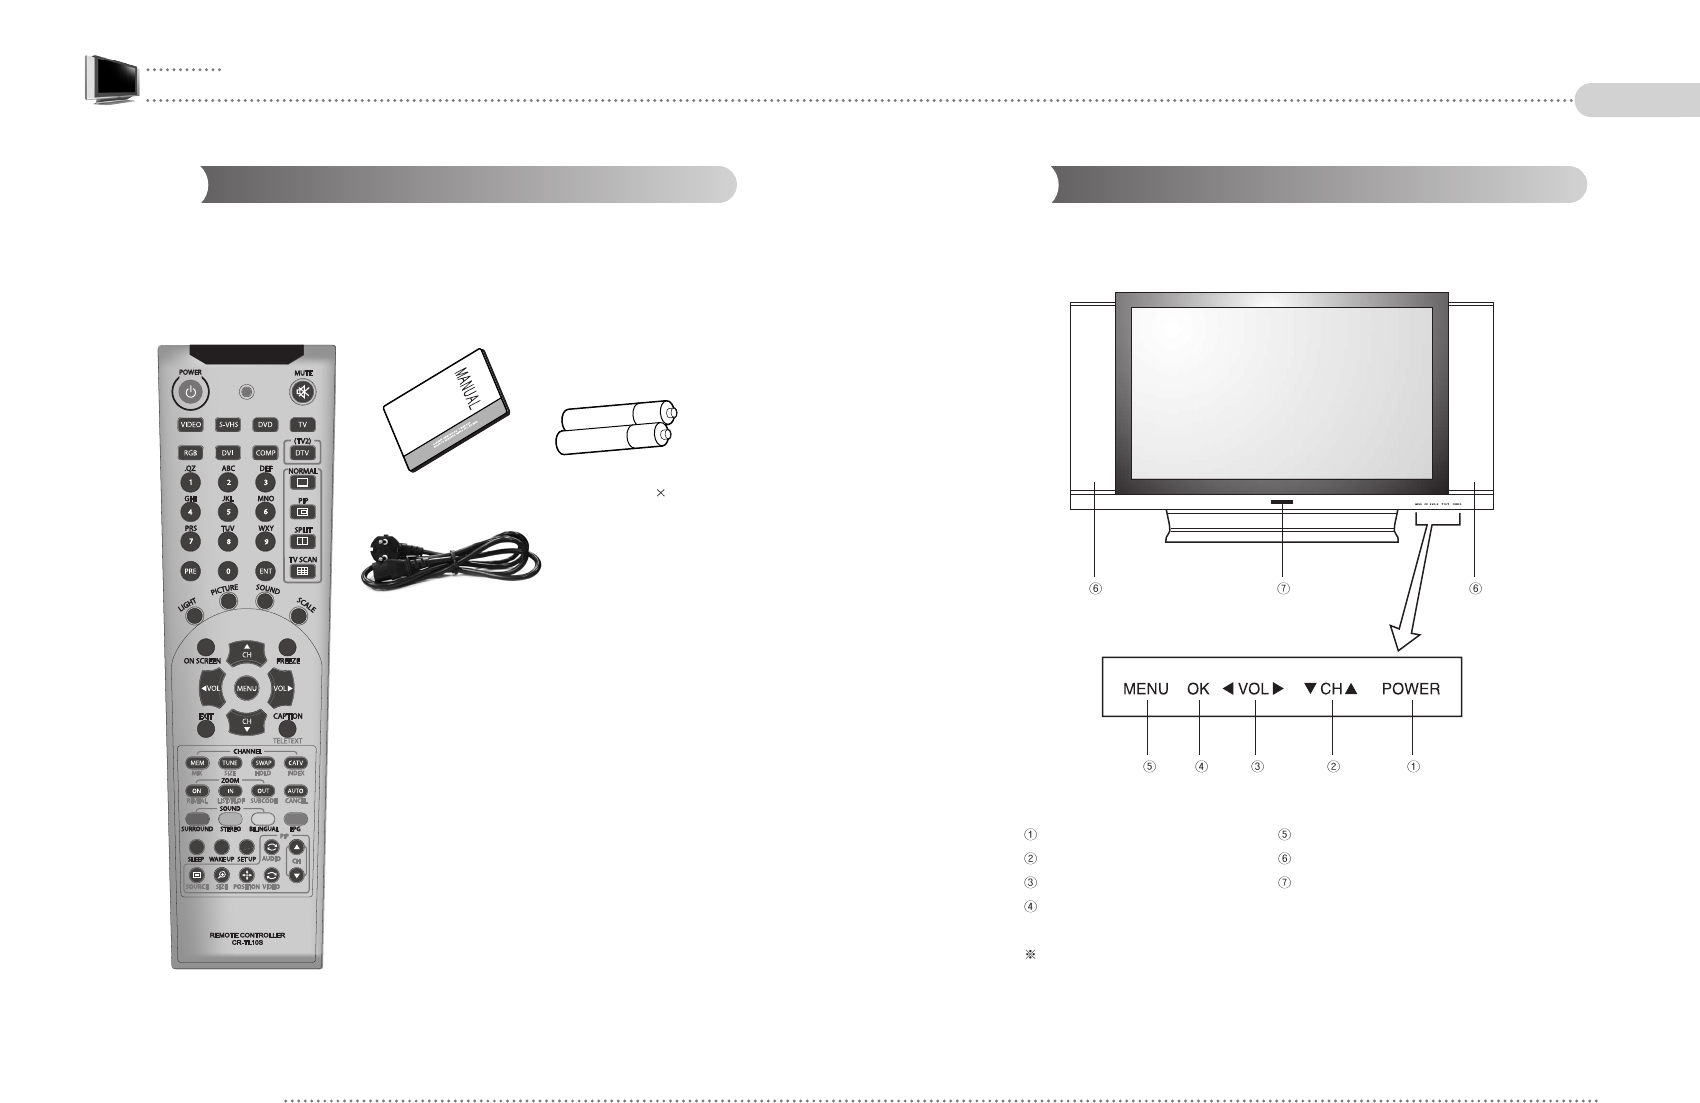
Panels
Front Panels
Power Load MENU
Channel Button Speaker
Sound Cont. Remote Control Sensor
MENU SET / Exit MENU
AUTO button searches automatically TV channels if set as TV, and it adjusts automatically
for PC mode.
Accessories
Please make sure the following items are included with your LCD TV.
If any items are missing, contact your dealer.
EN 10 26” / 32” WIDE TFT-LCD TV 11
ENGLISH
Remote Control
AAA-type battery( 2)
Power Cord
User’s Manual
1-1.
1-1.
1-1.
1-1.
1-1.
1-1.
1-1.
1-1.
1-1.
1-1.
1-1.
1-1. 1-2.
1-2.
1-2.
1-2.
1-2.
1-2.
1-2.
1-2.
1-2.
1-2.
1-2.
1-2.
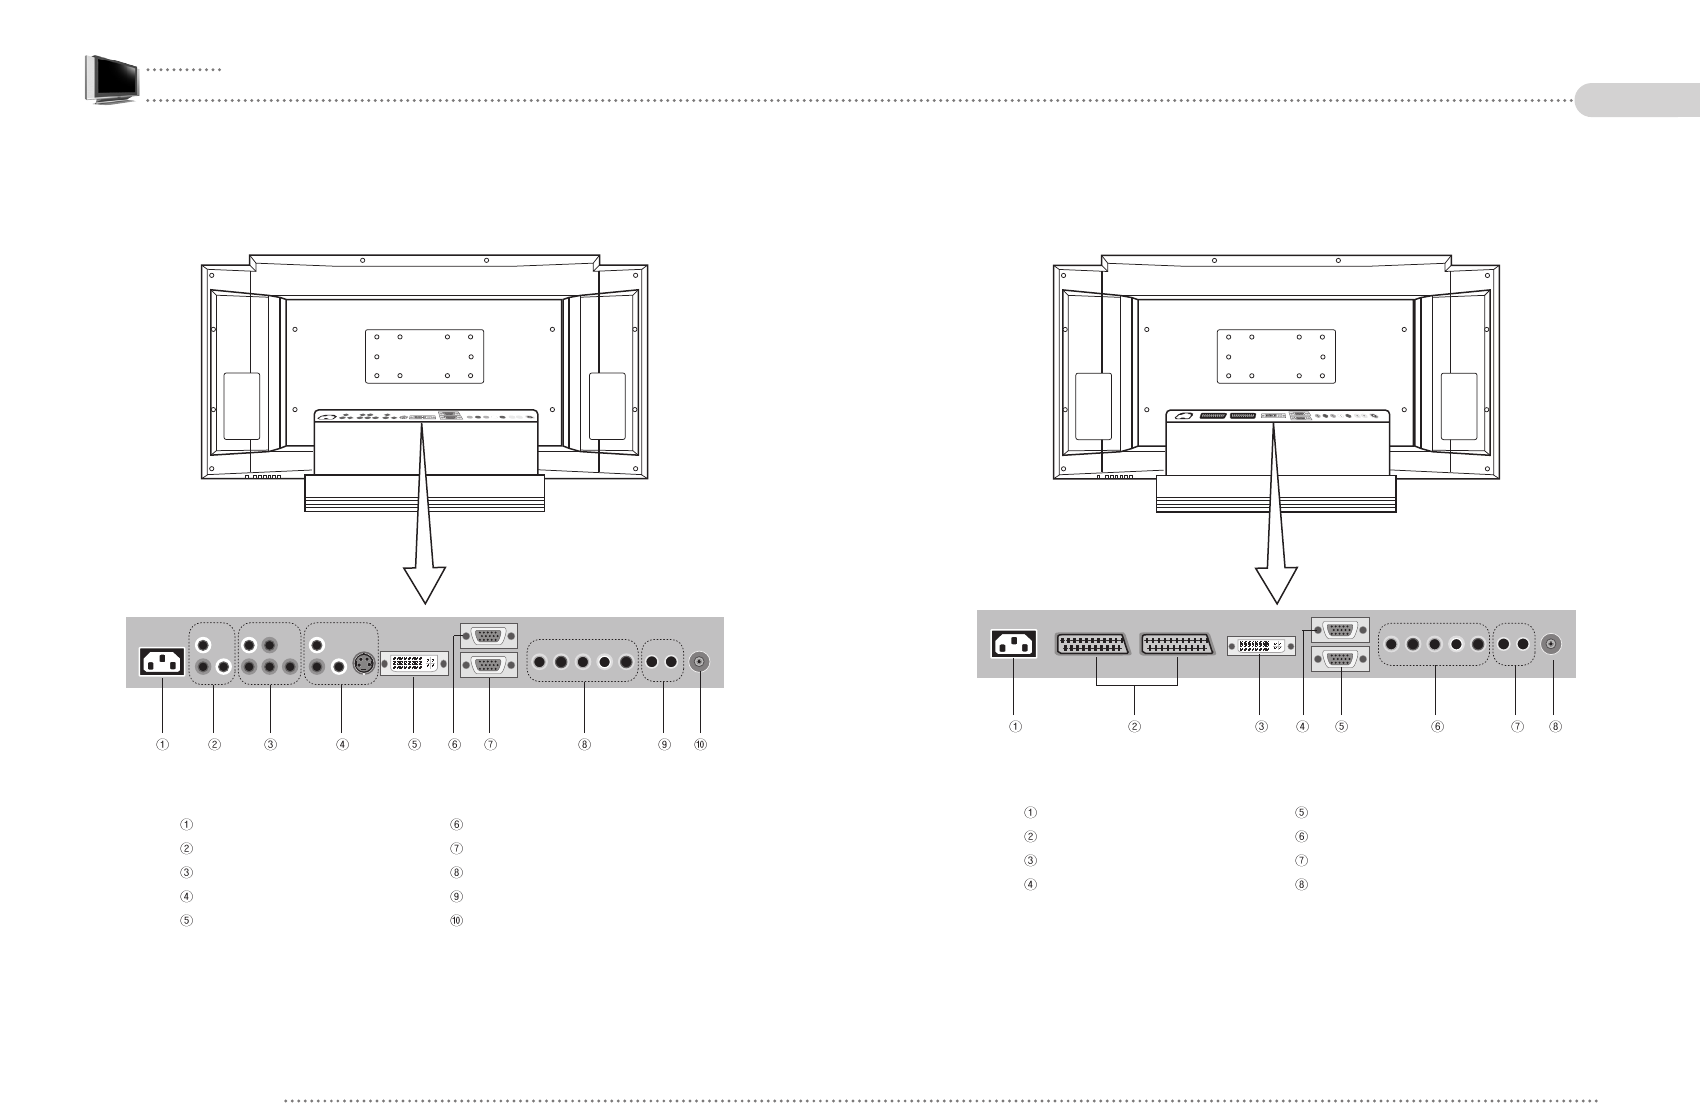
Rear Panels (PAL/SECAM)
Power Input PC Input (RGB)
SCART (FULL/HALF) DTV Input (Pb Y Pr L R)
PC Input (DVI) PC Sound Input/Head Phone Output
PC Input (Upgrade) TV Antenna Input
13
ENGLISH
EN 12 26” / 32” WIDE TFT-LCD TV
Rear Panels (NTSC)
Power Input PC Input (Upgrade)
Video/Audio Output PC Input (RGB)
DVD Input (Pb Y Pr L R) DTV Input (Pb Y Pr L R)
Video/Audio Iutput, S-VHS Input PC Sound Input/Head Phone Output
PC Input (DVI) TV Antenna Input
1-3.
1-3.
1-3.
1-3.
1-3.
1-3.
1-3.
1-3.
1-3.
1-3.
1-3.
1-3.
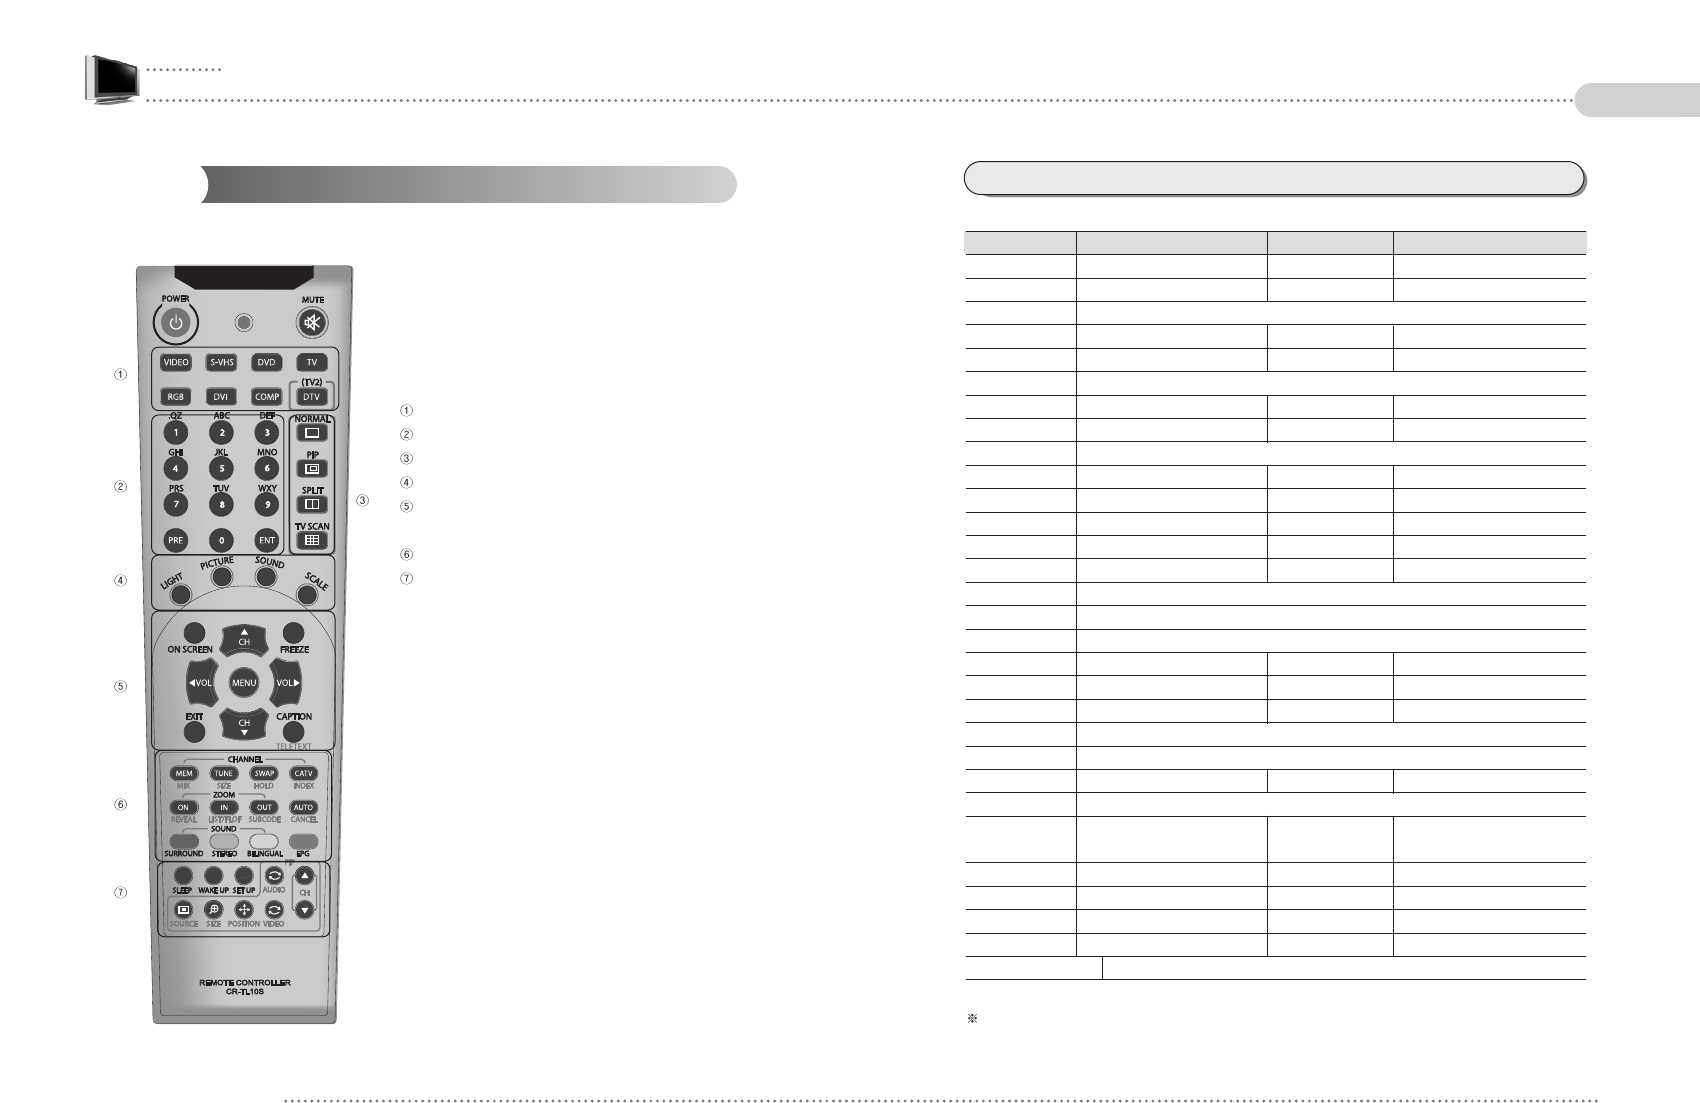
Functions by remote control buttons
Button Function Button Function
POWER Power On/Off MUTE Sound off Temporarily
VIDEO Composite Video Input S-VHS S-Video Input
DVD DVD Input (Y PbPr)
TV TV Input RGB PC Input
DVI DVI Input (Optional) COMP DTV Component Input
DTV (TV2) PIP TV Input (Optional) / DTV Input (If DTV Tuner is built in)
NORMAL Select Normal Display PIP PIP display
SPLIT Split (PBP) TV SCAN 16 Channels Multi Scan
0~9 Numeric Buttons
PRE Previous Channel ENT Input selected channels
LIGHT Control background Light PICTURE Control Picture Mode
SOUND Control Sound SCALE Control Picture Scale
FREEZE Pause ON SCREEN Display screen status
MENU Enter Main/Sub MENU EXIT Exit Main/Sub MENU
CH UP / DOWN
Move TV channels / Move MENU up and down
VOL + / - Control Volume / MENU settings
CAPTION Turn On/Off Caption
MEM Add/Remove a TV CH TUNE Not Available
SWAP Switch TV channels CATV TV Mode
Zoom ON Zooming On/Off IN Zoom in
OUT Zoom out
AUTO TV : Channel search / PC : Auto Adjustment
SURROUND Surround effect STEREO STEREO/MONO
BILINGUAL Select Multilanguage broadcasting system
EPG Electronic Program Guide SLEEP Sleep TImer setting
(Option for DTV)
WAKE UP Wake-Up Timer setting SET UP Other setting
PIP SOURCE PIP input signal change PIP VIDEO Switch Main/PIP screen
PIP AUDIO Switch Main/PIP sound PIP POSITION Change PIP position
PIP SIZE Control PIP size
PIP CH UP / DOWN Change PIP TV Channel
The remote control provided is available up to 7m from the optical receive part within Left/Right 15
degrees.
Remote Control
TV & Input Source Selection Button
Channel Selection Button
Display Selection Button
Display Mode & Audio Control Button
MENU Control Button
Channel & Volume Control Button
TV Functions & Teletext Menu Button
PIP Function and Setting Button
EN 14 26” / 32” WIDE TFT-LCD TV 15
ENGLISH
1-4.
1-4.
1-4.
1-4.
1-4.
1-4.
1-4.
1-4.
1-4.
1-4.
1-4.
1-4.
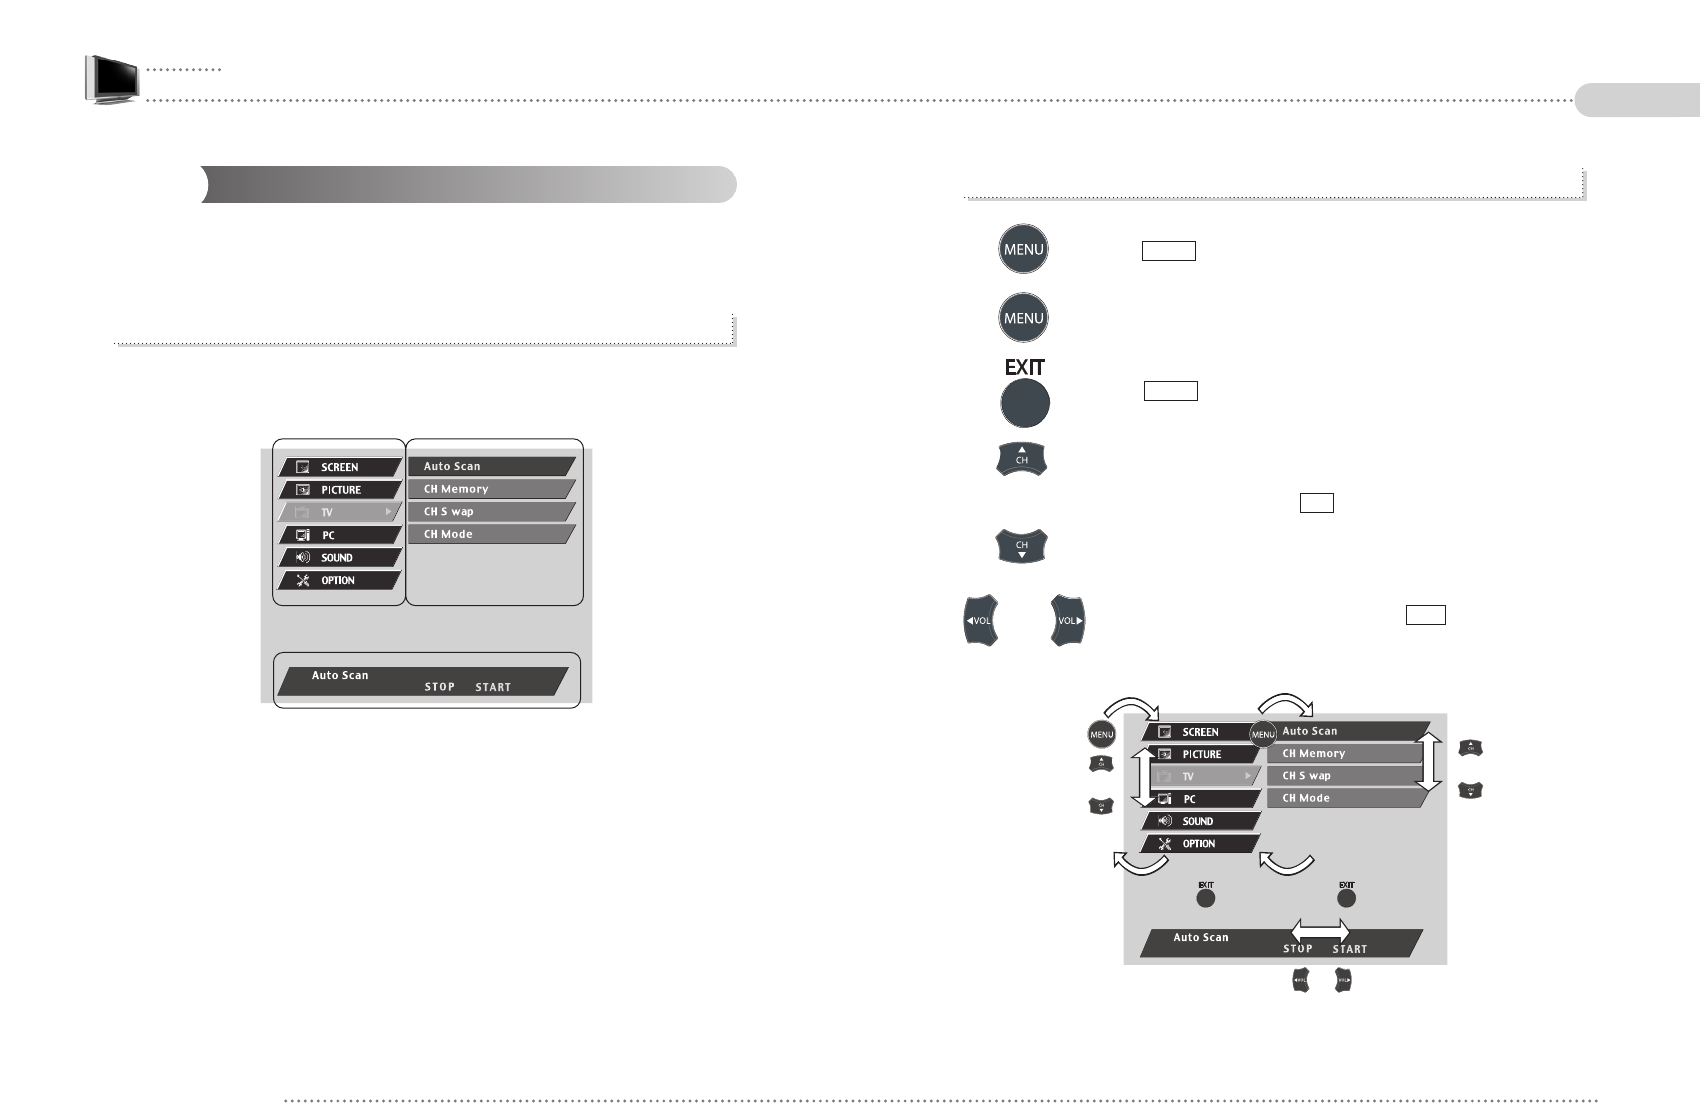
2.
Press it again to move to sub menu of a selected main menu.
1) Press button to display main menu.
2) Press it again to move to sub menu of a selected main menu.
3) Press to return from sub menu to main menu or from main
menu to menu removal.
4) To move among menus, use button.
5) To change a selected menu setting, use button.
VOL
CH
EXIT
MENU
MENU Configuration
Most functions of the TV set can be controlled by MENU and selection buttons on the
remote control, so learning how to operate them would be convenient for you.
1. Menu Configuration
EN 16 26” / 32” WIDE TFT-LCD TV 17
ENGLISH
Main Menu Sub Menu
Settings
CHAPTER 2
1-5.
1-5.
1-5.
1-5.
1-5.
1-5.
1-5.
1-5.
1-5.
1-5.
1-5.
1-5.
Connection (NTSC)
2-1. Connecting Power
2-2. Connecting TV Antenna
2-3. Connecting PC
2-4. Connecting PC DVI
2-5. Connecting DV (AV equipment)
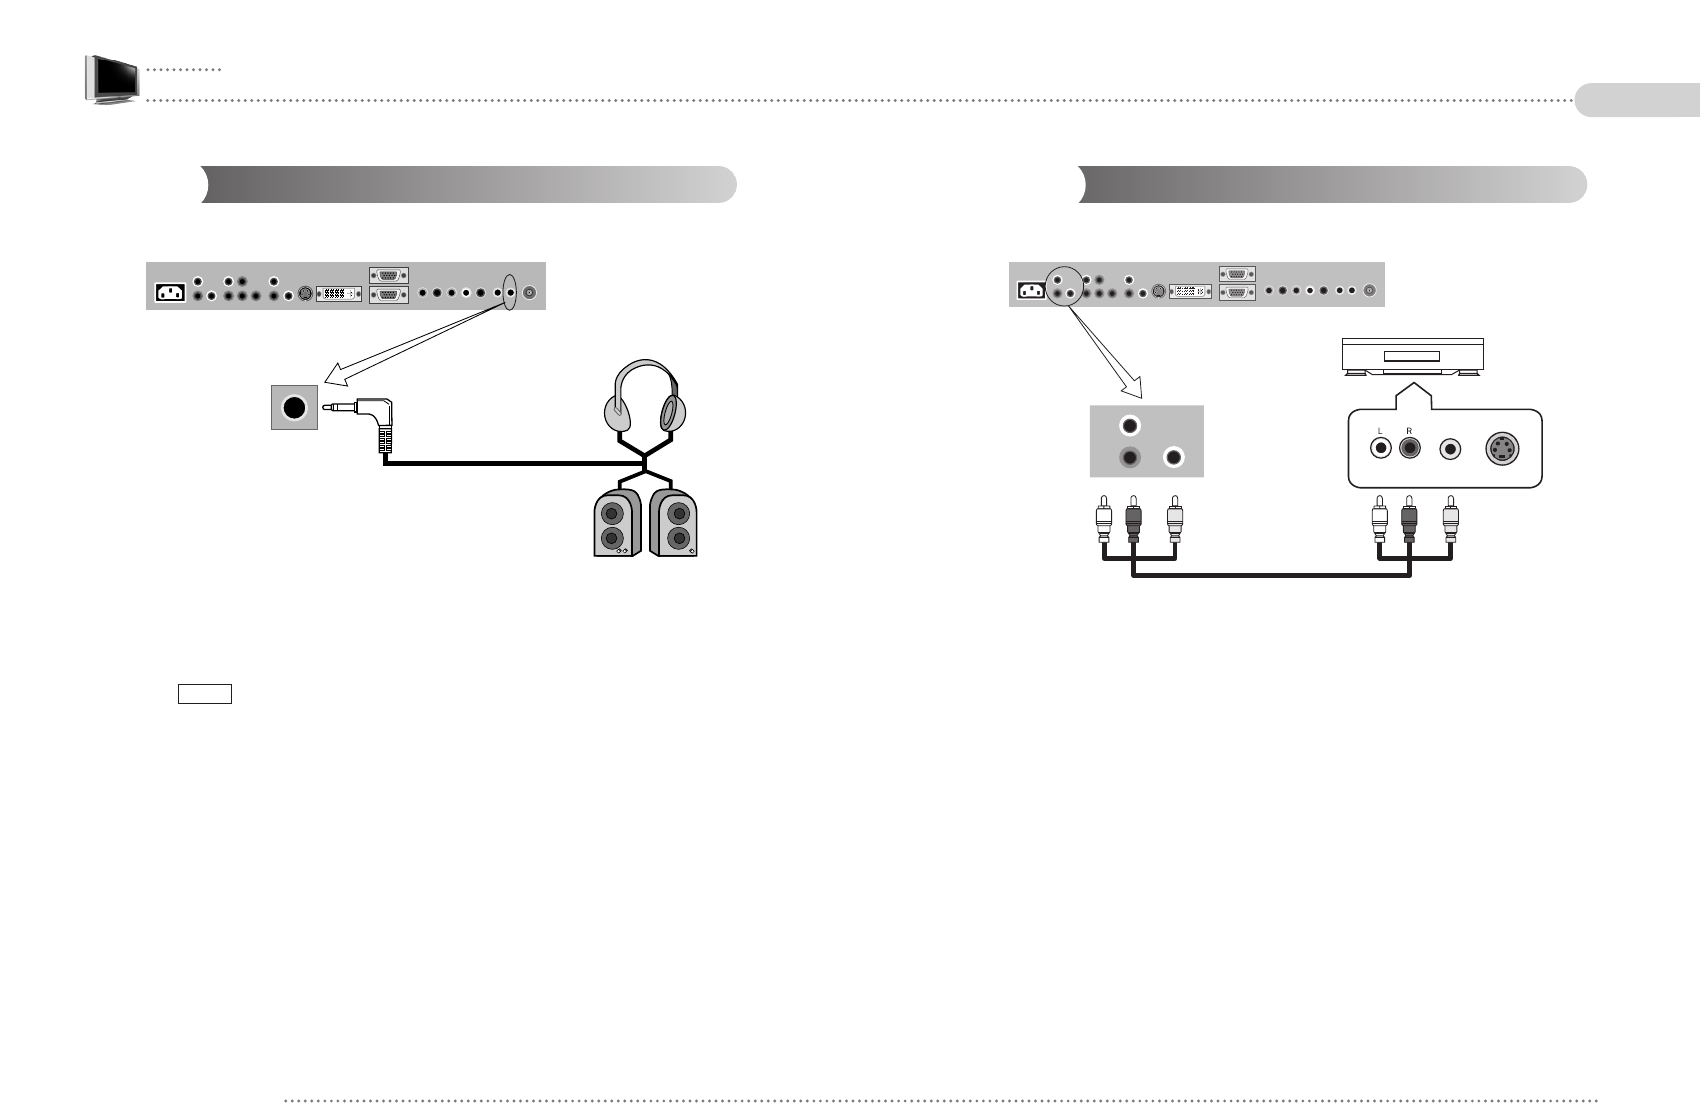
2-6. Connecting DTV
2-7. Connecting DVD
2-8. Connecting VIDEO / S-VHS Input
2-9. Connecting Headphone (speaker) Output
2-
10
.Connecting VIDEO Output
Inserting the Batteries in the Remote Control
1) Remove the cover of the remote control.
2) Check the polarity of batteries and insert them in right directions.
3) Replace the cover.
4) Available batteries : 2 DC 1.5V AAA-type batteries
Since incorrect insertion of batteries may cause breakage, leakage or injuries, check the
polarities before the insertion.
Separate and collect used batteries for the protection of environment.
Do not use alkaline and manganese batteries together.
EN 18 26” / 32” WIDE TFT-LCD TV 19
ENGLISH
2-1.
2-1.
2-1.
2-1.
2-1.
2-1.
2-1.
2-1.
2-1.
2-1.
2-1.
2-1. 2-3.
2-3.
2-3.
2-3.
2-3.
2-3.
2-3.
2-3.
2-3.
2-3.
2-3.
2-3.
2-4.
2-4.
2-4.
2-4.
2-4.
2-4.
2-4.
2-4.
2-4.
2-4.
2-4.
2-4.
2-2.
2-2.
2-2.
2-2.
2-2.
2-2.
2-2.
2-2.
2-2.
2-2.
2-2.
2-2.
Connecting PC
1. Connect D-Sub Cable to D-Sub port on the TV and PC.
2. Connect Audio Cable (not included) to Audio output of a PC (stereo jack) and PC Audio
Input Port of the TV (stereo jack).
Connecting PC DVI
1. Connect DVI Cable (not included) to DVI port of the TV and PC.
2.
Connect Audio Cable (not included) to Audio port of PC (stereo jack) and TV (stereo jack).
3. It is recommended to use D-type DVI cable.
Connecting Power
1. The product automatically adjusts voltage.
In case 110V is used, connect 110V plug before use.
2. Power Cable should be firmly connected to an outlet or TV Power input in order not to
be pulled out or shake.
Connecting TV Antenna
1. When round cable (75Ωcoaxial cable) is used, copper part of the cable should not be
bent.
1. When an outdoor antenna is used, it is recommended for a skilled technician to install it.
2. It may be helpful to better display to purchase additional installing amplifier if there is any problem
with weak radio wave.
Cautions
EN 20 26” / 32” WIDE TFT-LCD TV 21
ENGLISH
TV antenna
Antenna converter
Connecting RF
cable
Connecting
feeder cable
RF cable
feeder cable
copper wire
TV Wall-outlet
TV Wall-outlet PC
PC
2-6.
2-6.
2-6.
2-6.
2-6.
2-6.
2-6.
2-6.
2-6.
2-6.
2-6.
2-6.
2-5.
2-5.
2-5.
2-5.
2-5.
2-5.
2-5.
2-5.
2-5.
2-5.
2-5.
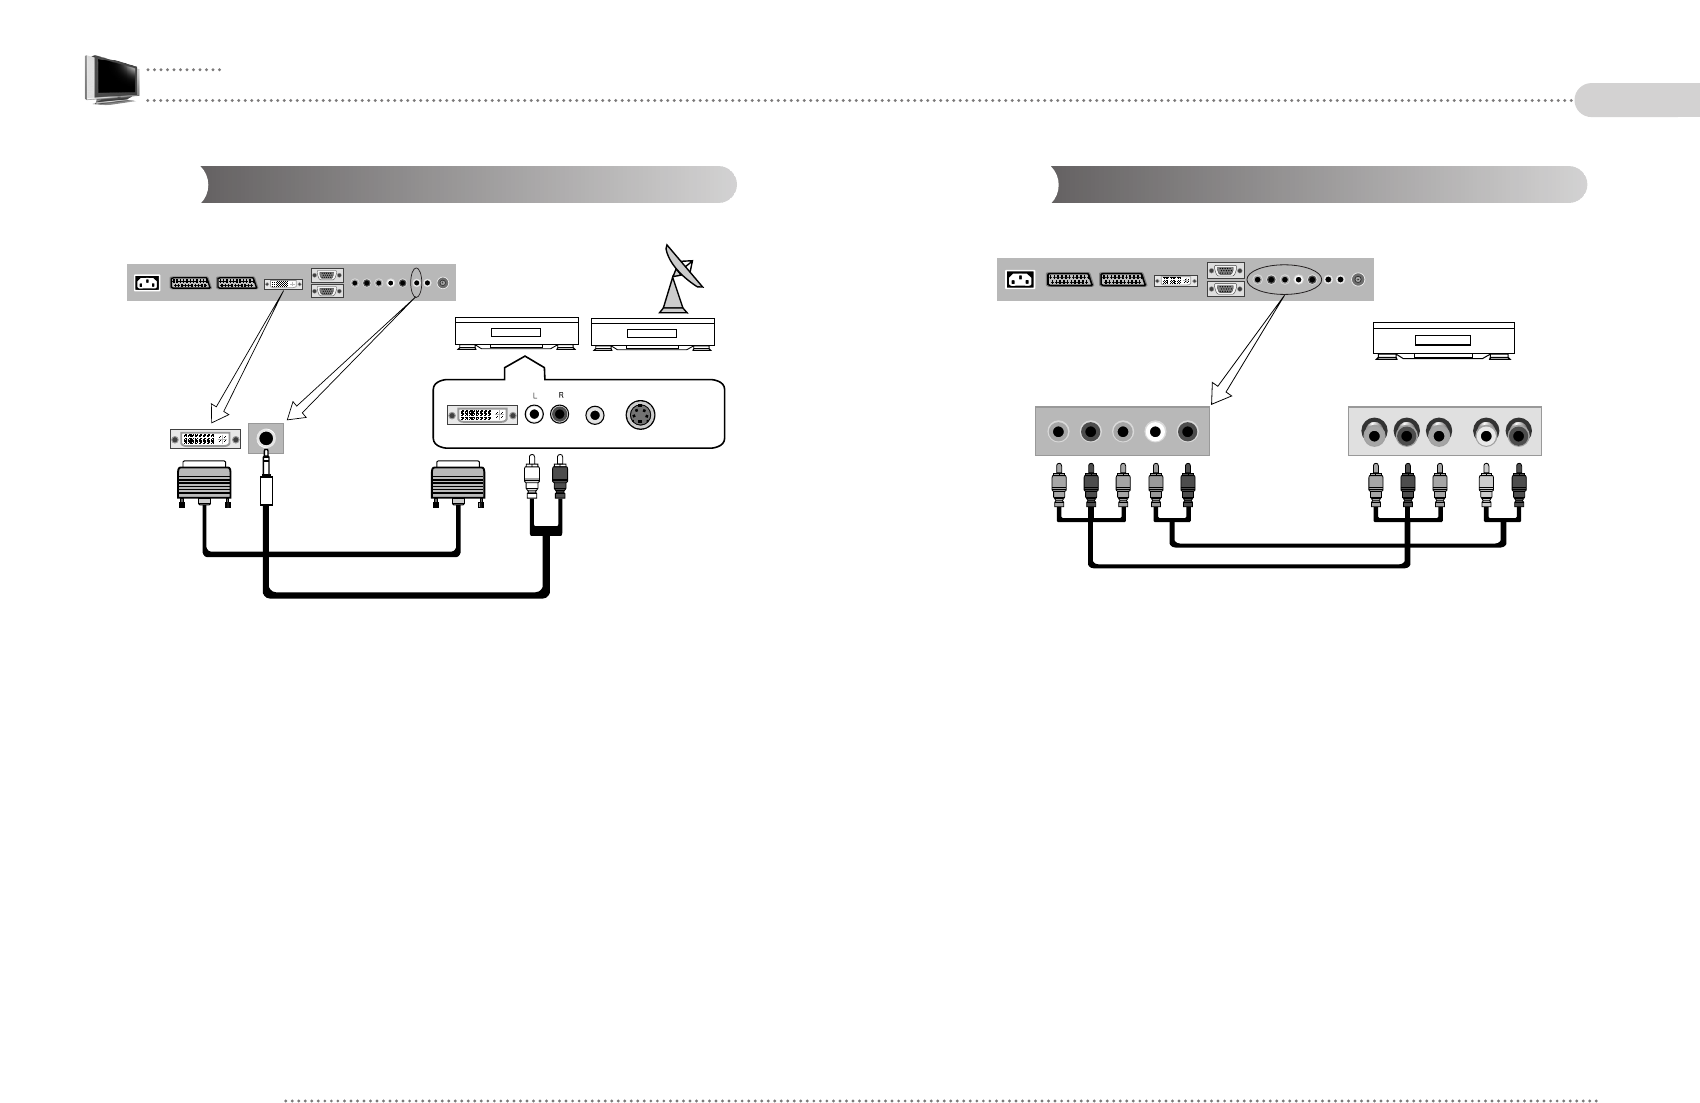
2-5. Connecting DTV
1. Connect Component Cable (not included) to DTV Connection ports of TV (Pb Y Pr) and
DTV Receiver.
2. Connect Audio Cable (not included) to Audio ports (L/R) of TV and DTV Receiver.
3. Cables should be connected to ports of same colors.
Connecting DVI (AV equipment)
1. Connect a DVI cable (Option) to DVI connector of TV, DVD, or Set-top Box.
2. Connect an audio cable (Option) between an audio connector of DVD player, Set-top
Box and PC audio connector of TV.
3. When using DVI connector of AV equipment, you have to connect audio cable to PC
audio input connector of TV. Otherwise, it doesn't work!
4. You have to use only DVI cable of D-type.
EN 22 26” / 32” WIDE TFT-LCD TV 23
ENGLISH
DVD Set-top
Audio Output / Video Output
Set-top
Pb Y Pr L AUDIO RPb Y Pr L R
2-7.
2-7.
2-7.
2-7.
2-7.
2-7.
2-7.
2-7.
2-7.
2-7.
2-7.
2-7. 2-8.
2-8.
2-8.
2-8.
2-8.
2-8.
2-8.
2-8.
2-8.
2-8.
2-8.
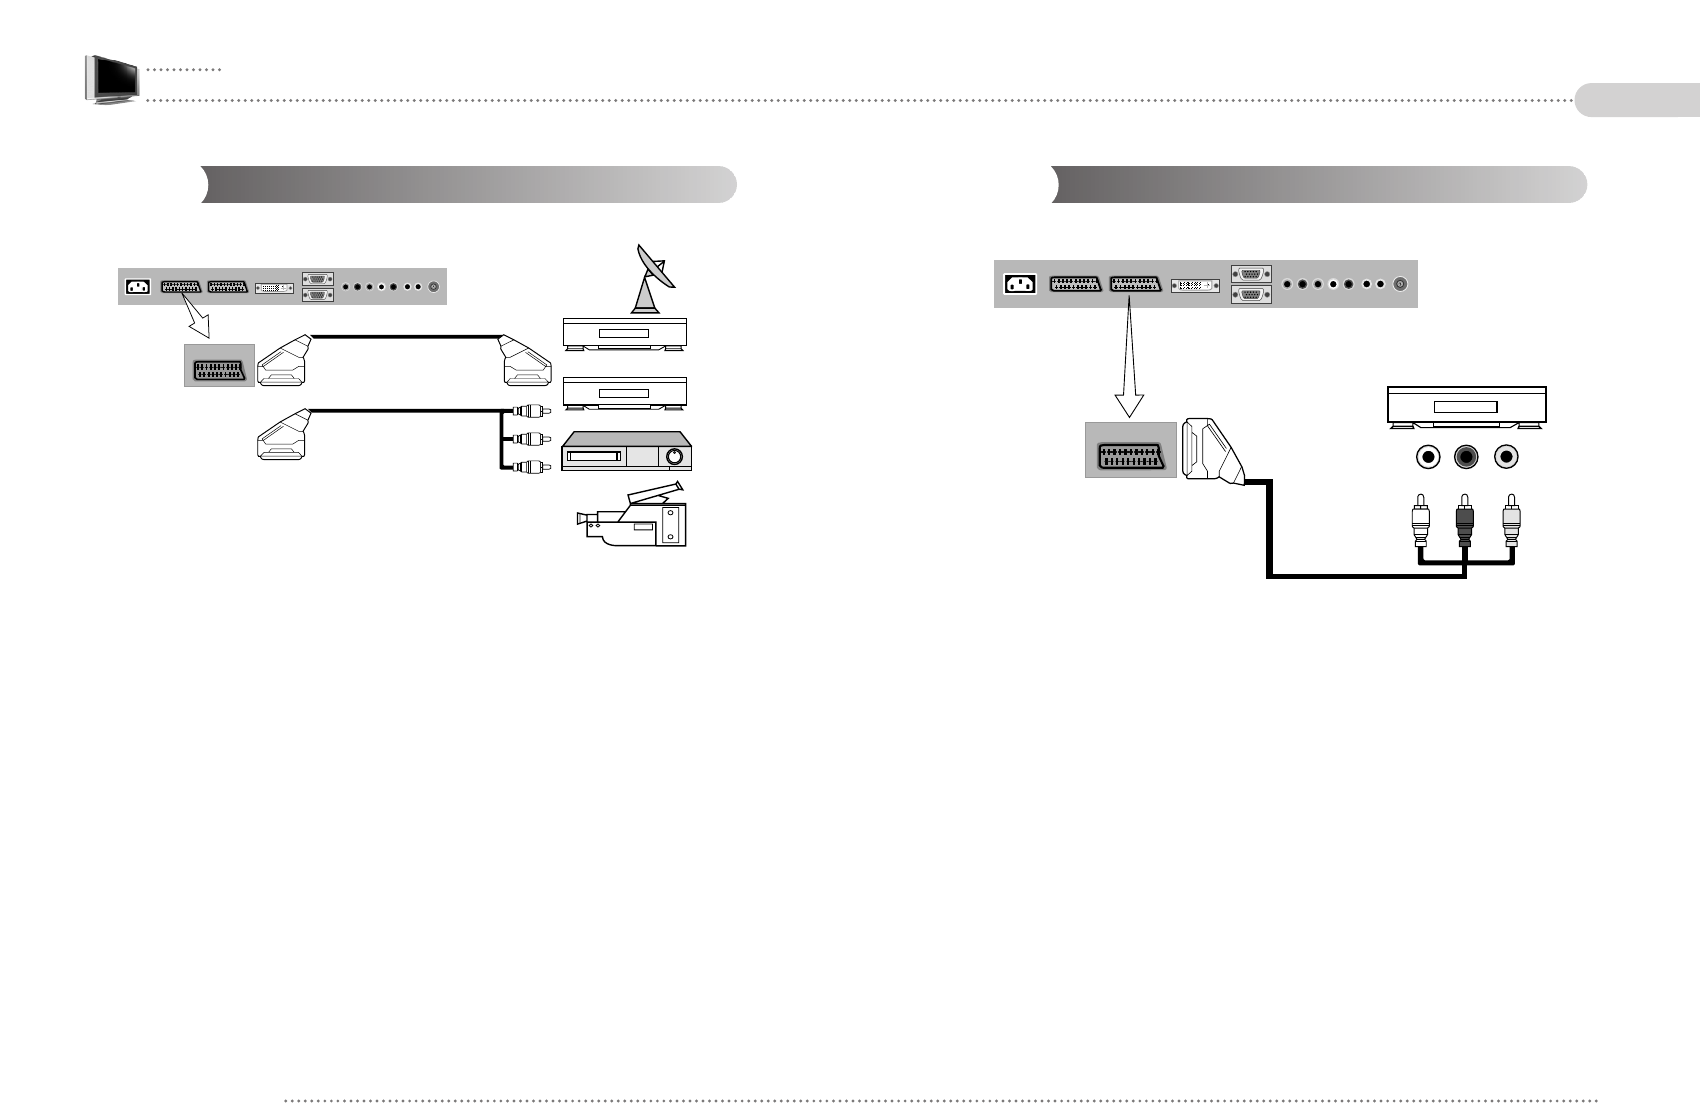
2-8. Connecting VIDEO / S-VHS Input
1. Connect Video/Audio Cable (not included) and S-VHS Cable to Video port of TV and
camcorder, game machines, VCR, DVD player or Set-Top box.
2. Cables should be connected to ports of same colors.
3. Audio signals of S-VHS should be used with external audio signal cables.
4. S-VHS signal secures better quality than composite video signal.
Connecting DVD
1. Connect Component Cable (not included) to Component ports of TV and DVD player.
2. Connect Audio Cable (not included) to Audio ports (L/R) of TV and DVD player.
3. Cables should be connected to ports of same colors.
EN 24 26” / 32” WIDE TFT-LCD TV 25
ENGLISH
Audio Output / Video Output
Video
Video
S-VHS
S-VHS
R
LS-VHS Output
Video & DVD Player
Pb Y Pr
Y
L
R
LRPbPrY
Pb
Pr
L Audio R
DVD Player
2-9.
2-9.
2-9.
2-9.
2-9.
2-9.
2-9.
2-9.
2-9.
2-9.
2-9.
2-9. 2-10.
2-10.
2-10.
2-10.
2-10.
2-10.
2-10.
2-10.
2-10.
2-10.
2-10.
2-10. Connecting VIDEO Output
1. When recording TV program or using the video/audio of the TV for other AV device
(VCR and etc), connect it to AUX Output terminal of the TV and Input Port of the device.
2. Cables should be connected to terminals of same colors.
3. External Output Signal outputs TV broadcasting signals of the main display.
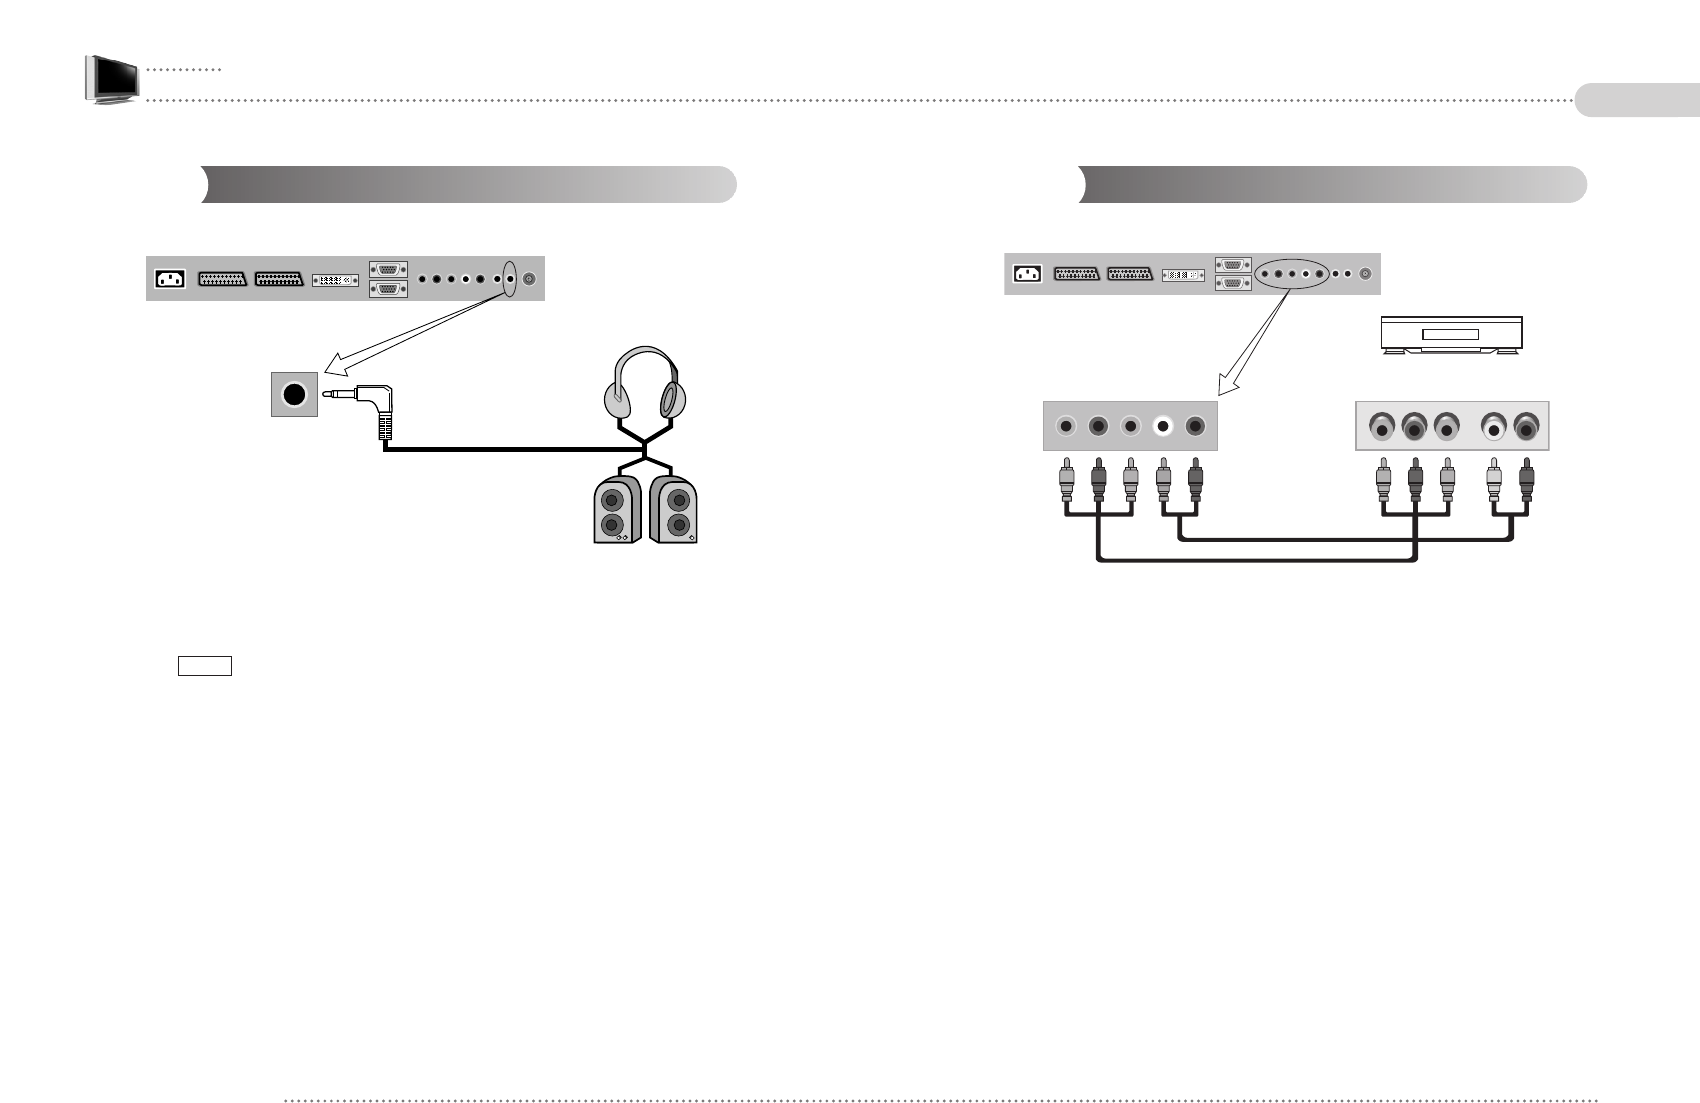
Connecting Headphone (speaker) Output
1. Connect Headphone (not included) to the Headphone output port of the TV.
2. Even in case of using headphone, internal speakers built in the TV still works and if you
press button, the speakers stop working.
3. If possible, use the headphones of which impedance is 8Ω. Other headphones may
output too weakly or strongly.
4. In case of connecting to speakers, connect speakers with amps. If connected with
speakers without amps, it may sound weakly.
5. To adjust the headphone volume level select SOUND in the configuration menu and
move to “Headphone Volume”.
MUTE
EN 26 26” / 32” WIDE TFT-LCD TV 27
ENGLISH
Audio Intput/Video Input/S-VHS Intput
Video & DVD Player
LVideo
L
R
R

CHAPTER 3
29EN 28 26” / 32” WIDE TFT-LCD TV
Connection (PAL/SECAM)
3-1. Connecting Power
3-2. Connecting TV Antenna
3-3. Connecting PC
3-4. Connecting PC DVI
3-5. Connecting DV (AV equipment)
3-6. Connecting DTV / DVD
3-7. Connecting SCART (Full)
3-8. Connecting SCART (Half)
3-9. Connecting Headphone (speaker) Output
3-
10
.Connecting VIDEO Output
ENGLISH
3-1.
3-1.
3-1.
3-1.
3-1.
3-1.
3-1.
3-1.
3-1.
3-1.
3-1.
3-1. 3-3.
3-3.
3-3.
3-3.
3-3.
3-3.
3-3.
3-3.
3-3.
3-3.
3-3.
3-3.
3-4.
3-4.
3-4.
3-4.
3-4.
3-4.
3-4.
3-4.
3-4.
3-4.
3-4.
3-4.
3-2.
3-2.
3-2.
3-2.
3-2.
3-2.
3-2.
3-2.
3-2.
3-2.
3-2.
3-2.
Connecting PC
1. Connect D-Sub Cable to D-Sub port on the TV and PC.
2. Connect Audio Cable (not included) to Audio output of a PC (stereo jack) and PC Audio
Input Port of the TV (stereo jack).
Connecting PC DVI
1. Connect DVI Cable (not included) to DVI port of the TV and PC.
2.
Connect Audio Cable (not included) to Audio port of PC (stereo jack) and TV (stereo jack).
3. It is recommended to use D-type DVI cable.
Connecting Power
1. The product automatically adjusts voltage.
In case 110V is used, connect 110V plug before use.
2. Power Cable should be firmly connected to an outlet or TV Power input in order not to
be pulled out or shake.
Connecting TV Antenna
1. When round cable (75Ωcoaxial cable) is used, copper part of the cable should not be
bent.
1. When an outdoor antenna is used, it is recommended for a skilled technician to install it.
2. It may be helpful to better display to purchase additional installing amplifier if there is any problem
with weak radio wave.
Cautions
EN 30 26” / 32” WIDE TFT-LCD TV 31
TV antenna
Antenna converter
Connecting RF
cable
Connecting
feeder cable
RF cable
feeder cable
copper wire
TV Wall-outlet
PC
PC
TV Wall-outlet
ENGLISH
3-6.
3-6.
3-6.
3-6.
3-6.
3-6.
3-6.
3-6.
3-6.
3-6.
3-6.
3-6.3-5.
3-5.
3-5.
3-5.
3-5.
3-5.
3-5.
3-5.
3-5.
3-5.
3-5.
3-5. Connecting DTV / DVD
1. Connect Component Cable (not included) to DTV / DVD Connection ports of TV (Pb Y
Pr) and DTV / DVD Receiver.
2. Connect Audio Cable (not included) to Audio ports (L/R) of TV and DTV / DVD Receiver.
3. Cables should be connected to ports of same colors.
Connecting DVI (AV equipment)
1. Connect a DVI cable (Option) to DVI connector of TV, DVD, or Set-top Box.
2. Connect an audio cable (Option) between an audio connector of DVD player, Set-top
Box and PC audio connector of TV.
3. When using DVI connector of AV equipment, you have to connect audio cable to PC
audio input connector of TV. Otherwise, it doesn't work!
4. You have to use only DVI cable of D-type.
EN 32 26” / 32” WIDE TFT-LCD TV 33
DVD Set-top
Audio Output / Video Output
Set-top
Pb Y Pr L AUDIO RPb Y Pr L R
ENGLISH
3-7.
3-7.
3-7.
3-7.
3-7.
3-7.
3-7.
3-7.
3-7.
3-7.
3-7.
3-7. 3-8.
3-8.
3-8.
3-8.
3-8.
3-8.
3-8.
3-8.
3-8.
3-8.
3-8.
3-8. Connecting SCART(Half)
1. Connect SCART Cable (not included) to SCART port of TV and DVD player, VCR, Set-
Top box or camcorder.
Connecting SCART(Full)
1. Connect SCART Cable (not included) to SCART port of TV and DVD player, VCR, Set-
Top box or camcorder.
EN 34 26” / 32” WIDE TFT-LCD TV 35
Audio Output / Video Output
Video & DVD Player
Set-top
DVD
SCART
SCART
ENGLISH
3-9.
3-9.
3-9.
3-9.
3-9.
3-9.
3-9.
3-9.
3-9.
3-9.
3-9.
3-9. 3-10.
3-10.
3-10.
3-10.
3-10.
3-10.
3-10.
3-10.
3-10.
3-10.
3-10.
3-10. Connecting VIDEO Output
1. When recording TV program or using the video/audio of the TV for other AV device
(VCR and etc), connect it to AUX Output terminal of the TV and Input Port of the device.
2. Cables should be connected to terminals of same colors.
3. External Output Signal outputs TV broadcasting signals of the main display.
Connecting Headphone (speaker) Output
1. Connect Headphone (not included) to the Headphone output port of the TV.
2. Even in case of using headphone, internal speakers built in the TV still works and if you
press button, the speakers stop working.
3. If possible, use the headphones of which impedance is 8Ω. Other headphones may
output too weakly or strongly.
4. In case of connecting to speakers, connect speakers with amps. If connected with
speakers without amps, it may sound weakly.
5. To adjust the headphone volume level select SOUND in the configuration menu and
move to “Headphone Volume”.
MUTE
EN 36 26” / 32” WIDE TFT-LCD TV 37
Video & DVD Player
L R
ENGLISH
Pb Y Pr L AUDIO RPb Y Pr L R

CHAPTER 4
EN 38 26” / 32” WIDE TFT-LCD TV 39
ENGLISH
Using TV Menus
4-1. Watching TV
4-2. Auto On/Off Timer
4-3. Change TV Channel Mode
4-4. Channel Search
4-5. Add/Remove Channel
4-6. Channel Swap
4-7. V-chip Funetion
4-8. Caption
4-9. Password
4-
10
.DTV Field
4-
11
.AVC Control
4-
12
. PC / DTV Mode
4-
13
.Stereo
4-
14
. Bilingual (Multi-Language Broadcasting)
4-1.
4-1.
4-1.
4-1.
4-1.
4-1.
4-1.
4-1.
4-1.
4-1.
4-1.
4-1.
3. Channel Selection
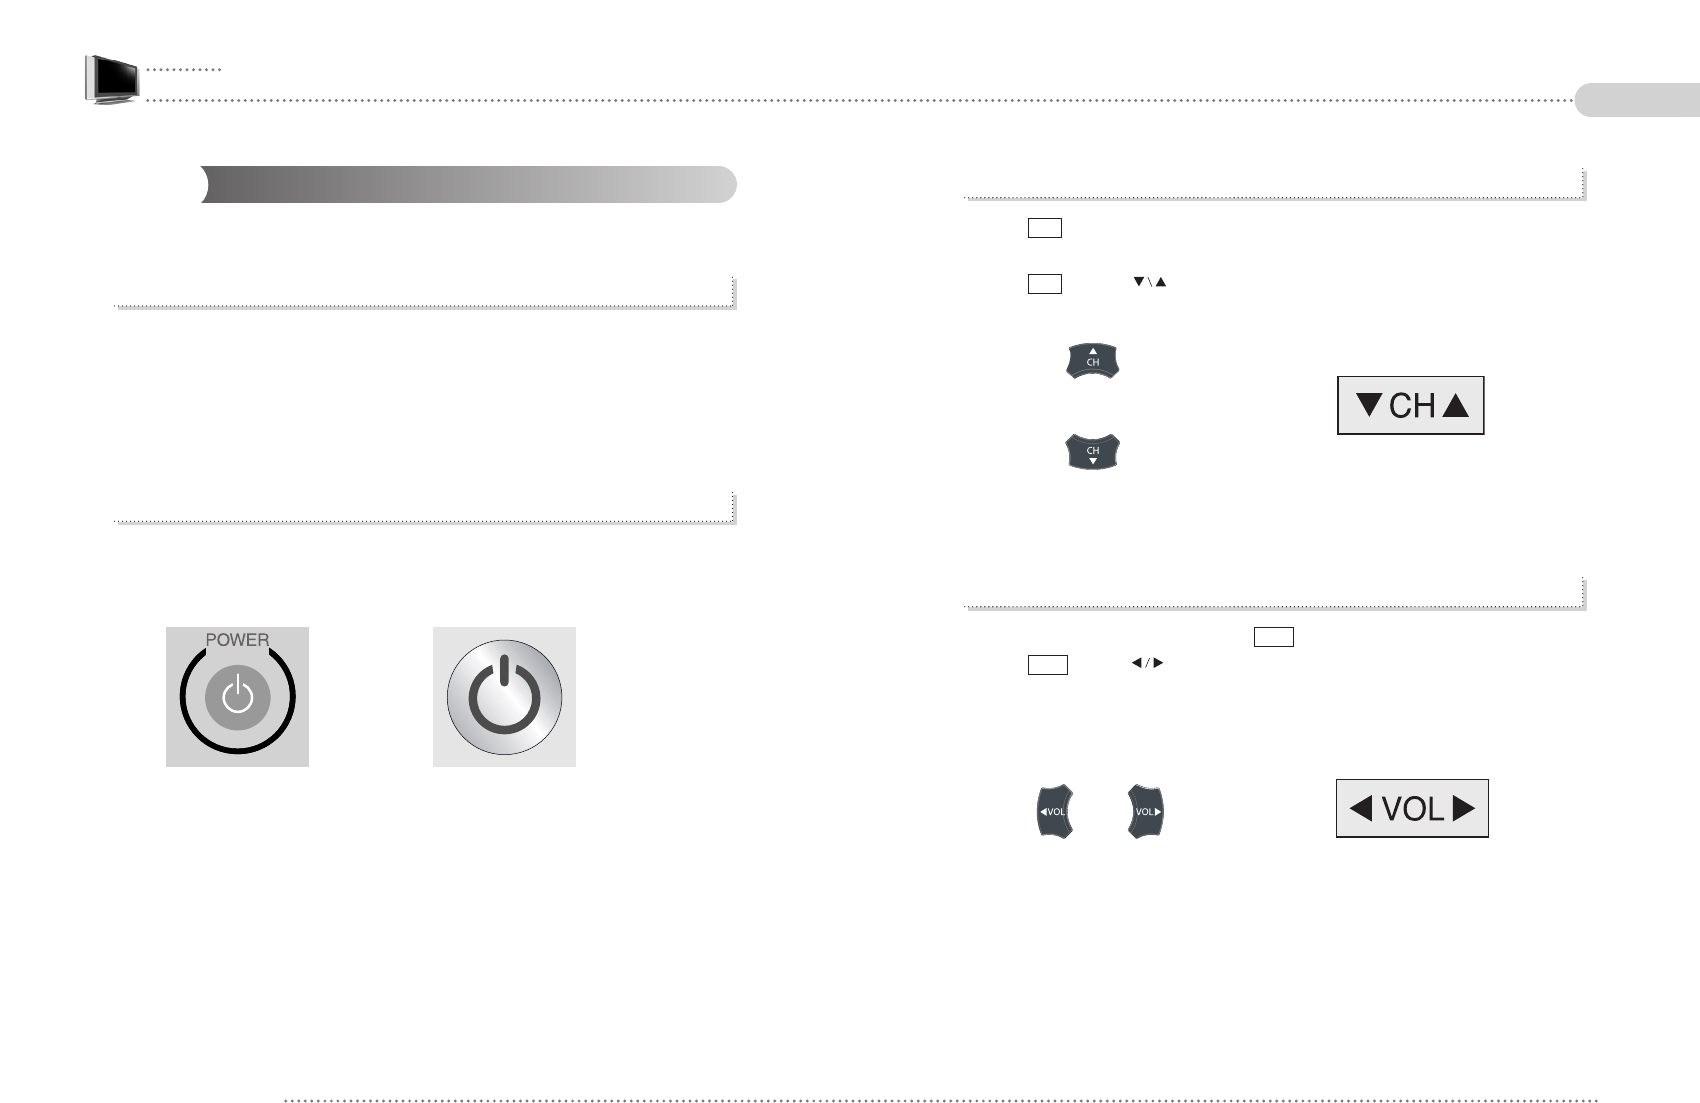
1) Press button on the remote control to change channels.
2) Press numeric buttons to go to a channel directly.
3) Press buttons ( ) on the TV set to increase or decrease TV channels.
4. Volume Control
1) Increase/decrease volume by pressing button on the remote control.
2) Press button ( ) on the TV set to control the volume.
Volume Button on the TV SetVolume Button on the remote control
VOL
VOL
Channel button on the TV setChannel button on the remote control
CH
CH
Watching TV
1. Precautions in the initial installation
1) Check whether TV antenna cable is properly connected.
2) After checking whether the voltage is 100V or 220V, supply the electric power and
connect the adaptor to the TV.
At the moment, TV is in standby.
2. Turning on TV
1) Turn on the Power button directly on the set or by remote control.
2) Each pressing the button turns on or off the set.
Power Button on the TV SetPower Button on Remote Control
EN 40 26” / 32” WIDE TFT-LCD TV 41
ENGLISH
4-2.
4-2.
4-2.
4-2.
4-2.
4-2.
4-2.
4-2.
4-2.
4-2.
4-2.
4-2. Auto On/Off Timer
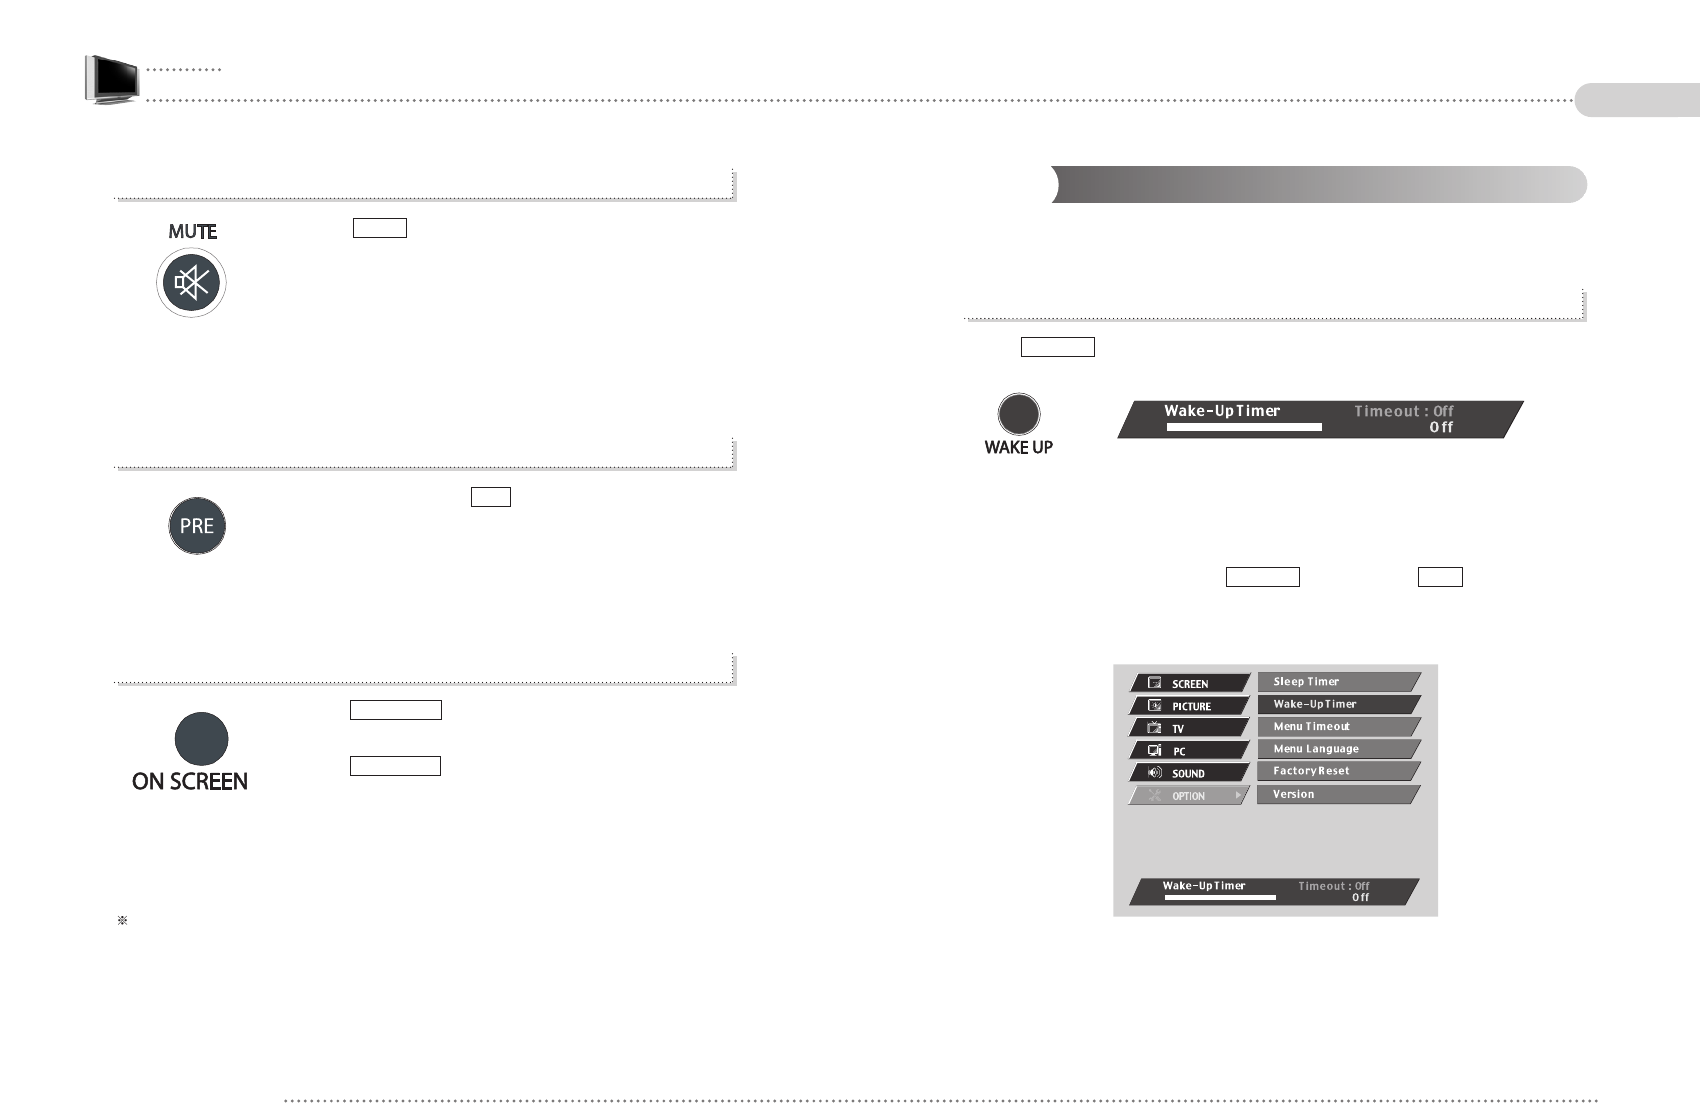
You may set the TV to turn on or off in a certain time period.
1. Setting Wake-Up Timer
- Press button on the remote control.
- Set the time to turn on the TV automatically by using volume button on the remote
control.
- Wake-up timer can be set from Off to 12 hours.
- Once the setting is complete, press button again or button.
- Also, it can be set in OSD menu if OSD button is used.
EXITWAKE UP
WAKE UP
5. Mute
1) Press button on the remote control to sound off
temporarily and “MUTE” is displayed.
2) Press it again to turn the sound back on or press volume
buttons.
6. Move to Previous Channel
1) Every time pressing the button on the remote control, it
moves to a previous channel.
7. Checking the present broadcasting information
1) Press button on the remote control to display
the information on the screen.
2) Press button again removes the information or
leaving it clears the information in 5 seconds.
In case of TV Signal, it displays channel info while it shows mode info in case of PC signal.
ON SCREEN
ON SCREEN
Previous Channel Button
PRE
MUTE button on the
remote control
MUTE
EN 42 26” / 32” WIDE TFT-LCD TV 43
ENGLISH
Broadcasting Info Button
4-3.
4-3.
4-3.
4-3.
4-3.
4-3.
4-3.
4-3.
4-3.
4-3.
4-3.
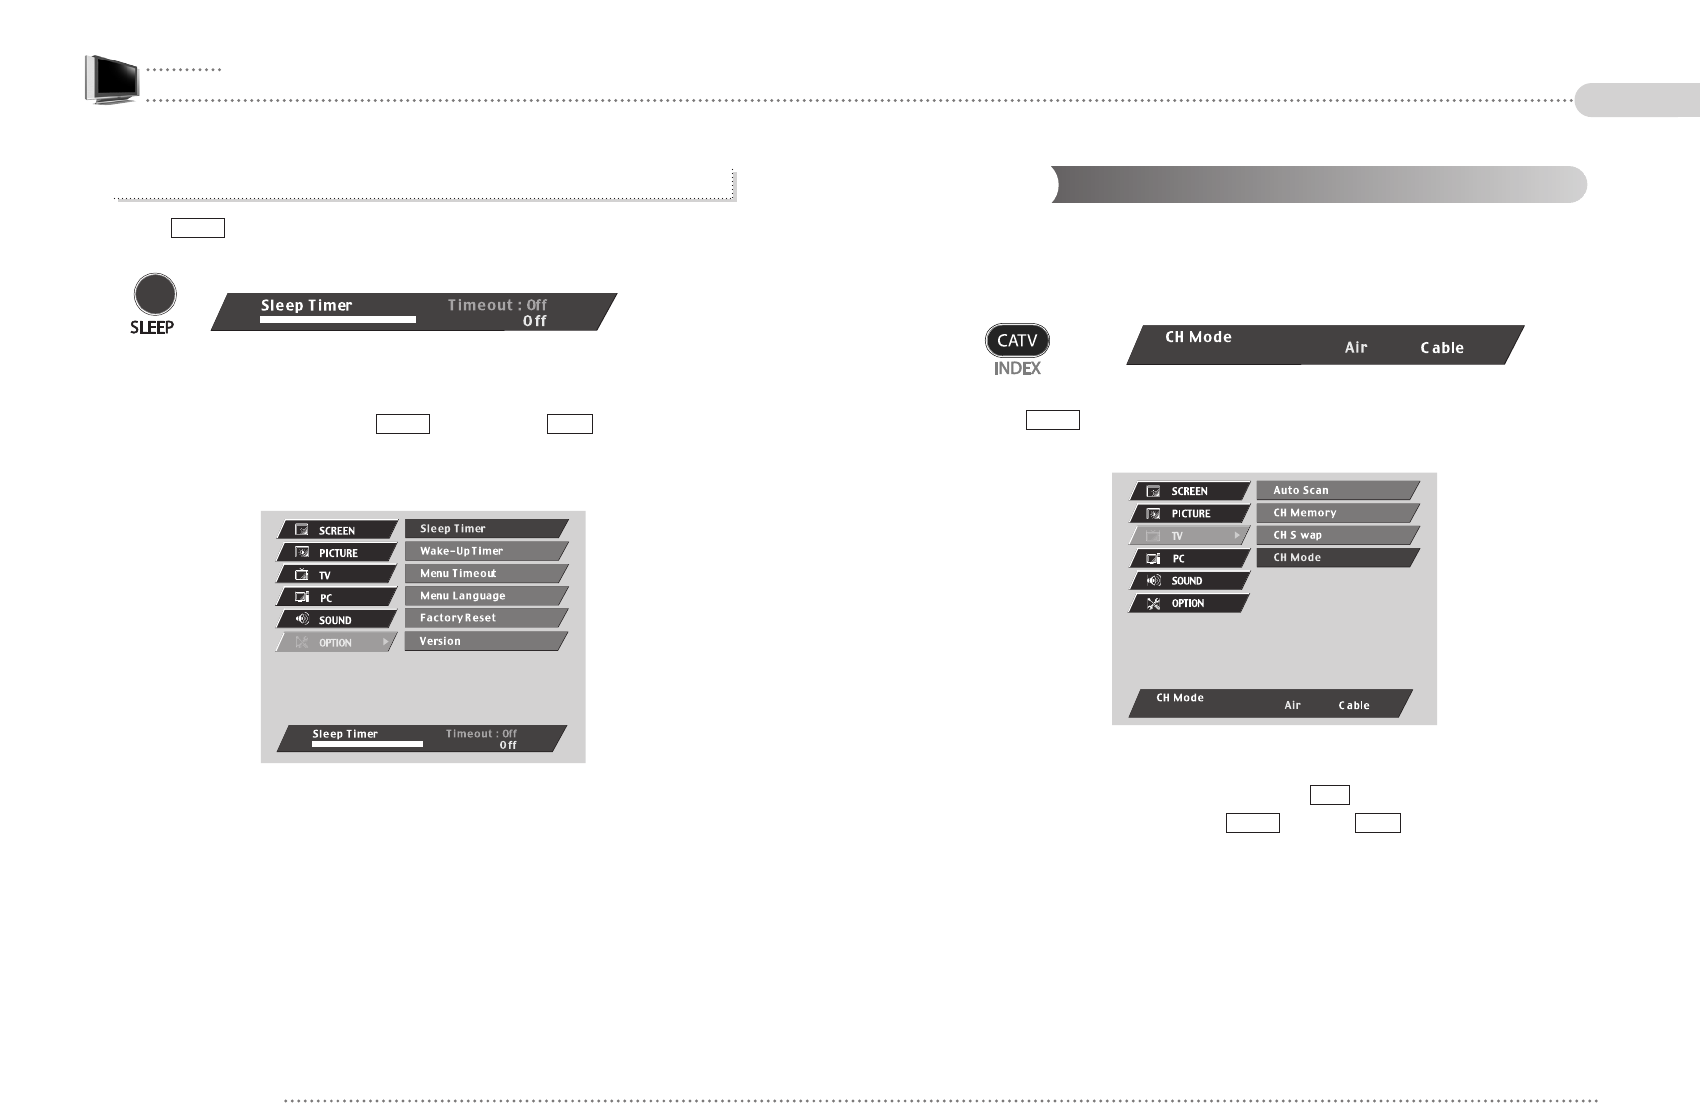
4-3. Change TV Channel Mode
Please set your broadcast type between Air and Cable.
If its mode is set as Air, some Cable broadcasts are not able to watch.
- Press button on the remote control.
- Set the CH Mode between Air & Cable by using button on the remote control.
- Once the setting is complete, press button or button.
- Also, it can be set in OSD menu if OSD button is used.
EXITCATV
VOL
CATV
2. Setting Sleep Timer
- Press button on the remote control.
- Set the sleep timer by using volume button on the remote control.
- Sleep Timer can be set from Off to 180 minutes.
- Once the setting is complete, press button again or button.
- Also, it can be set in OSD menu if OSD button is used.
EXITSLEEP
SLEEP
EN 44 26” / 32” WIDE TFT-LCD TV 45
ENGLISH
4-4.
4-4.
4-4.
4-4.
4-4.
4-4.
4-4.
4-4.
4-4.
4-4.
4-4.
4-4. 4-5.
4-5.
4-5.
4-5.
4-5.
4-5.
4-5.
4-5.
4-5.
4-5.
4-5.
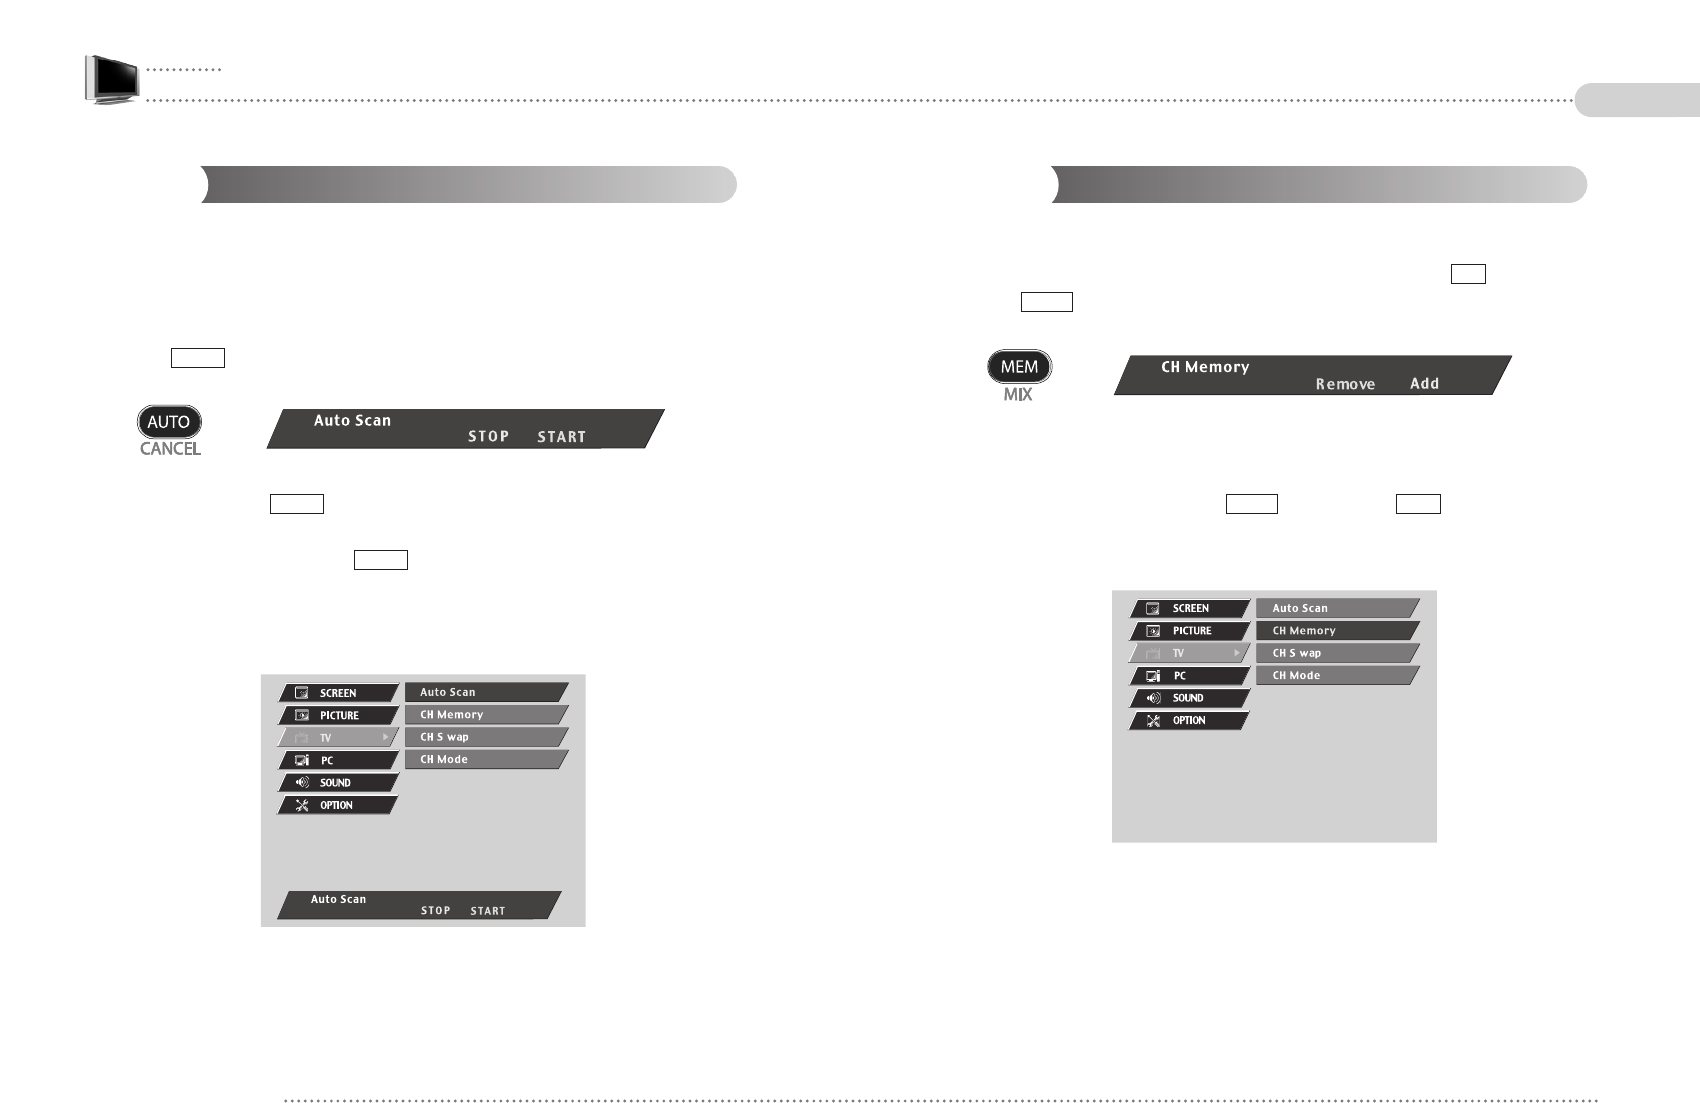
4-5. Add/Remove Channel
You may add or remove a channel as your need.
- Move to a channel to add or remove by pressing numeric buttons or button.
- Press button on the remote control.
- In case of adding a channel by using Volume button on the remote control, move to Add
or Remove.
- Once the setting is complete, press button again or button.
- Also, it can be set in OSD menu if OSD button is used.
EXITMEM
MEM
CH
Channel Search
When using the TV first after purchase, reconnecting it due to power failure or other
reasons, channels should be searched and registered again.
Since Channel Search function searches channels currently broadcasted, you should
execute it when most channels are broadcasted.
- Press button on the remote control.
- Once you move to by using Volume button on the remote control, it starts
channel search.
- To stop channel search, repress button on the remoter control.
- If you stop it during channel search, it stores the currently searched channels only.
- Also, it can be set in OSD menu if OSD button is used.
AUTO
START
AUTO
EN 46 26” / 32” WIDE TFT-LCD TV 47
ENGLISH
4-6.
4-6.
4-6.
4-6.
4-6.
4-6.
4-6.
4-6.
4-6.
4-6.
4-6.
4-6. 4-7.
4-7.
4-7.
4-7.
4-7.
4-7.
4-7.
4-7.
4-7.
4-7.
4-7.
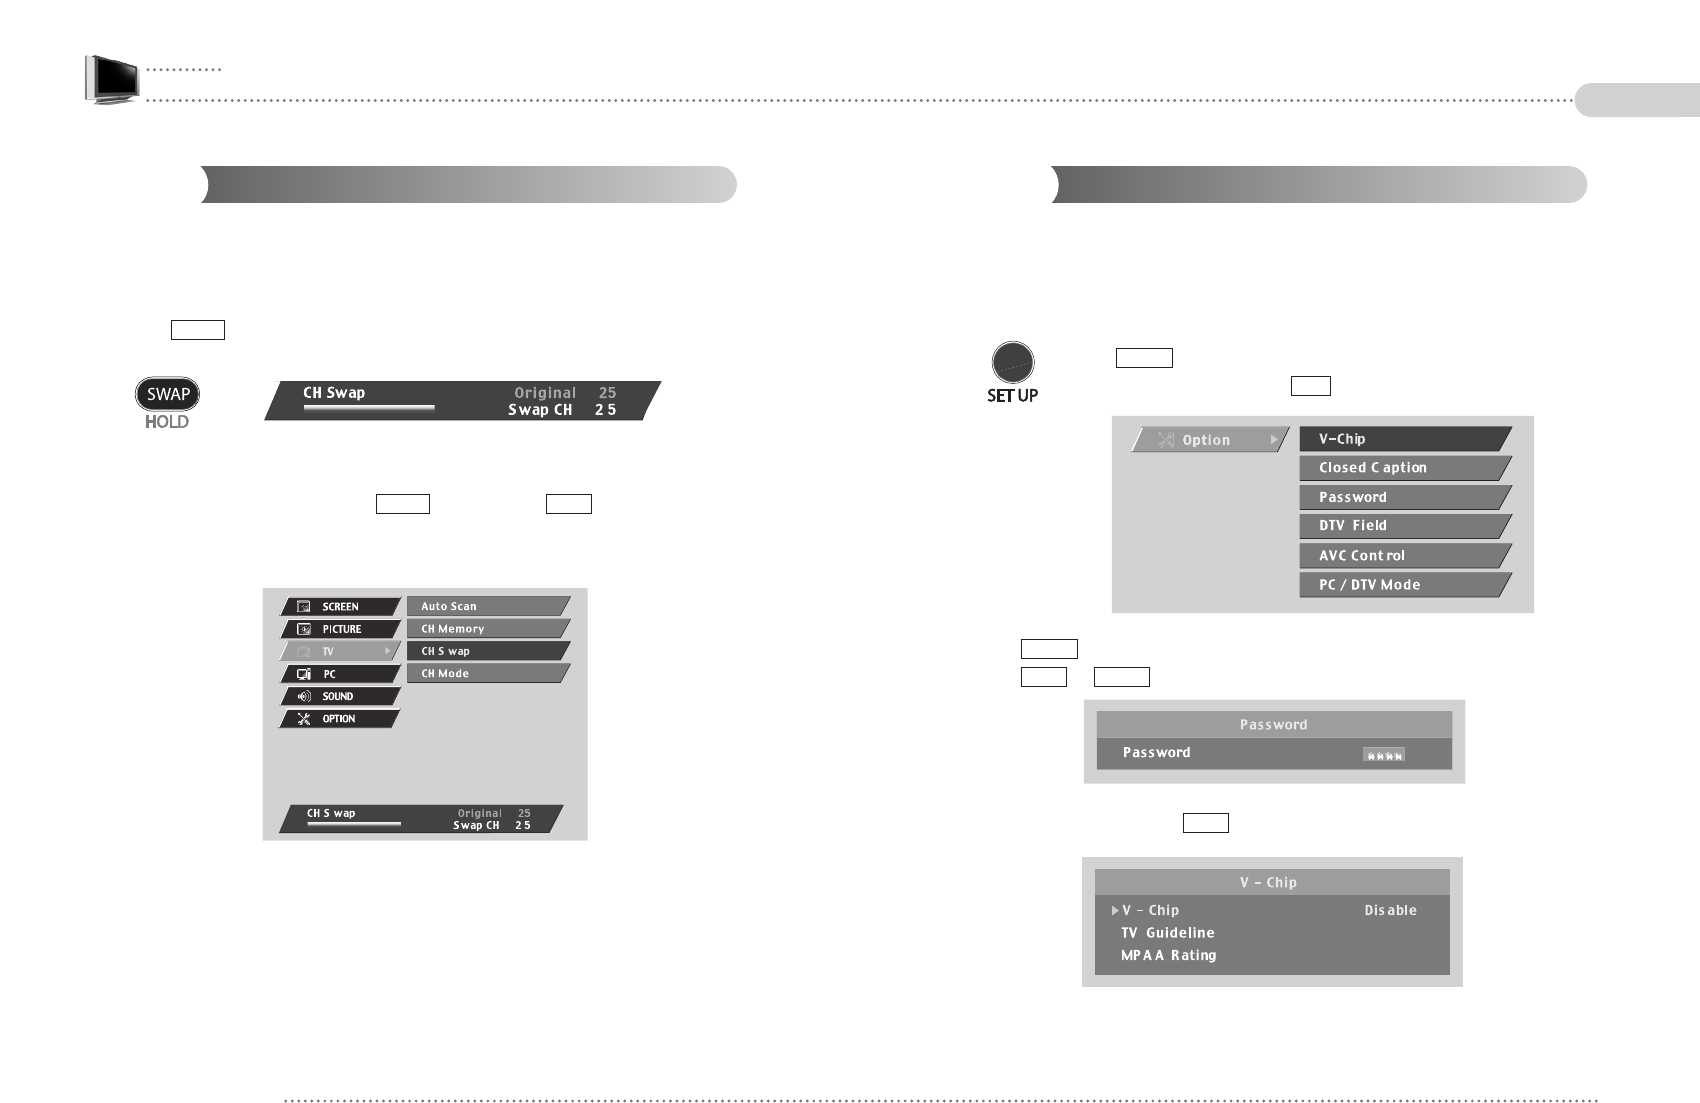
4-7. V-Chip Funetion
It makes MPAA rating of TV broadcast and other media.
It works only with V-Chip function broadcast and media.
It can be controlled by using the remote control only.
- Press button on the remote control.
- Move to V-Chip menu by using button on the remote control.
- Press button and enter Password.
- Press or button on the remote control.
- Set V-Chip function by using button on the remote control.
VOL
MENUENT
MENU
CH
SETUP
Channel Swap
In case of channels frequently watch, you can switch it to other channel numbers and
store them.
- Move to a channel to change.
- Press button on the remote control.
- Change a channel number to switch by using Volume button on the remote control.
- Once the setting is complete, press button again or button.
- Also, it can be set in OSD menu if OSD button is used.
EXITSWAP
SWAP
EN 48 26” / 32” WIDE TFT-LCD TV 49
ENGLISH
4-8.
4-8.
4-8.
4-8.
4-8.
4-8.
4-8.
4-8.
4-8.
4-8.
4-8.
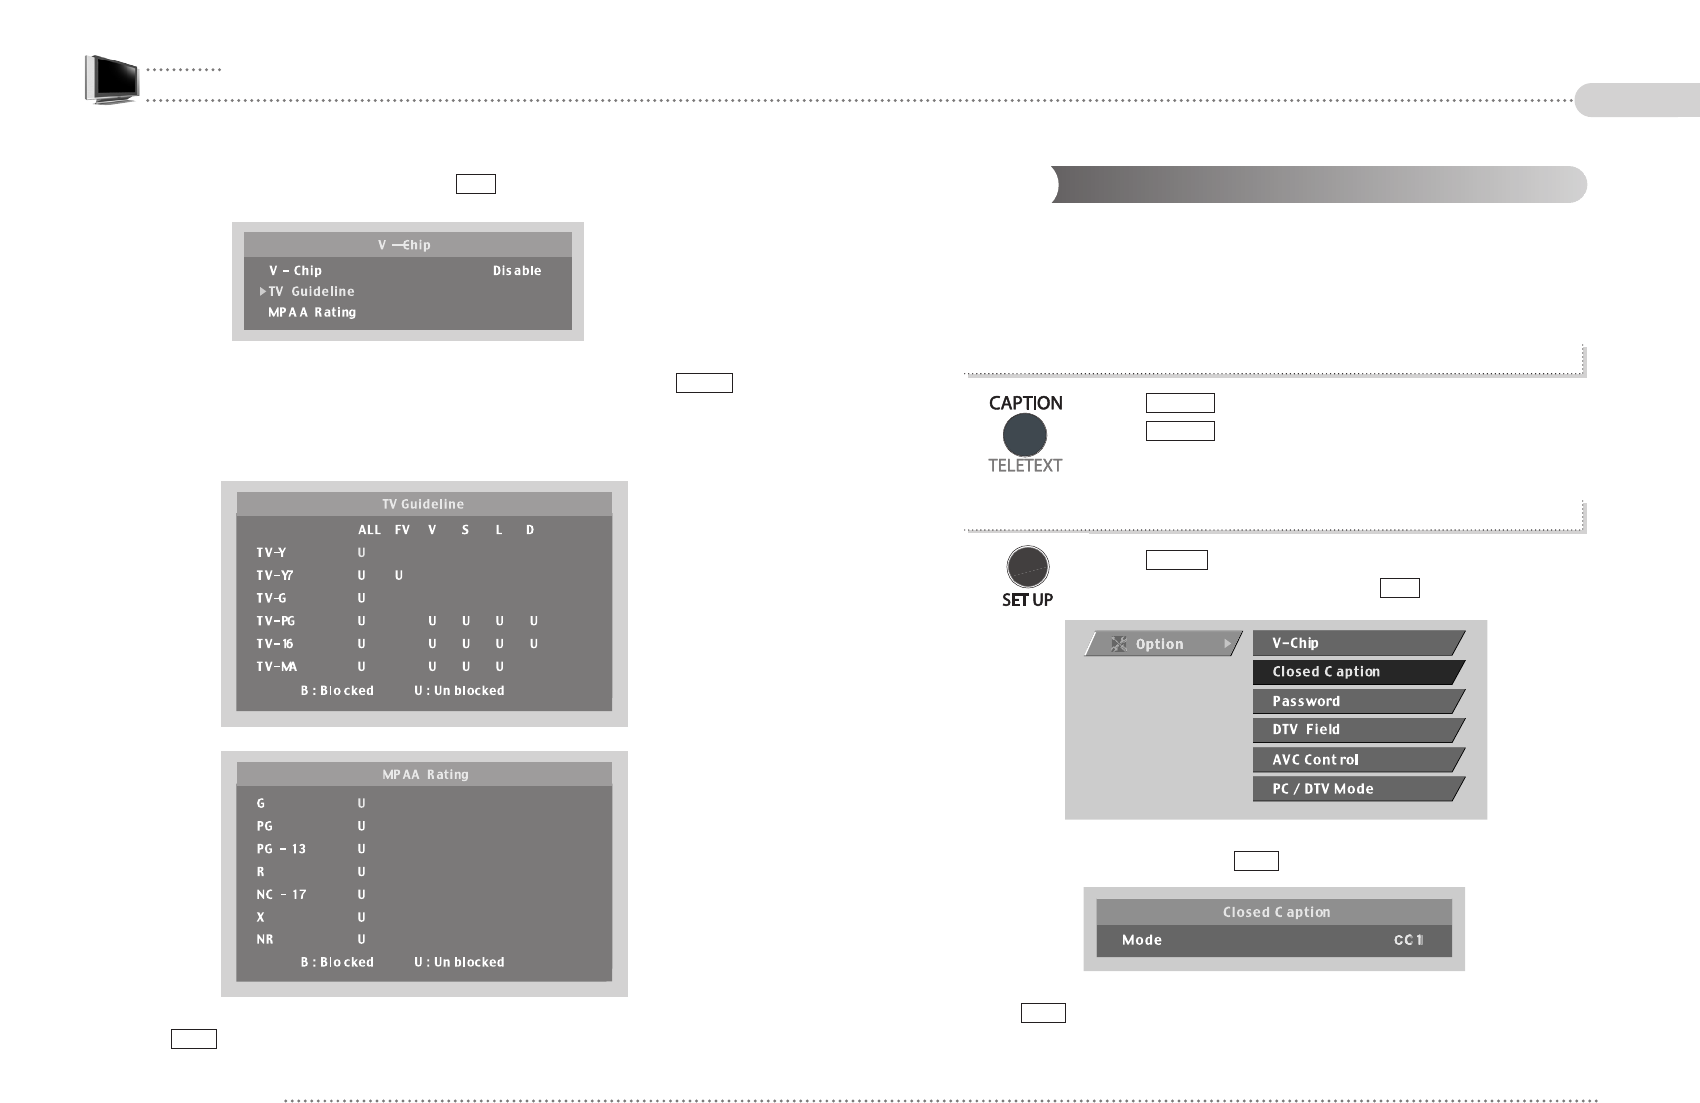
4-8. Caption
This function works only Caption broadcast or other CC marked video tape and DVD title.
Set the function in the SETUP menu.
Caption can be set only by using the remote control.
1. Caption On / Off
- Press button on the remote control when it is broadcasted.
- Press button for coming out from setting.
2. Set Caption
- Press button.
- Move to Closed Caption menu by using button.
- Set Caption broadcast type by using button on the remote control.
- Press button for coming out from setting.
EXIT
VOL
CH
SETUP
CAPTION
CAPTION
- Move to TV Guideline or MPAA Rating by using button on the remote control.
- Move to the position which you want to make channel blocking and press
button for setting.
- Press it again for cancellation.
- Press button for coming out from setting.
EXIT
MENU
CH
EN 50 26” / 32” WIDE TFT-LCD TV 51
ENGLISH
4-10.
4-10.
4-10.
4-10.
4-10.
4-10.
4-10.
4-10.
4-10.
4-10.
4-10.
4-10.4-9.
4-9.
4-9.
4-9.
4-9.
4-9.
4-9.
4-9.
4-9.
4-9.
4-9.
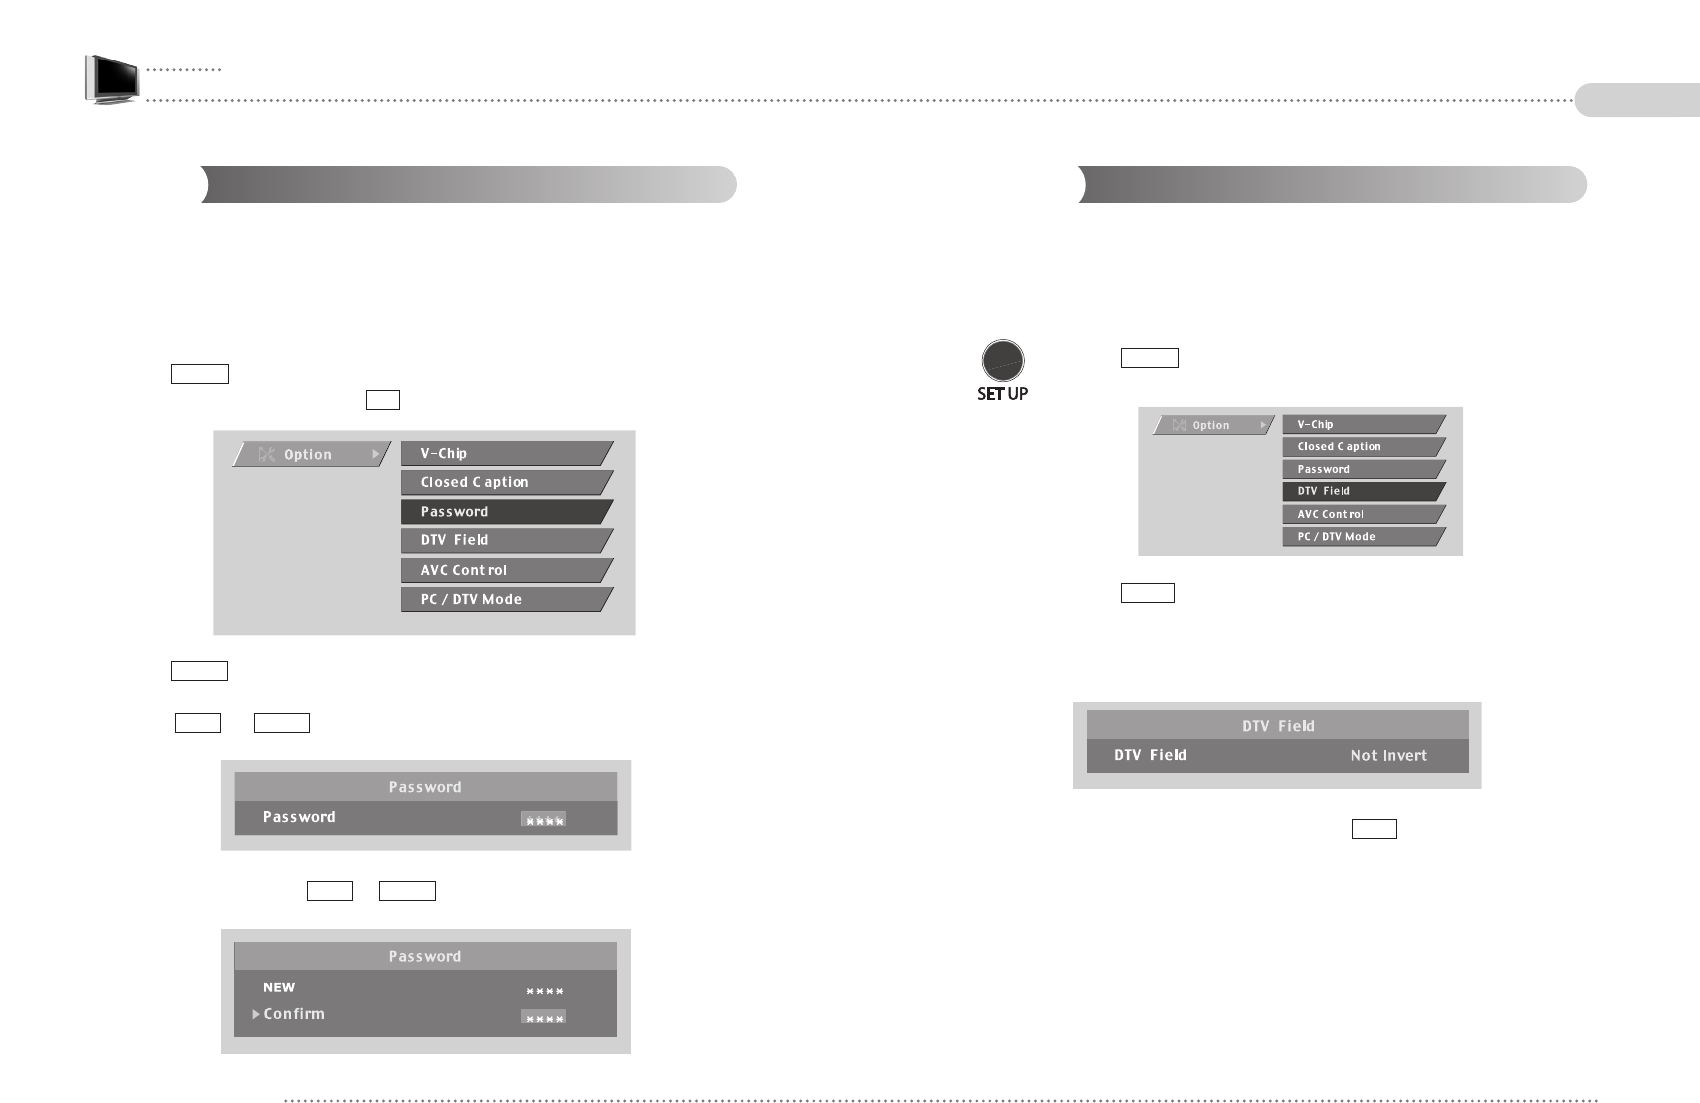
4-9. DTV Field
Depending on a DTV receiver, a signal is not identical with standard signal. It may cause
unclear display and if you change DTV Field value, it will be recovered to the normal
picture (it can be set only by the remote control).
- Press button.
- Press button to go into DTV Field Setting Menus.
- Set Not Invert/Invert with Volume button.
- Initially, ‘Not Invert’ is defaulted and you may change it to ‘Invert’ if the
display is not normal.
- Once the setting is complete, press the button.
EXIT
MENU
SET UP
Password
When using Contents Blocking function, you can set password and please keep the
password private.
Default password is <0000>.
Please change default password to new one after installing TV.
- Press button on the remote control.
- Move to password menu by using button on the remote control
- Press button on the remote control for entering Password setting menu.
- When setting password first after purchase, press <0000> on the remote control and
press or on the remote control after entering new password for
changing.
- Press new password and or again for confirmation it.
MENUENT
MENUENT
MENU
CH
SET UP
EN 52 26” / 32” WIDE TFT-LCD TV 53
ENGLISH
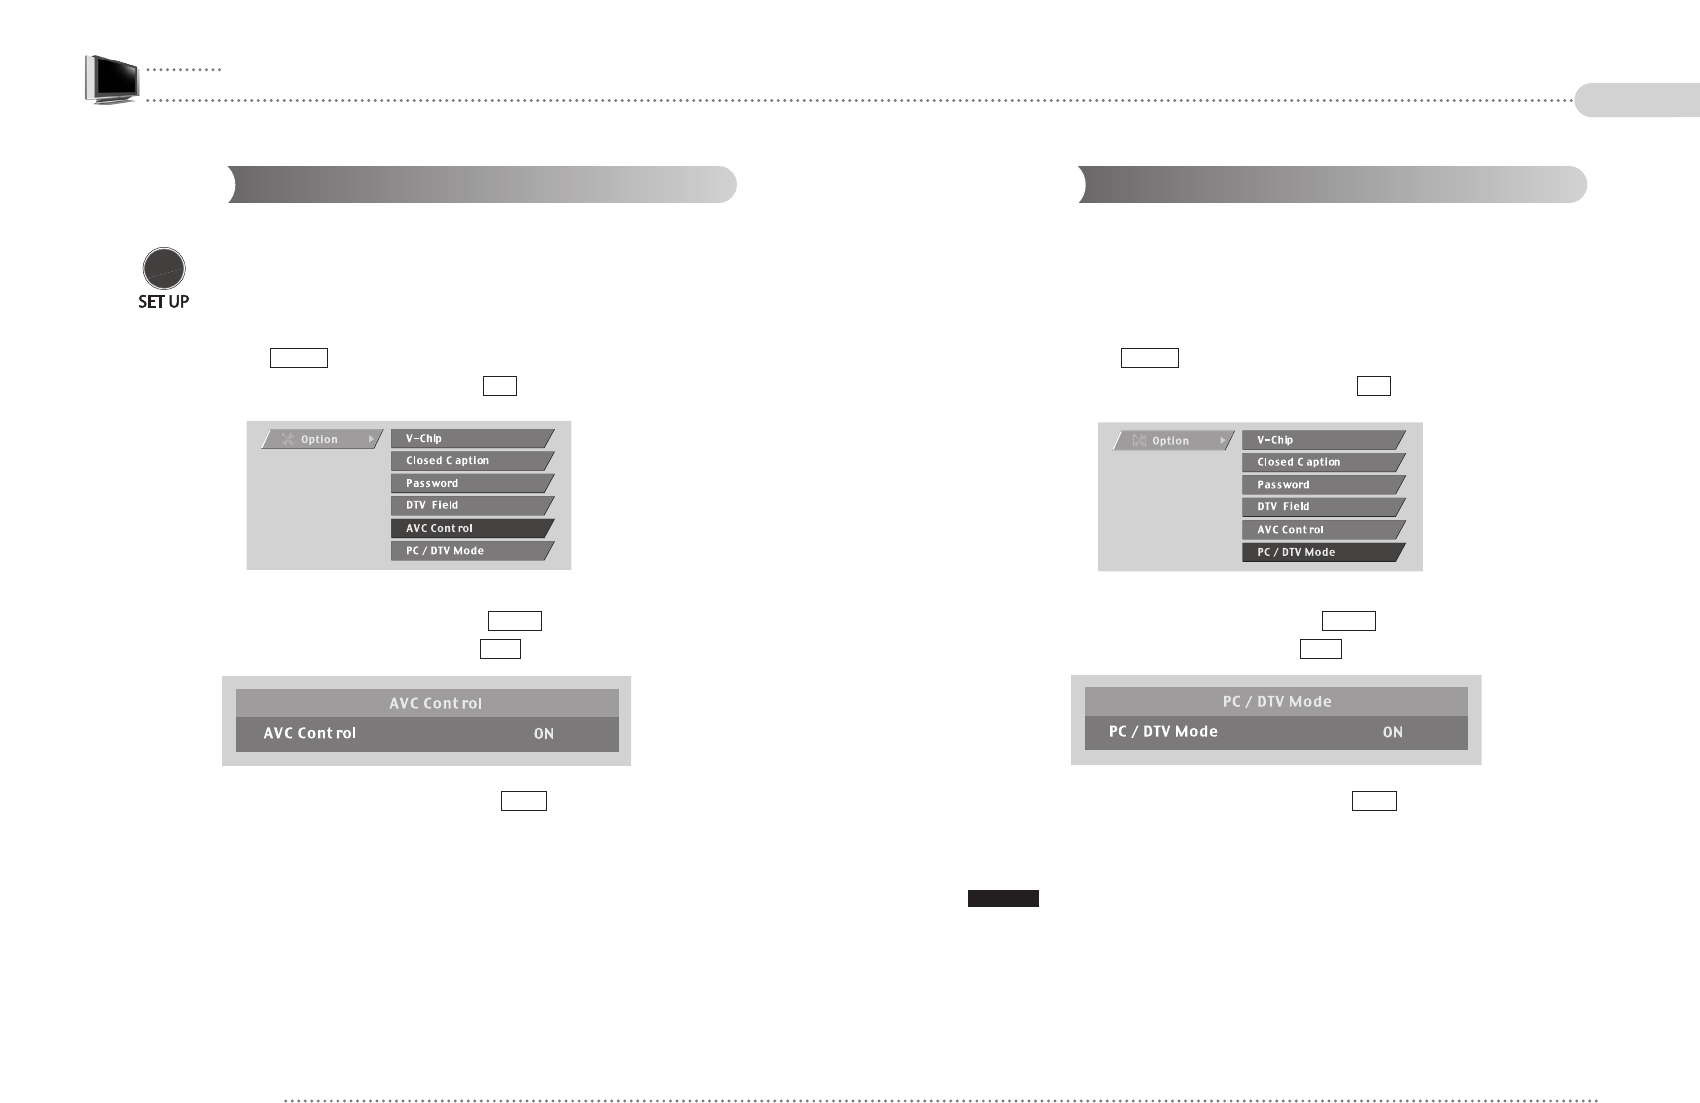
4-11.
4-11.
4-11.
4-11.
4-11.
4-11.
4-11.
4-11.
4-11.
4-11.
4-11.
4-11. 4-12.
4-12.
4-12.
4-12.
4-12.
4-12.
4-12.
4-12.
4-12.
4-12.
4-12.
4-12. PC / DTV Mode
Use this function when you use DVI connector for DTV / PC input signal.
When you use PC / DTV signal, please set its proper mode as PC / DTV, because PC &
DTV input signal is different.
- Press button on the remote control.
- Move to PC / DTV Mode menu by using button.
- Select PC / DTV Mode by pressing button.
- Set its PC / DTV mode by using button.
- Once the setting is complete, press the button.
If the screen size is not properly set on the display, please check whether you changed its mode
before input signal changed please check its input mode whether it is properly set as PC or DTV.
NOTICE
EXIT
VOL
MENU
CH
SET UP
AVC Control
AVC (Automatic Volume Correction) Control : This option is properly control
its sound volume level if there is different volume level from same sound
source.
- Press button on the remote control.
- Move to AVC Control menu by using button.
- Select AVC control menu by pressing button.
- Change its ON/OFF setting by using button.
- Once the setting is complete, press the button.
EXIT
VOL
MENU
CH
SET UP
EN 54 26” / 32” WIDE TFT-LCD TV 55
ENGLISH
CHAPTER 5
4-13.
4-13.
4-13.
4-13.
4-13.
4-13.
4-13.
4-13.
4-13.
4-13.
4-13.
4-13.
4-14.
4-14.
4-14.
4-14.
4-14.
4-14.
4-14.
4-14.
4-14.
4-14.
4-14.
4-14.
Stereo
If you use the TV in an area with weak or bad reception, there may cause sound noise or
other problem when selecting a channel. In this case, cancel the setting.
It can be canceled only by the remote control.
- Press button on the remote control to cancel stereo and
returning to Mono.
- Press button in Mono returns to Stereo.
- If Stereo is off, it is always set as Mono even though a channel is
changed.
Bilingual (Multi-Language Broadcasting)
In case of multi-language broadcasting, it can be converted if you wish to listen to other
language except main language.
Multilanguage broadcasting can be set only by the remote control.
- Every time pressing button on the remote control, the
language display is changed in good order of main language sub
language main + sub languages (dual language).
(Main - Sub - Dual)
BILINGUAL
STEREO
STEREO
STEREO
EN 56 26” / 32” WIDE TFT-LCD TV 57
ENGLISH
Using Menus of Picture,
Sound and Others
5-1. Setting Display Mode
5-2. Setting Scale Mode
5-3. Setting Picture Mode
5-4. Using Simultaneous Picture Mode
5-5.
Setting Screen MENU by Simultaneous Picture
5-6. Setting Sound
5-7. Setting Others
5-1.
5-1.
5-1.
5-1.
5-1.
5-1.
5-1.
5-1.
5-1.
5-1.
5-1.
5-1.
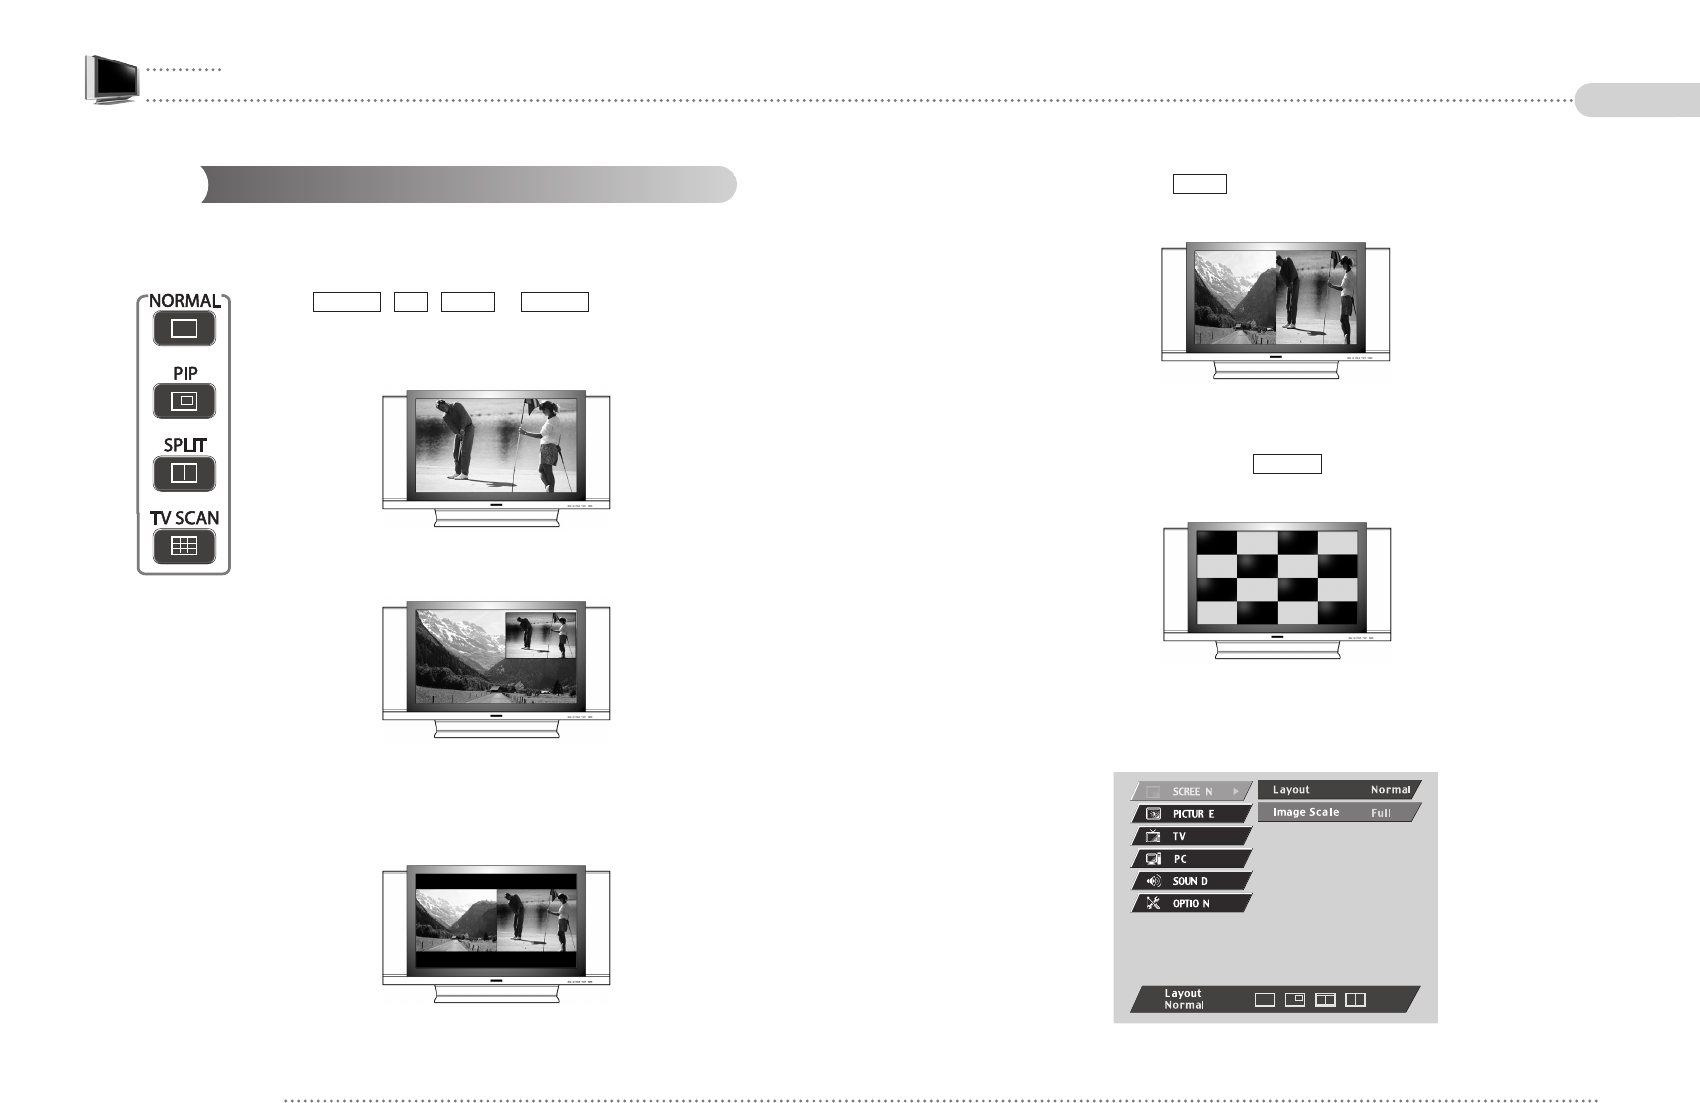
4) SPLIT FULL : Repressing button in Split display, shows main screen and sub
screen in split full screen.
5) TV SCAN : Show 16 channels searched and stored in the TV set in 16 pictures in
order on the screen. At the moment, can be operated only by the remote
control.
- Also, it can be set in OSD menu if OSD button is used.
- OSD Menu is different depending on Display Type [Screen Layout].
TV SCAN
SPLIT
Setting Display Mode
You may view other video screen while watching TV.
- Press , , or button.
1) NORMAL : Show a selected main screen in full size.
2) PIP : Show main screen and sub screen in full size and small size
together.
3) SPLIT : Show main screen and sub screen by horizontally shared.
You can control Main screen’s (left side screen) size and Sub
screen’s size is controlled inverse ratio of main screen.
TV SCANSPLITPIPNORMAL
EN 58 26” / 32” WIDE TFT-LCD TV 59
ENGLISH

5-3.
5-3.
5-3.
5-3.
5-3.
5-3.
5-3.
5-3.
5-3.
5-3.
5-3.
5-3.5-2.
5-2.
5-2.
5-2.
5-2.
5-2.
5-2.
5-2.
5-2.
5-2.
5-2.
5-2. Setting Picture Mode
By setting a picture mode suitable for broadcasting/video signals, you may enjoy better
quality picture.
- Press button on the remote control.
- Set a picture mode by using Volume button on the remote control.
1) Standard : Standard picture mode.
2) Soft : It displays a picture softly as a whole and is better for watching a film or TV
series.
3) Dynamic : The mode is suitable for watching sports, which changes pictures fast.
4) User : It is a picture mode customized by a user.
- Also, it can be set in OSD menu if OSD button is used.
PICTURE
Setting Scale Mode
You can set the screen’s suitable image scale of TV or Video input signals and view them
accordingly.
- Press button on the remote control.
- Control the scale (s) in desirable size (s) by using Volume button on the remote control.
1) FULL : Show a screen in the full LCD Penal.
2) 16:9 : Show a screen in 16:9 wide screen size.
3) 4:3 : Show a screen in 4:3 screen size for general broadcasting.
4) CAPTION : Show a screen suitable for Caption Broadcasting.
5) SMART VIEW : Show a screen in a proportion suitable for grand image.
In PIP or SPLIT screen, it can be set in types of AUTO, 16:9, 4:3. For more information,
see to 4-4 Setting Simultaneous Picture Mode.
- Once the setting is complete, press button or button on the remote
control.
- Also, it can be set in OSD menu if OSD button is used.
- OSD Menu is different depending on Display Type [Screen Layout].
EXITPICTURE
SCALE
EN 60 26” / 32” WIDE TFT-LCD TV 61
ENGLISH
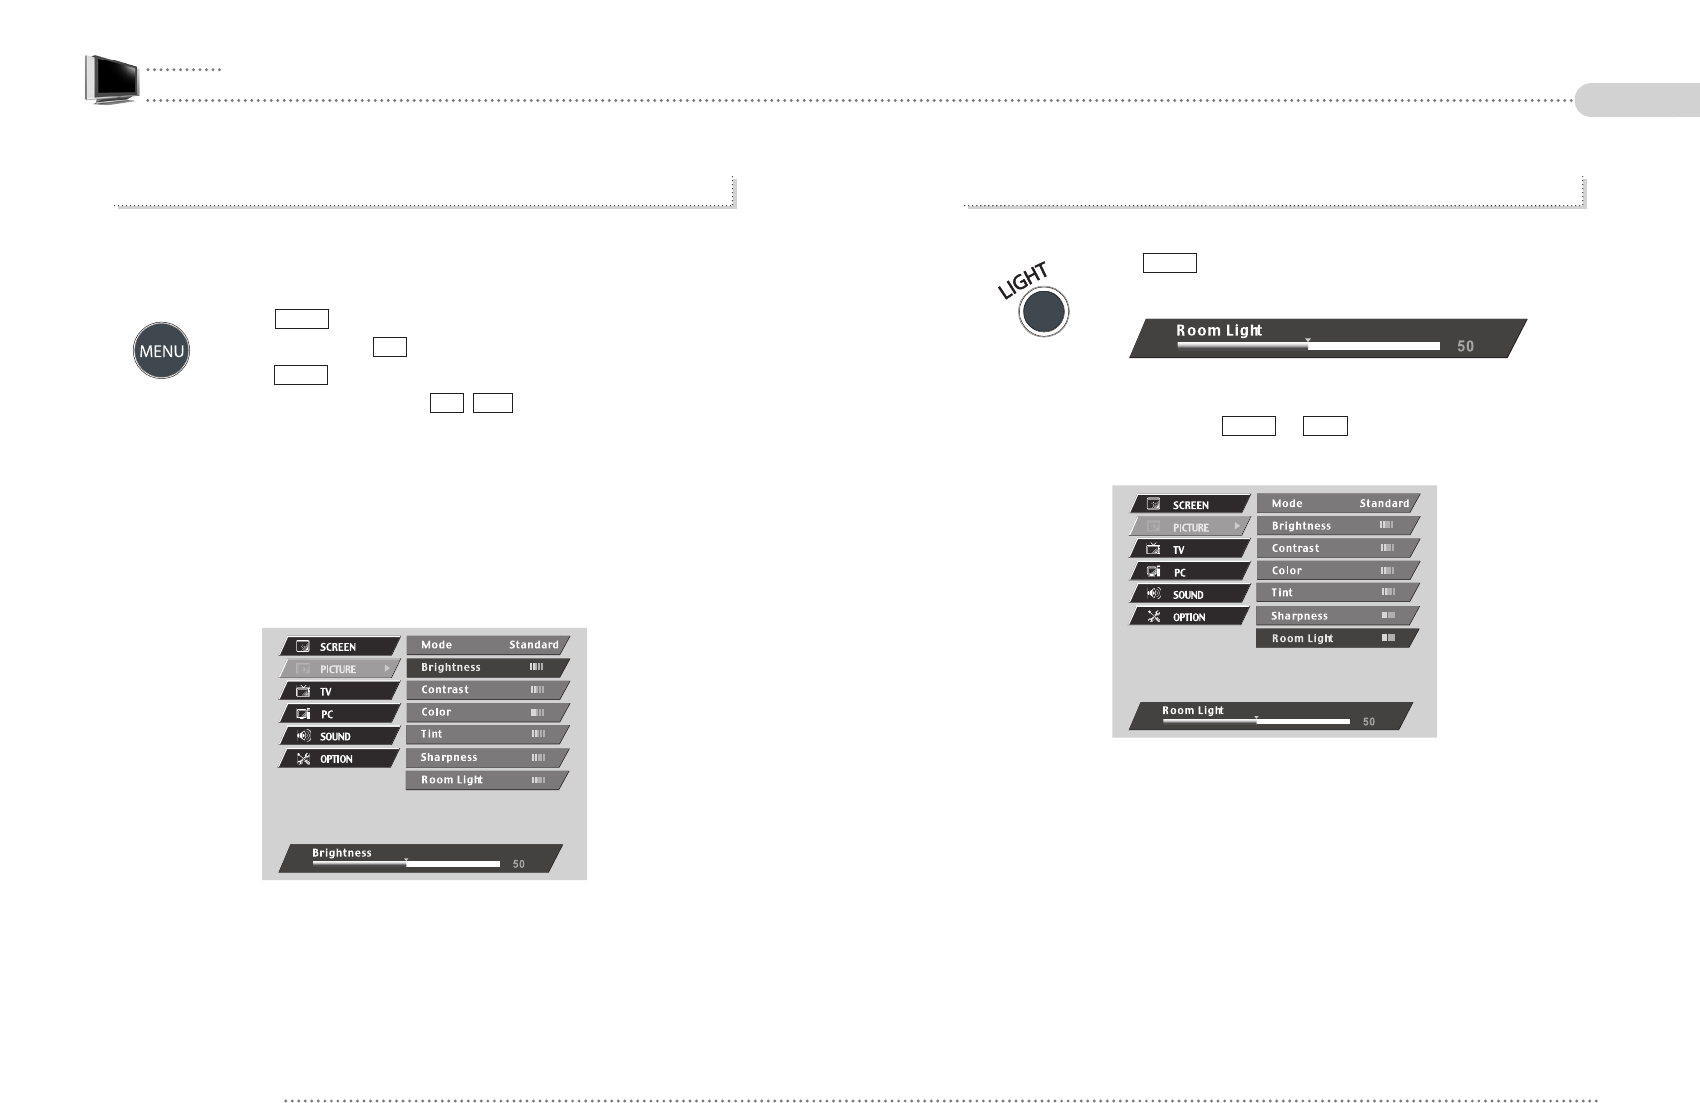
2. Setting Room Light
You can adjust the entire TV brightness according to lightning status.
- Press button on the remote control.
- Adjust values by using Volume button on the remote control.
- Once the setting is complete, press or button on the remote control.
EXITLIGHT
LIGHT
1. Setting USER Mode
You can set each picture mode according to your taste. If you set USER mode as your
taste, it is stored as USER Mode standard.
- Press button on the remote control and move to PICTURE of
main menu by using button on the remote control.
- Press button on the remote control and move to the sub menu
for changing values by using / buttons.
1) Brightness : Adjust screen brightness.
2) Contrast : Adjust screen contrast.
3) Color : Adjust screen color.
4) Tint : Adjust screen tint.
5) Sharpness : Adjust screen sharpness.
6) Room Light : Adjust the brightness of TV screen according to background brightness.
VOLCH
MENU
CH
MENU
EN 62 26” / 32” WIDE TFT-LCD TV 63
ENGLISH
5-4.
5-4.
5-4.
5-4.
5-4.
5-4.
5-4.
5-4.
5-4.
5-4.
5-4.
5-4.
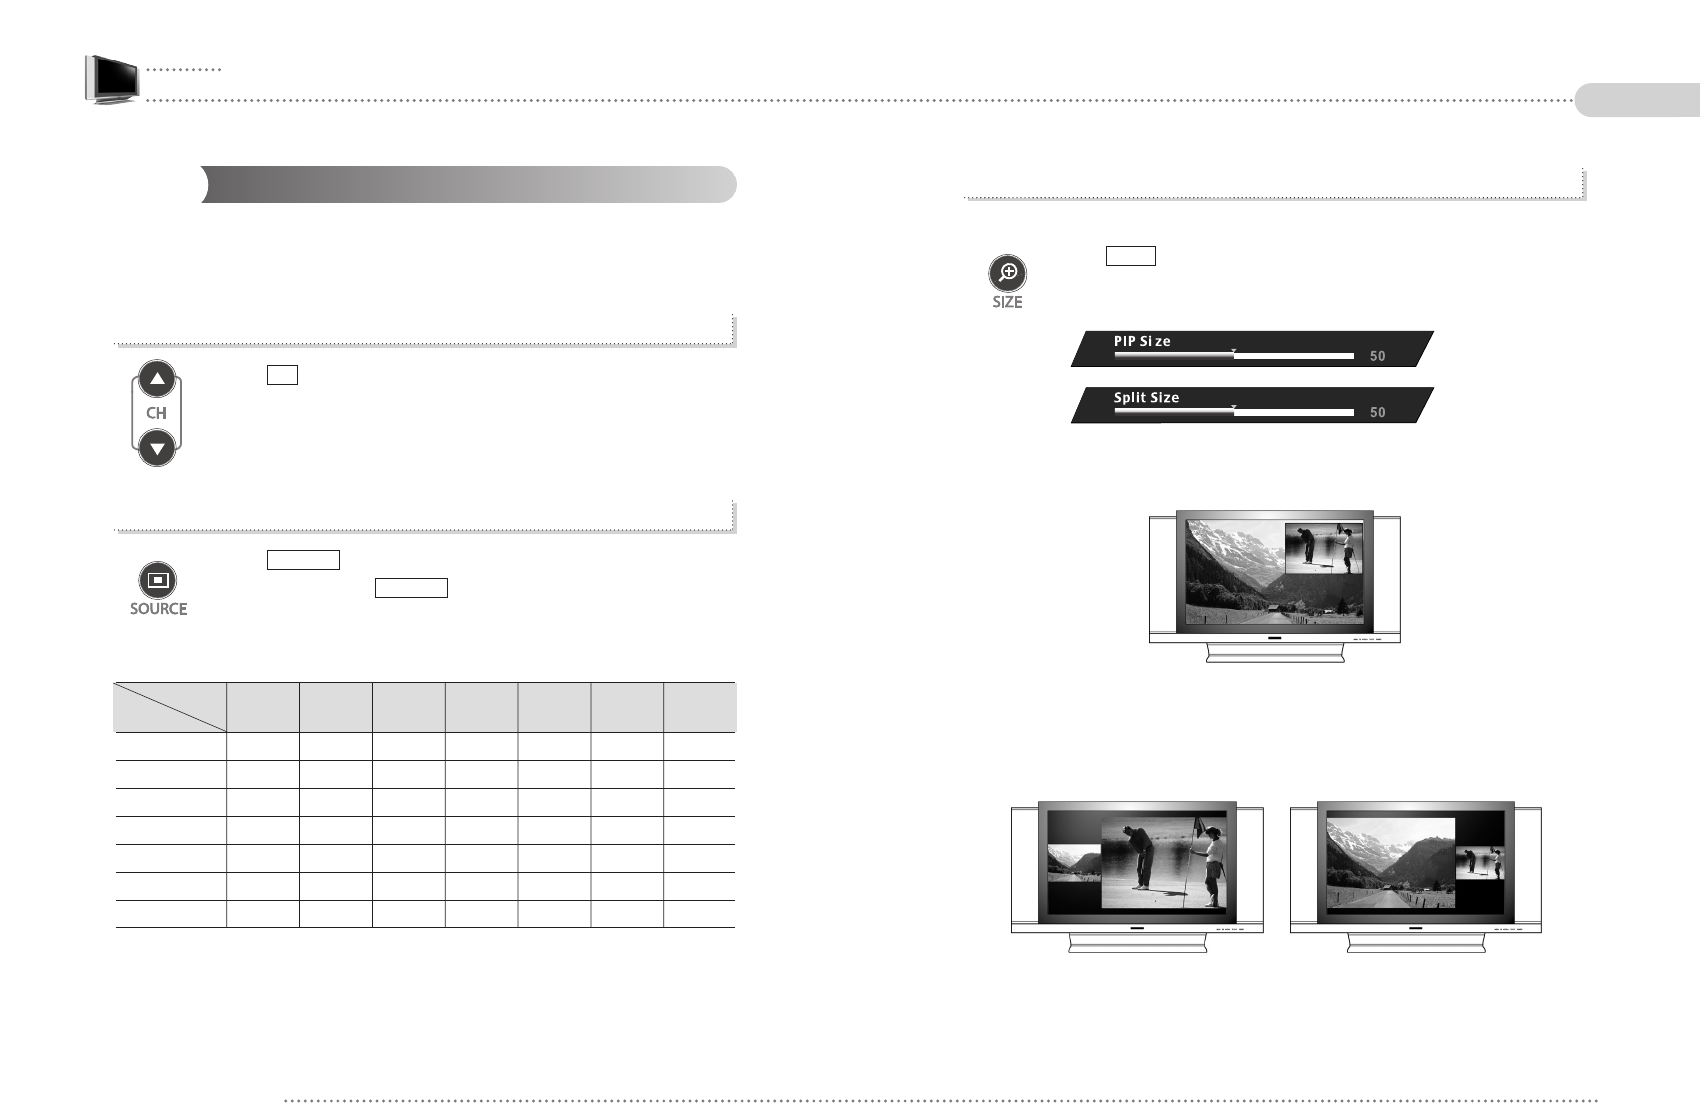
3. Changing Sub Screen Size
It adjusts sub screen size.
- Press button on the remote control.
- Adjust sub screen size by Volume button on the remote control.
- Different menus are displayed depending on PIP Picture or SPLIT Picture.
- On PIP Picture, sub screen size can be adjusted from 1/16 to 1/4 of the full size.
- On SPLIT Picture, main screen size is adjusted while sub screen size is adjusted
accordingly.
- On SPLIT Picture, the left screen always shows main screen.
SIZE
Setting Simultaneous Picture Mode
While watching TV on main screen, you can enjoy other video picture on the sub screen.
Simultaneous Picture means PIP and/or SPLIT Picture display.
1. Changing a channel of Simultaneous Picture
- Press button on the remote control.
- It changes a TV channel if the sub screen shows TV.
2. Changing input signal of Sub-Screen
- Press button on the remote control.
- Every time pressing button, it changes input signal of sub
screen.
- Available input signals of sub screen are as follows;
SUB PC PC TV VIDEO S-VHS COMP DVD
MAINRGB
RGB DVI (DTV)
PC RGB XX 000X0
PC DVI XX 000X0
TV 00XXX0X
VIDEO 00XXX0X
S-VHS 00XXX0X
COMP (DTV) XX 000X0
DVD 00XXXOX
SOURCE
SOURCE
CH
EN 64 26” / 32” WIDE TFT-LCD TV 65
ENGLISH
5-5.
5-5.
5-5.
5-5.
5-5.
5-5.
5-5.
5-5.
5-5.
5-5.
5-5.
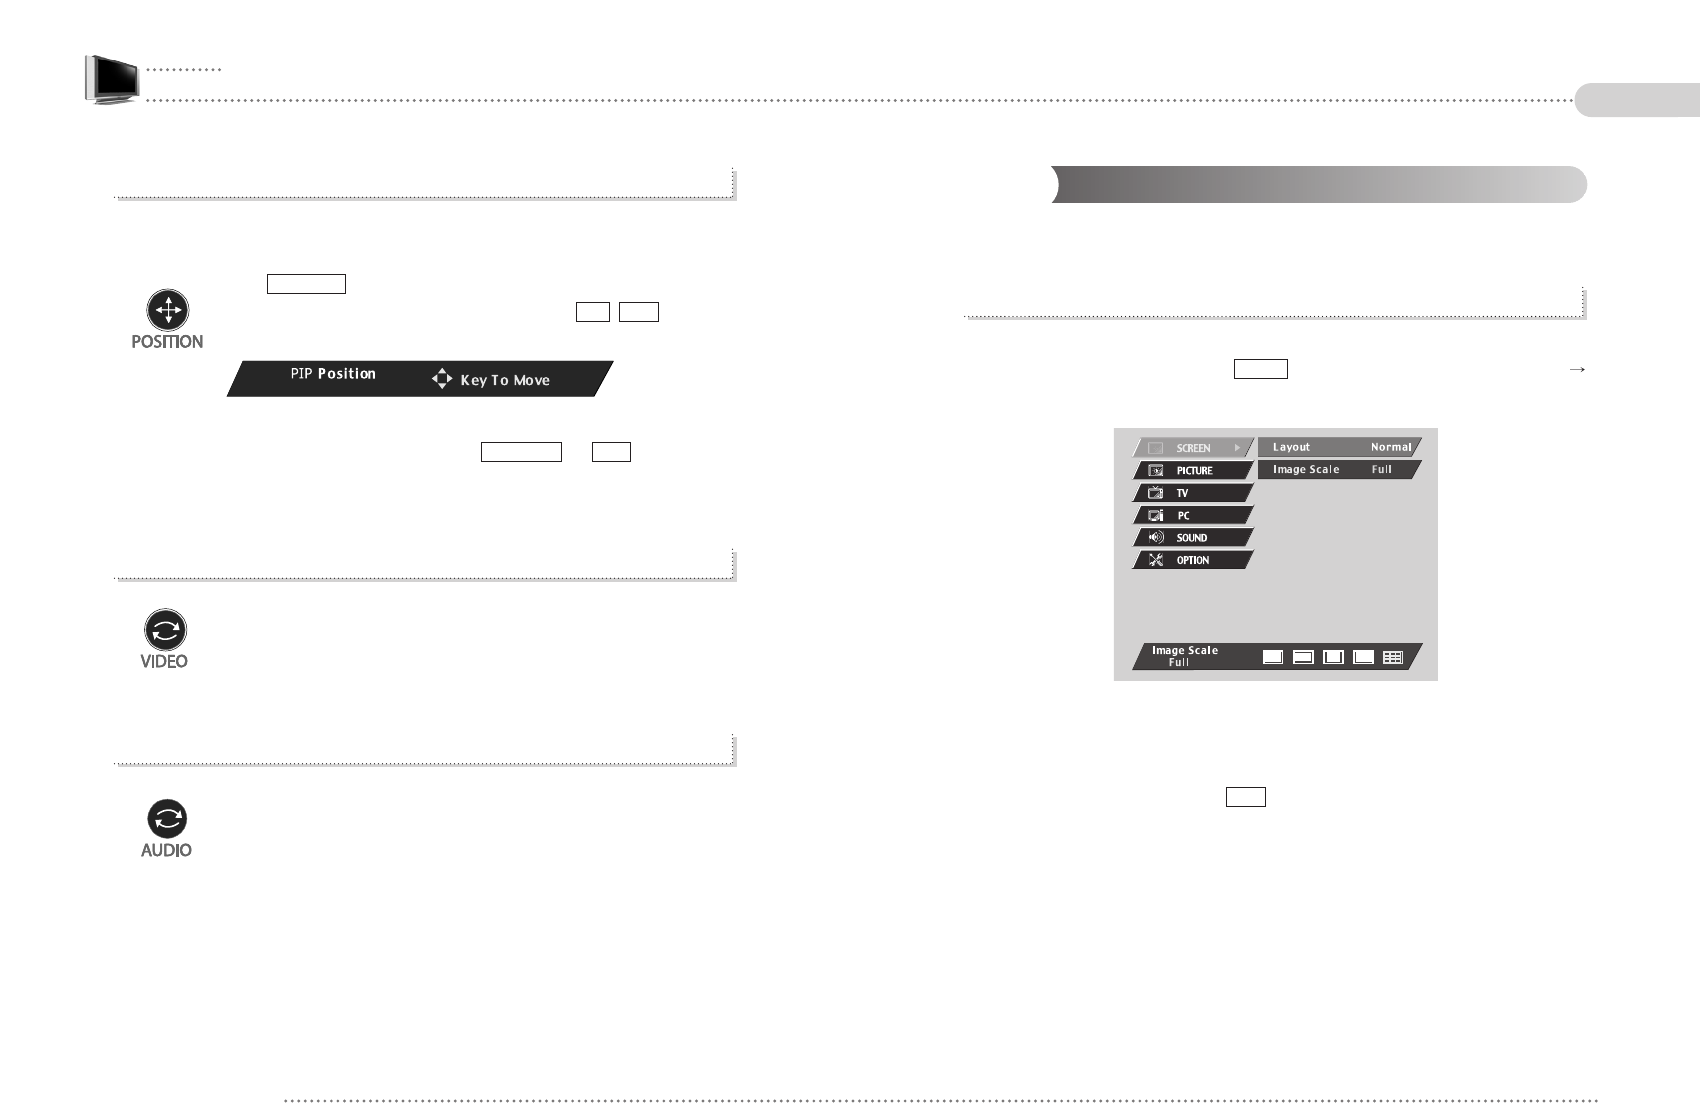
5-5. Setting Screen MENU by Simultaneous Picture
Depending on Layout in OSD Menu, sub menus of SCREEN are changed.
1. SCREEN MENU in NORMAL Picture
- It works only in NORMAL Picture.
- Select SCREEN menu by pressing button on the remote control (MENU
MENU).
1) Layout : Set Picture mode [Display Mode].
2) Image Scale : Select an image scale
(FULL, 16:9, 4:3, Caption, Smart View)
- Once the setting is complete, press button to exit it.
EXIT
MENU
4. Changing Sub Screen Position
Adjust a sub screen’s position on PIP Picture.
- Press button on the remote control.
- Move PIP picture to a desirable position by using / button on
the remote control.
- The position is set as USER setting of OSD menu.
- Once the setting is complete, press or button on the
remote control.
5. Switching Main/Sub Screen
It switches main/sub screens.
In case of switching main/sub screens, audio is changed accordingly.
The left screen always shows main screen.
6. Switching Audio of Main/Sub Screen
It switches audio of main/sub screen.
In case of switching audio of main/sub screen, it switches audio only, not
screens.
EXITPOSITION
VOLCH
POSITION
EN 66 26” / 32” WIDE TFT-LCD TV 67
ENGLISH
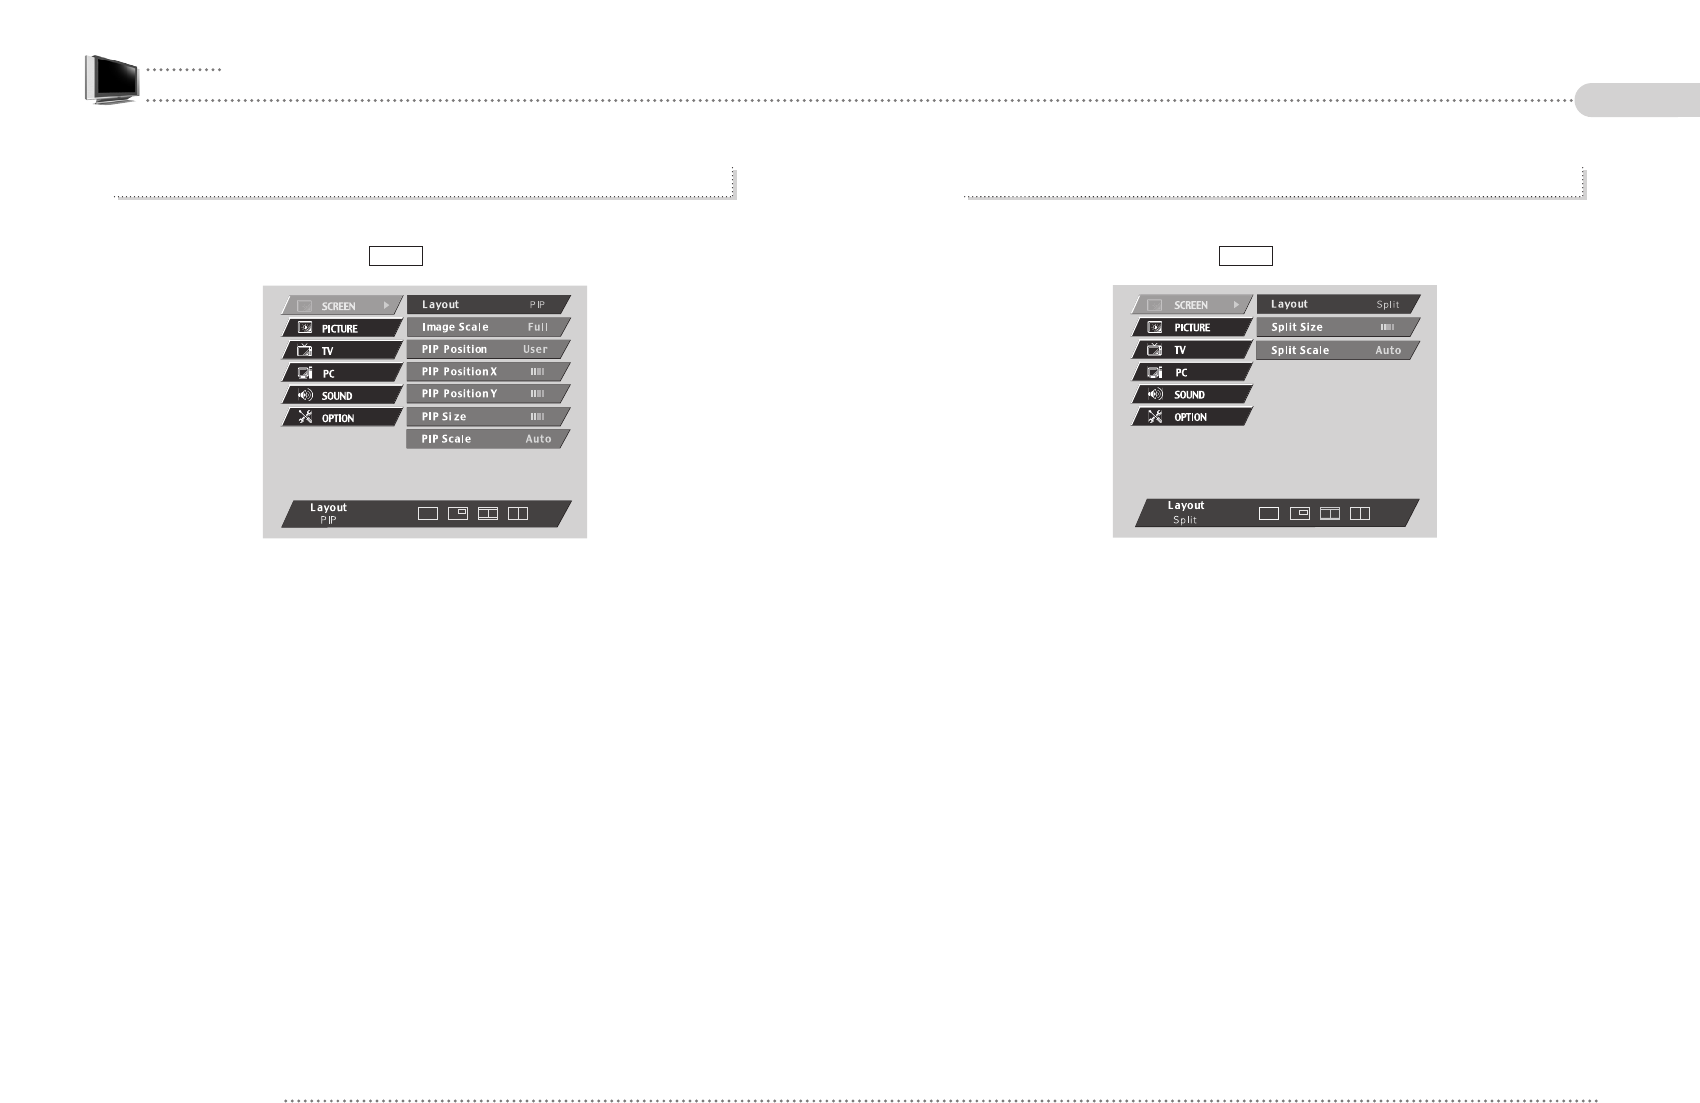
3. SCREEN Menu in SPLIT Picture
- It works only on SPLIT Picture.
- Select SCREEN menu by pressing button on the remote control.
1) Layout : Set a display layout
2) Split Size : Adjust a size of Split main screen. Sub screen size is adjusted by main
screen size.
3) SPLIT Scale : Adjust an image scale of SPLIT Picture.
- Auto : Adjust PIP scale by automatically determining input signals.
- 16:9 : It fixes PIP sub screen scale to 16:9.
- 4:3 : It fixes PIP sub screen scale to 4:3.
MENU
2. Screen Menu on PIP Picture
- It works only on PIP Picture.
- Select SCREEN menu by pressing button on the remote control.
1) Layout : Set a display layout.
2) Image Scale : Select an image scale of main screen.
(FULL, 16:9, 4:3, Caption, Smart View)
3) PIP Position : Adjust the position of PIP
(L-Top, L-Bottom, R-Top, R-Bottom, USER)
4) PIP Position X / Y : In case of PIP Position menu is set as USER, it sets X/Y position of
PIP.
5) PIP Size : Adjust PIP size. It can be adjusted from 1/16 to 1/4 of full screen.
6) PIP Scale : Adjust image scales of PIP.
- Auto : Adjust PIP scale by automatically determining input signals.
- 16:9 : It fixes PIP scale to 16:9.
- 4:3 : It fixes PIP scale to 4:3.
MENU
EN 68 26” / 32” WIDE TFT-LCD TV 69
ENGLISH
5-6.
5-6.
5-6.
5-6.
5-6.
5-6.
5-6.
5-6.
5-6.
5-6.
5-6.
5-6.
2. USER Mode Setting
USER mode can be set only in OSD menu.
- Press button to go into main menu.
- Move to SOUND menu by using button.
- Press button to move to the Sub Menu.
- Adjust sound in a desirable frequency bandwidth by using
/ button on the remote control.
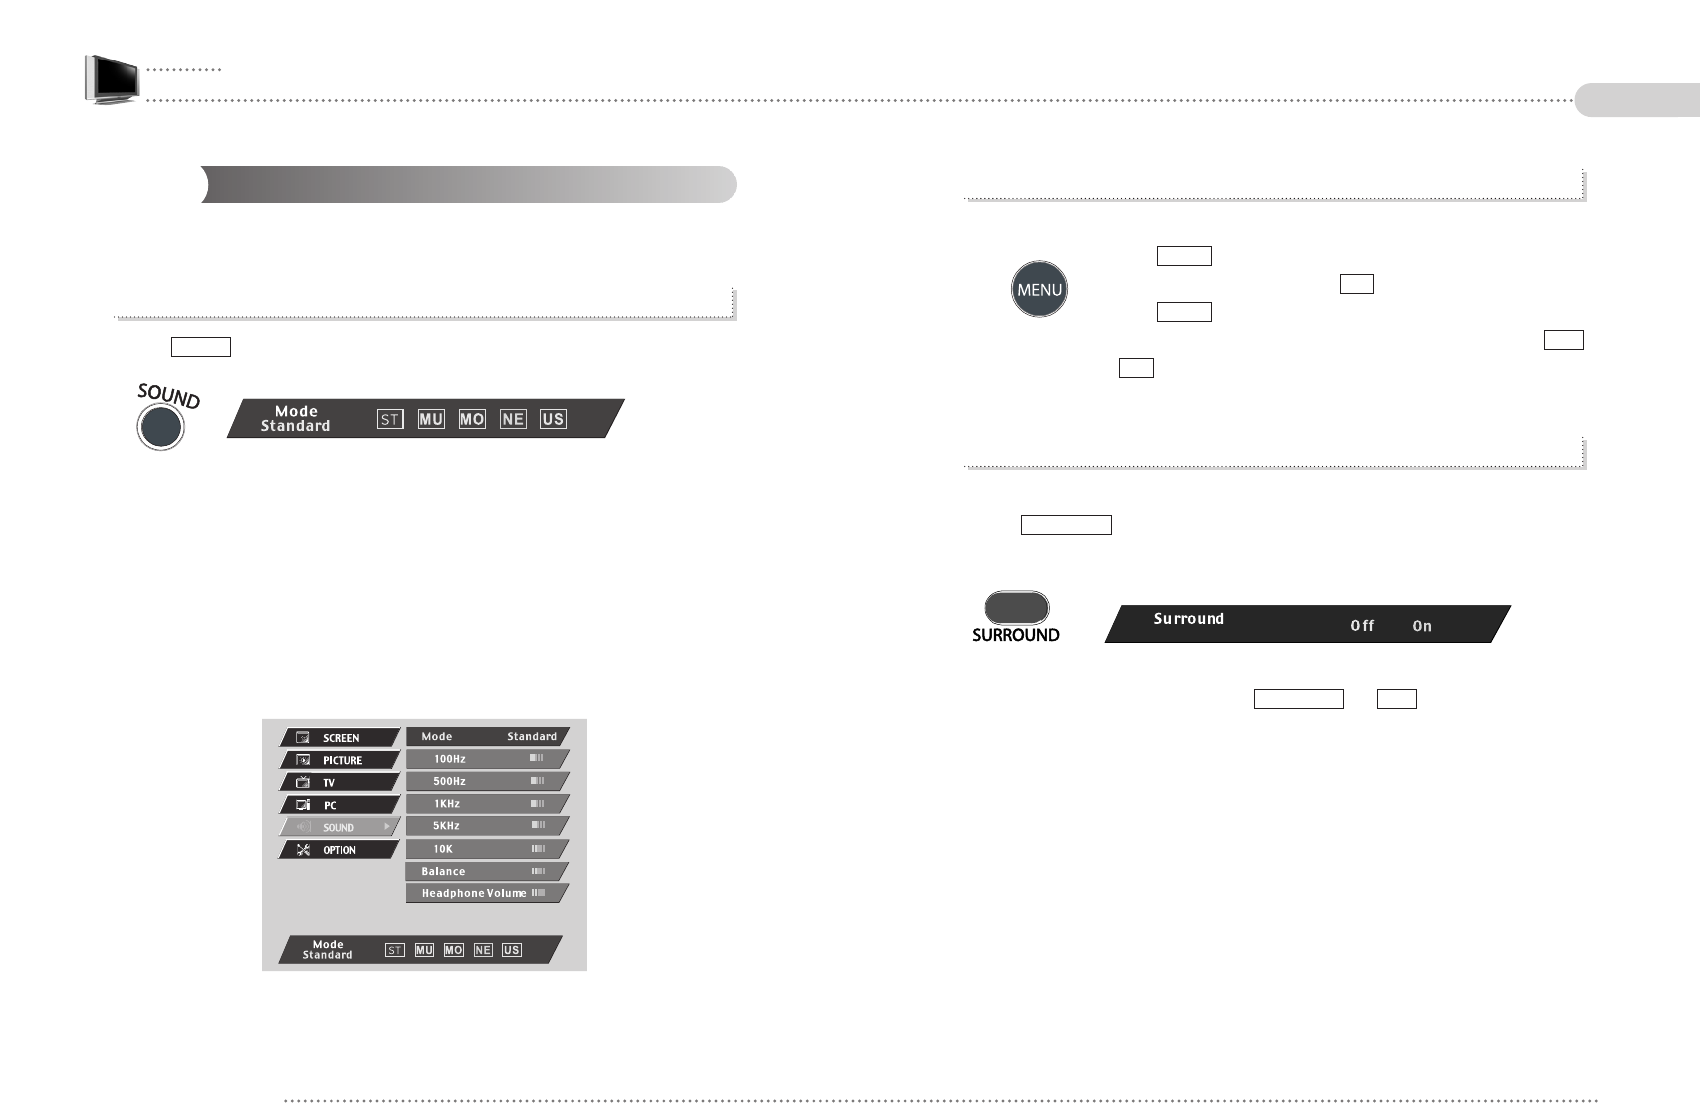
3. SURROUND Setting
Surround mode can be set only by the remote control.
- Press button on the remote control.
- Set ON/OFF by using Volume button on the remote control.
- Once the setting is complete, press or button on the remote
control.
EXITSURROUND
SURROUND
CH
VOL
MENU
CH
MENU
Setting Sound
You can set sound suitable for TV broadcasting or Video.
1. Mode Setting
- Press button on the remote control to display SOUND mode setting.
- Set the menu settings by using Volume button on the remote control.
1) Standard : Standard sound mode.
2) Music : Music broadcasting mode.
3) Movie : Cinema broadcasting mode.
4) News : News broadcasting mode.
5) User : User’s customization mode.
Also, it can be set in OSD menu if OSD button is used.
Balance : Control Left/Right speaker balance.
Headphone Volume : Control headphone volume.
SOUND
EN 70 26” / 32” WIDE TFT-LCD TV 71
ENGLISH
5-7.
5-7.
5-7.
5-7.
5-7.
5-7.
5-7.
5-7.
5-7.
5-7.
5-7.
5-7.
2. Setting OSD Menu Language
Change a language to display OSD.
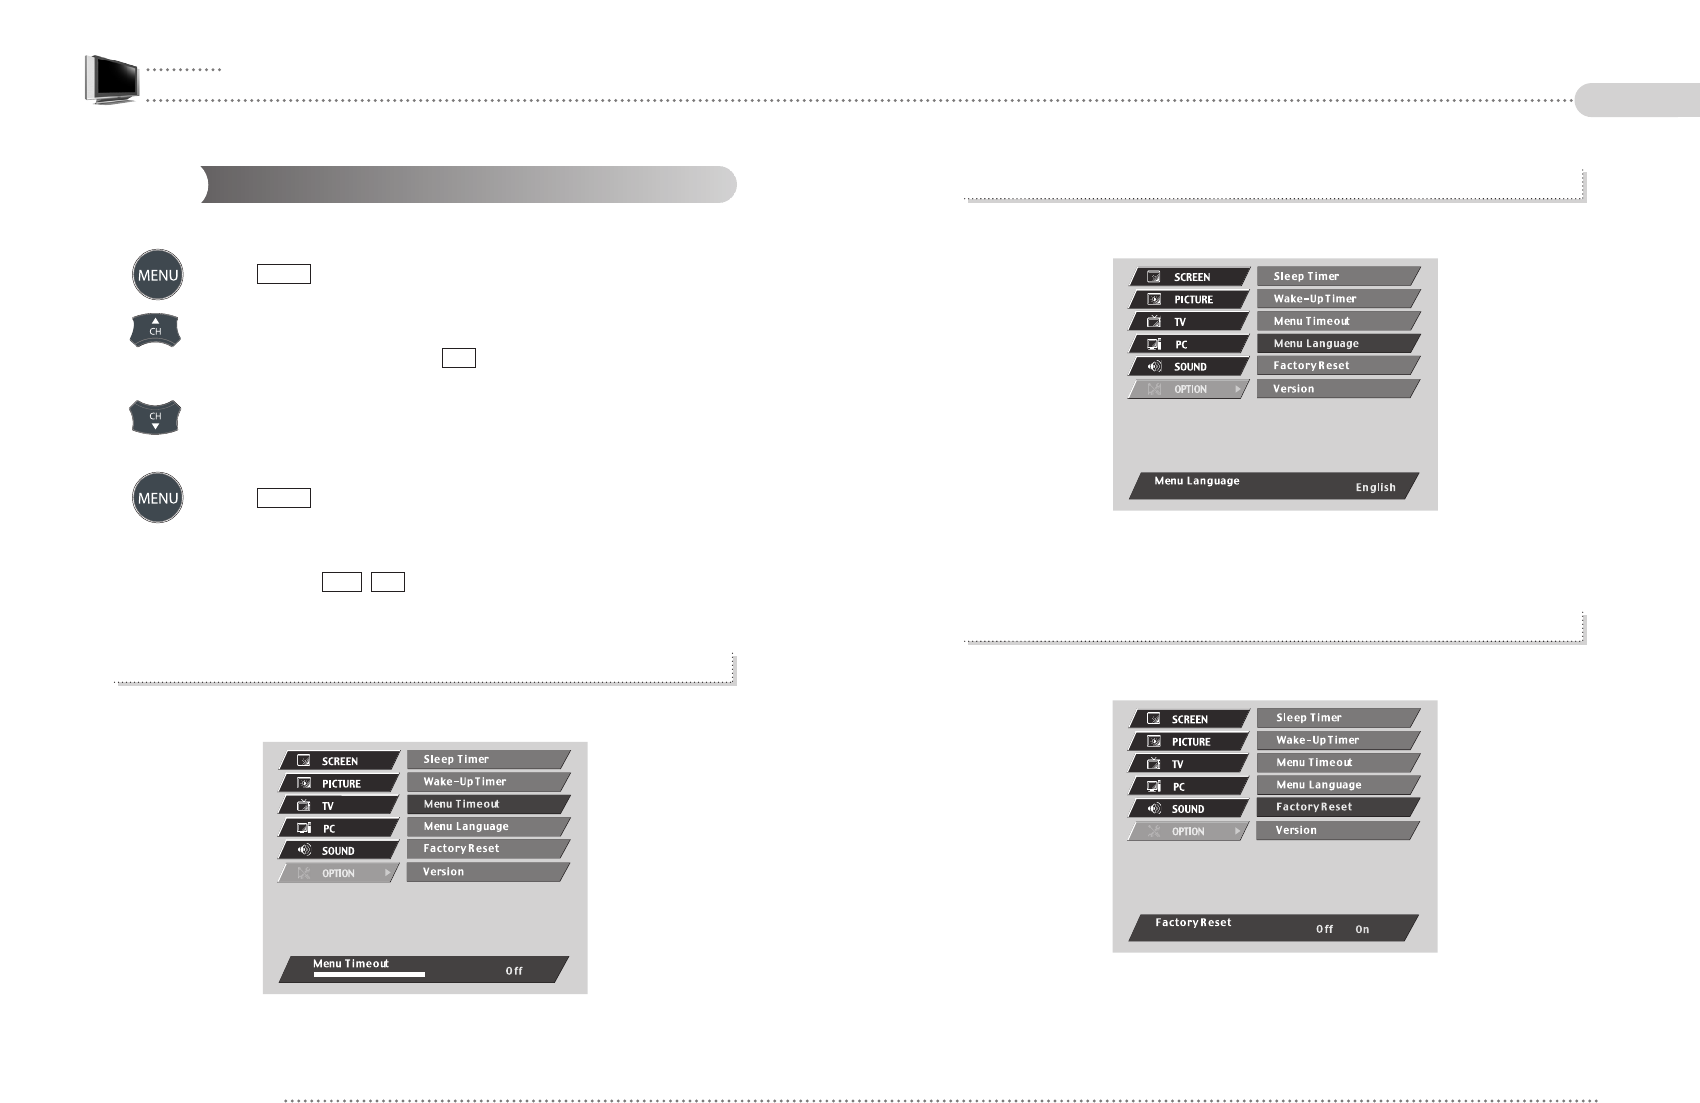
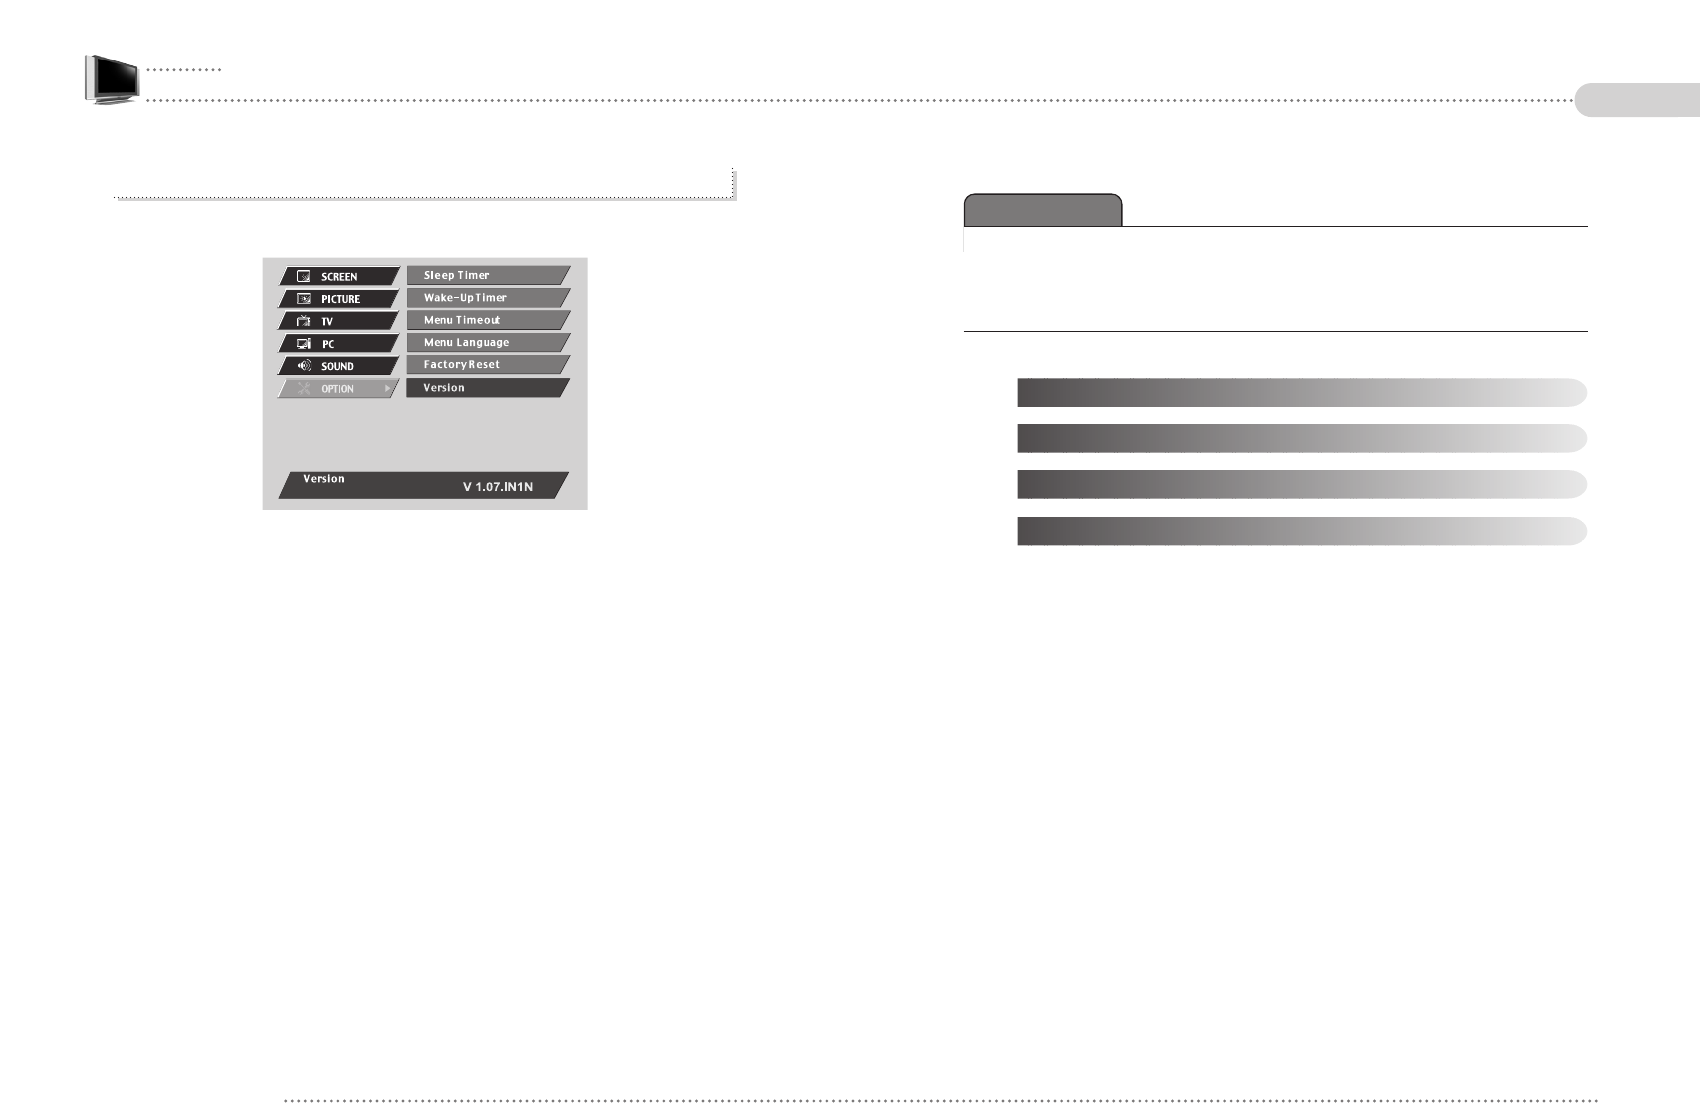
3. Factory Reset
Reset all the OSD control settings back to the factory setting status.
Setting Others
Press button on the remote control to move to Main Menu.
Move to OPTION menu by using button on the remote control
Press button to move to the Main menu.
Change the settings by using / button on the remote control.
1. Menu Timeout Setting
It can be adjusted to display OSD Menu between 5 ~ 60 seconds.
CHVOL
MENU
CH
MENU
EN 72 26” / 32” WIDE TFT-LCD TV 73
ENGLISH
CHAPTER 6
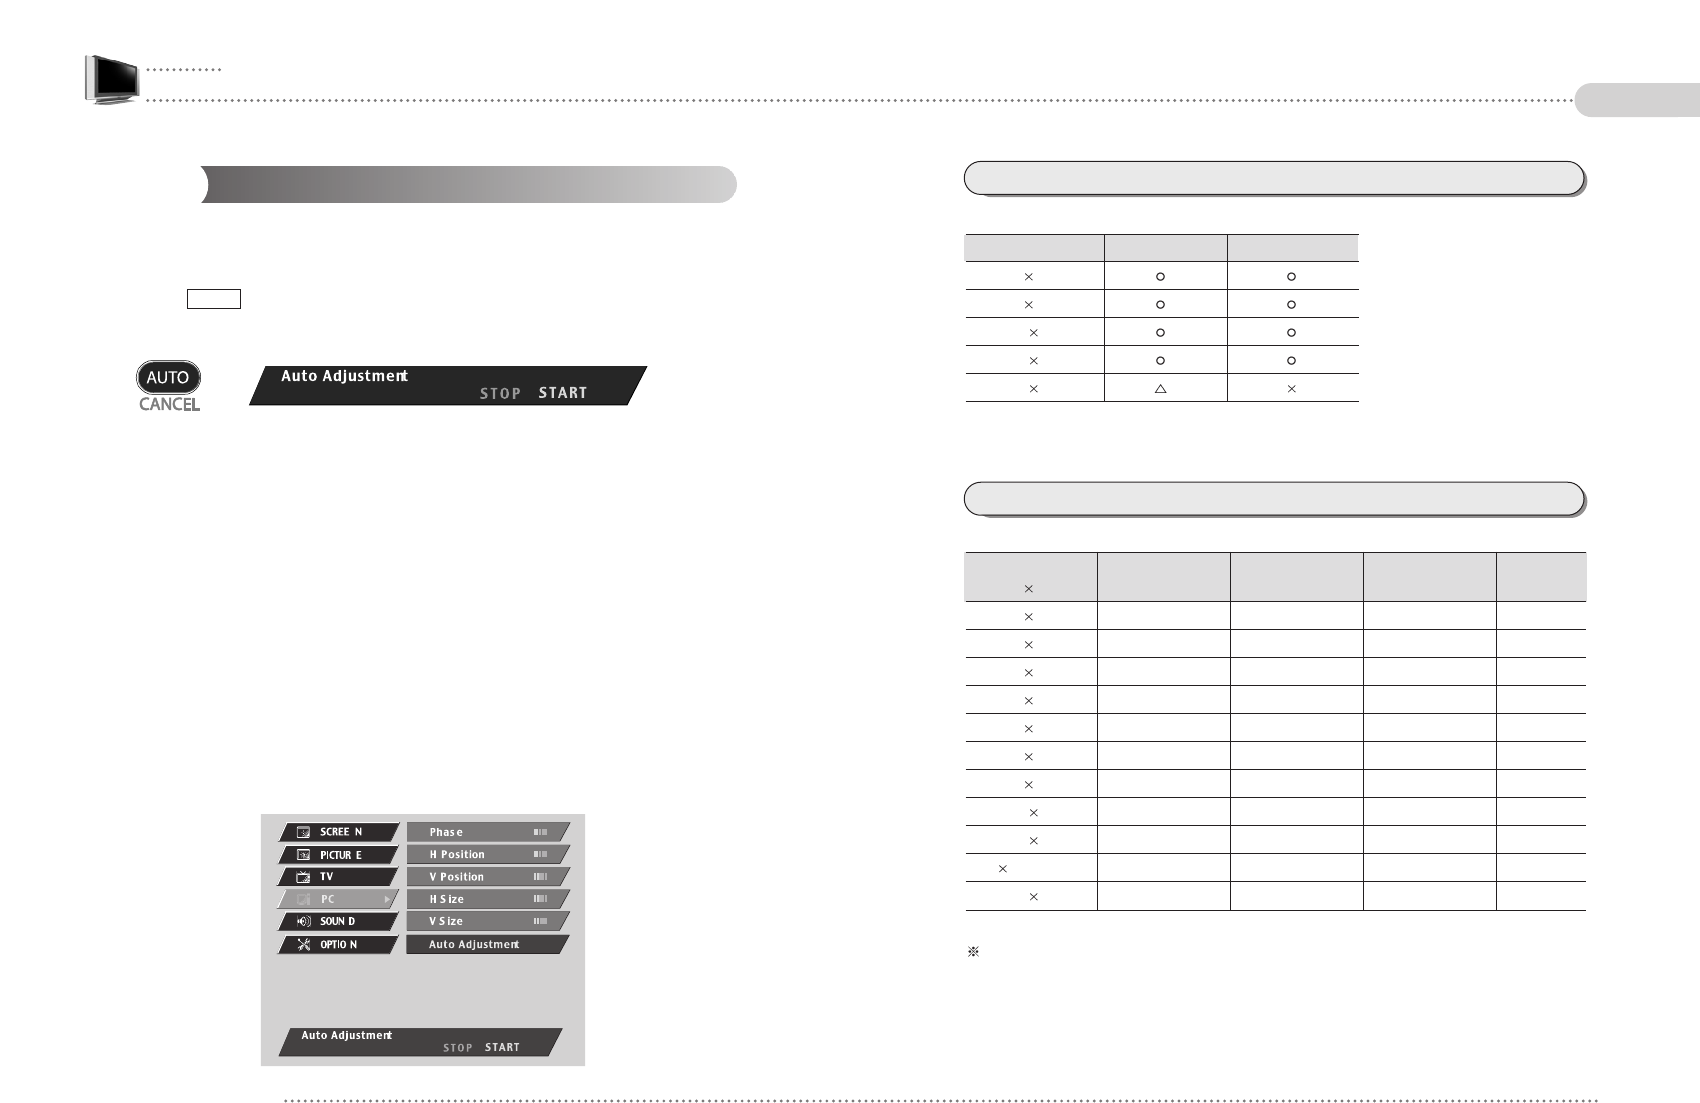
4. Version
It shows the product version.
EN 74 26” / 32” WIDE TFT-LCD TV 75
ENGLISH
Using PC MENU
6-1. Auto Adjustment
6-2. Setting PC Scale Mode
6-3. Setting Phase / Frequency
6-4. Setting Position / Size
6-1.
6-1.
6-1.
6-1.
6-1.
6-1.
6-1.
6-1.
6-1.
6-1.
6-1.
6-1.
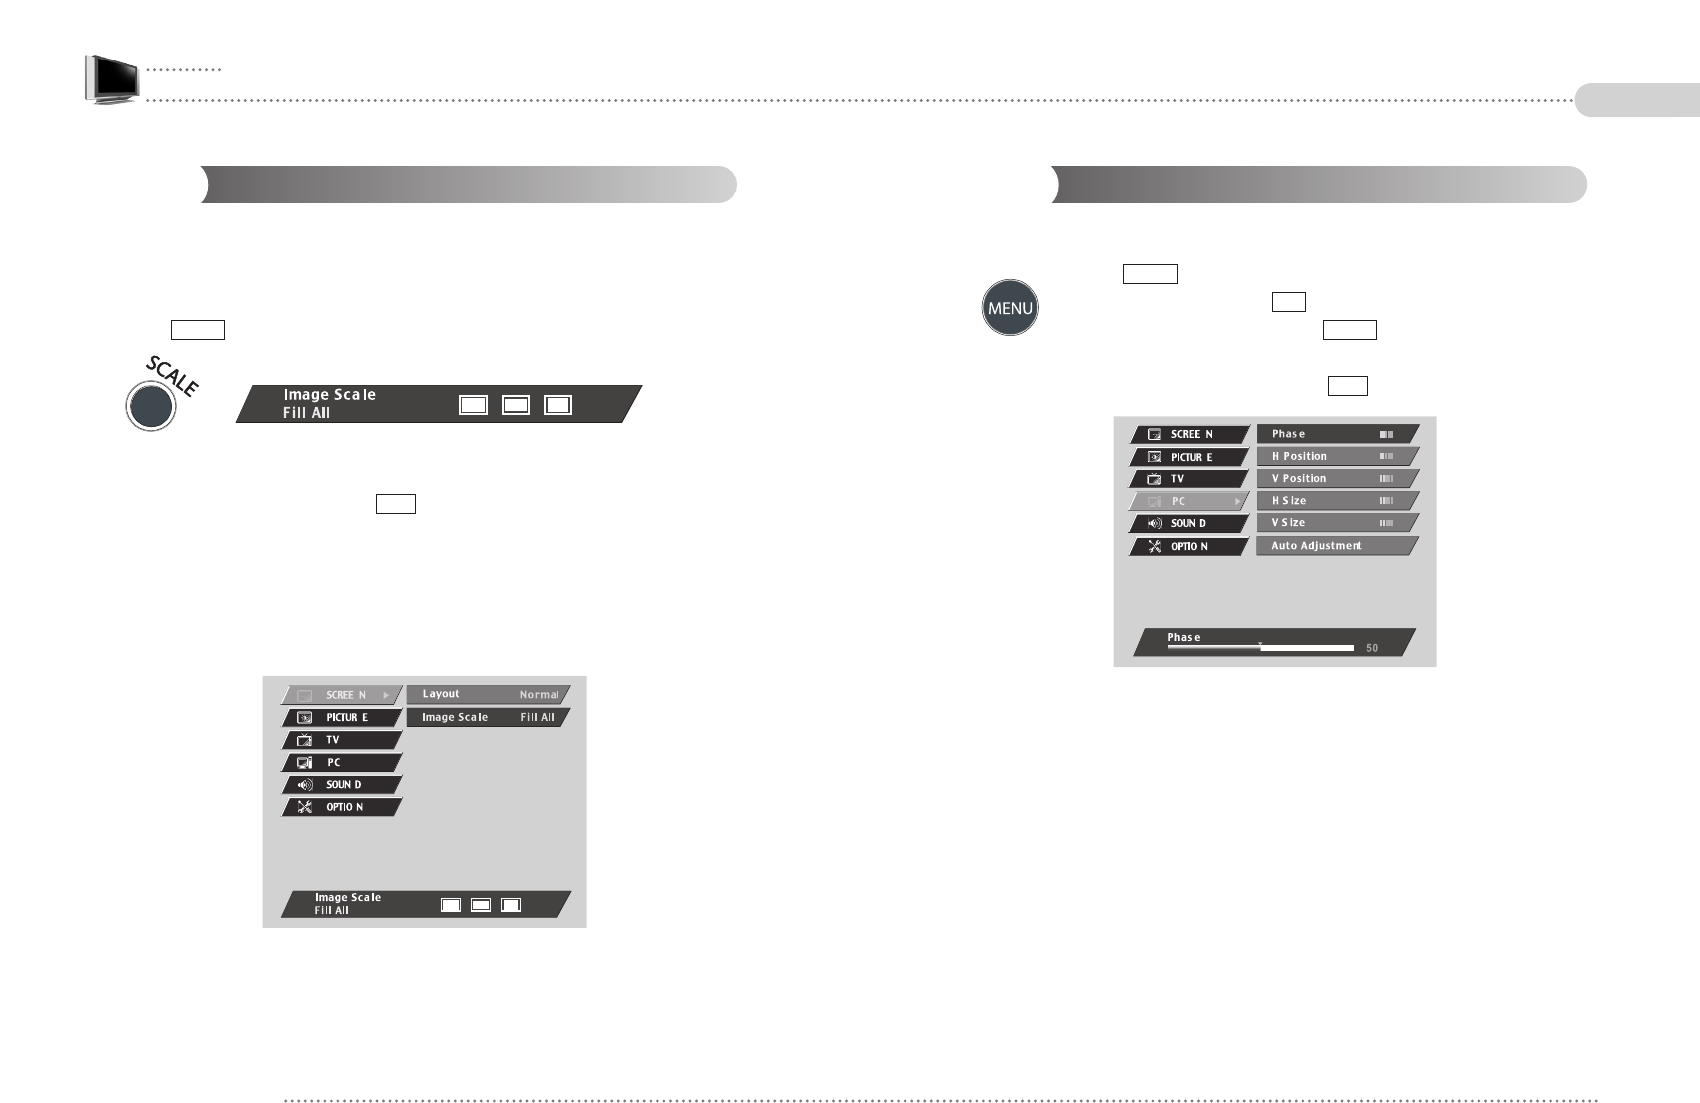
The Standard Signal Modes for PC Monitor
Resolution (H*V) RGB DVI
640 480
800 600
1024 768
1280 720
1280 768
The Standard Signal Modes for PC Monitor
Resolution
Vertical Frequency Horizontal Frequency Clock Frequency Polarity
(H V) (kHz) (Hz) (MHz) (Vert./Hor.)
640 480 31.469 59.94 25.175
-
/
-
640 480 37.861 72.809 31.5
-
/
-
640 480 37.5 75 31.5
-
/
-
720 400 31.469 70.087 28.322
-
/ +
800 600 37.879 60.317 40 + / +
800 600 48.077 72.188 50 + / +
800 600 46.875 75 49.5 + / +
1024 768 48.363 60.069 65
-
/
-
1024 768 56.476 70.069 75
-
/
-
1024 768 (Optimal)
60.023 75.029 78.75 + / +
1280 720 44.955 59.94 74.086
-
/ +
When you use it as a PC monitor, depending on signals of a PC, it may not display
picture normally even though it is set for standard mode resolution.
Auto Adjustment
In case of using it as a PC monitor, it is automatically set.
When the set is connected to a PC, the MODE should be set as PC RGB Mode.
- Press button on the remote control to automatically set the product’s
screen status.
- Move to START by using Volume button on the remote control to start Auto Adjustment.
When it is used as a PC monitor;
Optimal Resolution: 1024 x 768 @ 60Hz
Max. Resolution: 1024 x 768 @ 85Hz.
-
It may not normally display picture in any resolution out of the optimal resolution range.
- When you use it as a PC monitor, it requires to be set the Standard Signal Mode for
PC Monitor before use.
- Even though it is automatically adjusted, it may not normally display picture
depending on signals from a PC and in this case, it is recommended to execute Auto
Adjustment for several times.
Also, it can be set in OSD menu if OSD button is used.
AUTO
EN 76 26” / 32” WIDE TFT-LCD TV 77
ENGLISH
6-2.
6-2.
6-2.
6-2.
6-2.
6-2.
6-2.
6-2.
6-2.
6-2.
6-2.
6-2. 6-3.
6-3.
6-3.
6-3.
6-3.
6-3.
6-3.
6-3.
6-3.
6-3.
6-3.
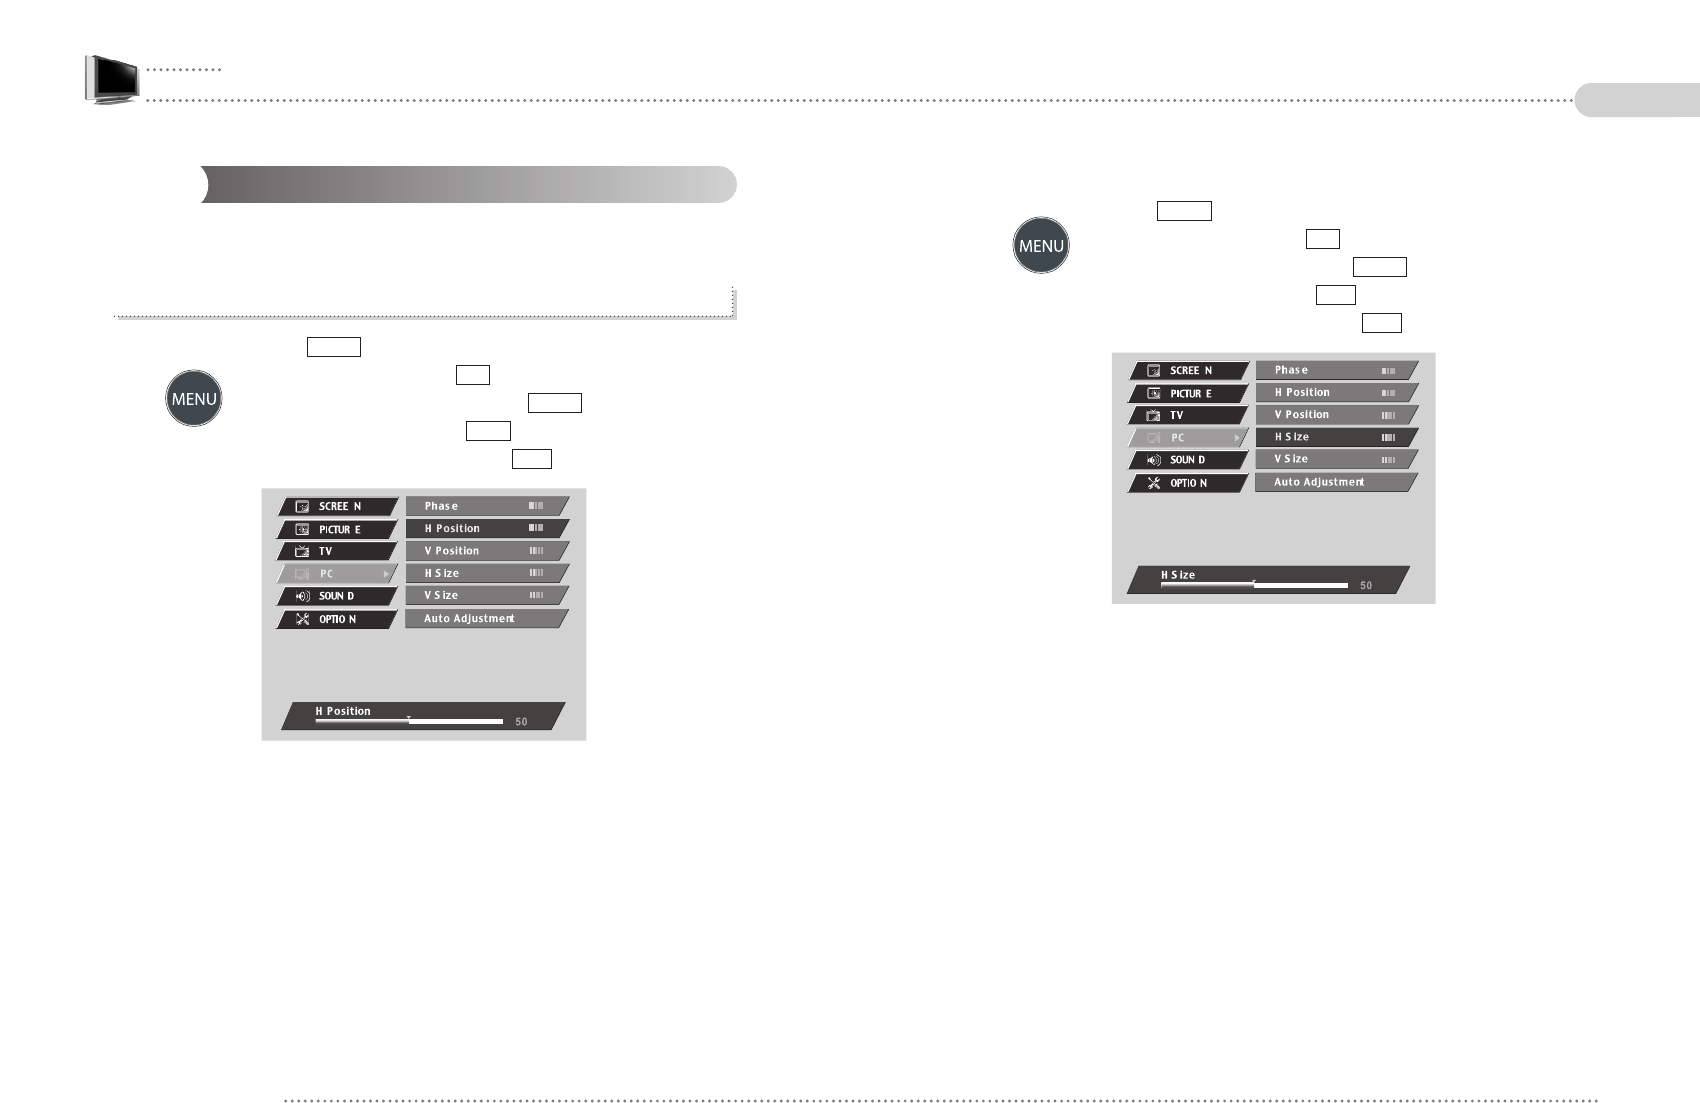
6-3. Setting Phase / Frequency
In case it is not optimally set even though automatically adjusting it, use PHASE function.
- Press button on the remote control.
- Move to PC menu by using button.
- Move to PHASE menu by pressing button.
- Adjust settings by controlling Volume button.
- Once the setting is complete, press button.
EXIT
MENU
CH
MENU
Setting PC Scale Mode
When being used as a PC Monitor, the scale can be adjusted.
PC Monitor Scale works only when PC signal is connected and input signals are selected
in RGB mode.
- Press button on the remote control.
- Select a desirable scale by using Volume button.
- Once the setting is complete, press button.
1. 1:1 : Display the resolution as 1:1.
2. Fill All : Display picture in the full screen regardless of the resolution.
3. Aspect Ratio : Display the resolution in 4:3 aspect ratio. Also, it can be set in OSD
menu if OSD button is used.
EXIT
SCALE
EN 78 26” / 32” WIDE TFT-LCD TV 79
ENGLISH
6-4.
6-4.
6-4.
6-4.
6-4.
6-4.
6-4.
6-4.
6-4.
6-4.
6-4.
6-4.
(1) Setting Vertical/Horizontal Size
- Press button on the remote control.
- Move to PC Menu by using button.
- Move to H / V Size Menu by using button.
- Adjust settings by controlling button.
- Once the setting is complete, press button.
EXIT
VOL
MENU
CH
MENU
Setting Position / Size
Adjust the position and size of the PC Monitor.
1. Setting Vertical/Horizontal Position
- Press button on the remote control.
- Move to PC Menu by using button.
- Move to H / V Position Menu by using button.
- Adjust settings by controlling button.
- Once the setting is complete, press button.
EXIT
VOL
MENU
CH
MENU
EN 80 26” / 32” WIDE TFT-LCD TV 81
ENGLISH
CHAPTER 7
EN 82 26” / 32” WIDE TFT-LCD TV 83
ENGLISH
Service & Others
7-1. Troubleshooting
7-2. Concerning Services
7-1.
7-1.
7-1.
7-1.
7-1.
7-1.
7-1.
7-1.
7-1.
7-1.
7-1.
7-1.
2. PC Monitor-related Troubles
Check whether the D-Sub cable is firmly connected to the TV and a PC.
Check whether a graphic card is correctly inserted into the slot.
Check whether the Power of a PC and the TV is on.
Check whether a graphic card or mode is set appropriately on a PC.
Referring to the Standard Signal Mode for PC Monitor in the previous chapter, change
graphic mode.
Check whether D-Sub cable pins are not inserted or bent.
Check whether the power cord is normally inserted and reconnect it.
Pull out the power cord from wall outlet and reconnect it in 10~20 minutes.
Check whether the graphic cable is connected to theTV and a PC.
Check whether a computer is in power-saving mode and attempt to operate keyboard
and mouse.
Check whether the D-Sub cable is connected to the TV and a PC.
If a PC’s display mode is changed, the screen needs readjusting, so you need to use
Auto Adjustment or Picture Adjustment.
Check whether the TV and your graphic card are compatible each other and whether it
is set as an appropriate refresh rate. If letters look distorted, change the refresh rate to
60Hz.
By using vertical/horizontal position in Picture Adjustment Menus, adjust the position.
Try to execute Auto Adjustment function.
Abnormal image scale
Unstable or unfocused image or trembling
LED Lamp turns off in red and it shows no image
No Power
No image on the monitor
Troubleshooting
Before contacting service to service personnel, please check the followings first.
If you still have the same symptoms even after taking the following actions, contact your
local dealer or qualified service personnel.
1. TV-related Troubles
Check whether TV antenna is correctly connected.
Broadcasting may not be good in an area with bad reception or far away from a
station/network.
Check whether you connect the power cord properly. And press the button.
Check whether the mode is set as PC monitor or Video/S-VHS Input, not TV mode.
It may be interrupted by neighboring radio waves (please check any wireless phone,
hair drier, electric drilling machine and etc)
Execute fine tuning for manual adjustment.
Check whether Channel Setting is normally set.
Try to rotate an antenna’s direction.
Try to press button.
Volume up by using Volume button.
MUTE
Picture plays without sound
Can’t catch a specific channel
Strips and shaking display
Black background only
POWER
No image
Unclear display or noisy sound
EN 84 26” / 32” WIDE TFT-LCD TV 85
ENGLISH

7-2.
7-2.
7-2.
7-2.
7-2.
7-2.
7-2.
7-2.
7-2.
7-2.
7-2.
7-2. Concerning Services
We guarantee free of charge After-sales service for a full year if any troubles are found
when you are using our product. However, any natural disasters or careless use cause the
trouble, it may cost even within a valid warranty period.
Responsibility of Chargeable After Sales Service (Customer’s Charge)
In one of the following cases, it may cost even in the valid warranty period.
1. In case of any troubles resulting from inserting of foreign substances (water, beverage,
coffee and etc)
2. Dropping or applying force cause a trouble to damage on the product or induce
malfunction.
3. Appearance damage or transformation by use of organic solutions such as thinner,
benzene and etc.
4. When it gets troubled due to your disassemble.
5. When other parts/consumption accessories (including adaptor) that are not supplied by
the company may directly cause any troubles.
6. Supplying wrong voltage may cause a trouble
7. Any personnel not from qualified service personnel repairs or modifies the product,
resulting in troubles.
8. Natural disasters (lightning, fire, flood, gas, damage from sea wind, earthquake and etc)
directly cause troubles
9. Violation against the directions in the manual cause any troubles
10. Customer’s mishandling cause a trouble
11. In case the date of purchase may be vague, the valid warranty period is counted after
2 months since the product is manufactured.
EN 86 26” / 32” WIDE TFT-LCD TV 87
ENGLISH