AQUATIC AV SM78I WATERPROOF MEDIA PLAYER User Manual
AQUATIC AV WATERPROOF MEDIA PLAYER
User Manual
products with a watertight reputation
®
PLEASE READ THIS INSTRUCTION MANUAL BEFORE
INSTALLATION AND OPERATION
WATERPROOF MEDIA PLAYER
USER / INSTALLATION MANUAL
AQ-MP-5UBT - WATERPROOF MEDIA PLAYER
for iPhone, iPod, USB, Bluetooth & MP3 devices
E-mail: info@aquaticav.com
US & Canada: 1 877 579 2782
International: +1 408 559 1668
Fax: +1 408 559 0125
www.aquaticav.com
Aquatic AV
282 Kinney Drive
San Jose, CA 95112, USA
products with a watertight reputation
®
Design for Shipborne
1 Getting Started.........................................................................................................................
1.1 Contents.............................................................................................................................
1.2 Connections........................................................................................................................
1.3 12-pin Harness Connection.................................................................................................
1.4 Wiring Diagram...................................................................................................................
1.5 Mounting Precautions.........................................................................................................
1.6 Mounting the Media Player..................................................................................................
1.7 Power On............................................................................................................................
2 Location of Controls.................................................................................................................
2.1 Media Player Controls..........................................................................................................
3 Listening to Devices..................................................................................................................
3.1 Listening via Bluetooth.......................................................................................................
3.1.1 Pair with Bluetooth Device...........................................................................................
3.1.2 Listening via Bluetooth Device.....................................................................................
3.2 Listening via USB...............................................................................................................
3.2.1 Listening via USB (Apple Devices)...................................................................................
3.2.2 Listening via USB Flash Drives........................................................................................
3.2.3 USB Search......................................................................................................................
3.2.4 Device Charging...............................................................................................................
3.3 Listening via Auxiliary Input (3.5mm Jack).........................................................................
3.4 Adjusting Volume Level.......................................................................................................
4 Listening to FM/AM Radio.........................................................................................................
4.1 Enter FM Radio Mode..........................................................................................................
4.2 Scan or Navigate FM Radio Channels.................................................................................
4.3 Saving Radio Channel to Memory.......................................................................................
4.4 Listening to Saved Radio Memory.......................................................................................
4.5 Switch between U.S. and European FM Modes.....................................................................
5 Settings Operation....................................................................................................................
5.1 Audio Menu.........................................................................................................................
5.2 Menu...................................................................................................................................
5.3 AS/PS (Auto Scan/Preset Scan)...........................................................................................
5.4 Local/Distant Tuning...........................................................................................................
5.5 Stereo/Mono........................................................................................................................
5.6 FM Tuning Area...................................................................................................................
5.7 Beep Tone...........................................................................................................................
5.8 System Reset......................................................................................................................
6 Specifications & Dimensions....................................................................................................
4.1 Specifications.....................................................................................................................
4.2 Dimensions........................................................................................................................
7 Warranty Information...............................................................................................................
3
3
3
3
4
5
6
8
9
9
10
10
10
10
10
10
11
11
11
11
11
12
12
12
12
12
12
13
13
13
13
13
13
13
13
13
14
14
14
15
Table of Contents Media Player AQ-MP-5UBT
19www.aquaticav.comwww.aquaticav.com2
FCC Statement Medfia Player AQ-MP-5UBT
This device complies with Part 15 of the FCC Rules. Operation is subject to the following
two conditions: (1) this device may not cause harmful interference, and (2) this device must
accept any interference received, including interference that may cause undesired operation.
NOTE:
The equipment has been tested and found to comply with the limits for a Class B digital
device, pursuant to Part 15 of the FCC Rules. These limits are designed to provide
reasonable protection against harmful interference in a residential installation. This
equipment generates, uses and can radiate radio frequency energy and, if not installed
and used in accordance with the instructions, may cause harmful interference to radio
communications. However, there is no guarantee that interference will not occur in a
particular installation.
If this equipment does cause harmful interference to radio or television reception, which
can be determined by turning the equipment off and on, the user is encouraged to try to
correct the interference by one or more of the following measures:
• Reorient or relocate the receiving antenna.
• Increase the separation between the equipment and receiver.
• Consult the dealer or an experienced radio/TV technician for help.
W arning: A ny Changes or modifications not ex pressly approved by the party responsible for
compliance could void the user' s authority to operate the equipment.
iPhone and iPod are trademarks of Apple Inc., registered in the U.S. and other countries.
Made for iPod and Made for iPhone mean that an electronic accessory has been designed to connect specifically to iPod or iPhone respectively, and has been
certified by the developer to meet Apple performance standards. Apple is not responsible for the operation of this device or its compliance with safety and
regulatory standards. Please note that the use of this accessory with iPod or iPhone may affect wireless performance.
Product design and specification subject to change without notice. E&OE.
Doc V1.1
Patent: 7,831,756 & 8,578,081
BLACK
RED
WHITE
C ONNECTIO N GR OUP
AUDIO IN
R-CH
L-CH
1
)
REAR LEFT SPEAKER ( GREEN/BLACK
2
)FRONT RIGHT SPEAKER (
6 WHITE/BLACK
FRONT LEFT SPEAKER ( )
9
REAR RIGHT SPEAKER ( ) VIOLET/BLACK
12
GROUND ( )
GREEN
4 YELLOW
10
BATTERY (BACK UP) 12V (+)
BLUE
3 REAR LEFT SPEAKER (+)
RED
7
ACCESSORY 12V (B+)
WHITE
8
FRONT LEFT SPEAKER (+)
GREY
5
FRONT RIGHT SPEAKER (+)
POWER ANTENNA
VIOLET
11
REAR RIGHT SPEAKER (+)
3 2 1
6 5 4
9 8 7
12 11 10
BLACK
RADIO ANTENNA
SUB-W OUT
BLACK
BLACK
REAR LINE OUT
GREY/BLACK
8 DIN WIRED REMOTE
FRONT LINE OUT
CONNECTION
GROUP
RED
WHITE
RED
WHITE
DC12V_00T1
DC12V_00T2
BROWN
BROWN/WHITE
BLACK
GREEN
GREY
BLACK
POWER SUPPLY: 12V DC
NEGATIVE GROUND
SPEAKER IMPEDANCE: 4 - 8 OHMS
INTERFERENCE ABSORPTION CIRCUIT
MODEL: AQ-MP-5UBT
USA/CANADA
FM 87.5-107.9 MHz
AM 530-1710 KHz
EUR FM 87.5-108 MHz
AM 522-1620 KHz
THIS DEVICE COMPLIES WITH PART 15 OF THE FCC
RULES. OPERATION IS SUBJECT TO THE FOLLOWING
TWO CONDITIONS: (1) THIS DEVICE MAY NOT CAUSE
HARMFUL INTERFERENCE. AND (2) THIS DEVICE
MUST ACCEPT ANY INTERFERENCE RECEIVED.
INCLUDING INTERFERENCE THAT MAY CAUSE
UNDESIRED OPERATION.
MADE IN CHINA
SI US PATENT NO.
7,831,756 & 8,578,081
FCC ID: WBQ-SM78I
0700
I C : 20987-SM78I
• Connect the equipment into an outlet on a circuit different from that to which the
receiver is connected.
This equipment complies with FCC radiation exposure limits set forth for an uncontrolled
environment. This equipment should be installed and operated with minimum distance
20cm between the radiator & your body.

• AQ-MP-5UBT Digital Media Player
• Wiring Harness (AQ-UNH-2)
• Four (4) Stainless Steel Mounting Screws
• Spare Fuse
• Mounting Template
• Mounting Bracket
• DIN Cage
• User/Installation Manual
1.1 Contents
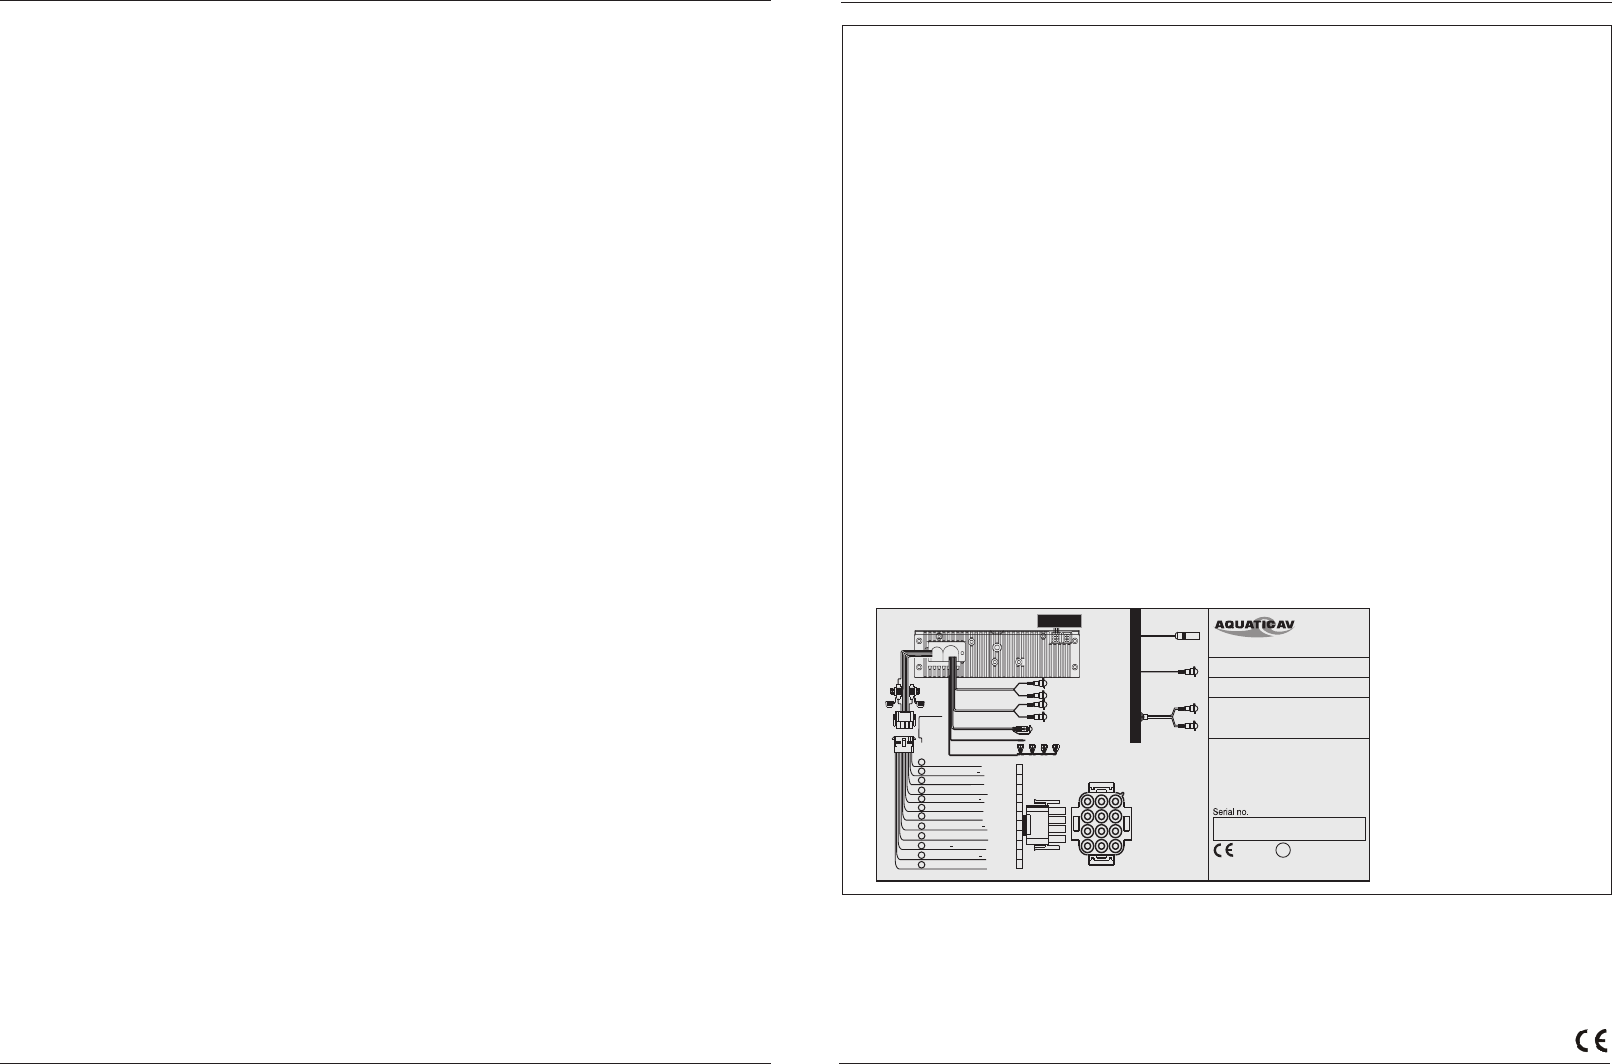
1. 12-pin Watertight Harness
The 12-pin harness supplies power and ground connections to the Media Player and four (4)
speaker channel output connections from the Media Player (see also 1.3 below).
Do not cut or modify the 12-pin harness on the Locker side or warranty will be void.
2. FM/AM Radio Antenna Jack
Allows connection of FM/AM radio antenna. For best FM/AM performance make sure the
antenna is extended to the highest achievable position.
3. Auxiliary Outputs
Allows external amplifiers to be connected to power additional speakers.
4. Auxiliary Inputs
Allows an additional RCA input, from a standalone unit or another stereo source.
5. 8-pin DIN Cable
Allows connection of the wired Remote Control (AQ-WR-5F sold separately) or wireless
Remote Control (AQ-RF-34 sold separately) RF receiver.
6. Subwoofer Output
Allows powered (active) subwoofer to be connected via RCA connector.
7. 12V DC External Trigger (x2)
Allows for external lighting or relays to be triggered (350mA max load).
8. USB Input
USB for connection of Apple devices USB flash drives. Charges USB devices when
connected.
1.2 Connections (see Wiring Diagram 1.4)
The AQ-MP-5UBT includes the universal harness AQ-UNH-2 in order to connect the stereo to
power and speakers.
All open wire connections should be soldered and protected against water and dust for best long-
term performance.
1.3 12-pin Harness Connection (see Wiring Diagram 1.4)
Getting Started Media Player AQ-MP-5UBT
3www.aquaticav.comwww.aquaticav.com18
Media Player AQ-MP-5UBT
This device complies with the essential requirements of the R&TTE Directive 1999/5/EC.
The follow ng test methods have been appl ed n order to prove presumpt on of conform ty w th
ETSI EN 301 489-1 V1.9.2: 2011
ETSI EN 301 489-17 V2.2.1: 2012
ETSI EN 300 328 V1.9.1: 2015
EN 62479: 2010
EN 60065: 2002+A1: 2006+A11: 2008+ A2: 2010+ A12: 2011
the essent al requ rements of the R&TTE D rect ve 1999/5/EC:
R&TTE Instruct on
This device complies with Industry Canada licence-exempt RSS standard(s).
Operation is subject to the following two conditions:
(1) This device may not cause interference, and
(2) This device must accept any interference, including interference that may cause undesired
operation of the device.
Le present appareil est conforme aux CNR d Industrie Canada applicables aux appareils radio
exempts de licence. L exploitation estautoris e aux deux conditions suivantes:
(1) l appareil ne doit pas produire de brouillage, et
(2) l utilisateur de l appareildoit accepter tout brouillageradio lectrique subi, m mesi le brouillage
est susceptible d en compromettre le fonctionnement.
-French:
,'
é
ê
'
'
'
'
é
-Engl sh:
i
i
i
ii
i
i i ii
i
i
Europe-EU Declarat on of Conformity
IC Caution
This equipment should be installed and operated with a minimum distance of 20 cm between
the radiator and your body.
Cet équipement doit être installé et utilisé à une distance minimale de 20 cm entre le radiateur et
votre corps.
Hereby, AQUATIC AV, declares that this product,WATERPROOF MEDIA PLAYER ,is in compliance
with essential requirements and other relevant provisions of Directive 1999/5/EC. A copy of the
Declaration of conformity can be found at www.aquaticav.com
Declaration of Conformity
R&TTE Instruction / IC Caution
1. A mounting template is included. Aquatic AV recommends using the ‘measure twice,
cut once’ method!
2. Once the mounting hole is complete, make sure the outside surface is clean and
clear of debris. The Media Player has an external water/dust proof gasket, but this
requires a clean and at surface for best performance.
3. The Media Player has four (4) front screws. Drive the screws using a screw driver.
During nal mounting apply equal pressure to all points for the best water/dust outer
seal performance. Make sure screws are snug and do not over tighten.
4. Review all outside surfaces of the Media Player to ensure a proper water/dust seal.
This is important for long-term environmental protection performance for your digital
media device.
1.5. Mounting Precautions
69.8mm
214.4mm
69.8mm
214.4mm
36.6mm
210.8mm
182.2mm
188.6mm
178mm
48.8mm
52.2mm
Getting Started Media Player AQ-MP-5UBT
5www.aquaticav.com
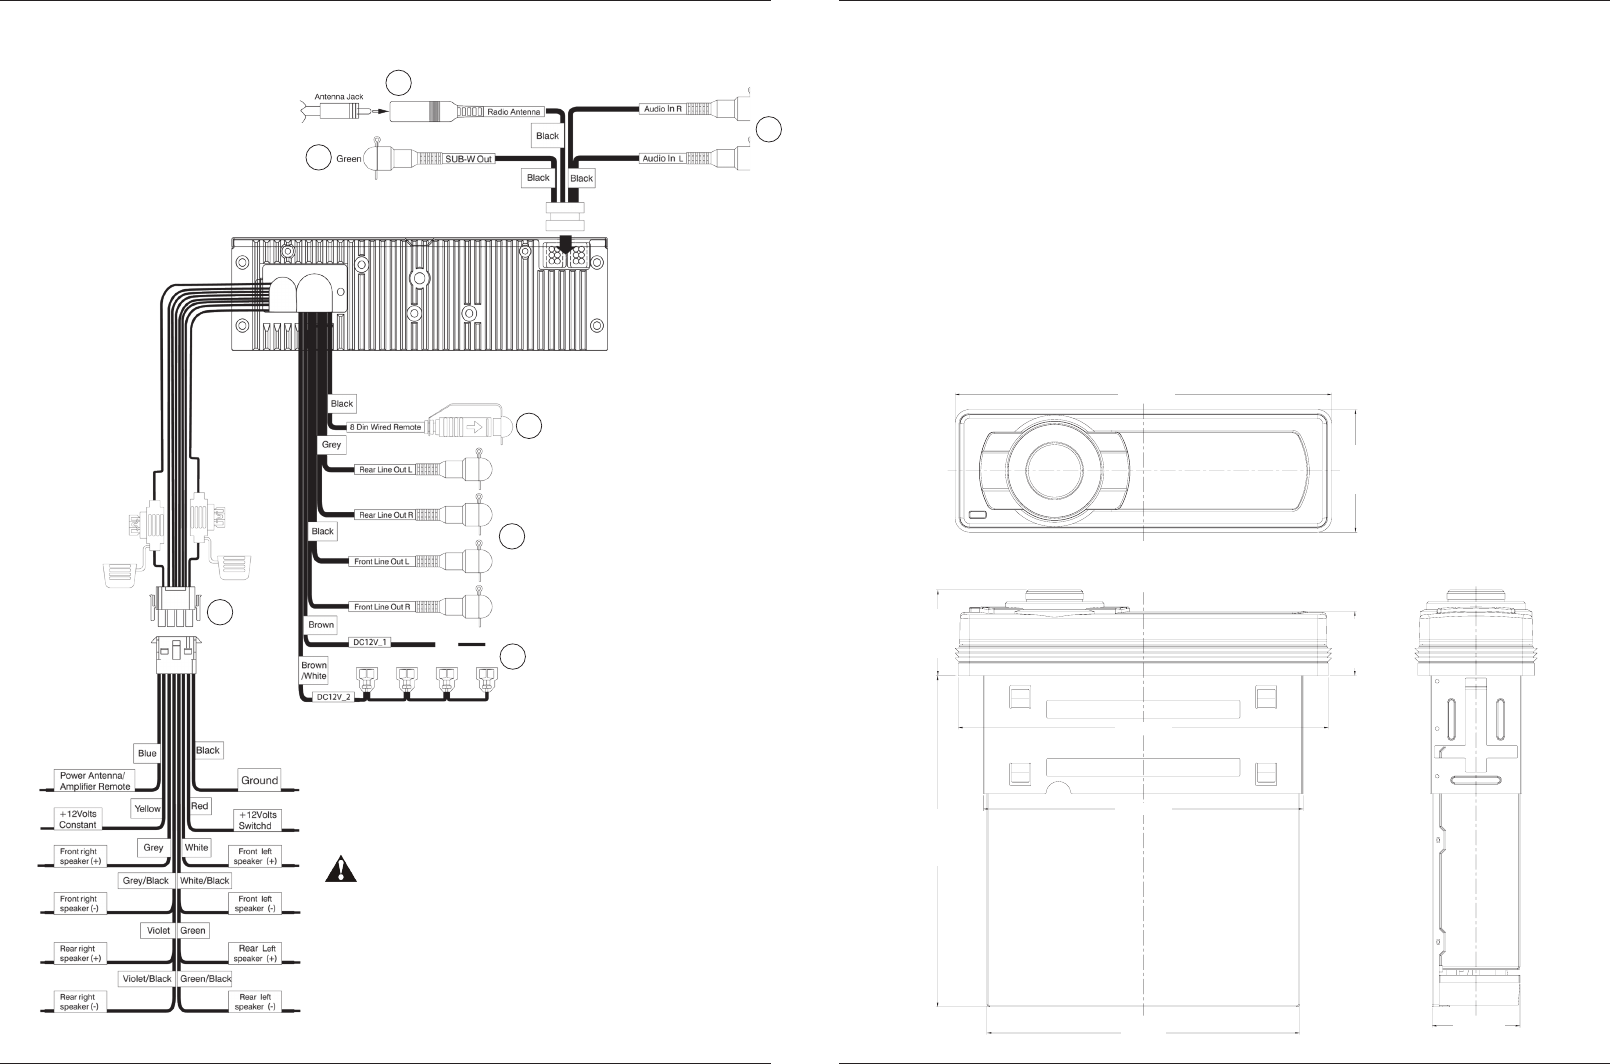
1.4 Wiring Diagram
4
5
1
2
3
No lower than a 2 Ohm load should be used
or damage may occur to the Media Player.
Make sure the polarity of speakers are
connected correctly.
6
7
Getting Started Media Player AQ-MP-5UBT
www.aquaticav.com4
1. Check clearances on both sides of a planned installation before drilling any holes or
installing any screws.
2. When routing RCA cables, keep them away from power cables and output speaker wires.
3. Due to the design for a multi environment application, always support the back of the unit
with the supplied back strap.
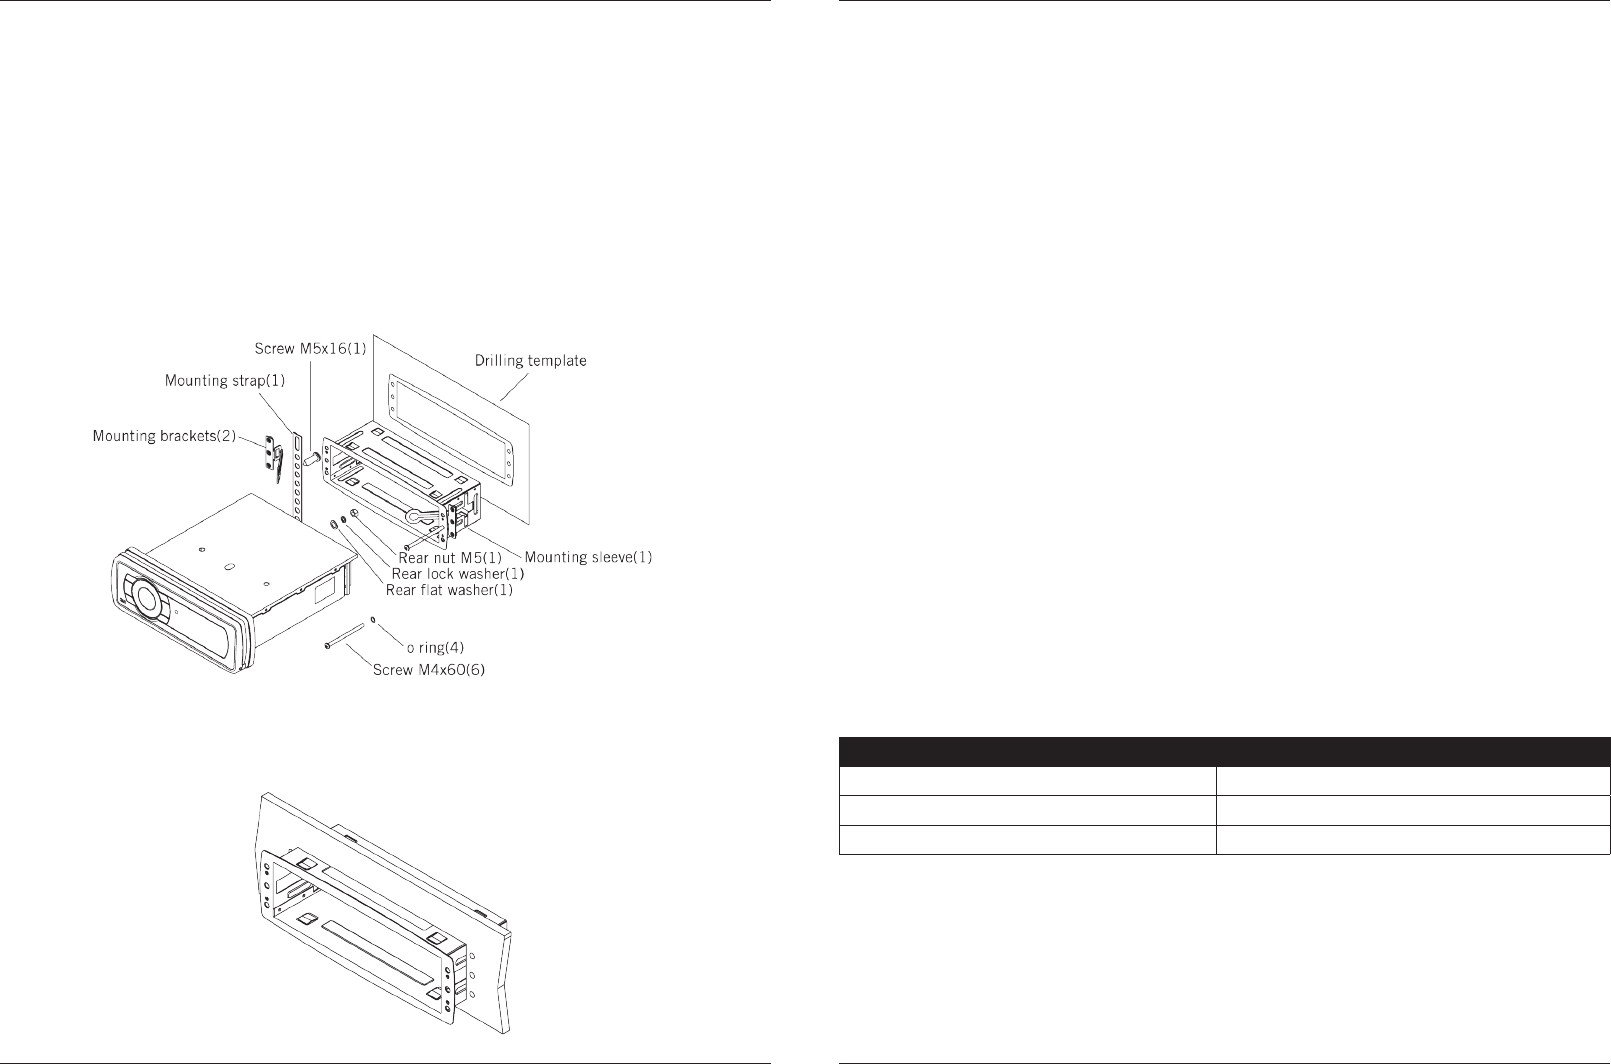
1.6 Mounting the Media Player
1.6.1 Slide mounting sleeve into DIN opening
The AQ-MP-5UBT is designed for a multi-environment application. For an easy system setup,
mount the Media Player so the front controls will be easily accessible. In addition, observe the
following precautions:
Getting Started Media Player AQ-MP-5UBT
Aquatic AV offers a limited warranty of our products on the following terms:
Length of warranty
2 years on audio systems, electronics, speakers, and accessories (receipt required).
Coverage
This warranty covers only the original purchaser of an Aquatic AV product purchased from an
authorized Aquatic AV dealer. In order to receive service, the purchaser must provide Aquatic AV
with a copy of the receipt stating the customer name, dealer name, product purchased and date
of purchase.
Defective products
Products found to be defective during the warranty period will be repaired or replaced (with a
product deemed to be equivalent) at Aquatic AV’s discretion.
What is not covered
Damage caused by accident, abuse, improper operations or theft. Any cost or expense related to
the removal or reinstallation of product. Service performed by anyone other than an authorized
Aquatic AV service center. Any product with the serial number or tamper labels defaced, altered,
or removed. Subsequent damage to other components. Any product not purchased from an
authorized Aquatic AV dealer.
Limit on implied warranties
Any implied warranties including warranties of tness for use and merchantability are limited
in duration to the period of the express warranty set forth above. Some states do not allow
limitations on the length of an implied warranty, so this limitation may not apply. No person is
authorized to assume for Aquatic AV any other liability in connection with the sale of the product.
How to obtain service
You must obtain a return material authorization number (RMA) to return any product to Aquatic
AV. You are responsible for shipping charges of returned products to Aquatic AV.
Please record the model and serial number[s] of your equipment in the space provided below as
your permanent record and will assist us with your factory warranty coverage. These numbers can
be found on the rear of the Digital Media Player.
Model number[s]: Serial number[s]:
Warranty Information Media Player AQ-MP-5UBT
15www.aquaticav.comwww.aquaticav.com6
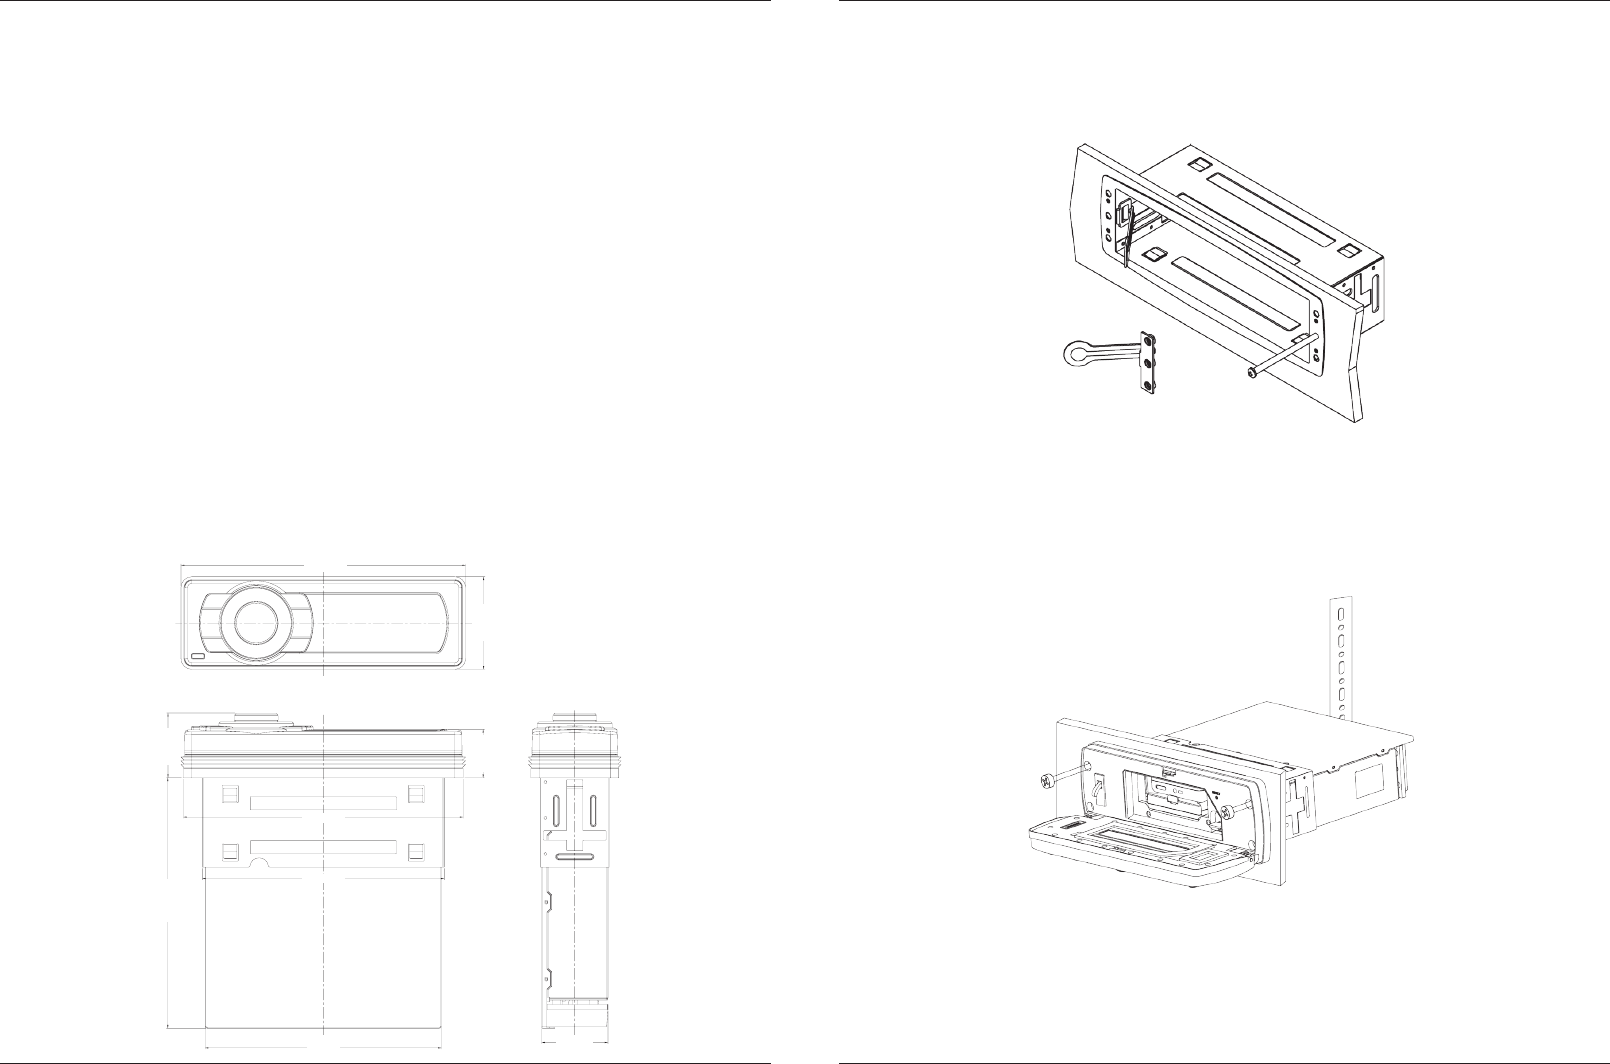
1.6.2 Slide mounting brackets into position and tighten center bolts. Remove mounting bracket
handles by bending backing brackets handles until they break off.
1.6.3 Slide Media Player into mounting sleeve. Secure Media Player using supplied hardware and
mounting strap.
Getting Started Media Player AQ-MP-5UBT
7www.aquaticav.com
6.2 Dimensions
69.8mm
214.4mm
69.8mm
214.4mm
36.6mm
210.8mm
182.2mm
188.6mm
178mm
48.8mm
52.2mm
Media
Supported media....................................
Supported media max. dimensions...........
Device charging......................................
Inputs
Auxiliary................................................
Outputs
Pre-Out..................................................
Subwoofer..............................................
12V Trigger............................................
Power
Output voltage @ 2 Ohm.........................
Output voltage @ 4 Ohm.........................
Operation voltage....................................
Max current draw....................................
Standby current draw..............................
Multi-Environment Certifications
Waterproof / Dustproof............................
Conformal PCB coating...........................
UV protection.........................................
Salt/Fog protection.................................
Stainless Steel mountings.......................
Bluetooth/USB/MP3/FM/AM
107 x 184mm (WxH)
via USB
1x 3.5mm stereo Jack socket, 1x stereo pair RCA
2x stereo pair RCA (4V)
1x RCA (4V)
2x 12V triggers (350mA)
4x 72W
4x 45W
12V
7A
6mA
Yes - IP55
Yes
500 hours stable, ASTM D4329 compliant
500 hours stable, ASTM B117 compliant
Yes
6.1 Specifications
Specifications & Dimensions Media Player AQ-MP-5UBT
www.aquaticav.com14
Operating Temperature............................
-15°C~+35°C
USB Host ............................................ Host 1.1 compatibles 2.0

The AQ-MP-5UBT requires +12V DC to both the red and yellow wires. When both of these wires
have power the AQ-MP-5UBT is always powered on. Ground is connected to the black wire.
Once all connections are made press the rotary knob and the stereo will turn ON.
In a spa application this requires the red and yellow wires to be jumped together and then con-
nected to the +12VDC output of the power source. In this set up the AQ-MP-5UBT will always be
on, with a very low current draw when idle.
In a boat, ATV or other application requiring power from a battery, the yellow wire (constant
power) should be connected to the battery, and the red wire should be connected to the ignition
or a switch.
For detailed instructions you can check out our online video:
‘How to wire your Aquatic AV stereo system’
http://www.aquaticav.com/support/videos
1.7 Power On
Getting Started Media Player AQ-MP-5UBT
5.6 Beep Tone
Beep tone plays when any button is pressed, it can be toggled on and off from this selection.
5.7 System Reset
Restores all factory settings.
5.1 Audio Menu
From the ‘Audio Menu’ you are able to change the bass, treble, balance, and fader.
Any changes made in the ‘Audio Menu’ are system wide so it will affect all modes.
1. To enter the ‘Audio Menu’ press the ‘AUDIO/MENU’ button.
2. In the ‘Audio Menu’ press the ‘AUDIO/MENU’ to scroll through all options.
3. To change the parameters use the rotary knob to adjust settings.
5.2. AS/PS (Auto Scan/Preset Scan)
Scans through the current frequency band, and assigns presets to the radio stations that have the
strongest signal strength. Press and hold PRESET button to swicth between AS and PS modes.
Only does this for one AM/FM band at a time.
1. When in AM/FM mode press FUNC to access the ‘AS/PS’ settings.
2. Use the rotary knob to adjust settings.
5.3 Local/Distant Tuning
When ‘Local’ is turned on the Media Player seeks to only the radio channels with strong signal
strength. When ‘Local’ is turned off the Media Player will seek to all radio channels it receives
signal from.
When local is turned on the word ‘Local’ will appear in the upper right hand corner of the Media Player LCD.
1. When in AM/FM mode press FUNC to access the ‘Local/Distant Tuning’ settings.
2. Use the rotary knob to adjust settings.
5.4 Stereo/Mono
Change the output mode between stereo and mono. Some applications only accept a mono input.
1. When in AM/FM mode press FUNC to access the ‘Stereo/Mono’ settings.
2. Use the rotary knob to adjust settings.
5.5 FM Tuning Area
The FM tuning can be set to different areas, using the rotary knob to scroll through to select the
desired tuning area.
There are seven different tuning areas: USA, EUR, LAT, ASIA, MIDDLE EAST, AUSTRALIA,
RUSSIA.
1. When in AM/FM mode press FUNC to access the ‘FM Tuning Area’ settings.
2. Use the rotary knob to adjust settings.
Settings Operation Media Player AQ-MP-5UBT
13www.aquaticav.comwww.aquaticav.com8
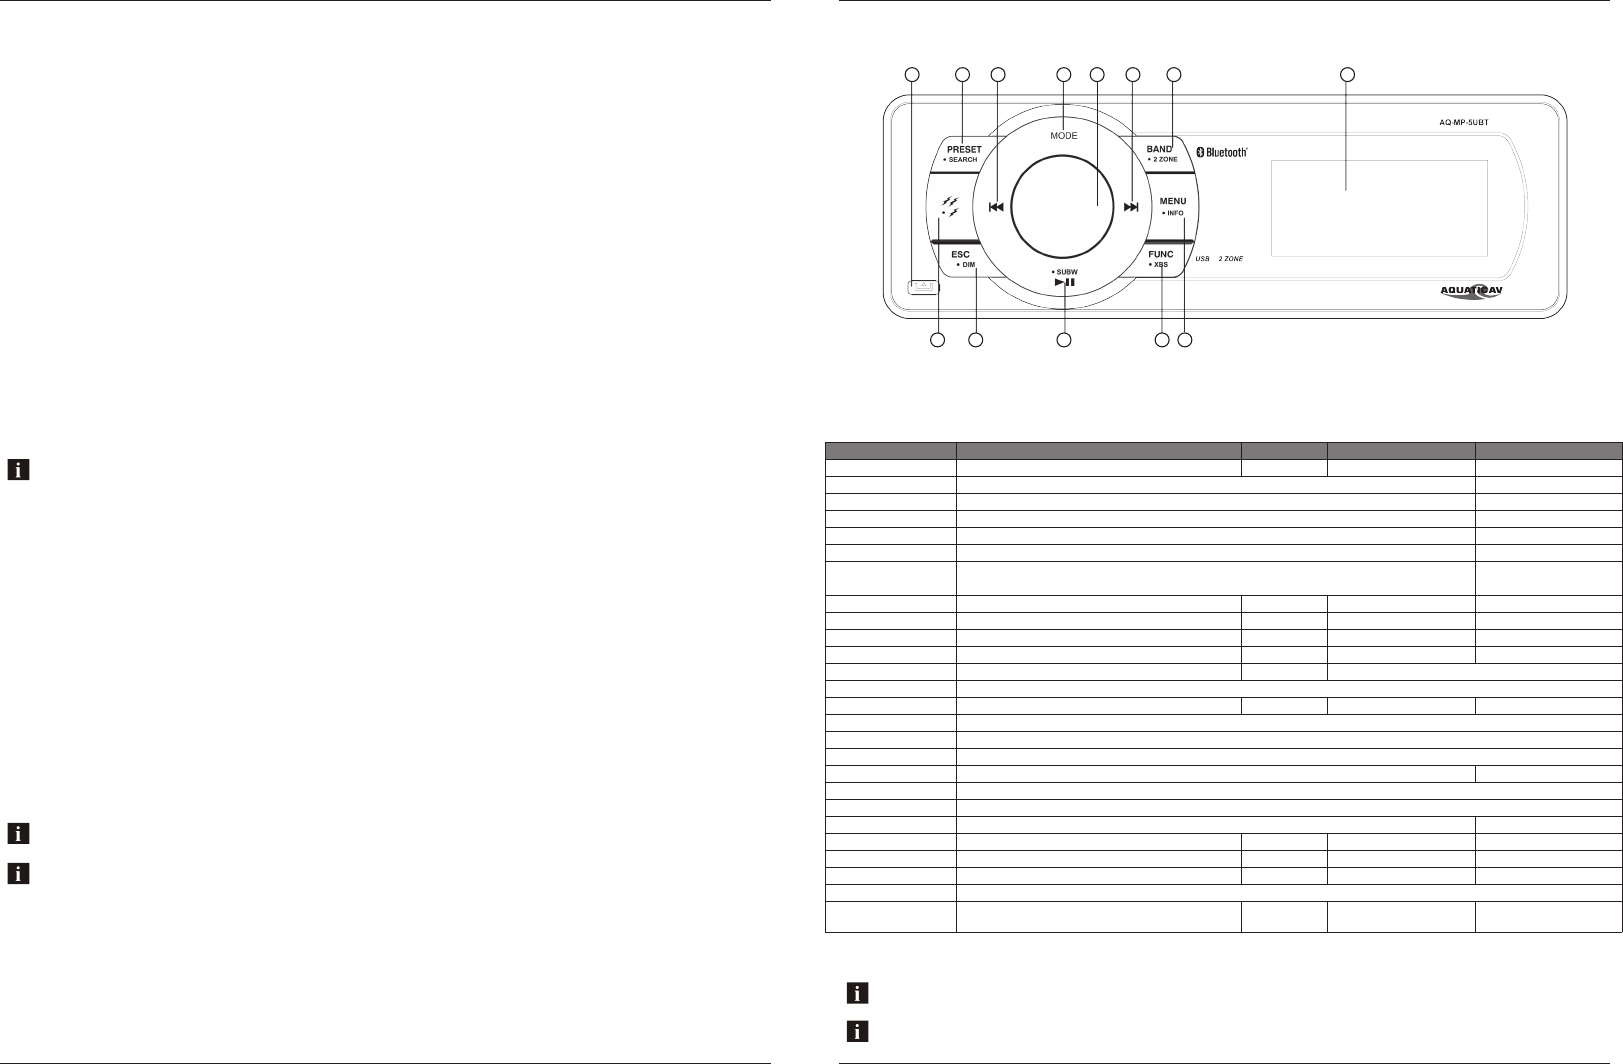
2.1 Media Player Controls
If your music player is connected via the Auxiliary input you will not be able to control track or receive track informa-
tion.
Turn off DSP to access control of Bass and Treble
1. Front face release
2. Preset/Search
3. Fast Rewind/Forward
4. Mode button
5. Band/2-Zone
6. LCD screen
7. Menu/Info
8. Function/XBS
9. Play/Pause/Subwoofer
10. ESC/Dimmer
11. 12V Triggers
12. Rotary Select Knob
Button AM/FM Mode Aux In Bluetooth USB
Rotary Select Knob Short Press: Mute
Long Press: Power Off
In menu: Select
Mode Short Press: Enter mode select screen
Long Press: No Function
Rotary Knob Clockwise When turned clockwise the volume increases
Rotary Knob Counter
Clockwise When turned counter clockwise the volume decreases
Fast Forward Short Press: Scans to the next station No Function Changes to next song Changes to next song
Long Press: Switches into manual seek mode No Function No Function No Function
Fast Rewind Short Press: Scans to the previous station No Function Changes to Previous Song Changes to Previous Song
Long Press: Switches into manual seek mode No Function No Function No Function
Play/Pause/Subwoofer Short Press: Toggles between Play and Pause No Function Short Press: Toggles between Play and Pause
Long Press: Displays subwoofer volume
Band/2 Zone Short Press: Switches between AM/FM Bands No Function No Function No Function
Long Press: Toggles 2 Zone selection menu
12V Trigger Short Press: Toggles 12V Trigger menu
Func/XBS Short Press: Toggles applicable functions for each mode
Long Press: Toggles XBS ON/OFF
ESC/DIM Short Press: Returns you to the previous screen
Long Press: Toggles between dimmer modes
ESC/Info Short Press: Returns you to the Default Screen
Long Press: Displays info if any available No Function No Function
Preset/Search Short Press: Displays your presets No Function Toggles Search feature* Toggles Search feature*
Long Press: Autosets presets No Function No Function No Function
Menu/Info Short Press: Toggles system menu
Long Press: Changes the information displayed on
screen
Changes the information
displayed on screen*
Changes the information
displayed on screen*
* iPod & iPhone only
6
35
42
13
7
91011 8
12
Location of Controls Media Player AQ-MP-5UBT
9www.aquaticav.com
4.5 Switching between US and European FM Modes
1. When in ‘RADIO’ mode.
2. Press the FUNC button to enter the Function menu.
3. Scroll to ‘AREA’ then press the rotary knob.
4. Use the Rotary Knob to scroll to the desired tuning Area and select by pressing the Ro-
tarey Knob.
Available Areas USA, OIRT, LATIN, ASIA, JAPAN,MID E, AUS, EURO.
4.2 Scan or Navigate FM/AM Radio Channels
1. Press FAST REWIND/FAST FORWARD to seek another station.
2. Press and hold either FAST REWIND/FAST FORWARD for manual tuning back or forward.
4.3 Saving Radio Channel to Memory
1. Tune to the station you would like to be saved as a preset.
2. Press the FUNC button to enter the Function menu.
3. Select ‘Manually Save Preset’.
4. Using the rotary knob you can choose which preset slot you would like to save the current
station to.
5. Upon successfully saving a preset, the preset number that was chosen will be shown in
the left corner.
4.4 Listening to Saved Radio Memory
1. Once the presets have been set either manually or using AS/PS press the ‘Preset’ button
to display your presets.
Presets are only for the current band you are on. Each band FM1, FM2, FM3, AM1 and AM2 has six presets for a
total of 30 (18x FM & 12x AM).
4.1 Enter FM/AM Radio Mode
1. Press MODE on the unit keypad and select RADIO mode.
US mode will increase and decrease the FM frequency in steps of 0.1 MHz, e.g. 88.5, 88.6,88.7 MHz. EUR mode will
increase and decrease the FM frequency in steps of 0.05 MHz, e.g. 88.25, 88.30, 88.35 MHz.
Listening to FM Radio Media Player AQ-MP-5UBT
www.aquaticav.com12

1. Enable Bluetooth mode by pressing MODE and selecting Bluetooth.
2. Switch on your Bluetooth device.
3. Select ‘AQUATIC AV’ from the list of available devices to pair (no password is needed).
4. A Bluetooth logo will illuminate on the Media Player LCD to verify Bluetooth is activated.
3.1.1 Pair with Bluetooth Device
Only one Bluetooth device can be paired with the Media Player at any time.
3.1 Listening via Bluetooth
3.1.2 Listening via Bluetooth Device
1. Bluetooth mode will be activated once a Bluetooth device is linked.
2. Play the song from device and the sound will play through the Media Player.
3. Press PLAY/PAUSE to play/pause the song.
4. Press FAST REWIND/FORWARD buttons to play previous/next song le.
5. Previous/next track and volume up/down can be controlled directly from your Bluetooth
device or directly from the Media Player controls.
The Bluetooth menu is accessible via the in the ‘Menu/Info’ button and is used to connect or
disconnect a Bluetooth device that has already been paired.
IAP (Information Apple Protocol) Bluetooth connectivity allows device information, such as
song, playlist and album titles, to be streamed wirelessly and viewable on the AQ-MP-5UBT-
H screen. This feature is available for Apple devices only.
1. Remove the faceplate and press the lever in the lower right corner of the unit to release
the mechanism.
2. Set the iPod/iPhone in the mechanism and adjust the clamps to hold it secure.
3. Plug the iPod/iPhone cable into the USB input, and tuck the cable in so the faceplate can
be reattached.
4. Replace the faceplate. If the stereo was previously on it will come back on. If not press
the Rotary Knob to power the unit on.
5. Press the Mode button and select USB Mode.
3.2 Listening via USB
3.2.1 Listening via USB (Apple Devices)
Listening to Devices Media Player AQ-MP-5UBT
3.4 Adjust Volume Level
1. Turn the rotary knob clockwise increase the volume.
2. Turn the rotary knob counter clockwise to reduce the volume.
3.3 Listening via Auxiliary Input (3.5mm Jack)
1. Remove the faceplate from the stereo.
2. Connect your MP3 device to the 3.5mm connector.
3. Re-attach the faceplate.
4. Press the rotary knob to power the Media Player ON (if the faceplate was removed with the
stereo still powered on, it will power on by itself).
5. Press (MODE) on the Media Player or remote control to select ‘AUX IN-1’ mode.
Always ensure to connect and disconnect your Media Player with dry hands!
When specied USB devices are connected to the USB input the device battery will charge.
3.2.4 Device Charging
3.2.3 USB Search
1. When using an iPhone, iPod or USB ash drive press SEARCH to enter USB searching
mode.
2. Once in searching mode the menu will display ‘Playlist’. Use the Rotary Knob to scroll
through the search modes below:
1) Playlist 2) Artist 3) Album 4) Song 5) Genre 6) Composer 7) Audio Book
3. Press the Rotary Knob to select the desired search mode and continue in this manner to
navigate the menu sub-folders.
4. Use and FAST REWIND/FAST FORWARD to navigate through your menu page by page.
1. Remove the faceplate and press the lever in the lower right corner of the unit to release
the mechanism.
2. Plug the USB drive in the USB port.
3. Replace the faceplate. If the stereo was previously on it will come back on. If not press
the Rotary knob to power it on.
4. Press the Mode button and select USB Mode.
3.2.2 Listening via USB Flash Drives
Listening to Devices Media Player AQ-MP-5UBT
11www.aquaticav.comwww.aquaticav.com10