ARCTIC MC101 Home Entertainment Center User Manual 0 Cover and Table of Contents v3
ARCTIC (HK) Ltd. Home Entertainment Center 0 Cover and Table of Contents v3
ARCTIC >
User Manual
MC101Series
User Manual
For further information, please visit mc101series.arctic.ac
2
Safety Instructions
Your MC101 is designed and tested to meet the latest standards of safety for information technology equipment.
However, to ensure your safety, it is important that you read the following safety instructions.
Setting up your system
Care during use
1. Do not spill water or any other liquids on your system.
2. When the system is turned off, a small amount of electrical current still flows. Always unplug all power, modem, and
network cables from the power outlets before cleaning the system.
3. If you encounter the following technical problems with the product, unplug the power cord:
• The power cord or plug is damaged.
• Liquid has been spilled into the system.
• The system does not function properly even if you follow the operating instructions.
• The system was dropped or the chassis is damaged.
• The system performance changes.
Warranty
This ARCTIC product includes a 2-year limited warranty. For further information, please consult warranty.arctic.ac
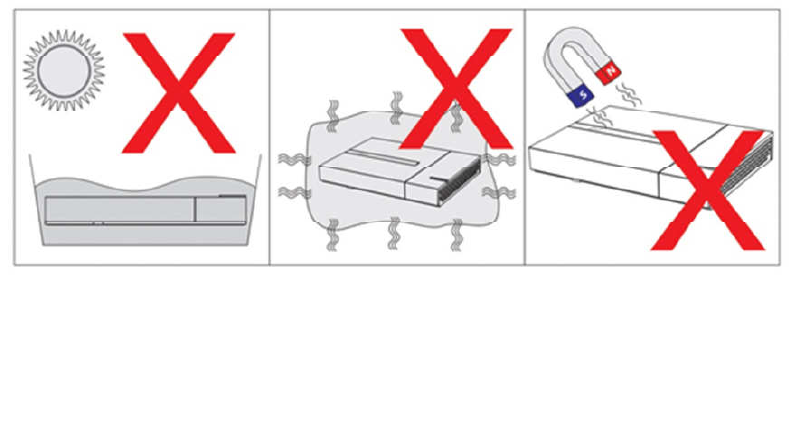
1. Do not use this product
near water or a heat
source such as a radiator.
2. Do not block the air vents
to this product or impede
the airflow in anyway.
3. Do not use or expose this
product around magnetic
fields as magnetic
interference may affect the
performance of the
product.
3
Table of Content
Chapter 1 Introducing the MC101
1.1 Package Contents…………………………………………………………………………….. 4
1.2 Front, Side and Rear View…………………………………………………………………… 5
Chapter 2 Connecting the MC101
2.1 Connecting USB 3.0 / 2.0 Devices…………………………………………………………. 6
2.2 Connecting the Video Display……………………………………………………………….. 6
2.3 Connecting the Network……………………………………………………………………… 6
2.4 Connecting the Speakers……………………………………………………………………. 7
2.5 Connecting the Power Cord…………………………………………………………………. 7
Chapter 3 Using the MC101
3.1 Enable Full Screen………………………………………………………………………….... 8
3.2 Play Movie Files …....…....………………………………………………………………….... 13
3.3 Play Blu-ray Disc in WMC ……………………………………………………………………. 16
3.4 Play Music Files………………………………………………………………………………. 18
3.4.1 WMC……………………………………………………………………………………. 18
3.4.2 WMP……………………………………………………………………………………. 18
3.5 Create Playlist…………………………………………………………………………………. 20
3.5.1 WMC……………………………………………………………………………………. 20
3.5.2 WMP……………………………………………………………………………………. 23
3.6 Add Radio Station…………………………………………………………………………….. 24
3.6.1 WMC……………………………………………………………………………………. 24
3.6.2 WMP……………………………………………………………………………………. 25
3.7 Install Internet TV in WMC…………………………………………………………………… 27
3.8 Scan TV Signal (TV tuner required)………………………………………………………… 34
3.9 Migrate iTunes Library from another Computer…………………………………………… 36
(users must first have iTunes installed on their system)
Chapter 4 Upgrade and Recovery
4.1 Change Memory Module…………………………………………………………………….. 37
4.2 Recovery Using the Recovery in Control Panel…………………………………………… 42
4.3 Recovery Using the Advanced Boot Options……………………………………………… 46
Chapter 1
Introducing the MC101
4
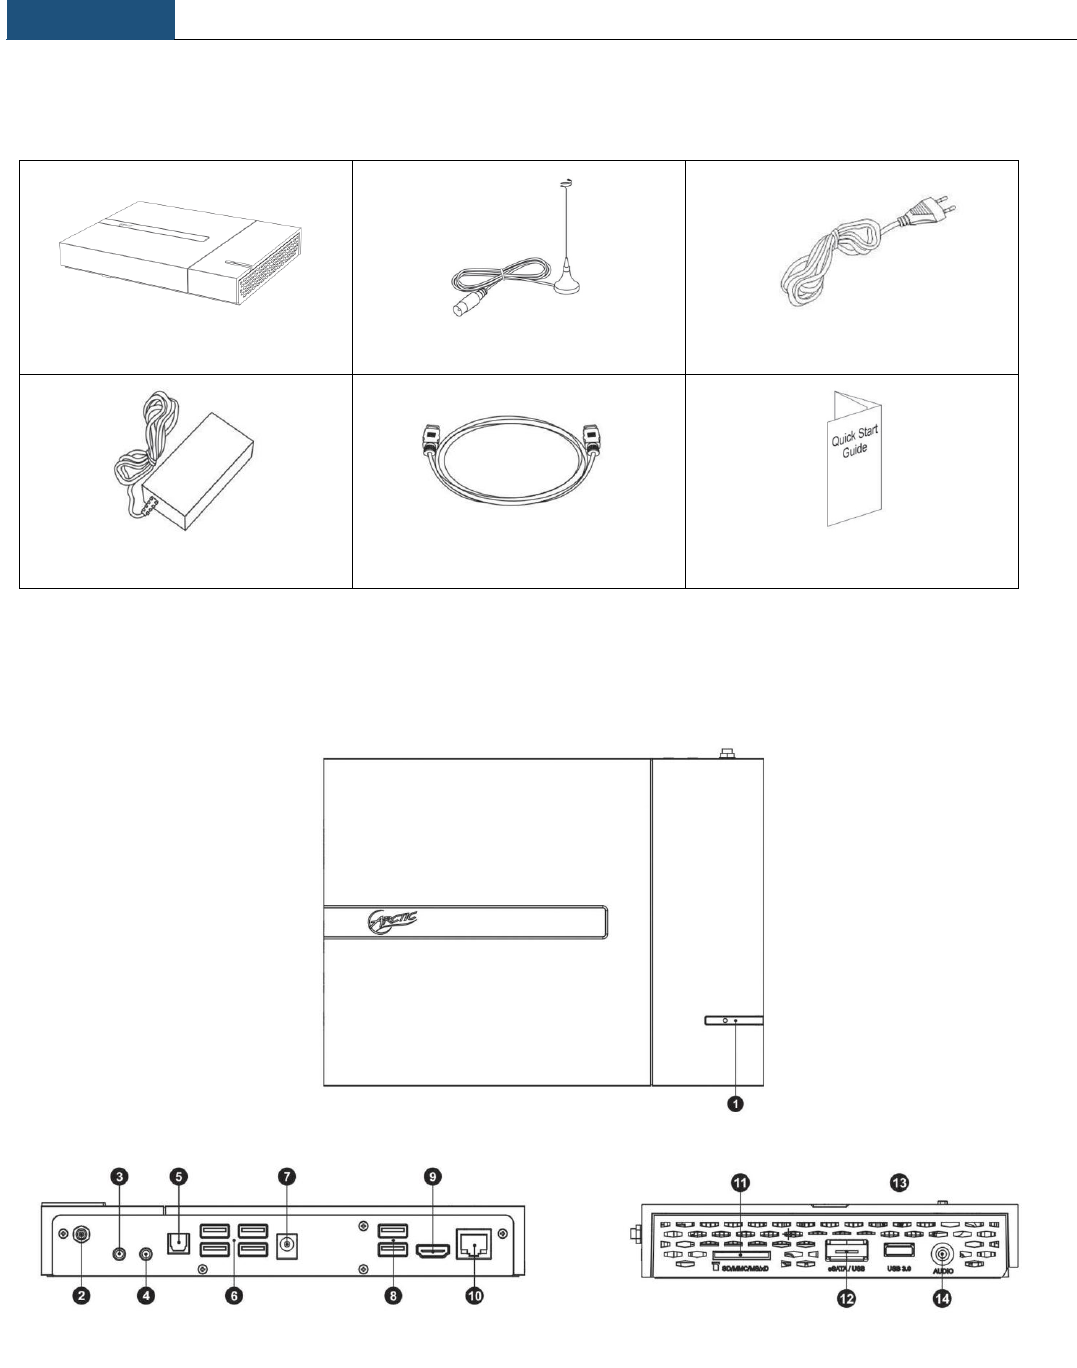
1.1 Packaging Contents
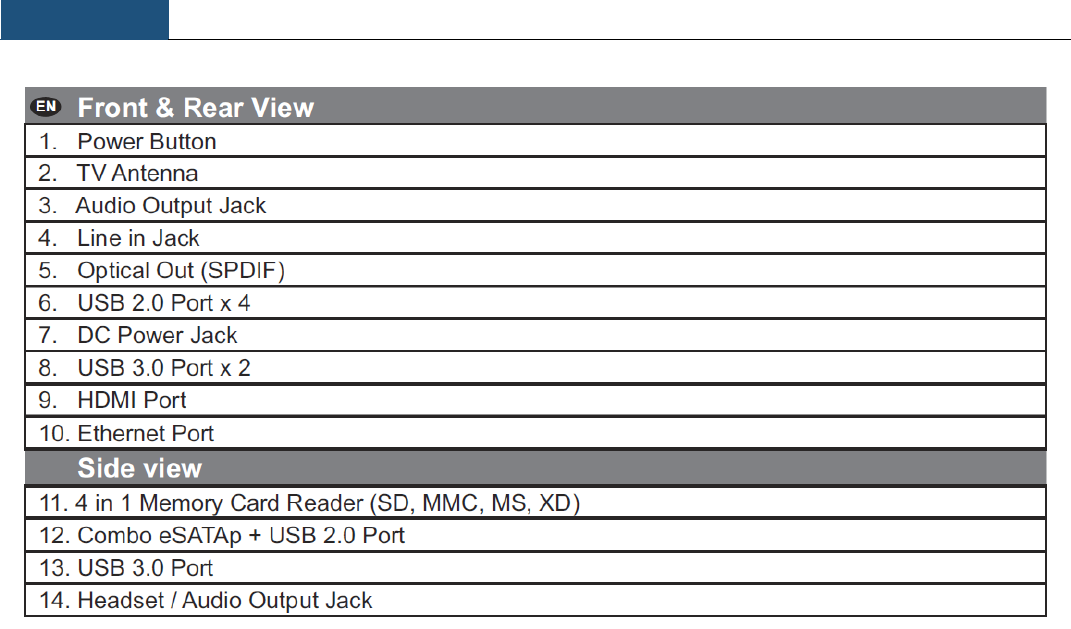
1.2 Front, Side and Rear View
MC101 x 1
TV Antenna x 1
AC Power Cable x 1
AC Power Adapter x 1
HDMI Cable x 1
Quick Start Guide x 1
Chapter 1
Introducing the MC101
5
Chapter 2
Connecting the MC101
6
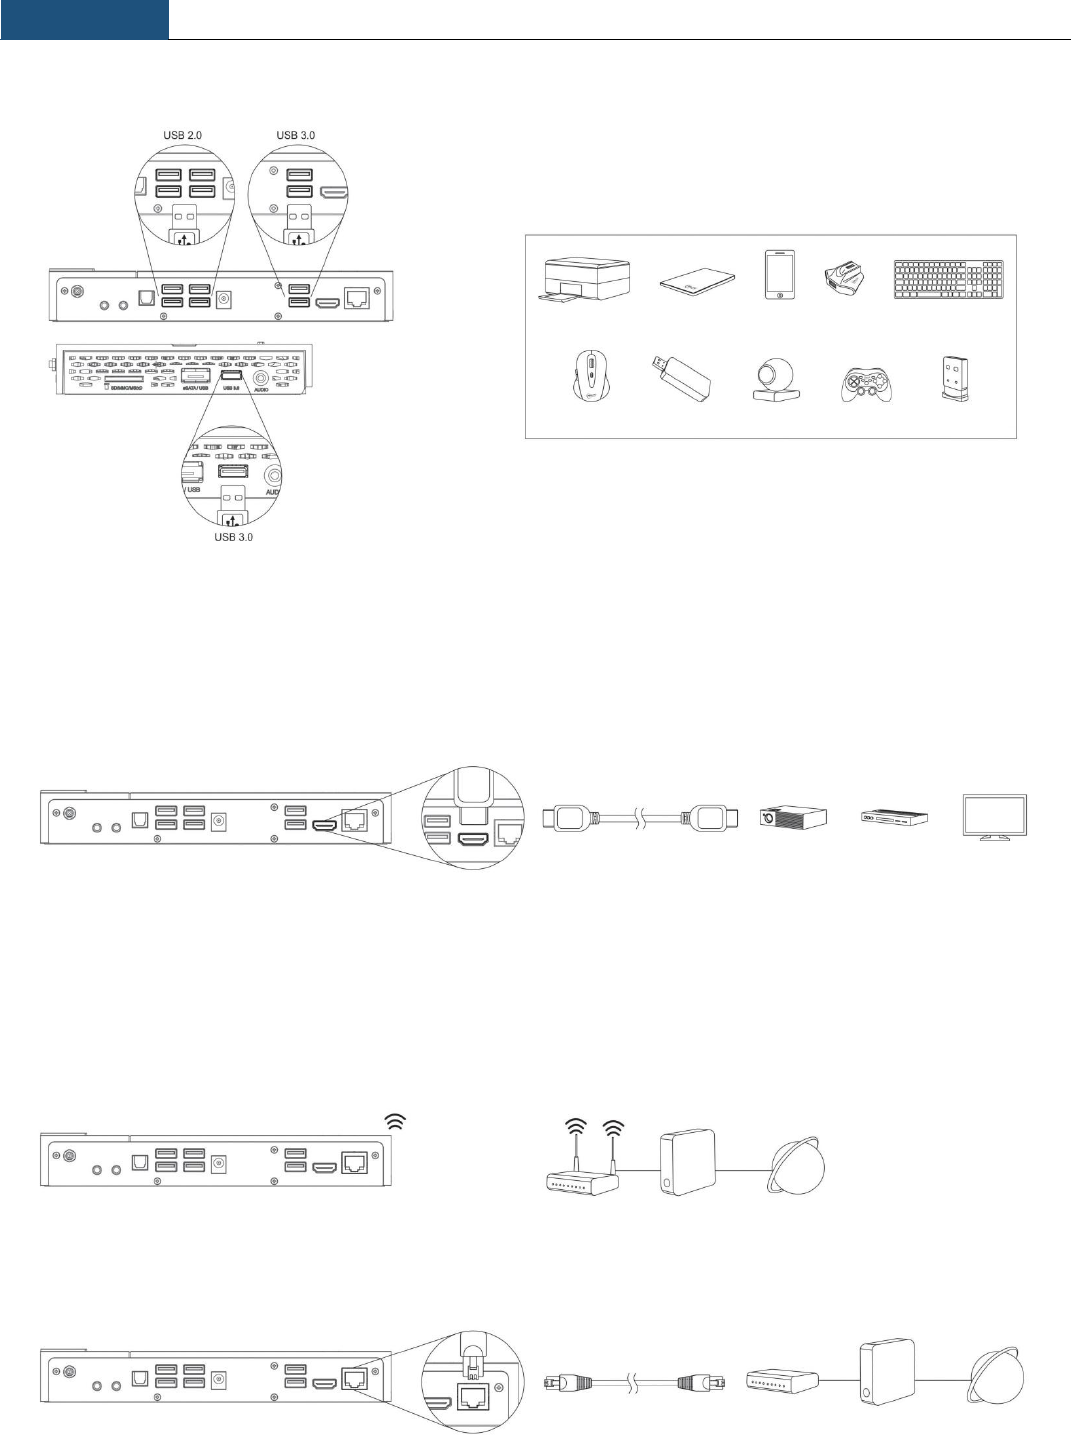
2.1 Connecting USB 3.0 / 2.0 Devices
*USB 3.0 devices will not achieve full speed if plugged in the rear panel USB 2.0 ports.
2.2 Connecting the Video Display
2.3 Connecting the Network
Wireless Connection
Wired Connection
Projector
Amplifier
LCD/LED
Monitor
HDMI Cable
Wired Network
Cable / DSL
Modem
Internet
Ethernet port
HDD Enclosure
Smartphon
e
Fax / Scanner
USB Hub
Keyboard
USB
flash drive
Webcam
Mouse
Gamepad
Bluetooth
USB Dongle
Wireless
Router
Cable / DSL
Modem
Internet
Wireless
Network
Router
Chapter 2
Connecting the MC101
7
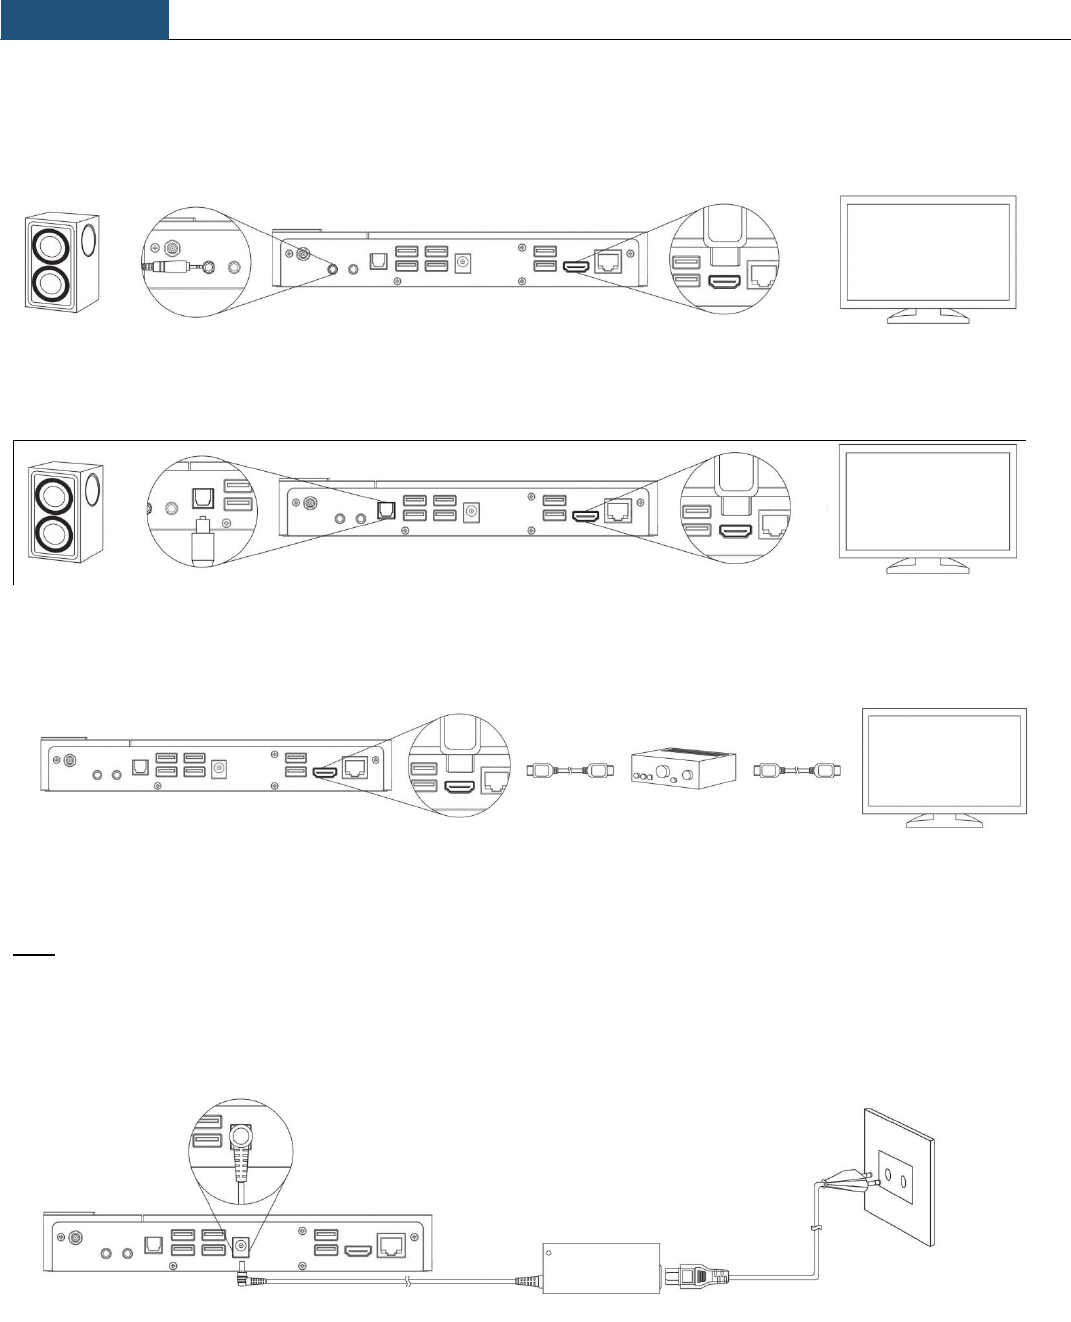
2.4 Connecting the Speakers
Analog connection - 2.0 and 2.1 systems
Digital connection (Optical) - 5.1 and 7.1 systems
Amplifier connection (HDMI)
Note : your amplifier need to be HDMI pass-through
2.5 Connecting the Power Cord
Audio output
jack
HDMI port
TV / Monitor
2.1 System
Optical Out
(SPDIF)
HDMI port
TV / Monitor
5.1 /7.1
System
HDMI port
Amplifier
TV / Monitor
HDMI cable
HDMI cable
DC power jack
Power cable
Chapter 3
Using the MC101
8
3.1 Enable Full Screen
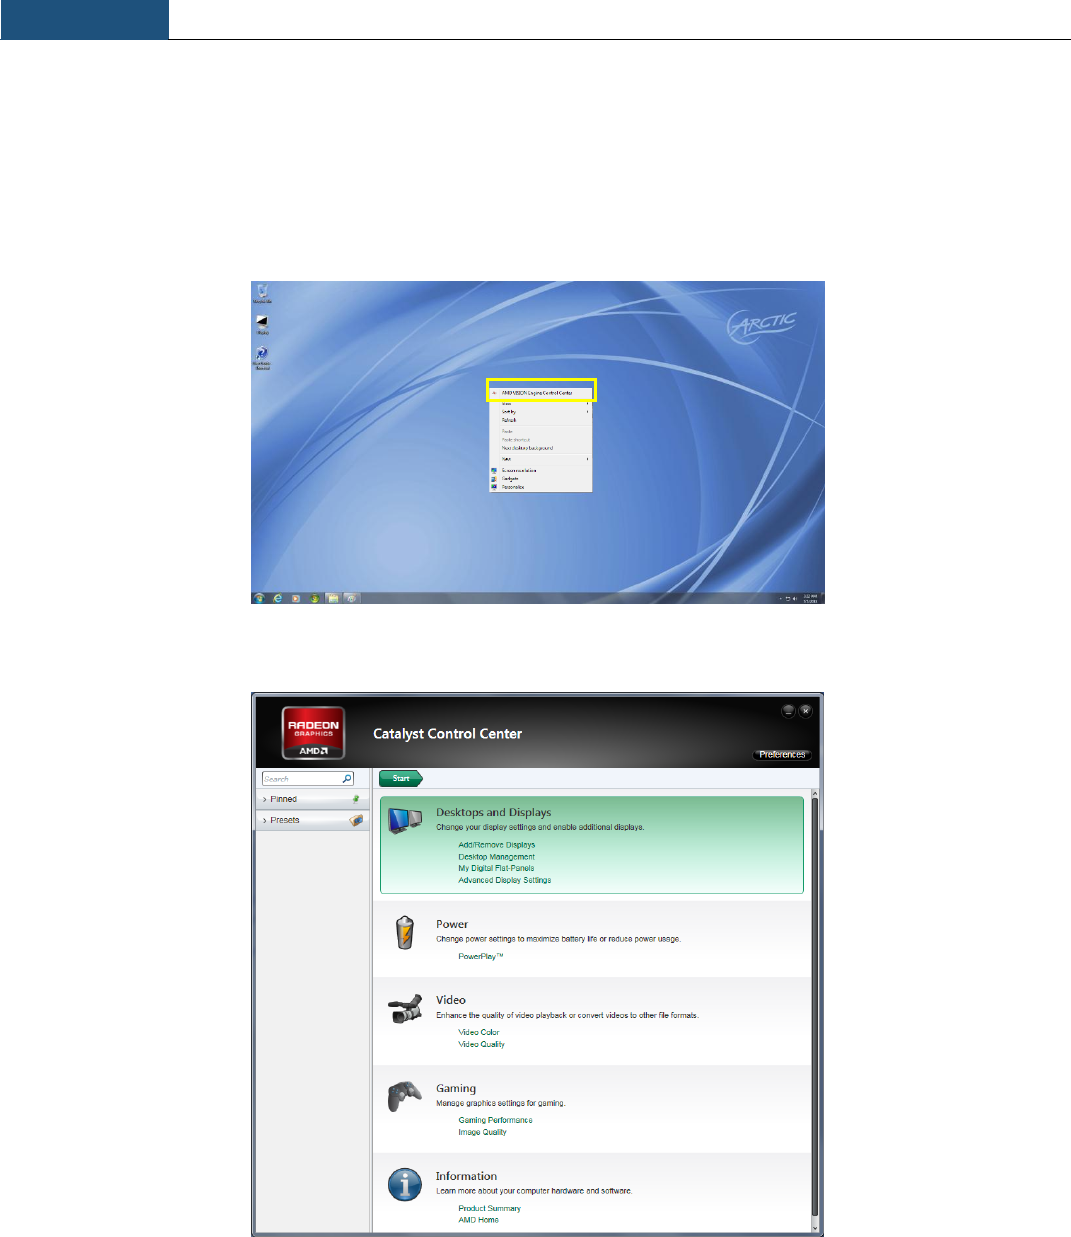
In some case, when you connect the video display through HDMI cable, the displayed image does not fill up the full
screen. This can be adjusted with the following steps:
1. Right click on the desktop and select “AMD VISION Engine Control Center” or select it from “Start Menu”.
2. Select “Desktops and Displays”.
Chapter 3
Using the MC101
9
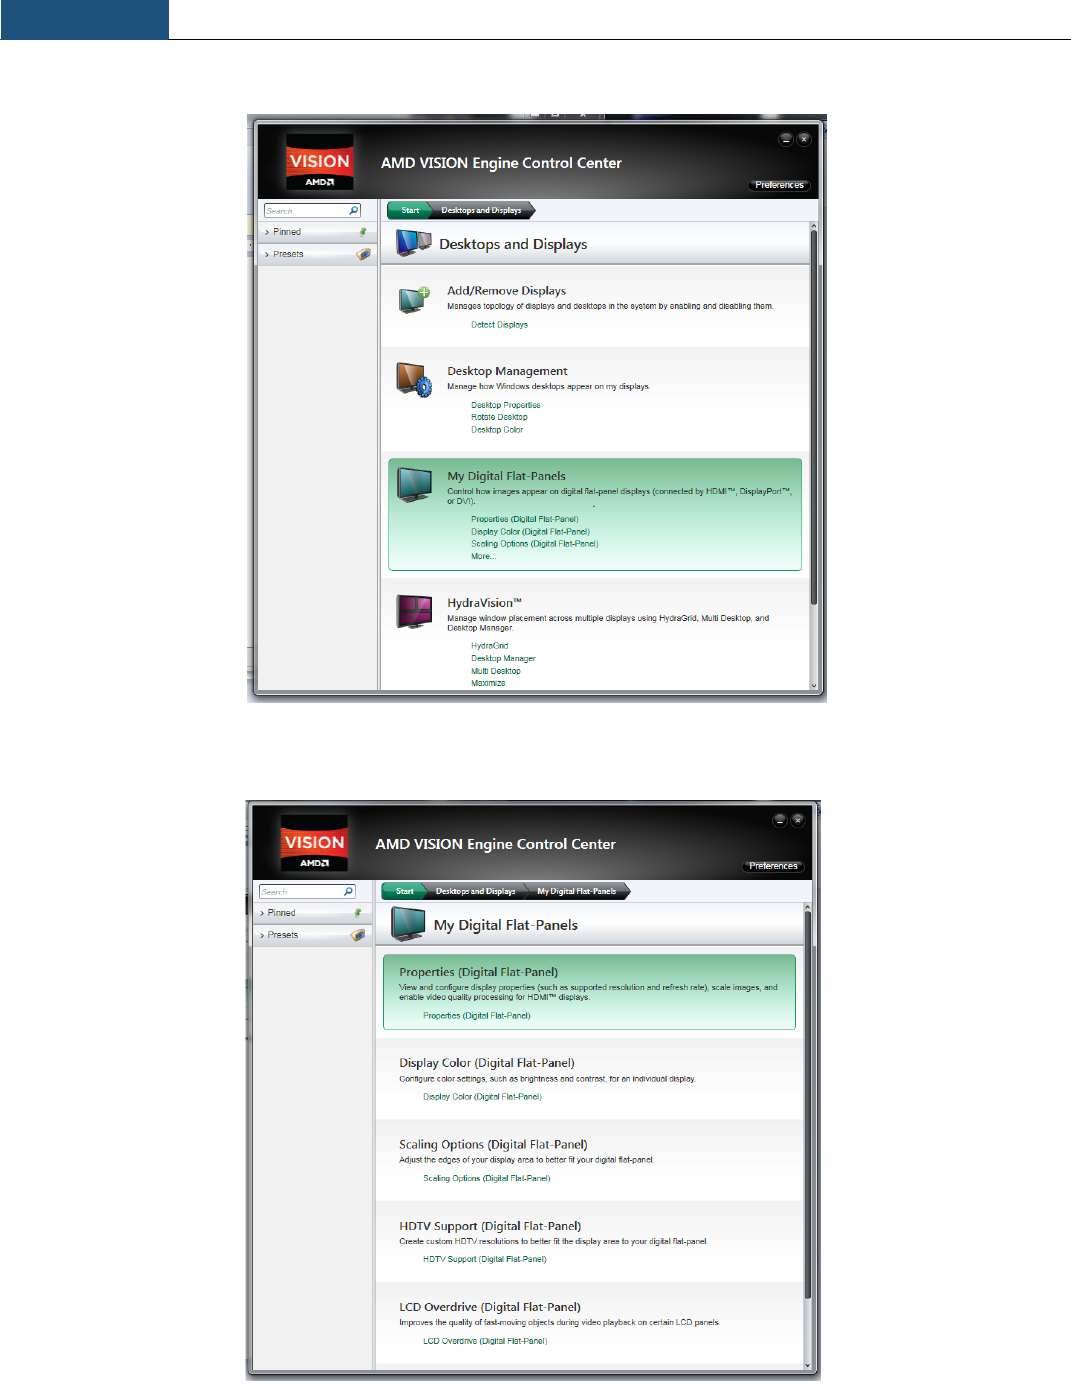
3. Select “My Digital Flat-Panels”.
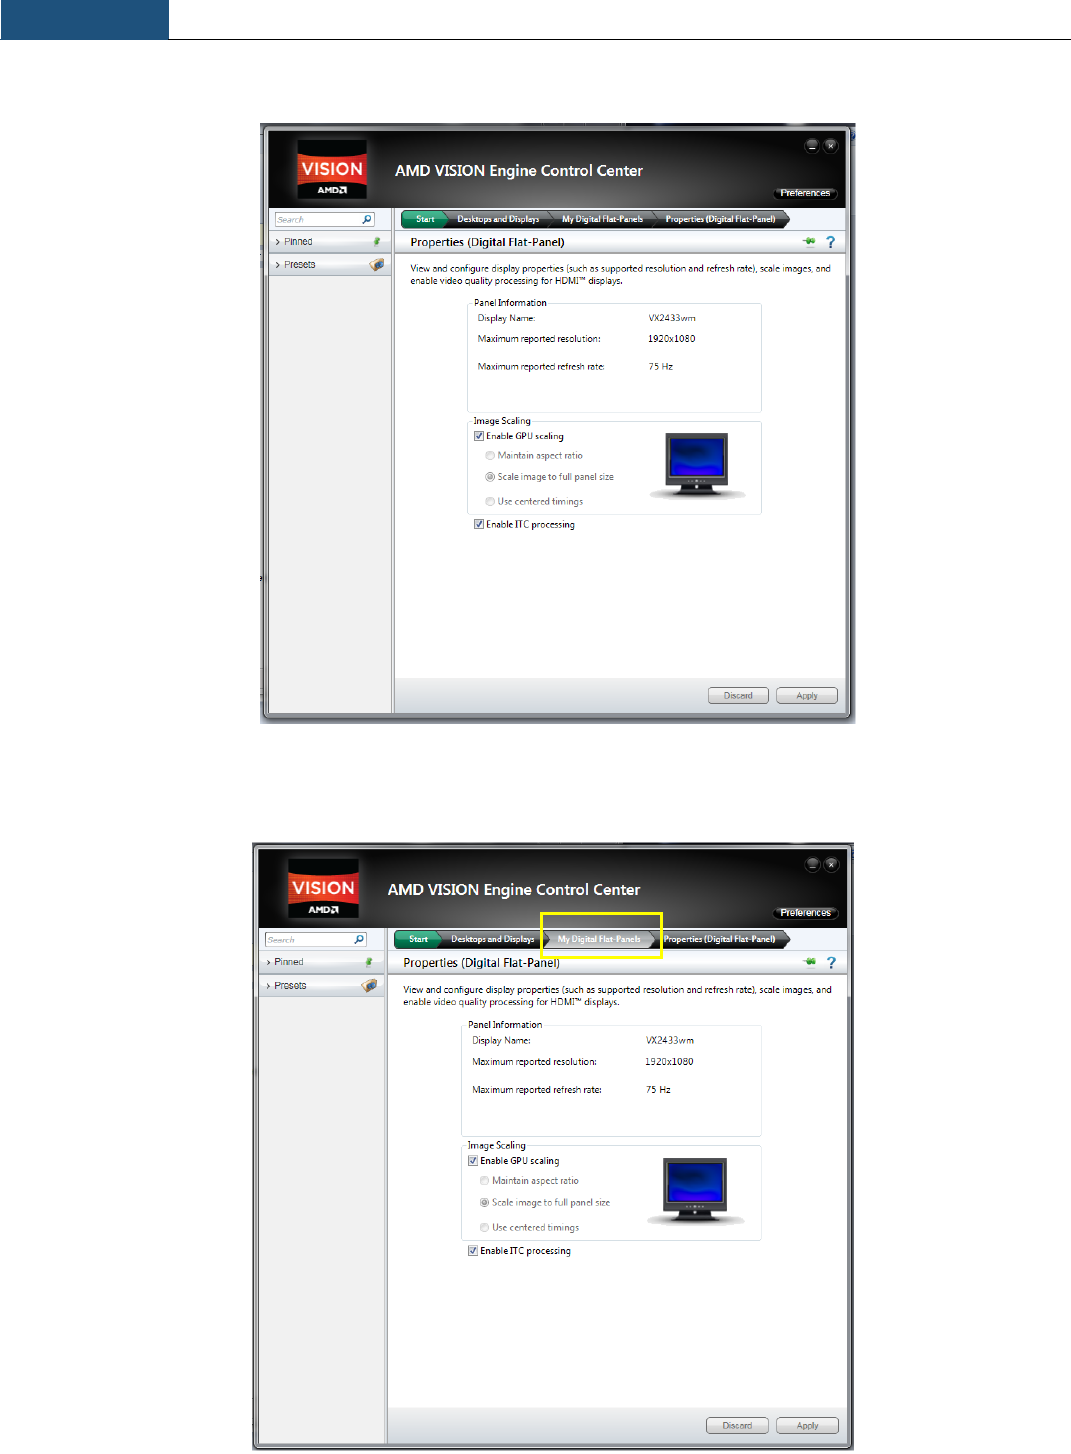
4. Select “Properties (Digital Flat-Panel)”.
Chapter 3
Using the MC101
10
5. Tick “Enable GPU scaling” and select “Apply”.
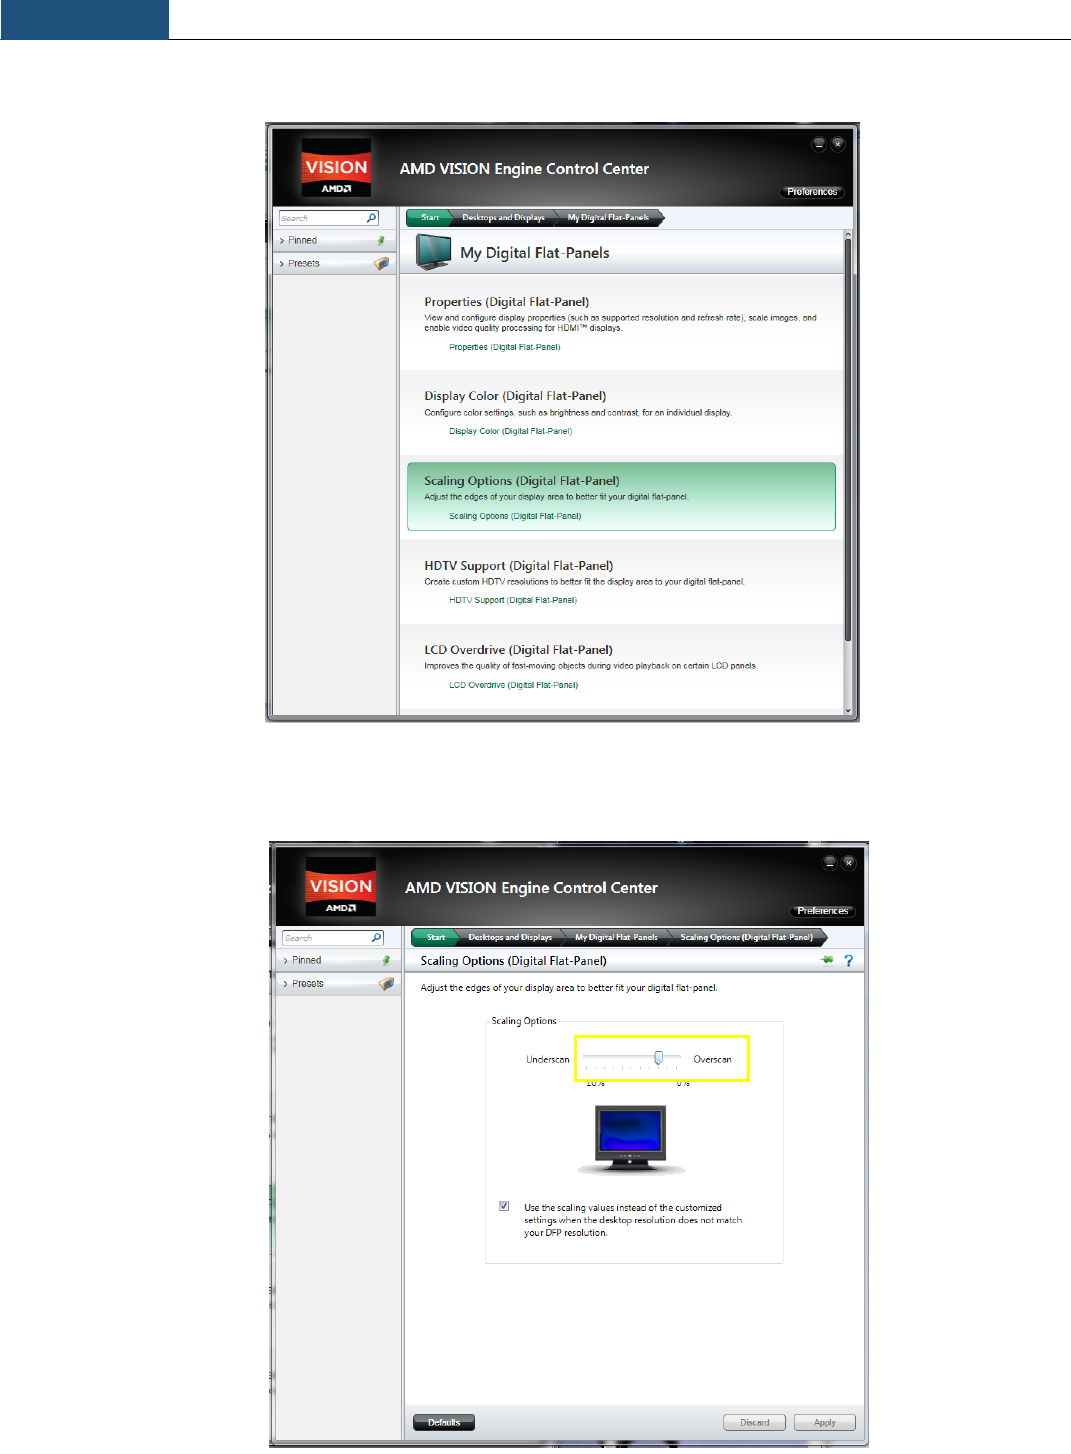
6. If the PC does not change to full screen after enabled the GPU scaling. Go to the tap above labelled “My digital
Flat-Panels”.
Chapter 3
Using the MC101
11
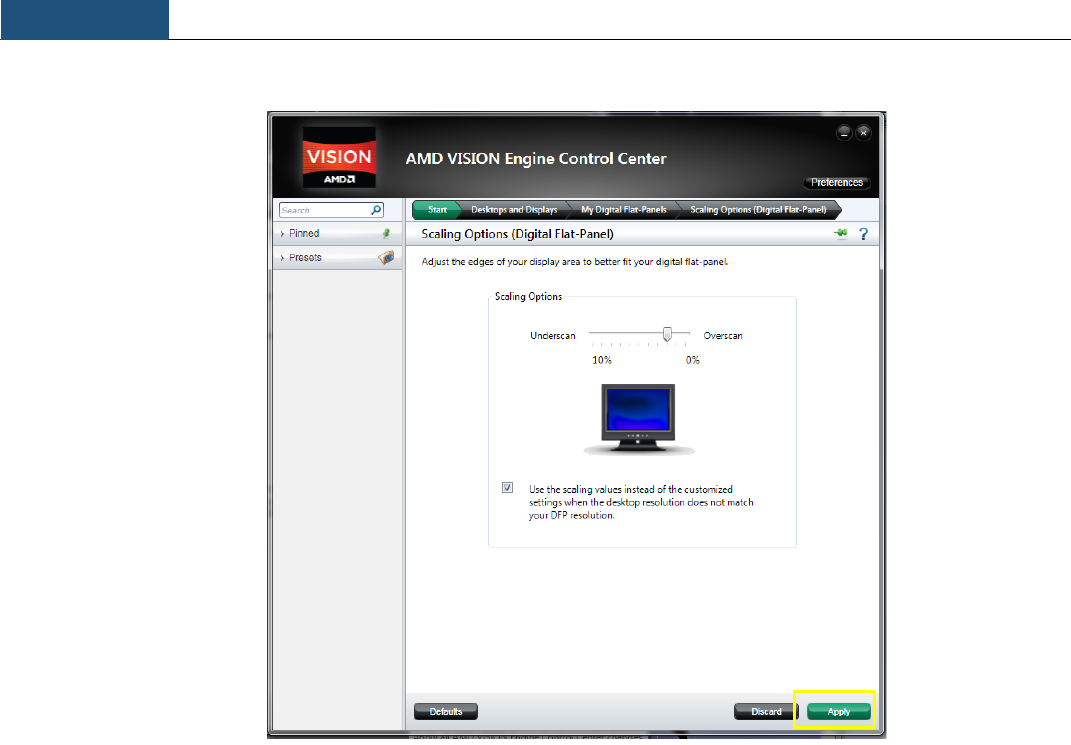
7. Go to the “Scaling Options (Digital Flat-Panel)”
8. Under the scan option, adjust the scale from15% to 0% until full screen is achieved.
Chapter 3
Using the MC101
12
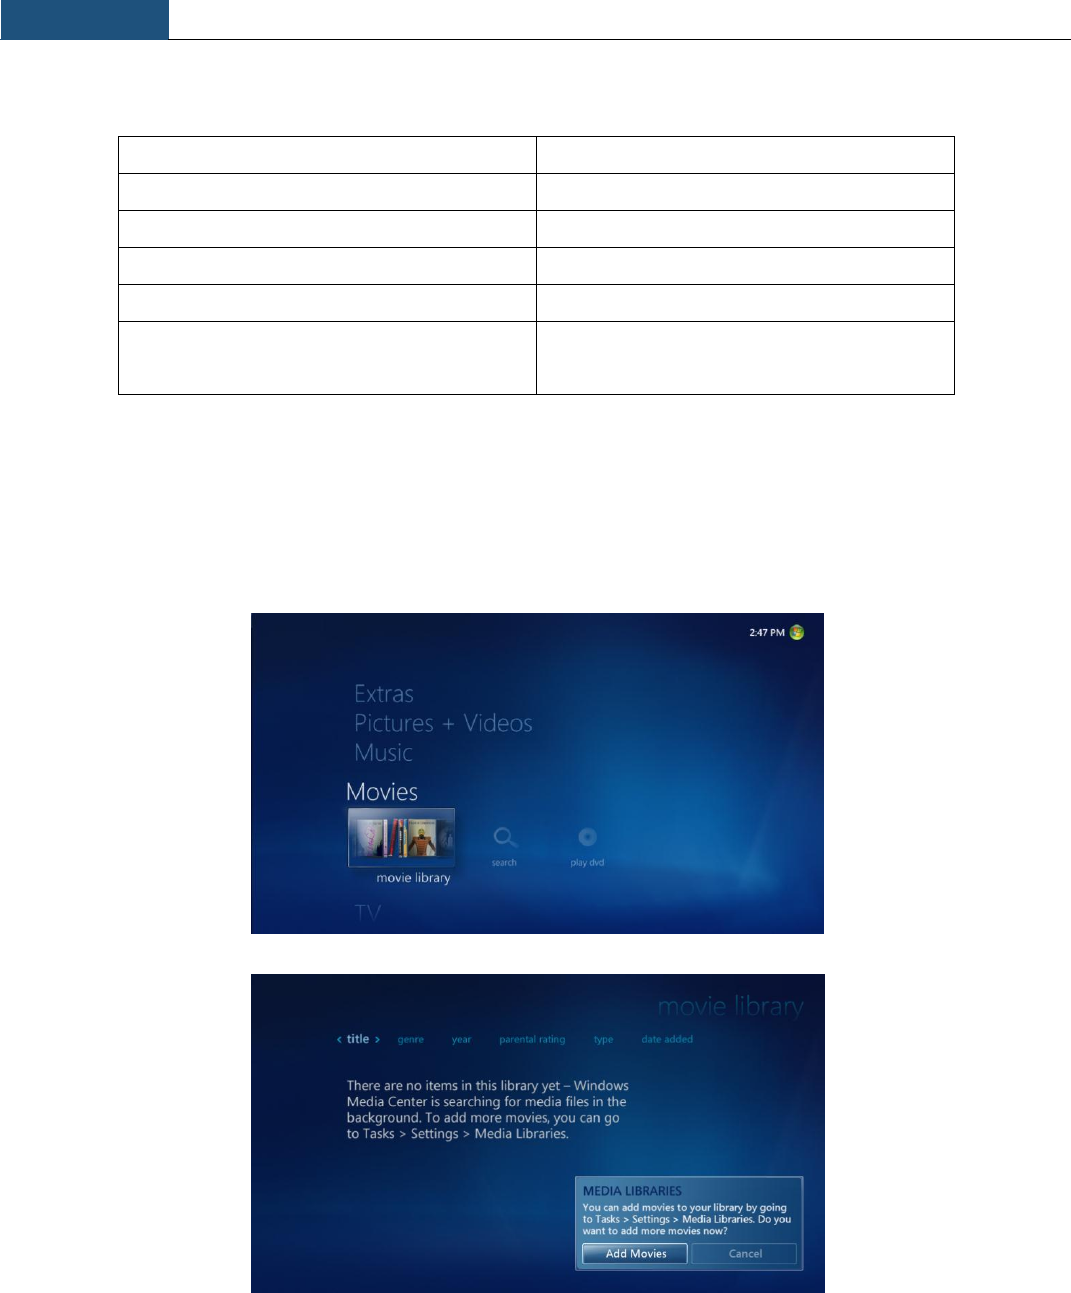
9. Click “Apply” to activate the full screen or “Discard” to go back to the last screen size
Note: In some cases, the image on the screen will still appear a bit blur when you reach the
full screen display. This is due to a pixel ratio discrepancy with the TV. You then need to pull
the overscan slider to 0% then refer to the TV manual to adjust the display area.
Chapter 3
Using the MC101
13
3.2 Play Movie Files
Video file types (format)
File name extensions
Windows Media file
.wm and .asf
Windows Media Video file
.wmv
Windows video file
.avi
Microsoft Recorded TV Show file
.dvr-ms
Movie file
.mpeg, .mpg, .mpe, .m1v, .mp2 and .mpv2
etc.
Codec pack has been pre-installed on your system which allows your MC101 to playback various video formats
generally not supported by the operating system itself.
Note: You can extend the capabilities by installing additional codecs to play other file formats if needed.
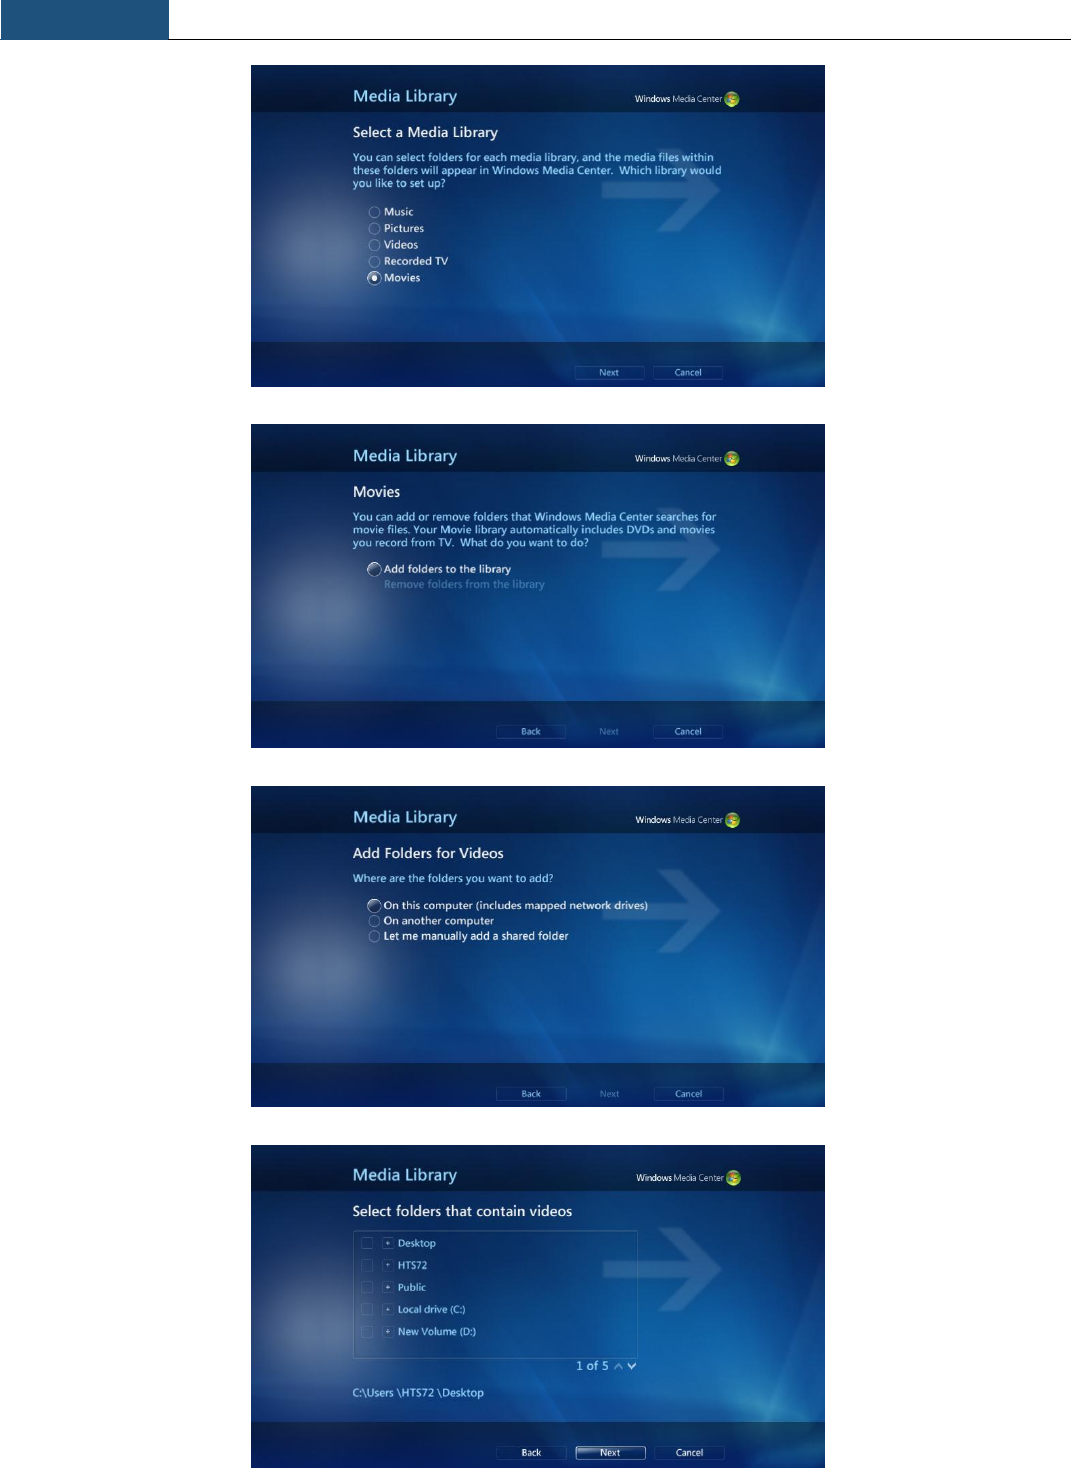
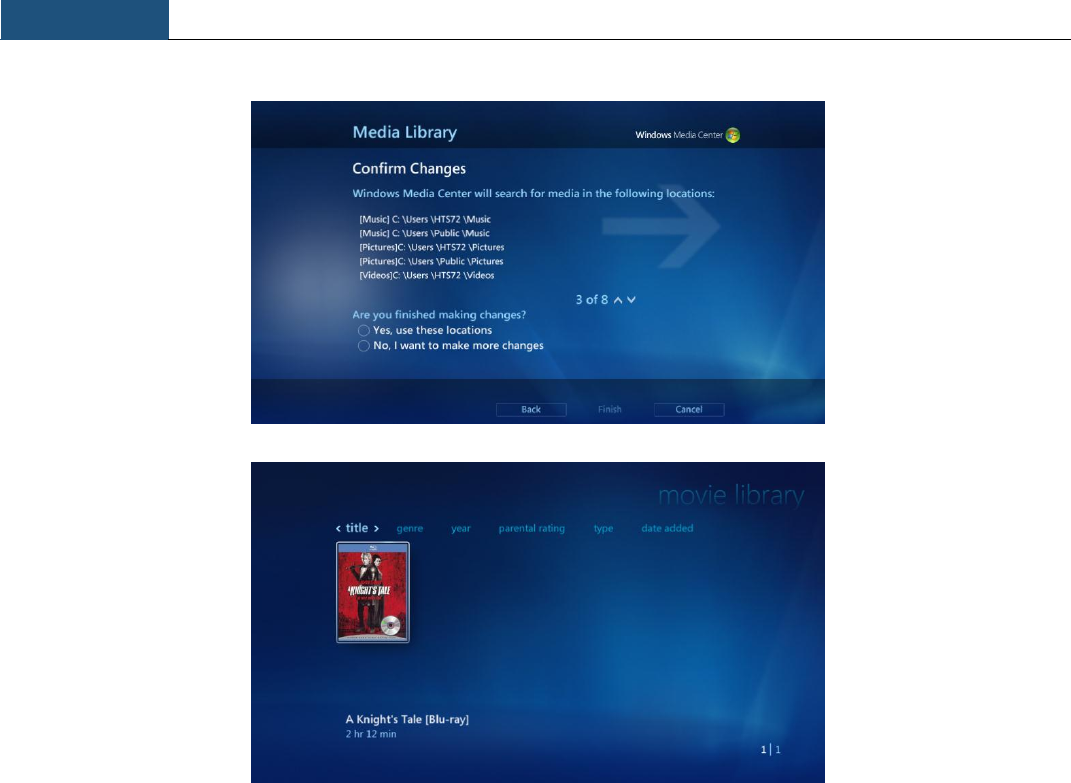
Add the media (movie) file into the library:
Chapter 3
Using the MC101
14
Chapter 3
Using the MC101
15
Chapter 3
Using the MC101
16
3. 3 Play Blu-ray Disc/ DVD in WMC
1. Install an external Blu-ray / DVD drive (Additional purchase of external optical drive required)
2. For Blu-ray playing, you will need to add additional software. This is usually provided with the drive. When installing, ensure
that you include the Plug-in for Windows Media Center. If no plug in is available, below procedure will not be valid and you will
have to use the third party software for Blu-ray playing.
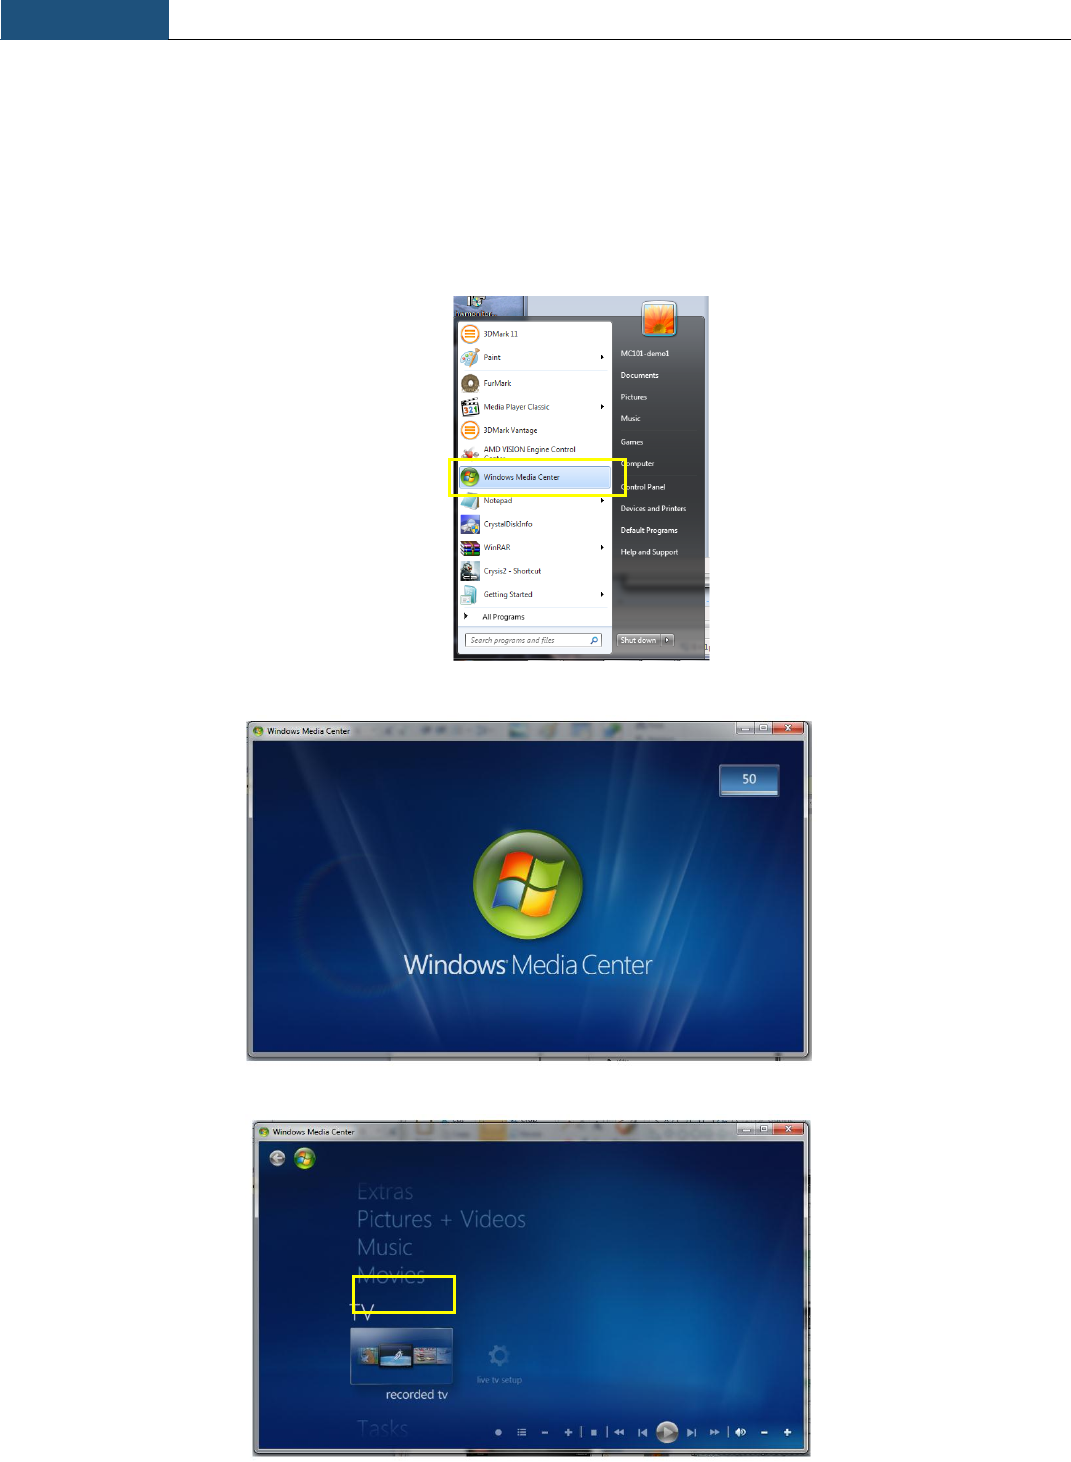
3. Start Window Media Center from the “start” menu
4. Wait for Window Media Center start up screen
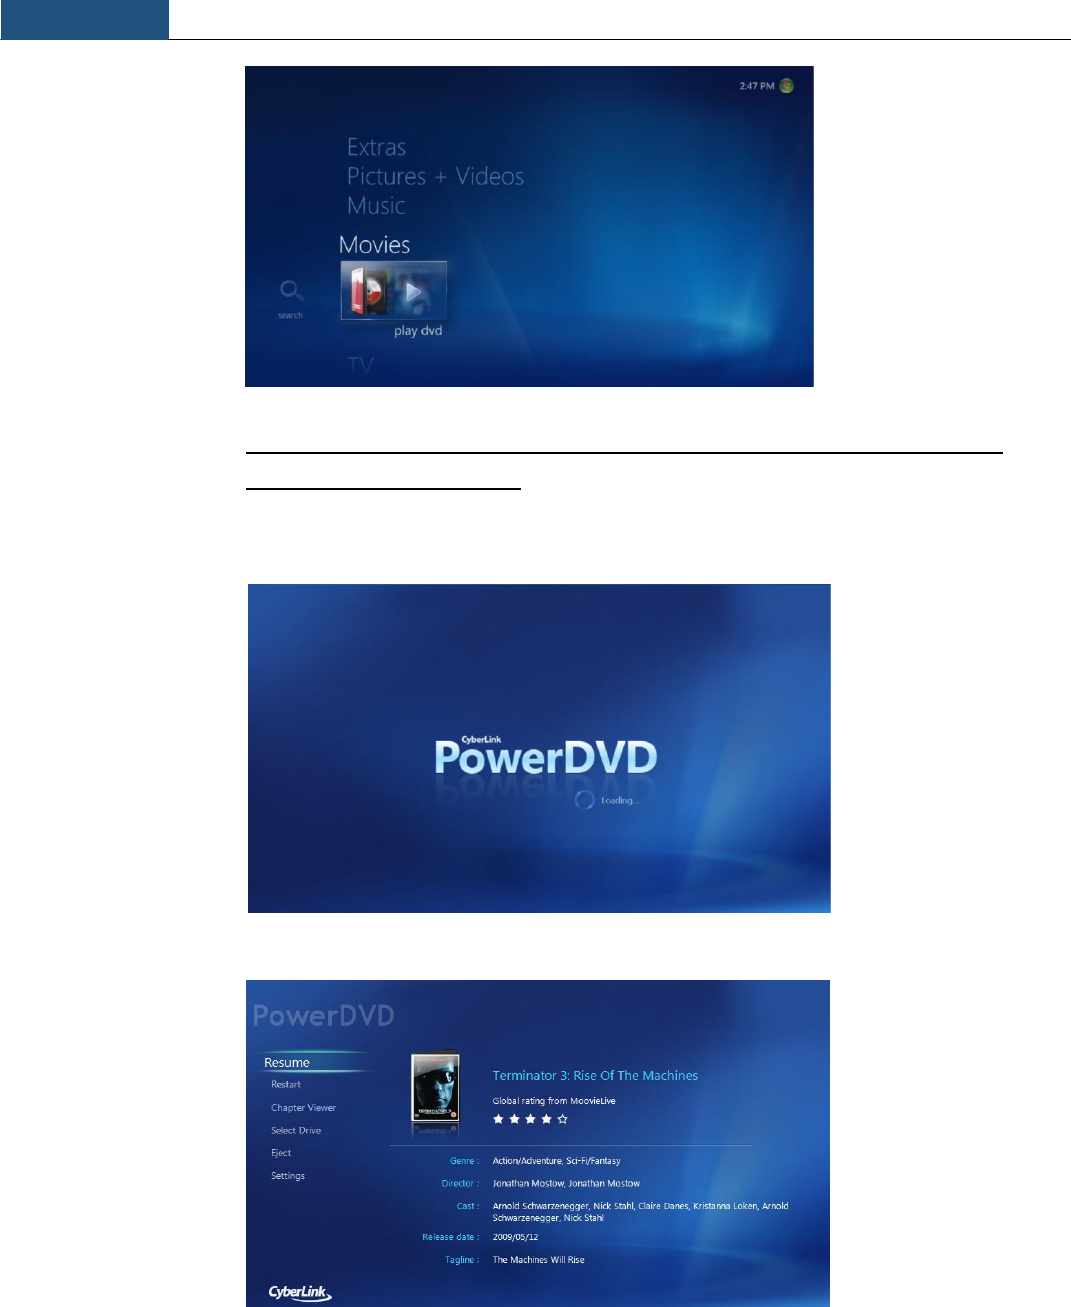
5. On the main menu, select “Movies”
Chapter 3
Using the MC101
17
Note : Although the menu says Play DVD, it is also valid for Blurays if you have
installed the plug-in in step 2
6. Your Blu-ray / DVD is now loading
7. The main menu of your Disk will now pop up, select the option and start enjoying your movie
Chapter 3
Using the MC101
18
3 .4 Play Music Files
3.4.1 WMC:
Music file types (format)
File name extensions
Audio CDs
.cda
Windows Media Audio file
.asx, .wm, .wma, and .wmx
Windows audio file
.wav
MP3 audio file
.mp3 and .m3u
Codec pack has been pre-installed on your system which allows your MC101 to playback various audio formats
generally not supported by the operating system itself.
Note: You can extend the capabilities by installing additional codecs to play other file formats if needed.
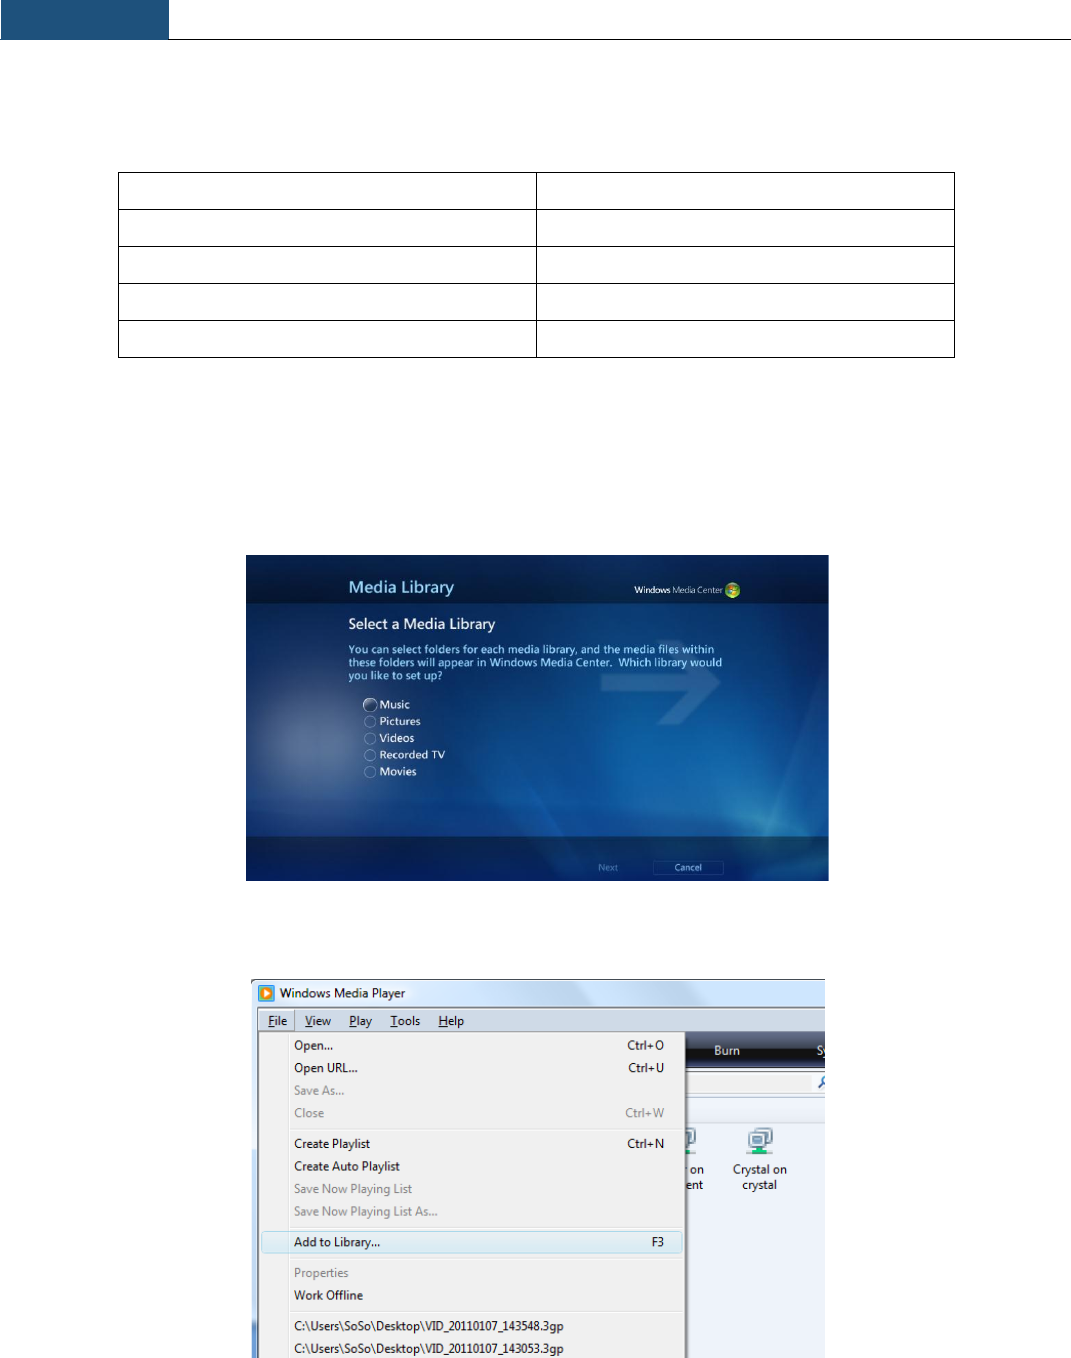
Add the media (audio) file into the library:
3.4.2 WMP:
Add the media (audio) file into the library:

Chapter 3
Using the MC101
19
Chapter 3
Using the MC101
20
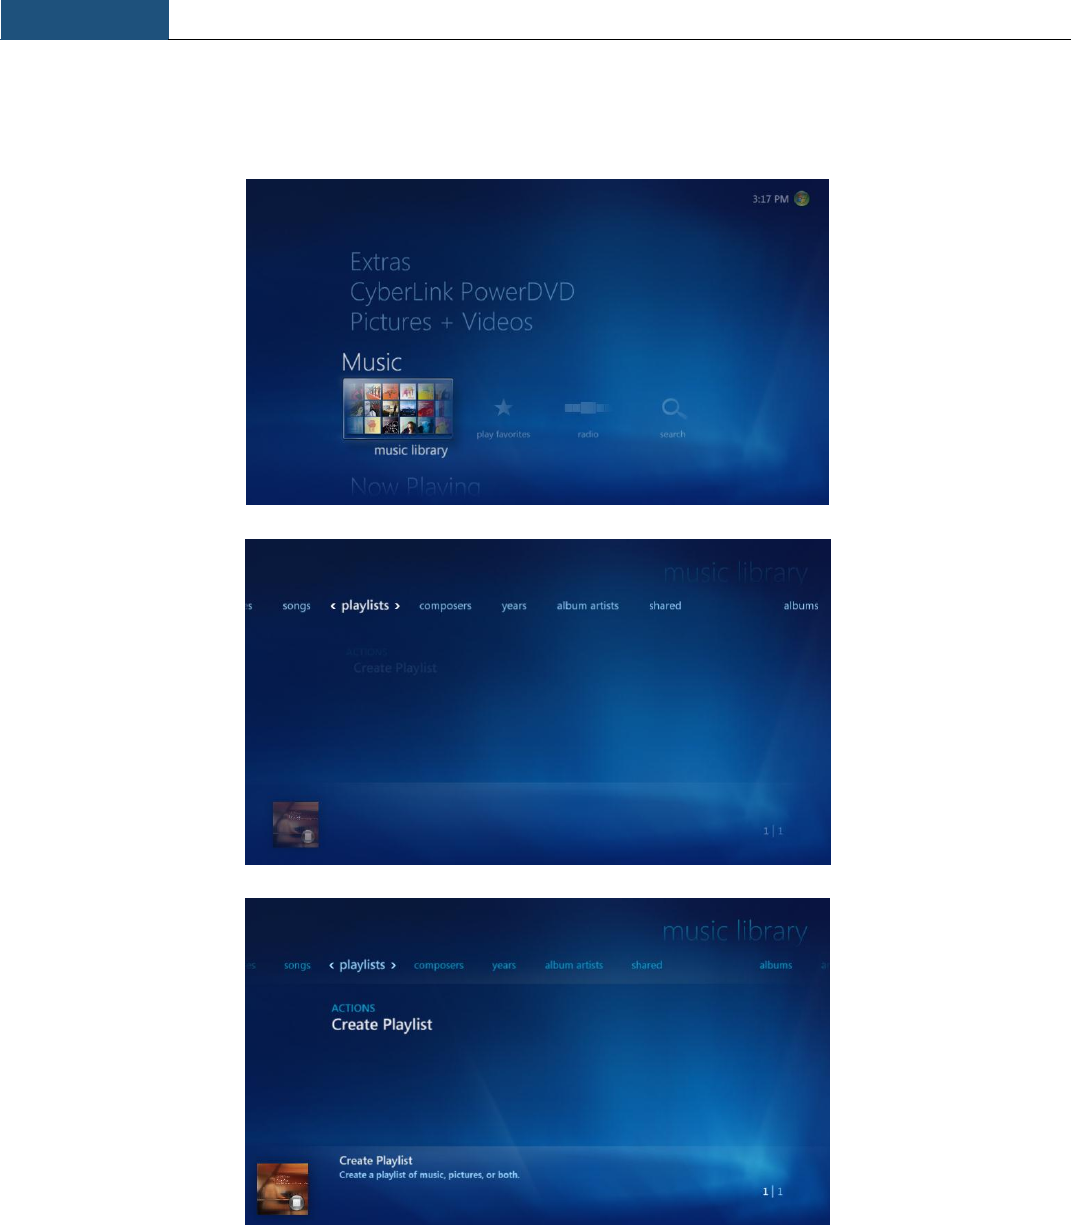
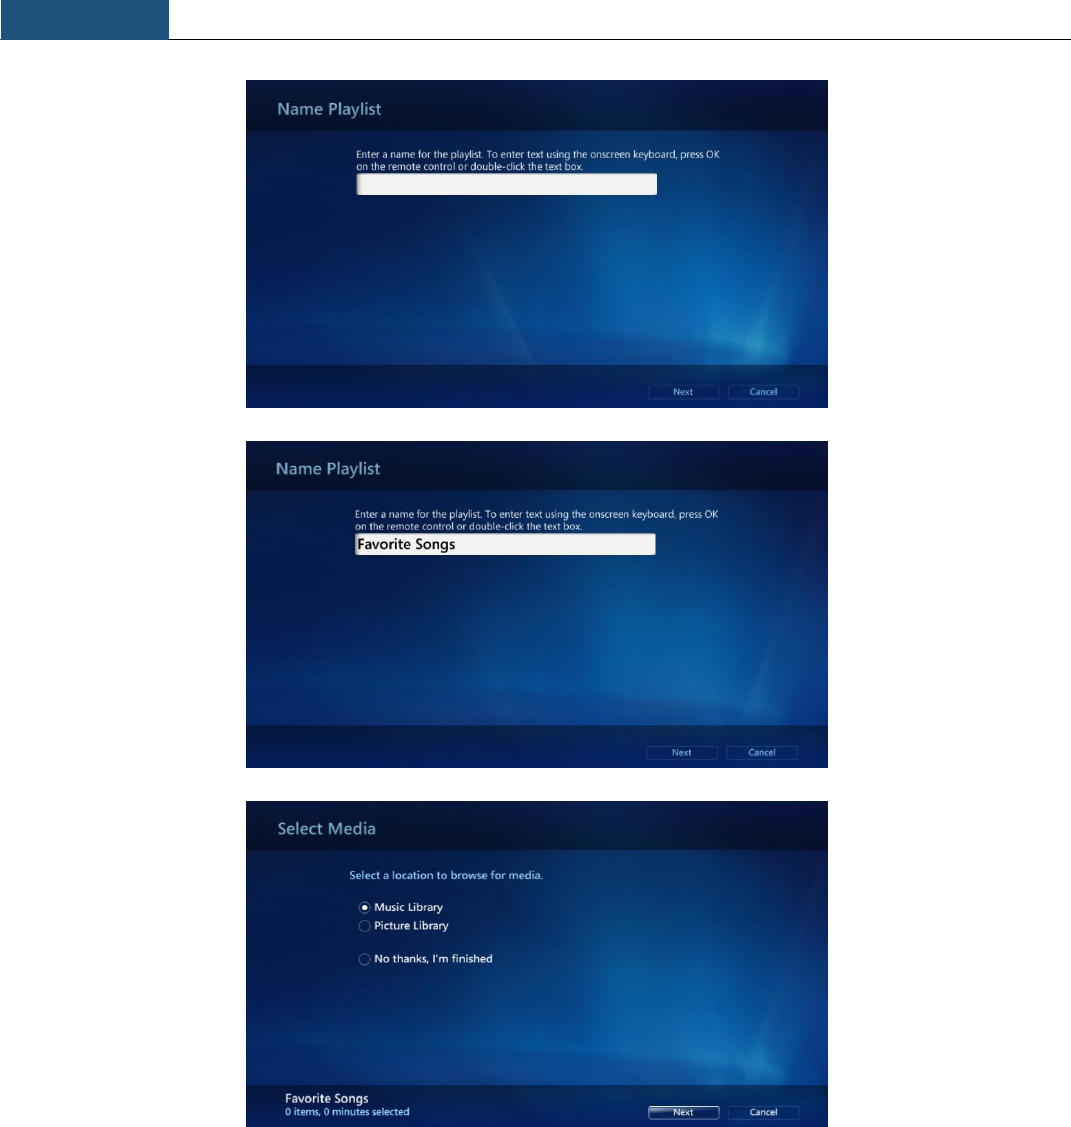
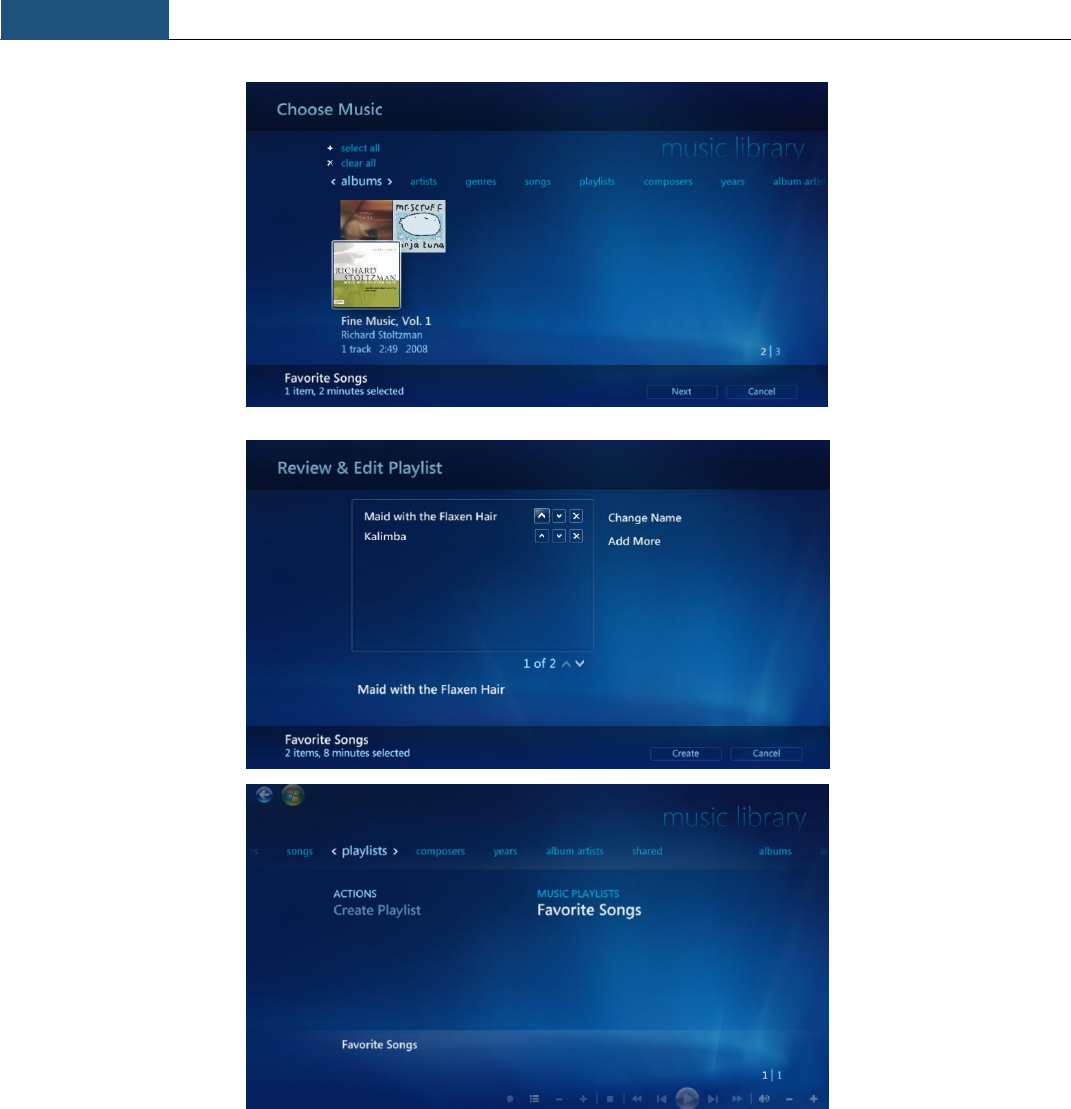
3.5 Create Playlist
3.5.1 WMC:
Chapter 3
Using the MC101
21
Chapter 3
Using the MC101
22
Chapter 3
Using the MC101
23
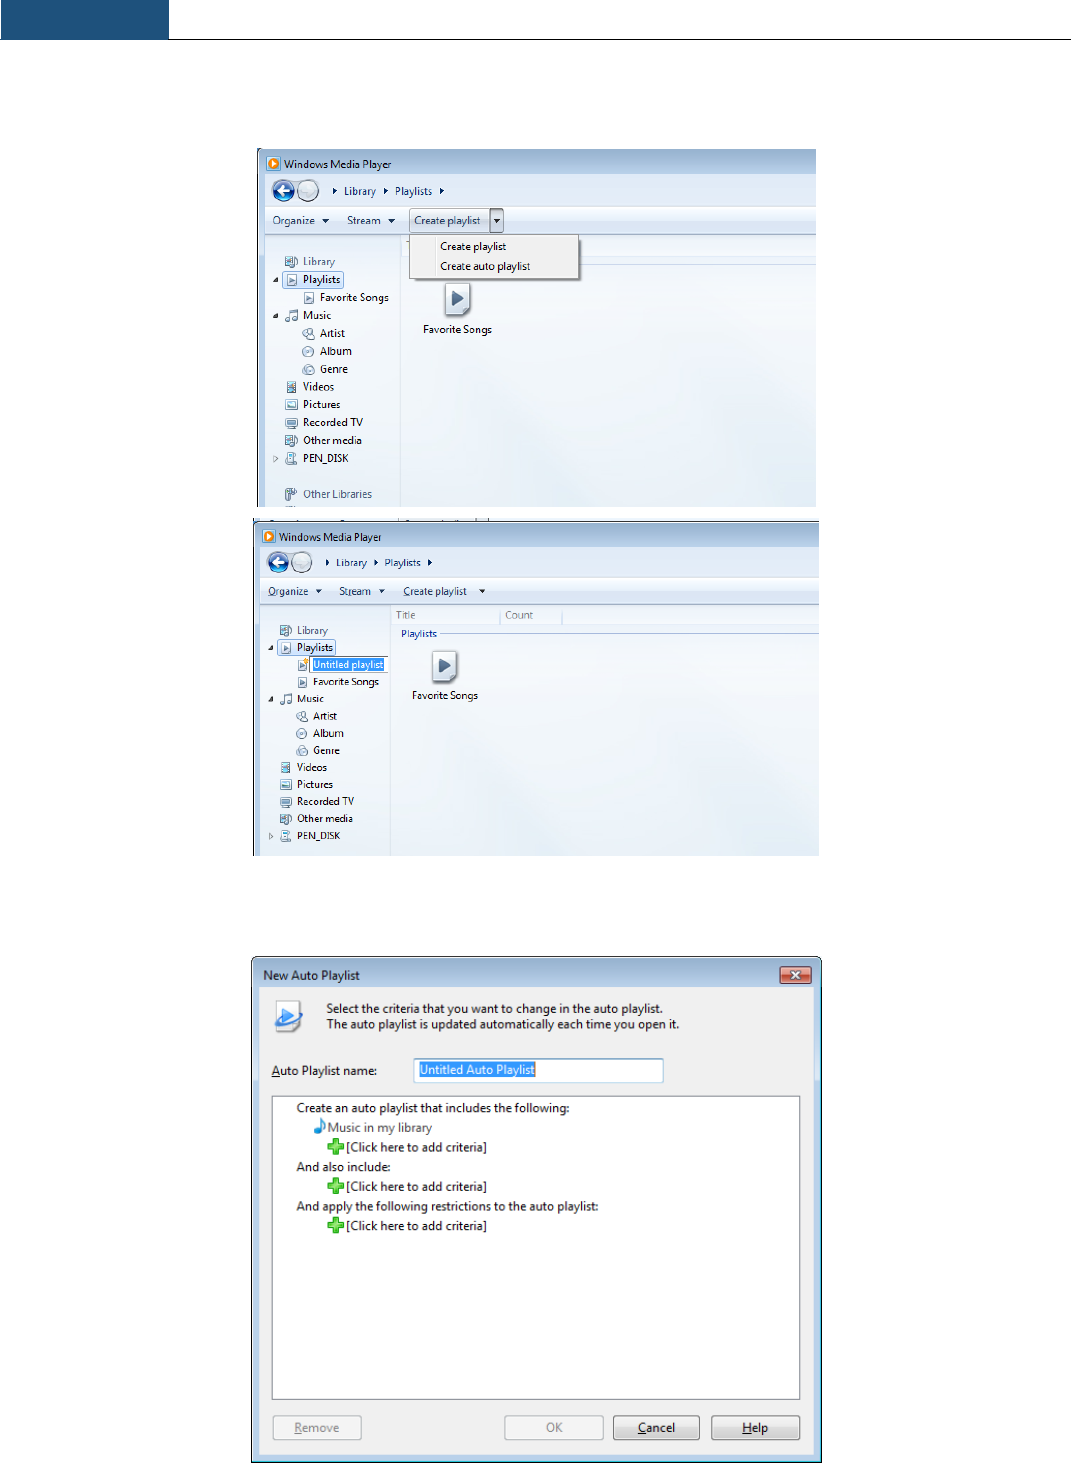
3.5.2 WMP:
Select “Create Playlist”
Select “Create auto playlist”
Chapter 3
Using the MC101
24
3.6 Add Radio Station
3.6.1 WMC:
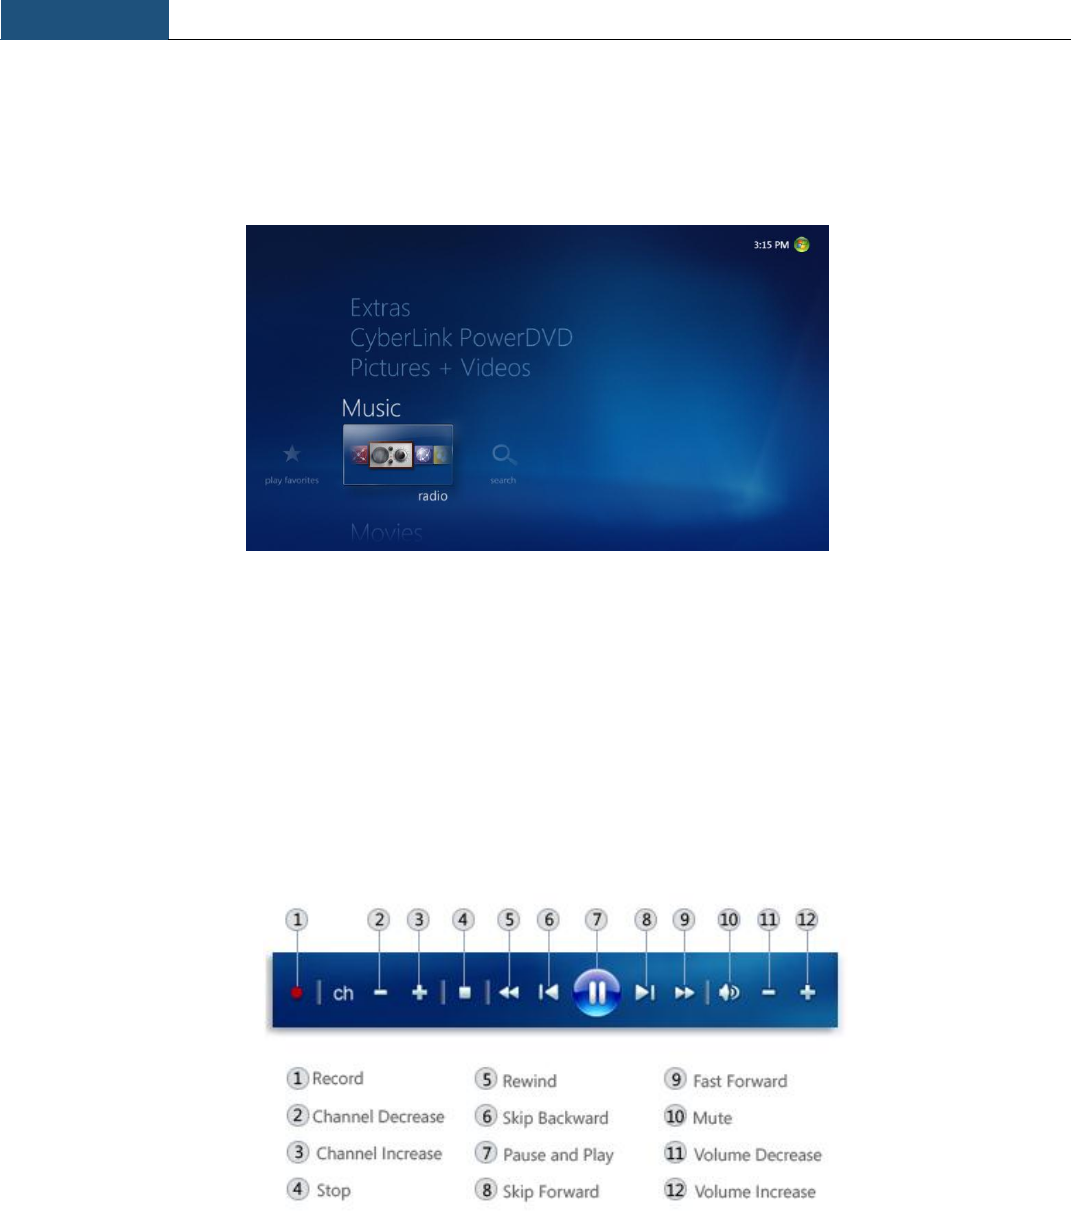
A. To find and listen to an FM radio station:
1. On the start screen, scroll to Music, click radio.
2. To set Windows Media Center to find a radio station:
• Under Seek or Tune, click - or + to find available stations.
• If you know the frequency of the station, enter the numbers using the numeric keypad on the remote
control or on the keyboard.
3. To control playback, use the on-screen transport controls in the bottom right of the screen (this includes changing
channels, adjusting volume, and pausing or stopping playback).
You must configure the tuner for use with Windows Media Center before FM radio will display by doing the
following:
1. On the start screen, scroll to Tasks, click settings, click General, click Windows Media Center Setup, and then click
Set Up TV Signal.
2. Proceed through set up to configure your tuner. The radio option should appear after you have configured your tuner.
Chapter 3
Using the MC101
25
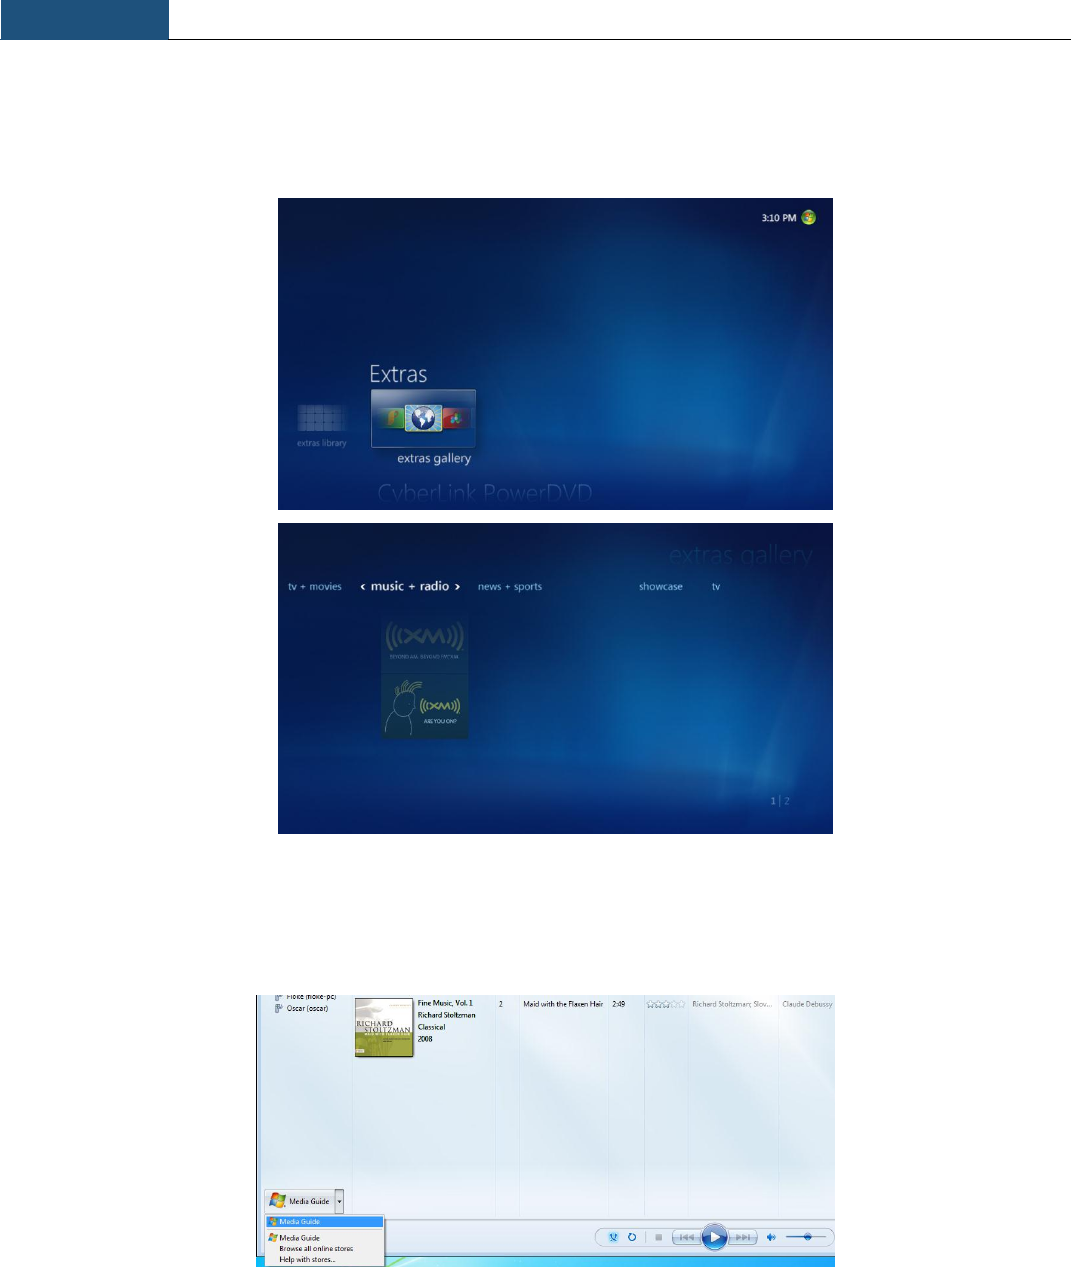
B. To find and listen to Internet radio
1. On the start screen, scroll to Extras, click Extras gallery, and then click music + radio.
3.6.2 WMP:
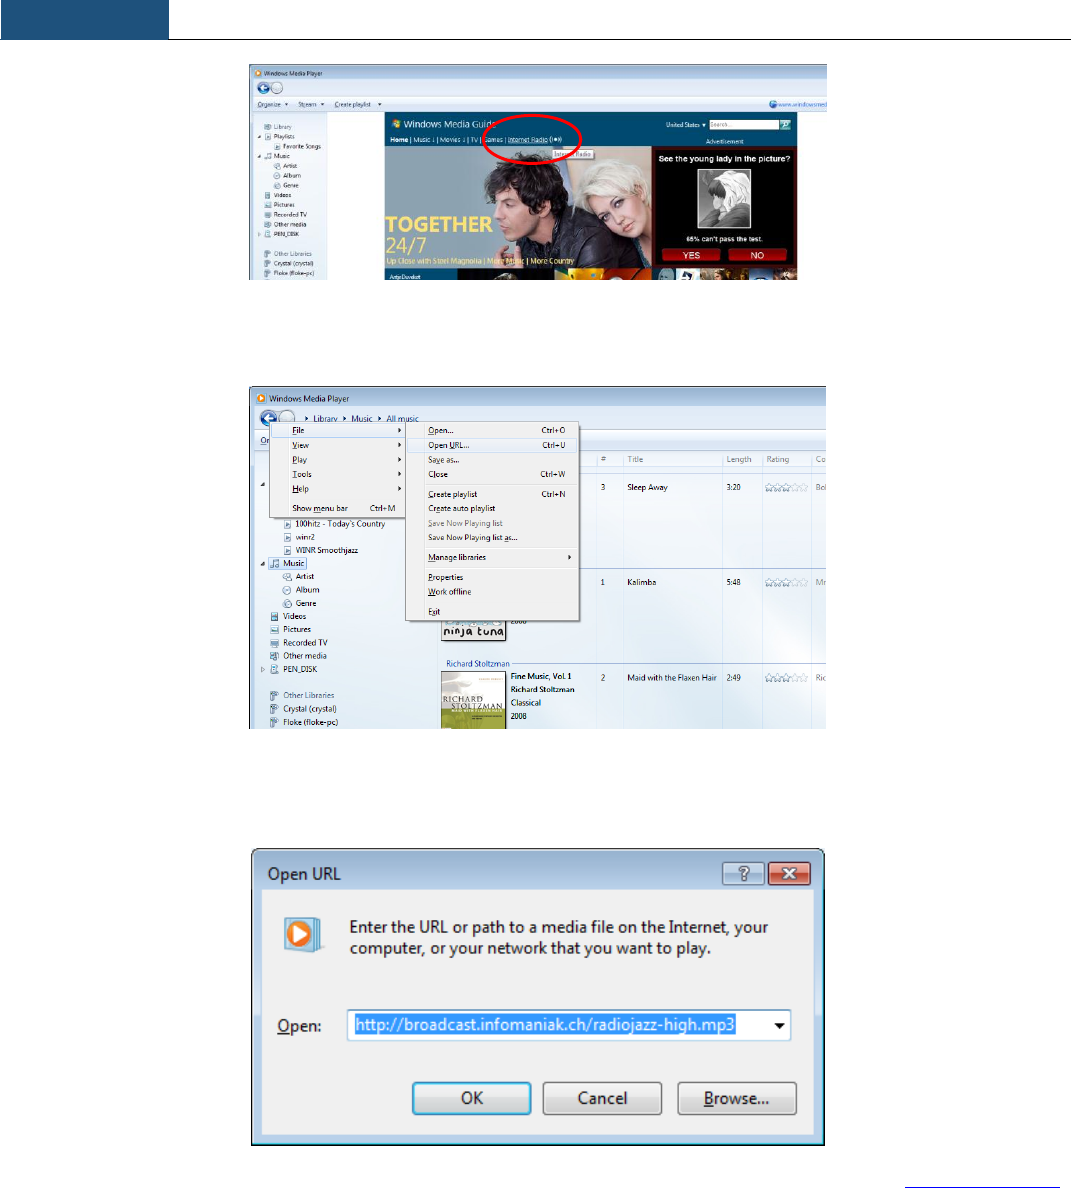
A. Listen to internet radio
1. Look down on the left side and click on Media Guide
2. Click “Internet Radio” at the top of the menu
Chapter 3
Using the MC101
26
Add internet radio station from URL
1. File>Open URL
2. Copy the internet radio URL and open. You can go onto www.listenlive.eu to get URLs of many radios
The URL of the different radio stations can be found on the radio websites. The website Listenlive.eu (http://listenlive.eu)
also list a lot of URL for the different Europeans countries.
Chapter 3
Using the MC101
27
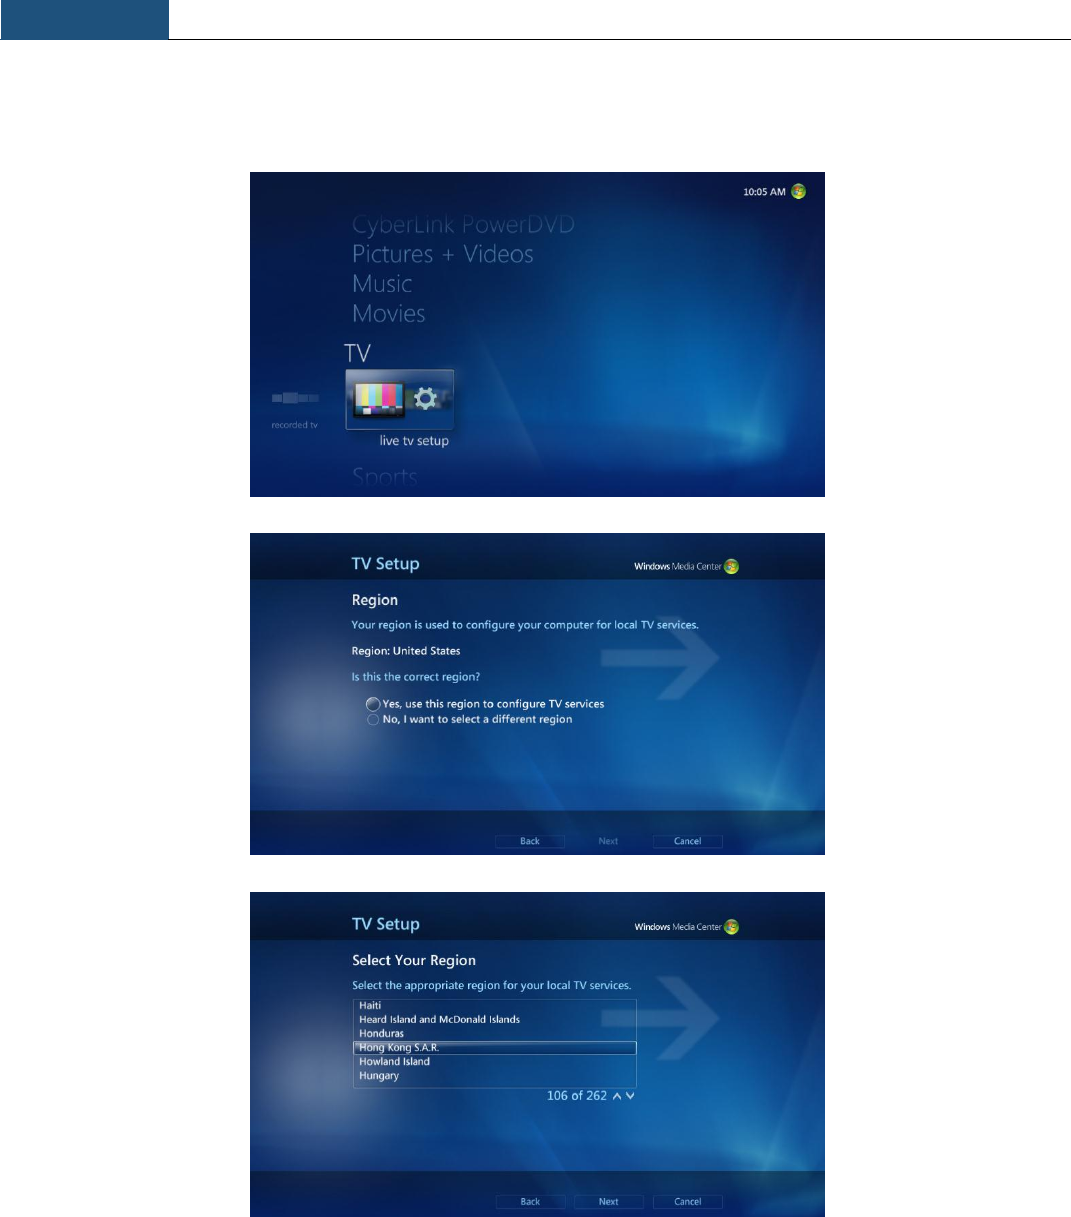
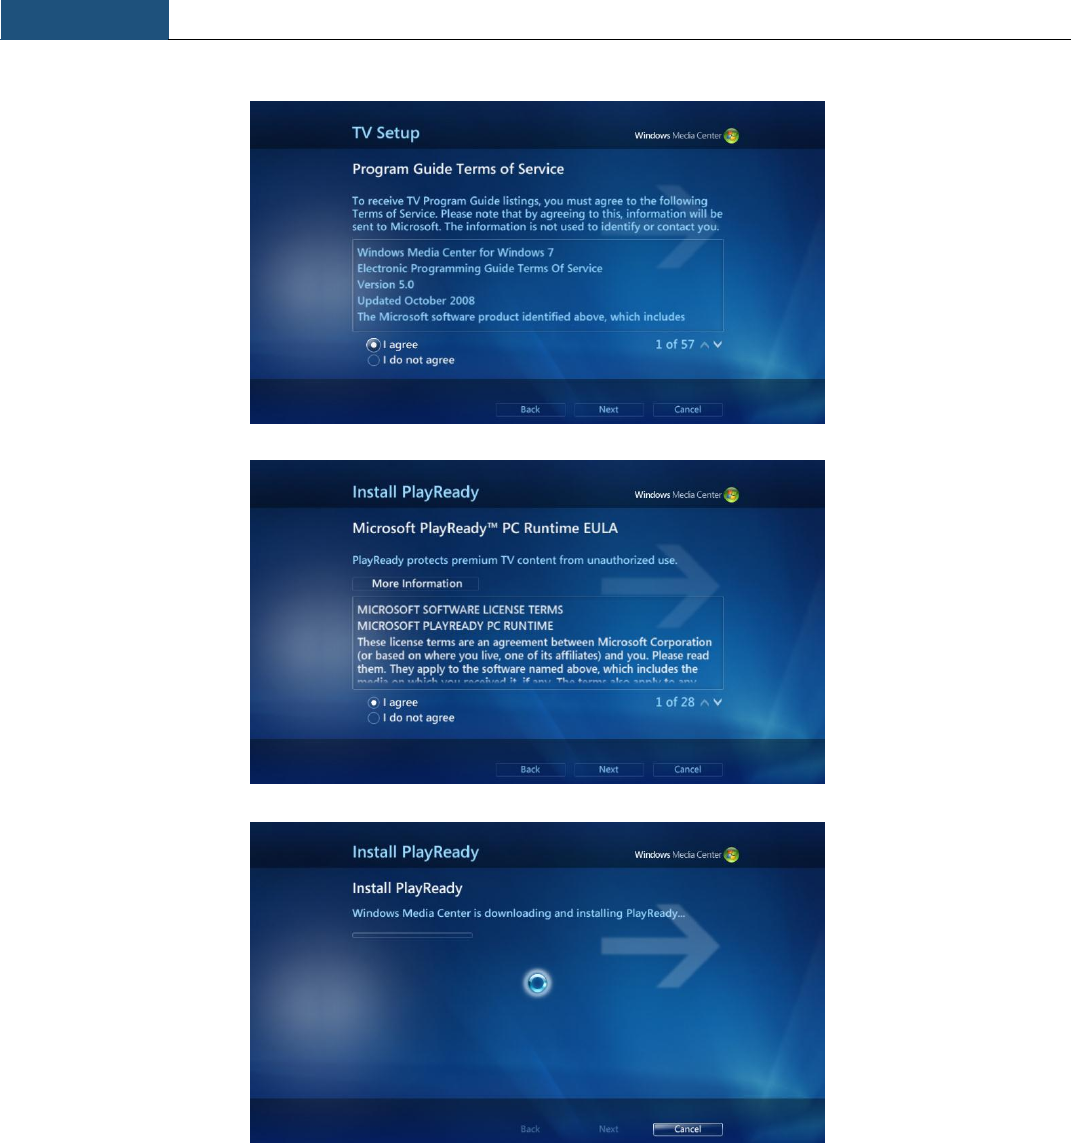
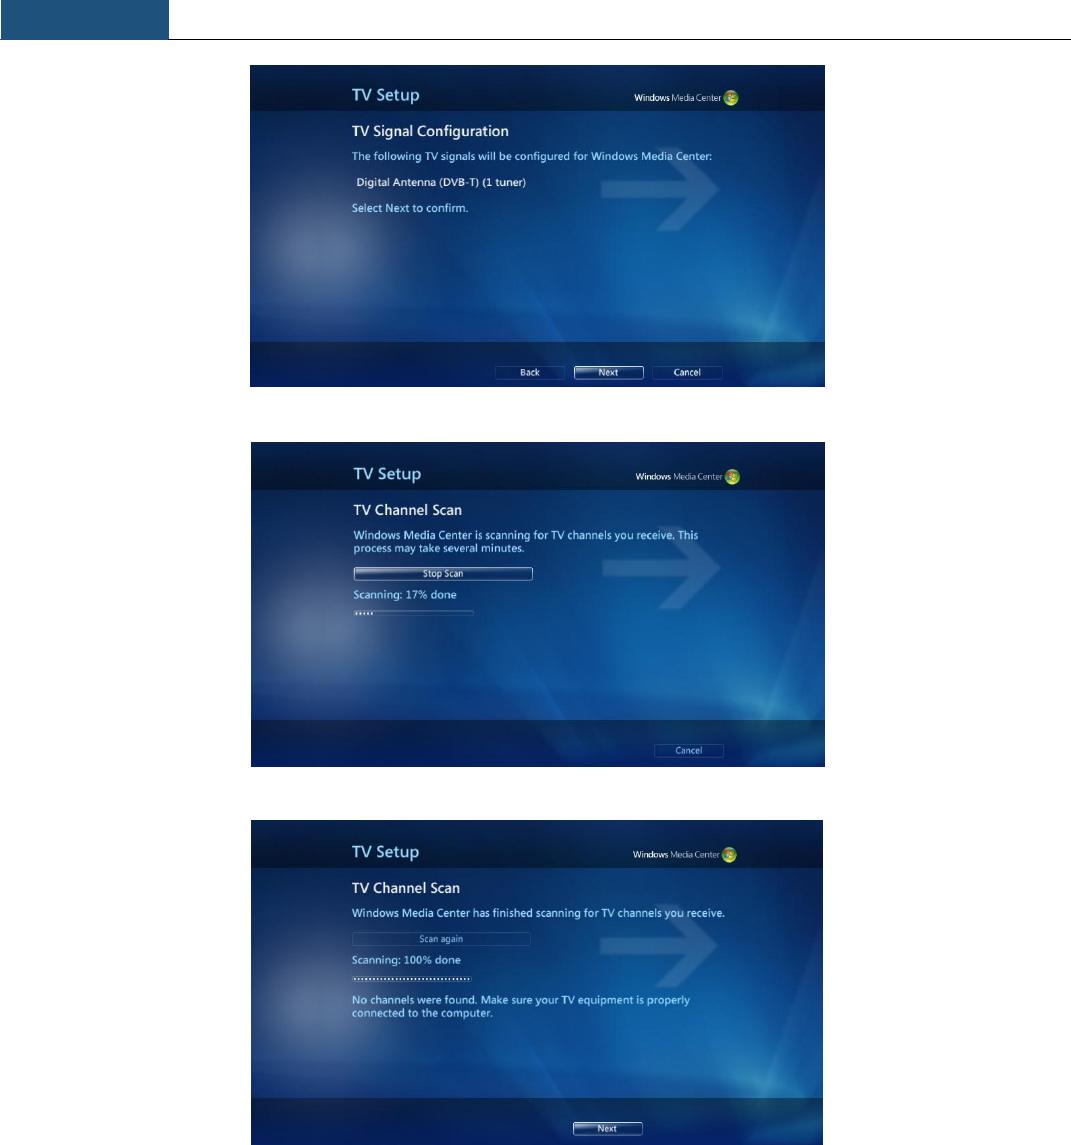
3.7 Scan TV Signal
1) For first time user, go to ‘live tv setup’:
Chapter 3
Using the MC101
28
Chapter 3
Using the MC101
29
Chapter 3
Using the MC101
30
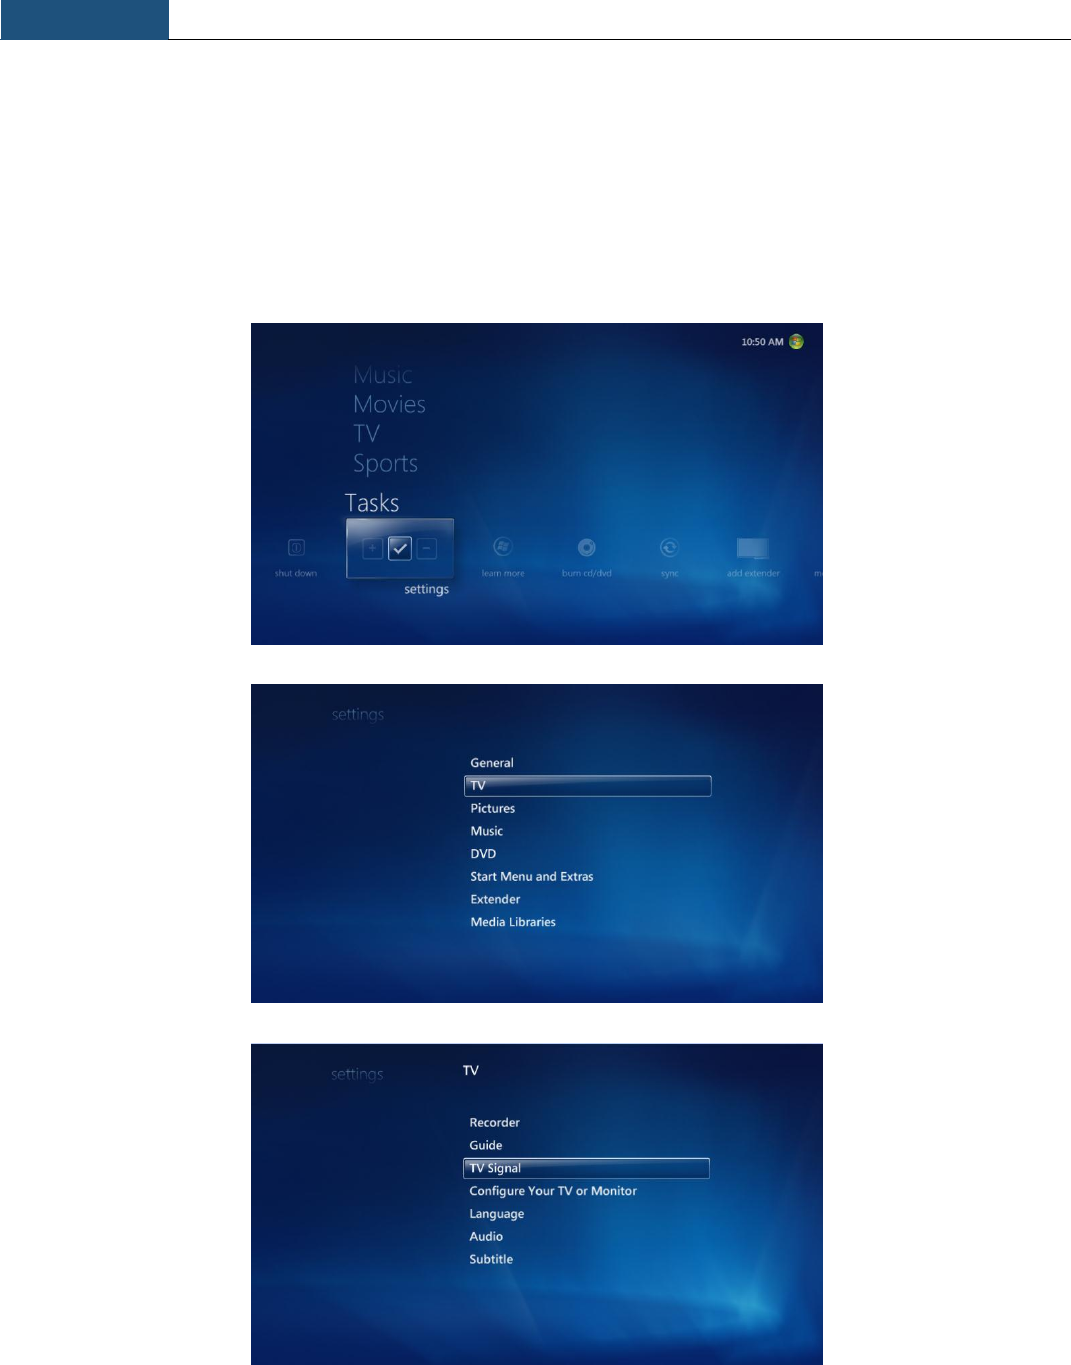
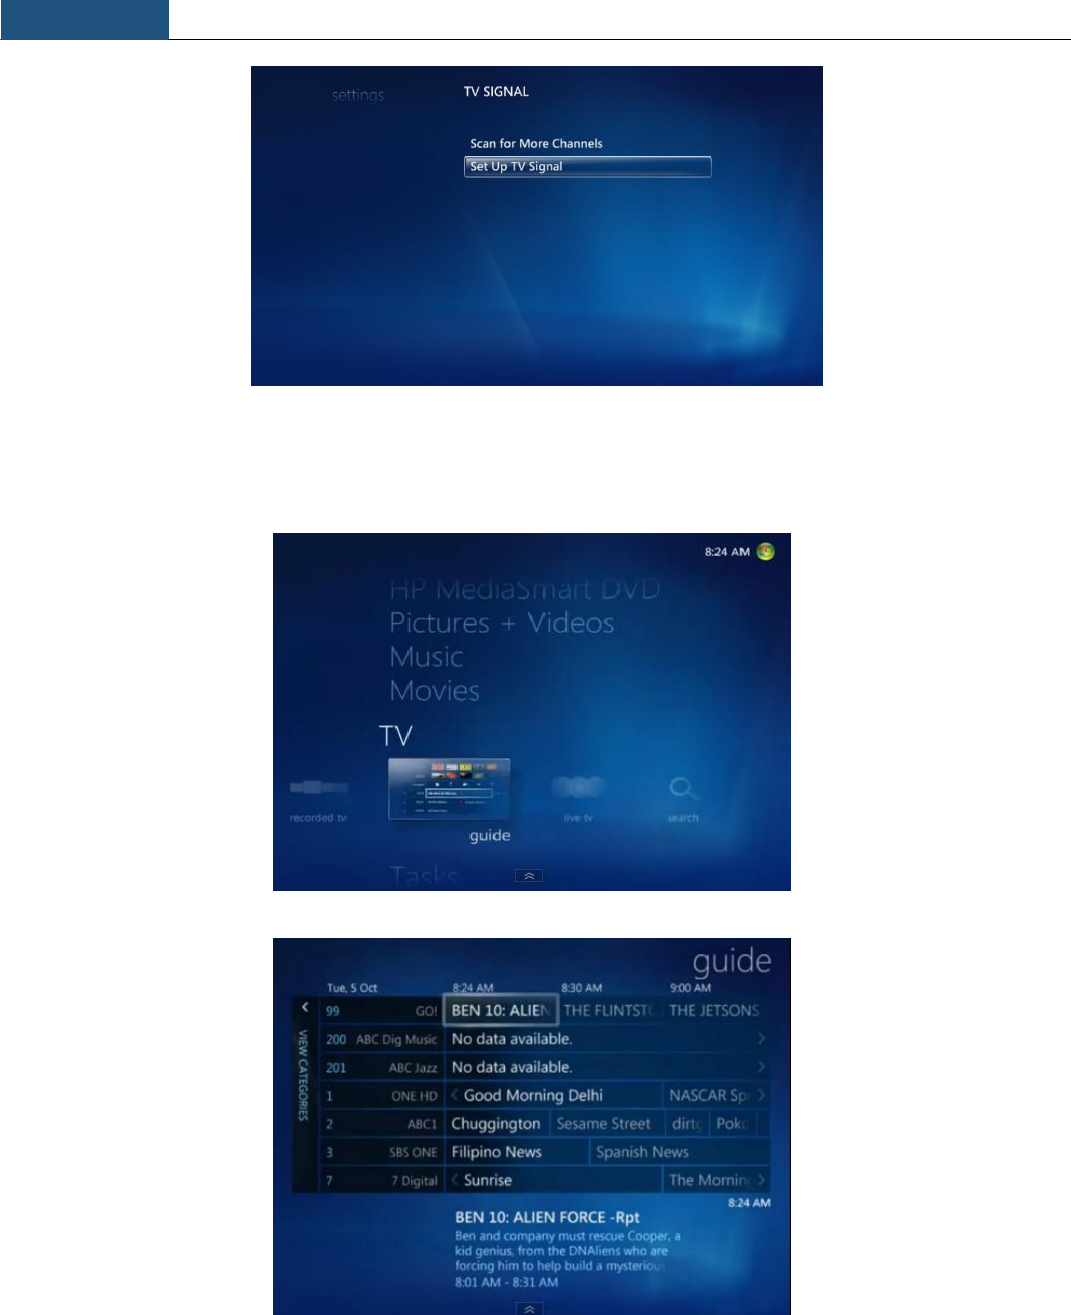
For the next time, go to setting and change the configuration or scan TV channel:
Note: This procedure apply in the following cases:-
- You changed location of the MC101
- You change Antenna
- New channels become available in your area
There is no need to scan the channel each time you want to watch TV.
Chapter 3
Using the MC101
31
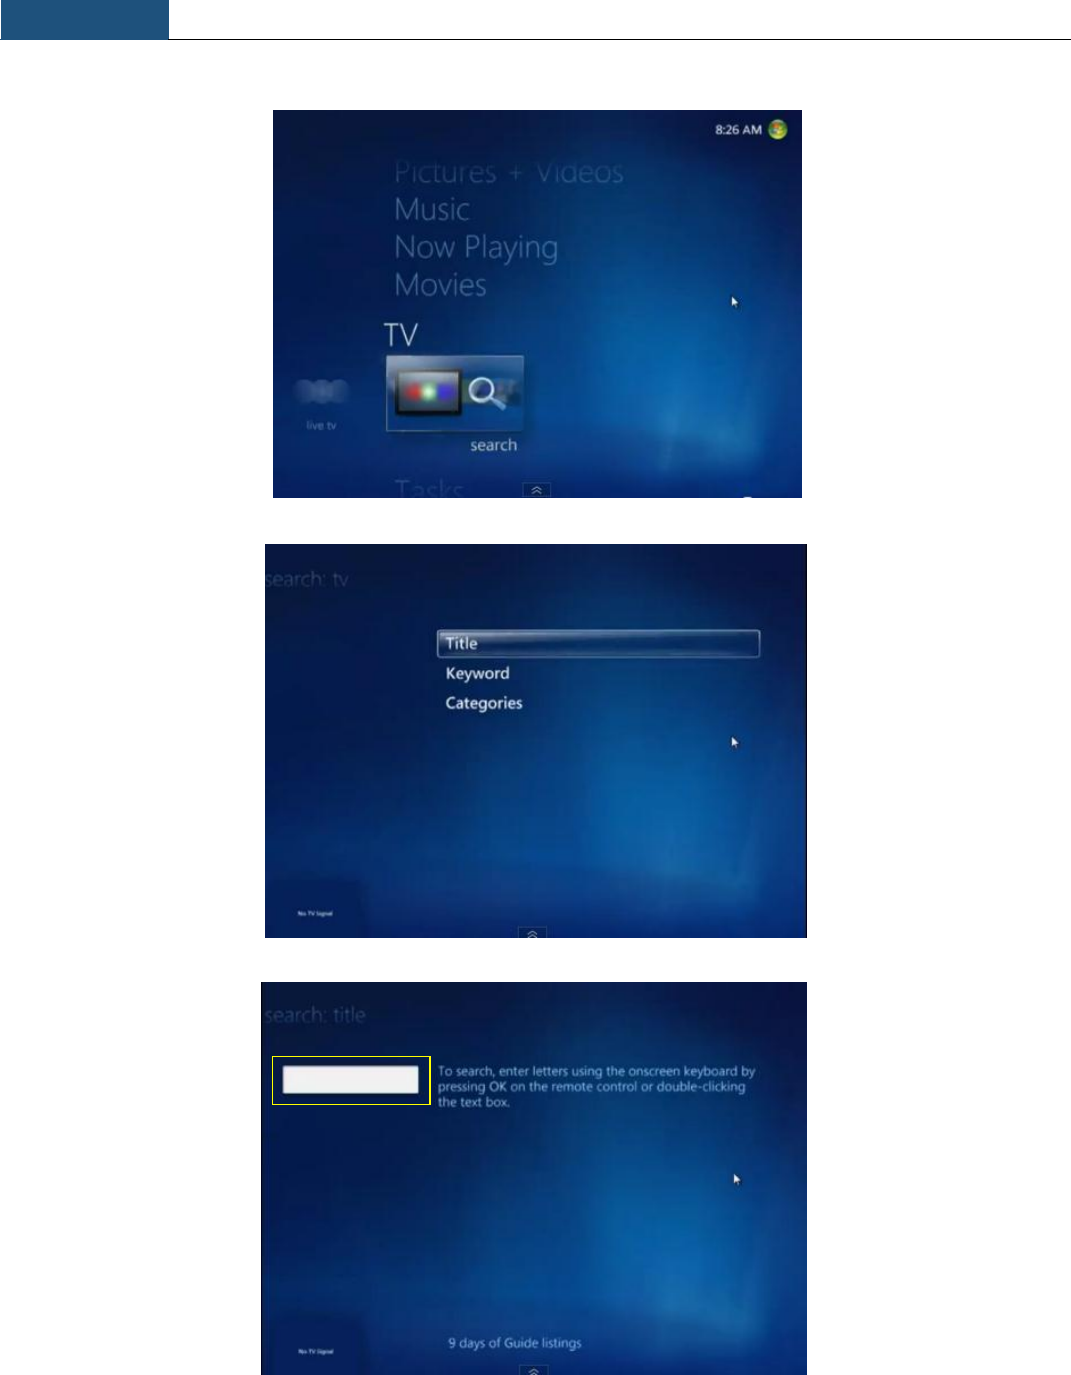
Note: When TV Signal is set, go back to Main menu to start watching TV.
2. To watch TV, go to “TV guide” in the main menu
Choose the program you want to watch in the guide, click on the title to start watching TV
Chapter 3
Using the MC101
32
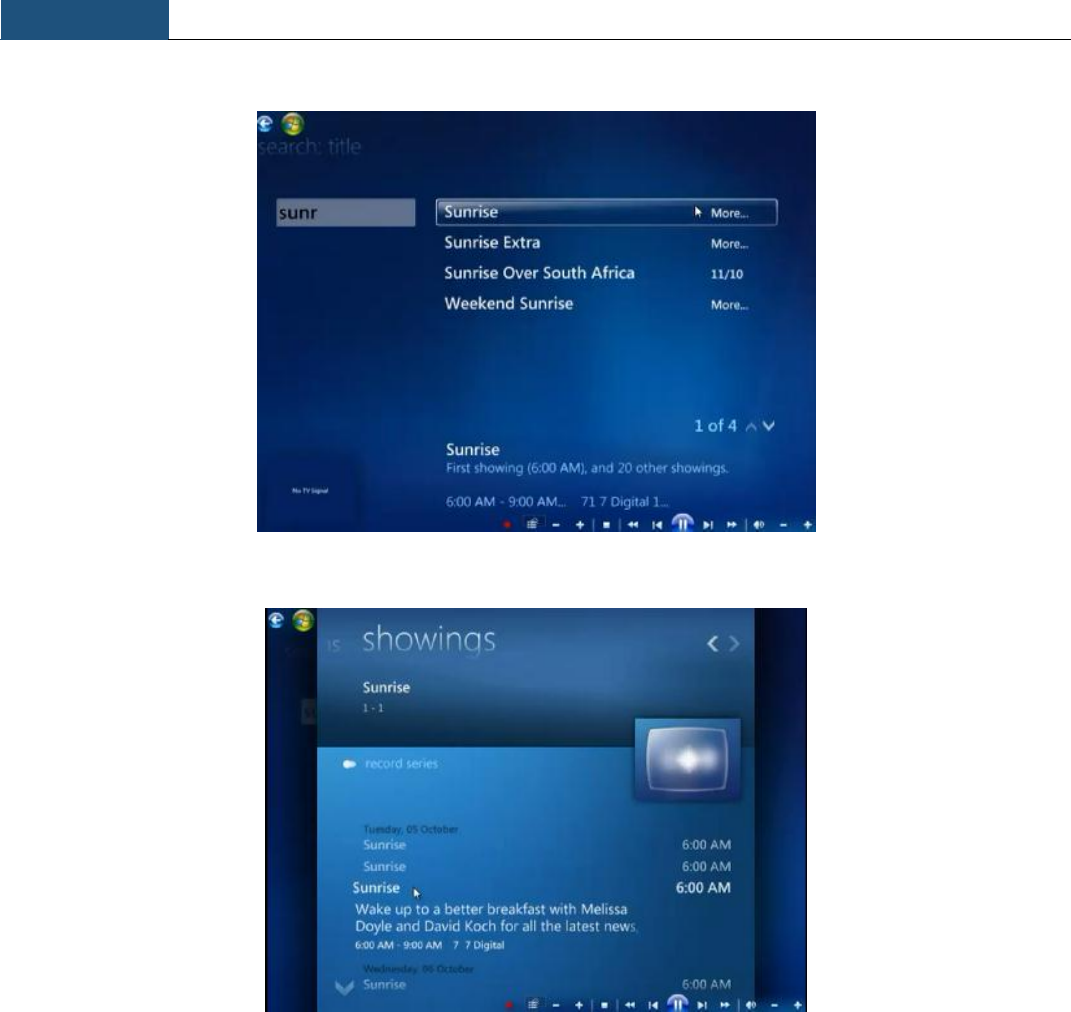
3. To search TV program, go to the main menu and go to TV “Search”
Choose type of search, for example, search by „Title‟
Type in the title of the program
Chapter 3
Using the MC101
33
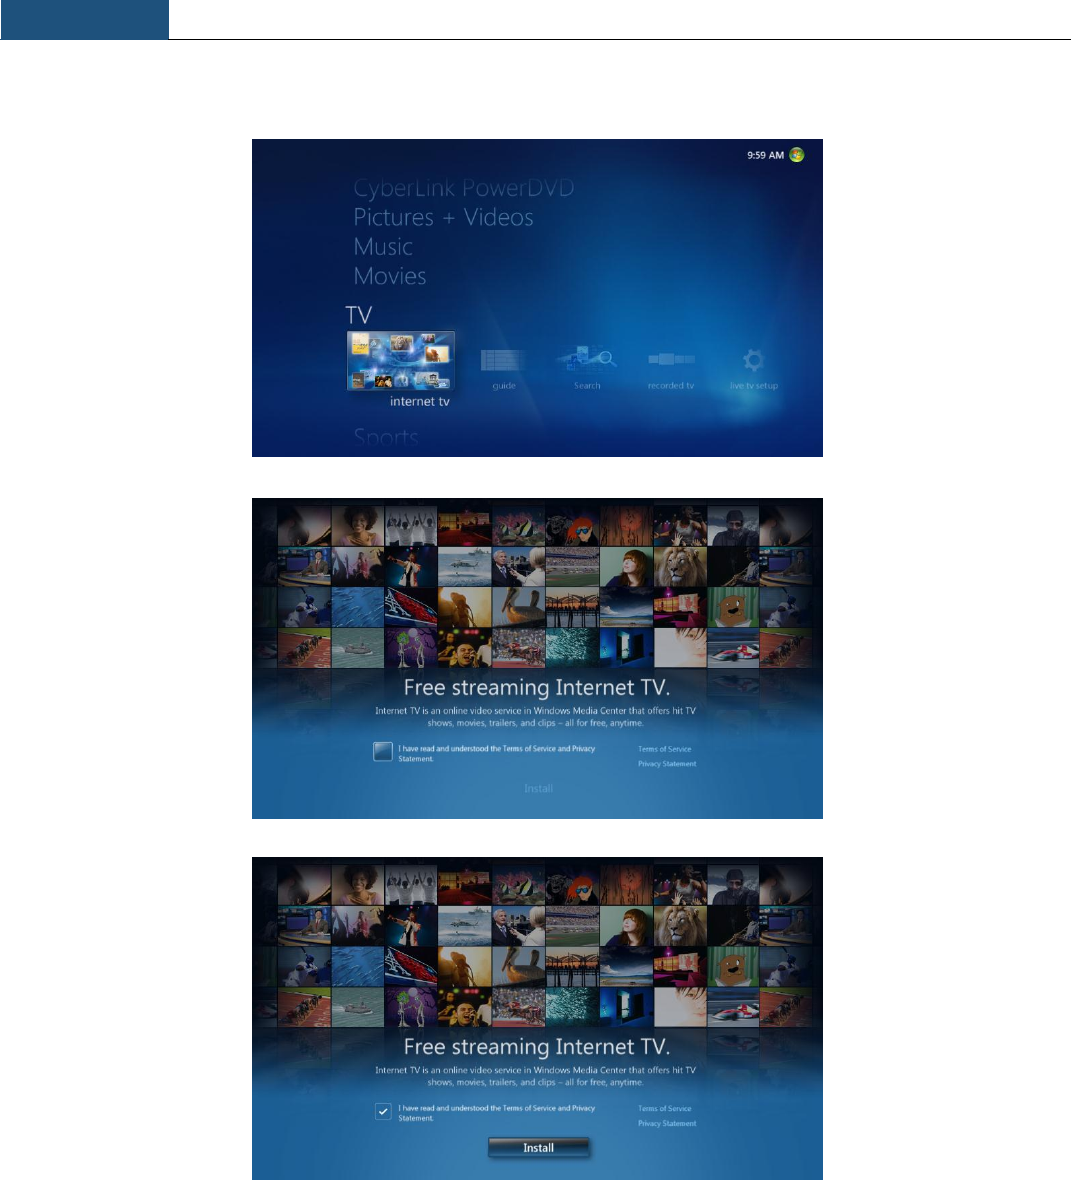
Select and click on the program you are searching for
You can now select the showing program to start watching or you can record this program by pressing “record”.
Note: You can watch all your record TV in main menu >TV >Record TV
Chapter 3
Using the MC101
34
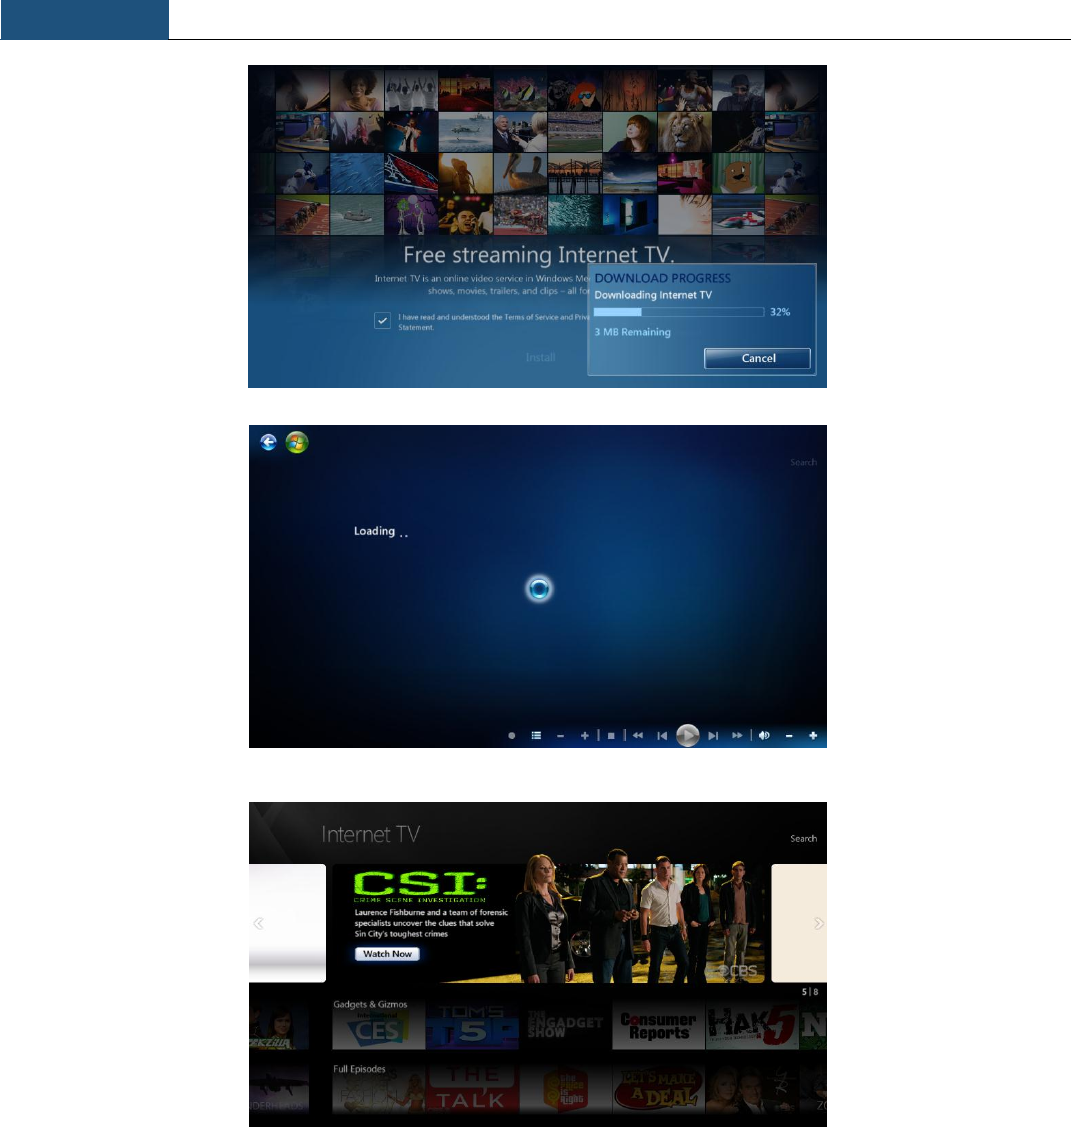
3. 8 Install Internet TV in WMC (only available for the U.S. region)
Chapter 3
Using the MC101
35
Chapter 3
Using the MC101
36
3.9 Migrate iTunes Library from another Computer
Note: users must first have iTunes installed on their system
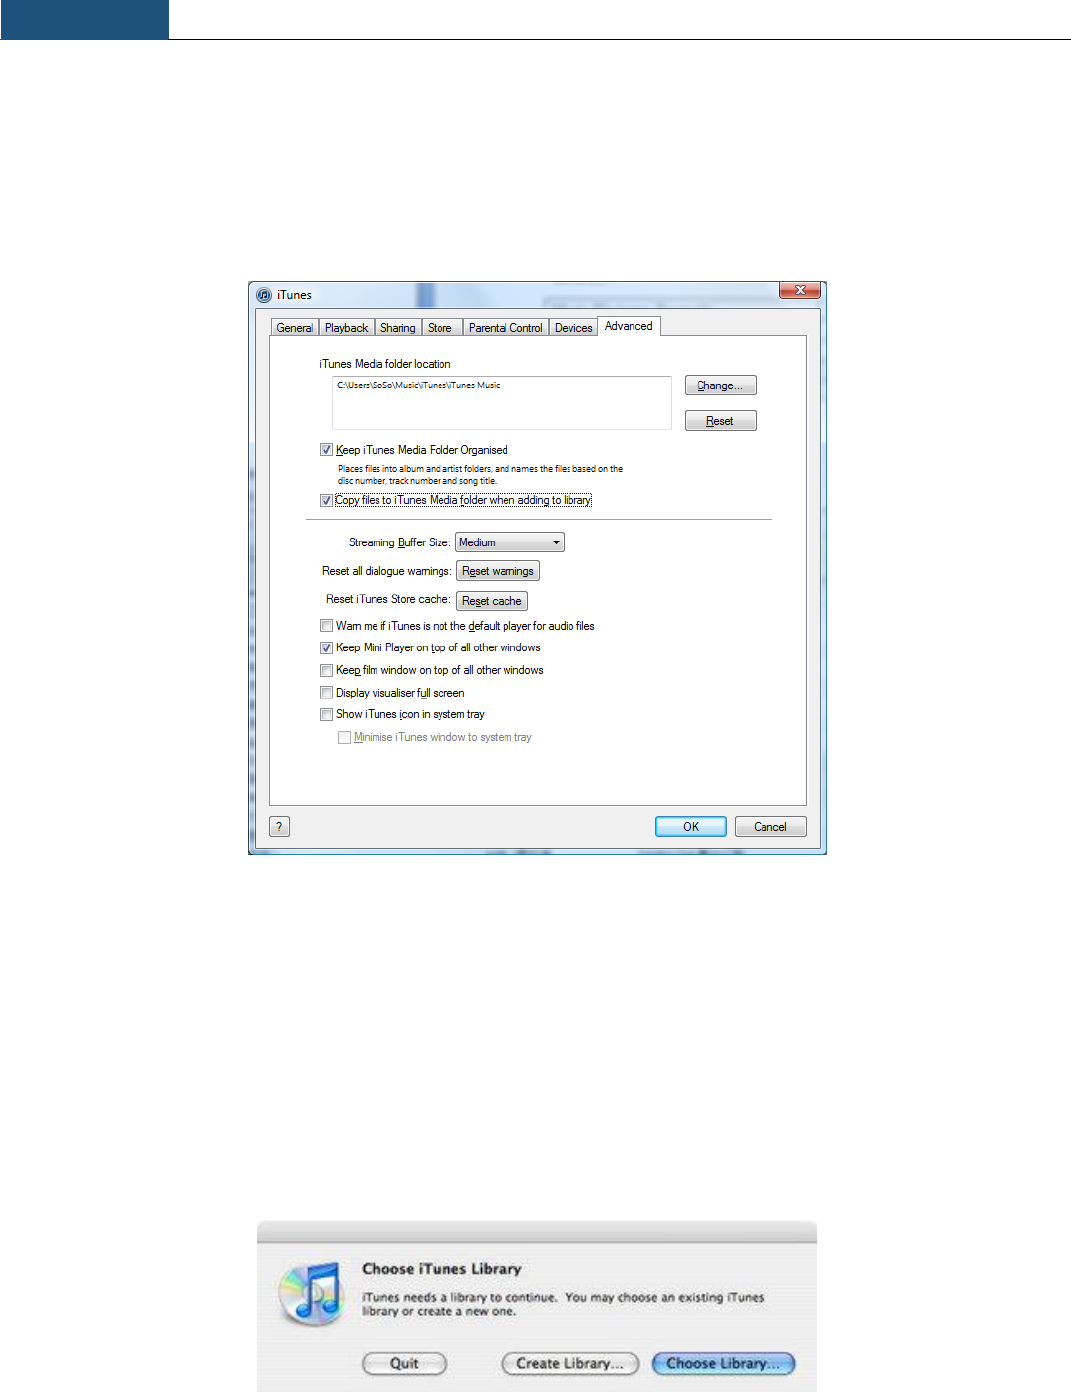
1. In iTunes, select the “Advanced” Tab in “Edit>Preferences”
2. In the Advanced section, make sure "Keep iTunes Music folder organized" and "Copy files to iTunes Music folder
when adding to library" are checked.
3. Then, in the "iTunes Music folder location" area, click on the Change... button, and enter the new location where you
want to move your library to.
4. Re-locate the music folder to the new location from the other computer
5. Copy the folder [Album Artwork], [iTunes Music Library.xml] and [iTunes Library.itl] from the old computer from
“\Users\[your username]\My Music\”.
6. Paste them to your new location (anywhere).
7. Hold down the Shift key when you launch iTunes.
8. When it asks what library to use, click the "Choose Library..." button and browse to the iTunes Library.itl file on the
new location.
Chapter 4
Upgrade and Recovery
37
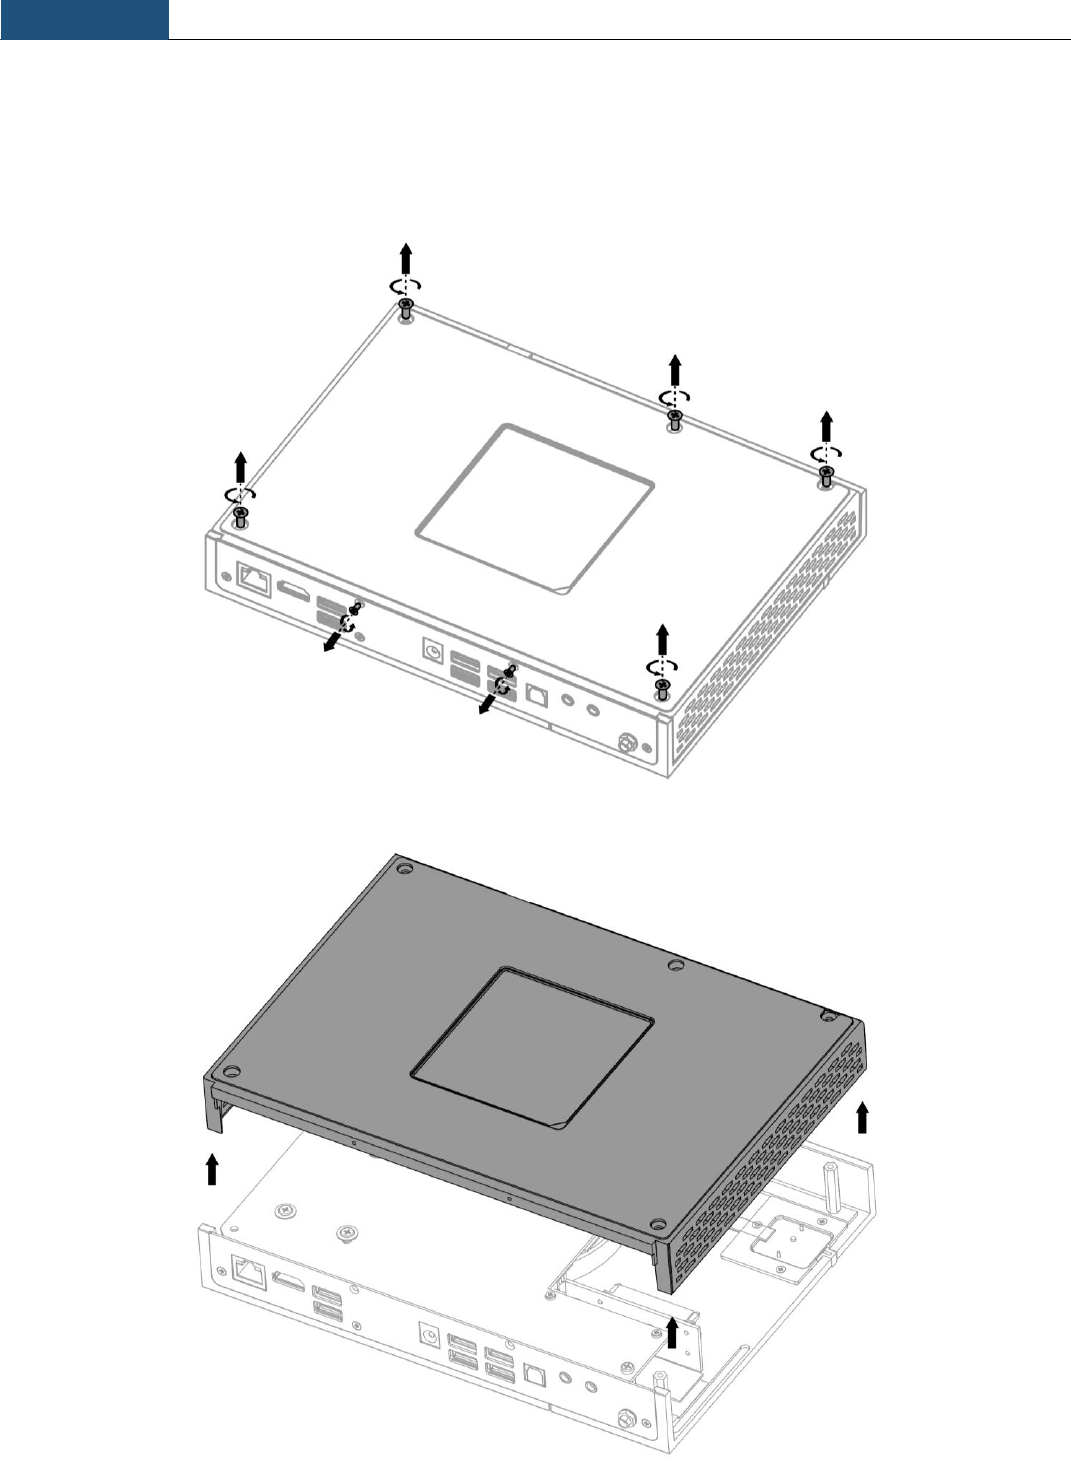
4.1 Change Hard Disc Drive (HDD)
Step 1: Remove 7 screws
Step 2: Lift and remove back cover
Chapter 4
Upgrade and Recovery
38
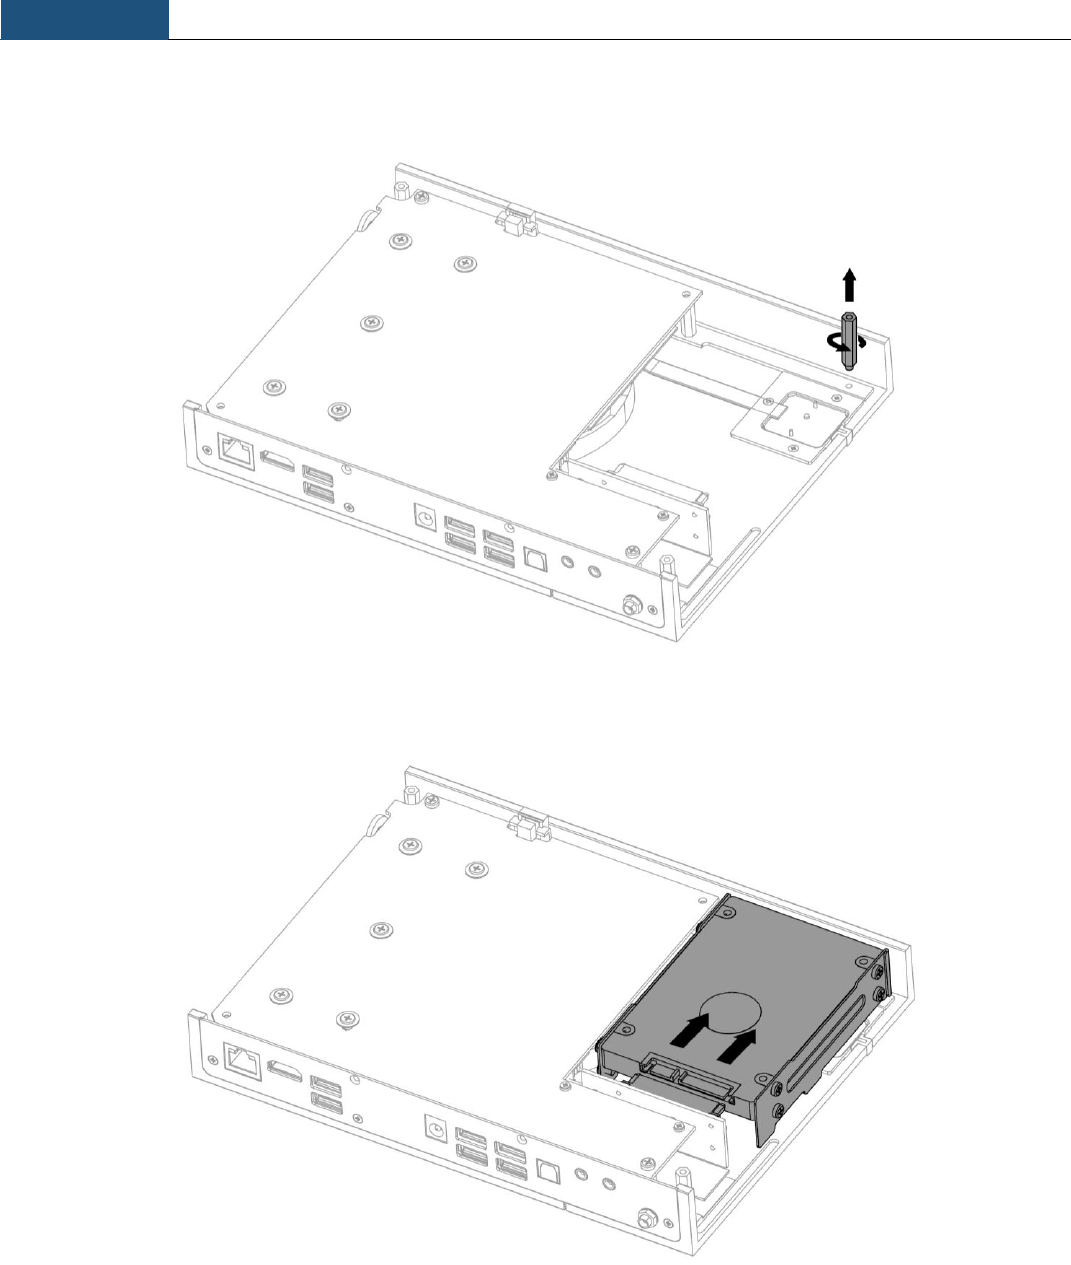
Step 3: Remove hexagonal pole. ( note - for Barebone version, go directly to step 6)
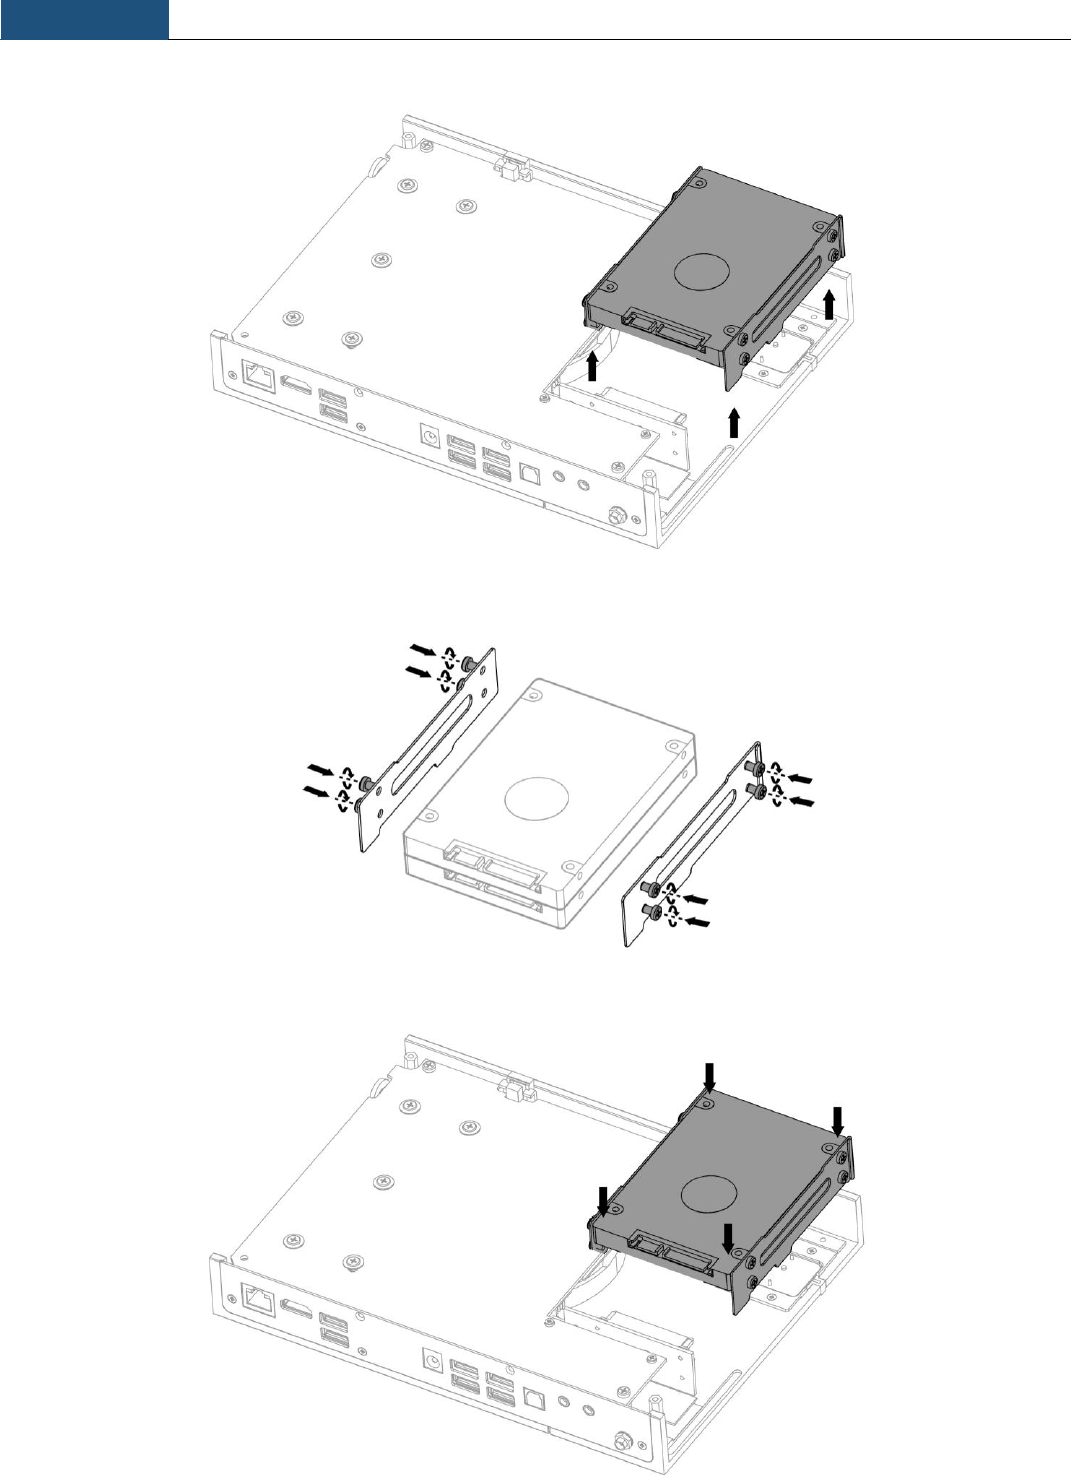
Step 4: To add HDD, slide toward the front and unplug HDD case then lift
Chapter 4
Upgrade and Recovery
39
Step 5: Remove HDD case to add HDD
Step 6: Assemble HDD with mounting (for Barebone version, parts are included in the pack)
Step 7: Insert HDD case back into the MC101
Chapter 4
Upgrade and Recovery
40
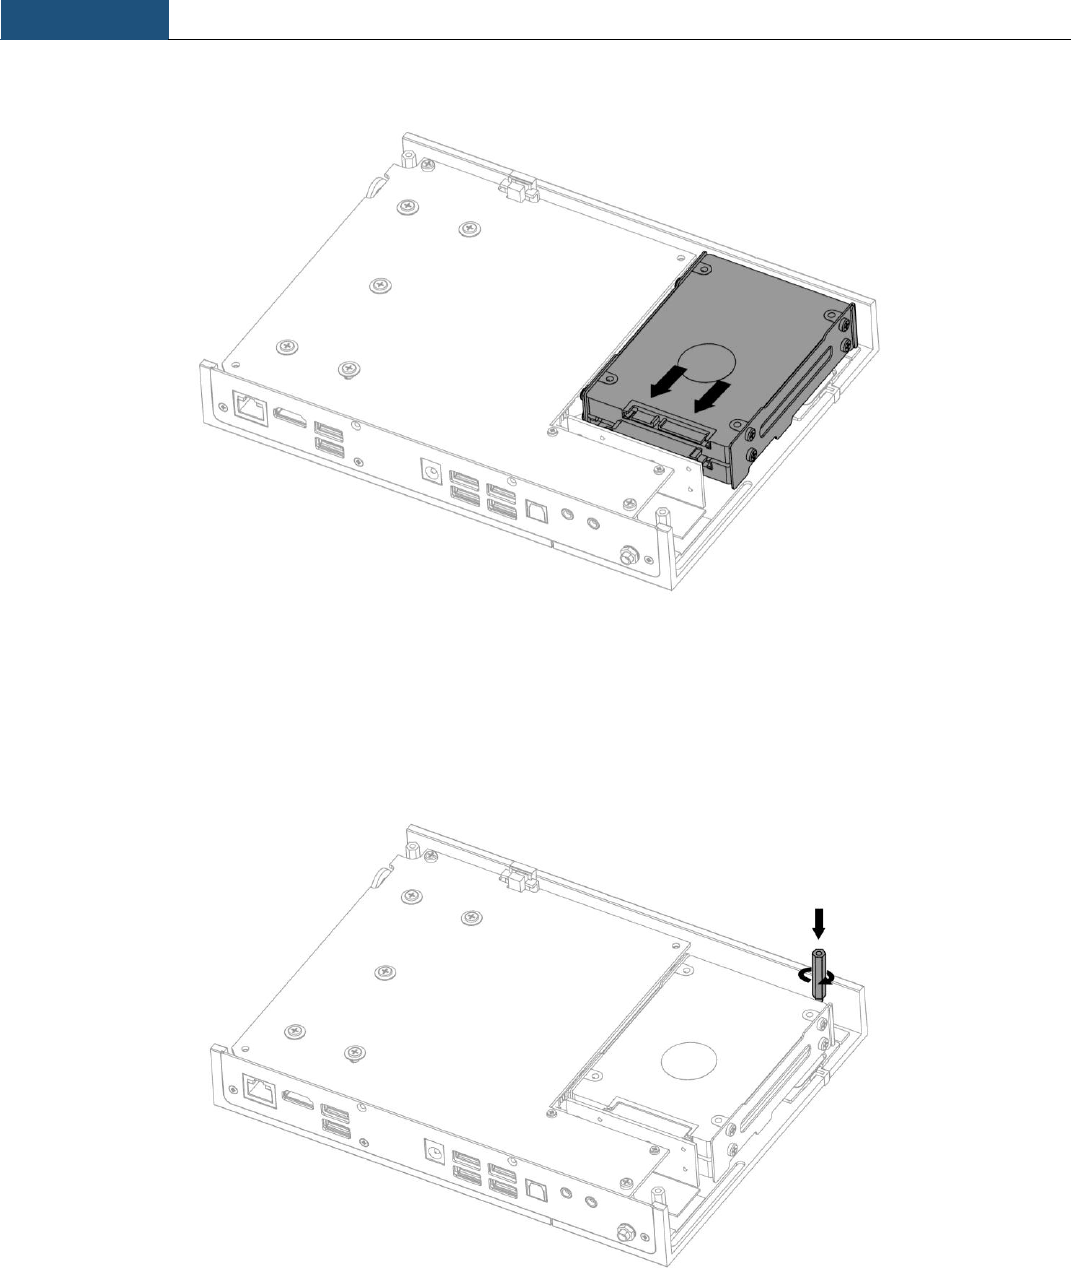
Step 8: Slide HDD case toward the back and plug it into the connection slot
Step 9: Screw the hexagonal pole back into the case
Chapter 4
Upgrade and Recovery
41
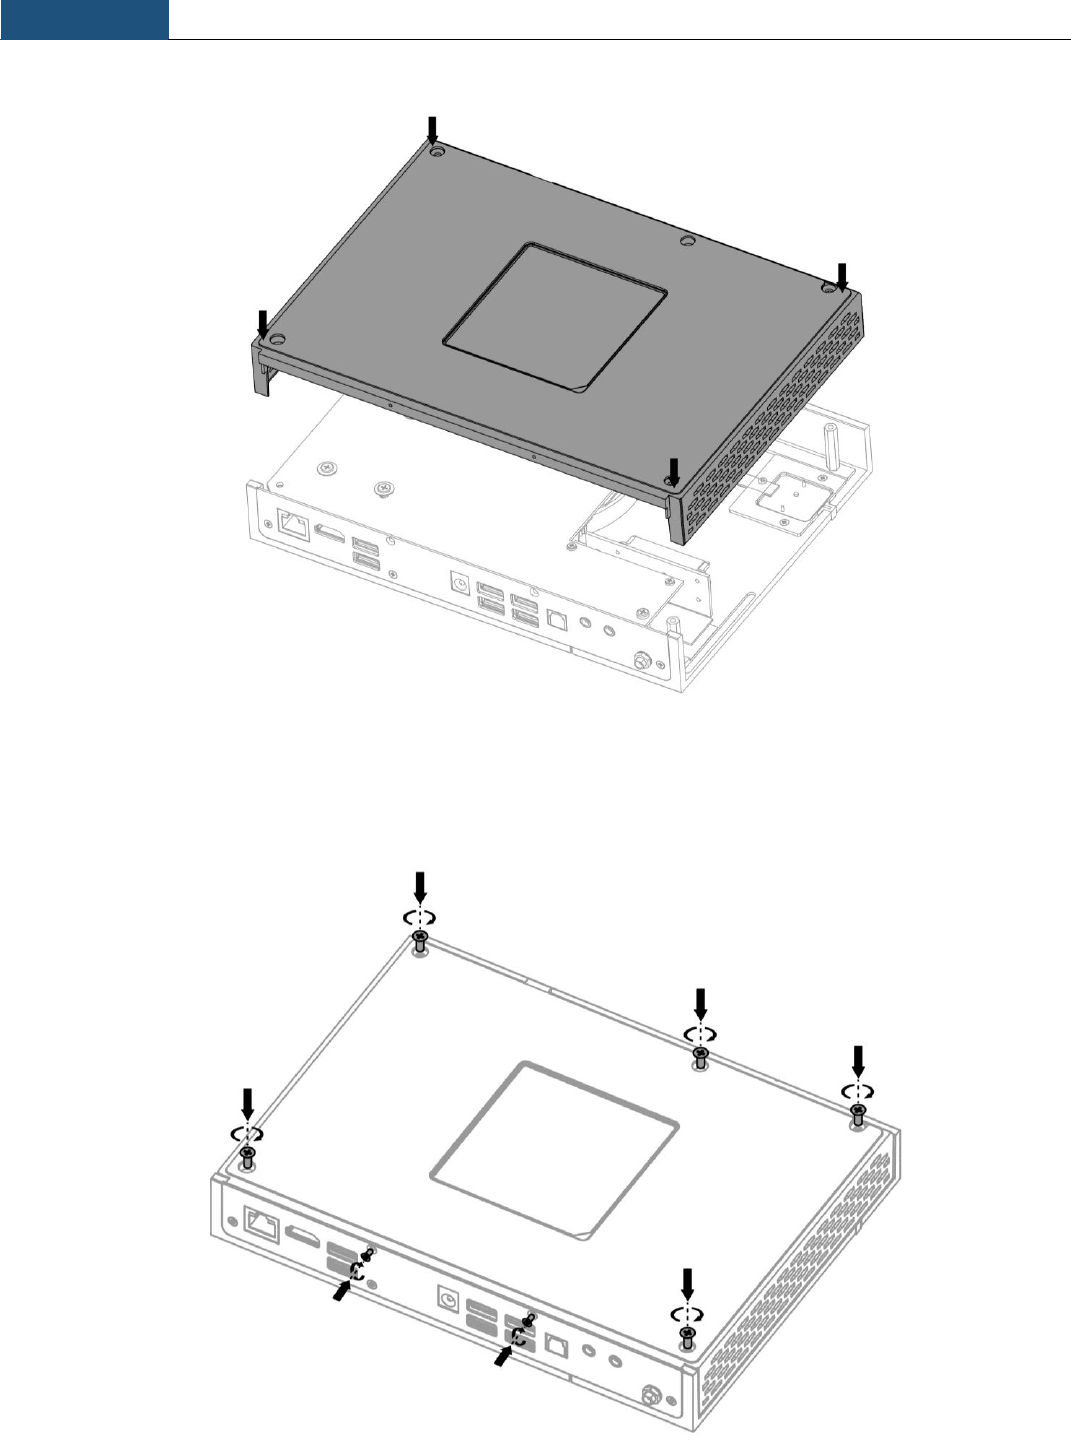
Step 10: Replace the back cover
Step 11: Assemble and fix the 7 screws back in place
Chapter 4
Upgrade and Recovery
42
4.2 Recovery Using the Recovery in Control Panel
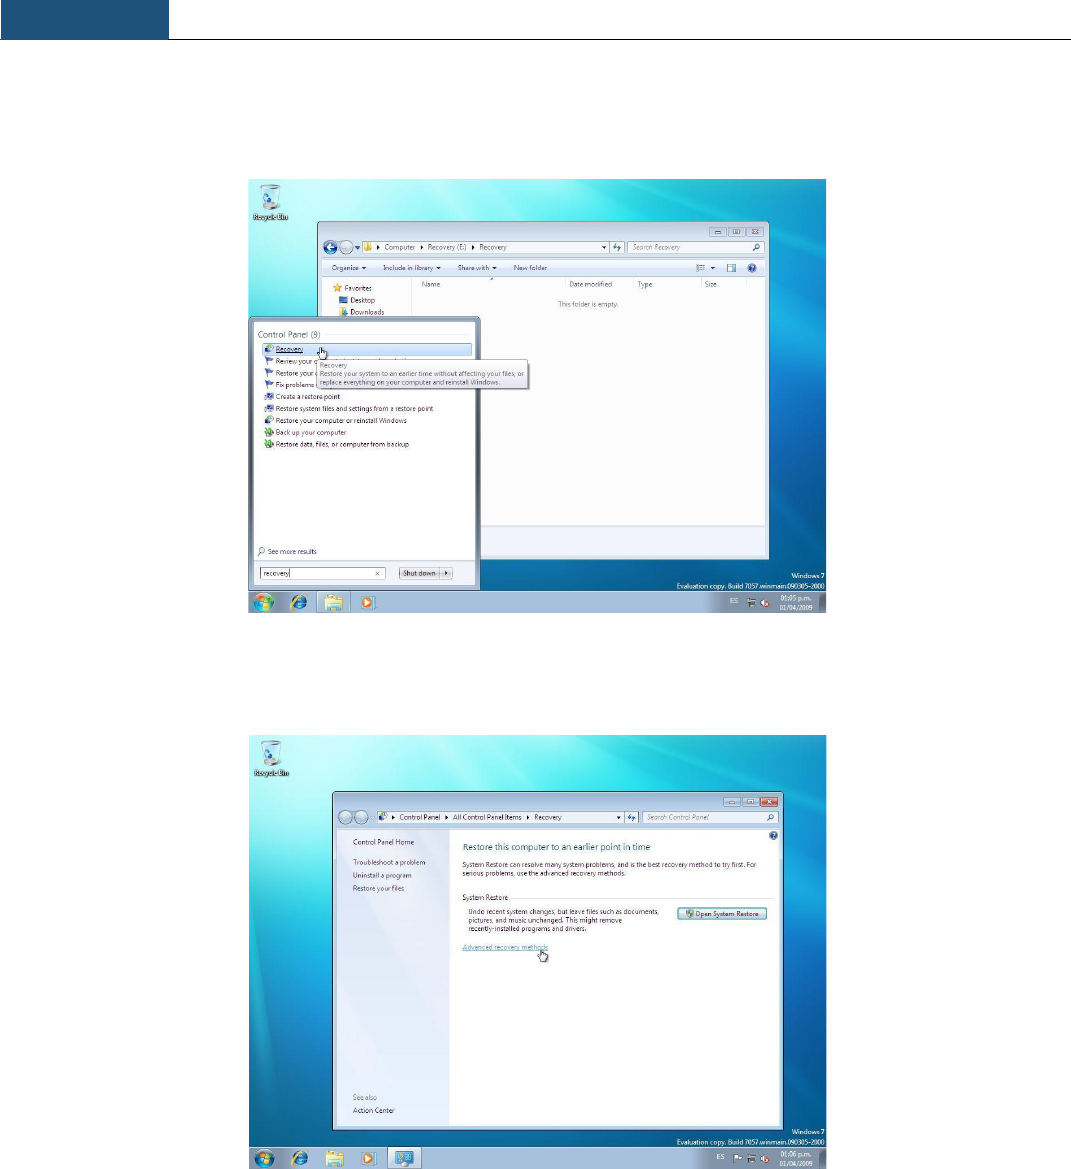
1. Press the Start Button and in the search input area, type "Recovery".
2. From the search results, launch the Recovery control applet.
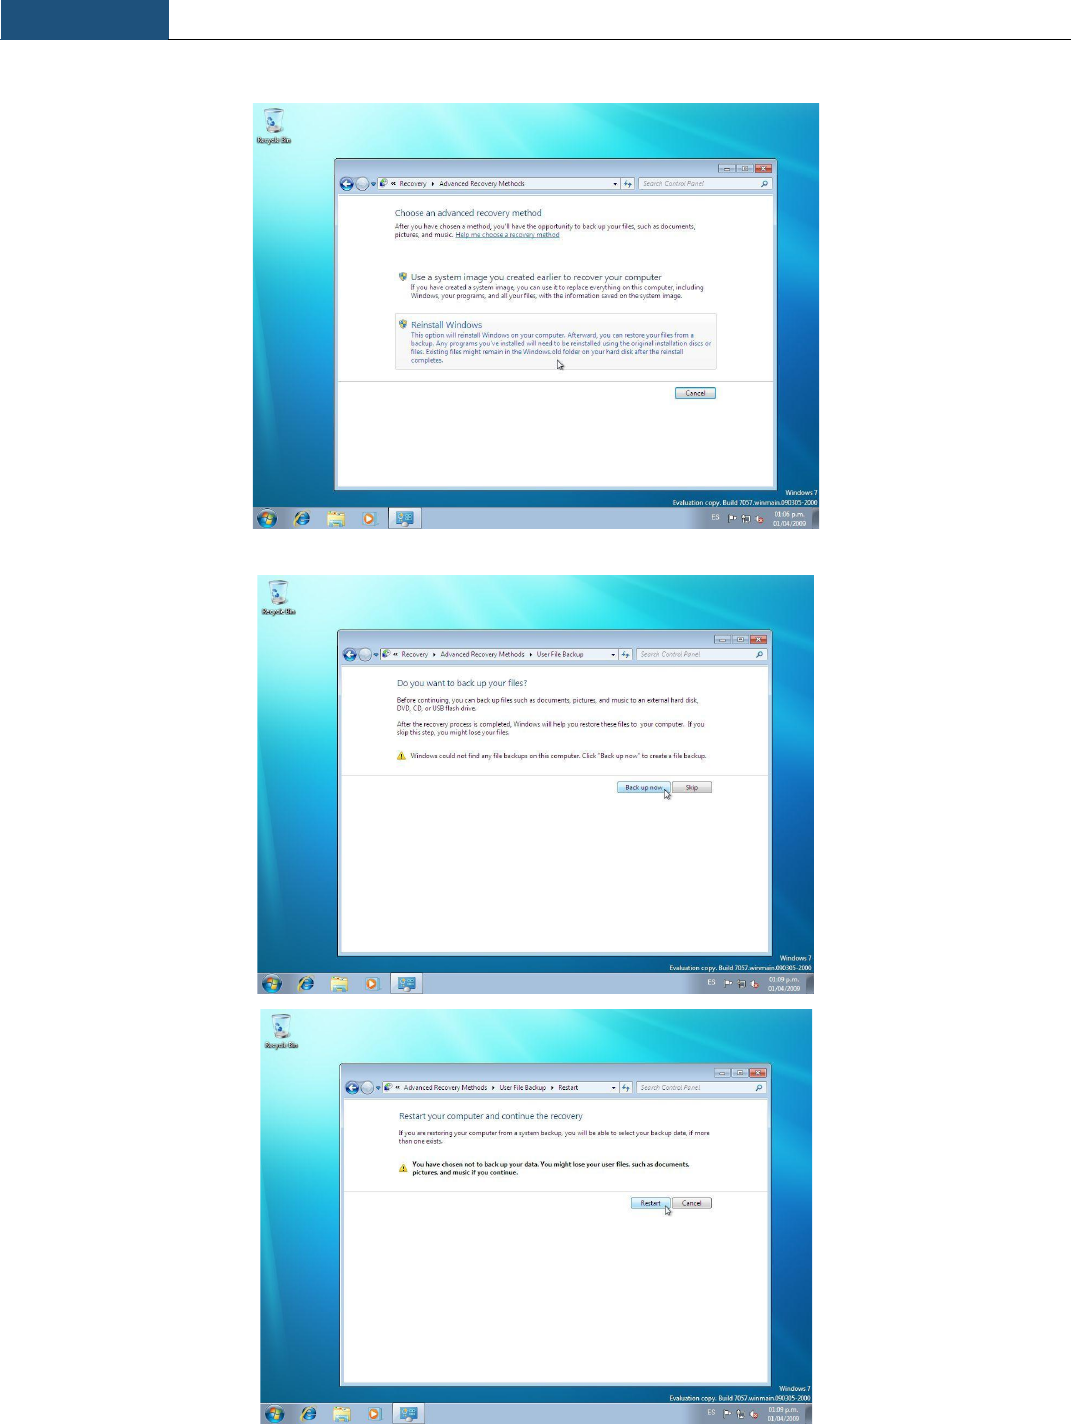
3. Select the "Advanced recovery methods" option.
Chapter 4
Upgrade and Recovery
43
4. Select "Reinstall Windows" option.
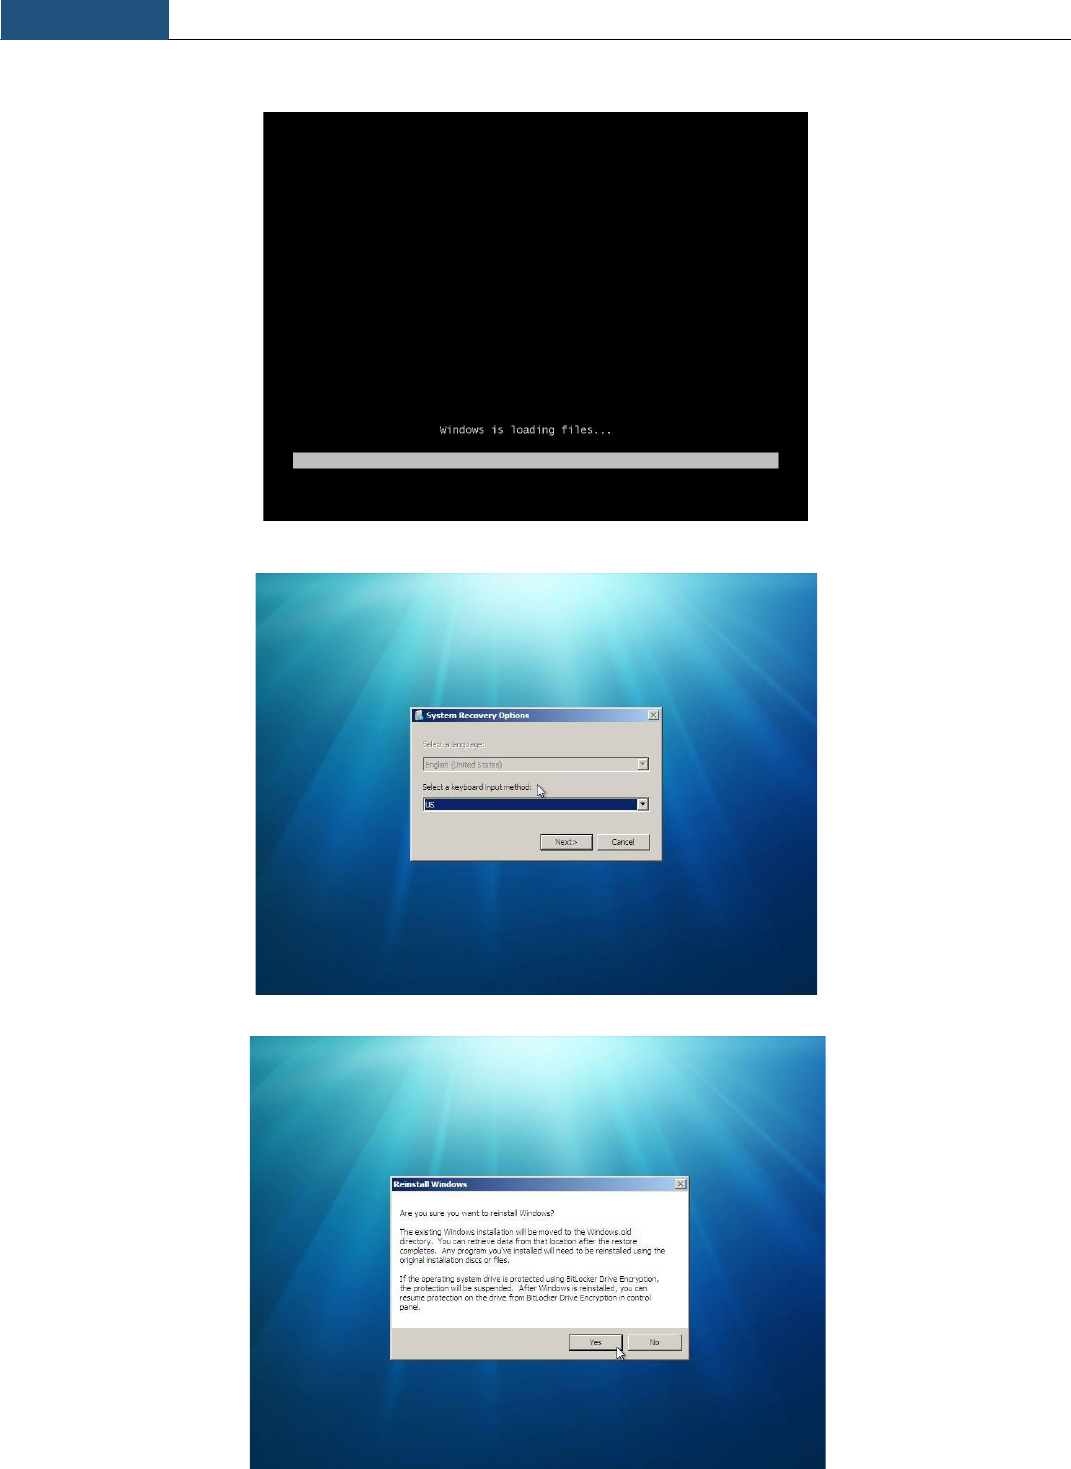
5. Follow the on-screen instructions to back up your files. Then, the computer will restart.
Chapter 4
Upgrade and Recovery
44
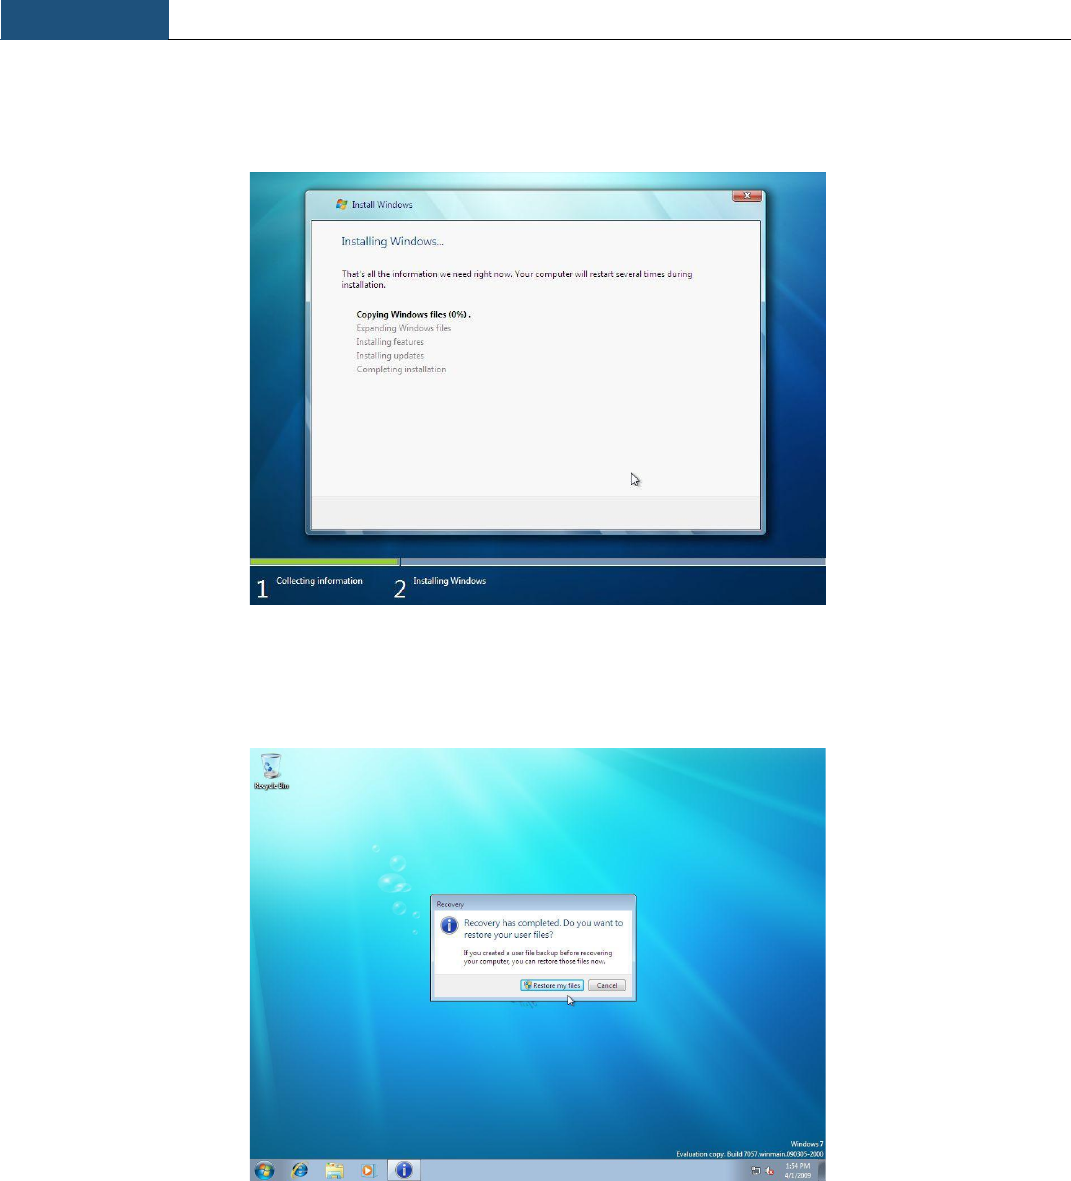
6. Verify that the computer starts in Windows RE.
7. From the System Recovery Options dialog box, select a language and keyboard layout.
8. Click the Yes button to reinstall Windows using the image you placed in the recovery partition
Chapter 4
Upgrade and Recovery
45
Note: By selecting Yes, Windows will begin the reinstallation of Windows using the recovery image
you created.
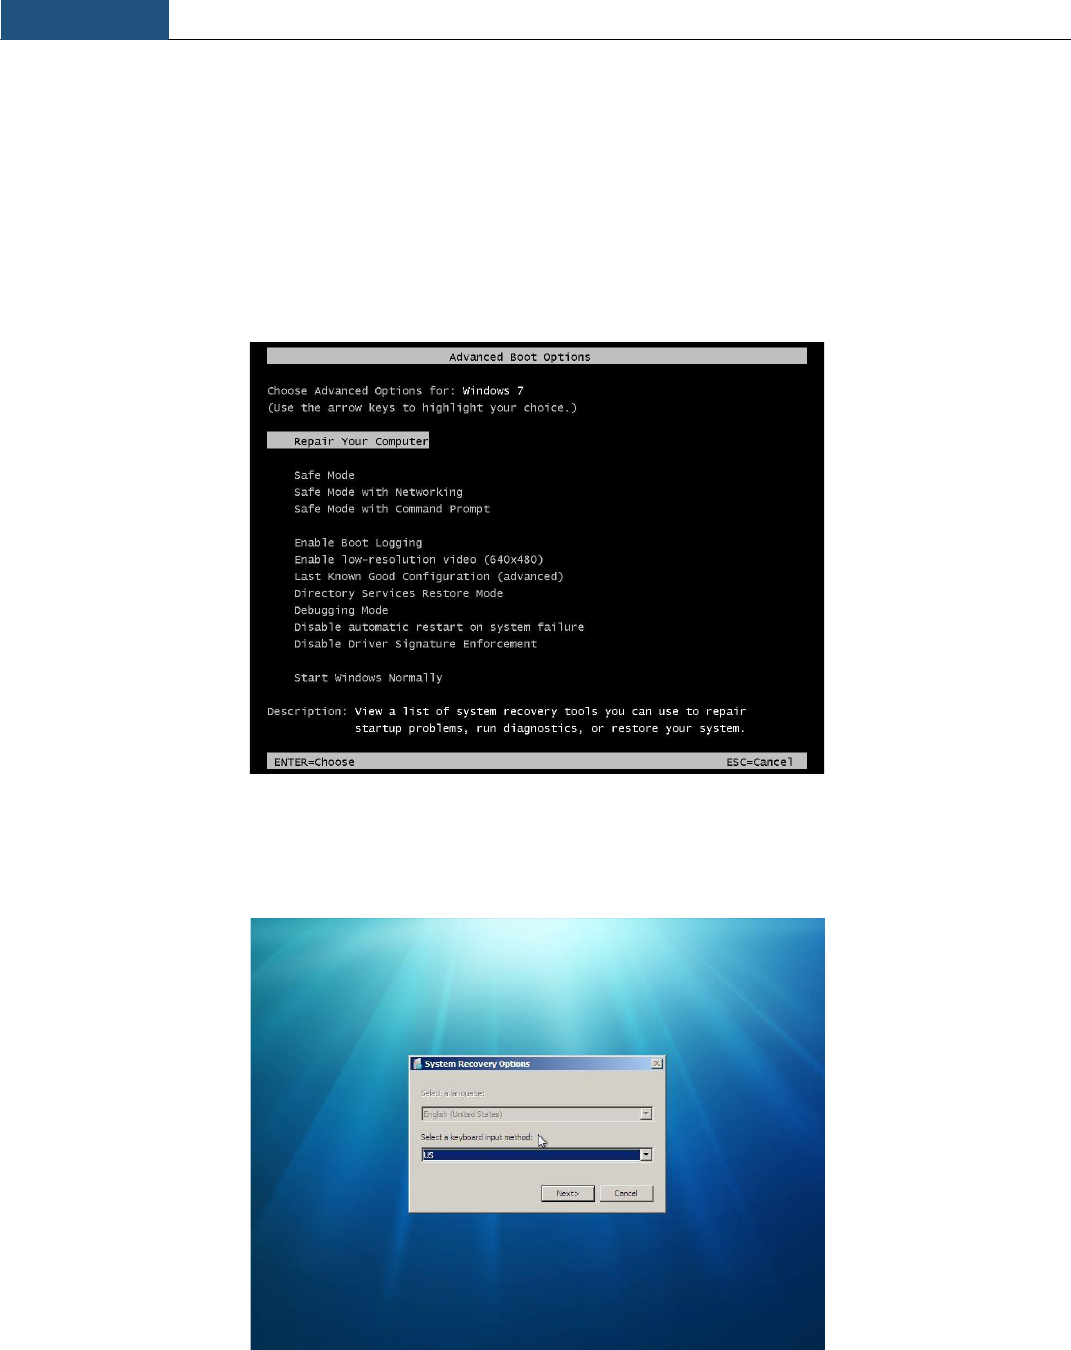
9. Once the Windows Setup is complete, the PC will reboot. Complete Windows Welcome.
Note: If you create a backup prior to the restore, you'll have the option to restore the backup.
Chapter 4
Upgrade and Recovery
46
4.3 Recovery Using the Advanced Boot Options
To access the Advanced Boot Options perform the following tasks:
1. Turn on the computer.
2. Press F8 before Windows starts.
Note: If Windows starts, you did not press F8 within the appropriate time allows. Shutdown the
computer and try again.
3. From the System Recovery Options dialog box, select a language and keyboard layout.
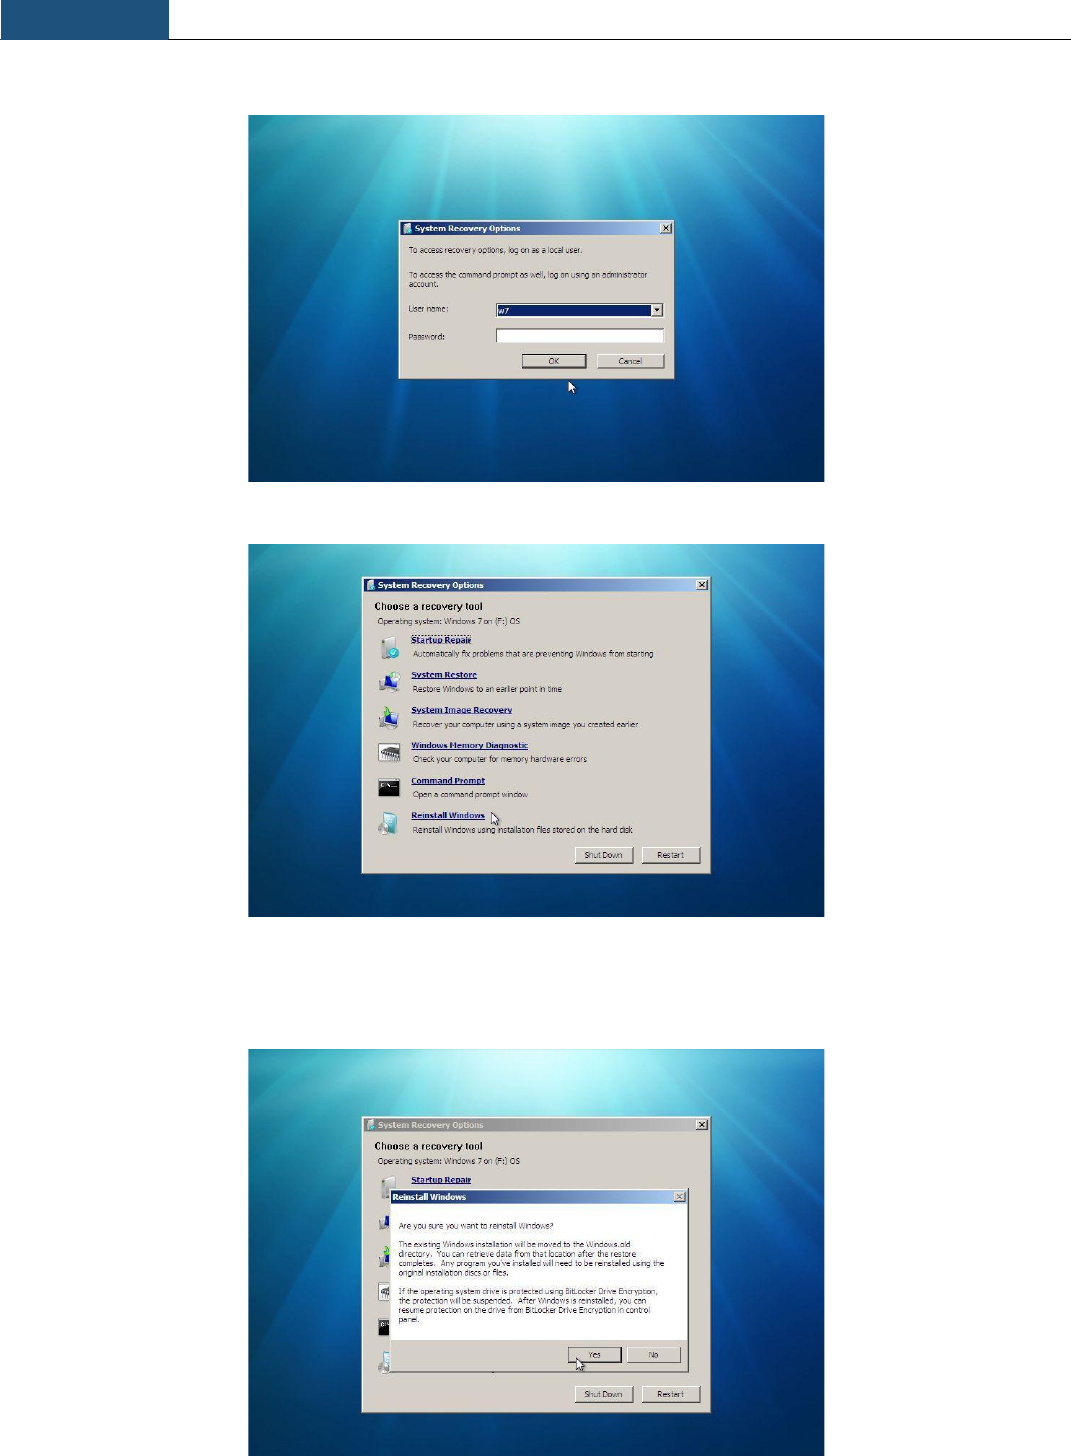
Chapter 4
Upgrade and Recovery
47
4. Select the user you created.
5. Select Reinstall Windows.
6. Click the Yes button to start the reinstallation of Windows using the image you placed in the
recovery partition.

Chapter 4
Upgrade and Recovery
48
ARCTIC Switzerland,
Untere Altbreitenstrasse 1, 8722 Kaltbrunn, Switzerland
www.arctic.ac
©2012 ARCTIC (HK) Ltd. All Rights Reserved.
No part of this manual including the products described in it, may be reproduced, transmitted, stored in a retrieval system, or translated into any
languages in any form or by any means, except documentation kept by the purchaser for backup purposes, without the express written permission of
ARCTIC (HK) Ltd. In no event shall ARCTIC (HK) Ltd. and its directors or employees be liable for any indirect, incidental or consequential damages
arising from any defect or error in this manual or product.
FCC Statement:
This device complies with part 15 of the FCC Rules. Operation is subject to the following
two conditions: (1) This device may not cause harmful interference, and (2) this device
must accept any interference received, including interference that may cause undesired
operation.
This equipment has been tested and found to comply with the limits for a Class B digital
device, pursuant to part 15 of the FCC Rules. These limits are designed to provide
reasonable protection against harmful interference in a residential installation. This
equipment generates, uses and can radiate radio frequency energy and, if not installed
and used in accordance with the instructions, may cause harmful interference to radio
communications. However, there is no guarantee that interference will not occur in a
particular installation. If this equipment does cause harmful interference to radio or
television reception, which can be determined by turning the equipment off and on, the
user is encouraged to try to correct the interference by one or more of the following
measures:
—Reorient or relocate the receiving antenna.
—Increase the separation between the equipment and receiver.
—Connect the equipment into an outlet on a circuit different from that to which the
receiver is connected.
—Consult the dealer or an experienced radio/TV technician for help.
Caution: Any changes or modifications not expressly approved by the party responsible
for compliance could void the user's authority to operate the equipment.
FCC RF Radiation Exposure Statement
This equipment should be installed and operated with a minimum distance of 20 centimeters
between the radiator and your body.