ARESON Technology AB0001 Optical Mouse User Manual Optical Mouse
ARESON Technology Corp. Optical Mouse Optical Mouse
Users Manual
Optical Mouse & Optical Mouse Pro
User’s Manual
-------------------------------------------------------------------------------------------------------------------------------
Introduction
Congratulations on your purchase of the most innovative mouse, which includes the
optical image sensor for superior performance on your PC.
The Optical Mouse/Pro, which is incorporated the revolutionary optical sensor and scrolling
technology is equipped with the following features:
‧ Increasing the accuracy of cursor motion: the optical image sensor records motion on
a surface 1,500 times per-second for pin-point accuracy.
‧ It works on most of surfaces, including wood, plastic, or even your pant leg. No mouse
pad is required.
‧ No parts to clean: A conventional mouse with a rubber ball needs to be cleaned very
often. Instead, the Optical Mouse/Pro detects the motion optically; there is no need for
regular cleaning of mouse parts.
‧ Auto-displaying for incoming e-mails. Works on IE5.0 and up version and Netscape.
The e-mail function only works on USB, PRO version only.
Hardware Installation
1. Turn off your PC
2. Connect Optical Mouse/Pro (PS/2,6-pin connector) to PS/2 port, or Connect Optical
Mouse/Pro (USB) to USB port.
3. Turn on the PC.
*The limited connection will be supported only based on the type of model you bought.
Software Installation
1. Un-Install or removing the current mouse driver
Before installing the driver of Optical Mouse/Pro, we suggest that you check if any
other mouse driver installed in your system. If yes, in order not to make conflict,
please un-install or remove that driver before installing the Optical Mouse/Pro driver.
2. Install the Optical Mouse software
a. Insert the Optical Mouse/Pro software diskette into drive A or B.
b. For Window 95/98/2000/NT/ME, choose the “Start” menu, and select “Run”
c. Type “A: SETUP”(or ”B: SETUP”) in the command line, and select “OK’.
d. Follow the instructions on the screen, and RESTART the PC when the installation
is completed.
e. For Pro version: E-mail displaying function will be initialed as well if the driver had
been installed successfully.
Note:
1. The optical Mouse/pro software diskette includes both optical Mouse/Pro driver and application
program. Please follow the above procedure to install both of them. The optical Mouse /pro
application programs will NOT be installed if you install only the driver through the hardware.
2. Because Microsoft Windows NT4.0 does not support USB interface, Please use the PS2 model to
work for window NT4.0.
3. Un-Install the Optical Mouse/Pro
To remove the Optical Mouse/Pro software from your hard disk:
In Windows 95/98/2000/NT/ME) Click the “Start” menu, select “Programs”, and move
to “Wheel Mouse”, then click ”Uninstall icon”.
Customize Optical Mouse/Pro
With the software provided, eight commonly used tasks can be assigned to the
programmable wheel button.
1. Double click the "Optical Mouse/Pro" icon at the lower right corner of Windows control
panel.
2. Or select “wheel Mouse” from windows.
3. Now the software control panel section will be displayed on the screen.
4. ere are five sections including left/right Button, Pointer, Motion, Wheel, and
Programmable button, in the mouse control panel. Please point to the tab you need
to configure your mouse.
You can enlarge, or reduce the whole document view in both Microsoft Excel and Word
97/2000 applications easily and quickly.
Programmable buttons Configurations
1. Select the Programmable Button from the Optical Mouse Control panel.
2. Assign one of the functions below to the Programmable Button: Programmable Button
is designed for users one step access to many frequently-used Windows and the web
functions as below.
3. Side button 1 and Side button 2 function assignments could be applied for 5B version.
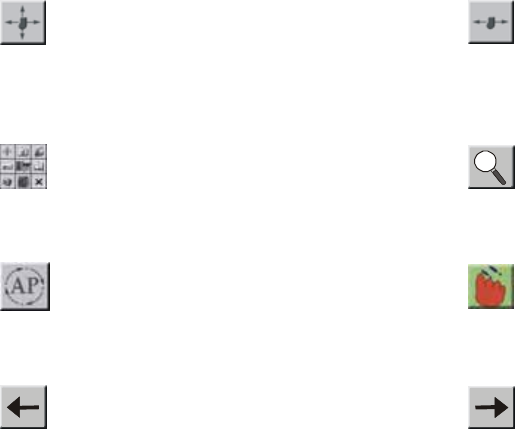
Auto Scroll
Move the documents in the direction with
just moving the scroll.
Third Button
The programmable button can be
assigned to perform special functions
in certain applications.
Magic Jump
Magic Jump lets you open eight special
functions quickly.
Data Zoom
Magnify or de-magnify the data view.
Switch AP
Quickly switch from one open application to
another without moving the mouse.
Double Click
You can assign the “Double Click”
function to reduce extra clicks.
Back
Return to the last page in the Internet.
Forward
Go to the next page in the Internet.
Federal Communication Commission Interference Statement
This equipment has been tested and found to comply with the limits for a Class B digital device,
pursuant to Part 15 of the FCC Rules. These limits are designed to provide reasonable protection
against harmful interference in a residential installation.
This equipment generates, uses and can radiate radio frequency energy and, if not installed and
used in accordance with the instructions, may cause harmful interference to radio
communications. However, there is no guarantee that interference will not occur in a particular
installation. If this equipment does cause harmful interference to radio or television reception,
which can be determined by turning the equipment off and on, the user is encouraged to try to
correct the interference by one of the following measures:
• Reorient or relocate the receiving antenna.
• Increase the separation between the equipment and receiver.
• Connect the equipment into an outlet on a circuit different from that to which the receiver
is connected.
• Consult the dealer or an experienced radio/TV technician for help.
This device complies with Part 15 of the FCC Rules. Operation is subject to the following two
conditions:
(1) This device may not cause harmful interference, and (2) This device must accept any
interference
received, including interference that may cause undesired operation.