ARESON Technology CL0030 2.4GHz Wireless Dongle User Manual
ARESON Technology Corp. 2.4GHz Wireless Dongle
User manual
User's Guide
Wireless Optical
Virtual Touch Mouse
B8021MR + C75
◎ Battery use reminders
◎ Trouble Shooting
FCC statement
Important Notes:
Please follow the instructions contained in the manual. Do not try to disassemble or replace parts
in the products.
Do not put the product in water or on any wet surfaces.
To avoid electrocution, please do not pick up the device when your hands are wet.
Do not put the product near a heat source.
1. Remove worn-out batteries from equipment immediately and dispose of them promptly
2. Keep all batteries (used or new) out of the reach of children.
3. Never dispose of batteries in fire, as they could explode.
4. Always replace all the batteries at the same time. Mixing old and new batteries or mining types (such as
alkaline with zinc carbon) will reduce overall performance and could cause leakage or rupture.
5. Do not mix different types of batteries (e.g. Ni MH, NiCd, alkaline, and etc) in the mouse.
6. Remove batteries from this device if the device is not going to be used for a long time.
7. If the performance of the batteries decreases substantially, it is time to replace the batteries.
This device complies with Part 15 of the FCC Rules. Operation is subject to the following two conditions:
(1) This device may not cause harmful interference, and (2) this device must accept any interference
received, including interference that may cause undesired operation.
This equipment has been tested and found to comply with the limits for a Class B digital device, pursuant
to Part 15 of the FCC Rules. These limits are designed to provide reasonable protection against harmful
interference in a residential installation. This equipment generates, uses, and can radiate radio
frequency energy, and if not installed and used in accordance with the instructions, may cause harmful
interference to radio or television reception. However, there is no guarantee that interference will not
occur in a particular installation. If this equipment causes interference to radio or television reception,
which can be determined by turning the equipment off and on, the user is encouraged to try to correct
the interference by one or more of the following measures:
• Reorient or relocate the receiving antenna.
• Increase the separation between the equipment and receiver.
• Connect the equipment into an outlet on a circuit different from that to which the receiver is
connected.
• Consult the dealer or an experienced radio/TV technician for help.
Note : Modifications not approved by the party responsible for compliance could void user’s authority to
operate the equipment.
a. Make sure you have connected the receiver correctly to the computer's USB port.
b. Check if the batteries have been installed correctly according to the diagram indicated in the battery
cabinet
c. For the best performance, we suggest that you place the receiver away from other electrical devices.
d. Unplug and re-plug the receiver, or try another USB port. Try connecting directly to your computer
instead of using a USB hub.

A wrong battery placement
may cause batteries overheat.
+
-
Battery compartment cover
2 * AAA batteries
Receiver
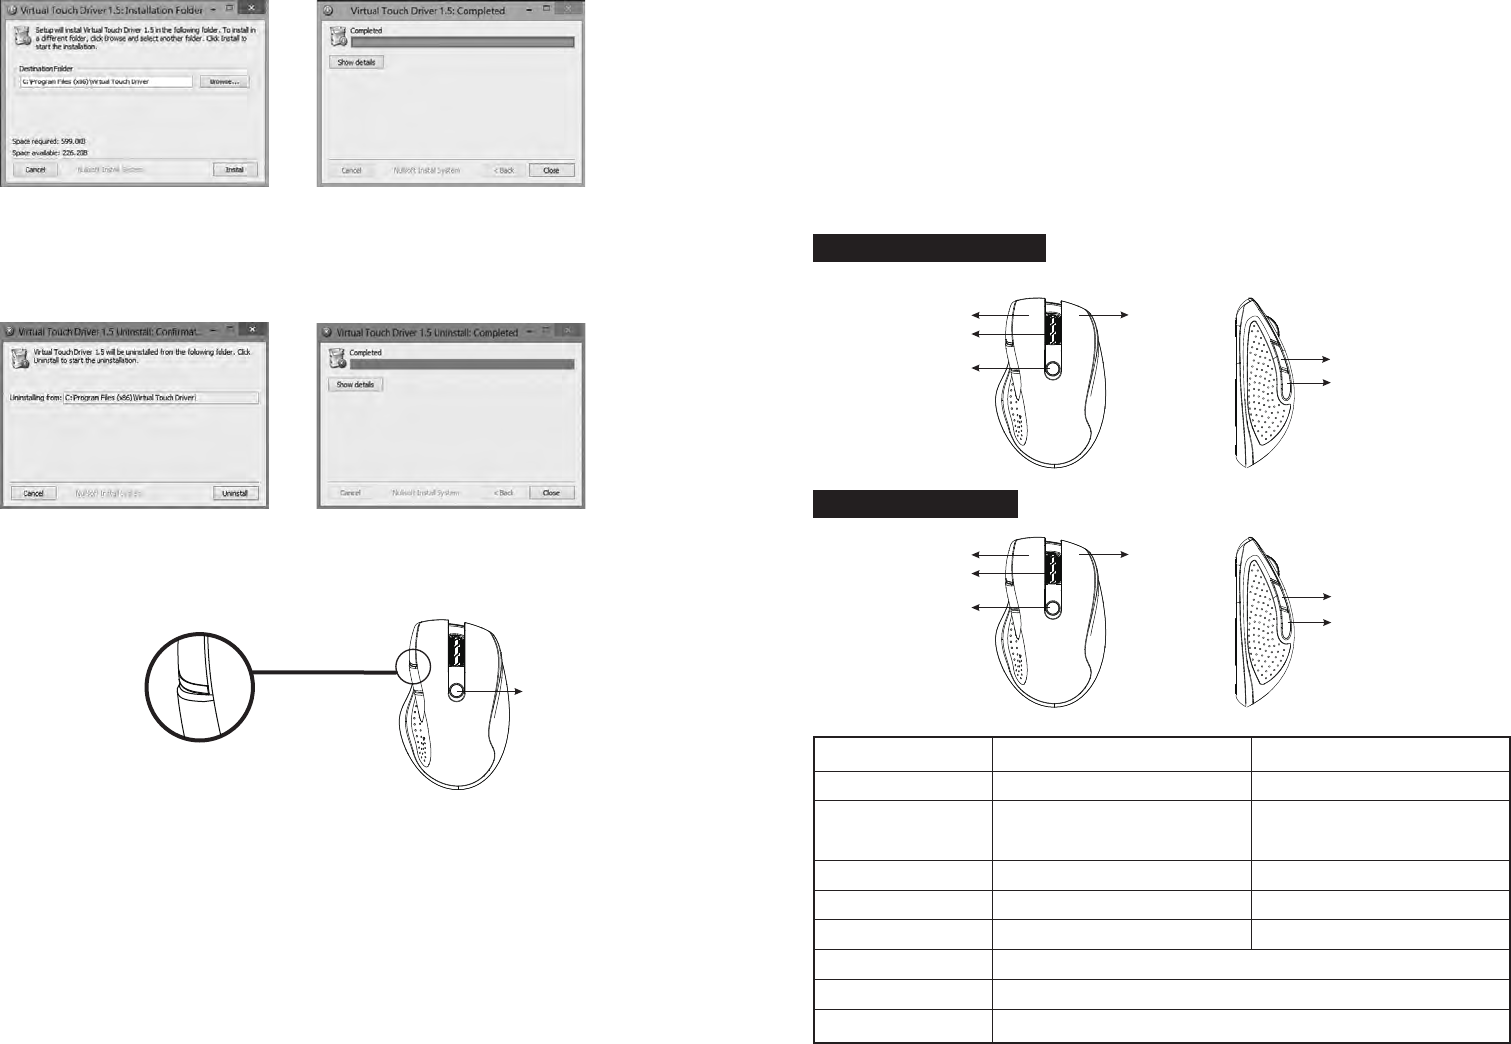
Wheel button
Power on/off switch
Receiver
Battery cover
Mode button
Mouse
Internet Forward &
Backward button
LED indicator
Features
Benefits of Virtual Touch Mouse
Introduction A. Hardware Installation
1. Insert the batteries
System Requirements
a. Remove the battery cover and insert new batteries.
b. Move the power switch to the ON position.
c. The Low Power red LED on the left side will be on for 6 seconds after the mouse power is
switched to on.
2. Connect the receiver
1. Installation
a. Turn on your PC.
b. Connect the receiver to the USB port on PC.
c. Please wait for a while for the PC to detect the receiver device. (The waiting time depends on PC
hardware.)
Congratulations on your purchase of the most innovative mouse, “Virtual Touch mouse”. The
Virtual Touch mouse features and integrates the advantages of the patented technology of
traditional mouse and the up-to-date touch screen technology, enabling users to operate
touch screen functions on Windows 8 by just mouse button click and mouse move-
ment, without fingers touching on screen. It is designed to make you more productive and
more comfortable.
2.4G Hz (distance 6~8m), 34 Channels 224 ID
Patented and state-of-art emulating touch screen technology
2-in-1 design : a traditional mouse with touch screen functions for Windows 8
To emulate touch screen behaviors by just mouse button click and mouse movement.
Two switchable modes:
1. standard mouse mode ----- for traditional mouse functions
2. Virtual-Touch mode ----- to emulate touch screen functions, with the Virtual Touch Driver
installed.
Longer battery life
800/1600 dpi switchable (simultaneously press the middle button and right button for 3 seconds
to change dpi), default at 1600dpi
To relieve hands fatigue from arm arising and finger touching on screen.
To achieve the same functions of touch screen without finger touching on the screen.
To operate the touch screen functions in a remote distance.
Desktop and Notebook users can also experience the touch screen functions even with a
non-touch screen monitor.
To keep screen always clean. No need to touch the screen with finger tips.
For standard mouse mode : Windows XP/Vista/7/8, and Mac OS 10.6 or higher
For Virtual Touch mouse mode: Windows 8 only. [Not available for Windows RT]
USB Port
PC
USB port
Pull out
the receiver
B. Software Installations
To activate the Virtual Touch mode functions, please insert the accompanied CD into your
computer, or download the Virtual Touch Driver from your local brand vendor's website.
4. Low Power Indicator : Red LED
If the battery power is low, the Red LED as the low power indicator will blink for six seconds when
the mouse is back to start working.
Virtual Touch Mode
Mode button
C. LED Indicators
3. Power On Indicator : Red LED
When batteries are installed or power is switched to on, the Red LED will be on for 6 seconds.
D. OPERATION
Standard Mouse Mode
Right button
Middle button
Mode button
Virtual touch button
Zoom button
Windows button
Right button
Middle button
Mode button
Left button
Backward button
Forward button
2. Dpi switch indicator : Red LED
Simultaneously press the middle button and the right button for 3 seconds to switch between 800
dpi and 1600 dpi.
To 800 dpi: The Red LED will blink for one time.
To 1600 dpi: The Red LED will blink for two times.
1. Mode Indicator : Green LED
Press the mode switch button to switch between the two modes.
Standard Mouse Mode : Green LED Off
Virtual Touch Mode: Green LED flashing shortly when just switched to this mode or when just
back to work after standby.
Green LED
O.S. Support
Left Button
4th Button
5th Button
Right Button
Middle Button
Mode Switch Button
Flash
Windows 8 only
Virtual-Touch button functions
Zoom button
Windows button
Off
Windows XP/Vista/7/8
Mac OS 10.6 or higher
Traditional Left button functions
Forward in Internet Explorer
Backward in Internet Explorer
Mode Comparison
Virtual-Touch Mode Standard Mode
Traditional Right button functions
Traditional Middle button functions
To switch between the 2 modes
2. Un-installtaion
To un-install this driver, please go to "Control Panel", click "Uninstall a program", and select it from
the list and click "Uninstall".
to fluidly browse your photos
Virtual-Touch button:
Press and hold the Virtual-Touch button, meanwhile slide the mouse along your desk. This
equals to your finger touching across the screen. All the one-finger gestures on Windows 8
touch screen can be emulated by just the Virtual-Touch button pressing and mouse movement.
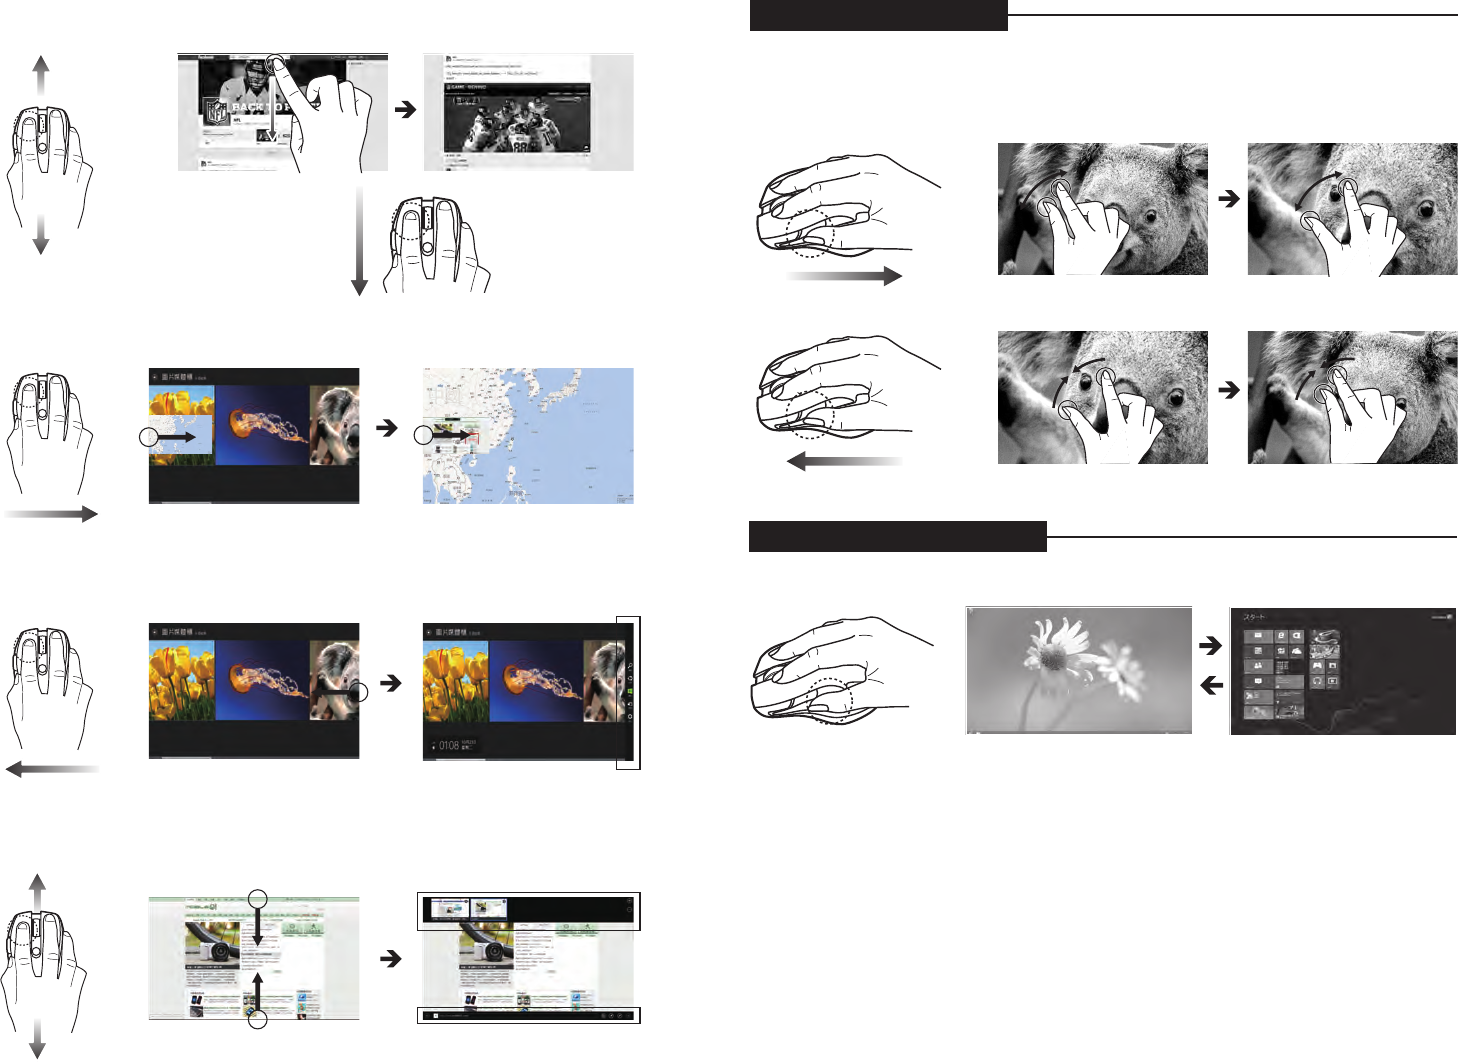
Zoom button:
Press and hold the Zoom button, sliding the mouse backward or forward along your desk, to
emulate 2 fingers touching on the touch screen moving apart or closer, in order to zoom in/out a
picture, a webpage or documents.
Windows button:
Push the Windows button to switch between wherever you are at and the Windows Start
Screen.
Note
The Virtual-Touch mode functions are not available on Windows RT.
Some applications, e.g. games, and 3D drawing software, e.g. AutoCAD, Pro/E may not
support Virtual-Touch mode functions. Please switch to the Standard Mouse mode under
those applications.
Some applications, like Desktop screen, games, may not support Zoom in/out functions on
Touch mode.
The buttons on Virtual Touch mode will perform the same functions as the Standard Mouse
mode, if the Virtual Touch Driver is not installed.
E. Illustrations of Virtual-Touch Mode Functions on Windows 8
Make sure the mouse is on the Virtual-Touch mode; the green LED on the left side will flash
when the mouse is switched to this mode.
Mode button
Virtual-Touch button functions
Press and hold the Virtual-Touch button, flicking, swiping or dragging the mouse along the desk,
to emulate fingers touching across the touch screen.
a. Horizontal Scroll
to fluidly navigate Metro Mode I.E. backward and forward
CAUTION
Risk of explosion if battery is replaced by an incorrect type.
Dispose of used batteries according to the instructions
Zoom Out
Zoom Button Function
Press and hold the Zoom button, sliding the mouse backward or forward along your desk, in order
to zoom in/out a picture, a webpage or documents
Windows Button Function
Push the Windows Button to switch between wherever you are at and the Metro Start
Screen.
Zoom In
d. Display the Application Bar on Metro mode
Swipe from the top or bottom edge to display the applciation bar on Windows 8 Metro mode.
d. Quick Charms Bar Access
Swipe from the right edge to display the charms bar.
c. Swipe App
Swipe from the left edge to cycle through open app.
b. Vertical Scroll
to fluidly scroll through web pages or your documents