ARKON ELECTRONICS DH1301G-001T 2.4GHz Digital Headphone User Manual
ARKON ELECTRONICS(HUIZHOU)CO., LIMITED 2.4GHz Digital Headphone
User manual
DH1300G
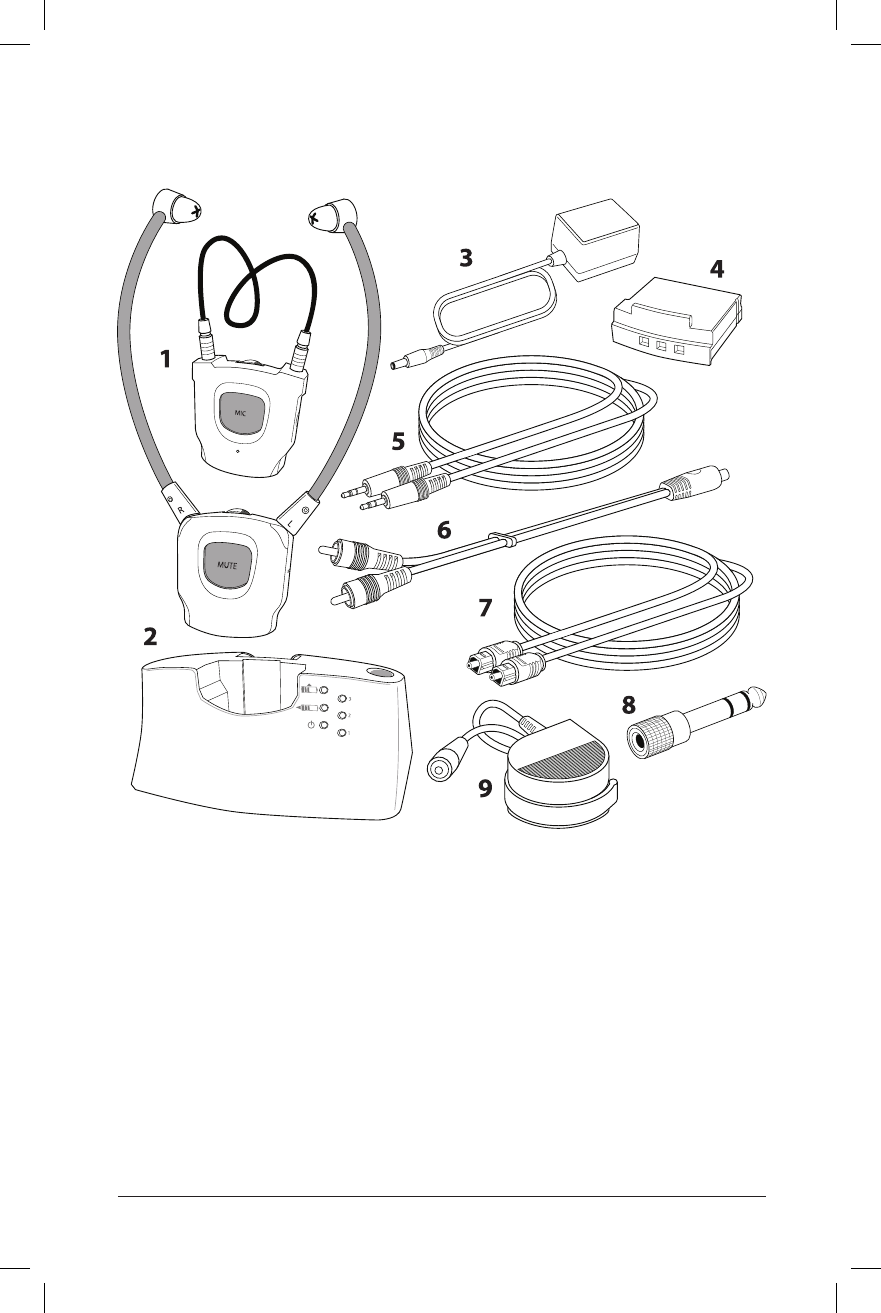
COMPONENT PART LIST
2.4GHz Digital Headphone
1. Headset Receiver or Neckloop Receiver
2. Transmitter
3. Power Suppy Cable
4. Battery (x2)
5. Audio Cable (3.5mm stereo plug)
6. RCA Adapter Cable
7. TOSLINK Optical Cable
8. 6.3mm (1/4”) to 3.5mm Adapter Plug
9. External Microphone
2

3
HRS
5V 550mA
DC IN STEREO OPTICAL IN
AUDIO IN
MONO
R
L
1. Plug in transmitter (base station).
2. Insert battery into bottom of receiver.
3. Place receiver in transmitter base to
charge overnight (or at least 3 hours).
4. Check to see which type of audio output your TV has. Connect transmitter
to TV by following the appropriate illustration in the set-up guide.
5. Enjoy!
Setup
3

OFF ON
R
VOLUME
1
green LED
OFF / ON
SWITCH
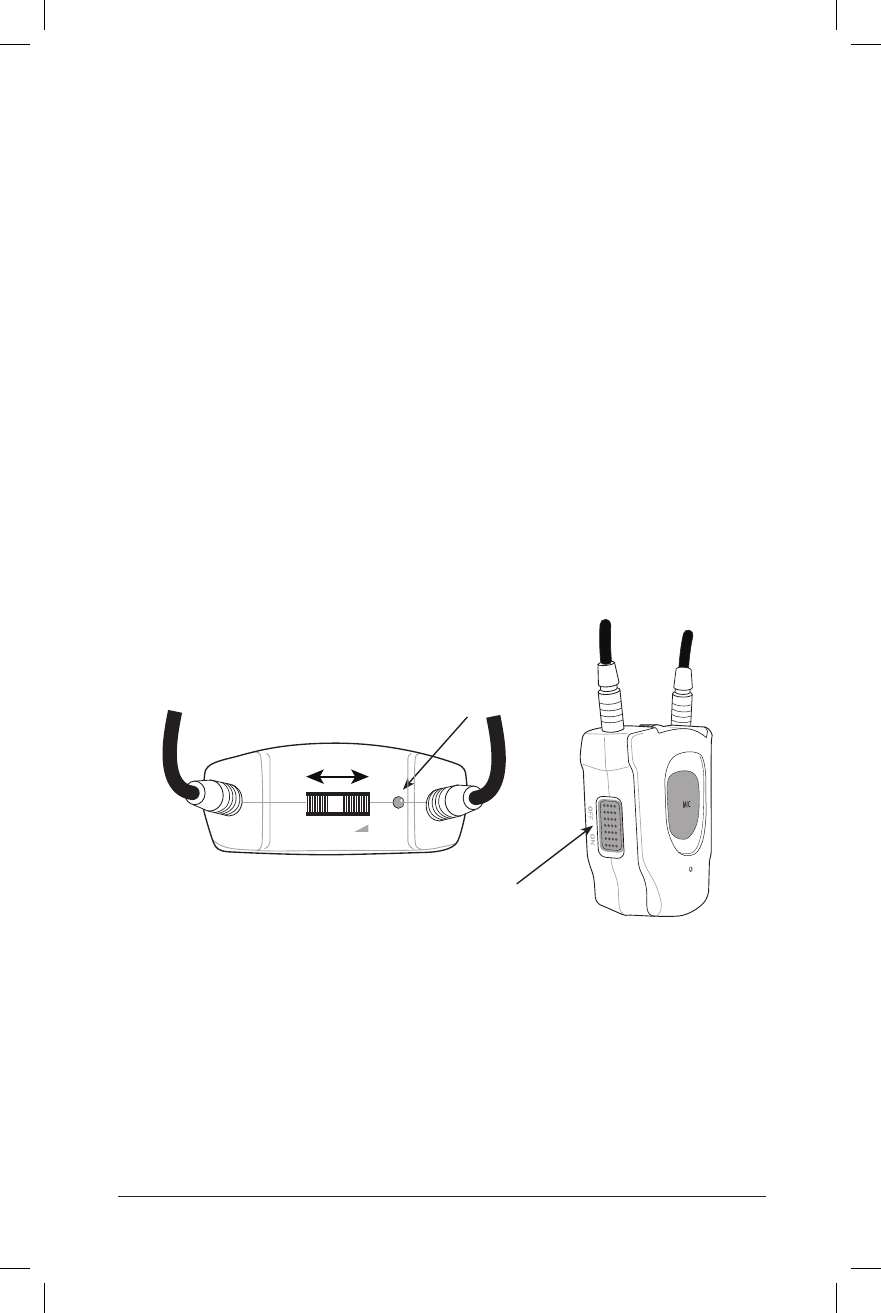
How to use:
EarTech TV Audio with under-the-chin Headset Receiver
1. Turn on your sound source (e.g. TV).
2. While wearing the headset, adjust the volume level initially to a low volume to protect
your hearing. The volume increases when you turn the dial toward “10” and it decreases
when you turn the dial in the direction of “0”.
3. Turn the headset on with the switch on the side. The flashing green LED indicates that
the receiver is switched on. The LED will be solid green once a signal is received from
the sound source. If the green LED continues to flash after one minute, refer to pg.
11 for pairing instructions.
4. Set the desired volume on your headset.
5. We recommend that you turn off the headset and place back into the transmitter cradle
when not in use, to ensure that the battery is always charged.
4
OFF / ON
SWITCH
green LED
VOLUME
1
How to use:
EarTech TV Audio Neckloop Receiver
CAUTION: If you have a heart pacemaker, contact your physician or the manufacturer of
the pacemaker before using the neckloop, to ensure that the pacemaker is not
subject to interference.
1. Turn on your sound source (e.g. TV), and switch your hearing aids to T-coil setting.
2. Adjust the volume level on the neckloop initially to a low volume to protect your
hearing.
3. The neckloop lock is used to safely wear the device and is designed to release to
minimize accidents. Ensure that the neckloop lock has been closed completely
(see pg. 5)
4. Turn on the neckloop receiver by using the ON/OFF switch on the side of the receiver.
The flashing green LED on the receiver indicates that the receiver is switched on. The
LED will be solid green once a signal is received from the sound source. If the green
LED continues to flash after one minute, refer to pg. 11 for pairing instructions.
5. Set the desired volume on your neckloop receiver.
6. We recommend that you turn off the neckloop and place back into the transmitter
cradle when not in use, to ensure that the battery is always charged.
5

3.5 mm stereo output connector
ear buds or
headphones
2
VOLUME
2
VOLUME
OUT
Safety lock in the Neckloop
Please ensure that the safety lock is completely closed in the neckloop to guarantee proper
functioning.
Listening with T-coil-equipped hearing aids (Neckloop)
Listening with the 3.5 mm stereo output (Neckloop)
Important!
The overall operating time of the receiver can be reduced significantly depending on the
listening volume and the accessories connected to the output.
6
3.5mm Output Balance Control
3
2
1
3
2
1
3
2
1
3
2
1
Flat
Default
1
2
3
Bass Boost +
Treble Boost
Treble Boost
Bass Boost
3
2
1
3
2
1
LR
LR
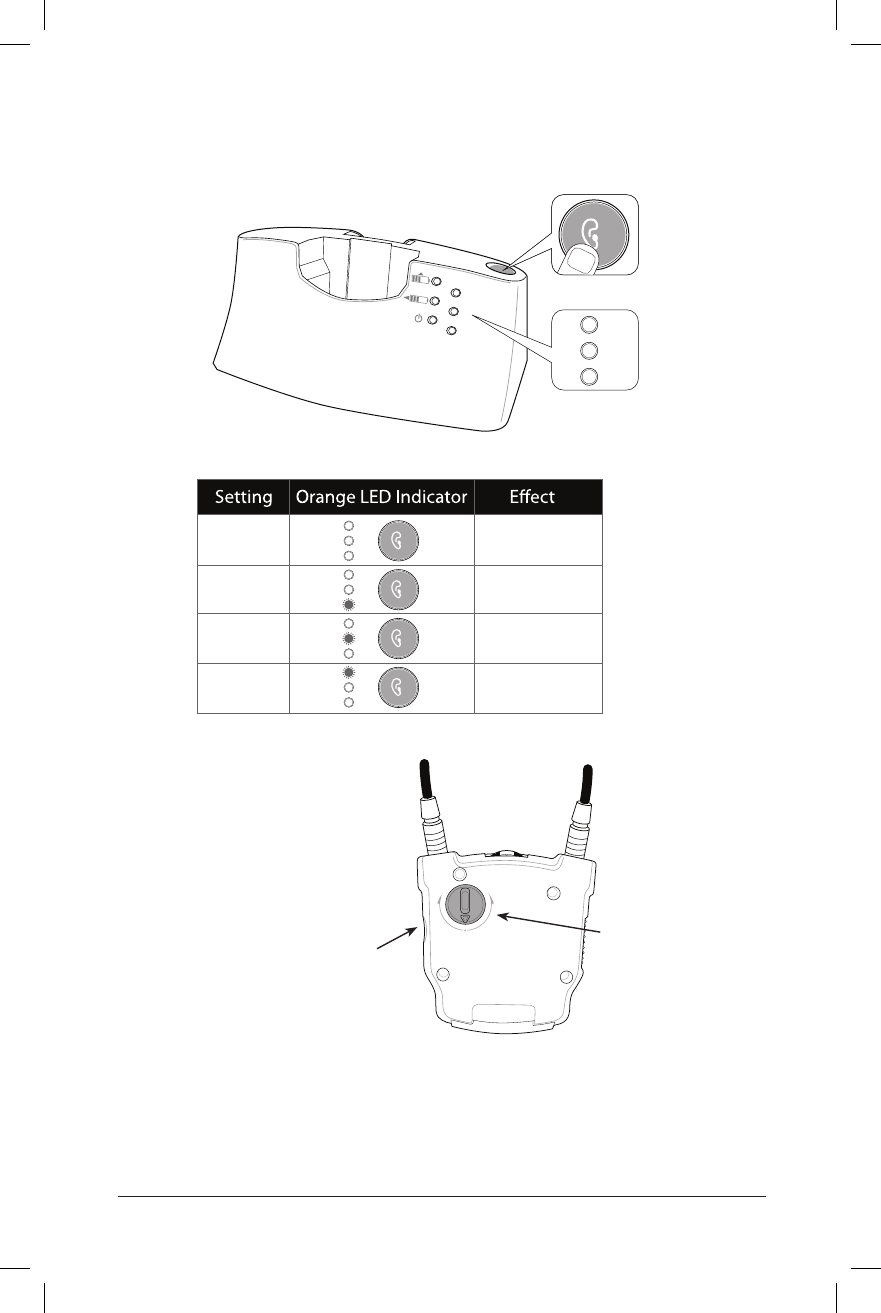
Tone Presets
You can set the Tone/Clarity with the button on the transmitter. Press and release the
button until you find a listening preset that is right for you.
The following table shows the settings. Select which setting works best for you.
Balance control
(EarTech TV Audio headset receiver and
the 3.5 mm stereo output of the
neckloop receiver only.)
The balance controls the volume distribution between the right and the left ear with
the headset or when the 3.5 mm stereo output is used on the neckloop with earbuds or
headphones. Adjust the balance so that you have the same volume level in both ears.
Note regarding neckloop: If using with T-coil equipped hearing aids, you can adjust the
volume and tone, but not the balance.
7
VOLUME
1
Volume control
Adjust the volume level on the headset initially to a low volume to protect your hearing.
The volume increases when you turn the dial toward “10” and it decreases when you turn
the dial in the direction of “0”.
Range
EarTech TV Audio uses the newest 2.4GHz technology. In optimal cases the range is up to
30.5 meters (100 feet).
The 2.4GHz radio frequency technology also works through walls. The range depends
greatly on the building and the environment.
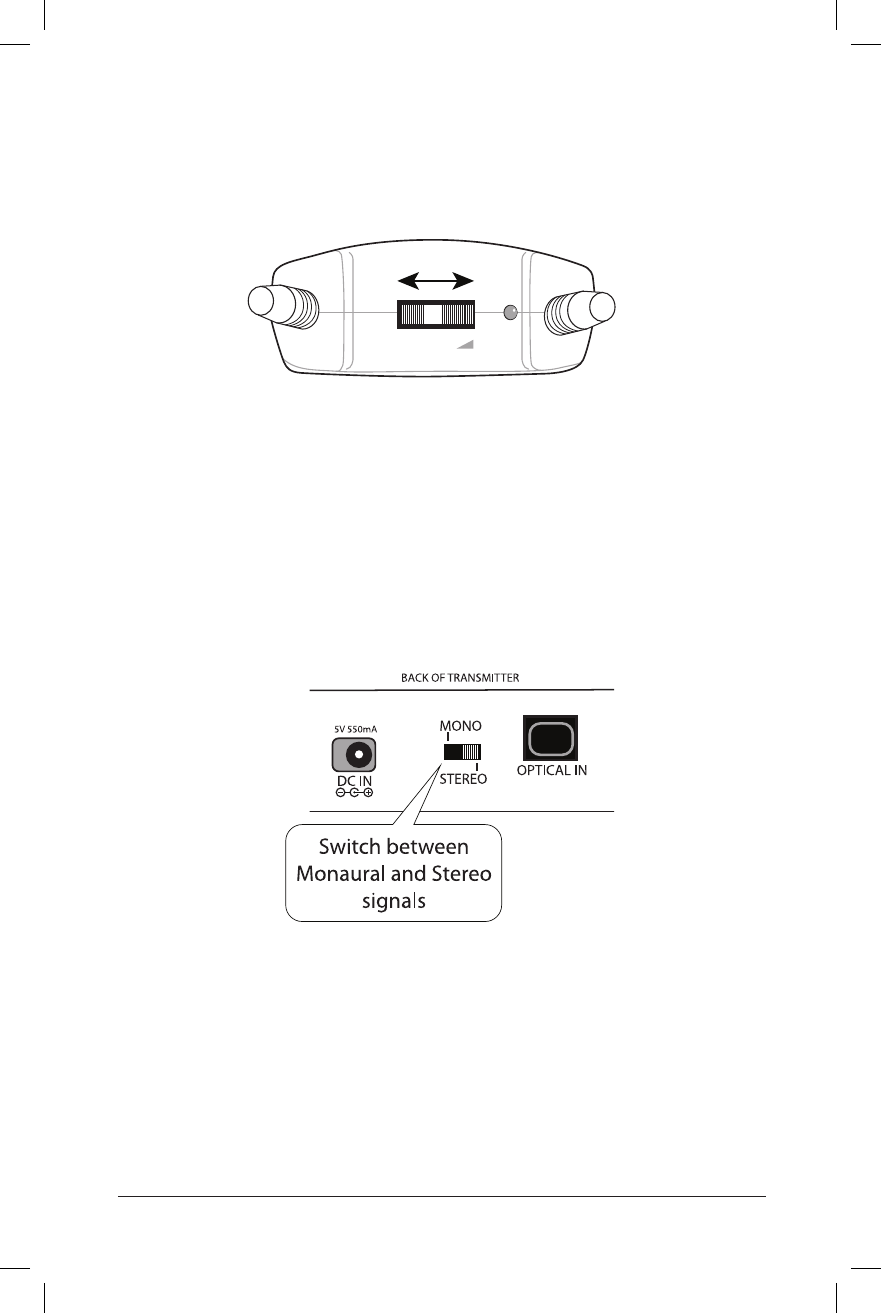
Mono/Stereo Switch
You can switch to stereo when using the headset or the 3.5mm output on the neckloop
with earbuds or headphones. When using T-coil enabled hearing aids with the neckloop,
the signal will always be mono.
Battery charging
Once the battery is fully charged, it can be used up to six (6) hours. The operating time may
vary, depending on the listening volume.
Headset: The green LED on the headset will blink slowly and beep every minute when the
battery is low.
Neckloop: When the battery level is low, you will hear 3 beeps every minute in the
neckloop. The neckloop will be switched off automatically after 5 minutes.
8

5V 550mA
DC IN STEREO OPTICAL IN
AUDIO IN
MONO
Additional battery
charging bay
3
2
1
Lit green LED indicates
receiver battery is charging
Lit green LED indicates
extra battery is charging
R
L
After use, gently place the receiver into the charging cradle of the transmitter.
Ensure that the receiver is placed correctly in the transmitter. If the receiver is charging,
the green LED at the right side of the receiver is illuminated. For first time operation, it is
recommended that the battery be charged for at least three (3) hours.
An additional battery can be charged in the transmitter. Additional batteries are available
through your EarTech TV Audio distributor.
The additional battery can be inserted into the charging bay behind the receiver charging
cradle. Please ensure that the sloped side points upward and that you insert it without
applying too much force. The LED on the base is illuminated green when the battery is
charging.
We recommend that you exchange the battery in the receiver with the spare battery in the
transmitter weekly. This ensures that the batteries are used regularly and that they achieve a
maximum service life.
9
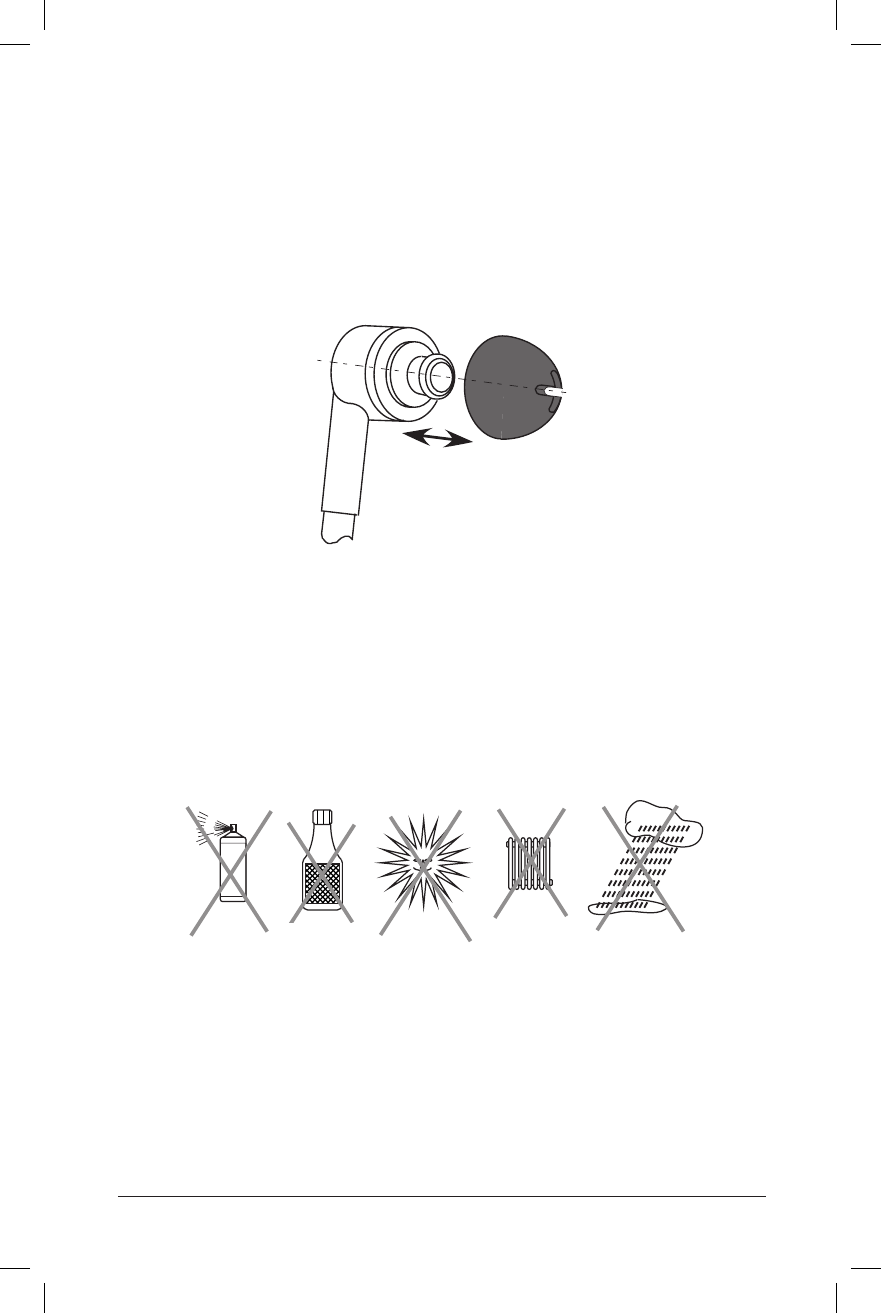
Chemical
solvents
Cleaning and care
Cleaning the transmitter and the receiver
If the device becomes dusty or dirty, you can clean it with a clean, damp cloth.
Disconnect the transmitter from the power supply before cleaning.
Cleaning the silicone ear tips
You can remove the ear tips from the headset. Clean the ear tips with mild soapy water. Dry
the ear tips thoroughly and reattach them.
Replacing the silicone ear tips
The hypoallergenic silicone ear tips should be replaced if they become worn or damaged.
New silicone tips can be ordered from your EarTech TV Audio distributor.
Important information
Product damage caused by improper handling as well as damage due to contamination are
excluded from the warranty.
This device is not protected against moisture. Do not place objects that are fi lled with fl uids
on or near the device, e.g. vases.
Open fi re sources such as burning candles, should not be placed on or near the transmitter.
Warranty
Refer to the warranty card included in the product package.
10

IMPORTANT:
TV must have Audio OUT jacks. (Will not work on Audio IN jacks.)
5V 550mA
DC IN STEREO OPTICAL IN
AUDIO IN
MONO
5V 550mA
DC IN STEREO OPTICAL IN
AUDIO IN
MONO
5V 550mA
DC IN STEREO OPTICAL IN
AUDIO IN
MONO
Connection guide
Connect to TV via Optical cable
Connect to TV via RCA cable
IMPORTANT NOTICE:
Set the digital output
of the audio source to
PCM, otherwise there
will be static, or no
sound at all.
If connecting to a PC use either the headphone jack or if available,
the optical audio output.
OPTICAL OPTICAL
11
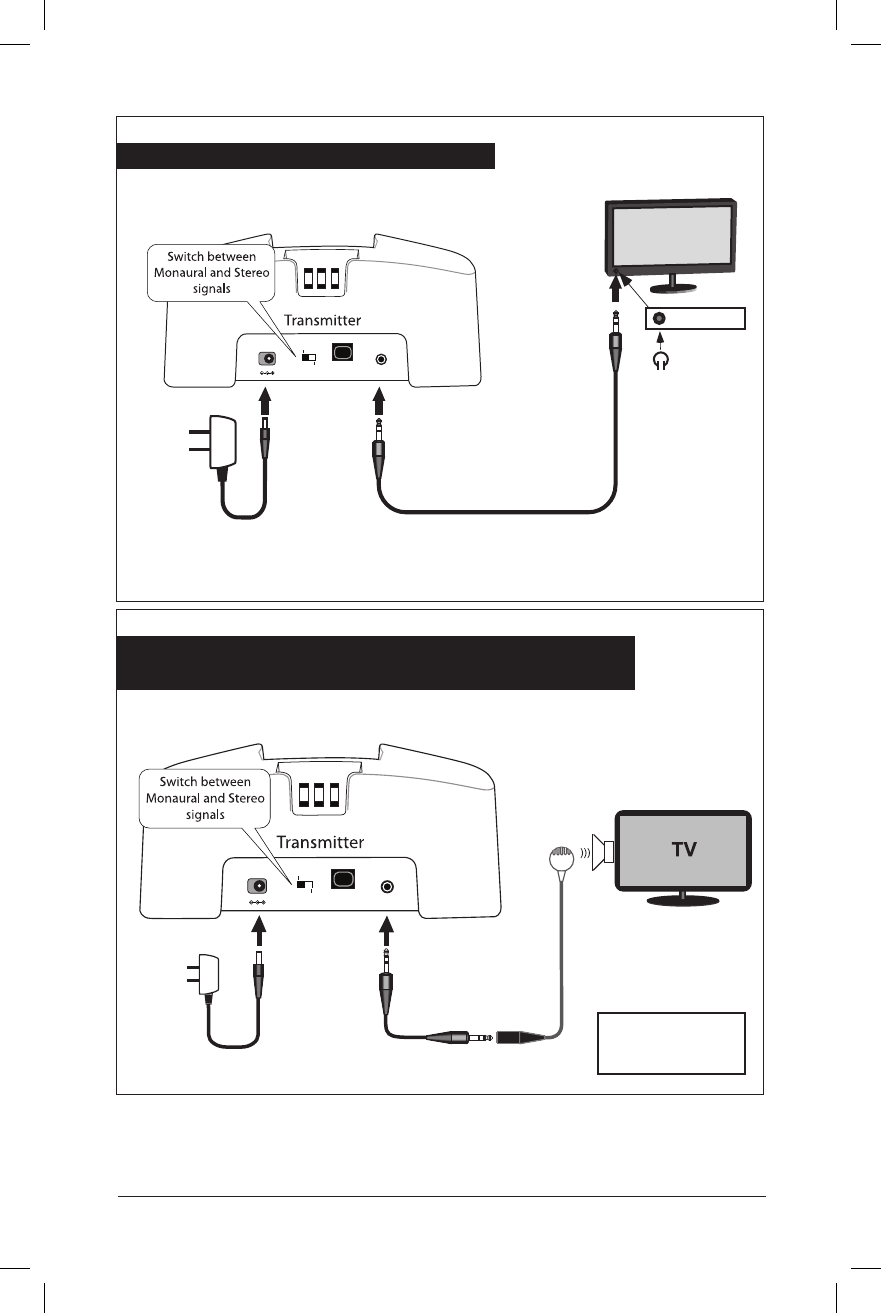
Connect to TV via single audio cable
If other options have not been effective, plug in
Microphone (included) instead of direct connection.
Attach microphone
to TV speaker using
Velcro fastener.
Note: Using the headphone jack may mute the TV speakers.
5V 550mA
DC IN STEREO OPTICAL IN
AUDIO IN
MONO
TV
HEADPHONE
5V 550mA
DC IN STEREO OPTICAL IN
AUDIO IN
MONO
Need assistance? Call us at 1-888-327-1299 (customer support hours
Monday – Friday 8:00 am – 5:30 pm ET) or
email info@EarTechTVAudio.com
12

Troubleshooting
The Neckloop Receiver cannot be linked to the Transmitter, please follow
this procedure for Pairing:
1. Turn OFF the power to the Transmitter by unplugging the power supply.
2. Turn ON the Neckloop Receiver.
3. Press and hold the MIC Button on the Receiver for 5 seconds. The green LED on the Receiver
will flash quickly.
4. Turn ON the Transmitter by plugging in the power supply.
5. The Receiver and the Transmitter are then Paired automatically and the green LED on the
Receiver lights steadily.
6. One Transmitter can be connected to multiple Receivers as above
The Headset Receiver cannot be linked to the Transmitter, please follow
this procedure for Pairing:
1. Turn OFF the power to the Transmitter by unplugging the power supply.
2. Turn ON the Headset Receiver.
3. Press and hold the MUTE Button on the Receiver for 5 seconds. The green LED on the Receiver
will flash quickly.
4. Turn ON the Transmitter by plugging in the power supply.
5. The Receiver and the Transmitter are then Paired automatically and the green LED on the
Receiver lights steadily.
6. One Transmitter can be connected to multiple Receivers as above
No sound
- Ensure that the power supply is inserted in the outlet and that it’s cable is properly connected
to the DC IN connector on the Transmitter.
- Ensure that the Receiver power ON/OFF switch is switched to ON.
- Make sure the battery is charged. If not, recharge the battery or replace it with a fully charged
battery.
- Ensure that the TV set, Hi-Fi system or audio component is switched ON and set to a channel
that broadcasts an audio signal.
- Use the Volume Control on the Receiver to increase the sound level.
- Try using a dierent connection RCA, OPTICAL or HEADPHONE.
Distortion
- The Receiver may be too far away from the Transmitter. Move the Receiver closer to
the Transmitter.
- The audio signal input level may be too low. Increase the volume from the audio source.
- The audio signal input level may be too high. Lower the volume from the audio source.
13

TECHNICAL SPECIFICATIONS: HEADSET
Transmission mode: Digital RF System
Carrier frequemcy: 2.4GHz ISM BAND
Operating voltage: Transmitter 5VC 550mA
Receiver 3.7 V, 350mA Lithium Polymer Battery
Frequency response: 30Hz - 20KHz
Distortion: <0.5%
Signal-to-noise ratio: >75dB
Listening time: up to 6 hours
Range: up to 25 meters (82 feet) (open area)
TECHNICAL SPECIFICATIONS: NECKLOOP
Transmission mode: Digital RF System
Carrier frequemcy: 2.4GHz ISM BAND
Operating voltage: Transmitter 5V
Receiver 3.7 V Lithium Polymer Battery
Frequency response: 20Hz - 20KHz
Distortion: <0.5%
Signal-to-noise ratio: >85dB
Listening time: up to 6 hours
Range: up to 30 meters (98.4 feet) (open area)
14
FCC Statement
This device complies with part 15 of the FCC rules. Operation is subject to the followi
ng two conditions: (1) this device may not cause harmful interference, and (2) this de
vice must accept any interference received, including interference that may ca
use undesired operation.
Changes or modifications not expressly approved by the party responsible for compli
ance could void the user’s authority to operate the equipment.
NOTE: This equipment has been tested and found to comply with the limits for a Clas
s B digital device, pursuant to part 15 of the FCC Rules. These limits are designed to p
rovide reasonable protection against harmful interference in a residential installation.
This equipment generates uses and can radiate radio frequency energy and, if not ins
talled and used in accordance with the instructions, may cause harmful interference t
o radio communications. However, there is no guarantee that interference will not oc
cur in a particular installation. If this equipment does cause harmful interference to r
adio or television reception, which can be determined by turning the equipment off a
nd on, the user is encouraged to try to correct the interference by one or more of the
following measures:
•Reorient or relocate the receiving antenna.
•Increase the separation between the equipment and receiver.
•Connect the equipment into an outlet on a circuit different from that to which the
receiver is connected.
- Consult the dealer or an experienced radio/TV technician for help important ann
ouncement
Important Note:
Radiation Exposure Statement
Charging:
This equipment complies with FCC radiation exposure limits set forth for an
uncontrolled environment. This equipment should be installed and operated with
minimum distance 20cm between the radiator and your body.
This transmitter must not be co-located or operating in conjunction with any other
antenna or transmitter.
earphone:
This equipment complies with FCC radiation exposure limits set forth for an
uncontrolled environment. This equipment should be installed and operated with
minimum distance 0mm between the radiator and your body.
This transmitter must not be co-located or operating in conjunction with any other
antenna or transmitter.
Important Note:
In the event that these conditions cannot be met (for example certain laptop
configurations or co-location with another transmitter), then the FCC authorization is
no longer considered valid and the FCC ID cannot be used on the final product. In
these circumstances, the OEM integrator will be responsible for re-evaluating the
end product (including the transmitter) and obtaining a separate FCC authorization.
ISED Statement
‐ English: This device complies with Industry Canada license‐exempt RSS standard(s)
.Operation is subject to the following two conditions: (1) This device may not cause in
terference, and (2) This device must accept any interference, including interference t
hat may cause undesired operation of the device.The digital apparatus complies with
Canadian CAN ICES‐3 (B)/NMB‐3(B).
‐ French:Le présentappareilestconforme aux CNR d'Industrie Canada applicables au
x appareils
radio exempts de licence. L'exploitationestautorisée aux deux conditions suivantes: (
1) l'appareil ne doit pas produire de brouillage, et (2) l'utilisateur de l'appareildoit acc
epter tout brouillageradioélectriquesubi, mêmesi le brouillageest susceptible d'enco
mpromettre le fonctionnement.
Radiation Exposure Statement
Charging:
This equipment complies with Canada radiation exposure limits set forth for an
uncontrolled environment. This equipment should be installed and operated with
minimum distance 20cm between the radiator & your body.
Déclaration d'exposition aux radiations
Cet équipement est conforme Canada limites d'exposition aux radiations dans un
environnement non contrôlé. Cet équipement doit être installé et utilisé à distance
minimum de 20cm entre le radiateur et votre corps.
earphone:
This equipment complies with Canada radiation exposure limits set forth for an
uncontrolled environment. This equipment should be installed and operated with
minimum distance 0cm between the radiator & your body.
Cet équipement est conforme Canada limites d'exposition aux radiations dans un
environnement non contrôlé. Cet équipement doit être installé et utilisé à distance
minimum de 0cm entre le radiateur et votre corps.