ARRIS 2W1000W 802.11b Chip Boy User Manual Book HPL 1000SW Install Guide 178 001 A

Pace Americas 802.11b Chip Boy Book HPL 1000SW Install Guide 178 001 A
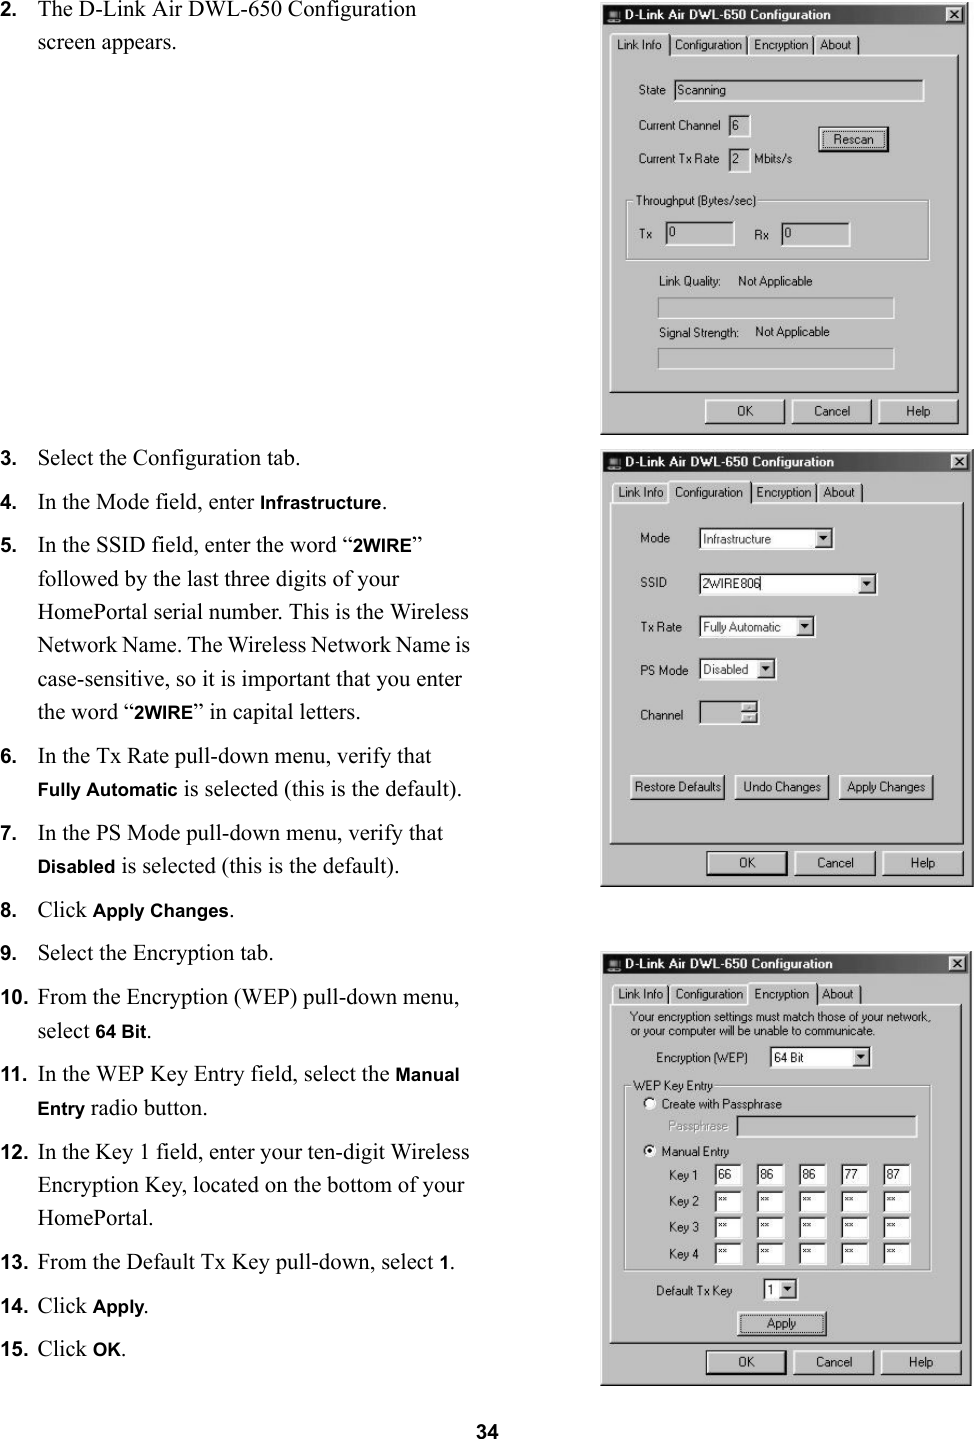
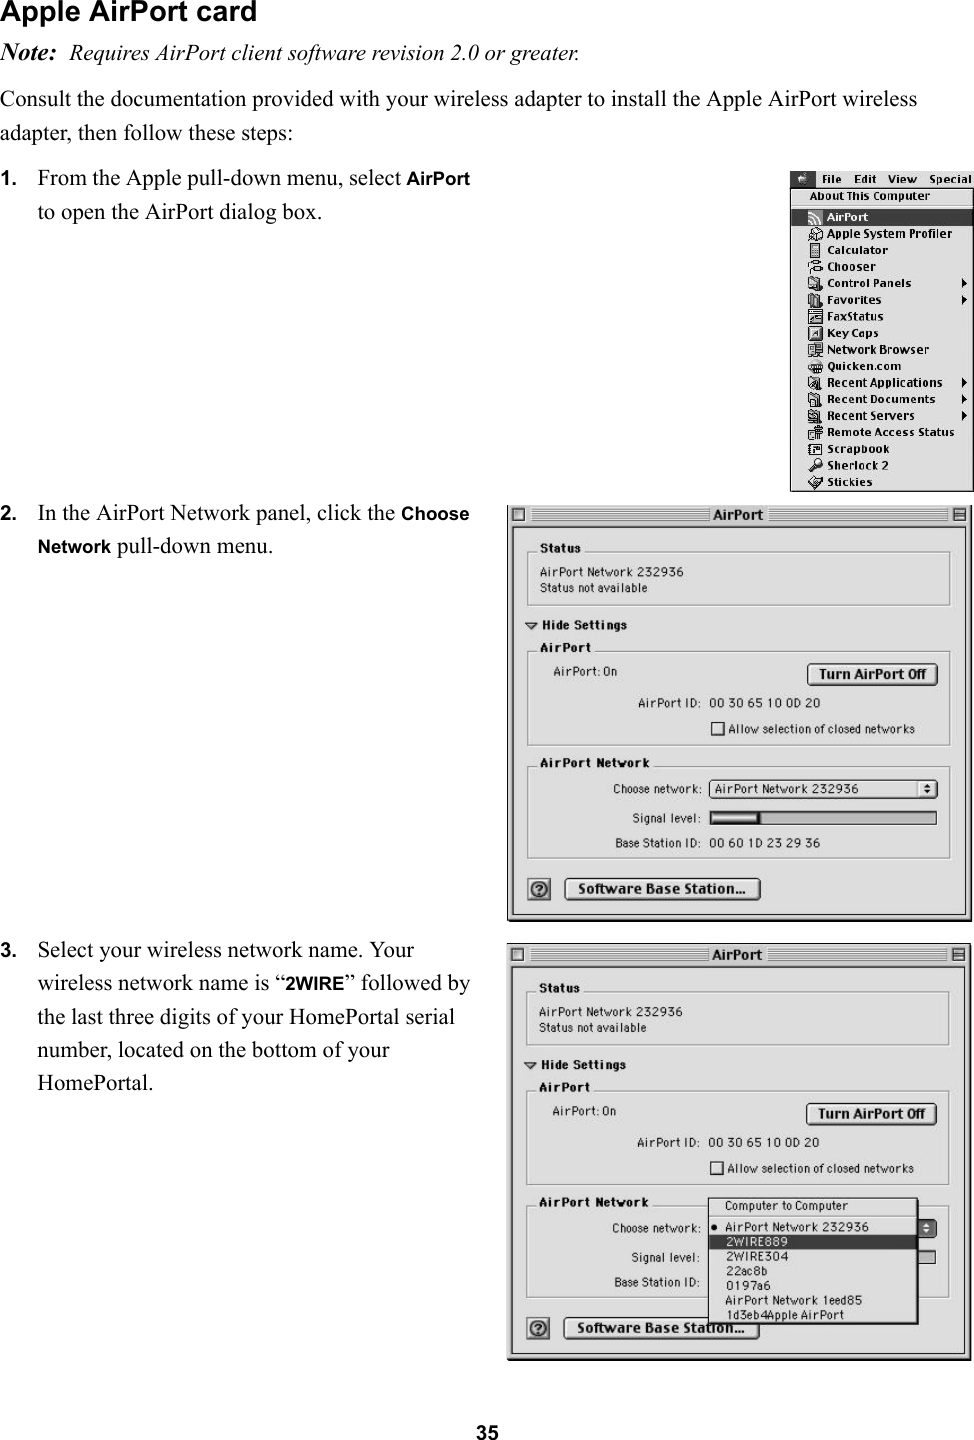
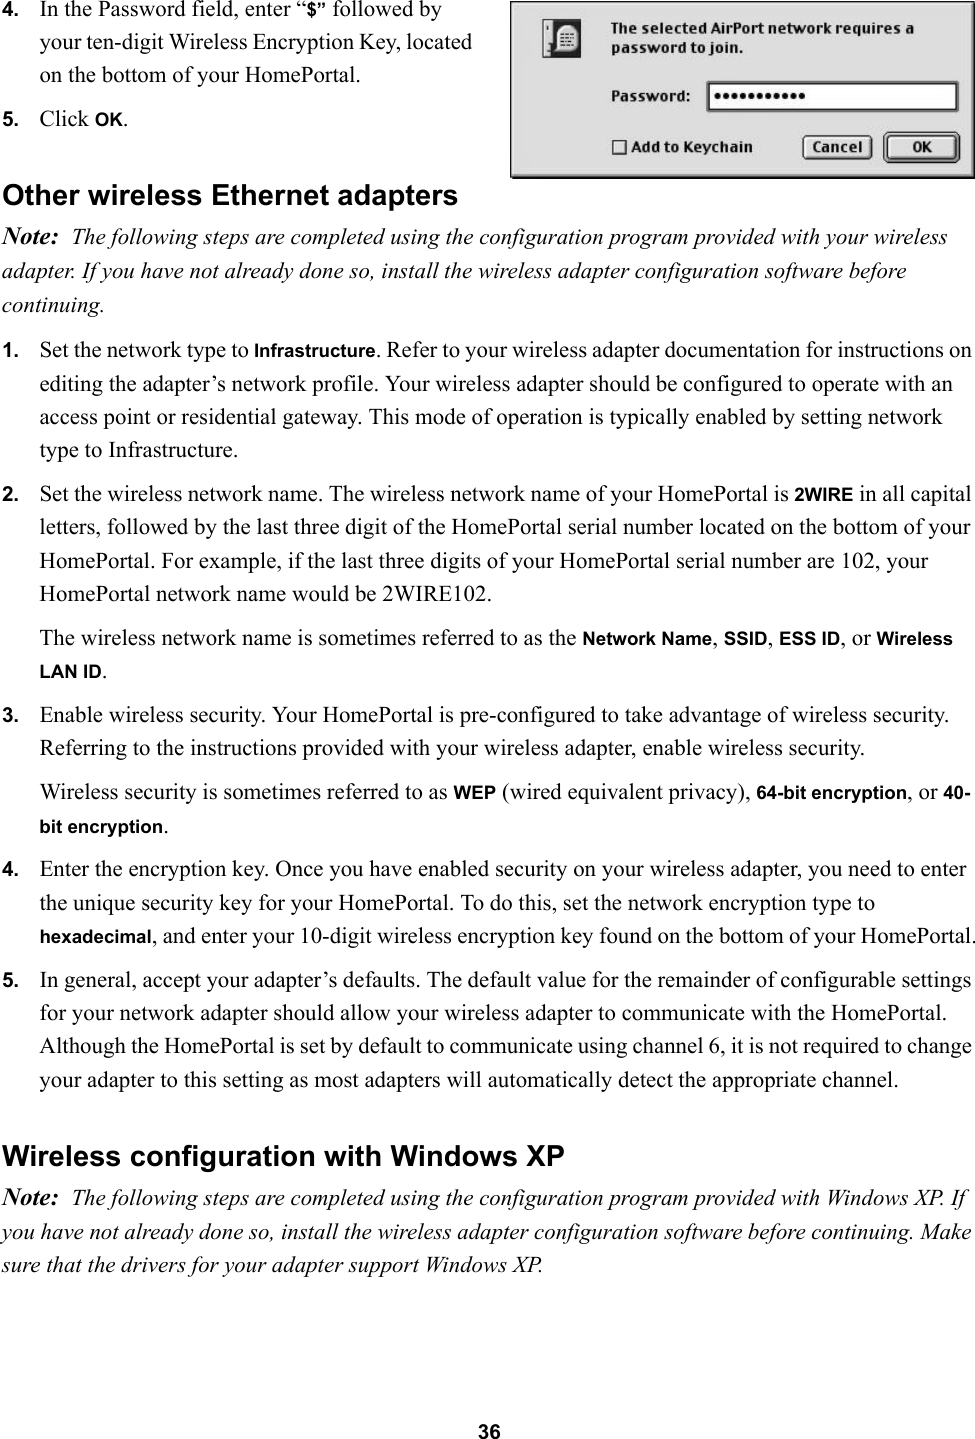
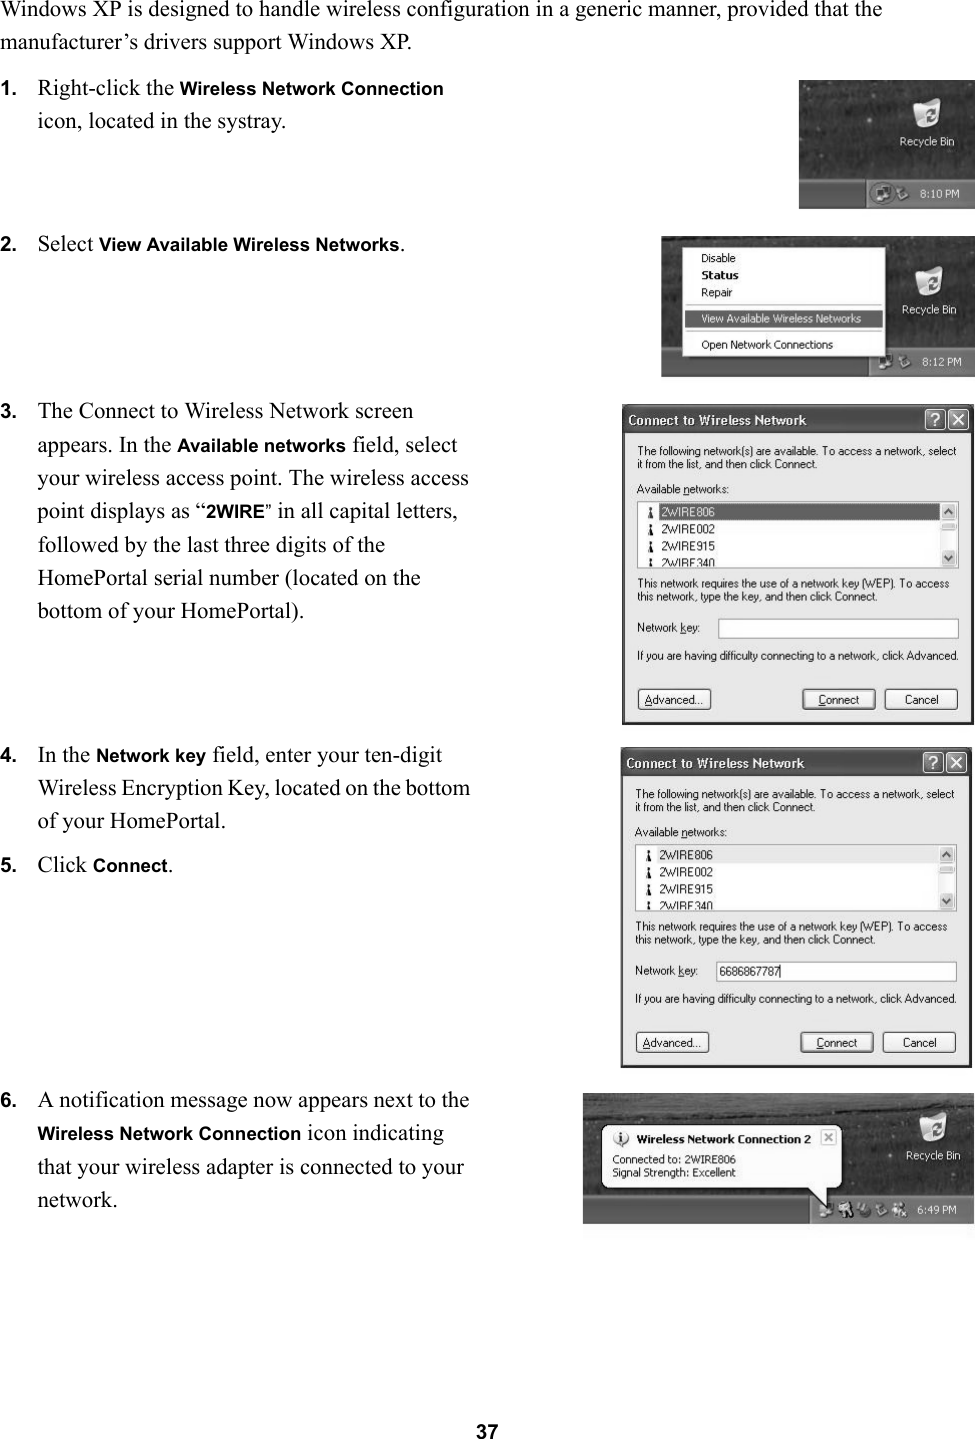
installguid

Installation Guide for Model 1000SW
Notice to Users©2003 2Wire, Inc. All rights reserved. This manual in whole or in part, may not be reproduced, translated, or reduced to any machine-readable form without prior written approval.2WIRE PROVIDES NO WARRANTY WITH REGARD TO THIS MANUAL, THE SOFTWARE, OR OTHER INFORMATION CONTAINED HEREIN AND HEREBY EXPRESSLY DISCLAIMS ANY IMPLIED WARRANTIES OF MERCHANTABILITY OR FITNESS FOR ANY PARTICULAR PURPOSE WITH REGARD TO THIS MANUAL, THE SOFTWARE, OR SUCH OTHER INFORMATION, IN NO EVENT SHALL 2WIRE, INC. BE LIABLE FOR ANY INCIDENTAL, CONSEQUENTIAL, OR SPECIAL DAMAGES, WHETHER BASED ON TORT, CONTRACT, OR OTHERWISE, ARISING OUT OF OR IN CONNECTION WITH THIS MANUAL, THE SOFTWARE, OR OTHER INFORMATION CONTAINED HEREIN OR THE USE THEREOF. 2Wire, Inc. reserves the right to make any modification to this manual or the information contained herein at any time without notice. The software described herein is governed by the terms of a separate user license agreement. Updates and additions to software may require an additional charge. Subscriptions to online service providers may require a fee and credit card information. Financial services may require prior arrangements with participating financial institutions.2Wire, the 2Wire logo, and HomePortal are trademarks of 2Wire, Inc. All other trademarks are trademarks of their respective owners. ___________________________________________________________________________________________________________________________Owner’s RecordThe serial number is located on the bottom of your 2Wire HomePortal. Record the serial number in the space provided here and refer to it when you call Customer Care.Serial Number:__________________________Safety Information• To prevent fire or shock hazard, do not expose your HomePortal to rain or moisture.• To avoid electrical shock, do not open the HomePortal. Refer servicing to qualified personnel only.• Never install modem, cable, or telephone wiring during a lightning storm.• Never install telephone jacks in wet locations unless the jack is specifically designed for wet locations.• Never touch uninsulated telephone wire or terminals unless the telephone line has been disconnected at the network interface.• Use caution when installing or modifying cable or telephone lines.• Avoid using your modem during an electrical storm.• Do not use your modem or a telephone to report a gas leak in the vicinity of the leak.• A socket outlet should be as close as possible to the unit and easily accessible.• You MUST use the 26 AWG telephone cord supplied when connecting this device.
ContentsNetworking Technology OverviewEthernet . . . . . . . . . . . . . . . . . . . . . . . . . . . . . . . . . . . . . . . . . . . . . . . . . . . . . . . . . . . . . . . . . . . . . . . . . . . . . . . . . 1USB   . . . . . . . . . . . . . . . . . . . . . . . . . . . . . . . . . . . . . . . . . . . . . . . . . . . . . . . . . . . . . . . . . . . . . . . . . . . . . . . . . . . 1Wireless   . . . . . . . . . . . . . . . . . . . . . . . . . . . . . . . . . . . . . . . . . . . . . . . . . . . . . . . . . . . . . . . . . . . . . . . . . . . . . . . . 2Home Phoneline Networking (HomePNA). . . . . . . . . . . . . . . . . . . . . . . . . . . . . . . . . . . . . . . . . . . . . . . . . . . . . . 2HomePortal . . . . . . . . . . . . . . . . . . . . . . . . . . . . . . . . . . . . . . . . . . . . . . . . . . . . . . . . . . . . . . . . . . . . . . . . . . . . . . 2Step 1: Getting StartedFirst: Remove or disable conflicting applications   . . . . . . . . . . . . . . . . . . . . . . . . . . . . . . . . . . . . . . . . . . . . . . . . 3Second: Check your computer’s browser and system requirements   . . . . . . . . . . . . . . . . . . . . . . . . . . . . . . . . . . 3Browser Requirements . . . . . . . . . . . . . . . . . . . . . . . . . . . . . . . . . . . . . . . . . . . . . . . . . . . . . . . . . . . . . . . . . 3System Requirements   . . . . . . . . . . . . . . . . . . . . . . . . . . . . . . . . . . . . . . . . . . . . . . . . . . . . . . . . . . . . . . . . . 3Step 2: Connect Your First Computer to the HomePortalChoose a computer and connection type  . . . . . . . . . . . . . . . . . . . . . . . . . . . . . . . . . . . . . . . . . . . . . . . . . . . . . . . 4Ethernet Connection   . . . . . . . . . . . . . . . . . . . . . . . . . . . . . . . . . . . . . . . . . . . . . . . . . . . . . . . . . . . . . . . . . . 5Check your connections   . . . . . . . . . . . . . . . . . . . . . . . . . . . . . . . . . . . . . . . . . . . . . . . . . . . . . . . . . . . 5USB Connection   . . . . . . . . . . . . . . . . . . . . . . . . . . . . . . . . . . . . . . . . . . . . . . . . . . . . . . . . . . . . . . . . . . . . . 6Install the 2Wire Gateway USB driver — Windows PC   . . . . . . . . . . . . . . . . . . . . . . . . . . . . . . . . . . 7Install the 2Wire Gateway USB driver — Macintosh   . . . . . . . . . . . . . . . . . . . . . . . . . . . . . . . . . . . . 8Check your connections   . . . . . . . . . . . . . . . . . . . . . . . . . . . . . . . . . . . . . . . . . . . . . . . . . . . . . . . . . . . 9Home Phoneline Networking (HomePNA) Connection  . . . . . . . . . . . . . . . . . . . . . . . . . . . . . . . . . . . . . . 10Check your connections   . . . . . . . . . . . . . . . . . . . . . . . . . . . . . . . . . . . . . . . . . . . . . . . . . . . . . . . . . . 10Network with Ethernet Hub or Switch   . . . . . . . . . . . . . . . . . . . . . . . . . . . . . . . . . . . . . . . . . . . . . . . . . . . 11Check your connections   . . . . . . . . . . . . . . . . . . . . . . . . . . . . . . . . . . . . . . . . . . . . . . . . . . . . . . . . . . 11Wireless Connection. . . . . . . . . . . . . . . . . . . . . . . . . . . . . . . . . . . . . . . . . . . . . . . . . . . . . . . . . . . . . . . . . . 12Check your connections   . . . . . . . . . . . . . . . . . . . . . . . . . . . . . . . . . . . . . . . . . . . . . . . . . . . . . . . . . . 12Step 3: Install the HomePortal SoftwareInstalling the HomePortal Setup Wizard on Windows PCs  . . . . . . . . . . . . . . . . . . . . . . . . . . . . . . . . . . . . . . . . 13Starting the Setup Wizard manually on Windows PCs  . . . . . . . . . . . . . . . . . . . . . . . . . . . . . . . . . . . . . . . 13Installing the HomePortal Setup Wizard on Macintosh computers  . . . . . . . . . . . . . . . . . . . . . . . . . . . . . . . . . . 14Step 4: Add Computers to the NetworkChoose a computer and connection type  . . . . . . . . . . . . . . . . . . . . . . . . . . . . . . . . . . . . . . . . . . . . . . . . . . . . . . 15USB Connection   . . . . . . . . . . . . . . . . . . . . . . . . . . . . . . . . . . . . . . . . . . . . . . . . . . . . . . . . . . . . . . . . . . . . 16Home Phoneline Networking (HomePNA) Connection. . . . . . . . . . . . . . . . . . . . . . . . . . . . . . . . . . . . . . . 17Wireless Connection  . . . . . . . . . . . . . . . . . . . . . . . . . . . . . . . . . . . . . . . . . . . . . . . . . . . . . . . . . . . . . . . . . 18
The HomePortal Indicator LightsHomePortal indicator and status lights . . . . . . . . . . . . . . . . . . . . . . . . . . . . . . . . . . . . . . . . . . . . . . . . . . . . . . . . 19Diagnosing connection problems  . . . . . . . . . . . . . . . . . . . . . . . . . . . . . . . . . . . . . . . . . . . . . . . . . . . . . . . . . . . . 20POWER indicator light is not lit. . . . . . . . . . . . . . . . . . . . . . . . . . . . . . . . . . . . . . . . . . . . . . . . . . . . . . . . . 20BROADBAND LINK indicator light is red   . . . . . . . . . . . . . . . . . . . . . . . . . . . . . . . . . . . . . . . . . . . . . . . 20LOCAL NETWORK indicator light is not lit  . . . . . . . . . . . . . . . . . . . . . . . . . . . . . . . . . . . . . . . . . . . . . . 20Appendix A: 2Wire Wireless Adapter Installation2Wire Wireless PC Card   . . . . . . . . . . . . . . . . . . . . . . . . . . . . . . . . . . . . . . . . . . . . . . . . . . . . . . . . . . . . . . . . . . 21Installing the Wireless PC Card . . . . . . . . . . . . . . . . . . . . . . . . . . . . . . . . . . . . . . . . . . . . . . . . . . . . . . . . . 212Wire Wireless USB Adapter . . . . . . . . . . . . . . . . . . . . . . . . . . . . . . . . . . . . . . . . . . . . . . . . . . . . . . . . . . . . . . . 22Installing the Wireless USB Adapter . . . . . . . . . . . . . . . . . . . . . . . . . . . . . . . . . . . . . . . . . . . . . . . . . . . . . 22Wireless Adapter Driver Installation  . . . . . . . . . . . . . . . . . . . . . . . . . . . . . . . . . . . . . . . . . . . . . . . . . . . . . . . . . 23Installing Drivers For Windows 98SE . . . . . . . . . . . . . . . . . . . . . . . . . . . . . . . . . . . . . . . . . . . . . . . . . . . . 23Installing Drivers For Windows ME  . . . . . . . . . . . . . . . . . . . . . . . . . . . . . . . . . . . . . . . . . . . . . . . . . . . . . 24Installing Drivers For Windows 2000  . . . . . . . . . . . . . . . . . . . . . . . . . . . . . . . . . . . . . . . . . . . . . . . . . . . . 25Installing Drivers For Windows XP   . . . . . . . . . . . . . . . . . . . . . . . . . . . . . . . . . . . . . . . . . . . . . . . . . . . . . 27Appendix B: Third-party Wireless Adapter ConfigurationLocate the serial number and wireless encryption key . . . . . . . . . . . . . . . . . . . . . . . . . . . . . . . . . . . . . . . . . . . . 28Agere ORiNOCO PC Card - Silver or Gold   . . . . . . . . . . . . . . . . . . . . . . . . . . . . . . . . . . . . . . . . . . . . . . . . . . . 29Cisco Aironet  . . . . . . . . . . . . . . . . . . . . . . . . . . . . . . . . . . . . . . . . . . . . . . . . . . . . . . . . . . . . . . . . . . . . . . . . . . . 31D-Link Air DWL-650   . . . . . . . . . . . . . . . . . . . . . . . . . . . . . . . . . . . . . . . . . . . . . . . . . . . . . . . . . . . . . . . . . . . . 33Apple AirPort card  . . . . . . . . . . . . . . . . . . . . . . . . . . . . . . . . . . . . . . . . . . . . . . . . . . . . . . . . . . . . . . . . . . . . . . . 35Other wireless Ethernet adapters  . . . . . . . . . . . . . . . . . . . . . . . . . . . . . . . . . . . . . . . . . . . . . . . . . . . . . . . . . . . . 36Wireless configuration with Windows XP . . . . . . . . . . . . . . . . . . . . . . . . . . . . . . . . . . . . . . . . . . . . . . . . . . . . . 36Regulatory InformationDeclaration of ConformityLimited Hardware Warranty
1Networking Technology OverviewA home network consists of two or more computers that have been connected so they can “talk” with each other. Individual users can now connect to Web servers worldwide through the Internet, a global computer network. A home network enables computer users in a household to share one Internet connection, share files without trading disks, and share peripherals such as printers and external drives. Several technologies are available to connect or “network” computers. These technologies include: •Ethernet• Universal Serial Bus (USB)•HomePNA• WirelessEthernetEthernet is a technology that lets you create a home network using special wiring. Many new computers are shipped with a built-in Ethernet adapter. If you have this kind of computer, you can use Ethernet cable to connect the Ethernet connection jack on the computer to the LOCAL ETHERNET port on the HomePortal. You can identify an Ethernet connection jack by its rectangular shape and size, which is slightly larger than a standard telephone jack. Ethernet is recommended if your primary computer will be in the same room as the HomePortal.Ethernet connection is recommended if your primary computer has an Ethernet adapter and will be in the same room as the HomePortal.USBMost computers and digital devices manufactured in the last few years come with USB connections. USB ports, which are small and rectangular, are located on the back of the computer. Desktop computers typically have at least two USB ports, and notebook computers commonly have at least one. USB connection is recommended if your primary computer does not have a network adapter other than an available USB port, and will be in the same room as the HomePortal.
2HomePortalThe 2Wire HomePortal residential gateway makes it possible to create a home network using any of the above technologies. By enabling you to connect the computers in your home, the HomePortal provides you with all the benefits of networking, including the ability to share one Internet connection among all the computers and computer users in your household.The HomePortal securely delivers rich content such as games and music from the Internet, distributing it to multiple simultaneous users within your household. The HomePortal is easy to install and as easy to use as browsing the Web. The HomePortal also makes it easy to share printers, MP3 players, Internet radios, game consoles and other Internet devices.The HomePortal enables high-speed, always-connected Internet access to the computers on your home network—while keeping your private files safe from Internet hackers. The firewall and denial-of-service attack protection built into the HomePortal keeps your data safe.Home Phoneline Networking (HomePNA)The HomePortal supports the HomePNA (Home Phoneline Networking Alliance) protocol. Home phoneline networking uses HomePNA technology to allow you to connect computers in different rooms using your home’s existing telephone wiring. To create a home phoneline network, you need either a PCI HomePNA card installed into your computer or an external HomePNA adapter. These devices make it possible to connect each additional computer through the phoneline.Home phoneline networking (HomePNA) is recommended for connecting secondary computers to your HomePortal if those computers are in the same room as the HomePortal, and for connecting computers in other rooms to the HomePortal.WirelessWireless networking uses radio waves to connect your computers to your network. A PC Card (PCMCIA) wireless adapter looks like a flat, metal credit card with a piece of black plastic attached at one end. Other types of wireless adapters can be attached using a USB connector. Wireless technology is recommended for networking mobile computers that are located in an area that is difficult to connect via a wired (Ethernet, HomePNA, or USB) network.
3Step 1Getting StartedFirst: Remove or disable conflicting applicationsApplications that enable a computer to share its Internet connection (often called Internet sharing software) and PC based firewall applications typically interfere with the HomePortal and should be removed or disabled before you install the HomePortal residential gateway. The HomePortal provides the same features as the products listed below so you don’t need to worry about losing Internet sharing and security capabilities. For more information on the HomePortal firewall, see Technical Support at www.2Wire.com.If you have any of the following (or similar) applications installed on your computers, remove or disable them according to the manufacturer’s instructions before proceeding.Second: Check your computer’s browser and system requirementsVerify that your computers meet the following minimum requirements:Browser RequirementsWindows: Microsoft Internet Explorer 5.0 or higher (included on the HomePortal Setup Wizard CD) or Netscape Navigator 4.7 or higher.Macintosh: Microsoft Internet Explorer 5.0 or Netscape 4.74 or higher (included on the HomePortal Setup Wizard CD).System Requirements• At least 32 MB of RAM• At least one computer with CD-ROM• 5 MB of available hard disk space for 2Wire HomePortal software• Windows 98, 98SE, Windows ME, Windows NT 4.0 with Service Pack 6, Windows 2000,Windows XP, or Mac OS 8.6 or higher• Network interface card(s) appropriate to your HomePortal model.Internet sharing applications such as... Proxy software such as... Security software such as...• 3Com HomeClick• Microsoft Internet Connection Sharing• Intel Anypoint ISS•WinGate• Sygate• Norton Internet Security• Black Ice• Zone Alarm
4Step 2Connect Your First Computerto the HomePortalChoose a computer and connection typeThe first computer you connect to your home network is used to configure the HomePortal residential gateway for proper operation. Choose one of the following methods to connect your first computer to the HomePortal. Save and close all open programs before you begin connecting your HomePortal.*If you use a 2Wire wireless adapter (PC card or USB adapter) for wireless networking, the HomePortal Setup Wizard software automatically configures it to communicate with the HomePortal during setup, but you will need to install a driver. See Appendix A for detailed installation instructions.If you are NOT using a 2Wire wireless adapter, you will need to manually configure your adapter of choice to communicate with the HomePortal BEFORE installing the HomePortal software. See Appendix B for detailed configuration instructions.Connection Type Go to...Ethernet (Yellow cable)Requires: A computer with an Ethernet port.Recommended for: Primary computer in the same room as the HomePortal.page 5USB (Blue cable)Requires: A computer with an available USB port. See the USB connection option for exceptions.Recommended for: Primary computer in the same room as the HomePortal.page 6Home phoneline networking (HomePNA) (Gray cable)Requires: A computer with a HomePNA port or an external HomePNA adapter such as the 2Wire PC Port.Recommended for: Additional computers in the same room as the HomePortal or computers in other rooms.page 10Network connection via Ethernet hub or switchRequires: An Ethernet hub or switch and a computer with an Ethernet port.Recommended for: Multiple computers in the same room as the HomePortal.page 11Wireless Requires: A computer with an 802.11b wireless network adapter installed.* Wireless adapters are purchased separately from the HomePortal.page 12
5.1. Connect the provided AC power adapter from the HomePortal’s POWER port to an electrical outlet. The green POWER light on the front of the HomePortal should come on.2. Connect the yellow Ethernet cable provided with the HomePortal from the ETHERNET port on the HomePortal to your computer’s Ethernet port.3. Connect the gray telephone cable provided with the HomePortal from the PHONE LINE port on the HomePortal to a telephone jack with DSL service. This connects the HomePortal’s internal DSL modem to your DSL service provider and sets up your home network for home phoneline (HomePNA) networking. If you have been using an external DSL modem, you will no longer need it.Check your connectionsWith your computer completely started, verify the POWER and LOCAL NETWORK indicator lights on the front of the HomePortal are green. If they are not, see “Diagnosing connection problems” on page 20. The BROADBAND LINK indicator light will not turn green until the HomePortal software has been installed and an Internet connection has been established.Continue from here to Step 3 “Install the HomePortal Software” on page 13.Ethernet ConnectionRequires a computer with an Ethernet port
6Note: Only one Windows or Macintosh computer can be directly connected to the HomePortal using the USB connection. HomePortal USB connectivity is NOT available for Macintosh OS earlier than 8.6, Mac OS 10.0, Mac OS 10.1, Windows 95, Window 95 OSR2, or Windows NT. Additional computers may be added to the network using connection options such as Ethernet.1. Connect the provided AC power adapter from the HomePortal’s POWER port to an electrical outlet. The green POWER light on the front of the HomePortal should come on.2. Connect the blue USB cable provided with the HomePortal from the USB port on the HomePortal to your computer’s USB port.3. Connect the gray telephone cable provided with the HomePortal from the PHONE LINE port on the HomePortal to a telephone jack with DSL service. This connects the HomePortal internal DSL modem to your DSL service provider and sets up your home network for home phoneline (HomePNA) networking. If you have been using an external DSL modem, you will no longer need it.USB ConnectionRequires a computer with an available USB port. See note below for exceptions.
7Install the 2Wire Gateway USB driver — Windows PCBefore installing your HomePortal software, you must install the 2Wire Gateway USB driver on your computer. The following screens show the installation under Windows XP and may vary somewhat on Windows 98, Windows ME, and Windows 2000.1. Power on your computer. When the Found New Hardware Wizard window opens, make sure that Install the software automatically (Recommended) is selected and click Next to continue.2. The driver installs.3.  Click Finish to complete the installation.
8Install the 2Wire Gateway USB driver — MacintoshBefore installing your HomePortal software, you must install the 2Wire Gateway USB driver on your computer. The following screens show the installation under Macintosh OS 10.2 and may vary somewhat on Macintosh OS 8.6 to 9.X.1. Power on your computer.2. Insert the HomePortal Setup Wizard CD in your computer’s CD-ROM drive.3. Double-click the 2Wire USB folder to install the driver.4. If you have set up an administrator name and password, the Authenticate screen opens. Enter your administrator name and password and click OK.5. Follow the onscreen instructions. When the driver installation is complete, you will be prompted to restart your computer.6. After your computer restarts, connect a USB cable from your Macintosh computer to the HomePortal USB port.7. Establish your connection. Open the network Control Panel and select the Apple icon>System Preferences...>Network.
9Note: Your Macintosh computer automatically assigns the name "(en1)" to the HomePortal USB port. If your computer has more than one Ethernet-type network device installed, the USB port may be named "(en2)" or higher.Check your connectionsWith your computer completely started, verify the POWER and LOCAL NETWORK indicator lights on the front of the HomePortal are green. If they are not, see “Diagnosing connection problems” on page 20. The BROADBAND LINK indicator light will not turn green until the HomePortal software has been installed and an Internet connection has been established.Continue from here to Step 3 “Install the HomePortal Software” on page 13.8. Verify that Ethernet Adaptor (en1) is selected in the Show field. If it is not, select it from the pull-down menu. When the New Port Detected message displays, click OK.9. Click Save to complete your installation.
10Computers connected with HomePNA access the HomePortal’s Internet connection and other computers on the network using existing telephone wiring. You will need one adapter for each computer that you are connecting through HomePNA. If your computer does not have a HomePNA port, you will need to install a PCI HomePNA adapter or an external HomePNA adapter. The HomePNA adapter shown above is a 2Wire PC Port Phoneline Adapter.1. Connect the provided AC power adapter from the HomePortal’s POWER port to an electrical outlet. The green POWER light on the front of the HomePortal should come on.2. Connect the gray telephone cable provided with the HomePortal from the PHONE LINE port on the HomePortal to a telephone jack with DSL service.3. Install your HomePNA adapter according to the manufacturer’s instructions.Note: If you are installing a phoneline filter, it must be installed directly between the telephone and the wall jack, as shown in the diagram. Do not connect the telephone line from the HomePNA adapter to the phoneline filter. The network will not work properly if the phoneline filter is connected directly to the HomePNA adapter. You can use the provided Y-adapter to connect both the HomePNA adapter and the phoneline filter to the same phone jack.Check your connectionsWith your computer completely started, verify the POWER and LOCAL NETWORK indicator lights on the front of the HomePortal are green. If they are not, see “Diagnosing connection problems” on page 20. The BROADBAND LINK indicator light will not turn green until the HomePortal software has been installed and an Internet connection has been established.Continue from here to Step 3 “Install the HomePortal Software” on page 13.Home Phoneline Networking (HomePNA) ConnectionRequires a computer with a HomePNA port or an external HomePNA adapter
11Note: The HomePortal has an auto-crossover port. You do not need to use a special crossover cable or make any changes to the configuration of your HomePortal, Ethernet hub, or switch. The HomePortal will establish the type of port needed during setup.1. Connect the provided AC power adapter from the HomePortal’s POWER port to an electrical outlet. The green POWER light on the front of the HomePortal should come on.2. Connect the yellow Ethernet cable provided with the HomePortal from the ETHERNET port on the HomePortal to an open port on the hub or switch.3. Connect the first computer’s Ethernet adapter to the hub or switch using an Ethernet cable.4. Connect the gray telephone cable provided with the HomePortal from the PHONE LINE port on the HomePortal to a telephone jack with DSL service.5. Using another Ethernet cable (not provided), connect any additional computers to the hub or switch. 6. Plug the hub or switch into an electrical outlet.Check your connectionsWith your computer completely started, verify the POWER and LOCAL NETWORK indicator lights on the front of the HomePortal are green. If they are not, see “Diagnosing connection problems” on page 20. The BROADBAND LINK indicator light will not turn green until the HomePortal software has been installed and an Internet connection has been established.Continue from here to Step 3 “Install the HomePortal Software” on page 13.Network with Ethernet Hub or SwitchRequires an Ethernet hub or switch and a computer with an Ethernet port
121. Connect the provided AC power adapter from the HomePortal’s POWER port to an electrical outlet. The green POWER light on the front of the HomePortal should light up.2. Connect the gray telephone cable provided with the HomePortal from the PHONE LINE port on the HomePortal to a telephone wall jack with DSL service.3. Install your wireless adapter according to the manufacturer’s instructions (see note below).Note: If you use a 2Wire wireless adapter (PC card or USB adapter) for wireless networking, the HomePortal Setup Wizard software automatically configures it to communicate with the HomePortal during setup, but you will need to install the driver. See Appendix A for detailed installation instructions.If you are NOT using a 2Wire wireless adapter, you will need to manually configure your adapter of choice to communicate with the HomePortal BEFORE installing the HomePortal software. See Appendix B for detailed configuration instructions.Check your connectionsWith your computer completely started and your wireless card properly configured, verify the POWER and LOCAL NETWORK indicator lights on the front of the HomePortal are green. If they are not, see “Diagnosing connection problems” on page 20. The BROADBAND LINK indicator light will not turn green until the HomePortal software has been installed and an Internet connection has been established.Continue from here to Step 3 “Install the HomePortal Software” on page 13.Wireless ConnectionRequires a computer with an 802.11b wireless network adapter installed. Wireless adapters are purchased separately from the HomePortal.
13Step 3Install the HomePortal SoftwareBefore installing the HomePortal software, it is very important that you disable any conflicting applications such as firewall and file- and printer-sharing applicationsSee Step 1, “Getting Started.”Installing the HomePortal Setup Wizard on Windows PCs Note: Close all programs before running the HomePortal Setup Wizard.Place the HomePortal Setup Wizard CD in the CD-ROM drive of your computer and follow the onscreen instructions. It may take up to one full minute for the Setup Wizard to start.Starting the Setup Wizard manually on Windows PCsAfter one minute, if the Setup Wizard does not run automatically, follow these steps:1. Double-click the My Computer icon located on the desktop.2. Double-click the icon that corresponds to your CD-ROM drive, then double-click Setup.exe.3. Follow the onscreen instructions.First computer only: After the Setup Wizard completes, the BROADBAND LINK indicator light on the front of the HomePortal flashes green as it attempts to establish a connection to your broadband service provider. This could take several minutes. The light will turn solid green when the connection is established. Your Web browser will automatically launch to complete the installation of the HomePortal software.
14Installing the HomePortal Setup Wizard on Macintosh computersIMPORTANT: If your Macintosh does not have a current Web browser, you must install one before installing the HomePortal software. To install a browser, drag the folder from the HomePortal Setup Wizard CD to your Macintosh hard drive, double-click the browser icon, then follow the onscreen instructions.Note: Close all programs before running the HomePortal Setup Wizard.1. Place the HomePortal Setup Wizard CD in the CD-ROM drive of your computer. 2. Double-click on the 2Wire icon. Double-click the 2Wire install icon and click Continue.3. Click Install to copy the HomePortal software to a folder called 2Wire HomePortal on the Macintosh hard drive. To copy the files to a different folder, click Select Folder... from the pull-down menu and select another folder. Click Install and follow the onscreen instructions.First computer only: After the Setup Wizard completes, the BROADBAND LINK indicator light on the front of the HomePortal flashes green as it attempts to establish a connection to your broadband service provider. This could take several minutes. The light will turn solid green when the connection is established. Your Web browser will automatically launch to complete the installation of the HomePortal software.
15Step 4Add Computers to the NetworkChoose a computer and connection typeAfter your first computer is connected to the HomePortal residential gateway and your Internet connection has been established, it is time to connect the other computers to the network.Use any or all of the following methods to connect additional computers to your network:*If you use a 2Wire wireless adapter (PC card or USB adapter) for wireless networking, the HomePortal Setup Wizard software automatically configures it to communicate with the HomePortal during setup, but you will need to install the driver. See Appendix A for detailed installation instructions.If you are NOT using a 2Wire wireless adapter, you will need to manually configure your adapter of choice to communicate with the HomePortal BEFORE installing the HomePortal software. See Appendix B for detailed configuration instructions.Connection Type Go to...USB (Blue cable)Requires a computer with an available USB port. See the USB connection option for exceptions.page 16Home phoneline networking (HomePNA) (Gray cable)Requires a computer with a HomePNA port or an external HomePNA adapter such as the 2Wire PC Port.page 17Network connection via Ethernet hub or switchRequires an Ethernet hub or switch and a computer with an Ethernet port.page 11Wireless Requires a computer with an 802.11b wireless network adapter installed.* Wireless adapters are purchased separately from the HomePortal.page 18
16Note: Only one Windows or Macintosh computer can be directly connected to the HomePortal using the USB connection. HomePortal USB connectivity is NOT available for Macintosh OS earlier than 8.6, Mac OS 10.0, Mac OS 10.1, Windows 95, Window 95 OSR2, or Windows NT. Additional computers may be added to the network using connection options such as Ethernet.1. Connect the blue USB cable provided with the HomePortal from the USB port on the HomePortal to the USB port on your computer.Before installing your HomePortal software on this computer, you must install a USB driver. Detailed instructions for installing USB drivers begins on page 7.Repeat Step 3 “Install the HomePortal Software” on page 13.USB ConnectionRequires a computer with an available USB port. See note below for exceptions.
17Computers connected with HomePNA access the Internet connection on the HomePortal residential gateway and other computers on the network using existing telephone wiring. You will need one adapter for each computer that you are connecting through HomePNA. If your computer does not have a HomePNA port, you must install a PCI HomePNA adapter or an external HomePNA adapter. Specific instructions for installing HomePNA network adapters can be found in the individual adapter package (if purchased separately) or on your HomePortal Setup Wizard CD (if included with your HomePortal). The HomePNA adapter shown in this example is a 2Wire PC Port Phoneline Adapter.1. Install the HomePNA adapter according to the manufacturer’s instructions.After your adapter is successfully installed, repeat Step 3 “Install the HomePortal Software” on page 13.Home Phoneline Networking (HomePNA) ConnectionRequires a computer with a HomePNA port or an external HomePNA adapter
18Note: If you use a 2Wire wireless adapter (PC card or USB adapter) for wireless networking, the HomePortal Setup Wizard software automatically configures it to communicate with the HomePortal during setup, but you will need to install the driver. See Appendix A for detailed installation instructions.If you are NOT using a 2Wire wireless adapter, you will need to manually configure your adapter of choice to communicate with the HomePortal BEFORE installing the HomePortal software. See Appendix B for detailed configuration instructions.1. Install your wireless adapter according to the manufacturer’s instructions (see note above).Repeat Step 3 “Install the HomePortal Software” on page 13.Wireless ConnectionRequires a computer with an 802.11b wireless network adapter installed. Wireless adapters are purchased separately from the HomePortal.
19The HomePortal Indicator LightsHomePortal indicator and status lightsThe HomePortal has three indicator lights that can be used to diagnose installation and connection problems. The following tables describe how to interpret the POWER, BROADBAND LINK, and LOCAL NETWORK lights.Power light Operating stateOFF The HomePortal is not plugged into a power outlet.Blinking green The HomePortal is booting up.Solid green Power is on.Solid red System error. Contact Technical Support.Broadband Link light Operating stateOFF No broadband signal is present. The HomePortal is not plugged into a power outlet, or the HomePortal is not physically connected to your broadband service.Blinking orange The HomePortal is attempting to establish a physical broadband connection. Solid red The HomePortal has not detected a broadband signal.Solid orange The HomePortal has established a physical broadband connection but was not able to successfully connect to your Internet Service Provider, or has not yet been configured.Blinking green The HomePortal is attempting to establish a connection to your broadband service(s).Solid green The HomePortal is fully connected to your broadband service(s).Local Network light Operating stateOFF The HomePortal is not plugged into a power outlet, or the HomePortal is not connected to any computer or hub by way of HomePNA, USB, Ethernet, or wireless.ON The HomePortal is connected to a computer or hub by way of HomePNA, USB, Ethernet, or wireless.
20Diagnosing connection problemsThis section describes some connection problems you may encounter with your HomePortal home network and provides suggestions for solving those problems. If the problem you are having is not covered here or in the 2Wire online Help system, or if the suggestions provided do not solve the problem, call the Technical Support number provided with your HomePortal.POWER indicator light is not litIf the POWER indicator light is not lit, the HomePortal is not getting power:1. Check to see if the power cable is plugged into the power outlet or power strip.2. If the power cable is plugged into a power strip, make sure the power strip is turned on.3. Make sure the power cord is correctly and securely connected into the HomePortal.4. Verify that both ends of the power cord are firmly plugged into the brick.Note: If the POWER indicator light is red (signifying a system error), or does not light after performing the steps above, contact 2Wire Customer Care.BROADBAND LINK indicator light is redIf the BROADBAND LINK indicator light is red, the HomePortal has not established a connection to your DSL service provider:1. Verify that a telephone cord is plugged into the PHONE LINE port on the HomePortal and into the telephone wall jack with DSL service.2. Verify that you have configured the HomePortal with the correct settings (for example, username and password) provided by your DSL service provider.3. Verify that DSL service is activated by calling your DSL service provider.LOCAL NETWORK indicator light is not litIf your networked computers are powered on and the LOCAL NETWORK indicator light is not lit, the HomePortal may not have been connected correctly. Double check the connection diagrams for your particular connection type against your completed HomePortal setup.
21Appendix A2Wire Wireless Adapter Installation2Wire Wireless PC CardThe Wireless PC Card is a wireless network card that fits into any standard PC Card Type II slot. A standard Ethernet card requires a cable connection to a hub or a patch panel. Using the Wireless PC Card, you have the same connectivity without the wires. Expanding or redesigning your network is easy, and unlike cabled Ethernet, the Wireless PC Card allows you to roam throughout the network while remaining connected to the LAN.Follow these steps to install the Wireless PC Card:Step 1 - Install the Wireless PC Card.Step 2 - Install the drivers.Step 3 - Reboot your computer so Windows recognizes the adapter.The following sections give you detailed instructions for completing each step.Installing the Wireless PC CardTo install the Wireless PC Card, turn off your computer and simply insert the card into the PC Card slot. If you have a desktop computer, you need to use an internal wireless adapter in order to insert the Wireless PC Card.Continue from here to “Wireless Adapter Driver Installation” on page 23 to complete your adapter installation.
222Wire Wireless USB AdapterThe Wireless USB Adapter is a wireless networking device that is connected to a USB port on your computer using a USB cable. Using the Wireless USB Adapter, you can communicate with one or more computers that are equipped with wireless adapters. Where a standard Ethernet card requires a cable connection to a hub or a patch panel, wireless networking provides the same connectivity without the wires. Expanding or redesigning your network is easy, and unlike cabled Ethernet, the Wireless USB Adapter allows users to roam throughout the network while remaining connected to the LAN.Follow these steps to install the Wireless USB Adapter:Step 1 - Install the Wireless USB Adapter.Step 2 -Install the drivers.Step 3 - Reboot your computer so Windows recognizes the adapter.The following sections give you detailed instructions for completing each step.Installing the Wireless USB AdapterThe supplied USB cable has a different type of USB connector on each end.Series A connector. The Series A USB connector plugs into the USB port on your computer. Series B connector. The Series B USB connector plugs into the back of your USB device, such as the port located on the back of your USB hub.To install the Wireless USB Adapter, simply connect the adapter to an available USB port on your computer using the supplied USB cable.Continue from here to “Wireless Adapter Driver Installation” on the following page to complete your adapter installation.
23Wireless Adapter Driver InstallationInstalling Drivers For Windows 98SE1. Power on your computer. The Add New Hardware Wizard opens. Click Next to continue.2. When the next window opens, select Search for a better driver for your device (Recommended), and click Next.3. Insert the HomePortal Setup Wizard CD into your CD-ROM drive, uncheck Floppy disk drives, select the CD-ROM drive checkbox, and click Next.
24Installing Drivers For Windows ME4. Windows locates the best driver for your device. Click Next to continue.5. After the drivers are copied, click Finish.6. When the System Setting Change window opens, click Yes to reboot your computer and complete the installation.1. Power on your computer and insert the HomePortal Setup Wizard CD into your CD-ROM drive.2. When the Add New Hardware Wizard window opens, select Automatic search for a better driver (Recommended), and click Next.
25Installing Drivers For Windows 20003. After the driver files are copied, click Finish.4. When the System Settings Change window opens, click Yes to reboot your computer and complete the installation.1. Power on your computer and insert the HomePortal Setup Wizard CD into your CD-ROM drive.2. When the Found New Hardware Wizard window opens, click Next to continue.3. The next window prompts you to install device drivers. Select Search for a suitable driver for my device (recommended), and click Next.
264. When the Locate Driver Files window opens, deselect the Floppy disk drives checkbox, select the CD-ROM checkbox, and click Next.5. When the Driver Files Search Results window opens, click Next.6. Click Finish to complete the installation.
27Installing Drivers For Windows XP1. Power on your computer and insert the HomePortal Setup Wizard CD into your CD-ROM drive.2. When the Found New Hardware Wizard window opens, select Install the software automatically (Recommended) and click Next to continue. 3. The drivers are installed.4. Click Finish to complete the installation.
28Appendix BThird-party Wireless Adapter ConfigurationAfter your 802.11b wireless adapter is installed in your computer, you must configure it to communicate with the HomePortal. This section describes how to configure a variety of third-party wireless Ethernet (IEEE 802.11b) adapters to operate with the HomePortal:Note: The instructions for Agere, Cisco, and D-Link adapters are for computers running Windows 98. The instructions for the Apple card are for computers running MacOS 9.0. Because not all Windows and Macintosh versions respond to new hardware in the same way, screens may appear in a different order and may have a slightly different appearance than the screens shown in these instructions. Locate the serial number and wireless encryption keyYour HomePortal is configured with unique security parameters that must be configured into your wireless adapter.On the bottom of your HomePortal you will find two important pieces of information required for configuring your adapter: the serial number and the wireless encryption key.After you have located the serial number and wireless encryption key, perform the following steps to configure your wireless adapter.Agere ORiNOCO PC Card - Silver or Gold Page 29Cisco Aironet 340 Series 11Mbps Wireless LAN Adapter Page 31D-Link Air DWL-650 Page 33Apple AirPort card Page 35Other wireless Ethernet adapters Page 36Wireless configuration with Windows XP Page 36
29Agere ORiNOCO PC Card - Silver or GoldConsult the documentation provided with your wireless adapter to install the Agere ORiNOCO PC Card - Silver or Gold, then follow these steps:1. From the Start menu, select Programs > ORiNOCO > Client Manager.The ORiNOCO Client Manager screen appears.2. From the Actions menu, select Add/Edit Configuration Profile.3. The Add/Edit Configuration Profile screen appears.4. To create your profile, click Add. The Edit Configuration screen appears. Enter a profile name in the Profile Name field. The profile name identifies your wireless profile, and should be no more than 29 characters in length. 5. From the Network Type pull-down menu, select Access Point.
306. To identify your network, click Next. The Edit Configuration screen appears.7. In the Network Name field, enter the word “2WIRE” followed by the last three digits of your HomePortal serial number, located on the bottom of your HomePortal. This is the Wireless Network Name. The Wireless Network Name is case-sensitive, so it is important that you enter the word “2WIRE” in capital letters.8. Click Next. In the Set Security field, check the Enable Data Security checkbox. Verify that the Use Hexadecimal (0-9, a-f, A-F) radio button is selected.9. In the Key field, enter your ten-digit Wireless Encryption Key, located on the bottom of your HomePortal. 10. Verify that Key 1 is selected in the Encrypt data with pull-down menu (this is the default).11. To select a power management option, click Next. The following screen appears.12. Select the power management option that you wish to use (the default is Off), and click Next.
3113. In the TCP/IP Behavior field, check the Renew IP Address when selecting this profile checkbox.14. Click Finish. The following screen appears.15. Click OK.Cisco AironetConsult the documentation provided with your wireless adapter to install the Cisco Aironet adapter, then follow these steps:1. Double-click the Aironet Client Utility icon on your desktop. The Aironet Client Utility screen appears.2. Click the Profile Manager button. The Profile Manager screen appears.3. Click Add.
324. In the Profile Management field, enter your profile name. The profile name identifies your wireless profile, and should be no more than 29 characters in length.5. Click Apply. The 340 Series Properties screen appears.6. Select the System Parameters tab. In the Client Name field, enter a client name. The client name identifies your PC.7. In the SSID1 field, enter the word “2WIRE” followed by the last three digits of your HomePortal serial number. This is the Wireless Network Name. The Wireless Network Name is case-sensitive, so it is important that you enter the word “2WIRE” in capital letters.8. In the Power Save Mode field, verify that the CAM (Constantly Awake Mode) radio button is selected (this is the default).9. In the Network Type field, verify that the Infrastructure radio button is selected (this is the default).10. Select the Network Security tab. In the WEP field, select the Use Static WEP Keys radio button.11. In the WEP Key Entry Method field, verify that the Hexadecimal (0-9, A-F) radio button is selected.12. In the WEP Key 1 field, select the Transmit Key radio button and enter your ten-digit Wireless Encryption Key, located on the bottom of your HomePortal.
3313. Click OK. The Profile Manager screen appears. Your profile name should now appear in the second line of the Profile Management field, indicating that your Cisco adapter is properly configured.14. Click OK.D-Link Air DWL-650Consult the documentation provided with your wireless adapter to install the D-Link Air DWL-650, then follow these steps:1. From the Start menu, select Programs > D-Link DWL-650 Control Utility > Configuration Utility.
342. The D-Link Air DWL-650 Configuration screen appears.3. Select the Configuration tab.4. In the Mode field, enter Infrastructure.5. In the SSID field, enter the word “2WIRE” followed by the last three digits of your HomePortal serial number. This is the Wireless Network Name. The Wireless Network Name is case-sensitive, so it is important that you enter the word “2WIRE” in capital letters.6. In the Tx Rate pull-down menu, verify that Fully Automatic is selected (this is the default).7. In the PS Mode pull-down menu, verify that Disabled is selected (this is the default).8. Click Apply Changes.9. Select the Encryption tab.10. From the Encryption (WEP) pull-down menu, select 64 Bit.11. In the WEP Key Entry field, select the Manual Entry radio button.12. In the Key 1 field, enter your ten-digit Wireless Encryption Key, located on the bottom of your HomePortal.13. From the Default Tx Key pull-down, select 1.14. Click Apply.15. Click OK.
35Apple AirPort cardNote: Requires AirPort client software revision 2.0 or greater.Consult the documentation provided with your wireless adapter to install the Apple AirPort wireless adapter, then follow these steps:1. From the Apple pull-down menu, select AirPort to open the AirPort dialog box.2. In the AirPort Network panel, click the Choose Network pull-down menu.3. Select your wireless network name. Your wireless network name is “2WIRE” followed by the last three digits of your HomePortal serial number, located on the bottom of your HomePortal.
364. In the Password field, enter “$” followed by your ten-digit Wireless Encryption Key, located on the bottom of your HomePortal.5. Click OK.Other wireless Ethernet adaptersNote: The following steps are completed using the configuration program provided with your wireless adapter. If you have not already done so, install the wireless adapter configuration software before continuing.1. Set the network type to Infrastructure. Refer to your wireless adapter documentation for instructions on editing the adapter’s network profile. Your wireless adapter should be configured to operate with an access point or residential gateway. This mode of operation is typically enabled by setting network type to Infrastructure.2. Set the wireless network name. The wireless network name of your HomePortal is 2WIRE in all capital letters, followed by the last three digit of the HomePortal serial number located on the bottom of your HomePortal. For example, if the last three digits of your HomePortal serial number are 102, your HomePortal network name would be 2WIRE102.The wireless network name is sometimes referred to as the Network Name, SSID, ESS ID, or Wireless LAN ID.3. Enable wireless security. Your HomePortal is pre-configured to take advantage of wireless security. Referring to the instructions provided with your wireless adapter, enable wireless security. Wireless security is sometimes referred to as WEP (wired equivalent privacy), 64-bit encryption, or 40-bit encryption.4. Enter the encryption key. Once you have enabled security on your wireless adapter, you need to enter the unique security key for your HomePortal. To do this, set the network encryption type to hexadecimal, and enter your 10-digit wireless encryption key found on the bottom of your HomePortal.5. In general, accept your adapter’s defaults. The default value for the remainder of configurable settings for your network adapter should allow your wireless adapter to communicate with the HomePortal. Although the HomePortal is set by default to communicate using channel 6, it is not required to change your adapter to this setting as most adapters will automatically detect the appropriate channel.Wireless configuration with Windows XPNote: The following steps are completed using the configuration program provided with Windows XP. If you have not already done so, install the wireless adapter configuration software before continuing. Make sure that the drivers for your adapter support Windows XP.
37Windows XP is designed to handle wireless configuration in a generic manner, provided that the manufacturer’s drivers support Windows XP.1. Right-click the Wireless Network Connection icon, located in the systray.2. Select View Available Wireless Networks.3. The Connect to Wireless Network screen appears. In the Available networks field, select your wireless access point. The wireless access point displays as “2WIRE” in all capital letters, followed by the last three digits of the HomePortal serial number (located on the bottom of your HomePortal). 4. In the Network key field, enter your ten-digit Wireless Encryption Key, located on the bottom of your HomePortal.5. Click Connect.6. A notification message now appears next to the Wireless Network Connection icon indicating that your wireless adapter is connected to your network.
19Regulatory InformationDeclaration of ConformityThis device complies with Part 15 of the FCC rules. Operation is subject to the following two conditions: (1) This device may not cause harmful interference, and (2) this device must accept any interference received, including interference that may cause undesired operation.This equipment has been tested and found to comply with the limits for a Class B digital device, pursuant to Part 15 of the Rules. These limits are designed to provide reasonable protection against harmful interference in a residential installation. This equipment generates, uses, and can radiate radio frequency energy and, if not installed and used in accordance with the instructions, may cause harmful interference to radio communications. However, there is no guarantee that interference will not occur in a particular installation. If this equipment does cause harmful interference to radio or television reception, which can be determined by turning the equipment off and on, the user is encouraged to try to correct the interference by one or more of the following measures:• Reorient or relocate the receiving antenna.• Increase the separation between the equipment and the receiver.• Connect the equipment into an outlet on a circuit different from that to which the receiver is connected.• Consult the dealer or an experienced radio/TV technician for help.You are cautioned that any changes or modifications not expressly approved in this manual could void your authority to operate this equipment.Only peripherals (computer input/output devices, terminals, printers, and so forth) that comply with FCC Class B limits may be attached to this computer product. Operation with noncompliant peripherals is likely to result in interference to radio and television reception.All cables used to connect peripherals must be shielded and grounded. Operation with cables, connected to peripherals, that are not shielded and grounded may result in interference to radio and television reception.WARNING: While this device is in operation, a separation distance of at least 20 cm (8 inches) must be maintained between the radiating antenna  and the bodies of all persons exposed to the transmitter in order to meet the FCC RF exposure guidelines. Making changes to the antenna or the device is not permitted. Doing so may result in the installed system exceeding RF exposure requirements. This device must not be co-located or operated in conjunction with any other antenna or radio transmitter.  Installers and end users must follow the installation instructions provided in this guide.FCC Part 68This equipment complies with Part 68 of the FCC rules. On the bottom of this equipment is a label that contains, among other information, the FCC equivalence number (REN) for this equipment. If requested, this information must be provided to the telephone company.The REN is used to determine the quantity of devices that may be connected to the telephone line. Excessive RENs on the telephone line may result in the devices not ringing in response to an incoming call. In most, but not all areas, the sum of the RENs should not exceed five. To be certain of the number of devices that may be connected to the line, as determined by the total RENs, contact the telephone company to determine the maximum REN for the calling area. If the terminal equipment causes harm to the telephone network, the telephone company will notify you in advance that temporary discontinuance of service may be required. But if advance notice is not practical, the telephone company will notify the customer as soon as possible. Also, you will be advised of your right to file a complaint with the FCC if you believe it is necessary.The telephone company may make changes in its facilities, equipment, operations or procedures that could affect the operations of the equipment. If this happens, the telephone company will provide advance notice in order for you to make the necessary modifications in order to maintain uninterrupted service.If trouble is experienced with this equipment, please contact the store, reseller, or agent from whom the product was purchased.Repair of this equipment should be made only by the 2Wire Service Center or a 2Wire authorized agent.Trade Name: 2WireResponsible Party: 2Wire, Inc.Address: 1704 Automation Pkwy.San Jose, CA 95131
39Limited Hardware Warranty 2Wire warrants to the original owner that the hardware product delivered in this package will be free from material defects and workmanship for one (1) year following the date stated on the receipt evidencing proof of purchase of the product. The warranty does not cover the product if it is damaged in the process of being installed. THE ABOVE WARRANTY IS IN LIEU OF ANY OTHER WARRANTY, WHETHER EXPRESS, IMPLIED OR     STATUTORY, INCLUDING, BUT NOT LIMITED TO ANY WARRANTY OF NONINFRINGEMENT OF INTELLECTUAL PROPERTY, MERCHANTABILITY, FITNESS FOR A PARTICULAR PURPOSE, OR ANY WARRANTY ARISING OUT OF ANY PROPOSAL, SPECIFICATION, SAMPLE OR OTHERWISE.This warranty does not cover replacement of products damaged by abuse, accidental misuse, neglect, alteration, repair, disaster, improper installation or improper usage. If the product is found to be otherwise defective, 2Wire, at its option, will replace or repair the product at no charge, except as set forth below, provided that you deliver the product along with a return material authorization (RMA) number either to the company from whom you purchased it or to 2Wire (North America only) within the one-year warranty period, or within 5 days after expiration of the warranty period (to allow for delivery time). If you ship the product, you must assume the risk of damage or loss in transit. You must use the original container (or the equivalent) and pay the shipping charge. 2Wire may replace or repair the product with either new or remanufactured product or parts, and the returned product becomes 2Wire’s property. 2Wire warrants the repaired or replaced product to be free from material defects and workmanship for a period of the greater of: (i) ninety (90) days from the date you received the repaired or replaced product, or (ii) the period of time remaining on the original one (1) year warranty. This warranty gives you specific legal rights, and you may have other rights that vary from state to state. All parts or components contained in this product are covered by 2Wire’s limited warranty for this product.Returning a Defective Product (RMA)Before returning any product, contact 2Wire Customer Support and obtain an RMA number by calling:US & Canada only:1-800-877-5718 for filter and adapter products1-877-347-8680 for residential gateway products or,Return the product to the place of purchase. If 2Wire Customer Support determines that the product may be defective, they will issue you an RMA number to place on the outer package of the product. 2Wire cannot accept any product without an RMA number on the package.Limitation of Liability and Remedies2Wire SHALL HAVE NO LIABILITY FOR ANY INDIRECT OR SPECULATIVE DAMAGES, INCLUDING, WITHOUT LIMITation, CONSEQUENTIAL, INCIDENTAL AND SPECIAL DAMAGES ARISING FROM THE USE OF OR INABILITY TO USE THIS PRODUCT, NEGLIGENCE, TORT, AND/OR BREACH OF WARRANTY, IRRESPECTIVE OF WHETHER 2Wire HAS ADVANCE NOTICE OF THE POSSIBILITY OF ANY SUCH DAMAGES, INCLUDING, BUT NOT LIMITED TO LOSS OF USE, INFRINGEMENT OF INTELLECTUAL PROPERTY RIGHTS, BUSINESS INTERRUPTIONS, AND LOSS OF PROFITS. NOTWITHSTANDING THE FOREGOING, 2Wire's TOTAL LIABILITY FOR ALL CLAIMS UNDER THIS AGREEMENT SHALL NOT EXCEED THE PRICE PAID FOR THE PRODUCT. THESE LIMITATIONS ON POTENTIAL LIABILITIES WERE AN ESSENTIAL ELEMENT IN SETTING THE PRODUCT PRICE. 2Wire NEITHER ASSUMES NOR AUTHORIZES ANYONE TO ASSUME FOR IT ANY OTHER LIABILITIES.Some states do not allow the exclusion or limitation of incidental or consequential damages, so the above limitations or exclusions may not apply to you.Critical Control Applications2Wire specifically disclaims liability for use of the hardware product in critical control applications (including, for example only, safety or health care control systems, nuclear energy control systems, or air or ground traffic control systems) by user, and such use is entirely at user’s risk. User agrees to defend, indemnify, and hold 2Wire harmless from and against any and all claims arising out of use of the hardware product in such applications.SoftwareSoftware provided with this product is not covered under the hardware warranty described above. See the applicable software license agreement that ships with your product for details on any software warranty. By your use of the software included with the product, you are hereby agreeing to the terms and conditions of the License Agreement.
5100-000178-001 Rev A

Navigation menu