ARRIS HPL000W Spread Spectrum Transceiver User Manual HPUG combo Final
Pace Americas Spread Spectrum Transceiver HPUG combo Final
ARRIS >
users manual
HomePortal
user’s guide
Model 1500CW

Notice to Users
©2000 2Wire, Inc. All rights reserved. This manual in whole or in part, may not be reproduced, translated, or reduced to any machine-readable form without
prior written approval.
2WIRE PROVIDES NO WARRANTY WITH REGARD TO THIS MANUAL, THE SOFTWARE, OR OTHER INFORMATION CONTAINED HEREIN
AND HEREBY EXPRESSLY DISCLAIMS ANY IMPLIED WARRANTIES OF MERCHANTABILITY OR FITNESS FOR ANY PARTICULAR
PURPOSE WITH REGARD TO THIS MANUAL, THE SOFTWARE, OR SUCH OTHER INFORMATION, IN NO EVENT SHALL 2WIRE, INC. BE
LIABLE FOR ANY INCIDENTAL, CONSEQUENTIAL, OR SPECIAL DAMAGES, WHETHER BASED ON TORT, CONTRACT, OR OTHERWISE,
ARISING OUT OF OR IN CONNECTION WITH THIS MANUAL, THE SOFTWARE, OR OTHER INFORMATION CONTAINED HEREIN OR THE
USE THEREOF.
2Wire, Inc. reserves the right to make any modification to this manual or the information contained herein at any time without notice. The software described
herein is governed by the terms of a separate user license agreement.
Updates and additions to software may require an additional charge. Subscriptions to online service providers may require a fee and credit card information.
Financial services may require prior arrangements with participating financial institutions.
2Wire, the 2Wire logo, and HomePortal are trademarks of 2Wire, Inc. All other trademarks are trademarks of their respective owners.
___________________________________________________________________________________________________________________________
Owner’s Record
The serial number is located on the bottom of your 2Wire HomePortal. Record the serial number in the space provided here
and refer to it when you call Customer Care.
Serial Number:__________________________
Safety Information
• To prevent fire or shock hazard, do not expose your HomePortal to rain or moisture.
• To avoid electrical shock, do not open the HomePortal. Refer servicing to qualified personnel only.
• Never install modem or telephone wiring during a lightning storm.
• Never install telephone jacks in wet locations unless the jack is specifically designed for wet locations.
• Never touch uninsulated telephone wire or terminals unless the telephone line has been disconnected at the network
interface.
• Use caution when installing or modifying telephone lines.
• Avoid using your modem during an electrical storm.
• Do not use your modem or a telephone to report a gas leak in the vicinity of the leak.
• A socket outlet should be as close as possible to the unit and easily accessible.
Part Number 5100-000058-000 Rev A

About this guide
This guide is designed to help you quickly install the HomePortal and your
HomePortal network. It introduces you to the features of the HomePortal and
guides you through the installation process. After installation, you can access the
most current and detailed version of this guide online by selecting Help in the
HomePortal Monitor or in the home console.
The HomePortal User’s Guide is organized as follows:
Chapter 1 Introduction
Acquaints you with the benefits of the HomePortal, describes how to find your
HomePortal Key Code, and helps you plan your home network.
Chapter 2 Installing the HomePortal hardware
Shows you how to physically install the HomePortal and describes the five ways
you can connect your first computer to the HomePortal network.
Chapter 3 Installing the HomePortal software
Describes how to launch the HomePortal Setup Wizard on Windows and
Macintosh computers.
Chapter 4 Adding computers to your network
Shows you the five ways you can add computers to your network.
Chapter 5 Using HomePortal Monitor
Provides an overview of the HomePortal Monitor. This chapter familiarizes you
with the Monitor’s components and shows you how to get the most from your
home network experience.
Chapter 6 Using network-enabled games and applications
Provides instructions for playing network-enabled games and applications.

About this guide
Chapter 7 Glossary
Gives you brief definitions of some of the networking terms used in this guide.
Chapter 8 Frequently asked questions
Answers questions often asked about the HomePortal, home networking in
general, and phoneline networking.
Chapter 9 Troubleshooting
Provides tips for solving problems that may occur when installing the HomePortal
and connecting to the Internet.
Chapter 10 Contacting 2Wire Customer Care
Provides contact information for 2Wire Customer Care.
Index
At the end, you’ll find an index so you can quickly find information in this guide.

Contents
Chapter 1: Introduction
Welcome to the HomePortal .................................................................................... 1-1
Features ......................................................................................................... 1-1
Before you begin ..................................................................................................... 1-2
Locating and recording your HomePortal Key Code ...................................... 1-2
Check your computers .................................................................................... 1-2
Remove conflicting applications ..................................................................... 1-3
Plan your home network ................................................................................. 1-4
Getting started ......................................................................................................... 1-6
Chapter 2: Installing HomePortal hardware
Choice 1: Computer with Ethernet connection ........................................................ 2-3
Choice 2: Windows 98 SE, ME, or 2000 computer with USB port .......................... 2-5
Choice 3: Computer with HomePNA connection ................................................... 2-10
Choice 4: Computer with Wireless Ethernet connection ....................................... 2-12
Choice 5: Network with Ethernet hub/switch ......................................................... 2-14
Chapter 3: Installing HomePortal software
The Setup Wizard on Windows ............................................................................... 3-1
The Setup Wizard on Macintosh ............................................................................. 3-2
Chapter 4: Adding computers to your network
Choice 1: Computers with HomePNA connection ................................................... 4-2
Choice 2: Computers with Wireless Ethernet connection ........................................ 4-3
Choice 3: Network with Ethernet hub/switch ........................................................... 4-4
Choice 4: Computer with Ethernet connection ........................................................ 4-5
Choice 5: Windows 98 SE, ME, or 2000 computer with USB port .......................... 4-6
Chapter 5: Using HomePortal Monitor
HomePortal Monitor tools ........................................................................................ 5-1
Launch your HomePortal default page ........................................................... 5-1
View home network information ..................................................................... 5-2
Change mobile computer location .................................................................. 5-2

Contents
Share files and printers (available on Windows 95, 98, and ME) ................... 5-2
Rename your computer .................................................................................. 5-2
Check for HomePortal upgrades .................................................................... 5-3
Make HomePortal your default Web page ...................................................... 5-3
Refresh your home network connection(s) ..................................................... 5-3
Choose to be notified of connection problems ............................................... 5-3
Troubleshoot ................................................................................................... 5-3
Get help using HomePortal ............................................................................ 5-3
Chapter 6: Using network-enabled games and applications
Playing games with other players in your home ...................................................... 6-2
Chapter 7: Glossary
Additional resources ................................................................................................ 7-2
Chapter 8: Frequently asked questions
Frequently asked questions about networking ........................................................ 8-1
Frequently asked questions about HomePortal ....................................................... 8-3
Frequently asked questions about HomePNA ......................................................... 8-6
Chapter 9: Troubleshooting HomePortal
Troubleshooting installation ..................................................................................... 9-1
Troubleshooting Internet connection ....................................................................... 9-8
Troubleshooting home networking ........................................................................... 9-8
Chapter 10: Contacting 2Wire Customer Care
Web support .......................................................................................................... 10-1
Email support ......................................................................................................... 10-1
Toll-free 24 x 7 telephone and fax support ............................................................ 10-1
Feedback ............................................................................................................... 10-1

1-1
Chapter 1
1Introduction
Welcome to the HomePortal
The HomePortal securely delivers rich content from the Internet through a
broadband connection and distributes it to multiple simultaneous users within the
home. This means that you can share one high-speed Internet connection with all
of your computers simultaneously. The HomePortal also makes it easy to share
files and printers between all of your Windows computers.
Features
Simplicity
The HomePortal comes with friendly installation tools to make setting up your
home network easy, and the HomePortal is as easy to use as browsing the Web.
Speed
The HomePortal enables high-speed, always-connected Internet access to multiple
computers.
Sharing
The HomePortal allows every member of your household to use the Internet
simultaneously. The HomePortal also makes it easy to share printers, MP3
players, Internet radios, game consoles and other Internet devices.
Security
The HomePortal includes business-grade security features such as firewall and
denial of service attack protection to block hackers from accessing your
computers and private files.

Chapter 1: Introduction
1-2
Before you begin
Before you install the HomePortal, you need to arrange and prepare your home
network. A home network connects the computers and Internet devices in your
home. These computers are connected by way of wires such as the phone wires
already in your home or by way of wireless.
Locating and recording your HomePortal Key Code
On the back of the HomePortal packaging, locate the HomePortal Key Code label.
Use the blank form below to record your Key Code. You will need to have this
Key Code handy when you are installing the HomePortal software on your first
computer, and you may need it if you ever have to reinstall the HomePortal
software.
Note: If your HomePortal packaging does not have a Key Code label, you
may obtain an activation Key Code on the 2Wire Web site:
http://www.2wire.com/keycode. Or your service provider may have provided
your Key Code by other means.
Check your computers
Each computer you connect to your HomePortal network must have:
• Windows 95, Windows 98, Windows ME, Windows NT 4.0 with Service Pack
6, Windows 2000, or Mac OS 8.5 or higher. You must have administrator
privileges on Windows NT and Windows 2000.
Note: If you would like to use the HomePortal with computers running other
operating systems, see “Does the HomePortal work with Linux, FreeBSD, and
other operating systems?” on page 8-4.
• CD-ROM drive. If one or more of the computers on your home network does
not have a CD-ROM drive, see “One of my computers doesn’t have a CD-
ROM drive.” on page 9-4.

Chapter 1: Introduction
1-3
• At least 5 MB available disk space if the computer has an up-to-date Web
browser installed (see below), or 150 MB available disk space if it does not.
• A screen resolution of at least 800 x 600 pixels.
• One of the following Web browsers:
−Windows: Internet Explorer 5.0 and higher or Netscape Navigator 4.7 and
higher.
−Macintosh: Internet Explorer 4.51 and 5.1 or Netscape Navigator 4.74
and higher.
Note: 2Wire provides a current Windows Web browser on the HomePortal
Setup Wizard CD. If one or more of your Windows computers does not have a
current Web browser, the Setup Wizard provides an opportunity to install one.
• One of the following network interfaces:
−Ethernet adapter.
−HomePNA adapter.
−Wireless Ethernet adapter (IEEE 802.11b).
−USB port on the computer. (Only one Windows 98 SE, Windows ME, or
Windows 2000 PC can be networked via USB. USB port/HomePortal
connection is not available for Macintosh, Windows 95, or Windows NT.)
Note: To learn how to determine whether your system meets the network
interface requirement, see “Troubleshooting installation” on page 9-1.
Remove conflicting applications
It could be that you, a family member, or a DSL service provider has installed
networking software on your computer. This software is no longer necessary when
you have the HomePortal and it may prevent successful installation of the
HomePortal.
Conflicting applications include 3Com HomeClick, Microsoft Internet
Connection Sharing, Intel Anypoint ISS, or proxy software such as WinGate,
Sygate, and similar programs. If you have any of these applications on your
computers, you should uninstall them before installing the HomePortal.

Chapter 1: Introduction
1-4
Windows provides two methods for uninstalling software. The method you use
depends on the type of software you are uninstalling. Consult the documentation
of the conflicting software for complete uninstallation instruction, or use the
following instructions as a guideline.
Method 1 on Windows:
1. From the Start menu, select Settings > Control Panel.
2. Double-click Add/Remove Programs.
3. From the list of programs, select the networking software and click Add/
Remove.
4. Click Yes to confirm that you want to remove the program and all of its
components.
Method 2 on Windows:
1. From the Start menu, select Programs.
2. From the list of programs, select the networking software.
3. From the submenu, select Uninstall.
4. Click Yes to confirm that you want to remove the program and all of its
components.
Uninstalling conflicting networking software on Macintosh:
1. Locate the CD and insert it in the CD-ROM drive.
2. Double-click to open the icon that appears on your desktop.
3. Choose Uninstall.
If you cannot locate the CD, you may need to contact your service provider or the
manufacturer of the conflicting application for instructions on uninstalling the
software.
Plan your home network
The following diagram shows some recommended locations and connection types
for the HomePortal and your computers. Below the diagram we explain why
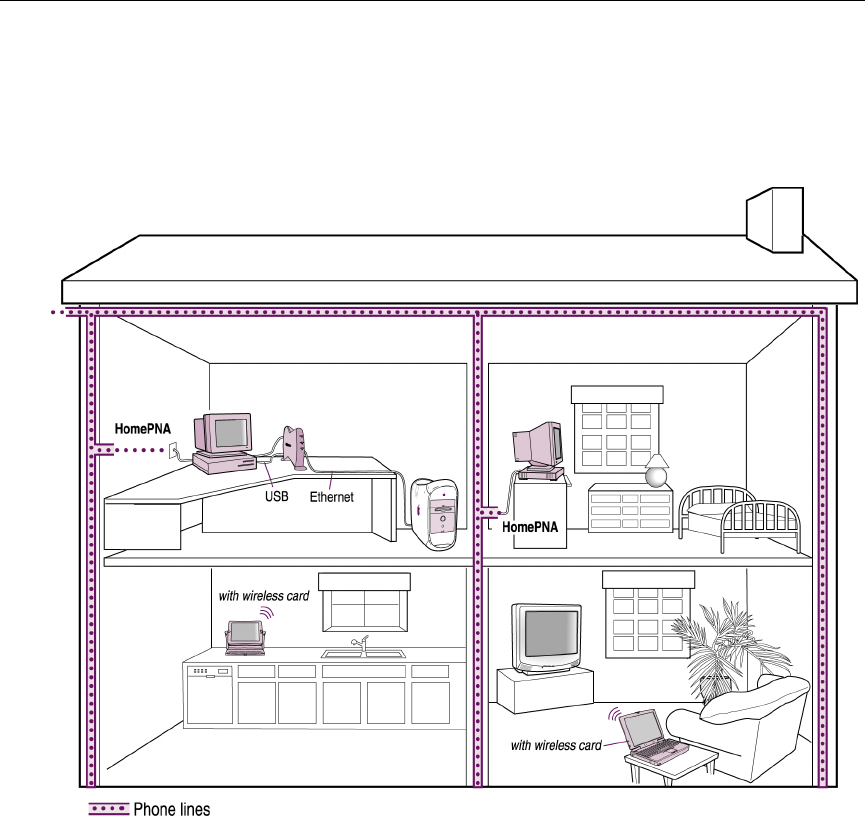
Chapter 1: Introduction
1-5
pairing these locations with these connection types makes sense in a home
network.
Study/home office
Place the HomePortal in a visible, easily accessible location near a power outlet,
phone jack, and a computer. If your office computer has Windows 98 SE, ME, or
2000, we recommend connecting it via USB. For two computers, consider USB
and Ethernet. If you have multiple computers requiring Ethernet, we recommend
using an Ethernet hub (10/100 Mbps) to connect the computers to the
HomePortal.

Chapter 1: Introduction
1-6
Kitchen
With limited counter space, web pads or notebook computers may be your best
choice in the kitchen. We recommend using a 2Wire PC Port USB HomePNA
adapter to connect via phoneline or using a wireless connection.
Bedrooms
We recommend using a 2Wire PC Port USB HomePNA adapter to connect via
phoneline because bedrooms are likely to have phone jacks, making phoneline
networking convenient.
Common living areas
We recommend connecting via phoneline because common living areas are likely
to have phone jacks making phoneline networking convenient. Or you may want
to connect via wireless to minimize cabling.
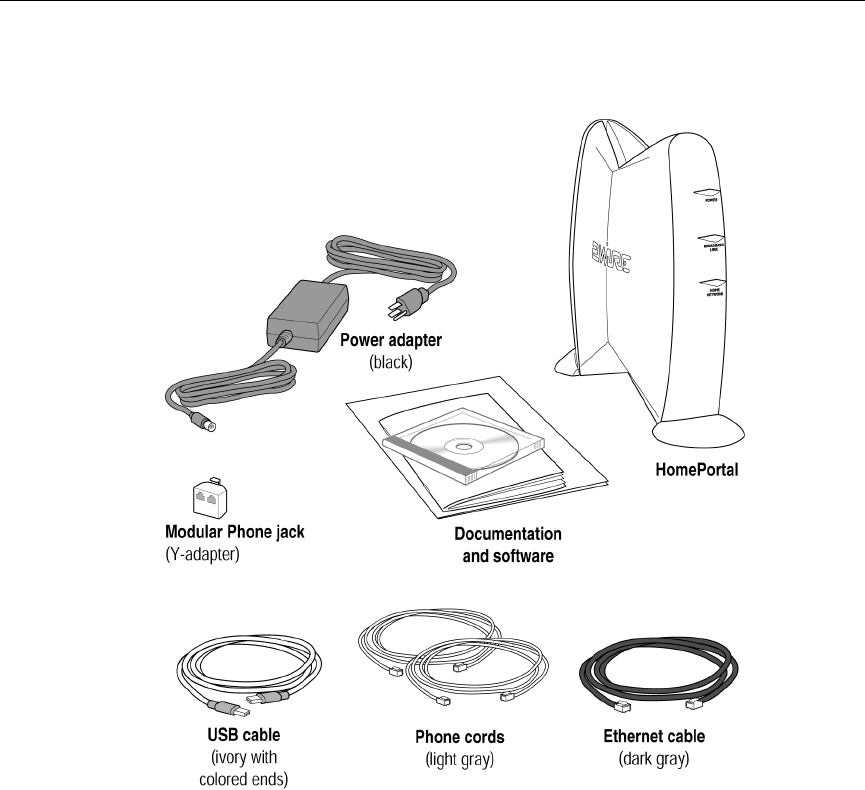
Getting started
Make sure your package includes the items shown here.
Note: The cables are included for your convenience. Your home network may
not require all of the included cables.
Chapter 1: Introduction
1-7

Chapter 1: Introduction
1-8

2-1
Chapter 2
2Installing HomePortal hardware
Important: Read this page.
With HomePortal you can use a combination of connectivity methods within your
home network. Some of your computers can be networked by way of phoneline
networking (HomePNA) by using your existing phoneline, some by way of
wireless, some by Ethernet, and one Windows 98 SE, Millenium, or 2000
computer by way of USB.
Assuming the first computer you are connecting to the HomePortal is located near
the HomePortal, you may wish to connect it using Ethernet or USB.
To install the HomePortal hardware:
1. Choose a computer to begin the installation.
The first computer you connect to your home network should be near your
DSL service wall jack, a telephone jack, and the HomePortal.
2. Choose a connection type.
To add your first computer to the HomePortal network, choose one of the
following five connection types:
Connection Type Go to...
Choice 1:
Computer with Ethernet card (no hub) page 2-3
Choice 2:
Windows 98 SE, ME, or 2000 computer with USB
Port
page 2-5
Chapter 2: Installing HomePortal hardware
2-2
Note: If you are not sure whether your computer has one of these options, see
“Troubleshooting installation” on page 9-1.
Choice 3:
Computer with HomePNA adapter page 2-10
Choice 4:
Computer with Wireless Ethernet card page 2-12
Choice 5:
Network with Ethernet hub page 2-14
Chapter 2: Installing HomePortal hardware
2-3
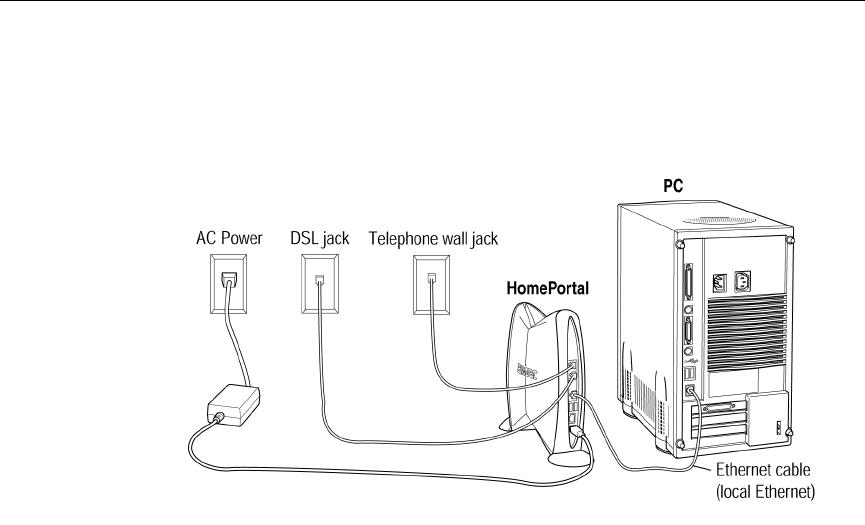
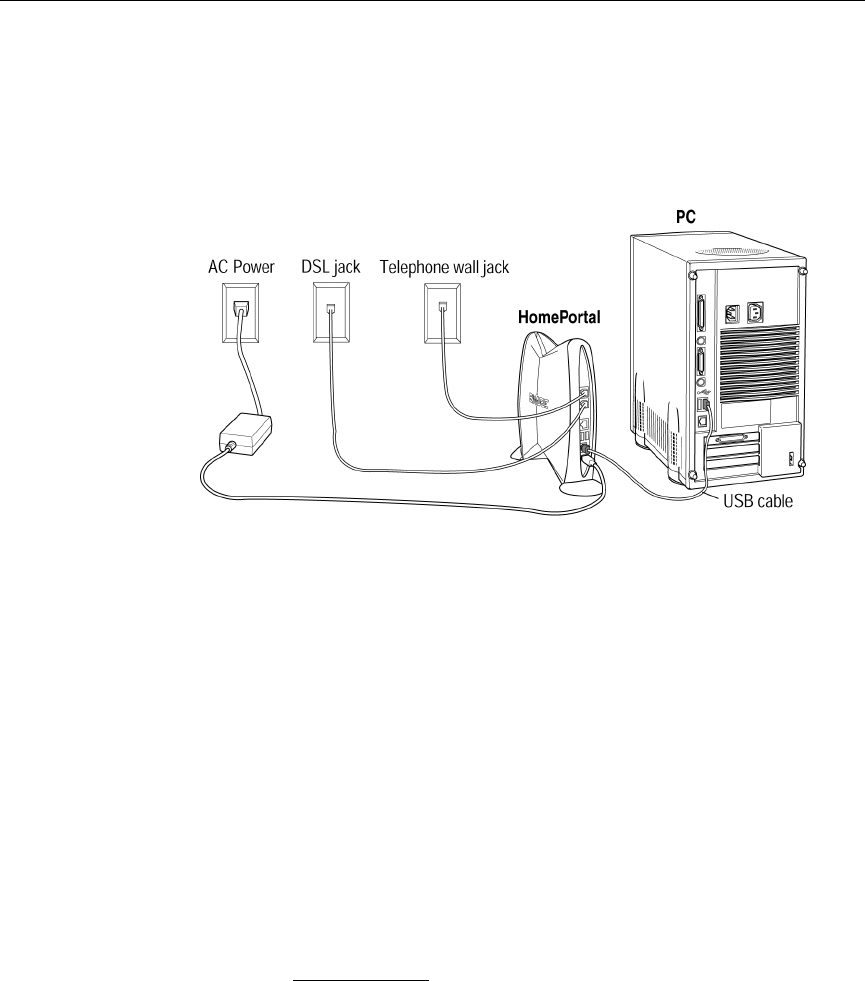
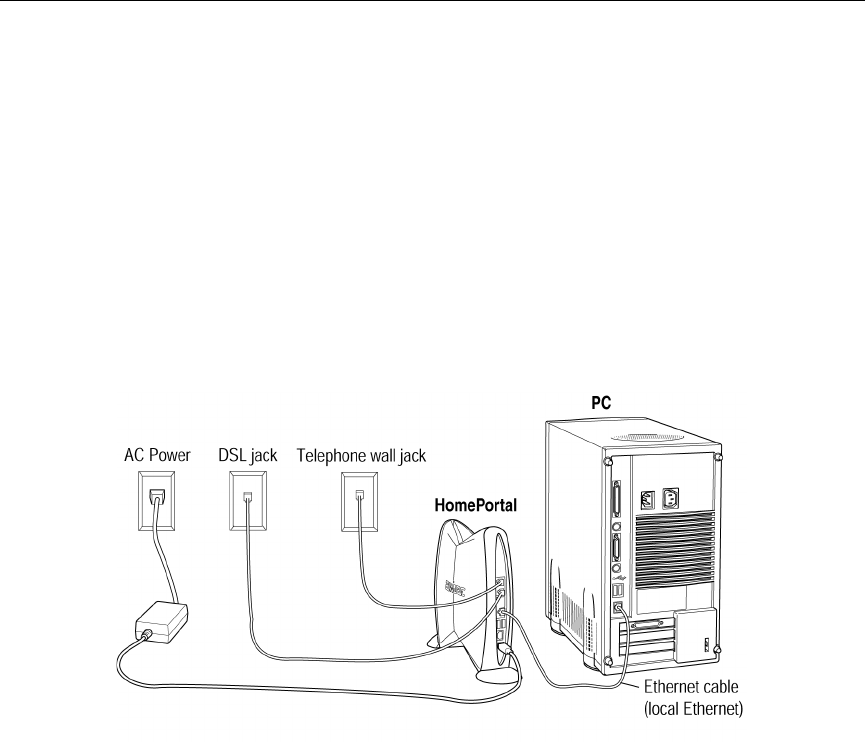
Choice 1: Computer with Ethernet connection
To connect your computer to the HomePortal via Ethernet:
1. Verify the computer has an Ethernet card.
If you are not sure whether your computer has an Ethernet card, see
“Troubleshooting installation” on page 9-1.
2. Making sure the round connector is lined up correctly, plug the black AC
power adapter into the HomePortal POWER port (bottom plug) and then
plug the other end into an electrical outlet.
The green Power light on the front of the HomePortal should come on.
3. page 8-1Recommended: If any of the computers in your home today or in
the future will connect to your home network via HomePNA, connect the
included light-gray telephone cable from the HomePortal LINE port (top
plug) to the telephone jack (should have dial tone).
4. Connect the other included light-gray telephone cable from the
HomePortal DSL port (2nd plug from top) to the DSL service wall jack.
This connects the HomePortal’s internal DSL modem to your DSL service
provider. If you already have an external DSL modem, you no longer need to
use it.

Chapter 2: Installing HomePortal hardware
2-4
Note: The DSL service wall jack is a special jack set up during installation of
DSL service. It is not a regular phone jack and should not have a dial tone.
One way to verify that you are connecting to the correct wall jack is to attach
a telephone to the jack and then listen for a dial tone. If you do not hear a dial
tone through the handset, this is the correct wall jack to connect to the
HomePortal DSL port.
Note: If your telephone jack is already in use, you can use the included Y-
adapter to share it with the HomePortal. See page 8-1.
5. Connect the included dark-gray Ethernet cable from the HomePortal
LOCAL ETHERNET port (3rd plug from top) to your computer’s Ethernet
port.
6. Power on your computer and after your computer has completely started,
verify the top and bottom indicator lights on the front of the HomePortal
are green.
If the POWER and HOME NETWORK lights are lit green, the HomePortal is
now connected to your computer and the telephone line that runs throughout
your home.
If they are not lit green, see “Checking indicator lights” on page 9-2.
Note: After installing the HomePortal software, the BROADBAND LINK
indicator light will also turn green.
7. Go to “Installing HomePortal software” on page 3-1.
Chapter 2: Installing HomePortal hardware
2-5
Choice 2: Windows 98 SE, ME, or 2000 computer
with USB port
Note: In a HomePortal network, only one Windows 98 SE, Windows ME, or
Windows 2000 computer can be connected via USB. USB/HomePortal
connectivity is not available for Macintosh, Windows 95, or Windows NT.
To connect your computer to the HomePortal via USB:
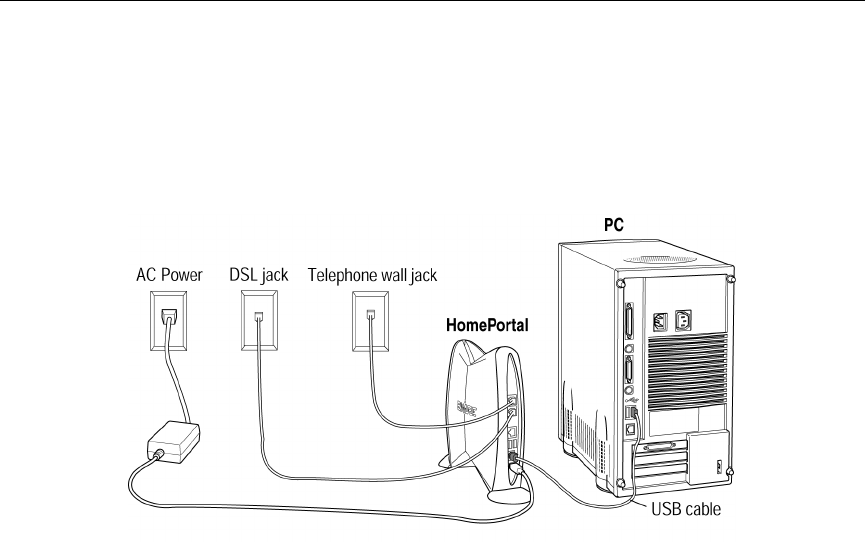
1. Making sure the round connector is lined up correctly, plug the black AC
power adapter into the HomePortal POWER port (bottom plug) and then
plug the other end into an electrical outlet.
The green Power light on the front of the HomePortal should come on.
2. Connect the ivory-colored USB cable from the HomePortal PC
port (2nd
plug from bottom)
to your computer’s USB port.
3. page 8-1Recommended: If any of the computers in your home today or in
the future will connect to your home network via HomePNA, connect the
included light-gray telephone cable from the HomePortal LINE port (top
plug) to the telephone jack (should have dial tone).
Chapter 2: Installing HomePortal hardware
2-6
4. Connect the other included light-gray telephone cable from the
HomePortal DSL port (2nd plug from top) to the DSL service wall jack.
This connects the HomePortal’s internal DSL modem to your DSL service
provider. If you already have an external DSL modem, you no longer need to
use it.
Note: The DSL service wall jack is a special jack set up during installation of
DSL service. It is not a regular phone jack and should not have a dial tone.
One way to verify that you are connecting to the correct wall jack is to attach
a telephone to the jack and then listen for a dial tone. If you do not hear a dial
tone through the handset, this is the correct wall jack to connect to the
HomePortal DSL port.
Note: If your telephone jack is already in use, you can use the included Y-
adapter to share it with the HomePortal, as shown on page 8-1.
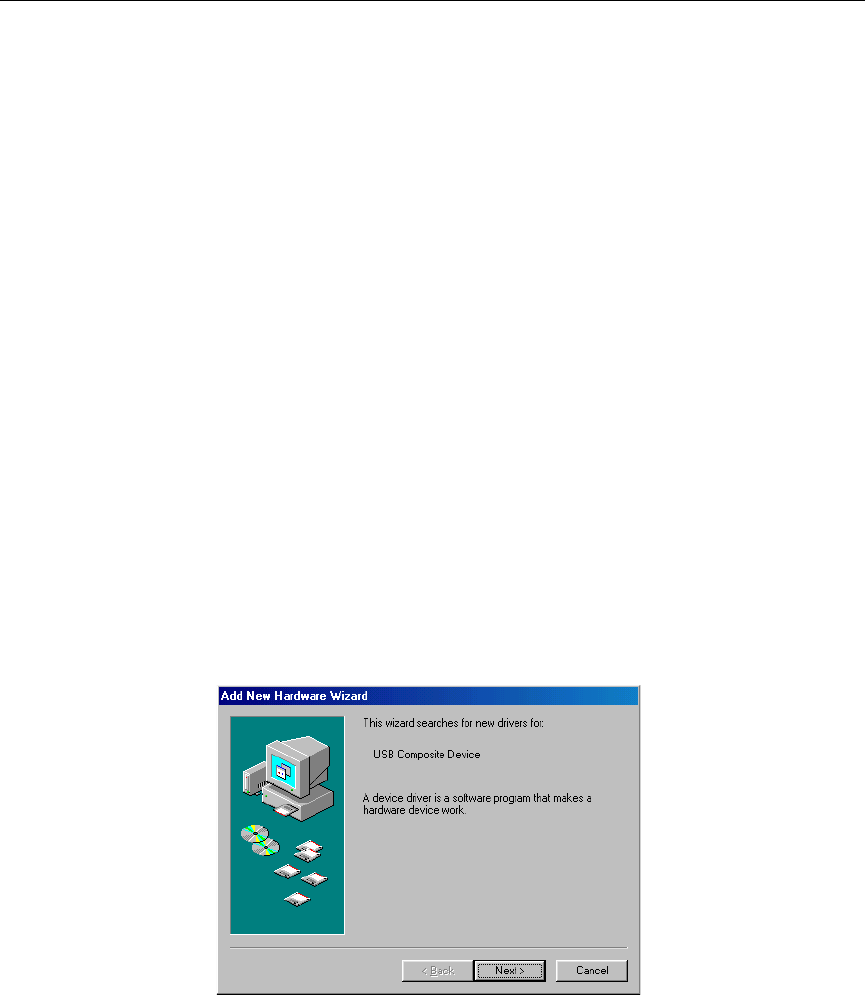
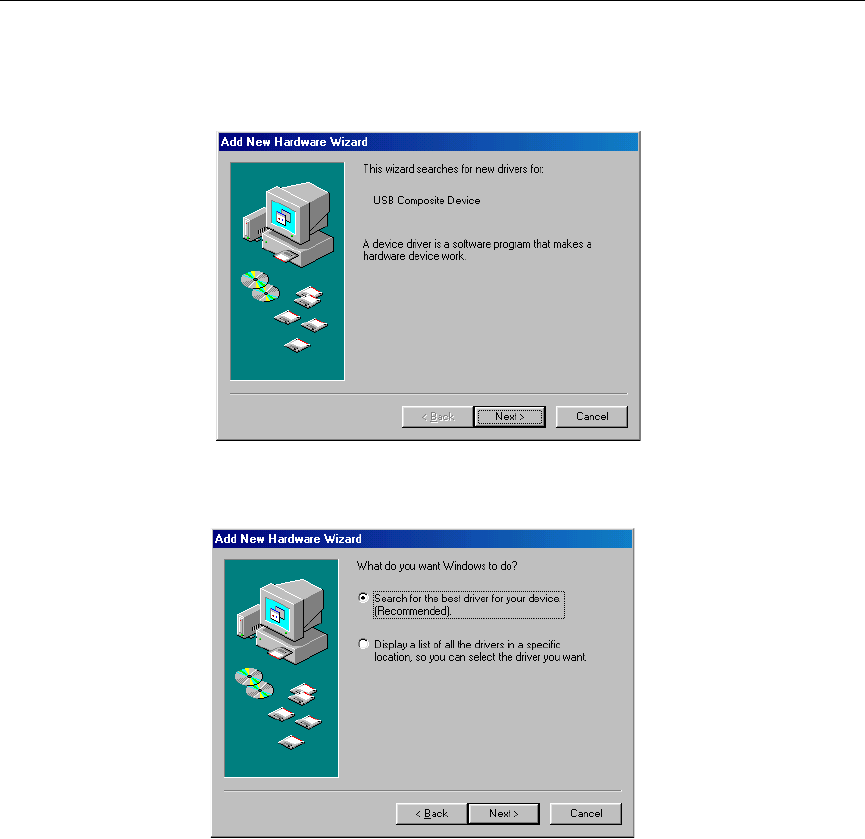
5. Power on your computer.
Note: The following screens may vary somewhat on Windows ME and
Windows 2000.
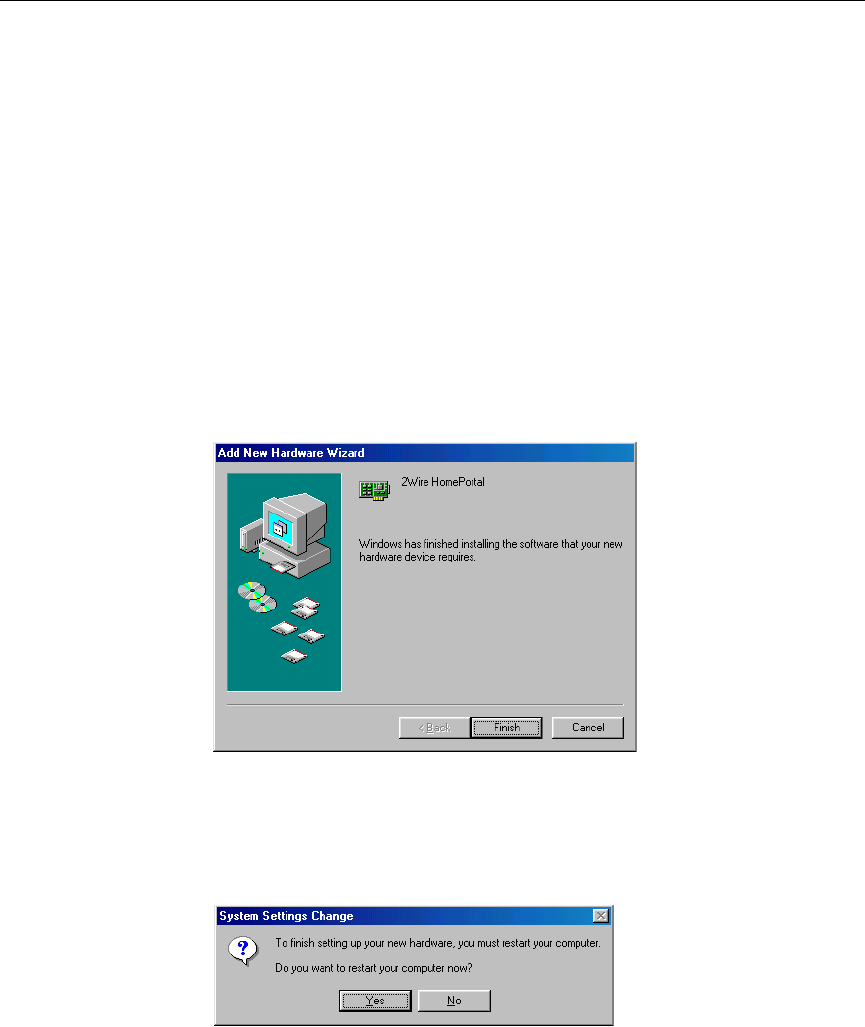
−The Add New Hardware Wizard appears. Click Next to continue.
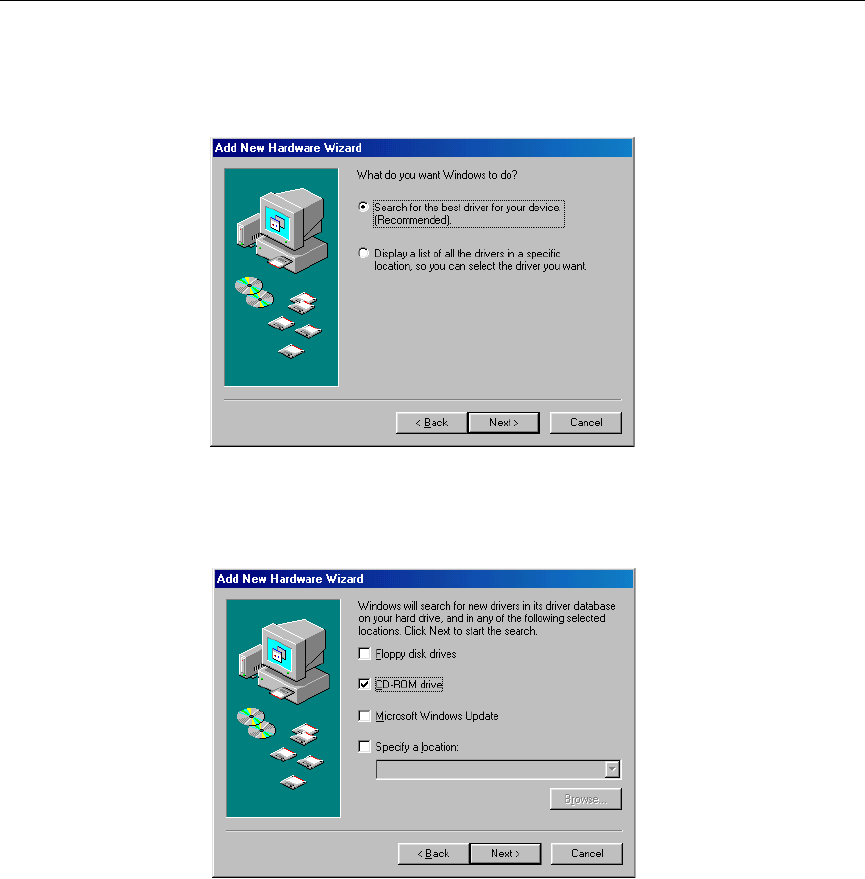
−Select Search for best driver for your device. Click Next to continue.
Chapter 2: Installing HomePortal hardware
2-7
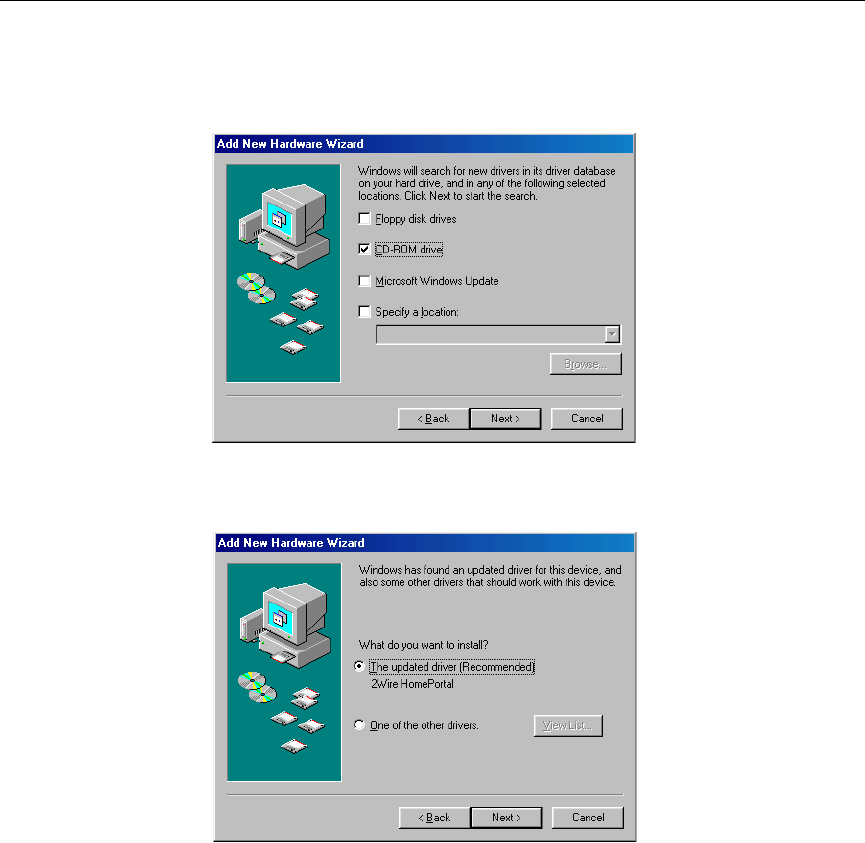
−Place the HomePortal Setup Wizard CD in the CD-ROM tray, and then
select CD-ROM drive. Click Next to continue.
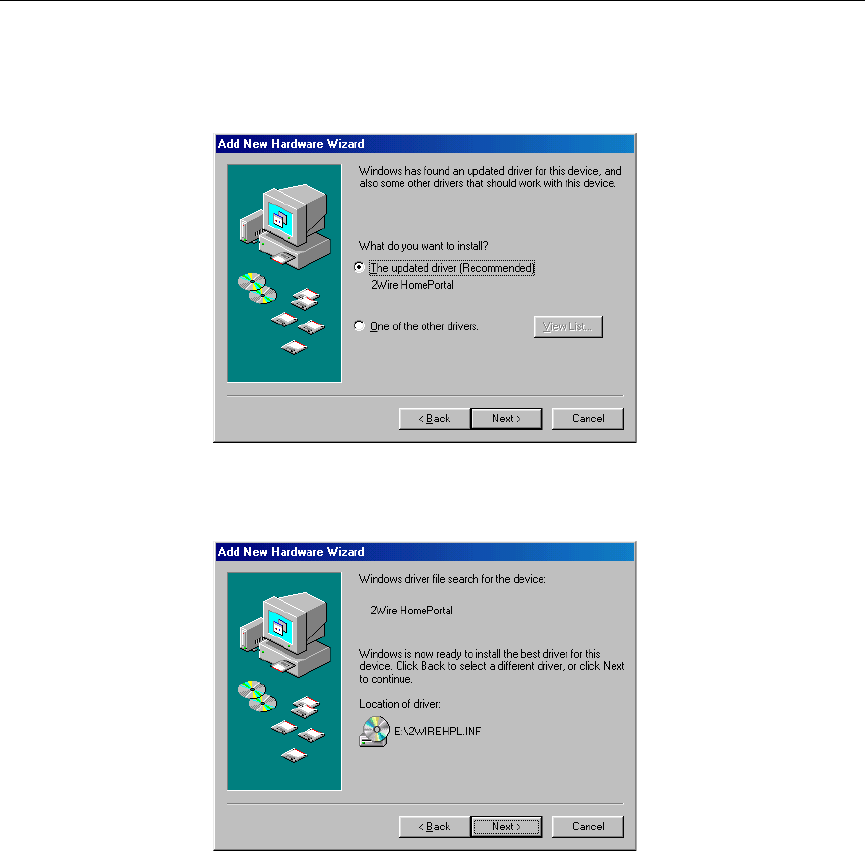
−Select The updated driver. Click Next to continue.
Chapter 2: Installing HomePortal hardware
2-8
−Click Next to continue.
Chapter 2: Installing HomePortal hardware
2-9
Note: If asked to insert your Windows CD, please do so and follow on-screen
instructions. If you don’t have your Windows CD handy, try the following
options for locating the driver:
C:\WINDOWS\options\cabs
C:\Windows
C:\Windows\system
D:\Win98
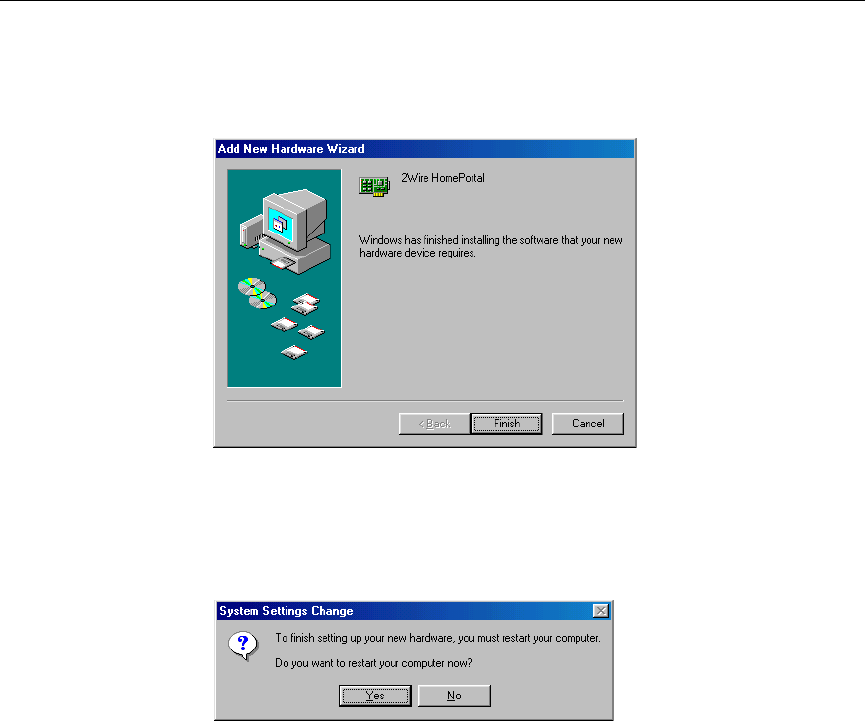
−Click Finish.
−Remove the CD from the CD-ROM tray, and then click Yes to restart your
computer.
Chapter 2: Installing HomePortal hardware
2-10
6. After your computer has completely restarted, verify the top and bottom
indicator lights on the front of the HomePortal are green.
If the POWER and HOME NETWORK lights are lit green, the HomePortal is
now connected to your computer and the telephone line that runs throughout
your home.
If they are not lit green, see “Checking indicator lights” on page 9-2.
Note: After installing the HomePortal software, the BROADBAND LINK
indicator light will also turn green.
7. Go to “Installing HomePortal software” on page 3-1.
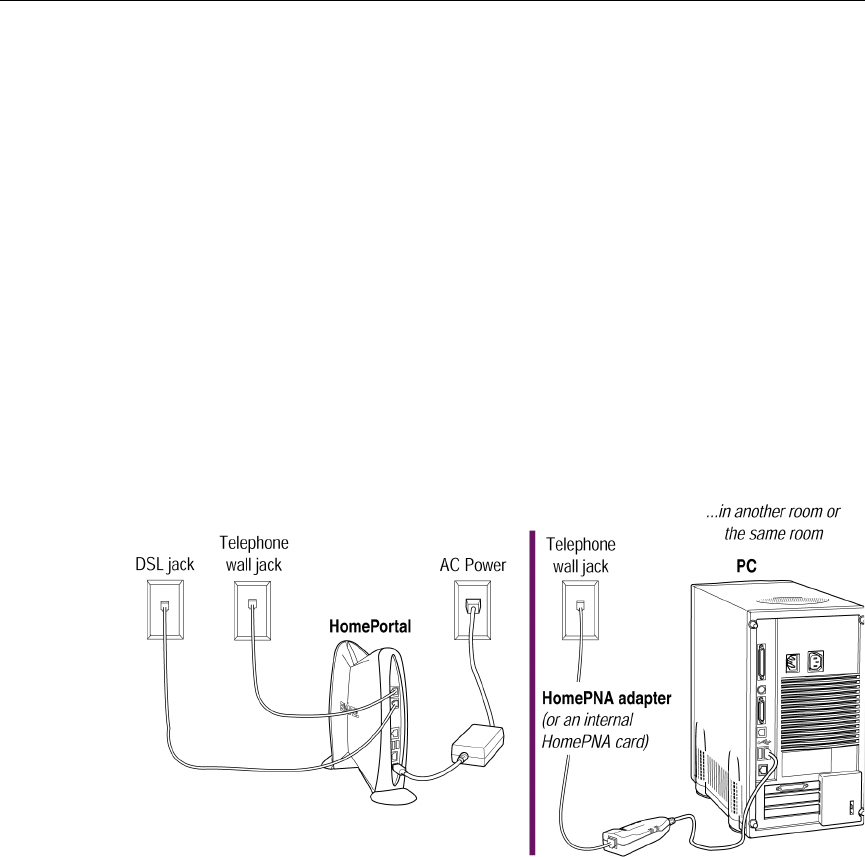
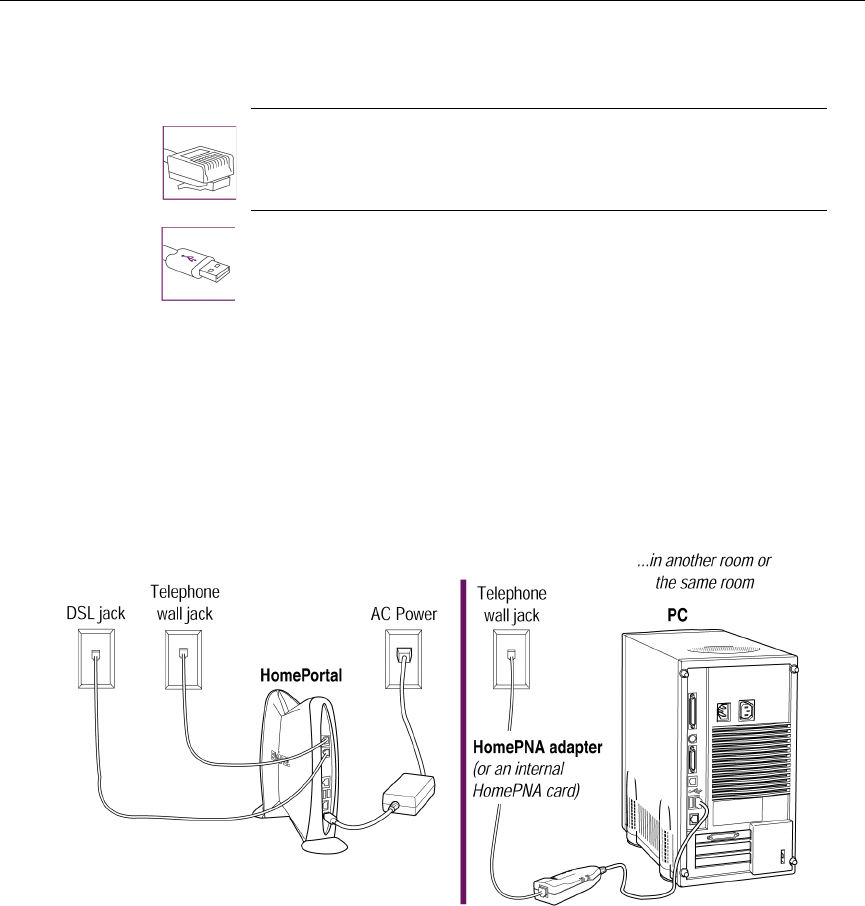
Choice 3: Computer with HomePNA connection
To connect your computer to the HomePortal via HomePNA:
1. Verify the computer has a HomePNA adapter.
You can order HomePNA adapters from 2Wire (2Wire PC Port Phoneline 10
Mbps USB Adapter).
Note: If you are not sure whether your computer has a HomePNA adapter, see
“Troubleshooting installation” on page 9-1.

Chapter 2: Installing HomePortal hardware
2-11
2. Verify that the telephone line in the room with your computer is active by
attaching a telephone to the wall jack and then listening for a dial tone.
If you hear a dial tone, you can use this jack for HomePNA.
3. Connect a telephone cord from the HomePNA adapter (or from the
HomePNA card in your computer) to a telephone wall jack.
Note: Your computer may have an internal analog modem. Analog modems
are used to connect to the Internet or other external networks by dialing a
phone number. Analog (dial-up) modems can look similar to HomePNA
adapters. Make sure that you connect your computer to the HomePNA
adapter and not to an analog modem.
4. Making sure the round connector is lined up correctly, plug the black AC
power adapter into the HomePortal POWER port (bottom plug) and then
plug the other end into an electrical outlet.
The green Power light on the front of the HomePortal should come on.
5. page 8-1Connect the included light-gray telephone cord from the
HomePortal LINE port (top plug) to your telephone jack (should have dial
tone).
6. Connect the other included light-gray telephone cable from the
HomePortal DSL port (2nd plug from top) to the DSL service wall jack.
This connects the HomePortal’s internal DSL modem to your DSL service
provider. If you already have an external DSL modem, you no longer need to
use it.
Note: The DSL service wall jack is a special jack set up during installation of
DSL service. It is not a regular phone jack and should not have a dial tone.
One way to verify that you are connecting to the correct wall jack is to attach
a telephone to the jack and then listen for a dial tone. If you do not hear a dial
tone through the handset, this is the correct wall jack to connect to the
HomePortal DSL port.
Note: If your telephone jack is already in use, you can use the included Y-
adapter to share it with the HomePortal. See page 8-1.

Chapter 2: Installing HomePortal hardware
2-12
7. Power on your computer and after your computer has completely started,
verify the top and bottom indicator lights on the front of the HomePortal
are green.
If the POWER and HOME NETWORK lights are lit green, the HomePortal is
now connected to your computer and the telephone line that runs throughout
your home.
If they are not lit green, see “Checking indicator lights” on page 9-2.
Note: After installing the HomePortal software, the BROADBAND LINK
indicator light will also turn green.
8. Go to “Installing HomePortal software” on page 3-1.
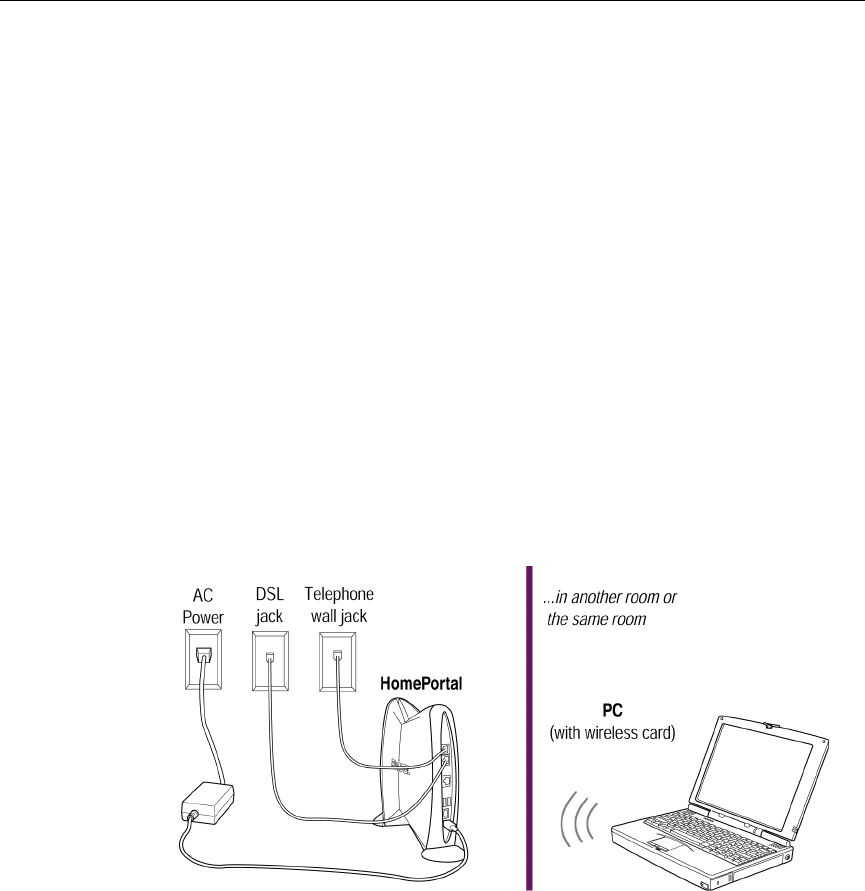
Choice 4: Computer with Wireless Ethernet connection
To connect your computer to the HomePortal via Wireless Ethernet:
1. Verify the computer has a Wireless Ethernet card, and verify the card is
configured to operate with your HomePortal.
We provide general guidelines for configuring Wireless Ethernet cards to
operate with the HomePortal in the Wireless Card Configuration booklet
included with your HomePortal. For your convenience, the Wireless Card
Configuration booklet also includes detailed instructions for configuring
Lucent, 3Com, Aironet, and Apple wireless cards.

Chapter 2: Installing HomePortal hardware
2-13
Note: If you are not sure whether your computer has a wireless card, see
“Troubleshooting installation” on page 9-1.
2. Making sure the round connector is lined up correctly, plug the black AC
power adapter into the HomePortal POWER port (bottom plug) and then
plug the other end into an electrical outlet.
The green Power light on the front of the HomePortal should come on.
3. page 8-1Recommended: If any of the computers in your home today or in
the future will connect to your home network via HomePNA, connect the
included light-gray telephone cable from the HomePortal LINE port (top
plug) to the telephone jack (should have dial tone).
4. Connect the other included light-gray telephone cable from the
HomePortal DSL port (2nd plug from top) to the DSL service wall jack.
This connects the HomePortal’s internal DSL modem to your DSL service
provider. If you already have an external DSL modem, you no longer need to
use it.
Note: The DSL service wall jack is a special jack set up during installation of
DSL service. It is not a regular phone jack and should not have a dial tone.
One way to verify that you are connecting to the correct wall jack is to attach
a telephone to the jack and then listen for a dial tone. If you do not hear a dial
tone through the handset, this is the correct wall jack to connect to the
HomePortal DSL port.
Note: If your telephone jack is already in use, you can use the included Y-
adapter to share it with the HomePortal. See page 8-1.
5. Power on your computer and after your computer has completely started,
verify the top and bottom indicator lights on the front of the HomePortal
are green.
If the POWER and HOME NETWORK lights are lit green, the HomePortal is
now connected to your computer and the telephone line that runs throughout
your home.
If they are not lit green, see “Checking indicator lights” on page 9-2.
Chapter 2: Installing HomePortal hardware
2-14
Note: After installing the HomePortal software, the BROADBAND LINK
indicator light will also turn green.
6. Go to “Installing HomePortal software” on page 3-1.
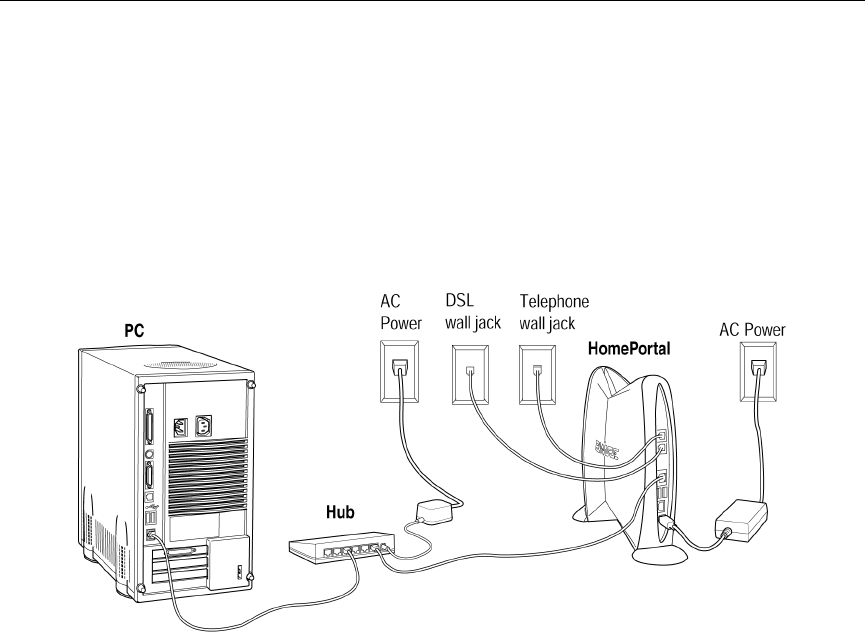
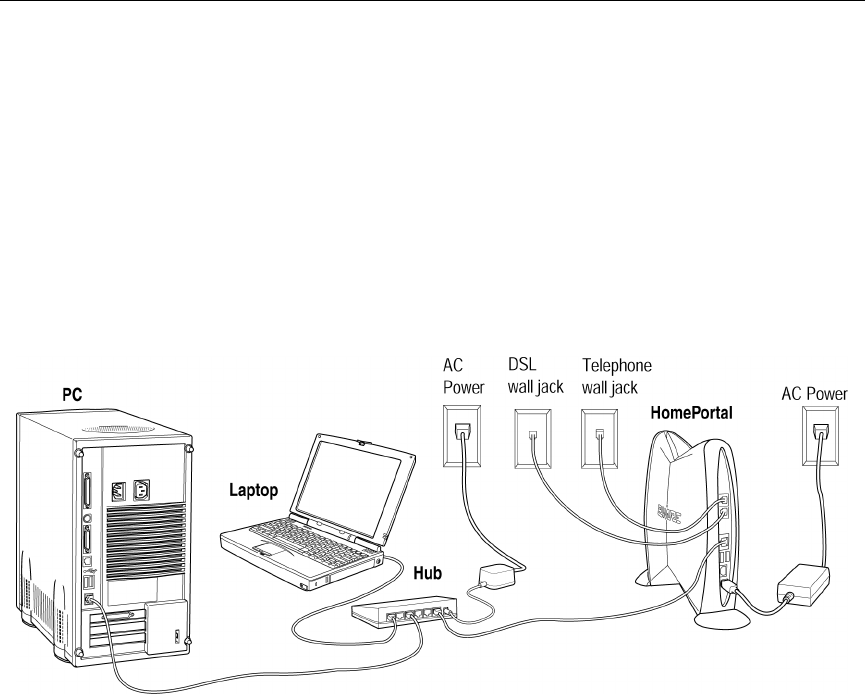
Choice 5: Network with Ethernet hub/switch
To connect your computer to the HomePortal via Ethernet hub:
1. Verify the computer has an Ethernet card.
Note: If you are not sure whether your computer has an Ethernet card, see
“Troubleshooting installation” on page 9-1.
2. If you have not already done so, connect each Ethernet device’s network
card to the hub with a network cable, similar to the dark-gray cable
included with the HomePortal.
Note: You can purchase additional Ethernet cables at any consumer
electronics retailer.
3. Make sure your Ethernet hub’s power adapter is plugged into an AC
power outlet.

Chapter 2: Installing HomePortal hardware
2-15
4. Making sure the round connector is lined up correctly, plug the black AC
power adapter into the HomePortal POWER port (bottom plug) and then
plug the other end into an electrical outlet.
The green Power light on the front of the HomePortal should come on.
5. page 8-1Recommended: If any of the computers in your home today or in
the future will connect to your home network via HomePNA, connect the
included light-gray telephone cable from the HomePortal LINE port (top
plug) to the telephone jack (should have dial tone).
6. Connect the other included light-gray telephone cable from the
HomePortal DSL port (2nd plug from top) to the DSL service wall jack.
This connects the HomePortal’s internal DSL modem to your DSL service
provider. If you already have an external DSL modem, you no longer need to
use it.
Note: The DSL service wall jack is a special jack set up during installation of
DSL service. It is not a regular phone jack and should not have a dial tone.
One way to verify that you are connecting to the correct wall jack is to attach
a telephone to the jack and then listen for a dial tone. If you do not hear a dial
tone through the handset, this is the correct wall jack to connect to the
HomePortal DSL port.
Note: If your telephone jack is already in use, you can use the included Y-
adapter to share it with the HomePortal, as shown on page 8-1.
7. Connect the included dark-gray Ethernet cable to the HomePortal
LOCAL ETHERNET port (3rd plug from top) and to any port on the
Ethernet hub.
8. Power on your computer and after your computer has completely started,
verify the top and bottom indicator lights on the front of the HomePortal
are green.
If the POWER and HOME NETWORK lights are lit green, the HomePortal is
now connected to your computer and the telephone line that runs throughout
your home.
If they are not lit green, see “Checking indicator lights” on page 9-2.


3-1
Chapter 3
3Installing HomePortal software
Congratulations! You have completed the hardware installation. But before you
start sending print jobs to the printer in the other room or start playing network
games with your family, you need to tell your computer that it is connected to a
network by installing the HomePortal software.
Note: Before installing the HomePortal software, locate your HomePortal Key
Code. See Before you begin in Chapter 1.
The Setup Wizard on Windows
It is strongly recommended that you close all Windows programs before running
the Setup Wizard.
To install the HomePortal software on Windows computers:
1. Place the HomePortal Setup Wizard CD in the CD-ROM drive and close
the CD tray.
Note: If your computer does not have a CD-ROM drive, see “One of my
computers doesn’t have a CD-ROM drive.” on page 9-4.
2. Follow on-screen instructions.
After the Setup Wizard completes, the BROADBAND LINK indicator light on
the front of your HomePortal will flash green as the HomePortal establishes a
connection to your broadband service provider. This could take several
minutes. The light will turn solid green once the connection is established.
Starting the Setup Wizard manually on Windows
Some Windows computers will automatically run the Setup Wizard. If after a full
minute the Setup Wizard doesn’t run automatically, you can start the Setup Wizard
manually.

Chapter 3: Installing HomePortal software
3-2
To start the Setup Wizard manually:
1. Double-click the “My Computer” icon located on the desktop.
2. Double-click the icon that corresponds to your CD-ROM drive.
3. Double-click Setup.exe.
The Setup Wizard on Macintosh
It is strongly recommended that you close all Macintosh programs before running
the Setup Wizard.
To install the HomePortal software on Macintosh computers:
1. Place the HomePortal Setup Wizard CD in the CD-ROM drive and close
the CD tray.
A 2Wire icon appears on your desktop.
2. Double-click the 2Wire icon.
A window opens with two icons. One is a HomePortal Install icon and the
other is an Internet Explorer 5 folder.
IMPORTANT: If your Macintosh does not have a current Web browser, you
must install a current Web browser before installing the HomePortal software.
To install Internet Explorer 5, drag the Internet Explorer folder to your
Macintosh hard drive, double-click the Internet Explorer icon, and, when
prompted, agree to make Internet Explorer 5 your default browser.
Alternatively, you can download and install the current version of Netscape
Navigator.
3. Double-click the HomePortal install icon.
4. Click Continue.
5. Click Install to copy the HomePortal software to a folder called
2Wire HomePortal on the Macintosh hard drive.
To copy the files to a different folder, click Select Folder... from the pull-down
menu and select another folder. Then click Install.

Chapter 3: Installing HomePortal software
3-3
6. Follow on-screen instructions.
After the Setup Wizard completes, the BROADBAND LINK indicator light
on the front of your HomePortal will flash green as the HomePortal
establishes a connection to your broadband service provider. This could take
several minutes. The light will turn solid green once the connection is
established.

Chapter 3: Installing HomePortal software
3-4
4-1
Chapter 4
4Adding computers to your network
With HomePortal you can use a combination of connectivity methods within your
home network. Some of your computers can be networked by way of phoneline
networking (HomePNA) by using your existing phoneline, some by way of
wireless, some by Ethernet, and one Windows 98 SE, Millenium, or 2000
computer by way of USB.
Unless you already have an Ethernet network installed, you may wish to add
computers to your network using HomePNA or a combination of HomePNA and
wireless because these technologies don’t require placing new wiring throughout
your home.
Choose a connection type for each computer to be added to your home network
and then refer to the indicated page for instructions:
Connection Type Go to...
Choice 1:
Computer with HomePNA adapter page 4-2
Choice 2:
Computer with Wireless Ethernet card page 4-3
Choice 3:
Network with Ethernet hub page 4-4
Chapter 4: Adding computers to your network
4-2
Note: If your computers have more than one of the above networking
technologies installed, choose one way to connect each computer to the
HomePortal. If you are not sure whether your computers have one of these
options, see “Troubleshooting installation” on page 9-1.
Choice 1: Computers with HomePNA connection
Note: You can connect computers to up to two phone lines that have different
phone numbers. See HomePortal online Help for details.
Choice 4:
Computer with Ethernet card (no hub) page 4-5
Choice 5:
Windows 98 SE, ME, or 2000 with USB Port page 4-6
Chapter 4: Adding computers to your network
4-3
To add a computer to your network via HomePNA:
1. Verify the computer has a HomePNA adapter.
You can order HomePNA adapters from 2Wire (2Wire PC Port Phoneline 10
Mbps USB Adapter).
2. Connect the HomePNA adapter to a telephone wall jack.
Note: Your computer may have an analog modem. Analog modems are used
to connect to the Internet or other external networks by dialing a phone
number. Analog (dial-up) modems can look similar to HomePNA adapters.
Make sure that you connect your computer to the HomePNA adapter and not
to an analog modem.
3. Install the HomePortal software.
Choice 2: Computers with Wireless Ethernet connection
To add a computer to your network via Wireless Ethernet connection:
1. Verify the computer has a Wireless Ethernet card, and verify the card is
configured to operate with your HomePortal.
We provide general guidelines for configuring Wireless Ethernet cards to
operate with the HomePortal in the Wireless Card Configuration booklet
included with your HomePortal. For your convenience, the Wireless Card
Chapter 4: Adding computers to your network
4-4
Configuration booklet also includes detailed instructions for configuring
Lucent, 3Com, Aironet, and Apple wireless cards.
Note: If you are not sure whether your computer has a wireless card, see
“Troubleshooting installation” on page 9-1.
2. Install the HomePortal software.
Choice 3: Network with Ethernet hub/switch
To add devices to your network via Ethernet hub:
1. Verify the devices have Ethernet cards.
Note: If you are not sure whether your computers have Ethernet cards, see
“Troubleshooting installation” on page 9-1.
2. Connect the included dark-gray Ethernet cable to the HomePortal
LOCAL ETHERNET port (2nd from top plug) and to any port on the
Ethernet hub.
Many hubs have one port designated as the “Unlink” port. Computers directly
connected to this port may require the use of a special cable called a crossover
cable. For more information see your hub documentation.
Chapter 4: Adding computers to your network
4-5
3. If you have not already done so, connect each Ethernet device’s network
card to the hub with a network cable, similar to the dark-gray cable
included with the HomePortal.
Note: You can purchase additional Ethernet cables at any consumer
electronics retailer.
4. Install the HomePortal software on each connected computer.
Choice 4: Computer with Ethernet connection
Note: If you recently purchased the Ethernet card, install the card and
software before proceeding with the HomePortal connection.
To add a computer to your network via Ethernet connection:
1. Connect the included dark-gray Ethernet cable from the Ethernet
adapter to the HomePortal LOCAL ETHERNET port (2nd from top plug).
Note: If the dark-gray Ethernet cable is not long enough, you can purchase a
longer cable (RJ-45 CAT 5) from any consumer electronics retailer.
2. Install the HomePortal software.
Chapter 4: Adding computers to your network
4-6
Choice 5: Windows 98 SE, ME, or 2000 computer
with USB port
Note: In a HomePortal home network, only one Windows 98 SE, ME, or 2000
computer with USB port can be connected via USB. USB/HomePortal
connectivity is not available for Macintosh, Windows 95 or Windows NT.
To add a computer to your network via USB:
1. Connect the included ivory-colored USB cable to the HomePortal PC port
(2nd plug from bottom) and the computer’s USB port.
2. Power on your computer.
Note: The following screens may vary somewhat on Windows ME and
Windows 2000.
−The Add New Hardware Wizard appears. Click Next to continue.
Chapter 4: Adding computers to your network
4-7
−Select Search for best driver for your device. Click Next to continue.
−Place the HomePortal Setup Wizard CD in the CD-ROM tray, and then
select CD-ROM drive. Click Next to continue
Chapter 4: Adding computers to your network
4-8
.
−Select The updated driver. Click Next to continue.
−Click Next to continue.

Chapter 4: Adding computers to your network
4-9
Note: If asked to insert your Windows CD, please do so and follow on-screen
instructions. If you don’t have your Windows CD handy, try the following
options for locating the driver:
C:\Windows\options\cabs
C:\Windows
C:\Windows\system
D:\Win98
−Click Finish.
Chapter 4: Adding computers to your network
4-10
−Remove the CD from the CD-ROM tray, and then click Yes to restart your
computer.
3. Install the HomePortal software.
5-1
Chapter 5
5Using HomePortal Monitor
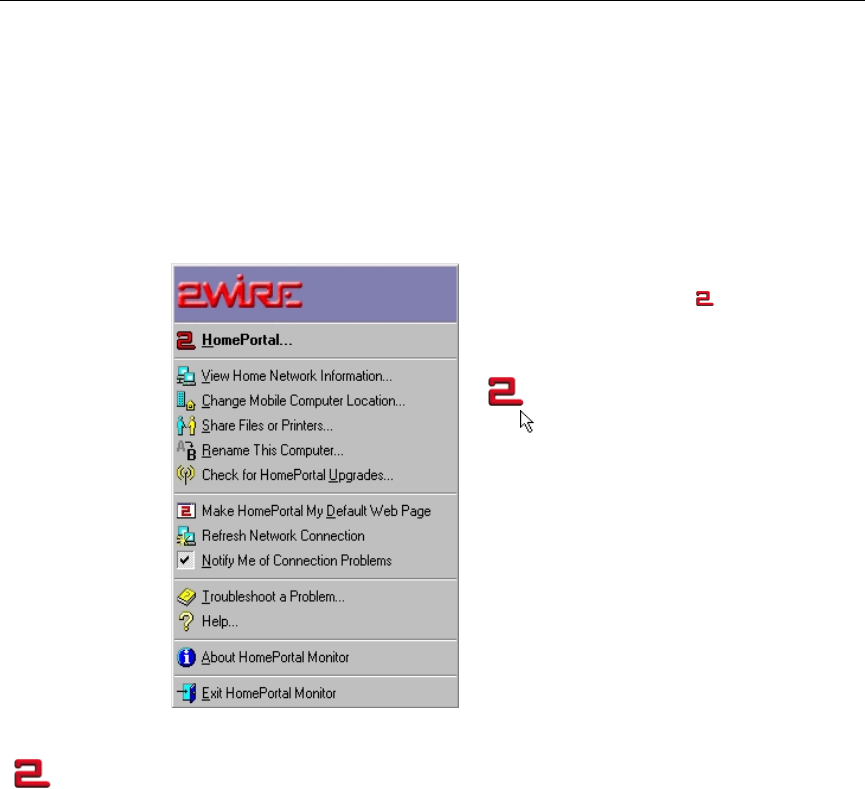
HomePortal Monitor provides useful networking tools for all the computers in
your home network.
HomePortal Monitor tools
After running the HomePortal
Setup Wizard, a icon appears in
the task bar of your computer
screen.
Click the icon to launch
HomePortal Monitor, which is a
handy menu of tools such as Share
Files or Printers, View Home
Network Information, and Online
Help.
The following pages briefly
describe how to use the tools in
HomePortal Monitor. For more
detailed instructions, refer to the
online Help system.
Launch your HomePortal default page
From HomePortal Monitor, select HomePortal… to launch your home console
(http:\\homeportal).

Chapter 5: Using HomePortal Monitor
5-2
View home network information
From HomePortal Monitor, select View Home Network Information... to open your
home network page, which displays information about all your networked
devices.
Change mobile computer location
From HomePortal Monitor, select Change Mobile Computer Location… to switch
network settings between home and one other location, such as work or school.
When you switch to a mobile location, your home settings are preserved. When
you switch back to your home settings, the most recent mobile settings are
preserved.
This feature is useful even if you don't have a mobile computer because you can
use it to protect the network settings required for your computer to function
properly with the HomePortal. For example, if you wish to experiment with
network settings or you are installing hardware or software that might alter
network settings, we highly recommend that you first switch to work mode. This
will protect your home mode settings from being altered.
Share files and printers (available on Windows 95, 98, and ME)
From HomePortal Monitor, select Share Files or Printers... to select drives and
printers you wish to share with other Windows 95, 98 SE, or ME computers on the
network. This is a computer-specific option, so if you want to share all drives and
printers, you must use this tool on each computer.
Rename your computer
From HomePortal Monitor, select Rename This Computer… to change your
computer name. The name you choose is the name you will see when you view the
computer on the home network. Each computer on your network must have a
unique name.

Chapter 5: Using HomePortal Monitor
5-3
Check for HomePortal upgrades
From HomePortal Monitor, select Check for HomePortal Upgrades… to launch a
page that intelligently offers upgrades as needed and shows the HomePortal
software version currently in use on your computer.
Make HomePortal your default Web page
From HomePortal Monitor, select Make HomePortal My Default Web Page so that
every time you open your browser, you will see your home console.
Refresh your home network connection(s)
From HomePortal Monitor, select Refresh Home Network Connection to
automatically resynchronize your computer and the HomePortal. This is useful if
your computer ever needs to be assigned a new IP address.
Choose to be notified of connection problems
From HomePortal Monitor, check Notify Me of Connection Problems if you would
like to automatically initiate 2Wire’s ongoing help in diagnosing and
troubleshooting potential problems on your home network.
Troubleshoot
From HomePortal Monitor, select Troubleshoot a Problem… to open HomePortal
online FAQs and Troubleshooting.
Get help using HomePortal
From HomePortal Monitor, select Help... to open HomePortal online Help system.

Chapter 5: Using HomePortal Monitor
5-4

6-1
Chapter 6
6Using network-enabled games and applications
For security reasons, the HomePortal normally blocks communication from the
Internet to “application servers” on your home network. If you need to “host” an
application server in your home, you may designate one computer in your home as
the host computer for that application, allowing data specifically associated with
that application to pass through to that computer. Only one computer may host a
particular application server at a time.
To view available hosted applications:
1. Double-click the icon on the bottom of the computer screen or point
your browser to http://homeportal to open the home console.
2. From the home console, click the Network tab.
3. Click the Advanced... link corresponding with the computer you want to
set up as a host computer.
To assign a hosted application to a computer:
1. From the left-hand list of available hosted applications, click to select the
one you want to apply to your network computer.
2. Click Add>>.
3. Click OK.
To remove a hosted application assignment:
1. From the right-hand list of assigned hosted applications, click to select
the one you want to remove from your network computer.
2. Click Remove>>.
3. Click OK.
If your computer is not powered on, it will appear as inactive (grayed-out) in the
list of Networked Devices. Even if your computer in inactive, you can designate it

Chapter 6: Using network-enabled games and applications
6-2
to be a host. However, the computer must be powered on to actually function as a
host for the designated application.
Playing games with other players in your home
To play a game with other players in the home:
1. Start the game software.
If you are playing a network-enabled game that requires a host computer, start
the software on the host computer first.
2. When the game starts, select the multi-player or equivalent option.
3. If the game prompts you to choose a host, choose the computer you
started the software on first.
4. If the game prompts you to select a protocol, choose TCP/IP. All players
must select the same protocol.
For more information on setting up a network-enabled game, see the
manufacturer’s documentation.

7-1
Chapter 7
7Glossary
The following terms are provided to help you become familiar with some of the
technologies related to your HomePortal network.
DSL The DSL (Digital Subscriber Line) modem inside the HomePortal creates a high-
speed connection between your home and your service provider. DSL allows fast,
always-connected, reliable Internet access and does not tie up your telephone line.
If you do not already have DSL service, you can use 2Wire’s DSL Lookup Service
at www.2Wire.com to help locate a provider.
Ethernet Ethernet allows you to create your home network using special wiring known as
Category 5 wiring like the dark gray cable included with the HomePortal. The
LOCAL ETHERNET port on the HomePortal connects to a computer’s Ethernet card
or to an Ethernet hub. However, for today’s home networks you do not necessarily
need to have an Ethernet network. Alternatives such as HomePNA are equally
effective and allow you to network your computers without special wiring.
HomePNA or
HPNA
HomePortal supports the HomePNA (Home Phoneline Networking Alliance)
protocol. This protocol allows you to simply and easily use the telephone wiring
within your home to create your home network with shared Internet access and
shared access to peripherals. HomePNA 1.0 offers 1 Mbps (megabit-per-second)
transmission speed, and HomePNA 2.0 offers 10 Mbps technology, allowing
faster real-time, multi-player gaming and swift downloading of large files and
graphic images. The LINE port on the HomePortal connects the HomePortal to
your HomePNA network.
Note: Whenever possible, use HomePNA 2.0 products rather than 1.0
products to avoid interfering with DSL service or slowing your home network.
TCP/IP Transmission Control Protocol/Internet Protocol. TCP/IP is a networking
protocol, a type of machine-to-machine language that provides communication
across interconnected networks, between computers with diverse hardware
architectures and various operating systems. Generally Windows and Macintosh

Chapter 7: Glossary
7-2
PCs come with TCP/IP already installed. Every computer in your HomePortal
network must have TCP/IP.
USB Most computers and digital devices manufactured in the last few years come with
USB (Universal Serial Bus) connections. The HomePortal has a USB connection
for a computer. The HomePortal also has USB connections to attach peripherals,
such as printers and digital cameras. These peripheral ports will be functional in a
later release of HomePortal software. Check with 2Wire.com to learn when these
ports will become active on your HomePortal.
Additional resources
Following are some additional resources for learning about networking
technology:
• www.2Wire.com
• www.whatis.com
• www.homepna.org

8-1
Chapter 8
8Frequently asked questions
Following are frequently asked questions for networking in general, the
HomePortal, and HomePNA.
Frequently asked questions about networking
How can I share files and printers between Macintosh computers?
The HomePortal file and printer sharing feature is not currently supported on
Macs. The HomePortal does not interfere with the Macintosh method for sharing
files and printers on a network. Refer to your Macintosh online Help system.
How can I share files and printers between Windows NT machines?
The HomePortal network fully supports Windows NT and Windows 2000 file and
printer sharing. However, the HomePortal Monitor’s sharing setup feature is not
currently supported for Windows NT and 2000. Instead, use the Windows method
for setting up file and printer sharing; this method is explained in detail in the
Windows online Help system.
Do I need to use a network hub or switch with my home network?
Only if you want to connect more than one Ethernet device (for example, two
computers with Ethernet cards or one computer with an Ethernet card and one
wireless base station). You do not need to use crossover cables when connecting
devices to the HomePortal.
To connect the HomePortal to an Ethernet hub, see “Choice 5: Network with
Ethernet hub/switch” on page 2-14.
What kind of Ethernet cable should I use, and how should I connect it?
With HomePortal you can use any kind of Ethernet cable and connect it in either
direction. This is because the HomePortal features built-in automatic sensing
capability that detects the difference between crossover and straight-through
Ethernet cabling (RJ-45 CAT 5). You still need to be careful with other devices
connected to your hub and follow the instructions that come with those devices.
Chapter 8: Frequently asked questions
8-2
How can I connect my telephone to the same telephone wall jack the
HomePortal connects to?
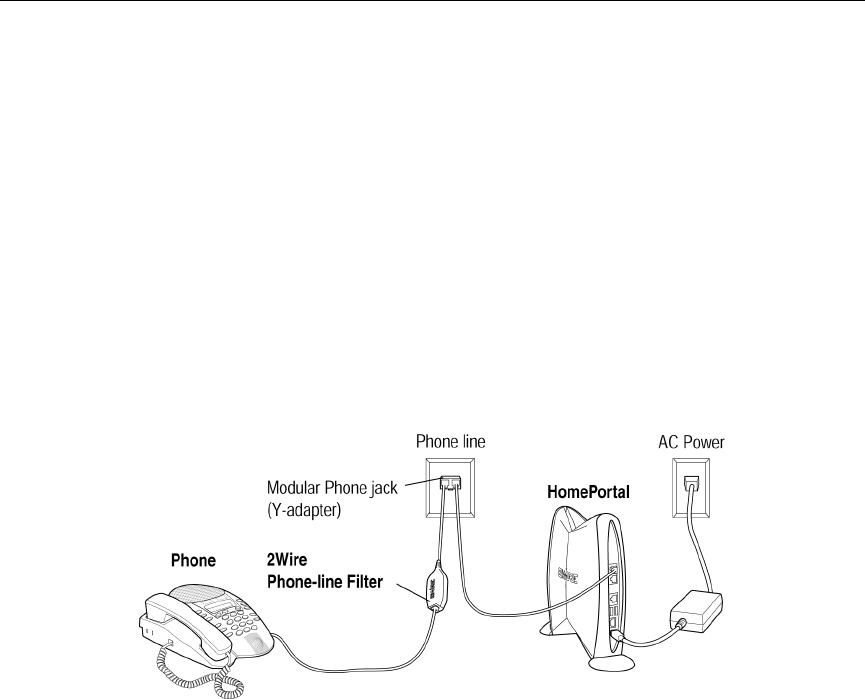
Use a phone-line filter and the included Y-adapter as shown in the following
figure.
Note: Phoneline filters are required if you have splitterless DSL and
sometimes they are required even if you have splittered DSL because splitters
installed by DSL service providers do not always completely eliminate noise
on the phone line. Use phoneline filters on each phone, answering machine,
fax machine, security system, and analog modem. You can order phoneline
filters from 2Wire (2Wire DSL Filter).
Connecting DSL Filter to single jack with the HomePortal
How far apart can any two computers be in my network?
Up to 300 feet for a wireless network, 500 feet for a phoneline network, and 300
feet for an Ethernet network.
IMPORTANT: 2Wire recommends using the included light-gray telephone cables
to connect computers via phoneline and the included dark-gray Ethernet cable to
connect computers via Ethernet.
How many computers can I attach to my home network?
You can attach as many as 253 computers or Internet devices (only 30 computers
via HomePNA).

Chapter 8: Frequently asked questions
8-3
Frequently asked questions about HomePortal
What security features does the HomePortal provide?
The HomePortal provides some of the best security on the market by acting as a
barrier between your computer and the Internet. The hacker simply cannot get
around the HomePortal to attack your computers or your network.
The HomePortal does several key things to protect your computer:
• As a separate piece of hardware it offers a layer of protection for a computer
owner that software simply can’t.
• The HomePortal cannot run software beyond what is factory installed. This
prevents a hacker from using the HomePortal to relay attacks.
• Because the HomePortal uses solid state memory and does not have a hard
drive, it can only provide limited functionality and is not open to becoming a
host to a number of Trojan horses and other hacker applications that are used
to crack systems.
• The HomePortal hides the IP addresses of the computer(s) attached to it. This
means that a port scanner scans the HomePortal open ports, not your
computers. As a first line of defense, this will stop you from being marked as
a potential victim by someone who is looking for an easy target with a port
scanner. It is similar to a house alarm or large dog that will make a burglar
look for another house to rob instead of yours.
• The HomePortal also blocks ports. This means that a port may be open on
your computer(s), but the open port will not be accessible from the Internet.
• The HomePortal prevents denial of service and distributed denial of service
attacks. This means that attempts to attack your home network by using
repeated connect requests, a common technique used by hackers, will fail.
• The HomePortal supports VPN (virtual private network) software, which
encrypts data and network addresses before sending them through the public
network and decrypts them at the receiving end.
Test your network security. Visit http://www.grc.com and use their ShieldsUP! test.

Chapter 8: Frequently asked questions
8-4
How can I change my home page in my browser to the HomePortal?
Note: You can reach the HomePortal default page anytime simply by typing
homeportal in your brower’s address field.
To make HomePortal your default home page:
1. Click the icon at the bottom of your computer screen to open
HomePortal Monitor.
2. From HomePortal Monitor, select Make HomePortal My Default Web Page.
How can I add peripherals to the HomePortal?
The HomePortal has two USB peripheral ports; however, these are not currently
available for use. Check www.2Wire.com to find out if your USB peripherals can
be used.
Does the HomePortal work with Linux, FreeBSD, and other operating
systems?
Installation of the HomePortal software on your first computer should be done on
a computer running Windows 95, 98, NT, 2000, or Macintosh 8.5 or higher. Also,
the HomePortal Monitor portion of the graphical user interface requires Windows
95, 98, NT, 2000, or Macintosh 8.5 or higher. Other operating systems are not
fully supported by 2Wire.
However, any computer capable of using a dynamically assigned IP address via
DHCP can be used within a HomePortal network. This means that computers
running any network-capable operating system can benefit from the security and
Internet sharing capabilities of the HomePortal. They can also point their browsers
to the HomePortal Web user interface (http://homeportal). To use the HomePortal
with an unsupported operating system:
1. Verify that the DHCP server and the DNS (Domain Name Server) are
stopped.
2. Configure your system to run as a DHCP client.
3. Connect the computer to the HomePortal network by way of HomePNA,
wireless, or Ethernet.
See “Adding computers to your network” on page 4-1.

Chapter 8: Frequently asked questions
8-5
Note: USB is not a supported method for adding computers with unsupported
operating systems.
Is the HomePortal software compatible with other Internet sharing software
packages out there?
No. You must disable or uninstall other Internet sharing software packages. The
HomePortal is designed to serve the Internet sharing function, and if two or more
software packages that provide Internet sharing are present, none of the packages
perform correctly. If you have inadvertently installed another Internet sharing
software package on a machine in your network, then you need to uninstall it and
re-install the HomePortal software.
How can I uninstall the HomePortal software?
You can remove all of the HomePortal components installed on your system with
the Uninstall utility.
To uninstall HomePortal (Windows):
1. From the Start Menu, select Programs > HomePortal.
2. From the HomePortal submenu, select Uninstall HomePortal.
3. Click Yes to confirm that you want to remove the program and all of its
components.
To uninstall HomePortal (Macintosh):
1. Insert the HomePortal Setup CD.
2. Double-click the 2Wire icon on the desktop.
3. Double-click the HomePortal Install icon.
4. Click Continue.
5. From the pull-down menu select Uninstall.
6. Click Uninstall.
7. Click Continue.

Chapter 8: Frequently asked questions
8-6
Frequently asked questions about HomePNA
Do I need to use phoneline filters in a HomePortal-enabled HomePNA
network?
Yes, whether or not you are using HomePNA. Phoneline filters are required if you
have splitterless DSL and sometimes they are required even if you have splittered
DSL because splitters installed by DSL service providers do not always
completely eliminate noise on the phone line. Use phoneline filters on each phone,
answering machine, fax machine, security system, and analog modem. You can
order phoneline filters from 2Wire (2Wire DSL Phone-Line Filter).
Does my DSL service interfere with my HomePNA network?
No. The HomePNA network is designed to be compatible with ADSL as well as
voice band.
Can I use HomePNA and my telephone at the same time?
Yes. If you have splitterless DSL, you must use a phone-line filter on each phone
in your home.
Can I use HomePNA and the HomePortal in a digital telephone system such
as those found in many corporate environments?
No. HomePNA is designed to be used only with standard analog home telephone
systems.
Will some devices interfere with my HomePNA network?
Yes, but only if you are using the older HomePNA 1.0 standard. HomePNA 1.0.
Ham radios on bands between 4.5 and 9 MHz, some cordless phones, power
devices with a rheostat (dimmer switch), and some older phones may affect the
HomePortal network. To diagnose such a problem, unplug all of the telephone
devices in your house, and turn off any power devices on dimmer switches and
ham radios. Then connect the HomePortal network and plug in, one at a time,
each of the telephone devices, checking the effect on your network before moving
to the next device. Then turn on your dimmer switch and ham radio, and check the
result on the HomePortal network connection. 2Wire recommends using only
HomePNA devices that support the HomePNA 2.0 standard.

9-1
Chapter 9
9Troubleshooting HomePortal
This chapter describes some problems you may encounter with your HomePortal
network, and it provides suggestions for solving these problems. In most cases,
you'll be able to diagnose and solve these problems quickly and easily, following
the suggestions provided.
If you’re having a problem with your HomePortal network, please check this
chapter first to see if the problem is included here. Then check 2Wire’s online
Troubleshooting system before contacting the 2Wire Customer Care Center. If the
problem you’re having is not covered here or online or if the suggestions provided
do not solve the problem, then please don’t hesitate to contact us.
Troubleshooting installation
I’m not sure whether my computer has a network adapter that can work with
the HomePortal.
To check Windows 95, Windows 98, and Windows ME:
1. On your desktop, right-click My Computer
.
2. Select Properties, then click the Device Manager tab.
3. Double-click Network adapters and verify that an Ethernet, HomePNA, or
wireless adapter is listed.
4. If one of these adapters is not listed, install or reinstall an adapter on this
computer.
Consult the manufacturer’s documentation for installation instructions.
To check Windows NT 4.0 and Windows 2000:
1. Right-click Network Neighborhood.
2. Select Properties.
Chapter 9: Troubleshooting HomePortal
9-2
3. Select the Adapters tab and verify that an Ethernet, HomePNA, or
wireless adapter is listed.
4. If one of these adapters is not listed, install or reinstall an adapter on this
computer.
Consult the manufacturer’s documentation for installation instructions.
To check Macintosh OS 8.5 or higher:
1. On your desktop, double-click your Hard Drive icon.
2. Select System Folder > Extension Folder and verify that an Ethernet,
HomePNA, or wireless adapter is listed.
3. If one of these adapters is not listed, install or reinstall an adapter on this
computer.
Consult the manufacturer’s documentation for installation instructions.
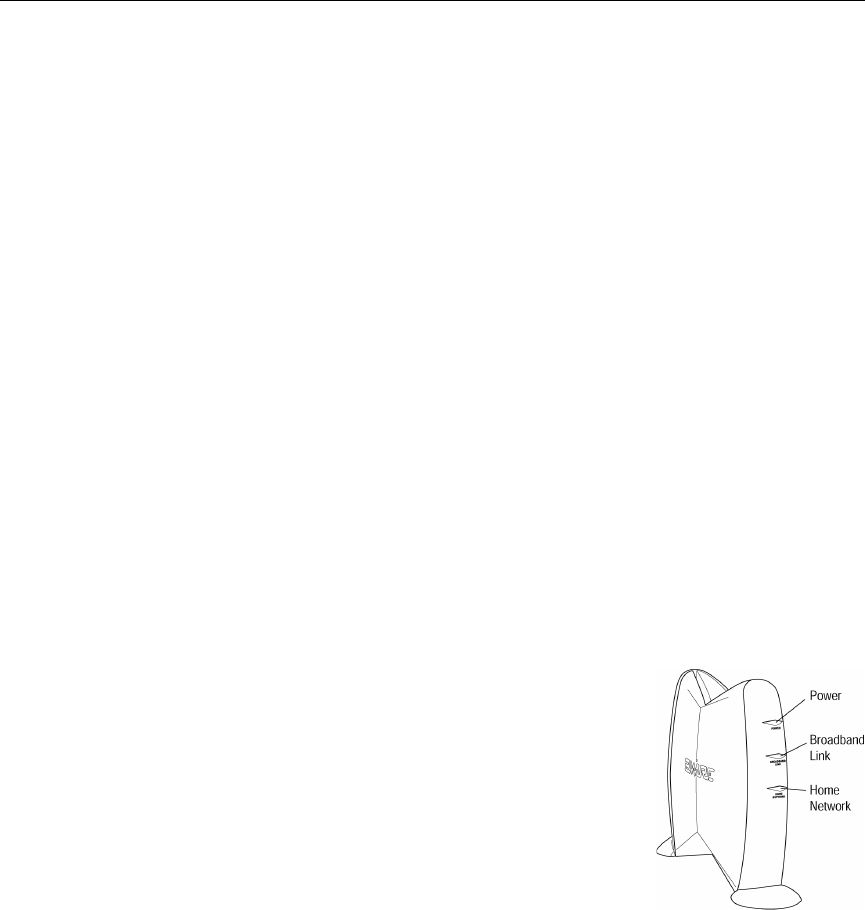
Checking indicator lights
The HomePortal has three indicator lights you can use to diagnose installation and
connection problems.
Power light
If the Power indicator light is not lit the HomePortal is
not getting power:
1. Check to see if the power cable is plugged into
the power outlet or power strip.
2. Check to see if the power strip is turned on.
3. Check to see if the power cord is plugged into
the HomePortal.
The power cord is keyed and can only go in one
way. You should feel a click when you plug it in.
Note: If the Power indicator light is red, there is a system error, and you
should contact 2Wire Customer Care.

Chapter 9: Troubleshooting HomePortal
9-3
Broadband link light
If the Broadband Link indicator light is red the HomePortal has not established a
connection to your DSL service provider:
1. Verify that DSL service is activated.
2. Verify that a regular telephone cord is plugged into the Line port on the
HomePortal and into the telephone outlet in the wall.
3. Verify that the included light-gray telephone cable is connected from the
HomePortal DSL port to your DSL service wall jack.
Note: The DSL service wall jack is a special jack set up during installation of
DSL service. One way to verify that this is the right telephone line is to attach
a telephone to the wall jack and then listen for a dial tone. If you do not hear a
dial tone through the handset, this is probably the right telephone line to
connect to the HomePortal DSL port.
4. Restart the HomePortal by disconnecting and re-connecting the power
cord. This will restart the HomePortal search for your broadband
service.
Home Network light
If your networked computers are powered on and the Home Network indicator light
is not lit, the HomePortal may not be connected to any computer or hub by way of
Ethernet, USB, HomePNA, or wireless. The HomePortal must be connected to
your home network in one of these ways:
• Ethernet: Verify that the Ethernet (dark-gray) cable is connected from the
HomePortal LOCAL ETHERNET port (4th plug from bottom) into the Ethernet
card in the computer or into an Ethernet hub. The Ethernet port on the
computer looks like a regular telephone jack, but bigger. If you are using an
Ethernet hub, verify the hub is plugged into a power outlet.
• USB: Verify that the ivory-colored USB cable is plugged into the computer
and the HomePortal PC port (2nd plug from bottom).
• HPNA: Verify that a regular telephone cord is connected to your HPNA card
or adapter and into a telephone outlet. Also verify that the second included
light-gray telephone cord is connected to the HomePortal Line port and into a
telephone outlet.

Chapter 9: Troubleshooting HomePortal
9-4
• Wireless: Verify that your wireless card is properly installed.
One of my computers doesn’t have a CD-ROM drive.
To install the HomePortal software on a computer that does not have a CD-ROM
drive, you will need to create installation diskettes from the HomePortal Setup
Wizard CD. To do this you need five formatted 1.44MB diskettes and another
computer with both a CD-ROM drive and a 3.5-inch diskette drive.
To create installation diskettes:
1. Label five diskettes “1,” “2,” “3,” “4,” and “5.”
2. Insert the HomePortal Setup Wizard CD into the CD-ROM drive of a
computer.
3. When the CD automatically starts, click Cancel.
4. View the files on the CD-ROM. To do so:
−After inserting the CD-ROM into the CD-ROM drive, double-click My
Computer.
−Double-click the icon that represents your CD-ROM drive.
5. On the CD-ROM, locate a file named Makefloppies.exe. Double click this
file. The Makefloppies application prompts you for each diskette in turn.
To install the HomePortal software using the installation diskettes:
1. Insert the diskette labeled “1” into the floppy disk drive of the computer
that does not have a CD-ROM drive.
2. View the files on this diskette. To do so:
−After inserting the diskette into the floppy disk drive, double-click My
Computer.
−Double-click the icon that represents your floppy drive.
3. On the diskette, locate a file named Install.exe. Double-click this file. The
Setup Wizard prompts you for each diskette in turn.

Chapter 9: Troubleshooting HomePortal
9-5
I’m having trouble installing the HomePortal software on Windows NT or
Windows 2000.
Verify that you have administrator user privileges. You must have administrative
user privileges to install the HomePortal software on Windows NT.
I can’t connect my computer to the HomePortal.
1. Make sure the computer has an adapter installed.
On Windows 95, 98, and ME:
−On your desktop, right-click My Computer.
−Select Properties, then click the Device Manager tab.
−Double-click Network adapters and verify that an Ethernet, HomePNA, or
wireless adapter is listed.
−If the adapter is not listed, reinstall the adapter on this computer. Consult
the manufacturer’s documentation for installation instructions.
−If more than one adapter in listed, you may need to disable the adapters
that are not being used for your HomePortal network. This is especially
true if you are using a Windows 98 computer to connect via USB. To
disable an inactive adapter, double-click the adapter, select Disable, and
click OK. Repeat for each unused adapter.
Note: A disabled adapter is unavailable. Therefore, if you use the adapter on
another network (such as work), do not disable it. Instead, use the adapter
rather than USB to connect your computer to the HomePortal network.
On Windows NT 4.0:
−Right-click Network Neighborhood.
−Select Properties.
−Select the Adapters tab and verify that an Ethernet, HomePNA, or
wireless adapter is listed.
−If the adapter is not listed, reinstall the adapter on this computer. Consult
the manufacturer’s documentation for installation instructions.

Chapter 9: Troubleshooting HomePortal
9-6
−If more than one adapter in listed, you may need to disable the adapters
that are not being used for your HomePortal network. To do this, click the
Bindings tab. From the Show Bindings for pull-down menu, select all
adapters. Then select your unused adapter(s) and click Disable.
On Windows 2000:
−On your desktop, right-click My Computer.
−Select Properties, click the Hardware tab, and click the Device Manager
tab.
−Double-click Network adapters and verify that an Ethernet, HomePNA, or
wireless adapter is listed.
−If the adapter is not listed, reinstall the adapter on this computer. Consult
the manufacturer’s documentation for installation instructions.
−If more than one adapter in listed, you may need to disable the adapters
that are not being used for your HomePortal network. To do this, double-
click the unused adapter, from the Device Usage pull-down menu on the
General tab select Do not use this device (disable) and click OK. Check the
Home Network indicator light.
On Macintosh OS 8.5 or higher:
−On your desktop, double-click your Hard Drive icon.
−Select System Folder>Extension Folder and verify that an Ethernet,
HomePNA, or wireless adapter is listed.
−If the adapter is not listed, reinstall the adapter on this computer. Consult
the manufacturer’s documentation for installation instructions.
2. Check the Home Network indicator light.
−If it is not on, check the adapter’s power supply, if one is used.
−If it is on, make sure the adapter is connected to the computer properly.
−If the adapter is not listed, reinstall the adapter on this computer. Consult
the manufacturer’s documentation for installation instructions.
3. Check the adapter’s power supply, if it requires a power supply.

Chapter 9: Troubleshooting HomePortal
9-7
−Make sure the outlet has power.
−Make sure the AC adapter is plugged in.
−Unplug the adapter and plug it in again.
−If you have another adapter power cable, try it with the adapter that is
causing problems.
4. If you have changed the way your computer connects to your network
(for example, from Ethernet to HomePNA), you should first uninstall and
then reinstall the HomePortal software on your computer.
If you have further problems, consult the Troubleshooting section in the user
guide that came with your adapter.

Chapter 9: Troubleshooting HomePortal
9-8
Troubleshooting Internet connection
I got connected once successfully but am now having problems.
From HomePortal Monitor, select Refresh Home Network Connection.
I can’t connect to the Internet.
Following are some tips to help you diagnose and remedy common Internet
connection problems:
1. Make sure the HomePortal is on and that the indicator lights are green.
See “Checking indicator lights” on page 9-2.
2. If everything seems ok, but you still cannot connect to the Internet, close
any open applications on the computer, and restart it. When the
computer has finished restarting, try connecting again.
3. Click the (2) at the bottom of your computer screen to open HomePortal
Monitor. From HomePortal Monitor, select Refresh Home Network
Connection.
4. Note to laptop users: You may need to switch back to your home settings.
From HomePortal Monitor, select Change Mobile Computer Location
and change to your home settings.
Troubleshooting home networking
I can’t see all my computers connected via HomePNA on the network.
See Chapter 2 of this guide and make sure all the computers connected via
HomePNA are connected correctly.
If you have multiple phonelines in your home, it is possible that your computers
are not connected to the same phoneline wiring. Consult the Phoneline
Networking FAQ in HomePortal online Troubleshooting for more information.
My computer doesn't appear on the home console Network page.
If you disconnect the network cable from your adapter and then reconnect it
within a few seconds, some computers on the network may not be able to see your
computer. If this happens, restart your computer.

Chapter 9: Troubleshooting HomePortal
9-9
I have more than one type of network interface card in my computer, and I’m
having network connection problems with this computer.
If you have multiple network adapters in a single computer, connect only one
network adapter at a time to the HomePortal network. You probably don’t need to
remove the unused adapters, unless you have an unused wireless card or adapter
that may be attempting to connect to a wireless base station attached to the
HomePortal. In that case, you may need to remove or disable the wireless card or
adapter.

Chapter 9: Troubleshooting HomePortal
9-10

10-1
Chapter 10
10Contacting 2Wire Customer Care
Web support
www.2Wire.com/support
Email support
Support@2Wire.com
Toll-free 24 x 7 telephone and fax support
(877) 347-8680
(877) 347-8684 (fax)
Feedback
Your feedback is important to us and is key to product improvement. Please email
your product ideas and suggestions to Support@2Wire.com.

Chapter 10: Contacting 2Wire Customer Care
10-2

Index
Numerics
2Wire Customer Care Center, 9-1
3Com HomeClick, 1-3
A
AC power adapter, 2-3, 2-5, 2-11, 2-13, 2-15
adding computers, 4-1
ADSL, 8-6
analog modem, 2-11, 4-3
available disk space, 1-3
B
before you begin, 1-2
broadband
link indicator light, 2-4, 2-10, 2-12, 2-14,
2-16, 9-3
C
Category 5 wiring, 7-1
changing mobile computer location, 5-2
checking for HomePortal upgrade, 5-3
choosing to be notified of connection prob-
lems, 5-3
conflicting applications
3Com HomeClick, 1-3
Intel Anypoint ISS, 1-3
Microsoft Internet Connection Sharing, 1-3
Sygate, 1-3
WinGate, 1-3
connection
attachable quantity of computers, 8-2
computer, 9-8
computer distance apart from one another
computer, 8-2
computer to HomePortal, 9-5
network problems, 9-9
problems, 9-5, 9-8
telephone and HomePortal to wall jack, 8-2
connection type
computer with Ethernet card, 2-1, 2-3, 4-2,
4-5
HomePNA adapter, 2-2, 2-10, 4-1, 4-2
network with Ethernet hub, 2-2, 2-14, 4-1,
4-4
Windows with USB port, 2-1, 2-5, 4-2, 4-6
wireless, 2-2, 2-12
D
default home page, 8-4
Digital Subscriber Line, 7-1
DSL, 7-1
Lookup Service, 7-1
modem, 2-3, 2-6, 2-11, 2-13, 2-15, 8-6
Phone-Line Filter, 8-2, 8-6
port, 2-3, 2-4, 2-6, 2-11, 2-13, 2-15

Index
service, 9-3
service provider, 2-3, 2-6, 2-11, 2-13, 2-15
service wall jack, 2-1, 2-3, 2-4, 2-6, 2-11,
2-13, 2-15, 9-3
E
Ethernet, 7-1, 9-3
adapter, 1-3, 4-5
cable, 2-4, 2-14, 2-15, 8-1
card, 2-1, 2-3, 2-14, 4-2, 4-4, 4-5, 9-3
device network card, 2-14, 4-5
hub, 2-2, 2-14, 2-15, 4-1, 4-4, 7-1, 9-3
hub power adapter, 2-14
hub/switch, 2-14
port, 2-4, 4-4, 4-5, 7-1
external DSL modem, 2-3, 2-6, 2-11, 2-13,
2-15
F
FAQs, 8-1
FreeBSD, 8-4
frequently asked questions, 8-1
G
getting started, 1-6
glossary, 7-1
H
hardware installation, 2-1
help online system, 5-3, 9-1
home network light, 2-4, 2-10, 2-12, 2-13, 2-15
HomePNA, 2-3, 2-10, 2-13, 2-15, 7-1
adapter, 1-3, 2-2, 2-10, 2-11, 4-1, 4-3
card, 2-11
connection, 4-2
network, 8-6
HomePortal, 1-1
connection problems, 9-8
DSL port, 9-3
features, 1-1
internal DSL modem, 2-3, 2-6, 2-11, 2-13,
2-15
launch default page, 5-1
Monitor tools, 5-1
setup, 4-3
Setup Wizard CD, 2-7, 4-7
upgrade, 5-3
HPNA, 7-1, 9-3
I
installation
bedrooms, 1-6
common living areas, 1-6
getting started, 1-6
HomePortal hardware, 2-1
HomePortal software, 3-1
kitchen, 1-6
planning your home network, 1-4
requirements, 1-2
study/home office, 1-5
Windows NT, 9-5
without CD-ROM drive, 9-4
Intel Anypoint ISS, 1-3
internal DSL modem, 2-3, 2-6, 2-11, 2-13, 2-15

Index
Internet
connection problems, 9-8
sharing software package, 8-5
IP
address, 8-3
K
Key Code, 1-2
L
laptop, 9-8
launching HomePortal default page, 5-1
line port, 2-3, 2-5, 2-11, 2-13, 2-15, 7-1, 9-3
Linux, 8-4
local Ethernet port, 2-4, 2-15, 4-4, 4-5, 7-1, 9-3
M
Macintosh, 2-5, 7-1
setup, 3-2
making HomePortal your default Web page,
5-3
Microsoft Internet Connection Sharing, 1-3
N
network
adapter, 9-1
enabled game, 6-2
hub or switch, 8-1
interface, 1-3
interface requirements, 1-3
page, 9-8
O
online Help, 9-1
P
PC port, 2-5, 2-10, 4-3, 4-6, 9-3
peripherals, 8-4
phone-line filter, 8-2
playing games, 6-2
power
light, 2-3, 2-4, 2-5, 2-10, 2-11, 2-12, 2-13,
2-15
port, 2-3, 2-5, 2-11, 2-13, 2-15
R
refreshing your home network connection, 5-3
removing conflicting applications, 1-3
renaming your computer, 5-2
requirements
CD-ROM drive, 1-2
disk space, 1-3
network interface, 1-3
software, 1-2
Web browsers, 1-3
RJ-45 CAT 5 cable, 4-5, 8-1
S
security, 1-1
features, 8-3
setup
Macintosh, 3-2
Windows, 3-1
share files and printers, 5-2

Index
Macintosh, 8-1
Windows, 8-1
sharing devices, 1-1
ShieldsUP!, 8-3
simplicity, 1-1
software installation, 3-1
speed, 1-1
Sygate, 1-3
T
TCP/IP, 7-2
telephone jack, 2-1, 2-3, 2-5, 2-11, 2-13, 2-15
Transmission Control Protocol/Internet Proto-
col, 7-1
troubleshooting, 5-3, 9-1
broadband link light, 9-3
indicator lights, 9-2
Macintosh, 9-2
power light, 9-2
Windows 95, 9-1
Windows 98 SE, 9-1
U
uninstall
HomePortal software, 8-5
Universal Serial Bus, 7-2
unlink port, 4-4
upgrade HomePortal, 5-3
USB, 2-1, 2-5, 4-1, 7-2, 8-5, 9-3
adapter, 2-10, 4-3
cable, 2-5, 4-6
peripheral ports, 8-4
port, 1-3, 2-1, 2-5, 4-2, 4-6
V
viewing home network information, 5-2
virtual private network, 8-3
VPN, 8-3
W
Web
browser, 1-3
Windows, 7-1
2000, 2-1, 2-5, 4-1, 4-6
95, 2-5, 4-6
98 SE, 2-1, 2-5, 4-1, 4-6
ME, 2-5, 4-6
Millenium, 2-1, 4-1
NT, 2-5, 4-6
setup, 3-1
WinGate, 1-3
wireless, 9-4
adapter, 1-3
base station setup, 4-3
Y
Y- a d a p t e r , 2-4, 2-6, 2-11, 2-13, 2-15, 8-2

Regulatory Information
Declaration of Conformity
Trade Name: 2Wire
Responsible Party: 2Wire, Inc.
Address: 1704 Automation Pkwy.
San Jose, CA 95131
Telephone Number.: 408-428-9500
This device complies with Part 15 of the FCC rules. Operation is subject to the following two conditions: (1) This device may not cause
harmful interference, and (2) this device must accept any interference received, including interference that may cause undesired operation.
This equipment has been tested and found to comply with the limits for a Class B digital device, pursuant to Part 15 of the Rules. These
limits are designed to provide reasonable protection against harmful interference in a residential installation. This equipment generates,
uses, and can radiate radio frequency energy and, if not installed and used in accordance with the instructions, may cause harmful
interference to radio communications. However, there is no guarantee that interference will not occur in a particular installation. If this
equipment does cause harmful interference to radio or television reception, which can be determined by turning the equipment off and on,
the user is encouraged to try to correct the interference by one or more of the following measures:
• Reorient or relocate the receiving antenna.
• Increase the separation between the equipment and the receiver.
• Connect the equipment into an outlet on a circuit different from that to which the receiver is connected.
• Consult the dealer or an experienced radio/TV technician for help.
You are cautioned that any changes or modifications not expressly approved in this manual could void your authority to operate this
equipment.
Only peripherals (computer input/output devices, terminals, printers, and so forth) that comply with FCC Class B limits may be attached to
this computer product.
Operation with noncompliant peripherals is likely to result in interference to radio and television reception.
All cables used to connect peripherals must be shielded and grounded. Operation with cables, connected to peripherals, that are not
shielded and grounded may result in interference to radio and television reception.
FCC Part 68
This equipment complies with Part 68 of the FCC rules. On the bottom of this equipment is a label that contains, among other information,
the FCC equivalence number (REN) for this equipment. If requested, this information must be provided to the telephone company.
The REN is used to determine the quantity of devices that may be connected to the telephone line. Excessive RENs on the telephone line
may result in the devices not ringing in response to an incoming call. In most, but not all areas, the sum of the RENs should not exceed
five. To be certain of the number of devices that may be connected to the line, as determined by the total RENs, contact the telephone
company to determine the maximum REN for the calling area.
If the terminal equipment causes harm to the telephone network, the telephone company will notify you in advance that temporary
discontinuance of service may be required. But if advance notice is not practical, the telephone company will notify the customer as soon
as possible. Also, you will be advised of your right to file a complaint with the FCC if you believe it is necessary.
The telephone company may make changes in its facilities, equipment, operations or procedures that could affect the operations of the
equipment. If this happens, the telephone company will provide advance notice in order for you to make the necessary modifications in
order to maintain uninterrupted service.
If trouble is experienced with this equipment, please contact the store, reseller, or agent from whom the HomePortal was purchased.

Regulatory Information
Repair of this equipment should be made only by the 2Wire Service Center or a 2Wire authorized agent.
Limited Hardware Warranty
2Wire warrants to the original owner that the hardware product delivered in this package will be free from defects in material and
workmanship for one (1) year following the date stated on the receipt evidencing proof of purchase of the product. The warranty does not
cover the product if it is damaged in the process of being installed.
THE ABOVE WARRANTY IS IN LIEU OF ANY OTHER WARRANTY, WHETHER EXPRESS, IMPLIED OR STATUTORY,
INCLUDING, BUT NOT LIMITED TO ANY WARRANTY OF NONINFRINGEMENT OF INTELLECTUAL PROPERTY,
MERCHANTABILITY, FITNESS FOR A PARTICULAR PURPOSE, OR ANY WARRANTY ARISING OUT OF ANY PROPOSAL,
SPECIFICATION, SAMPLE OR OTHERWISE.
This warranty does not cover replacement of products damaged by abuse, accidental misuse, neglect, alteration, repair, disaster, improper
installation or improper usage. If the product is found to be otherwise defective, 2Wire, at its option, will replace or repair the product at no
charge, except as set forth below, provided that you deliver the product along with a return material authorization (RMA) number either to
the company from whom you purchased it or to 2Wire (North America only). If you ship the product, you must assume the risk of damage
or loss in transit. You must use the original container (or the equivalent) and pay the shipping charge. 2Wire may replace or repair the
product with either new or remanufactured product or parts, and the returned product becomes 2Wire's property. 2Wire warrants the
repaired or replaced product to be free from defects in material and workmanship for a period of the greater of: (i) ninety (90) days from
the date you received the repaired or replaced product, or (ii) the period of time remaining on the original one (1) year warranty.
This warranty gives you specific legal rights, and you may have other rights that vary from state to state. All parts or components contained
in this product are covered by 2Wire's limited warranty for this product. The product may contain fully tested, recycled parts, warranted as
if new.
Returning a Defective Product (RMA)
Before returning any product, contact 2Wire Customer Support and obtain an RMA number by calling:
US & Canada only: 1-877-347-8680
Other locations: Return the product to the place of purchase.
If the 2Wire Customer Support determines that the product may be defective, they will issue you an RMA number to place on the outer
package of the product. 2Wire cannot accept any product without an RMA number on the package.
Limitation of Liability and Remedies
2Wire SHALL HAVE NO LIABILITY FOR ANY INDIRECT OR SPECULATIVE DAMAGES, INCLUDING, WITHOUT LIMITING
THE FOREGOING, CONSEQUENTIAL, INCIDENTAL AND SPECIAL DAMAGES, ARISING FROM THE USE OF OR INABILITY
TO USE THIS PRODUCT, NEGLIGENCE, TORT, BREACH OF WARRANTY IRRESPECTIVE OF WHETHER 2Wire HAS
ADVANCE NOTICE OF THE POSSIBILITY OF ANY SUCH DAMAGES, INCLUDING, BUT NOT LIMITED TO LOSS OF USE,
INFRINGEMENT OF INTELLECTUAL PROPERTY, BUSINESS INTERRUPTIONS, AND LOSS OF PROFITS.
NOTWITHSTANDING THE FOREGOING, 2Wire's TOTAL LIABILITY FOR ALL CLAIMS UNDER THIS AGREEMENT SHALL
NOT EXCEED THE PRICE PAID FOR THE PRODUCT. THESE LIMITATIONS ON POTENTIAL LIABILITIES WERE AN
ESSENTIAL ELEMENT IN SETTING THE PRODUCT PRICE. 2Wire NEITHER ASSUMES NOR AUTHORIZES ANYONE TO
ASSUME FOR IT ANY OTHER LIABILITIES.
Some states do not allow the exclusion or limitation of incidental or consequential damages, so the above limitations or exclusions may not
apply to you.
Critical Control Applications
2Wire specifically disclaims liability for use of the hardware product in critical control applications (including, for example only, safety or
health care control systems, nuclear energy control systems, or air or ground traffic control systems) by user, and such use is entirely at
user's risk. User agrees to defend, indemnify, and hold 2Wire harmless from and against any and all claims arising out of use of the
hardware product in such applications.
Software

Regulatory Information
Software provided with the home networking product is not covered under the hardware warranty described above. See the applicable
software license agreement that ships with the home networking product for details on any software warranty.
June 2000
License Agreement
This agreement (“Agreement”) is made between 2Wire, Inc. (“2Wire”) and you (“Licensee”).
This Agreement includes the terms and conditions and contains, among other things, warranty disclaimers, liability limitations and use
limitations.
TERMS AND CONDITIONS
1. Grant of License and Restrictions. Subject to all the terms of this Agreement and payment of all fees, 2Wire, Inc., grants Licensee a
nonsublicensable, nonexclusive, right to internally use the non-source code form of the software solely as embedded in and for installation
of the 2Wire HomePortal (the “Product”). Licensee will maintain the copyright notice and any other notices that appear on the Product on
any such copies and any media. Licensee will not (i) reverse engineer or attempt to discover any source code or underlying ideas or
algorithms of any Product (except to the extent that applicable law prohibits reverse engineering restrictions and then only after written
notice to 2Wire); (ii) use any Product, or allow the transfer, transmission, export, or re-export of any Product or portion thereof in violation
of any export control laws or regulations administered by the U.S. Commerce Department, OFAC, or any other government agency; or (iii)
copy or modify the software contained in the Product. All the limitations and restrictions on Products in this Agreement also apply to
documentation. 2Wire reserves all rights not expressly granted herein.
2. Support and Maintenance. This Agreement does not entitle Licensee to any support and maintenance services. Support and maintenance
are separately purchased by Licensee and are subject to the specific terms and conditions of each support and maintenance package.
3. Fees and Payment. All payments shall be made inside the U.S., in U.S. dollars. Any payments more than thirty (30) days overdue will
bear a late payment fee of 1.5% per month, or, if lower, the maximum rate allowed by law. In addition, Licensee will pay all freight, taxes,
duties, withholdings, and the like, promptly upon invoice.
4. Termination. This Agreement and all licenses will terminate thirty days (ten in the case of non-payment and immediately in the case of
a breach of Section 1) after notice of any breach by Licensee remaining uncured at the end of such notice period. Upon termination, or if a
license ceases to be effective, Licensee shall immediately cease all use of all affected Products and return or destroy all copies of all
affected Products and all portions thereof and so certify to 2Wire. Sections 6, 7, and 9 and any rights to payment already accrued shall
survive termination. Termination is not an exclusive remedy and all other remedies will be available whether or not termination occurs.
2Wire has the right to discontinue marketing, distribution, or licensing of the Product at any time in its sole discretion.
5. Indemnification. 2Wire shall hold Licensee harmless from liability to third parties resulting from infringement by a Product of any
United States patent or any copyright or misappropriation of any trade secret, provided 2Wire is promptly notified of any and all threats,
claims, and proceedings related thereto and given reasonable assistance and the opportunity to assume sole control over defense and
settlement; 2Wire will not be responsible for any settlement it does not approve in writing. The foregoing obligations do not apply with
respect to a Product or portions or components thereof (i) not supplied by 2Wire; (ii) made in whole or in part in accordance to Licensee
specifications; (iii) that are modified after delivery by 2Wire; (iv) combined with other products, processes, or materials where the alleged
infringement relates to such combination; (v) where Licensee continues allegedly infringing activity after being notified thereof or after
being informed of modifications that would have avoided the alleged infringement; (vi) where Licensee’s use of such Product is not strictly
in accordance with this Agreement; or (vii) that may cause infringement by the process of caching generally. Licensee will indemnify
2Wire from all damages, settlements, attorney’s fees, and expenses related to any claim of infringement or misappropriation excluded from
2Wire’s indemnity obligation by the preceding sentence.
6. Limited Warranty and Disclaimer. 2Wire warrants for a period of one (1) year from Licensee’s first acquisition of the Product that the
Product hardware and media will be free from material defects and will materially conform to 2Wire’s then current user documentation for
such Product. 2Wire’s sole obligation, and Licensee’s sole remedy, with respect to any warranties set forth herein and made within the
applicable warranty period that shall be for 2Wire, at 2Wire’s sole discretion, to: (i) use reasonable efforts to correct documented failures
that 2Wire’s diagnosis indicates are caused by a defect in the unaltered, latest version of the Product to cause the Product to materially

Regulatory Information
conform to 2Wire’s then-published specifications; (ii) replace the Product with a Product meeting such published Product specifications;
or (iii) accept return of the Product and refund to Licensee the fees with respect to such Product. The warranties set forth herein shall
become void: (i) at the expiration of the warranty period; (ii) if the Product has been modified or altered in any way; (iii) if the defect is the
result of an event after delivery to the Licensee; (iv) if Licensee is in breach of any agreement with 2Wire; (v) has not been installed,
operated, repaired or maintained in accordance with any installation, handling, maintenance, or operating instructions supplied by 2Wire;
(vi) has been subjected to unusual physical or electrical stress, misuse, negligence, or accident; (vii) is used in ultra-hazardous activities;
(viii) has been used in such a way that 2Wire cannot reasonably reproduce the software error; or (ix) has been misapplied. This warranty
covers only problems reported to 2Wire during the warranty period in connection with nonconforming Products returned to 2Wire in
accordance with 2Wire’s then current warranty return procedures. Product support beyond the warranty period may be available at
additional cost and subject to 2Wire’s standard support terms. ANY LIABILITY OF 2Wire WITH RESPECT TO A PRODUCT OR THE
PERFORMANCE THEREOF UNDER ANY WARRANTY, NEGLIGENCE, STRICT LIABILITY, OR OTHER THEORY WILL BE
LIMITED EXCLUSIVELY TO PRODUCT REPLACEMENT OR, IF REPLACEMENT IS INADEQUATE AS A REMEDY OR, IN
2Wire’s OPINION, IMPRACTICAL, TO REFUND OF THE LICENSE FEE. EXCEPT FOR THE FOREGOING, ALL PRODUCTS
ARE PROVIDED “AS IS” WITHOUT WARRANTY OF ANY KIND INCLUDING WITHOUT LIMITATION, ANY WARRANTY OF
MERCHANTABILITY OR FITNESS FOR A PARTICULAR PURPOSE OR NONINFRINGEMENT. FURTHER, COMPANY DOES
NOT WARRANT RESULTS OF USE OR THAT THE PRODUCTS ARE BUG FREE OR THAT THEIR USE WILL BE
UNINTERRUPTED. Some states do not allow limitations on how long an implied warranty lasts, so the above limitations may not apply
to you.
7. Limitation of Liability. NOTWITHSTANDING ANYTHING ELSE IN THIS AGREEMENT OR OTHERWISE, AND EXCEPT FOR
BODILY INJURY, THE COMPANY AND ITS LICENSORS SHALL NOT BE LIABLE OR OBLIGATED WITH RESPECT TO THE
SUBJECT MATTER OF THIS AGREEMENT OR UNDER ANY CONTRACT, NEGLIGENCE, STRICT LIABILITY OR OTHER
LEGAL OR EQUITABLE THEORY (i) FOR ANY AMOUNTS IN EXCESS IN THE AGGREGATE OF THE FEES PAID TO IT
HEREUNDER WITH RESPECT TO THE APPLICABLE PRODUCT DURING OR PRIOR TO THE CAUSE OF ACTION; OR (ii)
FOR ANY COST OF PROCUREMENT OF SUBSTITUTE GOODS, TECHNOLOGY, SERVICES OR RIGHTS; (iii) FOR ANY
INCIDENTAL OR CONSEQUENTIAL DAMAGES; (iv) FOR INTERRUPTION OF USE OR LOSS OR CORRUPTION OF DATA; OR
(v) FOR ANY MATTER BEYOND ITS REASONABLE CONTROL. Some states do not allow the exclusion or limitation of incidental or
consequential damages, so the above limitation and exclusions may not apply to you.
8. Miscellaneous. This Agreement and the licenses granted hereunder are assignable or transferable by Licensee only in conjunction with
the sale and transfer of the 2Wire HomePortal within which the software was first delivered. 2Wire may assign this Agreement in whole or
in part. Any notice, report, approval or consent required or permitted hereunder shall be in writing. Licensee hereby represents that
Licensee is not an agency, department or other entity of the United States Government. If this license is acquired under a U.S. Government
contract, use, duplication, or disclosure by the U.S. Government is subject to restrictions set forth in FAR subparagraphs 52.227.19 (a) and
(d) for civilian agency contracts and DFARS 252.227-7013@(ii) for Department of Defense contracts. No failure or delay in exercising
any right hereunder will operate as a waiver thereof, nor will any partial exercise of any right or power hereunder preclude further exercise.
If any provision of this Agreement shall be adjudged by any court of competent jurisdiction to be unenforceable or invalid, that provision
shall be limited or eliminated to the minimum extent necessary so that this Agreement shall otherwise remain in full force and effect and
enforceable. This Agreement shall be deemed to have been made in, and shall be construed pursuant to the laws of, the State of California
and the United States without regard to conflicts of laws or provisions thereof, and without regard to the United Nations Convention on the
International Sale of Goods. Any waivers or amendments shall be effective only if made in writing. This Agreement is the complete and
exclusive statement of the mutual understanding of the parties and supersedes and cancels all previous written and oral agreements and
communications relating to the subject matter of this Agreement. The prevailing party in any action to enforce this Agreement will be
entitled to recover its attorney’s fees and costs in connection with such action. Licensee represents that it is not a government agency and it
is not acquiring the license pursuant to a government contract or with government funds.