ARRIS NVG595 Fiber Business Gateway User Manual 3341 User Guide
ARRIS Group, Inc. Fiber Business Gateway 3341 User Guide
UserManual.wiki
>
ARRIS
>
NVG595 User Manual
User Manual.pdf
Navigation menu
Upload a User Manual
Namespaces
Wiki Guide
HTML
PDF
Info
Views
User Manual
Discussion / Help
Navigation
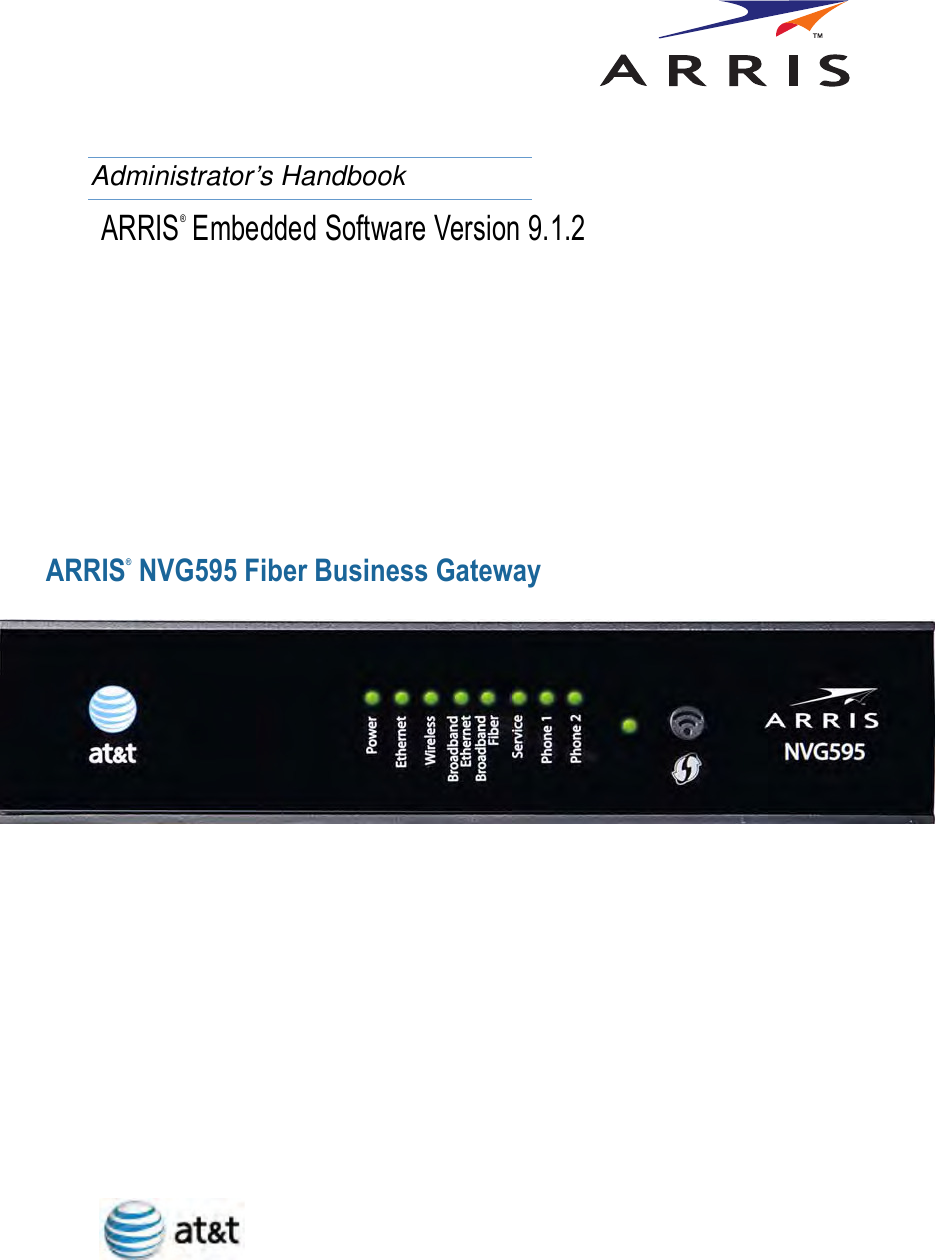
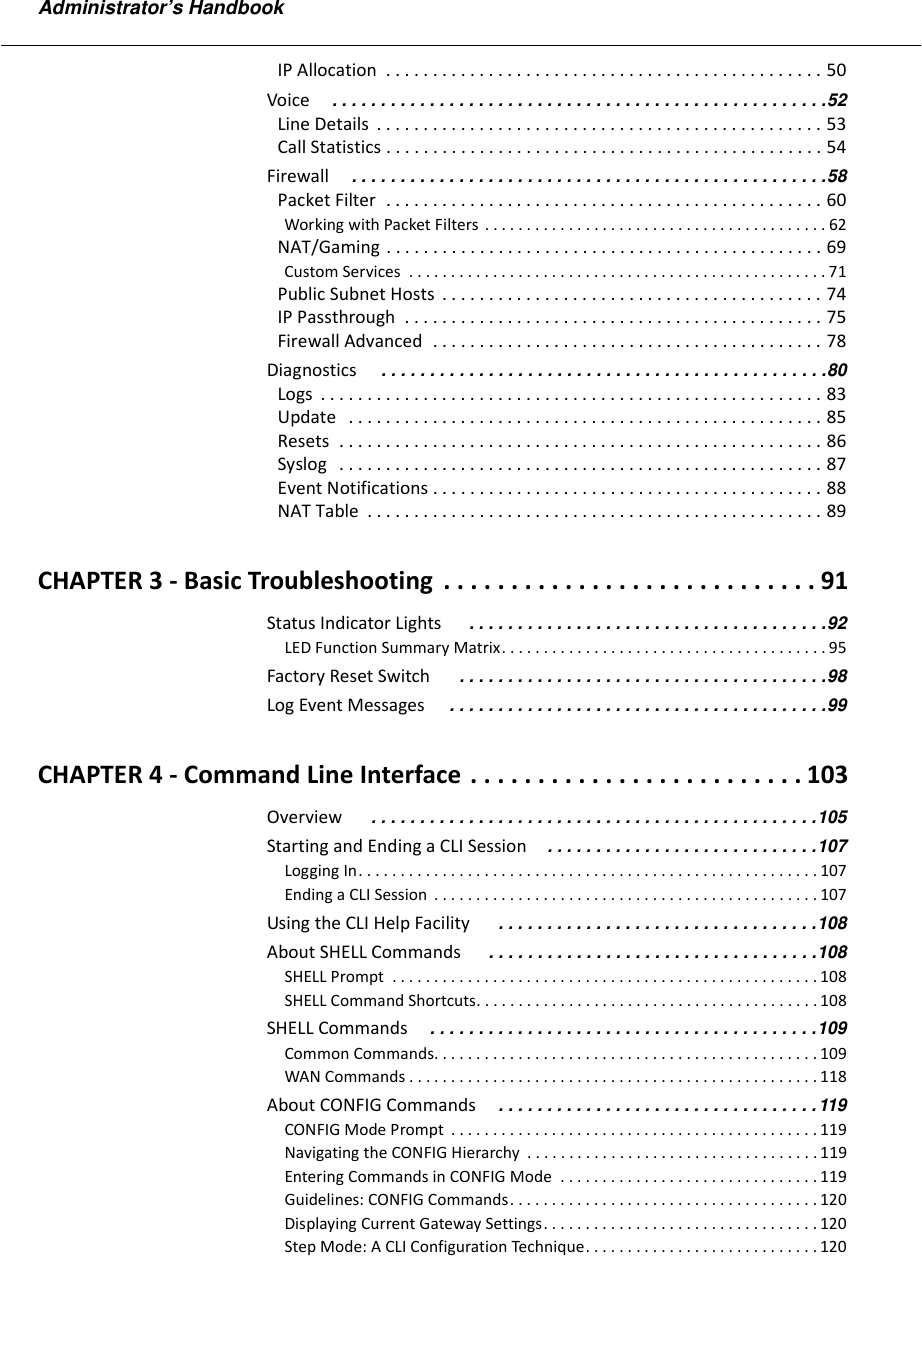
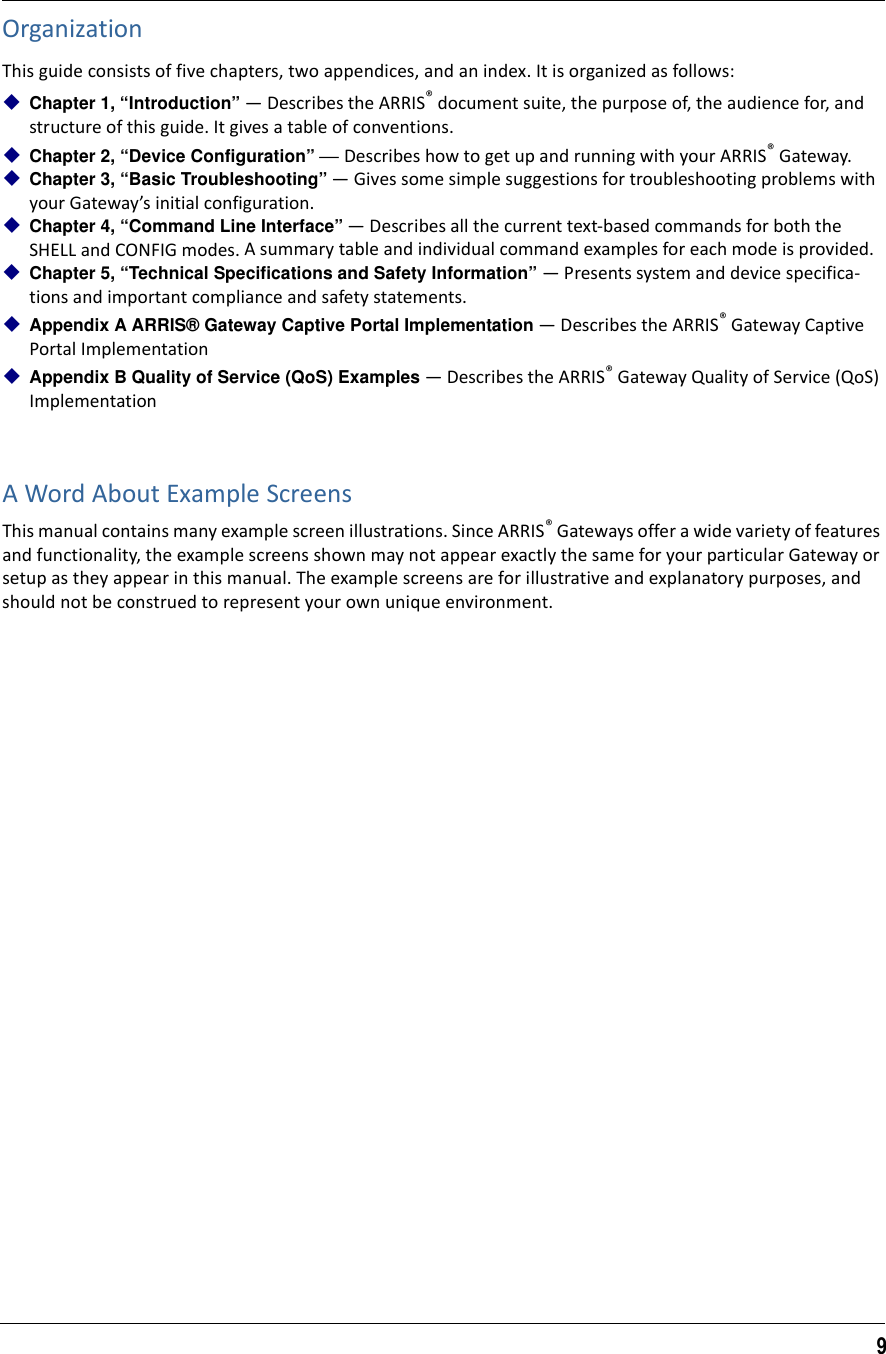
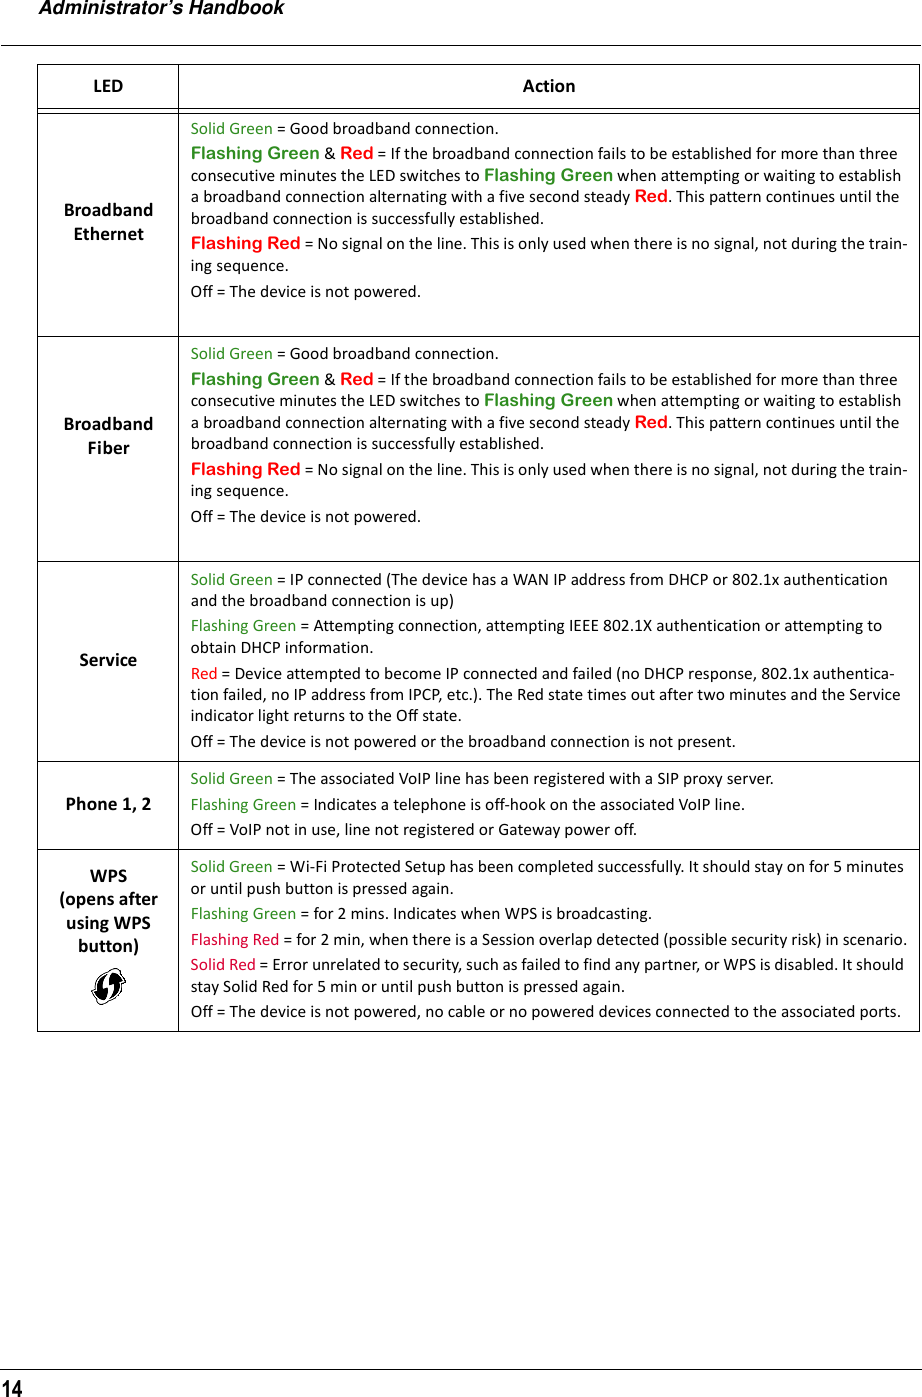
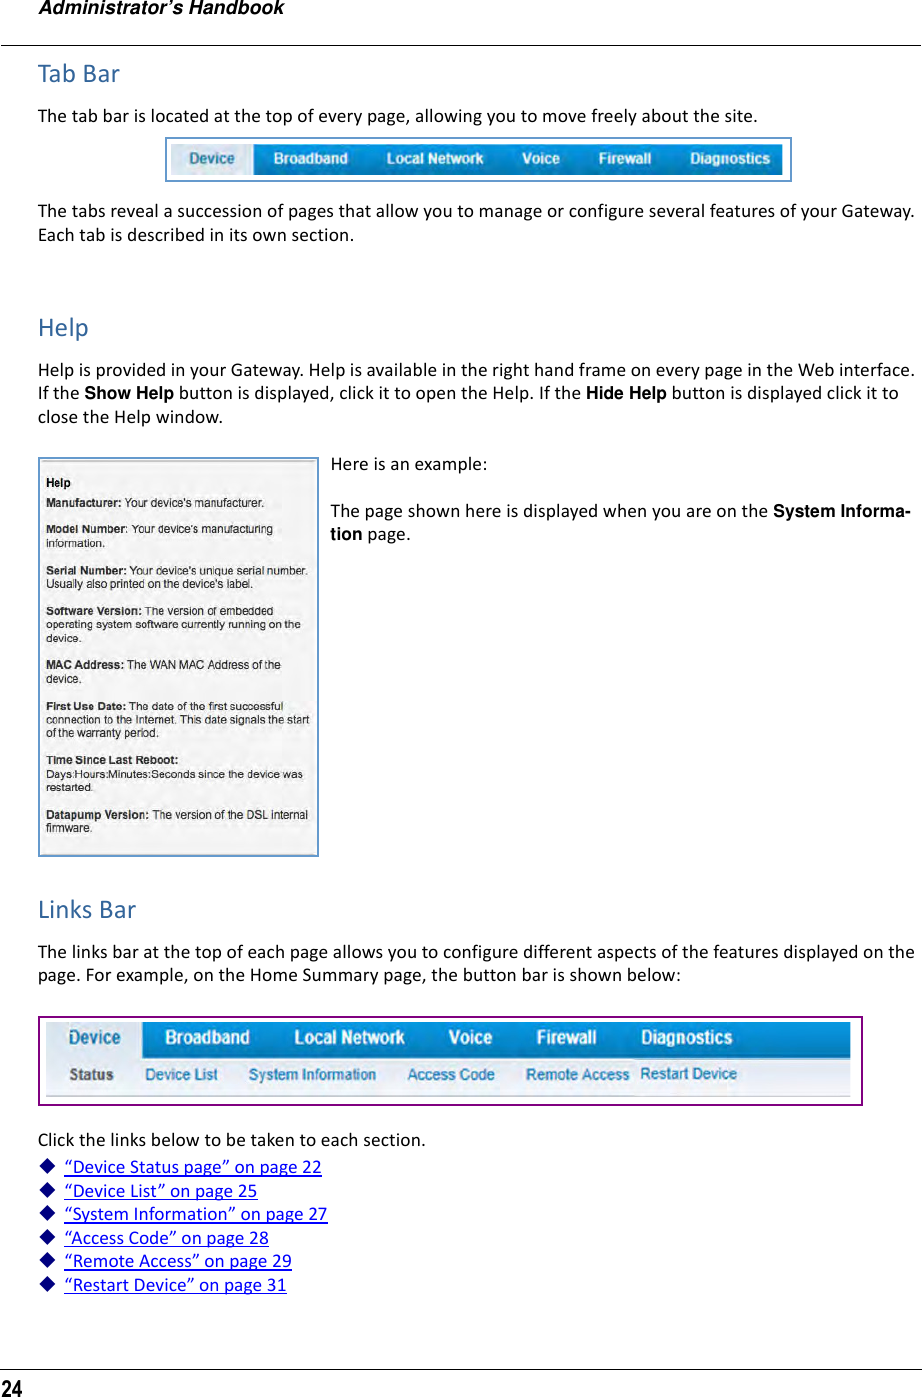
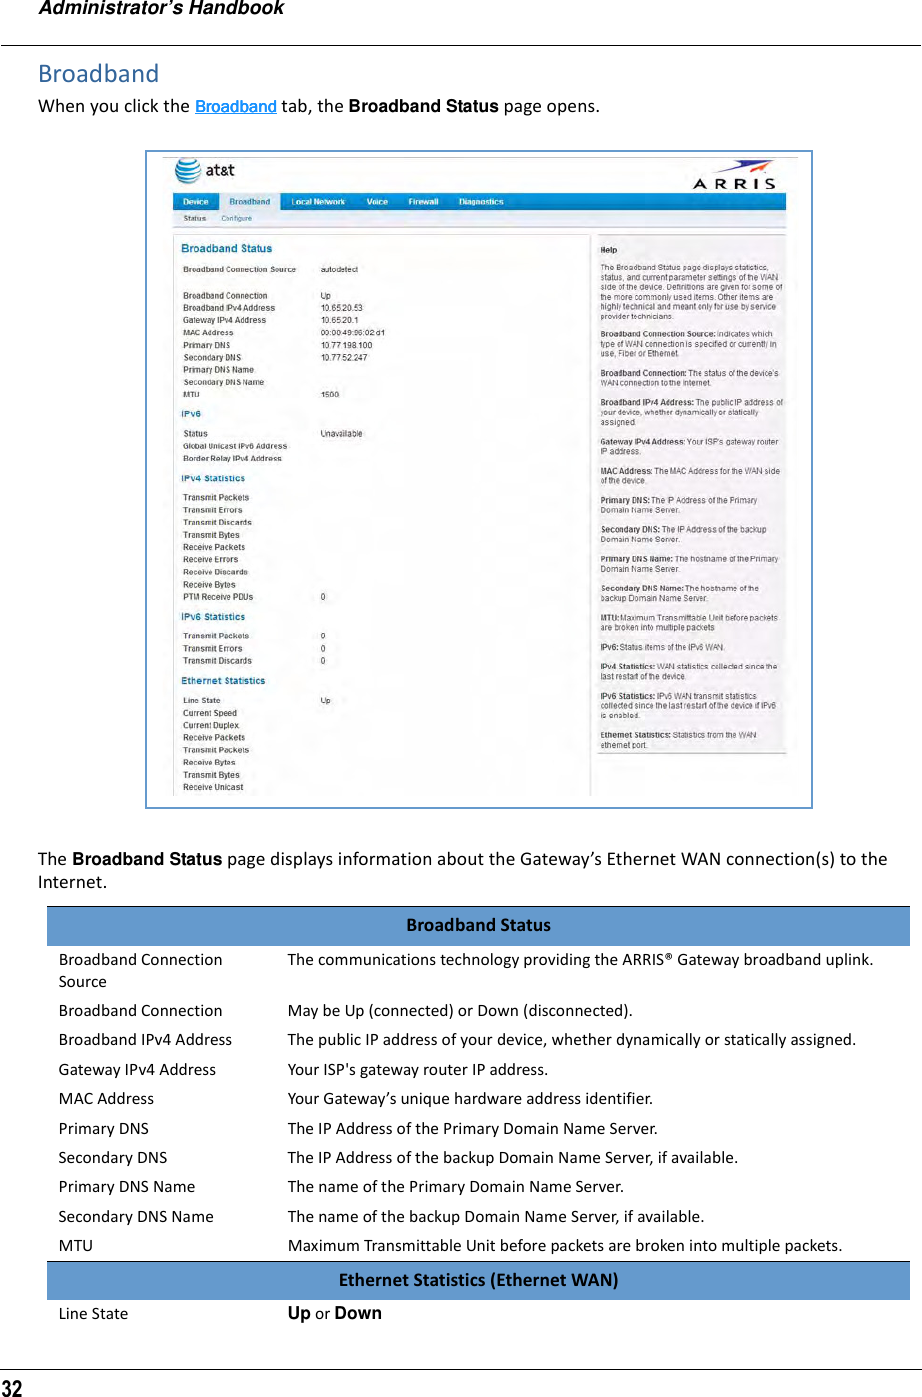
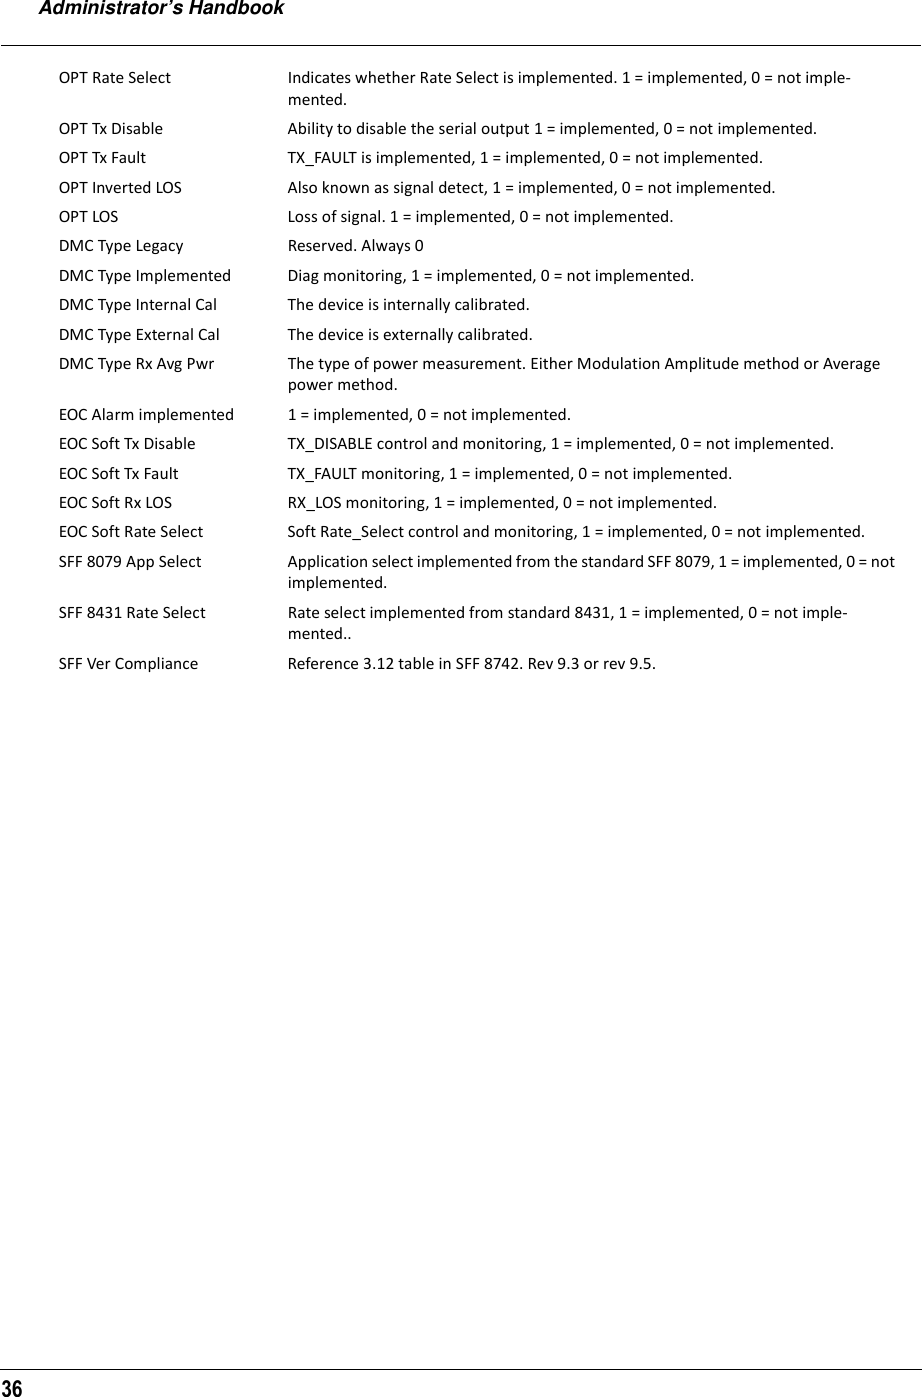
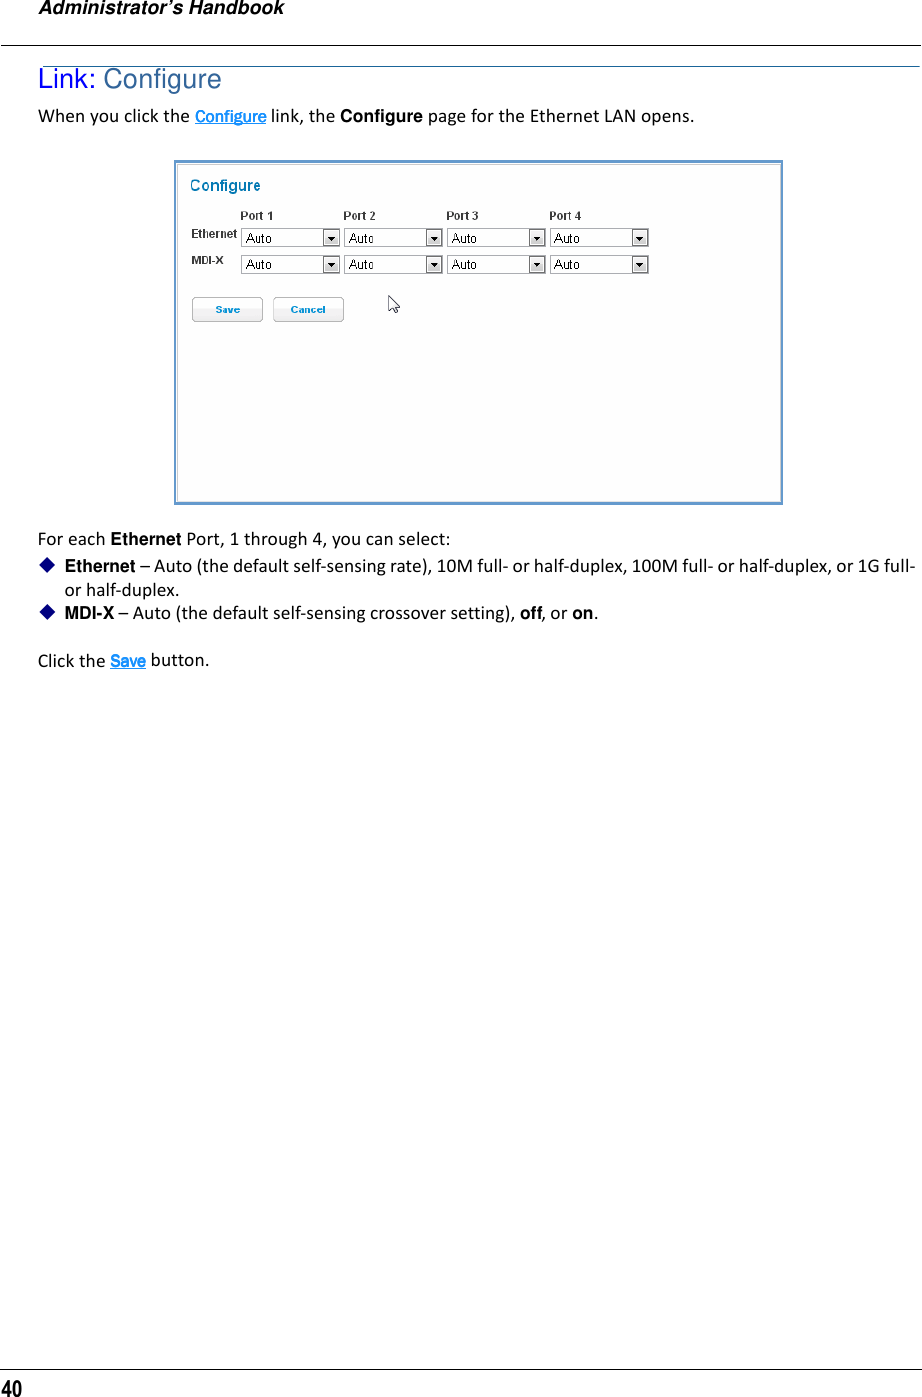
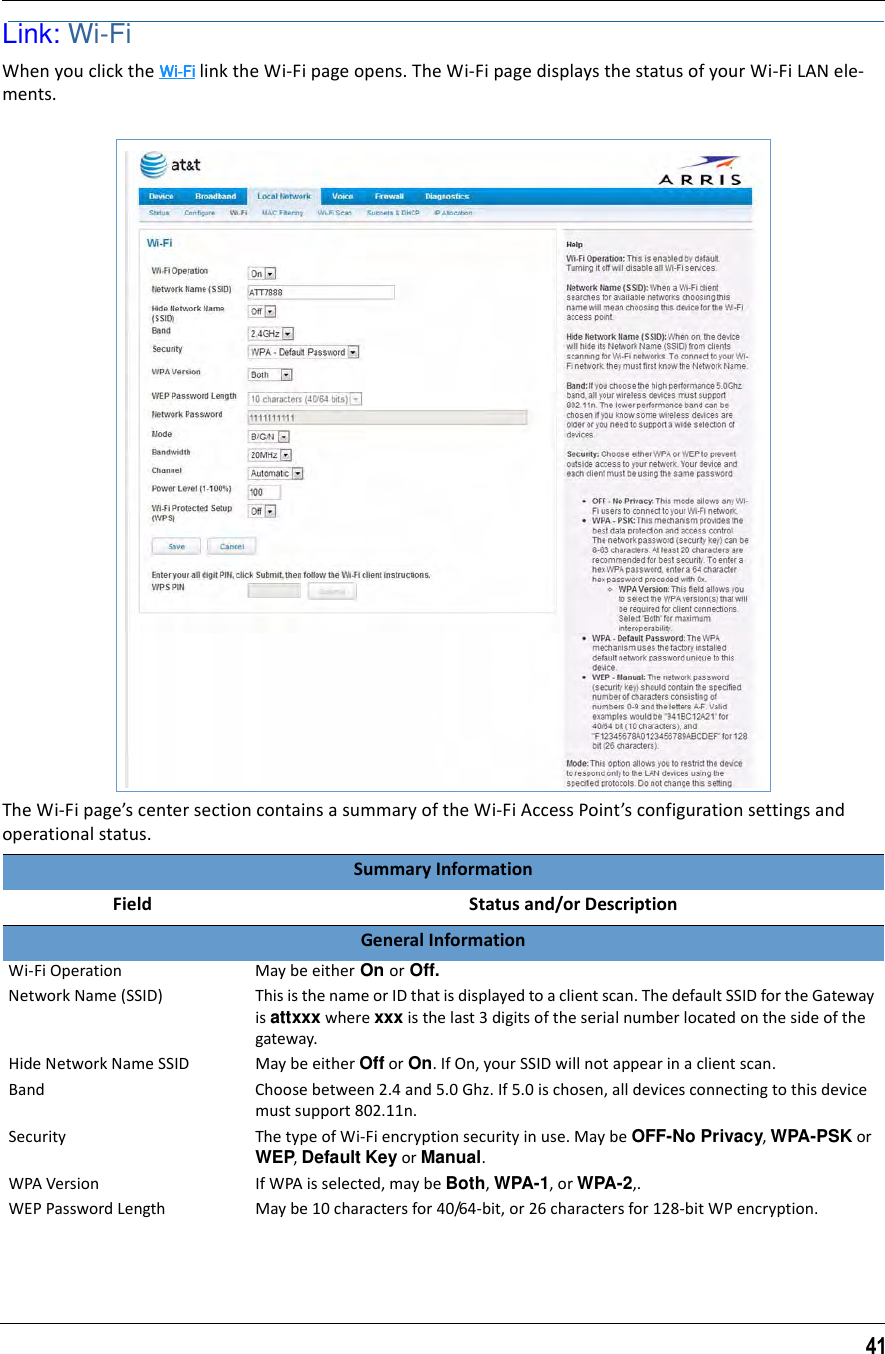
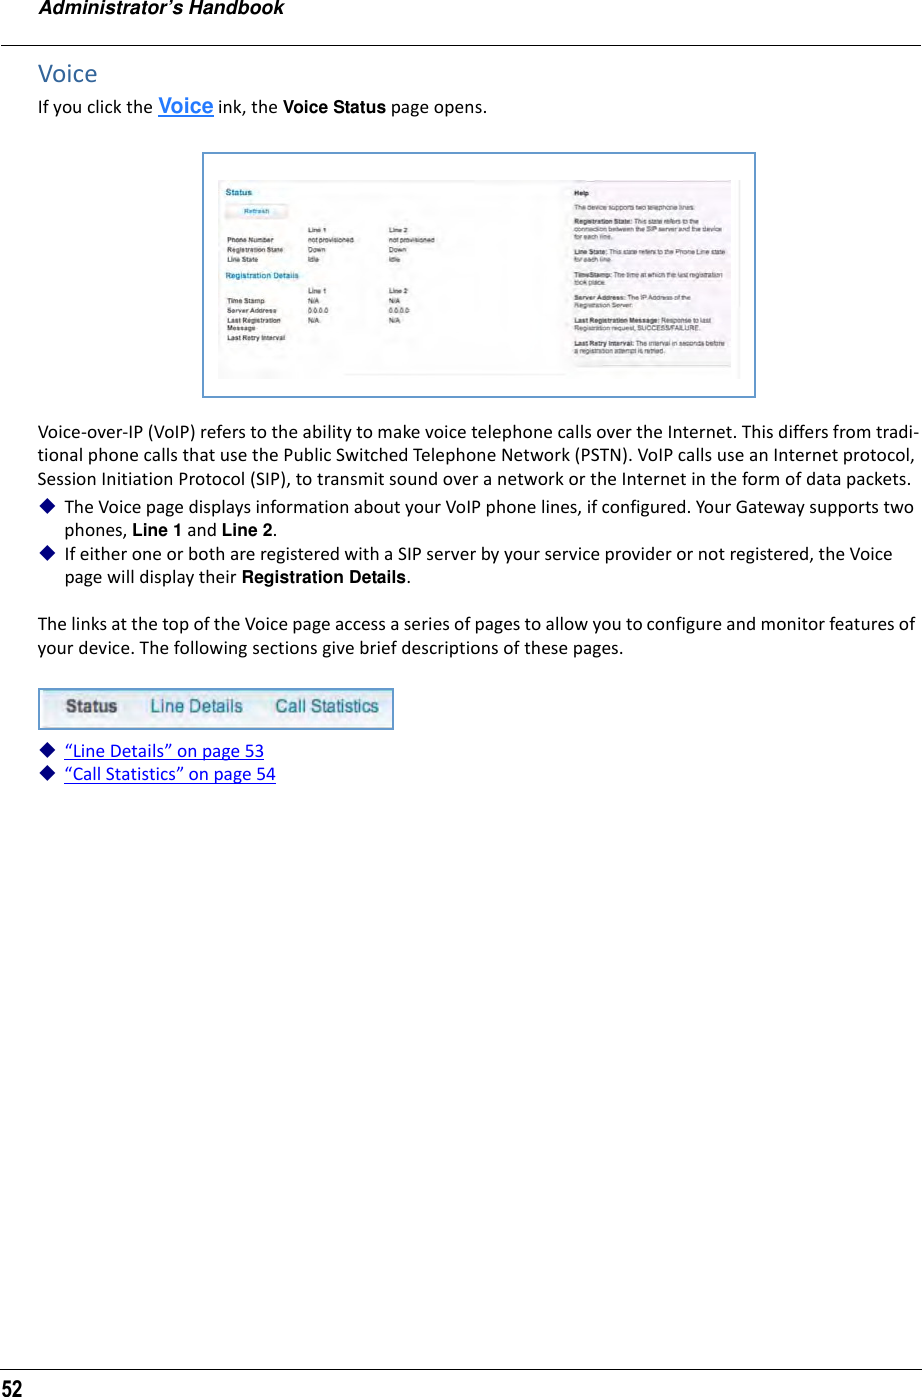
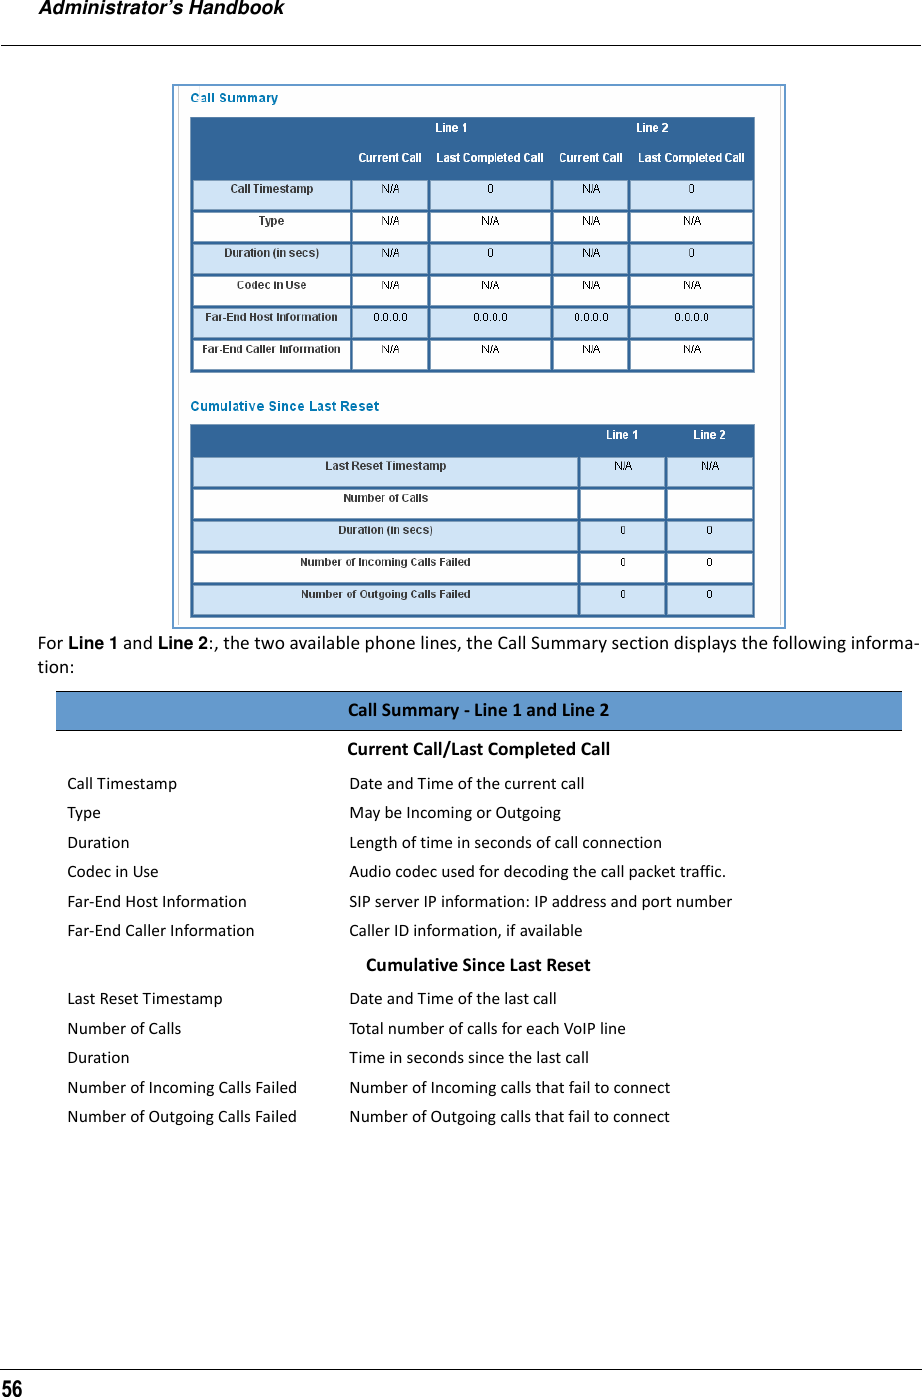
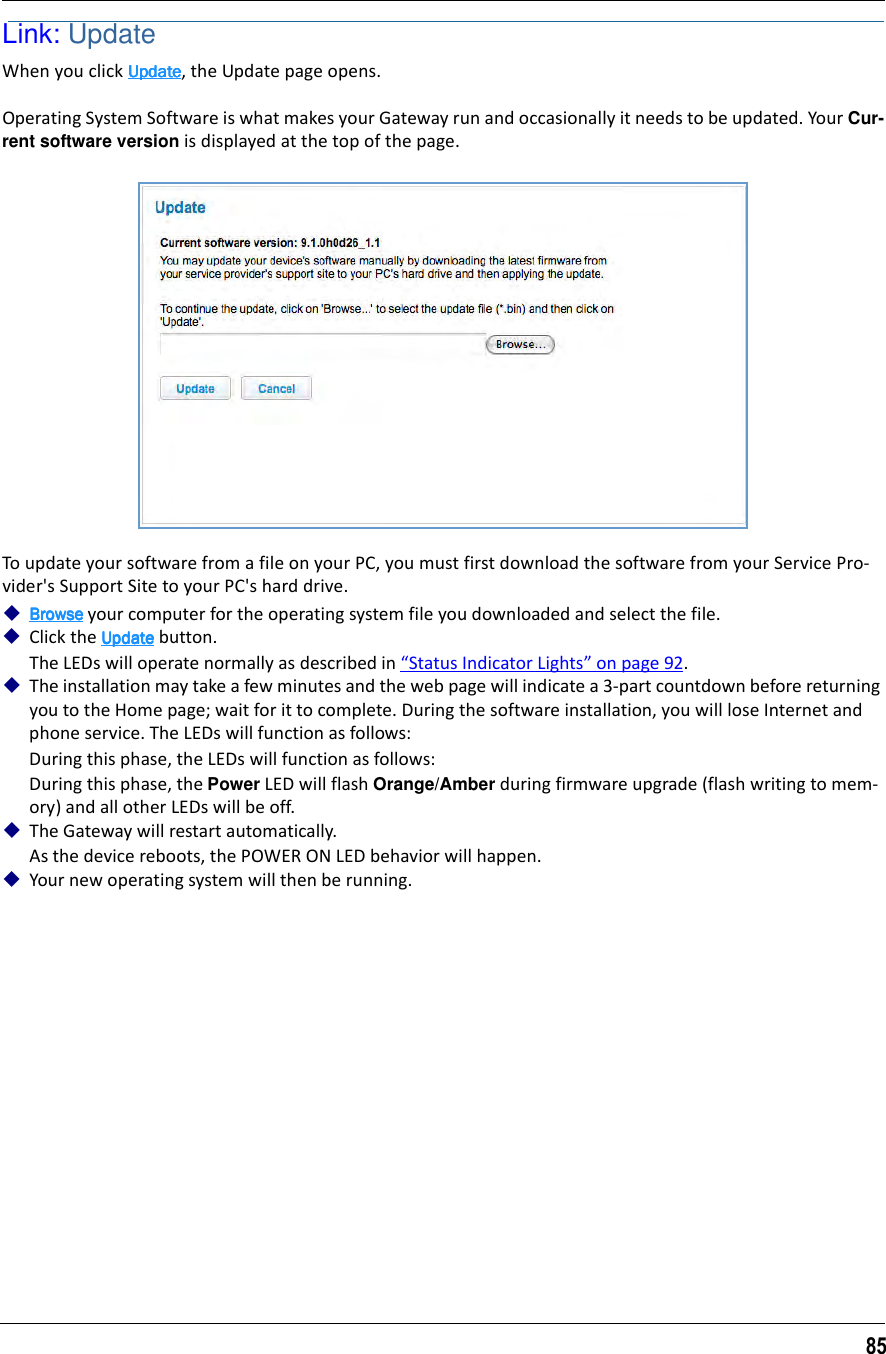
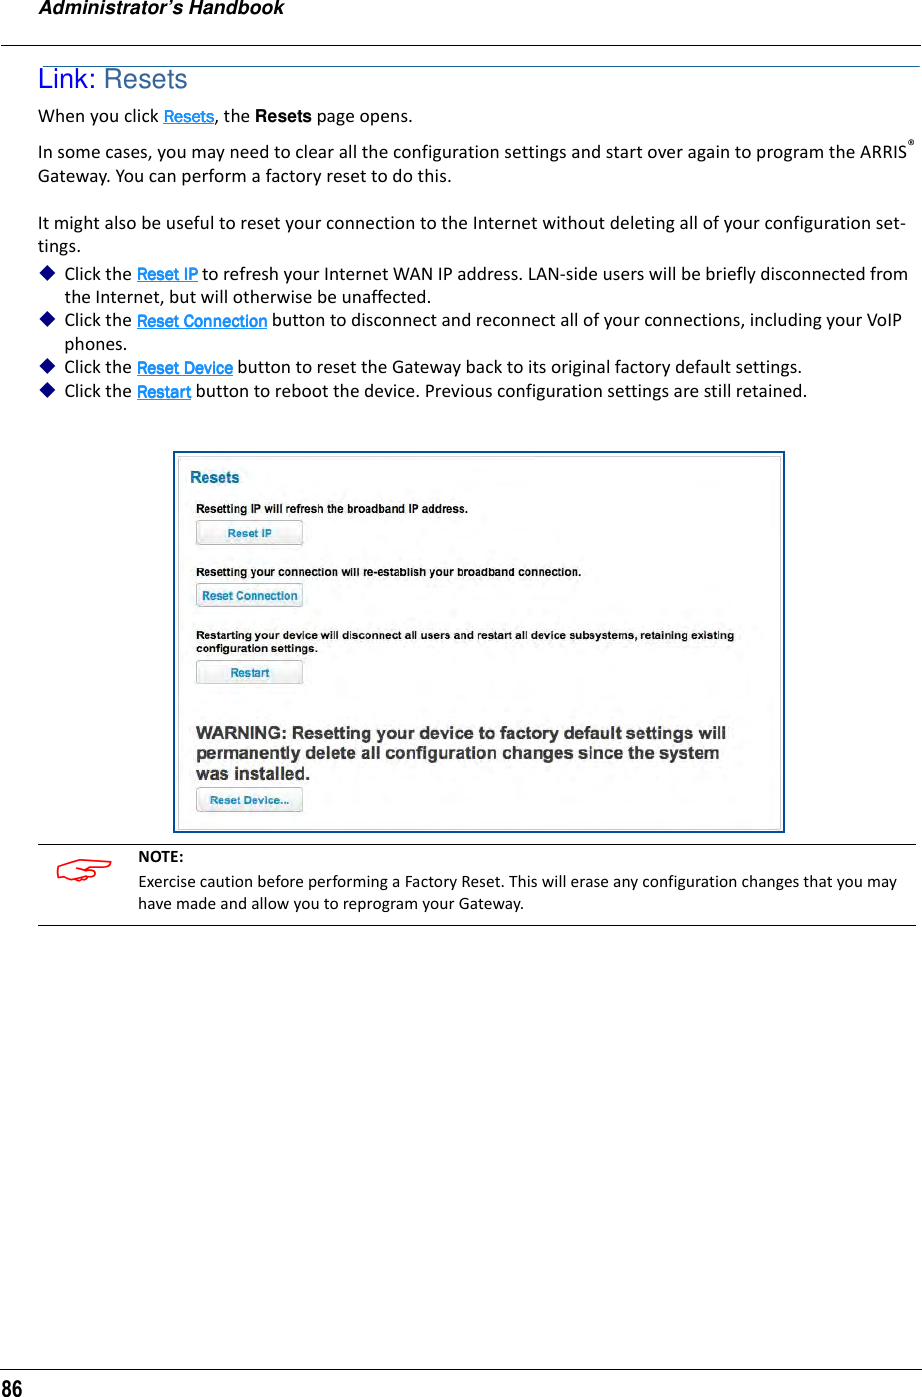
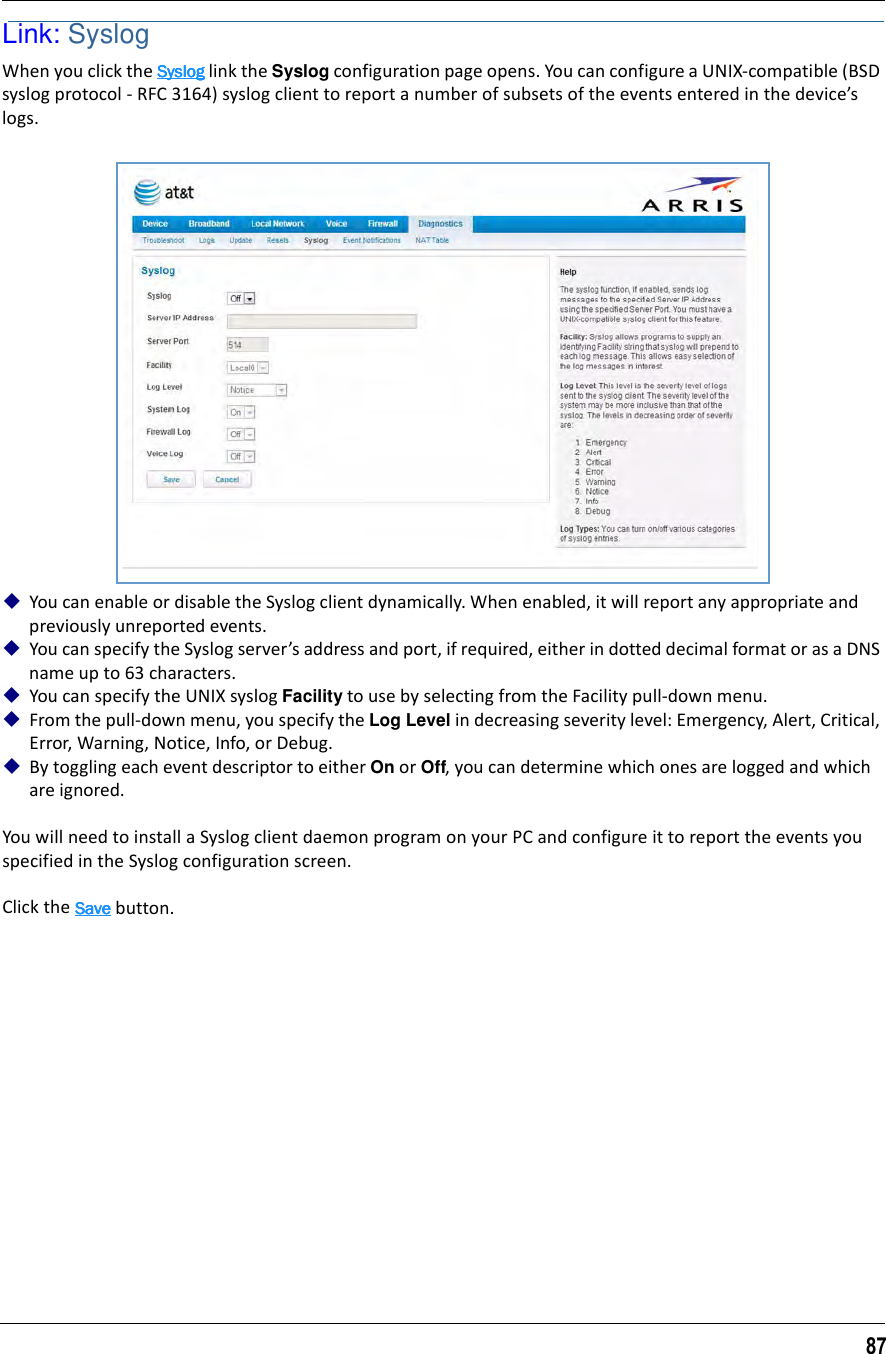
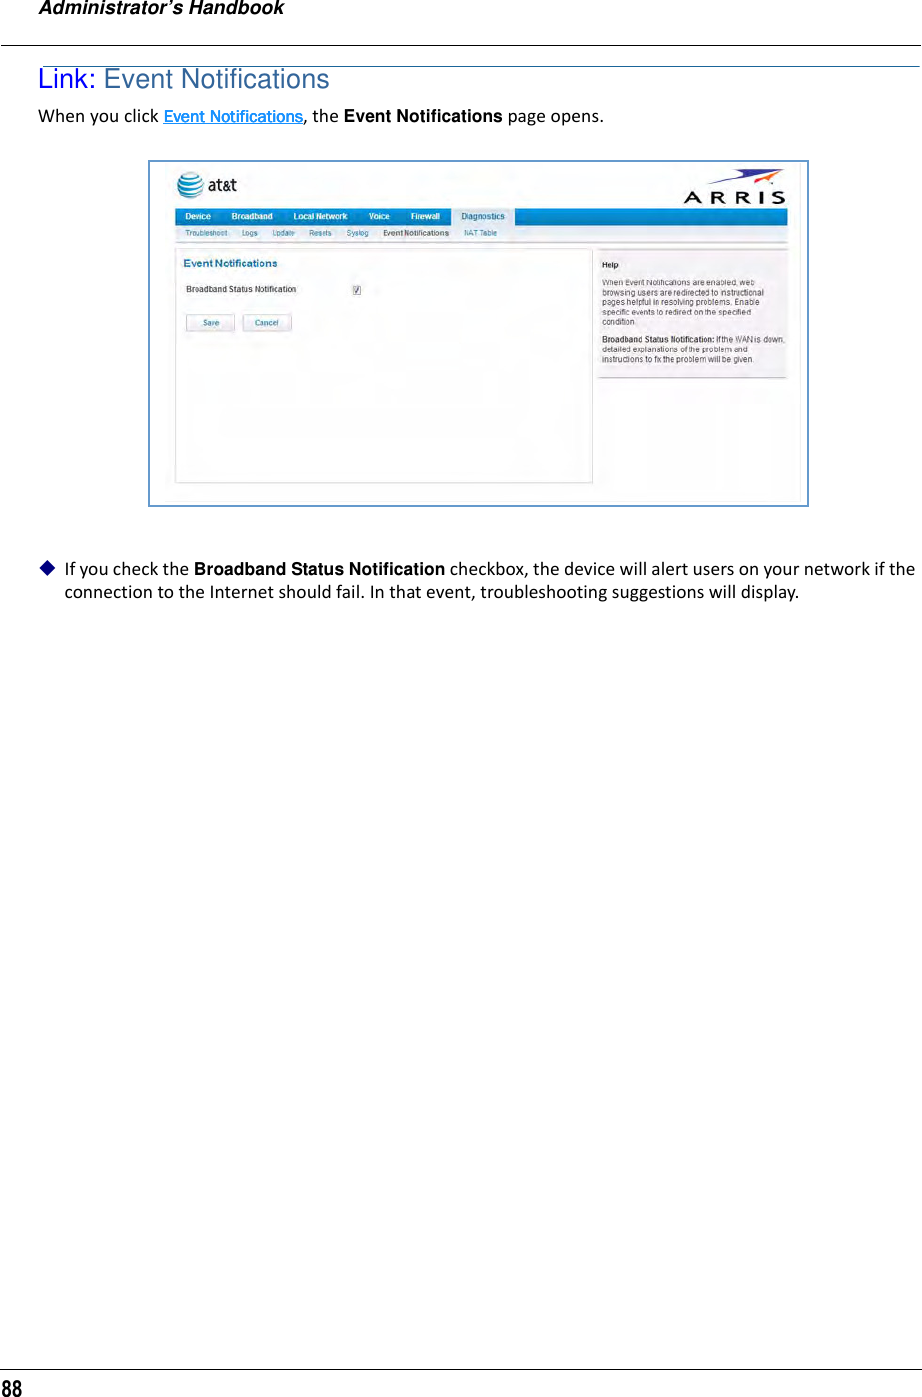
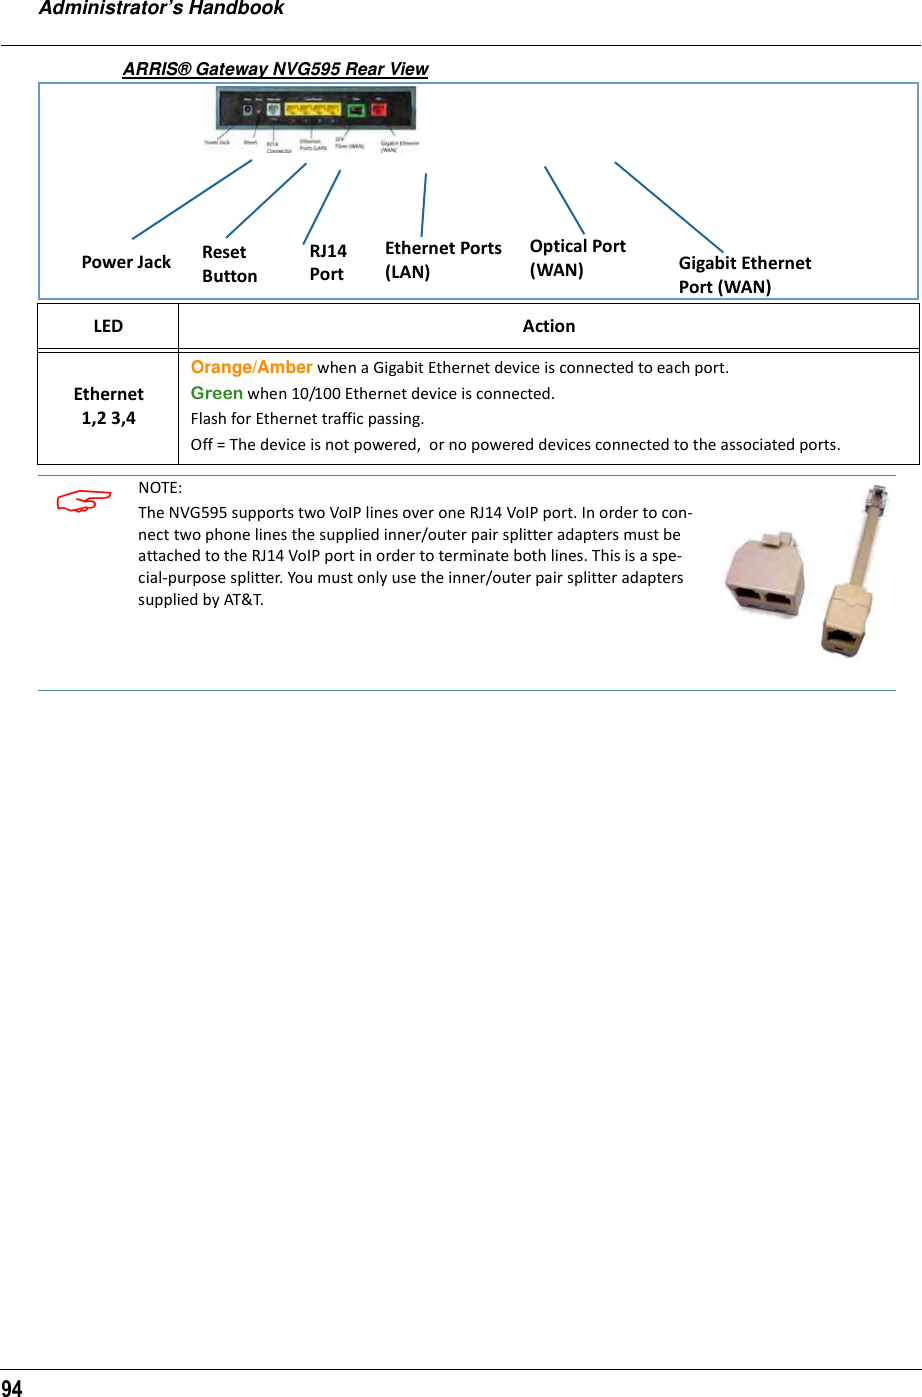
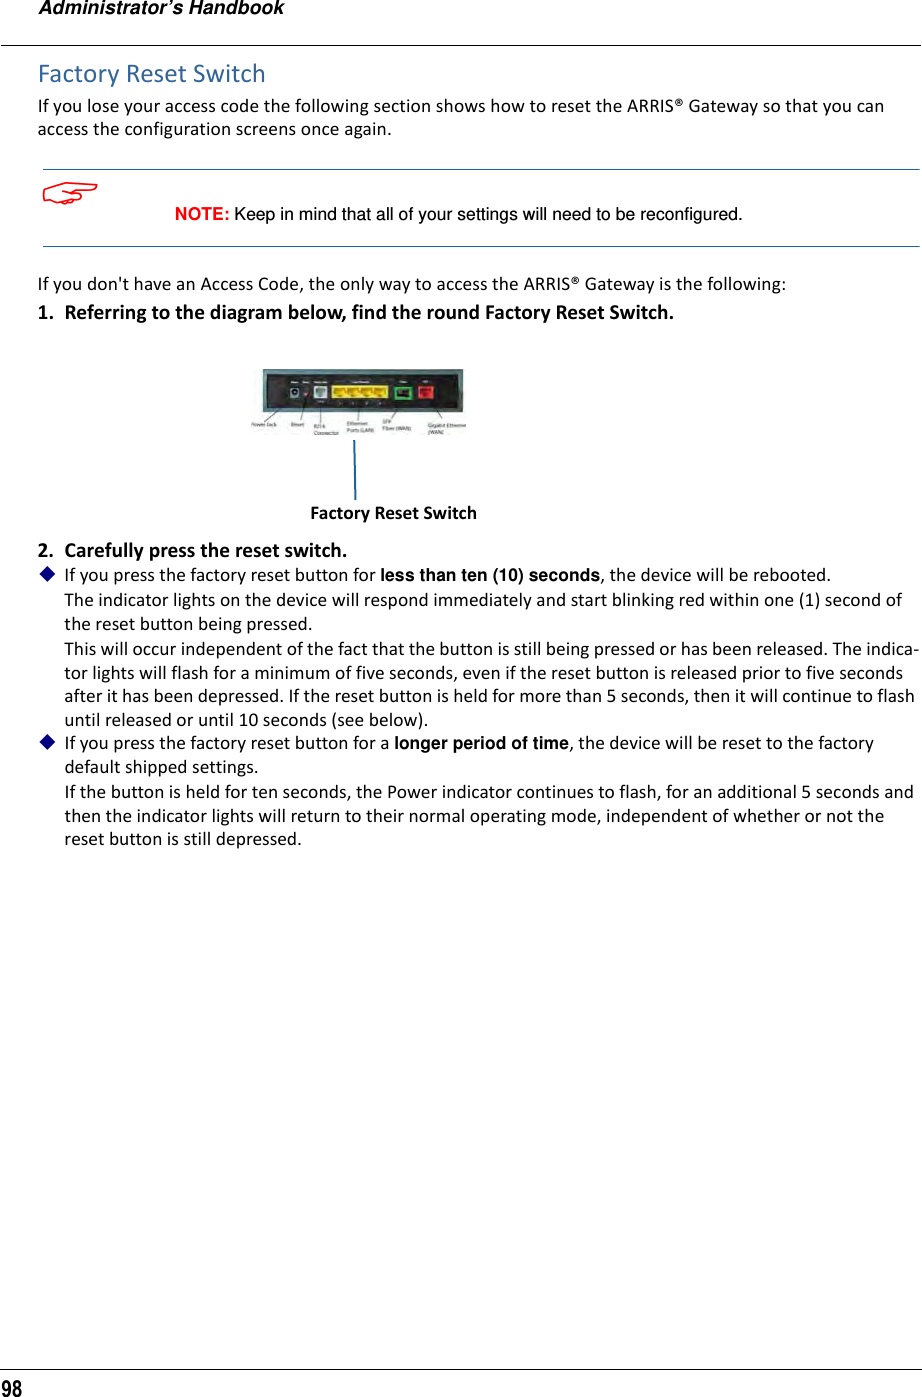
![Administrator’s Handbook8Documentation ConventionsGeneralThis manual uses the following conventions to present information:Internal Web InterfaceCommand Line InterfaceSyntax conventions for the ARRIS® Gateway command line interface are as follows:Convention (Typeface) Descriptionbold sans serif Menu commands and button namesunderlined sans serif underlined sans serif underlined sans serif underlined sans serif Web GUI page links terminal Computer display textbold terminal User-entered textItalic Italic type indicates the complete titles of manuals.Convention (Graphics) DescriptionDenotes an “excerpt” from a Web page or the visual truncation of a Web pageDenotes an area of emphasis on a Web pageConvention Descriptionstraight ([ ]) brackets in cmd line Optional command arguments curly ({ }) brackets, with values sepa-rated with vertical bars (|).Alternative values for an argument are presented in curly ({ }) brack-ets, with values separated with vertical bars (|).bold terminal type face User-entered textitalic terminal type face Variables for which you supply your own values](https://usermanual.wiki/ARRIS/NVG595/User-Guide-2138211-Page-8.png)

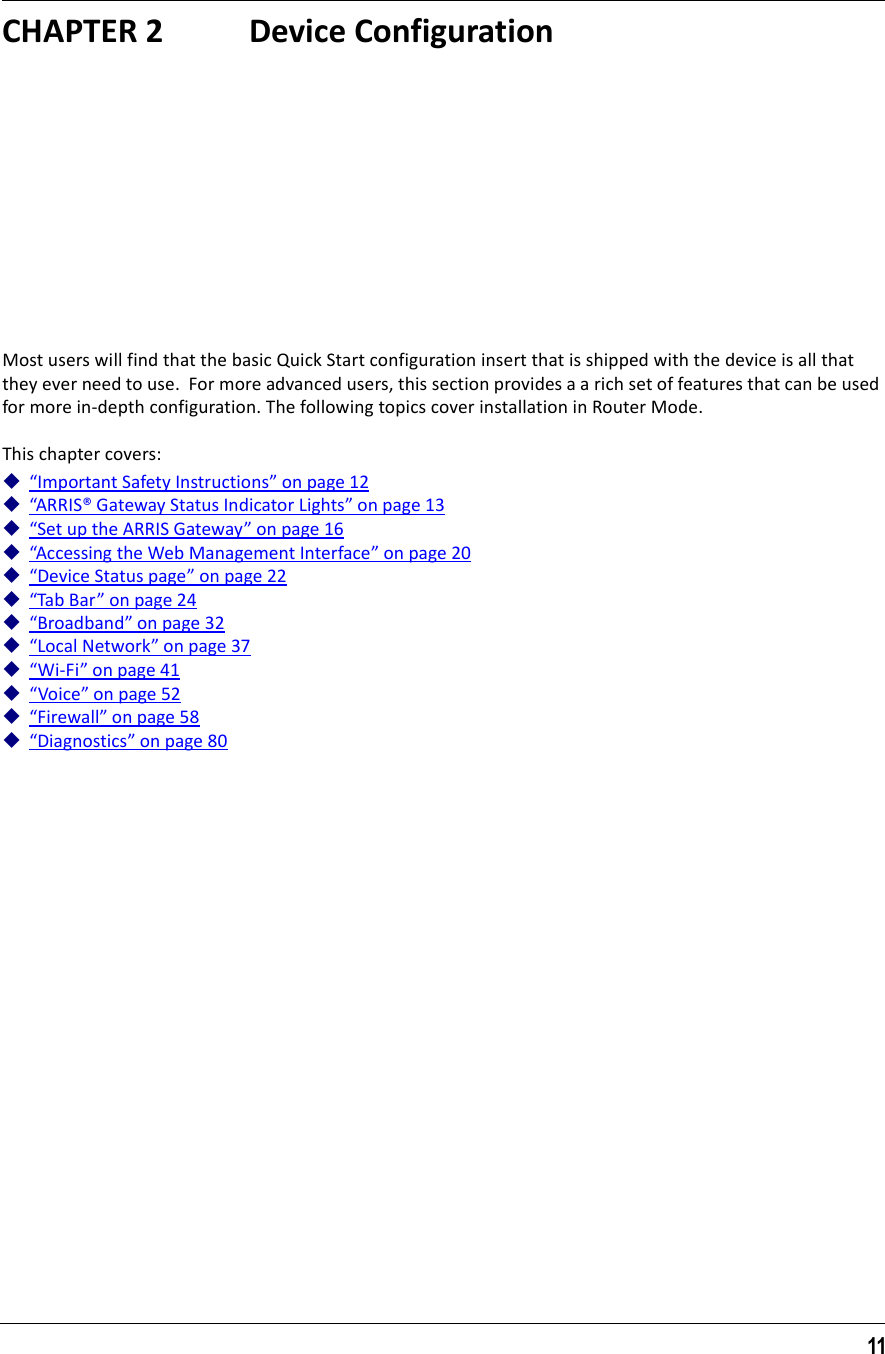
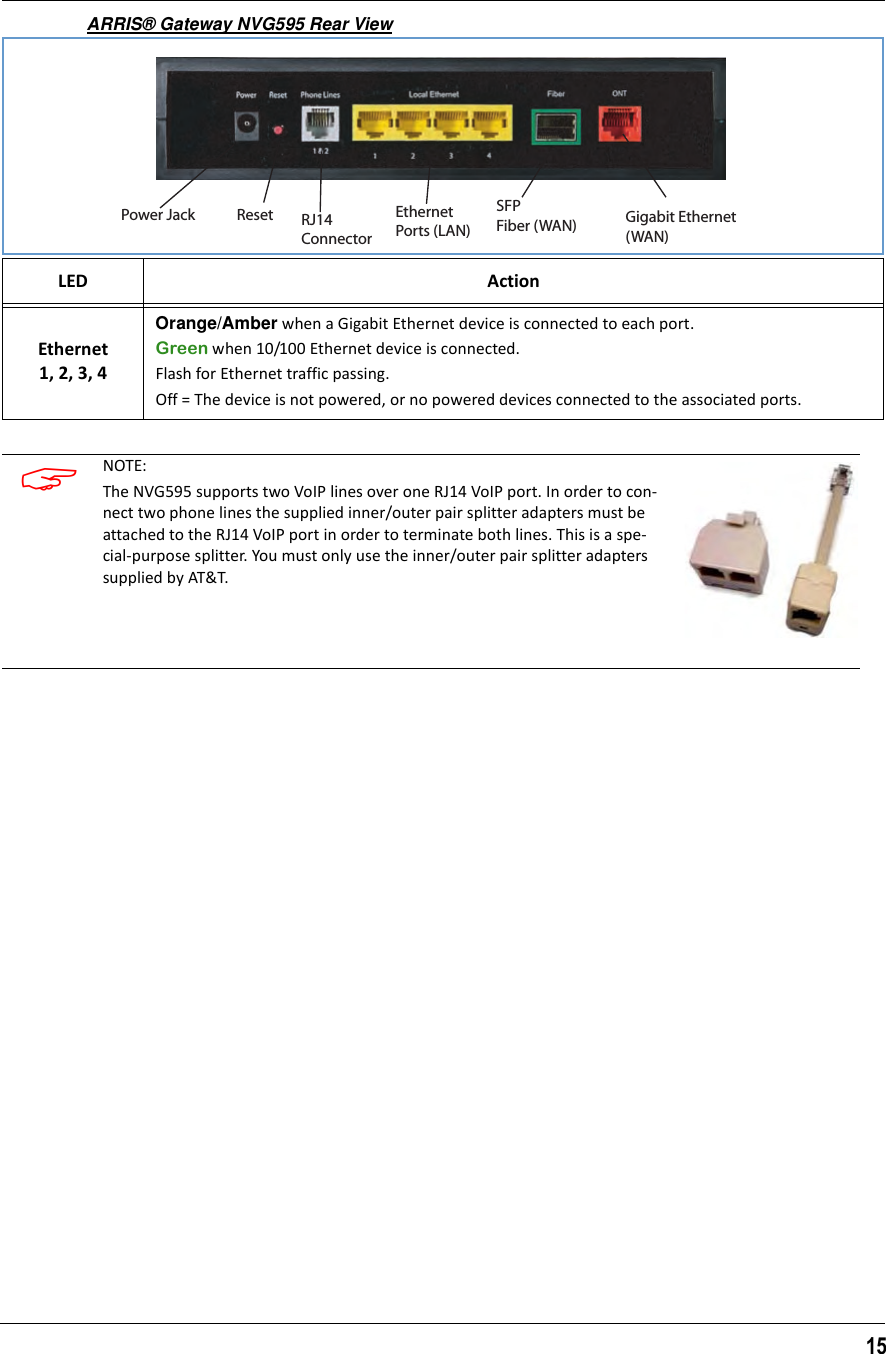
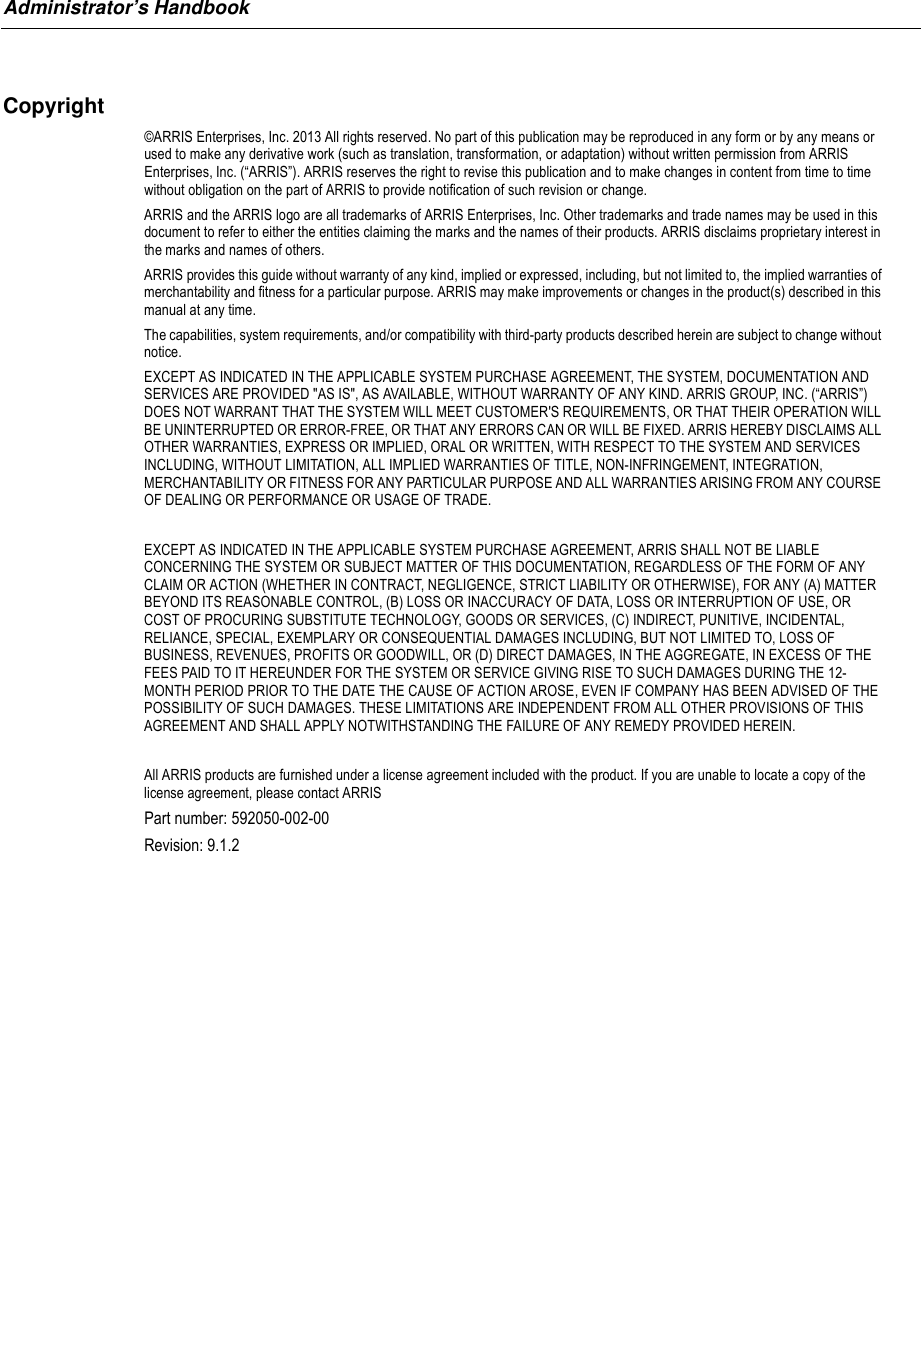
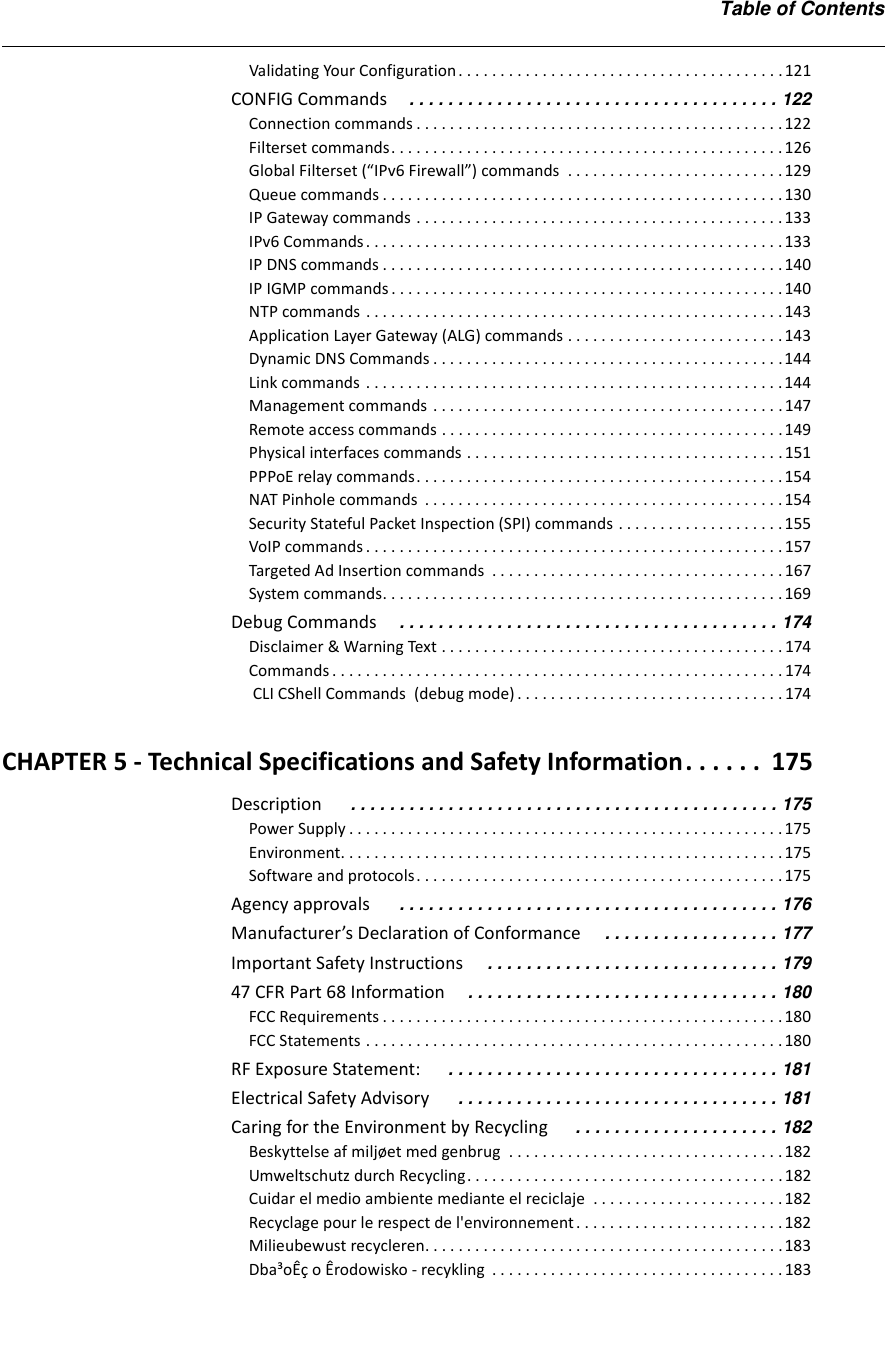
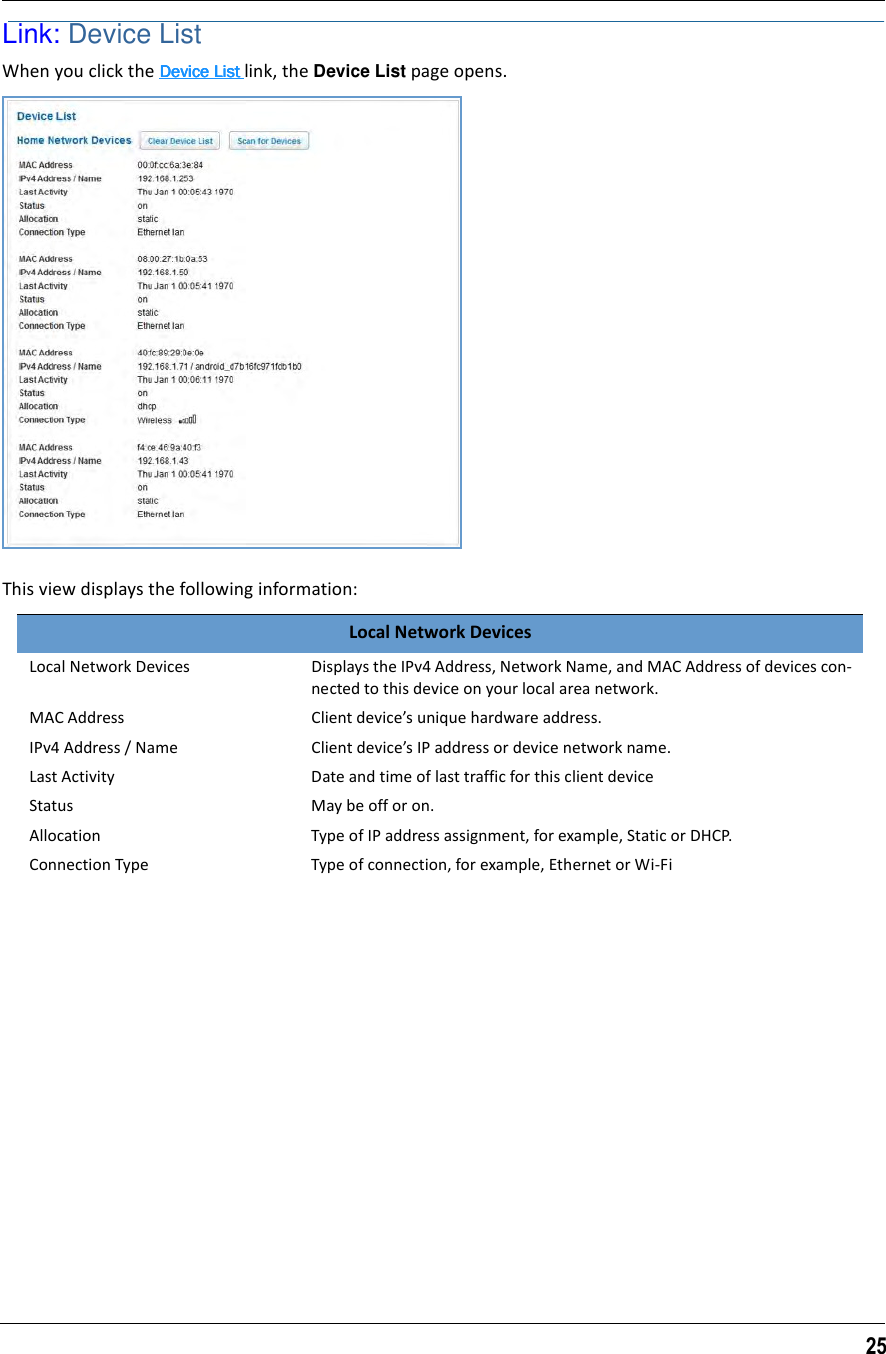
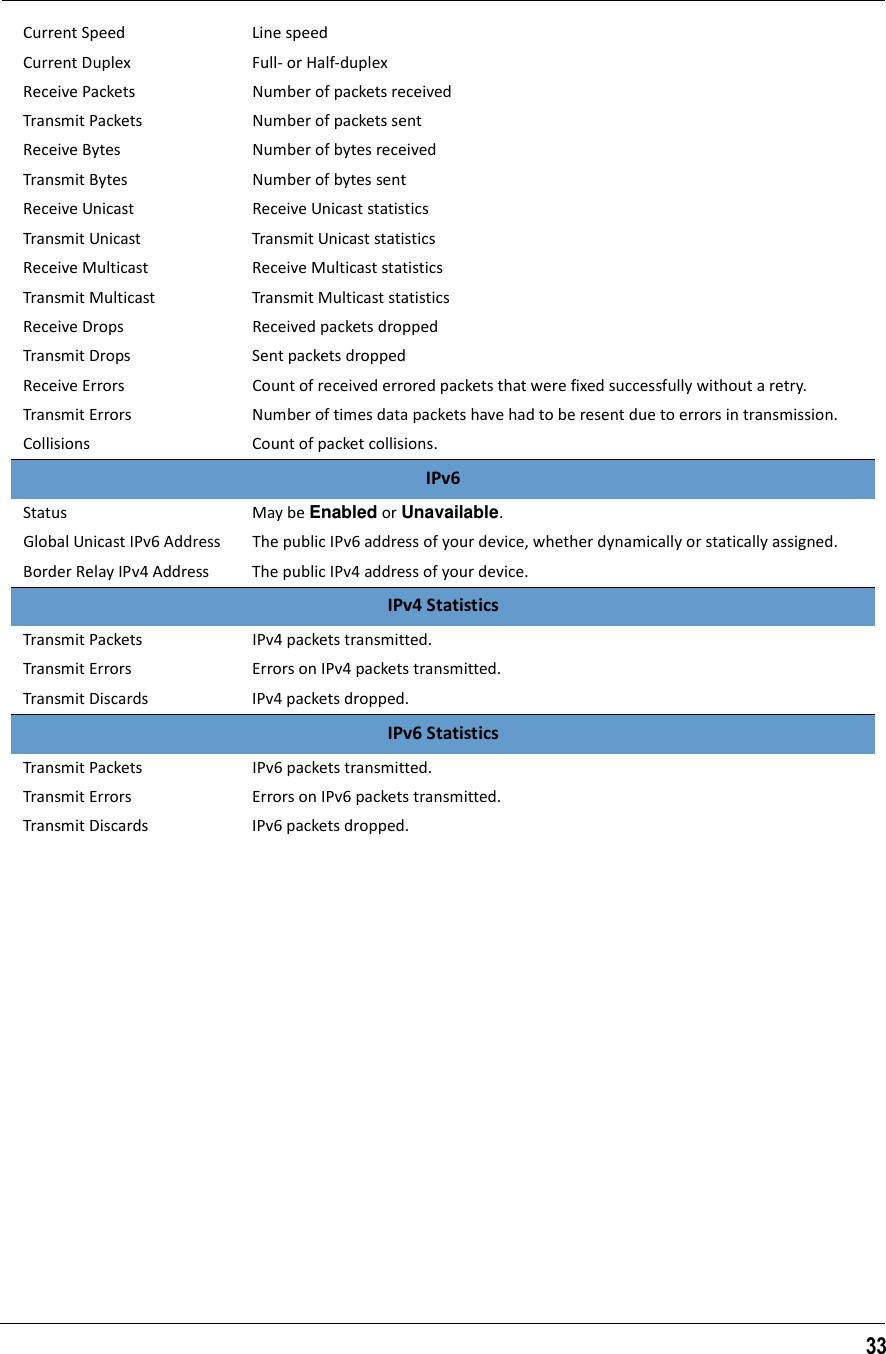
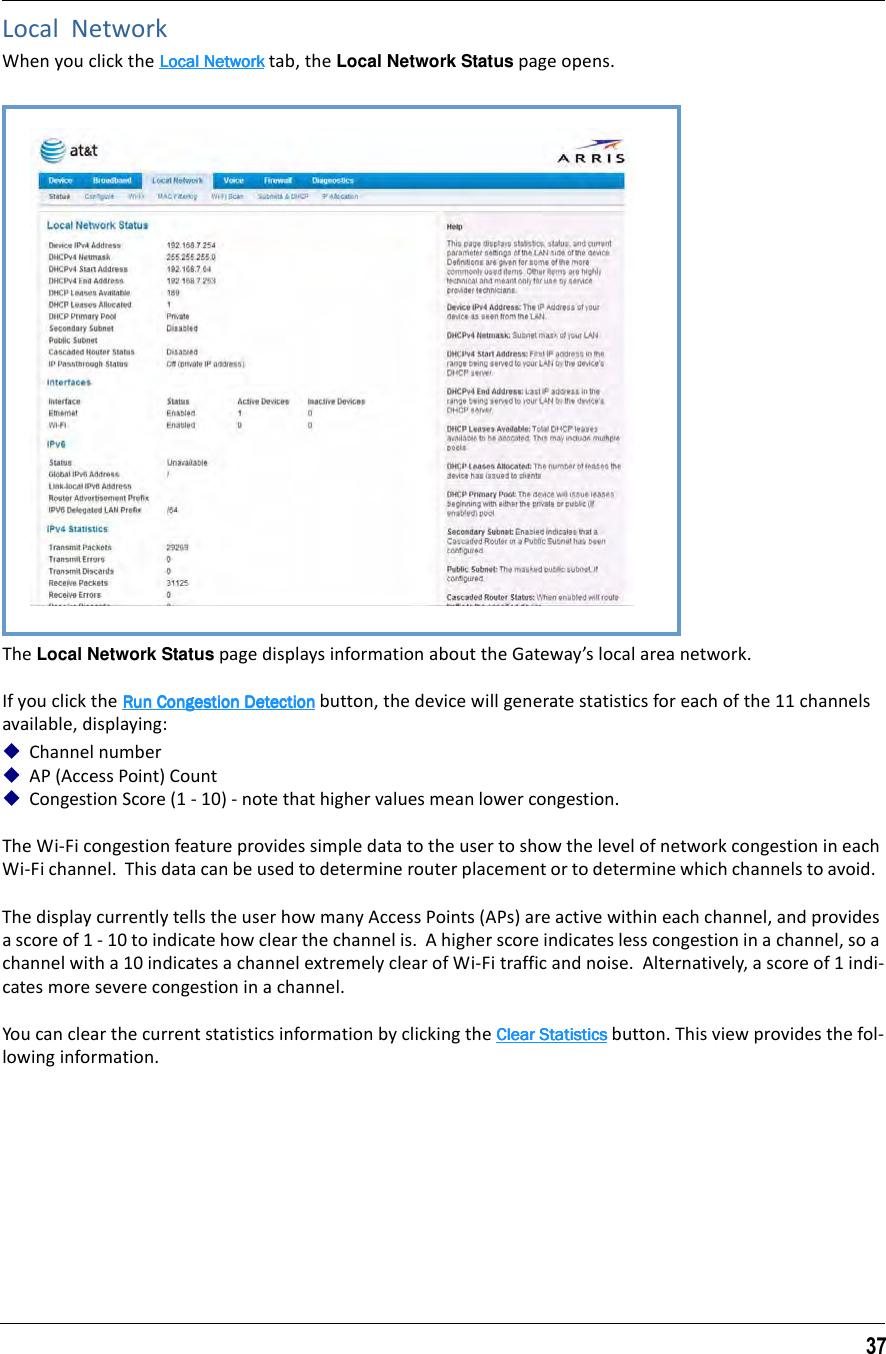
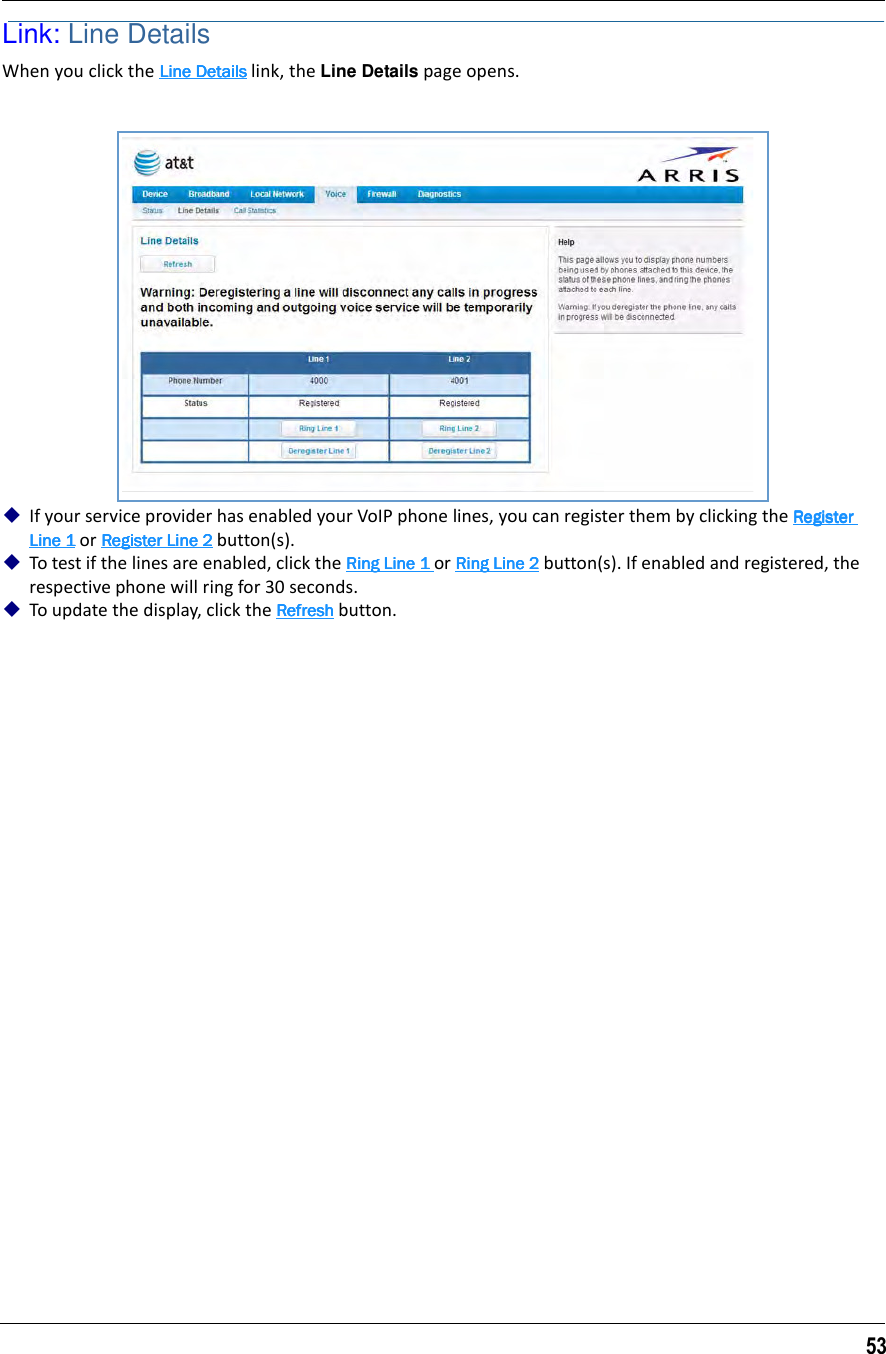
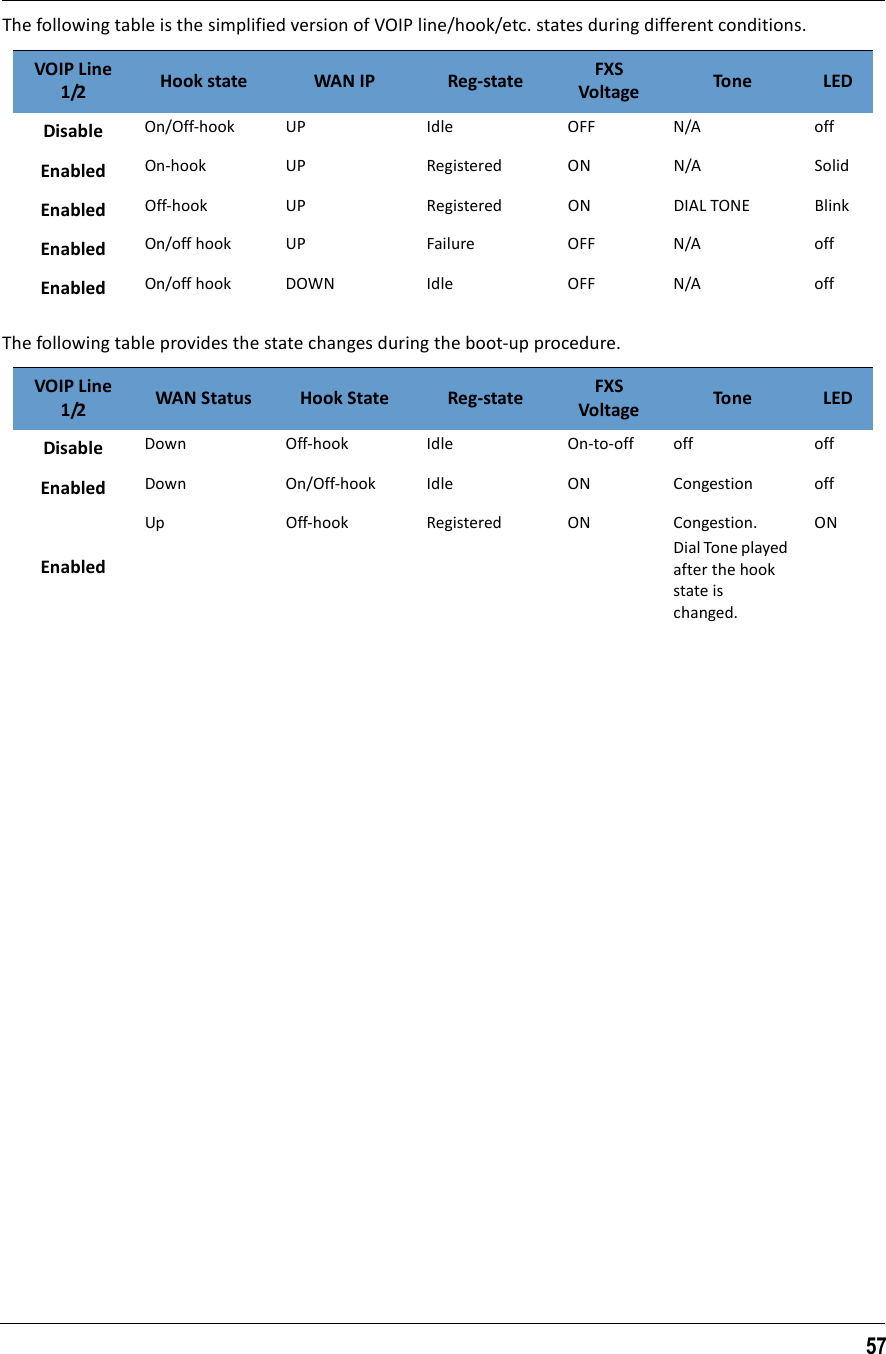
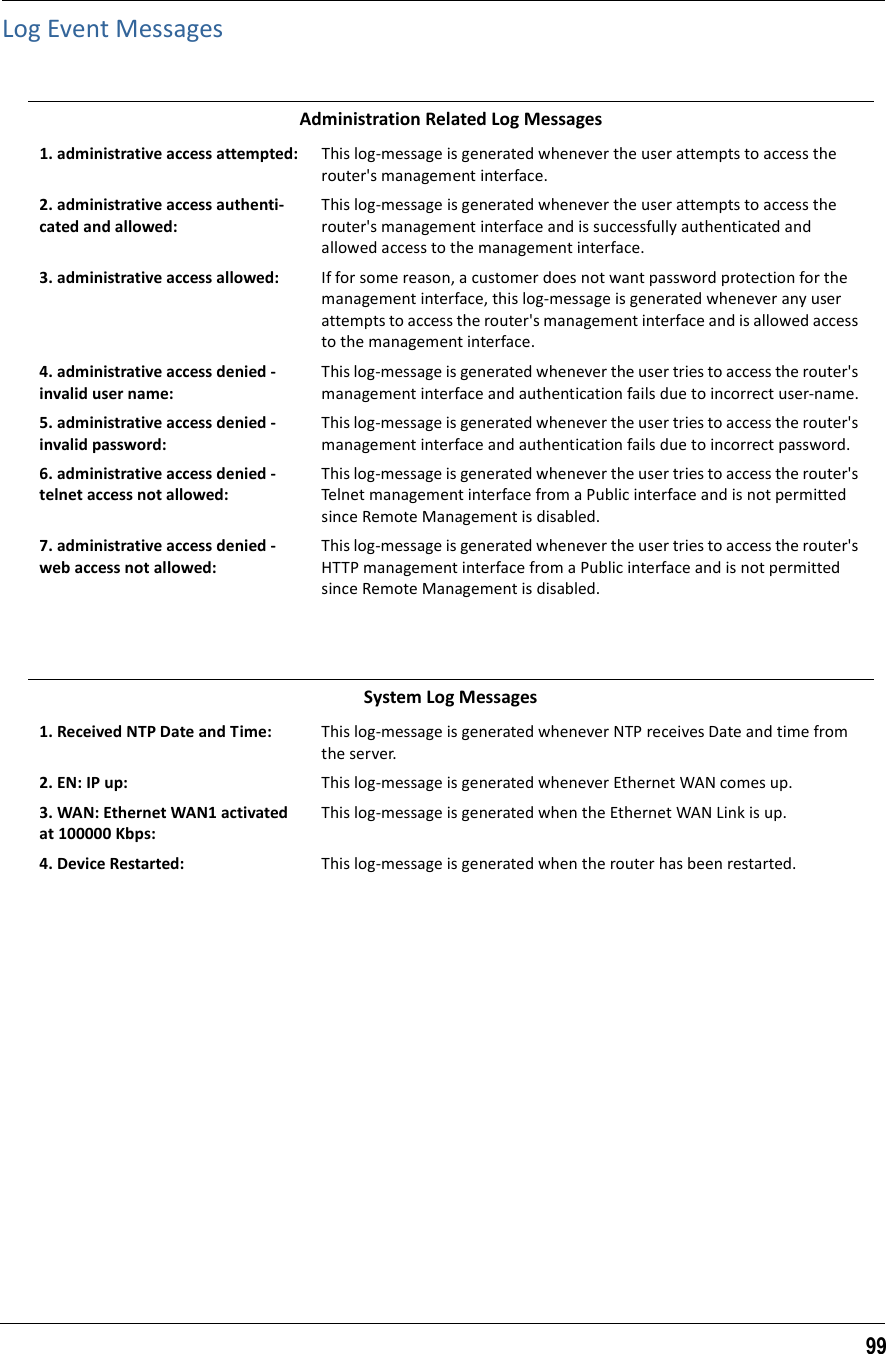
![Administrator’s Handbook16Set up the ARRIS GatewayRefer to your Quickstart Guide for instructions on how to connect your ARRIS® gateway to your power source, PC or local area network, and your Internet access point, whether it is a Fiber connection or a Gigabit Ethernet connection . Different ARRIS® Gateway models are supplied for any of these connections. If Dynamic Address-ing is not enabled on your PC, perform the following.Microsoft Windows:1. Navigate to the TCP/IP Properties Control Panel. Some Windows versions follow a path like this:Start menu -> Settings -> Control Panel -> Network (or Network and Dial-up Connections -> Local Area Connection -> Properties) -> TCP/IP [your_network_card] or Internet Protocol [TCP/IP] -> PropertiesSome Windows versions follow a path like this:Start menu -> Control Panel -> Network and Internet Con-nections -> Network Connections -> Local Area Connection -> Properties -> Internet Protocol [TCP/IP] -> Properties 2. Select Obtain an IP address automatically.3. Select Obtain DNS server address automatically, if avail-able.4. Remove any previously configured Gateways, if available.5. OK the settings. Restart if prompted. Windows Vista and Windows 7 obtain an IP address automatically by default. You may not need to configure it at all.](https://usermanual.wiki/ARRIS/NVG595/User-Guide-2138211-Page-16.png)
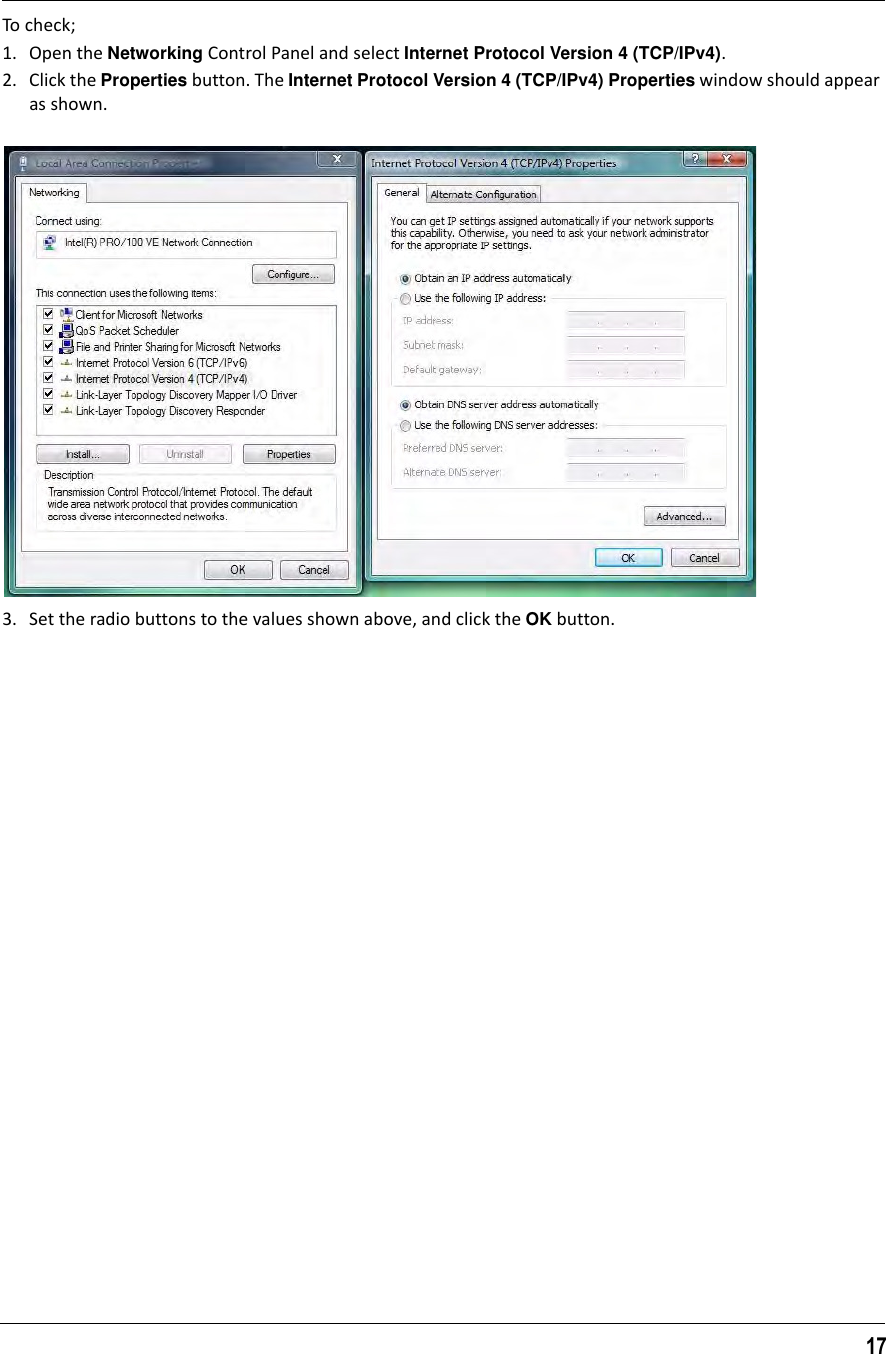
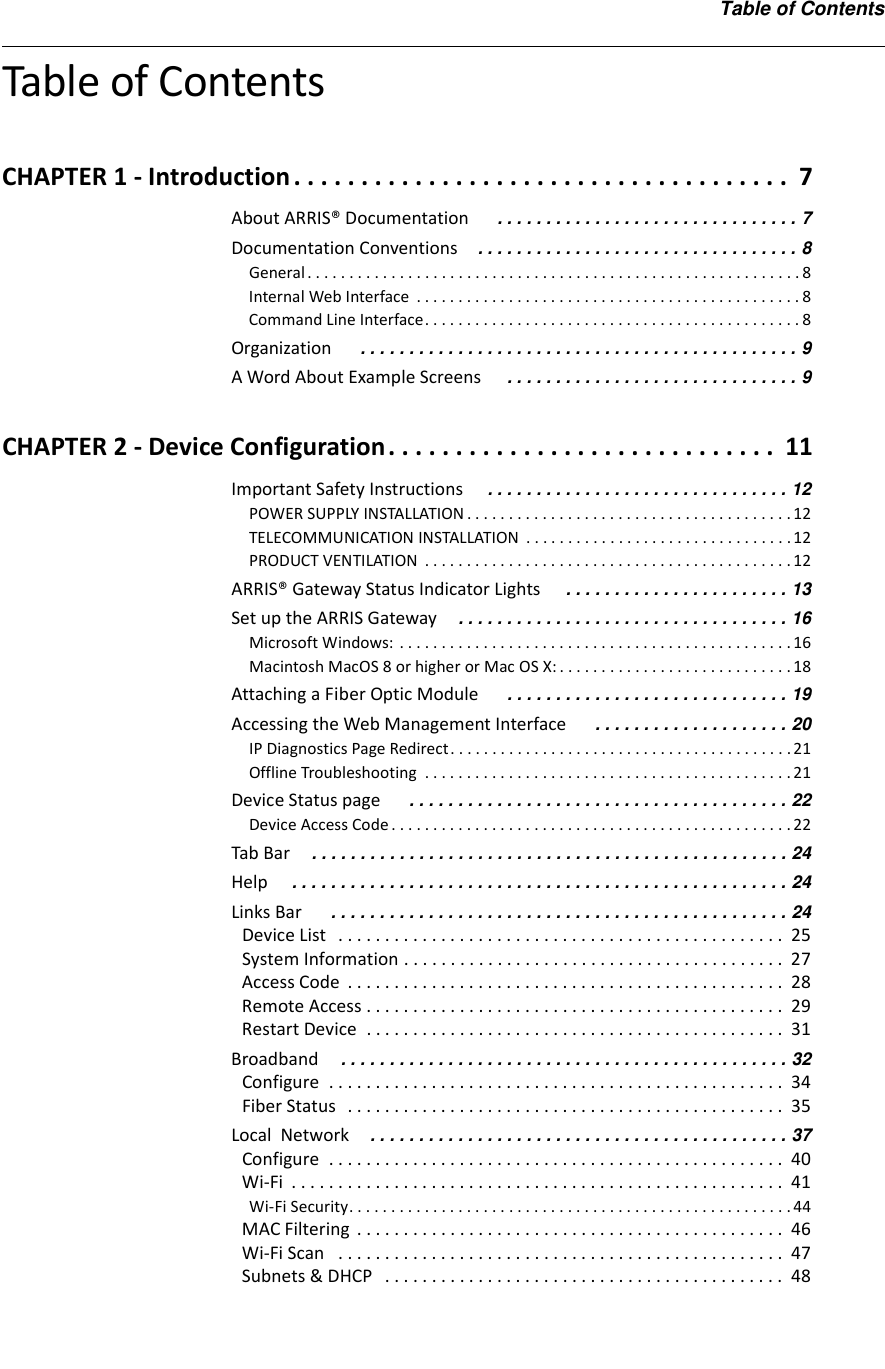
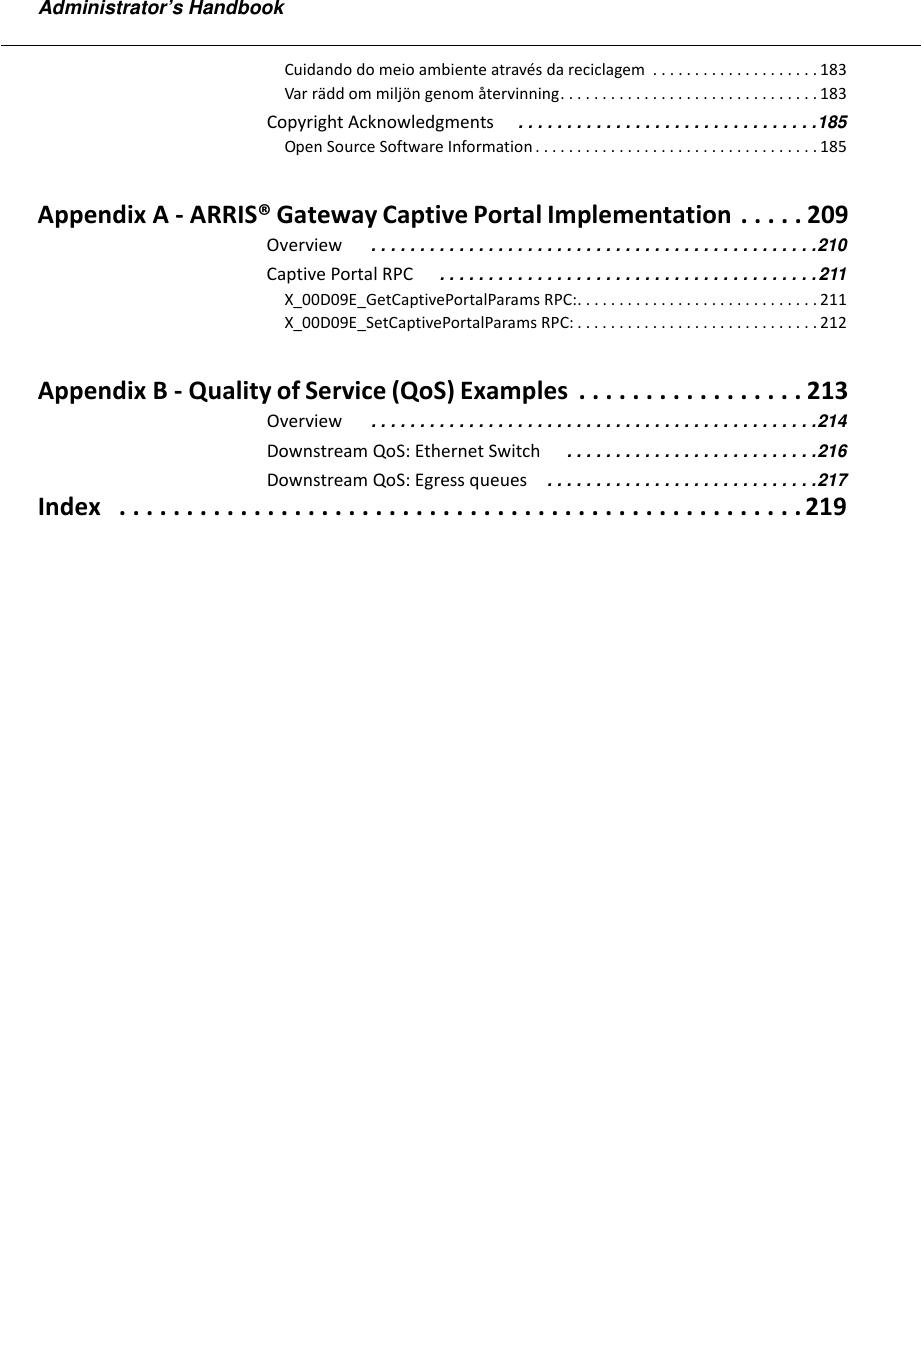
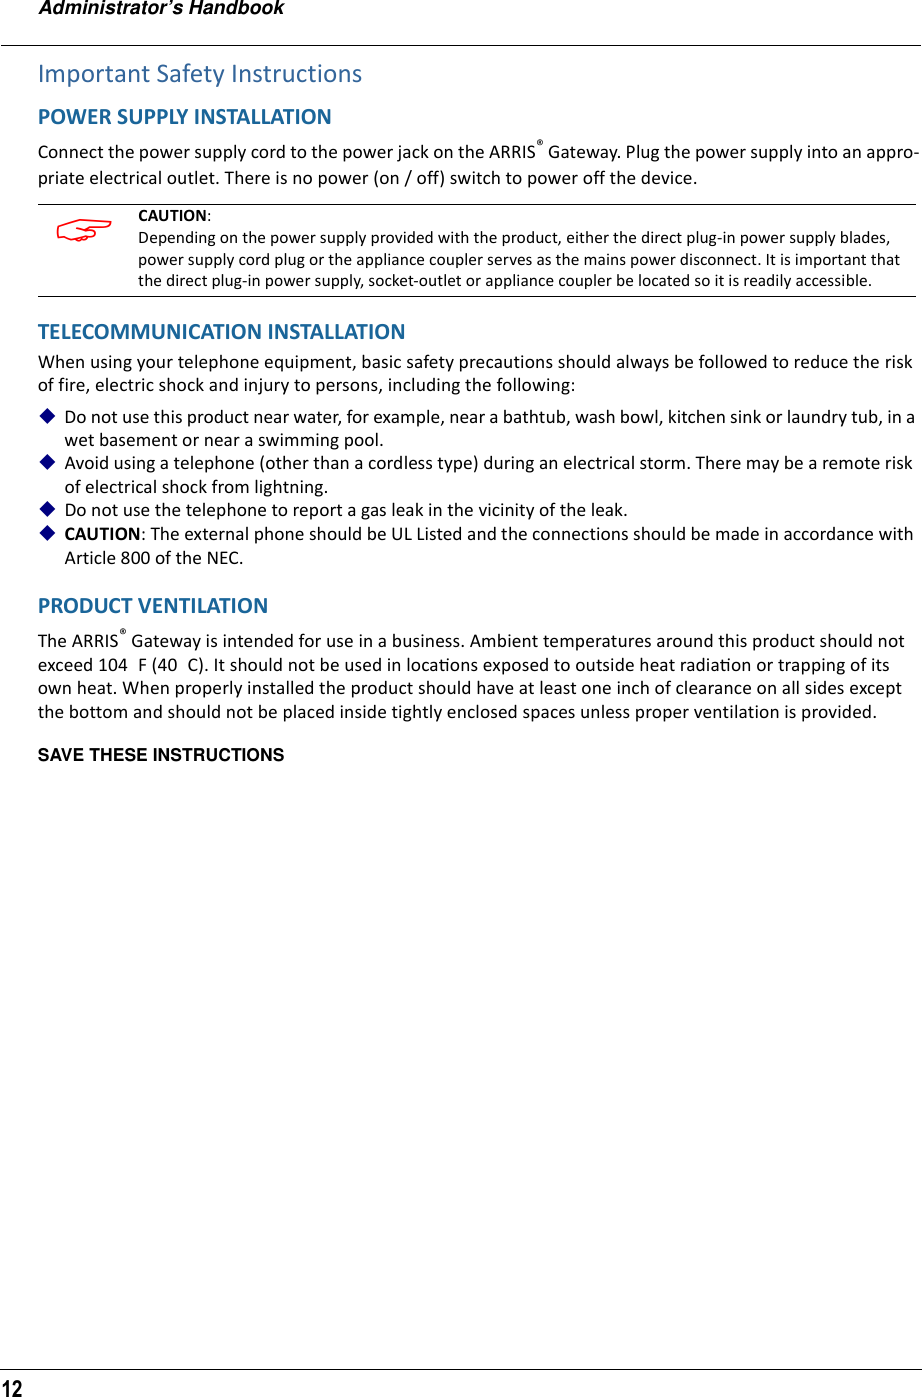
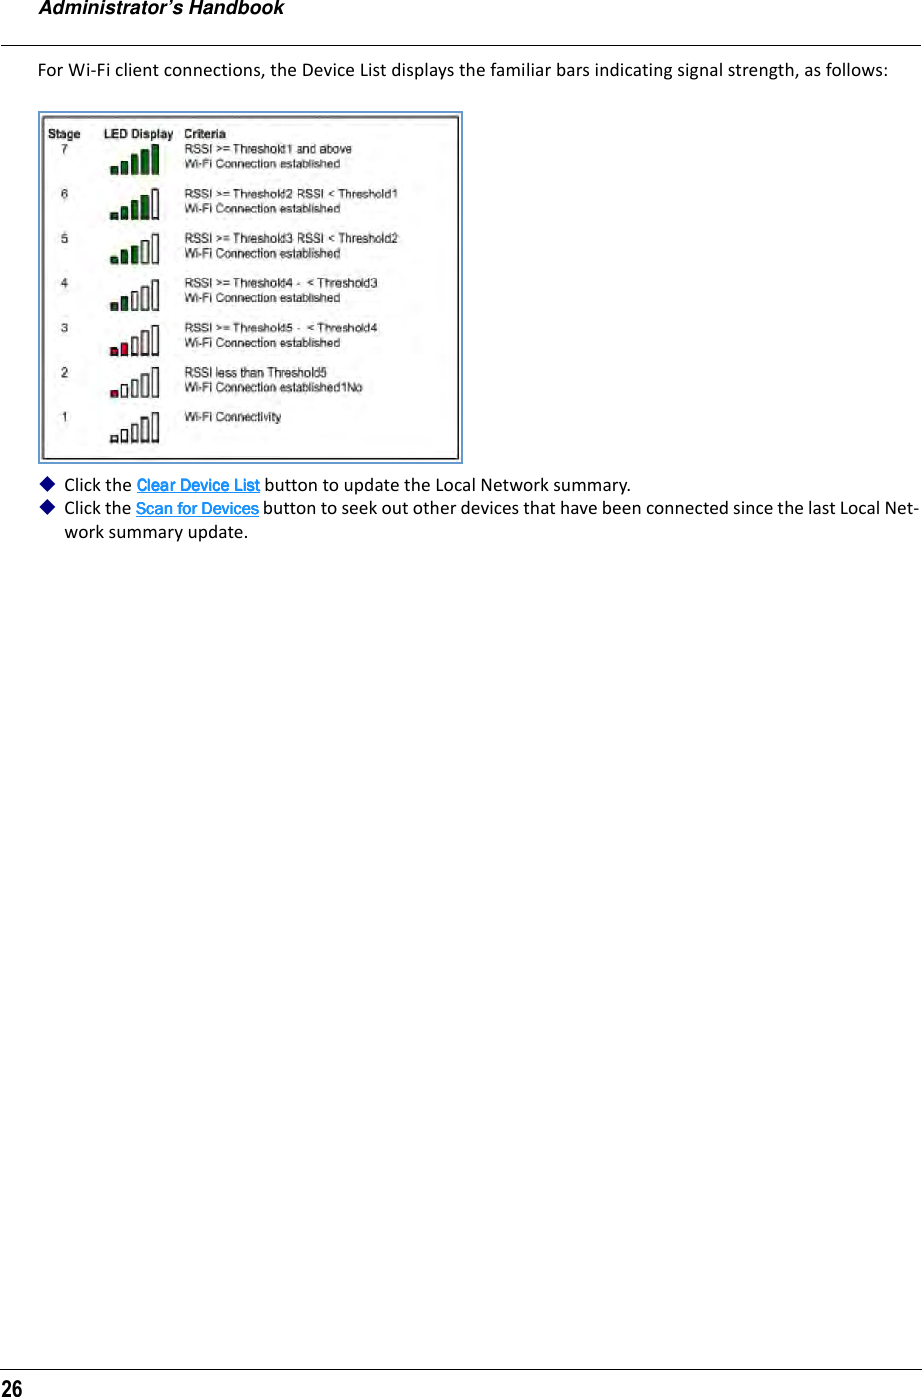
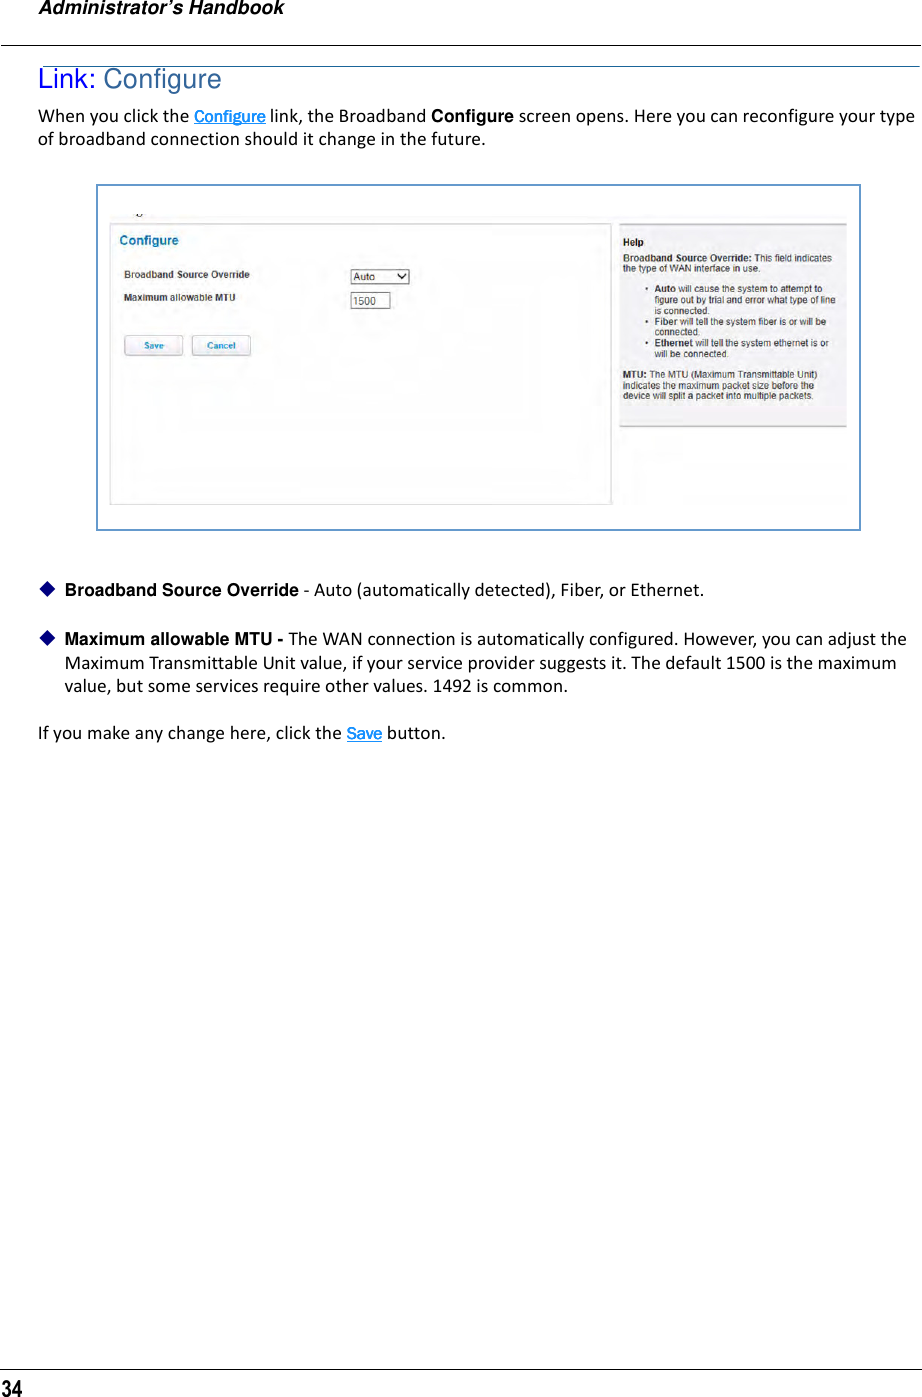
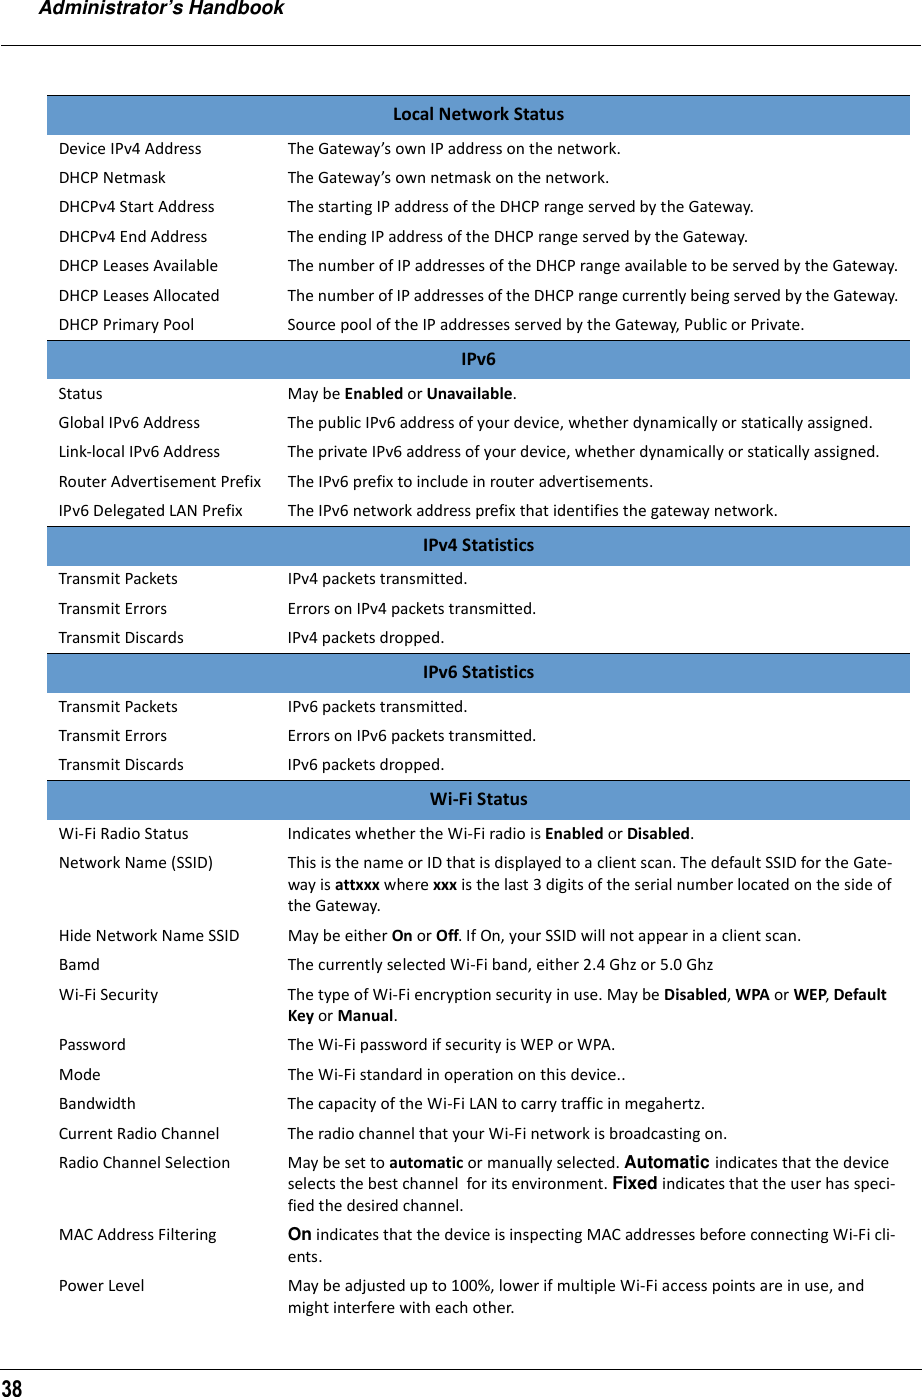
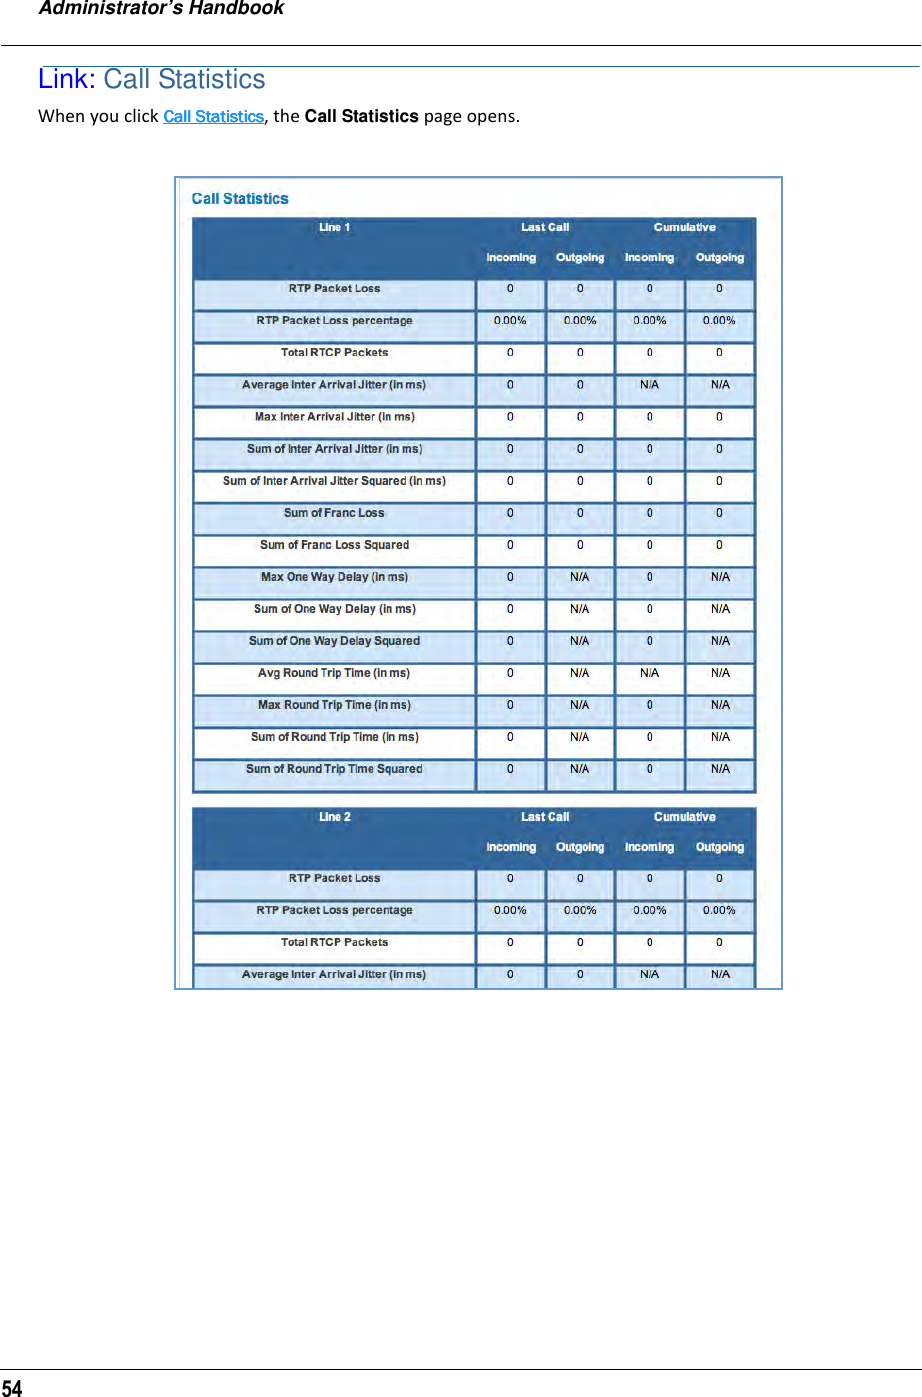
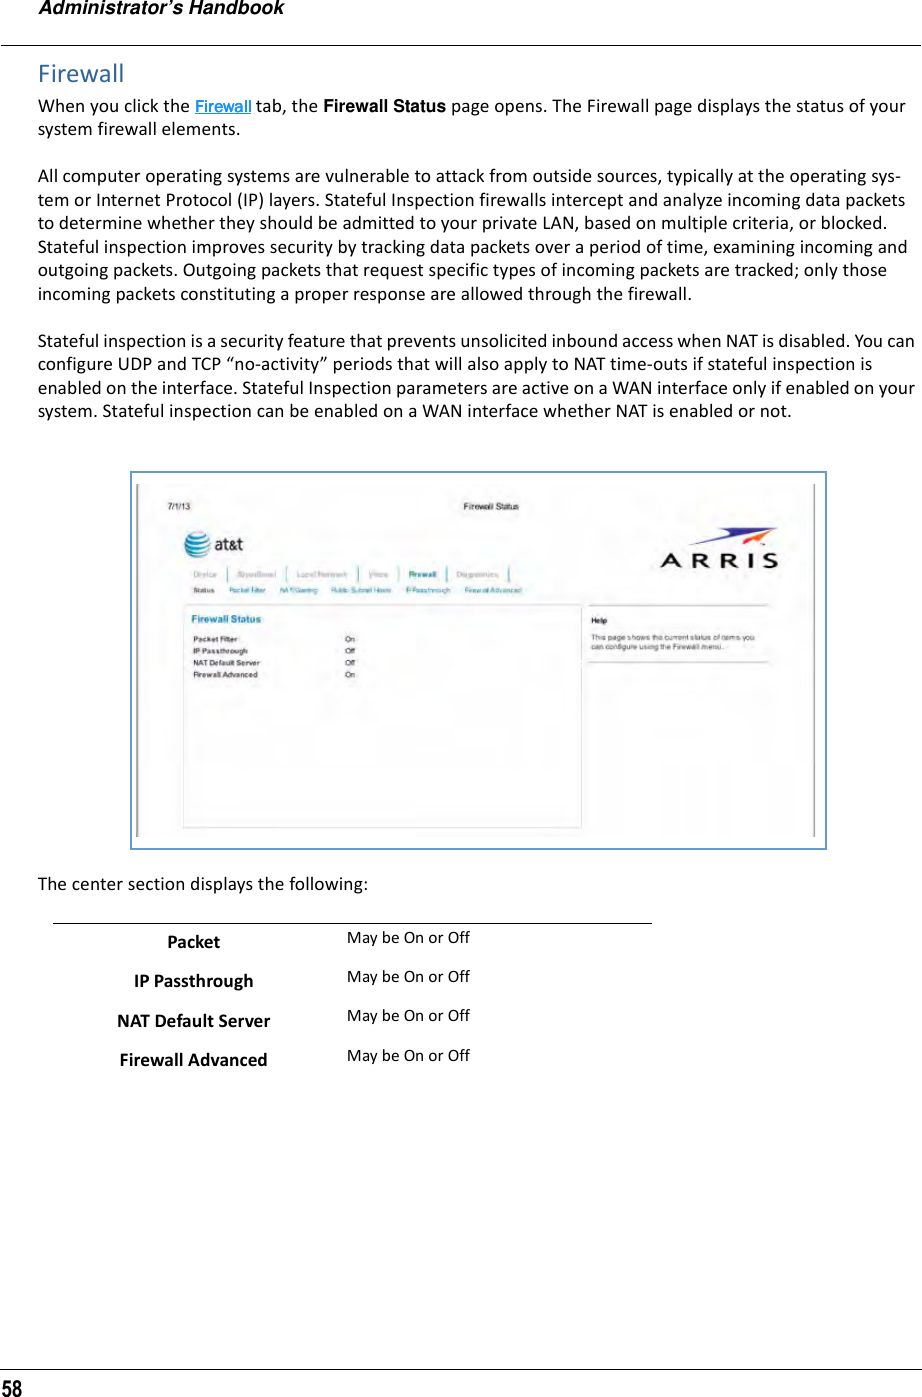
![21For additional troubleshooting information, see “Diagnostics” on page 80 and “Basic Troubleshooting” on page 91.When your connection is restored or the problem is resolved, the Broadband LED will turn GREEN.Offline TroubleshootingIf the WAN is down, the following information is displayed at the top of the page: NOTE: For AT&T this function is enabled by default. See the CLI command “set management lan-redirect enable [ off | on ]” on page 150](https://usermanual.wiki/ARRIS/NVG595/User-Guide-2138211-Page-21.png)
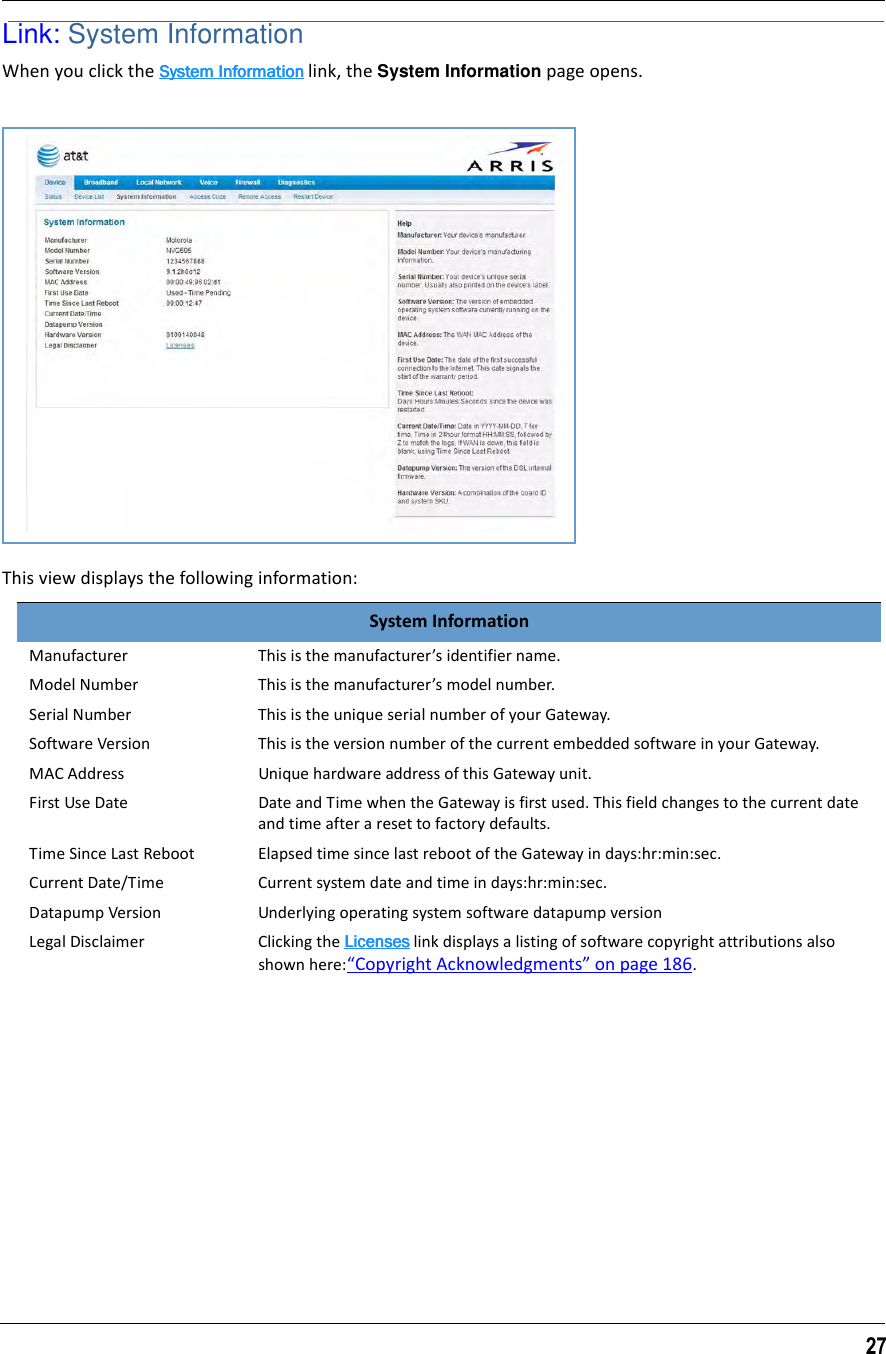
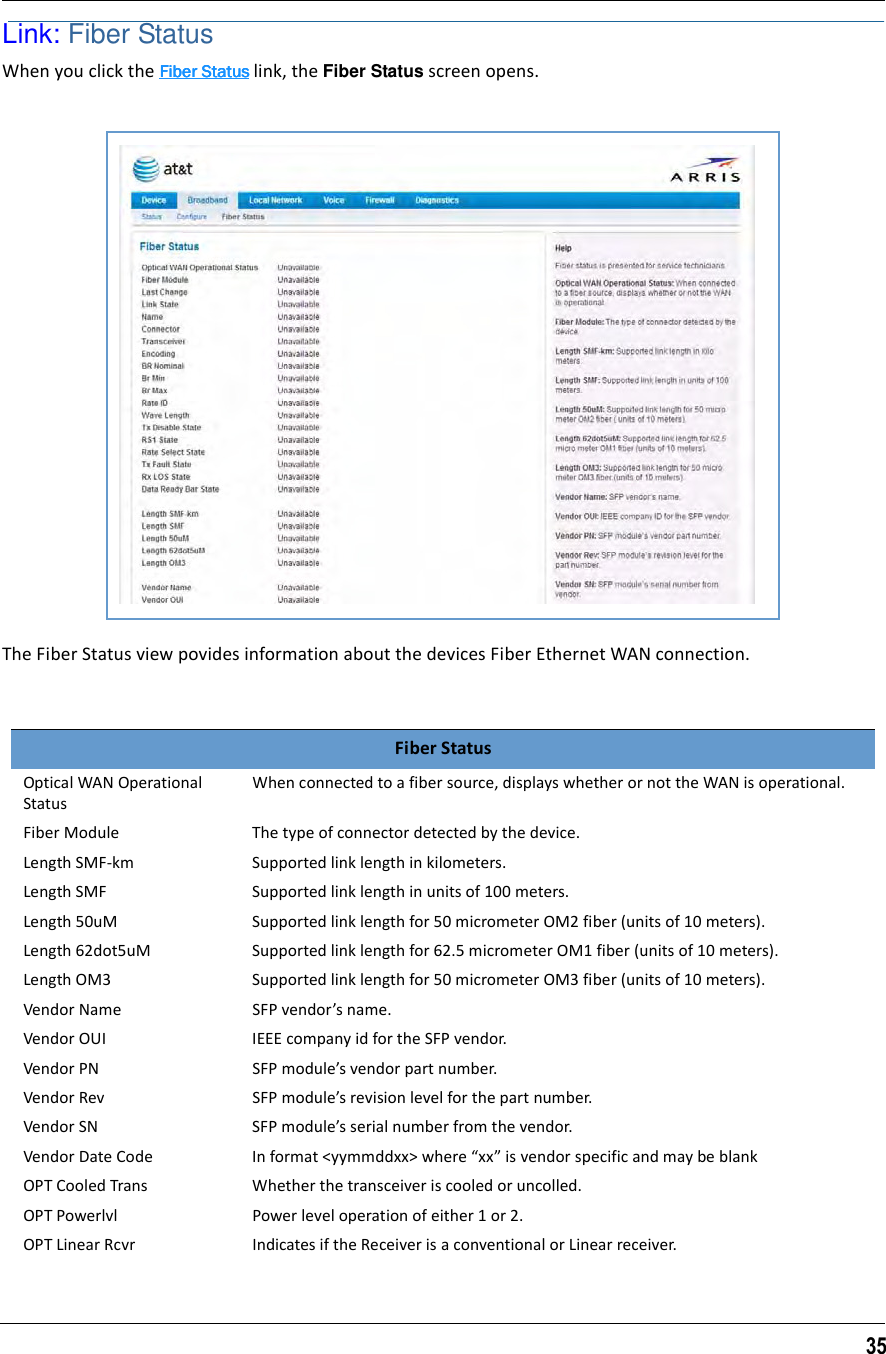
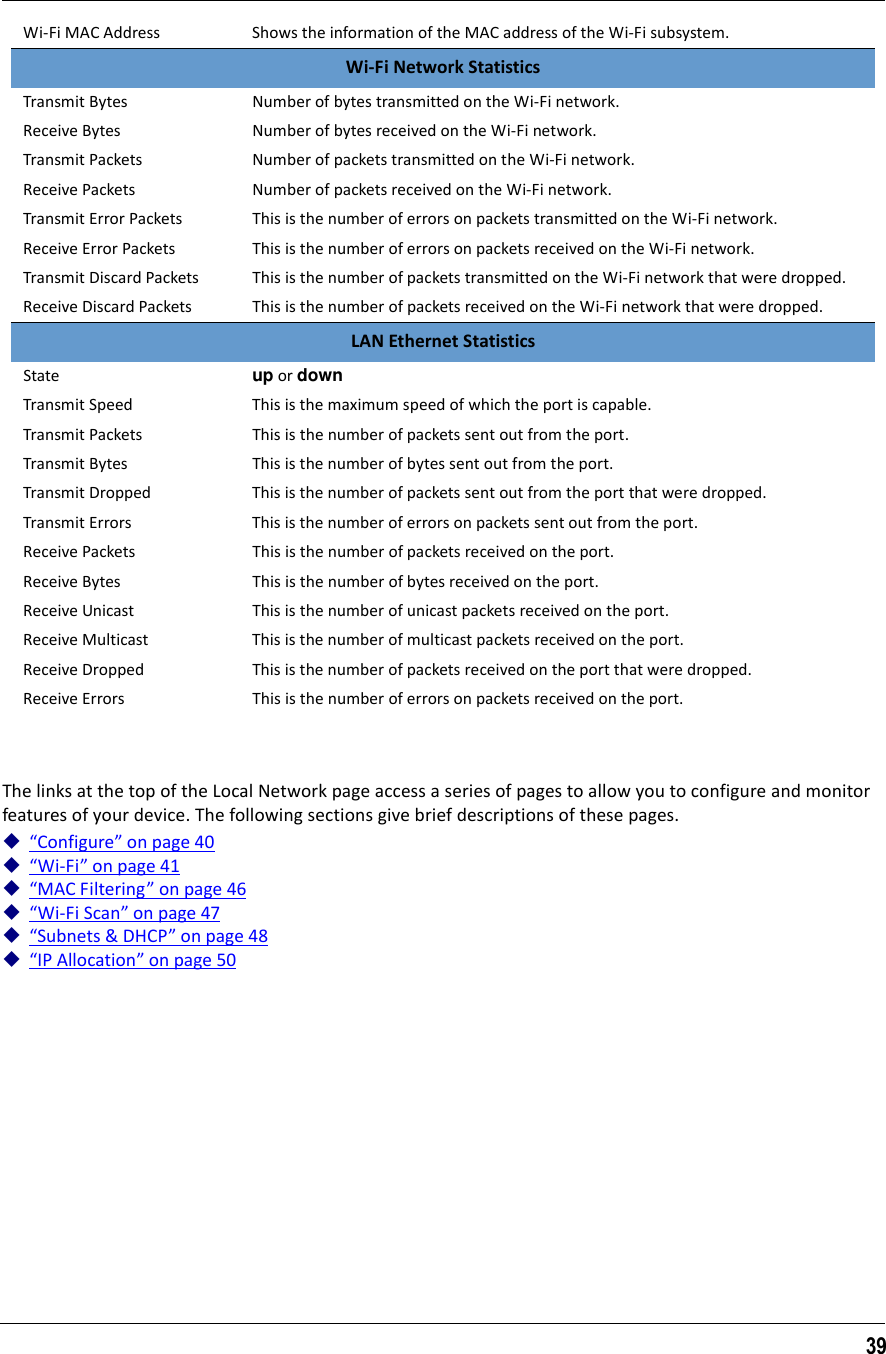
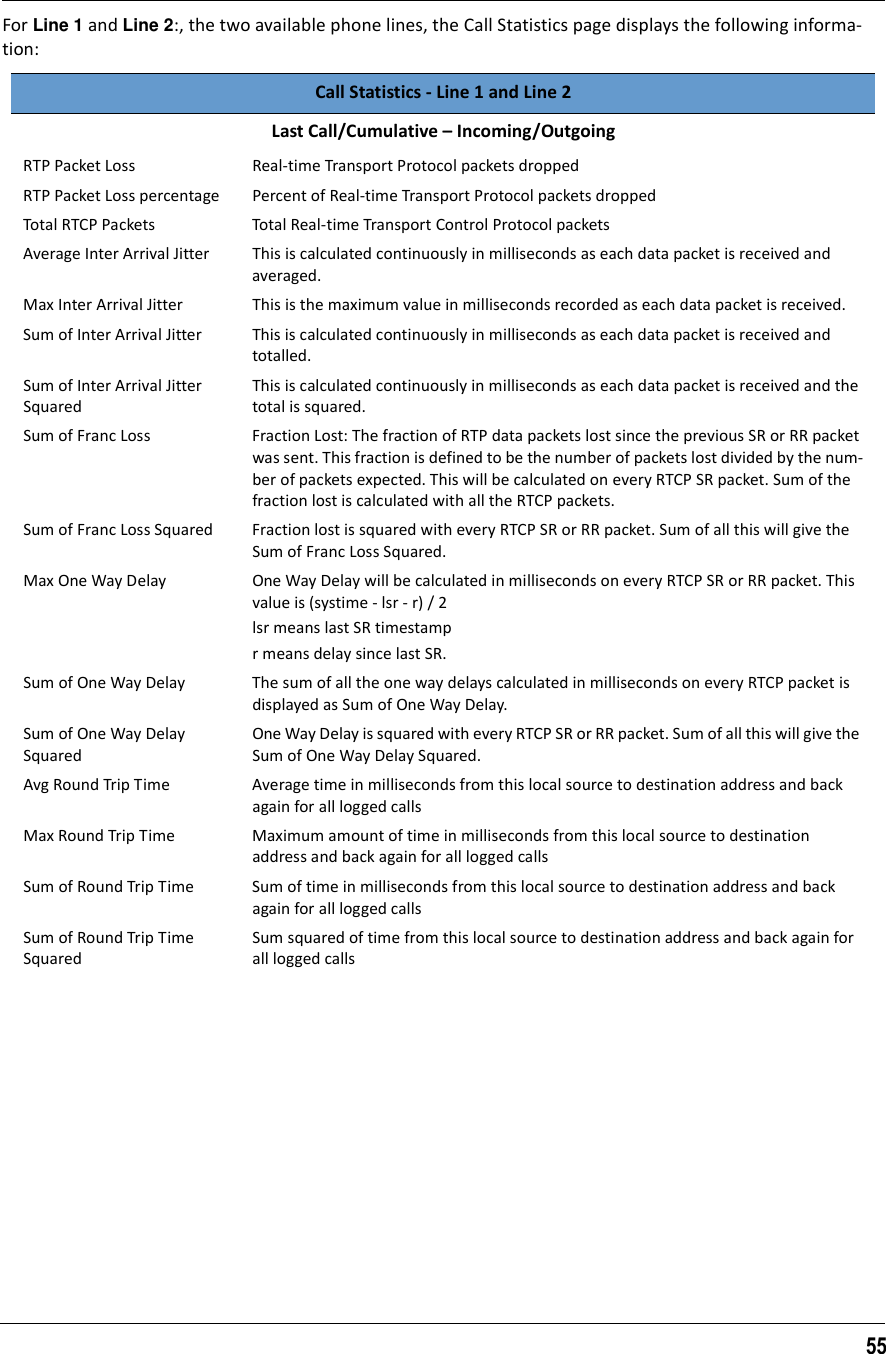

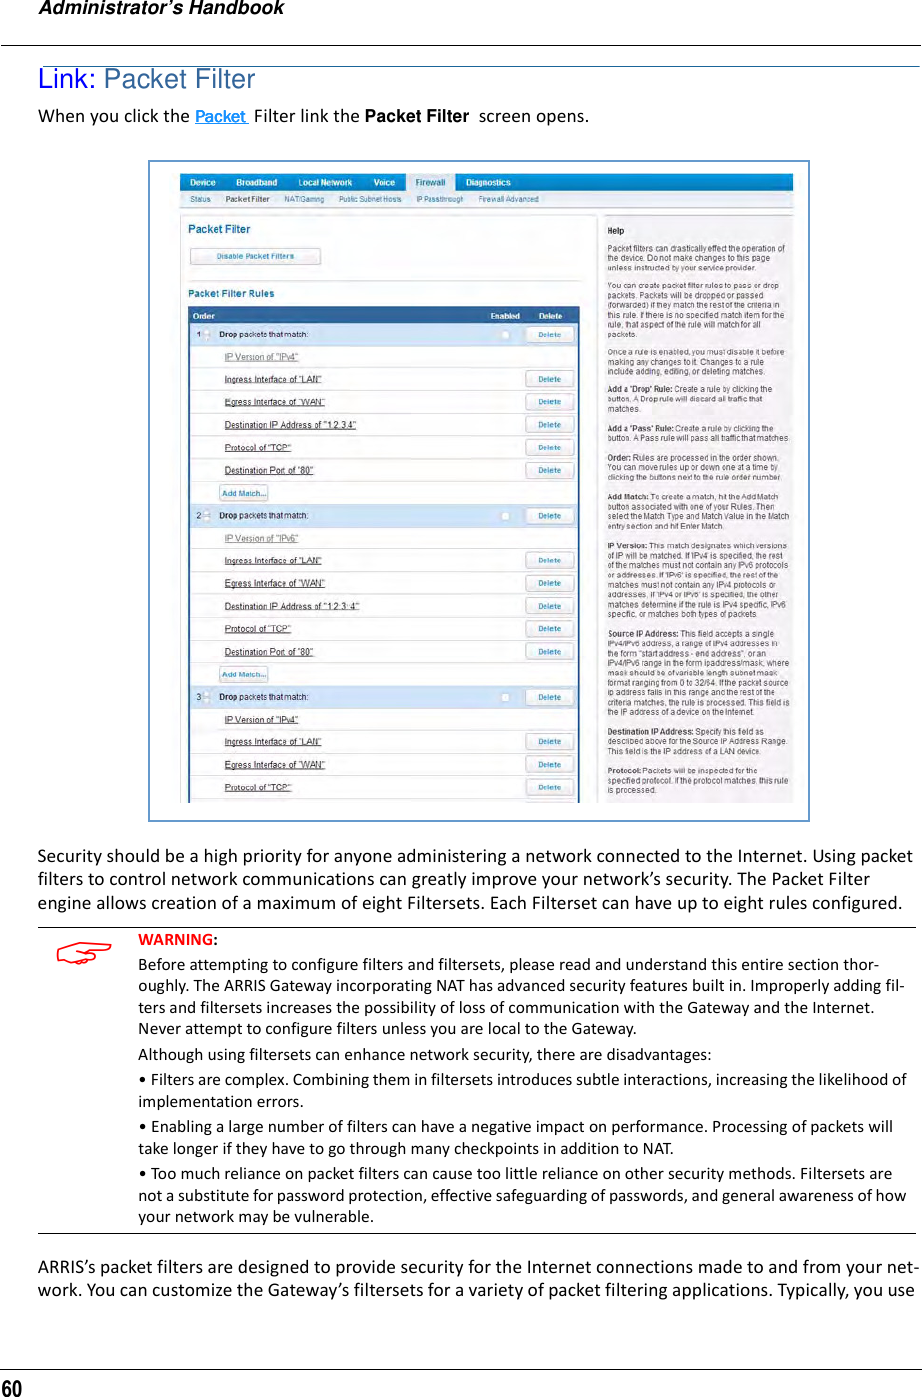

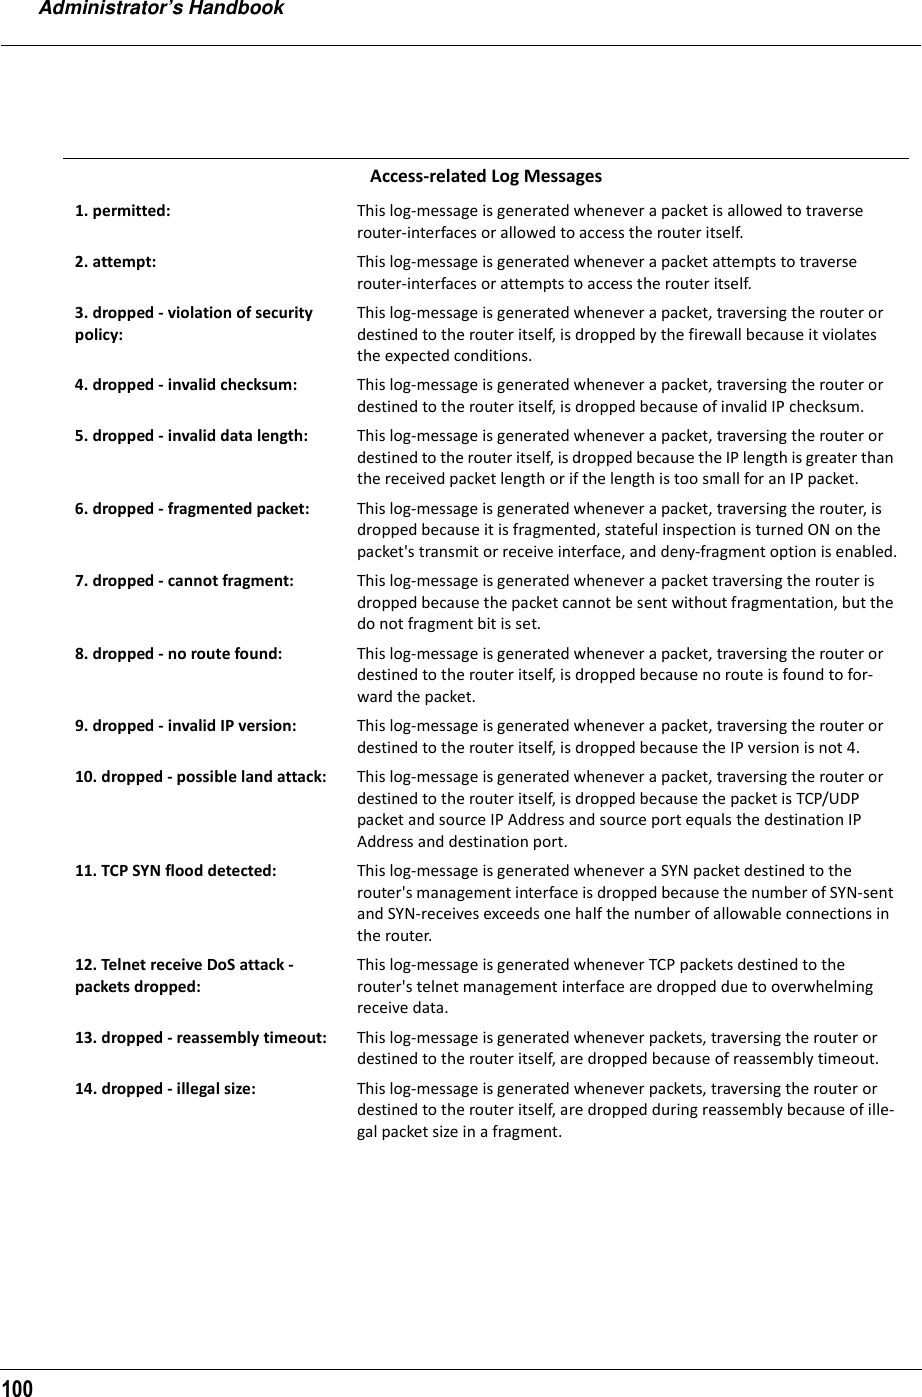
![Administrator’s Handbook102NM_LOGDROP_CAT_POLICY_ICMP_ECHO POLICY-ICMP-ECHO ICMP Echo Request discarded (more specific than NM_LOGDROP_CAT_ICMP_TYPE)NM_LOGDROP_CAT_POLICY_UWC_RESTRICT POLICY-UWC-RESTRICT Packets dropped because of “Uni-versal Wi-Fi Configuration” restric-tions (currently unused)NM_LOGDROP_CAT_POLICY_RESTRICTED_HOSTPOLICY-RESTRICTED-HOST Packets dropped because of “Restricted Host” feature (either content or time restrictions) (cur-rently unused)NM_LOGDROP_CAT_POLICY_WAN_DNS_QUERYPOLICY-WAN-SIDE-DNS-QUERYDNS query packets received on a WAN interfaceNM_LOGDROP_CAT_POLICY_WAN_DHCP_TOSRVRPOLICY-WAN-SIDE-DHCP-TO-SRVRDHCP DISCOVER/REQUEST received on a WAN interfaceNM_LOGDROP_CAT_POLICY_AH POLICY-IPV6-AH IPv6 Packets with AH Header (if so configured)NM_LOGDROP_CAT_POLICY_ESP POLICY-IPV6-ESP IPv6 Packets with ESP Header (if so configured)NM_LOGDROP_CAT_POLICY_DEP_HEADER POLICY-DEPRECATED-HEADERIPv6 Packets with deprecated header (currently this only includes routing extension header type 0)NM_LOGDROP_CAT_POLICY_CAPT_PORTAL POLICY-CAPTIVE-PORTAL [IPv6] Packets dropped because captive portal is enabled.NM_LOGDROP_CAT_FLOW FLOW Packets rejected as a result of analy-sis of multiple related packets (generic)NM_LOGDROP_CAT_FLOW_FLOOD FLOOD Packets rejected because of flood-limitingNM_LOGDROP_CAT_FLOW_PORTSCAN PORTSCAN Packets rejected because of Port-scan detectionNM_LOGDROP_CAT_FLOW_DOS_OTHER OTHER-DoS Packets rejected because of other DoS detection. Currently this includes downstream flows that don't generate upstream responses - specifically addressing IPv6 Neigh-bor Discovery DoS attacks.Firewall Log Messages Detail (AT&T requirement #841)Reason Enumeration ( C ) Log Text Representation Why the packet was logged](https://usermanual.wiki/ARRIS/NVG595/User-Guide-2138211-Page-102.png)
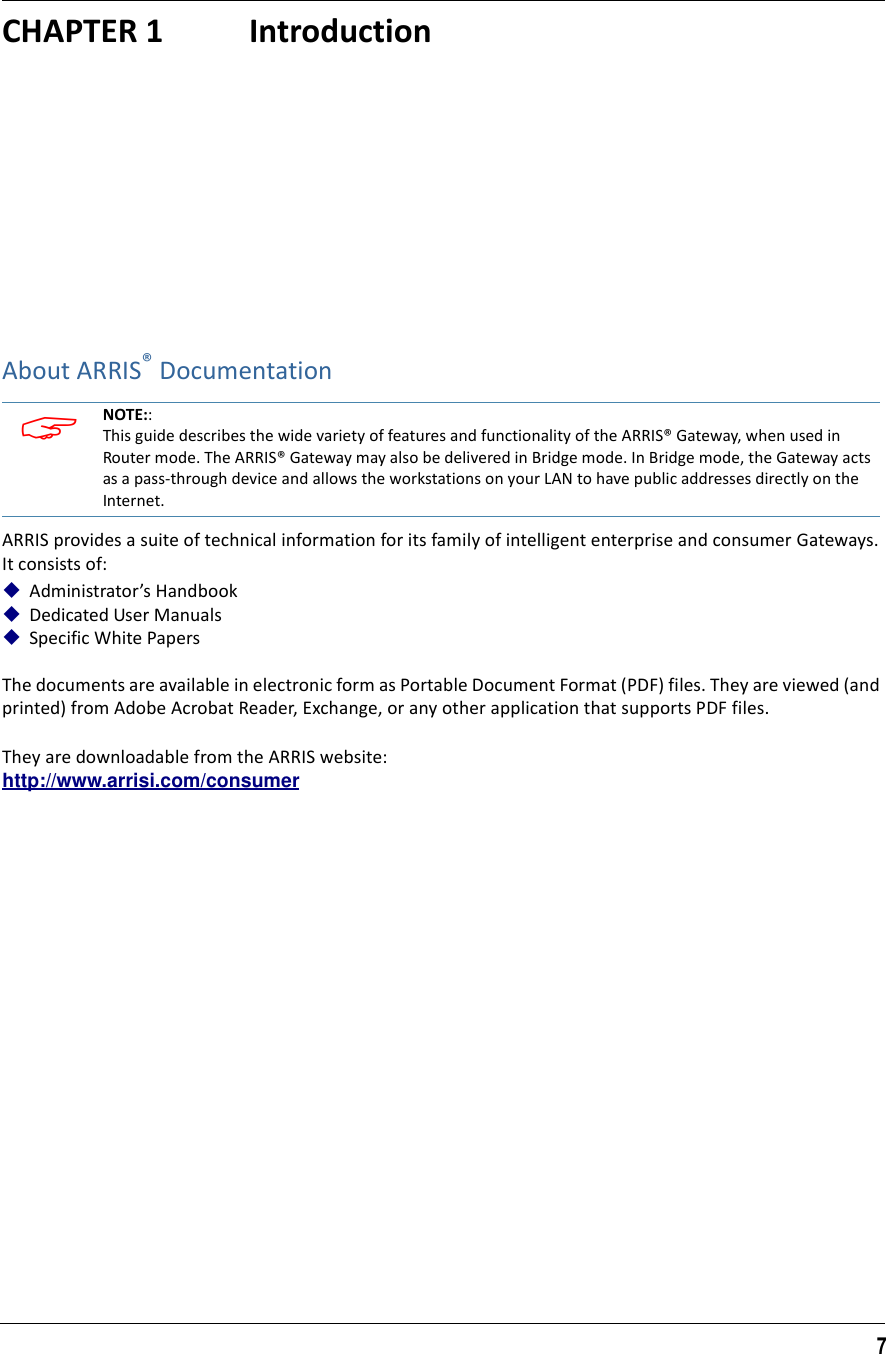
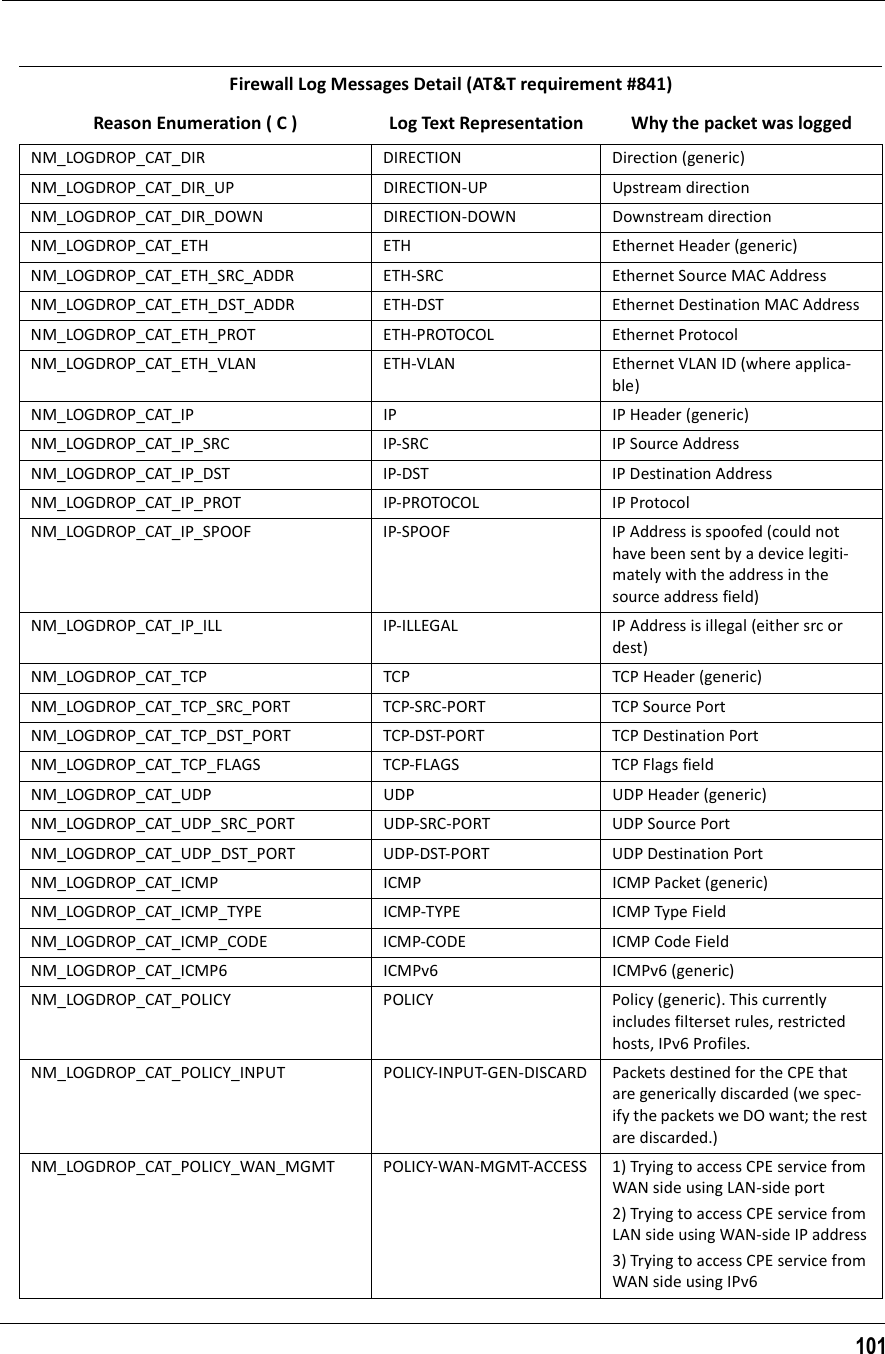
![109SHELL CommandsCommon Commandsarp nnn.nnn.nnn.nnnSends an Address Resolution Protocol (ARP) request to match the nnn.nnn.nnn.nnn IP address to an Ethernet hardware address.clear [ yes ]Clears the configuration settings in a ARRIS® Gateway. You are prompted to confirm the clear command by entering yes.clear_certificateRemoves an SSL certificate that has been installed.clear_https_certkeyRemoves any Secure HTTP certificate key value installed in the ARRIS® Gateway.configurePuts the command line interface into Configure mode, which lets you configure your ARRIS® Gateway with Config commands. Config commands are described starting on page 122. download [ server_address ] [ filename ] [ confirm ]This command installs a file of configuration parameters into the ARRIS Gateway from a TFTP (Trivial File Trans-fer Protocol) server. The TFTP server must be accessible on your Ethernet network.You can include one or more of the following arguments with the download command. If you omit arguments, the console prompts you for this information.The server_address argument identifies the IP address of the TFTP server from which you want to copy the ARRIS® Gateway configuration file. The filename argument identifies the path and name of the configuration file on the TFTP server. If you include the optional confirm keyword, the download begins as soon as all information is entered.You can also download an SSL certificate file from a trusted Certification Authority (CA), on platforms that sup-port SSL, as follows:download [-cert] [server_address ] [filename] [confirm]ffbbDisplays the number of times that the ARRIS® Gateway has entered a Power On Self Test (POST) fault state. install [ server_address ] [ filename ] [ confirm ]Downloads a new version of the ARRIS® Gateway operating software from a TFTP (Trivial File Transfer Protocol) server, validates the software image, and programs the image into the ARRIS® Gateway memory. After you install new operating software, you must restart the ARRIS® Gateway.](https://usermanual.wiki/ARRIS/NVG595/User-Guide-2138211-Page-109.png)
![Administrator’s Handbook110The server_address argument identifies the IP address of the TFTP server on which your ARRIS® Gateway operating software is stored. The filename argument identifies the path and name of the operating soft-ware file on the TFTP server.If you include the optional keyword confirm, you will not be prompted to confirm whether or not you want to perform the operation.log message_stringAdds the message in the message_string argument to the ARRIS® Gateway diagnostic log.loglevel [ level ] Displays or modifies the types of log messages you want the ARRIS® Gateway to record. If you enter the loglevel command without the optional level argument, the command line interface displays the cur-rent log level setting. You can enter the loglevel command with the level argument to specify the types of diagnostic mes-sages you want to record. All messages with a level number equal to or greater than the level you specify are recorded. For example, if you specify loglevel 3, the diagnostic log will retain high-level informational messages (level 3), warnings (level 4), and failure messages (level 5).Use the following values for the level argument:1 or low – Low-level informational messages or greater; includes trivial status messages.2 or medium – Medium-level informational messages or greater; includes status messages that can help monitor network traffic.3 or high – High-level informational messages or greater; includes status messages that may be significant but do not constitute errors.4 or warning – Warnings or greater; includes recoverable error conditions and useful operator informa-tion.5 or failure – Failures; includes messages describing error conditions that may not be recoverable. netstat -i Displays the IP interfaces for your ARRIS® Gateway.netstat -r Displays the IP routes stored in your ARRIS® Gateway.nslookup [ hostname | ip_address ]Performs a domain name system lookup for a specified host.The hostname argument is the name of the host for which you want DNS information; for example, nslookup klaatu.The ip_address argument is the IP address, in dotted decimal notation, of the device for which you want DNS information.ping [-s size] [-c count ] [ hostname | ip_address ]Causes the ARRIS® Gateway to issue a series of ICMP Echo requests for the device with the specified name or IP address. The hostname argument is the name of the device you want to ping; for example, ping ftp.mycompany.com.](https://usermanual.wiki/ARRIS/NVG595/User-Guide-2138211-Page-110.png)
![111The ip_address argument is the IP address, in dotted decimal notation, of the device you want to locate. If a host using the specified name or IP address is active, it returns one or more ICMP Echo replies, confirm-ing that it is accessible from your network.The -s size argument lets you specify the size of the ICMP packet.The -c count argument lets you specify the number of ICMP packets generated for the ping request. Val-ues greater than 250 are truncated to 250.You can use the ping command to determine whether a hostname or IP address is already in use on your net-work. You cannot use the ping command to ping the ARRIS® Gateway’s own IP address.quit Exits the ARRIS® Gateway command line interface.6rd-check [-s size] [-c count] conn_nameGenerates and sends 6rd loopback packets to the 6rd gateway.reset arp Clears the Address Resolution Protocol (ARP) cache on your unit.reset crash Clears crash-dump information, which identifies the contents of the ARRIS® Gateway registers at the point of system malfunction.reset dhcp serverClears the DHCP lease table in the ARRIS® Gateway.reset enet [ all ]Resets Ethernet statistics to zero. Resets individual LAN switch port statistics as well as Wi-Fi and WAN Ether-net statistics (where applicable).reset firewall-logRewinds the firewall log to the first entry.reset ipmapClears the IPMap table (NAT).reset logRewinds the diagnostic log display to the top of the existing ARRIS® Gateway diagnostic log. The reset log command does not clear the diagnostic log. The next show log command will display information from the beginning of the log file.reset wanThis function resets WAN interface statistics.](https://usermanual.wiki/ARRIS/NVG595/User-Guide-2138211-Page-111.png)
![Administrator’s Handbook112restart [ seconds ]Restarts your ARRIS® Gateway. If you include the optional seconds argument, your ARRIS® Gateway will restart when the specified number of seconds have elapsed. You must enter the complete restart com-mand to initiate a restart.show all-infoDisplays all settings currently configured in the ARRIS® Gateway.show bridge interfacesDisplays bridge interfaces maintained by the ARRIS® Gateway.show bridge tableDisplays the bridging table maintained by the ARRIS® Gateway.show configDumps the ARRIS Gateway’s configuration script just as the script command does in config mode.show crashDisplays the most recent crash information, if any, for your ARRIS® Gateway.show dhcp server leasesDisplays the DHCP leases stored in RAM by your ARRIS® Gateway.show dhcp clientDisplays the DHCP clients stored in RAM by your ARRIS® Gateway.show f device-associationDisplays LAN devices that conform with the TR111 Gateway requirement. It displays - IP Address, Manufacture OUI and Serial number.show enet [ all ]Displays Ethernet interface statistics maintained by the ARRIS® Gateway. Supports display of individual LAN switch port statistics as well as WAN Ethernet statistics (where applicable).Example:Ethernet driver full statistics - LAN10/100/1000 EthernetPort Status: Link upGeneral: Transmit OK : 253 Receive OK : 22 Tx Errors : 0 Rx Errors : 0Receiver: Dropped Packets : 0](https://usermanual.wiki/ARRIS/NVG595/User-Guide-2138211-Page-112.png)
![Administrator’s Handbook116show logDisplays blocks of information from the ARRIS® Gateway diagnostic log. To see the entire log, you can repeat the show log command or you can enter show log all.show firewall-log Displays blocks of information from the ARRIS® Gateway firewall log. show memory [ all ]Displays memory usage information for your ARRIS® Gateway. If you include the optional all argument, your ARRIS® Gateway will display a more detailed set of memory statistics.show ptmDisplays statistics information for each PTM session.show post-resultsDisplays POST results.show pppoeDisplays status information for each PPPoE socket, such as the socket state, service names, and host ID values.show rootcertDumps the Subject line for the list of all the trusted root certificates for the 802.1x supplicant.show rtspDisplays RTSP ALG session activity data.show statusDisplays the current status of a ARRIS® Gateway, the device's hardware and software revision levels, a sum-mary of errors encountered, and the length of time the ARRIS® Gateway has been running since it was last restarted. Identical to the status command.show summaryDisplays a summary of WAN, LAN, and Gateway information.show vlanDisplays detail of VLAN status and statistics.show Wi-Fi [ all ]Shows Wi-Fi status and statistics.](https://usermanual.wiki/ARRIS/NVG595/User-Guide-2138211-Page-116.png)
![117show Wi-Fi clients [ MAC_address ]Displays details on connected clients, or more details on a particular client if the MAC address is added as an argument.show voipDisplays VoIP call statistics.show voiplogDisplays VoIP event logs.telnet [ hostname | ip_address ] [ port ]Lets you open a telnet connection to the specified host through your ARRIS® Gateway.The hostname argument is the name of the device to which you want to connect; for example, telnet ftp.mycompany.com.The ip_address argument is the IP address, in dotted decimal notation, of the device to which you want to connect.The port argument is the number of t he port over which you want to open a telnet session.traceroute ( ip_address | hostname )Traces the routing path to an IP destination.upload [ server_address ] [ filename ] [ confirm ]Copies the current configuration settings of the Gateway to a TFTP (Trivial File Transfer Protocol) server. The TFTP server must be accessible on your Ethernet network. The server_address argument identifies the IP address of the TFTP server on which you want to store the ARRIS® Gateway settings. The filename argu-ment identifies the path and name of the configuration file on the TFTP server. If you include the optional confirm keyword, you will not be prompted to confirm whether or not you want to perform the operation.view configDumps the ARRIS Gateway’s configuration just as the view command does in config mode.who Displays the names of the current shell and PPP users. wpsEnters the Wi-Fi (Wi-Fi) Protected Setup mode. WPS CommandsThe following commands are available in Wi-Fi protected setup:pushbuttonSets the ARRIS® Gateway to WPS “pushbutton” mode, initiating protected setup.](https://usermanual.wiki/ARRIS/NVG595/User-Guide-2138211-Page-117.png)
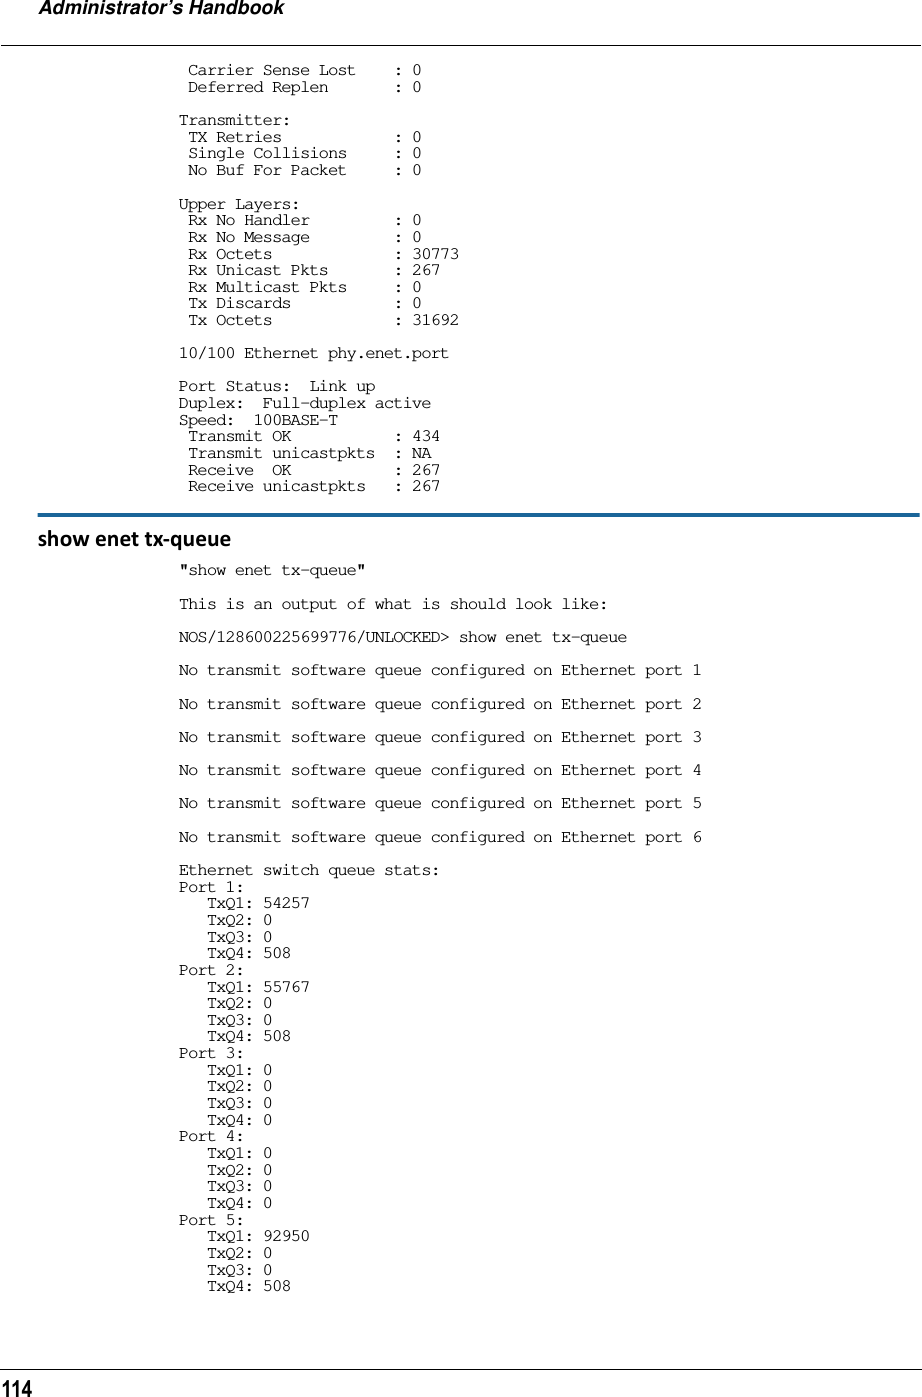
![Administrator’s Handbook118pinSets the ARRIS® Gateway to PIN mode, enabling authorized devices to be identified and added by MAC address Personal Identification Number.listLists the WPS-ready client devices (enrollees) known to the ARRIS® Gateway.self-pinDisplays the ARRIS® Gateway’s own Personal Identification Number (PIN) value.WAN Commandsshow enetDisplays statistics for both the WAN and the Wireless.show enet allDisplays statistics for the WAN, LAN and Wireless.show enet tx-queueDisplays all tx-queues configured on the devicve.show ppp [{ stats | lcp | ipcp }]show opticwan dataDisplays information for the Fiber WAN.Show voip allDisplays information for all the phone lines, including “test lines”.](https://usermanual.wiki/ARRIS/NVG595/User-Guide-2138211-Page-118.png)

![121For example, the following CLI step command indicates that the default value is off and that valid entries are limited to on and off.option (off) [on | off]: onYou can accept the default value for a field by pressing the Return key. To use a different value, enter it and press Return.You can enter the CONFIG step mode by entering set from the top node of the CONFIG hierarchy. You can enter step mode for a particular service by entering set service_name. In stepping set mode (press Con-trol-X <Return/Enter> to exit. For example:ARRIS-3000/9437188 (top)>> set system...system name (“ARRIS-3000/9437188”): Mycroft Diagnostic Level (High): mediumStepping mode ended.Validating Your ConfigurationYou can use the validate CONFIG command to make sure that your configuration settings have been entered correctly. If you use the validate command, the ARRIS® Gateway verifies that all required settings for all services are present and that settings are consistent.ARRIS-3000/9437188 (top)>> validateError: Subnet mask is incorrectGlobal Validation did not pass inspection!You can use the validate command to verify your configuration settings at any time. Your ARRIS® Gateway automatically validates your configuration any time you save a modified configuration.](https://usermanual.wiki/ARRIS/NVG595/User-Guide-2138211-Page-121.png)
![Administrator’s Handbook122CONFIG CommandsThis section describes the keywords and arguments for the various CONFIG commands.Connection commandsconns are used to create connections, for example, a WAN or LAN conn. There may be more than one of each depending on your model. names correspond to the system object IDs (OIDs) but you can name them yourself.set conn name name link-oid valueSets the connection named name to point to an associated link specified by the link-oid value.set conn name name type [ static | dhcpc | ppp ]Specifies whether the type of the connection named name is static, dhcpc, or ppp. set conn name name side [ lan | wan ]Specifies whether this conn is LAN- or WAN-side. A conn can be either lan or wan.set conn name name lan-type [ private | public | public-delegated ]Specifies whether this conn’s LAN is private, public, or public-delegated. The default is private, the usual type of local network.set conn name name dhcp-server-enable [ on | off ]Turns the DHCP server for this connection on or off. The DHCP server can be enabled per connection. The default is on.set conn name name mcast-forwarding [ off | on ]Turns IP IGMP multicast forwarding for this connection off or on. The default is off.set conn name name rip-send [ off | v1 | v2 | v1-compat | v2-md5 ]Specifies whether the device should use Routing Information Protocol (RIP) broadcasts to advertise its routing tables to other Gateways. RIP Version 2 (RIP-2) is an extension of the original Routing Information Protocol (RIP-1) that expands the amount of useful information in the RIP packets. While RIP-1 and RIP-2 share the same basic algorithms, RIP-2 supports several additional features, including inclusion of subnet masks in RIP packets and implementation of multicasting instead of broadcasting (which reduces the load on hosts which do not support routing protocols. RIP-2 with MD5 authentication is an extension of RIP-2 that increases security by requiring an authentication key when routes are advertised. Depending on your network needs, you can con-figure your device to support RIP-1, RIP-2, or RIP-2MD5.If you specify v2-MD5, you must also specify a rip-send-key. Keys are ASCII strings with a maximum of 31 char-acters, and must match the other Gateway(s) keys for proper operation of MD5 support. The default is off.set conn name name rip-receive [ off | v1 | v2 | v1-compat | v2-md5 ]Specifies whether the device should use Routing Information Protocol (RIP) broadcasts to update its routing tables with information received from other Gateways on the other side of the connection. If you specify v2-md5, you must also specify a rip-receive-key. Keys are ASCII strings with a maximum of 31 characters, and must match the other Gateway(s) keys for proper operation of MD5 support. The default is off.](https://usermanual.wiki/ARRIS/NVG595/User-Guide-2138211-Page-122.png)
![123set conn name name icmp-echo-drop [ off | on ]If set to on, drops echo-requests received on the particular interface. The default is off.set conn name name icmp-err-suppress [ off | on ]An additional option to suppress ICMP error messages on WAN IP interfaces. The default is off.set conn name name static ipaddr ipaddrSpecifies a static IP address when the connection type has been set to static. The default is 192.168.1.254.Example:NOS/128600225634272/confConfig Mode v1.3NOS/128600225634272 (top)>> connNOS/128600225634272 (conn)>> set conn(conn) node list ... "LAN" "WAN"Select (name) node to modify from list,or enter new (name) to create. conn name (?): name "LAN" link-oid ("LAN") [ LAN | WAN | PPPoE | ]: type (static) [ static | dhcpc | ppp ]: side (lan) [ lan | wan ]: lan-type (private) [ private | public | public-delegated ]: mcast-forwarding (off) [ off | on ]: rip-send (off) [ off | v1 | v2 | v1-compat | v2-md5 ]: rip-receive (off) [ off | v1 | v2 | v1-compat | v2-md5 ]: fs-egress ("") [ Security | QosUpstream | WanEgress | ]: fs-ingress ("") [ Security | QosUpstream | WanEgress | ]: static ipaddr ("192.168.1.254"): netmask ("255.255.255.0"): dhcp-server-enable (on) [ off | on ]: dhcp-server start-addr ("192.168.1.64"): end-addr ("192.168.7.253"): lease-time (01:00:00:00): subnet-order (1) [ 1 - 8 ]: gen-option(gen-option) node list ...Select (name) node to modify from list,or enter new (name) to create. gen-option name (?): option-group(option-group) node list ...Select (name) node to modify from list,or enter new (name) to create. option-group name (?): filterset(filterset) node list ...Select (name) node to modify from list,or enter new (name) to create. filterset name (?): name "WAN" link-oid ("WAN") [ LAN | WAN | PPPoE | ]: type (dhcpc) [ static | dhcpc | ppp ]: static side (wan) [ lan | wan ]: mcast-forwarding (off) [ off | on ]: nat-enable (on) [ off | on ]: rip-receive (off) [ off | v1 | v2 | v1-compat | v2-md5 ]: NOTE:You must also set the gateway address OR turn it off, otherwise the settings cannot be saved. See “IP Gate-way commands” on page 133.](https://usermanual.wiki/ARRIS/NVG595/User-Guide-2138211-Page-123.png)
![Administrator’s Handbook124 icmp-echo-drop (on) [ off | on ]: icmp-err-suppress (off) [ off | on ]: fs-egress ("WanEgress") [ Security | QosUpstream | WanEgress | ]: fs-ingress ("") [ Security | QosUpstream | WanEgress | ]: static ipaddr (""): 10.3.53.100 netmask ("255.255.255.0"):NOS/128600225634272 (conn)>> set ip gateway address 10.3.53.1NOS/128600225634272 (conn)>> saveIf you do not want the gateway use this command to turn it off: set ip gateway enable offset conn name name static netmask netmaskSpecifies a static netmask when the connection type has been set to static. The default is 255.255.255.0.set conn name name dhcp-server start-addr ipaddrIf dhcp-server-enable is set to on, specifies the first address in the DHCP address range. The ARRIS® Gateway can reserve a sequence of up to 253 IP addresses within a subnet, beginning with the specified address for dynamic assignment. The default is 192.168.1.64set conn name name dhcp-server end-addr ipaddrIf dhcp-server-enable is set to on, specifies the last address in the DHCP address range. The default is 192.168.7.253set conn name name dhcp-server lease-time secondsIf dhcp-server-enable is set to on, specifies the default length for DHCP leases issued by the ARRIS® Gateway. Lease time is in seconds. Default is 3600.set conn name name dhcp-server subnet-order [1... 8]If dhcp-server-enable is set to on, specifies the order in which to address the first of 8 possible subnets. Ordi-narily, this is the first one, the default 1.set conn name name nat-enable [ on | off ]Specifies whether you want the ARRIS Gateway to use network address translation (NAT) when communicating with remote Gateways. NAT lets you conceal details of your network from remote Gateways. It also permits all LAN devices to share a single IP address. By default, address NAT is turned on.set conn name name dhcp-client discover-time secondsThe DHCP client parameters appear when the connection type has been set to dhcpc. discover-time is in sec-onds; the default is 30.set conn name name dhcp-client dns-enable [ on | off ]This allows you to enable or disable the default behavior of acting as a DNS proxy. The default is on.set conn name name dhcp-client dns-override [ off | on ]This allows you to enable or disable overriding default DNS behavior. The default is off.](https://usermanual.wiki/ARRIS/NVG595/User-Guide-2138211-Page-124.png)
![Administrator’s Handbook126Filterset commandsFiltersets provide packet filtering and QoS configuration. Packets are identified by characteristics that allow QoS and forwarding decisions to be made. These characteristics can be at the MAC layer, IP layer, TCP | UDP | ICMP layer(s), or (in applicable circumstances) 802.1q/p (VLAN-tagging) layer.Your Gateway is capable of adding and stripping 802.1Q tags to and from frames before transmission on its LAN interfaces. See also “Link commands” on page 144 for more information.A maximum of 8 filtersets are supported. Each filterset can have up to 8 rules configured. A maximum 8 egress queues are supported. Each queue can have up to 8 entries.A filterset rule identifies packet attributes to match with its match parameters. It acts on these packets using its default action parameters.set filterset name filterset_name rule number order numberDetermines order of execution of filterset rules (1 before 2, etc). If order is unspecified, the value of order is set to 1 more than the last order in the filterset. If order is set to an already existing order value, order values of other rules are incremented automatically.set filterset name filterset_name rule number enable [ on | off ]Dynamically enables or disables the specified filterset rule.set filterset name filterset_name rule number match-eth-proto number Matches ethernet protocol field to the supplied value.set filterset name filterset_name rule number match-eth-length numberMatches ethernet length field to the supplied value.set filterset name filterset_name rule number match-eth-p-bits numberMatches VLAN priority bits.set filterset name filterset_name rule number match-eth-vid numberMatches VLAN id number.set filterset name filterset_name rule number match-eth-src-mac-addr mac_addressMatches supplied source MAC address field.set filterset name filterset_name rule number match-eth-dst-mac-addr mac_addressMatches supplied destination MAC address field.set filterset name filterset_name rule number match-src-ip-addr ip_address_rangeMatches supplied value with packet's source ip address field.set filterset name filterset_name rule number match-dst-ip-addr ip_address_rangeMatches supplied value with packet's destination ip address field.](https://usermanual.wiki/ARRIS/NVG595/User-Guide-2138211-Page-126.png)
![127set filterset name filterset_name rule number match-protocol protocol_stringMatches supplied value with packet's protocol field.set filterset name filterset_name rule number match-tos [ number | descriptive_value ]Matches tos field from numeric value 0-255; or one of the following descriptive values:Minimize-Delay (0x10)Maximize-Throughput (0x08)Maximize-Reliability (0x04)Minimize-Cost (0x02)Normal-Service (0x00)set filterset name filterset_name rule number match-dscp [ number | diffserv_class_string ]Matches diffserv class with supplied numerical value, which can be in decimal(ex: 32) or in Hex(ex: 0x20);Or match the supplied diffserv class. This value may be any of the BE, EF, AFxx or CSx classes. A full list is:{ "CS0", 0x00 }{ "CS1", 0x08 }{ "CS2", 0x10 }{ "CS3", 0x18 }{ "CS4", 0x20 }{ "CS5", 0x28 }{ "CS6", 0x30 }{ "CS7", 0x38 }{ "BE", 0x00 }{ "AF11", 0x0a }{ "AF12", 0x0c }{ "AF13", 0x0e }{ "AF21", 0x12 }{ "AF22", 0x14 }{ "AF23", 0x16 }{ "AF31", 0x1a }{ "AF32", 0x1c }{ "AF33", 0x1e }{ "AF41", 0x22 }{ "AF42", 0x24 }{ "AF43", 0x26 }{ "EF", 0x2e }set filterset name filterset_name rule number match-src-port number [ number ]Matches TCP|UDP source port field or port range.set filterset name filterset_name rule number match-dst-port number [ number ]Matches TCP|UDP destination port field or port range.set filterset name filterset_name rule number match-tcp-flags tcp_flag_stringMatches TCP flags in a packet. The flag string is comma-delimited.](https://usermanual.wiki/ARRIS/NVG595/User-Guide-2138211-Page-127.png)
![Administrator’s Handbook128set filterset name filterset_name rule number match-packet-length number [ number ]Matches packet length against value or range.set filterset name filterset_name rule number action forward [ pass | drop | reject ]Executes the named filterset’s default action: pass, drop, or reject.set filterset name filterset_name rule number match-qos-marker-enable [ off | on ]Turns the function of tagging the packet according to the queue marker name on or off. Default is off.set filterset name filterset_name rule number action set-qos-marker qos_marker_stringTags the packet according to the queue marker name. See “Queue commands” on page 130.set filterset name filterset_name rule number action set-tos numberSets the packet tos field to the supplied value.set filterset name filterset_name rule number action set-dscp [ number | diffserv_class_string ]Sets the dscp field to the supplied value.set filterset name filterset_name rule number action set-eth-p-bits numberSets vlan priority bits to the supplied value.set filterset filterset_name rule number action do-filterset nameExecutes the supplied filterset.Default actionsIf a packet passes through all of a filter's rules without a match, then the filterset's default-actions come into play. These behave the same way that rule actions behave.set filterset name filterset_name default-action set-qos-marker qos_marker_stringTags the packet according to the queue marker name.set filterset name filterset_name default-action set-tos numberSets the packet tos field to the supplied value.set filterset name filterset_name default-action set-dscp [ number |diffserv_class_string ]Sets the dscp field to the supplied value.set filterset name filterset_name default-action set-eth-p-bits numberSets vlan priority bits to the supplied value.](https://usermanual.wiki/ARRIS/NVG595/User-Guide-2138211-Page-128.png)
![129set filterset name filterset_name default-action do-filterset nameExecutes the supplied filterset.set filterset name filterset_name default-action forward [ pass | drop | reject ]Executes the named filterset’s default action: pass, drop, or reject.Global Filterset (“IPv6 Firewall”) commandsGlobal filtersets exist at the root level of the hierarchy, outside the umbrella of both the “ip” and “ip6” sub-trees, since they pertain to both.Global filterset rules allow for the specification of these match attributes:IP ProtocolSource and/or Destination PortUDPTCPTCP flags, for rules that specify TCP trafficICMP Type, for IP-protocol types 1 (ICMP) and 58 (IPv6-ICMP)LAN-side device/rangeBy MAC address (or current IPv4/6 address, host name, equivalently)IPv4 address, range, or subnetIPv6 address or subnetWAN-side rangeIPv4 address, range, or subnetIPv6 address or subnetIngress and egress interface, by link-oid (e.g. “LAN”)set gfs name filterset_name enable [ on | off ]Dynamically enables or disables the specified filterset rule.set gfs name filterset_name default-action value [ pass | drop ]Executes the named filterset’s default action: pass, or drop.set gfs name filterset_name rule number enable [ on | off ]Dynamically enables or disables the specified filterset rule.set gfs name filterset_name rule number active [ on | off ]Activates or deactivates the specified filterset rule.set gfs name filterset_name rule number type [ either | ipv4 | ipv6 ]Specifies whether the named filterset rule applies to IPv4, IPv6, or both (either).set gfs name filterset_name rule number action value [ pass | drop | accept ]Executes the named filterset’s action: pass, drop, or accept.](https://usermanual.wiki/ARRIS/NVG595/User-Guide-2138211-Page-129.png)
![Administrator’s Handbook130set gfs name filterset_name rule number order numberDetermines order of execution of filterset rules (1 before 2, etc). If order is unspecified, the value of order is set to 1 more than the last order in the filterset. If order is set to an already existing order value, order values of other rules are incremented automatically.set gfs name filterset_name rule number match number category [ src-ip-addr | dst-ip-addr | ip-proto | src-port | dst-port | tcp-flags | src-host-mac | dst-host-mac | in-link-oid | out-link-oid | icmp-type ]Matches on the following categories:set gfs name filterset_name rule number match number value [ value (category-specific) ]Queue commandsQueue configuration typically requires a classification component to set a QoS marker to a packet and a queue-ing component to schedule the marked packets to the link. This is accomplished using filtersets (“Filterset com-mands” on page 126).The basic queue's size and “length” are controls for how many packets and total bytes can be enqueued before it is considered to be full. Once it is full, any attempts to enqueue another packet will result in a “tail-drop.”Both constraints are simultaneously used, such that it is full when either packet count OR byte count exceeds the limit. This allows flexibility in obtaining a balance, where a large number of small packets, but only a small number of large packets can be enqueued.If there are no tail-drops – that is, the queue is not blocked from sending and doesn't over-fill and dump pack-ets – then these queue size/bytes parameters do not affect anything. Their only function is to adjust the threshold at which the queue is considered full, which dictates when tail drops will occur. So if there are no src-ip-addr (ip[4|6] address or subnet spec (type ip4 or ip6 only))dst-ip-addr (ip[4|6] address or subnet spec (type ip4 or ip6 only))ip-proto (0-255 or iana-defined string equivalents)src-port (1-65535[:1-65535], only if ip-proto == TCP or UDP)dst-port (1-65535[:1-65535], only if ip-proto == TCP or UDP)tcp-flags (only if ip-proto == TCP)icmp-type (only if ip-proto == ICMP or IPv6 ICMP)src-host-mac (MAC address of src)dst-host-mac (MAC address of dest)in-link-oid (oid of ingress link oid)out-link-oid (oid of egress link oid) NOTE:A rule cannot contain data that specifies both IPv6 and IPv4 at the same time, and thus be applicable to nei-ther iptables nor ip6tables; however, a rule can be IP-version-agnostic, in which case it will be applied to both iptables and ip6tables, given the proper conditions. For instance, if a LAN-side device has both an IPv4 address and a routable IPv6 address, then one can specify a rule for this device by referring to its MAC address, and if no other match attributes of the rule preclude its use in both tables, the rule will be applied to both iptables and ip6tables (given the assumption that the LAN Host Discovery database contains both addresses).](https://usermanual.wiki/ARRIS/NVG595/User-Guide-2138211-Page-130.png)
![131tail-drops, then increasing the queue length will have no effect. Increasing the queue length has no effect unless there are tail-drops.The maximum size/bytes of a queue balances how much burstiness can be buffered versus having a queue that is simply too long.Burstiness smoothing requires queueing up the buffers. For example, if the upstream line rate is 1mbps, but the traffic source sends 100mbps bursts for 10ms every second (which coincidentally averages 1mbps) then the router will have to buffer enough (about a full second worth of traffic) so that the burst of traffic doesn't get tail-dropped when it arrives and is enqueued at the same time in the same burst.On the other hand, it is undesirable to buffer too much data in the queue(s) since the packets may be stale by the time they are sent. It may be desirable to drop the traffic sufficiently that there are queuing disciplines such as Random Early Discard (red) that don't drop from the tail of the queue. Instead, red drops packets towards the front of the queue, so that the congestion is noticed more quickly in order for the sender to scale back bandwidth usage to avoid drops.the following types of queue “building blocks” are supported:basic queueingress queue priority queuewfq (weighted fair queue)Basic queues have three different packet dropping options byte|packet fifo (bpfifo)random early discard (red)stochastic fairness queuing (sfq)set queue name queue_name type [ basic | ingress | priority | wfq ]Sets the type of queue.set queue name queue_name options [ off | red | sfq ]Sets the queue packet dropping options.set queue name queue_name size [ 1... 64 ]Sets the maximum number of packets that can be enqueued.set queue name queue_name bytes [ 2048... 131072 ]Sets the maximum total number of bytes that can be enqueued.set queue name queue_name perturb [ 0... 100 ]Sets the interval in seconds for queue algorithm perturbation when queue option is sfq.set queue name queue_name police-rate [ 0... 100000000 ]Sets the rate in milliseconds that is used for policing traffic when the queue type is ingress.](https://usermanual.wiki/ARRIS/NVG595/User-Guide-2138211-Page-131.png)
![Administrator’s Handbook132set queue name queue_name police-burst [ 0... 100000000 ]Sets the burst rate in milliseconds that is used for policing traffic when the queue type is ingress.set queue name queue_name bw-sharing [ on | off ]Enables or disables bandwidth sharing, when the queue type is either priority or wfq.set queue name queue_name bps-mode [ bps | relative ]Sets the mode of the weighted fair queue. bps indicates that weights are defined as “bits-per-second”. relative indicates that weights are defined as a proportion of the sum of the weights of all inputs to the wfq.set queue name queue_name entry number input queue_nameSets the input to a priority or weighted fair queue.set queue name queue_name entry number marker queue_markerSets the marker with which packets must be marked to be directed to this queue entry's input queue when the type is priority or wfq.set queue name queue_name entry number priority [ 0... 255 ]Sets the priority level of this queue. A lower value indicates a higher priority. All entries of equal priority will be subject to a round robin algorithm.for (strict) priority queue, the higher priority gets link resource first.for wfq queue, each entry gets reserved bandwidth according to its weight. If different priority is given, any excess bandwidth is offered to higher priority entry first; otherwise any excess bandwidth is distributed to the weights ratio.set queue name queue_name entry number weight [ 0... 100 ]Sets the weight level of this weighted fair queue. Weight units are dependent on bps-mode setting. If bps-mode is set to bps, then setting the weight to 0 will allocate the remaining available bandwidth to the queue entry. If no priority specified, excess bandwidth will be distributed proportionately to the weight ratio.set queue name queue_name entry number peak [ 0... 100,000,000 ]Sets the peak level of this weighted fair queue. The peak parameter is a number of 0 through 100,000,000 in bits/second. It must be at least 50,000 for best effect. It is the peak data rate allowed on the queue entry, and usually supports bandwidth sharing, that is, if other queues are not busy and there is spare bandwidth, then a busy queue is allowed to go up to the peak rate.set queue name queue_name default-entry queue_nameIndicates the input queue which is used if there is no match between the packet queue marker and the config-ured markers in any of the queue's inputs when the queue type is priority or wfq.](https://usermanual.wiki/ARRIS/NVG595/User-Guide-2138211-Page-132.png)
![133IP Gateway commandsset ip gateway enable [ on | off ]Specifies the conn of the gateway. Normally, this would be the WAN connection. Specifies whether the ARRIS® Gateway should send packets to a default Gateway if it does not know how to reach the destination host.set ip gateway conn-oid valueSets the default Gateway to point to an associated link specified by the conn-oid value.set ip gateway address ip_addressSpecifies the IP address of a host on a local or remote network in standard dotted-quad format.IPv6 Commandsset ip6 enable [ on | off ]Enables/disables IPv6 globally. The default is off. When enabled, the following default configuration is created:set ip6 enable onset ip6 conn name "WANv6" enable onset ip6 conn name "WANv6" type rdset ip6 conn name "WANv6" mtu 1472set ip6 conn name "WANv6" side wanset ip6 conn name "WANv6" mcast-forwarding offset ip6 conn name "WANv6" icmp-echo-drop onset ip6 conn name "WANv6" traffic-class-clear onset ip6 conn name "WANv6" 6rd-tunnel type cpeset ip6 conn name "WANv6" 6rd-tunnel ipv4-conn "WAN"set ip6 conn name "WANv6" 6rd-tunnel use-dhcp-values offset ip6 conn name "WANv6" 6rd-tunnel prefix "::"set ip6 conn name "WANv6" 6rd-tunnel prefix-length 1set ip6 conn name "WANv6" 6rd-tunnel ipv4-common-bits 0set ip6 conn name "WANv6" 6rd-tunnel relay-ipv4-addr "0.0.0.0"set ip6 conn name "WANv6" 6rd-tunnel ipv4-tx-tos-mode offset ip6 conn name "WANv6" 6rd-tunnel force-tx-to-br onset ip6 conn name "WANv6" 6rd-tunnel anti-spoof-enable onset ip6 conn name "WANv6" 6rd-tunnel tx-df-bit-set onset ip6 conn name "LANv6" enable offset ip6 gateway enable onset ip6 gateway conn "WANv6"set ip6 gateway address "::"set ip6 dhcp-server enable onset ip6 dhcp-server information-only offset ip6 dhcp-server preference 255set ip6 dhcp-server authoritative onset ip6 dhcp-server rapid-commit onset ip6 dhcp-server unicast offset ip6 dhcp-server leasequery offset ip6 dhcp-server pd-enable onset ip6 dhcp-server default-lease-time 2592000set ip6 dhcp-server preferred-lifetime 604800set ip6 dhcp-server T1 302400set ip6 dhcp-server T2 483840set ip6 dhcp-server info-refresh-time 86400set ip6 dns primary-address ""set ip6 dns secondary-address ""Default IPv6 security configuration values:set security spi ip6 src-mcast-drop offset security spi ip6 invalid-mcast-scope-drop onset security spi ip6 forbidden-addr-drop onset security spi ip6 deprecated-ext-hdr-drop onset security spi ip6 src-addr-from-lan-unassigned-drop onset security spi ip6 lan-assigned-src-addr-from-wan-drop onset security spi ip6 ula-drop on](https://usermanual.wiki/ARRIS/NVG595/User-Guide-2138211-Page-133.png)
![Administrator’s Handbook134set security spi ip6 ignore-dns-from-wan onset security spi ip6 ignore-dhcp-from-wan onset security spi ip6 esp-hdr-drop onset security spi ip6 ah-hdr-drop onset security spi ip6 allow-inbound offset security spi ip4 invalid-addr-drop onset security spi ip4 private-addr-drop offset security spi flood-limit enable offset security ip6 firewall-level lowset security ip6 enable onip6 gateway connset ip6 gateway enable [ on | off ]Enables or disables IPv6 default gateway.set ip6 gateway conn valueSets the default Gateway to point to an associated link specified by the conn-oid value. Normally, this would be the WAN connection.set ip6 gateway address ipv6_addressSpecifies the IPv6 address of a host on a local or remote network in standard IPv6 format.ip6 connset ip6 conn name name enable [ on | off ]Enables/disables the IPv6 connection named name.set ip6 conn name name type [ static | autoconf | rd | dp | aiccu ]Type of connection. See below for connection types.set ip6 conn name name mtu octetsSpecified MTU of connection.set ip6 conn name name side [ lan | wan ]Specified whether the connection is LAN side or WAN side.set ip6 conn name name mcast-fwding [ off | on ] Turns IPv6 multicast forwarding for this connection off or on. The default is off. (not yet implemented)set ip6 conn name name old-prefix-purge-timer The time in seconds for which old, invalid prefixes are advertised with a lifetime of zero. The intent is to “flush out” global prefixes on attached IPv6 hosts which suddenly become invalid.Static Connectionsip6 conn (type = static): Statically configured IPv6 connection.](https://usermanual.wiki/ARRIS/NVG595/User-Guide-2138211-Page-134.png)
![135set ip6 conn name name static link-oid link_nameSets the connection named name to point to an associated link specified by the link-oid link_name.set ip6 conn name name static ipaddr ipv6_addressSpecifies a static IPv6 address.set ip6 conn name name static prefix-length valueSpecifies the prefix length of the connection's static IPv6 address. Default is 64.6rd Connectionsip6 conn (type = rd, side = wan). This WAN connection type is a 6rd tunnel over an IPv4 conn in accor-dance with RFC 5569.set ip6 conn name name 6rd-tunnel type [ cpe | gateway ]The 6rd connection can operate in “cpe” or “gateway” mode as configured by the type parameter. “cpe” mode is used when operating as a CPE; “gateway” mode is used when operating as a “6rd relay” as per RFC 5569.set ip6 conn name name 6rd-tunnel ipv4-conn-oid ipv4_nameSets the 6rd connection named name to tunnel over an associated IPv4 connection named ipv4_name.set ip6 conn name name 6rd-tunnel use-dhcp-values [ off | on ]If this parameter is on, 6rd-provisioned parameters are obtained via the underlying DHCPv4 client associated with IPv4 connection named ipv4-name. See “draft-ietf-softwire-ipv6-6rd-10” for DHCP format description.ip6 conn (type = rd, 6rd-tunnel use-dhcp-values = off). set ip6 conn name name 6rd-tunnel prefix IPv6_address6rd domain prefix.set ip6 conn name name 6rd-tunnel prefix-length value [ 1 - 63 ]6rd domain prefix length.set ip6 conn name name 6rd-tunnel ipv4-common-bits value [ 0 - 31 ]The number of bits common to all IPv4 addresses within the 6rd domain. The top-most bits of the IPv4 address will be “subtracted” from the 6rd address. If the whole 32-bit IPv4 address is contained in the 6rd IPv6 address, this value is set to zero. Default is 0, meaning all 42 bits of the IPv4 address are embedded in the 6rd prefix.set ip6 conn name name 6rd-tunnel relay-ipv4-addr IPv4_addressThe IPv4 anycast address of the 6rd border gateway.](https://usermanual.wiki/ARRIS/NVG595/User-Guide-2138211-Page-135.png)
![Administrator’s Handbook136set ip6 conn name name 6rd-tunnel ipv4-tx-tos-mode [ off | use-ipv6 ]off means the TOS field in the IPv4 header is set to zero for transmitted 6rd packets. use-ipv6 means the the TOS field in the IPv4 header is set to the DS field of the 6rd-encapsulated IPv6 packet.set ip6 conn name name 6rd-tunnel ipv4-tx-to-br [ off | on ]off means each packet set to a destination IPv6 address within the originating 6rd domain is sent directly to the 6rd endpoint. on means that all packets are transmitted to the 6rd border gateway.AICCU (SixXS tunnel broker) Connectionsip6 conn (type = aiccu, side = wan). This connection type enables an IPv6 connection to the IPv6 internet over an IPv4/NAT/UDP tunnel to a tunnel endpoint administered by tunnel broker SIXXS (www.sixxs.net).You set up an account with SIXXS, and subsequently get assigned a tunnel and a subnet (usually a /48 subnet).set ip6 conn name name aiccu username usernameSets the connection’s SIXXS username.set ip6 conn name name aiccu password passwordSets the connection’s SIXXS password.](https://usermanual.wiki/ARRIS/NVG595/User-Guide-2138211-Page-136.png)
![137Delegated Prefix Connectionsip6 conn (type = dp, side = lan). A conn of type “delegated prefix” obtains its global prefix information from one or more prefix from another IPv6 conn (typically a WAN conn), if available. In order for a “dp” con-nection to become fully operational, its underlying link must be up AND the IPv6 connection which delegates the prefix must have created one or more prefixes from which to draw the “dp” connection's global prefix.set ip6 conn name name dp link-oid link_nameSets the connection to obtain its prefix from the specified link.set ip6 conn name name dp conn-oid ipv6_conn_nameSets the dp connection named name to obtain its prefix from IPv6 connection named ipv6_conn_name.set ip6 conn name name dp subnet-length value [ 0 - 16 ]The length of the subnet portion of the delegated prefix. Default is 0.set ip6 conn name name dp subnet-id value [ 0 - 65535 ]If a subnet length is specified, the value that would occupy the of the subnet portion of the conn's IPv6 prefix. Default is 0.set ip6 conn name name dp stay-up [ off | on ]If the delegated prefix parameter stay-up is set to on, the global prefix assigned from the conn delegating the prefix remains active in the event that the conn delegating the prefix goes down, and the prefix becomes invalid. This enables local LAN-side hosts to continue to use the global prefix uninterrupted. If parameter stay-up is set to off, the connection's delegated prefix becomes invalid when the connection named ipv6-conn-name delegating the prefix goes down.Router Advertisement and DHCPv6 Serverip6 conn (side = lan). Router Advertisements and the DHCPv6 server are available on LAN-side conns as the means to provide clients with stateful or stateless IPv6 prefixes and addresses, as well as addition client param-eters such as MTU size and IPv6-addressable DNS servers.set ip6 conn name name radv enable [ off | on ]on means radv is enabled for this conn.set ip6 conn name name radv min-rtr-adv-interval seconds [ 3 - 1350 ]The minimum time allowed between sending unsolicited multicast router advertisements from the link, in sec-onds.set ip6 conn name name radv max-rtr-adv-interval seconds [ 4 - 1800 ]The maximum time allowed between sending unsolicited multicast router advertisements from the interface, in seconds. set ip6 conn name name dhcp-server enable [ off | on ]on means the DHCPv6 server is enabled for this conn.](https://usermanual.wiki/ARRIS/NVG595/User-Guide-2138211-Page-137.png)
![Administrator’s Handbook138set ip6 conn name name dhcp-server addr-count value [ 0 - 256 ]The number of IPv6 addresses available to serve to DHCPv6 stateful clients. If the addr-count parameter is set to zero, the DHCPv6 server operates in “stateless” mode.set ip6 conn name name dhcp-server start-addr-offset value [ 0 - 65536 ]If the addr-count parameter is greater than zero, the start address is an offset from the base address of the prefix which is assigned to the LAN conn.set ip6 conn name name dhcp-server lease-time seconds [ 180 - 8553600 ]DHCPv6 lease time.set ip6 conn name name dhcp-server dns-server optional IPv6 addressIPv6 address of advertised DNS server (optiona).IPv6 DHCP Serverset ip6 dhcp-server enable [ on | off ]Globally enables or disables DHCPv6 servers on all IPv6 LAN conns. The default is on.set ip6 dhcp-server information-only [ off | on ]When set to on DHCPv6 servers on all IPv6 LAN conns operate in stateless “information-only” mode. The default is off.set ip6 dhcp-server preference 255Sets the preference option, as defined in RFC1315, sec. 22.8. The preference option in the server’s Advertise message may assist a DHCPv6 client in selecting from more than one server on the LAN.set ip6 dhcp-server authoritative [ on | off ]If a client requests an IP address on a given network segment that the server knows is not valid for that seg-ment, and authoritative is set to on, the server will respond with a DHCPNAK message, causing the client to forget its IP address and try to get a new one. If authoritative is set to off, the server will ignore the client’s request. The default is on.set ip6 dhcp-server rapid-commit [ on | off ]Enables or disables the rapid commit option per rfc3315 sec 22.14. (http://tools.ietf.org/html/rfc3315#sec-tion-22.14) The default is on.set ip6 dhcp-server unicast [ off | on ]Enables or disables server unicast option per rfc3315 sec 22.12. (http://tools.ietf.org/html/rfc3315#section-22.12) The default is off.](https://usermanual.wiki/ARRIS/NVG595/User-Guide-2138211-Page-138.png)
![139set ip6 dhcp-server leasequery [ off | on ]Enables or disables DHCPv6 Leasequery option per rfc5007. (http://tools.ietf.org/rfc/rfc5007.txt) The default is off.set ip6 dhcp-server pd-enable [ on | off }Enables or disables prefix delegation globally on all DHCPv6 servers on all IPv6 LAN conns, overriding individual DHCPv6 server settings. The default is on.set ip6 dhcp-server default-lease-time secondsSets the global DHCPv6 lease time setting in seconds. The default is 2592000 (30 days).set ip6 dhcp-server preferred-lifetime secondsSets the global DHCPv6 preferred lifetime of prefixes in seconds, per RFC 3633. (http://www.ietf.org/rfc/rfc3633.txt) The default is 604800 (7 days).set ip6 dhcp-server T1 secondsset ip6 dhcp-server T2 secondsSets global DHCPv6 T1, T2 values, per RFC 3315 for local NA addresses:and also per global DHCPv6 T1, T2 values, per RFC 3633 for PD prefixes:set ip6 dhcp-server info-refresh-time secondsIn seconds, per rfc 4242: The information refresh time option specifies an upper bound for how long a client should wait before refreshing information retrieved from DHCPv6 in stateless mode. (http://tools.ietf.org/html/rfc4242) The default is 86400 (24 hours).Static Routesip6 static-route. set ip6 static-route name conn-oid ipv6_conn_nameRoute is directed to IPv6 connection named ipv6_conn_name.T1The time at which the client contacts the server from which the addresses in the IA_NA were obtained to extend the lifetimes of the addresses assigned to the IA_NA; T1 is a time duration relative to the current time expressed in units of seconds. Defaults to 302400 (3.5 days).T2The time at which the client contacts any available server to extend the lifetimes of the addresses assigned to the IA_NA; T2 is a time duration relative to the current time expressed in units of seconds. Defaults to 483840 (5.6 days).T1The time at which the requesting router should contact the delegating router from which the prefixes in the IA_PD were obtained to extend the lifetimes of the prefixes delegated to the IA_PD; T1 is a time dura-tion relative to the current time expressed in units of seconds.T2The time at which the requesting router should contact any available delegating router to extend the life-times of the prefixes assigned to the IA_PD; T2 is a time duration relative to the current time expressed in units of seconds.](https://usermanual.wiki/ARRIS/NVG595/User-Guide-2138211-Page-139.png)
![Administrator’s Handbook140set ip6 static-route name nexthop IPv6_addressNext-hop IPv6 address for forwarding. Can be a global or link-local address.set ip6 static-route name prefix IPv6_prefixIPv6 prefix.set ip6 static-route name prefix-length value [ 1 - 64 ]IPv6 prefix-length.set ip6 static-route name metric value [ 0 - 255 ]metric assigned to route.IP DNS commandsset ip dns domain-name domain_nameSpecifies the default domain name for your network. When an application needs to resolve a host name, it appends the default domain name to the host name and asks the DNS server if it has an address for the “fully qualified host name.” set ip dns primary-address ip_addressSpecifies the IP address of the primary DNS name server. set ip dns secondary-address ip_addressSpecifies the IP address of the secondary DNS name server. Enter 0.0.0.0 if your network does not have a sec-ondary DNS name server.set ip dns proxy-enable [ on | off ]This allows you to disable the default behavior of acting as a DNS proxy. The default is on.IP IGMP commandsMulticasting is a method for transmitting large amounts of information to many, but not all, computers over an internet. One common use is to distribute real time voice, video, and data services to the set of computers which have joined a distributed conference. Other uses include updating the address books of mobile com-puter users in the field, or sending out company newsletters to a distribution list.Since a router should not be used as a passive forwarding device, ARRIS Gateways use a protocol for forward-ing multicasting: Internet Group Management Protocol (IGMP).ARRIS Gateways support IGMP Version 1, Version 2, or Version 3.IGMP “Snooping” is a feature of Ethernet layer 2 switches that “listens in” on the IGMP conversation between computers and multicast routers. Through this process, it builds a database of where the multicast routers reside by noting IGMP general queries used in the querier selection process and by listening to other router protocols.](https://usermanual.wiki/ARRIS/NVG595/User-Guide-2138211-Page-140.png)
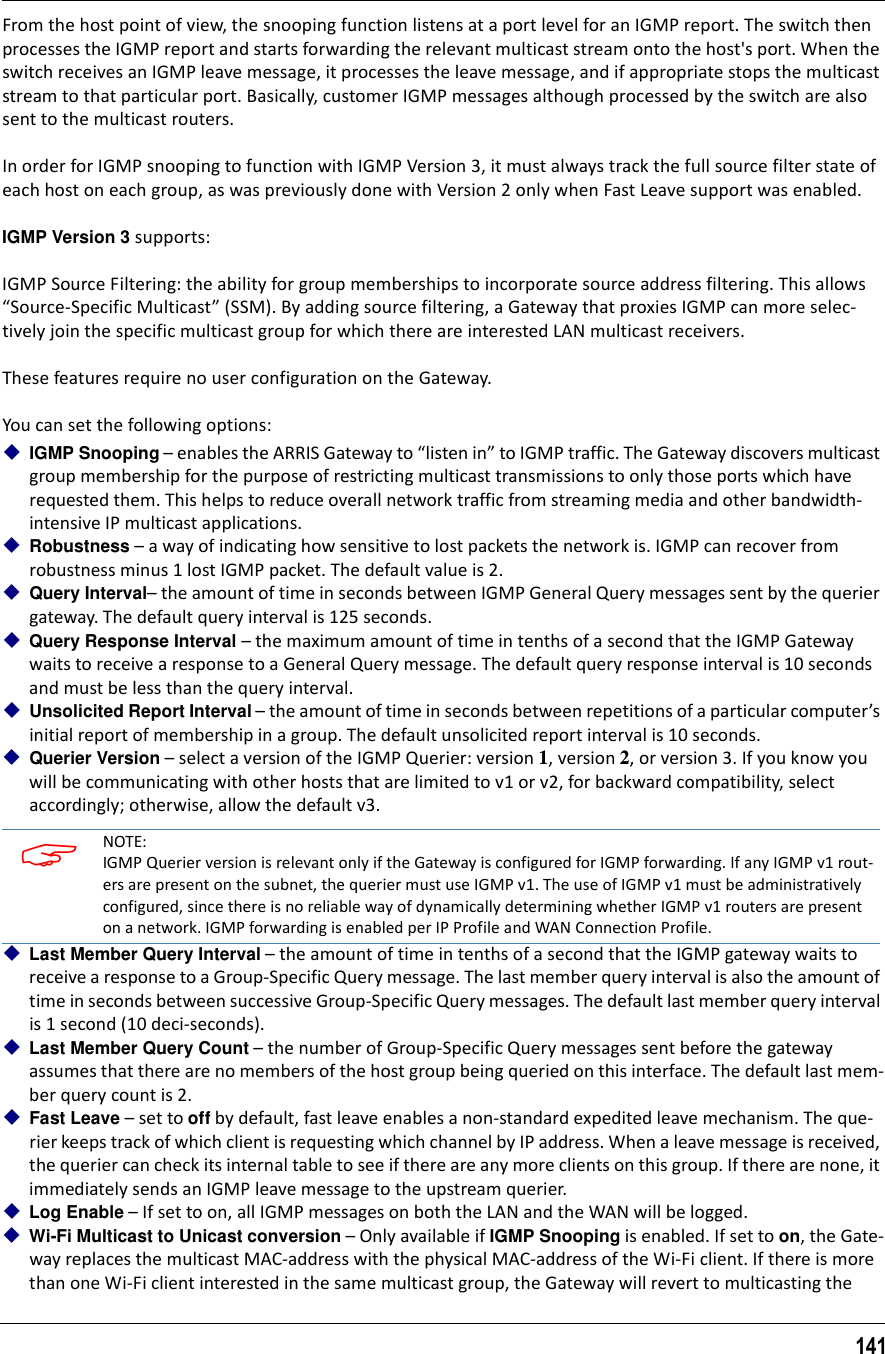
![Administrator’s Handbook142stream immediately. When one or more Wi-Fi clients leave a group, and the Gateway determines that only a single Wi-Fi client is interested in the stream, it will once again unicast the stream.set ip igmp querier-version [ 1 | 2 | 3 ]Sets the IGMP querier version: version 1, version 2, or version 3. If you know you will be communicating with other hosts that are limited to v1, for backward compatibility, select 1; otherwise, allow the default 3.set ip igmp robustness valueSets IGMP robustness range: from 2 – 255. The default is 2.set ip igmp query-interval valueSets the query-interval range: from 10 seconds – 600 seconds, The default is 125 seconds.set ip igmp query-response-interval valueSets the query-response interval range: from 5 deci-seconds (tenths of a second) – 255 deci-seconds. The default is 100 deci-seconds.set ip igmp unsolicited-report-interval valueSets the unsolicited report interval: the amount of time in seconds between repetitions of a particular com-puter’s initial report of membership in a group. The default is 10 seconds.set ip igmp fast-leave [ off | on ]Sets fast leave on or off. Set to on by default, fast leave enables a non-standard expedited leave mechanism. The querier keeps track of which client is requesting which channel by IP address. When a leave message is received, the querier can check its internal table to see if there are any more clients on this group. If there are none, it immediately sends an IGMP leave message to the upstream querier.set ip igmp max-group-memberships valueSets the maximum number of IGMP group memberships. Default is 20.set ip igmp fwd-admin-groups [ off | on ]Turns Admin group forwarding off or on. Default is off.set ip igmp last-member-interval valueSets the last member query interval: the amount of time in tenths of a second that the IGMP gateway waits to receive a response to a Group-Specific Query message. The last member query interval is also the amount of time in seconds between successive Group-Specific Query messages. The default is 1 second (10 deci-seconds).set ip igmp last-member-count valueSets the last member query count: the number of Group-Specific Query messages sent before the gateway assumes that there are no members of the host group being queried on this interface. The default is 2.set ip igmp default-fwd-allow [ on | off ]Turns default forwarding on or off. The default is on.](https://usermanual.wiki/ARRIS/NVG595/User-Guide-2138211-Page-142.png)
![143set ip igmp snoop-entry-time secondsThe snoop-entry-time is the amount of time an entry will remain in the snooping table (in seconds) after being added. An entry is added when a “JOIN” is seen from a multicast client. Any new joins (triggered by upstream queries) will reset the timeout back to seconds. If no additional joins are seen, the entry will expire after sec-onds. Default is 130.set ip igmp snooping-unreg-mode [ block | flood ]The snooping-unreg-mode can be set to block or flood. This indicates what should happen to unregistered multicast traffic – traffic that hasn't been subscribed to by any clients. If set to flood, the traffic will be sent to all LAN ports. If set to block, the traffic will not be sent to any LAN ports; it will be dropped. Default is block.NTP commandsset ip ntp enable [ on | off ]Enables or disables acquiring the time of day from an NTP (Network Time Protocol) server.set ip ntp server-address server_addressset ip ntp alt-server-address alt_server_addressSpecify the NTP server(s) to use for time updates. The NTP server-address and alt-server-address can be entered as DNS names as well as IP addresses.set ip ntp update-period minutesupdate-period specifies how often, in minutes, the Gateway should update the clock. Default is 1440.Application Layer Gateway (ALG) commandsThese commands allow you to enable or disable the router’s support for a variety of Application Layer Gate-ways (ALGs). An application layer gateway (ALG) is a NAT component that helps certain application sessions to pass cleanly through NAT. Each ALG has a slightly different function based on the particular application’s proto-col-specific requirements.An internal client first establishes a connection with the ALG. The ALG determines if the connection should be allowed or not and then establishes a connection with the destination computer. All communications go through two connections – client to ALG and ALG to destination. The ALG monitors all traffic against its rules before deciding whether or not to forward it. The ALG is the only address seen by the public Internet so the internal network is concealed. In some situations, it may be desirable to disable some of the ALGs.set ip alg esp-enable [ on | off ]Turns the ESP (Encapsulated Security Payload) ALG for file transfers on or off. Default is on.set ip alg esp-setup-timeout valueSpecifies the timeout value for the ESP ALG setup. Default is 180.set ip alg esp-stream-timeout valueSpecifies the timeout value for the ESP ALG streaming. Default is 300.](https://usermanual.wiki/ARRIS/NVG595/User-Guide-2138211-Page-143.png)
![Administrator’s Handbook144set ip alg ftp-enable [ on | off ]Turns the FTP (File Transfer Protocol) ALG for file transfers on or off. Default is on.set ip alg h323-enable [ on | off ]Turns the H323 ALG for audio, video, and data communications across IP-based networks on or off. Default is on.set ip alg pptp-enable [ on | off ]Turns the PPTP (Point-to-Point Transfer Protocol) ALG for authentication on or off. Default is on.set ip alg sip-enable [ on | off ]Turns the SIP (Session Initiation Protocol) ALG for voice communication initiation on or off. Default is on.set ip alg tftp-enable [ on | off ]Turns the TFTP (Trivial File Transfer Protocol) ALG for simple file transfers and firmware updates on or off. Default is on.Dynamic DNS Commandsset ip dynamic-dns enable [ off | on ]Enables or disables Dynamic DNS. Dynamic DNS support allows you to use the free services of www.dyndns.org. Dynamic DNS automatically directs any public Internet request for your computer's name to your current dynamically-assigned IP address. This allows you to get to the IP address assigned to your Gate-way, even though your actual IP address may change as a result of a PPPoE connection to the Internet.set ip dynamic-dns service-type [ dyndns ]set ip dynamic-dns username myusernameset ip dynamic-dns password mypasswordset ip dynamic-dns hostname myhostnameset ip dynamic-dns retries [ 1 - 64 ]Enables or disables dynamic DNS services. The default is off. If you specify dyndns.org, you must supply your hostname, username for the service, and password. Number of retries defaults to 5.Default server settingsSet ip wan-allocation mode [ normal | defaultserver ]Sets the WAN mode to direct your Gateway to forward all externally initiated IP traffic (TCP and UDP protocols only) to a default host on the LAN, otherwise this feature is disabled. Default is normal.Link commandslinks represent physical connections. Currently, port-based VLAN support is provided at this level. Your Gate-way is capable of adding and stripping 802.1Q tags to and from frames before transmission on its LAN inter-faces. See also “Filterset commands” on page 126 and “Queue commands” on page 130 for more information.](https://usermanual.wiki/ARRIS/NVG595/User-Guide-2138211-Page-144.png)
![145set link name name type [ ethernet | ppp ]Specifies whether the type of the link named name is ethernet or ppp.set link name name mtu-override [ 0 - 1500 ]Specifies whether the Maximum Transmission Unit value should be set to other than the standard 1500. A set-ting of 0 (zero) turns off override.set link name name igmp-snooping [ off | on ]Turns igmp-snooping off or on on the link named name.set link name name port-vlan ports [ lan-1... 4 | hpna | ssid-1...4 | ptm | vc-1 | vc-2 ]Specifies a port-based VLAN on the selected ports on the link named name.set link name name port-vlan priority [ 0 - 7 ]Specifies the 802.1p priority bit. If you set this to a value greater than 0, all packets of this VLAN with unmarked priority bits (pbits) will be re-marked to this priority.set link name name tagged-vlan name integer ports [ lan-1... 4 | hpna | ssid-1...4 | ptm | vc-1 | vc-2 ]Specifies a tagged VLAN on the selected port on the link named name. Default is ptm.set link name name tagged-vlan name integer vid vlan_idSpecifies a VLAN ID (vid) on the selected link named name. Default is 0.set link name name tagged-vlan name integer priority [ 0 - 7 ]Specifies the 802.1p priority bit. If you set this to a value greater than 0, all packets of this VLAN with unmarked priority bits (pbits) will be re-marked to this priority.set link name name supplicant type [ none | eap-tls ]Specifies whether the EAP TLS supplicant is enabled on the link named name. Default is eap-tls.set link name name supplicant priority [ 0 - 7 ]Sets the supplicant priority on the link named name when supplicant type is eap-tls. Default is 0.set link name name ppp sub-link link_nameSpecifies a name link_name for this secondary link when one is required.set link name name ppp auth-type [ on | off ]Enables or disables PPP login authorization.set link name name ppp username unameSpecifies a username uname for authentication on the specified link when ppp auth-type is set to on.](https://usermanual.wiki/ARRIS/NVG595/User-Guide-2138211-Page-145.png)
![Administrator’s Handbook146set link name name ppp password pwdSpecifies a password pwd for authentication on the specified link when ppp auth-type is set to on.set link name name ppp magic-number [ on | off ]Enables or disables LCP magic number negotiation.set link name name ppp protocol-compression [ off | on ]Specifies whether you want the Gateway to compress the PPP Protocol field when it transmits datagrams over the PPP link.set link name name ppp max-failures integerSpecifies the maximum number of Configure-NAK messages the PPP module can send without having sent a Configure-ACK message. The integer argument can be any number between 1 and 20.set link name name ppp max-configures integerSpecifies the maximum number of unacknowledged configuration requests that your Gateway will send. The integer argument can be any number between 1 and 20.set link name name ppp max-terminates integerSpecifies the maximum number of unacknowledged termination requests that your Gateway will send before terminating the PPP link. The integer argument can be any number between 1 and 10.set link name name ppp restart-timer integerSpecifies the number of seconds the Gateway should wait before retransmitting a configuration or termination request. The integer argument can be any number between 1 and 30.set link name name ppp connection-type [ instant-on | always-on ]Specifies whether a PPP connection is maintained by the ARRIS® Gateway when it is unused for extended peri-ods. If you specify always-on, the Gateway never shuts down the PPP link. If you specify instant-on, the Gate-way shuts down the PPP link after the number of seconds specified in the time-out setting (below) if no traffic is moving over the circuit.set link name name ppp echo-request [ on | off ]Specifies whether you want your Gateway to send LCP echo requests. You should turn off LCP echoing if you do not want the Gateway to drop a PPP link to a nonresponsive peer.set link name name ppp echo-failures integerSpecifies the maximum number of lost echoes the Gateway should tolerate before bringing down the PPP con-nection. The integer argument can be any number from between 1 and 20.set link name name ppp echo-interval integerSpecifies the number of seconds the Gateway should wait before sending another echo from an LCP echo request. The integer argument can be any number from between 5 and 300 (seconds).](https://usermanual.wiki/ARRIS/NVG595/User-Guide-2138211-Page-146.png)
![147set link name name ppp mru integerSpecifies the Maximum Receive Unit (MRU) for the PPP interface. The integer argument can be any number between 128 and 1492 for PPPoE; 1500 otherwise.set link name name ppp peer-dns [ on | off ]Controls whether the Gateway accepts nameserver addresses from the peer. The default is on, which means the Gateway expects to get nameserver addresses when the PPP link comes up. This especially applies when the primary WAN connection is PPP. However, there are some unusual situations where the PPP connection is not the primary WAN, for example when the connection is used only for management. In that situation it may be desirable to not pick up more nameserver addresses. You can do that by setting the parameter to off. Specifies an ISP name or a class or quality of service. The Service Name tells the access concentrator which net-work service the ARRIS® Gateway is trying to reach.set link name name pppoe ac-name nameSpecifies this particular Access Concentrator unit from all others.. Some access provider networks may have multiple PPPoE servers, and having the ARRIS® Gateway indicate an AC Name specifies to which one the ARRIS® Gateway is trying to connect. Management commandsAll management related items are grouped in this section.set management account administrator username usernameSpecifies the username for the administrative user – the default is admin.set management account user username usernameSpecifies the username for the non-administrative user – the default is user.set management cwmp enable [ off | on ]Turns cwmp (TR-069 CPE WAN Management Protocol) on or off. TR-069 allows a remote Auto-Config Server (ACS) to provision and manage the ARRIS Gateway. TR-069 protects sensitive data on the Gateway by not advertising its presence, and by password protection.set management cwmp acs-url acs_url:port_numberset management cwmp acs-username acs_usernameset management cwmp acs-password acs_passwordIf TR-069 WAN side management services are enabled, specifies the auto-config server URL and port number. A username and password must also be supplied, if TR-069 is enabled. NOTE:This is an expert-mode setting that will rarely be used. The setting should be left on, unless you are an expert user who knows you do not want the Gateway to acquire any nameserver addresses from this PPP connec-tion.](https://usermanual.wiki/ARRIS/NVG595/User-Guide-2138211-Page-147.png)
![Administrator’s Handbook148The auto-config server is specified by URL and port number. The format for the ACS URL is as follows:http://some_url.com:port_numberorhttp://123.45.678.910:port_numberOn units that support SSL, the format for the ACS URL can also be:https://some_url.com:port_numberorhttps://123.45.678.910:port_numberTR-064 Forum LAN Side CPE Configuration (TR-064) is an extension of UPnP. It defines more services to locally manage the ARRIS® Device. While UPnP allows open access to configure the Device's features, TR-064 requires a pass-word to execute any command that changes the Device's configuration.set management lanmgmt enable [ off | on ]Turns TR-064 LAN side management services on or off. The default is off.set management shell idle-timeout [ 1...120 ]Specifies a timeout period of inactivity for telnet access to the Gateway, after which a user must re-login to the Gateway. Default is 15 minutes for telnet.set management shell ssh-port [ 1 - 65534 ]Specifies the port number for secure shell (SSH) communication with the ARRIS® Gateway. Defaults to port 0 (off).set management shell telnet-port [ 1 - 65534 ]Specifies the port number for telnet (CLI) communication with the ARRIS® Gateway. Because port numbers in the range 0-1024 are used by other protocols, you should use numbers in the range 1025-65534 when assign-ing new port numbers to the ARRIS® Gateway telnet configuration interface. A setting of 0 (zero) will turn the server off.set management upnp enable [ off | on ]Turns Universal Plug-and-Play (UPnP) on or off.set management web http-port [ 1 - 65534 ]Specifies the port number for HTTP (web) communication with the ARRIS® Gateway. Because port numbers in the range 0-1024 are used by other protocols, you should use numbers in the range 1025-65534 when assign-ing new port numbers to the ARRIS® Gateway web configuration interface. A setting of 0 (zero) will turn the server off.set management web https-port [ 1 - 65534 ]Sets the secure web access port for secure management of the ARRIS® Gateway. Default is port 443.](https://usermanual.wiki/ARRIS/NVG595/User-Guide-2138211-Page-148.png)
![149set management web https-cert-cn stringSpecifies a certificate from a trusted certificate authority to identify the secure web access.set management web idle-timeout [ 1...120 ]Specifies a timeout period of inactivity for HTTP access to the Gateway, after which a user must re-login to the Gateway. Default is 5 minutes for HTTP.set management web isp-help-desk phone_number_stringSpecifies the ISP Help Desk phone number as it appears in the web UI. For AT&T, the default is: 1-800-288-2020.Remote access commandsset management remote-access http-port [ 1 - 65534 ]Sets the web access port for remote access management of the Gateway. Default is port 51003.set management remote-access http-idle-timeout [ 1...120 ]Specifies a timeout period of inactivity for remote HTTP access to the Gateway, after which a user must re-login to the Gateway. Default is 20 minutes for HTTP.set management remote-access http-total-timeout [ 1...120 ]Specifies a total timeout period of inactivity for remote HTTP access to the Gateway, after which a user must re-login to the Gateway. Default is 20 minutes for HTTP.set management remote-access http-max-clients numberSpecifies the maximum number of client sessions for remote web access management. Defaults to 1 (one).set management remote-access https-port [ 1 - 65534 ]Sets the secure web access port for remote access management of the Gateway. Default is port 51443.set management remote-access https-idle-timeout [ 1...120 ]Specifies a timeout period of inactivity for secure remote HTTPS access to the Gateway, after which a user must re-login to the Gateway. Default is 20 minutes for HTTPS.set management remote-access https-total-timeout [ 1...120 ]Specifies a total timeout period of inactivity for secure remote HTTPS access to the Gateway, after which a user must re-login to the Gateway. Default is 20 minutes for HTTPS. NOTE:You cannot specify a port setting of 0 (zero) for both the web and telnet ports at the same time. This would prevent you from accessing the Gateway.](https://usermanual.wiki/ARRIS/NVG595/User-Guide-2138211-Page-149.png)
![Administrator’s Handbook150set management remote-access https-max-clients numberSpecifies the maximum number of client sessions for secure remote web access management. Defaults to 1 (one).set management remote-access telnet-port [ 1 - 65534 ]Specifies the port number for remote access telnet (CLI) communication with the ARRIS® Gateway. Because port numbers in the range 0-1024 are used by other protocols, you should use numbers in the range 1025-65534 when assigning new port numbers to the ARRIS® Gateway telnet configuration interface. A setting of 0 (zero) will turn the server off. Defaults to port 0.set management remote-access telnet-idle-timeout [ 1...120 ]Specifies a timeout period of inactivity for remote telnet access to the Gateway, after which a user must re-login to the Gateway. Default is 5 minutes for telnet.set management remote-access telnet-total-timeout [ 1...120 ]Specifies a total timeout period of inactivity for remote telnet access to the Gateway, after which a user must re-login to the Gateway. Default is 20 minutes for telnet.set management remote-access telnet-max-clients numberSpecifies the maximum number of client sessions for remote telnet access management. Defaults to 4.set management remote-access ssh-port [ 1 - 65534 ]Specifies the port number for secure shell (SSH) communication with the ARRIS® Gateway. Defaults to port 22.set management remote-access ssh-idle-timeout [ 1...120 ]Specifies a timeout period of inactivity for remote secure shell (SSH) access to the Gateway, after which a user must re-login to the Gateway. Default is 5 minutes for SSH.set management remote-access ssh-total-timeout [ 1...120 ]Specifies a total timeout period of inactivity for remote secure shell (SSH) access to the Gateway, after which a user must re-login to the Gateway. Default is 20 minutes for SSH.set management remote-access ssh-max-clients numberSpecifies the maximum number of client sessions for remote secure shell (SSH) access management. Defaults to 4.set management lan-redirect enable [ off | on ]If set to on, if a WAN failure condition is detected, the LAN client's browser is redirected to a web page of fail-ure and help text information. The redirect will only occur once, as the web UI maintains a state variable to determine whether the redirect has occurred; to continually redirect would block the user from reconfiguring the router.](https://usermanual.wiki/ARRIS/NVG595/User-Guide-2138211-Page-150.png)
![151set management lan-redirect missing-filter-notify [ on | off ]If set to on, if a missing filter on the line is detected, the LAN client's browser is redirected to a web page of fail-ure and help text information. The redirect will only occur once, as the web UI maintains a state variable to determine whether the redirect has occurred; to continually redirect would block the user from reconfiguring the router.set management lan-access wan-cpe-mgmt-block [ off | web | all ]Blocks management of the device from the LAN via the web or all interface(s).TR-064DSL Forum LAN Side CPE Configuration (TR-064) is an extension of UPnP. It defines more services to locally manage the ARRIS® Gateway. While UPnP allows open access to configure the Gateway's features, TR-064 requires a password to execute any command that changes the Gateway's configuration.set management lanmgmt enable [ off | on ]Turns TR-064 LAN side management services on or off. The default is off.Physical interfaces commandsEthernet interfacesset physical enet [ 1 - 4 ] mac-addr-override mac_addrYou can override your Gateway’s Ethernet MAC address with any necessary setting. Some ISPs require your account to be identified by the MAC address, among other things. Enter your 12-character Ethernet MAC over-ride address as instructed by your service provider, for example: 12 34 AB CD 19 64set physical enet [ 1 - 4 ] port media [ auto | 100-fd | 100-hd | 10-fd | 10-hd ]Sets the Ethernet port’s media flow control: Automatic, 100 Mbps Full-Duplex, 100 Mbps Half-Duplex, 10 Mbps Full-Duplex, or 10 Mbps Half-Duplex. Default is auto.set physical enet [ 1 - 4 ] port mdix [ auto | on | off ]Sets the Ethernet port’s crossover detection. Default is off.set physical enet [ 1 - 4 ] tx-queue queue_nameAttaches the egress queue template to the ethernet interface when the queue type is egress.set physical enet [ 1 - 4 ] rx-queue queue_nameAttaches the ingress queue to the ethernet interface when the queue type is ingress.set physical enet [ 1 - 4 ] port power-save enable ""Turns power saving mode off or on.](https://usermanual.wiki/ARRIS/NVG595/User-Guide-2138211-Page-151.png)
![Administrator’s Handbook152set physical ensw max-age secondsSets the maximum delay on the Ethernet switch in seconds. Default is 300 (5 minutes).set physical ensw qos-mode [ off | p-bit ]Sets QoS up on Ethernet switch, classified by priority-bit mapping. Default is off. When p-bit is selected, pack-ets will be mapped from their priority (even if untagged) to one of four queues per-port in the Ethernet switch.See “Quality of Service (QoS) Examples” on page 213 for more information.set physical ensw p-bit-map pbit-to-4queue-mapSets the mapping from the 8 priority-bits to the four queues in the Ethernet switch. The lowest priority queue is “1”, and the highest priority queue is “4”.Example: Mapping is “1 1 2 2 3 3 4 4", where priority bit values 0 and 1 would map to queue 1, and values 2 and 3 would map to queue 2, etc.Wi-Fi interfacesset physical Wi-Fi enable [ on | off ]Enables or disables the Wi-Fi capability for supported Wi-Fi Gateways. Default is on.set physical Wi-Fi standard [ bg | b-only | g-only | bgn | n-only | an | a-only ]Sets and locks the Gateway into the Wi-Fi transmission mode you want: bg, b-only, g-only, bgn, n-only, an, or a-only. For compatibility with clients using 802.11b (up to 11 Mbps transmission), 802.11g (up to 20+ Mbps), 802.11a (up to 54 Mbit/s using the 5 GHz band), or 802.11n (from 54 Mbit/s to 600 Mbit/s with the use of four spatial streams at a channel width of 40 MHz), select B/G/N. To limit your Wi-Fi LAN to one mode or the other, select G-only, N-only, A-only, or B-only, or some combination that applies to your setup. Default is bgn.set physical Wi-Fi auto-channel [ off | on ]Turns auto-channel selection on or off.set physical Wi-Fi bandwidth [ narrow | wide ]Specifies whether the Wi-Fi channel is narrow or wide band. Default is narrow in compliance with FCC require-ments.set physical Wi-Fi default-channel [ 1... 11 ](1 through 11, for North America) on which the network will broadcast. This is a frequency range within the 2.4Ghz band. Channel selection can have a significant impact on performance, depending on other Wi-Fi activ-ity close to this Router. Channel selection is not necessary at the client computers; the clients will scan the available channels seeking access points using the same SSID as the client. Defaults to 6. NOTE:This only applies to packets sent from the host CPU to a switch port; it does not apply to port-to-port traffic.](https://usermanual.wiki/ARRIS/NVG595/User-Guide-2138211-Page-152.png)
![153set physical Wi-Fi power [ 1 - 100 ]Sets some value lower than 100 percent transmit power if your Gateway is located close to other Wi-Fi Gate-ways and causes interference. Defaults to 100 (percent).set physical Wi-Fi mul2uni [ off | on ]Turns Wi-Fi “many-to-one” packet scheduling off or on. Default is off.set physical Wi-Fi ssid 1 enable [ on | off ]Enables or disables the first (default) Wi-Fi SSID.set physical Wi-Fi ssid 1 name nameSpecifies a name for the first Wi-Fi SSID. Defaults to a unique value per router of the form “ATTxxx”.set physical Wi-Fi ssid 1 access-type [ none | allow | deny ]Specifies the type of address list for defining MAC address filtering. If set to allow, only hosts with the specified addresses will be permitted to join the WLAN of the specified SSID. If set to deny, any hosts except those with the specified addresses will be permitted to join the specified SSID. Default is none.set physical Wi-Fi ssid 1 access-list mac_addressSpecifies the MAC address of devices controlled by MAC address filtering.set physical Wi-Fi ssid 1 hidden [ off | on ]Enables or disables SSID hiding for the specified SSID. If set to on, the specified SSID will not appear on client scans. Clients must log into the SSID with the exact SSID name and credentials specified for that SSID.set physical Wi-Fi ssid 1 isolate [ off | on ]If set to on, blocks Wi-Fi clients from communicating with other Wi-Fi clients on the WLAN side of the Gate-way. Defaults to off.set physical Wi-Fi ssid 1 security [ none | wep | wpa ]Sets the Wi-Fi privacy type: none, wep, or wpa-psk. Default is none.set physical Wi-Fi ssid 2 enable [ off | on ]Enables or disables the second available SSID.set physical Wi-Fi ssid 3 enable [ off | on ]Enables or disables the third available SSID.set physical Wi-Fi ssid 4 enable [ off | on ]Enables or disables the fourth available SSID.](https://usermanual.wiki/ARRIS/NVG595/User-Guide-2138211-Page-153.png)
![Administrator’s Handbook154set physical Wi-Fi wps [ on | off ]Enables or disables Wi-Fi Protected Setup (WPS) for simplified security configuration with Wi-Fi clients that support it.set physical Wi-Fi wmm enable [ off | on ]Enables or disables Wi-Fi Multimedia settings for multimedia queueing characteristics.set physical Wi-Fi wmm power-save [ off | on ]Turns power saving mode off or on for Wi-Fi multimedia when wmm enable is on. Default is on.PPPoE relay commandsset pppoe-relay enable [ on | off ]Allows the Gateway to forward PPPoE packets. Default is on.set pppoe-relay max-sessions [ 0... 4 ]Specifies the maximum number of PPPoE relay sessions. Default is 4.NAT Pinhole commandsNAT pinholes let you pass specific types of network traffic through the NAT interfaces on the ARRIS® Gateway. NAT pinholes allow you to route selected types of network traffic, such as FTP requests or HTTP (Web) connec-tions, to a specific host behind the ARRIS® Gateway transparently.To set up NAT pinholes, you identify the type(s) of traffic you want to redirect by port number, and you specify the internal host to which each specified type of traffic should be directed.The following list identifies protocol type and port number for common TCP/IP protocols:FTP (TCP 21)telnet (TCP 23)SMTP (TCP 25),TFTP (UDP 69)set pinhole name name protocol [ tcp | udp ]Specifies the identifier for the entry in the Gateway's pinhole table. You can name pinhole table entries sequentially (1, 2, 3), by port number (21, 80, 23), by protocol, or by some other naming scheme. Specifies the type of protocol being redirected.set pinhole name name ext-port-range [ 0 - 49151 ]Specifies the first and last port number in the range being translated.set pinhole name name int-addr ipaddrSpecifies the IP address of the internal host to which traffic of the specified type should be transferred. NOTE:When configuring a PPPoE connection, you must also configure the required PPPoE authentication details (such as user name and password combinations) on the client computer.](https://usermanual.wiki/ARRIS/NVG595/User-Guide-2138211-Page-154.png)
![155set pinhole name name int-start-port [ 0 - 65535 ]Specifies the port number your ARRIS® Gateway should use when forwarding traffic of the specified type. Under most circumstances, you would use the same number for the external and internal port.Security Stateful Packet Inspection (SPI) commandsset security firewall-level [ low | high | off ]All computer operating systems are vulnerable to attack from outside sources, typically at the operating sys-tem or Internet Protocol (IP) layers. Stateful Inspection firewalls intercept and analyze incoming data packets to determine whether they should be admitted to your private LAN, based on multiple criteria, or blocked. Stateful inspection improves security by tracking data packets over a period of time, examining incoming and outgoing packets. Outgoing packets that request specific types of incoming packets are tracked; only those incoming packets constituting a proper response are allowed through the firewall.The high setting is recommended, but for special circumstances, a low level of firewall protection is available. You can also turn all firewall protection off. Defaults to low.set security spi ip4 invalid-addr-drop [ on | off ]Enables or disables whether Broadband packets with invalid source or destination addresses should be dropped. Default is on.set security spi ip4 private-addr-drop [ on | off ]Enables or disables whether Broadband packets with private source or destination addresses should be dropped. Default is off.set security spi unknown-ethertypes-drop [ on | off ]Enables or disables whether packets with unknown ether types are to be dropped. Default is on.set security spi portscan-protect [ on | off ]Enables or disables whether to detect and drop port scans. Default is on.set security spi invalid-tcp-flags-drop [ on | off ]Enables or disables whether packets with invalid TCP flag settings (NULL, FIN, Xmas, etc.) are to be dropped. Default is on.set security spi ip4 invalid-addr-drop [ on | off ]Broad sets of addresses exist that should not be used as one or both of source or destination addresses. These include the following:IP address/mask Source or destination10.0.0.0/8 source192.168.0.0.0/16 source169.254.0.0/16 source172.16.0.0/12 source](https://usermanual.wiki/ARRIS/NVG595/User-Guide-2138211-Page-155.png)
![Administrator’s Handbook156The default is on.set security spi ip4 private-addr-drop [ off | on ]Drops packets sourced or destined for private IPv4 addresses. The default is off.set security spi flood-limit enable [ on | off ]Enables or disables whether packet flooding should be detected and offending packets be dropped. Default is on.set security spi flood-limit limit pps_valueSets a maximum Packets Per Second (PPS) value for packet flood criterion. Defaults to 4.set security spi flood-limit burst-limit max_valueSets a maximum value in a packet-burst for packet flood criterion. Defaults to 8.set security spi flood-limit icmp enable [ on | off ]Enables or disables whether ICMP packet flooding should be detected and offending packets be dropped. Defaults to on.set security spi flood-limit udp enable [ off | on ]Enables or disables whether UDP packet flooding should be detected and offending packets be dropped. Defaults to off.set security spi flood-limit tcp enable [ off | on ]Enables or disables whether TCP packet flooding should be detected and offending packets be dropped. Defaults to off.set security spi flood-limit tcp syn-cookie [ on | off ]Allows TCP SYN cookies flooding to be excluded. Defaults to on.Reflexive ACLset security spi ip6 allow-inbound [ on | off ]Turns reflexive ACL on or off for IPv6.Reflexive Access Control Lists (ACL) provide that layer 4 Session information is used to make decisions about what packets to route. Reflexive ACL reduces exposure to spoofing and denial-of-service attacks, because desired inbound packet flows are usually in response to outbound traffic.224.0.0.0/4 Source / destination224.0.0.0/5 Source / destination0.0.0.0/8 Source / destination255.255.255.255 destinationIP address/mask Source or destination](https://usermanual.wiki/ARRIS/NVG595/User-Guide-2138211-Page-156.png)
![157ARRIS 9.x Gateways use the relevant session information about whether the packet flow was initiated from the LAN side (upstream) or WAN side (downstream). If the parameter security.spi.ip6.allow-inbound is set to off, then sessions which are initiated from the WAN side are disallowed. Upstream sessions are never pre-cluded because of reflexive ACL. (Of course there may be other reasons that particular packets are dropped.)For IPv4, NAT is generally enabled, so reflexive ACL is usually not an issue. VoIP commands(supported models only}Voice-over-IP (VoIP) refers to the ability to make voice telephone calls over the Internet. This differs from tradi-tional phone calls that use the Public Switched Telephone Network (PSTN). VoIP calls use an Internet protocol, Session Initiation Protocol (SIP), to transmit sound over a network or the Internet in the form of data packets. Certain ARRIS Gateway models have one or more voice ports for connecting telephone handsets. These mod-els support VoIP. If your Gateway is a VoIP model, you can configure the VoIP features.VoIP Profile Settingsset voip profile [ 1 - 4 ] prof-enable [ on | off ]Enables or disables the use and configuration of the specified VoIP profile on the ARRIS® Gateway.set voip profile [ 1 - 4 ] proxy-server addressSpecifies the IP address or fully-qualified domain name of the SIP proxy server that stations using the profile will connect to.set voip profile [ 1 - 4 ] proxy-port portSets the well-known port number the station using the profile will use to connect to the SIP proxy. Default is 5060.set voip profile [ 1 - 4 ] proxy-transport udpAssigns a proxy transport protocol to the VoIP profile. Default is udp.set voip profile [ 1 - 4 ] registrar-server addressSpecifies the IP address or fully-qualified domain name of the SIP registrar (server) that stations using the pro-file will connect to.set voip profile [ 1 - 4 ] registrar-port portnumberSets the well-known port number the user agent using the profile will use to connect to the SIP registrar. Default is 5060.set voip profile [ 1 - 4 ] registrar-transport [ tcp | udp | tls ]Assigns a registrar transport protocol to the VoIP profile. Default is udp.set voip profile [ 1 - 4 ] sip-expires [ 0 – 65535 ]Specifies the SIP registration server time-out duration from 0 – 65535 seconds for the specified profile. Default is 3600 (1 hour).](https://usermanual.wiki/ARRIS/NVG595/User-Guide-2138211-Page-157.png)
![Administrator’s Handbook158set voip profile [ 1 - 4 ] outbound-proxy-server addressSpecifies the SIP outbound proxy server for the specified profile by fully qualified server name or IP address.set voip profile [ 1 - 4 ] outbound-proxy-port portnumberSpecifies the SIP outbound proxy server port for the specified profile. Default is 5060.set voip profile [ 1 - 4 ] sip-user-domain nameSets the SIP user domain value to be used by the VoIP profile.set voip profile [ 1 - 4 ] sip-user-port [ 1 - 65535 ]Specifies the SIP user port for the specified phone, Default is 5060.set voip profile [ 1 - 4 ] sip-user-transport [ tcp | udp ]Assigns a transport protocol to the identified VoIP SIP profile. Default is udp.set voip profile [ 1 - 4 ] invite-expires secondsAssigns the “lifespan” of a SIP “INVITE” message for the identified profile. set voip profile [ 1 - 4 ] reinvite-expires secondsSets the amount of time a SIP user agent with the named profile will consider a “re-INVITE” message valid.set voip profile [ 1 - 4 ] reg-retry-interval secondsSpecifies the number of seconds that must elapse before a SIP user agent using the named profile may attempt to retry registration.set voip profile [ 1 - 4 ] reg-min-expires secondsAssign the profile a minimum length of time until a registration expires and must be renewed.set voip profile [ 1 - 4 ] registration-period secondsSets the amount of time that a registration remains valid.set voip profile [ 1 - 4 ] max-retrans-invite timesAssign the profile a maximum number of INVITE message retries. Default: 3.set voip profile [ 1 - 4 ] max-retrans-non-invite timesAssign the profile a maximum number of non-INVITE message retransmissions. Default: 4.set voip profile [ 1 - 4 ] sip-publish-method PUBLISHSet the specified profile’s SIP event state publication method to PUBLISH.](https://usermanual.wiki/ARRIS/NVG595/User-Guide-2138211-Page-158.png)
![159set voip profile [ 1 - 4 ] sip-publish-destination "DEFAULT"Set the specified profile’s SIP event state published destination to DEFAULT.set voip profile [ 1 - 4 ] sip-publish-destination2 "NULL"Clear (assign to NULL) the specified SIP profile’s second published destination.set voip profile [ 1 - 4 ] sip-publish-invocation neverSet the specified profile to never invoke PUBLISH.set voip profile [ 1 - 4 ] sip-publish-interval secondsAssign the publication interval to the specified profile.set voip profile [ 1 - 4 ] sip-publish-count -1Set the number of SIP publication events for the profile.set voip profile [ 1 - 4 ] sip-advanced-setting sip-hk-flash-mode infoAssign a SIP HK Flash mode to the profile.set voip profile [ 1 - 4 ] sip-advanced-setting sip-session-refresher autoAssign a SIP session refresh method to the identified profile.set voip profile [ 1 - 4 ] sip-advanced-setting sip-session-timer-value [value]Configure the SIP session timer value for the profile. Default: 2280.set voip profile [ 1 - 4 ] sip-advanced-setting sip-dynamic-payload [value]Set the dynamic payload value for the identified profile. Default: 101set voip profile [ 1 - 4 ] sip-advanced-setting sip-dtmf-mode [inband | rfc2833 | info]Assign a DTMF signaling mode for the SIP profile. inband: sends the DTMF digits as a normal inband tone.rfc2833: (default) sends the DTMF digits as an event as part of the RTP packet header information.info: sends the DTMF digits in the SIP INFO message.Default: rfc2833set voip profile [ 1 - 4 ] sip-advanced-setting sip-digit-map "O=15,I=6,S=3(*#101<:@C03>|*#103<:@C06>|T0|T*xx|T*xxx|E[2-9]11|E[01]911|1[2-9]xxxxxxxxx|T[2-9]xxxxxx|[2-9]xxxxxxxxx|n.)"Assign the specified digit map to the SIP profile.](https://usermanual.wiki/ARRIS/NVG595/User-Guide-2138211-Page-159.png)
![Administrator’s Handbook160set voip profile [ 1 - 4 ] sip-advanced-setting sip-compact-header [ on | off ]Sets the profile to use compact format when set to on. Sends the SIP messages with Compact Headers, reduc-ing the size of the SIP messages.set voip profile [ 1 - 4 ] sip-advanced-setting sip-q-value [ 0 - 10 ]Assigns a prioritizing SIP q-value to the profile. Default; 10set voip profile [ 1 - 4 ] sip-advanced-setting sip-qos-tos [ 0 - 255 ]Specifies the SIP Diff-Serv Type of Service (ToS) values for Quality of Service (QoS) assignment. Default: 160set voip profile [ 1 - 4 ] sip-advanced-setting sip-qos-p-bit [ 0 - 7 ]Assigns a Quality of Service Priority bit (P-Bit) value to the SIP profile. Default: 6set voip profile [ 1 - 4 ] sip-advanced-setting sip-qos-marker [ value ]Assigns a QoS packet marker to the SIP profile. Default "VO”.set voip profile [ 1 - 4 ] sip-advanced-setting fax-redundancy-level [ 0 - 1 ]Specifies the level of fax redundancy for t38 fax data rate management. Default: 1.set voip profile [ 1 - 4 ] sip-advanced-setting sip-init-de-register [ on | off ]Turns SIP de-registration on or off for the profile. Default: off.set voip profile [ 1 - 4 ] sip-advanced-setting sip-known-ip-list "[string]"Specifies a known IP address list of SIP servers for the SIP profile.set voip profile [ 1 - 4 ] sip-advanced-setting sip-allow-ip-list "[string]"Defines a string of named SIP servers that the profile may use.set voip profile [ 1 - 4 ] sip-advanced-setting sip-t1-timer-value 500Assigns a SIP t1 (estimated round trip time) value to the profile.set voip profile [ 1 - 4 ] sip-advanced-setting sip-t2-timer-value 4000Assigns a SIP t2 (maximum non-INVITE retransmit time) value to the profile.set voip profile [ 1 - 4 ] sip-advanced-setting sip-t4-timer-value 5000Assigns a SIP t4 (message clear time) value to the profile.set voip profile [ 1 - 4 ] sip-advanced-setting sip-timer-a-value 500Assigns a SIP A timer (UDP INVITE retransmit interval) value to the profile.](https://usermanual.wiki/ARRIS/NVG595/User-Guide-2138211-Page-160.png)
![161set voip profile [ 1 - 4 ] sip-advanced-setting sip-timer-b-value 32000Assigns a SIP B timer (INVITE transaction timeout) value to the profile.set voip profile [ 1 - 4 ] sip-advanced-setting sip-timer-c-value 0Assigns a SIP C timer value to the profile.set voip profile [ 1 - 4 ] sip-advanced-setting sip-timer-d-value 32000Assigns a SIP D timer (response retransmission time) value to the profile.set voip profile [ 1 - 4 ] sip-advanced-setting sip-timer-e-value 500Assigns a SIP E timer (UDP NON-INVITE retransmit interval) value to the profile.set voip profile [ 1 - 4 ] sip-advanced-setting sip-timer-f-value 32000Assigns a SIP F timer (NON-INVITE retransmit interval) value to the profile.set voip profile [ 1 - 4 ] sip-advanced-setting sip-timer-g-value 500Assigns a SIP G timer (INVITE response retransmit interval) value to the profile.set voip profile [ 1 - 4 ] sip-advanced-setting sip-timer-h-value 32000Assigns a SIP H timer (ACK reciept wait time) value to the profile.set voip profile [ 1 - 4 ] sip-advanced-setting sip-timer-i-value 5000Assigns a SIP I timer (ACK retransmit wait time) value to the profile.set voip profile [ 1 - 4 ] sip-advanced-setting sip-timer-j-value 32000Assigns a SIP J timer (non-INVITE retransmit request wait time) value to the profile.set voip profile [ 1 - 4 ] sip-advanced-setting sip-timer-k-value 0Assigns a SIP K timer (response retransmission wait time) value to the profile.set voip profile [ 1 - 4 ] sip-advanced-setting sip-reset-code "code"Sets the SIP reset code for the profile. Default: 101set voip profile [ 1 - 4 ] sip-advanced-setting sip-timer-shortinterdigit-value [value]Sets an interdigit (short) timer value for the profile. Default: 0set voip profile [ 1 - 4 ] sip-advanced-setting sip-timer-interdigit-value [value]Sets an interdigit timer value to the profile. Default: 0.set voip profile [ 1 - 4 ] rtp-advanced-setting rtp-qos-tos [value]Assigns a Real Time Protocol terms of service number code to the VoIP profile. Default: 184.](https://usermanual.wiki/ARRIS/NVG595/User-Guide-2138211-Page-161.png)
![Administrator’s Handbook162set voip profile [ 1 - 4 ] rtp-advanced-setting rtp-qos-p-bit [ 0 - 7]Sets a Real Time Protocol Priority bit (P-bit) value to the VoIP profile. Default: 6.set voip profile [ 1 - 4 ] rtp-advanced-setting rtp-qos-marker "string"Assigns a Real Time Protocol QoS packet marker to the VoIP profile. Default "VO”.set voip profile [ 1 - 4 ] rtp-advanced-setting rtp-port-range-start [value]Defines the beginning of the VoIP Real Time Protocol port range assigned to the profile. Default: 6002.set voip profile [ 1 - 4 ] rtp-advanced-setting rtp-port-range-end [value]Defines the end of the VoIP Real Time Protocol port range assigned to the profile. Default: 6200.set voip profile [ 1 - 4 ] rtp-advanced-setting rtcp-option [ on | off ]Configures the Real Time Control Protocol (RTCP) setting for the VoIP profile.set voip profile [ 1 - 4 ] rtp-advanced-setting rtcp-repeat-interval [value]Assigns a Real Time Control Protocol repeat interval value to the VoIP RTP profile. Default: 5000set voip profile [ 1 - 4 ] advanced-telephony-setting fxs-port-setting-for-fxo [ none | fxs1 | fxs2 | both | emgncy ]Sets a port to be used for the FXS (Foreign eXchange Subscriber interface) port to the FXO (Foreign eXchange Office interface -- the phone) port. Default is none.set voip profile [ 1 - 4 ] advanced-telephony-setting t38-option [ on | off ]Enables or disables T.38 fax capability for the VoIP profile.set voip profile [ 1 - 4 ] advanced-telephony-setting sip-dynamic-line-selection [ on | off ]Turns dynamic (next available) line selection off or on for the identified VoIP profile. Default is off.set voip profile [ 1 - 4 ] advanced-telephony-setting sip-dns-ns [ on | off ]Enable or disable SIP DNS NS records (for Authoritative Name Server zone specification). set voip profile [ 1 - 4 ] advanced-telephony-setting sip-dns-naptr [ on | off ]Enable or disable the Name Authority Pointer (NAPTR) DNS function in the SIP profile.set voip profile [ 1 - 4 ] advanced-telephony-setting sip-dns-srv [ on | off ]Enable or disable the use of DNS Service Locator (SRV) functions in the profile.set voip profile [ 1 - 4 ] advanced-telephony-setting testline-setting voip-testline-mode AlwaysAssign a line test mode to the VoIP profile specified.](https://usermanual.wiki/ARRIS/NVG595/User-Guide-2138211-Page-162.png)
![163set voip profile [ 1 - 4 ] advanced-telephony-setting testline-setting voip-testline-maxlenX5s [value]Set the maximum X5s length to the profile’s testline settings. Default: 6set voip profile [ 1 - 4 ] advanced-telephony-setting testline-setting voip-testline-maxfreq [value]Set the maximum frequency of line tests for the VoIP profile. Default: 10set voip profile [ 1 - 4 ] user-account [ 1 - 4 ] enable [ on | off ]Enables or disables the identified VoIP user account (indivudal account) on the specified VoIP profile.set voip profile [ 1 - 4 ] user-account [ 1 - 4 ] voip-testline-option [ on | off ]Enable or disable the test line option for the named user account on the VoIP profile. Default: off.set voip profile [ 1 - 4 ] user-account [ 1 - 4 ] fxs-line 1Sets a line in the user account to support FXS (Foreign eXchange Subscriber interface). Default is none.set voip profile [ 1 - 4 ] user-account [ 1 - 4 ] sip-user-disp-name “[string]”Assigns a display name for the identified user account on the specified VoIP profile. Default: "1000"=set voip profile [ 1 - 4 ] user-account [ 1 - 4 ] sip-user-name “[string]”Adds a user name value to the VoIP profile SIP user account. Default: "1000"set voip profile [ 1 - 4 ] user-account [ 1 - 4 ] sip-user-password “[string]”Sets the SIP password for the user account on the VoIP profile.set voip profile [ 1 - 4 ] user-account [ 1 - 4 ] sip-user-auth-id “[string]”Defines a user authentication ID value for the user account on the VoIP profile. Default: "1000"set voip profile [ 1 - 4 ] user-account [ 1 - 4 ] sip-uri ""Assigns a SIP Uniform Resource Identifier (URI) to the specified user account.set voip profile [ 1 - 4 ] user-account [ 1 - 4 ] sip-subscribe-expires [time]Sets the expiration timer value for SIP subscriptions by the identified user account. Default: 3600set voip profile [ 1 - 4 ] user-account [ 1 - 4 ] sip-service-outage-detect [ on | off ]Enables or disables the detection of SIP service outages by the user account. NOTE:User account settings may be specified for disabled user accounts, but the features will not be available unless the account is enabled.](https://usermanual.wiki/ARRIS/NVG595/User-Guide-2138211-Page-163.png)
![Administrator’s Handbook164set voip profile [ 1 - 4 ] user-account [ 1 - 4 ] codec G711U priority [ 1 - 7 | none ]Assigns a priority value to the mu-law (G711U) codec on the user account. Default: 1set voip profile [ 1 - 4 ] user-account [ 1 - 4 ] codec G711U packetization-time [value]Assigns a packetization time value to the mu-law (G711U) codec on the user account. Default: 20set voip profile [ 1 - 4 ] user-account [ 1 - 4 ] codec G711A priority [ 1 - 7 | none ]Assigns a priority value to the a-law (G711A) codec on the user account. Default: 2set voip profile [ 1 - 4 ] user-account [ 1 - 4 ] codec G711A packetization-time [value]Assigns a packetization time value to the a-law (G711A) codec on the user account. Default: 20set voip profile [ 1 - 4 ] user-account [ 1 - 4 ] codec G729 priority [ 1 - 7 | none ]Assigns a priority value to the G.729 codec on the user account. Default: 7set voip profile [ 1 - 4 ] user-account [ 1 - 4 ] codec G729 packetization-time [value]Assigns a packetization time value to the G.729 codec on the user account. Default: 20set voip profile [ 1 - 4 ] user-account [ 1 - 4 ] codec G729 annexb-support [ on | off]Enables or disabled G.729 Annex-B support on the specified user account. Default: off.set voip profile [ 1 - 4 ] user-account [ 1 - 4 ] codec G726_16 priority [ 1 - 7 | none ]Assigns a priority value to the 16 kbit/s G.726 codec on the user account. Default: 3.set voip profile [ 1 - 4 ] user-account [ 1 - 4 ] codec G726_16 payload-type [value]Assigns a payload value to the 16 kbit/s G.726 codec on the user account. Default: 102.set voip profile [ 1 - 4 ] user-account [ 1 - 4 ] codec G726_16 packetization-time [value]Assigns a packetization time value to the 16 kbit/s G.726 codec on the user account. Default: 20set voip profile [ 1 - 4 ] user-account [ 1 - 4 ] codec G726_24 priority [ 1 - 7 | none ]Assigns a priority value to the 24 kbit/s G.726 codec on the user account. Default: 4set voip profile [ 1 - 4 ] user-account [ 1 - 4 ] codec G726_24 payload-type [value]Assigns a payload value to the 24 kbit/s G.726 codec on the user account. Default: 103set voip profile [ 1 - 4 ] user-account [ 1 - 4 ] codec G726_24 packetization-time [value]Assigns a packetization time value to the 24 kbit/s G.726 codec on the user account. Default: 20set voip profile [ 1 - 4 ] user-account [ 1 - 4 ] codec G726_32 priority [ 1 - 7 | none ]Assigns a priority value to the 32 kbit/s G.726 codec on the user account. Default: 5.](https://usermanual.wiki/ARRIS/NVG595/User-Guide-2138211-Page-164.png)
![165set voip profile [ 1 - 4 ] user-account [ 1 - 4 ] codec G726_32 packetization-time [value]Assigns a packetization time value to the 32 kbit/s G.726 codec on the user account. Default: 20set voip profile [ 1 - 4 ] user-account [ 1 - 4 ] codec G726_40 priority [ 1 - 7 | none ]Assigns a priority value to the 40 kbit/s G.726 codec on the user account. Default: 6.set voip profile [ 1 - 4 ] user-account [ 1 - 4 ] codec G726_40 payload-type [value]Assigns a payload value to the 40 kbit/s G.726 codec on the user account. Default: 105.set voip profile [ 1 - 4 ] user-account [ 1 - 4 ] codec G726_40 packetization-time [value]Assigns a packetization time value to the 40 kbit/s G.726 codec on the user account. Default: 20set voip profile [ 1 - 4 ] user-account [ 1 - 4 ] codec AMR priority [ 1 - 7 | none ]Assigns a priority value to the Adaptive Multi-Rate (AMR) - Narrowband audio codec on the user account. Default: none.set voip profile [ 1 - 4 ] user-account [ 1 - 4 ] codec AMR payload-type [value]Assigns a payload value to the AMR codec on the user account. Default: 120,set voip profile [ 1 - 4 ] user-account [ 1 - 4 ] codec AMR packetization-time [value]Assigns a packetization time value to the AMR codec on the user account. Default: 20set voip profile [ 1 - 4 ] user-account [ 1 - 4 ] codec AMR_WB priority [ 1 - 7 | none ]Assigns a priority value to the Adaptive Multi-Rate - Wide Band (AMR-WB) audio codec on the user account. Default: none.set voip profile [ 1 - 4 ] user-account [ 1 - 4 ] codec AMR_WB payload-type [value]Assigns a payload value to the AMR-WB codec on the user account. Default: 122,set voip profile [ 1 - 4 ] user-account [ 1 - 4 ] codec AMR_WB packetization-time [value]Assigns a packetization time value to the AMR-WB codec on the user account. Default: 20set voip profile [ 1 - 4 ] user-account [ 1 - 4 ] call-feature call-forwarding-all-option [ on | off ]Turns unconditional call forwarding on or off for the specified user account.set voip profile [ 1 - 4 ] user-account [ 1 - 4 ] call-feature call-forwarding-on-busy-option [ on | off ]Enables or disables call forwarding when the line is busy for the specified user account.set voip profile [ 1 - 4 ] user-account [ 1 - 4 ] call-feature](https://usermanual.wiki/ARRIS/NVG595/User-Guide-2138211-Page-165.png)
![Administrator’s Handbook166call-forwarding-on-no-answer-option [ on | off ]Turns no-answer call forwarding on or off for the specified user account.set voip profile [ 1 - 4 ] user-account [ 1 - 4 ] call-feature call-waiting-option [ on | off ]Eanbles or disables call waiting for the specified user account.set voip profile [ 1 - 4 ] user-account [ 1 - 4 ] call-feature call-conferencing-option [ on | off ]Enables or disables 3-way conferencing for the user account.set voip profile [ 1 - 4 ] user-account [ 1 - 4 ] call-feature do-not-disturb-option [ on | off ]Activates or deactivates the ring-prevention (do not disturb) option for the specified user account.set voip profile [ 1 - 4 ] user-account [ 1 - 4 ] call-feature subscribe-mwi-option [ on | off ]Enables or disables the message waiting indicator for the user account.set voip profile [ 1 - 4 ] user-account [ 1 - 4 ] call-feature subscribe-send-message [ on | off ]Enables or disables message sending for the user account.set voip profile [ 1 - 4 ] user-account [ 1 - 4 ] call-feature anonymous-call-block-option [ on | off ]Sets the user account to block (on) or accept (off) calls from unidentified sources.set voip profile [ 1 - 4 ] user-account [ 1 - 4 ] call-feature call-transfer-option [ on | off ]Enables or disables the call transfer function on the user account.set voip profile [ 1 - 4 ] user-account [ 1 - 4 ] call-feature call-disconnsupervision-option [ on | off ]Enables or disabled disconnection supervision on the user account.set voip profile [ 1 - 4 ] user-account [ 1 - 4 ] call-feature call-osi-signaldur [ value ]Assigns an OSI signal duration value to the account. Default: 800.set voip profile [ 1 - 4 ] user-account [ 1 - 4 ] dsp-settings echo-option [ echo-off | echo-on | echo-on-nlp |echo-on-cng-nlp ]Specifies the conditions under which the user account will invoke or disable echo cancellation. Default: echo-on-cng-nlpset voip profile [ 1 - 4 ] user-account [ 1 - 4 ] dsp-settings echo-tail-length 0Specifies the length of the Digital Signal Processor (DSP) echo tail in milliseconds. Default: 0.set voip profile [ 1 - 4 ] user-account [ 1 - 4 ] dsp-settings vad-option [ on | off ]Enables or disables Voice Activity Detection (VAD) in the DSP for the user account.](https://usermanual.wiki/ARRIS/NVG595/User-Guide-2138211-Page-166.png)
![167Targeted Ad Insertion commandsset targeted-ad-insertion enable [ on | off ]Turns targeted ad insertion on or off. Default is on.set targeted-ad-insertion v-zone-ad [ on | off ]Specifies whether the targeted ad is zone-specific. Default is on.set targeted-ad-insertion sender-ssrc [ 0... n ]Specifies the synchronization source identifier for the sender.set targeted-ad-insertion carousel-ip-address ip_addressSpecifies the IP address of the ad carousel server.set targeted-ad-insertion carousel-port [ 0... n ]Specifies the port of the ad carousel server.set targeted-ad-insertion vcc-group-id [ 0... n ]Specifies the VCC group identifier of the ad carousel server.set targeted-ad-insertion key-identification-counter [ 0... n ]Sets a counter value for the ad key indentifier.set targeted-ad-insertion authentication-key stringSpecifies an authentication key for the targeted ads.set targeted-ad-insertion channel-change-notification [ on | off ]Turns the “change the channel’ notification on or off. Default is on.set targeted-ad-insertion retransmit [ on | off ]Turns ad retransmission on or off. Default is on.set targeted-ad-insertion unicast-filter [ on | off ]Turns unicast filtering on or off. Default is on.set targeted-ad-insertion blocked-unicast-sources stringSpecifies names of unicast targeted ad sources to be blocked.set targeted-ad-insertion hello-interval secondsSpecifies an interval for ad insertion in seconds. Default is 7200 (2 hours).](https://usermanual.wiki/ARRIS/NVG595/User-Guide-2138211-Page-167.png)
![Administrator’s Handbook168set targeted-ad-insertion hello-retransmit-min secondsSpecifies a minimum interval for retransmission of ad insertion in seconds. Default is 15 seconds.set targeted-ad-insertion hello-retransmit-max secondsSpecifies a maximum interval for retransmission of ad insertion in seconds. Default is 300 seconds.set targeted-ad-insertion vcc-ip-address ip_addressSpecifies the VCC IP address of the ad carousel server.set targeted-ad-insertion vcc-port [ 0... n ]Specifies the VCC port of the ad carousel server.set targeted-ad-insertion zones zone_numberSpecifies the zone for targeted ads when v-zone-ad is set to on.set targeted-ad-insertion during-ad-timeout valueSets a timeout value. Default is 25,000.](https://usermanual.wiki/ARRIS/NVG595/User-Guide-2138211-Page-168.png)
![169System commandsset system name nameSpecifies the name of your ARRIS® Gateway. Each ARRIS® Gateway is assigned a name as part of its factory ini-tialization. The default name for a ARRIS® Gateway consists of the word “ARRIS-7000/XXX” where “XXX” is the serial number of the device; for example, ARRIS-7000/9437188. A system name can be 1 – 255 characters long. Once you have assigned a name to your ARRIS® Gateway, you can enter that name in the Address text field of your browser to open a connection to your ARRIS® Gateway.set system time-zone [ UTC | HST10 | AKST9AKDT | YST8 | PST8PDT | MST7MDT | MST7 | CST6CDT | CST6 | EST5EDT | AST4ADT | NST3:30NDT ]time-zone of 0 is Coordinated Universal Time (UTC); options are -12 through 12 (+/- 1 hour increments from UTC time). set system auto-daylight-savings [ on | off ]Time zones honoring Daylight Saving Time may be automatically designated.set system firewall-log enable [ on | off ]Turns firewall logging on or off. The firewall log tracks attempted violations of the firewall rules. Default is on.set system firewall-log persist [ on | off ]When set to on, causes the log information to be kept in flash memory. Default is off.set system firewall-log file-size [ 4096... 65536 ]Specifies a size for the firewall logs. The most recent entries are posted to the beginning of the log. When the log becomes full, the oldest entries are dropped. The default is 16384.set system firewall-log file-count [ 2... 8 ]Specifies the number of possible log files. The default is 4.set system fastpath software-enable [ on | off ]Enables or disables the fastpath accelerator processor. Fastpath works on only TCP and UDP. Default is on.set system fastpath hardware-enable [ off | on ]Enables or disables the fastpath accelerator processor. Default is off.set system fastpath mcast-mode 3Sets the mode for multicast on the fastpath accelerator processor. NOTE:Some broadband cable-oriented Service Providers use the System Name as an important identification and support parameter. If your Gateway is part of this type of network, do NOT alter the System Name unless specifically instructed by your Service Provider.](https://usermanual.wiki/ARRIS/NVG595/User-Guide-2138211-Page-169.png)
![Administrator’s Handbook170set system scheduler enable [ off | on ]Turns the system scheduler feature on or off. The default is off.set system scheduler enable-time hr:minSpecifies a time at which to turn the system on. Default is midnight (00:00). enable-time must be supplied in 24 hour military time, colon separated, for example “05:21”.set system scheduler disable-time hr:minSpecifies a time at which to turn the system off. Default is 5 o’clock (05:00). disable-time must be supplied in 24 hour military time, colon separated, for example “21:44”.set system calendar-update enable [ on | off ]Turns the calendar update feature on or off. The device will periodically poll the update server for new operat-ing system software. The default is on.set system calendar-update interval [ monthly | biweekly ]Specifies how often the device should poll the update server, monthly or biweekly. The default is monthly.set system calendar-update protocol [ http | https | tftp ]Specifies the protocol for accessing the update server. The default is http.set system calendar-update server server_addressSpecifies the address of the update server by name or IP address. The default is "cpems.bellsouth.net".set system calendar-update username stringSpecifies the username for the update server. The default is "anonymous".set system calendar-update password stringSpecifies the password for the update server. The default is "guest".set system calendar-update fwverfile filenameSpecifies the firmware version filename to the update server. For the AT&T NVG595 the file is "netopiaNVG595_64.txt".set system calendar-update day day_of_monthSpecifies the numerical day of the month for the update server to be polled, for example, "21".set system calendar-update time hr:min_AMPMSpecifies the time of day for the update server to be polled, in the form HOUR:MINUTEAM/PM. Example: "06:00AM"](https://usermanual.wiki/ARRIS/NVG595/User-Guide-2138211-Page-170.png)
![171set system supplicant enable [ on | off ]Turns on the 802.1x supplicant functionality. You must set the corresponding "type" field in the WAN link to activate it:NOS/142253966608 (top)>> set link name WAN supplicant supplicant type (none) [ none | eap-tls ]: priority (0) [ 0 - 7 ]:Default is on.set system supplicant dest-broadcast [ off | on ]Mostly useful for debugging. If this is set to on, the destination MAC address FF:FF:FF:FF:FF:FF is used when the supplicant sends 802.lx packets. If this is off, the EAPOL-specific destination address of 01:80:C2:00:00:03 is used. Default is off.set system supplicant eap-tls-identity stringSets the identity sent by the supplicant in response to an Identity request from an 802.1x authenticator.set system supplicant server-cert-check [ on | off ]If set to on, examines the certificate chain sent by an 802.1x authenticator for validation, and ensures that the root cert of this chain is accepted by the CPE (i.e. in its trust list). Default is on.set system supplicant tagging-enable [ off | on ]Disable or enable VLAN tagging on the WAN port.set system syslog enable [ on | off ]Enables (on) or disables (off) the NVG595 syslog function. The syslog function is disabled by default. If syslog is enabled, the following additional syslog settings may be configured:set system syslog server-ip <IPv4/IPv6 Address>set system syslog server-port <port>set system syslog facility [ local0 ... local7 ]set system syslog level [ 0 ... 7 ]set system syslog log-system [ on | off ]set system syslog log-firewall [ on | off ]set system syslog log-igmp [ on | off ]set system syslog log-voice [ on | off ]You must specify the syslog server’s IP address and any custom UDP port number to identify system logging messages with the set system syslog server-ip <IPv4/IPv6 Address> and set system syslog server-port <port> commands. After the syslog server is specified, you may turn on any or all of the logging categories.The receiving server must have a properly configured syslog server package active.set system syslog server-ip <IPv4/IPv6 Address>Specifies the IP address (in IPv4 dotted decimal notation or IPv6 colon-separated hexadecimal notation) of the server that syslog messages will be sent to.](https://usermanual.wiki/ARRIS/NVG595/User-Guide-2138211-Page-171.png)
![Administrator’s Handbook172set system syslog server-port <port>Customizes the UDP port number that the syslog function marks messages to the logging server package with (range: 1 - 65535, default: 514).set system syslog facility [ local0 ... local7 ]Specifies the local facility number that syslog messages are sent to (range: local0 - local7, default: local0). set system syslog level [ 0 ... 7 ]Sets the severity level of syslog messages the NVG595 will send to the syslog server. Each severity level includes all higher-level messages (e.g; a level of 2 [Critical] will also send Alert and Emergency messages) . The severity levels are arranged and enumerated as follows:0 : Emergency1 : Alert2 : Critical3 : Error4 : Warning5 : Notice (default)6 : Info7 : Debugset system syslog log-system [ on | off ]Enables (on) or disables (off) the generation of system log messages for the syslog server. If the syslog function is enabled, system log is enabled (on) by default.set system syslog log-firewall [ on | off ]Enables (on) or disables (off) the delivery of firewall log messages to the syslog server. Firewall log is disabled by default.set system syslog log-igmp [ on | off ]Enables (on) or disables (off) the delivery of IGMP log messages to the syslog server. The igmp log is disabled by default.set system syslog log-voice [ on | off ]Enables (on) or disables (off) the generation of voice log messages for the syslog server. Voice log is disabled by default.set system voice-check enable [ off | on ]When this is set to on, and a voice call is in progress when a software update is scheduled, the software update is deferred for the voice-check interval until the call is completed, that is, the call state becomes “idle.” If set to off, and a voice call is in progress when an update is scheduled, the call is torn down. The default is on.set system voice-check interval [ 60 - 86400 ]This specifies the interval in seconds for the device to wait before attempting a software update, when a soft-ware update is scheduled but a voice call is in progress, when voice-check enable is set to on. The default is 300 (5 minutes).](https://usermanual.wiki/ARRIS/NVG595/User-Guide-2138211-Page-172.png)
![173set system voice-check max-time [ 300 - 604800 ]This specifies the maximum time in seconds for the device to continue to attempt a scheduled software update if a voice call is in progress and voice-check enable is set to on. The default is 3600 (1 hour).set system log buffer-size [ 4096... 65536 ]Specifies a size for the system log. The most recent entries are posted to the beginning of the log. When the log becomes full, the oldest entries are dropped. The default is 16384.set system log level [ low | medium | high | alerts | failures ]Specifies the types of log messages you want the ARRIS® Gateway to record. All messages with a level equal to or greater than the level you specify are recorded. For example, if you specify set system diagnostic-level medium, the diagnostic log will retain medium-level informational messages, alerts, and failure messages.Use the following guidelines:low - Low-level informational messages or greater; includes trivial status messages.medium - Medium-level informational messages or greater; includes status messages that can help monitor network traffic.high - High-level informational messages or greater; includes status messages that may be significant but do not constitute errors. The default.alerts - Warnings or greater; includes recoverable error conditions and useful operator information.failures - Failures; includes messages describing error conditions that may not be recoverable.](https://usermanual.wiki/ARRIS/NVG595/User-Guide-2138211-Page-173.png)
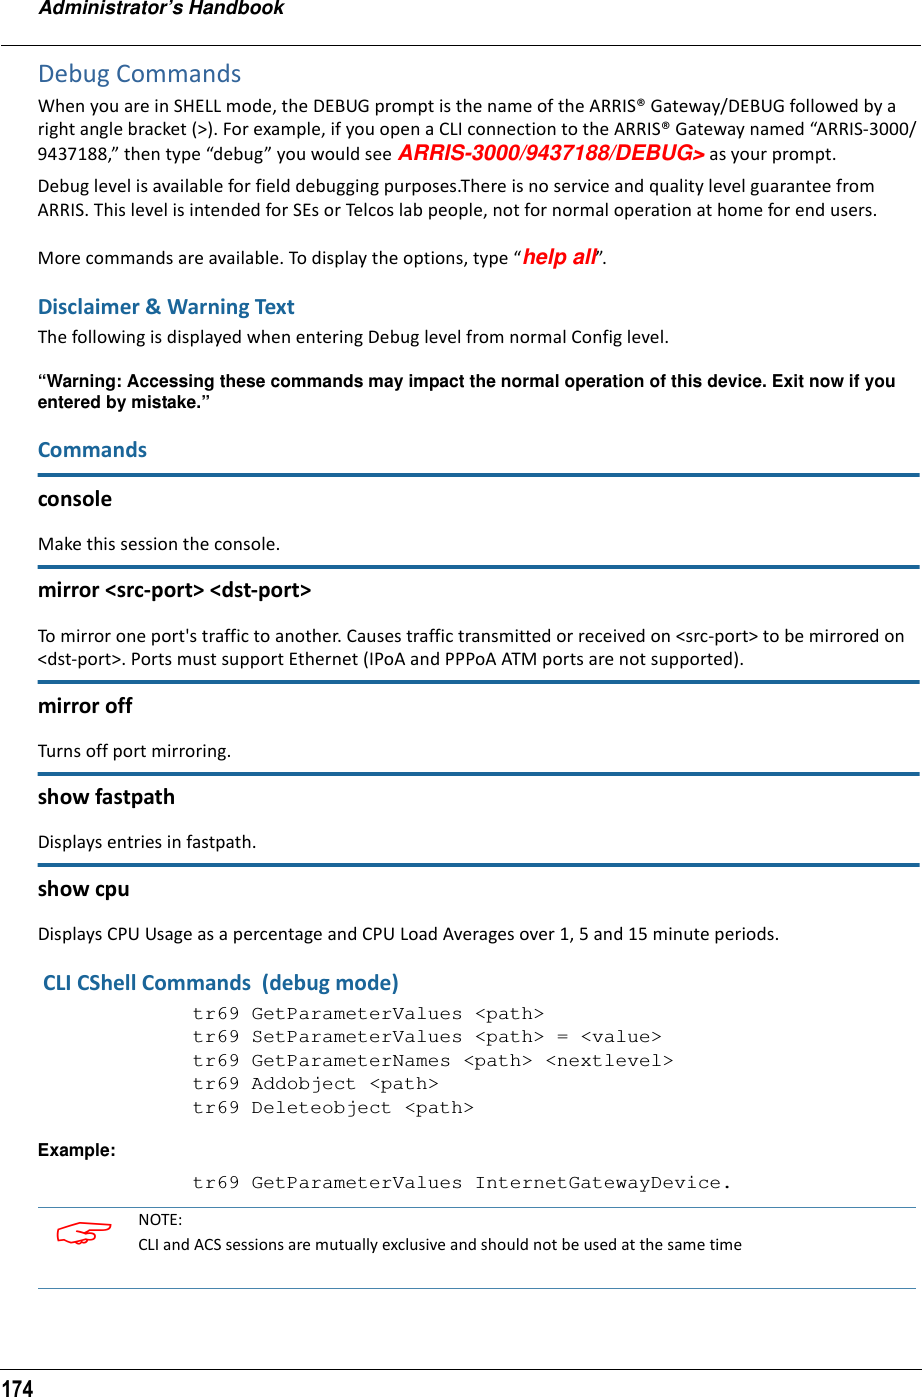
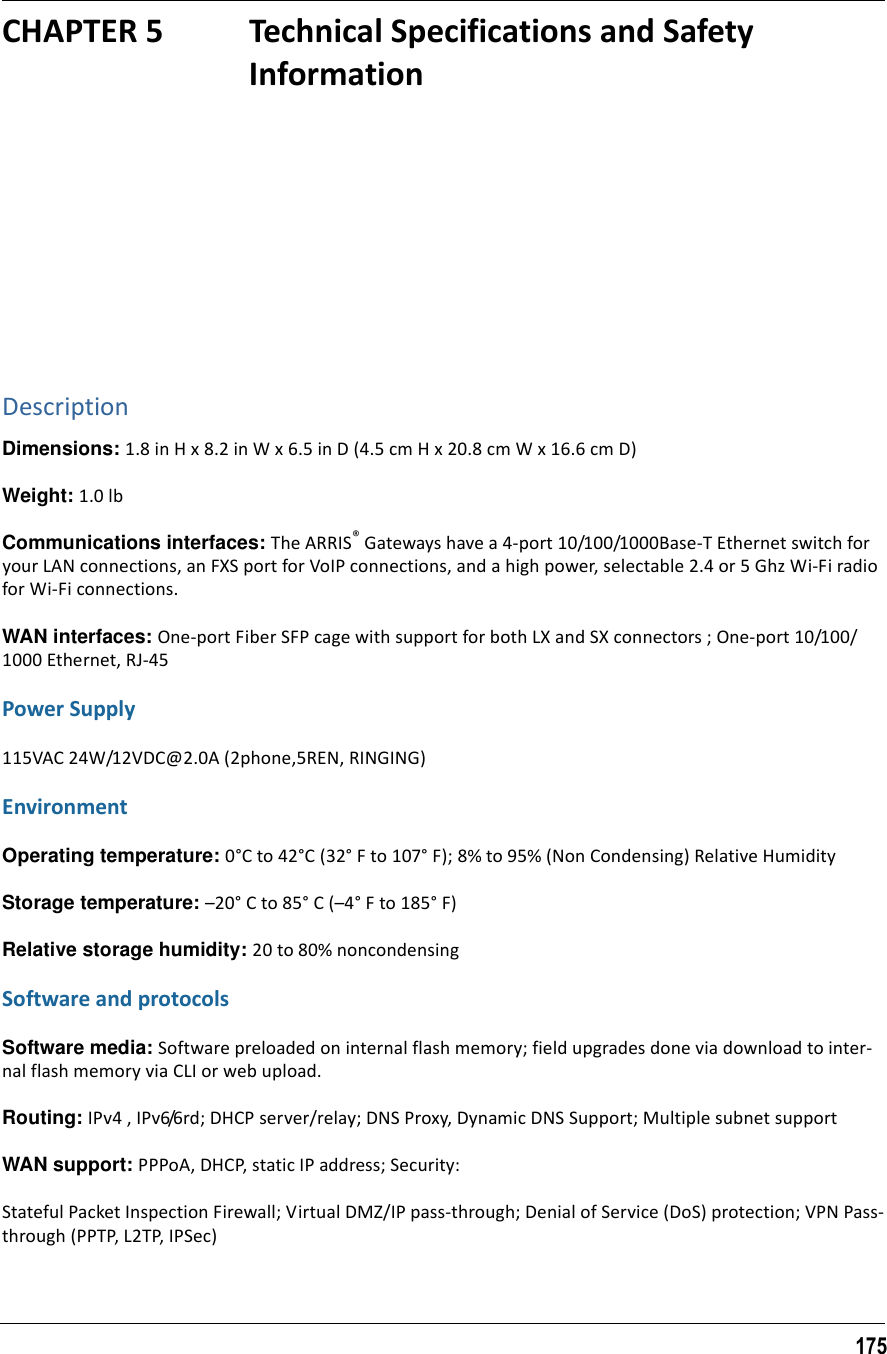
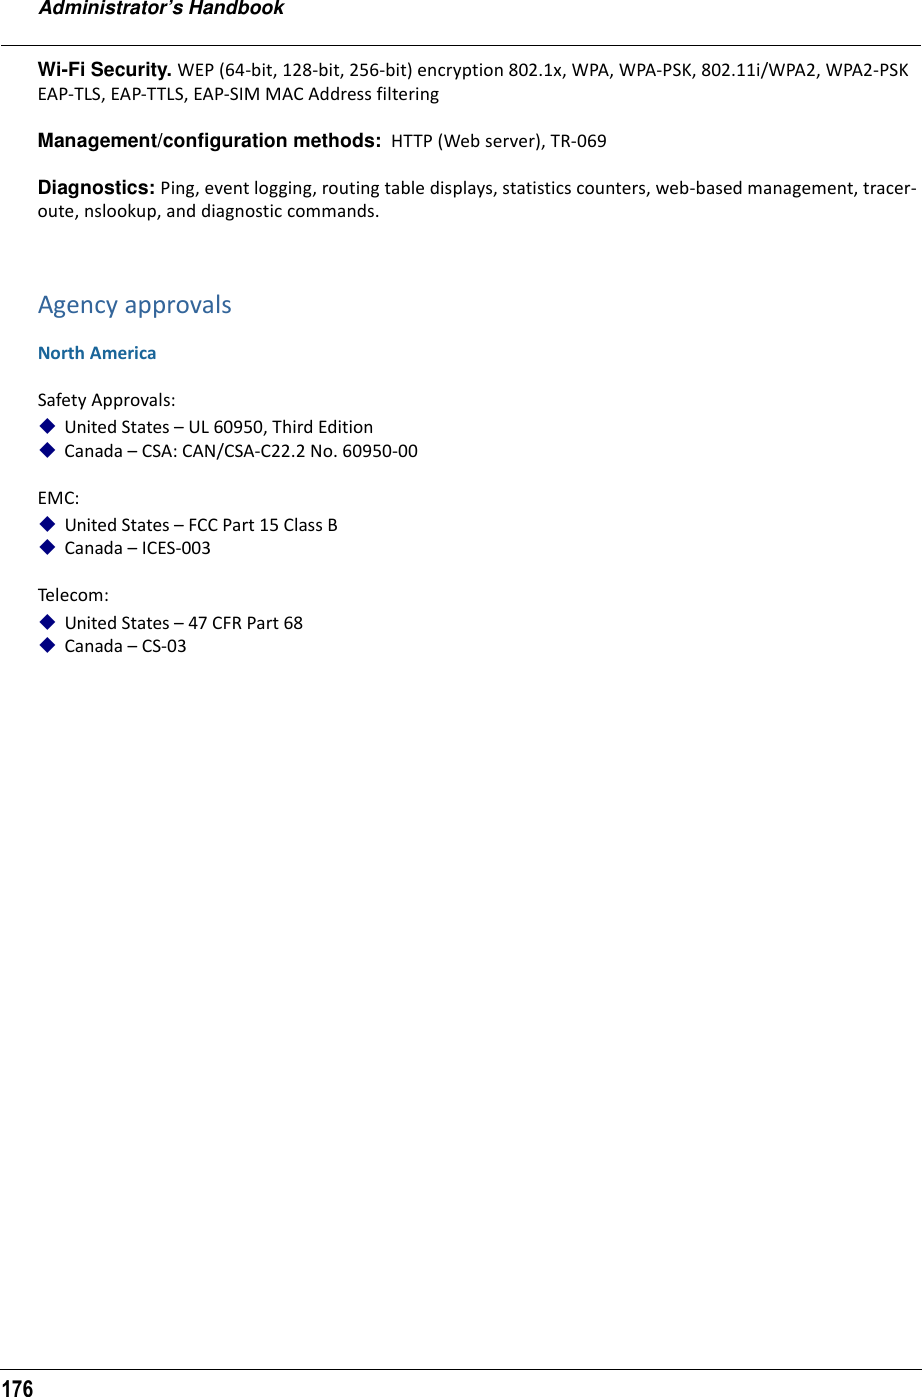

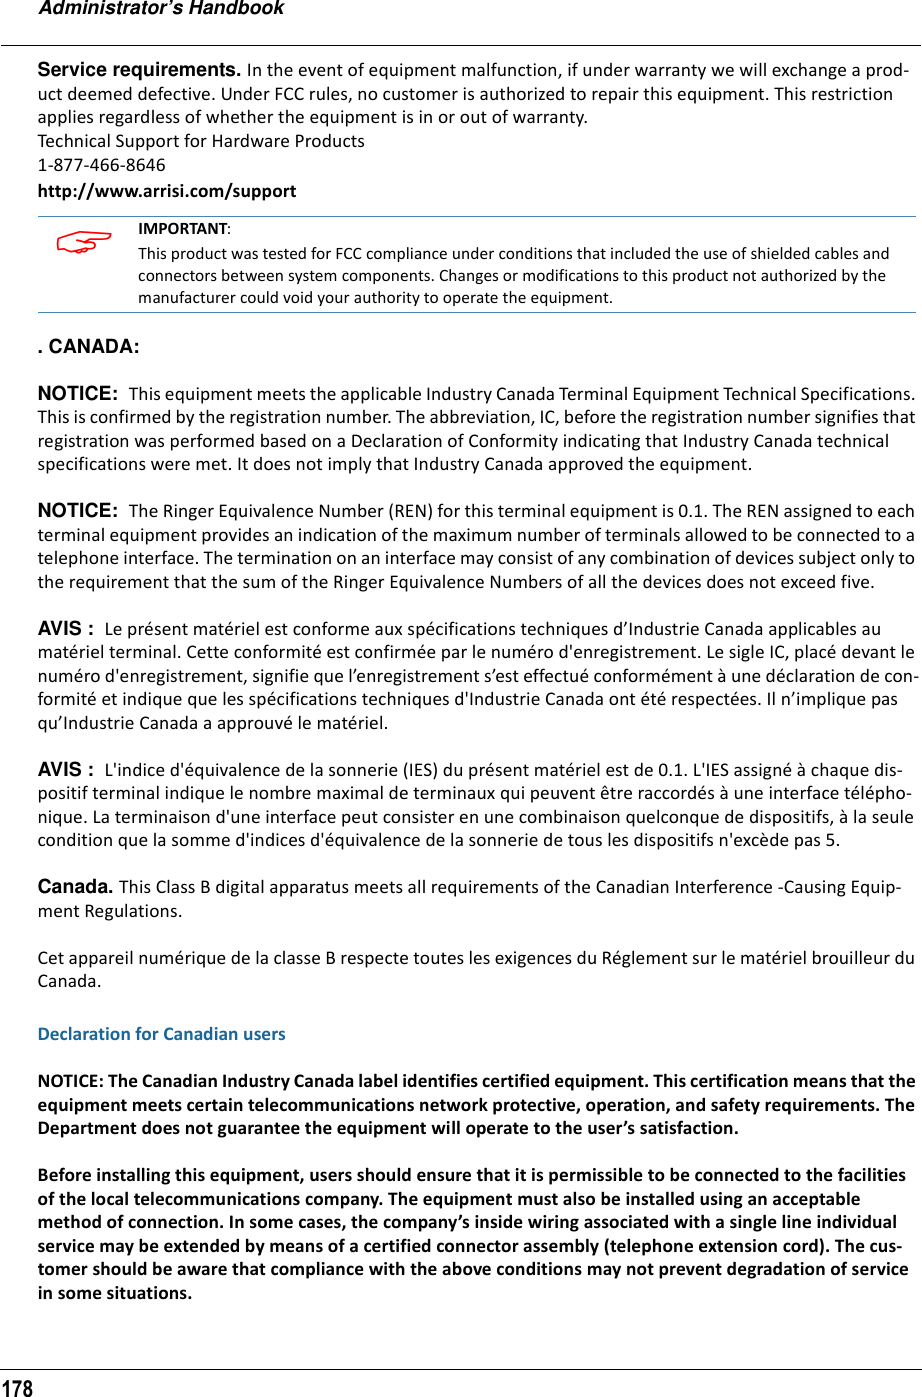
![18147 CFR Part 68 InformationFCC Requirements1. The Federal Communications Commission (FCC) has established Rules which permit this device to be directly connected to the telephone network. Standardized jacks are used for these connections. This equipment should not be used on party lines or coin phones.2. If this device is malfunctioning, it may also be causing harm to the telephone network; this device should be disconnected until the source of the problem can be determined and until repair has been made. If this is not done, the telephone company may temporarily disconnect service.3. The telephone company may make changes in its technical operations and procedures; if such changes affect the compatibility or use of this device, the telephone company is required to give adequate notice of the changes. You will be advised of your right to file a complaint with the FCC.4. If the telephone company requests information on what equipment is connected to their lines, inform them of:a. The telephone number to which this unit is connected.b. The ringer equivalence number. [0.XB]c. The USOC jack required. [RJ11C]d. The FCC Registration Number. [XXXUSA-XXXXX-XX-E]Items (b) and (d) are indicated on the label. The Ringer Equivalence Number (REN) is used to determine how many devices can be connected to your telephone line. In most areas, the sum of the REN's of all devices on any one line should not exceed five (5.0). If too many devices are attached, they may not ring properly.FCC Statementsa) This equipment complies with Part 68 of the FCC rules and the requirements adopted by the ACTA. On the bottom of this equipment is a label that contains, among other information, a product identifier in the format US:AAAEQ##TXXXX. If requested, this number must be provided to the telephone company.b) List all applicable certification jack Universal Service Order Codes (“USOC”) for the equipment: RJ11.c) A plug and jack used to connect this equipment to the premises wiring and telephone network must comply with the applicable FCC Part 68 rules and requirements adopted by the ACTA. A compliant telephone cord and modular plug is provided with this product. It is designed to be connected to a compatible modular jack that is also compliant. See installation instructions for details.d) The REN is used to determine the number of devices that may be connected to a telephone line. Excessive RENs on a telephone line may result in the devices not ringing in response to an incoming call. In most but not all areas, the sum of RENs should not exceed five (5.0). To be certain of the number of devices that may be con-nected to a line, as determined by the total RENs, contact the local telephone company. For products approved after July 23, 2002, the REN for this product is part of the product identifier that has the format US:AAAEQ##TXXXX. The digits represented by ## are the REN without a decimal point (e.g., 03 is a REN of 0.3). For earlier products, the REN is separately shown on the label.e) If this equipment, the ARRIS® Gateway, causes harm to the telephone network, the telephone company will notify you in advance that temporary discontinuance of service may be required. But if advance notice isn’t practical, the telephone company will notify the customer as soon as possible. Also, you will be advised of your right to file a complaint with the FCC if you believe it is necessary.f) The telephone company may make changes in its facilities, equipment, operations or procedures that could affect the operation of the equipment. If this happens the telephone company will provide advance notice in order for you to make necessary modifications to maintain uninterrupted service.g) If trouble is experienced with this equipment, the ARRIS® Gateway, for warranty information, please contact:](https://usermanual.wiki/ARRIS/NVG595/User-Guide-2138211-Page-181.png)


![193 END OF TERMS AND CONDITIONSGNU Lesser General Public License 2.1 (LGPL)This ARRIS Mobility product contains the following open source software packages licensed under the terms of the LGPL 2.1 license:• uClibc 0.9.27 (also Copyright (C) 2000-2006 Erik Andersen <andersen@uclibc.org>)Version 2.1, February 1999Copyright (C) 1991, 1999 Free Software Foundation, Inc.51 Franklin Street, Fifth Floor, Boston, MA 02110-1301 USAEveryone is permitted to copy and distribute verbatim copies of this license document, but changing it is not allowed.[This is the first released version of the Lesser GPL. It also counts as the successor of the GNU Library Public License, version 2, hence the version number 2.1.]PreambleThe licenses for most software are designed to take away your freedom to share and change it. By contrast, the GNU General Public Licenses are intended to guarantee your freedom to share and change free software--to make sure the software is free for all its users.This license, the Lesser General Public License, applies to some specially designated software packages--typically libraries--of the Free Software Foundation and other authors who decide to use it. You can use it too, but we suggest you first think carefully about whether this license or the ordinary General Public License is the better strategy to use in any particular case, based on the explanations below.When we speak of free software, we are referring to freedom of use, not price. Our General Public Licenses are designed to make sure that you have the freedom to distribute copies of free software (and charge for this service if you wish); that you receive source code or can get it if you want it; that you can change the software and use pieces of it in new free programs; and that you are informed that you can do these things.To protect your rights, we need to make restrictions that forbid distributors to deny you these rights or to ask you to surrender these rights. These restrictions translate to certain responsibilities for you if you distribute copies of the library or if you modify it.For example, if you distribute copies of the library, whether gratis or for a fee, you must give the recipients all the rights that we gave you. You must make sure that they, too, receive or can get the source code. If you link other code with the library, you must provide complete object files to the recipients, so that they can relink them with the library after making changes to the library and recompiling it. And you must show them these terms so they know their rights.We protect your rights with a two-step method: (1) we copyright the library, and (2) we offer you this license, which gives you legal permission to copy, distribute and/or modify the library.To protect each distributor, we want to make it very clear that there is no warranty for the free library. Also, if the library is modified by someone else and passed on, the recipients should know that what they have is not the original version, so that the original author's reputation will not be affected by problems that might be introduced by others.Finally, software patents pose a constant threat to the existence of any free program. We wish to make sure that a company cannot effectively restrict the users of a free program by obtaining a restrictive license from a patent holder. Therefore, we insist that any patent license obtained for a version of the library must be consistent with the full freedom of use specified in this license.Most GNU software, including some libraries, is covered by the ordinary GNU General Public License. This license, the GNU Lesser General Public License, applies to certain designated libraries, and is quite different from the ordinary General Public License. We use this license for certain libraries in order to permit linking those libraries into non-free programs.When a program is linked with a library, whether statically or using a shared library, the combination of the two is legally speaking a combined work, a derivative of the original library. The ordinary General Public License therefore permits such linking only if the entire combination fits its criteria of freedom. The Lesser General Public License permits more lax criteria for linking other code with the library.We call this license the "Lesser" General Public License because it does Less to protect the user's freedom than the ordinary General Public License. It also provides other free software developers Less of an advantage over competing non-free programs. These disadvantages are the reason we use the ordinary General Public License for many libraries. However, the Lesser license provides advantages in certain special circumstances.For example, on rare occasions, there may be a special need to encourage the widest possible use of a certain library, so that it becomes a de-facto standard. To achieve this, non-free programs must be allowed to use the library. A more frequent case is that a free library does the same job as widely used non-free libraries. In this case, there is little to gain by limiting the free library to free software only, so we use the Lesser General Public License.In other cases, permission to use a particular library in non-free programs enables a greater number of people to use a large body of free software. For example, permission to use the GNU C Library in non-free programs enables many more people to use the whole GNU operating system, as well as its variant, the GNU/Linux operating system.](https://usermanual.wiki/ARRIS/NVG595/User-Guide-2138211-Page-193.png)

![199This library is free for commercial and non-commercial use as long as the following conditions are aheared to. The following conditions apply to all code found in this distribution, be it the RC4, RSA, lhash, DES, etc., code; not just the SSL code. The SSL documentation included with this distribution is covered by the same copyright terms except that the holder is Tim Hudson (tjh@cryptsoft.com).Copyright remains Eric Young's, and as such any Copyright notices in the code are not to be removed. If this package is used in a product, Eric Young should be given attribution as the author of the parts of the library used. This can be in the form of a textual message at program startup or in documentation (online or textual) provided with the package. Redistribution and use in source and binary forms, with or without modification, are permitted provided that the following conditions are met: 1. Redistributions of source code must retain the copyright notice, this list of conditions and the following disclaimer.2. Redistributions in binary form must reproduce the above copyright notice, this list of conditions and the following disclaimer in the documentation and/or other materials provided with the distribution.3. All advertising materials mentioning features or use of this software must display the following acknowledgement: "This product includes cryptographic software written by Eric Young (eay@cryptsoft.com)" The word 'cryptographic' can be left out if the rouines from the library being used are not cryptographic related :-).4. If you include any Windows specific code (or a derivative thereof) from the apps directory (application code) you must include an acknowledgement:"This product includes software written by Tim Hudson (tjh@cryptsoft.com)"HIS SOFTWARE IS PROVIDED BY ERIC YOUNG ``AS IS'' AND ANY EXPRESS OR IMPLIED WARRANTIES, INCLUDING, BUT NOT LIMITED TO, THE MPLIED WARRANTIES OF MERCHANTABILITY AND FITNESS FOR A PARTICULAR PURPOSE ARE DISCLAIMED. IN NO EVENT SHALL THE AUTHOR OR CONTRIBUTORS BE LIABLE FOR ANY DIRECT, INDIRECT, INCIDENTAL, SPECIAL, EXEMPLARY, OR CONSEQUENTIAL DAMAGES (INCLUDING, BUT NOT LIMITED TO, PROCUREMENT OF SUBSTITUTE GOODS OR SERVICES; LOSS OF USE, DATA, OR PROFITS; OR BUSINESS INTERRUPTION) HOWEVER CAUSED AND ON ANY THEORY OF LIABILITY, WHETHER IN CONTRACT, STRICT LIABILITY, OR TORT (INCLUDING NEGLIGENCE OR OTHERWISE) ARISING IN ANY WAY OUT OF THE USE OF THIS SOFTWARE, EVEN IF ADVISED OF THE POSSIBILITY OF SUCH DAMAGE. The licence and distribution terms for any publically available version or derivative of this code cannot be changed. i.e. this code cannot simply be copied and put under another distribution licence [including the GNU Public Licence.]pcre 5.0PCRE is a library of functions to support regular expressions whose syntax and semantics are as close as possible to those of the Perl 5 language. Release 5 of PCRE is distributed under the terms of the "BSD" licence, as specified below. The documentation for PCRE, supplied in the "doc" directory, is distributed under the same terms as the software itself. Written by: Philip Hazel <ph10@cam.ac.uk> University of Cambridge Computing Service, Cambridge, England. Phone: +44 1223 334714. Copyright (c) 1997-2004 University of Cambridge All rights reserved. Redistribution and use in source and binary forms, with or without modification, are permitted provided that the following conditions are met: * Redistributions of source code must retain the above copyright notice, this list of conditions and the following disclaimer. * Redistributions in binary form must reproduce the above copyright notice, this list of conditions and the following disclaimer in the documentation and/or other materials provided with the distribution. * Neither the name of the University of Cambridge nor the names of its contributors may be used to endorse or promote products derived from this software without specific prior written permission. THIS SOFTWARE IS PROVIDED BY THE COPYRIGHT HOLDERS AND CONTRIBUTORS "AS IS" AND ANY EXPRESS OR IMPLIED WARRANTIES, INCLUDING, BUT NOT LIMITED TO, THE IMPLIED WARRANTIES OF MERCHANTABILITY AND FITNESS FOR A PARTICULAR PURPOSE ARE DISCLAIMED. IN NO EVENT SHALL THE COPYRIGHT OWNER OR CONTRIBUTORS BELIABLE FOR ANY DIRECT, INDIRECT, INCIDENTAL, SPECIAL, EXEMPLARY, OR CONSEQUENTIAL DAMAGES (INCLUDING, BUT NOT LIMITED TO, PROCUREMENT OF SUBSTITUTE GOODS OR SERVICES; LOSS OF USE, DATA, OR PROFITS; OR BUSINESS INTERRUPTION) HOWEVER CAUSED AND ON ANY THEORY OF LIABILITY, WHETHER IN CONTRACT, STRICT LIABILITY, OR TORT (INCLUDING NEGLIGENCE OR OTHERWISE) ARISING IN ANY WAY OUT OF THE USE OF THIS SOFTWARE, EVEN IF ADVISED OF THE POSSIBILITY OF SUCH DAMAGE. PPPD Composite LicensesCopyright (c) 1984-2000 Carnegie Mellon University. All rights reserved.](https://usermanual.wiki/ARRIS/NVG595/User-Guide-2138211-Page-199.png)
![201Copyright (C) 1995,1996,1997,1998 Lars Fenneberg <lf@elemental.net> Copyright (C) 2002 Roaring Penguin Software Inc.MPPE support is by Ralf Hofmann, <ralf.hofmann@elvido.net>, with modification from Frank Cusack, <frank@google.com>. This plugin may be distributed according to the terms of the GNU General Public License, version 2 or (at your option) any later version. ------------------------------------------------------------------------------ Author: Ben McKeegan ben@netservers.co.uk Copyright (C) 2002 Netservers This plugin may be distributed according to the terms of the GNU General Public License, version 2 or (at your option) any later version. See the respective source files to find out which copyrights apply. ------------------------------------------------------------------------------ Copyright (C) 2002 Roaring Penguin Software Inc. Permission to use, copy, modify, and distribute this software for any purpose and without fee is hereby granted, provided that this copyright and permission notice appear on all copies and supporting documentation, the name of Roaring Penguin Software Inc. not be used in advertising or publicity pertaining to distribution of the program without specific prior permission, and notice be given in supporting documentation that copying and distribution is by permission of Roaring Penguin Software Inc.. Roaring Penguin Software Inc. makes no representations about the suitability of this software for any purpose. It is provided "as is" without express or implied warranty.------------------------------------------------------------------------------Copyright (C) 1995,1996,1997,1998 Lars Fenneberg <lf@elemental.net> Permission to use, copy, modify, and distribute this software for any purpose and without fee is hereby granted, provided that this copyright and permission notice appear on all copies and supporting documentation, the name of Lars Fenneberg not be used in advertising or publicity pertaining to distribution of the program without specific prior permission, and notice be given in supporting documentation that copying and distribution is by permission of Lars Fenneberg. Lars Fenneberg makes no representations about the suitability of this software for any purpose. It is provided "as is" without express or implied warranty. ------------------------------------------------------------------------------ Copyright 1992 Livingston Enterprises, Inc. Livingston Enterprises, Inc. 6920 Koll Center Parkway Pleasanton, CA 94566 Permission to use, copy, modify, and distribute this software for any purpose and without fee is hereby granted, provided that this copyright and permission notice appear on all copies and supporting documentation, the name of Livingston Enterprises, Inc. not be used in advertising or publicity pertaining to distribution of the program without specific prior permission, and notice be given in supporting documentation that copying and distribution is by permission of Livingston Enterprises, Inc. Livingston Enterprises, Inc. makes no representations about the suitability of this software for any purpose. It is provided "as is" without express or implied warranty.------------------------------------------------------------------------------ [C] The Regents of the University of Michigan and Merit Network, Inc. 1992, 1993, 1994, 1995 All Rights Reserved](https://usermanual.wiki/ARRIS/NVG595/User-Guide-2138211-Page-201.png)