ARRIS RSG2500 Residential Seamless Mobility Gateway User Manual coverfr
ARRIS Group, Inc. Residential Seamless Mobility Gateway coverfr
ARRIS >
Manual
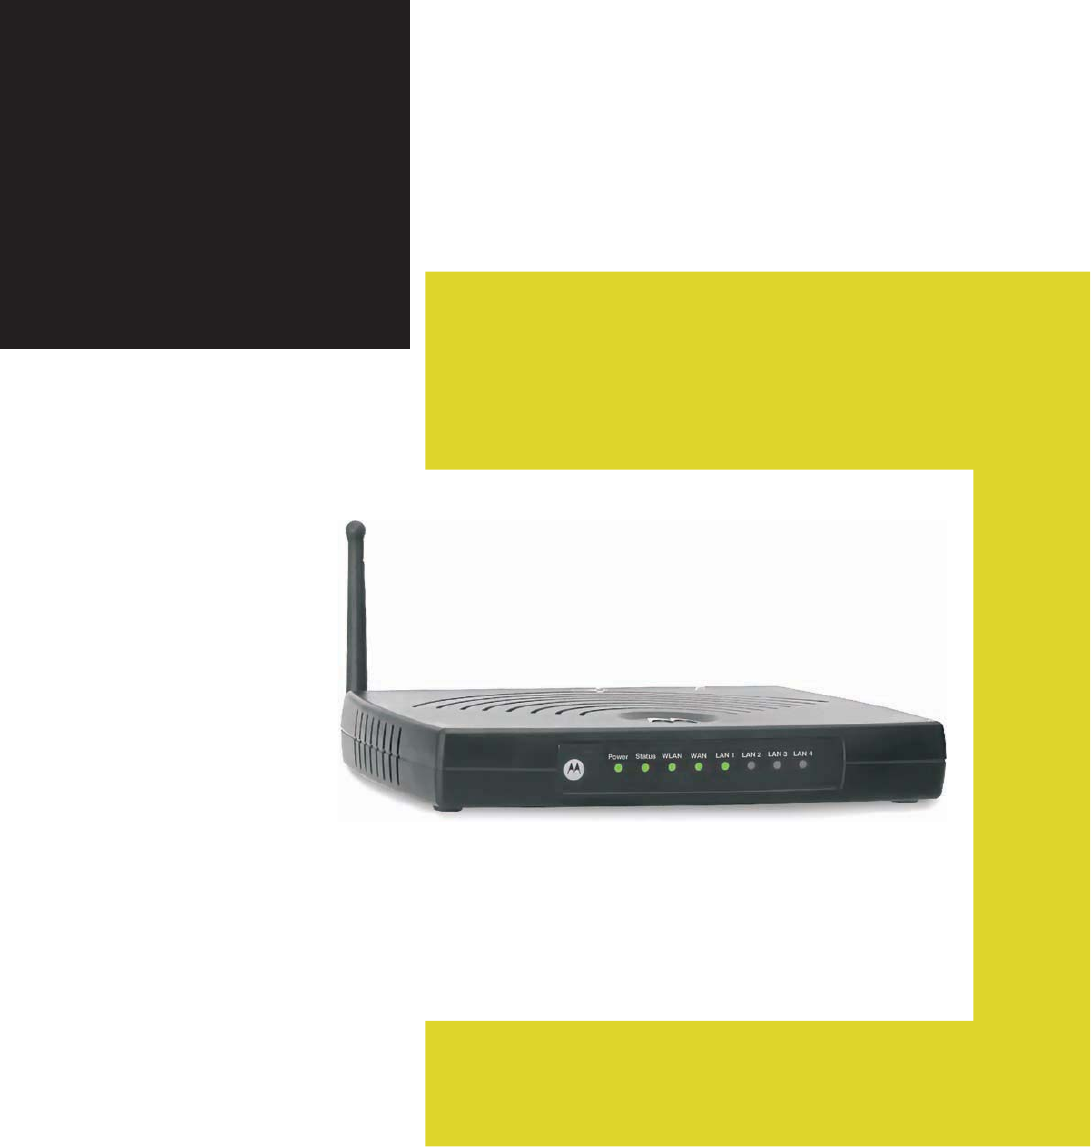
User Guide
RSG2500
Residential Seamless
Mobility Gateway
WARNING: TO PREVENT FIRE OR SHOCK HAZARD, DO NOT EXPOSE THIS PRODUCT TO RAIN OR MOISTURE. THE UNIT MUST NOT
BE EXPOSED TO DRIPPING OR SPLASHING. DO NOT PLACE OBJECTS FILLED WITH LIQUIDS, SUCH AS VASES, ON THE UNIT.
CAUTION: TO ENSURE REGULATORY COMPLIANCE, USE ONLY THE PROVIDED POWER AND INTERFACE CABLES.
CAUTION: DO NOT OPEN THE UNIT. DO NOT PERFORM ANY SERVICING OTHER THAN THAT CONTAINED IN THE INSTALLATION
AND TROUBLESHOOTING INSTRUCTIONS. REFER ALL SERVICING TO QUALIFIED SERVICE PERSONNEL.
This device must be installed and used in strict accordance with the manufacturer’s instructions as described in the user documentation that
comes with the product.
Postpone router installation until there is no risk of thunderstorm or lightning activity in the area.
Do not overload outlets or extension cords, as this can result in a risk of fire or electric shock. Overloaded AC outlets, extension cords, frayed
power cords, damaged or cracked wire insulation, and broken plugs are dangerous. They may result in a shock or fire hazard.
Route power supply cords so that they are not likely to be walked on or pinched by items placed upon or against them. Pay particular attention
to cords where they are attached to plugs and convenience receptacles, and examine the point where they exit from the product.
Place this equipment in a location that is close enough to an electrical outlet to accommodate the length of the power cord.
Place this equipment on a stable surface.
When using this device, basic safety precautions should always be followed to reduce the risk of fire, electric shock and injury to persons,
including the following:
Read all of the instructions {listed here and/or in the user manual} before you operate this equipment. Give particular attention to all safety
precautions. Retain the instructions for future reference.
Comply with all warning and caution statements in the instructions. Observe all warning and caution symbols that are affixed to this
equipment.
Comply with all instructions that accompany this equipment.
Avoid using this product during an electrical storm.There may be a risk of electric shock from lightning. For added protection for this
product during a lightning storm, or when it is left unattended and unused for long periods of time, unplug it from the wall outlet, and
disconnect the cable system. This will prevent damage to the product due to lightning and power surges.
Operate this product only from the type of power source indicated on the product’s marking label. If you are not sure of the type of power
supplied to your home, consult your dealer or local power company.
Upon completion of any service or repairs to this product, ask the service technician to perform safety checks to determine that the
product is in safe operating condition.
It is recommended that the customer install an AC surge protector in the AC outlet to which this device is connected. This is to avoid damaging
the equipment by local lightning strikes and other electrical surges.
Different types of cord sets may be used for connections to the main supply circuit. Use only a main line cord that complies with all applicable
product safety requirements of the country of use.
Installation of this product must be in accordance with national wiring codes.
Place unit to allow for easy access when disconnecting the power cord/adapter of the device from the AC wall outlet.
Wipe the unit with a clean, dry cloth. Never use cleaning fluid or similar chemicals. Do not spray cleaners directly on the unit or use forced air to
remove dust.
This product was qualified under test conditions that included the use of the supplied cables between system components. To be in compliance
with regulations, the user must use these cables and install them properly. Connect the unit to a grounding type AC wall outlet using the power
adapter supplied with the unit.
Do not cover the device, or block the airflow to the device with any other objects. Keep the device away from excessive heat and humidity and
keep the device free from vibration and dust.
Installation must at all times conform to local regulations.
FCC Compliance Class B Digital Device
This equipment has been tested and found to comply with the limits for a Class B digital device, pursuant to Part 15 of the FCC Rules. These
limits are designed to provide reasonable protection against harmful interference in a residential environment. This equipment generates, uses,
and can radiate radio frequency energy and, if not installed and used in accordance with the instructions, may cause harmful interference to
radio communications. However, there is no guarantee that interference will not occur in a particular installation. If this equipment does cause
harmful interference to radio or television reception, which can be determined by turning the equipment off and on, the user is encouraged to try
to correct the interference by one of the following measures:
Reorient or relocate the receiving antenna.
Increase the separation between the equipment and receiver.
Connect the equipment into an outlet on a circuit different from that to which the receiver is connected.
Consult the dealer or an experienced radio/TV technician for help.
CAUTION: Changes or modifications not expressly approved by Motorola for compliance could void the user’s authority to operate the
equipment.
FCC Declaration of Conformity
Motorola, Inc., Broadband Communications Sector, 101 Tournament Drive, Horsham, PA 19044, 1-215-323-1000, declares under sole
responsibility that the RSG2500 complies with 47 CFR Parts 2 and 15 of the FCC Rules as Class B digital devices. These devices comply with
Part 15 of FCC Rules. Operation of these devices is subject to the following two conditions: (1) These devices may not cause harmful
interference, and (2) these devices must accept any interference that may cause undesired operation.
Wireless LAN Information
The RSG2500 Wireless LAN products are wireless network products that use Direct Sequence Spread Spectrum (DSSS) radio technology. These products are
designed to be inter-operable with any other wireless DSSS type product that complies with:

The IEEE 802.11 Standard on Wireless LANs (Revision B and Revision G), as defined and approved by the Institute of Electrical
Electronics Engineers.
The Wireless Fidelity (Wi-Fi) certification as defined by the Wireless Ethernet Compatibility Alliance (WECA).
Wireless LAN and your Health
The RSG2500, like other radio devices, emits radio frequency electromagnetic energy, but operates within the guidelines found in radio
frequency safety standards and recommendations.
Restrictions on Use of Wireless Devices
In some situations or environments, the use of wireless devices may be restricted by the proprietor of the building or responsible
representatives of the organization. For example, using wireless equipment in any environment where the risk of interference to other devices
or services is perceived or identified as harmful.
If you are uncertain of the applicable policy for the use of wireless equipment in a specific organization or environment, you are encouraged to
ask for authorization to use the device prior to turning on the equipment.
The manufacturer is not responsible for any radio or television interference caused by unauthorized modification of the devices included with
this product, or the substitution or attachment of connecting cables and equipment other than specified by the manufacturer. Correction of
interference caused by such unauthorized modification, substitution, or attachment is the responsibility of the user.
The manufacturer and its authorized resellers or distributors are not liable for any damage or violation of government regulations that may arise
from failing to comply with these guidelines.
FCC Certification
The RSG2500 contains a radio transmitter and accordingly have been certified as compliant with 47 CFR Part 15 of the FCC Rules for
intentional radiators. Products that contain a radio transmitter are labeled with FCC ID and the FCC logo.
Caution: Exposure to Radio Frequency Radiation
To comply with the FCC RF exposure compliance requirements, the separation distance between the antenna and any person’s body (including
hands, wrists, feet and ankles) must be at least 20 cm (8 inches).
Canada — Industry Canada (IC)
The wireless radio of this device complies with RSS 210 and RSS 102 of Industry Canada.
This Class B digital device complies with Canadian ICES-003 (NMB-003). Cet appareil numérique de la classe B respects toutes les exigences
du Règlement sur le matériel brouilleur du Canada.
Caring for the Environment by Recycling
When you see this symbol on a Motorola product, do not dispose of the product with residential or commercial
waste.
Recycling your Motorola Equipment
Please do not dispose of this product with your residential or commercial waste. Some countries or regions, such
as the European Union, have set up systems to collect and recycle electrical and electronic waste items. Contact
your local authorities for information about practices established for your region. If collection systems are not
available, call Motorola Customer Service for assistance.
Copyright © 2006 Motorola, Inc.
All rights reserved. No part of this publication may be reproduced in any form or by any means or used to make any derivative work (such as
translation, transformation or adaptation) without written permission from Motorola, Inc.
Motorola reserves the right to revise this publication and to make changes in content from time to time without obligation on the part of Motorola
to provide notification of such revision or change. Motorola provides this guide without warranty of any kind, either implied or expressed,
including but not limited to, the implied warranties of merchantability and fitness for a particular purpose. Motorola may make improvements or
changes in the product(s) described in this manual at any time.
MOTOROLA and the Stylized M Logo are registered in the US Patent & Trademark Office. Microsoft, Windows, Windows Me, Windows XP,
Windows 95, Windows 98, Windows NT, Windows 2000, DirectX, MSN, and NetMeeting are either registered trademarks or trademarks of
Microsoft Corporation in the United States and/or other countries. Microsoft Windows screen shots are used by permission of Microsoft
Corporation. Wi-Fi is a registered trademark of Wireless Ethernet Compatibility Alliance, Inc. AOL is a registered trademark and Instant
Messenger is a trademark of America Online, Inc. QuickTime is a registered trademark of Apple Computer, Inc. Net2Phone is a registered
trademark of Net2Phone, Inc. Battle.net is a registered trademark of Blizzard Entertainment. UNIX is a registered trademark of The Open
Group. UPnP™ is a trademark of the UPnP™ Implementers Corporation. The following websites are not sponsored, affiliated, or controlled by
Motorola: www.dyndns.org, www.changeip.com, and www.ntp.org. All other product or service names are the property of their respective
owners.
This transmitter must not be co-located or operating in conjunction with any other antenna or transmitter.
The availability of some specific channels and/or operational frequency bands are country dependent and are firmware programmed at the
factory to match the intended destination. The firmware setting is not accessible by the end user.
Dbobeb.Joevtusz!Dbobeb!)JD*
This device complies with RSS-210 of the Industry Canada Rules. Operation is subject to the following two conditions:
1) this device may not cause interference and
2) this device must accept any interference, including interference that may cause undesired operation of the device
This device has been designed to operate with an antenna having a maximum gain of 0 dBi.
A
ntenna having a higher gain is strictly prohibited per regulations of Industry Canada. The required antenna
impedance is 50 ohms.
To reduce potential radio interference to other users, the antenna type and its gain should be so chosen that the EIRP is not more than required for
successful cò̀̈́˼˶˴̇˼̂́ˁ
IMPORTANT NOTE:
IC Radiation Exposure Statement:
˧˻˼̆ʳ˸̄̈˼̃̀˸́̇ʳ˶̂̀̃˿˼˸̆ʳ̊˼̇˻ʳ˜˖ʳ̅˴˷˼˴̇˼̂́ʳ˸̋̃̂̆̈̅˸ʳ˿˼̀˼̇̆ʳ̆˸̇ʳ˹̂̅̇˻ʳ˹̂̅ʳ˴́ʳ̈́˶̂́̇̅̂˿˿˸˷ʳ˸́̉˼̅̂́̀˸́̇ˁʳ˧˻˼̆ʳ˸̄̈˼̃̀˸́̇ʳ̆˻̂̈˿˷ʳ˵˸ʳ˼́̆̇˴˿˿˸˷ʳ˴́˷ʳ̂̃˸̅˴̇˸˷ʳ̊˼̇˻ʳ̀˼́˼̀̈̀ʳ
˷˼̆̇˴́˶˸ʳ˅˃˶̀ʳ˵˸̇̊˸˸́ʳ̇˻˸ʳ̅˴˷˼˴̇̂̅ʳʹʳ̌̂̈̅ʳ˵̂˷̌ˁ

Contents
Section 1: Overview ____________________________________ 1-1
Package Contents ..............................................................................................................................1-2
Front Panel .........................................................................................................................................1-2
Back Panel..........................................................................................................................................1-4
Section 2: Installation ___________________________________ 2-1
Positioning Your RSG2500 for Optimal Wireless Performance .....................................................2-1
Wireless Range and Transmission Speed ....................................................................................2-2
Electrical Connection ............................................................................................................................2-2
Establishing Your Connection to the RSG2500...............................................................................2-2
Manual Install—Wired Connection................................................................................................2-3
Establishing a Wireless Connection..............................................................................................2-4
Configuring Your Computers to Communicate with the RSG2500................................................2-5
Configuring Windows 98SE and ME.....................................................................................................2-5
Configuring Windows 2000 ...................................................................................................................2-6
Configuring Windows XP ......................................................................................................................2-8
Section 3: Configuration Utility Reference __________________ 3-1
Logging In...........................................................................................................................................3-1
Main Menu ..........................................................................................................................................3-1
Configuring WAN Settings ................................................................................................................3-2
WAN > BASIC...............................................................................................................................3-2
WAN > Router – PPPoE .......................................................................................................................3-3
WAN > ROUTER ..................................................................................................................................3-4
WAN > ADVANCED......................................................................................................................3-5
Configuring LAN Settings .................................................................................................................3-6
LAN > LAN SETUP .......................................................................................................................3-7
Add a Reserved DHCP Entry................................................................................................................3-8
Edit a Reserved DHCP Entry................................................................................................................3-8
LAN > ADVANCED.......................................................................................................................3-9
Configuring Wireless Network Settings.........................................................................................3-10
Wireless > NETWORK................................................................................................................3-10
Wireless > SECURITY ................................................................................................................3-12
Wireless > ADVANCED ..............................................................................................................3-15
Configuring Router Settings ...........................................................................................................3-16
Add a Static Route ..............................................................................................................................3-17
Configuring Security Settings.........................................................................................................3-18
Security > LOGS.........................................................................................................................3-18
Security > BLOCK SITE..............................................................................................................3-19
Security > BLOCK SERVICE......................................................................................................3-19
Adding a Blocked Service ...................................................................................................................3-20
Editing a Blocked Service ...................................................................................................................3-21
Security > SCHEDULE ...............................................................................................................3-21
Security > EMAIL ........................................................................................................................3-22
Configuring Management Settings.................................................................................................3-23
Management > BACKUP ............................................................................................................3-23
Management > ADMIN ...............................................................................................................3-23
Management > UPGRADE .........................................................................................................3-24
Configuring Service Settings..........................................................................................................3-24
Service > UPnP ..........................................................................................................................3-24
Service > PORT FORWARD ......................................................................................................3-25
Editing or Adding a Port Forwarding Rule...........................................................................................3-25
Service > PORT TRIGGER ........................................................................................................3-26
Adding a Port Trigger..........................................................................................................................3-27
Displaying the RSG2500 Status......................................................................................................3-28
Status > ATTACHED DEVICE....................................................................................................3-28
Status > STATUS .......................................................................................................................3-28
Section 4: Troubleshooting
RSG2500 1-1
Section 1: Overview
Congratulations on purchasing the Motorola RSG2500 Residential Seamless Mobility
Gateway. The RSG2500:
Enables a caller using a compatible dual-mode handset (DMH) to seamlessly roam
between a Wi-Fi® and cellular network without interrupting the call
Offers wireless and wired home network connectivity, eliminating the need for
standalone routers, hubs, and wireless access points:
— IEEE 802.11b and 802.11g wireless access point
— WPA or WEP wireless security
— Four-port wired Ethernet 10/100Base-T auto-MDIX router
— Firewall to protect against Internet intruders
Provides Network Address Translation (NAT), IP, and MAC filtering to hide your LAN IP
addresses from the Internet
Prioritizes voice over Internet traffic using IEEE 802.11e admission control, enabling
high-quality voice calls while surfing the Web
Works with any active cable modem or DSL broadband connection
Enables every connected device to share an Internet connection, files, pictures,
printers, or other peripherals
Supports VPN pass-through for IPSEC/PPTP/L2TP NAT tunneling
Supports CLASS services, including caller ID, call waiting, and three-way calling
Supports Universal Plug and Play (UPnP™)
Supports Routing Interface Protocol (RIP)
Provides parental control through site filtering and LAN client access control
Has upgradeable firmware to keep your RSG2500 up-to-date
Section 1 Overview
1-2 RSG2500
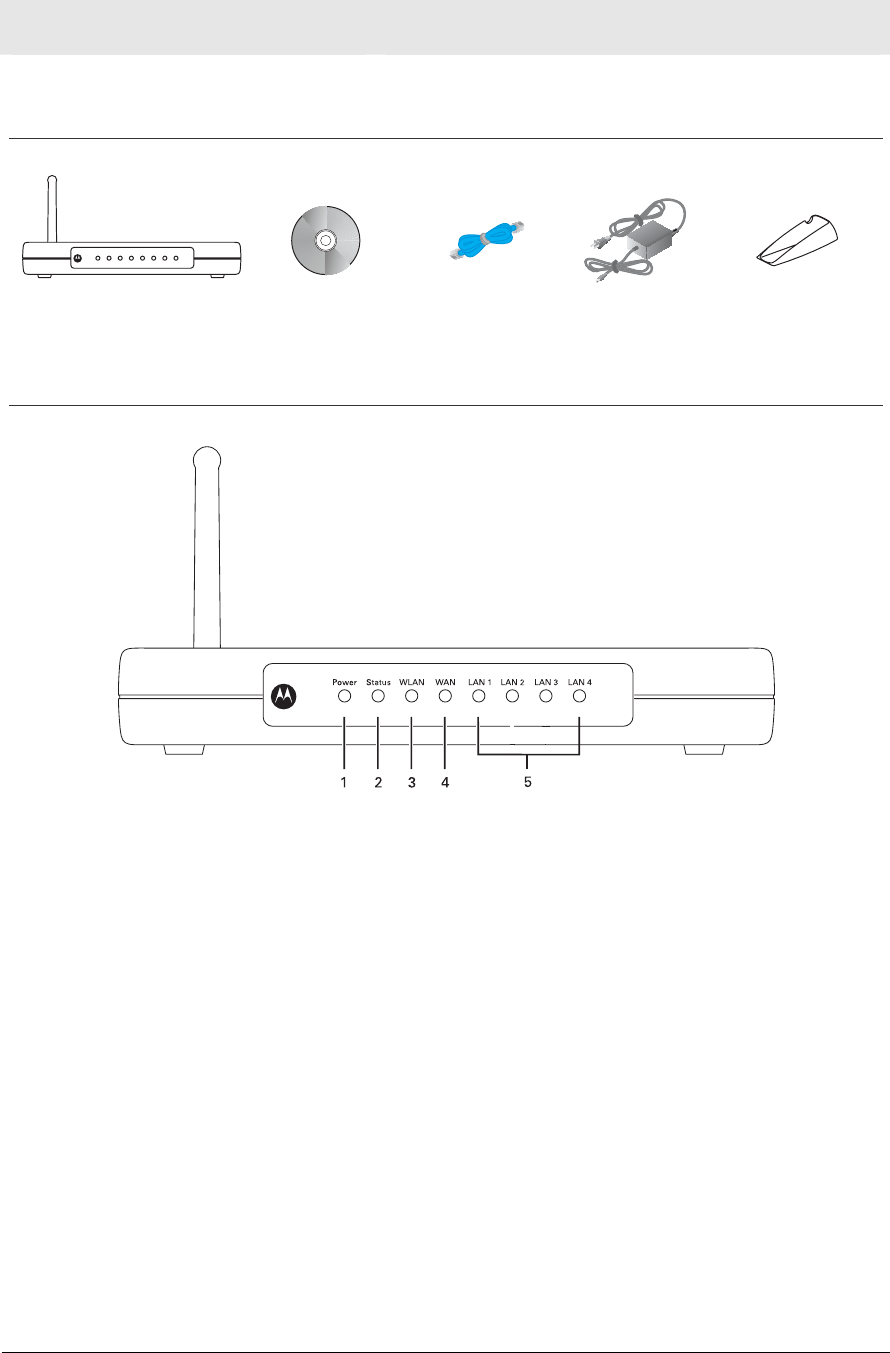
Package Contents
RSG2500 CD-ROM Ethernet cable Power supply
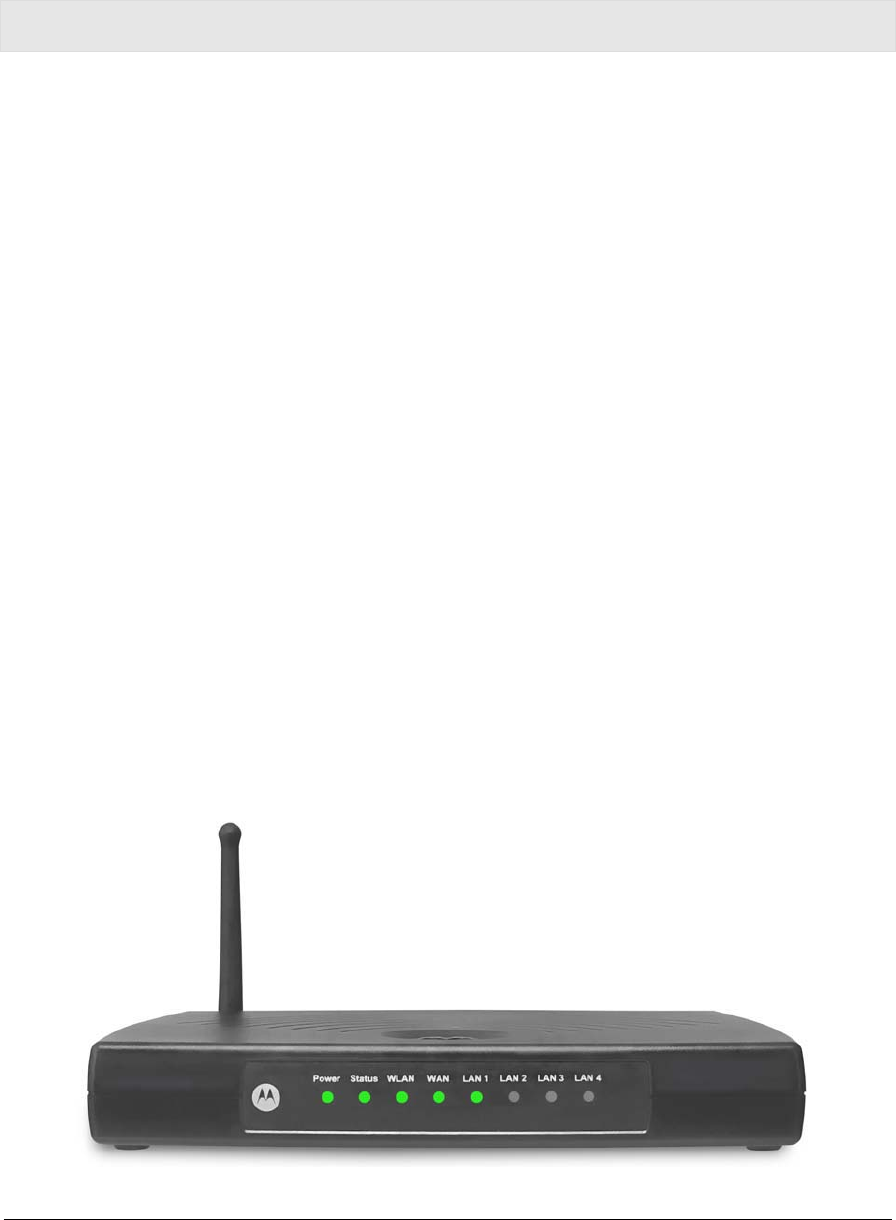
Power Status WLAN WAN LAN 1 LAN 2 LAN 3 LAN 4
Vertical mounting
stand (o )ptional
Front Panel
Key LED Condition Status
1Power On (green) The RSG2500 is plugged in and operating normally.
2Status Off Wireless security is off (configured as No Security).
Solid green Wireless security is enabled
Solid or flashing
amber
The RSG2500 is waiting for a DMH handset to
communicate.
Solid or flashing
green
The RSG2500 is pairing with a DMH handset.
3WLAN Off The wireless interface is disabled or no wireless
device is connected.
Solid green The wireless interface is enabled and a device is
connected over wireless.
Flashing green There is wireless network activity.

Overview Section 1
RSG2500 1-3
Key LED Condition Status
4WAN Off The RSG2500 is not connected to a cable or DSL
modem.
Solid yellow The RSG2500 is connected to a cable or DSL modem
(10Base-T).
Solid green The RSG2500 is connected to a cable or DSL modem
(100Base-T).
Flashing (yellow
or green)
There is activity on the WAN connection between your
RSG2500 and modem.
5Off No device is connected to this Ethernet port. LAN
1 to 4 Solid yellow A device is connected to this port (10Base-T).
Solid green A device is connected to this port (100Base-T).
Flashing (yellow
or green)
There is activity on this LAN connection.
Section 1 Overview
1-4 RSG2500
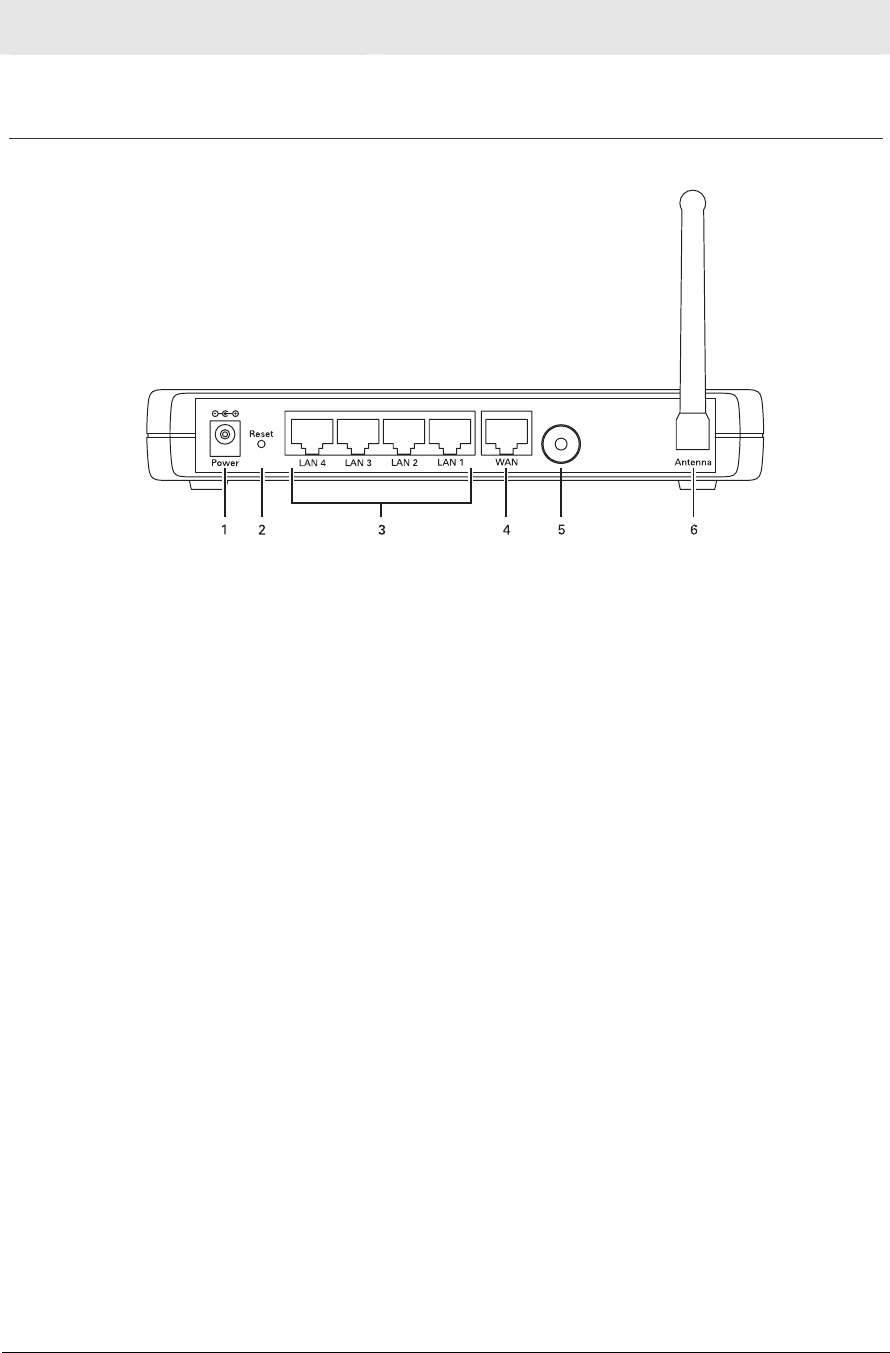
Back Panel
Key Feature Description
1 Power
Plug in the AC power adapter here.
2 Reset
If the RSG2500 experiences trouble connecting to the Internet, briefly press and
release this button to re-establish your connection.
To reset the RSG2500 to its factory default settings, press and hold this button for
more than five seconds. This clears the user settings, including User ID,
Password, IP Address, and Subnet Mask. To reconfigure the RSG2500, see
Section 3, Configuration Utility Reference.
3 LAN
1 to 4
RJ-45 ports to connect up to four computers or other Ethernet devices directly to
the RSG2500 using Ethernet cables. You can connect another router or a switch
to any LAN port to expand your network to more than four devices.
The connected devices can have a 10Base-T or 100Base-T Ethernet adapter. You
can use a straight-through or crossover Ethernet cable.
4 WAN
Connect your modem to this RJ-45 port using the Ethernet cable supplied with the
RSG2500. The connected modem can support 10Base-T or 100Base-T. You can
use a straight-through or crossover Ethernet cable.
5 Pairing
Button
Use this button to simplify Wi-Fi configuration with a compatible dual-mode
handset.
6 Antenna
The antenna used for wireless connections. You can rotate the antenna to obtain
the best signal reception.

RSG2500 2-1
Section 2: Installation
We recommend following the step-by-step easy install process on the included RSG2500
CD-ROM. The Installation Wizard automatically starts when you insert the CD-ROM in your
Windows PC’s CD drive and leads you through setting up your RSG2500.
If you cannot or prefer not to use the Installation Assistant, this section will help you:
x Physically connect your RSG2500
x Establish a first connection between a computer and the RSG2500
Once this first connection is made, you can configure the RSG2500 to support all of the
wired or wireless connections you need. If you prefer to set up the RSG2500 software
manually, refer to the Manual Software Setup found later in this section.
Positioning Your RSG2500 for Optimal Wireless Performance
To achieve the best wireless performance, review these guidelines before deciding where
to place your RSG2500:
x Connect at least one computer through a wired Ethernet connection.
x Placing your RSG2500 in the physical center of your network is best, because its
antenna sends out signal in all directions.
x Placing the RSG2500 in a higher location, such as on top of a cabinet, helps disperse
the signal cleanly, especially to upper floors.
x If possible, position your RSG2500 so there is direct line of sight between it and other
home network devices using a wireless connection.
x Avoid placing the RSG2500 next to large, solid objects like computer cases, monitors,
walls, fireplaces, etc. This helps the signal penetrate more cleanly.
x Other wireless devices such as televisions, radios, microwaves, or 2.4 GHz cordless
telephones can interfere with the signal. Keep these devices away from the RSG2500.
x Mirrors, especially those that are silver-coated, can reduce transmission performance.

Section 2 Installation
2-2 RSG2500
Wireless Range and Transmission Speed
The following table lists the expected wireless range. It is only a guide. Your actual
throughput and distance may vary. The radio waves radiate out in a donut-shaped pattern.
The waves travel through walls and floors, but transmission power and distance are affected.
Data Rate Open Area Closed Area
54 Mbps Up to 100 ft (30 m) Up to 60 ft (18 m)
11 Mbps Up to 900 ft (275 m) Up to 160 ft (49 m)
5.5 Mbps Up to 1300 ft (396 m) Up to 200 ft (61 m)
1 or 2 Mbps Up to 1500 ft (457 m) Up to 300 ft (91 m)
Electrical Connection
The RSG2500 has no On/Off switch. It is powered on by plugging in its power adapter.
1Connect the power adapter to the Power port on the back of the RSG2500.
2Plug the power adapter into an unswitched, grounded, and surge-protected AC power
outlet. The Power LED on the front panel lights green when connected properly.
Establishing Your Connection to the RSG2500
You can now establish your first wired network connection:
We recommend following the step-by-step easy install process on the included
RSG2500 CD-ROM. The Installation Wizard automatically runs when you insert the
RSG2500 CD-ROM in your computer CD-ROM drive. It confirms that the antenna and
electrical connections have been made, and then leads you step-by-step through
setting up your RSG2500.
If you do not wish to use the Installation Wizard, you can manually configure this first
wired connection.
Installation Section 2
RSG2500 2-3
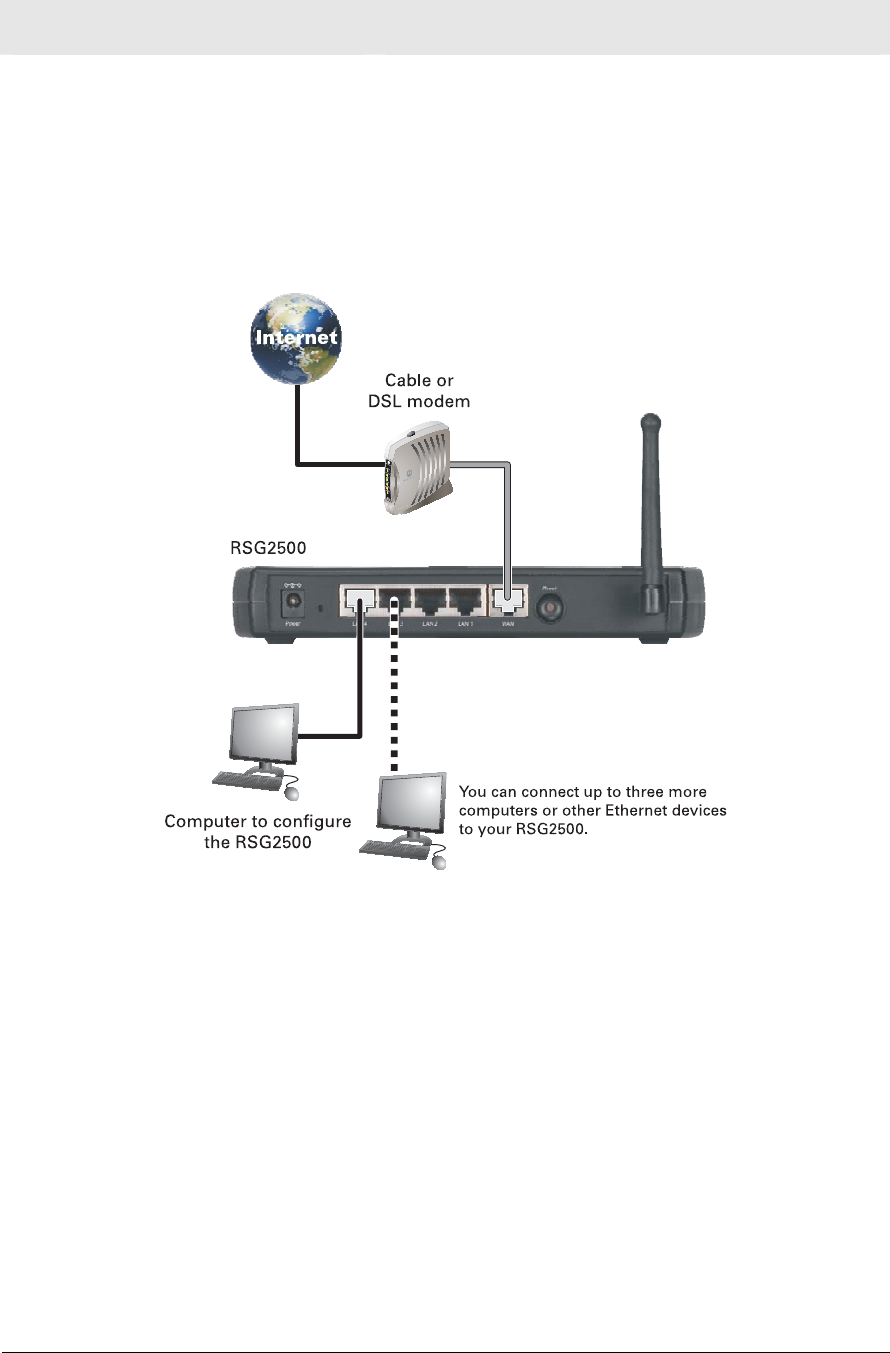
Manual Install—Wired Connection
The computer must have an Ethernet adapter installed. You need two Ethernet cables —
one to connect the RSG2500 to the modem and one to connect the computer to the
RSG2500.
Wired connection
1If you are currently running broadband to a single computer, unplug the Ethernet cable
connecting your modem to your PC and plug it into the WAN port on the RSG2500. If
you are not running broadband to a single computer, connect an Ethernet cable to the
WAN port on the RSG2500.
2Connect the other end of the same Ethernet cable to your cable or DSL modem.
You may need to restart your modem after making this connection.
3Connect a second Ethernet cable to the Ethernet port on the back of your PC.
4Connect the other end of this cable to one of the LAN ports on your RSG2500.
5To connect more devices, repeat steps 3 and 4.
Section 2 Installation
2-4 RSG2500
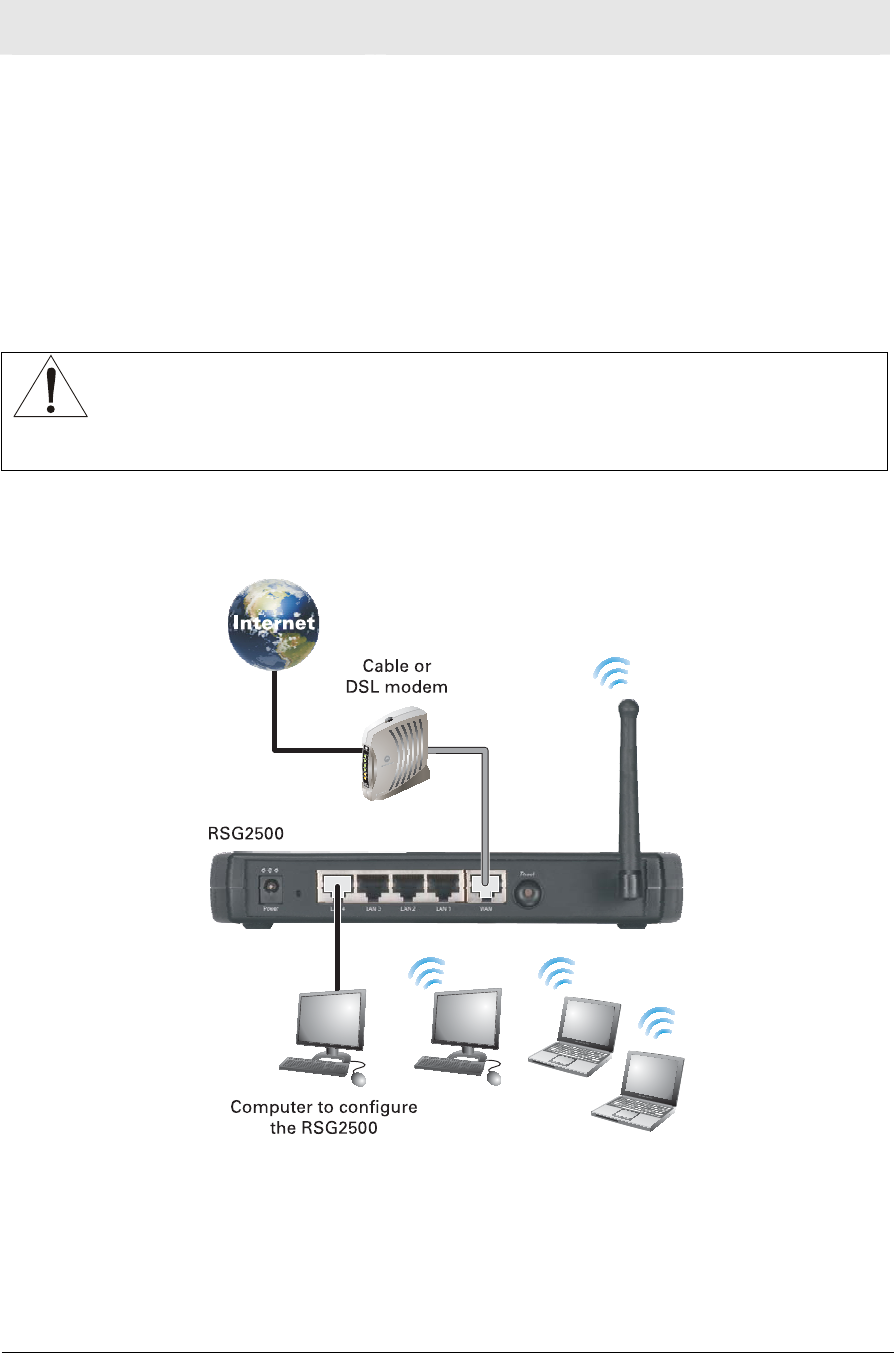
Establishing a Wireless Connection
To connect to the RSG2500 wirelessly, a computer must have an 802.11b or 802.11g
wireless adapter installed. If all wireless security and encryption are disabled on the adapter
and the RSG2500, the computer will automatically connect to the RSG2500.
Motorola ships the RSG2500 with all wireless security measures disabled. For information
about security defaults on your wireless adapter, refer to its documentation.
CAUTION!
Connect at least one computer to an RSG2500 Ethernet port to perform configuration.
Do not attempt to configure the RSG2500 over a wireless connection.
The default RSG2500 settings provide no wireless security. After your wireless LAN is
operational, be sure to enable security.
Wireless connection

Installation Section 2
RSG2500 2-5
Configuring Your Computers to Communicate with the RSG2500
To enable each computer on your network to communicate with the RSG2500, you may
need to configure it to automatically obtain an IP address. This section describes how to
configure computers running:
x Windows® 98 SE
x Windows ME®
x Windows® 2000
x Windows XP™
Configuring Windows 98SE and ME
1Click Start.
2 Select Settings > Control Panel.
3 Double-click Network to display the Network window:
4 On the Configuration tab, select the TCP/IP line for the Ethernet adapter installed in
your PC. There may be multiple TCP/IP components listed. Choose only the one that is
configured for your adapter. In the example above, a 3Com Ethernet adapter card is
installed and is the correct choice.
Section 2 Installation
2-6 RSG2500
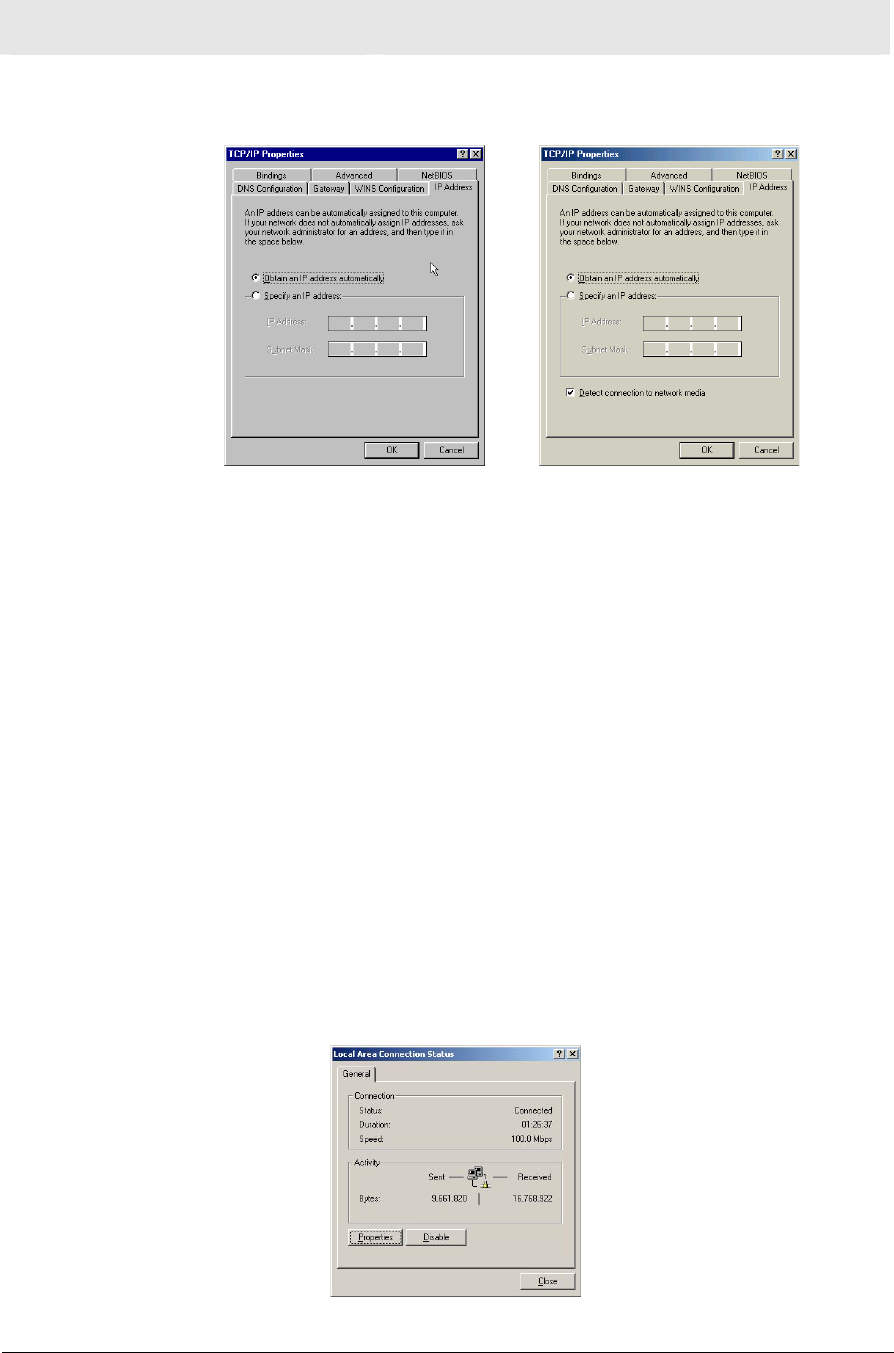
5 Click Properties. The TCP/IP Properties window is displayed:
Windows 98SE Windows ME
6 Click the IP Address tab.
7 Select Obtain an IP address automatically.
8 Click OK.
9 Click the Gateway tab and confirm that the Installed Gateway field is blank.
10 Click OK twice to exit and save your settings.
Windows may ask for the Windows Installation disk. First check to see if the installation
files are installed at c:\windows\options\cabs. Otherwise, load your Windows CD and
follow the prompts.
11 Restart your PC.
Configuring Windows 2000
1Click Start.
2Select Settings > Control Panel.
3Double-click Network and Dial-Up Connections.
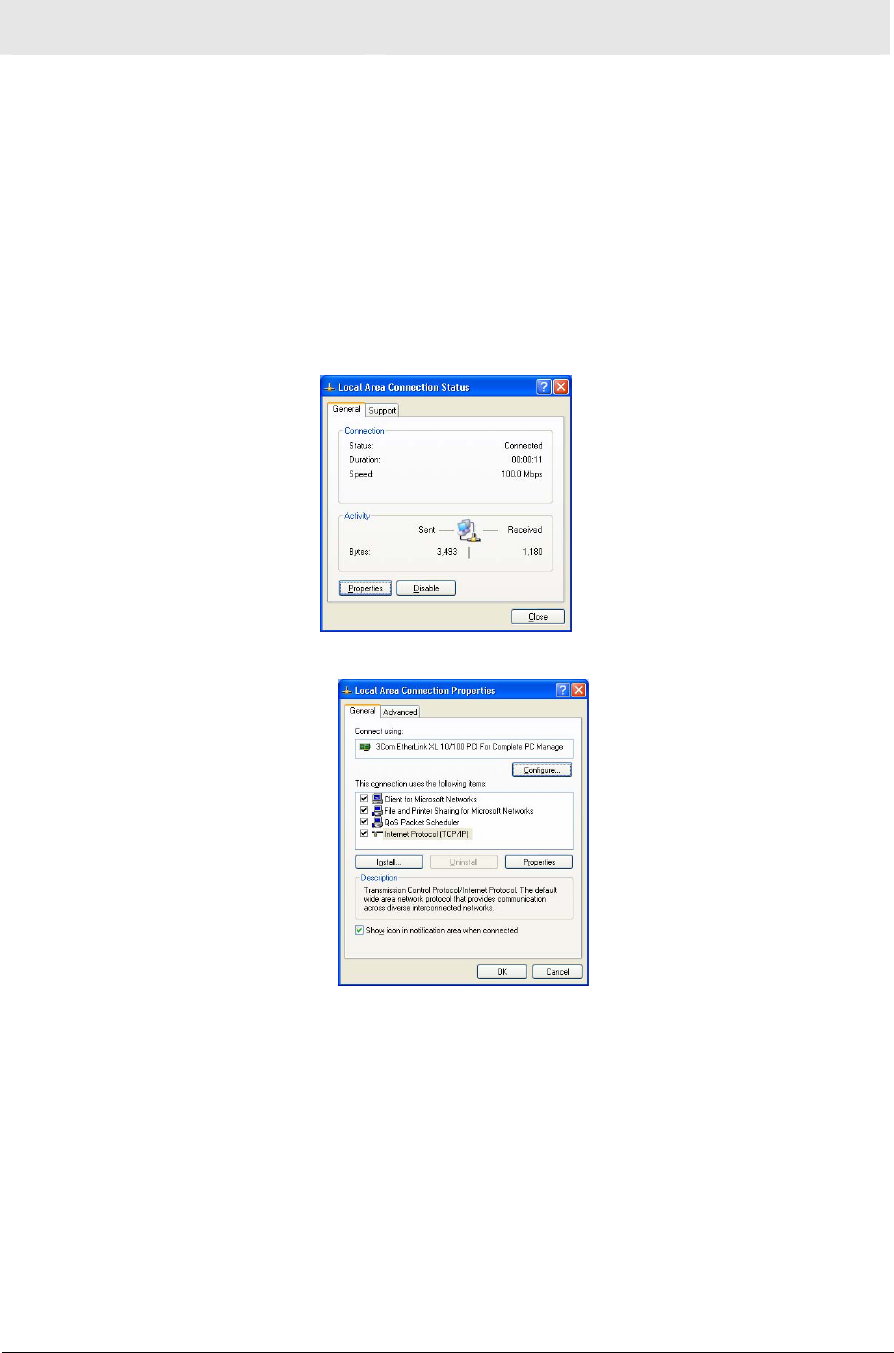
4Double-click Local Area Connection. The Local Area Connection Status window is
displayed:
Installation Section 2
RSG2500 2-7
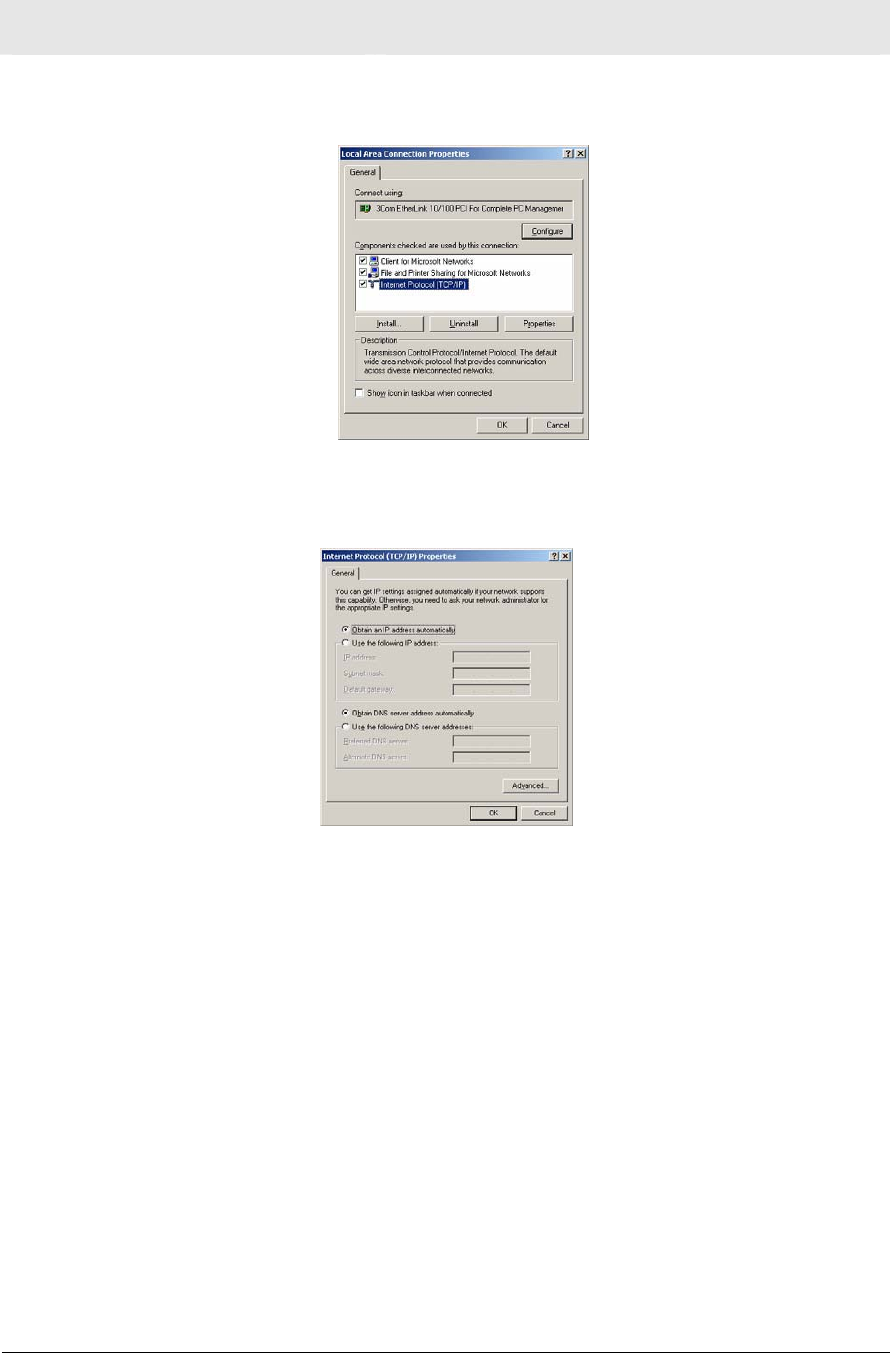
6Click Properties. The Local Area Connection Properties window is displayed:
7 Be sure the box next to Internet Protocol (TCP/IP) is checked.
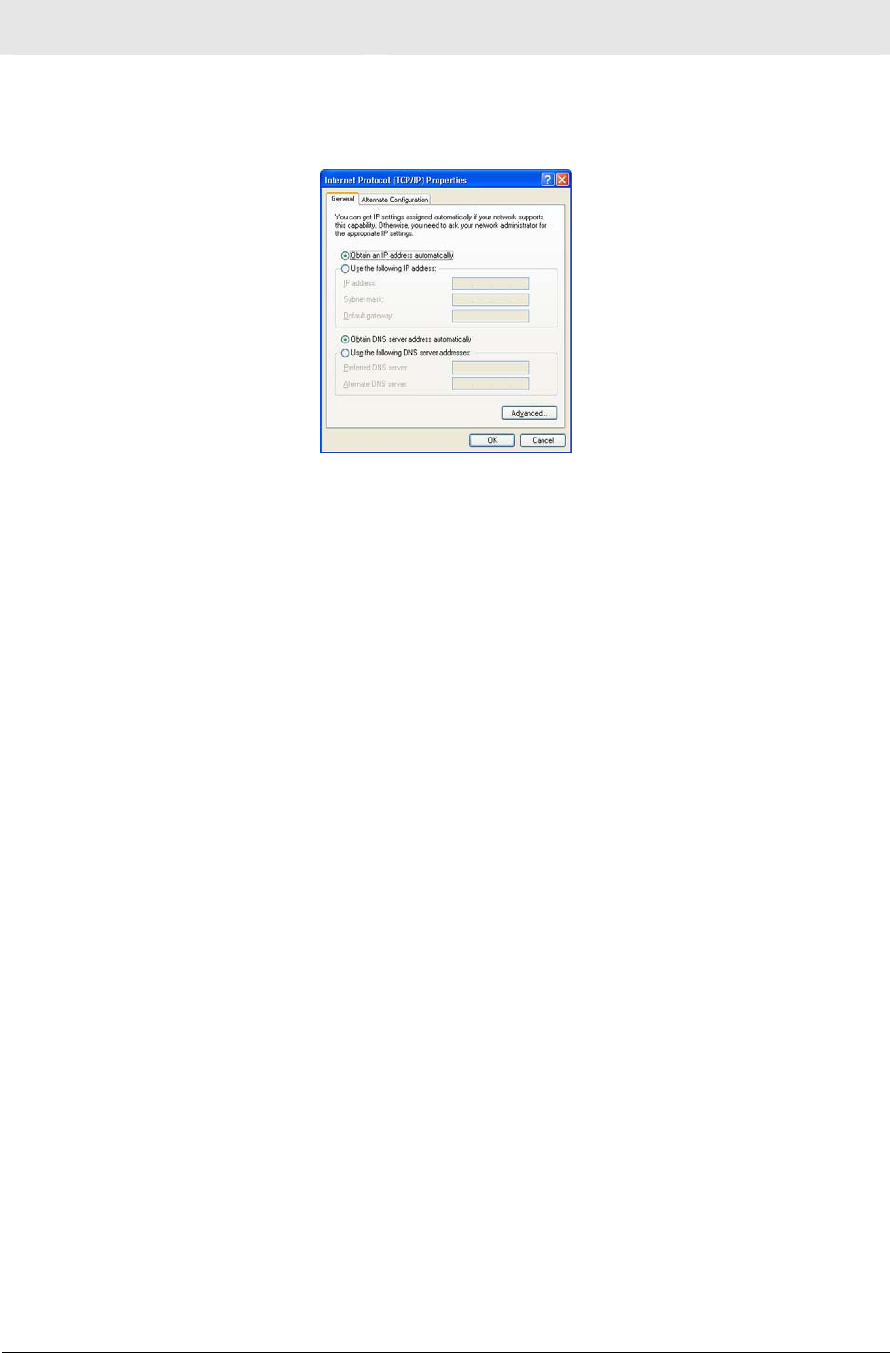
8Click Internet Protocol (TCP/IP) and click Properties. The Internet Protocol (TCP/IP)
Properties window is displayed:
9 Select Obtain an IP address automatically. Click OK twice to exit and save your settings.
10 Restart your PC.
Section 2 Installation
2-8 RSG2500
Configuring Windows XP
This procedure assumes you are using the default Windows XP interface. If you are running
the Classic interface, follow the instructions for Windows 2000.
1Click Start.
2Select Settings > Control Panel.
3Double-click Network and Dial-Up Connections.
4Double-click Local Area Connection. The Local Area Connection Status window is
displayed:
5 Click Properties. The Local Area Connection Properties window is displayed:
6 Be sure the box next to Internet Protocol (TCP/IP) is selected.
Installation Section 2
RSG2500 2-9
7 Click to highlight Internet Protocol (TCP/IP) and click Properties. The Internet Protocol
(TCP/IP) Properties window is displayed:
8Click Obtain an IP address automatically. Click OK twice to exit and save your settings.

RSG2500 3-1
Section 3: Configuration Utility Reference
This section describes using the RSG2500 configuration utility on a computer wired to the
RSG2500. Do not attempt to configure the RSG2500 over a wireless connection.
Logging In
1Open a Web browser.
2In the URL field, type http://192.168.0.1 and press Enter to display the login window.
3In the User Name field, type the User Name.
The default user name is admin.
4In the Password field, type the Password.
The default password is 12345. For security reasons, we recommend changing the
Password on the Management > Admin window.
5Click OK. The WAN – ROUTER window is displayed.
Main Menu
The main menu items are:
Click To Configure
WAN Connections to broadband services through cable or DSL
LAN Local area network settings
Wireless Wireless network settings, including security
Router Static routes and Routing Interface Protocol (RIP) settings
Security Blocked services and sites and security notifications
Management Backups, the RSG2500 password, and firmware upgrades
Service UPnP, port forwarding, or port triggering
Status Display status information
Reboot Restart your RSG2500
Logout Log out of your RSG2500
The following buttons are available on most windows and always have the same function:
Apply Click to save your settings
Cancel Click to cancel any changes
Section 3 Configuration Utility Reference
3-2 RSG2500
Configuring WAN Settings
The WAN windows enable you configure the connection to your cable or DSL service:
BASIC
ROUTER – PPPoE
ROUTER
ADVANCED
WAN > BASIC
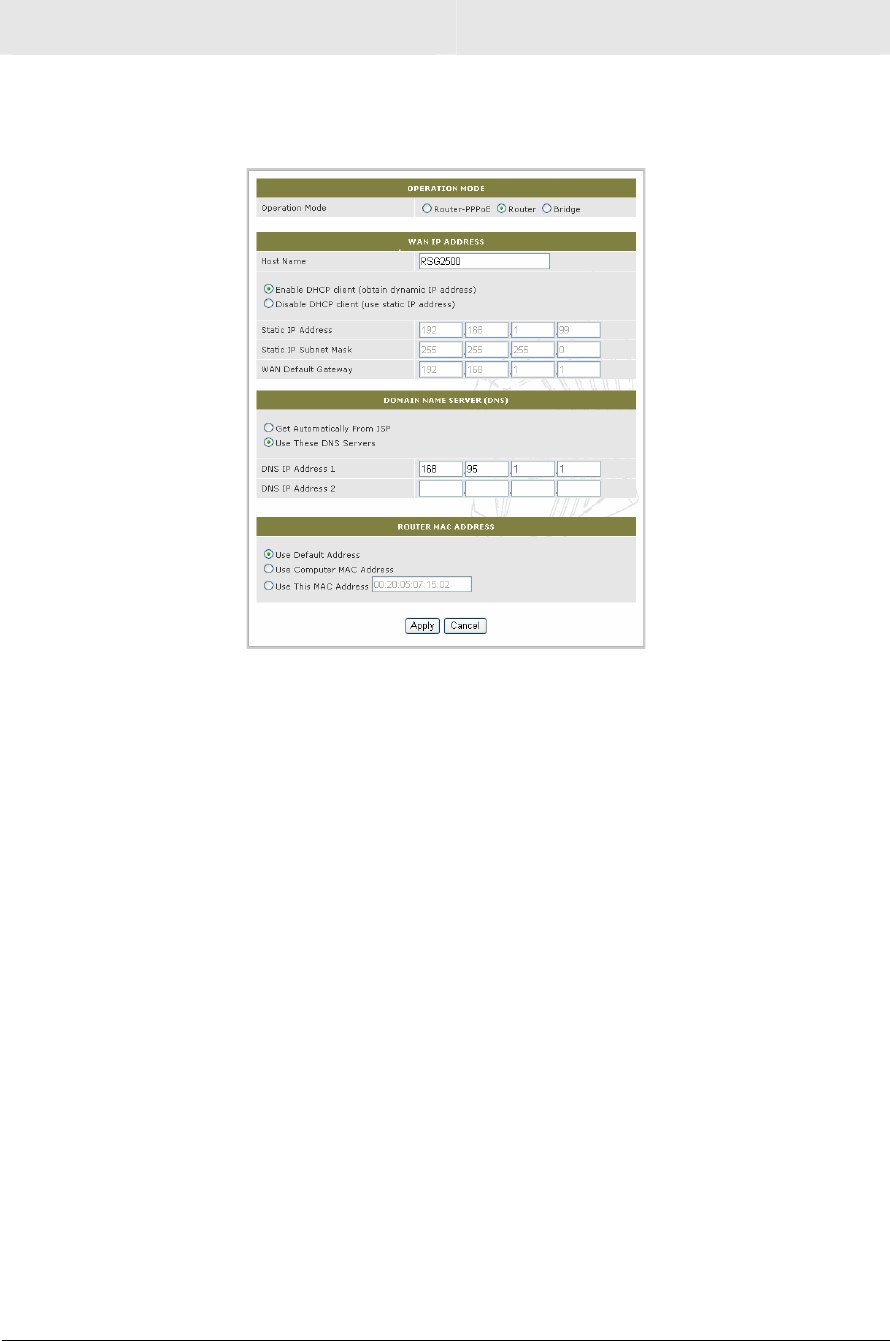
Select the Operation Mode:
Operation Mode WAN Connection Type NAT
Router-PPPoE Through PPPoE Enabled
Router Dynamic Host Configuration Protocol (DHCP) client
or static IP address
Enabled
Bridge Bridge mode for all interfaces: LAN, WAN, WLAN Disabled
Configuration Utility Reference Section 3
RSG2500 3-3
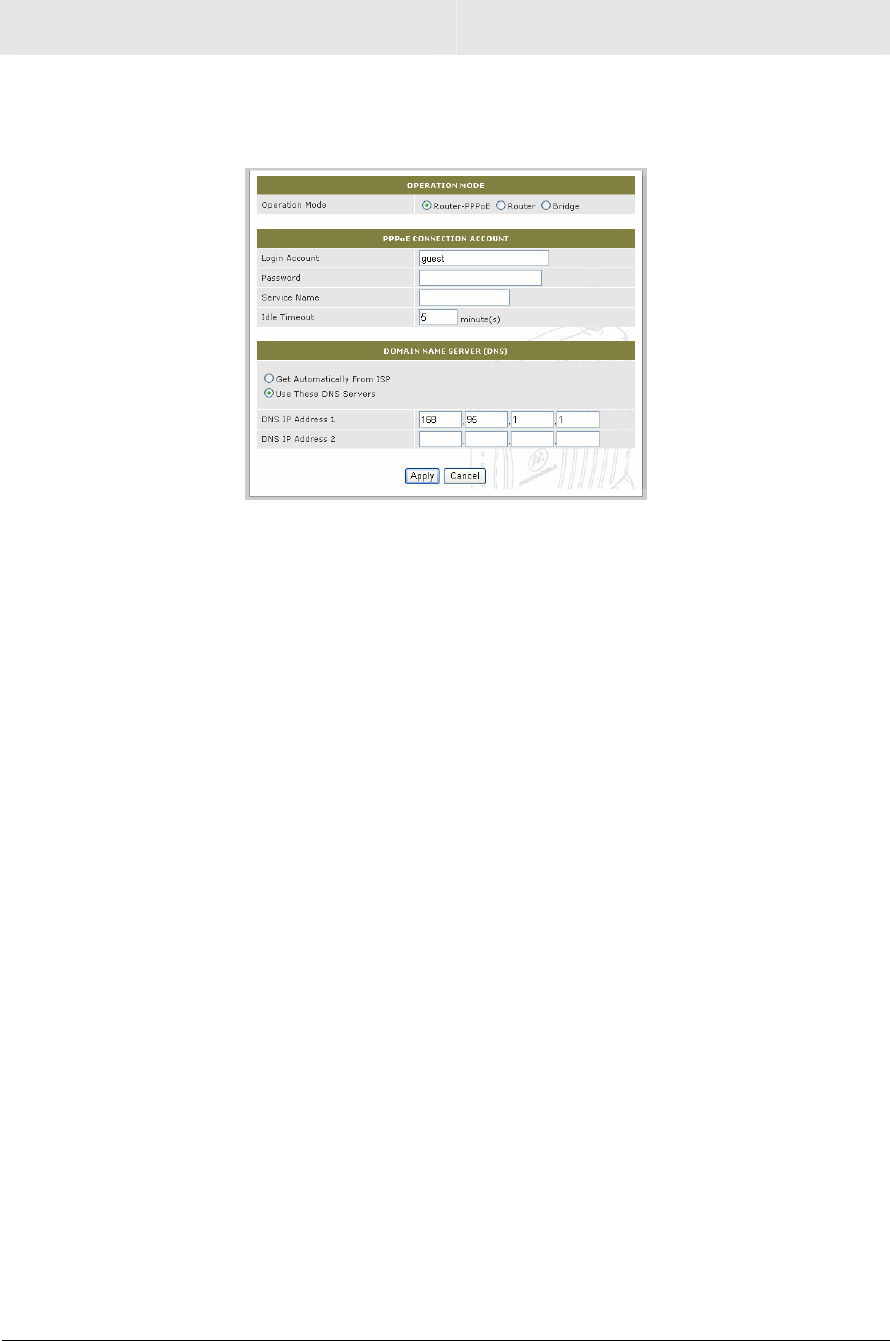
WAN > Router – PPPoE
Field or Button Description
PPPoE Connection Account
Login Account Type the account name provided by your DSL provider.
Password Type the password provided by your DSL provider.
Service Name Type the service name provided by your DSL provider.
Idle Timeout Type the PPP idle timeout. It sets how long the connection can
remain inactive before it is dropped. It works only when dial-on-
demand is enabled.
Domain Name Server (DNS)
Get Automatically
From ISP
If selected, the RSG2500 obtains the DNS server IP address
automatically from your DSL provider.
Use These DNS
Servers
If selected, you must enter the DNS IP Address 1 and DNS IP
Address 2 provided by your DSL provider.
Section 3 Configuration Utility Reference
3-4 RSG2500
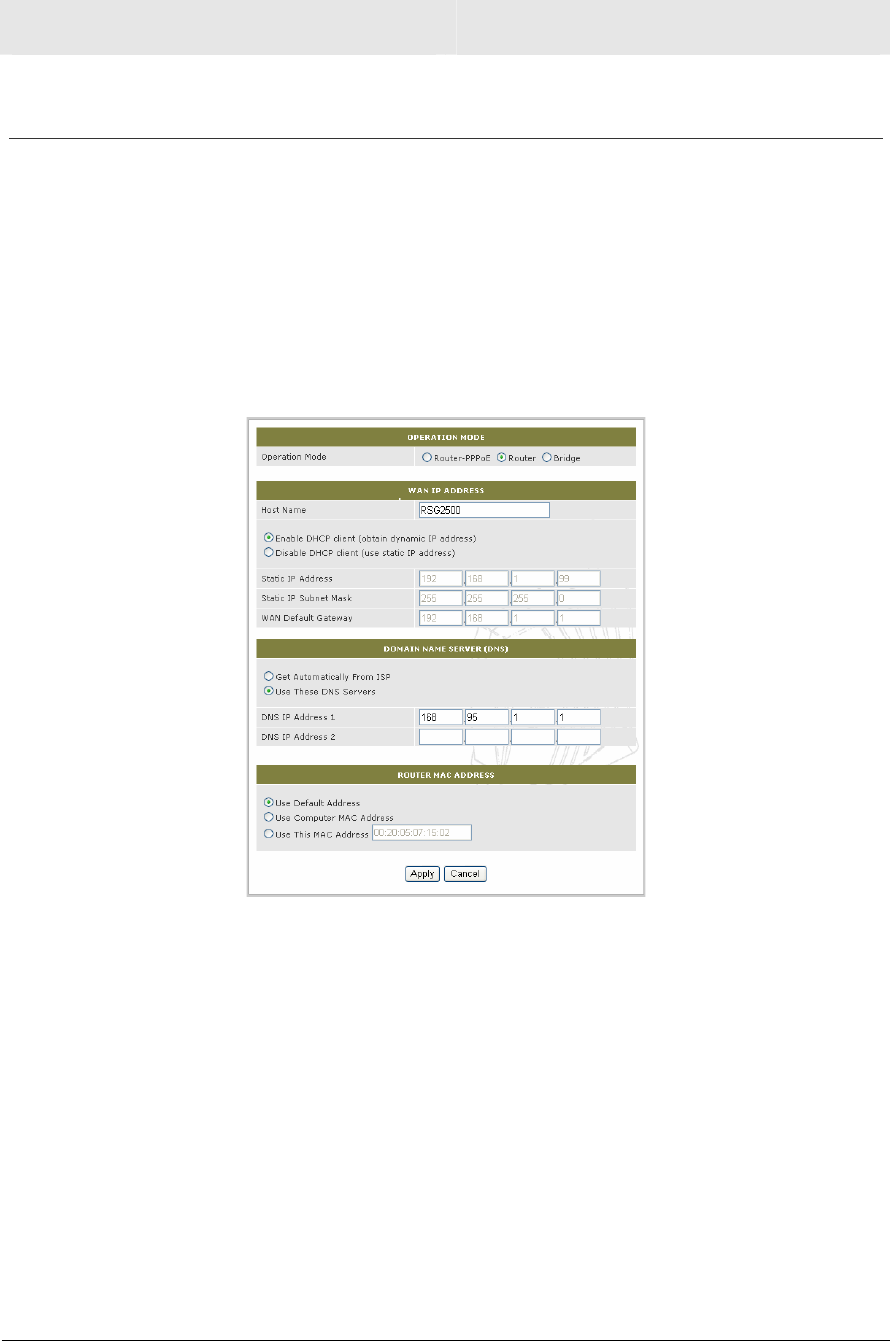
WAN > ROUTER
Field or Button Description
WAN IP Address
Host Name Type the host name provided by your ISP.
Enable DHCP
Client
If selected, the RSG2500 obtains its WAN IP address dynamically
from your ISP.
Disable DHCP
Client
If selected, the following fields are enabled. You must type the
following, as provided by your ISP:
Static IP Address
Static IP Subnet Mask
WAN Default Gateway
Domain Name Server (DNS)
Get Automatically
From ISP
If selected, the RSG2500 obtains the DNS server IP address
automatically from your ISP.
Use These DNS
Servers
If selected, you must enter the DNS IP Address 1 and DNS IP
Address 2 provided by your ISP.
Configuration Utility Reference Section 3
RSG2500 3-5
Field or Button Description
Router MAC Address
Use Default
Address
Select to use the RSG2500 WAN MAC address. It is printed on the
label on the bottom of your RSG2500.
Use Computer
MAC Address
If your cable or DSL provider required you to register a MAC address
for their service, select this option and connect the computer having
that MAC address to the LAN 1 port on the RSG2500.
Use this MAC
Address
If your cable or DSL provider required you to register a MAC address
for their service, select this option and type the MAC address you
registered.
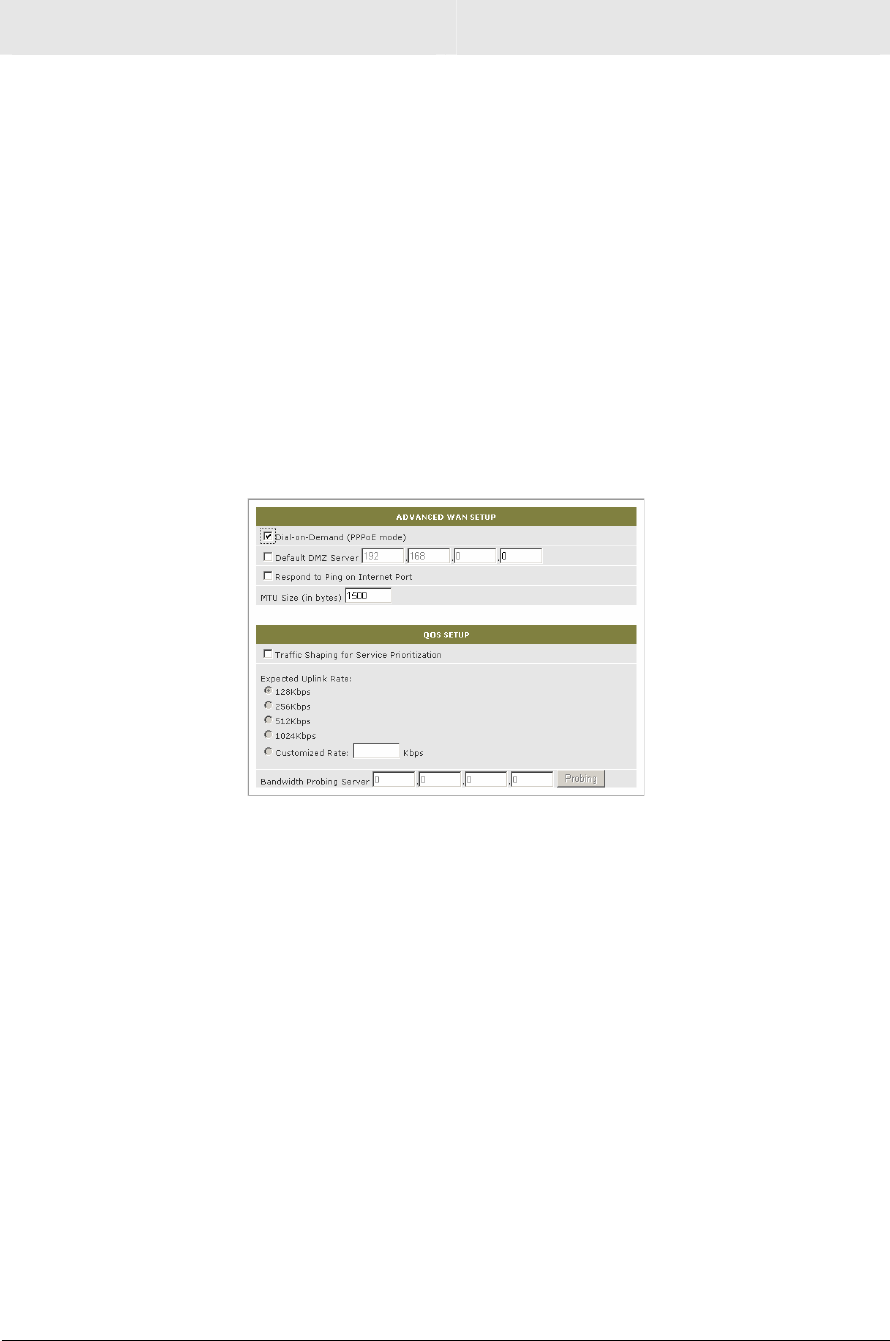
WAN > ADVANCED
Field or Button Description
Advanced WAN Setup
Dial-on-Demand
(PPPoE Mode)
If selected, dial-on-demand is enabled for PPPoE. If the PPP
session is in an idle timeout state, PPP dials automatically to
establish a new connection when you access the Internet again.
The default is enabled.
Default DMZ
Server
If selected, you can specify a computer on your LAN as the DMZ
(de-militarized zone). Type the computer IP address in the fields, in
dotted-decimal format.
Specifying a computer as the DMZ allows external Internet traffic to
reach the specified computer without inspection from the RSG2500
firewall. Certain applications, such as some online games, may
work better on a DMZ computer where there is no intervention from
the firewall. Use this option with extreme care because the DMZ
computer has no protection from Internet attacks.

Section 3 Configuration Utility Reference
3-6 RSG2500
Field or Button Description
Respond to Ping
on Internet
If selected, disables the WAN port ping function to protect your
network from Internet ping attacks. The default is disabled.
MTU Size Sets the maximum transmit unit size, in bytes. The default is 1500
bytes.
QoS Setup
Traffic Shaping
for Service
Prioritization
Select to enable traffic shaping for service (such as voice)
prioritization for uplink traffic. Use only when your CPE device
(ADSL, cable modem) does not support QoS packet prioritization
and you have voice/video traffic to transmit uplink. Enabling this
function can reduce the possibility of service packet loss.
Expected Uplink
Rate
The traffic shaping limits the transmit uplink speed based on this
parameter. The service packets will have a higher priority to
transmit than data packets. Input a customized one if the
predefined options are not matched. Predefined rates are:
128Kbps
256Kbps
512Kbps
1Mbps
Bandwidth
Probing Server
For systems that support bandwidth probing only, it is a dynamic
method to identify the available upstream bandwidth to optimize
how the RSG2500 performs QoS. To use bandwidth probing, type
the bandwidth probing server IP address provided by your service
provider.
Configuring LAN Settings
The LAN configuration windows are:
LAN SETUP
ADVANCED
Unless you have sufficient networking knowledge, we recommend not changing the
defaults for any LAN settings.
Configuration Utility Reference Section 3
RSG2500 3-7
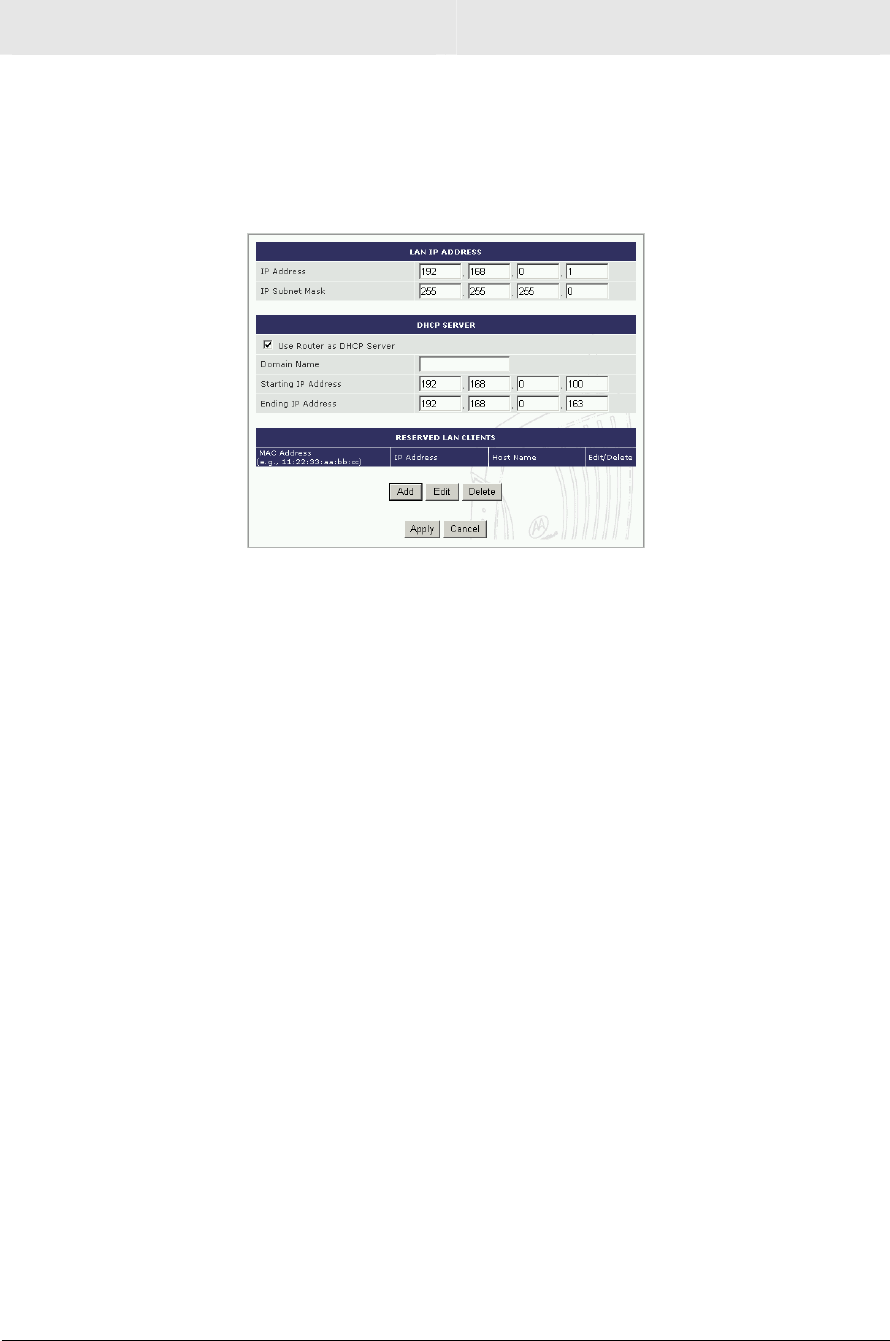
LAN > LAN SETUP
This window enables you to set the RSG2500 LAN IP address and DHCP server options.
We recommend using DHCP to administer your network. All computers on your network
must be configured to obtain an IP address automatically.
Field Description
LAN IP Address
IP Address Sets the IP address for your private network. The default is
192.168.0.1.
IP Subnet Mask Sets the subnet mask. The default is 255.255.255.0.
DHCP Server
Use Router as
DHCP Server
Enables or disables the DHCP server on the RSG2500. The default
is enabled. You can only run one DHCP server on your network. In
bridge mode, the RSG2500 DHCP server is always disabled.
Domain Name Provides the DNS suffix to clients.
Starting IP
Address
Sets the starting IP address for the DHCP address pool. The default
is 192.168.0.100.
Ending IP
Address
Sets the ending IP address for the DHCP address pool. The default
is 192.168.0.163.
Reserved LAN
Clients
Displays the MAC Address, IP Address, and Host Name for all
reserved IP address LAN clients on your network. Select Add,Edit,
or Delete to add, edit, or delete an entry.
Section 3 Configuration Utility Reference
3-8 RSG2500
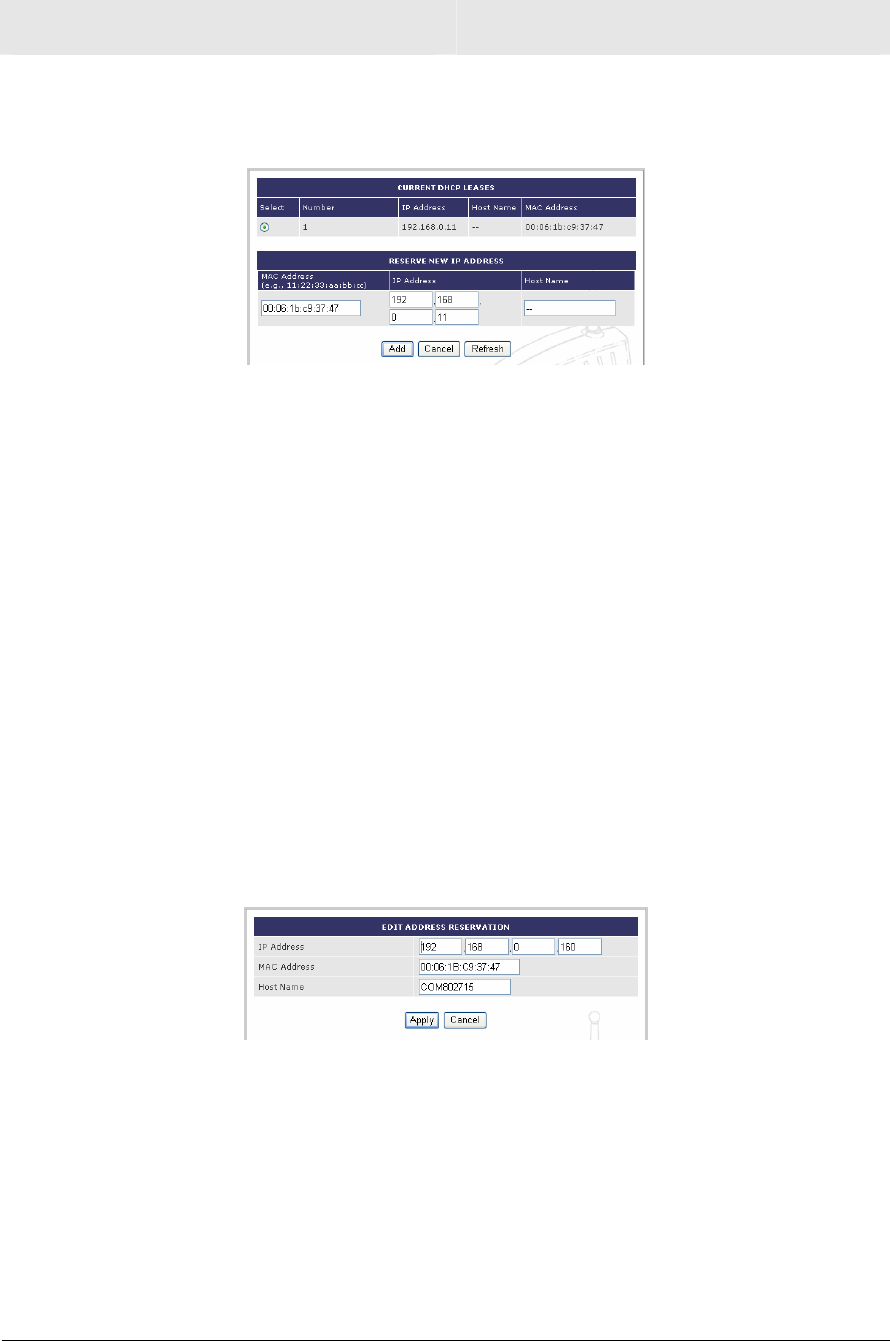
Add a Reserved DHCP Entry
Field Description
Current DHCP
Leases
Displays the IP address and MAC address of each device that has an IP
address assigned dynamically by the RSG2500 DHCP server.
Reserve New IP
Address
MAC
Address
Type the MAC address of the device for which you reserving the IP
address.
IP Address Type the IP address to reserve.
Host Name (Optional) Type the host name of the device for which you reserving
the IP address.
Add Adds the entry and return to the LAN Setup window
Cancel Cancels your changes and return to the LAN Setup window
Refresh Refreshes the Current DHCP Leases table
Edit a Reserved DHCP Entry
The fields have the same function as their counterparts for adding a reserved DHCP entry.

Configuration Utility Reference Section 3
RSG2500 3-9
LAN > ADVANCED
Field Description
802.1p Select to give outgoing LAN traffic a VLAN tag. The default VLAN ID is 1.
Section 3 Configuration Utility Reference
3-10 RSG2500
Configuring Wireless Network Settings
The Wireless configuration windows are:
NETWORK
SECURITY
ADVANCED
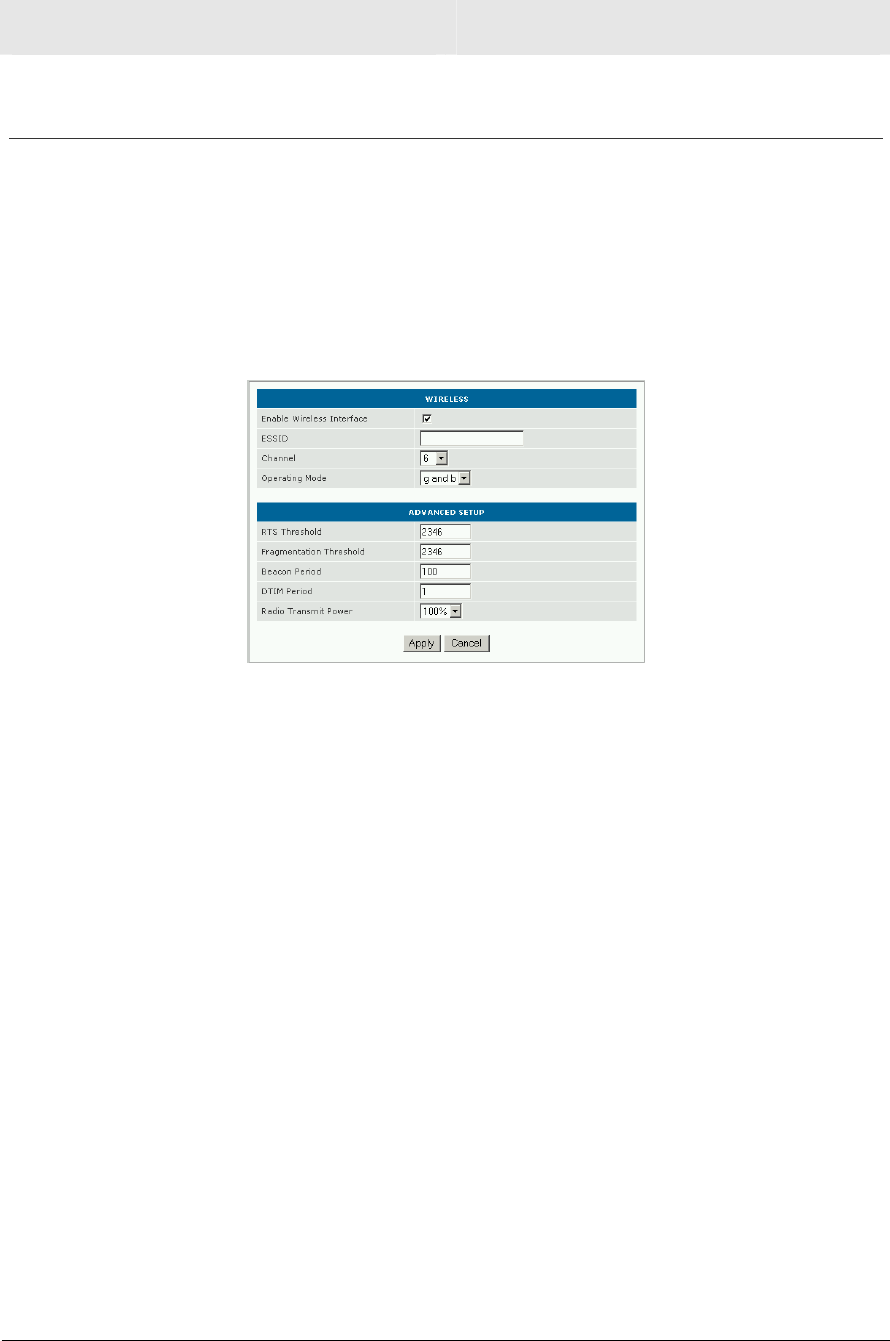
Wireless > NETWORK
Field or Button Description
Wireless
Enable
Wireless
Interface
Turns the wireless interface on or off. The default is enabled. If you
disable the wireless interface, the RSG2500 wired network continues
to operate.
ESSID Sets the extended service set identifier (ESSID); the network name
used by all devices on your wireless network. It can be up to 32
alphanumeric characters. The ESSID must be entered on every
device on your wireless network to enable communication with the
RSG2500.
The default RSG2500 ESSID is Motorola. We recommend changing
the ESSID to a unique name that is easy for you to remember. Do not
change this or any other setting over a wireless connection.
Channel Sets the channel on which the RSG2500 communicates. The default
is channel 6. Each wireless client must use this channel. If changed
wirelessly, once you restart the RSG2500, you will lose your wireless
connection. Do not change this or any other setting over a wireless
connection.
Operating
Mode
Sets the transmission protocol for the wireless network:
b only: 802.11b only
g only: 802.11g only
g and b: 802.11b/g mixed mode; the default

Configuration Utility Reference Section 3
RSG2500 3-11
Field or Button Description
Advanced Setup
RTS
Threshold
Sets the packet size at which the RSG2500 issues a request to send.
The range is 1 to 2347 bytes. The default is 2347.
Fragmentation
Threshold
Sets the size at which packets are fragmented and transmitted a piece
at a time instead of all at once. The range is 256 to 2346 bytes. The
default is 2346.
Beacon
Period
Sets the interval between network synchronization broadcasts. The
range is 1 to 65535 milliseconds. The default is 100 milliseconds.
DTIM Period Sets the Delivery Traffic Indicator Maps period value from 1 to 255, in
multiples of the Beacon Period. The default is 1.
Because changing the Beacon and DTIM Period settings may affect
wireless performance, we recommend not changing the defaults.
Radio
Transmit
Power
Sets the percentage of wireless transmission power that is used —
100%, 75%, 50&, 25%, 12%, 6%, or 3%.
Section 3 Configuration Utility Reference
3-12 RSG2500
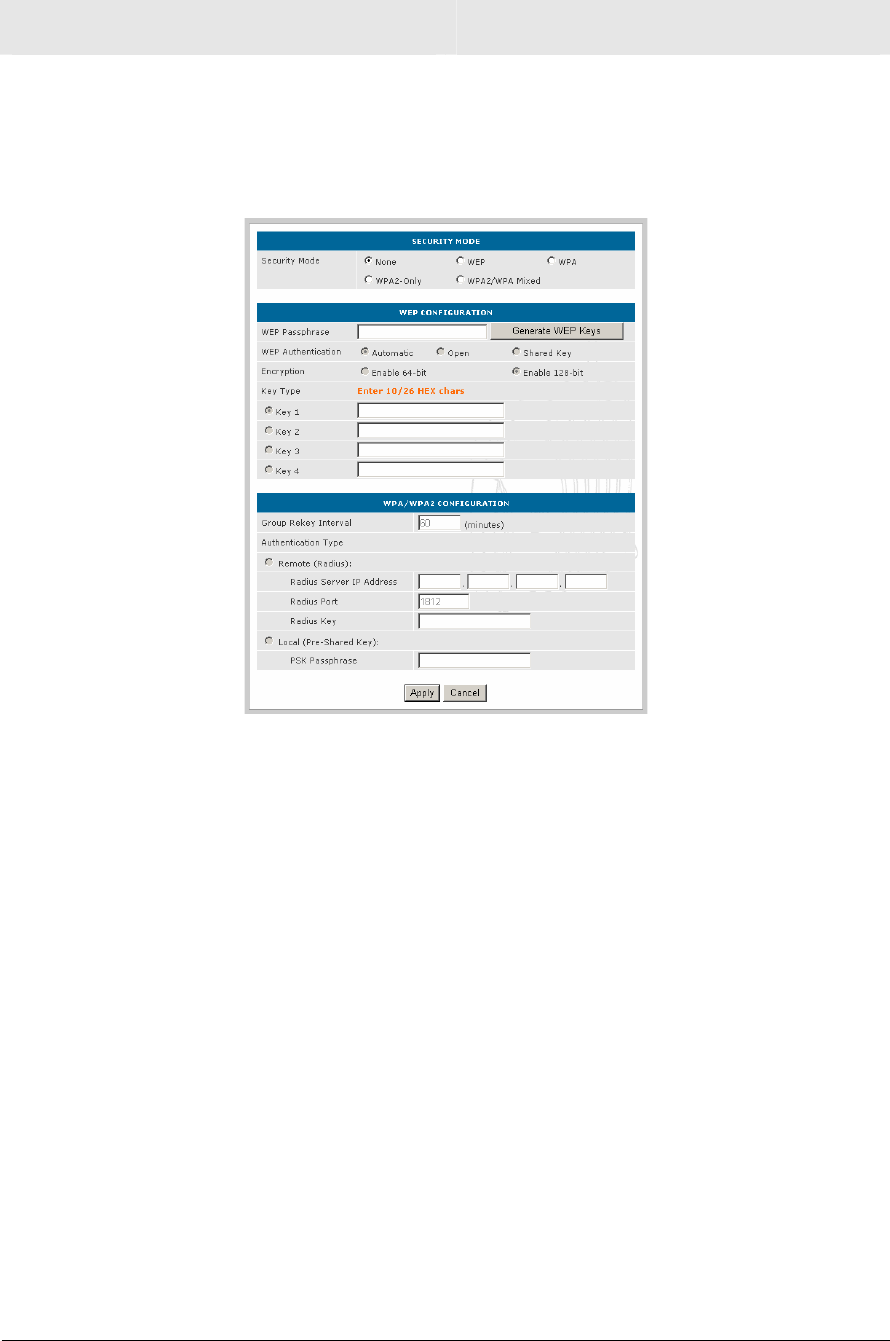
Wireless > SECURITY
This window enables you to configure wireless security settings.
Field Description
Security Mode Sets the security type for your wireless network.
None No wireless security; the default
WEP Wired Equivalent Privacy
WPA Allows the association of Wi-Fi® Protected Access
(WPA) clients only, but not WPA2 clients
WPA2-Only Allows the association of WPA2 clients only, but not
WPA clients
WPA2/WPA
Mixed
Allows the association of WPA2 or WPA clients

Configuration Utility Reference Section 3
RSG2500 3-13
Field Description
WEP Configuration
WEP
Passphrase
Type a passphrase for easier WEP key setup on computers
equipped with a Motorola wireless adapter. The Key Content fields
(Key 1, Key 2, etc) are not filled with automatically-generated WEP
keys until you click Generate WEP Keys.
You cannot use the WEP Passphrase if you have any computers
equipped with a non-Motorola wireless adapter. For non-Motorola
adapters, you must type your WEP keys in the Key 1-4 fields.
Generate WEP
Keys
Generates WEP keys based on the WEP Passphrase.
WEP
Authentication
Sets the authentication method used when WEP is enabled:
Automatic (The default) Wireless clients can authenticate with
the RSG2500 using Open System or Shared Key
authentication.
Open Wireless clients can authenticate using Open
System authentication only.
Shared
Key
Wireless clients can authenticate using Shared Key
authentication only.
Encryption Sets the WEP key length:
Enable
64-bit
64-bit strength; the key must contain 10 hexadecimal
characters (0 to 9 and A to F only)
Enable
128-bit
128-bit strength; the key must contain 26
hexadecimal characters (0 to 9 and A to F only)
Key Type Select one WEP key — the Key 1, Key 2, Key 3, or Key 4 field — to
encrypt outgoing wireless packets on the RSG2500.
You must use the Key selected here on every wireless client. For
example, if you select Key 1 here, you must select Key 1 on every
wireless client. The default is 1.
Key 1, Key 2,
Key 3, Key 4
Enter WEP keys in these fields. Up to four different Keys (1, 2, 3, or
4) are available. Only the selected Key is used to encrypt wireless
packets. Do not enter all 0s. This is not a secure key.

Section 3 Configuration Utility Reference
3-14 RSG2500
Field Description
WPA/WPA2
Configuration
All of the following settings apply to WPA, WPA2-Only, or
WPA2/WPA Mixed Security Mode:
Group Rekey
Interval
Sets the time, in minutes, until the RSG2500 sends a new group key.
The default is 60 minutes.
Authentication
Type
Sets the authentication and key management type:
Remote
(Radius)
IEEE 802.1X is used for authentication and key
management. A remote RADIUS authentication
server is required to verify users.
Local (Pre-
Shared Key)
The Pre-Shared Key (PSK) method is used for
authentication and key management. No remote
authentication servers are required. This is
recommended for home users not using a remote
RADIUS server.
Radius Server
IP Address
If the Authentication Type is Remote (Radius), enter the RADIUS
server IP address in this field.
Radius Port If the Authentication Type is Remote (Radius), enter the RADIUS
server port number in this field. The default is 1812.
Radius Key If the Authentication Type is Remote (Radius), enter the Radius
shared secret. It must be from 1 to 64 characters.
PSK
Passphrase
If the Authentication Type is Local (Pre-Shared Key), enter the key
encryption passphrase. It must be from 8 to 63 characters. Record it
to enter on your wireless LAN clients, if supported.
Configuration Utility Reference Section 3
RSG2500 3-15
Wireless > ADVANCED
This window enables you to configure several advanced wireless features. Generally, these
settings should remain at their default values.
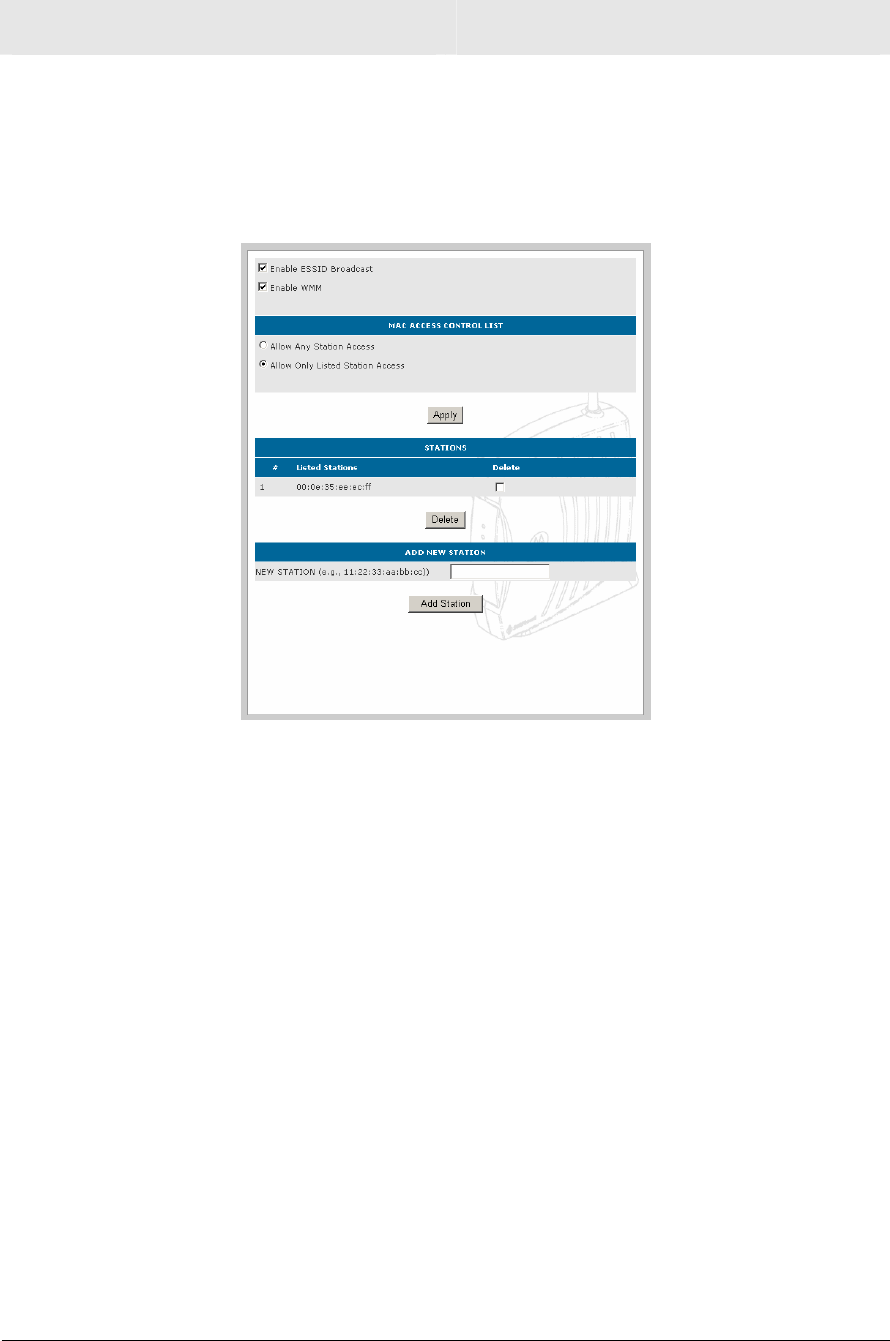
Field Description
Enable ESSID
Broadcast
Enables ESSID broadcasting from the RSG2500. If selected, wireless
clients receive the RSG2500 ESSID. The default is enabled.
Enable WMM Enables Wi-Fi Multimedia (WMM). If selected, it provides multimedia
enhancements for the wireless network. We recommend enabling
WMM for better audio, video, and voice application services. The
default is enabled.
MAC Access
Control List
Enables you to control which devices access your wireless network
based upon their MAC address.
Allow Any Station Access: Disables the MAC access control list
(ACL). When selected, the MAC ACL is not active and any wireless
station can communicate with your RSG2500. This is the default.
Allow Only Listed Station Access: Only the wireless devices in
the ACL can communicate with your RSG2500.
Section 3 Configuration Utility Reference
3-16 RSG2500
Field Description
To add a MAC address to the ACL:
1Type the wireless client MAC address in the NEW STATION field.
2Click Add Station.
3Click Apply.
To delete a MAC address from the ACL:
1Select the Delete box to the right side of the MAC address.
2Click Delete.
3Click Apply.
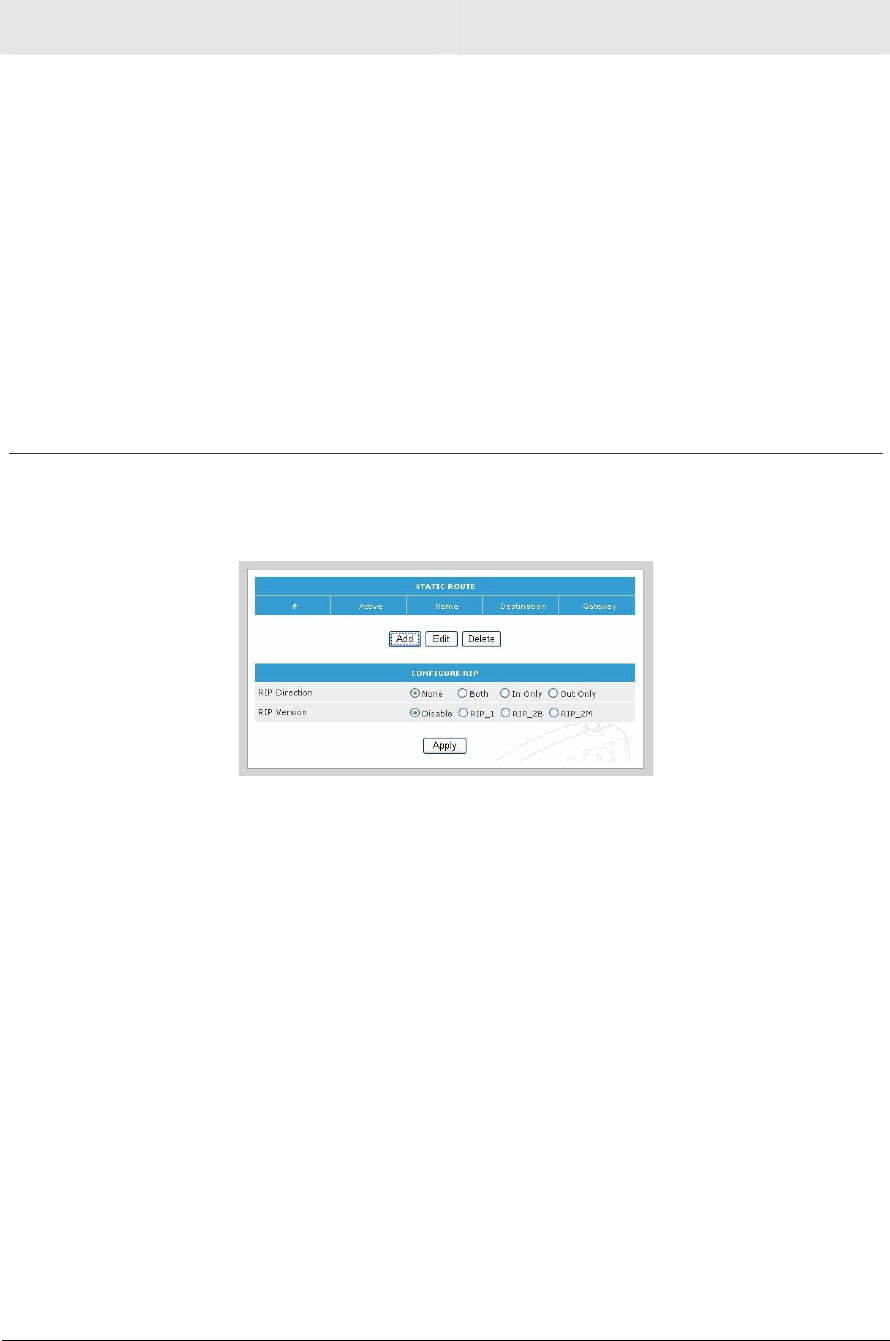
Configuring Router Settings
The Router window enables you to configure static routes and Routing Information Protocol
(RIP) settings:
Field or Button Description
Static Route You can Add,Edit, or Delete a static route.
Configure RIP
RIP Direction The direction of RIP information — None, Both, In Only, or Out Only
Version Sets the RIP version:
Disable — Disables RIP
RIP1 — RIP V1
RIP2B — RIP V2 broadcast
RIP2M — RIP V2 multicast
Configuration Utility Reference Section 3
RSG2500 3-17
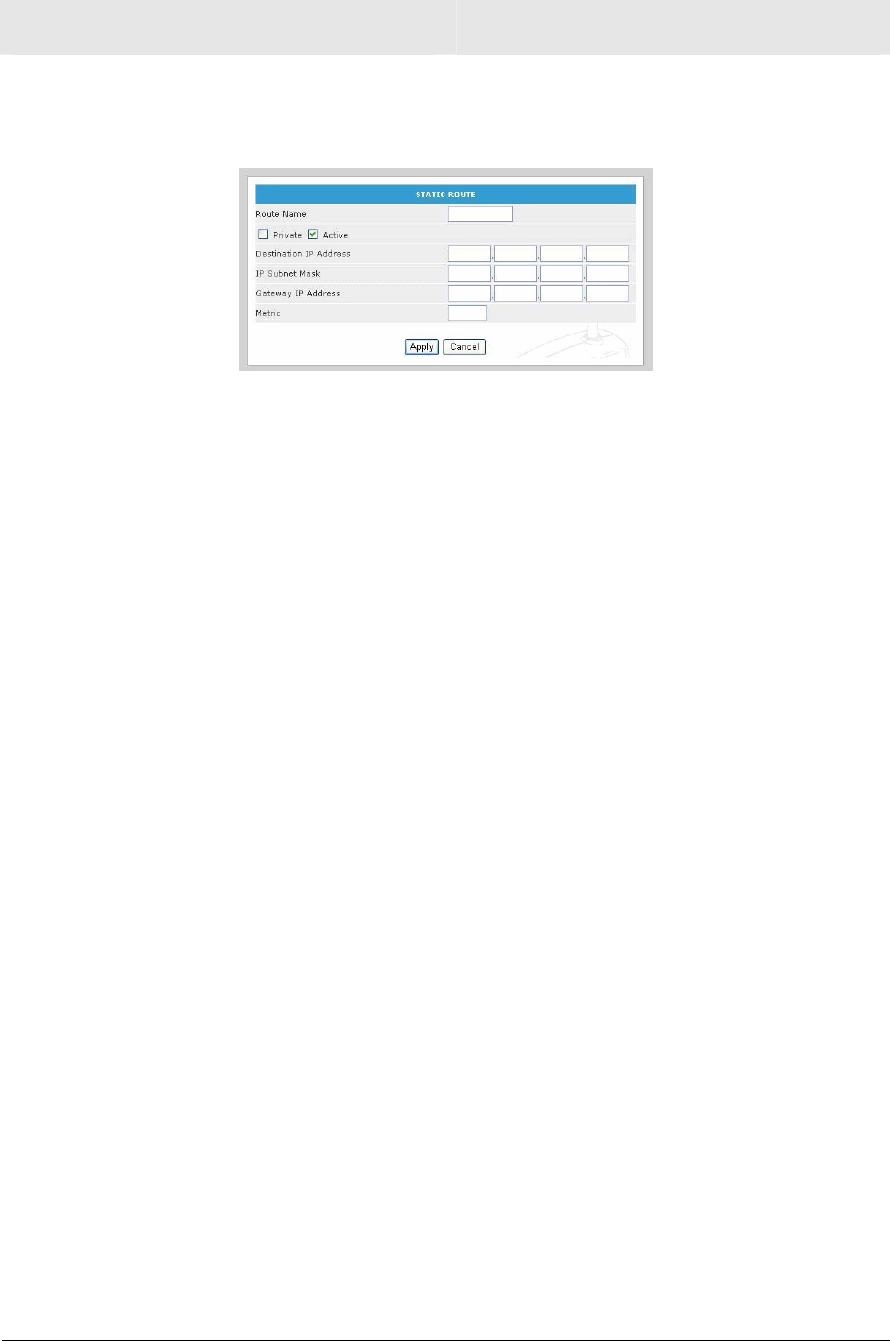
Add a Static Route
Field or Button Description
Route Name Sets the static route name
Private If selected, the RSG2500 does not broadcast the route in RIP
messages.
Active Activates the static route
Destination IP
Address
Sets the route destination IP address
IP Subnet Mask Sets the subnet mask of the route
Gateway IP
Address
Sets the destination gateway
Metric Not implemented in this version
Section 3 Configuration Utility Reference
3-18 RSG2500
Configuring Security Settings
The Security configuration windows are:
LOGS
BLOCK SITE
BLOCK SERVICE
SCHEDULE
EMAIL
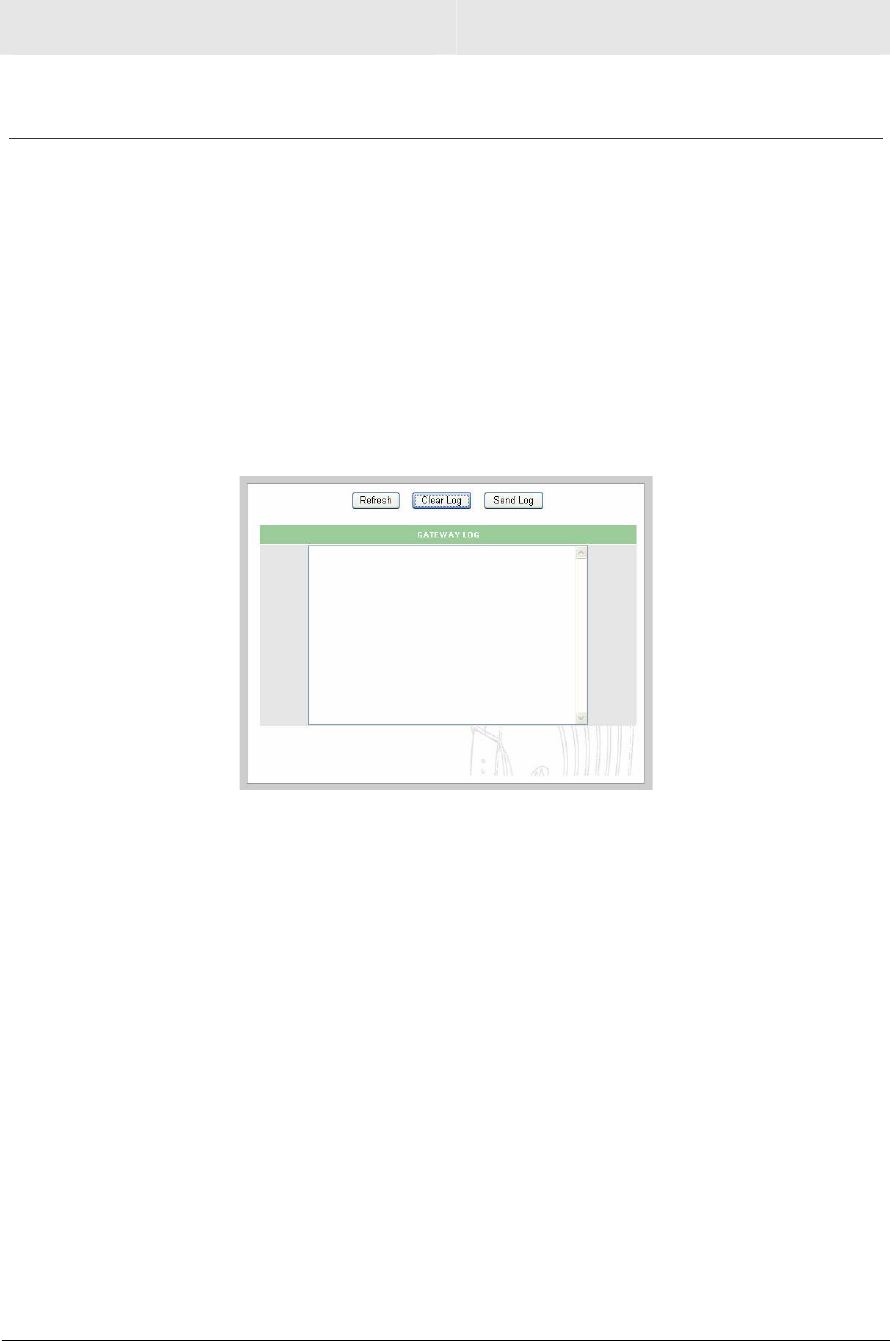
Security > LOGS
Button Description
Refresh Refreshes the log
Clear Log Clears the log
Send Log Sends the log to the e-mail address specified on the Security > Email
window

Configuration Utility Reference Section 3
RSG2500 3-19
Security > BLOCK SITE
Field or Button Description
Block Sites Sets the time to block the sites:
Never — Never block the sites
Per Schedule — Block the sites based on the schedule set on the
Security > Schedule page
Always — Always block the sites
Add Blocks the keywords you type in the field
Security > BLOCK SERVICE
You can block specific services by adding a predefined or user-defined service.
Field or Button Description
Block Services Select the time period to block the services:
Never — Never block the services
Per Schedule — Block the services based on the schedule set on
the Security > Schedule page
Always — Always block the services
Add Adds the service to block
Edit Edits the blocked service
Delete Deletes the blocked service
Section 3 Configuration Utility Reference
3-20 RSG2500
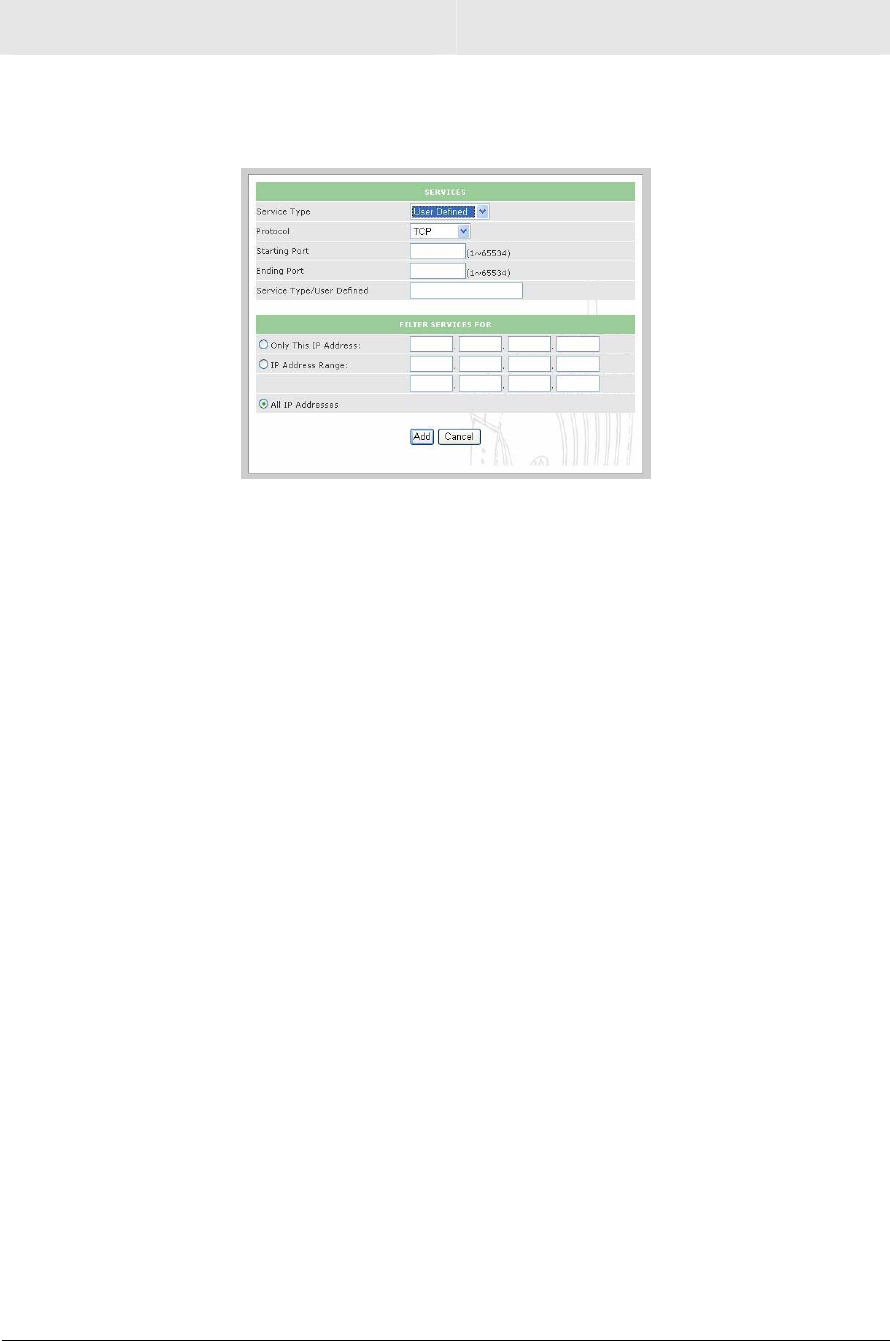
Adding a Blocked Service
Field Description
Service Type You can create a service or select a predefined service from AIM, Age-
of-Empire, FTP, HTTP, ICUII, IP_Phone, NetMeeting, News, PPTP,
QuakeII/III, Real-Audio, or Telnet.
Protocol Sets the service protocol — TCP, UDP, or TCP/UDP
Starting Port Sets the service starting port
Ending Port Sets the service ending port
Service Type/
User Defined
Sets the service name
Filter Services
For
Sets the LAN address to associate with this service:
Only This IP Address — Block the service from the IP address
you type in this field only
IP Address Range — Block the service from all IP addresses
between the starting and ending IP address you type in the fields
All IP addresses — Block the service from all IP addresses
Add Adds the service to the blocked services list
Cancel Cancels any changes

Configuration Utility Reference Section 3
RSG2500 3-21
Editing a Blocked Service
Field Description
Service Type You can modify any predefined service or one you created. The
Protocol,Starting Port,Ending Port,Service Type/User Defined,
and Filter Services For fields have the same function as when you
add a blocked service.
Accept Finishes editing the service
Cancel Cancels any changes
Security > SCHEDULE
Field or Button Description
Day to Block Select the days to block — Every Day, Sunday, Monday, Tuesday,
Wednesday, Thursday, Friday, or Saturday
Time of Day to
Block
Select All Day to block the service all day or specify a range in the
Start Blocking and End Blocking fields.

Section 3 Configuration Utility Reference
3-22 RSG2500
Security > EMAIL
Field or Button Description
Turn E-mail notification
On
Enables e-mail notification of RSG2500 alerts and logs.
Your Outgoing Mail
Server
Sets the SMTP server for sending mail.
Send to This E-mail
Address
Sets the e-mail address to which to send the notifications.
Send Alert Immediately
When Someone Attempts
to Visit Blocked Site
If selected, an e-mail is sent immediately when any network
user visits a blocked site.
Send Logs According to
Schedule
Sets how often e-mail notifications are sent:
When log is full
Hourly
Daily (you can specify the time of day)
Weekly (you can specify the day and time)
None
Time Zone Sets the time zone by synchronizing with the NTP server
Adjust for Daylight
Savings Time
If selected, adjusts for daylight saving time.
Configuration Utility Reference Section 3
RSG2500 3-23
Configuring Management Settings
The management configuration windows are:
BACKUP
ADMIN
UPGRADE
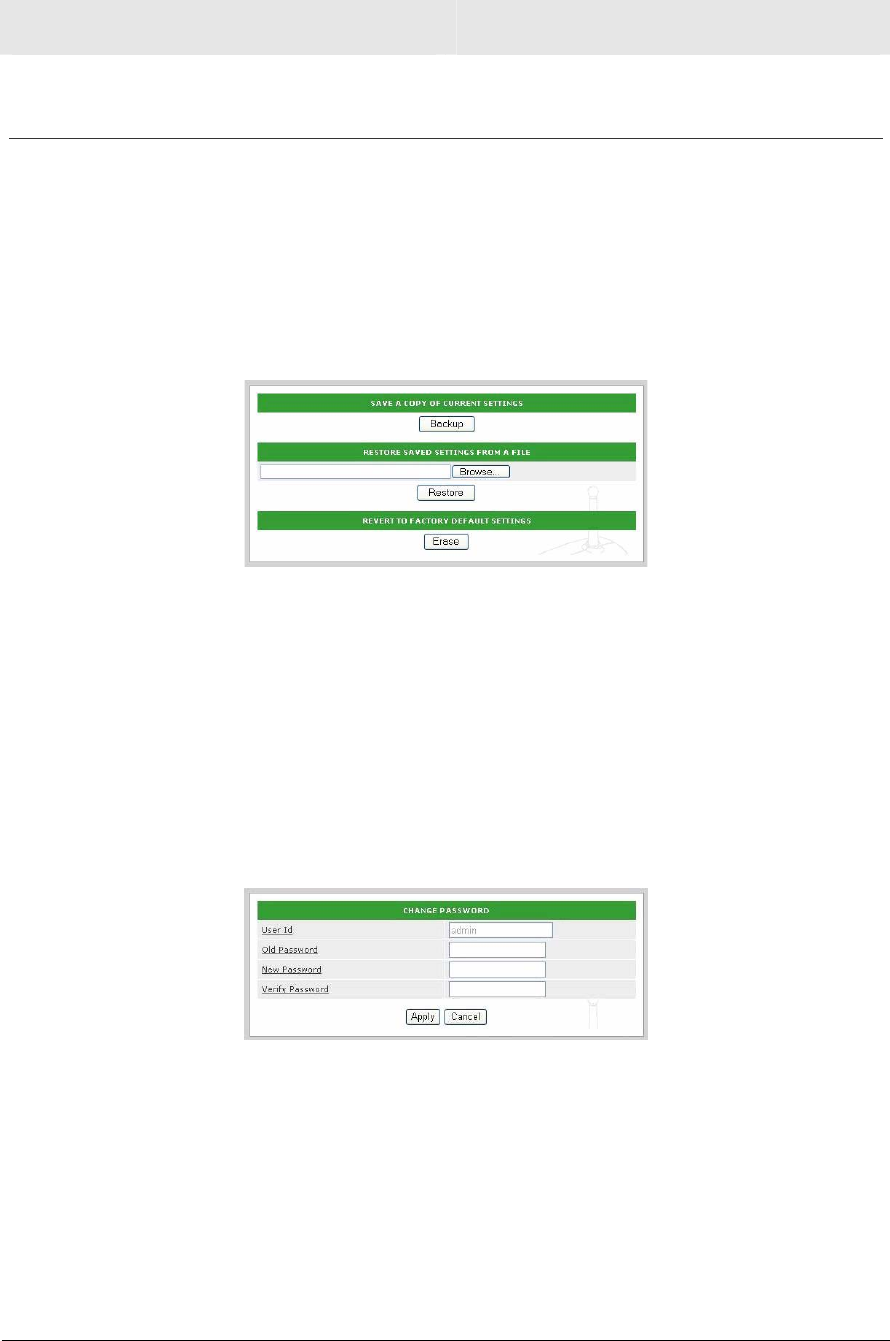
Management > BACKUP
Button Description
Backup Click to save the current settings.
Restore Click to restore the settings saved in a file to the RSG2500 and reboot
the RSG2500. You can click Browse to find the file containing the
saved settings.
Erase Click to restore the factory default settings to the RSG2500 and reboot
the RSG2500.
Management > ADMIN
Field Description
Old Password Type the original password
New Password Type the new password.
Verify Password Type the new password again.
Section 3 Configuration Utility Reference
3-24 RSG2500
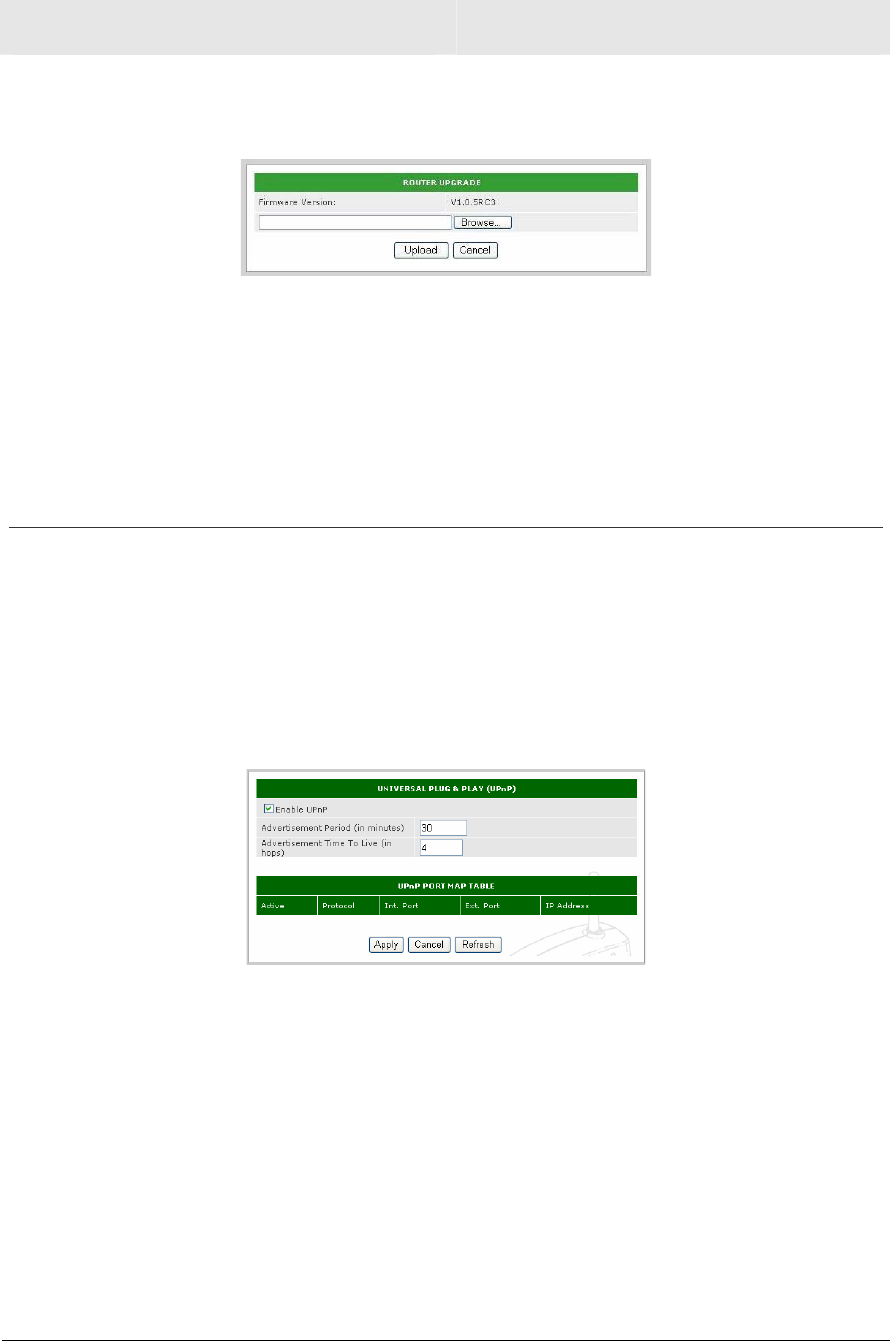
Management > UPGRADE
Field or Button Description
Firmware Version Displays the current firmware version
Upload Click to upgrade the firmware. You can click Browse to help find the
firmware file.
Cancel Click to cancel an in-process code upgrade.
Configuring Service Settings
The Service windows enable you to configure:
UPnP
PORT FORWARDING
PORT TRIGGERING
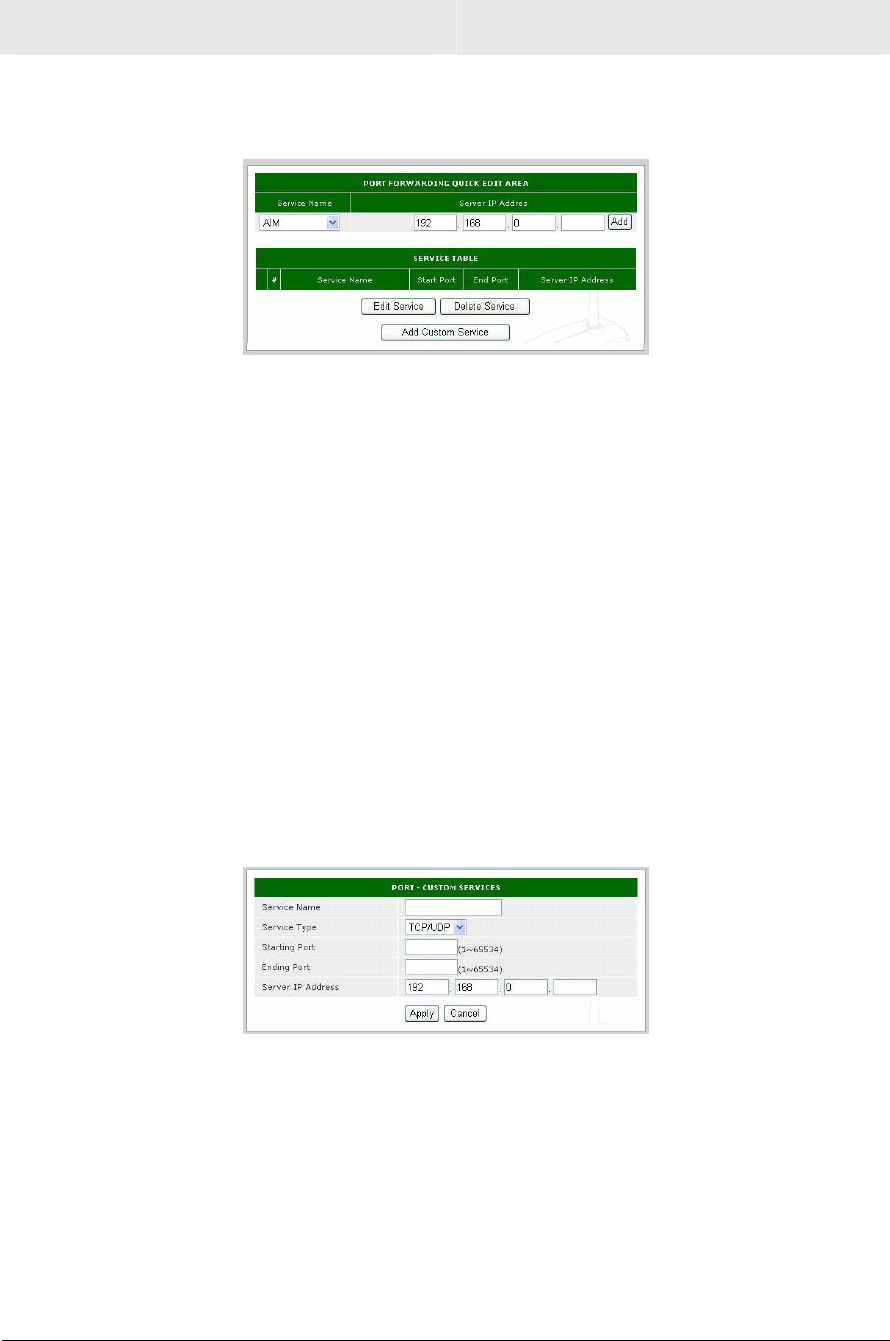
Service > UPnP
Field Description
Enable UPnP Enables UPnP; the default is enabled
Advertisement Period
(in minutes)
Sets the period to send a UPnP advertisement; the default is
30 minutes
Advertisement Time To
Live (in hops)
Sets the maximum hop count for the UPnP advertisement
transmission; the default is 4 hops
Configuration Utility Reference Section 3
RSG2500 3-25
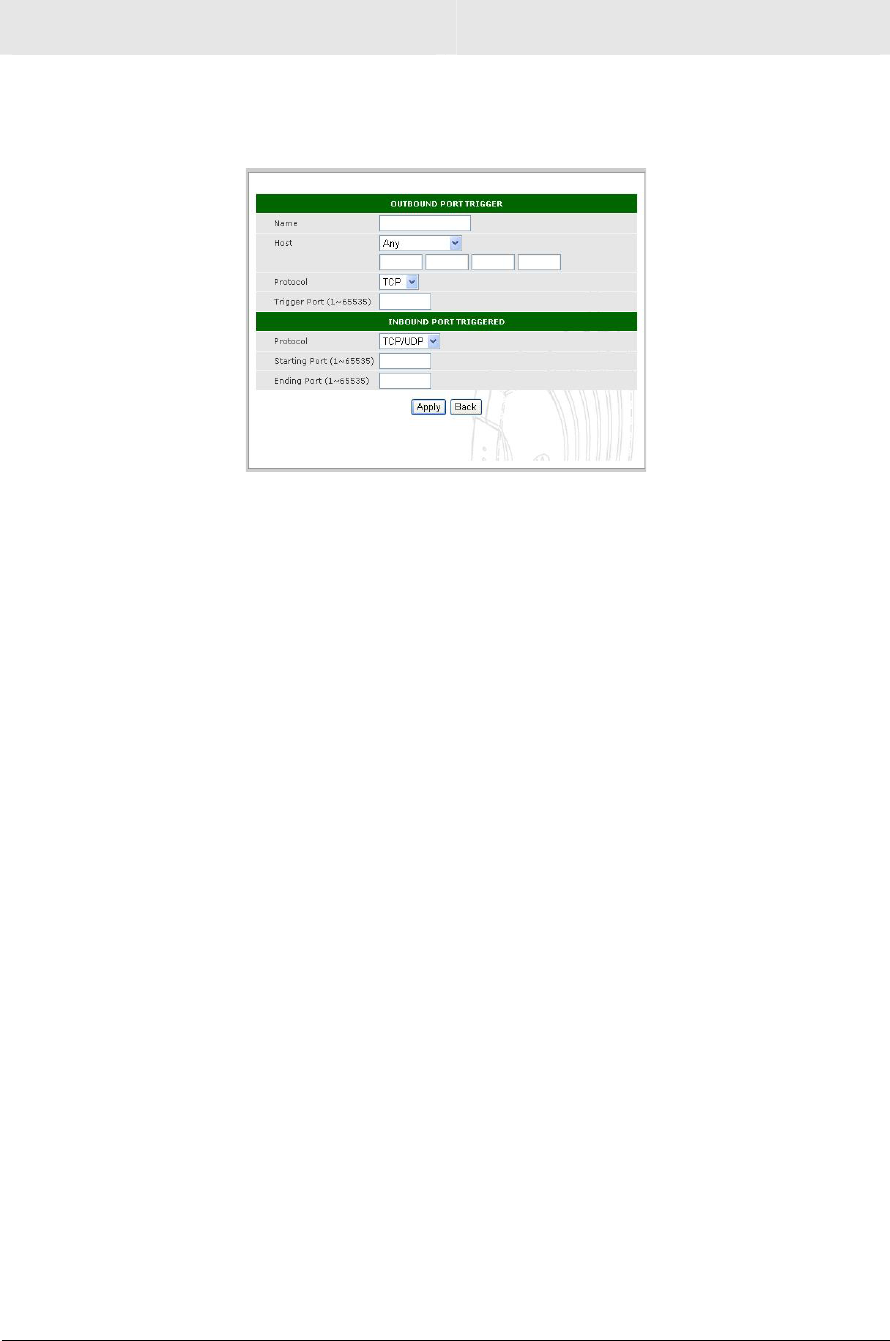
Service > PORT FORWARD
Field Description
Port Forwarding Quick Edit Area
Service Name Select AIM, Age-of-Empire, FTP, HTTP, ICUII, IP_Phone, NetMeeting,
News, PPTP, QuakeII/III, Real-Audio, or Telnet
Server IP
Address
Type the server IP address, in dotted-decimal format.
Add Click to add the port forwarding entry.
Service Table Displays all defined port forwarding rules.
Edit Service Click to edit the selected port forwarding rule. The PORT – CUSTOM
SERVICES window is displayed.
Delete Service Click to delete the selected port forwarding rule.
Add Custom
Service
Click to create a new port forwarding rule. The PORT – CUSTOM
SERVICES window is displayed.
Editing or Adding a Port Forwarding Rule
Field Description
Service Name Sets the service name
Service Type Select TCP/UDP, TCP, or UDP
Starting Port Sets the starting port 1 to 65534
Ending Port Sets the ending port 1 to 65534
Server IP Address Sets the LAN IP address

Section 3 Configuration Utility Reference
3-26 RSG2500
Service > PORT TRIGGER
You can configure up to 32 custom port triggers.
Field or Button Description
Enable Port Triggers Enables port triggers
Port Trigger Timeout
(in minutes)
Sets the time until the port-trigger is terminated, in minutes.
Add Click to add a port trigger.
Port Trigger Map
Table
Displays all current port triggers.
Delete Click to delete the selected port trigger.
Configuration Utility Reference Section 3
RSG2500 3-27
Adding a Port Trigger
Field or Button Description
Outbound Port Trigger
Name Rule name.
Host Sets the host that triggers the rule — Any host or an IP address
Protocol Can be TCP or UDP
Trigger Port Can be from 1 to 65535
Inbound Port Triggered
Protocol Can be TCP/UDP, TCP, or UDP
Starting Port
Ending Port
Can be from 1 to 65535
Section 3 Configuration Utility Reference
3-28 RSG2500
Displaying the RSG2500 Status
The Status windows are:
ATTACHED DEVICE
STATUS
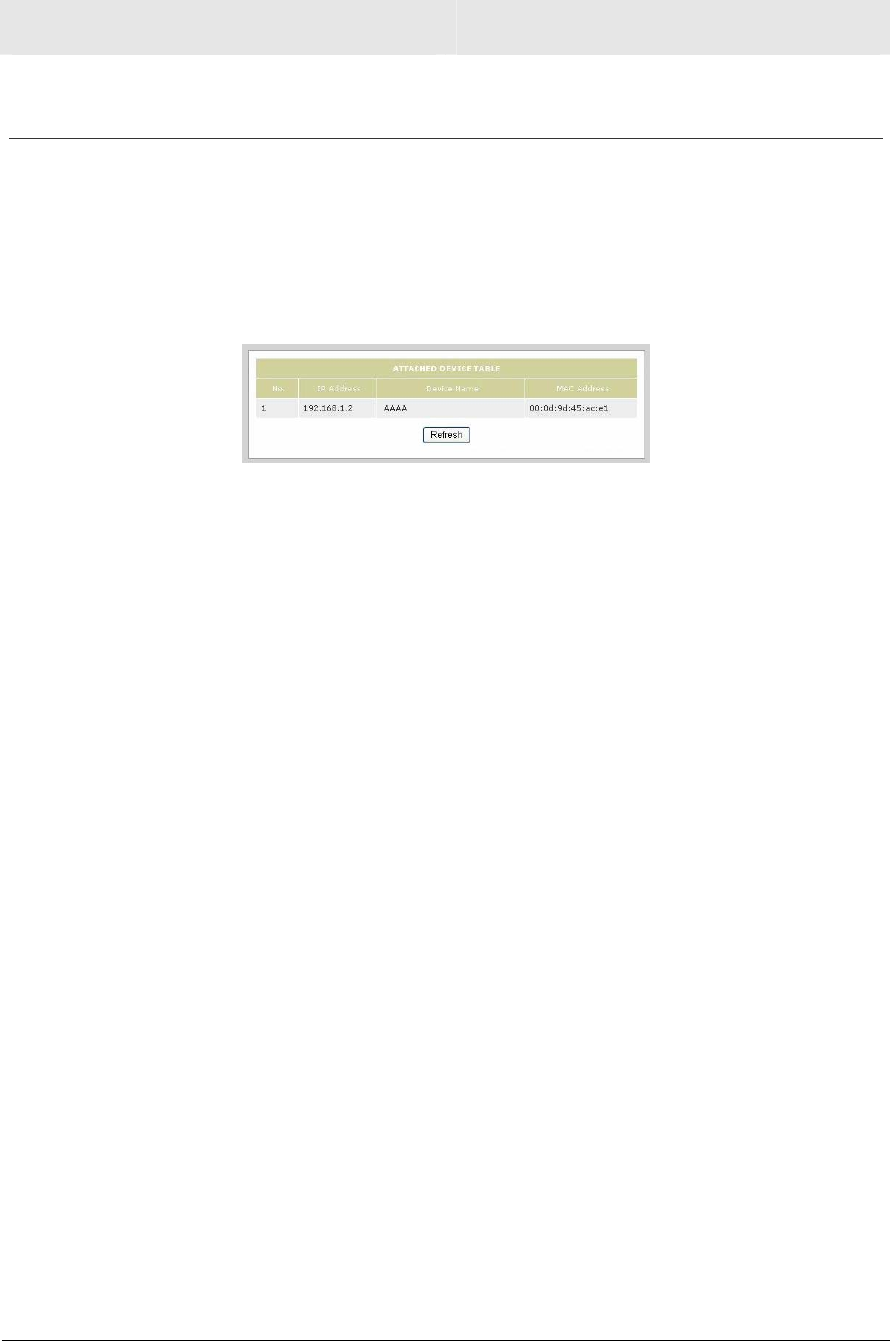
Status > ATTACHED DEVICE
Field Description
Attached Device
Table
Displays information about each device on the RSG2500 network
Refresh Click to update the device list
Status > STATUS
The fields displayed on the Status window vary depending on the Operation Mode set on
the WAN > BASIC window.
You can click Show Statistics to display related to network performance.
You can click Connection Status to:
Display detailed information about the Internet (WAN) connection
Release or renew the WAN connection

RSG2500 4-1
Section 4: Troubleshooting
This section suggests solutions to home networking issues you may encounter. If you
cannot find a solution here, please contact your service provider.
My computer cannot connect to the wireless network.
x Be sure your RSG2500 is connected to the AC adapter and the AC adapter is plugged in
to an AC power outlet. If they are, the Power light on the RSG2500 front panel is on.
x Be sure the computer is in range of the RSG2500 and not behind an obstruction. Thick
walls, metal structures, 2.4 GHz cordless phones, or microwave ovens all can interfere
with the signal.
x Be sure the computer’s wireless adapter is correctly installed with its radio signal
enabled and its antenna properly connected. Refer to the adapter’s documentation.
x Verify that the WEP or WPA settings for the computer wireless adapter match those on
the RSG2500. Refer to the adapter’s documentation.
x If you want to use WPA for more robust security, verify that the wireless adapter
supports WPA. If it does not, replace the adapter or choose a different security method.
x For a non-Motorola wireless adapter, verify that you are not using a WEP passphrase.
You cannot use a WEP Passphrase if you have any computers equipped with a non-
Motorola wireless adapter.
x If you selected Allow Only Listed Station Access on the Wireless > ADVANCED
window, be sure the computer’s MAC address is one of the Listed Stations.
Section 4 Troubleshooting
4-2 RSG2500
My computer cannot communicate with the RSG2500 through a wired connection.
x Be sure the cabling from the wall to your modem, from the modem to your RSG2500,
and from the RSG2500 to your computer is correctly and firmly connected.
x Be sure no lights on the RSG2500 front panel are red or off. For more information, see
Section 1 “Overview.”
x Be sure you are using Ethernet cables rather than phone cables to connect the modem,
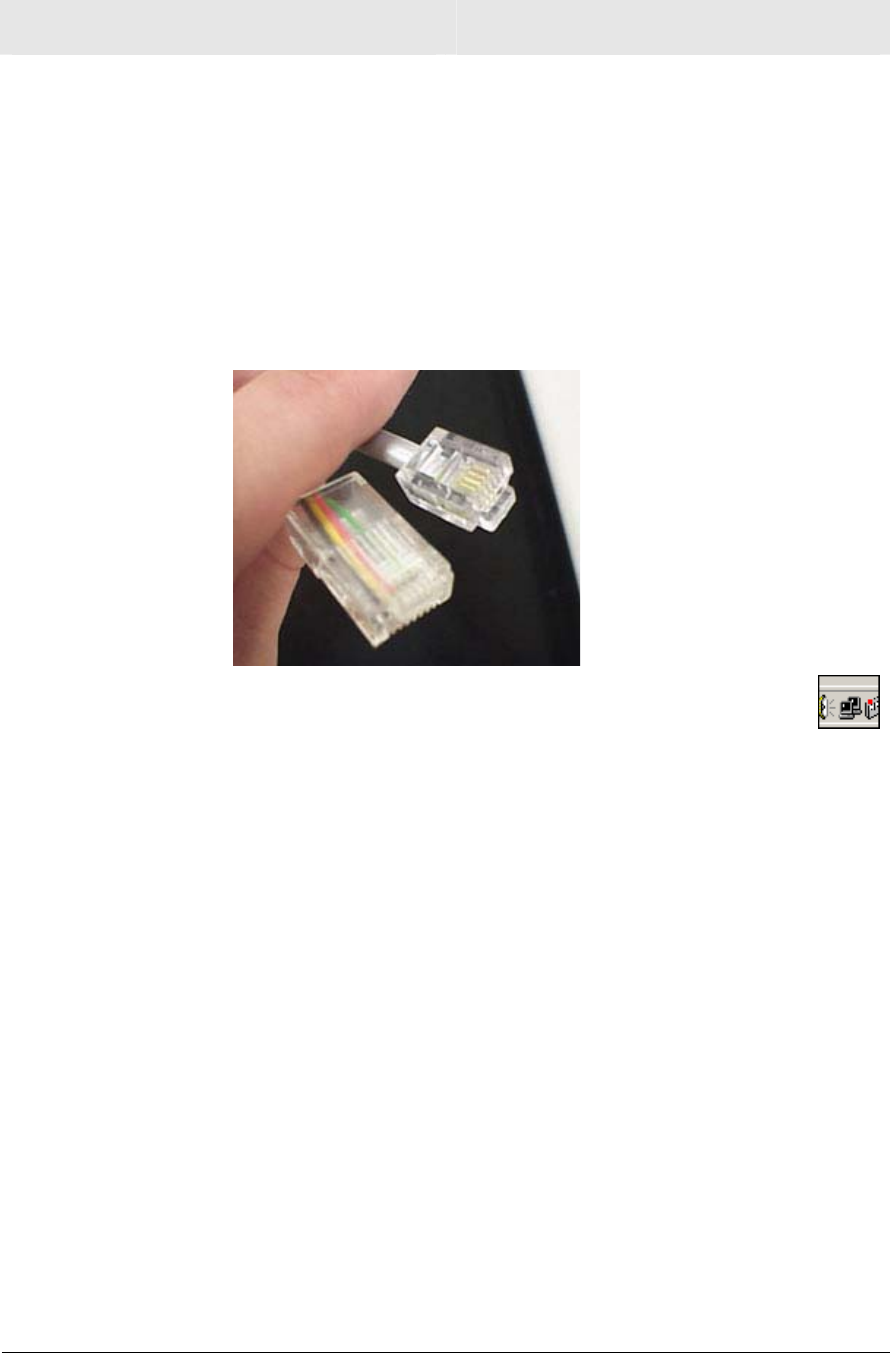
RSG2500, and computer. An RJ-45 Ethernet plug is shown at left. A RJ-11 plug for a
telephone is shown at right:
Be sure your Ethernet adapter is enabled. To check the status of a PC adapter,
click the monitor icon in the System Tray at the bottom right of your screen or
select Control Panel > Network and Dial-Up Connections:
My broadband modem contains a built-in router.
Because the two routers will cancel each other out, turn off the NAT function in the modem
to enable access for your router. Refer to your modem’s documentation for further
instructions.

Troubleshooting Section 4
RSG2500 4-3
How can I test my Internet connection?
1Be sure Obtain an IP address automatically is selected on the computer and that an
IP address is assigned.
2Click Start and Run.
3In Windows 98 or ME, in the Open field, type command and press Enter or OK.
In Windows 2000 or XP, type cmd.
4In the Command window, type ipconfig. Text similar to the following is displayed:
Windows IP Configuration
Ethernet adapter Local Area Connection:
Connection specific DNS suffix . : xxx.xxx.xxx.com
IP Address. . . . . . . . . . . . : 192.168.0.100
Subnet Mask . . . . . . . . . . . : 255.255.255.0
Default Gateway . . . . . . . . . : 192.168.0.1
5Verify that your PC’s IP address is displayed.
6Type ping RSG2500-IP-address and press Enter.
x If you receive a reply, your computer is connected to the RSG2500. Continue with
step 7.
x If you do not receive a reply, if there is another computer on the network, repeat
steps 1 to 4 on that computer to verify that the first computer is not the cause of the
problem. Your computer Default Gateway’s IP address may also be your RSG2500
IP address. Verify the RSG2500’s IP address by logging on to the RSG2500
Configuration Utility and reviewing the IP Address field on the LAN Page.
7Start a Web browser and attempt to view a website; for example www.yahoo.com or
www.google.com. If this works, your Internet connection is fine. Otherwise, contact your
service provider.
I cannot browse past the first screen of the Configuration Utility.
Sometimes, especially when upgrading, some leftover files may be in your Internet cache.
In Internet Explorer, to clear your cache, choose Internet Options from the Tools menu
and click Delete Files. Then, restart your RSG2500.

Visit our website at:
www.motorola.com
526910-001
03-06