ARRIS SD20X SD200 Access Appliance User Manual Manual
Arris International, Inc. SD200 Access Appliance Manual
ARRIS >
Manual
Installation Guide
P/N 601002-001
SD200 Access Appliance
This document is intended to provide instructions on installing the coaXmedia SD200 Access
Appliance. Through the use of our SD200 Access Appliance and your PC, you can take
advantage of the many high-speed Internet services which are available.
The SD200 Access Appliance is designed to insure a fast, easy installation. Once this product is
installed, using this product is as easy as clicking on an icon. A more detailed version of the
Installation Guide is available on the Install CD.
Introduction
1220 Oak industrial Lane, Suite B,
Cumming, GA 30041, USA
Port Selection
Setup Wizard
Launchpad
The computer port you select for connection
to the SD200 Access Appliance depends on
your computer’s Operating System and the
available ports. Check which ports are not in
use and refer to the table below when
making your selection.
USB Windows 98, Me, 2000, XP
Parallel Windows 98, ME, 2000, XP
The CD supplied with your SD200 Access
Appliance contains a Setup Wizard to
simplify the setup process. Use the following
procedure to use the Setup Wizard:
1. Switch your computer ON.
2. Load the coaXmedia Setup Wizard CD
into your CD ROM drive.
3. Follow the Setup Wizard instructions. Once
the Setup Wizard starts, follow the on-screen
instructions. The Wizard sets up the necessary
PC interface support, as well as installs a
Launchpad application.
End of Procedure
Once the Setup Wizard runs successfully to
completion, your computer reboots. When
the system restarts, there is a coaXmedia
icon added to your desktop.
The Access Appliance has been designed
to use serial, parallel, and USB interfaces. The
Setup Wizard provides the option of installing
software support for each of these port
types.
If you have chosen USB to use with
the Access Appliance, you can
connect the PC cable at this time.
Launchpad is a connection manager which
provides a central location that controls and
configures your Access Appliance Internet
connection.
The Launchpad user interface allows you to
connect or disconnect from the Internet,
modify Internet connection parameters,
and provides up-to-date connection
information, as shown below.
The following table explains the Launchpad
screen selections.
Port OS
Changing Port Type Persistent Connection
To change the port type used by
Launchpad, use the following procedure:
1. Double-click on the coaXmedia icon on
your desktop. Notice the icon in the tray.
2. Right-click on the icon in the system
tray.
3. Select from the menu. The
following screen is displayed.
4. Select the tab.
5. Click on the desired radio
button. In the example, parallel is selected.
6. Click to save the port selection and
to close the dialog box.
If the new device type is displayed as the
current in Launchpad’s main
dialog, the port was properly selected, as
shown below.
End of Procedure
The Launchpad option can be used to help
maintain an active connection to the
Internet. When the option is selected,
Launchpad automatically attempts to
reconnect your session to the Internet, if for
any reason it goes down.
1.Right-click the X icon and select
2. Select the tab.
3. Check the box.
End of Procedure
X
X
Properties
Device Type
Device Type
OK
Device Type
Properties
Users
Persistent Connection
SDSERIES
PSTRD
Connection
Status
Connected - connection
to Internet is active.
Idle - you are not
connected to Internet.
Up Time
Device
How long a connection has
been active.
The currently selected PC
interface device type.
Connect
Disconnect
Help
This button is available
when the current Connection
Status is Idle. Use this button
to establish an Internet
connection. The button
changes to
once a connection is
established.
Disconnect
This button is available
when the current Connection
Status is Connected. Use this button
to disconnect from the Internet.
The button should be used
every time you are finished using
the Internet, as a security measure
against unauthorized access.
Displays helpful information about
using Launchpad.
!
XLaunchpad
Connection Status
Idle...
Connect
Up Time: 00:00:00 Device: Parallel
Help
x
XLaunchpad
Connection Status
Connected
Connect
Up Time: 10:01:30 Device: Parallel
Help
x
Device Type
Device Type User
OK Cancel Apply
Apply Help
Debug RAS
Parallel Port
USB Port
Launchpad Properties x
FCC Statement
Industry Canada
Statement
NEC Statement
Support Information
Warning
Notice
The coaXmedia SD200 Access Appliance has
been tested and found to comply with the limits
for a Class B personal computer and peripherals,
pursuant to Part 15 of the FCC Rules. These
limits are designed to provide reasonable
protection against harmful interference in a
residential installation. This equipment
generates, uses, and can radiate radio frequency
energy, and, if not installed and used in
accordance with the instructions, may cause
harmful interference to radio communications.
However, there is no guarantee that interference
will not occur in a particular installation. If this
unit does cause harmful interference to radio or
television reception, which can be determined by
turning the unit off and on, the user is encouraged
to try to correct the interference by one of more of
the following measures: reorient or relocate the
receiving antenna, increase the separation
between the equipment and the receiver, connect
the equipment into an outlet on a circuit different
from that to which the receiver is connected, or
consult the dealer or experienced radio/TV
technician for help.
"This Class B digital apparatus complies with
Canadian ICES-003."
"Cet appareil numérique de la classe B est
conforme la norme NMB-003 du Canada."
The is intended to be
connected to a cable system which has been
properly grounded in accordance with the
National Electric Code.
If you require technical support, contact your
equipment dealer or coaXmedia . The Support
staff can be reached by phone at the following
numbers, from 8:30 a.m. to 5:00 p.m. Eastern
time, Monday through Friday.
coaXmedia and the coaXmedia logo are
trademarks of coaXmedia All trademarked
products mentioned in this document are
trademarks of their respective companies.
This product may not be exported outside the
United States and Canada without authorization
from the U.S. Department of Commerce, Bureau
of Export Administration. Any export or re-
export by the purchaser, directly or indirectly, in
contravention of U.S. Export Administration
Regulation is prohibited.
This document may not be reproduced, in whole
or part, without the written permission of
coaXmedia . The contents of this document are
subject to change without notice. coaXmedia ,
Inc. assumes no liability for damages resulting
from the use of this product or for the information
contained in this manual.
®
à
®
®®
®
®
®
877-885-COAX(2629) Toll Free
.
SD200 Access Appliance
Trademarks
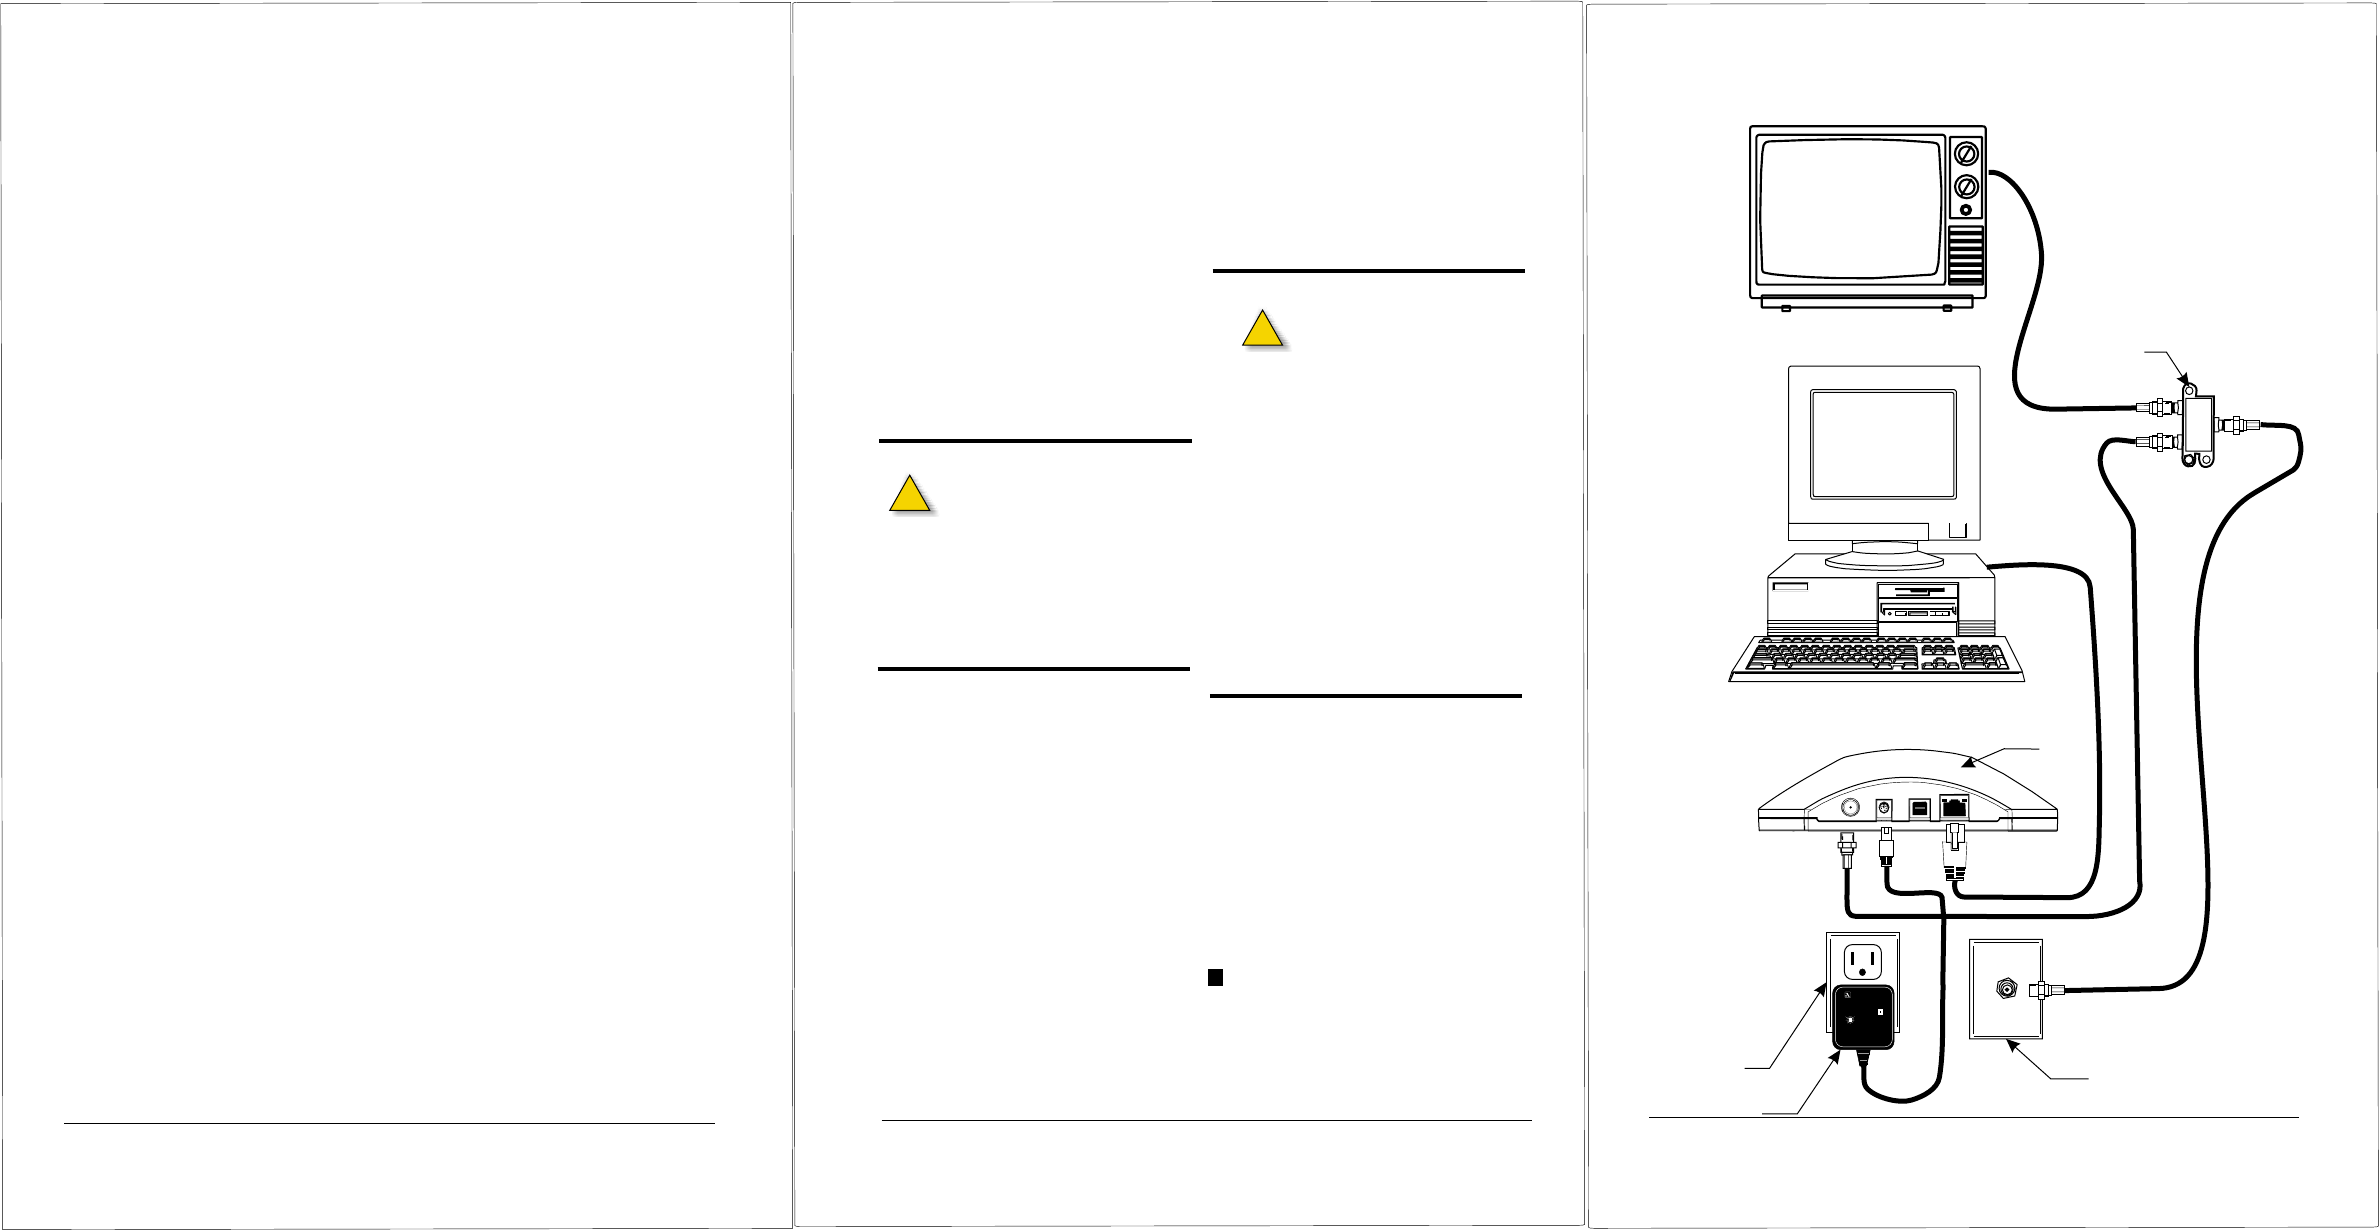
Use the following procedure to install the
Access Appliance and refer to the
1. Disconnect the TV from the Cable TV
outlet. Unscrew the end from the wall
connector but leave the other end
connected to the TV/VCR.
2. Connect the TV to the provided Diplex-filter
TV port . If a TV is not being used, leave the TV
port unconnected.
Do not substitute a generic cable
splitter for the Diplex-filter. Although
doing so will not damage the TV or
Access Appliance, the Diplex-
filter improves performance.
If you use one or more cable splitters in the
room, you may continue to use them.
However, you should install the Diplex-filter so
that it is the first device connected to the
Cable TV outlet.
Connection Diagram:
3. Connect the Diplex-filter to the Cable TV
outlet.
3a. Locate the shortest coaxial cable
included with the Access Appliance
and connect one end to the port of
the Diplex-filter.
3b. Connect the other end of the cable
to the Cable TV outlet.
4. Connect the Access Appliance to the
diplexer-filter.
4a. Locate the remaining coaxial
cable and connect one end to the
port of the Diplex-filter.
4b. Connect the other end of the cable
to the port of the Access Appliance.
If longer cables are required, they can
be obtained from an electronics supply
shop.
Do not use any devices
between the cable from the
Access Appliance and the
computer.
Disable any active port monitoring
services because some of these can
interfere with proper operation of the
Access Appliance.
Don’t connect the PC cable if you will
be using USB. It is necessary to connect
this cable after running the Setup
Wizard.
If you do not have the correct cable for
the interface you want to use, call
coaXmedia at:
6. Verify that the power available at the
nearest AC receptacle matches the
requirements of the SD200 Access
Appliance.
7. Connect the power adapter output
connector to the connector on the
Access Appliance.
8. Plug the power module into the AC outlet.
The P indicator on the Access Appliance
lights when power is applied.
End of Procedure
IN
X
RF
NOTE:
PWR
5. Connect the PC cable.
5a. Locate the PC cable included with
the Access Appliance
5b. Connect the other cable end to the
appropriate interface port on your PC.
Phone: 1-877-885-2629
E-mail: support@coaXmedia.com
Legal Notices
Installing the Hardware
!
!
LZRelectronics, inc.
PART NO: AD121A-7
MODEL NO: 481210003C0
INPUT: 120VAC 60Hz 18W
OUTPUT: 12VDC @1A
AC ADAPTOR
coa media
X
509001-001
DIPLEXER
TV
X
IN
Cable TV
Outlet
AC Outlet
Power Module
Diplex-filter
TV
x
IN
1
23
45
AULT INCORPORATED
P/N:SS203TA0000B03
I.T.E. POWER SUPPLY
MODEL:SA210A-35-K
INPUT: 120V ~ 60Hz 250mA
OUTPUT: 5V=800mA
3.3V=700mA
1,5: COM
2,4: 3.3V 3: 5.0V
MADE IN TAIWAN
SD200
ETHERNET
RF
PWR USB
Connection Diagram