ASOKA USA PL9550-WAP WIRELESS ACCESS POINT User Manual UM PL9550 WAP 1210
ASOKA USA Corporation WIRELESS ACCESS POINT UM PL9550 WAP 1210
users manual

User’s Guide
PlugLink 9550 Wireless Access Point
PL9550-WAP
Version: 1.01
© Copyright 2005. Asoka USA Corporation. All rights reserved. Asoka USA Corporation reserves the
right to modify product offerings or specifications without advance notice. No part of this publication may
be produced in any format without the express written permission of Asoka USA Corporation.
FCC Caution:
1. This device complies with Part 15 of the FCC rules. Operation is subject to the
following two conditions:
(1) This device may not cause harmful interference, and
(2) This device must accept any interference received, including interference that may
cause undesired operation.
2. This device and its antenna(s) must not be co-located or operating in conjunction
with any other antenna or transmitter.
3. Changes or modifications to this unit not expressly approved by the party responsible
for compliance could void the user authority to operate the equipment.
4. This equipment has been tested and found to comply with the limits for a Class B
digital device, pursuant to Part 15 of the FCC Rules. These limits are designed to
provide reasonable protection against harmful interference in a residential installation.
This equipment generates, uses and can radiate radio frequency energy and, if not
installed and used in accordance with the instructions, may cause harmful interference
to radio communications. However, there is no guarantee that interference will not
occur in a particular installation. If this equipment does cause harmful interference to
radio or television reception, which can be determined by turning the equipment off and
on, the user is encouraged to try to correct the interference by one or more of the
following measures:
-- Reorient or relocate the receiving antenna.
-- Increase the separation between the equipment and receiver.
-- Connect the equipment into an outlet on a circuit different from that to which the
receiver is connected.
-- Consult the dealer or an experienced radio/TV technician for help.
5. This equipment complies with FCC RF radiation exposure limits set forth for an
uncontrolled environment. This equipment should be installed and operated with a
minimum distance of 20 centimeters between the radiator and your body.
Asoka® User’s Guide
PlugLink 9550 Wireless Access Point PL9550-WAP
1. Introduction.............................................................................................................. 4
1.1 Features............................................................................................................... 4
1.2 Package............................................................................................................... 4
2. Hardware Installation.................................................................................................. 5
2.1 The Front Panel ................................................................................................... 5
2.2 Connect Device and PC....................................................................................... 5
3. Wireless AP Configuration ......................................................................................... 5
3.1 Logging in ............................................................................................................ 5
3.2 System................................................................................................................. 6
3.2.1 Details........................................................................................................ 6
3.2.2 Time........................................................................................................... 7
3.2.3 Password................................................................................................... 7
3.2.4 System Logs .............................................................................................. 8
3.2.5 Reset ......................................................................................................... 8
3.2.6 Backup....................................................................................................... 9
3.2.7 Firmware.................................................................................................... 9
3.3 Wireless ............................................................................................................. 10
3.3.1 Wireless Setting....................................................................................... 10
3.3.2 Wireless Security ..................................................................................... 11
3.4 IP ADDRESS ..................................................................................................... 12
3.4.1 IP Address................................................................................................ 13
3.5 POWER LINE .................................................................................................... 13
3.5.1 Password Setting..................................................................................... 13
3.5.2 Device Scan............................................................................................. 13
Asoka® User’s Guide
PlugLink 9550 Wireless Access Point PL9550-WAP
Technical Support
You can download latest software from our website. If you have any question or difficulty
during installation or using PlugLinkTM PL9550-WAP, please contact our technical support
engineer.
About User’s Manual
User’s Manual of PL9550-WAP is released in December, 2005, the version is 1.01. This
manual illustrate how to installation and configure PL9550-WAP. Please spend some time
to read this manual before using our PLC-based Wireless Access Point.
Asoka® User’s Guide
PlugLink 9550 Wireless Access Point PL9550-WAP
Introduction
Thanks for your selection of AsokaUSA PlugLinkTM PL9550-WAP. We are devoting to
provide powerful, high-performance and applied power line networding system. The
product is designed for home, hotel, office, apartment . It provides a full local network
solution with PLC technical.
1.1 Features
Complies IEEE 802.3, IEEE 802.3u, IEEE802.3x, IEEE 802.3z/ab standards
Support both 802.11b and 802.11g wireless standards
IEEE 802.11i Wireless Network Security
IEEE 802.1x client support
Complies with HomePlug 1.0
Supports QAM 256/64/16,DQPSK,DBPSK and ROBO modulation schemes
Supports OFDM with patented signal processing techniques
Supports up to 85Mbps with PLC
Supports Web-based GUI (CGI , SSL) with any web browser
Supports web-based firmware upgrade
Easily extend your local network, in the home, office, even at tradeshows
1.2 Package
Please make sure the package with contents as below:
1 PL9550-WAP
1 CAT-5 UTP Cable
User’s Manual
1 CD with Product Document
If you find any item as upper lost or damaged, please contact the local sales.

Asoka® User’s Guide
PlugLink 9550 Wireless Access Point PL9550-WAP
2. Hardware Installation
2.1 The Front Panel
2.2 Connect Device and PC
a. Plug the wireless AP into a electrical outlets.
b. Connect the wireless AP to a PC or Laptop with CAT5 cable through RJ45 port.
d. Set network configuration of PC to communicate with the wireless AP. The default IP
address of the wireless AP is as below:
Default LAN IP address: 192.168.1.254
e. Power on the wireless AP, Use command “ping” in PC side to test the connection
between the wireless AP and PC. For example, you connect PC to LAN port, the IP
address of PC should be set to “192.168.1.x” (1<x<255 and x!=254), the network mask is
“255.255.255.0”.
f. Use laptop or PC with wireless card to connect the wireless AP, the default ESSID is
“Asoka” and is without encryption or authenticate key.
3. Wireless AP Configuration
The Wireless AP provides Web-based GUI for user to configure the device. It means
user can use any web explorer (Internet Explorer ,Netscape Communicator etc. ) to
implement configuration of PL9550-WAP.
3.1 Logging in
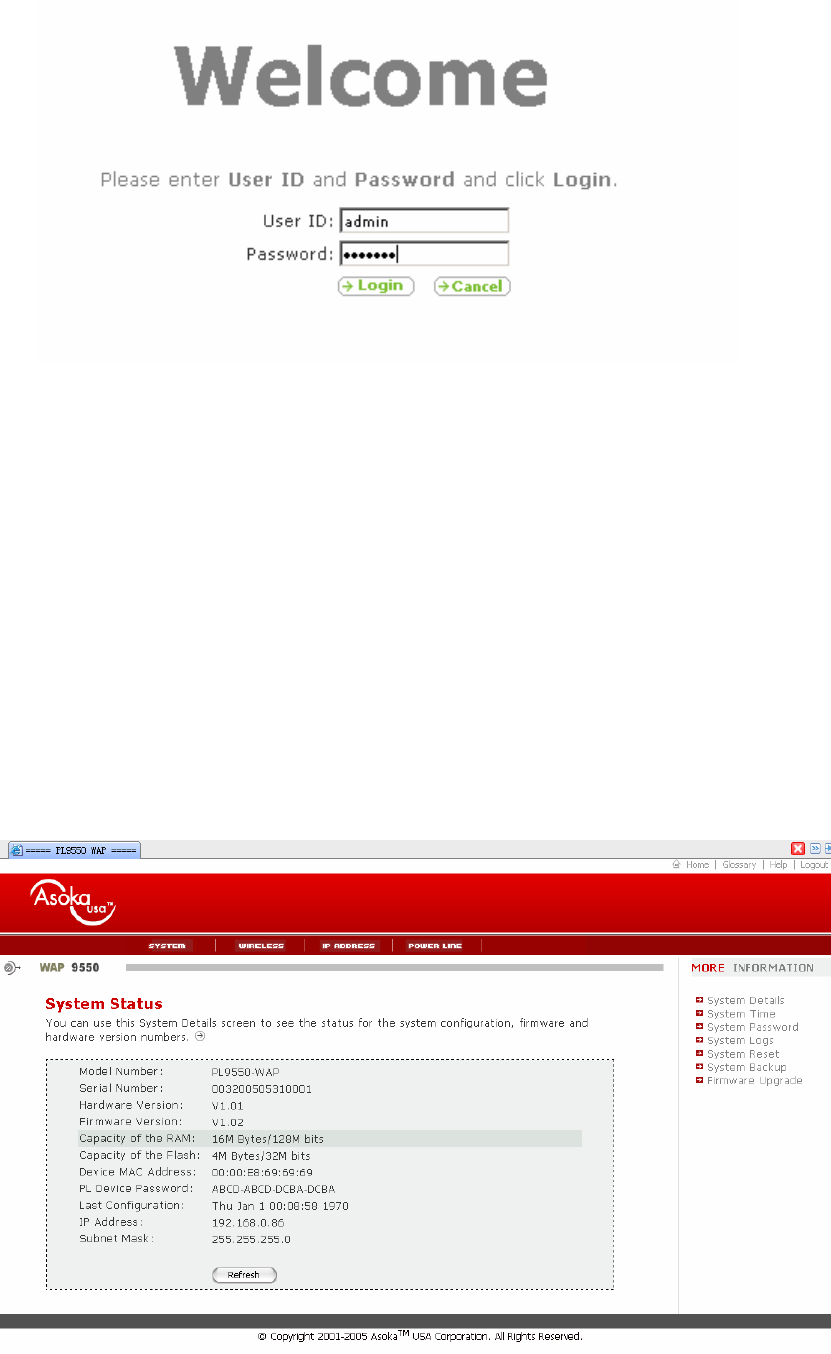
Connect monitor PC to RJ45 port or through Wireless connection, Start web browser program,
input corresponding IP address of the Wireless AP, then will display login page as Figure 1,
input correct UserID & Password, then can enter management interfaces.
Asoka® User’s Guide
PlugLink 9550 Wireless Access Point PL9550-WAP
Figure 1. system login
The default User ID is “admin” and the default Password is “welcome”. Please remember
to modify User ID and Password after you login successfully first time.
3.2 System
System configuration provides interface to view the general configuration and status and
set general configuration of the device including Date & Time, Password & User ID etc. It
also provides interface to backup configuration, reset system, update firmware etc.
3.2.1 Details
When you login the web-based GUI of PL9550-WAP, The pages as below will be shown as
Figure 2 of the system details including status and basic configuration.
Asoka® User’s Guide
PlugLink 9550 Wireless Access Point PL9550-WAP
Figure 2. system details
From the page, we can find that there is one main menu in the upper part for configuration.
The submenu in the left part of the page show all items for each menu selected.
There are four links in the left-top of the page including:
Home Click this link will go back to the page of System Details
Help If any assistance is required in using AP, click this link
Glossary To lean some knowledge of PL9550-WAP, click this link
Logout To logout the configuration GUI, click this link
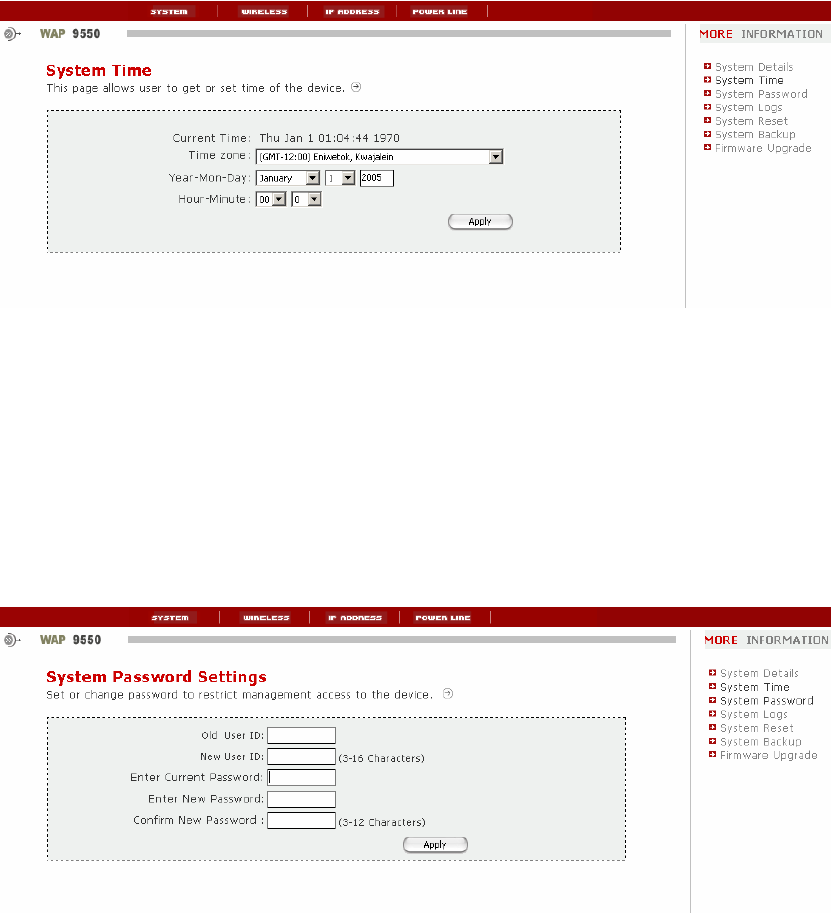
3.2.2 Time
To change the time of the device, click submenu “SYSTEM->Time”, a page as below
appears.
Current Time Shows the current system time of the device
Time Zone Select the time zone of your local time
Year-Mon-Day Select year, month and day of the new time
Hour-Minute Select hour, minute of the new time
3.2.3 Password
To change User ID or Password of the WAP, click submenu “SYSTEM->Password”, the
page as Figure 3 will display.
Figure 3. access configuration

Asoka® User’s Guide
PlugLink 9550 Wireless Access Point PL9550-WAP
The upper form shows how to change system user ID and Password
Input old user id in the first text box
Input new user id in the second text box (input old user id means keep user id without
change )
Input current password in the third text box
Input new password in the fourth text box
Reinput new password in the fifth text box
Click button ‘Apply’ begin set new user id or password, then a new page will show the
result of the setting
3.2.4 System Logs
To view the system logs and set some parameters of logs, click submenu “SYSTEM->
Logs”, a page as Figure 4 will display.
Figure 4. System Logs
The upper list box shows the current system logs
Click button “Download”, a dialog will display to begin log file downloading
Click button “Clear” to delete all current logs
Click button “Refresh” to refresh this page to show latest logs
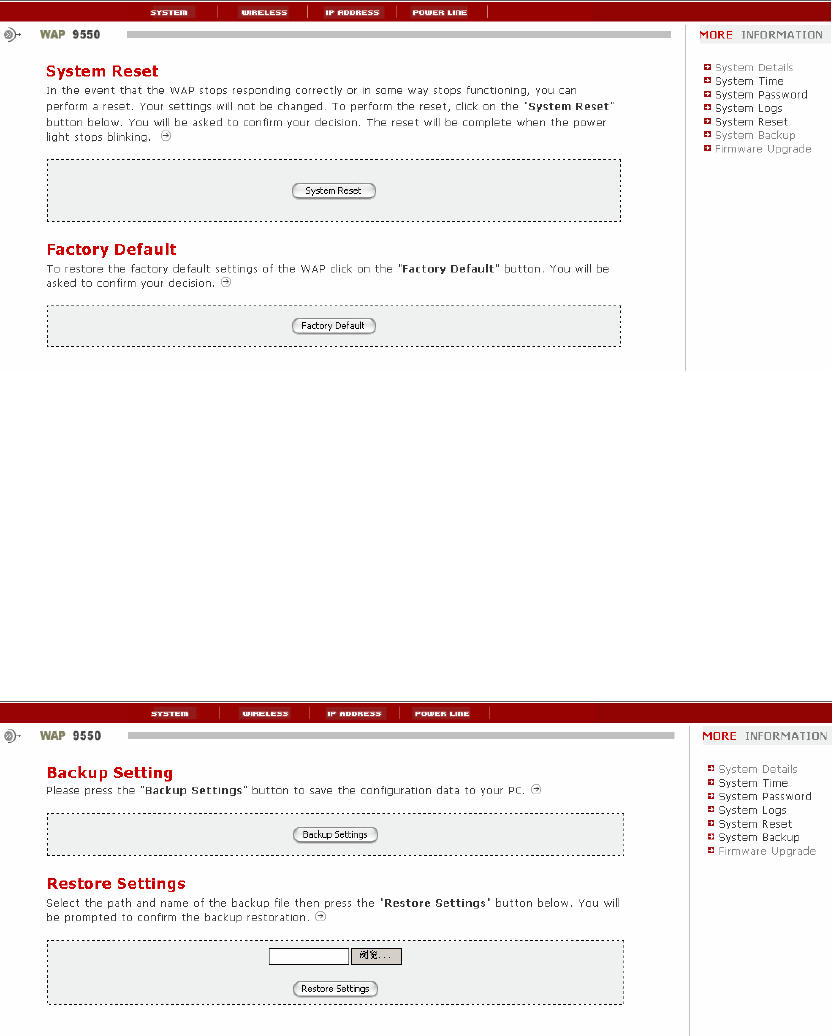
3.2.5 Reset
To reset the Wireless AP or set the configuration to factory default, click submenu
“SYSTEM->Reset”, a page as Figure 5 will be shown.
Asoka® User’s Guide
PlugLink 9550 Wireless Access Point PL9550-WAP
Figure 5. System Reset
To reset system, click button “System Reset”. If you confirm your decision, please wait a
minute for the system reboot.
To restore the factory setting to the gateway, click button “Factory Default”. If you confirm
your decision, please wait a minute because the system should be rebooted.
3.2.6 Backup
To save the system configuration or restore the system configuration with saved file, click
submenu “SYSTEM-> Backup”, a page as Figure 6 will be shown.
Figure 6. system Backup
To save the system configuration in local disk, click button “Back Settings”, then a windows
dialog will be pop to guide you how to save the file to local disk.
To restore settings of the Wireless AP, click button “Browser” to select the configuration file
which saved in local host, then click button “Restore Settings” to begin restore process.
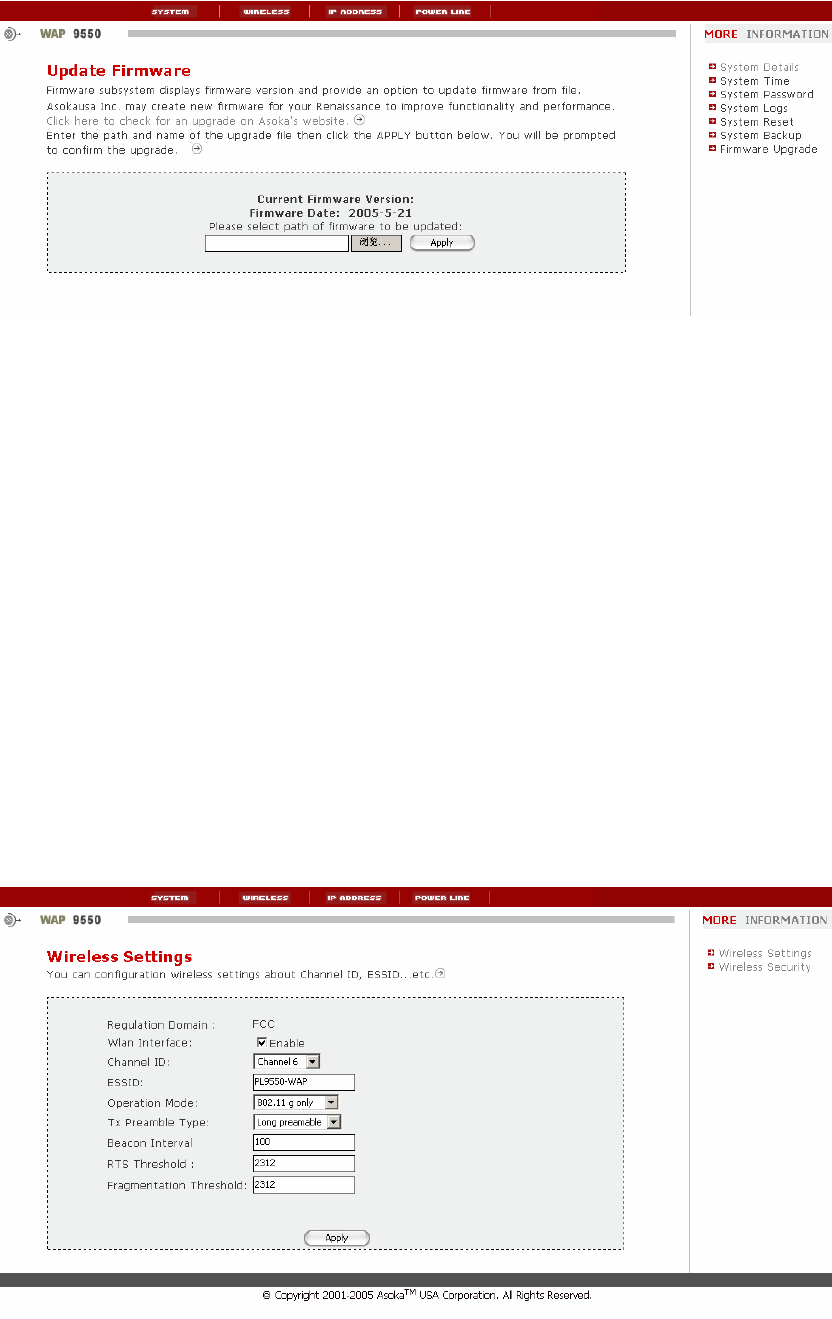
3.2.7 Firmware
To upgrade firmware, click submenu “System->Firmware”, then a page as Figure 7 will be
displayed.
Asoka® User’s Guide
PlugLink 9550 Wireless Access Point PL9550-WAP
Figure 7. Firmware upgrade
Click button “Browser” to select firmware file, then one windows dialog will be popped up
for user to select local file
Check the ‘clear old configuration’ box to clear old configuration saved in the device and
restore with factory default during upgrade.
Click button “Update” to begin update. If you confirm your decision, it will update the
firmware and reboot the device, the process will cost about 2 minutes.
3.3 Wireless
Wireless Menu provides the interface for advanced administer to set the Wireless AP
including basic setting and security setting.
3.3.1 Wireless Setting
To view or set wireless basic parameters configuration, click on the link “Wireless Setting”
of the left submenu, a screen is displayed as shown in Figure 8.
Figure 8. Wireless Setting

Asoka® User’s Guide
PlugLink 9550 Wireless Access Point PL9550-WAP
The screen contains the following details.
Wlan Interface: To enable or disable wireless part of the device. Select the check box
to enable wireless function.
Channel Id: Identifies the channel on which the AP communicates. Each wireless
client must use the same channel to enable communication. This can only be altered from
a PC that is wired directly to the AP, not wirelessly. The default is Channel 6
ESSID: Enter a ESSID (Network Name) of no more than 32 alphanumeric
characters. This ESSID must be entered on each wireless device of your wireless network,
The default ESSID is “Asoka”.
Operation Mode Enable you select the type of transmission protocol for your wireless
network, It can be one of three types: 802.11b only, 802.11g only and 802.11b/g mixed.
The default type is 802.11b/g mixed.
Tx Preamble Type It can be long preamble or short preamble, the default option is long
preamble
Beacon Interval It is used to keep power management in check. For example, if a client
does not receive a beacon within a certain time period, it goes to sleep. You can set
Beacon Interval value from 1 to 65536, but too low or too high value is not recommended,
usually the default value 100 is fine.
RTS Threshold The packet size at which an AP issue a request to send (RTS). The
range is 0 to 2312 bytes, the default value is 2312. If you encounter inconsistent data flow,
only minor modifications are recommended. If need, enter a new value.
Fragmentatin Threshold The size at which packets are fragmented and transmitted a piece
at a time instead of all at once. The setting must be the range of 256 to 2312 bytes. The
default is 2312. If need, enter a new value.
Click button “Apply” to save the information had entered.
To make the new setting on effect, please reboot the AP.
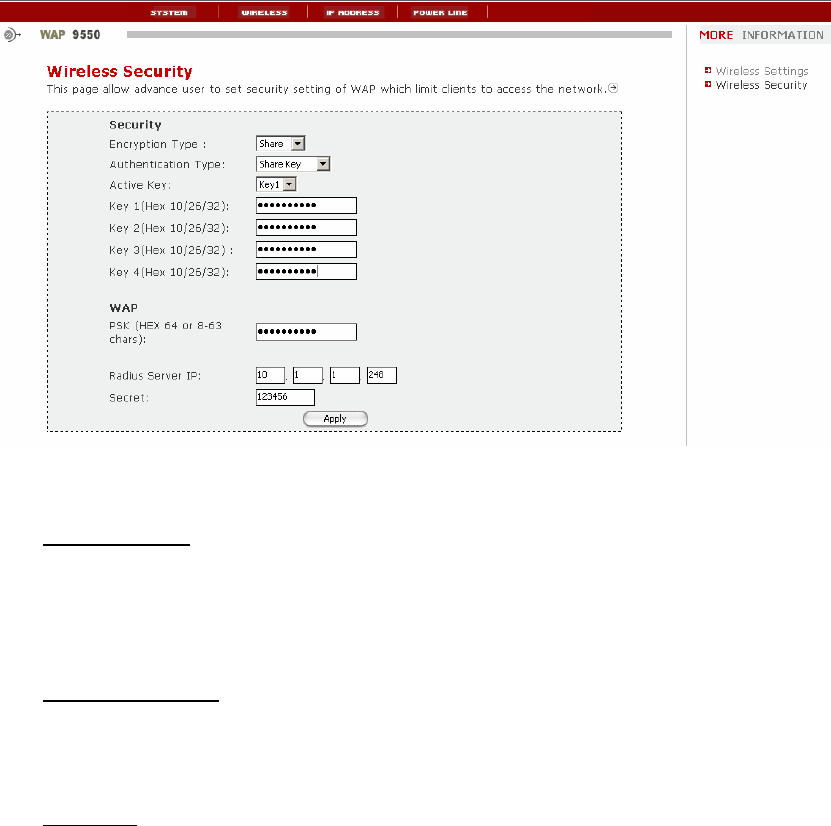
3.3.2 Wireless Security
To view or set wireless security setting, click on the link Wireless Security of the left
submenu, a screen is displayed as shown in Figure 9.
Asoka® User’s Guide
PlugLink 9550 Wireless Access Point PL9550-WAP
Figure 9. Wireless Security
The screen contains the following details.
Encryption Type Determines the type of security encryption algorithms for the key
index. This security setting encrypts your wireless transmission. None, WEP are available
only when Open System or Pre-shared KEY (PSK) is selected for authentication type.
TKIP and AES are available only when WPA and WPA-PSK (PSK) are selected. The
default type is None. (no security)
Authentication Type Authentication differs from Encryption in that you are establishing
either an open secure verification of communication with an AP. This setting does not
encryption transmission. The options are: Open System, Share key, WPA-PSK, 802.1x
The default type is Open System, it means no authentication is used.
Active key There are up to different 4 keys (1, 2,3 or 4) that can be selected. The
amount determined by what is selected in the Encryption Type and Authentication Type.
The key selected here must match between the AP and the client. For example, if you
select Key 1 here you have to select Key 1 for the client. The default is key 1.
Key 1~4 You must input hexadecimal value with 10, 26 or 32 length
PSK Key for WPA-PSK
Radius Server IP If you select 802.1x as authentication type, please input the ip
address of the radius server which used for authentication.
Secret The access password for communication between AP and radius
server.
Click button “Apply” to save the information had entered.
To make the new setting on effect, please reboot the AP.
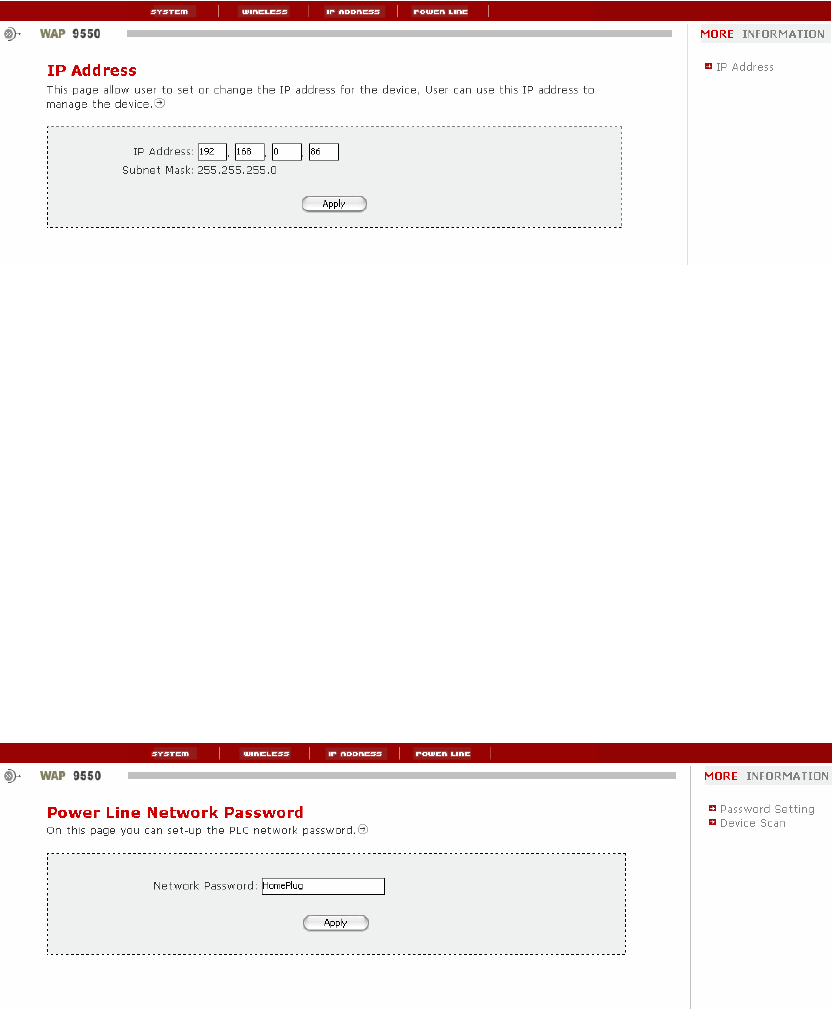
3.4 IP ADDRESS
IP ADDRESS menu provides interface to set IP address of the Wireless AP, user can
access Wireless AP by this IP address.
Asoka® User’s Guide
PlugLink 9550 Wireless Access Point PL9550-WAP
3.4.1 IP Address
To configure the IP Address of the Wireless AP, click on the link IP Address in the left
submenu, a screen is displayed as shown in Figure 11.
Figure 11. IP Address Configuration
The screen contains the following details:
IP Address: To enter the IP address of the Wireless AP
Subnet mask: the subnet mask
Click button “Apply” to save the configuration and renew system IP address.
3.5 POWER LINE
PowerLine menu provides interface to set NEK or scan devices of the Power line network.
3.5.1 Password Setting
To set NEK of the Wireless AP, click on the link Password Setting of the left submenu, you
will enter pages showed in figure 12.
Figure 12. NEK setting
Input new NEK of the power line network
Click button “Apply” to save and set the configuration
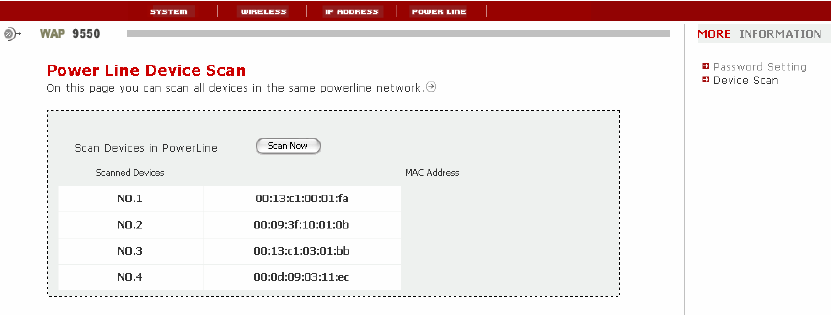
3.5.2 Device Scan
To view and scan devices in the same power line network with Wireless AP, click on the
Asoka® User’s Guide
PlugLink 9550 Wireless Access Point PL9550-WAP
link Device Scan in the left submenu, a screen is displayed as shown in Figure 13.
Figure 13. Scan devices
The screen contains the following details.
Scanned Devices: The No. of the device have been scanned
MAC Address: The MAC address of the device in the same power line
network
Click button “Scan Now” to refresh the device list.