ASUSTeK Computer 01000846 PDA PHONE User Manual
ASUSTeK Computer Inc PDA PHONE Users Manual
Contents
- 1. Users Manual
- 2. USERS MANUAL
Users Manual
nüvifone™ 01000846
owner’s manual
01000846
© 2010 Garmin Ltd. or its subsidiaries and ASUSTeK Computer, Inc.
Garmin International, Inc.
1200 East 151
st
Street,
Olathe, Kansas 66062,
USA
Tel. (913) 397.8200 or
(800) 800.1020
Fax (913) 397.8282
Garmin (Europe) Ltd.
Liberty House
Hounsdown Business Park,
Southampton, Hampshire,
SO40 9LR UK
Tel. +44 (0) 870.8501241
(outside the UK)
0808 2380000 (within the UK)
Fax +44 (0) 870.8501251
Garmin Corporation
No. 68,
Jangshu 2
nd
Road,
Sijhih, Taipei
County, Taiwan
Tel. 886/2.2642.9199
Fax 886/2.2642.9099
ASUSTeK Computer Inc.
15 Li-Te Road,
Peitou, Taipei,
Taiwan 11259
Tel. 886/2.2894.3447
Fax 886/2.2890.7698
All rights reserved. Except as expressly provided herein, no part of this manual may be reproduced, copied,
transmitted, disseminated, downloaded or stored in any storage medium, for any purpose without the express
prior written consent of Garmin and ASUS. Garmin and ASUS hereby grant permission to download a single
copy of this manual onto a hard drive or other electronic storage medium to be viewed and to print one copy of
this manual or of any revision hereto, provided that such electronic or printed copy of this manual must contain
the complete text of this copyright notice and provided further that any unauthorized commercial distribution of
this manual or any revision hereto is strictly prohibited.
Information in this document is subject to change without notice. Garmin and ASUS reserve the right to
change or improve their products and to make changes in the content without obligation to notify any person
or organization of such changes or improvements. Go to www.garminasus.com for current updates and
supplemental information concerning the use and operation of this and other Garmin-Asus products.
The combined Garmin-Asus logo is a trademark of Garmin Ltd. and ASUSTeK Computer, Inc.
Garmin
®
is a trademark of Garmin Ltd. or its subsidiaries, registered in the USA and other countries. Ciao!
™
,
nüMaps Guarantee
™
, and nüvifone
™
are trademarks of Garmin Ltd. or its subsidiaries. These trademarks may not
be used without the express permission of Garmin.
Microsoft, Ofce, Outlook, PowerPoint, Windows, Windows Live, and Windows Vista are either registered
trademarks or trademarks of Microsoft Corporation in the United States and/or other countries. Facebook is a
registered trademark of Facebook, Inc. The Bluetooth
®
word mark and logos are owned by the Bluetooth SIG,
Inc. and any use of such marks by Garmin or ASUS is under license. Wi‑Fi is a registered mark of the Wi‑Fi
Alliance. Gmail and Picasa are trademarks of Google Inc. Adobe is a registered trademark of Adobe Systems
Incorporated

Introduction
nüvifone 01000846 Owner’s Manual i
DRAFT
Introduction
The nüvifone™ 01000846 is a multi-
media mobile phone with integrated
navigation and services.
Getting Support
Go to www.garminasus.com for
in-country support information.
Registering Your Product
1. Go to www.garminasus.com.
2. Follow the on-screen instructions to
register your product.
3. Keep the original sales receipt, or a
photocopy, in a safe place.
Updating the Software
1. Go to www.garminasus.
com/01000846.
2. Follow the on-screen instructions to
download the latest software update
and update your product.
nüMaps Guarantee™
To receive one free map update (if
available), register your nüvifone at
www.garminasus.com within 60 days
of acquiring satellites while driving
with your nüvi. You are not eligible
for the free map update if you register
by phone or wait longer than 60 days
after the rst time you acquire satellites
while driving with your nüvifone.
Additional Maps
You can purchase additional maps for
your nüvifone. To see a list of maps
that are compatible with your nüvifone,
go to www.garminasus.com/01000846.
0700

Table of Contents
ii nüvifone 01000846 Owner’s Manual
DRAFT
Table of Contents
Introduction ...................................i
Getting Support ..............................i
Registering Your Product ................i
Updating the Software ....................i
nüMaps Guarantee™ ....................... i
Additional Maps ..............................i
Getting Started .............................1
nüvifone Device Features ..............1
Setting Up the Device ....................2
Turning On Your nüvifone ..............4
Mounting Your nüvifone .................4
Completing the Setup ....................5
Getting to Know Your nüvifone ..6
Using the Home Screen ................6
Using the Keys ..............................7
Using the Touchscreen ..................7
Rotating the nüvifone.....................8
Viewing Notications .....................9
Adjusting the Volume ...................10
Using the Widgets .......................10
Using Lists ..................................11
Using the On-screen Keyboard ... 11
Getting Help.................................12
Locking Your nüvifone .................13
Status Bar Icons ..........................14
Using the Phone ........................16
Opening the Phone Application ...16
Dialing a Number .........................16
Calling a Contact .........................16
Calling a Found Location ............16
Using In-Call Options...................17
Ending a Call ...............................17
Receiving a Call...........................18
Activating Call Waiting .................18
Using Call Waiting .......................18
Setting Up Voice Mail ..................19
Calling Voice Mail ........................19
Using Call History ........................19
Placing a Conference Call ...........21
Forwarding Calls..........................21
Barring Calls ................................22
Setting the Default Ring Tone ......22

Table of Contents
nüvifone 01000846 Owner’s Manual iii
DRAFT
Checking Your Phone Usage.......22
Turning On Airplane Mode ...........23
About the Headset .......................23
Managing Your Contacts ..........24
Adding a Contact .........................24
Calling a Contact .........................24
Searching for a Contact ...............24
Editing and Deleting Contacts .....24
Navigating to a Contact ...............26
Setting a Ring Tone for
a Contact ...................................26
Managing Your SIM Contacts ......26
Searching for Locations ...........28
Finding a Point of Interest............28
Working with Found Locations ....29
Changing the Search Area ..........30
Saving and Editing Locations ......30
Sharing Locations ........................32
Finding Your Parking Spot ...........33
Setting Your Home Location ........33
Finding an Address ......................34
Finding Local Businesses ............34
Finding Saved Locations .............35
Finding Recently-Found
Locations ...................................35
Finding Upcoming Events............35
Finding Panoramio™ Photos ........36
Finding Gas Prices ......................36
Finding Cities ...............................36
Using the White Pages Phone
Directory ....................................37
Entering Coordinates ...................37
Finding Intersections ...................38
About Extras ................................38
Finding Your Current Location .....39
Starting a Route to a
Photograph ...............................39
Following Your Route ................40
Using the Map .............................40
About Usage Modes ....................41
Using the Map to Navigate in
Driving Mode .............................41
About Trafc ................................44

Table of Contents
iv nüvifone 01000846 Owner’s Manual
DRAFT
Using the Map to Navigate in
Walking Mode ...........................46
Taking a Detour ...........................47
Stopping the Route ......................48
Working with Routes ....................48
Viewing Your Trip Log ..................50
Sending and Receiving
Messages ...................................51
Sending an SMS/Text Message ..51
About Multimedia Messages ......52
Reading Messages ......................53
Using E-mail ................................55
Using Ciao!™ ..............................59
Registering Your Device and
Joining Ciao! .............................59
Changing Your Display Name......60
Inviting a Friend ...........................60
Accepting or Declining an
Invitation ....................................60
Sending a Location Update .........60
Automatically Sending Location
Updates .....................................60
Updating your Status ...................61
Viewing Friends ...........................61
Adding a Friend to Contacts ........61
Sending a Message to a Friend ..61
Starting a Route to a Friend’s
Location ...................................61
Removing an Invitation ................62
Removing a Friend ......................62
Hiding Your Location....................62
Viewing Ciao! Networks ...............62
Disabling Ciao! ............................62
Browsing the Web .....................63
Using the Browser .......................63
Viewing Multiple Browser
Windows ..................................65
Save a Web Page to a Favorites .65
Viewing Your History ...................65
Sharing a URL .............................66
Open a Favorite in a New
Window ....................................66
Setting Your Browser Home
Page ..........................................66

Table of Contents
nüvifone 01000846 Owner’s Manual v
DRAFT
Downloading Files .......................67
Playing Music.............................68
Playing a Song ............................68
Changing the Music Player View 68
Save a Song as a Ring Tone .......69
About Playlists ............................69
Streaming Online Music ..............70
Taking and Viewing Pictures
and Videos .................................71
Taking a Picture ...........................71
Taking a Picture with GPS
Information ................................71
Recording a Video .......................72
Changing the Camera and Video
Settings .....................................72
About Picture and Video File
Types and Locations .................73
About the Gallery .........................73
Viewing Pictures ..........................74
Viewing a Video ...........................74
Viewing a Slideshow ....................74
Sharing Pictures and Videos .......74
Editing Pictures and Videos .........74
Setting Your Wallpaper ................75
Adding a Picture to a Contact ......75
Navigating to a Picture ................75
Organizing Your Life .................77
Using the Calendar .....................77
Viewing a Document ....................78
Checking the Weather Forecast ..79
Using the Clock ...........................80
Using the Converter.....................82
Checking Flight Status.................83
Connecting with Other
Devices .......................................84
Synchronizing Your nüvifone with
Your Computer ..........................84
Synchronizing Your nüvifone with
a Microsoft Exchange Server ....84
Using Bluetooth Technology ........86
Transferring Files .........................88
About Wi-Fi ..................................89
Customizing Your nüvifone ......91
General Device Settings ..............91

Table of Contents
vi nüvifone 01000846 Owner’s Manual
DRAFT
Security Settings..........................91
Changing the Text Language .......93
Keyboard Settings .......................93
Date/Time Settings ......................94
Changing the Storage Settings....94
Data Connection Settings ............94
Audio Settings .............................96
Navigation Settings......................96
Application Settings .....................98
Display Settings .........................103
Viewing Software Information ....103
Restoring Settings .....................103
Clearing All User Data ...............104
Appendix ..................................105
About Satellite Signals...............105
Resetting the nüvifone ...............106
Battery Information ....................106
Changing the Fuse in the Vehicle
Power Cable ...........................107
Mounting on Your Dashboard ....108
Removing the nüvifone, Cradle,
and Mount ...............................108
About Connected Services ........109
Caring for Your Device...............109
Specications ............................110
Troubleshooting/ Frequently Asked
Questions ................................ 112
Important Safety and Product
Information ...............................114
Index .........................................129
Getting Started
nüvifone 01000846 Owner’s Manual 1
DRAFT
Getting Started
WARNING
See the Important Safety and Product Information document in the product box
for product warnings and other important information.
Download the latest owner’s manual at www.garminasus.com/01000846.
nüvifone Device Features
Camera key
Direction pad
Volume keys
Mini-USB connector
Power key
Power connector for
navigation cradle
Getting Started
2 nüvifone 01000846 Owner’s Manual
DRAFT
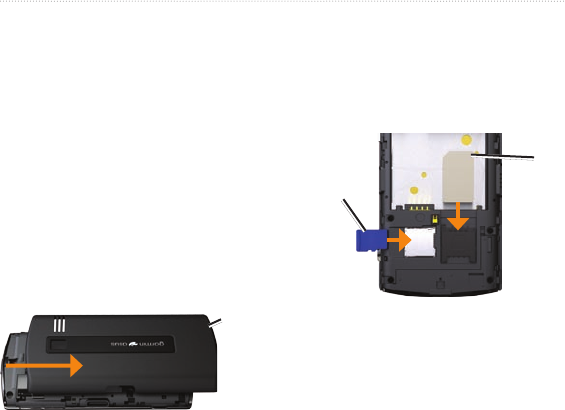
Setting Up the Device
1. Remove the battery cover.
2. Install the SIM card.
3. Install the microSD card (optional).
4. Install the battery. See page 3.
5. Replace the battery cover. See page
3.
6. Charge the battery. See page 3.
Removing the Battery Cover
Slide the battery cover off the back
of the nüvifone.
Battery
cover
Installing the SIM Card
Insert the SIM card in the holder
with the gold contacts facing down
and the notched corner toward the
center of the device.
SIM
card
microSD
card
Installing the microSD Card
You can use an optional microSD card
to hold more data.
Insert the microSD card in the
microSD slot with the gold contacts
facing down.
Getting Started
nüvifone 01000846 Owner’s Manual 3
DRAFT
Installing the Battery
1. Locate the battery that came in the
product box.
2. Locate the metal contacts on the
end of the battery and in the battery
compartment.
3. Insert the battery with the
Garmin-Asus logo facing up, and
the metal contacts on the battery
aligned with the contacts in the
battery compartment.
Battery
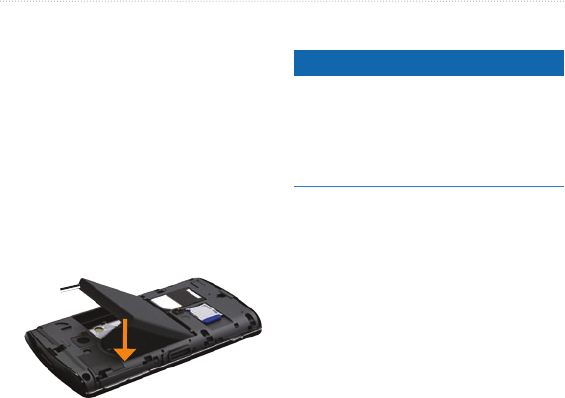
Replacing the Battery Cover
Slide the battery cover onto the back of
the device until it clicks.
Charging the Battery
Notice
Your nüvifone will not charge if it has
exceeded 104°F (40°C). If the nüvifone
is mounted in the windshield, remove it
from the mount and place it somewhere
out of direct sunlight.
Charge the battery for at least four
hours before using the nüvifone for the
rst time.
1. Insert the plug into the AC power
adapter, if necessary.
2. Plug the USB cable into the AC
adapter.
3. Connect the mini-USB end of the
USB cable to the connector on the
bottom of the device.
4. Plug the AC adapter into a power
outlet.
Getting Started
4 nüvifone 01000846 Owner’s Manual
DRAFT
If you completely discharge the battery,
recharge it for at least 20 minutes
before turning on your nüvifone.
Alternate Charging Methods
(Preferred) Insert your nüvifone
into the cradle, and connect the
vehicle power cable to the cradle.
Connect the vehicle power cable to
your nüvifone.
Connect your nüvifone to a
computer using the USB cable
included in the box.
Insert the battery into the battery
charger (accessory). For more
information about accessories, go to
www.garminasus.com.
Turning On Your nüvifone
Press and hold the Power key to turn
on the nüvifone.
•
•
•
•
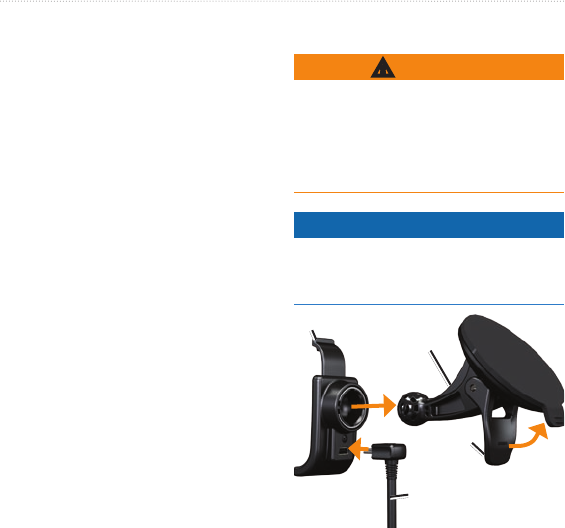
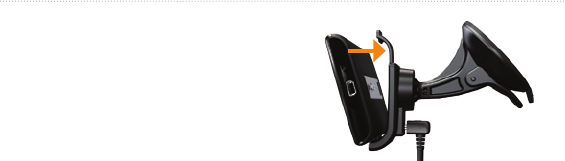
Mounting Your nüvifone
WARNING
This product contains a lithium-ion
battery. To prevent personal injury or
product damage, remove the device
from the vehicle when exiting or store
it out of direct sunlight.
Notice
Before mounting the nüvifone, see
page 117 for information about laws
pertaining to windshield mounting.
Lever
Suction
cup arm
Cradle
Vehicle power
cable
Getting Started
nüvifone 01000846 Owner’s Manual 5
DRAFT
1. Plug the vehicle power cable into
the power connector on the back of
the cradle.
2. Remove the clear plastic from the
suction cup.
3. Clean and dry your windshield
and the suction cup with a lint-free
cloth.
4. Place the suction cup on the
windshield.
5. Flip the lever back, toward the
windshield.
6. Snap the cradle onto the suction
cup arm.
7. Fit the gold contacts on the left side
of your nüvifone into the cradle.
8. Tilt the nüvifone back until it snaps
into the cradle.
9. Plug the other end of the vehicle
power cable into a power outlet in
your vehicle.
Completing the Setup
You can complete some or all of the
following tasks to nish setting up your
nüvifone:
Set up voice mail. See page 19.
Set up an e-mail account. See page
55.
Synchronize the nüvifone with your
computer. See page 84.
Synchronize the nüvifone with an
Exchange account. See page 85.
•
•
•
•

Getting to Know Your nüvifone
6 nüvifone 01000846 Owner’s Manual
DRAFT
Getting to Know Your
nüvifone
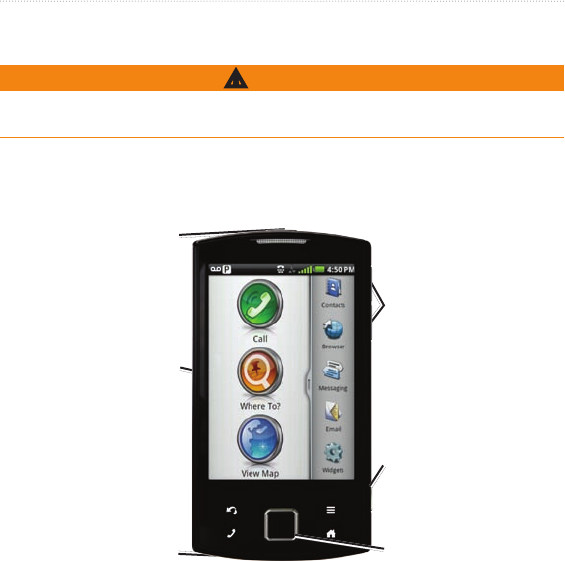
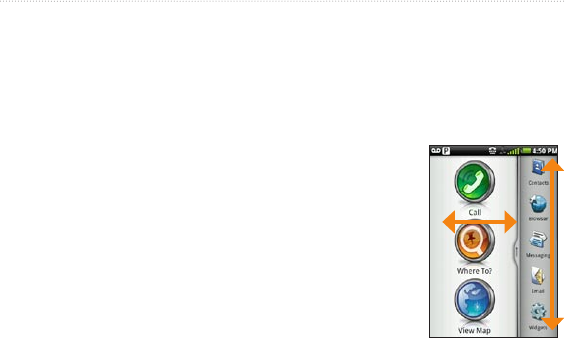
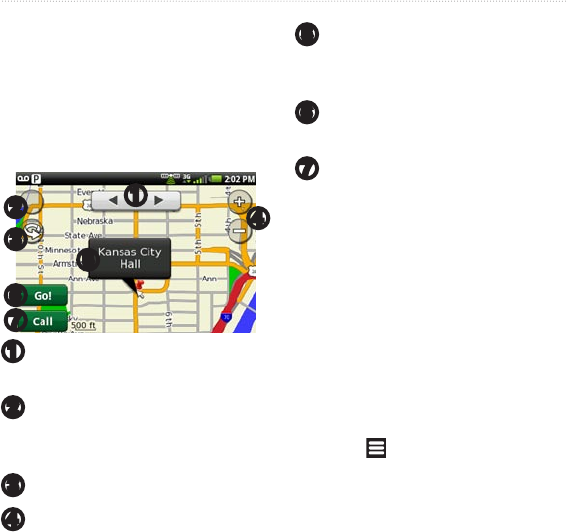
Using the Home Screen
➋
➌
➍
➎
➊
➊
Status bar. Displays notication
icons and status icons, and the
current time. Touch and drag down
to view. See page 9 and page 14.
➋
Application tray. Touch a shortcut
to start an application. Touch and
drag the bar to scroll through
shortcuts.
➌
Touch to place a phone call and
access contacts.
➍
Touch to nd and navigate to a
location.
➎
Touch to view the map.
Getting to Know Your nüvifone
nüvifone 01000846 Owner’s Manual 7
DRAFT
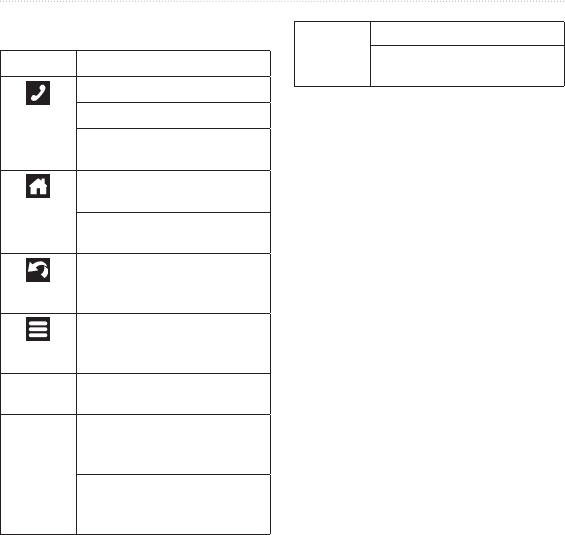
Using the Keys
Key Use
Touch to open the phone.
Touch to send a call.
Double-tap to dial the most
recent call in Call History.
Touch to return to the Home
screen.
Touch and hold to open the
Widgets.
Touch to go back to the
previous screen or to exit the
current application.
Touch to view a menu of
options for the current screen
or application.
Volume up
and down
Press to increase or decrease
the audio level.
Direction
pad
Press up, down, left, or right
to highlight items or to scroll
through lists.
Press the center of the
directional pad to select a
highlighted item.
Camera Press to take a picture.
Press to take a screenshot,
when enabled.
Using the Touchscreen
Touch and drag your nger to
slowly scroll the screen. You can
scroll the screen both vertically and
horizontally.
Touch, drag, and quickly remove
your nger to continue scrolling
after removing your nger.
Touch the screen to stop scrolling.
In some applications, use the
touchscreen to zoom in and out.
To zoom in, touch two points
near the center of the page, and
drag your ngers apart.
To zoom out, touch two points
near opposite edges of the
screen, and drag your ngers
toward the center of the screen.
•
•
•
•
◦
◦
Getting to Know Your nüvifone
8 nüvifone 01000846 Owner’s Manual
DRAFT
NOTE: The nüvifone has a capacitive
touchscreen that requires direct contact
with your skin. The nüvifone will not
detect a touch if you touch the screen
with your ngernail or with a glove.
Rotating the nüvifone
From vertical mode, rotate your
nüvifone to the left or the right
to view in horizontal (landscape)
mode.
From horizontal mode, rotate your
nüvifone to the left or the right to
view in vertical (portrait) mode.
NOTE: Some applications are
only viewed in one orientation. For
example, the camera is only available
in landscape mode.
•
•
Using the Application Tray
The application tray contains shortcuts
for the applications stored on the
nüvifone. The rst row or column of
shortcuts is always visible on the Home
screen.
Scroll the
application
tray up and
down to
view more
shortcuts.
Touch and
drag the
application
tray toward the opposite side of the
screen.
The application tray expands, and a
second section of shortcuts appears.
•
•

Getting to Know Your nüvifone
nüvifone 01000846 Owner’s Manual 9
DRAFT
Arranging Shortcuts
You can change the order of shortcuts,
and you can move shortcuts into or out
of the rst section of the application
tray.
1. Expand the application tray.
2. Touch and hold the shortcut you
want to move until the nüvifone
vibrates.
3. Drag the shortcut to a new location.
Viewing Notications
Notication icons appear in the status
bar for alerts, such as upcoming
appointments, or for running
applications, such as the music player.
When a notication icon appears, you
can open the notication window to
view more information.
1. Touch and drag the status bar
toward the bottom of the screen.
The notication window expands to
ll the screen.
2. Touch an item to view more details
or to go to an the application.
To hide the notication window, touch
and drag the bottom of the window to
the top of the screen.
Setting the Notication Tone
1. From the application tray, touch
Settings > Audio > Notications.
2. Select a tone, and touch OK.

Getting to Know Your nüvifone
10 nüvifone 01000846 Owner’s Manual
DRAFT
Adjusting the Volume
Press the Volume up key or the
Volume down key to adjust the
audio levels.
Press the Volume down key until
is shown to place the device in
vibrate mode.
Press the Volume key button until
is shown to mute the device.
Changing Mixer Settings
1. From the application tray, touch
Settings > Audio.
2. In the Volume section, change
the volume for the ringer and
notications, navigation prompts,
and music and videos.
•
•
•
Using the Widgets
Widgets provide quick access to
frequently used tasks and information.
1. Use one of the following options to
open the Widgets:
Touch and hold .
From the application tray, touch
Widgets.
2. Touch and drag the screen to
the left or to the right to view
additional widgets. Three panels of
widgets are available. shows
which panel you are currently
viewing.
Customizing the Widgets
1. Touch and hold .
2. Customize the widgets panel.
To add widgets, touch .
Select an item.
•
•
•
Getting to Know Your nüvifone
nüvifone 01000846 Owner’s Manual 11
DRAFT
To move a widget, touch and
hold the widget until the device
vibrates, and drag the widget to
a new location.
To remove a widget, touch
> .
Using Lists
Use the following options (when
available) to help nd items in a list:
Touch or , or touch and drag
the screen, to scroll.
Quickly tap or to scroll
faster.
Touch Spell Name, if available, to
enter letters from the name of the
item.
Touch the letters along the side
of the screen to browse quickly
through an alphabetized list of
items.
•
•
•
•
•
•
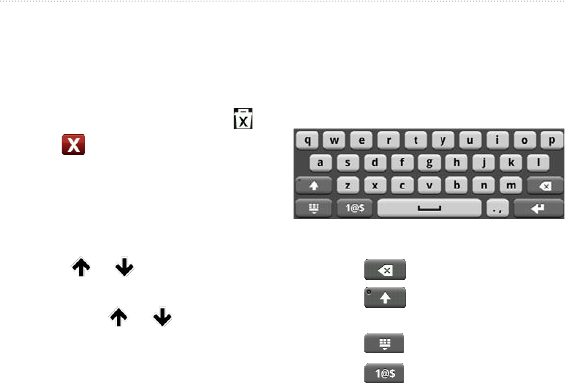
Using the On-screen
Keyboard
A keyboard appears when you need to
enter text.
Touch a key to enter text.
Touch to backspace
Touch to shift. Touch and
hold to turn on caps lock.
Touch to close the keyboard.
Touch to display numbers
and symbols.
Touch to display an alphabetic
keyboard.
To insert a cursor in text or numbers
that you have entered, touch the
text or numbers on the screen.
•
•
•
•
•
•
•

Getting to Know Your nüvifone
12 nüvifone 01000846 Owner’s Manual
DRAFT
Using Text Completion
The nüvifone includes an text
completion feature that recognizes
words you are typing.
1. Begin typing a word.
A row of suggested auto-text words
appears above the keyboard. The
closest match appears underlined.
2. Continue typing.
The text completion words may
change or disappear.
3. Touch an text completion word to
accept it.
To learn about adjusting the text
completion settings, see page 93.
Selecting an Input Method
The nüvifone includes multiple
input methods, such as language-
specic keyboards and handwriting
recognition, when available.
1. Touch and hold a text eld.
2. Touch Input Method.
3. Select an option.
You can enable additional input
methods in the keyboard settings. See
page 93.
Getting Help
1. From the application tray, touch
Help > Garmin-Asus.
2. Touch a topic.

Getting to Know Your nüvifone
nüvifone 01000846 Owner’s Manual 13
DRAFT
Locking Your nüvifone
The nüvifone automatically locks if
you do not use it for a specied amount
of time.
If the nüvifone is in the mount with
external power, the screen will not
automatically lock.
Manually Locking the Device
Press the Power key.
Unlocking the Device
1. Quickly press the Power key, if
necessary.
2. Double-tap .
To adjust the how to unlock the device,
see page 92.
Changing Auto Lock Settings
1. From the application tray, touch
Settings > Display > Screen
Timeout.
2. Select a time, and touch OK.
Getting to Know Your nüvifone
14 nüvifone 01000846 Owner’s Manual
DRAFT
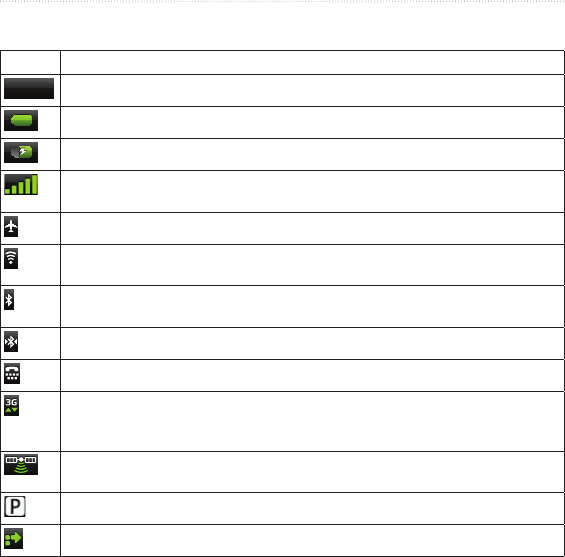
Status Bar Icons
Icon Description
11:40 AM
11:40 AM
Current time. Based on your network provider..
Battery life.
External power is connected, and the battery is charging.
Mobile signal strength. The more colored bars that appear, the stronger the signal.
A red bar indicates no mobile signal strength.
Airplane mode.
Wi-Fi® connectivity. This icon appears in place of the network connectivity icon
when the nüvifone is using Wi-Fi.
Bluetooth wireless technology is enabled, but the nüvifone is not connected to a
device.
The nüvifone is connected to a device using Bluetooth® wireless technology.
Teletypewriter (TTY) mode is activated.
Network connectivity. This icon appears when the nüvifone is connected for
Internet access. The connection types are as follows: G—GPRS, E—Edge,
3G—3G.
Satellite connectivity. The more colored bars that appear, the stronger the satellite
signal. A red “X” indicates no satellite signals.
Your Parking Spot has been saved.
You are currently navigating a route.

Getting to Know Your nüvifone
nüvifone 01000846 Owner’s Manual 15
DRAFT
Icon Description
An alarm is enabled.
You have a new voice mail message.
Connected to the computer using the USB cable.
Synchronizing data with your computer.
There is an error synchronizing data with your computer.

Using the Phone
16 nüvifone 01000846 Owner’s Manual
DRAFT
Using the Phone
Opening the Phone
Application
Use one of the following methods to
open the phone application:
Touch .
From the Home screen, touch Call.
Dialing a Number
1. Press the key.
2. Touch to open the keypad.
3. Dial the number.
4. Touch .
•
•
Calling a Contact
1. Touch > .
2. Select a contact, and touch Call.
3. If the contact has more than one
phone number, touch the phone
number you want to call.
For more information about adding and
editing contacts, see page 24.
Calling a Found Location
1. From the Home screen, touch
Where To?.
2. Search for a location (see
pages 28–38).
3. If a phone number is available for
the location, touch Call.
Using the Phone
nüvifone 01000846 Owner’s Manual 17
DRAFT
Using In-Call Options
While you are in a call, use the
following options:
Touch Speakerphone to activate
the speakerphone.
Touch Audio to select audio output.
Available when a wireless hands-
free is connected. See page 86.
•
•
Touch Mute to mute the audio
input.
Touch Add Call to place a new
call. The rst call is placed on hold.
Touch Switch to change
between the current call and the
call on hold, if you are on call
waiting.
Touch Merge to create a
conference call.
Touch Hold to place the current
call on hold.
Touch to display a numeric
keypad for automated systems that
require numeric entries.
Ending a Call
To end a call, touch End Call.
•
•
◦
◦
•
•

Using the Phone
18 nüvifone 01000846 Owner’s Manual
DRAFT
Receiving a Call
Touch Answer to answer the call, or
touch Ignore to ignore the call.
To answer a call when the screen is
locked, double-tap .
To ignore a call when the screen is
locked, press the Power key.
Activating Call Waiting
1. From the application tray, touch
Settings > Phone > Call Waiting.
2. Touch On > OK.
Using Call Waiting
If call waiting is activated, use the
following call waiting options when
you receive an incoming call.
Touch Answer + Hold to answer
the new call and place the original
call on hold. Touch Merge to create
a conference call with the original
call and the new call, or you can
touch Switch to switch between the
original call and the new call.
Touch Answer + End to answer the
new call and end the original call.
Touch Ignore to send the new call
to your voice mail.
•
•
•
Using the Phone
nüvifone 01000846 Owner’s Manual 19
DRAFT
Setting Up Voice Mail
1. From the application tray, touch
Settings > Phone > Voice Mail
Number, and verify that your voice
mail number is correct.
2. From the Home screen, touch Call
> Contacts > Voice Mail, and
follow the prompts.
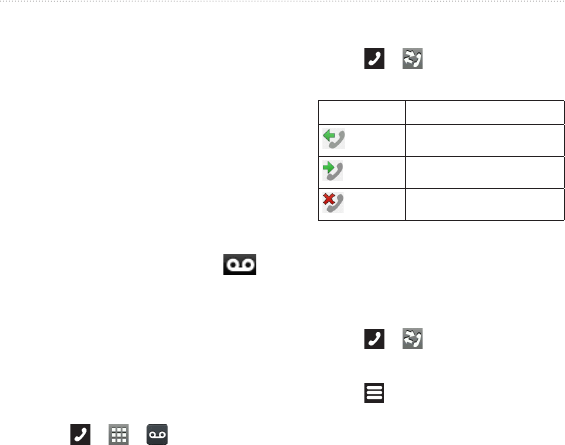
Calling Voice Mail
When you have new voice mail,
appears in the status bar. Select one of
following methods to call your voice
mail:
Touch and drag the status bar
toward the bottom of the screen.
Touch New Voice Mail.
Touch > > .
•
•
Using Call History
1. Touch > . Calls are organized
into three categories:
Icon Description
Dialed call
Received call
Missed call
2. Touch a call in the list.
3. Touch an option.
Deleting a Call from the Call
History
1. Touch > .
2. Touch a call.
3. Touch > Delete from Call
History > OK.

Using the Phone
20 nüvifone 01000846 Owner’s Manual
DRAFT
Adding a Number to Contacts
1. Touch > .
2. Touch a call.
3. Touch > Add to Contacts.
4. Touch Name, enter a name, and
touch Done.
5. Touch Save.
Viewing Related Calls
Related calls are calls made to or
received from the same number.
1. Touch > .
2. Touch a call.
3. Touch > View Related Calls.
A list of related calls appears
displaying the length of each call or a
status message.
Using Reverse Lookup
This service may be available as a
paid subscription. This service is not
available in all areas. A data connection
is required for this feature.
A reverse lookup allows you to search
for the address of a phone number that
called you.
1. Touch > .
2. Touch a call.
3. Touch > Reverse Lookup.
Deleting All Calls from the Call
History
Touch > > > Clear Call
Log.

Using the Phone
nüvifone 01000846 Owner’s Manual 21
DRAFT
Placing a Conference Call
1. Place a call to the rst phone
number.
2. Touch Add Call.
3. Place a call to the second phone
number.
4. Touch Merge.
To view the other members of the
conference call, touch More.
If you receive a call while you are
already on another call, you can start a
conference call by touching Merge.
Speaking Privately During a
Conference Call
You can speak privately with another
member of the conference call.
1. During the conference call, touch
More.
2. Touch the contact with whom you
would like to speak with privately,
and touch Private. The other
members of the conference call can
continue to speak to each other.
3. To end the private conversation,
touch Conference.
Forwarding Calls
1. From the application tray,
touch Settings > Phone > Call
Forwarding.
2. Select a call type.
3. Select an option:
Enter a number to which you
want to forward calls.
Touch to select a contact
to whom you want to forward
calls.
Touch Disable to disable call
forwarding for that call type.
•
•
•

Using the Phone
22 nüvifone 01000846 Owner’s Manual
DRAFT
Barring Calls
You can block incoming calls and
outgoing calls.
1. From the application tray, touch
Settings > Phone > Call Barring.
2. Select a call type.
3. Select an option.
4. Touch OK.
5. Enter the call barring password, and
touch OK.
Setting the Default Ring
Tone
1. From the application tray, touch
Settings > Audio > Ring Tone.
2. Select a ring tone, and touch OK.
Checking Your Phone
Usage
You can check the amount of call
minutes and data that you have used.
1. From the application tray, touch
Settings.
2. Touch > About > Usage.
3. Select an option:
Touch Last Call, Total Time,
This Session, or Total Data to
see usage details.
Touch > Reset Call Time to
reset the Call Time values.
Touch > Reset Data Usage
to reset the Data Usage values.
TIP: To track your approximate
monthly usage, reset the call time and
the data usage at the beginning of each
billing cycle.
•
•
•

Using the Phone
nüvifone 01000846 Owner’s Manual 23
DRAFT
Turning On Airplane Mode
Airplane mode turns off the phone and
data connections, for situations such as
an airplane ight.
From the application tray, touch
Settings > Wireless Manager >
Airplane Mode.
When Airplane mode is on, the
telephone, the network, Bluetooth,
and GPS features are deactivated. You
cannot send or receive new e-mail or
SMS/MMS messages.
About the Headset
You can use the wired headset
(included in some packages) or a
Bluetooth wireless headset to listen to
audio and talk on the phone.
Connecting the Headset
1. Connect the mini-USB connector
on the headset to the nüvifone.
2. Connect 2.5 mm headphones to the
2.5 mm connector on the headset.
Using the Headset
When receiving a call, press the
to answer the call.
Use the Volume knob to adjust the
audio volume.
Press the to end the call.
•
•
•
Managing Your Contacts
24 nüvifone 01000846 Owner’s Manual
DRAFT
Managing Your
Contacts
Adding a Contact
1. From the application tray, touch
Contacts > .
2. Touch an item to enter the
information. Touch Done when
nished.
3. Touch Save.
Calling a Contact
1. From the application tray, touch
Contacts.
2. Touch a contact.
3. Touch Call.
Searching for a Contact
1. From the application tray, touch
Contacts > .
2. Enter part of the contact name.
3. Touch the contact.
Editing and Deleting
Contacts
Editing a Contact
1. From the application tray, touch
Contacts.
2. Touch a contact.
3. Touch More Info > Edit.
4. Touch the to edit the
information in that category.
5. Touch the to delete the
information from that category.
6. Touch Save.

Managing Your Contacts
nüvifone 01000846 Owner’s Manual 25
DRAFT
Changing the Picture of a
Contact
1. From the application tray, touch
Contacts.
2. Touch a contact.
3. Touch More Info > Edit.
4. Touch the picture of the contact.
5. Select an option:
Touch Take Picture to take a
picture using the phone camera.
Touch Select Picture to select a
saved picture.
6. Touch and drag the square to crop
the picture.
7. Touch Save.
•
•
Assigning a Location to a
Contact
1. From the application tray, touch
Contacts.
2. Touch a contact.
3. Touch More Info > Edit.
4. Select the location using one of the
following methods:
Touch the location on the map.
Touch and use the Where
To? menu to select a location.
5. Touch Use this Location > Save
Deleting a Contact
1. From the application tray, touch
Contacts.
2. Touch a contact.
3. Touch More Info > Edit > Delete
Contact.
•
•

Managing Your Contacts
26 nüvifone 01000846 Owner’s Manual
DRAFT
Navigating to a Contact
1. From the application tray, touch
Contacts.
2. Touch a contact.
3. Touch Go!.
4. If necessary, select an option to
enter a location:
Enter the full address or location
name, and touch Done.
Touch Add Location, nd a
location, and touch Use this
Location.
Touch Add Location, nd a
location, and touch Use this
Location.
5. Touch Done.
•
•
•
Setting a Ring Tone for a
Contact
1. From the application tray, touch
Contacts.
2. Touch a contact.
3. Touch More Info > Edit > Ring
Tone.
4. Select a ring tone, and touch Done.
Managing Your SIM
Contacts
Exporting Contacts to Your SIM
Card
1. From the application tray, touch
Contacts.
2. Touch > SIM Phone Book >
Export Contacts to SIM.
3. Select an method to export contacts.

Managing Your Contacts
nüvifone 01000846 Owner’s Manual 27
DRAFT
Importing Contacts from Your
SIM Card
1. From the application tray, touch
Contacts.
2. Touch > SIM Phone Book >
Import Contacts from SIM.
3. Select an method to export contacts.
Creating a New SIM Contact
1. From the application tray, touch
Contacts.
2. Touch > SIM Phone Book >
View SIM Contacts > Create New
SIM Contact.
3. Enter the name and number, and
touch Done.
4. Touch Save.
Editing Contacts On Your SIM
Card
1. From the application tray, touch
Contact > > SIM Phone Book
> View SIM Contacts
2. Select the contact that you want to
edit.
3. Touch > Edit.
4. Edit the name and phone number,
and touch Done > Save.
Deleting Contacts On Your SIM
Card
1. From the application tray, touch
Contacts > > SIM Phone Book
> View SIM Contacts
2. Select the contact that you want to
delete.
3. Touch > Delete > OK.

Searching for Locations
28 nüvifone 01000846 Owner’s Manual
DRAFT
Searching for
Locations
The Where To? menu provides several
different categories you can use to
search for locations and destinations.
NOTE: Before you can navigate with
your nüvifone, you need to acquire
satellites. See page 105.
Finding a Point of Interest
The detailed maps loaded in your
nüvifone contain points of interest,
such as restaurants, hotels, and auto
services.
Finding by Category
1. From the Home screen, touch
Where To? > Points of Interest.
2. Touch a category.
3. Touch a subcategory or All
Categories. A list of items near
your current location appears.
4. To narrow the search, touch the
data entry eld along the top of the
screen, enter the text, and touch
Done.
5. Touch the item you want.
Finding by Spelling the Name
1. From the Home screen, touch
Where To? > Points of Interest.
2. Touch Spell Name, enter all or part
of the name, and touch Done.
3. Touch the item you want.
Searching for Locations
nüvifone 01000846 Owner’s Manual 29
DRAFT
Working with Found
Locations
After you nd a location, the location
appears on the map. An information
balloon displays the name of the found
location.
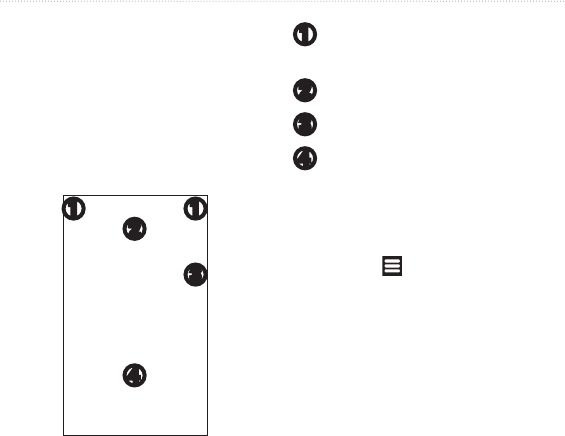
➋➍
➊
➌
➎
➐
➏
➊
Touch to view the other locations
in the list on the map.
➋
Touch to view the map in 3D
mode. Touch again to view the 2D
map.
➌
Touch to rotate the map.
➍
Touch to zoom in and out of the
map.
➎
Touch to view additional details,
such as the address and the phone
number, if known.
➏
Touch to create a route to the
location.
➐
Touch to dial the phone number of
the location, if available.
Starting a Route to a Location
1. Find a location.
2. Touch Go!.
Calling a Location
1. Find a location.
2. Touch Call.
Finding a Nearby Location
1. Find a location.
2. Touch > Search Near.
3. Select an option to search for a
location.

Searching for Locations
30 nüvifone 01000846 Owner’s Manual
DRAFT
Viewing the Location in the
Street View
You can view the location on a
photograph of the street surrounding
the location.
1. Find a location.
2. Touch > Street View.
Adding a Location to Contacts
1. Find a location.
2. Touch the information balloon.
3. Touch > Add to Contacts.
4. Select an option:
Touch Create New Contact.
Touch an existing contact to add
the information to it, and touch
Save.
•
•
Changing the Search Area
By default, your nüvifone nds
locations near your current location.
1. From the Home screen, touch
Where To?.
2. Touch > Change Location.
3. Select the location using one of the
following methods:
Touch the location on the map.
Touch and use the Where
To? menu to select a location.
4. Touch Use this Location.
Saving and Editing
Locations
Saving a Found Location
1. Find a location.
2. Touch the information balloon.
3. Touch > Save.
•
•

Searching for Locations
nüvifone 01000846 Owner’s Manual 31
DRAFT
Saving Your Current Location
1. From the Home screen, touch View
Map.
2. Touch the vehicle icon.
3. Touch Save.
Editing Favorites
1. From the Home screen, touch
Where To? > My Locations.
2. Touch and hold the location you
want to edit.
3. Touch Edit.
4. Touch an item to edit it.
5. Touch Save when you are nished.
Deleting a Favorite
1. From the Home screen, touch
Where To? > My Locations.
2. Touch and hold the location you
want to edit.
3. Touch Delete.
Creating Categories
When you save a location, it is
automatically assigned to a category.
You can create your own categories to
help organize your saved locations.
1. From the Home screen, touch
Where To? > My Locations.
2. Touch and hold the location you
want to edit.
3. Touch Edit > Categories > Enter
New Category.
4. Enter a name for the category, and
touch Done.

Searching for Locations
32 nüvifone 01000846 Owner’s Manual
DRAFT
Assigning Saved Locations to
Categories
1. From the Home screen, touch
Where To? > My Locations.
2. Touch and hold the location you
want to edit.
3. Touch Edit > Categories.
4. Select the categories to which you
want to assign the saved location.
5. Touch Done when nished.
Sharing Locations
Sharing a Found Location
1. Find a location.
2. Touch the information balloon.
3. Touch Share.
4. Select an option to send the
location: E-mail or Text Message.
5. Touch To, add a recipient, and
touch Done.
6. Touch Message, enter a message,
and touch Done.
7. Touch Send.
Sharing Your Current Location
1. From the application tray screen,
touch Where Am I?.
2. Touch the information balloon.
3. Touch Share.
4. Select an option to send the
location: E-mail or Text Message.
5. Touch To, add a recipient, and
touch Done.
6. Touch Message, enter a message,
and touch Done.
7. Touch Send.

Searching for Locations
nüvifone 01000846 Owner’s Manual 33
DRAFT
Finding Your Parking Spot
Enable My Parking Spot
1. From the application tray, touch
Settings > System > General >
My Parking Spot.
2. Touch the check box next to My
Parking Spot to place a check
mark in the box.
Saving Your Parking Spot
Before your nüvifone can save your
parking spot automatically, you must
enable the feature. See page 31.
When the My Parking Spot feature is
enabled, the location of your parking
spot is saved automatically if you are
receiving satellite signals when you
remove the nüvifone from the cradle.
When your parking spot is saved,
appears in the status bar.
Starting a Route to Your
Parking Spot
1. Select a method:
From the Home screen, touch
Where To? > My Locations.
Touch and drag the status bar
toward the bottom of the screen.
2. Touch My Parking Spot > Go!.
Setting Your Home
Location
You can save a home location and
quickly generate a route to it.
1. From the Home screen, touch
Where To? > Home.
2. Select an option to set your home
location.
•
•

Searching for Locations
34 nüvifone 01000846 Owner’s Manual
DRAFT
Starting a Route to Your Home
Before you can create a route to your
home location, you need to set your
home location.
Touch Where To? > Home > Go!.
Finding an Address
NOTE: Depending on the version of
the built-in map data on your device,
the button names and order of steps
could be different than the steps below.
1. From the Home screen, touch
Where To? > Addresses.
2. If necessary, touch Change
State/Country, and select a state, a
province, or a country.
3. Touch Enter House Number, enter
the house number, and touch Next.
4. Enter all or part of the street name
or number, and touch Done. Touch
the street in the list.
5. Touch the correct address in the list,
if necessary.
Finding Local Businesses
Local search enables you to search
for local businesses. In addition to
searching by spelling the name of a
location, you can also spell the names
of categories, like “salon” or “coffee.”
This service may be available as a
paid subscription. This service is not
available in all areas. A data connection
is required for this feature.
1. From the Home screen, touch
Where To? > Local Search.
2. Enter your search term, and touch
.
3. Touch the item you want.

Searching for Locations
nüvifone 01000846 Owner’s Manual 35
DRAFT
Finding Saved Locations
To learn how to save a location, see
page 30.
1. From the Home screen, touch
Where To? > My Locations.
2. To search different categories,
touch and .
3. Touch the item you want.
Finding Recently-Found
Locations
Your nüvifone stores the last 50
locations you have found.
1. From the Home screen, touch
Where To? > Recently Found.
2. Select a location.
Clearing the Recently-Found
List
Touch Where To? > Recently
Found > > Clear > OK.
The list of recently-found locations
is cleared. These locations are not be
deleted from the map data.
Finding Upcoming Events
Search for upcoming events, such as
art shows and sporting events.
This service may be available as a
paid subscription. This service is not
available in all areas. A data connection
is required for this feature.
1. From the Home screen, touch
Where To? > Upcoming Events.
2. Touch a category.
3. Touch the arrows or the date to
select a different date, if necessary.
4. Touch an event to view more
information.

Searching for Locations
36 nüvifone 01000846 Owner’s Manual
DRAFT
5. If the event begins within two
hours, touch Go! to navigate to the
event. Touch Remind Me! to add
the event as an appointment on
your calendar.
Finding Panoramio™
Photos
Panoramio photographs contain special
information about the location where
the photograph was taken. You can
use this information to navigate to
locations and landmarks shown in
Panoramio photographs.
This service is not available in all
areas. A data connection is required for
this feature.
1. From the Home screen, touch
Where To? > Panoramio Photos.
2. A list of photographs from nearby
locations appears.
3. Touch a photograph in the list.
Finding Gas Prices
This service may be available as a
paid subscription. This service is not
available in all areas. A data connection
is required for this feature.
1. From the Home screen, touch
Where To? > Gas Prices. A list
of fuel prices near your current
location appears.
2. Touch .
3. Touch a fuel type.
Finding Cities
1. From the Home screen, touch
Where To? > Cities.
2. Enter the name, and touch Done.
3. Touch a city.

Searching for Locations
nüvifone 01000846 Owner’s Manual 37
DRAFT
Using the White Pages
Phone Directory
This service may be available as a
paid subscription. This service is not
available in all areas. A data connection
is required for this feature.
Finding by Name
1. From the Home screen, touch
Where To? > White Pages > By
Name.
2. Enter all or part of the last name,
and touch Next.
3. Enter all or part of the rst name
(optional), and touch Search.
4. Enter the postal code, if necessary.
Finding by Phone Number
1. From the Home screen, touch
Where To? > White Pages > By
Phone Number.
2. Enter the area code and phone
number, and touch Search.
Entering Coordinates
If you know the geographic coordinates
of your destination, you can use your
nüvifone to navigate there. This can be
especially helpful when geocaching.
1. From the Home screen, touch
Where To? > Coordinates.
2. Touch a cardinal direction button to
change the direction
3. Touch a eld to enter the latitude
and longitude data.
3. When nished, touch View Map.
Changing the Coordinate
Format
1. From the Home screen, touch
Where To? > Coordinates > >
Coordinate Format.
2. Select a format.

Searching for Locations
38 nüvifone 01000846 Owner’s Manual
DRAFT
Finding Intersections
1. From the Home screen, touch
Where To? > Addresses.
2. If necessary, touch Change
State/Country to change the state,
country, or province.
3. Touch Enter Street 1, enter tall or
part of the street name, and touch
the correct street.
4. Touch Enter Street 2, enter tall or
part of the street name, and touch
the correct street.
5. Touch the correct intersection in the
list, if necessary.
About Extras
You can download additional content,
such as custom POIs, from
www.garminasus.com/extras.
Custom POIs are customized points
on the map. They can contain alerts
that let you know if you are near a
designated point or if you are traveling
faster than a specied speed.
You can create or download custom
POI lists and install them on your
device using Garmin POI Loader
software available at www.garminasus.
com/extras. See the POI Loader Help
le for more information.
Finding Extras
1. From the Home screen, touch
Where To? > Extras.
2. Touch a category.

Searching for Locations
nüvifone 01000846 Owner’s Manual 39
DRAFT
Finding Your Current
Location
Use the Where Am I? page to view
information about your current
location. This is a helpful feature if you
need to tell emergency personnel your
location.
1. Use one of the following methods
to open the Where Am I? page:
From the application tray, touch
Where Am I?.
Touch View Map, and touch the
vehicle icon.
2. Touch the information balloon to
view your location coordinates and
nearby items, such as fuel stations.
•
•
Starting a Route to a
Photograph
You can route to photographs that have
GPS location information. See page 71.
1. From the Application tray, touch
Gallery.
2. Touch a picture.
3. Touch .
Following Your Route
40 nüvifone 01000846 Owner’s Manual
DRAFT
Following Your Route
From the Home screen, touch View
Map to display a default 3D view of
your current location. You can change
this view by changing the settings for
the current usage mode.
The vehicle icon displays your position
on the map. If you are not navigating a
route, your current speed and heading
appear at the bottom of the screen.
A speed-limit icon may appear as you
travel on major roadways.
You can view your trip log, which is
the path you have traveled. The trip log
appears as a colored line on the map.
See page 48 for more information.
Using the Map
Touch View Map and touch anywhere
on the map.
Touch and drag to view different
parts of the map.
Touch and to zoom in and
out.
Touch to rotate the map.
Touch to view the map in two-
dimensions (2D).
Touch to view the map in three-
dimensions (3D).
Touch to center the map on your
location.
•
•
•
•
•
•
snap new

Following Your Route
nüvifone 01000846 Owner’s Manual 41
DRAFT
Touch anywhere on the map. An
arrow points to the location.
Touch for more options.
As you zoom out, the map changes
to a digital elevation map showing
the contours of the area.
Zoom far out to view a globe.
Touch and drag to spin the globe.
NOTE: You can only see detailed map
information for areas that you have
maps loaded on your nüvifone.
About Usage Modes
You can navigate to a destination in
Driving mode or in Walking mode. The
navigation tools vary slightly based on
your usage mode.
In Driving mode, your nüvifone
calculates routes for automobiles.
These routes obey trafc rules, such
as for one-way streets. Your nüvifone
uses typical automobile speeds when
•
•
•
•
estimating your arrival time.
In Walking mode, your nüvifone
calculates routes for walking. These
routes avoid highways in favor
of smaller streets. Your nüvifone
uses typical walking speeds when
estimating your arrival time. If you
have cityXplorer™ maps installed, your
nüvifone may include public transit
systems in pedestrian routes.
Using the Map to Navigate
in Driving Mode
After you select a location and touch
Go! > Driving, your nüvifone creates
a route to the location and opens the
map. Your route is marked with a
magenta line.
As you travel, your nüvifone guides
you to your destination with voice
prompts, arrows on the map, and
directions at the top of the map.
Following Your Route
42 nüvifone 01000846 Owner’s Manual
DRAFT
If you deviate from the original route,
your nüvifone recalculates the route
and provides new directions.
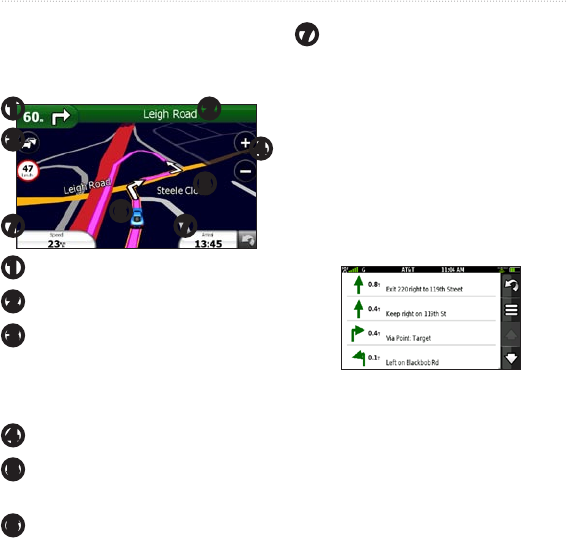
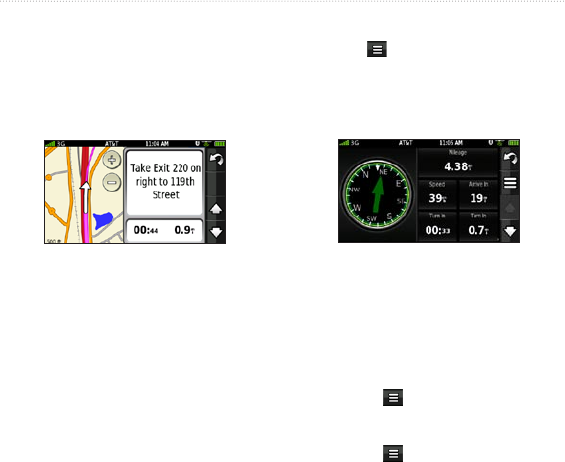
➋
➍
➎
➐
➊
➌
➐➏
➊
Touch to view the next turn.
➋
Touch to view the route details.
➌
Touch to view the Trafc menu,
when available. Trafc services
require an additional subscription
and data plan charges.
➍
Touch to zoom in and zoom out.
➎
Touch anywhere on the map to
browse the map.
➏
Touch to information about the
location.
➐
Touch to view the trip computer.
Viewing the Route Details
When you are navigating a driving
route, you can view all of the turns
for your entire route and the distance
between turns.
While navigating to a destination,
touch the text bar on the top of the
map.
Viewing the Entire Route on
the Map
1. From the map, touch the text bar on
the top of the screen.
2. Touch View Map. The map appears
with your route marked in a
magenta line.
Following Your Route
nüvifone 01000846 Owner’s Manual 43
DRAFT
Viewing the Next Turn
When you are navigating a driving
route, you can view the turn on the
map and the distance and time left
before you reach the turn.
1. While navigating to a destination,
touch the turn bubble on the map,
or touch any turn in the route
details list.
2. Touch the arrows to see more turns
in the route.
Viewing the Trip Computer
The trip computer displays a compass,
your current speed, and other helpful
statistics about your trip.
Use one of the following options to
open the Trip Computer:
From the map page, press
the key, and touch Trip
Computer.
From the map page, touch
Speed, Arrival, or Heading.
Resetting the Trip Computer
Reset the trip computer before
beginning a trip.
1. From the Home screen, touch View
Map.
2. Press the key.
3. Touch Trip Computer.
4. Press the key.
5. Select an item to reset.
•
•

Following Your Route
44 nüvifone 01000846 Owner’s Manual
DRAFT
Avoiding Road Features
1. From the application tray,
touch Settings > Navigation >
Automobile > Avoidances.
2. Touch a check box to mark the road
features you want to avoid.
About Trafc
This service may be available as a
paid subscription. This service is not
available in all areas. A data connection
is required for this feature.
NOTE: Garmin and ASUS are not
responsible for the accuracy of the
trafc information.
About the Trafc Icon
The trafc icon on the map changes
color to indicate the severity of trafc
conditions.
Transparent—trafc information not
available.
Green—trafc is owing freely.
Yellow—trafc is moving but there is a
delay, moderate trafc congestion.
Red—trafc is not moving or moving
very slowly, severe delay.
Trafc on Your Route
When calculating your route, the
nüvifone examines the current trafc
and automatically optimizes the route
for the shortest time. If a severe trafc
delay occurs on your route while
you are navigating, the nüvifone
automatically recalculates the route.
You might still be routed through
trafc if no better alternative routes
exist.
If a non‑severe trafc delay occurs on
your route, the trafc icon shows how
much time the delay has added to your
route. This time is already included in
your estimated arrival time.

Following Your Route
nüvifone 01000846 Owner’s Manual 45
DRAFT
Changing Trafc Avoidance
Settings
1. From the application tray,
touch Settings > Navigation. >
Automobile > Avoidances.
2. Select or clear the Trafc check
box.
Manually Avoiding Trafc on
Your Route
1. On the Map page, touch the trafc
icon.
2. Touch Trafc On Route.
3. Touch the arrows to select a trafc
delay, if necessary.
4. Touch > Avoid to avoid the
selected trafc delay.
You might still be routed through
trafc if no better alternative routes
exist.
Viewing the Trafc Map
The trafc map shows color‑coded
trafc ow and delays on nearby roads.
1. On the Map page, touch the trafc
icon.
2. Touch Show Trafc Map.
To return to the normal map, touch the
trafc icon, and touch Show Normal
Map.
Viewing Trafc Delays
1. On the Map page, touch the trafc
icon.
2. Touch Trafc Search to view a list
of trafc delays.
3. Touch an item in the list to view the
delay on a map and details about
the delay. If there is more than one
delay, touch the arrows to view the
additional delays.
Following Your Route
46 nüvifone 01000846 Owner’s Manual
DRAFT
Using the Map to Navigate
in Walking Mode
After you select a location and touch
Go! > Walking, your nüvifone creates
a route to the location and opens the
map. Your route is marked with a
magenta line.
➋
➍
➊
➌
➊
➊
Touch to view the next or previous
turn.
➋
Touch to view the itinerary page.
➌
Touch to zoom in and zoom out.
➍
Touch to view the Where Am I?
page.
Viewing the Itinerary Page
While navigating a route in Walking
mode, touch > View Itinerary.
snap new

Following Your Route
nüvifone 01000846 Owner’s Manual 47
DRAFT
Using the Compass
Use one of the following options to
open the Trip Computer with compass:
From the map page, touch >
Trip Computer.
From the map page, touch
Speed, Arrival, or Heading.
As you travel, the compass rotates to
indicate your direction of travel.
The bug indicator, which appears
as an inverted triangle at the top of
the compass, indicates your current
heading.
The green arrow indicates the bearing
to your destination. When the green
arrow points at the bug indicator, you
are traveling directly to the destination.
•
•
Calibrating the Compass
1. From the Home screen, touch View
Map > > Trip Computer >
> Calibrate Compass.
2. Follow the on-screen directions.
Taking a Detour
While navigating a route, you can use
detours to avoid obstacles ahead of
you, such as construction zones.
1. While navigating a route, touch .
2. From the application tray, touch
Detour.
If the route you are currently taking
is the only reasonable option, the
nüvifone might not calculate a detour.

Following Your Route
48 nüvifone 01000846 Owner’s Manual
DRAFT
Stopping the Route
1. While navigating a route, touch .
2. From the application tray, touch
Stop.
Working with Routes
Adding Points to the Active
Route
1. While navigating a route, touch .
2. From the Home screen, touch
Where To?.
3. Select an option for the search area.
4. Select the intermediate location,
and touch Go!.
5. When prompted to add the point
as a via point to the current route,
touch Insert Via Point.
Saving the Active Route
1. While navigating a route, touch .
2. From the application tray, touch
Routes > Current Route > Edit >
Save.
Planning a Route
1. From the application tray, touch
Routes > Create New Route >
Add Location.
2. Select the location using one of the
following methods:
Touch the location on the map.
Touch and use the Where
To? menu to select a location.
3. Touch Use this Location.
4. Continue to add locations to the
route.
4. Touch Save when nished.
•
•

Following Your Route
nüvifone 01000846 Owner’s Manual 49
DRAFT
Editing a Saved Route
1. From the application tray, touch
Routes.
2. Touch the route you want to edit.
3. Touch Edit.
4. Edit the route:
Touch Add Location to add
more locations.
Touch to delete a location.
Optimizing and Reversing a
Saved Route
1. From the application tray, touch
Routes.
2. Touch the route you want to edit.
3. Touch Edit > > Optimize
Route or Reverse Route.
4. Touch Save when nished.
•
•
Deleting a Saved Route
1. From the application tray, touch
Routes.
2. Touch the route you want to edit.
3. Touch Edit > >Delete Route >
OK.
Navigating a Saved Route
1. From the application tray, touch
Routes.
2. Touch the route you want to
navigate.
3. Touch Go!.

Following Your Route
50 nüvifone 01000846 Owner’s Manual
DRAFT
Viewing Your Trip Log
You can record the path you travel
(called a trip log) and view it as a
dotted line on the map.
1. From the application tray, touch
Settings > Navigation.
2. Select Automobile or Pedestrian.
3. Touch the check box next to Trip
Log.
The trip log appears as a colored line
on the map.
Clearing the Trip Log
From the application tray, touch
Settings > Navigation >
>Clear Trip Log.

Sending and Receiving Messages
nüvifone 01000846 Owner’s Manual 51
DRAFT
Sending and
Receiving Messages
Your regular messaging fees apply
when sending and receiving messages.
Sending an SMS/Text
Message
1. From the application tray, touch
Messaging > New Text Message.
2. Touch To to enter a recipient:
Enter a phone number, or
contact name, touch Done.
Touch Add from Contacts,
select a contacts from your
Contacts list.
3. Touch Message, and enter the text
message up to 160 characters.
•
•
4. Touch for additional options:
Touch Attach to add
attachments such as media,
contacts, or events.
Touch Add Subject to add a
subject line.
Touch Add CC to add carbon-
copy recipients.
Touch View Contact to view
the contact information for the
recipient, if available.
Touch Discard to discard the
text message without saving.
Touch Delete Thread to delete
the entire text thread.
5. Touch Send.
•
•
•
•
•
•

Sending and Receiving Messages
52 nüvifone 01000846 Owner’s Manual
DRAFT
About Multimedia
Messages
A multimedia (MMS) message is
similar to a text message, but it
includes an attachment, such as a
photo, a video, a contact, or a calendar
event.
You can touch > Attach while
creating a text message to add a
multimedia attachment.
The following multimedia attachments
are available:
Photo/Video—a saved photo or a
saved video.
Camera—a new photo or a new
video.
Slideshow
Audio—a saved audio recording.
Record Audio—a new audio
recording.
Contact
•
•
•
•
•
•
Calendar Event—an event you
have scheduled in the Calendar.
Sending a Multimedia Message
(MMS)
1. From the application tray, touch
Messaging > New Text Message.
2. Touch To, and enter a recipient.
3. Touch > Attach.
4. Select a media type.
5. Select the le to attach.
6. Touch Message, and enter the text
message up to 160 characters.
7. Touch Send.
•
Sending and Receiving Messages
nüvifone 01000846 Owner’s Manual 53
DRAFT
Sending a Location Message
CAUTION
Use caution when sharing your location
information with others.
Location messages allow you to send
your current location information to
other people. Sending a map image
requires MMS picture messaging
support on the phones of both the
sender and the receiver.
1. From the application tray, touch
Messaging > New Text Message.
2. Select a recipient.
3. Touch > Attach > Location.
4. Select the location using one of the
following methods:
Touch the location on the map.
Touch and use the Where
To? menu to select a location.
5. Touch Use this Location.
•
•
6. Touch Message, and enter the text
message up to 160 characters.
7. Touch Send.
You can also touch Share after you
nd a location to send a location
message.
Reading Messages
A number appears on the Messaging
icon showing the number of unread
messages in your inbox.
1. From the Home screen, touch
Messaging. The inbox appears,
containing Short Message Service
(SMS) messages and Multimedia
Messaging Service (MMS)
notications/messages received
from other devices.
Unread messages are displayed in
bold.
2. Touch a message to read it.

Sending and Receiving Messages
54 nüvifone 01000846 Owner’s Manual
DRAFT
3. Touch to view the location
information, if available.
4. Touch the arrows to view other
messages in the conversation.
5. Touch Reply to compose a reply to
the message.
6. Touch for the following options:
Touch Call to call the sender.
Touch Add to Contacts to add
the sender to your contacts.
Touch Delete Conversation to
delete the entire conversation.
Touch Send Location to send
a reply to the original message,
and include a location.
•
•
•
•
Replying to or Forwarding a
Message
1. From the Home screen, touch
Messaging.
2. Touch a message.
3. Touch Reply or Forward Message.
4. Touch To, and select a recipient.
5. Touch Message, and edit the
message, if necessary.
6. Touch Send.
Deleting a Text Message
1. From the Home screen, touch
Messaging.
2. Select a message from the list.
3. Select a message from the
conversation.
4. Touch Delete Message.

Sending and Receiving Messages
nüvifone 01000846 Owner’s Manual 55
DRAFT
Deleting a Conversation
1. From the Home screen, touch
Messaging.
2. Select a message from the list.
3. Touch > Delete Conversation.
Using E-mail
Adding an E-mail Account
The nüvifone can automatically
congure account information for some
e-mail accounts. These accounts only
require you to enter minimal account
information, such as your e-mail
address and password.
If additional information is required,
the nüvifone prompts you to enter the
required information. Contact your e-
mail account provider for conguration
information.
1. From the application tray, touch
E-mail > Other (POP3/IMAP4).
2. Enter the e-mail address and the
e-mail password, and touch Done >
Save.
3. If necessary, enter account
conguration information from
your service provider.
4. Touch Next to test the account
settings.
5. Touch Save to save the account
settings.
Adding an Exchange E-mail
Account
To set up an exchange account, see
page 85.

Sending and Receiving Messages
56 nüvifone 01000846 Owner’s Manual
DRAFT
Sending an E-mail Message
1. From the application tray, touch
E-mail > Compose.
2. Touch the elds on the screen to
enter recipients, to enter a subject,
and to add attachments.
3. Touch Message, and enter the
message text.
4. Touch for the following options:
Touch Show Cc/Bcc to show
the elds to add carbon‑copy
recipients and blind-carbon-
copy recipients.
Touch Show Reply To to show
the eld to enter a “reply to”
address. This is the address to
which replies from recipients
will be sent.
Touch Set Importance to select
Low, Normal, or High, and
touch Done.
•
•
•
Touch Save as Draft to save the
message to your Drafts folder
without sending it.
Touch Send Later to keep the
message in the Outbox until
the next time the nüvifone is
scheduled to check for e-mail.
Use the Check Interval setting
in Mail Settings to set this
schedule.
Touch Discard to discard the
e-mail without saving changes.
6. Touch Send.
•
•
•
Sending and Receiving Messages
nüvifone 01000846 Owner’s Manual 57
DRAFT
Viewing an E-mail Message
1. From the application tray, touch
E-mail.
2. Touch to check for new e-mail
messages, if necessary.
3. Select an e-mail message in the list.
4. Select any of the following options:
Touch to view the location
information, if available.
Touch to open the
attachment.
Touch Reply to compose a reply
to the sender.
Touch Reply All to compose a
reply to the sender and all other
recipients.
Touch Forward to send the
e-mail to another recipient.
Touch to delete the e-mail.
Touch > Mark as unread to
display the e-mail as unread in
your inbox.
•
•
•
•
•
•
•
Deleting E-mail Messages
1. From the application tray, touch
E-mail > .
3. Select the messages you want to
delete.
4. Touch Delete > OK.
Changing Folders
1. From the application tray, touch
E-mail.
2. Touch > View Folders.
3. Select a folder.
Searching a Folder
1. From the application tray, touch
E-mail.
2. Touch > View Folders, and
select a folder, if necessary.
3. Touch > Search Current
Folder.
4. Enter the text for which you wish to
search, and touch Done.

Sending and Receiving Messages
58 nüvifone 01000846 Owner’s Manual
DRAFT
Setting an E-mail Signature
You can set an e-mail signature for
each e-mail account you have added.
1. From the application tray, touch
Settings > Applications > E-mail.
2. Select an account.
3. Touch Advanced Settings.
4. Select the check box next to Use
Signature.
5. Touch Signature.
6. Enter a signature, and touch OK.
7. Touch Done.
Changing E-mail Accounts
1. From the application tray, touch
E-mail.
2. Touch and .
Setting the Default E-mail
Account
1. From the application tray, touch
Settings > Applications > E-mail.
2. Touch > Set Default Account.
3. Select an account, and touch Done.

Using Ciao!
nüvifone 01000846 Owner’s Manual 59
DRAFT
Using Ciao!™
Ciao! periodically sends your location
to our partner networks and downloads
the most recent location of your
friends. This application only submits
your location when you tell it to, unless
you enable automatic updates.
This service may be available as a
paid subscription. This service is not
available in all areas. A data connection
is required for this feature.
NOTE: Use caution when sharing your
location information with others.
Registering Your Device
and Joining Ciao!
1. From the application tray, touch
Ciao!.
2. Read and accept the on-screen
messages.
3. Follow the steps to register your
device. After registering, you
will receive an SMS message for
verication.
4. Open the SMS message received
from myGarmin, and click the link
to complete the verication process.
5. Touch OK. The Ciao! registration
page appears.
6. Select the check box to verify that
you are of legal age to use Ciao!,
and touch Next.
7. Enter a display name, and touch
Done.
8. Select a type of location update:
Manual or Automatic.
9. Touch the link to read the terms of
service for the displayed network or
networks, and touch Accept.
Your location is updated and becomes
available to your friends.

Using Ciao!
60 nüvifone 01000846 Owner’s Manual
DRAFT
Changing Your Display
Name
1. From the application tray, touch
Ciao! > My Details > >
Change Name.
2. Enter a new name, and touch Done.
Inviting a Friend
1. From the application tray, touch
Ciao! > Invite > Enter Phone
Number.
2. Select an option:
Touch Choose from Contacts
to select a contact.
Touch Enter Phone Number,
enter a phone number and a
country, and touch Done.
Touch Enter E-mail Address,
enter an e-mail address, and
touch Done.
Your invited friend must accept the
invitation before you can receive
•
•
•
location updates from that friend.
Accepting or Declining an
Invitation
1. From the application tray, touch
Ciao!.
3. Touch the friend that sent you the
invitation.
4. Touch Accept or Decline.
Sending a Location
Update
From the application tray, touch
Ciao! > My Details > Send
Update.
Automatically Sending
Location Updates
NOTE: Use caution when sharing your
location information with others.
By default, your location is only sent
when you manually send it.

Using Ciao!
nüvifone 01000846 Owner’s Manual 61
DRAFT
1. From the application tray, touch
Ciao! > My Details.
2. Touch > Change Location
Updates > Automatic > Done.
Updating your Status
1. From the application tray, touch
Ciao! > My Details > Change
Status.
2. Enter a new status message, and
touch Done.
Viewing Friends
Your list of friends shows the status,
distance to, and direction to your
friends.
1. From the application tray, touch
Ciao!.
2. Touch a friend in the list. The
location for the friend appears on a
map.
To view all of your friends on the map,
from the application tray, touch Ciao!
> View Map.
Adding a Friend to
Contacts
1. From the application tray, touch
Ciao!.
2. Touch a friend in the list.
3. Touch > Add to Contacts.
Sending a Message to a
Friend
1. From the application tray, touch
Ciao!.
2. Touch a friend in the list.
3. Touch Message.
Starting a Route to a
Friend’s Location
1. From the application tray, touch
Ciao!.
2. Touch a friend in the list.

Using Ciao!
62 nüvifone 01000846 Owner’s Manual
DRAFT
3. Touch Go!.
Removing an Invitation
1. From the application tray, touch
Ciao!.
2. Touch an invited friend in the list.
3. Touch Uninvite.
Removing a Friend
1. From the application tray, touch
Ciao!.
2. Touch a friend in the list.
3. Touch the information balloon.
4. Touch > Remove Friend > Yes.
Hiding Your Location
From the application tray, touch
Ciao! > > Hide > Hide. Your
current location is hidden from your
friends.
To stop hiding, touch Ciao! > >
Stop Hiding > Stop Hiding.
•
•
Viewing Ciao! Networks
1. From the application tray, touch
Ciao!.
2. Touch > Privacy > >
Networks.
Disabling Ciao!
1. From the application tray, touch
Ciao!.
2. Touch > Privacy > >
Disable Ciao!.
All the Ciao! information stored on
your device is removed. You no longer
send any position updates.
To enable Ciao!, you must join Ciao!
again.
Browsing the Web
nüvifone 01000846 Owner’s Manual 63
DRAFT
Browsing the Web
1. From the application tray, touch
Browser.
2. Touch the URL bar.
3. Enter a search term or a URL.
4. Touch Go.
Using the Browser
Touch to refresh the current
Web page.
Touch to stop loading the
Web page.
Touch and drag the screen to scroll
the Web page.
To zoom in on the Web page, touch
two points near the center of the
page, and then move your ngers
apart.
To zoom out, touch two points near
opposite edges of the page, and
then move your ngers toward the
center of the page.
Touch links, text-entry boxes, and
other interactive items to activate
them. Touch and hold interactive
items to view a menu of additional
options.
•
•
•
•
•
•
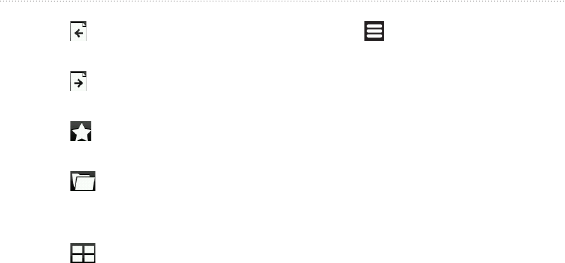
Browsing the Web
64 nüvifone 01000846 Owner’s Manual
DRAFT
Touch to return to the previous
Web page in your history.
Touch to go to the next to the
Web page in your history.
Touch to add this Web page to
your favorites.
Touch to view your history,
favorites, and most viewed Web
sites.
Touch to view other active
browser windows.
Touch to stop loading the Web
page.
•
•
•
•
•
•
Touch for the following options:
Touch Share to send the URL in
a text message.
Touch Find on Page to nd text
in the current Web page.
Touch Select Text to copy text
from the current Web page to
the system clipboard. Touch and
drag across the text you want to
copy. When you lift your nger,
the selected text is copied to the
clipboard.
Touch View Downloads to view
your Download History.
•
◦
◦
◦
◦

Browsing the Web
nüvifone 01000846 Owner’s Manual 65
DRAFT
Viewing Multiple Browser
Windows
You can view another Web page
without closing the current page by
launching another browser window.
1. From the application tray, touch
Browser > > New Page.
2. Select a Web page from the list, or
touch to select another Web
page.
3. Touch to switch between active
browser windows.
Save a Web Page to a
Favorites
1. Open to the Web page you want to
save.
2. Touch .
When you view one of your favorite
Web pages, appears gold.
Opening a Favorite Web Page
1. From the application tray, touch
Browser > > .
2. Touch a Favorite to view the
Favorite in the browser.
Viewing Your History
1. From the application tray, touch
Browser > > .
3. Select a Web page to view the Web
page in the browser.
Clearing Your Web Page
History
From the application tray, touch
Settings > Applications > Browser
> Clear History > Yes.

Browsing the Web
66 nüvifone 01000846 Owner’s Manual
DRAFT
Sharing a URL
1. From the application tray, touch
Browser > .
2. Select a category.
3. Touch and hold a Web page.
4. Touch Share to send a text message
with the URL.
Open a Favorite in a New
Window
1. From the application tray, touch
Browser > .
2. Select a category.
3. Touch and hold a Web page.
4. Touch Open in New Window.
Setting Your Browser
Home Page
1. From the application tray, touch
Settings > Applications > Browser
> Set Home Page.
2. Enter a URL, and touch OK.

Browsing the Web
nüvifone 01000846 Owner’s Manual 67
DRAFT
Downloading Files
1. From the application tray, touch
Browser.
2. Open a Web page that contains a
download link.
3. Touch the download link. The
download history appears, and a
progress bar shows the status of the
download.
4. Touch and hold the download for
the following options:
Pause Download
Resume Download
Cancel Download
•
•
•
5. Touch for the following options:
Touch Clear List to clear the
download history. This option
does not remove downloaded
les from the nüvifone.
Pause all downloads
Resume all downloads
Touch Cancel all downloads
to cancel all in-progress
downloads. This option does
not remove downloads that have
already completed.
5. When the progress bar is full,
touch the le name to view the
downloaded le.
You can view the download history
at any time by touching > View
Downloads from the browser.
•
•
•
•

Playing Music
68 nüvifone 01000846 Owner’s Manual
DRAFT
Playing Music
You must transfer music les to
your nüvifone before playing songs
or creating playlists. For more
information on transferring les, see
page 88.
The music player supports the
following le types:
MP3
MPEG4
WMA
AAC/AAC+/eAAC+
WAV
WMA
MIDI
All supported music les on your
device are included in the music
library, which appears when you start
the Music Player.
•
•
•
•
•
•
•
Playing a Song
1. From the application tray, touch
Music.
2 Select category and subcategory,
if necessary. All the songs in the
selected subcategory are added to
the current playlist.
3. Touch All Songs, or touch a song in
the list.
4. Touch . The music player
plays the song and the following
songs in the list.
Changing the Music
Player View
While playing a song, touch the
following icons to switch between
music player views:
Touch to view the current
playlist.
Touch to view the current
track, cover art, and a progress
•
•
Playing Music
nüvifone 01000846 Owner’s Manual 69
DRAFT
slider.
When using the playlist view, you
can touch > Browse Music
Library to browse the music
library without stopping the music.
Save a Song as a Ring
Tone
1. From the music player playlist
view, touch and hold the song.
2. Touch Use as Phone Ring Tone.
About Playlists
A playlist is a list of songs that can be
saved. The current playlist appears on
the playlist screen of the music player.
You can also create and save playlists
for future playback.
Creating a Playlist
1. From the application tray, touch
Music > Playlists > .
•
2. Touch the automatic name, enter
a new name for the playlist, and
touch Done.
3. Select the new playlist, and touch
.
4. Select a category and subcategories,
if necessary.
5. Select the check box next to each
song you want to add to the playlist,
and touch Add to Playlist.
6. Repeat steps 4 and 5 to add
additional songs.
7. Touch Done.
8. To change the order of the playlist,
touch , and drag the song to a
new position in the list.
9. Touch Save.
Playlists are saved as .m3u les on
your device.

Playing Music
70 nüvifone 01000846 Owner’s Manual
DRAFT
Playing a Playlist
1. From the application tray, touch
Music > Playlists.
2. Select a playlist.
3. Touch , or select a song to
begin playing the playlist.
Editing a Playlist
1. From the application tray, touch
Music > Playlists.
2. Select a playlist.
3. Touch > Edit Playlist.
4. Use any of the following options to
edit the playlist:
Touch to add songs to the
playlist.
Touch to remove a song
from the playlist.
Touch and hold , and drag the
song to a new position in the
playlist.
5. Touch Save.
•
•
•
Streaming Online Music
You can stream supported music les
without saving them on the nüvifone.
1. From the application tray, touch
Browser.
2. Enter a URL, or navigate to a page
with a link to a supported music
le.
3. Touch the music le link.
The music player launches and plays
the song. The URL for the song
appears.
If possible, to save the song, touch
> Save.

Taking and Viewing Pictures and Videos
nüvifone 01000846 Owner’s Manual 71
DRAFT
Taking and Viewing
Pictures and Videos
NOTE: Remove the plastic lm from
the camera lens before using the
camera.
Taking a Picture
1. Press the Camera key on the side
of the nüvifone.
2. Use the screen as a viewnder, and
point the camera lens at the subject
you want to photograph.
3. Lightly press the Camera key. A
green box appears on the screen.
The nüvifone focuses on the object
that appears inside of the box.
4. Press and hold the Camera key,
and hold the camera still. When you
hear the camera click, the photo is
saved.
Taking a Picture with GPS
Information
If you are receiving GPS signals, the
nüvifone can assign a GPS location to
the photo.
1. Press the Camera key on the side
of the nüvifone.
2. Touch > Yes.
3. Aim the viewnder.
4. Press and hold the Camera key,
and hold the camera still. When you
hear the camera click, the photo is
saved.
When you view the photo, touch
navigate to the location, display
the location on the map, or save the
location as a Favorite.

Taking and Viewing Pictures and Videos
72 nüvifone 01000846 Owner’s Manual
DRAFT
Recording a Video
1. Press the Camera key on the side
of the nüvifone.
2. Use the screen as a viewnder, and
point the camera lens at the subject
you want to photograph.
3. Touch .to begin recording.
4. Touch to stop recording.
Changing the Camera and
Video Settings
1. Press the Camera key on the side
of the nüvifone.
2. Touch > Options.
3. Touch an option to change the
setting:
Touch Lighting Adjustment to
select a lighting condition, or
select Automatic.
•
Touch Picture Resolution to
select the resolution at which
you want to capture photos.
Higher settings use more
storage memory to provide
better-quality photos.
Touch Shutter Sound to turn
the shutter sound on or off.
Touch Auto Review to turn the
photograph review page on or
off.
Touch Video Quality to select
the resolution at which you
want to record video.
Touch Video Format to select
the video format to use when
saving videos.
NOTE: Only 3GPP videos
may be sent as a message
attachment.
•
•
•
•
•

Taking and Viewing Pictures and Videos
nüvifone 01000846 Owner’s Manual 73
DRAFT
About Picture and Video
File Types and Locations
Copy pictures and videos from your
computer to the following folders on
your device:
\My Documents\My Pictures
\My Storage\My Pictures
\Storage Card\My Pictures
For more information on copying les
from your computer to your device, see
page 88.
Your device supports the following le
types:
Picture: JPEG, PNG, BMP
Video: 3GP, WMV, MP4
•
•
•
•
•
About the Gallery
You can view and edit pictures and
videos using the Gallery.
Open the Gallery using one of the
following methods:
From the application tray, touch
Gallery.
Opening the Gallery from the
application tray allows you to view
all pictures and videos stored on the
nüvifone.
From the camera, touch .
Opening the Gallery from the
Camera allows you to view only
pictures and videos that you have
taken with the nüvifone camera.
•
•
Taking and Viewing Pictures and Videos
74 nüvifone 01000846 Owner’s Manual
DRAFT
Viewing Pictures
1. From the Application tray, touch
Gallery.
2. Touch a picture.
3. Touch the arrows to view additional
photos.
Viewing a Video
1. From the Application tray, touch
Gallery.
2. Touch a video. Videos are indicated
by .
3. Touch to play the video.
4. Touch the screen to view the
playback controls.
Viewing a Slideshow
1. From the Application tray, touch
Gallery.
2. Touch .
Sharing Pictures and
Videos
1. From the Application tray, touch
Gallery.
2. Touch the picture or the video that
you want to share.
3. Touch .
4. Select an option to send the image.
Editing Pictures and
Videos
1. From the Application tray, touch
Gallery.
2. Touch the picture or the video to
edit.
3. Touch , and select an option:
Touch Rotate to turn photos left
or right.
Touch Crop, touch and drag the
edges of the rectangle to crop
the picture, and touch Save.
•
•

Taking and Viewing Pictures and Videos
nüvifone 01000846 Owner’s Manual 75
DRAFT
Touch Rename, enter a new
name, and touch Save.
Setting Your Wallpaper
1. From the Application tray, touch
Gallery.
2. Touch a picture.
3. Touch > Set as > Wallpaper.
4. Touch and drag the edges of the
rectangle to crop the photo.
5. Touch Save.
The wallpaper image appears when the
nüvifone screen is locked.
Adding a Picture to a
Contact
1. From the Application tray, touch
Gallery.
2. Touch a picture.
3. Touch > Set as > Contact icon.
•
4. Touch and drag the edges of the
square to crop the photo.
5. Touch Save.
Navigating to a Picture
If a picture includes a GPS location,
you can create a route to the picture.
See page 71.
1. From the Application tray, touch
Gallery.
2. Touch a picture.
4. Touch > Go!.

Taking and Viewing Pictures and Videos
76 nüvifone 01000846 Owner’s Manual
DRAFT
MPEG-4 EULA
This product is licensed under the
MPEG‑4 Visual Patent Portfolio
License for the personal and non-
commercial use of a consumer for (i)
encoding video in compliance with
the MPEG-4 visual standard (“MPEG-
4 Video”) and/or (ii) decoding
MPEG-4 video that was encoded by
a consumer engaged in a personal
and non-commercial activity and/or
was obtained from a video provider
licensed by MPEG LA to provide
MPEG-4 video. No license is granted
or shall be implied for any other use.
Additional information including that
relating to promotional, internal, and
commercial uses and licensing may be
obtained from MPEG LA, LLC. See
www.MPEGLA.com.
AVC EULA
This product is licensed under the
AVC Patent Portfolio License for the
personal and non-commercial use
of a consumer to (i) encode video in
compliance with the AVC standard
(“AVC Video”) and/or (ii) decode
AVC video that was encoded by
a consumer engaged in a personal
and non-commercial activity and/or
was obtained from a video provider
licensed to provide AVC video.
No license is granted or shall be
implied for any other use. Additional
information may be obtained from
MPEG LA, LLC. See
www.MPEGLA.com.
Organizing Your Life
nüvifone 01000846 Owner’s Manual 77
DRAFT
Organizing Your Life
Synchronize your phone with your
computer to keep your task list and
calendar up-to-date in both locations.
Using the Calendar
1. From the application tray, touch
Calendar.
2. Use any of the following options:
Touch or to change
the day.
Touch to view to the
current day. The number in the
circle is the current day of the
month.
Touch to add an
appointment.
Touch to view your
upcoming appointments.
Touch to view the daily
calendar.
•
•
•
•
•
Touch to view the monthly
calendar. The current day is
circled in red.
Creating an Appointment
1. From the application tray, touch
Calendar.
2. Touch .
3. Touch Subject, and enter a subject.
4. Touch Location, and select an
option to enter a location:
Enter the full address or location
name, and touch Done.
Touch Add Location, nd a
location, and touch Use this
Location.
5. Select a start time and an end time,
or select the All Day check box to
create an all-day appointment.
6. Touch Reminder, and select a time.
7. Select how often you want the
appointment to recur:
•
•
•
Organizing Your Life
78 nüvifone 01000846 Owner’s Manual
DRAFT
Touch Repeat, and select an
option.
Touch Repeat End, and select
the date on which you want the
appointment to stop recurring.
8. Touch Notes, and enter a note.
9. Touch Save.
Viewing an Appointment
1. From the application tray, touch
Calendar.
2. Select an option to nd an
appointment:
Touch or to change
the day.
Touch to view an agenda
of upcoming appointments.
Touch to view today’s
appointments.
Touch to select a date on
the monthly calendar.
•
•
•
•
•
•
3. Touch an appointment to view
details.
Starting a Route to an
Appointment
If the appointment has location
information, you can start a route to the
location.
1. From the application tray, touch
Calendar.
2. Touch the appointment.
4. Touch > Go!.
Viewing a Document
You can view the following document
types using the document viewer:
Microsoft® Word (.doc), Excel® (.xls),
PowerPoint® (.ppt), Adobe® PDF
(.pdf), HTML (.html), and plain text
(.txt) les.
1. From the application tray, touch
Document Viewer.
Organizing Your Life
nüvifone 01000846 Owner’s Manual 79
DRAFT
2. Touch the document you want to
view.
NOTE: You can also open a
document attached to an e-mail or
linked on a Web page.
3. Use any of the following options to
view the document:
Touch or to move
backward or forward one page.
Touch Page, and enter a page
number you want to view.
To zoom in, touch two points
near the center of the page, and
drag your ngers apart.
To zoom out, touch two points
near opposite edges of the page,
and drag your ngers toward the
center of the page.
•
•
•
•
Touch > Search to search
the document. Enter a search
term, and touch . Touch
or to nd the next
occurrence or the previous
occurrence of the search term.
Touch > Rotate to rotate the
document 90° clockwise.
Touch > Save to save the
document on your device.
Touch > Share to e-mail the
document.
Checking the Weather
Forecast
This service may be available as a
paid subscription. This service is not
available in all areas. A data connection
is required for this feature.
•
•
•
•

Organizing Your Life
80 nüvifone 01000846 Owner’s Manual
DRAFT
1. From the application tray, touch
Weather. The current local weather
conditions and a six-day forecast
are displayed.
2. Select a day to view a detailed
forecast for the day.
TIP: To change the units of measure,
see page 91.
Viewing the Forecast in Other
Cities
1. From the application tray, touch
Weather > > Edit Favorite
Cities > Add City.
2. Enter the city name, and tap Done.
3. If necessary, touch the city.
4. Touch Done.
5. Touch or to view the
forecast in your favorite cities.
Using the Clock
For information on manually changing
the time or time zone, see page 94.
Adding Cities to View the Time
1. From the application tray, touch
Clock > > .
3. Enter all or part of a city name, and
touch Done.
4. Select the city from the list.
To remove cities from the list, touch
.
Setting an Alarm
1. From the application tray, touch
Clock > > Add New Alarm.
2. Touch Alarm Message, enter a
message for the alarm, and touch
Done.
3. Touch Start, select an alarm time,
and touch Done.

Organizing Your Life
nüvifone 01000846 Owner’s Manual 81
DRAFT
4. Touch Repeat, select how often
you want the alarm to repeat, and
touch Done.
5. Touch Enabled to place a check
mark in the check box and turn on
the alarm.
6. Touch Ringer, and select a ringer,
if necessary, and touch Done.
7. Touch Vibrate to place a check
mark in the check box and enable a
vibrating alarm.
8. Touch Save.
Managing Alarms
Use the check box next to an alarm
to enable or disable the alarm.
To delete an alarm, touch an alarm
in the list, and touch > Delete
Alarm.
When the alarm sounds, touch
Snooze to hear the alarm again in
ve minutes, or touch Dismiss.
•
•
•
Viewing the World Map
1. From the application tray, touch
Clock > . The globe displays
areas of daylight and night across
the world.
2. Use the following options to view
the world map:
Touch and drag the globe
to change the speed or the
direction of rotation.
Touch and release the globe to
stop the rotation.
When the rotation is stopped,
touch and release the globe to
switch to a at map view.
Touch the map to switch back to
the globe view.
Using the Stop Watch
1. From the application tray, touch
Tools > Clock > .
2. Touch Start to start the timer.
•
•
•
•

Organizing Your Life
82 nüvifone 01000846 Owner’s Manual
DRAFT
3. Touch Lap to record the lap time
and the split time.
4. Touch Stop to stop the timer.
5. Touch the Split and Lap times to
view details.
6. Touch Reset to reset the lap time
and the split time.
Using the Converter
Converting Units
1. From the application tray, touch
Converter.
2. Touch the button next to Convert,
select the type of items to be
converted, and touch Done.
3. Touch a unit of measurement, select
the unit type, and touch Done.
4. Touch a number, enter the number
of units to be converted, and touch
Done.
5. To clear the number of units, touch
> Clear.
Converting Currency
1. From the application tray, touch
Converter.
2. Touch the button next to Convert.
3. Select Currency, and touch Done.
4. Touch a currency button, select a
currency, and touch Done.
5. Touch the amount below the
currency you want to convert.
6. Enter the amount, and touch Done.
The nüvifone automatically downloads
the current conversion rates. A data
connection is required for this feature.
You can also set conversion rates
manually.
Setting Conversion Rates
Manually
1. From the application tray, touch
Tools > Converter.
2. Touch the button next to Convert.
3. Select Currency, and touch OK.

Organizing Your Life
nüvifone 01000846 Owner’s Manual 83
DRAFT
4. Touch a currency button, select the
currency for which you want to
set the conversion rate, and touch
Done.
4. Touch > Custom.
5. Touch a conversion rate.
6. Enter a new conversion rate, and
touch Done.
7. Touch Done.
Checking Flight Status
A data connection is required to use
this service.
1. From the application tray, touch
Flight Status.
2. Touch a search option:
Touch Current Location to
search for ights in airports near
your current location.
Touch Another City to search
for ights in airports near the
city you select.
•
•
A list of airports near your current
location appears. Major airports are
listed rst, and all other airports are
sorted by distance.
3. Select an airport.
TIP: Touch to view the airport
on the map.
4. Select an option:
Touch Flight Number, enter a
ight number, and touch OK.
Touch Arrivals and select an
airline.
Touch Departures, and select
a search option, and enter the
appropriate data.
5. Select a ight.
•
•
•

Connecting with Other Devices
84 nüvifone 01000846 Owner’s Manual
DRAFT
Connecting with Other
Devices
Synchronizing Your
nüvifone with Your
Computer
Synchronize your nüvifone with your
computer to transfer your contacts and
calendar events to your nüvifone.
Downloading and Installing
nüvifone Sync Agent
1. Go to www.garminasus.com/
syncagent.
2. Fellow the on-screen instructions to
download and install nüvifone Sync
Agent software.
NOTE: nüvifone Sync Agent
software is not compatible with Mac®
computers.
Synchronizing With Your
Computer
1. Verify that you have downloaded
and installed nüvifone Sync Agent
software on your computer.
2. Connect the mini-USB cable to
the connector on the bottom of the
nüvifone.
3. Connect the mini-USB to a USB
port on your computer.
4. Touch Sync.
Your Microsoft Outlook contacts,
calendar events, and tasks are
synchronized with your nüvifone
contact list and calendar.
Synchronizing Your
nüvifone with a Microsoft
Exchange Server
Synchronize your contacts, your
calendar, and your e-mail with a
Microsoft Exchange account. You

Connecting with Other Devices
nüvifone 01000846 Owner’s Manual 85
DRAFT
must have a data connection to use this
feature.
Setting Up your Exchange
Account
Contact you network administrator to
obtain the necessary information for
your network.
1. From the application tray, touch
E-mail > Exchange.
2. Enter your e-mail address and your
password, and touch Next.
3. Enter the necessary information.
4. Select Use SSL Encryption check
box to encrypt the data you send
and receive from the Exchange
server.
5. Touch Next. The nüvifone veries
the account settings.
6. If the nüvifone cannot verify your
account, touch Edit to correct the
settings, or touch Save to save the
unveried settings.
The nüvifone will not synchronize
with your Exchange account until the
account is veried. You can edit your
account settings to update or verify
your account.
You can select which types of data to
synchronize in the sync settings.
Editing your Exchange
Account
After you set up an Exchange account,
you can edit the account information
and verify your account.
Contact you network administrator to
obtain the necessary information for
your network.
1. From the application tray, touch
Settings > Sync > Exchange
Active Sync > Account Info.
2. Edit the elds as necessary
3. Touch .

Connecting with Other Devices
86 nüvifone 01000846 Owner’s Manual
DRAFT
4. Touch Yes to verify your account,
or touch No to save the changes
without verifying.
Using Bluetooth
Technology
Use Bluetooth wireless technology to
connect with other devices wirelessly.
Turning On Bluetooth
1. From the application tray, touch
Settings > Wireless Manager >
Bluetooth.
2. Select the check box next to
Bluetooth.
Making Your Device
Discoverable
1. From the application tray, touch
Settings > Wireless Manager >
Bluetooth.
2. Select the check box next to
Bluetooth.
3. Select the check box next to
Discoverable.
Pairing with a Device
1. Place the device with which you
want to pair in discoverable mode.
2. From the application tray, touch
Settings > Wireless Manager >
Bluetooth.
3. Select the check box next to
Bluetooth.
4. Touch > Scan for Devices.
NOTE: You might have to wait
a moment for the names of the
devices to appear.
4. Touch the device with which you
want to pair.
5. Enter the passkey of the device, and
touch OK.
Connecting to a Paired Device
Before you can connect to a device,
you need to pair it with the nüvifone.

Connecting with Other Devices
nüvifone 01000846 Owner’s Manual 87
DRAFT
1. From the application tray, touch
Settings > Wireless Manager >
Bluetooth.
2. Touch a paired device.
3. Touch Connect.
Changing Your Device Name
You can change the name that identies
your device on other Bluetooth
devices.
1. From the application tray, touch
Settings > Wireless Manager >
Bluetooth.
2. Select the check box next to
Bluetooth.
3. Touch Device Name.
4. Enter a name, and touch OK.
Disconnecting a Device
1. From the application tray, touch
Settings > Wireless Manager >
Bluetooth.
2. Touch the device.
3. Touch Disconnect.
The device is disconnected, but it
remains paired with your nüvifone.
Removing a Paired Device
1. From the application tray, touch
Settings > Wireless Manager >
Bluetooth.
2. Touch the device.
3. Touch Unpair.
Deactivating Bluetooth
1. From the application tray, touch
Settings > Wireless Manager >
Bluetooth.
2. Remvoe the check from the check
box next to Bluetooth.

Connecting with Other Devices
88 nüvifone 01000846 Owner’s Manual
DRAFT
Transferring Files
You can transfer les, such as MP3s
and JPEGs, to your nüvifone.
1. If necessary, insert a microSD card.
See page 2.
2. Connect the mini-USB cable to
the connector on the bottom of the
nüvifone (not the cradle).
3. Connect the cable to your computer.
4. Touch File Transfer.
Two additional drives (volumes)
appear in the list of drives on your
computer. One is the available
storage in the internal memory
of the nüvifone. The other is the
memory card inserted into the
nüvifone.
5. Copy and paste the les you want
to transfer into the appropriate
folders in the new drives.
NOTE: Your nüvifone cannot send or
receive phone calls or text messages
while in mass storage mode.
About File Transfer Mode
CAUTION
If you are not sure about the purpose
of a le, do NOT delete the le. Your
nüvi memory contains important
system les that should NOT be
deleted. Be especially cautious of les
located in folders entitled “Garmin.”
File transfer mode is also referred
to as USB mass storage mode. Use
le transfer mode to add les to the
nüvifone. The computer does not need
nüvifone Sync Agent installed to use
le transfer mode.

Connecting with Other Devices
nüvifone 01000846 Owner’s Manual 89
DRAFT
About Wi-Fi
Connect to the Internet using a Wi‑Fi
connection. You must be in a Wi‑Fi
coverage area (Wi‑Fi hotspot) to use
Wi‑Fi.
Connecting to a Wi-Fi Network
1. From the application tray, touch
Settings > Wireless Manager >
Wi-Fi.
2. Select the check box next to Wi‑Fi.
The nüvifone searches for Wi‑Fi
networks.
3. If necessary, touch > Scan.
4. Touch a network.
5. Enter the network encryption key, if
necessary.
6. Touch Connect.
Adding a Network
You can add non-broadcasting
networks, or other networks that your
nüvifone does not automatically detect.
1. From the application tray, touch
Settings > Wireless Manager >
Wi-Fi.
2. Select the check box next to Wi-Fi.
3. Touch next to Add Wi-Fi
Network.
4. Touch the eld below Network
SSID.
5. Enter the network SSID, and touch
Done.
6. Touch below Security and
select a security type.
7. Enter a password, and touch Done.
8. Touch Save.

Connecting with Other Devices
90 nüvifone 01000846 Owner’s Manual
DRAFT
Removing a Remembered
Network
After you have connected to a Wi‑Fi
network, the nüvifone remembers the
network for future use. Remembered
networks appear in the network list
even when they are out of range.
1. From the application tray, touch
Settings > Wireless Manager >
Wi-Fi.
2. Touch the network, and touch
Forget.
Turning Off Wi-Fi
1. From the application tray, touch
Settings > Wireless Manager >
Wi-Fi.
2. Remove the check from the check
box next to Wi‑Fi.

Customizing Your nüvifone
nüvifone 01000846 Owner’s Manual 91
DRAFT
Customizing Your
nüvifone
General Device Settings
From the application tray, touch
Settings > System > General.
Distance—units of measure for
distance.
Temperature—units of measure
for temperature.
Coordinates—units of measure for
the coordinates format.
Safe Mode—prevents you from
entering data when your vehicle is
in motion.
My Parking Spot—saves your
parking spot when you remove the
nüvifone from the mount while
power is applied to it.
Share Feedback—allows
Garmin-Asus to collect your speed,
•
•
•
•
•
•
direction, and location information
and share it with strategic partners
and service providers. This service
requires the use of your data plan,
and any associated charges would
apply.
Security Settings
Location Settings
From the application tray, touch
Settings > System > Security.
Use wireless networks—
determines your location using
Wi‑Fi and mobile networks.
Enable GPS satellites—determines
your location using GPS satellites.
Share with Google—allows
Google to collect your location
information. This service requires
the use of your data plan, and any
associated charges would apply.
•
•
•

Customizing Your nüvifone
92 nüvifone 01000846 Owner’s Manual
DRAFT
Using a Pattern to Unlock the
Screen
When the screen unlock pattern is
turned on, the user must enter a pattern
to unlock the nüvifone when the screen
is locked. You can still use the nüvifone
to contact emergency services without
using the screen unlock pattern.
1. From the application tray, touch
Settings > System > Security >
Set Unlock Pattern.
2. Follow the on-screen instructions to
create an unlock pattern.
3. If you want to view the pattern as
you enter it, select the Use visible
pattern check box.
If you forget your pattern, contact
Product Support at www.garminasus.
com. Your device can be unlocked, but
all personal information will be erased
in the process. See page 104 for more
information.
To turn off the screen unlock pattern,
remove the check mark from the
Require pattern check box.
Locking the SIM Card
Use these settings to require a PIN
to enable all non-emergency features
of the nüvifone. You can still use the
nüvifone to contact emergency services
without a PIN. You can remove the
SIM card to use the non-telephone
features of the nüvifone.
1. From the application tray, touch
Settings > System > Security >
Lock SIM Card.
2. Enter a PIN, and touch OK.
If you forget your SIM PIN, contact
your mobile service carrier to obtain a
Personal Unblocking Key (PUK).
Viewing Passwords as you
Type Them
1. From the application tray, touch
Settings > System > Security.

Customizing Your nüvifone
nüvifone 01000846 Owner’s Manual 93
DRAFT
2. Select the Visible Passwords check
box.
Using Credential Storage
You can store security credentials, such
as passwords and certicates, for quick
access.
1. From the application tray, touch
Settings > System > Language >
Text > Use Secure Credentials.
2. Touch Set Password, enter a
password, and touch Done.
Changing the Text
Language
1. From the application tray, touch
Settings > System > Language >
Text.
2. Select a language for all on-screen
text.
NOTE: Changing the text language
does not change the language of map
data, such as street names, or user-
entered data.
Keyboard Settings
From the application tray, touch
Settings > System > Keyboard.
Vibrate on Key Press
Portrait Keyboard—the keyboard
mode used when the device is
in portrait view: Phone Pad or
QWERTY.
Auto Capitalization—
automatically capitalizes the rst
word in a eld.
Text Completion—shows
suggested words as you enter text.
If you enable auto-complete, the
underlined word will be inserted
automatically when you enter a
space or a punctuation mark.
Enable Keyboards—enable
keyboards for different languages.
From the keyboard, touch to
•
•
•
•
•

Customizing Your nüvifone
94 nüvifone 01000846 Owner’s Manual
DRAFT
change the keyboard.
Date/Time Settings
NOTE: By default, the nüvifone time
is set by the network provider settings.
From the application tray, touch
Settings > System > Date/Time.
Automatic—uses the network
settings for the date and the time.
Set Date—allows you to set the
date manually.
Set Time—allows you to set the
time manually.
Set Time Zone—allows you to
select a time zone manually.
Date Format
Time Format—sets the time
format to 12-Hour, 24-Hour, or
UTC.
•
•
•
•
•
•
Changing the Storage
Settings
1. From the application tray, touch
Settings > System > Storage.
2. Scroll to view the total space and
the available space for each storage
type.
3. Touch Change Default Storage.
4. Select Phone Storage or SD Card,
and touch OK.
Data Connection Settings
From the application tray, touch
Settings > Wireless Manager > Data.
Data Connection—turns on the
data connection.
NOTE: Data charges apply if On
Demand or On are selected.
Data Roaming—turns on the data
connection when roaming.
NOTE: There may be additional
•
•

Customizing Your nüvifone
nüvifone 01000846 Owner’s Manual 95
DRAFT
charges from your service provider to
use the data connection while roaming.
Access Point Names—displays
connected data service access
points. Select an access point to
view detailed information.
From the application tray, touch
Settings > Phone.
Call Forwarding
Call Barring
Call Waiting
Send My Caller ID—a preference
for sending caller ID information
when you make phone calls. Touch
Set by Network to send caller
ID information according to the
settings of your network provider.
Voice Mail Number—the number
to access voice mail. This is usually
the same as your phone number.
TTY—enables TTY
(teletypewriter) mode.
•
•
•
•
•
•
•
Hearing Aid Mode—optimizes the
phone speaker for use with hearing
aids.
Fixed Dialing Numbers—enables
the xed dialing numbers. See page
96.
Network Operators—searches for
local networks. Select a network in
the list, and touch OK.
Enabling and Adding Fixed
Dialing Numbers (FDN)
You can set up your device so that it
can only dial certain phone numbers.
To change FDN settings, you must
acquire the FDN PIN for your SIM
card from your service provider.
1. From the application tray, touch
Settings > Phone > Fixed Dialing
Numbers.
2. Touch FDN Disabled.
3. Enter the FDN PIN, and touch OK.
4. Touch Manage FDN List.
•
•
•

Customizing Your nüvifone
96 nüvifone 01000846 Owner’s Manual
DRAFT
5. Touch > Add Contact.
6. Enter a name and a number, and
touch Save.
7. Enter the FDN PIN to add the
contact to the FDN phone number
list.
To change the FDN PIN, touch
Change PIN.
To disable Fixed Dialing Numbers,
touch FDN Enabled, and enter the
FDN PIN.
Audio Settings
From the application tray, touch
Settings > Audio.
Ringtone—ringtone for a telephone
call.
Ringer Mode
Ringer
Notications—ringtone for
notications, such as text message.
•
•
•
•
Voice—the language used for
all voice prompts and messages.
Preview plays a sample of the
voice.
Touchtones—plays a tone when
you touch the screen.
Ringer, Navigation, or Media—
allows you to adjust the levels of
each output.
Navigation Settings
You can use different navigation
settings for Automobile usage mode
and Pedestrian usage mode.
Changing Automobile and
Pedestrian Navigation Settings
From the application tray, touch
Settings > Navigation > Automobile
or Pedestrian.
Route Preference—the preference
for calculating routes.
Notication Type—the method
•
•
•
•
•
Customizing Your nüvifone
nüvifone 01000846 Owner’s Manual 97
DRAFT
for which you are notied of
maneuvers in the route.
Map Detail—the level of detail
the map displays. More detail may
result in slower map drawing.
Map View—the perspective of
the Map page. Track Up displays
the map in two dimensions (2D)
with your direction of travel at the
top. North Up displays the map
in 2D with North at the top. 3D
displays the map in 3D, Track Up
orientation (default).
Avoidances—types of roads
and maneuvers you want the
nüvifone to attempt to avoid when
creating routes. (Only available in
Automobile usage mode.)
Vehicle or Avatar—changes the
icon to represent your position on
the map. Go to www.garmingarage.
com for more icons.
Trip Log—displays the path of
•
•
•
•
•
your travels on the map.
Changing Public
Transportation Navigation
Settings
From the application tray, touch
Settings > Navigation > Public
Transportation.
Bus
Train
Metrorail
Long Walks
Downloading Safety Cameras
CAUTION
Garmin and ASUS are not
responsible for the accuracy of, or the
consequences of using, a custom point
of interest (POI) or a safety camera
database.
This service may be available as a
paid subscription. This service is not
available in all areas. A data connection
•
•
•
•

Customizing Your nüvifone
98 nüvifone 01000846 Owner’s Manual
DRAFT
is required for this feature.
1. From the application tray, touch
Settings > Navigation > Safety
Cameras.
2. Touch a region or regions in the list,
and touch Done.
Viewing Map Information
1. From the application tray, touch
Settings > Navigation > >
Map Info. A list of installed maps
appears.
2. Select or clear the check box next
to a map to enable or disable the
map.
Application Settings
Calendar Settings
From the application tray, touch
Settings > Applications > Calendar.
Set alerts and notications—sets
how the device reminds you of
an upcoming appointment. Select
•
Alert to view a pop-up alert, or
select Status bar notication to
view a notication in the status bar.
Select Off to turn off appointment
reminders.
Select ringtone—sets the ringtone
to play when the device reminds
you of an upcoming appointment.
Vibrate—the device will vibrate
when it reminds you of an
upcoming appointment.
Set default reminder—sets
the default number of minutes
before an appointment that the
device should remind you of the
appointment.
Set snooze time—sets the amount
of time to snooze when you touch
Snooze on a reminder.
E-mail Account Settings
From the application tray, touch
Settings > Applications > E-mail.
Select an account.
•
•
•
•

Customizing Your nüvifone
nüvifone 01000846 Owner’s Manual 99
DRAFT
Your Name
E-mail Address
Password
Account Name—name displayed
for this e-mail account.
E-mail Notications—you are
notied when you receive an
e-mail.
Select Ringtone
Vibrate
Protocol
Incoming Settings
Outgoing Settings
Use SSL Encryption
Advanced Settings
Check Interval—the interval
to wait before checking for new
e-mail.
From Address
Reply To Address
•
•
•
•
•
•
•
•
•
•
•
•
◦
◦
◦
Use Signature
Signature
Messaging Settings
From the application tray, touch
Settings > Applications > Messaging.
Delivery Reports—requests a
delivery report for each SMS
message you send.
Manage SIM card messages—
copy or delete SMS messages
stored on your SIM card. Touch an
hold a message, and select Copy to
phone memory or Delete.
Delivery Reports—requests a
delivery report for each MMS
message you send.
Read Reports—requests a read
report for each MMS message you
send.
Auto-retrieve—retrieves MMS
messages automatically when you
are not roaming.
◦
◦
•
•
•
•
•

Customizing Your nüvifone
100 nüvifone 01000846 Owner’s Manual
DRAFT
Roaming auto-retrieve—retrieves
MMS messages automatically when
you are roaming.
Notications—displays a
notication in the status bar when
you receive a message.
Select ringtone—sets a ringtone to
play when you receive a message.
Vibrate—the device vibrates when
you receive a message.
General Browser Settings
From the application tray, touch
Settings > Applications > Browser.
Set Home Page—sets the browser
home page.
Block Pop-ups—blocks pop-up
windows while browsing.
Auto-t Web Pages—resizes Web
pages to t the screen.
Load Web Page Images—allows
you to view images on Web pages.
•
•
•
•
•
•
•
•
Set Text Size—sets the size of text
that the Browser uses to display
Web pages.
Enable JavaScript—allows
JavaScript.
Map URL Handling—adjusts how
maps URLs are opened
Enable Support—allows map
URLs to be opened in Garmin
maps.
Set as Default—opens map
URLs in Garmin maps by
default.
Browser Privacy Settings
From the application tray, touch
Settings > Applications > Browser.
Accept Cookies
Remember Form Data
Clear Cache
Clear History
Clear Cookies
•
•
•
◦
◦
•
•
•
•
•

Customizing Your nüvifone
nüvifone 01000846 Owner’s Manual 101
DRAFT
Clear Form Data
Browser Security Settings
From the application tray, touch
Settings > Applications > Browser.
Remember Passwords—saves
user names and passwords for Web
sites.
Show Security Warning—displays
a warning when the browser detects
a problem with the security of a
Web site.
Clear Passwords—clears saved
password information.
Advanced Browser Settings
From the application tray, touch
Settings > Applications > Browser.
Enable Gears—enables Gears
browser applications. Gears
applications add functionality to the
browser.
Gears Settings—changes settings
•
•
•
•
•
•
for installed Gears applications.
Quick Search Settings
From the application tray, touch
Settings > Applications > Quick
Search.
Searchable items—sets what is
searched when using the Search
widget.
Clear search shortcuts—clears the
shortcuts to recently selected search
results.
Google search settings—changes
the search settings for Google
Mobile Services.
Contacts Settings
1. From the application tray, touch
Settings > Applications >
Contacts.
2. Touch Sort by to select whether to
sort your contacts by rst name or
by last name.
•
•
•

Customizing Your nüvifone
102 nüvifone 01000846 Owner’s Manual
DRAFT
Managing Applications
Notice
Cleared data cannot be restored.
1. From the application tray, touch
Settings > Applications >.
2. Select the Unknown Sources
check box to allow the installation
of applications from outside the
Android Market.
3. Touch Manage Applications. A list
of applications appears showing the
amount of memory used for each
application.
4. Touch and change the following
options:
Touch Sort by size to sort the
applications by the amount of
memory used, from largest to
smallest.
Touch Sort by name to sort the
applications alphabetically.
•
•
Touch Filter to lter the
application list. Select All to
view all applications, Running
to view currently running
applications, or Third Party to
view applications provided by
a company other than Garmin,
ASUS, or Google.
5. Touch an application to view
details, including storage
size, cache size, defaults, and
permissions.
6. Change the following options:
Touch Clear data to clear
stored data associated with this
application.
Touch Clear cache—clear
cached data for the application.
Touch Clear defaults to clear
application defaults.
•
•
•
•

Customizing Your nüvifone
nüvifone 01000846 Owner’s Manual 103
DRAFT
Display Settings
From the application tray, touch
Settings > Display.
Brightness—changes the
brightness of the screen. Decreasing
the brightness can save battery
power. Auto Brightness sets the
brightness based on the ambient
lighting.
Color Mode—sets a light
background (Daytime), a dark
background (Nighttime), or to
automatically switches between
the two based on the sunrise time
and the sunset time for your current
location (Auto).
Screen Timeout—the screen
automatically shuts off if the
nüvifone is inactive for the selected
length of time.
Screen Shot—allows you to take
a picture of the nüvifone screen.
Touch the Camera key to take a
•
•
•
•
picture of a screen. Screen shots are
saved in the Screenshot directory
on the nüvifone.
Viewing Software
Information
1. From the application tray, touch
Settings > > About.
2. Touch an item to view more
information.
Restoring Settings
Restoring Categories of
Settings
1. From the application tray, touch
Settings.
2. Select the setting category you want
to restore.
3. Touch > Restore.
Restoring All Settings
From the application tray, touch
Settings > > Restore.

Customizing Your nüvifone
104 nüvifone 01000846 Owner’s Manual
DRAFT
Clearing All User Data
Notice
This process restores all settings to
factory defaults and removes all user
data.
Any items that you have saved on your
nüvifone, such as Favorites, photos,
and contacts, are erased.
Any applications you have purchased
and downloaded are removed. You
should be able to download and install
the applications again.
Map data is not erased.
Deleted information cannot be
recovered.
From the Applications bar, touch
Settings > > Master Clear.
Appendix
nüvifone 01000846 Owner’s Manual 105
DRAFT
Appendix
About Satellite Signals
Before you can navigate with your
nüvifone, you need to acquire satellites.
Acquiring Satellites
1. Turn on your nüvifone.
2. If necessary, go outdoors to an open
area, away from tall buildings and
trees.
Acquiring satellite signals can take a
few minutes.
About the GPS Status Icons
The icon in the upper-right corner
of the status bar displays GPS signal
strength. When at least one of the lines
is green, your nüvifone has acquired
satellite signals.
The more green lines, the stronger
the GPS signal. If the nüvifone is not
receiving GPS signals, appears.
For troubleshooting information about
acquiring satellites, see page 112.
Viewing Detailed GPS Signal
Information
1. From the application tray, touch
Where Am I?.
2. Touch the information balloon.
3. Touch > Satellite Info.

Appendix
106 nüvifone 01000846 Owner’s Manual
DRAFT
Resetting the nüvifone
CAUTION
Do not use a sharp object to remove the
battery. A sharp object may puncture
the battery which may present a risk
of re, chemical burn, electrolyte leak,
and/or injury.
If the nüvifone stops functioning, may
need to reset the device.
1. Turn off the nüvifone, and then turn
on the nüvifone.
2. If necessary, remove and replace
the battery.
The nüvifone should restart and
operate normally.
Battery Information
The icon in the status bar
indicates the status of the internal
battery. To increase the accuracy of
the battery gauge, fully discharge the
battery and then fully charge it; do not
unplug the nüvifone until it is totally
charged.
Maximizing the Battery Life
From the application tray, touch
Settings > Display > Brightness to
turn down the backlight.
From the application tray, touch
Settings > Display > Screen
Timeout to reduce the timeout
length.
Do not leave your nüvifone in
direct sunlight. Avoid prolonged
exposure to excessive heat.
•
•
•
Appendix
nüvifone 01000846 Owner’s Manual 107
DRAFT
Replacing the Battery
CAUTION
Do not use a sharp object to remove the
battery. A sharp object may puncture
the battery which may present a risk
of re, chemical burn, electrolyte leak,
and/or injury.
Only use the correct battery type.
Using an incorrect battery may present
a risk of explosion.
Notice
To avoid losing your customized
settings, replace the battery within
ve minutes of removing it from your
device.
Contact your local waste disposal
department for information on properly
disposing of the battery and device.
If you need to replace the battery in
the nüvifone, use an SBP-20 lithium-
ion battery. For more information on
purchasing a replacement battery, go to
www.garminasus.com.
Changing the Fuse in the
Vehicle Power Cable
Notice
When replacing the fuse, do not lose
any of the small pieces and make
sure they are put back in the proper
position.
If your device does not charge in your
vehicle, you may need to replace the
fuse located at the tip of the vehicle
adapter.
1. Use a coin to push down the sliver
tip, and turn the coin one-quarter,
counter-clockwise turn.
2. Remove the end piece, silver tip,
and the fuse.
2. Install a 1A fast blow fuse of the
same size.

Appendix
108 nüvifone 01000846 Owner’s Manual
DRAFT
3. Ensure that the silver tip is located
in the end piece. Using a coin,
replace the end piece.
Mounting on Your
Dashboard
Notice
The permanent mounting adhesive is
extremely difcult to remove after it is
installed.
A mounting disk is included in some
nüvifone packages. Use the mounting
disk to mount your device to the
dashboard and comply with certain
state and local regulations.
1. Clean and dry the dashboard where
you are placing the disk.
2. Remove the backing from the
adhesive on the bottom of the disk.
3. Place the disk on the dashboard.
4. Remove the clear plastic cover
from the top of the disk.
5. Place the suction cup mount on top
of the disk. Flip the lever down
(toward the disk).
Removing the nüvifone,
Cradle, and Mount
Removing the nüvifone from
the Cradle
1. Press up on the tab on the top of the
cradle.
2. Tilt the nüvifone forward.
Removing the Cradle from the
Mount
1. Turn the cradle to the right or left.
2. Apply pressure until the socket on
the cradle releases the ball on the
mount.
Removing the Suction Cup
Mount from the Windshield
1. Flip the lever on the suction cup
mount toward you.

Appendix
nüvifone 01000846 Owner’s Manual 109
DRAFT
2. Pull the tab on the suction cup
toward you.
About Connected
Services
Use Connected Services to search for
location-relevant information such as
trafc, weather data, and ight status.
These services are not available in all
areas. A data connection is required
for these services. Your regular
data transfer charges apply. These
services may be available with paid
subscriptions.
Additional services my be available
with a subscription. For more
information, go to www.garminasus.
com.
Caring for Your Device
Avoid dropping your device and
operating it in high-shock and high-
vibration environments.
Do not expose the device to water.
Contact with water can cause this
device to malfunction.
Do not store the device where
prolonged exposure to extreme
temperatures can occur, because it
can cause permanent damage.
Never use a hard or sharp object to
operate the touchscreen, or damage
may result.
To help avoid theft, remove the
device and mount from sight when
not in use. Remove the residue on
the windshield left by the suction
cup.
•
•
•
•
•

Appendix
110 nüvifone 01000846 Owner’s Manual
DRAFT
Specications
Physical size (W × H × D):
2.45 × 4.57 × 0.50 in.
(62.30 × 116 × 12.75 mm)
Weight: 5.29 oz. (150 g)
Display: 3.5 in. diagonal, 320 × 480
pixels; HVGA display with white
backlight and touchscreen
Case: Not waterproof (IP51)
Operating Temperature Range:
from 5°F to 104°F (from -15°C
to 40°C)
Storing Temperature Range: from
-4°F to 158°F (from -20°C to
70°C)
Battery Charging Temperature
Range: from 32°F to 140°F (from
0°C to 60°C)
Connector: Mini-USB for power,
computer, or audio headphones
Battery type: User-replaceable
1200 mAh lithium-ion battery
Battery life: 4 hours talk time,
250 hours standby time,
depending on usage and settings
Charge time: Approximately 3 hours
Power input: AC input using mini-
USB connector and AC charger,
or DC input using vehicle power
cable
Usage: 3 W max.
GPS receiver: High-sensitivity
Acquisition times*:
Warm: <1 sec.
Cold: <38 sec.
Factory Reset: <45 sec.
*Average acquisition times for a
stationary receiver with a clear
view of the sky.
Frequency Band: 3G Band IV;
2G 850/900/1800/1900
Other connectivity: Bluetooth
2.0+EDR; 802.11 b/g (Wi‑Fi);
mini-USB 2.0

Appendix
nüvifone 01000846 Owner’s Manual 111
DRAFT
Operating System: Android™
Camera/Pictures: 3.0 MP camera
Data storage: Internal memory and
optional removable microSD
card. Data stored indenitely.
Computer interface: Plug-and-play
USB mass storage

Appendix
112 nüvifone 01000846 Owner’s Manual
DRAFT
Troubleshooting/ Frequently Asked Questions
Issue/Question Solution
How can I acquire
satellite signals?
From the application tray, touch Settings > System > Security.
Ensure there is a check mark in the Enable GPS Satellites check
box.
Make sure the GPS has enough time to initialize. When the GPS is
turned on for the rst time, it may take a few minutes to initialize.
The device will not
turn on.
Charge the battery. See page 3 and page 4.
Replace the battery. See page 107.
The device will not
charge.
Replace the fuse in the vehicle power cable. See page 108.
As a safety precaution in high temperature environments, the
device will suspend charging and use battery power.
If the device is mounted in a vehicle, remove the device from the
mount and place it out of direct sunlight.
I cannot place a phone
call.
The call function may have been suspended because of low battery
power. In low battery situations, you might be asked to turn off the
call functions. You can still navigate in these situations.
Do not delete
necessary les.
In Mass storage mode, do not delete or format the original
directories, such as Garmin and Documents. Do not delete les for
which you do not know the purpose.

Appendix
nüvifone 01000846 Owner’s Manual 113
DRAFT
How can I improve the
cell signal?
Step outside your vehicle.
Use a hands-free headset.
Move phone outside, in the open air
Walk to a window to improve indoor reception.
Avoid windows with reective metal lm to improve reception
Move to a higher elevation.
Move the phone away from electronic equipment.
Important Safety and Product Information
114 nüvifone 01000846 Owner’s Manual
DRAFT
Important Safety and
Product Information
For updates to the safety and product
information, see the most recent
owner’s manual.
WARNING
Failure to avoid the following
potentially hazardous situations could
result in an accident or collision
resulting in death or serious injury.
Installation and Operation
Warnings
When installing the device in a
vehicle, place the device securely
so it does not obstruct the driver’s
view of the road or interfere with
vehicle operating controls, such as
the steering wheel, the foot pedals, or
the transmission levers. Do not place
the device in front of or above any
•
airbag. (See diagram.)
Do not place unsecured on the
vehicle dashboard.
Do not mount where the driver’s
eld of vision is blocked.
Do not mount in front of an
airbag eld of deployment.
The windshield mount may not
stay attached to the windshield in
all circumstances. Do not place
the mount where it will become
a distraction if the mount should
become detached. Keep your
windshield clean to help ensure that
the mount stays on the windshield.
Always use your best judgement,
and operate the vehicle in a safe
manner. Do not become distracted
◦
◦
◦
•
•

Important Safety and Product Information
nüvifone 01000846 Owner’s Manual 115
DRAFT
by the device while driving, and
always be fully aware of all driving
conditions. Minimize the amount of
time spent viewing the device screen
while driving, and use voice prompts
when possible.
Do not send text messages, input
destinations, change settings, or
access any functions requiring
prolonged use of the device controls
while driving. Pull over in a safe and
legal manner before attempting such
operations.
Navigation Warnings
When navigating, carefully compare
information displayed on the device
to all available navigation sources,
including road signs, road closures,
road conditions, trafc congestion,
weather conditions, and other
factors that may affect safety while
driving. For safety, always resolve
•
•
any discrepancies before continuing
navigation, and defer to posted road
signs and road conditions.
The device is designed to provide
route suggestions. It is not a
replacement for driver attentiveness
and good judgement. Do not follow
route suggestions if they suggest
an unsafe or illegal maneuver
or would place the vehicle in an
unsafe situation.
Battery Warnings
If these guidelines are not followed,
the internal lithium-ion battery may
experience a shortened life span or may
present a risk of damage to the GPS
device, re, chemical burn, electrolyte
leak, and/or injury.
Do not leave the device exposed to a
heat source or in a high temperature
location, such as in the sun in an
unattended vehicle. To prevent
•
•

Important Safety and Product Information
116 nüvifone 01000846 Owner’s Manual
DRAFT
damage, remove the device from
the vehicle or store it out of direct
sunlight, such as in the glove box.
Do not puncture or incinerate the
device or battery.
When storing the device for an
extended time, store within the
following temperature range: from
-4°F to 158°F (from -20°C to 70°C).
Do not operate the device outside
of the following temperature range:
from 5°F to 104°F (from -15°C to
40°C).
Contact your local waste disposal
department to dispose of the device/
battery in accordance with applicable
local laws and regulations.
Do not use a sharp object to remove
the battery.
Keep the battery away from children.
Do not disassemble, puncture, or
•
•
•
•
•
•
•
damage the battery.
If using an AC charger or an
external battery charger, only use the
accessory approved for your product.
Only replace the battery with the
correct replacement battery. Using
another battery presents a risk of
re or explosion. To purchase a
replacement battery, see your Garmin
or ASUS dealer or the Garmin-Asus
Web site.
Do not remove or attempt to remove
the non-user-replaceable battery.
Health Warning
This product, its packaging, and its
components contain chemicals known
to the State of California to cause
cancer, birth defects, or reproductive
harm. This notice is provided
in accordance with California’s
Proposition 65. See www.garmin.
•
•
•

Important Safety and Product Information
nüvifone 01000846 Owner’s Manual 117
DRAFT
com/prop65 for more information.
Notice
Windshield Mounting
Legal Restrictions
Before using the suction cup mount
on your windshield, check the state
and local laws and ordinances where
you drive. Some state laws prohibit
drivers from using suction mounts
on their windshields while operating
motor vehicles. Other state laws
allow the suction mount to be located
only in specic locations on the
windshield. Many other states have
enacted restrictions against placing
objects on the windshield in locations
that obstruct the driver’s vision. IT IS
THE USER’S RESPONSIBILITY
TO MOUNT THE GARMIN-ASUS
DEVICE IN COMPLIANCE WITH
ALL APPLICABLE LAWS AND
ORDINANCES. Where required,
other Garmin-Asus dashboard or
friction mount options should be used.
Always mount your Garmin-Asus
device in a location that does not
obstruct the driver’s view of the road.
Neither Garmin nor ASUS assume any
responsibility for any nes, penalties,
or damages that may be incurred as
a result of any state or local law or
ordinance relating to the use of your
Garmin-Asus device.
Notice to Customers in
the European Union
Use of 2.4 GHz Wi‑Fi transmitters is
currently restricted in certain European
countries due to specic radio
frequency legislation. You must check
the local regulations in all European
countries in which you intend to use
the Wi‑Fi radio to ensure the legality
of use. You accept full responsibility
for complying with all such laws
and regulations applicable in your

Important Safety and Product Information
118 nüvifone 01000846 Owner’s Manual
DRAFT
particular country of operation.
The following countries have
restrictions on certain uses of 2.4 GHz
Wi‑Fi products:
France: This product may be used
indoors on any available Wi‑Fi channel
(channels 1–11). If used outdoors,
however, the usage must be limited to
the channels operating between 2400
MHz and 2454 MHz (channels 1–7).
Italy: This product may be used
indoors on any available Wi‑Fi
channel (channels 1–11). However,
Italy requires general authorization
for outdoor use of this product if used
outside the boundaries of the owner’s
property.
Latvia: This product may be used
indoors on any available Wi‑Fi channel
(channels 1–11). However, Latvia
requires a license for outdoor use of
this product.
Map Data Information
Garmin and ASUS use a combination
of governmental and private data
sources. Virtually all data sources
contain some inaccurate or incomplete
data. In some countries, complete and
accurate map information is either not
available or is prohibitively expensive.
Information about
Recycling and WEEE
Information about the recycling
programs for Garmin and ASUS, and
WEEE compliance can be found at
www.garminasus.com/compliance.
Information about RoHS
and REACH
Information about RoHS and REACH
for Garmin-Asus products can be
found at www.garminasus.com
/compliance.

Important Safety and Product Information
nüvifone 01000846 Owner’s Manual 119
DRAFT
Avoiding Hearing Damage
You can permanently damage your
ears and lose hearing if you listen to
the device, earbuds, or headphones at
high volume. The volume is typically
too loud if you cannot hear people
speaking around you. Limit the amount
of time you listen at high volume. If
you experience ringing in your ears or
mufed speech, stop listening and have
your hearing checked.
Avoiding Repetitive
Motion
You may experience occasional
discomfort in your hands, arms,
shoulders, neck, or other parts of
your body if you perform repetitive
activities, such as typing, on the mobile
device. Take frequent breaks. If you
have discomfort while or after using
the device, stop using it and see a
physician.
Avoiding Seizures,
Blackouts, and Eyestrain
A very small percentage of people
can experience seizures or blackouts
caused by light ashes or patterns, such
as while watching videos or playing
games. If you have experienced, or
have a family history of, seizures or
blackouts, consult a physician before
playing games or watching videos on
your device.
Avoid prolonged use of and take
frequent breaks from using the device.
Hold the device away from your
eyes. Use the device in a well-lit
room. If you experience convulsions,
eye or muscle twitching, loss of
awareness, involuntary movement, or
disorientation, stop using the device
use and consult a physician.

Important Safety and Product Information
120 nüvifone 01000846 Owner’s Manual
DRAFT
Hearing Aid Compatibility
(HAC)
Digital wireless phones have the
potential to interfere with certain
hearing aids. A rating system has been
developed to aid consumers in picking
compatible devices. The M rating is
a general measure of compatibility.
The T rating, if used, measures the
compatibility of the phone specically
for T-Coil devices. Consumers should
pick a device with minimum ratings of
3 (M3 rating or M3T3 rating). Higher
numbers indicate better compatibility.
This device is rated M3T3.
When using a phone with a hearing
aid, you may need to experiment
with phone placement near your ear
to ensure optimum compatibility. If
interference is experienced, contact
your hearing aid manufacturer for
advice or information on alternatives.
Pacemakers and Other
Medical Devices
Studies have shown that there may
be a potential interaction between
mobile devices and normal pacemaker
operation. The pacemaker industry
recommends that people with
pacemakers follow these guidelines to
minimize any risk of interference with
pacemaker operation:
Always maintain a distance of
6 inches (15 cm) between the
pacemaker and any mobile device
that is turned on.
Store the device on the opposite side
of the pacemaker. Do not carry the
device in a breast pocket.
Use the ear furthest from the
pacemaker in order to minimize any
potential for interference.
If you think that interference may
be occurring, turn off the device
•
•
•
•

Important Safety and Product Information
nüvifone 01000846 Owner’s Manual 121
DRAFT
immediately.
For other medical devices, consult with
your physician or the manufacturer to
determine if your mobile device may
interfere with the medical device, and
to determine any precautions that you
can take to avoid interference.
Radio Frequency
Exposure/Specic
Absorption Rate
This device is a transmitter and
receiver that uses its antenna to
send and receive low levels of radio
frequency (RF) energy for voice and
data communications. The cellular
antenna is located along the bottom
edge of the rear of the phone. The
Wi‑Fi and Bluetooth antenna is located
between the volume keys and the
camera on the rear of the phone.
This device must not be co-located or
operated in conjunction with any other
transmitter or antenna.
Regular review of scientic research
and studies has led to the formation
of international safety guidelines and
regulations regarding limiting exposure
to this RF energy. This product emits
RF energy below the published limits
when operating in its maximum output
power mode and when used with
Garmin authorized accessories. These
guidelines use a unit of measurement
known as the specic absorption rate,
SAR. The SAR limit applicable to this
device set by the FCC is 1.6 watts per
kilogram (W/kg), 1.6 W/kg by Industry
Canada, and 2.0 W/kg by the Council
of the European Union.
To comply with FCC, and European
RF exposure compliance requirements,
the device should be used in its
automobile mount or with Garmin
authorized belt clips and holsters only.
Use with other third party accessories

Important Safety and Product Information
122 nüvifone 01000846 Owner’s Manual
DRAFT
may not ensure compliance with
FCC, EU, or other local RF exposure
requirements. The actual measured
values are as follows:
Band Position SAR (W/kg)
GSM 850 Head 0.483
Body 0.908
GSM 900 Head TBD
Body TBD
GSM 1800 Head TBD
Body TBD
GSM 1900 Head 0.466
Body 0.601
FDD
(WCDMA)
Band IV
Head 0.714
Body 0.645
802.11b/g
(Wi-Fi)
Head 0.031
Body 0.016
Industry Canada
Compliance
Category I radiocommunication
devices comply with Industry Canada
Standard RSS-210. This Class B digital
apparatus complies with Canadian
ICES-003.
Ce dispotif de radiocommunication de
catégorie I respecte la norme CNR-
210 d’Industrie Canada. Cet appareil
numérique de la classe B est conforme
à la norme NMB-003 du Canada.
IC Radiation Exposure
Statement
This device is in compliance with SAR
for general population/uncontrolled
exposure limits in IC RSS-102
and has been tested in accordance
with the measurement methods and
procedures specied in IEEE 1528.
This equipment should be installed and
operated with a minimum separation
distance of 1.5 cm between the device
and your body.
The device and its antenna must not be
co-located or operated in conjunction

Important Safety and Product Information
nüvifone 01000846 Owner’s Manual 123
DRAFT
with any other antenna or transmitter.
Declaration of Conformity
Hereby, ASUSTek Computer,
Inc, declares that this device is
in compliance with the essential
requirements and other relevant
provisions of Directive 1999/5/EC.
The Declaration of Conformity may be
obtained at www.garminasus.com
/declaration-of-conformity.
Equipment Use
This device is for use worldwide,
including the following countries: AT,
BE, BG, CH, CY, CZ, DE, DK, EE,
ES, FI, FR, GB, GR, HU, IE, IS, IT,
LI, LT, LU, LV, MT, NL, NO, PL, PT,
RO, SE, SI, SK, TR.
FCC Compliance
This device complies with part 15 of
the FCC Rules. Operation is subject
to the following two conditions: (1)
this device may not cause harmful
interference, and (2) this device must
accept any interference received,
including interference that may cause
undesired operation.
This equipment has been tested and
found to comply with the limits for
a Class B digital device, pursuant to
part 15 of the FCC rules. These limits
are designed to provide reasonable
protection against harmful interference
in a residential installation. This
equipment generates, uses, and can
radiate radio frequency energy and
may cause harmful interference to
radio communications if not installed
and used in accordance with the
instructions. However, there is no
guarantee that interference will not
occur in a particular installation. If
this equipment does cause harmful
interference to radio or television
reception, which can be determined by

Important Safety and Product Information
124 nüvifone 01000846 Owner’s Manual
DRAFT
turning the equipment off and on, the
user is encouraged to try to correct the
interference by one of the following
measures:
Reorient or relocate the receiving
antenna.
Increase the separation between the
equipment and the receiver.
Connect the equipment into an outlet
that is on a different circuit from the
GPS unit.
Consult the dealer or an experienced
radio/TV technician for help.
This product does not contain any
user-serviceable parts. Repairs should
only be made by an authorized Garmin
service center. Unauthorized repairs or
modications could result in permanent
damage to the equipment, and void
your warranty and your authority
to operate this device under Part 15
regulations.
•
•
•
•
Driving Tips from the
Cellular Telephone
Industry of America
If it is necessary to use a wireless
device while driving, the wireless
industry encourages drivers to follow
some basic tips to make sure that a
wireless device does not become a
distraction.
Be responsible behind the wheel. Do
not text and drive!
Use speed dial and redial.
Position your wireless device within
easy reach.
Dial sensibly and assess the trafc;
place calls when you are not moving
or use a vehicle passenger to interact
with the device.
Let the person you are speaking with
know you are driving. If necessary,
suspend the call in heavy trafc or
•
•
•
•
•

Important Safety and Product Information
nüvifone 01000846 Owner’s Manual 125
DRAFT
hazardous weather conditions.
Do not take notes or look up phone
numbers while driving.
Use a hands-free device for
convenience and comfort.
Do not engage in stressful or
emotional conversations that might
divert your attention from the road.
Dial 911 or other local emergency
numbers to report serious
emergencies. It is free from your
wireless phone.
Use your wireless phone to help
others in emergencies.
Call roadside assistance or a special
non-emergency wireless number
when necessary.
Limited Warranty
This Garmin-Asus product is warranted
to be free from defects in materials
•
•
•
•
•
•
and workmanship under normal use
per the terms outlined herein for the
term of 1 year starting from the date of
retail purchase by the original end-user
purchaser (collectively the “Warranty
Period”). THIS WARRANTY DOES
NOT AFFECT YOUR STATUTORY
RIGHTS.
Within the relevant Warranty Period,
Garmin and/or ASUSTeK Computer,
Inc. (“Asus”) will, at its sole option,
either repair or replace any components
that fail in normal use. Such repairs
or replacement will be made at no
charge to the customer for parts or
labor, provided that the customer shall
be responsible for any transportation
cost. A replacement product or part
assumes the remaining Warranty
Period of the original product or ninety
(90) days from the date of replacement
or repair, whichever provides longer
coverage for you. When a product or
part is exchanged, any replacement

Important Safety and Product Information
126 nüvifone 01000846 Owner’s Manual
DRAFT
item becomes your property and the
replaced item becomes Garmin’s or
Asus’ property as the case may be.
Exclusions and Limitations
This Limited Warranty applies only to
the hardware product manufactured
by or for Garmin or Asus that can be
identied by the Garmin‑Asus logo
afxed to it. Software distributed by
Garmin or Asus with or as part of the
product (including system software)
is not covered under this Limited
Warranty and is instead covered by
the accompanying End User License
Agreement.
Neither Garmin nor Asus warrants
that the operation of the product will
be uninterrupted or error-free, nor
is Garmin or Asus responsible for
damage arising from failure to follow
product instructions. In addition,
this warranty does not apply to: (i)
cosmetic damage, such as scratches,
nicks and dents; (ii) consumable
parts, such as batteries, unless product
damage has occurred due to a defect in
materials or workmanship; (iii) damage
caused by use of the product with non
Garmin-Asus products; (iv) damage
caused by accident, abuse, misuse,
water, ood, re, or other acts of nature
or external causes; (v) damage caused
by service performed by anyone who
is not an authorized service provider
of Garmin or Asus; or (iv) damage to
a product that has been modied or
altered without the written permission
of Garmin or Asus.
TO THE MAXIMUM EXTENT
PERMITTED BY APPLICABLE
LAW, THE WARRANTIES
AND REMEDIES CONTAINED
HEREIN ARE EXCLUSIVE
AND IN LIEU OF ALL OTHER
WARRANTIES, WHETHER ORAL,
WRITTEN, EXPRESS, IMPLIED,
OR STATUTORY, INCLUDING,

Important Safety and Product Information
nüvifone 01000846 Owner’s Manual 127
DRAFT
WITHOUT LIMITATION,
ANY LIABILITY ARISING
UNDER ANY WARRANTY
OF MERCHANTABILITY OR
FITNESS FOR A PARTICULAR
PURPOSE. IN NO EVENT SHALL
GARMIN OR ASUS BE LIABLE
FOR ANY DIRECT, SPECIAL,
INCIDENTAL, INDIRECT, OR
CONSEQUENTIAL DAMAGES,
WHETHER RESULTING FROM THE
USE, MISUSE, OR INABILITY TO
USE THIS PRODUCT OR FROM
DEFECTS IN THE PRODUCT
OR FROM ANY BREACH OF
WARRANTY OR OTHER LEGAL
THEORY.
Some states, provinces or countries do
not allow the exclusion of incidental or
consequential damages, so the above
limitations may not apply to you. This
warranty gives you specic legal rights,
and you may also have other rights
that vary by country, state or province.
This limited warranty is governed by
and construed under the laws of the
country in which the product purchase
took place. If any term is held to be
illegal or unenforceable, the legality or
enforceability of the remaining terms
shall remain valid and shall not be
affected.
Garmin and/or Asus retains the
exclusive right to repair, have repaired
or replace (with a new or newly-
overhauled replacement product) the
product or component parts or offer
a full refund of the purchase price at
its sole discretion. SUCH REMEDY
SHALL BE YOUR SOLE AND
EXCLUSIVE REMEDY FOR ANY
BREACH OF WARRANTY. When a
refund is given, the product for which
the refund is provided must be returned
to Garmin or Asus and becomes
Garmin-Asus property.

Important Safety and Product Information
128 nüvifone 01000846 Owner’s Manual
DRAFT
Obtaining Warranty Service
To obtain warranty service go to
www.garminasus.com/support
/warranty for specic instructions on
where and how to return your Garmin-
Asus product for warranty service if it
is still eligible for warranty coverage.
Garmin-Asus may restrict warranty
service to the country in which
Garmin-Asus or its authorized dealers
originally sold the product. An original
or copy of the product sales receipt
from the original retailer is required to
obtain warranty service.
Online Auction Purchases
Products sold through online auctions
are not eligible for warranty coverage
or protection from Garmin and/or Asus.
Online auction conrmations are not
accepted for warranty verication.

Index
nüvifone 01000846 Owner’s Manual 129
DRAFT
Index
Symbols
12-hour time format 94
2D map view 97
3D map view 97
3GP 73
A
additional maps i
address 34
applications
managing 102
settings 98
appointment
save local event as 36
audio settings 96–97
notications 9
avoid
edit custom
avoidances 97
road types 97
avoiding road features 44
B
backlight
brightness 103
battery
charge 3
information 106
remove 107
warnings 115–116
BMP 73
brightness 103
browser
settings 100–101
browse the map 40
browse the web 63–64
bus 97
C
call 16
end 17
forwarding 95
caller ID 95
call history 19
call options 17
call waiting 95
camera 71
screen shot 103
care information 109
Ciao! 59–62
accept invite 60
hide location 62
invite 60
join 59
register 59
remove a friend 62
status 61
view friends 61
cities, nd 36
clock 94
setting 94
compass
calibrating 47
conference call 21
contacts
add 24
call 16
navigate to 26
cookies 100–101
coordinates 37
cradle 5
custom avoids 97

Index
130 nüvifone 01000846 Owner’s Manual
DRAFT
D
date, setting 94
delete
all user data 104
call history 20
recently-found 35
detour 47
digital elevation map 41
display settings 103
E
E-mail 55–58
e-mail 56
emergency assistance 39
emergency mode 92
enter data 11
F
Favorite
locations 35
les 88
le types
media gallery 73
music 68
nding places
item on the map 40
nd locations. See search
for locations
Fixed Dialing Numbers 95
ight mode 23
forwarding a message 54
fuse, change 107
G
geocache 37
globe view 41
go home 34
H
hearing aid 95
Help le 12
hold phone call 17
home location 33
Home screen 6
I
Internet
connection icon 14
intersections, nd 38
J
JPEG 73
K
keyboard 11, 93
key press notication 96
L
lamguage
keyboard 93–104
language
text 93–104
lithium-ion battery 106
local events 35
local search 34
location information 29
change update
method 61
location messages 53
lock
the nüvifone 92
lock the phone 13
M
make a phone call 16
map
additional i
browse 40
moving 40

Index
nüvifone 01000846 Owner’s Manual 131
DRAFT
settings 96–97
update i
zoom 40
map contours 41
map detail 97
MapSource i
maximum speed, reset 43
Media Gallery 73–76
message
reply 54
messages (SMS/MMS)
new 51
read 53
messaging
forward 54
metrorail 97
mini-USB 1
MMS 52
mount
on windshield 4
remove from
mount 108
MP4 73
mute 10, 17
N
navigation. See route
settings 96–97
nüMaps Guarantee i
O
odometer 43
on-screen keyboard 11
P
Panoramio 36
Panoramio photos 36
parking spot 33
phone 16–23
receive a call 18
picture
le types 73
take 71
view 74
play music 68
PNG 73
Power key 1
public transportation 97
R
recently found locations 35
register i, 59
remove the mount 108
reply to a message 54
reset 106
M20 106
maximum speed 43
odometer 43
trip computer 43
restore settings 103
restrict dialing 95
ring settings 96
ring tone
save a song as 69
rotate screen 4, 8
Route
to an appointment 78
route
add stops 48
all turns in 42
details 42
edit 48, 49
next turn 43
plan 48–49
save 48
saved route 49

Index
132 nüvifone 01000846 Owner’s Manual
DRAFT
stop 48
take saved route 49
to a Ciao friend’s
location 61
to a contact 26
to a found location 29
to an upcoming
event 36
to a photograph
location 39
to your home 34
to your parking spot 33
turn list 42
view on map 42
S
safe mode 91
safety cameras 97–104
save location to
Favorites 30
save your current
location 31
screen
brightness 103
color mode 103
Home 6
lock 13
orient 8
rotate 8
use the touchscreen 7
screen shot 103
search for locations 28
address 34
by category 28
change the search
area 30
favorites 35
navigate to a
contact 26
points of interest 28
recently found 35
spell name 28
security settings 91–92
send
e-mail 56
found location 32
MMS 52
SMS 51
text 51
your location 53
settings 91–104
restore 103
SIM card
copy contacts 26
SMS 51–58
software
update i
view information 103
speakerphone 17
specications 110
spell the location 28
status bar 14
storage
available 94
default 94
storage information 109
synchronize 84
system settings 91
T
teletypewriter 95
text completion 93
text message 51–58
theft, ways to avoid 109
time, setting 94

Index
nüvifone 01000846 Owner’s Manual 133
DRAFT
time format 94
time settings 94
time zone 94
trafc 44–50
avoid 45–50
icon 44
train 97
transfer les 88
trip computer 43
TTY 95
turn off phone 4
U
units of measure 91
update
maps i
software i
USB cable 3
user data, delete 104
V
vechicle routes.
See automobile routes
vibrate 10
video
le types 73
record 72, 72–76
voice mail 19
volume 10
Volume keys 1
W
walking routes
settings 96
web browser 63–67
set the home page 66
WebUpdater i
Where Am I? 39
white pages 37, 37–39
WMV 73
Z
zoom 40