ASUSTeK Computer A620BT Bluetooth Pocket PC User Manual manual 4
ASUSTeK Computer Inc Bluetooth Pocket PC manual 4
Contents
- 1. manual 1
- 2. manual 2
- 3. manual 3
- 4. manual 4
manual 4

Pocket Internet Explorer
6-1
Chapter 6
Pocket Internet Explorer
♦♦
♦♦
♦Introduction........................................................... 6-2
♦♦
♦♦
♦Using Pocket Internet Explorer ........................... 6-2
Changing View settings ...................................................... 6-3
Browsing the Internet ......................................................... 6-3
♦♦
♦♦
♦AvantGo Channels................................................ 6-4
♦♦
♦♦
♦Mobile Favorites folder ........................................ 6-5
Favorite links ...................................................................... 6-5
Mobile Favorites ................................................................. 6-5
Viewing mobile favorites and channels .............................. 6-7
Adding/Deleting mobile favorites and folders ..................... 6-8
6-2
Chapter 6
Introduction
Use Microsoft Pocket Internet Explorer to view Web or WAP pages in any
of these ways.
•During synchronization with your desktop computer, download your
favorite links and mobile favorites that are stored in the Mobile Favorites
sub-folder in the Internet Explorer on the desktop computer.
•Connect to an Internet service provider (ISP) or network and browse the
Web. To do this, you need to create the connection first. See Chapter 7
for information on creating a connection.
When connected to an ISP or network, you can also download files and
programs from the Internet or intranet.
Using Pocket Internet Explorer
You can use Pocket Internet Explorer to browse mobile favorites and
channels that have been downloaded to your device without connecting to
the Internet. You can also connect to the Internet through an ISP or a
network connection to browse the Web.
To launch Pocket Internet Explorer:
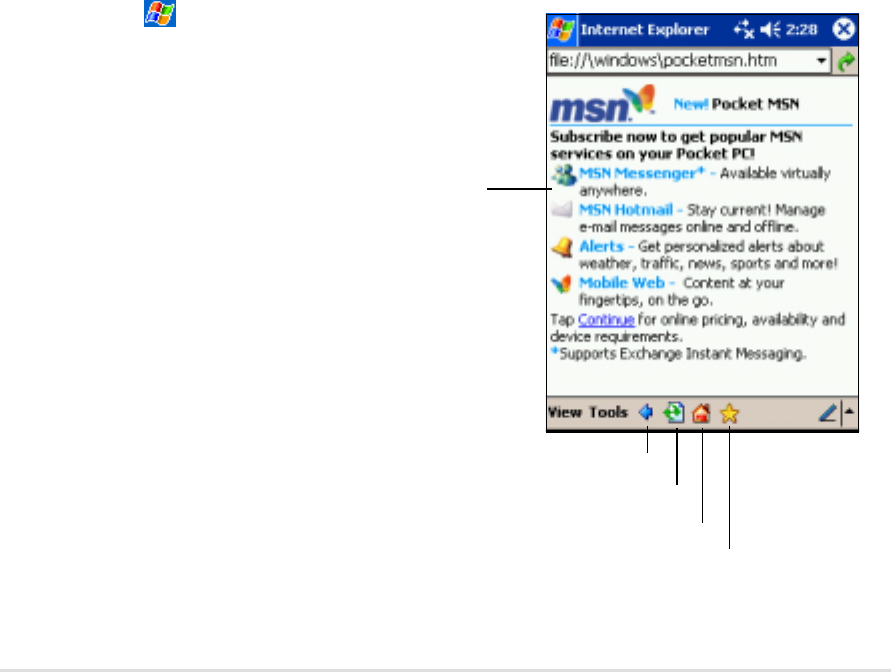
1. Tap , then Internet Explorer
to display the Pocket MSN
services.
Tap to launch Favorites
Tap to go to Pocket Internet Explorer home
Tap to stop/refresh
Tap to go back to previous page
New Pocket MSN services

Pocket Internet Explorer
6-3
2. Tap the Home button to display
the Pocket Internet Explorer
welcome screen with links to
some useful Web sites.
3. Tap any of the Web site buttons to
go to a specific site.
Changing View settings
To change View settings:
1. Tap View to display a pop-up
menu.
2. Tap Fit to Screen to see all the
screen items at the same time.
3. Tap Address Bar to display the
Web site address bar.
4. Tap and hold Text Size to display
another pop-up menu with a text
size selection. Select your desired
text size for the screen.
Browsing the Internet
To browse the Internet:
1. Set up a connection to your ISP or corporate network using
Connections. See Chapter 7 for details.
2. Do one of the following to connect and start browsing:
•Tap the Favorites button, then tap the favorite that you wish to view.
•Tap View, then Address Bar. Enter the Web address that you want
to visit then tap Go.
6-4
Chapter 6
AvantGo Channels
AvantGo is a free interactive service that gives you access to personalized
content and thousands of popular Web sites. You subscribe to AvantGo
channels directly from your device. Then, synchronize your device and
desktop computer, or connect to the Internet to download the content.
For more information, visit the AvantGo web site at http://avantgo.com/
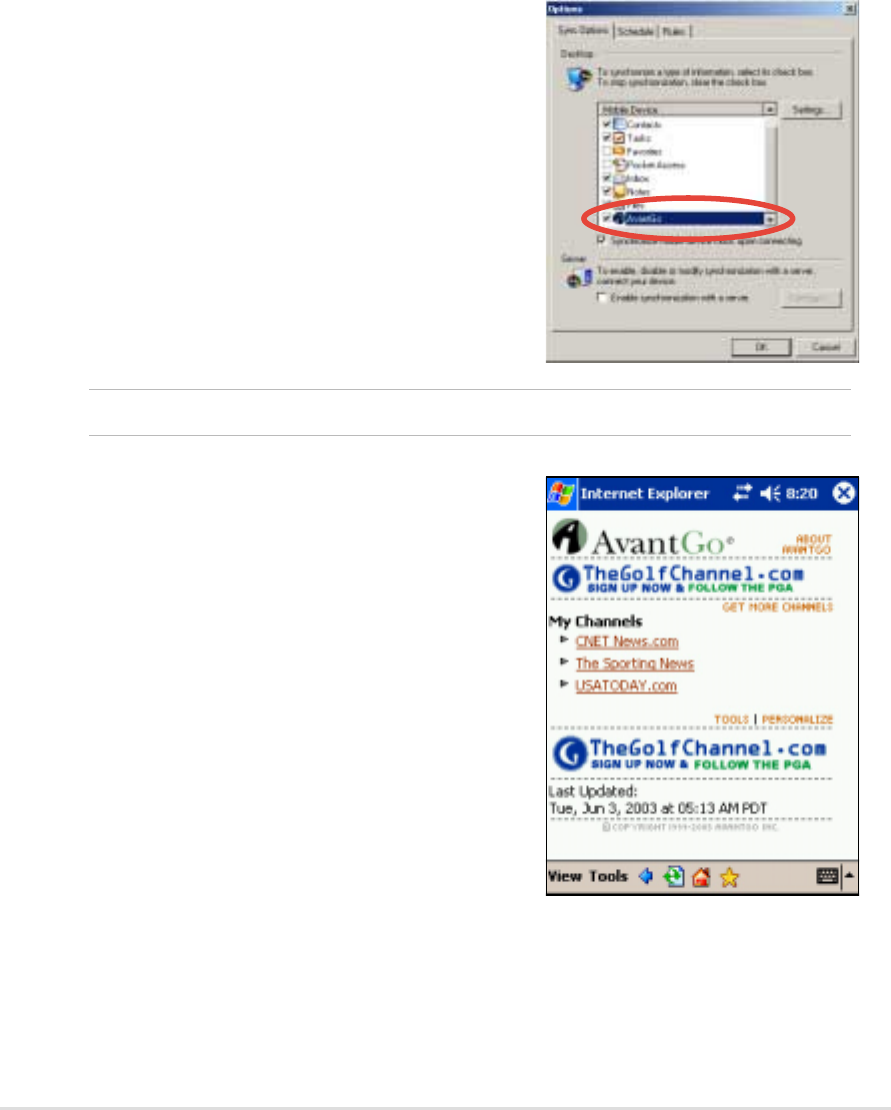
To activate AvantGo:
1. In the ActiveSync window on your
desktop computer, click Options.
2. In the Sync Options tab, check
the box beside the AvantGo item.
Click OK.
ActiveSync automatically updates
the settings and synchronizes
with your device.
NOTE Make sure that your computer is connected to the Internet.
3. When synchronization is
complete, the AvantGo home
page appears on your device.
To launch AvantGo:
1. In Pocket Internet Explorer on
your device, tap the Favorites
button to display your list of
favorites.
2. Tap the AvantGo Channels link
to go directly to the AvantGo
home page and see a few of the
most popular channels.
To add or remove channels:
Tap the Add or Remove link.

Pocket Internet Explorer
6-5
Mobile Favorites folder
Only items items stored in the Mobile Favorites sub-folder in the Favorites
folder in the Internet Explorer on your desktop computer will be
synchronized with your device. This folder was created automatically when
you installed ActiveSync.
Favorite links
During synchronization, the list of favorite links in the Mobile Favorites
folder on your desktop computer is synchronized with Pocket Internet
Explorer on your device. Both computers are updated with changes made
to either list each time you synchronize. Unless you mark the favorite link
as a mobile favorite, only the link will be downloaded to your device, and
you will need to connect to your ISP or network to view the content. For
more information on synchronization, see ActiveSync Help on the desktop
computer.
Mobile Favorites
If you are using Microsoft Internet Explorer 5.0 or later on your desktop
computer, you can download mobile favorites to your device.
Synchronizing mobile favorites downloads Web content to your device so
that you can view pages while you are disconnected from your ISP and
desktop computer.
Use the Internet Explorer plug-in installed with ActiveSync to create mobile
favorites quickly.
6-6
Chapter 6
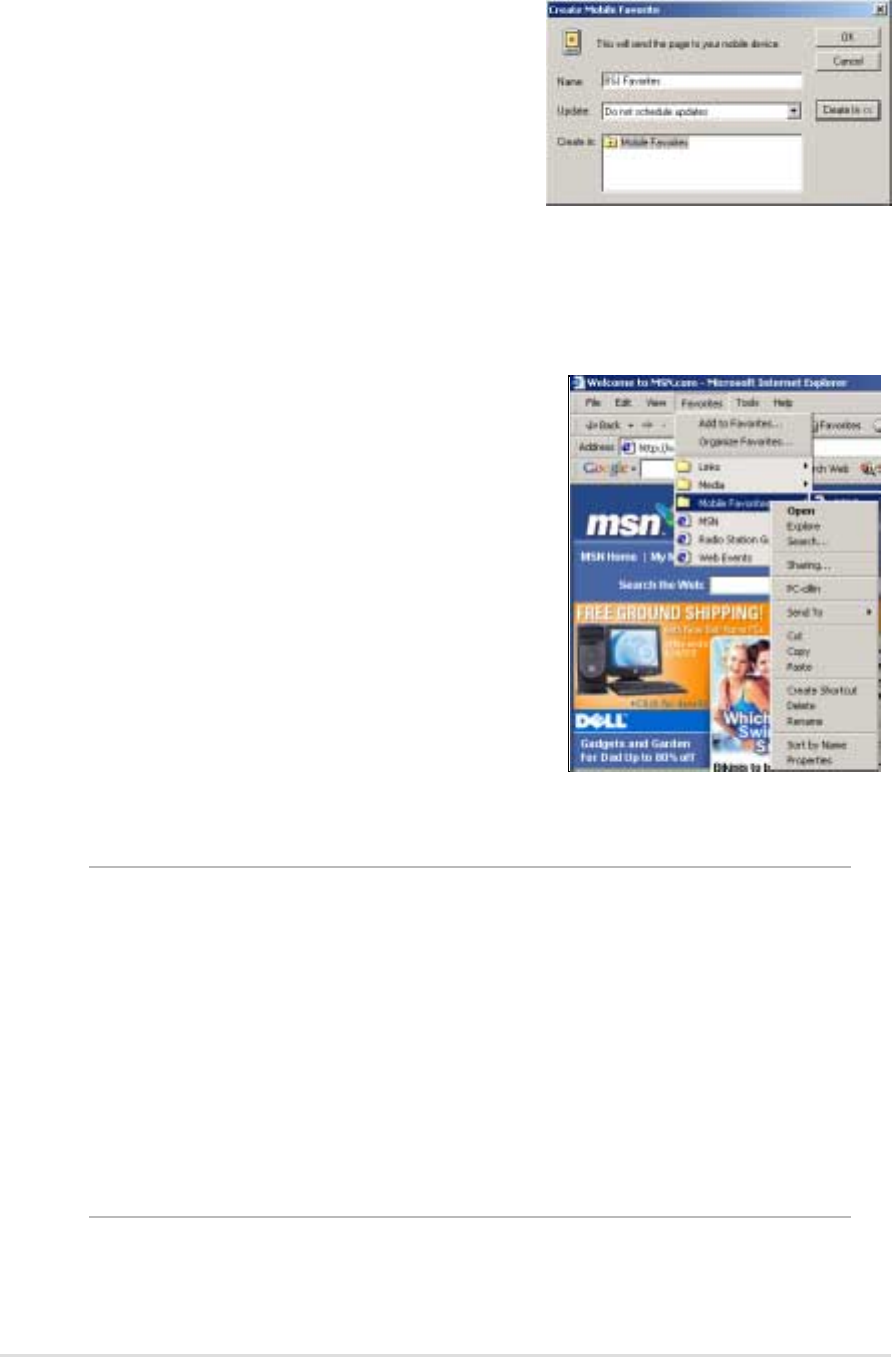
To create a mobile favorite:
1. In Internet Explorer on your desktop
computer, click Tools then Create
Mobile Favorite.
2. To change the link name, enter a new
name in the Name box.
3. Select your desired update schedule
in Update. This is optional.
4. Click OK. Internet Explorer downloads
the latest version of the page to your
desktop computer.
5. If you want to download the pages that
are linked to the mobile favorite you
just created, in Internet Explorer on the
desktop computer, right-click the
mobile favorite, then click Properties.
In the Download tab, specify the
number of links deep you want to
download. To conserve device
memory, go only one level deep.
6. Synchronize your device and your
desktop computer. Mobile favorites that
are stored in the Mobile Favorites in
Internet Explorer are downloaded to
your device.
NOTE If you did not specify an update schedule in step 3, you will
need to manually download content to keep the information
updated on your desktop computer and device. Before
synchronizing with your device, in Internet Explorer on your
desktop computer, click Tools then Synchronize. You will
see the last time content was downloaded to the desktop
computer, and you can manually download content if needed.
You can add a button to the Internet Explorer toolbar for
creating mobile favorites. In Internet Explorer on your desktop
computer, click View, Toolbars, and Customize.
Pocket Internet Explorer
6-7
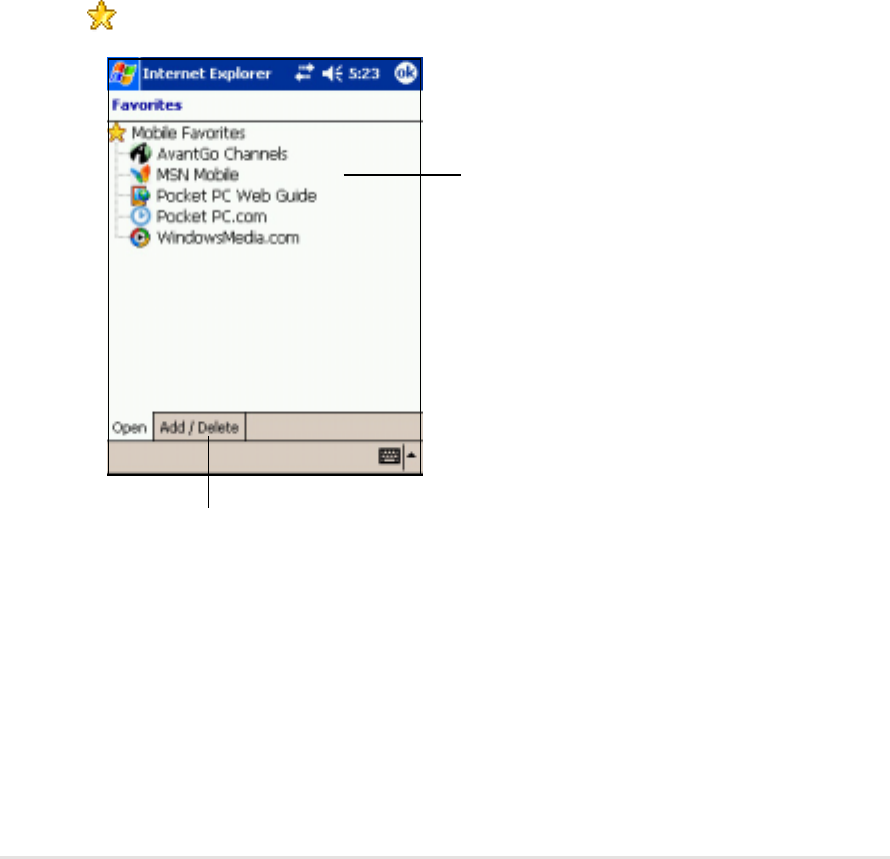
Viewing mobile favorites and channels
To view mobile favorites and channels:
1. Tap to display your list of favorites.
2. Tap a Favorites page that you wish to view.
You will see the page that was downloaded the last time you
synchronized with your desktop computer. If the page is not on your
device, the favorite is dimmed. You need to synchronize with your
desktop computer again to download the page to your device, or
connect to the Internet to view the page.
Tap the favorite that
you wish to view
Tap to add or delete a
folder or favorite link
Saving device memory
Mobile favorites take up storage memory on your device. To minimize the
amount of memory used:
•In the settings for the Favorites information type in ActiveSync options,
turn off pictures and sounds, or stop some mobile favorites from being
downloaded to the device. For more information, see ActiveSync Help.
•Limit the number of downloaded linked pages. In Interner Explorer on
your desktop computer, right-click the mobile favorite you want to
change, then click Properties. In the Download tab, specify 0 or 1 for
the number of linked pages you want to download.
6-8
Chapter 6
Adding/Deleting mobile favorites and folders
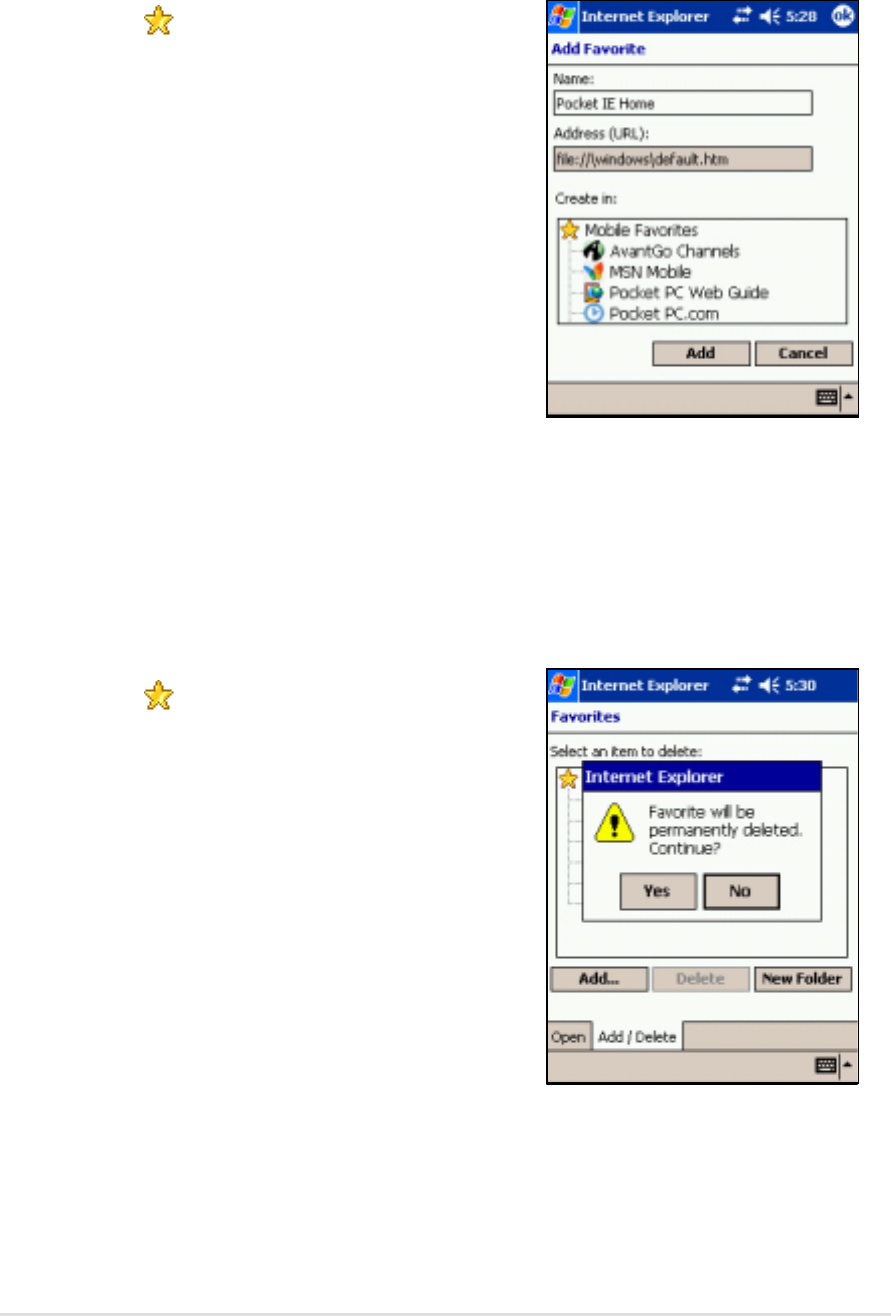
To add a favorite:
1. Tap to display your list of
favorites.
2. Tap the Add/Delete button to
display the Favorites screen.
3. Tap the Add... button to show the
Add Favorite screen.
4. Type a name for the favorite that
you wish to add in the Name field.
5. Type in the URL address in the
Address (URL) field.
6. Select a folder to place the
favorite from the Create in: box.
7. Tap Add to return to the Favorites
screen, which now shows the
favorite that you added.
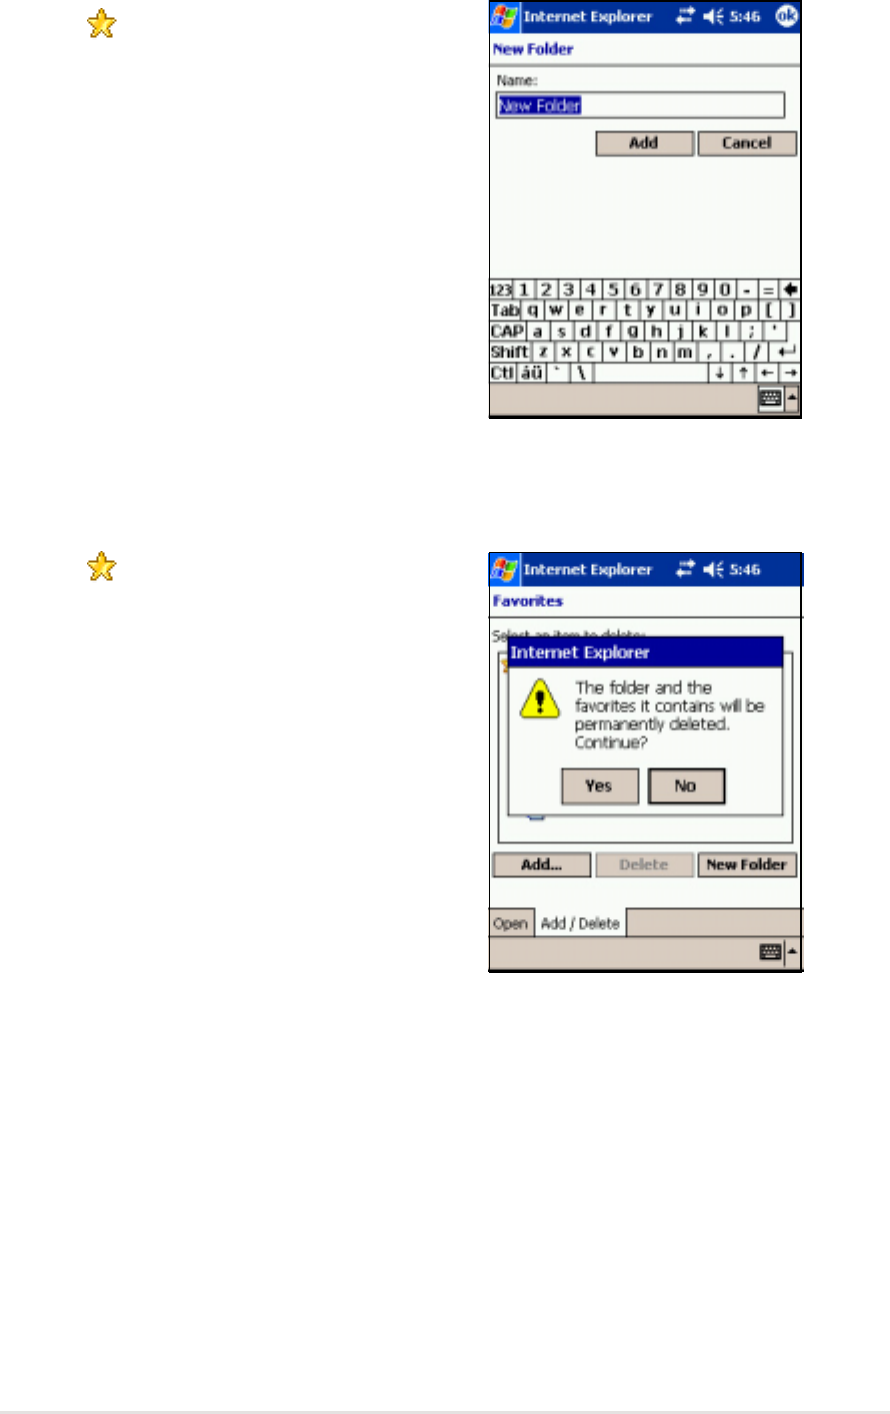
To delete a favorite:
1. Tap to display your list of
favorites.
2. Tap the Add/Delete button to
display the Favorites screen.
3. Select the favorite that you wish
to delete, then tap Delete.
4. When prompted to permanently
delete the favorite, tap Yes.
Pocket Internet Explorer
6-9
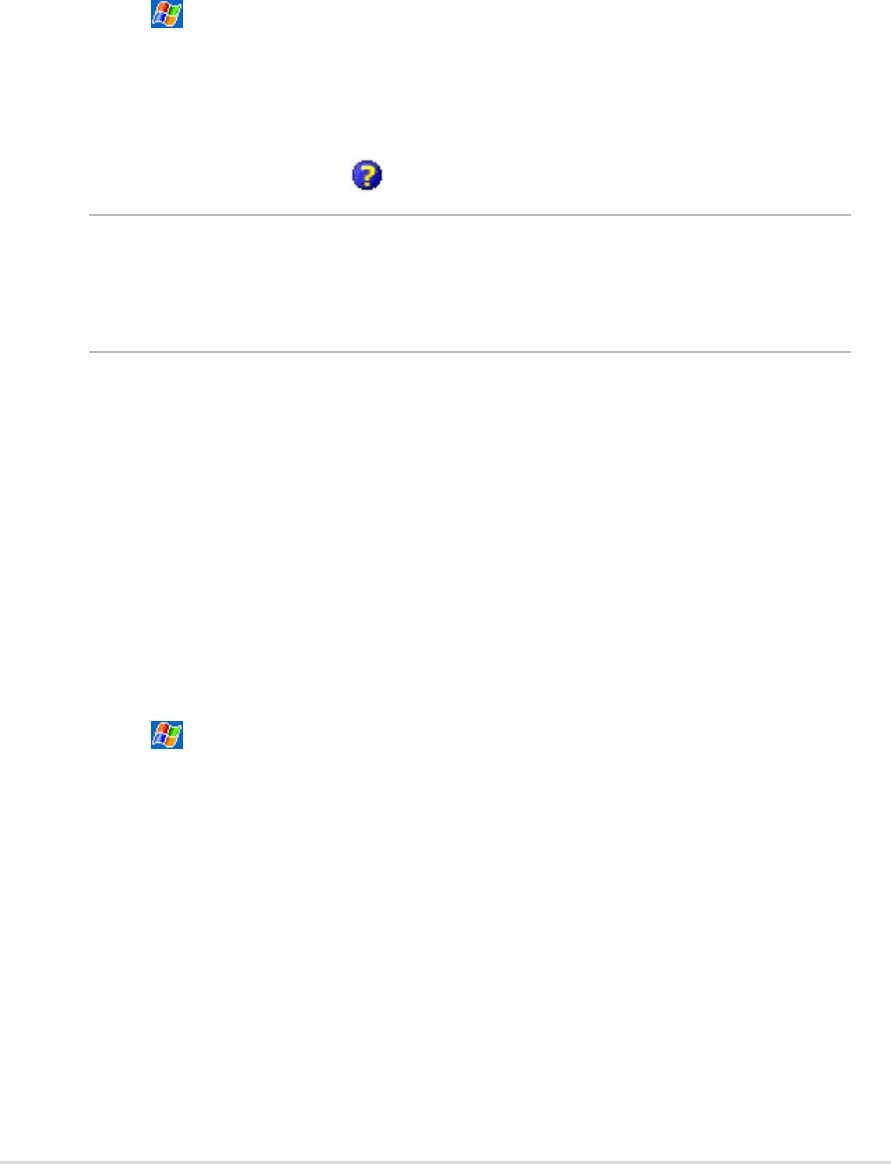
To add a folder:
1. Tap to display your list of
favorites.
2. Tap the Add/Delete button to
display the Favorites screen.
3. Tap the New Folder button.
4. Type a name for the folder that
you wish to create.
5. Tap Add to return to the Favorites
screen, which now shows the
folder that you added.
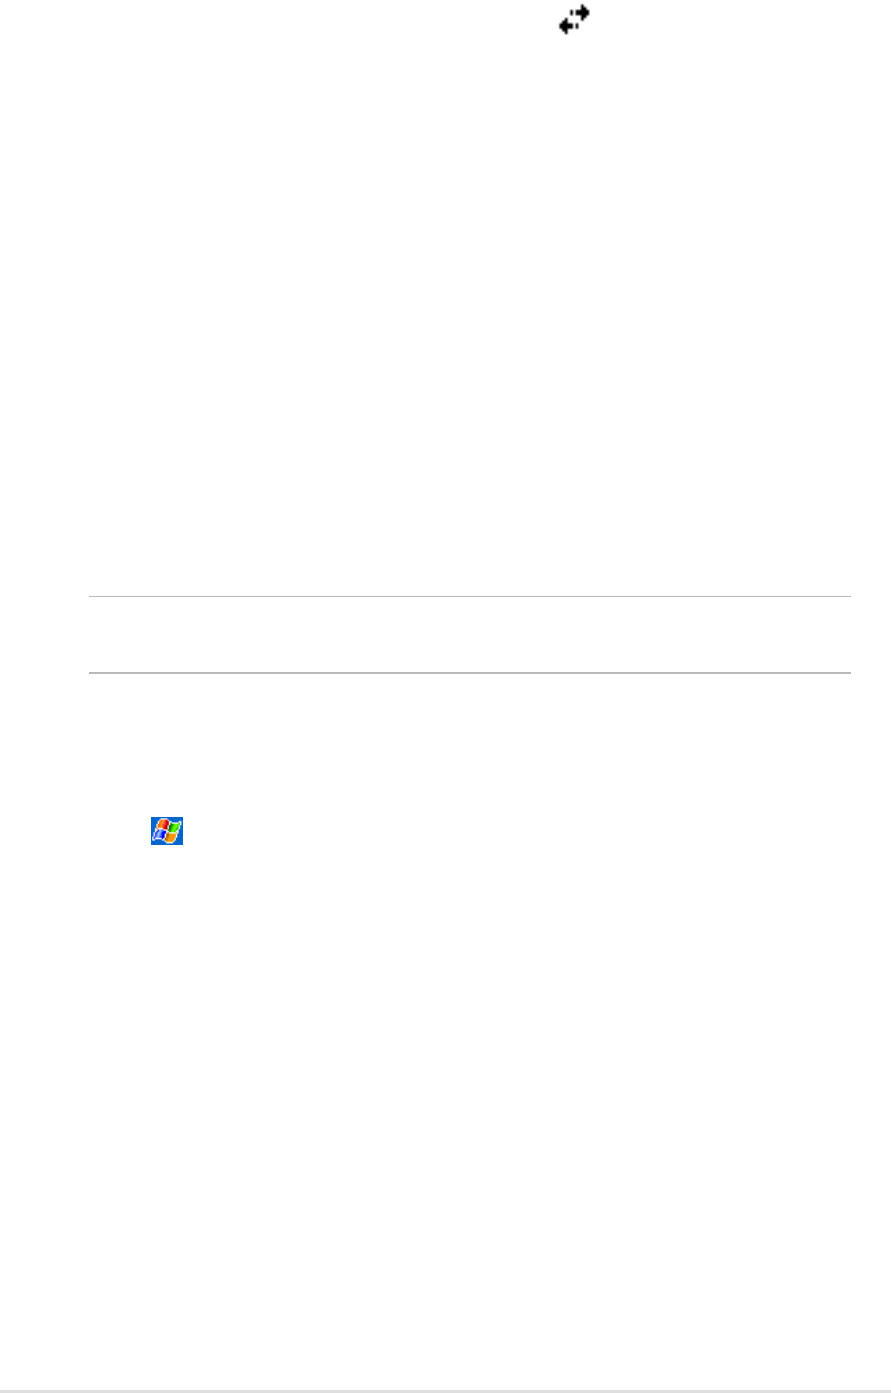
To delete a folder:
1. Tap to display your list of
favorites.
2. Tap the Add/Delete button to
display the Favorites screen.
3. Select the folder that you wish to
delete, then tap Delete.
4. When prompted to permanently
delete the folder, tap Yes.

6-10
Chapter 6

Get connected
7-1
Chapter 7
Get connected
♦♦
♦♦
♦Introduction........................................................... 7-2
♦♦
♦♦
♦Connect to the Internet ........................................ 7-2
♦♦
♦♦
♦Connect to Work ................................................... 7-3
♦♦
♦♦
♦Set up connections .............................................. 7-3
Modem connections ................................................................. 7-3
VPN server connections .......................................................... 7-4
Proxy server settings ............................................................... 7-4
Network card connections........................................................ 7-5
Wireless network connections ................................................. 7-6
Enter settings information ........................................................ 7-6
Configure authentication settings............................................. 7-7
Change connection settings name........................................... 7-7
♦♦
♦♦
♦End a connection.................................................. 7-8
♦♦
♦♦
♦Set up a WAP gateway ......................................... 7-8
♦♦
♦♦
♦Use dialing rules ................................................... 7-9
♦♦
♦♦
♦Infrared (IR) connection ..................................... 7-10
Sending information ................................................................7-11
Receiving information .............................................................7-11

7-2
Chapter 7
Introduction
You can set up connections to the Internet and corporate network at work
in order to do such activities as browse the Internet or intranet, send and
receive e-mail and instant messages, and synchronize information using
ActiveSync.
Connections can be made using a modem, wireless network, or
network (Ethernet) card. A modem connection can be used to set up
connections with an external modem, or through your mobile phone
network using a cellular line.
Your device has two groups of connection settings: My ISP and My Work
Network. My ISP settings are used to connect to the Internet, and My
Work Network settings can be used to connect to any private network,
such as a corporate network you use at work. Simply fill in the settings and
get ready to start connecting. For more information, see the sections
“Connect to the Internet” or “Connect to Work.”
You may also establish connection to another device with infrared (IR) or
Bluetooth features. For more information, see sections “Infrared (IR)
connection” or “Bluetooth connection.”
Connect to the Internet
To connect to the Internet:
1. Obtain the following information from your ISP: ISP server phone
number, user name, and password.
2. Tap > Settings > Connections tab > Connections.
3. In My ISP, tap Add a new modem connection.
4. Create a modem connection. For more information, see section “Set
up modem connections.”
5. To start the connection, begin using the desired program. For example,
switch to Pocket Internet Explorer and browse a Web page. Your
device automatically connects.
NOTE To set up a network card or wireless network connection to
your ISP, add a new connection under My Work Network.

Get connected
7-3
Connect to Work
1. Obtain the following information from your network administrator:
server phone number, user name, and password.
2. Tap > Settings > Connections tab > Connections.
3. In My Work Network, set up either a modem, network card, wireless
network, or VPN server connection. Refer to the section “Set up
connections” for the procedure.
4. To start the connection, start using a desired program. For example,
switch to Pocket Internet Explorer and browse to a Web page. Your
device automatically starts connecting.
Set up connections
Modem connections
To set up a modem connection:
Obtain the following information from your ISP or network administrator:
telephone number, user name, password, domain name, and TCP/IP
settings.
If your device does not have access to a mobile phone network, insert a
modem card.
1. Tap > Settings > Connections tab > Connections.
2. To create a new connection, in either My ISP or My Work Network,
tap Add a new modem connection, then follow the instructions in the
New Connection wizard.
3. To view additional information for any screen in the wizard or while
changing settings, tap .
NOTE To change modem connection settings in either My ISP or My
Work Network, tap Manage existing connections. Select
the desired modem connection, tap Settings, and follow the
instructions on the screen.
7-4
Chapter 7
VPN server connections
A VPN connection helps you to securely connect to servers, such as a
corporate network, via the Internet. Ask your network administrator for your
user name, password, domain name, TCP/IP settings, and host name or
IP address of the VPN server.
To set up a VPN server connection:
1. Tap > Settings > Connections tab > Connections.
2. To create a new VPN server connection, in My Work Network, tap Add
a new VPN server connection, then follow the screen instructions.
3. To view additional information for any screen in the wizard or while
changing settings, tap .
NOTE To change existing settings, in My Work Network, tap
Manage existing connections > VPN tab. Select your
desired VPN connection, tap Settings, then follow the
instructions on the screen.
Proxy server settings
If you are connected to your ISP or private network during synchronization,
your mobile device should download the proper proxy settings from your
PC. If these settings are not on your PC or need to be changed, ask your
ISP or network administrator for the proxy server name, server type, port,
type of Socks protocol used, and your user name and password.
To change proxy server settings:
1. Tap > Settings > Connections tab.
2. To create a new connection, in My Work Network, tap Add a new
proxy server.
3. To change proxy server settings, in My Work Network, tap Edit my
proxy server. Select the desired proxy server, and tap Settings.
4. Select This network connects to the Internet and This network uses a
proxy server to connect to the Internet.
5. In the Proxy server box, enter the proxy server name.
6. To change such settings as port number or proxy server type, tap
Advanced and change desired settings.

Get connected
7-5
Network card connections
Use a network (Ethernet) card to connect directly to a network. Once
connected, you can view the Internet or intranet, or download e-mail. You
do not need to create a new connection on your device. For more
information, see your network administrator. Make sure to purchase and
configure a network card that is compatible with your device.
To set up a network card:
1. Obtain the following information from your network administrator: user
name, password, and domain name.
2. Insert the network card into your device.
3. The first time you insert the card, Network Settings appears
automatically so that you can configure the network card. If it does not
appear, or to change settings later, tap > Settings > Connections
tab > Connections > Advanced tab > Network Card.
4. If you need to enter specific server information, tap the appropriate
adapter, and then tap Properties. Most networks use DHCP, so you
should not have to change these settings unless your network
administrator instructs you to do so.
5. If necessary, connect the network card to the network by using a
network cable. For information, refer to the documentation that came
with your network card.
6. To start a connection, insert the network card, and begin using a
desired program. For example, switch to Pocket Internet Explorer
and browse a Web page. Your device automatically starts connecting.
If you use your network card with two networks, such as a private
network at work and one at home for the Internet, you need to change
the network to which the network card connects.
NOTE You may need proxy server and VPN connection settings.
For more information, see your network administrator.

7-6
Chapter 7
Wireless network connections
Networks that you have already configured are preferred networks and are
listed in Wireless networks. You can select to connect to only preferred
networks or have your device search for and connect to any available
network whether it is preferred or not.
To set up a wireless network:
1. Tap > Settings > Connections tab > Connections > Network
Card > Wireless tab.
2. To change network settings, in Wireless networks, tap a network. If
you do not see a desired network, tap Add new and follow the
instructions on the screen.
3. From Networks to access, select All available, Only access points,
or Only computer-to-computer depending on the type of network(s)
you connect to.
4. To connect only to networks you have already configured, clear
Automatically connect to non-preferred networks.
NOTE If you select to automatically connect to non-preferred
networks, your device detects any new networks and provide
you the opportunity to configure them.
Enter settings information
A wireless network can be added either when the network is detected, or
manually by entering settings information.
To enter new settings:
1. To manually enter information, tap > Settings > Connections tab
> Connections > Network Card > Wireless tab. Then, tap Add new.
If the network was detected, step one is not necessary.
2. In the General tab, enter a network name. If the network was detected,
the network name is automatically entered and can't be changed.
3. From Connects to, select what your network connects to, Work or the
Internet.
4. To connect to an ad-hoc connection, select This is a device-to-
computer (ad-hoc) connection.

Get connected
7-7
Configure authentication settings
A wireless network can be added either when the network is detected, or
manually by entering settings information. To determine if authentication
information is needed, see your network administrator.
To configure authentication settings:
1. To manually enter information, tap > Settings > Connections tab
> Connections > Network Card > Wireless tab.
2. Tap Add new. If the network was detected, step one and two are not
necessary.
3. To use data encryption, tap Data encryption (WEP enabled).
4. To use Shared Key authentication, tap Network Authentication
(shared mode). You need a network key.
5. To automatically use a network key, tap The key is provided for me
automatically. Otherwise, enter the network key.
6. For increased security, select Use IEEE 802.1x network access
control, then select the appropriate EAP type.
Change connection settings name
Your mobile device is already set up with two sets of connection settings:
My ISP and My Work Network. You can change the name of these
settings to something more familiar. For example, if you put all of your
corporate settings under My Work Network, you can change the name
from My Work Network to your company name.
To change a connection name:
1. Tap > Settings > Connections tab > Connections.
2. Under My ISP or My Work Network, tap Manage existing
connections.
3. Tap the General tab.
4. Enter a name for the settings.
7-8
Chapter 7
End a connection
•When connected via modem or VPN, tap on the navigation bar,
then tap Disconnect.
•When connected via cable or cradle, detach your device from the cable
or cradle.
•When connected via Infrared, move the device away from the other
computer or device.
•When connected via a network (Ethernet) card, remove the card from
your device.
•When connected via a wireless network, switch off the connection.
Set up a WAP gateway
To access WAP sites through Pocket Internet Explorer, configure your
device to use a WAP gateway. Use the following steps to create a new set
of connections to the Internet with WAP gateway settings.
NOTE Some device models do not support the WAP sites viewing
feature.
1. Get the following information from your ISP: ISP server phone number,
user name, and password. Also, contact your mobile phone service
provider and ask for your WAP gateway server name and port number.
2. Tap > Settings > Connections tab > Connections > Tasks tab.
3. Tap Edit my proxy server. If a proxy server has not been set up, tap Set
up my proxy server.
4. In Programs that automatically connect to the Internet should
connect using, tap New and enter a name for the ISP connection.
5. On the Proxy Settings tab, select This network connects to the
Internet and This network uses a proxy server to connect to the
Internet.
6. If necessary, in the Proxy server box, enter the proxy server name.
7. Tap Advanced.
8. In the WAP box, enter the WAP gateway server name. Under Port,
enter the port number. The most common WAP port number is 9201.

Get connected
7-9
Use dialing rules
Additional numbers may need to be dialed depending on your given
location when connecting. For example, if you want to dial from work, a 9
prefix must often be dialed, or an area code is needed.
To avoid creating a new modem connection for each situation, set dialing
rules for the locations from which you connect often. Three dialing
locations, Home, Mobile, and Work, have been created for you, and you
can create more. If a connection cannot be made, your device gives you
an opportunity to change the dialing location.
1. Tap > Settings > Connections tab > Connections > Advanced
tab.
2. Tap Select Location.
3. Tap Use dialing rules.
4. Select a location.
•Home - Dials the number as a local call without a 9 prefix.
•Work - Dials the number as local call with the 9 prefix.
NOTE To create a new location, tap New and follow the directions
on the screen. To view additional information at any time,
tap .
9. Create a modem connection. See section “Set up connections.”
If necessary, set dialing rules. See section “Use dialing rules.”
10. If your device does not have a connection to a mobile phone network,
insert a modem card.
7-10
Chapter 7
Infrared (IR) connection
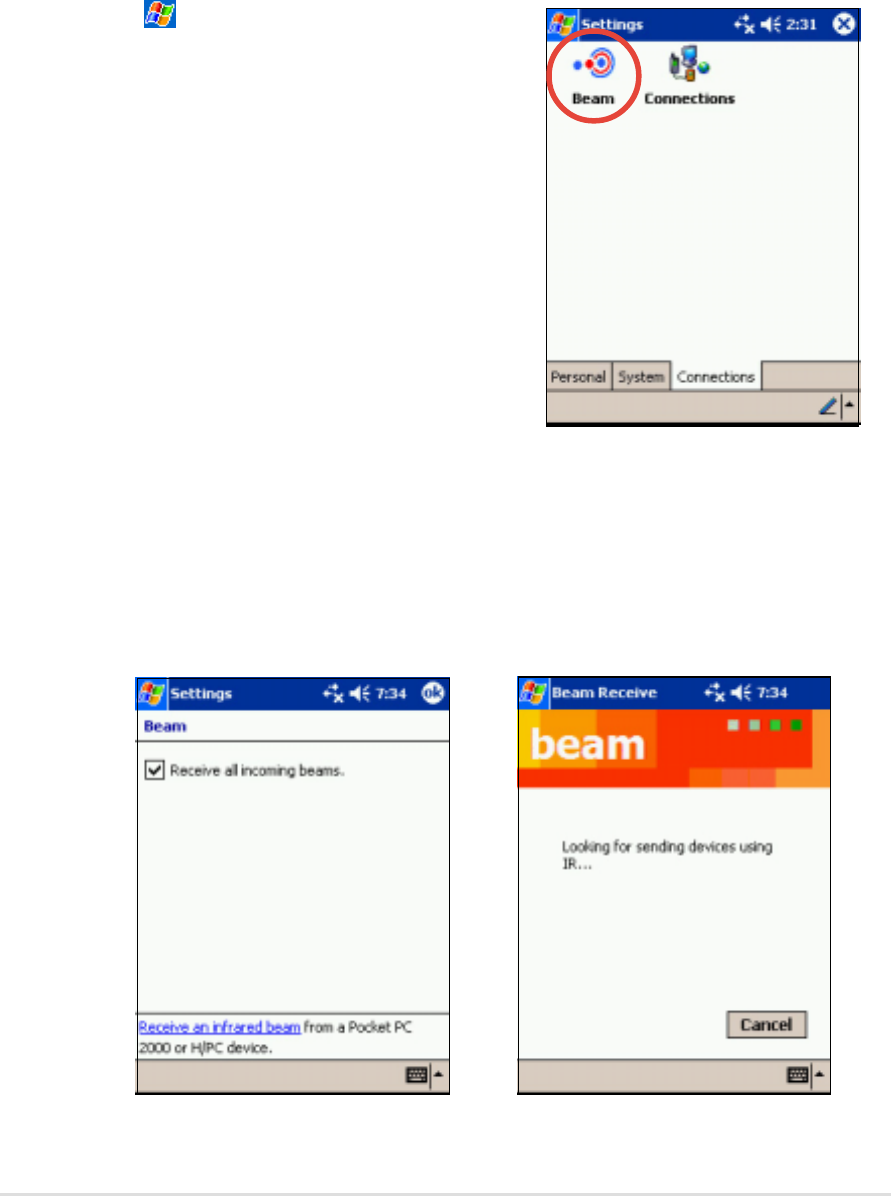
By default, your device detects incoming infrared (IR) beams and prompts
you to accept them. If you do not want your device to detect or receive
beans, clear the Receive all incoming beams check box.
To set the Beam options:
1. Tap , then Settings.
2. Tap the Connections tab.
3. Tap the Beam icon to display the
Settings screen.
4. Make your desired change and tap OK.
5. To receive an infrared beam from this screen, tap the link at the
bottom. Your device automtically looks for another device using
infrared.
Get connected
7-11
Receiving information
To receive information:
1. Align the IR ports so that they are unobstructed and within a close
range.
2. Have the owner of the other device send the information to you. Your
device automatically receive the information.
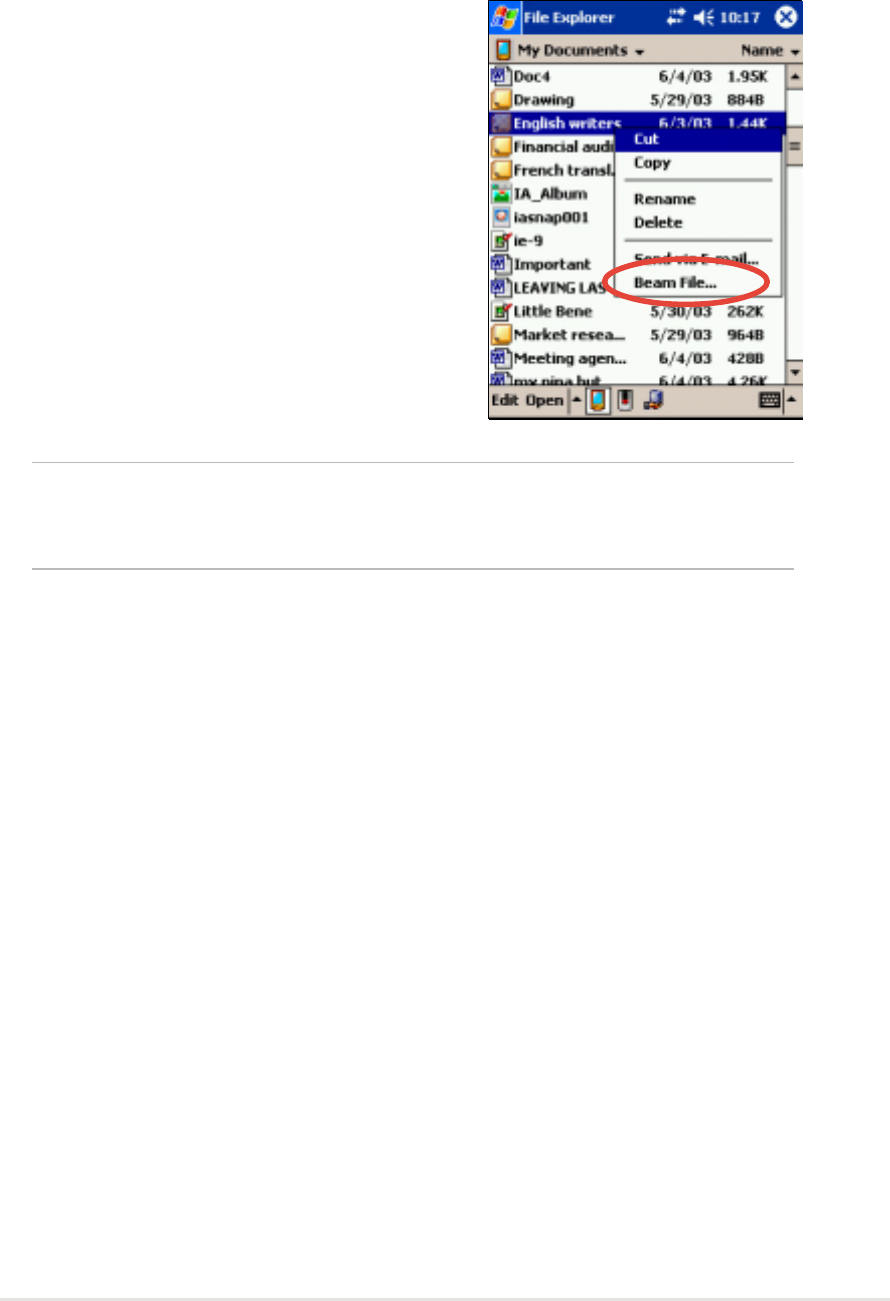
NOTE You can also send items, but not folders, from File Explorer.
Tap and hold the item that you want to send, then tap Beam
File on the pop-up menu.
Sending information
To send information:
1. Switch to the program where you
created the item that you want to
send, and locate that item in the
list.
2. Align the IR ports so that they are
unobstructed and within a close
range.
3. Tap and hold the item, then tap
Beam File... on the pop-up menu.

7-12
Chapter 7

Bluetooth™
8-1
Chapter 8
Bluetooth™
♦♦
♦♦
♦Introducing Bluetooth .......................................... 8-2
Bluetooth for Windows CE (BTW-CE) ..................................... 8-2
Bluetooth icon .......................................................................... 8-2
♦♦
♦♦
♦Bluetooth settings ................................................ 8-3
General .................................................................................... 8-3
Accessibility ............................................................................. 8-3
File Transfer ............................................................................. 8-4
Information Exchange .............................................................. 8-4
Serial Port ................................................................................ 8-4
Personal Network Server ......................................................... 8-5
Audio Gateway......................................................................... 8-5
About........................................................................................ 8-5
♦♦
♦♦
♦Bluetooth Manager ............................................... 8-6
Bluetooth connection wizard .................................................... 8-7
Business Card Exchange......................................................... 8-8
♦♦
♦♦
♦Remote device services ....................................... 8-9
Wireless serial port .................................................................. 8-9
Dial-up networking ................................................................. 8-10
Bluetooth file explorer .............................................................8-11
Send via Bluetooth ................................................................. 8-14
Dial via Bluetooth ................................................................... 8-15
Bluetooth Personal Area Network .......................................... 8-16
8-2
Chapter 8
Introducing Bluetooth™
Bluetooth is a short-range wireless communications technology. Devices
with Bluetooth capabilities can exchange information over a distance of
about 10 meters (30 feet) without requiring a physical connection.
Unlike infrared, you don’t need to line up the devices to beam information
with Bluetooth. The devices only need to be within a range of about 10
meters. You can even beam information to a device in a different room, as
long as it is within the specififed range.
Bluetooth™ for Windows
®
CE (BTW-CE)
BTW-CE is the solution to smoothly integrate the Bluetooth technology into
devices that use the Pocket PC operating system.
The Bluetooth technology allows your Pocket PC to:
•Locate other Bluetooth devices within the vicinity
•Discover the services that those devices offer
•Connect to, use, and disconnect from those services
•Enable or disable individual services
•Use security features including authentication, authorization, and
encryption
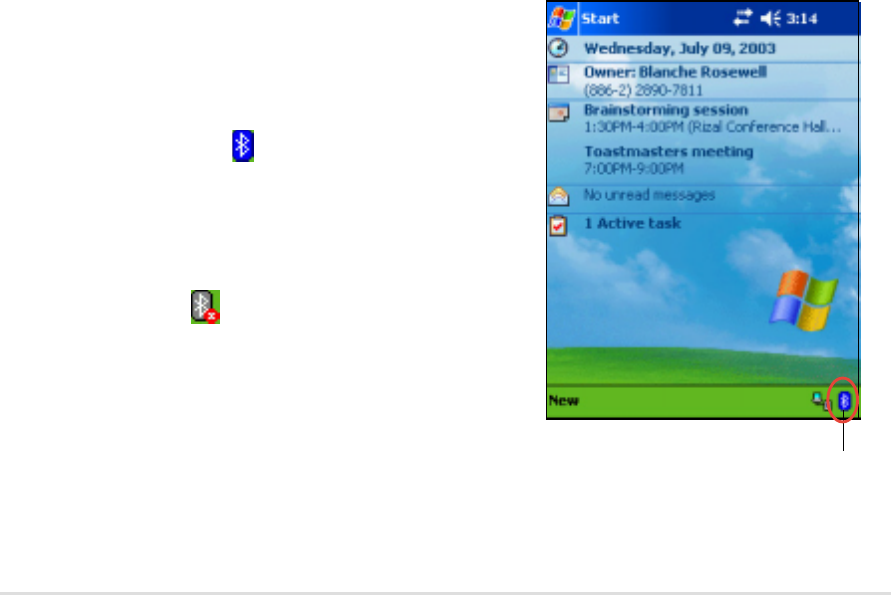
Bluetooth icon
The Bluetooth icon is located on the lower
right corner of the Today screen.
Bluetooth icon
When Bluetooth is enabled (turned ON),
the icon is blue , and the Bluetooth LED
on the left side of the device blinks blue.
When Bluetooth is disabled (turned OFF),
the icon is grayed with a red X on its lower
right corner .
Tapping the icon displays a menu that
allows you to:
•turn Bluetooth on or off
•launch the Bluetooth Manager
•change the Bluetooth Settings
Bluetooth™
8-3
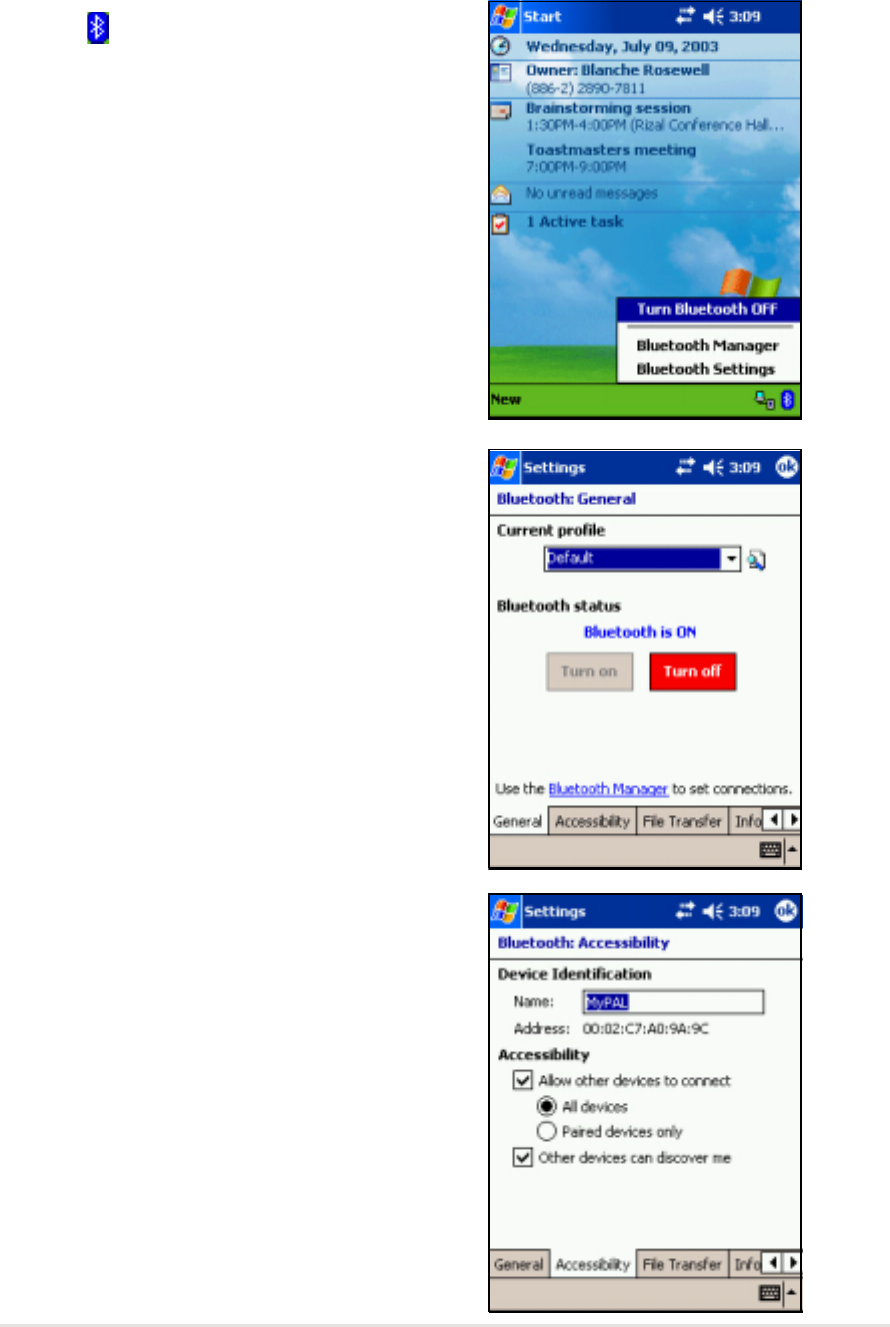
Bluetooth settings
To configure the Bluetooth settings:
1. Tap from the lower right corner of
the Today screen to display the
Bluetooth menu.
2. Tap Bluetooth Settings.
3. Tap one of the tabs at the bottom of
the Settings screen to make your
desired changes.
General
Allows you to:
•select the user profile
•see the Bluetooth status (ON/OFF)
•turn Bluetooth ON or OFF
•tap a link to the Bluetooth Manager
Accessibility
Allows you to:
•set the device name
•see the Bluetooth Device Address
(BDA)
•select the remote devices you wish to
connect
•set whether to allow remote devices to
see your device
8-4
Chapter 8
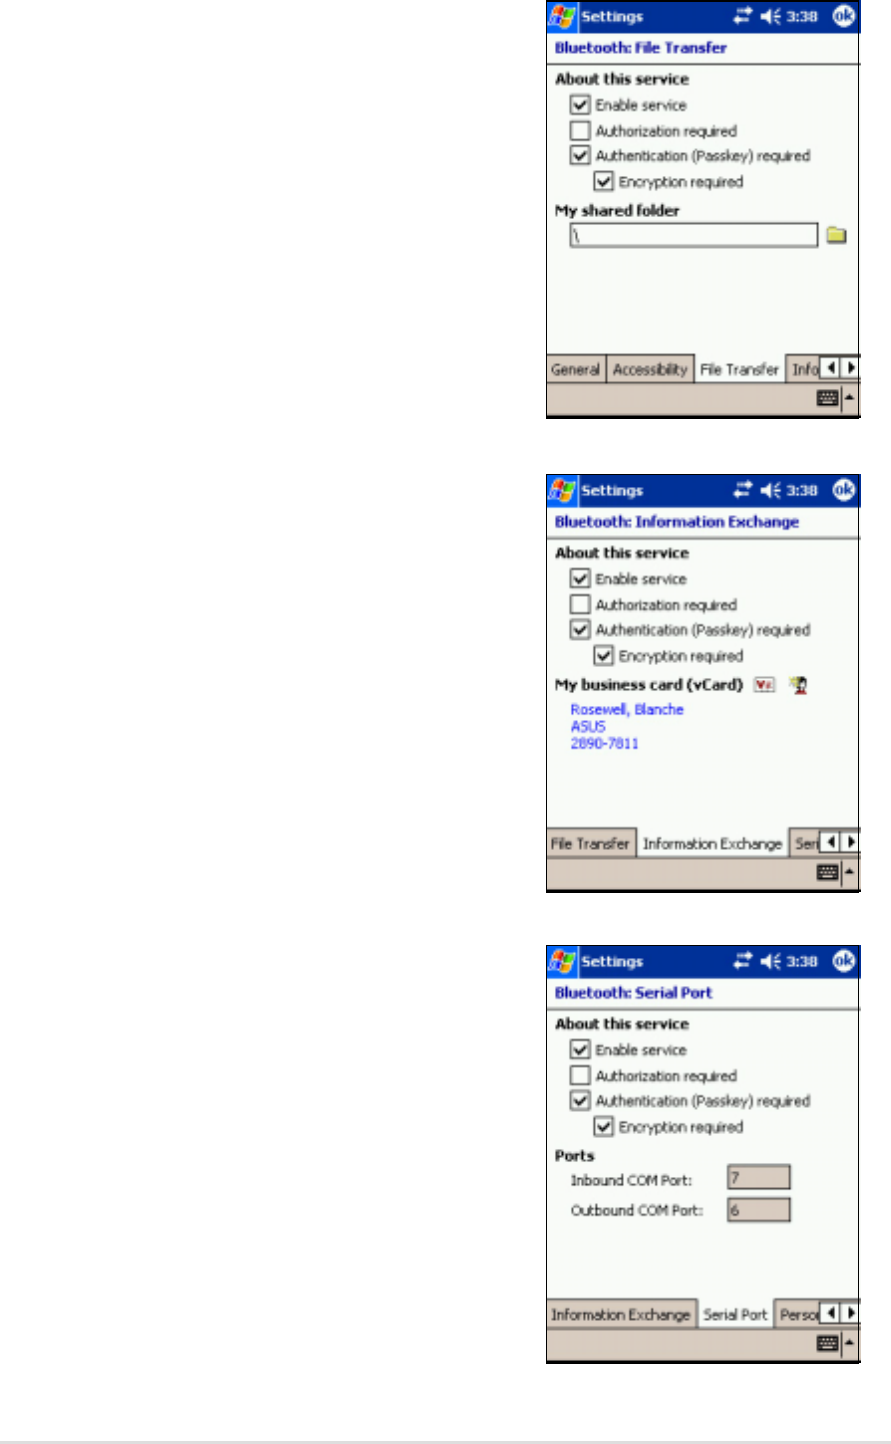
File Transfer
Allows you to customize the settings for
file transfers, and set the highest level
directory on your device that remote
devices can access.
Refer to section “Remote device
services” for more information.
Information Exchange
Allows you to customize the service
settings, and set the default business
card.
Serial Port
Allows you to customize the service
settings, and display the serial port
addresses. The port address
assignments cannot be changed.
Refer to section “Remote device
services” for more information.
Bluetooth™
8-5
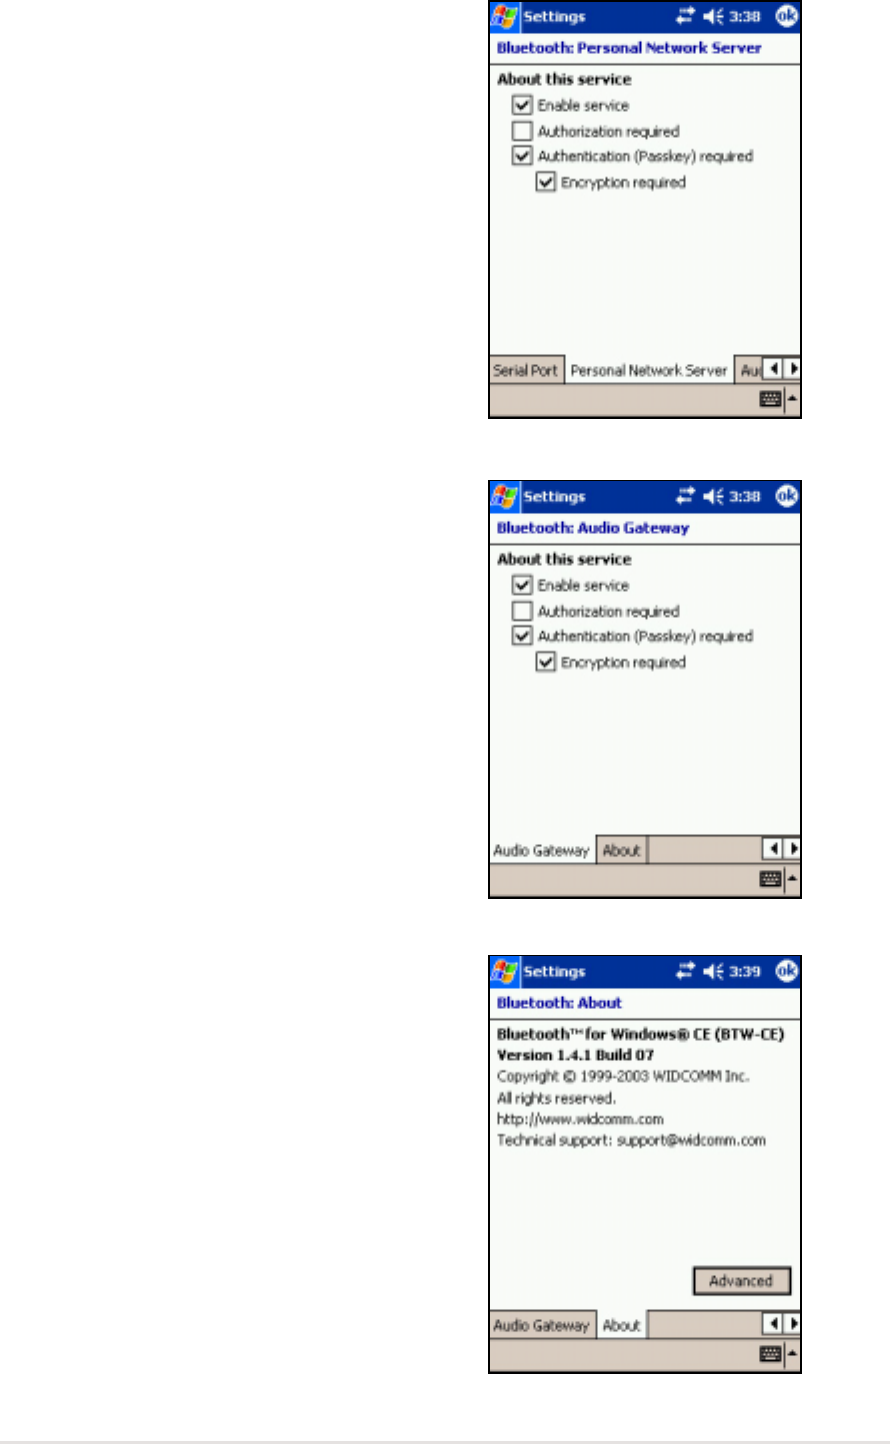
Personal Network Server
Allows you to customize the service
settings for your personal network
server.
Refer to section “Remote device
services” for more information.
Audio Gateway
Allows you to customize the service
settings for the Audio Gateway.
About
Displays the Bluetooth™ for Windows
®
CE (BTW-CE) information including the
release version, copyright notice,
website address, technical support
email, and the Advanced button. The
Advanced buttons contains the version
information about the individual software
modules that make up BTW-CE.
The information on this screen is not
configurable.
8-6
Chapter 8
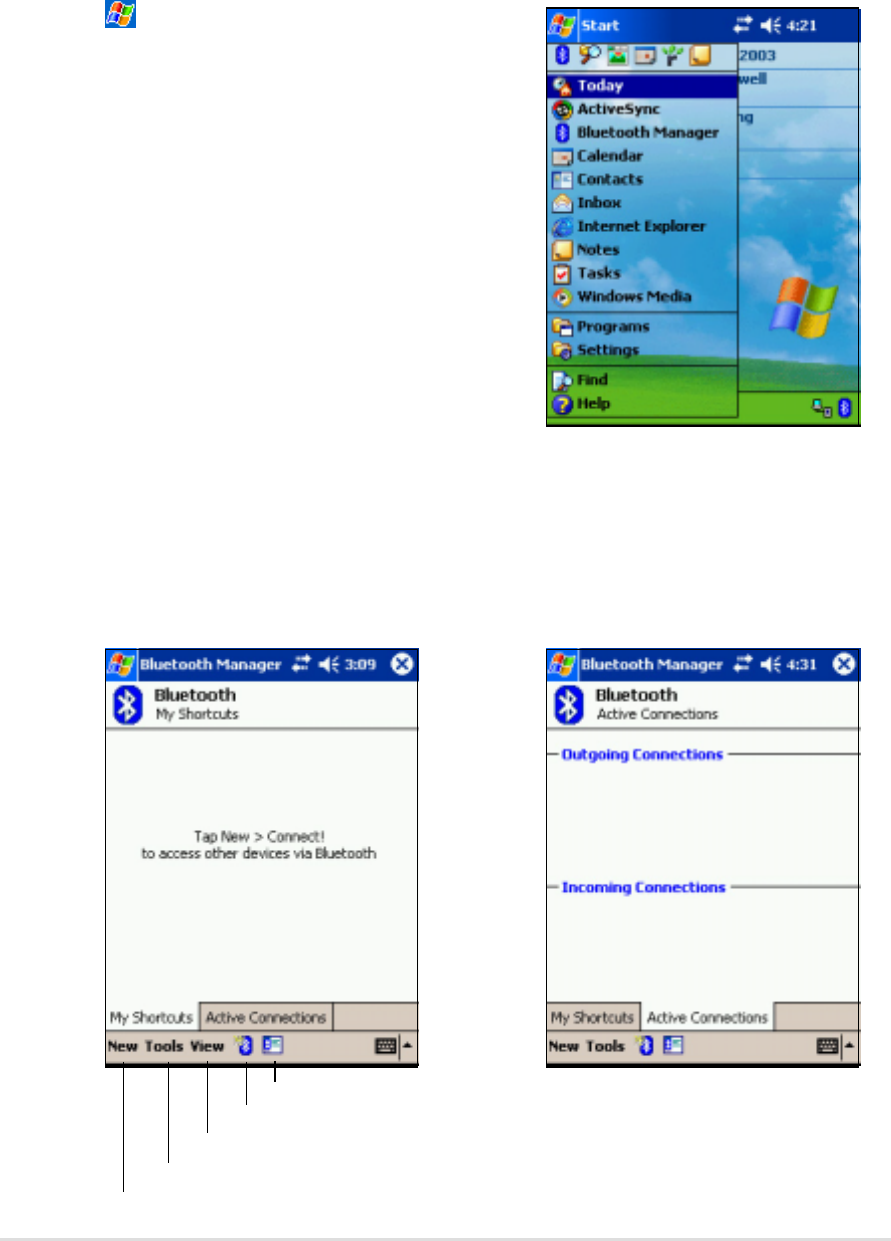
Bluetooth Manager
The Bluetooth Manager allows you to create, manage, and use Bluetooth
to connect to remote devices.
To launch the Bluetooth Manager:
Tap , then tap the Bluetooth Manager
from the Start menu.
The My Shortcuts screen displays a list of pre-configured connections, if
any. Tap New > Connect to connect to other devices via Bluetooth.
The Active Connections screen displays the active incoming and outgoing
connections.
Tap to make a new connection
Tap to add or remove paired devices
Tap to set view options
Tap to launch the Bluetooth connection wizard
Tap to set Business Card excahnge options
Bluetooth™
8-7
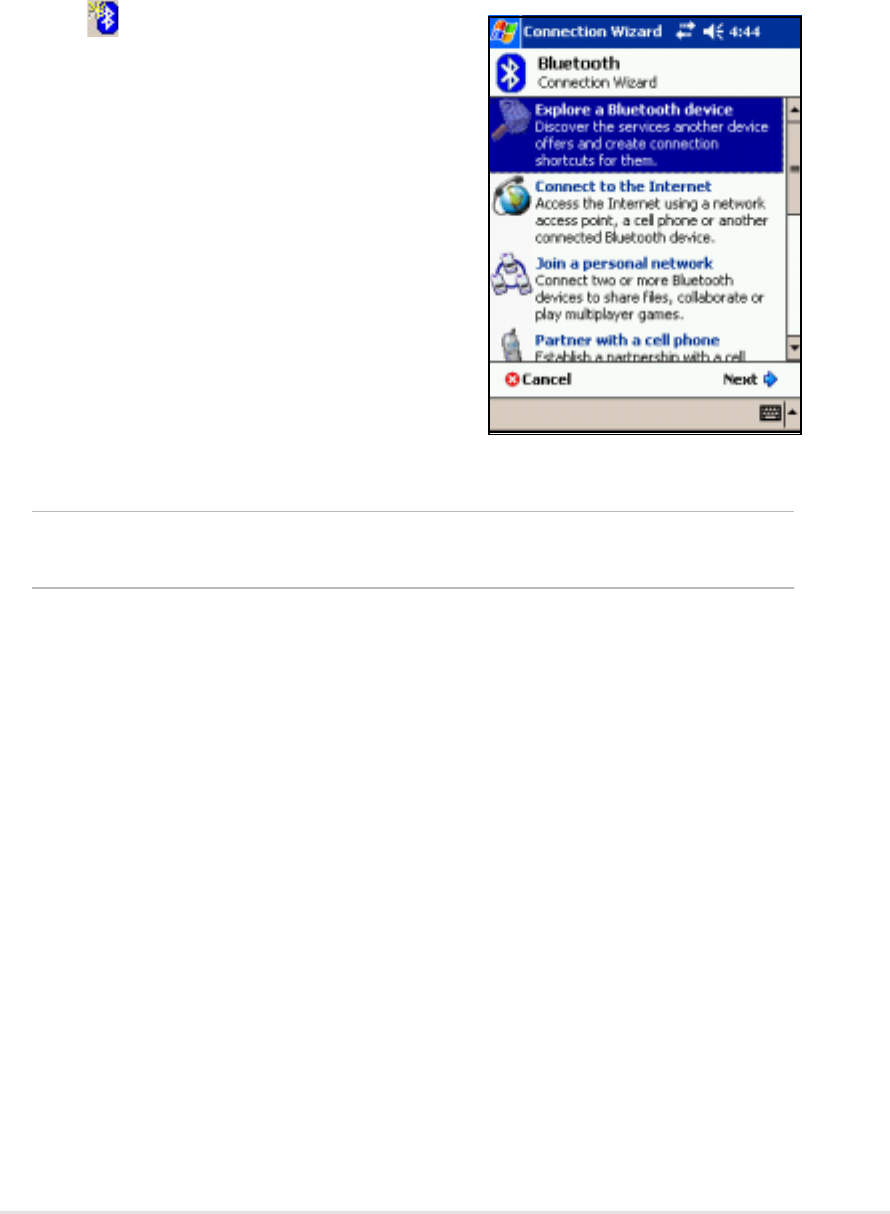
Bluetooth connection wizard
The Bluetooth connection wizard helps you set up connections with
remote Bluetooth devices.
To launch the Bluetooth connection wizard:
1. Tap from the Bluetooth Manager
command bar. The Bluetooth
Connection Wizard screen appears.
2. Select a type of connection that you
wish set up. Tap Next.
Tap Cancel if you do not wish to
continue the connection process.
NOTE Refer to the device online help for other information on
Bluetooth.
8-8
Chapter 8
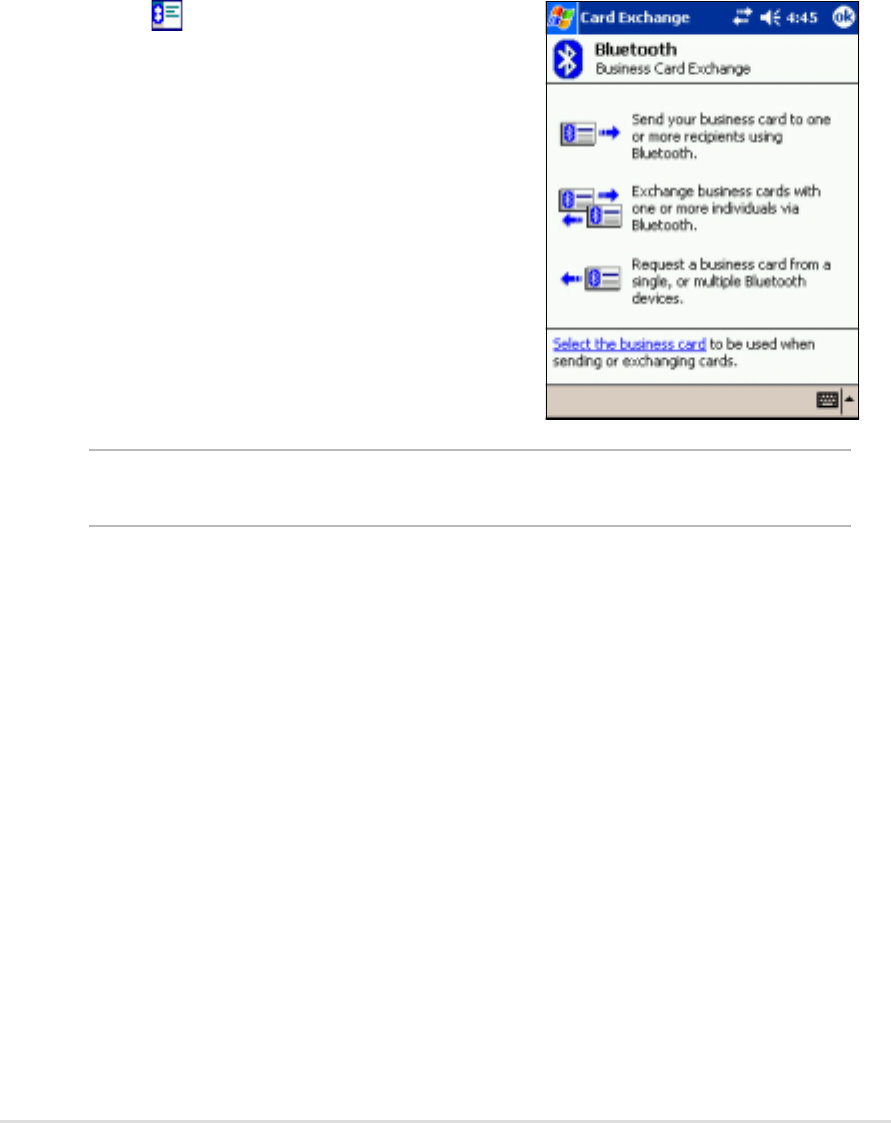
Business Card Exchange
The Business Card Exchange function allows you to:
•send your business card to a remote device
•receive a business card from a remote device
•exchange business cards with one or more remote devices
To launch the Business Card Exchange screen:
1. Tap from the Bluetooth Manager
command bar.
2. Select the action that you wish to
make.
NOTE From this screen, tap the link Select the business card to
go to the Information Exchange settings.
Bluetooth™
8-9
Remote device services
Wireless serial port
Using a Bluetooth serial port is equivalent to using a physical cable serial
port connection between two devices. As with a physical connection, you
have to configure the application that will use the serial port.
To configure the Bluetooth Serial Port:
1. Tap from the lower right corner
of the Today screen to display the
Bluetooth menu.
2. Tap Bluetooth Settings, then the
Serial Port tab.
3. Note the assigned Outbound
COM Port 6 and configure the
application that will use the
Bluetooth serial port to send data
to this port.
NOTE Refer to the application’s documentation for more information
about configuring your application’s Outbound COM port.
4. From the Bluetooth Manager My Shortcuts screen, open the Bluetooth
Serial Port connection to the remote device.
5. Send/receive data from the application.

8-10
Chapter 8
Dial-up networking
The Dial-up Networking feature allows you to connect to a rmeote
computer through a phone line. Once connected, you can browse the
Internet, check/read emails, etc.
NOTE The remote Bluetooth device that will provide the Dial-up
Networking service should have access to a telephone
system, either a hard-wired or a cellular connection, and
capable of answering a call.
Devices that may provide a Dial-up Networking service:
•Bluetooth-enabled cellular telephones
•Bluetooth-enabled desktop computers attached to a telephone system
•Bluetooth modems
To use Dial-up Networking:
1. Create a connection to the device that will provide telephone access.
See the section “Bluetooth connection wizard” on page 8-7.
2. Tap , then the Bluetooth Manager from the Start menu.
3. In My Shortcuts screen, tap and hold the Dial-up Networking
Connection shortcut, then select Connect from the pop-up menu.
4. On the first Bluetooth: Dial-up Connection screen, double-tap New
Connection... OR select New Connection then tap OK.
5. Key-in the following informatin on the second Bluetooth: Dial-up
Connection screen:
•Name for a connection
•Country code (if dialing outside the default contry setting)
•Area code (if dialing outside the default area code setting)
•Phone number to be dialed
6. Tap OK.
7. Enter the required information on the succeeding screens to complete
the connection process.
8. When the connection is active, open a web browser from the device.

Bluetooth™
8-11
Bluetooth file explorer
The Bluetooth File Explorer appears automatically after a file transfer
connection is established.
This service feature allows you to do the following operations:
•Navigate the directory structure of the remote device
•View the files and folders on the remote device
•Create new folders on the remote device
•Send files to, and copy or get files from the remote device
•Delete files from the remote device
NOTE The file operations on the remote device are limited to the
configured FTP root directory and sub-directories of the
remote device.
The Bluetooth File Explorer also allows you to set a folder in your device
for receiving inbound files. You may configure this folder for each of your
connection shortcuts. See the section “To set a local folder” on page 8-13.
Bluetooth File Explorer menus
File Send a File...
Create a Folder
Get
Delete
Tools Set Local Folder
Refresh
To change the remote device folder:
1. To move down in the directory structure of the remote device, tap the
New Folder from the main window of Bluetooth File Explorer.
2. To move up in the directory structure of the remote device, tap the
down-arrow to the right of the currently selected folder and select the
New Folder from the drop-down list.

8-12
Chapter 8
To create a folder on the remote device:
1. Select the folder in which you wish to place the new folder.
2. From the File menu, tap Create a Folder.
3. Enter a name for the new folder while the default name New Folder is
highlighted.
To send a file to the remote device:
1. From the File menu, tap Send a File... to display the Open screen.
The Open screen includes the following:
Folder - tap the down-arrow and select the folder that contains the file
you wish to send
Type - default and only option is “All Files (*.*)
A list of files in the selected folder - tap a file that you wish to send
Cancel button - abort the Send a File... operation
2. Tap your desired operation.
The file that you selected is automatically sent when tapped, after
which the Bluetooth File Explorer re-appears.
To get a file from the remote device:
1. Select the folder containing the file.
2. Tap the file that you wish to get or copy.
3. From the File menu, tap Get.
OR
Tap and hold the desired file and select Get from the pop-up menu.
The file is copied to the local folder listed in the Local Folder field at the
bottom of the screen.
To delete a file from the remote device:
1. Tap the file that you wish to delete.
2. From the File menu, tap Delete.
3. Tap OK in the confirmation dialog box.
OR
Tap and hold the desired file and select Delete from the po-up menu.

Bluetooth™
8-13
To set a local folder for incoming files:
1. From the Tools menu, tap Set Local Folder.
2. Use the drop-down menu at the top of the screen to go to your desired
folder.
3. Tap OK to return to the main screen of Bluetooth File Explorer. You will
see the Local Folder field is updated to reflect the new folder selection.
NOTE The Local Folder information is associated with the currently
open shortcut and is saved with the active profile. You can
separately configure your Local Folder for each connection
shortcut.
To refresh the list of displayed files and folders on the remote device,
simply tap Refresh from the Tools menu.
8-14
Chapter 8
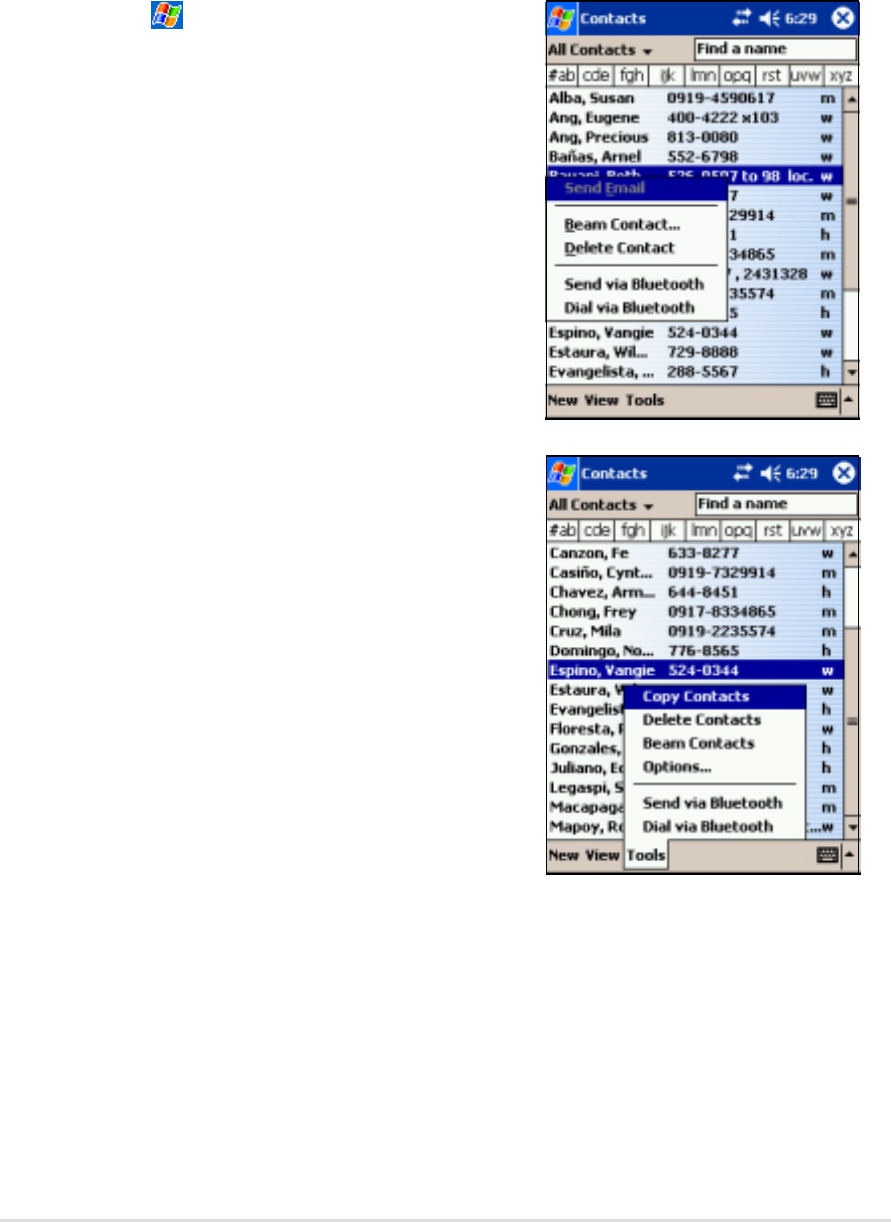
Send via Bluetooth
You can conveniently send your Pocket Outlook contacts, calendar items,
and tasks individually or collectively to the remote device via Bluetooth.
To send data via Bluetooth:
1. Tap , then either Contacts,
Calendar, or Tasks.
2. Highlight an item that you wish to
send to the remote device.
3. Tap and hold the item, then tap
Send via Bluetooth from the
pop-up menu.
OR
Tap Tools from the command bar,
then select Send via Bluetooth.
4. On the Select a Bluetooth Device
screen, tap the name of the
destination, then tap OK.

Bluetooth™
8-15
Dial via Bluetooth
The Dial via Bluetooth option allows you to select a contact from the
Pocket Outlook contacts list, and have your paired cell phone dial the
contact’s phone number. If a contact has more than one phone number,
select the number that you wish to dial. You may also modify a phone
number before you dial.
To dial via Bluetooth:
1. From the Pocket Outlook Contacts screen, tap and hold a contact and
select Dial via Bluetooth.
2. If your device is paired with more than one cell phone, or if a phone is
not yet selected, tap the phone icon next to Select a phone, and
choose the phone that you wish to use.
3. Select the number that you wish to dial, then tap Dial Number.
4. To modify the number, tap Edit Number and make your desired
changes. Tap OK to return to the previous screen.
NOTE If you modify a phone number, a dialog box appears with an
option to save or to discard the modification.
5. Tap Dial Number.
After the number is sent to the cell phone, the connection on the
device is closed.
After the cell phone completes the dialing process, you can use the
use the phone the normal way.
8-16
Chapter 8
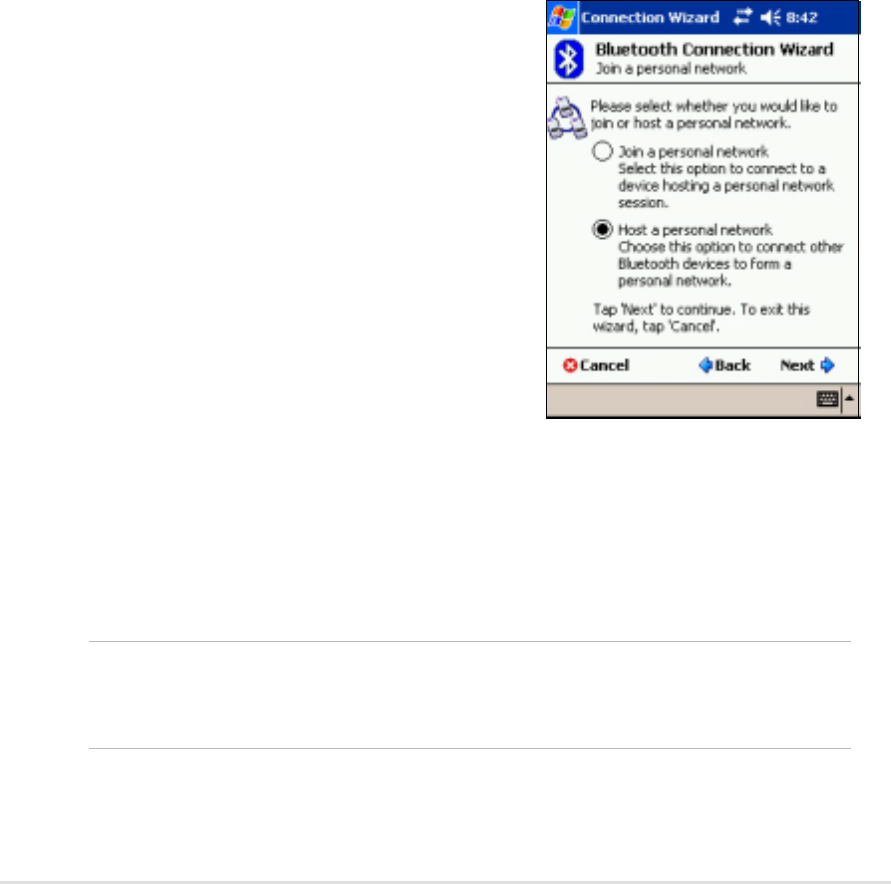
Bluetooth Personal Area Network
A Bluetooth personal area network is a private, temporary, ad-hoc network
of up to eight (8) devices. A Bluetooth personal area network allows you to
easily exchange information that normally requires a TCP/IP network.
Most chat utilities, multi-player games, etc. are fully functional in a
Bluetooth personal area network environment.
Bluetooth private area networks are subject to the same security settings
(service availability, authorization, authentication, and encryption) that
govern other Bluetooth communications.
One Bluetooth device must be the host of the personal area network.
Other Bluetooth devices join the network as clients. The host cna accept
and reject clients on an individual basis.
To set up a Bluetooth personal area network:
1. From the Bluetooth Manager,
select New>Connect> Join a
personal network. Tap Next.
2. On the wizard screen, select Host
a personal network, then tap
Next.
3. Add remote devices to the
Bluetooth personal network, if
desired.
a. Tap the Add button and select
the device that you wish to add.
b. Add other devices, if desired.
There can be up to eight devices,
including the host.
4. After adding devices, tap OK to
complete the setup and close the
wizard.
NOTE Adding devices is optional. You do not have to add devices to
the personal network while configuring the host. You can let
other devices join the personal network later.

Bluetooth™
8-17
To join a personal network:
1. From the Bluetooth Manager,
select New>Connect>Join a
personal network. Tap Next.
2. On the wizard screen, select Join
a personal network, then tap
Next. The Bluetooth browser
appears.
3. Select the host of the personal
network, then tap Next to
establish a connection to the
personal area network.
If you are asked to enter IP network
settings, select Use server-
assigned IP address, then tap
OK.

8-18
Chapter 8

Notices
A-1
Appendix
Notices

A-2
Appendix
Federal Communications Commission Statement
This device complies with Part 15 of the FCC Rules. Operation is subject to the following two
conditions:
• This device may not cause harmful interference, and
• This device must accept any interference received, including interference that may cause
undesired operation.
This device and its antenna must not be co-located or operating in conjunction with any other
antenna or transmitter.
This equipment has been tested and found to comply with the limits for a Class B digital
device, pursuant to Part 15 of the FCC Rules. These limits are designed to provide reasonable
protection against harmful interference in a residential installation. This equipment generates,
uses and can radiate radio frequency energy and, if not installed and used in accordance with
manufacturer’s instructions, may cause harmful interference to radio communications.
However, there is no guarantee that interference will not occur in a particular installation. If this
equipment does cause harmful interference to radio or television reception, which can be
determined by turning the equipment off and on, the user is encouraged to try to correct the
interference by one or more of the following measures:
• Reorient or relocate the receiving antenna.
• Increase the separation between the equipment and receiver.
• Connect the equipment to an outlet on a circuit different from that to which the receiver is
connected.
• Consult the dealer or an experienced radio/TV technician for help.
Canadian Department of Communications Statement
This digital apparatus does not exceed the Class B limits for radio noise emissions from digital
apparatus set out in the Radio Interference Regulations of the Canadian Department of
Communications.
This class B digital apparatus complies with Canadian ICES-003.
WARNING! The use of shielded cables for connection of the monitor to the
graphics card is required to assure compliance with FCC regulations.
Changes or modifications to this unit not expressly approved by the
party responsible for compliance could void the user’s authority to
operate this equipment.

Notices
A-3
UL Safety Notices
Required for UL 1459 covering telecommunications (telephone) equipment intended to be
electrically connected to a telecommunication network that has an operating voltage to ground that
does not exceed 200V peak, 300V peak-to-peak, and 105V rms, and installed or used in
accordance with the National Electrical Code (NFPA 70).
When using the Pocket PC, basic safety precautions should always be followed to reduce the risk
of fire, electric shock, and injury to persons, including the following:
•Do not use the Pocket PC near water, for example, near a bath tub, wash bowl, kitchen sink
or laundry tub, in a wet basement or near a swimming pool.
•Do not use the Pocket PC during an electrical storm. There may be a remote risk of electric
shock from lightning.
•Do not use the Pocket PC in the vicinity of a gas leak.
Required for UL 1642 covering primary (nonrechargeable) and secondary (rechargeable) lithium
batteries for use as power sources in products. These batteries contain metallic lithium, or a lithium
alloy, or a lithium ion, and may consist of a single electrochemical cell or two or more cells
connected in series, parallel, or both, that convert chemical energy into electrical energy by an
irreversible or reversible chemical reaction.
•Do not dispose the Pocket PC battery pack in a fire, as they may explode. Check with local
codes for possible special disposal instructions to reduce the risk of injury to persons due to fire
or explosion.
•Do not use power adapters or batteries from other devices to reduce the risk of injury to
persons due to fire or explosion. Use only UL certified power adapters or batteries supplied by
the manufacturer or authorized retailers.
Replaceable batteries
If an equipment is provided with a replaceable batterym and if replacement by an incorrect type
could result in an explosion (e.g. with some lithium batteries), the following applies:
–if the battery is placed in an OPERATOR ACCESS AREA, there shall be a marking close
to the battery or a statement in both the operating and the servicing instructions;
–if the battery is placed elsewhere in the equipmen, there shall be a marking close to the
battery or a statement in the servicing instructions.
The marking or statement shall include the following or similar text:
CAUTION
RISK OF EXPLOSION IF BATTERY IS REPLACED
BY AN INCORRECT TYPE.
DISPOSE OF USED BATTERIES ACCORDING
THE INSTRUCTIONS
Compliance is checked by inspection.
Operator access with a tool
If a TOOL is necessary to gain access to an OPERATOR ACCESS AREA, either all other
compartments within that area containing a hazard shall be inaccessible to the OPERATOR by the
use of the same TOOL, or such compartments shall be marked to discourage OPERATOR access.
An acceptable marking for an electric shock hazard is (ISO 3864, No. 5036)
Equipment for restricted access locations
For equipment intended only for installation in a RESTRICTED ACCESS LOCATION, the
instalation instructions shall contain a statement to this effect.

A-4
Appendix