ASUSTeK Computer DCW615 Cable Router User Manual RCA DCW615 Quick Guide1
ASUSTeK Computer Inc Cable Router RCA DCW615 Quick Guide1
Contents
- 1. DoC Form
- 2. Users Manual
- 3. Additional Information for Users Manual
Users Manual

RCA DCW615 Cable Router
Quick Guide
(Draft User’s Manual)

1
Table of Contents
INTRODUCTION......................................................................................................................................................................................................3
Overview..............................................................................................................................................................................................................3
Features................................................................................................................................................................................................................3
PREPARATIONS.......................................................................................................................................................................................................7
System Requirements............................................................................................................................................................................................7
Installing a Network Card....................................................................................................................................................................................7
Installing the TCP/IP Protocol ............................................................................................................................................................................9
USING THE ROUTER ...........................................................................................................................................................................................14
The Front Panel .................................................................................................................................................................................................14
The Rear Panel...................................................................................................................................................................................................15
CONNECT THE ROUTER ....................................................................................................................................................................................17
Overview............................................................................................................................................................................................................17
Connecting Your Hardware Together and Booting Up......................................................................................................................................17
CONFIGURE YOUR PCS ......................................................................................................................................................................................19
Overview............................................................................................................................................................................................................19
Configuring Windows 95, 98, and Millennium PCs ..........................................................................................................................................20

2
Configuring Windows 2000 PCs........................................................................................................................................................................23
Configuring Windows XP PCs...........................................................................................................................................................................24
CONFIGURE THE ROUTER................................................................................................................................................................................26
PRODUCT SPECFICATIONS...............................................................................................................................................................................30

3
Introduction
Overview
Thank you for purchasing the RCA DCW615 Cable Router. This cable router delivers the highest performance in
data over cable technology. Ideal for home and small business users, this easy-to-use communication device
offers reliable connectivity as well as remarkable data transfer rates – 100 times faster than a 56K dial-up modem.
Once the cable router is powered up, you are online to enjoy real-time 3D animation, video conferencing, and
perform other data intensive operations.
Features
DOCSIS Features
l Cable Modem (CM) is 1.0 and non 1.1 upgradeable
l Concatenation, Fragmentation, Payload Header suppression, IGMP and BPI and BPI Plus are
supported features for DOCSIS 1.1
l 4/16/32/64/128/256/512/1024 QAM Downstream Receiver
l 2/4/8/16/32/64/128/256 QAM Advanced TDMA Upstream Transmitter
l Both IP and LLC filters are supported
l Sixteen (16) destination address filters and 256 multicast/unicast DA filters

4
l Sixteen (16) independent upstream queues for multiple QoS support
USB Features
l OS (Win2K, XP, WinME) supported for USB interface
Wireless Features
l Supports at least one beacon/DTIM interval of within the range 20-1000κμs
l Supports reception of fragmented packets
l Supports reception of RTS and generation of CTS
Firewall Features
l tateful Packet Inspection against both Denial of Service and Distributed Denial of Service attacks
and will protect against the following:
Ø Reassembly attacks
Ø SYN Attack (SYN Flood)
Ø ICMP Flood
Ø Ping of Death Attack
Ø Tear Drop Attack
Ø IP Spoofing Attack
Ø LAND Attack
Ø Jolt
Ø Winnuke Attack (Netbios out-of-bound)

5
Ø OverDrop
Ø BONK, BOINK
Ø Blind Spoofing
Ø Echo/Chargen
Ø Storm
Ø Smurf Attack
Ø Mime Flood
l De-Militarized Zone (DMZ) which allows a computer on the LAN to expose all of its ports to the
WAN that are not otherwise filtered
l Logged Events which all security incidents will be logged
l Keyword blocking is based on keywords in a URL and can be specified by the user
NAT Requirements
The implementation of NAT must allow for specific port redirection. Listed below are applications
supported.
Ø FTP
Ø IRC
Ø H.323
Ø Quake
Ø Blizzard games
Ø Chat ALG

6
Ø Real Audio/Video
Ø CUSEEME
Ø Netmeeting
Ø MS Games but not with game zone
Ø DIABOLO II
Ø Activision Games
Ø PCAnywhere
Ø SSL
Ø NNTP
l Port Forwarding, incoming traffic that is not part of an existing connection will be dropped unless
the user specifies forwarding of the server to a host on the LAN
Virtual Private Network (VPN) Feature
l Having the ability to enable or disable PPTP and IPSec pass through

7
Preparations
System Requirements
„ One RJ-45 Broadband Internet connection, with a Cable Modem
„ One PC with an installed 10Mbps, 100Mbps, or 10/100 Mbps Ethernet card (optional)
„ TCP/IP network protocol for each PC
„ UTP network cable with RJ-45 connector
„ Microsoft Internet Explorer 4.0 or later, or Netscape Navigator 4.0 or later. (5.0 and 4.7, respectively, are
strongly recommended.)
„ Windows 95, 98, Millennium, NT 4.0, 2000 or XP
Installing a Network Card
If your system does not have an embedded LAN controller, you must install a network interface card. This is an
example of setup procedures for some systems:
1. Install an Ethernet card on your motherboard.
2. Power up your PC and follow the Add New Hardware Wizard’s instructions to install the driver. When asked to
restart your computer at the end of the installation, click Yes.
3. After restarting the system, right-click My Computer on the desktop, select Properties, click the Device
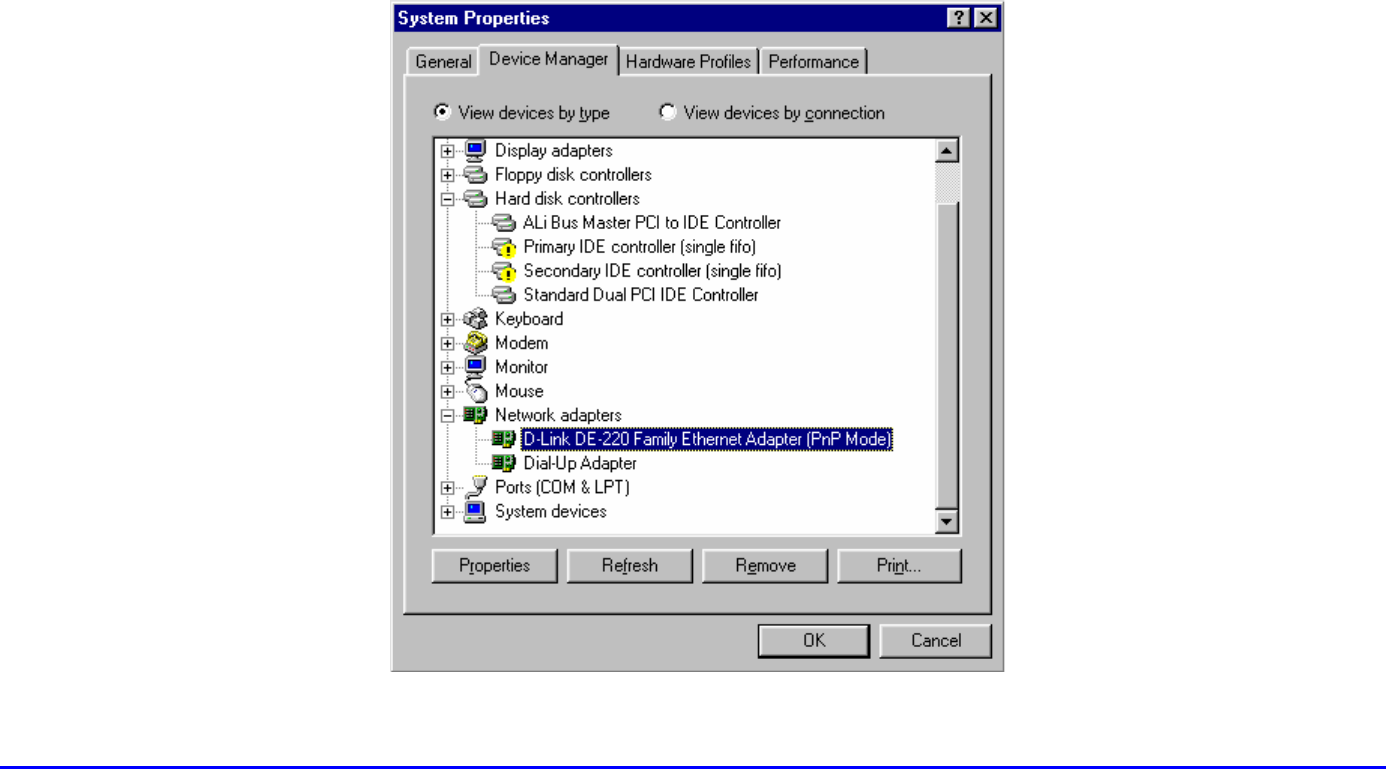
8
Manager tab, and then double-click Network adapters to confirm that the Ethernet driver is properly installed.
After the TCP/IP protocol is installed, restart your computer and consult the installation guide provided by your

9
cable operator to complete TCP/IP configurations for router.
Installing the TCP/IP Protocol
Follow these instructions to install the TCP/IP protocol on one of your PCs only after a network card has been
successfully installed inside the PC. These instructions are for Windows 95, Windows 98, and Windows Me. For
TCP/IP setup under Windows NT, 2000, and XP, see your Windows documentation.
1. Click the Start button. Choose Settings and then Control Panel.
2. Double-click on the Network icon to bring up your Network window. Select the Configuration tab.
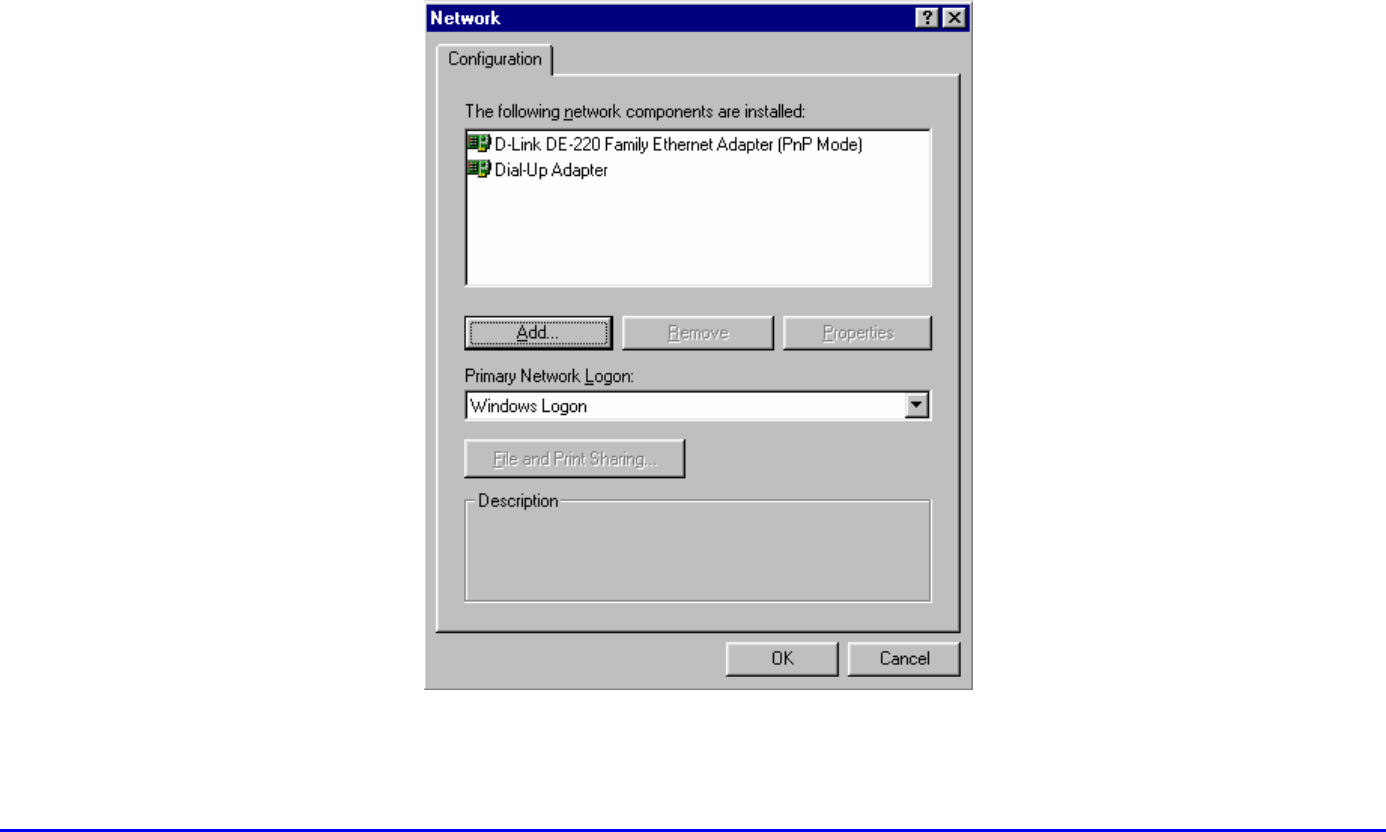
10
3. Click the Add button.

11
4. Double-click on Protocol.
5. Highlight Microsoft under the list of manufacturers.
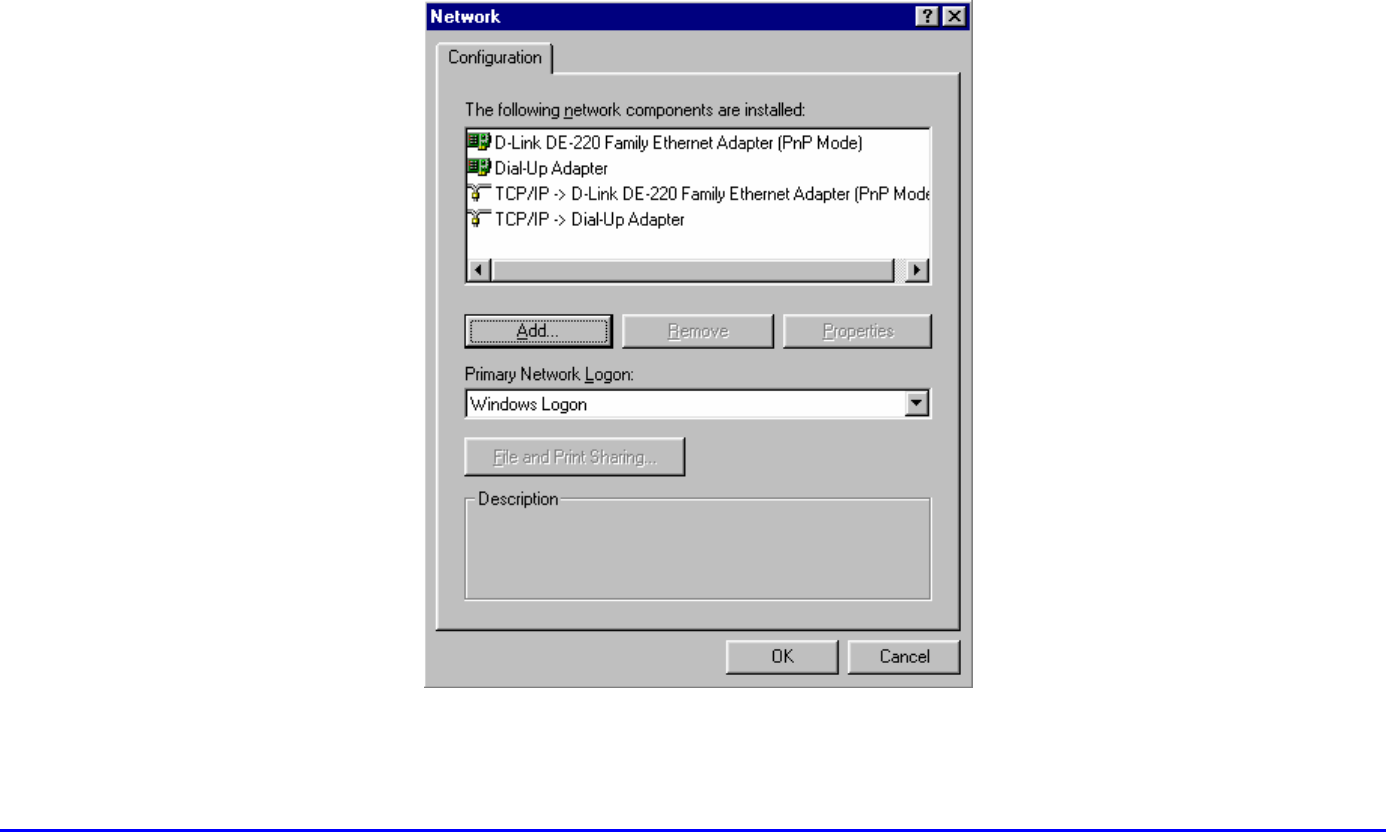
6. Find and double-click TCP/IP in the list to the right (see Figure below).
7. After a few seconds, the main Network window will appear. The TCP/IP Protocol should now be listed.
12
8. Click the OK button. Windows may ask for original Windows installation files. Supply them as needed, e.g.,
c:\windows\options\cabs, D:\win98, D:\win95, D:\win9x.

13
9. Windows will ask you to restart the PC. Click the Yes button.
The TCP/IP installation is now complete.
14
Using the Router
The Front Panel
Power Green. The power LED illuminates when the device is powered on.
Test Red. The Test LED illuminates when the device goes through its self-diagnosis mode during boot-up and
restart. It will turn off upon successful completion of the diagnosis.
The LAN indicators
USB Green. The USB LED illuminates when the USB port is properly connected to your PC.
HPNA Green. The HPNA LED illuminates when the HPNA port is plugged in and ready to transfer data.
WLAN Green. The WLAN LED illuminates when the Wireless PC card slide-in.
Link/Act Green. Steady on when link is up and blinking when data is following through this LAN port.
Full/Col Green. Steady on when it operates at full duplex mode. Off at half duplex mode. Blinking when collision is
occurred on this port.
Test
Power
USB
HPNA
WLAN
Link/Act
Link/Act
Full/Col
100/10
1 2 3 4
Ready
Receive
Send
Cable Modem

15
100/10 Green. Steady on when a successful 100/10Mbps connection is made through the corresponding port.
The WAN indicators
Ready Green. Steady on when cable is registered and ready to transfer data. Blinking when no downstream RF
carrier present.
Receive Green. Blinking when user data going through the cable modem to PC present.
Send Green. Blinking when user data going through the cable modem from PC present.
The Rear Panel
Power The Power Port is where you will connect the included AC Power adapter.
HPNA The Home PNA Port (RJ-11 connector).
USB The USB Port. You can connect the Router to PC using USB line.
HPNA
USB
1 2 3 4
Power
Wireless PC Card
Cable
Reset

16
Ports 1-4 These four LAN (Local Area Network) ports are where you will connect networked devices, such as PCs,
print servers and any other Ethernet devices you want to put on your network. If Port 4 is being used, the
Uplink Port will not work.
Cable The Cable Line Port (Coaxial Copper).
Wireless The Wireless Network PC Card is inserted into this slot to enable the wireless features. This slot is not
PC Card hot swappable.
Reset Briefly pressing the Reset Button will refresh the Router’s connections, potentially clearing any jammed
links. Pressing the Reset Button and holding it in for a few seconds will clear all of the Router’s data and
restore the factory defaults. This should be done only if you are experiencing heavy routing problems,
and only after you have exhausted all of the other troubleshooting options. By resetting the Router, you
run the risk of creating conflicts between your PCs’ actual IP Addresses and What the Router thinks their
IP Addresses should be. You may be forced to reboot the entire system(s). If your Router locks up, simply
power it down for 5 seconds by removing the power cable from the Router’s Power Port. Leaving the
power off for too long could result in the loss of network connections.

17
Connect the Router
Overview
Unlike a simple hub or switch, the Router’s setup consists of more than simply plugging hardware together. You
will have to configure your networked PCs to accept the IP addresses that the Router assigns them (if applicable),
and you will also have to configure the Router with setting(s) provided by your Internet Service Provider (ISP).
The installation technician from your ISP should have left the setup information with you after installing your
broadband connection. If not, you can call your ISP to request the data.
Once you have the setup information you need for your specific type of Internet connection, you can begin
installation and setup of the Router.
Connecting Your Hardware Together and Booting Up
1. Before you begin, make sure that all of you hardware is powered off, including the Router, PCs, hubs, and
switches.

18
2. Connect one end of an Ethernet cable to one of the LAN ports (labeled 1, 2, 3, or 4) on the back of the
Router and the other end to a standard port on a network device, e.g., a PC, print server, hub, or switch.
Repeat the above step to connect more PCs or network devices to the Router.
3. Connect the cable from your ISP to the Cable port on the Router’s back panel.
4. Connect the power-supply cable to the Power port on the rear of the Router, then plug the supplied AC
power cable into a power outlet and power on the RCA DCW615.
• The Power LED on the front panel will light up green as soon as the power adapter is connected
properly.
• The Diag LED will light up red for a few seconds when the Router
goes through its self-diagnostic test. The LED will turn off when the self-test is complete.
5. Power on the network devices that connected to the RCA DCW615.
The Hardware Installation is complete. Continue to the next page to configure your PCs with RCA
DCW615.

19
Configure Your PCs
Overview
The instructions in this chapter will help you configure each of your computer to be able to communicate with the
Router.
To do this, you need to configure your PC’s network settings to obtain an IP (or TCP/IP) address automatically
(called DHCP). Computers use IP addresses to communicate with each other across a network or the Internet.
Find out which operating system your computer is running, such as Windows 95, 98, Millennium, NT 4.0, 2000, or
XP. You will need to know which operating system your computer is running. You can find out by clicking the Start
button and then going to the Settings option. Then click Control Panel, and then double-click the System icon. If
your Start menu doesn’t have a Settings option, you’re running Windows XP. Click the Cancel button when done.
You may need to do this for each computer you are connecting to the Router.
Important: These instructions apply only to Windows 95, 98, Millennium, 2000, or XP machines. For TCP/IP
setup under Windows NT, see your Windows manual. By default Windows 98, 2000, Me, and XP has TCP/IP
installed and set to obtain an IP address automatically.

20
The next few pages tell you, step by step, how to configure your network settings based on the type of Windows
operating system you are using. Make sure that an Ethernet card or adapter has been successfully installed in
each PC you will configure. Once you’ve configured your computers, continue to “Configure the Router”
Configuring Windows 95, 98, and Millennium PCs
1. Go to the Network screen by click the Start button. Click Settings and then Control Panel. From there,
double-click the Network icon.
2. On the Configuration tab, select the TCP/IP line for the applicable Ethernet adapter. Do not choose a
TCP/IP entry whose name mentions DUN, PPPoE, VPN, or AOL. If the work TCP/IP appears by itself, select
that line. (If there is no TCP/IP line listed, refer to “Appendix D: Installing the TCP/IP Protocol.) Click the
Properties button.

21
3. Click the IP Address tab. Select Obtain an IP address automatically.
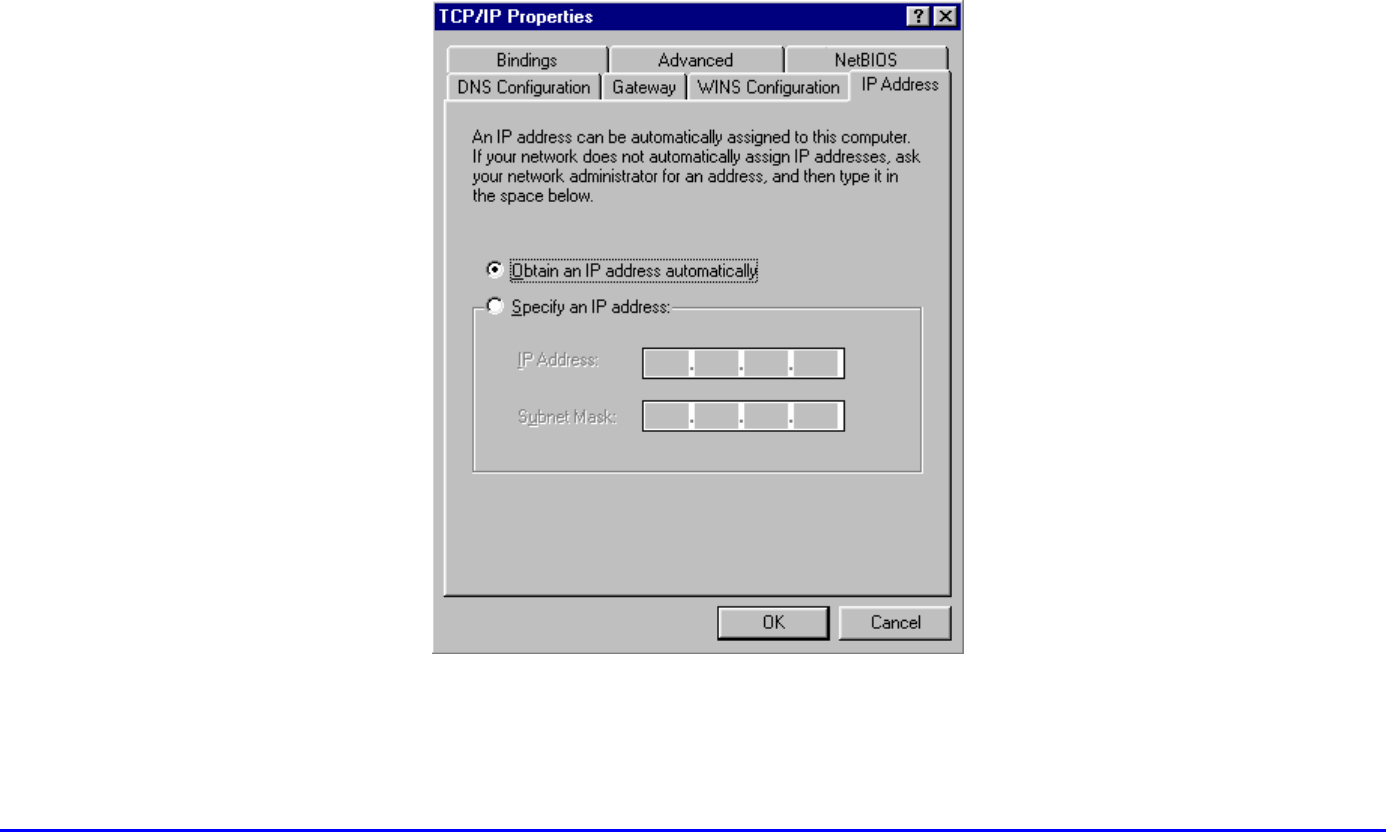
22
4. Now click the Gateway tab to ensure that the Installed Gateway field is left blank. Click the OK button.
5. Click the OK button again. Windows may ask you for the original Windows installation disk or additional files.

23
Supply them by pointing to the correct file location, e.g., D:\win98, D:\win9x, c:\windows\options\cabs, etc. (if
“D” is the letter of your CD-ROM drive).
6. Windows may ask you to restart your PC. Click the Yes button. If Windows does not ask you to restart,
restart your computer anyway.
Go to “Configure the Router.”
Configuring Windows 2000 PCs
1. Go to the Network screen by clicking the Start button. Click Settings and then Control Panel. From there,
double-click the Network and Dial-up Connections icon.
2. Select the Local Area Connection icon for the applicable Ethernet adapter (usually it is the first Local Area
Connection listed). Double-click the Local Area Connection. Click the Properties button.
3. Select Internet Protocol (TCP/IP), and click the Properties button.
4. Select Obtain an IP address automatically. Once the new window appears, click the OK button. Click the
OK button again to complete the PC configuration.

24
5. Restart your computer.
Go to “Configure the Router.”
Configuring Windows XP PCs
The following instructions assume you are running Windows XP with the default interface. If you are using the
Classic interface (where the icons and menus look like previous Windows versions), please follow the instructions
for Windows 2000.
1. Go to the Network screen by clicking the Start button and then Control Panel. From there, double-click the
Network Internet Connections icon and then the Network Connections icon.
2. Select the Local Area Connection icon for the applicable Ethernet adapter (usually it is the first Local Area
Connection listed). Double-click the Local Area Connection. Click the Properties button.
3. Select Internet Protocol (TCP/IP), and click the Properties button.
4. Select Obtain an IP address automatically. Once the new window appears, click the OK button. Click the
OK button again (or the Close button if any settings were changed) to complete the PC configuration.

25
5. Restart your computer.
Go to “Configure the Router.”
26
Configure the Router
This chapter will show you how to configure the Router to function in your network and gain access to the Internet
through your Internet Service Provider (ISP). The RCA DCW615’s Web-based Utility.” Your ISP may require the
use of a Host Name and Domain Name. You will need the setup information from your ISP. If you do not have this
information, please contact your ISP before proceeding.
The instructions from your ISP will tell you how to set up your PC for Internet access. Because you are now using
the Router to share Internet access among several computers, you will use the setup information to configure the
Router instead of your PC. You only need to configure the Router once using the first computer you set up.
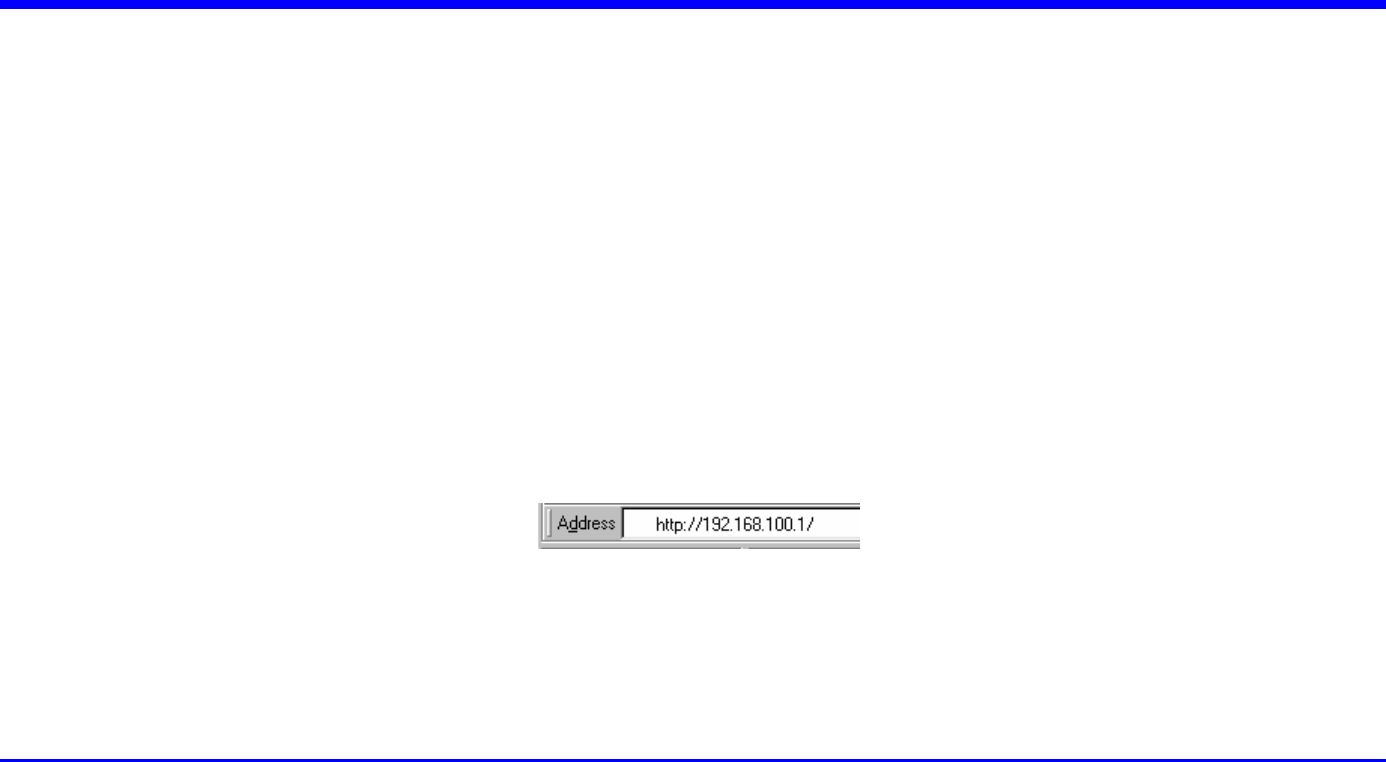
1. Open your web browser. (It is all right if you get an error message at this point. Continue following these
directions,) Enter http://192.168.100.1 in the browser’s Address field. Press the Enter key.
2. An Enter Network Password window, shown in below figure, will appear (For Windows XP users, the screen
may look different). Leave the User Name field empty, and enter admin in lowercase letters in the Password
field (admin is the default password). Then, click the OK button.

27
3. The Router configuration screen will appear. Press Basic tab and then select Setup menu. Based on the
setup instructions from your ISP, you may need to provide the following information.
LAN IP Address: The value for the Router’s IP address is shown on the Setup screen. The default value is
192.168.100.1. Leave these settings alone.

28
Host Name and Domain Name: These fields allow you to provide a host name and domain name for the
Router. These fields are usually left blank. If requested by your ISP, complete these two fields.
Static IP Address and IP Mask: If your ISP says that you are connecting through a static or fixed IP
address from your ISP, you should enter the field of Default Gateway, Primary DNS and/or Secondary
DNS also.
Spoofed MAC Address: You can give a spoofed MAC Address to hide your real MAC address.
4. The Router also provided Security and DHCP settings in Basic tab. You can change the access priviledge
and restore factory default of the Router. Also, you can enable/disable the DHCP Server function.
IMPORTANT: If you have previously enabled any Internet-Sharing Proxy server software on any of your
PCs, you must disable it now.
Some examples of Internet-sharing software are Internet LanBridge, Wingate, ICS, and Sygate. To disable
your Internet-sharing software:
• If you are running Netscape Navigator: Click Edit >> Preference >> Advanced >> Proxies > and click
Direct Connection to the Internet.
• If you are running Internet Explorer v5 or better, click Start >> Settings >> Control Panel >> Internet
Options >> Connections >> LAN Settings. Remove the checks from all three boxes. Click OK to

29
continue.
Also, you must disable any Internet log-on software (such as Ivasion Winpoet or Enternet 300) and any
firewall software (such as ZoneAlarm and Watchdog) on all of your PCs.
5. If you have already done so, click the Apply button to save your settings. Close the web browser.
6. Restart your computers so that they can obtain the Router’s new settings.
30
Product Specfications
WAN Cable Interface F type female 75ohm
LAN 4 10/100 BASE-T
1 USB 1.1 Connector Type B
1 HomePNA2.0 RJ-11
1 IEEE 802.11b (2.4 GHz Unlicensed ISM radio band)
CPU 140 MHz MIPS32-ISA
SDRAM 128Mb
Flash ROM 64Mb
System Power 12V/700mA
Power Supply 12V/1.25A
EMI/EMC FCC Class B, CE Class B
Operation Requirement Operating Temp. 0ºC to 40ºC (32ºF to 104ºF)
Storage Temp. -20ºC to 70ºC (-4ºF to 158ºF)
Operating Humidity 10% to 85% Non-Condensing
Storage Humidity 5% to 90% Non-Condensing
Dimensions 186 x 155 x 63 (mm)