ASUSTeK Computer P525 Quad-Band Smart Phone User Manual revised users manual 2
ASUSTeK Computer Inc Quad-Band Smart Phone revised users manual 2
Contents
revised users manual 2
81
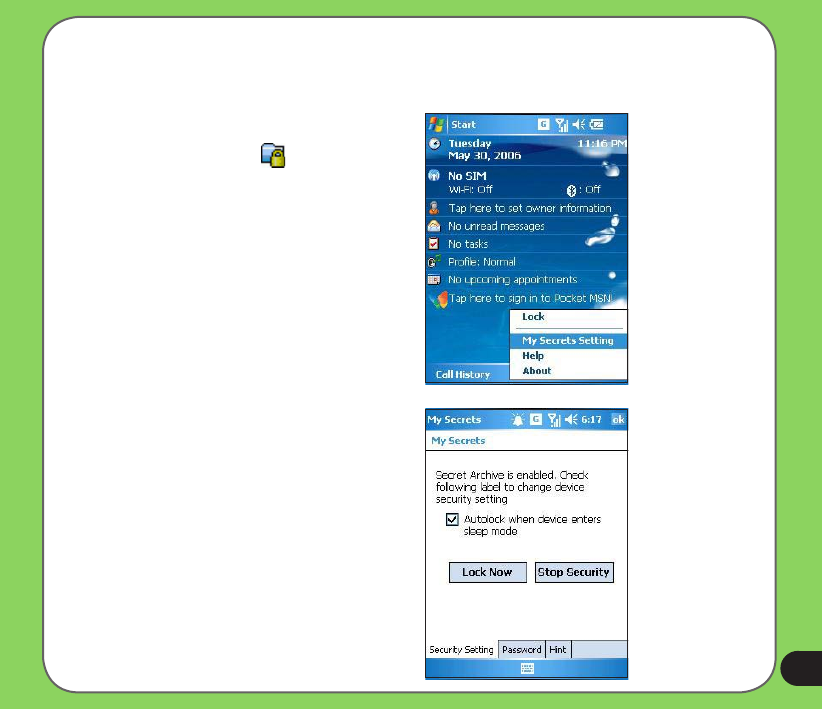
Disabling My Secrets
To disable My Secrets:
1. From Today screen, tap Start >
Programs > My Secrets or
Tap the My Secrets icon on the
Today screen and from the shortcut
menu, tap My Secrets Setting.
2. Select Security Setting tab, then tap
Stop Security.
82
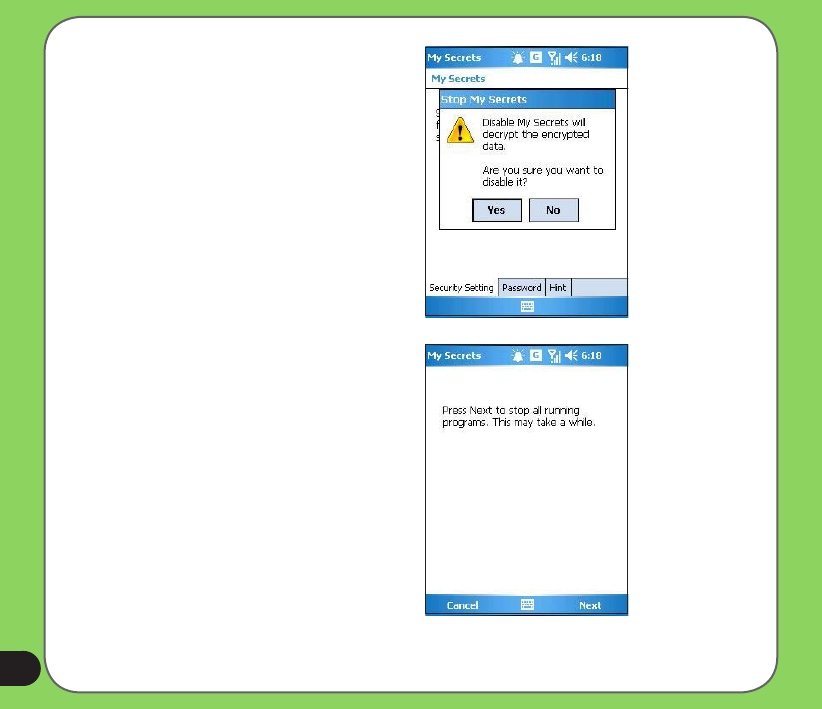
3. When prompted, tap Yes to conrm.
4. Tap Next to stop all running programs.

83
5. Tap Next to start decrypting les in My
Secrets folder.
6. Tap Done when nished.

84

85
Multimedia features
Chapter
• Using the camera
• Viewing pictures and video
6
86
The built-in two-megapixel camera allows you to take photos and record audio/video clips.
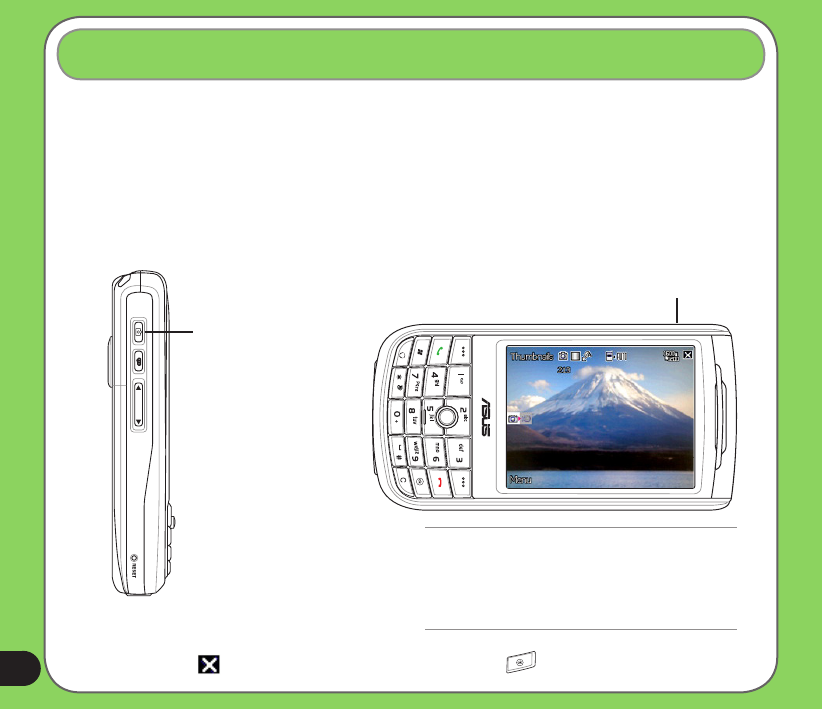
Launching the camera
To start using the camera:
• Tap Start > Programs > Pictures and Videos > Camera icon or
• Press the Camera button on the left side of your device.
Using the camera
Camera button
To exit the Camera:
• Tap the exit icon on the camera screen or press the button.
NOTE:
• By default, the preview screen is set to landscape.
• After launching the camera, your device is set to
camera mode by default.
• In camera mode, the camera button function as
shutter button.
Camera/shutter button
87
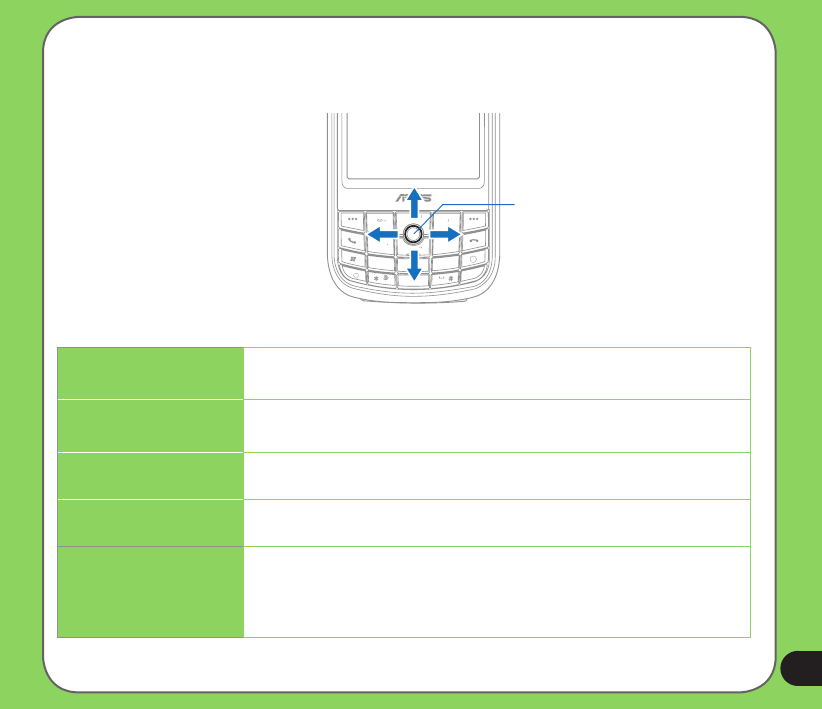
Joystick functions in camera mode
The following describes the 5-way joystick functions in Camera mode:
ㄅㄉㄚ
ㄍㄐㄞ
ㄆㄊㄛ
ㄇㄋㄜ
ㄏㄔ ㄠㄡ
ㄈㄌㄝ
ㄎㄑㄟ
ㄔㄘㄣㄧ
ㄕㄙㄤㄨ
ㄖㄥㄩ
ㄓㄗㄢㄦ
12
abc
def
ghi
jkl
mno
pq r s
tuv
wxyz
3
456
78
0
9
+
ok
C
ENTER/ACTION Button
Forward
Up
Down
Backward
Up In camera preview mode, press for video mode.
In the camera or video option menu, press to select menu items.
Down In video preview mode, press for camera mode.
In the video or camera options menu, press to select menu items.
Backward In camera mode and if the resolution is not 1600x1200, press to
zoom in.
Forward In camera mode and if the resolution is not 1600x1200, press to
zoom out.
Enter/Action button Press to take picture or start recording video. Press again to stop
recording.
Press to execute a selected menu item or to display more menu
items.

88
Available capture modes
Your device camera can be set to two capture modes:
• Camera mode - Camera mode allows you to take photos, and save them to your device
or MiniSD. You can also congure the camera to match an environment, set picture size,
select magnication, adjust the picture quality, apply effects, and modify other advanced
settings.
• Video mode - Video mode enables you to record audio/video clips. Like in camera
mode, it also allows you to select the magnication, set the video size, enable macro
mode, apply some effects, select target storage, and modify advanced video settings.
Supported formats
Using the camera mode or video mode, the images or video clip captured are stored in the
following formats:
• Still image (Camera mode) - JPEG (.jpg)
• Video (Video mode) - 3GP (.3gp), MPEG-4 (.mp4)
89
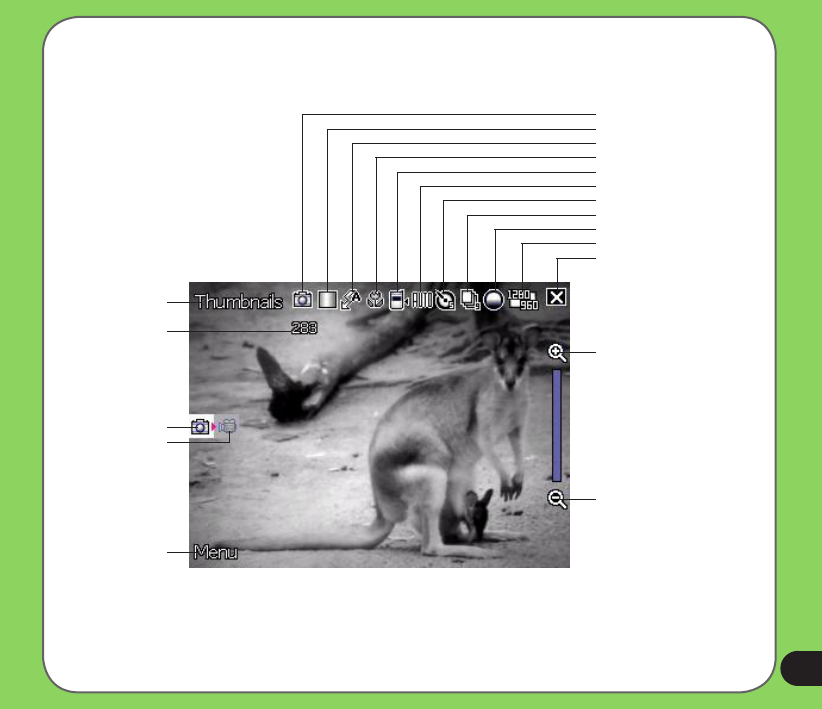
Camera mode screen
The following describes the screen icons in Camera mode:
Capture mode icon
Picture quality icon
Flash light status
Macro mode status
Default storage icon
Scene mode icon
Timer icon
Burst mode status
Effects icon
Picture resolution
Tap to close camera
Tap to zoom in
Tap to zoom out
Tap to launch Pictures
and Videos
Tap to launch
camera menu
Number of .
available shots
Capture modes:
Camera mode
Video mode
90
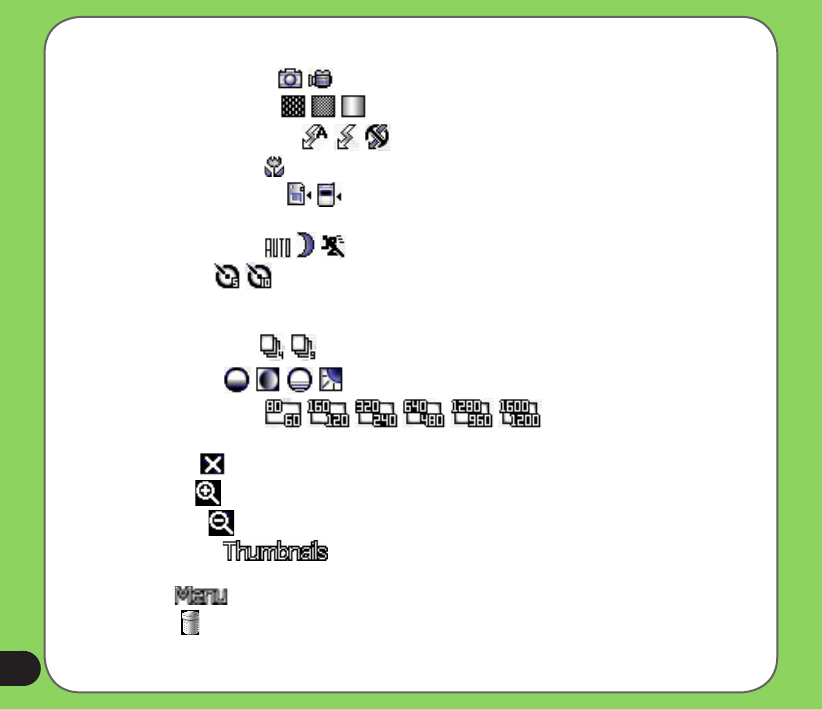
Camera mode icons
• Capture mode icon [ / ] - indicates the current capture mode.
• Picture quality icon [ / / ]- indicates the picture quality used.
• Flash light status icon [ / / ] - indicates the camera ash status.
• Macro mode icon [ ] - this icon appears when the camera is in macro mode.
• Default storage icon [ / ] - indicates default storage for captured images and
videos clips.
• Scene mode icon [ / / ] - indicates the scene mode used.
• Timer icon [ / ] - when the camera timer is enabled (5 seconds or 10 seconds), the
corresponding timer icon appears. When you press the shutter button or the joystick to take
a picture, the count down begins and picture is taken after the time set.
• Burst mode icon [ / ] - indicates the number of frames in burst mode.
• Effects icon [ / / / ] - indicates the effects used.
• Picture resolution [ / / / / / ] - shows the resolution used.
When set to 1600x1200 resolution, the zoom in/zoom out function is disabled.
• Exit icon [ ] - tap to exit camera.
• Zoom In [ ] - tap to zoom in view of subject on screen.
• Zoom Out [ ] - tap to zoom out view of subject on screen.
• Thumbnails [ ]- tap to launch Pictures and Video application and preview
your images in thumbnails.
• Menu [ ] - tap to launch camera menu options.
• Delete [ ] - tap to delete picture.
• Remaining shots information - shows the remaining, available shots of pictures based on
the current settings.
91
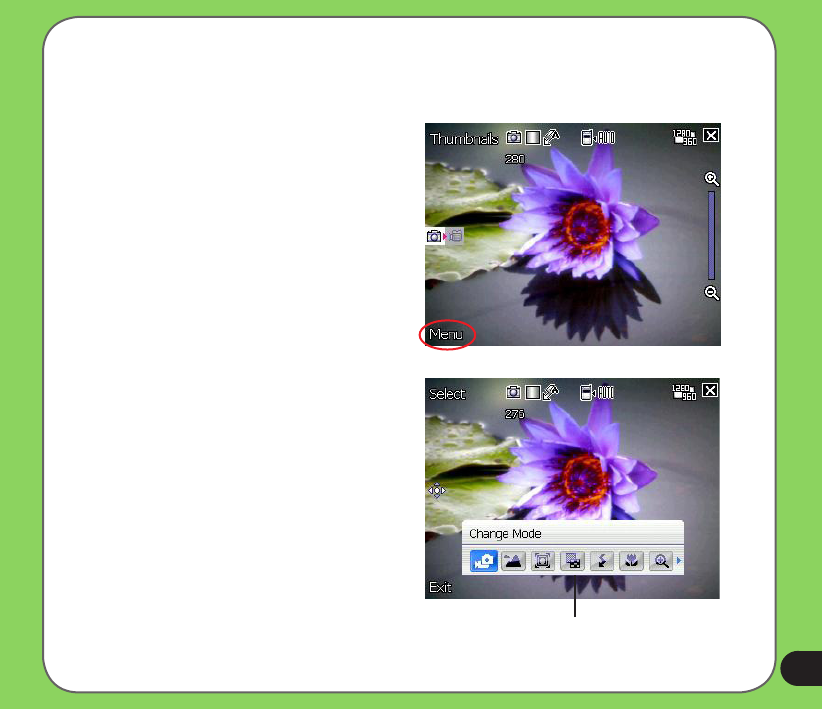
Camera options menu
The camera options menu allows you to change various camera and picture settings.
To launch options menu:
1. Tap Menu from the camera screen.
2. From the shortcut menu, tap an icon to
display contents.
Camera options
shortcut menu
92
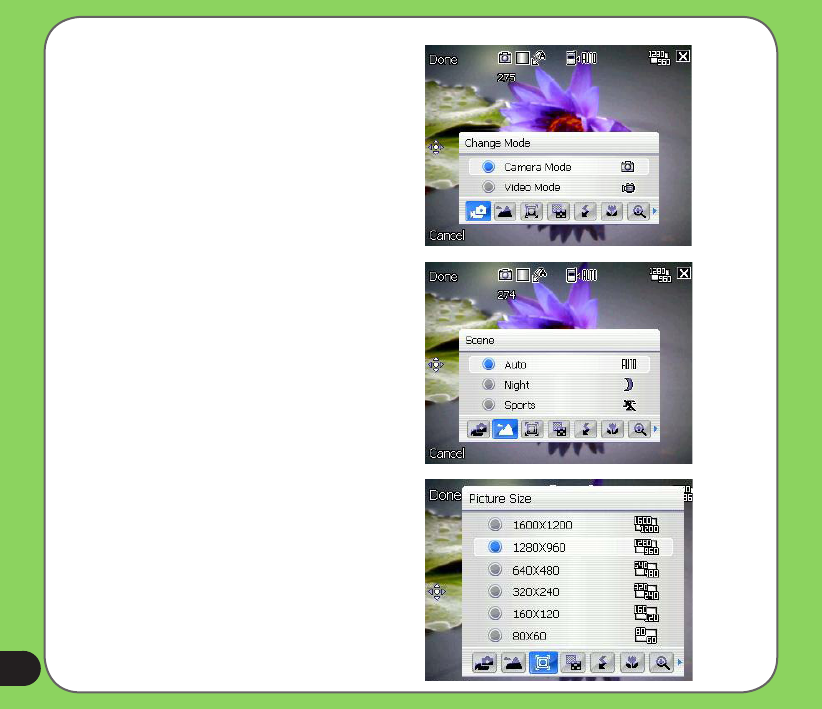
Change Mode
The Change Mode option allows you to set
capture mode into Camera or Video mode.
Scene
The Scene option allows you to select
presets appropriate for a night scene or
sports event. Select Auto to use best setting
for any scene.
Picture Size
Allows you to set the frame size of picture.
93
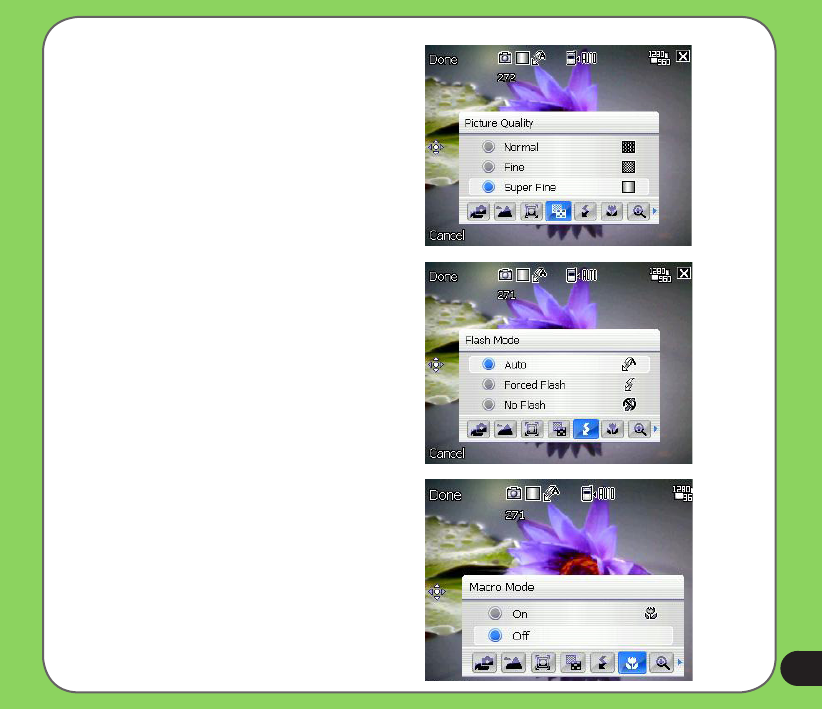
Picture Quality
This option provides three picture quality
presets: Normal, Fine, and Super Fine. The
picture quality is set to Super Fine by default.
Flash Mode
This option allows you to change the ash
mode to suit a variety of lighting situations.
Macro Mode
Enables or disables the macro photography
feature.
94
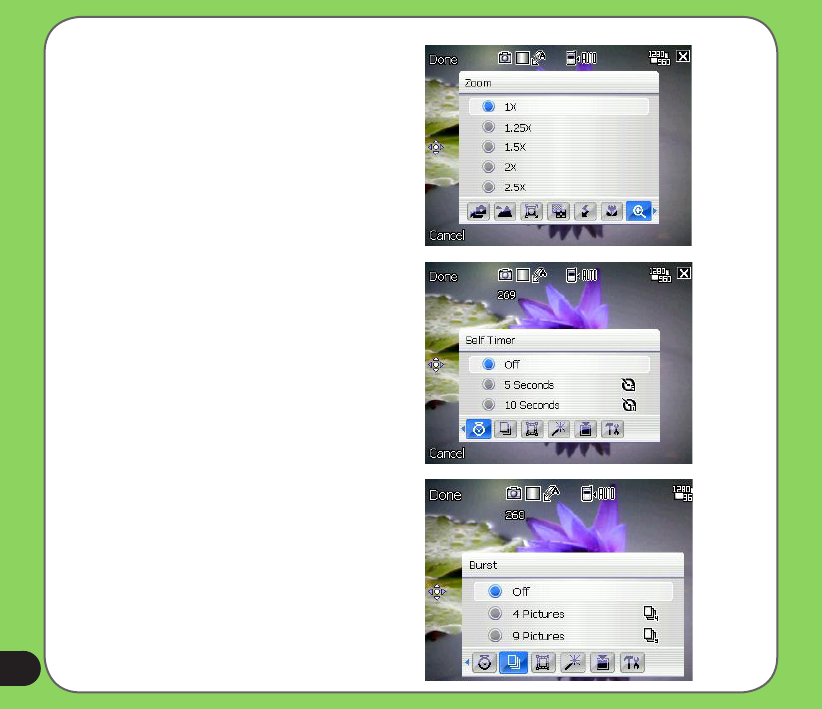
Zoom
Allows you to change the maximum
magnication allowed.
Self-Timer
Sets the delay of shutter release to 5 or 10
seconds after you have pressed the
camera/shutter button..
Burst
Allows you to take 4 or 9 pictures in
succession by pressing the camera/shutter
button only once.
95
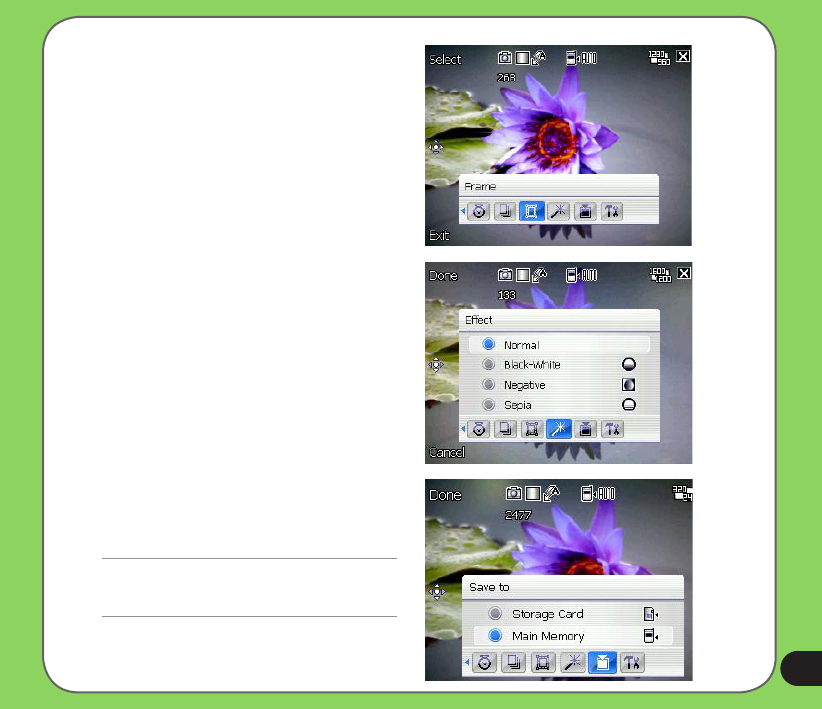
Frame
Allows you to set a frame.
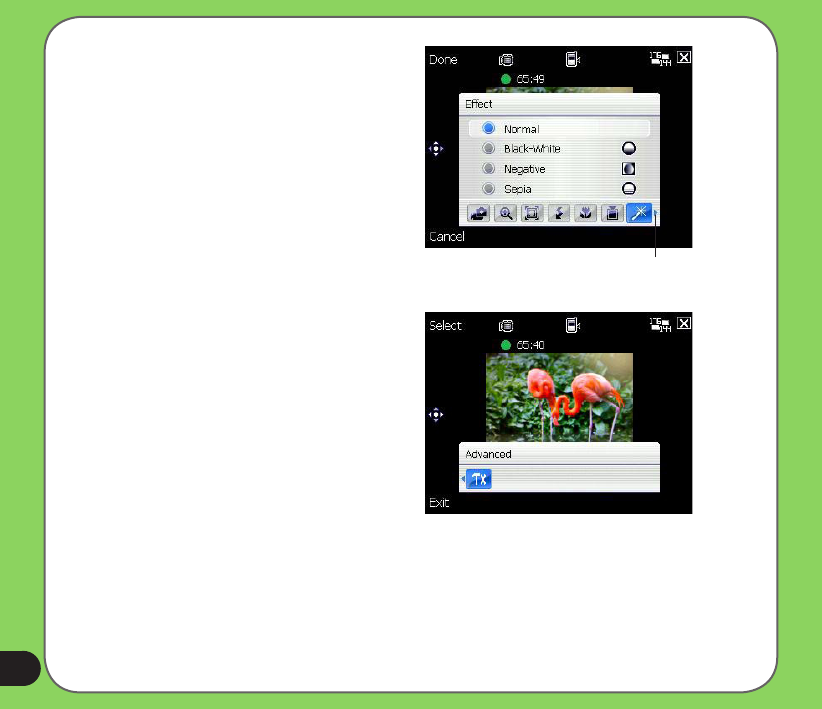
Effect
The Effect option allows you to apply some
effects to the subject. Select from the
following conguration options: Black-White,
Negative, and Sepia. Set to Normal for no
effect.
Save to
Allows you to select the default storage for
captured pictures.
NOTE:
Prepare a MiniSD card before setting default storage
to Storage Card.
96
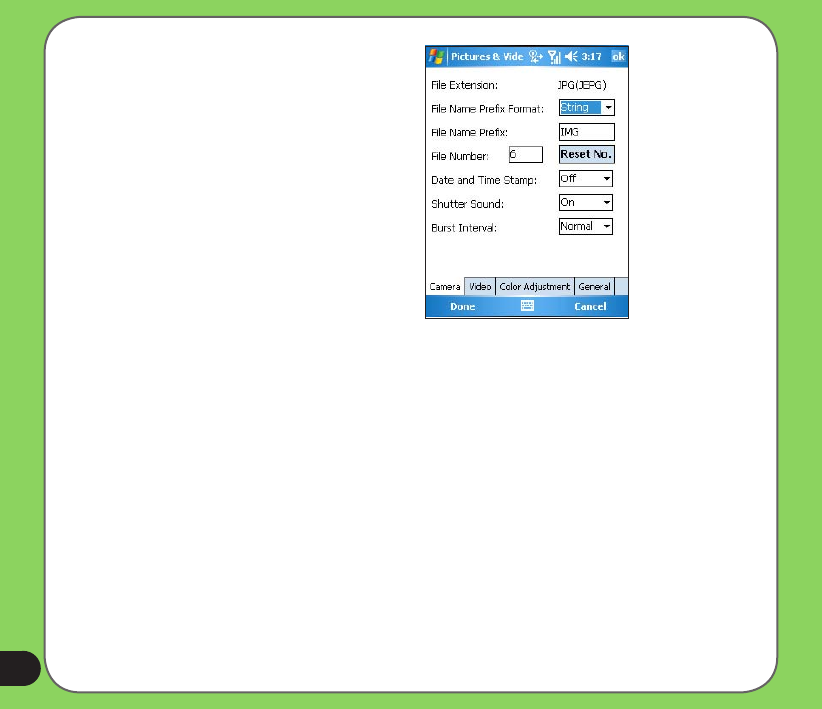
Advanced
This option allows you to set the following:
- Filename prex format
- Filename prex
- File number
- Date and time stamp
- Shutter sound
- Burst interval
97
Taking photos
After launching the camera, your device is set to Camera mode by default. If set otherwise,
tap Menu > Change Mode > Camera Mode then tap Done.
You can also set to camera mode by tapping the camera mode icon on the screen.
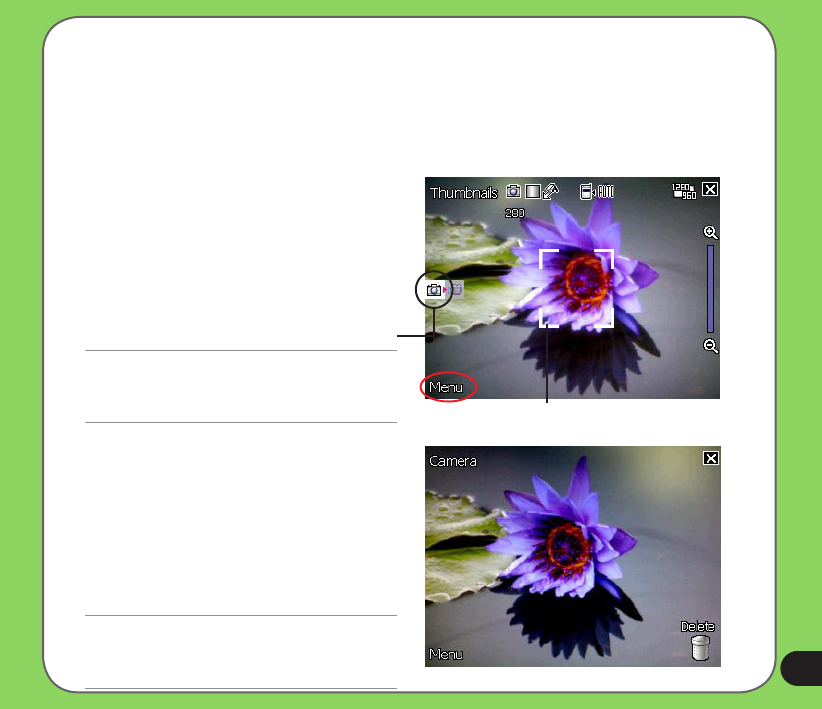
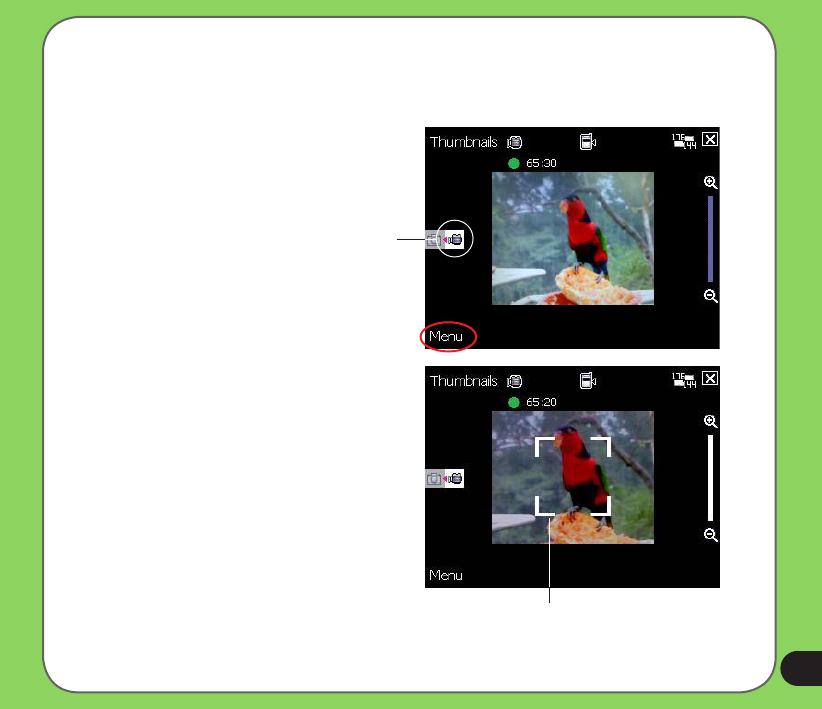
To take a photo:
1. Aim device to your subject then
half-press camera/shutter button to
auto-focus on subject.
While camera/shutter button is
half-pressed, you can see the
auto-focus frame on the center of the
screen. The frame turns green indicating
the auto-focus is nished.
IMPORTANT:
The auto-focus range is effective only from 8~80 cm, if
you want to skip this feature, press the joystick action
button to take a picture.
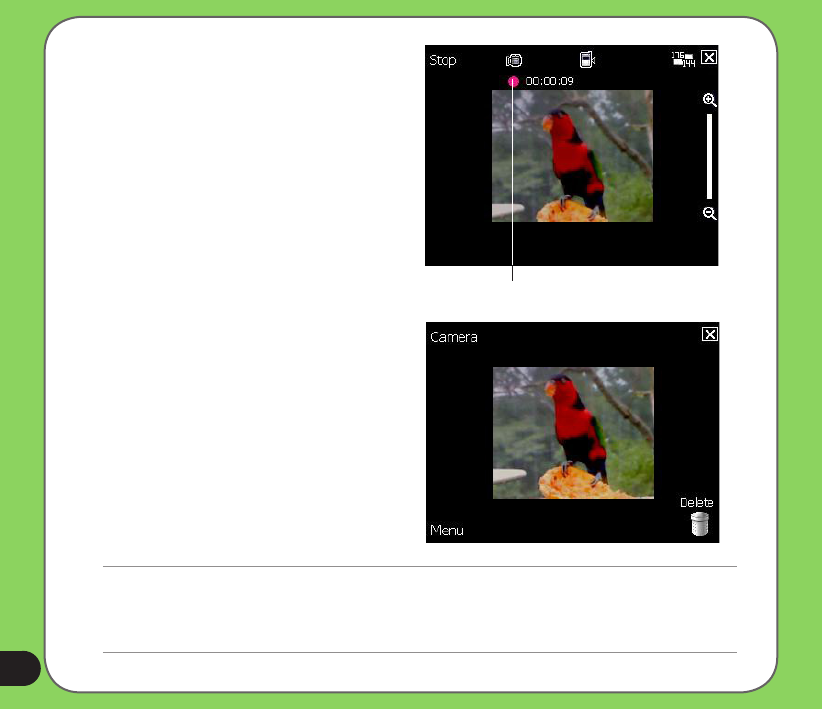
2. Full-press the camera/shutter button or
press the joystick action button to capture
image.
3. Tap Camera or press the joystick action
button again to go back to camera
screen.
4. Repeat steps 1 to 3 to take more photos.
NOTE:
The image is automatically saved to the default storage
location and can be previewed using the Pictures and
Videos application.
Camera mode icon
Auto-focus frame
98
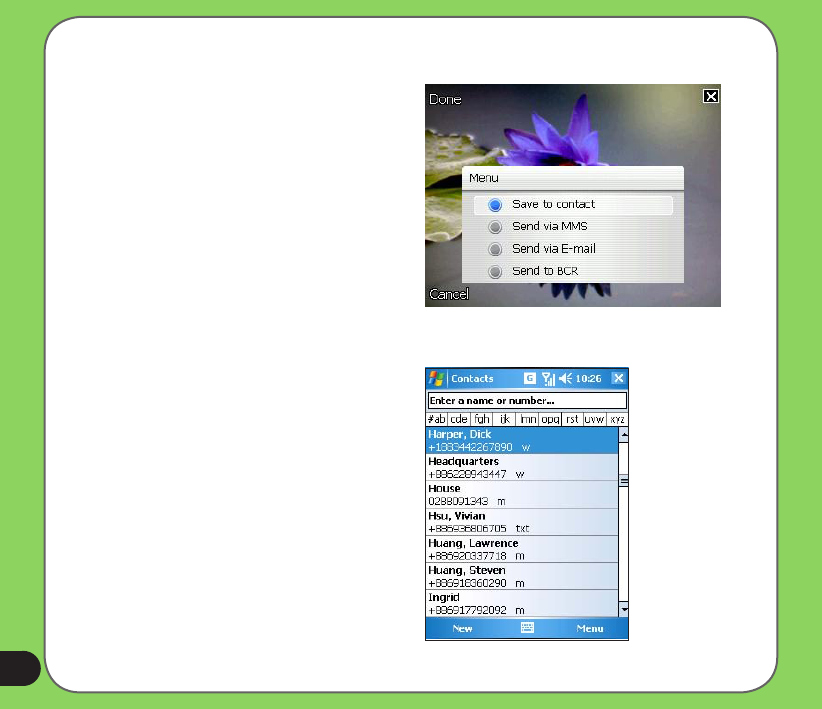
Other options
Tap Menu to access the following options:
• Save to Contact
• Send via MMS
• Send via e-mail
• Send via BCR (Business Card Reader)
Save to Contact
To save to contacts:
1. Tap Menu then tap Save to contact.
2. From the Contact screen, select
contact where you want the image
saved then tap Select.
99
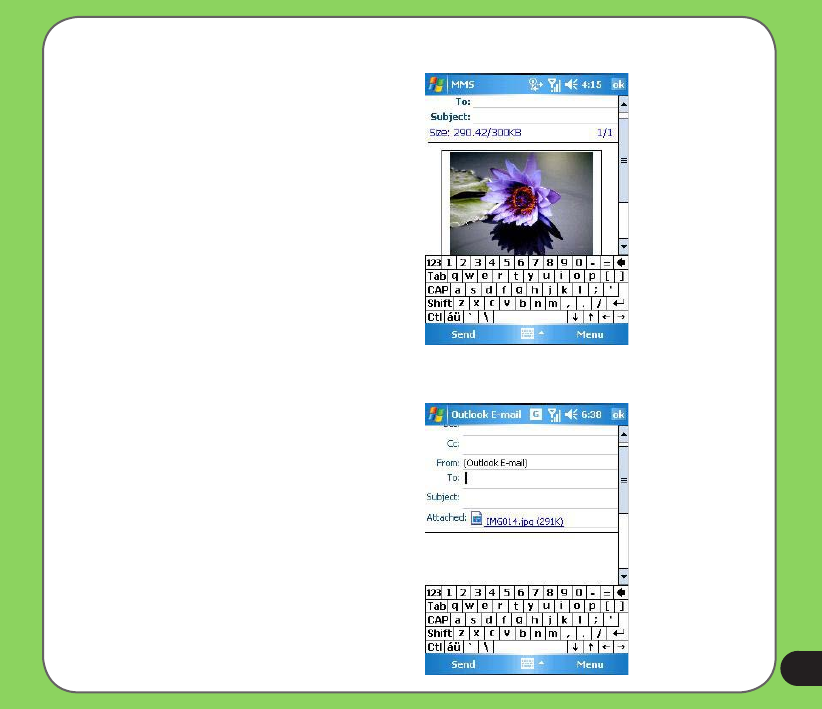
Send via MMS
To send image via MMS:
1. Tap Menu then tap Send via MMS.
2. Key in recipient or tap To to display
contact list.
3. Key in subject.
4. Tap Send.
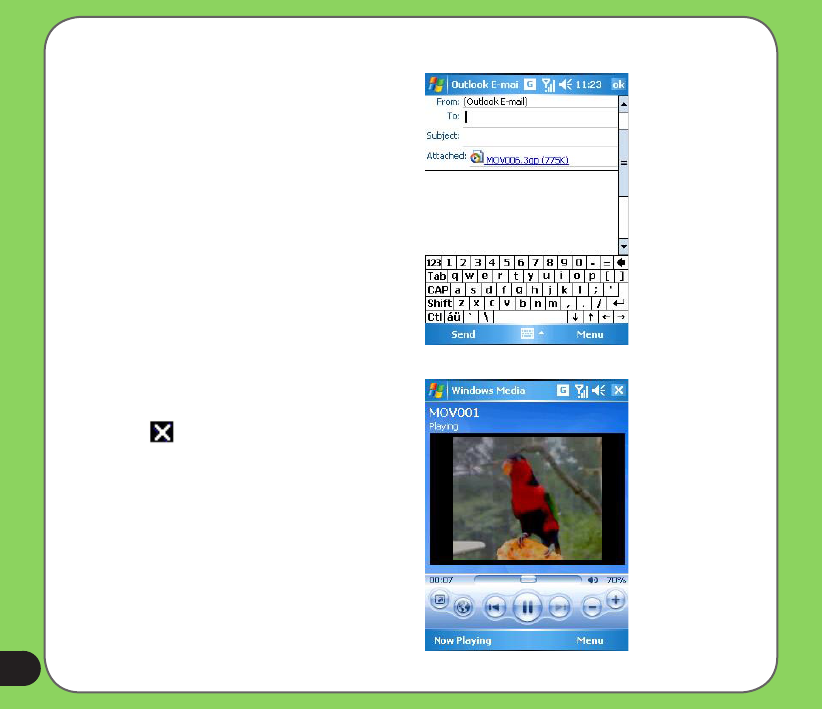
Send via Email
To send image via electronic mail:
1. Tap Menu then tap Send via E-mail.
2. Key in recipient or tap To to display
contact list.
3. Key in subject.
4. Key in message.
5. Tap Send.
100
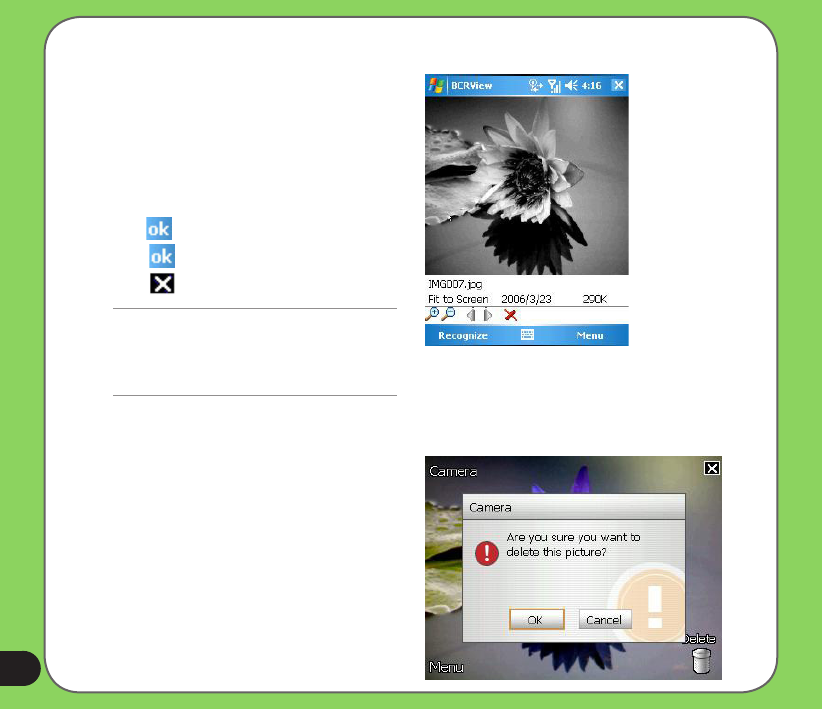
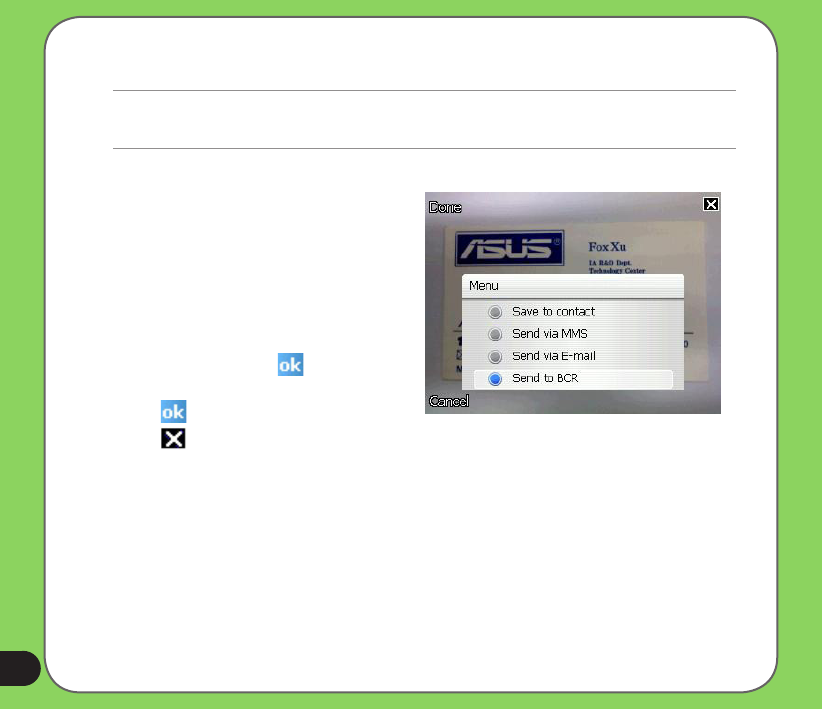
Send to BCR
To send image to BCR:
1. Tap Menu then tap Send to BCR.
2. From the BCRView screen, tap
Recognize.
3. When nished, the information details
are displayed onscreen. Tap Save to
save the information to Contacts then
tap on the conrmation screen.
4. Tap again to close application.
5. Tap to exit.
Delete image
To delete image:
1. Tap Delete icon.
2. Tap OK from the conrmation
message.
NOTE:
• Send picture to BCR only if you used the camera
to take picture of a business card.
• Refer to section “Using the Business Card
Reader” on page 108 for details.
101
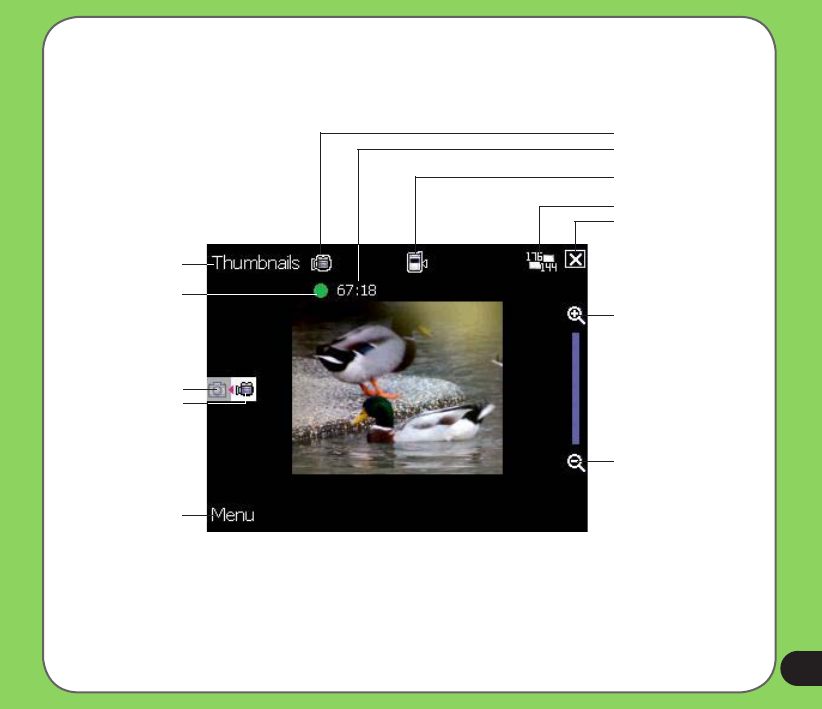
Video mode screen
The following describes the screen icons in Video mode:
Capture mode icon
Remaining video .
recording time
Default storage icon
.
Video resolution
Tap to close camera
Tap to zoom in
Tap to zoom out
Tap to launch Pictures
and Videos
Capture mode icons:
Camera mode
Video mode
Tap to launch .
video menu
Recording indicator
Green: Ready.
Red: Recording

102
Video mode icons
• Capture mode icon [ / ] - indicates the current capture mode.
• Flash light status icon [ ] - this icon appears when the ash light is enabled.
• Macro mode icon [ ] - this icon appears when the video is in macro mode.
• Default storage icon [ / ] - indicates default storage for captured video clips.
• Effects icon [ / / / ] - indicates the effects used.
• Picture resolution [ / / ] - shows the resolution used.
• Exit icon [ ] - tap to exit video.
• Zoom In [ ] - tap to zoom in view of subject on screen.
• Zoom Out [ ] - tap to zoom out view of subject on screen.
• Thumbnails [ ]- tap to launch Pictures and Video application and play
your video.
• Menu [ ] - tap to launch video menu options.
• Delete [ ] - tap to delete video.
• Remaining video recording time information - shows the remaining, video recording
time based on the current settings.
103
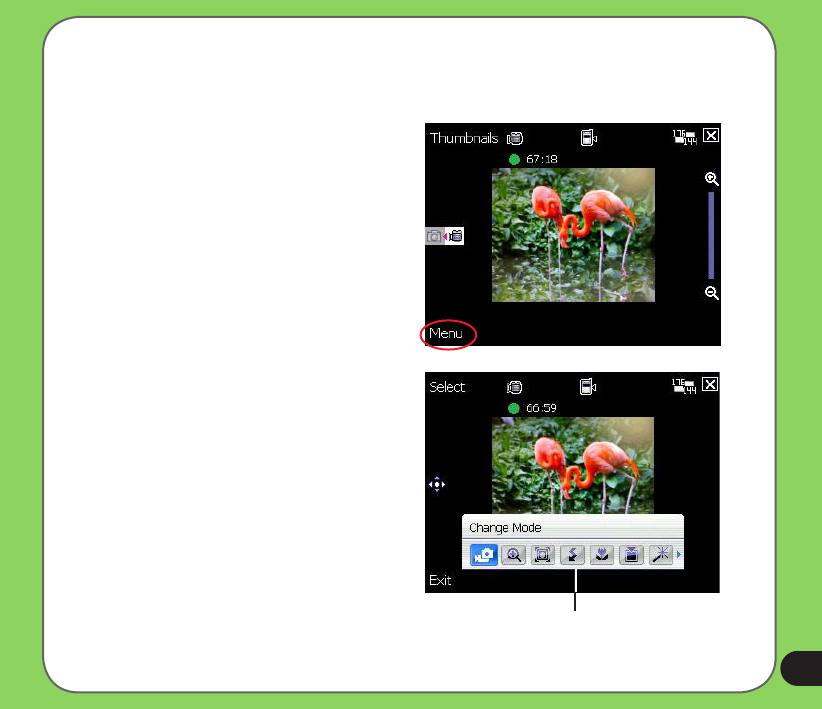
Video options menu
The video options menu allows you to change various video and playback settings.
To launch video options menu:
1. Tap Menu from the video screen.
2. From the shortcut menu, tap an icon to
display contents.
Video options .
shortcut menu
104
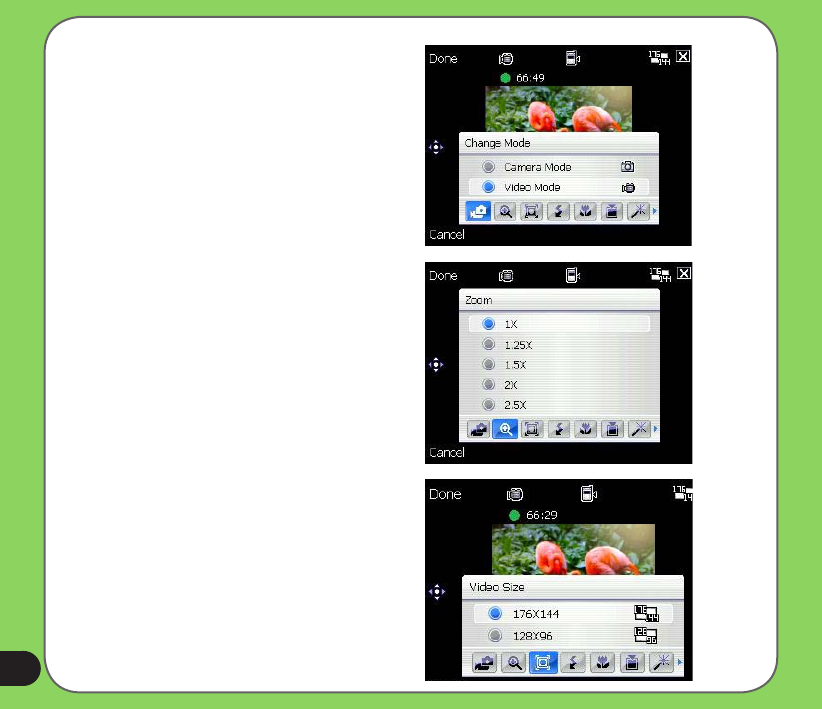
Change Mode
The Change Mode option allows you to set
your device into Camera or Video capture
mode.
Zoom
Allows you to change the maximum
magnication allowed.
Video Size
Allows you to set the frame size of video.
105
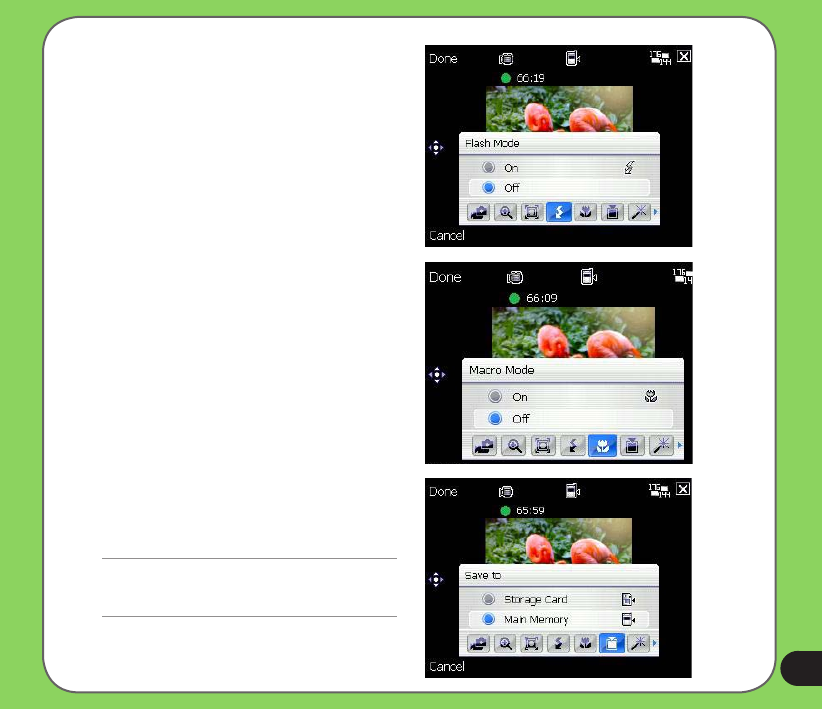
Flash Mode
This option allows you to change the ash
mode to suit a variety of lighting situations.
Macro Mode
Enables or disables the macro photography
feature.
Save to
Allows you to select the default storage
location for captured pictures.
NOTE:
Prepare a MiniSD card before setting default storage
to Storage Card.
106
Effect
The Effect option allows you to apply some
effects to the subject. Select from the
following conguration options: Black-White,
Negative, and Sepia. Set to Normal for no
effect.
Advanced
This option allows you to set the following:
- Video letype
- Filename prex format
- Filename prex
- File number
- Enable or disable audio when recording
Tap to display .
more options
107
Recording videos
Set the device to video capture mode to record videos.
To set video mode:
To record video:
1. Aim device to your subject then
half-press camera/shutter button to
auto-focus on subject.
While camera/shutter button is
half-pressed, the auto-focus frame
appears on the center of the screen.
Video mode icon
• Tap Menu > Change Mode > Video Mode
then tap Done.
• You can also set the video mode by tapping
the video mode icon on the screen as
shown.
Auto-focus frame
108
2. Full-press the camera/shutter button to
begin recording.
The record indicator turns from green
to red while video is recording.
3. Full-press the camera/shutter button
again to stop recording.
NOTE:
• The video clip is automatically saved to the default storage location.
• Use Windows Media Player Mobile to playback video clip in your device.
• Use Apple® QuickTime™ player, if you wish to play video clips in your computer. You can download QuickTime™
installer from www.apple.com/quicktime.
4. Tap Camera to go back to camera
screen.
5. Repeat steps 1 to 4 to record another
video.
Record indicator
109
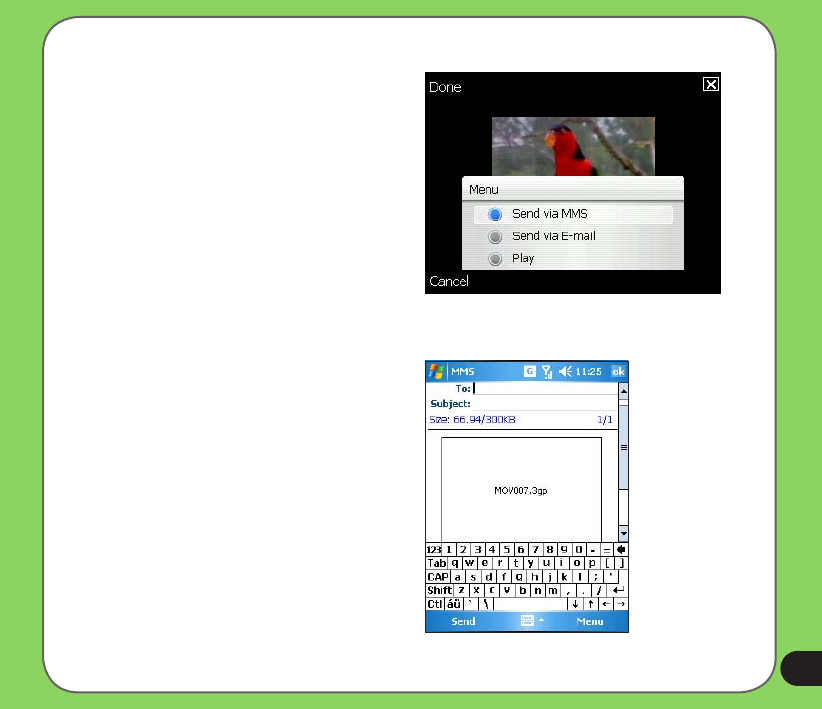
Send via MMS
To send video via MMS:
1. Tap Menu then tap Send via MMS.
2. Key in recipient or tap To to display
contact list.
3. Key in subject.
4. Tap Send.
Other options
Tap Menu to access the following options:
• Send via MMS
• Send via E-mail
• Play
110
Send via Email
To send video via electronic mail:
1. Tap Menu then tap Send via E-mail.
2. Key in recipient or tap To to display
contact list.
3. Key in subject.
4. Key in message.
5. Tap Send.
Play
To play video:
1. Tap Menu then tap Play.
2. Tap to exit.
111
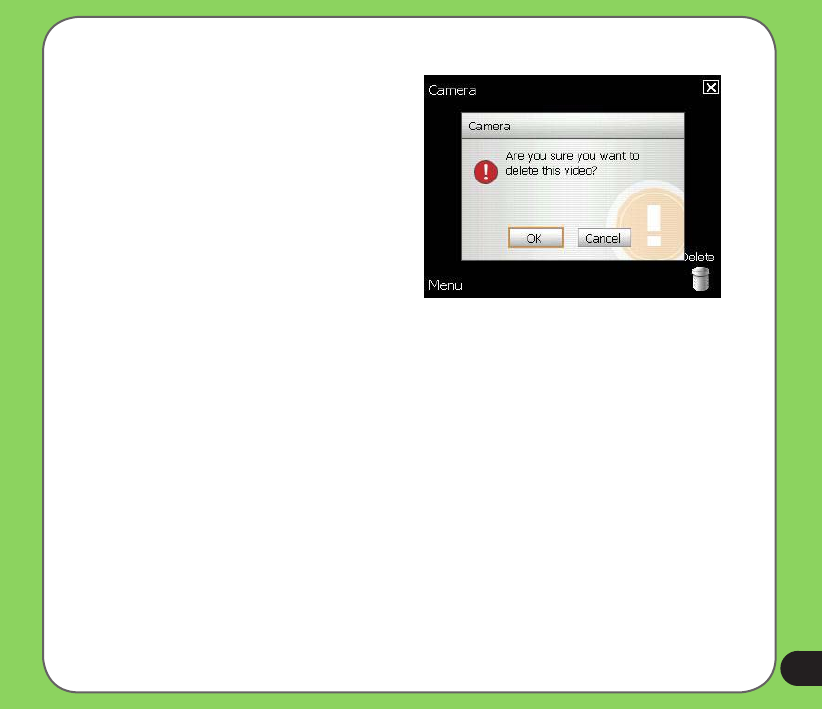
Delete
To delete video:
1. Tap Delete icon.
2. Tap OK from the conrmation
message.

112
Use the Pictures and Video Application to preview stored images and playback video clips.
Viewing pictures and video
To view pictures and video:
1. Tap Start > Programs > Pictures and Videos.
2. Tap the picture or video clip you want to see.
• To view pictures or launch video clips stored in MiniSD card, tap the folder list (labeled
My Pictures), and tap MiniSD Card.
• To view pictures stored in My Pictures folder on your device, tap My Pictures then tap
picture thumbnail.
• To playback video clips in My Videos folder on your device, tap My Videos then tap
video thumbnail.
Viewing pictures and video

113
Other features
Chapter
• Business Card Reader
• Setting ring tone
• Wake-up setting
• Mode switcher
• System information
• Restoring factory default settings
7
114
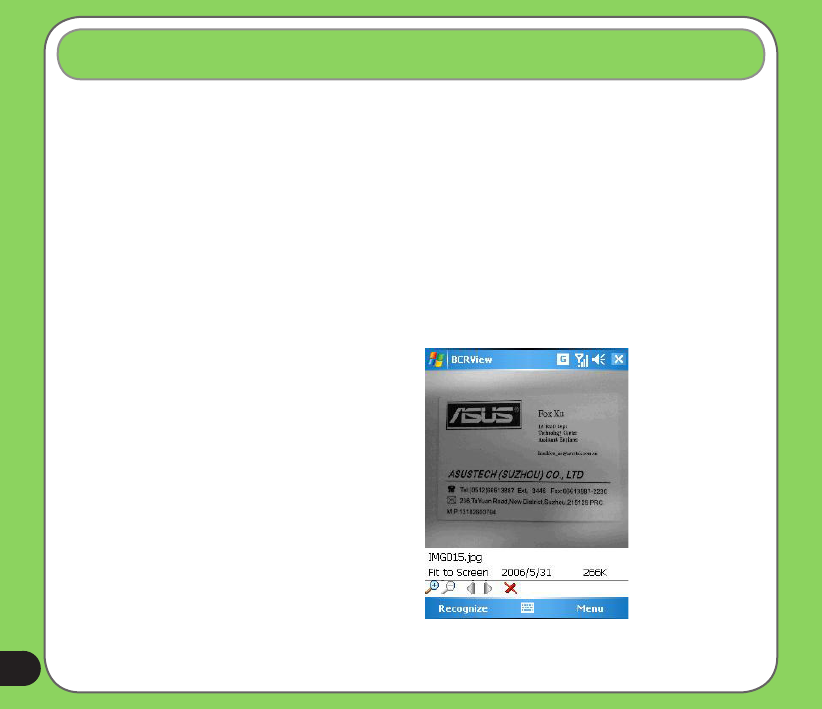
The Business Card Reader is a character recognition tool that scans and identies the
printed text on a business card then automatically categorizes the information and sends it
to your Contact list. Using a picture le of a business card, Business Card Reader analyzes
the appearance of the details in the business card and converts them to editable text in your
Contact list.
Using the Business Card Reader
Business Card Reader
To process a saved business card picture le:
1. Tap Start > Programs > Biz Card Recognition.
2. Tap Menu > Select Picture.
3. Tap the picture of the business card
that you want to process.
4. From the BCRView screen, tap
Recognize.
115
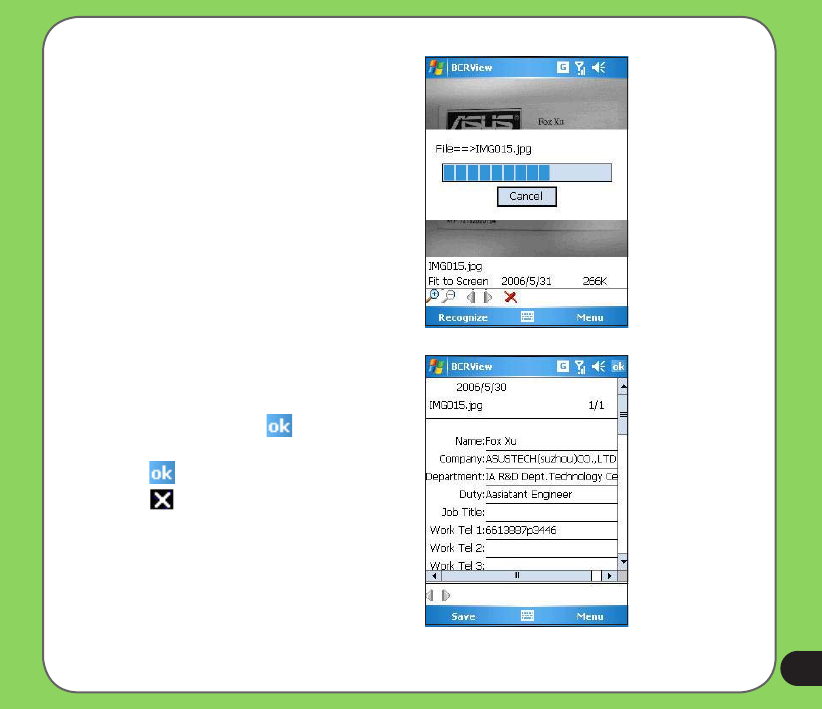
The process may take a few seconds.
5. When nished, the information details
are displayed onscreen.
Tap Save to save the information
in Contacts then tap on the
conrmation screen.
6. Tap again to close application.
7. Tap to exit.
116
To process a business card using the camera:
IMPORTANT:
• Make sure to clean the camera lens and provide enough lighting before taking pictures for BCR.
• Keep a “1280x960” resolution when taking pictures for BCR.
1. Launch the camera and take a clear picture of the business card.
2. From the camera menu, tap Menu
then select Send to BCR.
3. From the BCRView screen, tap
Recognize. The process may take a
few seconds.
4. When nished, the information
details are displayed onscreen.
Tap Save to save the information
in Contacts then tap on the
conrmation screen.
5. Tap again to close application.
6. Tap to exit.
117
With P525 you can add and congure your favorite music as your phone ring tone. You can
easily congure your favorite song our sound as your ring tone with the following compatible
audio formats: .mp3, .wav, .wma, and .mid.
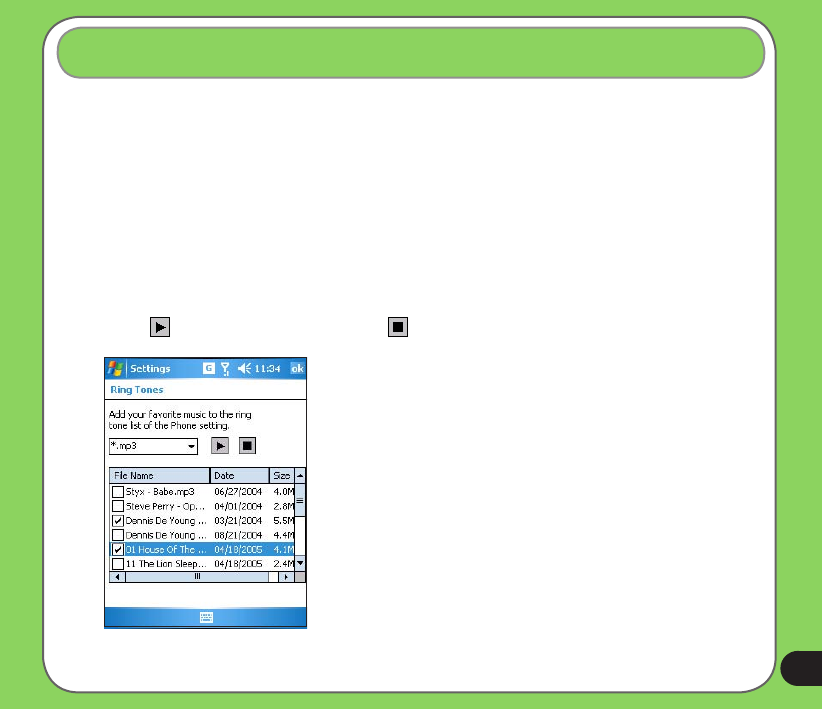
Adding ring tone to selection
To add ring tone to the selection category under phone setting:
1. Tap Start > Settings > Personal > Ringtone icon.
2. Select a specic le extension from the list box.
3. Tap to check a ring tone le that you want to add.
Tap to try ring tone sound and tap to stop.
Setting ring tone
118
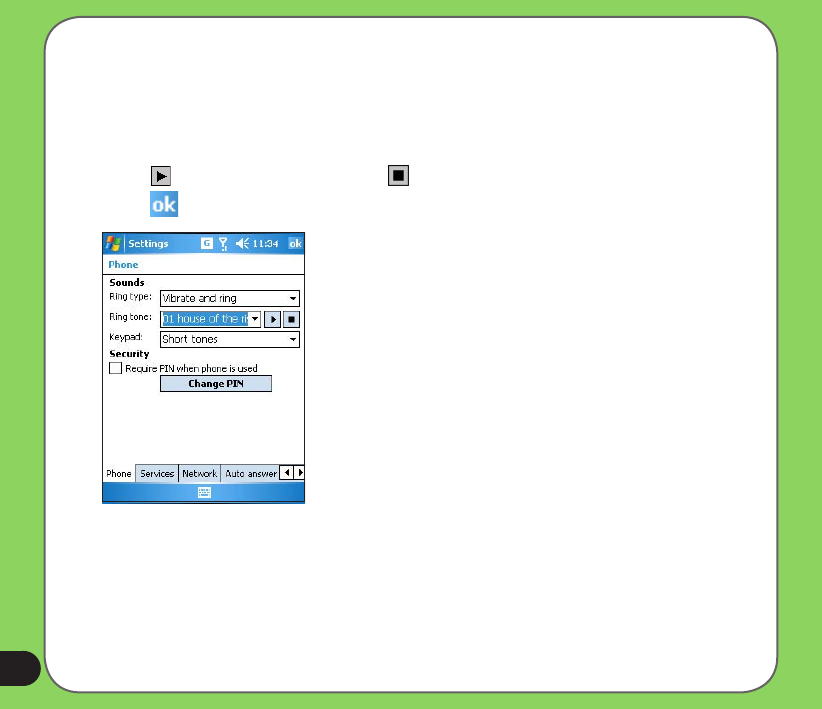
Setting ring tone
To set the ring tone:
1. Tap Start > Settings > Personal > Phone icon.
2. Select a ring tone from the Ring tone: list box. The songs or sounds that you added as
ring tone appears on this list along with the default ring tones that came with the device.
Tap to try ring tone sound and tap to stop.
3. Tap when nished.
119
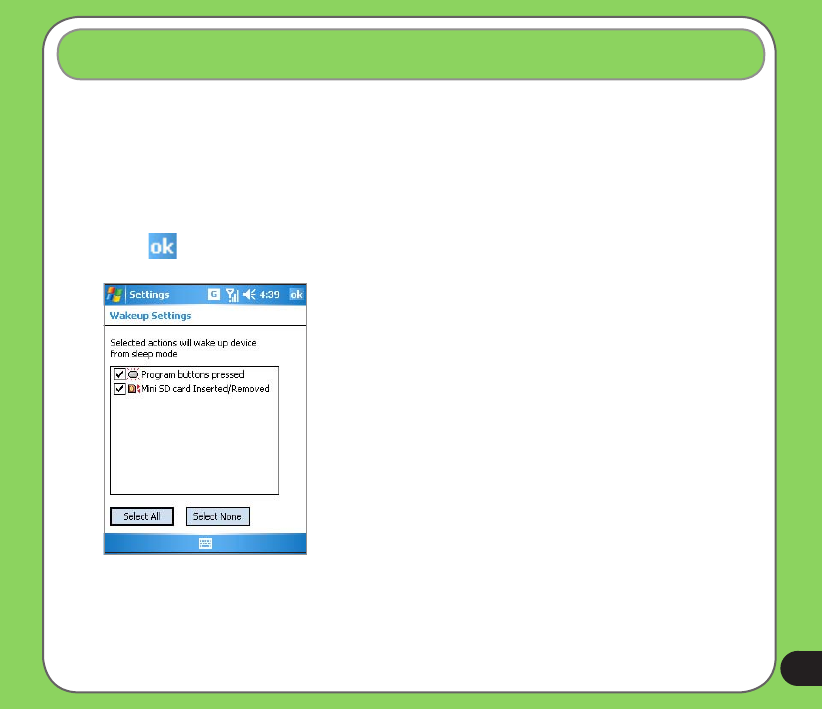
You can set the wake-up actions whenever your device is in sleep mode.
To set the wake-up action:
1. Tap Start > Settings > Personal > Wakeup source icon.
2. Select from the available wake-up actions.
Tap Select All to select all actions or tap Select None to deselect all available actions.
3. Tap when nished.
Wake-up setting
120
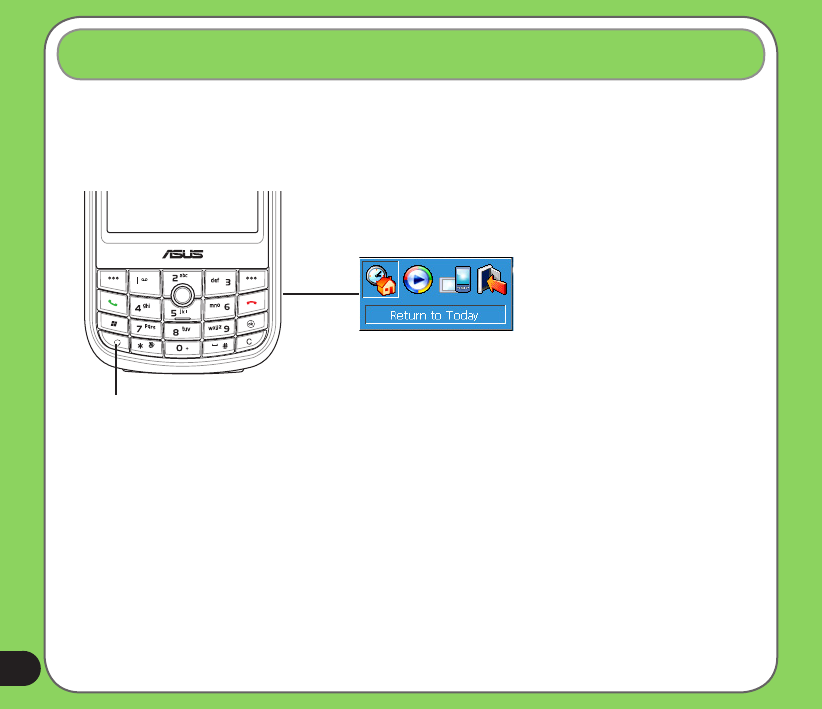
Mode switcher allows you to easily switch between applications and tasks.
To use the mode switcher, press the mode switcher button on your device keypad. Press again
to shift between applications.
Mode switcher button
You can congure the mode switcher and dene the switcher type or select items to appear in
the mode switcher pop-up menu.
To dene the switcher type:
1. Tap Start > Settings > System > Mode Switcher icon.
2. Tap the radio buttons to select the Switcher type.
3. Tap and drag the handle bar to set the switch Waiting Time.
To select items to appear in the switcher pop-up menu:
1. Tap Start > Settings > System > Mode Switcher icon.
2. Tap the Items tab.
3. Select the items by tapping the check boxes.
Mode switcher
Mode switcher pop-up menu
121
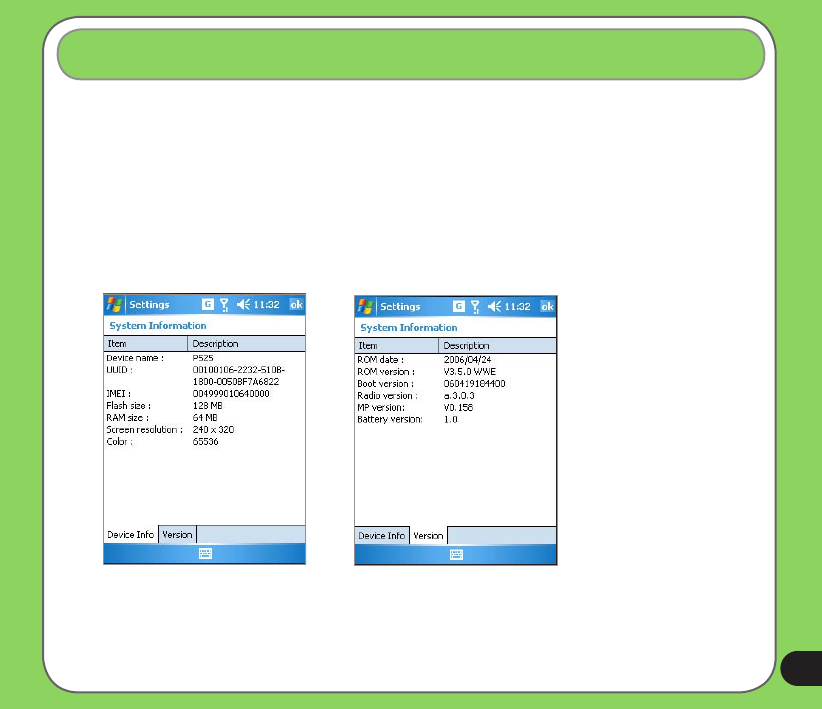
The System Information contains important device information including the current device
settings and version.
To launch the System Information:
1. Tap Start > Settings > System > System Information icon.
2. Tap the Device Info tab for device hardware information.
3. Tap Version tab to display the ROM, Boot, Radio, MP and Battery version.
System information
Device Info Version
122
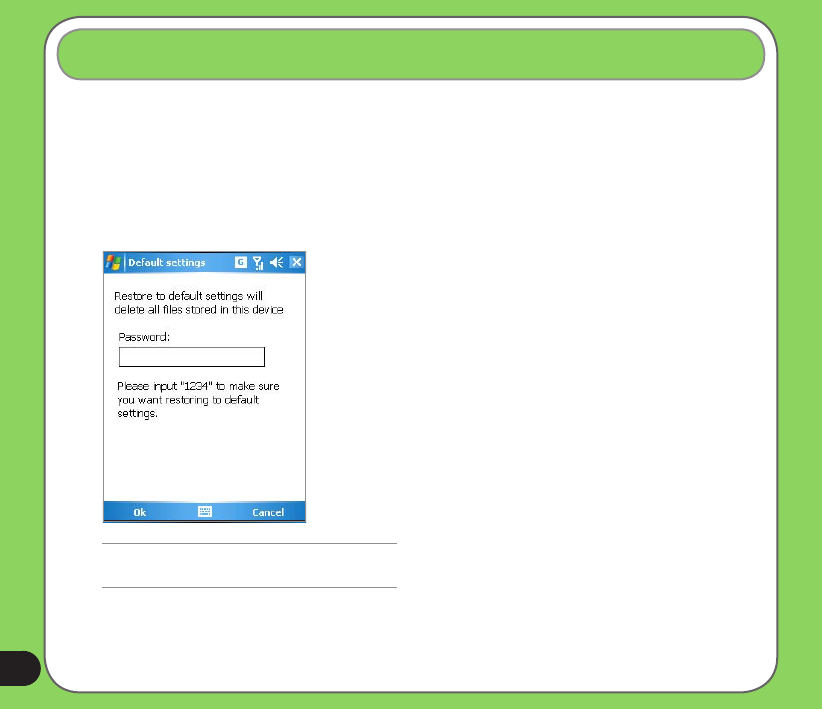
This option allows you to restore the default factory settings.
To restore default settings:
1. Tap Start > Programs > Default Settings.
2. Input ‘1234’ in the Password eld to conrm that you want to restore to default settings.
3. Tap Ok.
Restoring default factory settings
WARNING:
This option will delete all les stored in this device.

123
Device components status
Chapter
• ASUS Status icon
8
124
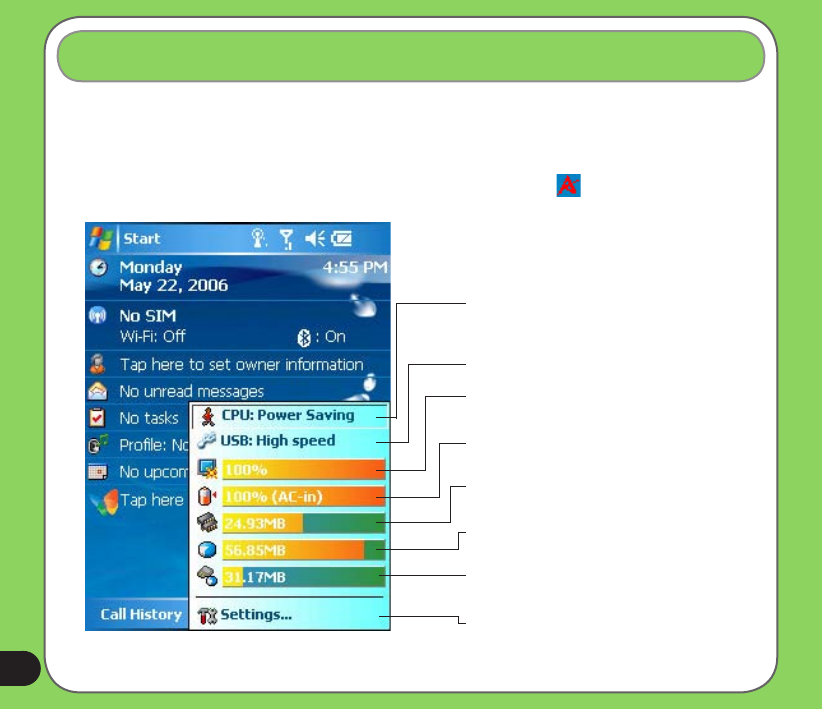
The ASUS status icon allows you to easily check and see the current status of the following
device components: CPU, USB, LCD Brightness, Battery power, Memory, MiniSD card, and
storage.
To check the status of these components, tap the ASUS Status icon on the Today screen.
ASUS status icon
CPU: Allows you to set the CPU mode. Set to
Automatic Mode to automatically change the CPU
speed according to the CPU loading.
USB: Allows you to set the USB connection mode.
Brightness: Tap to adjust the LCD brightness on
battery power or external power.
Power: Displays the remaining battery power and
allows you to set advanced power saving features.
Memory: Displays the total, currently used, and
remaining memory available.
Storage card memory: Displays the total, used,
and remaining storage card memory.
MiniSD card: Tap to display the contents of the
miniSD card installed.
Settings: Allows you to select the items to display in
this ASUS Status pop-up menu.
125
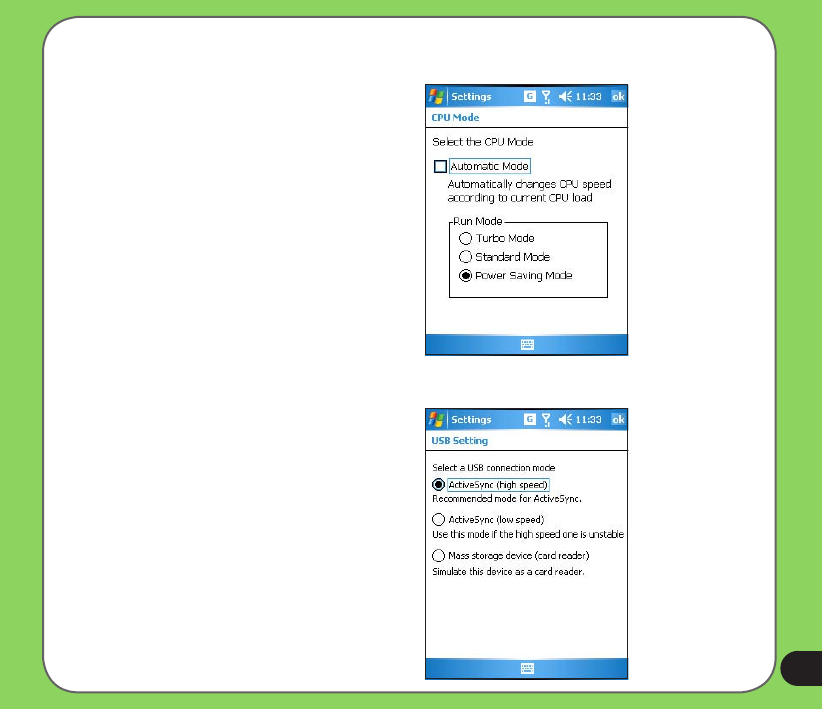
CPU mode setting
Allows you to select the CPU mode (Turbo,
Standard, Power Saving). Tap to check
Automatic Mode to automatically change the
CPU speed according to the CPU loading.
USB setting
Allows you to set the USB connection mode.
126
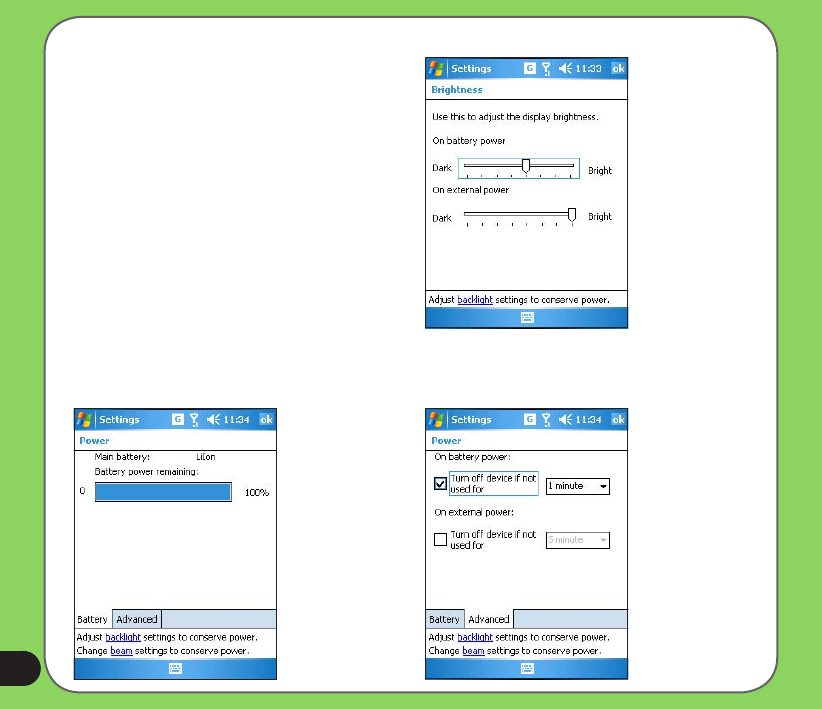
LCD Brightness
Adjusts the LCD brightness on battery power
and external power.
Battery
Displays the battery power status. The Advanced settings allows you to set a
time when to turn-off the device if not used.
127
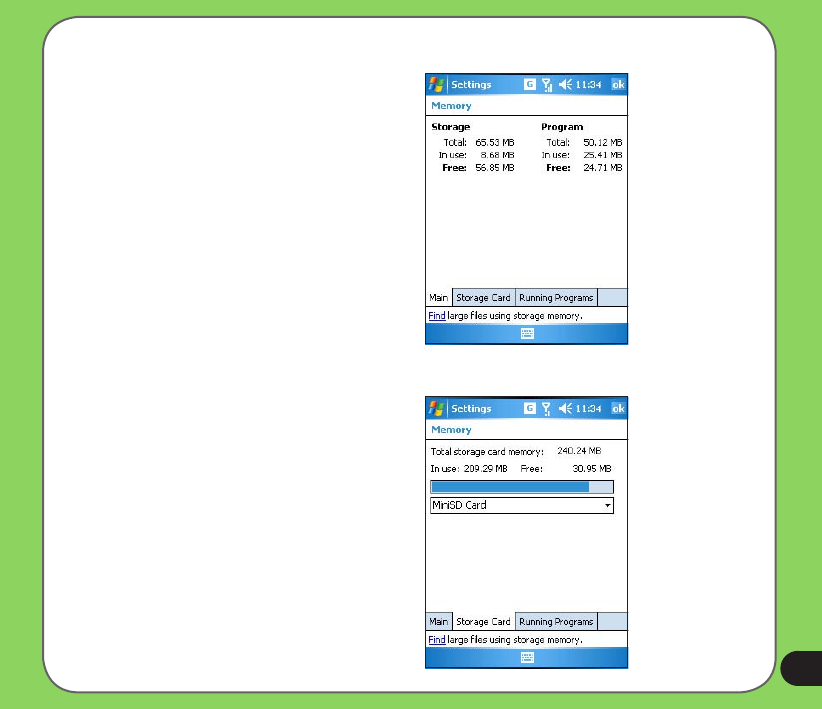
Memory
Displays the total, in use and free memory.
Storage card memory
Displays the total, in use, and available
storage card memory.
128
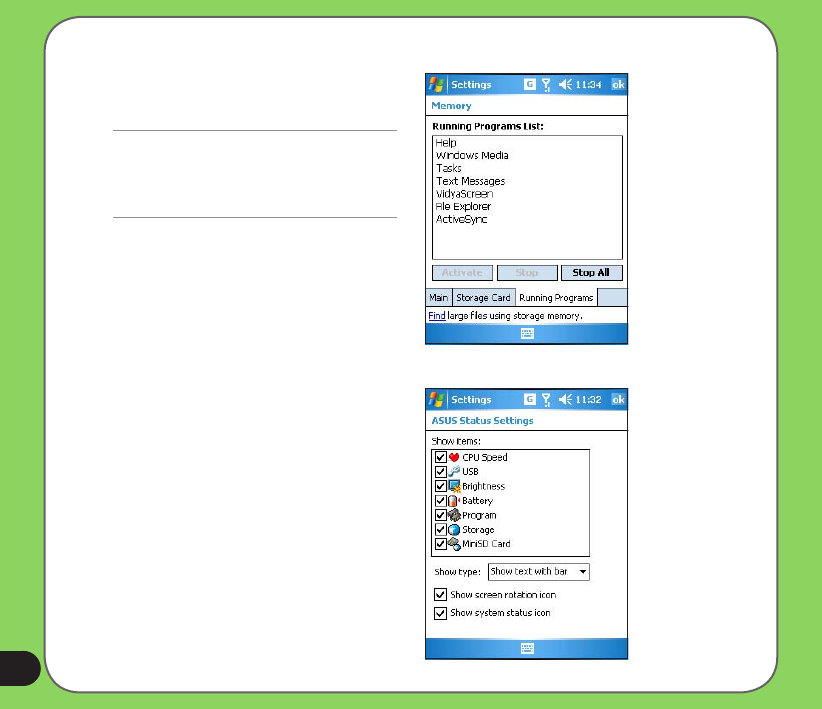
Programs running in memory
Allows you to activate or stop any program
running on memory.
Settings
Allows you to select the items to display in
the ASUS Settings pop-up menu.
IMPORTANT:
When you exit a running program, you are actually
only minimizing it and the program remains in the
memory. You can stop these programs from running
in the background using this option.

129
Appendix
• Notices
• Contact information

130
Replaceable batteries
If an equipment is provided with a replaceable battery and if replacement by an
incorrect type could result in an explosion (e.g. with some lithium batteries), the
following applies:
– if the battery is placed in an OPERATOR ACCESS AREA, there shall be a
marking close to the battery or a statement in both the operating and the
servicing instructions;
– if the battery is placed elsewhere in the equipment, there shall be a marking
close to the battery or a statement in the servicing instructions.
The marking or statement shall include the following or similar text:
CAUTION
RISK OF EXPLOSION IF BATTERY IS REPLACED
BY AN INCORRECT TYPE.
DISPOSE OF USED BATTERIES ACCORDING
THE INSTRUCTIONS
Notices

131
Operator access with a tool
If a TOOL is necessary to gain access to an OPERATOR ACCESS AREA, either
all other compartments within that area containing a hazard shall be inaccessible
to the OPERATOR by the use of the same TOOL, or such compartments shall be
marked to discourage OPERATOR access.
An acceptable marking for an electric shock hazard is (ISO 3864, No. 5036).
Equipment for restricted access locations
For equipment intended only for installation in a RESTRICTED ACCESS
LOCATION, the installation instructions shall contain a statement to this effect.

132
WARNING
The user needs to switch off the device when exposed to areas with potentially
explosive atmospheres such as petrol stations, chemical storage depots and
blasting operations.

133
ASUS
Address: 15 Li-Te Road, Peitou, Taipei, Taiwan
Tel: 886-2-2894-3447; Fax: 886-2-2890-7698
Declaration
We declare that the IMEI codes for this product, P525, are unique to each unit
and only assigned to this model. The IMEI of each unit is factory set and cannot
be altered by the user and that it complies with the relevant IMEI integrity related
requirements expressed in the GSM standards.
Should you have any questions or comments regarding this matter, please have my
best attention.
Sincerely yours,
Contact Person: Jonathan Wu
Company: ASUSTeK COMPUTER INC.
Tel: 886-2-2894-3447 Ext: 7225
Fax: 886-2-2890-7698
E-mail: http://vip.asus.com/eservice/techserv.aspx

134
Contact information
ASUSTeK COMPUTER INC. (Taiwan)
Hotline: 0800-093-456 (Toll-Free call from Taiwan only)
Fax: 886-2-2895-9254
E-mail: http://vip.asus.com/eservice/techserv.aspx
WWW: http://tw.asus.com
ASUSTeK COMPUTER INC. (Asia-Pacic)
Hotline: 886-2-2894-3447
Fax: 886-2-2890-7698
E-mail: http://vip.asus.com/eservice/techserv.aspx
WWW: http://www.asus.com
ASUS COMPUTER GmbH (Germany/Austria)
Hotline: MB/Others: +49-2102-9599-0
Notebook: +49-2102-9599-10
Fax: +49-2102-9599-11
E-mail: http://www.asus.de/support/support.htm
WWW: http://www.asus.de
ASUS COMPUTER (China)
Tel: +86-10-82667575
E-Mail: http://vip.asus.com.cn/eservice/techserv.aspx.

135
FCC Regulations
• This mobile phone complies with part 15
of the FCC Rules. Operation is subject to
the following two conditions: (1) This device
may not cause harmful interference, and
(2) this device must accept any interference
received, including interference that may
cause undesired operation.
• This mobile phone has been tested and
found to comply with the limits for a Class
B digital device, pursuant to Part 15 of the
FCC Rules. These limits are designed to
provide reasonable protection against harmful
interference in a residential installation.
This equipment generates, uses and can
radiated radio frequency energy and, if not
installed and used in accordance with the
instructions, may cause harmful interference
to radio communications. However, there is
no guarantee that interference will not occur
in a particular installation If this equipment
does cause harmful interference to radio or
television reception, which can be determined
by turning the equipment off and on, the user is
encouraged to try to correct the interference by
one or more of the following measures:
- Reorient or relocate the receiving antenna.
- Increase the separation between the
equipment and receiver.
- Connect the equipment into an outlet on
a circuit different from that to which the
receiver is connected.
- Consult the dealer or an experienced
radio/TV technician for help.
Changes or modications not expressly
approved by the party responsible for
compliance could void the user‘s authority to
operate the equipment.

136
RF Exposure Information
(SAR)
This model phone meets the government’s
requirements for exposure to radio waves.
This phone is designed and manufactured not
to exceed the emission limits for exposure to
radio frequency (RF) energy set by the Federal
Communications Commission of the U.S.
Government.
The exposure standard for wireless mobile
phones employs a unit of measurement known
as the Specic Absorption Rate, or SAR. The
SAR limit set by the FCC is 1.6W/kg. *Tests for
SAR are conducted using standard operating
positions accepted by the FCC with the phone
transmitting at its highest certied power level
in all tested frequency bands. Although the
SAR is determined at the highest certied
power level, the actual SAR level of the
phone while operating can be well below the
maximum value. This is because the phone is
designed to operate at multiple power levels
so as to use only the poser required to reach
the network. In general, the closer you are to
a wireless base station antenna, the lower the
power output.
The highest SAR value for the model phone
as reported to the FCC when tested for use at
the ear is 0.48 W/kg for GSM and 0.21 for
WLAN and when worn on the body, as
described in this user guide, is 0.79 W/kg for
GSM and 0.00453 W/kg for WLAN (Body-
worn measurements differ among phone
models, depending upon available enhance-
ments and FCC requirements.)
Co-location of GSM and WLAN is 0.492 W/kg
for head and 0.790 for body.
While there may be differences between the
SAR levels of various phones and at various
positions, they all meet the government
requirement.
The FCC has granted an Equipment
Authorization for this model phone with
all reported SAR levels evaluated as in
compliance with the FCC RF exposure
guidelines. SAR information on this model
phone is on le with the FCC and can be found
under the Display Grant section of http://www.
fcc.gov/oet/fccid after searching on FCC ID:
MSQP525.

137
For body worn operation, this phone
has been tested and meets the FCC
RF exposure guidelines for use with an
accessory that contains no metal and
the positions the handset a minimum
of 1.5 cm from the body. Use of
other enhancements may not ensure
compliance with FCC RF exposure
guidelines. If you do no t use a body-
worn accessory and are not holding the
phone at the ear, position the handset a
minimum of 1.5 cm from your body when
the phone is switched on.