ASUSTeK Computer RPAC56 Dual-band Wireless-AC1200 Range Extender User Manual
ASUSTeK Computer Inc Dual-band Wireless-AC1200 Range Extender Users Manual
Users Manual
Quick Start Guide
RP-AC56
Wireless-AC1200 Range Extender
Q10396 / First Edition / April 2015
English ....................................................................................................................................................................................................................3
French ...................................................................................................................................................................................................................xx
Brazilian ................................................................................................................................................................................................................xx
Portuguese .........................................................................................................................................................................................................xx
Spanish ................................................................................................................................................................................................................. xx
English
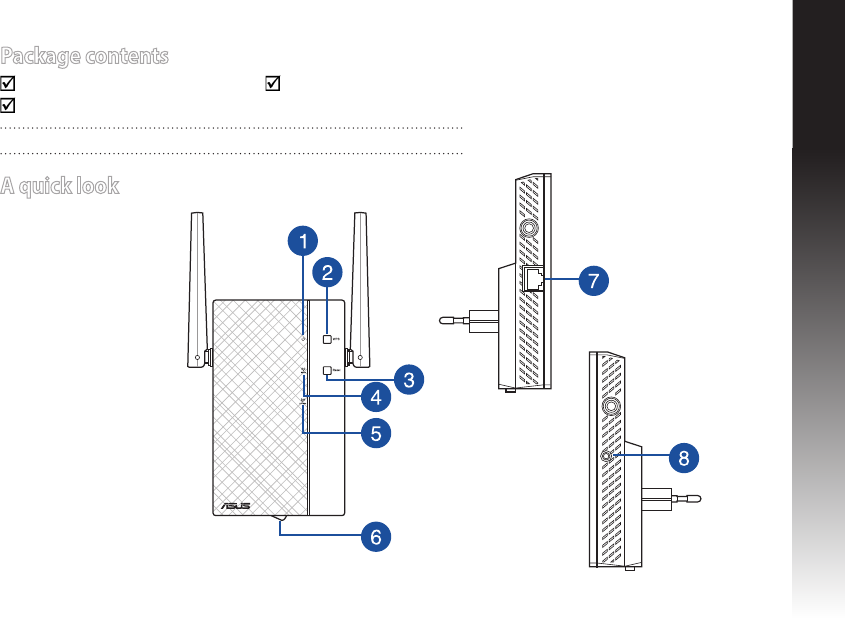
Package contents
RP-AC56 Range Extender Quick Start Guide
Warrenty Card
NOTE: If any of the items is damaged or missing, please contact your retailer.
A quick look
1) Power LED
On: RP-AC56 is on.
O: RP-AC56 is o.
2) WPS button
3) Reset button
4) 5GHz LED
5) 2.4GHz LED
6) Power On/O switch
7) Gigabit RJ-45 port
8) 3.5 mm audio jack
English
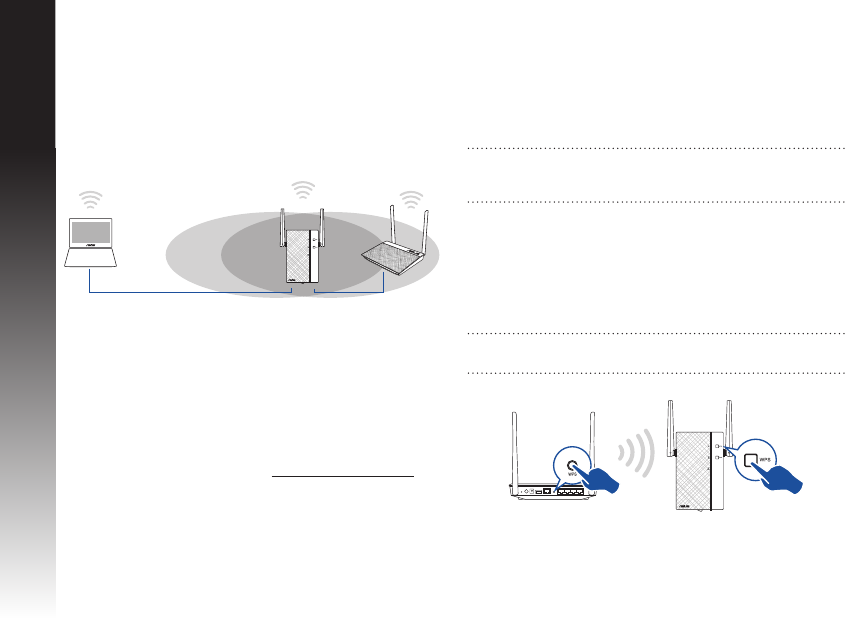
Turning the Range Extender on
1. Place RP-AC56 near your Router/AP.
2. Plug RP-AC56 to a power outlet, wait for one (1) minute until
the Power LED becomes solid green.
Setting up the Range Extender
Connecting to a network
Select one of the following ways to connect the Range Extender
to a network.
Option A: Connecting through GUI
1. Use a Wi-Fi enabled device, such as your desktop PC/note-
book/tablet, to nd and connect to ASUS_RPAC56 /ASUS_
RPAC56_5G wireless network.
2. Launch a web browser and enter http://repeater.asus.com in
the address bar to access the Range Extender.
3. Enter the default login name and password, which are admin/
admin.
4. Follow the Quick Internet Setup steps below to set up the
Range Extender:
• ConnectyourwirelessdevicestothenewExtendernetwork.
• ConnecttoaWi-Finetworkandwhenprompted,enterthe
security key. If your Wi-Fi network is hidden, click Manual
setting.
• Youcaneithertick“Use default setting” or enter the SSID
and security key/password for your extended network. When
done, click Next.
Option B: Using WPS (Wi-Fi Protected Setup)
1. Press the WPS button on the router/AP.
2. Press the WPS button on the top of the RP-AC56 for more than
two (2) seconds, until the Power LED starts to blink.
NOTE: Refer to the router’s manual for the location of the WPS
button.
NOTE: The Range Extender’s wireless network name (SSID)
changes to your existing Wi-Fi network name, ending with _RPT
or _RPT5G and shares your router/AP’s Wireless Password.
English
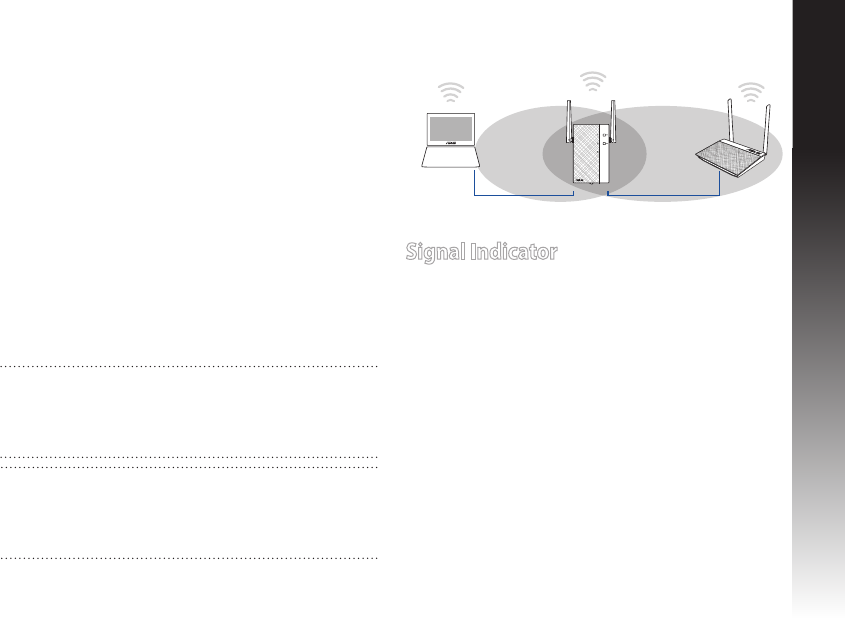
Move the Range Extender
When the connection is complete, locate the Range Extender
between the router/AP and the wireless device to get better
performance. After placing your RP-AC56 in an ideal location, RP-
AC56 connects to your router/AP in about one (1) minute.
Signal Indicator
• Togetthebestperformance,placetheRangeExtender
between your router/AP and wireless device.
• TheWi-Fisignalindicatorindicatestheconnectionperfor-
mance from the Range Extender to the router/AP. Refer to the
Wi-Fi LED indicator in section A Quick Look.
NOTES:
• PlaceyourRP-AC56betweenyourrouter/APandwireless
device to get the best extender performance.
• PlaceyourRP-AC56inalocationwhereyoucangetgreenWi-
Fi LED.
IMPORTANT!
• Tominimizeinterference,keepRP-AC56awayfromdevices
like cordless phones, Bluetooth devices and microwave ovens.
• WerecommendthatyouplaceyourRP-AC56inopenor
spacious location.
3. Check if RP-AC56’s Wi-Fi indicator turns solid light, which indi-
cates that the Range Extender has connected to the wireless
network successfully. The Range Extender’s wireless network
name (SSID) changes to your existing Wi-Fi network name,
ending with _RPT or _RPT5G. For example:
Existing Wi-Fi network name: existing NetworkName
New Extender 2.4GHz network name: existing Networ-
kName_RPT
New Extender 5GHz network name: existing Networ-
kName_RPT5G
To connect an additional Wi-Fi device to your Extender net-
work, use the same network password as that of your existing
wireless router.

English
Frequently Asked Questions
Q1: What should I do if my router does not support WPS?
•YoucanuseOptionAtosetupRP-AC56.
Q2: Why is that the Wi-Fi LED does not light up after completing Method Two?
•YoumayhaveenteredthewrongrouterSSIDandpassword.ResetyourRP-AC56,doublecheckyourrouterSSID/password,and
set up RP-AC56 again.
Q3: Why is it that I cannot see the login page after entering http://repeater.asus.com in the browser?
•Ensurethatyourcomputerisconnectedtotheextendernetworkonly,andsetyourcomputertoObtain an IP address auto-
matically.
Q4: My router security is WEP, and I entered a wrong passphrase or security key on the extender. Now I
cannot access the Extender any more. What can I do?
•TheRangeExtendercannotcheckwhethertheWEPpassphraseiscorrectornot.Whenenteredawrongpassphrase,yourwire-
less device cannot get the correct IP address from the Range Extender. Please reset the Range Extender to its factory defaults to
get the IP address back.
Q5: How do I reset RP-AC56?
• Press the RESET button on the top of RP-AC56 for about two (2) seconds. Wait for about ve (5) seconds until the LEDs blink
slowly.
Q6: Why doesn’t the 5GHz signal indicator of the Range Extender light up?
•Checkwhetheryourroutersupports5GHzband.Ifyourrouterissingleband,theRangeExtender’s5GHzSignalIndicatorwillnot
light up and it works at 2.4GHz band only.
Wireless Media Playback
The Range Extender supports wireless media playback, which allows you to stream and play your
networkmusicthroughitsaudioport.YoucanuseASUSAiPlayerapptocontrolthemusicstreaming
overtheRangeExtenderfromyourmobiledevice.Searchfor“RP-AC56”or“AiPlayer”fromGooglePlay
or App Store and download the app to your mobile device.
NOTE:Youcaninsertanearphone,poweredspeaker,orstereosystemtothe3.5mmstereoaudio
port.
English
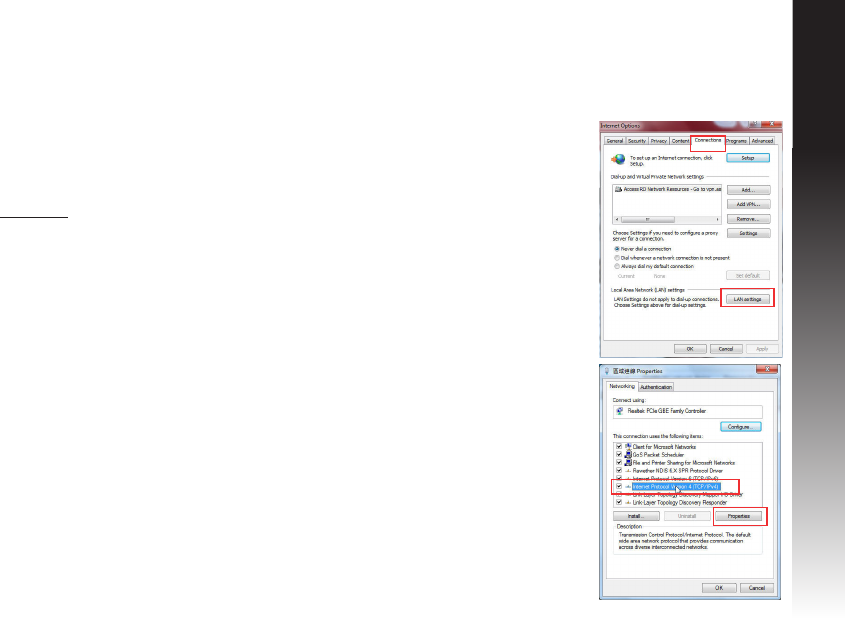
Q8: I cannot access the web GUI to congure the RP-AC56 settings.
• Closeallrunningwebbrowsersandlaunchagain.
• Followthestepsbelowtocongureyourcomputersettingsbasedonits
operating system.
Windows 7
A. Disable the proxy server, if enabled.
1. Click Start > Internet Explorer to launch the web browser.
2. Click Tools > Internet options > Connections tab > LAN settings.
3. From the Local Area Network (LAN) Settings screen, untick Use a proxy server for your LAN.
4. Click OK when done.
B. Set the TCP/IP settings to automatically obtain an IP address.
1. Click Start > Control Panel > Network and Internet > Network and Sharing Center > Manage
network connections.
2. Select Internet Protocol Version 4 (TCP/IPv4), then click Properties.
3. Tick Obtain an IP address automatically.
4. Click OK when done.
Q7: When I connect a speaker or stereo system to RP-AC56, there is no sound coming out when I play audio
les.
•Makesurethatyouhavenotturnedotheaudiooutputviathetouchcontroller.Thetouchcontrollerissettoturnon/othe
nightlightandmute/unmutetheaudiobydefault.YoucanlogintotheRangeExtender’sWebGUItochangethesettings.
English
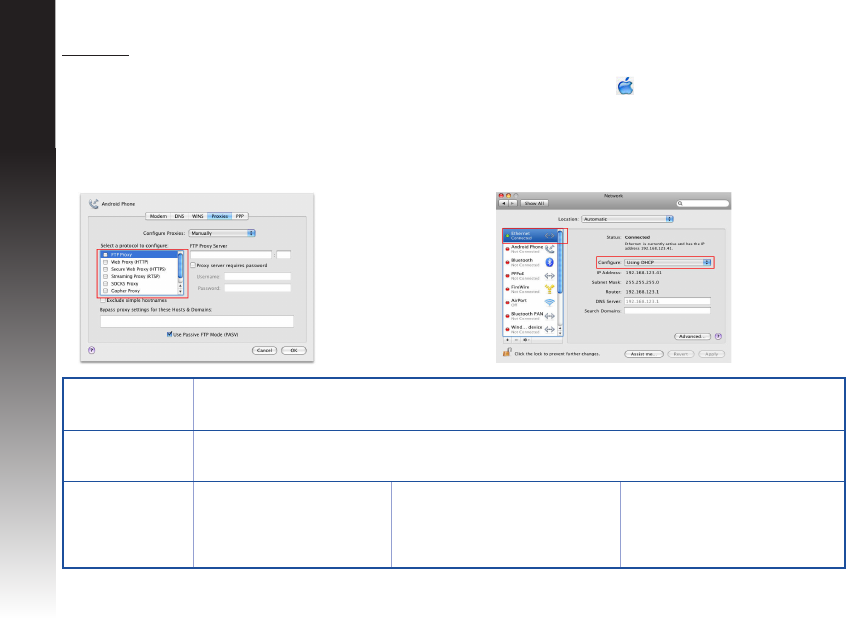
Mac 10.5.8
A. Disable the proxy server, if enabled.
1. From the menu bar, click Safari > Preferences... > Advanced tab.
2. Click Change Settings... in the Proxies eld.
3. From the list of protocols, deselect FTP Proxy and Web Proxy
(HTTP).
4. Click OK when done.
B. Set the TCP/IP settings to automatically obtain an IP
address.
1. Click the Apple icon > System Preferences > Network.
2. Select Ethernet and select Using DHCP in the Congure
eld.
3. Click Apply when done.
Manufacturer ASUSTeK Computer Inc.
Tel: +886-2-2894-3447
Address: No. 150, LI-TE RD., PEITOU, TAIPEI 112, TAIWAN
Authorised
representative in
Europe
ASUS Computer GmbH
Address:HARKORTSTR.21-23,40880RATINGEN,GERMANY
Authorised
distributors in Turkey
BOGAZICI BIL GISAYAR SAN. VE
TIC. A.S.
Tel: +90 212 3311000
Address:AYAZAGAMAH.
KEMERBURGAZCAD.NO.10
AYAZAGA/ISTANBUL
CIZGI Elektronik San. Tic. Ltd. Sti.
Tel: +90 212 3567070
Address:CEMALSURURICD.HALIM
MERICISMERKEZI
No:15/CD:5-634394MECIDIYEKOY/
ISTANBUL
KOYUNCU ELEKTRONiK BiLGi iSLEM
SiST. SAN. VE DIS TIC. A.S.
Tel: +90 216 5288888
Address:EMEKMAH.ORDUCAD.NO:18,
SARIGAZi,SANCAKTEPEISTANBUL
AEEE Yönetmeliğine Uygundur.
This equipment also should be installed and operated with minimum distance 20cm between
the radiator & your body.