ASUSTeK Computer RTN66U Dark Knight Double 450Mbps Dual N Band User Manual
ASUSTeK Computer Inc Dark Knight Double 450Mbps Dual N Band
Contents
- 1. user manual
- 2. User manual
- 3. User Manual
user manual
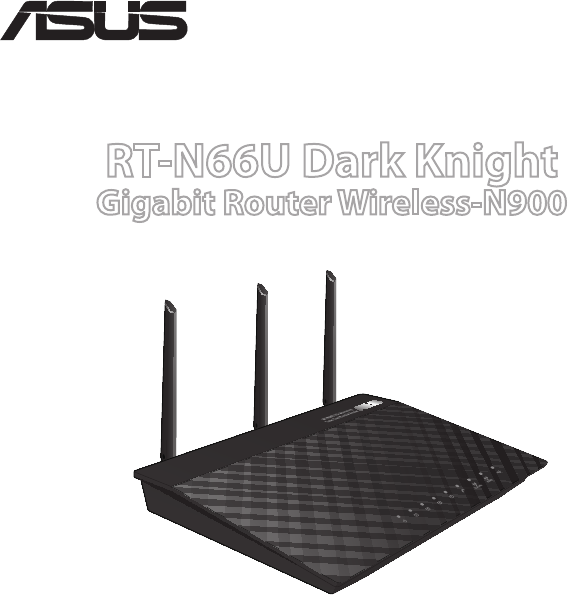
Quick Start Guide
RT-N66U Dark Knight
Gigabit Router Wireless-N900
®
E7019 / Second Edition / November 2011
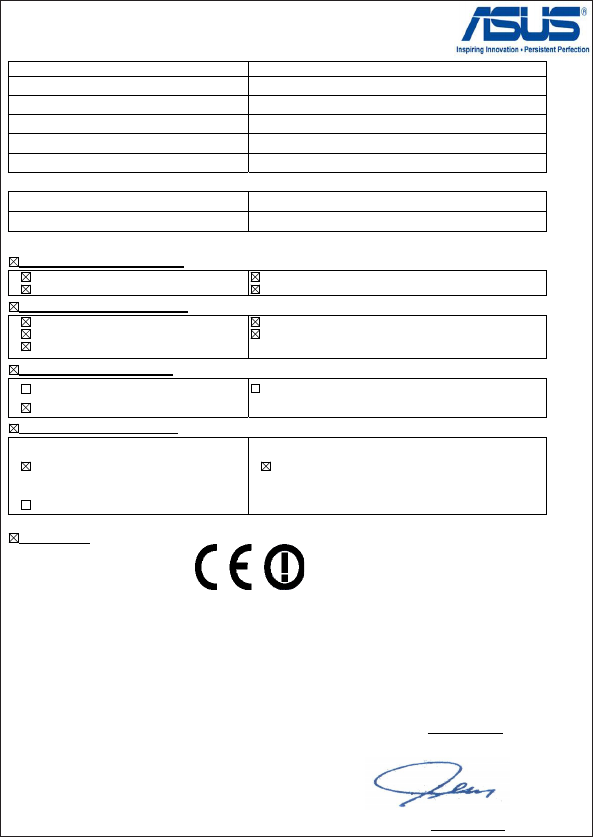
EC Declaration of Conformity
We, the undersigned,
Manufacturer: ASUSTek COMPUTER INC.
Address, City: No. 150, LI-TE RD., PEITOU, TAIPEI 112, TAIWAN R.O.C.
Country: TAIWAN
Authorized representative in Europe: ASUS COMPUTER GmbH
Address, City: HARKORT STR. 21-23, 40880 RATINGEN
Country: GERMANY
declare the following apparatus:
Product name : Dark Knight Double 450Mbps Dual N Band Router
Model name : RT-N66U
conform with the essential requirements of the following directives:
2004/108/EC-EMC Directive
EN 55022:2006+A1:2007 Class B
EN 61000-3-2:2006+A2:2009 Class A
EN 55024:1998+A1:2001+A2:2003
EN 61000-3-3:2008
1999/5/EC-R &TTE Directive
EN 300 328 V1.7.1(2006-10)
EN 301 893 V1.5.1(2008-12)
EN 62311:2008
EN 301 489-1 V1.8.1(2008-04)
EN 301 489-17 V2.1.1(2009-05)
2006/95/EC-LVD Directive
EN 60950-1:2006
EN 60950-1:2006+A11:2009
EN 60065:2002+A1:2006+A11:2008
2009/125/EC-ErP Directive
Regulation (EC) No. 1275/2008
EN 62301:2005
Regulation (EC) No. 642/2009
EN 62301:2005
Regulation (EC) No. 278/2009
EN 62301:2005
Ver. 110101
CE marking
Declaration Date: Nov. 1, 2011
Year to begin affixing CE marking:2011
Position : CEO
Name : Jerry Shen
Signature : __________
(
E
C co
nf
o
rmit
y
m
a
rkin
g)
NOTE / <T-CHINESE> / <FRENCH> / <PORTUGUESE> /
<SPANISH>
• For more details, refer to the user manual included in the
support CD.
• <T-CHINESE>
• <FRENCH>
• <PORTUGUESE>
• <SPANISH>
Table of contents
English .............................................................................................4
T-Chinese ........................................................................................17
French ..............................................................................................30
Portuguese ....................................................................................43
Spanish ............................................................................................56
4
English
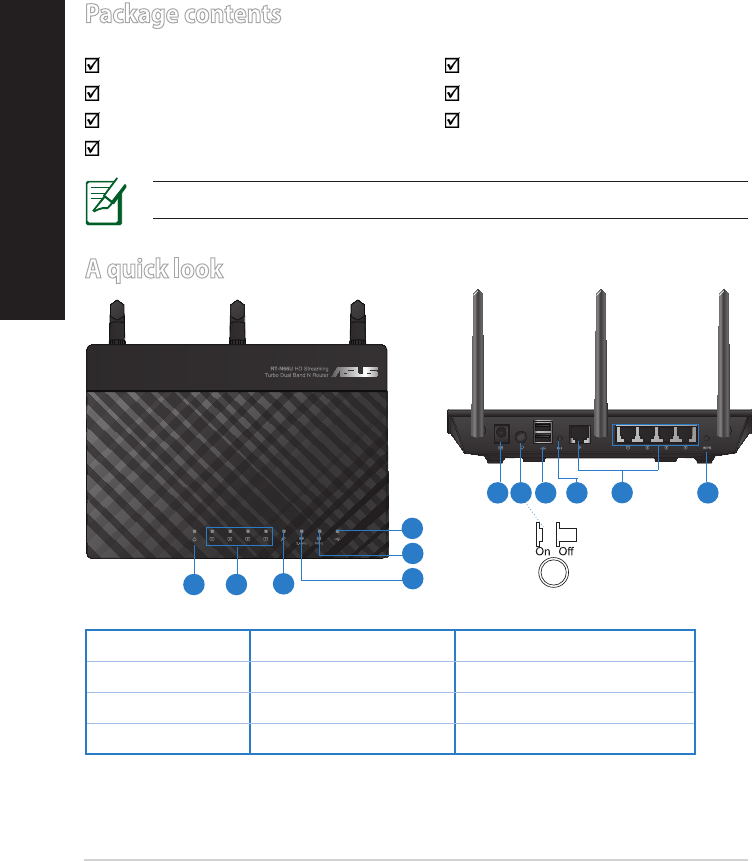
Package contents
RT-N66U AC adapter
Network cable Quick Start Guide
Support CD (User Manual/utilities) Warranty card
Stand
A quick look
1) Power LED 5) 5GHz LED 9) USB 2.0 ports
2) LAN LED 6) USB 2.0 LED 10) Reset button
3) WAN LED 7) Power (DC-In) port 11) Internet & LAN ports
4) 2.4GHz LED 8) Power switch 12) WPS button
NOTE: If any of the items is damaged or missing, contact your retailer.
7 9 10 12
11
8
1 2 3
5
6
4

5
English
NOTES:
• USB External HDD/Flash disk:
• The wireless router works with most USB HDDs/Flash disks up to
2TB and supports read-write access for FAT16, FAT32, EXT2, EXT3,
and NTFS.
• To safely remove the USB disk, launch the web GUI
(http://192.168.1.1), then in the Network Map page's upper right
corner, click the USB icon and click Eject USB 1.
• Incorrect removal of the USB disk may cause data corruption.
• For the list of le system and hard disk partitions that the
wireless router supports, visit http://event.asus.com/networks/
disksupport
• For the list of printers that the wireless router supports, visit
http://event.asus.com/networks/printersupport
6
Positioning your wireless router
For the best wireless signal transmission between the wireless router and the
network devices connected to it, ensure that you:
• Place the wireless router in a centralized area for a maximum wireless coverage
for the network devices.
• Keep the device away from metal obstructions and away from direct sunlight.
• Keep the device away from 802.11g or 20MHz only Wi-Fi devices, 2.4GHz
computer peripherals, Bluetooth devices, cordless phones, transformers,
heavy-duty motors, uorescent lights, microwave ovens, refrigerators, and other
industrial equipment to prevent signal interference or loss.
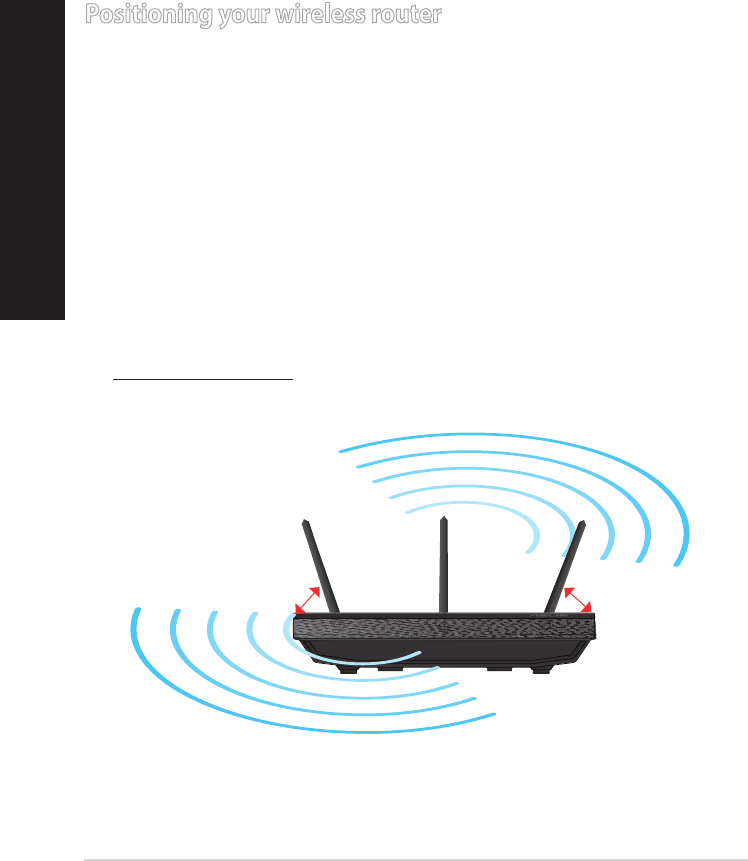
• To ensure the best wireless signal, orient the three detachable antennas as
shown in the drawing below.
• For optimum performance, adjust the internal cooling system. Refer to the user
manual for details.
• Always update to the latest rmware. Visit the ASUS website at
http://www.asus.com to get the latest rmware updates.
450
450
900
English
7
Mounting to the stand
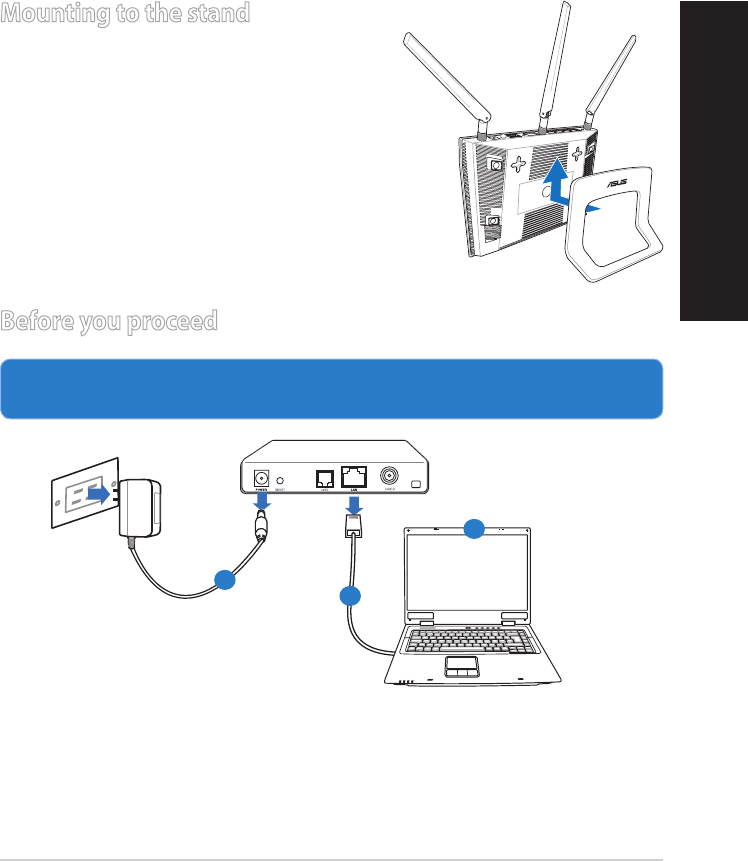
• Align and insert the stand’s mounting hooks
to the wireless router’s mounting holes.
Before you proceed
1. Unplug and disconnect the wires/cables from your existing modem setup
and release your computer’s outmoded IP address.
a: Unplug the AC adapter from the power outlet and disconnect it from your
cable/ADSL modem.
b: Disconnect the network cable from your cable/ADSL modem.
c: Reboot your computer (recommended).
Modem
OFF!
a
b
c
English
8
WARNING! Before disconnecting the wires/cables, ensure that your
cable/ADSL modem has been turned o for at least two minutes. If your
modem has a backup battery, remove it as well.
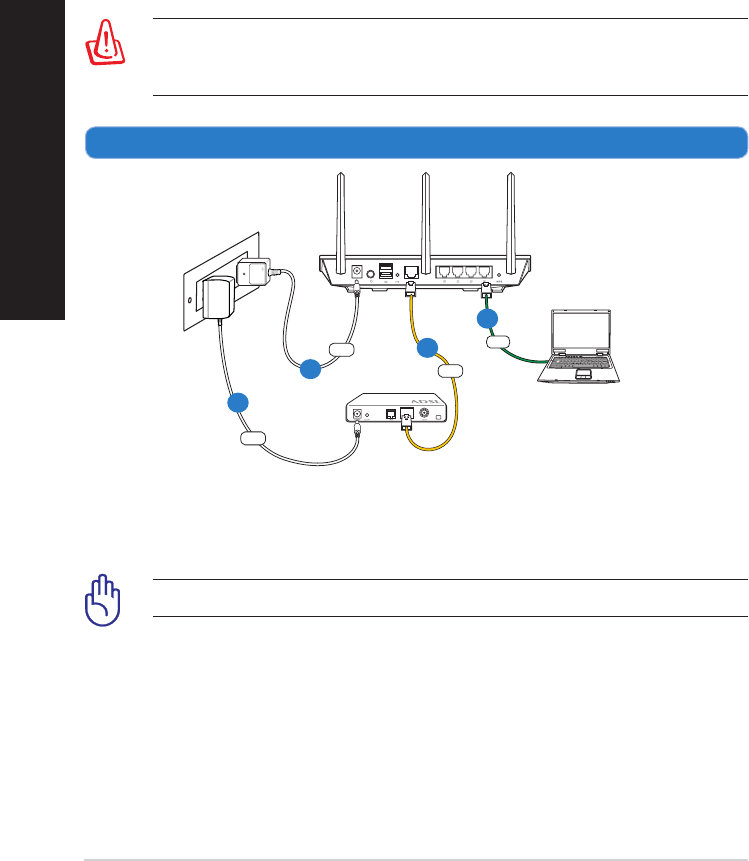
2. Set up your wireless environment.
RT-N66U
Computer
Modem
LAN
Power
Wall Power Outlet
Power
WAN
a
b
c
d
a: Insert your wireless router’s AC adapter to the DC-In port and plug it to a
power outlet.
b: Using the bundled network cable, connect your computer to your wireless
router’s LAN port.
IMPORTANT! Ensure that the WAN and LAN LEDs are blinking.
c: Using another network cable, connect your modem to your wireless router’s
WAN port.
d: Insert your modem’s AC adapter to the DC-In port and plug it to a power
outlet.
English
9
3. Disable some settings on your computer.
A. Disable the proxy server, if enabled.
B. Set the TCP/IP settings to automatically obtain an IP address.
C. Disable the dial-up connection, if enabled.
NOTE: For more details on disabling your computer settings, refer to
Frequently Asked Questions (FAQs).
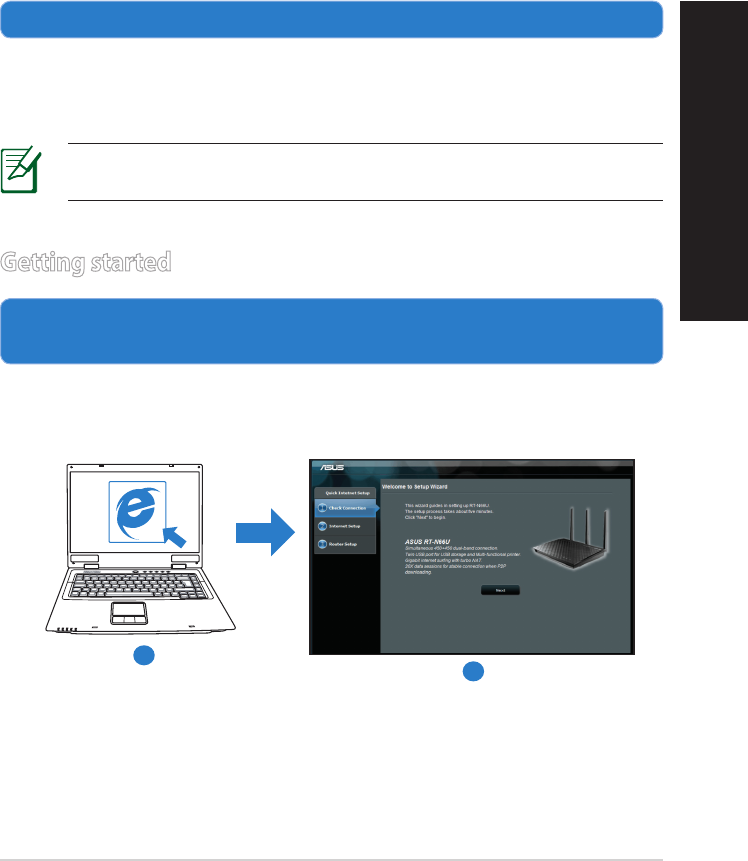
1. Congure your wireless settings via the wireless router’s web graphics
user interface (web GUI).
a: Launch your web browser such as Internet Explorer, Firefox, Google Chrome,
or Safari.
Getting started
b
a
English
10
NOTE: If QIS does not launch automatically, follow these steps to
manually launch QIS:
• On your web browser, key in http://192.168.1.1 and run the Quick
Internet Setup (QIS) Wizard again.
• Disable the proxy settings, dial-up connection, and set your TCP/IP
settings to automatically obtain an IP address. For more details, refer
to the FAQs section or use the Setup Wizard in the support CD for
auto-diagnosis.
b: The wireless router’s Quick Internet Setup (QIS) feature automatically detects
if your ISP connection type is Dynamic IP, PPPoE, PPTP, L2TP, and Static IP.
Key in the necessary information for your connection type.
IMPORTANT! Obtain the necessary information about your Internet
connection type from your Internet Service Provider (ISP).
NOTE: The auto-detection of your ISP connection type takes place
when you congure the wireless router for the rst time or when your
wireless router is reset to its default settings.
NOTE: You can assign a network name with up to 32 characters.
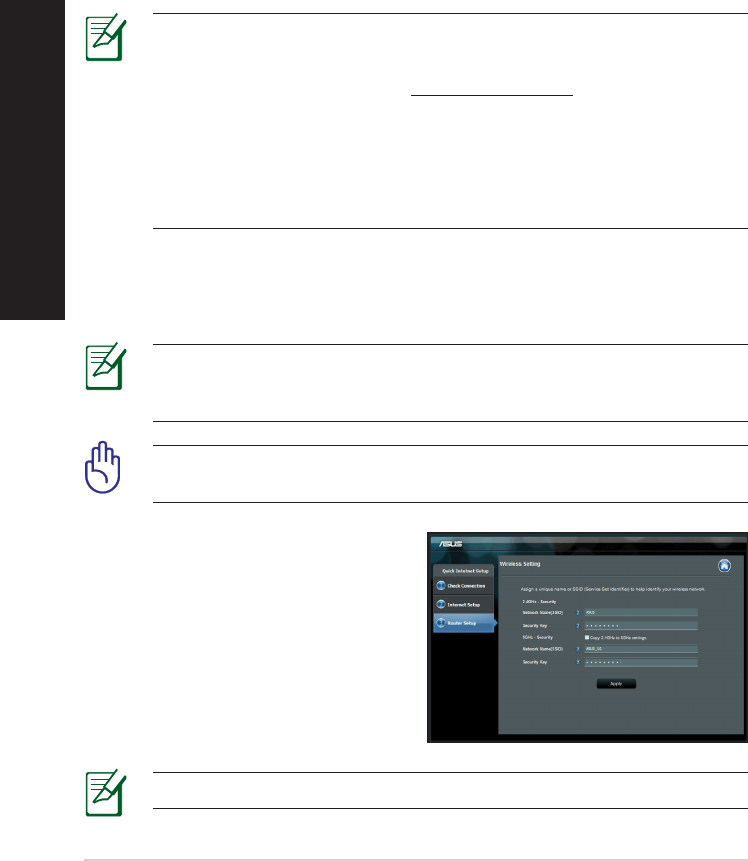
c: Assign the network name (SSID) and
security key for your 2.4GHz and
5GHz wireless connection. Click Ap-
ply when done.
d: Your Internet and wireless settings
are displayed. Click Next to con-
tinue.
e: Read the wireless network con-
nection tutorial. When done, click
Finish.
English
11
Frequently Asked Questions (FAQs)
After following the steps, I still cannot access the wireless router’s web
graphics user interface (web GUI) to congure the wireless router settings.
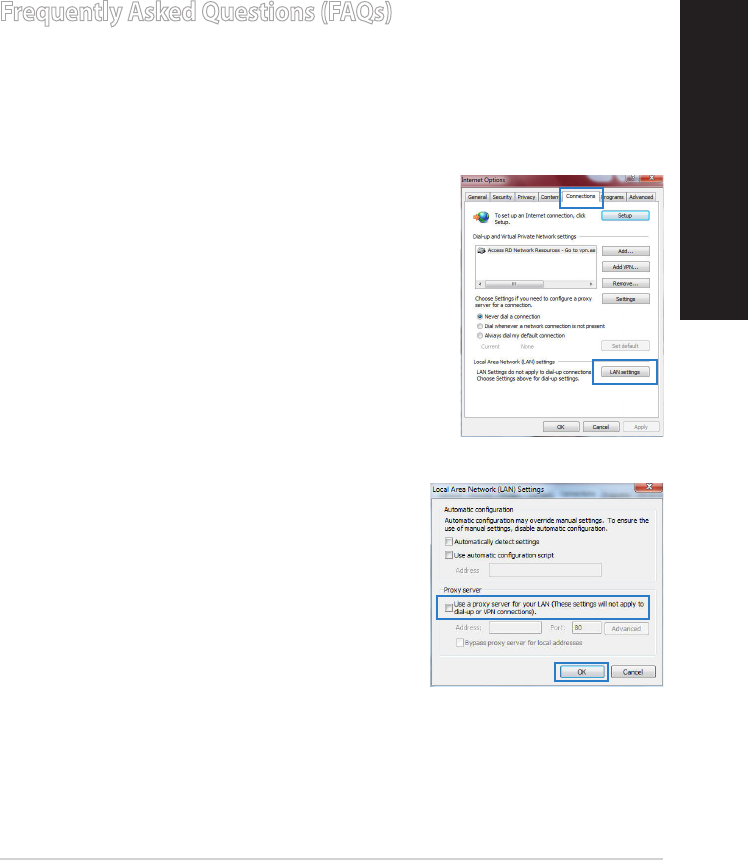
A. Disable the proxy server, if enabled.
Windows® 7
1. Click Start > Internet Explorer to launch the web
browser.
2. Click Tools > Internet options > Connections tab
> LAN settings.
3. From the Local Area Network (LAN) Settings
screen, untick Use a proxy server for your
LAN.
4. Click OK when done.
English
12
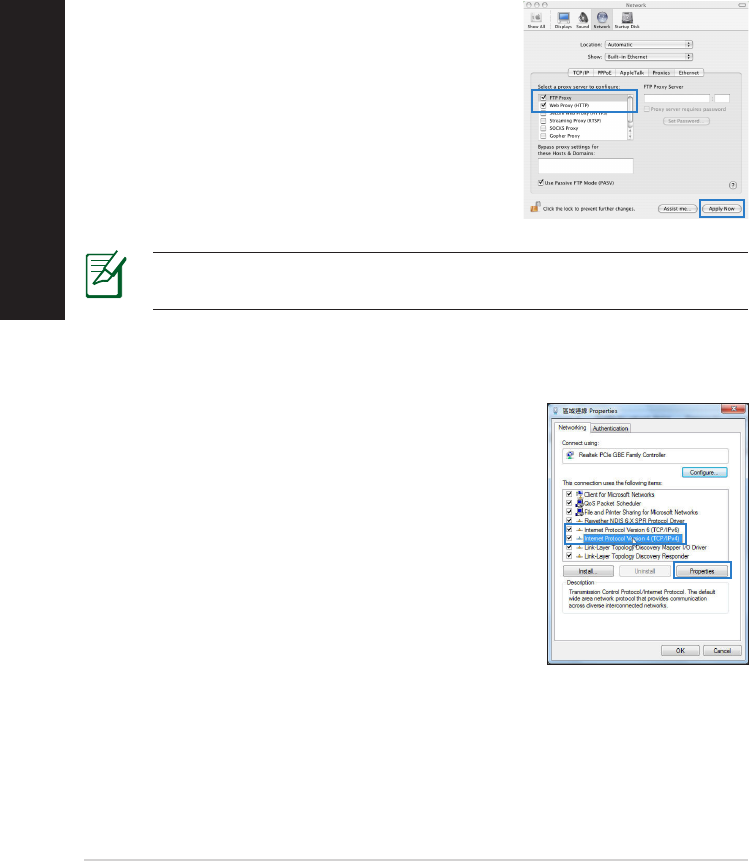
MAC OS
1. From your Safari browser, click Safari > Prefer-
ences > Advanced > Change Settings...
2. From the Network screen, deselect FTP Proxy
and Web Proxy (HTTP).
3. Cllick Apply Now when done.
NOTE: Refer to your browser's help feature for details on disabling the
proxy server.
B. Set the TCP/IP settings to automatically obtain an IP address.
Windows® 7
1. Click Start > Control Panel > Network and
Internet > Network and Sharing Center >
Manage network connections.
2. Select Internet Protocol Version 4 (TCP/IPv4),
then click Properties.
English
13
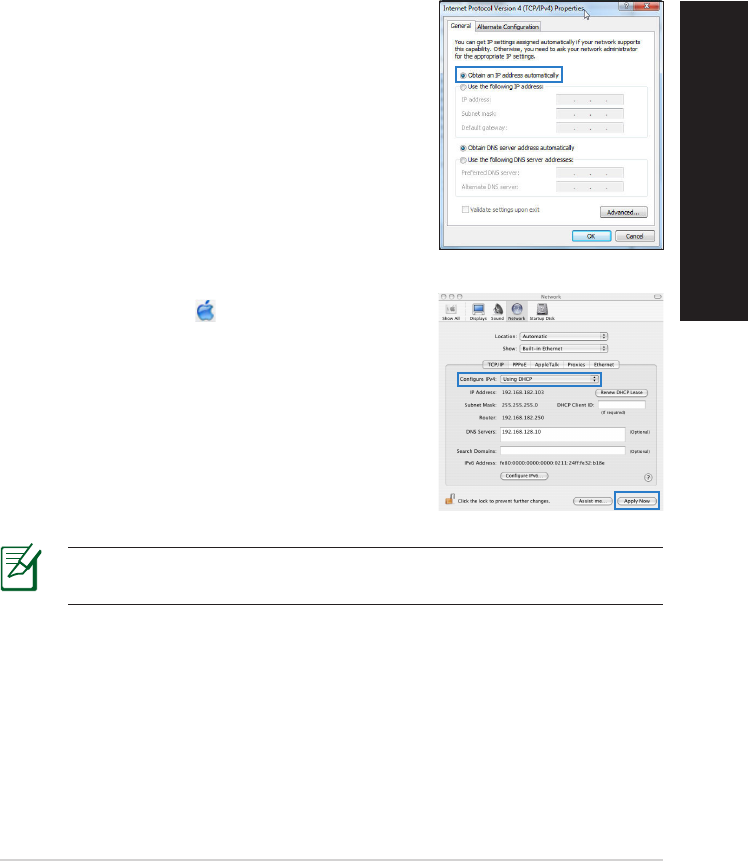
3. To obtain the iPv4 IP settings automatically, tick
Obtain an IP address automatically.
4. Click OK when done.
MAC OS
1. Click the Apple icon located on the top left of
your screen.
2. Click System Preferences > Network >
Congure...
3. From the TCP/IP tab, select Using DHCP in the
Congure IPv4 dropdown list.
4. Cllick Apply Now when done.
NOTE: Refer to your operating system’s help and support feature for
details on conguring your computer’s TCP/IP settings.
English
14
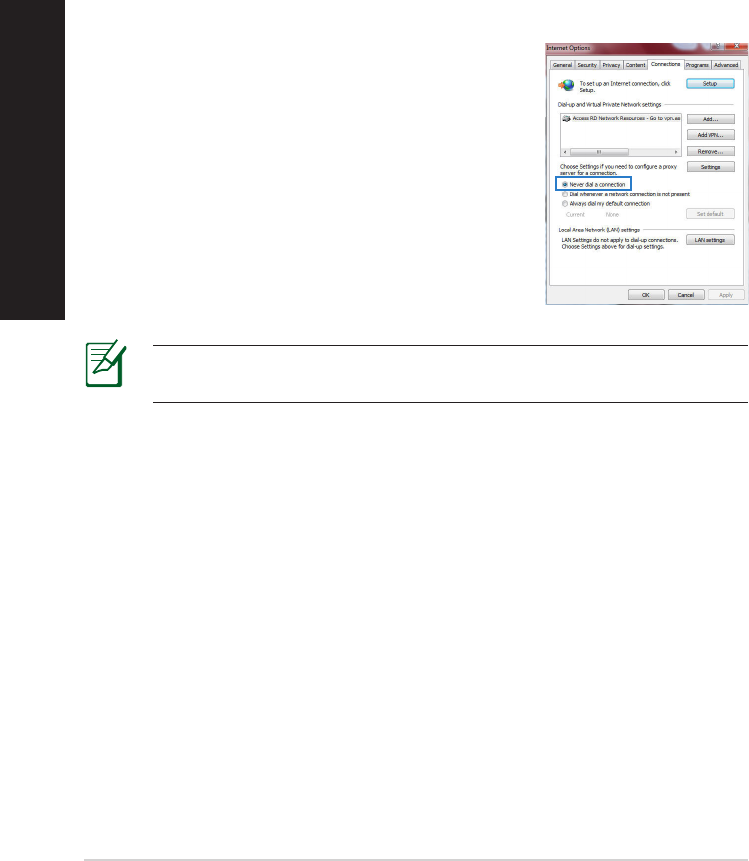
C. Disable the dial-up connection, if enabled.
D. Close all running web browsers.
NOTE: Refer to your browser's help feature for details on disabling
the dial-up connection settings.
Windows® 7
1. Click Start > Internet Explorer to launch the
browser.
2. Click Tools > Internet options > Connections tab.
3. Tick Never dial a connection.
4. Click OK when done.
The client cannot establish a wireless connection with the router.
Out of Range:
• Put the router closer to the wireless client.
• Try to change the channel settings.
Authentication:
• Use wired connection to connect to the router.
• Check the wireless security settings.
• Press the Reset button at the rear panel for more than ve seconds.
English

15
Cannot nd the router:
• Press the Reset button at the rear panel for more than ve seconds.
• Check the setting in the wireless adapter such as SSID and encryption
settings.
Cannot access the Internet via wireless LAN adapter.
• Move the router closer to the wireless client.
• Check whether the wireless adapter is connected to the correct wireless
router.
• Check whether the wireless channel in use conforms to the channels avail-
able in your country/area.
• Check the encryption settings.
• Check if the ADSL or Cable connection is correct.
• Retry using another Ethernet cable.
If the ADSL “LINK” light blinks continuously or stays o, Internet access is
not possible - the Router is unable to establish a connection with the ADSL
network.
• Ensure that all your cables are all properly connected .
• Disconnect the power cord from the ADSL or cable modem, wait a few min-
utes, then reconnect the cord.
• If the ADSL light continues to blink or stays OFF, contact your ADSL service
provider.
Network name or encryption keys are forgotten.
• Try setting up the wired connection and conguring the wireless encryption
again.
• Press the Reset button of the wireless router for more than ve seconds.
• Factory default settings:
User name / Password:
admin / admin
IP address:
192.168.1.1
SSID: ASUS
English

ASUS Recycling/Takeback Services
ASUS recycling and takeback programs come from our commitment to the
highest standards for protecting our environment. We believe in providing
solutions for you to be able to responsibly recycle our products, batteries, other
components, as well as the packaging materials. Please go to http://csr.asus.
com/english/Takeback.htm for the detailed recycling information in dierent
regions.
REACH
Complying with the REACH (Registration, Evaluation, Authorisation, and Restric-
tion of Chemicals) regulatory framework, we published the chemical substances
in our products at ASUS REACH website at
http://csr.asus.com/english/REACH.htm
Federal Communications Commission Statement
This device complies with Part 15 of the FCC Rules. Operation is subject to the
following two conditions:
• This device may not cause harmful interference.
• This device must accept any interference received, including interference
that may cause undesired operation.
This equipment has been tested and found to comply with the limits for a class
B digital device, pursuant to part 15 of the FCC Rules. These limits are designed
to provide reasonable protection against harmful interference in a residential
installation.
This equipment generates, uses and can radiate radio frequency energy and, if
not installed and used in accordance with the instructions, may cause harmful
interference to radio communications. However, there is no guarantee that
interference will not occur in a particular installation. If this equipment does
cause harmful interference to radio or television reception, which can be
determined by turning the equipment o and on, the user is encouraged to try
to correct the interference by one or more of the following measures:
• Reorient or relocate the receiving antenna.
• Increase the separation between the equipment and receiver.
• Connect the equipment into an outlet on a circuit dierent from that to
which the receiver is connected.
• Consult the dealer or an experienced radio/TV technician for help.
WARNING! Any changes or modifications not expressly approved by
the party responsible for compliance could void the user’s authority to
operate the equipment.
Prohibition of Co-location
This device and its antenna(s) must not be co-located or operating in conjunc-
tion with any other antenna or transmitter.
IMPORTANT NOTE:
Radiation Exposure Statement: This equipment complies with FCC radia-
tion exposure limits set forth for an uncontrolled environment. End users must
follow the specic operating instructions for satisfying RF exposure compliance.
To maintain compliance with FCC exposure compliance requirement, please
follow operation instruction as documented in this manual.
WARNING! This equipment must be installed and operated in
accordance with provided instructions and the antenna(s) used for this
transmitter must be installed to provide a separation distance of at
least 20 cm from all persons and must not be co-located or operating in
conjunction with any other antenna or transmitter.
Declaration of Conformity for R&TTE directive 1999/5/EC
Essential requirements – Article 3
Protection requirements for health and safety – Article 3.1a
Testing for electric safety according to EN 60950-1 has been conducted. These
are considered relevant and sucient.
Protection requirements for electromagnetic compatibility – Article 3.1b
Testing for electromagnetic compatibility according to EN 301 489-1 and EN
301 489-17 has been conducted. These are considered relevant and sucient.
Eective use of the radio spectrum – Article 3.2
Testing for radio test suites according to EN 300 328- 2 has been conducted.
These are considered relevant and sucient.
CE Mark Warning
This is a Class B product, in a domestic environment, this product may cause
radio interference, in which case the user may be required to take adequate
measures.Operation Channels: CH1~11 for N. America; Ch1~14 for Japan;
CH1~13 for Europe (ETSI)

Canada, Industry Canada (IC) Notices
This Class B digital apparatus complies with Canadian ICES-003 and RSS-210.
Operation is subject to the following two conditions: (1) this device may not
cause interference, and (2) this device must accept any interference, including
interference that may cause undesired operation of the device.
Radio Frequency (RF) Exposure Information
The radiated output power of the ASUS Wireless Device is below the Industry
Canada (IC) radio frequency exposure limits. The ASUS Wireless Device should
be used in such a manner such that the potential for human contact during
normal operation is minimized.
This device has been evaluated for and shown compliant with the IC Specic
Absorption Rate (“SAR”) limits when installed in specic host products operated
in portable exposure conditions (antennas are less than 20 centimeters of a
person’s body).
This device has been certied for use in Canada. Status of the listing in the
Industry Canada’s REL (Radio Equipment List) can be found at the following web
address: http://www.ic.gc.ca/app/sitt/reltel/srch/nwRdSrch.do?lang=eng
Additional Canadian information on RF exposure also can be found at the
following web: http://www.ic.gc.ca/eic/site/smt-gst.nsf/eng/sf08792.html
Canada, avis d’Industry Canada (IC)
Cet appareil numérique de classe B est conforme aux normes canadiennes ICES-
003 et RSS-210.
Son fonctionnement est soumis aux deux conditions suivantes : (1) cet
appareil ne doit pas causer d’interférence et (2) cet appareil doit accepter
toute interférence, notamment les interférences qui peuvent a ecter son
fonctionnement.
Informations concernant l’exposition aux fréquences radio (RF)
La puissance de sortie émise par l’appareil de sans l ASUS est inférieure à
la limite d’exposition aux fréquences radio d’Industry Canada (IC). Utilisez l’
appareil de sans l ASUS de façon à minimiser les contacts humains lors du
fonctionnement normal.

Ce périphérique a été évalué et démontré conforme aux limites SAR (Speci c
Absorption Rate – Taux d’absorption spéci que) d’IC lorsqu’il est installé dans des
produits hôtes particuliers qui fonctionnent dans des conditions d’exposition à
des appareils portables (les antennes se situent à moins de 20 centimètres du
corps d’une personne).
Ce périphérique est homologué pour l’utilisation au Canada. Pour consulter l’
entrée correspondant à l’appareil dans la liste d’équipement radio (REL - Radio
Equipment List) d’Industry Canada rendez-vous sur:
http://www.ic.gc.ca/app/sitt/reltel/srch/nwRdSrch.do?lang=eng
Pour des informations supplémentaires concernant l’exposition aux RF au
Canada rendezvous sur :
http://www.ic.gc.ca/eic/site/smt-gst.nsf/eng/sf08792.html
NCC 警語
經型式認證合格之低功率射頻電機,非經許可,公司、商號或使用者均不得
擅自變更頻率、加大功率或變更原設計之特性及功能。
低功率射頻電機之使用不得影響飛航安全及干擾合法通信;經發現有干擾現
象時,應立即停用,並改善至無干擾時方得繼續使用。
前項合法通信,指依電信法規定作業之無線電通信。
低功率射頻電機須忍受合法通信或工業、科學及醫療用電波輻射性電機設備
之干擾。
Area Hotline Number Support
Languages Availability
Australia 1300-2787-88 English Mon. to Fri.
9:00-18:00
Austria 0043-820240513 German Mon. to Fri.
9:00-18:00
Belgium 0032-78150231 Dutch /French Mon. to Fri.
9:00-17:00
China 800-820-6655;
021-34074610 Simplied Chinese Mon. to Sun.
9:00-18:00
Denmark 0045-3832-2943 Denish/English Mon. to Fri.
9:00-17:00
Finland 00358-9693-7969 Finnish/English/Swed-
ish
Mon. to Fri.
10:00-18:00
France 0033-170949400 France Mon. to Fri.
9:00-17:45
Greece 00800-44-14-20-44 Greek
Mon. to Fri.
9:00-13:00;
14:00-18:00
Hong Kong 3582-4770
Cantonese/
Chinese/
English
Mon. to Fri.
10:00-20:00
Sat.
10:00-17:00
Ireland 0035-31890719918 English Mon. to Fri.
9:00-17:00
Japan 0800-123-2787 Japanese
Mon. to Fri.
9:00-18:00
Sat. to Sun.
9:00-17:00
Networks Global Hotline Information
NOTE: For more information, visit the ASUS support site at:
http://support.asus.com

Area Hotline Number Support
Languages Availability
Malaysia
+603 2148 0827
(Check Repair De-
tail Status Only)
+603-6279-5077
Bahasa Melayu/English Mon. to Fri.
10:00-19:00
Netherlands
/ Luxembourg 0031-591-570290 Dutch / English Mon. to Fri.
9:00-17:00
New Zealand 0800-278-788 /
0800-278-778 English Mon. to Fri.
9:00-17:00
Norway 0047-2316-2682 Norwegian
/English
Mon. to Fri.
9:00-17:00
Philippine +632-636 8504;
180014410573 English Mon. to Fri.
9:00-18:00
Poland 00225-718-033
00225-718-040 Polish
Mon. to Fri.
9:00-17:00
8:30-17:30
Portugal 707-500-310 Portuguese Mon. to Fri.
9:00-17:00
Russia +8-800-100-ASUS;
+7-495-231-1999
Russian/
English
Mon. to Fri.
9:00-18:00
Singapore
+65-6720-3835
(Check Repair De-
tail Status Only)
-66221701
English
Mon. to Fri.
11:00-19:00
Slovak 00421-232-162-
621 Czech Mon. to Fri.
8:00-17:00
Spain 902-88-96-88 Spanish Mon. to Fri.
9:00-18:00
Sweden 0046-8587-6940 Swedish/
English
Mon. to Fri.
9:00-17:00
Networks Global Hotline Information
Area Hotline Number Support
Languages Availability
Switzerland
0041-848111010 German/French Mon. to Fri.
9:00-18:00
0041-848111014 French Mon. to Fri.
9:00-17:45
0041-848111012 Italian Mon. to Fri.
9:00-17:00
Taiwan 0800-093-456;
02-81439000 Traditional Chinese
Mon. to Fri.
9:00-12:00;
13:30-18:00
Thailand
+662-679-8367
-70; 001 800 852
5201
Thai/English Mon. to Fri.
9:00-18:00
Turkey +90-216-524-3000 Turkish Mon. to Fri.
09:00-18:00
United Kingdom
0044-870-
1208340;
0035-31890719918
English Mon. to Fri.
9:00-17:00
USA/Canada 1-812-282-2787 English
Mon. to Fri.
8:30-12:00am
EST
(5:30am-9:00pm
PST)
Sat. to Sun.
9:00am-6:00pm
EST
(6:00am-3:00pm
PST)
Networks Global Hotline Information

EEE Yönetmeliğine Uygundur.
Manufacturer ASUSTeK Computer Inc.
Tel: +886-2-2894-3447
Address: No. 150, LI-TE RD., PEITOU, TAIPEI 112,
TAIWAN
Authorised
representative in Europe
ASUS Computer GmbH
Address: HARKORT STR. 21-23, 40880 RATINGEN,
GERMANY
Authorised distributors
in Turkey
BOGAZICI BIL GISAYAR SAN. VE TIC. A.S.
Tel: +90 212 3311000
Address: AYAZAGA MAH. KEMERBURGAZ CAD.
NO.10 AYAZAGA/ISTANBUL
CIZGI Elektronik San. Tic. Ltd. Sti.
Tel: +90 212 3567070
Address: CEMAL SURURI CD. HALIM MERIC IS
MERKEZI
No: 15/C D:5-6 34394 MECIDIYEKOY/ ISTANBUL