ASUSTeK Computer WL100GE ASUS WLAN PC CARD User Manual WL 100gE Manual English
ASUSTeK Computer Inc ASUS WLAN PC CARD WL 100gE Manual English
USERS MANUAL
Quick Start Guide
ASUS WLAN Card
WL-100gE
(For 802.11g & 802.11b Wireless Networks)
®
PWR
AIR
QE2159 / Jul 2005
2ASUS WLAN Card
Quick Start Guide
English
Carefully insert the WLAN card into your
computer’s PC card slot. Windows will auto-
matically find and configure the WLAN card
using the drivers installed in the previous steps.
When the program is launched for the first time
(during Windows restart), you will be asked
which function to use. Select to use utilities for
more functions.
Installing the WLAN utilities and driver
Follow these instructions to install the WLAN card utilities and driver. Insert the support
CD and an autorun menu will appear. If your autorun is disabled, double click
SETUP.EXE in the root directory of the support CD. Select your language and click
Install WLAN Card Utilities/Driver. Follow instructions to complete the installation.
Installation Procedures
Important: Install the WLAN card utilities before inserting the WLAN
Card into your computer.
Follow these two easy steps before using the WLAN card.
1. Install the WLAN card utilities and driver from the support CD.
2. Insert the WLAN card into your computer.
ASUS WLAN Card 3
Quick Start Guide
English
Orientating the Antenna
The ASUS WLAN Card has two integrated antennas, one external omnidirectional
antenna and the other is a built-in diversity antenna. It is recommended that you adjust
the external antenna straight up for maximum range and higher link quality. Lower the
external antenna when transporting your Notebook PC.
Inserted with antenna down Inserted with antenna up
Internal diversity antenna
External omnidirectional antenna
Reading the WLAN Status Indicators
The part of the WLAN Card that protrudes out of the PCMCIA socket consists of two
LEDs that indicate the status of the WLAN Card .
Power LED
OFF: No power or error.
ON: Power ON.
Air LED
OFF: No wireless activity.
Blink: Transmitting/receiving wireless data.
PWR
AIR
Air LED
Power LED
4ASUS WLAN Card
Quick Start Guide
English
One Touch Wizard (new wireless LAN)
Use the One Touch Wizard to setup your wireless connection.
1. Select Create a new... and click Next to
use the simplest configuration or select an-
other option first.
2. Enter the SSID name of the access point that
you wish to connect to. Select Data encryp-
tion if secured connections are enabled.
One Touch Wizard (existing LAN)
Use the One Touch Wizard to setup your wireless connection.
1. Select Connect to... and click Next to use
the simplest configuration or select another
option first.
2. Select an AP from the available networks.
ASUS WLAN Card 5
Quick Start Guide
English
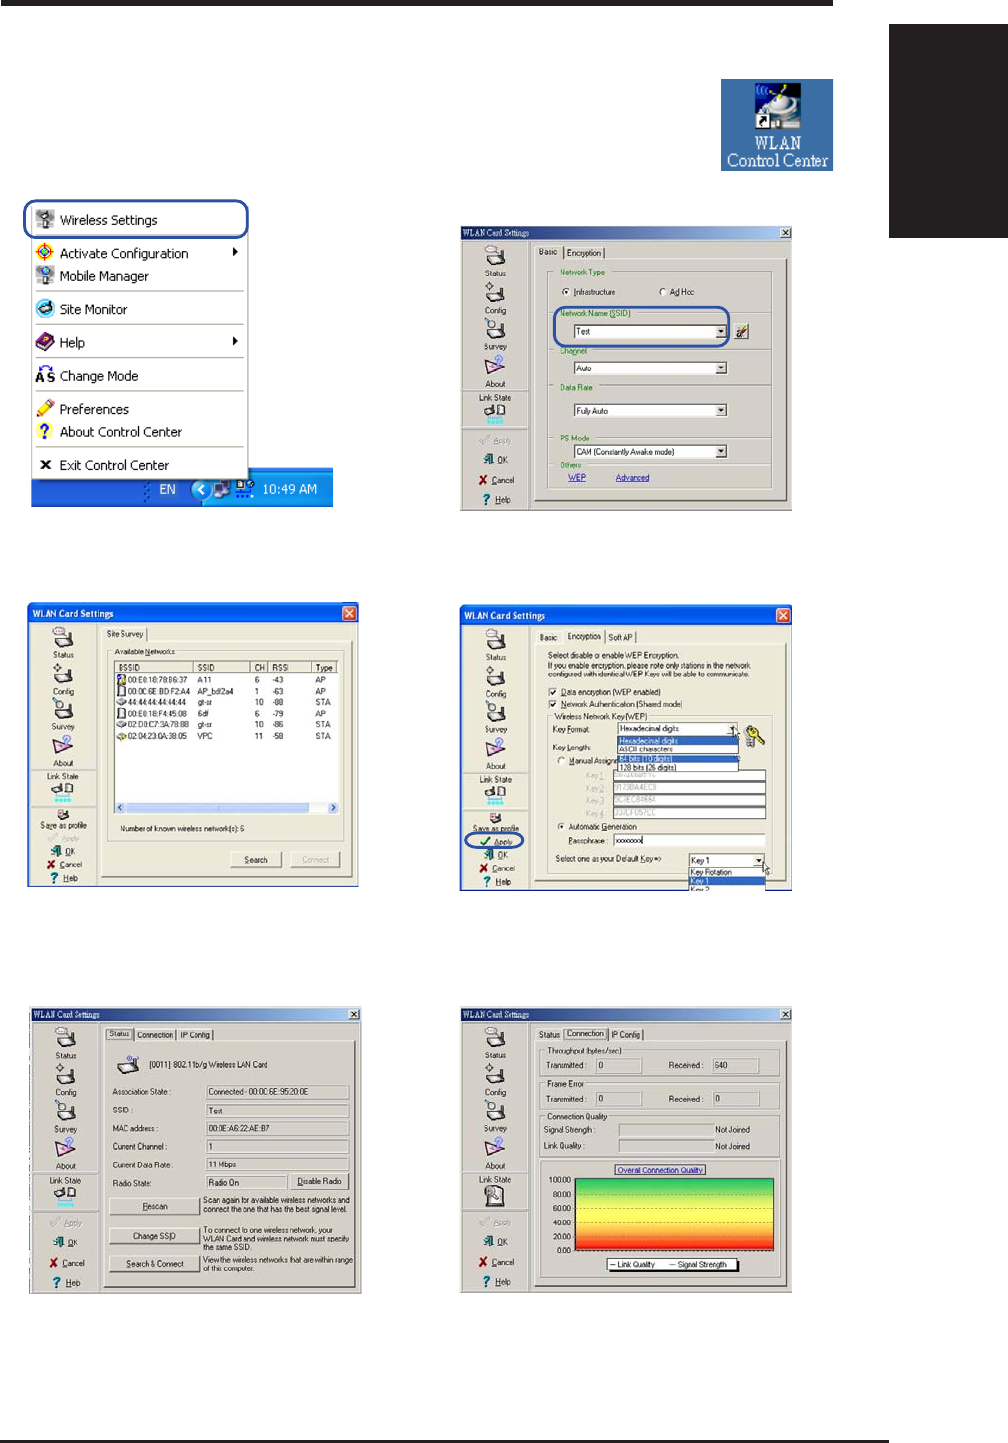
Configuring the WLAN utility
After installing the WLAN Card Utilities, you will need to make some
settings before being able to use your wireless connection. Double-click
the WLAN Control Center icon to start the utility.
6. You can also see the connection quality on
the “Connection” page. Click OK to exit the
utility.
5. Check the “Status” page to see the “Asso-
ciation State”. It should show “Connected -
xx:xx:xx:xx:xx:xx”.
3. Use “Site Survey” if you don’t know the
name of your access point(s).
4. Encryption settings must also match those
set in the access point. Ask your network
administrator about settings if necessary.
Click Apply to save your settings
1. Right-click the WLAN icon and select “Wire-
less Settings” 2. Set the Network Name (SSID) to the same
name as the SSID set in your wireless ac-
cess point.
6ASUS WLAN Card
Quick Start Guide
English
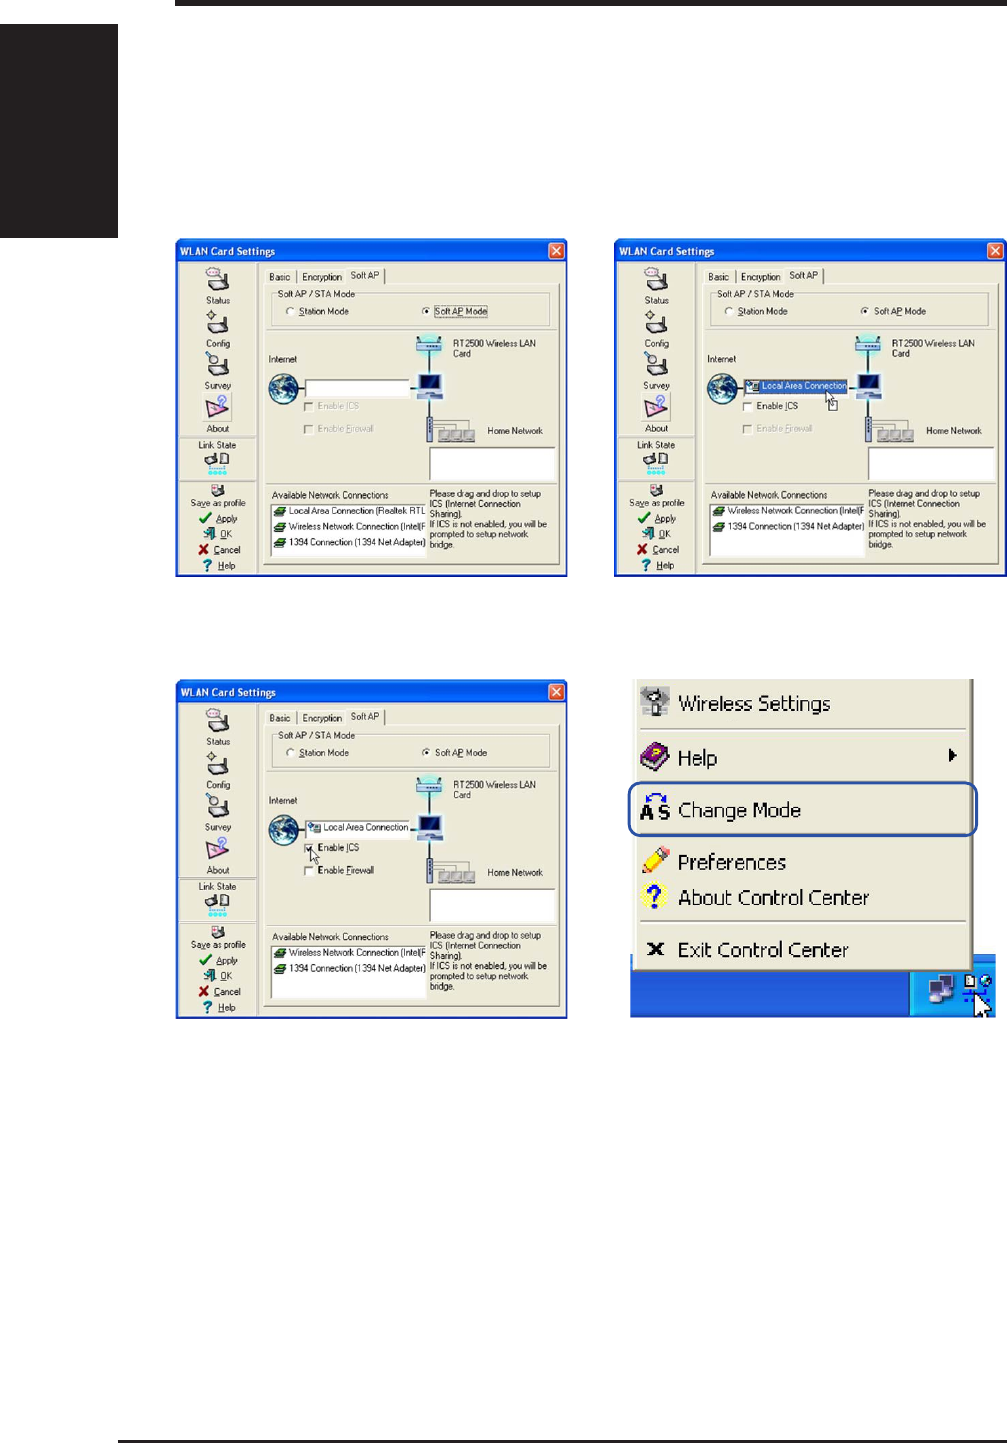
Soft AP (Windows XP Only)
Soft AP mode allows the WLAN card to act as a virtual access point. The computer
needs to be connected to a wired network using an Ethernet connection in order to
provide network access to WLAN clients.
1. Select Soft AP Mode
3. Enable ICS* and Firewall if desired. Refer
to Windows help for information on “Inter-
net Connection Sharing”.
2. Drag and drop a wired network connection
next to the globe icon.
4. You can easily switch between Soft AP and
Station mode by right clicking the taskbar
icon and selecting “A-S Change Mode”.
*ICS is used to share this computer’s Internet connection with the rest of the computers on your
network. When this computer is connected to the Internet, communication to and from the Inter-
net to all the computers on your network are sent through this computer, called the host com-
puter. Other computers can send and receive email and access the Web as if it were connected
directly to the Internet.
ASUS WLAN Card 7
Quick Start Guide
English
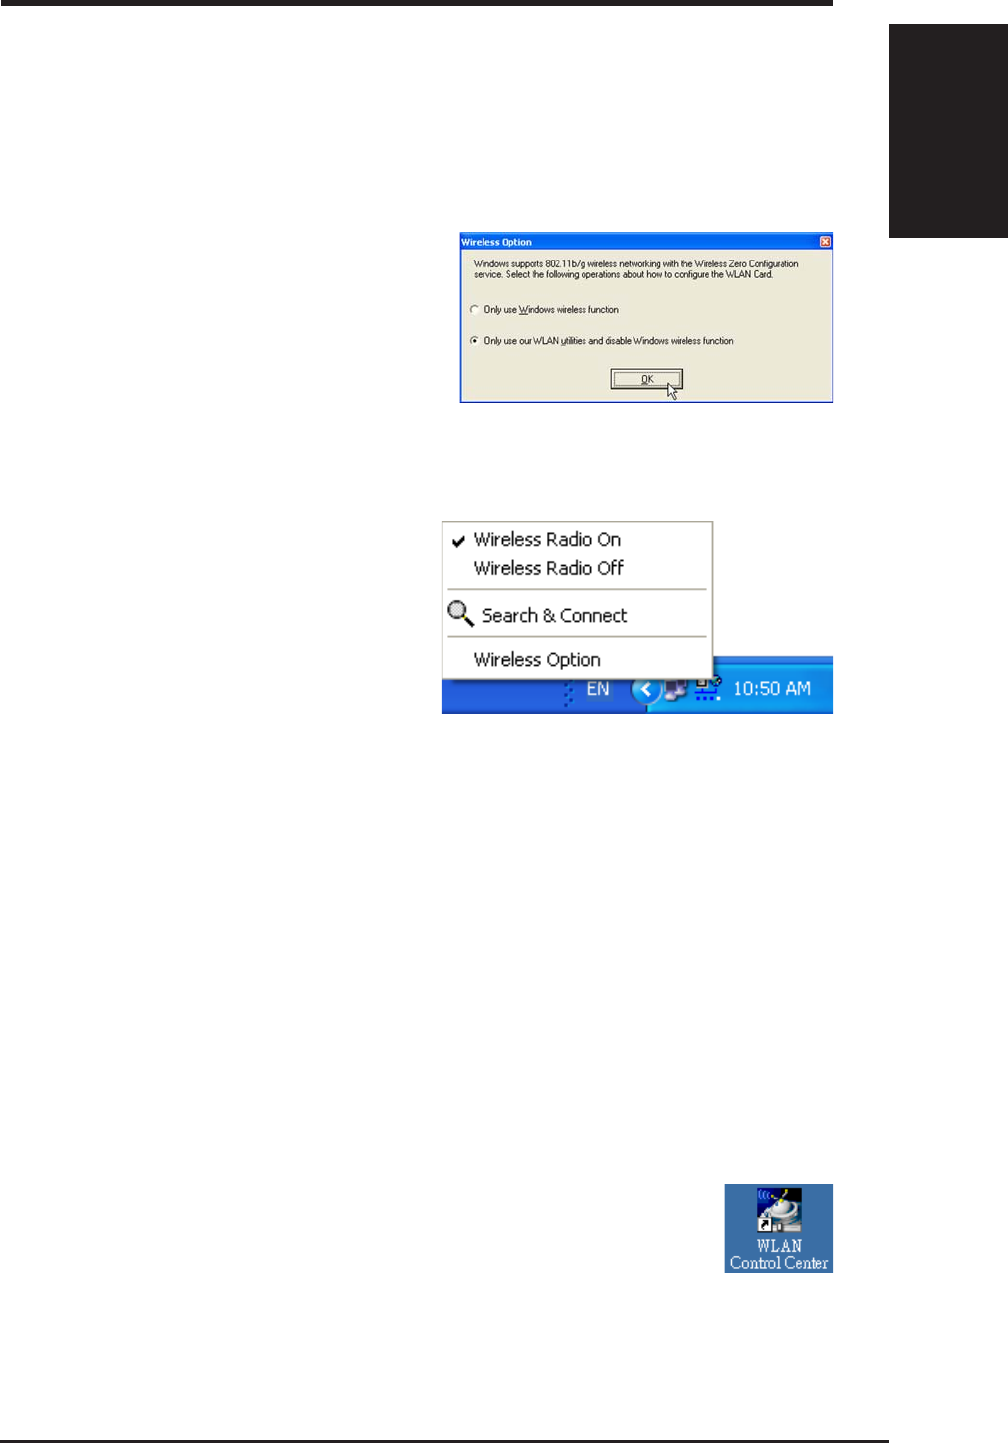
Windows XP Wireless Options
The wireless options shown below is only available for Windows XP. The first
time you run the Control Center utility, it will automatically show. Select one of
the radio buttons to decide which interface to use with your WLAN Card.
Only use XP wireless function – Only use “Windows XP” wireless network settings
to configure the WLAN Card.
Only use utilities and disable XP wireless
function – Only use “WLAN Card
utilities” to configure the WLAN Card.
(recommended)
You can return to the Wireless Option
setting at any time by left clicking the
control center icon and choosing
“Wireless Option”.
Taskbar Left-Click Menu
WLAN Control Center
Control Center is an application that makes it easy to launch applications and activate
network location settings. Control Center starts automatically when the system
boots. Whenever Control Center is running, you will see a Control Center icon
displayed on the Windows taskbar.
Starting the Control Center manually
• Select WLAN Control Center in Windows Start menu.
or
• Double click the WLAN Control Center icon on the desk-
top.
8ASUS WLAN Card
Quick Start Guide
English
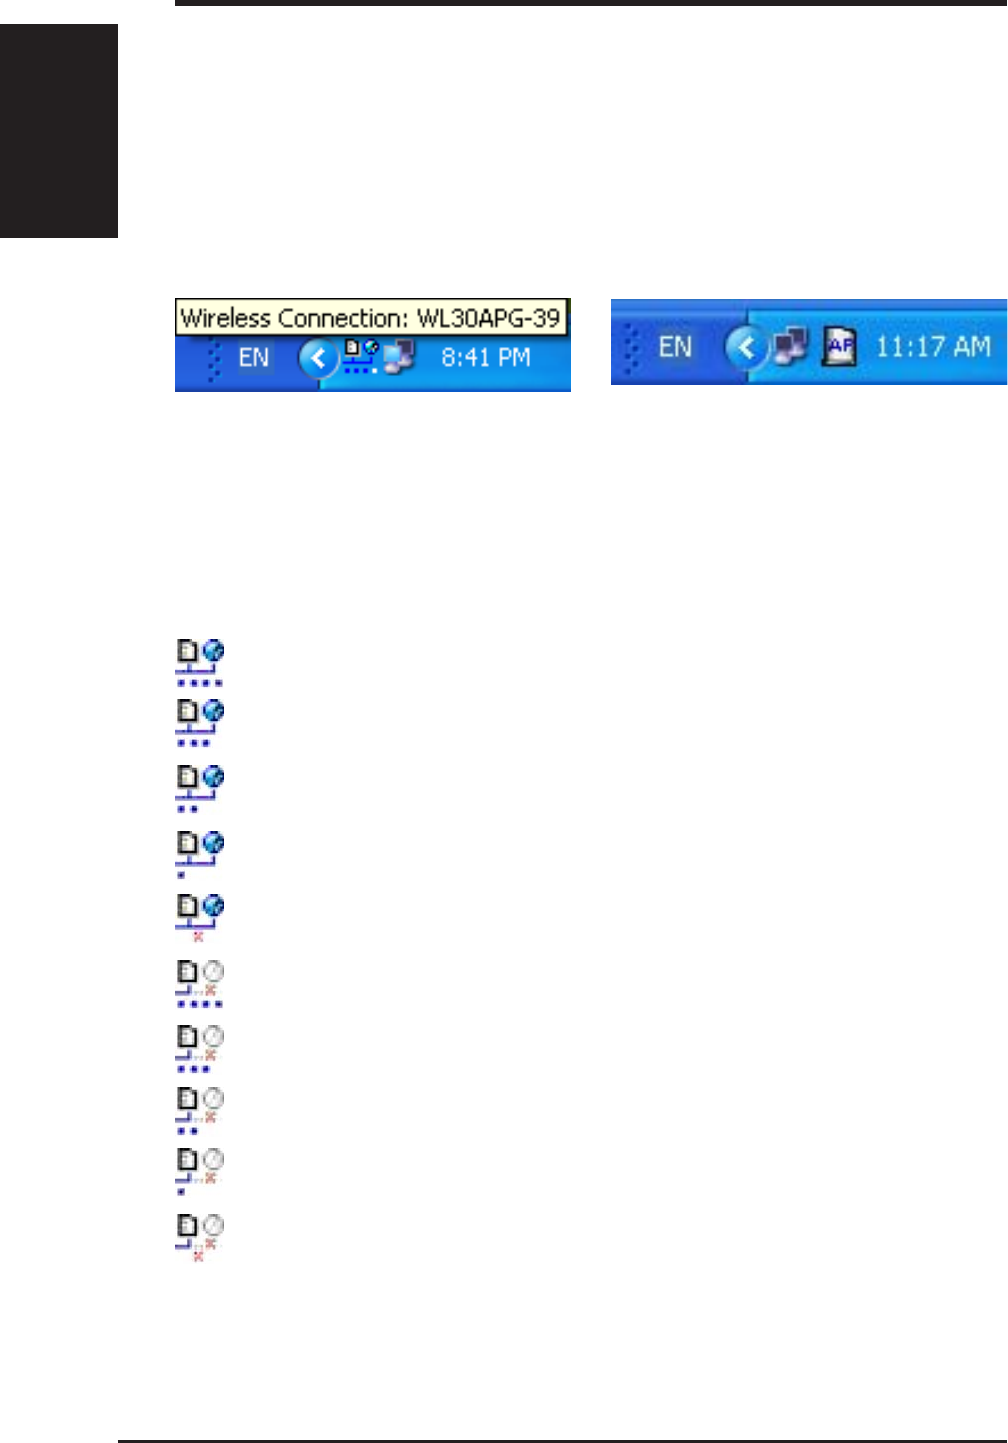
Wireless Status Icons (on the taskbar)
Excellent link quality and connected to Internet (Infrastructure)
Good link quality and connected to Internet (Infrastructure)
Fair link quality and connected to Internet (Infrastructure)
Poor link quality and connected to Internet (Infrastructure)
Not linked but connected to Internet (Infrastructure)
Excellent link quality but not connected to Internet (Infrastructure)
Good link quality but not connected to Internet (Infrastructure)
Fair link quality but not connected to Internet (Infrastructure)
Poor link quality but not connected to Internet (Infrastructure)
Not linked and not connected to Internet (Infrastructure)
Using the Control Center Taskbar
The Control Center Taskbar menu display the following information:
• The link quality of the WLAN Card (Excellent, Good, Fair, Poor,
Not Linked)
• Whether the WLAN Card is connected to the Internet (Blue: Con-
nected, Gray: Not Connected)
Taskbar Icon and Status
(Station mode) Taskbar Icon and Status
(Access Point mode)
ASUS WLAN Card 9
Quick Start Guide
English
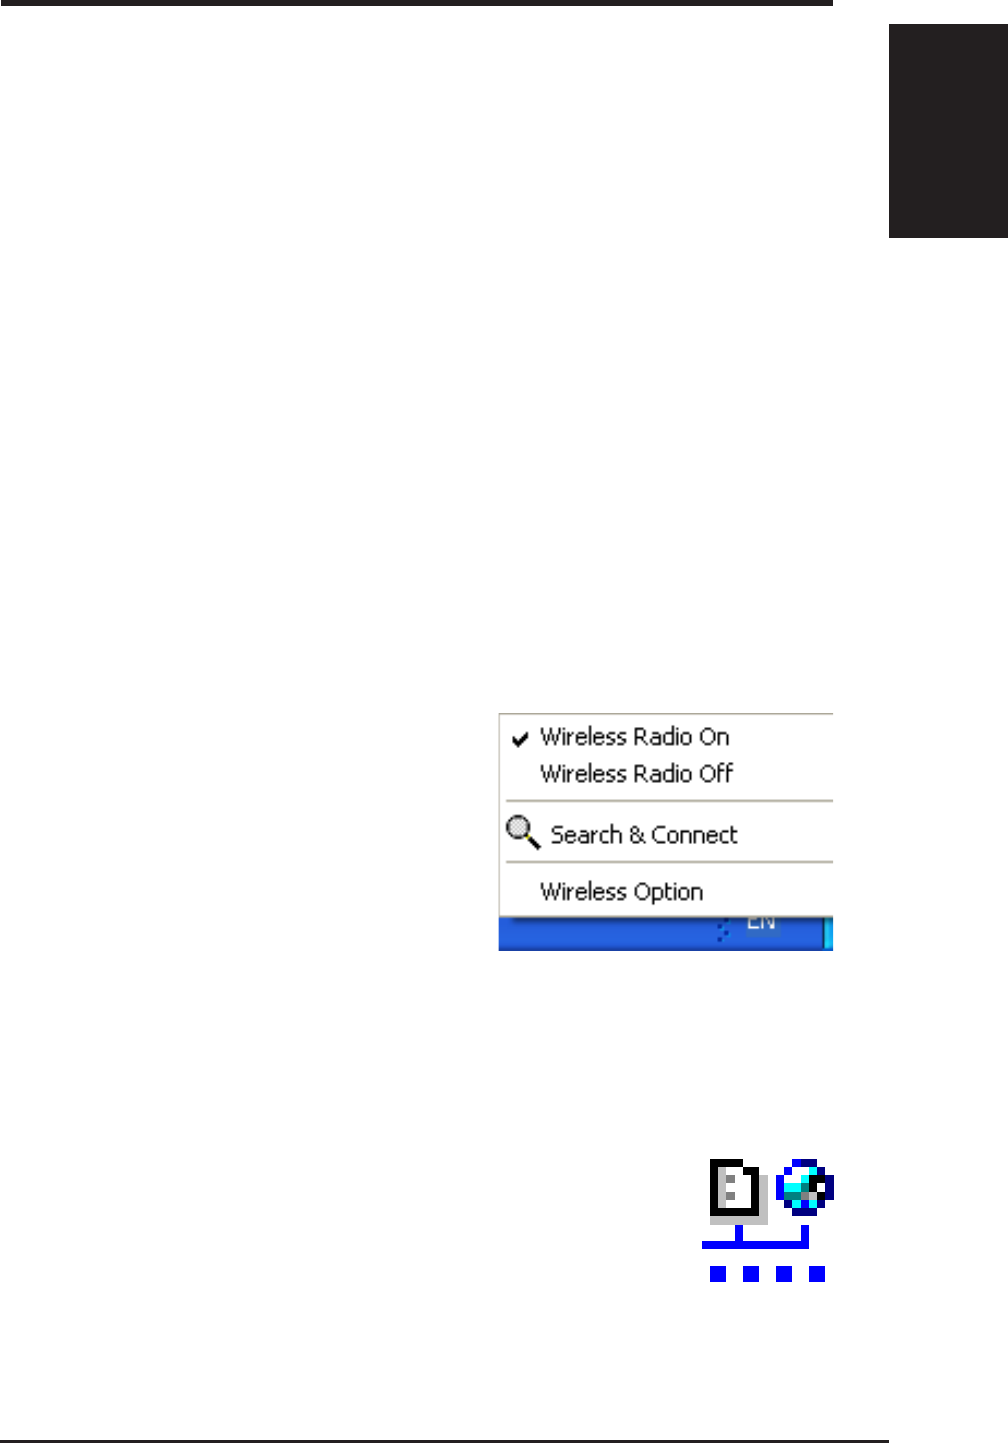
Taskbar Icon - Left Menu
Left-clicking the taskbar icon shows the
following menu:
•Wireless Radio On – Turns the
wireless radio ON.
•Wireless Radio Off – Turns the
wireless radio OFF.
•Search & Connect – View the
properties of available Access Points within range.
•Wireless Option (Windows XP only) – Sets your Windows XP wire-
less networking environment.
Taskbar Icon - Launch Wireless Settings
Double-clicking the taskbar icon:
• Launches the Wireless Settings application.
Taskbar Icon - Right Menu
Right-clicking the taskbar icon shows the following menu items:
•Wireless Settings – Launches Wireless Settings application.
•Activate Configuration – Allows you to set which profile to use.
•Mobile Manager – Launches Mobile Manager application.
•Site Monitor – Launches the Site Monitor application.
•Change Mode (Windows XP Only) - Configures your card in Station
(STA) or Soft Access Point (Soft AP) mode. In STA mode, your card
connects to an access point to access a wireless network or the Internet.
In Soft AP mode, your card transmits and receives signals to and from
other WiFi devices in a wireless network.
•Preferences – Customizes the way the Control Center program behaves.
You can create a Control Center shortcut on the desktop. You can also
set whether Control Center starts up with Windows.
•Exit – Closes the Control Center program.
Taskbar Left-Click Menu
10 ASUS WLAN Card
Quick Start Guide
English
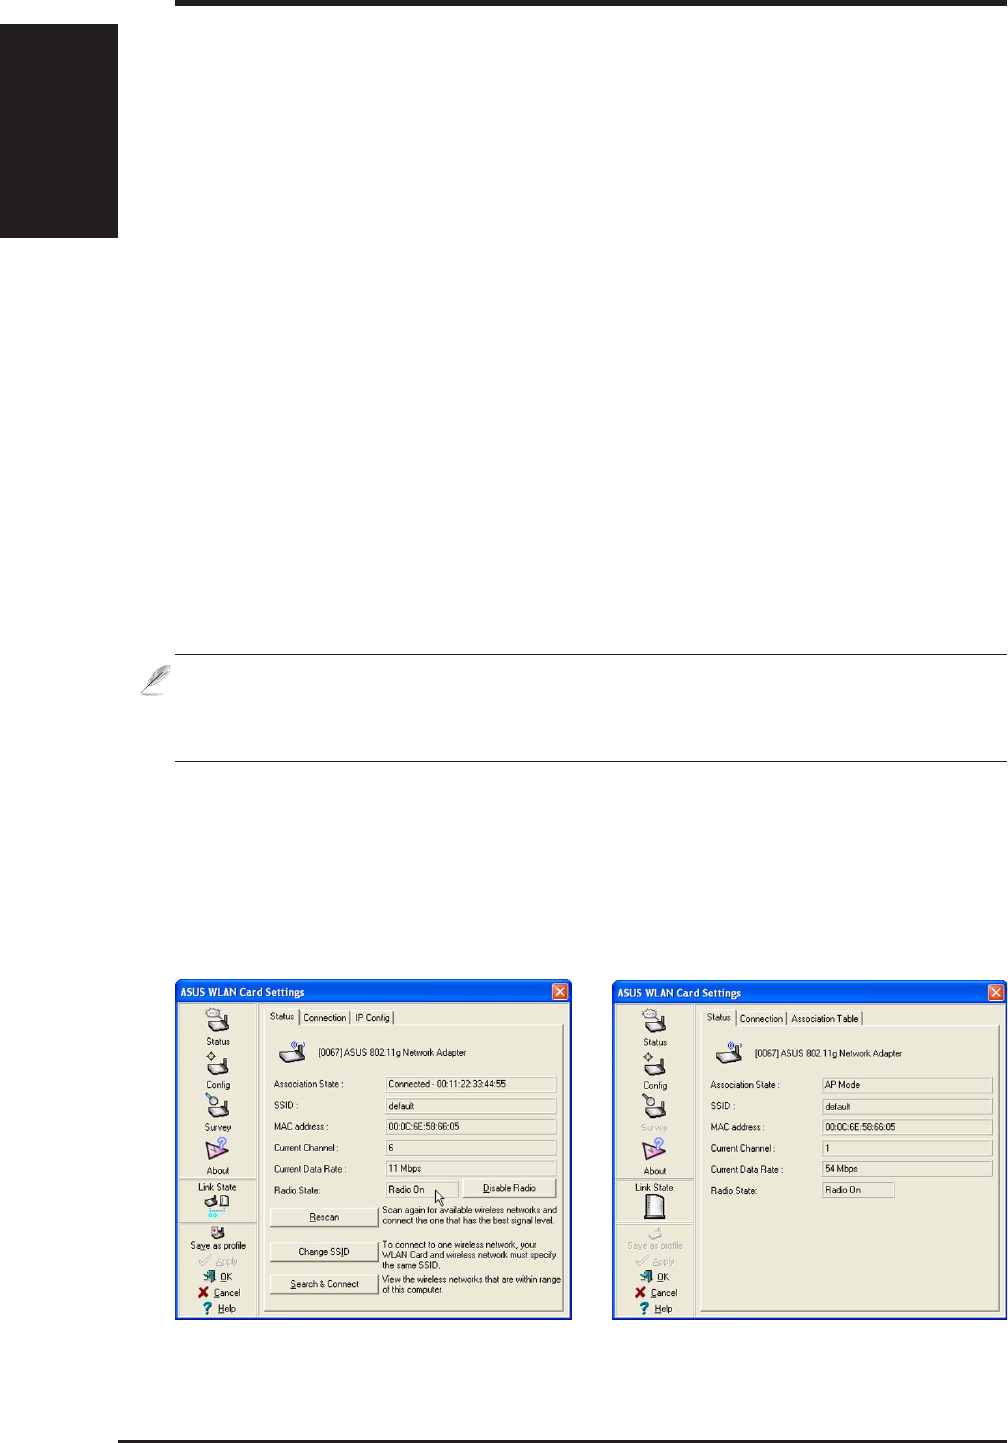
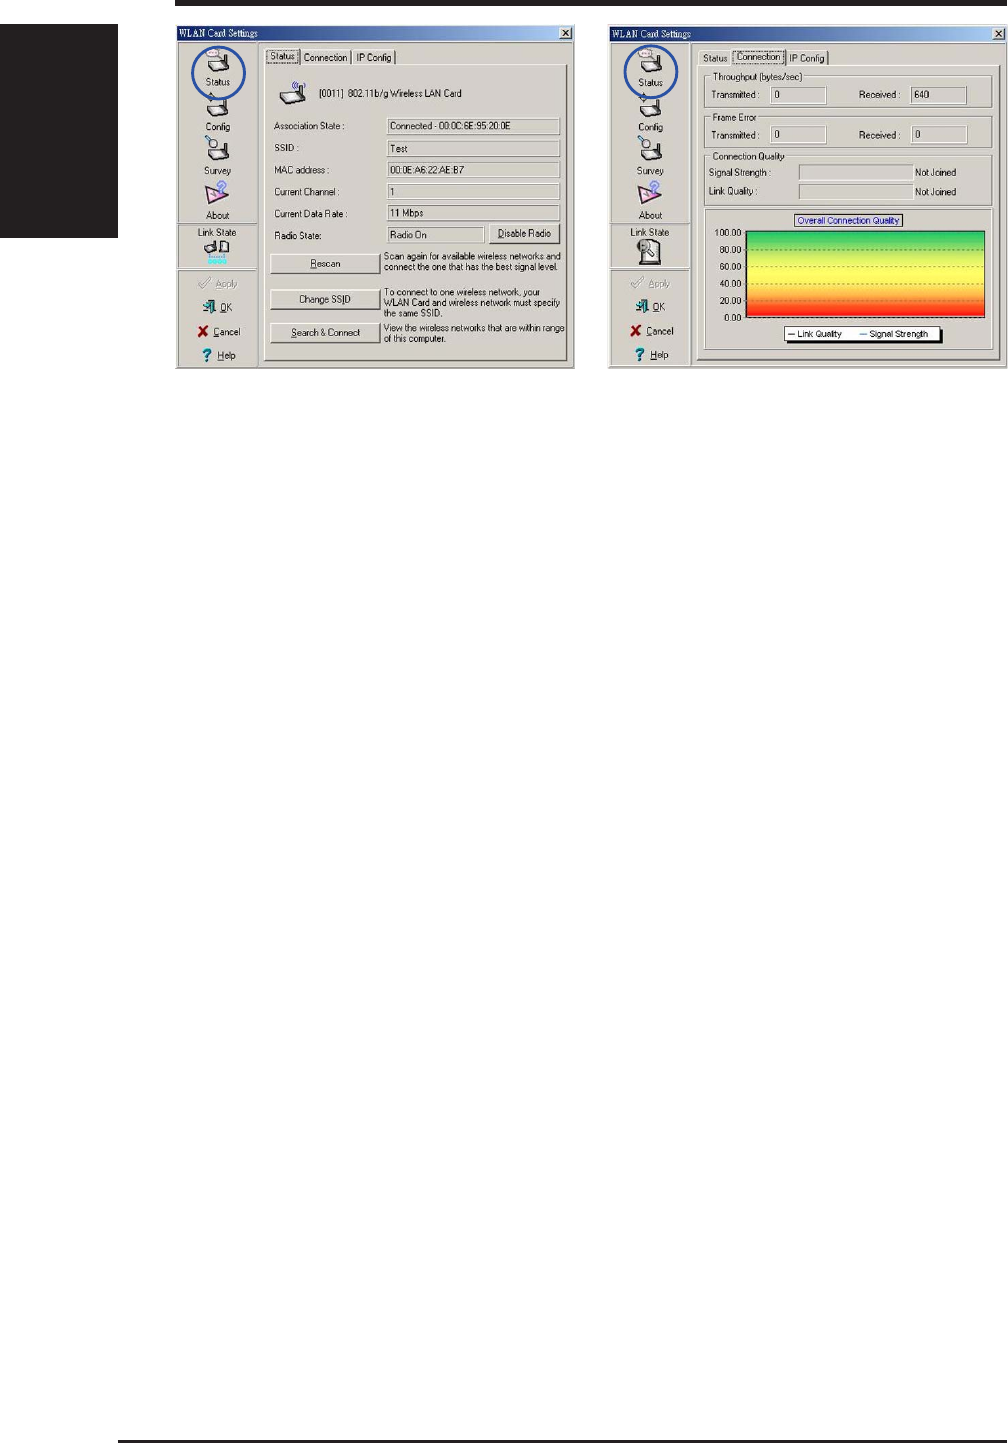
Status - Status Tab
You can view the information about the WLAN Card from the general menu. These
fields are blank if the WLAN Card does not exist. You can turn OFF the WLAN
Card by clicking the “Disable Radio” button.
Station Mode
Wireless Settings Utility
Wireless Settings is an application that allows you to control your WLAN Card. Use
Wireless Settings to View or Modify the configuration settings and monitor the
operational status of your PC Card. Once Wireless Settings is launched, you can see
the tabbed property sheet. This property sheet is composed of tabbed “pages”, each
with its own group of feature-specific settings.
Starting Wireless Settings
• Open the Windows Control Panel, and then double-click the WLAN
Card Settings icon.
or
• Click the Windows Start button, select Programs | ASUS Utility |
WLAN Card | Wireless Settings.
or
• Right-click the Control Center icon on the Windows taskbar, select
Wireless Settings.
Access Point Mode
NOTE: If you have more than one WLAN device, you will be given a
device selection window when you launch the “Wireless Settings”
utility. Select the appropriate model if you face this situation.

ASUS WLAN Card 11
Quick Start Guide
English
Association State
Displays the connection status as follows:
Connected - The station is now associated with one wireless LAN device. When
operating in Infrastructure mode, this field shows the MAC address of the Access Point
with which you are communicating. When operating in Ad Hoc
*
mode, this field shows
the virtual MAC address used by computers participating in the Ad Hoc
*
network.
Scanning... - The station is now attempting to authenticate and associate with the desired
Access Point or Ad Hoc
*
node.
Disconnected - The link is connected, but no beacon received.
SSID
Displays the Service Set Identifier (SSID) that the card is either associated or intending
to join.
MAC address
Indicates the hardware address of the card. MAC address is a unique identifier for
networking devices (typically written as twelve hexadecimal digits 0 through 9 and A
through F, six hexadecimal numbers separated by colons, i.e. 00:E0:18:F0:05:C0).
Current Channel
Displays the radio channel that the card is currently tuned. This number changes as the
radio scans the available channels.
Current Data Rate
Displays the current transmit data rate in megabits per second (Mbps).
Radio State
Shows the wireless radio ON or OFF.
Radio On - When the wireless radio is turned ON, the following icon appears
in the upper left of the Settings property page.
Radio Off- When the wireless radio is turned OFF, the following icon appears
in the upper left of the Settings property page.
Rescan – Force the radio to rescan all available channels. If your link quality or
signal strength is poor, rescanning can be used to push the radio off a weak Access
Point and search for a better link with another Access Point. This function will
take some time to complete.
Change SSID – Click on this to set the SSID.
Search & Connect – Click on this to connect to an available network.
12 ASUS WLAN Card
Quick Start Guide
English
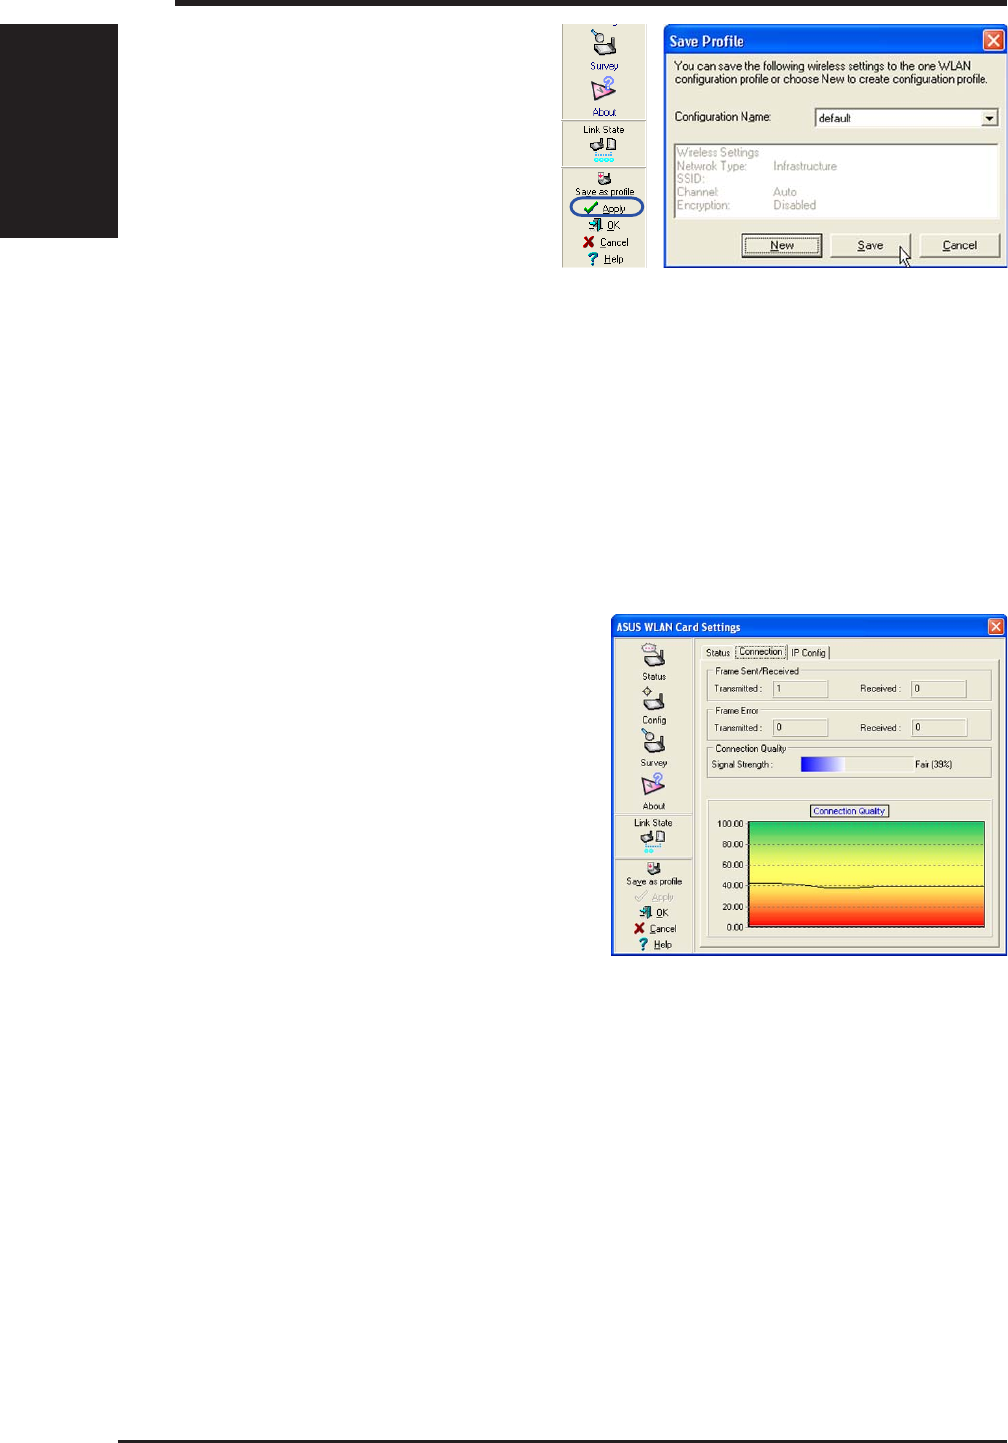
Status - Connection
You can view the current link statistics
about the WLAN Card. These statistics are
updated once per second and are valid only
if the WLAN Card exists.
Frame Sent/Received
Transmitted - The number of frames that
were transmitted.
Received - The number of frames that were
received.
Frame Error
Transmitted - The number of frames that were not successfully transmitted.
Received - The number of frames that were not successfully received.
Connection Quality
Signal Strength - Reflects the signal level related to the Access Point or Ad Hoc node
the station is currently connected to. Ratings are: Excellent, Good, Fair, and Poor.
Overall Connection Quality
It is derived from the current "Signal Strength". A graph displays a connection quality
range between 0 and 100 percent.
Activate Configuration
Auto roaming is enabled by default and will automatically switch to stronger access
points. You can uncheck it if you have many access points and do not want to
constantly switch to different networks. If you want to use a particular profile. You
can also check it here.
Save as Profile
Later, when you make individual
settings, you may want to use profiles
to save your settings. Profiles will
help you combine all your settings for
work, home, roaming, and other
locations so that you do not have to
repeat individual settings. When you
travel from work to home, for example, choose a “home” profile that contains all
your settings for home use. When you travel back to work, choose an “office”
profile.
ASUS WLAN Card 13
Quick Start Guide
English
Status - IP Config
IP Config tab shows all the current
network configuration information for the
WLAN Card. Use it to verify your
network settings.
IP CONFIG will display all the current
TCP/IP configuration values including the
IP address, subnet mask, default gateway
and Windows Internet Naming Service
(WINS) and DNS configuration.
Button
IP Release - Clicking this button will attempt to release the DHCP IP address for
the WLAN Card in case you wish to remove your IP address.
IP Renew - Clicking this button will attempt to renew the DHCP IP address for the
WLAN Card in case you want to obtain a new IP address.
NOTE: The IP Release and IP Renew buttons can only be used on
the WLAN Card that is configured with DHCP.
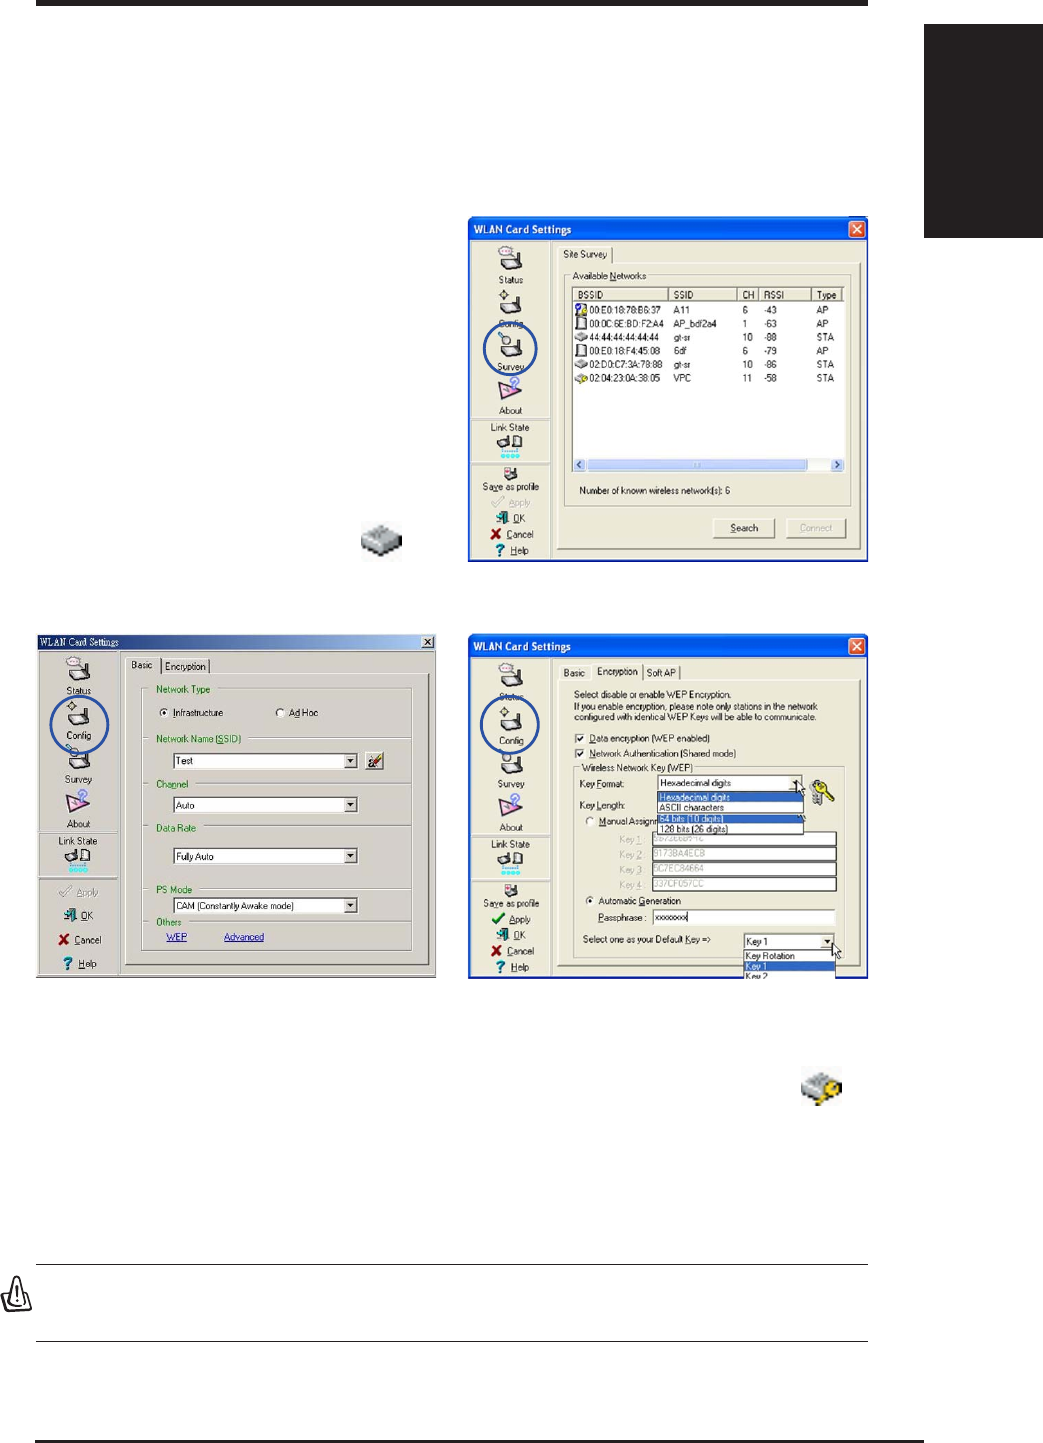
Config - Basic
Lets you can change the WLAN Card
configurations without rebooting your
computer.
Network Type
Infrastructure – Select the Infrastructure
mode to establish a connection with an
Access Point. Your computer is able to access
wireless LAN and wired LAN (Ethernet), via
an associated access point. The Channel field
turns to “Auto” when “Infrastructure” is selected.
Ad Hoc – Select the “Ad Hoc” mode to communicate directly with each other without
using an Access Point. An “Ad Hoc” network is typically formed quickly and easily
without pre-planning. For example, share meeting notes between networked computers
in a meeting room.

14 ASUS WLAN Card
Quick Start Guide
English
Network Name (SSID)
Use the SSID field to configure the SSID for the WLAN Card. You can enter a new
SSID or select one from the drop-down list box. SSID stands for “Service Set Identifier”,
which is a string used to identify a wireless LAN. You will only be able to connect
Access Points which has the same SSID as the one you set. Use different SSIDs to
segment the wireless LAN and increase security. SSIDs must all be printable characters
and having a maximum of 32 case sensitive characters, such as “ Wireless LAN”.
NOTE: Set the SSID to a null string, if you wish to allow your station
to connect to any Access Point it can find. But you cannot use null
string in Ad Hoc mode.
Channel
Use the Channel field to select the radio channel for WLAN Card. In an "infrastructure"
network, your WLAN Card will automatically select the correct frequency channel
required to communicate with an Access Point, this parameter will be fixed in "Auto"
and cannot be changed. In an "Ad Hoc" network, you can decide the channel number
for the WLAN Card. Any WLAN Card can communicate in the same network if they
have the same frequency channel setting.
The radio channels you may use depend on the regulations in your country. For United
States (FCC) and Canada (IC), channels 1 to 11 are supported. For Europe (ETSI),
channels 1 to 13 are supported. For operation in Japan (MKK), channels 1 to 14 are
supported.
Data Rate
Select the transmit data rate (fix or auto). The data rates supported for the WLAN
Cards are:
Auto – The adapter will adjust to the most suitable transmission rate.
Fix – 11g: Fix data rate to 1, 2, 5.5, 6, 9, 11, 12, 18, 24, 36, 48, or 54 Mbps.
11b: Fix data rate to 1, 2, 5.5, or 11 megabits per second.
Others
Encryption – Click on this to show the "Encryption" tab.
Advanced – Click on this to show the "Advanced" tab. In most cases, the default
values do not have to be changed.
Troubleshooting – Click on this to show the Troubleshooting utility.
Click Apply to save and activate the new configurations.
ASUS WLAN Card 15
Quick Start Guide
English
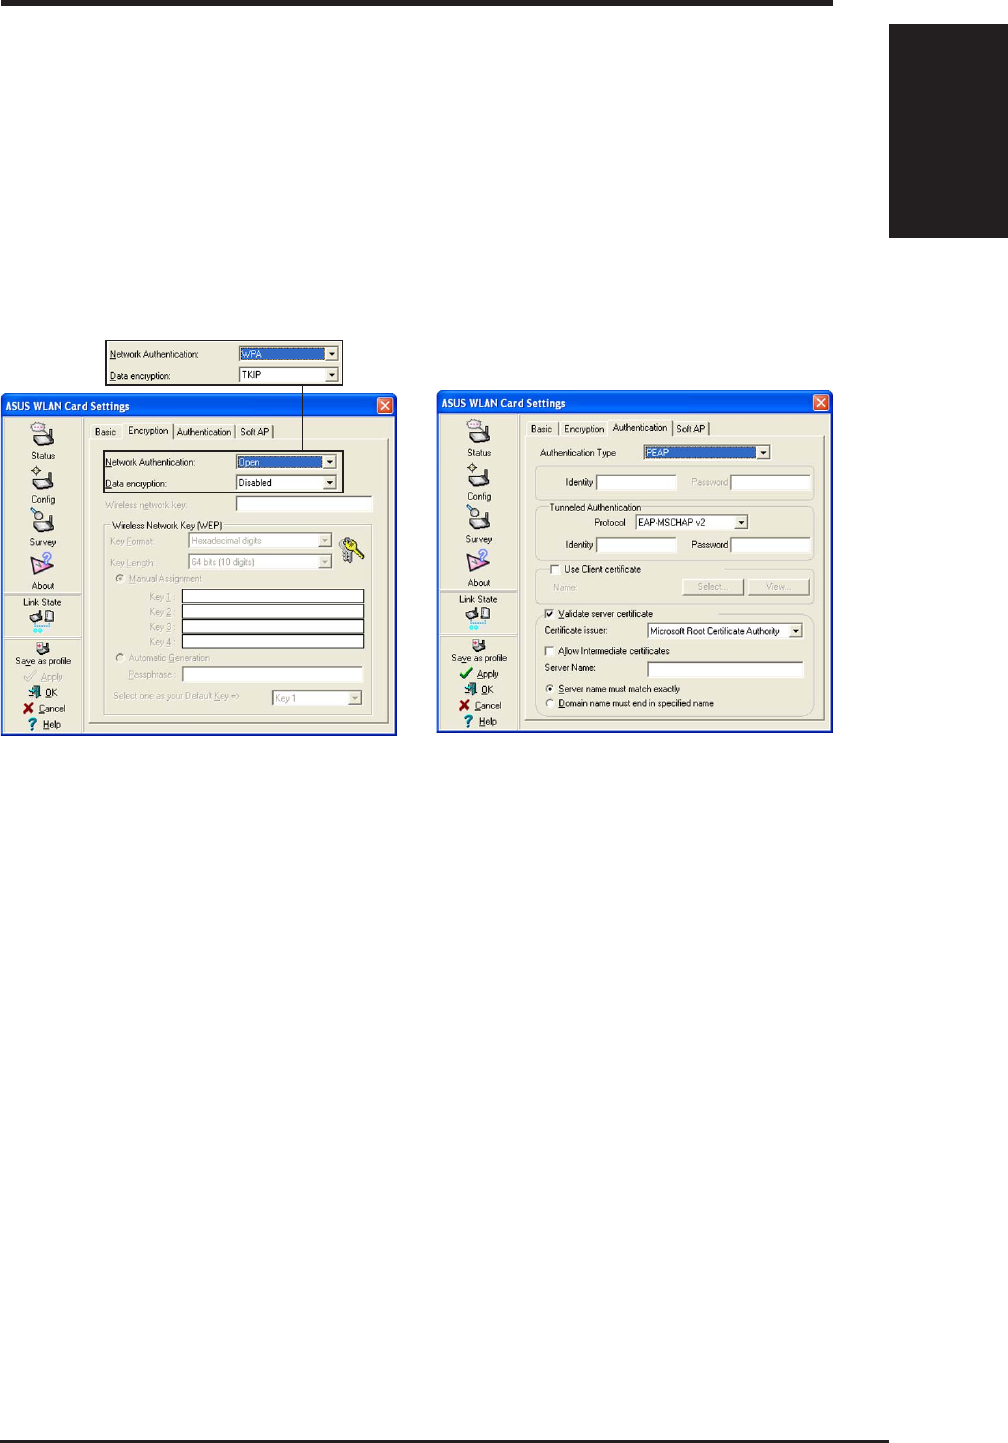
Config - Encryption
Lets you configure the Wireless LAN Card encryption settings. For data confidentiality
in a wireless environment, IEEE 802.11 specifies a Wired Equivalent Privacy (WEP)
algorithm to offer transmission privacy similar to wired network. The WEP uses keys
to encrypt transmit data packets and decrypt received data packets. The encryption
process can scramble frame bits to avoid disclosure to others. The WPA (Wi-Fi Protected
Access) is an improved security system for 802.11 that encryption data sent over radio
waves. The WPA was developed to overcome the weakness of the WEP protocol.
Network Authentication
Because there is no precise bound in wireless LANs, it needs to be implemented in
another mechanism to provide higher level of security. That is where Authentication
services come in. If a mutual authentication relationship has not been established between
stations and Access Point, an association cannot be established.
Open - Select this option allows the network to operate on an Open System mode. A
null authentication algorithm. A station can authenticate with any other station or Access
Point and without checking any WEP Key, even if one exists.
Shared - Select this option allows the network to operate on an Shared Key mode. In a
Share Key Authentication system, four-step exchange of frames is required to validate
that the station is using the same WEP Key as the Access Point.
WPA-PSK - Specifies the use of a preshared key with infrastructure mode. Enables
WPA Preshared key, which enables your client adapter to associate to Access Point
using WPA-PSK.
WPA-None - Specifies the use of a preshared key with Ad Hoc mode.

16 ASUS WLAN Card
Quick Start Guide
English
WPA - The network is operating in IEEE 802.1x authentication mode. This mode is
environments with a RADIUS (Remote Access Dial-in User Service) infrastructure. In
a RADIUS environment, various Extensible Authentication Protocol (EAP) are
supported, including PEAP, TLS/Smart Card, TTLS, and LEAP.
Data encryption
For open and shared authentication mode, the selection of encryption type are Disable
and WEP. For WPA-PSK and WPA authentication mode, it must support TKIP (Temporal
Key Integrity Protocol) encryption, and may support AES (Advanced Encryption
Standard) encryption.
Disabled - Disable the encryption function.
WEP - A WEP Key is used to encrypt your data before it is transmitted over the air. You
will only be able to communicate with wireless devices that have use the same WEP
keys.
TKIP: TKIP uses an encryption algorithm methods which is more stringent than the
WEP algorithm and also uses existing WLAN calculation facilities to perform encryption
operations. TKIP verifies the security configuration after the encryption keys are
determined.
AES: AES is a symmetric 128-bit block encryption technique which works
simultaneously on multiple network layers.
Wireless Network Key
Selecting “TKIP” or “AES” in the encryption filed is used as a password to begin the
encryption proceed. Note: 8 to 63 characters are required.
Wireless Network Key (WEP)
This option is enable only if you enable WEP Encryption. The WEP Key is a 64 bits (5
byte) or 128 bits (13 byte) Hexadecimal digits that is used to encrypt transmit data
packets and decrypt received data packets.
Key Format
You can enter the WEP Key as a Hexadecimal digits (0~9, a~f, and A~F), or as ASCII
characters, based on the state of the Key Format.
Key Length
For 64 bits encryption, each Key contains exactly 10 hex digits, or 5 ASCII characters.
For 128 bits encryption, each Key contains exactly 26 hex digits, or 13 ASCII characters.
ASUS WLAN Card 17
Quick Start Guide
English
Two ways to assign WEP keys
1. Manual Assignment - When you click this button, the cursor appears
in the field for Key 1. For 64-bit encryption, you are required to enter
four WEP Keys. Each Key contains exactly 10 hex digits (0~9, a~f, and
A~F). For 128-bit encryption, you are required to enter four WEP Keys.
Each Key contains exactly 26 hex digits (0~9, a~f, and A~F).
2. Automatic Generation - Type a combination of up to 64 letters, num-
bers, or symbols in the Passphrase column, then the Wireless Settings
Utility uses an algorithm to generate four WEP Keys for encryption.
NOTE: This function ease users from having to remember their pass-
words and is compatible to some existing WLAN utilities, but it is
not very secure. “Manual Assignment” is more secure.
Select one as your Default Key
The Default Key field lets you specify which of the four encryption keys you use to
transmit data on your wireless LAN. You can change the default key by clicking on the
down arrow at the right of this field, selecting the number of the key you want to use
and then clicking the Apply button. As long as the Access Point or station with which
you are communicating has the same key in the same position, you can use any of the
keys as the default.
You then click the Apply button to create your encryption keys. After you click the
Apply button, the Wireless Settings Utility uses asterisks to mask your keys.
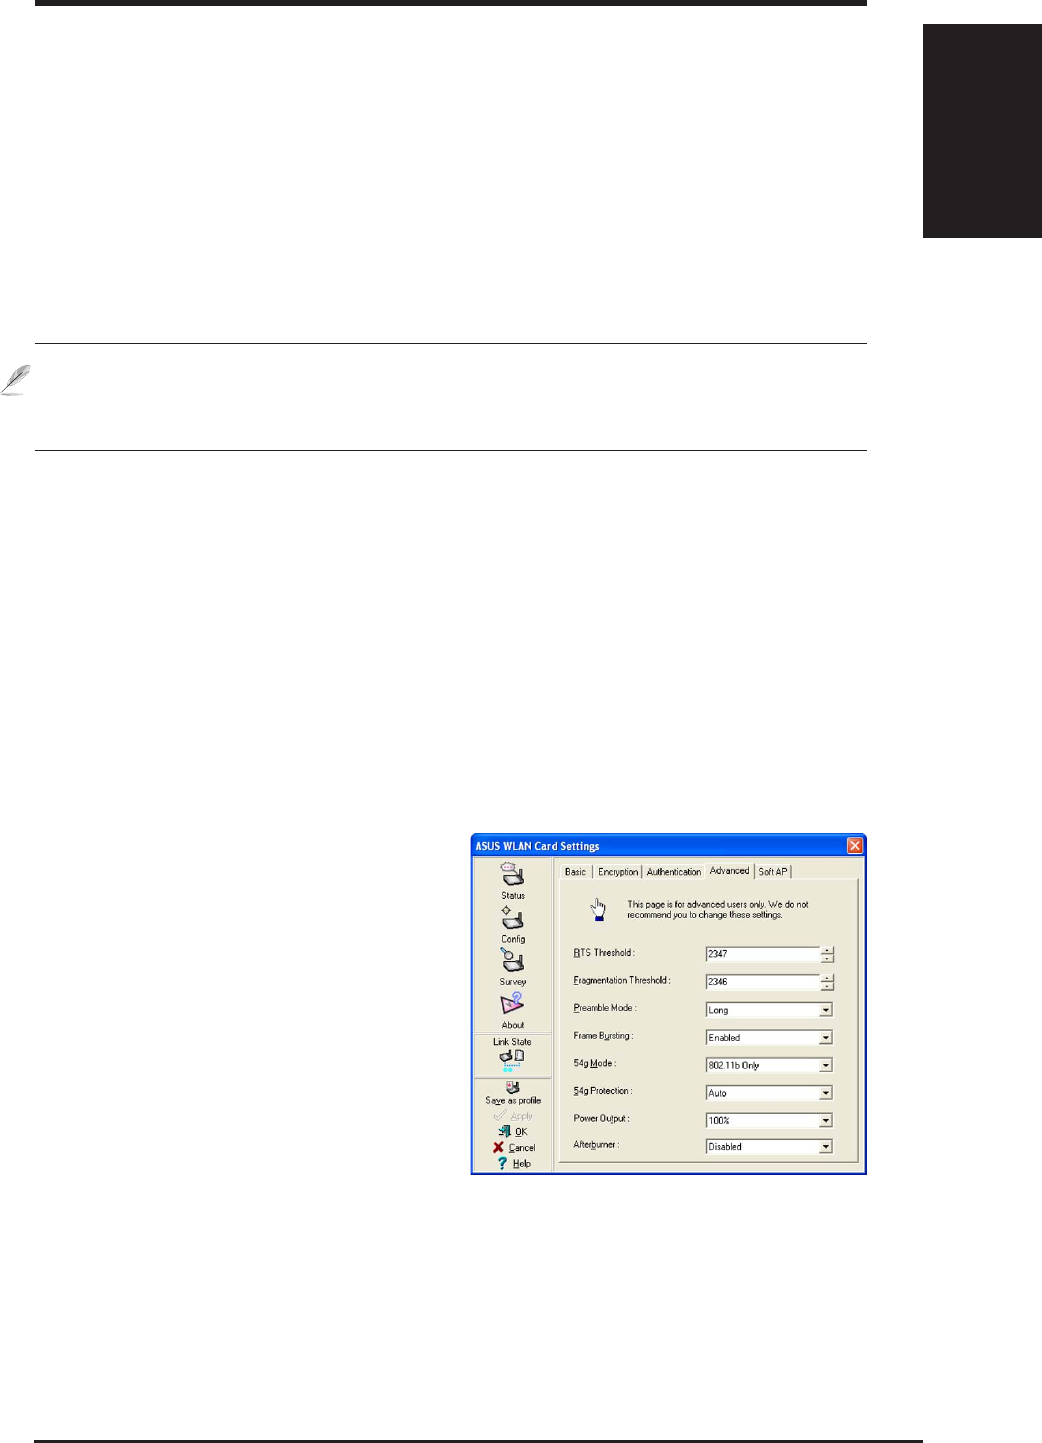
Status - Advanced
This section allows you to set up additional
parameters for the wireless router function.
We recommend that you use the default
values for all items in this window.
RTS Threshold (0-2347)
The RTS/CTS (Request to Send/Clear to
Send) function is used to minimize collisions
among wireless stations. When RTS/CTS is
enabled, the router refrains from sending a
data frame until another RTS/CTS handshake is completed. Enable RTS/CTS by setting
a specific packet size threshold. The default value (2347) is recommended.
Fragmentation Threshold (256-2346)
Fragmentation is used to divide 802.11 frames into smaller pieces (fragments) that are

18 ASUS WLAN Card
Quick Start Guide
English
Click Apply to save and activate the new configurations.
sent separately to the destination. Enable fragmentation by setting a specific packet
size threshold. If there is an excessive number of collisions on the WLAN, experiment
with different fragmentation values to increase the reliability of frame transmissions.
The default value (2346) is recommended for normal use.
Preamble Mode
This parameter is used to control whether frames will transmit with the Long or Short
Preamble. The default value is Long Tx Preamble.
Frame Bursting
Frame Bursting technology is standards-based Wi-Fi performance enhancement
technology that improves wireless network efficiency and boosts throughput.
54g Mode
54g LRS (Limited Rate Support) - is used to communicate with older 11b clients
that only support 4 rates. But 54g cards can still use all 12 rates.
54g Auto - support both 802.11b and 802.11g adapters.
54g Performance - will support ONLY high-performance 54g adapters.
All of these modes only pertain to when the STA is creating their own IBSS network.
802.11b only - support both 802.11b adapters.
All of these modes only pertain to when the STA is creating their own IBSS network.
The default ad-hoc mode is 802.11b only.
54g Protection
Extended Rate PHY (ERP) protection mechanism of 802.11g definition.
Auto – Automatically change as AP announcement.
Enabled - Always send frame with protection.
Disabled - Always send frame without protection.
Power Output
Indicates transmit power level.
Afterburner
It’s is a proprietary solution to take advantage of the high data rate (125 Mbps), the
consumer will have to possess a wireless card and router compliant with the Afterburner
technology.
ASUS WLAN Card 19
Quick Start Guide
English
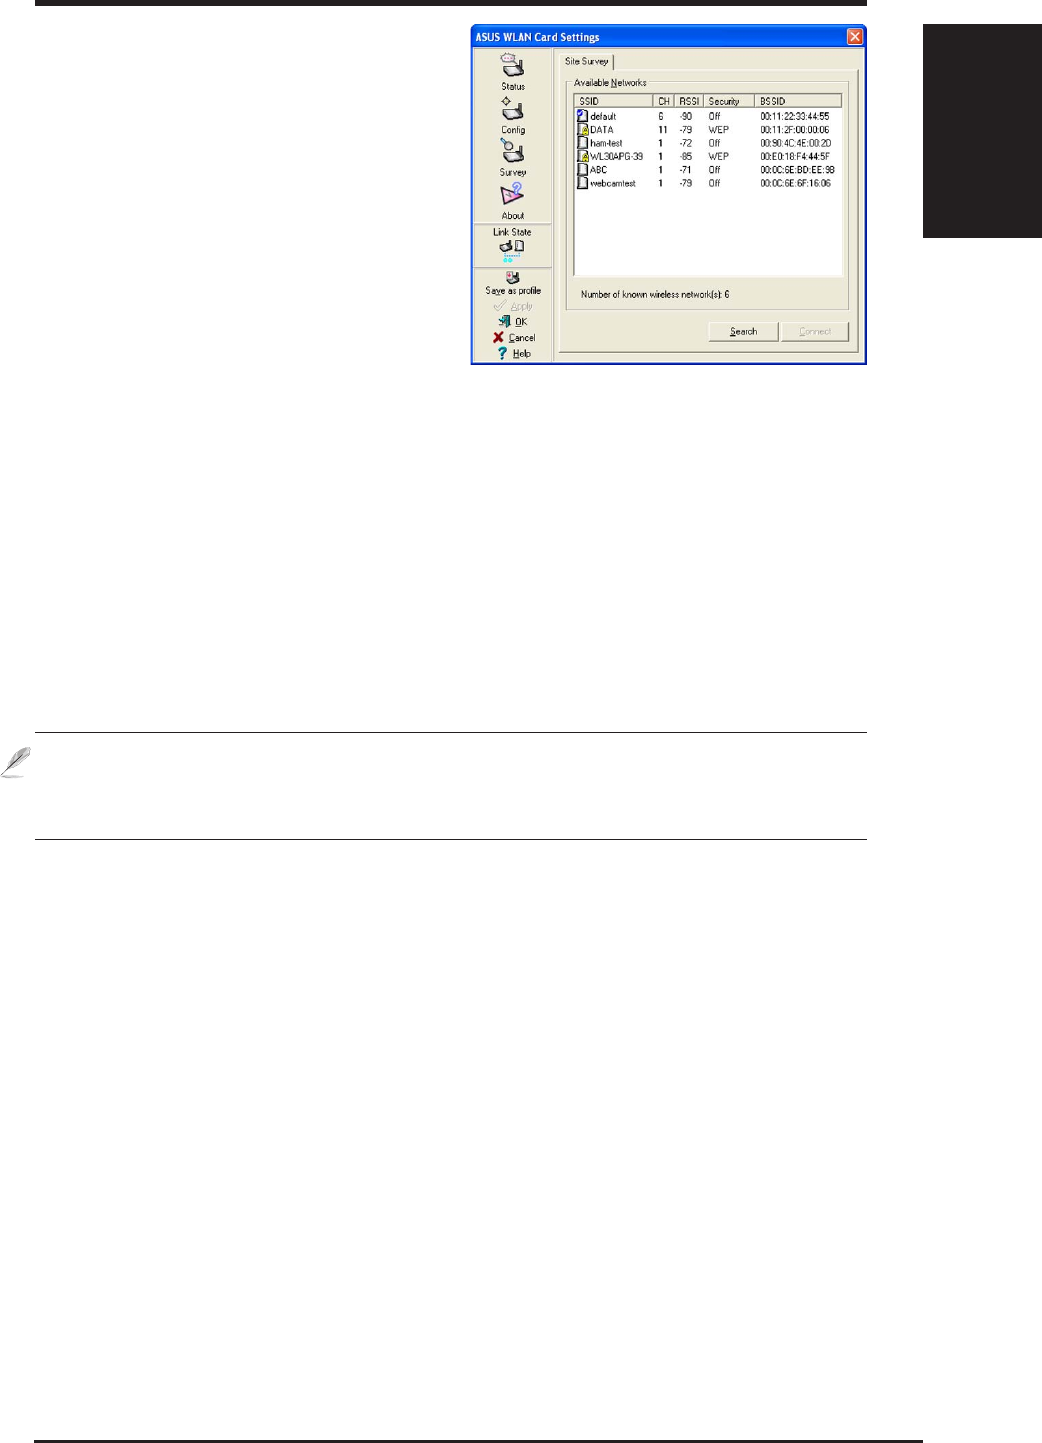
Survey - Site Survey
Use the Site Survey tab to view statistics
on the wireless networks available to the
WLAN Card. The Site Survey tab is read-
only with no user configurable data fields.
Use the Site Survey tab to view the
following network parameters.
•SSID: View the SSID (service set
identification) of the available net-
works.
•CH: View the direct-sequence channel used by each network.
•RSSI: View the Received Signal Strength Indication (RSSI) transmitted
by each network. This information is helpful in determining which net-
work to associate to. The value is then normalized to a dBm value.
•Encryption: View wireless network encryption information. All devices
in the network should use the same encryption method to ensure the com-
munication.
•BSSID: View the media access control (MAC) address of the Access Point
or the Basic Service Set ID of the Ad Hoc node.
Buttons
Search – Scan all available wireless networks and show the scan result in the
“Available Network List”.
Connect – To associate a network, select it from the “Available Network List” and
click this button.
NOTE: Some Access Points can disable broadcasting SSID to hide
themselves from “Site Survey” or “Site Monitor” for added secu-
rity but still allow you to join if you know their SSID.
20 ASUS WLAN Card
Quick Start Guide
English
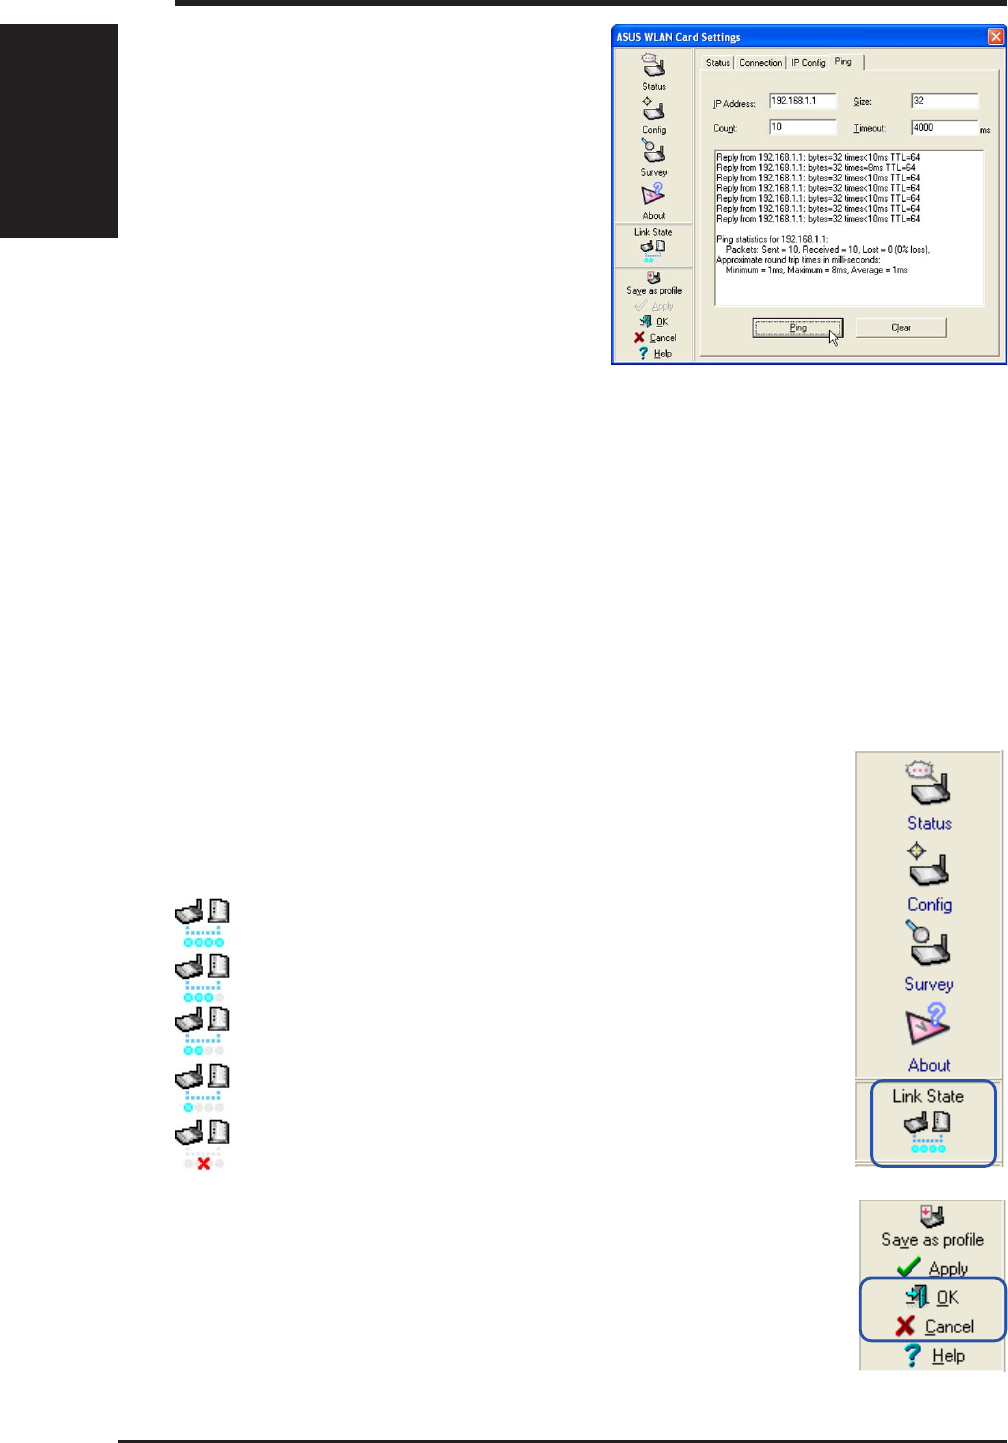
Link State
WLAN Card “Link State” icon appears on the left side of the
WLAN Card Settings. Use the icon to view the current signal status.
Exit Wireless Settings
To exit Wireless Settings, you can click OK or Cancel. This utility
may be closed at any time and from any tab. If you did not save
the configuration settings, you will be prompted to do so.
Excellent Link Quality (Infrastructure)
Good Link Quality (Infrastructure)
Fair Link Quality (Infrastructure)
Poor Link Quality (Infrastructure)
Not linked (Infrastructure)
Ping
The Ping tab allows you to verify the
connection of your computer with
another computer in a network. To
ping a connection:
1. Type the IP address of the
connection you want to verify in
the IP Address field.
2. Configure the ping session by
assigning the size and count of
packet to send, and the time limit for a ping session to continue (in
milliseconds).
3. Click the Ping button.
During the ping session, the Ping button toggles into a Stop button. Click
Stop anytime to cancel the ping session.
The session field displays information on the verified connection including
the roundtrip time (minimum, maximum, and average) and packets sent,
received, and lost after a ping session.
Click the Clear button to clear the session field.
ASUS WLAN Card 21
Quick Start Guide
English
Ad Hoc
The Wireless LAN card when set to Ad Hoc mode can connect to other wireless device(s)
in a wireless network called an Ad Hoc network. To connect the Wireless LAN card to
another wireless device:
1. Launch the Wireless Settings util-
ity by double-clicking the Control
Center icon in the Windows® task-
bar.
2. Click the Survey button to scan
available wireless device(s) within
the Wireless LAN card’s range.
Select the wireless device you
wish to connect. A wireless device
is indicated by this icon ( ).
3. Click the Config button to con-
figure the device settings. Set the
Network type to Ad Hoc, then
enter the Network Name (SSID)
and Channel of wireless device
you wish to connect. Click Ap-
ply when done.
4. Click the Encryption tab if your
selected wireless device has an
enabled WEP encryption ( ).
Obtain the WEP encryption keys
from the network administrator,
then enter them in the Key 1 ~ 4
fields. Click Apply when finish.
IMPORTANT! The encryption settings of the Wireless LAN card and
the wireless device must be identical to establish a connection.
22 ASUS WLAN Card
Quick Start Guide
English
5. Click the Status button to verify
if the Wireless LAN card is con-
nected to the device. If connec-
tion is established, the Associa-
tion State field shows “Con-
nected - XX:XX:XX:XX:XX:XX”
6. Click the Connection tab to dis-
play the connection strength and
link quality between the Wireless
LAN card and the wireless de-
vice.

Appendix
ASUS WLAN Card 23
FCC Requirements
This device complies with Part 15 of the FCC Rules. Operation is subject to the
following two conditions:
(1) this device may not cause harmful interference, and
(2) this device must accept any interference received, including interference that may
cause undesired operation..
This equipment has been tested and found to comply with the limits for a class B digital
device, pursuant to part 15 of the FCC Rules. These limits are designed to provide
reasonable protection against harmful interference in a residential installation.
This equipment generates, uses and can radiate radio frequency energy and, if not
installed and used in accordance with the instructions, may cause harmful interference
to radio communications. However, there is no guarantee that interference will not
occur in a particular installation. If this equipment does cause harmful interference to
radio or television reception, which can be determined by turning the equipment off and
on, the user is encouraged to try to correct the interference by one or more of the
following measures:
ЁReorient or relocate the receiving antenna.
ЁIncrease the separation between the equipment and receiver.
ЁConnect the equipment into an outlet on a circuit different from that to which the
receiver is connected.
ЁConsult the dealer or an experienced radio/TV technician for help.
CAUTION: Any changes or modifications not expressly approved in this manual
could void your authorization to use this device.
CAUTION: This device and its antenna(s) must not be co-located or operating in
conjunction with any other antenna or transmitter.
CAUTION: To maintain compliance with FCC’s RF exposure guidelines, this
equipment should be installed and operated with minimum distance 2.5cm between
the radiator and your body. Use on the supplied antenna.

Appendix
24 ASUS WLAN Card
Declaration of Conformity for R&TTE directive 1999/5/EC
Essential requirements – Article 3
Protection requirements for health and safety – Article 3.1a
Testing for electric safety according to EN 60950-1 has been conducted. These are
considered relevant and sufficient.
Protection requirements for electromagnetic compatibility – Article 3.1b
Testing for electromagnetic compatibility according to EN 301 489-1 and EN 301
489-17 has been conducted. These are considered relevant and sufficient.
Effective use of the radio spectrum – Article 3.2
Testing for radio test suites according to EN 300 328 has been conducted. These are
considered relevant and sufficient.
CE Mark Warning
This is a Class B product, in a domestic environment, this product may cause radio
interference, in which case the user may be required to take adequate measures.