ASUSTeK Computer WL160W WIRELESS LOCAL AREA NETWORK ADAPTER User Manual WL 160W
ASUSTeK Computer Inc WIRELESS LOCAL AREA NETWORK ADAPTER WL 160W
USERS MANUAL
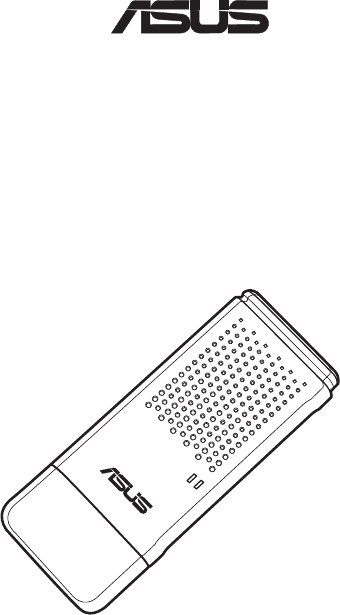
Quick Start Guide
Wireless Local Area Network Adapter
WL-160W
(For 802.11n draft, 80211g & 80211b Networks)
®
QE2920/ Nov. 2006
2 ASUS WLAN Adapter
English
Quick Start Guide
Installation Procedures
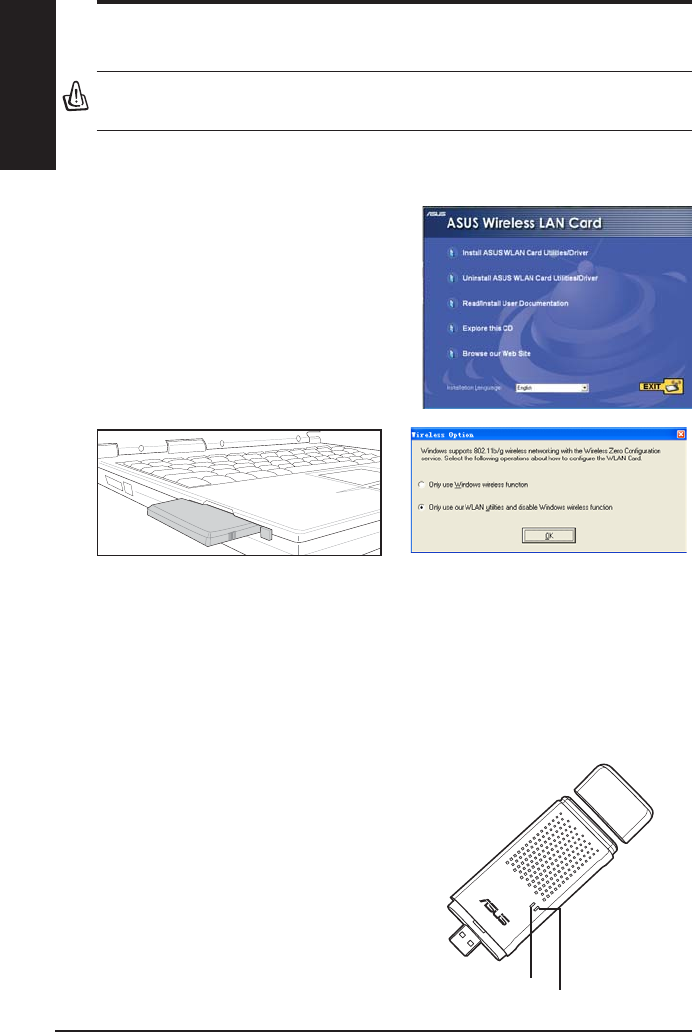
Important: Install the WLAN Adapter utilities before inserting the WLAN
Adapter into your computer.
Installing the WLAN utilities and driver
Follow these instructions to install the
WLAN Adapter utilities and driver. Insert
the support CD into your optical drive.
If autorun is enabled in your computer,
the CD automatically displays the utilitymatically displays the utility
menu. Click Install ASUS WLAN
Adapter Utilities/Driver. If autorun is
disabled, double-click SETUP.EXE in the
root directory of the CD.
Carefully insert the WLAN Adapter into
your computer’s PCMCIA slot. Windows
ZLOO DXWRPDWLFDOO\ GHWHFW DQG FRQÀJXUH WKH
:/$1$GDSWHUXVLQJWKHXWLOLWLHVDQGGULYHUV
installed in the previous steps.
:LQGRZV;3 XVHUV:KHQWKHSURJUDPLV
ODXQFKHGIRUWKHÀUVWWLPHGXULQJ:LQGRZV
restart), you are asked to choose one utility
WRFRQILJXUHWKH:/$1$GDSWHU6HOHFW
"Only use our WLAN utilities and disable
Windows wireless function".
Reading the WLAN status indicators
The device comes with two LEDs that indicate the status of the WLAN
Adapter.
ACT LED
Blinking:7UDQVPLWWLQJGDWDWKHEOLQNLQJ
speed indicates the link speed.
OFF: Radio off or Adapter is disabled.
LINK LED
ON: Connected to wireless device.
OFF: No wireless connection.
LINK
ACT
ASUS WLAN Adapter 3
English
Quick Start Guide
One Touch Wizard
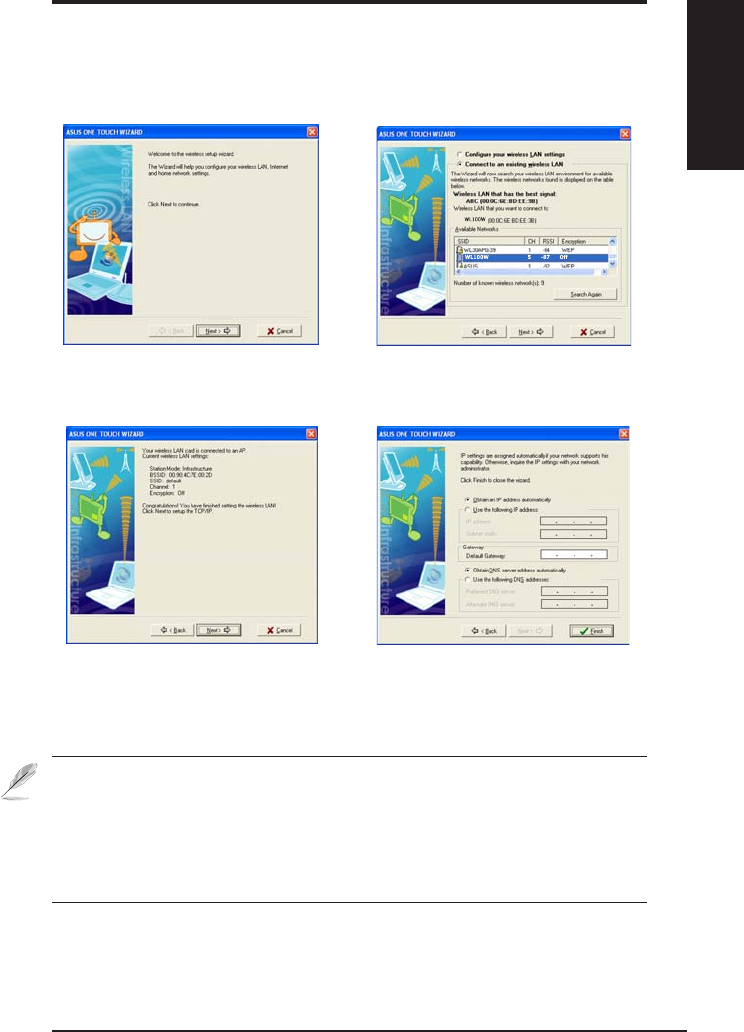
8VH 2QH 7RXFK :L]DUG WR VHWXS \RXU ZLUHOHVV FRQQHFWLRQ ZLWK DQ H[LVWLQJ
wireless LAN.
1. Launch One Touch Wizard from Start
menu and click Next to set up your
wireless network.
2. Select an AP from the Available Networks
then click Next.
3. Connection is complete. Click Next
to setup the IP address for the WLAN
Adapter.
4. Choose to obtain an IP address or to
DVVLJQVWDWLFDGGUHVV PDQXDOO\IRU\RXU
:/$1$GDSWHU:KHQ,3VHWWLQJLV
complete, click Finish to exit the One
Touch Wizard.
Note: If the access point you want to connect has set up encryption
SROLFLHV\RXPXVWFRQÀJXUHWKHVDPHHQFU\SWLRQRQ\RXU:/$1$GDSWHU
Select "Configure your wireless LAN settings" radio button in step 2
and make the settings accordingly. When the encryption settings are
complete, you can launch the One Touch Wizard once again from the Start
menu to set up the connection with your AP.
4 ASUS WLAN Adapter
English
Quick Start Guide
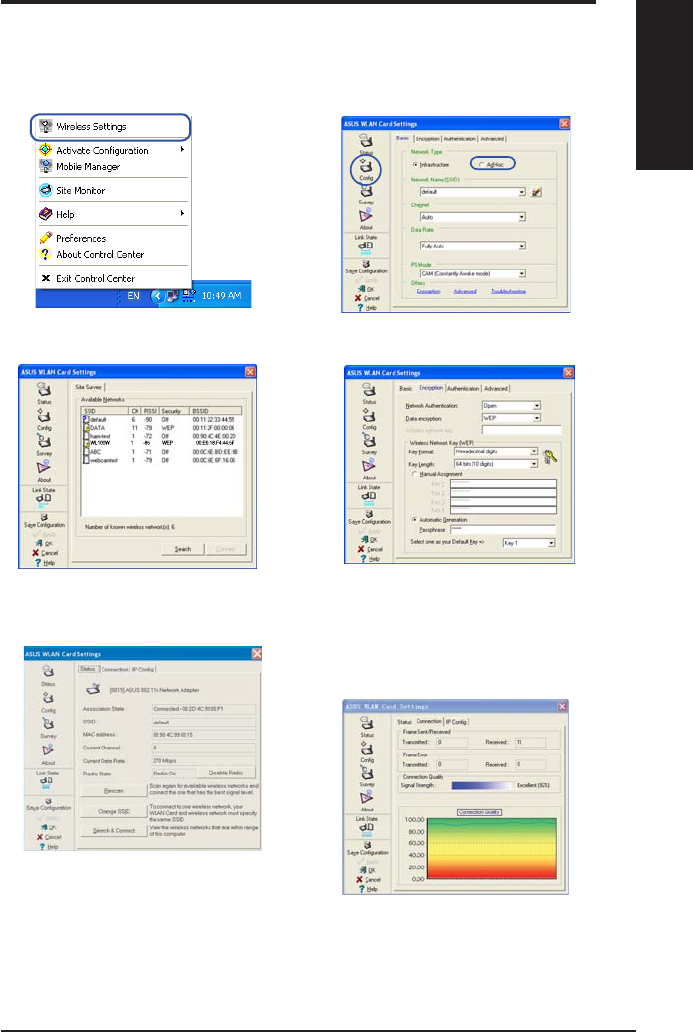
&RQÀJXULQJZLWKWKH:/$1XWLOLW\,QIUDVWUXFWXUH
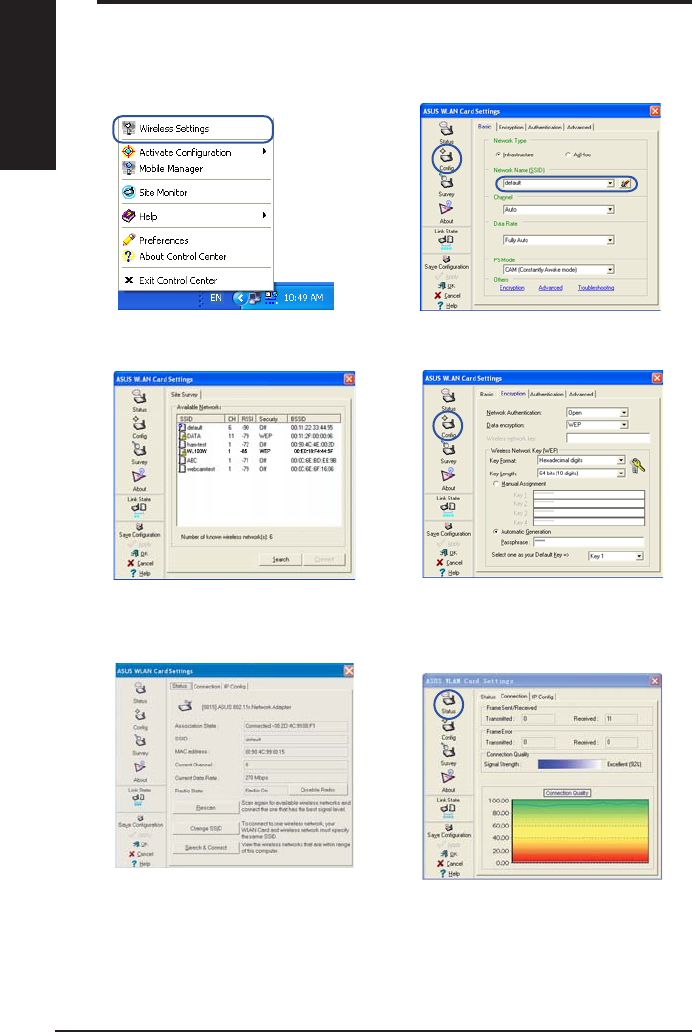
8VH$686:/$1XWLOLW\WRJHWFRQQHFWHGZLWKDQH[LVWLQJZLUHOHVVQHWZRUN
6. Check the Connection tab to see the
VLJQDOVWUHQJWK&OLFNOK to exit the utility.
5. Check the StatusSDJHWRVHHWKH
association state. If connection is
established, the box shows “Connected -
xx:xx:xx:xx:xx:xx”.
3. Use Site Survey if you don’t know the
66,'RI\RXUDFFHVVSRLQWV
(QFU\SWLRQVHWWLQJVPXVWPDWFKWKRVH
at the access point. Ask your network
DGPLQLVWUDWRUDERXWVHWWLQJVLIQHFHVVDU\
Click Apply WRDFWLYDWHWKHVHWWLQJV
5LJKWFOLFN WKH ZLUHOHVV FRQQHFWLRQ LFRQ
and select Wireless Settings.
2. Check the ConfigSDJHWRVHWWKHSSID
QHWZRUNQDPHWRWKDWRI\RXUZLUHOHVV$3
ASUS WLAN Adapter 5
English
Quick Start Guide
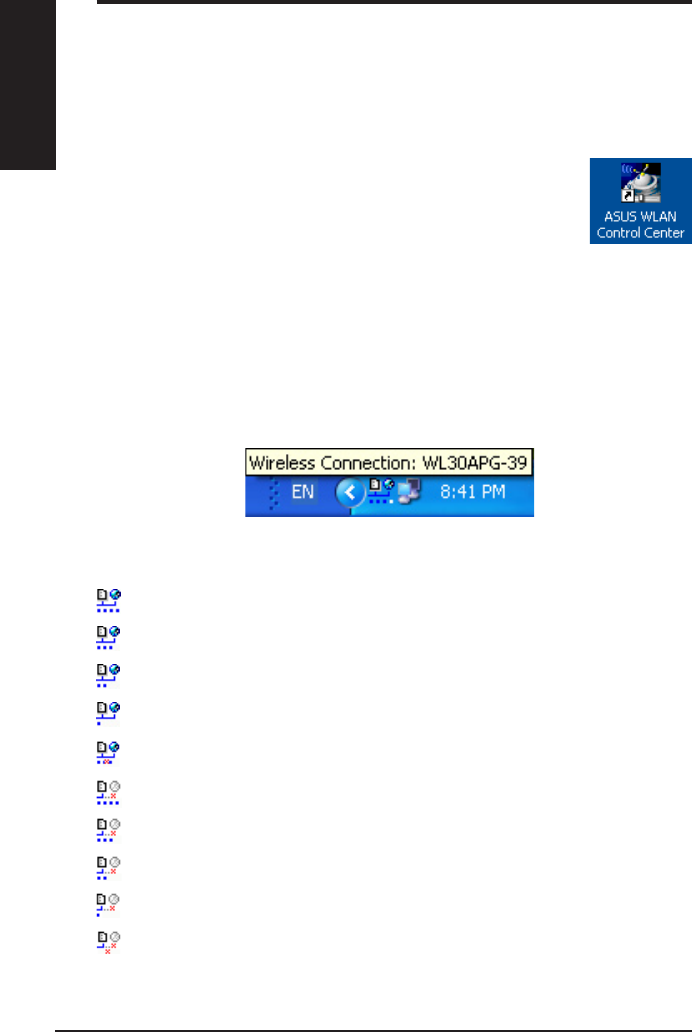
&RQÀJXULQJZLWKWKH:/$1XWLOLW\$G+RF
The WLAN adapter supports Ad Hoc mode which allows communication
between wireless stations without an AP.
&OLFNWKH&RQILJEXWWRQDQGVHWWKH
WLAN Card to $G+RFconnection mode.
3. Click the Survey button to scan for Ad
Hoc nodes. Select the node you want to
communicate with and press Connect.
,IWKHHQFU\SWLRQVHWWLQJVRI\RXU:/$1
Adapter are different from those of the
other Ad Hoc nodes, you are prompted
to make the encryption of the two nodes
identical. Click Apply to activate the
VHWWLQJV
5LJKWFOLFN WKH ZLUHOHVV FRQQHFWLRQ LFRQ
and select Wireless Settings.
5. Check the StatusSDJHWRVHHWKHDVVRFLDWLRQ
state. If connection is established, the box
shows “Connected - xx:xx:xx:xx:xx:xx”.
6. Check the Connection tab to see the
VLJQDOVWUHQJWK&OLFNOK to exit the utility.
6 ASUS WLAN Adapter
English
Quick Start Guide
Using the Control Center
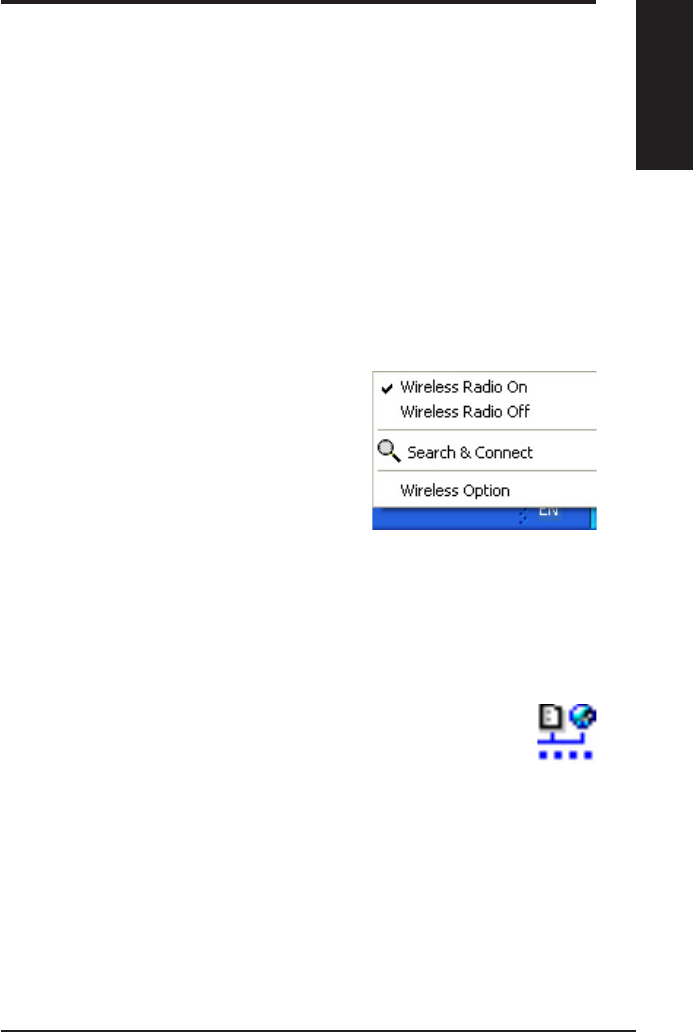
7KH&RQWURO&HQWHUWDVNEDULFRQGLVSOD\VWKHIROORZLQJLQIRUPDWLRQ
/LQN TXDOLW\ RI WKH :/$1$GDSWHU ([FHOOHQW *RRG )DLU 3RRU 1RW
Linked)
:KHWKHUWKH:/$1$GDSWHULVFRQQHFWHGWRDQHWZRUN%OXH
&RQQHFWHG*UD\1RW&RQQHFWHG
Taskbar Icon and Status
Wireless Status Icons (on the taskbar)
Excellent link quality and connected to Internet ,QIUDVWUXFWXUH
Good link quality and connected to Internet ,QIUDVWUXFWXUH
Fair link quality and connected to Internet ,QIUDVWUXFWXUH
Poor link quality and connected to Internet ,QIUDVWUXFWXUH
Not linked but connected to Internet ,QIUDVWUXFWXUH
Excellent link quality but not connected to Internet ,QIUDVWUXFWXUH
Good link quality but not connected to Internet ,QIUDVWUXFWXUH
Fair link quality but not connected to Internet ,QIUDVWUXFWXUH
Poor link quality but not connected to Internet ,QIUDVWUXFWXUH
Not linked and not connected to Internet ,QIUDVWUXFWXUH
ASUS WLAN Control Center
ASUS WLAN Control Center is an application which makes it easier to launch
:/$1DSSOLFDWLRQVDQGDFWLYDWHQHWZRUNORFDWLRQVHWWLQJV7KH:/$1&RQWURO
Center starts automatically when system boots. When WLAN Control Center is
UXQQLQJ\RXFDQVHHD&RQWURO&HQWHULFRQRQWKH:LQGRZVWDVNEDU
Starting the Control Center
• Select ASUS WLAN Control Center in Windows Start
menu, or
• Double-click the ASUS WLAN Control Center icon on the desktop.
ASUS WLAN Adapter 7
English
Quick Start Guide
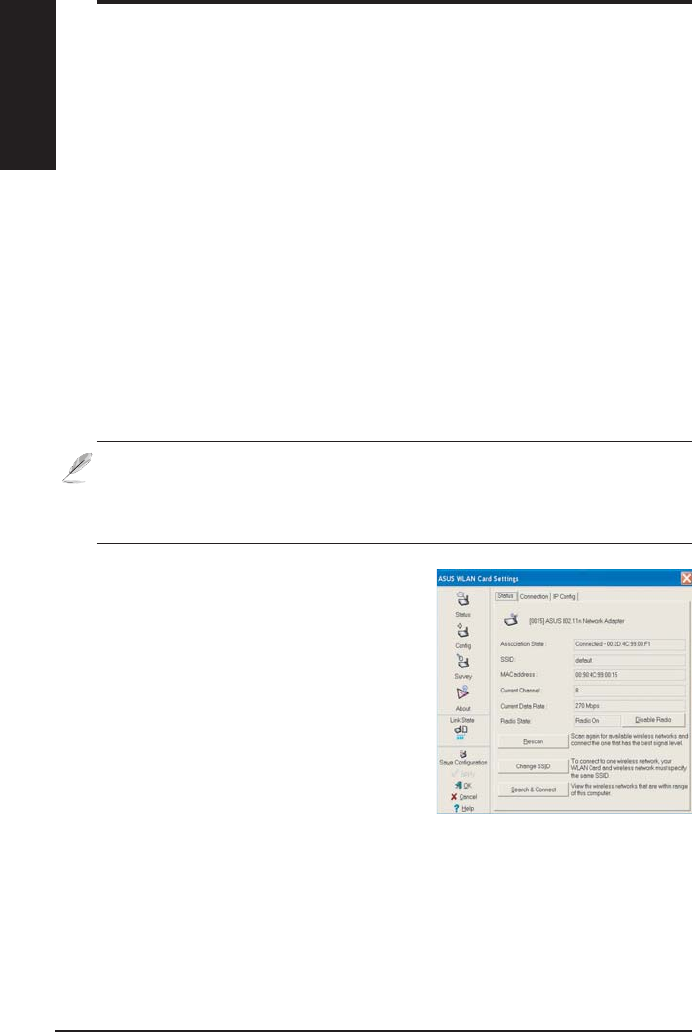
Taskbar icon - Left-click menu
Left-click the taskbar icon to show the
IROORZLQJPHQXLWHPV
•Wireless Radio On – Turns the
wireless radio ON.
•Wireless Radio Off – Turns the
wireless radio OFF.
•Search & Connect – View the
properties of available access points.
•Wireless Option :LQGRZV® XP only) – Choose Windows® Wireless
=HUR &RQÀJXUDWLRQ :=& VHUYLFH RU$686 XWLOLWLHV WR FRQÀJXUH \RXU
WLAN Adapter.
Taskbar Icon - Launch Wireless Settings
'RXEOHFOLFNWKHWDVNEDULFRQ WR ODXQFK WKH :LUHOHVV 6HWWLQJV XWLOLW\WRODXQFKWKH:LUHOHVV6HWWLQJVXWLOLW\
Taskbar icon - Right-click menu
5LJKWFOLFNWKHWDVNEDULFRQWRVKRZWKHIROORZLQJPHQXLWHPV
•Wireless Settings²/DXQFKHV:LUHOHVV6HWWLQJVDSSOLFDWLRQ
•$FWLYDWH&RQÀJXUDWLRQ²$OORZV\RXWRFKRRVHDSUHVHWSURÀOH
•Mobile Manager²/DXQFKHV0RELOH0DQDJHUDSSOLFDWLRQ
•Site Monitor – Launches the Site Monitor application.
•Preferences ²&XVWRPL]HVWKH&RQWURO&HQWHUSURJUDP<RX FDQ
create a Control Center shortcut on the desktop and decide whether to
start Control Center when system boots.
•About Control Center-Shows the version of Control Center.
•Exit ²&ORVHVWKH&RQWURO&HQWHUSURJUDP
Taskbar Left-Click Menu
8 ASUS WLAN Adapter
English
Quick Start Guide
Status - Status
<RXFDQYLHZWKHLQIRUPDWLRQDERXWWKH
WLAN Adapter from the Status menu.
The status fields are blank if the WLAN
$GDSWHULVQRWLQVWDOOHG<RXFDQWXUQ
RIIWKH:/$1$GDSWHUE\FOLFNLQJWKH
“Disable Radio” button.
Association State
Displays the connection status as follows:
Connected - The adapter is now associated with one wireless LAN device.
:KHQRSHUDWLQJLQ ,QIUDVWUXFWXUHPRGHWKLVILHOGVKRZV WKH0$&DGGUHVV
RI WKH DFFHVV SRLQW ZLWK ZKLFK WKH :/$1$GDSWHU LV FRPPXQLFDWLQJ :KHQ
RSHUDWLQJLQ$G +RF PRGH WKLVÀHOGVKRZV WKH YLUWXDO0$&DGGUHVVXVHG E\
FRPSXWHUVSDUWLFLSDWLQJLQWKH$G+RF network.
ASUS Wireless Settings Utility
:LUHOHVV6HWWLQJVLVDQDSSOLFDWLRQIRUPDQDJLQJWKH:/$1$GDSWHU8VH:LUHOHVV
6HWWLQJVWRYLHZRUPRGLI\WKHFRQÀJXUDWLRQVHWWLQJVRUWRPRQLWRUWKHRSHUDWLRQDO
VWDWXVRI\RXU:/$1$GDSWHU:KHQ:LUHOHVV 6HWWLQJVLVODXQFKHG\RXFDQ
VHHWKHWDEEHGSURSHUW\VKHHWV ZKLFKFDWHJRUL]H WKHFRQÀJXUDWLRQRSWLRQVLQWR
JURXSV
Starting Wireless Settings
• Open the Windows Control Panel, then double-click the ASUS WLAN
Adapter Settings icon.
or
• Click the Windows Start button, select Programs | ASUS Utility |
WLAN Adapter | Wireless Settings.
or
5LJKWFOLFNWKHControl Center icon on the Windows taskbar and
select Wireless Settings.
NOTE: If you have more than one ASUS WLAN device installed on your
computer, you may see a device selection window when you launch the “
Wireless Settings” utility. Select the device you want when such situation
occurs.

ASUS WLAN Adapter 9
English
Quick Start Guide
Scanning... :7KHVWDWLRQLVWU\LQJWRDXWKHQWLFDWHDQGDVVRFLDWHZLWKDQDFFHVV
point or Ad Hoc node.
Disconnected - The WLAN Adapter is installed to the system, but not yet
connected to a wireless device.
SSID:
'LVSOD\VWKH6HUYLFH6HW,GHQWLÀHU66,'RIWKHGHYLFHWKDWWKHDGDSWHU
LVHLWKHUDVVRFLDWHGRULQWHQGLQJWRMRLQ
MAC address:
Shows the hardware address of the WLAN Adapter. MAC
DGGUHVVLVDXQLTXHLGHQWLÀHUIRUQHWZRUNLQJGHYLFHVW\SLFDOO\ZULWWHQDVWZHOYH
KH[DGHFLPDOGLJLWVIURPWKURXJKDQG$WKURXJK)VHSDUDWHGE\FRORQVLH
()&
Current Channel:
Displays the radio channel to which the adapter
LVFXUUHQWO\ WXQHG7KLVQXPEHUFKDQJHVDV WKHUDGLRVFDQV WKHDYDLODEOH
channels.
Current Data Rate:
'LVSOD\VWKHFXUUHQWGDWDUDWHLQPHJDELWVSHUVHFRQG
0ESV
Radio State:
Shows the wireless radio status: ON or OFF.
Radio On::KHQWKHZLUHOHVVUDGLRLVWXUQHG21WKHLFRQRQWKHULJKW
DSSHDUVLQWKHXSSHUOHIWRIWKH6WDWXVSDJH
Radio Off- :KHQWKHZLUHOHVVUDGLRLVWXUQHG2))WKHLFRQRQWKHULJKW
DSSHDUVLQWKHXSSHUOHIWRIWKH6WDWXVSDJH
Buttons
Rescan – Make the WLAN Adapter rescan all available devices. If the current
OLQNTXDOLW\RUVLJQDOVWUHQJWKLVSRRUUHVFDQQLQJFDQEHXVHGWRSXVKWKHUDGLR
off a weak access point and search for a better link with another access point.
This function usually takes several seconds.
Change SSID – Click this button to set the SSID to that of the AP you want to
connect.
Search & Connect – Click this button to connect to an available wireless AP.
127()RUQSHUIRUPDQFHVHOHFW0+]EDQGZLGWKLQZLUHOHVV
router. Channel option will depend on the bandwidth that you select.
10 ASUS WLAN Adapter
English
Quick Start Guide
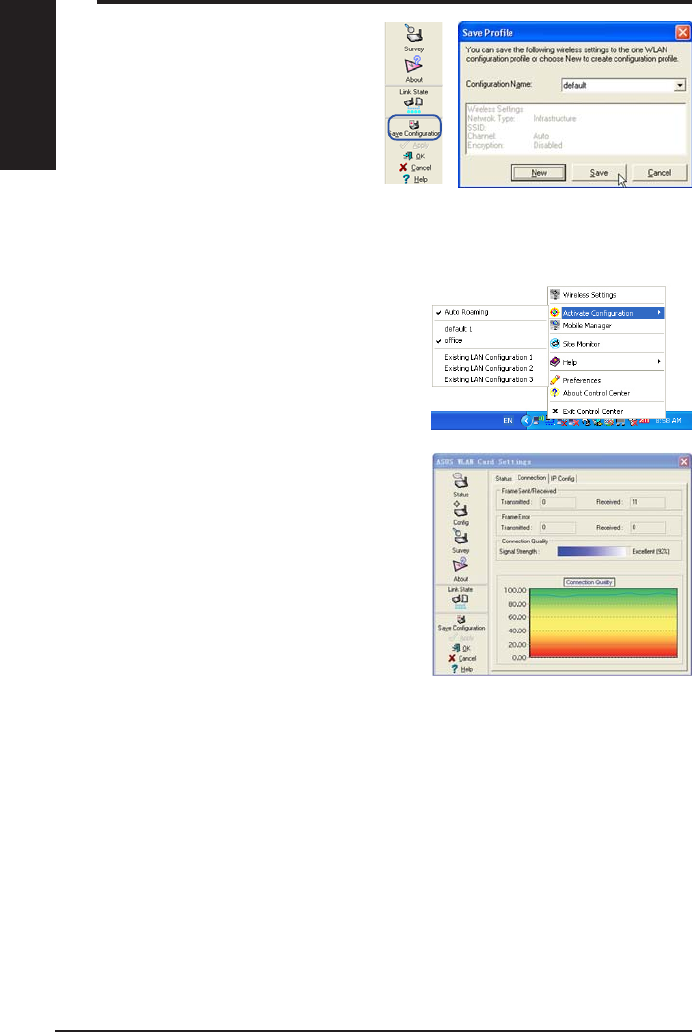
6DYH&RQÀJXUDWLRQ
:KHQ\RXPDNHVHWWLQJVIRUD
FHUWDLQZRUNLQJHQYLURQPHQW\RX
PD\QHHGWRVDYH\RXUVHWWLQJVWRD
SURÀOHVRWKDW\RXFDQHDVLO\VZLWFK
WRWKHVHWWLQJVZLWKRXWUHSHDWLQJWKH
FRQILJXUDWLRQV)RUH[DPSOH\RX
FDQVHWSURÀOHVIRUZRUN KRPHDQG
RWKHUVLWXDWLRQV:KHQ\RXWUDYHOIRUPKRPHWRZRUNFKRRVHWKHRIÀFHSURÀOH
WKDWFRQWDLQVDOO \RXUVHWWLQJV IRURIILFHXVH:KHQ\RXWUDYHO EDFNKRPH
FKRRVHWKH´KRPHµSURÀOH
$FWLYDWH&RQÀJXUDWLRQ
$XWRURDPLQJLVHQDEOHGE\GHIDXOWDQG
makes the Adapter automatically switch to
$3V RI EHWWHU VLJQDO <RX FDQ XQFKHFN LW LI
\RXZDQWWRFRQQHFWWRDVSHFLÀHG$3XVLQJ
DSDUWLFXODUSURÀOH
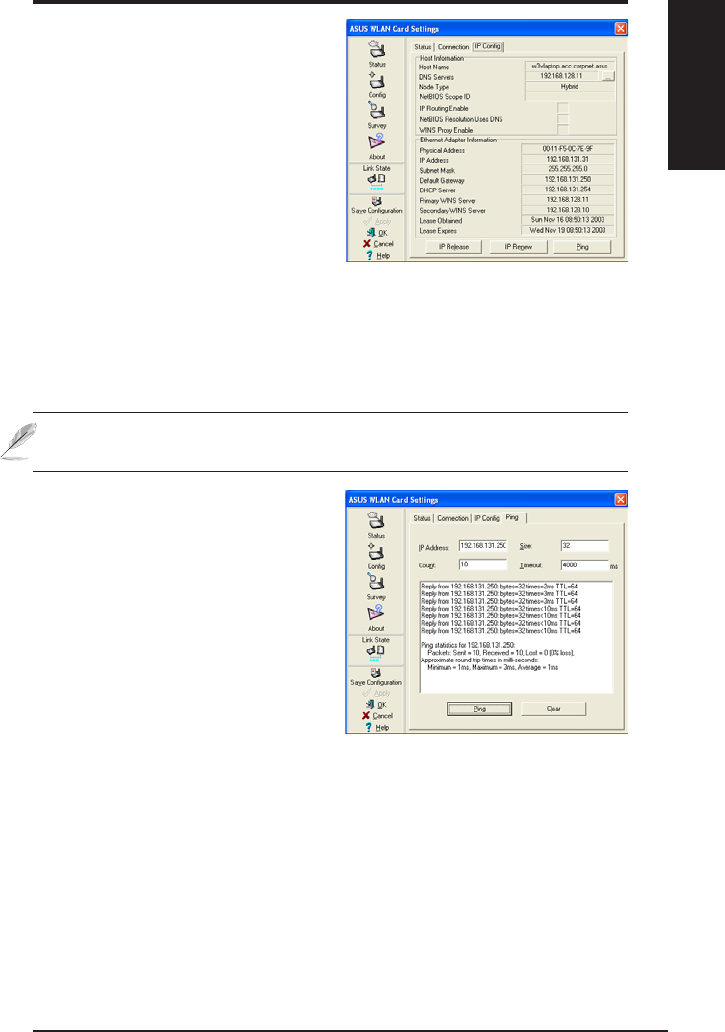
Status - Connection
<RXFDQYLHZWKHFXUUHQWOLQNVWDWLVWLFVDERXW
the WLAN Adapter. These statistics are
updated once per second and are valid if the
WLAN Adapter is correctly installed.
Frame Sent/Received
Transmitted - The number of frames that
were transmitted.
Received - The number of frames that were received.
Frame Error
Transmitted - The number of frames that were not successfully transmitted.
Received - The number of frames that were not successfully received.
Connection Quality
Signal Strength - Shows the link quality of the access point or Ad Hoc node
WKH :/$1$GDSWHU LV FXUUHQWO\ FRQQHFWHG WR 5DWLQJV DUH ([FHOOHQW *RRG
Fair, and Poor.
Overall Connection Quality
7KH RYHUDOO FRQQHFWLRQ TXDOLW\ LV GHULYHG IURP WKH FXUUHQW VLJQDO VWUHQJWK$
JUDSKLFFKDUWXVHVSHUFHQWDJHWRVKRZVLJQDOTXDOLW\
ASUS WLAN Adapter 11
English
Quick Start Guide
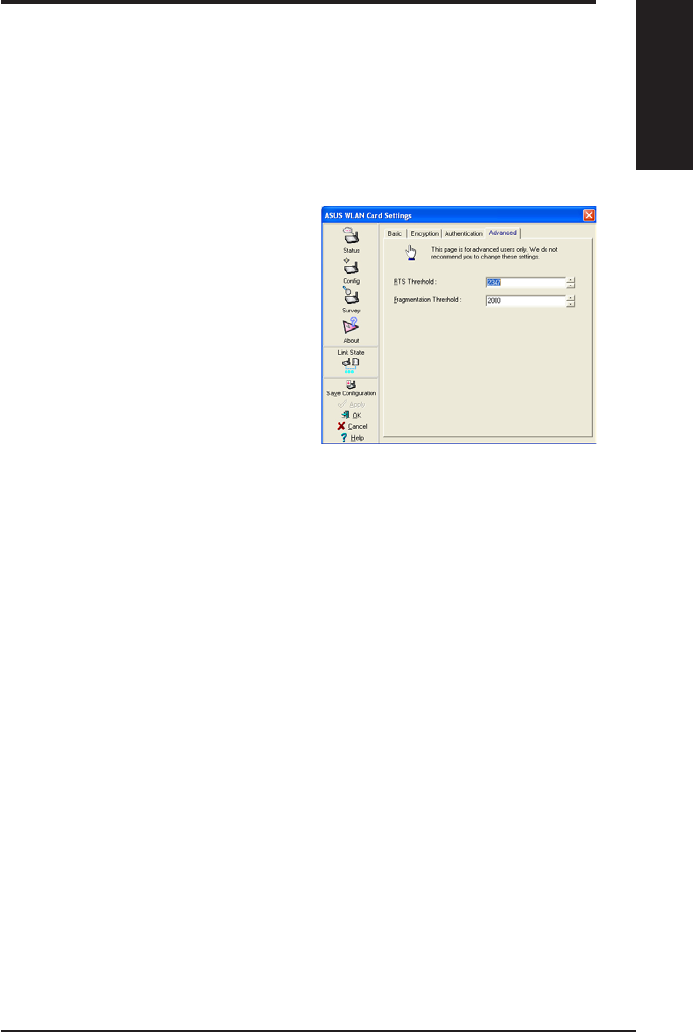
6WDWXV,3&RQÀJ
,3&RQILJWDEVKRZVDOOWKHFXUUHQW
host and WLAN Adapter information
LQFOXGLQJKRVWQDPH'16VHUYHUV
IP address, subnet mask and default
JDWHZD\
Button
IP Release - If you want to remove the
current IP address, click this button to
release the IP address from DHCP server.
IP Renew - If you want to obtain a new IP address from DHCP server, click this
button to renew the IP address.
Ping &OLFNWKLVEXWWRQWRRSHQ´3LQJµWDEZKLFKLVXVHGWRSLQJWKHGHYLFHVLQ
your network.
NOTE: The IP Release and IP Renew buttons can only be used on the
:/$1$GDSWHUZKLFKJHWV,3DGGUHVVIURP'+&3VHUYHU
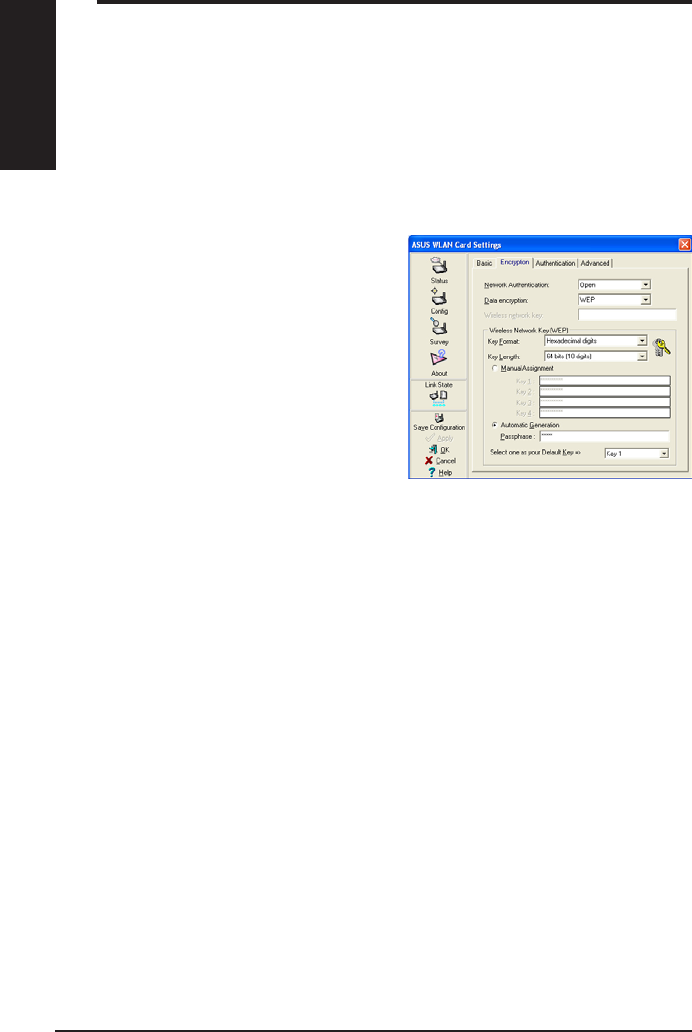
Status - Ping
&OLFNWKH3LQJEXWWRQLQ6WDWXV,3
&RQÀJWDEWRRSHQWKLVSDJH7KH3LQJ
tab allows you to verify the accessibility
of other computers or network devices.
7RSLQJDFRQQHFWLRQ
1. Type the IP address of the device you
ZDQWWRYHULI\LQWKH,3$GGUHVVÀHOG
&RQILJXUHWKHSLQJVHVVLRQE\
DVVLJQLQJWKHSLQJSDFNHWVL]HDQG
QXPEHURISDFNHWWRVHQGDQGWKHWLPHRXWYDOXHLQPLOOLVHFRQGV
&OLFNWKH´3LQJµEXWWRQ
'XULQJWKHSLQJVHVVLRQWKH3LQJEXWWRQWRJJOHVLQWRD6WRSEXWWRQ7RFDQFHO
WKHSLQJVHVVLRQFOLFNWKH´6WRSµEXWWRQ
7KHVHVVLRQÀHOGGLVSOD\VLQIRUPDWLRQRQWKHYHULÀHGFRQQHFWLRQLQFOXGLQJWKH
URXQGWULSWLPHPLQLPXPPD[LPXPDQGDYHUDJHDQGSDFNHWVVHQWUHFHLYHG
DQGORVWDIWHUDSLQJVHVVLRQ
&OLFNWKH´&OHDUµEXWWRQWRFOHDUWKHVHVVLRQÀHOG

12 ASUS WLAN Adapter
English
Quick Start Guide
&RQÀJ%DVLF
7KLV SDJH HQDEOHV \RX WR FKDQJH WKH
:/$1$GDSWHUFRQÀJXUDWLRQV
Network Type
Infrastructure – Infrastructure
means to establish a connection with
an access point. Once connected,
the access point allows you to
access wireless LAN and wired LAN
(WKHUQHW 7KH &KDQQHO ILHOG WXUQV WR Auto if the connection is based on
Infrastructure.
$G +RF – Ad Hoc means to communicate directly with other wireless clients
ZLWKRXW XVLQJDQDFFHVVSRLQW$Q´$G+RFµQHWZRUNFDQEHVHWXSTXLFNO\
DQG HDVLO\ ZLWKRXW SUHSODQQLQJ IRU H[DPSOH VKDULQJ PHHWLQJ QRWHV EHWZHHQ
DWWHQGDQWVLQDPHHWLQJURRP
Network Name (SSID)
66,' VWDQGV IRU ´6HUYLFH 6HW ,GHQWLILHUµ ZKLFK LV D VWULQJ XVHG WR LGHQWLI\ D
ZLUHOHVV /$1 8VHWKH 66,' WR FRQQHFW ZLWK D NQRZQ DFFHVV SRLQW <RX FDQ
HQWHUDQHZ66,'RUVHOHFWRQHIURPWKHGURSGRZQOLVWER[,I\RXJHWFRQQHFWHG
E\ GHVLJQDWLQJ WKH 66,' \RX DUH RQO\ WR FRQQHFW WKH$3 ZLWK WKH 66,' \RX
DVVLJQHG,IWKH$3LVUHPRYHGIURPWKHQHWZRUN\RXU:/$1$GDSWHUGRHVQRW
roam automatically to other APs. SSIDs must all be printable characters and
KDYLQJDPD[LPXPRIFDVHVHQVLWLYHFKDUDFWHUVVXFKDV´:LUHOHVVµ
NOTE: Set the SSID to a null string, if you wish to allow your station to
FRQQHFWWRDQ\DFFHVVSRLQWLWFDQÀQG%XW\RXFDQQRWXVHQXOOVWULQJLQ
$G+RFPRGH
Channel
7KH&KDQQHOILHOGLVIRUVHWWLQJUDGLRFKDQQHO<RXU:/$1$GDSWHUFDQ
automatically select the correct channel to communicate with a wireless device,
DQGWKHSDUDPHWHULVÀ[HGWR$XWRLQERWK,QIUDVWUXFWXUHDQG$G+RFPRGH
7KH DYDLODEOH UDGLR FKDQQHOV GHSHQG RQ WKH UHJXODWLRQV LQ \RXU FRXQWU\ )RU
WKH8QLWHG6WDWHV)&&DQG&DQDGD,&FKDQQHOWRDUHVXSSRUWHG
&OLFN$SSO\WRVDYHDQGDFWLYDWHWKHQHZFRQÀJXUDWLRQV
ASUS WLAN Adapter 13
English
Quick Start Guide
Others
Encryption – Click this link to show the "Encryption" tab.
Advanced – Click this link to show the "Advanced" tab. In most cases, the
GHIDXOWYDOXHVGRQRWKDYHWREHFKDQJHG
Troubleshooting –&OLFNRQWKLVWRVKRZWKH7URXEOHVKRRWLQJXWLOLW\
&RQÀJ$GYDQFHG
Click Advanced OLQN RQ &RQILJ%DVLF
SDJH WR VKRZ WKLV WDE 7KLV WDE DOORZV
you to set up additional parameters for
the wireless adapter. We recommend
XVLQJWKHGHIDXOWYDOXHVIRUDOOLWHPVLQ
this window.
RTS Threshold (0-2347)
7KH576&765HTXHVWWR6HQG&OHDU
WR 6HQGIXQFWLRQLVXVHGWRPLQLPL]HFROOLVLRQVDPRQJZLUHOHVVVWDWLRQV
:KHQ576&76LVHQDEOHGWKHURXWHUUHIUDLQVIURPVHQGLQJDGDWDIUDPHXQWLO
DQRWKHU 576&76 KDQGVKDNH LV FRPSOHWHG (QDEOH 576&76 E\ VHWWLQJ D
VSHFLÀFSDFNHWVL]HWKUHVKROG7KHGHIDXOWYDOXHLVUHFRPPHQGHG
Fragmentation Threshold (256-2346)
)UDJPHQWDWLRQLVXVHGWRGLYLGHIUDPHVLQWRVPDOOHUSLHFHVIUDJPHQWV
WKDW DUH VHQW VHSDUDWHO\ WR WKH GHVWLQDWLRQ (QDEOH IUDJPHQWDWLRQ E\ VHWWLQJ
DVSHFLÀFSDFNHW VL]HWKUHVKROG,IWKHUH LVDQH[FHVVLYH QXPEHU RIFROOLVLRQV
RQWKH:/$1H[SHULPHQW ZLWK GLIIHUHQWIUDJPHQWDWLRQYDOXHV WR LQFUHDVH WKH
UHOLDELOLW\RIIUDPHWUDQVPLVVLRQV7KHGHIDXOWYDOXHLVUHFRPPHQGHGIRU
normal use.
14 ASUS WLAN Adapter
English
Quick Start Guide
Network Authentication
Since there is no precise bound in
wireless LANs, the WLAN users need
to implement certain mechanism
to provide security solution. The
Authentication policies in this tab
provide protection of different levels
such as Open, WEP, WPA, and WPA2.
Open - Select this option to make the
network operate on Open System
mode, which use no authentication
DOJRULWKP 2SHQ VWDWLRQV DQG$3V FDQ DXWKHQWLFDWH ZLWK HDFK RWKHU ZLWKRXW
FKHFNLQJDQ\:(3.H\HYHQLIWKHUHLV
Shared - Select this option to make the network operate on Shared key mode.
,QD6KDUH.H\$XWKHQWLFDWLRQV\VWHPIRXUVWHSH[FKDQJHRIIUDPHVLVUHTXLUHG
WRYDOLGDWHWKDWWKHVWDWLRQLVXVLQJWKHVDPH:(3.H\DVWKHDFFHVVSRLQW
WPA-PSK/ WPA2-PSK - Select this option to enable WPA Pre-Shared Key
under Infrastructure mode. It enables communication between your client and
$3VXVLQJ:3$36.:3$36.HQFU\SWLRQPRGH
WPA/ WPA27KHQHWZRUNLVRSHUDWLQJLQ,((([DXWKHQWLFDWLRQPRGH
7KLV PRGH LV IRU HQYLURQPHQWV ZLWK 5$',86 5HPRWH$FFHVV 'LDOLQ 8VHU
Service). In a RADIUS environment, various Extensible Authentication Protocol
($3DUHVXSSRUWHGLQFOXGLQJ3($37/66PDUW&DUG77/6DQG/($3
&RQÀJ(QFU\SWLRQ
7KLVSDJHHQDEOHV\RX WRFRQILJXUHWKH :LUHOHVV/$1$GDSWHUHQFU\SWLRQ
VHWWLQJV )RU GDWDFRQILGHQWLDOLW\LQDZLUHOHVV HQYLURQPHQW ,(((
VSHFLILHV D :LUHG (TXLYDOHQW 3ULYDF\ :(3 DOJRULWKP WR RIIHU WUDQVPLVVLRQ
privacy. The WEP uses keys to encrypt and decrypt data packets. The
encryption process can scramble frame bits to avoid disclosure to others. The
:3$:3$ LV LPSURYHG VHFXULW\ V\VWHP IRU ZKLFK DUH GHYHORSHG WR
overcome the weakness of the WEP protocol.

ASUS WLAN Adapter 15
English
Quick Start Guide
Data encryption
)RU2SHQDQG6KDUHGDXWKHQWLFDWLRQPRGHWKHFRQILJXUDWLRQRSWLRQVRI
encryption type are Disabled and WEP. For WPA, WPA-PSK, WPA2 and
:3$36.DXWKHQWLFDWLRQ PRGH7HPSRUDO.H\,QWHJULW\ 3URWRFRO 7.,3
HQFU\SWLRQDQG$GYDQFHG(QFU\SWLRQ6WDQGDUG$(6HQFU\SWLRQDUHVXSSRUWHG
Disabled - Disable the encryption function.
WEP - WEP Key is used to encrypt your data before it is transmitted over air.
<RX FDQ RQO\ FRQQHFW DQG FRPPXQLFDWH ZLWK ZLUHOHVV GHYLFHV WKDW XVH WKH
same WEP keys.
TKIP 7.,3 XVHV DQ HQFU\SWLRQ DOJRULWKP PHWKRGV ZKLFK LV PRUH VWULQJHQW
WKDQ WKH :(3 DOJRULWKP ,W DOVR XVHV H[LVWLQJ :/$1 FDOFXODWLRQ IDFLOLWLHV WR
SHUIRUPHQFU\SWLRQ7.,3YHULÀHVWKHVHFXULW\FRQÀJXUDWLRQDIWHUWKHHQFU\SWLRQ
keys are determined.
AES:$(6LVDV\PPHWULFELWEORFNHQFU\SWLRQWHFKQLTXHZKLFKZRUNV
simultaneously on multiple network layers.
Wireless Network Key
This option is enabled only if you select WPA-PSK or WPA2-PSK authentication
PRGH 6HOHFW ´7.,3µ RU ´$(6µ LQ WKH HQFU\SWLRQ ÀOHG DV HQFU\SWLRQ PRGH WR
EHJLQWKHHQFU\SWLRQSURFHHG1RWHWRFKDUDFWHUVDUHUHTXLUHGLQWKLVÀHOG
Wireless Network Key (WEP)
7KLVRSWLRQ LVFRQÀJXUDEOHRQO\ LI\RXHQDEOH:(3LQ1HWZRUN$XWKHQWLFDWLRQ
ÀHOG 7KH :(3 .H\ LV D ELWV E\WH RU ELWV E\WH +H[DGHFLPDO
GLJLWVZKLFKLVXVHGWRHQFU\SWDQGGHFU\SWGDWDSDFNHWV
Key Format
<RX FDQVHOHFWWR HQWHU+H[DGHFLPDOGLJLWV aDaIDQG$a)RU$6&,,
FKDUDFWHUVWRVHWXSNH\VE\GHÀQLQJWKH.H\)RUPDW
Key Length
)RUELWVHQFU\SWLRQHDFKNH\FRQWDLQVKH[GLJLWVRU$6&,,FKDUDFWHUV
)RUELWVHQFU\SWLRQHDFKNH\FRQWDLQVKH[GLJLWVRU$6&,,FKDUDFWHUV
Two ways to assign WEP keys
1. Manual Assignment - When you select this option, the cursor appears
LQWKHÀHOGIRU.H\)RUELWHQFU\SWLRQ\RXDUHUHTXLUHGWRHQWHUIRXU
:(3.H\V(DFK.H\FRQWDLQVH[DFWO\KH[GLJLWVa DaIDQG$a)
)RUELWHQFU\SWLRQ\RXDUHUHTXLUHGWRHQWHUIRXU:(3.H\V(DFK.H\
FRQWDLQVH[DFWO\KH[GLJLWVaDaIDQG$a)

16 ASUS WLAN Adapter
English
Quick Start Guide
2. Automatic Generation - Type a combination of up to 64 letters,
QXPEHUVRUV\PEROVLQWKH 3DVVSKUDVH ER[ WKH :LUHOHVV6HWWLQJV8WLOLW\
DXWRPDWLFDOO\XVHVDQDOJRULWKPWRJHQHUDWHIRXU:(3.H\V
Select one as your Default Key
7KH'HIDXOW.H\ÀHOGDOORZV\RXVSHFLI\ZKLFKRIWKHIRXUHQFU\SWLRQNH\VLVWR
XVHIRUWUDQVPLWWLQJGDWDRYHUZLUHOHVV/$1 <RXFDQFKDQJHWKHGHIDXOW NH\
E\FOLFNLQJRQWKHGRZQZDUGDUURZVHOHFWLQJWKHQXPEHURIWKHNH\\RXZDQW
WRXVHDQGFOLFNLQJWKH´$SSO\µEXWWRQ,IWKHDFFHVVSRLQWRUVWDWLRQZLWKZKLFK
\RXDUHFRPPXQLFDWLQJXVHVWKHLGHQWLFDONH\E\WKHVDPHVHTXHQFH\RXFDQ
use any of the keys as the default on your WLAN Adapter.
Click the “Apply” button after you have created the encryption keys, the
:LUHOHVV6HWWLQJV8WLOLW\XVHVDVWHULVNVWRPDVN\RXUNH\V
64/128bits versus 40/104bits
7KHUHDUHWZROHYHOVRI:(3(QFU\SWLRQELWVDQGELWV
)LUVWO\ELW :(3DQG ELW :(3 DUHWKH VDPHHQFU\SWLRQPHWKRG DQG
can interoperate in the wireless network. This lower level of WEP encryption
XVHVDELW+H[FKDUDFWHUDVD´VHFUHWNH\µVHWE\XVHUDQGDELW´
,QLWLDOL]DWLRQ9HFWRUµQRWXQGHUXVHUFRQWURO7KLVWRJHWKHUPDNHVELWV
6RPHYHQGRUVUHIHUWRWKLVOHYHORI:(3DVELWVDQGRWKHUVUHIHUWRWKLV
DVELWV2XU:LUHOHVV/$1SURGXFWVXVHWKHWHUPELWVZKHQUHIHUULQJWR
this lower level of encryption.
6HFRQGO\ELW:(3DQGELW:(3DUHWKHVDPHHQFU\SWLRQPHWKRGDQG
FDQLQWHURSHUDWHLQWKHZLUHOHVVQHWZRUN7KLVKLJKHUOHYHORI:(3HQFU\SWLRQ
XVHVDELW+H[FKDUDFWHUDVD´VHFUHWNH\µVHWE\XVHUDQGDELW´
,QLWLDOL]DWLRQ9HFWRUµQRWXQGHUXVHUFRQWURO7KLVWRJHWKHUPDNHVELWV
6RPH YHQGRUV UHIHU WR WKLV OHYHO RI :(3 DV ELWV DQG RWKHUV UHIHU
WR WKLV DV ELWV 2XU :LUHOHVV /$1 SURGXFWV XVH WKH WHUP ELWV ZKHQ
UHIHUULQJWRWKLVKLJKHUOHYHORIHQFU\SWLRQ
ASUS WLAN Adapter 17
English
Quick Start Guide
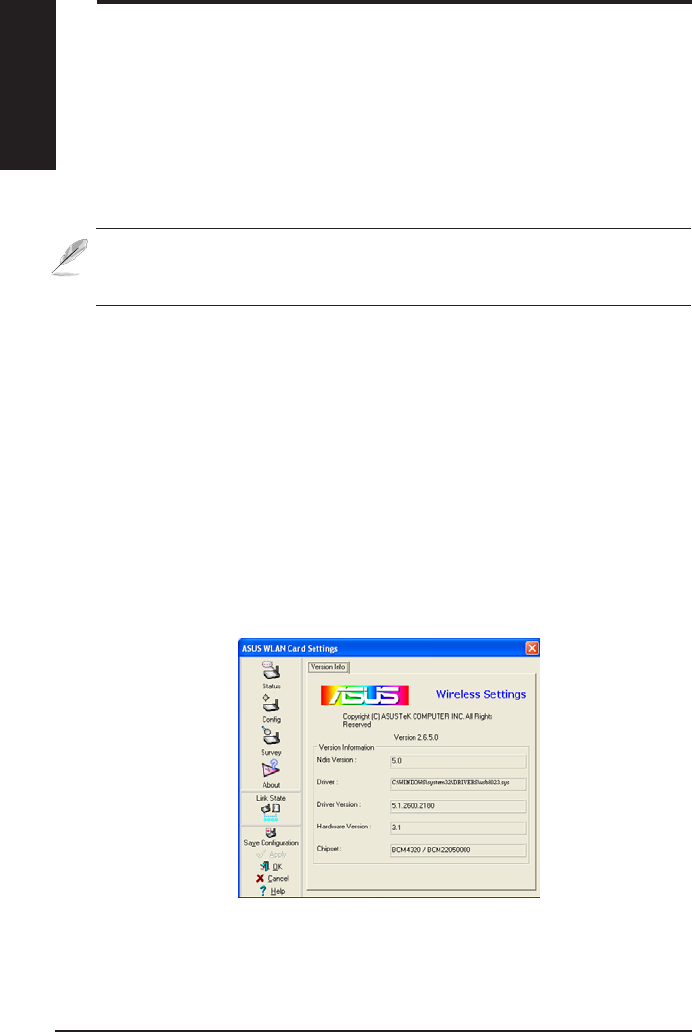
Survey - Site Survey
Use the Site Survey tab to view statistics
on the wireless networks available to the
WLAN Adapter and their parameters.
•SSID: The SSID of the available
networks.
•Channel: The channel used by each
network.
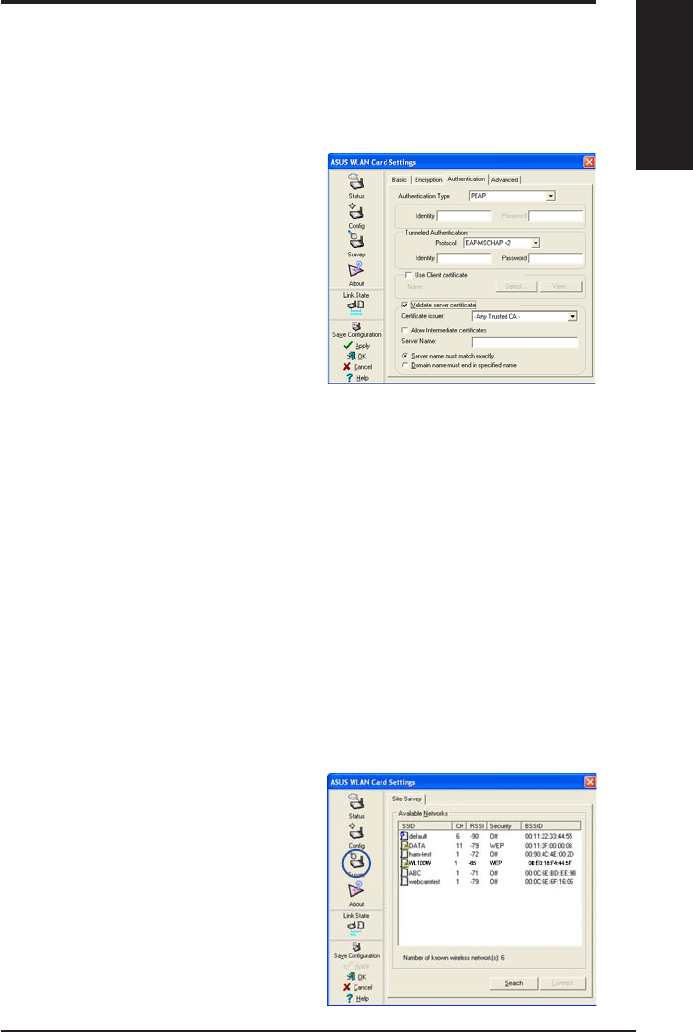
&RQÀJ$XWKHQWLFDWLRQ
7KLVWDEDOORZV\RXWRVHWWKHVHFXULW\VHWWLQJVWRPDWFKWKRVHRI\RXU$3,WLV
FRQÀJXUDEOHRQO\LI\RXKDYH VHW1HWZRUN$XWKHQWLFDWLRQ WR:3$RU:3$LQ
&RQÀJ(QFU\SWLRQWDE
Authentication Type
The authentication type methods include:
PEAP:3($33URWHFWHG([WHQVLEOH
Authentication Protocol) authentication
is a version of Extensible Authentication
3URWRFRO($3($3HQVXUHVPXWXDO
authentication between a wireless client
and a server that resides at the network
operations center.
TLS/Smart Card: 7/67UDQVSRUW/D\HU
Security) authentication is used to create an encrypted tunnel and achieve
server-side authentication in a manner similar to Web server authentication
XVLQJ6HFXUH6RFNHWV/D\HU66/SURWRFRO7KLVPHWKRGXVHVGLJLWDO
FHUWLÀFDWHVWRYHULI\WKHLGHQWLW\RIDFOLHQWDQGVHUYHU
TTLS: 77/6 DXWKHQWLFDWLRQ XVHV FHUWLÀFDWHV WR DXWKHQWLFDWH WKH VHUYHU ZKLOH
PDLQWDLQLQJ VLPLODU VHFXULW\ SURSHUWLHV WR 7/6 VXFK DV PXWXDO DXWKHQWLFDWLRQ
DQGDVKDUHGFRQÀGHQWLDOLW\IRUVHVVLRQ:(3NH\
LEAP:/($3/LJKW ([WHQVLEOH$XWKHQWLFDWLRQ 3URWRFRODXWKHQWLFDWLRQ LV D
YHUVLRQRI([WHQVLEOH$XWKHQWLFDWLRQ3URWRFRO($3($3HQVXUHV PXWXDO
authentication between a wireless client and a server that resides at the
network operations center.
Md5-challenge: 0GFKDOOHQJH LV D RQHZD\ HQFU\SWLQJ DOJRULWKP WKDW XVHV
XVHUQDPHVDQGSDVVZRUGV7KLVPHWKRGGRHVQRWVXSSRUWNH\PDQDJHPHQW
but require a preset key.
18 ASUS WLAN Adapter
English
Quick Start Guide
Buttons
Search – To scan all available wireless networks and show the scan result in the
“Available Network” list.
Connect ²7R DVVRFLDWH ZLWK D QHWZRUN E\ VHOHFWLQJ WKH QHWZRUN IURP WKH
´$YDLODEOH1HWZRUNµOLVWDQGFOLFNLQJWKLVEXWWRQ
NOTE: Some access points may disable SSID broadcast and hide
themselves from “Site Survey” or “Site Monitor”, however, you can
connect such AP if you know their SSID.
•RSSI:7KH5HFHLYHG6LJQDO6WUHQJWK,QGLFDWLRQ566,WUDQVPLWWHGE\
HDFKQHWZRUN7KLV LQIRUPDWLRQ LV KHOSIXO LQ GHWHUPLQLQJ ZKLFK QHWZRUN WR
DVVRFLDWHWR7KHYDOXHLVWKHQQRUPDOL]HGWRDG%PYDOXH
•Encryption: Wireless network encryption information. All devices in
the network should use the same encryption method to ensure the
communication.
•BSSID: 7KH PHGLD DFFHVV FRQWURO 0$& DGGUHVV RI WKH DFFHVV SRLQW RU
WKH%DVLF6HUYLFH6HW,'RIWKH$G+RFQRGH
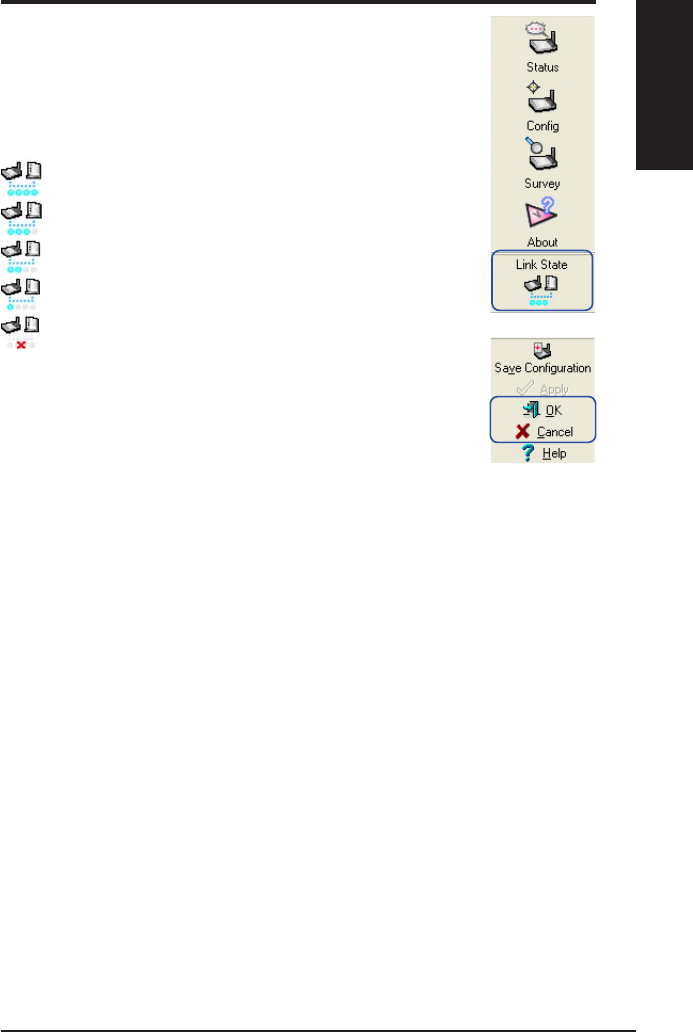
About - Version Info
8VHVWKH9HUVLRQ,QIRWDEWRYLHZSURJUDPDQG:/$1$GDSWHUYHUVLRQ
LQIRUPDWLRQ7KHSURJUDPYHUVLRQLQIRUPDWLRQÀHOGLQFOXGHVWKH&RS\ULJKWDQG
utility version. The version information includes the NDIS version, driver name,
and driver version.
This screen is an example only. Your version numbers
will be different from what are shown here.
ASUS WLAN Adapter 19
English
Quick Start Guide
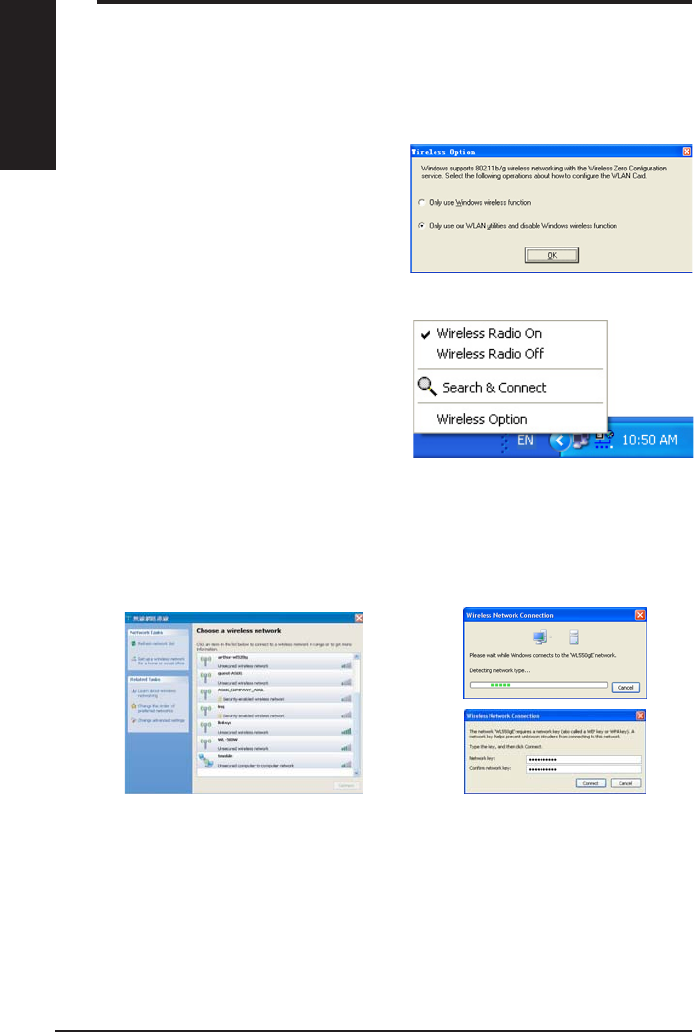
Link State
WLAN Adapter “Link State” icon appears on the left side of
WKH:/$1$GDSWHU6HWWLQJV8VHWKHLFRQWRYLHZWKHFXUUHQW
VLJQDOVWDWXV
Exit Wireless Settings
7RH[LW:LUHOHVV6HWWLQJV\RXFDQFOLFNOK or Cancel.
([FHOOHQW/LQN4XDOLW\,QIUDVWUXFWXUH
*RRG/LQN4XDOLW\,QIUDVWUXFWXUH
)DLU/LQN4XDOLW\,QIUDVWUXFWXUH
3RRU/LQN4XDOLW\,QIUDVWUXFWXUH
1RWOLQNHG,QIUDVWUXFWXUH
20 ASUS WLAN Adapter
English
Quick Start Guide
Windows
®
XP Wireless Options
The wireless options window shown below is only available for Windows® XP.
,WDSSHDUV ZKHQ\RXUXQWKH&RQWURO &HQWHUXWLOLW\DWWKHÀUVWWLPH6HOHFWWKH
XWLOLW\\RXZDQWWRXVHIRUFRQÀJXULQJ\RXU:/$1$GDSWHU
Only use Windows wireless function
– Only use Windows® XP Wireless
=HUR&RQÀJXUDWLRQVHUYLFHWRFRQÀJXUH
the WLAN Adapter.
Only use our WLAN utilities and
disable XP wireless function
– 2QO\XVH$686:/$1XWLOLWLHVWRFRQÀJXUHWKH:/$1$GDSWHU
UHFRPPHQGHG
<RXFDQ RSHQ WKH:LUHOHVV2SWLRQ
VHWWLQJ ZLQGRZDWDQ\WLPH E\ OHIW
FOLFNLQJWKHFRQWURO FHQWHULFRQ DQG
FKRRVLQJWireless Option.
Taskbar Left-Click Menu
&RQÀJXULQJZLWK:LQGRZV®:LUHOHVV=HUR&RQÀJXUDWLRQVHUYLFH
,I\RXZDQW WRFRQILJXUH\RXU :/$1$GDSWHUYLD:LQGRZV® Wireless Zero
&RQÀJXUDWLRQ:=&VHUYLFHIROORZWKHLQVWUXFWLRQEHORZWRPDNHWKHVHWWLQJV
$ZLQGRZSURPSWVRXWDVNLQJ
you for the key if you have set up
encryption on your wireless router,
input the keys and click Connect.
The connection is complete.
1. Double-click the wireless network
icon on the task bar to view available
networks.Select the AP and click
Connect.
ASUS WLAN Adapter 21
English
Quick Start Guide
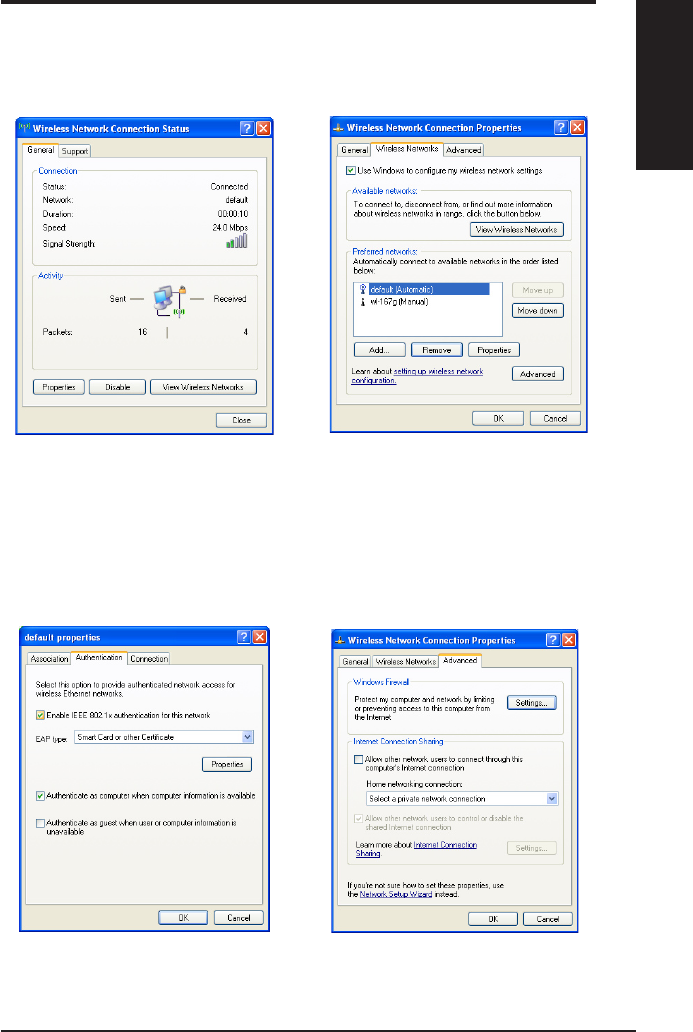
7RVHWXSWKHZLUHOHVVFRQQHFWLRQSURSHUWLHVULJKWFOLFNWKHZLUHOHVVLFRQRQWKH
taskbar and select Open Network Connection 7KHQ ULJKWFOLFN WKH QHWZRUN
connection icon and select Property to open the Wireless Network Connection
6WDWXVSDJH
1. The GeneralSDJHVKRZVVWDWXVGXUDWLRQ
VSHHGDQGVLJQDOVWUHQJWK6LJQDO
VWUHQJWKLVUHSUHVHQWHGE\JUHHQEDUVZLWK
EDUVLQGLFDWLQJH[FHOOHQWVLJQDODQG
EDUPHDQLQJSRRUVLJQDO
2. Select “Wireless Networks” tab to show
Preferred networks. Use the Add button
to add the “SSID” of available networks
and set the connection preference order
with the Move up and Move down
EXWWRQV7KHUDGLRWRZHUZLWKDVLJQDO
icon identifies the currently connected
access point. Click Properties to set the
authentication of the wireless connection.
3. The Authentication SDJH DOORZV \RX WR
DGGVHFXULW\VHWWLQJV5HDG:LQGRZVKHOS
for more information.
4. The AdvancedSDJHDOORZV\RXWRVHW
ÀUHZDOODQGVKDULQJ5HDG:LQGRZVKHOS
for more information.

APPENDIX
FCC Warning Statement
This device complies with Part 15 of the FCC Rules. Operation is subject to the following
two conditions:
(1) this device may not cause harmful interference, and
(2) this device must accept any interference received, including interference that may
cause undesired operation.
This equipment has been tested and found to comply with the limits for a class B digital device,
pursuant to part 15 of the FCC Rules. These limits are designed to provide reasonable protection
against harmful interference in a residential installation.
This equipment generates, uses and can radiate radio frequency energy and, if not installed and
used in accordance with the instructions, may cause harmful interference to radio communications.
However, there is no guarantee that interference will not occur in a particular installation. If this
equipment does cause harmful interference to radio or television reception, which can be
determined by turning the equipment off and on, the user is encouraged to try to correct the
interference by one or more of the following measures:
-Reorient or relocate the receiving antenna.
-Increase the separation between the equipment and receiver.
-Connect the equipment into an outlet on a circuit different from that to which the receiver is
connected.
-Consult the dealer or an experienced radio/TV technician for help.
Any changes or modifications not expressly approved by the party responsible for
compliance could void the user’s authority to operate the equipment.
Prohibition of Co-location
This device and its antenna(s) must not be co-located or operating in conjunction with any other
antenna or transmitter
Safety Information
To maintain compliance with FCC’s RF exposure guidelines, this equipment should be installed and
operated with minimum distance 2.5cm between the radiator and your body. Use on the supplied
antenna. Use on the supplied antenna. Unauthorized antenna, modification, or attachments
could damage the transmitter and may violate FCC regulations.

APPENDIX
Declaration of Conformity for R&TTE directive 1999/5/EC
Essential requirements – Article 3
Protection requirements for health and safety – Article 3.1a
Testing for electric safety according to , EN50392 and EN 60950-1 has been conducted. These are
considered relevant and sufficient.
Protection requirements for electromagnetic compatibility – Article 3.1b
Testing for electromagnetic compatibility according to EN 301 489-1 and EN 301 489-17 has been
conducted. These are considered relevant and sufficient.
Effective use of the radio spectrum – Article 3.2
Testing for radio test suites according to EN 300 328 has been conducted. These are considered
relevant and sufficient.
CE Mark Warning
This is a Class B product, in a domestic environment, this product may cause radio interference, in
which case the user may be required to take adequate measures.