ASUSTeK Computer X101NE785H Eee PC User Manual Eee PC X101 UserMan
ASUSTeK Computer Inc Eee PC Eee PC X101 UserMan
(Eee PC X101) UserMan
Eee PC User Manual
Eee PC X101
15060-00900000
E6659
Notes for This Manual
A few notes and warnings are used throughout this guide, allowing you to
complete certain tasks safely and effectively. These notes have different degrees
of importance as follows:
WARNING! Important information that must be followed for safe operation.
IMPORTANT! Vital information that must be followed to prevent damage
to data, components, or persons.
TIP: Tips for completing tasks.
NOTE: Information for special situations.
ASUS is devoted to creating environment-friendly products/
packagings to safeguard consumers’ health while minimizing
the impact on the environment. In order to reduce the use of
substances harmful to the environment, the Eee PC™ product
package does not come with the Eee PC™ support DVD. The
reduction of the number of the manual pages complies with
the reduction of carbon emission. For system recovery, refer
to the section System Recovery for the instruction on the USB
recovery.
For the detailed user manual and related information, visit the
ASUS Support Site at http://support.asus.com/

ASUS Eee PC
2
Transportation Precautions
To prepare your Eee PC for transport, you should turn it OFF and disconnect
all external peripherals to prevent damage to the connectors. The hard
disk drive’s head retracts when the power is turned OFF to prevent scratching
of the hard disk surface during transport. Therefore, you should not
transport your Eee PC while the power is still ON. Close the display panel
to protect the keyboard and display panel.
The Eee PC’s surface is easily dulled if not properly cared for. Be careful not to
rub or scrape surfaces when transporting your Eee PC. You can put your Eee
PC in a carrying case for protection from dirt, water, shock, and scratches.
There are three main types of airport security devices: X-ray machines
(used on items placed on conveyor belts), magnetic detectors (used on
people walking through security checks), and magnetic wands (hand-
held devices used on people or individual items). You can send your
Eee PC and diskettes through airport X-ray machines. However, it is
recommended that you do not send your Eee PC or diskettes through
airport magnetic detectors or expose them to magnetic wands.
Airplane Precautions
Contact your airline if you want to use the Eee PC on the airplane. Most
airlines have restrictions for using electronic devices. Most airlines allow
electronic use only between and not during takeoffs and landings.
Charging Your Batteries
If you intend to use battery power, be sure to fully charge your battery pack
before going on long trips. Remember that the power adapter charges the
battery pack as long as it is plugged into the computer and an AC power
source. Be aware that it takes much longer to charge the battery pack when
the Eee PC is in use.
Remember to fully charge the battery (8 hours or more) before first use
and whenever it is depleted to prolong battery life. The battery reaches its
maximum capacity after a few full charging and discharging cycles.
Sound Pressure warning
Excessive sound pressure from earphones or headphones can cause hearing
damage or loss. Adjustment of the volume control as well as the equalizer
to settings other than the center position may increase the earphones or
headphones output voltage and the sound pressure level.
ASUS Eee PC
3
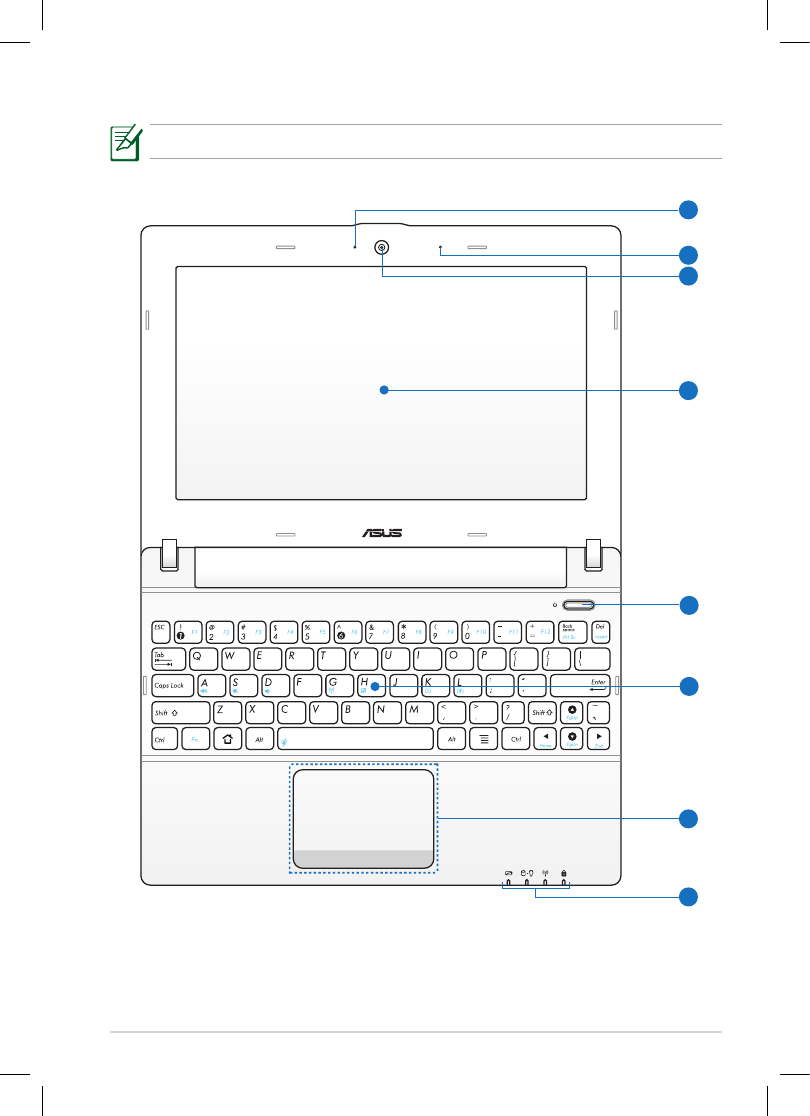
Top Side
The top side may vary in appearance depending on models.
4
7
5
8
2
3
1
6
ASUS Eee PC
4
7
1
2
3
4
5
6
8
Built-in Camera LED
Microphone (Built-in)
Built-in Camera
Display Panel
Power Switch
The power switch allows powering ON and OFF the Eee PC and
recovering from standby mode. Press the switch once to turn ON and
hold it to turn OFF the Eee PC. The power switch only works when
the display panel is opened.
Power Indicator
The power indicator lights when the Eee PC is turned ON and
blinks slowly when the Eee PC is in the Suspend-to-RAM (Sleep)
mode. This indicator is OFF when the Eee PC is turned OFF.
Keyboard
The keyboard differs for each territory.
Touchpad and Buttons
Status Indicators
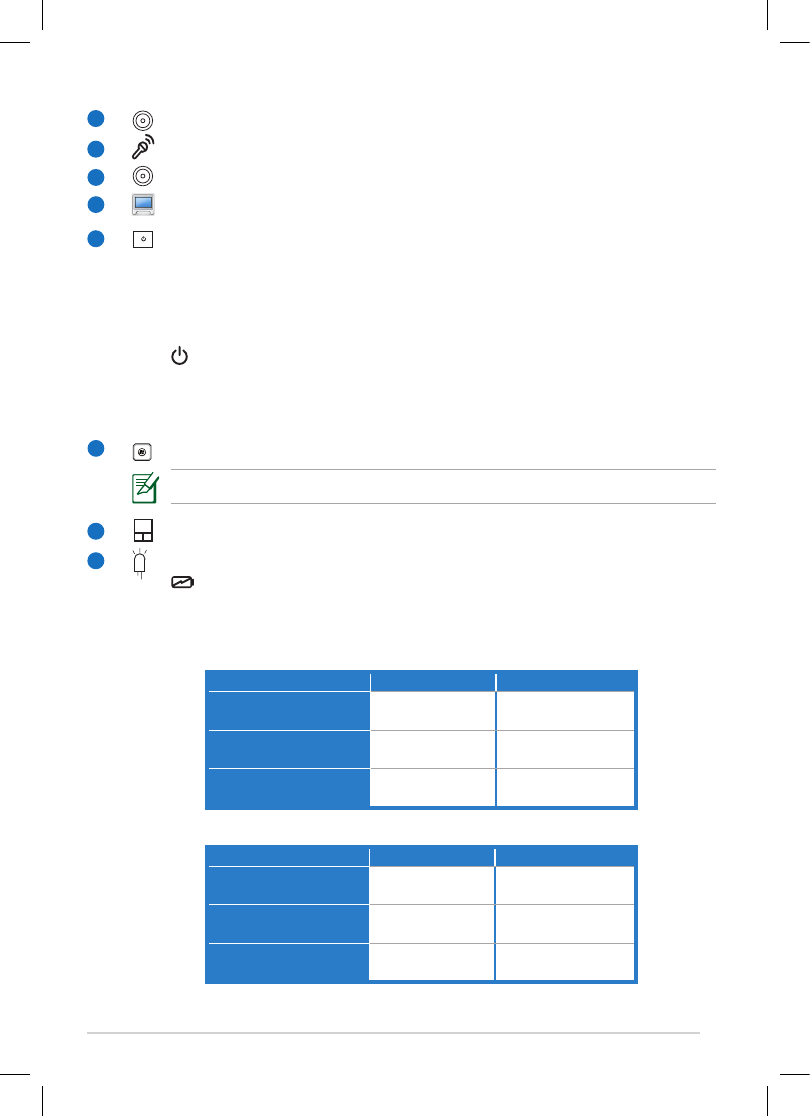
Battery Charge Indicator
The battery charge indicator (LED) shows the battery charging
status as follows:
Powered ON
With Adapter Without Adapter
High battery power
(95%–100%) Green ON Off
Medium battery power
(11%–94%) Orange ON Off
Low battery power
(0%–10%) Orange Blinking Orange Blinking
Powered OFF / Standby mode
With Adapter Without Adapter
High battery power
(95%–100%) Green ON Off
Medium battery power
(11%–94%) Orange ON Off
Low battery power
(0%–10%) Orange Blinking Off
ASUS Eee PC
5
Solid State Drive (SSD) Indicator
The solid state drive indicator blinks when data is written to or
read from the disk drive.
Power Indicator
The power indicator lights when the Eee PC is turned ON and
blinks slowly when the Eee PC is in the Suspend-to-RAM (Sleep)
mode. This indicator is OFF when the Eee PC is turned OFF.
Wireless/Bluetooth Indicator
This is only applicable on models with built-in wireless LAN/
Bluetooth (on selected models). When the built-in wireless LAN/
Bluetooth is enabled, this indicator lights.
Capital Lock Indicator
Indicates that capital lock [Caps Lock] is activated when lighted.
Capital lock allows some of the keyboard letters to type using
capitalized letters (e.g. A, B, C). When the capital lock light is OFF,
the typed letters will be in the lower case form (e.g. a,b,c).
ASUS Eee PC
6
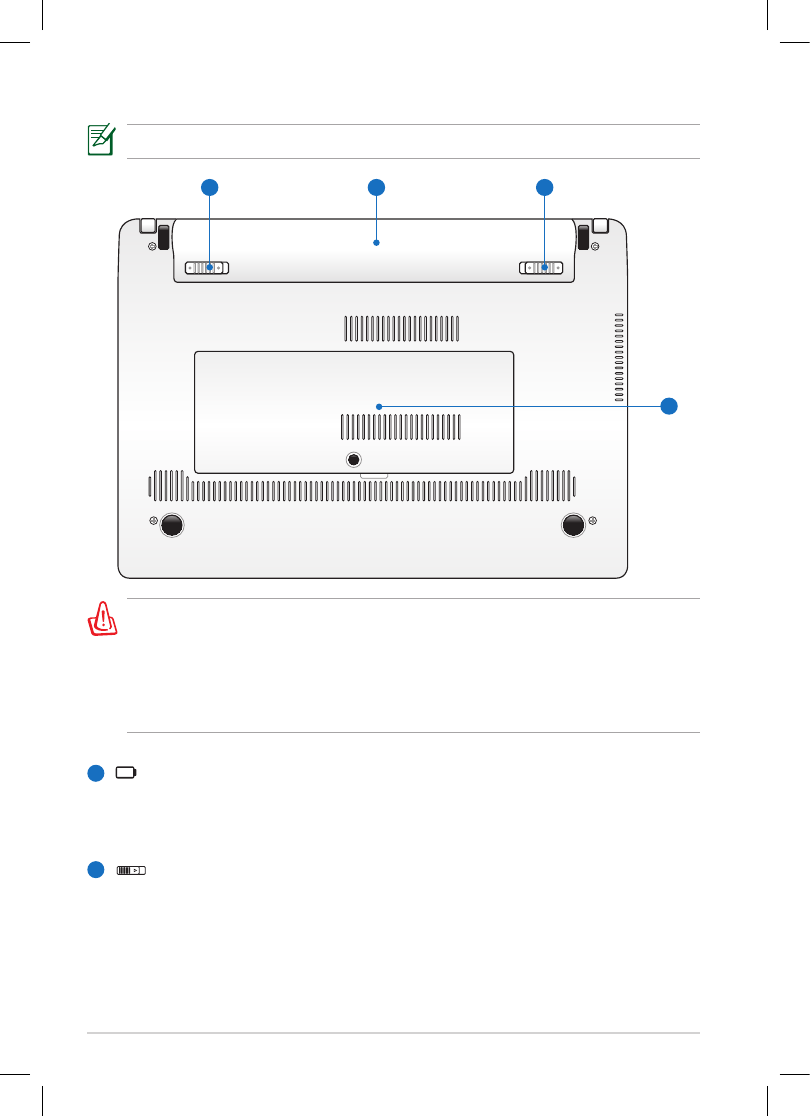
Bottom Side
The bottom side may vary in appearance depending on model.
The bottom of the Eee PC can get very hot. Be careful when handling
the Eee PC while it is in operation or recently been in operation. High
temperatures are normal during charging or operation. DO NOT USE
ON SOFT SURFACES SUCH AS SOFAS OR BEDS, WHICH MAY BLOCK
THE VENTS. DO NOT PUT THE Eee PC ON YOUR LAP OR OTHER PARTS
OF THE BODY TO AVOID INJURY FROM THE HEAT.
1
2
4
12 3
Battery Pack
Battery time varies by usage and by the specifications for this Eee PC.
The battery pack cannot be disassembled and must be purchased as
a single unit.
Battery Lock - Spring
The spring battery lock is used to keep the battery pack secured.
When the battery pack is inserted, it will automatically lock. To
remove the battery pack, this spring lock must be held in the
unlocked position.
ASUS Eee PC
7
3
Memory Compartment
The memory module is secured in a dedicated compartment.
Battery Lock - Manual
The manual battery lock is used to keep the battery pack secured.
Move the manual lock to the unlocked position to insert or remove
the battery pack. Move the manual lock to the locked position after
inserting the battery pack.
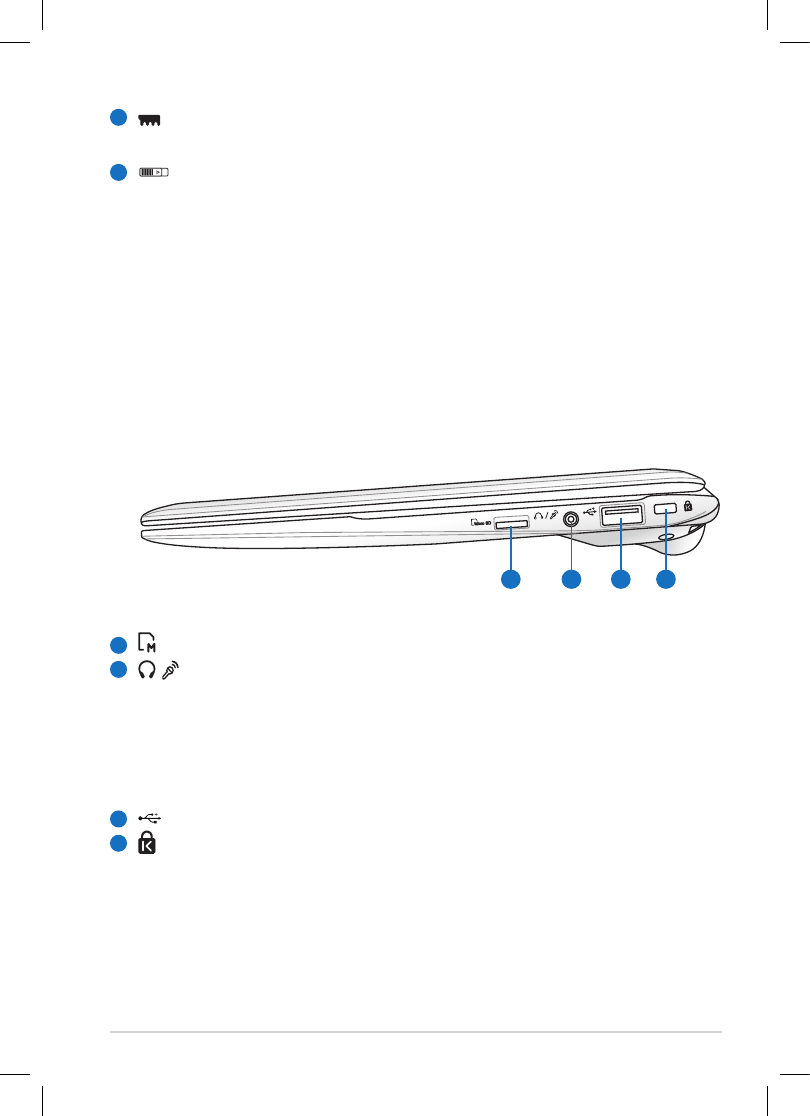
Right Side
2 3 41
Micro SD Card Slot
/ Headphone Output / Microphone Input Combo Jack
The 1/8” stereo combo jack (3.5mm) connects the Eee PC’s audio
out signal to amplified speakers or headphones. Using this jack
automatically disables the built-in speaker.
The jack is also designed to connect the microphone used for Skype,
voice narrations, or simple audio recordings.
USB Port (2.0/1.1)
Kensington® Lock port
1
2
3
4
4
ASUS Eee PC
8
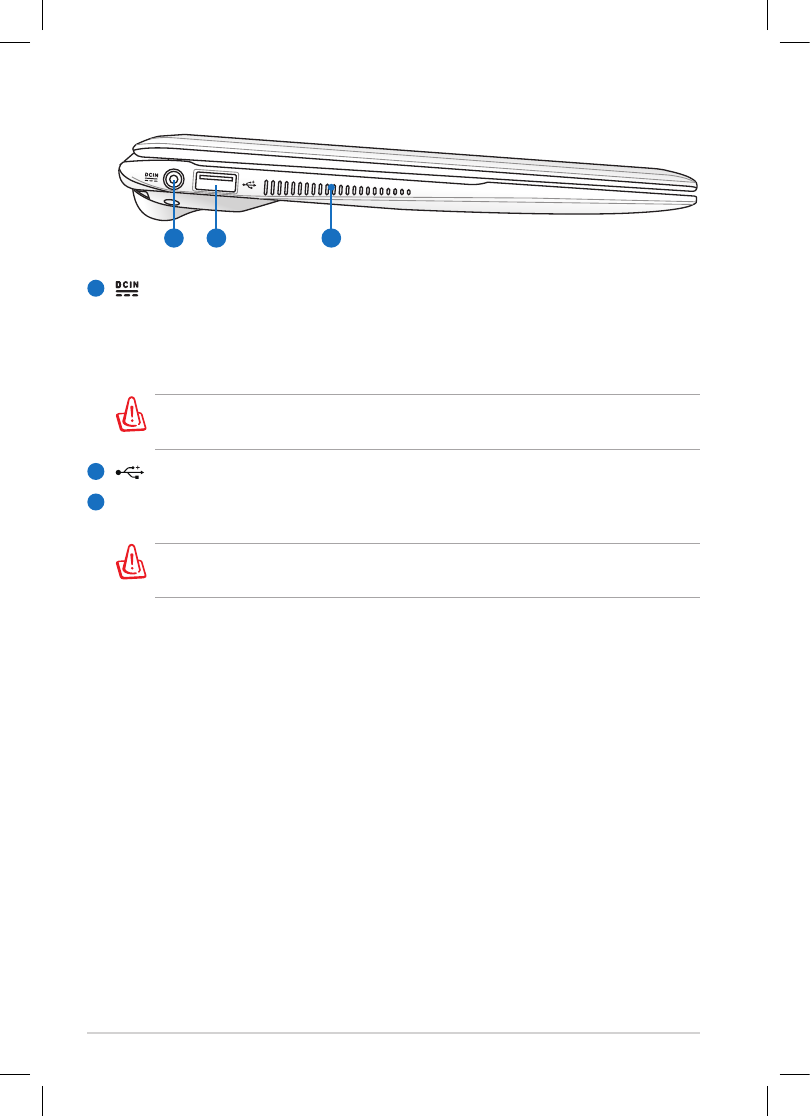
Power (DC) Input
The supplied power adapter converts AC power to DC power for use
with this jack. Power supplied through this jack supplies power to the
Eee PC and charges the internal battery pack. To prevent damage to
the Eee PC and battery pack, always use the supplied power adapter.
THE ADAPTER MAY BECOME WARM TO HOT WHEN IN USE. BE SURE
NOT TO COVER THE ADAPTER AND KEEP IT AWAY FROM YOUR BODY.
USB Port (2.0/1.1)
Air Vents
The air vents allow cool air to enter and warm air to exit the Eee PC.
Ensure that paper, books, clothing, cables, or other objects do not
block any of the air vents or else overheating may occur.
2
1
3
Left Side
1 2 3
ASUS Eee PC
9
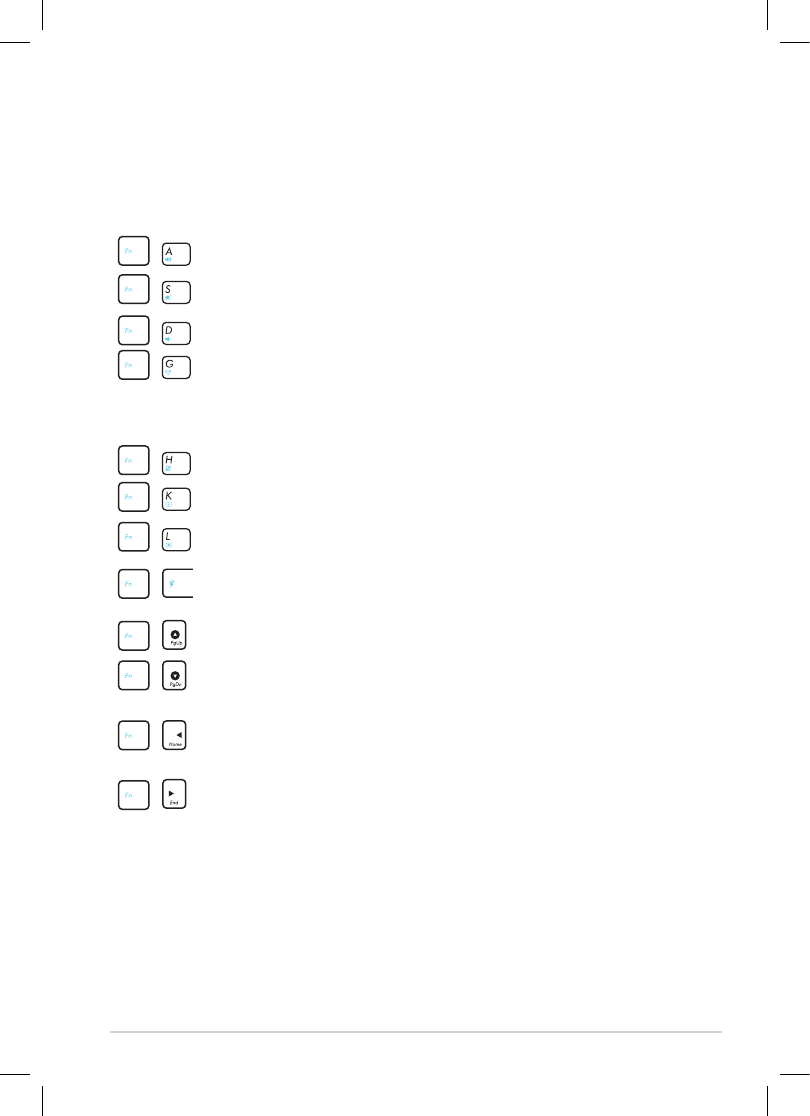
Keyboard Usage
Special Function Keys
The following defines the colored hot keys on the Eee PC’s keyboard. The
colored commands can only be accessed by first pressing and holding the
function key while pressing a key with a colored command.
Volume Up Icon (A): Increases the speaker volume.
Crossed Speaker Icon (S): Mutes the speaker.
Volume Down Icon (D): Decreases speaker volume.
Radio Tower (G) (Wireless Models Only): Toggles the internal
wireless LAN or Bluetooth (on selected models) ON or OFF with
an on-screen-display. When enabled, the corresponding wireless
indicator will light.
Touchpad (H): Toggles the touchpad ON/OFF.
Sun Down Icon (K): Decreases the display brightness.
Sun Up Icon (L): Increases the display brightness.
Super Hybrid Engine (Space Bar): Toggles among various
power saving modes. The selected mode is shown on the display.
Pg Up (↑): Press to scroll up in documents or the web browser.
Pg Dn (
↓
): Press to scroll down in documents or the web
browser.
Home (
←
): Press to move the pointer to the beginning of the
line.
End (
→
): Press to move the pointer to the end of the line.
ASUS Eee PC
10
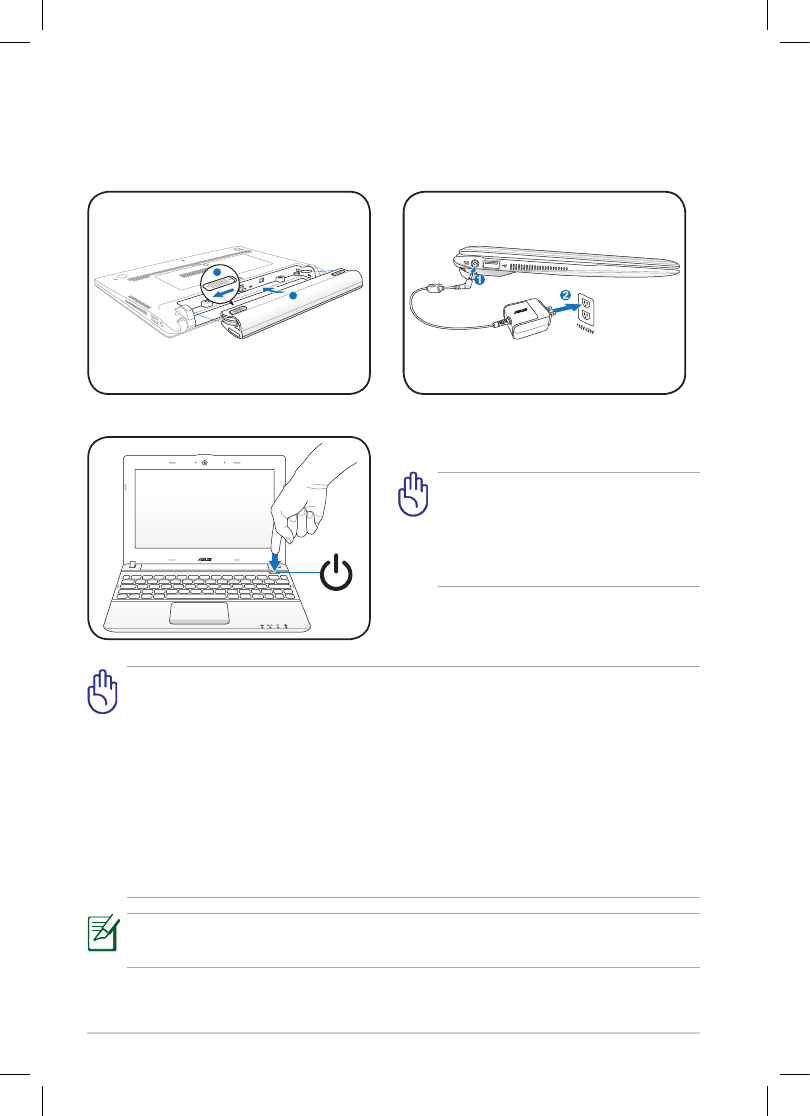
Powering on your Eee PC
These are quick instructions for using your Eee PC.
1. Install the battery pack 2. Connect the AC power adapter
• When you open the display panel, do not force it down to the table
or else the hinges may break! Never lift the Eee PC by the display
panel!
• Only use battery packs and power adapters supplied with this Eee
PC or specifically approved by the manufacturer or retailer for use
with this model or else damage may occur to the Eee PC. The input
voltage range between the wall outlet and this adapter is AC 100V–
240V.
• Never attempt to remove the battery pack while the Eee PC is turned
ON, as this may result in the loss of working data.
Remember to fully charge the battery before first use and whenever it is
depleted to prolong battery life.
3. Turn ON the Eee PC
Damage may occur if you use a
different adapter to power the
Eee PC. You may damage both
your battery pack(s) and the Eee
PC with a faulty AC-DC adapter.
1
2
ASUS Eee PC
11
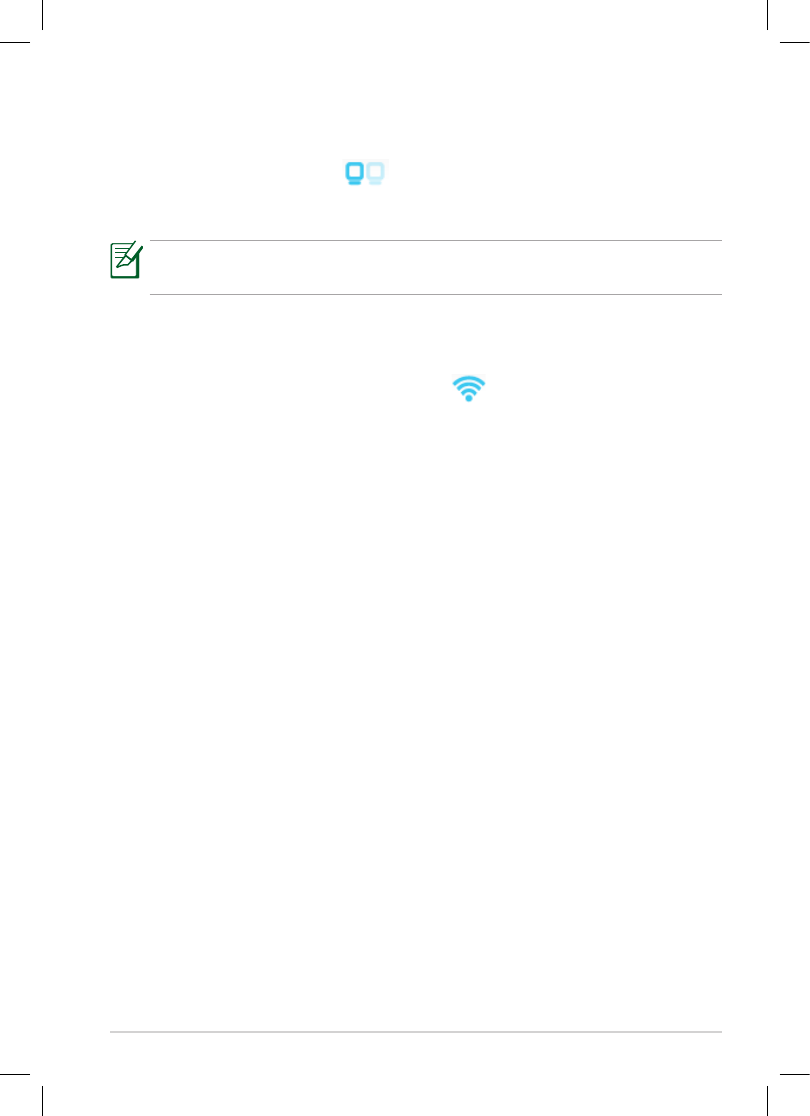
Wireless Network Connection
Configuring a wireless network connection (MeeGo OS)
1. Click the networks icon from the toolbar.
2. Select the wireless access point you want to connect to from the list and
click Connect to build the connection.
If no network is detected, activate the wireless LAN function by pressing
<Fn> + <G> before configuring a wireless network connection.
3. When connecting, you may have to enter a password.
4. After a connection has been established, the connection is shown on the
list.
5. You can see the wireless network icon in the toolbar.

ASUS Eee PC
12
Back up the system recovery files to a USB flash drive
1. The system recovery files can only be backed up during the first-time
startup process. Follow the screen instructions to initialize your Eee PC.
2. Connect a USB flash drive to your Eee PC and click make when you come
to the step of USB recovery during the first-time startup process.
• The size of the connected USB flash drive should be larger than 8GB.
• Memory cards and hard disk drives are not supported for this
function.
The USB flash drive will be formatted to Ext2 file system. You will lose
all your data on the drive. Ensure to back up your important data
beforehand.
System Recovery
3. The system backup starts. Click Next when done.
Recover system files
Ensure to connect your Eee PC to the AC power adapter before using
system recovery to avoid recovery failure.
1. Connect the USB flash drive that you
backup the system recovery files.
2. Press <ESC> on bootup and the
Please select boot device screen
appears. Select USB:XXXXXX to boot
from the connected USB storage
device.
3. When you are prompted for your
permission to start recovery, enter yes
and press the <Enter> key. Follow the onscreen instructions to complete
the recovery process.
Please select boot device:
↑ and ↓ to move selection
ENTER to select boot device
HDD:PM-JMicron
USB:XXXXXXXX
ASUS Eee PC
13
Power Safety Requirement
Products with electrical current ratings up to 6A and weighing more than 3Kg
must use approved power cords greater than or equal to: H05VV-F, 3G, 0.75mm2
or H05VV-F, 2G, 0.75mm2.
DO NOT throw the battery in municipal waste. The symbol of the
crossed out wheeled bin indicates that the battery should not be
placed in municipal waste.
DO NOT throw the Eee PC in municipal waste. This product has been
designed to enable proper reuse of parts and recycling. The symbol
of the crossed out wheeled bin indicates that the product (electrical,
electronic equipment and mercury-containing button cell battery)
should not be placed in municipal waste. Check local regulations for
disposal of electronic products.
SAFE TEMP: This Eee PC should only be used in environments with ambient
temperatures between 5°C (41°F) and 35°C (95°F).
Risk of Explosion if Battery is Replaced by an Incorrect Type.
Dispose of Used Batteries According to the Instructions.
CE Mark Warning
CE marking for devices without wireless LAN/Bluetooth
The shipped version of this device complies with the requirements of the EEC
directives 2004/108/EC “Electromagnetic compatibility” and 2006/95/EC “Low
voltage directive”.
Declarations and Safety Statements
CE marking for devices with wireless LAN/ Bluetooth
This equipment complies with the requirements of Directive 1999/5/EC of the
European Parliament and Commission from 9 March, 1999 governing Radio
and Telecommunications Equipment and mutual recognition of conformity.

ASUS Eee PC
14
Copyright Information
No part of this manual, including the products and software described
in it, may be reproduced, transmitted, transcribed, stored in a retrieval
system, or translated into any language in any form or by any means, except
documentation kept by the purchaser for backup purposes, without the
express written permission of ASUSTeK COMPUTER INC. (“ASUS”).
ASUS and Eee PC logo are trademarks of ASUSTek Computer Inc.
Information in this document is subject to change without notice.
Copyright © 2011 ASUSTeK COMPUTER INC. All Rights Reserved.
Limitation of Liability
Circumstances may arise where because of a default on ASUS’ part or other
liability, you are entitled to recover damages from ASUS. In each such instance,
regardless of the basis on which you are entitled to claim damages from ASUS,
ASUS is liable for no more than damages for bodily injury (including death)
and damage to real property and tangible personal property; or any other
actual and direct damages resulted from omission or failure of performing
legal duties under this Warranty Statement, up to the listed contract price of
each product.
ASUS will only be responsible for or indemnify you for loss, damages or claims
based in contract, tort or infringement under this Warranty Statement.
This limit also applies to ASUS’ suppliers and its reseller. It is the maximum for
which ASUS, its suppliers, and your reseller are collectively responsible.
UNDER NO CIRCUMSTANCES IS ASUS LIABLE FOR ANY OF THE FOLLOWING: (1)
THIRD-PARTY CLAIMS AGAINST YOU FOR DAMAGES; (2) LOSS OF, OR DAMAGE
TO, YOUR RECORDS OR DATA; OR (3) SPECIAL, INCIDENTAL, OR INDIRECT
DAMAGES OR FOR ANY ECONOMIC CONSEQUENTIAL DAMAGES (INCLUDING
LOST PROFITS OR SAVINGS), EVEN IF ASUS, ITS SUPPLIERS OR YOUR RESELLER
IS INFORMED OF THEIR POSSIBILITY.
Manufacturer ASUSTek COMPUTER INC.
Address, City No. 150, LI-TE RD., PEITOU, TAIPEI 112, TAIWAN R.O.C
Country TAIWAN
Authorized Representative
in Europe
ASUS COMPUTER GmbH
Address, City HARKORT STR. 21-23, 40880 RATINGEN
Country GERMANY
FEDERAL COMMUNICATIONS COMMISSION
INTERFERENCE STATEMENT
This equipment has been tested and found to comply with the limits for a Class B digital
device, pursuant to Part 15 of the FCC Rules. These limits are designed to provide
reasonable protection against harmful interference in a residential installation. This
equipment generates, uses and can radiate radio frequency energy and, if not installed
and used in accordance with the instructions, may cause harmful interference to radio
communications. However, there is no guarantee that interference will not occur in a
particular installation. If this equipment does cause harmful interference to radio or
television reception, which can be determined by turning the equipment off and on, the
user is encouraged to try to correct the interference by one or more of the following
measures:
– Reorient or relocate the receiving antenna.
– Increase the separation between the equipment and receiver.
– Connect the equipment into an outlet on a circuit different from that to which the
receiver is connected.
– Consult the dealer or an experienced radio/TV technician for help.
CAUTION:
Any changes or modifications not expressly approved by the party responsible for
compliance could void the user's authority to operate the equipment.
This device complies with part 15 of the FCC Rules. Operation is subject to the following two
conditions: (1) This device may not cause harmful interference, and (2) this device must
accept any interference received, including interference that may cause undesired operation.
RF exposure warning
This equipment must be installed and operated in accordance with provided instructions
and must not be co-located or operating in conjunction with any other antenna or
transmitter. End-users and installers must be provide with antenna installation instructions
and transmitter operating conditions for satisfying RF exposure compliance.
Max. SAR Measurement (1g): FCC: 0.021W/kg
IC: 0.151W/kg

Canada, Industry Canada (IC) Notices
This Class B digital apparatus complies with Canadian ICES-003 and RSS-210.
Operation is subject to the following two conditions: (1) this device may not cause interference, and (2) this
device must accept any interference, including interference that may cause undesired operation of the
device.
Radio Frequency (RF) Exposure Information
The radiated output power of the Wireless Device is below the Industry Canada (IC) radio frequency
exposure limits. The Wireless Device should be used in such a manner such that the potential for human
contact during normal operation is minimized.
This device has been evaluated for and shown compliant with the IC Specific Absorption Rate (“SAR”)
limits when installed in specific host products operated in portable exposure conditions.
Canada’s REL (Radio Equipment List) can be found at the following web address:
http://www.ic.gc.ca/app/sitt/reltel/srch/nwRdSrch.do?lang=eng
Additional Canadian information on RF exposure also can be found at the following web address:
http://www.ic.gc.ca/eic/site/smt-gst.nsf/eng/sf08792.html
Canada, avis d'Industry Canada (IC)
Cet appareil numérique de classe B est conforme aux normes canadiennes ICES-003 et RSS-210.
Son fonctionnement est soumis aux deux conditions suivantes : (1) cet appareil ne doit pas causer
d'interférence et (2) cet appareil doit accepter toute interférence, notamment les interférences qui peuvent
affecter son fonctionnement.
Informations concernant l'exposition aux fréquences radio (RF)
La puissance de sortie émise par l’appareil de sans fil Dell est inférieure à la limite d'exposition aux
fréquences radio d'Industry Canada (IC). Utilisez l’appareil de sans fil Dell de façon à minimiser les
contacts humains lors du fonctionnement normal.
Ce périphérique a été évalué et démontré conforme aux limites SAR (Specific Absorption Rate – Taux
d'absorption spécifique) d'IC lorsqu'il est installé dans des produits hôtes particuliers qui fonctionnent
dans des conditions d'exposition à des appareils portables.
Ce périphérique est homologué pour l'utilisation au Canada. Pour consulter l'entrée correspondant à
l’appareil dans la liste d'équipement radio (REL - Radio Equipment List) d'Industry Canada
rendez-vous sur:
http://www.ic.gc.ca/app/sitt/reltel/srch/nwRdSrch.do?lang=eng
Pour des informations supplémentaires concernant l'exposition aux RF au Canada rendez-vous sur :
http://www.ic.gc.ca/eic/site/smt-gst.nsf/eng/sf08792.html