ATCOM TECHNOLOGY ATCOMATAMP01 WiFi Mesh ATA User Manual ATCOM MP01 Administrator Manual V1 0 fcc
ATCOM TECHNOLOGY CO., LIMITED WiFi Mesh ATA ATCOM MP01 Administrator Manual V1 0 fcc
UserManual.wiki
>
ATCOM TECHNOLOGY
>
ATCOMATAMP01 User Manual
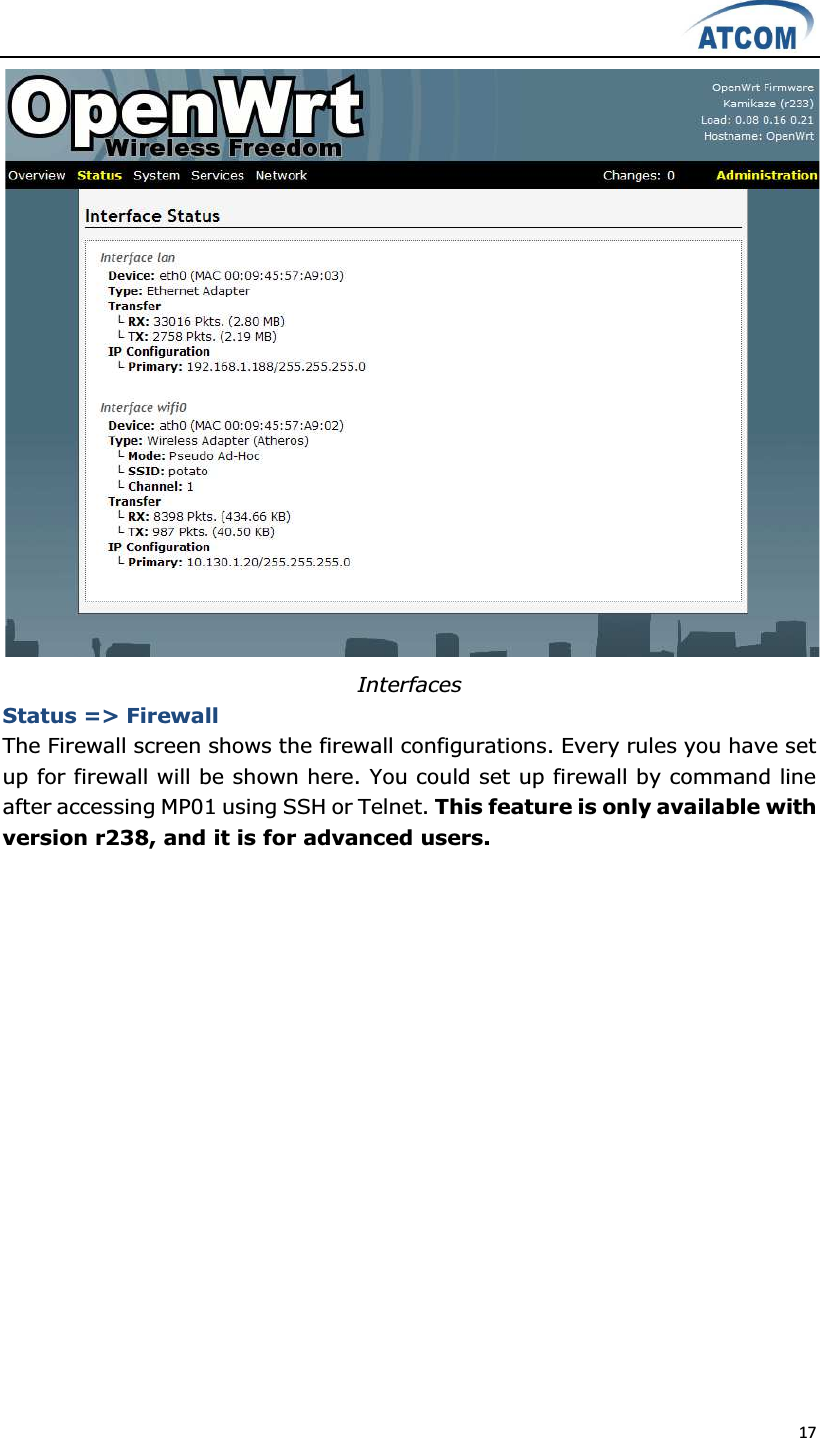
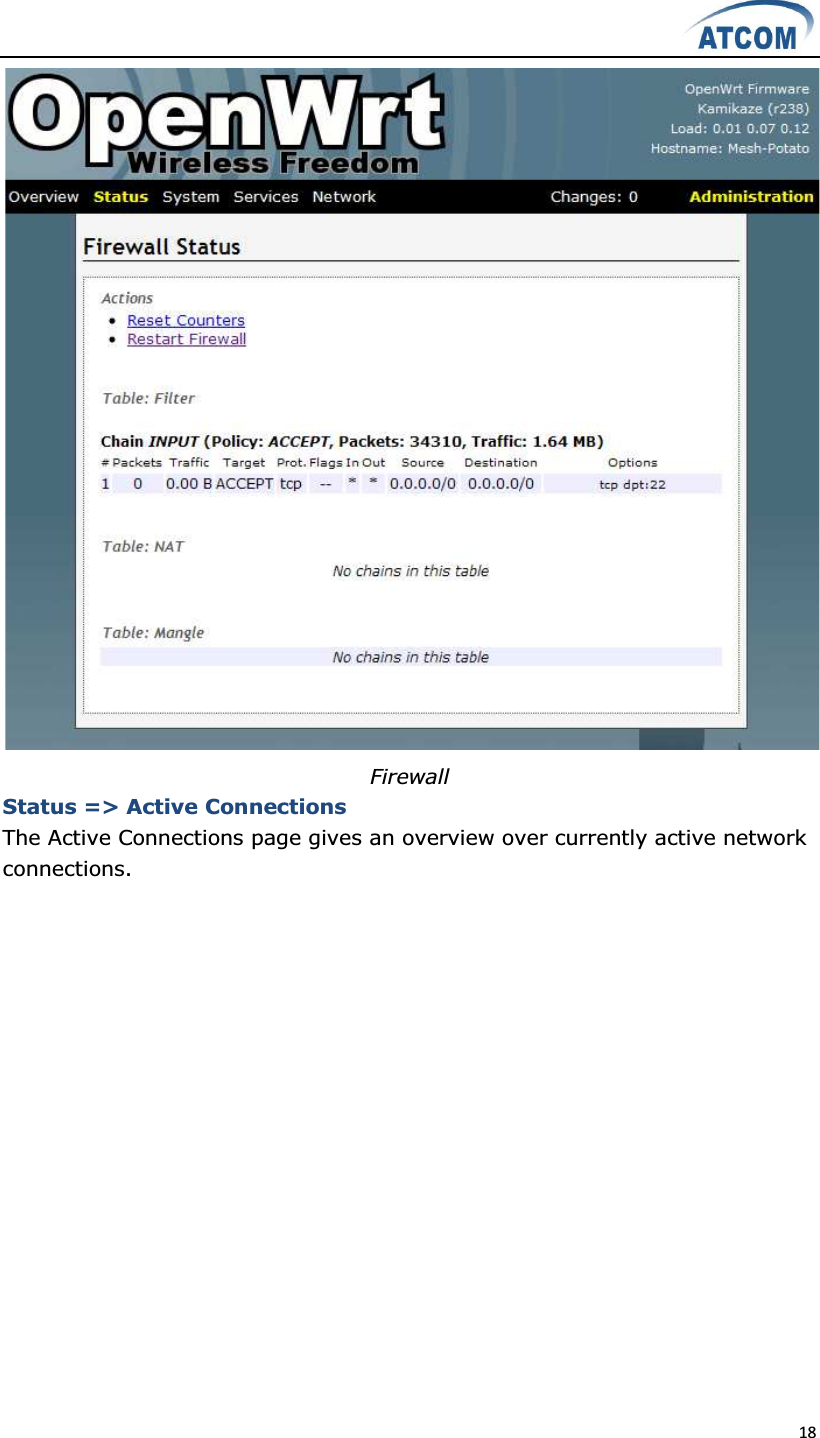
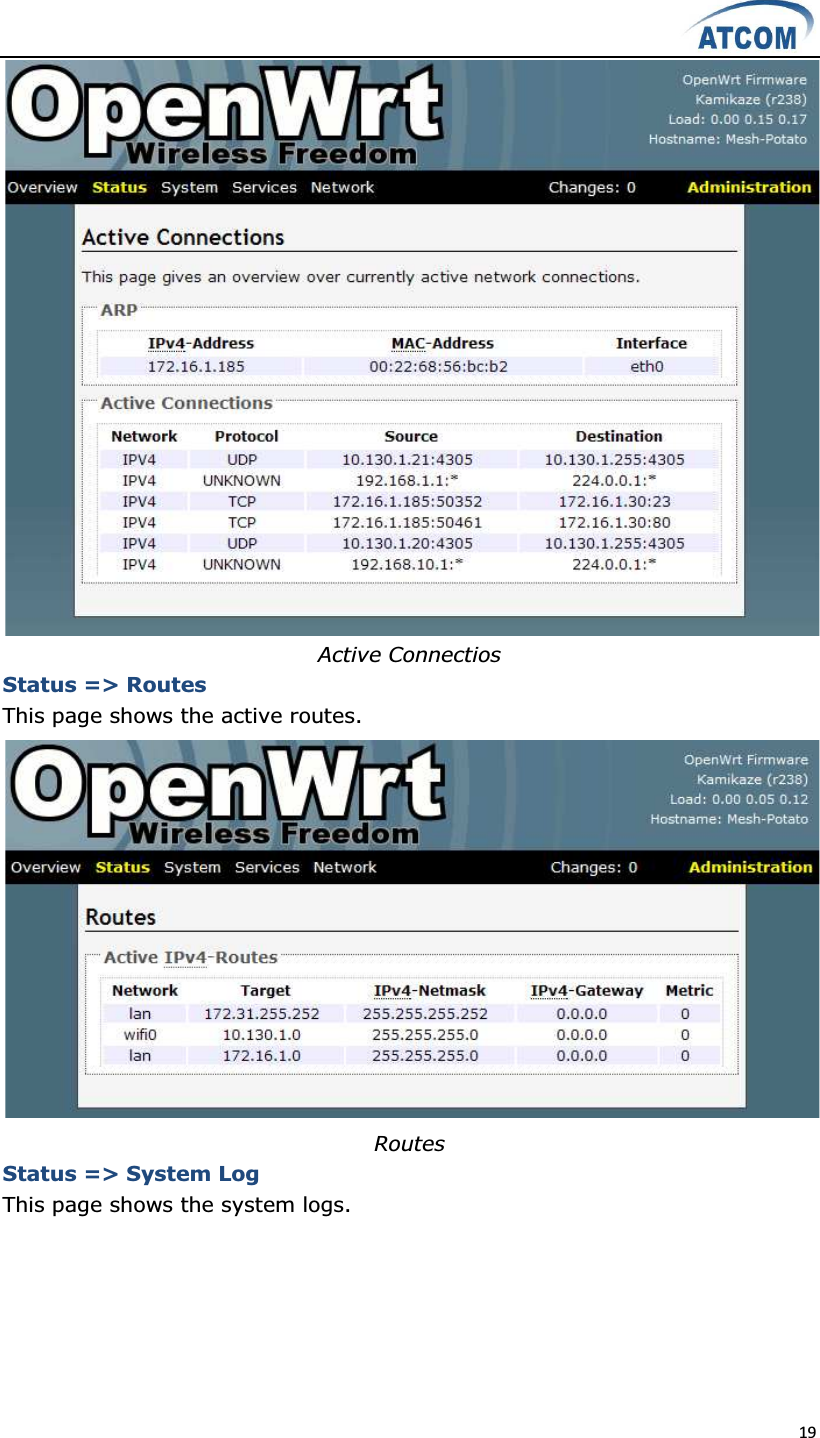
Users Manual
Navigation menu
Upload a User Manual
Namespaces
Wiki Guide
HTML
PDF
Info
Views
User Manual
Discussion / Help
Navigation
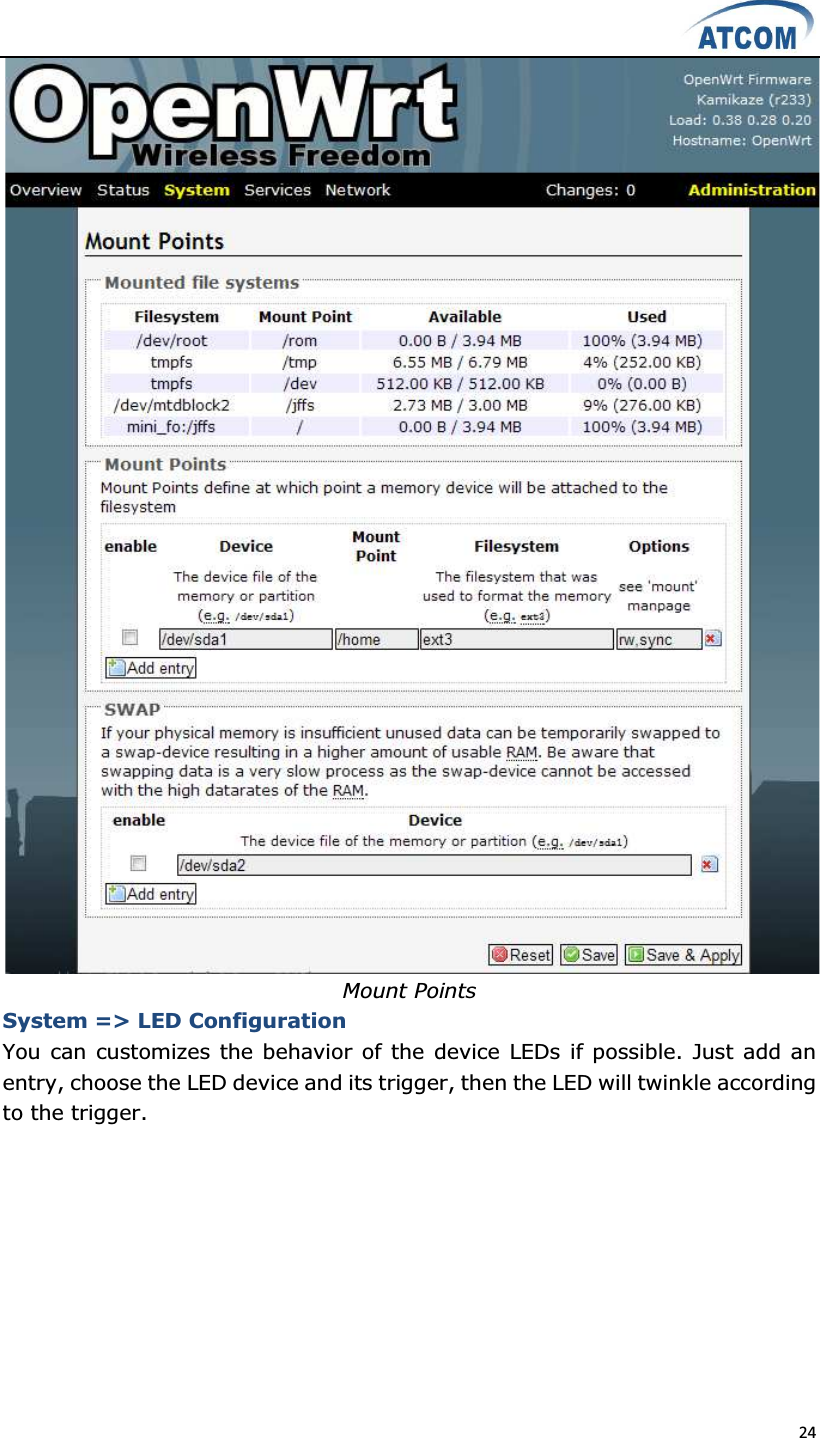
![8 If you haven't already set the password on the MP01, do that now by telneting to 192.168.1.20 and issuing the µpasswd¶ command. This will enable ssh and you will be able to continue with the following. 2) Copy the packages to the MP01. scp *ipk root@192.168.1.20:/root 3) Login into the MP01 ssh root@192.168.1.20 4) Install and configure the packages on MP01 (Answer µY¶ when asked to replace /etc/config/afrimesh) opkg install netcat_0.7.1-1_mips.ipk opkg install villagetelco-device_1.0pre-r954-1_mips.ipk /etc/init.d/provision enable chmod -R a+rw /etc/config uci set batmand.general.routing_class=1 uci set afrimesh.settings.root=10.130.1.1 uci set batmand.general.visualisation_srv=10.130.1.1 uci set system.@system[0].log_ip=10.130.1.1 uci commit reboot 5) Configure DNS for MP01 Edit /etc/resolv.conf to reflect the following: nameserver 141.1.1.1 2.2.3 Start up the Afrimesh Dashboard You may be able to make this all work with the Network Manager but I ran into problems and disabled it. So, first kill the network-manager and stop any versions of batmand that might be running. You may wish to paste the below into a script for convenience. The commands should be run as root. stop network-manager killall NetworkManager killall batmand Then start your wireless interface. Replace wlan0 if necessary with whatever your wireless device. ifconfig wlan0 down iwconfig wlan0 mode ad-hoc ifconfig wlan0 up ifconfig wlan0 10.130.1.1/24 iwconfig wlan0 essid potato iwconfig wlan0 channel 1 iwconfig wlan0 ap 01:CA:FF:EE:BA:BE Assuming your wired Ethernet port is connected, you can set up that connectivity as well. If your Ethernet port is not eth0, adjust as appropriate. iptables --flush iptables --table nat --flush](https://usermanual.wiki/ATCOM-TECHNOLOGY/ATCOMATAMP01/User-Guide-1558659-Page-9.png)
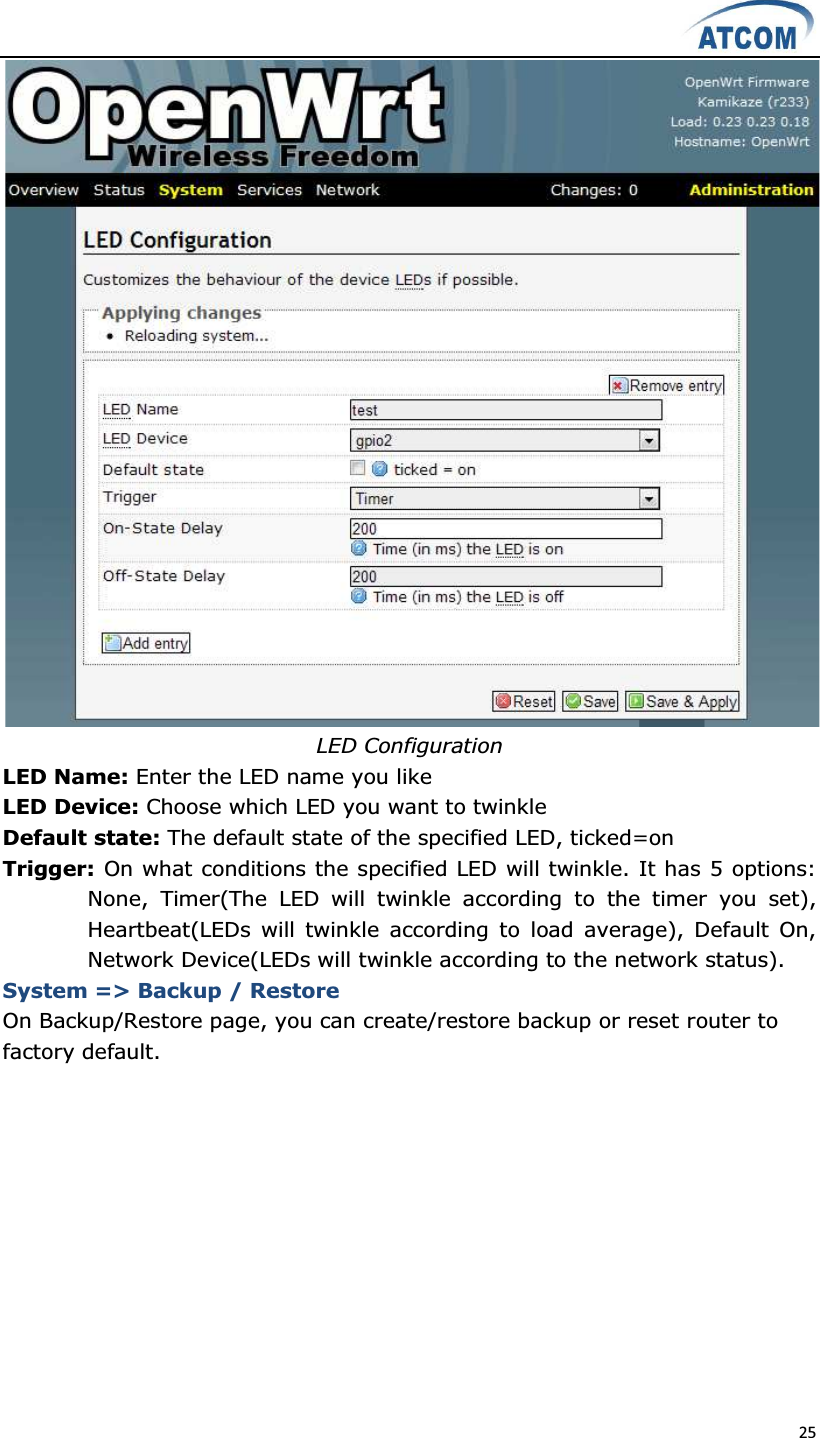
![10 [general] register=6015:6015@192.168.1.100 [6015] host=192.168.1.100 secret=6015 username=6015 insecure=very type=friend disallow=all allow=gsm,ulaw,alaw dtmfmode=rfc2833 qualify=yes canreinvite=no nat=yes context=default 2) On MP01, edit /etc/asterisk/extension.conf and add some lines as below: [default] exten => _9.,1,Dial(SIP/6015/${EXTEN:1}) 3) Assume that the outgoing calling rules on IP08 is µ88+phone number¶, then you can use MP01 to make international calls by dialing µ988+phone number¶. 2.2.5 Configure the MP01 to let the computers connected to it by Ethernet port can access the Internet 1) Paste the below into a script named meshclientgw.sh and save it to /bin on MP01. #!/bin/sh # This script has been tested with the ash shell from BusyBox. # Written by Elektra OLD_WIFI0_IP=`uci show network.wifi0.ipaddr | cut -d = -f 2` if [ -z $OLD_WIFI0_IP ] then echo "You need to set a IP address for the wifi0 interface before running this script." exit 1 fi /etc/init.d/batmand /etc/rc.d/S90batmand OCTET_A=`uci show network.wifi0.ipaddr | cut -d = -f2 | cut -d . -f1`](https://usermanual.wiki/ATCOM-TECHNOLOGY/ATCOMATAMP01/User-Guide-1558659-Page-11.png)


![37 4. Troubleshooting 4.1 What to do if you can¶t connect to the MP anymore - using the Fallback-IP This can easily happen if you are messing around with the IP settings of the MP. Luckily the MP has a additional IP subnet at the Ethernet port that can not be changed or disabled from a web interface. On your PC configure the Ethernet port to use 172.31.255.253/30 (netmask 255.255.255.252). You can add multiple IP addresses to each interface, so you don't have to reconfigure it if you need other addresses as well. After finishing the configuration you should be able to access the MP01 using IP 172.31.255.254. 4.2 My MP01 can¶t make calls You have set up you MP01 IPs but can't make calls. Here are some basic tests: 1. Can you hear dial tone in a phone connected to the MP? If not please reboot it and try again. Some of the modules have come loose while shipping. 2. Check you mesh network. Telnet/ssh into your MP and: batmand -cbd1 You should see the IP of the other MP(s) on your mesh. If you see no IPs then check your WiFi settings are identical except for the IP. These can be checked in /etc/config/wireless or via the GUI. Also compare "iwconfig ath0" on both MPs and "ifconfig ath0". 3. Try pinging one MP from the other. 4. On each MP, dial 4001. This performs an echo test. Can you hear your own voice coming back to you? 5. Start an Asterisk CLI and see what happens when you dial an IP: root@OpenWrt:~# asterisk -r OpenWrt*CLI> set verbose 3 Note: The 'set verbose' command is deprecated, please use 'core set verbose' instead. Now dial the IP of another MP. You should see something like: -- event_offhook -- AST_STATE_DOWN: -- start mp_new -- event_dtmf 1 -- event_dtmf 4 -- event_dtmf 2 -- event_digit_timer -- extension exists, starting PBX 142 -- Executing [142@default:1] Dial("MP/1", "SIP/4000@10.130.1.142") in new stack](https://usermanual.wiki/ATCOM-TECHNOLOGY/ATCOMATAMP01/User-Guide-1558659-Page-38.png)