ATEN Technology IOGEAR GBU241 BLUETOOTH 2.0 EDR ENHANCED DATA RATE USB ADAPTER User Manual GBU241W6 M0418 manual indd
ATEN Technology, Inc., dba IOGEAR BLUETOOTH 2.0 EDR ENHANCED DATA RATE USB ADAPTER GBU241W6 M0418 manual indd
Contents
- 1. USERS MANUAL 1
- 2. USERS MANUAL 2
USERS MANUAL 1

Bluetooth™ Wireless USB Adapter
Manual (GBU241W6-341W6)
© 2006 IOGEAR. All Rights reserved. Part No. M0418
IOGEAR, the IOGEAR logo, are trademarks or registered trademarks of IOGEAR, Inc. Microsoft and Windows are registered
trademarks of Microsoft Corporation. All other brand and product names are trademarks or registered trademarks of their respective
holders. IOGEAR makes no warranty of any kind with regards to the information presented in this document. All information furnished
here is for informational purposes only and is subject to change without notice. IOGEAR, Inc. assumes no responsibility for any inac-
curacies or errors that may appear in this document.

3
Welcome
Thank you for purchasing one of the most feature-rich Bluetooth™ to USB adapters
available. IOGEAR’s Bluetooth™ to USB adapters are first-rate wireless connectivity
accessories designed to help reduce the frustration of dealing with cable glut in your home
or office. These adapters allow computers with USB connections to become Bluetooth™
enabled computers. They comply to Bluetooth 2.0 and USB 1.1 specifications, and provide
users with a 2.1Mbps data rate. They also enable wireless Personal Area Network (PAN)
connectivity to Bluetooth™ enabled devices such as PDA’s, printers, cellular phones,
computers, etc.
We hope you enjoy using your IOGEAR Bluetooth™ to USB adapter, another connectivity
solution from IOGEAR.

4
Table of Contents
Package Contents ........................................................................................................ 5
Features ....................................................................................................................... 6
System Requirements .................................................................................................. 7
Introduction ................................................................................................................... 8
Software Installation ..................................................................................................... 9
Hardware Installation .................................................................................................. 13
Installing the Bluetooth Mouse ................................................................................... 14
Disabling Blutooth Mouse ........................................................................................... 17
Installing a Windows Mobile Bluetooth PDA ............................................................... 18
Installing a Nokia PDA Phone .................................................................................... 23
Installing a Bluetooth GPS .......................................................................................... 25
Installing a Bluetooth Headset .................................................................................... 27
Installing a Bluetooth Stereo Headphone .................................................................. 29
Using a Bluetooth Stereo Headphone as Headset on your PC ................................. 34
Installing a Bluetooth Print Adapter ........................................................................... 36
Technical Support/Radio & TV Interference Statement .............................................. 42
Limited Warranty ......................................................................................................... 43

5
Package Contents
This package contains:
• 1 USB Bluetooth Adapter
• 1 Installation CD
• 1 User Manual
• 1 Warranty/Registration Card
If any items are damaged or missing, please contact your dealer.

6
Features
- Eliminates cables between your computers
- Controlls and communicates with Bluetooth™ enabled devices
- Enables wireless Personal Area Network (PAN) connectivity
- Bluetooth™ specification 2.0 compliant
- USB specification 1.1 compliant
- Up to 20 meter (66 feet) wireless working distance for GBU241W6, up to 100 meter
(330 feet) for GBU341W6
- Up to 2.1 Mbps, 3x faster than 1.2
- Small form factor makes it easy to carry and place
- Crisp, easy, and fast installation and setup
- Built-in security to assure the privacy of your communication – Pairing, Encryption,
and Authentication
- Transfer data between your cell phone and PC.
- PC and Mac compatible

7
System Requirements
Hardware Requirement:
· Available USB port
Operating System:
For PCs: Windows 2000/XP
For Macs: OS X v10.3.9 or later

8
IOGEAR®’s GBU241W6 Wireless Bluetooth™ to USB Adapter is a class 2 device with
a wireless working distance of 60 feet (20 meters), GBU341W6 is a class 1 device with
a wireless working distance of 330 feet (100 meters). This device allows any computer
with USB connections to become a Bluetooth™ enabled computer. It complies with
Bluetooth 2.0 and USB 1.1 specifications, and provides users with a 2.1 Mbps data
transfer rate at ranges up to 66 feet for GBU241W6, and 330 feet for GBU341W6. It
also enables wireless Personal Area Network (PAN) connectivity to Bluetooth™ enabled
devices such as PDA’s, printers, cellular phones, computers, etc.
The Wireless Bluetooth™ to USB adapter is compatible with both PC and Mac. It is easy
to install and use, and very portable. Another great solution from IOGEAR® for home
and mobile networking needs.
Introduction
9
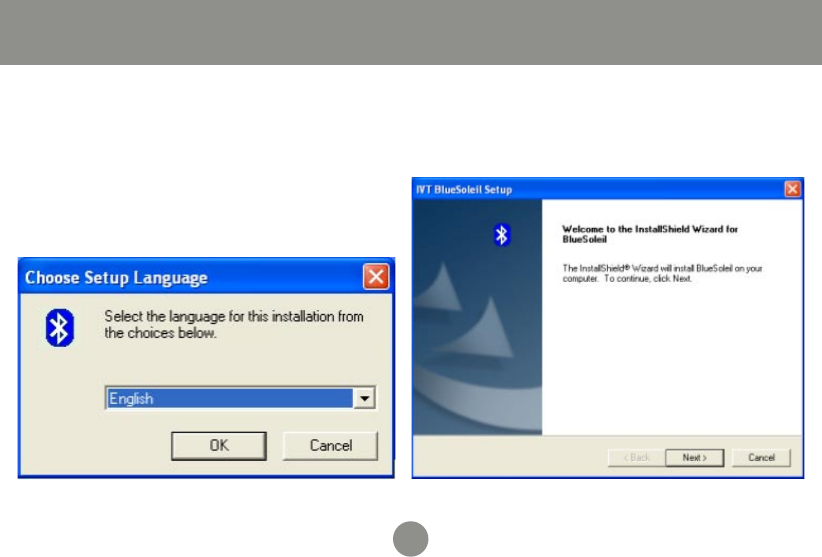
Software Installation
Software Installation
Insert the driver CD into an available
CD drive on your computer. Select
the language you would like to use for
the installation and click OK.
1.
The InstallShield Wizard for the
BlueSoleil software will appear. Click
Next to continue.
2.
10
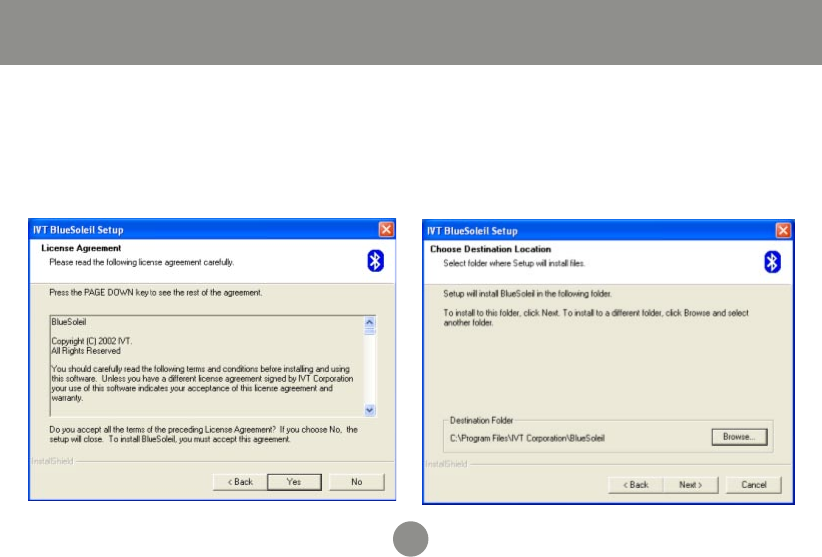
Software Installation
If you agree to the terms of the license
agreement click Yes to continue.
3. Click Browse if you would like to change
the directory that the Bluetooth software
is installed to. Click Next when you are
ready to continue.
4.
11
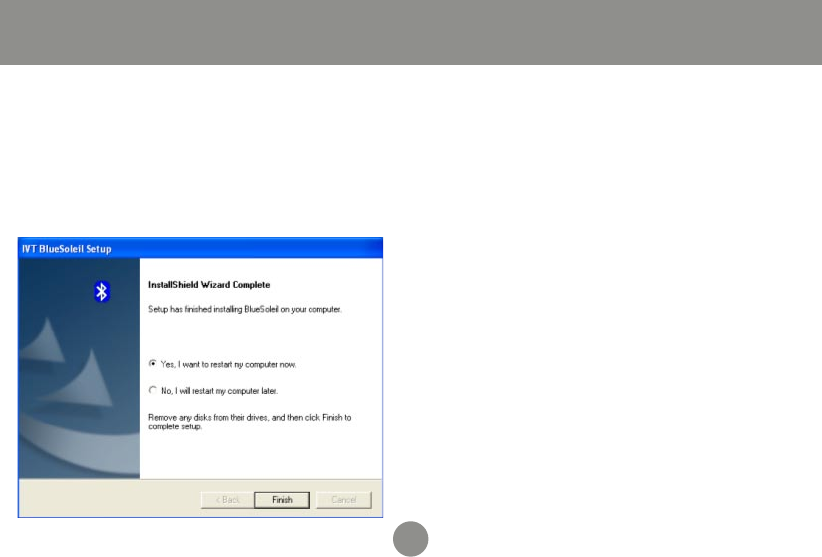
After the BlueSoleil software has
completely loaded, you will need
to restart to begin using it. The
installer will restart your computer
automatically when you click Finish
unless you ask it not to.
5.
Software Installation
12
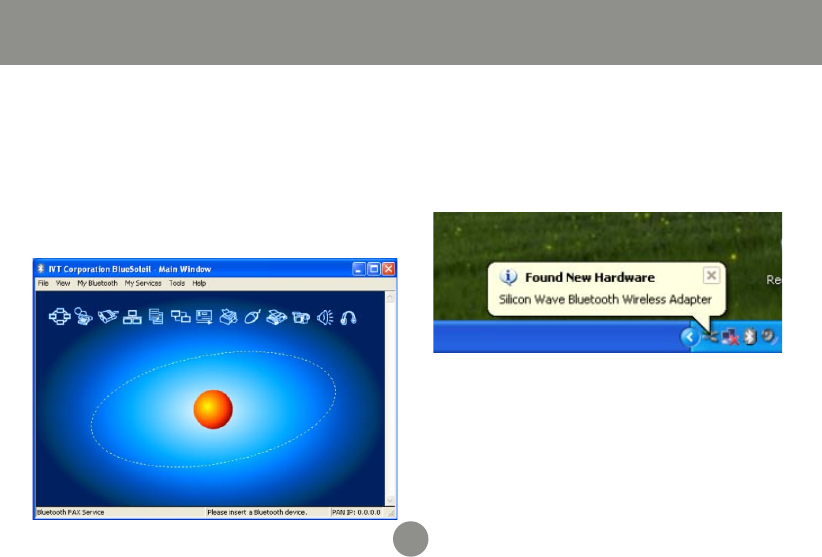
Hardware Installation
After restarting you will be presented
with the main BlueSoleil window. At
the bottom of the window will be
a message asking you to insert a
Bluetooth device. Insert the Bluetooth
adapter into an available USB port on
your computer now.
1. On Windows XP, you will see a
message bubble appear in the lower
right corner of your screen as drivers
are loaded for the Bluetooth adapter.
2.
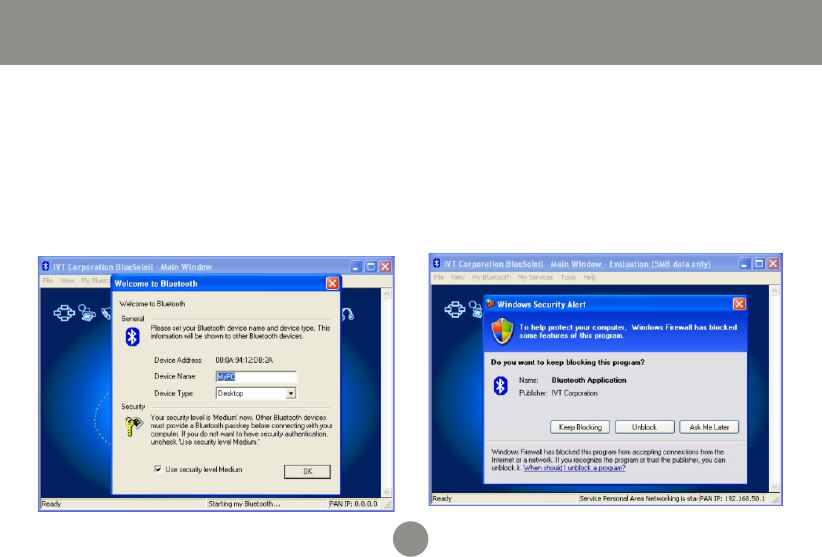
13
When the drivers have completely
loaded, the BlueSoleil software will
ask you for the name and type of
your computer so that other Bluetooth
devices can correctly identify it. Press
OK when you are done entering this
information.
3. As the Bluetooth network is
established, you may see a warning
from any firewall software you have
installed. Make sure you unblock
the BlueSoleil software or you may
experience problems with networking.
4.
Hardware Installation
14
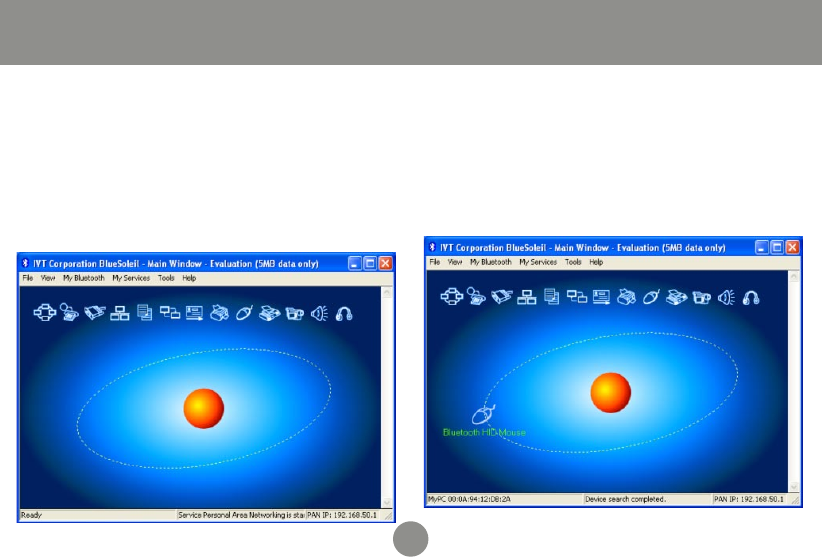
Installing the Bluetooth Mouse
To set up your Bluetooth mouse, flip
the power switch to on and briefly
press the button to make the mouse
temporarily discoverable. Then click
the orange orb in the center of your
Bluetooth window representing your
computer.
1. After a brief search, any Bluetooth de-
vices which are in range and in discov-
erable mode will appear around the orb.
If your mouse does not appear, press
the button on the bottom of the mouse
and search again by clicking the orb.
2.
15
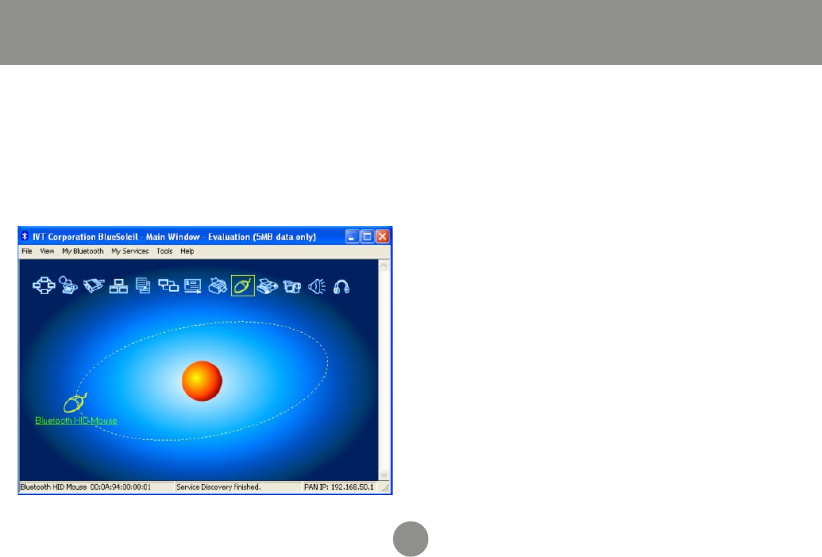
Double-click on the mouse to discover
what Bluetooth features it supports.
You will see the Bluetooth Human
Interface Device (HID) icon light up at
the top of the BlueSoleil window.
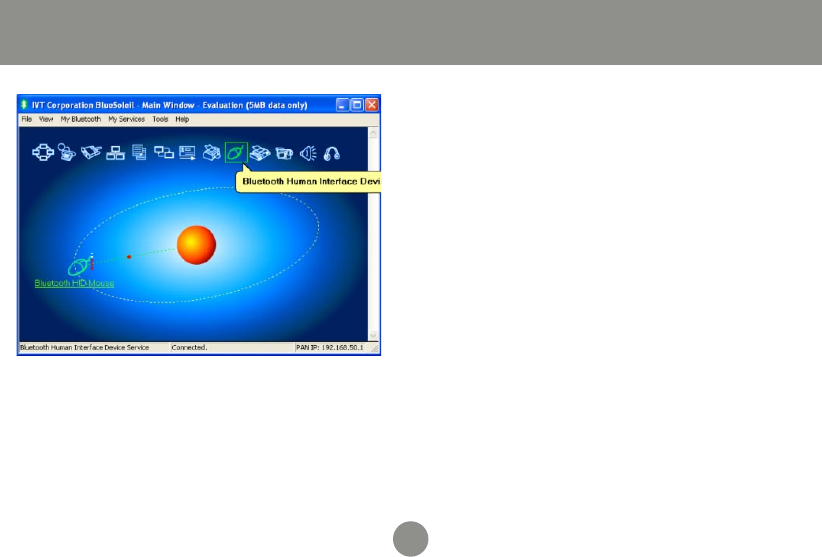
3. Click once on the HID icon (the mouse
with the box around it) to connect to
your mouse. The icon should turn
green and a link should appear be-
tween your mouse and the orb. If this
is the first time you have used a Blue-
tooth mouse there will be a brief pause
while drivers are loaded, but your
mouse should now be ready to use.
You can close the BlueSoleil window
and your mouse will continue to work.
4.
Installing the Bluetooth Mouse
see screen shot on next page
16
Installing the Bluetooth Mouse
17
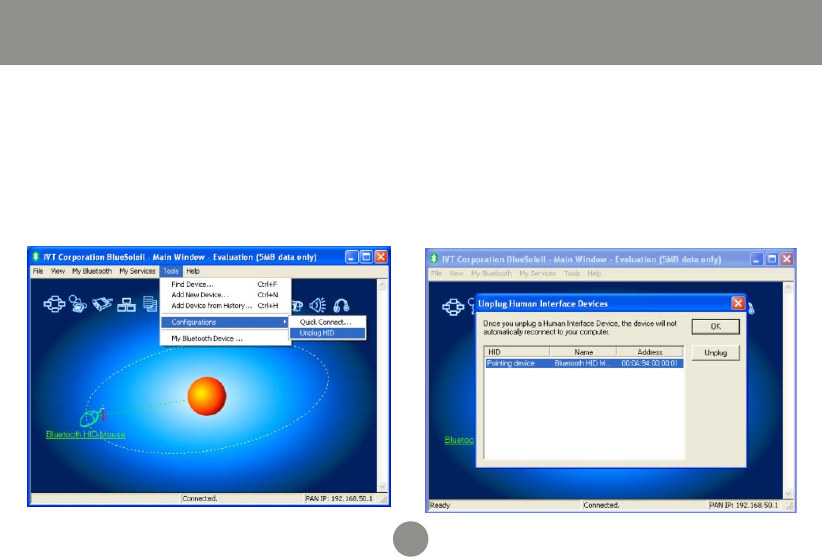
Disabling Blutooth Mouse
If you would like to stop the mouse
from automatically connecting when it
is turned on, you will need to “unplug”
it. You can do this by pulling down the
Tools menu, selecting Configurations
and then Unplug HID.
1. You will see a list of any HID devices
you have connected to. Select the
mouse and click Unplug to prevent
the mouse from reconnecting
automatically.
2.
18
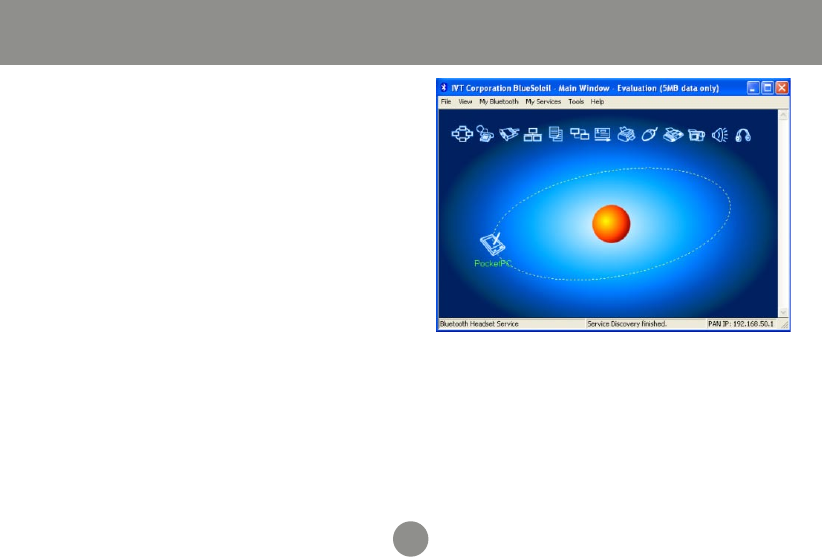
Installing a Windows Mobile Bluetooth PDA
For a Windows Mobile PDA, you will
need to have ActiveSync software
installed on your computer. See your
PDA’s documentation for help installing
ActiveSync. When installation is
complete, click the orange orb in the
center of your Bluetooth window to
search for the PDA. If it is not found,
make sure your PDA is in discoverable
mode and try again.
1.
19
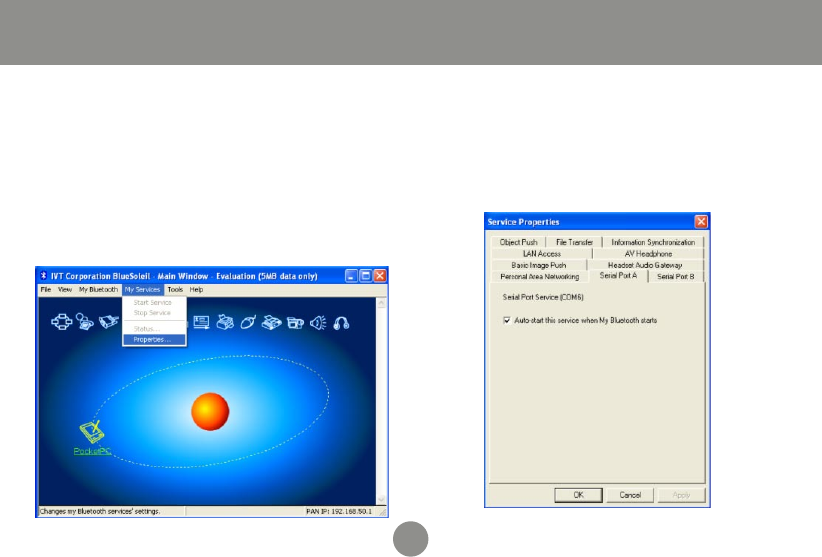
When you can see the PDA in your
Bluetooth window, the PDA is set up
properly. Next find out which serial
port (COM port) the PDA will be
connecting to by pulling down the
My Services menu and selecting
Properties.
2. Find and click on the Serial Port A tab
in the properties window. Make a note
of what COM number it is using (in this
example, COM6). Click OK when you
are finished.
3.
Installing a Windows Mobile Bluetooth PDA
20
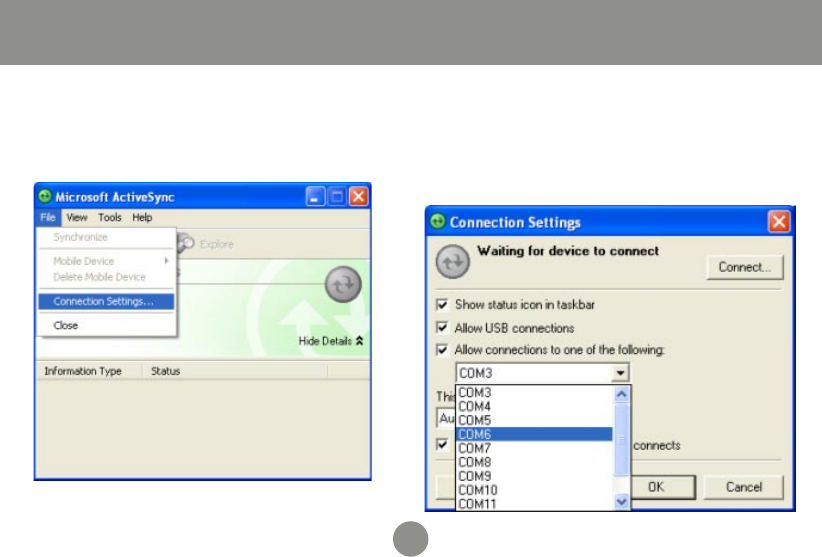
Select the COM port number that
matches the one found earlier, and
click OK to save the changes. You can
close the ActiveSync window when
finished.
5.Open the ActiveSync window and
select Connection Settings from the
File menu.
4.
Installing a Windows Mobile Bluetooth PDA
21
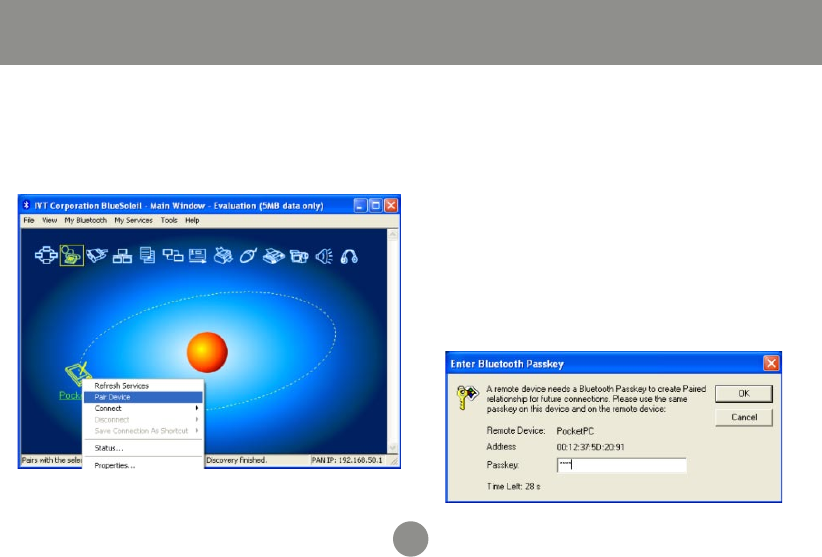
In the Bluetooth window, right click on
the PDA and select Pair Device.
6. Enter a passkey which will be used
to protect all communication between
the computer and PDA, then click OK.
The PDA should then ask if you would
like to allow the connection. Choose
Yes and enter the same passkey. If
the software on your computer is
correctly configured, the PDA should
show that your computer is offering
the ActiveSync service. Click Finish to
complete setup.
7.
Installing a Windows Mobile Bluetooth PDA
22
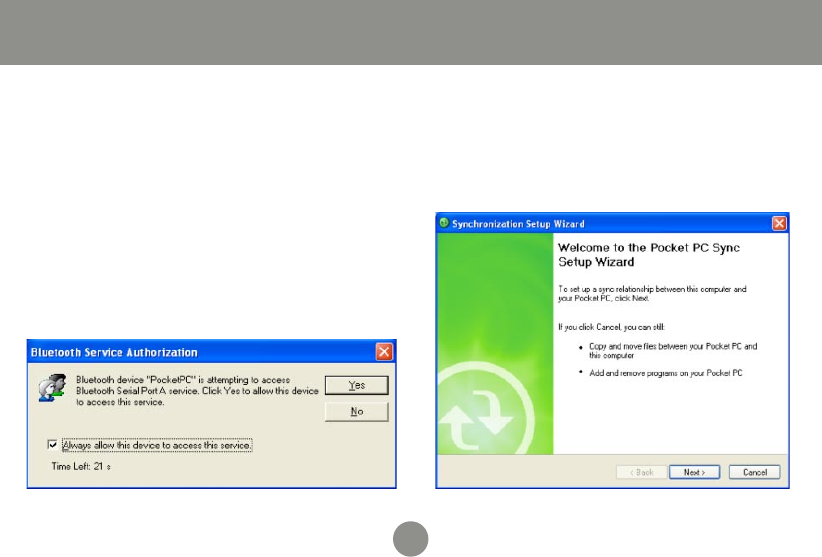
When you would like to synchronize
your PDA with your computer, simply
open ActiveSync on the PDA and click
Menu, then Connect via Bluetooth.
The first time you connect via the
Bluetooth Serial Port you may need
to authorize the connection. Check
the box for Always allow this device to
access this service to skip this step in
the future.
8. The ActiveSync software on your
computer should detect the connection
automatically and guide you through
the synchronization process.
9.
Installing a Windows Mobile Bluetooth PDA
23
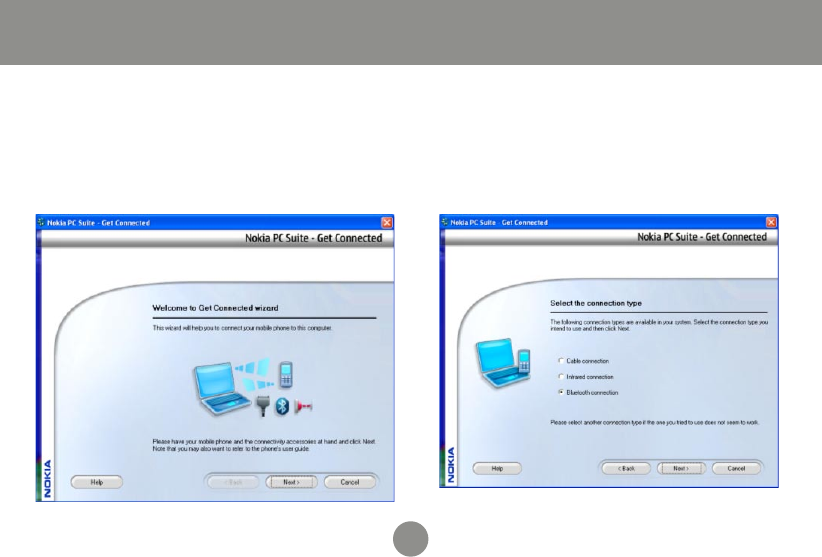
Installing a Nokia PDA Phone
The Nokia PC Suite software is
necessary to synchronize a Nokia
PDA/Phone with your computer using
Bluetooth. Please contact Nokia if you
do not have this software.
1. During the PC Suite install process,
simply select Bluetooth connection
when asked how you will be connecting
the phone to your computer.
2.
24
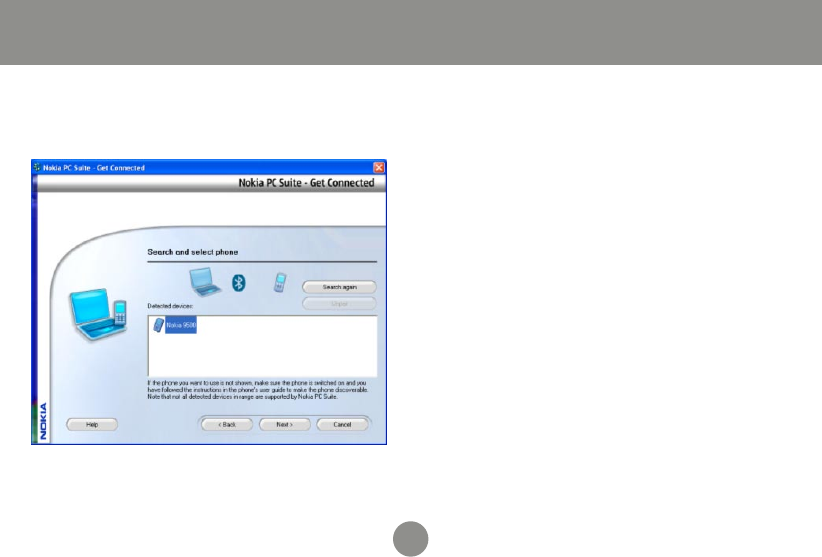
PC Suite will automatically use your
Bluetooth adapter to find and pair with
your Nokia device.
3.
Installing a Nokia PDA Phone
25
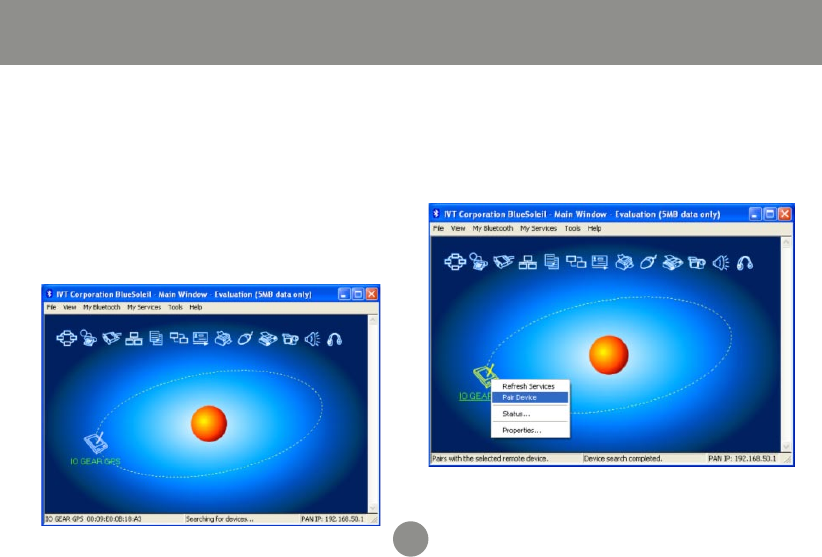
To connect to a GPS device, make
sure the device is in discoverable
mode (if necessary) and click the
orange orb to search for nearby
Bluetooth devices. If the device
cannot be found, refer to your GPS
documentation for instructions on
making it discoverable.
1.
Installing a Bluetooth GPS
If the device requires authentication,
right-click on the GPS icon and choose
Pair Device. Then enter the passkey
found in the device’s documentation.
2.
26
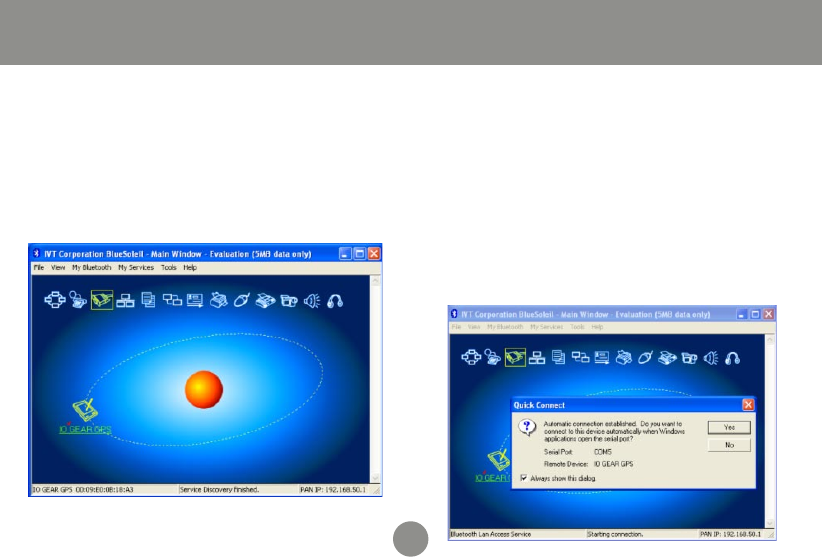
Installing a Bluetooth GPS
Double-click on the GPS icon to
discover what services are offered
by the device. The icon for Bluetooth
Serial Port should light up. Click this
icon to connect to the GPS.
3. A window will appear, showing which
COM port number has been assigned
to the GPS. If your GPS software
does not have an auto-detect feature,
you may need to manually select the
COM port number shown here in the
software preferences. Click Yes to
allow your GPS software to start the
connection on its own.
4.
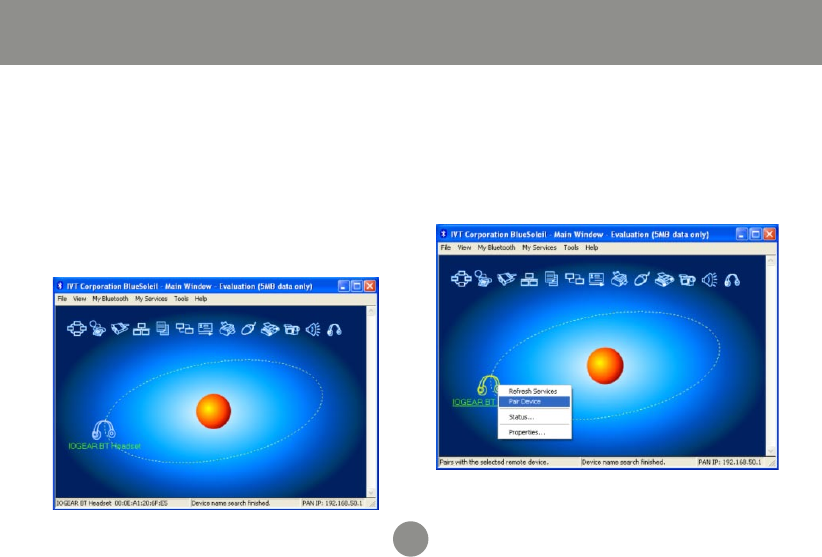
27
To connect to a Bluetooth headset,
first make sure the headset has been
set to discoverable mode. Refer
to your headset documentation for
instructions on how to do this. Then
click the orange orb at the center of
the Bluetooth window to search for the
headset.
1.
Installing a Bluetooth Headset
If the headset requires authentication,
right click the headset icon and choose
Pair Device. Then enter the passkey
from the headset’s documentation and
click OK.
2.
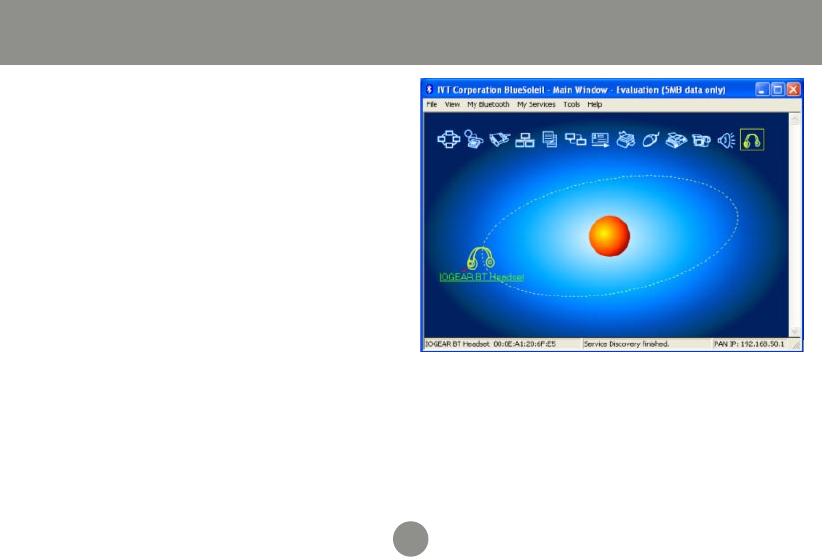
28
Double-click the headset icon to
discover the services it offers. The
Headset service should light up at the
top of the window. Click the Headset
service icon (in the box) to connect
to the headset. The headset should
ring as if you were receiving an
incoming call. A press of the button
on your headset should accept the
call and begin transmitting sound from
your computer to the headset. The
microphone on the headset should
also transmit to the computer, allowing
you to make voice over IP (VOIP)
phone calls.
3.
Installing a Bluetooth Headset
29
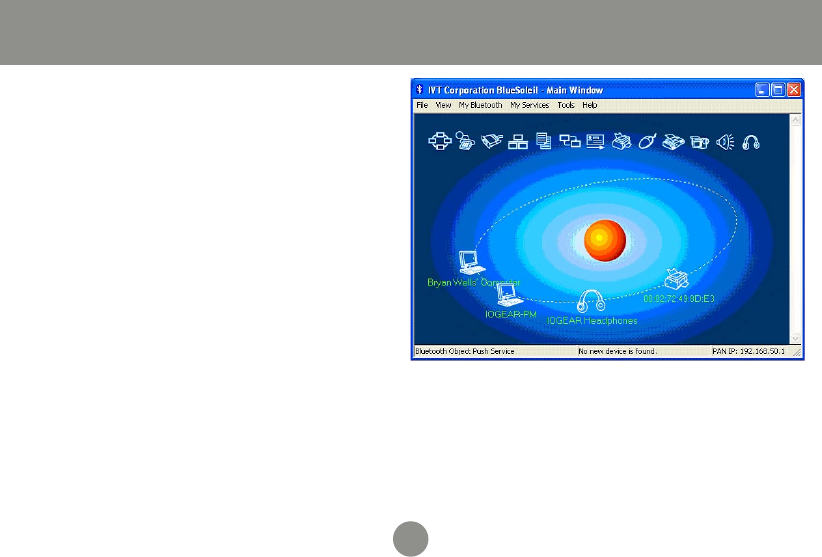
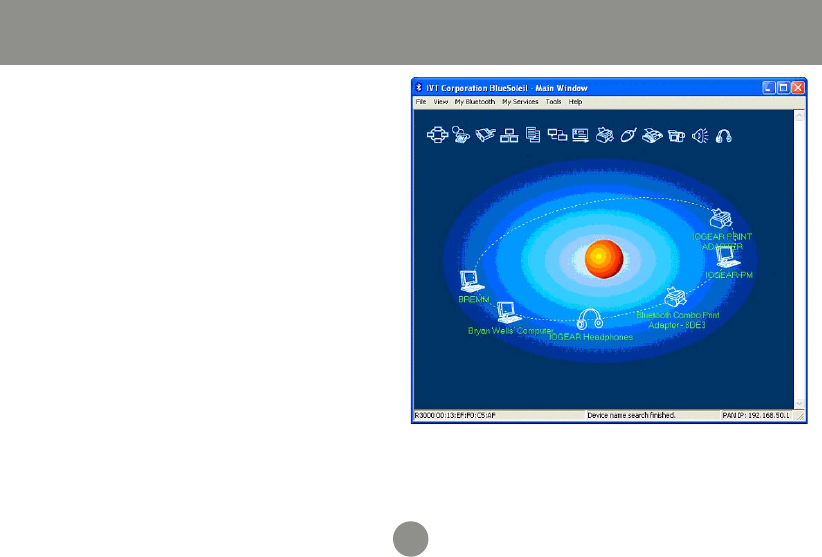
Installing a Bluetooth Stereo Headphone
1. To connect to a Bluetooth Stereo
Headphone, first make sure the
headphone has been set to discov-
erable mode. Refer to your head-
phone documentation for instruc-
tions on how to do this. Then click
the orange orb at the center of the
Bluetooth window to search for the
headphone.
30
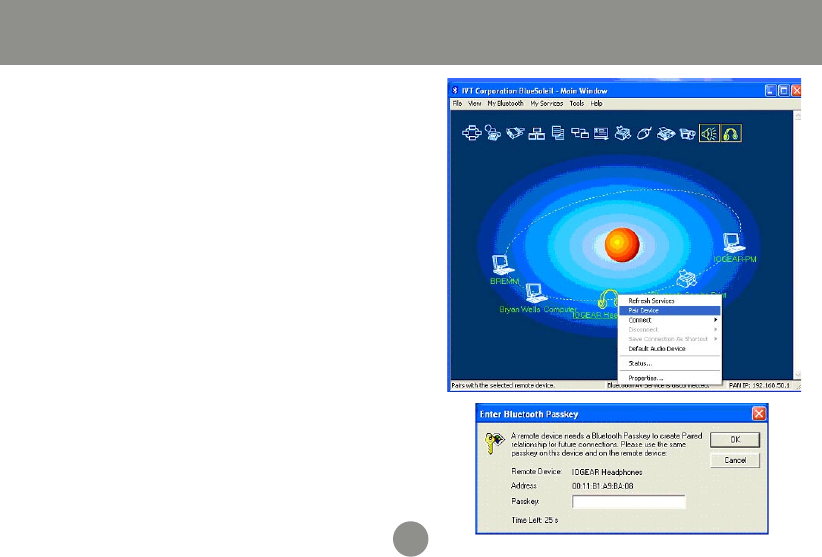
Installing a Bluetooth Stereo Headphone
2. If the headphone requires authenti-
cation, right click on the headphone
icon and choose Pair Device. Then
enter the passkey from the head-
phone’s documentation and click OK.
Both Headset and AV service icons
should light up at the top right corner
of the window.
31
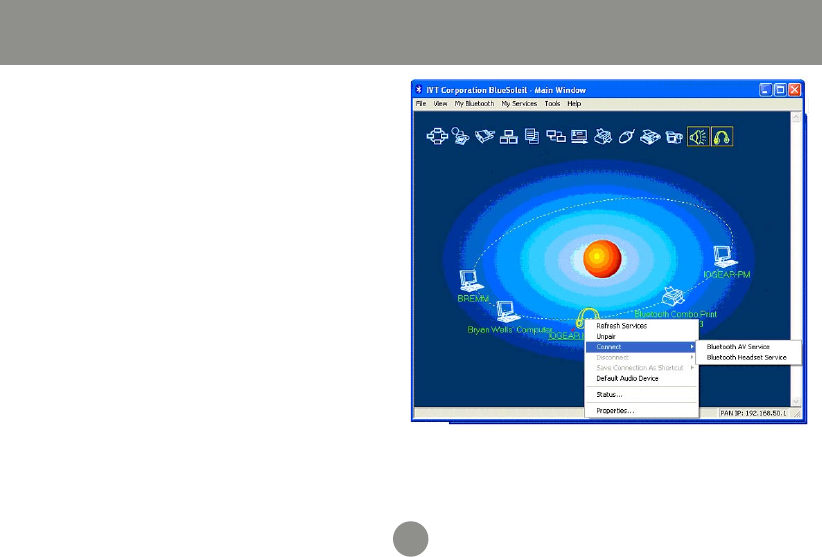
3. Right click on the headphone icon to
discover the services it offers. Click
on Bluetooth AV Service from the
selection list to connect to the head-
phone
Installing a Bluetooth Stereo Headphone
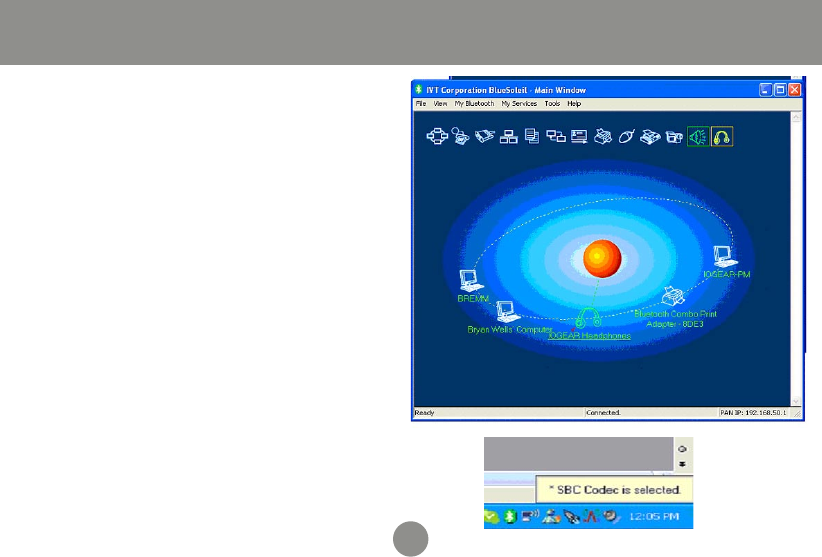
32
4. AV service icon at the top right
corner of the window should turn
GREEN when the service is activat-
ed. A message dialog box will also
show up at the bottom right corner of
your desktop indicating SBC Codec
is selected.
Installing a Bluetooth Stereo Headphone
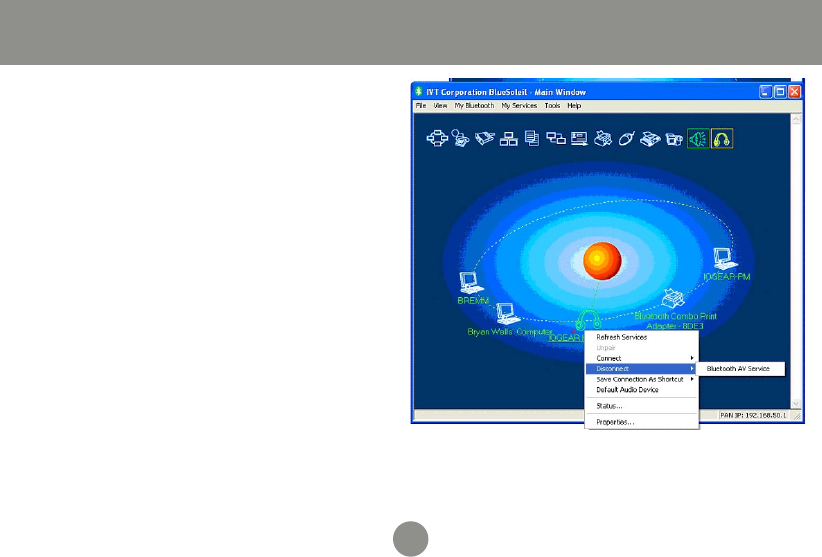
33
5. To disconnect the AV service, right
click on the headphone icon, select
Disconnect, then click on Bluetooth
AV Service to disconnect the AV
service.
Installing a Bluetooth Stereo Headphone
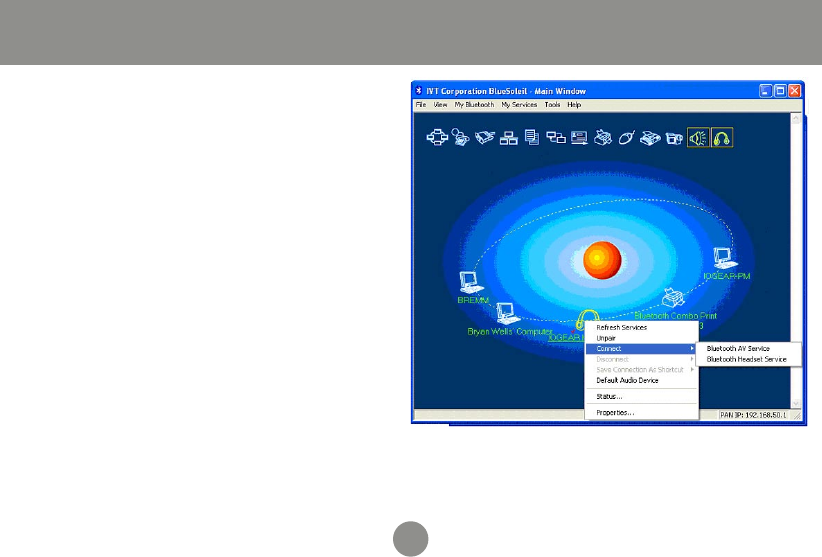
34
6. To connect to the Headset service,
right click on the headphone icon.
Select Connect, then click on Blue-
tooth Headset Service to connect.
Using a Bluetooth Stereo Headphone as Headset on your PC

35
7. The headphone should ring as if
you were receiving an incoming call.
Press on the phone button on your
headphone to accept the call and
begin transmitting sound from your
computer to the headphone. The
Headset icon on the top right corner
of the window should turn GREEN
indicating the Headset service is now
activated. The microphone on the
headphone should also transmit to
the computer, allowing you to make
voice over IP (VOIP) phone calls.
Using a Bluetooth Stereo Headphone as Headset on your PC
36
1. To connect to a Bluetooth Print
Adapter, first make sure the adapter
has been set to discoverable mode.
Refer to your adapter documenta-
tion for instructions on how to do this.
Then click the orange orb at the cen-
ter of the Bluetooth window to search
for the adapter.
Installing a Bluetooth Print Adapter
37
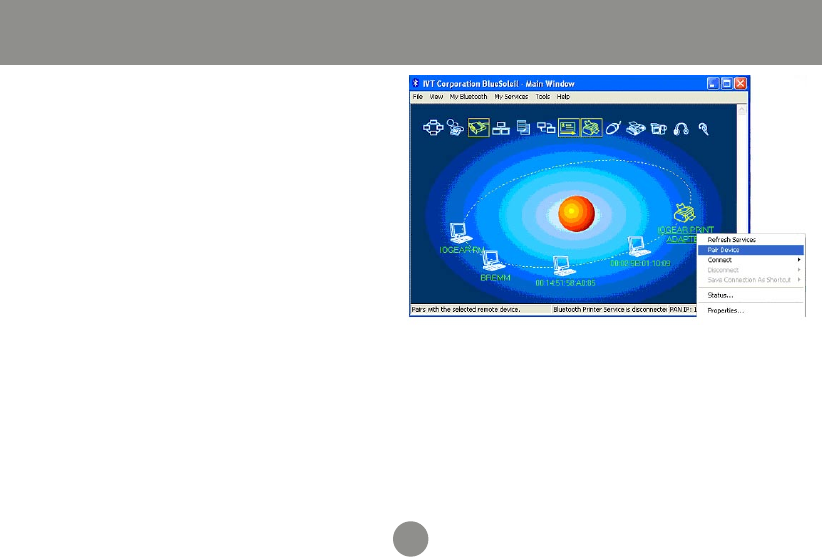
2. If the adapter requires authentication,
right click on the adapter icon, then
click on Pair Device. Then enter the
passkey from the adapter documen-
tation, then click OK.
Installing a Bluetooth Print Adapter
38
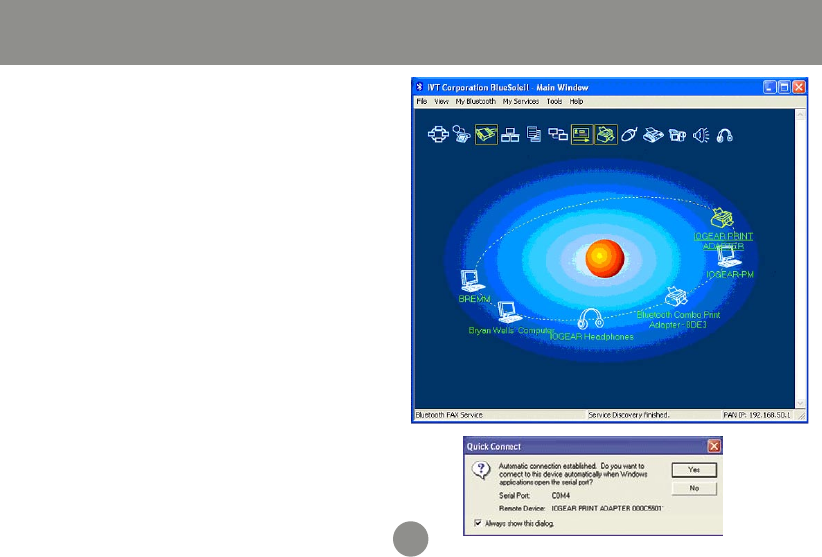
3. If the adapter does not require
authentication, double click on the
adapter icon. The Bluetooth Serial
Port Service, Bluetooth Object Push
Service, and Bluetooth Printer Ser-
vice should light up in YELLOW on
the top of the window. Click on the
Bluetooth Printer Service and press
YES in the Quick Connect window.
Installing a Bluetooth Print Adapter
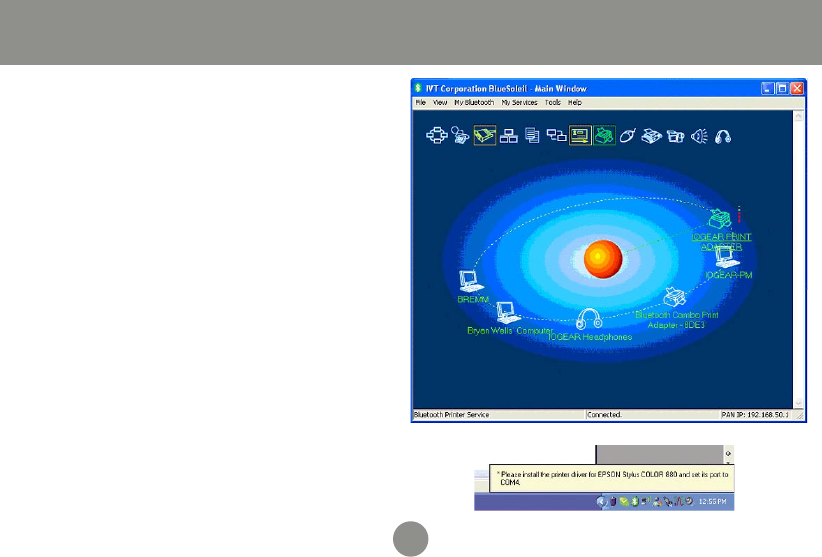
39
4. When you are connected to the
Printer Service, the Bluetooth Printer
Service icon will turn GREEN on the
top of the window. Please follow the
instruction of the dialog box show-
ing at the bottom right corner of the
desktop. Install the connected printer
driver and set the print port to the
designated port number.
Installing a Bluetooth Print Adapter
40
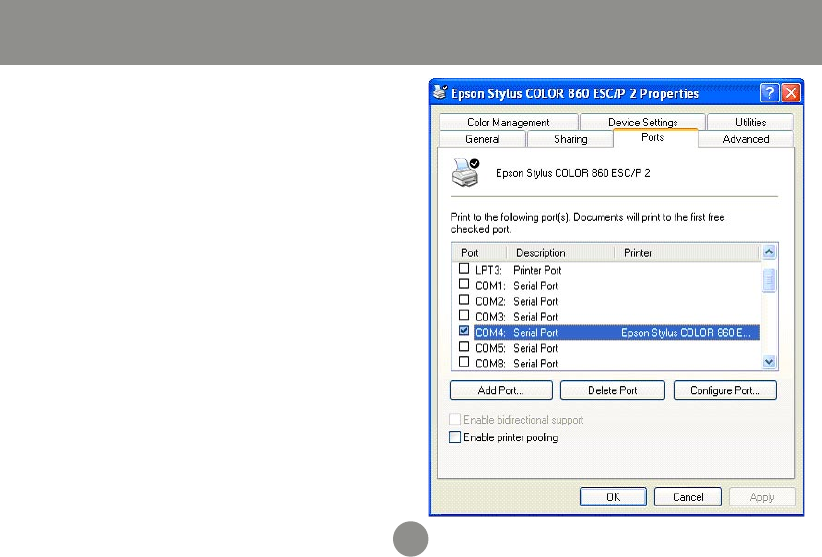
Installing a Bluetooth Print Adapter
6. After the printer driver is installed,
please go to Start -> Control Panel ->
double click on Printers and Faxes.
Right click on the printer icon and
select Properties. Select Ports tab to
make sure your printer is set on the
correct port.
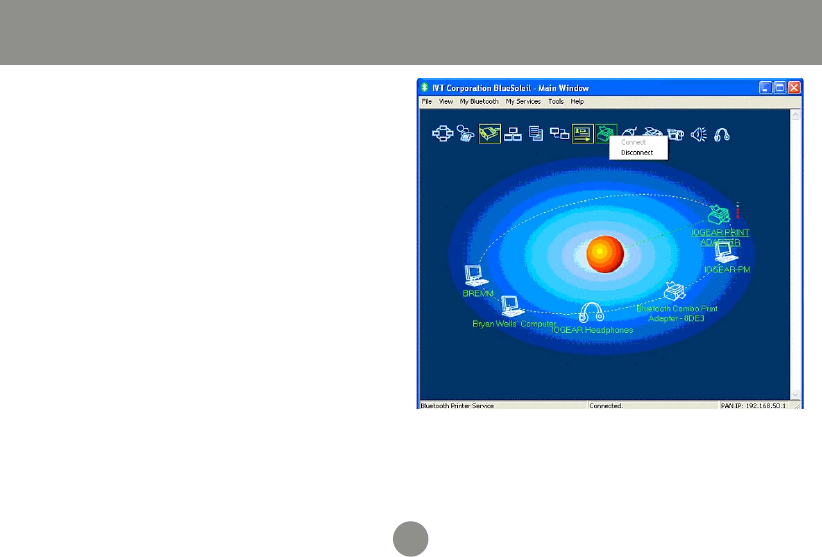
41
6. To disconnect the Bluetooth Print
Service, right click on the Print Ser-
vice icon, then click Disconnect.
Installing a Bluetooth Print Adapter

42
WARNING!!! This equipment generates uses and can radiate radio frequency energy and, if not
installed and used in accordance with the instruction manual, may cause interference to radio
communications. This equipment has been tested and found to comply with the limits for a Class
B computing device pursuant to Subpart J of Part 15 of FCC Rules, which are designed to provide
reasonable protection against such interference when operated in a commercial environment.
Operation of this equipment in a residential area is likely to cause interference, in which case the
user at his own expense will be required to take whatever measures may be required to correct the
interference.
If you need technical support, please check out our IOGEAR Tech Info Library (TIL) at http://www.
iogear.com/support for the latest tips, tricks, and troubleshooting. The TIL is designed to provide
you with the latest technical information about our products. Most of the answers to your questions
can be found here, so please try it out before contacting technical support.
Technical support is available Monday through Friday from 8:00 am to 5:00 pm PST by calling our
toll-free number 866-9-IOGEAR (866-946-4327). International callers may need to use the number
949-453-8782. Help is also available by e-mailing us at support@iogear.com.
Radio & TV Interference Statement
Technical Support

43
Limited Warranty
IN NO EVENT SHALL THE DIRECT VENDOR’S LIABILITY FOR DIRECT, INDIRECT,
SPECIAL, INCIDENTAL OR CONSEQUENTIAL DAMAGES RESULTING FROM THE
USE OF THE PRODUCT, DISK, OR ITS DOCUMENTATION EXCEED THE PRICE PAID
FOR THE PRODUCT.
The direct vendor makes no warranty or representation, expressed, implied, or statutory
with respect to the contents or use of this documentation, and especially disclaims its
quality, performance, merchantability, or fitness for any particular purpose.
The direct vendor also reserves the right to revise or update the device or documentation
without obligation to notify any individual or entity of such revisions, or updates. For
further inquiries please contact your direct vendor.

Contact us
Hubble • Irvine, CA 92618 • (P) 949.453.8782 • (F) 949.453.8785 • www.iogear.com