ATEN Technology IOGEAR GWU735 Wireless AC1200 Dual Band USB Adapter User Manual GWU735 Q1262 1 mv indd
ATEN Technology, Inc., dba IOGEAR Wireless AC1200 Dual Band USB Adapter GWU735 Q1262 1 mv indd
User manual

1
Quick Start Guide
Wireless AC1200 Dual-Band
USB Adapter
GWU735
PART NO. Q1262
www.iogear.com
© 2014 IOGEAR® Part No. Q1262
IOGEAR, the IOGEAR logo, are trademarks or registered trademarks of IOGEAR. Microsoft and
Windows are registered trademarks of Microsoft Corporation. All other brand and product names are
trademarks or registered trademarks of their respective holders. IOGEAR makes no warranty of any
kind with regards to the information presented in this document. All information furnished here is for
informational purposes only and is subject to change without notice. IOGEAR assumes no responsi-
bility for any inaccuracies or errors that may appear in this document.

3
Table of Content
Table of Contents 3
Package Contents 4
System Requirements 4
Overview 5
Software Installation – PC 6
:LUHOHVV1HWZRUN&RQ¿JXUDWLRQ±3& 7
Software Installation – MAC 16
:LUHOHVV1HWZRUN&RQ¿JXUDWLRQ±0$& 11
FCC Statement 27
CE Statement 27
Limited Warranty 28
Contact 28

4
1 x Wireless AC1200 Dual-Band USB Adapter
1 x Quick Start Guide
1 x Driver Installation CD
1 x Warranty Card
Operating System
:LQGRZV9LVWD®, Windows® 7, Windows® 8, Windows® 8.1
0DF26;RUDERYH
Available USB 1.1, USB 2.0, or USB 3.0 port*
*Note: For best results, connect the wireless AC1200 Dual-Band USB
adapter to a USB 3.0 port.
Package Contents
System Requirements
5
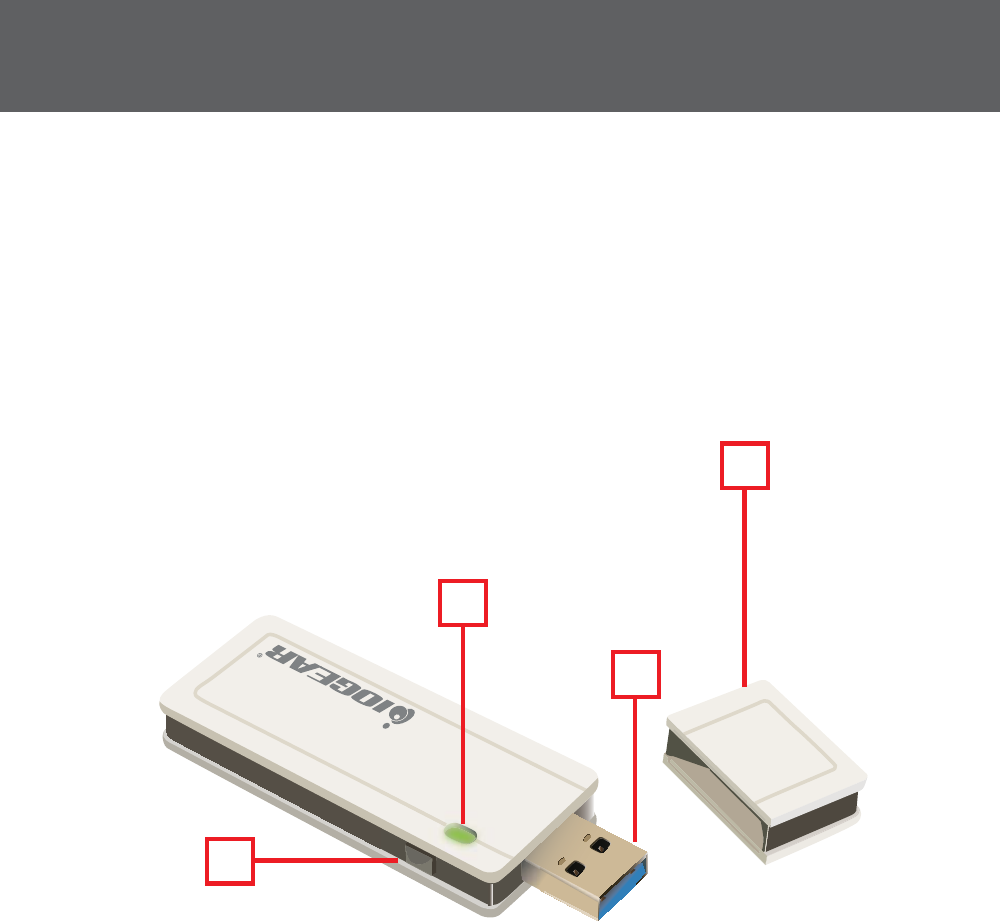
Overview
1. WPS Button
2. LED Status Indicator
DÀDVKVHF±:LUHOHVV/$1$GDSWHULVDFWLYH
EÀDVKHVVHF±$GDSWHULVFRQQHFWLQJWRDQ$FFHVV3RLQW
c. Off – Wireless LAN adapter is disabled
3. USB Connector
4. Cap
3
2
4
1
6
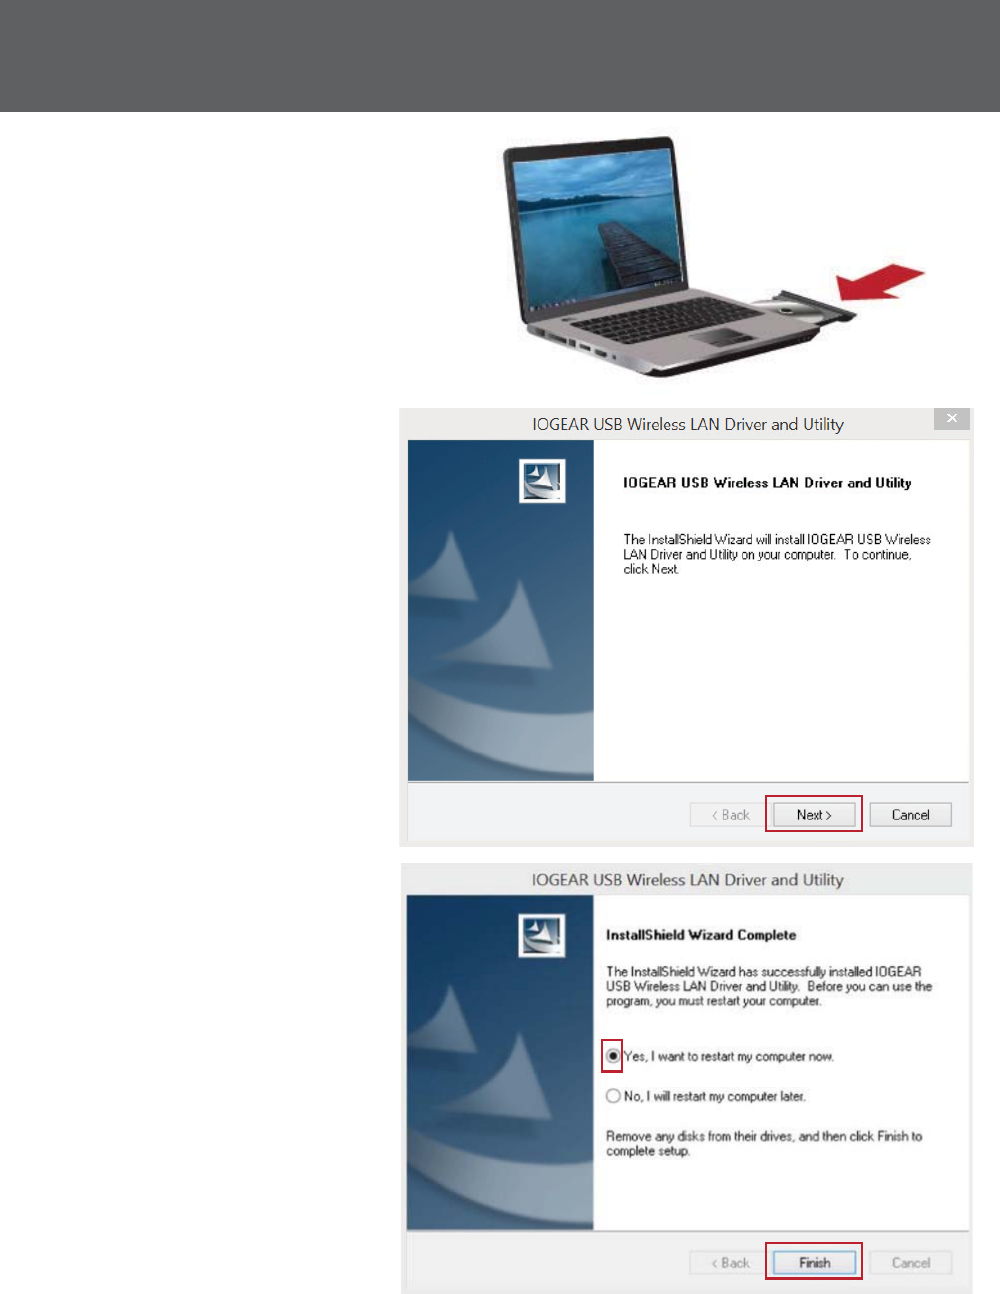
1. Insert the driver installation
CD into your CD-ROM Drive.
Double-click on Setup.exe
to start the installation.
2. Wizard is ready to
install driver and
utility. Click Next to
begin installation.
3. Click Finish to restart
your computer for the
installation to be
in effect.
Software Installation – PC
77
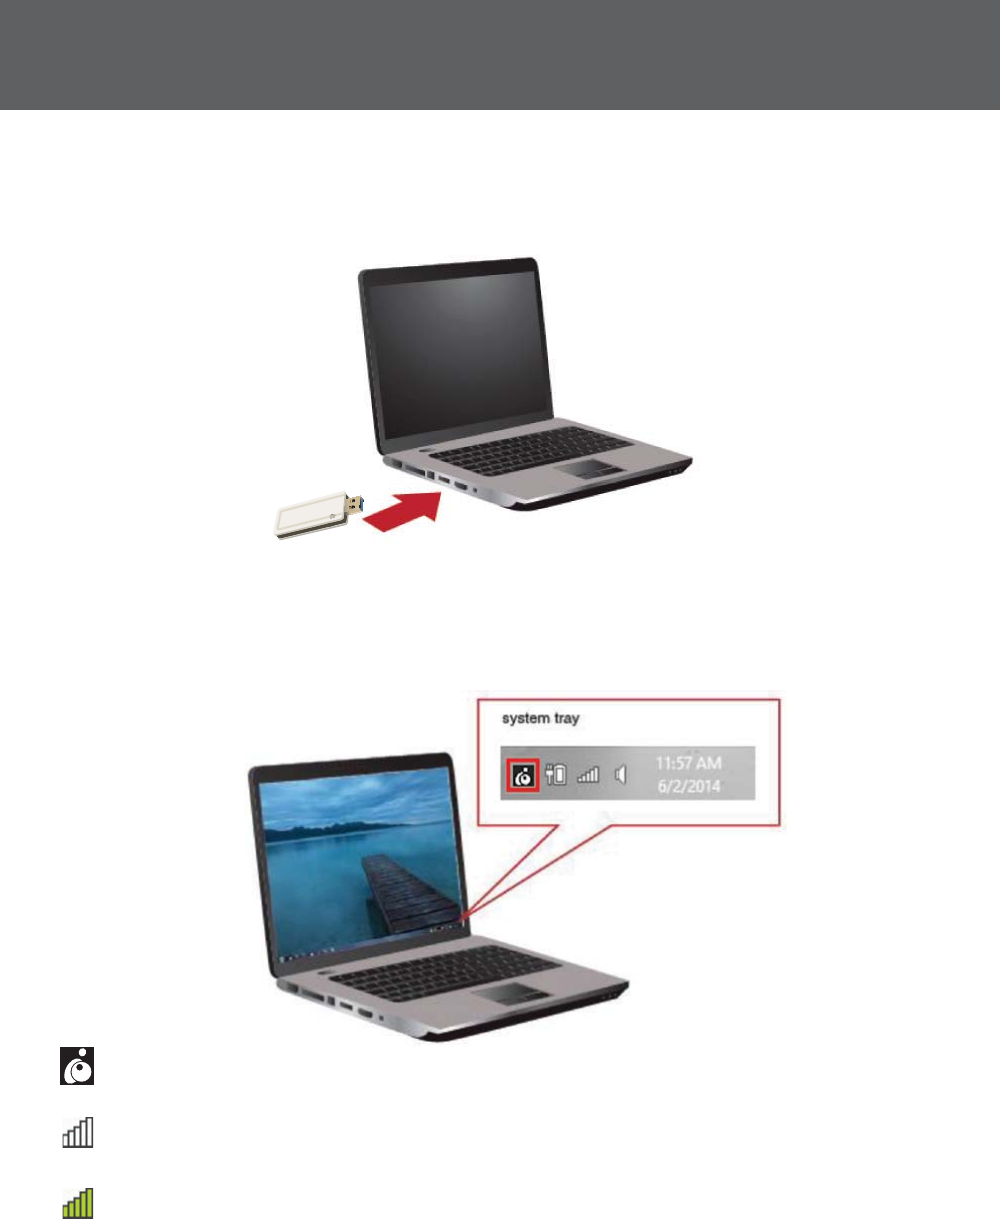
Insert the USB Adapter
1. After the computer has restarted, insert the GWU735 Wireless
AC1200 Dual-Band USB Adapter into an available USB port.*
*Note: For optimal performance, connect to a USB 3.0 port.
$QHZLFRQZLOODSSHDULQ\RXUV\VWHPWUD\RQFHWKHFRPSXWHU¿QLVKHV
the driver installation.
&OLHQWPRGHXWLOLW\UXQQLQJEXW*:8LVQRWSOXJJHGLQWR
computer.
&OLHQWPRGHXWLOLW\UXQQLQJ*:8LVSOXJJHGLQDQGFDQQRZ
scan for an available Access Point (AP).
&OLHQWPRGHXWLOLW\UXQQLQJ*:8LVQRZFRQQHFWHGWR\RXU
wireless AP.
:LUHOHVV1HWZRUN&RQ¿JXUDWLRQ±3&
8
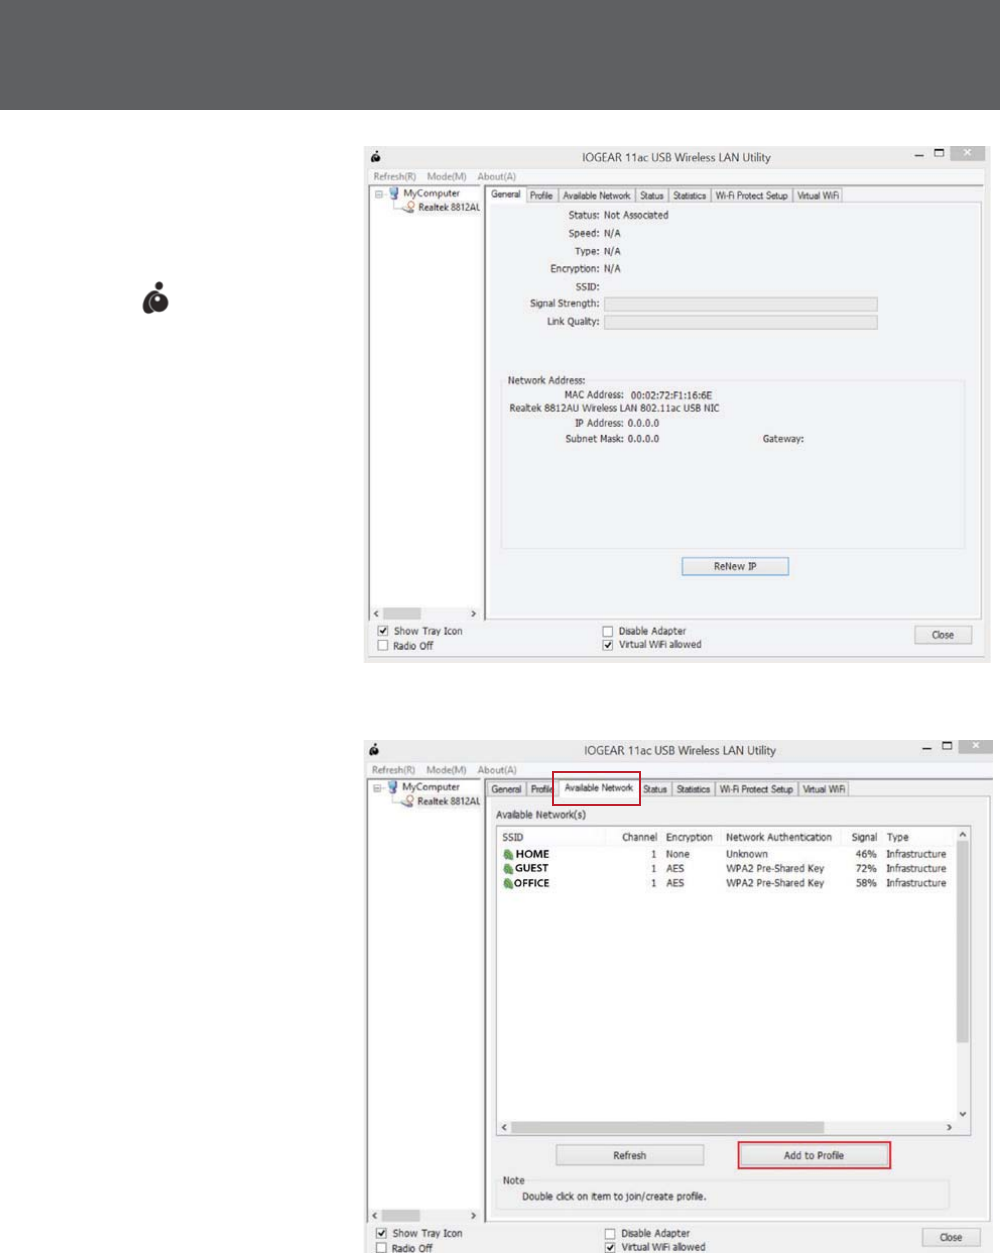
Connect to a
Wireless Network
1. Double-click the
wireless utility
icon on your
desktop to open the
IOGEAR USB
Wireless LAN Utility.
2. Select the Available
Network tab and
wait for the utility to
search for available
wireless networks.
The available
networks will be
listed in the table.
Select the desired
network and click
$GGWR3UR¿OH.
9
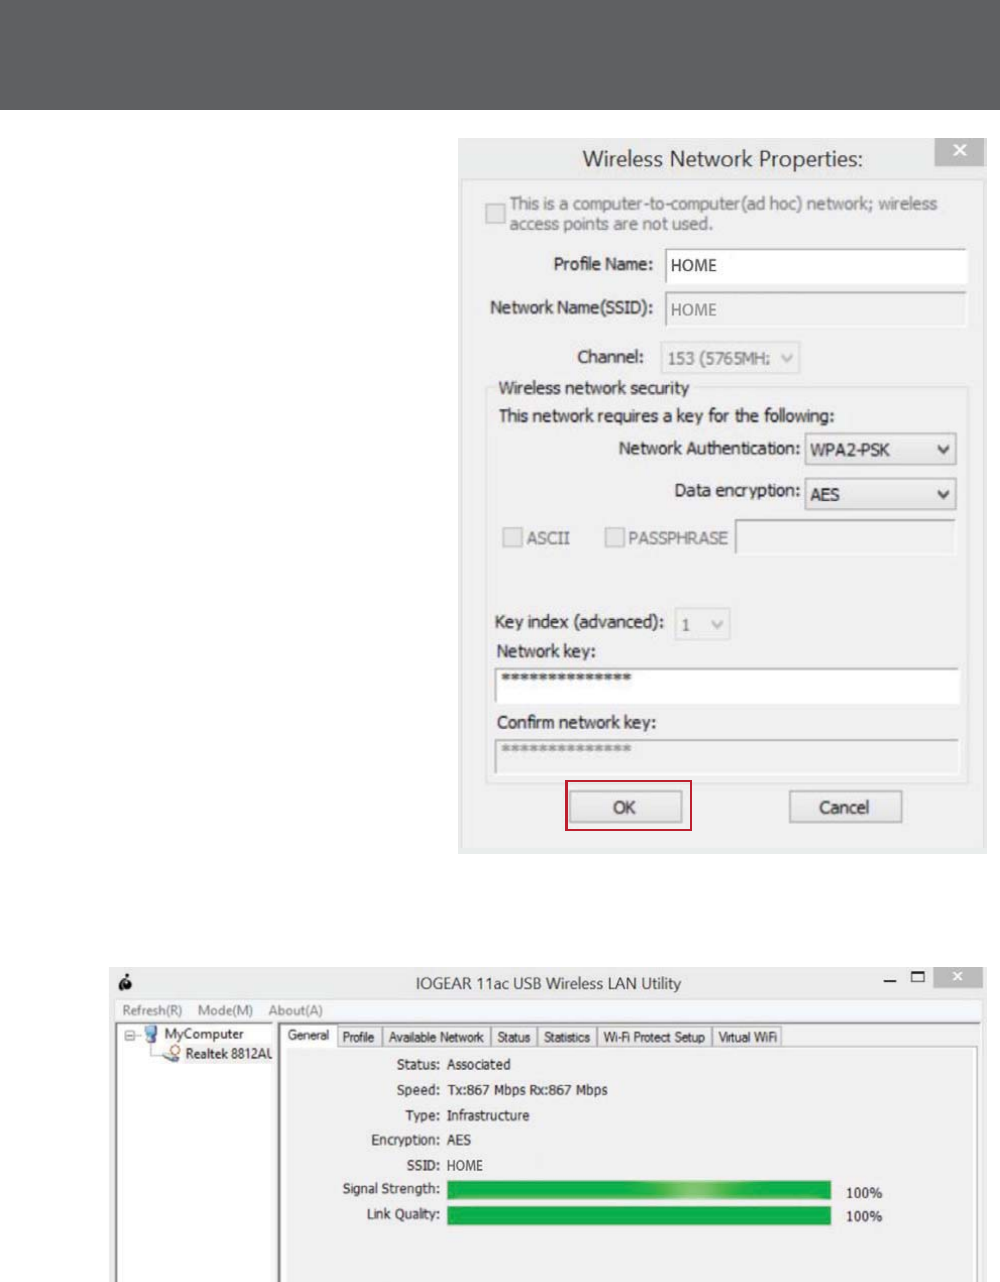
3. Next, the Wireless
Network Properties
window will appear.
Enter the network key,
then click OK to continue.
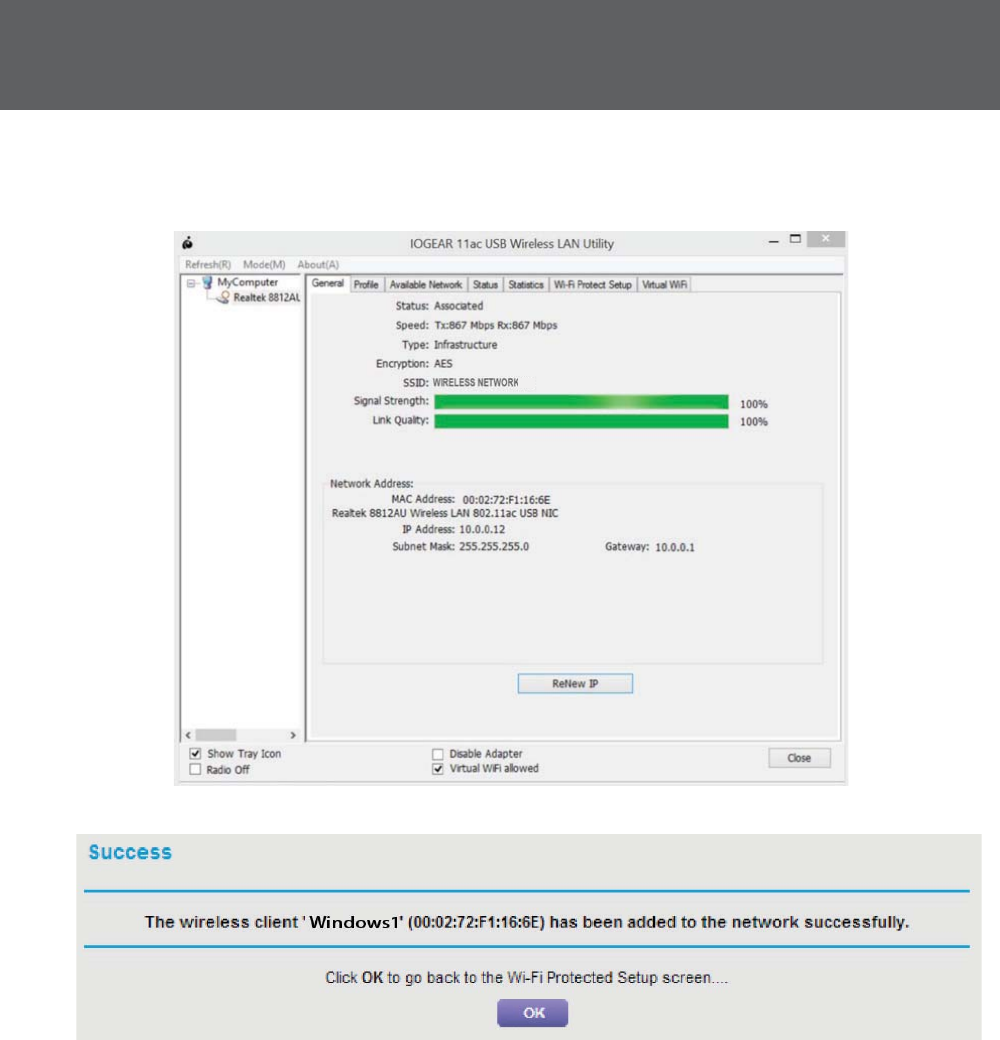
4. Once connected, the utility will display the Signal Strength and
Link Quality.
10
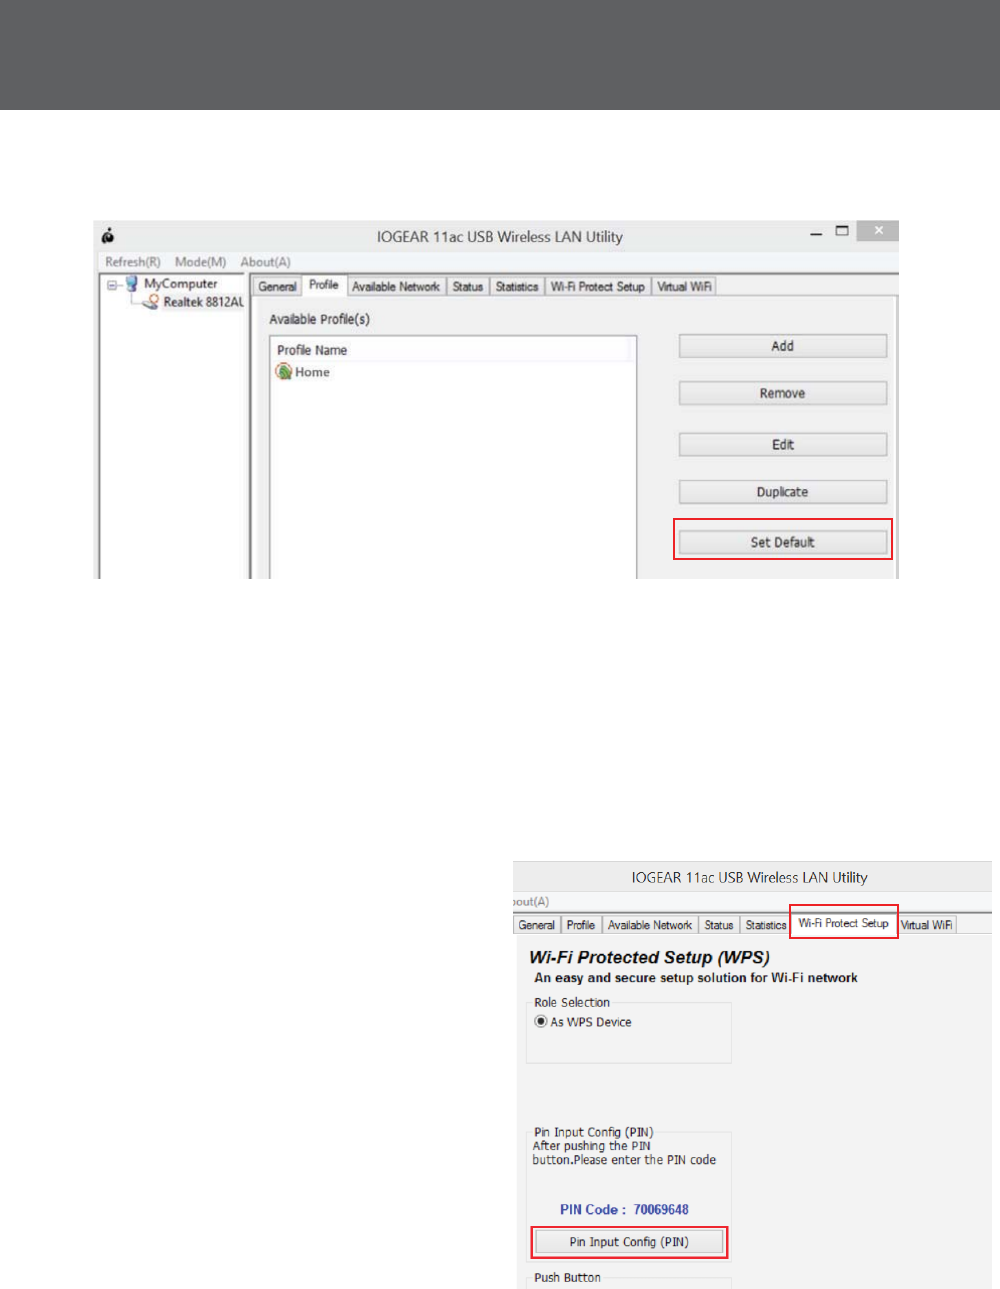
5. To set the currently connected network as your default, select the
SUR¿OHWDEDQGFOLFN“Set Default”.
Wi-Fi Protected SetupTM
Wi-Fi Protected Setup (WPS) is a simple and secure way to connect to
an existing network. Before you start, make sure your wireless router
$FFHVV3RLQW$3VXSSRUWV:367KLVRSWLRQDOFHUWL¿FDWLRQIHDWXUH
provides two connection methods: 3,1,QSXW&RQ¿JXUDWLRQ3,1 or
3XVK%XWWRQ&RQ¿JXUDWLRQ3%&.
Option 1: 3,1,QSXW&RQ¿JXUDWLRQ3,1PHWKRG
1. 2SHQWKH&RQ¿JXUDWLRQ
program for your wireless
URXWHU$FFHVV3RLQWDQGVHOHFW
the WPS Client set-up option.
2. Next, select the Wi-Fi
Protect Setup tab in the
IOGEAR USB Wireless LAN
Utility, click the Pin Input
&RQ¿J3,1 button.
11
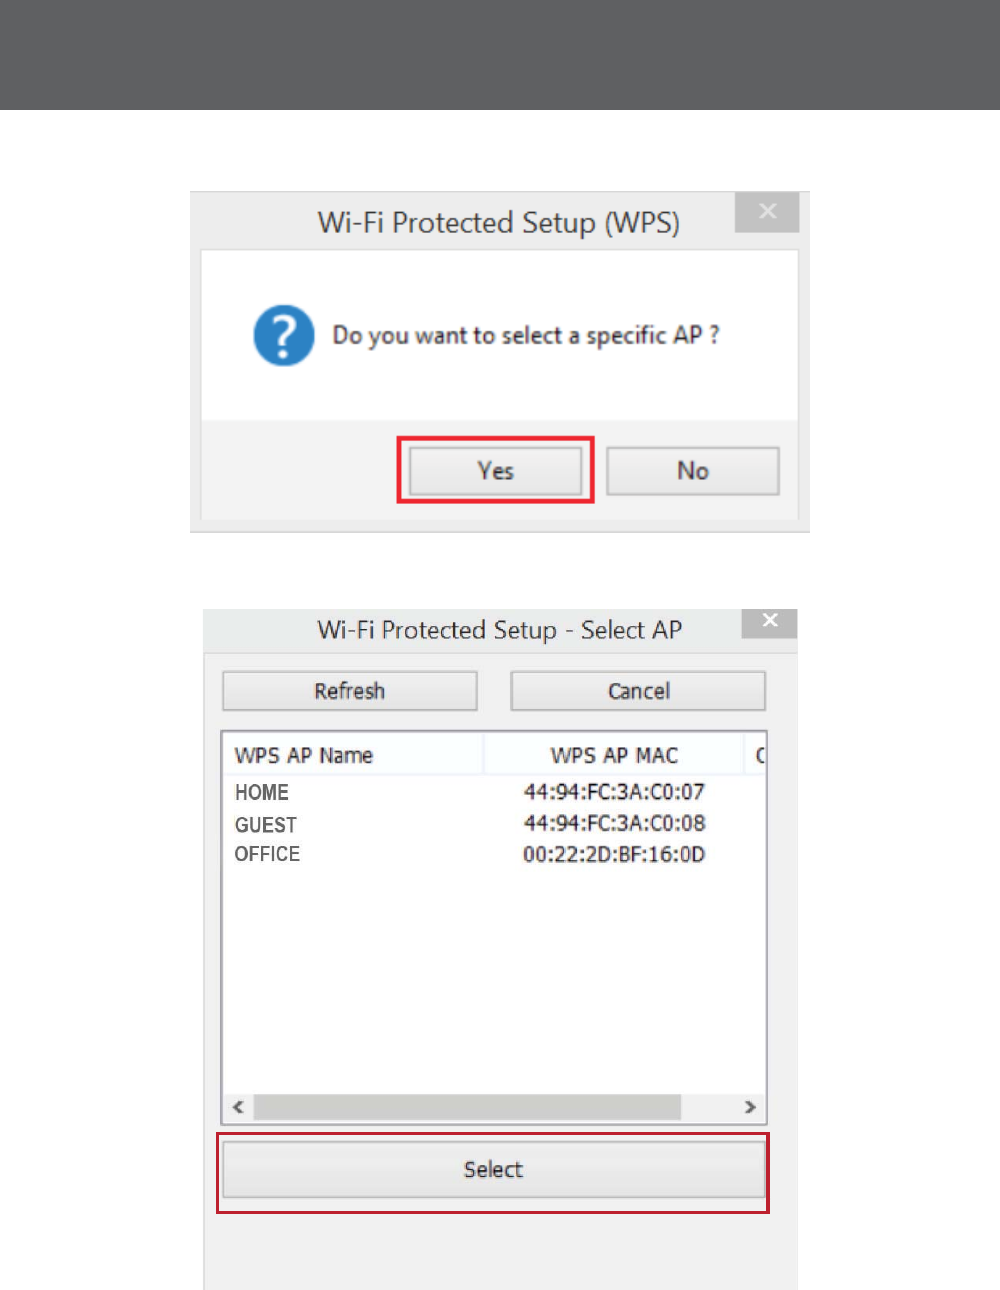
2. Click YesWRVHOHFWDVSHFL¿F$3
&KRRVHWKH$3WRFRQ¿JXUHWKHQFOLFNSelect.
12
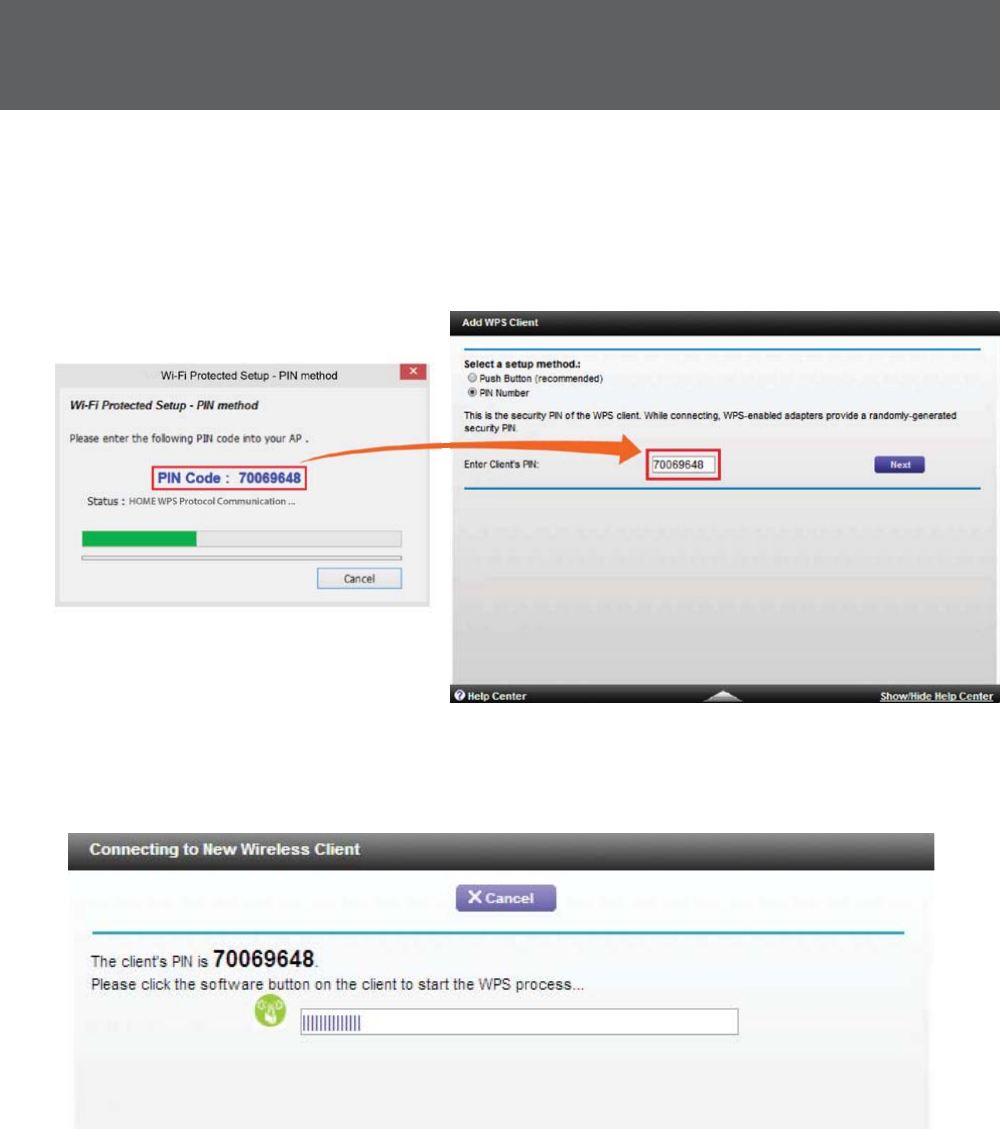
4. Enter the pre-generated PIN code into the Wireless AP WPS client
setting. Please refer to your router’s user manual for more instructions
on how to add a WPS client. The WPS client screen you see may vary
depending on your router.
$OORZLWWRFRQ¿JXUHWKHVHFXULW\VHWWLQJRI\RXUZLUHOHVVURXWHU$3
13
6. You have now
successfully added
your computer to your
router’s network.
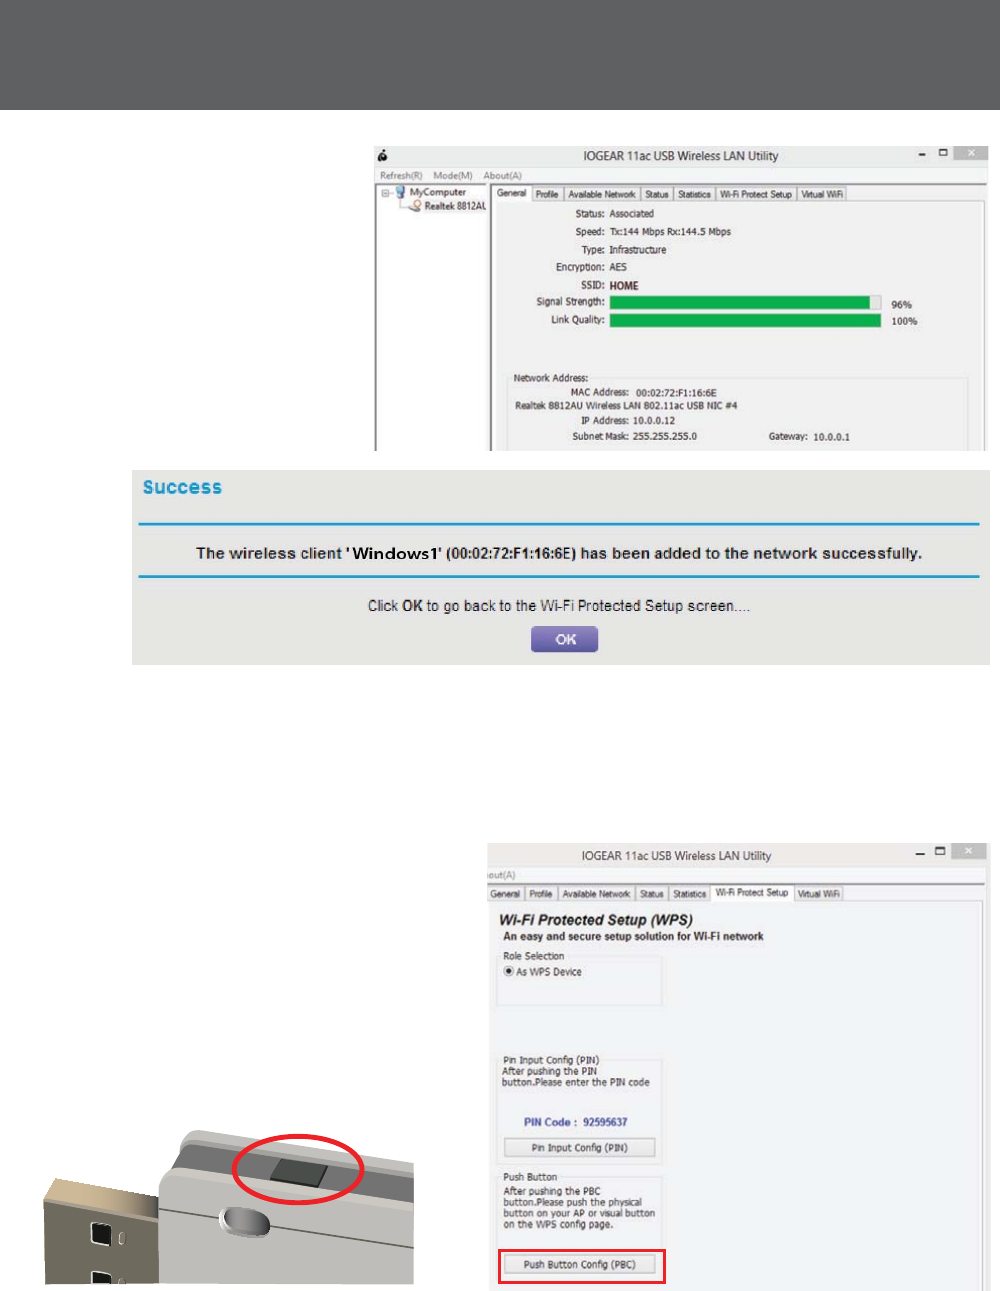
Option 2: 3XVK%XWWRQ&RQ¿JXUDWLRQ3%&PHWKRG
1. Press and hold the WPS button on the side of the GWU735
adapter for 5 seconds or click 3XVK%XWWRQ&RQ¿J3%&
button under the Wi-Fi Protect Setup tab in the utility.
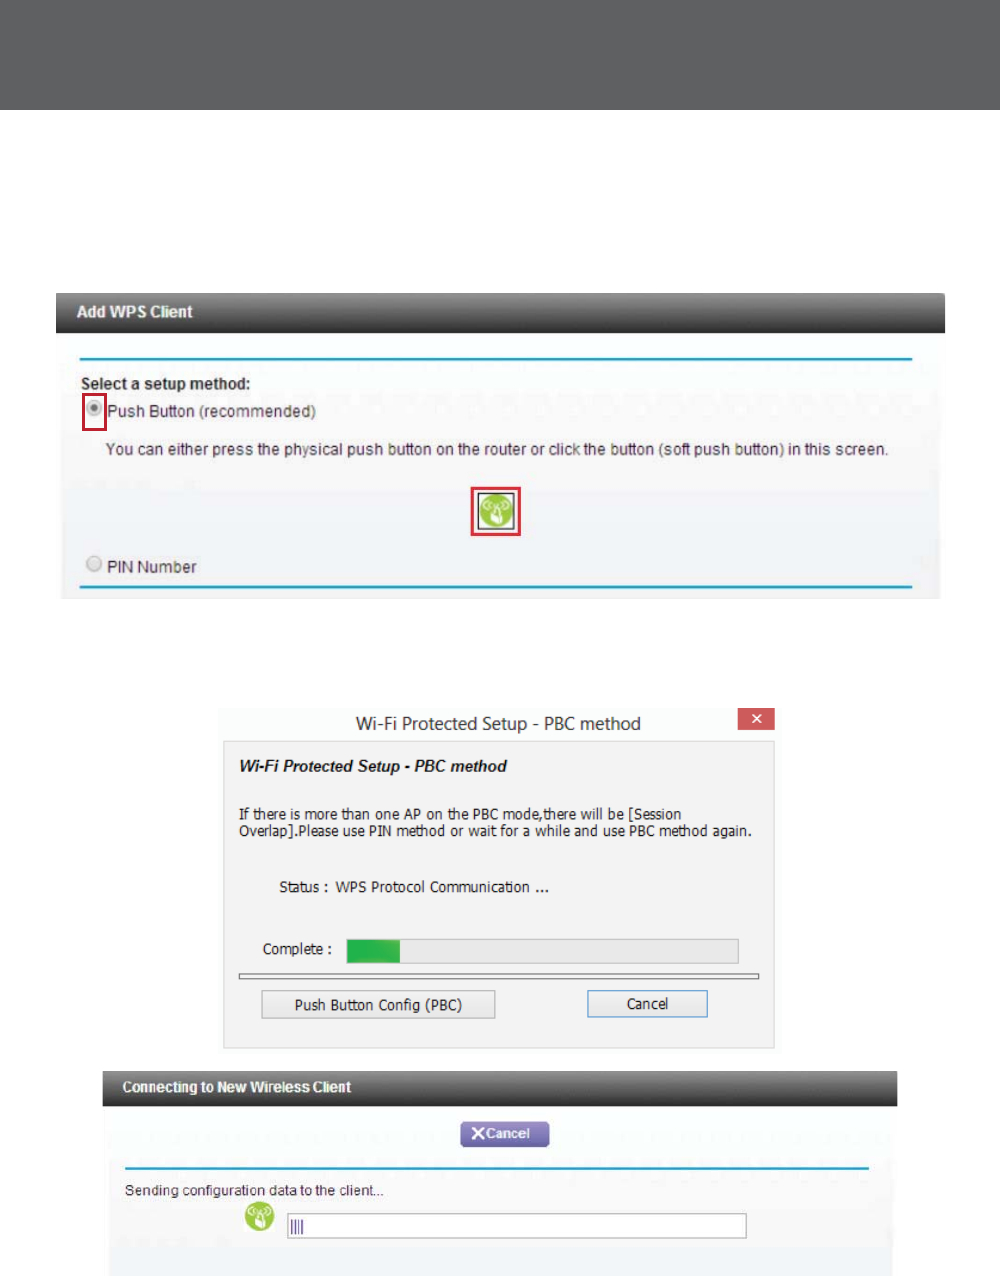
14
1H[WSUHVVWKHSK\VLFDO:36EXWWRQRQ\RXUZLUHOHVVURXWHU$3RU
YLUWXDOEXWWRQRQWKH:36FRQ¿JXUDWLRQSDJHRIWKHZLUHOHVVURXWHU
$3FRQ¿JXUDWLRQVRIWZDUH7KH:36FOLHQWVFUHHQ\RXVHHPD\YDU\
depending on your router.
$OORZLWWRFRQ¿JXUHWKHVHFXULW\VHWWLQJRI\RXUZLUHOHVVURXWHU$3
The WPS client screen you see may vary depending on your router.
15
4. You have now successfully added your computer to your
router’s network.
16
Note: Do not connect GWU735 Wireless AC1200 Dual-Band Adapter
until prompted.
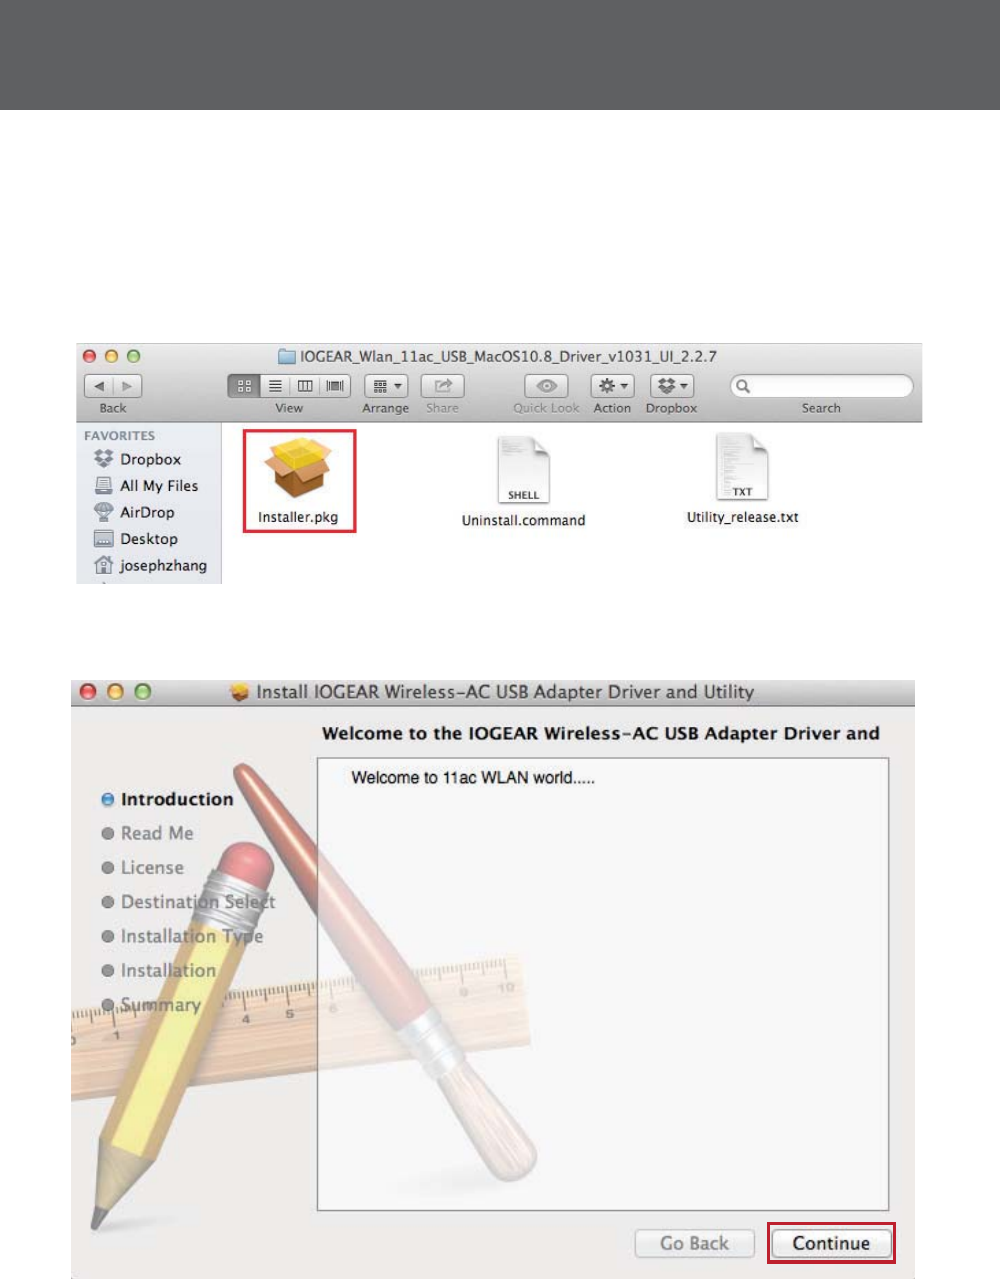
1. Insert the driver installation CD into your computer’s CD-ROM drive,
open the MAC folder, then select the driver folder for your Mac OS
system. Double-click Installer.pkg to begin the installation.
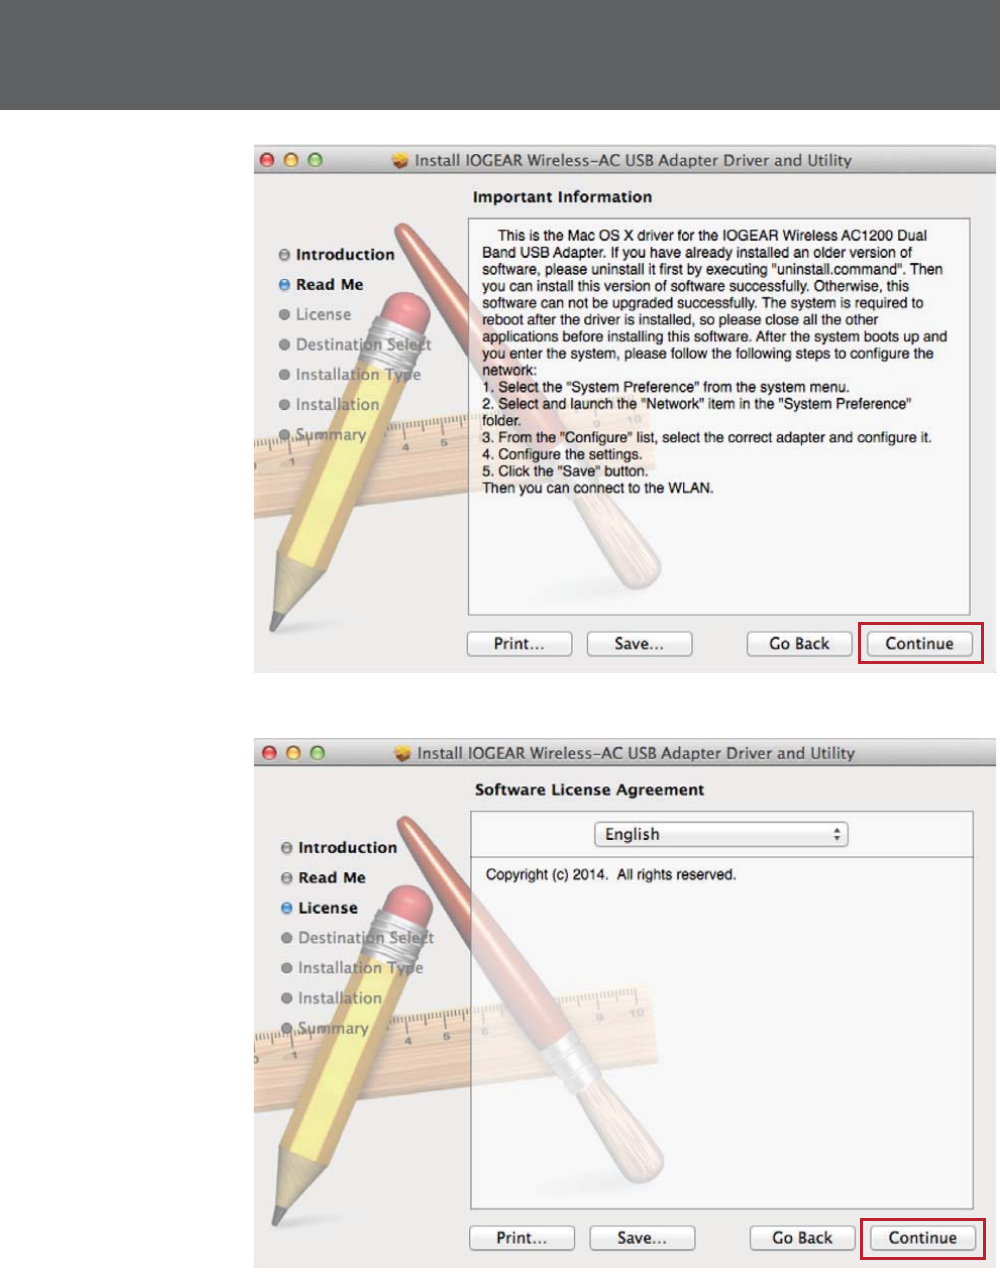
2. On the introduction page, click Continue to proceed.
Software Installation – MAC
17
4. Select your
language
and click
Continue
to proceed.
3. Read the
important
information
and click
Continue
to proceed.
18
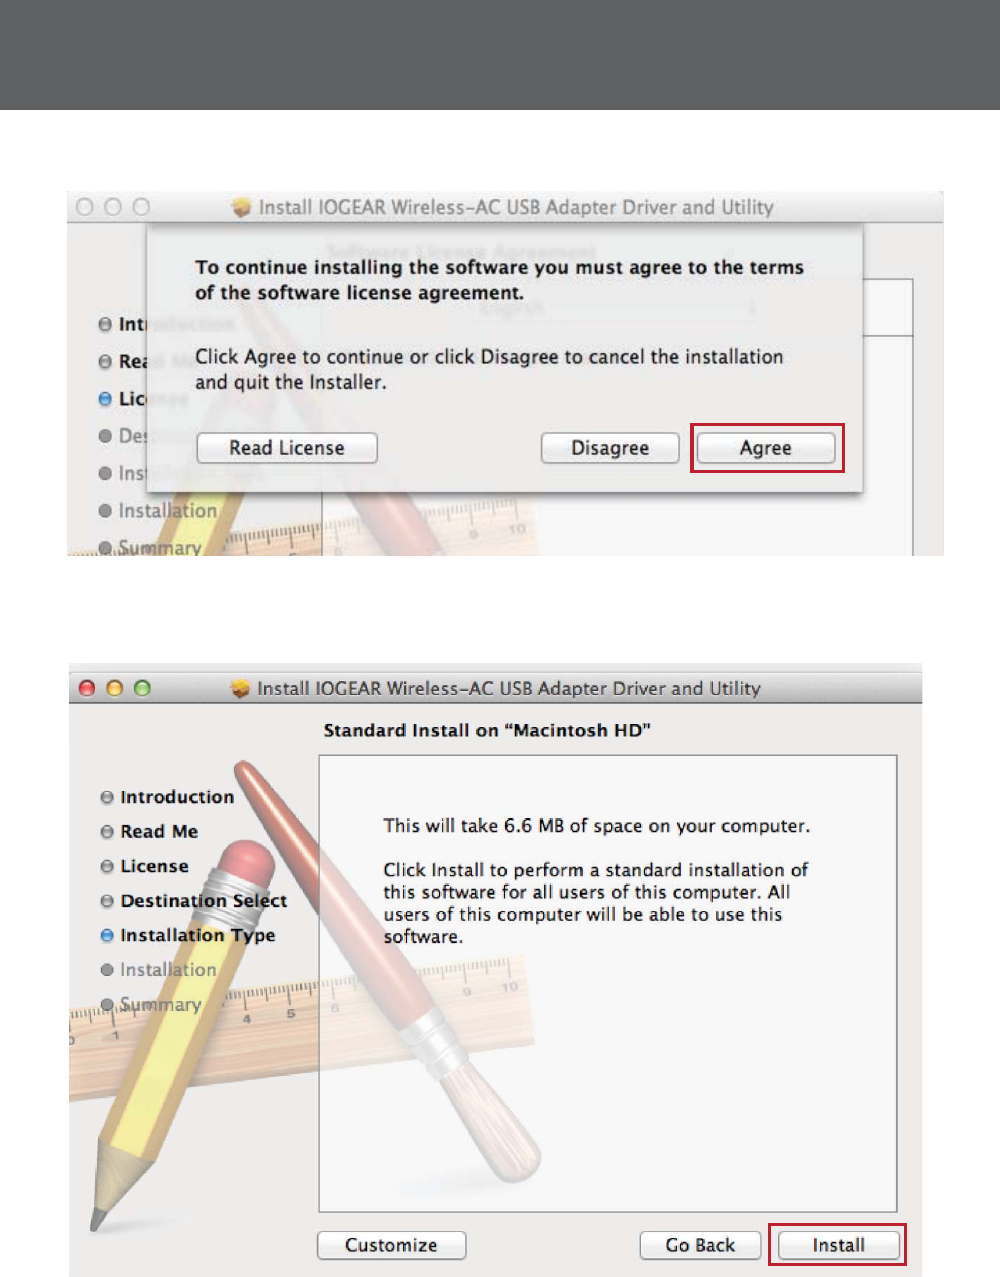
6. Click Install to start the driver and utility installation.
5. Click Agree to continue.
19
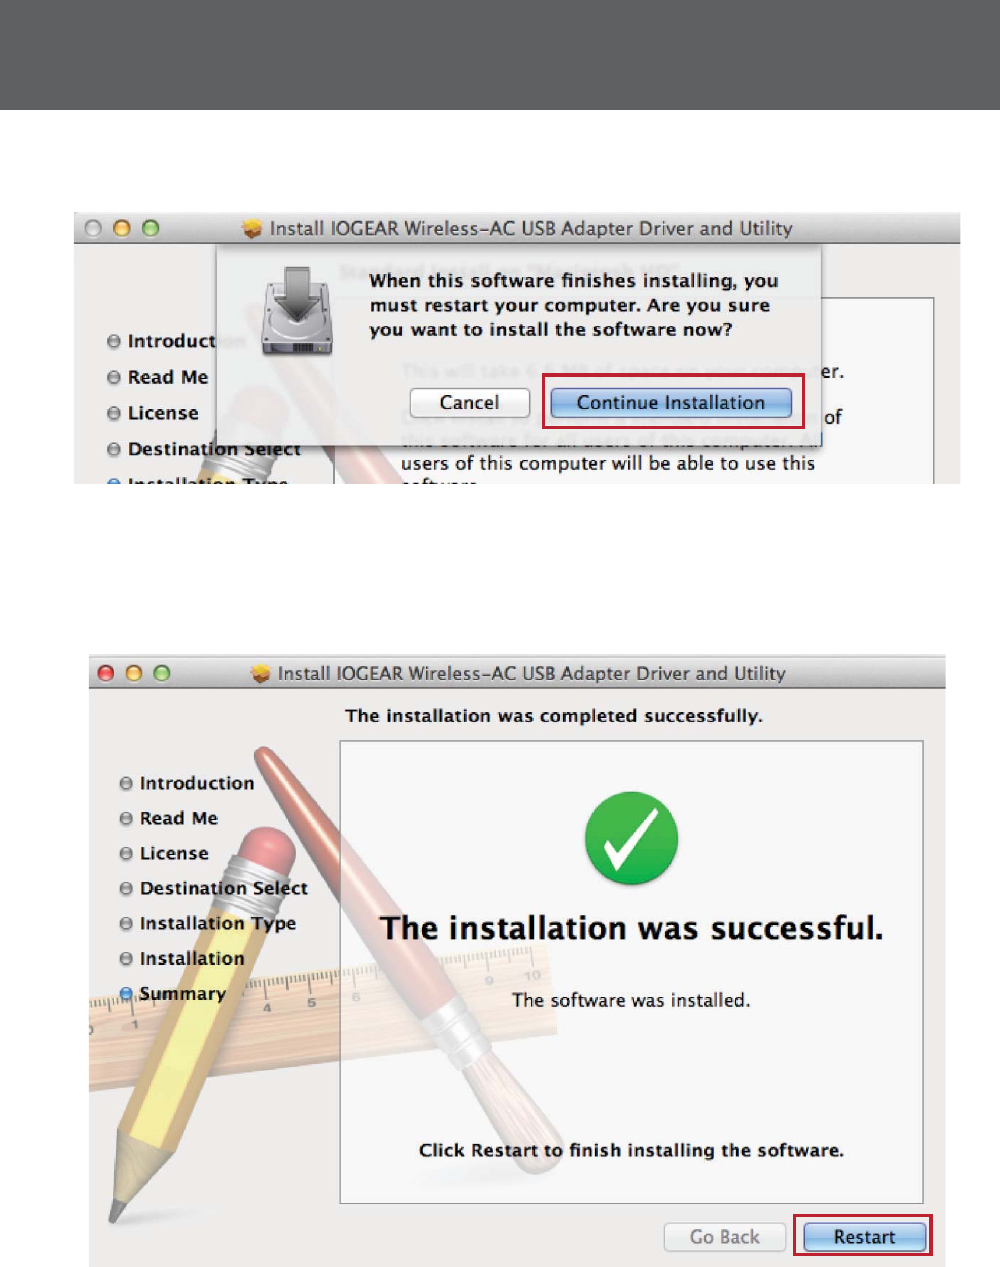
7. When prompted, click Continue Installation to proceed.
8. Once the installation is successful, click Restart to complete
the installation process.
20
:LUHOHVV1HWZRUN&RQ¿JXUDWLRQ±0$&
Connecting to a Network
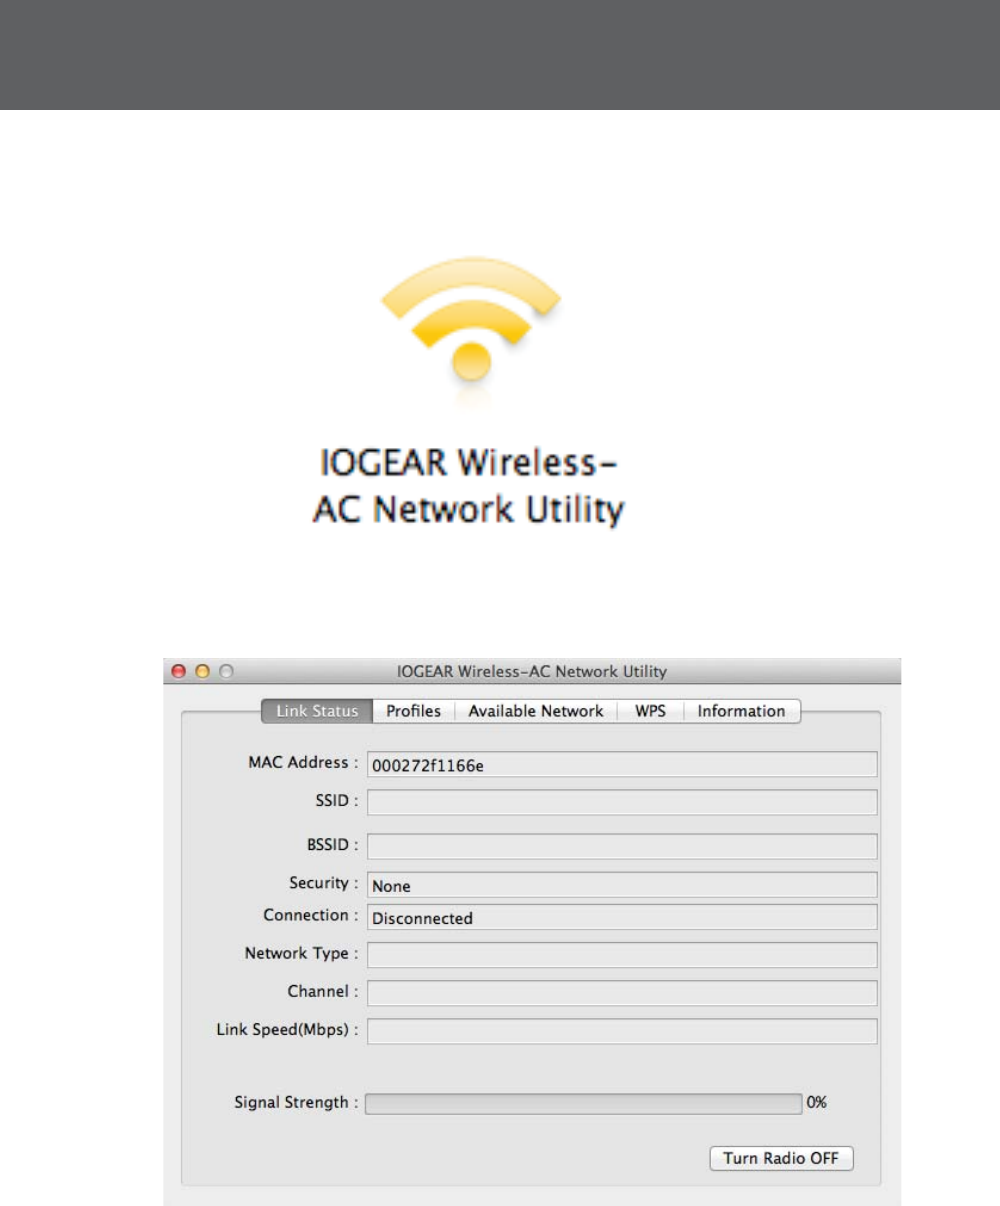
1. After restarting, open the Applications folder on your Mac and the
IOGEAR Wireless-AC Network Utility will appear.
2. Insert GWU735 into an available USB port*, then open the
IOGEAR Wireless-AC Network Utility in your Applications folder.
*Note: For optimal performance, connect to a USB 3.0 port.
21
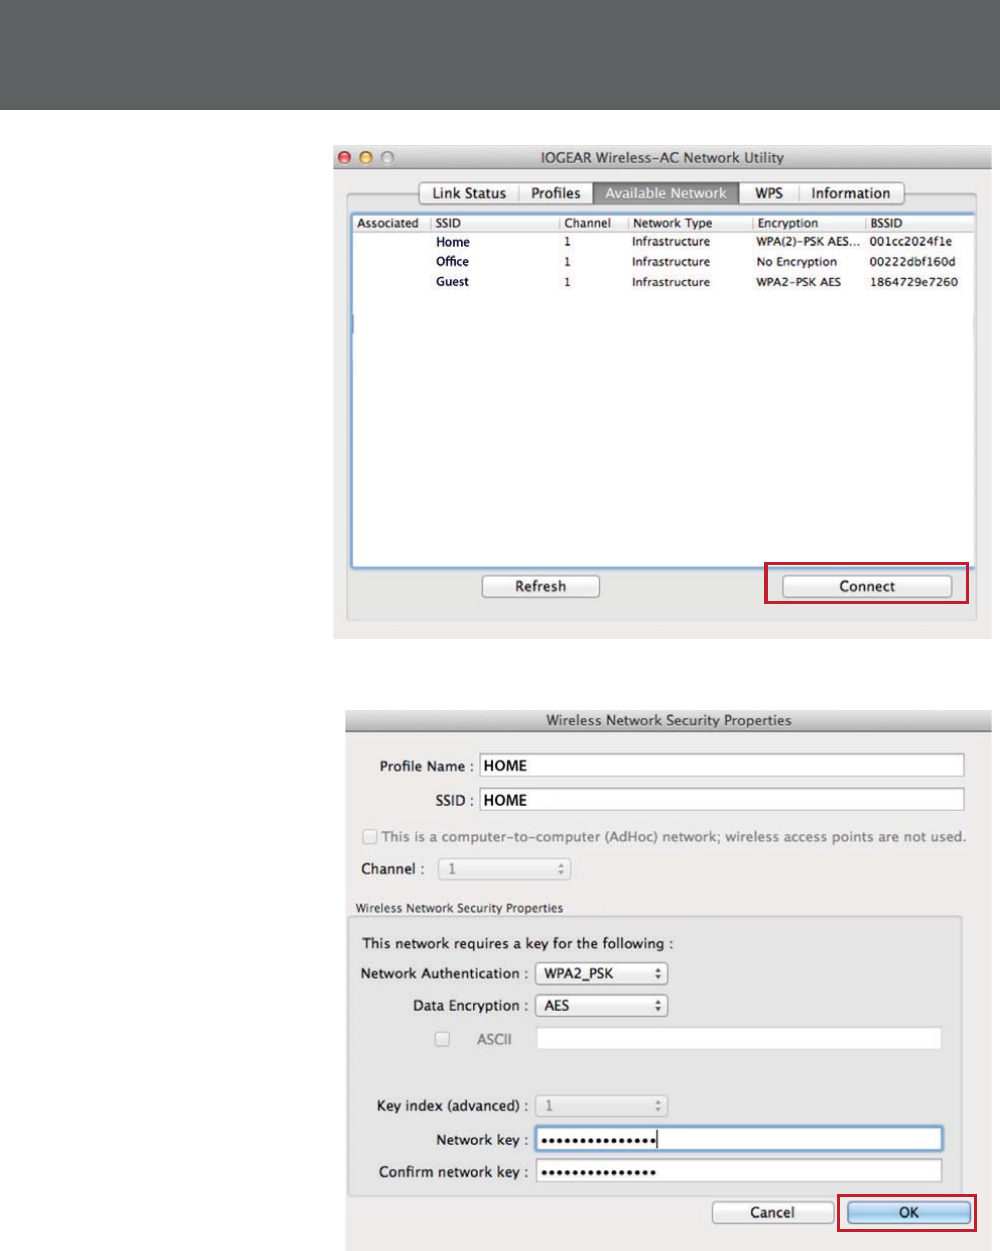
4. Next the
Wireless
Network
Security
Properties
window will
appear. Enter
the network key,
then click OK
to continue.
3. To connect to
an available
network, click
the Available
Network tab,
select the
desired network,
and click
Connect.
22
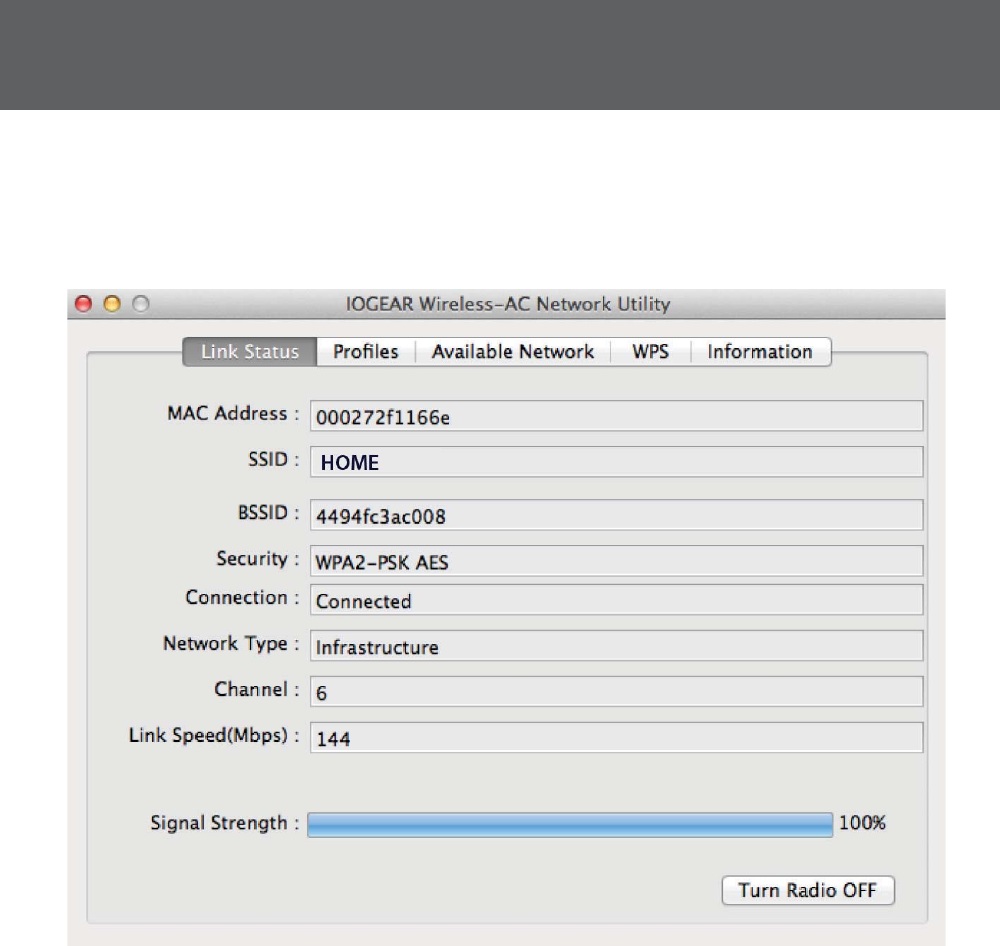
5. Once successfully connected, the utitlity will display the signal
strength of the network.
23
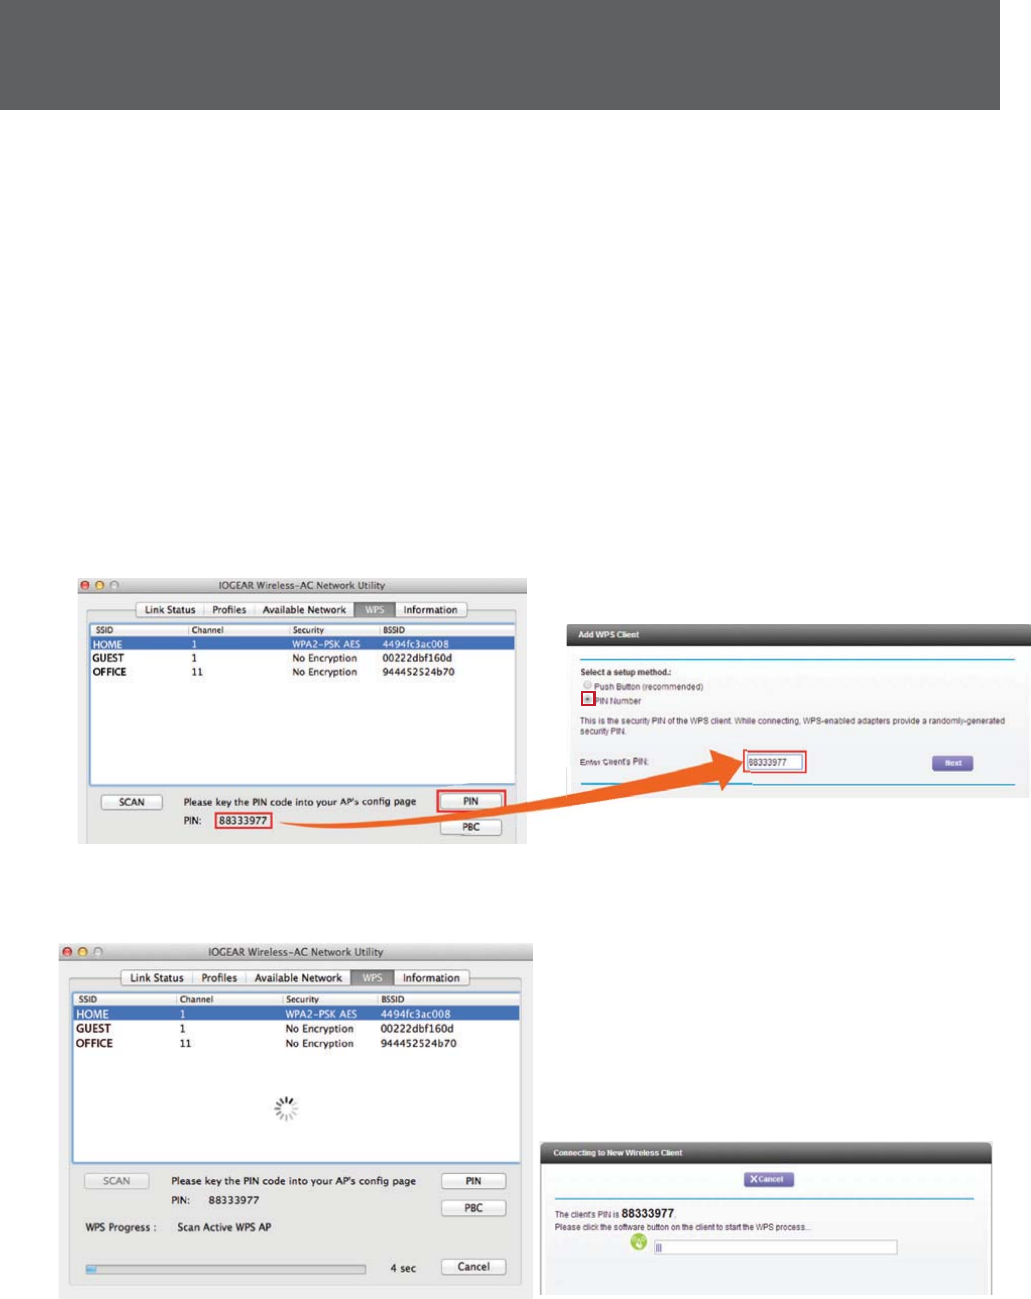
$OORZLWWRFRQ¿JXUHWKHVHFXULW\VHWWLQJRI\RXUZLUHOHVVURXWHU$3
The WPS client screen you see may vary depending on your router.
2. Next, select the WPS tab in the IOGEAR Wireless-AC Network
Utility and enter the pre-generated PIN into the Client PIN¿HOGLQ
\RXUURXWHU$3VRIWZDUH
2SWLRQ3,1,QSXW&RQ¿JXUDWLRQ0HWKRG
1. 2SHQWKHFRQ¿JXUDWLRQSURJUDPIRU\RXU:LUHOHVV5RXWHU$FFHVV
Point and select the WPS Client Setup. Then select the PIN
&RQ¿JXUDWLRQ option.
:L)L3URWHFWHG6HWXS:36 is a simple and secure way to connect
your Mac to an existing network. Before you start, make sure your wireless
URXWHU$FFHVV3RLQW$3VXSSRUWV:367KLVRSWLRQDOFHUWL¿FDWLRQIHDWXUH
provides two connection methods: 3,1,QSXW&RQ¿JXUDWLRQ3,1 or
3XVK%XWWRQ&RQ¿JXUDWLRQ3%&
24
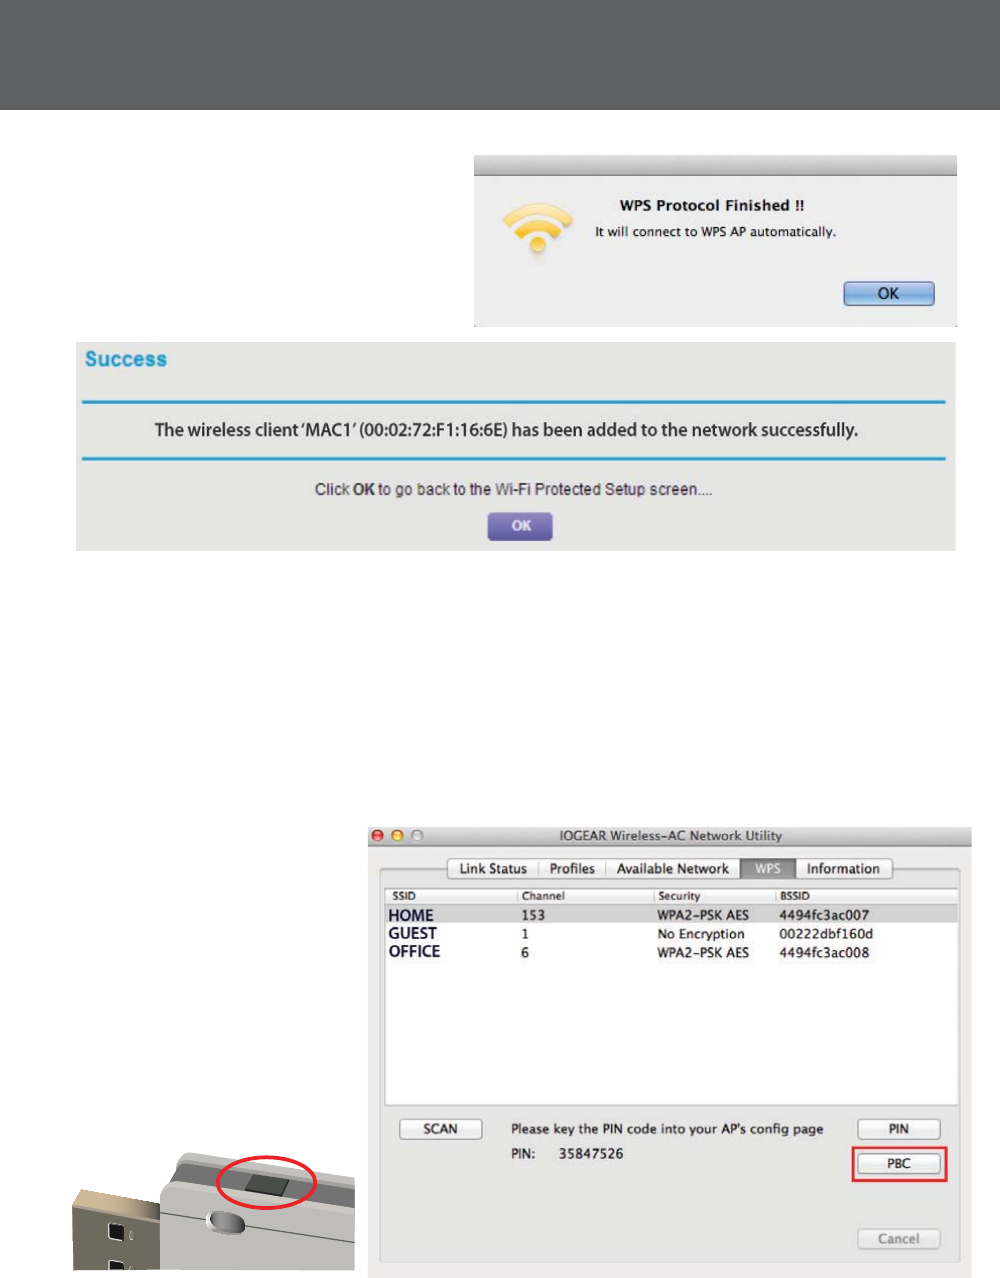
4. You have now successfully
added your computer to
your router’s network.
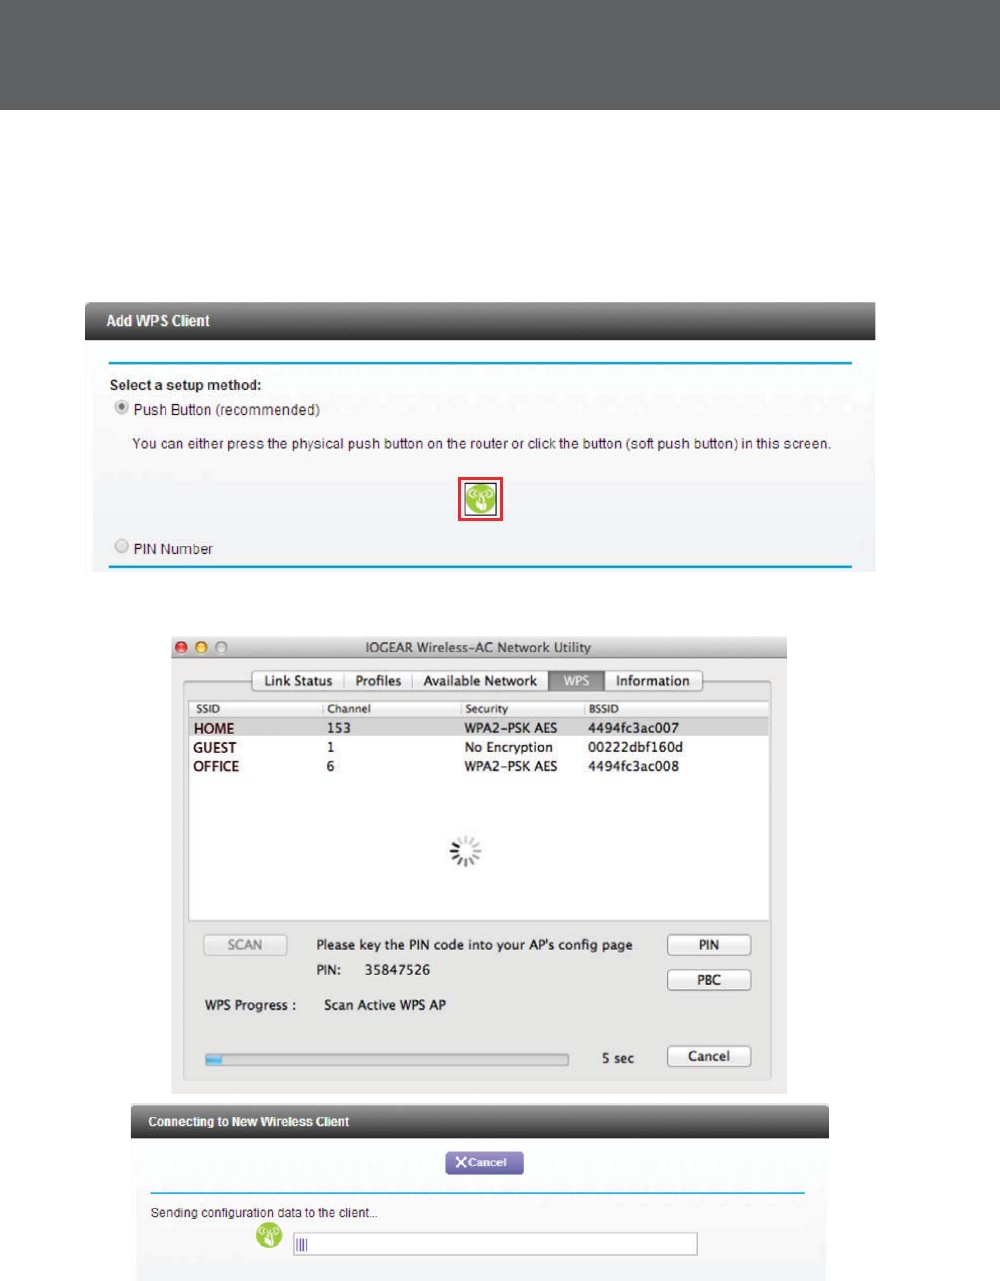
2SWLRQ3XVK%XWWRQ&RQ¿JXUDWLRQ3%&0HWKRG
1. Press and hold the WPS Button on the side of the GWU735
adapter for 5 seconds or you can press the virtual PBC button
under the WPS tab of the IOGEAR Wireless-AC Network
Utility, as shown below.
25
$OORZLWWRFRQ¿JXUHWKHVHFXULW\VHWWLQJRI\RXUZLUHOHVVURXWHU$3
1H[WSUHVVWKHSK\VLFDO:36EXWWRQRQ\RXUZLUHOHVVURXWHU$3
RUWKHYLUWXDOEXWWRQRQWKH:36FRQ¿JXUDWLRQSDJHRIWKHZLUHOHVV
URXWHU$3FRQ¿JXUDWLRQVRIWZDUH7KH:36&OLHQWVFUHHQ\RXVHH
may vary depending on your wireless router.

26
4. You have now successfully added your computer to your router’s
network.

27
This equipment has been tested and found to comply with the limits for
a Class B digital device, pursuant to Part 15 of the FCC Rules. These
limits are designed to provide reasonable protection against harmful
interference in a residential setting. This product generates, uses, and
can radiate radio frequency energy and, if not installed and used as
directed, it may cause harmful interference to radio communications.
Although this product complies with the limits for a Class B digital
device, there is no guarantee that interference will not occur in a
particular installation.
This device has been tested and found to comply with the following
(XURSHDQ8QLRQGLUHFWLYHV(OHFWURPDJQHWLF&DSDELOLW\(&
/RZ9ROWDJH(&DQG577('(&
Federal Communications Commission
)&&6WDWHPHQW
CE Statement

28
Limited Warranty
WE’RE HERE TO HELP YOU!
NEED ASSISTANCE SETTING UP THIS PRODUCT?
Make sure you:
9LVLWZZZLRJHDUFRPIRUPRUHSURGXFWLQIRUPDWLRQ
9LVLWZZZLRJHDUFRPVXSSRUWIRUOLYHKHOSDQGSURGXFWVXSSRUW
Warranty Information
This product carries a 3 Year Limited. For the terms and conditions of
WKLVZDUUDQW\SOHDVHJRWRKWWSZZZLRJHDUFRPVXSSRUWZDUUDQW\
5HJLVWHURQOLQHDWKWWSZZZLRJHDUFRPUHJLVWHU
Important Product Information
Product Model
Serial Number
IOGEAR
iogear.custhelp.com
support@iogear.com
www.iogear.com
'D9LQFL)RRWKLOO5DQFK&$
CE Statement

FEDERAL COMMUNICATIONS COMMISSION INTERFERENCE STATEMENT
T
his equipment has been tested and found to comply with the limit s for a
Class B digital device, pursuant to Part 15 of the FCC Rules.
T
hese limits are designed to provide reasonable protection against harmful
interference in a residential installation.
T
his equipment generates, uses and can radiate radio frequency energy and,
if
not installed and used in accordance with the instructions, may cause harmful
in
terference to radio communications. However, there is no guarantee that interference
w
ill not occur in a particular installation. If this equipment does cause harmful
in
terference to radio or television reception, which can be determined by turning
t
he equipment of f and on, the user is encouraged to try to correct the interference
b
y one or more of the following measures:
-
- Reorient or relocate the receiving antenna.
-
- Increase the separation between the equipment and receiver.
-
- Connect the equipment into an outlet on a circuit different from that to
w
hich the receiver is connected.
-
- Consult the dealer or an experienced radio/TV technician for help.
C
AUTION: Any changes or modifications not expressly approved by the
p
arty responsible for compliance could void the user's authority to operate the equipment
.
T
his device complies with part 15 of the FCC Rules.
O
peration is subject to the following two conditions:
(1
) This device may not cause harmful interference, and
(
2) this device must accept any interference received, including interference
that may cause undesired operation.
F
CC RF Radiation Exposure Statement:
1
. This Transmitter must not be co-located or operating in conjunction with
a
ny other antenna or transmitter.
2
. This equipment complies with FCC RF radiation exposure
l
imits set forth for an uncontrolled environment.
T
his equipment should be installed and operated with a minimum
d
istance of 20 centimeters between the radiator and your body.
R
&TTE directive
“Hereby, ATEN Technology, Inc., dba IOGEAR , declares that this
W
LAN 11ac USB Adapter,2T2Ris in compliance with the essential
r
equirements and other relevant provisions of Directive 1999/5/EC.”

© 2014 IOGEAR®