ATI Electronics ATIH300 BLUETOOTH DEVICE User Manual TB 10EL English Espana
ATI Electronics (Shenzhen) Co. Ltd BLUETOOTH DEVICE TB 10EL English Espana
Users Manual

H300

Please read this user's guide to get started, and to make the best use of the headsets
many features.
Bluetooth Specification: Bluetooth Version 2.0 compliant.
Power Level: Class II.
Support Profile: Hands-Free, Headset (Headset role only).
Standby Time: 120 hours.
Talk Time: Up to 5 hours
Operating Range: 10 meters (30 feet).
*Above mentioned standby time and talk time will be different depending on mobile
phone setting and usage environment. The figures above show the average values
tested by laboratory.
Product Specification
BEFORE USING YOUR HEADSET
1
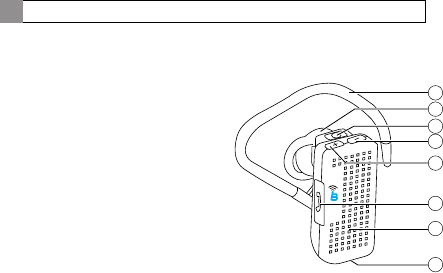
Your headset overview
2
The headset contains the following parts:
1.Ear Hook
2.Speaker
3.Charging Socket
4.Volume Down Button
5.Volume Up Button
6.Multi-function Button
7.Indicator Light
8.Microphone
1
2
3
4
5
6
8
7

T
NA
T
R
O
P
M
I
1. If you hear the low battery warning sound (beep every 5
seconds) and the red indicator light is flashing every 5 seconds,
this means the battery needs to be charged.
2. If you turn the headset on and the ending melody is immediately
played, that also means the battery needs to be charged.
3. The headset is not functional while charging.
3
Charging the headset
This device has an internal, nonremovable, rechargeable battery. Do not
attempt to remove the battery from the device as you may damage the device.
1. Connect the charger to the correct outlet.
2. While the charger is connected, the red indicator light is displayed during
charging. If charging does not start, disconnect the charger, plug it in again,
and retry. Charging the battery fully may take up to 2 hours.
3. When the battery is fully charged, the red indicator light turns off.
Disconnect the charger from the headset and the wall outlet.

Always store the headset with the power off and make sure it is safely protected.
Avoid storage at high temperatures (above 40 C/104F), such as in a hot vehicle or
in direct sunlight. (Storage at high temperatures can damage performance and
reduce battery life).
Do not expose the headset or any of its supplied parts to rain or other liquids.
To turn the headset on, press and hold the Multi-Function button for 2-4
seconds. The blue indicator light will illuminate for 3 seconds and you will
hear a long beep tone. The blue light will then flash every 5 seconds.
To turn the headset off, press and hold the Multi-Function button for 2-4
seconds or until you hear a short beep tone. The indicator light will flash red.
Release the button, an ending melody will be played indicating the
headset has powered off.
Note: If you turn the headset on and leave it unpaired with your phone for 5 minutes, the headset will
automatically turn off to conserve battery power.
Storage of the headset
BASIC OPERATIONS
Turning headset On/Off
4

1. Ensure that your phone's Bluetooth feature is on (see your phone's guide for details).
2. Ensure that the headset is off (see Turning the headset on/off).
3. Press and hold the Multi-Function button for about 6-8 seconds until the indicator light
alternately flashes blue and red.
4. Set your Bluetooth phone to discover the headset by following your phone's guide.
Typically, the steps involve going to set up, connect, or Bluetooth menu on your
phone and the selecting the option to discover Bluetooth devices.
5. Your phone will find the headset and ask if you want it to pair. Confirm this by
pressing the Yes or OK key.
6. Enter passkey or PIN, 0000 (4 zeros), then press the Yes or OK key.
7. Follow instructions on your phone to complete pairing. (You can also press the
Multi-Function button once to complete this step).
Pairing will create an encrypted wireless link between your bluetooth phone and
bluetooth headset.
If the above steps are not successful, please delete the pairing data (see Deleting the
pairing data) and repeat steps 1-7.
Pairing with your Bluetooth phone
5
To confirm your phone and headset are operating properly, make a test call:
1. Place the headset over your ear.
2. On your phone, dial the number you want to call and press the "send" key.
3. If paired successfully, you will hear the ring tone on the headset.
After headset is successfully paired , you should not need to repeat these initial setup
steps each time you use the headset, unless pairing data is deleted on your phone.
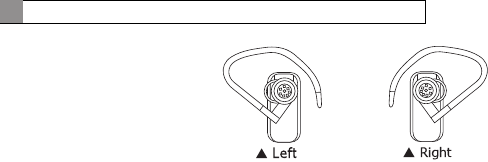
Place the headset in your ear.
Depending on which ear you are
going to wear the headset, simply
adjust the hook accordingly.
Wearing the headset
6

Making a voice activated call
If the voice recognition feature is on, you can make a voice activated call.
1. Press the Multi- Function button once, you will hear the voice-activation tone.
2. Say the name of the person you wish to call.
Depending on your phone, this feature may not be supported.
Redialing the last number
One of the following may or may not apply. Please refer to your mobile phone manual.
To make a call to the last number you have dialed:
1. Press and hold both volume control buttons then release.
2. Press the Multi-Function button briefly.
3. Press and hold the Multi-Function button.
*Depending on mobile phone type, functions may vary or may not apply.
Press the Multi-Function button once.
Making a call
Ending a call
7
IMPORTANT

After you hear the ring tone, press the Multi-Function button once.
If you answer the call with your phone, you can transfer the call to the headset by
simultaneously pressing both volume control buttons once or , by using the transfer
function on your phone.
You can also transfer the call from the headset to the phone by simultaneously pressing
both volume control buttons once or, by using the transfer function on your phone.
When you hear the ring tone, press and hold both volume control buttons until you
hear a short beep. The call will be rejected. Depending on your phone's setting or type,
you may only be able to mute the ringer or this feature may not be supported.
Answering a call
Transferring a call between phone and headset
Rejecting a call
8

Press [ + ] on the top of the headset to increase the volume level and [ - ] to decrease
the volume level. *For your protection, the volume may not be able to be raised to its maximum level using
only your headset.
When the headset is on and disconnected from your phone, the pairing information can
be deleted by pressing and holding the Multi-Function button until a long beep tone
is heard.
To prevent possible harm to the environment, please separate this
device from other types of waste and recycle it responsibly to promote
the sustainable reuse of material resources.
Deleting all pairing data
Adjusting the volume
9

FCC Statement
Operation is subject to the following two conditions:
(1) This device may not cause harmful interference, and
(2) This device must accept any interference received, including interference
that may cause undesired operation.
Note: The manufacturer is not responsible for ANY interference, for example RADIO or
TV interference, caused by unauthorized modifications to this equipment.
Such modifications could void the user sauthority to operate the equipment.
EU
This product is CE certified according to the provision of the R&TTE Directive (99/5/EC).
Declares that this product is in compliance with the essential requirements and other
relevant provisions of Directive 1999/5/EC.
Please note that this product uses radio frequency bands not harmonized within EU.
Within the EU this product is intended to be used in Austria, Belgium, Denmark,
Finland, France, Germany, Greece, Ireland, Italy, Luxembourg,
The Netherlands, Portugal, Spain, Sweden, United Kingdom and within EFTA
in Iceland, Norway and Switzerland.
Bluetooth is a trademark owned by the Bluetooth SIG, Inc.
10

Warranty
The condition of this warranty and our responsibilities under this warranty are as follows:
Warranty is non-transferable, and is limited to the original purchaser only.
* You must be able to prove the date of original purchase of the unit with a dated receipt.
* The warranty is not applicable if the product has been subject to physical abuse,
improper installation, modification or repair by unauthorized third party.
,
* The responsibility of supplier s products shall be limited to the repair or replacement
,
of the product at it s sole discretion.
* Specifically exempt from any warranty are limited-life consumable components subject
to normal wear and tear, such as, batteries and other accessories.
* Supplier will not take any responsibility if the failure of the unit has resulted from
accident, abuse, misuse, or any unauthorized repair, modification or disassemble.
* Modification and repair of the unit this device must be done by an authorized and
qualified service center or returned to the manufacturer.
*This warranty gives you specific legal rights, and you may also have other rights which
vary under local laws.
11