ATI Electronics BTHSH6 BLUETOOTH HEADSET User Manual H6
ATI Electronics (Shenzhen) Co. Ltd BLUETOOTH HEADSET H6
Users Manual
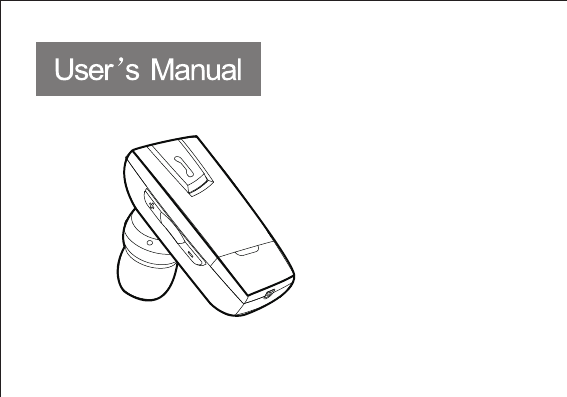
Bluetooth Wireless Headset
H6
Contents
,
What s in the box ............................................................................................................
Pair to your Bluetooth phone ........................................................................................
Charging the battery .....................................................................................................
Battery information........................................................................................................
Turning headset on /off ................................................................................................
Wearing your headset....................................................................................................
Making a call ..................................................................................................................
Ending a call ...................................................................................................................
Reject an incoming call ................................................................................................
Answering a call .............................................................................................................
Transferring a call ..........................................................................................................
Call-waiting (Three-Way Calling) .................................................................................
Volume control ............................. .................................................................................
Mute.................................................................................................................................
Summary of button operation .....................................................................................
Safety and general information ..................................................................................
FCC & IC Statement ......................................................................................................
EU ....................................................................................................................................
Warranty ........................................................................................................................
1
2
5
6
7
4
8
9
9
12
13
13
14
10
5
8
8
8
8
,
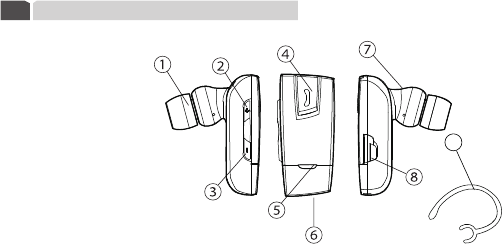
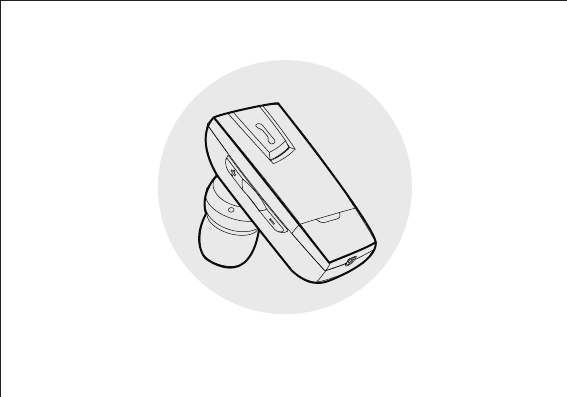
What s in the box
The headset contains the following parts:
1
1
1.Ear Gel
2.Volume Up Button
3.Volume Down Button
4.Multi-function Button
5.Indicator Light
6.Microphone
7.Speaker
8.Charging Socket
9.Ear Hook
A. H6 Bluetooth Headset.....................1
B. Travel Charger....................................1
C. Charging Cable..................................1
D. User Manual.......................................1
Package contents list:
Item Name Quantity
9
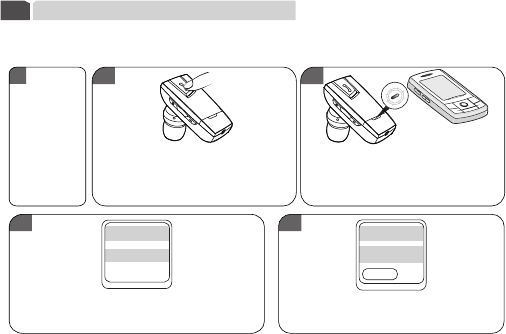
2Pair to your Bluetooth phone
2
Before you use your headset the first time, you must pair the unit with a Bluetooth device e.g.
Bluetooth mobile phone. This operation guide based on the Bluetooth phone as the host's device.
Please refer to the following step to set up the pairing:
****
H6
Press and hold the MFB for 4 seconds
until you see the Blue and Red LED
light flash alternately to enterthe
pairing mode.
Your phone will find the headset and show
the device name on the screen, select the
device name and confirm to pairing.
Enter PIN code as 0000 (4 zeros) and
confirm to complete pairing.
Following your phone's instruction
guide, operate your Bluetooth phone
to active Bluetooth function and
search the headset.
Ensure the
headset is off.
Bluetooth devices Scan results
Enter Bluetooth
Passkey
1 2 3
45
NOTE:
l If the pairing is successful, the headset will connect to your phone automatically, you may
need to confirm the enquiry.
l While the headset is paired with the phone and connected, the indication light will flash 2
times every 5 seconds. If failed or didn't connect to the phone, the blue indicator light will
flash 1 time every 3 seconds.
l Once you paired the headset with one device or more, the Headset will automatically
connect to the phone you last connected wherever you turn the headset on, but make sure
your phone's Bluetooth function is active.
l The headset is supports Bluetooth v2.1+EDR specification, the simplified pairing process
will make paring your devices easily, if your mobile phone supports Bluetooth v2.1+EDR
specification, you just need turn on both of them, and add new Bluetooth device on your
phone, the headset and your phone will find each other and connect automatically.
nd
l The headset supports multi-point technology. If you need connect the headset to the 2
Bluetooth phone, please repeat the pairing operation steps above. When finish the pairing,
turn off the headset and turn on again, the headset will connect to the both 2 phones
automatically.
3
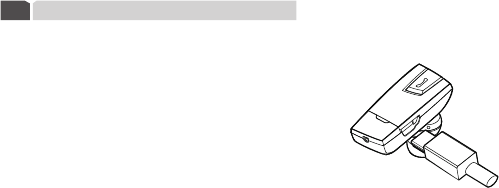
Charging the battery
4
3
This headset has an internal, non-removable, rechargeable battery. Do not attempt to remove
the battery from the device as you may damage the device. Please refer to the following step to
charge the battery:
1. Connect the charger to the correct outlet.
2. When the charger is connected to headset, the red indicator
light will turn on during charging. If charging does not start,
disconnect the charger, plug it in again. Charging the battery
fully may take up to 2 hours.
3. When the battery is fully charged, the red indicator light turn blue.
Disconnect the charger from the headset and the wall outlet.
NOTE:
l The fully charged battery has power for up to 4-6.5 hours of talk-time or up to 120-150 hours
of standby time. However, the talk and standby times may vary when used with different
mobile phones or other compatible Bluetooth devices, usage settings, usage styles, and
environments.
l When battery power is low, the headset will remind you by beeps every 20 seconds, and the
red indicator light starts to flash.
l For first time use, please charge the headset fully. If you can not see the indicator light while
charging, please leave the headset on the charging for a while, then the indicator light will
turn on.

Battery information
Your device is powered by a chargeable battery. The full performance of a new battery's an
achieved only after two or three complete charge and discharge cycle. The battery can be
charged and discharged hundreds of times, but it will eventually wear out.
Unplug the charger from the electrical plug and the device when not in use. Do not leave a fully
charged battery connected to a charger, since overcharging may shorten its lifetime. If left
unused, a fully charged battery will lose its charge over time.
If the headset would be leave unused for a long time, please charge fully and turn off the headset.
To prevent over discharge endangering the battery, you are recommended to charge the
headset fully each month.
Never use any other charger that is damaged.
Turning headset on /off
5
4
5
*Turn on the headset
If the headset is turned off, press and hold MFB for 2 seconds until you hear a melody from low to
high, the headset turns on, the Blue indicator light will flash 3 times at the same time.
*Connects to the phone
1.If your headset has finished the pairing operation successfully, when the headset is turned on,
it will connect to the phone(s) you last connected automatically, but make sure your phone's
Bluetooth function is active.
2.The headset supports multi-point and connects to 2 phones at the same time. In some
operations, you need to distinguish the connection sequence, so we appoint the phone first
connected as phone 1, the second one as phone 2.
6
6
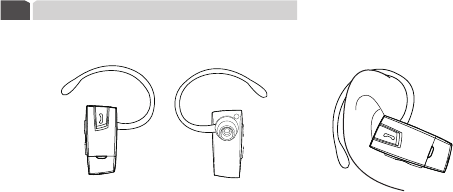
Wearing your headset
The headset can be worn on either the Left or Right ear. If you want to carry the headset on the
other ear, please refer to the following figures to change the direction of the ear hook:
*Turn off the headset
At any working state after the headset turns on, press and hold MFB for 4 seconds, you will hear
a melody from high to low, and the Red indicator light will flash 3 times at the same time, the
headset turns off.
Note
l For saving the power, while the headset didn't connect to any device over 1 hour,
the headset will turn off automatically.

Making a call
7
* By phone's keypad
At the stand-by state, dial the number on your phone directly to make a call.
* Use Voice-Dialing
At the stand-by state, press the MFB shortly, you will hear a short tone from the headset, and the
phone will prompt you say the voice tag like your friend's name. If the voice tag is identified by
the phone, the related number will be dial-out later.
Make sure whether your mobile phone supports voice dialing function, and you need to set up
voice tags on your mobile phone first. If the headset has connected to 2 phones, double press
the MFB will start Voice-Dialing of phone 2.
* Last number re-dialing
Press and hold Volume Down button for 2 seconds, you will hear 2 short tones, the last number
you dialed will be re-dial out. If the headset has connected to 2 phones, press and hold Volume
Up button for 2 seconds will start last number re-dialing of phone 2.
NOTE
l If the headset has connected to 2 phones, when one phone has active a call, the headset
will disconnect to other phone temperately, when you end the call the headset will
re-connect it automatically, please make sure your phone's Bluetooth function would not
be inactive during the calling.
7

Reject an incoming call
9
When you receive an incoming call, press and hold MFB for 2 seconds will reject the incoming call.
Answering a call
10
When you receive an incoming call, press the MFB shortly can pick up the incoming call; also you
can pick up the call on your mobile.
Transferring a call
11
When in the calling, press and hold Volume Up button for 2 seconds can transfer the call from headset
to phone. Repeat the operation can transfer the call between the phone and headset each other.
Call-waiting (Three-Way Calling)
12
Before using Call-waiting function on your headset, please ensure that your phone supports the
Hands-free profile, and you have been provide the service by the net provider.
* If there is another incoming call while you are in the calling, press MFB shortly can accept the
waiting call and end current calling.
* If there is another incoming call while you are in the calling, press and hold MFB for 2 seconds
can accept the waiting call and hold on current calling.
Ending a call
When in the calling, press the MFB shortly will end the call, also you can end call on your mobile.
8
8

Volume control & Mute function
13
14
While you are in the calling, you can adjust the volume by pressing volume up and volume down
button or you can adjust the volume on your mobile.
9
Mute
While you are in the calling, Press and hold the Volume Down Button for 2 seconds, you will
hear a melody from low to high, then the headset's MIC will be muted, and you will hear
remindful melody every 10 seconds. Repeat the operation your will hear the melody from
high to low, the mute function is cancelled.
* While you are in the calling and another call was holding on, press MFB shortly can end current
call and resume the holding on calling.
* While you are in the calling and another call was holding on, press and hold MFB for 2 seconds
can shift the current calling to the holding on calling.
* While you are in the calling and another call was holding on, press Volume Up button shortly can
add the holding on call to the current conversation to make a multiparty call.
* While you are in the calling and another call was holding on, or you are in a multiparty calling,
double press MFB can end the calling or remove yourself from the multiparty calling.

Summary of button operation
15
10
Button ACTION Standby
(No Calls Active) Incoming Call 1 call Active
Volume
Down
Quick Press
HEADSET STATUS
Answer incomingcall End a call
2 Seconds
Quick Press
Reject incoming call
4 Seconds Turn headset OFF Turn headset OFF Turn headset OFF
Increase volume Increase volume Increase volume
2 Seconds
4 Seconds
Quick Press
2 Seconds
4 Seconds
_
_
_ _
Decrease volume Decrease volume Decrease volume
_
Microphone mute ON/ OFF
_ _
Volume
Up
Multi-
function
Button
Initiate voice dialing
Transfer the active calling
to/from phone
_
_
Double Press Initiate Voice dialing
of phone 2
_ _
Re-dial last number
of phone 2
Re-dial last number
_

11
Button ACTION 1 Call Active,
1 Incoming Call
1 Call Active,
1 Call on Hold
Quick Press
HEADSET STATUS
2 Seconds
Quick Press
4 Seconds Turn headset OFF Turn headset OFF
Increase volume
2 Seconds
4 Seconds
Quick Press
2 Seconds
4 Seconds
_
Decrease volume
_
Answer incoming call,
hold active call
__
Answer incoming call,
end active call End active call , retrieve held call
Transfer active calling to/from phone
__
_
Shift Calls
Add held call to TWC
Volume
Down
Volume
Up
Multi-
function
Button
Double press End all of the calls
Decrease volume

16 Safety and general information
1.Please read this guidebook carefully and follow the instructions.
2.To avoid any damage or malfunction of the device do not drop device from
high places.
3.Keep device away form humidity, water and any other liquid. If the device is
exposed to water, moisture and other liquid , do not operate it to avoid any
electrical shock, explosion and damage to the device or yourself.
4.Do not place or keep this device near any heat sources, such as, direct sun light,
radiators, stoves or other apparatus which produce heat. It may cause explosion,
degrade the performance and/or reduce battery life.
5.Do not modify, repair or disassemble device at discretion(Especially battery:
It may cause an explosion). Doing this will avoid the warranty.
6.Do not place the heavy objects on the device.
7.Use only supplied and approved charger.
8.Replacement or service must be done by qualified service center or
manufacturer.
9.Unplug this device when unused for long periods of time or during lightening
storms.
CAUTION: ELECTRIC SHOCK HAZARD
The battery used in this device may present a risk of fire or chemical burn
if mistreated.
!
12

FCC & IC Statement
Operation is subject to the following two conditions:
17
(1) This device may not cause harmful interference, and
(2) This device must accept any interference received, including interference that may
cause undesired operation.
Note: The manufacturer is not responsible for ANY interference, for example RADIO or TV
interference, caused by unauthorized modifications to this equipment.
Such modifications could void the user’
sauthority to operate the equipment.
EU
18
Please note that this product uses radio frequency bands not harmonized within EU.
Within the EU this product is intended to be used in Austria, Belgium, Denmark, Finland,
France, Germany, Greece, Ireland, Italy, Luxembourg, The Netherlands, Portugal, Spain,
Sweden, United Kingdom and within EFTA in Iceland, Norway and Switzerland.
This product is CE certified according to the provision of the R&TTE Directive (99/5/EC).
Declares that this product is in compliance with the essential requirements and other
relevant provisions of Directive 1999/5/EC.
Bluetoothis a trademark owned by the BluetoothSIG, Inc.
13

Warranty
19
14
The condition of this warranty and our responsibilities under this warranty are as follows:
Warranty is non-transferable and is limited to the original purchaser only.
* You must be able to prove the date of original purchase of the unit with a dated receipt.
* The warranty is not applicable if the product has been subject to physical abuse,
improper installation, modification or repair by unauthorized third party.
,
* The responsibility of supplier s products shall be limited to the repair or replacement of
,
the product at it s sole discretion.
* Specifically exempt from any warranty are limited-life consumable components subject
to normal wear and tear such as batteries, decorates and other accessories.
* Supplier will not take any responsibility if the failure of the unit has resulted from
accident, abuse, misuse, or any unauthorized repair, modification or disassemble.
* Modification and repair of the unit should be done by authorized and qualified service
center or returned to the manufacturer
*This warranty gives you specific legal rights, and you may also have other rights which
vary under local laws.
Made in China
FCC Warning
This device complies with Part 15 of the FCC Rules. Operation is subject to the following two
conditions:
(1) this device may not cause harmful interference, and (2) this device must accept any
interference received, including interference that may cause undesired operation.
NOTE 1: This equipment has been tested and found to comply with the limits for a Class B digital
device, pursuant to part 15 of the FCC Rules. These limits are designed to provide reasonable
protection against harmful interference in a residential installation. This equipment generates, uses
and can radiate radio frequency energy and, if not installed and used in accordance with the
instructions, may cause harmful interference to radio communications. However, there is no
guarantee that interference will not occur in a particular installation. If this equipment does cause
harmful interference to radio or television reception, which can be determined by turning the
equipment off and on, the user is encouraged to try to correct the interference by one or more of
the following measures:
- Reorient or relocate the receiving antenna.
- Increase the separation between the equipment and receiver.
-Connect the equipment into an outlet on a circuit different from that to which the receiver is
connected.
-Consult the dealer or an experienced radio/TV technician for help.
NOTE 2: Any changes or modifications to this unit not expressly approved by the party
responsible for compliance could void the user's authority to operate the equipment.