ATID AT911 INDUSTRIAL PDA User Manual Quick Reference Guide
ATID Co., Ltd INDUSTRIAL PDA Quick Reference Guide
ATID >
Contents
- 1. User Manual
- 2. User manual
User Manual
AT911 User
Manual
Guide (Rev1.0)
Android Ruggedized PDA
Series Highlights:
• Android 2.2
• SAMSUNG S5PC110 1GHz
• Memory RAM 512 MB/ROM 512 MB
• WVGA TFT LCD 480W x 800L with backlight
• UHF 900MHz GEN2, ISO/IEC 18000-6C Ovw{pvuP
• 1D Laser Barcode Scanner
• WLAN(IEEE802.11 b/g)
• 3G HSDPA
• Bluetooth Class II, v2.0
• 5.0M Camera with Flash

AT911 User Reference Guide
FCC Compliance Information
This equipment has been tested and found to comply with the limits
for a Class A digital device, pursuant to part 15 of the FCC Rules.
These limits are designed to provide reasonable protection against harmful interference when
the equipment is operated in a commercial environment. This equipment generates, uses, and
can radiate radio frequency energy and, if not installed and used in accordance with the
instruction manual, may cause harmful interference to radio communications. Operation of this
equipment in a residential area is likely to cause harmful interference in which case the user
will be required to correct the interference at his own expense.
This device complies with Part 15 of FCC Rules. Operation is subject to the following
twoconditions:
(1) the device may not cause interference, and
(2) the device must accept any interference, including interference that may cause undesired
operation of this device.
For body-worn operation, this device has been tested and meets the FCC RF exposure
guidelines when used with an accessory that contains no metal and that positions the handset a
minimum of 1.5cm from the user’s body.
NOTE: THE GRANTEE IS NOT RESPONSIBLE FOR ANY CHANGES OR MODIFICATIONS
NOT EXPRESSLY APPROVED BY THE PARTY RESPONSIBLE FOR COMPLIANCE.
SUCH MODIFICATIONS COULD VOID THE USER’S AUTHORITY TO OPERATE
THE EQUIPMENT.

AT911 User Reference Guide
ATID Co., Ltd.
#1210, Byuksan/Gyungln Digital Valley II, #481-10,
Gasan-Dong, Gumchon-Gu, Seoul, Korea
Telephone: +82-2-544-1436
Fax: +82-2-2113-0040
www.atid1.com
Copyright ○
c2006 ATID Co., Ltd. An Unpublished Work – All right reserved. No part of the
contents of this documentation or the procedures described there in may be reproduced or
transmitted in any form or by any means without prior written permission of ATID Co., Ltd..
or its wholly owned subsidiaries ("ATID ").
Owners of ATID products are hereby granted a non-exclusive, revocable license to
reproduce and transmit this documentation for the purchaser's own internal business
purposes.
Purchaser shall not remove or alter any proprietary notices, including copyright notices,
contained in this documentation and shall ensure that all notices appear on any
reproductions of the documentation.
Should future revisions of this manual be published, you can acquire printed versions by
contacting ATID Customer Administration. Electronic versions may either be downloadable
from the ATID web site (www.atid1.com) or provided on appropriate media. If you visit our
web site and would like to make comments or suggestions about this or other ATID
publications, please let us know via the “Contact ATID ” page.
Disclaimer
Reasonable measures have been taken to ensure that the information included in this
manual is complete and accurate. However, ATID reserves the right to change any
specification at anytime without prior notice.
ATID is a registered trademark of ATID Co., Ltd..
The ATID logo is a trademark of ATID . All other trademarks and trade names referred to
herein are property of their respective owners.
AT911 is a registered trademark of ATID Co., Ltd.. and of its wholly owned subsidiaries.
X

AT911 User Reference Guide
User Manual Guide
Before begin to use
..................................................................................................................Z
Cap1. Using the AT911
..........................................................................................................5
1.
Introducing
...........................................................................................................................5
1.1 Package components
.................................................................................................
5
1.2 View of the PDA #1
....................................................................................................
6
1.3 V i e w o f t h e P D A #2
............................................................................................
7
2. Power
................................................................................................................................. 8
2.1 Power ON/OFF
.............................................................................................................
8
2.1.1 Power on
..........................................................................................................
8
2.1.2 Power off
........................................................................................................
8
2.2
Battery..........................................................................................................................
8
2.2.1 C h e c k i n g b a t t e r y p o w e r
............................................................................
8
2.2.2 Very low battery status
......................................................................................
8
2.3 Removing and installing the battery
................................................................
8
2.3.1 Removing the battery
.......................................................................................
8
2.3.2 Installing the battery
.......................................................................................
8
2.4 Battery discharging
................................................................................................
8
2.5 Recharging the battery
...............................................................................................
8
2.5.1 Using the adapte
..........................................................................................
9
2.6 Disposal of the spent battery
......................................................... ............ ............
9
3. AT911 Reset
.................................................................................................................. 10
3.1 Warm
Reset ......................................................................................................
10
3.2 Cold Reset
............................................................................................
10
Y

AT911 User Reference Guide
Before You Begin
This section provides you with safety information, technical support information, and sources for
additional product information.
Who should read this manual?
This manual is written for the person who is responsible for installing, configuring, and
maintaining the AT288.
This manual provides you with information about the features of the AT911, and how to install,
configure, operate, and maintain it.
Before you work with the AT911, you should be familiar with your network and general
networking terms, such as IP address.
Safety information
Your safety is extremely important. Read and follow all warnings and cautions in this
document before you handle and operate ATID equipment. If you do not follow the safety
warnings and cautions, you might be seriously injured, and the equipment and data are also
might be damaged.
WARNING
A warning requires you must pay attention to the operating procedure, practice, condition,
and statement strictly, or might be injured seriously.
CAUTION
A caution alerts you that you must be observe strictly when you operating procedure, practicing,
configuring, for preventing from damage and destruction of equipment, and loss of data.
NOTICE
A notice provides you the information which you must needs while you using AT911
Z

AT911 User Reference Guide
4
AT911 User Reference Guide
Chapter1. Caution when you using AT911
Before you handle and operate your device, please through and familiar with the contents of
this manual
1 Introduced device
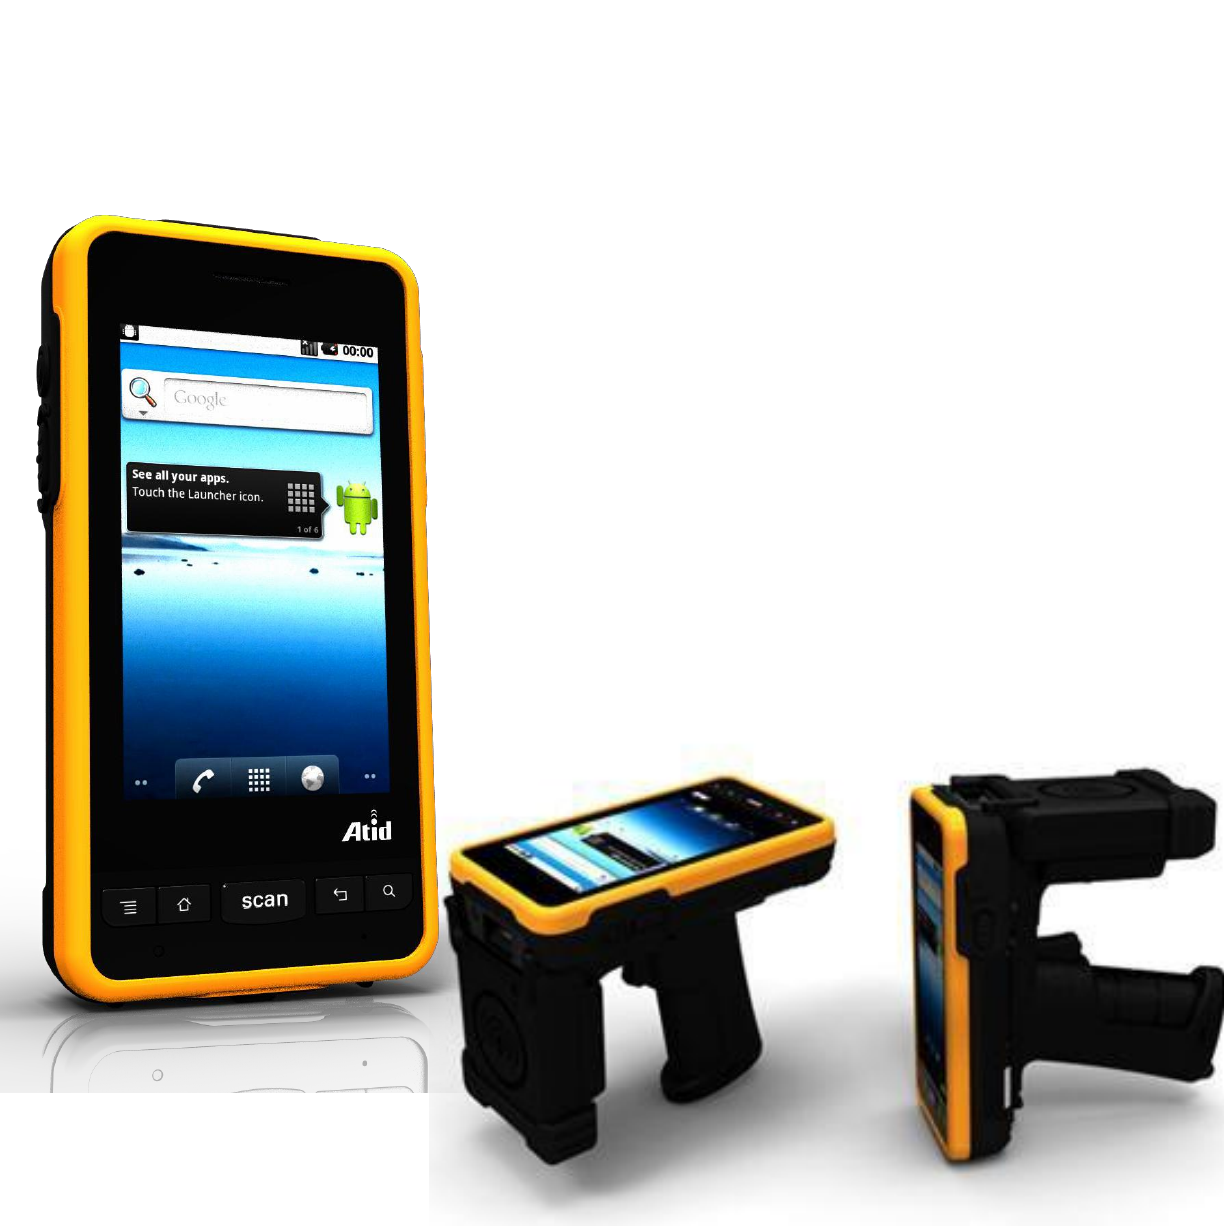
ATID AT911 is based android 2.2 O/S system and supporting touch screen display with RFID
and Wireless LAN 802.11 b/g (embedded module)
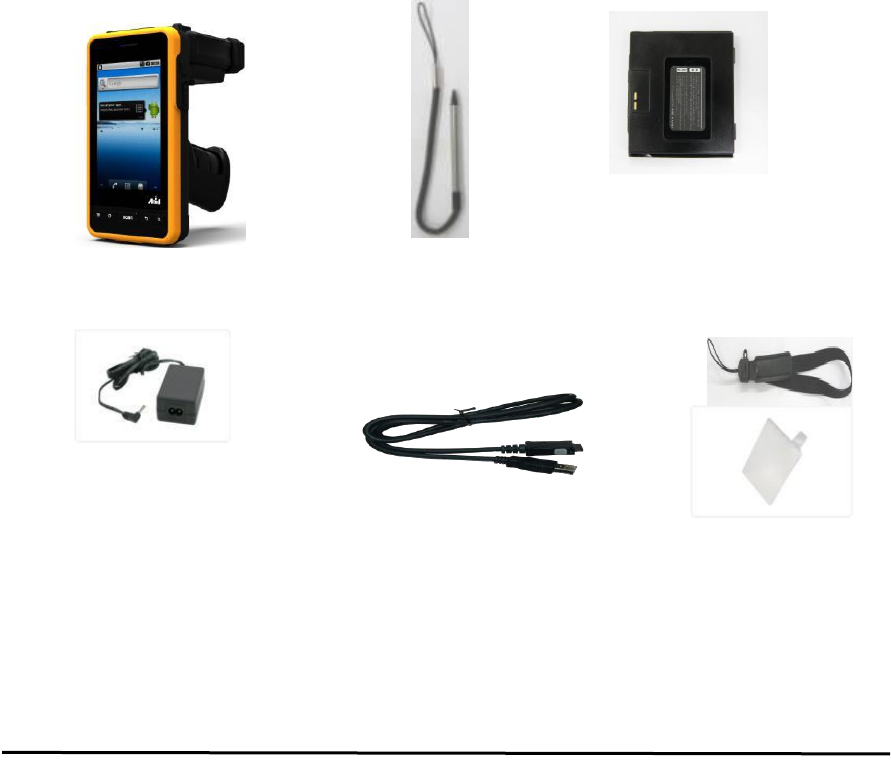
1.1 Package components
After opening the product packaging box, check the items listed as below:
1) PDA body
2) Stylus pen
3) S t a n d a r d b a t t e r y p a c k for the body
4) Adaptor
5) Cable
6) Hand strap
If there is missing or defective products as below, please contact th customer support center of your
place of purchase.
1 2 3
4 5 6
< In the Packing box
>
5
AT911 User Reference Guide
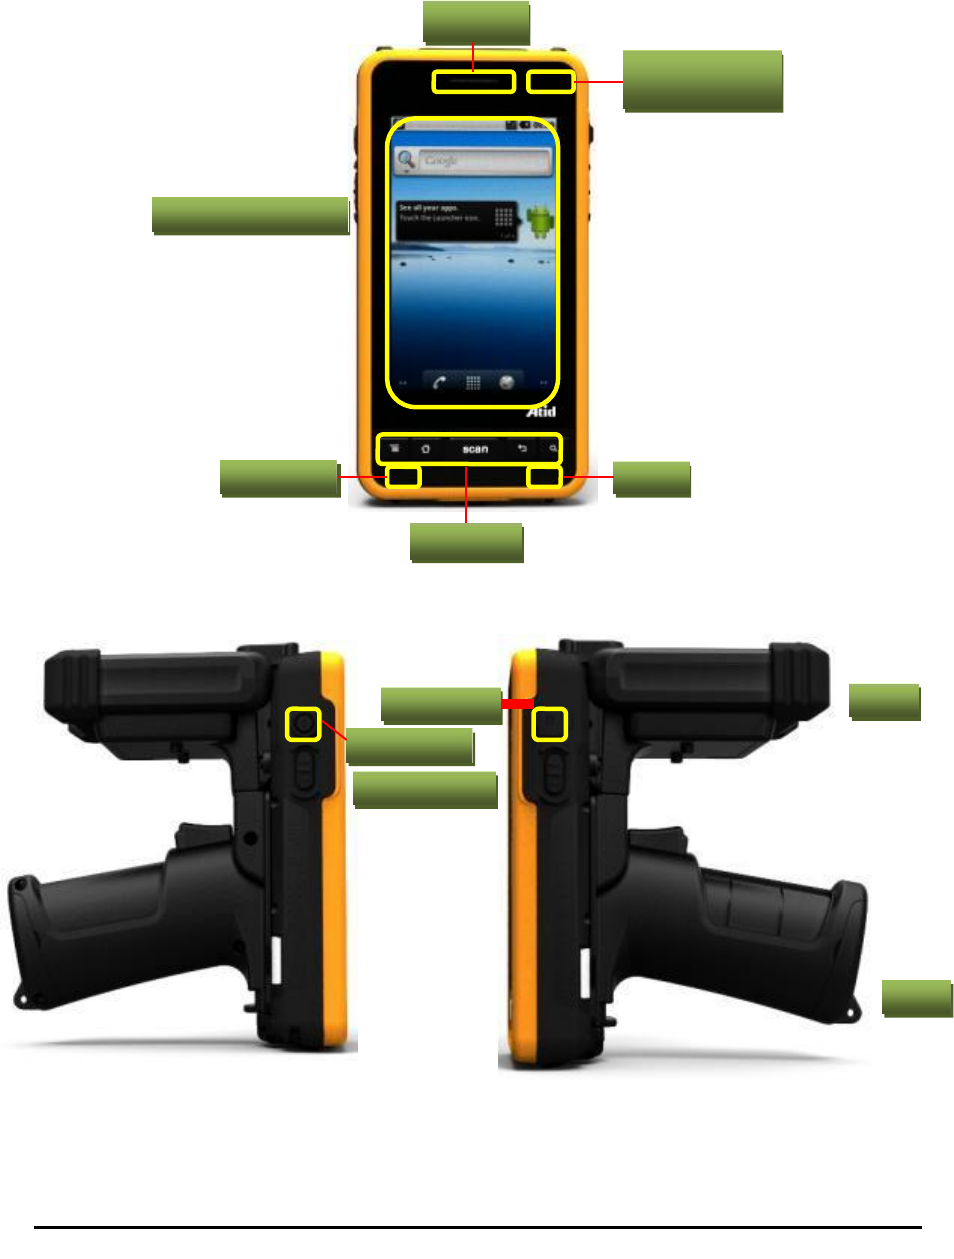
1.2 Name of each part
Please check the details of the product areas. This each part of name will be description guide
Speaker
Power LED
WLAN/3G LED
LCD Touch Screen
Reset Key MIC
Key Pad
< Front view
>
Ear Jack UHF
Power Key
Scan Key
Gun
< Side view
>
6
AT911 User Reference Guide
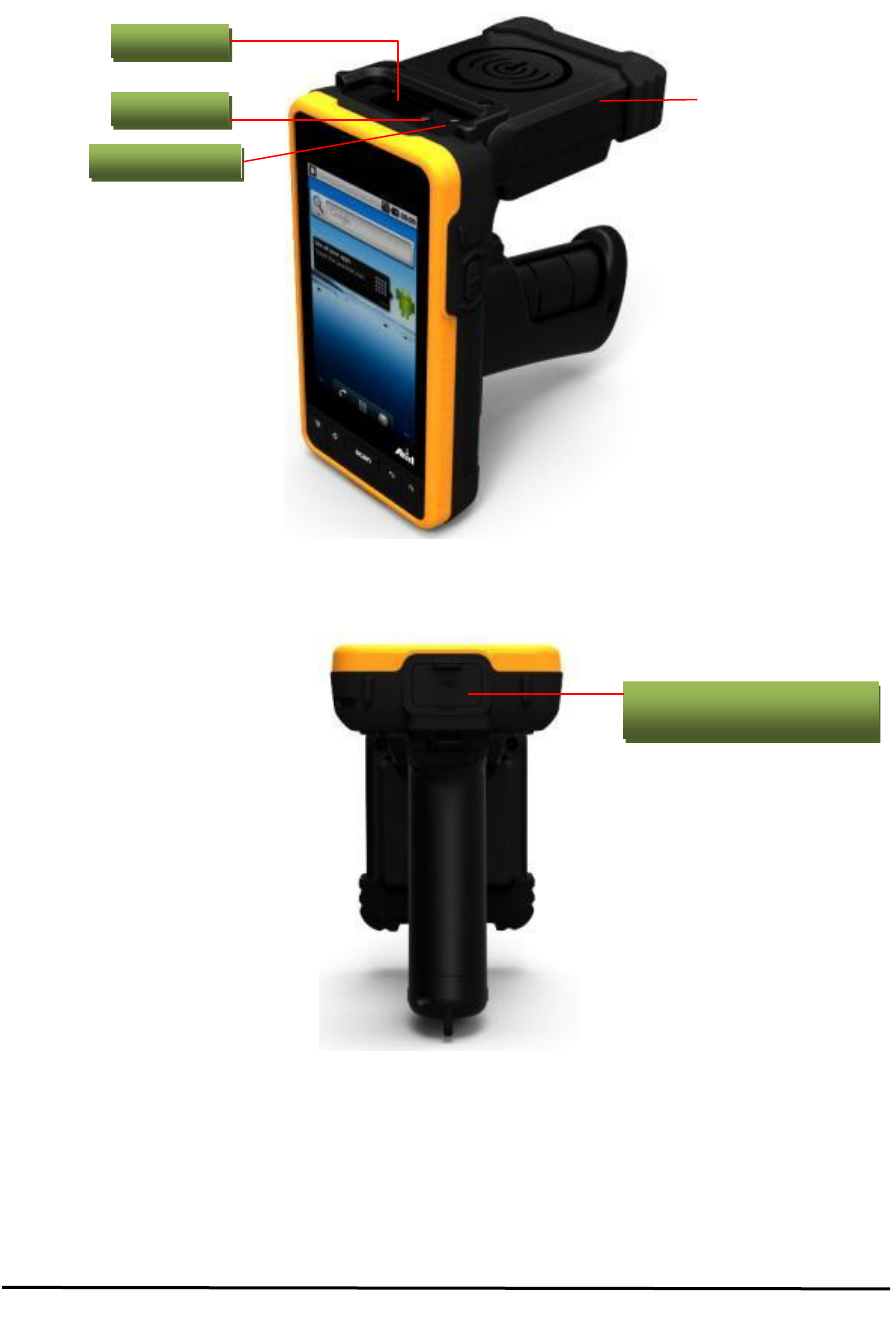
1.3 Name of each part #2
Scanner
Camera
Camera Flash
<
Front>
USB Synchronization/
DC Power Port
< Bottom >
7
(UHF OPTION)
Antenna

AT911 User Reference Guide
2. Power
This section introduces the power system of AT911 as power switch and battery
2.1 Power ON/OFF
2.1.1 Power ON
1. Press power key, the AT911 and the backlight will be on
2. Idle to conserve battery power when power is turned on, the backlight is OFF
2.1.2 P o w e r O F F
1. Press power key, you actually suspend the AT911 and turn off the display and backlight.
2.2 Battery
AT911 uses replaceable 2200mAh Li-ion batteries
If the battery continues to drop to the “Low battery Status” the battery status LED becomes red
and blinks. You need to recharge the battery
2.2.1 Checking battery Power
You can check the battery status by using the power applet.
Settings > Power
If you open this ICON you can check the Battery power gauge.
2.2.2 V e r y L o w b a t t e r y s t a t u s
To prevent the AT911 from being discharged completely, your AT911 will be suspended, when
the battery continues to get low. You need to recharge your battery before the battery
continues to drop
2.3 Removing and installing the battery
2.3.1 Removing the battery
If you are using the Gun handle, please remove the Gun handle first
from device, and you do not have to remove whole body, just remove
top or bottom then change the battery
2.3.2 Installing the battery
Insert the bottom of battery into the sunken place located in battery compartment and press
the battery latch to the above until the battery is installed completely.
2.4 Battery discharging
Several factors determine the life of your battery such as extreme temperatures, input devices,
and your usage, but generally you can use At911 for 5~12 hours.
2.5 Recharging the battery
Use the adapter provided from ATID to recharge your battery
Caution
Your AT870 can be damaged, in case of using the adapter that is not provided from ATID
8

AT911 User Reference Guide
2.5.1 Using the adapter
1. Connect the adapter to the power cord.
2. Connect the DC power jack to the AT911
3. When the battery is charging, the LED becomes red
(PDA’s power LED is not lit, press the power button on the side)
2.6 Disposal of the spent battery
When the battery reaches the end of useful life, the spent battery must be disposed by a qualified
recycler or material handler
Warning
Do not mix the spent battery with the solid waste stream and keep away from children
9

AT911 User Reference Guide
3. AT911System Reset
When the AT911 completely stops responding for your command or an application is locked up
and does not respond, and when you want to upgrade the firmware, it maybe necessary to
perform a system reset.
Caution
Once you initiate a system reset, all applications are forcibly closed and working RAM and files
are cleared. It is a good idea to store important data in the resident Flash Disk) for this reason.
Warning
Do not sure force of a sharp object like paper clip to press the reset button. Use the stylus for
that purpose. Sharp object like paper clip could puncture the seal of the reset key
3.1 Cold Reset (Hard reset)
When you should perform the system reset?
If the performed reset method fails to restore system operation, it may be necessary to perform
a system reset.
Reset procedure
To perform a system reset simultaneously press the <Reset> key with the stylus during pressing
the poser key
.
10