ATMI NOWTRAKI NOWTrak Critical Materials Management System User Manual TM002E A0503
ATMI NOWTrak Critical Materials Management System TM002E A0503
ATMI >
Contents
- 1. TagWriter Users Manual
- 2. NowTrak Users Manual
TagWriter Users Manual
Manual
TM002E A0503
- Critical Materials Packaging Solutions -
NOWTrak
Tagwriter
Operation and Installation Manual
- 2 -
NOWTrak Tagwriter
Operation and Installation Manual
ATMI Packaging, Inc.
10779 Hampshire Avenue South
Minneapolis, Minnesota 55438-2359 USA
Phone 952.942.0855 Fax 952.829.5647
www.atmi.com
- 3 -
Table of Contents
1. Introduction ..................................................................................................................................................... 4
1.1. NOWTrak System Overview .................................................................................................................. 4
1.2. NOWTrak Tagwriter ...............................................................................................................................4
1.3. NOWTrak Components........................................................................................................................... 4
2. Installation....................................................................................................................................................... 5
2.1. PC Requirements..................................................................................................................................... 5
2.2. Reader Card Installation.......................................................................................................................... 5
2.3. Software Installation ............................................................................................................................... 5
2.4. Antenna and Cable Installation ............................................................................................................... 7
3. Operation......................................................................................................................................................... 9
3.1. Hardware Operation ................................................................................................................................ 9
3.2. Tag Writing Templates (csv files)......................................................................................................... 10
3.3. Tag Data Tab......................................................................................................................................... 12
3.4. Setup Tab............................................................................................................................................... 13
3.5. History Tab............................................................................................................................................ 15
3.6. Diagnostics Tab..................................................................................................................................... 16
3.7. I/O control ............................................................................................................................................. 16
3.8. Version Tab........................................................................................................................................... 17
4. Troubleshooting and Repair.......................................................................................................................... 18
4.1. Computer............................................................................................................................................... 18
4.2. Reader Cables and Hardware ................................................................................................................ 18
4.3. NOWTrak Tagwriter software .............................................................................................................. 19
4.4. NOWTrak Technical Support ............................................................................................................... 20
5. Regulatory Information ................................................................................................................................. 21
5.1. United States ......................................................................................................................................... 21

- 4 -
1. Introduction
1.1. NOWTrak System Overview
The NOWTrak system is divided into three major subsystems, the Material Supplier, Material User and
Intelligent Package. The Material Supplier subsystem is made composed of the NOWTrak Tagwriter
software, Controller, and RFID Writer Hardware. The Material User subsystem includes the NOWTrak,
NOWTrak Editor and NOWTrak Fabview software, RFID Reader Hardware. The Intelligent Package
subsystem includes the NOWPak and IntelliCap.
1.2. NOWTrak Tagwriter
The NOWTrak Tagwriter system provides the NOWTrak product line with the ability to write information
to the RFID tag embedded in a NOWTrak “IntelliCap”. The Tagwriter is capable of automatic or manual
operation. There is also a read-only mode to display the data stored on the tag.
1.3. NOWTrak Components
1.3.1. Controller
The NOWTrak controller is typically an industrial PC running the Microsoft Windows 2000
Professional operating system. For small tag writing systems a desktop PC may be used provided it
meets the minimum requirements of the software. The controller is equipped with a NOWTrak RFID
circuit board inserted into a PCI card slot.
1.3.2. IntelliCap
The IntelliCap is a chemical bottle cap with an RFID tag embedded in it. The
IntelliCap is an integral part of the NOWTrak system. The embedded RFID tag
contains information about the contents of the NOWPak.
1.3.3. Tagwriter Antenna
A NOWTrak antenna is attached to wand or capping fixture and connected to the controller with coaxial
cable.
1.3.4. IntelliCheck PCV
The IntelliCheck PCV is a wand that contains an RFID antenna and cable and
an I/O cable. When the wand is within close proximity to a RFID tag, it has the
ability to read or write data to the RFID tag. The wand also contains a red and
green LED. These LEDs provide feedback to the operator during tag reading
and writing.
1.3.5. NOWTrak Tagwriter Software
The NOWTrak Tagwriter software has a graphic user interface that assists the user with the process of
writing tag data. NOWTrak Tagwriter is also called NOWTrak CSP. These terms are interchangeable.
1.3.6. NOWTrak Reader Card
The NOWTrak Reader card performs the actual writing of the RFID tag. It is
the interface between the PC software and the RFID tag. The reader card is a
PCI card with connections for 4 RFID antennas, although the NOWTrak
Tagwriter only works with one antenna at a time. The reader card, like any
PCI card, requires a PCI slot and a windows driver to become operational.
- 5 -
2. Installation
2.1. PC Requirements
The NOWTrak Tagwriter application operates on a MS-Windows 2000 PC system. It may operate on other
MS-Windows 32 bit professional operating systems such as NT-4 and XP Professional, but it has not been
tested on these systems. The PC must contain at least one free PCI slot. When configured to operate as part
of an automated line, a monitor, keyboard and mouse are not a required, but are recommended. The
Tagwriter is not resource intensive but for best performance and reliability the computer hardware should be
of recent vintage meeting the minimum specifications below.
• Processor: Pentium III, 500Mhz or Better
• RAM: 256MB
• Video: SVGA 1024x768
• HDD: 10GB
• CDROM: 8X
2.2. Reader Card Installation
Caution: A qualified PC technician should install the reader board.
Caution: Observe ESD procedures during board installation.
• Shut down the computer and disconnect the power cord.
• Open the chassis to expose an available PCI Slot.
• Install the Reader card and secure the card using the chassis retaining screw or clamp.
• Close the chassis.
• Reconnect power and start the computer.
• Load the reader card device driver, See Driver Installation below.
2.3. Software Installation
2.3.1. Driver Installation
When the system is booted with a newly installed reader board, MS-Windows will detect it and launch
the “New Hardware Wizard”.
1. Load the NOWTrak CD into the CD-ROM drive.
2. When the wizard asks for the location of the driver. Select the “Have Driver” option and browse to
IOP480.sys on the NOWTrak CD-ROM.
3. Finish the wizard by accepting the defaults.
Once the driver is installed, the board becomes operational.
2.3.2. Unicode Font Installation
Note: This font MUST be installed for proper operation of the NOWTrak software.
• Load the NOWTrak CD into the CD-ROM drive.
• Using Windows Explorer, Browse to the CD.
• Double-click on ArialUnicodeFont.exe.
• Accept the license agreement and complete the installation.
• Restart the computer if required.
- 6 -
2.3.3. NOWTrak Software Installation
• Copy the NOWTrakCSP directory from the CD to the C: Drive. Note: an alternate drive may be used
but the program registry must be edited to reflect the correct directory assignment. See Software
Configuration below.
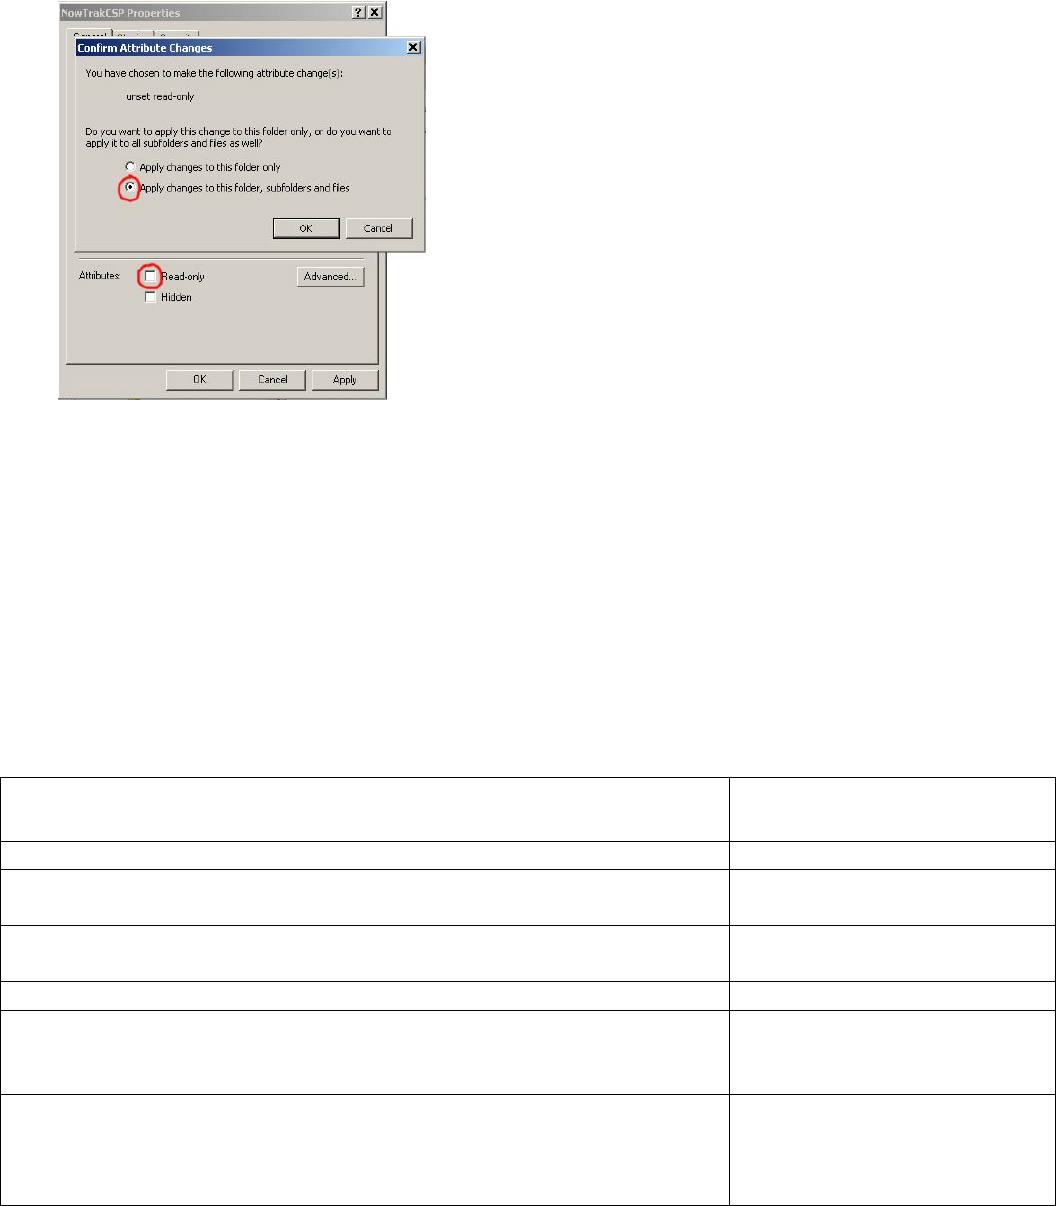
• Using Windows Explorer, edit the properties of the C:\NowTrakCSP directory. Clear the read-only
attribute on and apply changes to the folder, subfolders and files. (See picture below)
2.3.4. NOWTrak Software Configuration
• Load the NOWTrak CD into the CD-ROM drive.
• Using Windows Explorer, Browse to the CD.
• Double-click on NOWTrakCSP.reg
• Click “Yes” to the edit system registry dialog box.
• If the Tagwriter software was NOT installed in C:\NOWTrakCSP edit the directory path in the
NOWTrak registry: HKEY_LOCALMACHINE/SOFTWARE/ATMI/NOWTrakCSP.
• Note: Improperly editing the system registry can cause system instability or loss of data. A qualified
system administrator should perform this task.
2.3.5. Key files and folders
File and Path Description
C:\NOWTrakCSP\bin\NOWTrakCSP.exe Tagwriter executable file
C:\NOWTrakCSP\Database\Config\ConfigDatabases.xml Stores software configuration
data.
C:\NOWTrakCSP\Database\History\HistoricalDatabases.xml Stores the historical
information
C:\NOWTrakCSP\Database\Html\ChemicalSupplierProgram.htm Help files and related data
C:\NOWTrakCSP\Database\System\RFIDTagMemoryMap.xml Defines the RFID tag memory
map. Used in writing the data
in the CSV file to the tag.
C:\NOWTrakCSP\Database\TEMP Default directory for storing
the CSV files. CSV files can
also be stored in other
locations.
- 7 -
2.4. Antenna and Cable Installation
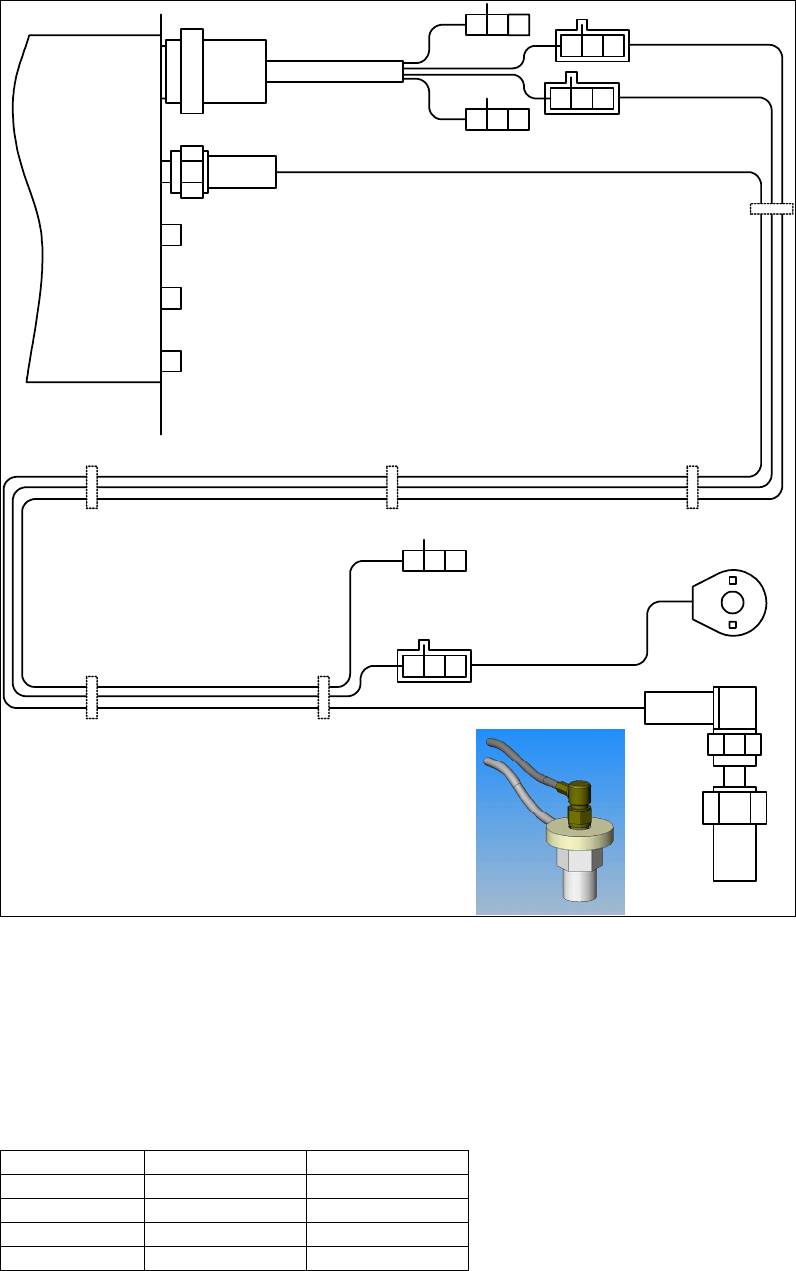
2.4.1. Reader Board Cable
Attach the Reader Board Cable to the Reader Card using the 60-pin mini d-sub connector. Tighten the
retaining screws.
Reader Board Cable
I/O RF Cable
Reader
Board
LED Ring
Antenna
Tool Enable
Line
2.4.2. Single I/0-RF Cable
• Attach the female Molex connector of the I/O-RF cable to the male connector labeled “1 2 3 LED”
on the I/O Splitter cable.
• Attach the straight TNC connector (same end of the cable as the female Molex) to the TNC jack on
the reader board furthest from the I/O Splitter. Labeled ‘1’ in the diagram below.
• If more than one cable is used see the table below.
Cable I/O Splitter TNC Jack
1 1 2 3 LED 1
2 4 5 6 LED 2
3 7 8 9 LED 3
4 10 11 12 LED 4

- 8 -
2.4.3. Quad I/O-RF Cable
• Attach each female Molex connector of the I/O-RF cable to the corresponding male connector on the
I/O Splitter cable. All connectors are labeled.
• Attach the straight TNC connectors to the corresponding TNC jack on the reader board. The RF
cables are labeled “Cable 1” through “Cable 4”; the jacks are identified in the diagram below.
3 2 14I/O
2.4.4. IntelliCheck PCV Wand (for manual tag writing)
• Remove the screws and separate the top and bottom halves of the IntelliCheck wand.
• Make sure the LED ring is facing up (one trace on each side visible through the clear plastic
doughnut).
• Place the LED Ring over the antenna Jack.
• Place the 90° TNC connector of the RF cable onto the antenna jack and tighten (finger tight).
• Route the LED cable through one side of the slot in the lower handle.
• Route the RF cable through the other side of the slot in the lower handle.
• Ensure the cables do NOT cross over or twist around each other in the slot.
• Reassemble the top and bottom halves and tighten the screws.
2.4.5. Automatic Tag Writing using a fixture
Automatic tag writing equipment is tailored to suit the needs of each production line. Typically the tag-
writing antenna is attached to the capping device. Depending on the application, custom cables may be
needed. As a minimum there will be an RF cable and antenna. More complex installations could
multiple antennas, I/O cables and indicators. Detailed installation instructions are provided separately.
- 9 -
3. Operation
3.1. Hardware Operation
3.1.1. Reading and Writing
The antenna must be in centered over the tag with a gap of less than 2mm to operate
properly. The RFID tag is underneath the black dot on top of the IntelliCap. The
IntelliCap has a distinctive blue top-ring while regular SmartCaps are all white.
SmartCaps cannot be used with the NOWTrak system.
3.1.2. IntelliCheck PCV wand
There are two LEDs on the IntelliCheck wand.
• The blinking green LED indicates a tag has been detected.
• The steady green LED indicates write was successful.
• The steady red LED indicates a write failure.
- 10 -
3.2. Tag Writing Templates (csv files)
3.2.1. NOWTrak Tagwriter Software
The NOWTrak Tagwriter software uses textual information contained in a comma separated value (csv)
formatted file to determine what will be written to the tag. Each line in the file represents an attribute
name, attribute value pair. The attribute names are defined in the RFIDTagMemoryMap.xml file and are
shown on the user interface on the Tag Data tab. If the attribute name in the csv file does not match any
of the defined lists of names, the line in the csv file is ignored.
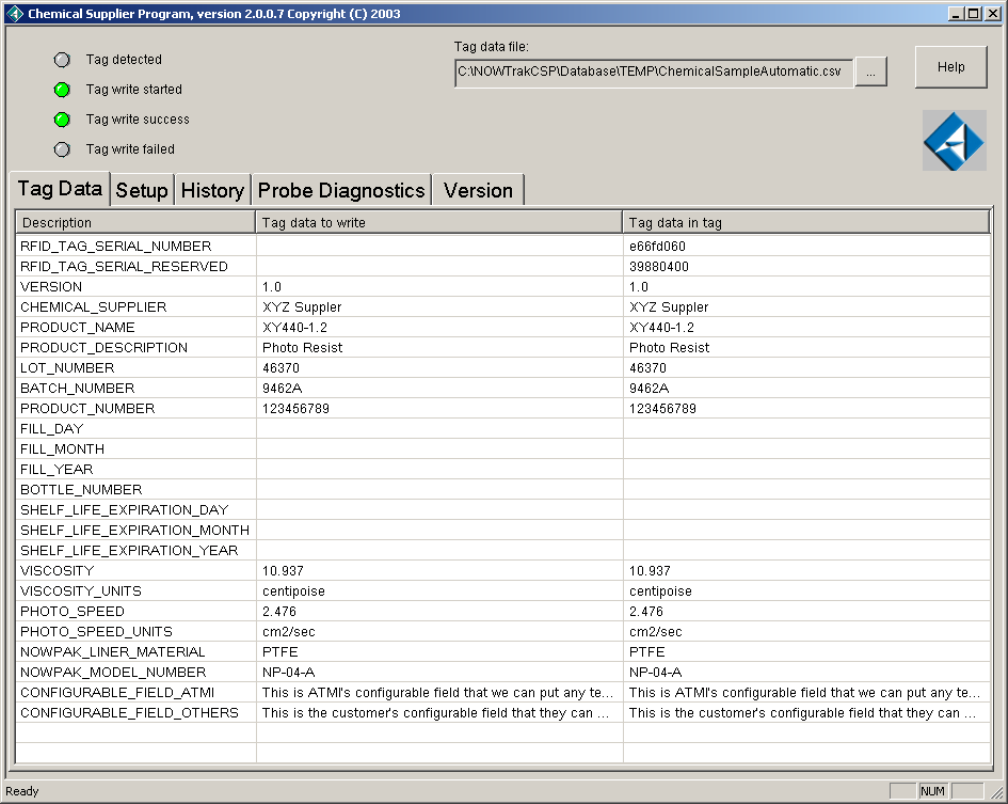
RFID Tag Memory Map
TITLE
FORMAT or
UNITS
FIELD
LENGTH
(bytes)
RFID Tag Serial Number Alpha 4
RFID Tag Serial Number expansion Alpha 4
Version Text 8
NOWPak Installation Day Text 2
NOWPak Installation Month Text 2
NOWPak Installation Year Text 4
Chemical Supplier Text 20
Product name Text 20
Product Description Text 40
Lot Number Text 16
Batch Number Text 16
Product Number Text 16
Fill Day Text 2
Fill Month Text 2
Fill Year Text 4
Bottle Number Text 8
Shelf life Expiration Day Text 2
Shelf life Expiration Month Text 2
Shelf life Expiration Year Text 4
Viscosity Text 10
Viscosity Units Text 10
Photospeed Text 10
Photospeed Units Text 10
NOWPak Liner Material Text 10
NOWPak Model Number Text 16
Configurable Fields ATMI Text 300
Configurable Fields Others Text 218
Total Bytes 760
3.2.2. RFID Tag data and the CSV file.
The tag data is broken down into fixed length fields. If the CSV file defines a value longer than allowed
by the definition, the value is truncated. The following list describes each of the fields that are available
for writing data.
- 11 -
3.2.3. Attributes available for CSV definition
• CHEMICAL_SUPPLIER – 20 characters long.
• PRODUCT_NAME – 20 characters long
• PRODUCT_DESCRIPTION – 40 characters long
• LOT_NUMBER – 16 characters long
• BATCH_NUMBER – 16 characters long
• PRODUCT_NUMBER – 16 characters long
• VISCOSITY – 10 characters long
• VISCOSITY_UNITS – 10 characters long
• PHOTO_SPEED – 10 characters long
• PHOTO_SPEED_UNITS – 10 characters long
• NOWPAK_LINER_MATERIAL – 10 characters long
• NOWPAK_MODEL_NUMBER – 16 characters long
• CONFIGURABLE_FIELD_OTHERS – 218 characters long
3.2.4. Special attributes
3.2.4.1. File date
If the fill date is not defined in the CSV file, today’s date is written to the tag in these fields.
• FILL_DAY – 2 characters long. Example: 11
• FILL_MONTH – 2 characters long. Example: 31
• FILL_YEAR – 4 characters long. Example: 2003
3.2.4.2. Shelf life expiration date
If the shelf life expiration date is not defined in the CSV file, today’s date plus the value of
“SHELF_LIFE_EXPIRATION_DAYS” from the CSV file is written to the tag in these fields.
• SHELF_LIFE_EXPIRATION_DAYS – This attribute is used in the computation of the
expiration date. Example: 365
• SHELF_LIFE_EXPIRATION_DAY – 2 characters long. Example: 11
• SHELF_LIFE_EXPIRATION_MONTH – 2 characters long. Example: 31
• SHELF_LIFE_EXPIRATION_YEAR – 4 characters long. Example: 2004
3.2.5. Reserved attributes
The following fields are reserved and will be ignored when reading the CSV file.
• RFID_TAG_SERIAL_NUMBER – The unique ID of the RFID tag. This value is read only.
• RFID_TAG_SERIAL_RESERVED – The unique ID of the RFID tag. This value is read only.
• VERSION – The version is written by ATMI.
• NOWPAK_INSTALLATION_DAY – This is for future use. The NOWPAK_INSTALLATION
date fields may be written when the bottle is put into service.
• NOWPAK_INSTALLATION_MONTH
• NOWPAK_INSTALLATION_YEAR
• BOTTLE NUMBER – 8 characters long. This field is written if the bottle number saved in
ConfigDatabases.xml is greater than zero. The bottle number is minimum of 6 characters long with
leading zeros.
• CONFIGURABLE_FIELD_ATMI – The date that the tag was initially written at ATMI is stored in
this field. It is of the format DDMonthYYYY, where DD and YYYY are numeric and Month is the
month spelled out in English.
- 12 -
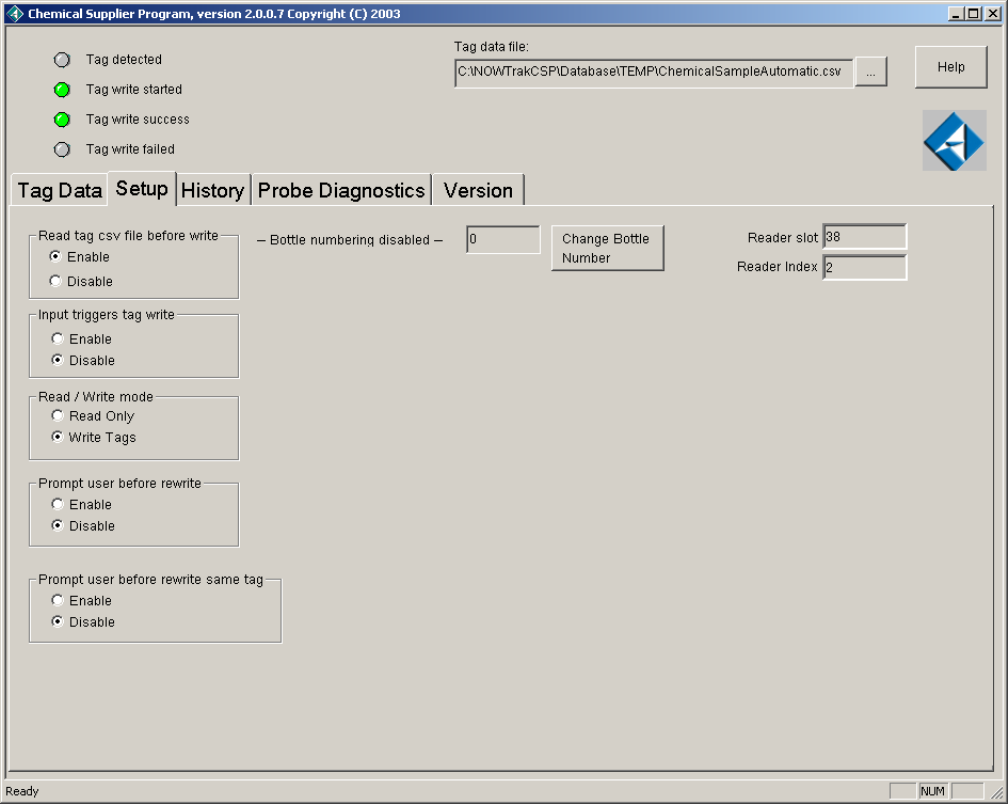
3.3. Tag Data Tab
The tag data tab shows the information that is to be written to the tag and what was actually read from and
written to the RFID tag. Generally, the only differences that will be visible from one tag write to the next is
the serial number and the bottle number. All other fields are constant. The following is an example of the
user interface with the Tag Data tab selected and a tag being read.
- 13 -
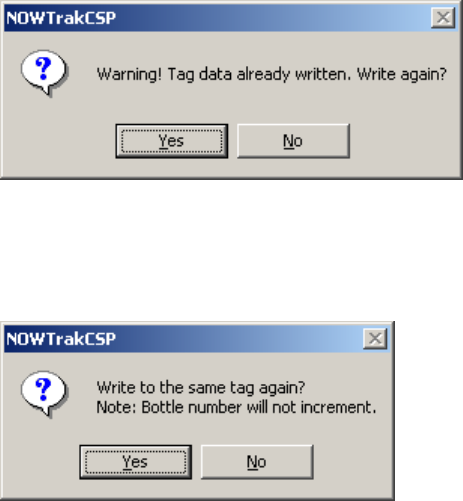
3.4. Setup Tab
The setup tab allows the application behavior to be modified. When a radio button is selected, this new
selection is written to the ConfigDatabases.xml file so that the program will maintain the same behavior
from run to run. The only exception to this is the Read Only radio button. This mode is not saved. This tab
also shows the current bottle number to be written and the default probe antenna in use. The default probe
antenna’s reader slot and index will show “UNDEFINED” until the application detects a tag at an antenna.
The reader slot and index will be filled in when this occurs.
3.4.1. Radio button selections
3.4.1.1. Read tag CSV file before write
This feature exists for situations where an automation line implementation needs to write unique data
to each tag. This will most likely be used with the option “Input triggers tag write” so that the csv
file is updated before the write tag occurs.
- 14 -
3.4.1.2. Input triggers tag write
This feature is used when the system is used in an automation line. Writing of the tag data is held up
until an input triggers the system that the tag is ready to be written.
3.4.1.3. Read / Write mode
This feature can be used to turn the Tagwriter application into a tag reader application. As stated
earlier, this feature is reset to “write tags” every time the application is restarted.
3.4.1.4. Prompt user before rewrite
This feature allows the end user to prevent a tag write if a tag was accidentally place in the field of
the antenna again. This is detected by looking at the bottle number. If it is not empty, then the
rewrite event can be detected. If there is no bottle number, this feature is not useful. . The user can
choose to write the tag again at the prompt.
3.4.1.5. Prompt user before rewrite same tag
This feature allows the end user to prevent a tag write if the same tag was just place in the field of
the antenna again before another tag. This is detected by looking at the tag serial number and
comparing it to the last tag written. The user can choose to write the tag again at the prompt.
- 15 -
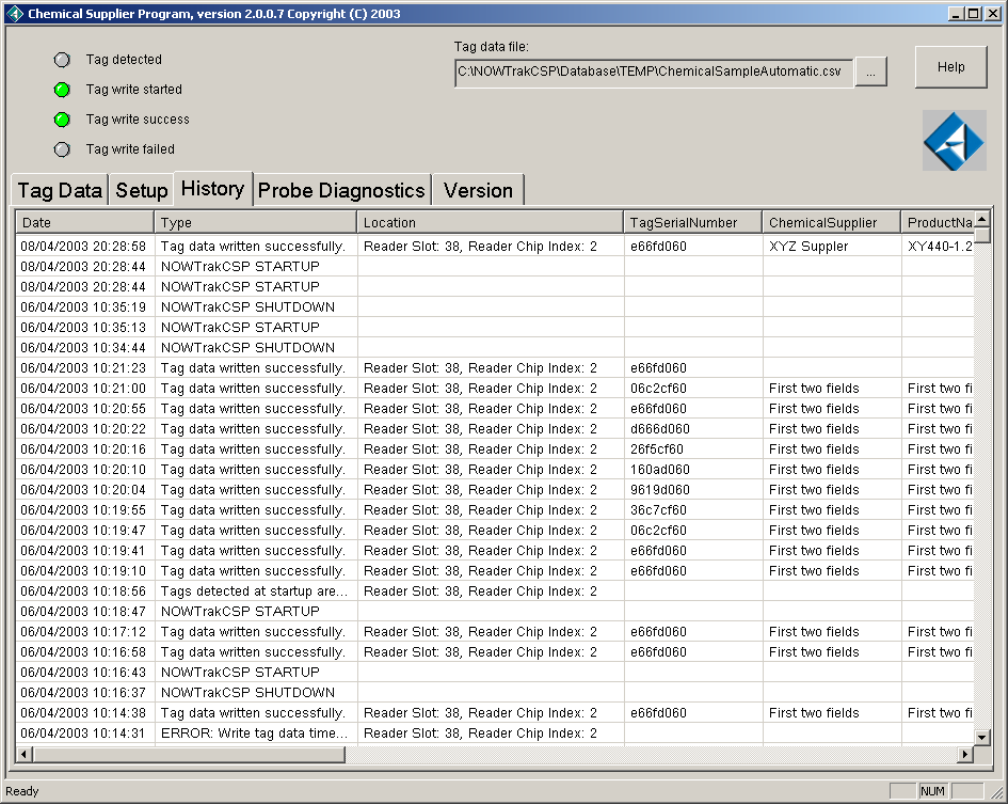
3.5. History Tab
The history tag displays the information saved in HistoricalDatabases.xml. This data records significant
events during the process of reading and writing tags. The following is an example.
- 16 -
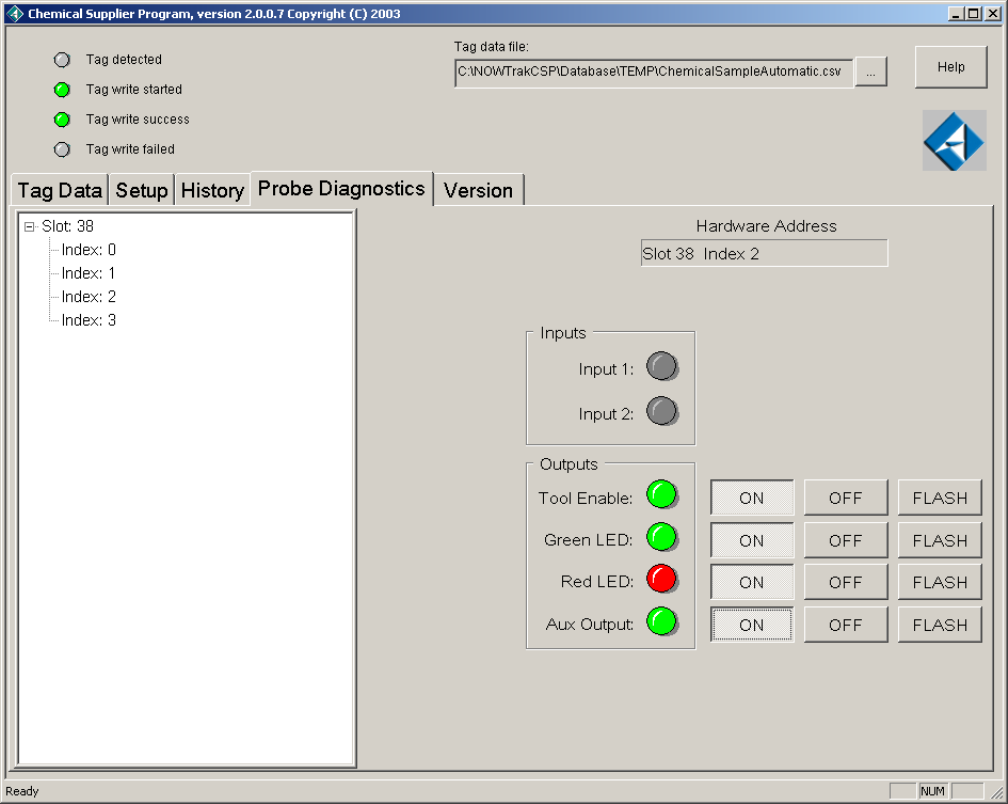
3.6. Diagnostics Tab
The probe diagnostics tab provides the ability to control the outputs and read the inputs of the various probe
antenna readers. If an I/O is suspected to be bad, this diagnostic can be useful in determining the scope of
the failure.
3.7. I/O control
There are three I/O’s in, addition to LED control, which are used by the Tagwriter application.
3.7.1. Input – begin tag write
The input triggers the writing of the tag. It needs to cycle ON/OFF before the next write can occur.
INPUT_PORT_0 is the input used. Listed as “Input 1” on the dialog above.
3.7.2. Output – write success
This output is turned ON when the tag write succeeds. OUTPUT_PORT_TOOL_ENABLE is the output
used. Listed as “Tool Enable” on the dialog above.
3.7.3. Output – write failure
This output is turned ON when the tag write fails. OUTPUT_PORT_1 is the output used. Listed as “Aux
Output” on the dialog above.
- 17 -
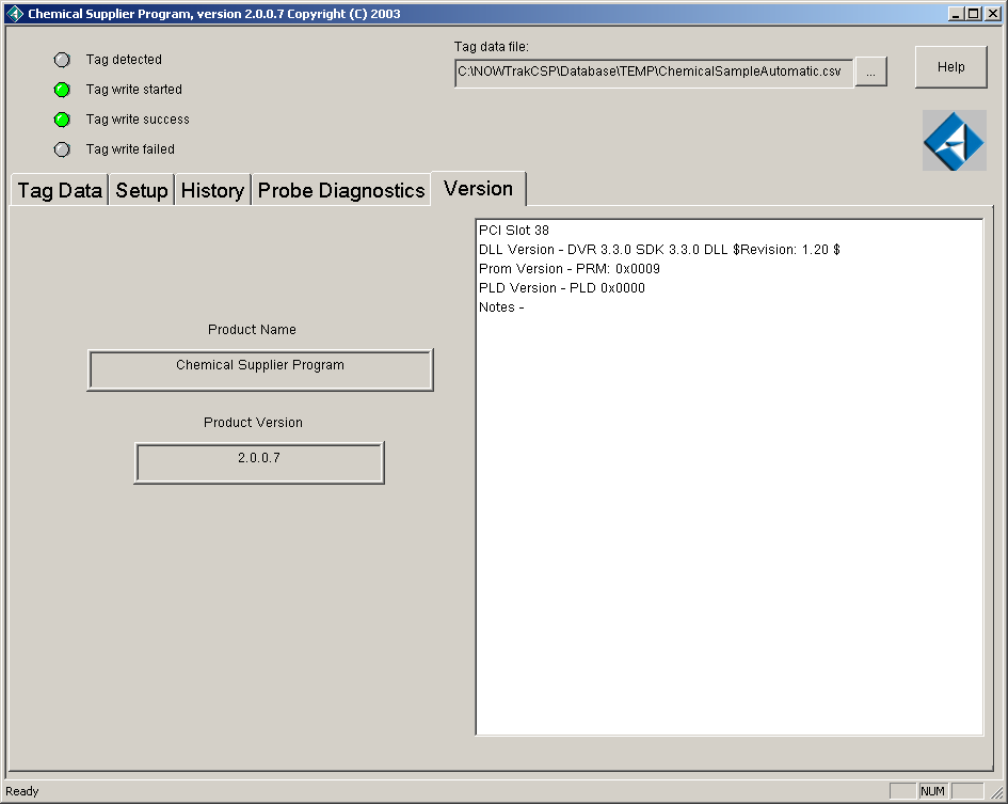
3.8. Version Tab
The purpose of the version tab is to provide information about the various software versions in use. It
displays the version of this application and lists the version of the RFID boards, drivers and dll’s.
The following is an example of the version tab with one board on PCI slot 38. Note: Slot numbering is
controlled by the computer hardware and usually starts at some number greater than 30. A computer may
contain between 2 and 12 physical slots.
- 18 -
4. Troubleshooting and Repair
4.1. Computer
4.1.1. RFID reader board Failure
The RFID reader board uses internal software to make it function. If the board hangs (locks up), this
internal software is the most likely cause. A hang occurs when the system operates normally for a while
then stops recognizing tags and/or will not respond to diagnostic commands. There are several steps that
can be taken to restore normal operation.
• The first step is to reboot the system this will reset the board and it’s software.
• If the problem continues reload the IOP480.sys driver from the NOWTrak CD-ROM.
• If the problem is still present, reload the NOWTrak CSP Software.
• If this does not fix the problem board replacement may be necessary.
Replace a NOWTrak RFID Reader Board
• To replace a NOWTrak Reader Board:
• Ensure that the computer is powered off.
• Ensure that the cables attached to the board are labeled and removed from the board.
• Remove the cover from the computer.
• Use an electro-static wrist strap and connect it to the computer.
• Using a Philips screwdriver, remove the screw holding the board in the computer.
• Remove the board.
• Install the new board.
• Insert the board in the slot and use the original screw to lock the board in place.
• Replace the cover on the computer.
• Reconnect the cables to the computer.
• The system is now ready for use.
4.1.2. Computer Hardware
Consult the computer manufacturer’s documentation for troubleshooting and repair guidance.
4.1.3. RAID System
If the Tag-writing computer is equipped with a RAID (Redundant Array of Inexpensive Disks) Hard
Disk Drives, consult the RAID Controller documentation for diagnostic and recovery options.
4.2. Reader Cables and Hardware
4.2.1. IntelliCheck Wand Failure
The IntelliCheck has three NOWTrak components; the antenna, LED ring and cable assembly. If you
suspect any of these parts, troubleshoot using the instructions below.
4.2.2. IntelliCap Failure
If an IntelliCap cannot be read or written, it may be a bad RFID tag. To determine if it is the RFID tag,
place another IntelliCap at the antenna. If the system reads the tag, then the IntelliCap is bad.
- 19 -
4.2.3. I/O Cable Failure
A cable problem can symptomatic of several possible points of failure: The I/O Device, I/O Cable, I/O
Splitter Cable and the Reader Board.
• Start testing at the device using the Probe Diagnostics Tab in the software. Verify that each LED
Output and Input functions correctly.
• If the majority of I/O functions are OK troubleshoot the device and I/O Cables.
• If the majority of I/O functions fail troubleshoot the reader board and I/O Splitter Cable.
• If a cable problem is still indicated perform a full continuity check of the suspect cable.
• If nothing is found, replace the RFID reader board.
4.2.4. Antenna Failure
It should be easy to determine if an antenna is bad. The possible points of failure are: the antenna, RFID
tag, reader board and RF cable.
• Rule out a bad RFID tag by placing a known good tag under the antenna.
• Swap the antenna and LED to the next available channel on the reader board and retest.
• Swap the RF Cable with a known good cable.
• Swap the antenna with a known good antenna.
• Replace the RFID reader board.
• If this does not fix the problem, more robust testing than that addressed in this document may be
required.
4.2.5. LED Failure
The NOWTrak application’s Diagnostic tab provides validation of the LED output signal. If diagnostics
indicate an LED is not working see the I/O cable failure section for further instructions.
4.3. NOWTrak Tagwriter software
In the software domain, the less its environment changes, the less likely the software will fail. When
software suddenly exhibits abnormal behavior it is usually because the environment changed.
• The first step in troubleshooting software is to look for and document all recent changes. Have databases
changed? Has new hardware been installed? Has the network environment been modified? Has there
been a recent hardware failure? Has a new release of the software been recently installed? Have files
been deleted? Have new, unrelated, applications been installed on the computer?
• The next step is to make the problem repeatable and predictable. This step is complete when you can
confidently say, “Every time I perform action ‘X’ the software exhibits behavior ‘Y’”.
• The information you gathered about system changes when combined with a repeatable problem will help
the software developers solve your problem quickly.

- 20 -
4.3.1. The NOWTrak application hangs
As with all software applications, there is a small chance that a NOWTrak Tagwriter application will
hang. A hang is indicated by the user interface failing to respond to user interaction within a reasonable
period of time. Since the user interface is hung, the application will need to be killed and restarted.
• To kill a NOWTrak Tagwriter application, the “Windows Task Manager” will have to be opened.
Select the NOWTrak CSP and press “End Task”. Pressing the right mouse on the task bar and
selecting “Task Manager” from the pop up menu will start the “Windows Task Manager”. Another
way to start it is to press, “control-alt-delete” and select “Task Manager” from this dialog.
• Once the NOWTrakCSP has terminated, restart the application by double clicking on the
NOWTrakCSP icon on the desktop.
If the application hangs again, it is probable that there are other problems in the NOWTrak Tagwriter
environment. It may require hardware analysis or possibly restoring prior databases. If the databases
have just changed, it may be appropriate to back track and restore an earlier version of the database to
see if the hang situation goes away.
4.3.2. A database or CSV file is corrupt
A corrupt database or csv file can cause abnormal operation of the NOWTrak Tagwriter system. It may
cause the application to hang or crash. If a database was just modified and NOWTrak applications begin
to display abnormal operations, the database would have to be the primary suspect as the cause of the
problem. If regular backups have been performed, the system can readily be restored to a previous
period in time.
4.4. NOWTrak Technical Support
• Telephone: 952.942.0855 Fax 952.829.5647
• Shipping Address: 10779 Hampshire Avenue South, Minneapolis, Minnesota 55438-2359 USA
• Web: www.atmi.com
- 21 -
5. Regulatory Information
5.1. United States
This equipment has been tested and found to comply with the limits for a Class A digital device, pursuant to part 15 of the FCC
Rules. These limits are designed to provide reasonable protection against harmful interference when the equipment is operated in
a commercial environment. This equipment generates, uses, and can radiate radio frequency energy and, if not installed and used
in accordance with the instruction manual, may cause harmful interference to radio communications. Operation of this equipment
in a residential area is likely to cause harmful interference in which case the user will be required to correct the interference at
their own expense.

- 22 -
NOWTrak
Tagwriter
N
OWTrak is a trademark of ATMI, Inc.
N
OWPak is a registered trademark of ATMI, Inc.
10779 Hampshire Avenue South • Minneapolis, MN 55438-2359
Phone 952.942.0855 • Fax 952.942.8474 • www.atmi.com