AUSWAY PACIFIC UR-A56 Walkie Talkie User Manual UV A56 0806
AUSWAY PACIFIC PTY LTD Walkie Talkie UV A56 0806
UserManual.wiki
>
AUSWAY PACIFIC
>
UR A56 User Manual
User Manual
Navigation menu
Upload a User Manual
Namespaces
Wiki Guide
HTML
PDF
Info
Views
User Manual
Discussion / Help
Navigation
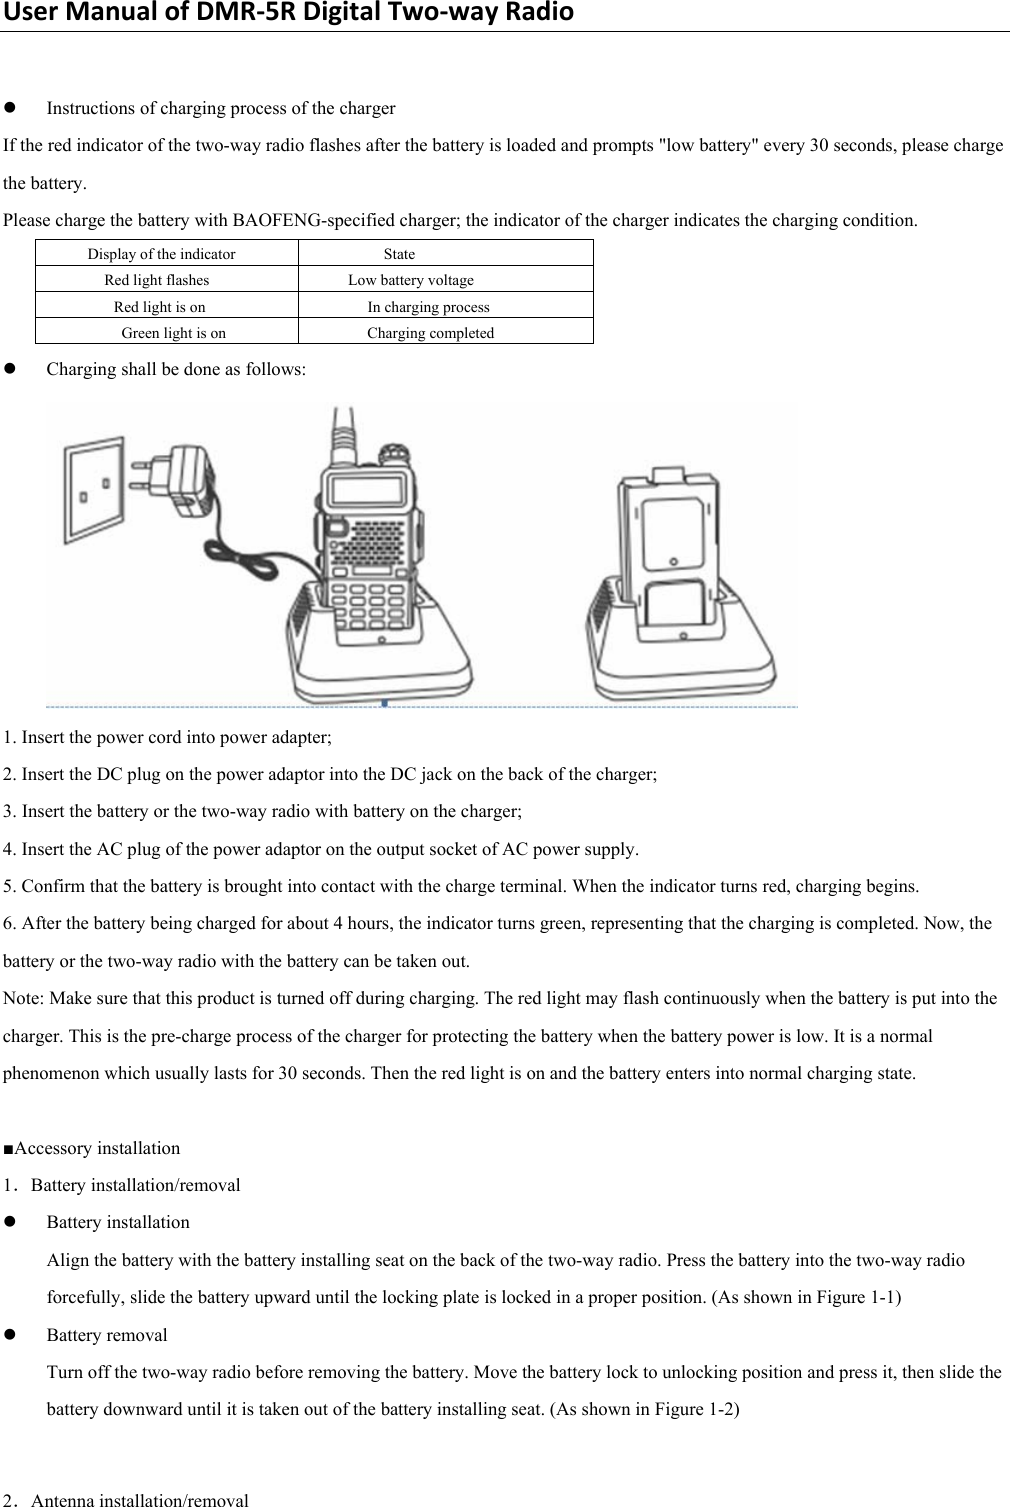
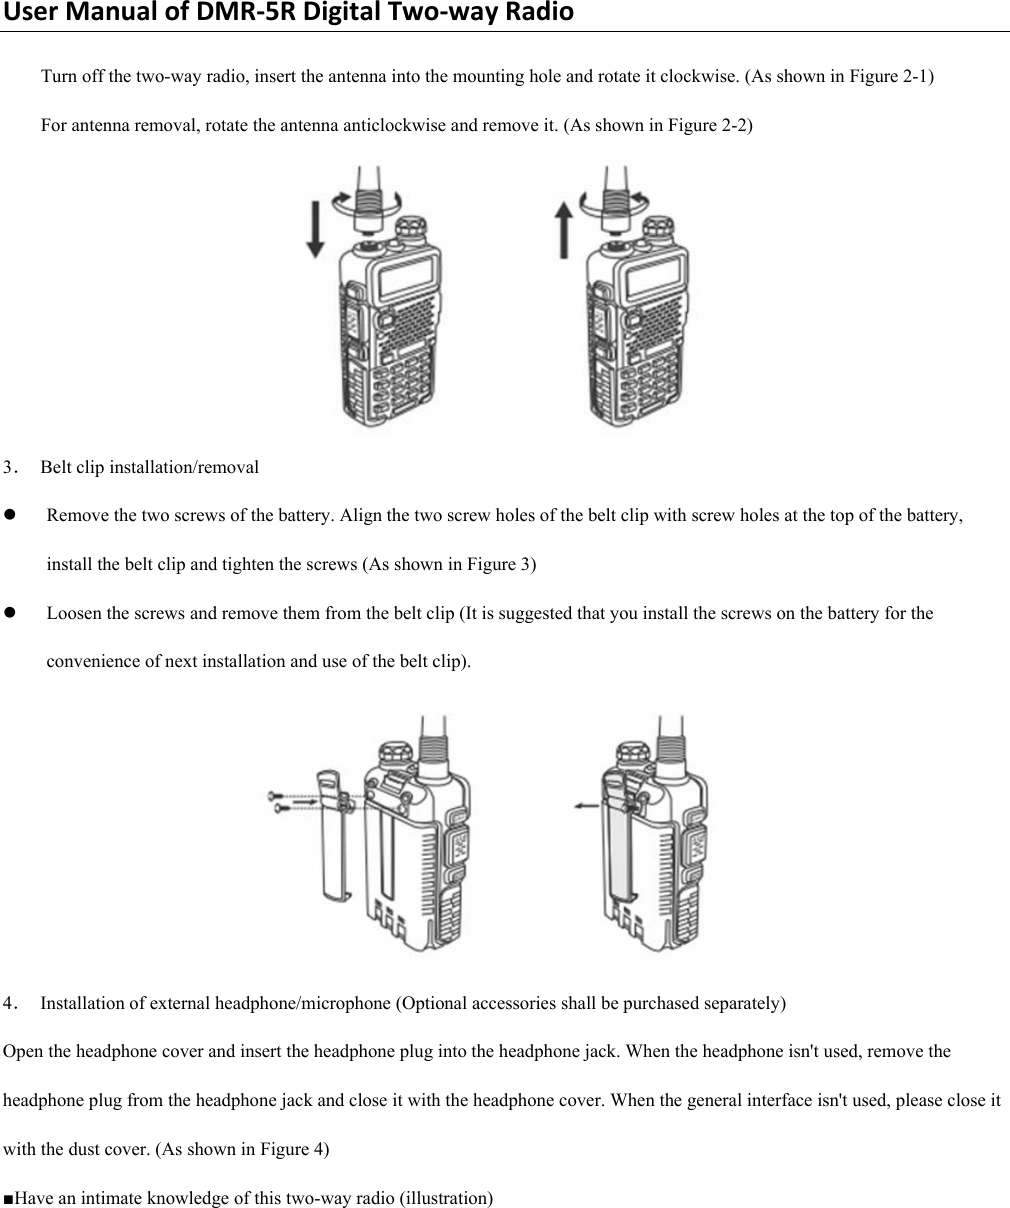
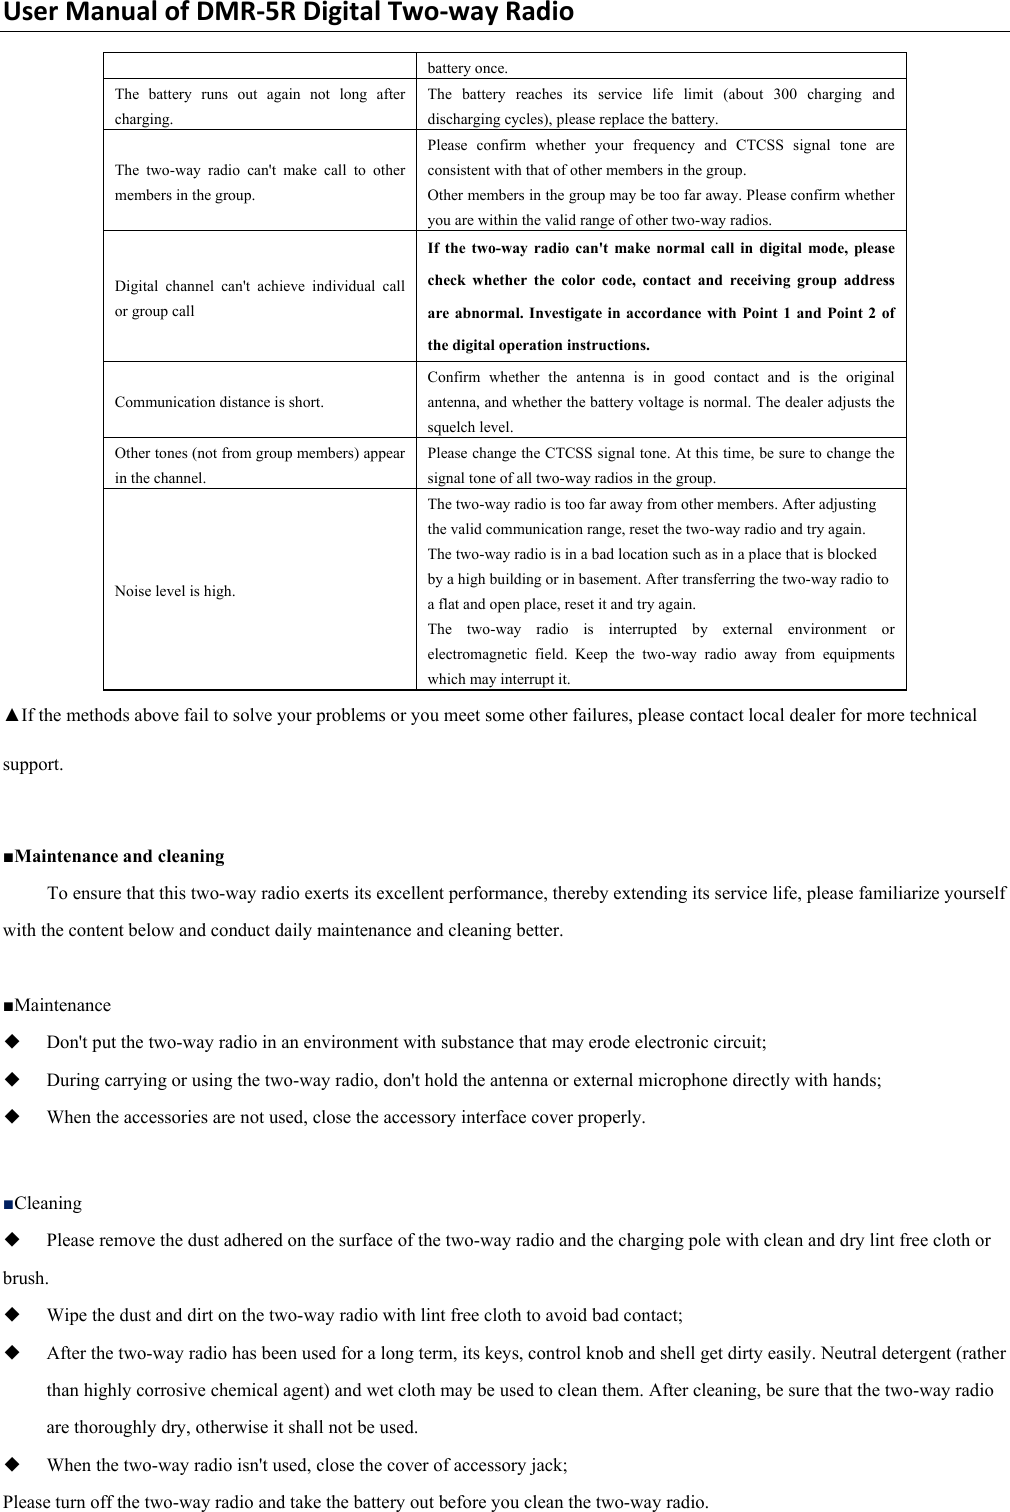
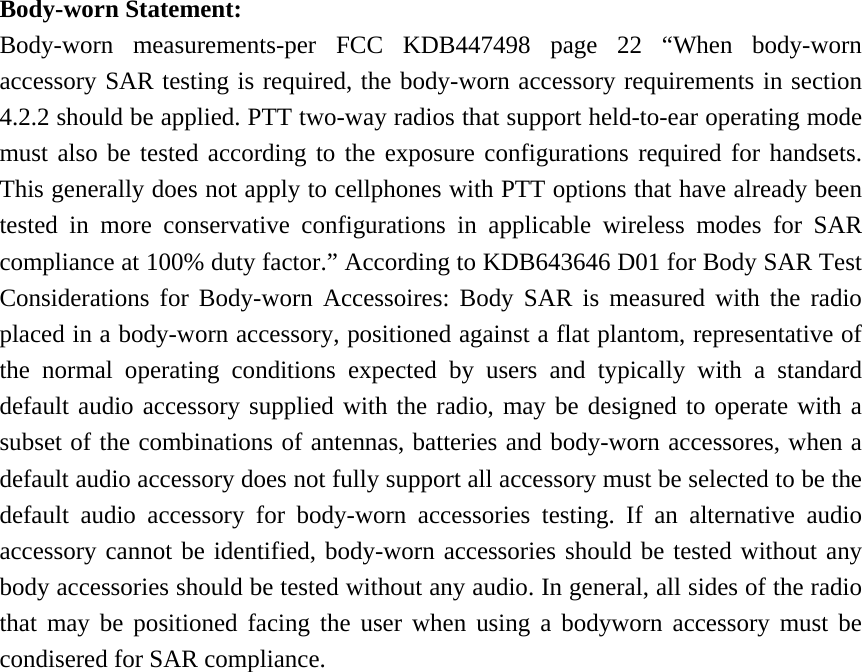
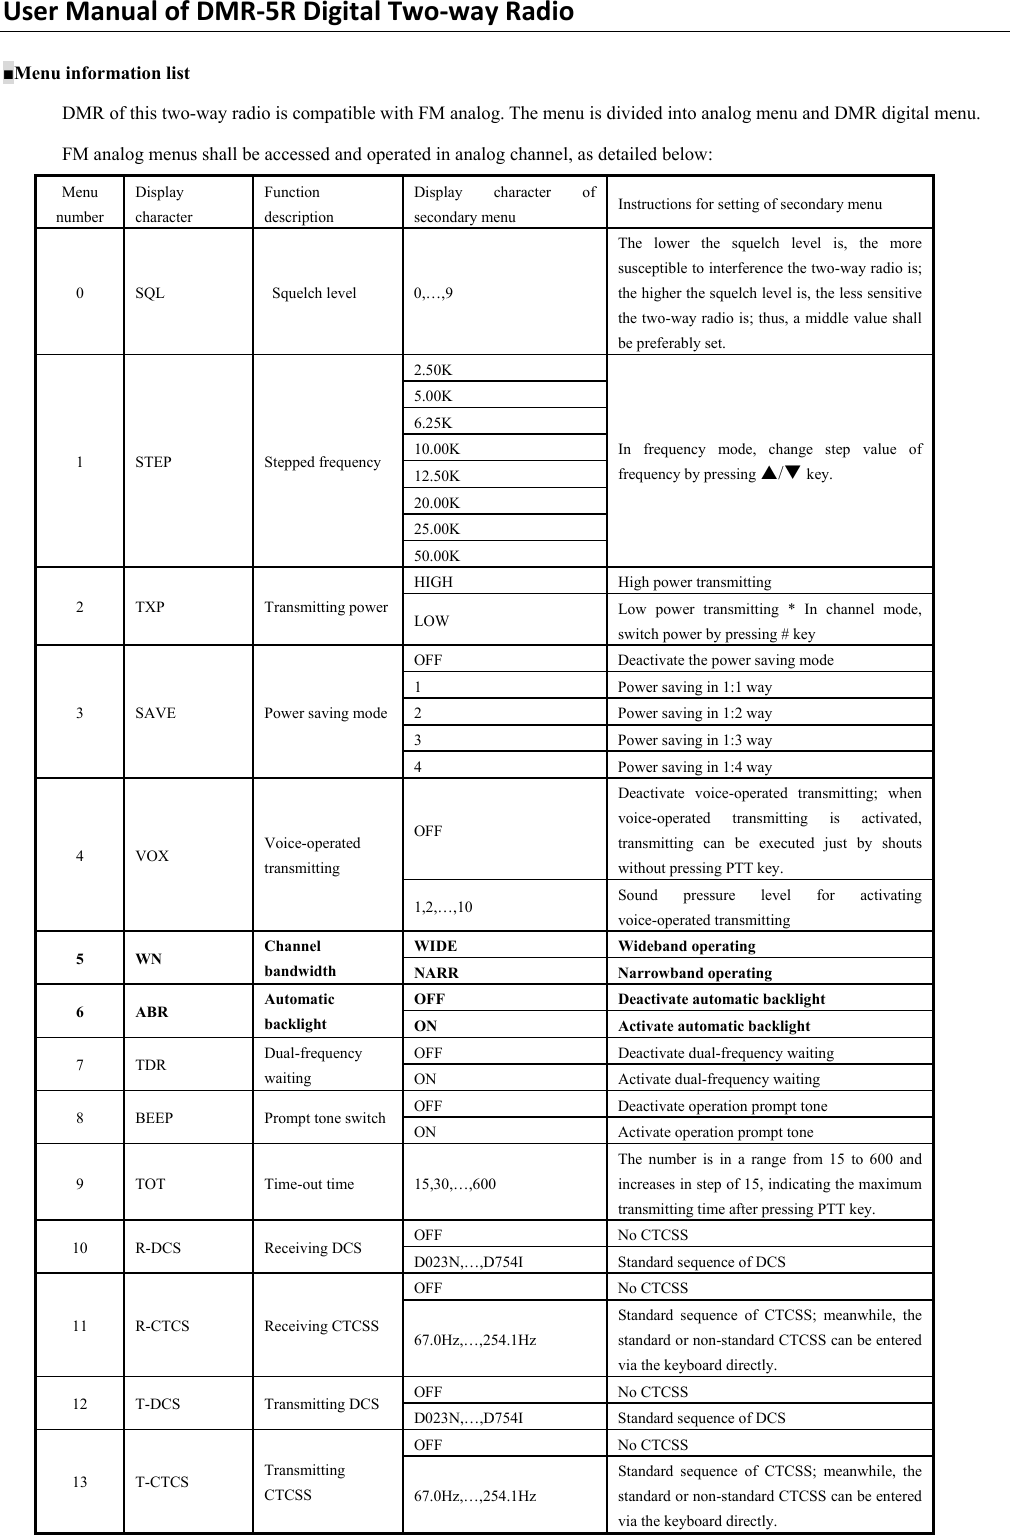
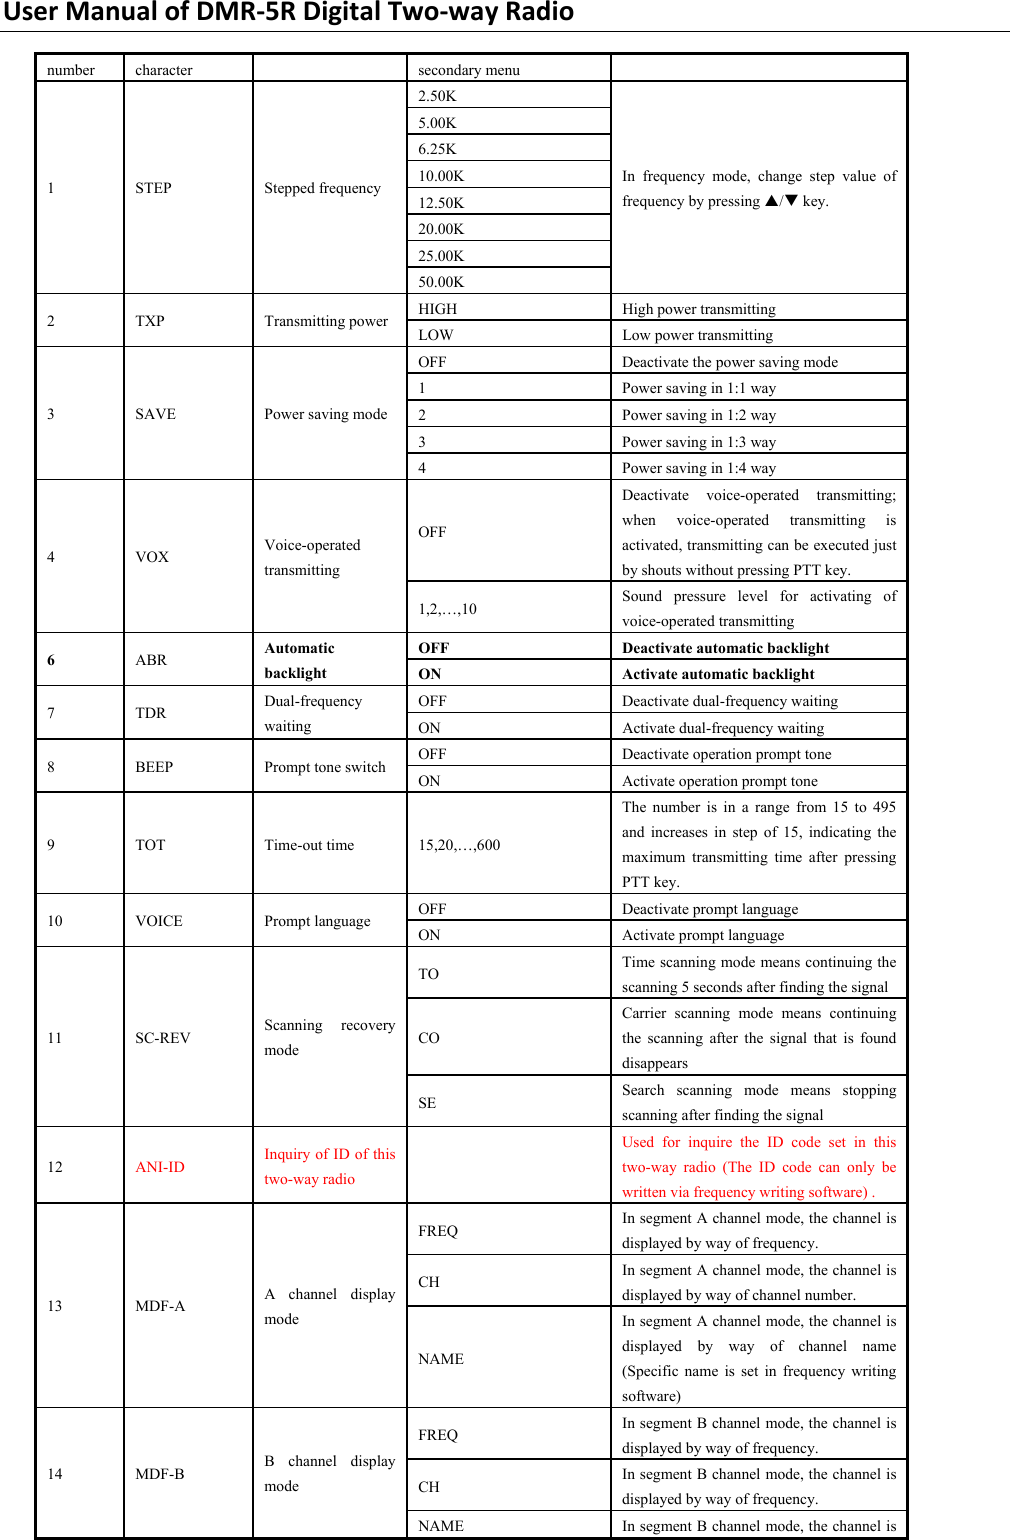
![UserManualofDMR‐5RDigitalTwo‐wayRadio Antenna Helical antenna with screwed plug for receiving and transmitting signals. Bright flashlight [Power on/off/volume control] button] button Turn on two-way radio power supply or increase the volume gradually by rotating this button clockwise; Turn off two-way radio power supply or reduce the volume gradually by rotating this button anticlockwise LCD Lattice LCD 【CALL】key Activate the radio function (Enter radio frequency by keyboard or search radio station automatically by #SCAN) by pressing this key; deactivate the radio function by pressing this key again. In analog mode, activate the alarm function by long pressing this key, now the green indicator, red indicator and flashlight flash simultaneously; remove the alarm by pressing this key again. In digital mode, activate the alarm function by long pressing this key; remove the alarm by pressing this key again. 【MONI】key Activate the flashlight function by pressing this key, and now the flashlight is on; make the flashlight flashing by pressing this key twice; deactivate the flashlight function by pressing this key again. In analog mode, activate the monitoring function by pressing and holding this key for long time; deactivate the monitoring function by releasing this key. In digital mode, activate the two-way radio detection function of the two-way radio to detect whether the other party is online. 【PTT】transmitting key After pressing this key, the two-way radio enters transmitting state; call the other party by speaking to the microphone. After releasing this key, the two-way radio enters receiving state. 【VFO/MR】Key Frequency mode or channel mode switching key Transmitting/receiving state light The red light is on when the two-way radio is in transmitting state; the green light is on when the two-way radio is in receiving state. String hole Hang the string with this hole as necessary. External interface Used for external headphone; or when used for external frequency writing line, frequency writing operation and program upgrading can be completed with PC frequency writing software. 【A/B】key In standby mode, switch A/B pointer by pressing this key; 【BAND】key ;Key for UHF/VHF frequency bank switching; in radio mode, switch 65-75/76-108MHz frequency band by pressing this key; 0-9 numeric keys 0 – 9 numeric keys for frequency, channel sequence number, menu item and menu value input. In menu setting mode, the menu item name behind each numeric key can be set by pressing the key directly. Microphone Voice input; keep the microphone about 3~5 cm away from the mouth when transmitting. Battery pack Supply power for the two-way radio. Battery charging contacts Contact piece between the battery and the charging dock. Don't bring battery](https://usermanual.wiki/AUSWAY-PACIFIC/UR-A56/User-Guide-3551255-Page-6.png)
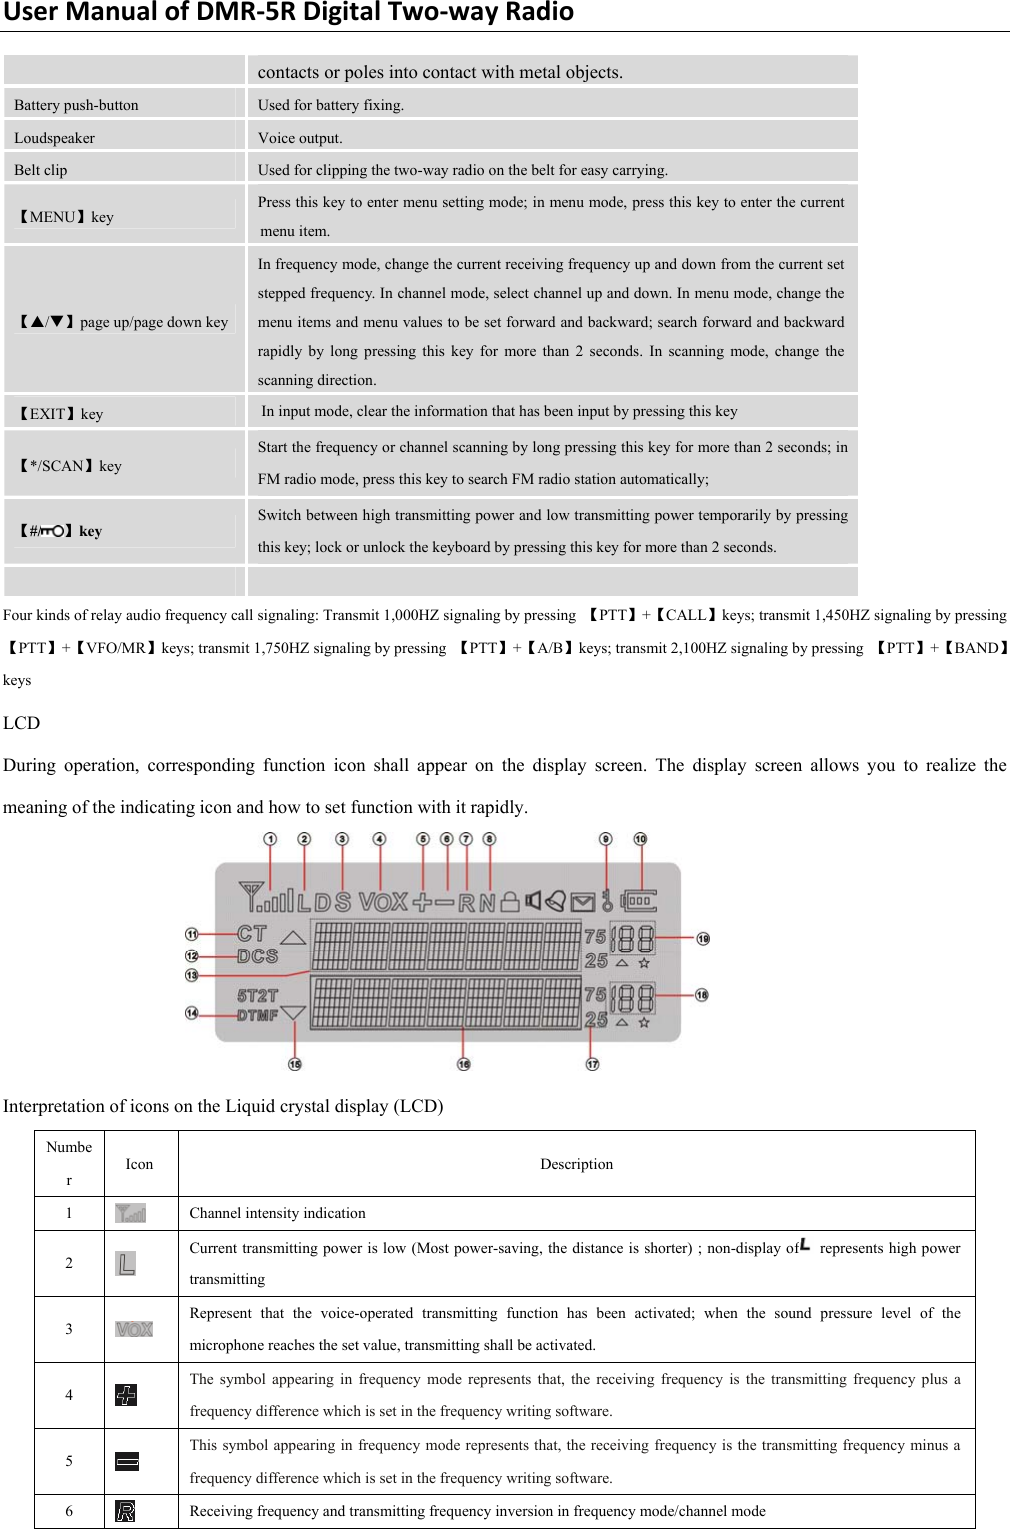
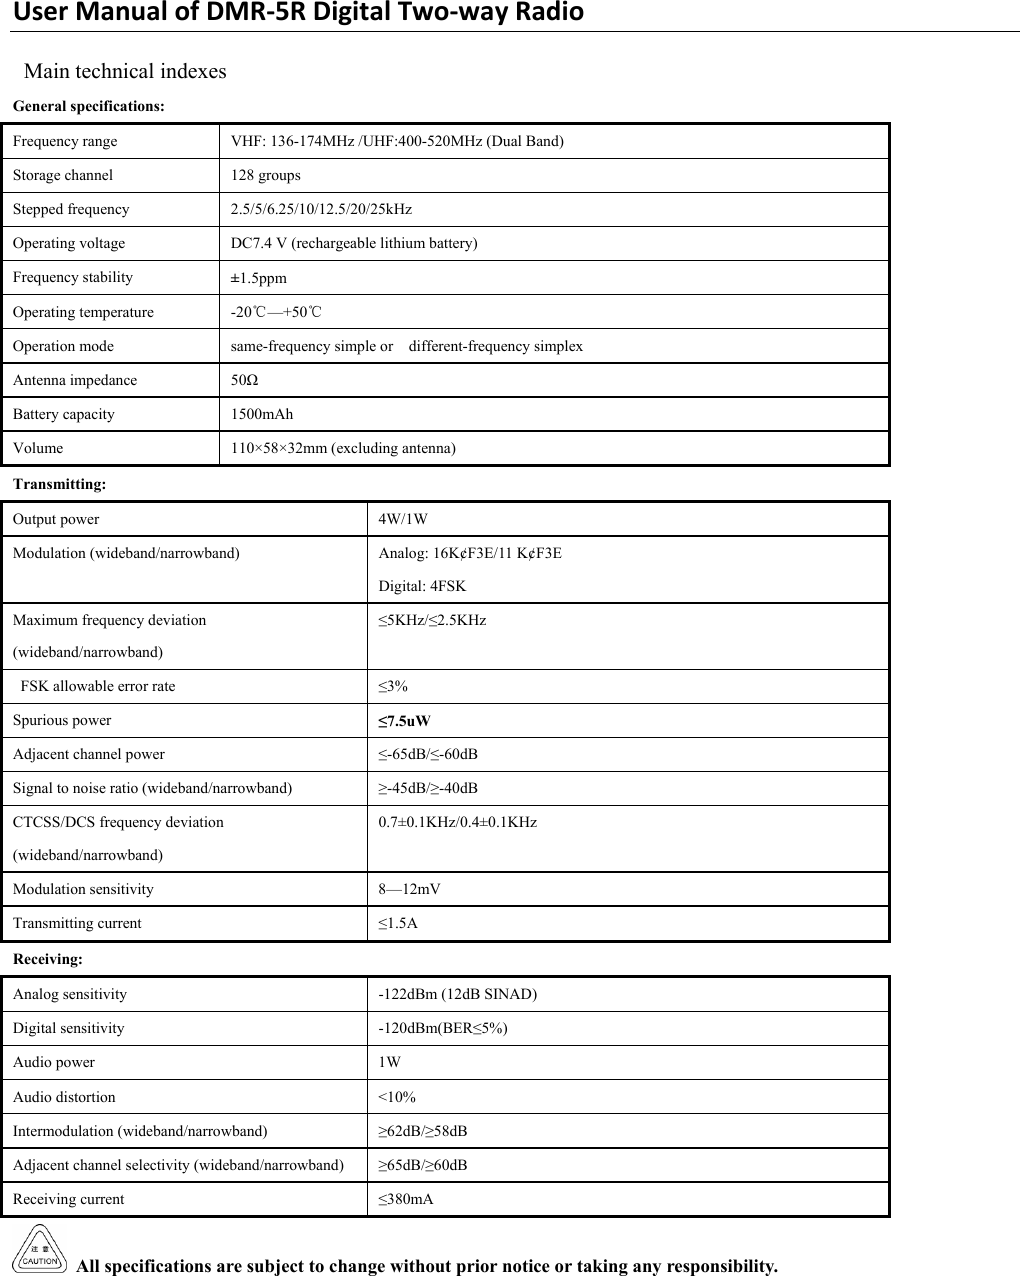
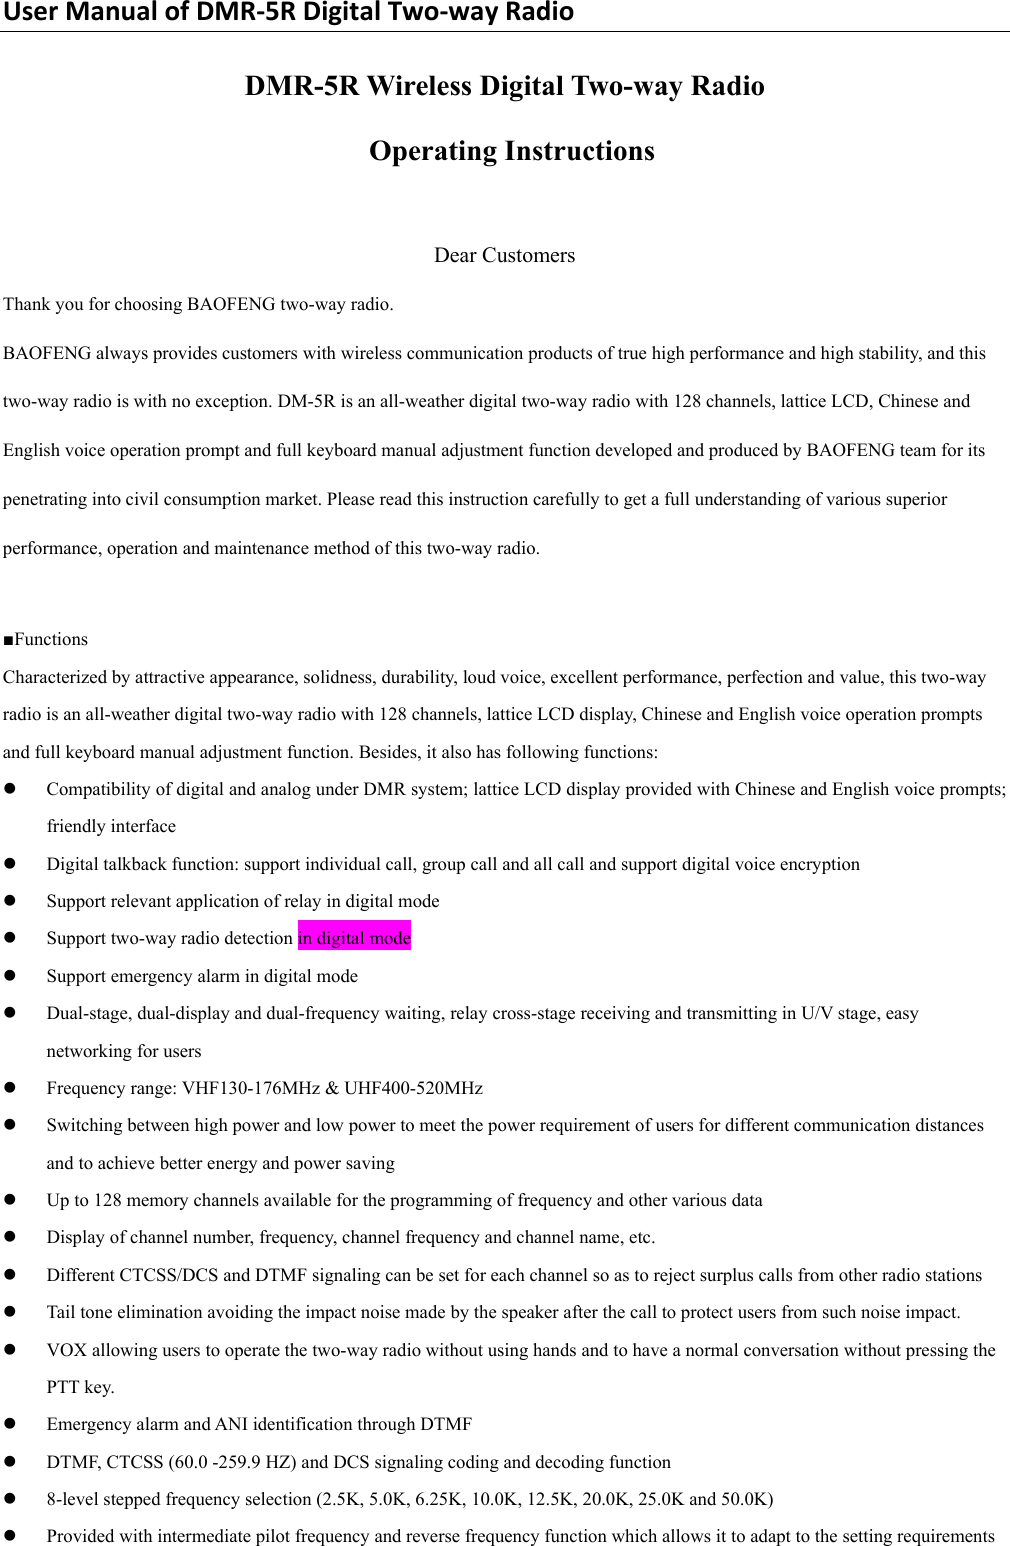
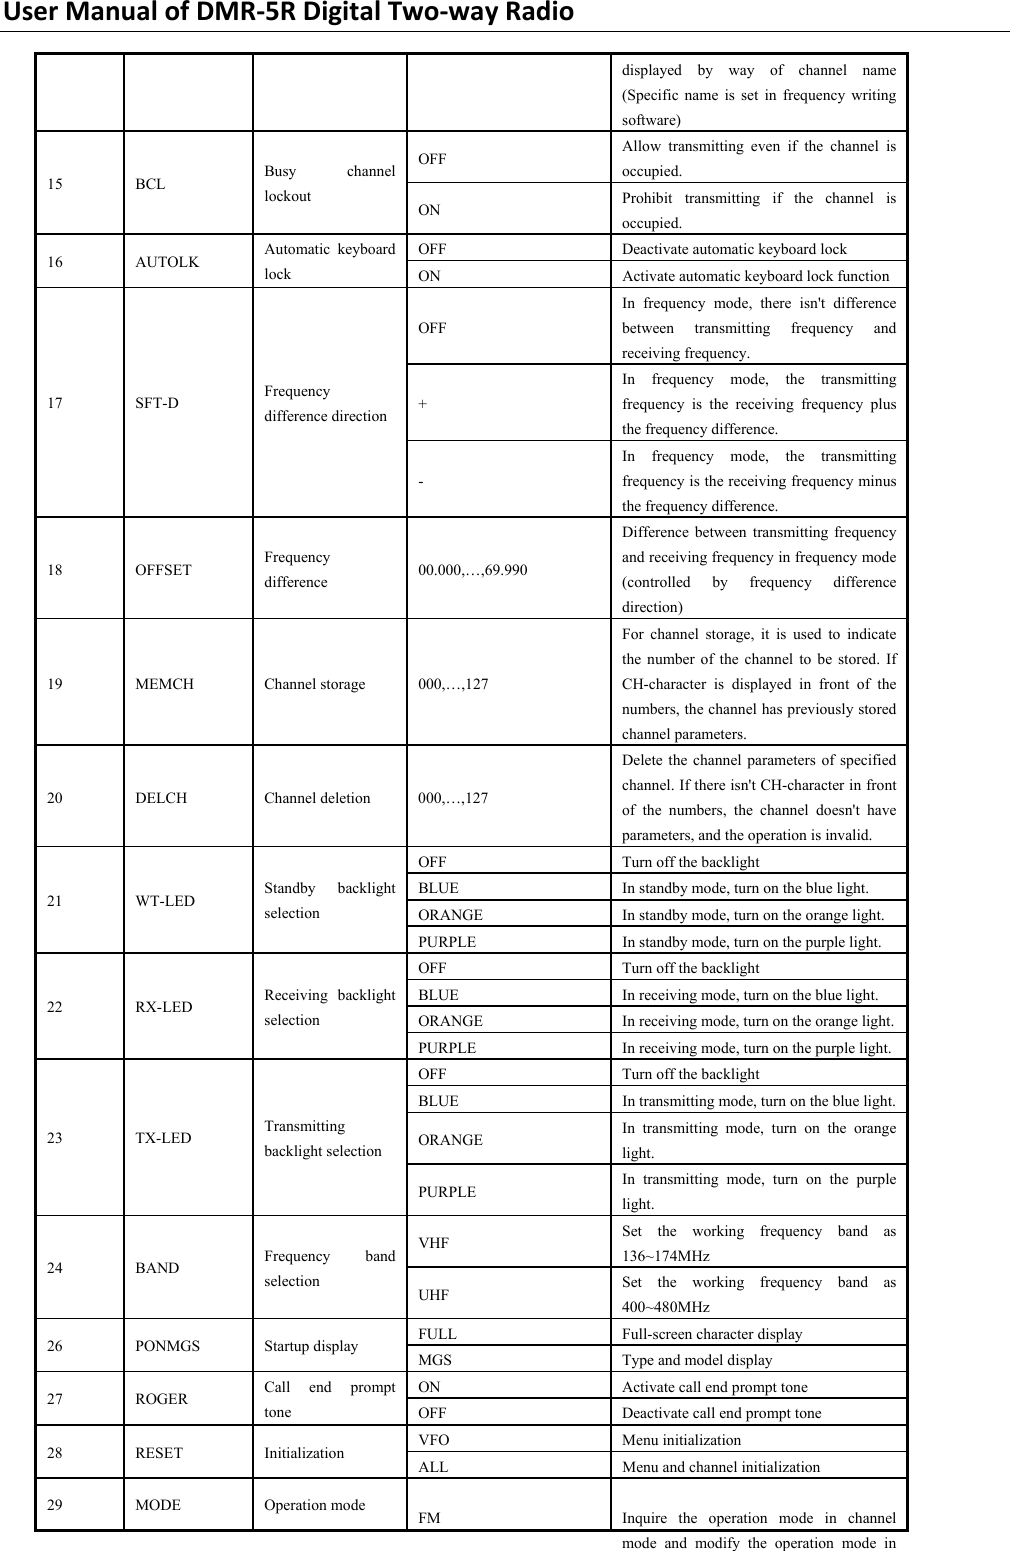
![UserManualofDMR‐5RDigitalTwo‐wayRadio7 This symbol appears when the channel operates in narrow band. 8 This symbol appears when the keyboard is in locking state. The keyboard can be unlocked by pressing #/LOCK key. 9 Display of current remaining battery power; indicates that the battery is in full charge; indicates the remaining battery power; indicates that the battery is running out, now the outline of the icon flashes, and no transmitting shall be done. 10 This symbol indicates that current CTCSS is CTCSS. This signal appearing when transmitting represents that the CTCSS signaling is being transmitted. 11 This symbol indicates that current CTCSS is DCS. This signal appearing when transmitting represents that the DCS signaling is being transmitted. 12 Frequency A, channel display area; simple menu prompt and set parameter display in menu setting mode. 13 This symbol indicates that the DTMF signaling is activated. 14 Frequency A and Frequency B pointer 15 Frequency B, channel display area; simple menu prompt and set parameter display in menu setting mode. 16 Indication of stepped frequency mantissa (in KHZ) 17 Indicate channel sequence number in Segment B channel mode. 18 Indicate channel sequence number in Segment A channel mode; indicate menu sequence number in menu mode. 19 D Display of D represents that current channel is digital channel; non-display of D represents that current channel is analog channel. ■Basic operation ◆Startup and shutdown Rotate the [power on/off/volume control] button clockwise until you hear "click" sound, the two-way radio beeps twice loudly, now you can see that the full two-way radio screen lights up immediately and hear the voice prompt that current mode is channel (or frequency) mode. Then frequency and other designators are displayed. △ Rotate the same button until you hear "click" sound to turn off the two-way radio. If the voice prompt function of the two-way radio is disabled, startup prompt tone will not be issued. Startup display mode setting is in Menu 38; it can be set as full screen lighting up (FULL) or model display (MGS). ◆Volume adjustment After turning on the power supply, rotate the [power on/off/volume control] button clockwise to increase the volume gradually. △ Rotate the same button anticlockwise to reduce the volume gradually until the power supply is turned off. ◆Talkback (transmitting and receiving) ◎Call transmitting: After selecting a proper channel (or entering your desired frequency), press [PTT] key, now the two-way radio is in transmitting state. Then speak to the microphone with a normal tone. You can switch the transmitting power according to actual need (power setting is in Menu 2): ·When transmitting by pressing [PTT] key, display of L at the top of the screen represents that the current transmitting power is low power. ·When transmitting by pressing [PTT] key, non-display of L at the top of the screen represents that the current transmitting power is](https://usermanual.wiki/AUSWAY-PACIFIC/UR-A56/User-Guide-3551255-Page-8.png)
![UserManualofDMR‐5RDigitalTwo‐wayRadiohigh power. ◎Call receiving: After the [PTT] key is released, the two-way radio enters receiving state. When continuous transmitting time exceeds that specified in "Menu 9" (default 60 seconds) , the two-way radio stops transmitting (before transmitting is stopped, the internal time-out timer shall cause the transmitting indicator flashing 10 times in advance, and then voice prompt of "transmitting time out" is issued) . In this case, release the [PTT] key to stop the two-way radio for a while, then press the [PTT] key again to continue the call operation. ①To ensure that the two-way radio of the receiver receives the call in best volume, please keep the microphone about 3~5 cm away from the mouth when transmitting. ②Communication distance may be shortened in rainy day and in the woods. ◆Monitoring function (available for analog channel) In standby mode, press [MONI] key to start monitoring. When squelch circuit is shut off, you will hear the background noise (the prompt tone sounds once); release the same key to stop monitoring, then you will not hear the background noise. If it is needed to check whether channel interference exists, you can press this key and rotate the volume control knob, then you will hear the background noise or interference noise. ◆Intermediate pilot frequency transmitting (available for analog channel) Transmit 1,750Hz tone pulse signal by pressing [PTT] key first and then pressing [A/B] key; Cancel the transmitting of 1,750Hz tone pulse signal by releasing [A/B] key. ◆DTMF transmitting (available for analog channel) Transmit corresponding DTMF number by pressing [PTT] key first and then pressing corresponding numeric key. ◆Frequency/channel mode switching When the two-way radio is turned on and the keyboard is not locked, switch to channel mode by pressing [VFO/MR] key. or is displayed on the screen. Channel number displayed at the bottom right corner represents that the two-way radio currently is in channel mode. Increase or reduce the channel value by pressing [S] key or [T] key. Switch between frequency mode (VFO) and channel mode by repeating this operation. In frequency mode, is displayed on the screen. ◆Frequency selection 1) VFO mode (frequency mode) VFO mode is the basic mode for operating frequency changing Switch to VFO mode by pressing [VFO/MR] key, and increase or reduce the frequency by pressing [S] key or [T] key.](https://usermanual.wiki/AUSWAY-PACIFIC/UR-A56/User-Guide-3551255-Page-9.png)
![UserManualofDMR‐5RDigitalTwo‐wayRadio2) Enter the frequency directly Besides pressing [S] key or [T] key, you can also enter the frequency directly. If the desired operating frequency is far from current frequency, the frequency can be entered directly through keyboard. ① Switch to VFO mode by pressing [VFO/MR] key. ·It's only the VFO mode that allows to enter the frequency directly. ② Enter the desired frequency by pressing the numeric keys ([0]~[9]) (three digits before the decimal point represents MHZ, and three digits after the decimal point represents KHZ) ◆Single waiting/dual-frequency waiting function switching (available for analog channel) In double waiting mode, the two-way radio can receive the frequency set in Channel A or Channel B (achieve the receiving and communication in two frequencies, the UHF/UHF and VHF/VHF). Execute the operation steps below: 1) In analog channel, access to the menu by pressing [MENU] key. 2) Press [S] key or [T] key (or enter 7 directly) until the screen shows and the pointer points to TDR; then perform the selection operation by pressing [MENU] key. 3) Press [S] key or [T] key until the pointer on the screen points to ON; then activate the dual-frequency waiting function by pressing [MENU] key. ·or: the pointer on the screen points to OFF; then deactivate the dual-frequency waiting function by pressing [MENU] key. 4) Return to the previous menu. SThe dual-frequency waiting function can be activated only when both of Channel A and Channel B are analog channel. If one of them is digital channel, the function can't be activated. For digital channel, the sign ‘D’ displayed next to the signal strength sign represents that the current channel is digital channel. ◆VOX After this function is activated, if the speech volume of the user reaches the level set for the two-way radio, the two-way radio can activate transmitting operation via voice without the [PTT] key being pressed. The function above may be activated in certain workplaces where the user's hands are too occupied to press [PTT] key. Execute the operation steps below: 1) Access to the menu by pressing [MENU] key. 2) Press [S] key or [T] key (or enter 4 directly) until the screen shows and the pointer points to VOX; then perform the selection operation by pressing [MENU] key. 3) Press [S] key or [T] key to change current setting according to the screen prompts, then press [MENU] key to select new voice control sensitivity (selection range is 1~10; the greater the value is, the higher the sensitivity is) . ·or: the pointer on the screen points to OFF; then deactivate the VOX function by pressing [MENU] key. 4) Return to the previous menu. ▲After the VOX function is activated, the voice can be transmitted by speaking to the microphone; the transmitting shall be stopped by stopping speaking. You can select VOX sensitivity level according to the quiet degree of service environment; in the environment where there are too much noises, long-time transmitting may occur after the VOX function is activated.](https://usermanual.wiki/AUSWAY-PACIFIC/UR-A56/User-Guide-3551255-Page-10.png)
![UserManualofDMR‐5RDigitalTwo‐wayRadio ◆Key locking and unlocking In order to prevent unintentional entering, you can lock the keys of the two-way radio. Execute the operation steps below: 1) Access to the menu by pressing [MENU] key. 2) Press [S] key or [T] key until the screen shows and the pointer points to AUTOLK; then perform the selection operation by pressing [MENU] key. 3) Press [S] key or [T] key until the pointer on the screen points to ON; then activate the automatic key locking function by pressing [MENU] key. ·or: the pointer on the screen points to OFF; then deactivate the automatic key locking function by pressing [MENU] key. 4) Return to the previous menu. ▲After the keyboard locking function is activated, when the keyboard is in unlocking state, the numerical keyboard shall lock automatically if no keyboard operation is conducted for a period of 8 seconds, and the screen shows icon. When the keybaord is in locking state, it can be unlocked by pressing [#/ ] key, and now the icon disappers. After the automatic keyboard locking function is activated, it can be used normally by pressing [PTT]+[MENU],[PTT]+numeric key. ◆Activate or deactivate keyboard You can activate and deactivate the keyboard sound as necessary. Execute the operation steps below: 1) Access to the menu by pressing [MENU] key. 2) Press [S] key or [T] key (or enter 8 directly) until the screen shows and the pointer points to BEEP; then perform the selection operation by pressing [MENU] key. 3) Press [S] key or [T] key until the pointer on the screen points to ON; then activate the keyboard sound by pressing [MENU] key. ·or: the pointer on the screen points to OFF; then deactivate the keyboard sound by pressing [MENU] key. 4) Return to the previous menu. ◆Squelch level setting (available for analog channel) You can adjust the squelch level of the two-way radio; screen out useless call with weak signal or channel the background noise is higher than common value. Execute the operation steps below: 1) Access to the menu by pressing [MENU] key. 2) The screen shows and the pointer points to SQL; then perform the selection operation by pressing [MENU] key. 3) Press [S] key or [T] key to change current setting, then select new squelch level by pressing [MENU] key. 4) Return to the previous menu. ▲When the squelch level is set as o or too low, the two-way radio is easy to be interrupted by useless call with weak signal; when the squelch level is set too high, call from remote position may also be screened out. ◆High/low power setting You can set the two-way radio power level of each channel as high or low. When it is set as HIGH, communication with two-way radio which is relatively far to this two-way radio can be achieved. When it is set as LOW, communication with two-way radio which](https://usermanual.wiki/AUSWAY-PACIFIC/UR-A56/User-Guide-3551255-Page-11.png)
![UserManualofDMR‐5RDigitalTwo‐wayRadiois relatively close to this two-way radio can be achieved. Execute the operation steps below: 1) Access to the menu by pressing [MENU] key. 2) Press [S] key or [T] key (or enter 2 directly) until the screen shows and the pointer points to TXP; then perform the selection operation by pressing [MENU] key. 3) Press [S] key or [T] key until the pointer on the screen points to HIGH; then set the two-way radio as high power transmitting by pressing [MENU] key. ·or: the pointer on the screen points to LOW; then set the two-way radio as low power transmitting by pressing [MENU] key. 4) Return to the previous menu. ▲In high power state, switch to low power rapidly by pressing [#/ ] key. ◆Automatic backlight function You can select to activate or deactivate the keys and screen backlight of the two-way radio as necessary. Execute the operation steps below: 1) Access to the menu by pressing [MENU] key. 2) Press [S] key or [T] key (or enter 6 directly) until the screen shows and the pointer points to ABR; then perform the selection operation by pressing [MENU] key. 3) Press [S] key or [T] key until the pointer on the screen points to ON; then activate the automatic backlight function by pressing [MENU] key. ·or: the pointer on the screen points to OFF; then deactivate the automatic backlight function by pressing [MENU] key. 4) Return to the previous menu. ▲If the automatic backlight function is deactivated, the screen backlight and keyboard backlight shall be deactivated automatically. ■Scanning function Your two-way radio finds out whether there is voice activity in current channel/contacts group by scanning the channel/contacts group sequence in the list. Your two-way radio can support up to 128 scanning list. You can add or delete channels by editing the scanning lists with frequency writing software. There are three optional scanning recovery modes for the two-way radio. Execute the operation steps below: 1) Access to the menu by pressing [MENU] key. 2) Press [S] key or [T] key (or enter 15 directly) until the screen shows and the pointer points to SC-REV; then perform the selection operation by pressing [MENU] key. 3) Press [S] key or [T] key until the pointer on the screen points to TO; then set the scanning mode as time scanning mode by pressing [MENU] key, then continue the scanning 5 seconds after finding the signal. ·or: the pointer on the screen points to CO; then set the scanning mode as carrier scanning mode by pressing [MENU] key. Then continue the scanning after the signal that is found disappears. ·or: the pointer on the screen points to SE; then set the scanning mode as search scanning mode by pressing [MENU] key. Stop](https://usermanual.wiki/AUSWAY-PACIFIC/UR-A56/User-Guide-3551255-Page-12.png)
![UserManualofDMR‐5RDigitalTwo‐wayRadioscanning after finding the signal. 4) Return to the previous menu. ◆Start and stop scanning Execute the operation steps below: 1) Start scanning by pressing [*SCAN] key. ·or: When scanning, your two-way radio stops in the channel/contacts group where activity is detected. The two-way radio stops in the channel for the preset time which is called "idle time". You can press the [PTT] key and then speak to the microphone clearly. 2) Answer it by releasing [PTT] key. 3) If you fail to make a response within the idle time, the two-way radio shall go back and scan other channels/contacts groups. 4) You can stop the scanning by pressing any key during scanning. ◆Channel deletion You might want to delete certain storage channel due to setting error or changing other settings. Execute the operation steps below: 1) In analog channel, access to the menu by pressing [MENU] key. 2) Press [S] key or [T] key (or enter 24 directly) until the screen shows and the pointer points to DELCH; then perform the selection operation by pressing [MENU] key. 3) Press [S] key or [T] key to select forward or backward the channel to be deleted. If: ·The pointer on the screen pointing to where there is CH character prompt and channel number (such as CH-000) represents that the channel number has previously stored channel parameters and can be deleted. ·The pointer on the screen pointing to where there is channel number (such as 000) but there isn't CH character prompt represents that the channel number is blank, needn't be deleted, and can be stored directly. 4) Then delete the channel by pressing [MENU] key; return to the previous menu. ◆Channel storage Parameters that should be contained in a complete channel include receiving frequency, transmitting frequency, receiving CTCSS, transmitting CTCSS, channel bandwidth, busy channel lockout, scan channel adding, and channel name, etc. Except that scan channel adding and channel name need to be edited with frequency writing software, all other parameters can be set in frequency mode and stored in specified channel number by Menu 23 channel storage. For example, it is required that the following channel storage parameters shall be stored in Channel Number 001. ① Receiving frequency 440.5 MHZ ② Transmitting frequency 430.5 MHZ ③ Receiving CTCSS number D031N ④ Transmitting CTCSS number D031N ⑤ Transmitting power high ⑥ Channel bandwidth wideband ⑦ Join scanning queue Execute the operation steps below:](https://usermanual.wiki/AUSWAY-PACIFIC/UR-A56/User-Guide-3551255-Page-13.png)
![UserManualofDMR‐5RDigitalTwo‐wayRadio1) Select analog channel, switch to VFO mode by pressing [VFO/MR] key, is displayed on the screen. 2) In frequency mode, make A/B frequency pointer points to A (uplink frequency point) by pressing [A/B] key. 3) Make the two-way radio operate in UHF band by pressing [BAND] key. 4) Adjust the frequency to 440.500MHZ by pressing numeric keys 4,4,0,5,0,0 in turn, is displayed on the screen. 5) Power setting: Select power (HIGH/LOW) as HIGH by pressing [MENU] →2→ [MENU]→ [S] or [T], then return to the menu → [MENU], 6) Bandwidth setting: Select channel bandwidth (NARR/WIDE) as WIDE by pressing 5→ [MENU]→ [S] or [T], then return to the menu → [MENU], 7) DCS receiving setting: Select CTCSS value D031N by pressing 10→ [MENU] → [S] or [T], then return to the menu → [MENU], ·After received DCS is set, the CTCSS receiving is turned off automatically; in the same way, after received CTCSS is set, the received DCS is turned off automatically. If it is needed to set CTCSS: Select CTCSS value by pressing [MENU] →11→[MENU] → [S] or [T],then return to the menu → [MENU], 8) DCS transmitting setting: Select CTCSS value D031N by pressing 12→ [MENU] → [S] or [T], then return to the menu → [MENU], ·After transmitted DCS is set, the transmitted CTCSS is turned off automatically; in the same way, after transmitted CTCSS is set, the DCS transmitting is turned off automatically. If it is needed to set CTCSS: Select CTCSS value by pressing [MENU] →13→[MENU] → [S] or [T],then return to the menu → [MENU], ·The CTCSS can be entered through keyboard directly in which case both of standard CTCSS and non-standard CTCSS can be selected, or set by [S] or [T] key in which case only standard CTCSS can be selected. 9) Storage setting for the receiving and transmitting of channels in the same frequency: 9.1) By pressing 23, the screen shows and the pointer points to MEMCH, the screen shows . 9.2) By pressing [MENU] key, voice prompt "store channel" is issued and the screen shows , 9.3) By pressing [S] key or [T] key, select forward or backward the idle channel, and the screen shows . 9.4) By pressing [MENU] key, voice prompt "receiving storage" is issued, and the screen shows . 9.5) By pressing [MENU] key, voice prompt "transmitting storage" is issued, and the screen shows ; 9.6) By pressing [EXIT] key, return to frequency mode. ◆If it is needed to set relay function, storage setting for the receiving and transmitting of channels in different frequencies 10.1) By pressing [MENU] →23, the screen shows , 10.2) By pressing [MENU] key, voice prompt "store channel" is issued and the screen shows ,](https://usermanual.wiki/AUSWAY-PACIFIC/UR-A56/User-Guide-3551255-Page-14.png)
![UserManualofDMR‐5RDigitalTwo‐wayRadio10.3) By pressing [S] key or [T] key, select forward or backward the idle channel, and the screen shows . 10.4) By pressing [MENU] key, voice prompt "receiving storage" is issued, and the screen shows . 10.5) By pressing [EXIT] key, return to frequency mode. 10.6) Execute Step 4) , enter desired transmitting frequency; 10.7) By pressing [MENU] →27, the screen shows , 10.8) By pressing [MENU] key, voice prompt "store channel" is issued, and the screen shows , 10.9) By pressing [MENU] key, voice prompt "transmitting storage" is issued, and the screen shows ; 10.10) By pressing [EXIT] key, return to frequency mode. ◆CTCSS scanning Before setting CTCSS scanning, set the receiving frequency, ensure that signals can be received at such receiving frequency, and meanwhile cancel dual-frequency waiting function, as well as make the two-way radio operate in frequency mode. 1) DCS scanning 1.1) Enter correct receiving frequency via the numeric keys. 1.2) By pressing [MENU] key, enter function menu setting after voice prompt "menu setting" is issued; 1.3) By pressing [S] key or [T] key, select forward or backward the Menu 10; or enter number 10 directly to enter Menu 10, the screen shows . 1.4) By pressing [MENU] key, voice prompt "DCS" is issued; by pressing [*/SCAN] key, the screen shows . ·DCS sign flashing represents that the two-way radio has enter DCS scanning state; the numbers of the DCS will not move when there isn't signal; ·After receiving signals, the numbers of the DCS move rapidly in turn according to sequence of standard CTCSS. When the two-way radio finds that the CTCSS in the receiving signals is consistent with one group standard DCS, the two-way radio will issue a "beep" prompt tone, and scanning stops. ·If you want to store this CTCSS scanned, press [MENU] key to store it, otherwise press [EXIT] key to exit. 2) CTCSS scanning. 2.1) Enter correct receiving frequency via the numeric keys 2.2) By pressing [MENU] key, enter function menu setting after voice prompt "menu setting" is issued 2.3) By pressing [S] key or [T] key, select forward or backward the Menu 11; or enter number 11 directly to enter Menu 11, the screen shows . 2.4) By pressing [MENU] key, voice prompt " CTCSS " is issued; by pressing [*/SCAN] key, the screen shows .](https://usermanual.wiki/AUSWAY-PACIFIC/UR-A56/User-Guide-3551255-Page-15.png)
![UserManualofDMR‐5RDigitalTwo‐wayRadio·CT sign flashing represents that the two-way radio has enter CTCSS scanning state; the numbers of the CTCSS will not move when there isn't signal; ·After receiving signals, the numbers of the CTCSS move rapidly in turn according to sequence of standard CTCSS. When the two-way radio finds that the CTCSS in the receiving signals is consistent with one group standard CTCSS, the two-way radio will issue a "beep" prompt tone, and scanning stops. ·If you want to store this CTCSS scanned, press [MENU] key to store it, otherwise press [EXIT] key to exit. ◆Relay echo (relay acknowledgement tone) Relay echo means that, due to the delay of the relay station in its judgment on the loss of carrier signals transmitted by the handset of the transmitter when the signal transmitted by the handset is retransmitted by the relay station, the relay station is in transmitting state for a little short time after the handset of the transmitter enters receiving state. Some HAMs just utilize this little short time to judge whether the relay station has retransmitted our signal. Via the setting of Menu 30, 31 and 32, this residual signal of the relay station can be caught accurately when returning to receiving state so as to acknowledge whether our signal has been retransmitted by the relay station. To do this, Menu 30 and Menu 31 must be set as OFF, and Menu 32 may do the selection between 1 and 10 which can be set as 5 based on the empirical value. ◆Sound and light alarm/alarm cancellation In analog mode, enter emergency alarm state by long pressing the alarm function key [CALL]; the system issues alarm sound continuously, and the bright light flashes at the same time; after pressing the alarm function key [CALL], the system exits from emergency alarm state and stops issuing alarm sound. In emergency alarm state, enter PTT transmitting state by pressing [PTT] key (In emergency alarm state, except PTT key and emergency alarm key, other keys are unavailable) . When there is call incoming, alarm stops, the call can be received normally. ◆CTCSS/ CDCSS CTCSS and CDCSS are mainly used to avoid receiving irrelevant calls in the same frequency. If CTCSS/CDCSS is set, only calls for which the same CTCSS signaling is set in the channel within the effective communication range can be received; but if CTCSS/CDCSS isn't set, all calls in the same channel within the effective communication range can be received. You can set the CTCSS/CDCSS signaling of this two-way radio manually via frequency writing software. CTCSS/CDCSS signaling code can be set as any value within the range of 67.0~254.1/D023~D777 respectively. A. CTCSS: (51 in total) 67.0,69.3,71.9,74.4,77.0,79.7,82.5,85.4,88.5,91.5,94.8,97.4,100.0,103.5,107.2,110.9,114.8,118.8,123.0,127.3,131.8,136.5,141.3,146.2,151.4,156.7,159.8,162.2,165.5,167.9,171.3,173.8,177.3,179.9,183.5,186.2,189.9,192.8,196.6,199.5,203.5,206.5,210.7,218.1,225.7,229.1,233.6,241.8,250.3,254.1。 B. List of CDSs: (210 in total) D023N,D025N,D026N,D031N,D032N,D036N,D043N,D047N,D051N,D053N,D054N,D065N,D071N,D072N,D073N,D074N,D114N,D115N,D116N,D122N,D125N,D131N,D132N,D134N,D143N,D145N,](https://usermanual.wiki/AUSWAY-PACIFIC/UR-A56/User-Guide-3551255-Page-16.png)

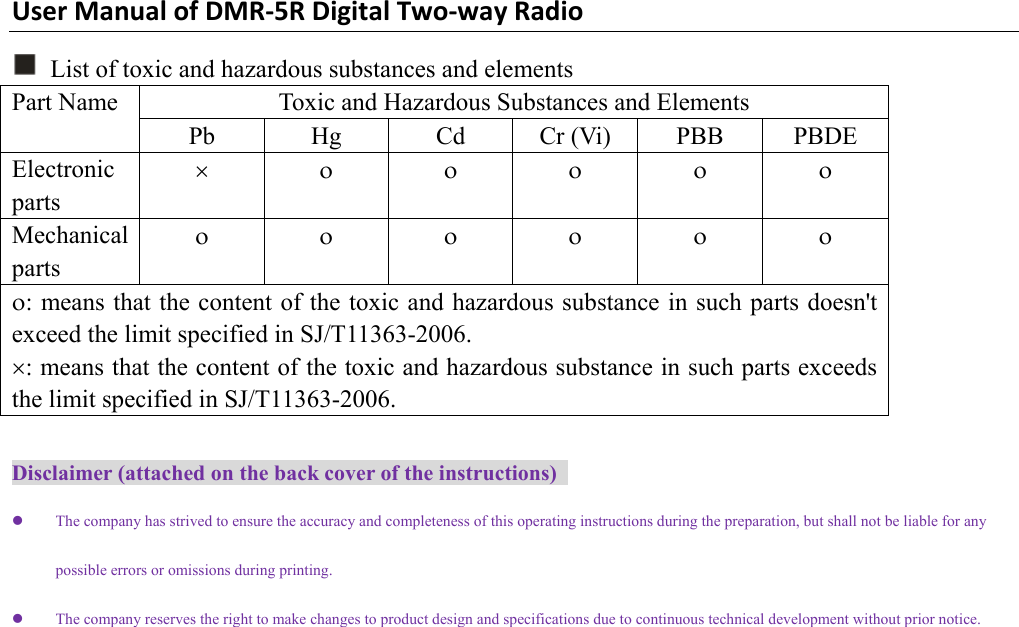
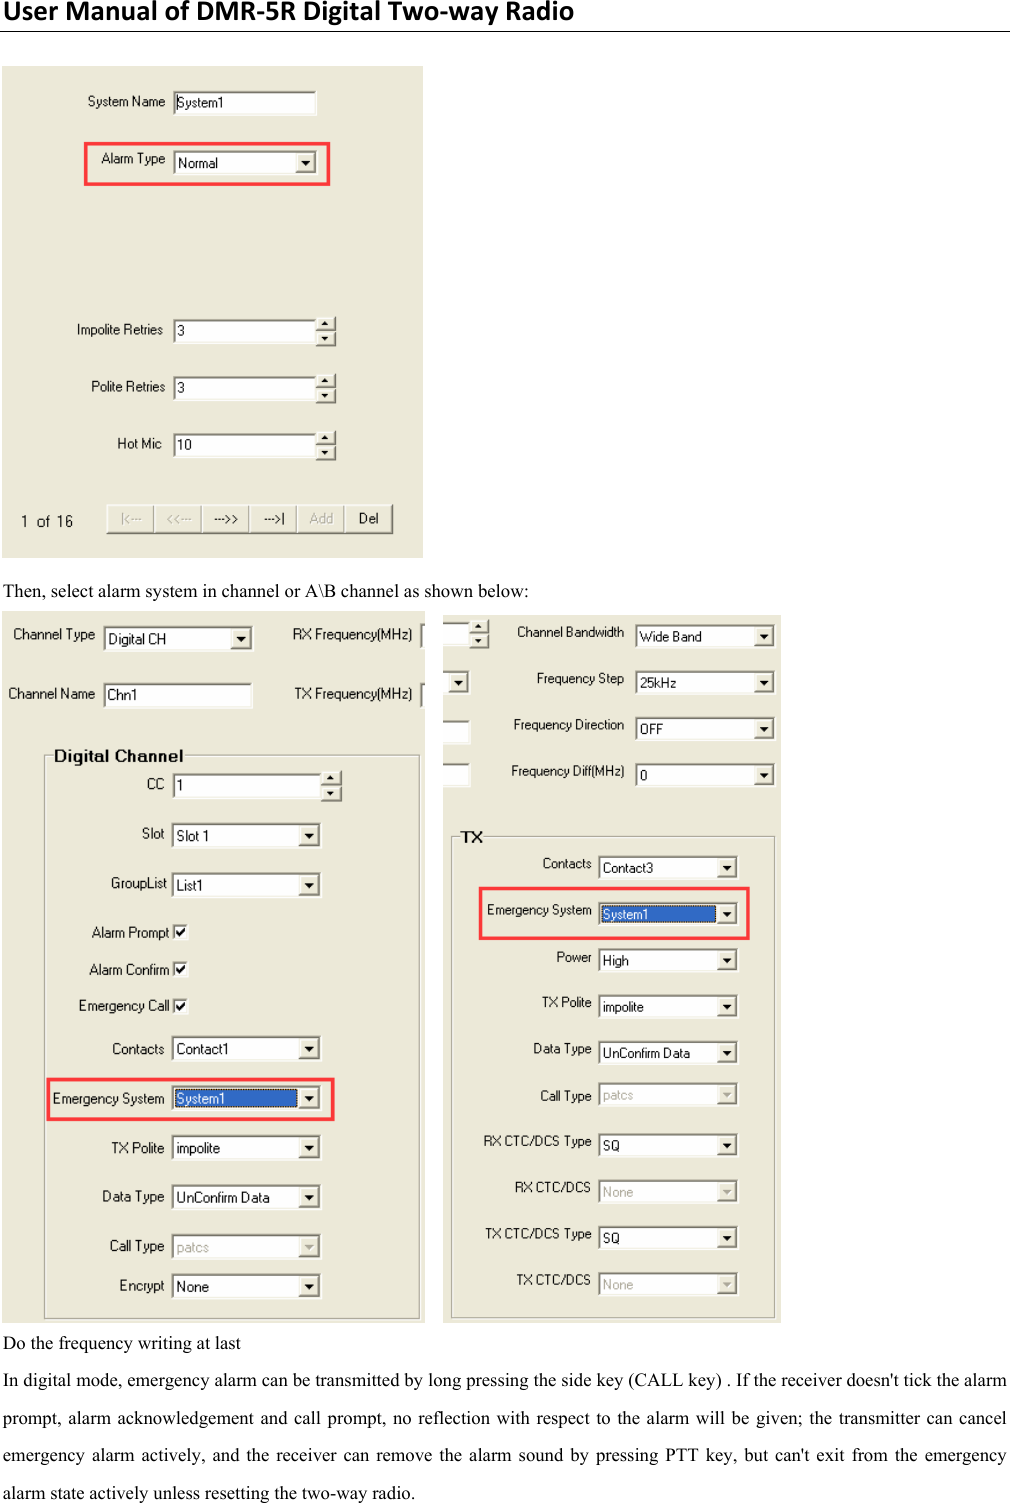
![UserManualofDMR‐5RDigitalTwo‐wayRadio Do the frequency writing at last ◇Make individual call When you can receive and/or respond to individual call made by authorized individual two-way radio, you must preset your two-way radio in order to make individual call. After execution of transmitting by pressing [PTT] key, you can make call to handset with ID number of 1, and only two-way radio with ANI-ID number of 1 can receive the call. 2. Group call in digital mode First, use the frequency writing software to establish new contact in digital contacts, select call type--voice group call, and set the call ID as 61235 (the range is 1~16776415) . Next, add this contact in the receiving group list, select the Contact1 in the member list and press "ADD" key to incorporate it into selected members as shown below:](https://usermanual.wiki/AUSWAY-PACIFIC/UR-A56/User-Guide-3551255-Page-18.png)
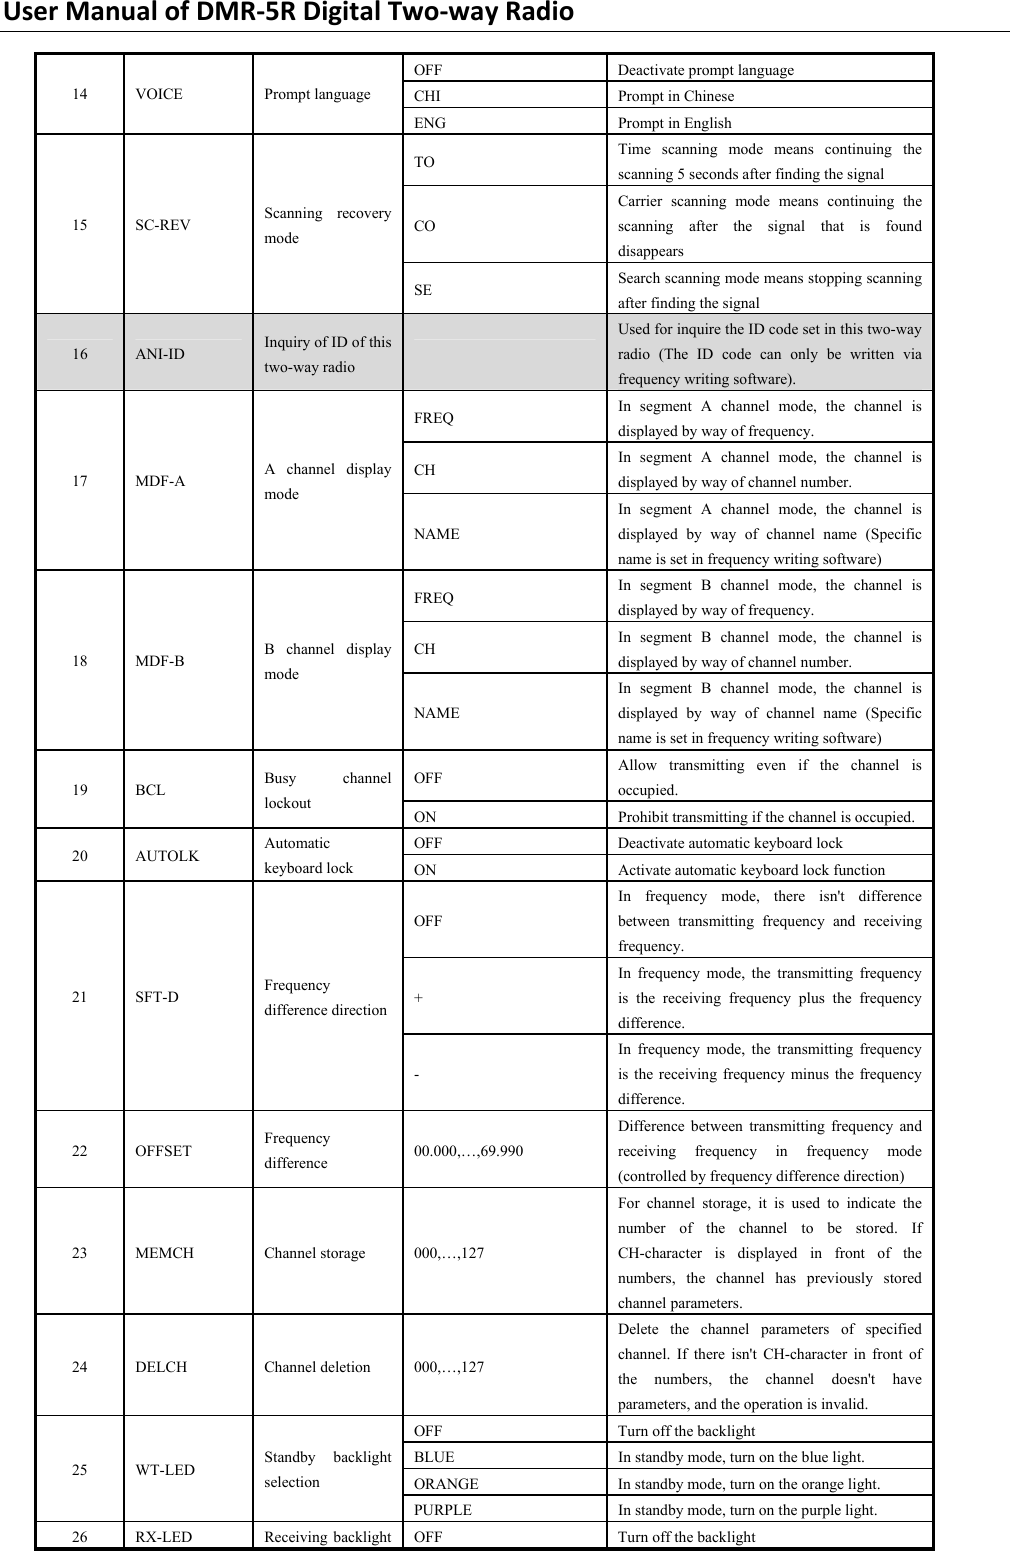
![UserManualofDMR‐5RDigitalTwo‐wayRadio Then, add channel contacts and group call receiving list in channel or A\B channel as shown below: Do the frequency writing at last Make group call After execution of transmitting by pressing [PTT] key, you can make call to Group ID61235, and the receiver can receive the call as long as Group ID61235 is included in its receiving list. 3. All call in digital mode This functions allow you to transmit signals to all users on the channel. You must preset your two-way radio so as to allow](https://usermanual.wiki/AUSWAY-PACIFIC/UR-A56/User-Guide-3551255-Page-19.png)
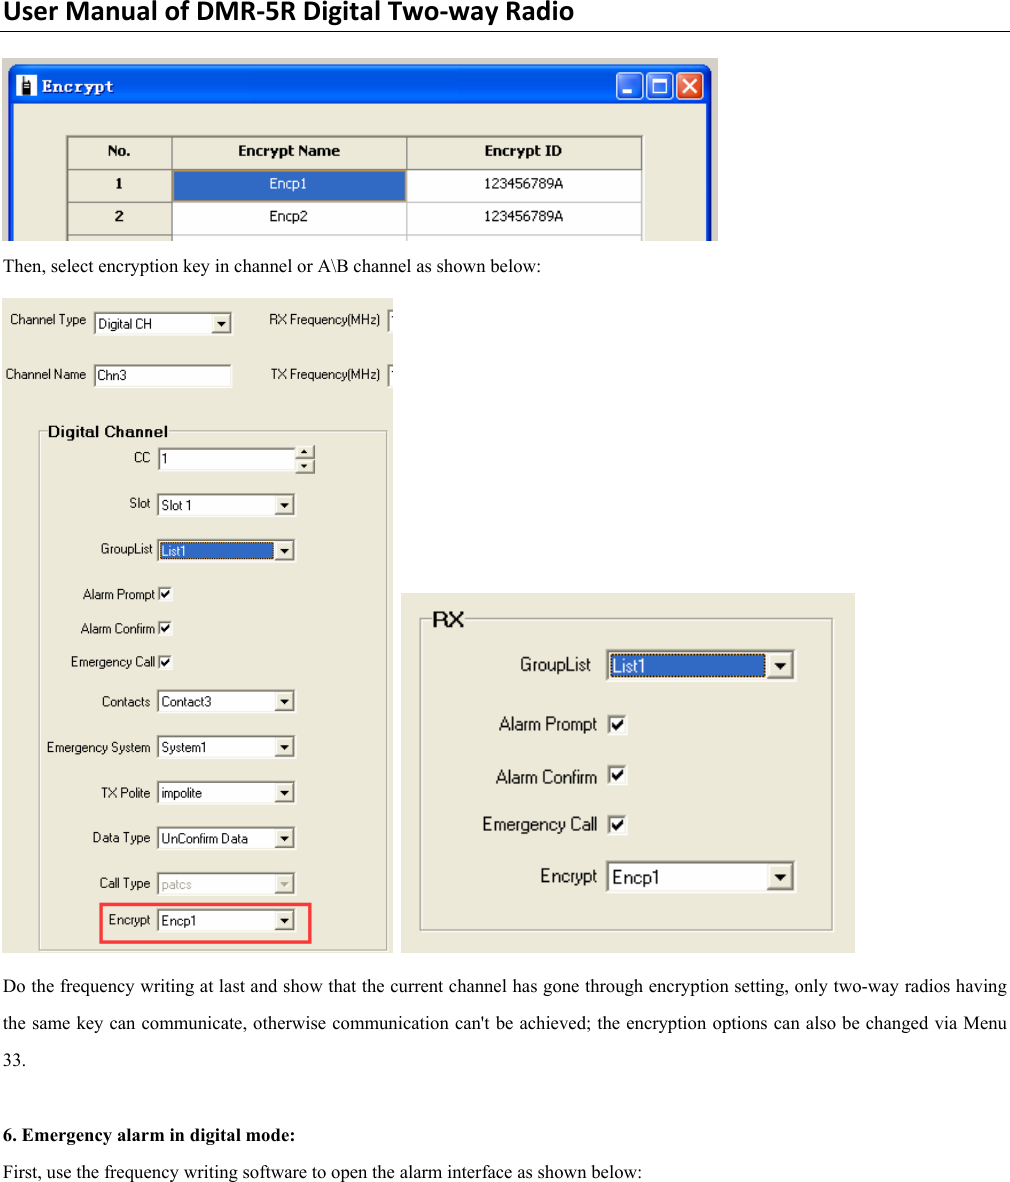
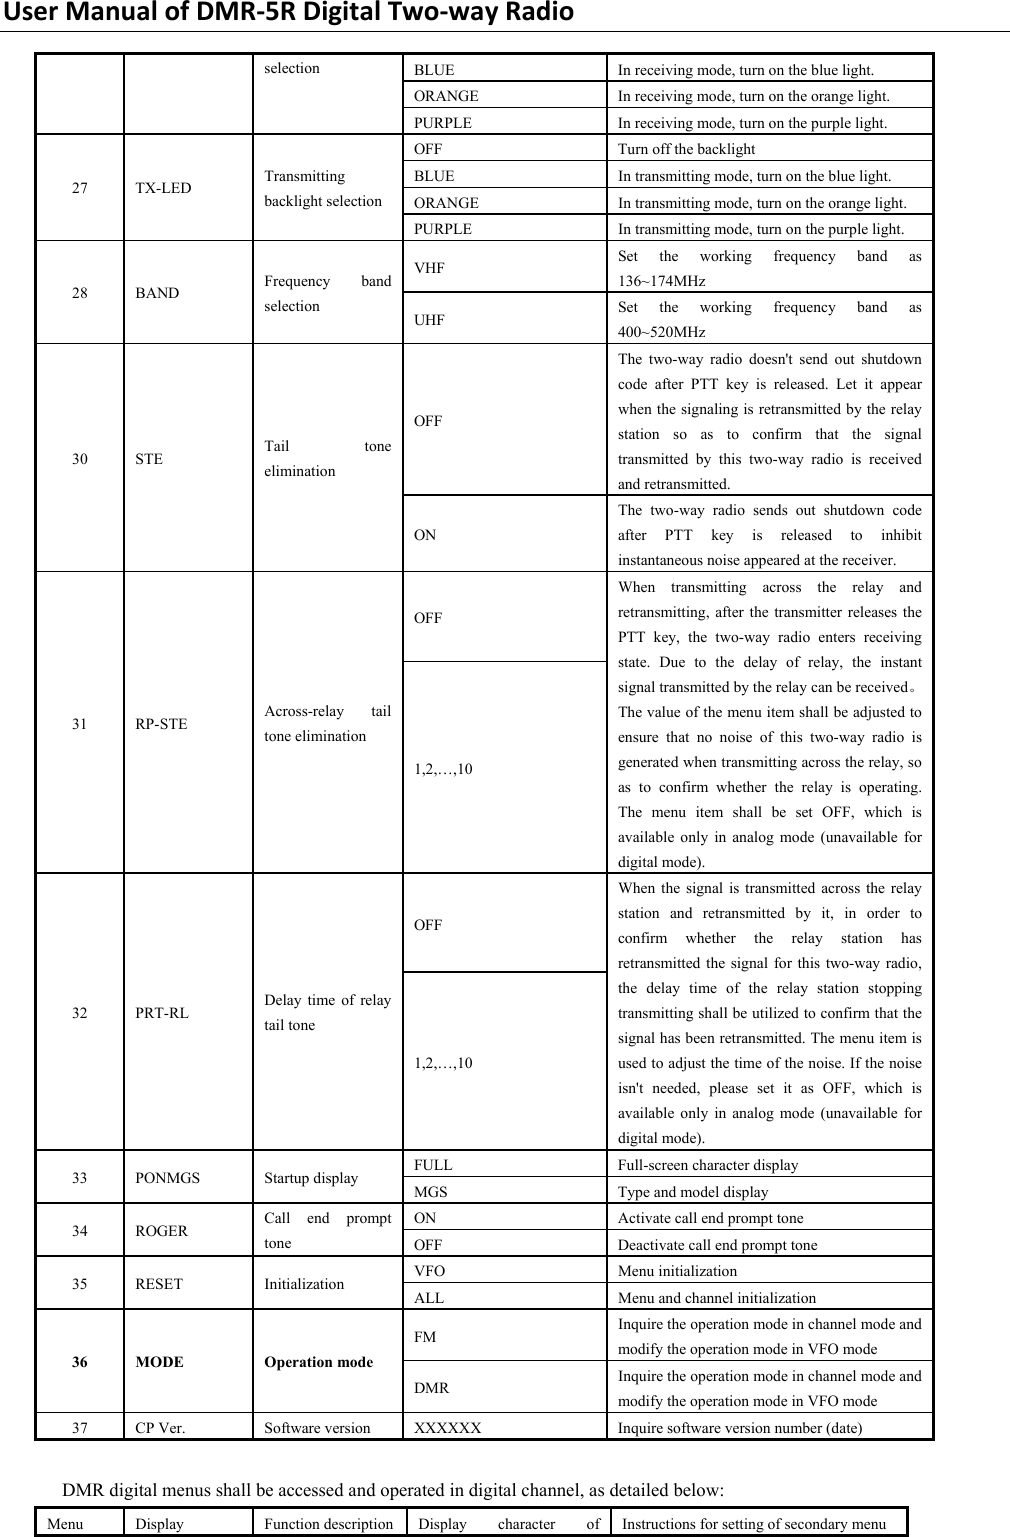
![UserManualofDMR‐5RDigitalTwo‐wayRadioyou to use the function. Setting steps are as follows: First, use the frequency writing software to establish new contact in digital contacts, select call type--voice all call, and set the call ID as 16777215. As shown in the figure below: Then, add channel contacts in channel or A\B channel as shown below: Do the frequency writing at last Make full call: After execution of transmitting by pressing [PTT] key, you can make call to all two-way radios in the same frequency. 4. Contacts setting in digital mode: All contacts shall be established and written via frequency writing software, then current channel contact can be selected via Menu 31, i.e., select the ID to be called by pressing [PTT]. 5. Voice encryption in digital mode Set key value in encryption options of DMR service via frequency writing software (note that the key shall comprise several different characters, otherwise poor encryption effect may caused) as shown below:](https://usermanual.wiki/AUSWAY-PACIFIC/UR-A56/User-Guide-3551255-Page-20.png)
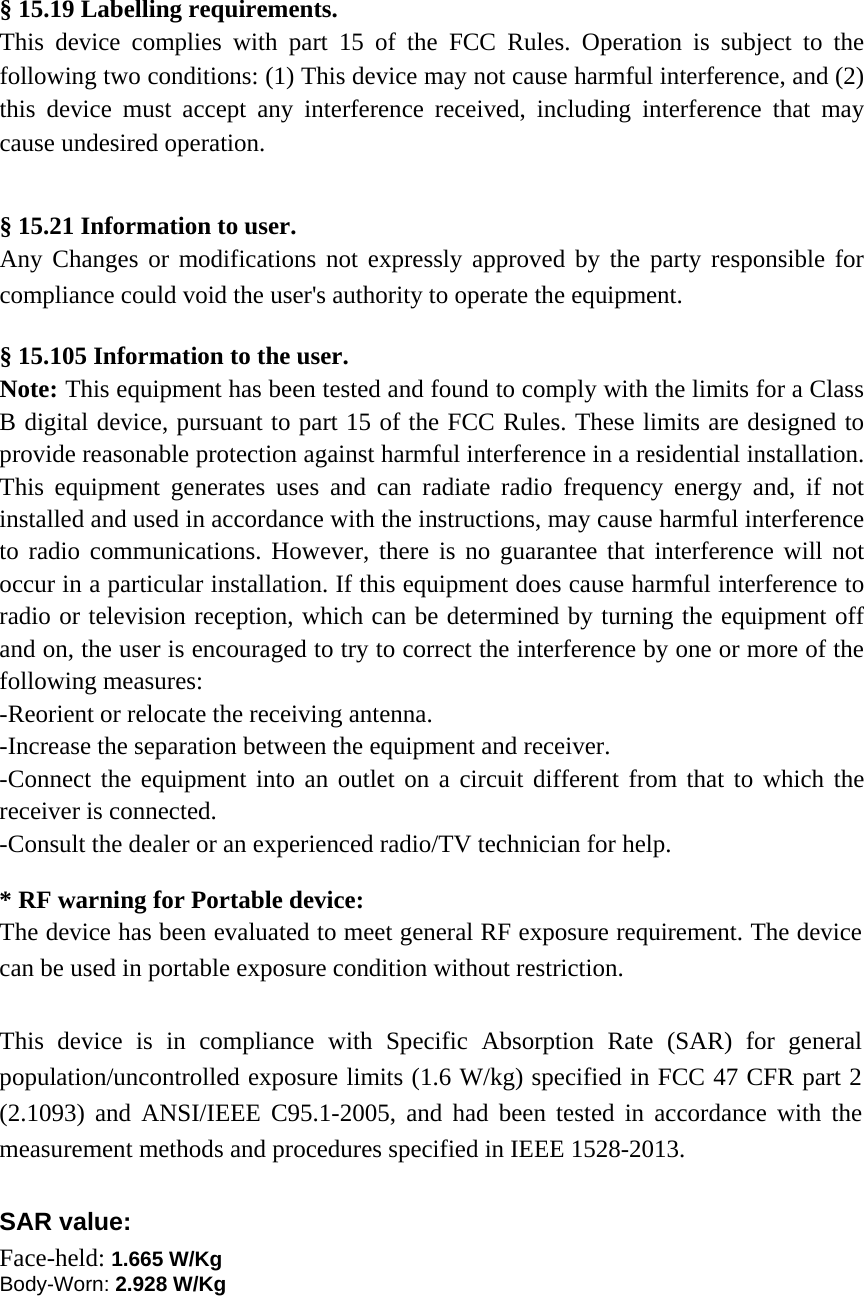
![UserManualofDMR‐5RDigitalTwo‐wayRadioTwo-way radio detection (available in digital mode) If it is activated, the function can help you confirm, whether there are other two-way radios in the system that are activated, without disturbing two-way radio users. No voice or visual notices are sent to target two-way radio. The function is only applicable to user nickname or ID. Two-way radio detection transmitting Execute the operation steps below: 1) Access to the menu by pressing [MENU] key. 2) Press [S] key or [T] key (or enter 31 directly) until the screen shows and the pointer points to CONTCT; then perform the selection operation by pressing [MENU] key. 3) Press [S] key or [T] key until the pointer on the screen points to P 1; then set as individual call P by pressing [MENU] key (note: Group call G and all call ALLCALL don't support two-way radio detection function) 4) Return to the previous menu. 5) Achieve two-way radio detection by long pressing [MONI] key. For example: ID of main two-way radio is 1 and ID of two-way radio detected is 2; "Beep" in long low pitch sounding after the [MONI] key is pressed represents failure of detection and that Two-way radio B is offline or current communication environment is so poor that the detection can't be completed successfully. "Beep" in high pitch sounding after the [MONI] key is pressed represents success of detection and that Two-way radio B is online. Digital channel storage Parameters that should be contained in a complete channel include receiving frequency, transmitting frequency, channel contacts, color code, transmitting power, time slot, encryption, scan channel adding, and channel name, etc. Except that scan channel adding and channel name need to be edited with frequency writing software, all other parameters can be set in frequency mode and stored in specified channel number by Menu 19 channel storage. For example, it is required that the following digital channel parameters shall be stored in Channel Number 001. Receiving frequency 454.325 MHZ Transmitting frequency 460.325 MHZ Channel contacts Selection Color code 1 Transmitting power High Time slot Slot1 Encryption Off Join scanning queue Channel name Write in frequency writing software as necessary ■Operation steps for deletion of digital channel: 1) In digital channel mode, access to the menu by pressing [MENU] key. 2) Press [S] key or [T] key (or enter 20 directly) until the screen shows and the pointer points to DELCH; then perform the selection operation by pressing [MENU] key. 3) Press [S] key or [T] key until the pointer on the screen pointing to CH-001, representing that Channel 001 has previously stored](https://usermanual.wiki/AUSWAY-PACIFIC/UR-A56/User-Guide-3551255-Page-23.png)
![UserManualofDMR‐5RDigitalTwo‐wayRadiochannel parameters and can be deleted. ·Only 001 is displayed (CH character isn't displayed) , representing that Channel 001 doesn't have channel parameters, needn't be deleted, and can be stored directly. 4) Then delete the channel by pressing [MENU] key and the channel becomes idle channel (Only channel number is displayed, CH character isn't displayed) . ■Operation steps for storage of digital channel: 1) Select digital channel (pay attention to Symbol D) , switch to frequency mode by pressing [VFO/MR] key, is displayed on the screen. 2) In frequency mode, make A/B frequency pointer points to A (uplink frequency point) by pressing [A/B] key. 3) Make the two-way radio operate in UHF band by pressing [BAND] key; 4) Adjust the frequency to 454.325MHZ by pressing numeric keys 4,5,4,3,2,5 in turn, is displayed on the screen. 5) Power setting: Select transmitting power TXP as HIGH by pressing [MENU] →2→ [MENU]→ [S] or [T], then return to the menu → [MENU]; 6) Channel contacts setting: Select channel contacts CONTCT as G by pressing →31→【MENU】→[S] or [T],then return to the menu → [MENU], 7) Color code setting: Select color code CC as 1 by pressing 32→【MENU】→[S] or [T],then return to the menu → [MENU]; 8) Encryption setting: Select encryption ENC-KEY as OFF by pressing 33→【MENU】→[S] or [T],then return to the menu → [MENU]; 9) Time slot setting: Select time slot BS-SLOT as SLOT1 by pressing 34→【MENU】→[S] or [T],then return to the menu → [MENU]; 10) Frequency difference direction setting: Select frequency difference direction SFT-D as + by pressing 17→【MENU】→[S] or [T],then return to the menu → [MENU]; Note: The frequency difference direction in this example is +. ·+ means that transmitting frequency is the receiving frequency plus frequency difference; ·- means that transmitting frequency is the receiving frequency plus frequency difference; ·OFF means off. In frequency mode, there isn't difference between transmitting frequency and receiving frequency. 11) Frequency difference setting: Press 18→ [MENU] →voice prompt "frequency difference" and screen display OFFSET →press numeric keys to enter 006000→[MENU]. Note: The frequency different in this example is 006.000MHZ. It shall be set according to the actual situation of the relay station. 12) Channel storage 12.1) Access to the menu by pressing [MENU] key 12.2) Press [S] key or [T] key (or enter 19 directly) until the screen shows and the pointer points to MEMCH; then perform the selection operation by pressing [MENU] key. Voice prompt "store channel" is issued.](https://usermanual.wiki/AUSWAY-PACIFIC/UR-A56/User-Guide-3551255-Page-24.png)
![UserManualofDMR‐5RDigitalTwo‐wayRadio12.3) Press [S] key or [T] key to select forward or backward Channel 001 (or idle channel) . 12.4) Then press [MENU] key to confirm channel storage, and now CH-001 is displayed at the position of channel number. By the above settings, press [FVO/MR] key to switch to channel mode, enter 1 directly, and now you can find that there are channel parameters on channel number 001. You can also decide the display mode of channel parameters via Menu 13 and Menu 14. Menu 13 decides the channel display mode of uplink channel; Menu 14 decides the channel display mode of downlink channel. ·FREQ means frequency mode; ·CH means channel mode; ·NAME means channel number and channel name and mode. Menu operation ■What is menu? For this two-way radio, many functions can be selected and configured via menu controlled by software rather than physical control components of the two-way radio. Once you become familiar with the menu system, its various functions will make you feel convenient. You can customize various setting and programming functions for this two-way radio as needed to avoid frequent use of keys, control buttons and switches. ■Access to menu and menu operation (operation in standby mode) 1) Press [MENU] key to enter function menu setting, "menu setting" voice prompt is issued, and the screen shows . ·The display screen shows simple menu description and setting and menu number. 2) Press [S] key or [T] key to select forward (rising prompt tune) or backward (falling prompt tune) the desired menu number, or enter into the desired menu number by or entering a number according to the sequence number of the menu. ·When changing menu number, the display screen will show a short description of each menu and current parameters. 3) Enter menu content setting by pressing [MENU] key, simple voice prompt (such as stepped frequency) is issued, the screen shows , the pointer on the left points down to prompt that there is options to be selected. 4) Press [S] key or [T] key to select forward or backward the desired parameters; 5) Confirm by pressing [MENU] key, voice prompt "confirm" is issued, save and return to previous menu; 6) Cancel the save action and exit from the menu mode by pressing [EXIT] key, return to main interface. ■Rapid menu search function After entering into menu selection or function parameter selection under menu items by pressing [MENU] key, search upward or downward the menu and various parameters by pressing [S] key or [T] key once, or search rapidly upward or downward by pressing and holding the [S] key or [T] key. Setting of following menu items are unavailable in channel mode: CTCSS, DCS, wideband/narrowband, BCL, scan channel adding, signaling code and channel name. In current channel mode, high/low power can be switched rapidly via [#/ ] key only.](https://usermanual.wiki/AUSWAY-PACIFIC/UR-A56/User-Guide-3551255-Page-25.png)
![UserManualofDMR‐5RDigitalTwo‐wayRadioVFO mode DMR Inquire the operation mode in channel mode and modify the operation mode in VFO mode INBOX Inbox (not available temporarily) 30 MSG Message OUTBOX Outbox (not available temporarily) 31 Contact Digital contacts Contact name Set via frequency writing software 32 CC Color code 0,1,…,15 Set color code value in digital mode 33 ENC-KEY Encryption key Key name Set via frequency writing software SLOT1 Time slot 1 34 BS-SLOT Time slot SLOT2 Time slot 2 35 CP Ver. Software version XXXXXX Inquire software version number (date) Note: MSG,CP Ver. doesn't support modification; ANI-ID needs to be modified via frequency writing software. Auxiliary functions Restore factory settings In case of a failure of this two-way radio due to misoperation or setting error, resetting the microprocessor may solve the problem. This function operation can be used to restore all settings and channels of this two-way radio to factory state. Memory data and stored information may be lost during the resetting process. Before resetting, please back up or write down important data. ■All reset Execute the operation steps below: 1) Access to the menu by pressing [MENU] key. 2) Press [S] key or [T] key (or enter 28 directly) until the screen shows and the pointer points to RESET; then perform the selection operation by pressing [MENU] key. 3) Press [S] key or [T] key until the pointer on the screen points to ALL; then execute all reset operation by pressing [MENU] key. 4) During operation, go back and exit from the menu mode by pressing [EXIT] key. By resetting, data shall be deleted and factory settings of the two-way radio shall be restored, therefore, this function shall be used prudently. ■VFO reset "VFO reset" means resetting two-way radio parameters except DTMF memory, memory channel content and call channel content. Execute the operation steps below: 1) Access to the menu by pressing [MENU] key. 2) Press [S] key or [T] key (or enter 28 directly) until the screen shows and the pointer points to RESET; then perform the selection operation by pressing [MENU] key. 3) Press [S] key or [T] key until the pointer on the screen points to VFO; then execute VFO reset by pressing [MENU] key. 4) The screen shows WAIT… until the two-way radio is reset. ▲During operation, go back and exit from the menu mode by pressing [EXIT] key. By resetting, data shall be deleted and factory settings of the two-way radio shall be restored, therefore, this function shall be used prudently. ■Troubleshooting guide Problem Solution Without power supply, the two-way radio doesn't work. The battery may has run out. Please replace or charge the battery. The battery may be installed improperly. Please remove and reinstall the](https://usermanual.wiki/AUSWAY-PACIFIC/UR-A56/User-Guide-3551255-Page-31.png)