AVer Information CC30R15-2 Wireless Receiver User Manual
AVer Information Inc. Wireless Receiver
UserManual.wiki
>
AVer Information
>
CC30R15 2 User Manual
User Manual.pdf
Navigation menu
Upload a User Manual
Namespaces
Wiki Guide
HTML
PDF
Info
Views
User Manual
Discussion / Help
Navigation
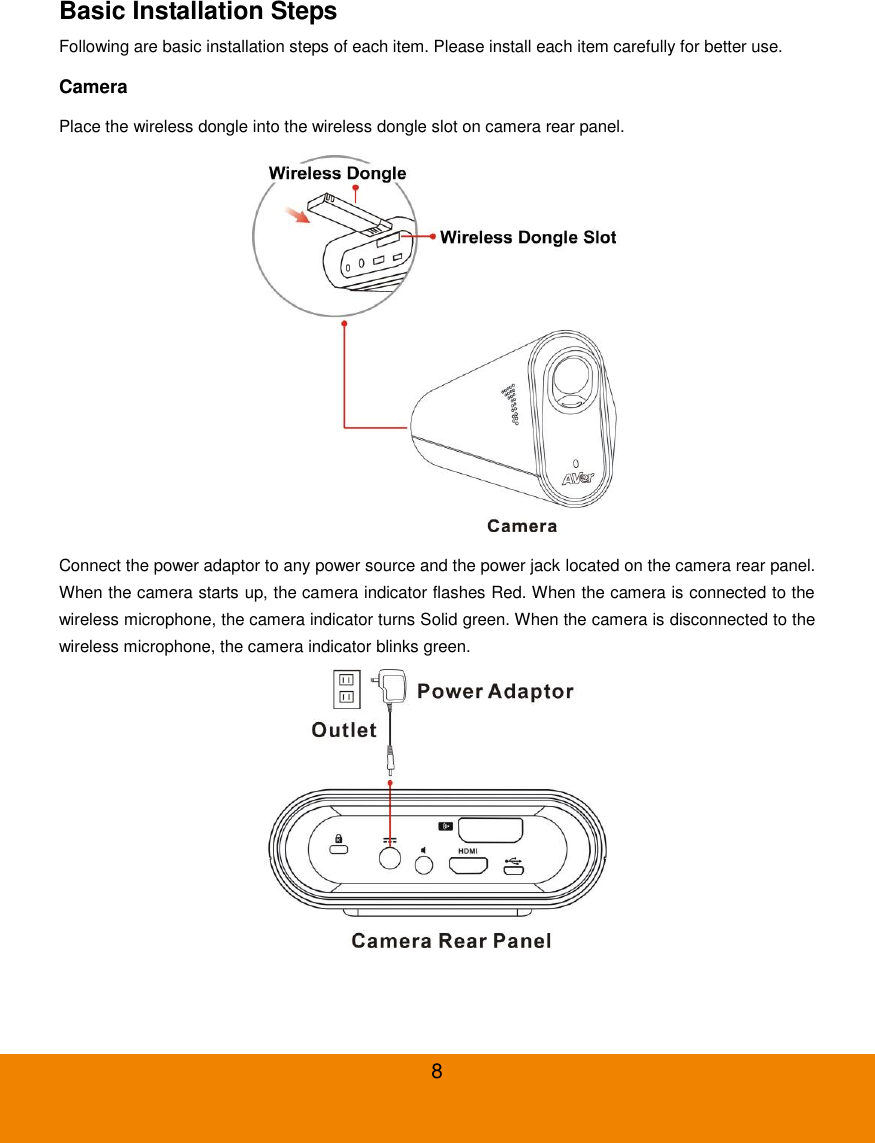
![3 Package Contents The following items are included in the package. Please check if each item is available and confirm if there are damage before using. [Note] 1. Do not disassemble or modify the items by yourself. Contact the dealer for help when the items is failed to work. 2. Store the items in a dry place away from moisture. Camera Unit Microphone Receiver Mini Tripod Power Adaptor USB Cable Battery Manual [Note] The power cord will vary depending on the standard power outlet of the country where it is sold.](https://usermanual.wiki/AVer-Information/CC30R15-2/User-Guide-2908054-Page-8.png)
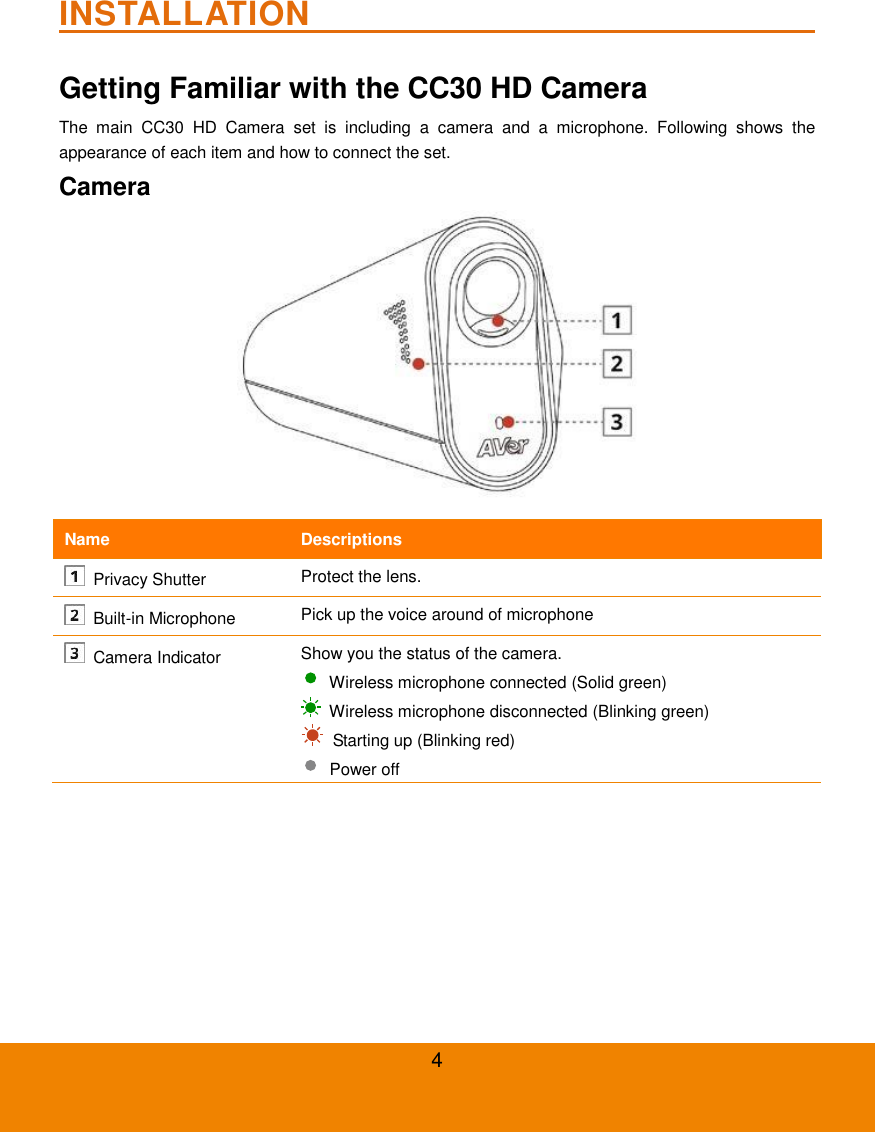
![9 Pull down the privacy shutter of the camera carefully. Clean thoroughly the lens with lens tissue for better viewing effect before using. [Note] 1. You may close the privacy shutter after using for protecting your privacy and protect the lens. 2. Do not clean the lens with cleaners containing strong acid or alkaline. 3. Do not press hard on the lens that will cause the camera malfunction. Mini tripod Press both sides of the circular shaft and spread the head of your mini tripod to the end. Spread the left and right legs of the tripod away from the center support so that the three legs of tripod evenly rests on a flat surface, such as a table. Attach the tripod socket of camera to the head of mini tripod. Lock the screw located in the center of the head, into the hole at the base of tripod socket. [Note] Do not rotate over close avoiding damage.](https://usermanual.wiki/AVer-Information/CC30R15-2/User-Guide-2908054-Page-14.png)
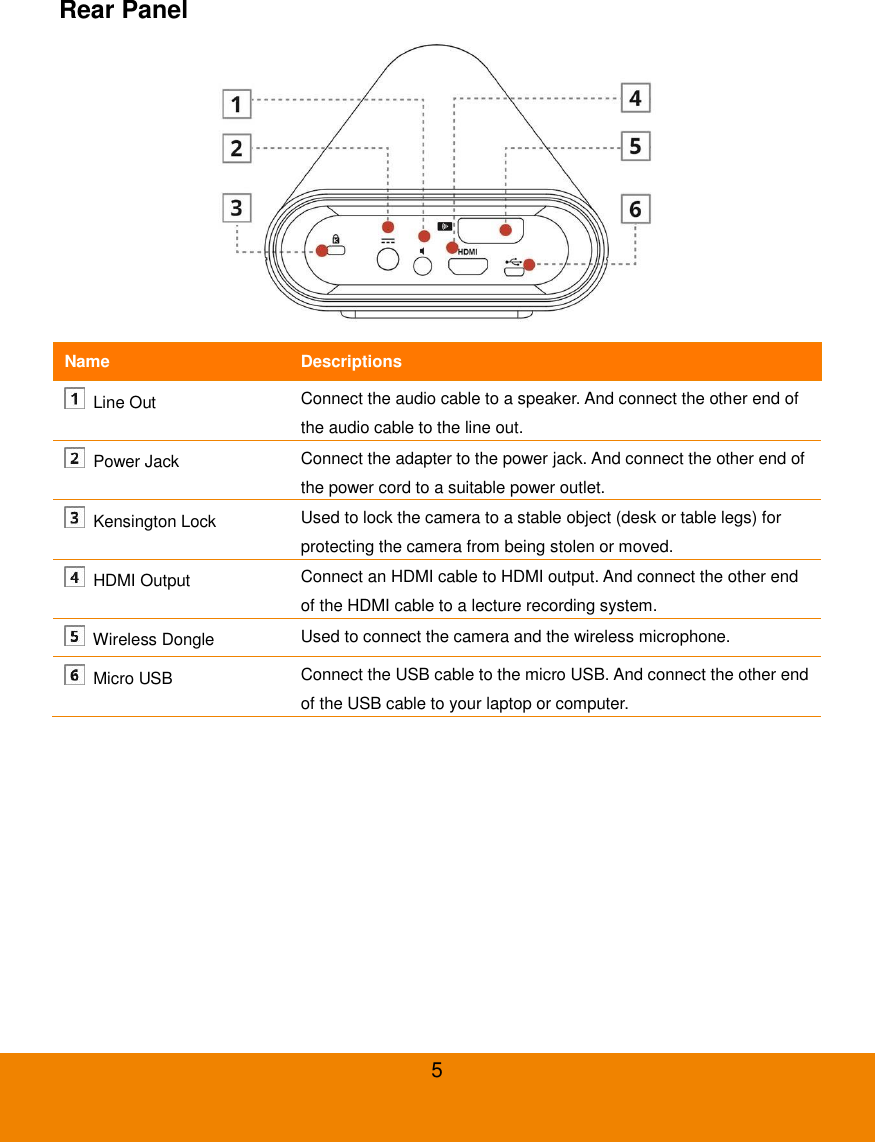
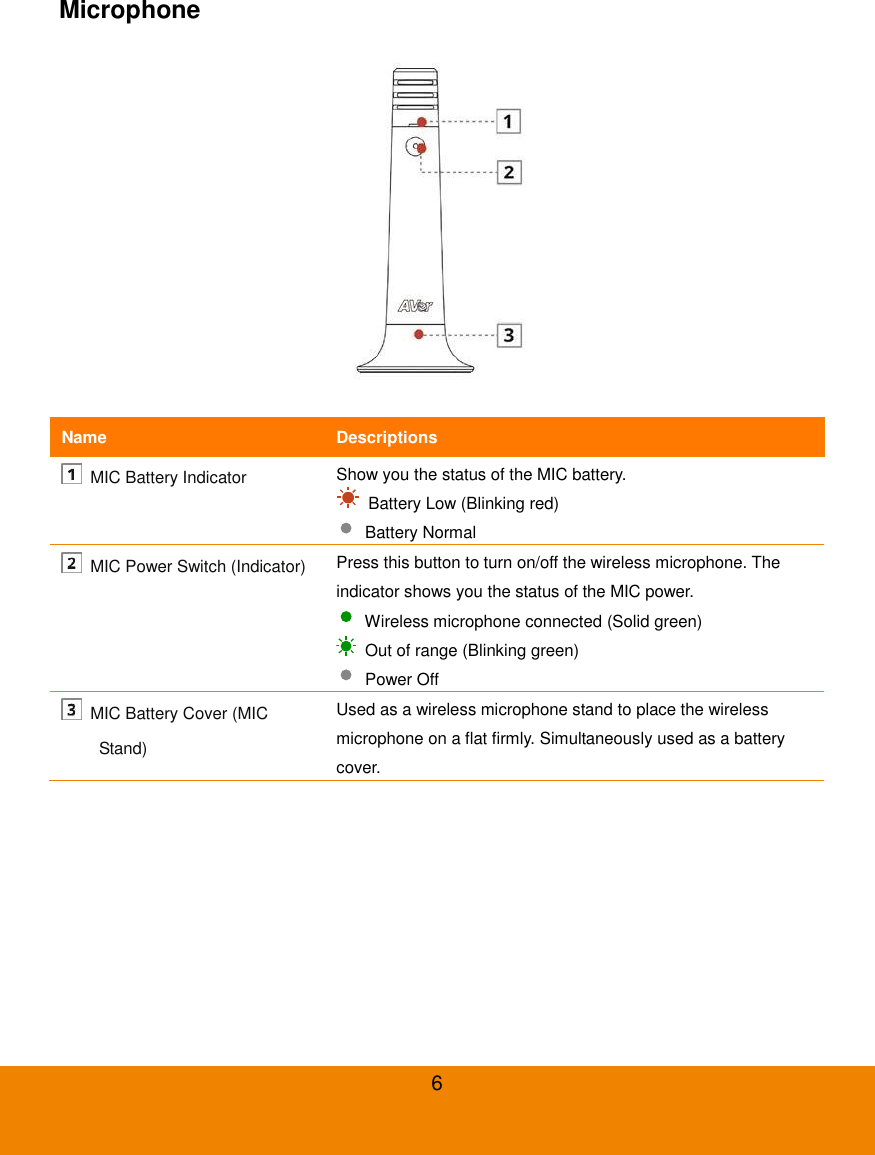
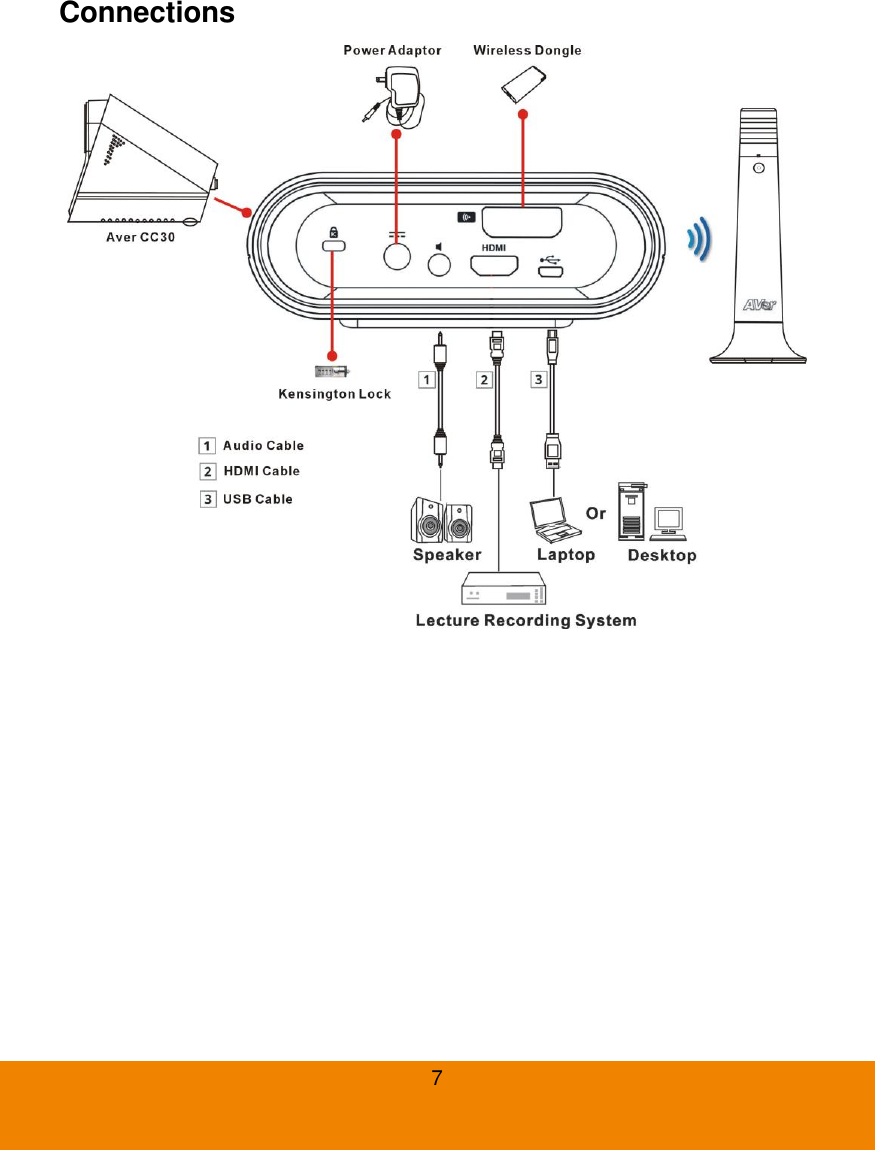
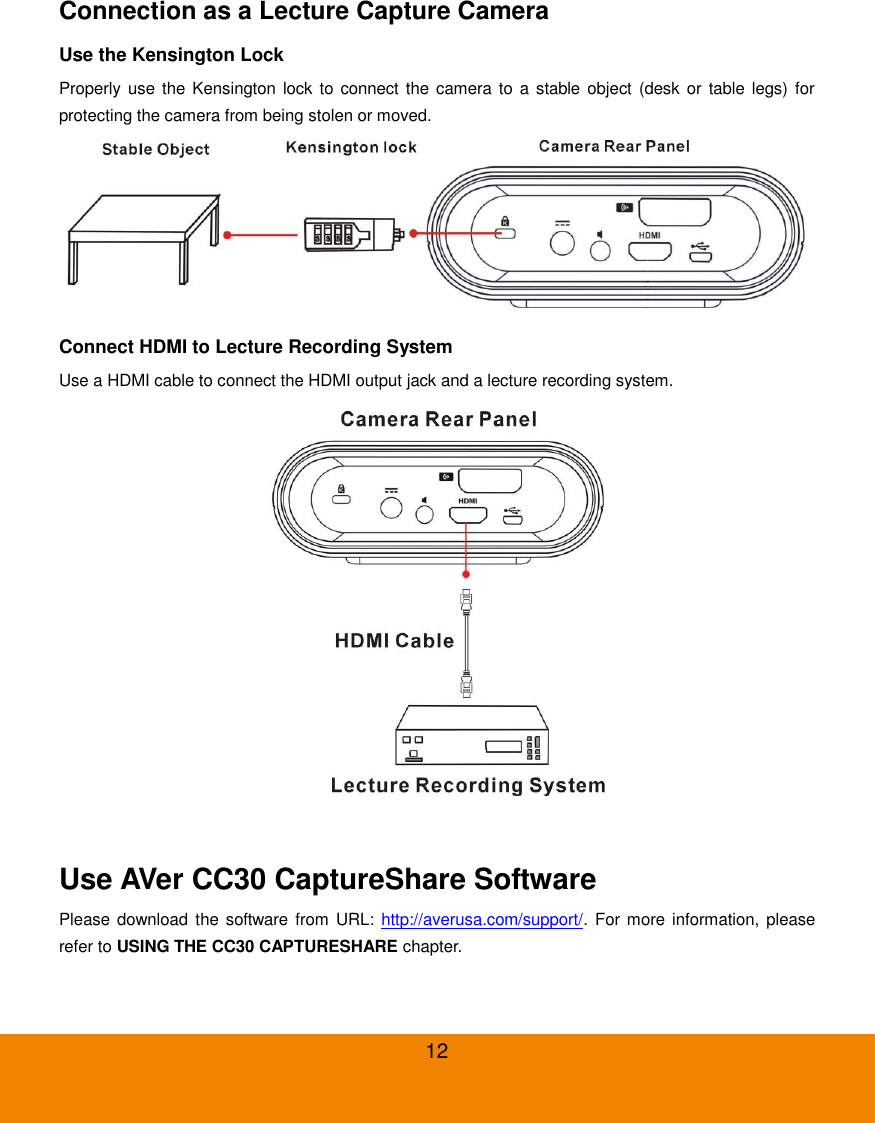
![10 Wireless microphone Hold the upper part of the microphone and turn counterclockwise carefully to open the microphone. Place two AA batteries in to the battery holder. The battery cathode are toward outside. Hold the upper part back to the base and turn clockwise carefully to close the microphone. [Note] When you close the microphone base, be sure aligning the latch slot avoiding causing damage. Press the microphone power switch to turn on the microphone. When the microphone connected to the camera successfully, the indicator turns to Solid green. If out of range or disconnected from wireless dongle, the indicator is blinking green. Connection as a Conference Camera Connect Camera to a computer or a laptop Use a USB cable to connect the USB jack located on the camera rear panel and your computer or laptop.](https://usermanual.wiki/AVer-Information/CC30R15-2/User-Guide-2908054-Page-15.png)
![11 Connect Speaker to Camera Use an audio cable to connect the line out port and a speaker. [Note] It is highly recommended that setting low volume level before turn on the speaker for protecting your hearing.](https://usermanual.wiki/AVer-Information/CC30R15-2/User-Guide-2908054-Page-16.png)
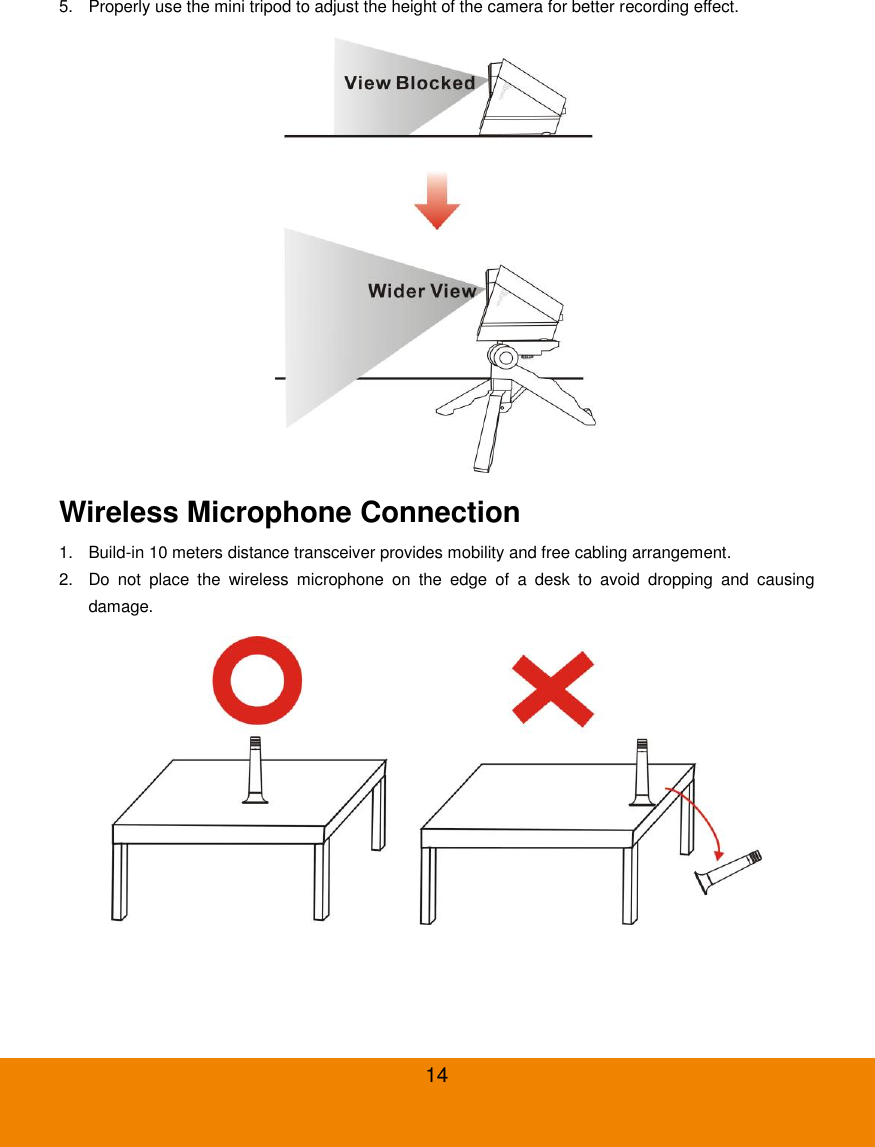
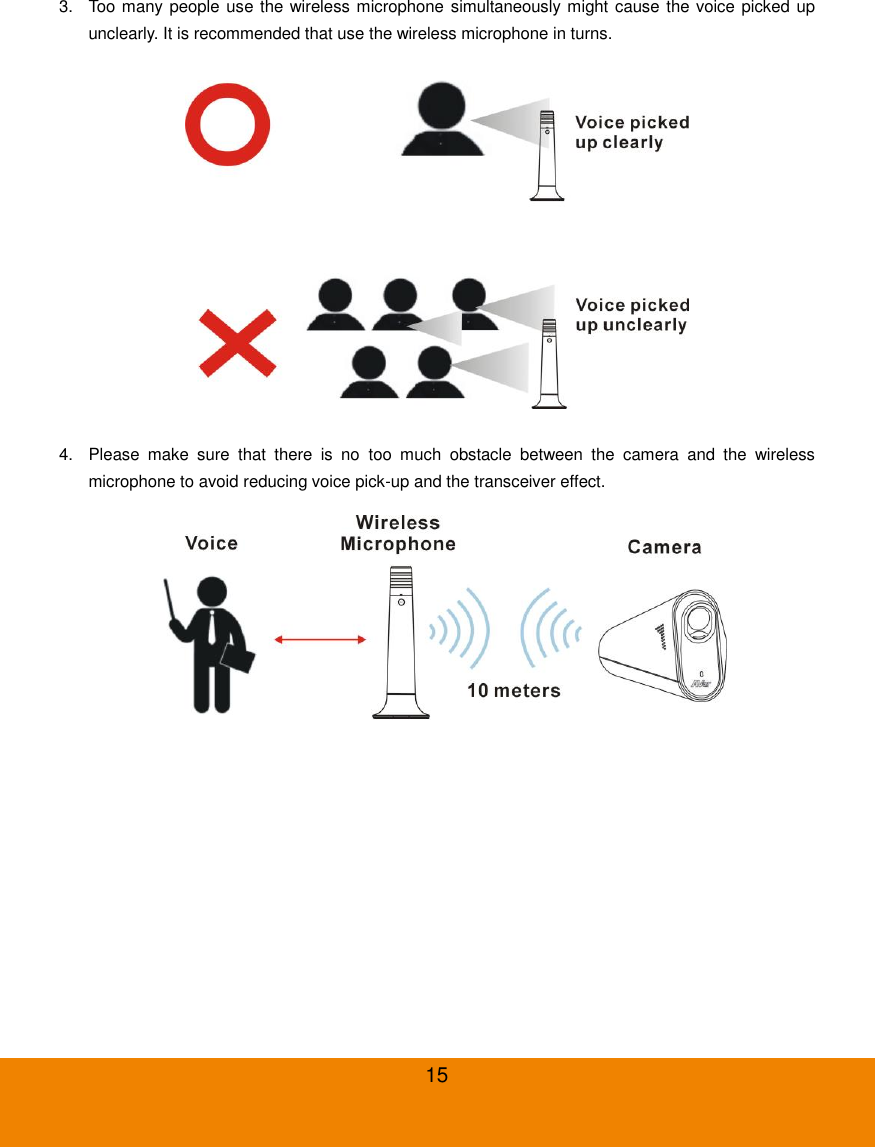
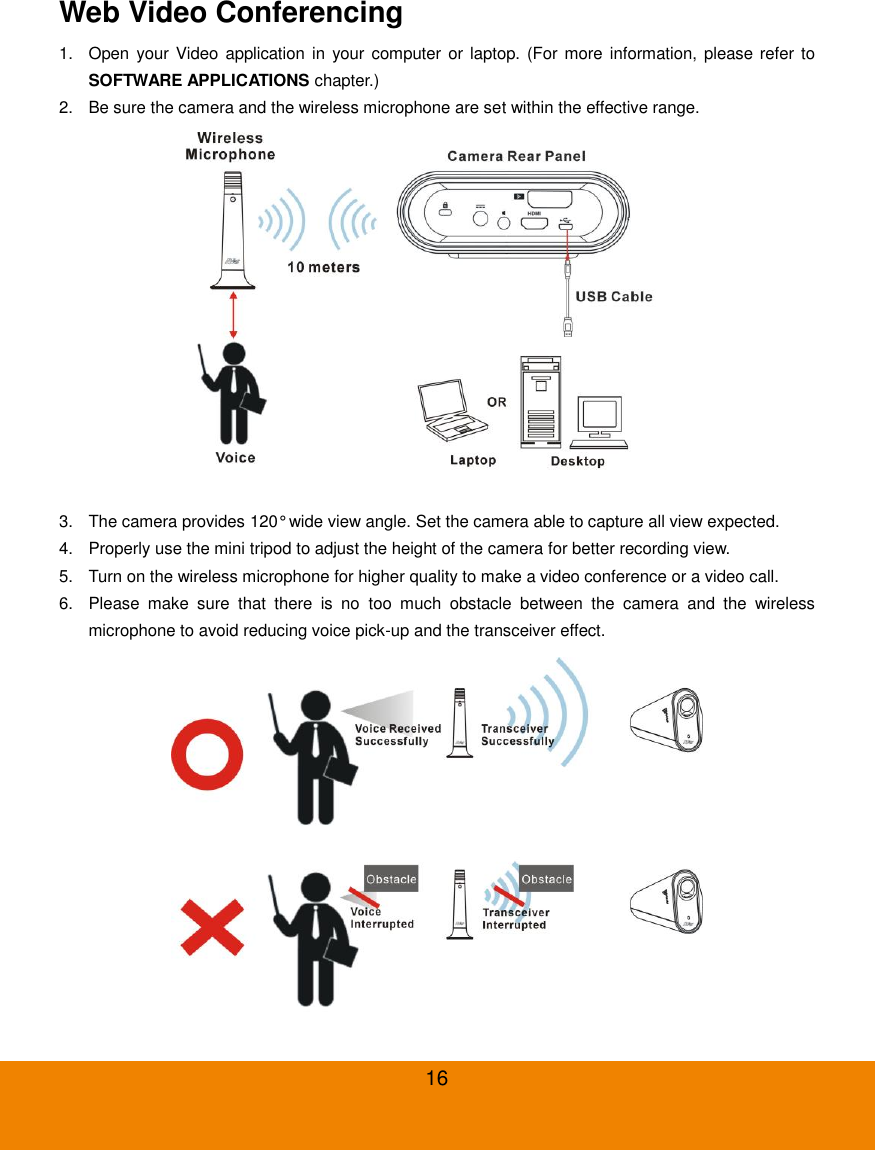
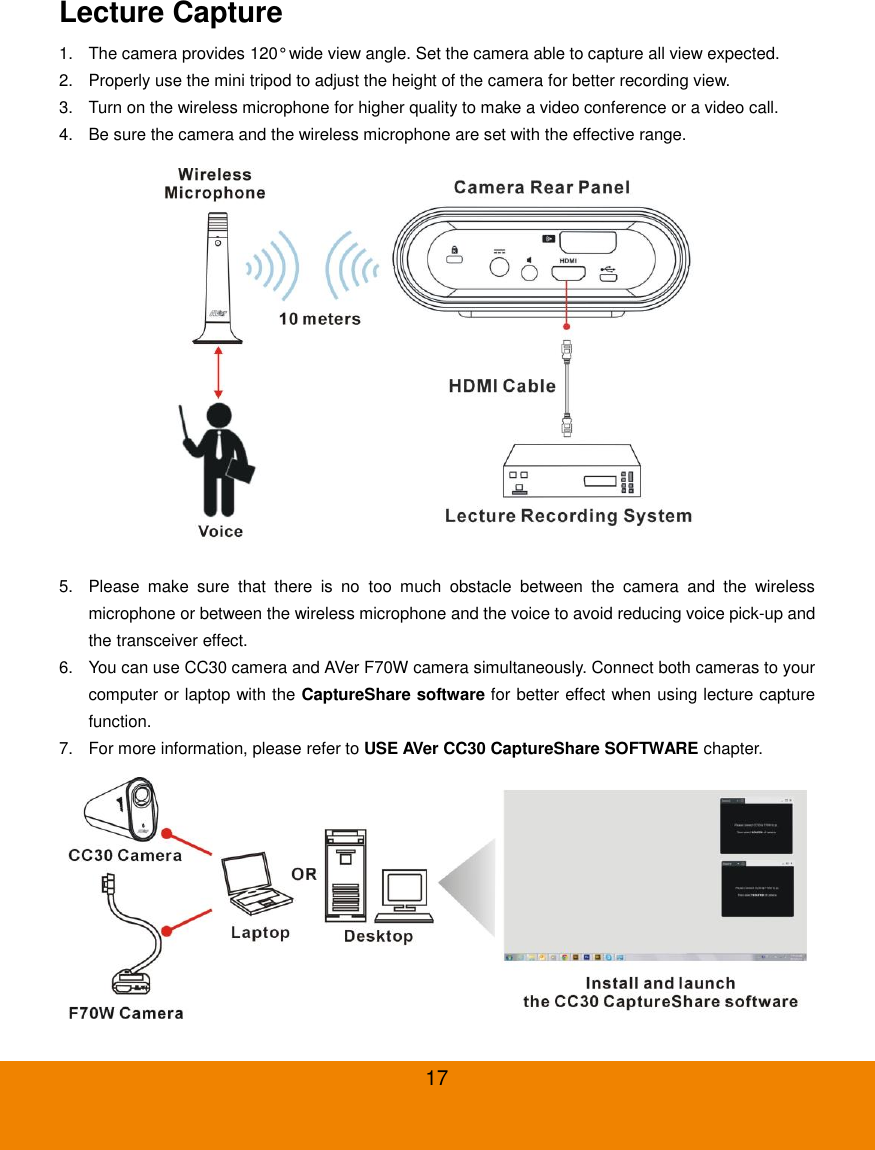
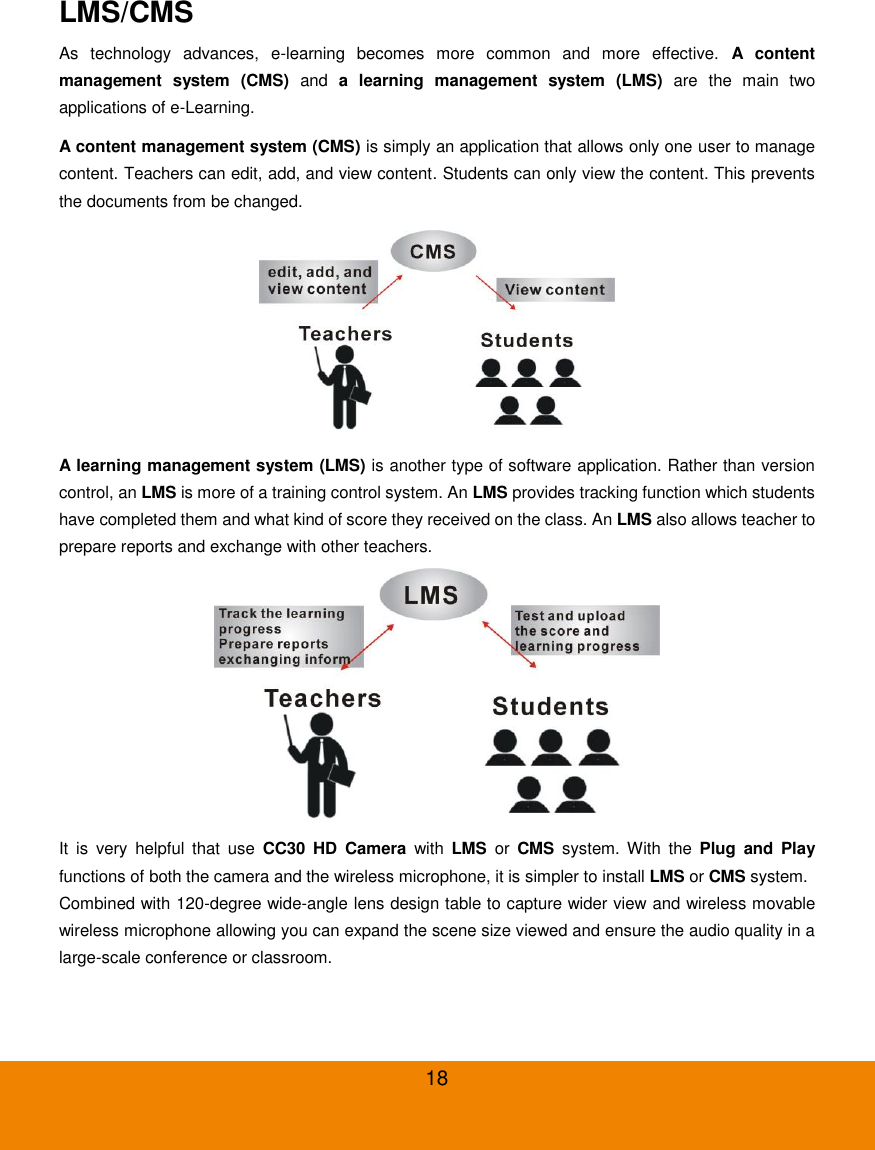
![13 DEPLOYMENT This chapter explains how to deploy the CC30 HD Camera in a best suitable angle and position for a good visual and audio effect. Using the Camera 1. The camera provides 120° wide view angle. Set the camera able to capture all view expected. 2. Do not place objects in front of the camera to avoid influencing the recording effect. 3. Clean and dry thoroughly the lens with lens tissue to avoid influencing the viewing effect. [Note] Do not clean the lens with cleaners containing strong acid or alkaline. 4. Do not place the camera on the edge of a desk to avoid dropping and causing damage.](https://usermanual.wiki/AVer-Information/CC30R15-2/User-Guide-2908054-Page-18.png)
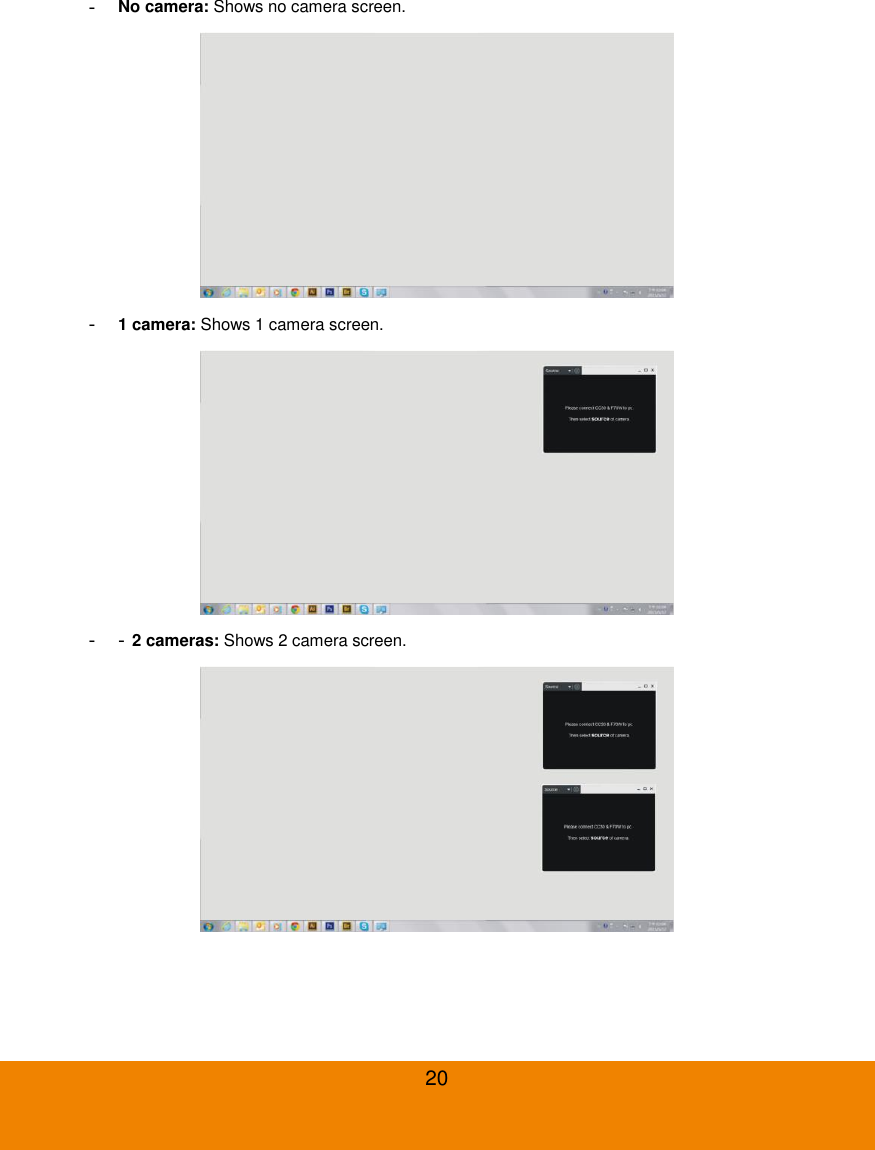
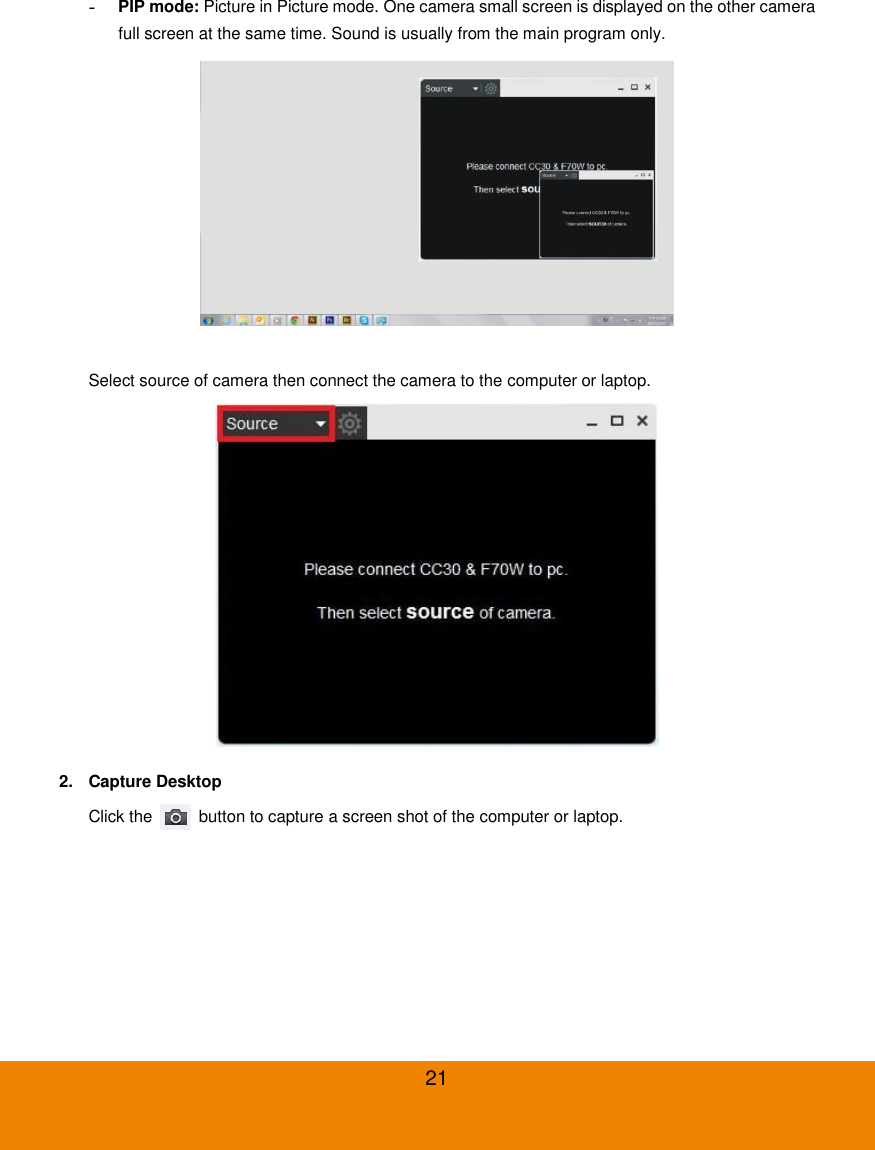
![19 USE AVer CC30 CaptureShare SOFTWARE Please download software from the following web link: USA http://averusa.com/support/ Global http://www.aver.com/download-center [Note] The version may be different. Before You Begin Make sure all connections are connected successfully before you are using the CC30 CaptureShare application. Connections error will cause no image showing, no audio or no reaction. (For more information, please refer to INSTALLATION chapter.) Windows Tool Bar When you launch CaptureShare, the tool bar is showed at the bottom of the windows. 1. Select Layout CaptureShare can connect up to two cameras simultaneously. There are four types of layout modes to choose.](https://usermanual.wiki/AVer-Information/CC30R15-2/User-Guide-2908054-Page-24.png)
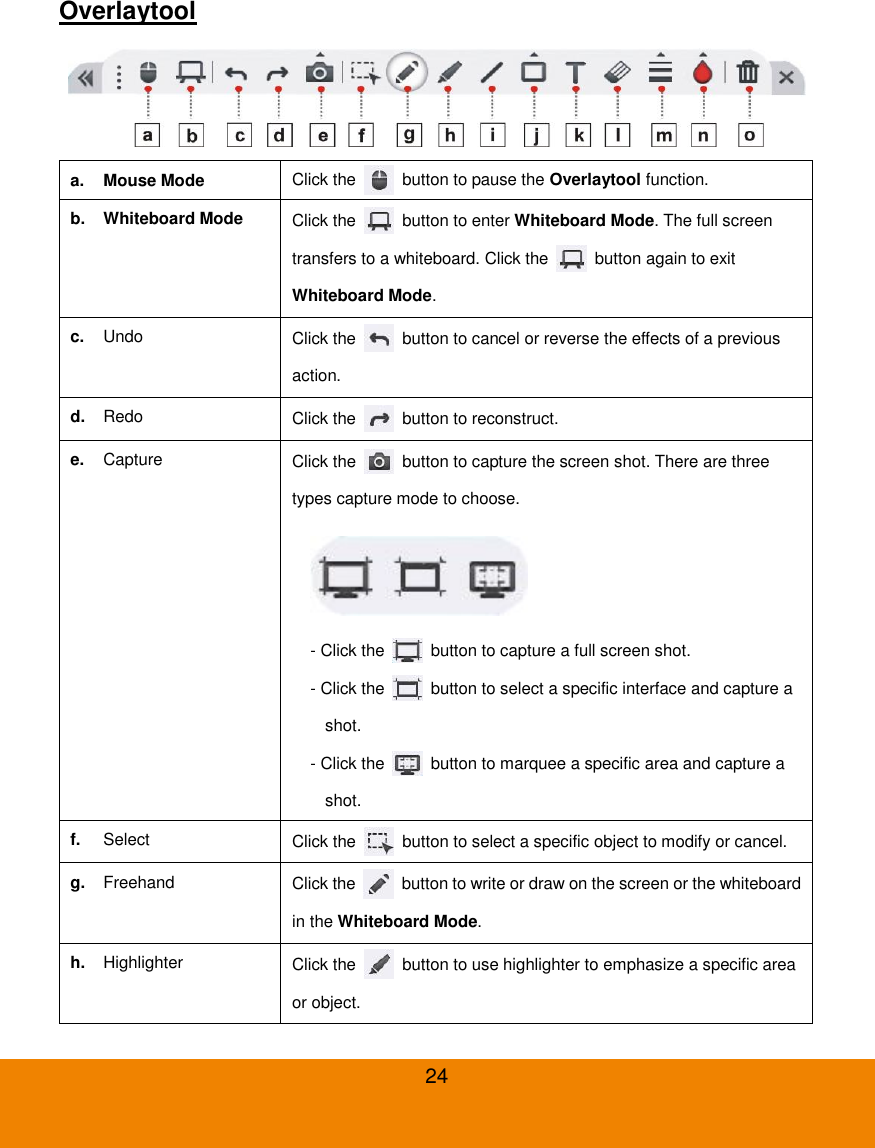
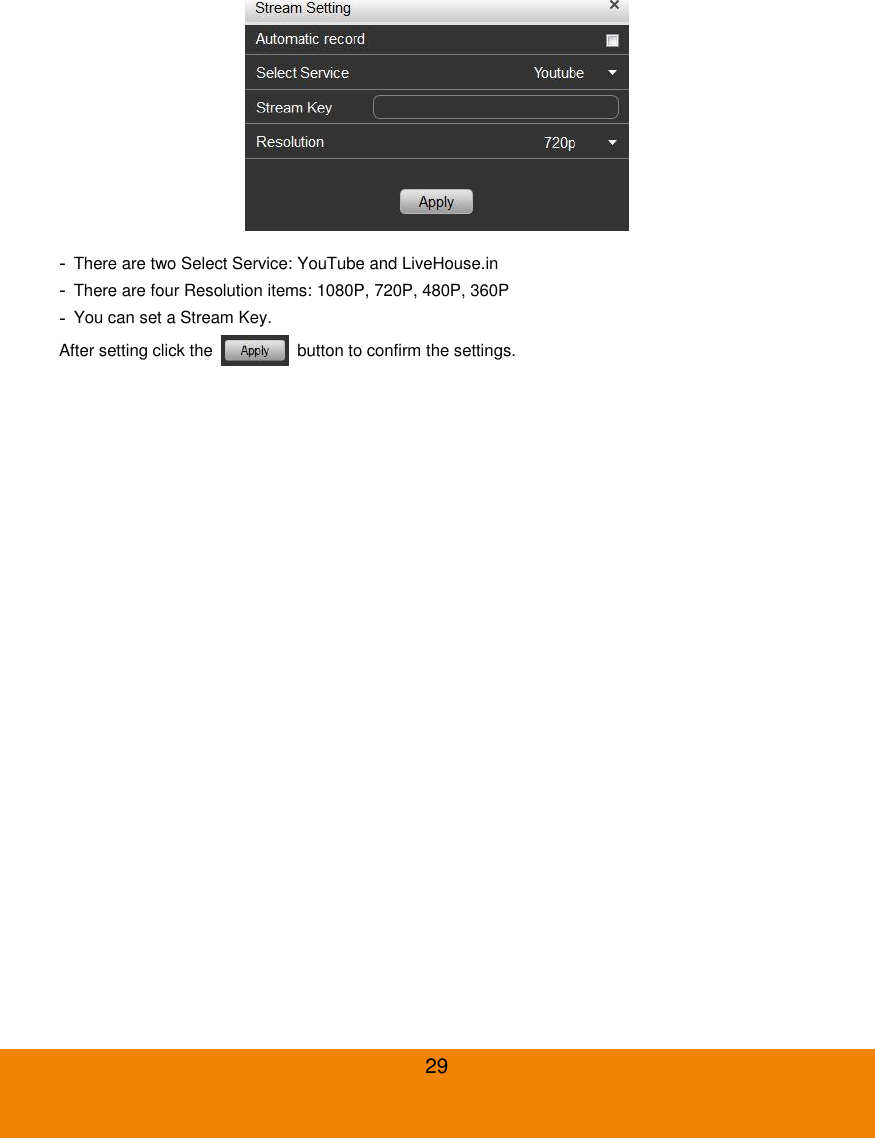
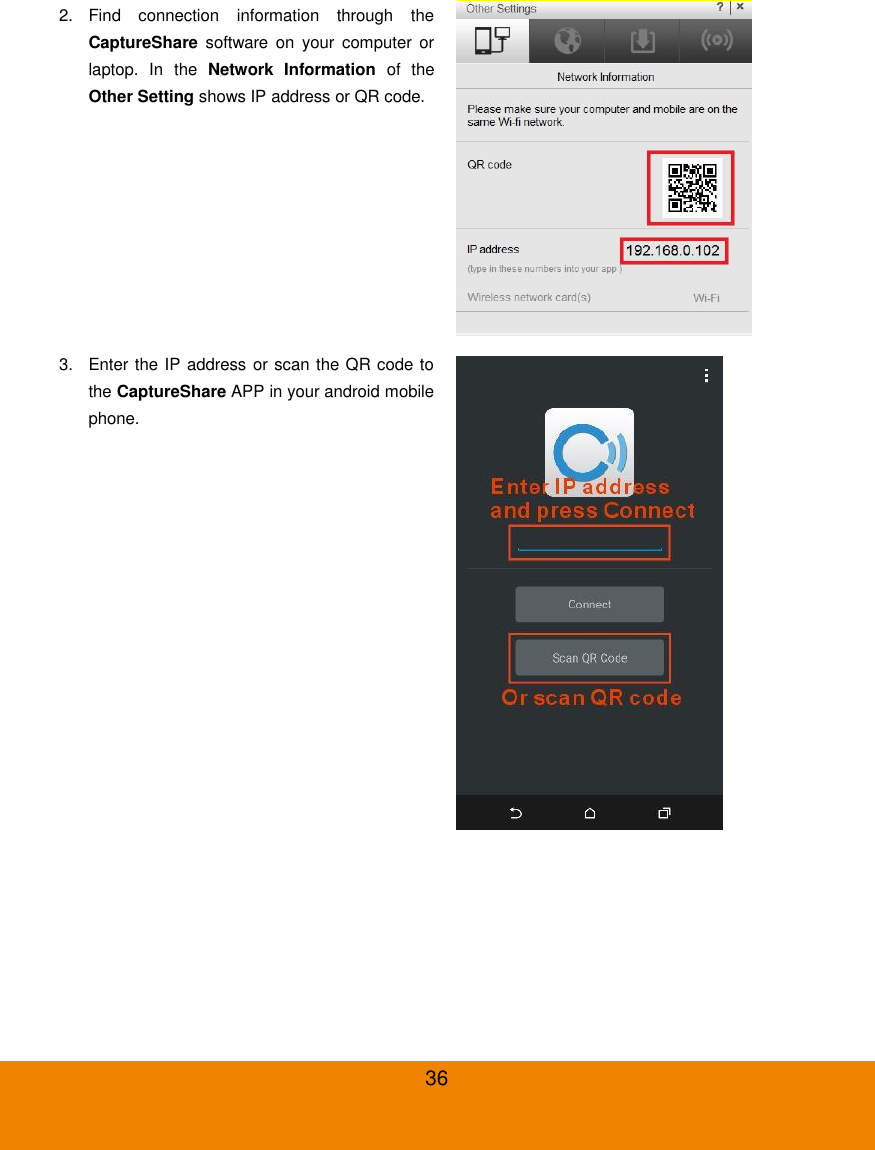
![23 - There are two Select Service: YouTube and LiveHouse.in - There are four Resolution: 1080P, 720P, 480P, 360P - You can set a Stream Key. After setting click the button to confirm the settings. 5. Open File Click the button to review all the recorded videos and captured shots. 6. Other Setting Network Information: QR code for connection of an android mobile phone and a computer or laptop. [Note] The computer or laptop and the mobile phone should share the same Wi-Fi network. Language Setting: Set the language displayed on the screen. - English - 日本語 - Polski - Русский - 繁體中文 Software Update/Firmware Update: Click the button to check if the version of software and the firmware is the latest. It is recommended to check if the software and firmware need to upgrade regularly for better use. Stream Setting: - There are two Select Service: YouTube and LiveHouse.in - There are four Resolution: 1080P, 720P, 480P, 360P - You can set a Stream Key. Click the button to confirm the setting. 7. Overlaytool Click the button to show overlaytool bar.](https://usermanual.wiki/AVer-Information/CC30R15-2/User-Guide-2908054-Page-28.png)
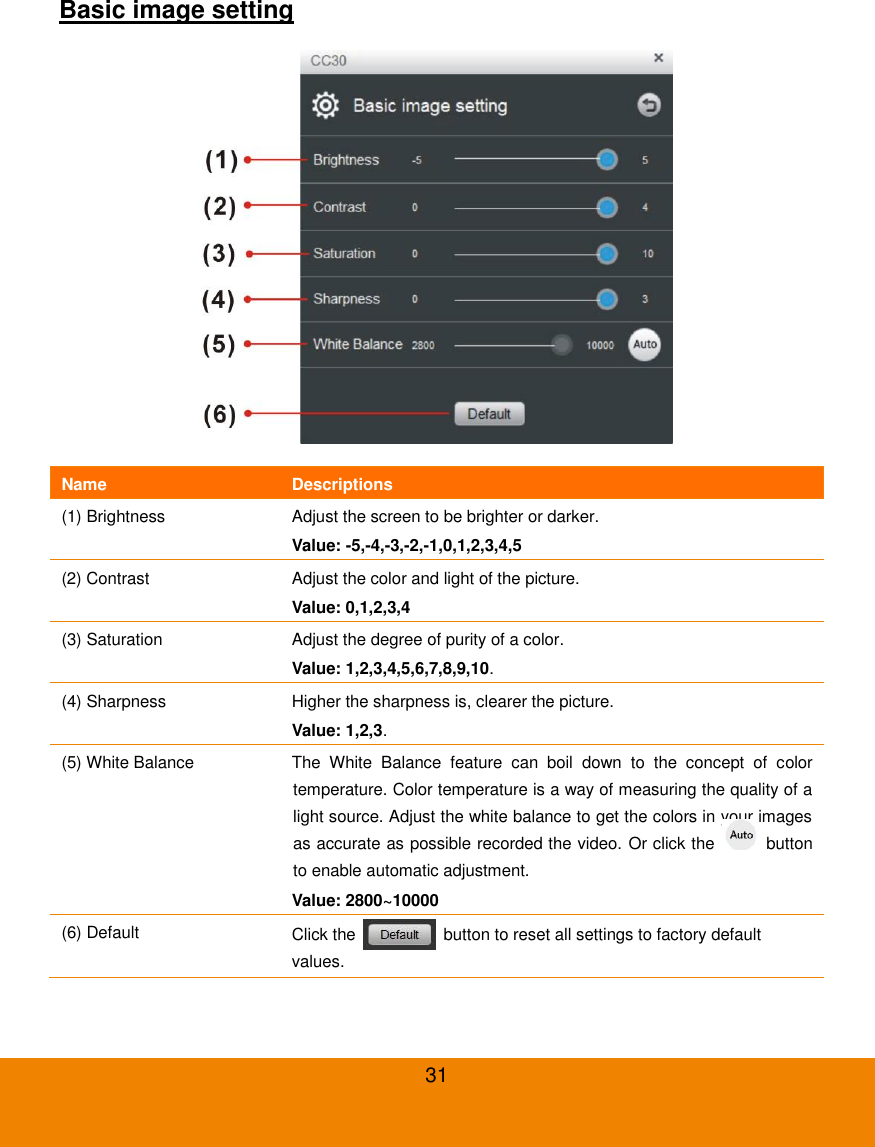
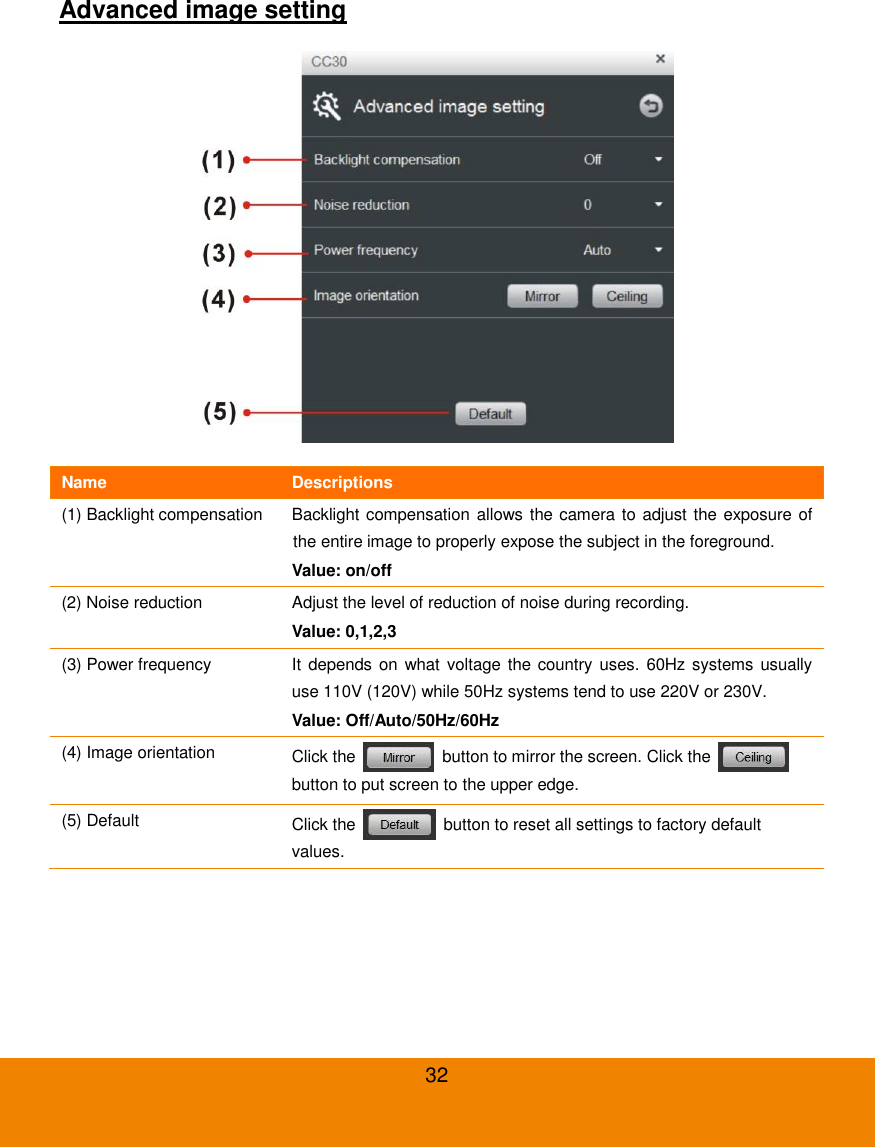
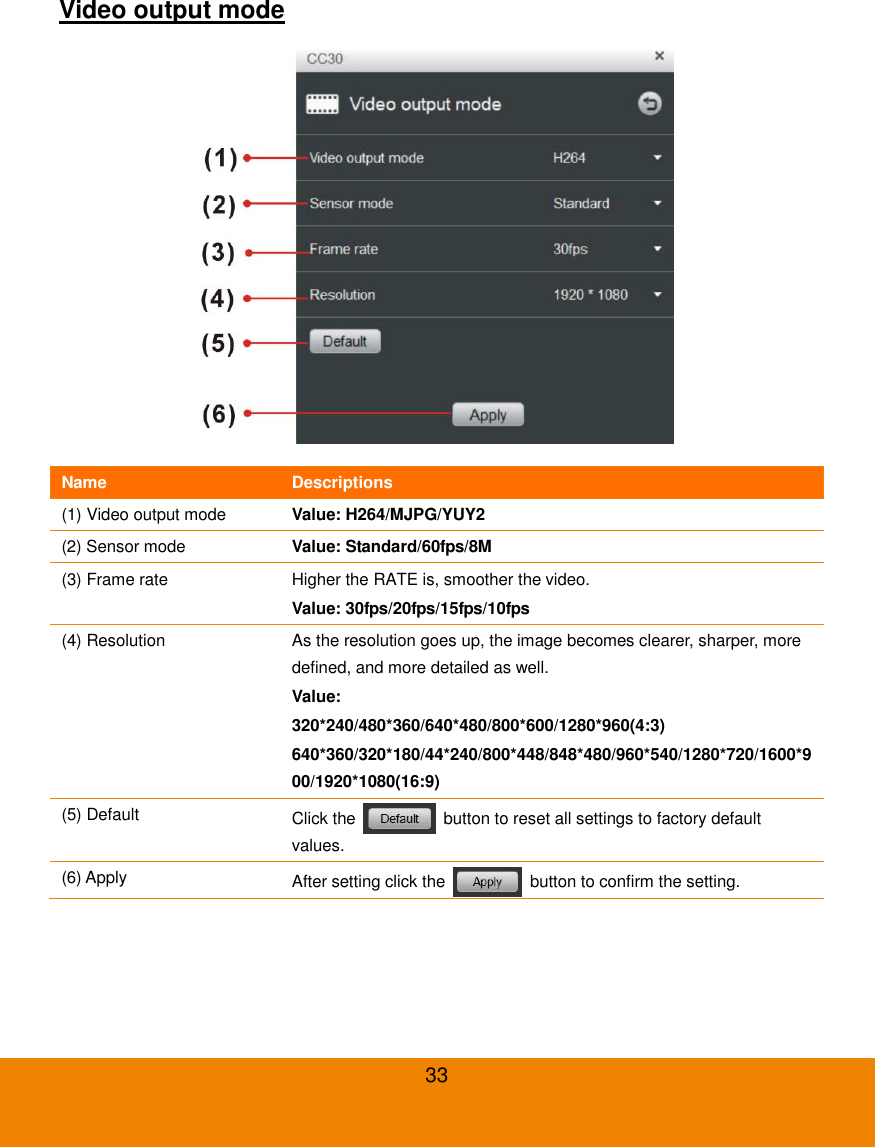
![34 Audio setting Name Descriptions (1) Microphone setting Enable both the CC30 built in microphone and CC30 wireless microphone together. Value: Enable/Disable (2) HDMI output setting Enable CC30 HDMI audio output Value: Enable/Disable. (3) More information Click this link to learn more about CC30 audio setting. [Note] Video output mode setting can’t adjust during recording. Make sure that this setting is correct before recording.](https://usermanual.wiki/AVer-Information/CC30R15-2/User-Guide-2908054-Page-39.png)
![35 Android Use your android mobile phone as remote controller to control the camera properly. Improve the mobility of a conference or a course. The Same Network The computer or laptop and the mobile phone should share the same Wi-Fi network. Connect to CaptureShare Software 1. Enable the CaptureShare APP in your android mobile phone and CaptureShare software in your computer or laptop simultaneously. [Note] It is recommended that the version of the CaptureShare APP and CaptureShare software are the same for better using. You can check if the CaptureShare software is the latest in the Software Update/Firmware Update of Other Setting.](https://usermanual.wiki/AVer-Information/CC30R15-2/User-Guide-2908054-Page-40.png)
![37 4. Select the source as CC30. [Note] The camera is required to connect to your computer or laptop. 5. Press the button firstly and press the button to start recording.](https://usermanual.wiki/AVer-Information/CC30R15-2/User-Guide-2908054-Page-42.png)
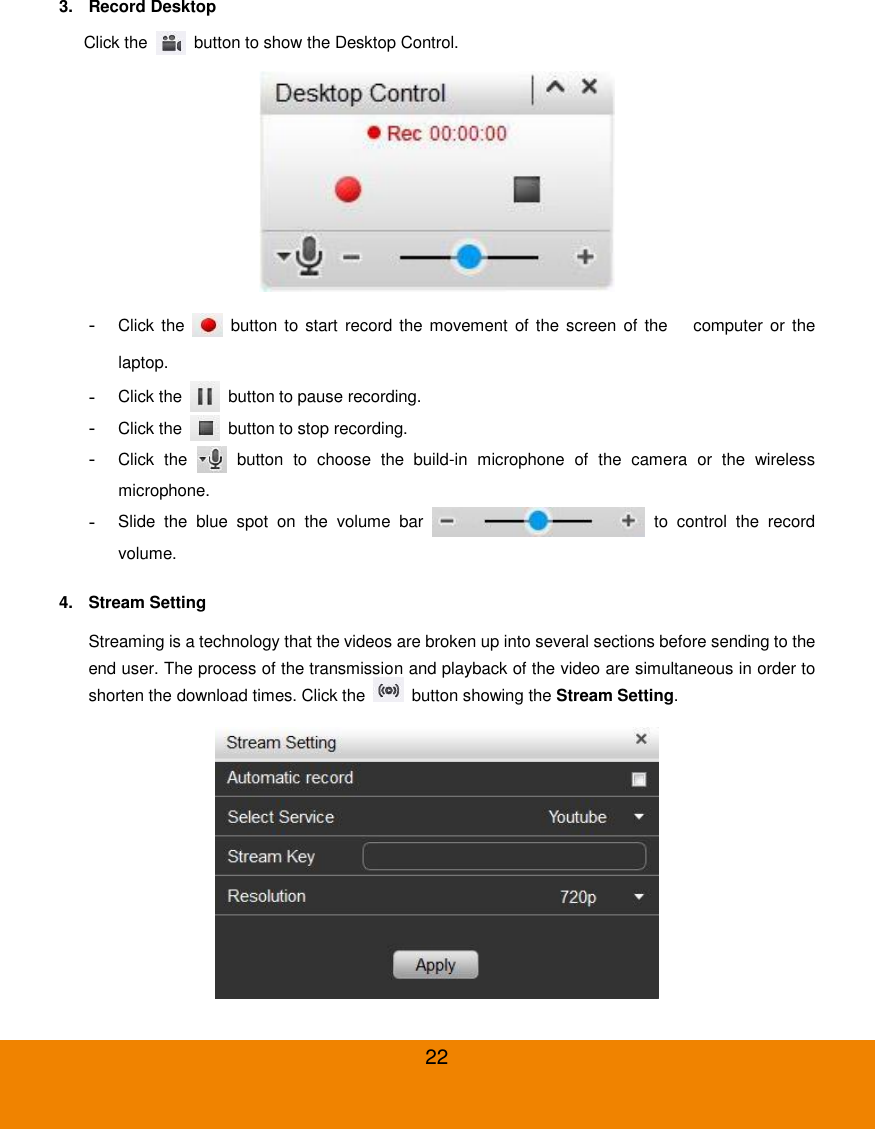
![38 6. After starting recording, your computer or laptop will shows Desktop Control. 7. Press the button to pause recording. Press the button to stop recording. [Note] You can pause or stop recording on your computer or laptop.](https://usermanual.wiki/AVer-Information/CC30R15-2/User-Guide-2908054-Page-43.png)
![39 8. When the recording is complete, the recording file is saved on your computer or laptop. [Note] Click the button in the CaptureShare software in your computer or laptop to review the recorded videos. 9. Press the button to start stream. This function should set through the CaptureShare software in your computer or laptop.](https://usermanual.wiki/AVer-Information/CC30R15-2/User-Guide-2908054-Page-44.png)
![40 10. Press the button to capture the screen shot. [Note] Click the button in the CaptureShare software in your computer or laptop to review the captured shots. 11. If you choose the source as Desktop, the recording video and the captured shots will be the screen of your computer or laptop.](https://usermanual.wiki/AVer-Information/CC30R15-2/User-Guide-2908054-Page-45.png)
![41 SOFTWARE APPLICATIONS Before You Begin Make sure all connections are connected successfully before you are using Video applications. Connections error will cause no image showing, no audio or no reaction. (For more information, please refer to chapter INSTALLATION.) Making a Video Call 1. Open your Video application (Skype™, Skype for Business, Google Hangouts™, Zoom™, WebEx™, Adobe Connect™, WebRTC and etc.) 2. Some Video application needs specific account before using. 3. Set the CC30 as your primary camera, microphone and speaker devices in your application. (For more information, please refer to chapter INSTALLATION.) 4. Ready to make a video call. 5. It is highly recommended that setting low volume level before turn on the speaker for protecting your hearing when you start the video call. 6. For a good visual and audio effect, please refer to chapter DEPLOYMENT. [Note] A computer or a laptop is required to use this device.](https://usermanual.wiki/AVer-Information/CC30R15-2/User-Guide-2908054-Page-46.png)
![42 Skype 1. Download SkypeTM from the official website. (Reference: http://skype.pchome.com.tw/download.html) [Note] A SkypeTM account is required. 2. Install SkypeTM. 3. Open SkypeTM 4. Choose CC30 as video camera.](https://usermanual.wiki/AVer-Information/CC30R15-2/User-Guide-2908054-Page-47.png)
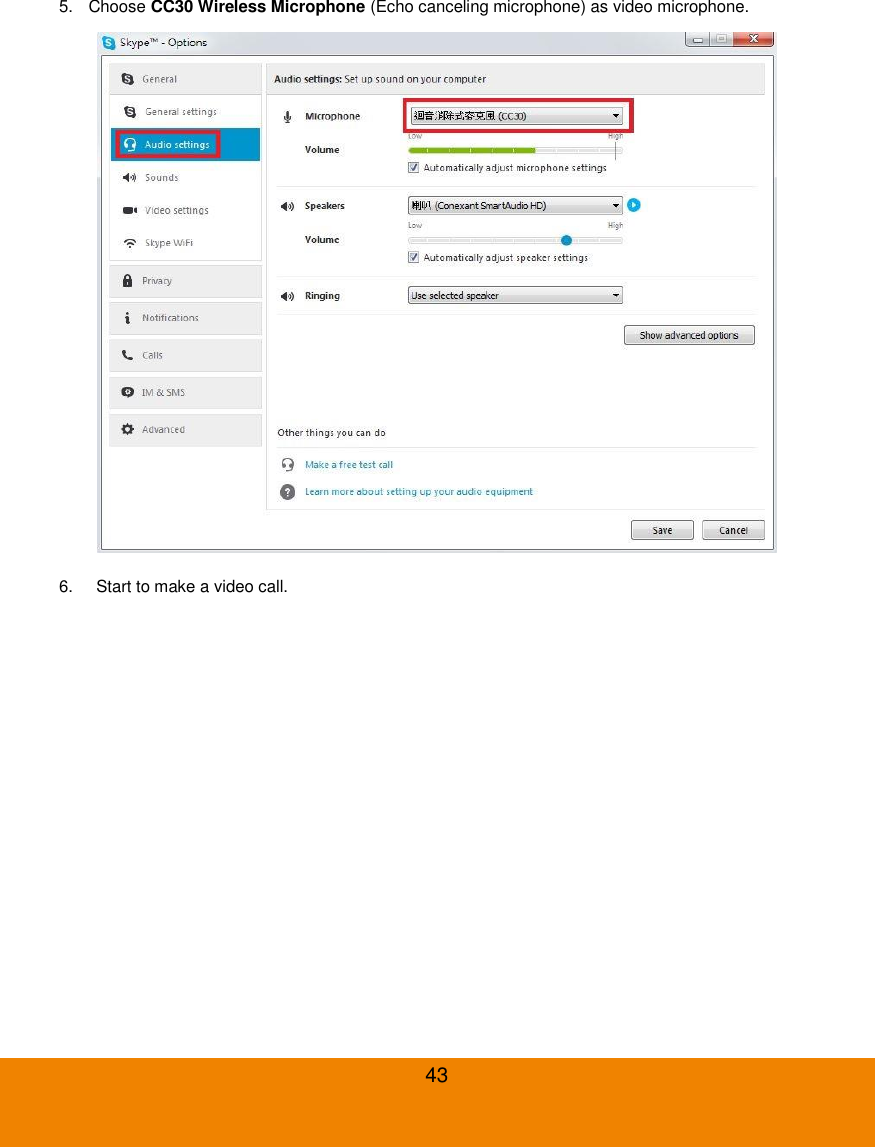
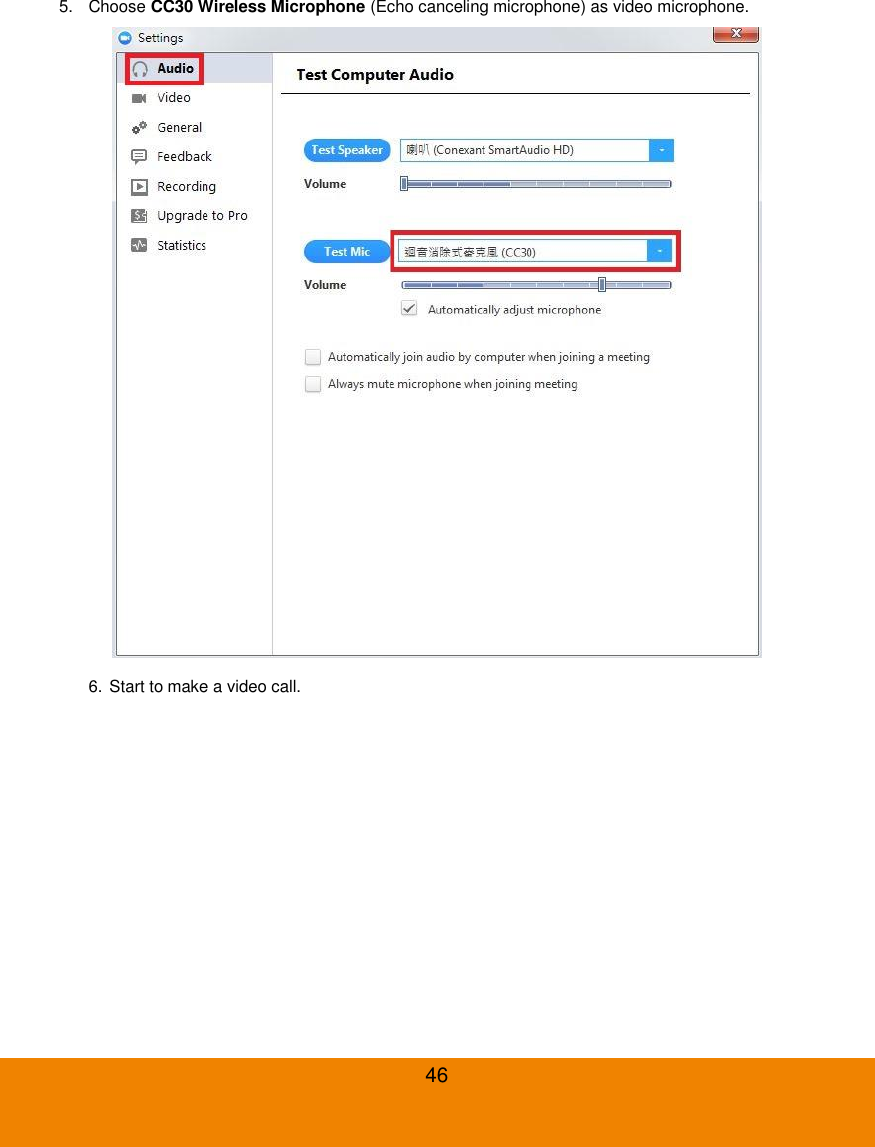
![44 Google Hangouts 1. Open your Google Hangouts. (Reference: https://hangouts.google.com/) [Note] A Google account is required. 2. Choose CC30 as video camera. 3. Choose CC30 Wireless Microphone (Echo canceling microphone) as video microphone. 4. Start to make a video call.](https://usermanual.wiki/AVer-Information/CC30R15-2/User-Guide-2908054-Page-49.png)
![45 Zoom 1. Download Zoom from the official website. (Reference: https://zoom.us/support/download) [Note] A Zoom account is required. Or you can use Google or Facebook account to register. 2. Install Zoom. 3. Open Zoom. 4. Choose CC30 as video camera.](https://usermanual.wiki/AVer-Information/CC30R15-2/User-Guide-2908054-Page-50.png)
![48 Q: Unable to booting the CaptureShare application A: 1. Please make sure if the installation is successful. 2. Restart your computer or laptop before use the CaptureShare firstly. 3. Try to reinstall the CaptureShare. Q: Unable to connect the computer or laptop to the mobile phone when use the CaptureShare. A: 1. Please make sure if the CaptureShare software on your computer or laptop and the CaptureShare APP on your mobile phone installed successful. 2. Please make sure if the CaptureShare software on your computer or laptop and the CaptureShare APP on your mobile phone enabled simultaneously. 3. Please make sure your computer or laptop and mobile phone are on the same Wi-Fi network. 4. Please make sure if the entered IP address in your mobile phone is correct. 5. Please make sure that your computer or laptop and mobile phone is not too far away from each other. 6. Please try to restart your computer or laptop again. Q: Unable to connect to other lecture capture systems. A: 1. Ensure the power status of the device from the other sited is on. 2. Verify if the firewall blocks the inbound traffics from the other site. 3. Verify if the other site rejected your lecture capture systems. Q: No image or poor image on the screen. A: 1. Please make sure if pull down and open the privacy shutter of the camera. 2. Please make sure if the power adaptor connected to any power source and the power jack is on the camera rear panel. 3. Please make sure if the camera connected to your computer or laptop with USB cable successfully. 4. Please do not place objects before the camera to avoid influencing the recording effect. It is recommended the use properly the mini tripod to adjust the height of the camera for better recording effect. 5. Clean and dry thoroughly the lens to avoid influencing the recording effect. [Note] Do not clean the lens with cleaners containing strong acid or alkaline.](https://usermanual.wiki/AVer-Information/CC30R15-2/User-Guide-2908054-Page-53.png)
![49 Q: No image or poor image when use Video applications. A: 1. Please make sure if pull down and open the privacy shutter of the camera. 2. Please make sure if the power adaptor connected to any power source and the power jack is on the camera rear panel. 3. Please make sure if the camera connected to your computer or laptop with USB cable successfully. 4. Please make sure if the CC30 is chosen as video camera. 5. Please do not place objects before the camera to avoid influencing the recording effect. It is recommended the use properly the mini tripod to adjust the height of the camera for better recording effect. 6. Clean and dry thoroughly the lens to avoid influencing the recording effect. [Note] Do not clean the lens with cleaners containing strong acid or alkaline.](https://usermanual.wiki/AVer-Information/CC30R15-2/User-Guide-2908054-Page-54.png)