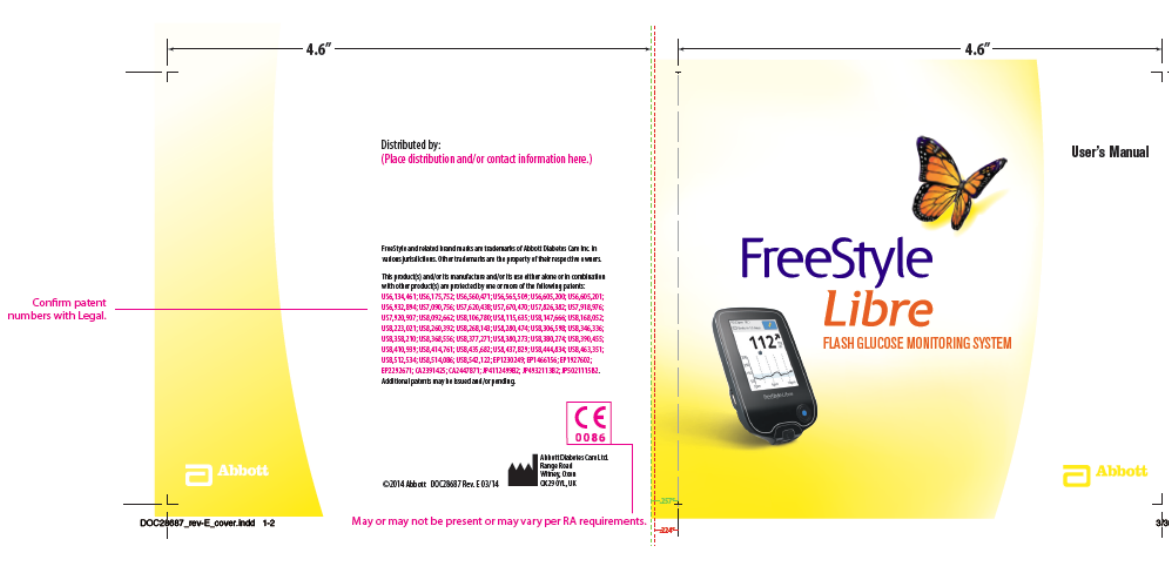
Abbott Diabetes Care LIB01 Freestyle Libre Glucose Monitoring System User Manual
Abbott Diabetes Care Freestyle Libre Glucose Monitoring System
User Manual
DO NOT PRINT FROM THIS FILE
-
FOR REFERENCE
ONLY
Reader Symbols
. . . . . . . . . . . . . . . . . . .
. . . . . . . . . . . . . . . . . . . . .
.
1
Important Safety Information
. . . . . . . . . . . . .
. . . . . . . . . . . . .
.
3
Indications
for
Use . . . . . . . . . . . . . . . . . . .
. . . . . . . . . . . . . . . . . . . .
.
3
Contraindications . . . . . . . . . . . . . . . . . .
. . . . . . . . . . . . . . . . . . . . .
.
4
Getting
to
Know Your System
. . . . . . . . . . . . . . . . . . . . . . . . . . .
8
Reader
Kit
. . . . . . . . . . . . . . . . . . . . . . . . . . . . . . . . . . . . . . . . . . . . . . .
9
S
ensor
Kit . . . . . . . . . . . . . . . . . . . . . .
. . . . . . . . . . . . . . . . . . . . . . . .
.
10
F
r
eeS
t
yle
Libre
S
of
t
w
are
. . . . . . . . . . . . . . . . . . . . . . . . . . . . . . . . .
13
Setting up
Your Reader for
the
First
Time
. . . . . . . . . . . . . .
14
Using Your Sensor
. . . . . . . . . . . . . . . . . . .
. . . . . . . . . . . . . . . . . .
.
17
Applying Your
S
ensor
. . . . . . . . . . . . . . . . . . . . . . . . . .
. . . . . . . . . .
18
S
tar
ting
Your
S
ensor
. . . . . . . . . . . . . . . . . . . . . . . . . . .
. . . . . . . . . .
22
Checking Your Glucose
. . . . . . . . . . . . . . . . . . . . . . . . . . . . . . . . . .
23
Adding Notes
. . . . . . . . . . . . . . . . . . . .
. . . . . . . . . . . . . . . . . . . . . .
.
29
C
on
t
en
ts

Reviewing Your
History
. . . . . . . . . . . . . . . . . . . . . . . . . . . . . . . .
31
Logbook
. . . . . . . . . . . . . . . . . . . . . . . . . . . . . . . . . . . . . . . . . . . . . . . .
33
Daily
Graph . . . . . . . . . . . . . . . . . . . .
. . . . . . . . . . . . . . . . . . . . . . . .
.
34
Other History
Options
. . . . . . . . . . . . . . . . . . . . . . . . . . . . . . . . . . .
35
Removing Your Sensor
. . . . . . . . . . . . . . . .
. . . . . . . . . . . . . . . .
.
37
Replacing
Your Sensor
. . . . . . . . . . . . . . . .
. . . . . . . . . . . . . . . .
.
38
Using Reminders
. . . . . . . . . . . . . . . . . . . . . . . . . . . . . . . . . . . . . . .
39
Using
the
Built-in
Meter . . . . . . . . . . . . . . .
. . . . . . . . . . . . . . . .
.
41
Blood Glucose Testing
. . . . . . . . . . . . . . . . . . . . . . . . . . . . . . . . . . .
43
Blood Ketone Testing
. . . . . . . . . . . . . . . . . . . . . . . . . . . . . . . . . . . .
47
Control
S
olution
Testing . . . . . . . . . . . . . . . .
. . . . . . . . . . . . . . . .
.
52
Using
the
R
apid-
A
c
ting
Insulin
C
alcula
t
or
. . . . . . . . . . . . . . . .
56
Charging
the
Reader
. . . . . . . . . . . . . . . . . . . . . . . . . . . . . . . . . . .
63
Changing
the
Reader Settings
. . . . . . . . . . . . .
. . . . . . . . . . .
.
64
Living
With Your FreeStyle Libre System
. . . . . . . . . . . . . . .
67
Maintenance and Disposal
. . . . . . . . . . . . . .
. . . . . . . . . . . . . .
.
69
Troubleshooting
. . . . . . . . . . . . . . . . . . . . . . . . . . . . . . . . . . . . . . .
70
Reader Does
Not
Power
On
. . . . . . . . . . . . . . . . . . . . . . . . . . . . . .
70
Problems
at the
S
ensor
Application
Site . . . . . . . . . . . . . . . . .
.
71
Problems
S
tar
ting
Your
S
ensor
or
R
ec
eiving
S
ensor
R
eadings
. . . . . . . . . . . . . . . . . . . . . . . . . . . . . . . . . . . . . . . . . . . . . . . .
72
Blood Glucose
or
Ketone Error Messages . . . . . . . . . . . . . . . .
.
75
Problems Checking Your Blood Glucose
or Ketone . . . . . . .
.
79
Perform a Reader Test . . . . . . . . . . . . . . . . . . . . . . . . . . . . . . . . . . .
.
81
Customer
S
er
vic
e
. . . . . . . . . . . . . . . . . . . . . . . . . . . . . . . . . . . . . . .
81
Professional
Options . . . . . . . . . . . . . . . . . . . . . . . . . . . . . . . .
. .
.
82
Changing Dose Increments
. . . . . . . . . . . . . . . . . . . . . . . . . . . . . .
83
S
etting up the
Insulin
C
alcula
t
or
. . . . . . . . . . . . . . . . . . . . . . . . .
84
Easy
S
etup of the
Insulin
C
alcula
t
or
. . . . . . . . . . . . . . . . . . . . . .
86
Advanced
S
etup of the
Insulin
C
alcula
t
or
. . . . . . . . . . . . . . . . .
90
Changing
the
Insulin
C
alcula
t
or
S
ettings
. . . . . . . . . . . . . . . .
101
System Specifications
. . . . . . . . . . . . . . . . . . . . . . . . . . . . . . . . .
102
Rapid-Acting Insulin Calculator Specifications
. . . . . .
. .
106
Labeling Symbols
. . . . . . . . . . . . . . . . . . . . . . . . . . . . . . . . . . . . .
108
Electromagnetic Compatibility
. . . . . . . . . . . . . . . . . . . . . .
. .
109
DOC28687_rev-E_manual.indd 2-3 3/30/14 2:52 PM
S
ymbol
What
It M
eans
Blood glucose
or
ketone
test
S
ettings
Control solution test
result
R
apid-ac
ting
insulin
calculator
Details
of
your suggested insulin
dose
Estima
t
ed
rapid-acting insulin remaining
in body
Low
battery
Ba
tt
er
y
charging
S
e
n
s
or
too cold
S
ensor
too hot
Reader
Symbols
S
ymbol
What
It M
eans
Active
sensor
Direction your glucose is going
.
See Checking
Your
Glucose section
for
more
information
C
aution
View
previous/next
screen
Notes
+
Add more
information to notes
Food
note
R
apid-ac
ting
insulin
note
Time changed
on
R
eader
R
eminders
1
2
DOC28687_rev-E_manual.indd 1-2 3/30/14 2:52 PM
Important
Safety
Inf
orma
tion
Indications
for Use
The
F
r
eeS
t
yle
Libre Flash Glucose
Monitoring
S
y
st
em
is
indicated
for
measuring
interstitial fluid
glucose levels
in
adults aged 18
years
and
older
.
It
is designed
to
replace
blood
glucose
testing
in the
self-managemen
t
of
diabetes
with the
exceptions listed
belo
w
.
Under
the following
circumstanc
es
,
use a
blood
glucose
meter
to
check
the
current
glucose readings
from the
F
r
eeS
t
yle
Libre
F
lash
Glucose
Monitoring
S
y
st
em
S
ensor
:
•
During times
of
rapidly changing glucose lev
els
,
interstitial glucose
levels as measured
by the
S
ensor
and reported
as
current may
not
ac
cur
a
t
ely
reflect
blood
glucose
lev
els
.
When glucose levels are
falling
rapidly
,
glucose readings
from the
S
ensor
may
be
higher
than blood
glucose
lev
els
.
Conversely when glucose levels are rising
rapidly
,
glucose readings
from the
S
ensor
may
be
lower
than blood glucose
lev
els
.
•
In order
to
confirm hypoglycemia
or
impending hypoglycemia as
reported
by the
S
ensor
.
•
If
symptoms
do not
match
the
F
r
eeS
t
yle
Libre Flash
Glucose
Monitoring
S
y
st
em
r
eading
.
Do
not
ignore symptoms
that
may
be
due
to low blood
glucose
or high blood
gluc
ose
.
C
on
tr
aindic
a
tions
The
F
r
eeS
t
yle
Libre Flash Glucose
Monitoring
S
y
st
em
must
be removed
prior to
Magnetic
R
esonanc
e
Imaging
(MRI)
.
W
A
R
NIN
G:
•
The
F
r
eeS
t
yle
Libre Flash Glucose
Monitoring
S
y
st
em
contains
small parts
that
may
be
dangerous
if
sw
allo
w
ed
.
•
During times
of
rapidly changing glucose (more
than 2 mg/dL
per minute),
interstitial fluid
glucose levels as measured
by the
F
r
eeS
t
yle
Libre Flash Glucose
Monitoring
S
y
st
em
S
ensor
may
not
ac
cur
a
t
ely
reflect
blood
glucose
lev
els
.
Under these circumstanc
es
,
check
the
S
ensor
glucose readings
by
conducting a fingerstick
test
using a
blood
glucose
met
er
.
•
In order
to
confirm hypoglycemia
or
impending hypoglycemia
as
reported
by the
F
r
eeS
t
yle
Libre Flash Glucose
Monitoring
S
y
st
em
Sensor,
conduct
a
fingerstick test using
a
blood
glucose
met
er
.
•
Do
not
ignore symptoms
that
may
be
due
to low or high blood
gluc
ose
.
If
you have symptoms
that do not
match
the
F
r
eeS
t
yle
Libre Flash Glucose
Monitoring
S
y
st
em
reading
or
suspec
t
tha
t
your reading may
be
inac
cur
a
t
e
,
check
the
reading
by conducting
a
fingerstick test using
a
blood
glucose
met
er
.
If
you
are
experiencing symptoms
that
are
not
c
onsisten
t
with
your
glucose
r
eadings
,
consult your health care professional
.
3
4
DOC28687_rev-E_manual.indd 3-4 3/30/14 2:52 PM

C
A
UTION:
•
On rare
oc
casions
,
you may
get
inac
cur
a
t
e
S
ensor
glucose
r
eadings
.
If
you believe your glucose readings are
not correct
or
are
inconsisten
t
with how
you
f
eel
,
perform a
blood
glucose
test
on
your finger
to
confirm your gluc
ose
.
If the
problem
c
on
tinues
,
remove
the
current
S
ensor
and apply
a
new
one
.
•
Performance
of the
S
y
st
em
when used
with other
implan
t
ed
medical devic
es
,
such as
pacemakers
,
has
not been
evalua
t
ed
.
•
The Reader is
for
use
by
a single
person
.
It
must
not be used
on
more
than
one person
including other
family
members
due
to the
risk
of
spreading
inf
ec
tion
.
All
parts
of the
R
eader
are considered biohazardous and can
potentially transmit
infectious
diseases, even
after performing
the cleaning
pr
oc
edur
e
.
System-Related
Information
• The
F
r
eeS
t
yle
Libre Flash Glucose
Monitoring
S
y
st
em
is designed
to be
used
only with
F
r
eeS
t
yle
P
r
ecision/F
r
eeS
t
yle
Optium blood
glucose
and
blood
ketone test
strips and MediSense
control
solution
.
•
Avoid
getting
dust
,
dir
t
,
blood
,
control
solution,
w
a
t
er
,
or other
substances
in the
Reader’s USB
and test
strip por
ts
.
•
Physiologic differences between
the interstitial fluid
and capillary
blood
may result
in
differences
in
glucose
r
eadings
.
Differences
in glucose
readings between
interstitial fluid
and capillary
blood
may
be observed
during
times
of
rapid change
in blood
gluc
ose
,
such as
after
ea
ting
,
dosing insulin,
or
e
xer
cising
.
• Severe
dehydration and
excessive
water
loss may cause
inaccurate
r
esults
.
If
you believe you are suffering
from
dehydration, consult
your
health care professional
imm
e
dia
te
l
y
.
Confirm Precision
or Optium
test strip
as
appropriate
for
mar
ket
.
Change MediSense
to Optium for
A
ustr
alia
.
5
6
DOC28687_rev-E_manual.indd 5-6 3/30/14 2:52 PM
•
If
you have a medical
appointment that
includes strong magnetic
or
electromagnetic radiation,
for
example an X-ray, MRI
(Magnetic
R
esonanc
e
Imaging),
or
CT
(Computed Tomography)
scan, remove
the
S
ensor
you are wearing and apply a
new one after
the
appointmen
t
.
The
effect
of
these
t
ypes
of
procedures
on the
performance
of the
system has
not
been
evalua
t
ed
.
• The
F
r
eeS
t
yle
Libre Flash Glucose
Monitoring
S
y
st
em
has
not been
evalua
t
ed
for
use
in
pregnant women,
persons
on
dialy
sis
,
or people
less
than
18 years
of
age
.
Getting to
Kno
w
Your
System
The
F
r
eeS
t
yle
Libre Flash Glucose
Monitoring
S
y
st
em
has
two
main parts:
a
handheld
Reader and a disposable
Sensor, which you wear
on
your
body
.
You use
the
Reader
to
wirelessly scan
the
S
ensor
and
get
your
glucose
r
eadings
.
The Reader also has a
built-in blood
glucose and ketone
met
er
,
which works
with
F
r
eeS
t
yle
P
r
ecision/F
r
eeS
t
yle
Optium blood
glucose
and
blood
ketone test str
ips
.
IMPORTANT:
S
af
et
y
information about
th
e
S
y
s
t
e
m
is
in
thi
s
User’s
M
a
nu
a
l
.
Read all
o
f
the information in the
User’s Manual and
the
Fr
ee
S
t
y
l
e
P
re
c
i
s
i
on
/
F
re
e
S
t
y
l
e
Optium b
l
ood
glucose
and ketone
te
s
t
s
tr
ip in
s
tr
u
c
t
i
on
s
for
use before
u
s
i
n
g
your
S
y
s
t
e
m
.
Your
S
y
st
em
comes
in
a
Reader Kit
and a
Sensor
K
i
t
.
When opening
your
k
its
,
check
that the
contents
are undamaged and
that
you have all
parts
list
ed
.
If
any parts are missing
or
damaged
,
contact
Customer
S
er
vic
e
.
7
8
DOC28687_rev-E_manual.indd 7-8 3/30/14 2:52 PM
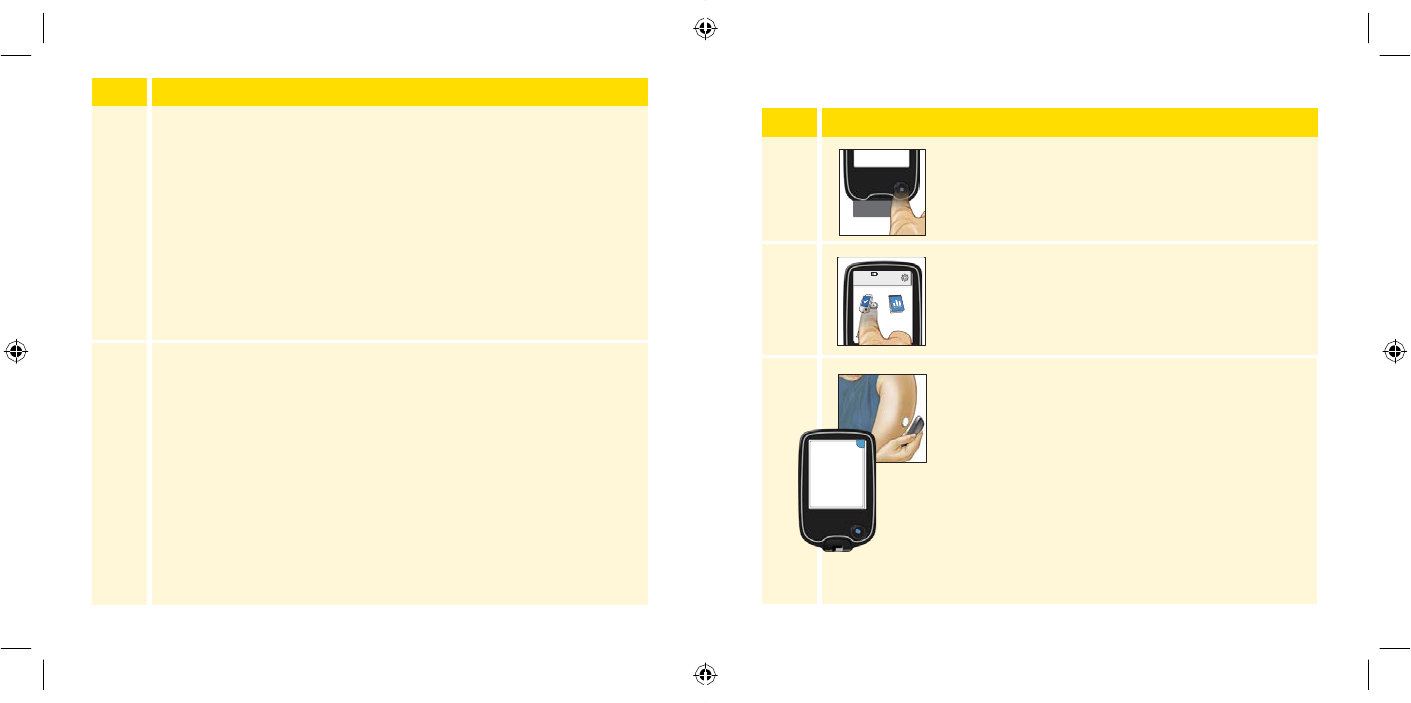
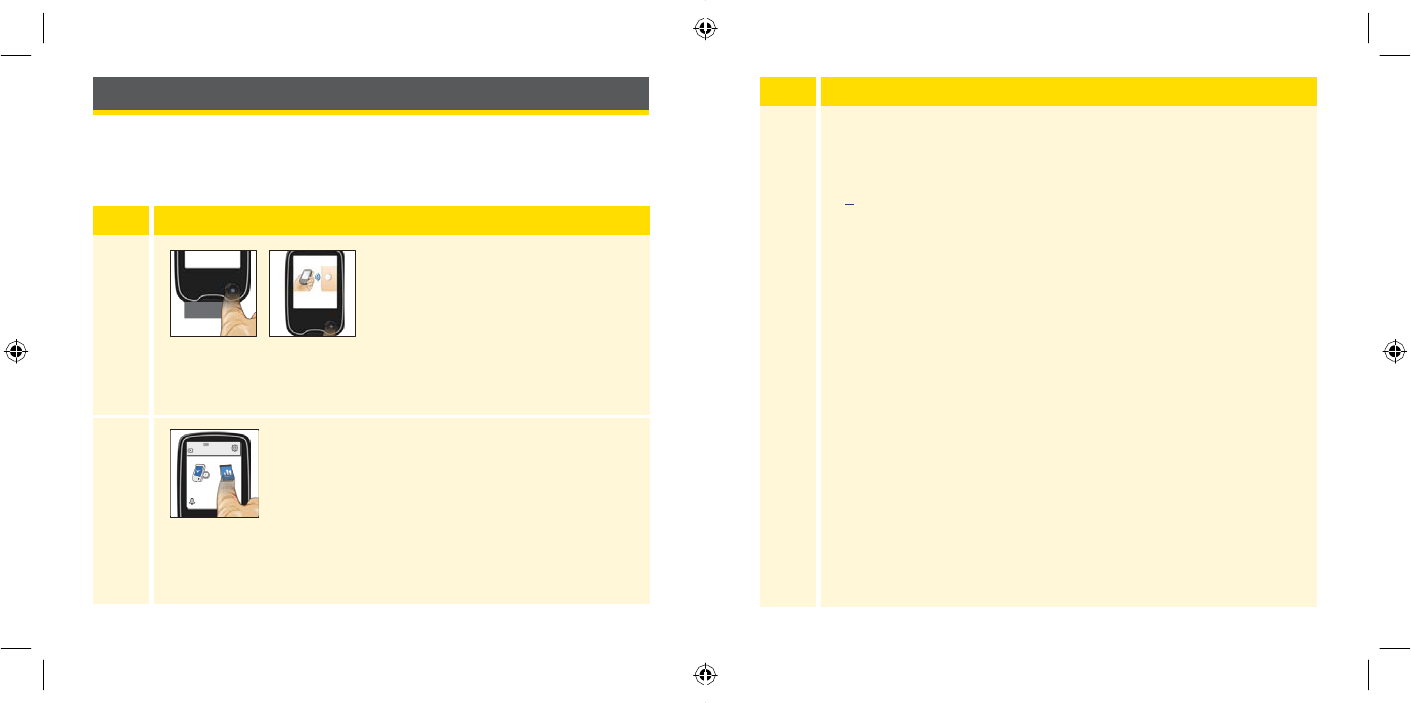
Reader
Kit
The Reader
Kit
includes:
•
1
F
r
eeS
t
yle
Libre
R
eader
•
1
USB C
able
USB
P
o
r
t
Used
to
charge
the
R
eader
and connect
it to
a c
o
mpu
t
e
r
.
Test Strip
P
o
r
t
•
1
Power
Adapter
• User’s
Manual
•
Quick
S
tar
t
Guide
T
ou
c
hsc
r
ee
n
Home
Bu
tt
o
n
Turns
the
Reader
o
n/off
and takes you
to
the
Home screen
from
a
n
y
Sensor
Kit
The
S
ensor
Kit
includes:
•
1
S
ensor
P
ack
•
1
S
ensor
Applicator
Sensor
Pack
Used
with the
S
ensor
Applicator
t
o
prepare
the
S
ensor
for
use
.
•
1
Alcohol
wipe
•
P
roduc
t
insert
Sensor
Applicator
Applies
the
S
ensor
to
your
body
.
I
n
s
e
r
t
a
test
strip
here
to use
the built-in
me
t
e
r
.
other
sc
r
een
.
The
S
ensor
measures and stores glucose readings when
worn on your
body
.
It initially
comes
in two
parts: one
part
is
in the
S
ensor
Pack
and
the other part
is
in the
S
ensor
A
pplica
t
or
.
By
following the
instruc
tions
,
you prepare and apply
the
S
ensor
on the
back
of your
The Reader is used
to get
glucose readings
from
your
S
ensor
.
It
can
store
approximately
90-days
of
glucose
history and notes you enter
about
ac
tivities
,
such as taking insulin, eating
f
ood
,
or
e
xer
cising
.
This
information
can
help
you understand
how
these activities aff
ec
t
your
gluc
ose
.
upper
ar
m
.
The
S
ensor
has a
small
,
flexible
tip that is
inser
t
ed
just under
the
sk
in
.
The
S
ensor
can
be worn
for up to
14
day
s
.
S
ensor
Measures your
g
lu
c
o
se
while on
y
our
body
(
on
l
y
visible
after appl
i
ed
).
9
10
DOC28687_rev-E_manual.indd 9-10 3/30/14 2:52 PM

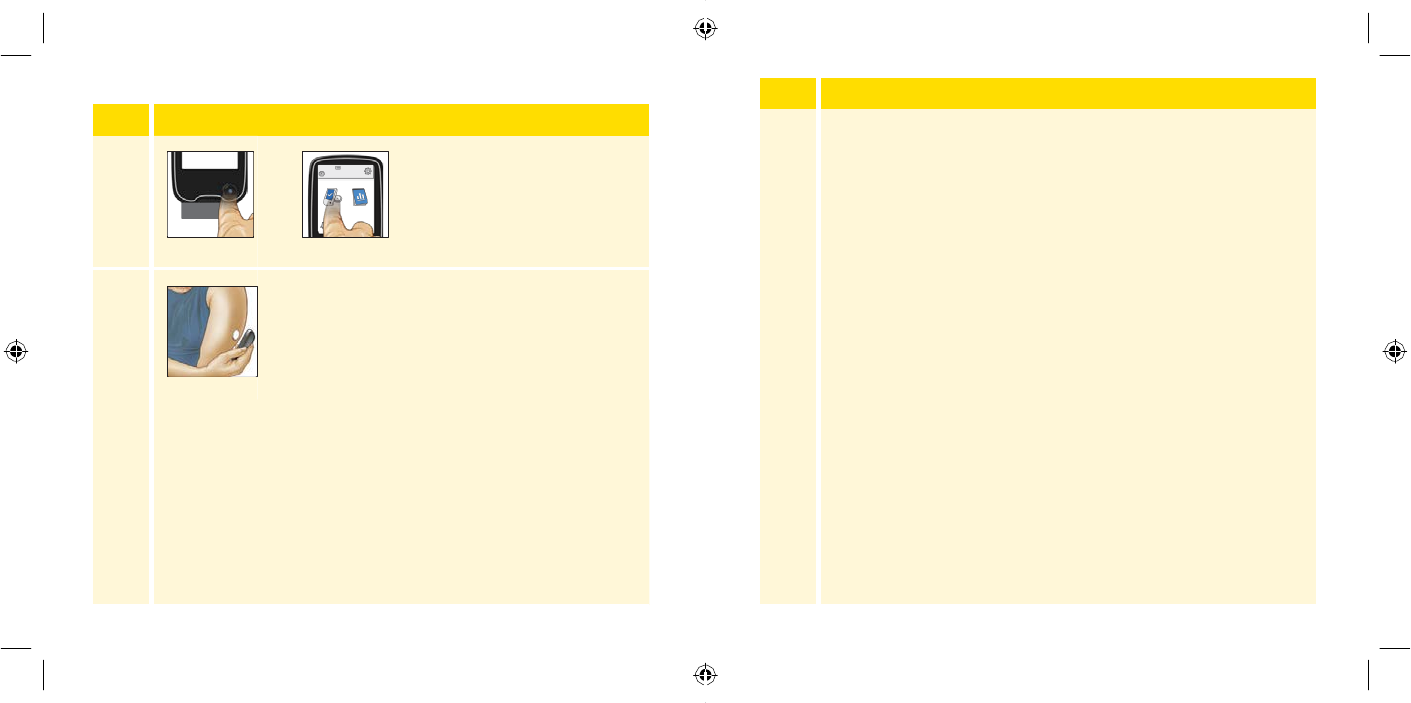
92
The Reader Home
S
creen
provides access
to information about your
glucose and
the
S
y
st
em
.
You can press
the
Home Button
to get to the
Home
S
creen
.
Home
S
cr
een
The
S
ensor
Glucose
R
eadings
screen appears
after you
use
the
R
eader
to
scan your
S
ensor
.
Your
R
eading
includes your
C
urr
en
t
Glucose,
a
Glucose Trend Arrow
indicating
which way your glucose is going
,
and
a
graph
of
your current and stored
glucose
r
eadings
.
Sensor Glucose
Readings
Time
C
urr
e
n
t
time
s
e
t
on
the
R
e
ad
e
r
.
Sensor
S
t
a
t
u
s
Information
about your
current
S
en
so
r
.
Check
G
lu
c
os
e
Touch
to
check
your
S
ens
or
g
l
u
cos
e
.
10:23pm
Ends
in 14 days
Check
Glucose
Review
History
Battery
Le
v
e
l
B
a
tt
e
r
y
charge
r
ema
i
n
i
n
g
.
S
etti
ng
s
Touch
to
change
t
h
e
Reader’s
sett
i
ng
s
.
Review
His
t
o
r
y
Touch
to
review
in
f
or
m
a
t
io
n
Message
Touch
for more
in
f
or
m
a
ti
on
.
Current
G
lu
c
os
e
Glucose
from your
l
a
t
e
st
scan
.
Food
Note
350
250
150
50
Glucose
Going
Low
mg
dL
Add
N
o
t
e
s
Touch
to
add
no
t
es
to the
glucose
r
ea
ding
.
G
lu
c
ose
Trend
Arrow
Direction
your
glucose is goi
n
g
.
Rapid-Acting
Insulin
Note
Reminder
Touch
to
se
t
or change
r
e
mi
n
d
e
r
s
.
about your past g
l
u
c
o
s
e
r
e
a
d
i
ng
s
.
2pm 6pm
10pm
Glucose
G
r
aph
Graph
of
your
current
and stored glucose
readings
.
11
12
DOC28687_rev-E_manual.indd 11-12 3/30/14 2:52 PM
Step
A
c
tion
1
Press
the
Home Button
to turn on the
R
eader
.
2
If prompt
ed
,
use
the
t
ouchscreen
to
selec
t
your
preferred language
for the
R
eader
.
Touch
OK
to
c
on
tinue
.
N
o
te
:
Use
the
pad
of
your
finger
.
Do NOT
use
your fingernail
or
any
other object on the
scr
een
.
3
Current Date
Set
the
Current Date
using
the
arrows
on the
t
ouchscreen
.
Touch
next
to
c
on
tinue
.
14 June
2014
back
next
FreeStyle Libre
Software
F
r
eeS
t
yle
Libre
sof
t
w
ar
e
can
be
used
to
view reports and change
R
eader
settings
.
The
sof
t
w
ar
e
is compatible
with
most
W
indow
s
and
Mac
operating
sy
stems
.
Go
to www
.
F
r
eeS
t
yleLibr
e
.
c
om
and
follow
onscreen
instructions
to
download and install
the
sof
t
w
ar
e
.
Setting up
Your Reader
for the
First
Time
Before using
the
S
y
st
em
for the
first time
,
the
Reader must
be
set up
.
INTENDED
U
SE
F
r
eeS
t
yle
Libre
sof
t
w
ar
e
is
intended
for
use
by
individuals
and
health care professionals
to
aid
in the
r
eview
,
analysis,
and
evaluation
of information
such as
S
ensor
glucose
r
eadings
,
blood
glucose
test
r
esults
,
blood
ketone test
r
esults
,
and
other
data uploaded
from the
F
r
eeS
t
yle
Libre Flash
Glucose
Monitoring
S
y
stem,
in
support
of
an effective diabetes
health
management pr
ogr
am
.
F
r
eeS
t
yle
Libre
sof
t
w
ar
e
is
not
intended
for the
diagnosis
of
or
screening
for
diabetes
mellitus
.
Users should
be
aware
tha
t
F
r
eeS
t
yle
Libre
sof
t
w
ar
e
is merely an
information management
tool
and
it
is therefore
not
intended
to
substitute
for the
support
of
a health care prof
essional
.
Individuals should alw
a
y
s
consult
their
health care professional
if they
have any queries
or
concerns
about
diabetes managemen
t
.
13
14
DOC28687_rev-E_manual.indd 13-14 3/30/14 2:52 PM

Step
A
c
tion
4
Current Time
Set
the
Current Ti
me
.
Touch
next
to
c
on
tinue
.
12 am 00
CAUTION:
It
is very
important to
set
the time
and date
c
orr
ec
tly
.
These values
aff
ec
t
the
Reader data and
settings
.
back
next
5
Target Glucose
?
Set
your
Target Glucose
R
a
nge
.
Work
with your
Range
health care professional
to
determine your
T
ar
get
Glucose
R
ange
.
Touch
next
to
c
on
tinue
.
80 to 140 dL
mg
N
o
te
:
Your Target Glucose
R
ange
is
displayed
on
glucose graphs
on the
Reader and used
t
o
back next
calcula
t
e
your Time In
T
ar
get
.
Step
A
c
tion
6
The Reader
now
displays
important information about two key
topics
to help
you use
the system:
•
How
to
understand
the
Glucose Trend Arrow included
on
the
Glucose
R
eading
scr
een
.
•
How
to return to the
Home
S
creen
from
any
other
scr
een
.
When you scan your Sensor
an
arrow
will
indicate your
recent glucose
trend:
Rising quickly While using the Reader, press
Rising the Home
button
to
return to
the Home screen.
Changing
slowly
Falling
Touch
next
to
move
to the
Falling
quickly
next
t
opic
.
At the
end
of the
back next
Reader
setup
,
touch
done
to
go to the
Home
S
creen
.
back done
N
o
t
e
:
Charge
the
Reader
if the
battery level
is
l
o
w
.
Only use
the
USB
cable
and power ad
a
p
t
er
included
with the
S
y
s
t
e
m
.
15
16
DOC28687_rev-E_manual.indd 15-16 3/30/14 2:52 PM
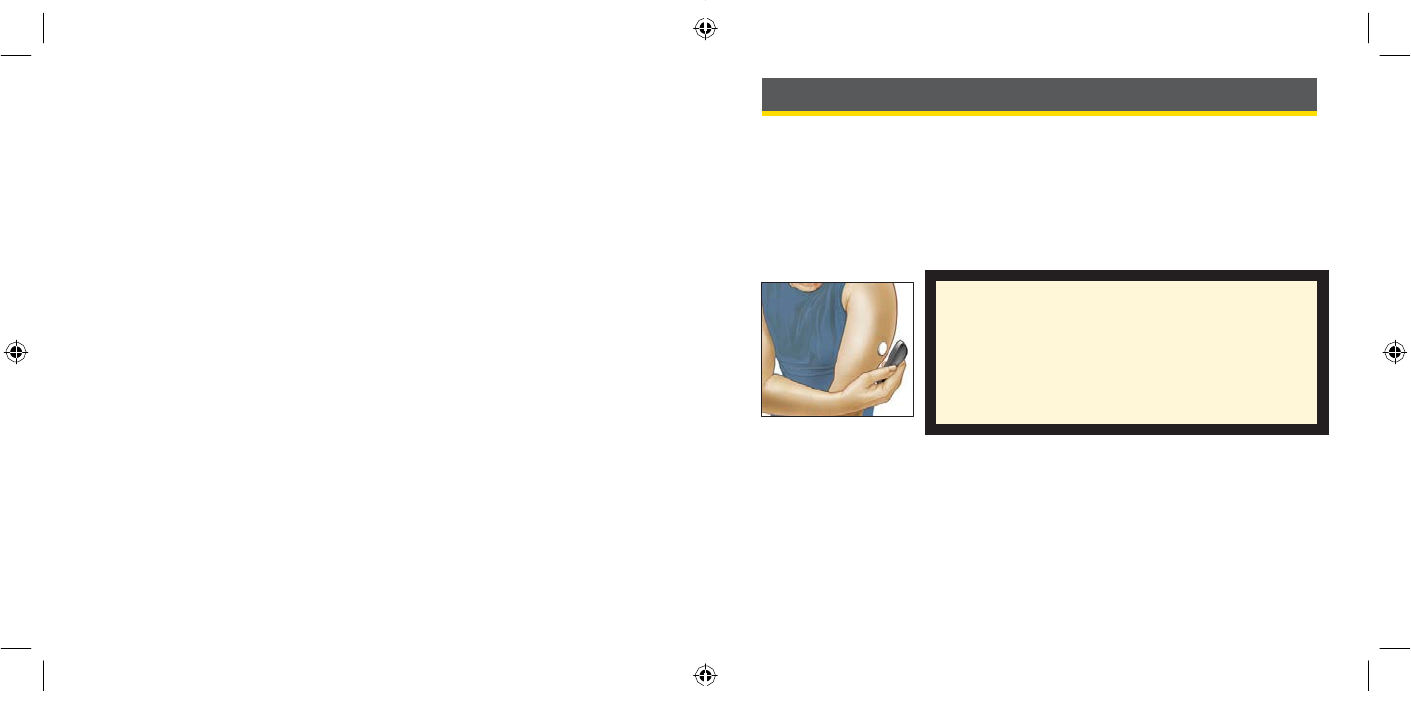
Step
A
c
tion
1
Apply Sensors
only on the
back
of
your
upper
ar
m
.
Avoid areas
with
scars,
moles
,
stretch mar
ks
,
or
lumps
.
S
elec
t
an area
of
skin
that
generally stays
flat
during
your normal daily activities (no
bending
or
f
olding)
.
Choose a site
that
is
at
least 2
.
5
cm
(1 inch) away
from
an insulin
injection
sit
e
.
T
o
prevent discomfort
or
skin
irritation,
you
should
selec
t
a
different
site
other than the
one
most
recently
used
.
2
Clean application site
with
an alcohol
wipe and
allow site
to dry
before proc
eeding
.
This
helps
the
S
ensor
stay attached
to
your
body
.
N
o
te
:
The area
MUST
be
clean and dr
y
,
or the
S
ensor
may
not
stick
to the
sit
e
.
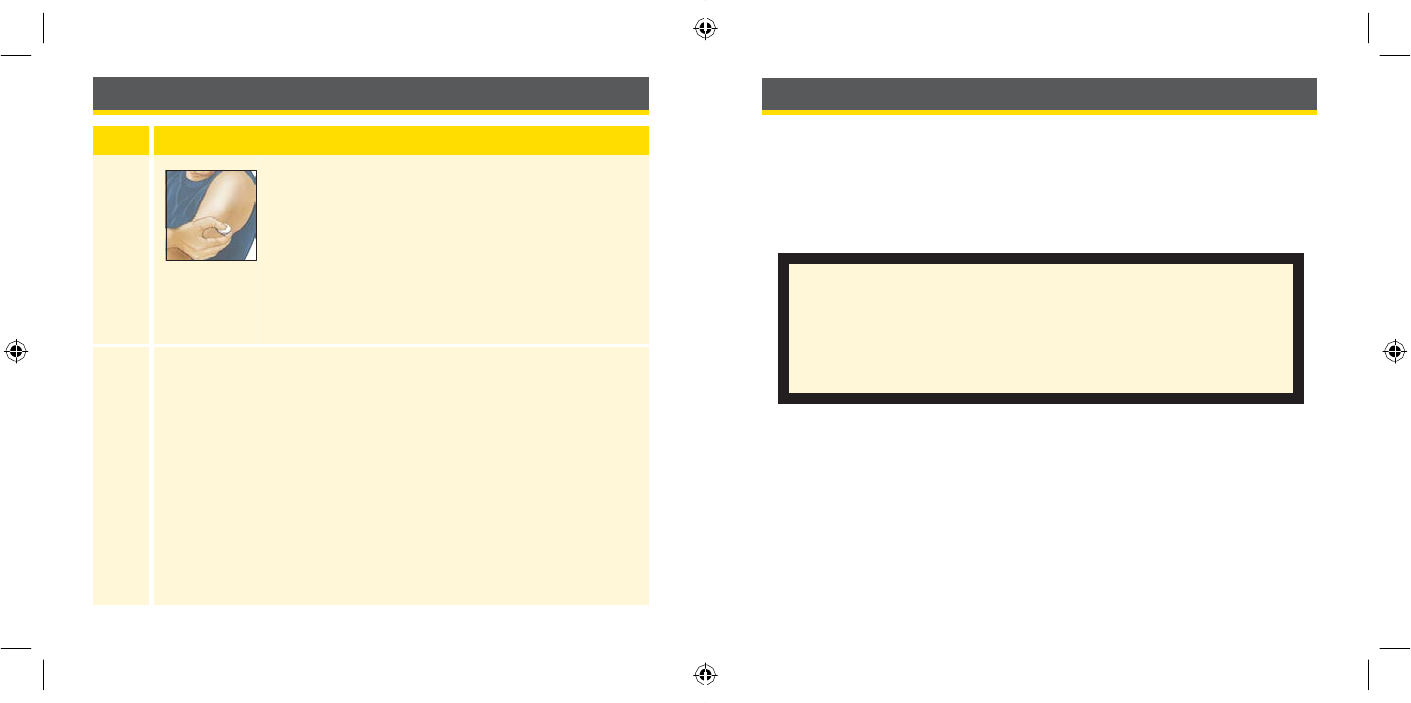
Using Your
Sensor
Applying Your
Sensor
C
AU
T
I
O
N
S:
• The
S
ensor
Pack and
S
ensor
Applicator
are packaged as
a
set
(separ
a
t
ely
from the
Reader) and have
the
same
S
ensor
c
ode
.
Check
that the
S
ensor
codes
match
before using your
S
ensor
Pack and
S
ensor
A
pplica
t
or
.
S
ensor
Packs and
S
ensor
A
pplica
t
ors
with the
same
S
ensor
code
should
be
used
together
or
your
S
ensor
glucose readings may
be
inc
orr
ec
t
.
F
r
eeS
t
y
S
ensor
P
CODE XXX
XXXXXXX
X
YYY
Y/M
•
I
n
t
ense
exercise may cause your
S
ensor
to
loosen due
t
o
sw
ea
t
or
movement
of the
S
ensor
.
If
your
S
ensor
comes
loose
,
you may
get no
readings
or
unreliable
r
eadings
,
which may
not
match
how
you
f
eel
.
F
ollow the instructions
to
selec
t
an appropriate application sit
e
.
17
18
DOC28687_rev-E_manual.indd 17-18 3/30/14 2:52 PM

Step
A
c
tion
6
The
S
ensor
Applicator
is prepared and ready
t
o
apply
the
S
ensor
.
CAUTION:
The
S
ensor
Applicator
now
contains a
needle
.
Do NOT
touch
inside
the
S
ensor
Applicator
or put it
back
into the
S
ensor
P
ack
.
7
Place
the
S
ensor
Applicator over
the prepared
site and push
down firmly to
apply
the
S
ensor
t
o
your
body
.
CAUTION:
Do NOT push
down on the
S
ensor
Applicator
until
placed over prepared site
t
o
prevent unintended
results
or injur
y
.
Step
A
c
tion
3
Lid
Open
the
S
ensor
Pack
by
peeling
the lid off
c
omplet
ely
.
Unscrew
the
cap
from the
S
ensor
Applicator and
set
the
cap aside
.
CAUTION:
Do NOT use
if the
S
ensor
Pack
or
C
ap
the
S
ensor
Applicator
seem
to be damaged
or
already
opened
.
Do NOT use
if past
expiration
da
t
e
.
4
Line
up the
dark mark
on the
S
ensor
Applicator
with the
dark mark
on the
S
ensor
P
ack
.
P
r
ess
firmly down on the
S
ensor
Applicator
until
it
comes
to
a
st
op
.
5
Lift the
S
ensor
Applicator
out of the
S
ensor
P
ack
.
19
20
DOC28687_rev-E_manual.indd 19-20 3/30/14 2:52 PM
Step
A
c
tion
8
Gently
pull the
S
ensor
Applicator
away
from your
body
.
The
S
ensor
should
now
be attached
to your
Sensor
sk
in
.
Note:
Applying
the
S
ensor
may cause
bruising or
bleeding
.
If
there is bleeding
that
does
not
st
op
,
remove
the
Sensor, and apply a new one
at
a
different
sit
e
.
9
Make sure
the
S
ensor
is secure
after applica
tion
.
Put
the
cap back
on the
S
ensor
A
pplica
t
or
.
Discard
the
used
S
ensor
Pack and
S
ensor
Applicator according
to
local
r
egula
tions
.
6
Starting Your
Sensor
Step
A
c
tion
1
Press
the
Home Button
to turn on the
R
eader
.
2
10:23pm
No Active Sensor
Touch
Start New
S
e
n
s
o
r
.
Start
New
Sensor
Review
History
3
Hold
the
Reader
within 4
cm
(1
.
5
inches)
of the
S
ensor
to
scan
it
.
This starts your
S
ensor
.
If sounds
are
turned
on,
the
Reader beeps when
the
S
ensor
New
Sensor
OK
Starting Up
Sensor
can be
used
in:
mi
nutes
has been successfully ac
tiv
a
t
ed
.
The
S
ensor
can
be
used
to
check your glucose
after 60
minut
es
.
Note:
If the
S
ensor
is
not
successfully
scanned
within
15
sec
onds
,
the
Reader displays a pr
ompt
to
scan
the
S
ensor
again
.
Touch
OK
to return
t
o
the
Home
S
creen
and
touch
Start New
S
e
n
s
o
r
to
scan your
S
ensor
.
21
22
DOC28687_rev-E_manual.indd 21-22 3/30/14 2:52 PM
Step
A
c
tion
3
The Reader displays
your current
glucose
reading
Glucose Going
along
with
your glucose graph and an
arrow
Low
350 92
indicating
the
direction your glucose is g
o
i
n
g
.
mg
dL
250
150
50
2pm 6pm 10pm
Checking Your
Glucose
Step
A
c
tion
1
10:23pm
En ds
in
14 days
OR
Check
Glucose
Review
Histo ry
Turn
the
Reader
on by p
r
e
ss
i
n
g
the
Home
B
u
tt
on
or touch
Check Glucose
from the Home
Sc
r
ee
n
.
2
Hold
the
Reader
within 4
cm
(1
.
5
inches)
of your
S
ensor
to
scan
it
.
Your
S
ensor
wirelessly
sends
glucose readings
to the
R
eader
.
If
sounds
are
turned
on,
the
Reader beeps when
the
S
ensor
has been successfully
scanned
.
Note:
If the
S
e
n
s
or
is
not
successfully scanned
within 15
seconds,
the
Reader displays a
prompt to
scan
the
S
e
n
s
or
a
g
ai
n
.
Touch
OK
to return to the
Home
S
c
r
ee
n
and
touch
Check Glucose
to
scan your
S
ens
or
.
23
24
DOC28687_rev-E_manual.indd 23-24 3/30/14 2:52 PM
Glucose is rising
quickly
(more
than 2 mg/dL
per
minute)
Glucose is
rising
(between
1
and
2 mg/dL
per
minute)
Glucose is changing
s
l
o
w
l
y
(less
than 1 mg/dL
per
minute)
Glucose is
falling
(between
1
and
2 mg/dL
per
minute)
Glucose is falling
quickly
(more
than 2 mg/dL
per
minute)
92
Sensor Glucose
Readings
The Glucose Trend Arrow gives you an
indication
of the
direction
your
glucose is going
.
Glucose Going
Low
G
lu
c
ose
Trend
A
rr
o
w
Target
Glucose
Range
mg
dL
350
250
150
50
Current
G
lu
c
ose
2pm 6pm 10pm
N
o
t
e
s:
•
The graph displays glucose readings
up to
350 mg
/
d
L
.
G
lu
c
o
s
e
readings above 350
mg/dL
are displayed
at
350 mg
/
d
L
.
• The
s
y
mb
o
l
may
a
pp
e
a
r
,
indicating
the
Reader
time
was c
h
a
n
g
e
d
.
Gaps
in the
graph may
r
e
s
u
l
t
or
glucose readings may
be hidd
e
n
.
Note:
The Glucose Trend Arrow may
not
always appear
with
your r
e
a
d
i
n
g
.
25
26
DOC28687_rev-E_manual.indd 25-26 3/30/14 2:52 PM

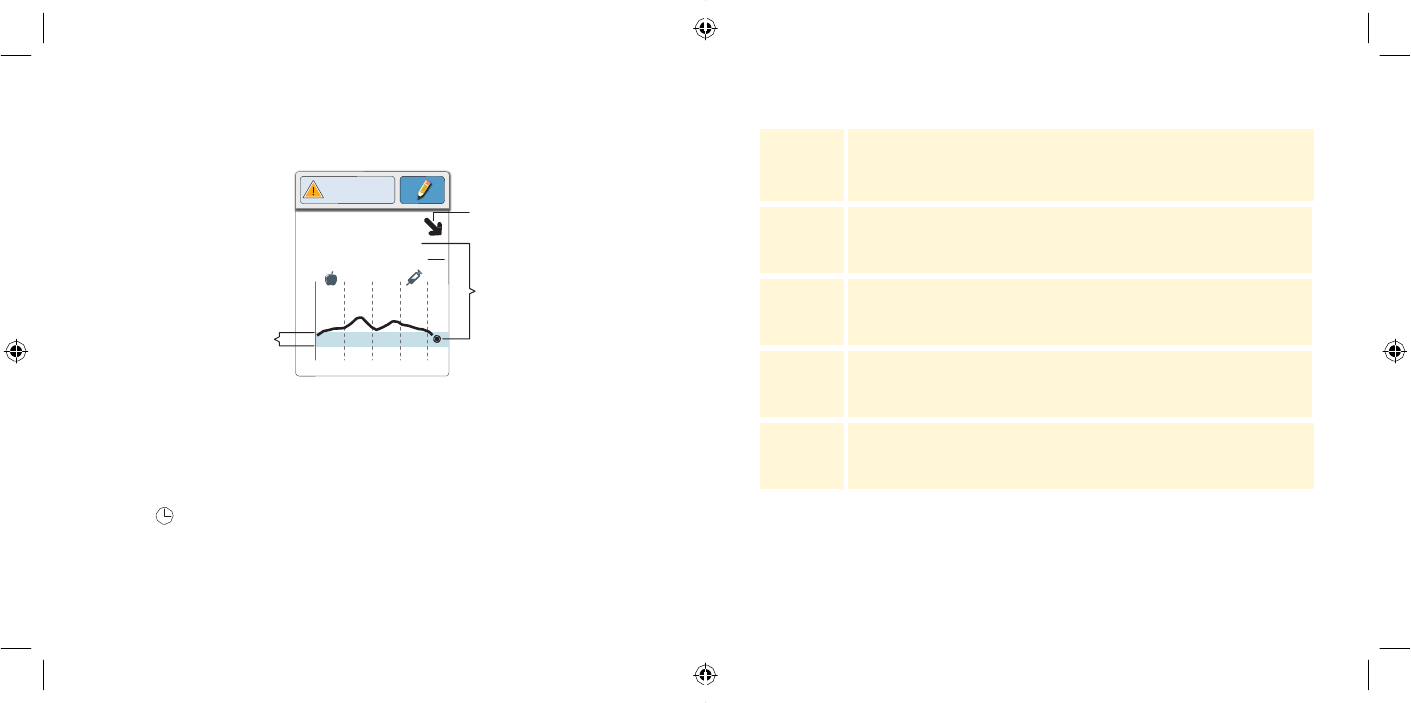
Display
What To
Do
Glucose Going
Low
72
mg dL
350
250 Glucose Going
High
150
50
237
dL
350
250
150
50
2pm 6pm
10pm
If
your glucose is
projected
to be
higher
than
240
mg/dL or
lower
than
70
mg/dL within 15
minut
es
,
you
will
see a message
on the
scr
een
.
You can
touch the
message
button for more
information
and set a reminder
to
check
your
gluc
ose
.
Display
What To
Do
Low Glucose
LO
mg dL
350
250
150 High
Glucose
50 HI
mg
2pm 6pm
10pm
dL
350
250
150
50
2pm
6pm 10pm
If
LO
appears
on the
Reader, your reading is
lower
than
40
mg/dL
.
If HI
appears
on the
Reader,
your
reading is higher
than
500
mg/dL
.
You can
touch
the
message
button for
more
inf
or
ma
tion
.
Check
your
blood
glucose
on
your finger
with
a
test str
ip
.
If
you
get
a second
LO
or HI
r
esult
,
contact
your
health care professional
imm
e
dia
te
l
y
.
Low Glucose
63
mg dL
350
250 High Glucose
150
50
289
2pm 6pm 10pm mg
dL
350
250
150
50
2pm 6pm
10pm
If
your glucose is higher
than
240
mg/dL or lower
than
70 mg/dL, you
will
see a message
on the
scr
een
.
You can
touch the
message
button for
more
information
and set a reminder
to check
your
gluc
ose
.
The
following
table shows messages you may see
with
your
glucose
r
eadings
.
2pm 6pm 10pm mg
N
o
t
e
:
If
you are
not
sure
about
a message
or
r
e
a
d
i
n
g
,
contact
your
health
care professional before you
do
a
n
y
t
h
i
ng
.
27
28
DOC28687_rev-E_manual.indd 27-28 3/30/14 2:52 PM
Step
A
c
tion
1
Glucose Goi ng
From
the
Glucose
R
eading
screen, add
not
es
Low by touching the
symbol
in the
upper r
igh
t
92
mg
corner
of the
t
ouchscreen
.
If
you
do not want
t
o
dL
350
250
add
not
es
,
you can press
the
Home Button
to go
150 to the
Home
S
creen
or hold the
Home Button
t
o
50
2pm 6pm
10pm
turn the
Reader
off
.
2
S
elec
t
the
checkbox
next
to the
notes you
would
like
to
add
.
Touch
the down
arrow
to
view
other
Insulin
Note
options
.
Long-Acting
Insulin
Food
1
/ 4
+
+
Adding
Notes Step
A
c
tion
Notes can
be
saved
with
your glucose
r
eadings
.
You can add a
note at
the time of
your glucose reading
or within
15 minutes after your
reading
was
obtained
.
You can track
f
ood
,
insulin, exercise, and any
medication
you
take
.
3 Add Notes
Rapid-Ac
ting
Insulin
Long-Acting
Insulin
Food
OK
+
+Enter Rapid-Acting OK
Insulin
+
1
/ 4
After you
check
the box for food and
insulin
not
es
,
the +
symbol
appears
to the right of the
Not
e
.
You can
touch
it to
add more specific
information
t
o
your
not
e
.
Then
touch
O
K
.
•
Insulin notes:
En
t
er
the
number
of
units
units
taken
.
•
Food notes:
En
t
er
grams
or serving
inf
or
ma
tion
.
Note:
Food
and rapid-acting
insulin
notes are
shown
on
your glucose graphs and
in
your Logbook
as
symbols
.
Add Notes OK
Rapid-Ac
ting
4 Add Notes OK
Rapid-Acting
Insulin
Long-Acting
Insulin
Food +
Touch
OK
to
save your
Not
es
.
1
/
4
You can review your Notes
from the
L
ogbook
.
See Reviewing Your
History
section
for
more
inf
or
ma
tion
.
29
R
emov
e
magenta
content for
F
r
ance
.
30
DOC28687_rev-E_manual.indd 29-30 3/30/14 2:52 PM
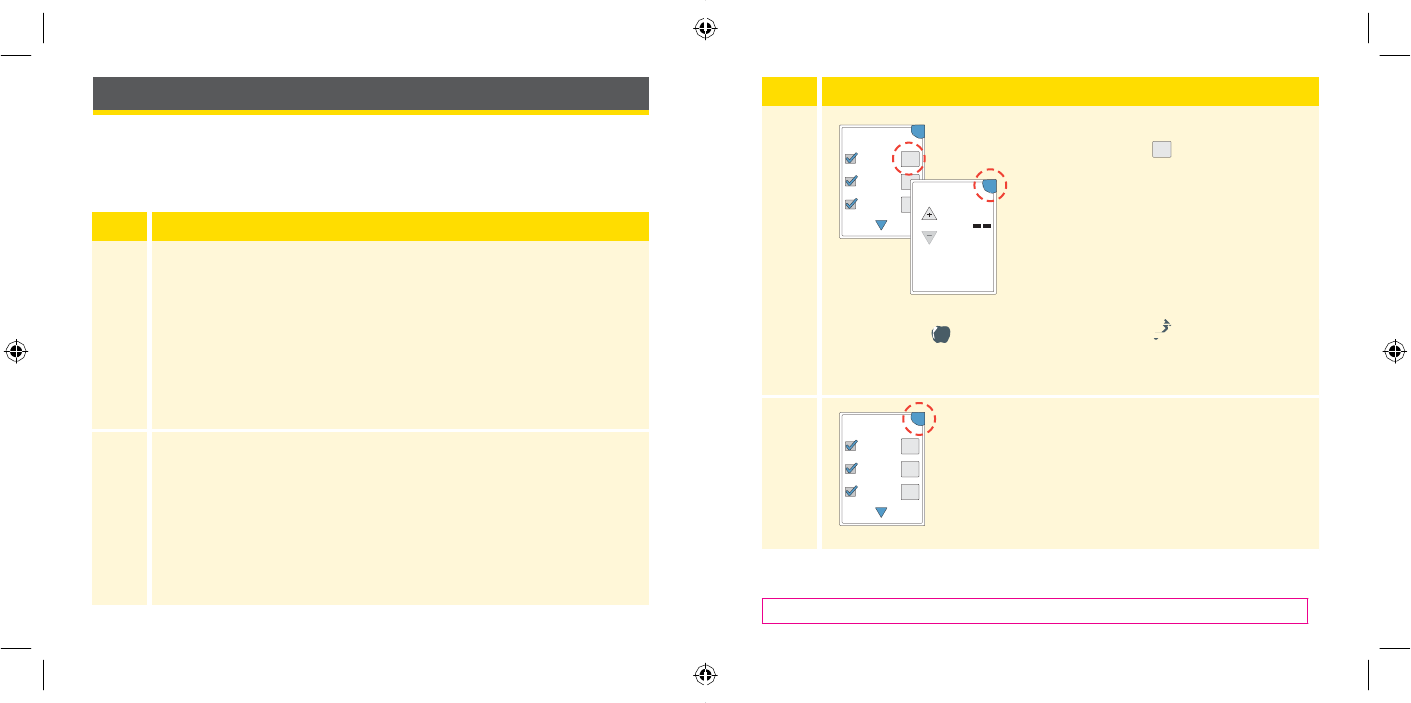
Step
A
c
tion
3
Review History
Use
the
arrows
to
view
the
available
options
.
Logbook
Daily
Graph
Daily Patterns
Average Glucose
Time In
T
ar
get
1
/ 2
Low
Glucose
Events
Sensor
Usage
IMPORTANT:
Work
with
your health care professional
to
understand your glucose
histor
y
.
2
Reviewing Your
History
R
eviewing
and understanding your glucose history can
be
an impor
tan
t
tool for improving
your glucose
c
on
tr
ol
.
The Reader stores
about
90
day
s
of information
and has several ways
to
review your past glucose
r
eadings
,
not
es
,
and
other inf
or
ma
tion
.
Step
A
c
tion
1 Che ck Glucose
Sc an
Sensor to check
gluco se.
Press
the
Home Button
to turn on
the
R
eader
.
Press
the
Home
Button
again
to go to the
Home
S
creen
.
10:23pm
En ds
in
14 days
Touch
the
Review History
ic
on
.
Chec k
Glucose
Revie w
Hist ory
31
32
DOC28687_rev-E_manual.indd 31-32 3/30/14 2:52 PM

143
108
98
The
Logbook and Daily Graph show detailed information,
while other
history options show summaries
of information
over a number
of
day
s
.
Daily Graph
Logbook
Logbook OK
E
n
t
r
i
e
s
for
each
time
you scanned your
S
ensor
Daily Graph OK
(mg/dL)
350
250
150
A graph
of
your
S
e
n
s
or
glucose readings
by d
a
y
.
The graph shows your
T
a
r
g
e
t
Glucose Range
and
symbols
for food or
rapid-acting
i
n
s
u
li
n
no
t
e
s
you
have
en
t
er
e
d
.
or
performed a
blood
glucose
or
ketone
t
est
.
50
12 6 12 6 12
23
Feb
10:23am
23
Feb
6:37a
m
If
you entered
Notes
with
a glucose
r
eading
,
the
symbol appears
in that
ro
w
.
For
more
am a m pm pm
am
22 Feb
Wednesday
N
o
t
e
s:
• The
graph
displays glucose readings
up
t
o
22
Feb
11:09pm
mg/dL
information about the
symbols
,
see Reader
S
ymbols
sec
tion
.
Touch
the
entry
to
review
the
detailed
information,
including
any Notes you
en
t
er
ed
.
You can add
or
edit
(change) Notes
for the
most r
ec
en
t
Logbook
en
tr
y
,
provided your glucose reading was
within
the
last 15 minutes and you have
not used
F
r
eeS
t
yle
Libre
sof
t
w
ar
e
to
cr
ea
t
e
repor
ts
.
350 mg
/
d
L
.
Glucose readings above 350
mg/dL
are displayed
at
350
mg/dL
.
•
You
might
see gaps
in the
graph
during
times when you have
not
scanned
at least
once
in 8
hours
.
• The
s
y
mb
o
l
may appear indicating
the
Reader
time
was
ch
a
n
g
e
d
.
Gaps
in the graph
may
r
e
s
u
l
t
or
glucose readings may
be hidd
e
n
.
33
34
DOC28687_rev-E_manual.indd 33-34 3/30/14 2:52 PM
5
Other History
Options
Use
the
arrows
to
view
information about
your last 7, 14, 30,
or
90
day
s
.
Time In Target OK
A graph showing
the p
e
r
ce
n
t
a
g
e
of time your
S
e
n
s
or
glucose readings were
a
b
o
v
e
,
b
e
l
o
w
,
or
Average Glucose OK
Information
about the
average
of
your
S
e
n
s
or
Above
In
T
arget
Below
12%
34%
54% within
your
T
a
r
g
e
t
Glucose
R
a
n
g
e
.
Average: 119 mg/dL
152 134
glucose
r
e
a
d
i
n
g
s
.
The overall average
for the
ti
m
e
is displayed above
the g
r
a
p
h
.
The average is
a
l
s
o
Target Range
80-140 mg/dL
Last 7 Days
121
12
69
6 12 6
12
shown
for four different
6-hour
p
e
r
i
o
d
s
of the d
a
y
.
Time
In
T
arget
am a m pm pm
am
Last 7
Days
A
v
erage
Glucose
R
e
a
d
i
n
g
s
above
or below
your
T
a
r
g
e
t
G
lu
c
o
s
e
Range are
or
a
n
g
e
,
while
readings
in
range are
blu
e
.
Low Glucose OK
Events
Total Events: 10
6
3
Information
about the
number
of low glu
c
o
s
e
e
v
e
n
t
s
measured
by
your
S
e
n
s
or
.
A
low glu
c
o
s
e
event
is recorded when your
S
e
n
s
or
glu
c
o
s
e
reading is lower
than
70
mg/dL for longer
1 0
12 6 12 6
12
than
15 m
i
nu
t
e
s
.
The
total
number
of
e
v
e
n
t
s
Daily Patterns OK
(mg/dL)
350
250
150
50
A graph showing
the pattern
and variability
of your
S
ensor
glucose over a
typical
day
.
The
thick black
line
shows
the
median
(midpoint) of
your
glucose
r
eadings
.
The gray shading represents a
range
am a m pm pm
am
Last 7
Days
Low
Glucose
E
v
ents
is displayed above
the g
r
a
p
h
.
The bar
graph
displays
the low
glucose
e
v
e
n
t
s
in four different
6-hour
p
e
r
i
o
d
s
of the d
a
y
.
12 6 12 6 12
(10-90 percentiles)
of
your
S
ensor
r
eadings
.
Information
about how often
you scan your
S
e
n
s
or
.
am a m pm pm
am
Last 7
Days
D
ail
y
P
a
tt
erns
N
o
t
e
:
Daily
P
a
tt
e
rn
s
needs
at
l
e
a
s
t
5
days
o
f
glucose
d
a
t
a
.
Sensor Usage OK
Scans Per
Day
Sensor Data
The Reader
r
e
p
or
t
s
an average
of how many
ti
m
e
s
you scanned your
S
e
n
s
or
each
d
a
y
,
and
the
Captured 100
%
Last 7
Days
p
e
r
ce
n
t
a
g
e
of
possible
S
e
n
s
or
d
a
t
a
the
R
e
a
d
e
r
recorded
from
your
s
c
a
n
s
.
Sensor
Usage
35
36
DOC28687_rev-E_manual.indd 35-36 3/30/14 2:52 PM
Removing Your
Sensor
Step
A
c
tion
1
Pull
up the
edge
of the
adhesive
that
keeps
your
S
ensor
attached
to
your
sk
in
.
Slowly peel
away
from
your skin
in
one
motion
.
N
o
t
e
:
Any remaining adhesive residue
on the
skin can
be
removed
with
warm soapy
water
or
isopropyl
a
l
c
oho
l
.
2
Discard
the
used
S
ensor
according
to
local
r
egula
tions
.
S
ee
Maintenance and Disposal
sec
tion
.
When you are ready
to
apply a new Sensor,
follow the
instructions
in the
Applying Your
S
ensor
and Starting Your
S
ensor
sec
tions
.
If
you removed your last
S
ensor
before 14 days
of
use
,
you
will be prompted to
confirm
that
you
would
like
to
star
t
a
new
S
ensor
when you first scan
it
.
Replacing
Your
Sensor
Your
S
ensor
automatically stops
working
after
14 days
of
wear
and
must
be
r
eplac
ed
.
You should also replace your
S
ensor
if
you notice
any
irritation or
discomfort
at the
application site
or if the
Reader reports
a
problem
with the
S
ensor
currently
in
use
.
Taking action early can
keep
small problems
from turning into
larger
ones
.
CAUTION:
If the
glucose readings
from the
F
r
eeS
t
yle
Libre
F
lash
Glucose
Monitoring
S
y
st
em
do
NOT seem
to
match
with
ho
w
y
ou
f
eel
,
check
to
make sure
that
your
S
ensor
has
not come
loose
.
If the
S
ensor
tip
has come
out of
your skin,
or
your
S
ensor
is coming loose
,
remove
the
S
ensor
and apply a new
one
.
37
38
DOC28687_rev-E_manual.indd 37-38 3/30/14 2:52 PM

Step
A
c
tion
4
Set
the
reminder
Time
using
the
arrows
on the
t
ouchscreen
.
Touch
s
av
e
.
5
Reminders
From
the
R
eminders
screen, you can
turn the
reminder
On/Off
or
add new
r
eminders
.
8:30am On
Touch
done
to return to the
Home
S
creen
.
12:30pm Off
00:00:00 On
add new done
Step
A
c
tion
1
10:23pm
Ends in 14 days
From
the
Home Screen,
touch the
symbol
.
Check Review
Glucose History
2
Set Reminder
Touch
to
selec
t
which
Type
of
reminder you
want
to
set: Check Glucose, Take Insulin,
or
A
lar
m
.
Type Alarm
Repeat Daily
Time XX:XX
cancel save
3
Touch
to
selec
t
how often
you
want the
reminder
to
R
e
pe
a
t
:
Onc
e
,
Daily
,
or
T
imer
.
N
o
te
:
You can set
the
reminders
for
a specific
time
(e
.
g
.
8:30
am)
or
as a
timer
(e
.
g
.
3
hours
from the
current time)
.
Using
Reminders
You can use
R
eminders
to help
you remember
to
check your
gluc
ose
,
take
insulin,
or
as a general
alar
m
.
Reminder
8:30am
Alarm
snoo
ze
15 min
OK
When reminders are On,
the
next reminder
time
appears
next
to the
reminder symbol
on the
Home
S
creen
.
For
example, 8:30am
Your reminder comes
on
even
if the
Reader
is
turned off
.
Touch
OK
to
dismiss your reminder
or
snooze
to be
reminded again
in
15
minut
es
.
N
o
te
:
R
eminders
will not
appear
if the
Reader
is
c
onnec
t
ed
to
a
c
omput
er
.
39
40
DOC28687_rev-E_manual.indd 39-40 3/30/14 2:52 PM
Using
the
Built-in
Met
er
The Reader has a
built-in
meter
that
can
be
used
to
test your
blood
glucose and
blood
ket
one
,
or to
test
the
meter and strips
with control
solution
.
WARNING:
Do NOT use
the built-in
meter
while the
Reader
is
c
onnec
t
ed
to
an electrical
outlet or
a
c
omput
er
.
IM
P
O
RT
A
N
T
:
•
Use
the
Reader
within the
test
strip
operating
temperature
range as
blood
glucose and ketone results obtained
outside
the
range may
be
less
ac
cur
a
t
e
.
•
Use
only
F
r
eeS
t
yle
P
r
ecision/F
r
eeS
t
yle
Optium
test str
ips
.
• Use a
test
strip
immediately after removing
from its
f
oil
packet
.
•
Only use a
test
strip
onc
e
.
•
Do
not
use
expired test
strips as
they
may cause
inaccurate
r
esults
.
•
Do
not
use a
w
et
,
ben
t
,
scra
t
ched
,
or
damaged test str
ip
.
•
Do
not
use
the
test
strip if the foil
packet has a hole
or
is
t
orn
.
• Results
from the built-in
meter are shown
only in your
Logbook and
not in other
history
options
.
• Refer
to
your lancing device instructions
for
use
for how
t
o
use your lancing
devic
e
.
41
42
DOC28687_rev-E_manual.indd 41-42 3/30/14 2:52 PM

Step
A
c
tion
2
D5
Check
the
test
strip
expiration
da
t
e
.
13758
2016/03
E
.
g
.
Expiration
date:
March 31,
2016
3
Open
the foil
test
strip
packet
at the notch and
t
ear
down to
remove
the
test str
ip
.
Use
the test
strip
immediately after removing
from the
f
oil
packet
.
4
I
nser
t
the
test
strip with the
three black lines
at
the
end facing up
.
Push
the strip in until it
stops
.
5
Apply Blood
Use your lancing device
to obtain
a
blood drop
and apply
blood to the white
area
at the
end
of
the
test str
ip
.
If
sounds are
turned
on,
the
Reader beeps
once
to let
you
know
you have applied enough blood
.
N
o
te
:
See
t
e
s
t
s
t
r
i
p
i
n
s
t
ru
c
ti
on
s
for
use
for
re-application
i
n
s
t
ru
c
t
i
on
s
.
Blo
S
Abbott Di a b et es C ar e L
t
d.
Range Road
Witney,
Oxon, OX 29 0YL
Made in UK .
Blood Glucose
Testing
You can use
the built-in
meter
to
check your
blood
gluc
ose
,
whether
you
are wearing a
S
ensor
or not
.
You can perform a
blood
glucose
test
on
your
fingertip or
approved alternate sit
e
.
Be sure
to
read
the
test
strip
instructions
for
use
prior to
using
the built-in
met
er
.
Step
A
c
tion
1
CAUTION:
If
you
think
you have lo
w
glucose (hypoglycemia)
or
you suffer
from
hypoglycemia una
w
ar
eness
,
test
on your
fingers
.
Wash your hands and
the
test site
with warm
soapy
water
for
ac
cur
a
t
e
r
esults
.
Thoroughly
dry
your hands and
the
test sit
e
.
To warm
the
sit
e
,
apply a warm
dry
pad
or rub
vigorously
for
a
few
sec
onds
.
N
o
te
:
Avoid areas near bones and
areas
with
l
o
t
s
of
h
a
i
r
.
If
you
get
a
b
ru
i
s
e
,
consider
s
e
l
ec
t
i
n
g
another
s
i
t
e
.
43
44
DOC28687_rev-E_manual.indd 43-44 3/30/14 2:52 PM
Display
What To
Do
Low Glucose
LO
mg dL
High
Glucose
HI dL
If
LO
appears
on the
Reader, your result is
lower
than
20
mg/dL
.
If HI
appears
on the
Reader,
your
result is higher
than
500
mg/dL
.
You can
touch the
message
button for
more
inf
or
ma
tion
.
Check
your
blood
glucose again
with
a
test str
ip
.
If
you
get a
second
LO
or HI
r
esult
,
contact your health
care
professional
imm
e
dia
te
l
y
.
Low Glucose
63
mg
dL
High Glucose
289
mg
dL
If
your glucose is higher
than
240
mg/dL or lower
than
70 mg/dL, you
will
see a message
on the
scr
een
.
You can
touch the
message
button for
more
information
and set a reminder
to check
your
gluc
ose
.
dL
Step
A
c
tion
You
will
see a
butterfly on the
screen
while you
wait for
your
r
esult
.
If
sounds are
turned
on,
the
Reader beeps once when your result is
r
eady
.
6
After reviewing your
r
esult
,
remove and discard
the
used
test
mg
strip
according
to
local
r
egula
tions
.
10:23pm
IMPORTANT:
After performing
a
blood
glucose
t
est
,
wash your hands and
the
test site
with
soap and
water
and
thoroughly dry
them
.
Your Blood Glucose
Results
Blood glucose results are marked
on the
results screen and
in the
Logbook
with the
143
mg
symbol
.
N
o
te
:
C
on
tac
t
your health care
p
ro
f
e
ss
i
on
a
l
if
you have symptoms
that do not
match
your
test
r
es
u
lt
s
.
45
46
DOC28687_rev-E_manual.indd 45-46 3/30/14 2:52 PM
Step
A
c
tion
2
D5
Check
the
test
strip
expiration
da
t
e
.
13758
2016/03
E
.
g
.
Expiration
date:
March 31,
2016
3
Open
the foil
test
strip
packet
at the notch and
t
ear
down to
remove
the
test str
ip
.
Use
the test
strip
immediately after removing
from the
f
oil
packet
.
4
N
o
te
:
Use
only blood
ketone test str
ips
.
Do
not
put
urine
on the
test str
ip
.
I
nser
t
the
test
strip with the
three black
lines
facing up
.
Push
the strip in until it
stops
.
Blo
S
Abbott Di a b et es C ar e L
t
d.
Range Road
Witney,
Oxon, OX 29 0YL
Made in UK .
After you
get
your
blood
glucose
r
esult
,
you can add Notes
by touching
the
symbol
.
If
you
do not want to
add a
Not
e
,
press
the
Home
Button
to go to the
Home
S
creen
or hold the
Home Button
to turn the
Reader
off
.
Blood Ketone
Testing
You can use
the built-in
meter
to
check your
blood ketone
(β
-hy
dr
o
x
ybut
yr
a
t
e)
.
It
is
important to
consider
doing
this
when:
•
You are
sick
•
Your glucose is higher
than
240
mg/dL
•
You and your health care professional decide you
should
N
o
te
:
Be sure
to
read
the
t
e
s
t
s
t
r
i
p
instructions
for
use
prior
t
o
performing a
ketone
t
e
s
t
.
Step
A
c
tion
1
Wash your hands
with
warm soapy water
for
ac
cur
a
t
e
r
esults
.
Thoroughly
dry
your
hands
.
To warm
the
sit
e
,
apply a warm
dry
pad
or rub
vigorously
for
a
few
sec
onds
.
N
o
te
:
Use
only fingertip
samples
for blood
ketone
t
esting
.
47
48
DOC28687_rev-E_manual.indd 47-48 3/30/14 2:52 PM
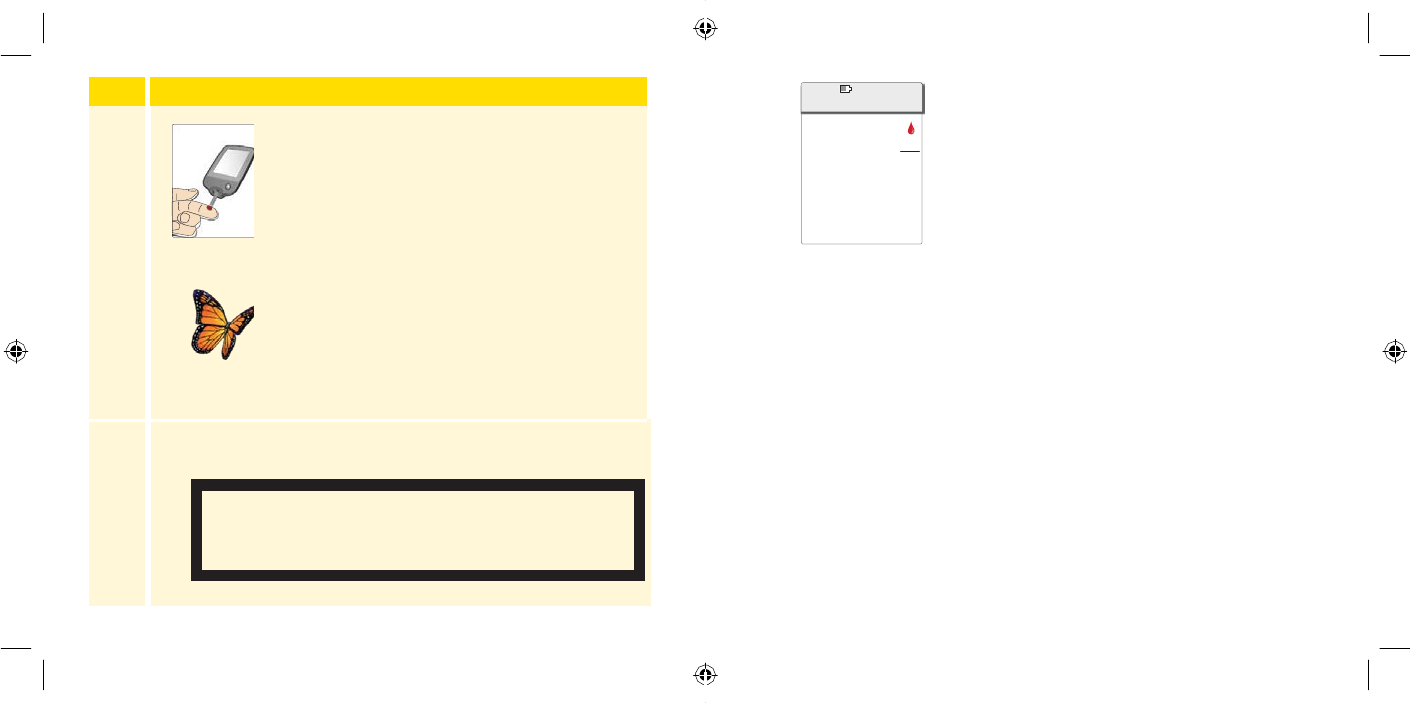
Step
A
c
tion
5
Apply Blood
Ketone
T
est
Use your lancing device
to obtain
a
blood drop
and apply
blood to the white
area
at the
end
of
the
test str
ip
.
If
sounds are
turned
on,
the
Reader beeps
once
to let
you
know
you have applied enough blood
.
N
o
te
:
See
test
strip
instructions
for
use
for
re-application instruc
tions
.
You
will
see a
butterfly on the
screen
while you
wait for
your
r
esult
.
If
sounds are
turned
on,
the
Reader beeps once when your result is
r
eady
.
6
After reviewing your
r
esult
,
remove and discard
the
used
test
strip
according
to
local
r
egula
tions
.
IMPORTANT:
After performing
a
blood
ketone
t
est
,
wash your hands
with
soap
and water and
thor
oughly
dry
them
.
10:23pm
0
.
4
mmol
Your Blood Ketone
Results
Blood ketone results are marked
on the results
screen and
in the
Logbook
with the word
K
e
t
on
e
.
L
Ketone
T
est
N
o
te
s:
•
Blood ketone is e
xpec
t
ed
to be
lower
than
0
.
6
mmol/L
.
•
Blood ketone may
be
higher when you are sick,
fasting
,
have
exercised
har
d
,
or if
glucose levels are
not
c
on
tr
olled
.
•
If
your
blood
ketone result remains
high or
becomes higher
than
1
.
5
mmol/L, contact your health
care professional
imm
e
dia
te
l
y
.
49
50
DOC28687_rev-E_manual.indd 49-50 3/30/14 2:52 PM
Display
What To
Do
High
Ketone
1.7
mmol
L
Ketone
T
est
If
your
blood
ketone is high, you
will
see
a
message
on the
scr
een
.
You can
touch the
message
button for
more
inf
or
ma
tion
.
High Ketone
HI
mmol
L
Ketone
T
est
If HI
appears
on the
Reader, your ketone result
is
higher
than 8
mmol/L
.
You can
touch the
message
button for
more
inf
or
ma
tion
.
R
epea
t
the ketone
test
with
a
new test str
ip
.
If
you
get
a
second
HI
r
esult
,
contact your health
care
professional
imm
e
dia
te
l
y
.
Control Solution
Testing
You should
do
a
control
solution test when you
are
not
sure
of
your
test
strip
results and
want to
check
that
your Reader
and test
strips are
working
pr
operly
.
You can
do
a
control
solution test
with
a
blood
glucose
or ketone
test str
ip
.
IM
P
O
RT
A
N
T
:
•
Control solution results should
fall within the control
solution range
printed on the
test
strip
instructions
for
use
.
•
Do NOT use
control
solution past
the
expiration
da
t
e
.
Discard
control
solution
3
months after
opening
.
• The
control
solution range is a
target
range
for control
solution only
,
not for
your
blood
glucose
or
ketone
r
esults
.
• The
control
solution test
does
not
reflect your
blood glucose
or
ketone lev
els
.
•
Use
only
MediSense glucose and ketone
control
solution
.
•
Check
that the
LOT
number
printed on the
test
strip
f
oil
packet and instructions
for
use
ma
t
ch
.
• Replace
the
cap securely
on the bottle
immediately after
use
.
•
Do NOT
add water
or other liquid to the control
solution
.
•
C
on
tac
t
Customer
S
er
vic
e
for information on how to obtain
control
solution
.
51
Change MediSense
to Optium for
A
ustr
alia
.
52
DOC28687_rev-E_manual.indd 51-52 3/30/14 2:52 PM
Step
A
c
tion
1
Ends in 14 days
From
the
Home Screen,
touch the
S
ettings
10:23pm
symbol
.
Touch
Control Solution Test
to do
a
control
solution
t
est
.
Check Review
Glucose History
Settings
Sounds
Target Range
Control Solution Test
1
/ 3
2
D5
Check
the
test
strip
expiration
da
t
e
.
13758
E
.
g
.
Expiration
date:
March 31,
2016
3
Open
the foil
test
strip
packet
at the notch and
t
ear
down to
remove
the
test str
ip
.
Step
A
c
tion
4
I
nser
t
the
test
strip with the
three black
lines
facing up
.
Push
the strip until it
stops
.
5
Apply Control Solution
Shake
the control
solution
bottle to mix the
solution
.
Apply a
drop of control
solution
to the
white
area
at the
end
of the
test str
ip
.
If
sounds are
turned
on,
the
Reader beeps
once
to let
you
know that
you have applied
enough
control
solution
.
You
will
see a
butterfly on the
screen
while you
wait for the
r
esult
.
If
sounds are
turned
on,
the
Reader beeps once when
the
result is
r
eady
.
Blo
S
Abbott Di a b et es C ar e L
t
d.
Range Road
Witney,
Oxon, OX 29 0YL
Made in UK .
2016/03
53
54
DOC28687_rev-E_manual.indd 53-54 3/30/14 2:52 PM
L
dL
10:23pm
100
mg
Control Solution
T
est
Blood
Glucose
C
ontr
ol
S
olution
T
est
10:23pm
0.4 mmol
Ketone
Control
Solution
T
est
Control Solution
Results
Compare
the control
solution result
to the
range
printed on the
test
strip instructions
for
use
.
The result
on
your screen should
be
in
this r
ange
.
Control solution results are marked
on
the
results screen and
in the Logbook
with a
symbol
.
N
o
te
:
R
epea
t
the control
solution test
if the
results are outside
of the
range
printed on
the
test
strip
instructions
for
use
.
S
t
op using
the built-in
meter
if the control solution
results are
r
epea
t
edly
outside
of the prin
t
ed
r
ange
.
C
on
tac
t
Customer
S
er
vic
e
.
Using
the
Rapid-Acting Insulin
C
alcula
t
or
This
optional
feature requires an understanding
of the
use
of
insulin
.
Misuse
or
misunderstanding
of
this feature and
the
suggested
dose
may lead
to
inappropriate insulin
dosing
.
The
calcula
t
or
suggests
doses
for
rapid-acting insulin only
.
The
calcula
t
or
is
only for
use
with
fingerstick
blood
glucose results
from the built-in
met
er
.
You
cannot
use
the
insulin
calcula
t
or
with
S
ensor
glucose
r
eadings
.
An access code is
required
to
set
up or
change
the rapid-acting
insulin
calcula
t
or
settings
.
This access code is available
only
to
your health care professional
.
Work
with
your health
care
professional
to
set
up or
change
the
calcula
t
or
for
y
ou
.
If
you are
not
sure
about the
calcula
t
or
’
s
suggested
dose
,
you can adjust
it
based
on
instructions
from
your health care professional
.
K
et
one
C
ontr
ol
S
olution
T
est
55
56
DOC28687_rev-E_manual.indd 55-56 3/30/14 2:52 PM
Step
A
c
tion
2
to log any rapid-acting
E
n
t
er
information about any
Have you
for
got
ten
insulin you have taken
rapid-acting insulin you may
have
since X:XX?
Enter any rapid-
?
forgotten to log
.
Touch
n
ex
t
.
acting insulin you
have
forgotten
to log.
no yes 2
units
How long ago was
?
back
ne
th
x
e
t
unlogged dose
of
rapid-acting insulin?
15
minutes or less
back next
Step
A
c
tion
1
10:23pm
Test your
blood
glucose
on
your
finger
.
T
ouch
143
mg
results
scr
een
.
You can also access
the insulin
calcula
t
or
by touching the
calcula
t
or
icon
next
to
Rapid-Acting Insulin
from the
Add
N
o
t
e
s
Insulin Calculator
scr
een
.
CAUTION:
The
rapid-acting insulin
calcula
t
or
cannot
account
for
all
the
fac
t
ors
that
may
aff
ec
t
your insulin
dose
.
These
include incorrectly entered
data, incorrectly set
date
or time
,
un-logged insulin, smaller
or
larger
meals
,
sickness,
e
xer
cise
,
et
c
.
It
is
important that
you review your suggested dose
and
acc
oun
t
for
these fac
t
ors
before
taking
insulin
.
If
you have added a rapid-acting insulin
note to
a glucose result
without
indicating how
much insulin you
t
ook
,
the
calcula
t
or
will not be available
for up to 8
hours
.
Insulin Calculator
from the blood glucose
dL
N
o
t
e
s:
•
You have
up to
15 minutes after testing your
blood
glucose
to
acc
ess
the
calcula
t
or
.
If the
Reader turns
off or if
you have navigated
away
from the
result screen, you can
go to the
Logbook and
touch
add
or
edit
notes
to
access
the
calcula
t
or
from
your last
blood
glucose
en
tr
y
.
•
If
your
blood
glucose result is
below
60 mg/dL,
the
calcula
t
or
is
not
a
vailable
.
•
Do
not
use
control
solution
to obtain
a suggested
dose
.
57
58
DOC28687_rev-E_manual.indd 57-58 3/30/14 2:52 PM

Step
A
c
tion
3
Breakfast If
your
calcula
t
or
was programmed
with
E
as
y
S
etup
,
touch the
meal you plan
to
ea
t
no
w
.
T
ouch
n
ex
t
.
Dinner
No meal
back
next
Or
Enter Carbs
?
If
your
calcula
t
or
was programmed
with
Advanced
S
etup
,
enter
the
grams
of
20
car
boh
y
dr
a
t
es
or
servings
of carbohydrates
grams
you plan
to
ea
t
no
w
.
Touch
don
e
.
back done
Or
Enter Servings
?
2.0
servings
= 30g carbs
back done
R
emov
e
magenta
content for
F
r
ance
.
Step
A
c
tion
4
Suggested Dose
R
eview
your suggested
dose
.
If
needed
,
use
the
arrow
buttons to
adjust your suggested dose
for
any planned
ac
tivit
y
,
a smaller
or
larger meal
,
12u
sickness,
et
c
.
Touch
the
symbol
to
see
details
User change: of what
is included
in
your suggested
dose
.
+2.0
back log dose
Insulin
to
cover your
meal
Dose
Details
OK
I
n
s
u
li
n
to
c
orr
e
c
t
for
your
current
For breakfast 9
glucose
level
For 143 mg/dL +2
Active insulin -1
I
n
s
ulin
remaining
in
your
body
User change +2
Total 12u
A change you have made
to the
s
u
gg
e
s
t
e
d in
s
ulin d
o
s
e
1
/
2
Your
total
suggested
dose
Lunch Adjust if needed
59
60
DOC28687_rev-E_manual.indd 59-60 3/30/14 2:52 PM
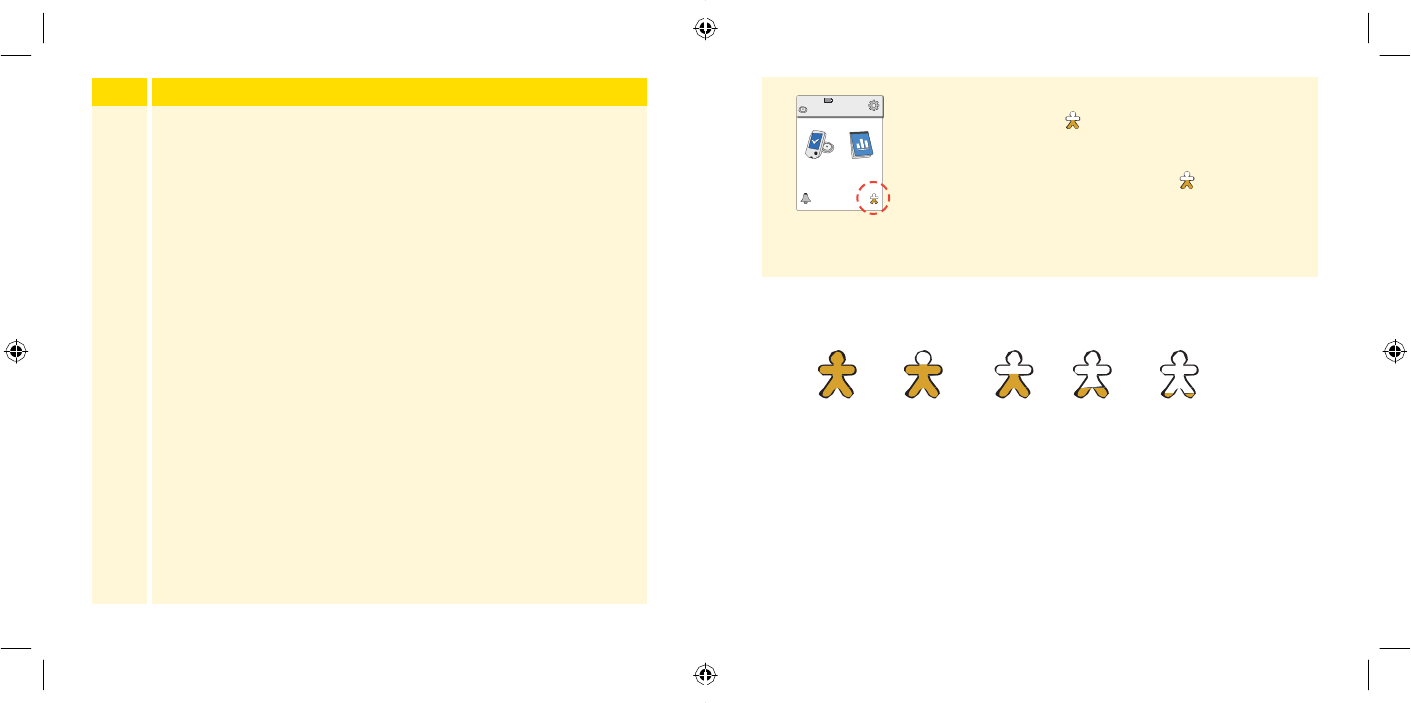
Step
A
c
tion
5
Touch
log dose
to
save
to
your Logbook and take your
dose
.
Your dose is
only
saved
to the
Logbook
if
you
touch
log d
o
se
.
CAUTION:
It
is
important to log
all your
rapid-acting
insulin doses so your Reader can acc
oun
t
for active
insulin when calculating your suggested
doses
.
F
ailur
e
to log
all your rapid-acting insulin doses may result
in a
suggested dose
that
is
too high
.
N
o
te
:
The
total
dose is rounded
up or down to the nearest
whole number unless your health care professional
has
changed your Reader
to count by
half
unit
st
eps
.
10:23pm
Ends in 3 days
Check
Glucose
8:30am
Review
History
If
your health care professional
turned on the Active
I
n
s
u
li
n
f
e
a
t
ur
e
,
the
s
y
mb
o
l
may appear
on your
Home
S
c
r
ee
n
.
It
shows an
e
s
ti
m
a
t
e
of the
amount o
f
rapid-acting
i
n
s
u
li
n
left in
your
body
and
how much
longer
it
may
be
a
c
ti
v
e
.
Touch
the
s
y
mb
o
l
to
s
ee
more
information about the
remaining
rapid-acting
i
n
s
u
li
n
from
your logged
d
o
s
e
s
.
Estimated percentage
of
active insulin remaining
in
your
body
No symbol
100-87% 86-62% 61-37% 36-12% 11-1% 0%
61
62
DOC28687_rev-E_manual.indd 61-62 3/30/14 2:52 PM
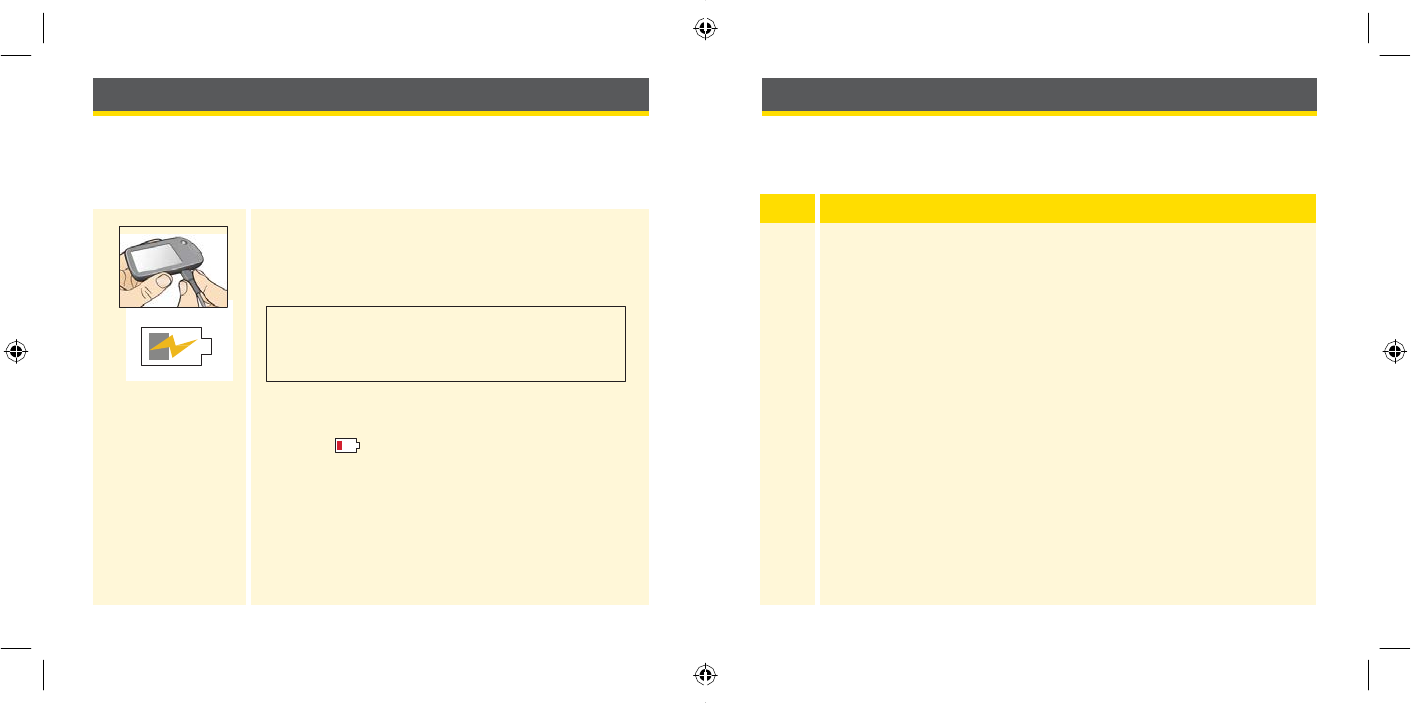
Step
A
c
tion
1
Ends in 14 days
To
get to the
S
ettings
menu
,
touch the
S
ettings
10:23pm
symbol on the
Home
S
creen
.
Check Review
Glucose History
Settings
Sounds
Target Range
Control Solution Test
1
/ 3
Charging
the Reader
A
fully
charged Reader
battery should
last
up to 7
day
s
.
Your
battery
life
may vary depending
on
your
usage
.
A
Low Battery
message
acc
ompanies
your result when you have enough charge remaining
for about
one day
of
use
.
Changing
the
Reader
Settings
You can
go to the
S
ettings
menu
to
change many settings
on the
R
eader
,
like Time &
Da
t
e
or
S
ounds
.
The
S
ettings
menu is also where you
go to do
a Control
S
olution
Test
or to
check
the
S
y
st
em
S
ta
tus
.
Char
ging
Plug
the
included
USB cable
into
an
electrical
outlet
using
the
included power adapt
er
.
T
hen,
plug the other
end
of the
USB cable
into the
USB
port on the
R
eader
.
CAUTION:
Be sure
to
selec
t
a location
for
charging
that
allows
the
power adapter
to be
easily
unplugged
.
N
o
t
e
s:
•
You must charge
the
Reader when
the battery
is
low to
keep using
the
R
eader
.
• To
fully
charge
the
ba
tt
er
y
,
charge
the
R
eader
for at
least
3
hours
.
•
Only use
the
USB
cable and power
adapter
included
with the
sy
st
em
.
•
Fully charge your Reader before storing
it for
more
than 3
mon
ths
.
63
64
DOC28687_rev-E_manual.indd 63-64 3/30/14 2:52 PM

Step
A
c
tion
2
(c
ont.)
•
View
E
ven
t
Logs: A
list of
events recorded
by the
Reader, which may
be
used
by
Customer
S
er
vic
e
to help
•
troubleshoot your
S
y
st
em
Perform a Reader Test: The Reader Test
will
perform
internal
diagnostics and allow you
to
check
that the
Display
is
showing all
pix
els
,
S
ounds
(including
both
t
ones
and
vibrations) are
w
or
k
ing
,
and the Touchscreen is
responding
when
touched
Calculator Settings
–
R
eview
the
currently
programmed
settings
(option only
available
if
your health care
professional
has ac
tiv
a
t
ed
your insulin
calculator)
Reader Basics
–
R
eview
the information
screens
shown
during the
Reader
setup
Professional Options
– Set
by
health care professionals
only
Touch
OK
when you are
d
on
e
.
Step
A
c
tion
2
Touch
the
setting you
want to change:
Sounds
– Set
t
ones
and
vibrations
Target
Range
– Set range displayed
on
R
eader
glucose
graphs
Control Solution Test
– Perform a Control
S
olution test
Time & Date
– Change the Time
or Date
Language
– Change
the
language
on the
Reader
(option only
available
on
Readers
with multiple languages)
System Status
– Check Reader
information
and
performance
•
View
S
y
st
em
Information:
The Reader
will
display
information
about
your
S
y
st
em
including:
-
C
urr
en
t
S
ensor
end date and
time
-
Reader serial
number and version
number
-
S
er
ial
numbers
of
most r
ec
en
t
Sensors
(up to three)
-
S
ensor
version
for
most r
ec
en
t
S
ensor
-
Number
of
Sensors
that
have been used
with
R
eader
-
Number
of
t
ests
that
have
been performed using test
strips
65
66
DOC28687_rev-E_manual.indd 65-66 3/30/14 2:52 PM
A
c
tivit
y
What You Need To
Know
Traveling by
Air
Check
with the
airline
prior to
departure
as
rules
and regulations may change
without notic
e
.
F
ollow
these guidelines when
traveling:
•
Notify
security personnel
of the
presence
of the
device when
going through
security
sy
stems
.
•
Do
not
scan your
S
ensor
or
power
on the
R
eader
using
the
Home Button
while flying
,
if restricted
by flight
r
egula
tions
.
You may inser
t
a
strip
t
o
perform a
blood
glucose
or
ketone
t
est
.
N
o
te
:
If
you are changing
time
z
ones
,
you
can
change
the time
and date settings
on the
R
eader
by touching the
S
ettings
symbol from the
Home Screen,
then
Time &
D
at
e
.
Changing
the time
and date
affects
the g
r
aphs
,
sta
tistics
,
and settings programmed
by time of
day
.
T
h
e
s
y
mb
o
l
may appear
on
your glucose
graph
indicating
the
Reader
time
was
ch
a
n
g
e
d
.
Gaps
i
n
the
graph may
r
e
s
u
l
t
or
glucose readings may
be
h
i
dden
.
Living
W
ith
Your FreeStyle Libre
System
Your
F
r
eeS
t
yle
Libre Flash Glucose
Monitoring
S
y
st
em
can
be
used
during
a
wide
variety
of
ac
tivities
.
A
c
tivit
y
What You Need To
Know
Bathing,
Showering,
and
S
w
i
mming
The Reader is
not w
a
t
er
-r
esistan
t
and
should
NEVER
be
submerged
in
water
or other liquid
.
Your
S
ensor
is
w
a
t
er
-r
esistan
t
and can
be worn
while
ba
thing
,
sho
w
er
ing
,
or
swimming
.
N
o
te
:
Do NOT take your
S
ensor
deeper
than
1
meter (3 feet)
or
immerse
it
longer
than 30
minutes
in w
a
t
er
.
Sleeping
Your
S
ensor
should
not
interfere
with
your
sleep
.
It
is recommended
that
you scan your
S
ensor
before
going to
sleep and when you wake
up
because your
S
ensor
holds
8
hours
of
data
at a
time
.
If
you have reminders set
to go off while
you
are
sleeping
,
place
the
Reader
near
b
y
.
67
68
DOC28687_rev-E_manual.indd 67-68 3/30/14 2:52 PM
Problem What It May Mean
What To
Do
Reader does
not
power
on after
you press
the
Home Button
or
inser
t
a
test str
ip
.
Reader
battery
is
too low
.
Charge
the
R
eader
.
Reader is outside
of
its operating
temperature r
ange
.
Move
the
Reader
to a
temperature
between
10 °C and 45 °C and
then
try to
power
it
on
.
Maintenance and
Disposal
C
leaning
You may clean
the
Reader using a
cloth
dampened
with
a mixture
of
1 part
household bleach
to 9
parts
w
a
t
er
.
Gently
wipe the
exterior
of
the
Reader and allow
to
air dr
y
.
CAUTION:
Do NOT place
the
Reader
in
water
or other
liquids
.
Avoid
getting
dust
,
dir
t
,
blood
,
control
solution,
w
a
t
er
,
or any
other
substance
in the
test
strip or
USB por
ts
.
Maintenance
The
F
r
eeS
t
yle
Libre Flash Glucose
Monitoring
S
y
st
em
has
no
ser
vic
eable
par
ts
.
Disposal
This
product
should
be
disposed
of in
accordance
with
all applicable
local
regulations
r
ela
t
ed
to the
disposal
of
electronic
equipmen
t
,
ba
tt
er
ies
,
sharps, and
ma
t
er
ials
potentially
exposed
to body
fluids
.
C
on
tac
t
Customer
S
er
vic
e
for further information on the appropriate
disposal
of
system
c
omponen
ts
.
Troubleshooting
This section lists problems
or
observations
that
you may
ha
v
e
,
the possible
cause(s),
and recommended
ac
tions
.
If the
Reader experiences an
er
ror
,
a
message
will
appear
on the
screen
with
directions
to
resolve
the
er
ror
.
Reader Does
Not
Power
On
If the
Reader
still
does
not
power
on
after
trying
these st
eps
,
contact
Customer
S
er
vic
e
.
69
70
DOC28687_rev-E_manual.indd 69-70 3/30/14 2:52 PM
Problem What It May Mean
What To
Do
The
S
ensor
is
not sticking
to
your
sk
in
.
The site is
not free
of dir
t
,
oil
,
hair
,
or
sw
ea
t
.
1
.
R
emov
e
the
S
ensor
.
2
.
Consider shaving
and/or
cleaning
the
site
with soap
and
w
a
t
er
.
3
.
F
ollow the
instructions
in
Applying and Starting
Y
our
S
ensor
sec
tions
.
Skin
ir
rita
tion
at the
S
ensor
application
sit
e
.
Seams
or other
constrictive
clothing
or accessories
causing
friction at
the
sit
e
.
Ensure
that nothing
rubs
on the
sit
e
.
You may
be
sensitiv
e
to the adhesive
ma
t
er
ial
.
If the irritation
is where
the
adhesive
t
ouches
skin,
contact
your health care professional
t
o
identify the
best
solution
.
Problems
at the
Sensor Application
Site
Problems Starting Your Sensor
or
Receiving
Sensor
Readings
Display What It May Mean
What To
Do
New
S
ensor
S
tar
ting
Up
S
ensor
is
not ready
to
read
gluc
ose
.
Wait
until the
60
minute
S
ensor
start-up period
has c
omplet
ed
.
S
can
T
imeout
The Reader is
not
held
close
enough
to the
S
ensor
.
Hold
the
Reader
within
4
cm
(1
.
5
inches)
of the
S
ensor
.
Bring
the
screen
of the
R
eader
close
to the
S
ensor
.
S
e
n
so
r
Ended
The
S
e
n
s
or
life
h
a
s
ende
d
.
Apply and
s
t
a
r
t
a new
S
e
n
s
or
.
71
72
DOC28687_rev-E_manual.indd 71-72 3/30/14 2:52 PM
Display What It May Mean
What To
Do
Glucose
R
eading
Una
vailable
Your
S
ensor
is
t
oo
hot or too
c
old
.
Move
to
a location where
the
temperature
is
appropriate
and
scan again
in
a
few minut
es
.
S
ensor
Already
in
Use
The
S
ensor
w
as
star
t
ed
by another
R
eader
.
A
S
ensor
can
only be scanned
by the
Reader
that
star
t
ed
it
.
Scan
the
S
ensor
again
with the
Reader
that
star
t
ed
it
.
Or,
apply
and
star
t
a new
S
ensor
.
Check
S
e
n
s
or
The sensor
tip may
not be
under
your
sk
i
n
.
Try
to
s
t
a
r
t
your
S
e
n
s
or
a
g
a
i
n
.
If
Reader displays “Check
S
e
n
s
or
”
a
g
a
i
n
,
your
S
e
n
s
or
was
no
t
applied pro
p
e
rly
.
Apply
and
s
t
a
r
t
a new
S
e
n
s
or
.
R
e
p
l
a
ce
S
e
n
so
r
The
S
y
s
t
e
m
h
a
s
detected
a
problem
with
your
S
e
n
so
r
.
Apply and
s
t
a
r
t
a new
S
e
n
s
or
.
Display What It May Mean
What To
Do
New
S
e
n
s
or
Found
You scanned a
new
S
e
n
s
or
before
your
pr
e
v
i
ou
s
S
e
n
so
r
ende
d
.
Your Reader can
only be
u
s
e
d
with
one
S
e
n
s
or
at
a
ti
m
e
.
If
you
s
t
a
r
t
a new Sensor, you
w
ill
no
longer
be
able
to
scan
your
old
S
e
n
s
or
.
If
you
would
like
t
o
begin
u
s
i
n
g the
new
S
e
n
s
or
,
s
e
l
ec
t
“
Y
es”
.
Scan
E
rror
The Reader
w
a
s
unable
t
o
communicate
w
ith
the
Se
n
so
r
.
Try scanning
a
g
a
i
n
.
N
o
te
:
You may need
to move
away
from potential
sources
of
electromagnetic
in
t
er
f
erenc
e
.
S
e
n
so
r
E
rror
The
S
y
s
t
e
m
i
s
unable
to
provide
a
glucose re
a
ding
.
Scan again
in
10 m
i
nu
t
e
s
.
73
74
DOC28687_rev-E_manual.indd 73-74 3/30/14 2:52 PM
Err
or
M
essage
What It May Mean
What To
Do
E-3
Blood
drop
is
t
oo
small
.
or
I
nc
orr
ec
t
test
pr
oc
edur
e
.
or
There may
be a
problem
with the t
est
str
ip
.
1
.
R
e
v
i
e
w the
t
e
s
ti
n
g
i
n
s
t
ru
c
t
i
on
s
.
2
.
R
epea
t
the
test using
a
new
test str
ip
.
3
.
If the
error
r
eappears
,
contact
Customer
S
er
vic
e
.
E-4
The
blood glucose
level may
be too high
to be
read
by the
sy
st
em
.
or
There may
be a
problem
with the t
est
str
ip
.
1
.
R
e
p
e
a
t
the
t
e
s
t
u
s
i
n
g
a
new
te
s
t
s
t
r
i
p
.
2
.
If the
error
r
eappears
,
contact
your health care
professional
imm
e
dia
te
l
y
.
Blood Glucose
or
Ketone Error
Messages
Err
or
M
essage
What It May Mean
What To
Do
E-1
The
temperature
is
too hot or too cold
for the
Reader
t
o
work
c
orr
ec
tly
.
1
.
Move
the
Reader and
t
e
s
t
s
t
r
i
p
s
to
a location where
the
temperature
is
within the
t
e
s
t
s
t
r
i
p
operating r
a
n
g
e
.
(
S
ee
t
e
s
t
s
t
r
i
p
i
n
s
t
ru
c
ti
on
s
for
u
s
e
for the
appropriate r
a
n
ge
)
.
2
.
Wait
for the
Reader and
test
strips
to
adjust
to the new
t
emper
a
tur
e
.
3
.
R
epea
t
the
test using
a
new
test str
ip
.
4
.
If the
error
r
eappears
,
contact
Customer
S
er
vic
e
.
E-2
Reader
er
ror
.
1
.
Turn
off the
R
e
a
d
e
r
.
2
.
R
epea
t
the
test using
a
new
test str
ip
.
3
.
If the
error
r
eappears
,
contact
Customer
S
er
vic
e
.
75
76
DOC28687_rev-E_manual.indd 75-76 3/30/14 2:52 PM

Err
or
M
essage
What It May Mean
What To
Do
E-7
T
e
s
t
s
t
r
i
p
may
be
d
a
m
a
g
e
d
,
u
s
e
d
,
or
the
Reader does
no
t
recognize
it
.
1
.
Check
that
you are
u
s
i
n
g
the
c
orr
ec
t
t
e
s
t
s
t
r
i
p for
the
R
e
a
d
e
r
.
(See
t
e
s
t
s
t
r
i
p
i
n
s
t
ru
c
ti
on
s
for
use
to verify
your
s
t
r
i
p
is compatible
w
ith
the
R
e
ader
)
.
2
.
R
epea
t
the
test using
a
test
strip for
use
with
your
R
eader
.
3
.
If the
error
r
eappears
,
contact
Customer
S
er
vic
e
.
E-9
Reader
er
ror
.
1
.
Turn
off the
R
e
a
d
e
r
.
2
.
R
epea
t
the
test using
a
new
test str
ip
.
3
.
If the
error
r
eappears
,
contact
Customer
S
er
vic
e
.
Err
or
M
essage
What It May Mean
What To
Do
E-5
Blood was
applied
to the
test
strip
t
oo
soon
.
1
.
R
e
v
i
e
w the
t
e
s
ti
n
g
i
n
s
t
ru
c
t
i
on
s
.
2
.
R
epea
t
the
test using
a
new
test str
ip
.
3
.
If the
error
r
eappears
,
contact
Customer
S
er
vic
e
.
E-6
The
test
strip
may
not
be
compatible
with
the
R
eader
.
1
.
Check
that
you are
u
s
i
n
g
the
c
orr
ec
t
t
e
s
t
s
t
r
i
p for
the
R
e
a
d
e
r
.
(See
t
e
s
t
s
t
r
i
p
i
n
s
t
ru
c
ti
on
s
for
use
to verify
your
s
t
r
i
p
is compatible
w
ith
the
R
e
ader
)
.
2
.
R
epea
t
the
test using
a
test
strip for
use
with
your
R
eader
.
3
.
If the
error
r
eappears
,
contact
Customer
S
er
vic
e
.
77
78
DOC28687_rev-E_manual.indd 77-78 3/30/14 2:52 PM
Problem What It May Mean
What To
Do
The
test
does
not
star
t
after
applying
the blood
sample
.
Blood sample is
t
oo
small
.
1
.
See
t
e
s
t
s
t
r
i
p
i
n
s
t
ru
c
ti
on
s
for
use
for re-application
i
n
s
t
ru
c
t
i
on
s
.
2
.
R
e
p
e
a
t
the
t
e
s
t
u
s
i
n
g
a
new
te
s
t
s
t
r
i
p
.
3
.
If the
t
e
s
t
s
ti
ll
does
not
s
t
a
r
t
,
contact
C
u
s
t
o
m
e
r
S
e
r
v
i
ce
.
S
ample
applied
aft
er
the
Reader
turned
off
.
1
.
R
e
v
i
e
w the
t
e
s
ti
n
g
i
n
s
t
ru
c
t
i
on
s
.
2
.
R
e
p
e
a
t
the
t
e
s
t
u
s
i
n
g
a
new
te
s
t
s
t
r
i
p
.
3
.
If the
t
e
s
t
s
ti
ll
does
not
s
t
a
r
t
,
contact
C
u
s
t
o
m
e
r
S
e
r
v
i
ce
.
Problem
with
Reader
or
test str
ip
.
1
.
R
e
p
e
a
t
the
t
e
s
t
u
s
i
n
g
a
new
te
s
t
s
t
r
i
p
.
2
.
If the
t
e
s
t
s
ti
ll
does
not
s
t
a
r
t
,
contact
C
u
s
t
o
m
e
r
S
e
r
v
i
ce
.
Problems Checking Your Blood Glucose
or Ketone
Problem What It May Mean
What To
Do
The
R
eader
does
not
star
t
a
test
after
inserting
a
test str
ip
.
Test
strip
is
not
inser
t
ed
correctly
or not
inser
t
ed
fully
into the strip por
t
.
1
.
With the 3
black lines
facing
up
,
inser
t
the
test
strip in
t
o
the strip port until it
stops
.
2
.
If the
Reader
still
does
not
star
t
a
t
est
,
contact
C
ust
omer
S
er
vic
e
.
Reader
battery
is
t
oo
l
o
w
.
Charge
the
R
eader
.
The
test
strip is
damaged
,
used
,
or
unrecognizable
by
the
R
eader
.
I
nser
t
a new
F
r
eeS
t
yle
P
r
ecision/
F
r
eeS
t
yle
Optium
test str
ip
.
Reader is outside
of
its operating
temperature r
ange
.
Move
the
Reader
to a
temperature between 10
°C
and
45 °C and
then try to
power
it
on
.
Reader is
in
a
power
saving
mode
.
Press
the
Home Button
then
inser
t
a
test str
ip
.
79
80
DOC28687_rev-E_manual.indd 79-80 3/30/14 2:52 PM
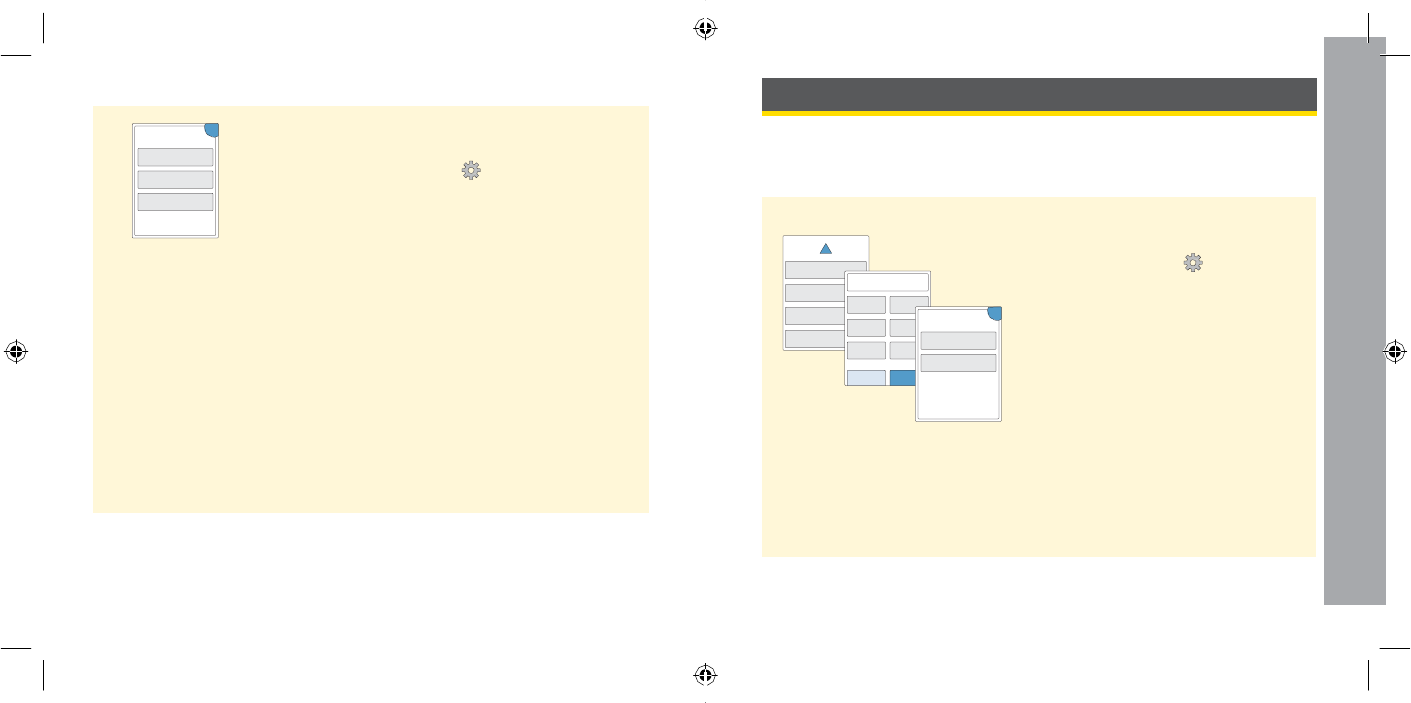
Professional
Options
Perform
a
Reader
Test
Professional
Options
System Status OK
System
Info
Reader Test
Event Log
If
you
think the
Reader is
not working p
ro
p
e
r
l
y
,
you
can check
the
Reader
by
performing
a Reader
T
e
s
t
.
Touch
the
O
p
ti
on
s
s
y
mb
o
l
from the Home
Screen,
selec
t
System Status
and
then
s
e
l
ec
t
Reader
T
e
s
t
.
N
o
te
:
The Reader Test
will
perform
internal
diagnostics and
will
allow you
to
check
that the
This section is
only
meant
for
health care prof
essionals
.
It
describes
the
access
code-protected
features
of the
R
eader
.
Health care prof
essionals
can change dose increments
or
set
up the
insulin
calcula
t
or
.
From
the
Home Screen,
touch
the
S
ettings
symbol
.
S
cr
oll
display
,
sounds
,
and
t
ouchscreen
are
working
pr
operly
.
System Status
Calculator
Set
tings
Enter Code to Unlock down
using
the
arrows and
touch
Professional
O
p
t
i
o
n
s
.
En
t
er
the
A
Reader
Basics
B
Professional Options
C
1 Professional OK
2 Options
Dose
Increment
3
Insulin Calculator
access
c
ode
.
cancel done
Customer
Service
Customer
S
er
vic
e
is available
to
answer any questions you may have
about
your
F
r
eeS
t
yle
Libre Flash Glucose
Monitoring
S
y
st
em
.
Please
go the back
cover
of
this manual
for
your Customer
S
er
vic
e
phone number
.
81
N
o
te
:
If
you are a health care professional
,
contact
Customer
S
er
vic
e
for
more
inf
or
ma
tion
.
82
DOC28687_rev-E_manual.indd 81-82 3/30/14 2:53 PM
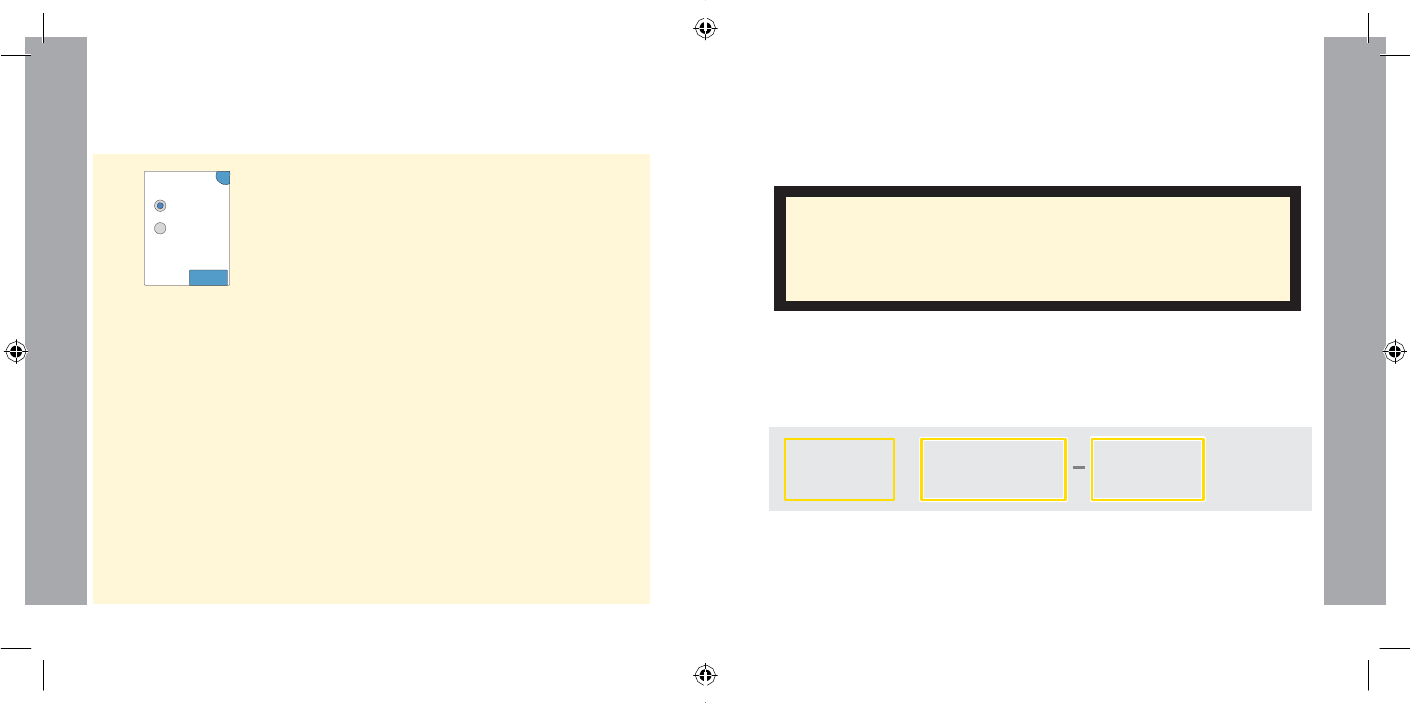
Professional
Options
Professional
Options
+
Changing Dose
Increments
You can set
the
insulin dose increments
to
either
1
.
0
or
0
.
5
units
for use
with the
R
apid-ac
ting
insulin
calcula
t
or
and insulin
not
es
.
Setting
up the
Insulin
C
alcula
t
or
The insulin calcula
t
or
can
help
your patients
calcula
t
e
their rapid-acting
insulin doses based
on
meal and fingerstick
blood
glucose
level
inf
or
ma
tion
.
From
the
Professional Options
screen, selec
t
Insulin
Dose
Increment
?
1
unit
0.5
unit
done
From
the
Professional Options
screen,
select
Dose
In
c
rem
e
n
t
.
Then choose
1 unit or 0.5 unit
.
Touch
don
e
.
C
alcula
t
or
.
CAUTION:
This
feature requires an understanding
of the use
of
insulin
.
Misuse
or
misunderstanding
of
this feature and
the
suggested dose may lead
to
inappropriate insulin
dosing
.
T
he
calcula
t
or
suggests doses
for
rapid-acting insulin only
.
Complete
the
setup
to
store your pa
tien
t
’
s
individual
insulin settings
in
the
R
eader
.
The
calcula
t
or
uses
the
fingerstick
blood
glucose
r
esults
,
meal
information
and
the
stored settings
to
calcula
t
e
a suggested insulin
dose
based
on
this
formula:
Blood glucose
c
orr
ec
tion
(if
needed)
Meal
|
C
ar
b
ohy
dr
a
t
e
Intake
Active
Insulin
(if present)
T
otal
=
suggest
ed
dose
83
84
DOC28687_rev-E_manual.indd 83-84 3/30/14 2:53 PM
Step
A
c
tion
1
Choose Setup Option
Choose
the
Easy
option on the
slide bar
and
touch
n
ex
t
.
Easy
For
patients
who
star t with
a
N
o
te
:
You need
to know
your pa
tien
t
’
s
fixed
dose of
r
apid-acting
insulin at
meals.
meal-time insulin
doses,
target
glucose
r
ange
,
and correction
fac
t
or
.
back
next
2
Breakfast
?
En
t
er
the
meal-time rapid-acting insulin
doses
.
Touch
next
after
each
en
tr
y
.
4
units of
insulin
back
next
3
Correction Target
?
E
n
t
e
r
the blood
glucose
Correction
T
a
rge
t
.
T
his
is
the
desired
target
range
for blood glucose
mg
values before meals
.
Touch
n
ex
t
.
70 to 130 dL
N
o
te
:
If
you just
want to
set one
target instead
of
a
r
ange
,
set
both the low
and
high
values
t
o
back next the
same
number
.
Professional
Options
Professional
Options
You can set
up the
insulin
calcula
t
or
using
the
Easy
or Advanced
settings
.
The Easy
S
etup
is
for
patients
who
star
t
with
a fixed dose
of
rapid-acting insulin
for
meals
.
The Advanced
S
etup
is
for
patients
who
count
car
boh
y
dr
a
t
es
(in
grams
or
servings)
to
adjust
their rapid-acting
insulin dose
for
meals
.
You must complete all
of the
steps
in the
insulin
calcula
t
or
setup
in order
for the patient to
use
the
calcula
t
or
.
When you have finished setting up
the
insulin
calcula
t
or
,
you can review
the
settings
to
make sure
they are
c
orr
ec
t
for
your pa
tien
t
.
You can also review settings
at
a
later time
.
T
ouch
the
S
ettings
symbol from the
Home Screen,
then
selec
t
C
a
lc
ula
t
o
r
S
e
tt
i
n
gs
.
Easy Setup
of the
Insulin
C
alcula
t
or
IMPORTANT:
If the time on the
Reader is wr
ong
,
this may
lead
to
an incorrect suggested
dose
.
R
emov
e
magenta
content for
F
r
ance
.
85
86
DOC28687_rev-E_manual.indd 85-86 3/30/14 2:53 PM
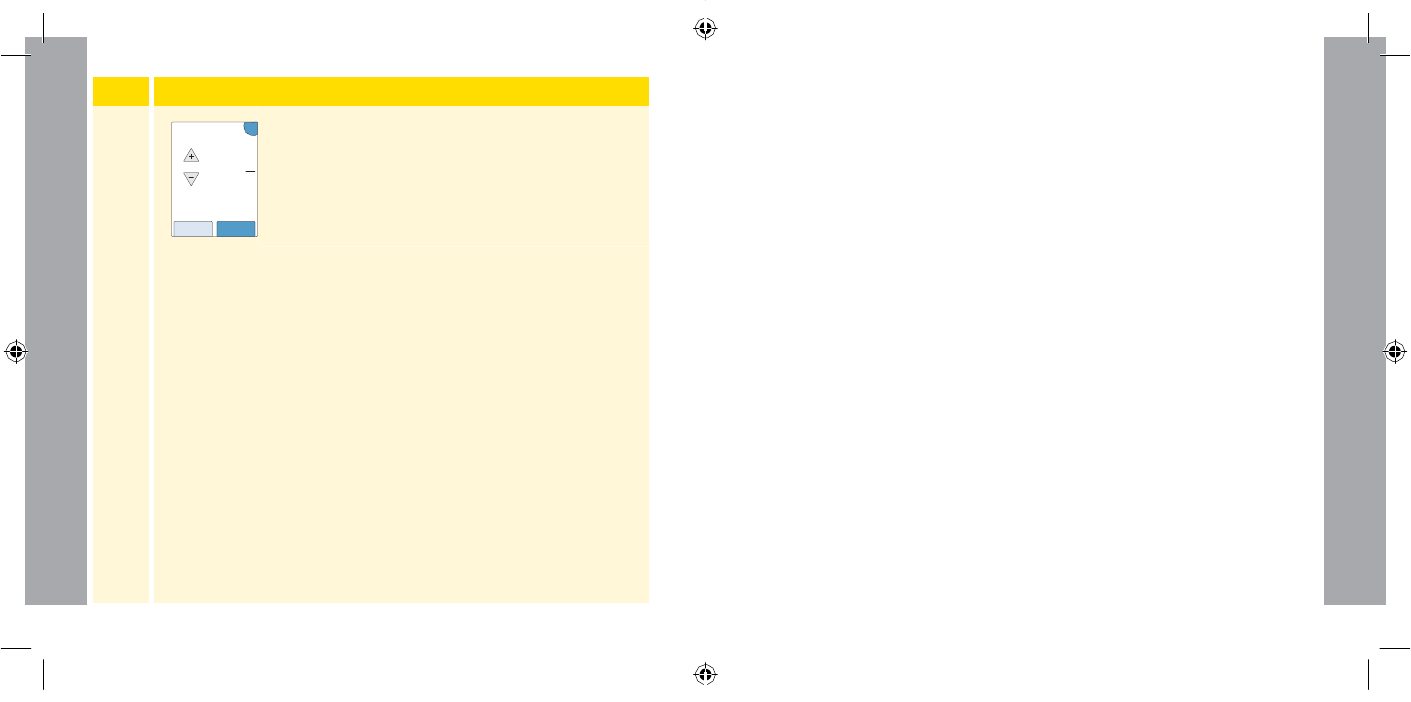
10
Professional
Options
Professional
Options
Step
A
c
tion
Notes about
the
Easy
O
p
t
i
o
n
:
• The
calcula
t
or
estima
t
es
the amount of
rapid-acting insulin
still in the
4
Correction Factor
?
1 u
insulin
for
mg
dL
back
next
N
o
t
e
s:
En
t
er
the
Correction Factor
(for example:
if
1
unit
of
insulin lowers
blood
glucose 50 mg/dL,
then
the
correction factor
is
50)
.
If the blood
glucose
value
is outside
the blood
glucose
tar
get
,
the
calcula
t
or
will
use
the
correction target and
factor
t
o
calcula
t
e
a correction dose
.
body
and
how
much longer
it
may
be
active
(if the
correction factor
is
set
to “no
correction
insulin
”
,
active insulin is
not
calcula
t
ed)
.
The
active
insulin
estima
t
e
is based
on
a 4-hour insulin
duration
calcula
t
ed
from
the time
and
amount of the
last logged rapid-acting insulin
dose
.
•
Both meal and correction doses are included
in the
active
insulin
tr
ack
ing
.
•
Insulin doses
calcula
t
ed
0-2
hours after
a previously logged
dose
•
If
your
patient
does
not
take correction insulin,
touch the
down
arrow
to go below 1 to
set
“No correction
insulin
”
.
If you
set
“No correction
insulin
”
,
the
calcula
t
or
only
includes
meal
doses
.
A
dditionally
,
active insulin is
not
tracked
or
calcula
t
ed
.
• The
calcula
t
or
corrects a
blood
glucose value
to the single
target or the
average
of the target
r
ange
.
• The
calcula
t
or
will not
suggest a dose
that
is
estima
t
ed
t
o
drop the blood
glucose
below the
lower end
of the target
range
or
single
tar
get
.
Touch
n
ex
t
.
Then
touch
done
to
complete
the
setup
.
You
can
now
review
the
calcula
t
or
settings
.
Touch
OK
when
done
.
will only
include a meal dose
.
Active insulin
will not be subtracted
from the
meal
or
car
boh
y
dr
a
t
e
dose
,
and a correction dose
will not
be
included even
if the blood
glucose is outside
the
tar
get
.
During
this
time
per
iod
,
the
previous dose has
not
reached peak action
and
additional correction
doses, referred
to
as `insulin
stack
ing
’
,
may
result
in
hypogly
c
emia
.
•
Insulin doses
calcula
t
ed
2-4
hours after
a previously logged dose
will
have active insulin
subtr
ac
t
ed
from the
suggested
dose
.
•
All
previously injected rapid-acting insulin should
be
logged
to
ensur
e
ac
cur
a
t
e
active insulin tracking and
calcula
tions
.
87
88
DOC28687_rev-E_manual.indd 87-88 3/30/14 2:53 PM
Professional
Options
Professional
Options
Calculator Settings
-
Easy
Option
This page can
be
used
to
record insulin
calcula
t
or
settings
.
Advanced Setup
of the
Insulin
C
alcula
t
or
Step
A
c
tion
Breakfast
Dose
units of insulin
Lunch
Dose
units of insulin
Dinner
Dose
units of insulin
This is
the insulin
required
to
cover
f
ood
.
1 Choose Setup Option
Advanced
For
patients
who
count
ca
rbs
(in
gra ms or servings) to a
djust
their rapid-acting insulin dose
at meals.
Choose
the
Advanced
option on the
slide
bar
and
touch
n
ex
t
.
N
o
te
:
You need
to know
your pa
tien
t
’
s
meal-
time
insulin
settings
,
target
glucose
r
ange
,
correction
fac
t
or
,
and insulin
dur
a
tion
.
0-50
0-50 0-50 back
next
Correction
Target
_
mg/dL mg/dL
70-180
70-180
Correction
Factor
This is
the
desired
range
for
before meal
blood
gluc
ose
.
This is
the estimated
2 Enter food by:
?
Grams of carbs
Servings
Touch
to
s
e
l
ec
t
how meal/carbohydrate
information will be
en
t
er
ed
.
Touch
n
ex
t
.
For
Grams
of
carbs
,
go to
S
t
ep
3
.
For
S
e
rv
i
n
gs
,
go to
S
t
ep
4
.
1 unit of insulin for
mg/dL
1-99
(or No
Correction)
amount blood glucose
will drop by taking one
unit of
insulin
.
back
next
Changes
to
these settings can
only be
made
by
a health care prof
essional
.
For France: remove
S
t
ep
2 & 4 and magenta
content in
S
t
ep
3
.
R
enumber
steps
.
89
90
DOC28687_rev-E_manual.indd 89-90 3/30/14 2:53 PM
Step
A
c
tion
4
Servings
Definition
?
If
you chose
to
enter Servings in Step 2:
T
he
1 serving =
rapid-acting insulin dose suggestion is based
on
10.0
ser
vings
.
grams carbs
En
t
er
the
Servings Definition
(10
to 15
Servings
Ratio
?
grams
of
carbs) and
touch
n
ex
t
.
En
t
er
the
back
next
For 1 serving:
Servings Ratio
(
units
of rapid-acting
1.5
insulin per
1
ser
ving)
.
Touch
next
when
units
insulin
c
omplet
e
.
Optional: by time
of day
back next
Servings ratio
?
2 u ins
N
o
te
:
If
you
want to
set
different serving
morning
ratios
for different
times
of
day
,
touch the
3 u ins 3 u ins
night midday option
by time
of
da
y
.
Touch each
time
4 u ins
evening
period
to
change
the
servings
r
a
tio
.
T
ouch
Servings Ratio OK
back done
OK
after
each entry
to
sa
v
e
.
Touch
done
.
For 1 serving:
2
Morning:
4am to 10am
Professional
Options
Professional
Options
Step
A
c
tion
3
Carbohydrate Ratio
?
If
you chose
to
enter Grams
of
carbs in Step
2
:
1 u
insulin
for
The rapid-acting insulin dose suggestion is
based
10 on
grams
of
car
bs
.
grams carbs
Optional: by time
En
t
er
the
Carbohydrate Ratio
(1
unit of rapid-
of day
acting insulin
for
grams
of
carbs)
.
T
ouch
back
next
next
when
c
omplet
e
.
Carbohydrate ratio
?
1 unit insulin for:
10g
Note:
If
you
want to
set
different
morning
15g 15g
car
boh
y
dr
a
t
e
ratios
for different times
night midday
20g of
day
,
touch the option
by time
of
da
y
.
eveniCnagrbohydrate OK
Ratio
Touch each
time
period
to
change
the
back done 1 u
insulin
for
10
car
boh
y
dr
a
t
e
r
a
tio
.
Touch
OK
after
each
grams carbs
entry
to
sa
v
e
.
Touch
done
.
Morning:
4am to 10am
Go
to
S
t
ep
5
.
Time
of
day blocks can
not be
adjusted
.
They correspond
to the
following times:
Morning
4:00 AM
-
9:59 AM (04:00
-
09:59)
Midday
10:00 AM
-
3:59 PM (10:00
- 15:59)
Evening
4:00 PM
-
9:59 PM (16:00
- 21:59)
Night
10:00 PM
-
3:59 AM (22:00
-
03:59)
for 1 serving:
units
insulin
91
92
DOC28687_rev-E_manual.indd 91-92 3/30/14 2:53 PM
Step
A
c
tion
5
How does your
?
S
elec
t
how
you
want
your
patient to
c
orr
ec
t
their
patient correct
their
glucose?
gluc
ose
.
Touch
n
ex
t
.
To a single
tar
get
To a target
r
ange
back
next
6
Correction Target
?
En
t
er
the
Correction Target
value
or
r
ange
.
T
his
100
is
the
desired
target
value
or
range
for blood
glucose values before meals
.
Touch
next
when
mg/dL
c
omplet
e
.
Optional: by
time
of day
back Corre
nc
e
t
x
io
t n Target
?
in mg/dL:
N
o
te
:
If the
Correction Target
is
100
morning
based
on time of
day
,
touch the
120 110
night midday option
by time
of
d
ay
.
Touch
each
100 time
period
to
change
the correction
evening
back Corr
d
e
o
cn
ti
e
on Target OK target for that
per
iod
.
Touch
OK
after
each entry
to
sa
v
e
.
Touch
don
e
.
100
mg/dL
Morning:
4am to 10am
10
10
Professional
Options
Professional
Options
Step
A
c
tion
7
Correction Factor
?
1 u insulin
for
mg
dL
En
t
er
the
Correction Factor
(for example:
if 1
unit of
insulin lowers
blood
glucose 50
mg/dL,
then the
correction factor
is
50)
.
If the blood
glucose reading is outside
the blood glucose
Optional:
Correction factor
by time
of day
?
tar
get
,
the
calcula
t
or
will
use
the correction
1 u insulin
f
b
oa
r
c:
k next
10 mg/dL
morning
target
and factor
to
calcula
t
e
a correction dose
.
Touch
next
when
c
omplet
e
.
20 mg/dL
night
20 mg/dL
midday
15 mg/dL
evening
back done
Correction Factor OK
1 u
insulin
for
mg
dL
Morning:
4am to 10am
N
o
t
e
s:
•
If the
Correction
F
ac
t
or
is based
on time of
day
,
touch the option
by time
of
da
y
.
T
ouch
each
time
period
to
change
the correction
factor
for that
per
iod
.
Touch
OK
after
each
entry
to
sa
v
e
.
Touch
done
.
• The
calcula
t
or
corrects a
blood
glucose
v
alue
to the
single
target or the
average
of the
target
r
ange
.
• The
calcula
t
or
will not
suggest a dose
that
is
estima
t
ed
to drop the blood
glucose
below
the
lower end
of the target
range
or single
tar
get
.
93
94
DOC28687_rev-E_manual.indd 93-94 3/30/14 2:53 PM
Step
A
c
tion
9
Do you want the
?
S
elec
t
whether
or not to
show
the
Active
Insulin
Active Insulin symbol
to be displayed on the symbol on the
Home
S
creen
.
Home Screen?
Yes
This symbol shows an
estima
t
e
of the
amoun
t
No of
rapid-acting insulin
still in the body
and
how
much longer
it
may
be
ac
tiv
e
.
If
you
selec
t
“No
”
,
back next
active insulin is
still
included
in the
suggested
dose calcula
tion
.
Touch
n
ex
t
.
Then
touch
done
to
complete
the
setup
.
You can
now
review
the
calcula
t
or
settings
.
Touch
OK
when
done
.
Professional
Options
Professional
Options
Step
A
c
tion
8
Insulin Duration
?
En
t
er
the
Insulin
Dur
a
tion
.
This is
the amount of
time that
rapid-acting insulin remains active
in
4:30 the
pa
tien
t
’
s
body
.
hrs:min
Touch
n
ex
t
.
back
next
IMPORTANT:
In
gener
al
,
the
insulin
duration for rapid-
acting insulin ranges
from
3-5
hours
,
and can vary
for
each
person
1
.
The Reader allows an insulin
duration
from
3-8
hours
.
1
P
roduc
t
Inserts: HumaLog®, NovoLog®,
A
pidr
a®
95
96
DOC28687_rev-E_manual.indd 95-96 3/30/14 2:53 PM
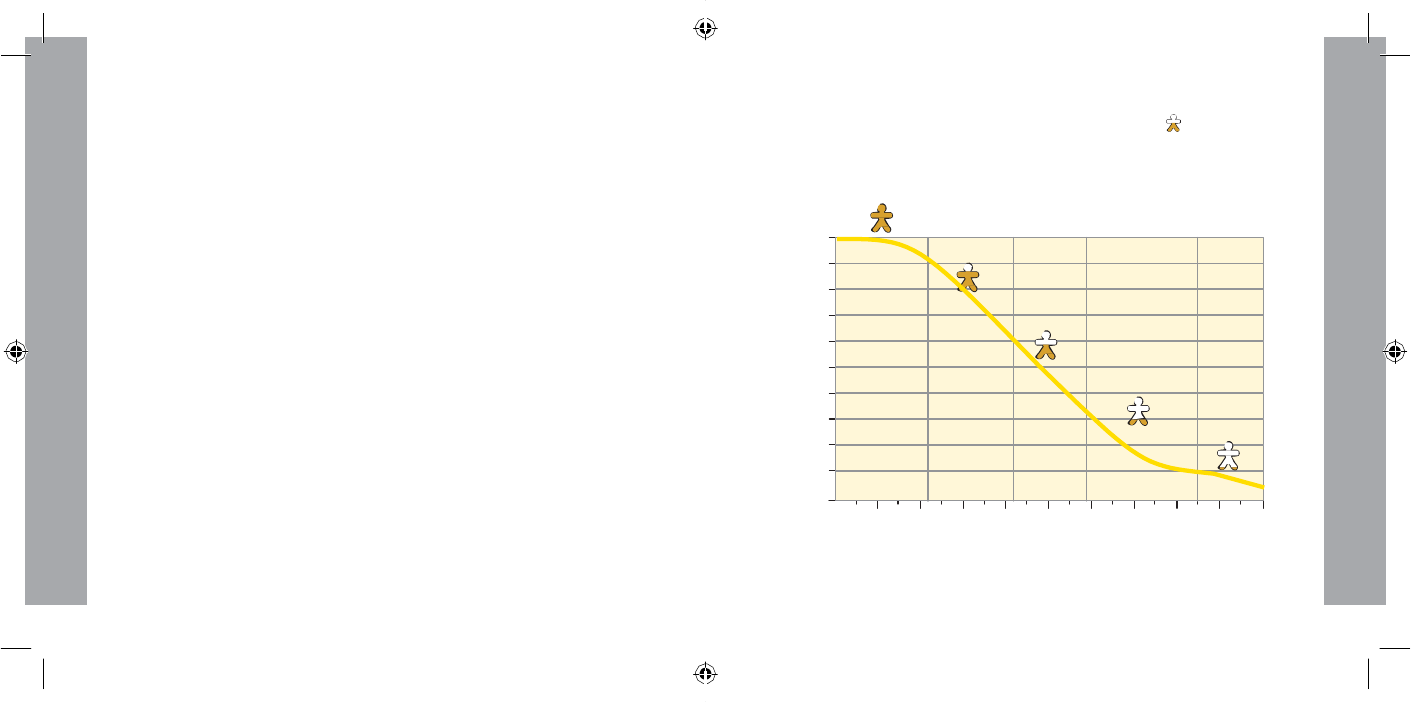
Professional
Options
Professional
Options
% active insulin
Notes about
the
Advanced O
p
t
i
o
n
:
• The
calcula
t
or
estima
t
es
the amount of
rapid-acting insulin
still in
the body
and
how
much longer
it
may
be
ac
tiv
e
.
The active
insulin
estima
t
e
is
calcula
t
ed
from the
set insulin duration,
the time
,
and
amount of the
last logged rapid-acting insulin
dose
.
•
Both meal and correction doses are included
in the
active
insulin
tr
ack
ing
.
•
Insulin doses
calcula
t
ed
0-2
hours after
a previously logged
dose
will only
include a meal dose
.
Active insulin
will not be subtracted
from the
meal
or
car
boh
y
dr
a
t
e
dose
,
and a correction dose
will not
be
included even
if the blood
glucose is outside
the
tar
get
.
During
this
time
per
iod
,
the
previous dose has
not
reached peak action
and
additional correction
doses, referred
to
as `insulin
stack
ing
’
,
may
result
in
hypogly
c
emia
.
•
Insulin doses
calcula
t
ed
between
2
hours and
the
set insulin
duration
will
have active insulin
subtr
ac
t
ed
from the
suggested dose
(for
example
if
insulin
duration
is set
at 5
hours
,
active insulin
will be
subtr
ac
t
ed
from
doses
calcula
t
ed
between 2-5
hours)
.
•
All
previously injected rapid-acting insulin should
be
logged
to ensure
ac
cur
a
t
e
active insulin tracking and
calcula
tions
.
This graph shows
how the
insulin
calcula
t
or
estima
t
es
the amount of
active insulin as a
function of
logged insulin dose and insulin
duration
over time
.
It
also shows
the
relationship between
the
symbol
and
amount of
active
insulin
.
Active insulin curvilinear
model
100
90
80
70
60
50
40
30
20
10
0
10 20 30 40 50 60 70 80 90 100
% insulin
dur
a
tion
Adapted
from
Mudaliar
et
al
.
Diabetes Care,
Volume 22(9),
S
ept
1999,
pp 1501-1506
97
98
DOC28687_rev-E_manual.indd 97-98 3/30/14 2:53 PM
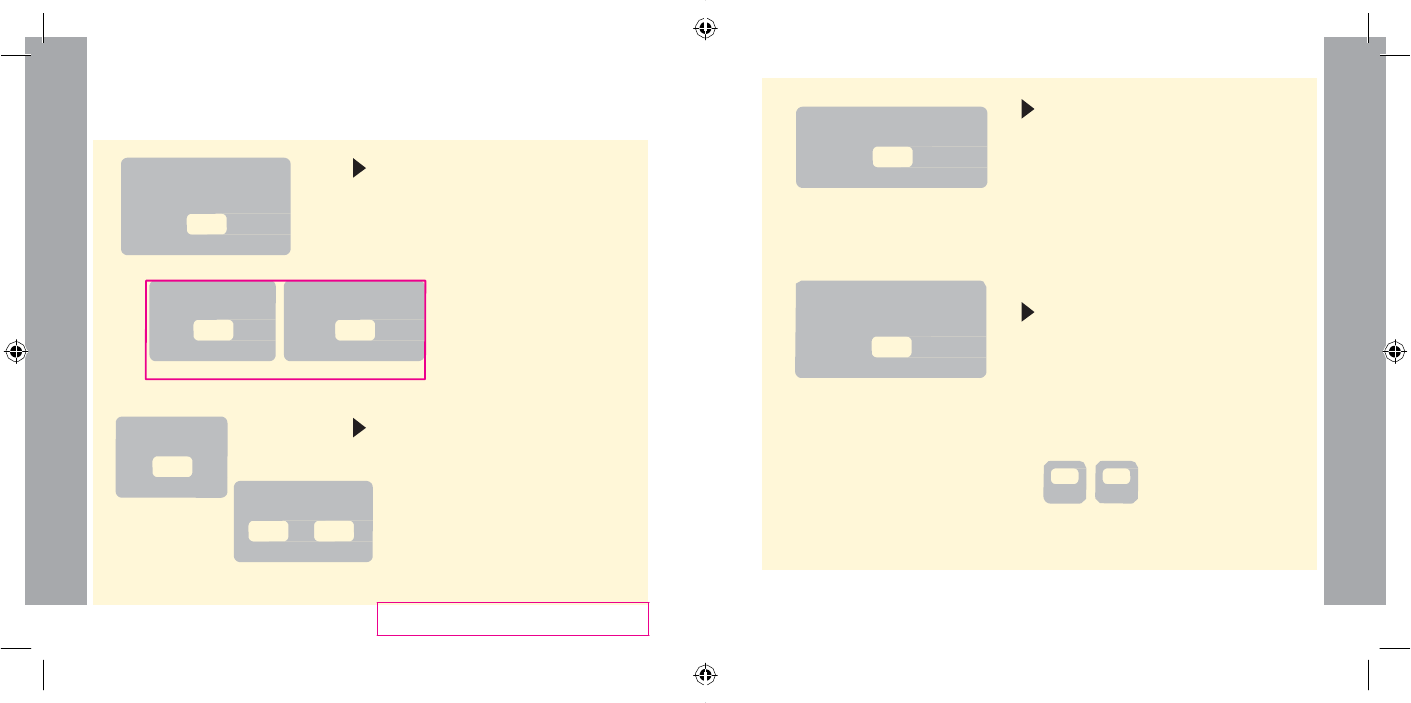
Professional
Options
Professional
Options
Calculator Settings
-
Advanced
Option
This page can
be
used
to
record insulin
calcula
t
or
settings
.
Correction
Factor
1 unit of insulin for
This is
the
estima
t
ed
amount blood
glucose
will drop by taking one
unit of
insulin
.
(Option
to
enter
by
Carbohydrate
Ratio
1 unit of insulin for
grams
of
carbs
OR
1-50
Servings
Definition
grams
of
carbs
10-15
This is
the
number
of
grams
of
carbs
that
one
unit of rapid-acting
insulin
will
cover OR
the number
of
units
of
rapid-acting insulin tha
t
will
cover one
ser
ving
.
(Option
t
o
enter
by time of
day
.
)
Servings Ratio
For
1
serving
take
units of insulin
0.5-15
mg/dL
1-99
Insulin Du
r
a
tion
Insulin is active
in the body
f
or
hours:mins
3-8
time of
day
.
)
This is
the amount of time
tha
t
a dose
of
rapid-acting
insulin
remains active
in the
body
.
Correction
Target
mg/dL
70-180
OR
Correction
Target
Range
to
This is
the
desired
target or range
for
before meal
blood
gluc
ose
.
(Option
to
enter
by time of
day
.
)
Active Insulin
f
ea
tur
e?
Yes
No
mg/dL mg/dL
70-180
70-180
99
R
emov
e
magenta
content for
F
r
ance
.
Changes
to
these settings can
only be
made
by
a health care prof
essional
.
100
DOC28687_rev-E_manual.indd 99-100 3/30/14 2:53 PM

Step
A
c
tion
1
From
the
Home Screen,
touch the
S
ettings
System Status symbol
.
S
cr
oll down
using
the
arrows
and
touch
Professional
Options
.
En
t
er
the
acc
ess
Calculator
Set
tings
c
ode
.
Touch
Insulin
C
alcula
t
or
.
Reader Basics
Professional Options
2
Calculator Settings
Touch
Turn Off Calculator
to turn off the insulin
calcula
t
or
or
Change Calculator Settings
t
o
Turn Off Calculator
change
the
insulin
calcula
t
or
settings
.
Change Calculator
Set
tings
N
o
te
:
If
you
turn off the
insulin
calcula
t
or
,
your
patient will no
longer see
the calculator
back button
after
a
blood
glucose
t
est
.
You can
tur
n
the
calcula
t
or
back
on by
repeating
the insulin
calcula
t
or
setup
.
Professional
Options
Changing
the
Insulin Calculator
Settings
System
Specifications
See
test
strip
and
control
solution instructions
for
use
for additional
specifica
tions
.
Sensor
Specifications
Sensor glucose
assa
y
method
Amperometric electrochemical
sensor
Sensor glucose
reading
range
40
to
500
mg/dL
Sensor
size
5 mm height
and 35
mm diameter
Sensor
weight
5 grams
Sensor power sour
c
e
One silver oxide
battery
101
102
DOC28687_rev-E_manual.indd 101-102 3/30/14 2:53 PM
Sensor
life
Up
to
14
day
s
Sensor
memory
8
hours (glucose readings stored
every
15
minutes)
Operating
temperature
10 °C
to
45 °C
Sensor Applicator
and
Sensor Pack
storage
temperature
4
°C
to
30 °C
Operating and
st
orage
relative
humidity
10-90%,
non-condensing
Sensor water
resistance
IP27: Can
withstand
immersion
in
t
o
one meter (3
ft) of
water
for up to 30
minutes
Operating and
st
orage
altitude
-381 meters (-1,250
ft) to
3,048
meters
(10,000
f
t)
Reader
Specifications
Blood glucose
assa
y
range
20
to
500
mg/dL
Blood ketone assay
range
0
.
0
to
8
.
0
mmol/L
Reader
size
95
mm x
60
mm x
16
mm
Reader
weight
65
grams
Reader power
sour
c
e
One
lithium-ion
rechargeable
battery
Reader battery
life
7
days
of
typical
use
Reader
memory
90 days
of
typical
use
Reader
operating
temperature
10 °C
to
45 °C
Reader
storage
temperature
-20 °C
to
60 °C
103
104
DOC28687_rev-E_manual.indd 103-104 3/30/14 2:53 PM
Operating and
st
orage
relative
humidity
10-90%,
non-condensing
Reader moisture
protection
Keep
dry
Operating and
st
orage
altitude
-381 meters (-1,250
ft) to
3,048
meters
(10,000
f
t)
Reader display
timeout
60 seconds (120 seconds when
test
strip
is
inserted)
Radio
Frequency
13
.
56
MHz
Data
port
Micro USB
Minimum
C
omputer
Requirements
S
y
st
em
must
only be
used
with
EN60950-1
rated
computers
Mean service
life 3
years
of
typical
use
Power
Adapter
Abbott
Diabetes
C
ar
e
PRT25612 (UK
plug)
PRT25613 (EU
P
lug)
PRT25847 (Australia
plug)
PRT25611 (Canada
plug)
Operating
t
emper
a
tur
e:
10 °C
to
40 °C
USB
C
able
Abbott
Diabetes Care
PR
T21373
Length: 94 cm (37
inches)
Rapid-Acting Insulin Calculator
Specifications
Parameter Unit
Range
or
Value
Correction
target
mg/dL
70
to 180
Carbohydrate
ratio
1
unit
per X
grams
of carbs
1
to 50
Servings
ratio
Units
of
insulin
per
serving
0
.
5
to 15
Servings
definition
Grams
of carbs
10
to 15
Mealtime insulin
doses
(breakfast, lunch,
dinner)
Units
of insulin
0
to 50
Correction
factor
1
unit
per X
mg/dL
1
to 99
Insulin
duration
(duration of insulin
action)
Hours
Easy:
4
Advanced: 3
to 8
105
106
DOC28687_rev-E_manual.indd 106 3/30/14 2:53 PM

Parameter Unit
Range
or
Value
Dose
increments
Units
of insulin
0
.
5
or 1
Maximum insulin
dose
Units
of insulin
50
Consult instructions
for
use
Use-by
date
Temperature
limit
Catalog
number
Manufacturer
S
er
ial
number
CE
Mark
Do
not
use
if
package
is
damaged
Ba
t
ch
code
Keep
dry
Type BF
applied
part
Non-ionizing
radiation
C
ODE
S
ensor
code
C
aution
Do
not re-use
S
t
er
iliz
ed
using
irradiation
This
product
must
not
be disposed
of
via municipal
waste
c
ollec
tion
.
S
epar
a
t
e
collection
for
electrical and
electronic
equipment
waste per Directive 2012/19/EC
in the
E
ur
opean
Union is
requir
ed
.
C
on
tac
t
the
manufacturer
for
details
.
Labeling
Symbols
R
emov
e
magenta
content for
F
r
ance
.
107
May
or
may
not be pr
esen
t
or
may vary per RA
requir
ements
.
108
DOC28687_rev-E_manual.indd 107-108 3/30/14 2:53 PM
Emissions
t
est
C
ompliance
E
lec
tr
omagnetic
environment
–
guidance
RF
emissions
CISPR
11
Group
1
T
he
System uses
RF
energy only
for its internal
func
tion.
T
her
efor
e
,
its
RF
emissions
ar
e
very low and are not likely
t
o
cause any interference in
nearb
y
electronic
equipmen
t
.
RF
emissions
CISPR
11
C
lass
B
T
he
S
yst
em
is
suitable
f
or
use
in all
establishments, including
domestic establishments
and
those directly connected to
the
public low voltage power supply
network that supplies buildings
used for domestic
purposes.
Harmonic emissions
IEC
61000-3-2
C
lass
A
V
oltage
fluc
tua
tions
/
flicker
emissions
IEC
61000-3-3
C
omplies
Include
for
C
anada
Electromagnetic
C
ompa
tibilit
y
•
T
he
S
yst
em
needs
special
pr
ec
autions
r
egarding
EMC
and
needs
t
o
be
installed
and
put
in
t
o
ser
vic
e
according to the
EMC
information provided in this
manual.
• Portable and mobile
RF
communications equipment can affect the
S
yst
em.
•
T
he
use
of
ac
c
essories
,
tr
ansducers
and
c
ables
other
than
those
specified
b
y
A
bbott
D
iabet
es
C
ar
e
may result in increased
EMISSIONS
or decreased
IMMUNITY
of the
S
yst
em.
•
T
he
System should not be used adjacent to or stacked with other equipment and that
if
adjac
en
t
or stacked use is necessary, the
System should be observed to
verify normal operation in
the
configuration in which it will be
used.
• This
device complies with part 15 of the
FCC
Rules.
O
per
a
tion
is
subject to the following
t
w
o
conditions: (1)
This
device may not cause harmful interference, and (2) this device must accept
an
y
interference received, including interference that may cause undesired
oper
a
tion.
•
C
hanges
or
modific
a
tions
not
appr
o
v
ed
b
y
A
bbott
c
ould
v
oid
the
user
’
s
authorit
y
t
o
oper
a
t
e
the
equipmen
t
.
Guidance and manufacturer’s declaration
–
electromagnetic
emissions
T
he
S
yst
em
is
in
t
ended
f
or
use
in
the
elec
tr
omagnetic
en
vir
onmen
t
specified
below.
T
he
c
ust
omer
or
the user of the System should assure that it is used in such an
en
vir
onmen
t
.
109
110
DOC28687_rev-E_manual.indd 109-110 3/30/14 2:53 PM
IMMUNIT
Y
t
est
IEC
60601
test le
v
el
C
ompliance
L
e
ve
l
E
lec
tr
omagnetic
environment
–
guidance
Surge
IEC
61000-4-5
±1 kV
diff
er
en
tial
mode
±2
kV
c
ommon
mode
±1 kV
diff
er
en
tial
mode
±2
kV
c
ommon
mode
Mains power quality should be
tha
t
of a typical domestic,
c
ommer
cial
,
or
hospital
en
vir
onmen
t
.
V
oltage
dips
,
shor
t
in
t
erruptions
and
voltage
v
ariations
on power supply
input lines
IEC
61000-4-11
<5 %
U
T
(>95
% dip in
U
T
)
f
or
0.5
cy
cle
40 %
U
T
(60
%
dip in
U
T
) for
5
cy
cles
70 %
U
T
(30
%
dip in
U
T
) for
25
cy
cles
<5 %
U
T
(>95 % dip
in
U
T
)
for
5
sec
onds
<5 %
U
T
(>95
% dip in
U
T
)
f
or
0.5
cy
cle
40 %
U
T
(60
%
dip in
U
T
) for
5
cy
cles
70 %
U
T
(30
%
dip in
U
T
) for
25
cy
cles
<5 %
U
T
(>95 % dip
in
U
T
)
for
5
sec
onds
Mains power quality should be
tha
t
of a typical domestic,
c
ommer
cial
,
or
hospital environment.
If
the user
of the System requires
c
on
tinued
operation during power mains
interruptions, it
is
rec
ommended
that the System be powered
fr
om
an
uninterruptible power supply or
a
ba
tt
er
y
.
Guidance and manufacturer’s declaration
–
electromagnetic
immunity
T
he
System is intended for use in the electromagnetic environment specified
below.
T
he
customer or
the user of the System should assure that it is used in such an
en
vir
onmen
t
.
IMMUNIT
Y
t
est
IEC
60601
test le
v
el
C
ompliance
L
e
ve
l
E
lec
tr
omagnetic
environment
–
guidance
E
lec
trosta
tic
discharge
(ESD
)
IEC
61000-4-2
±
6 kV
c
ontac
t
±
8 kV
air
±
6 kV
c
ontac
t
±
8 kV
air
Floors
should be wood, concrete or
ceramic tile.
If
floors are
c
o
v
er
ed
with synthetic material, the
r
ela
tiv
e
humidity should be at
least 30 %.
E
lec
trical
fast
tr
ansien
t/burst
IEC
61000-4-4
±
2 kV
f
or
power supply
lines
±
1 kV for
input/
output lines
±
2 kV
f
or
power supply
lines
±
1 kV for
input/
output lines
Mains power quality should be
tha
t
of a typical domestic,
c
ommer
cial
,
or
hospital
en
vir
onmen
t
.
111
112
DOC28687_rev-E_manual.indd 111-112 3/30/14 2:53 PM
IMMUNIT
Y
t
est
IEC
60601
test le
v
el
C
ompliance
L
e
ve
l
E
lec
tr
omagnetic
environment
–
guidance
C
onduc
t
ed
RF
IEC
61000-4-6
3
V
rms
150 kHz
t
o
80
MH
z
3
V
rms
Portable and mobile RF
communications
equipment should
be used no closer to any part of
the
System, including cables, than
the
recommended separation distanc
e
calculated from the
equa
tion
applicable to the frequency of
the
transmitt
er.
Recommended separa
tion
distance
d =
1.2
IMMUNIT
Y
t
est
IEC
60601
test le
v
el
C
ompliance
L
e
ve
l
E
lec
tr
omagnetic
environment
–
guidance
Power
fr
equenc
y
(50/60
H
z)
magnetic field
IEC
61000-4-8
3 A/m
3 A/m
Power frequency magnetic fields
should be at levels charac
t
eristic
of
a typical location in a
t
ypic
al
domestic, commercial, or
hospital
en
vir
onmen
t
.
NOTE
U
T
is the a.c. mains voltage prior to application of the test lev
el
.
113
114
DOC28687_rev-E_manual.indd 113-114 3/30/14 2:53 PM
IMMUNIT
Y
t
est
IEC
60601
test le
v
el
C
ompliance
L
e
ve
l
E
lec
tr
omagnetic
environment
–
guidance
R
adia
t
ed
RF
IEC
61000-4-3
3
V/m
80 MHz
t
o
2.5
GH
z
3
V/m
Recommended separa
tion
distance
d =
1.2
80 MHz
to 800
MH
z
d =
2.3
800 MHz
to 2.5
GH
z
a
Field strengths from fixed
transmitters, such as base stations
for radio
(
c
ellular/c
ordless)
telephones and
land mobile radios, amateur radio,
AM and FM
radio broadcast
and
TV
br
oadc
ast
cannot be predicted theoretically with accuracy.
To
assess the electromagnetic environment due
t
o
fixed
RF
transmitters, an electromagnetic site survey should be considered.
If
the measured field
strength in the location in which the
System is used exceeds the applicable
RF
compliance
lev
el
above, the System should be observed to
verify normal operation.
If
abnormal performance is
observed, additional measures may be necessary, such as re-orienting or relocating the
S
yst
em.
b
Over the frequency range 150 kHz
to 80
MHz,
field strengths should be less than
3
V/m.
P
is
the maximum output power rating of the transmitter in watts (W) according
to the transmitt
er
manufacturer and
d
is
the recommended separation distance in
meters (m).
Field strengths from fixed
RF
transmitters, as determined by
an electromagnetic site survey,
a
should
be less than the compliance level in each frequency r
ange
.
b
Interference may occur in the vicinity of
equipment marked with the following symbol:
NOTE
1
A
t
80 MHz and 800 MHz,
the higher frequency range
applies.
NOTE
2
T
hese
guidelines may not apply in all situations.
E
lec
tr
omagnetic
propagation
is
affected
b
y
absorption and reflection from structures, objects and
people.
115
116
DOC28687_rev-E_manual.indd 115-116 3/30/14 2:53 PM

Recommended separation distances between
por
table
and mobile RF
communications equipment and
the
System
T
he
System is intended for use in an electromagnetic environment in which radiated
RF
disturbances
are
c
on
tr
olled
.
T
he
customer or the user of the System can help prevent electromagnetic
in
t
er
f
erenc
e
by maintaining a minimum distance between portable and mobile
RF
communications
equipmen
t
(transmitters) and the System as recommended below, according to the maximum output power of
the communications
equipmen
t
.
For
transmitters rated at a maximum output power not listed above, the recommended separ
a
tion
distance
d
in meters (m) can be estimated using the equation applicable to the frequency of
the
transmitter, where
P
is
the maximum output power rating of the transmitter in watts (W)
ac
c
or
ding
to the transmitter
manufac
tur
er.
NOTE
1
A
t
80 MHz and 800 MHz,
the separation distance for the higher frequency range
applies.
NOTE
2
T
hese
guidelines may not apply in all situations.
E
lec
tr
omagnetic
propagation
is
affected
b
y
absorption and reflection from structures, objects and
people.
Ra
t
ed
maximum
output
power
of
transmitt
er
W
S
eparation
distance
according
to
frequency
of
transmitt
er
m
150
kHz
t
o
80
MHz
d =
1.2
80
MHz
t
o
800
MHz
d =
1.2
800
MHz
t
o
2.5
GHz
d =
2.3
0.01
0.12
0.12
0.23
0.1
0.38
0.38
0.73
1
1.2
1.2
2.3
10
3.8
3.8
7.3
100
12
12
23
117
118
DOC28687_rev-E_manual.indd 117-118 3/30/14 2:53 PM
Her
eby
,
Abbott
Diabetes Care
L
t
d
,
declares
that the
F
r
eeS
t
yle
Libre
Flash Glucose
Monitoring
S
y
st
em
is
in
compliance
with the essential
requirements and
other
r
elevan
t
provisions
of the
R&TTE
Dir
ec
tiv
e
.
A
copy
of the
original declaration
of
conformity may be obtained
from
Abbott
Diabetes Care
L
t
d
.
,
R
ange
Road, W
itney
,
Oxon, OX29 0YL, UK
.
F
on
t
License
©2013 A
bbott
Licensed
under the
Apache License, Version
2
.
0
(the “License”);
you may
not
use
this file
except
in
compliance
with the
License
.
You may
obtain a
copy
of the
License at:
http://www .
apache
.
or
g/lic
enses/LICENSE-2
.
0
Unless required
by
applicable law
or
agreed
to in wr
iting
,
software
distributed
under
the
License is
distributed on
an
“AS
IS
”
BASIS,
WITHOUT WARRANTIES OR CONDITIONS OF ANY KIND,
either
express
or implied
.
See
the
License
for the
specific
language
governing permissions and limitations under
the
License
.
May
or
may
not be pr
esen
t
or
may vary per RA
requir
ements
.
119