Abbott Diabetes Care TX030301 Glucose Monitor Transmitter User Manual Therasense
Abbott Diabetes Care Glucose Monitor Transmitter Therasense
User Manual
TheraSense
Continuous Glucose Monitoring System
July 8, 2002
Therasense Confidential
Therasense Confidential
Therasense Confidential
Therasense Confidential
Table of Contents i
Preface . . . . . . . . . . . . . . . . . . . . . . . . . . . . . . . . . . . . . . . . . . . . . . . . . . . . . . . . . . . . . . . . . .iii
Safety and Precautions . . . . . . . . . . . . . . . . . . . . . . . . . . . . . . . . . . . . . . . . . . . . . . . . . . . . . . . . . . . . iv
Important Information About Your Continuous Glucose Monitor . . . . . . . . . . . . . . . . . . . . . . iv
Important Health Related Information . . . . . . . . . . . . . . . . . . . . . . . . . . . . . . . . . . . . . . . . . . . iv
Help is Available . . . . . . . . . . . . . . . . . . . . . . . . . . . . . . . . . . . . . . . . . . . . . . . . . . . . . . . . . . . . . . . . iv
Learning the System . . . . . . . . . . . . . . . . . . . . . . . . . . . . . . . . . . . . . . . . . . . . . . . . . . . . . . . 1
Introduction . . . . . . . . . . . . . . . . . . . . . . . . . . . . . . . . . . . . . . . . . . . . . . . . . . . . . . . . . . . . . . . . . . . . . 1
The Complete System . . . . . . . . . . . . . . . . . . . . . . . . . . . . . . . . . . . . . . . . . . . . . . . . . . . . . . . . . . . . . 1
Receiver . . . . . . . . . . . . . . . . . . . . . . . . . . . . . . . . . . . . . . . . . . . . . . . . . . . . . . . . . . . . . . . . . . . . 1
Transmitter . . . . . . . . . . . . . . . . . . . . . . . . . . . . . . . . . . . . . . . . . . . . . . . . . . . . . . . . . . . . . . . . . 2
Sensor Support Mount and Inserter . . . . . . . . . . . . . . . . . . . . . . . . . . . . . . . . . . . . . . . . . . . . . . . 2
FreeStyle Test Strip . . . . . . . . . . . . . . . . . . . . . . . . . . . . . . . . . . . . . . . . . . . . . . . . . . . . . . . . . . 3
Lancing Device . . . . . . . . . . . . . . . . . . . . . . . . . . . . . . . . . . . . . . . . . . . . . . . . . . . . . . . . . . . . . . 4
The Receiver/Transmitter Connection . . . . . . . . . . . . . . . . . . . . . . . . . . . . . . . . . . . . . . . . . . . . . . . . . 4
Using the System . . . . . . . . . . . . . . . . . . . . . . . . . . . . . . . . . . . . . . . . . . . . . . . . . . . . . . . . . . 5
Operating the Receiver . . . . . . . . . . . . . . . . . . . . . . . . . . . . . . . . . . . . . . . . . . . . . . . . . . . . . . . . . . . . 5
Selecting a Menu Option . . . . . . . . . . . . . . . . . . . . . . . . . . . . . . . . . . . . . . . . . . . . . . . . . . . . . . . 5
Replacing the Sensor . . . . . . . . . . . . . . . . . . . . . . . . . . . . . . . . . . . . . . . . . . . . . . . . . . . . . . . . . . . . . . 6
Removing the Old Sensor . . . . . . . . . . . . . . . . . . . . . . . . . . . . . . . . . . . . . . . . . . . . . . . . . . . . . . 6
Inserting a New Sensor . . . . . . . . . . . . . . . . . . . . . . . . . . . . . . . . . . . . . . . . . . . . . . . . . . . . . . . . 7
Testing Your Blood Glucose . . . . . . . . . . . . . . . . . . . . . . . . . . . . . . . . . . . . . . . . . . . . . . . . . . . . . . . 10
When to Perform a Blood Glucose Test . . . . . . . . . . . . . . . . . . . . . . . . . . . . . . . . . . . . . . . . . . 10
Using the Lancing Device . . . . . . . . . . . . . . . . . . . . . . . . . . . . . . . . . . . . . . . . . . . . . . . . . . . . . 13
Checking the System . . . . . . . . . . . . . . . . . . . . . . . . . . . . . . . . . . . . . . . . . . . . . . . . . . . . . . . . . . . . . 15
When to Perform a Control Solution Test . . . . . . . . . . . . . . . . . . . . . . . . . . . . . . . . . . . . . . . . . 15
Important Information about the Control Solution . . . . . . . . . . . . . . . . . . . . . . . . . . . . . . . . . . 15
How to Perform a Control Solution Test . . . . . . . . . . . . . . . . . . . . . . . . . . . . . . . . . . . . . . . . . 15
Control Solution Results . . . . . . . . . . . . . . . . . . . . . . . . . . . . . . . . . . . . . . . . . . . . . . . . . . . . . . 17
Troubleshooting . . . . . . . . . . . . . . . . . . . . . . . . . . . . . . . . . . . . . . . . . . . . . . . . . . . . . . . . . . 19
Error Codes . . . . . . . . . . . . . . . . . . . . . . . . . . . . . . . . . . . . . . . . . . . . . . . . . . . . . . . . . . . . . . . . . . . . 19
Error Messages . . . . . . . . . . . . . . . . . . . . . . . . . . . . . . . . . . . . . . . . . . . . . . . . . . . . . . . . . . . . . . . . . 19
Problems . . . . . . . . . . . . . . . . . . . . . . . . . . . . . . . . . . . . . . . . . . . . . . . . . . . . . . . . . . . . . . . . . . . . . . 21
Table of Contents
Therasense Confidential
Therasense Confidential
ii TheraSense Continuous Glucose Monitor User’s Guide
Therasense Confidential
Therasense Confidential
iii
Preface
The TheraSense Continuous Glucose Monitor is intended for use... I still do not have an intended use
statement. It should not be used for the diagnosis of diabetes?
The TheraSense Continuous Glucose Monitor helps people with diabetes monitor their sugar (glucose)
level. The system provides glucose values on a continual basis allowing you to see patterns in your
glucose levels.
The Continuous Glucose Monitor System includes:
• a sensor, which is inserted under your skin and takes glucose measurements for up to 72 hours
• a wireless transmitter that connects to the sensor and sends glucose results to a receiver
• a wireless receiver that captures and displays the glucose measurements sent by the transmitter
Glucose levels are measured and displayed every 3 minutes from a tiny sensor inserted just below the
surface of your skin. The top of the sensor sits above the skin and connects to a transmitter, which sends
glucose readings to a receiver that you keep with you like a pager. The receiver displays the glucose
values, and also functions as a FreeStyle blood glucose meter, allowing you to perform discrete blood
glucose tests using a FreeStyle Test Strip.
By getting more frequent glucose results over time, you can monitor your glucose levels more closely and
gain more control of your diabetes. Understanding the continuous trend of glucose levels, rather than
several isolated readings will help you and your healthcare professional to adjust your treatment plan and
understand how your diet, insulin, exercise, and medication are affecting your diabetes.
Therasense Confidential
Therasense Confidential
iv TheraSense Continuous Glucose Monitor User’s Guide
Safety and Precautions
Important Information About Your Continuous Glucose Monitor
• Before using the Continuous Glucose Monitor to test your glucose, read this owner’s booklet and
practice the testing procedures.
• Glucose monitoring should be done with the guidance of a healthcare professional.
• Do not leave a sensor inserted under your skin for more than 3 days (72 hours).
• Do not fly on an airplane while you are wearing a transmitter.
• Do not swim in salt water.
• Do not drop the receiver or allow it to get wet.
• The receiver should be used only with the FreeStyle Test Strips and Control Solution. Using other
brands of test strips or control solution with the receiver can give you inaccurate results.
Important Health Related Information
• Severe dehydration and excessive water loss may cause false low results. If you believe you are
suffering from severe dehydration, consult your physician immediately.
• Test results below 60 mg/dL (3.3 mmol/L) mean low blood glucose (hypoglycemia). Test results
greater than 240 mg/dL (13.3 mmol/L) mean high blood glucose (hyperglycemia).
• If you get results below 60 mg/dL or above 240 mg/dL, and you do not have symptoms of
hypoglycemia or hyperglycemia, repeat the test. If you have symptoms or continue to get results that
fall below 60 mg/dL or above 240 mg/dL, follow the treatment advice of your healthcare
professional.
• If you are experiencing symptoms that are not consistent with your blood glucose test results AND
you have followed all instructions described in the Continuous Glucose Monitor Owner’s Booklet,
call your healthcare professional.
Help is Available
Help is available from your clinical trial site coordinator 24 hours a day, 7 days a week. Your site
coordinator will provide you with contact information. You may also visit our website at
www.therasense.com.
If the receiver displays an error message or if you have any questions about your TheraSense Continuous
Glucose Monitor, call:
during business hours (8:00 am to 5:00 pm PST): ____________________________
nights and weekends: _________________________________________________
Therasense Confidential
Therasense Confidential
Learning the System 1
Learning the System
Introduction
The Continuous Glucose Monitor System... (Neil, still waiting for mktg literature that talks about the
product features) (readings are taken from interstitial fluid, sensor is inserted under the skin and worn for
72 hours,
Would be good to have an illustration (line drawing) showing the relationship between receiver and
transmitter while the transmitter is being worn with the sensor.
The Complete System
The Continuous Glucose Monitor System includes:
• a sensor, which is inserted under your skin and takes glucose measurements for up to 3 days (72 hours)
• a wireless transmitter that connects to the sensor and sends glucose results to a receiver
• a wireless receiver that captures and displays the glucose measurements sent by the transmitter
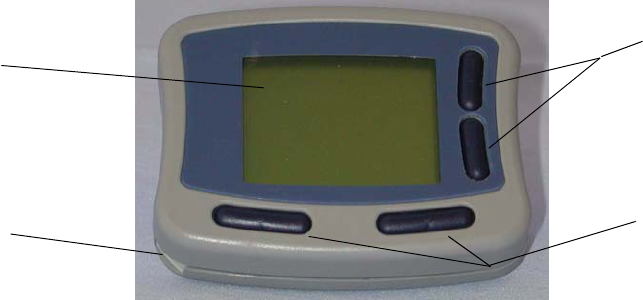
Receiver
The receiver is like a pager. You may wear it on your belt or carry it in your pocket or purse. It receives
glucose readings sent from the transmitter. You can see the readings, which are updated about every
3 minutes, on the display screen. The receiver also acts as a FreeStyle blood glucose meter, allowing you
to perform regular blood glucose tests using a FreeStyle test strip. Refer to “Testing Your Blood Glucose”
on page 10 for information on performing a FreeStyle test with the receiver.
NOTE: To conserve on battery power, the receiver screen goes blank after 10 seconds. To turn on the display, simply
press the right selection button.
Test Strip Port
Where you insert the
test strip.
Selection buttons
Allow you to select options
displayed on the screen. The
options change depending on the
screen that is displayed.
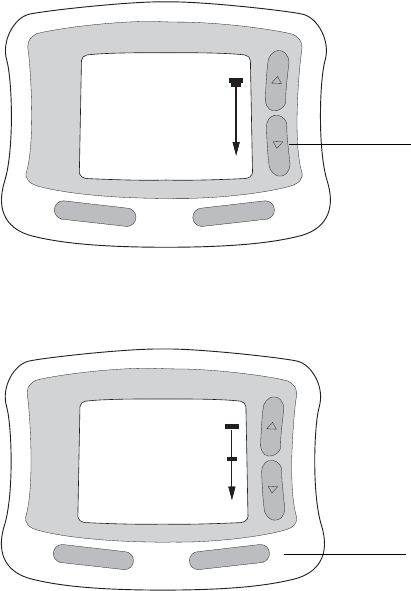
Scroll buttons
Allow you to move the cursor up or
down to scroll through a list. The
top button scrolls up. The bottom
button scrolls down.
Display screen
Displays the glucose result and
other messages.
Therasense Confidential
Therasense Confidential
2TheraSense Continuous Glucose Monitor User’s Guide
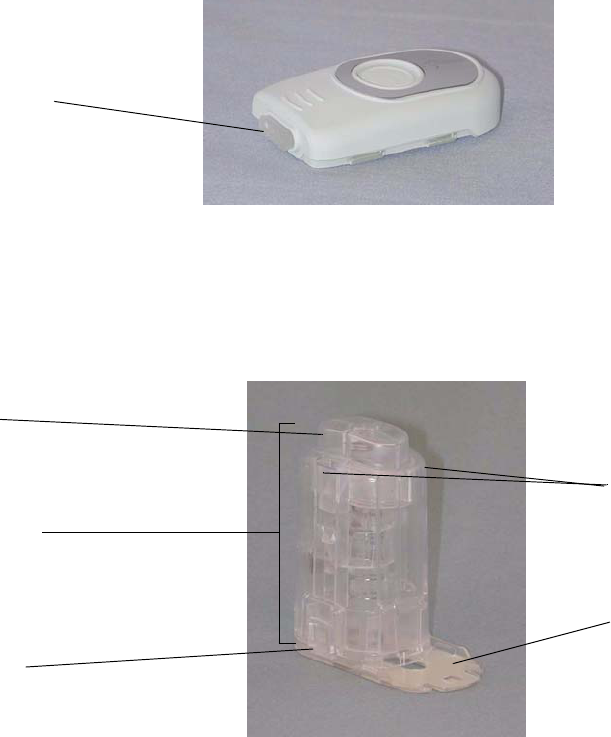
Transmitter
The transmitter is a small electronic device that gets glucose readings from the sensor, inserted under
your skin, and sends them to the receiver. Always keep the receiver within 10 feet of the transmitter.
Sensor Support Mount and Inserter
The sensor is a small device that is attached to the support mount. The tiny tip of the sensor is placed just
below the surface of your skin by the sensor inserter. The top of the sensor connects to the transmitter.
The sensor takes the glucose readings from under the skin.
Contact points
Connect to the sensor support
mount.
Sensor inserter
Used to insert the sensor in the skin.
Sensor support mount
Sticks to the skin and holds the sensor in
place. The transmitter slides onto a track on
top of the support mount.
Plunger
Fires a needle into the skin, placing
the tip of the sensor just below the
surface of the skin.
Release tabs
Releases the sensor inserter
from the support mount after the
sensor is inserted in the skin.
Safety tabs
Unlock the sensor inserter to prepare it for
firing. Press the safety tabs when you are
ready to insert the sensor into the skin.
Sensor (not visible)
Located in the support mount. Measures
your glucose levels. The tip of the sensor is
inserted just below the surface of your skin.
Therasense Confidential
Therasense Confidential
Learning the System 3
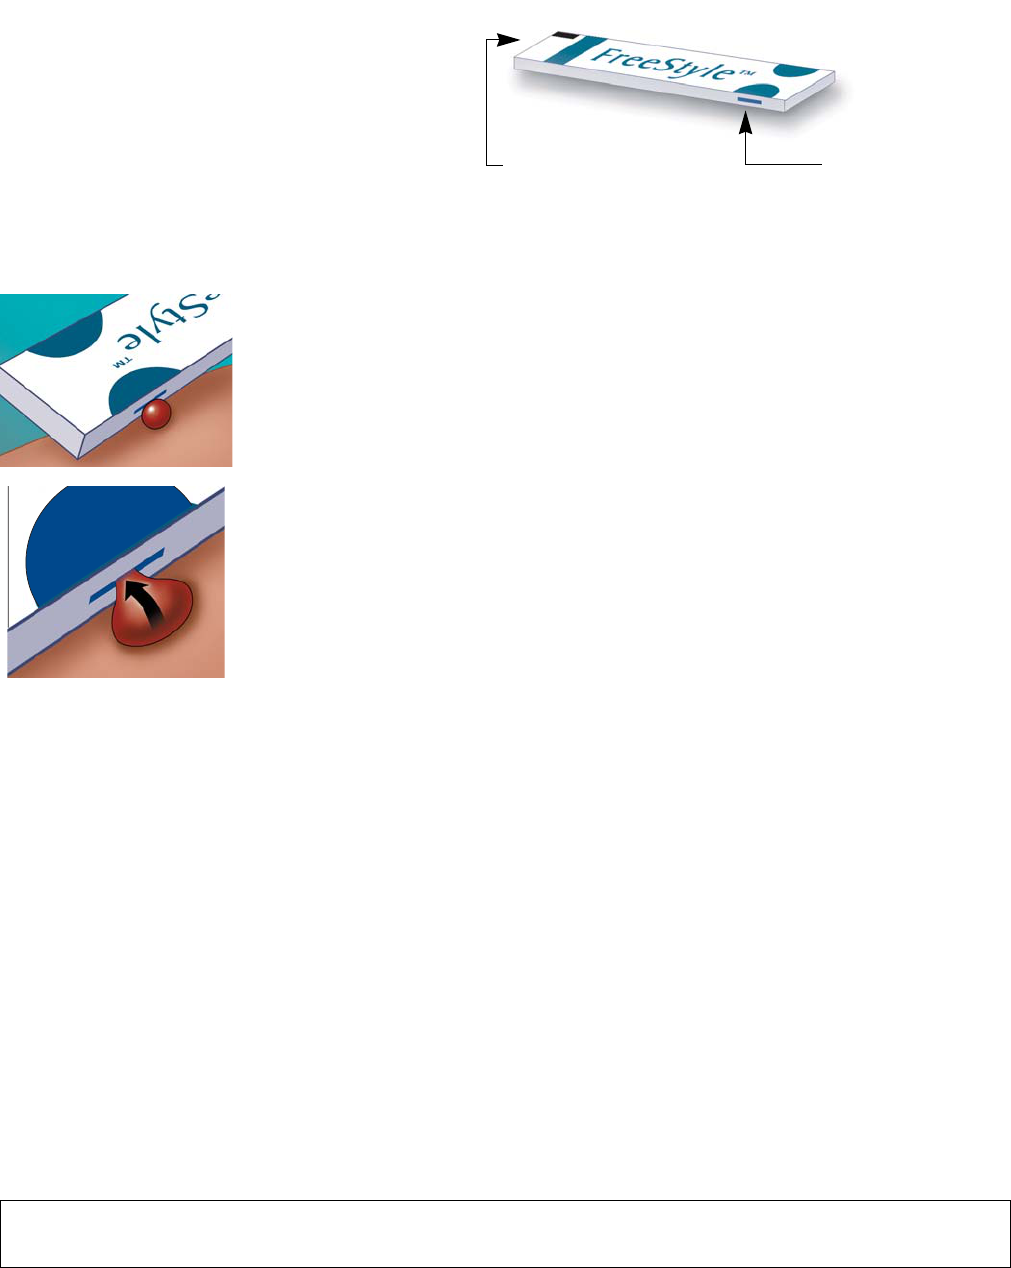
FreeStyle Test Strip
Use the FreeStyle Test Strip to run a FreeStyle
blood glucose test. The receiver will prompt
you to “perform a blood glucose test” each
time you insert a new sensor and then
periodically after that.
Apply blood to only one side of the test strip
for each test.
Gently touch one edge of the test strip to the blood sample.
The blood sample will be pulled up into the test strip.
Important Test Strip Information
For detailed information on FreeStyle Test Strips, refer to the FreeStyle Test Strips package insert.
• Store the test strip package in a cool, dry place below 86°F (30°C). Do not refrigerate or freeze.
• Keep away from direct sunlight and heat.
• Store test strips in their original vial only. Never transfer test strips to another vial or container. Do not
store individual test strips in your carrying case. See your clinical trial site coordinator to get
additional test strips.
• To ensure accurate results, use the test strips at room temperature.
• After removing a test strip from the vial, immediately replace the vial cap and close tightly.
• With clean, dry hands, you may gently touch the test strip anywhere when removing it from the vial
or inserting it into the receiver.
• Do not use test strips beyond the expiration date printed on the package or you may get inaccurate
results.
• Do not use test strips that are bent, cut, torn, or altered in any way.
WARNING: Keep the test strip vial away from children. The cap is a choking hazard. The cap contains a pouch
filled with a drying agent that may be harmful if inhaled or swallowed and may cause skin and eye irritation.
Apply blood to only ONE
side of the test strip.
IMPORTANT: Do not apply blood to both sides.
Insert this end into the
receiver.
Therasense Confidential
Therasense Confidential
4TheraSense Continuous Glucose Monitor User’s Guide
Lancing Device
Use the lancing device to get a blood sample when you perform a FreeStyle blood glucose test.
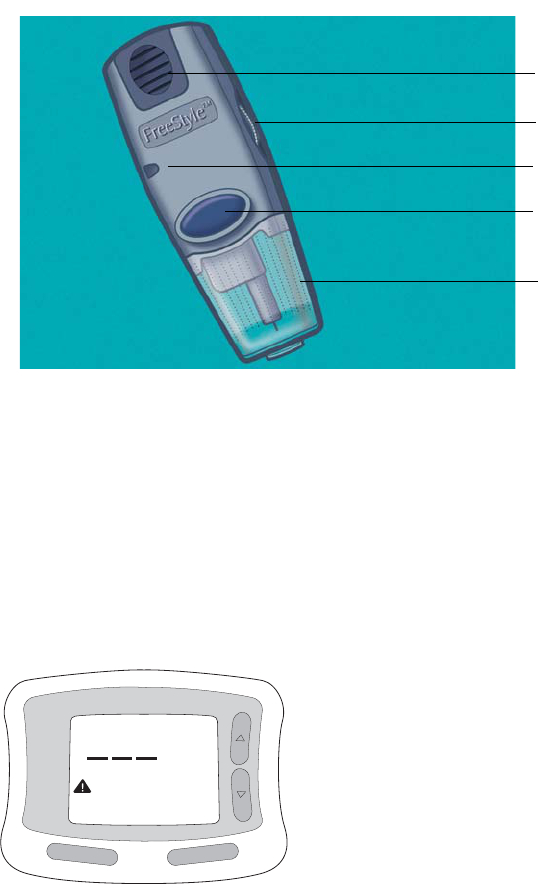
The Receiver/Transmitter Connection
The receiver and the transmitter must be kept within 10 feet of one another for glucose readings to be
successfully transmitted. If the receiver is moved more that 10 feet from the transmitter, the connection
will be broken and the receiver will not be able to receive glucose readings.
When the connection is broken, the following screen appears and the receiver beeps once every minute.
To silence the alarm, move the receiver within 10 feet of the transmitter.
NOTE: If you hear the receiver beep, check the display screen for a message. Refer to the Troubleshooting section for
information on the receiver messages.
cocking handle
depth settings dial
depth indicator window
release button
clear cap
Glucose&Alarm
Main
Acknowledge
Reconnect
Therasense Confidential
Therasense Confidential
Using the System 5
Using the System
Operating the Receiver
In addition to continually displaying glucose readings, the receiver displays messages to help you use the
system and to inform you of problems. Some messages prompt you to make a selection or perform a task.
Use the buttons on the front of the receiver to acknowledge the information displayed and make
selections.
• Use the scroll buttons on the right to scroll through a list or increase or decrease a number when
entering the test strip code, for example.
• Use the selection buttons on the bottom to select the option.
Selecting a Menu Option
1To select an option from the main menu, use the scroll button on the right to move the cursor up or
down the list.
2Press a selection button on the bottom to select the option displayed on the screen just above the
button. In this example, press the right button to select New Sensor.
Reconnect
New Sensor
Receiver status
Transmitter status
Main
Select
Glucose
Press the scroll button to move the
cursor down the list.
Receiver status
Transmitter status
Main
Select
Glucose
Reconnect
New Sensor
Press the right selection button to select the
New Sensor option.
Therasense Confidential
Therasense Confidential
6TheraSense Continuous Glucose Monitor User’s Guide
Replacing the Sensor
Once inserted, a sensor can be left if place for 3 days (72 hours). After 72 hours the receiver prompts you
to remove the old sensor. After you remove the old sensor and insert a new one, the receiver will prompt
you to perform a FreeStyle blood glucose test.
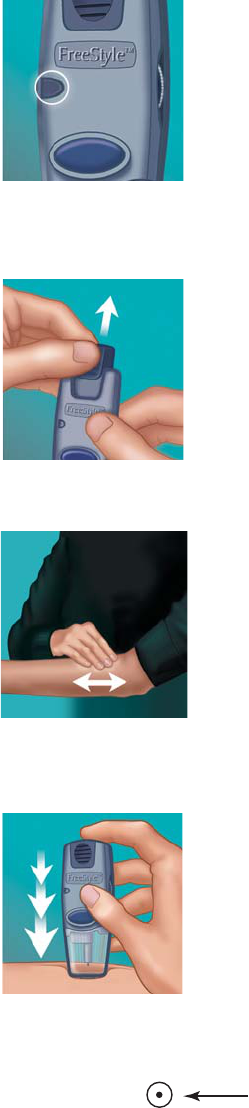
Removing the Old Sensor
The receiver will prompt you to remove the used sensor.
1Select Cancel, then choose New Sensor from the main menu.
2Spray a small amount of adhesive remover around the edges of the support mount. (Or, moisten a
cotton ball with the adhesive remover, then dab the cotton ball around the edges of the support
mount.)
Allow the adhesive remover to soak under the support mount.
3With the transmitter still attached to the support mount, grasp the edge of the support mount and
slowly peel it off of your skin in one continuous motion.
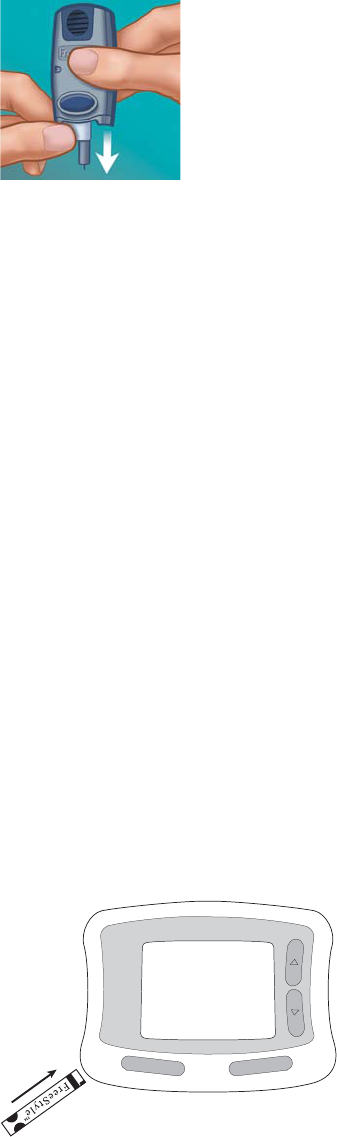
4Slide the transmitter off the support mount and discard the support mount. It cannot be reused. Do not
discard the transmitter.
5Gently wash the contact points on the transmitter with soapy water. Rinse thoroughly. Shake the
transmitter to remove excess water, then blot the contact points on a soft cloth or lint-free paper towel
or tissue. Set it aside.
6If necessary, use the adhesive remover, baby oil, or a wet, soapy wash cloth to remove any adhesive
residue left on your skin.
Remove Sensor
Cancel
Therasense Confidential
Therasense Confidential
Using the System 7
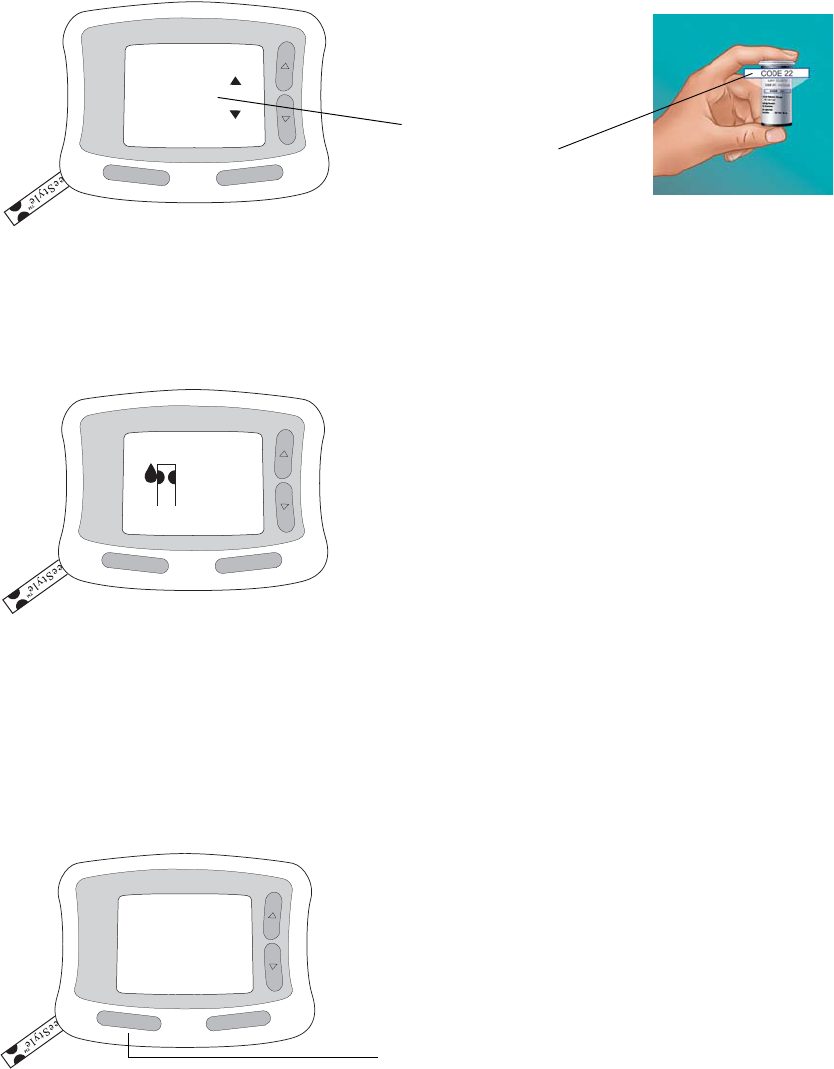
7The receiver can detect that the sensor has been removed and will automatically prompt you for the
code number of the new sensor. The code number can be found on the foil package. Use the scroll
arrows to display the correct code, then select Set.
8When the code number has been set, the receiver prompts you to insert the new sensor. Refer to
“Inserting a New Sensor” in the following section for information.
Inserting a New Sensor
Before inserting a new sensor, be sure you have the following materials:
• sensor inserter (in its unopened, foil package)
• transmitter
• receiver
• soap and water
1Select an insertion site. You can insert the sensor at one of the following sites:
• on the middle of your abdomen at least 2 inches away from your navel and above the belt line
• on the backside of your upper arm
NOTE: Avoid areas where the edges of clothing may catch or rub against the sensor. Avoid inserting the sensor in
the same place as it was previously inserted.
2Wash your hands thoroughly with soap and water.
3Clean the insertion site with soap and water. Be sure to thoroughly rinse and dry the area.
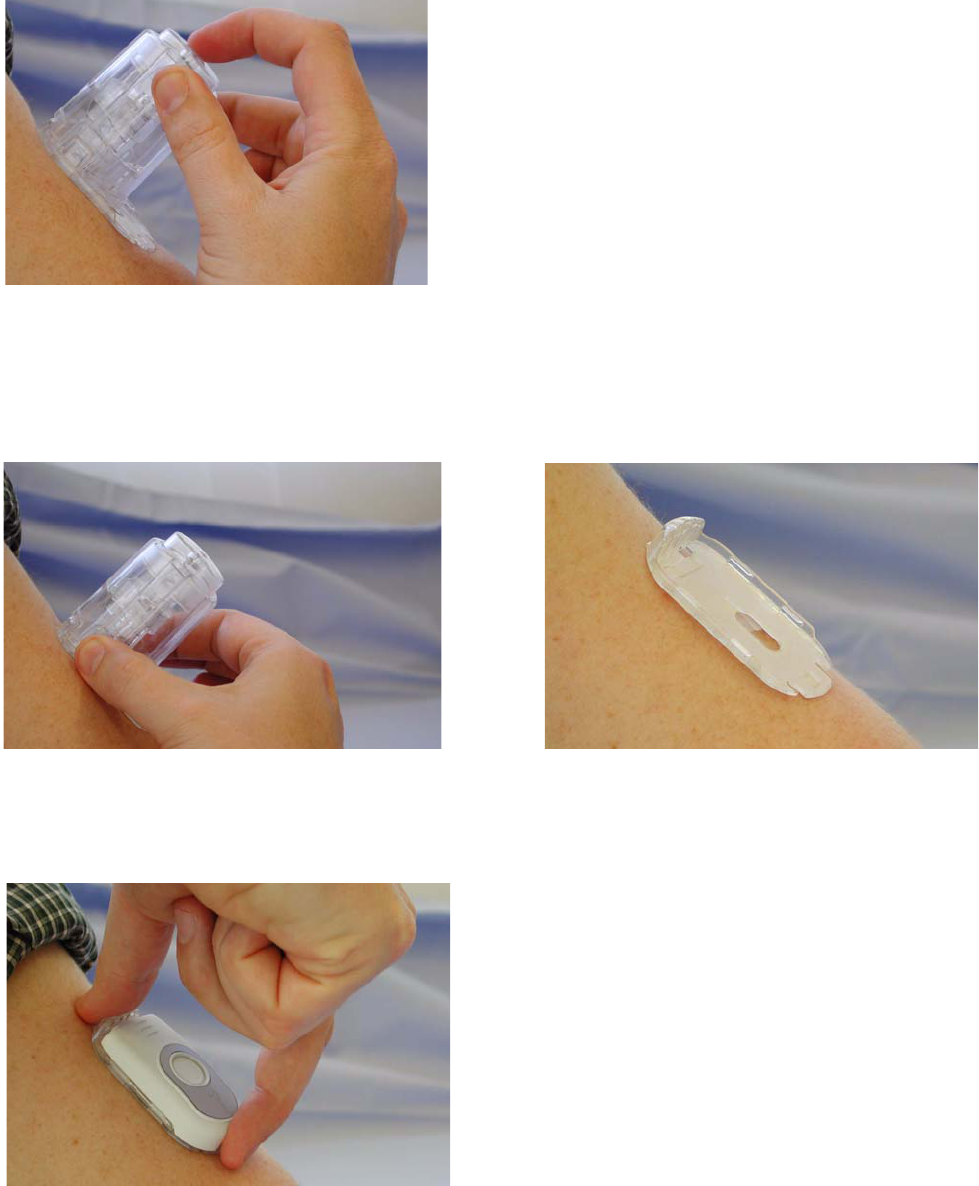
4Carefully disable the safety mechanism by squeezing the safety tabs on the sides of the plunger.
You may find it easier to press one safety tab at a time.
CAUTION! Once the safety tabs are pressed, the sensor inserter will fire if the plunger is depressed. Be careful not
to press the plunger until you have correctly placed the sensor inserter on the skin and are ready to insert the
sensor.
Sensor Code
Cancel Set
101 Use scroll arrows to select sensor code.
Select Set.
Insert Sensor
Cancel
Therasense Confidential
Therasense Confidential
8TheraSense Continuous Glucose Monitor User’s Guide
5Remove the adhesive backing at the bottom of the support mount.
6Place the sensor inserter, adhesive-side down, on the skin at the insertion site. Hold it firmly in place
to ensure it sticks to the skin.
If inserting the sensor on your arm, position the sensor support mount so that it runs lengthwise down
your arm.
*GRAPHIC squeezing safety tabs/pulling pin*
Therasense Confidential
Therasense Confidential
Using the System 9
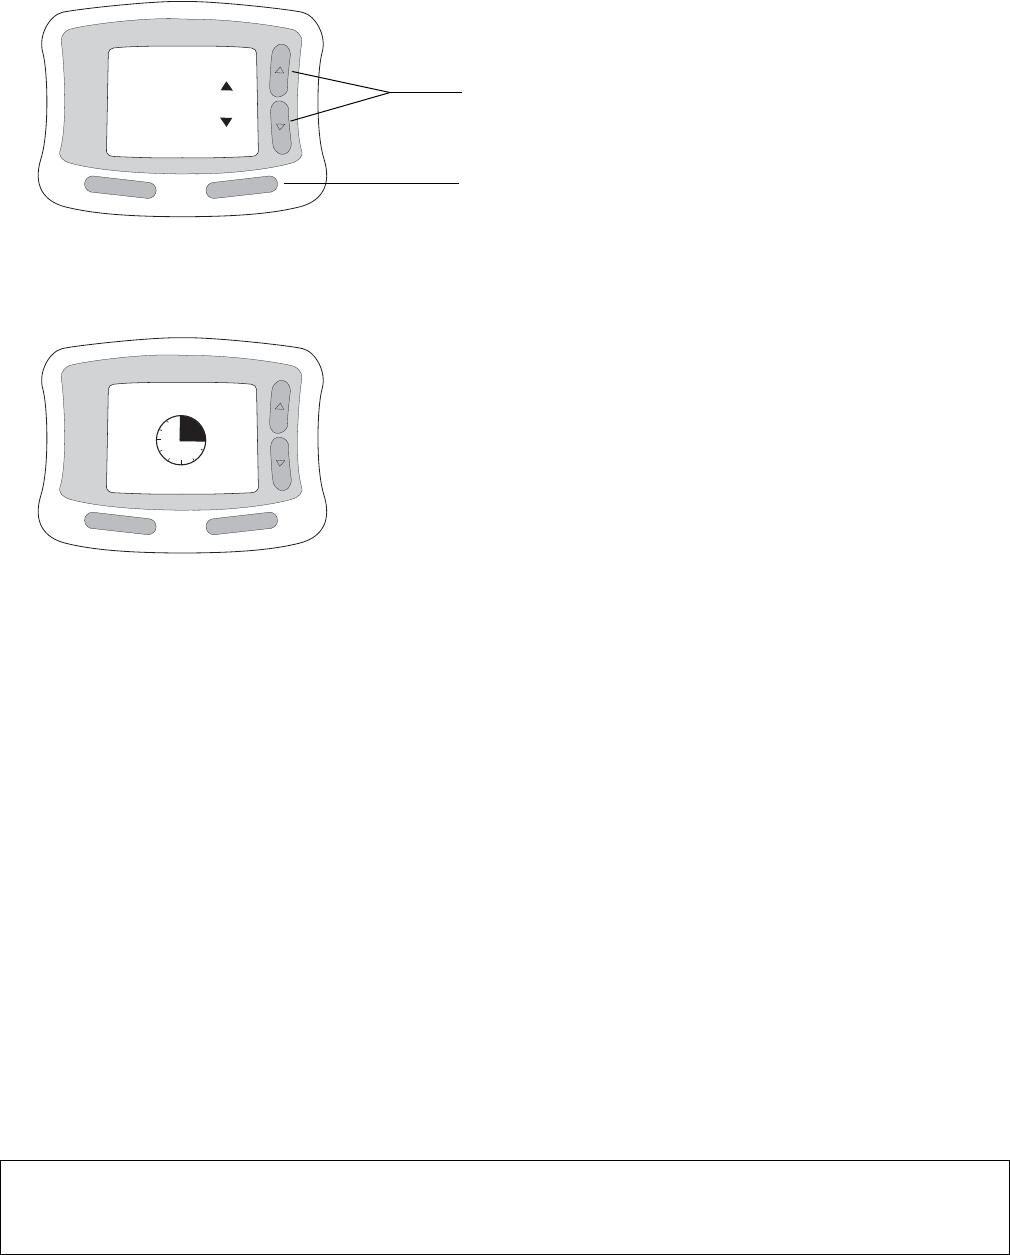
7Press the plunger on the top of the sensor inserter. A needle will quickly penetrate your skin to place
the sensor, then withdraw leaving the sensor in place.
NOTE: Once the plunger is pressed, the sensor inserter cannot be reused.
8While holding the sensor inserter at the site, firmly squeeze the release tabs at the base of the inserter,
then lift the sensor inserter straight up and out of the support mount. Make sure the support mount
remains on your skin.
NOTE: A small drop of blood appearing at the sensor site is normal.
9Discard the sensor inserter.
10 Firmly slide the transmitter onto the support mount and push it until it clicks into place. It is important
to get a tight connection.
Therasense Confidential
Therasense Confidential
10 TheraSense Continuous Glucose Monitor User’s Guide
IMPORTANT: Make sure you keep the receiver within 10 feet of the transmitter. The receiver must be kept close to the
transmitter so that glucose readings taken by the sensor can be sent to the receiver. If you move more than 10 feet
from the receiver, the receiver will begin to beep once each minute.
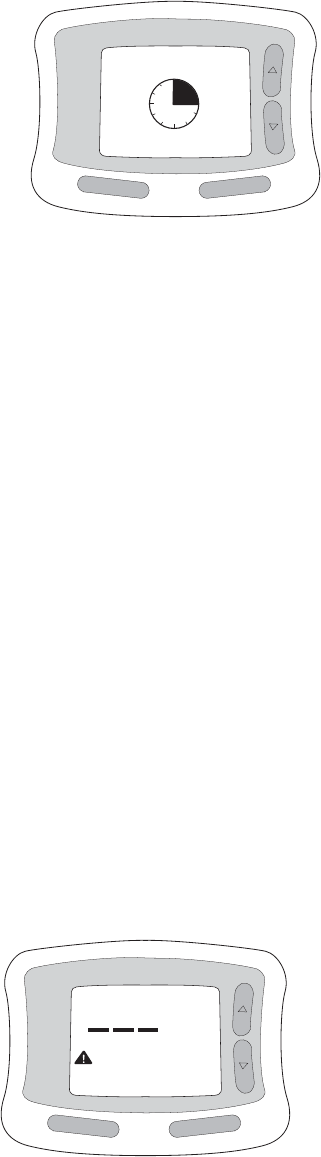
11 When the sensor has been correctly inserted and the transmitter is in place, the receiver beeps once,
displays the Sensor Settling screen, beeps twice, then displays the main menu.
12 In approximately 1 hour after you insert the sensor, the receiver will prompt you to perform a blood
glucose test. Proceed to “Testing Your Blood Glucose” in the following section when you see this
prompt.
Testing Your Blood Glucose
Before performing a blood test, be sure you have the following materials:
• receiver
• Free Style Test Strips
• FreeStyle Lancing Device
• sterile lancets
• soap and water
When to Perform a Blood Glucose Test
The receiver will prompt to perform a blood glucose test after you insert a new sensor. You will also need
to perform a test at various other times throughout the day.
• when the receiver prompts you to perform a blood glucose test at 1, 4, and 24 hours after a new sensor
insertion
• before each meal
• 1 and 2 hours after each meal
• before you go to bed
• at midnight
Sensor
Cancel
Settling
Glucose&Alarm
Main
Acknowledge
Peform Blood
Glucose Test
Therasense Confidential
Therasense Confidential
Using the System 11
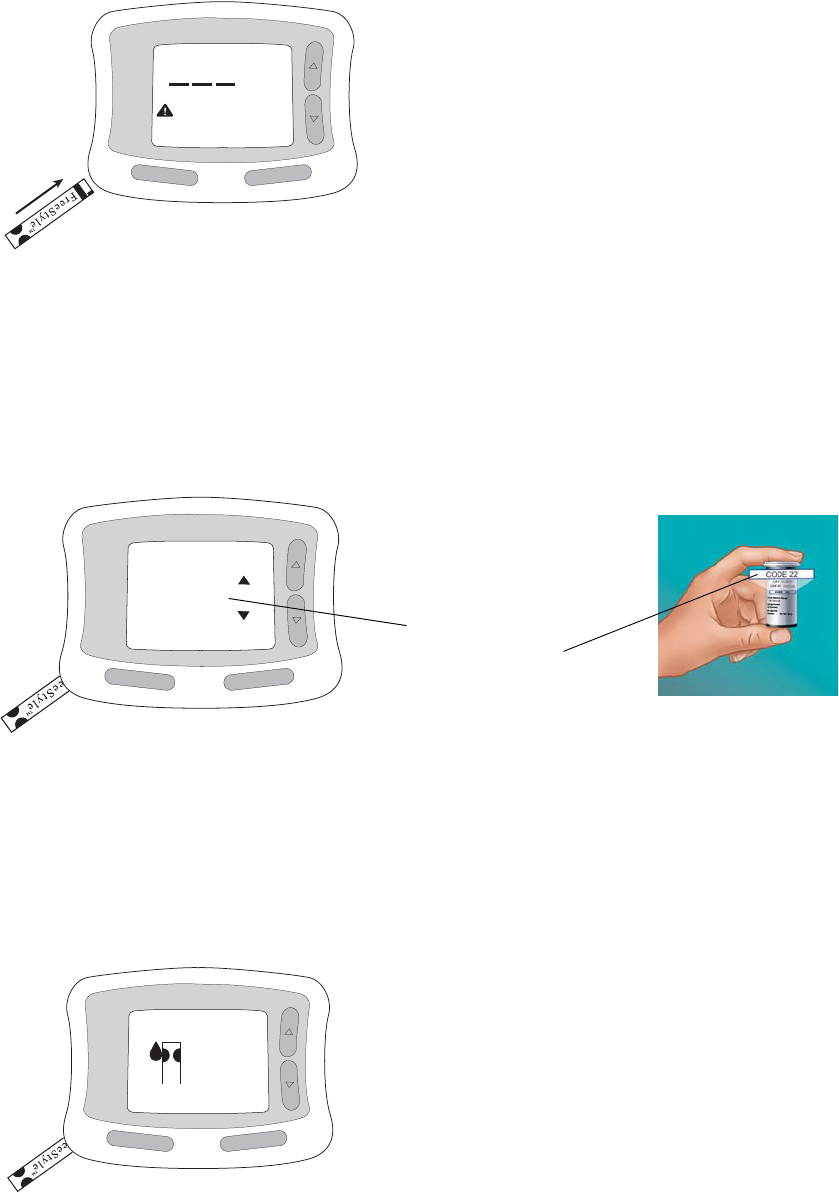
1Insert a test strip into the receiver. Push the test strip until it stops.
NOTE: If you do not start the test within 2 minutes of inserting the test strip, the receiver will automatically turn
off. To restart the receiver, take out the unused test strip and reinsert it into the receiver.
2When the receiver detects the test strip, the strip code number appears on the display. Compare the
code number on the display to the code number shown on the test strip vial. Make sure the code
numbers match.
• If the code numbers match, select Set and proceed to step 4.
• If the code numbers do not match, proceed to step 3 to change the code number on the receiver.
IMPORTANT: To ensure accurate results, make sure the code number shown on the receiver screen matches the
code number on the test strip vial.
3If the code number on the receiver screen does not match the code number on the test strip vial, use
the scroll buttons to the right of the display screen to change the code number on the receiver. Select
Set when the code numbers match.
4The receiver prompts you to apply a sample and displays a test strip and blood drop. Wash the testing
site with soap and water. Be sure there is no cream or lotion where you will lance. Lance your forearm
or finger to get a blood sample. Refer to “Using the Lancing Device” on page 13.
Glucose&Alarm
Main
Acknowledge
Peform Blood
Glucose Test
Strip Code
Cancel Set
22
Make sure test strip
code numbers match.
Apply Sample
Cancel
Main
Therasense Confidential
Therasense Confidential
12 TheraSense Continuous Glucose Monitor User’s Guide
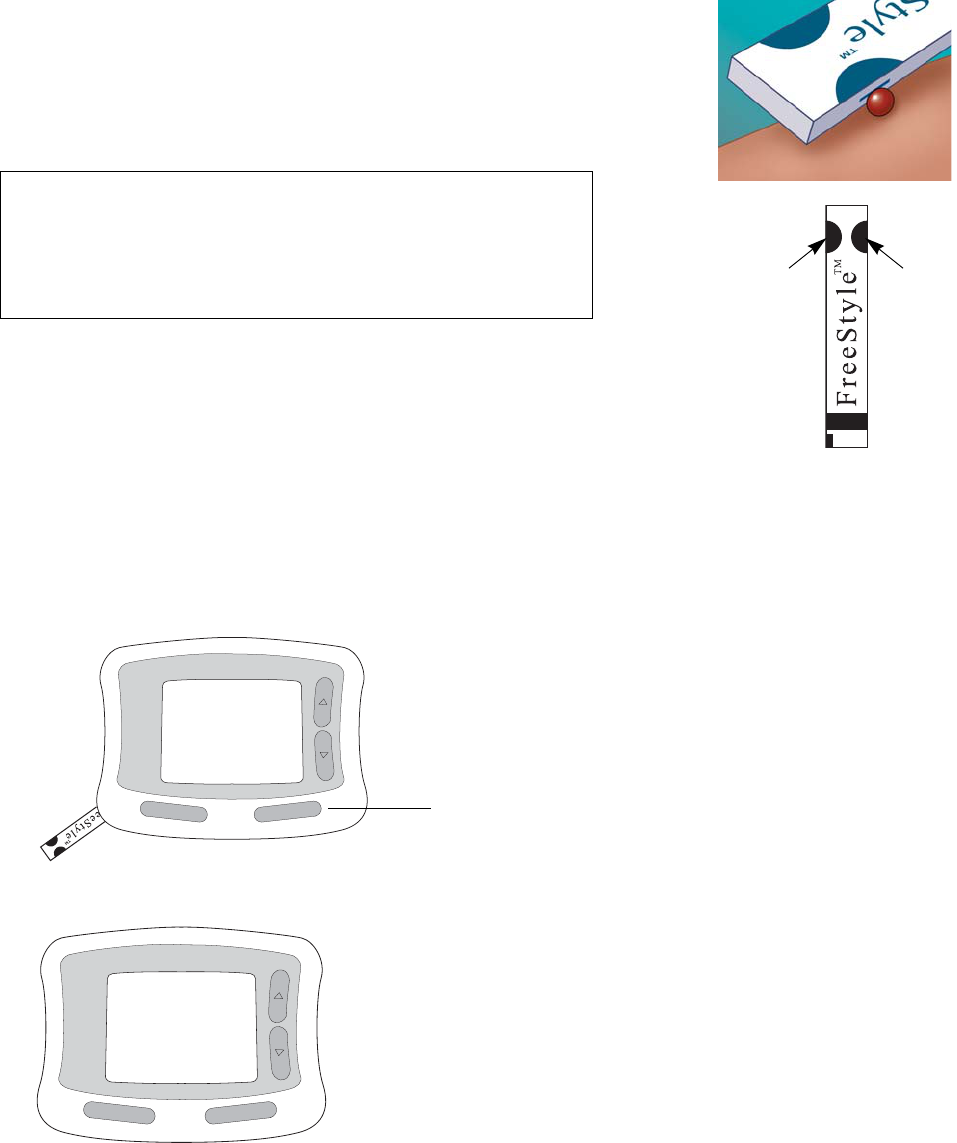
5Apply blood to the test strip.
• Bring the test strip to the blood sample at a slight angle.
• Gently touch one edge of the test strip to the blood sample
on your arm. The blood will be pulled into the test strip.
• A single beep means that enough sample was applied.
NOTE: If after 5 seconds, your meter has not beeped, the blood sample
may be too small. You can continue to fill the test strip for up to
60 seconds as long as you continue to apply blood to the same edge
with which you started.
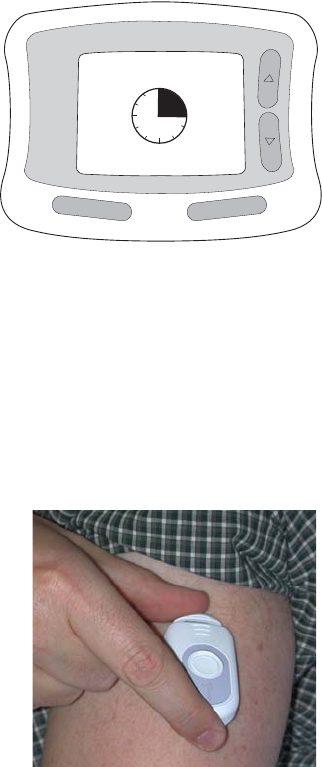
A clock appears as the receiver measures the glucose result. The time it takes depends on your blood
glucose level. The higher your glucose value, the longer it takes. Normal blood glucose levels will
take an average of 15 seconds.
6The test is complete when you hear 2 beeps. The receiver prompts you to indicate if the result is a
control solution result. Select No.
7Remove and discard the test strip.
CAUTION!
Do not press the test strip down hard against your arm.
Do not scrape the blood.
Do not apply blood to the flat side of the test strip.
Do not apply blood to both edges of the test strip.
Sample goes here or here
Not on both edges
Glucose
189
mg/dL
Yes No
Control Solution?
Select No indicating this is not a result from a control solution test.
Glucose
189 mg/dL
Home
Therasense Confidential
Therasense Confidential

Using the System 13
Using the Lancing Device
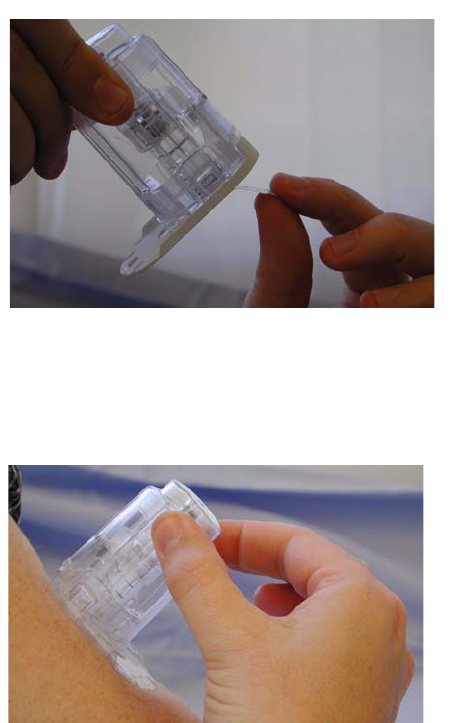
1Snap off the clear cap.
2Insert a new lancet into the white lancet holder cup.
3Hold the lancet firmly in place with one hand while you use your other hand to twist off the round
disk on the top of the lancet.
4Replace the clear cap on the lancing device. It will snap into place. Be careful not to touch the
exposed needle on the lancet.
Therasense Confidential
Therasense Confidential
14 TheraSense Continuous Glucose Monitor User’s Guide
5Select a depth setting.
The lancing device has five depth settings—1 is for a shallow puncture and 5 is for the deepest
puncture. Turn the settings dial to the desired setting as shown in the depth indicator window. If this is
your first time lancing, start at level 3.
6Pull the dark blue cocking handle out until it clicks.
If the handle is already out, you may have cocked the device in step 2 when you inserted the lancet.
7Rub the test site until you feel it getting warm. This will bring blood to the surface of the skin.
8Lance your skin by pressing the clear cap down against your skin and pressing the release button. DO
NOT LIFT UP.
9Continue to hold the lancing device on your arm and gradually increase pressure for several seconds.
Look through the clear cap on your arm. The blood sample should be about the size of a pinhead or
about this big
10 Lift the lancing device straight up. Be careful not to smear the blood sample.
11 Gently touch one edge of the test strip to the blood sample. Refer to step 5 on page 12 for information
on applying blood to the test strip.
Therasense Confidential
Therasense Confidential
Using the System 15
12 To remove the lancet from the lancing device:
• Remove the clear cap of the lancing device.
• Hold the lancet over a puncture-proof container.
• Pinch the white clip that holds the lancet. The lancet will fall out.
Checking the System
When to Perform a Control Solution Test
• When you open a new vial of test strips
• If you suspect that your meter or test strips are not working properly
• If you think your test result is not accurate, or if your test results are not consistent with how you feel
• If you drop your receiver or expose it to liquids
• When your healthcare professional advises you to do so
Important Information about the Control Solution
• Use only FreeStyle brand control solution. Use of other brands may produce inaccurate results.
• Replace the cap on the control solution vial immediately.
• Results from a control solution test do not reflect your glucose levels.
• Discard the control solution 3 months after you open the vial. Write the discard date on the vial when
you first open. The discard date is 3 months from the day you open the vial.
• Do not use the control solution past the expiration date or you may get inaccurate results.
• Do not add water or any liquid to the control solution
How to Perform a Control Solution Test
1Insert a test strip into the receiver. Push the test strip until it stops.
2The receiver automatically turns on and displays the test strip code number. Compare the code on the
display to the code number shown on the test strip vial. Make sure the code numbers match.
Therasense Confidential
Therasense Confidential
16 TheraSense Continuous Glucose Monitor User’s Guide
• If the code numbers match, select Set and proceed to step 4.
• If the code numbers do not match, proceed to step 3 to change the code number on the receiver.
IMPORTANT: To ensure accurate results, make sure the code number shown on the receiver screen matches the
code number on the test strip vial.
3If the code number on the receiver screen does not match the code number on the test strip vial, use
the scroll buttons to the right of the display screen to change the code number on the receiver. Select
Set when the code numbers match.
The receiver prompts you to apply a sample and displays a test strip and blood drop.
4Apply the control solution as follows:
• turn the vial to the side and gently squeeze it to bring a drop to the vial tip
• touch one edge of the test strip to the control solution
• a beep means that enough sample was applied
5The test result is complete when you hear 2 beeps. The receiver prompts you to indicate if the result is
a control solution result. Select Ye s .
Strip Code
Cancel Set
22
Make sure test strip
code numbers match.
Apply Sample
Cancel
Main
Glucose
106
mg/dL
Yes No
Control Solution?
Select Yes indicating this is a result from a control solution test.
Therasense Confidential
Therasense Confidential
Using the System 17
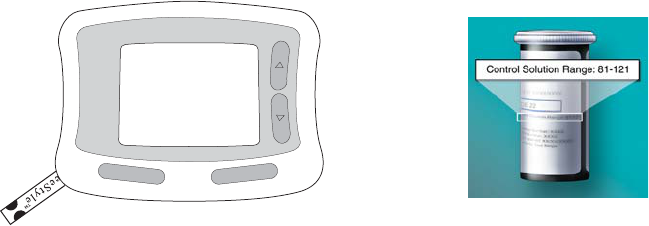
6The receiver displays the result marked as a control solution. Compare the control solution result to
the range printed on the test strip vial.
7Record the result in your log book.
8Remove and discard the test strip.
Control Solution Results
Compare the control solution result to the range printed on the test strip vial.
• The control result should fall within the range printed on the test strip vial.
• If the control solution result falls outside this range, repeat the control test with a new test strip.
IMPORTANT: If the control solution result continues to fall outside the range printed on the test strip vial, the receiver
may not be working properly.
• Do not use the system to test your blood.
• Call your clinical trial site coordinator.
Out-of-range control results may be caused by:
• expired control solution
• expired or damaged test strip
• error in performing the test
• code number on receiver does not match code number on test strip vial
• receiver malfunction
Glucose
106
mg/dL
Home
Marked as control
Therasense Confidential
Therasense Confidential
18 TheraSense Continuous Glucose Monitor User’s Guide
Therasense Confidential
Therasense Confidential

Troubleshooting 19
Troubleshooting
Error Codes
Error Messages
Error Code What It Means What To Do
Er1 1. Not enough blood was applied to test
strip.
2. Problem with test strip.
3. Problem with meter.
4. Very low blood glucose (less than 20
mg/dL)
1. If you have symptoms such as
weakness or sweating, follow your
doctor’s advice.
2. If meter beeps, call your clinical trial
coordinator for help.
3. If meter does not beep, run a control
solution test. If control solution test
works, repeat blood test using new
test strip.
If control solution test does not work,
call your clinical trial coordinator.
Er2 1. Incorrect procedure (for example, a
used test strip was inserted).
2. Problem with test strip.
3. Problem with meter.
4. Very high blood glucose (greater
than 500 mg/dL)
1. If you have symptoms such as thirst
or blurry vision, follow your doctor’s
advice.
2. If in doubt about your symptoms, test
again with a new test strip.
Er3 1. Incorrect procedure (for example,
blood was applied to test strip before
test strip was inserted).
2. Problem with test strip.
3. Problem with meter.
1. Be sure you see “Apply Sample” on
display before you apply sample.
2. Test with control solution. If out of
range or error persists, call your
clinical trial coordinator.
Er4 Receiver Malfunction. Call your clinical trial coordinator for a
replacement.
Er5 Faulty or damaged test strip. Try another test strip or clean the test
strip port.
Error Code What It Means What To Do
Failed Sensor The receiver has detected a damaged
or irregular sensor.
Be sure the sensor was inserted cor-
rectly, the support mount is securely in
place, and the transmitter is firmly
inserted.
Cal expire soon
Therasense Confidential
Therasense Confidential

20 TheraSense Continuous Glucose Monitor User’s Guide
Cannot Find PC
for Data Upload
The receiver cannot establish commu-
nications with a PC. not for clinicals
File System Error
High glucose
History log full
Impending high
Impending low
Log cleared
Log data corrupted
Low glucose
New Sensor Time
Out
The receiver has not detected a new
sensor.
Insert a new sensor and attach the trans-
mitter to the support mount. If you have
already done so, make sure the trans-
mitter is pushed firmly into the support
mount.
No glucose data
No Sensor
Detected
The transmitter was not correctly
installed into the support mount.
Perform blood
glucose test
See Help #25
The receiver will prompt you to per-
form a blood test in approximately 1,
4, and 24 hours after a new sensor is
inserted.
Perform a blood test using a test strip.
Refer to “Testing Your Blood Glucose”
on page 10.
Reconnect to Tx
See Help #23
The receiver cannot detect the
transmitter.
Be sure the receiver and transmitter are
within 10 feet of one another.
Replace the sensor
See Help #24
Once inserted a sensor is good for 72
hours, after that you need to replace it
with a new sensor.
Remove the sensor and insert a new
one. Refer to “Replacing the Sensor” on
page 6.
Sensor expire soon
Stabilize
Conditions
See Help #26
The transmitter temperature is above
X°F or below X°F or changing rapidly.
System Time Error
Reestablish link
Rx battery low The receiver battery power is low. Replace the batteries.
Error Code What It Means What To Do
Therasense ConfidentialTherasense Confidential
Therasense Confidential
Troubleshooting 21
Problems
Tx battery low The transmitter battery is very low.
for clinicals?
Change the battery.
Tx Link Failure The receiver has linked to an unidenti-
fied transmitter.
Turn off any transmitters not in use.
Reestablish the link.
Upload Failure
Problems What To Do
The support mount is not sticking to your skin. 1. Make sure your skin is clean and thoroughly dry
before placing the support mount on the skin.
2. Place an over-bandage over the transmitter after
connecting the transmitter to the support mount.
Error Code What It Means What To Do
Therasense ConfidentialTherasense Confidential
Therasense Confidential