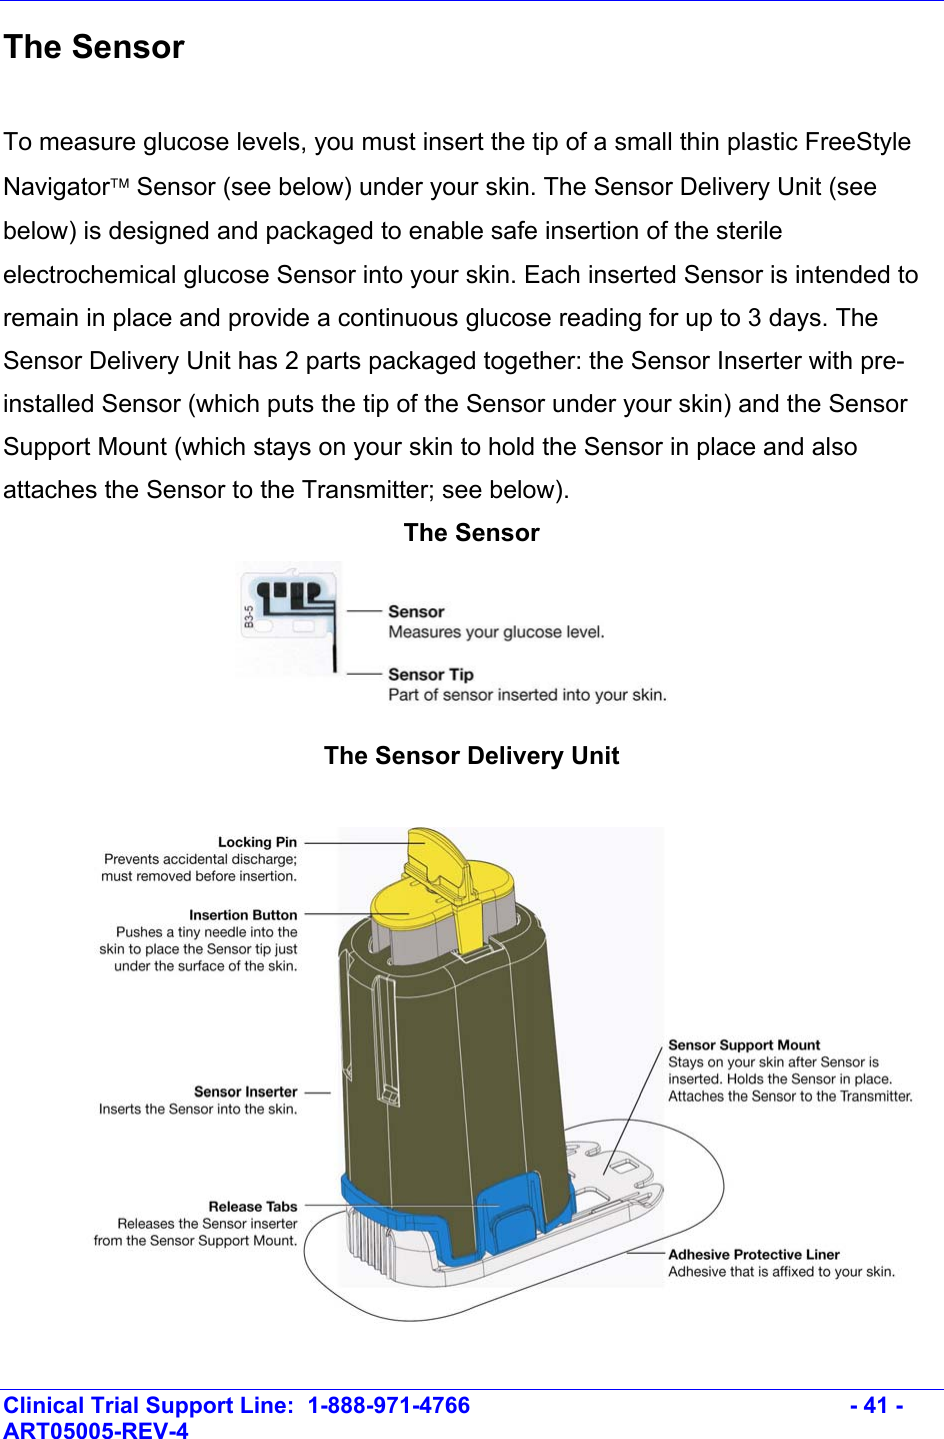
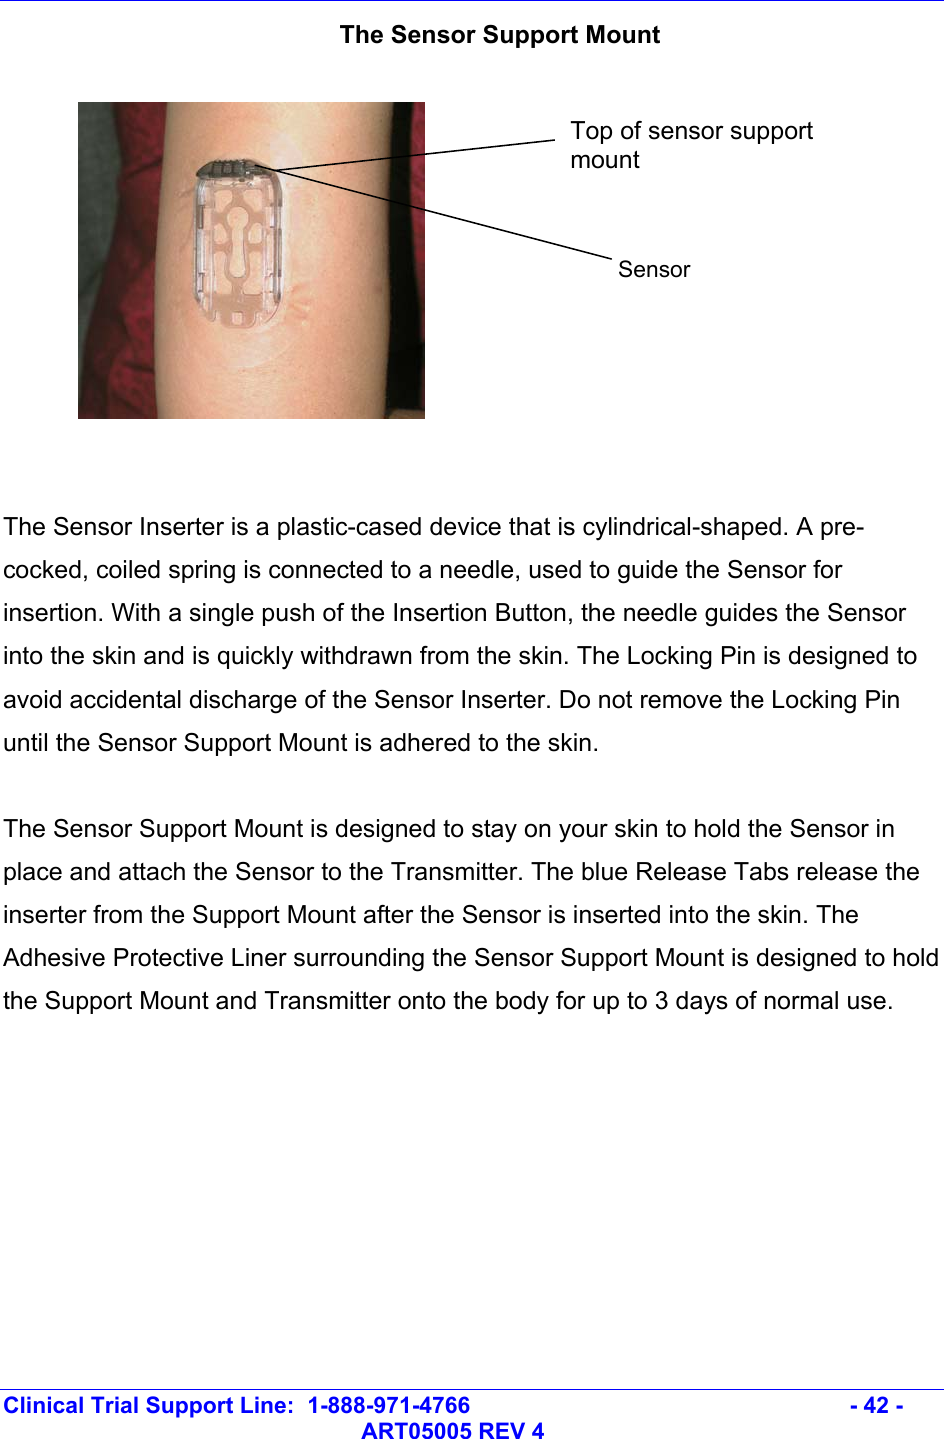
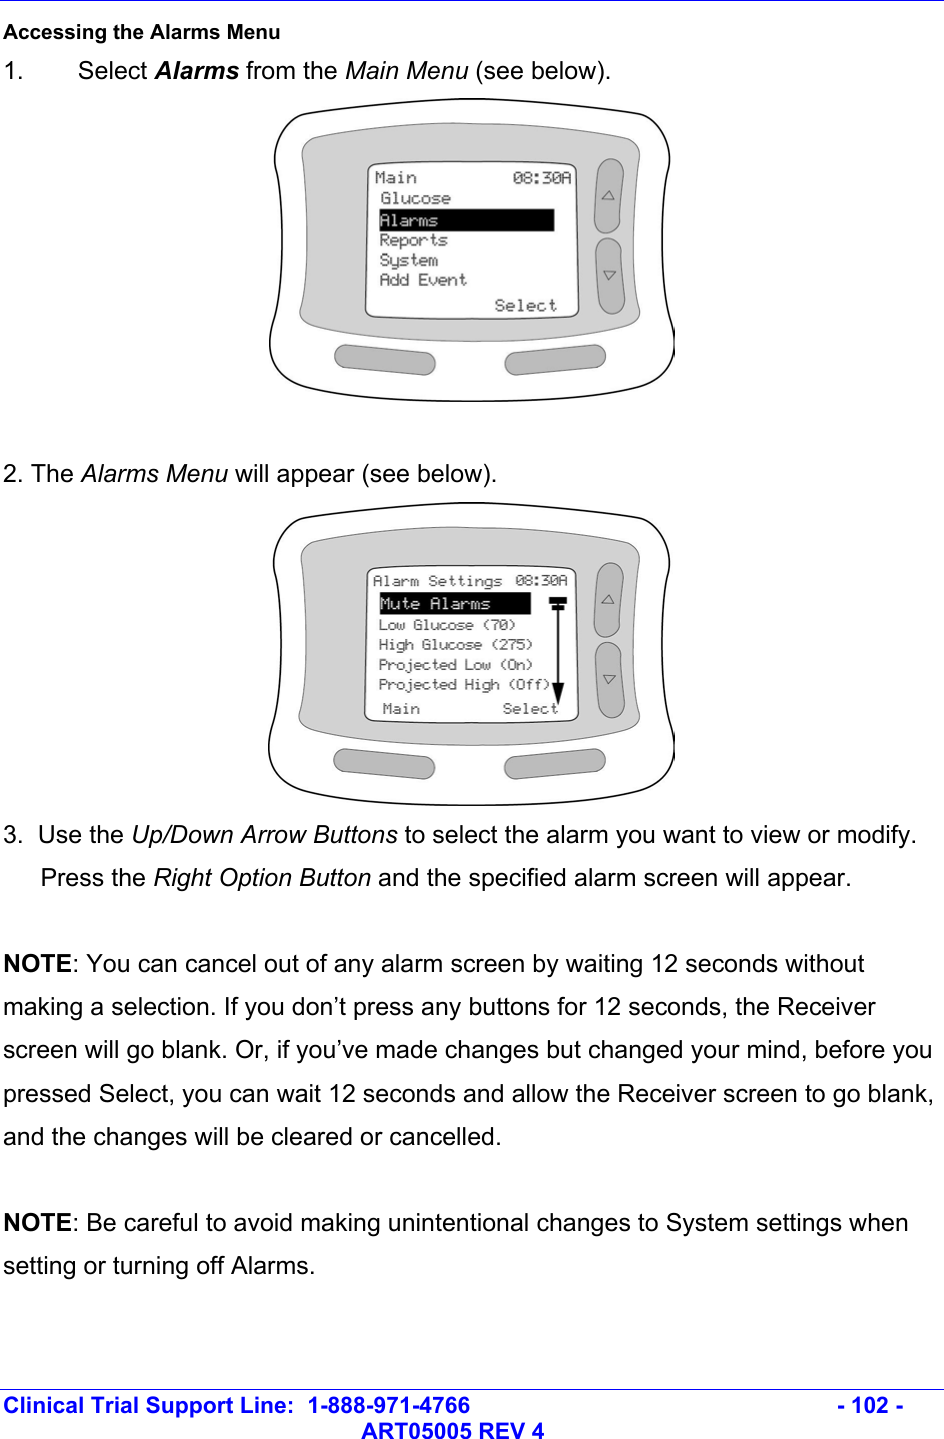
Abbott Diabetes Care TX111004 Diabetes Monitor Transmitter User Manual ART05005 REV 4
Abbott Diabetes Care Diabetes Monitor Transmitter ART05005 REV 4
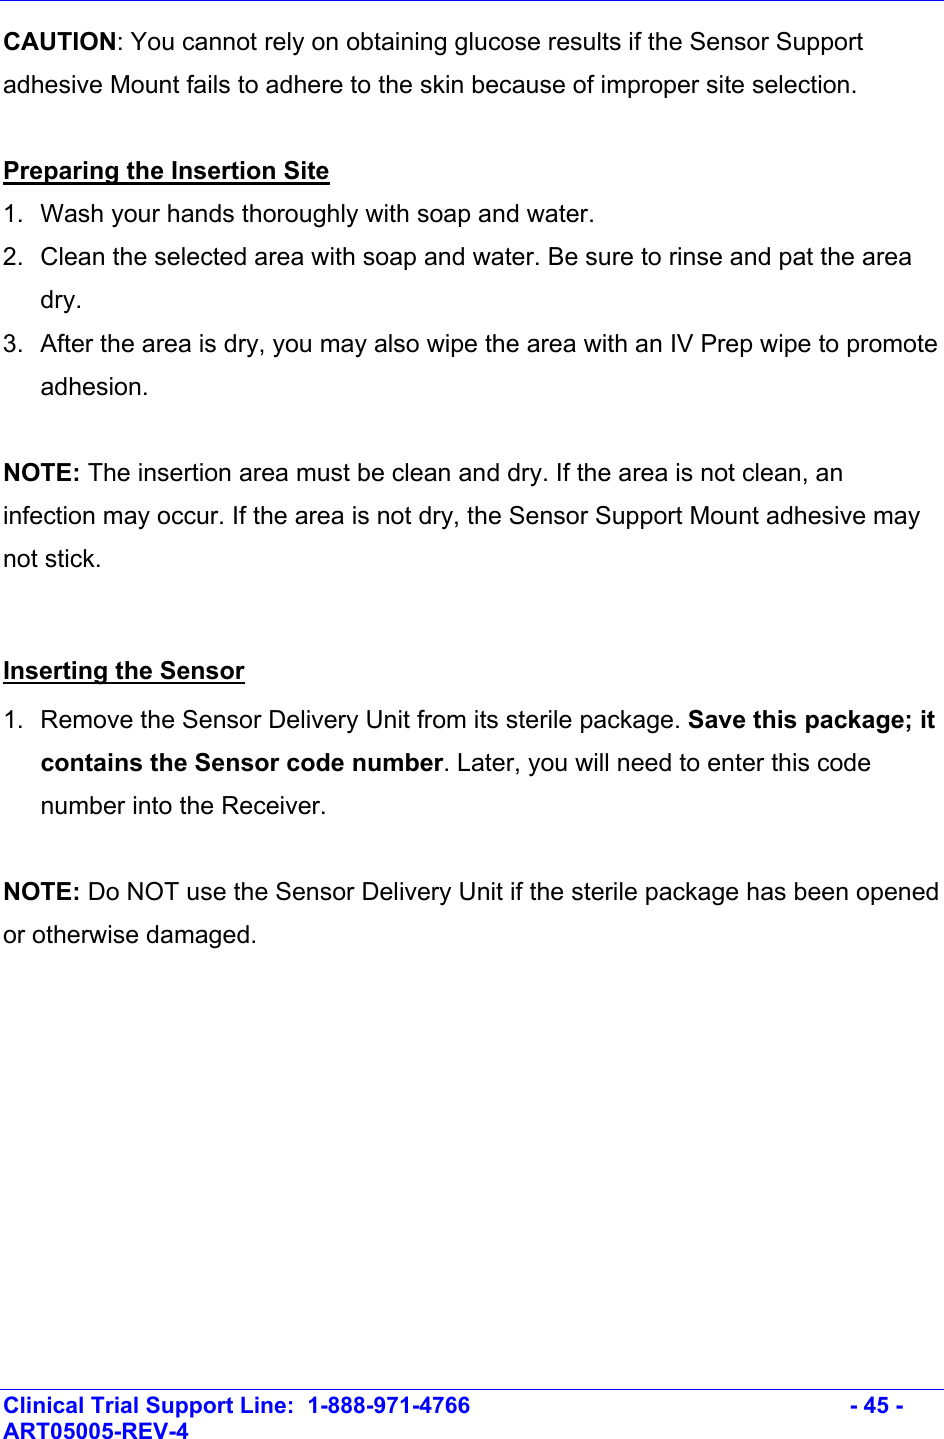
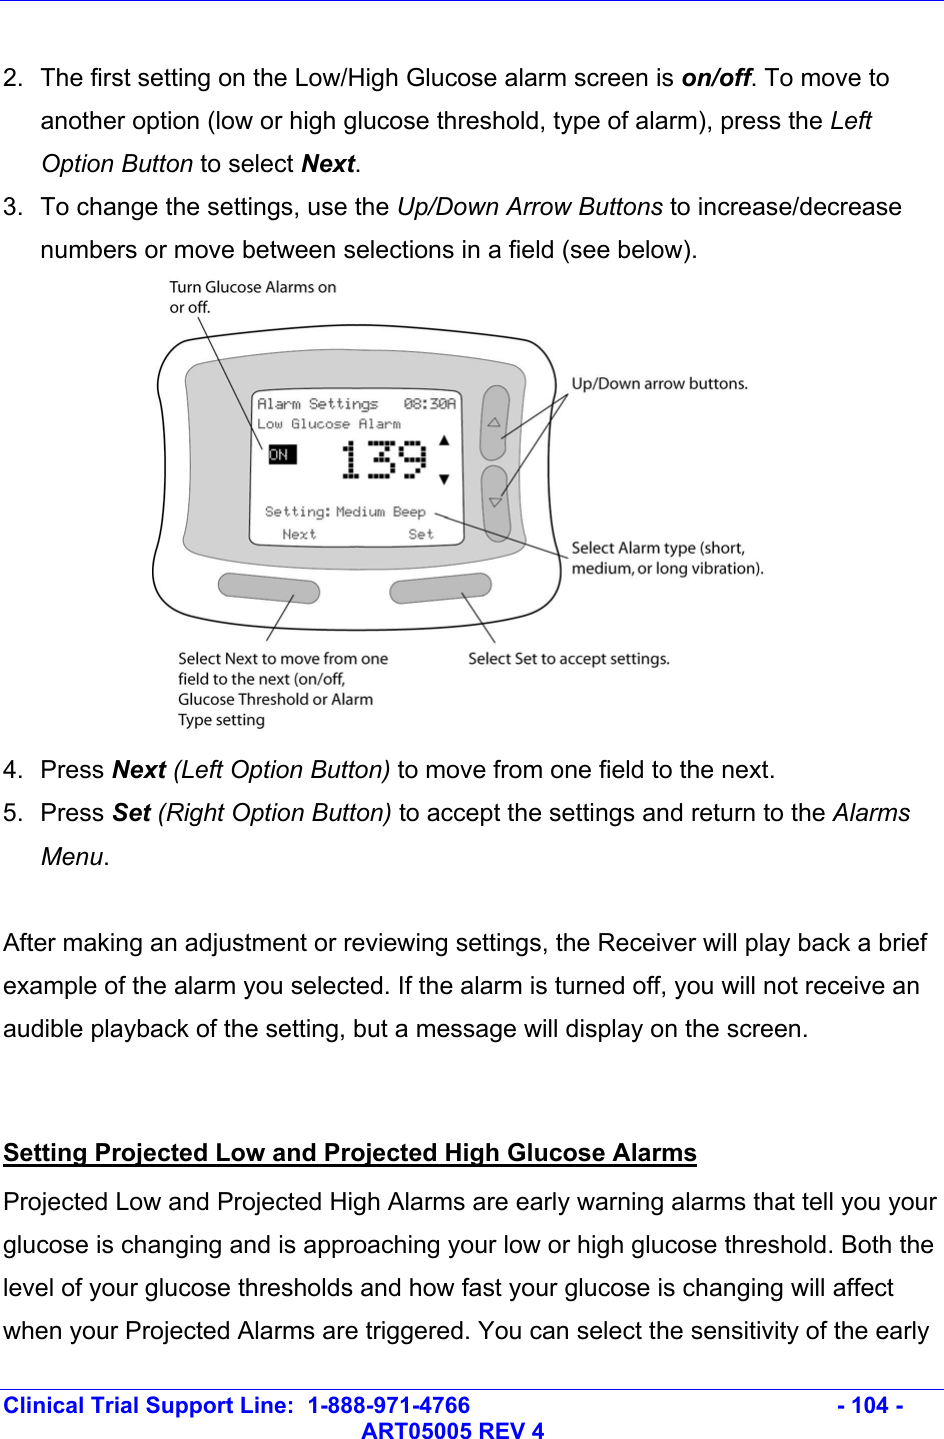
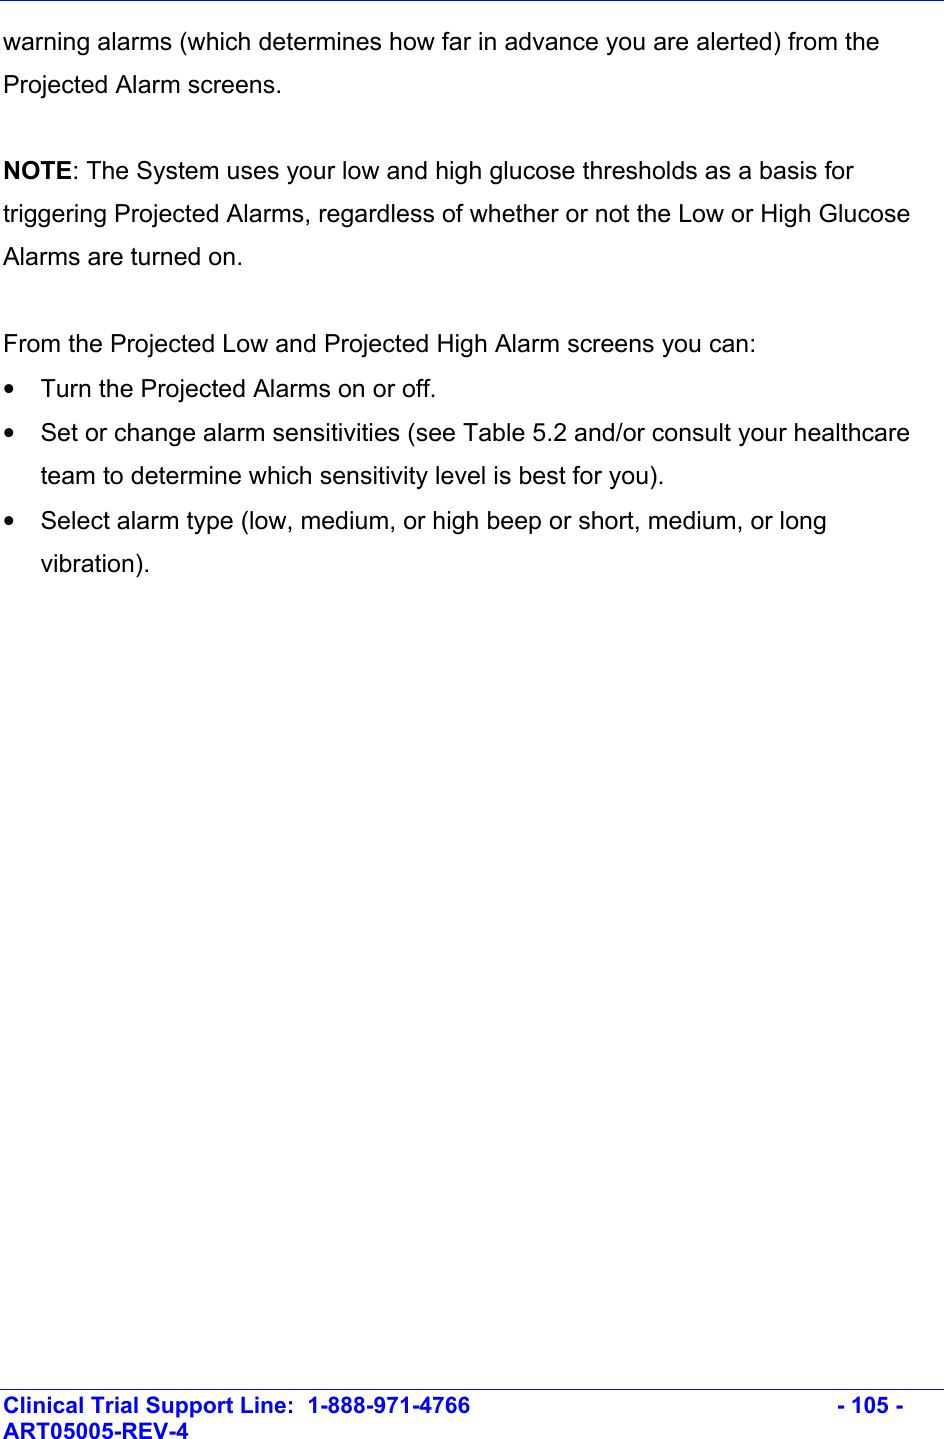
UserManual.wiki
>
Abbott Diabetes Care
>
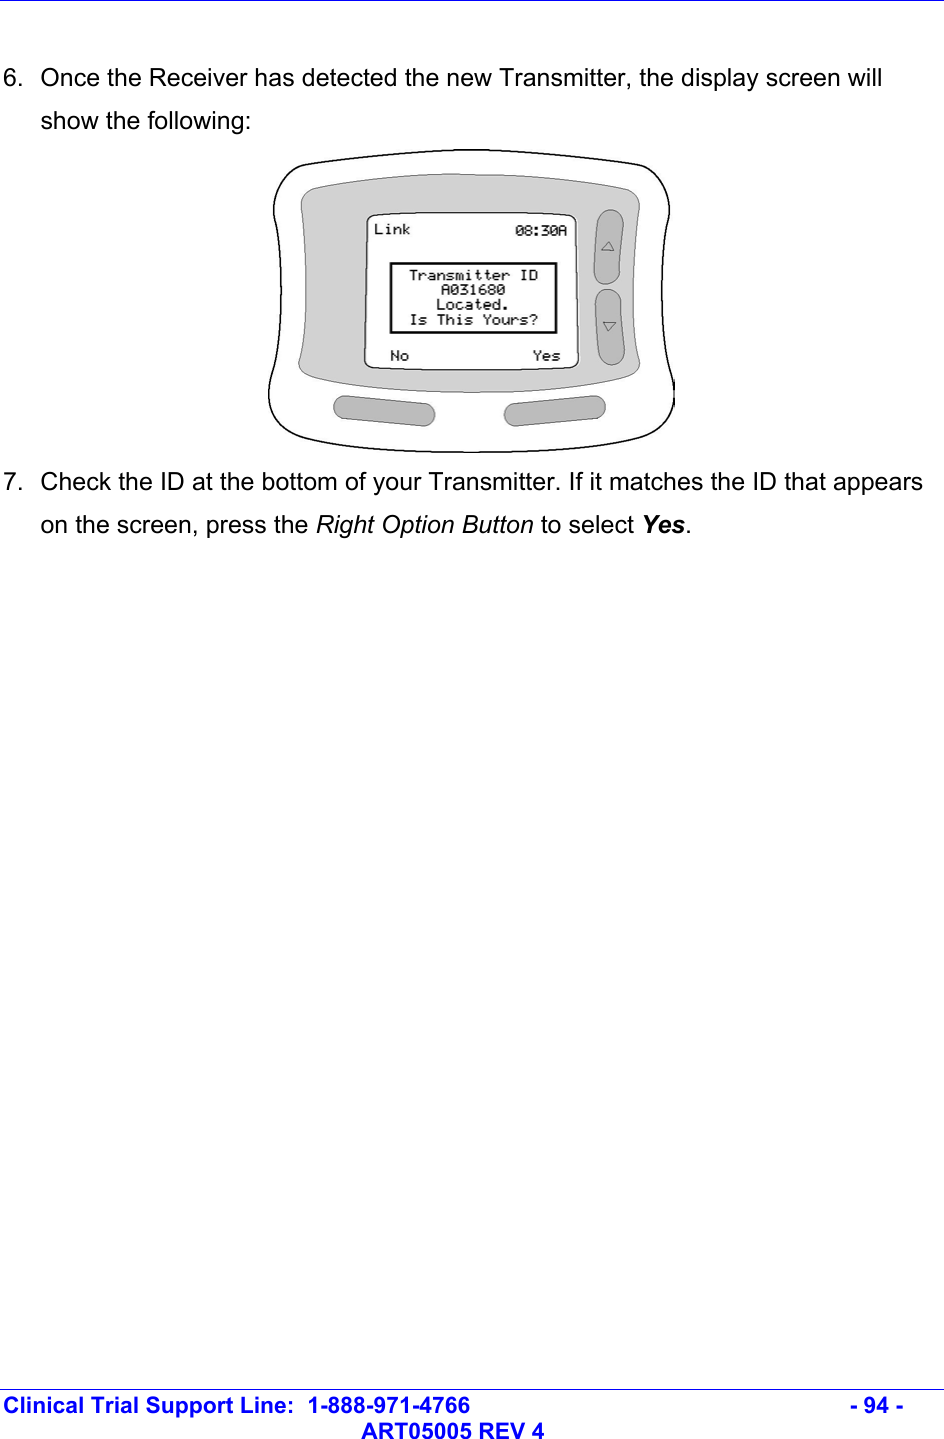
TX111004 User Manual
Users Manual
Navigation menu
Upload a User Manual
Namespaces
Wiki Guide
HTML
PDF
Info
Views
User Manual
Discussion / Help
Navigation
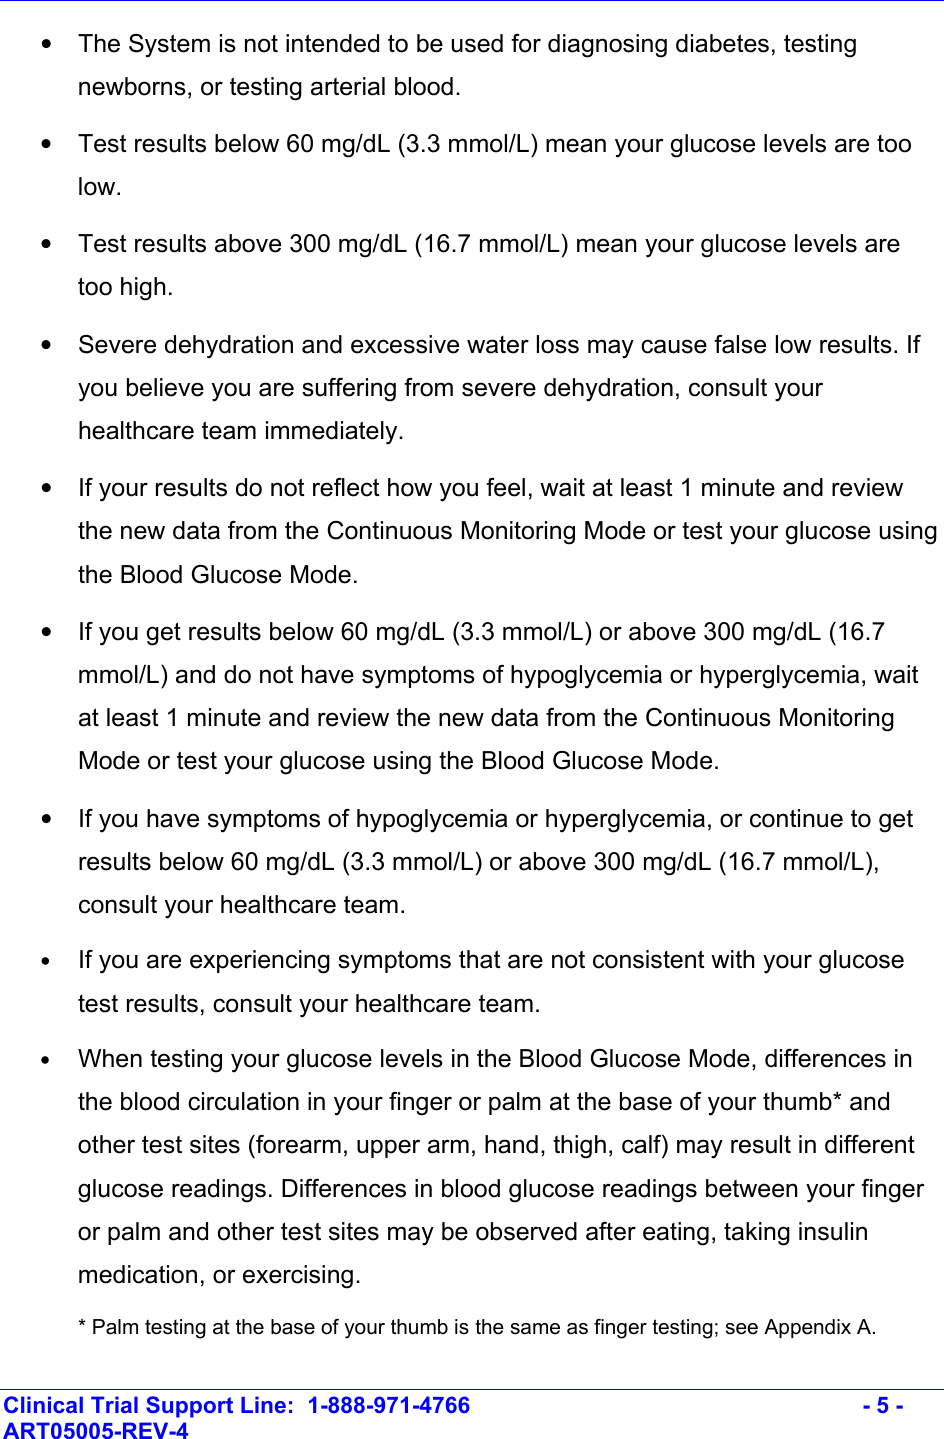
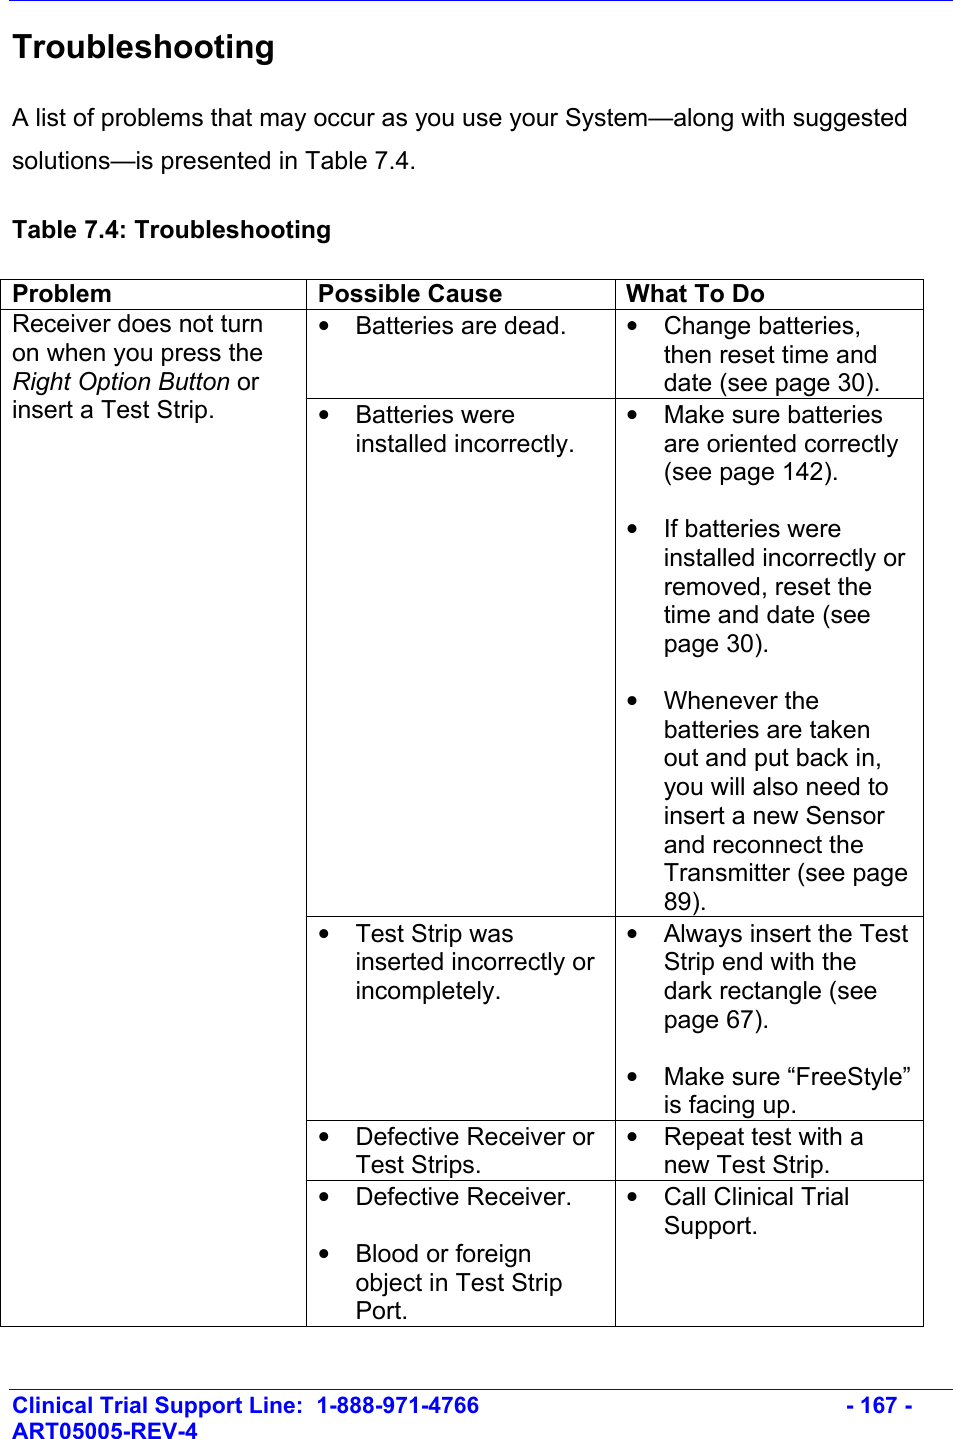
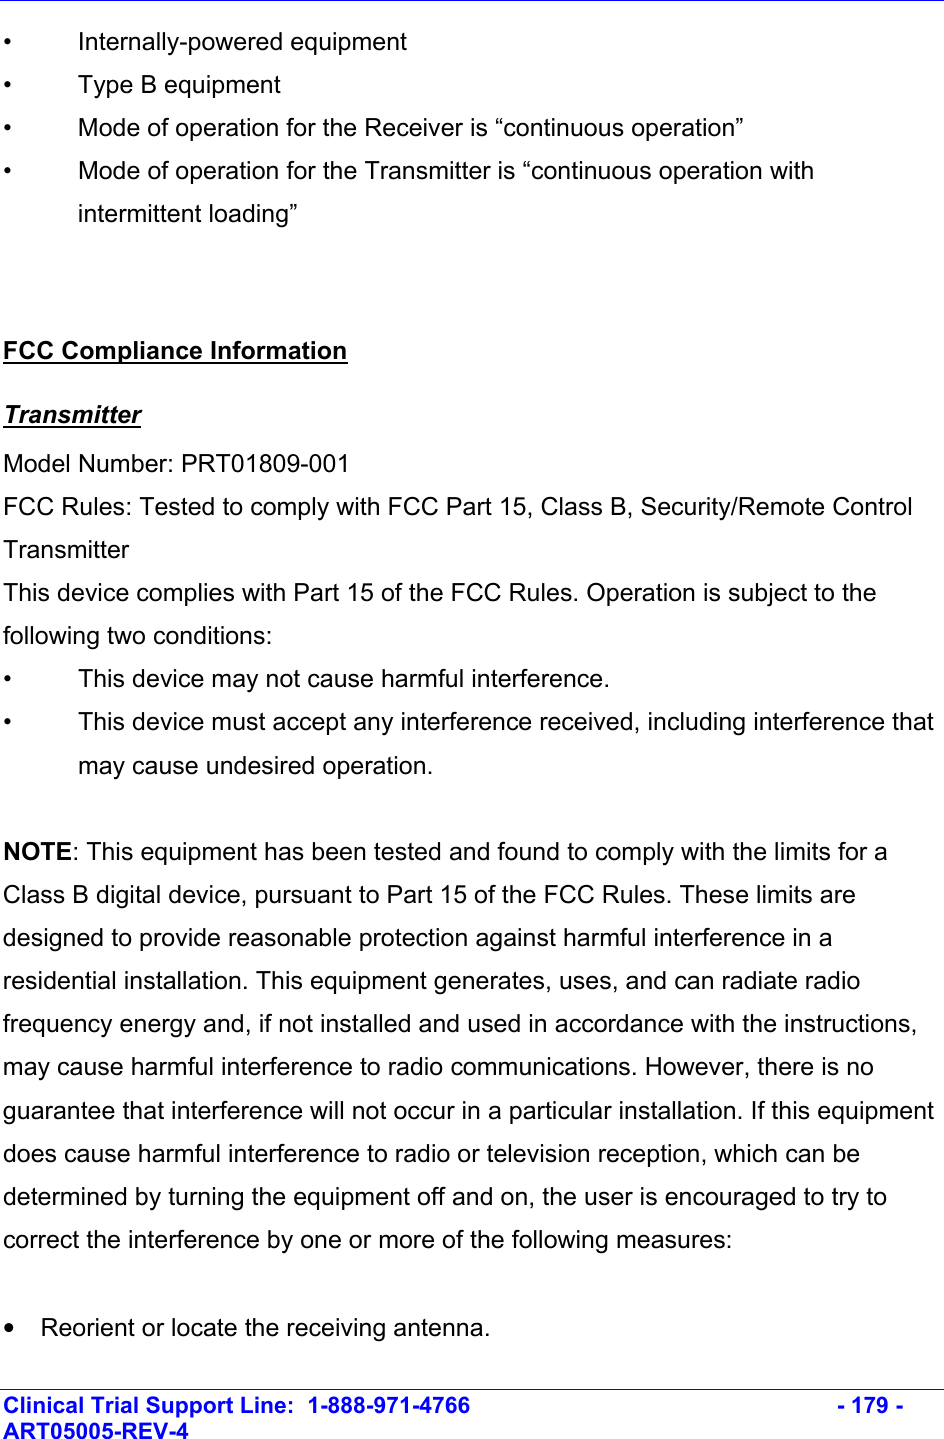
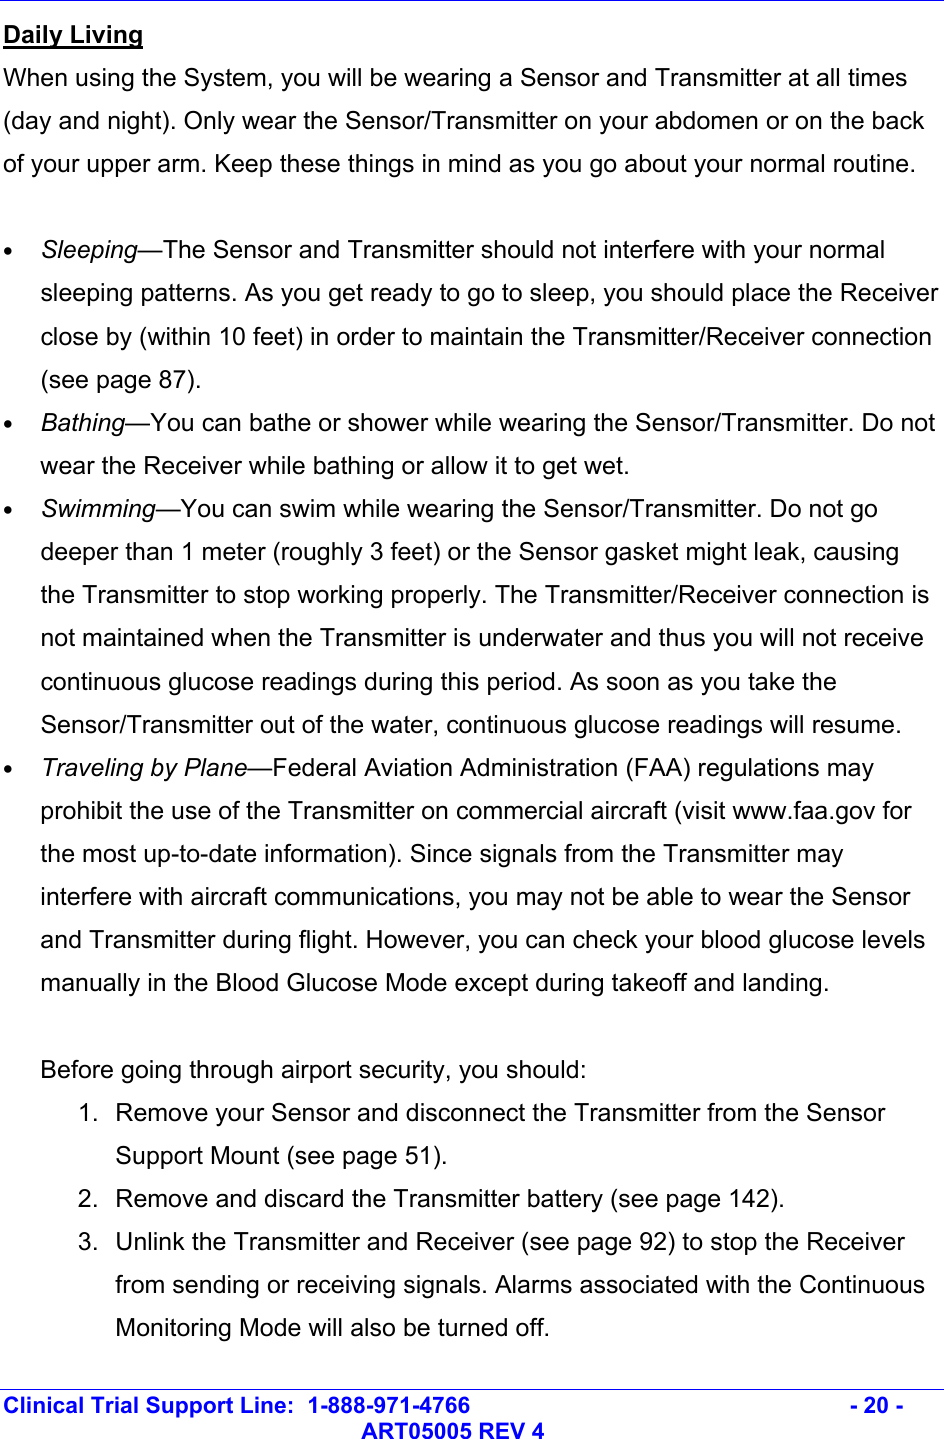
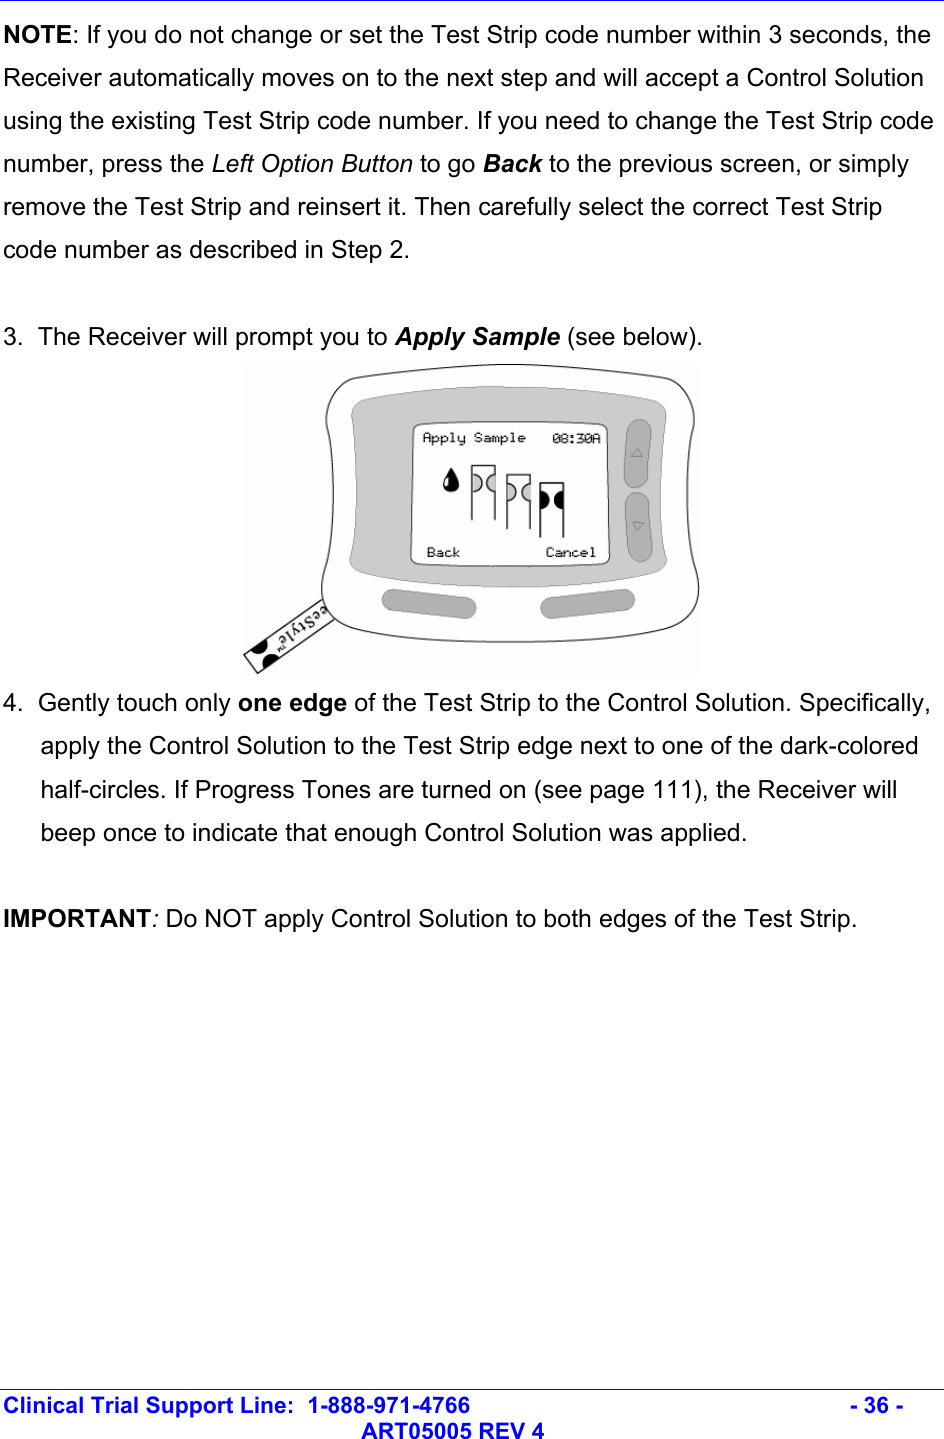
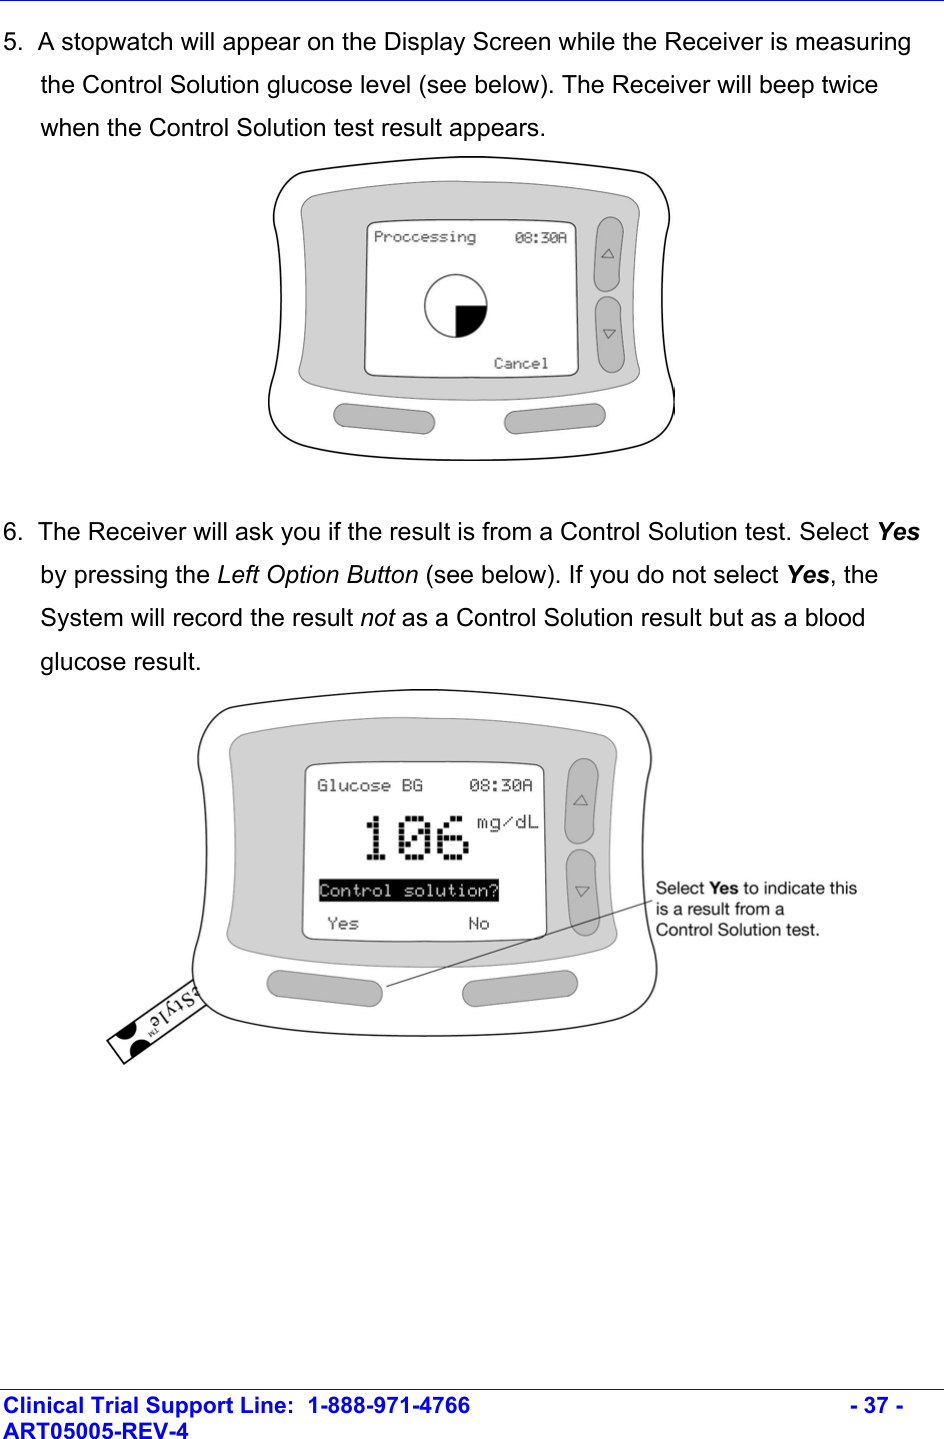
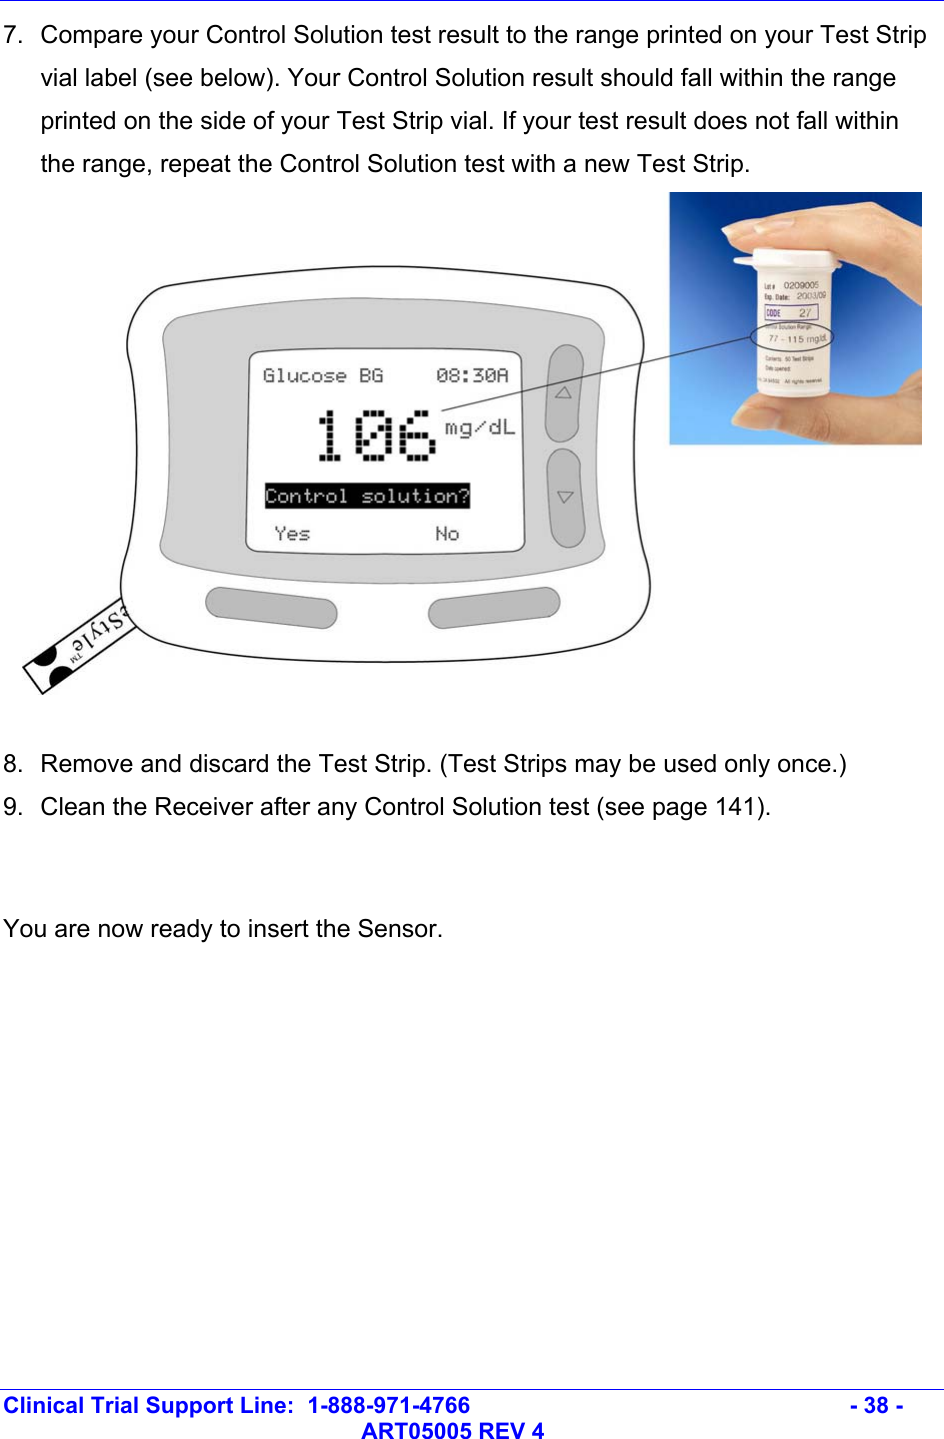
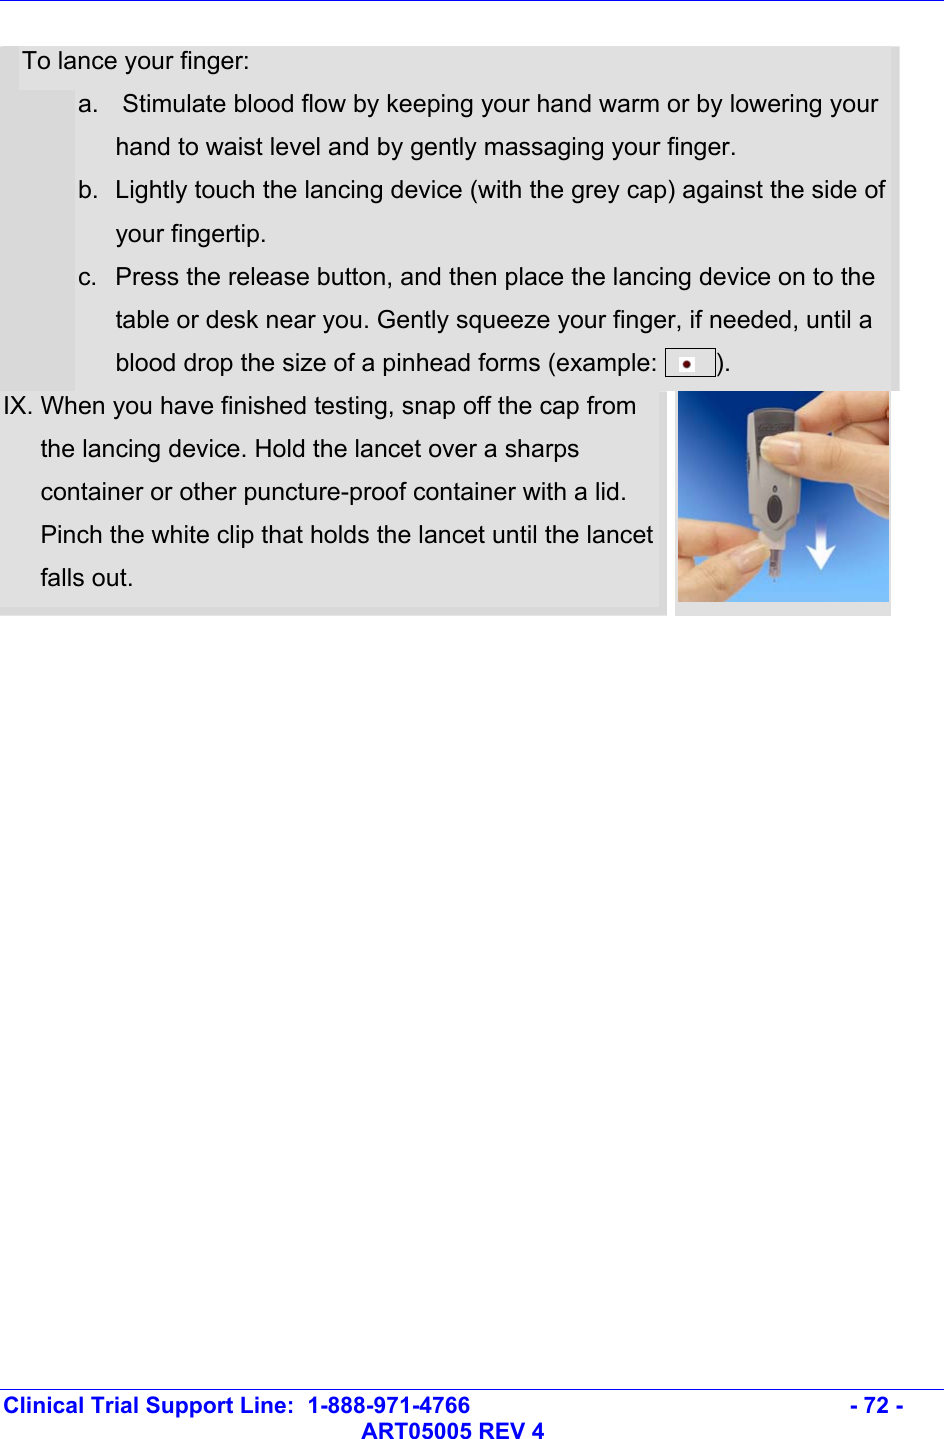
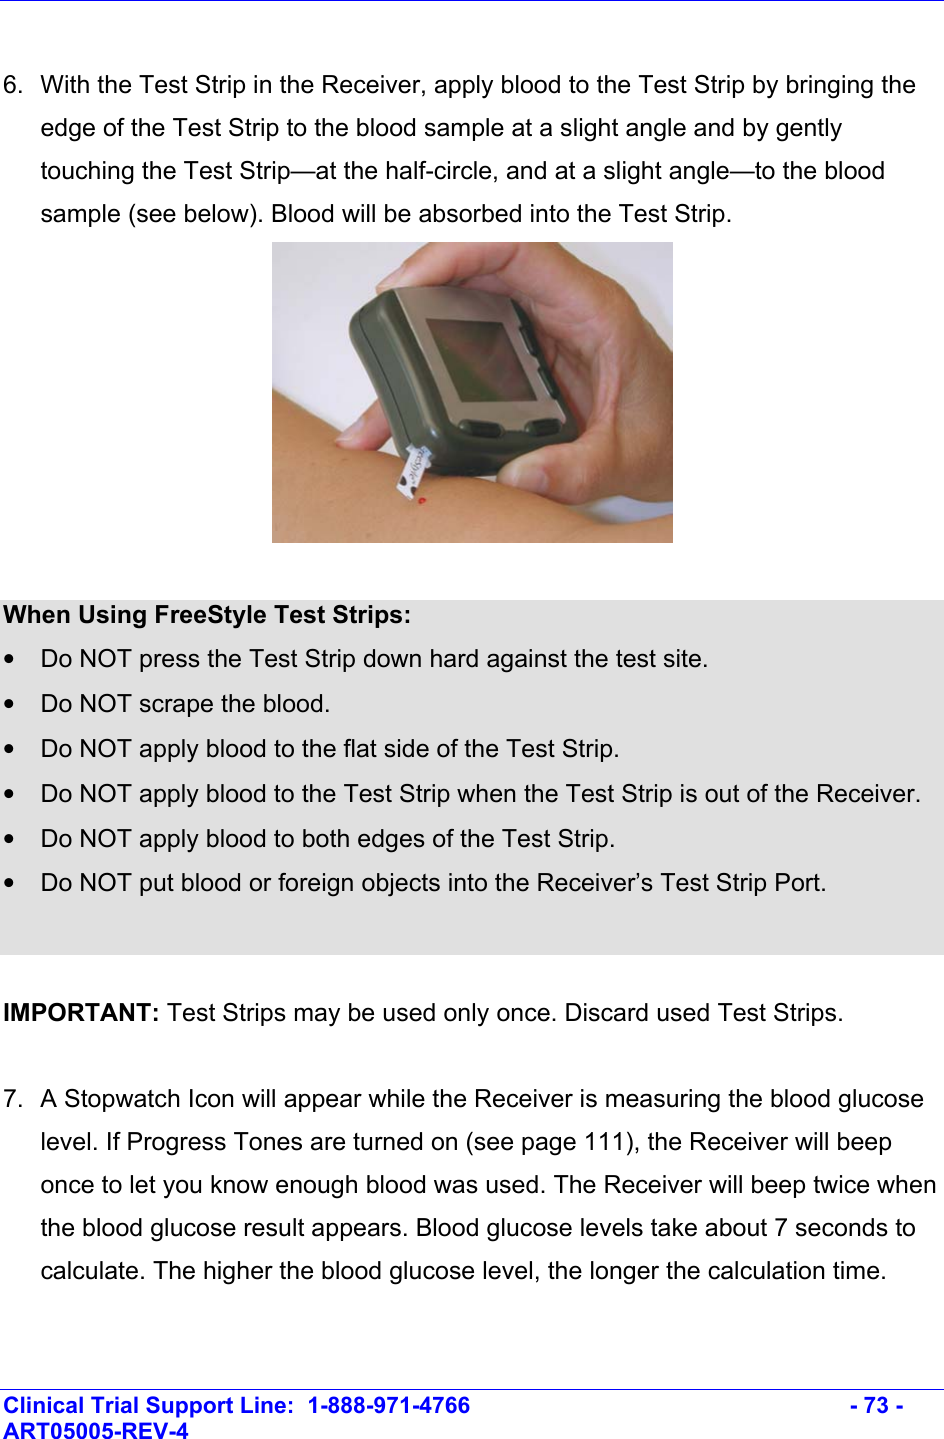
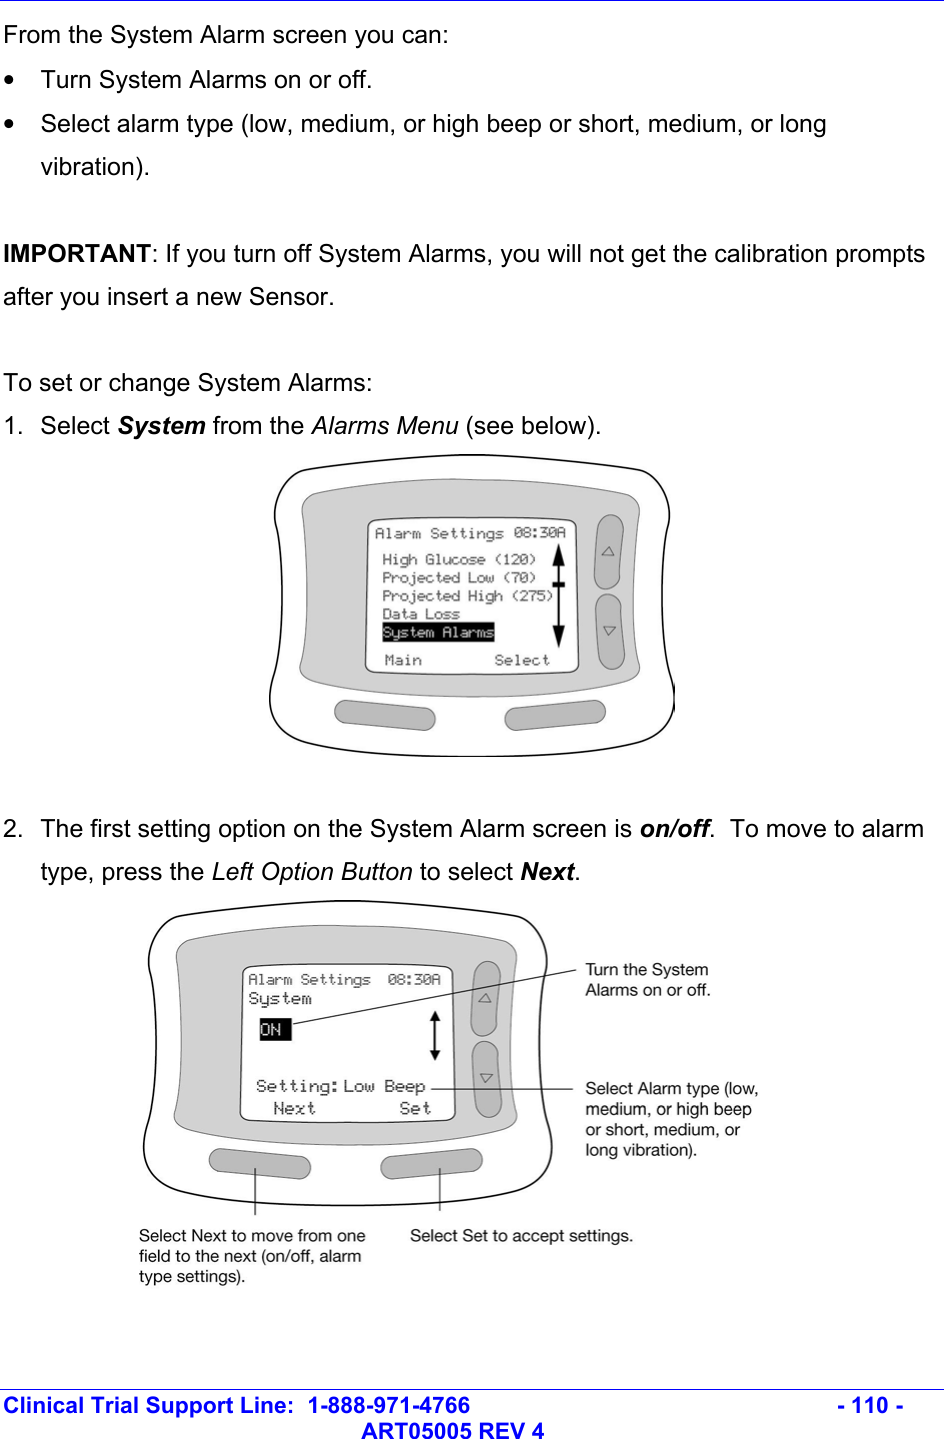
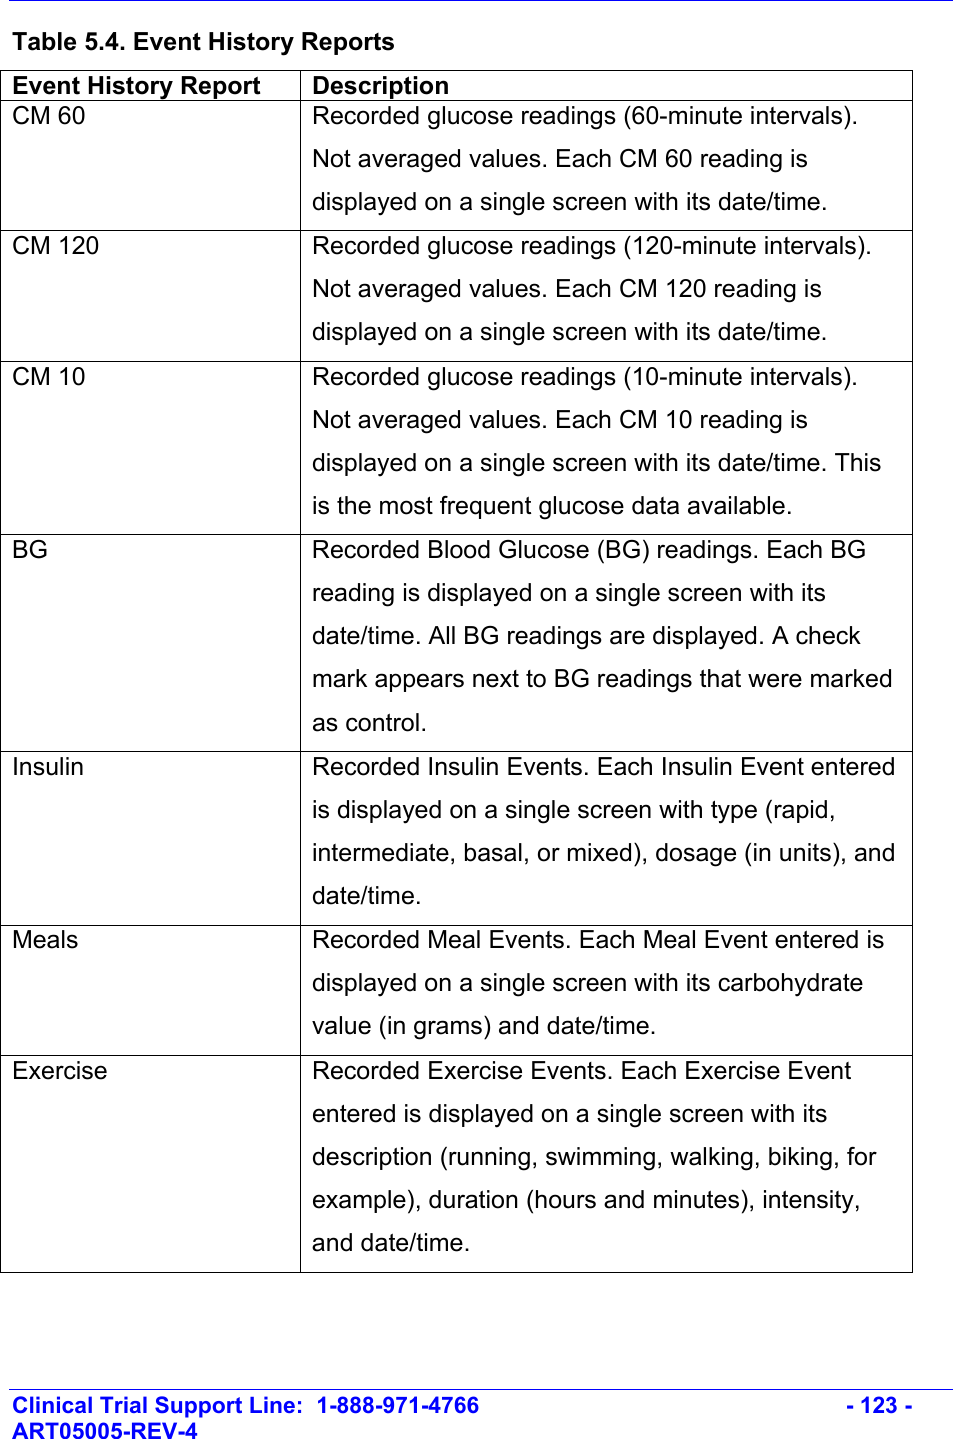
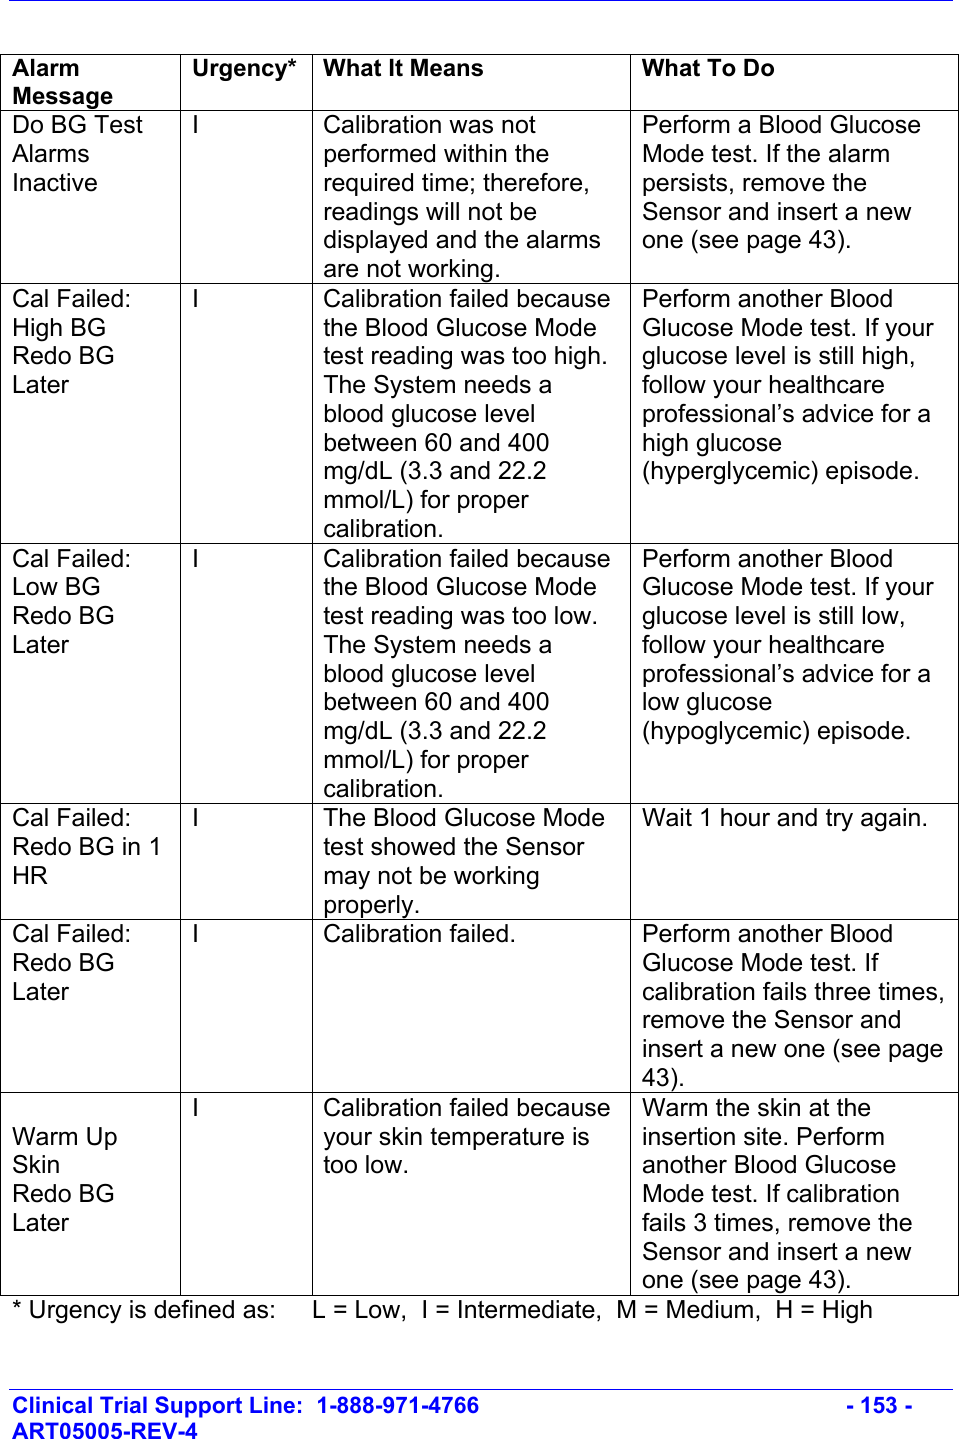
![Clinical Trial Support Line: 1-888-971-4766 - 6 - ART05005 REV 4 • It is recommended that you test your finger or palm at the base of your thumb if you are testing for hypoglycemia or if you suffer from hypoglycemia unawareness (see Table below). Changes in glucose levels may be observed in finger or palm blood samples sooner than in samples from alternate sites (forearm, upper arm, hand, thigh, calf). Vigorous rubbing of alternate sites before lancing can help minimize this difference. How Would I Know if I Have Hypoglycemia Unawareness? Yes No1. Do you often get blood glucose readings below 55 mg/dL (3.1 mmol/L) without any of the usual symptoms of hypoglycemia (sweating, tremors, rapid heartbeat, nervousness, extreme hunger)? 2. Have you had episodes of impaired thinking? 3. Have there been times when other people told you that you appeared pale, tired, confused, or acted as if in "slow motion?" 4. Have you been irritable or forgetful, even though you physically felt fine? 5. Have you had difficulty managing a hypoglycemic episode alone, and needed others to help you? 6. Have you ever had a seizure or loss of consciousness without any warning signs? 7. Do you try to maintain a very tightly controlled blood glucose level (often running below 90 mg/dL [5 mmol/L])? 8. Have you had frequent episodes of hypoglycemia? 9. Have you had diabetes for more than 20 years? 10. Have you had a recent episode of severe hypoglycemia? If you answered Yes to any of these questions, consult your healthcare team.](https://usermanual.wiki/Abbott-Diabetes-Care/TX111004/User-Guide-507084-Page-6.png)
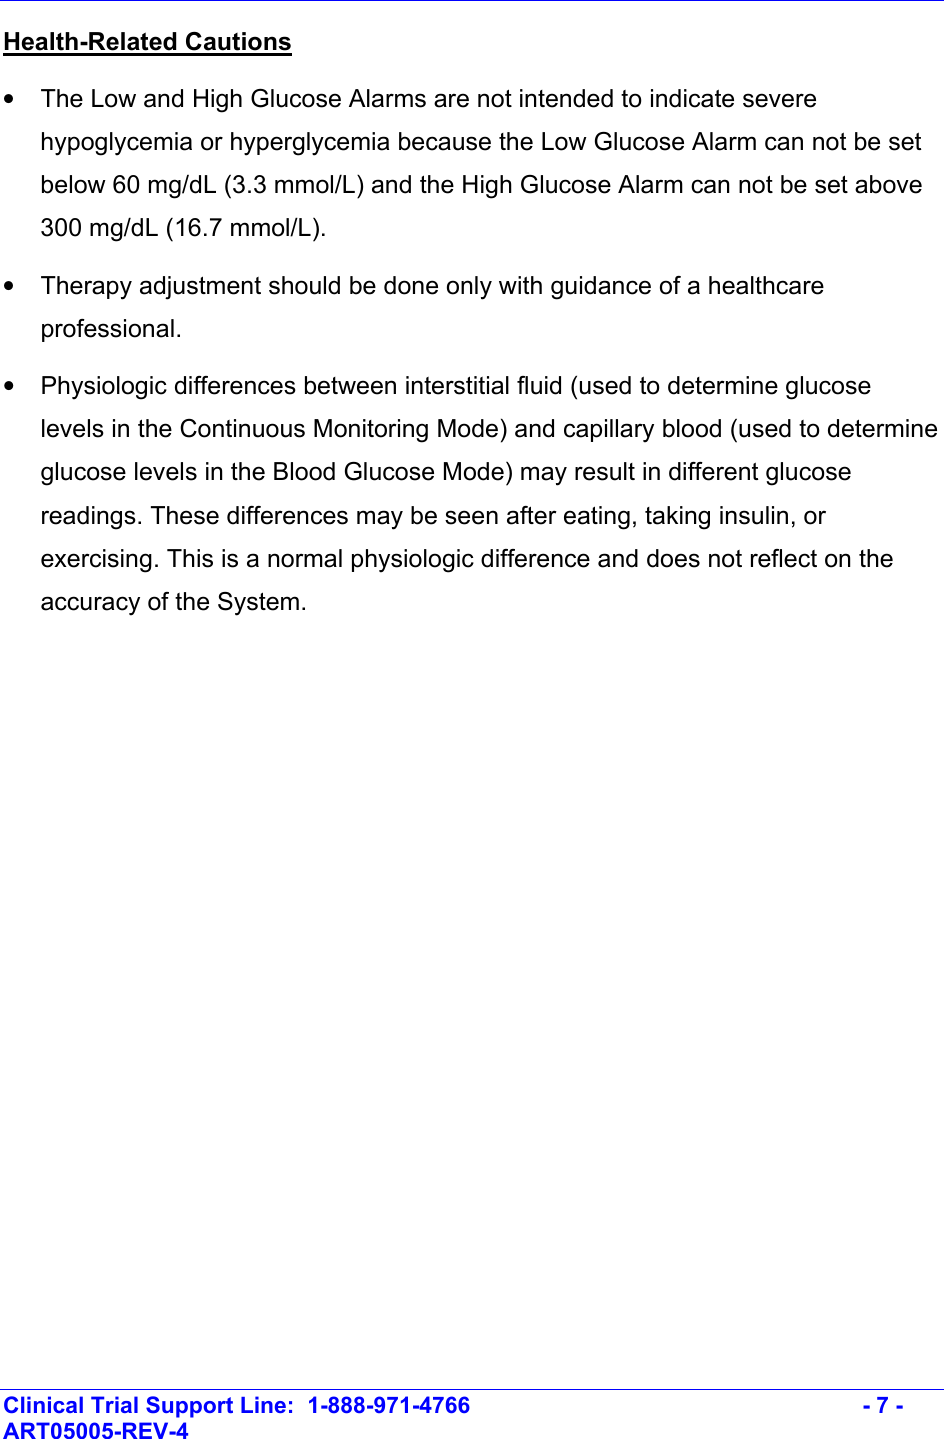


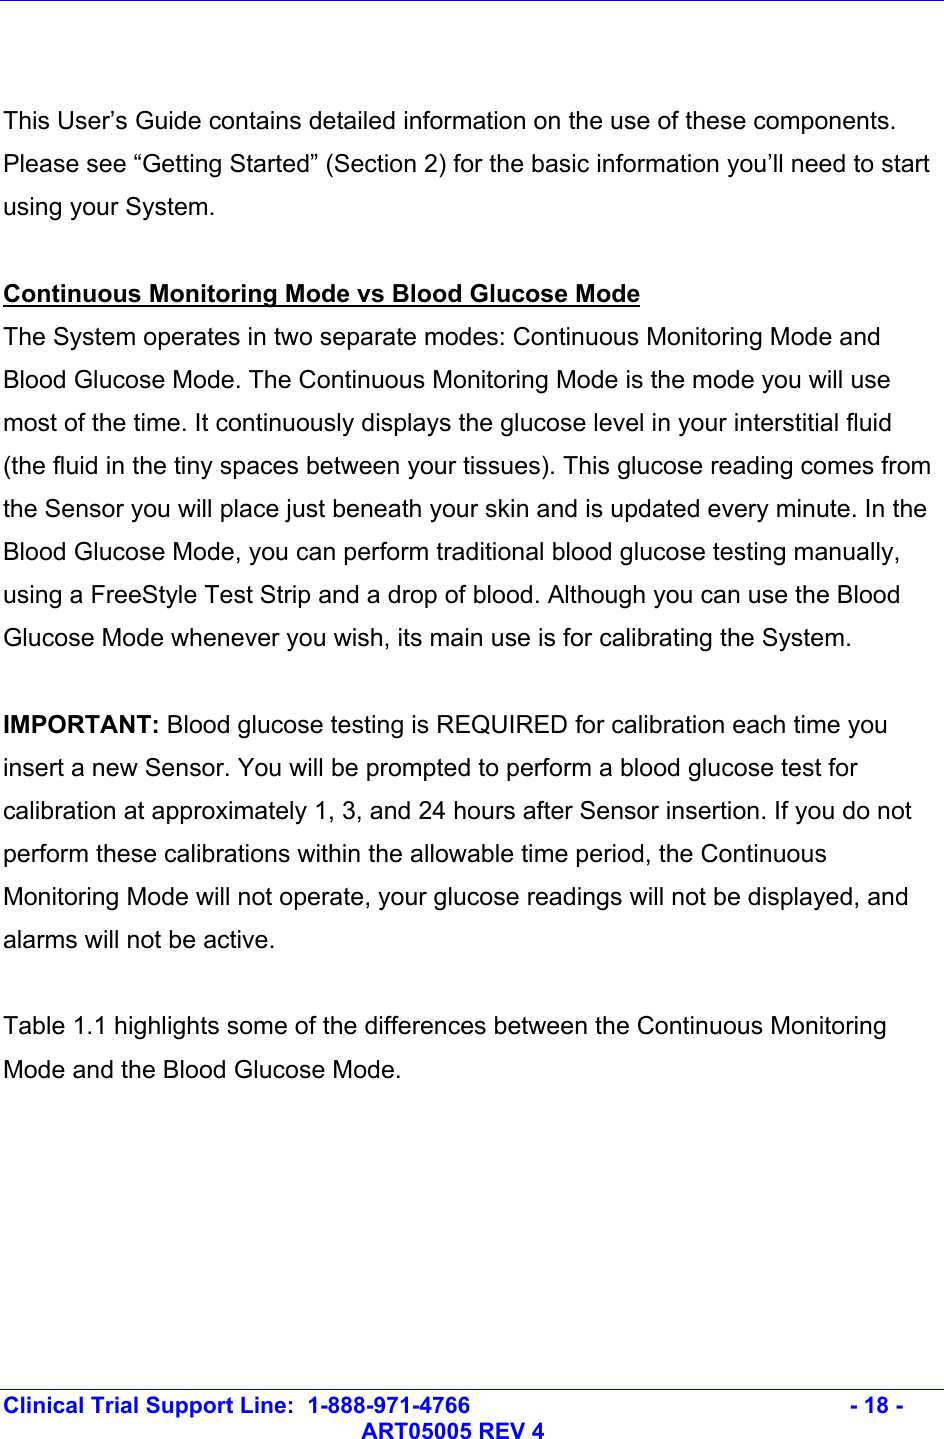


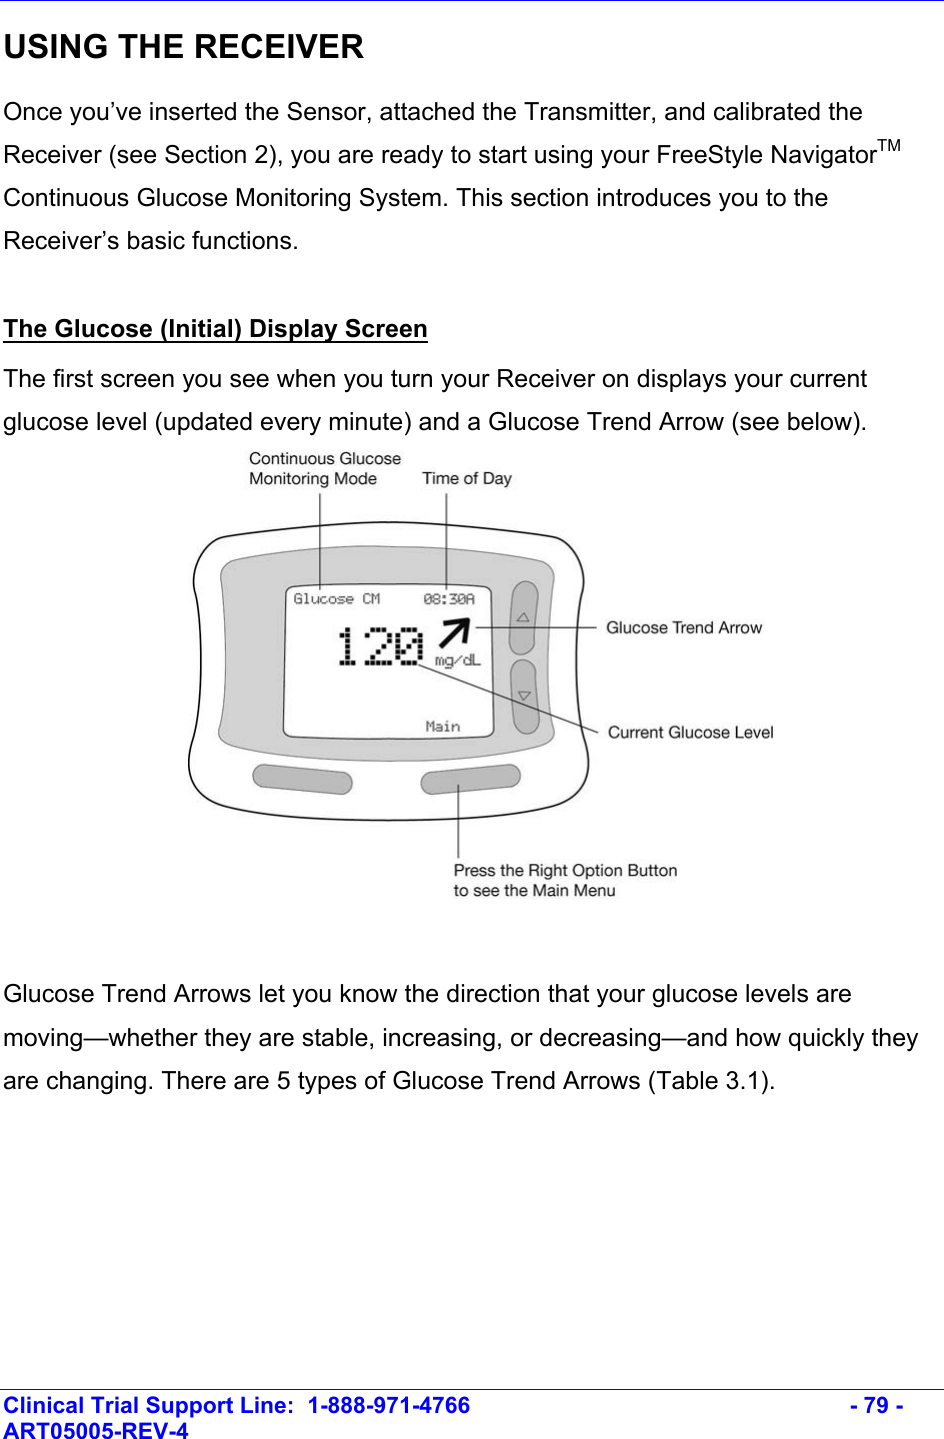
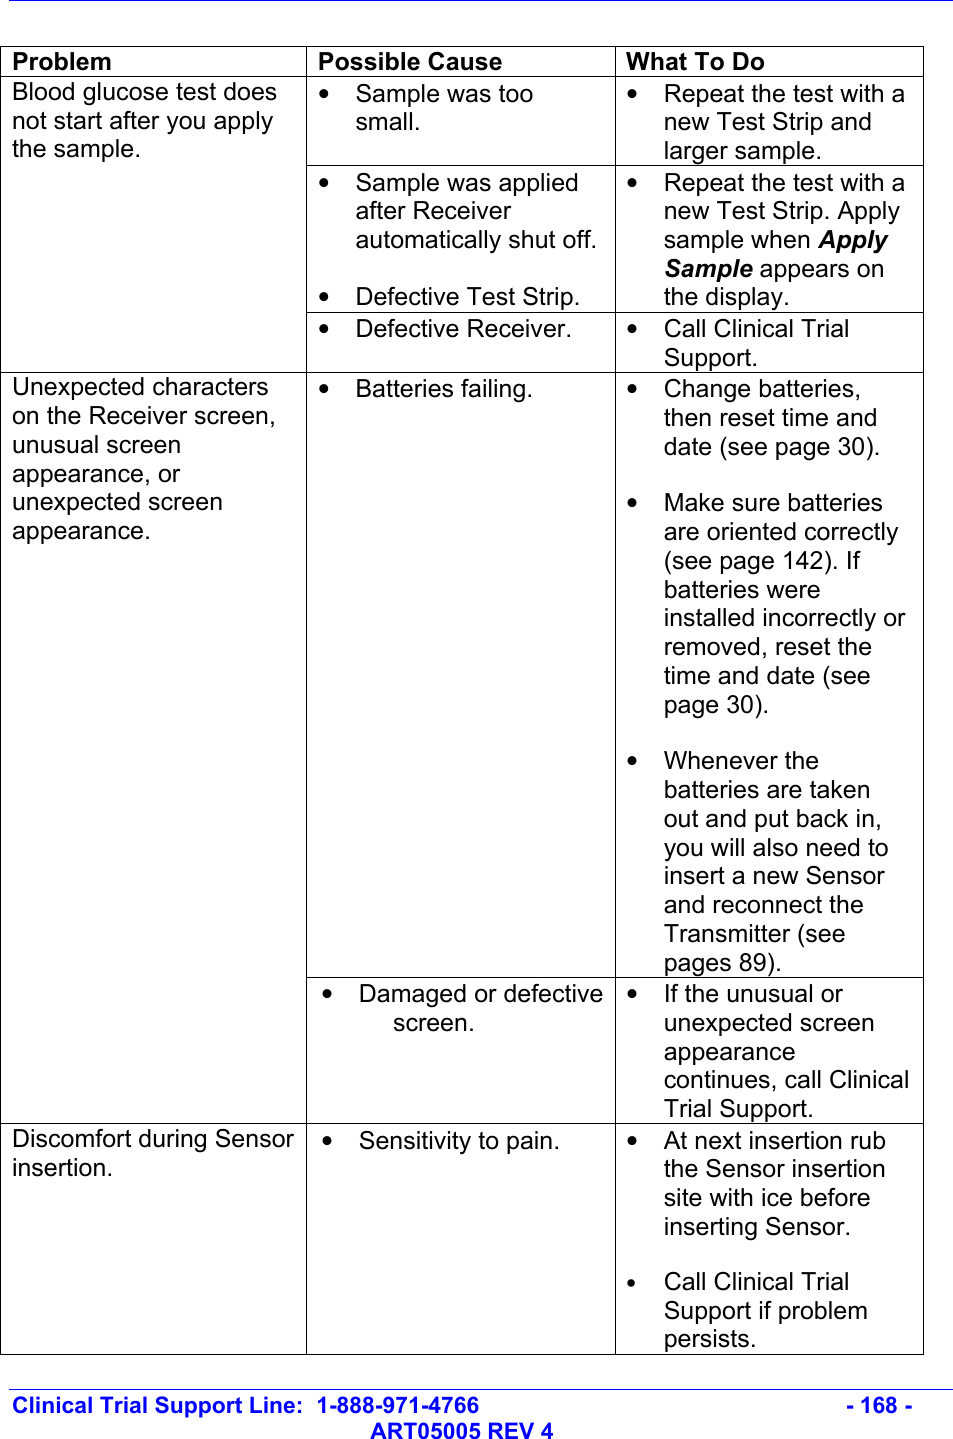
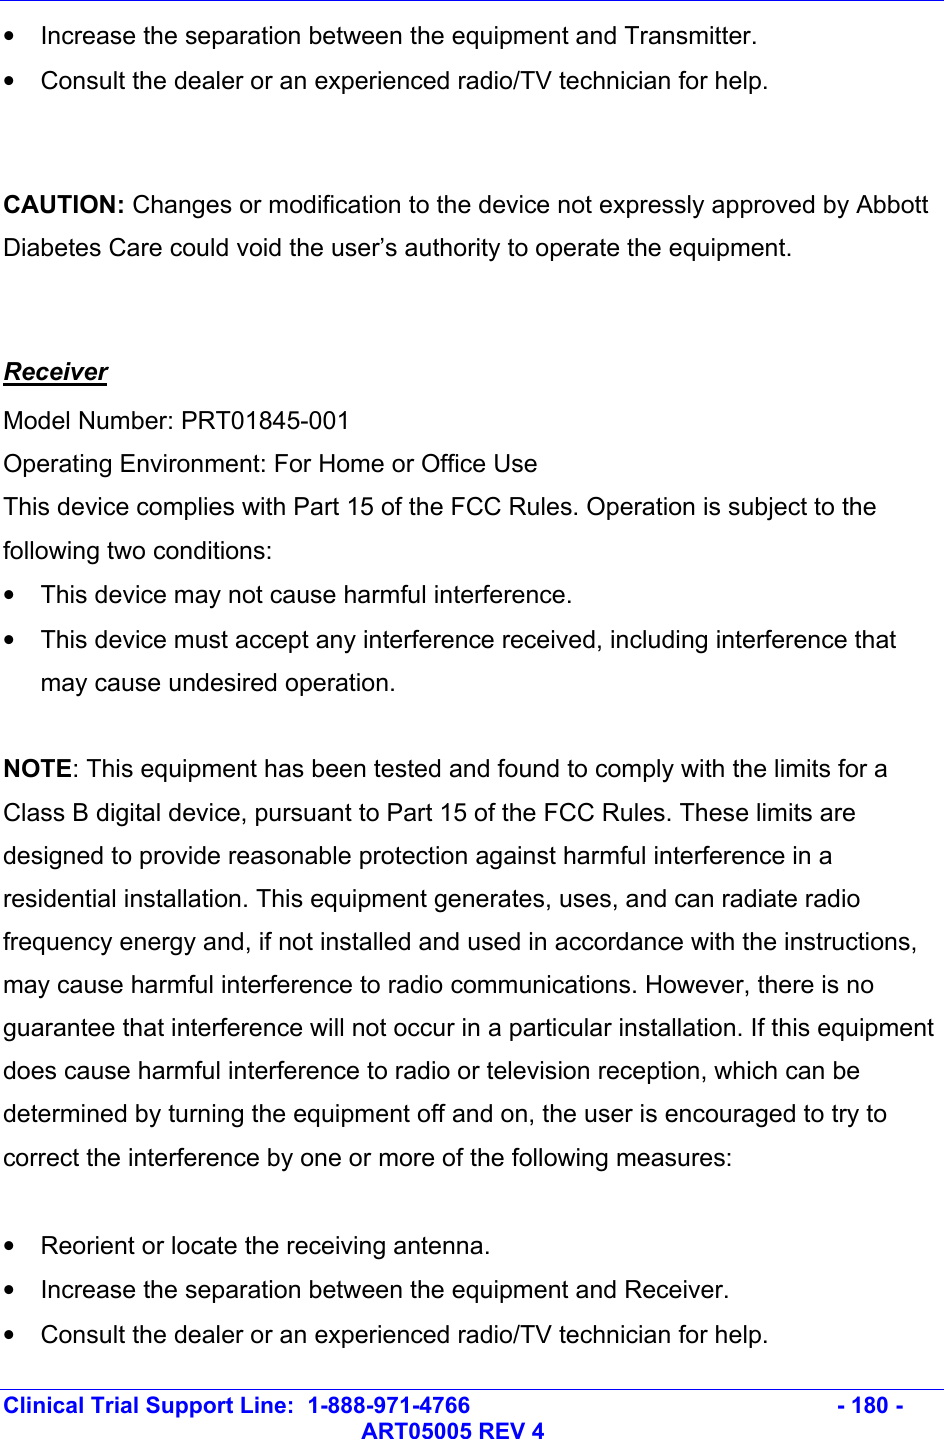
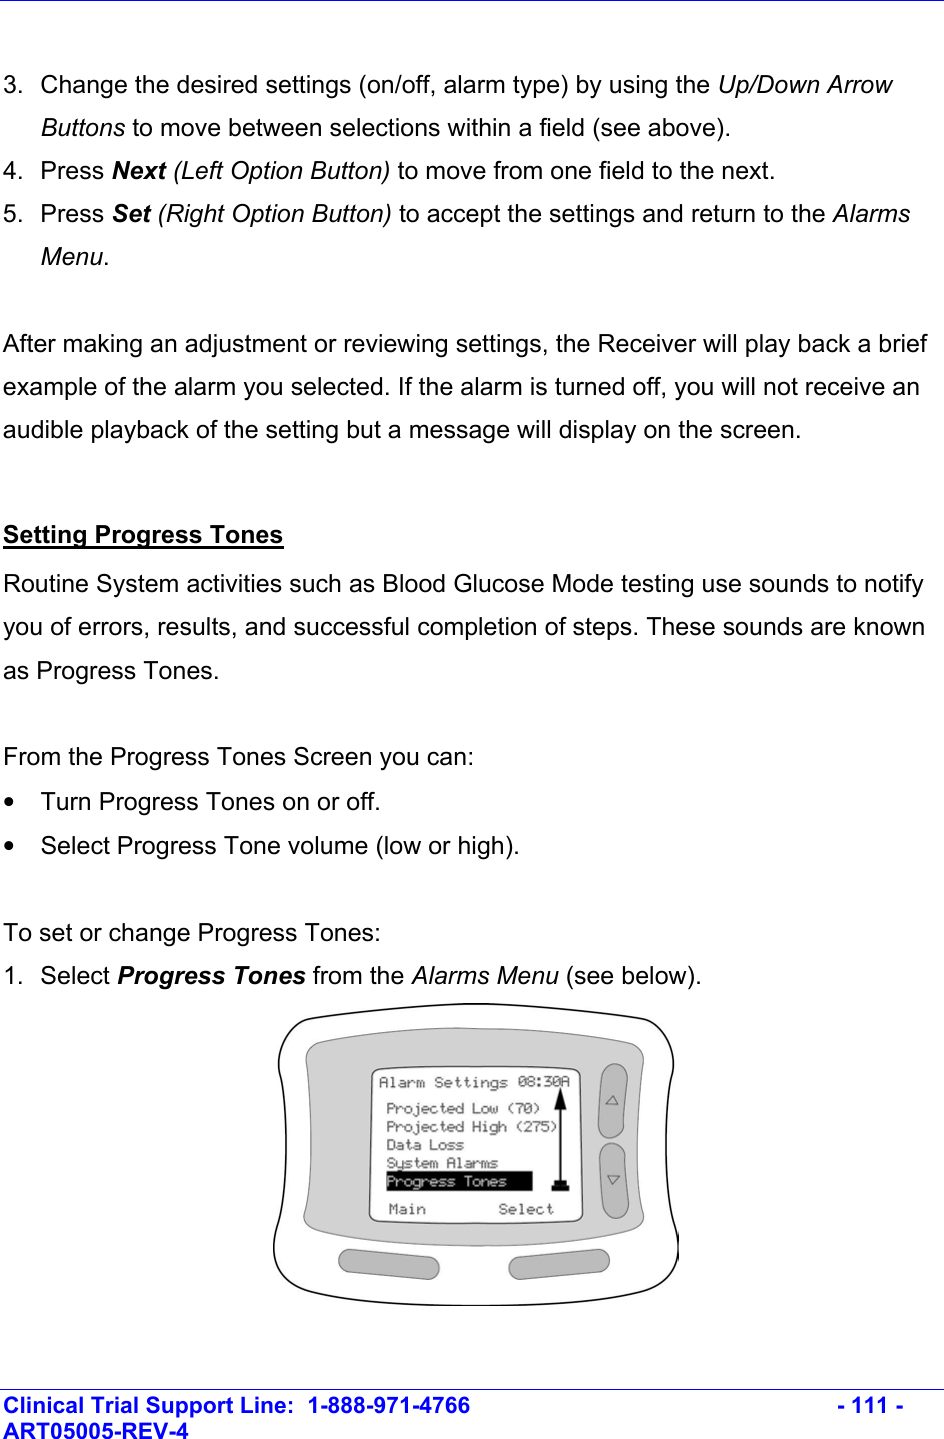
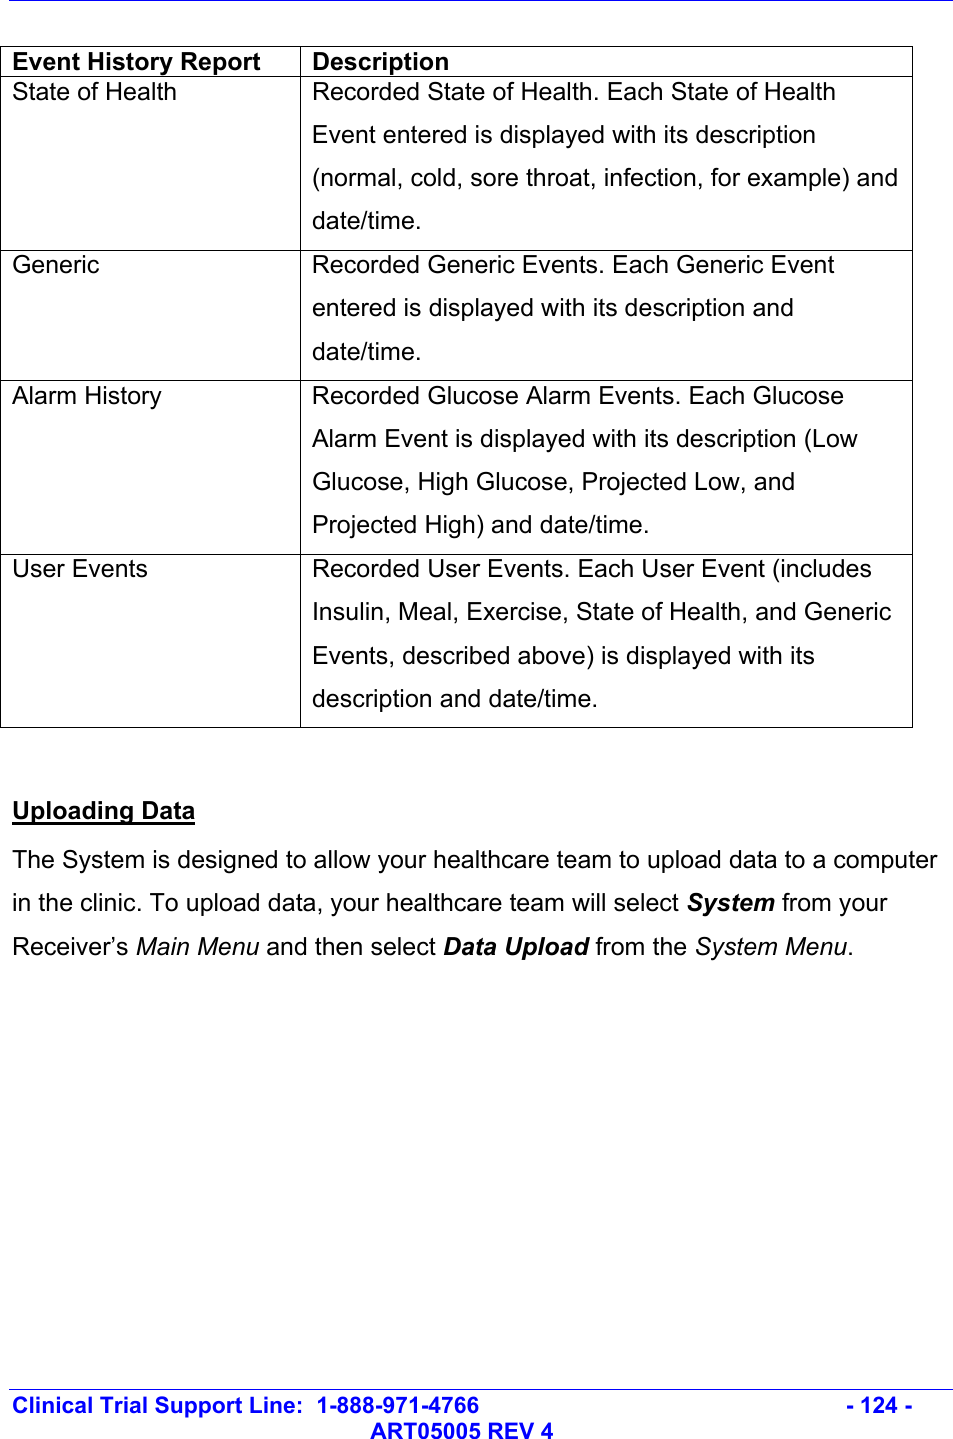
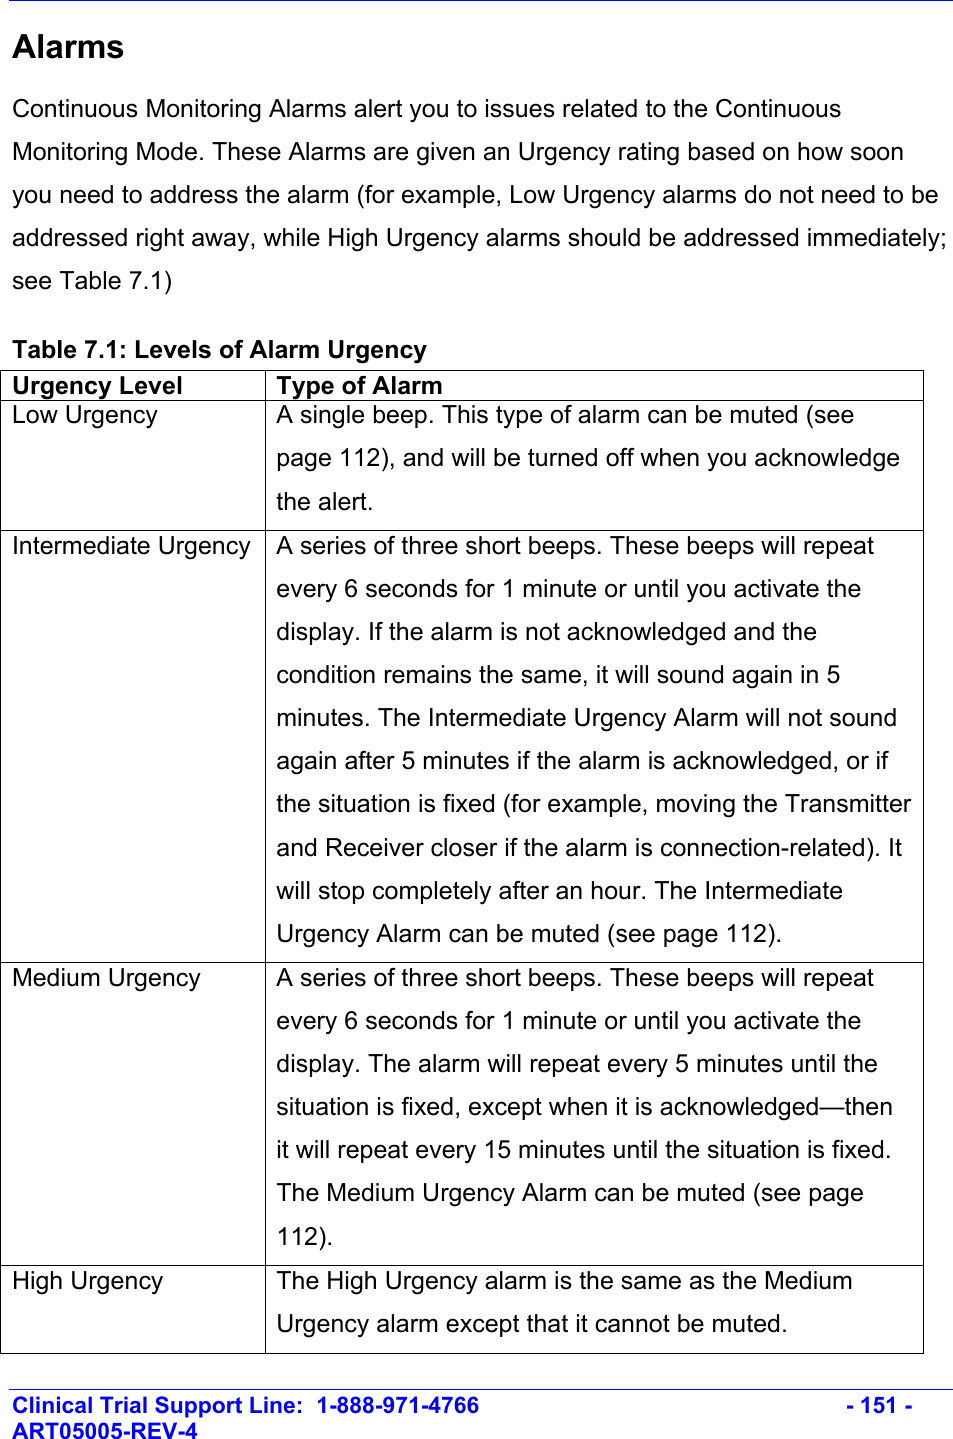
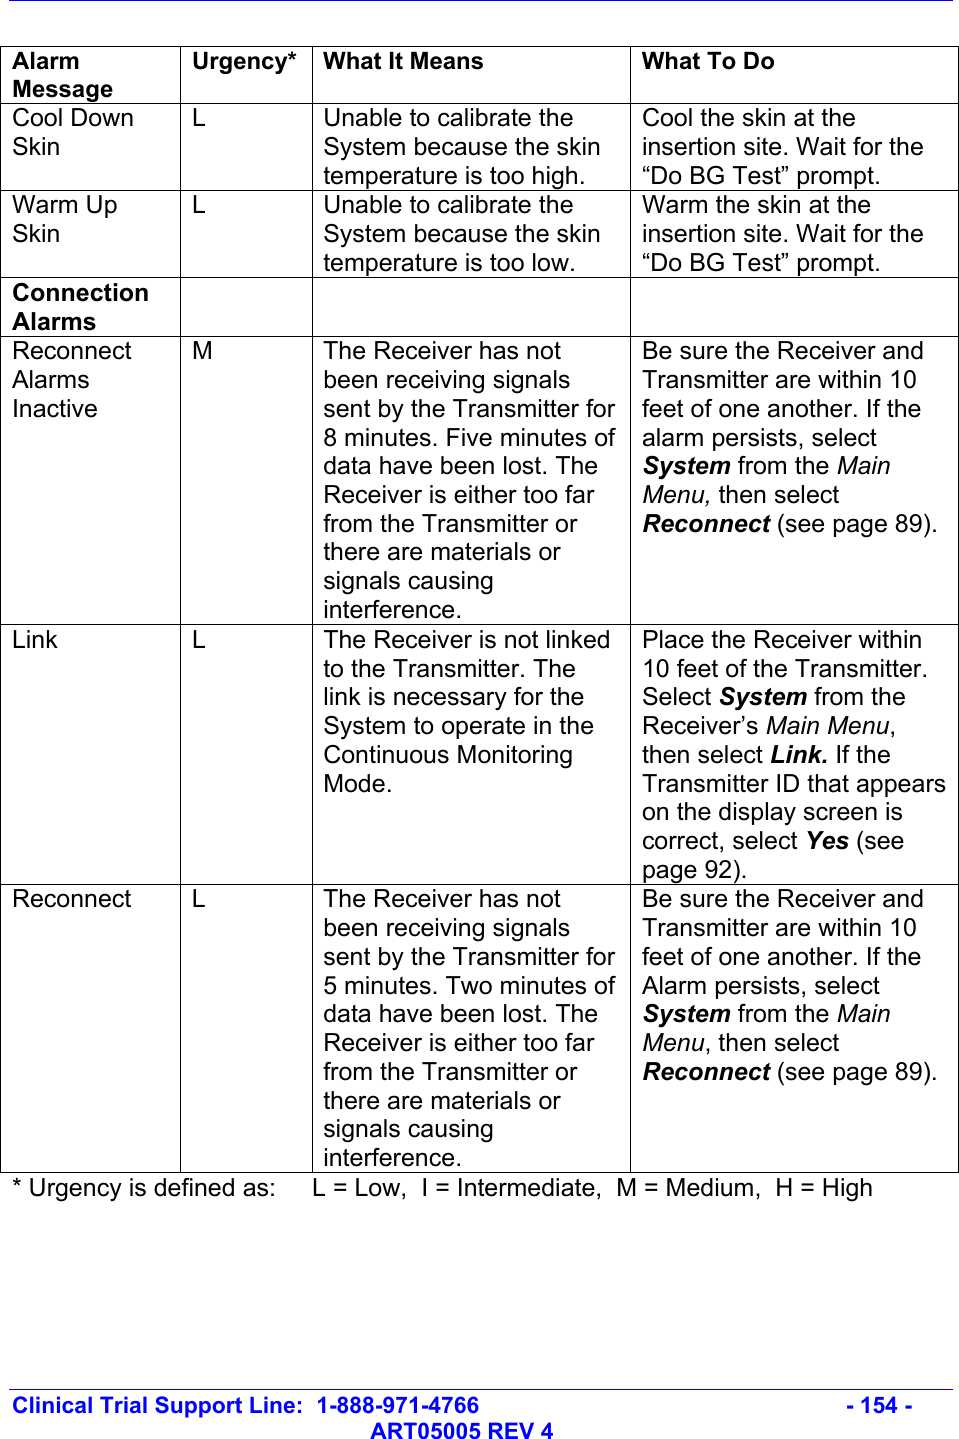
![Clinical Trial Support Line: 1-888-971-4766 - 80 - ART05005 REV 4 Table 3.1. Glucose Trend Arrows Glucose Trend Arrow Description Relatively Stable A horizontal Glucose Trend Arrow means your glucose is relatively stable (changing at a rate of less than 60 mg/dL/hr [3.3 mmol/L/hr]). Moderate Rise A Glucose Trend Arrow angled upward means your glucose is increasing moderately (at a rate of greater than 60 mg/dL/hr [3.3 mmol/L/hr] but less than 120 mg/dL/hr [6.7 mmol/L/hr]). Moderate Fall A Glucose Trend Arrow angled downward means your glucose is decreasing moderately (at a rate of greater than 60 mg/dL/hr [3.3 mmol/L/hr] but less than 120 mg/dL/hr [6.7 mmol/L/hr]). Rapid Rise A Glucose Trend Arrow pointing straight up means your glucose is increasing rapidly (at a rate of greater than 120 mg/dL/hr [6.7 mmol/L/hr]). Rapid Fall A Glucose Trend Arrow pointing straight down means your glucose is decreasing rapidly (at a rate of more than 120 mg/dL/hr [6.7 mmol/L/hr]). The letters CM in the display screen’s upper left corner indicate the Receiver is operating in the Continuous Monitoring Mode. This means the glucose reading that you see comes from the Sensor inserted under your skin, not from a drop of blood on a Test Strip.](https://usermanual.wiki/Abbott-Diabetes-Care/TX111004/User-Guide-507084-Page-80.png)


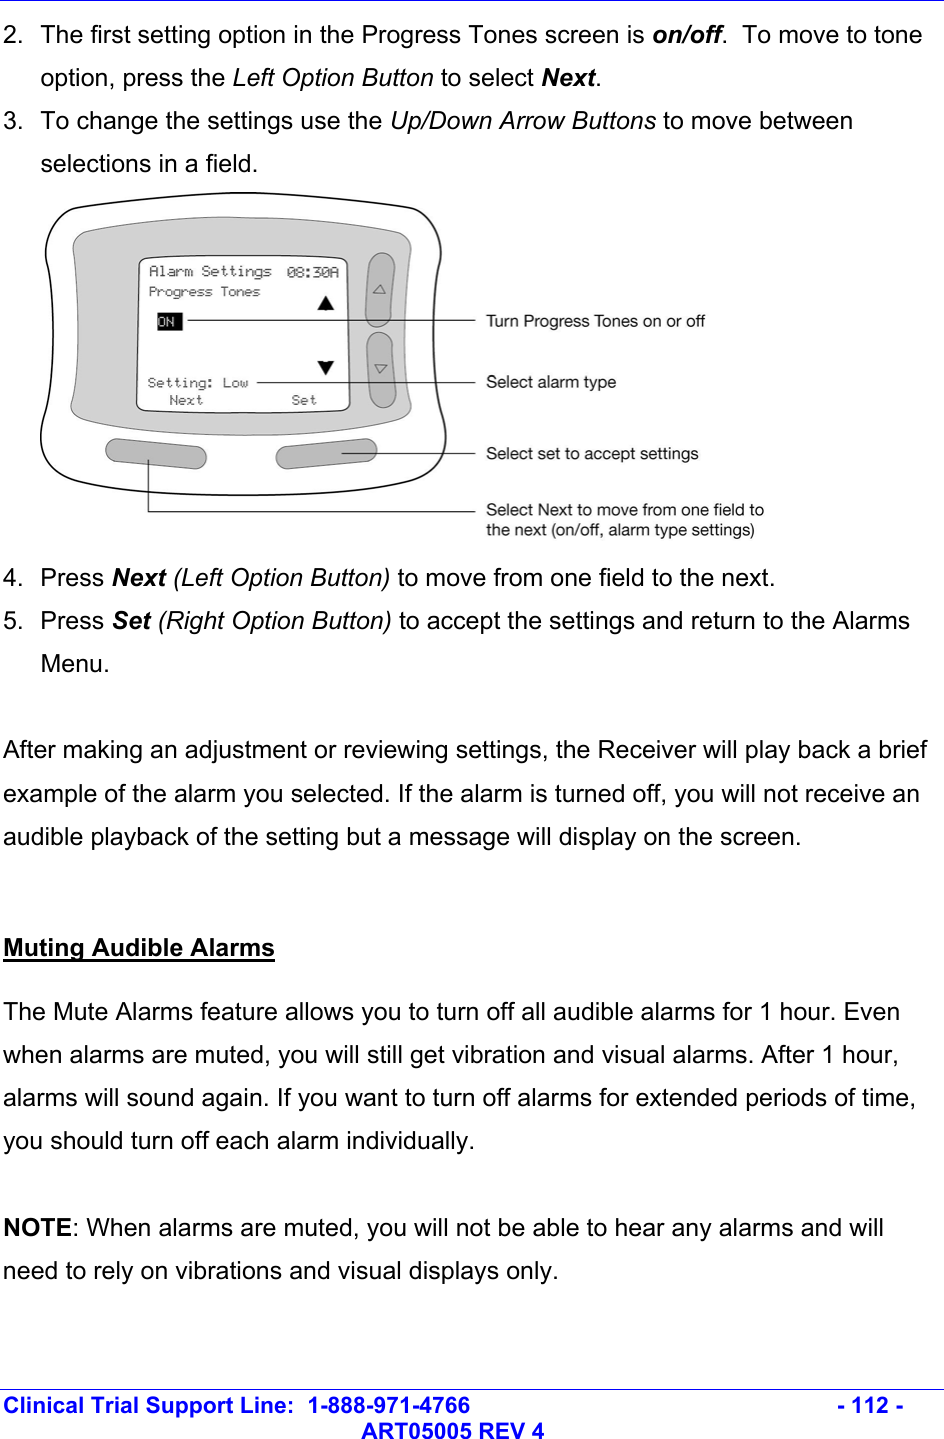

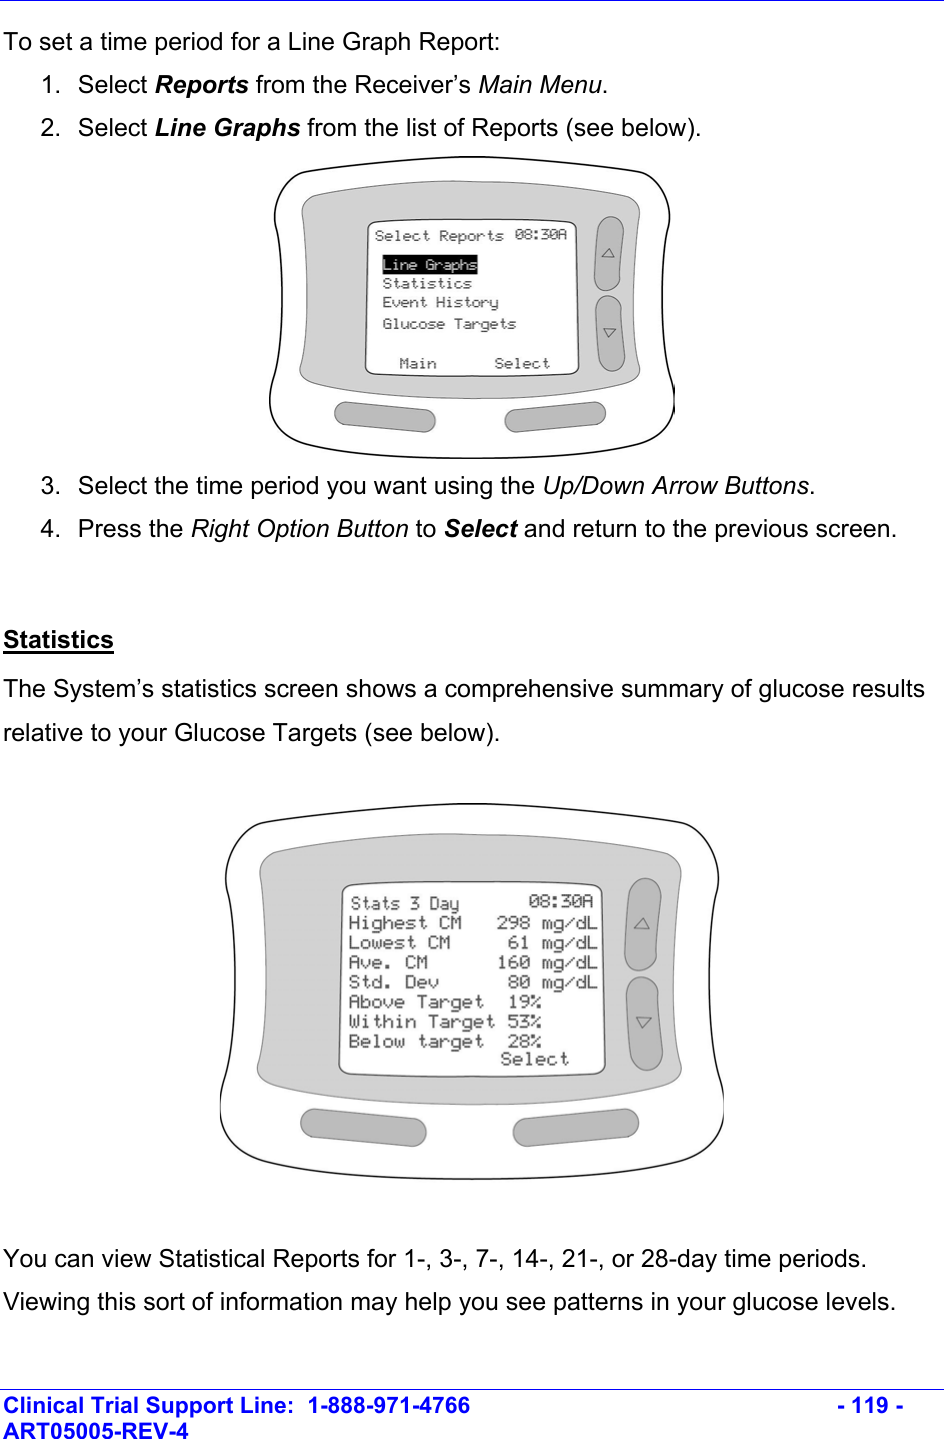
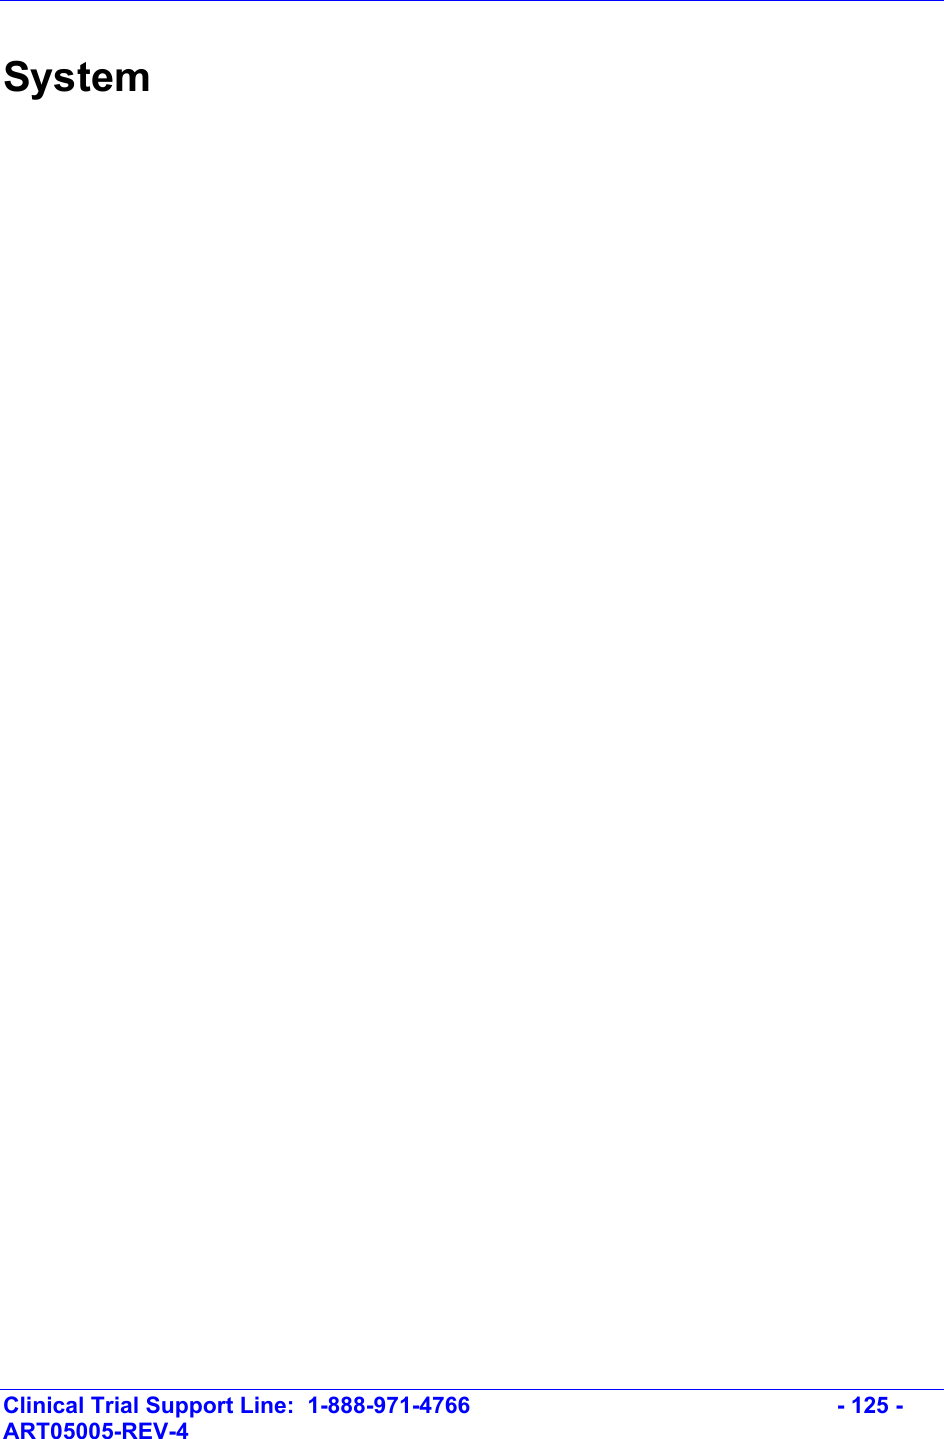


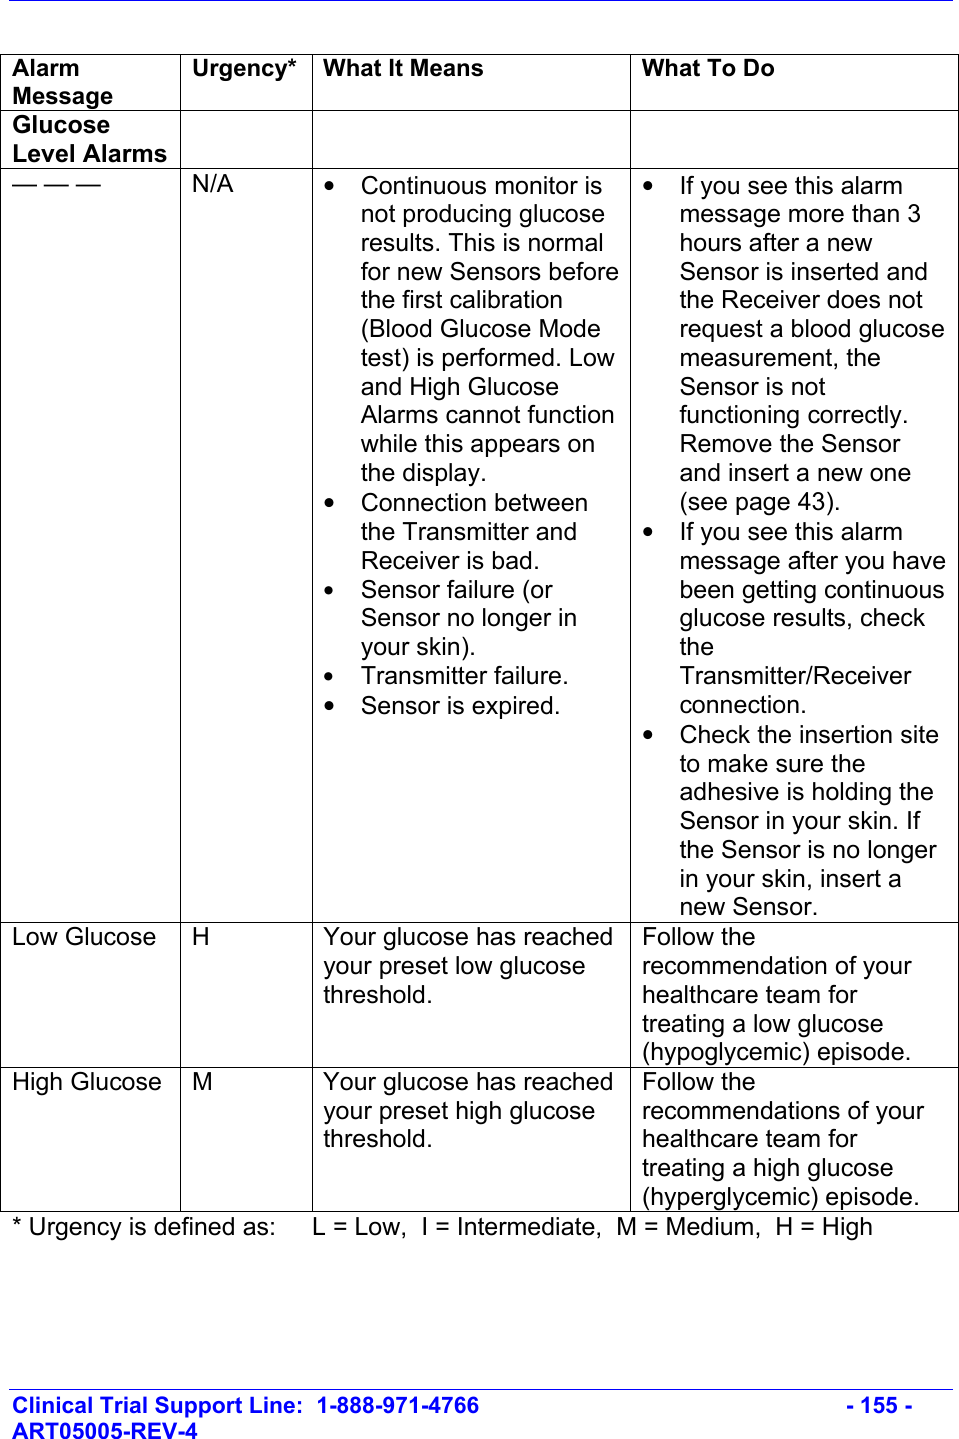


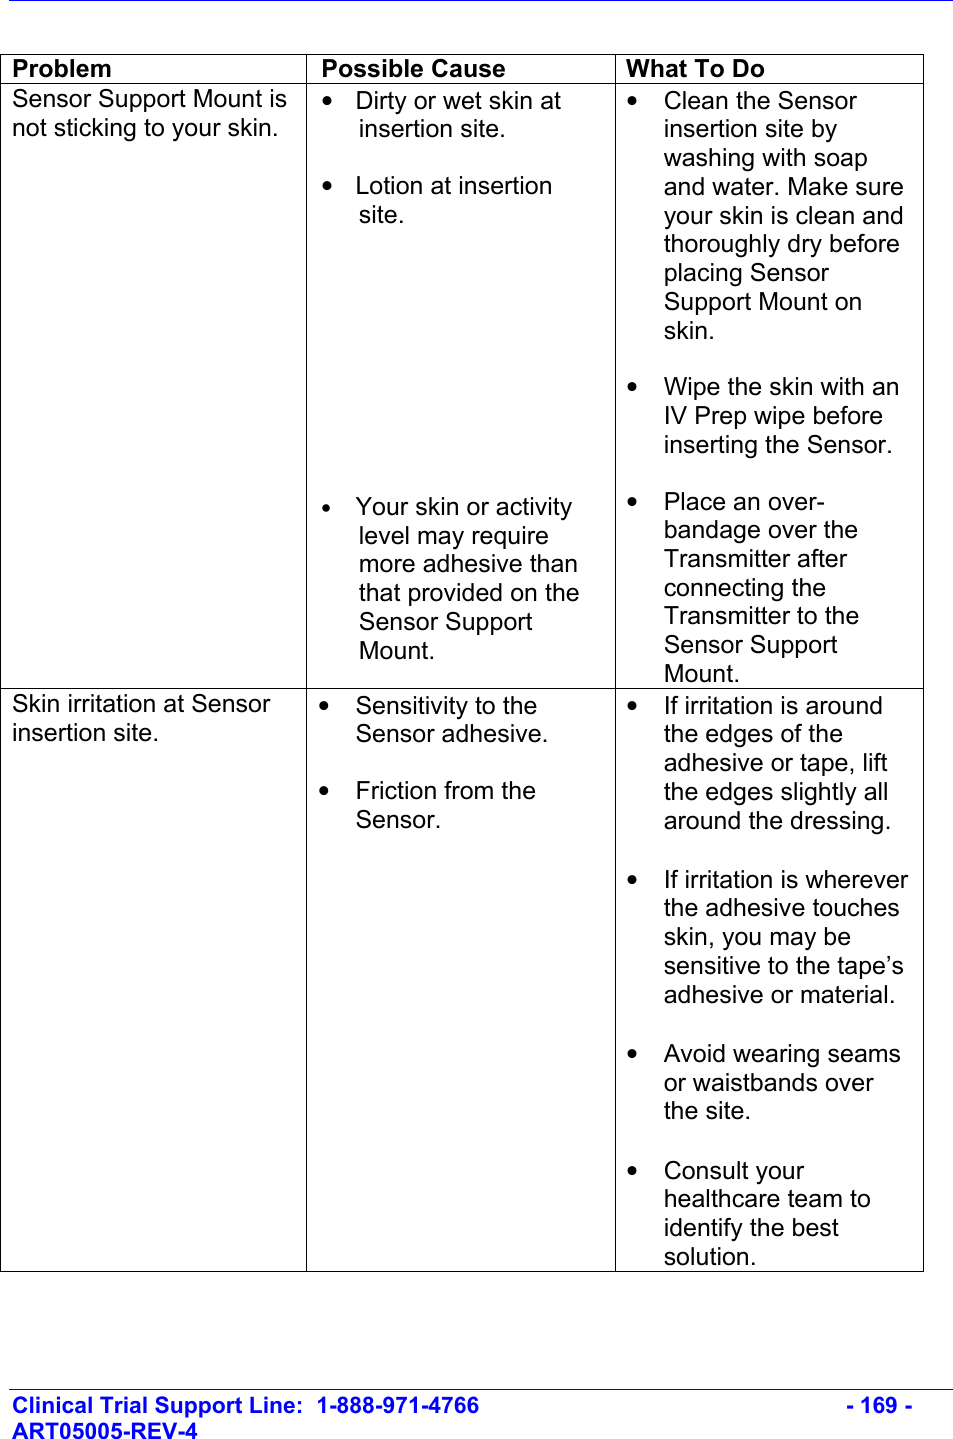
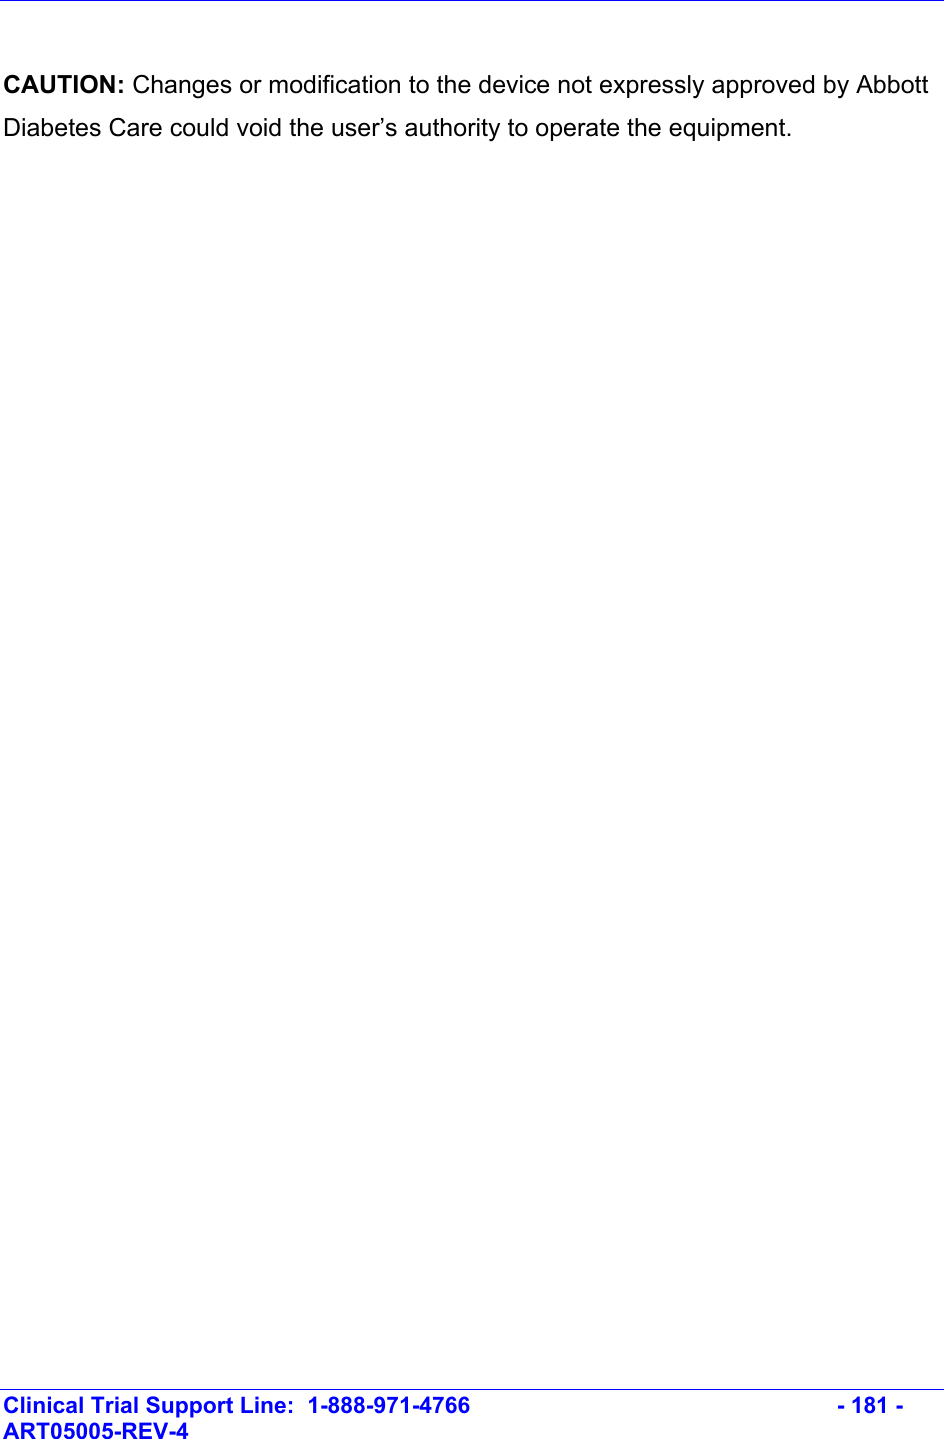
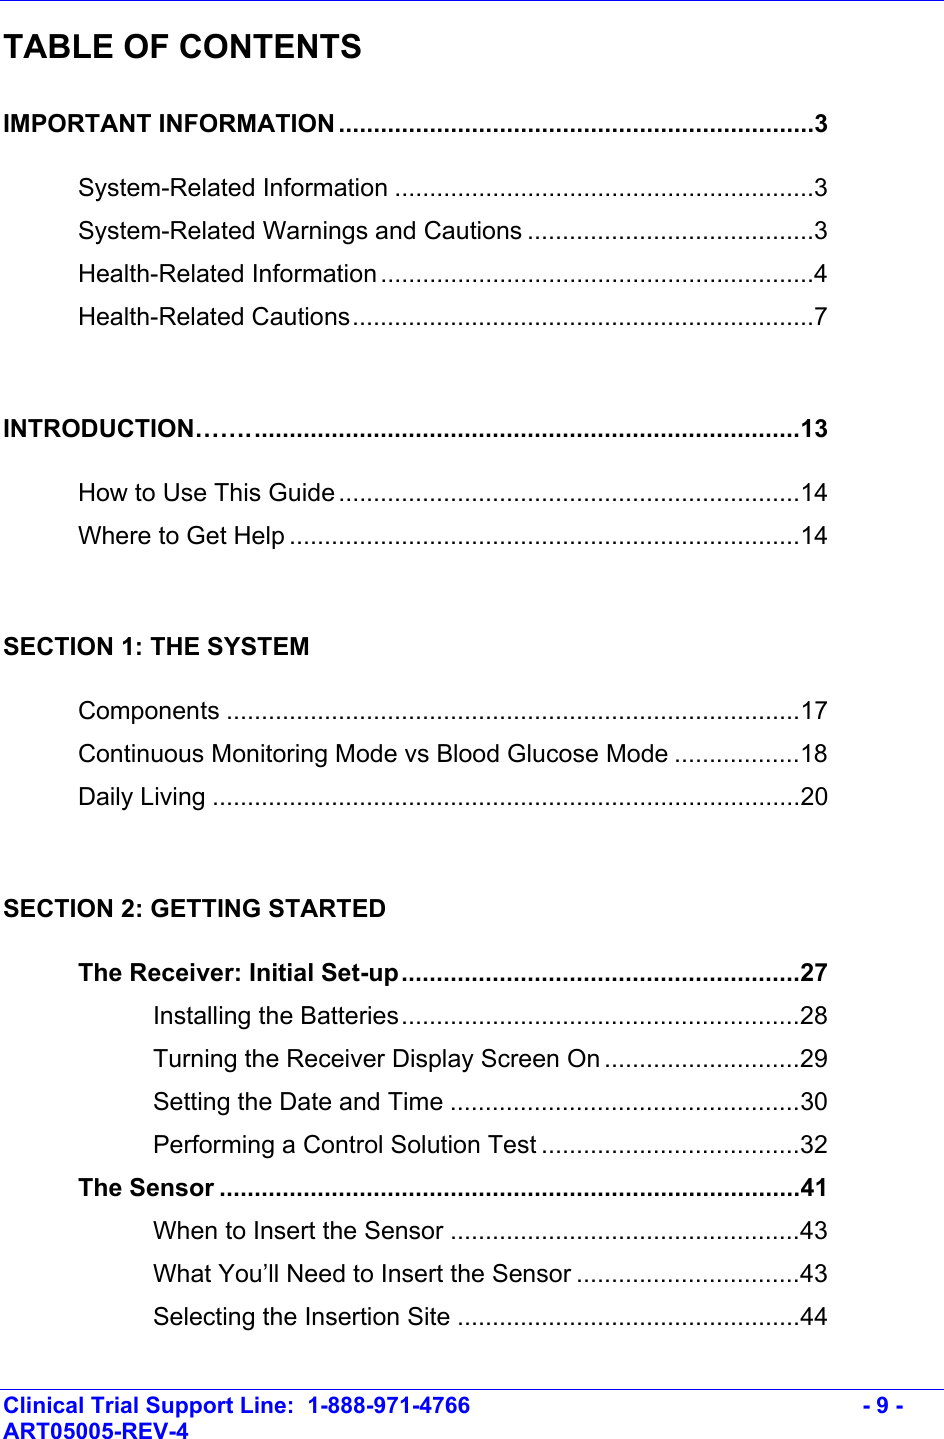
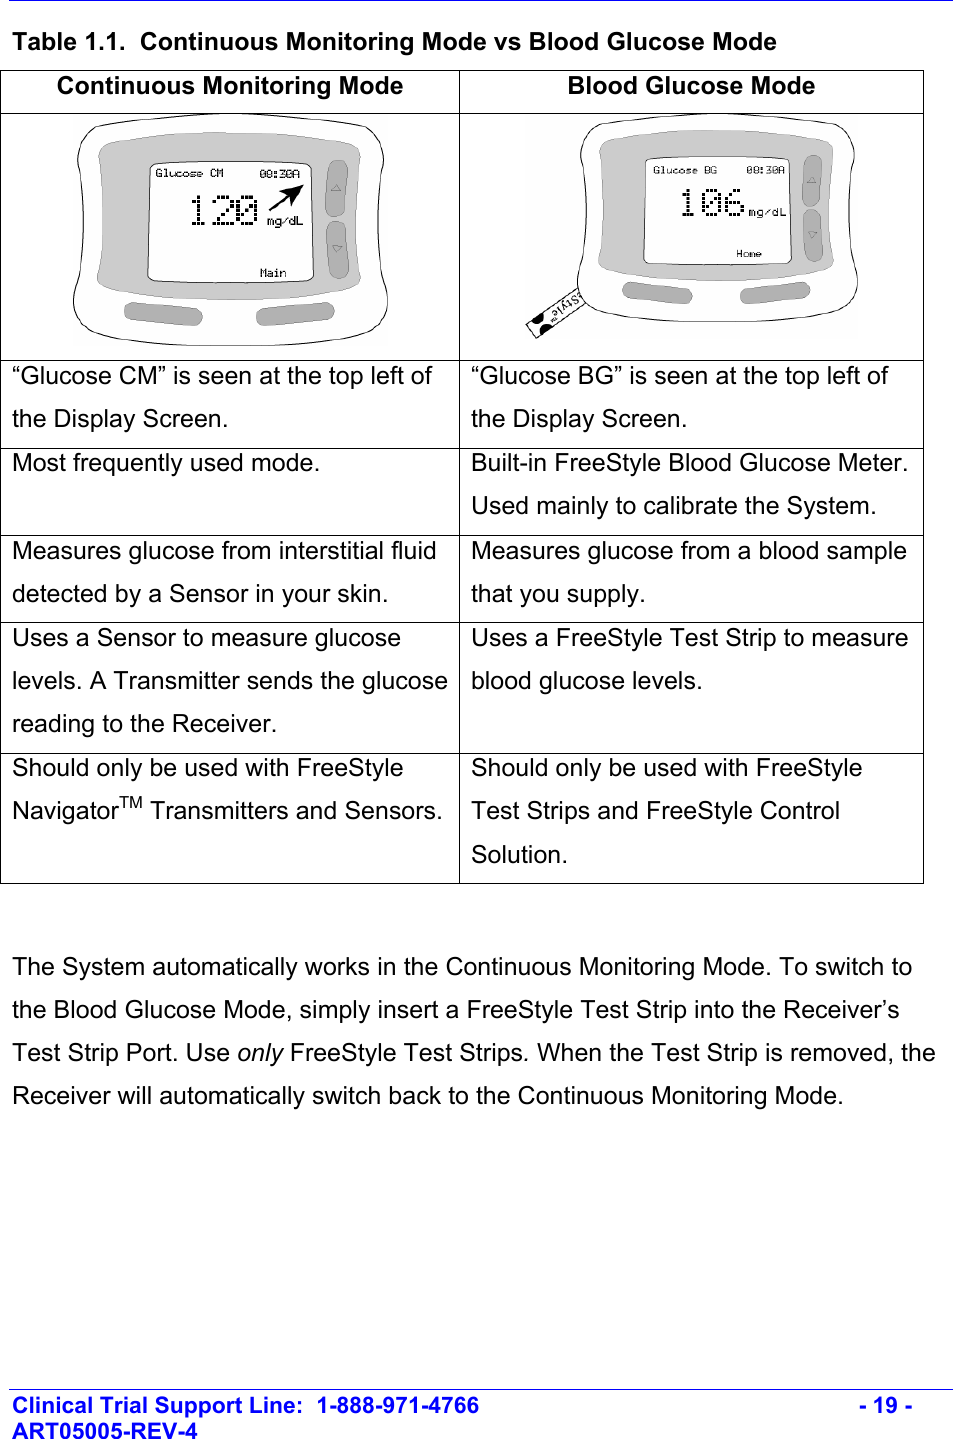
![Clinical Trial Support Line: 1-888-971-4766 - 163 - ART05005-REV-4 Error Codes A complete listing of the Blood Glucose Mode Error Codes can be found in Table 7.3. Table 7.3: Blood Glucose Mode Error Codes Error Code What It Means What To Do Er1 • Not enough blood was applied to Test Strip. • Problem with Test Strip. • Problem with Receiver. • Very low blood glucose (less than 20 mg/dL [1.1 mmol/L]). • If you have symptoms such as weakness, sweating, nervousness, headache, or confusion, follow your healthcare team’s advice for treating a low glucose level (hypoglycemic) episode. • Perform a Control Solution test using a new Test Strip. If results are within the range printed on Test Strip vial, retest your blood using a new Test Strip. • If Control Solution test does not work or error code persists, call Clinical Trial Support. Er2 • Problem with the Test Strip. • Problem with Receiver. • Very high blood glucose (greater than 500 mg/dL [27.8 mmol/L]). • High Control Solution applied when temperature is too cold. (This applies only to Control Solution labeled High.) • If you have symptoms such as thirst, fatigue, excess urination, or blurry vision, follow your healthcare team’s advice for treating a high glucose level (hyperglycemic) episode. • Perform a Control Solution test using a new Test Strip. If results are within the range printed on Test Strip vial, retest your blood using a new Test Strip. • If Control Solution test does not work or error code persists, call Clinical Trial Support.](https://usermanual.wiki/Abbott-Diabetes-Care/TX111004/User-Guide-507084-Page-163.png)