Abocom Systems WBD512 USB 802.11b Wireless LAN Adapter User Manual WBD512 manual SAR
Abocom Systems Inc USB 802.11b Wireless LAN Adapter WBD512 manual SAR
Users Manual Revised
Doc. No.: 082203-01
USB
802.11b Wireless LAN
Adapter
/Flash Disk
REGULATORY STATEMENTS
FCC Certification
The United States Federal Communication Commission (FCC) and the
Canadian Department of Communications have established certain rules
governing the use of electronic equipment.
Part15, Class B
This device 802.11b Wireless LAN/Disk (WBD512) and 802.11b Wireless
LAN USB Adapter (WUB1600) complies with Part 15 of FCC rules.
Operation is subject to the following two conditions:
1) This device may not cause harmful interface, and
2) This device must accept any interface received, including interface that
may cause undesired operation. This equipment has been tested and found to
comply with the limits for a Class B digital device, pursuant to Part 15 of
the FCC Rules. These limits are designed to provide reasonable protection
against harmful interference in a residential installation. This equipment
generates, uses and can radiate radio frequency energy, and if not installed
and used in accordance with the instructions, may cause harmful
interference to radio communications. However, there is no guarantee that
interference will not occur in a particular installation. If this equipment does
cause harmful interference to radio or television reception, which can be
determined by turning off and on, the user is encouraged to try to correct the
interference by one or more of the following measures:
Ø Reorient or relocate the receiving antenna.
Ø Increase the distance between the equipment and receiver.
Ø Connect the equipment into an outlet on a circuit different from that to
which the
receiver is connected.
Warning: Changes or modifications to this unit not expressly approved by the
party
responsible for compliance could void the user authority to operate
the equipment.
Tested To Comply With FCC Standards. FOR HOME OR OFFICE USE.
CAUTION:
1) This transmitter must not be co-located or operating in conjunction
with any other antenna or transmitter.
2) The equipment complies with FCC RF radiation exposure limits set
forth for
an uncontrolled environment, under 47 CFR 2.1093 paragraph
(d)(2).
3) This Transmitter must not be co-located or operating in conjunction
with any other antenna or transmitter
The 11Mbps Wireless LAN PCMCIA Card has been tested to the
FCC exposure requirements (Specific Absorbtion Rate).
U.S. Service Centre:
Company name: Xterasys Corporation
Address:4711 CHINO AVE. CHINO,CA91710 USA
Contact person: Mr. Larry
TEL: 909-590-0600
FAX: 909-590-0388
Table of Contents
FCC CERTIFICATION…………….1
INTRODUCTION……………………1
PARTS NAME AND FUNCTIONS……………1
LED Indicators…………………..1
Switch (optional)………………...2
PART 1: 802.11B WIRELESS LAN……..1
INSTALLATION………………………….2
INSTALL THE DRIVER & UTILITY………...2
In Windows 98SE/ME…………...2
In Windows 2000………………...5
In Windows XP………………….6
INSTALL THE DEVICE…………………….8
In Windows 98SE……………….8
In Windows
ME…………………10
In Windows
2000………………..11
In Windows
XP………………….12
Verify……………………………1
6
NETWORK
CONNECTION…………….17
IN WINDOWS
98SE/ME………………….17
IN WINDOWS
2000/XP…………………...21
CONFIGURATION………………………2
5
USE MANUFACTURER’S CONFIGURATION
UTILITY…………………………………27
Configuration Tool……………..28
More Setting……………………30
Advanced Setting……………….36
Information……………………..39
USE WINDOWS XP CONFIGURATION
UTILITY………………………………….4
0
UNINSTALLATION……………………..4
9
UNINSTALL THE MANUFACTURER’S
CONFIGURATION
UTILITY………………..49
UNINSTALL THE
DEVICE………………….50
PART 2: USB FLASH DISK……………..1
INSTALL DRIVER……………………….2
Windows 98/98SE – Install from
CD RO………………………...…2
Windows ME/2000/XP-No Driver
is Required……………………….3
REMOVING YOUR USB FLASH DISK……...4
MANAGE YOUR USB FLASH DISK…..5
MAIN MENU……………………………...5
DISK MANAGER………………………….6
DISK PARTITION………………………….6
Switch between Protected and
Un-protected Disks………………8
PASSWORD
MANAGER……………………10
Change
Password………………...10
Password
Hint……………………11
PC
LOCK………………………………..11
Plug-in USB Flash
Disk…………11
Plug-in USB Flash Disk and Input
Password…………………………1
2
To lock a
PC……………………..13
To unlock a
PC…………………..14

Part 1: 802.11b Wireless LAN
1-1
Introduction
About this manual
This document is composed of two
parts, which will guide you through
the installation procedures for setting
up the 802.11b Wireless LAN USB
Adapter and the optional USB Flash
Disk, respectively.
However, if you want to use the
optional USB Flash Disk function in
Windows ME/2000/XP, no driver
installation is required since it is Plug
and Play ready.
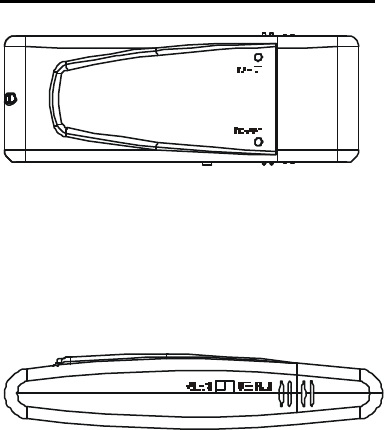
Parts name and functions
LED Indicators
Link/ACT: Green, on/Blink
Power: Green, on
Part 1: 802.11b Wireless LAN
1-2
Switch (optional)
Switch left to use this device as a Wireless
LAN adapter, switch right to use it as a Flash
Disk.
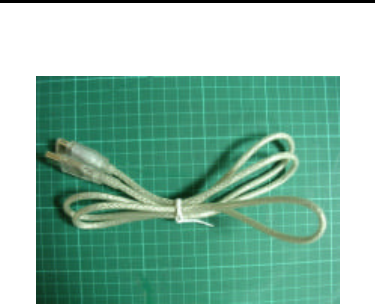
* USB Extension Cable to be used together
with USB Adapter.
The product must be used with the USB
cable and a separation distance of at least
20cm must be maintained between the
antenna of this device and users.
Part 1: 802.11b Wireless LAN
1-3
USB extension cable

Part 1: 802.11b Wireless LAN
1-1
Part 1: 802.11b Wireless
LAN
Part 1: 802.11b Wireless LAN
1-2
Installation
Install the Driver & Utility
Note: Always remember to install the
Driver & Utility before you plug USB
cable into the PC’s USB port.
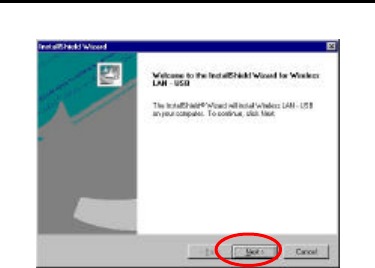
In Windows 98SE/ME
For Windows 98SE users: As you
perform the installation, have your system
operating CD-ROM at hand. You may be
asked to insert the OS CD-ROM for the
system to download a specific driver.
1. Insert the supplied CD-ROM into the
CD-ROM drive. Double click on
Setup.exe to install the Wireless LAN
Driver & Utility.
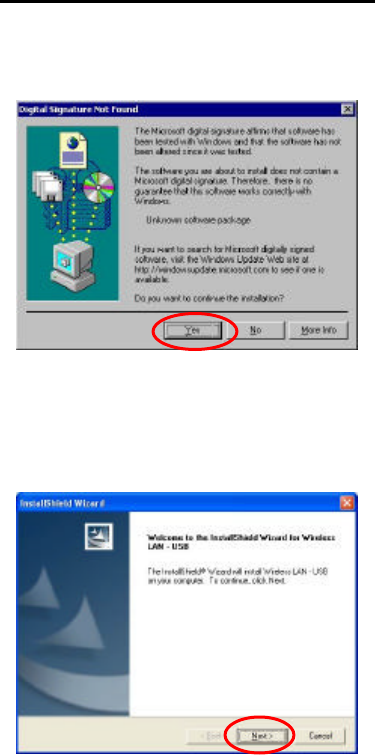
2. In the Welcome screen, click Next.
Part 1: 802.11b Wireless LAN
1-3
Part 1: 802.11b Wireless LAN
1-4
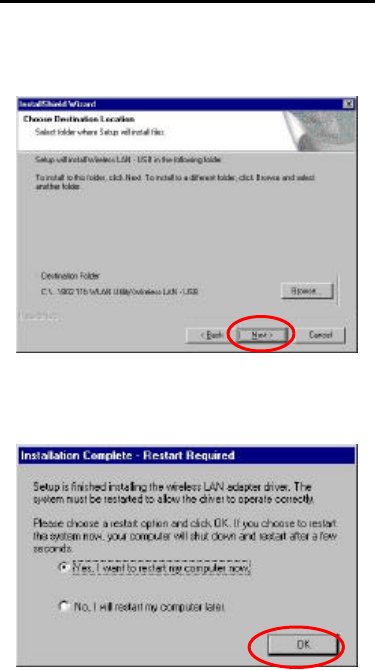
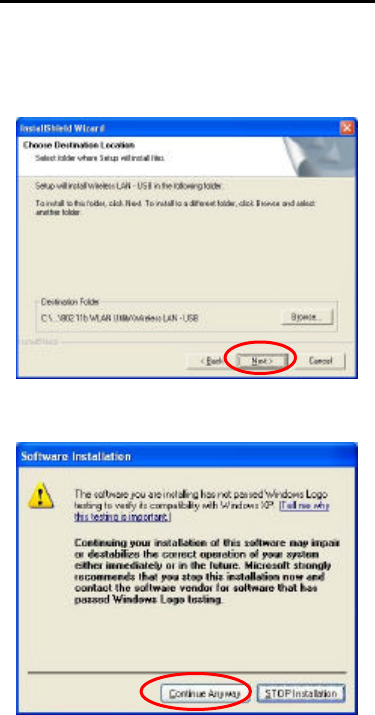
3. Click Next; Windows will copy all the
necessary files to your system.
4. When Windows prompts you to restart
your computer, select Yes and click OK.

Part 1: 802.11b Wireless LAN
1-5
In Windows 2000
1. In the Welcome screen, click Next.
2. Click Next; Windows will copy all the
necessary files to your system.
Part 1: 802.11b Wireless LAN
1-6
3. In the Digital Signature Not Found
window, click Yes to continue.
4. Restart your computer.
In Windows XP
1. In the Welcome screen, click Next.
Part 1: 802.11b Wireless LAN
1-7
2. Click Next; Windows will copy all the
necessary files to your system.
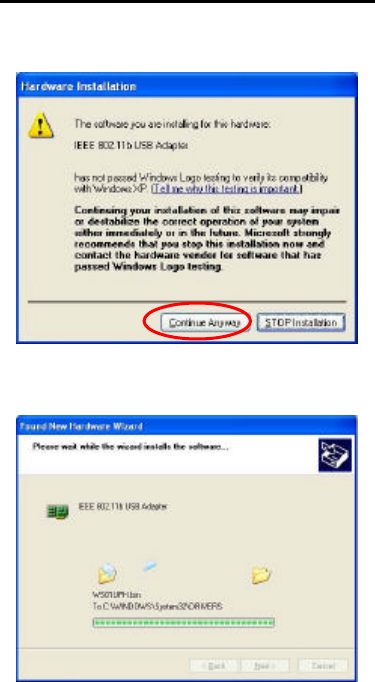
3. Click Continue Anyway to proceed.
Part 1: 802.11b Wireless LAN
1-8
Install the Device
1. Plug the square end (Type B) of USB
cable into the adapter's USB port.
2. Plug the rectangle end (Type A) of USB
cable into the PC's USB port
3. After installing the Wireless USB
Adapter, follow below sections to install
the adapter’s hardware.
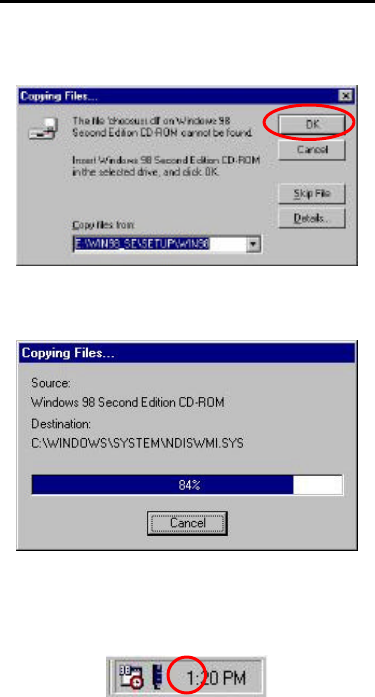
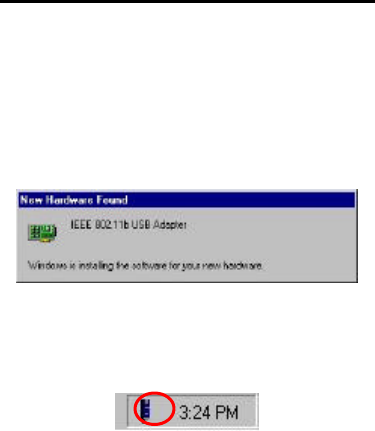
In Windows 98SE
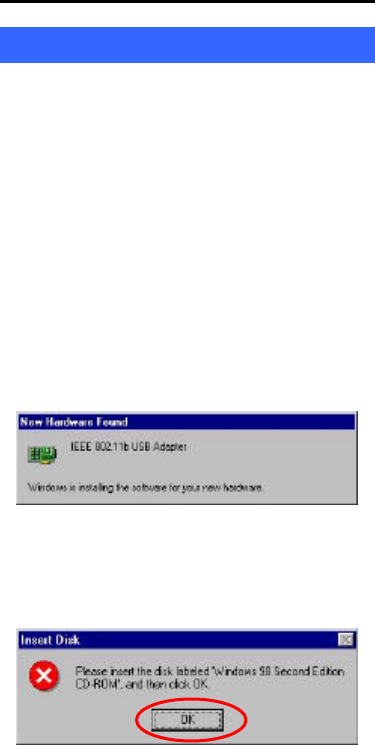
1. Plug USB cable into the PC’s USB port.
Windows will auto-detect the 802.11b
USB Adapter and a “New Hardware
Found” window will show up.
2. Once the “Please insert the disk labeled
‘Windows 98 Second Edition
CD-ROM’, and then click OK”
window appears, click OK.
Part 1: 802.11b Wireless LAN
1-9
3. Select the correct drive and click OK.
4. Windows will copy all the necessary
files to your system.
5. Windows will auto-detect the 802.11b
USB Adapter promptly as the icon
showed below.
Part 1: 802.11b Wireless LAN
1-10
In Windows ME
1. Plug USB cable into the PC’s USB port.
Windows will auto-detect the 802.11b
USB Adapter and a “New Hardware
Found” window will show up.
2. Windows will auto-detect the 802.11b
USB Adapter promptly as the icon
showed below.
Part 1: 802.11b Wireless LAN
1-11
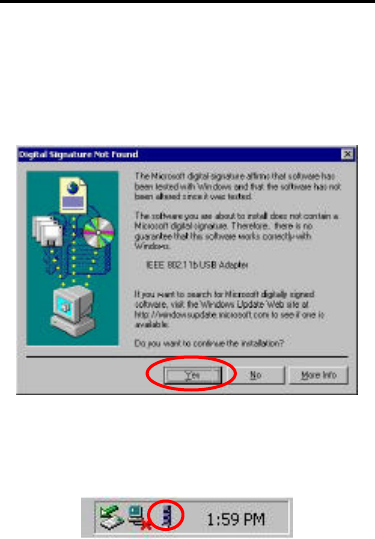
In Windows 2000
1. In Digital Signature Not Found
window, click Yes to continue.
2. Windows will auto-detect the 802.11b
USB Adapter promptly as the icon
showed below.
Part 1: 802.11b Wireless LAN
1-12
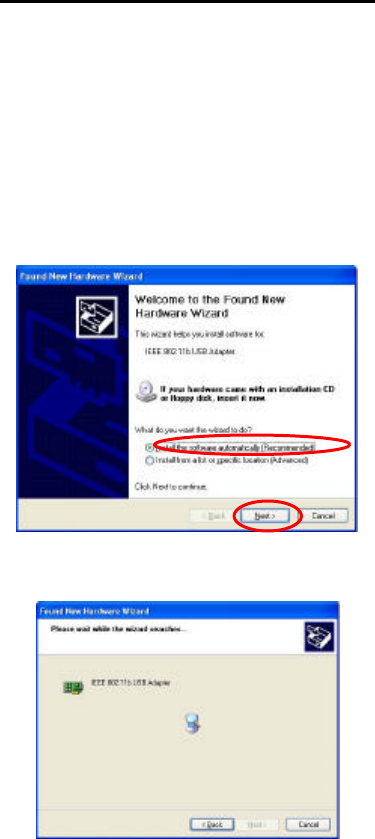
In Windows XP
1. Plug USB cable into the PC’s USB port.
Windows will auto-detect the 802.11b
USB Adapter and a “Found New
Hardware Wizard” window will show
up. Select “Install the software
automatically (recommended)”. Click
Next to continue.
2. Wait and the Wizard will search for the
802.11b USB Adapter.

Part 1: 802.11b Wireless LAN
1-13
Part 1: 802.11b Wireless LAN
1-14
3. Click Continue Anyway to proceed.
4. Click Next; Windows will copy all the
necessary files to your system.
Part 1: 802.11b Wireless LAN
1-15
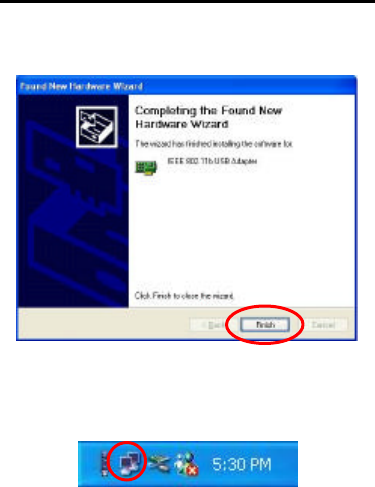
5. Click Finish to complete the installation.
6. Windows will auto-detect the 802.11b
USB Adapter promptly as the icon
showed below.
Part 1: 802.11b Wireless LAN
1-16
Verify
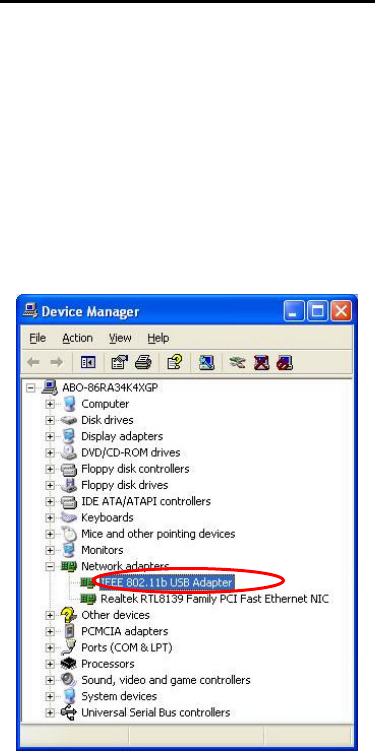
To verify if the device exists in your
computer and is enabled, go to Start à
Settings à Control Panel à System (à
Hardware) à Device Manager. Expand the
Network adapters category. If the IEEE
802.11b USB Adapter is listed here, it means
that your device is properly installed and
enabled.
Part 1: 802.11b Wireless LAN
1-17
Network Connection
Once the driver has been installed, you must
make some changes to your network
settings.
In Windows 98SE/ME
1. Go to Start
à
Settings
à
Control
Panel
à
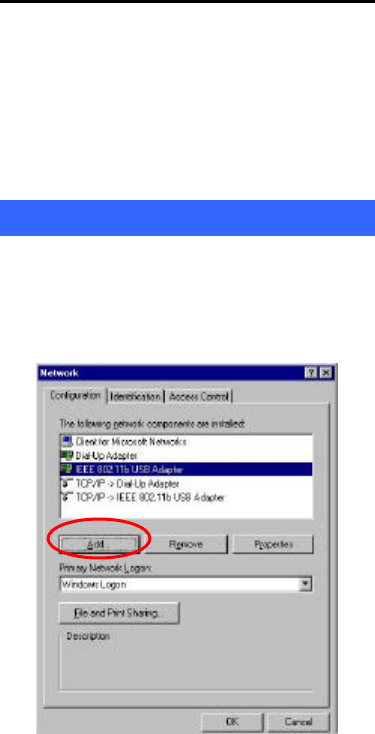
Network.
2. Make sure that you have all the
following components installed.
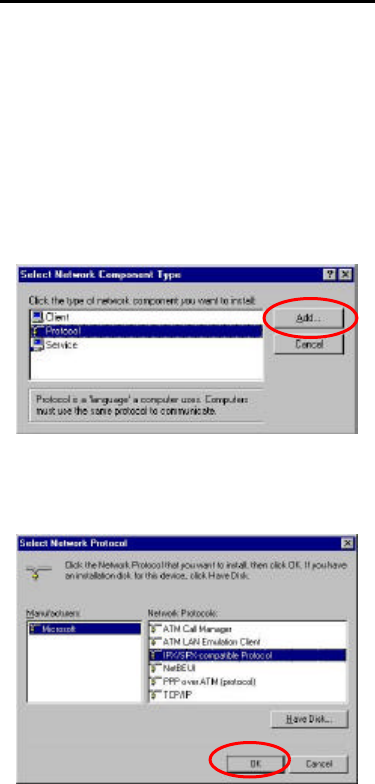
§ Wireless US B Adapter
§ IPX/SPX-compatible Protocol
Part 1: 802.11b Wireless LAN
1-18
§ NetBEUI
§ TCP/IP
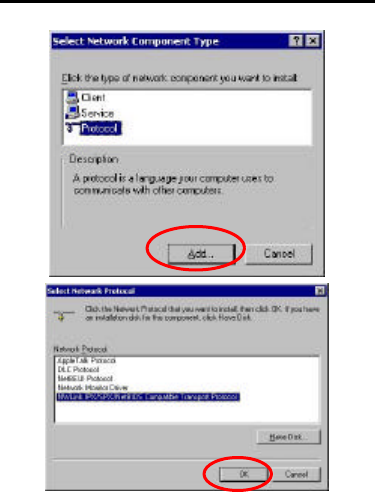
3. If any components are missing, click on
the Add button to add them in. All the
protocols and clients required listed above
are provided by Microsoft.
4. After clicking Add, highlight the
component you need, click Add.
5. Highlight Microsoft, and then double
click on the item you want to add. Click
OK.
Part 1: 802.11b Wireless LAN
1-19
6. For making your computer visible on the
network, enable the File and Print
Sharing.
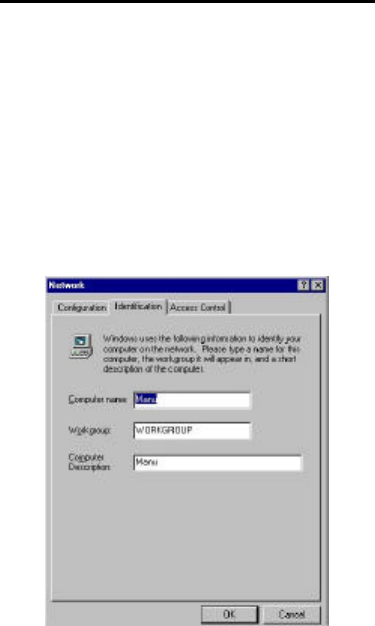
7. Click the Identification tab. Make up a
name that is unique from the other
computers' names on the network. Type
the name of your workgroup, which
should be the same used by all of the
other PCs on the network.
Part 1: 802.11b Wireless LAN
1-20
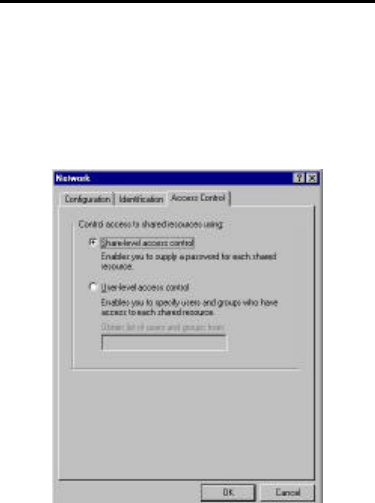
8. Click the Access Control tab. Make
sure that “Shared-level access control”
is selected. If connecting to a Netware
server, share level can be set to
“User-level access control.”
9. When finished, reboot your computer
to activate the new device.
10. Once the computer has restarted and
Windows has booted up, a Logon window
will appear and require you to enter a
username and password. Make up a
username and password and click OK.
Do not click the Cancel button, or you
won’t be able to log onto the network.
11. Double-click the Network
Neighborhood icon on the Windows
Part 1: 802.11b Wireless LAN
1-21
desktop, and you should see the names
of the other PCs on the network.
In Windows 2000/XP
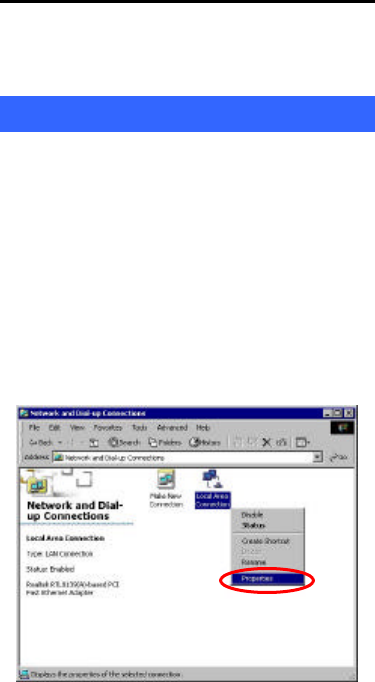
1. (In Windows 2000)
Go to Start
à
Settings
à
Control
Panel
à
Network and Dial-up
Connections
à
Local Area
Connection
à
Properties.
(In Windows XP)
Go to Start
à
Control Panel
à
Network Connections
à
Wireless
Network Connection Enabled Wireless
USB Adapter
à
Properties.
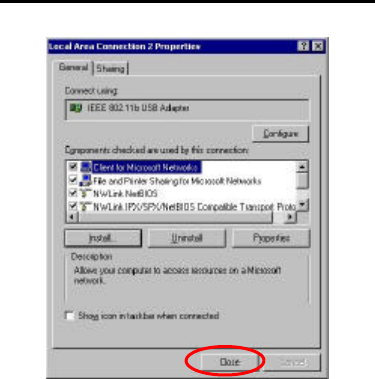
2. Make sure that you have all the
following components installed.
§ Client for Microsoft Networks
§ NWLink NetBIOS

Part 1: 802.11b Wireless LAN
1-22
§ NWLink IPX/SPX/NetBIOS
Compatible Transport
Protocol
§ Internet Protocol (TCP/IP)
3. If any components are missing, click on
the Install …button to select the
Client/Service/Protocol required. After
selecting the component you need, click
Add…to add it in.
Part 1: 802.11b Wireless LAN
1-23
Part 1: 802.11b Wireless LAN
1-24
4. For making your computer visible on
the network, make sure you have installed
File and Printer Sharing for Microsoft
Networks.
5. When finished, you must restart your
computer to complete installation.
Part 1: 802.11b Wireless LAN
1-25
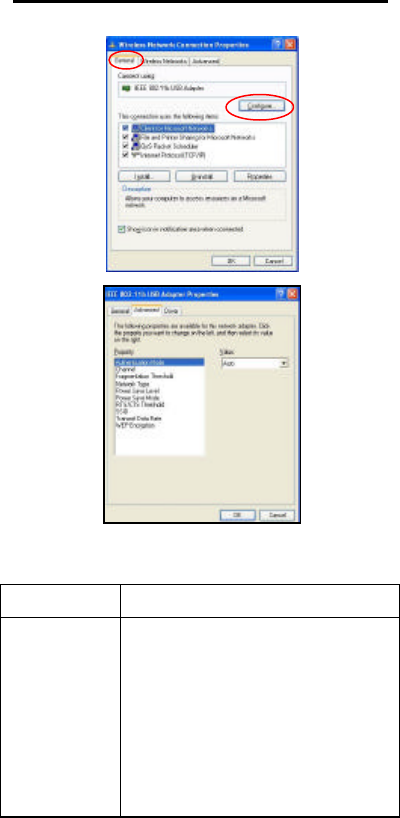
Configuration
Note: For Windows XP users, you have
an option of using one of two
Configuration Utilities.
1) Use Windows XP Configuration Utility.
(the default setting)
Please refer to Use Windows XP
Configuration Utility section to use the
configuration.
2) Use Manufacturer’s Configuration
Utility
If you want to use the Configuration
Utility that came with the supplied
CD-ROM, you need to disable the
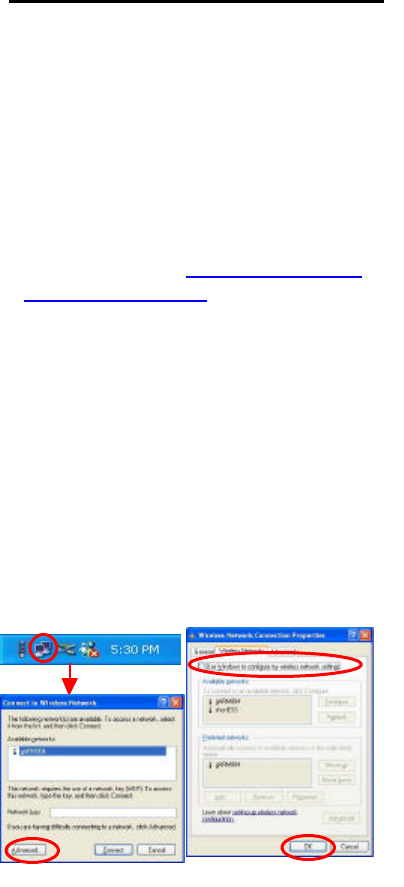
Windows XP's wireless configuration.
1. Double-click the network status icon. (see
Fig. 1)
2. Click Advanced. (see Fig. 2)
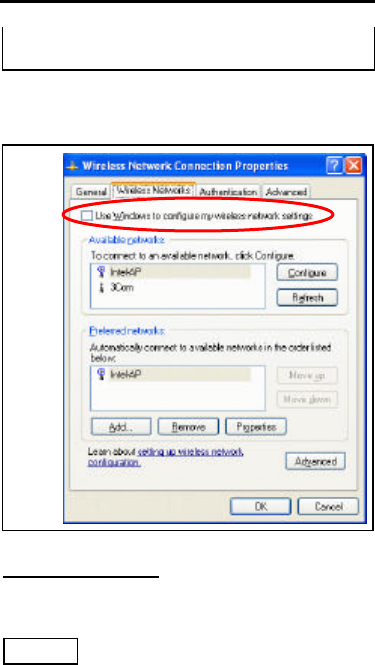
3. Uncheck Use Windows to configure my
wireless network settings then click OK.
Fig. 1
Fig. 2
Fig. 3

Part 1: 802.11b Wireless LAN
1-26
(see Fig. 3)

Part 1: 802.11b Wireless LAN
1-27
Use Manufacturer’s Configuration
Utility
After successful installation of the Wireless
PC Card’s driver and utility, the
Configuration Utility icon will appear in the
taskbar. You will be able to access the
Configuration Utility through the
Configuration icon.

Part 1: 802.11b Wireless LAN
1-28
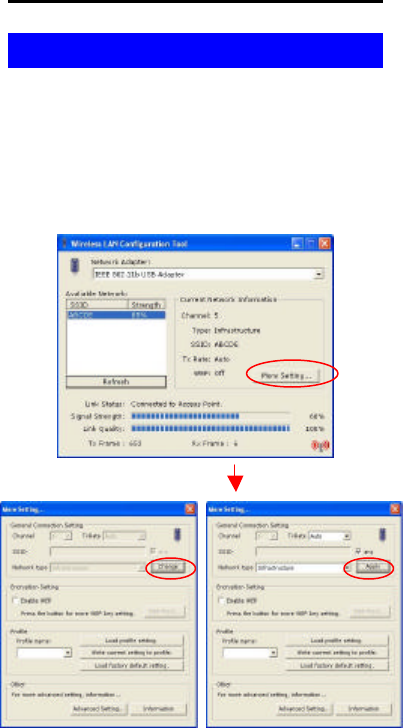
Configuration Tool
The Configuration Tool Screen displays the
current status of the Wireless USB Adapter.
Note: Remember to press Refresh to
rescan and search for the Access
Point.
Item Description
SSID The SSID is the unique name shared among
all points in your wireless network. The
name must be identical for all devices and
points attempting to connect to the same
network.
It shows the current SSID setting of the
Wireless USB Adapter.
Strength Displays the signal strength of the
connection between the Wireless USB
Adapter and the Access Point it connects.

Part 1: 802.11b Wireless LAN
1-29
Item Description
Channel
Shows the selected channel that is currently
in use. (There are 14 channels available,
depending on the country.)
Type The infrastructure is intended for the
connection between wireless network cards
and Access Point.
Tx Rate Shows the current transfer rate. (Fixed 1
Mbps , Fixed 2 Mbps , Fixed 5.5 Mbps,
Fixed 11Mbps or Auto)
WEP WEP is a data privacy mechanism based on
a 64-bit/128-bit shared key algorithm. Under
the drop-down box, you can choose to have
WEP encryption Disabled, 64 Bit, or 128
Bit.
Link
Status Displays the information about the status of
the communication (the BSSID of the
Access Point to which the card is
associated).
Tx
Frame The quantities for which the wireless
network card transmit.
(Frame: The unit of packet)
Rx
Frame The quantities for which the wireless
network card receive.
(Frame: The unit of packet)
Part 1: 802.11b Wireless LAN
1-30
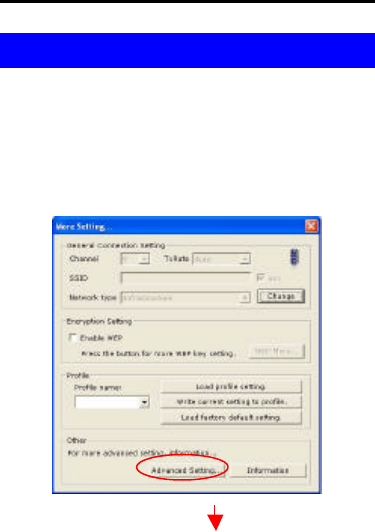
More Setting…
The More Setting Screen displays the
available settings of Access Point according
to wireless network card including General
Connection Setting, Encryption Setting,
Profile Setting and Other Settings.
Part 1: 802.11b Wireless LAN
1-31
I. General Connection Setting
Item Description
Channel The Ch
annel will change automatically
according to AP.
Any You may change the setting of SSID
by
choosing Any.
Change
or
Apply
You may change the settings of TxRate
and Network Type.
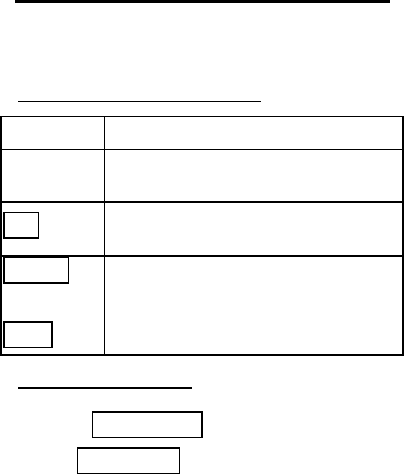
II. Encryption Setting
Choose Enable WEP , and then you may
press WEP More to proceed with the
following screen.
Part 1: 802.11b Wireless LAN
1-32
Note: You may press Change/Apply to
change the settings.
Item Description
Encryption WEP is a data privacy mechanism
based on a 64-bit/128-bit shared key
algorithm. Under the drop-down box,
you can choose to have WEP
encryption Disabled, 64 Bit, or 128 Bit.
Default Key
ID You can specify up to 4 different keys
to decrypt wireless data. Select the
Default key setting from the drop-down
menu.
Note: You must use the same
Default
Key and Default Key settings for th
e
both sides of the wireless network to
connect to).
Key #1/Key
#2/
This setting is the configuration key
used in accessing the wireless network
Part 1: 802.11b Wireless LAN
1-33
Fig. 1 Fig. 2
#2/
Key #3/Key
#4
via WEP encryption.
A key of 10 hexadecimal characters
(0-9, A-F) is required if a 64-bit Key
Length was selected. A key of 26
hexadecimal characters (0-9, A-F) is
required if a 128-bit Key Length was
selected.
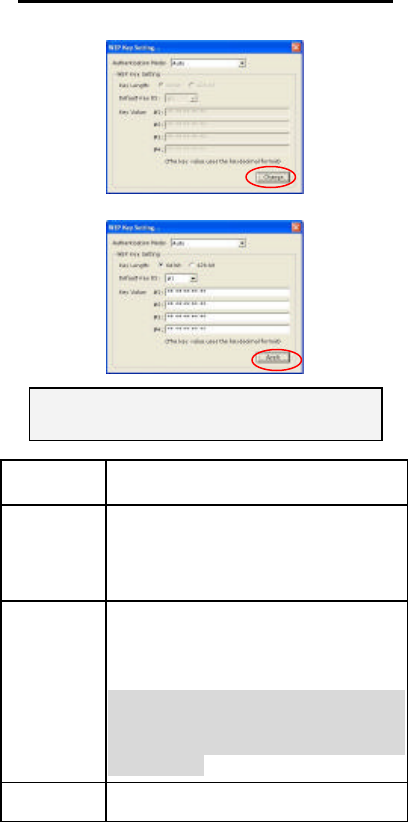
III. Profile Setting
1. Write current setting to profile:
You may add one new item in "Profile name",
and then press "Write current setting to
profile" to record the status of connected AP.
(see Figure 1 & 2)
Part 1: 802.11b Wireless LAN
1-34
Fig. 1 Fig. 2
2. Load profile setting:
You may select the added item in "Profile
name", and then press "Load profile
setting". The original setting status of AP can
be restored.
Part 1: 802.11b Wireless LAN
1-35
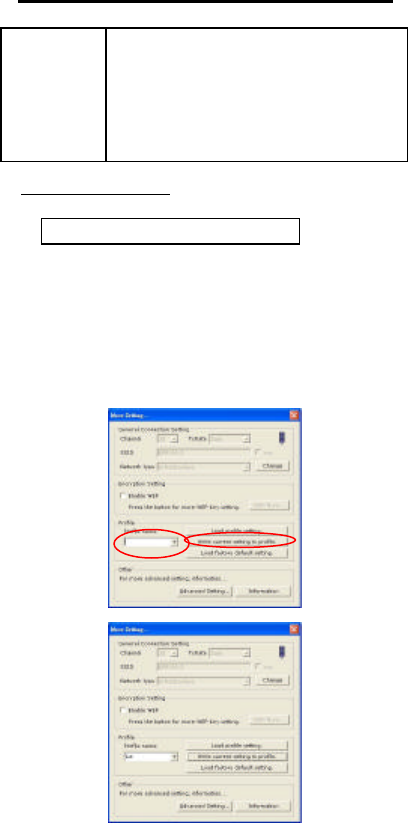
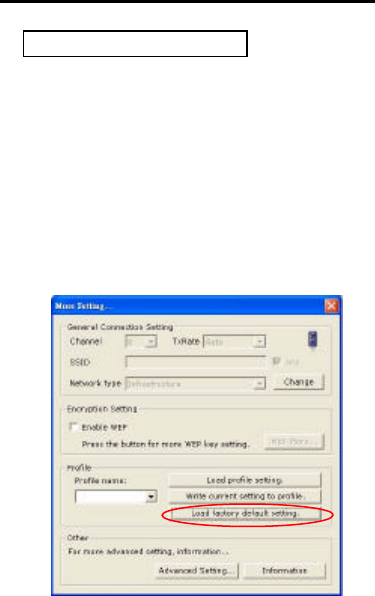
3. Load factory default setting:
Once you press "Load factory default
setting", this Adapter will research for the
original default of wireless network card; if you
can not find out AP under the channel of default,
the wireless network card will choose the AP
within other channels to operate.
Part 1: 802.11b Wireless LAN
1-36
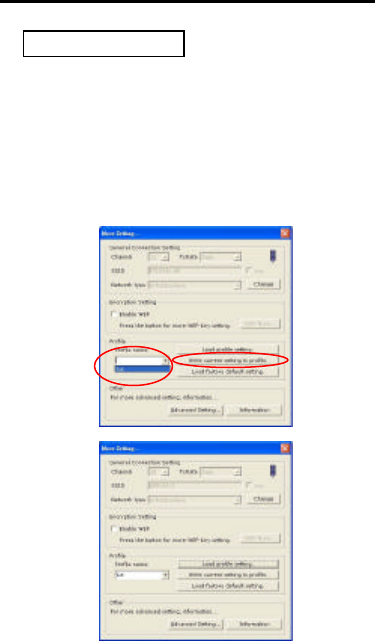
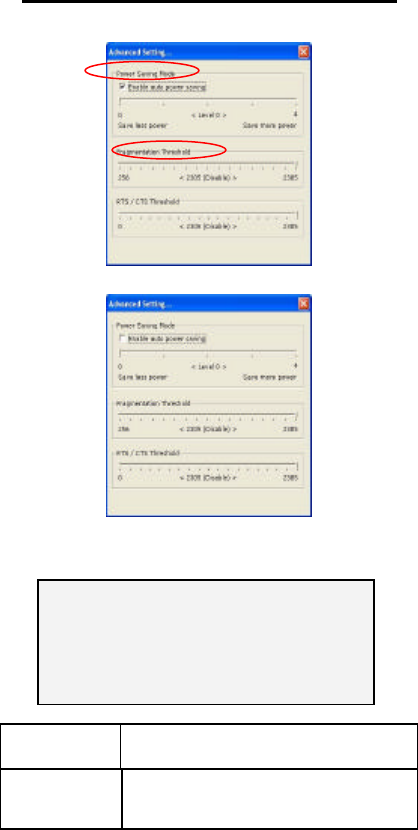
Advanced Setting
The Advanced Setting Screen shows you to
change advanced configuration, such as
Power Saving Mode, Fragmentation
Threshold, and RTS/CTS Threshold.
Part 1: 802.11b Wireless LAN
1-37
Note: Once you choose the “Enable
auto power saving" item, the system
will auto-detect the levels of power
saving; if not, you will need to choose
the levels manually.
Item Description
Power Saving
Mode Displays the power saving levels (Level
0 ~ Level 4)

Part 1: 802.11b Wireless LAN
1-38
Item Description
Fragmentation
Threshold
To fragment MSDU
or MMPDU into
small sizes of frames for increasing the
reliability of frame (The maximum
value of 2346 means no fragmentation
is needed) transmission. The
performance will be decreased as well,
thus a noisy environment is
recommended.
RTS/CTS
Threshold
This value should remain at its default
setting of 2347. Should you
encounter inconsistent data flow, only
minor modifications of this value are
recommended.

Part 1: 802.11b Wireless LAN
1-39
Information
Click Information Tab to view basic
information about the Utility like the Driver,
Firmware and ZDConfig Version. Press the
OK button to exit the application.
Part 1: 802.11b Wireless LAN
1-40
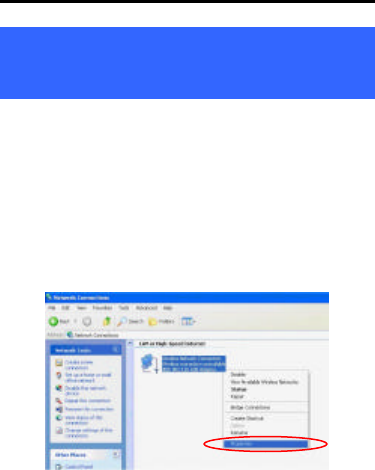
Use Windows XP Configuration
Utility
1. Go to Start
à
Control Panel
à
Network and Internet Connections
à
Network Connections.
2. In Network Connections window,
right-click the Wireless Network
Connection Enabled Wireless USB
Adapter icon, and select Properties.
3. In Wireless Network Connection
Properties window, select the General
tab. Click Configure to enable Windows
configuration.
Part 1: 802.11b Wireless LAN
1-41
Property Description
Authentication
Mode The authentication mode defines
configuration options for the sharing
of wireless networks to verify
identity and access privileges of
roaming wireless network cards.
You may choose between Open
System, Shared Key, and Auto.
Open System: If the Access Point is
using "Open System"

Part 1: 802.11b Wireless LAN
1-42
authentication, then the wireless
adapter will need to be set to the
same authentication type.
Shared Key: Shared Key is when
both the sender and the recipient
share a secret key.
Auto: Select Auto for the USB
adapter to select the Authentication
type automatically depending on the
Access Point Authentication type.
Channel Shows the selected channel that is
currently used.
Fragmentation
Threshold
To fragment MSDU or MMPDU
into small sizes of frames for
increasing the reliability of frame
(The maximum value of 2346 means
no fragmentation is needed)
transmission. The performance will
be decreased as well, thus a noisy
environment is recommended.
Network Type
It displays the current network type,
which can be divided into two types:
j Ad-Hoc k Infrastructure
Power Save
Level It shows the levels of Power Save,
which can be divided into five
levels:
j Level 0 (Save less power)
k Level 1
l Level 2
m Level 3
n Level 4 (Save more power)
Power Save
Mode
Enable the function to allow the
Adapter to go to sleep mode, during
which data communication could be
interrupted. (Disabled or Enabled)

Part 1: 802.11b Wireless LAN
1-43
RTS/CTS
Threshold
This value should remain at its
default setting of 2347. Should
you encounter inconsistent data
flow, only minor modifications of
this value are recommended.
SSID The SSID is the unique name shared
among all points in your wireless
network.
The name must be identical for all
devices and points attempting to
connect to the same network.
Transmit Data
Rate
It shows the current transfer rate. (1,
2, 5.5, or 11Mbps or Auto)
WEP
Encryption WEP is a data privacy mechanism
based on a 64-bit/128-bit shared key
algorithm. Under the drop-down
box, you can choose to have WEP
encryption Disabled, 64 Bit, or 128
Bit.
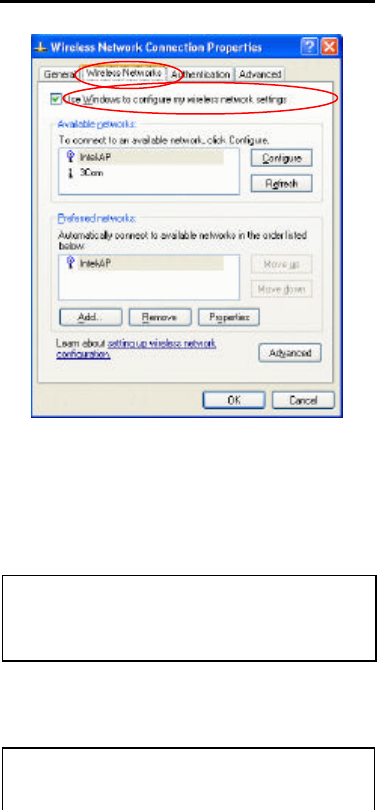
4. In Wireless Network Connection
Properties window, select the Wireless
Networks tab.
Part 1: 802.11b Wireless LAN
1-44
¨
Use Windows to configure…
Check the box to enable Windows
configuration.
* Use Windows to configure
Note: Once you enable windows configuration,
you can use Windows XP’s Wireless
Configuration Utility to configure the wireless
settings.
* Use Manufacturer’s Configuration
Utility
Note: If you want to use Manufacturer’s
Configuration Utility to configure the wireless
settings, make sure the check box is not checked
Part 1: 802.11b Wireless LAN
1-45
then click the Network Status icon in the taskbar.
(Please refer to below figure)
Available networks
Displays all available networks.
Configure
Click the button to set up a new network or
WEP configuration as illustrated as below.
Part 1: 802.11b Wireless LAN
1-46
Refresh
Click the button to refresh and search for all
available networks.
Preferred networks
From available network(s) listed above, you
can select preferred one(s) in an order that
you can arrange.
The marked one is the currently used
network.
Move up
Part 1: 802.11b Wireless LAN
1-47
Move the selected network forward one
position.
Move down
Move the selected network back one position
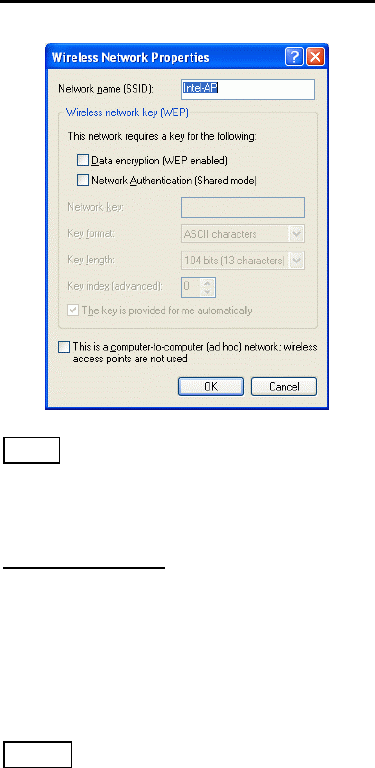
Add…
Click the button and the Wireless Network
Properties window will appear. In the
Network name field, enter your desired
network name listed in the above Available
networks box, and click OK.
Note: The new settings will be active only
after you click on OK in the Wireless
Network Connection Properties window.
Remove
Highlight the unwanted network listed in the
Preferred networks box, and click the
button to remove it.
Properties
Highlight the network listed in the above
Preferred networks box, and click the
button to display its properties.

Part 1: 802.11b Wireless LAN
1-48
Once network configuration is done, make
sure to click OK. The new parameters will
be saved and active only after doing so.
Part 1: 802.11b Wireless LAN
1-49
Uninstallation
In case you need to uninstall the
Manufacturer’s Configuration Utility or
the Driver, please refer to below section.
Uninstall the Manufacturer’s
Configuration Utility
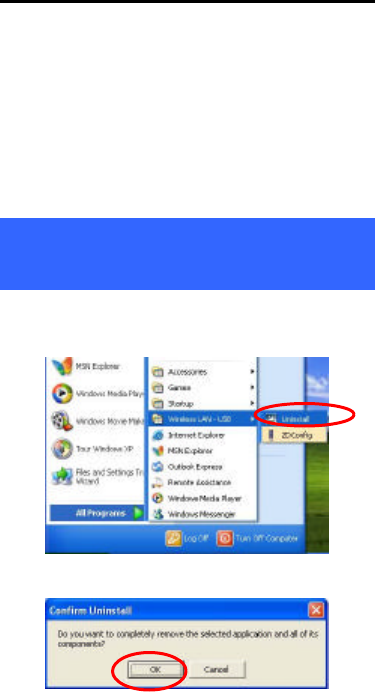
1. Go to Start
à
Programs
à
Wireless
LAN USB
à
Uninstall.
2. Click OK to continue.
Part 1: 802.11b Wireless LAN
1-50
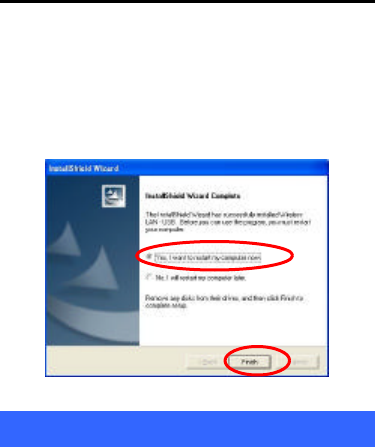
3. Select Yes, I want to start my
computer now. Click Finish to
complete the uninstalled procedure.
Uninstall the device
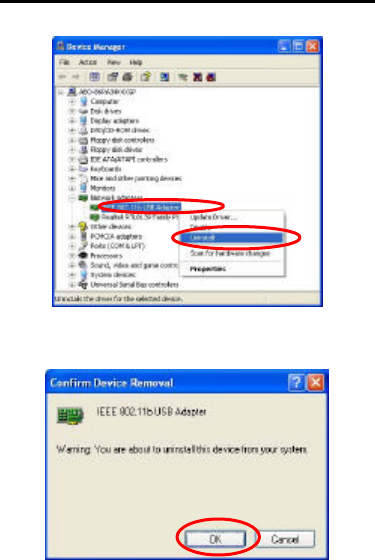
1. Right-click My Computer
→
Properties
→
Hardware
→
Device
Manager.
2. Right-click Wireless USB Adapter then
click Uninstall (or Remove).
Part 1: 802.11b Wireless LAN
1-51
3. Click OK to uninstall the device.
4. The system may prompt you to restart
your computer. Click Yes. It’s okay now
to uninstall the device from your
computer.

Part 2: USB Flash disk
2-1
Part 2: USB Flash Disk

Part 2: USB Flash disk
2-2
Install Driver
Windows 98/98SE – Install from CD ROM
In Windows 98/98SE, you will need to install
the driver found on the CD that comes with
this device.
Run Flash Driver.exe..
Follow the on-screen instructions to proceed.
Part 2: USB Flash disk
2-3
Click Finish to complete the installation.
After the installing process is finished,
remove the cap from your USB Flash Dish
and plug the USB connector to the USB port
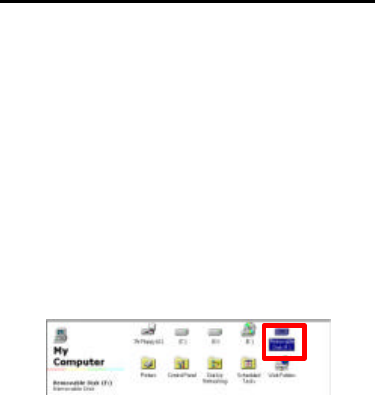
on your computer. Then, open My
Computer and you will see a newly added
icon; shown on the screen as a removable
disk drive.
Windows ME/2000/XP-No Driver is
Required
This device is Plug and Play compliant,
therefore, once you plug it into your
Window’s based system, your system will
automatically detect it as a removable hard
disk. You can go to My Computer to check
if there is a newly added icon. If yes, it is
ready for use. If not, you may have to check
if the USB Flash Disk is connected properly
to your USB port.

Part 2: USB Flash disk
2-4
Removing your USB Flash Disk
Warning: Each time you remove the USB
Flash Disk from your computer, be sure to
use the Unplug/Eject icon on the taskbar
to avoid data loss or damage to your Flash
Disk.
Part 2: USB Flash disk
2-5
Manage your USB Flash
Disk
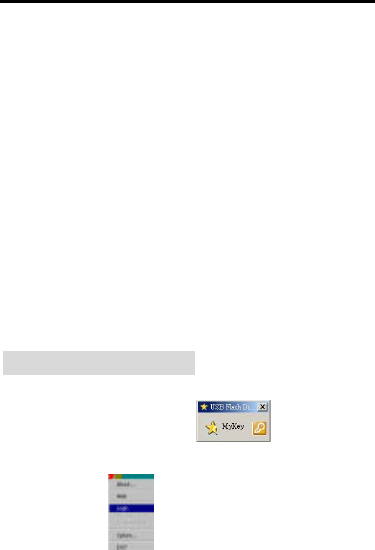
Main Menu
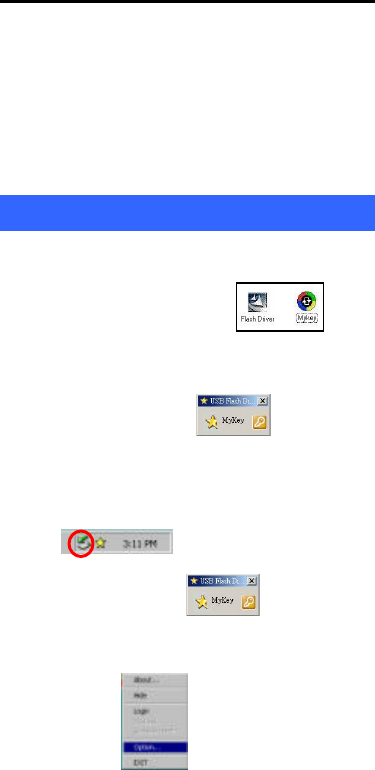
Step 1.Load the included CD and open it.
Double-click MYKEY.
Step 2.An USB Flash Disk icon will appear
on your desktop , a Star icon
will also appear on the bottom right
corner of the task bar on your screen.
.
Step 3.Right-click the icon.
Step 4.Click Option. The USB Flash Disk
Utility will appear.
Part 2: USB Flash disk
2-6
Step 5.The USB Flash Disk Utility consists
of four tabs for management. See the
following for details as how to use and
manage this device.
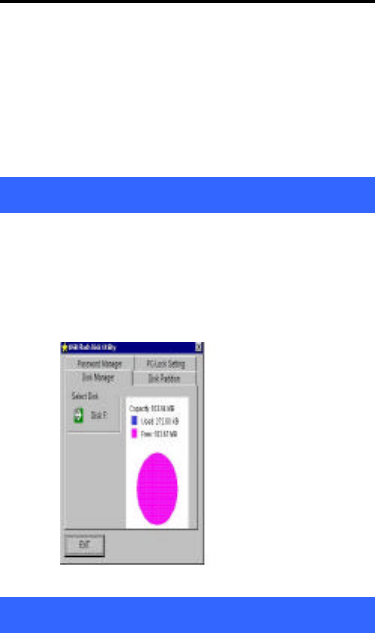
Disk Manager
Disk Manager is readable only. On this box,
you will know the used/free capacity of your
flash disk.
Disk Partition
In this box, you can divide the USB Flash
Disk into two partitions:
Un-protected Disk Space: all data located
here is accessible to anyone who uses your
computer or Flash Disk. When logging out
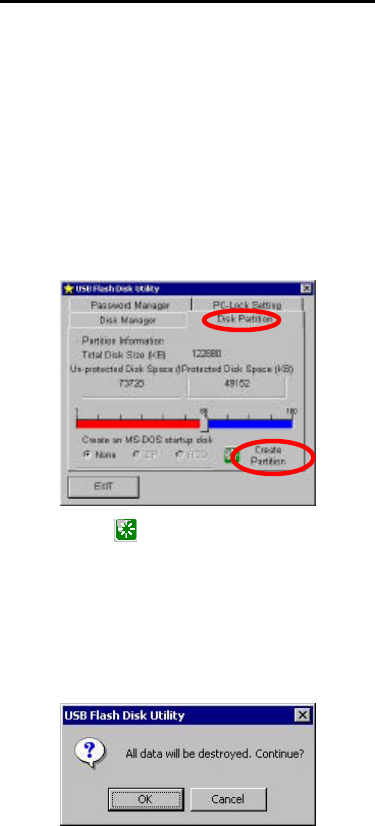
Part 2: USB Flash disk
2-7
of the protected area you are automatically
redirected to the Un-protected Disk area.
Protected Disk Space: this area is password
protected.
Step 1.Drag the pointer to adjust the capacity
of the Protected/Un-protected disk.
Step 2.Press Create Partition.
A warning message appears to advise that all
data on the disk will be erased. You can
cancel this action by clicking Cancel. Or
click OK to continue.
Part 2: USB Flash disk
2-8
Step 3. Click Cancel to copy your data to a
Hard Disk before creating your
prtition. Click OK to create your
partition. Any and all Data stored on
your Flash Disk will be
destroyed.
Switch between Protected and
Un-protected Disks
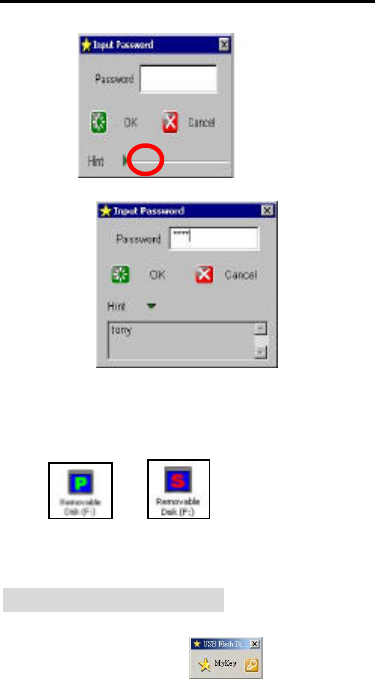
Enter the Protected Disk
Step 1. Right click . Select
Login .
Step 2. You are prompted to enter your
password. The default password is
0000. It is suggested that you set your
own password. If you forget your
password, press uto get see your
password hint.
Part 2: USB Flash disk
2-9
Once you enter the protected disk, the disk
icon shown in My Computer will change
from to , and vise versa.
Enter the Un-protected Disk
Step 1.Right click . Select
Logout to enter the Un-protected
Disk.
Part 2: USB Flash disk
2-10
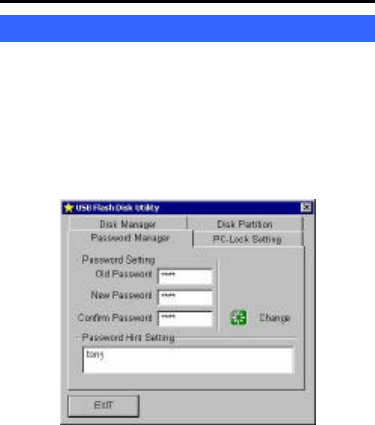
Password Manager
Password can be changed in this box. You
can also set a password hint for use if you
forget your password. Default password is
set to: 0000
Change Password
Step 1. Enter the “Old Password”, the
default is “0000”.
Step 2. Enter the “New Password”.
(Maximum 4 characters long – use
letters or numbers)
Step 3. Confirm password by re-entering the
new password.

Part 2: USB Flash disk
2-11
Step 4. Enter a hint of your own; this will be
helpful to remind you if you forget
your password.
Step 5. Press Change to continue.
Step 6. Password has been changed
message appears. Click OK.
Password Hint
Ÿ You can leave the Password Hint blank if
you don’t want to use it.
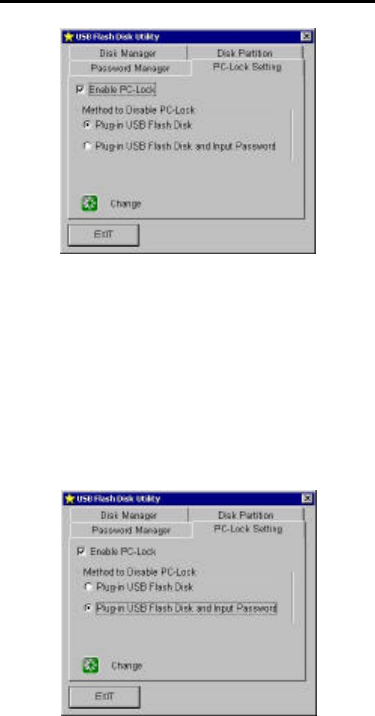
PC LOCK
Once PC-Lock is enabled, the PC you are
presently using is locked. To unlock this PC,
you can only use this USB Flash Disk.
To enable PC Lock, there are two conditions
for your choice,
Plug-in USB Flash Disk
This means that you have to plug this USB
Flash Disk into your computer’s USB port in
order to open your PC;
Part 2: USB Flash disk
2-12
Plug-in USB Flash Disk and Input
Password
This means to open the PC, you are required
not only to plug the USB Flash Disk, but also
have to enter your password.
Part 2: USB Flash disk
2-13
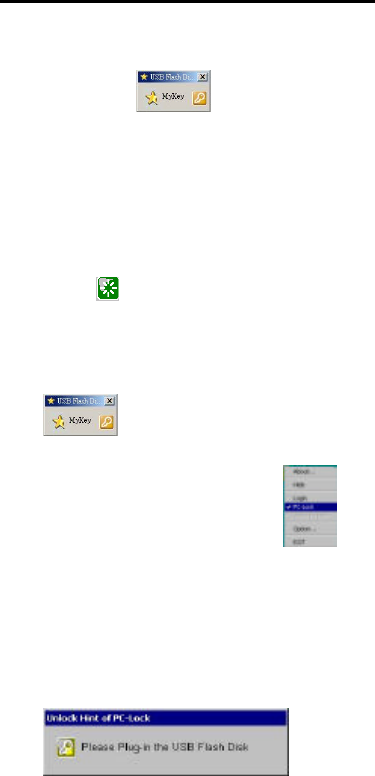
To lock a PC
1. Right click .
2. Select Option žPC-Lock Setting.
3. Check Enable PC-Lock.
4. Select the Unlock Condition that fits
your needs.
5. Press Change.
6. Press Exit.
7. Return to your desktop and right click
again.
8. Move the cursor to PC Lock
You PC is now locked.
9. If this function is enabled, your PC will
not respond unless this USB Flash Disk
is plugged in.
Part 2: USB Flash disk
2-14
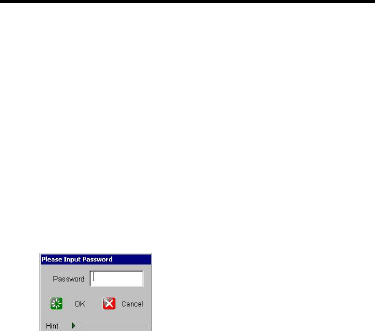
To unlock a PC
1. Plug the USB Flash Disk into the locked
PC.
2. If the unlock condition is set to Plug-in
USB Flash Disk and Input Password, a
password box will pop up.
3. Enter your password. The PC is now
unlocked.