Abocom Systems WUG2K2 802.11g Wireless LAN USB Adapter User Manual WUG2200MNL
Abocom Systems Inc 802.11g Wireless LAN USB Adapter WUG2200MNL
User Manual
802.11g Wireless LAN
USB Adapter
User Manual
REGULATORY STATEMENTS
FCC Certification
The United States Federal Communication
Commission (FCC) and the Canadian Department of
Communications have established certain rules
governing the use of electronic equipment.
Part15, Class B
This device complies with Part 15 of FCC rules.
Operation is subject to the following two conditions:
1) This device may not cause harmful interface, and
2) This device must accept any interface received,
including interface that may cause undesired
operation. This equipment has been tested and
found to comply with the limits for a Class B
digital device, pursuant to Part 15 of the FCC
Rules. These limits are designed to provide
reasonable protection against harmful interference
in a residential installation. This equipment
generates, uses and can radiate radio frequency
energy, and if not installed and used in accordance
with the instructions, may cause harmful
interference to radio communications. However,
there is no guarantee that interference will not
occur in a particular installation. If this equipment
does cause harmful interference to radio or
television reception, which can be determined by
turning off and on, the user is encouraged to try to
correct the interference by one or more of the
following measures:
◗ Reorient or relocate the receiving antenna.
◗ Increase the distance between the equipment and
receiver.
◗ Connect the equipment into an outlet on a circuit
different from that to which the receiver is
connected.
CAUTION:
1) To comply with FCC RF exposure compliance
requirements, a separation distance of at least 20
cm must be maintained between the antenna of
this device and all persons.
2) This transmitter must not be co-located or
operating in conjunction with any other antenna
or transmitter.
Table of Contents
INTRODUCTION...............................................1
FEATURES ..........................................................1
WIRELESS NETWORK OPTIONS ..........................2
The Peer-to-Peer Network.....................2
The Access Point Network....................3
LED INDICATORS ..............................................4
Power: Green (On/Off)..........................4
Act/Link: Green (Blink)........................4
INSTALLATION ................................................5
INSTALL THE DEVICE .........................................5
INSTALL THE DRIVER.........................................5
In Windows 98SE .................................5
In Windows ME ....................................8
In Windows 2000 ................................10
In Windows XP...................................13
Verify ..................................................15
INSTALL THE UTILITY ......................................16
NETWORK CONNECTION...........................18
IN WINDOWS 98/ME........................................18
IN WINDOWS 2000/XP.....................................22
CONFIGURATION..........................................25
USE MANUFACTURER’S CONFIGURATION
UTILITY ...........................................................27
ACCESSING THE CONFIGURATION UTILITY ......28
General Tab.........................................29
Profiles Tab .........................................33
About Tab ...........................................35
USE WINDOWS XP CONFIGURATION UTILITY .36
UNINSTALLATION ........................................43
UNINSTALL THE UTILITY .................................43
UNINSTALL THE DRIVER ..................................45
SPECIFICATIONS...........................................46

- 1 -
INTRODUCTION
A wireless LAN links network users to LAN
services without the hassle of cabling or wiring,
which significantly brings mobile workers the
freedom of staying connected to the network while
roaming around a building or multiple buildings
maintaining access to the Internet, e-mail,
networked applications, and print services.
This device is the perfect solution for your
wireless network applications based on the IEEE
802.11g standard that offers a data rate up to
54Mbps in a wireless LAN environment. It is a
high-speed wireless network card that plugs into
your notebook or desktop PC and accesses to the
LAN or peer-to-peer networking easily without
wires or cables. Whether you’re at your desk or in
the boardroom, it allows you to share printers, files,
and other network resources.
The 802.11g Wireless LAN USB Adapter is
designed for a USB type A port of a laptop or
desktop computer for creating a wireless
workstation.
Features
Complies with IEEE 802.11g standard for
2.4GHz Wireless LAN
USB 2.0 compliant
USB Plug & Play
Interoperable with existing network
infrastructure
Secure information transmission
- 2 -
Freedom to roam while staying connected
Compatible with specialty wireless products
and services
Up to 54 Mbps data rate
Antenna is built in the card with LEDs
indication
Low power consumption
Easy to install and configure
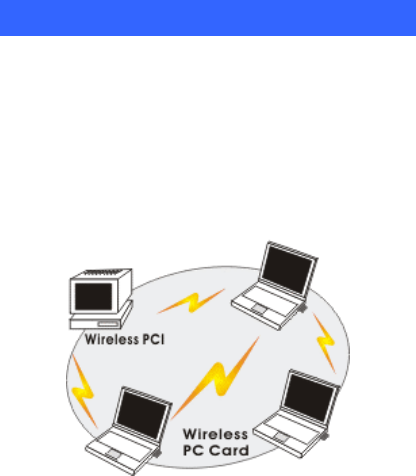
Wireless Network Options
The Peer-to-Peer Network
This network installation lets you set a small
wireless workgroup easily and quickly. Equipped
with wireless PC Cards or wireless PCI, you can
share files and printers between each PC and
laptop.
- 3 -
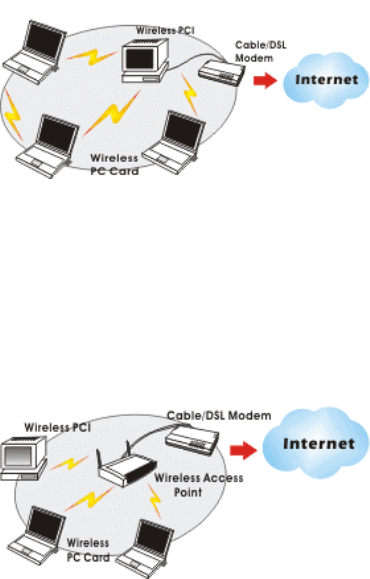
Or you can use one computer as an Internet Server
to connect to a wired global network and share
files and information with other PCs via a wireless
LAN.
The Access Point Network
The network installation allows you to share files,
printers, and Internet access much more
conveniently. With wireless PC Cards, you can
connect wireless LAN to a wired global network
via an Access Point.

- 4 -
LED Indicators
Power: Green (On/Off)
Glow – linking to an Access Point or Peer-to-Peer
mode.
Act/Link: Green (Blink)
Blink – Transmitting/receiving wireless data.
Notice:
To comply with FCC RF exposure compliance
requirements, the antenna(s) used for this transmitter
must be installed to provide a separation distance of
at least 20cm from all persons and must not be
co-located or operating in conjunction with any other
antenna or transmitter. No change to the antenna or
the device is permitted. Any change to the antenna or
the device could result in the device exceeding the RF
exposure requirements and void user's authority to
operate the device.
- 5 -
INSTALLATION
Install the Device
1. Plug the Wireless USB Adapter into the PC’s
USB port.
2. Once the device has been connected to your
computer, Windows will detect the new
hardware and then automatically copy all of
the files needed for networking.
Install the Driver
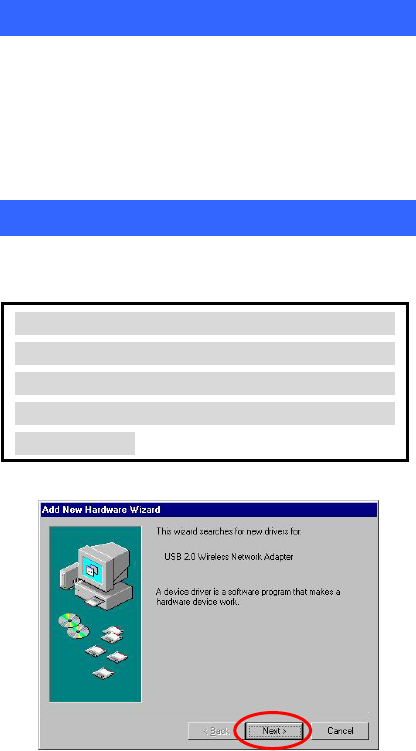
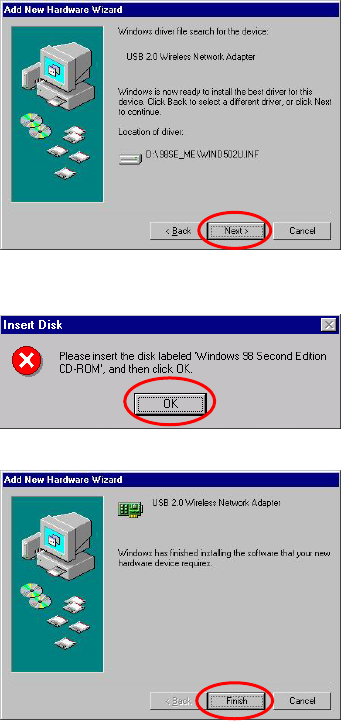
In Windows 98SE
For Windows 98SE users: As you perform
the installation, have your system operating
CD-ROM at hand. You may be asked to insert
the OS CD-ROM for the system to download a
specific driver.
1. In Add New Hardware Wizard, click Next.
- 6 -
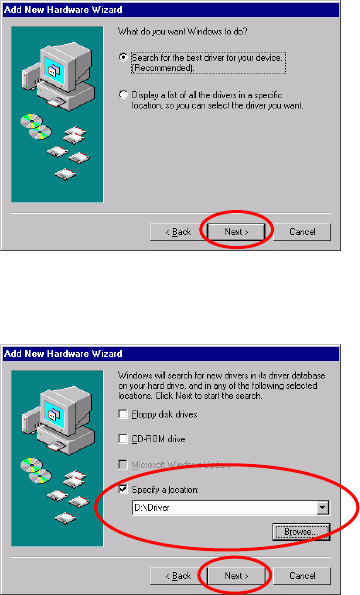
2. Select Search for the best driver for your
device (Recommended). Click Next.
3. Insert the supplied CD-ROM into the
CD-ROM drive. Select Specify a location:
and click Browse to provide the appropriate
path (e.g. D:\Driver). Click Next.
- 7 -
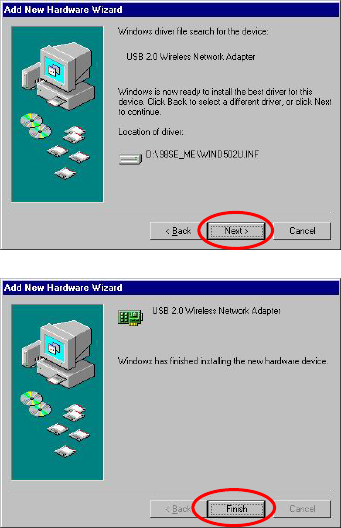
4. Click Next, Windows will copy all the
necessary files to your system.
5. Insert Windows 98SE CD-ROM, and then
click OK.
6. Click Finish to complete the installation.
7. When Windows prompts you to restart your
computer, click Yes.
- 8 -
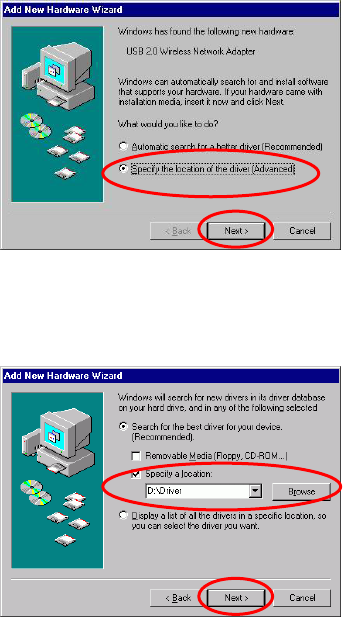
In Windows ME
1. Select Specify the location of the driver
(Advanced), click Next.
2. Insert the supplied CD-ROM into the
CD-ROM drive. Select Search for the best
driver for your device (Recommended) and
click Browse to provide the appropriate path
(e.g. D:\Driver). Click Next.
- 9 -
3. Click Next, Windows will copy all the
necessary files to your system.
4. Click Finish to complete the installation.
5. When Windows prompts you to restart your
computer, click Yes.
- 10 -
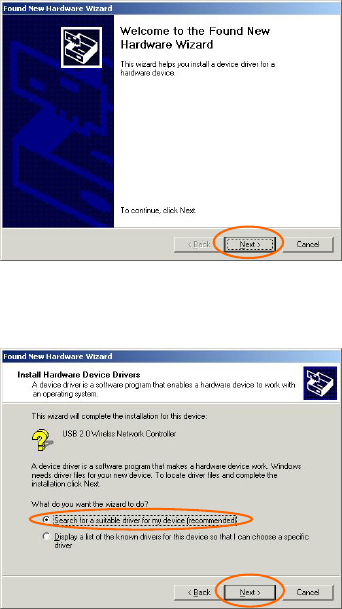
In Windows 2000
1. In Found New Hardware Wizard, click
Next.
2. Select Search for a suitable driver for my
device (recommended) and click Next.
- 11 -
3. Insert the device driver CD-ROM into your
CD-ROM drive. Select CD-ROM drives and
click Next.
4. Click Browse to provide the appropriate path
(e.g. D:\Driver). Click OK.
- 12 -
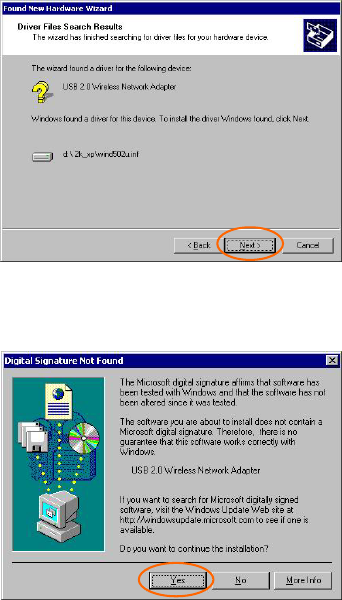
5. Click Next to continue.
6. In “Digital Signature Not Found” window,
click Yes to continue.
- 13 -
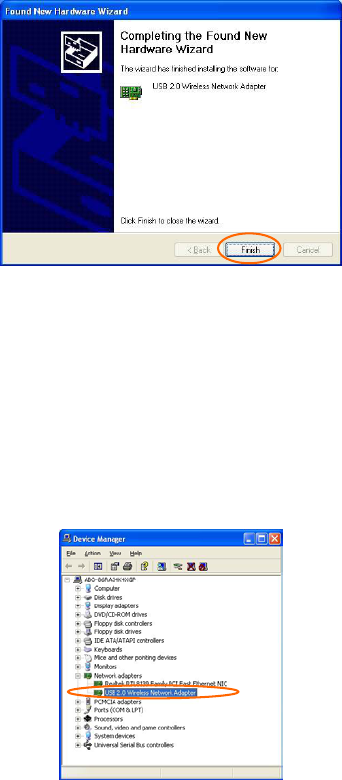
7. Click Finish to complete the installation.
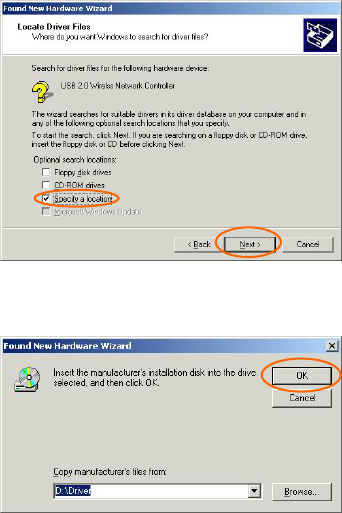
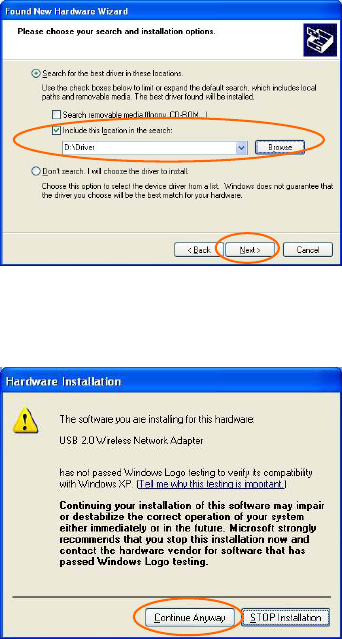
In Windows XP
1. Select Install from a list or specific
location (Advanced) and click Next.
- 14 -
2. Insert the supplied CD-ROM into the
CD-ROM drive. Select Include this
location in the search: and click Browse to
provide the appropriate path (e.g. D:\Driver).
Click Next.
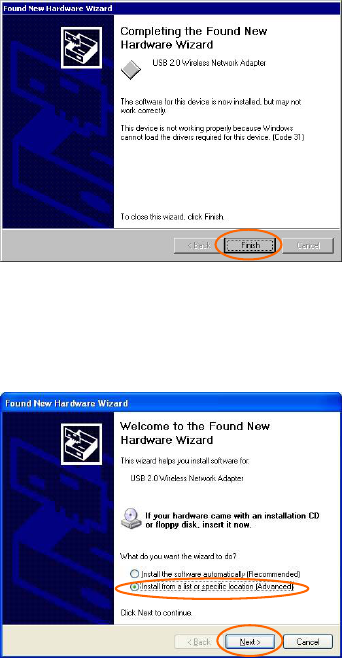
3. Click Continue Anyway to proceed.
Windows will copy all the necessary files to
your system.
- 15 -
4. Click Finish to complete the installation.
Verify
To verify if the device exists in your computer and
is enabled, go to Start Settings Control
Panel System ( Hardware) Device
Manager. Expand the Network Adapters
category. If the USB 2.0 Wireless Network
Adapter is listed here, it means that your device is
properly installed and enabled.
- 16 -
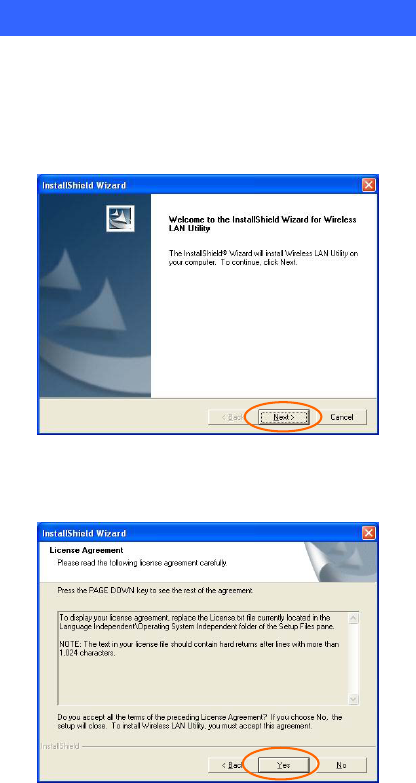
Install the Utility
1. Insert the supplied CD-ROM into the
CD-ROM drive. Double click on Setup.exe to
install the Wireless LAN Utility.
2. When the Welcome screen appears, click
Next to continue.
3. In License Agreement, click Yes to accept
the terms.
- 17 -
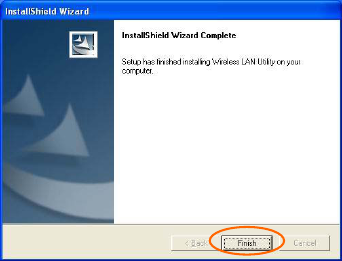
4. Click Finish to complete the installation.
- 18 -
NETWORK CONNECTION
Once the driver has been installed, you must make
some changes to your network settings.
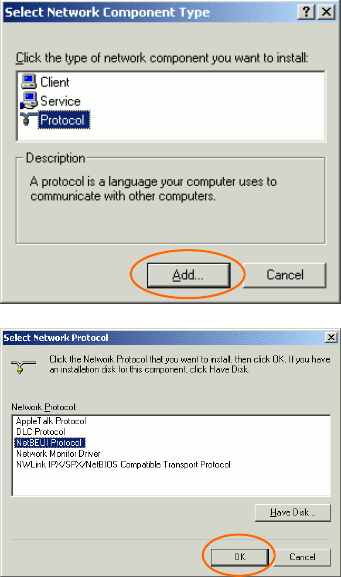
In Windows 98/ME
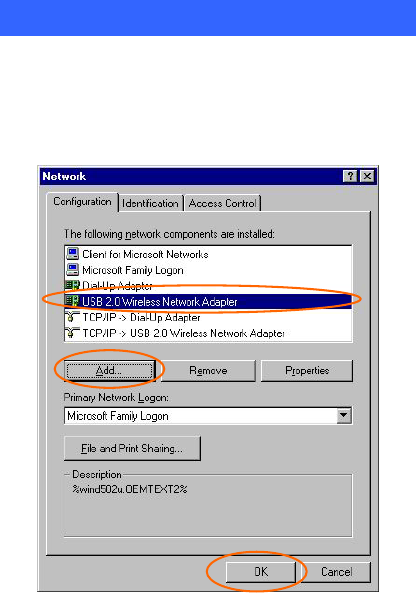
1. Go to Start Settings Control Panel
Network.
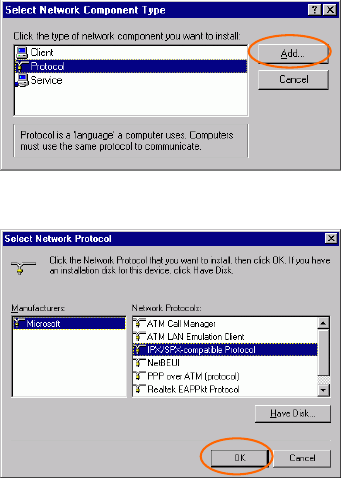
2. Make sure that the following components are
installed.
802.11b Wireless LAN CardBus (Mini-) PCI NIC
IPX/SPX-compatible Protocol
NetBEUI
- 19 -
TCP/IP
If any components are missing, click on the Add
button to add them in. All the protocols and
clients required and listed above are provided by
Microsoft.
3. After clicking Add, highlight the component
you need, click Add.
4. Highlight Microsoft, and then double click on
the item you want to add. Click OK.
5. For making your computer visible on the
network, enable the File and Print Sharing.
- 20 -
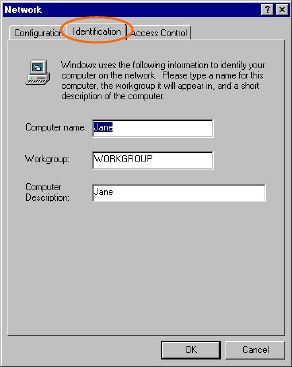
6. Click the Identification tab. Make up a name
that is unique from the other computers' names
on the network. Type the name of your
workgroup, which should be the same used by
all of the other PCs on the network.
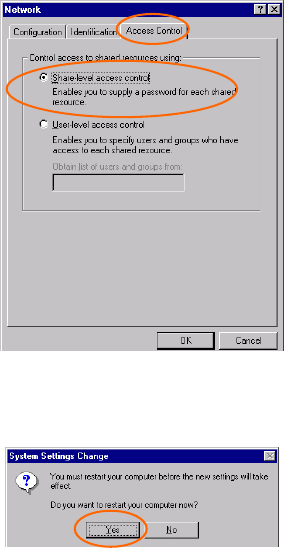
7. Click the Access Control tab. Make sure
that “Share-level access control” is selected.
If connecting to a Netware server, share level
can be set to “User-level access control.”
- 21 -
8. When finished, restart your computer to
activate the new device.
9. Once the computer has restarted and Windows
has booted up, a Logon window will appear
and require you to enter a username and
password. Make up a username and password
and click OK. Do not click the Cancel
button, or you won’t be able to log onto the
network.
10. Double-click the Network Neighborhood
icon on the windows desktop, and you should
see the names of the other PCs on the network.
- 22 -
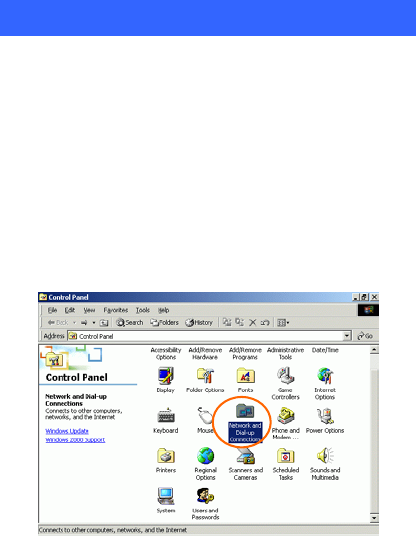
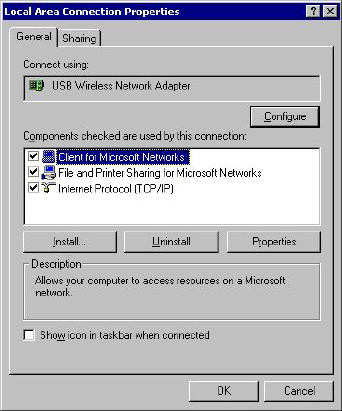
In Windows 2000/XP
1. (In Windows 2000)
Go to Start Settings Control Panel
Network and Dial-up Connections Local
Area Connection Properties.
(In Windows XP)
Go to Start Control Panel Network
Connections Wireless Network
Connection Enabled USB Wireless
Network Adapter Properties.
- 23 -
2. Make sure that you have all the following
components installed.
Client for Microsoft Networks
File and Printer Sharing for Microsoft
Networks
Internet Protocol (TCP/IP)
3. If any components are missing, click on the
Install… button to select the
Client/Service/Protocol required. After
selecting the component you need, click
Add… to add it in.
- 24 -
4. For making your computer visible on the
network, make sure you have installed File
and Printer Sharing for Microsoft
Networks.
5. When finished, you must restart your
computer to complete the installation.
- 25 -
CONFIGURATION
Note: For Windows XP users, you have an
option of using one of two Configuration
Utilities.
1) Use Windows XP Configuration Utility. (the
default setting)
Please refer to Use Windows XP
Configuration Utility section to use the
configuration.
2) Use Manufacturer’s Configuration Utility
If you want to use the Configuration Utility
that came with the supplied CD-ROM, you
need to disable the Windows XP's wireless
configuration.
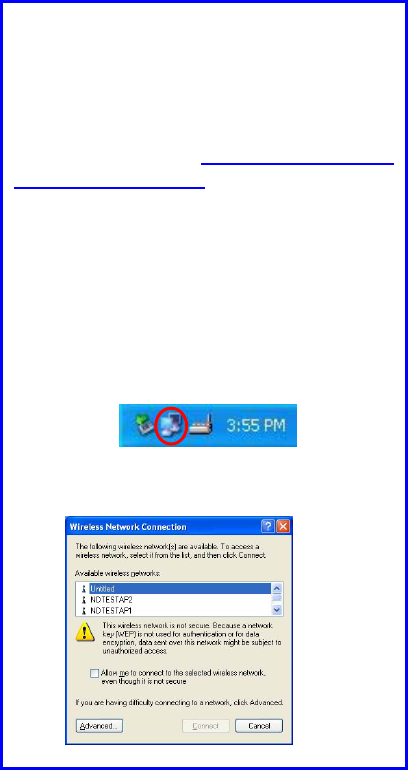
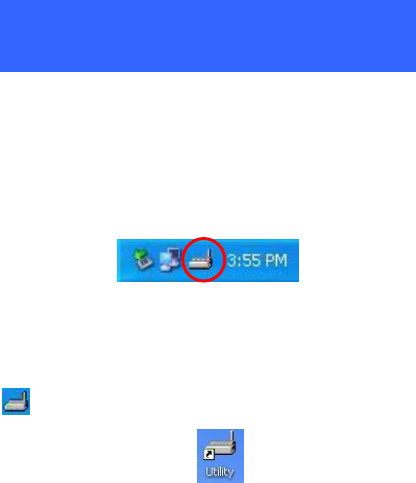
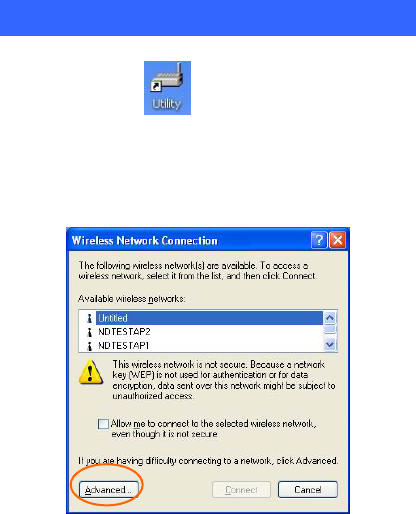
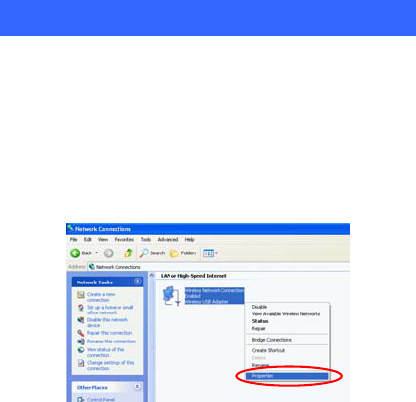
1. Double-click the network status icon. (see
Fig. 1)
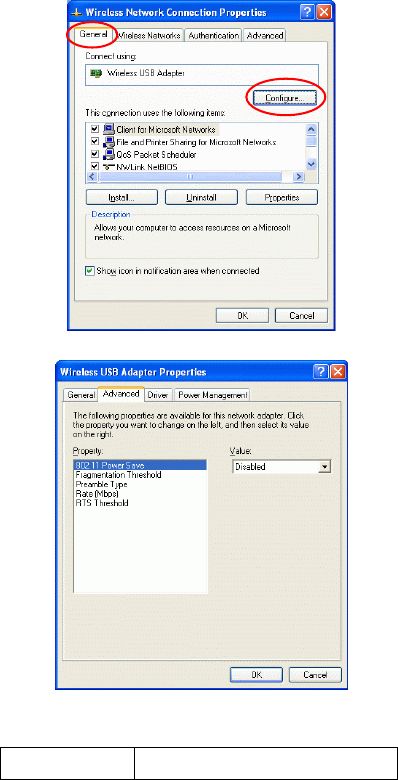
2. Click Advanced. (see Fig. 2)
Fig. 2
Fig. 1
- 26 -
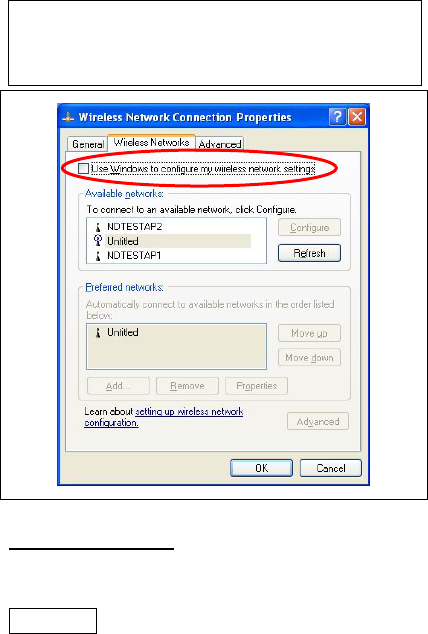
3. Uncheck Use Windows to configure my
wireless network settings then click OK.
(see Fig. 3)
- 27 -
Use Manufacturer’s Configuration
Utility
After successful installation of the Wireless PC
Card’s driver and utility, the Configuration Utility
icon will appear in the taskbar. You will be able to
access the Configuration Utility through the
Configuration icon.
After successful installation of the Wireless PC
Card’s Driver and Utility, a Network Status icon
will display in the system tray. Meanwhile, a
Utility Shortcut icon will appear on the
desktop.
Fig. 3
- 28 -
Accessing the Configuration Utility
Double-click on to open the Configuration
Utility.
Click Advanced to enter the Configuration
Window.
All settings are categorized into 3 Tabs:
General Tab
Profiles Tab
About Tab
- 29 -
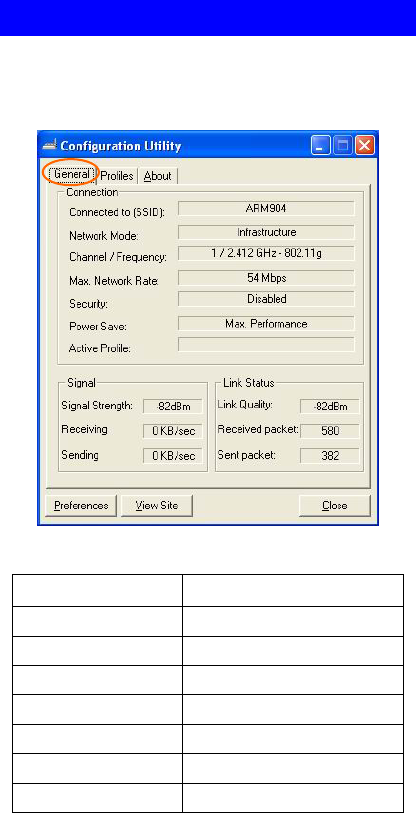
General Tab
The General tab allows you to know about the
general information of Connection, Signal and
Link Status.
1. Connection
Item Description
Connected to (SSID)
Network Mode
Channel/ Frequency
Max. Network Rate
Security
Power Save
Active Profile
- 30 -
2. Signal
Item Description
Signal Strength It represents the wireless
signal between the access
point and the wireless PC
Card.
Receiving
Sending
3. Link Status
Item Description
Link Quality It displays the link quality
for the wireless connection
to the access point.
Received Packet
Sent Packet
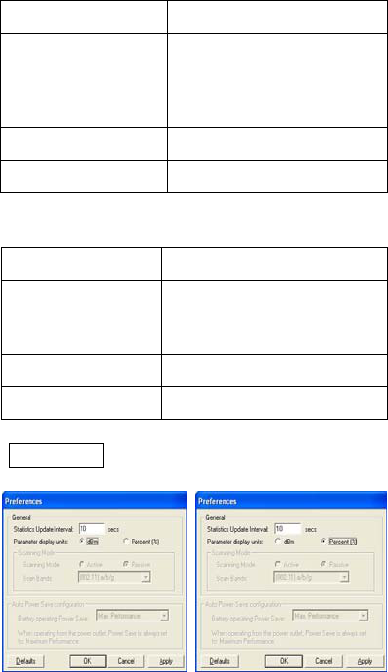
4. Preferences
- 31 -
5. View Site
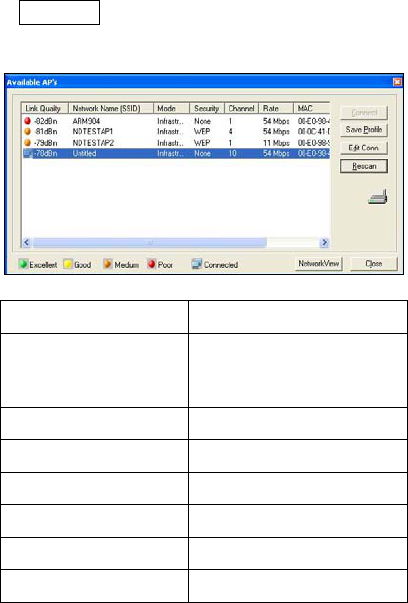
(1) Available AP’s: 詳細顯示 AP 的狀態
Item Description
Link Quality It displays the link quality
for the wireless connection
to the access point.
Network Name (SSID)
Mode
Security
Channel
Rate
MAC
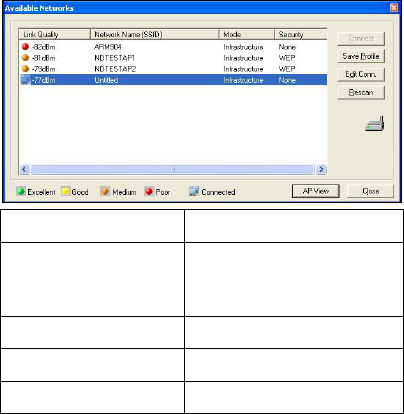
(2) Available Networks: The following figure
displays the Available Networks, which highlights
the network to which you wish to connect.
- 32 -
Item Description
Link Quality It displays the link quality
for the wireless connection
to the access point.
Network Name (SSID)
Mode
Security
- 33 -
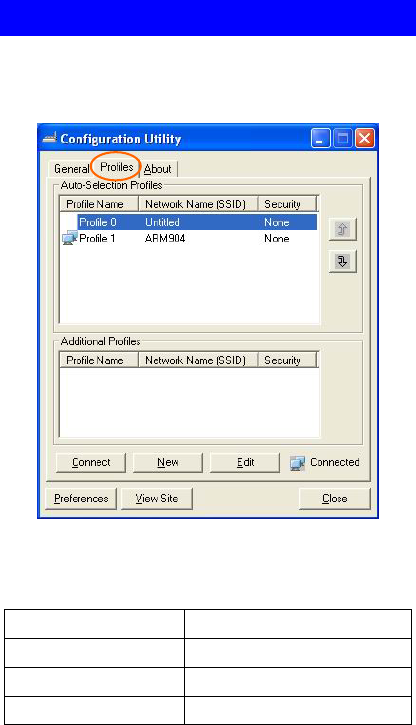
Profiles Tab
The Profiles Tab allows you to choose the settings,
such as the Auto-Selection Profiles and
Additional Profiles.
1. Auto-Selection Profiles
記錄 AP 的狀態/自動連接 AP
Item Description
Profile Name
Network Name (SSID)
Security
- 34 -
2. Additional Profiles
記錄 AP 的狀態
Item Description
Profile Name
Network
Name (SSID)
Security
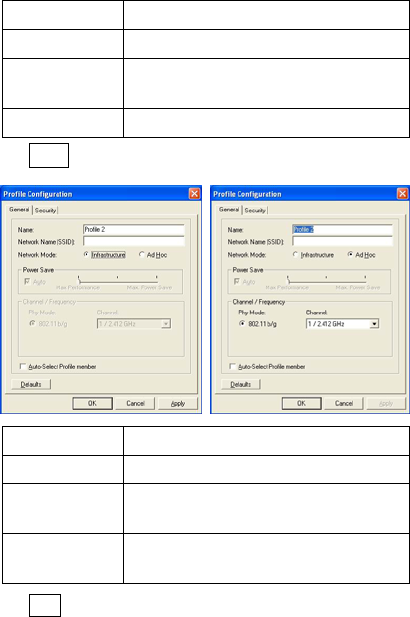
(1) New
Item Description
Name
Network
Name (SSID)
Network
Mode
(2) Edit
- 35 -
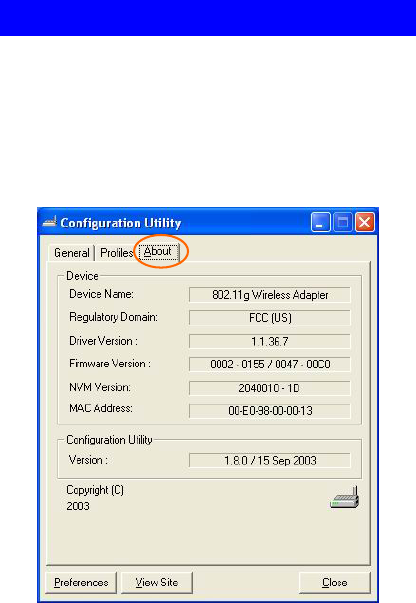
About Tab
The About Tab displays basic link information of
Device and Configuration Utility, including
Device Name, Regulatory Domain, Driver
Version, Firmware Version, NVM Version,
MAC Address and Version of Configuration
Utility.
- 36 -
Use Windows XP Configuration Utility
1. Go to Start Control Panel Network
and Internet Connections Network
Connections.
2. In Network Connections window, right-click
the Wireless Network Connection Enabled
Wireless USB Adapter icon, and select
Properties.
3. In Wireless Network Connection Properties
window, select the General tab. Click
Configure to enable Windows configuration.
- 37 -
Property Description

- 38 -
802.11 Power
Save
Enable the function to allow the
Adapter to go to sleep mode,
during which data communication
could be interrupted. (Disabled or
Enabled)
Fragmentation
Threshold
To fragment MSDU or MMPDU
into small sizes of frames for
increasing the reliability of frame
(The maximum value of 2346
means no fragmentation is
needed) transmission. The
performance will be decreased as
well, thus a noisy environment is
recommended.
Preamble Type A preamble is a signal used in
wireless environment to
synchronize the transmitting
timing including Synchronization
and Start frame delimiter. (Note:
Please check the setting of AP
first.)
Long In a "noisy" network environment,
the Preamble Type should be set
to Long Preamble.
Short The Short Preamble is intended
for applications where minimum
overhead and maximum
performance is desired. In a
"noisy" network environment, the
performance would be decreased.
Auto Select Auto for the USB adapter
to select the Preamble type
automatically depending on the
Access Point Preamble type.
Rate (Mbps) It shows the current transfer rate.
(1, 2, 5.5, or 11Mbps or Auto)
- 39 -
RTS Threshold This value should remain at its
default setting of 2347. Should
you encounter inconsistent data
flow, only minor modifications of
this value are recommended.
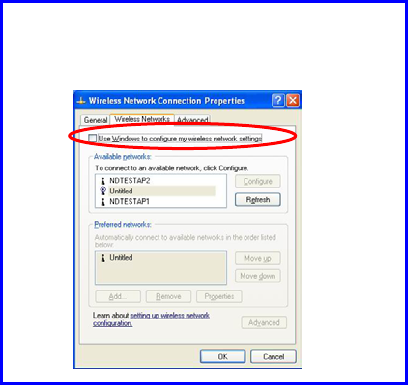
4. In Wireless Network Connection Properties
window, select the Wireless Networks tab.
Use Windows to configure…
Check the box to enable Windows configuration.
* Use Windows to configure
Note: Once you enable windows configuration, you can
use Windows XP’s Wireless Configuration Utility to
configure the wireless settings.
- 40 -
* Use Manufacturer’s Configuration Utility
Note: If you want to use Manufacturer’s Configuration
Utility to configure the wireless settings, make sure the
check box is not checked then click the Network Status
icon in the taskbar. (Please refer to below figure)
Available networks
Displays all available networks.
Configure
Click the button to set up a new network or WEP
configuration as illustrated as below.
- 41 -
Refresh
Click the button to refresh and search for all
available networks.
Preferred networks
From available network(s) listed above, you can
select preferred one(s) in an order that you can
arrange.
The marked one is the currently used network.
Move up
Move the selected network forward one position.
Move down
- 42 -
Move the selected network back one position
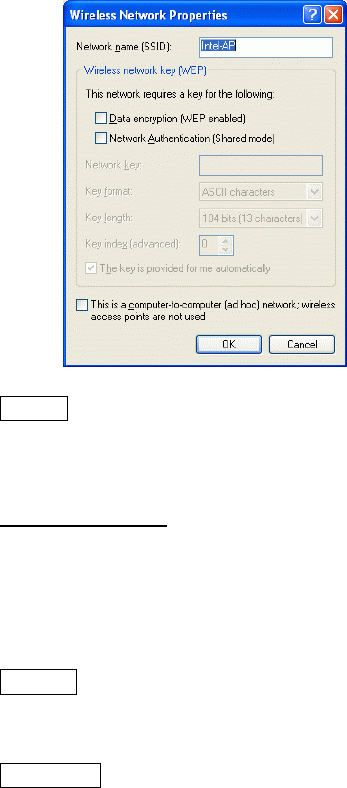
Add…
Click the button and the Wireless Network
Properties window will appear. In the Network
name field, enter your desired network name listed
in the above Available networks box, and click
OK.
Note: The new settings will be active only after
you click on OK in the Wireless Network
Connection Properties window.
Remove
Highlight the unwanted network listed in the
Preferred networks box, and click the button to
remove it.
Properties
Highlight the network listed in the above
Preferred networks box, and click the button to
display its properties.
Once network configuration is done, make sure to
click OK. The new parameters will be saved and
active only after doing so.
- 43 -
UNINSTALLATION
In case you need to uninstall the Utility or Driver, please
refer to below sections.
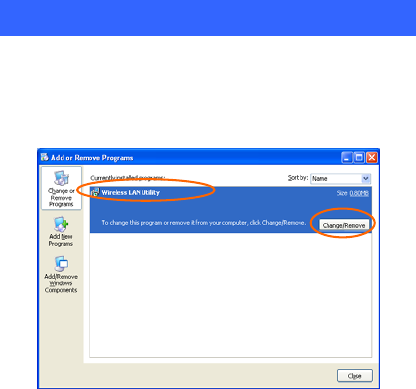
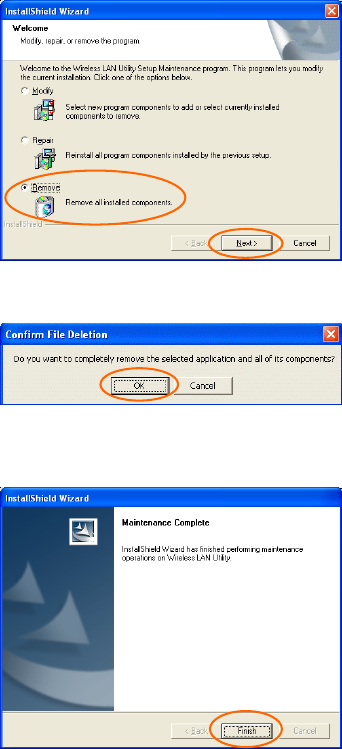
Uninstall the Utility
1. Go to Start (Settings ) Control Panel
Add or Remove Programs.
2. Highlight Wireless LAN Utility, Click
Change/Remove.
3. Select Remove and the click Next to continue.
- 44 -
4. Click OK to continue.
5. Click Finish to complete the uninstalled
procedure.
- 45 -
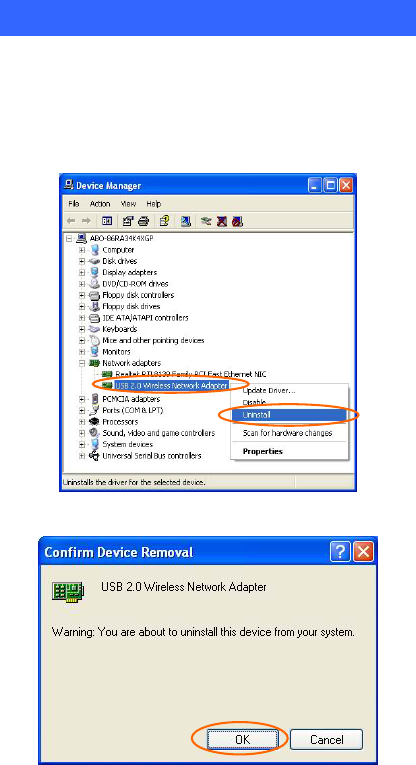
Uninstall the Driver
1. Right-click My Computer → Properties →
Hardware → Device Manager.
2. Right-click USB 2.0 Wireless Network
Adapter and then click Uninstall (or
Remove).
3. Click OK.
4. The system may prompt you to restart your
computer. Click Yes.

- 46 -
SPECIFICATIONS
Standards IEEE 802.11g
Host
Interface USB 2.0
Antenna External Antenna, rotating angle 0° to
90°
Frequency
Range 2.412GHz-2.4835GHz
Number of
Selectable
Channels
USA, Canada: 11 channels
Japan: 14 channels
Europe: 13 channels
Modulation
Technique
Direct Sequence Spread Spectrum
(CCK, DQPSK, DBPSK)
Orthogonal frequency division
multiplexing (OFDM)
Security 0/64/128 bit WEP
Media Access
Protocol
CSMA/CA (Collision Avoidance)
with ACK
Out Power 11g: 14 dBm
11b: 18 dBm
Data Rate
802.11g(54 Mbps, 48 Mbps, 36 Mbps,
24 Mbps, 18 Mbps, 12 Mbps, 9 Mbps,
6 Mbps)
802.11b(11 Mbps, 5.5 Mbps, 2 Mbps,
1 Mbps)
Physical
Specifications
Weight: 50 g
Dimension: 107 (L) x 64 (W) x 21(H)
mm
LED
Indicators
Power: Green
ACT: Green
LINK: Green
Power
Requirement
Operating Voltage: 5V DC
TX consumption: 480mA (Max)
RX consumption: 460mA (Max)
Supported OS Windows 2000 (SP3,4)

- 47 -
Windows XP (SP1)
Windows ME
Windows XP
Environment
Specifications
Operating Temperature: -5~60℃
ambient temperature
Storage Temperature: -20~70℃
ambient temperature
Operating humidity: 90% maximum
(non-condensing)
Storage humidity: 90% maximum
(non-condensing)
EMC
Certification
FCC Part 15 in US
EN300328 and EN300826
(EN301489-17) in Europe
DGT and BSMI in Taiwan